

Page 1

Installation
623631-0403_Elkhorn-US.book Page 1 Tuesday, September 7, 2004 5:19 PM
Installation
Step up to
advanced precision
Logitech
®
ViewPort AV 100
Page 2

623631-0403_Elkhorn-US.book Page 2 Tuesday, September 7, 2004 5:19 PM
623631-0403.A0
FCC Compliance and Advisory Statement. This hardware device complies with Part 15 of the FCC Rules. Operation is subject to the following
two conditions: 1) this device may not cause harmful interference, and 2) this device must accept any interference received, including interference
that may cause undesired operation. This equipment has been tested and found to comply with the limits for a Class B digital device, pursuant
to Part 15 of the FCC Rules. These limits are designed to provide reasonable protection against harmful interference in a residential installation.
This equipment generates, uses, and can radiate radio frequency energy and, if not installed or used in accordance with the instructions, may cause
harmful interference to radio communications. However, there is no guarantee that interference will not occur in a particular installation. If this
equipment does cause harmful interference to radio or television reception, which can be determined by turning the equipment of f and on, the user
is encouraged to try to correct the interference by one or more of the following measures: 1) reorient or relocate the receiving antenna; 2) increase
the separation between the equipment and the receiver; 3) connect the equipment to an outlet on a circuit different from that to which the receiver
is connected; 4) consult the dealer or an experienced radio/TV technician for help. Any changes or modifications not expressly approved by the
party responsible for compliance could void the user's authority to operate the equipment. Where shielded interface cables have been provided
with the product or specified additional components or accessories elsewhere defined to be used with the installation of the product, they must
be used in order to ensure compliance with FCC regulations.
Canadian DOC Statement. This digital device does not exceed the Class B limits for radio noise emissions from digital apparatus specified
in the interference-causing equipment standard entitled “Digital Apparatus,” ICES-003 of the Department of Communications.
This device complies with RSS-210 of Industry and Science Canada. Operation is subject to the following two conditions: 1) this device may not
cause interference, and 2) this device must accept any interference, including interference that may cause undesired operation of the device.
Déclaration FCC. Cet équipement a été testé et déclaré conforme à la section 15 du règlement de la FCC. Son fonctionnement est soumis
aux conditions suivantes: 1) l'équipement concerné ne doit pas causer d'interférences dangereuses, et 2) il doit accepter toute interférence reçue,
y compris les interférences risquant d'engendrer un fonctionnement indésirable. Cet équipement a été testé et déclaré conforme aux limitations
prévues dans le cadre de la catégorie B des appareils numériques défini par la section 15 du règlement de la FCC. Ces limitations sont stipulées aux
fins de garantir une protection raisonnable contre les interférences gênantes en installation résidentielle. Cet équipement génère, utilise et diffuse
des ondes radio, et s'il n'est pas installé ni utilisé en conformité avec les instructions dont il fait l'objet, peut causer des interférences gênantes avec
les communications radio. Cependant, nous ne pouvons vous garantir qu'une interférence ne se produira pas dans une installation particulière.
Si cet équipement produit des interférences graves lors de réceptions radio ou télévisées qui peuvent être détectées en allumant et en éteignant
l'équipement, vous êtes invités à les supprimer de plusieurs manières: 1) Réorienter ou déplacer l'antenne de réception; 2) Augmenter la distance
séparant l'équipement et le récepteur; 3) Connecter l'équipement à un circuit différent de celui auquel le récepteur est connecté; 4) Contacter votre
revendeur ou un technicien radio/TV qualifié. Toutes modifications ou tous changements effectués sans l'accord exprès de la partie responsable de
la conformité aux normes pourraient contraindre l'utilisateur à ne plus utiliser son équipement. Afin d'assurer la conformité avec les règlements FCC,
les câbles d'interface blindés fournis avec le produit doivent être utilisés, ainsi que tout autres composants ou accessoires également spécifiés, lors de
l'installation du produit.
Déclaration du Ministère des Communications Canadien. Cet appareil numérique est conforme aux limitations concernant l'émission
d'interférences radio par des appareils numériques de catégorie B, telles que stipulées dans le cadre de la norme Appareils numériques ICES-003
édictée par le Ministère canadien de l’Industrie.
Cet équipement a été déclaré conforme à la norme RSS-210 édictée par le Ministère canadien des Sciences et de l'Industrie. Son fonctionnement
est soumis aux conditions suivantes: 1) l'équipement concerné ne doit pas causer d'interférences, et 2) il doit accepter toute interférence reçue,
y compris les interférences risquant d'engendrer un fonctionnement indésirable.
ii
Page 3
623631-0403_Elkhorn-US.book Page 3 Tuesday, September 7, 2004 5:19 PM
Contents
English . . . . . . . . . . . . . . . . . . . . . . . . . . . . . . . . . . . . . . . . . . . . . . . . . . . . . . . . . . . . . . 1
Español . . . . . . . . . . . . . . . . . . . . . . . . . . . . . . . . . . . . . . . . . . . . . . . . . . . . . . . . . . . . 15
Français . . . . . . . . . . . . . . . . . . . . . . . . . . . . . . . . . . . . . . . . . . . . . . . . . . . . . . . . . . . . 29
Português . . . . . . . . . . . . . . . . . . . . . . . . . . . . . . . . . . . . . . . . . . . . . . . . . . . . . . . . . . 43
iii
Page 4
1
623631-0403_Elkhorn-US.book Page 1 Tuesday, September 7, 2004 5:19 PM
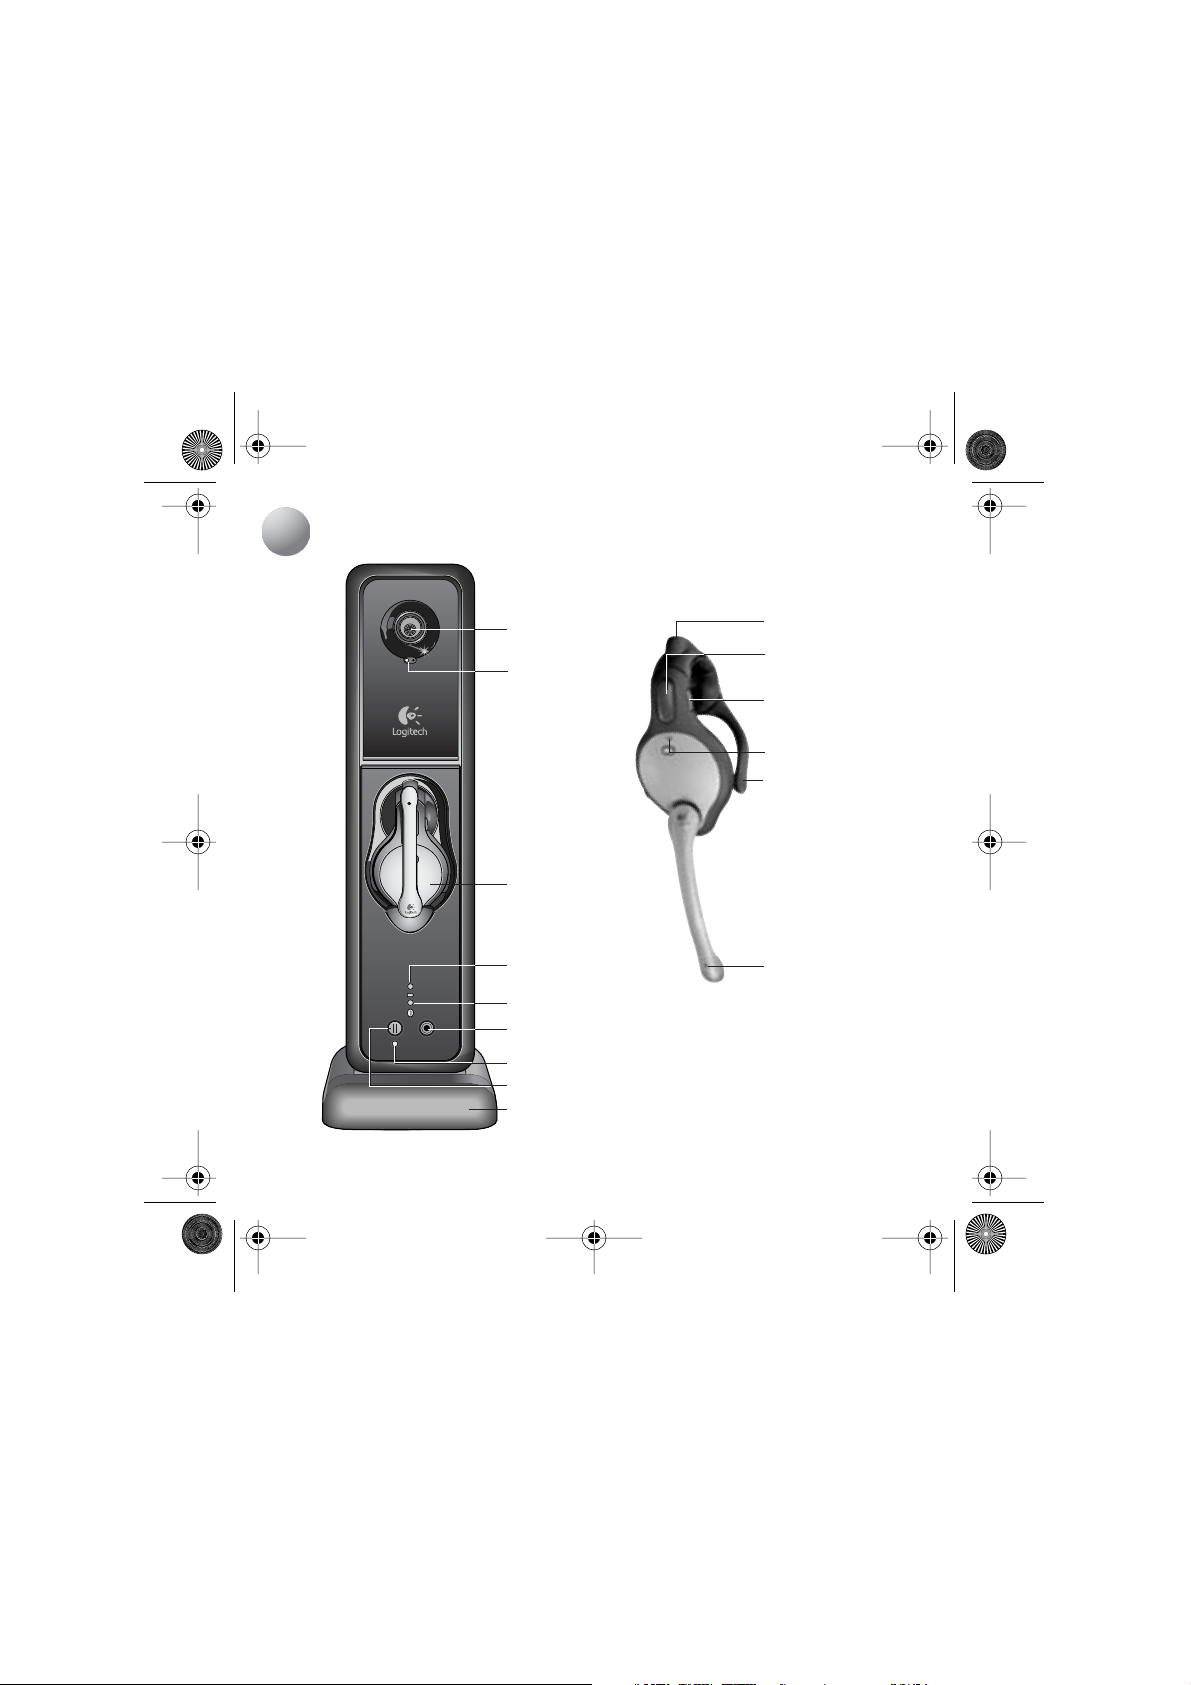
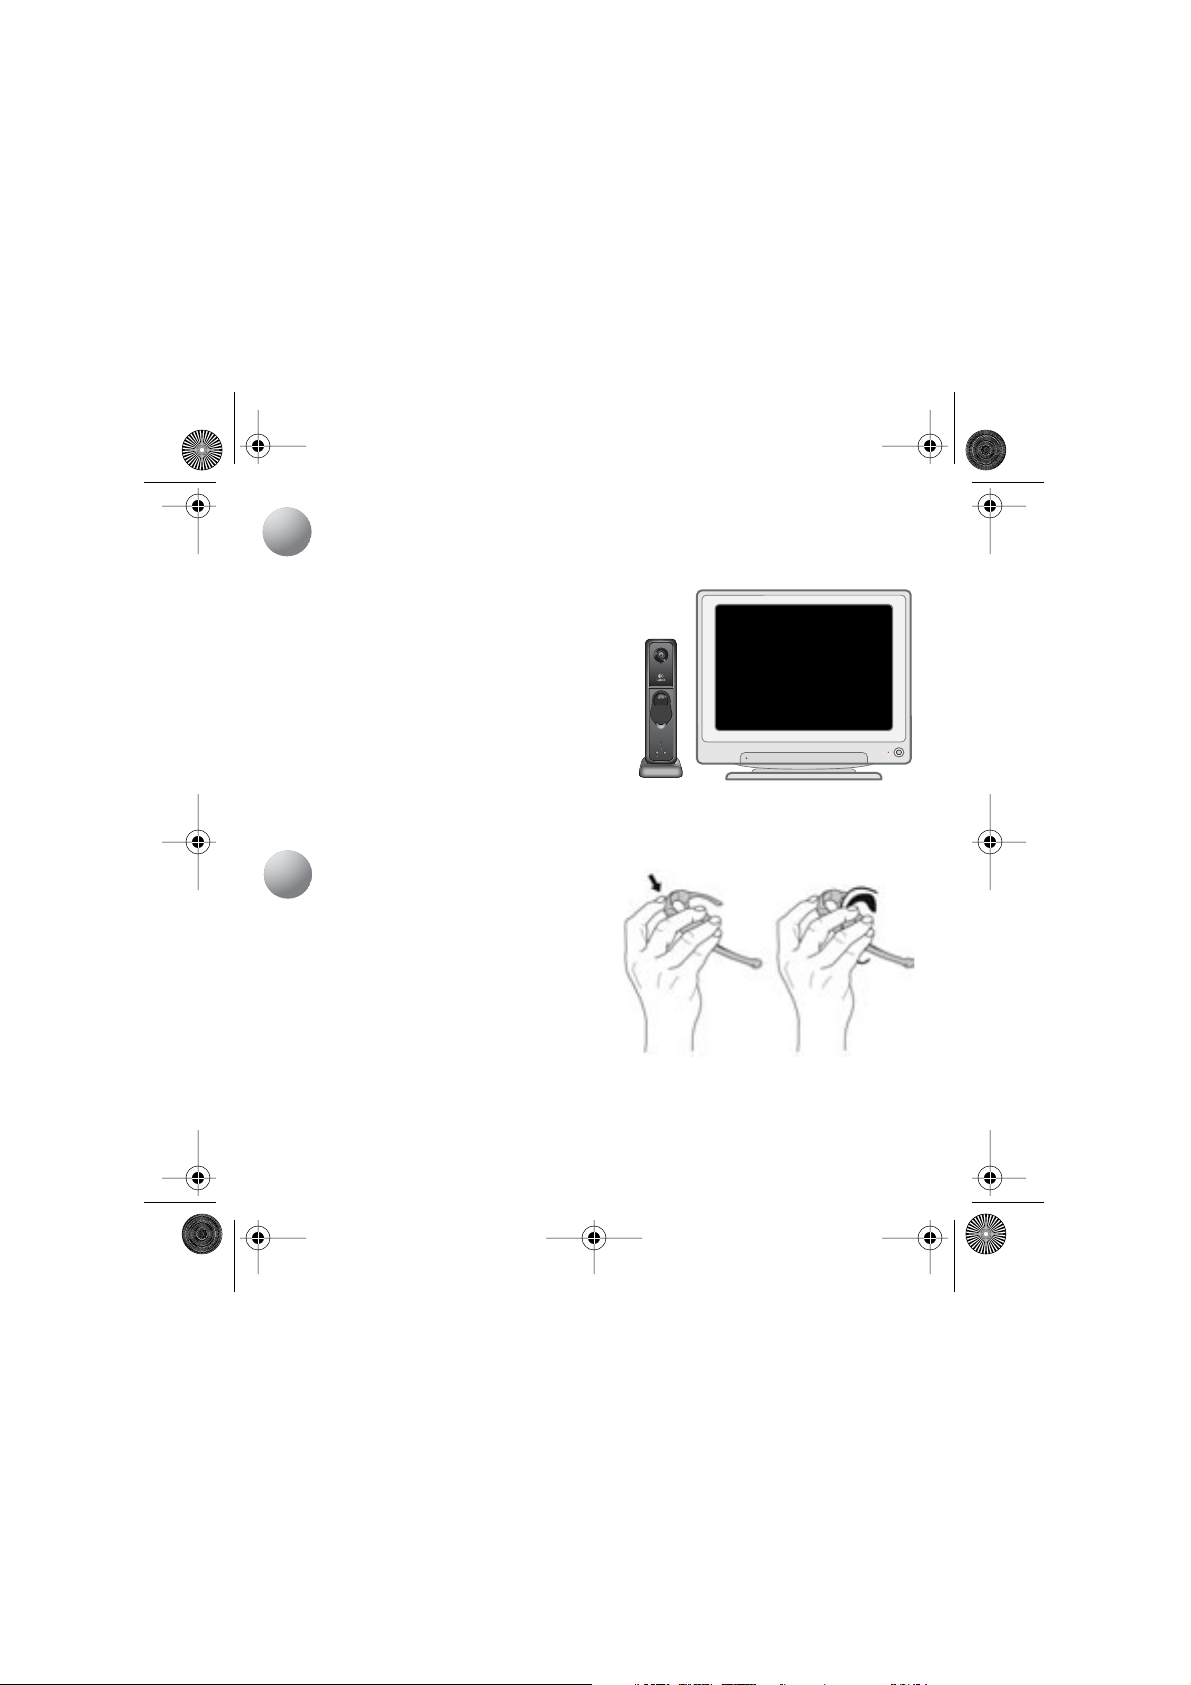
Camera and Headset Features
1
Camera lens
Video streaming
status LED
Headset
Headset battery
charging LED
Bluetooth link LED
Start button
Pause/mute LED
Pause button
Base
Ear-clip adjuster
Volume control/
mute button
Multi-function button:
Power unit on/off;
answer/end calls
LED
Ear-clip
Noise canceling
microphone
English
1
Page 5
2
3
USB
1.
2.
3.
4.
5.
6.
623631-0403_Elkhorn-US.book Page 2 Tuesday, September 7, 2004 5:19 PM
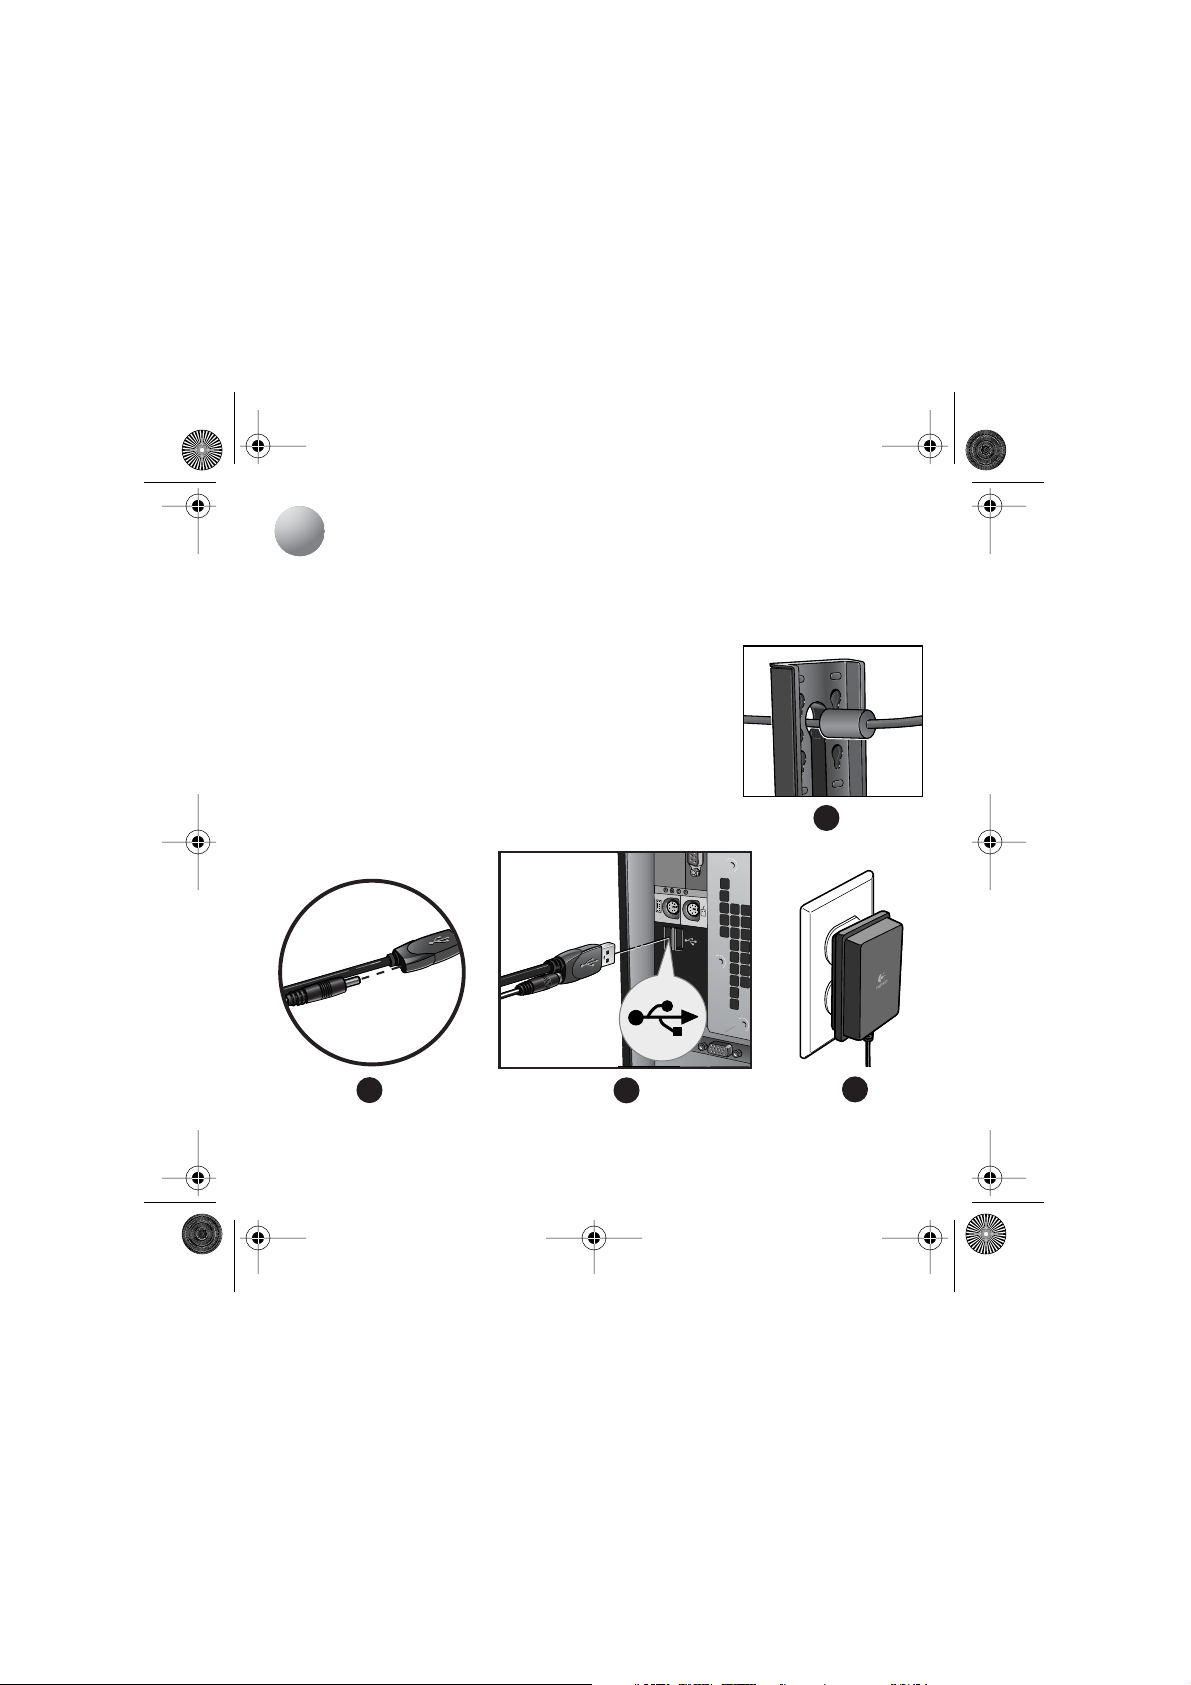
Setting Up the Camera
2
Turn on the computer.
Install the software that came with your product. Make sure to follow all on-screen instructions.
Mount camera on base.
• Insert camera cable through opening in camera base.
• Align screws on camera back with only one set of slots on
camera base. There are three sets of slots to choose from.
•Press camera onto base and pull down to secure camera.
Insert AC power cord into end of camera cable.
Plug camera cable into USB port on computer.
Plug AC adapter into AC outlet.
2
English
4
5
6
Page 6

3
1.
2.
3.
623631-0403_Elkhorn-US.book Page 3 Tuesday, September 7, 2004 5:19 PM
Charging the Headset
3
Set up the camera following the instructions in the previous section. The computer does not need
to be turned on in order to charge the headset.
Note A full battery charge for
the headset may take up to
four hours.
The LED on the headset should be
off indicating that the headset
is turned off. If the LED is blinking,
press the Multi-function button
for three seconds to turn
the headset off.
Place the headset in the camera
cradle to charge it.
The Battery Charging LED on
the camera will turn amber while
the headset is charging. This LED
turns green when the headset is fully
charged. If the LED is not lit,
make sure the camera AC adapter
is plugged into an AC outlet.
Also make sure the headset
is making proper contact
with the camera cradle.
Try repositioning the headset in the camera cradle until the Battery Charging LED turns on.
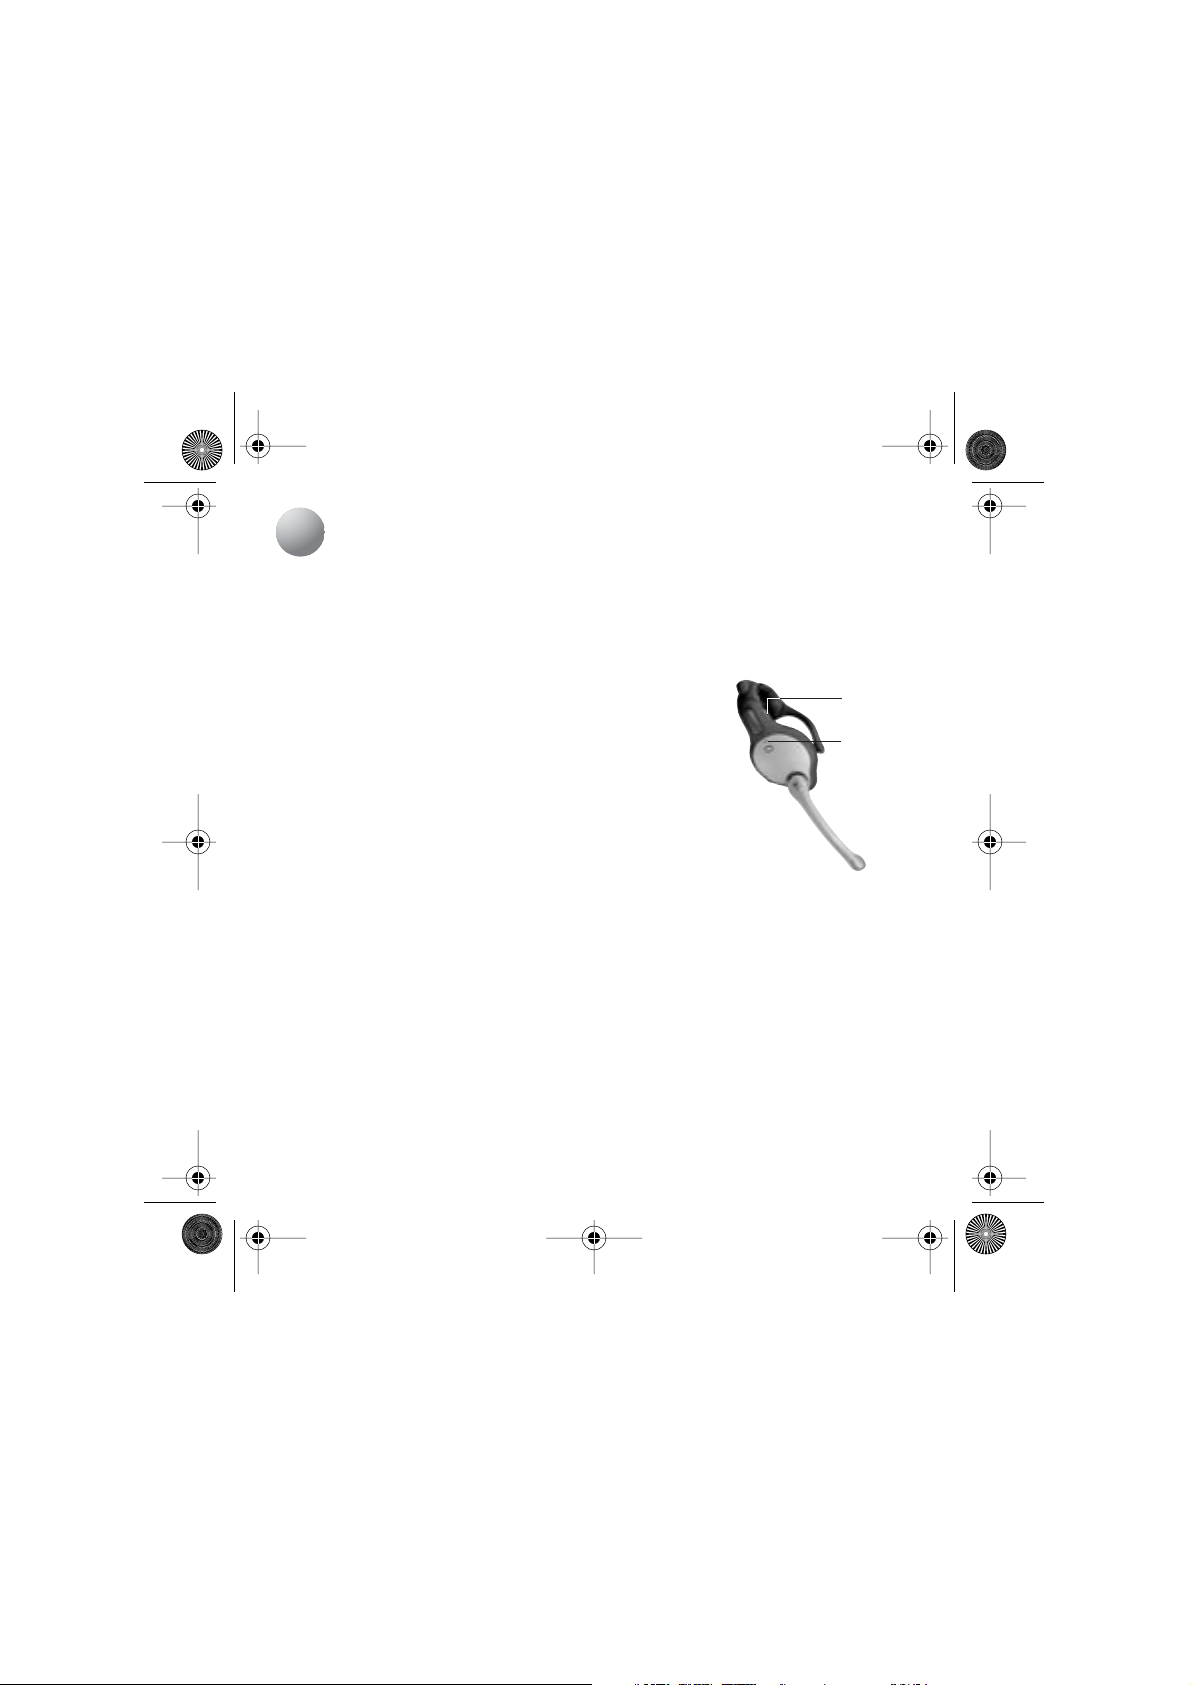
Multi-function
button
1
3
Battery charging LED
2
English
3
Page 7
4
1.
2.
3.
4.
5.
6.
7.
8.
9.
623631-0403_Elkhorn-US.book Page 4 Tuesday, September 7, 2004 5:19 PM
Pairing the Headset with the Camera (Optional)
4
The camera and headset come already paired. However, if the headset does not work or you are
replacing it with another headset, follow the steps below to pair the headset with the camera.
You need to set up the camera, turn on the computer, and charge the headset. (See the previous
sections for more information.)
Make sure the headset is turned off (headset LED is off).
Press and hold the Multi-function button on the headset
for seven seconds until the headset LED flashes red-blue.
Release the Multi-function button. The LED will flash for
60 seconds, indicating the headset is in pairing mode.
Launch the camera software installed on the computer,
and then select the Audio tab.
Select the Private Mode for using the headset. Click the link
to be guided through the headset pairing process.
Follow the on-screen instructions.
When paired, the camera’s Bluetooth link LED blinks slowly and the headset’s LED blinks blue every
three seconds.
Verify successful headset-camera pairing by pressing the headset’s Multi-function button once.
The camera’s Bluetooth Link LED should turn on (see “Camera and Headset LEDs” for more
information). Press the Multi-function button again and the Bluetooth LInk LED will blink slowly.
If pairing does not occur, turn off the camera by unplugging the power, turn off the headset,
wait 10 seconds, turn the headset and camera back on, and repeat steps 2-8.
10. Place the headset back in its cradle when not in use.
Note If more than one ViewPort camera is used in the same general area (same room or
office area), please make sure to pair each device separately. Pairing various headsets
and cameras simultaneously may result in a mismatch between paired devices.
Multi-function
button
LED
4
English
Page 8
5
6
1.
2.
3.
4.
5.
623631-0403_Elkhorn-US.book Page 5 Tuesday, September 7, 2004 5:19 PM
Positioning the Camera
5
Place the camera near your computer monitor
for optimal eye contact.
The camera can be placed onto any stable flat
surface.
If you need to adjust camera height, remove the
camera from its base and reinsert the camera
using a different set of slots on the camera base.
Launch the camera control software from
your computer. Use the Quick Capture function
to help guide your camera adjustments.
Pivot the camera head forward and back for the best camera angle.
Wearing the Headset
6
Press the ear-clip adjuster and slide the headset over
your left or right ear. Carefully rotate the microphone
boom so it is pointing toward the corner of your
mouth. Adjust the headset until it feels comfortable.
Caution Although you can expect reliable service
from the headset, do not force
the microphone boom into position.
Excessive force, or rotating the microphone
beyond its range of intended motion, may damage the headset. If the headset is placed on
the right ear, the microphone boom is rotated counter clockwise. If it is placed on the left
ear, the microphone boom is rotated clockwise.
English
5
Page 9

7
623631-0403_Elkhorn-US.book Page 6 Tuesday, September 7, 2004 5:19 PM
Using the Camera and Headset
7
With the camera correctly set and positioned, the headset in place, and your computer on, you are
ready to use your video calling application.
Using the Camera with a Video Calling Application: Turning the Camera/Headset On/Off
To Start. If you like to use the Start button to launch a particular video call application, use the camera
control settings under the Other tab to point to your application. Otherwise, you can launch the
desired application from the Start menu. Once your camera is configured to launch your preferred
default application, press the Start button on the camera to launch the software.
When initiating a call, make sure the headset is turned on by pressing the Multi-function button for
three seconds. You can leave your headset on even after the call.
To Talk. Press and release (do not hold) the Multi-function button on the headset. To stop talking,
press and release the Multi-function button.
To End. You can end your video call using your video call software. Press and release the headset Multi-
function button once.
Adjusting Headset Volume
To adjust the headset volume, push the “+” button
to increase volume or the “-” button to lower it.
A tone will sound indicating a change in volume.
When the headset is turned off, the current volume
level is saved.
Muting Headset Audio
You can mute the headset by pressing either the “+”
or “-” button for four seconds. To restore headset
audio, press either the “+” or the “-” button. When the
headset is muted, there will be an audible tone every
two seconds. It is recommended to use the camera
Pause button on your video call software to mute
the audio instead of the headset as the mute status will then be graphically displayed by the software.
6
English
Headset
Decrease volume
Increase volume
Page 10

623631-0403_Elkhorn-US.book Page 7 Tuesday, September 7, 2004 5:19 PM
Camera Pause Button
Pressing the camera Pause button closes the camera’s privacy shutter. The Video Streaming Status and
Pause/Mute LEDs on the camera flash. Both video and audio are paused. Pressing the Pause button
again opens the privacy shutter, and both the Video and Pause LEDs stop flashing. Video and audio are
now on. Note that some applications may allow audio to be muted while video is on, or pausing video
while audio is on.
Headset Standby Mode
When not using the headset, place it in standby mode to conserve battery power. Once the headset
has been turned on, you can switch between standby mode and active call mode by pressing
and releasing the headset Multi-function button. When the headset is in standby mode, the Camera
Bluetooth Link LED blinks slowly and the Headset LED flashes three times. When the headset is in active
call mode, the camera Bluetooth Link LED turns solid blue and the Headset LED flashes four times.
Adjusting the Microphone Boom
The microphone boom should be stored in its “closed” position with
microphone element resting just above the Multi-function button.
To adjust, swivel the boom gently and stop where the microphone
element is as close to your mouth as possible.
IMPORTANT: DO NOT FORCE THE MICROPHONE BOOM. IF YOU FEEL
IT STOP, DO NOT FORCE IT. FORCING THE BOOM PAST THE HARD STOP
IN EITHER DIRECTION WILL DAMAGE YOUR HEADSET.
Lighting
For the best video experience, use a bright light source behind the camera.
English
7
Page 11
623631-0403_Elkhorn-US.book Page 8 Tuesday, September 7, 2004 5:19 PM
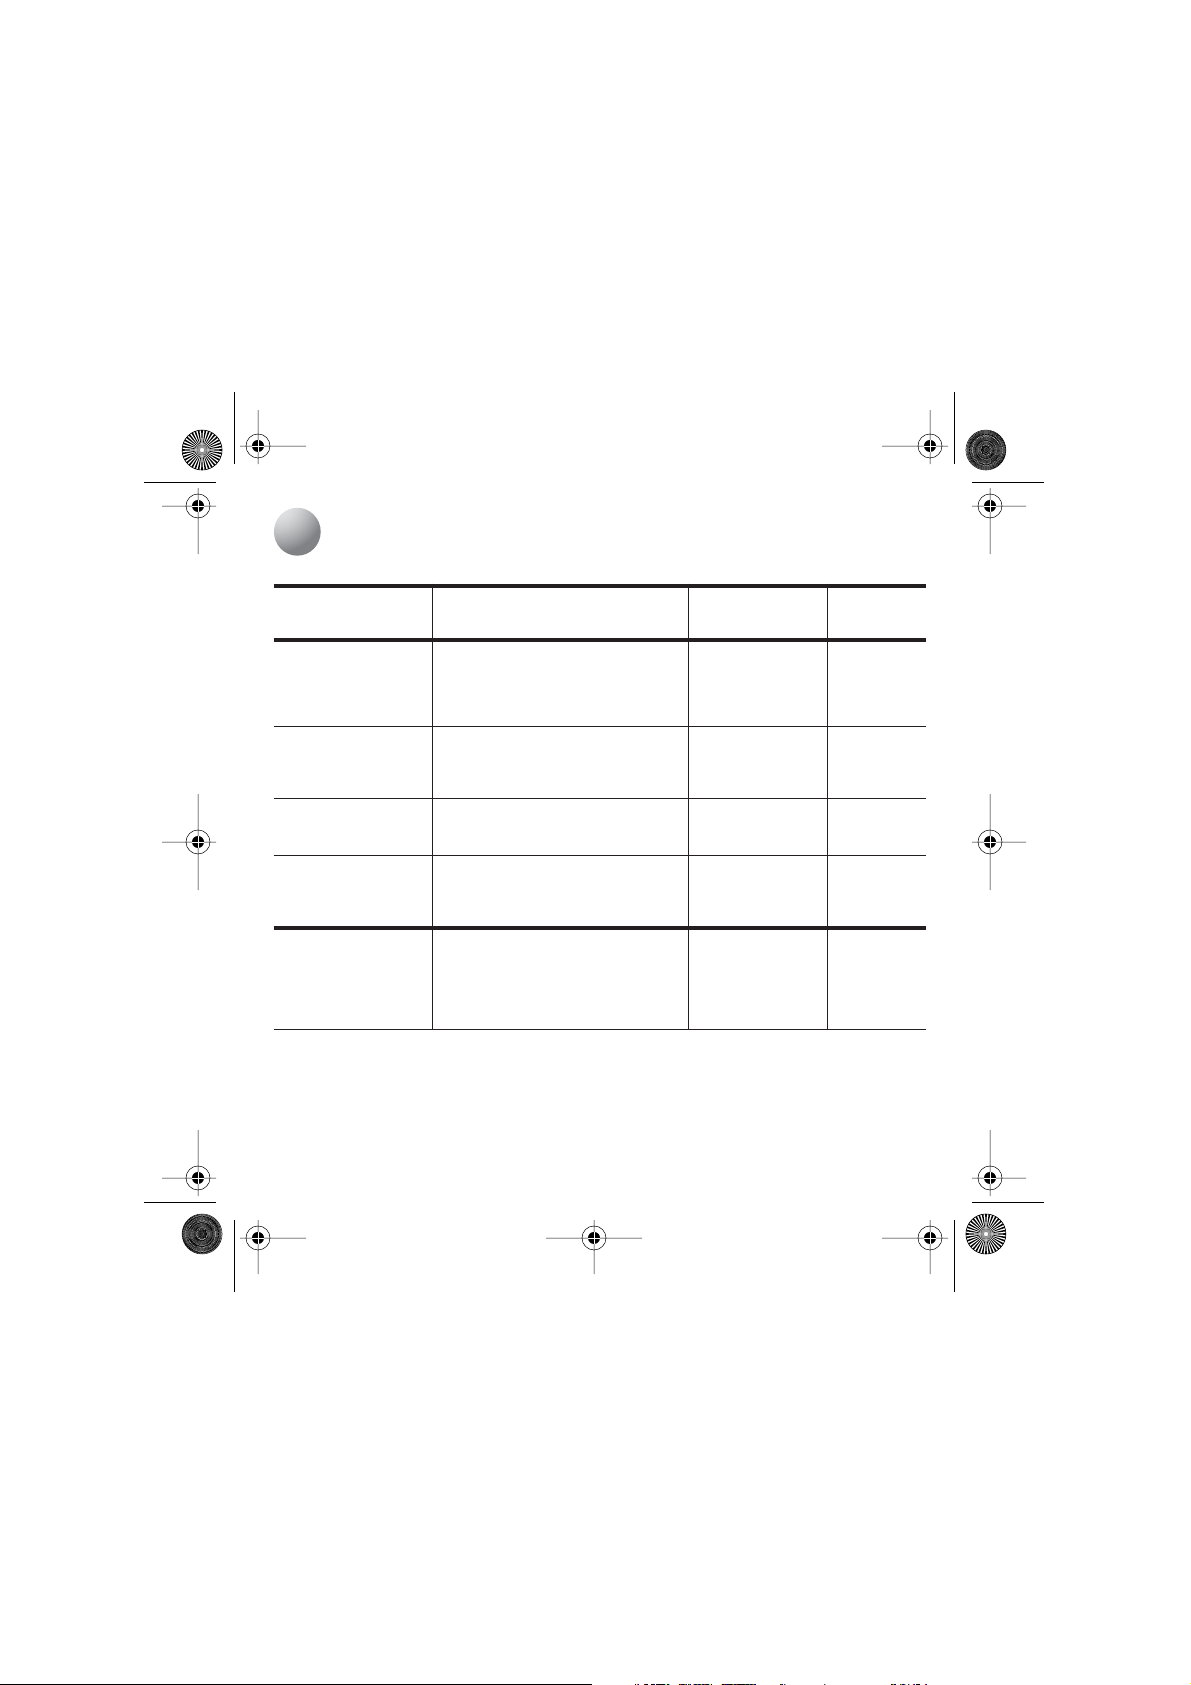
Camera and Headset LEDs
8
LED State
Video Streaming
Status LED on Camera
Bluetooth Link LED
on Camera
Headset Battery
Charging LED on Camera
Pause/Mute LED
on Camera
Headset State In-Use
8
English
Camera off
Camera on, not in use
Camera in preview mode
Video call in progress
Call in progress (video off)
Camera power off
Headset paired and ready to be used
Pairing in progress
Headset in use
Battery charging
Battery fully charged
Headset off hook
Camera power off
Camera powered on, but not in use
Video call in progress
Audio muted and/or video paused
In-Use, Mic Mute On
Pairing
Stand-by
Low Battery
Off
LED Flashing
Status
Off
Off
Steady
Steady
Off
Off
Slow Blinking
Fast Blinking
Steady
Steady
Steady
Off
Off
Off
Off
Blinking
3 Flashes, Slow
Fast
Fast
Slow
Slow
Off
LED Color
None
None
Green
Green
Green
None
Blue
Blue
Blue
Amber
Green
None
None
None
None
Red
Blue
Blue
Blue/Red
Blue
Red
None
Page 12

623631-0403_Elkhorn-US.book Page 9 Tuesday, September 7, 2004 5:19 PM
Frequently Asked Questions
9
How long should it take to charge the headset?
It should take approximately four hours to charge the headset when the headset battery is completely
discharged. The Headset Battery Charging LED on Camera will turn green when the battery is fully
recharged.
What happens if the signal from the headset to the camera is lost?
A lost signal can occur when the headset battery power is very low. Simply recharge the headset
battery. A lost signal can also occur when the headset is out of range of the camera. The operating
range between camera and headset is 30 feet (9.14 meters).
Should the headset be stored in the camera and charging while not in use?
Yes. Storing the headset insures that it will remain charged for use. Charging stops when the headset
battery has been fully charged.
When wearing the headset, where should I position the microphone boom?
For best results, place the end of the boom as close to your mouth as possible.
Is there a power saving mode for the headset?
Yes. Whenever a call is not active, the headset is in power-conserving, standby mode.
English
9
Page 13

623631-0403_Elkhorn-US.book Page 10 Tuesday, September 7, 2004 5:19 PM
10
• Full duplex communication
• Rechargeable lithium-ion battery
• Charging case: 4.2 V.D.C.
• Range: up to 30 feet/10m
• Telephone voice quality sound
• Talk time: up to 7 hours
• Stand by time: up to 300 hours
• Bluetooth profile v1.1 compliant
• Weight: < 1 ounce
• Maximum conducted output power = 2.5mW (variable adaptive power control)
• Operates in (2402MHz-2480MHz) Frequency Bands
• FHSS Modulation
Headset Technical Specifications
10
English
Page 14

1.
2.
3.
623631-0403_Elkhorn-US.book Page 11 Tuesday, September 7, 2004 5:19 PM
End-of-life Battery Disposal Instructions
The headset uses a 4.0V, 140mAh Lithium-ion battery that should last the lifetime of the product.
If you suspect that the battery may be dead, try charging it. If the battery does not recharge,
please contact Logitech
serviceable battery. Please do NOT attempt to change the battery yourself. If the battery has died and
you do not want Logitech to replace the battery, you should follow the disposal instructions below.
Consult local laws and regulations for proper battery disposal in your region. If there are no local
regulations concerning battery disposal, please dispose of the headset in a waste bin for electronic
devices.
Caution The battery used in this device may present a risk of fire or chemical burn if misused.
Do not disassemble, expose to heat above 100° C (212°F), or incinerate. Do not use or
charge the battery if it appears to be leaking, discolored, deformed, or in any way abnormal.
Do not leave the battery discharged or unused for extended periods of time. When the
battery is misused, it may explode or leak, causing burns and personal injury. If the battery
leaks, use normal precaution and discard the battery immediately. A leaking battery
can cause skin burns or other personal injury. Keep this and all batteries out of the reach
of children.
®
Customer Support for repair information. The headset does not have a user-
Recycling Information for Lithium-ion Batteries:
Battery Removal
Use a flat-blade screwdriver to open headset, as shown.
Disconnect battery connector from circuit board.
Do not place battery in trash. Dispose of battery
according to local battery recycling laws.
English
11
Page 15
623631-0403_Elkhorn-US.book Page 12 Tuesday, September 7, 2004 5:19 PM
IMPORTANT SAFETY INFORMATION
FOR POWER SUPPLY ONLY
CAUTION! ELECTRIC SHOCK HAZARD
This product operates in a frequency range that is not EU harmonized. Refer to specific
country approvals marked on the packaging prior to selling/operating in a designated
country.
• Read these instructions.
• Keep these instructions.
• Heed all warnings.
• Follow all instructions.
• Caution: risk of electric shock. Do not open main
operated device.
• Do not use apparatus near water.
•Clean only with a dry cloth.
•Install in accordance with the manufacturer’s instructions.
• Do not install near any heat sources, such as radiators,
heat registers, stoves, or other apparatus
(including amplifiers) that produce heat.
• Do not defeat the safety purpose of the polarized plug.
A polarized plug has two blades with one wider than
the other. The wide blade is provided for your safety.
If the provided plug does not fit into your outlet,
consult an electrician for replacement of the obsolete
outlet.
•Protect the power cord from being walked on or
pinched particularly at plugs, convenience receptacles,
and the point where they exit from the apparatus.
• Only use attachments/accessories specified by
the manufacturer.
•Use only the power adapter provided or recommended
by Logitech. For details, contact Logitech using the
contact information in this manual.
• Unplug this apparatus when unused for long periods
of time or during lightning storms.
• Servicing is required when the product has been
damaged in any way. For example, when the power
supply cord or plug has been damaged, liquid has been
spilled on the product, an object has fallen onto
the product, the product has been exposed to water,
or the product has been dropped or does not operate
normally.
• Refer all servicing to qualified service personnel.
• The product shall be disconnected from the mains
by pulling the mains power plug. The socket - outlet shall
be installed near the equipment and shall be easily
accessible.
• Batteries built into the device are NOT user replaceable.
Discard used batteries according to the manufacturer’s
instructions.
WARNING: TO REDUCE THE RISK
OF ELECTRIC SHOCK, DO NOT EXPOSE
THIS APPARATUS TO RAIN, MOISTURE,
OR SNOW.
12
English
Page 16

623631-0403_Elkhorn-US.book Page 13 Tuesday, September 7, 2004 5:19 PM
Warranty
Limited Warranty. Logitech warrants that any hardware product accompanying this documentation shall be free from significant
defects in material and workmanship for a period of two (2) years from the date of purchase. Logitech's limited warranty is
nontransferable and is limited to the original purchaser. This warranty gives you specific legal rights, and you may also have other rights
which vary under local laws.
Remedies. Logitech’s entire liability and your exclusive remedy for any breach of warranty shall be, at Logitech’s option, to: (a) repair
or replace the hardware, or (b) refund the price paid, provided that the hardware is returned to the point of purchase or such other place
as Logitech may direct, with a copy of the sales receipt. Any replacement hardware will be warranted for the remainder of the original
warranty period or thirty (30) days, whichever is longer. These remedies are void if failure of the hardware has resulted from accident,
abuse, misapplication, or any unauthorized repair, modification or disassembly. Further, for cordless devices, these remedies are void if
you use battery types other than those recommended by Logitech. Upon request from Logitech, you must prove the date of the original
purchase of the hardware by a dated bill of sale or dated itemized receipt.
DISCLAIMER OF WARRANTY. THE WARRANTIES EXPRESSLY SET FORTH IN THIS AGREEMENT REPLACE ALL OTHER WARRANTIES.
LOGITECH AND ITS SUPPLIERS EXPRESSLY DISCL AIM ALL OTHER WARRANTIES, INCLUDING, BUT NOT LIMITED TO, THE IMPLIED WARRANTIES
OF MERCHANTABILITY AND FITNESS FOR A PARTICUL AR PURPOSE AND NONINFRINGEMENT OF THIRD-PARTY RIGHTS WITH RESPECT TO
THE HARDWARE, SOFTWARE, DOCUMENTATION AND ANY OTHER MATERIALS PROVIDED BY LOGITECH AND/OR ITS SUPPLIERS, AND ANY
WARRANTIES OF NON-INTERFERENCE OR ACCURACY OF INFORMATIONAL CONTENT. NO LOGITECH DEALER, AGENT, OR EMPLOYEE IS
AUTHORIZED TO MAKE ANY MODIFICATION, EXTENSION, OR ADDITION TO THIS WARRANTY. Some jurisdictions do not allow limitations
on how long an implied warranty lasts, so the above limitation may not apply to you.
LIMITATION OF LIABILITY. IN NO EVENT WILL LOGITECH OR ITS SUPPLIERS BE LIABLE FOR ANY COSTS OF PROCUREMENT OF SUBSTITUTE
PRODUCTS OR SERVICES, LOST PROFITS, LOSS OF INFORMATION OR DATA, OR ANY OTHER SPECIAL, INDIRECT, CONSEQUENTIAL,
OR INCIDENTAL DAMAGES ARISING IN ANY WAY OUT OF THE SALE OF, USE OF, OR INABILITY TO USE ANY LOGITECH PRODUCT OR SERVICE,
EVEN IF LOGITECH HAS BEEN ADVISED OF THE POSSIBILITY OF SUCH DAMAGES. IN NO CASE SHALL LOGITECH'S AND ITS SUPPLIERS' TOTAL
LIABILITY EXCEED THE ACTUAL MONEY PAID FOR THE LOGITECH PRODUCT OR SERVICE GIVING RISE TO THE LIABILITY. Some jurisdictions
do not allow the exclusion or limitation of incidental or consequential damages, so the above limitation or exclusion may not apply
to you. The above limitations will not apply in case of personal injury where and to the extent that applicable law requires such liability.
How to Obtain Warranty Support. Before submitting a warranty claim, we recommend you visit the support section
at www.logitech.com for technical assistance. Valid warranty claims are generally processed through the point of purchase during
the first two years of the warranty period; however, this period may vary in different countries, such as in the U.K., where valid warranty
claims are processed through the point of purchase during the first year only. Valid warranty claims that are not processed through
the point of purchase, and any other warranty related questions, should be addressed directly to Logitech. The addresses and customer
service telephone numbers for Logitech can be found in the documentation accompanying your product and on the web at
www.logitech.com.
Logitech camera products are intended to be used in a lawful manner. Certain uses of digital PC camera products may be
prohibited by local laws in some countries or states, such as the surreptitious recording of audio and/or video communications for certain
purposes. If you have any question about whether a proposed use of your product is lawful, you should consult a local legal authority
before proceeding.
English
13
Page 17

1
623631-0403_Elkhorn-US.book Page 15 Tuesday, September 7, 2004 5:19 PM
Características de la cámara y el casco telefónico
1
Objetivo de la cámara
Indicador luminoso de
transmisión de vídeo
Casco telefónico
Indicador luminoso de carga
de pila del casco telefónico
Indicador luminoso de vínculo Bluetooth
Botón de inicio
Indicador luminoso de pausa/silencio
Botón de pausa
Base
Ajuste de clip auricular
Control de volumen
y botón de silencio
Botón de varias funciones:
Encendido/apagado,
contestar/finalizar llamada
Indicador luminoso
Clip auricular
Micrófono con supresión
de ruido
Español
15
Page 18

2
3
USB
623631-0403_Elkhorn-US.book Page 16 Tuesday, September 7, 2004 5:19 PM
Configuración de la cámara
2
Encienda el ordenador.
Instale el software suministrado con el producto. Siga todas las instrucciones en pantalla.
Monte la cámara en la base.
• Inserte el cable de la cámara por el orificio en la base de
la cámara.
• Alinee los tornillos en la parte posterior de la cámara con un
conjunto de ranuras en la base de la cámara. Hay tres conjuntos
de ranuras entre los que elegir.
•Presione la cámara contra la base y tire hacia abajo para fijarla.
Inserte el cable de alimentación CA en el extremo del cable
de la cámara.
Conecte el cable de la cámara al puerto USB del ordenador.
Conecte el adaptador CA a la toma de alimentación CA.
1.
2.
3.
4.
5.
6.
16
Español
4
5
6
Page 19

3
623631-0403_Elkhorn-US.book Page 17 Tuesday, September 7, 2004 5:19 PM
Carga del casco telefónico
3
Configure la cámara siguiendo las instrucciones de la sección anterior. No hace falta encender
el ordenador para cargar el casco telefónico.
Nota cargar completamente la pila
del casco telefónico puede tardar
hasta cuatro horas.
El botón luminoso del casco
telefónico debe estar apagado para
indicar que el casco telefónico
también lo está. Si el indicador
luminoso parpadea, pulse el botón
de varias funciones durante tres
segundos para apagar el casco
telefónico.
Coloque el casco telefónico en
la base de la cámara para cargarlo.
El indicador luminoso de carga de
la pila en la cámara se pondrá en
ámbar mientras se cargue el casco
telefónico. Se pondrá en verde
cuando el casco telefónico
esté completamente cargado.
Si no se enciende, compruebe que
el adaptador CA de la cámara esté
conectado a la toma de corriente CA. Compruebe también que el casco telefónico haga
contacto firme con la base de la cámara. Vuelva a colocar el casco telefónico en la base
de la cámara hasta que se encienda el indicador luminoso de carga de la pila.
Botón de varias
funciones
1
3
Indicador luminoso de carga de la pila
2
1.
2.
3.
Español
17
Page 20

4
Botón de varias
funciones
Indicador
luminoso
623631-0403_Elkhorn-US.book Page 18 Tuesday, September 7, 2004 5:19 PM
Emparejamiento del casco telefónico con la cámara (opcional)
4
La cámara y el casco telefónico ya vienen emparejados. Sin embargo, si el casco telefónico no funciona
o lo ha sustituido por otro, siga los pasos siguientes para emparejar el casco telefónico con la cámara.
1. Debe instalar la cámara, encender el ordenador y cargar el casco telefónico.
(Consulte las secciones anteriores si desea más información.)
2. Compruebe que el casco telefónico esté apagado (su indicador
luminoso debe estar apagado). Mantenga pulsado el botón de
varias funciones del casco telefónico durante siete segundos
hasta que el indicador luminoso del casco telefónico parpadee
en rojo-azul.
3. Suelte el botón de varias funciones. El indicador luminoso
parpadeará durante 60 segundos para indicar que el casco
telefónico está en modo de emparejamiento.
4. Inicie el software de la cámara instalado en el ordenador y,
a continuación, seleccione la ficha Audio.
5. Seleccione Modo Privado para usar el casco telefónico.
Haga clic en el link para realizar de forma guiada el proceso de emparejamiento del casco
telefónico.
6. Siga las instrucciones que aparezcan en pantalla.
7. Cuando la cámara se ha emparejado, su indicador luminoso de vínculo Bluetooth parpadea
en azul cada tres segundos.
8. Verifique que se ha realizado correctamente el emparejamiento de la cámara y el casco
telefónico pulsando una vez el botón de varias funciones del casco telefónico. Se debe encender
el indicador luminoso de vínculo Bluetooth de la cámara (consulte "Indicadores luminosos de
la cámara y el casco telefónico" si desea más información). Vuelva a pulsar el botón de varias
funciones y el indicador luminoso de vínculo Bluetooth parpadeará lentamente.
18
Español
Page 21

5
623631-0403_Elkhorn-US.book Page 19 Tuesday, September 7, 2004 5:19 PM
9. Si no se realiza el emparejamiento, apague la cámara desconectándola de la corriente, apague
el casco telefónico, espere 10 segundos, vuelva a encender ambos y repita los pasos 2 a 8.
10. Vuelva a colocar el casco telefónico en su base cuando no lo utilice.
Nota Si se usan más de una cámara ViewPort en la misma área general (habitación u oficina),
empareje cada dispositivo individualmente. El emparejamiento simultáneo de varios
cascos telefónicos y cámaras puede provocar errores entre los dispositivos emparejados.
Colocación de la cámara
5
1. Coloque la cámara sobre el monitor para obtener
un contacto visual insuperable.
2. La cámara se puede colocar en cualquier
superficie plana y estable.
3. Si necesita ajustar la altura de la cámara,
retírela de la base y vuelva a insertarla
en un conjunto distinto de ranuras en la base.
4. Inicie el software de control de la cámara
desde el ordenador. Use la función de captura
rápida como guía para ajustar la cámara.
5. Incline el cuerpo de la cámara hacia delante y hacia atrás para obtener mejores ángulos.
Español 19
Page 22

6
7
623631-0403_Elkhorn-US.book Page 20 Tuesday, September 7, 2004 5:19 PM
Colocación del casco
6
telefónico
Pulse el ajuste de clip auricular y deslice el casco
telefónico sobre la oreja izquierda o derecha.
Gire con cuidado la varilla de micrófono para dirigirla
a un extremo de la boca. Ajuste el casco telefónico
hasta que le resulte cómodo llevarlo.
Precaución aunque el casco telefónico es robusto,
7
Con la cámara instalada correctamente, el casco telefónico en su sitio y el ordenador encendido,
puede comenzar a utilizar la aplicación de videoconferencia.
Uso de la cámara con una aplicación de videoconferencia: Encendido/Apagado de
la cámara y el casco telefónico
Para empezar. Si desea usar el botón Inicio para abrir una aplicación de videoconferencia
en particular, use la configuración de la cámara en la ficha Otra para indicar otra aplicación.
Si no, puede iniciar la aplicación desde el menú Inicio. Cuando la cámara esté configurada para iniciar
la aplicación que desee, pulse el botón Inicio en la cámara para iniciar el software.
Al iniciar una llamada, compruebe que el casco telefónico esté encendido presionando el botón
de varias funciones durante tres segundos. Puede dejar el casco telefónico encendido después
de la llamada.
20 Español
no fuerce la varilla del micrófono
para colocarla en una posición.
La fuerza excesiva, o girar el micrófono más allá del alcance de su movimiento,
puede dañar el casco telefónico. Si se coloca el casco telefónico en la oreja derecha,
la varilla del micrófono se gira en dirección contraria a las agujas del reloj. Si se coloca
el casco telefónico en la oreja izquierda, la varilla del micrófono se gira en la dirección
de las agujas del reloj.
Uso de la cámara y el caso telefónico
Page 23

623631-0403_Elkhorn-US.book Page 21 Tuesday, September 7, 2004 5:19 PM
Para hablar. Pulse y suelte (no mantenga pulsado) el botón de varias funciones en el casco telefónico.
Para dejar de hablar, pulse y suelte el botón de varias funciones.
Para terminar. Puede terminar la videoconferencia mediante el software de videoconferencia.
Pulse y suelte una vez el botón de varias funciones del casco telefónico.
Ajuste del volumen del casco telefónico
Para ajustar el volumen del casco telefónico, pulse el
botón "+" si desea subirlo o el botón "-" si desea bajarlo.
Para indicar el cambio, oirá un tono. Al apagar el casco
Casco
telefónico
telefónico, se guardará el nivel de volumen.
Cómo silenciar el audio en el casco telefónico
Puede silenciar el casco telefónico pulsando el botón
Bajar volumen
"+" o "-" durante cuatro segundos. Para restaurar el
audio del casco telefónico, pulse el botón "+" o el botón
"-". Cuando el casco telefónico esté silenciado, se
escuchará un tono cada dos segundos. Se recomienda
Subir volumen
que use el botón de pausa de la cámara en el software
de videoconferencia para silenciar el audio en vez
del casco telefónico, ya que el software mostrará gráficamente el estado de silencio.
Botón de pausa de la cámara
Si se pulsa el botón de pausa de la cámara, se cierra la tapa del obturador. Los indicadores luminosos
del estado de la transmisión de vídeo y de pausa/silencio en la cámara parpadean. Se ponen en pausa
el vídeo y el audio. Si se vuelve a pulsar el botón de pausa, se abre la tapa del obturador y los
indicadores luminosos de vídeo y de pausa dejan de parpadear. Ahora están activos el vídeo y el audio.
Algunas aplicaciones permiten silenciar el audio mientras el vídeo sigue activo, o detener el vídeo con
el audio activo.
Español 21
Page 24

623631-0403_Elkhorn-US.book Page 22 Tuesday, September 7, 2004 5:19 PM
Modo de espera del casco telefónico
Cuando no use el casco telefónico, colóquelo en modo de espera para conservar la carga de la pila.
Una vez encendido el casco telefónico, puede alternar entre el modo en espera y el de llamada activa
pulsando y soltando el botón de varias funciones del casco telefónico. Cuando el casco telefónico
se encuentra en modo de espera, el indicador luminoso de vínculo Bluetooth de la cámara parpadea
lentamente y el del casco telefónico lo hace tres veces. Cuando el casco telefónico se encuentra en
modo de llamada activa, el indicador luminoso de vínculo Bluetooth de la cámara permanece en color
azul y el del casco telefónico parpadea cuatro veces.
Ajuste de la varilla del micrófono
La varilla del micrófono debe guardarse en la posición "cerrada" con
el micrófono de la varilla apoyado sobre el botón de varias funciones
del casco telefónico. Para ajustar la varilla, gírela con cuidado hasta
que el micrófono esté lo suficientemente cerca de la boca.
IMPORTANTE: NO FUERCE LA VARILLA DEL MICRÓFONO.
SI NOTA QUE SE DETIENE, NO LA FUERCE. SI FUERZA LA VARILLA
EN CUALQUIER DIRECCIÓN, PODRÍA DAÑAR EL CASCO TELEFÓNICO.
Iluminación
Para obtener los mejores resultados en vídeo, use una fuente de luz intensa detrás de la cámara.
22 Español
Page 25

623631-0403_Elkhorn-US.book Page 23 Tuesday, September 7, 2004 5:19 PM
Indicadores luminosos de la cámara y el casco telefónico
8
Indicador luminoso Estado
Indicador luminoso
de transmisión de vídeo
en cámara
Indicador luminoso
de vínculo Bluetooth
en la cámara
Indicador luminoso
de carga de la pila
del casco telefónico
en la cámara
Indicador luminoso
de pausa/silencio
en la cámara
Estado del casco
telefónico
Cámara apagada
Cámara encendida, pero no en uso
Cámara en modo de vista previa
Videoconferencia en curso
Llamada en curso (vídeo desactivado)
Cámara apagada
Casco telefónico emparejado y listo
para uso
Emparejamiento en curso
Casco telefónico en uso
Pila cargándose
Pila completamente cargada
Casco telefónico desconectado
Cámara apagada
Cámara encendida, pero no en uso
Videoconferencia en curso
Audio silenciado o vídeo en pausa
En uso
En uso, silencio de micrófono activado
Emparejamiento
Espera
Carga de pilas baja
Apagado
Estado
del indicador
luminoso
Apagado
Apagado
Iluminado
Iluminado
Apagado
Apagado
Parpadeo lento
Parpadeo rápido
Iluminado
Iluminado
Iluminado
Apagado
Apagado
Apagado
Apagado
Intermitente
3 destellos lentos
Rápido
Rápido
Lento
Lento
Apagado
Color
del indicador
luminoso
Ninguno
Ninguno
Verd e
Verd e
Verd e
Ninguno
Azul
Azul
Azul
Ámbar
Verd e
Ninguno
Ninguno
Ninguno
Ninguno
Rojo
Azul
Azul
Azul / Rojo
Azul
Rojo
Ninguno
Español 23
Page 26

623631-0403_Elkhorn-US.book Page 24 Tuesday, September 7, 2004 5:19 PM
Preguntas más habituales
9
¿Cuánto tiempo tarda en cargarse el casco telefónico?
Si la pila se ha descargado por completo, el casco telefónico tardará unas cuatro horas en cargarse.
El indicador luminoso de carga de la pila del casco telefónico en la cámara se pondrá en verde cuando
la pila esté completamente cargada.
¿Qué ocurre si se pierde la señal entre el casco telefónico y la cámara?
Se puede perder la señal cuando la pila del casco telefónico tenga muy poca carga. Vuelva a cargar
la pila del casco telefónico. También se puede perder la señal cuando el casco telefónico esté
fuera del radio de acción de la cámara. El radio de acción entre la cámara y el casco telefónico es
de 9,14 metros.
¿Debería guardarse el casco telefónico en la cámara y cargarlo mientras no se use?
Sí. Guardar el casco garantiza que permanecerá cargado para su uso. La carga se detiene cuando
la pila del casco telefónico se ha cargado completamente.
¿Dónde debo colocar la varilla del micrófono, con el casco telefónico puesto?
Para obtener resultados óptimos, coloque el extremo de la varilla tan cerca de la boca como
sea posible.
¿Hay un modo de ahorro de energía para el casco telefónico?
Sí. Si no hay una llamada activa, el casco entra automáticamente en modo de ahorro de energía.
24 Español
Page 27

623631-0403_Elkhorn-US.book Page 25 Tuesday, September 7, 2004 5:19 PM
10
• Comunicación con dúplex completo
• Pila recargable de ion litio
• Estuche cargador: 4,2 V CC
• Alcance: hasta 10 metros
• Sonido con calidad telefónica
• Tiempo en conversación: hasta 7 horas
• Tiempo en espera: hasta 300 horas
• Compatible con perfil Bluetooth v1.1
• Peso: < 30 gramos
• Máxima potencia de salida propagada = 2,5 mW (control de potencia autoadaptable)
• Funciona en bandas de frecuencia 2.402 MHz – 2.480 MHz
• Modulación FHSS
Especificaciones técnicas del casco telefónico
Español 25
Page 28

623631-0403_Elkhorn-US.book Page 26 Tuesday, September 7, 2004 5:19 PM
Instrucciones para desechar la pila
El casco telefónico utiliza una pila de ion litio de 4 V y 140 mAh, que debería durar tanto como
el producto propiamente dicho. Si piensa que la pila puede estar gastada, pruebe a cargarla. Si no se
recarga, póngase en contacto con el servicio de atención al cliente de Logitech® para información
sobre reparación. El casco telefónico no tiene una pila que pueda reparar el usuario. NO intente
cambiar la pila. Si la pila está completamente gastada y no quiere recurrir a Logitech para que
la cambien, siga las instrucciones para desecharla indicadas a continuación. Infórmese sobre las
regulaciones y leyes concernientes a su jurisdicción en cuanto a pilas desechables. Si no existiera
ninguna normativa aplicable, le rogamos que deposite el casco telefónico en un contenedor
para dispositivos electrónicos.
Precaución La pila usada en este dispositivo puede provocar incendios o quemaduras químicas si no
Información de reciclaje para pilas de ion litio:
Extracción de la pila
1. Utilice un destornillador plano para abrir el casco
2. Desactive el conector de la pila de la placa base.
3. No la tire la pila a la basura. Deshágase de la pila según
se usa debidamente. No la desmonte, ni la someta a temperaturas superiores a 100° C
(212° F) ni incineración. No utilice ni recargue la pila si parece que tiene una fuga,
pérdida de color, está deformada o presenta cualquier otro tipo de anomalía. No deje la
pila descargada o sin utilizar durante periodos prolongados. Un uso inadecuado de la pila
puede hacerla explotar u originar escapes, con el consiguiente riesgo de quemaduras
y lesiones físicas. Si se produce alguna fuga, tome las precauciones habituales y deseche
la pila inmediatamente. Una pila con fuga puede producir quemaduras en la piel u otros
tipos de lesiones físicas. Mantenga todo tipo de pilas fuera del alcance de los niños.
telefónico de la forma mostrada.
las leyes sobre reciclaje concernientes a su jurisdicción.
26 Español
Page 29

623631-0403_Elkhorn-US.book Page 27 Tuesday, September 7, 2004 5:19 PM
INFORMACIÓN DE SEGURIDAD SÓLO
PARA FUENTE DE ALIMENTACIÓN
ATENCIÓN. RIESGO DE DESCARGA ELÉCTRICA
Este producto funciona en una gama de frecuencia sin homologación UE. Antes de
la venta o la puesta en funcionamiento en un país concreto, deben comprobarse los datos
de aprobación que figuran en el embalaje.
• Lea estas instrucciones.
• Conserve estas instrucciones.
• Haga caso de todas las advertencias.
•Siga todas las instrucciones.
•Precaución: riesgo de descargas eléctricas. No abra
el dispositivo conectado a la red de suministro eléctrico.
• No use el dispositivo cerca del agua.
•Limpie el dispositivo sólo con un paño seco.
• Realice la instalación de acuerdo con las instrucciones
del fabricante.
• No realice la instalación cerca de fuentes de calor
como radiadores, calentadores, estufas u otros aparatos
(incluidos amplificadores) que generen calor.
• No anule, bajo ninguna circunstancia, las prestaciones de
seguridad del enchufe polarizado. Un enchufe polarizado
tiene dos clavijas, una más ancha que la otra. La clavija
ancha representa su seguridad. Si el enchufe suministrado
no encaja en la toma de corriente, encargue a un
electricista la sustitución de la toma de corriente antigua.
• Evite que el cable de alimentación quede expuesto
a pisadas o excesivamente doblado especialmente cerca
de la clavija, puntos de conexión y el punto desde el que
sale del dispositivo.
•Utilice únicamente adaptadores o accesorios
específicamente recomendados por el fabricante.
• No utilice otro adaptador de corriente que no sea
el suministrado o recomendado por Logitech. Para más
detalles, consulte con Logitech (encontrará los datos
de contacto en este documento).
• Desenchufe este dispositivo si no va a utilizarlo durante
periodos de tiempo prolongados o durante tormentas
con relámpagos.
•El producto requerirá servicio técnico en aquellos
casos en que haya sufrido algún desperfecto.
Por ejemplo: daños en el cable o en la clavija
de alimentación, contacto con líquidos, introducción
de objetos en el interior del producto, exposición
a lluvia o humedad excesiva, funcionamiento incorrecto,
golpes o caídas.
• Asigne las posibles operaciones de mantenimiento
y reparación a personal técnico cualificado.
• Para desconectar el producto del suministro eléctrico,
tire de la clavija del cable. La toma de pared debería
estar instalada cerca del equipo, en un lugar fácilmente
accesible.
• Las pilas integradas en el dispositivo NO son sustituibles
por el usuario. Deseche las pilas usadas de acuerdo con
las instrucciones del fabricante.
ADVERTENCIA: PARA REDUCIR AL MÍNIMO
EL RIESGO DE DESCARGAS ELÉCTRICAS,
NO EXPONGA ESTE DISPOSITIVO A LLUVIA
O HUMEDAD.
Español 27
Page 30

623631-0403_Elkhorn-US.book Page 28 Tuesday, September 7, 2004 5:19 PM
Garantía
Garantía limitada. Logitech garantiza la ausencia de anomalías importantes en lo referente a los materiales y fabricación de todos
los productos de hardware suministrados con este documento durante un periodo de dos (2) años a partir de la fecha de adquisición
del producto. La garantía limitada de Logitech es intransferible y protege exclusivamente al comprador original. Esta garantía otorga
al usuario derechos legales específicos; puede que posea otros derechos que variarán de acuerdo con la legislación local.
Indemnización. La responsabilidad total de Logitech y la única indemnización a la que el usuario tendrá derecho en caso de
incumplimiento de la garantía consistirá, a discreción de Logitech, en: (a) la reparación o sustitución del hardware o (b) el reembolso
del importe abonado, siempre y cuando el hardware se devuelva al punto de venta, o cualquier otro lugar que Logitech indique,
junto con una copia del recibo de compra. Los productos de hardware suministrados para reemplazar al producto original tendrán una
garantía equivalente al periodo restante de la garantía original o a un periodo de treinta (30) días, prevaleciendo el periodo más largo.
Estas disposiciones carecen de validez en aquellos casos en los que el hardware haya resultado dañado como consecuencia
de un accidente o el uso indebido o incorrecto del producto, o a reparaciones, modificaciones o montajes no autorizados.
Además, en el caso de los dispositivos inalámbricos, estas disposiciones carecen de validez si se utilizan pilas distintas
a las recomendadas por Logitech. En caso de que Logitech lo solicitara, deberá demostrar la fecha de compra original del hardware
mediante un comprobante de compra fechado o de un recibo detallado y fechado.
RENUNCIA DE GARANTÍA. LAS GARANTÍAS DETALLADAS EN EL PRESENTE CONTRATO SUSTITUYEN A TODAS LAS DEMÁS GARANTÍAS.
LOGITECH Y SUS PROVEEDORES RECHAZAN EXPRESAMENTE EL RESTO DE GARANTÍAS, INCLUIDAS, PERO SIN LIMITARSE A, LAS GARANTÍAS
IMPLÍCITAS DE COMERCIALIZACIÓN Y ADECUACIÓN PARA UN USO ESPECÍFICO, Y LA GARANTÍA DE NO INFRACCIÓN DE LOS DERECHOS
DE TERCEROS RESPECTO AL HARDWARE, SOFTWARE, DOCUMENTACIÓN O CUALQUIER OTRO MATERIAL SUMINISTRADO POR LOGITECH
O SUS PROVEEDORES, Y CUALQUIER GARANTÍA DE NO INTROMISIÓN O EXACTITUD DEL CONTENIDO DE LA INFORMACIÓN.
NINGÚN DISTRIBUIDOR, AGENTE NI EMPLEADO DE LOGITECH ESTÁ AUTORIZADO A INTRODUCIR MODIFICACIONES, AMPLIACIONES NI
ADICIONES EN LA PRESENTE GARANTÍA. Dado que en algunas jurisdicciones no se permiten las limitaciones de duración de una garantía,
puede que las restricciones expuestas arriba no le sean aplicables.
LIMITACIÓN DE RESPONSABILIDAD. EN NINGÚN CASO SE PODRÁ CONSIDERAR A LOGITECH NI A SUS PROVEEDORES RESPONSABLES
POR NINGÚN COSTE INCURRIDO DURANTE EL ABASTECIMIENTO O SUSTITUCIÓN DE PRODUCTOS O SERVICIOS, NI POR LA PÉRDIDA
DE BENEFICIOS, INFORMACIÓN NI DATOS, NI POR NINGÚN OTRO DAÑO ESPECIAL, INDIRECTO, RESULTANTE O FORTUITO DERIVADO
EN CUALQUIER FORMA DE LA VENTA, EL USO O LA NO DISPONIBILIDAD DEL USO DE UN PRODUCTO O SERVICIO DE LOGITECH,
INCLUSO CUANDO SE HAYA NOTIFICADO A LOGITECH LA POSIBILIDAD DE TALES DAÑOS. LA RESPONSABILIDAD DE LOGITECH Y SUS
PROVEEDORES SE LIMITAR Á, EN TODOS LOS CASOS, AL IMPORTE REAL ABONADO POR LOS PRODUCTOS O SERVICIOS DE LOGITECH.
Dado que en algunas jurisdicciones no se permiten las exclusiones o limitaciones de responsabilidad por daños resultantes o fortuitos,
puede que las limitaciones expuestas arriba no le sean aplicables. Así, la limitación anterior carecerá de validez en caso de lesiones
personales, en que y en la medida en la que la ley vigente considere responsable al fabricante.
Procedimiento de reclamación de garantía. Antes de enviar una reclamación de garantía, recomendamos que visite la sección de
asistencia técnica en www.logitech.com por si fuera de utilidad. Aunque las reclamaciones de garantía válidas se suelen procesar a través
del punto de venta durante los dos primeros años del periodo de garantía, el plazo de tiempo puede variar según países. Por ejemplo,
en el Reino Unido el procesamiento de reclamaciones válidas sólo se lleva a cabo durante el primer año, a través del punto de venta.
Las reclamaciones de garantía válidas que no se procesen a través del punto de venta, así como cualquier pregunta relativa a garantías,
deben dirigirse directamente a Logitech. Las direcciones y números de teléfono del servicio de atención al cliente de Logitech figuran
en la documentación adjunta con su producto, y en la página Web www.logitech.com.
Las cámaras Logitech deberían utilizarse dentro de lo permitido por la ley.Es posible que las leyes de algunos países o estados
prohíban usos de cámaras digitales para PC tales como la grabación subrepticia de audio o vídeo para ciertos propósitos. En caso
de dudas sobre la legalidad del uso que piensa hacer de su cámara, consulte con las autoridades competentes antes de utilizarla.
Español 28
Page 31

1
623631-0403_Elkhorn-US.book Page 29 Tuesday, September 7, 2004 5:19 PM
Fonctions de la caméra et du casque
1
Objectif de la caméra
Témoin d'état
de la diffusion vidéo
Casque
Témoin lumineux de chargement
de la batterie du casque
Témoin lumineux de liaison Bluetooth
Bouton de démarrage
Témoin lumineux de pause/coupure
Bouton de pause
Socle
Système de réglage du clip
Bouton de réglage
et de coupure du volume
Bouton multifonction:
marche/arrêt,
réception/fin d'appel
Témoin lumineux
Clip de maintien
Micro anti-bruits parasites
Français 29
Page 32

2
3
USB
623631-0403_Elkhorn-US.book Page 30 Tuesday, September 7, 2004 5:19 PM
Installation de la caméra
2
1. Mettez l'ordinateur sous tension.
2. Installez le logiciel livré avec votre produit. Suivez
scrupuleusement les instructions qui s'affichent à l'écran.
3. Placez la caméra sur le socle.
• Insérez le câble de la caméra dans l'ouverture située sur
le socle de la caméra.
• Alignez les vis à l'arrière de la caméra en choisissant
un emplacement parmi les trois disponibles sur le socle
de la caméra.
• Enfoncez la caméra dans son socle et fixez-la solidement.
4. Insérez le cordon d'alimentation à l'extrémité du câble de la caméra.
5. Branchez le câble de la caméra dans le port USB de l'ordinateur.
6. Branchez l'adaptateur secteur dans la prise électrique.
30 Français
4
5
6
Page 33

3
623631-0403_Elkhorn-US.book Page 31 Tuesday, September 7, 2004 5:19 PM
Chargement du casque
3
Installez la caméra conformément aux instructions de la section précédente. Il n'est pas nécessaire
que l'ordinateur soit sous tension pour pouvoir charger le casque.
Remarque: un cycle de chargement
1. Le témoin lumineux du casque
2. Placez le casque dans le socle
3. Le témoin de chargement de
complet peut durer
jusqu'à quatre heures.
doit être éteint pour indiquer
que le casque est hors tension.
Si le témoin clignote, appuyez sur
le bouton multifonction pendant
trois secondes pour mettre le casque
hors tension.
de la caméra pour le charger.
la batterie, situé sur la caméra,
clignote en orange pendant que
le casque se recharge. Le témoin
devient vert une fois le casque
entièrement rechargé. Si le témoin
lumineux est éteint, vérifiez que
l'adaptateur secteur est branché dans
une prise électrique. Vérifiez également que le casque est en contact avec le socle de la caméra.
Essayez de replacer le casque dans le socle de la caméra jusqu'à ce que le témoin de chargement
de la batterie s'allume.
Bouton
multifonction
1
3
Témoin de chargement de la batterie
2
Français 31
Page 34

4
Bouton
multifonction
Témoin
lumineux
623631-0403_Elkhorn-US.book Page 32 Tuesday, September 7, 2004 5:19 PM
Couplage du casque à la caméra (facultatif)
4
La caméra et le casque sont fournis couplés. Cependant, si le casque ne fonctionne pas ou si vous le
remplacez par un autre casque, suivez la procédure ci-dessous afin de coupler le casque à la caméra.
1. Vous devez configurer la caméra, mettre l'ordinateur sous tension et charger le casque.
Consultez les sections précédentes pour de plus amples informations.
2. Vérifiez que le casque est hors tension (le témoin du casque
est éteint). Appuyez sur le bouton multifonction du casque
pendant sept secondes, jusqu'à ce que le témoin du casque
clignote en rouge et bleu.
3. Relâchez le bouton multifonction. Le témoin lumineux
clignote pendant 60 secondes, indiquant que le casque est
en mode de couplage.
4. Lancez le logiciel de la caméra installé sur l'ordinateur,
puis sélectionnez l'onglet Audio.
5. Sélectionnez le Mode Privé afin d'utiliser le casque.
Cliquez sur le lien pour être guidé tout au long de la procédure
de couplage du casque.
6. Suivez les instructions affichées à l'écran.
7. Une fois le couplage effectué, le témoin lumineux de liaison Bluetooth de la caméra clignote
lentement et le témoin du casque clignote en bleu toutes les trois secondes.
8. Vérifiez que le couplage du casque à la caméra a correctement été effectué en appuyant
une fois sur le bouton multifonction du casque. Le témoin de liaison Bluetooth de la caméra doit
en principe s'allumer (voir la section Témoins lumineux de la caméra et du casque pour de plus
amples informations). Appuyez de nouveau sur le bouton multifonction, le témoin de liaison
Bluetooth se met à clignoter lentement.
32 Français
Page 35

5
623631-0403_Elkhorn-US.book Page 33 Tuesday, September 7, 2004 5:19 PM
9. S'il est impossible d'effectuer le couplage, mettez la caméra hors tension en débranchant
le cordon d'alimentation, mettez le casque hors tension, patientez 10 secondes,
remettez le casque et la caméra sous tension, puis répétez les étapes 2 à 8.
10. Placez le casque dans son socle lorsque vous ne l'utilisez pas.
Remarque: si vous utilisez plusieurs caméras ViewPort dans une même zone (par exemple,
5
1. Placez la caméra près du moniteur de
votre ordinateur pour un contact visuel optimal.
2. La caméra se place sur toute surface plane stable.
3. Si vous avez besoin de régler la caméra
en hauteur, retirez la caméra de son socle et
réinsérez-la après avoir choisi un emplacement
différent parmi les trois disponibles sur le socle
de la caméra.
4. Lancez le logiciel de contrôle de la caméra à partir
de votre ordinateur. Utilisez la fonction Quick
Capture pour faciliter le réglage de la caméra.
5. Faites pivoter la tête de la caméra vers l'avant et vers l'arrière afin de déterminer le meilleur angle.
la même pièce ou le même bureau), veillez à coupler chaque dispositif séparément.
Le couplage simultané de plusieurs casques et caméras risque de provoquer
des conflits entre les différents dispositifs couplés.
Positionnement de la caméra
Français 33
Page 36

6
7
623631-0403_Elkhorn-US.book Page 34 Tuesday, September 7, 2004 5:19 PM
Port du casque
6
Appuyez sur le système de réglage du clip et placez
le casque sur votre oreille droite ou gauche.
Orientez délicatement le micro vers la commissure
de vos lèvres. Réglez le casque jusqu'à vous sentir
parfaitement à l'aise.
Attention: même si le casque est relativement solide,
7
La caméra étant correctement réglée et positionnée, le casque en place et votre ordinateur sous
tension, vous êtes prêt à utiliser l'application de visioconférence.
Utilisation de la caméra avec une application de visioconférence: mise sous tension
ou hors tension de la caméra ou du casque
Lancement. Si vous avez l'habitude d'utiliser le bouton de démarrage pour lancer une application
de visioconférence spécifique, utilisez les paramètres de contrôle de la caméra, situés dans la page de
l'onglet Autre, pour désigner votre application. Sinon, vous avez la possibilité de lancer l'application
de votre choix à partir du menu Démarrer. Une fois la caméra configurée pour lancer l'application par
défaut de votre choix, appuyez sur le bouton de démarrage de la caméra pour lancer le logiciel.
Lorsque vous lancez un appel, vérifiez que le casque est sous tension en appuyant sur le bouton
multifonction pendant trois secondes. Vous pouvez garder le casque sur l'oreille même après l'appel.
ne forcez pas sur la tige du micro.
Si vous appuyez trop fort sur le micro
ou le faites pivoter en dehors de l'amplitude de mouvement pour laquelle il a été prévu,
vous risquez d'endommager le casque. Si vous portez le casque sur l'oreille droite,
faites pivoter le micro en sens horaire inverse. Si vous portez le casque sur l'oreille gauche,
faites pivoter le micro en sens horaire.
Utilisation de la caméra et du casque
34 Français
Page 37

623631-0403_Elkhorn-US.book Page 35 Tuesday, September 7, 2004 5:19 PM
Communication. Appuyez sur le bouton multifonction du casque et relâchez-le aussitôt
(ne le maintenez pas enfoncé). Pour arrêter de parler, appuyez sur le bouton multifonction et
relâchez-le aussitôt.
Arrêt. Vous pouvez mettre fin à votre appel vidéo à l'aide de votre logiciel de visioconférence.
Appuyez une fois sur le bouton multifonction du casque et relâchez-le aussitôt.
Réglage du volume du casque
Pour augmenter le volume, appuyez sur le bouton +
et pour le baisser sur le bouton -. Un signal est
Casque
émis pour indiquer le changement de volume.
Lorsque vous mettez le casque hors tension,
le réglage actuel du volume est enregistré.
Coupure du son au niveau du casque
Baisse du volume
Vous pouvez couper le son du casque en appuyant
sur le bouton + ou le bouton - pendant 4 secondes.
Pour rétablir le son, il suffit d'appuyer sur le bouton +
ou -. Quand vous coupez le son du casque,
Augmentation
du volume
vous entendez un bip toutes les 2 secondes.
Il est conseillé d'utiliser le bouton Pause de la caméra
situé dans le logiciel de visioconférence afin de couper le son plutôt que le bouton placé sur le casque,
car ainsi l'état de coupure du son est signalé visuellement par le logiciel.
Bouton Pause de la caméra
Le fait d'appuyer sur le bouton Pause de la caméra a pour effet de refermer le volet de protection
de la caméra. Sur la caméra, le témoin d'état de la diffusion vidéo et celui de Pause/coupure du son
clignotent. L'audio et la vidéo sont arrêtés. Appuyez de nouveau sur le bouton Pause pour rouvrir
le volet de protection. Les deux témoins lumineux arrêtent alors de clignoter. L'audio et la vidéo sont
de nouveau activés. Veuillez noter que certaines applications permettent de couper le son alors que
la vidéo est activée ou d'interrompre la vidéo alors que l'audio est activé.
Français 35
Page 38

623631-0403_Elkhorn-US.book Page 36 Tuesday, September 7, 2004 5:19 PM
Mode Veille du casque
Si vous n'utilisez pas le casque, placez-le en mode Veille afin d'économiser la batterie. Une fois
le casque sous tension, vous pouvez alterner entre le mode Veille et le mode Appel actif en appuyant
sur le bouton multifonction du casque et en le relâchant aussitôt. Lorsque le casque est en mode
Veille, le témoin de liaison Bluetooth de la caméra clignote lentement et le témoin du casque clignote
trois fois. Lorsque le casque est en mode Appel actif, le témoin de liaison Bluetooth de la caméra reste
allumé en bleu et le témoin du casque clignote quatre fois.
Réglage du micro
Lorsque vous rangez le casque, repliez la tige de sorte que le micro
repose au-dessus du bouton multifonction du casque. Pour régler
la position du micro, faites doucement pivoter la tige jusqu'à ce que
la partie micro soit aussi proche que possible de votre bouche.
IMPORTANT: NE FORCEZ PAS SUR LA TIGE. SI VOUS SENTEZ QU'ELLE
SE BLOQUE, EVITEZ DE LA FORCER. SI VOUS FORCEZ SUR LA TIGE DANS
L'UNE OU L'AUTRE DIRECTION, VOUS RISQUEZ D'ABIMER LE CASQUE.
Eclairage
Pour obtenir une vidéo de la meilleure qualité possible, placez une source d'éclairage vif derrière
la caméra.
36 Français
Page 39

623631-0403_Elkhorn-US.book Page 37 Tuesday, September 7, 2004 5:19 PM
Témoins lumineux de la caméra et du casque
8
Témoin lumineux Etat
Témoin d'état
de la diffusion vidéo
de la caméra
Témoin de liaison
Bluetooth
de la caméra
Témoin de chargement
de la batterie du casque
sur la caméra
Témoin lumineux
de pause/coupure
de la caméra
Etat du casque En cours d'utilisation
Caméra hors tension
Caméra sous tension, mais non utilisée
Caméra en mode d'aperçu
Visioconférence en cours
Appel en cours (vidéo désactivée)
Caméra hors tension
Casque couplé et prêt à être utilisé
Couplage en cours
Casque en cours d'utilisation
Chargement de la batterie
Batterie entièrement chargée
Casque décroché
Caméra hors tension
Caméra sous tension, mais non utilisée
Visioconférence en cours
Audio coupé ou vidéo arrêtée
En cours d'utilisation, son coupé au niveau
du micro
Couplage
Veille
Batterie faible
Désactivé
Etat du
clignotement
du témoin
Désactivé
Désactivé
Allumé en continu
Allumé en continu
Désactivé
Désactivé
Clignotement lent
Clignotement rapide
Allumé en continu
Allumé en continu
Allumé en continu
Désactivé
Désactivé
Désactivé
Désactivé
Clignotement
3 clignotements lents
Rapide
Rapide
Lent
Lent
Désactivé
Couleur
du témoin
Aucune
Aucune
Ver t
Ver t
Ver t
Aucune
Bleu
Bleu
Bleu
Orange
Ver t
Aucune
Aucune
Aucune
Aucune
Rouge
Bleu
Bleu
Bleu / Rouge
Bleu
Rouge
Aucune
Français 37
Page 40

623631-0403_Elkhorn-US.book Page 38 Tuesday, September 7, 2004 5:19 PM
Questions fréquentes
9
Combien de temps faut-il pour charger le casque?
Il faut environ 4 heures pour charger le casque dans le cas où la batterie est complètement déchargée.
Le témoin lumineux de chargement de la batterie du casque, placé sur la caméra, devient vert lorsque
la batterie est entièrement chargée.
Que se passe-t-il en cas de perte du signal acheminé du casque vers la caméra?
Il arrive que le signal soit perdu si le niveau de la batterie du casque est très faible. Il suffit de recharger
la batterie du casque. Il est également possible de perdre le signal si le casque est hors de portée
de la caméra. La plage de fonctionnement entre la caméra et le casque est de 9,14 mètres.
Si le casque est rangé dans la caméra, est-il possible de le mettre en charge alors
qu'il n'est pas utilisé?
Oui. Ranger le casque permet de le charger pour une utilisation ultérieure. Le chargement s'arrête
lorsque la batterie du casque est entièrement rechargée.
Où placer la tige du micro quand je porte le casque?
Pour obtenir des résultats optimaux, placez l'extrémité de la tige le plus près possible de votre bouche.
Le casque possède-t-il un mode d'économie d'énergie?
Oui. Entre chaque appel, le casque passe en mode Veille pour économiser la batterie.
38 Français
Page 41

623631-0403_Elkhorn-US.book Page 39 Tuesday, September 7, 2004 5:19 PM
10
• Communication duplex intégrale
• Batterie au lithium-ion rechargeable
• Etui de chargement: 4,2 V en courant continu
• Portée: jusqu'à 10 mètres
• Son de qualité téléphonique
• Autonomie en communication: 7 heures maximum
• Autonomie en veille: 300 heures maximum
• Conforme au profil Bluetooth version 1.1
• Poids: < 28,4 g
• Puissance de sortie maximum = 2,5 mW (commande de puissance variable adaptative)
• Fonctionne dans les bandes de fréquence de 2402 à 2480 MHz
• Modulation du système à spectre dispersé à saut de fréquence
Spécifications techniques du casque
Français 39
Page 42

623631-0403_Elkhorn-US.book Page 40 Tuesday, September 7, 2004 5:19 PM
Consignes de recyclage des batteries usagées
Le casque fonctionne avec une batterie au lithium-ion 4,0 V 140 mAh d'une durée de vie égale
à la sienne. Si vous pensez que la batterie ne fonctionne plus, essayez de la recharger. Si elle ne se
recharge pas, veuillez contacter le Service clientèle de Logitech® pour obtenir des informations sur les
réparations. La batterie du casque n'est pas réparable par l'utilisateur. N'essayez PAS de la remplacer
vous-même. Si vous constatez que la batterie est morte et ne souhaitez pas que Logitech la remplace,
veuillez respecter les consignes suivantes: respectez les lois et règlements de votre région sur
le recyclage des batteries. S'il n'existe aucun règlement local concernant leur recyclage, veuillez jeter
le casque dans une poubelle réservée aux dispositifs électroniques.
Attention: la batterie utilisée dans ce dispositif, si elle n'est pas utilisée avec précaution, peut
Informations sur le recyclage
des batteries lithium-ion: retrait de la batterie
1. Utilisez un tournevis pour ouvrir le casque,
2. Déconnectez le connecteur de la batterie
3. Ne jetez pas la batterie dans une poubelle ordinaire.
s'enflammer ou provoquer des brûlures chimiques. Ne la démontez pas, ne l'incinérez pas
et ne l'exposez pas à des températures supérieures à 100° C (212° F). N'utilisez pas
la batterie et ne la rechargez pas si elle coule, si elle est décolorée, déformée ou si elle
présente une anomalie. Ne laissez pas la batterie déchargée ni inutilisée pendant de
longues périodes. En cas de mauvaise utilisation, la batterie risque d'exploser ou de couler,
entraînant des dommages matériels et corporels. Si elle coule, prenez les précautions
d'usage et débarrassez-vous en immédiatement. Une batterie qui coule risque
de provoquer des brûlures de peau ou d'autres dommages corporels. Tenez-la hors
de portée des enfants.
comme illustré.
de la carte à circuits imprimés.
Débarrassez-vous-en conformément aux directives
locales en matière de recyclage.
40 Français
Page 43

623631-0403_Elkhorn-US.book Page 41 Tuesday, September 7, 2004 5:19 PM
CONSIGNES DE SECURITE IMPORTANTES
POUR ALIMENTATION ELECTRIQUE UNIQUEMENT
ATTENTION! RISQUE D'ELECTROCUTION
Ce produit fonctionne dans une plage de fréquences qui n'est pas harmonisée pour toute
l'UE. Reportez-vous aux accords spécifiques à chaque pays indiqués sur l'emballage avant de
le vendre ou de l'utiliser dans un pays spécifique.
• Veuillez lire ces instructions.
• Conservez ces instructions.
• Tenez compte de tous les avertissements.
• Suivez toutes les instructions à la lettre.
•Attention: risque d'électrocution. Cet appareil est
alimenté sur secteur, ne l'ouvrez pas.
•N'utilisez pas l'appareil à proximité d'une source d'eau.
• Nettoyez-le uniquement à l'aide d'un chiffon sec.
•Procédez à l'installation en respectant les instructions
du fabricant.
•N'installez pas les haut-parleurs à proximité
d'un radiateur, d'un poêle ou de toute autre source
de chaleur (y compris les amplificateurs).
• Ne supprimez pas la fonction de sécurité de la fiche
polarisée. Une fiche secteur polarisée possède
deux broches, dont l'une est plus large que l'autre.
La broche la plus large est fournie pour votre sécurité.
Si la fiche fournie n'est pas adaptée à votre prise,
consultez un électricien pour la remplacer.
• Evitez de marcher sur le cordon d'alimentation
ou de le pincer, en particulier au niveau des prises,
des socles de prises d'alimentation et du point de sortie
de l'appareil.
•N'utilisez que les éléments annexes et les accessoires
spécifiés par le fabricant.
•Utilisez uniquement l'adaptateur d'alimentation
électrique fourni ou recommandé par Logitech.
Pour plus d'informations, contactez Logitech à l'adresse
indiquée dans ce guide.
• Débranchez cet appareil en cas d'orage ou si vous ne
l'utilisez pas pendant des périodes prolongées.
•L'appareil doit être réparé dès qu'il a été endommagé.
Par exemple, au niveau du cordon d'alimentation ou
de la prise, si un liquide a été renversé, si des objets sont
tombés dessus, s'il a été exposé à la pluie ou à l'humidité,
s'il ne fonctionne pas normalement ou s'il est tombé.
• Les réparations doivent être effectuées par des techniciens qualifiés.
• Déconnectez le produit de l'alimentation secteur
en retirant la fiche de la prise électrique. La prise
d'alimentation doit se trouver à proximité du produit
et doit être facilement accessible.
• Les batteries intégrées au dispositif ne peuvent PAS être
remplacées par l'utilisateur. Avant de vous débarrasser
des batteries usagées, référez-vous aux instructions
du fabricant.
AVERTISSEMENT: POUR REDUIRE LE RISQUE
D'ELECTROCUTION, N'EXPOSEZ PAS CET APPAREIL
A LA PLUIE, A L'HUMIDITE OU A LA NEIGE.
Français 41
Page 44

623631-0403_Elkhorn-US.book Page 42 Tuesday, September 7, 2004 5:19 PM
Garantie
Garantie limitée. Logitech certifie que les produits matériels correspondant à cette documentation sont exempts de tout défaut
de fabrication et de toute malfaçon majeurs et sont garantis pendant une période de deux (2) ans à compter de la date d'achat.
La garantie Logitech est limitée à l'acheteur initial et ne peut faire l'objet d'un transfert. La présente garantie vous confère des droits
légaux spécifiques, qui peuvent varier d'un pays à l'autre.
Recours. En cas de rupture de garantie, l'intégralité de la responsabilité de Logitech et votre recours exclusif consisteront, à la discrétion
de Logitech, à: (a) réparer ou remplacer le matériel, sous réserve qu'il soit renvoyé au point de vente ou à tout autre lieu indiqué par
Logitech, accompagné d'une copie du justificatif d'achat, ou (b) rembourser le prix d'achat. Tout matériel remplacé sera garanti jusqu'à
échéance de la garantie d'origine ou pour une durée de trente (30) jours, en fonction de la période la plus longue. Ces recours sont
nuls si la défaillance du matériel est due à un accident, à un mauvais traitement, à une utilisation inappropriée ou à des réparations,
modifications ou démontages non autorisés. De plus, pour les dispositifs sans fil, ces recours sont nuls si vous utilisez des types de piles
différents de ceux conseillés par Logitech. A la demande de Logitech, vous devez prouver la date de l'achat initial du matériel en
présentant une facture datée de la vente ou un reçu détaillé et daté.
GARANTIE LIMITEE. LES GARANTIES PREVUES DANS CET ACCORD REMPLACENT TOUTES LES AUTRES GARANTIES. LOGITECH ET SES
FOURNISSEURS DECLINENT EXPRESSEMENT TOUTES AUTRES GARANTIES, Y COMPRIS ET SANS QUE CETTE ENUMERATION SOIT LIMITATIVE,
TOUTE GARANTIE IMPLICITE DU CARACTERE ADEQUAT POUR LA COMMERCIALISATION OU UN USAGE PARTICULIER, AINSI QUE LES
GARANTIES DE NON VIOLATION DE DROITS DE TIERS A L'EGARD DU MATERIEL, DES LOGICIELS, DE LA DOCUMENTATION ET DE TOUT AUTRE
SUPPORT FOURNIS PAR LOGITECH OU SES FOURNISSEURS, ET TOUTES LES GARANTIES DE NON-INTERFERENCE OU D'EXACTITUDE
DU CONTENU INFORMATIF. AUCUN DISTRIBUTEUR, AGENT OU EMPLOYE DE LOGITECH N'EST AUTORISE A EFFECTUER DES MODIFICATIONS,
DES EXTENSIONS OU DES AJOUTS A CETTE GARANTIE. Certaines juridictions ne reconnaissent pas les limitations de durée des garanties
implicites; il est donc possible que la limitation susmentionnée ne s'applique pas à votre cas.
LIMITES DE RESPONSABILITE. EN AUCUN CAS LOGITECH OU SES FOURNISSEURS NE SAURAIENT ETRE TENUS RESPONSABLES A
L'EGARD DES COUTS D'APPROVISIONNEMENT EN PRODUITS OU SERVICES DE REMPL ACEMENT, DU MANQUE A GAGNER, DE LA PERTE
D'INFORMATIONS OU DE DONNEES, OU DE TOUT AUTRE DOMMAGE PARTICULIER, INDIRECT, CONSECUTIF OU ACCIDENTEL DECOULANT
DE QUELQUE FAÇON QUE CE SOIT DE LA VENTE, DE L'UTILISATION OU DE L'IMPOSSIBILITE D'UTILISER UN PRODUIT OU UN SERVICE
LOGITECH, MEME SI LOGITECH A ETE INFORME DE L'EVENTUALITE DE TELS DOMMAGES. LA RESPONSABILITE DE LOGITECH ET DE
SES FOURNISSEURS NE SAURAIT EN AUCUN CAS DEPASSER LE MONTANT DEBOURSE POUR L'ACQUISITION DES PRODUITS OU SERVICES
LOGITECH MIS EN CAUSE. Certaines juridictions n'autorisent pas l'exclusion ou la limitation des dommages accessoires ou consécutifs;
il est donc possible que la limitation ou l'exclusion susmentionnée ne s'applique pas à votre cas. En outre, il est possible que les limitations
susmentionnées ne s'appliquent pas en cas de blessures corporelles là où les juridictions n'autorisent pas de telles limitations.
Comment bénéficier de la garantie. Avant de porter une réclamation relative à la garantie, il est recommandé de consulter
notre rubrique de support technique sur www.logitech.com. Les réclamations sont généralement traitées au point d'achat d'origine
dans les deux premières années de validité de la garantie. Cette période peut toutefois varier en fonction des pays, comme au RoyaumeUni où les réclamations ne sont plus recevables après la première année. Pour toute réclamation non traitée au point d'achat et pour
toute autre question relative à la garantie, veuillez vous adresser directement à Logitech. Vous trouverez les coordonnées du service
clientèle Logitech dans la documentation accompagnant le produit ou sur notre site Web à l'adresse www.logitech.com.
Les caméras Logitech doivent faire l'objet d'une utilisation légale. Certaines utilisations de caméras numériques pour PC
peuvent être interdites par les lois locales dans certains pays ou états, telles que l'enregistrement clandestin de communications
audio ou vidéo pour des usages particuliers. Pour toute question concernant la légalité de l'utilisation proposée de votre produit,
veuillez consulter une autorité légale locale au préalable.
Français 42
Page 45

1
623631-0403_Elkhorn-US.book Page 43 Tuesday, September 7, 2004 5:19 PM
Funções da câmara e auscultadores
1
Lente da câmara
LED do estado
de transmissão vídeo
Auscultadores
Bateria dos auscultadores
a carregar LED
LED da ligação Bluetooth
Botão de iniciar
LED da reprodução/pausa
Botão de pausa
Base
Ajustador do clipe para
a orelha
Botão de controlo
de volume/sem som
Botão de funções múltiplas:
Ligar/desligar unidade,
atender/desligar chamadas
A luz verde do LED
Clipe para a orelha
Microfone eliminador
de ruídos
Português 43
Page 46

2
3
USB
623631-0403_Elkhorn-US.book Page 44 Tuesday, September 7, 2004 5:19 PM
Instalação da câmara
2
1. Ligue o computador.
2. Instale o software que foi fornecido juntamente com o seu produto. Certifique-se de que segue
todas as instruções fornecidas no ecrã.
3. Monte a câmara na base.
• Introduza o cabo da câmara através da abertura na base
da câmara.
• Alinhe os parafusos situados na parte de trás da câmara
com apenas um conjunto de ranhuras na base da câmara.
Poderá escolher entre três conjuntos de ranhuras.
•Pressione a câmara sobre a base e puxe para baixo para a fixar.
4. Introduza o fio eléctrico dentro da extremidade do cabo da câmara.
5. Ligue o cabo da câmara à porta USB do computador.
6. Ligue o adaptador CA à tomada de parede.
4
44 Português
5
6
Page 47

3
623631-0403_Elkhorn-US.book Page 45 Tuesday, September 7, 2004 5:19 PM
Carregar os auscultadores
3
Instale a câmara seguindo as instruções fornecidas na secção anterior. O computador não precisa
de ser ligado para carregar os auscultadores.
Nota Uma carga completa da bateria
para os auscultadores pode
demorar até quatro horas.
1. O LED nos auscultadores deve
estar desligado indicando que eles
estão desligados. Se o LED estiver
a piscar, pressione o botão
de múltiplas funções durante
três segundos para
desligar os auscultadores.
2. Coloque os auscultadores no suporte
da câmara para os carregar.
3. O LED da bateria a carregar
na câmara passa para ambâr
enquanto os auscultadores estão
a carregar. Este LED fica verde
quando os auscultadores se
encontram completamente
carregados. Se o LED não estiver
aceso, certifique-se de que
o adaptador CA da câmara está ligado a uma tomada CA. Certifique-se também de que os
auscultadores está a fazer contacto devidamente com o suporte da câmara. Tente reposicionar
os auscultadores no suporte da câmara até o LED da bateria a carregar se acender.
Botão de funções
múltiplas
1
3
LED da bateria a carregar
2
Português 45
Page 48

4
623631-0403_Elkhorn-US.book Page 46 Tuesday, September 7, 2004 5:19 PM
Emparelhamento dos Auscultadores com a Câmara (Opcional)
4
A câmara e os auscultadores são fornecidos já emparelhados. No entanto, se os auscultadores não
funcionarem ou os for substituir por outros, siga os seguintes passos para emparelhar os auscultadores
com a câmara.
1. Precisa de instalar a câmara, ligar o computador, e carregar o auscultador. (Consulte as secções
anteriores para obter informações mais detalhadas).
2. Certifique-se de que os auscultadores se encontram desligados
(o LED dos auscultadores está desligado).
Pressione ininterruptamente o botão de funções múltiplas
existente nos auscultadores durante sete segundos até o LED
dos auscultadores piscar vermelho-azul.
3. Solte o botão de funções múltiplas. O LED irá piscar durante
60 segundos, indicando que os auscultadores se encontram
no modo de emparelhamento.
4. Inicie a câmara instalada no computador, e em seguida
seleccione o separador Áudio.
5. Seleccione o Modo Privado para utilizar os auscultadores.
Clique no link para ser orientado ao longo do processo de emparelhamento dos auscultadores.
6. Siga as instruções no ecrã.
7. Quando emparelhados, o LED da ligação Bluetooth da câmara pisca lentamente e o LED
dos auscultadores pisca em azul a cada três segundos.
8. Verifique se o emparelhamento dos auscultadores-câmara foi bem sucedido pressionando
o botão de múltiplas funções dos auscultadores uma vez. O LED da ligação Bluetooth da câmara
deverá acender-se (consulte a secção "LEDs da câmara e auscultadores" para obter informações
mais detalhadas). Pressione o botão de múltiplas funções novamente e o LED da ligação
Bluetooth irá piscar lentamente.
Botão de funções
múltiplas
A luz verde
do LED
46 Português
Page 49

5
623631-0403_Elkhorn-US.book Page 47 Tuesday, September 7, 2004 5:19 PM
9. Se o emparelhamento não ocorrer, desligue a câmara desligando a corrente, desligue os
auscultadores, espere 10 segundos, ligue os auscultadores e a câmara novamente, e repita
os passos 2-8.
10. Coloque os auscultadores novamente no seu suporte quando não estiverem a ser utilizados.
Nota Se mais de uma câmara ViewPort for utilizada na mesma área geral (na mesma área
de uma sala ou escritório), por favor certifique-se de que emparelha cada dispositivo
separadamente. O emparelhamento simultâneo de vários auscultadores e câmaras pode
originar um cruzamento entre dispositivos emparelhados.
Posicionar a câmara
5
1. Coloque a câmara perto do monitor do seu
computador para um melhor contacto visual.
2. A câmara pode ser colocada sobre qualquer
superfície plana.
3. Se precisar de ajustar a altura da câmara, remova-a
da sua base e volte a introduzi-la utilizando um
conjunto de ranhuras diferente na base da câmara.
4. Inicie o software de controlo da câmara do
seu computador. Utilize a função Quick Capture
para o ajudar orientando-o através dos ajustes
da câmara.
5. Mova a cabeça da câmara para a frente e para trás para obter o melhor ângulo da câmara.
Português 47
Page 50

6
7
623631-0403_Elkhorn-US.book Page 48 Tuesday, September 7, 2004 5:19 PM
Utilizar os Auscultadores
6
Pressione o ajustador do clipe para a orelha e deslize
os auscultadores sobre a sua orelha esquerda ou
direita. Gire cuidadosamente o boom do microfone
de maneira a apontar para o canto da boca. Ajuste os
auscultadores até sentir que estão confortáveis.
Atenção Muito embora possa esperar um serviço
Com a câmara instalada e posicionada correctamente, os auscultadores no seu devido lugar,
o computador ligado, você está pronto a utilizar a sua aplicação de vídeochamadas.
Utilizar a Câmara com uma Aplicação de Vídeochamada: Ligar/Desligar Câmara/
Auscultadores
Para iniciar. Se gosta de utilizar o botão Iniciar para iniciar uma determinada aplicação de
vídeochamada, utilize as definições de controlo da câmara situada no separador Outro para apontar
para a sua aplicação. De resto, pode iniciar a aplicação desejada a partir do menu Iniciar. Depois da
câmara estar configurada para iniciar a sua aplicação predefinida preferida, pressione o botão Iniciar
na câmara para iniciar o software.
Quando iniciar uma chamada, certifique-se de que os auscultadores se encontram ligados
pressionando o botão de múltiplas funções durante três segundos. Pode deixar os auscultadores
ligados depois da chamada.
fiável dos auscultadores, ão force o boom
do microfone até à sua devida posição.
O uso de força excessiva, ou rodar o microfone para além do seu alcance, pode danificar os
auscultadores. Se os auscultadores forem colocados na orelha direita, o boom do microfone
é rodado no sentido contrário aos ponteiros do relógio. Se os auscultadores forem
colocados na orelha esquerda, o boom do microfone é rodado no sentido dos ponteiros
do relógio.
Utilizar a Câmara e os Auscultadores
7
48 Português
Page 51

623631-0403_Elkhorn-US.book Page 49 Tuesday, September 7, 2004 5:19 PM
Para falar. Pressione e solte (não pressione ininterruptamente) o botão de funções múltiplas
nos auscultadores. Para deixar de falar, pressione e solte o botão de funções múltiplas.
Para terminar. Pode terminar a sua vídeochamada utilizando o seu software de vídeochamada.
Pressione e solte o botão de funções múltiplas dos auscultadores uma vez.
Ajustar o volume dos auscultadores
Para ajustar o volume dos auscultadores, pressione
o botão “+” para aumentar o volume ou o botão “-” para
o diminuir. Um som confirmará a mudança no volume.
Auscultador
es
Quando os auscultadores estão desligados, o volume
actual é memorizado.
Tirar o Áudio dos Auscultadores
Diminuir o volume
Pode tirar o áudio dos auscultadores pressionando
o botão “+” ou “-” durante quatro segundos.
Para restaurar o áudio dos auscultadores, pressione
o botão “+” ou o “-”. Quando os auscultadores estiverem
Aumentar
o volume
sem áudio, irá soar um sinal audível a cada 2 segundos.
Recomendamos que utilize o botão da Pausa da câmara
do software de vídeochamada para tirar o áudio em vez dos auscultadores porque este estado serão
então exibido graficamente pelo software.
Botão de Pausa da Câmara
O pressionar do botão de Pausa da câmara fecha a viseira de privacidade da câmara. Os LEDs do Estado
de Transmissão Vídeo e de Pausa/Sem som. O vídeo e o áudio entram em pausa. Ao pressionar o botão
de Pausa novamente abre a viseira de privacidade, e os LEDs do Vídeo e da Pausa deixam de piscar.
O vídeo e o áudio encontram-se agora ligados. De realçar que algumas aplicações podem permitir que
o som seja retirado enquanto o vídeo está a passar, ou colocar o vídeo em pausa enquanto o áudio
está a passar.
Português 49
Page 52

623631-0403_Elkhorn-US.book Page 50 Tuesday, September 7, 2004 5:19 PM
Modo Em Espera dos Auscultadores
Quando não estiver a utilizar os auscultadores, coloque-os no modo em espera para preservar
a bateria. Depois dos auscultadores terem sido ligados, pode alternar entre o modo em espera e
o modo de chamada activa pressionando e soltando o botão de funções múltiplas dos auscultadores.
Quando os auscultadores se encontram no modo em espera, o LED da Ligação Bluetooth da Câmara
pisca lentamente e o LED dos auscultadores pisca três vezes. Quando os auscultadores se encontram
no modo activo, o LED da Ligação Bluetooth da Câmara fica azul sólido e o LED dos auscultadores pisca
quatro vezes.
Ajustar o Boom do Microfone
O boom do microfone deve ser guardado na posição de “fechado”
com o microfone sobre o botão de funções múltiplas. Para ajustar,
gire o boom cuidadosamente e pare quando o microfone estiver
o mais perto possível da boca.
IMPORTANTE: NÃO FORCE O BOOM DO MICROFONE. AO SENTILO PARAR, NÃO O FORCE. FORÇÁ-LO PARA ALÉM DO PONTO DE PARADA
EM AMBAS AS DIREÇÕES IRÁ DANIFICAR OS AUSCULTADORES.
Iluminação
Para a melhor experiência vídeo, utilize uma fonte de luz brilhante por detrás da câmara.
50 Português
Page 53

623631-0403_Elkhorn-US.book Page 51 Tuesday, September 7, 2004 5:19 PM
LEDs da Câmara e Auscultadores
8
A luz verde do LED Estado
Transmissão Vídeo LED
do Estado na Câmara
LED da Ligação Bluetooth
na Câmara
LED da Bateria
dos Auscultadores
a Carregar na Câmara
LED da Pausa/Sem som
na Câmara
Estado dos Auscultadores Em uso
Câmara desligada
Câmara ligada, não está a ser utilizada
Câmara no modo de pré-visualização
Vídeochamada em curso
Chamada em curso (video desligado)
Corrente da câmara desligada
Auscultadores emparelhados e prontos
a serem utilizados
Emparelhamento em curso
Auscultadores a serem utilizados
Bateria a carregar
Bateria completamente carregada
Auscultadores fora do suporte
Corrente da câmara desligada
Câmara ligada, mas não está a ser utilizada
Vídeochamada em curso
Áudio desligado e/ou pausa do vídeo
Em uso, sem som do mic ligado
Emparelhamento
Em Espera
Pilhas fracas
Off
Estado do LED
a Piscar
Off
Off
Estável
Estável
Off
Off
A piscar lentamente
A piscar rapidamente
Estável
Estável
Estável
Off
Off
Off
Off
A piscar
3 sinais, lentos
Rápido
Rápido
Lento
Lento
Off
Cor do LED
Nenhum
Nenhum
Verd e
Verd e
Verd e
Nenhum
Azul
Azul
Azul
Âmbar
Verd e
Nenhum
Nenhum
Nenhum
Nenhum
Vermelho
Azul
Azul
Azul / Vermelho
Azul
Vermelho
Nenhum
Português 51
Page 54

623631-0403_Elkhorn-US.book Page 52 Tuesday, September 7, 2004 5:19 PM
Perguntas frequentes
9
Quanto demora para carregar os auscultadores?
Deve demorar aproximadamente 4 horas para carregar os auscultadores quando a bateria está
completamente descarregada. O LED da Bateria dos Auscultadores a Carregar na Câmara irá ficar
verde quando a bateria estiver completamente recarregada.
O que acontece se o sinal dos auscultadores para a câmara se perder?
Um sinal perdido pode ocorrer quando a carga da bateria dos auscultadores é muito fraca.
Basta recarregar a bateria dos auscultadores. Um sinal perdido também pode ocorrer quando os
auscultadores se encontram fora do alcance da câmara. A extensão de funcionamento entre a câmara
e os auscultadores é de 9,14 metros.
Os auscultadores podem ser armazenados na câmara e ser carregado quando não estiver
a ser utilizado?
Sim. O armazenamento dos auscultadores assegura que eles permanecem carregados para serem
utilizados. O carregamento pára quando a bateria dos auscultadores estiver completamente
carregada.
Ao colocar os auscultadores, onde devo posicionar o boom do microfone?
Para obter os melhores resultados, coloque a extremidade final do boom o mais perto da boca
possível.
Existe um modo de poupança de energia para os auscultadores?
Sim. Sem uma chamada activa, os auscultadores ficam no modo em espera de poupança de energia.
52 Português
Page 55

623631-0403_Elkhorn-US.book Page 53 Tuesday, September 7, 2004 5:19 PM
10
• Comunicação dupla completa
• Bateria de íon de lítio recarregável
• Estojo para carregamento: 4.2 V.D.C.
• Alcance: até 10 metros
• Som com qualidade de voz de telefone
• Tempo de utilização: até 7 horas
• Tempo em espera: até 300 horas
• Compatível com perfil Blootooth v1.1
• Peso: < 1 onça
• Potência de saída conduzida máxima = 2.5mW (controlo da potência adaptável variável)
• Funciona em Bandas de Frequência (2402MHz-2480MHz)
• Modulação FHSS
Especificações Técnicas dos Auscultadores
Português 53
Page 56

623631-0403_Elkhorn-US.book Page 54 Tuesday, September 7, 2004 5:19 PM
Instruções para deitar fora a bateria ao expirar
Os auscultadores utilizam uma bateria de íon de lítio 140mAh, 4.0V, que deve durar tanto quanto
o produto. Se suspeitar que a bateria está sem energia, tente carregá-la. Se a bateria não recarregar,
por favor contacte o serviço de suporte a clientes da Logitech® para obter informações sobre conserto.
Os auscultadores não tem uma bateria para manutenção por parte do utilizador. NÃO tente substituir
a bateria. Se a bateria estiver sem energia e não pretende que a Logitech a substitua, siga as instruções
abaixo para se desfazer da mesma. Consulte as leis e as normas locais para deitar fora a bateria
apropriadamente. Se não existirem normas locais no que respeita à eliminação da bateria, coloque
os auscultadores num recipiente de lixo para dispositivos electrónicos.
Atenção A bateria utilizada neste dispositivo pode apresentar risco de incêndio ou de queimadura
Informações sobre reciclagem da bateria de íon
de lítio: Remoção da bateria
1. Utilize uma chave de fenda plana para abrir
2. Desligue o conector da bateria da placa de circuito.
3. Não coloque a bateria no lixo. Deite fora a bateria de
química se não for manuseada devidamente. Não desmonte, não exponha a temperatura
superior a 100° C (212°F) nem queime. Não utilize nem carregue a bateria se tiver
aparentemente uma fuga, estiver esbatida, deformada ou com alguma anormalidade.
Não deixe a bateria descarregada nem inutilizada por longos períodos de tempo. Se utilizar
a bateria indevidamente, pode ocorrer uma explosão ou fuga, causando queimaduras
e ferimentos. Se existirem fugas na bateria, tome as precauções normais e deite fora
a bateria imediatamente. Uma bateria com fugas pode queimar a pele ou causar outros
danos. Mantenha as baterias fora do alcance das crianças.
os auscultadores como mostrado.
acordo com as normas locais de reciclagem de bateria.
54 Português
Page 57

623631-0403_Elkhorn-US.book Page 55 Tuesday, September 7, 2004 5:19 PM
INFORMAÇÕES IMPORTANTES SOBRE SEGURANÇA
APENAS PARA FORNECIMENTO DE CORRENTE
AVISO! PERIGO DE CHOQUE ELÉCTRICO
Este produto opera numa extensão de frequência que não tem uma norma europeia.
Consulte as aprovações específicas do país indicadas na embalagem antes de vender/operar
o dispositivo num país designado.
• Leia estas instruções.
• Guarde estas instruções.
•Preste atenção a todos os avisos.
•Siga todas as instruções.
• Aviso: risco de choque eléctrico. Não abra dispositivo
operado por corrente eléctrica.
• Não utilize o aparelho perto de água.
•Limpe somente com um pano seco.
•Instale de acordo com as instruções do fabricante.
• Não instale o equipamento perto de fontes de calor,
como radiadores, aquecedores, fogões ou qualquer
aparelho (inclusive amplificadores) que produza calor.
• Respeite o propósito de segurança da ficha macho
polarizada. Uma ficha macho polarizada tem duas
lâminas, uma mais larga que a outra. A lâmina mais larga
é fornecida para a sua segurança. Se a ficha fornecida
não se encaixar na tomada, consulte um electricista
para substituir a tomada.
• Evite pisar o fio eléctrico ou pressioná-lo , em especial
perto das fichas, receptáculos e do local em que saem
do aparelho.
•Utilize apenas acessórios especificados pelo fabricante.
•Utilize apenas o adaptador de corrente fornecido ou
recomendado pela Logitech. Para obter informações
detalhadas, contacte a Logitech utilizando a informação
do contacto fornecida neste manual.
• Desligue o aparelho quando não utilizado por longos
períodos de tempo ou durante tempestades com raios.
•A assistência é necessária quando o produto foi
danificado de qualquer maneira. Por exemplo, quando
o fio eléctrico ou tomada tiverem sido danificados, líquido
foi derramado sobre o produto, um objecto caíu sobre
o produto, o produto foi exposto a água, ou o produto
tenha caído ou não funcione normalmente.
• Para consertar, chame um profissional qualificado.
• Desligue o produto da fonte de alimentação
removendo a ficha macho da tomada. A tomada
deve estar instalada perto do equipamento e ser
de fácil acesso.
•As baterias incorporadas no dispositivo NÃO são
substituíveis pelo utilizador. Deite fora as baterias usadas
de acordo com as instruções dos fabricantes.
AVISO: PARA REDUZIR O RISCO DE CHOQUE
ELÉCTRICO, NÃO EXPONHA ESTE APARELHO
À CHUVA OU À HUMIDADE.
Português 55
Page 58

623631-0403_Elkhorn-US.book Page 56 Tuesday, September 7, 2004 5:19 PM
Garantia
Garantia limitada. A Logitech garante que qualquer produto de hardware a acompanhar esta documentação está isento de defeitos
significativos no material e no fabrico por um período de dois (2) anos a partir da data da compra. A garantia limitada da Logitech não
é transferível, sendo exclusiva do comprador original. Esta garantia confere-lhe direitos específicos, sendo admissível que, em cada caso,
a legislação local lhe confira outros direitos.
Salvaguardas. A responsabilidade integral da Logitech e as salvaguardas a que exclusivamente tem direito pela violação da garantia
serão, de acordo com a discricionariedade da Logitech, as seguintes: (a) reparar ou substituir o hardware ou (b) reembolsar o valor pago,
desde que o hardware seja devolvido ao local de compra ou a outro local que a Logitech indicar, com uma cópia do recibo da compra.
A substituição do hardware será garantida durante o período restante da garantia original ou trinta (30) dias, qualquer que seja mais
longo. Estas salvaguardas serão nulas se o defeito do hardware tiver resultado de acidente, maus tratos e mau uso, ou de uma reparação,
de uma modificação ou de uma desmontagem não autorizadas. Além disso, para dispositivos sem fios, estas salvaguardas serão nulas
se utilizar tipos de pilhas diferentes dos recomendados pela Logitech. A pedido da Logitech, deve provar a data da compra original
do hardware apresentando uma factura datada ou um recibo com especificações.
REJEIÇÃO DE OUTRAS GARANTIAS. AS GARANTIAS EXPRESSAMENTE ESTIPULADAS NESTE CONTRATO SUBSTITUEM TODAS AS OUTRAS
GARANTIAS. A LOGITECH E OS SEUS FORNECEDORES EXCLUEM EXPRESSAMENTE TODAS AS OUTRAS GARANTIAS, INCLUINDO, MAS SEM
CARÁCTER LIMITATIVO, AS GARANTIAS IMPLÍCITAS DE COMERCIABILIDADE E ADEQUAÇÃO A UM PROPÓSITO ESPECIAL E A NÃO VIOLAÇÃO
DOS DIREITOS DE TERCEIROS NO QUE RESPEITA AO HARDWARE, AO SOFTWARE, À DOCUMENTAÇ ÃO E A OUTROS MATERIAIS FORNECIDOS
PELA LOGITECH E/OU POR SEUS FORNECEDORES, E QUAISQUER GARANTIAS DE NÃO INTERFERÊNCIA OU PRECISÃO DE CONTEÚDO
INFORMATIVO. NENHUM REVENDEDOR, AGENTE OU EMPREGADO DA LOGITECH ESTÁ AUTORIZADO A FAZER QUALQUER MODIFICAÇÃO,
EXTENSÃO OU DITAMENTO A ESTA GARANTIA. Algumas jurisdições não permitem a limitação do período de vigência de uma garantia
implícita, pelo que a limitação acima referida poderá não ser-lhe aplicável.
LIMITAÇÃO DA RESPONSABILIDADE. A LOGITECH OU OS SEUS FORNECEDORES NÃO SERÃO RESPONSÁVEIS, EM CIRCUNSTÂNCIA
ALGUMA, POR QUAISQUER CUSTOS DE OBTENÇÃO DE PRODUTOS OU SERVIÇOS DE SUBSTITUIÇÃO, PERDA DE LUCROS, PERDA DE
INFORMAÇÕES OU DE DADOS OU POR QUAISQUER OUTROS DANOS ESPECIAIS, INDIRECTOS, CONSEQUENCIAIS OU DIRECTOS
DECORRENTES, DE ALGUMA FORMA, DA VENDA OU UTILIZAÇ ÃO OU INC APACIDADE DE UTILIZAÇÃO DE QUALQUER PRODUTO OU SERVIÇO
DA LOGITECH, MESMO QUE ESTA TENHA SIDO INFORMADA DA POSSIBILIDADE DE OCORRÊNCIA DE TAIS DANOS. O MONTANTE TOTAL
DA RESPONSABILIDADE DA LOGITECH E DOS SEUS FORNECEDORES NÃO EXCEDERÁ, EM CASO ALGUM, O MONTANTE EFECTIVAMENTE
DESEMBOLSADO PELO PRODUTO OU SERVIÇO DA LOGITECH QUE VENHA A DAR ORIGEM À RESPONSABILIDADE. Algumas jurisdições
não permitem a exclusão ou limitação de danos directos ou indirectos, pelo que a limitação acima referida poderá não ser-lhe aplicável.
As limitações acima indicadas não serão aplicadas em caso de danos pessoais nas situações e na medida em que tal legislação aplicável
exija tal responsabilidade.
Como obter suporte de garantia. Antes de apresentar um pedido de garantia, recomendamos que visite a secção de suporte no
endereço www.logitech.com para obter assistência técnica. Os pedidos de garantia válidos são geralmente processados através do local
de compra durante os primeiros dois anos do período da garantia; contudo, este período varia conforme o país, como por exemplo
no Reino Unido, onde os pedidos de garantia válidos são processados através do local de compra somente durante o primeiro ano.
Os pedidos de garantia válidos não processados através do local de compra, assim como todas as questões relacionadas com a garantia,
devem ser dirigidos directamente à Logitech. Os endereços e os números do serviço de atendimento ao cliente da Logitech encontramse na documentação que acompanha o produto e no endereço da Web www.logitech.com.
Os produtos de câmara da Logitech foram concebidos para uma utilização legal. Determinadas utilizações de produtos
de câmara digital para PC podem ser proibidas pelas leis de alguns países ou estados, como por exemplo a gravação furtiva
de comunicações de áudio e/ou vídeo para determinados objectivos. Para obter informações sobre a legitimidade de uma utilização
proposta do seu produto, consulte uma autoridade jurídica antes de agir.
Português 56
Page 59

623631-0403_Elkhorn-US.book Page 57 Tuesday, September 7, 2004 5:19 PM
Logitech Addresses and Telephone Numbers
Adresses et Numéros de Téléphone de Logitech
Americas
Hotline Tec hnical HelpHotline (
+1 702 269 3457
Aide Technique)
Europe
Hotline
Location
Austria
Belgium
Eastern Europe English: +41-(0)21 863 54 01
Finland
France
Germany
Hungary
Ireland
Italy
Netherlands
Norway
Portugal
Spain
Sweden
Switzerland
United Kingdom +44 -(0)207-309-01 26
Other countries
Hotline
+43-(0)1 502 221 348
Dutch: +32-(0)2 626 89 60; French: +32-(0)2 626 89 62
+358-(0)9 817 100 21
+33-(0)1-43 62 34 14
+49-(0)69-92 032 166
English: +41-(0)21 863 54 01
+353-(0)1-605 8357
+39-02-214 08 71
+31-(0)10-243 88 98
+47-(0)23 500 083
+351-21 316 4124
+34 –91-375 33 69
+46-(0)8-519 920 20
D +41-(0)21-863 54 11; F +41-(0)21-863 54 31
I +41-(0)21-863 54 61
English: +41-(0)21 863 54 01
Tec hnical Help
Page 60

623631-0403_Elkhorn-US.book Page 58 Tuesday, September 7, 2004 5:19 PM
www.logitech.com
© 2004 Logitech. All rights reserved. Logitech, the Logitech logo, and other Logitech marks
are owned by Logitech and may be registered. All other trademarks are the property
of their respective owners. Logitech assumes no responsibility for any errors that may appear
in this manual. Information contained herein is subject to change without notice.
© 2004 Logitech. Tous droits réservés. Logitech, le logo Logitech et les autres marques
Logitech sont la propriété exclusive de Logitech et sont susceptibles d’être des marques
déposées. Toutes les autres marques sont la propriété exclusive de leurs détenteurs respectifs.
Logitech décline toute responsabilité en cas d'erreurs dans ce manuel. Les informations
énoncées dans le présent document peuvent faire l’objet de modifications sans avis préalable.
623631-0403.A0
 Loading...