

Page 1

Logitech® Mouse, Trackball,
and Keyboard
User’s Guide for MouseWare® and iTouch
®
™
™
1
Page 2

Welcome!
Welcome!
Congratulations on your purchase of your Logitech® product.
Your mouse, trackball, or keyboard is part of the Logitech family
of interactive desktop products, which make your time at the computer,
or on the Internet, more productive, comfortable, and enjoyable.
Logitech has been designing, manufacturing, and marketing computer
peripherals for over 18 years. These products form the bridge between
people and computers, a link so intuitive that the digital world feels like
a natural extension of your senses.
To help you get the most from your Logitech product, this manual was
written to be used either online or as a printed document. It is a downloadable file, which is copied to your hard drive automatically during
software installation. You can quickly view the contents of this manual
by clicking one of the topics you see listed on the left. Or you can print
this manual by clicking “File” then “Print” in the menu bar above.
2
To use this manual effectively, you must
first
install your Logitech product
by connecting the hardware and installing the software. To install
your Logitech product, please refer to the printed Getting Started Guide
that comes with your product. This document tells you everything
you need to know in order to get started right away. After you have
finished installation, refer to this document to learn more about
the following topics:
• Comfort Guidelines
• MouseWare®, Logitech’s Premier Pointing Device Software for Windows
and Macintosh
®
• Button Assignments for Your Mouse or Trackball
• Scrolling and Zooming (Zooming in Windows® Only) in Documents with
Your Mouse or Trackball
• WebWheel
™
, Logitech’s Easy-to-Use and Intuitive Web Interface
• iTouch™ Software, Logitech’s Innovative Keyboard and Internet Software
• Product Maintenance
• Troubleshooting
• Logitech
®
Addresses and Telephone Numbers
• Product Warranties
Page 3

Comfort Guidelines
Important Ergonomic Information
Feels Good, Feels Better...
Whether you spend five minutes or five hours using your keyboard, mouse,
or trackball, these suggestions can help you stay comfortable and
productive.
Some research suggests that
• long periods of repetitive motion,
• using an improperly set up work space,
• incorrect body position, and
• poor work habits
may be associated with physical discomfort and injury to nerves, tendons,
and muscles. If you feel pain, numbness, tingling, weakness, swelling,
burning, cramping, or stiffness in your hands, wrists, arms, shoulder, neck,
or back, see a qualified health professional.
Comfort Guidelines
Follow the guidelines in this booklet to maximize your comfort and lessen
the chance of injury.
3
Page 4
DO
Comfort Guidelines
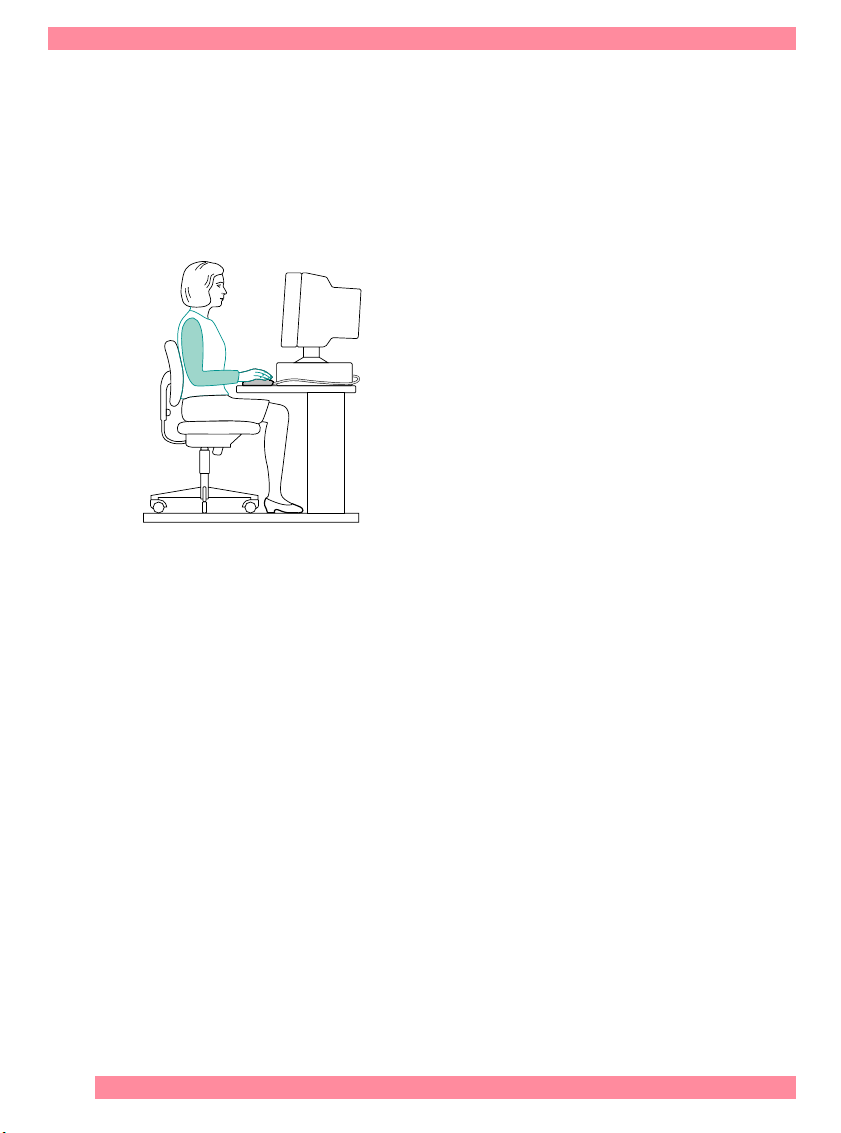
Make sure that your workspace is set up properly...
Your keyboard and monitor should be directly in front of you with
your mouse or trackball next to it. Place your mouse or trackball within easy
reach so that your elbow can remain next to your side when using them.
DO
• DO adjust the height of your chair and table
as to have the keyboard, mouse, or trackball
at or below elbow height.
• DO use the adjustment mechanism
on the keyboard, if necessary to obtain
the proper keyboard height.
• DO remember, if you use a mouse pad,
take its thickness into consideration when
making the height adjustments.
• DO have your feet well supported and
your shoulders relaxed.
4
place materials on your desk according to their frequency of use:
• Frequent - Put materials you use the most closest to you.
• Occasional - Put materials that you use occasionally no farther than
an arm's length away.
• Infrequent - Put your infrequently used materials further away,
but consider convenience.
DO
place documents you need while typing close to the monitor to reduce
frequent head turning and change of eye focus. You can use a document
holder to help.
Page 5

Comfort Guidelines
Keep your shoulders, arms, wrists, and hands relaxed and comfortable as you work...
To keep your shoulders, arms, wrists, and hands relaxed as you work,
let them hang loosely at your sides for a moment, allowing them to dangle
toward the floor and to become relaxed. Try to maintain this relaxed feeling
while you work.
DO
If you have a wrist rest or a palm rest, use it
between keying tasks, not while typing.
Using it while typing may increase pressure
against the hand and increase the chance
of injury.
When you use your keyboard, mouse, or trackball,
avoid placing or supporting your wrists on sharp
edges or on your desktop.
As you use your keyboard, mouse, or trackball,
make sure that your elbow is next to your side.
Keep your wrist relaxed and straight–don't bend it
up, down, or to either side. Keep your shoulders
relaxed. Do not hunch or shrug.
DON’T rest your wrist
on sharp edges.
DON’T bend your wrist.
5
Page 6

•
Comfort Guidelines
Practice good work habits...
Take frequent short breaks. Get up and walk around at least a couple
of times every hour.
• Vary your tasks throughout the day. Do something different with
your hands and arms for a while.
•
Use a light touch
or trackball.
•
Use software features
you reduce stress to your arm, wrist, or hand by minimizing repetitive
or awkward motions.
on the keyboard and for better control of the mouse
to customize your mouse or trackball to help
Be alert to signs of discomfort...
If at any time during or after typing you feel pain, weakness, numbness,
or tingling in your hands, wrists, elbows, shoulders, neck, or back,
or if you have any reason to believe that you might be experiencing
discomfort as a result of typing or from using the mouse, you should
consult a qualified health professional.
6
Getting information...
Please review this entire booklet for suggestions regarding work habits
and workspace arrangement.
For information regarding strategies or customizations which might
increase your comfort when using the other parts of your computer system
(monitor, CPU, etc.), please consult the literature and software packaged
with those components.
Page 7

MouseWare for Windows
MouseWare for Windows
®®
This section of the Online User’s Guide is for Windows users. If you are
running Windows
or Windows
and trackball.
Using MouseWare
Your mouse or trackball comes with the MouseWare
includes features for making button assignments, controlling cursor
movement, and setting up the mouse or trackball in Windows
Windows
support, refer to “Using the Mouse or Trackball in Windows
To access the MouseWare software, double-click the mouse icon
on the Windows Taskbar, or start MouseWare from the Control
Panel. The Mouse Properties displays, as shown below. Choose from
the available options to set up the mouse or trackball.
Modifies cursor movement Sets mouse orientation
Selects a pointer shape
®
98, Windows
Sets up a mouse
®
3.1x, Windows
®
2000, refer to this section to learn how to use your mouse
®
2000, and Windows NT
®
95, Windows
®
®
98, Windows NT
®
software, which
®
®
4.0. (For Windows
®
3.1x.”)
Adds another mouse
Shows battery level
®
95,
4.0,
®
3.1x
Click this button to run
the Mouse Wizard which
helps you set up a mouse
Click here to launch
the Logitech website
Mouse picture varies
depending on device
connected to system
Makes button
assignments
7
Page 8
MouseWare for Windows
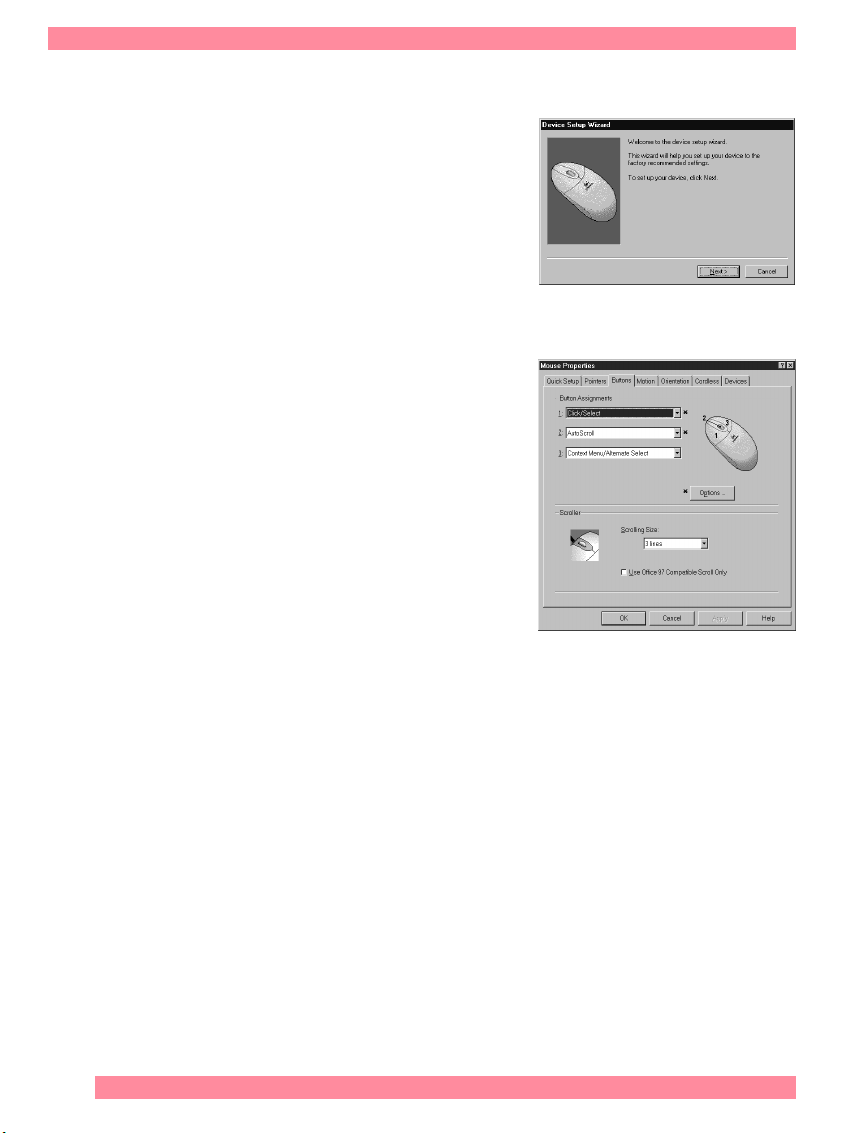
Choosing Options
Need help choosing options? Let the Mouse
Wizard show you how. To begin,
go to the Mouse Properties. To do this,
double-click the mouse icon in
the Windows
®
Taskbar. Now choose
the Quick Setup tab. Click Device Setup,
then follow the on-screen instructions.
Button Assignments
By default, the mouse or trackball buttons
are assigned various useful functions, such
as Click/Select, AutoScroll, Context Menu/
Alternate Select, Double-Click, etc.
Using the Buttons tab of the Mouse
Properties, you can change the button
settings of your mouse or trackball and
configure the wheel, if your device has
one. (Refer to the figure to the right.)
Note
The setting Context Menu/Alternate
Select provides easy-to-use shortcuts to speed up common tasks,
such as cut and paste.
8
To change button assignments, click the down arrow to select a function
for a button. (Note that at least one button must be assigned to Click/
Select.)
Click the down arrow under “Scrolling Size:” to choose the amount
of scrolling.
much you move the wheel.
Click the Options button to specify settings for AutoScroll, CyberJump
This sets the amount of scrolling in relation to how
®
,
HyperJump and double-click timing.
For more information, click the Help button.
Page 9

MouseWare for Windows
Battery Warning!
(Cordless Devices and Desktop Systems Only)
When battery power is low for the mouse, trackball, or keyboard, the
MouseWare
Windows
batteries. It is recommended that when you change batteries you change
them for the mouse/trackball and keyboard (if you own a Logitech
®
software displays a dialog box in Windows
®
2000, and Windows NT
®
4.0 suggesting that you change the
®
95, Windows
®
cordless
®
98,
keyboard) at the same time to optimize performance. When replacing the
batteries, use alkalines. You may use other battery types, but do not mix
them with alkalines. Note that the battery level indicator in the iTouch
™
software or in the Mouse Properties is calibrated for alkaline batteries only,
and will not give an accurate indication of battery life for batteries other
than alkalines.
Note For the cordless trackball, removing the ball for long periods of time
may accelerate the rate at which battery power is used.
Discard all used batteries according to the battery manufacturer’s
instructions. Exercise care when handling batteries. When batteries are
misused, they may explode or leak, causing burns and personal injury.
Do not open a battery or mutilate, dispose of in a fire, expose to heat
above 130
o
F (54
o
C), immerse in water, install improperly, or recharge.
Conducting materials, such as rings, bracelets, and keys, can short out
a battery causing it to overheat and possibly leak or explode. When you are
not using your cordless device for long periods of time, remove the
batteries and store them in a dry place at normal room temperature.
9
Page 10

MouseWare for Windows
Cordless Desktop
Various Cordless Desktop icons appear on the Windows
™
Icons
®
Taskbar.
These icons provide valuable information about the Cordless Desktop,
and make it possible for you to display keyboard and mouse property
sheets easily and quickly. Double-clicking either the keyboard or mouse
icon launches its respective property sheet in which you can specify
options. Standard keyboard functions are also conveniently displayed on
the Taskbar, which give the status of Num Lock, Caps Lock, and Scroll Lock.
When mouse or keyboard battery power is low, a warning icon appears to
let you know that it is time to change the batteries. Whenever you change
the batteries, it is a good idea to change the batteries in both the keyboard
and mouse at the same time for best performance.
MouseWare
®
for Windows
Double-click the MouseWare
®
icon located in the Logitech
®
3.1x
®
MouseWare
group window (or in the Windows Control Panel). Choose from the
available options to configure the wheel mouse. Note that Scroll and
Zoom, as well as WebWheel
™
, CyberJump
®
and HyperJump
functions, are not supported in Windows 3.1x.
Performs Windows
functions
Sets double-click speed
Saves settings
10
Identifies button being pressed
Assigns shortcuts
to second/third buttons
Sets cursor travel in relation
to mouse speed
Interchanges
button functions
Cancels changes
Enhances the cursor
Provides Connection settings
and battery status
Redetects devices after
plugging/unplugging a serial
mouse
Provides online help
Moves cursor to default command button
automatically
Adjusts cursor speed in relation
to mouse movement
Page 11
MouseWare for Windows
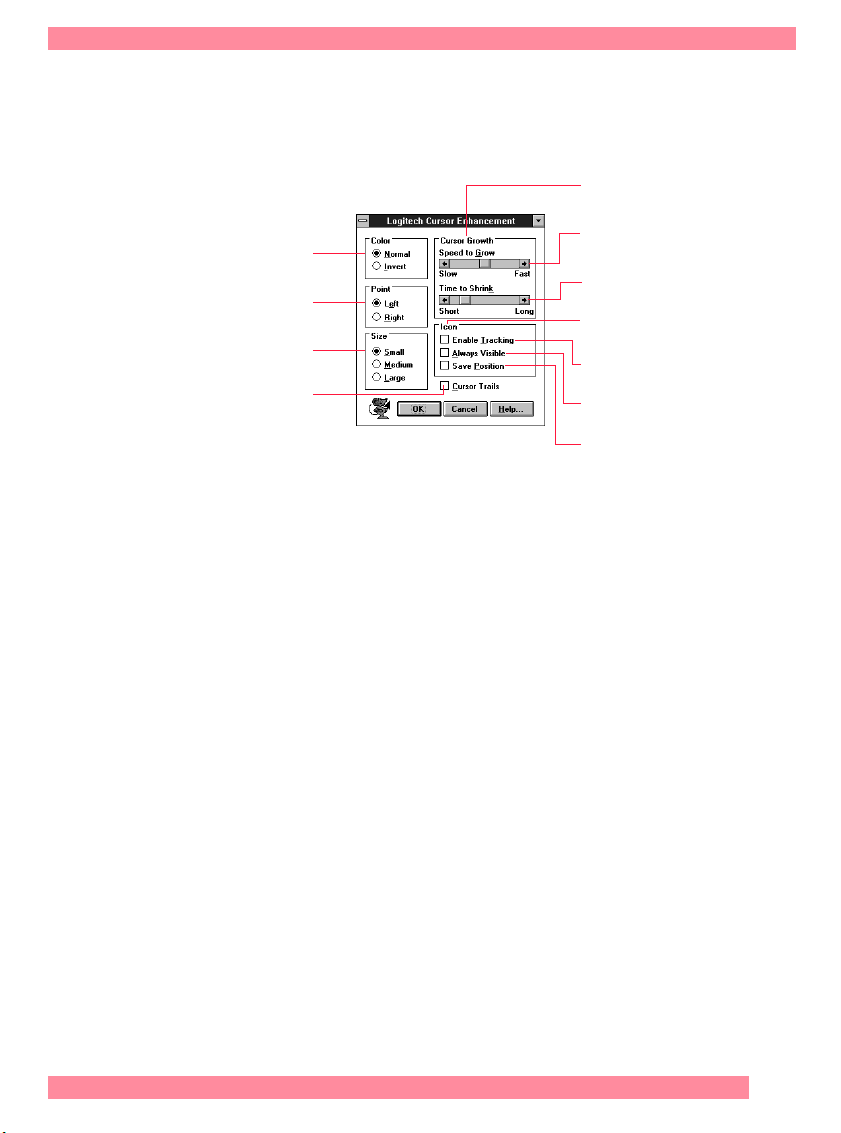
Cursor Enhancement
Use the Cursor Enhancement dialog box to customize the cursor. To display
the dialog box, click the Cursor button in the Mouse Control Center.
Makes the cursor grow larger
as it moves across the screen**
Sets the speed the cursor must move
Displays the cursor in normal
or reverse video
Changes the pointing
direction of the cursor
Sets cursor size
Leaves trail behind cursor
as it moves*
* Disabled with some SVGA resolutions.
**Disabled if Size is set to Large.
Button Assignments
MouseWare allows you to assign functions to three mouse/trackball
buttons and replaces frequently used tasks, such as Double-Click,
DragLock, etc., to a single button click. To override a button
assignment temporarily so you can use an application-specific feature,
press the Control key while clicking the button to be overridden.
to change size**
Sets the time the cursor stays large
before it shrinks in size**
Controls tracker icon at the bottom
of screen
Causes tracker icon to point to cursor
as it moves
Places the tracker icon on top
of all applications
Retains position of tracker icon upon
exiting
11
Page 12
MouseWare for Macintosh
MouseWare for Macintosh
®®
This section of the Online User’s Guide is for Macintosh® users.
Refer to this section to learn how to use your mouse or trackball with
your Macintosh computer.
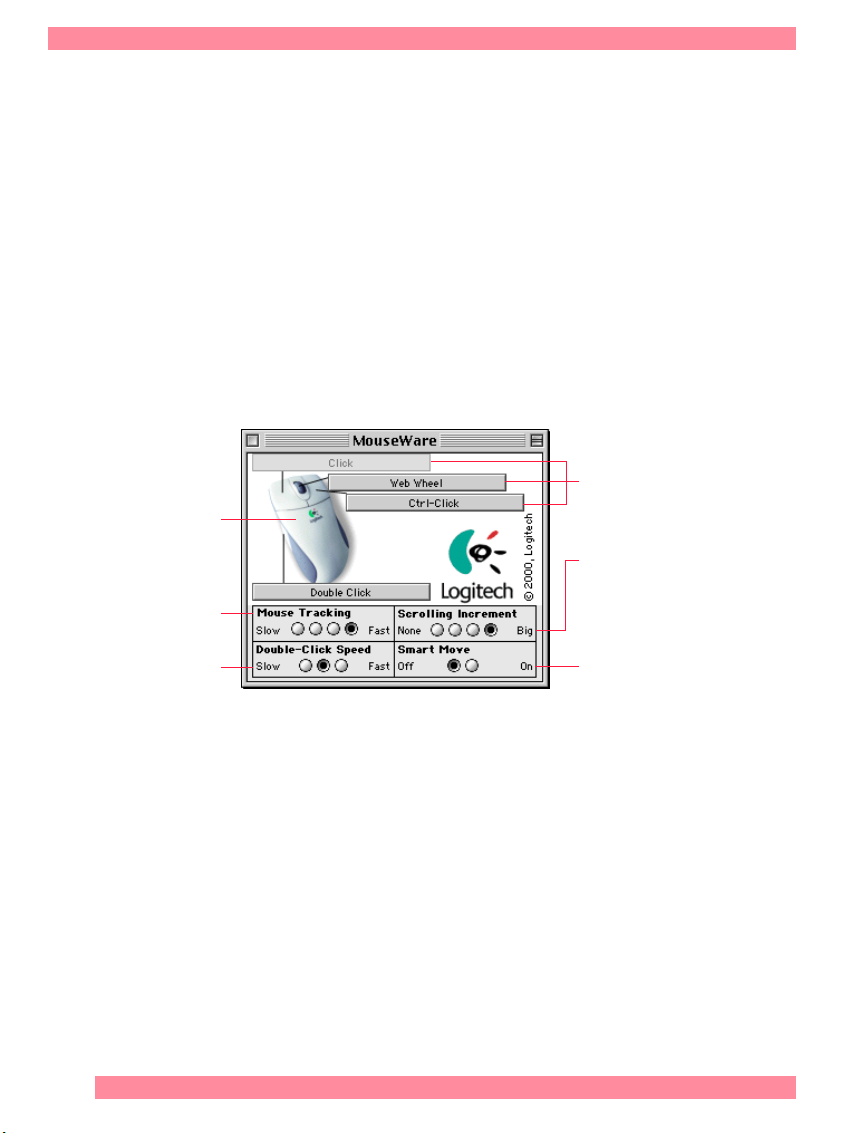
Customizing the Mouse or Trackball
The Logitech® MouseWare® software includes features for making
button assignments, controlling the amount of scrolling,
and setting up the mouse or trackball.
select MouseWare in the Control Panels.
options to set up your mouse or trackball.
The picture displayed here
will show the mouse
or trackball connected
to your computer.
Adjust cursor speed
in relation to mouse
movement.
Choose double-click
speed.
To access MouseWare,
Choose from the available
Click one of these boxes
to make button assignments.
(One button must be assigned
to “Click.”)
Choose how much is scrolled
in the active window when
you move the mouse wheel.
Choose to have the cursor move
automatically to a default
command button when an
application window is opened.
12
Page 13

Scrolling: Windows and Macintosh
Battery Warning!
(Cordless Devices)
When battery power is low for the mouse or trackball, the MouseWare®
software displays a dialog box on your desktop suggesting that you change
the batteries. When replacing the batteries, use alkalines. You may
use other battery types, but do not mix them with alkalines. Discard all
used batteries according to the battery manufacturer’s instructions.
Exercise care when handling batteries. When batteries are misused,
they may explode or leak, causing burns and personal injury. Do not
open a battery or mutilate, dispose of in a fire, expose to heat above
o
130
F (54o C), immerse in water, install improperly, or recharge.
Conducting materials, such as rings, bracelets, and keys, can short out
a battery causing it to overheat and possibly leak or explode.
When you are not using your cordless device for long periods of time,
remove the batteries and store them in a dry place at normal room
temperature.
Scrolling: Windows and Macintosh
®®
(Not Available in Windows® 3.1x)
If your mouse or trackball has a wheel, it functions both as a wheel
and as a button. As a wheel, you can use it to scroll both vertically
and horizontally, and you can also use it to zoom. To scroll,
simply move the wheel. To use the wheel like a standard mouse button,
click (press down) the wheel. Read the following tables to find out more
about scrolling and zooming with your mouse or trackball.
13
Page 14

Scrolling: Windows and Macintosh
Scrolling with a Wheel
Task What is It? How to Do It?
Wheel Scroll Use Wheel Scroll for precise up
Horizontal Scroll Use Horizontal Scroll in Windows
and down movement.
®
98, Windows® 2000,
Windows
and Windows NT
®
4.0 to scroll left
to right, or right to left,
whenever horizontal scroll bars are
present in the active window.
To scroll up, move the wheel forward; to scroll down,
move the wheel back.
®
95,
When both vertical and horizontal scroll bars are
present in a window, press the Ctrl and Shift keys
(Option key for the Macintosh
then move the wheel forward to scroll left;
move the wheel backward to scroll right.
If no vertical scroll bars are present, simply move
the wheel to scroll horizontally.
®
) on the keyboard,
Zoom
(Windows
®
)
Use Zoom to either magnify
or demagnify the view of a document
in an application that supports it.
Place the cursor in an application that is compliant
with Microsoft Office 97 (or a higher version of
this application). Press and hold the Ctrl key on
the keyboard, then to zoom in, move the wheel
forward; to zoom out, move the wheel backwards.
Scrolling without a Wheel (Windows
Task What is It? How to Do It?
Universal Scroll
®
)
(Windows
AutoScroll
®
)
(Windows
Zoom
®
)
(Windows
Universal Scroll
in a document without having
to use the window’s scroll bars.
Use the mouse or trackball to scroll up
and down or left and right.
Use AutoScroll to scroll through large
documents in Microsoft® Windows 95,
Windows 98, and Windows
and in applications that are compatible
with Microsoft
version of this application). AutoScroll
allows you to scroll a document
automatically without having to move
the mouse or trackball continuously.
Use Zoom to either magnify
or demagnify the view of a document.
™
lets you scroll
®
2000,
®
Office 97 (or a higher
Assign Universal Scroll to a button on the mouse
or trackball if it is not already assigned.
Press the button you have assigned to Universal
Scroll. To scroll up, move the mouse or trackball up;
to scroll down, move the mouse or trackball down.
To scroll left or right, move the mouse or trackball
left or right respectively.
Assign AutoScroll to a button on the mouse
or trackball if it is not already assigned.
Place the cursor in an application. Press the button
assigned to AutoScroll. The AutoScroll icon appears.
Move the mouse or trackball once in the direction
you want to scroll (vertical, horizontal, or diagonal).
The farther you move the pointer from the starting
point, the faster the scrolling. To stop AutoScroll,
press any mouse or trackball button.
Place the cursor in an application that is compatible
with Microsoft Office 97 (or a higher version of
this application). Press the Ctrl key on the keyboard,
click the button assigned to Universal Scroll
or AutoScroll, then to Zoom in, move the mouse
or trackball up; to Zoom out, move the mouse
or trackball down.
®
)
14
Page 15
WebWheel for Windows and Macintosh
™
®
WebWheel for Windows
®
and Macintosh
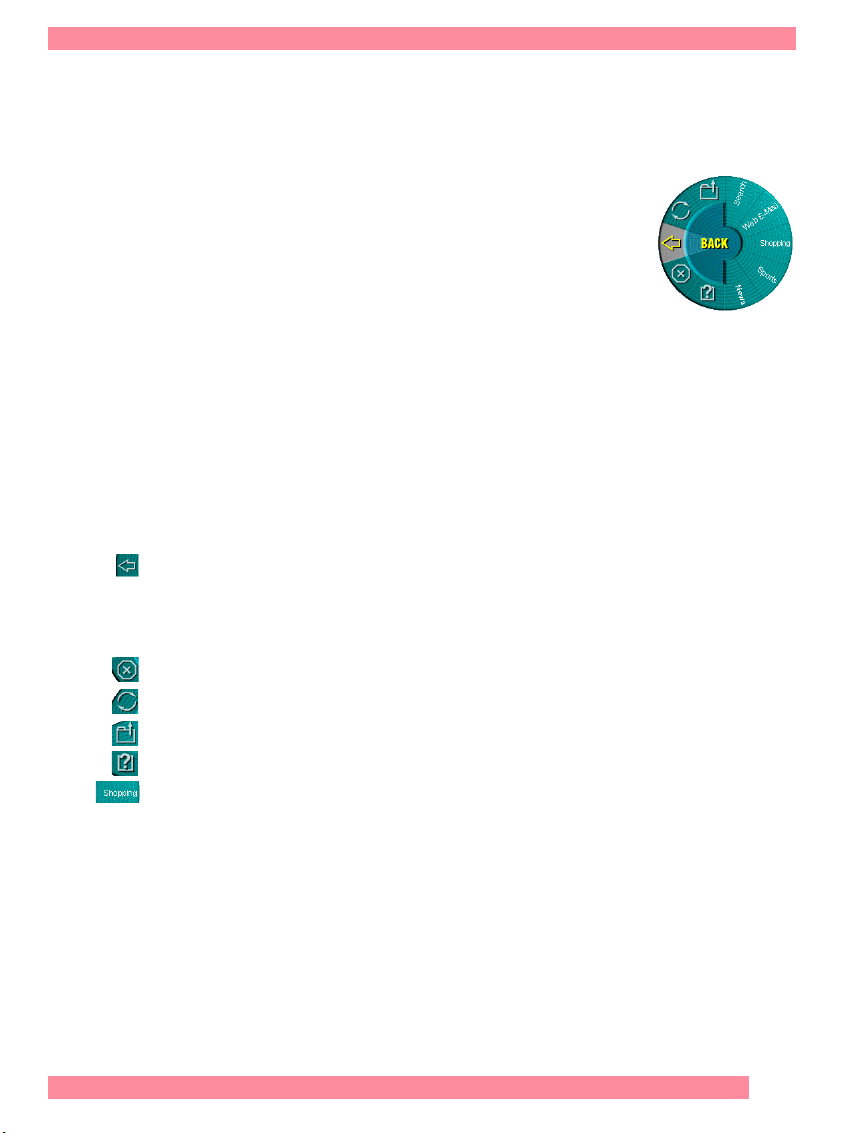
The Logitech® WebWheel™ helps you work faster
and with greater ease when using your Internet
web browser. The WebWheel has three of the most
commonly used web browsing commands along
with five web addresses, which you can personalize.
1. Launch your Internet browser.
Note The WebWheel browser command icons (Back, Stop, Reload,
Bookmarks/Favorites) will appear with a small red “X” when
you are not in your web browser.
2. Click and depress the assigned WebWheel button on
your mouse or trackball.
3. Roll the wheel-button, or move your mouse, to highlight
a selection on the WebWheel.
Back. Returns you to the previous web page. Since the Back
function is always the starting point when launching the WebWheel,
double-clicking the assigned WebWheel button executes the Back
function.
Stop. Halts the loading of a web page.
Reload. Reloads or refreshes the current web page.
Open Bookmarks/Favorites. Opens your bookmarks or favorites page.
View WebWheel Help. Opens the WebWheel help file.
Go to a Web Address. Opens the designated URL (Internet address)
or one of the other web address selections on the WebWheel.
(Not Available in Windows® 3.1x)
4. Click the highlighted WebWheel button, or press your clickselect button on your mouse or trackball.
15
Page 16

WebWheel for Windows and Macintosh
Assigning a New Web Address
The WebWheel™ comes set up with five web addresses. These web pages
give you an overview of possible addresses that you may wish to assign
to the WebWheel. You may change these assignments to Internet
addresses of your own choosing.
Note Some web addresses may be “locked”; that is, customization will not
be possible. If you attempt to reassign a locked web address, you will
receive a message telling you that reassignment is not permitted.
1. Open your web browser, then navigate to the desired web
address.
2. Launch the WebWheel by pressing the assigned WebWheel
button on your mouse or trackball.
3. Choose the section of the WebWheel where the web address
is to be placed by rolling the mouse/trackball wheel or moving
the mouse. Note that WebWheel browser command buttons cannot
be changed.
4. To assign the web address, press and hold the CTRL key
while clicking the WebWheel button you wish to change.
16
5. In the dialog box that displays, enter a name for the web
address, then click the assigned WebWheel button (or click OK
for Macintosh).
Note When assigning web addresses within the AOL
®
4.0 browser,
the CTRL-click method may not work. In this case, type the web
address (e.g., http://www.logitech.com) and name in the edit
boxes provided.
Page 17

iTouch Software for Logitech Keyboards
iTouch Software
™
for Logitech Keyboards
®
Your Logitech® cordless keyboard, with the included iTouch™ software,
brings you closer and keeps you in touch with your desktop world.
Browsing the web, sending e-mail, launching applications, and playing
CDs or DVDs are more intuitive, easy to use, efficient, fun, and natural
with your iTouch keyboard and software.
Set up and organize your iTouch keyboard your way. Using the iTouch keys
and the iTouch software, customize your iTouch keyboard so you can be
at your Internet home page, or favorite chat room, and run your e-mail
application with the push of a button. The iTouch keys are divided into
three groups, as defined by their functions.
Battery Warning!
When battery power is low for the mouse or keyboard, the MouseWare®
software displays a dialog box in Windows
Windows
the batteries. It is recommended that when you change batteries
you change them for the mouse and keyboard at the same time
to optimize performance. When replacing the batteries, use alkalines.
You may use other battery types, but do not mix them with alkalines.
Note that the battery level indicator in the iTouch software or in the Mouse
Properties is calibrated for alkaline batteries only, and will not give
an accurate indication of battery life for batteries other than alkalines.
®
2000, and Windows NT® 4.0 suggesting that you change
(Windows® 95 or Later)
®
95, Windows® 98,
Discard all used batteries according to the battery manufacturer’s
instructions. Exercise care when handling batteries. When batteries are
misused, they may explode or leak, causing burns and personal injury.
Do not open a battery or mutilate, dispose of in a fire, expose to heat
above 130
o
F (54o C), immerse in water, install improperly, or recharge.
Conducting materials, such as rings, bracelets, and keys, can short
out a battery causing it to overheat and possibly leak or explode.
When you are not using your cordless device for long periods of time,
remove the batteries and store them in a dry place at normal room
temperature.
17
Page 18

iTouch Software for Logitech Keyboards
Cordless Desktop™ Icons
Various Cordless Desktop icons appear on the Windows® Taskbar.
These icons provide valuable information about the Cordless desktop,
and make it possible for you to display keyboard and mouse property
sheets easily and quickly. Double-clicking either the keyboard or mouse
icon launches its respective property sheet in which you can specify
options. Standard keyboard functions are also conveniently displayed on
the Taskbar, which give the status of Num Lock, Caps Lock, and Scroll Lock.
When mouse or keyboard battery power is low, a warning icon appears to
let you know that it is time to change the batteries. Whenever you change
the batteries, it is a good idea to change the batteries in both the keyboard
and mouse at the same time for best performance.
The Internet Keys
Depending upon the model of your Logitech® keyboard, there are three,
four, or five programmable Internet keys, which you must set up before
using. (Refer to the
desktop system for the location of these special keys, and for the location
of the other iTouch
specific needs. For example, you can set up the Internet keys as follows:
The My Home
address
The E-mail key launches your e-mail application
The Search key displays a menu of Internet search engines
The Go key starts an application, accesses a web site, or displays a menu
of applications and web sites
The Logitech
®
starts an application, accesses a web site, or displays a menu
of applications and web sites, like the Go key example above.
Quick Start Guide
™
keys.) You can customize the Internet keys to suit you
™
key accesses your home web page or favorite Internet
®
key (found only on the Cordless iTouch™ Pro keyboard)
that ships with your keyboard or
18
The Internet keys have built-in flexibility. If you find it more convenient,
for example, to program the Search key to access a favorite web site
instead of displaying a menu of Internet search engines, the iTouch
software makes it very easy for you to do so, and provides visual feedback
on your screen for the operations described above.
Page 19

iTouch Software for Logitech Keyboards
Launching iTouch
Launch the iTouch™ software by double-clicking the iTouch™ icon
on the Windows
®
Taskbar.
™
Setting Up the Internet Keys
1. Connect to the Internet so you can easily assign Internet
addresses to the iTouch
you must have an Internet account.
2. Launch the iTouch
displays.
3. Choose an Internet key to set up by clicking a tab, such as
the My Home™ tab or the Go tab.
Sets up the Search key
Sets up the My Home key
Sets up the E-mail key
Enter a name for the web site,
application
™
Internet keys, if desired. Note that
™
software. The Logitech® Internet Keys dialog box
Sets up the Go key
Shows on-screen effects
and the iTouch icon on the Taskbar
Sets up the Logitech® key
on the iTouch
Choose Web Site, Program, or Menu
for the current key
™
Pro keyboard
Enter an Internet address
or file path
Click to save entries
Click to get online help
Click to cancel entries
19
Page 20

iTouch Software for Logitech Keyboards
4. Choose “Web Site,” “Program,”
or “Menu” for the key you are
customizing. Click the down arrow
to display these choices,
then highlight your choice by clicking it.
• Web Site links a web site to the key.
• Program links an application to the key.
• Menu links a menu of web addresses, Internet search engines,
and/or applications to the key, which you will need to specify.
The Internet Keys dialog box has a different layout when Menu
is chosen.
5. Enter information about the web site, program, or menu.
Click the Add button
As you add items
to the menu, one by one,
their short cut key
and name appear here
to add web addresses and
applications to the menu
20
• Web Site. You can use the Browse button under the Location box
of the Logitech Internet Keys dialog box to open your web browser
(if it is not already running) and to navigate to the desired site.
Enter a name for the web site in the Name box, then enter the web
address in the Location box.
• Program. Use the Browse button under the Location box to find
the application. Enter a name for the application in the Name box,
then enter a file path in the Location box.
Page 21

iTouch Software for Logitech Keyboards
• Menu. Click the Add button to display the Menu Item dialog box.
Enter information in this dialog box, as indicated below.
Enter a letter or number for
the shortcut key; pressing this
key will launch the web site
or application directly
Enter a name for the web site
or application
Enter an Internet address
or file path
Choose
“Web Site”
or “Program”
Click the Browse
button to find
the web site
or application
When specifying an Internet address, you can navigate to the desired
web site, and once there, press CTRL and the iTouch key you are setting
up (e.g., the Go key) to have the Internet address entered automatically
in the Location box.
6. Click the OK button to save your changes. To modify your entries
or to make changes to your iTouch keys at a later time, refer to Steps 1-5.
Assigning a Web Site to an Internet Key
You can easily assign a web site to an iTouch™ key while surfing the Net.
1. While logged on to the Internet, navigate to the web site
to which you want to assign an iTouch key.
2. After you have reached the desired web site, press CTRL and
the iTouch key you are assigning. For example, if your are assigning
the My Home
™
key, hold down the CTRL key and press the My Home key.
21
Page 22

iTouch Software for Logitech Keyboards
The Multimedia Keys
Play CD music and DVD music and movies (sound card or AV board
required) with the Multimedia keys.
Play/Pause. Plays or pauses the CD/DVD.
Stop. Stops play.
Previous Track. Plays the previous track.
Next Track. Plays the next track.
Mute. Greatly reduces the sound volume.
Volume Up. Increases sound volume.
Volume Down. Decreases sound volume.
™
The iTouch
software provides visual feedback on your screen for each
of these operations. To turn off visual feedback, open the iTouch software
and click the Options tab. Remove the check mark in the box for “Show OnScreen Key Effects.”
Using the Suspend Key
Access the Windows® Shut Down dialog box, where you can put your system
on stand-by or shut down Windows.
22
More Information about the iTouch™ Keys
A quick way to get information about an Internet key, the
that key, is to use the Logitech
®
iTouch™ web site.
1. Connect to the Internet to access the Logitech iTouch web site.
2. Press the key you want information about, then click “Yes”
in the dialog box that displays.
3. Read the instructions on setting up the button.
You can also obtain information about the iTouch software by clicking
a help key while using the iTouch software, or by double-clicking the help
folder in the Logitech iTouch program group. To access the Logitech iTouch
program group from the Windows
®
Taskbar, choose Start, Programs,
Logitech iTouch, then Help.
first
time you use
Page 23

Product Maintenance
Ball
Inside roller
Retainer ring
Ball-cage
Product Maintenance
Cleaning the Mouse
If the cursor skips or moves abnormally, clean the ball of your mouse
if your pointing device uses this technology.
1. Remove the retainer ring to remove
the ball. On the bottom of the mouse,
press in the direction of the Open arrow
imprinted on the retainer ring cover.
2. Wipe the ball with a clean, lint-free
cloth, then blow carefully into the ballcage to dislodge dust and lint.
Look for a build-up of dirt on the rubber
roller(s) inside the ball-cage.
3. If dirty, clean the roller(s) using a
cotton swab moistened lightly with isopropyl (rubbing) alcohol.
After cleaning, make sure the roller(s) are still centered in their channels.
Make sure that fluff from the swab is not left on the roller(s).
4. Replace the ball and retainer ring.
23
Page 24

Product Maintenance
Cleaning the Trackball
Logitech® trackballs are very reliable, and thanks to Marble® Technology,
they are especially resistant to dirt and dust while most other trackballs
need regular cleaning. In case a particle of dirt blocks or causes the ball
to move less smoothly, you should clean the ball as follows:
1. Turn off your computer and unplug your trackball.
®
2. For TrackMan
the indentation on the retainer ring and pull counter-clockwise
to remove the ring.
3. For TrackMan® Marble® FX, push the ball in the direction of
the larger opening to remove the ball from its socket.
4. Wipe the ball with a clean, lint-free cloth, then blow carefully
into the socket or ball-cage to dislodge dust and lint.
Note When cleaning TrackMan
the small contact points on which the trackball rests.
5. Replace the ball (or the ball and retainer ring for the TrackMan
Marble Wheel).
6. Plug in your trackball and turn on your computer.
Note For the cordless trackball, removing the ball for long periods
of time may accelerate the rate at which battery power is used.
Marble® Wheel, insert a straight pin into
®
Marble®, be careful not to remove
24
Page 25

Troubleshooting
Cordless Product Does Not Work
Troubleshooting
• Make sure you have connected the receiver correctly. The receiver cable
goes into the computer’s PS/2 mouse port (Windows
®
only) or USB port.
For optimal performance, place the receiver at least 8 inches
or 20 centimeters away from other electrical devices, such as
the computer, the computer monitor, or external storage drives.
• Make sure you have installed the batteries correctly. Check to make sure
the batteries you have installed are not dead. Try the batteries in another
device.
• For the cordless trackball, removing the ball for long periods of time may
accelerate the rate at which battery power is used.
• Establish communication between the receiver and the mouse,
trackball, or keyboard. Press the Connect button on the receiver first.
Then press the Connect button under the mouse, trackball, or keyboard.
If you have a Logitech
®
cordless keyboard and pointing device, make sure
to press the connect button on both the pointing device and keyboard.
t
n
i
r
P
e
s
u
a
P
l
l
o
r
c
S
n
e
e
r
c
S
2
1
F
k
c
o
L
k
a
e
r
B
q
P
s
y
S
e
c
a
p
s
k
c
a
B
e
m
o
H
t
r
e
s
n
I
|
d
n
E
e
t
e
l
e
D
\
r
e
t
n
E
l
r
t
C
-
/
e
g
a
P
m
u
N
*
k
c
o
L
p
U
7
8
9
e
g
a
P
n
w
o
D
p
U
P
g
e
m
o
H
+
4
5
6
1
3
2
d
n
E
n
D
P
g
r
e
t
n
E
0
l
e
D
s
n
I
• If you are working on a metallic surface, try using a mouse pad.
• Try unplugging then reconnecting the receiver cable to the computer.
25
Page 26

Troubleshooting
Cordless Product Is Not Detected
• Make sure the receiver cable is plugged into the PS/2 mouse port or USB
port. For a Windows
®
PS/2 mouse port connection only, do not
plug or unplug the receiver cable while the computer is running.
®
• Make sure the PS/2 mouse port (Windows
only) or USB port has
the proper configuration. Refer to your computer documentation for
the correct port configuration.
• In Windows you may have other system devices that conflict with
the mouse, trackball, or keyboard. Check the IRQ/address settings
of these devices for conflicts, and change the settings as required.
Refer to your computer documentation to make these changes.
• Try unplugging then reconnecting the receiver cable to the computer.
Screen Cursor Does Not Move Properly
• Clean the mouse ball and roller(s) if your mouse uses this technology.
• For cordless devices, try changing the position of the receiver.
It is possible that the receiver may be too far from the mouse
or trackball. Or the computer monitor (or a large metal object)
may be interfering with the receiver’s radio reception. Also, the batteries
may be low. Check the batteries as described previously. You may
also need to re-establish the connection between the mouse/trackball
and its receiver. To do this, press the Connect button on the receiver,
then press the Connect button on the bottom of the mouse or trackball.
26
• If you are using a mouse with optical technology and your tabletop
surface is red in color or is highly reflective like a mirror, your tabletop
surface may be interfering with the optical sensor of the mouse.
Try using a traditional mouse pad, or use the mouse on a different
tabletop surface.
Page 27

Troubleshooting
Non-Cordless Pointing Device Is Not Detected
• Make sure the mouse or trackball cable is plugged into the right port –
USB or PS/2 (PS/2 is for Windows
or trackball on a PC, install the MouseWare
®
only). When installing the mouse
®
software
before
connecting
the mouse or trackball cable. Reboot the system.
®
• Make sure the PS/2 mouse port (Windows
only) or USB port has
the proper configuration. Refer to your computer documentation for
the correct port configuration.
• In Windows you may have other system devices (e.g., a modem card)
that conflict with the mouse or trackball. Check the IRQ/address settings
of these devices for conflicts, and change the settings as required.
If the problem persists, please contact technical support.
27
Page 28

Contacts
*
Product Information
✆ +31 (0)10 243 88 97
✆ +32 (0)2 626 89 63
✆ +32 (0)2 626 89 61
✆ +45-35 44 55 16 ✆ +45-35 44 55 17
✆ +49 (0)69-92 032 165 ✆ +49 (0)69-92 032 166
✆ +34 91-375 33 68 ✆ +34 91-375 33 69
✆ +33 (0)1-43 62 34 13 ✆ +33 (0)1-43 62 34 14
✆ +41-21 863 54 00
✆ +39-02 215 1062 ✆ +39-02 214 0871
✆ +43 (0)1 502 221 349 ✆ +43 (0)1 502 221 348
✆ D +41 (0)21 863 54 10
✆ F +41 (0)21 863 54 30
✆ I +41 (0)21 863 54 60
✆ +46 (0)8-519 920 19
✆ +47 (0)23 500 084
✆ +358 (0)9 817 100 21
✆ +44 (0)171 309 01 27 ✆ +44 (0)171 309 01 26
(Infoline)
Nederlands
Français (Belg.)
Vlaams (Belg.)
English
Sweden
Norway
Finland
Technical Help
✆ +31 (0)10 243 88 98
✆ +32 (0)2 626 89 62
✆ +32 (0)2 626 89 60
✆ +41-21 863 54 01
✆ D +41 (0)21 863 54 11
✆ F +41 (0)21 863 54 31
✆ I +41 (0)21 863 54 61
✆ +46 (0)8-519 920 20
✆ +47 (0)23 500 083
✆ +358 (0)9 817 100 21
(Hotline)
Nederlands
Français (Belg.)
Vlaams (Belg.)
English
Sweden
Norway
Finland
Country Address
Benelux (B, LUX, NL)
LOGITECH Benelux
Denmark
LOGITECH Representation
Deutschland & Eastern European countries
LOGITECH GmbH
España
LOGITECH S.A.
France
LOGITECH France SARL
Hungary
IMSZ Kft. (Logitech)
Italia
LOGITECH Italia S.r.l
Österreich
LOGITECH Repräsentanz
Schweiz/ Suisse/Svizzera
LOGITECH Switzerland
Sweden, Iceland, Norway & Finland
Logitech Representation
UK + Eire
LOGI (U.K.) Ltd.
Contacts
Bedrijvenpark Lindenholt
Kerkenbos 1045
NL - 6546 BB Ni
Århusgade 88, 4.sal
DK - 2100 Københa
Gabriele-Münter-Strasse 3
D - 82110 Ger
Oficina de representación en España
Calle Nicaragua, 48 2º 1ª
E - 08029 Bar
26-28 Rue Danielle Casanova
F - 75002 P
Att. Kovacs Dora / Koszegi Mihaly
Vamhaz Krt. 10. 1/13
1053 Budapes
Centro Direzionale Colleoni
Palazzo Andromeda 3
I - 20041 A
Göra 580, Postfach 77
A - 5580 T
Täfernstrasse 16
CH - 5405 Baden-Dättwil
Geometrivägen 3-7
S - 141 75 K
The Old Court House
267-273 High Street
GB - Dorking
jmegen
vn Ø
mering
celona
aris
t - HUNGARY
grate Brianza, MI
amsweg
ungens Kurva
, RH4 1RL, Surrey
Logitech Headquarters
European, Middle Eastern
& African Headquarters
LOGITECH Trading S.A.
Corporate Headquarters
LOGITECH Inc.
Asian Pacific Headquarters
LOGITECH Far East Ltd.
Australia
Logitech Australia Computer
Peripherals Pty Ltd.
Canada
Sales & Marketing Office
Japan
LOGICOOL Co. Ltd.
In Latin America and the Caribbean: Contact your local authorized distributor, or call our Customer Support Hotline in the USA, at
Moulin-du-Choc
CH - 1122 R
6505 Kaiser Drive
remont, CA 94555
USA - F
#2 Creation Road IV
Science-Based – Industrial Park
ROC - Hsinc
Level 2, 633 Pittwater Road
AUS - Dee Wh
5025 Orbitor Dr., Bldg. 6, Suite 200
CDN - Mississaug
Ryoshin Ginza East Mirror Bldg., 7F
3-15-10 Ginza
Chuo-ku, T
World Wide Web:
omanel-sur-Morges
hu, Taiwan
y NSW 2099, Australia
a, ON L4W 4Y5
okyo, Japan 104-0061
http://www.logitech.com
✆ +41 (0)21 863 54 00
Fax +41 (0)21 863 54 02
✆ (800) 231-7717 ✆ +1 (702) 269 3457
✆ (800) 231-7717 ✆ +1 702 269 3457
FTP:
ftp://ftp.logitech.com/pub
* Refer to your Registration Card for the most up-to-date addresses and phone numbers.
Note For USA and Canadian customers only: please read the following prior to exchanging or returning your product. To exchange
or return your product within the first 30 days, we recommend returning it to the point of purchase. If you return or exchange
your product through Logitech, you must first contact Customer Support to obtain a Return Merchandise Authorization (RMA)
number. Customer Support will give you an RMA number and a special address for the exchange.
✆ +41 (0)21 863 54 01
English
Fax +41 (0)21 863 54 02
✆ +886 (2) 27466601
x2206
✆ +61 (02)9804 6968
✆ +61 (02)9972 3561
✆ +81 (3) 3543 2122
Fax +81 (3) 3543 2911
+1 (702) 269 3457.
✆
English
28
Page 29

Mouse
Product Warranties
Mouse
Cordless MouseMan® Wheel
© 2000 Logitech. All Rights Reserved. Logitech, the Logitech logo, and other Logitech marks are owned by Logitech and may be registered.
All other trademarks are the property of their respective owners. Logitech assumes no responsibility for any errors that may appear in this manual.
Information contained herein is subject to change without notice.
Software License Agreement. LOGITECH IS WILLING TO LICENSE THE ENCLOSED SOFTWARE TO YOU ONLY ON THE CONDITION THAT YOU ACCEPT ALL
OF THE TERMS CONTAINED IN THIS LICENSE AGREEMENT. This is a legal agreement between you (either an individual end-user or an entity)
and Logitech. By opening the software package, you are agreeing to be bound by the terms and conditions of the Agreement. If you
do not agree to the terms of this Agreement, promptly return the software package and other items that are part of this product in
their original package with your payment receipt to your point of purchase for a full refund. Grant of License. Logitech and its suppliers
grant you a nonexclusive license to use one copy of the enclosed software program (“Software”) on one computer only with the Logitech product you have
purchased. No other rights are granted. The Software is in use if it is loaded on the computer’s permanent or temporary memory. For backup purposes
only, you may make one copy of the Software. You must include on the backup copy all copyright and other notices included on the Software as supplied
by Logitech. Installation on a network server for the sole purpose of your internal distribution of the Software is permitted only if you have purchased an
individual Software package for each networked computer to which the Software is distributed.
Restrictions. Logitech and its suppliers retain ownership of the Software. You shall not decompile, disassemble, reverse-engineer, or modify the Software
in any way. You may not transmit the Software over a network (except as expressly permitted above), by telephone, or electronically using any means.
You may not transfer the Software except upon a permanent transfer of the enclosed Logitech product provided that all Software updates are included in
the transfer, you do not retain a copy of the Software, and the transferee agrees to be bound by the terms and conditions in this license. Upon any violation
of any of the provisions of this Agreement, rights to use the Software shall automatically terminate and the Software must be returned to Logitech or all
copies of the Software destroyed. Limited Product Warranty. Logitech warrants that the hardware accompanying this documentation shall be free from
significant defects in material and workmanship for a period of five years from the date of purchase. Logitech also warrants that the software accompanying
this documentation will perform substantially in accordance with the documentation for a period of 90 days from the date of purchase. Logitech’s hardware
and software warranty is nontransferable and is limited to the original purchaser. Product Remedies. Logitech’s entire liability and the Licensee’s exclusive
remedy for any breach of warranty, shall be, at Logitech’s option, either (a) return of the price paid or (b) repair or replacement of the hardware or software,
provided that the hardware or software is returned to the point of purchase, with a copy of the sales receipt. Any replacement hardware or software will be
warranted for the remainder of the original warranty period or 30 days for the hardware and 30 days for the software, whichever is longer. These remedies
are void if failure of the hardware or software has resulted from accident, abuse, or misapplication.
LIMITATION OF LIABILITY. THE WARRANTIES SET FORTH IN THIS AGREEMENT REPLACE ALL OTHER WARRANTIES. LOGITECH EXPRESSLY DISCLAIMS
ALL OTHER WARRANTIES, INCLUDING, BUT NOT LIMITED TO, THE IMPLIED WARRANTIES OF MERCHANTABILITY AND FITNESS FOR A PARTICULAR PURPOSE
AND NONINFRINGEMENT OF THIRD-PARTY RIGHTS WITH RESPECT TO THE DOCUMENTATION, SOFTWARE, AND HARDWARE. NO LOGITECH DEALER, AGENT,
OR EMPLOYEE IS AUTHORIZED TO MAKE ANY MODIFICATION, EXTENSION, OR ADDITION TO THIS WARRANTY. IN NO EVENT WILL LOGITECH OR ITS SUPPLIERS
BE LIABLE FOR ANY COSTS OF PROCUREMENT OF SUBSTITUTE PRODUCTS OR SERVICES, LOST PROFITS, LOSS OF INFORMATION OR DATA, OR ANY OTHER SPECIAL,
INDIRECT, CONSEQUENTIAL, OR INCIDENTAL DAMAGES ARISING IN ANY WAY OUT OF THE SALE OF, USE OF, OR INABILITY TO USE ANY LOGITECH PRODUCT
OR SERVICE, EVEN IF LOGITECH HAS BEEN ADVISED OF THE POSSIBILITY OF SUCH DAMAGES. IN NO CASE SHALL LOGITECH’S LIABILITY EXCEED THE ACTUAL
MONEY PAID FOR THE PRODUCTS AT ISSUE. Because some jurisdictions do not allow the limitation of implied warranties or liability for incidental,
consequential, special, or indirect damages, the above limitation may not always apply. The above limitations will not apply in case of personal injury where
and to the extent that applicable law requires such liability.
U.S. Government Restricted Rights. The Software is provided to the U.S. Government only with restricted rights and limited rights. Use, duplication,
or disclosure by the U.S. Government is subject to restrictions set forth in 48 C.F.R. 2.101 (October 1995), consisting of “Commercial Computer Software”
and “Commercial Computer Software Documentation” as such terms are used in 48 C.F.R. 12.212 (September 1995), and in FAR Sections 52-227-14 and
52-227-19 or DFARS Section 52.227-7013 (C) (1) (ii), or their successors, as applicable. Consistent with 48 C.F.R. 12.
227.7204-4 (June 1995), or any successor regulations, this Software is provided to U.S. Government users pursuant to the terms and conditions herein.
Contractor/Manufacturer is Logitech Inc., 6505 Kaiser Drive, Fremont, CA 94555.
FCC Compliance and Advisory Statement. This hardware device complies with Part 15 of the FCC Rules. Operation is subject to the following two
conditions: 1) this device may not cause harmful interference, and 2) this device must accept any interference received, including interference that may
cause undesired operation. This equipment has been tested and found to comply with the limits for a Class B digital device, pursuant to Part 15 of the FCC
Rules. These limits are designed to provide reasonable protection against harmful interference in a residential installation. This equipment generates, uses,
and can radiate radio frequency energy and, if not installed or used in accordance with the instructions, may cause harmful interference to radio
communications. However, there is no guarantee that interference will not occur in a particular installation. If this equipment does cause harmful interference
to radio or television reception, which can be determined by turning the equipment off and on, the user is encouraged to try to correct the interference
by one or more of the following measures: 1) reorient or relocate the receiving antenna; 2) increase the separation between the equipment and the receiver;
3) connect the equipment to an outlet on a circuit different from that to which the receiver is connected; 4) consult the dealer or an experienced radio/TV
technician for help. Any changes or modifications not expressly approved by the party responsible for compliance could void the user's authority to operate
the equipment. Where shielded interface cables have been provided with the product or specified additional components or accessories elsewhere defined
to be used with the installation of the product, they must be used in order to ensure compliance with FCC regulations.
Canadian DOC Statement. This digital device does not exceed the Class B limits for radio noise emissions from digital apparatus specified in the
interference-causing equipment standard entitled “Digital Apparatus,” ICES-003 of the Department of Communications.
Cet appareil numérique respecte les limites bruits radioélectriques applicables aux appareils numériques de Classe B prescrites dans la norme sur le matériel
brouilleur: “Appareils Numériques,” NMB-003 édictée par le Ministère des Communications.
212
and 48 C.F.R. 227.7202-1 through
29
Page 30

Mouse
Cordless Wheel Mouse
© 2000 Logitech. All Rights Reserved. Logitech, the Logitech logo, and other Logitech marks are owned by Logitech and may be registered.
All other trademarks are the property of their respective owners. Logitech assumes no responsibility for any errors that may appear in this manual.
Information contained herein is subject to change without notice.
Software License Agreement. LOGITECH IS WILLING TO LICENSE THE ENCLOSED SOFTWARE TO YOU ONLY ON THE CONDITION THAT YOU ACCEPT
ALL OF THE TERMS CONTAINED IN THIS LICENSE AGREEMENT. This is a legal agreement between you (either an individual end-user or an entity)
and Logitech. By opening the software package, you are agreeing to be bound by the terms and conditions of the Agreement. If you
do not agree to the terms of this Agreement, promptly return the software package and other items that are part of this product in
their original package with your payment receipt to your point of purchase for a full refund. Grant of License. Logitech and its suppliers
grant you a nonexclusive license to use one copy of the enclosed software program (“Software”) on one computer only with the Logitech product you have
purchased. No other rights are granted. The Software is in use if it is loaded on the computer’s permanent or temporary memory. For backup purposes
only, you may make one copy of the Software. You must include on the backup copy all copyright and other notices included on the Software as supplied
by Logitech. Installation on a network server for the sole purpose of your internal distribution of the Software is permitted only if you have purchased an
individual Software package for each networked computer to which the Software is distributed.
Restrictions. Logitech and its suppliers retain ownership of the Software. You shall not decompile, disassemble, reverse-engineer, or modify the Software
in any way. You may not transmit the Software over a network (except as expressly permitted above), by telephone, or electronically using any means.
You may not transfer the Software except upon a permanent transfer of the enclosed Logitech product provided that all Software updates are included in
the transfer, you do not retain a copy of the Software, and the transferee agrees to be bound by the terms and conditions in this license. Upon any violation
of any of the provisions of this Agreement, rights to use the Software shall automatically terminate and the Software must be returned to Logitech or all
copies of the Software destroyed.
Limited Product Warranty. Logitech warrants that the hardware accompanying this documentation shall be free from significant defects in material
and workmanship for a period of five years from the date of purchase. Logitech also warrants that the software accompanying this documentation will
perform substantially in accordance with the documentation for a period of 90 days from the date of purchase. Logitech’s hardware and software warranty
is nontransferable and is limited to the original purchaser.
Product Remedies. Logitech’s entire liability and the Licensee’s exclusive remedy for any breach of warranty, shall be, at Logitech’s option, either (a) return
of the price paid or (b) repair or replacement of the hardware or software, provided that the hardware or software is returned to the point of purchase,
with a copy of the sales receipt. Any replacement hardware or software will be warranted for the remainder of the original warranty period or 30 days for
the hardware and 30 days for the software, whichever is longer. These remedies are void if failure of the hardware or software has resulted from accident,
abuse, or misapplication.
LIMITATION OF LIABILITY. THE WARRANTIES SET FORTH IN THIS AGREEMENT REPLACE ALL OTHER WARRANTIES. LOGITECH EXPRESSLY DISCLAIMS
ALL OTHER WARRANTIES, INCLUDING, BUT NOT LIMITED TO, THE IMPLIED WARRANTIES OF MERCHANTABILITY AND FITNESS FOR A PARTICULAR PURPOSE
AND NONINFRINGEMENT OF THIRD-PARTY RIGHTS WITH RESPECT TO THE DOCUMENTATION, SOFTWARE, AND HARDWARE. NO LOGITECH DEALER, AGENT,
OR EMPLOYEE IS AUTHORIZED TO MAKE ANY MODIFICATION, EXTENSION, OR ADDITION TO THIS WARRANTY. IN NO EVENT WILL LOGITECH OR ITS SUPPLIERS
BE LIABLE FOR ANY COSTS OF PROCUREMENT OF SUBSTITUTE PRODUCTS OR SERVICES, LOST PROFITS, LOSS OF INFORMATION OR DATA, OR ANY OTHER SPECIAL,
INDIRECT, CONSEQUENTIAL, OR INCIDENTAL DAMAGES ARISING IN ANY WAY OUT OF THE SALE OF, USE OF, OR INABILITY TO USE ANY LOGITECH PRODUCT
OR SERVICE, EVEN IF LOGITECH HAS BEEN ADVISED OF THE POSSIBILITY OF SUCH DAMAGES. IN NO CASE SHALL LOGITECH’S LIABILITY EXCEED THE ACTUAL
MONEY PAID FOR THE PRODUCTS AT ISSUE. Because some jurisdictions do not allow the limitation of implied warranties or liability for incidental,
consequential, special, or indirect damages, the above limitation may not always apply. The above limitations will not apply in case of personal injury where
and to the extent that applicable law requires such liability.
U.S. Government Restricted Rights. The Software is provided to the U.S. Government only with restricted rights and limited rights. Use, duplication,
or disclosure by the U.S. Government is subject to restrictions set forth in 48 C.F.R. 2.101 (October 1995), consisting of “Commercial Computer Software”
and “Commercial Computer Software Documentation” as such terms are used in 48 C.F.R. 12.212 (September 1995), and in FAR Sections 52-227-14 and
52-227-19 or DFARS Section 52.227-7013 (C) (1) (ii), or their successors, as applicable. Consistent with 48 C.F.R. 12.212 and 48 C.F.R. 227.7202-1 through
227.7204-4 (June 1995), or any successor regulations, this Software is provided to U.S. Government users pursuant to the terms and conditions herein.
Contractor/Manufacturer is Logitech Inc., 6505 Kaiser Drive, Fremont, CA 94555.
FCC Compliance and Advisory Statement. This hardware device complies with Part 15 of the FCC Rules. Operation is subject to the following two
conditions: 1) this device may not cause harmful interference, and 2) this device must accept any interference received, including interference that may
cause undesired operation. This equipment has been tested and found to comply with the limits for a Class B digital device, pursuant to Part 15 of the FCC
Rules. These limits are designed to provide reasonable protection against harmful interference in a residential installation. This equipment generates, uses,
and can radiate radio frequency energy and, if not installed or used in accordance with the instructions, may cause harmful interference to radio
communications. However, there is no guarantee that interference will not occur in a particular installation. If this equipment does cause harmful interference
to radio or television reception, which can be determined by turning the equipment off and on, the user is encouraged to try to correct the interference
by one or more of the following measures: 1) reorient or relocate the receiving antenna; 2) increase the separation between the equipment and the receiver;
3) connect the equipment to an outlet on a circuit different from that to which the receiver is connected; 4) consult the dealer or an experienced radio/TV
technician for help. Any changes or modifications not expressly approved by the party responsible for compliance could void the user's authority to operate
the equipment. Where shielded interface cables have been provided with the product or specified additional components or accessories elsewhere defined
to be used with the installation of the product, they must be used in order to ensure compliance with FCC regulations.
Canadian DOC Statement. This digital device does not exceed the Class B limits for radio noise emissions from digital apparatus specified in the
interference-causing equipment standard entitled “Digital Apparatus,” ICES-003 of the Department of Communications.
Cet appareil numérique respecte les limites bruits radioélectriques applicables aux appareils numériques de Classe B prescrites dans la norme sur le matériel
brouilleur: “Appareils Numériques,” NMB-003 édictée par le Ministère des Communications.
This device complies with RSS-210 of Industry and Science Canada. Operation is subject to the following two conditions: 1) this device may not cause
interference, and 2) this device must accept any interference, including interference that may cause undesired operation of the device. Transmitter
frequency: 26.995; 27.045; 27.145; 27.195 MHz. Power Output: < 10mV/m @ 3m.
30
Page 31

Mouse
First +/Pilot Wheel Mouse
© 2000 Logitech. All Rights Reserved. Logitech, the Logitech logo, and other Logitech marks are owned by Logitech and may be registered.
All other trademarks are the property of their respective owners. Logitech assumes no responsibility for any errors that may appear in this manual.
Information contained herein is subject to change without notice.
Software License Agreement. LOGITECH IS WILLING TO LICENSE THE ENCLOSED SOFTWARE TO YOU ONLY ON THE CONDITION THAT YOU ACCEPT
ALL OF THE TERMS CONTAINED IN THIS LICENSE AGREEMENT. This is a legal agreement between you (either an individual end-user or an entity)
and Logitech. By opening the software package, you are agreeing to be bound by the terms and conditions of the Agreement. If you
do not agree to the terms of this Agreement, promptly return the software package and other items that are part of this product in
their original package with your payment receipt to your point of purchase for a full refund. Grant of License. Logitech and its suppliers
grant you a nonexclusive license to use one copy of the enclosed software program (“Software”) on one computer only with the Logitech product you have
purchased. No other rights are granted. The Software is in use if it is loaded on the computer’s permanent or temporary memory. For backup purposes
only, you may make one copy of the Software. You must include on the backup copy all copyright and other notices included on the Software as supplied
by Logitech. Installation on a network server for the sole purpose of your internal distribution of the Software is permitted only if you have purchased an
individual Software package for each networked computer to which the Software is distributed.
Restrictions. Logitech and its suppliers retain ownership of the Software. You shall not decompile, disassemble, reverse-engineer, or modify the Software
in any way. You may not transmit the Software over a network (except as expressly permitted above), by telephone, or electronically using any means.
You may not transfer the Software except upon a permanent transfer of the enclosed Logitech product provided that all Software updates are included in
the transfer, you do not retain a copy of the Software, and the transferee agrees to be bound by the terms and conditions in this license. Upon any violation
of any of the provisions of this Agreement, rights to use the Software shall automatically terminate and the Software must be returned to Logitech or all
copies of the Software destroyed.
Limited Product Warranty. Logitech warrants that the hardware accompanying this documentation shall be free from significant defects in material
and workmanship for a period of two years from the date of purchase. Logitech also warrants that the software accompanying this documentation will
perform substantially in accordance with the documentation for a period of 90 days from the date of purchase. Logitech’s hardware and software warranty
is nontransferable and is limited to the original purchaser.
Product Remedies. Logitech’s entire liability and the Licensee’s exclusive remedy for any breach of warranty, shall be, at Logitech’s option, either (a) return
of the price paid or (b) repair or replacement of the hardware or software, provided that the hardware or software is returned to the point of purchase,
with a copy of the sales receipt. Any replacement hardware or software will be warranted for the remainder of the original warranty period or 30 days for
the hardware and 30 days for the software, whichever is longer. These remedies are void if failure of the hardware or software has resulted from accident,
abuse, or misapplication.
LIMITATION OF LIABILITY. THE WARRANTIES SET FORTH IN THIS AGREEMENT REPLACE ALL OTHER WARRANTIES. LOGITECH EXPRESSLY DISCLAIMS
ALL OTHER WARRANTIES, INCLUDING, BUT NOT LIMITED TO, THE IMPLIED WARRANTIES OF MERCHANTABILITY AND FITNESS FOR A PARTICULAR PURPOSE
AND NONINFRINGEMENT OF THIRD-PARTY RIGHTS WITH RESPECT TO THE DOCUMENTATION, SOFTWARE, AND HARDWARE. NO LOGITECH DEALER, AGENT,
OR EMPLOYEE IS AUTHORIZED TO MAKE ANY MODIFICATION, EXTENSION, OR ADDITION TO THIS WARRANTY. IN NO EVENT WILL LOGITECH OR ITS SUPPLIERS
BE LIABLE FOR ANY COSTS OF PROCUREMENT OF SUBSTITUTE PRODUCTS OR SERVICES, LOST PROFITS, LOSS OF INFORMATION OR DATA, OR ANY OTHER SPECIAL,
INDIRECT, CONSEQUENTIAL, OR INCIDENTAL DAMAGES ARISING IN ANY WAY OUT OF THE SALE OF, USE OF, OR INABILITY TO USE ANY LOGITECH PRODUCT
OR SERVICE, EVEN IF LOGITECH HAS BEEN ADVISED OF THE POSSIBILITY OF SUCH DAMAGES. IN NO CASE SHALL LOGITECH’S LIABILITY EXCEED THE ACTUAL
MONEY PAID FOR THE PRODUCTS AT ISSUE. Because some jurisdictions do not allow the limitation of implied warranties or liability for incidental,
consequential, special, or indirect damages, the above limitation may not always apply. The above limitations will not apply in case of personal injury where
and to the extent that applicable law requires such liability.
U.S. Government Restricted Rights. The Software is provided to the U.S. Government only with restricted rights and limited rights. Use, duplication,
or disclosure by the U.S. Government is subject to restrictions set forth in 48 C.F.R. 2.101 (October 1995), consisting of “Commercial Computer Software”
and “Commercial Computer Software Documentation” as such terms are used in 48 C.F.R. 12.212 (September 1995), and in FAR Sections 52-227-14 and
52-227-19 or DFARS Section 52.227-7013 (C) (1) (ii), or their successors, as applicable. Consistent with 48 C.F.R. 12.212 and 48 C.F.R. 227.7202-1 through
227.7204-4 (June 1995), or any successor regulations, this Software is provided to U.S. Government users pursuant to the terms and conditions herein.
Contractor/Manufacturer is Logitech Inc., 6505 Kaiser Drive, Fremont, CA 94555.
FCC Compliance and Advisory Statement. This hardware device complies with Part 15 of the FCC Rules. Operation is subject to the following two
conditions: 1) this device may not cause harmful interference, and 2) this device must accept any interference received, including interference that may
cause undesired operation. This equipment has been tested and found to comply with the limits for a Class B digital device, pursuant to Part 15 of the FCC
Rules. These limits are designed to provide reasonable protection against harmful interference in a residential installation. This equipment generates, uses,
and can radiate radio frequency energy and, if not installed or used in accordance with the instructions, may cause harmful interference to radio
communications. However, there is no guarantee that interference will not occur in a particular installation. If this equipment does cause harmful interference
to radio or television reception, which can be determined by turning the equipment off and on, the user is encouraged to try to correct the interference
by one or more of the following measures: 1) reorient or relocate the receiving antenna; 2) increase the separation between the equipment and the receiver;
3) connect the equipment to an outlet on a circuit different from that to which the receiver is connected; 4) consult the dealer or an experienced radio/TV
technician for help. Any changes or modifications not expressly approved by the party responsible for compliance could void the user's authority to operate
the equipment. Where shielded interface cables have been provided with the product or specified additional components or accessories elsewhere defined
to be used with the installation of the product, they must be used in order to ensure compliance with FCC regulations.
Canadian DOC Statement. This digital device does not exceed the Class B limits for radio noise emissions from digital apparatus specified in the
interference-causing equipment standard entitled “Digital Apparatus,” ICES-003 of the Department of Communications.
Cet appareil numérique respecte les limites bruits radioélectriques applicables aux appareils numériques de Classe B prescrites dans la norme sur le matériel
brouilleur: “Appareils Numériques,” NMB-003 édictée par le Ministère des Communications.
This device complies with RSS-210 of Industry and Science Canada. Operation is subject to the following two conditions: 1) this device may not cause
interference, and 2) this device must accept any interference, including interference that may cause undesired operation of the device.
31
Page 32

Mouse
Logitech® Mouse 2 Button
© 2000 Logitech. All Rights Reserved. Logitech, the Logitech logo, and other Logitech marks are owned by Logitech and may be registered.
All other trademarks are the property of their respective owners. Logitech assumes no responsibility for any errors that may appear in this manual.
Information contained herein is subject to change without notice.
Software License Agreement. LOGITECH IS WILLING TO LICENSE THE ENCLOSED SOFTWARE TO YOU ONLY ON THE CONDITION THAT YOU ACCEPT
ALL OF THE TERMS CONTAINED IN THIS LICENSE AGREEMENT. This is a legal agreement between you (either an individual end-user or an entity)
and Logitech. By opening the software package, you are agreeing to be bound by the terms and conditions of the Agreement. If you
do not agree to the terms of this Agreement, promptly return the software package and other items that are part of this product in
their original package with your payment receipt to your point of purchase for a full refund. Grant of License. Logitech and its suppliers
grant you a nonexclusive license to use one copy of the enclosed software program (“Software”) on one computer only with the Logitech product you have
purchased. No other rights are granted. The Software is in use if it is loaded on the computer’s permanent or temporary memory. For backup purposes
only, you may make one copy of the Software. You must include on the backup copy all copyright and other notices included on the Software as supplied
by Logitech. Installation on a network server for the sole purpose of your internal distribution of the Software is permitted only if you have purchased an
individual Software package for each networked computer to which the Software is distributed.
Restrictions. Logitech and its suppliers retain ownership of the Software. You shall not decompile, disassemble, reverse-engineer, or modify the Software
in any way. You may not transmit the Software over a network (except as expressly permitted above), by telephone, or electronically using any means.
You may not transfer the Software except upon a permanent transfer of the enclosed Logitech product provided that all Software updates are included in
the transfer, you do not retain a copy of the Software, and the transferee agrees to be bound by the terms and conditions in this license. Upon any violation
of any of the provisions of this Agreement, rights to use the Software shall automatically terminate and the Software must be returned to Logitech or all
copies of the Software destroyed.
Limited Product Warranty. Logitech warrants that the hardware accompanying this documentation shall be free from significant defects in material
and workmanship for a period of two years from the date of purchase. Logitech also warrants that the software accompanying this documentation will
perform substantially in accordance with the documentation for a period of 90 days from the date of purchase. Logitech’s hardware and software warranty
is nontransferable and is limited to the original purchaser.
Product Remedies. Logitech’s entire liability and the Licensee’s exclusive remedy for any breach of warranty, shall be, at Logitech’s option, either (a) return
of the price paid or (b) repair or replacement of the hardware or software, provided that the hardware or software is returned to the point of purchase,
with a copy of the sales receipt. Any replacement hardware or software will be warranted for the remainder of the original warranty period or 30 days for
the hardware and 30 days for the software, whichever is longer. These remedies are void if failure of the hardware or software has resulted from accident,
abuse, or misapplication.
LIMITATION OF LIABILITY. THE WARRANTIES SET FORTH IN THIS AGREEMENT REPLACE ALL OTHER WARRANTIES. LOGITECH EXPRESSLY DISCLAIMS
ALL OTHER WARRANTIES, INCLUDING, BUT NOT LIMITED TO, THE IMPLIED WARRANTIES OF MERCHANTABILITY AND FITNESS FOR A PARTICULAR PURPOSE
AND NONINFRINGEMENT OF THIRD-PARTY RIGHTS WITH RESPECT TO THE DOCUMENTATION, SOFTWARE, AND HARDWARE. NO LOGITECH DEALER, AGENT,
OR EMPLOYEE IS AUTHORIZED TO MAKE ANY MODIFICATION, EXTENSION, OR ADDITION TO THIS WARRANTY. IN NO EVENT WILL LOGITECH OR ITS SUPPLIERS
BE LIABLE FOR ANY COSTS OF PROCUREMENT OF SUBSTITUTE PRODUCTS OR SERVICES, LOST PROFITS, LOSS OF INFORMATION OR DATA, OR ANY OTHER SPECIAL,
INDIRECT, CONSEQUENTIAL, OR INCIDENTAL DAMAGES ARISING IN ANY WAY OUT OF THE SALE OF, USE OF, OR INABILITY TO USE ANY LOGITECH PRODUCT
OR SERVICE, EVEN IF LOGITECH HAS BEEN ADVISED OF THE POSSIBILITY OF SUCH DAMAGES. IN NO CASE SHALL LOGITECH’S LIABILITY EXCEED THE ACTUAL
MONEY PAID FOR THE PRODUCTS AT ISSUE. Because some jurisdictions do not allow the limitation of implied warranties or liability for incidental,
consequential, special, or indirect damages, the above limitation may not always apply. The above limitations will not apply in case of personal injury where
and to the extent that applicable law requires such liability.
U.S. Government Restricted Rights. The Software is provided to the U.S. Government only with restricted rights and limited rights. Use, duplication,
or disclosure by the U.S. Government is subject to restrictions set forth in 48 C.F.R. 2.101 (October 1995), consisting of “Commercial Computer Software”
and “Commercial Computer Software Documentation” as such terms are used in 48 C.F.R. 12.212 (September 1995), and in FAR Sections 52-227-14 and
52-227-19 or DFARS Section 52.227-7013 (C) (1) (ii), or their successors, as applicable. Consistent with 48 C.F.R. 12.212 and 48 C.F.R. 227.7202-1 through
227.7204-4 (June 1995), or any successor regulations, this Software is provided to U.S. Government users pursuant to the terms and conditions herein.
Contractor/Manufacturer is Logitech Inc., 6505 Kaiser Drive, Fremont, CA 94555.
FCC Compliance and Advisory Statement. This hardware device complies with Part 15 of the FCC Rules. Operation is subject to the following two
conditions: 1) this device may not cause harmful interference, and 2) this device must accept any interference received, including interference that may
cause undesired operation. This equipment has been tested and found to comply with the limits for a Class B digital device, pursuant to Part 15 of the FCC
Rules. These limits are designed to provide reasonable protection against harmful interference in a residential installation. This equipment generates, uses,
and can radiate radio frequency energy and, if not installed or used in accordance with the instructions, may cause harmful interference to radio
communications. However, there is no guarantee that interference will not occur in a particular installation. If this equipment does cause harmful interference
to radio or television reception, which can be determined by turning the equipment off and on, the user is encouraged to try to correct the interference
by one or more of the following measures: 1) reorient or relocate the receiving antenna; 2) increase the separation between the equipment and the receiver;
3) connect the equipment to an outlet on a circuit different from that to which the receiver is connected; 4) consult the dealer or an experienced radio/TV
technician for help. Any changes or modifications not expressly approved by the party responsible for compliance could void the user's authority to operate
the equipment. Where shielded interface cables have been provided with the product or specified additional components or accessories elsewhere defined
to be used with the installation of the product, they must be used in order to ensure compliance with FCC regulations.
Canadian DOC Statement. This digital device does not exceed the Class B limits for radio noise emissions from digital apparatus specified in the
interference-causing equipment standard entitled “Digital Apparatus,” ICES-003 of the Department of Communications.
Cet appareil numérique respecte les limites bruits radioélectriques applicables aux appareils numériques de Classe B prescrites dans la norme sur le matériel
brouilleur: “Appareils Numériques,” NMB-003 édictée par le Ministère des Communications.
This device complies with RSS-210 of Industry and Science Canada. Operation is subject to the following two conditions: 1) this device may not cause
interference, and 2) this device must accept any interference, including interference that may cause undesired operation of the device.
32
Page 33

Mouse
Mini Wheel Mouse
© 2000 Logitech. All Rights Reserved. Logitech, the Logitech logo, and other Logitech marks are owned by Logitech and may be registered.
All other trademarks are the property of their respective owners. Logitech assumes no responsibility for any errors that may appear in this manual.
Information contained herein is subject to change without notice.
Software License Agreement. LOGITECH IS WILLING TO LICENSE THE ENCLOSED SOFTWARE TO YOU ONLY ON THE CONDITION THAT YOU ACCEPT
ALL OF THE TERMS CONTAINED IN THIS LICENSE AGREEMENT. This is a legal agreement between you (either an individual end-user or an entity)
and Logitech. By opening the software package, you are agreeing to be bound by the terms and conditions of the Agreement. If you
do not agree to the terms of this Agreement, promptly return the software package and other items that are part of this product in
their original package with your payment receipt to your point of purchase for a full refund. Grant of License. Logitech and its suppliers
grant you a nonexclusive license to use one copy of the enclosed software program (“Software”) on one computer only with the Logitech product you have
purchased. No other rights are granted. The Software is in use if it is loaded on the computer’s permanent or temporary memory. For backup purposes
only, you may make one copy of the Software. You must include on the backup copy all copyright and other notices included on the Software as supplied
by Logitech. Installation on a network server for the sole purpose of your internal distribution of the Software is permitted only if you have purchased an
individual Software package for each networked computer to which the Software is distributed.
Restrictions. Logitech and its suppliers retain ownership of the Software. You shall not decompile, disassemble, reverse-engineer, or modify the Software
in any way. You may not transmit the Software over a network (except as expressly permitted above), by telephone, or electronically using any means.
You may not transfer the Software except upon a permanent transfer of the enclosed Logitech product provided that all Software updates are included in
the transfer, you do not retain a copy of the Software, and the transferee agrees to be bound by the terms and conditions in this license. Upon any violation
of any of the provisions of this Agreement, rights to use the Software shall automatically terminate and the Software must be returned to Logitech or all
copies of the Software destroyed.
Limited Product Warranty. Logitech warrants that the hardware accompanying this documentation shall be free from significant defects in material
and workmanship for a period of two years from the date of purchase. Logitech also warrants that the software accompanying this documentation will
perform substantially in accordance with the documentation for a period of 90 days from the date of purchase. Logitech’s hardware and software warranty
is nontransferable and is limited to the original purchaser.
Product Remedies. Logitech’s entire liability and the Licensee’s exclusive remedy for any breach of warranty, shall be, at Logitech’s option, either (a) return
of the price paid or (b) repair or replacement of the hardware or software, provided that the hardware or software is returned to the point of purchase,
with a copy of the sales receipt. Any replacement hardware or software will be warranted for the remainder of the original warranty period or 30 days for
the hardware and 30 days for the software, whichever is longer. These remedies are void if failure of the hardware or software has resulted from accident,
abuse, or misapplication.
LIMITATION OF LIABILITY. THE WARRANTIES SET FORTH IN THIS AGREEMENT REPLACE ALL OTHER WARRANTIES. LOGITECH EXPRESSLY DISCLAIMS
ALL OTHER WARRANTIES, INCLUDING, BUT NOT LIMITED TO, THE IMPLIED WARRANTIES OF MERCHANTABILITY AND FITNESS FOR A PARTICULAR PURPOSE
AND NONINFRINGEMENT OF THIRD-PARTY RIGHTS WITH RESPECT TO THE DOCUMENTATION, SOFTWARE, AND HARDWARE. NO LOGITECH DEALER, AGENT,
OR EMPLOYEE IS AUTHORIZED TO MAKE ANY MODIFICATION, EXTENSION, OR ADDITION TO THIS WARRANTY. IN NO EVENT WILL LOGITECH OR ITS SUPPLIERS
BE LIABLE FOR ANY COSTS OF PROCUREMENT OF SUBSTITUTE PRODUCTS OR SERVICES, LOST PROFITS, LOSS OF INFORMATION OR DATA, OR ANY OTHER SPECIAL,
INDIRECT, CONSEQUENTIAL, OR INCIDENTAL DAMAGES ARISING IN ANY WAY OUT OF THE SALE OF, USE OF, OR INABILITY TO USE ANY LOGITECH PRODUCT
OR SERVICE, EVEN IF LOGITECH HAS BEEN ADVISED OF THE POSSIBILITY OF SUCH DAMAGES. IN NO CASE SHALL LOGITECH’S LIABILITY EXCEED THE ACTUAL
MONEY PAID FOR THE PRODUCTS AT ISSUE. Because some jurisdictions do not allow the limitation of implied warranties or liability for incidental,
consequential, special, or indirect damages, the above limitation may not always apply. The above limitations will not apply in case of personal injury where
and to the extent that applicable law requires such liability.
U.S. Government Restricted Rights. The Software is provided to the U.S. Government only with restricted rights and limited rights. Use, duplication,
or disclosure by the U.S. Government is subject to restrictions set forth in 48 C.F.R. 2.101 (October 1995), consisting of “Commercial Computer Software”
and “Commercial Computer Software Documentation” as such terms are used in 48 C.F.R. 12.212 (September 1995), and in FAR Sections 52-227-14 and
52-227-19 or DFARS Section 52.227-7013 (C) (1) (ii), or their successors, as applicable. Consistent with 48 C.F.R. 12.212 and 48 C.F.R. 227.7202-1 through
227.7204-4 (June 1995), or any successor regulations, this Software is provided to U.S. Government users pursuant to the terms and conditions herein.
Contractor/Manufacturer is Logitech Inc., 6505 Kaiser Drive, Fremont, CA 94555.
FCC Compliance and Advisory Statement. This hardware device complies with Part 15 of the FCC Rules. Operation is subject to the following two
conditions: 1) this device may not cause harmful interference, and 2) this device must accept any interference received, including interference that may
cause undesired operation. This equipment has been tested and found to comply with the limits for a Class B digital device, pursuant to Part 15 of the FCC
Rules. These limits are designed to provide reasonable protection against harmful interference in a residential installation. This equipment generates, uses,
and can radiate radio frequency energy and, if not installed or used in accordance with the instructions, may cause harmful interference to radio
communications. However, there is no guarantee that interference will not occur in a particular installation. If this equipment does cause harmful interference
to radio or television reception, which can be determined by turning the equipment off and on, the user is encouraged to try to correct the interference
by one or more of the following measures: 1) reorient or relocate the receiving antenna; 2) increase the separation between the equipment and the receiver;
3) connect the equipment to an outlet on a circuit different from that to which the receiver is connected; 4) consult the dealer or an experienced radio/TV
technician for help. Any changes or modifications not expressly approved by the party responsible for compliance could void the user's authority to operate
the equipment. Where shielded interface cables have been provided with the product or specified additional components or accessories elsewhere defined
to be used with the installation of the product, they must be used in order to ensure compliance with FCC regulations.
Canadian DOC Statement. This digital device does not exceed the Class B limits for radio noise emissions from digital apparatus specified in the
interference-causing equipment standard entitled “Digital Apparatus,” ICES-003 of the Department of Communications.
Cet appareil numérique respecte les limites bruits radioélectriques applicables aux appareils numériques de Classe B prescrites dans la norme sur le matériel
brouilleur: “Appareils Numériques,” NMB-003 édictée par le Ministère des Communications.
This device complies with RSS-210 of Industry and Science Canada. Operation is subject to the following two conditions: 1) this device may not cause
interference, and 2) this device must accept any interference, including interference that may cause undesired operation of the device.
33
Page 34

Mouse
Mouse™ 3 Button
© 2000 Logitech. All Rights Reserved. Logitech, the Logitech logo, and other Logitech marks are owned by Logitech and may be registered.
All other trademarks are the property of their respective owners. Logitech assumes no responsibility for any errors that may appear in this manual.
Information contained herein is subject to change without notice.
Software License Agreement. LOGITECH IS WILLING TO LICENSE THE ENCLOSED SOFTWARE TO YOU ONLY ON THE CONDITION THAT YOU ACCEPT
ALL OF THE TERMS CONTAINED IN THIS LICENSE AGREEMENT. This is a legal agreement between you (either an individual end-user or an entity)
and Logitech. By opening the software package, you are agreeing to be bound by the terms and conditions of the Agreement. If you
do not agree to the terms of this Agreement, promptly return the software package and other items that are part of this product in
their original package with your payment receipt to your point of purchase for a full refund. Grant of License. Logitech and its suppliers
grant you a nonexclusive license to use one copy of the enclosed software program (“Software”) on one computer only with the Logitech product you have
purchased. No other rights are granted. The Software is in use if it is loaded on the computer’s permanent or temporary memory. For backup purposes
only, you may make one copy of the Software. You must include on the backup copy all copyright and other notices included on the Software as supplied
by Logitech. Installation on a network server for the sole purpose of your internal distribution of the Software is permitted only if you have purchased an
individual Software package for each networked computer to which the Software is distributed.
Restrictions. Logitech and its suppliers retain ownership of the Software. You shall not decompile, disassemble, reverse-engineer, or modify the Software
in any way. You may not transmit the Software over a network (except as expressly permitted above), by telephone, or electronically using any means.
You may not transfer the Software except upon a permanent transfer of the enclosed Logitech product provided that all Software updates are included in
the transfer, you do not retain a copy of the Software, and the transferee agrees to be bound by the terms and conditions in this license. Upon any violation
of any of the provisions of this Agreement, rights to use the Software shall automatically terminate and the Software must be returned to Logitech or all
copies of the Software destroyed.
Limited Product Warranty. Logitech warrants that the hardware accompanying this documentation shall be free from significant defects in material
and workmanship for a period of two years from the date of purchase. Logitech also warrants that the software accompanying this documentation will
perform substantially in accordance with the documentation for a period of 90 days from the date of purchase. Logitech’s hardware and software warranty
is nontransferable and is limited to the original purchaser.
Product Remedies. Logitech’s entire liability and the Licensee’s exclusive remedy for any breach of warranty, shall be, at Logitech’s option, either (a) return
of the price paid or (b) repair or replacement of the hardware or software, provided that the hardware or software is returned to the point of purchase,
with a copy of the sales receipt. Any replacement hardware or software will be warranted for the remainder of the original warranty period or 30 days for
the hardware and 30 days for the software, whichever is longer. These remedies are void if failure of the hardware or software has resulted from accident,
abuse, or misapplication.
LIMITATION OF LIABILITY. THE WARRANTIES SET FORTH IN THIS AGREEMENT REPLACE ALL OTHER WARRANTIES. LOGITECH EXPRESSLY DISCLAIMS
ALL OTHER WARRANTIES, INCLUDING, BUT NOT LIMITED TO, THE IMPLIED WARRANTIES OF MERCHANTABILITY AND FITNESS FOR A PARTICULAR PURPOSE
AND NONINFRINGEMENT OF THIRD-PARTY RIGHTS WITH RESPECT TO THE DOCUMENTATION, SOFTWARE, AND HARDWARE. NO LOGITECH DEALER, AGENT,
OR EMPLOYEE IS AUTHORIZED TO MAKE ANY MODIFICATION, EXTENSION, OR ADDITION TO THIS WARRANTY. IN NO EVENT WILL LOGITECH OR ITS SUPPLIERS
BE LIABLE FOR ANY COSTS OF PROCUREMENT OF SUBSTITUTE PRODUCTS OR SERVICES, LOST PROFITS, LOSS OF INFORMATION OR DATA, OR ANY OTHER SPECIAL,
INDIRECT, CONSEQUENTIAL, OR INCIDENTAL DAMAGES ARISING IN ANY WAY OUT OF THE SALE OF, USE OF, OR INABILITY TO USE ANY LOGITECH PRODUCT
OR SERVICE, EVEN IF LOGITECH HAS BEEN ADVISED OF THE POSSIBILITY OF SUCH DAMAGES. IN NO CASE SHALL LOGITECH’S LIABILITY EXCEED THE ACTUAL
MONEY PAID FOR THE PRODUCTS AT ISSUE. Because some jurisdictions do not allow the limitation of implied warranties or liability for incidental,
consequential, special, or indirect damages, the above limitation may not always apply. The above limitations will not apply in case of personal injury where
and to the extent that applicable law requires such liability.
U.S. Government Restricted Rights. The Software is provided to the U.S. Government only with restricted rights and limited rights. Use, duplication,
or disclosure by the U.S. Government is subject to restrictions set forth in 48 C.F.R. 2.101 (October 1995), consisting of “Commercial Computer Software”
and “Commercial Computer Software Documentation” as such terms are used in 48 C.F.R. 12.212 (September 1995), and in FAR Sections 52-227-14 and
52-227-19 or DFARS Section 52.227-7013 (C) (1) (ii), or their successors, as applicable. Consistent with 48 C.F.R. 12.212 and 48 C.F.R. 227.7202-1 through
227.7204-4 (June 1995), or any successor regulations, this Software is provided to U.S. Government users pursuant to the terms and conditions herein.
Contractor/Manufacturer is Logitech Inc., 6505 Kaiser Drive, Fremont, CA 94555.
FCC Compliance and Advisory Statement. This hardware device complies with Part 15 of the FCC Rules. Operation is subject to the following two
conditions: 1) this device may not cause harmful interference, and 2) this device must accept any interference received, including interference that may
cause undesired operation. This equipment has been tested and found to comply with the limits for a Class B digital device, pursuant to Part 15 of the FCC
Rules. These limits are designed to provide reasonable protection against harmful interference in a residential installation. This equipment generates, uses,
and can radiate radio frequency energy and, if not installed or used in accordance with the instructions, may cause harmful interference to radio
communications. However, there is no guarantee that interference will not occur in a particular installation. If this equipment does cause harmful interference
to radio or television reception, which can be determined by turning the equipment off and on, the user is encouraged to try to correct the interference
by one or more of the following measures: 1) reorient or relocate the receiving antenna; 2) increase the separation between the equipment and the receiver;
3) connect the equipment to an outlet on a circuit different from that to which the receiver is connected; 4) consult the dealer or an experienced radio/TV
technician for help. Any changes or modifications not expressly approved by the party responsible for compliance could void the user's authority to operate
the equipment. Where shielded interface cables have been provided with the product or specified additional components or accessories elsewhere defined
to be used with the installation of the product, they must be used in order to ensure compliance with FCC regulations.
Canadian DOC Statement. This digital device does not exceed the Class B limits for radio noise emissions from digital apparatus specified in the
interference-causing equipment standard entitled “Digital Apparatus,” ICES-003 of the Department of Communications.
Cet appareil numérique respecte les limites bruits radioélectriques applicables aux appareils numériques de Classe B prescrites dans la norme sur le matériel
brouilleur: “Appareils Numériques,” NMB-003 édictée par le Ministère des Communications.
This device complies with RSS-210 of Industry and Science Canada. Operation is subject to the following two conditions: 1) this device may not cause
interference, and 2) this device must accept any interference, including interference that may cause undesired operation of the device.
34
Page 35

Mouse
MouseMan® Wheel
© 2000 Logitech. All Rights Reserved. Logitech, the Logitech logo, and other Logitech marks are owned by Logitech and may be registered.
All other trademarks are the property of their respective owners. Logitech assumes no responsibility for any errors that may appear in this manual.
Information contained herein is subject to change without notice.
Software License Agreement. LOGITECH IS WILLING TO LICENSE THE ENCLOSED SOFTWARE TO YOU ONLY ON THE CONDITION THAT YOU ACCEPT
ALL OF THE TERMS CONTAINED IN THIS LICENSE AGREEMENT. This is a legal agreement between you (either an individual end-user or an entity)
and Logitech. By opening the software package, you are agreeing to be bound by the terms and conditions of the Agreement. If you
do not agree to the terms of this Agreement, promptly return the software package and other items that are part of this product in
their original package with your payment receipt to your point of purchase for a full refund. Grant of License. Logitech and its suppliers
grant you a nonexclusive license to use one copy of the enclosed software program (“Software”) on one computer only with the Logitech product you have
purchased. No other rights are granted. The Software is in use if it is loaded on the computer’s permanent or temporary memory. For backup purposes
only, you may make one copy of the Software. You must include on the backup copy all copyright and other notices included on the Software as supplied
by Logitech. Installation on a network server for the sole purpose of your internal distribution of the Software is permitted only if you have purchased an
individual Software package for each networked computer to which the Software is distributed.
Restrictions. Logitech and its suppliers retain ownership of the Software. You shall not decompile, disassemble, reverse-engineer, or modify the Software
in any way. You may not transmit the Software over a network (except as expressly permitted above), by telephone, or electronically using any means.
You may not transfer the Software except upon a permanent transfer of the enclosed Logitech product provided that all Software updates are included in
the transfer, you do not retain a copy of the Software, and the transferee agrees to be bound by the terms and conditions in this license. Upon any violation
of any of the provisions of this Agreement, rights to use the Software shall automatically terminate and the Software must be returned to Logitech or all
copies of the Software destroyed.
Limited Product Warranty. Logitech warrants that the hardware accompanying this documentation shall be free from significant defects in material
and workmanship for a period of five years from the date of purchase. Logitech also warrants that the software accompanying this documentation will
perform substantially in accordance with the documentation for a period of 90 days from the date of purchase. Logitech’s hardware and software warranty
is nontransferable and is limited to the original purchaser.
Product Remedies. Logitech’s entire liability and the Licensee’s exclusive remedy for any breach of warranty, shall be, at Logitech’s option, either (a) return
of the price paid or (b) repair or replacement of the hardware or software, provided that the hardware or software is returned to the point of purchase,
with a copy of the sales receipt. Any replacement hardware or software will be warranted for the remainder of the original warranty period or 30 days for
the hardware and 30 days for the software, whichever is longer. These remedies are void if failure of the hardware or software has resulted from accident,
abuse, or misapplication.
LIMITATION OF LIABILITY. THE WARRANTIES SET FORTH IN THIS AGREEMENT REPLACE ALL OTHER WARRANTIES. LOGITECH EXPRESSLY DISCLAIMS
ALL OTHER WARRANTIES, INCLUDING, BUT NOT LIMITED TO, THE IMPLIED WARRANTIES OF MERCHANTABILITY AND FITNESS FOR A PARTICULAR PURPOSE
AND NONINFRINGEMENT OF THIRD-PARTY RIGHTS WITH RESPECT TO THE DOCUMENTATION, SOFTWARE, AND HARDWARE. NO LOGITECH DEALER, AGENT,
OR EMPLOYEE IS AUTHORIZED TO MAKE ANY MODIFICATION, EXTENSION, OR ADDITION TO THIS WARRANTY. IN NO EVENT WILL LOGITECH OR ITS SUPPLIERS
BE LIABLE FOR ANY COSTS OF PROCUREMENT OF SUBSTITUTE PRODUCTS OR SERVICES, LOST PROFITS, LOSS OF INFORMATION OR DATA, OR ANY OTHER SPECIAL,
INDIRECT, CONSEQUENTIAL, OR INCIDENTAL DAMAGES ARISING IN ANY WAY OUT OF THE SALE OF, USE OF, OR INABILITY TO USE ANY LOGITECH PRODUCT
OR SERVICE, EVEN IF LOGITECH HAS BEEN ADVISED OF THE POSSIBILITY OF SUCH DAMAGES. IN NO CASE SHALL LOGITECH’S LIABILITY EXCEED THE ACTUAL
MONEY PAID FOR THE PRODUCTS AT ISSUE. Because some jurisdictions do not allow the limitation of implied warranties or liability for incidental,
consequential, special, or indirect damages, the above limitation may not always apply. The above limitations will not apply in case of personal injury where
and to the extent that applicable law requires such liability.
U.S. Government Restricted Rights. The Software is provided to the U.S. Government only with restricted rights and limited rights. Use, duplication,
or disclosure by the U.S. Government is subject to restrictions set forth in 48 C.F.R. 2.101 (October 1995), consisting of “Commercial Computer Software”
and “Commercial Computer Software Documentation” as such terms are used in 48 C.F.R. 12.212 (September 1995), and in FAR Sections 52-227-14 and
52-227-19 or DFARS Section 52.227-7013 (C) (1) (ii), or their successors, as applicable. Consistent with 48 C.F.R. 12.212 and 48 C.F.R. 227.7202-1 through
227.7204-4 (June 1995), or any successor regulations, this Software is provided to U.S. Government users pursuant to the terms and conditions herein.
Contractor/Manufacturer is Logitech Inc., 6505 Kaiser Drive, Fremont, CA 94555.
FCC Compliance and Advisory Statement. This hardware device complies with Part 15 of the FCC Rules. Operation is subject to the following two
conditions: 1) this device may not cause harmful interference, and 2) this device must accept any interference received, including interference that may
cause undesired operation. This equipment has been tested and found to comply with the limits for a Class B digital device, pursuant to Part 15 of the FCC
Rules. These limits are designed to provide reasonable protection against harmful interference in a residential installation. This equipment generates, uses,
and can radiate radio frequency energy and, if not installed or used in accordance with the instructions, may cause harmful interference to radio
communications. However, there is no guarantee that interference will not occur in a particular installation. If this equipment does cause harmful interference
to radio or television reception, which can be determined by turning the equipment off and on, the user is encouraged to try to correct the interference
by one or more of the following measures: 1) reorient or relocate the receiving antenna; 2) increase the separation between the equipment and the receiver;
3) connect the equipment to an outlet on a circuit different from that to which the receiver is connected; 4) consult the dealer or an experienced radio/TV
technician for help. Any changes or modifications not expressly approved by the party responsible for compliance could void the user's authority to operate
the equipment. Where shielded interface cables have been provided with the product or specified additional components or accessories elsewhere defined
to be used with the installation of the product, they must be used in order to ensure compliance with FCC regulations.
Canadian DOC Statement. This digital device does not exceed the Class B limits for radio noise emissions from digital apparatus specified in the
interference-causing equipment standard entitled “Digital Apparatus,” ICES-003 of the Department of Communications.
Cet appareil numérique respecte les limites bruits radioélectriques applicables aux appareils numériques de Classe B prescrites dans la norme sur le matériel
brouilleur: “Appareils Numériques,” NMB-003 édictée par le Ministère des Communications.
This device complies with RSS-210 of Industry and Science Canada. Operation is subject to the following two conditions: 1) this device may not cause
interference, and 2) this device must accept any interference, including interference that may cause undesired operation of the device.
35
Page 36

Mouse
USB Wheel Mouse
© 2000 Logitech. All Rights Reserved. Logitech, the Logitech logo, and other Logitech marks are owned by Logitech and may be registered.
All other trademarks are the property of their respective owners. Logitech assumes no responsibility for any errors that may appear in this manual.
Information contained herein is subject to change without notice.
Software License Agreement. LOGITECH IS WILLING TO LICENSE THE ENCLOSED SOFTWARE TO YOU ONLY ON THE CONDITION THAT YOU ACCEPT
ALL OF THE TERMS CONTAINED IN THIS LICENSE AGREEMENT. This is a legal agreement between you (either an individual end-user or an entity)
and Logitech. By opening the software package, you are agreeing to be bound by the terms and conditions of the Agreement. If you
do not agree to the terms of this Agreement, promptly return the software package and other items that are part of this product in
their original package with your payment receipt to your point of purchase for a full refund. Grant of License. Logitech and its suppliers
grant you a nonexclusive license to use one copy of the enclosed software program (“Software”) on one computer only with the Logitech product you have
purchased. No other rights are granted. The Software is in use if it is loaded on the computer’s permanent or temporary memory. For backup purposes
only, you may make one copy of the Software. You must include on the backup copy all copyright and other notices included on the Software as supplied
by Logitech. Installation on a network server for the sole purpose of your internal distribution of the Software is permitted only if you have purchased an
individual Software package for each networked computer to which the Software is distributed.
Restrictions. Logitech and its suppliers retain ownership of the Software. You shall not decompile, disassemble, reverse-engineer, or modify the Software
in any way. You may not transmit the Software over a network (except as expressly permitted above), by telephone, or electronically using any means.
You may not transfer the Software except upon a permanent transfer of the enclosed Logitech product provided that all Software updates are included in
the transfer, you do not retain a copy of the Software, and the transferee agrees to be bound by the terms and conditions in this license. Upon any violation
of any of the provisions of this Agreement, rights to use the Software shall automatically terminate and the Software must be returned to Logitech or all
copies of the Software destroyed.
Limited Product Warranty. Logitech warrants that the hardware accompanying this documentation shall be free from significant defects in material
and workmanship for a period of three years from the date of purchase. Logitech also warrants that the software accompanying this documentation will
perform substantially in accordance with the documentation for a period of 90 days from the date of purchase. Logitech’s hardware and software warranty
is nontransferable and is limited to the original purchaser.
Product Remedies. Logitech’s entire liability and the Licensee’s exclusive remedy for any breach of warranty, shall be, at Logitech’s option, either (a) return
of the price paid or (b) repair or replacement of the hardware or software, provided that the hardware or software is returned to the point of purchase,
with a copy of the sales receipt. Any replacement hardware or software will be warranted for the remainder of the original warranty period or 30 days for
the hardware and 30 days for the software, whichever is longer. These remedies are void if failure of the hardware or software has resulted from accident,
abuse, or misapplication.
LIMITATION OF LIABILITY. THE WARRANTIES SET FORTH IN THIS AGREEMENT REPLACE ALL OTHER WARRANTIES. LOGITECH EXPRESSLY DISCLAIMS
ALL OTHER WARRANTIES, INCLUDING, BUT NOT LIMITED TO, THE IMPLIED WARRANTIES OF MERCHANTABILITY AND FITNESS FOR A PARTICULAR PURPOSE
AND NONINFRINGEMENT OF THIRD-PARTY RIGHTS WITH RESPECT TO THE DOCUMENTATION, SOFTWARE, AND HARDWARE. NO LOGITECH DEALER, AGENT,
OR EMPLOYEE IS AUTHORIZED TO MAKE ANY MODIFICATION, EXTENSION, OR ADDITION TO THIS WARRANTY. IN NO EVENT WILL LOGITECH OR ITS SUPPLIERS
BE LIABLE FOR ANY COSTS OF PROCUREMENT OF SUBSTITUTE PRODUCTS OR SERVICES, LOST PROFITS, LOSS OF INFORMATION OR DATA, OR ANY OTHER SPECIAL,
INDIRECT, CONSEQUENTIAL, OR INCIDENTAL DAMAGES ARISING IN ANY WAY OUT OF THE SALE OF, USE OF, OR INABILITY TO USE ANY LOGITECH PRODUCT
OR SERVICE, EVEN IF LOGITECH HAS BEEN ADVISED OF THE POSSIBILITY OF SUCH DAMAGES. IN NO CASE SHALL LOGITECH’S LIABILITY EXCEED THE ACTUAL
MONEY PAID FOR THE PRODUCTS AT ISSUE. Because some jurisdictions do not allow the limitation of implied warranties or liability for incidental,
consequential, special, or indirect damages, the above limitation may not always apply. The above limitations will not apply in case of personal injury where
and to the extent that applicable law requires such liability.
U.S. Government Restricted Rights. The Software is provided to the U.S. Government only with restricted rights and limited rights. Use, duplication,
or disclosure by the U.S. Government is subject to restrictions set forth in 48 C.F.R. 2.101 (October 1995), consisting of “Commercial Computer Software”
and “Commercial Computer Software Documentation” as such terms are used in 48 C.F.R. 12.212 (September 1995), and in FAR Sections 52-227-14 and
52-227-19 or DFARS Section 52.227-7013 (C) (1) (ii), or their successors, as applicable. Consistent with 48 C.F.R. 12.212 and 48 C.F.R. 227.7202-1 through
227.7204-4 (June 1995), or any successor regulations, this Software is provided to U.S. Government users pursuant to the terms and conditions herein.
Contractor/Manufacturer is Logitech Inc., 6505 Kaiser Drive, Fremont, CA 94555.
FCC Compliance and Advisory Statement. This hardware device complies with Part 15 of the FCC Rules. Operation is subject to the following two
conditions: 1) this device may not cause harmful interference, and 2) this device must accept any interference received, including interference that may
cause undesired operation. This equipment has been tested and found to comply with the limits for a Class B digital device, pursuant to Part 15 of the FCC
Rules. These limits are designed to provide reasonable protection against harmful interference in a residential installation. This equipment generates, uses,
and can radiate radio frequency energy and, if not installed or used in accordance with the instructions, may cause harmful interference to radio
communications. However, there is no guarantee that interference will not occur in a particular installation. If this equipment does cause harmful interference
to radio or television reception, which can be determined by turning the equipment off and on, the user is encouraged to try to correct the interference
by one or more of the following measures: 1) reorient or relocate the receiving antenna; 2) increase the separation between the equipment and the receiver;
3) connect the equipment to an outlet on a circuit different from that to which the receiver is connected; 4) consult the dealer or an experienced radio/TV
technician for help. Any changes or modifications not expressly approved by the party responsible for compliance could void the user's authority to operate
the equipment. Where shielded interface cables have been provided with the product or specified additional components or accessories elsewhere defined
to be used with the installation of the product, they must be used in order to ensure compliance with FCC regulations.
Canadian DOC Statement. This digital device does not exceed the Class B limits for radio noise emissions from digital apparatus specified in the
interference-causing equipment standard entitled “Digital Apparatus,” ICES-003 of the Department of Communications.
Cet appareil numérique respecte les limites bruits radioélectriques applicables aux appareils numériques de Classe B prescrites dans la norme sur le matériel
brouilleur: “Appareils Numériques,” NMB-003 édictée par le Ministère des Communications.
This device complies with RSS-210 of Industry and Science Canada. Operation is subject to the following two conditions: 1) this device may not cause
interference, and 2) this device must accept any interference, including interference that may cause undesired operation of the device.
36
Page 37

Mouse
Wheel Mouse
© 2000 Logitech. All Rights Reserved. Logitech, the Logitech logo, and other Logitech marks are owned by Logitech and may be registered.
All other trademarks are the property of their respective owners. Logitech assumes no responsibility for any errors that may appear in this manual.
Information contained herein is subject to change without notice.
Software License Agreement. LOGITECH IS WILLING TO LICENSE THE ENCLOSED SOFTWARE TO YOU ONLY ON THE CONDITION THAT YOU ACCEPT
ALL OF THE TERMS CONTAINED IN THIS LICENSE AGREEMENT. This is a legal agreement between you (either an individual end-user or an entity)
and Logitech. By opening the software package, you are agreeing to be bound by the terms and conditions of the Agreement. If you
do not agree to the terms of this Agreement, promptly return the software package and other items that are part of this product in
their original package with your payment receipt to your point of purchase for a full refund. Grant of License. Logitech and its suppliers
grant you a nonexclusive license to use one copy of the enclosed software program (“Software”) on one computer only with the Logitech product you have
purchased. No other rights are granted. The Software is in use if it is loaded on the computer’s permanent or temporary memory. For backup purposes
only, you may make one copy of the Software. You must include on the backup copy all copyright and other notices included on the Software as supplied
by Logitech. Installation on a network server for the sole purpose of your internal distribution of the Software is permitted only if you have purchased an
individual Software package for each networked computer to which the Software is distributed.
Restrictions. Logitech and its suppliers retain ownership of the Software. You shall not decompile, disassemble, reverse-engineer, or modify the Software
in any way. You may not transmit the Software over a network (except as expressly permitted above), by telephone, or electronically using any means.
You may not transfer the Software except upon a permanent transfer of the enclosed Logitech product provided that all Software updates are included in
the transfer, you do not retain a copy of the Software, and the transferee agrees to be bound by the terms and conditions in this license. Upon any violation
of any of the provisions of this Agreement, rights to use the Software shall automatically terminate and the Software must be returned to Logitech or all
copies of the Software destroyed.
Limited Product Warranty. Logitech warrants that the hardware accompanying this documentation shall be free from significant defects in material
and workmanship for a period of three years from the date of purchase. Logitech also warrants that the software accompanying this documentation will
perform substantially in accordance with the documentation for a period of 90 days from the date of purchase. Logitech’s hardware and software warranty
is nontransferable and is limited to the original purchaser.
Product Remedies. Logitech’s entire liability and the Licensee’s exclusive remedy for any breach of warranty, shall be, at Logitech’s option, either (a) return
of the price paid or (b) repair or replacement of the hardware or software, provided that the hardware or software is returned to the point of purchase,
with a copy of the sales receipt. Any replacement hardware or software will be warranted for the remainder of the original warranty period or 30 days for
the hardware and 30 days for the software, whichever is longer. These remedies are void if failure of the hardware or software has resulted from accident,
abuse, or misapplication.
LIMITATION OF LIABILITY. THE WARRANTIES SET FORTH IN THIS AGREEMENT REPLACE ALL OTHER WARRANTIES. LOGITECH EXPRESSLY DISCLAIMS
ALL OTHER WARRANTIES, INCLUDING, BUT NOT LIMITED TO, THE IMPLIED WARRANTIES OF MERCHANTABILITY AND FITNESS FOR A PARTICULAR PURPOSE
AND NONINFRINGEMENT OF THIRD-PARTY RIGHTS WITH RESPECT TO THE DOCUMENTATION, SOFTWARE, AND HARDWARE. NO LOGITECH DEALER, AGENT,
OR EMPLOYEE IS AUTHORIZED TO MAKE ANY MODIFICATION, EXTENSION, OR ADDITION TO THIS WARRANTY. IN NO EVENT WILL LOGITECH OR ITS SUPPLIERS
BE LIABLE FOR ANY COSTS OF PROCUREMENT OF SUBSTITUTE PRODUCTS OR SERVICES, LOST PROFITS, LOSS OF INFORMATION OR DATA, OR ANY OTHER SPECIAL,
INDIRECT, CONSEQUENTIAL, OR INCIDENTAL DAMAGES ARISING IN ANY WAY OUT OF THE SALE OF, USE OF, OR INABILITY TO USE ANY LOGITECH PRODUCT
OR SERVICE, EVEN IF LOGITECH HAS BEEN ADVISED OF THE POSSIBILITY OF SUCH DAMAGES. IN NO CASE SHALL LOGITECH’S LIABILITY EXCEED THE ACTUAL
MONEY PAID FOR THE PRODUCTS AT ISSUE. Because some jurisdictions do not allow the limitation of implied warranties or liability for incidental,
consequential, special, or indirect damages, the above limitation may not always apply. The above limitations will not apply in case of personal injury where
and to the extent that applicable law requires such liability.
U.S. Government Restricted Rights. The Software is provided to the U.S. Government only with restricted rights and limited rights. Use, duplication,
or disclosure by the U.S. Government is subject to restrictions set forth in 48 C.F.R. 2.101 (October 1995), consisting of “Commercial Computer Software”
and “Commercial Computer Software Documentation” as such terms are used in 48 C.F.R. 12.212 (September 1995), and in FAR Sections 52-227-14 and
52-227-19 or DFARS Section 52.227-7013 (C) (1) (ii), or their successors, as applicable. Consistent with 48 C.F.R. 12.212 and 48 C.F.R. 227.7202-1 through
227.7204-4 (June 1995), or any successor regulations, this Software is provided to U.S. Government users pursuant to the terms and conditions herein.
Contractor/Manufacturer is Logitech Inc., 6505 Kaiser Drive, Fremont, CA 94555.
FCC Compliance and Advisory Statement. This hardware device complies with Part 15 of the FCC Rules. Operation is subject to the following two
conditions: 1) this device may not cause harmful interference, and 2) this device must accept any interference received, including interference that may
cause undesired operation. This equipment has been tested and found to comply with the limits for a Class B digital device, pursuant to Part 15 of the FCC
Rules. These limits are designed to provide reasonable protection against harmful interference in a residential installation. This equipment generates, uses,
and can radiate radio frequency energy and, if not installed or used in accordance with the instructions, may cause harmful interference to radio
communications. However, there is no guarantee that interference will not occur in a particular installation. If this equipment does cause harmful interference
to radio or television reception, which can be determined by turning the equipment off and on, the user is encouraged to try to correct the interference
by one or more of the following measures: 1) reorient or relocate the receiving antenna; 2) increase the separation between the equipment and the receiver;
3) connect the equipment to an outlet on a circuit different from that to which the receiver is connected; 4) consult the dealer or an experienced radio/TV
technician for help. Any changes or modifications not expressly approved by the party responsible for compliance could void the user's authority to operate
the equipment. Where shielded interface cables have been provided with the product or specified additional components or accessories elsewhere defined
to be used with the installation of the product, they must be used in order to ensure compliance with FCC regulations.
Canadian DOC Statement. This digital device does not exceed the Class B limits for radio noise emissions from digital apparatus specified in the
interference-causing equipment standard entitled “Digital Apparatus,” ICES-003 of the Department of Communications.
Cet appareil numérique respecte les limites bruits radioélectriques applicables aux appareils numériques de Classe B prescrites dans la norme sur le matériel
brouilleur: “Appareils Numériques,” NMB-003 édictée par le Ministère des Communications.
This device complies with RSS-210 of Industry and Science Canada. Operation is subject to the following two conditions: 1) this device may not cause
interference, and 2) this device must accept any interference, including interference that may cause undesired operation of the device.
37
Page 38

Mouse
Wheel Mouse for Macintosh®
© 2000 Logitech. All Rights Reserved. Logitech, the Logitech logo, and other Logitech marks are owned by Logitech and may be registered.
All other trademarks are the property of their respective owners. Logitech assumes no responsibility for any errors that may appear in this manual.
Information contained herein is subject to change without notice.
Software License Agreement. LOGITECH IS WILLING TO LICENSE THE ENCLOSED SOFTWARE TO YOU ONLY ON THE CONDITION THAT YOU ACCEPT
ALL OF THE TERMS CONTAINED IN THIS LICENSE AGREEMENT. This is a legal agreement between you (either an individual end-user or an entity)
and Logitech. By opening the software package, you are agreeing to be bound by the terms and conditions of the Agreement. If you
do not agree to the terms of this Agreement, promptly return the software package and other items that are part of this product in
their original package with your payment receipt to your point of purchase for a full refund. Grant of License. Logitech and its suppliers
grant you a nonexclusive license to use one copy of the enclosed software program (“Software”) on one computer only with the Logitech product you have
purchased. No other rights are granted. The Software is in use if it is loaded on the computer’s permanent or temporary memory. For backup purposes
only, you may make one copy of the Software. You must include on the backup copy all copyright and other notices included on the Software as supplied
by Logitech. Installation on a network server for the sole purpose of your internal distribution of the Software is permitted only if you have purchased an
individual Software package for each networked computer to which the Software is distributed.
Restrictions. Logitech and its suppliers retain ownership of the Software. You shall not decompile, disassemble, reverse-engineer, or modify the Software
in any way. You may not transmit the Software over a network (except as expressly permitted above), by telephone, or electronically using any means.
You may not transfer the Software except upon a permanent transfer of the enclosed Logitech product provided that all Software updates are included in
the transfer, you do not retain a copy of the Software, and the transferee agrees to be bound by the terms and conditions in this license. Upon any violation
of any of the provisions of this Agreement, rights to use the Software shall automatically terminate and the Software must be returned to Logitech or all
copies of the Software destroyed.
Limited Product Warranty. Logitech warrants that the hardware accompanying this documentation shall be free from significant defects in material
and workmanship for a period of two years from the date of purchase. Logitech also warrants that the software accompanying this documentation will
perform substantially in accordance with the documentation for a period of 90 days from the date of purchase. Logitech’s hardware and software warranty
is nontransferable and is limited to the original purchaser.
Product Remedies. Logitech’s entire liability and the Licensee’s exclusive remedy for any breach of warranty, shall be, at Logitech’s option, either (a) return
of the price paid or (b) repair or replacement of the hardware or software, provided that the hardware or software is returned to the point of purchase,
with a copy of the sales receipt. Any replacement hardware or software will be warranted for the remainder of the original warranty period or 30 days for
the hardware and 30 days for the software, whichever is longer. These remedies are void if failure of the hardware or software has resulted from accident,
abuse, or misapplication.
LIMITATION OF LIABILITY. THE WARRANTIES SET FORTH IN THIS AGREEMENT REPLACE ALL OTHER WARRANTIES. LOGITECH EXPRESSLY DISCLAIMS
ALL OTHER WARRANTIES, INCLUDING, BUT NOT LIMITED TO, THE IMPLIED WARRANTIES OF MERCHANTABILITY AND FITNESS FOR A PARTICULAR PURPOSE
AND NONINFRINGEMENT OF THIRD-PARTY RIGHTS WITH RESPECT TO THE DOCUMENTATION, SOFTWARE, AND HARDWARE. NO LOGITECH DEALER, AGENT,
OR EMPLOYEE IS AUTHORIZED TO MAKE ANY MODIFICATION, EXTENSION, OR ADDITION TO THIS WARRANTY. IN NO EVENT WILL LOGITECH OR ITS SUPPLIERS
BE LIABLE FOR ANY COSTS OF PROCUREMENT OF SUBSTITUTE PRODUCTS OR SERVICES, LOST PROFITS, LOSS OF INFORMATION OR DATA, OR ANY OTHER SPECIAL,
INDIRECT, CONSEQUENTIAL, OR INCIDENTAL DAMAGES ARISING IN ANY WAY OUT OF THE SALE OF, USE OF, OR INABILITY TO USE ANY LOGITECH PRODUCT
OR SERVICE, EVEN IF LOGITECH HAS BEEN ADVISED OF THE POSSIBILITY OF SUCH DAMAGES. IN NO CASE SHALL LOGITECH’S LIABILITY EXCEED THE ACTUAL
MONEY PAID FOR THE PRODUCTS AT ISSUE. Because some jurisdictions do not allow the limitation of implied warranties or liability for incidental,
consequential, special, or indirect damages, the above limitation may not always apply. The above limitations will not apply in case of personal injury where
and to the extent that applicable law requires such liability.
U.S. Government Restricted Rights. The Software is provided to the U.S. Government only with restricted rights and limited rights. Use, duplication,
or disclosure by the U.S. Government is subject to restrictions set forth in 48 C.F.R. 2.101 (October 1995), consisting of “Commercial Computer Software”
and “Commercial Computer Software Documentation” as such terms are used in 48 C.F.R. 12.212 (September 1995), and in FAR Sections 52-227-14 and
52-227-19 or DFARS Section 52.227-7013 (C) (1) (ii), or their successors, as applicable. Consistent with 48 C.F.R. 12.212 and 48 C.F.R. 227.7202-1 through
227.7204-4 (June 1995), or any successor regulations, this Software is provided to U.S. Government users pursuant to the terms and conditions herein.
Contractor/Manufacturer is Logitech Inc., 6505 Kaiser Drive, Fremont, CA 94555.
FCC Compliance and Advisory Statement. This hardware device complies with Part 15 of the FCC Rules. Operation is subject to the following two
conditions: 1) this device may not cause harmful interference, and 2) this device must accept any interference received, including interference that may
cause undesired operation. This equipment has been tested and found to comply with the limits for a Class B digital device, pursuant to Part 15 of the FCC
Rules. These limits are designed to provide reasonable protection against harmful interference in a residential installation. This equipment generates, uses,
and can radiate radio frequency energy and, if not installed or used in accordance with the instructions, may cause harmful interference to radio
communications. However, there is no guarantee that interference will not occur in a particular installation. If this equipment does cause harmful interference
to radio or television reception, which can be determined by turning the equipment off and on, the user is encouraged to try to correct the interference
by one or more of the following measures: 1) reorient or relocate the receiving antenna; 2) increase the separation between the equipment and the receiver;
3) connect the equipment to an outlet on a circuit different from that to which the receiver is connected; 4) consult the dealer or an experienced radio/TV
technician for help. Any changes or modifications not expressly approved by the party responsible for compliance could void the user's authority to operate
the equipment. Where shielded interface cables have been provided with the product or specified additional components or accessories elsewhere defined
to be used with the installation of the product, they must be used in order to ensure compliance with FCC regulations.
Canadian DOC Statement. This digital device does not exceed the Class B limits for radio noise emissions from digital apparatus specified in the
interference-causing equipment standard entitled “Digital Apparatus,” ICES-003 of the Department of Communications.
Cet appareil numérique respecte les limites bruits radioélectriques applicables aux appareils numériques de Classe B prescrites dans la norme sur le matériel
brouilleur: “Appareils Numériques,” NMB-003 édictée par le Ministère des Communications.
This device complies with RSS-210 of Industry and Science Canada. Operation is subject to the following two conditions: 1) this device may not cause
interference, and 2) this device must accept any interference, including interference that may cause undesired operation of the device.
38
Page 39

Mouse
Wheel Mouse for Notebooks
© 2000 Logitech. All Rights Reserved. Logitech, the Logitech logo, and other Logitech marks are owned by Logitech and may be registered.
All other trademarks are the property of their respective owners. Logitech assumes no responsibility for any errors that may appear in this manual.
Information contained herein is subject to change without notice.
Software License Agreement. LOGITECH IS WILLING TO LICENSE THE ENCLOSED SOFTWARE TO YOU ONLY ON THE CONDITION THAT YOU ACCEPT
ALL OF THE TERMS CONTAINED IN THIS LICENSE AGREEMENT. This is a legal agreement between you (either an individual end-user or an entity)
and Logitech. By opening the software package, you are agreeing to be bound by the terms and conditions of the Agreement. If you
do not agree to the terms of this Agreement, promptly return the software package and other items that are part of this product in
their original package with your payment receipt to your point of purchase for a full refund. Grant of License. Logitech and its suppliers
grant you a nonexclusive license to use one copy of the enclosed software program (“Software”) on one computer only with the Logitech product you have
purchased. No other rights are granted. The Software is in use if it is loaded on the computer’s permanent or temporary memory. For backup purposes
only, you may make one copy of the Software. You must include on the backup copy all copyright and other notices included on the Software as supplied
by Logitech. Installation on a network server for the sole purpose of your internal distribution of the Software is permitted only if you have purchased an
individual Software package for each networked computer to which the Software is distributed.
Restrictions. Logitech and its suppliers retain ownership of the Software. You shall not decompile, disassemble, reverse-engineer, or modify the Software
in any way. You may not transmit the Software over a network (except as expressly permitted above), by telephone, or electronically using any means.
You may not transfer the Software except upon a permanent transfer of the enclosed Logitech product provided that all Software updates are included in
the transfer, you do not retain a copy of the Software, and the transferee agrees to be bound by the terms and conditions in this license. Upon any violation
of any of the provisions of this Agreement, rights to use the Software shall automatically terminate and the Software must be returned to Logitech or all
copies of the Software destroyed.
Limited Product Warranty. Logitech warrants that the hardware accompanying this documentation shall be free from significant defects in material
and workmanship for a period of two years from the date of purchase. Logitech also warrants that the software accompanying this documentation will
perform substantially in accordance with the documentation for a period of 90 days from the date of purchase. Logitech’s hardware and software warranty
is nontransferable and is limited to the original purchaser.
Product Remedies. Logitech’s entire liability and the Licensee’s exclusive remedy for any breach of warranty, shall be, at Logitech’s option, either (a) return
of the price paid or (b) repair or replacement of the hardware or software, provided that the hardware or software is returned to the point of purchase,
with a copy of the sales receipt. Any replacement hardware or software will be warranted for the remainder of the original warranty period or 30 days for
the hardware and 30 days for the software, whichever is longer. These remedies are void if failure of the hardware or software has resulted from accident,
abuse, or misapplication.
LIMITATION OF LIABILITY. THE WARRANTIES SET FORTH IN THIS AGREEMENT REPLACE ALL OTHER WARRANTIES. LOGITECH EXPRESSLY DISCLAIMS
ALL OTHER WARRANTIES, INCLUDING, BUT NOT LIMITED TO, THE IMPLIED WARRANTIES OF MERCHANTABILITY AND FITNESS FOR A PARTICULAR PURPOSE
AND NONINFRINGEMENT OF THIRD-PARTY RIGHTS WITH RESPECT TO THE DOCUMENTATION, SOFTWARE, AND HARDWARE. NO LOGITECH DEALER, AGENT,
OR EMPLOYEE IS AUTHORIZED TO MAKE ANY MODIFICATION, EXTENSION, OR ADDITION TO THIS WARRANTY. IN NO EVENT WILL LOGITECH OR ITS SUPPLIERS
BE LIABLE FOR ANY COSTS OF PROCUREMENT OF SUBSTITUTE PRODUCTS OR SERVICES, LOST PROFITS, LOSS OF INFORMATION OR DATA, OR ANY OTHER SPECIAL,
INDIRECT, CONSEQUENTIAL, OR INCIDENTAL DAMAGES ARISING IN ANY WAY OUT OF THE SALE OF, USE OF, OR INABILITY TO USE ANY LOGITECH PRODUCT
OR SERVICE, EVEN IF LOGITECH HAS BEEN ADVISED OF THE POSSIBILITY OF SUCH DAMAGES. IN NO CASE SHALL LOGITECH’S LIABILITY EXCEED THE ACTUAL
MONEY PAID FOR THE PRODUCTS AT ISSUE. Because some jurisdictions do not allow the limitation of implied warranties or liability for incidental,
consequential, special, or indirect damages, the above limitation may not always apply. The above limitations will not apply in case of personal injury where
and to the extent that applicable law requires such liability.
U.S. Government Restricted Rights. The Software is provided to the U.S. Government only with restricted rights and limited rights. Use, duplication,
or disclosure by the U.S. Government is subject to restrictions set forth in 48 C.F.R. 2.101 (October 1995), consisting of “Commercial Computer Software”
and “Commercial Computer Software Documentation” as such terms are used in 48 C.F.R. 12.212 (September 1995), and in FAR Sections 52-227-14 and
52-227-19 or DFARS Section 52.227-7013 (C) (1) (ii), or their successors, as applicable. Consistent with 48 C.F.R. 12.212 and 48 C.F.R. 227.7202-1 through
227.7204-4 (June 1995), or any successor regulations, this Software is provided to U.S. Government users pursuant to the terms and conditions herein.
Contractor/Manufacturer is Logitech Inc., 6505 Kaiser Drive, Fremont, CA 94555.
FCC Compliance and Advisory Statement. This hardware device complies with Part 15 of the FCC Rules. Operation is subject to the following two
conditions: 1) this device may not cause harmful interference, and 2) this device must accept any interference received, including interference that may
cause undesired operation. This equipment has been tested and found to comply with the limits for a Class B digital device, pursuant to Part 15 of the FCC
Rules. These limits are designed to provide reasonable protection against harmful interference in a residential installation. This equipment generates, uses,
and can radiate radio frequency energy and, if not installed or used in accordance with the instructions, may cause harmful interference to radio
communications. However, there is no guarantee that interference will not occur in a particular installation. If this equipment does cause harmful interference
to radio or television reception, which can be determined by turning the equipment off and on, the user is encouraged to try to correct the interference
by one or more of the following measures: 1) reorient or relocate the receiving antenna; 2) increase the separation between the equipment and the receiver;
3) connect the equipment to an outlet on a circuit different from that to which the receiver is connected; 4) consult the dealer or an experienced radio/TV
technician for help. Any changes or modifications not expressly approved by the party responsible for compliance could void the user's authority to operate
the equipment. Where shielded interface cables have been provided with the product or specified additional components or accessories elsewhere defined
to be used with the installation of the product, they must be used in order to ensure compliance with FCC regulations.
Canadian DOC Statement. This digital device does not exceed the Class B limits for radio noise emissions from digital apparatus specified in the
interference-causing equipment standard entitled “Digital Apparatus,” ICES-003 of the Department of Communications.
Cet appareil numérique respecte les limites bruits radioélectriques applicables aux appareils numériques de Classe B prescrites dans la norme sur le matériel
brouilleur: “Appareils Numériques,” NMB-003 édictée par le Ministère des Communications.
This device complies with RSS-210 of Industry and Science Canada. Operation is subject to the following two conditions: 1) this device may not cause
interference, and 2) this device must accept any interference, including interference that may cause undesired operation of the device.
39
Page 40

Trackball
Trackball
Cordless TrackMan® Wheel
© 2000 Logitech. All Rights Reserved. Logitech, the Logitech logo, and other Logitech marks are owned by Logitech and may be registered.
All other trademarks are the property of their respective owners. Logitech assumes no responsibility for any errors that may appear in this manual.
Information contained herein is subject to change without notice.
Software License Agreement. LOGITECH IS WILLING TO LICENSE THE ENCLOSED SOFTWARE TO YOU ONLY ON THE CONDITION THAT YOU ACCEPT
ALL OF THE TERMS CONTAINED IN THIS LICENSE AGREEMENT. This is a legal agreement between you (either an individual end-user or an entity)
and Logitech. By opening the software package, you are agreeing to be bound by the terms and conditions of the Agreement. If you
do not agree to the terms of this Agreement, promptly return the software package and other items that are part of this product in
their original package with your payment receipt to your point of purchase for a full refund. Grant of License. Logitech and its suppliers
grant you a nonexclusive license to use one copy of the enclosed software program (“Software”) on one computer only with the Logitech product you have
purchased. No other rights are granted. The Software is in use if it is loaded on the computer’s permanent or temporary memory. For backup purposes
only, you may make one copy of the Software. You must include on the backup copy all copyright and other notices included on the Software as supplied
by Logitech. Installation on a network server for the sole purpose of your internal distribution of the Software is permitted only if you have purchased an
individual Software package for each networked computer to which the Software is distributed.
Restrictions. Logitech and its suppliers retain ownership of the Software. You shall not decompile, disassemble, reverse-engineer, or modify the Software
in any way. You may not transmit the Software over a network (except as expressly permitted above), by telephone, or electronically using any means.
You may not transfer the Software except upon a permanent transfer of the enclosed Logitech product provided that all Software updates are included in
the transfer, you do not retain a copy of the Software, and the transferee agrees to be bound by the terms and conditions in this license. Upon any violation
of any of the provisions of this Agreement, rights to use the Software shall automatically terminate and the Software must be returned to Logitech or all
copies of the Software destroyed.
Limited Product Warranty. Logitech warrants that the hardware accompanying this documentation shall be free from significant defects in material
and workmanship for a period of five years from the date of purchase. Logitech also warrants that the software accompanying this documentation will
perform substantially in accordance with the documentation for a period of 90 days from the date of purchase. Logitech’s hardware and software warranty
is nontransferable and is limited to the original purchaser.
Product Remedies. Logitech’s entire liability and the Licensee’s exclusive remedy for any breach of warranty, shall be, at Logitech’s option, either (a) return
of the price paid or (b) repair or replacement of the hardware or software, provided that the hardware or software is returned to the point of purchase,
with a copy of the sales receipt. Any replacement hardware or software will be warranted for the remainder of the original warranty period or 30 days for
the hardware and 30 days for the software, whichever is longer. These remedies are void if failure of the hardware or software has resulted from accident,
abuse, or misapplication.
LIMITATION OF LIABILITY. THE WARRANTIES SET FORTH IN THIS AGREEMENT REPLACE ALL OTHER WARRANTIES. LOGITECH EXPRESSLY DISCLAIMS
ALL OTHER WARRANTIES, INCLUDING, BUT NOT LIMITED TO, THE IMPLIED WARRANTIES OF MERCHANTABILITY AND FITNESS FOR A PARTICULAR PURPOSE
AND NONINFRINGEMENT OF THIRD-PARTY RIGHTS WITH RESPECT TO THE DOCUMENTATION, SOFTWARE, AND HARDWARE. NO LOGITECH DEALER, AGENT,
OR EMPLOYEE IS AUTHORIZED TO MAKE ANY MODIFICATION, EXTENSION, OR ADDITION TO THIS WARRANTY. IN NO EVENT WILL LOGITECH OR ITS SUPPLIERS
BE LIABLE FOR ANY COSTS OF PROCUREMENT OF SUBSTITUTE PRODUCTS OR SERVICES, LOST PROFITS, LOSS OF INFORMATION OR DATA, OR ANY OTHER SPECIAL,
INDIRECT, CONSEQUENTIAL, OR INCIDENTAL DAMAGES ARISING IN ANY WAY OUT OF THE SALE OF, USE OF, OR INABILITY TO USE ANY LOGITECH PRODUCT
OR SERVICE, EVEN IF LOGITECH HAS BEEN ADVISED OF THE POSSIBILITY OF SUCH DAMAGES. IN NO CASE SHALL LOGITECH’S LIABILITY EXCEED THE ACTUAL
MONEY PAID FOR THE PRODUCTS AT ISSUE. Because some jurisdictions do not allow the limitation of implied warranties or liability for incidental,
consequential, special, or indirect damages, the above limitation may not always apply. The above limitations will not apply in case of personal injury where
and to the extent that applicable law requires such liability.
U.S. Government Restricted Rights. The Software is provided to the U.S. Government only with restricted rights and limited rights. Use, duplication,
or disclosure by the U.S. Government is subject to restrictions set forth in 48 C.F.R. 2.101 (October 1995), consisting of “Commercial Computer Software”
and “Commercial Computer Software Documentation” as such terms are used in 48 C.F.R. 12.212 (September 1995), and in FAR Sections 52-227-14 and
52-227-19 or DFARS Section 52.227-7013 (C) (1) (ii), or their successors, as applicable. Consistent with 48 C.F.R. 12.212 and 48 C.F.R. 227.7202-1 through
227.7204-4 (June 1995), or any successor regulations, this Software is provided to U.S. Government users pursuant to the terms and conditions herein.
Contractor/Manufacturer is Logitech Inc., 6505 Kaiser Drive, Fremont, CA 94555.
FCC Compliance and Advisory Statement. This hardware device complies with Part 15 of the FCC Rules. Operation is subject to the following two
conditions: 1) this device may not cause harmful interference, and 2) this device must accept any interference received, including interference that may
cause undesired operation. This equipment has been tested and found to comply with the limits for a Class B digital device, pursuant to Part 15 of the FCC
Rules. These limits are designed to provide reasonable protection against harmful interference in a residential installation. This equipment generates, uses,
and can radiate radio frequency energy and, if not installed or used in accordance with the instructions, may cause harmful interference to radio
communications. However, there is no guarantee that interference will not occur in a particular installation. If this equipment does cause harmful interference
to radio or television reception, which can be determined by turning the equipment off and on, the user is encouraged to try to correct the interference
by one or more of the following measures: 1) reorient or relocate the receiving antenna; 2) increase the separation between the equipment and the receiver;
3) connect the equipment to an outlet on a circuit different from that to which the receiver is connected; 4) consult the dealer or an experienced radio/TV
technician for help. Any changes or modifications not expressly approved by the party responsible for compliance could void the user's authority to operate
the equipment. Where shielded interface cables have been provided with the product or specified additional components or accessories elsewhere defined
to be used with the installation of the product, they must be used in order to ensure compliance with FCC regulations.
Canadian DOC Statement. This digital device does not exceed the Class B limits for radio noise emissions from digital apparatus specified in the
interference-causing equipment standard entitled “Digital Apparatus,” ICES-003 of the Department of Communications.
Cet appareil numérique respecte les limites bruits radioélectriques applicables aux appareils numériques de Classe B prescrites dans la norme sur le matériel
brouilleur: “Appareils Numériques,” NMB-003 édictée par le Ministère des Communications.
This device complies with RSS-210 of Industry and Science Canada. Operation is subject to the following two conditions: 1) this device may not cause
interference, and 2) this device must accept any interference, including interference that may cause undesired operation of the device.
40
Page 41

Trackball
Marble® Mouse
© 2000 Logitech. All Rights Reserved. Logitech, the Logitech logo, and other Logitech marks are owned by Logitech and may be registered.
All other trademarks are the property of their respective owners. Logitech assumes no responsibility for any errors that may appear in this manual.
Information contained herein is subject to change without notice.
Software License Agreement. LOGITECH IS WILLING TO LICENSE THE ENCLOSED SOFTWARE TO YOU ONLY ON THE CONDITION THAT YOU ACCEPT
ALL OF THE TERMS CONTAINED IN THIS LICENSE AGREEMENT. This is a legal agreement between you (either an individual end-user or an entity)
and Logitech. By opening the software package, you are agreeing to be bound by the terms and conditions of the Agreement. If you
do not agree to the terms of this Agreement, promptly return the software package and other items that are part of this product in
their original package with your payment receipt to your point of purchase for a full refund. Grant of License. Logitech and its suppliers
grant you a nonexclusive license to use one copy of the enclosed software program (“Software”) on one computer only with the Logitech product you have
purchased. No other rights are granted. The Software is in use if it is loaded on the computer’s permanent or temporary memory. For backup purposes
only, you may make one copy of the Software. You must include on the backup copy all copyright and other notices included on the Software as supplied
by Logitech. Installation on a network server for the sole purpose of your internal distribution of the Software is permitted only if you have purchased an
individual Software package for each networked computer to which the Software is distributed.
Restrictions. Logitech and its suppliers retain ownership of the Software. You shall not decompile, disassemble, reverse-engineer, or modify the Software
in any way. You may not transmit the Software over a network (except as expressly permitted above), by telephone, or electronically using any means.
You may not transfer the Software except upon a permanent transfer of the enclosed Logitech product provided that all Software updates are included in
the transfer, you do not retain a copy of the Software, and the transferee agrees to be bound by the terms and conditions in this license. Upon any violation
of any of the provisions of this Agreement, rights to use the Software shall automatically terminate and the Software must be returned to Logitech or all
copies of the Software destroyed.
Limited Product Warranty. Logitech warrants that the hardware accompanying this documentation shall be free from significant defects in material
and workmanship for a period of five years from the date of purchase. Logitech also warrants that the software accompanying this documentation will
perform substantially in accordance with the documentation for a period of 90 days from the date of purchase. Logitech’s hardware and software warranty
is nontransferable and is limited to the original purchaser.
Product Remedies. Logitech’s entire liability and the Licensee’s exclusive remedy for any breach of warranty, shall be, at Logitech’s option, either (a) return
of the price paid or (b) repair or replacement of the hardware or software, provided that the hardware or software is returned to the point of purchase,
with a copy of the sales receipt. Any replacement hardware or software will be warranted for the remainder of the original warranty period or 30 days for
the hardware and 30 days for the software, whichever is longer. These remedies are void if failure of the hardware or software has resulted from accident,
abuse, or misapplication.
LIMITATION OF LIABILITY. THE WARRANTIES SET FORTH IN THIS AGREEMENT REPLACE ALL OTHER WARRANTIES. LOGITECH EXPRESSLY DISCLAIMS
ALL OTHER WARRANTIES, INCLUDING, BUT NOT LIMITED TO, THE IMPLIED WARRANTIES OF MERCHANTABILITY AND FITNESS FOR A PARTICULAR PURPOSE
AND NONINFRINGEMENT OF THIRD-PARTY RIGHTS WITH RESPECT TO THE DOCUMENTATION, SOFTWARE, AND HARDWARE. NO LOGITECH DEALER, AGENT,
OR EMPLOYEE IS AUTHORIZED TO MAKE ANY MODIFICATION, EXTENSION, OR ADDITION TO THIS WARRANTY. IN NO EVENT WILL LOGITECH OR ITS SUPPLIERS
BE LIABLE FOR ANY COSTS OF PROCUREMENT OF SUBSTITUTE PRODUCTS OR SERVICES, LOST PROFITS, LOSS OF INFORMATION OR DATA, OR ANY OTHER SPECIAL,
INDIRECT, CONSEQUENTIAL, OR INCIDENTAL DAMAGES ARISING IN ANY WAY OUT OF THE SALE OF, USE OF, OR INABILITY TO USE ANY LOGITECH PRODUCT
OR SERVICE, EVEN IF LOGITECH HAS BEEN ADVISED OF THE POSSIBILITY OF SUCH DAMAGES. IN NO CASE SHALL LOGITECH’S LIABILITY EXCEED THE ACTUAL
MONEY PAID FOR THE PRODUCTS AT ISSUE. Because some jurisdictions do not allow the limitation of implied warranties or liability for incidental,
consequential, special, or indirect damages, the above limitation may not always apply. The above limitations will not apply in case of personal injury where
and to the extent that applicable law requires such liability.
U.S. Government Restricted Rights. The Software is provided to the U.S. Government only with restricted rights and limited rights. Use, duplication,
or disclosure by the U.S. Government is subject to restrictions set forth in 48 C.F.R. 2.101 (October 1995), consisting of “Commercial Computer Software”
and “Commercial Computer Software Documentation” as such terms are used in 48 C.F.R. 12.212 (September 1995), and in FAR Sections 52-227-14 and
52-227-19 or DFARS Section 52.227-7013 (C) (1) (ii), or their successors, as applicable. Consistent with 48 C.F.R. 12.212 and 48 C.F.R. 227.7202-1 through
227.7204-4 (June 1995), or any successor regulations, this Software is provided to U.S. Government users pursuant to the terms and conditions herein.
Contractor/Manufacturer is Logitech Inc., 6505 Kaiser Drive, Fremont, CA 94555.
FCC Compliance and Advisory Statement. This hardware device complies with Part 15 of the FCC Rules. Operation is subject to the following two
conditions: 1) this device may not cause harmful interference, and 2) this device must accept any interference received, including interference that may
cause undesired operation. This equipment has been tested and found to comply with the limits for a Class B digital device, pursuant to Part 15 of the FCC
Rules. These limits are designed to provide reasonable protection against harmful interference in a residential installation. This equipment generates, uses,
and can radiate radio frequency energy and, if not installed or used in accordance with the instructions, may cause harmful interference to radio
communications. However, there is no guarantee that interference will not occur in a particular installation. If this equipment does cause harmful interference
to radio or television reception, which can be determined by turning the equipment off and on, the user is encouraged to try to correct the interference
by one or more of the following measures: 1) reorient or relocate the receiving antenna; 2) increase the separation between the equipment and the receiver;
3) connect the equipment to an outlet on a circuit different from that to which the receiver is connected; 4) consult the dealer or an experienced radio/TV
technician for help. Any changes or modifications not expressly approved by the party responsible for compliance could void the user's authority to operate
the equipment. Where shielded interface cables have been provided with the product or specified additional components or accessories elsewhere defined
to be used with the installation of the product, they must be used in order to ensure compliance with FCC regulations.
Canadian DOC Statement. This digital device does not exceed the Class B limits for radio noise emissions from digital apparatus specified in the
interference-causing equipment standard entitled “Digital Apparatus,” ICES-003 of the Department of Communications.
Cet appareil numérique respecte les limites bruits radioélectriques applicables aux appareils numériques de Classe B prescrites dans la norme sur le matériel
brouilleur: “Appareils Numériques,” NMB-003 édictée par le Ministère des Communications.
This device complies with RSS-210 of Industry and Science Canada. Operation is subject to the following two conditions: 1) this device may not cause
interference, and 2) this device must accept any interference, including interference that may cause undesired operation of the device.
41
Page 42

Trackball
TrackMan® Live!™
© 2000 Logitech. All Rights Reserved. Logitech, the Logitech logo, and other Logitech marks are owned by Logitech and may be registered.
All other trademarks are the property of their respective owners. Logitech assumes no responsibility for any errors that may appear in this manual.
Information contained herein is subject to change without notice.
Software License Agreement. LOGITECH IS WILLING TO LICENSE THE ENCLOSED SOFTWARE TO YOU ONLY ON THE CONDITION THAT YOU ACCEPT
ALL OF THE TERMS CONTAINED IN THIS LICENSE AGREEMENT. This is a legal agreement between you (either an individual end-user or an entity)
and Logitech. By opening the software package, you are agreeing to be bound by the terms and conditions of the Agreement. If you
do not agree to the terms of this Agreement, promptly return the software package and other items that are part of this product in
their original package with your payment receipt to your point of purchase for a full refund. Grant of License. Logitech and its suppliers
grant you a nonexclusive license to use one copy of the enclosed software program (“Software”) on one computer only with the Logitech product you have
purchased. No other rights are granted. The Software is in use if it is loaded on the computer’s permanent or temporary memory. For backup purposes
only, you may make one copy of the Software. You must include on the backup copy all copyright and other notices included on the Software as supplied
by Logitech. Installation on a network server for the sole purpose of your internal distribution of the Software is permitted only if you have purchased an
individual Software package for each networked computer to which the Software is distributed.
Restrictions. Logitech and its suppliers retain ownership of the Software. You shall not decompile, disassemble, reverse-engineer, or modify the Software
in any way. You may not transmit the Software over a network (except as expressly permitted above), by telephone, or electronically using any means.
You may not transfer the Software except upon a permanent transfer of the enclosed Logitech product provided that all Software updates are included in
the transfer, you do not retain a copy of the Software, and the transferee agrees to be bound by the terms and conditions in this license. Upon any violation
of any of the provisions of this Agreement, rights to use the Software shall automatically terminate and the Software must be returned to Logitech or all
copies of the Software destroyed.
Limited Product Warranty. Logitech warrants that the hardware accompanying this documentation shall be free from significant defects in material and
workmanship for a period of three years from the date of purchase. Logitech also warrants that the software accompanying this documentation will perform
substantially in accordance with the documentation for a period of 90 days from the date of purchase. Logitech’s hardware and software warranty is
nontransferable and is limited to the original purchaser.
Product Remedies. Logitech’s entire liability and the Licensee’s exclusive remedy for any breach of warranty, shall be, at Logitech’s option, either (a) return
of the price paid or (b) repair or replacement of the hardware or software, provided that the hardware or software is returned to the point of purchase,
with a copy of the sales receipt. Any replacement hardware or software will be warranted for the remainder of the original warranty period or 30 days for
the hardware and 30 days for the software, whichever is longer. These remedies are void if failure of the hardware or software has resulted from accident,
abuse, or misapplication.
LIMITATION OF LIABILITY. THE WARRANTIES SET FORTH IN THIS AGREEMENT REPLACE ALL OTHER WARRANTIES. LOGITECH EXPRESSLY DISCLAIMS
ALL OTHER WARRANTIES, INCLUDING, BUT NOT LIMITED TO, THE IMPLIED WARRANTIES OF MERCHANTABILITY AND FITNESS FOR A PARTICULAR PURPOSE
AND NONINFRINGEMENT OF THIRD-PARTY RIGHTS WITH RESPECT TO THE DOCUMENTATION, SOFTWARE, AND HARDWARE. NO LOGITECH DEALER, AGENT,
OR EMPLOYEE IS AUTHORIZED TO MAKE ANY MODIFICATION, EXTENSION, OR ADDITION TO THIS WARRANTY. IN NO EVENT WILL LOGITECH OR ITS SUPPLIERS
BE LIABLE FOR ANY COSTS OF PROCUREMENT OF SUBSTITUTE PRODUCTS OR SERVICES, LOST PROFITS, LOSS OF INFORMATION OR DATA, OR ANY OTHER SPECIAL,
INDIRECT, CONSEQUENTIAL, OR INCIDENTAL DAMAGES ARISING IN ANY WAY OUT OF THE SALE OF, USE OF, OR INABILITY TO USE ANY LOGITECH PRODUCT OR
SERVICE, EVEN IF LOGITECH HAS BEEN ADVISED OF THE POSSIBILITY OF SUCH DAMAGES. IN NO CASE SHALL LOGITECH’S LIABILITY EXCEED THE ACTUAL MONEY
PAID FOR THE PRODUCTS AT ISSUE. Because some jurisdictions do not allow the limitation of implied warranties or liability for incidental, consequential,
special, or indirect damages, the above limitation may not always apply. The above limitations will not apply in case of personal injury where and to the
extent that applicable law requires such liability.
U.S. Government Restricted Rights. The Software is provided to the U.S. Government only with restricted rights and limited rights. Use, duplication,
or disclosure by the U.S. Government is subject to restrictions set forth in 48 C.F.R. 2.101 (October 1995), consisting of “Commercial Computer Software”
and “Commercial Computer Software Documentation” as such terms are used in 48 C.F.R. 12.212 (September 1995), and in FAR Sections 52-227-14 and
52-227-19 or DFARS Section 52.227-7013 (C) (1) (ii), or their successors, as applicable. Consistent with 48 C.F.R. 12.212 and 48 C.F.R. 227.7202-1 through
227.7204-4 (June 1995), or any successor regulations, this Software is provided to U.S. Government users pursuant to the terms and conditions herein.
Contractor/Manufacturer is Logitech Inc., 6505 Kaiser Drive, Fremont, CA 94555.
FCC Compliance and Advisory Statement. This hardware device complies with Part 15 of the FCC Rules. Operation is subject to the following two
conditions: 1) this device may not cause harmful interference, and 2) this device must accept any interference received, including interference that may
cause undesired operation. This equipment has been tested and found to comply with the limits for a Class B digital device, pursuant to Part 15 of the FCC
Rules. These limits are designed to provide reasonable protection against harmful interference in a residential installation. This equipment generates, uses,
and can radiate radio frequency energy and, if not installed or used in accordance with the instructions, may cause harmful interference to radio
communications. However, there is no guarantee that interference will not occur in a particular installation. If this equipment does cause harmful interference
to radio or television reception, which can be determined by turning the equipment off and on, the user is encouraged to try to correct the interference
by one or more of the following measures: 1) reorient or relocate the receiving antenna; 2) increase the separation between the equipment and the receiver;
3) connect the equipment to an outlet on a circuit different from that to which the receiver is connected; 4) consult the dealer or an experienced radio/TV
technician for help. Any changes or modifications not expressly approved by the party responsible for compliance could void the user's authority to operate
the equipment. Where shielded interface cables have been provided with the product or specified additional components or accessories elsewhere defined
to be used with the installation of the product, they must be used in order to ensure compliance with FCC regulations.
Canadian DOC Statement. This digital device does not exceed the Class B limits for radio noise emissions from digital apparatus specified in the
interference-causing equipment standard entitled “Digital Apparatus,” ICES-003 of the Department of Communications.
Cet appareil numérique respecte les limites bruits radioélectriques applicables aux appareils numériques de Classe B prescrites dans la norme sur le matériel
brouilleur: “Appareils Numériques,” NMB-003 édictée par le Ministère des Communications.
This device complies with RSS-210 of Industry and Science Canada. Operation is subject to the following two conditions: 1) this device may not cause
interference, and 2) this device must accept any interference, including interference that may cause undesired operation of the device. Transmitter
frequency: 26.995; 27.045; 27.145; 27.195 MHz. Power Output: < 10mV/m @ 3m.
42
Page 43

Trackball
TrackMan® Marble® FX
© 2000 Logitech. All Rights Reserved. Logitech, the Logitech logo, and other Logitech marks are owned by Logitech and may be registered.
All other trademarks are the property of their respective owners. Logitech assumes no responsibility for any errors that may appear in this manual.
Information contained herein is subject to change without notice.
Software License Agreement. LOGITECH IS WILLING TO LICENSE THE ENCLOSED SOFTWARE TO YOU ONLY ON THE CONDITION THAT YOU ACCEPT
ALL OF THE TERMS CONTAINED IN THIS LICENSE AGREEMENT. This is a legal agreement between you (either an individual end-user or an entity)
and Logitech. By opening the software package, you are agreeing to be bound by the terms and conditions of the Agreement. If you
do not agree to the terms of this Agreement, promptly return the software package and other items that are part of this product in
their original package with your payment receipt to your point of purchase for a full refund. Grant of License. Logitech and its suppliers
grant you a nonexclusive license to use one copy of the enclosed software program (“Software”) on one computer only with the Logitech product you have
purchased. No other rights are granted. The Software is in use if it is loaded on the computer’s permanent or temporary memory. For backup purposes
only, you may make one copy of the Software. You must include on the backup copy all copyright and other notices included on the Software as supplied
by Logitech. Installation on a network server for the sole purpose of your internal distribution of the Software is permitted only if you have purchased an
individual Software package for each networked computer to which the Software is distributed.
Restrictions. Logitech and its suppliers retain ownership of the Software. You shall not decompile, disassemble, reverse-engineer, or modify the Software
in any way. You may not transmit the Software over a network (except as expressly permitted above), by telephone, or electronically using any means.
You may not transfer the Software except upon a permanent transfer of the enclosed Logitech product provided that all Software updates are included in
the transfer, you do not retain a copy of the Software, and the transferee agrees to be bound by the terms and conditions in this license. Upon any violation
of any of the provisions of this Agreement, rights to use the Software shall automatically terminate and the Software must be returned to Logitech or all
copies of the Software destroyed.
Limited Product Warranty. Logitech warrants that the hardware accompanying this documentation shall be free from significant defects in material
and workmanship for a period of three years from the date of purchase. Logitech also warrants that the software accompanying this documentation will
perform substantially in accordance with the documentation for a period of 90 days from the date of purchase. Logitech’s hardware and software warranty
is nontransferable and is limited to the original purchaser.
Product Remedies. Logitech’s entire liability and the Licensee’s exclusive remedy for any breach of warranty, shall be, at Logitech’s option, either (a) return
of the price paid or (b) repair or replacement of the hardware or software, provided that the hardware or software is returned to the point of purchase,
with a copy of the sales receipt. Any replacement hardware or software will be warranted for the remainder of the original warranty period or 30 days for
the hardware and 30 days for the software, whichever is longer. These remedies are void if failure of the hardware or software has resulted from accident,
abuse, or misapplication.
LIMITATION OF LIABILITY. THE WARRANTIES SET FORTH IN THIS AGREEMENT REPLACE ALL OTHER WARRANTIES. LOGITECH EXPRESSLY DISCLAIMS
ALL OTHER WARRANTIES, INCLUDING, BUT NOT LIMITED TO, THE IMPLIED WARRANTIES OF MERCHANTABILITY AND FITNESS FOR A PARTICULAR PURPOSE
AND NONINFRINGEMENT OF THIRD-PARTY RIGHTS WITH RESPECT TO THE DOCUMENTATION, SOFTWARE, AND HARDWARE. NO LOGITECH DEALER, AGENT,
OR EMPLOYEE IS AUTHORIZED TO MAKE ANY MODIFICATION, EXTENSION, OR ADDITION TO THIS WARRANTY. IN NO EVENT WILL LOGITECH OR ITS SUPPLIERS
BE LIABLE FOR ANY COSTS OF PROCUREMENT OF SUBSTITUTE PRODUCTS OR SERVICES, LOST PROFITS, LOSS OF INFORMATION OR DATA, OR ANY OTHER SPECIAL,
INDIRECT, CONSEQUENTIAL, OR INCIDENTAL DAMAGES ARISING IN ANY WAY OUT OF THE SALE OF, USE OF, OR INABILITY TO USE ANY LOGITECH PRODUCT OR
SERVICE, EVEN IF LOGITECH HAS BEEN ADVISED OF THE POSSIBILITY OF SUCH DAMAGES. IN NO CASE SHALL LOGITECH’S LIABILITY EXCEED THE ACTUAL MONEY
PAID FOR THE PRODUCTS AT ISSUE. Because some jurisdictions do not allow the limitation of implied warranties or liability for incidental, consequential,
special, or indirect damages, the above limitation may not always apply. The above limitations will not apply in case of personal injury where and to the
extent that applicable law requires such liability.
U.S. Government Restricted Rights. The Software is provided to the U.S. Government only with restricted rights and limited rights. Use, duplication,
or disclosure by the U.S. Government is subject to restrictions set forth in 48 C.F.R. 2.101 (October 1995), consisting of “Commercial Computer Software”
and “Commercial Computer Software Documentation” as such terms are used in 48 C.F.R. 12.212 (September 1995), and in FAR Sections 52-227-14 and
52-227-19 or DFARS Section 52.227-7013 (C) (1) (ii), or their successors, as applicable. Consistent with 48 C.F.R. 12.212 and 48 C.F.R. 227.7202-1 through
227.7204-4 (June 1995), or any successor regulations, this Software is provided to U.S. Government users pursuant to the terms and conditions herein.
Contractor/Manufacturer is Logitech Inc., 6505 Kaiser Drive, Fremont, CA 94555.
FCC Compliance and Advisory Statement. This hardware device complies with Part 15 of the FCC Rules. Operation is subject to the following two
conditions: 1) this device may not cause harmful interference, and 2) this device must accept any interference received, including interference that may
cause undesired operation. This equipment has been tested and found to comply with the limits for a Class B digital device, pursuant to Part 15 of the FCC
Rules. These limits are designed to provide reasonable protection against harmful interference in a residential installation. This equipment generates, uses,
and can radiate radio frequency energy and, if not installed or used in accordance with the instructions, may cause harmful interference to radio
communications. However, there is no guarantee that interference will not occur in a particular installation. If this equipment does cause harmful interference
to radio or television reception, which can be determined by turning the equipment off and on, the user is encouraged to try to correct the interference
by one or more of the following measures: 1) reorient or relocate the receiving antenna; 2) increase the separation between the equipment and the receiver;
3) connect the equipment to an outlet on a circuit different from that to which the receiver is connected; 4) consult the dealer or an experienced radio/TV
technician for help. Any changes or modifications not expressly approved by the party responsible for compliance could void the user's authority to operate
the equipment. Where shielded interface cables have been provided with the product or specified additional components or accessories elsewhere defined
to be used with the installation of the product, they must be used in order to ensure compliance with FCC regulations.
Canadian DOC Statement. This digital device does not exceed the Class B limits for radio noise emissions from digital apparatus specified in the
interference-causing equipment standard entitled “Digital Apparatus,” ICES-003 of the Department of Communications.
Cet appareil numérique respecte les limites bruits radioélectriques applicables aux appareils numériques de Classe B prescrites dans la norme sur le matériel
brouilleur: “Appareils Numériques,” NMB-003 édictée par le Ministère des Communications.
This device complies with RSS-210 of Industry and Science Canada. Operation is subject to the following two conditions: 1) this device may not cause
interference, and 2) this device must accept any interference, including interference that may cause undesired operation of the device.
43
Page 44

Trackball
TrackMan® Marble® Wheel
© 2000 Logitech. All Rights Reserved. Logitech, the Logitech logo, and other Logitech marks are owned by Logitech and may be registered.
All other trademarks are the property of their respective owners. Logitech assumes no responsibility for any errors that may appear in this manual.
Information contained herein is subject to change without notice.
Software License Agreement. LOGITECH IS WILLING TO LICENSE THE ENCLOSED SOFTWARE TO YOU ONLY ON THE CONDITION THAT YOU ACCEPT
ALL OF THE TERMS CONTAINED IN THIS LICENSE AGREEMENT. This is a legal agreement between you (either an individual end-user or an entity)
and Logitech. By opening the software package, you are agreeing to be bound by the terms and conditions of the Agreement. If you
do not agree to the terms of this Agreement, promptly return the software package and other items that are part of this product in
their original package with your payment receipt to your point of purchase for a full refund. Grant of License. Logitech and its suppliers
grant you a nonexclusive license to use one copy of the enclosed software program (“Software”) on one computer only with the Logitech product you have
purchased. No other rights are granted. The Software is in use if it is loaded on the computer’s permanent or temporary memory. For backup purposes
only, you may make one copy of the Software. You must include on the backup copy all copyright and other notices included on the Software as supplied
by Logitech. Installation on a network server for the sole purpose of your internal distribution of the Software is permitted only if you have purchased an
individual Software package for each networked computer to which the Software is distributed.
Restrictions. Logitech and its suppliers retain ownership of the Software. You shall not decompile, disassemble, reverse-engineer, or modify the Software
in any way. You may not transmit the Software over a network (except as expressly permitted above), by telephone, or electronically using any means.
You may not transfer the Software except upon a permanent transfer of the enclosed Logitech product provided that all Software updates are included in
the transfer, you do not retain a copy of the Software, and the transferee agrees to be bound by the terms and conditions in this license. Upon any violation
of any of the provisions of this Agreement, rights to use the Software shall automatically terminate and the Software must be returned to Logitech or all
copies of the Software destroyed.
Limited Product Warranty. Logitech warrants that the hardware accompanying this documentation shall be free from significant defects in material
and workmanship for a period of five years from the date of purchase. Logitech also warrants that the software accompanying this documentation will
perform substantially in accordance with the documentation for a period of 90 days from the date of purchase. Logitech’s hardware and software warranty
is nontransferable and is limited to the original purchaser.
Product Remedies. Logitech’s entire liability and the Licensee’s exclusive remedy for any breach of warranty, shall be, at Logitech’s option, either (a) return
of the price paid or (b) repair or replacement of the hardware or software, provided that the hardware or software is returned to the point of purchase,
with a copy of the sales receipt. Any replacement hardware or software will be warranted for the remainder of the original warranty period or 30 days for
the hardware and 30 days for the software, whichever is longer. These remedies are void if failure of the hardware or software has resulted from accident,
abuse, or misapplication.
LIMITATION OF LIABILITY. THE WARRANTIES SET FORTH IN THIS AGREEMENT REPLACE ALL OTHER WARRANTIES. LOGITECH EXPRESSLY DISCLAIMS
ALL OTHER WARRANTIES, INCLUDING, BUT NOT LIMITED TO, THE IMPLIED WARRANTIES OF MERCHANTABILITY AND FITNESS FOR A PARTICULAR PURPOSE
AND NONINFRINGEMENT OF THIRD-PARTY RIGHTS WITH RESPECT TO THE DOCUMENTATION, SOFTWARE, AND HARDWARE. NO LOGITECH DEALER, AGENT,
OR EMPLOYEE IS AUTHORIZED TO MAKE ANY MODIFICATION, EXTENSION, OR ADDITION TO THIS WARRANTY. IN NO EVENT WILL LOGITECH OR ITS SUPPLIERS
BE LIABLE FOR ANY COSTS OF PROCUREMENT OF SUBSTITUTE PRODUCTS OR SERVICES, LOST PROFITS, LOSS OF INFORMATION OR DATA, OR ANY OTHER SPECIAL,
INDIRECT, CONSEQUENTIAL, OR INCIDENTAL DAMAGES ARISING IN ANY WAY OUT OF THE SALE OF, USE OF, OR INABILITY TO USE ANY LOGITECH PRODUCT
OR SERVICE, EVEN IF LOGITECH HAS BEEN ADVISED OF THE POSSIBILITY OF SUCH DAMAGES. IN NO CASE SHALL LOGITECH’S LIABILITY EXCEED THE ACTUAL
MONEY PAID FOR THE PRODUCTS AT ISSUE. Because some jurisdictions do not allow the limitation of implied warranties or liability for incidental,
consequential, special, or indirect damages, the above limitation may not always apply. The above limitations will not apply in case of personal injury where
and to the extent that applicable law requires such liability.
U.S. Government Restricted Rights. The Software is provided to the U.S. Government only with restricted rights and limited rights. Use, duplication,
or disclosure by the U.S. Government is subject to restrictions set forth in 48 C.F.R. 2.101 (October 1995), consisting of “Commercial Computer Software”
and “Commercial Computer Software Documentation” as such terms are used in 48 C.F.R. 12.212 (September 1995), and in FAR Sections 52-227-14 and
52-227-19 or DFARS Section 52.227-7013 (C) (1) (ii), or their successors, as applicable. Consistent with 48 C.F.R. 12.212 and 48 C.F.R. 227.7202-1 through
227.7204-4 (June 1995), or any successor regulations, this Software is provided to U.S. Government users pursuant to the terms and conditions herein.
Contractor/Manufacturer is Logitech Inc., 6505 Kaiser Drive, Fremont, CA 94555.
FCC Compliance and Advisory Statement. This hardware device complies with Part 15 of the FCC Rules. Operation is subject to the following two
conditions: 1) this device may not cause harmful interference, and 2) this device must accept any interference received, including interference that may
cause undesired operation. This equipment has been tested and found to comply with the limits for a Class B digital device, pursuant to Part 15 of the FCC
Rules. These limits are designed to provide reasonable protection against harmful interference in a residential installation. This equipment generates, uses,
and can radiate radio frequency energy and, if not installed or used in accordance with the instructions, may cause harmful interference to radio
communications. However, there is no guarantee that interference will not occur in a particular installation. If this equipment does cause harmful interference
to radio or television reception, which can be determined by turning the equipment off and on, the user is encouraged to try to correct the interference
by one or more of the following measures: 1) reorient or relocate the receiving antenna; 2) increase the separation between the equipment and the receiver;
3) connect the equipment to an outlet on a circuit different from that to which the receiver is connected; 4) consult the dealer or an experienced radio/TV
technician for help. Any changes or modifications not expressly approved by the party responsible for compliance could void the user's authority to operate
the equipment. Where shielded interface cables have been provided with the product or specified additional components or accessories elsewhere defined
to be used with the installation of the product, they must be used in order to ensure compliance with FCC regulations.
Canadian DOC Statement. This digital device does not exceed the Class B limits for radio noise emissions from digital apparatus specified in the
interference-causing equipment standard entitled “Digital Apparatus,” ICES-003 of the Department of Communications.
Cet appareil numérique respecte les limites bruits radioélectriques applicables aux appareils numériques de Classe B prescrites dans la norme sur le matériel
brouilleur: “Appareils Numériques,” NMB-003 édictée par le Ministère des Communications.
This device complies with RSS-210 of Industry and Science Canada. Operation is subject to the following two conditions: 1) this device may not cause
interference, and 2) this device must accept any interference, including interference that may cause undesired operation of the device.
44
Page 45

Keyboard/Desktop
Keyboard/Desktop
Cordless Desktop™ Pro
© 2000 Logitech. All Rights Reserved. Logitech, the Logitech logo, and other Logitech marks are owned by Logitech and may be registered.
All other trademarks are the property of their respective owners. Logitech assumes no responsibility for any errors that may appear in this manual.
Information contained herein is subject to change without notice.
Software License Agreement. LOGITECH IS WILLING TO LICENSE THE ENCLOSED SOFTWARE TO YOU ONLY ON THE CONDITION THAT YOU ACCEPT
ALL OF THE TERMS CONTAINED IN THIS LICENSE AGREEMENT. This is a legal agreement between you (either an individual end-user or an entity)
and Logitech. By opening the software package, you are agreeing to be bound by the terms and conditions of the Agreement. If you
do not agree to the terms of this Agreement, promptly return the software package and other items that are part of this product in
their original package with your payment receipt to your point of purchase for a full refund. Grant of License. Logitech and its suppliers
grant you a nonexclusive license to use one copy of the enclosed software program (“Software”) on one computer only with the Logitech product you have
purchased. No other rights are granted. The Software is in use if it is loaded on the computer’s permanent or temporary memory. For backup purposes
only, you may make one copy of the Software. You must include on the backup copy all copyright and other notices included on the Software as supplied
by Logitech. Installation on a network server for the sole purpose of your internal distribution of the Software is permitted only if you have purchased an
individual Software package for each networked computer to which the Software is distributed.
Restrictions. Logitech and its suppliers retain ownership of the Software. You shall not decompile, disassemble, reverse-engineer, or modify the Software
in any way. You may not transmit the Software over a network (except as expressly permitted above), by telephone, or electronically using any means.
You may not transfer the Software except upon a permanent transfer of the enclosed Logitech product provided that all Software updates are included in
the transfer, you do not retain a copy of the Software, and the transferee agrees to be bound by the terms and conditions in this license. Upon any violation
of any of the provisions of this Agreement, rights to use the Software shall automatically terminate and the Software must be returned to Logitech or all
copies of the Software destroyed.
Limited Product Warranty. Logitech warrants that the hardware accompanying this documentation shall be free from significant defects in material
and workmanship for a period of five years from the date of purchase. Logitech also warrants that the software accompanying this documentation will
perform substantially in accordance with the documentation for a period of 90 days from the date of purchase. Logitech’s hardware and software warranty
is nontransferable and is limited to the original purchaser.
Product Remedies. Logitech’s entire liability and the Licensee’s exclusive remedy for any breach of warranty, shall be, at Logitech’s option, either (a) return
of the price paid or (b) repair or replacement of the hardware or software, provided that the hardware or software is returned to the point of purchase,
with a copy of the sales receipt. Any replacement hardware or software will be warranted for the remainder of the original warranty period or 30 days for
the hardware and 30 days for the software, whichever is longer. These remedies are void if failure of the hardware or software has resulted from accident,
abuse, or misapplication.
LIMITATION OF LIABILITY. THE WARRANTIES SET FORTH IN THIS AGREEMENT REPLACE ALL OTHER WARRANTIES. LOGITECH EXPRESSLY DISCLAIMS
ALL OTHER WARRANTIES, INCLUDING, BUT NOT LIMITED TO, THE IMPLIED WARRANTIES OF MERCHANTABILITY AND FITNESS FOR A PARTICULAR PURPOSE
AND NONINFRINGEMENT OF THIRD-PARTY RIGHTS WITH RESPECT TO THE DOCUMENTATION, SOFTWARE, AND HARDWARE. NO LOGITECH DEALER, AGENT,
OR EMPLOYEE IS AUTHORIZED TO MAKE ANY MODIFICATION, EXTENSION, OR ADDITION TO THIS WARRANTY. IN NO EVENT WILL LOGITECH OR ITS SUPPLIERS
BE LIABLE FOR ANY COSTS OF PROCUREMENT OF SUBSTITUTE PRODUCTS OR SERVICES, LOST PROFITS, LOSS OF INFORMATION OR DATA, OR ANY OTHER SPECIAL,
INDIRECT, CONSEQUENTIAL, OR INCIDENTAL DAMAGES ARISING IN ANY WAY OUT OF THE SALE OF, USE OF, OR INABILITY TO USE ANY LOGITECH PRODUCT OR
SERVICE, EVEN IF LOGITECH HAS BEEN ADVISED OF THE POSSIBILITY OF SUCH DAMAGES. IN NO CASE SHALL LOGITECH’S LIABILITY EXCEED THE ACTUAL MONEY
PAID FOR THE PRODUCTS AT ISSUE. Because some jurisdictions do not allow the limitation of implied warranties or liability for incidental, consequential,
special, or indirect damages, the above limitation may not always apply. The above limitations will not apply in case of personal injury where and to the
extent that applicable law requires such liability.
U.S. Government Restricted Rights. The Software is provided to the U.S. Government only with restricted rights and limited rights. Use, duplication,
or disclosure by the U.S. Government is subject to restrictions set forth in 48 C.F.R. 2.101 (October 1995), consisting of “Commercial Computer Software”
and “Commercial Computer Software Documentation” as such terms are used in 48 C.F.R. 12.212 (September 1995), and in FAR Sections 52-227-14 and
52-227-19 or DFARS Section 52.227-7013 (C) (1) (ii), or their successors, as applicable. Consistent with 48 C.F.R. 12.212 and 48 C.F.R. 227.7202-1 through
227.7204-4 (June 1995), or any successor regulations, this Software is provided to U.S. Government users pursuant to the terms and conditions herein.
Contractor/Manufacturer is Logitech Inc., 6505 Kaiser Drive, Fremont, CA 94555.
FCC Compliance and Advisory Statement. This hardware device complies with Part 15 of the FCC Rules. Operation is subject to the following two
conditions: 1) this device may not cause harmful interference, and 2) this device must accept any interference received, including interference that may
cause undesired operation. This equipment has been tested and found to comply with the limits for a Class B digital device, pursuant to Part 15 of the FCC
Rules. These limits are designed to provide reasonable protection against harmful interference in a residential installation. This equipment generates, uses,
and can radiate radio frequency energy and, if not installed or used in accordance with the instructions, may cause harmful interference to radio
communications. However, there is no guarantee that interference will not occur in a particular installation. If this equipment does cause harmful interference
to radio or television reception, which can be determined by turning the equipment off and on, the user is encouraged to try to correct the interference
by one or more of the following measures: 1) reorient or relocate the receiving antenna; 2) increase the separation between the equipment and the receiver;
3) connect the equipment to an outlet on a circuit different from that to which the receiver is connected; 4) consult the dealer or an experienced radio/TV
technician for help. Any changes or modifications not expressly approved by the party responsible for compliance could void the user's authority to operate
the equipment. Where shielded interface cables have been provided with the product or specified additional components or accessories elsewhere defined
to be used with the installation of the product, they must be used in order to ensure compliance with FCC regulations.
Canadian DOC Statement. This digital device does not exceed the Class B limits for radio noise emissions from digital apparatus specified in the
interference-causing equipment standard entitled “Digital Apparatus,” ICES-003 of the Department of Communications.
Cet appareil numérique respecte les limites bruits radioélectriques applicables aux appareils numériques de Classe B prescrites dans la norme sur le matériel
brouilleur: “Appareils Numériques,” NMB-003 édictée par le Ministère des Communications.
This device complies with RSS-210 of Industry and Science Canada. Operation is subject to the following two conditions: 1) this device may not cause
interference, and 2) this device must accept any interference, including interference that may cause undesired operation of the device. Transmitter
frequency: 26.995; 27.045; 27.145; 27.195 MHz. Power Output: < 10mV/m @ 3m.
45
Page 46

Keyboard/Desktop
Cordless iTouch® Keyboard
© 2000 Logitech. All Rights Reserved. Logitech, the Logitech logo, and other Logitech marks are owned by Logitech and may be registered.
All other trademarks are the property of their respective owners. Logitech assumes no responsibility for any errors that may appear in this manual.
Information contained herein is subject to change without notice.
Software License Agreement. LOGITECH IS WILLING TO LICENSE THE ENCLOSED SOFTWARE TO YOU ONLY ON THE CONDITION THAT YOU ACCEPT
ALL OF THE TERMS CONTAINED IN THIS LICENSE AGREEMENT. This is a legal agreement between you (either an individual end-user or an entity)
and Logitech. By opening the software package, you are agreeing to be bound by the terms and conditions of the Agreement. If you
do not agree to the terms of this Agreement, promptly return the software package and other items that are part of this product in
their original package with your payment receipt to your point of purchase for a full refund. Grant of License. Logitech and its suppliers
grant you a nonexclusive license to use one copy of the enclosed software program (“Software”) on one computer only with the Logitech product you have
purchased. No other rights are granted. The Software is in use if it is loaded on the computer’s permanent or temporary memory. For backup purposes
only, you may make one copy of the Software. You must include on the backup copy all copyright and other notices included on the Software as supplied
by Logitech. Installation on a network server for the sole purpose of your internal distribution of the Software is permitted only if you have purchased an
individual Software package for each networked computer to which the Software is distributed.
Restrictions. Logitech and its suppliers retain ownership of the Software. You shall not decompile, disassemble, reverse-engineer, or modify the Software
in any way. You may not transmit the Software over a network (except as expressly permitted above), by telephone, or electronically using any means.
You may not transfer the Software except upon a permanent transfer of the enclosed Logitech product provided that all Software updates are included in
the transfer, you do not retain a copy of the Software, and the transferee agrees to be bound by the terms and conditions in this license. Upon any violation
of any of the provisions of this Agreement, rights to use the Software shall automatically terminate and the Software must be returned to Logitech or all
copies of the Software destroyed.
Limited Product Warranty. Logitech warrants that the hardware accompanying this documentation shall be free from significant defects in material
and workmanship for a period of five years from the date of purchase. Logitech also warrants that the software accompanying this documentation will
perform substantially in accordance with the documentation for a period of 90 days from the date of purchase. Logitech’s hardware and software warranty
is nontransferable and is limited to the original purchaser.
Product Remedies. Logitech’s entire liability and the Licensee’s exclusive remedy for any breach of warranty, shall be, at Logitech’s option, either (a) return
of the price paid or (b) repair or replacement of the hardware or software, provided that the hardware or software is returned to the point of purchase,
with a copy of the sales receipt. Any replacement hardware or software will be warranted for the remainder of the original warranty period or 30 days for
the hardware and 30 days for the software, whichever is longer. These remedies are void if failure of the hardware or software has resulted from accident,
abuse, or misapplication.
LIMITATION OF LIABILITY. THE WARRANTIES SET FORTH IN THIS AGREEMENT REPLACE ALL OTHER WARRANTIES. LOGITECH EXPRESSLY DISCLAIMS
ALL OTHER WARRANTIES, INCLUDING, BUT NOT LIMITED TO, THE IMPLIED WARRANTIES OF MERCHANTABILITY AND FITNESS FOR A PARTICULAR PURPOSE
AND NONINFRINGEMENT OF THIRD-PARTY RIGHTS WITH RESPECT TO THE DOCUMENTATION, SOFTWARE, AND HARDWARE. NO LOGITECH DEALER, AGENT,
OR EMPLOYEE IS AUTHORIZED TO MAKE ANY MODIFICATION, EXTENSION, OR ADDITION TO THIS WARRANTY. IN NO EVENT WILL LOGITECH OR ITS SUPPLIERS
BE LIABLE FOR ANY COSTS OF PROCUREMENT OF SUBSTITUTE PRODUCTS OR SERVICES, LOST PROFITS, LOSS OF INFORMATION OR DATA, OR ANY OTHER SPECIAL,
INDIRECT, CONSEQUENTIAL, OR INCIDENTAL DAMAGES ARISING IN ANY WAY OUT OF THE SALE OF, USE OF, OR INABILITY TO USE ANY LOGITECH PRODUCT
OR SERVICE, EVEN IF LOGITECH HAS BEEN ADVISED OF THE POSSIBILITY OF SUCH DAMAGES. IN NO CASE SHALL LOGITECH’S LIABILITY EXCEED THE ACTUAL
MONEY PAID FOR THE PRODUCTS AT ISSUE. Because some jurisdictions do not allow the limitation of implied warranties or liability for incidental,
consequential, special, or indirect damages, the above limitation may not always apply. The above limitations will not apply in case of personal injury where
and to the extent that applicable law requires such liability.
U.S. Government Restricted Rights. The Software is provided to the U.S. Government only with restricted rights and limited rights. Use, duplication,
or disclosure by the U.S. Government is subject to restrictions set forth in 48 C.F.R. 2.101 (October 1995), consisting of “Commercial Computer Software”
and “Commercial Computer Software Documentation” as such terms are used in 48 C.F.R. 12.212 (September 1995), and in FAR Sections 52-227-14 and
52-227-19 or DFARS Section 52.227-7013 (C) (1) (ii), or their successors, as applicable. Consistent with 48 C.F.R. 12.212 and 48 C.F.R. 227.7202-1 through
227.7204-4 (June 1995), or any successor regulations, this Software is provided to U.S. Government users pursuant to the terms and conditions herein.
Contractor/Manufacturer is Logitech Inc., 6505 Kaiser Drive, Fremont, CA 94555.
FCC Compliance and Advisory Statement. This hardware device complies with Part 15 of the FCC Rules. Operation is subject to the following two
conditions: 1) this device may not cause harmful interference, and 2) this device must accept any interference received, including interference that may
cause undesired operation. This equipment has been tested and found to comply with the limits for a Class B digital device, pursuant to Part 15 of the FCC
Rules. These limits are designed to provide reasonable protection against harmful interference in a residential installation. This equipment generates, uses,
and can radiate radio frequency energy and, if not installed or used in accordance with the instructions, may cause harmful interference to radio
communications. However, there is no guarantee that interference will not occur in a particular installation. If this equipment does cause harmful interference
to radio or television reception, which can be determined by turning the equipment off and on, the user is encouraged to try to correct the interference
by one or more of the following measures: 1) reorient or relocate the receiving antenna; 2) increase the separation between the equipment and the receiver;
3) connect the equipment to an outlet on a circuit different from that to which the receiver is connected; 4) consult the dealer or an experienced radio/TV
technician for help. Any changes or modifications not expressly approved by the party responsible for compliance could void the user's authority to operate
the equipment. Where shielded interface cables have been provided with the product or specified additional components or accessories elsewhere defined
to be used with the installation of the product, they must be used in order to ensure compliance with FCC regulations.
Canadian DOC Statement. This digital device does not exceed the Class B limits for radio noise emissions from digital apparatus specified in the
interference-causing equipment standard entitled “Digital Apparatus,” ICES-003 of the Department of Communications.
Cet appareil numérique respecte les limites bruits radioélectriques applicables aux appareils numériques de Classe B prescrites dans la norme sur le matériel
brouilleur: “Appareils Numériques,” NMB-003 édictée par le Ministère des Communications.
This device complies with RSS-210 of Industry and Science Canada. Operation is subject to the following two conditions: 1) this device may not cause
interference, and 2) this device must accept any interference, including interference that may cause undesired operation of the device. Transmitter
frequency: 26.995; 27.045; 27.145; 27.195 MHz. Power Output: < 10mV/m @ 3m.
46
Page 47

Keyboard/Desktop
Internet Keyboard
© 2000 Logitech. All Rights Reserved. Logitech, the Logitech logo, and other Logitech marks are owned by Logitech and may be registered.
All other trademarks are the property of their respective owners. Logitech assumes no responsibility for any errors that may appear in this manual.
Information contained herein is subject to change without notice.
Software License Agreement. LOGITECH IS WILLING TO LICENSE THE ENCLOSED SOFTWARE TO YOU ONLY ON THE CONDITION THAT YOU ACCEPT
ALL OF THE TERMS CONTAINED IN THIS LICENSE AGREEMENT. This is a legal agreement between you (either an individual end-user or an entity)
and Logitech. By opening the software package, you are agreeing to be bound by the terms and conditions of the Agreement. If you
do not agree to the terms of this Agreement, promptly return the software package and other items that are part of this product in
their original package with your payment receipt to your point of purchase for a full refund. Grant of License. Logitech and its suppliers
grant you a nonexclusive license to use one copy of the enclosed software program (“Software”) on one computer only with the Logitech product you have
purchased. No other rights are granted. The Software is in use if it is loaded on the computer’s permanent or temporary memory. For backup purposes
only, you may make one copy of the Software. You must include on the backup copy all copyright and other notices included on the Software as supplied
by Logitech. Installation on a network server for the sole purpose of your internal distribution of the Software is permitted only if you have purchased an
individual Software package for each networked computer to which the Software is distributed.
Restrictions. Logitech and its suppliers retain ownership of the Software. You shall not decompile, disassemble, reverse-engineer, or modify the Software
in any way. You may not transmit the Software over a network (except as expressly permitted above), by telephone, or electronically using any means.
You may not transfer the Software except upon a permanent transfer of the enclosed Logitech product provided that all Software updates are included in
the transfer, you do not retain a copy of the Software, and the transferee agrees to be bound by the terms and conditions in this license. Upon any violation
of any of the provisions of this Agreement, rights to use the Software shall automatically terminate and the Software must be returned to Logitech or all
copies of the Software destroyed.
Limited Product Warranty. Logitech warrants that the hardware accompanying this documentation shall be free from significant defects in material
and workmanship for a period of three years from the date of purchase. Logitech also warrants that the software accompanying this documentation will
perform substantially in accordance with the documentation for a period of 90 days from the date of purchase. Logitech’s hardware and software warranty
is nontransferable and is limited to the original purchaser.
Product Remedies. Logitech’s entire liability and the Licensee’s exclusive remedy for any breach of warranty, shall be, at Logitech’s option, either (a) return
of the price paid or (b) repair or replacement of the hardware or software, provided that the hardware or software is returned to the point of purchase,
with a copy of the sales receipt. Any replacement hardware or software will be warranted for the remainder of the original warranty period or 30 days for
the hardware and 30 days for the software, whichever is longer. These remedies are void if failure of the hardware or software has resulted from accident,
abuse, or misapplication.
LIMITATION OF LIABILITY. THE WARRANTIES SET FORTH IN THIS AGREEMENT REPLACE ALL OTHER WARRANTIES. LOGITECH EXPRESSLY DISCLAIMS
ALL OTHER WARRANTIES, INCLUDING, BUT NOT LIMITED TO, THE IMPLIED WARRANTIES OF MERCHANTABILITY AND FITNESS FOR A PARTICULAR PURPOSE
AND NONINFRINGEMENT OF THIRD-PARTY RIGHTS WITH RESPECT TO THE DOCUMENTATION, SOFTWARE, AND HARDWARE. NO LOGITECH DEALER, AGENT,
OR EMPLOYEE IS AUTHORIZED TO MAKE ANY MODIFICATION, EXTENSION, OR ADDITION TO THIS WARRANTY. IN NO EVENT WILL LOGITECH OR ITS SUPPLIERS
BE LIABLE FOR ANY COSTS OF PROCUREMENT OF SUBSTITUTE PRODUCTS OR SERVICES, LOST PROFITS, LOSS OF INFORMATION OR DATA, OR ANY OTHER SPECIAL,
INDIRECT, CONSEQUENTIAL, OR INCIDENTAL DAMAGES ARISING IN ANY WAY OUT OF THE SALE OF, USE OF, OR INABILITY TO USE ANY LOGITECH PRODUCT
OR SERVICE, EVEN IF LOGITECH HAS BEEN ADVISED OF THE POSSIBILITY OF SUCH DAMAGES. IN NO CASE SHALL LOGITECH’S LIABILITY EXCEED THE ACTUAL
MONEY PAID FOR THE PRODUCTS AT ISSUE. Because some jurisdictions do not allow the limitation of implied warranties or liability for incidental,
consequential, special, or indirect damages, the above limitation may not always apply. The above limitations will not apply in case of personal injury where
and to the extent that applicable law requires such liability.
U.S. Government Restricted Rights. The Software is provided to the U.S. Government only with restricted rights and limited rights. Use, duplication,
or disclosure by the U.S. Government is subject to restrictions set forth in 48 C.F.R. 2.101 (October 1995), consisting of “Commercial Computer Software”
and “Commercial Computer Software Documentation” as such terms are used in 48 C.F.R. 12.212 (September 1995), and in FAR Sections 52-227-14 and
52-227-19 or DFARS Section 52.227-7013 (C) (1) (ii), or their successors, as applicable. Consistent with 48 C.F.R. 12.212 and 48 C.F.R. 227.7202-1 through
227.7204-4 (June 1995), or any successor regulations, this Software is provided to U.S. Government users pursuant to the terms and conditions herein.
Contractor/Manufacturer is Logitech Inc., 6505 Kaiser Drive, Fremont, CA 94555.
FCC Compliance and Advisory Statement. This hardware device complies with Part 15 of the FCC Rules. Operation is subject to the following two
conditions: 1) this device may not cause harmful interference, and 2) this device must accept any interference received, including interference that may
cause undesired operation. This equipment has been tested and found to comply with the limits for a Class B digital device, pursuant to Part 15 of the FCC
Rules. These limits are designed to provide reasonable protection against harmful interference in a residential installation. This equipment generates, uses,
and can radiate radio frequency energy and, if not installed or used in accordance with the instructions, may cause harmful interference to radio
communications. However, there is no guarantee that interference will not occur in a particular installation. If this equipment does cause harmful interference
to radio or television reception, which can be determined by turning the equipment off and on, the user is encouraged to try to correct the interference
by one or more of the following measures: 1) reorient or relocate the receiving antenna; 2) increase the separation between the equipment and the receiver;
3) connect the equipment to an outlet on a circuit different from that to which the receiver is connected; 4) consult the dealer or an experienced radio/TV
technician for help. Any changes or modifications not expressly approved by the party responsible for compliance could void the user's authority to operate
the equipment. Where shielded interface cables have been provided with the product or specified additional components or accessories elsewhere defined
to be used with the installation of the product, they must be used in order to ensure compliance with FCC regulations.
Canadian DOC Statement. This digital device does not exceed the Class B limits for radio noise emissions from digital apparatus specified in the
interference-causing equipment standard entitled “Digital Apparatus,” ICES-003 of the Department of Communications.
Cet appareil numérique respecte les limites bruits radioélectriques applicables aux appareils numériques de Classe B prescrites dans la norme sur le matériel
brouilleur: “Appareils Numériques,” NMB-003 édictée par le Ministère des Communications.
This device complies with RSS-210 of Industry and Science Canada. Operation is subject to the following two conditions: 1) this device may not cause
interference, and 2) this device must accept any interference, including interference that may cause undesired operation of the device.
47
Page 48

Keyboard/Desktop
iTouch® Keyboard
© 2000 Logitech. All Rights Reserved. Logitech, the Logitech logo, and other Logitech marks are owned by Logitech and may be registered.
All other trademarks are the property of their respective owners. Logitech assumes no responsibility for any errors that may appear in this manual.
Information contained herein is subject to change without notice.
Software License Agreement. LOGITECH IS WILLING TO LICENSE THE ENCLOSED SOFTWARE TO YOU ONLY ON THE CONDITION THAT YOU ACCEPT
ALL OF THE TERMS CONTAINED IN THIS LICENSE AGREEMENT. This is a legal agreement between you (either an individual end-user or an entity)
and Logitech. By opening the software package, you are agreeing to be bound by the terms and conditions of the Agreement. If you
do not agree to the terms of this Agreement, promptly return the software package and other items that are part of this product in
their original package with your payment receipt to your point of purchase for a full refund. Grant of License. Logitech and its suppliers
grant you a nonexclusive license to use one copy of the enclosed software program (“Software”) on one computer only with the Logitech product you have
purchased. No other rights are granted. The Software is in use if it is loaded on the computer’s permanent or temporary memory. For backup purposes
only, you may make one copy of the Software. You must include on the backup copy all copyright and other notices included on the Software as supplied
by Logitech. Installation on a network server for the sole purpose of your internal distribution of the Software is permitted only if you have purchased an
individual Software package for each networked computer to which the Software is distributed.
Restrictions. Logitech and its suppliers retain ownership of the Software. You shall not decompile, disassemble, reverse-engineer, or modify the Software
in any way. You may not transmit the Software over a network (except as expressly permitted above), by telephone, or electronically using any means.
You may not transfer the Software except upon a permanent transfer of the enclosed Logitech product provided that all Software updates are included in
the transfer, you do not retain a copy of the Software, and the transferee agrees to be bound by the terms and conditions in this license. Upon any violation
of any of the provisions of this Agreement, rights to use the Software shall automatically terminate and the Software must be returned to Logitech or all
copies of the Software destroyed.
Limited Product Warranty. Logitech warrants that the hardware accompanying this documentation shall be free from significant defects in material
and workmanship for a period of five years from the date of purchase. Logitech also warrants that the software accompanying this documentation will
perform substantially in accordance with the documentation for a period of 90 days from the date of purchase. Logitech’s hardware and software warranty
is nontransferable and is limited to the original purchaser.
Product Remedies. Logitech’s entire liability and the Licensee’s exclusive remedy for any breach of warranty, shall be, at Logitech’s option, either (a) return
of the price paid or (b) repair or replacement of the hardware or software, provided that the hardware or software is returned to the point of purchase,
with a copy of the sales receipt. Any replacement hardware or software will be warranted for the remainder of the original warranty period or 30 days for
the hardware and 30 days for the software, whichever is longer. These remedies are void if failure of the hardware or software has resulted from accident,
abuse, or misapplication.
LIMITATION OF LIABILITY. THE WARRANTIES SET FORTH IN THIS AGREEMENT REPLACE ALL OTHER WARRANTIES. LOGITECH EXPRESSLY DISCLAIMS
ALL OTHER WARRANTIES, INCLUDING, BUT NOT LIMITED TO, THE IMPLIED WARRANTIES OF MERCHANTABILITY AND FITNESS FOR A PARTICULAR PURPOSE
AND NONINFRINGEMENT OF THIRD-PARTY RIGHTS WITH RESPECT TO THE DOCUMENTATION, SOFTWARE, AND HARDWARE. NO LOGITECH DEALER, AGENT,
OR EMPLOYEE IS AUTHORIZED TO MAKE ANY MODIFICATION, EXTENSION, OR ADDITION TO THIS WARRANTY. IN NO EVENT WILL LOGITECH OR ITS SUPPLIERS
BE LIABLE FOR ANY COSTS OF PROCUREMENT OF SUBSTITUTE PRODUCTS OR SERVICES, LOST PROFITS, LOSS OF INFORMATION OR DATA, OR ANY OTHER SPECIAL,
INDIRECT, CONSEQUENTIAL, OR INCIDENTAL DAMAGES ARISING IN ANY WAY OUT OF THE SALE OF, USE OF, OR INABILITY TO USE ANY LOGITECH PRODUCT
OR SERVICE, EVEN IF LOGITECH HAS BEEN ADVISED OF THE POSSIBILITY OF SUCH DAMAGES. IN NO CASE SHALL LOGITECH’S LIABILITY EXCEED THE ACTUAL
MONEY PAID FOR THE PRODUCTS AT ISSUE. Because some jurisdictions do not allow the limitation of implied warranties or liability for incidental,
consequential, special, or indirect damages, the above limitation may not always apply. The above limitations will not apply in case of personal injury where
and to the extent that applicable law requires such liability.
U.S. Government Restricted Rights. The Software is provided to the U.S. Government only with restricted rights and limited rights. Use, duplication,
or disclosure by the U.S. Government is subject to restrictions set forth in 48 C.F.R. 2.101 (October 1995), consisting of “Commercial Computer Software”
and “Commercial Computer Software Documentation” as such terms are used in 48 C.F.R. 12.212 (September 1995), and in FAR Sections 52-227-14 and
52-227-19 or DFARS Section 52.227-7013 (C) (1) (ii), or their successors, as applicable. Consistent with 48 C.F.R. 12.212 and 48 C.F.R. 227.7202-1 through
227.7204-4 (June 1995), or any successor regulations, this Software is provided to U.S. Government users pursuant to the terms and conditions herein.
Contractor/Manufacturer is Logitech Inc., 6505 Kaiser Drive, Fremont, CA 94555.
FCC Compliance and Advisory Statement. This hardware device complies with Part 15 of the FCC Rules. Operation is subject to the following two
conditions: 1) this device may not cause harmful interference, and 2) this device must accept any interference received, including interference that may
cause undesired operation. This equipment has been tested and found to comply with the limits for a Class B digital device, pursuant to Part 15 of the FCC
Rules. These limits are designed to provide reasonable protection against harmful interference in a residential installation. This equipment generates, uses,
and can radiate radio frequency energy and, if not installed or used in accordance with the instructions, may cause harmful interference to radio
communications. However, there is no guarantee that interference will not occur in a particular installation. If this equipment does cause harmful interference
to radio or television reception, which can be determined by turning the equipment off and on, the user is encouraged to try to correct the interference
by one or more of the following measures: 1) reorient or relocate the receiving antenna; 2) increase the separation between the equipment and the receiver;
3) connect the equipment to an outlet on a circuit different from that to which the receiver is connected; 4) consult the dealer or an experienced radio/TV
technician for help. Any changes or modifications not expressly approved by the party responsible for compliance could void the user's authority to operate
the equipment. Where shielded interface cables have been provided with the product or specified additional components or accessories elsewhere defined
to be used with the installation of the product, they must be used in order to ensure compliance with FCC regulations.
Canadian DOC Statement. This digital device does not exceed the Class B limits for radio noise emissions from digital apparatus specified in the
interference-causing equipment standard entitled “Digital Apparatus,” ICES-003 of the Department of Communications.
Cet appareil numérique respecte les limites bruits radioélectriques applicables aux appareils numériques de Classe B prescrites dans la norme sur le matériel
brouilleur: “Appareils Numériques,” NMB-003 édictée par le Ministère des Communications.
This device complies with RSS-210 of Industry and Science Canada. Operation is subject to the following two conditions: 1) this device may not cause
interference, and 2) this device must accept any interference, including interference that may cause undesired operation of the device.
48
Page 49

Keyboard/Desktop
Cordless Desktop iTouch
© 2000 Logitech. All Rights Reserved. Logitech, the Logitech logo, and other Logitech marks are owned by Logitech and may be registered.
All other trademarks are the property of their respective owners. Logitech assumes no responsibility for any errors that may appear in this manual.
Information contained herein is subject to change without notice.
Software License Agreement. LOGITECH IS WILLING TO LICENSE THE ENCLOSED SOFTWARE TO YOU ONLY ON THE CONDITION THAT YOU ACCEPT
ALL OF THE TERMS CONTAINED IN THIS LICENSE AGREEMENT. This is a legal agreement between you (either an individual end-user or an entity)
and Logitech. By opening the software package, you are agreeing to be bound by the terms and conditions of the Agreement. If you
do not agree to the terms of this Agreement, promptly return the software package and other items that are part of this product in
their original package with your payment receipt to your point of purchase for a full refund. Grant of License. Logitech and its suppliers
grant you a nonexclusive license to use one copy of the enclosed software program (“Software”) on one computer only with the Logitech product you have
purchased. No other rights are granted. The Software is in use if it is loaded on the computer’s permanent or temporary memory. For backup purposes
only, you may make one copy of the Software. You must include on the backup copy all copyright and other notices included on the Software as supplied
by Logitech. Installation on a network server for the sole purpose of your internal distribution of the Software is permitted only if you have purchased an
individual Software package for each networked computer to which the Software is distributed.
Restrictions. Logitech and its suppliers retain ownership of the Software. You shall not decompile, disassemble, reverse-engineer, or modify the Software
in any way. You may not transmit the Software over a network (except as expressly permitted above), by telephone, or electronically using any means.
You may not transfer the Software except upon a permanent transfer of the enclosed Logitech product provided that all Software updates are included in
the transfer, you do not retain a copy of the Software, and the transferee agrees to be bound by the terms and conditions in this license. Upon any violation
of any of the provisions of this Agreement, rights to use the Software shall automatically terminate and the Software must be returned to Logitech or all
copies of the Software destroyed.
Limited Product Warranty. Logitech warrants that the hardware accompanying this documentation shall be free from significant defects in material
and workmanship for a period of five years from the date of purchase. Logitech also warrants that the software accompanying this documentation will
perform substantially in accordance with the documentation for a period of 90 days from the date of purchase. Logitech’s hardware and software warranty
is nontransferable and is limited to the original purchaser.
Product Remedies. Logitech’s entire liability and the Licensee’s exclusive remedy for any breach of warranty, shall be, at Logitech’s option, either (a) return
of the price paid or (b) repair or replacement of the hardware or software, provided that the hardware or software is returned to the point of purchase,
with a copy of the sales receipt. Any replacement hardware or software will be warranted for the remainder of the original warranty period or 30 days for
the hardware and 30 days for the software, whichever is longer. These remedies are void if failure of the hardware or software has resulted from accident,
abuse, or misapplication.
LIMITATION OF LIABILITY. THE WARRANTIES SET FORTH IN THIS AGREEMENT REPLACE ALL OTHER WARRANTIES. LOGITECH EXPRESSLY DISCLAIMS
ALL OTHER WARRANTIES, INCLUDING, BUT NOT LIMITED TO, THE IMPLIED WARRANTIES OF MERCHANTABILITY AND FITNESS FOR A PARTICULAR PURPOSE
AND NONINFRINGEMENT OF THIRD-PARTY RIGHTS WITH RESPECT TO THE DOCUMENTATION, SOFTWARE, AND HARDWARE. NO LOGITECH DEALER, AGENT,
OR EMPLOYEE IS AUTHORIZED TO MAKE ANY MODIFICATION, EXTENSION, OR ADDITION TO THIS WARRANTY. IN NO EVENT WILL LOGITECH OR ITS SUPPLIERS
BE LIABLE FOR ANY COSTS OF PROCUREMENT OF SUBSTITUTE PRODUCTS OR SERVICES, LOST PROFITS, LOSS OF INFORMATION OR DATA, OR ANY OTHER SPECIAL,
INDIRECT, CONSEQUENTIAL, OR INCIDENTAL DAMAGES ARISING IN ANY WAY OUT OF THE SALE OF, USE OF, OR INABILITY TO USE ANY LOGITECH PRODUCT
OR SERVICE, EVEN IF LOGITECH HAS BEEN ADVISED OF THE POSSIBILITY OF SUCH DAMAGES. IN NO CASE SHALL LOGITECH’S LIABILITY EXCEED THE ACTUAL
MONEY PAID FOR THE PRODUCTS AT ISSUE. Because some jurisdictions do not allow the limitation of implied warranties or liability for incidental,
consequential, special, or indirect damages, the above limitation may not always apply. The above limitations will not apply in case of personal injury where
and to the extent that applicable law requires such liability.
U.S. Government Restricted Rights. The Software is provided to the U.S. Government only with restricted rights and limited rights. Use, duplication,
or disclosure by the U.S. Government is subject to restrictions set forth in 48 C.F.R. 2.101 (October 1995), consisting of “Commercial Computer Software”
and “Commercial Computer Software Documentation” as such terms are used in 48 C.F.R. 12.212 (September 1995), and in FAR Sections 52-227-14 and
52-227-19 or DFARS Section 52.227-7013 (C) (1) (ii), or their successors, as applicable. Consistent with 48 C.F.R. 12.212 and 48 C.F.R. 227.7202-1 through
227.7204-4 (June 1995), or any successor regulations, this Software is provided to U.S. Government users pursuant to the terms and conditions herein.
Contractor/Manufacturer is Logitech Inc., 6505 Kaiser Drive, Fremont, CA 94555.
FCC Compliance and Advisory Statement. This hardware device complies with Part 15 of the FCC Rules. Operation is subject to the following two
conditions: 1) this device may not cause harmful interference, and 2) this device must accept any interference received, including interference that may
cause undesired operation. This equipment has been tested and found to comply with the limits for a Class B digital device, pursuant to Part 15 of the FCC
Rules. These limits are designed to provide reasonable protection against harmful interference in a residential installation. This equipment generates, uses,
and can radiate radio frequency energy and, if not installed or used in accordance with the instructions, may cause harmful interference to radio
communications. However, there is no guarantee that interference will not occur in a particular installation. If this equipment does cause harmful interference
to radio or television reception, which can be determined by turning the equipment off and on, the user is encouraged to try to correct the interference
by one or more of the following measures: 1) reorient or relocate the receiving antenna; 2) increase the separation between the equipment and the receiver;
3) connect the equipment to an outlet on a circuit different from that to which the receiver is connected; 4) consult the dealer or an experienced radio/TV
technician for help. Any changes or modifications not expressly approved by the party responsible for compliance could void the user's authority to operate
the equipment. Where shielded interface cables have been provided with the product or specified additional components or accessories elsewhere defined
to be used with the installation of the product, they must be used in order to ensure compliance with FCC regulations.
Canadian DOC Statement. This digital device does not exceed the Class B limits for radio noise emissions from digital apparatus specified in the
interference-causing equipment standard entitled “Digital Apparatus,” ICES-003 of the Department of Communications.
Cet appareil numérique respecte les limites bruits radioélectriques applicables aux appareils numériques de Classe B prescrites dans la norme sur le matériel
brouilleur: “Appareils Numériques,” NMB-003 édictée par le Ministère des Communications.
This device complies with RSS-210 of Industry and Science Canada. Operation is subject to the following two conditions: 1) this device may not cause
interference, and 2) this device must accept any interference, including interference that may cause undesired operation of the device.
™
49
Page 50

Keyboard/Desktop
Deluxe Access™ 104 Keyboard
© 2000 Logitech. All Rights Reserved. Logitech, the Logitech logo, and other Logitech marks are owned by Logitech and may be registered.
All other trademarks are the property of their respective owners. Logitech assumes no responsibility for any errors that may appear in this manual.
Information contained herein is subject to change without notice.
Software License Agreement. LOGITECH IS WILLING TO LICENSE THE ENCLOSED SOFTWARE TO YOU ONLY ON THE CONDITION THAT YOU ACCEPT
ALL OF THE TERMS CONTAINED IN THIS LICENSE AGREEMENT. This is a legal agreement between you (either an individual end-user or an entity)
and Logitech. By opening the software package, you are agreeing to be bound by the terms and conditions of the Agreement. If you
do not agree to the terms of this Agreement, promptly return the software package and other items that are part of this product in
their original package with your payment receipt to your point of purchase for a full refund. Grant of License. Logitech and its suppliers
grant you a nonexclusive license to use one copy of the enclosed software program (“Software”) on one computer only with the Logitech product you have
purchased. No other rights are granted. The Software is in use if it is loaded on the computer’s permanent or temporary memory. For backup purposes
only, you may make one copy of the Software. You must include on the backup copy all copyright and other notices included on the Software as supplied
by Logitech. Installation on a network server for the sole purpose of your internal distribution of the Software is permitted only if you have purchased an
individual Software package for each networked computer to which the Software is distributed.
Restrictions. Logitech and its suppliers retain ownership of the Software. You shall not decompile, disassemble, reverse-engineer, or modify the Software
in any way. You may not transmit the Software over a network (except as expressly permitted above), by telephone, or electronically using any means.
You may not transfer the Software except upon a permanent transfer of the enclosed Logitech product provided that all Software updates are included in
the transfer, you do not retain a copy of the Software, and the transferee agrees to be bound by the terms and conditions in this license. Upon any violation
of any of the provisions of this Agreement, rights to use the Software shall automatically terminate and the Software must be returned to Logitech or all
copies of the Software destroyed.
Limited Product Warranty. Logitech warrants that the hardware accompanying this documentation shall be free from significant defects in material
and workmanship for a period of three years from the date of purchase. Logitech also warrants that the software accompanying this documentation will
perform substantially in accordance with the documentation for a period of 90 days from the date of purchase. Logitech’s hardware and software warranty
is nontransferable and is limited to the original purchaser.
Product Remedies. Logitech’s entire liability and the Licensee’s exclusive remedy for any breach of warranty, shall be, at Logitech’s option, either (a) return
of the price paid or (b) repair or replacement of the hardware or software, provided that the hardware or software is returned to the point of purchase,
with a copy of the sales receipt. Any replacement hardware or software will be warranted for the remainder of the original warranty period or 30 days for
the hardware and 30 days for the software, whichever is longer. These remedies are void if failure of the hardware or software has resulted from accident,
abuse, or misapplication.
LIMITATION OF LIABILITY. THE WARRANTIES SET FORTH IN THIS AGREEMENT REPLACE ALL OTHER WARRANTIES. LOGITECH EXPRESSLY DISCLAIMS
ALL OTHER WARRANTIES, INCLUDING, BUT NOT LIMITED TO, THE IMPLIED WARRANTIES OF MERCHANTABILITY AND FITNESS FOR A PARTICULAR PURPOSE
AND NONINFRINGEMENT OF THIRD-PARTY RIGHTS WITH RESPECT TO THE DOCUMENTATION, SOFTWARE, AND HARDWARE. NO LOGITECH DEALER, AGENT,
OR EMPLOYEE IS AUTHORIZED TO MAKE ANY MODIFICATION, EXTENSION, OR ADDITION TO THIS WARRANTY. IN NO EVENT WILL LOGITECH OR ITS SUPPLIERS
BE LIABLE FOR ANY COSTS OF PROCUREMENT OF SUBSTITUTE PRODUCTS OR SERVICES, LOST PROFITS, LOSS OF INFORMATION OR DATA, OR ANY OTHER SPECIAL,
INDIRECT, CONSEQUENTIAL, OR INCIDENTAL DAMAGES ARISING IN ANY WAY OUT OF THE SALE OF, USE OF, OR INABILITY TO USE ANY LOGITECH PRODUCT
OR SERVICE, EVEN IF LOGITECH HAS BEEN ADVISED OF THE POSSIBILITY OF SUCH DAMAGES. IN NO CASE SHALL LOGITECH’S LIABILITY EXCEED THE ACTUAL
MONEY PAID FOR THE PRODUCTS AT ISSUE. Because some jurisdictions do not allow the limitation of implied warranties or liability for incidental,
consequential, special, or indirect damages, the above limitation may not always apply. The above limitations will not apply in case of personal injury where
and to the extent that applicable law requires such liability.
U.S. Government Restricted Rights. The Software is provided to the U.S. Government only with restricted rights and limited rights. Use, duplication,
or disclosure by the U.S. Government is subject to restrictions set forth in 48 C.F.R. 2.101 (October 1995), consisting of “Commercial Computer Software”
and “Commercial Computer Software Documentation” as such terms are used in 48 C.F.R. 12.212 (September 1995), and in FAR Sections 52-227-14 and
52-227-19 or DFARS Section 52.227-7013 (C) (1) (ii), or their successors, as applicable. Consistent with 48 C.F.R. 12.212 and 48 C.F.R. 227.7202-1 through
227.7204-4 (June 1995), or any successor regulations, this Software is provided to U.S. Government users pursuant to the terms and conditions herein.
Contractor/Manufacturer is Logitech Inc., 6505 Kaiser Drive, Fremont, CA 94555.
FCC Compliance and Advisory Statement. This hardware device complies with Part 15 of the FCC Rules. Operation is subject to the following two
conditions: 1) this device may not cause harmful interference, and 2) this device must accept any interference received, including interference that may
cause undesired operation. This equipment has been tested and found to comply with the limits for a Class B digital device, pursuant to Part 15 of the FCC
Rules. These limits are designed to provide reasonable protection against harmful interference in a residential installation. This equipment generates, uses,
and can radiate radio frequency energy and, if not installed or used in accordance with the instructions, may cause harmful interference to radio
communications. However, there is no guarantee that interference will not occur in a particular installation. If this equipment does cause harmful interference
to radio or television reception, which can be determined by turning the equipment off and on, the user is encouraged to try to correct the interference
by one or more of the following measures: 1) reorient or relocate the receiving antenna; 2) increase the separation between the equipment and the receiver;
3) connect the equipment to an outlet on a circuit different from that to which the receiver is connected; 4) consult the dealer or an experienced radio/TV
technician for help. Any changes or modifications not expressly approved by the party responsible for compliance could void the user's authority to operate
the equipment. Where shielded interface cables have been provided with the product or specified additional components or accessories elsewhere defined
to be used with the installation of the product, they must be used in order to ensure compliance with FCC regulations.
Canadian DOC Statement. This digital device does not exceed the Class B limits for radio noise emissions from digital apparatus specified in the
interference-causing equipment standard entitled “Digital Apparatus,” ICES-003 of the Department of Communications.
Cet appareil numérique respecte les limites bruits radioélectriques applicables aux appareils numériques de Classe B prescrites dans la norme sur le matériel
brouilleur: “Appareils Numériques,” NMB-003 édictée par le Ministère des Communications.
This device complies with RSS-210 of Industry and Science Canada. Operation is subject to the following two conditions: 1) this device may not cause
interference, and 2) this device must accept any interference, including interference that may cause undesired operation of the device.
50
Page 51

Keyboard/Desktop
Deluxe Access™ Keyboard
© 2000 Logitech. All Rights Reserved. Logitech, the Logitech logo, and other Logitech marks are owned by Logitech and may be registered.
All other trademarks are the property of their respective owners. Logitech assumes no responsibility for any errors that may appear in this manual.
Information contained herein is subject to change without notice.
Software License Agreement. LOGITECH IS WILLING TO LICENSE THE ENCLOSED SOFTWARE TO YOU ONLY ON THE CONDITION THAT YOU ACCEPT
ALL OF THE TERMS CONTAINED IN THIS LICENSE AGREEMENT. This is a legal agreement between you (either an individual end-user or an entity)
and Logitech. By opening the software package, you are agreeing to be bound by the terms and conditions of the Agreement. If you
do not agree to the terms of this Agreement, promptly return the software package and other items that are part of this product in
their original package with your payment receipt to your point of purchase for a full refund. Grant of License. Logitech and its suppliers
grant you a nonexclusive license to use one copy of the enclosed software program (“Software”) on one computer only with the Logitech product you have
purchased. No other rights are granted. The Software is in use if it is loaded on the computer’s permanent or temporary memory. For backup purposes
only, you may make one copy of the Software. You must include on the backup copy all copyright and other notices included on the Software as supplied
by Logitech. Installation on a network server for the sole purpose of your internal distribution of the Software is permitted only if you have purchased an
individual Software package for each networked computer to which the Software is distributed.
Restrictions. Logitech and its suppliers retain ownership of the Software. You shall not decompile, disassemble, reverse-engineer, or modify the Software
in any way. You may not transmit the Software over a network (except as expressly permitted above), by telephone, or electronically using any means.
You may not transfer the Software except upon a permanent transfer of the enclosed Logitech product provided that all Software updates are included in
the transfer, you do not retain a copy of the Software, and the transferee agrees to be bound by the terms and conditions in this license. Upon any violation
of any of the provisions of this Agreement, rights to use the Software shall automatically terminate and the Software must be returned to Logitech or all
copies of the Software destroyed.
Limited Product Warranty. Logitech warrants that the hardware accompanying this documentation shall be free from significant defects in material
and workmanship for a period of three years from the date of purchase. Logitech also warrants that the software accompanying this documentation will
perform substantially in accordance with the documentation for a period of 90 days from the date of purchase. Logitech’s hardware and software warranty
is nontransferable and is limited to the original purchaser.
Product Remedies. Logitech’s entire liability and the Licensee’s exclusive remedy for any breach of warranty, shall be, at Logitech’s option, either (a) return
of the price paid or (b) repair or replacement of the hardware or software, provided that the hardware or software is returned to the point of purchase,
with a copy of the sales receipt. Any replacement hardware or software will be warranted for the remainder of the original warranty period or 30 days for
the hardware and 30 days for the software, whichever is longer. These remedies are void if failure of the hardware or software has resulted from accident,
abuse, or misapplication.
LIMITATION OF LIABILITY. THE WARRANTIES SET FORTH IN THIS AGREEMENT REPLACE ALL OTHER WARRANTIES. LOGITECH EXPRESSLY DISCLAIMS
ALL OTHER WARRANTIES, INCLUDING, BUT NOT LIMITED TO, THE IMPLIED WARRANTIES OF MERCHANTABILITY AND FITNESS FOR A PARTICULAR PURPOSE
AND NONINFRINGEMENT OF THIRD-PARTY RIGHTS WITH RESPECT TO THE DOCUMENTATION, SOFTWARE, AND HARDWARE. NO LOGITECH DEALER, AGENT,
OR EMPLOYEE IS AUTHORIZED TO MAKE ANY MODIFICATION, EXTENSION, OR ADDITION TO THIS WARRANTY. IN NO EVENT WILL LOGITECH OR ITS SUPPLIERS
BE LIABLE FOR ANY COSTS OF PROCUREMENT OF SUBSTITUTE PRODUCTS OR SERVICES, LOST PROFITS, LOSS OF INFORMATION OR DATA, OR ANY OTHER SPECIAL,
INDIRECT, CONSEQUENTIAL, OR INCIDENTAL DAMAGES ARISING IN ANY WAY OUT OF THE SALE OF, USE OF, OR INABILITY TO USE ANY LOGITECH PRODUCT
OR SERVICE, EVEN IF LOGITECH HAS BEEN ADVISED OF THE POSSIBILITY OF SUCH DAMAGES. IN NO CASE SHALL LOGITECH’S LIABILITY EXCEED THE ACTUAL
MONEY PAID FOR THE PRODUCTS AT ISSUE. Because some jurisdictions do not allow the limitation of implied warranties or liability for incidental,
consequential, special, or indirect damages, the above limitation may not always apply. The above limitations will not apply in case of personal injury where
and to the extent that applicable law requires such liability.
U.S. Government Restricted Rights. The Software is provided to the U.S. Government only with restricted rights and limited rights. Use, duplication,
or disclosure by the U.S. Government is subject to restrictions set forth in 48 C.F.R. 2.101 (October 1995), consisting of “Commercial Computer Software”
and “Commercial Computer Software Documentation” as such terms are used in 48 C.F.R. 12.212 (September 1995), and in FAR Sections 52-227-14 and
52-227-19 or DFARS Section 52.227-7013 (C) (1) (ii), or their successors, as applicable. Consistent with 48 C.F.R. 12.212 and 48 C.F.R. 227.7202-1 through
227.7204-4 (June 1995), or any successor regulations, this Software is provided to U.S. Government users pursuant to the terms and conditions herein.
Contractor/Manufacturer is Logitech Inc., 6505 Kaiser Drive, Fremont, CA 94555.
FCC Compliance and Advisory Statement. This hardware device complies with Part 15 of the FCC Rules. Operation is subject to the following two
conditions: 1) this device may not cause harmful interference, and 2) this device must accept any interference received, including interference that may
cause undesired operation. This equipment has been tested and found to comply with the limits for a Class B digital device, pursuant to Part 15 of the FCC
Rules. These limits are designed to provide reasonable protection against harmful interference in a residential installation. This equipment generates, uses,
and can radiate radio frequency energy and, if not installed or used in accordance with the instructions, may cause harmful interference to radio
communications. However, there is no guarantee that interference will not occur in a particular installation. If this equipment does cause harmful interference
to radio or television reception, which can be determined by turning the equipment off and on, the user is encouraged to try to correct the interference
by one or more of the following measures: 1) reorient or relocate the receiving antenna; 2) increase the separation between the equipment and the receiver;
3) connect the equipment to an outlet on a circuit different from that to which the receiver is connected; 4) consult the dealer or an experienced radio/TV
technician for help. Any changes or modifications not expressly approved by the party responsible for compliance could void the user's authority to operate
the equipment. Where shielded interface cables have been provided with the product or specified additional components or accessories elsewhere defined
to be used with the installation of the product, they must be used in order to ensure compliance with FCC regulations.
Canadian DOC Statement. This digital device does not exceed the Class B limits for radio noise emissions from digital apparatus specified in the
interference-causing equipment standard entitled “Digital Apparatus,” ICES-003 of the Department of Communications.
Cet appareil numérique respecte les limites bruits radioélectriques applicables aux appareils numériques de Classe B prescrites dans la norme sur le matériel
brouilleur: “Appareils Numériques,” NMB-003 édictée par le Ministère des Communications.
This device complies with RSS-210 of Industry and Science Canada. Operation is subject to the following two conditions: 1) this device may not cause
interference, and 2) this device must accept any interference, including interference that may cause undesired operation of the device.
51
 Loading...