


Contents
1.0 WELCOME ...................................................................... 2
2.0 PACKAGE CONTENTS ................................................... 3
3.0 WIRELESS USB ADAPTER OVERVIEW ........................ 4
4.0 WIRELESS USB ADAPTER INSTALLATION .................. 5
WINDOWS 7 ...................................................................... 5
4.1
WINDOWS XP ...................................... ........................ ...... 9
4.2
5.0 MAKING A BASIC WIRELESS NETWORK
CONNECTION .......................................................................13
6.0 CLIENT UTILITY INTERFACE ........................................18
- - 1

Do not throw the appliance away with the normal
household waste at the end of its life, but hand it in at
an official collection point for recycling. By doing this
you will help to preserve the environment.
1.0 Welcome
Thank you for purchasing the WL0084B Wireless N USB Adapter.
This Wireless Adapter is easy to use and easy to setup. If you
have been tired of dealing with all those messy wires to connect
a laptop or PC to office or home network, this Wireless adapter is
an ideal access solution for wireless Internet connection
A typical Internet access application for the USB wireless
adapter is shown as the following figure:
- - 2

There are two different ways to access Internet:
1. With a wireless adaptor, receiving and transferring signal via
a wireless router, then passed to an ADSL modem, then to
local ISP (Internet service supplier) through a telephone line.
2. With a wireless adaptor, receiving and transferring signal via
local AP (Access Point) or so called Hotpoint directly.
Tips: An 802.11 LAN is based on a cellular architecture where
the system is subdivided into cells, where each cell (called
Basic Service Set or BSS) is controlled by a Base Station
(called Access Point, or in short AP).
2.0 Package Contents
The Wireless USB Adapter package includes the following.
Wireless N 150Mbps USB Adapter
Quick Installation Guide
Autorun CD
- - 3

3.0 Wireless USB Adapter Overview
Wireless USB Adapter has the USB
interface and LED below.
Interface
USB Interface: Connect the USB
Interface to a USB port on your computer.
LED Description
LED: The LED stays lighted to indicate WLAN link established
and active.
- - 4

4.0 Wireless USB Adapter Installation
The following instructions will guide you to through the process
of installing the Wireless USB Adapter.
4.1 Windows 7
Step 1:
Once USB dongle connected to computer and the following will
appear on screen.
Step 2:
Please insert the AUTORUN CD into your CD-ROM drive.
The CD should auto-start, displaying the following window. If it
does not start, click on Start – Run and type in CD:
\autorun.exe (where CD is the drive letter of your CD-ROM
drive.) Click " Driver Installation ".
- - 5

Step 3:
For Security reasons Windows 7 requires the installer program
to have administrator privileges so the new policy called " User
Account Control " has been introduced in Windows 7. If UAC is
enabled Windows pops up a window " User Account Control "
Windows need your permission to continue. User needs to Click
" Yes " to proceed with the installation.
Step 4:
Click " Next ".
- - 6

Step 5:
Click "Next ".
Step 6:
Click "Install".
- - 7

Step 7:
Click "Finish".
- - 8

4.2 Windows XP
Step 1:
As Windows starts it will detect that new hardware has been
added, and start the " Found New Hardware Wizard ". Click on
" Cancel ".
Step 2:
Please insert the AUTORUN CD into your CD-ROM drive.
The CD should auto-start, displaying the following window. If it
does not start, click on Start – Run and type in CD:
\autorun.exe (where CD is the drive letter of your CD-ROM
drive.) Click " Driver Installation ".
- - 9

Step 3:
Click "Next ".
Step 4:
Click "Next ".
- - 10

Step 5:
Click "Install".
- - 11

Step 6:
Click "Finish".
- - 12

5.0 Making a Basic Wireless Network
Connection
1. After finishing driver installation, insert the USB adapter to
Notebook or PC that supports USB 2.0/1.1 interface.
Remarks: Make sure to connect the adapter to an
USB port on your computer directly rather than an
USB hub. Although it might work when connecting
with an USB hub, the likelihood of configuration
problems will be higher.
2. The system shows a wireless utility icon in the Windows
system tray, which locates in the bottom-right corner of your
computer screen, and pops up a message that indicates a
new hardware is found and installed, something like this:
Should the service " Wireles s Zero C onfiguration( WZC)" be applied.
3. Double-click the utility icon or right click the icon and then
select “View Available Wireless Networks” to launch the
utility, the Wireless Network Connection window appears
and displays your wireless network listed with the SSID
you chose.
- - 13

Notes: Before configuring your WiFi access, you need to
have your network’s SSID (service set identifier),
security key and authentication type handy. Check
the documentation coming with your router, ask your
network administrator to get the information.
4. If you don't see your network, click “Refresh network list” in
the upper left corner. If you are locating within the valid
range of hotspots or wireless routers, all available
networks will be recognized and listed automatically. Click
your preferred network, and then click “Connect” in the
lower right corner.
- - 14

5. If the network security key hasn’t been inputted before,
Windows XP prompts you to enter the network’s security
key to access the wanted SSID. Type the encryption key
that you wrote down earlier in both the Network key and
Confirm network key boxes, and then click “Connect”.
Tips: If there are free hotspots, simply select the
network you want from the list displayed, then click
Connecting. It tries to launch your Internet
browser—you should be connected to the Internet.
If there is a pay hotspot, signing in or up will require either to
enter your login information-if you‘re an existing customer,
or to enter your credit card information for payment, it is just
decided by you. Then clicking the Connecting, your default
Internet browser will launch and take you to the service
provider’s login page. Most providers have very simple and
step-by-step instructions for you to sign up and then to be
connected. Another way to access the service provider’s
login page is to simply launch your Internet browser, if
there’s a pay network available, you’ll be taken directly to
the login page.
- - 15

Should the service of Ralink wireless connection utility be applied.
After the installation of Ralink utility, the system shows a special
wireless utility icon in the Windows system tray, which locates in
the bottom-right corner of your computer screen:
When an USB wireless adapter is inserted into an USB 2.0/1.1
port of Notebook or PC, the icon changes colors according to
the wireless signal quality.
1. Double-click the icon or right click the icon and then select
“Launch Config Utility” to launch the utility, the RaUI window
appears like:
The Ralink wireless utility starts in compact mode as shown
above, provides profile management, the available networks
listing, a statistical counter display, Wi-Fi multimedia (WMM),
protected Wi-Fi setup, Cisco compatible
extensions (CCX), call admission control (CAC),
radio controls, Ralink driver/utility information, and
- - 16

help functions. Clicking the expanding icon can change to the
full mode as shown below:
- - 17

6.0 Client Utility Interface
1. After the installation of Ralink utility, the system shows a
special wireless utility icon in the Windows system tray,
which locates in the bottom-right corner of your computer
screen:
2. When an USB wireless adapter is inserted into an USB
2.0/1.1 port of Notebook or PC, the icon changes colors
according to the wireless signal quality.
3. Double-click the icon or right click the icon and then select
“Launch Config Utility” to launch the utility, the Ralink utility
window appears like:
Note: In the Windows XP, you can select the included WL0084B
Client Utility Interface or the Windows XP internal wireless
application to configure the device.
There are two client utility applications in WL0084B: Station
mode and AP mode.
Note: In this utility interface, Station Mode (Client Mode) is the
default access way.
- - 18

6.1 Station Mode
6.1.1 Station Mode Topology
In this mode, WL0084B serves as a client to receive the wireless
signals to access the Internet.
6.1.2 Status
In the Network Status window, it displays something on wireless
adapter and wireless network status, including SSID,
Authentication type, Encryption Type, IP address, subnet mask
and gateway and so on.
- - 19

6.1.3 Site Survey
The Site Survey is used to scan the available wireless network
around, showing the wireless network’s signal strength and
other information which provides the basis for you to access
which wireless network.
a) Connect: select one entry in the wireless network list and
click the button to connect the device with the selected
network.
b) Refresh: rescan the wireless network around.
6.1.4 Link Information
Link Information is used to summarize Rx and Tx data packets,
including the success and error packet amount.
- - 20

a) Clear: Click this button to renew the statistics.
- - 21

6.1.5 Profile List
This window saves the general wireless parameters for different
profiles, which is used to fast connect the wireless network you
need.
a) Connect: To activate one profile.
b) New: To create a new profile and configure the site
status and security setting.
Site Status = For Entering a Profil Name, the SSID and
the Network Type
- - 22

Security Setting = For Entering the Authentification
Type, the Encryption Type and the Key.
- - 23

c) Modify: To modify one existing profile.
d) Delete: To delete one existing profile.
- - 24

6.1.6 Advanced
Choose Advanced, there are “Wireless Mode” and “Select You
Country Region Code”.
6.1.7 About
The “About” screen lists version numbers and other information
about the card.
- - 25

AP Mode
6.1.8 AP Mode Topology
The device also can serve as an access point to transmit
wireless signals and create wireless network, allowing other
wireless clients to access the network.
To switch to AP mode, right-click the Ralink utility icon and
click “Switch to AP Mode”.
- - 26

6.1.9 Config AP
This window is used to configure the AP’s basic para- meters,
including SSID, Wireless Mode and Channel.
- - 27

a) SSID: Wireless network’s ID name scanned by wireless
adapter.
b) Wireless Mode: 802.11b/802.11g/802.11b/g mixed.
c) Channel: 1~11 channels provided.
Security Setting
This window is used to configure the wireless network’s security
authentication, providing WEP, WPA-PSK, WPA2-PSK, and
WPA-PSK/WPA2-PSK encryption methods.
d) WEP: 10/26 bits Hex or 5/13 ASCII support.
e) WPA-PSK: 8~32 bits ASCII support.
f) WPA2-PSK: 8~32 bits ASCII support.
g) WPA-PSK/WPA2-PSK: 8~32 bits ASCII support.
- - 28

Note:
1. The Hex characters include 0~9 numbers and a~f letters.
2. ASCII characters include any numbers/letters and
characters.
- - 29
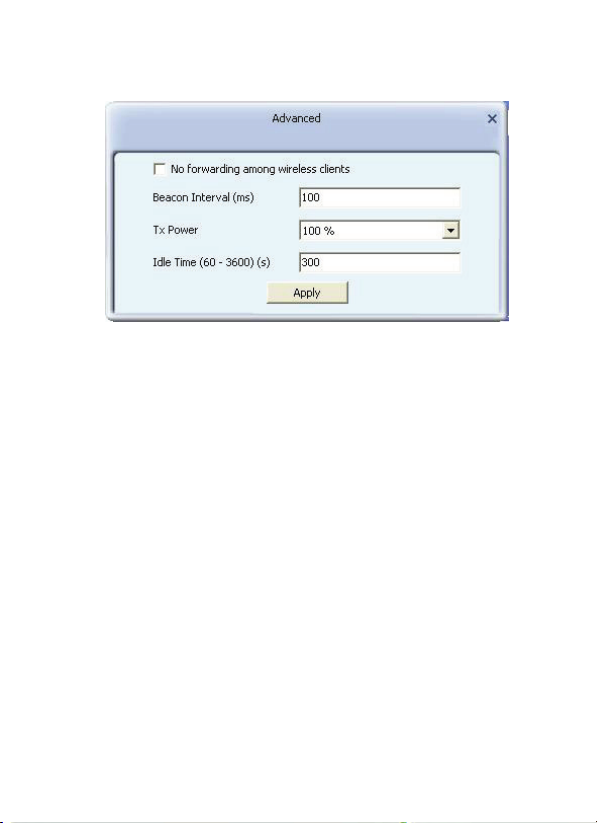
6.1.10 Advanced
a) No forwarding among wireless clients: When selected,
wireless clients won’t be able to share data with each other.
b) Beacon Interval (ms) : You can define the time interval that
a beacon signal should be sent. The default value is 100.
NOTE: Do not modify this value unless you know what will
be affected.
c) Tx Power : Select a proper output power setting according
to your actual needs.
For example, you may not need 100% of output power if
other wireless clients are not far from you.
d) Idle Time: Select the idle time for the wireless access point.
The default value is 300.
NOTE: Do not modify this value unless you know what will
be affected.
- - 30

6.1.11 Access Control
Access Control is based on the MAC address to decide that the
specified client connects to the wireless network, or disables it to
access the wireless network.
a) Access Policy:
Disabled: to disable the filter function.
Allow All: to permit all clients in the list to access the
wireless network.
Reject All: to refuse all clients in the list to access the
wireless network.
b) MAC Address: to input the client’s MAC address to
implement the corresponding filter policy. For example:
b0000a8cd702
- - 31

c) Add: to add the entered MAC address into the list.
d) Delete: to delete one existing MAC address in the list.
e) Remove All: to delete all clients’ MAC address in the list.
f) Apply: to make the changes made take effect.
6.1.12 About
This window displays something about software version and
wireless adapter.
- - 32

Appendix One: Acronyms and Terms
WLAN Wireless Local Area Network
802.11 A family of specifications developed by the IEEE for
WLAN technology.
802.11a An extension to 802.11 WLAN standard that
provides up to 54 Mbps transmission in the 5 GHz
UNI radio band.
802.11b An extension to 802.11 WLAN standard that
provides up to 11 Mbps transmission in the 2.4 GHz
ISM radio band. 802.11b uses DSSS modulation.
802.11g An extension to 802.11 WLAN standard that
provides up to 54 Mbps transmission in the 2.4 GHz
ISM radio band. 802.11b uses OFDM modulation
and is backwards compatible with 802.11b.
Ad-Hoc A group of computers each with wireless adapters,
connected as an independent WLAN.
AES Advanced Encryption Standard
BSSID Basic Service Set ID
DHCP Dynamic Host Configuration Protocol
DSSS Direct Sequence Spread Spectrum. DSSS is one of
two types of spread spectrum radio. The other is
frequency-hopping spread spectrum (FHSS).
QoS Quality of Service
- - 33

OFDM Orthogonal Frequency Division Multiplexing
RADIUS Remote Authentication Dial In User Service
RTS Request to Send
SSID Service Set Identifier. A 32-character unique
identifier attached to the header of packets sent over
a WLAN that acts as a password when a mobile
device tries to connect to the BSS.
TCP/IP Transmission Control Protocol/Internet Protocol
TKIP Temporal Key Integrity Protocol
WDS Wireless Distribution System
WEP Wired Equivalent
The CE mark confirmed that this product meets the
main requirements of the Directive 1995/5/EC of the
European Parliament and the Council of Europe
concerning telecommunications and terminals
regarding the Safety and health of users and of
electro-magnetic interference compliance. The CE has
been demonstrated. These statements are deposited
by the manufacturer.
- - 34
 Loading...