

Page 1

LPV 2250
Digital TV Recorder
User Guide
LPV 2250
Digital TV Recorder
User Guide
Page 2

2
Welcome
Thank you for buying this Digital TV Recorder.
This product allows you to enjoy free-to-view Digital TV on any
television, and record your favourite programmes at the touch of a
button.
Your Digital TV Recorder is simple to install - please follow the
installation instructions carefully.
Before you begin, make sure you have easy access to the
connectors on your TV and any other connected equipment.
Please take the time to read the safety instructions before setting up
your Digital TV Recorder.
This Digital TV Recorder has been manufactured to meet international
safety standards, but you must take care to operate it safely.
If you have any doubts about the installation, operation or safety of this
Digital TV Recorder, see the Helpline details section towards the rear of
this guide.
Electrical warning:
Your Digital TV Recorder contains a high voltage, which is sufcient to
cause a dangerous electric shock.
Do not remove the cover. There are no user-serviceable parts inside
and you CANNOT upgrade the Hard Disk.
Only use the supplied power supply (or manufacturer’s replacement)
with your Digital TV Recorder.
Switch off the power supply from the mains wall socket before you
connect or disconnect any equipment from the Digital TV Recorder.
•
•
•
•
Positioning the box:
The Digital TV Recorder and cables should be placed so that they are
not likely to be walked on or pinched by items placed upon or against
them.
Do not place the Digital TV Recorder on an unstable surface or on
a bed, sofa, rug, or similar surface as this may block air ventilation
and cause it to overheat. Never place the Digital TV Recorder over a
radiator or in an unventilated cabinet.
Never place the Digital TV Recorder on top of a loudspeaker as the
vibrations and magnetic eld may damage the Digital TV Recorder’s
Hard Disk.
Unplug when not in use:
When not in use for an extended period, unplug the Digital TV
Recorder from the mains outlet. Do not overload wall outlets and
extension adaptors as this can result in a risk of re or electric shock.
Please note:
Please keep this guide and product packaging in a safe place.
This product can be stored in its original packaging in a cool dry place
at a temperature between -20°C and +60°C. Wait until the product has
reached room temperature before use.
If any parts are missing, do not attempt to install this product. Please
refer to the Helpline details section towards the rear of this guide.
Maintenance:
Refer all maintenance and servicing to qualied personnel. Any attempt
to service the product or use non-recommended parts will invalidate
the warranty. For more detailed safety information, read the safety
instructions at the back of this guide.
For more detailed safety information, read the safety instructions at
the back of this guide.
•
•
•
•
•
•
•
•
Page 3

3
Index of contents
Remote control buttons ..........................................................................4
Package contents ...................................................................................6
Attaching the supplied feet .....................................................................6
Safe installation ......................................................................................6
Connections on the rear of your Digital TV Recorder .............................7
Symbols on the front of your Digital TV Recorder ..................................7
Setting up your Digital Box with a SCART cable ....................................8
Using your Digital Box for the rst time ..................................................11
Using the Electronic Programme Guide .................................................12
Info display .............................................................................................12
The Channel List ....................................................................................13
The Timers screen ..................................................................................13
The Library menu ...................................................................................15
Recording programmes ..........................................................................17
Instant Record ........................................................................................17
Record using the Electronic Programme Guide .....................................18
Record using the Manual Timer..............................................................18
Record using the Info display .................................................................18
Watch a recording ..................................................................................19
Timeshifting ............................................................................................20
The menu system ...................................................................................21
Edit Channel List ..............................................................................
21
Settings ............................................................................................
22
DVR Settings ....................................................................................
24
Parental Control ...............................................................................
26
Tuning ..............................................................................................
27
Service .............................................................................................
27
Software Upgrade ............................................................................
27
Using Interactive TV and Teletext ...........................................................28
Programming the remote control ............................................................28
Finding the remote control’s current codes ............................................29
Controlling a TV and DVD player ...........................................................30
General problem solving.........................................................................31
Helpline details .......................................................................................32
Product technical specications .............................................................32
Important care and safety advice ...........................................................33
Environmental information ......................................................................34
Remote Control Code List ......................................................................34
Page 4

4
Remote control buttons
%
Turns the TV’s sound on/off*.
DTV/RADIO
Switches between Digital TV channels and Digital Radio channels.
1
Switches the Digital TV Recorder, TV* or DVD* on/into standby.
MODE buttons
(TV, DTV, DVD)
Sets the remote control to operate the Digital TV Recorder, a TV or DVD*.
MENU
Displays/exits the menu.
HELP
Displays/exits the Help pages.
SAVER/CLOCK
Displays the Clock for 4 seconds. With the Clock displayed, press again to
display the Screen Saver.
Returns to the previous channel watched. Switches between 4 and 24 hours
advance in EPG.
EPG
Switches the Electronic Programme Guide (EPG) on/off.
BACK
Returns to the previous level in the menu. Exits EPG, Info and Menu (rst
level).
INFO
Displays programme and recording information.
VOL. +/−
Adjusts the TV’s volume*.
OK, V, v, B, b
Displays the Channel list/conrms a selection (OK button). Navigate the EPG/
menu/Channel list/Info menu (V, v, B, b buttons).
CH. +/−
Selects the next/previous channel.
x STOP
Stops playback when viewing recordings. Stops timeshifting.
j
Rewinds live TV and recordings. Press repeatedly to increase the rewind
speed.
X
Pauses live TV and recordings.
B
Plays recording and resumes paused live TV and recordings.
J
Fast forwards recordings. Press repeatedly to increase the fast forward speed.
When pausing live TV or recordings, press to watch in slow motion.
Page 5

5
Remote control buttons - continued
z RECORD
Records live TV. Sets highlighted programmes to timer record in the EPG.
l
Skips to the start when viewing a recording. Skips to the start of the pause
buffer when watching live TV.
TIMER
Displays the Timers screen.
LIB
Displays the Library of recorded programmes.
L
Skips to the end when viewing a recording.
Coloured buttons Selects options in digital text/EPG/Channel List/menu.
0-9
Selects channels, enter PIN, use Help pages.
SUB/AV
Displays subtitles (if available). In TV mode, changes the Video Input on the
TV*.
TEXT/−/−−
Displays digital text (if available). In TV mode, selects double digit channel
numbers*.
*Once the remote control has been programmed to operate your equipment. Refer to page 28.
Page 6
6
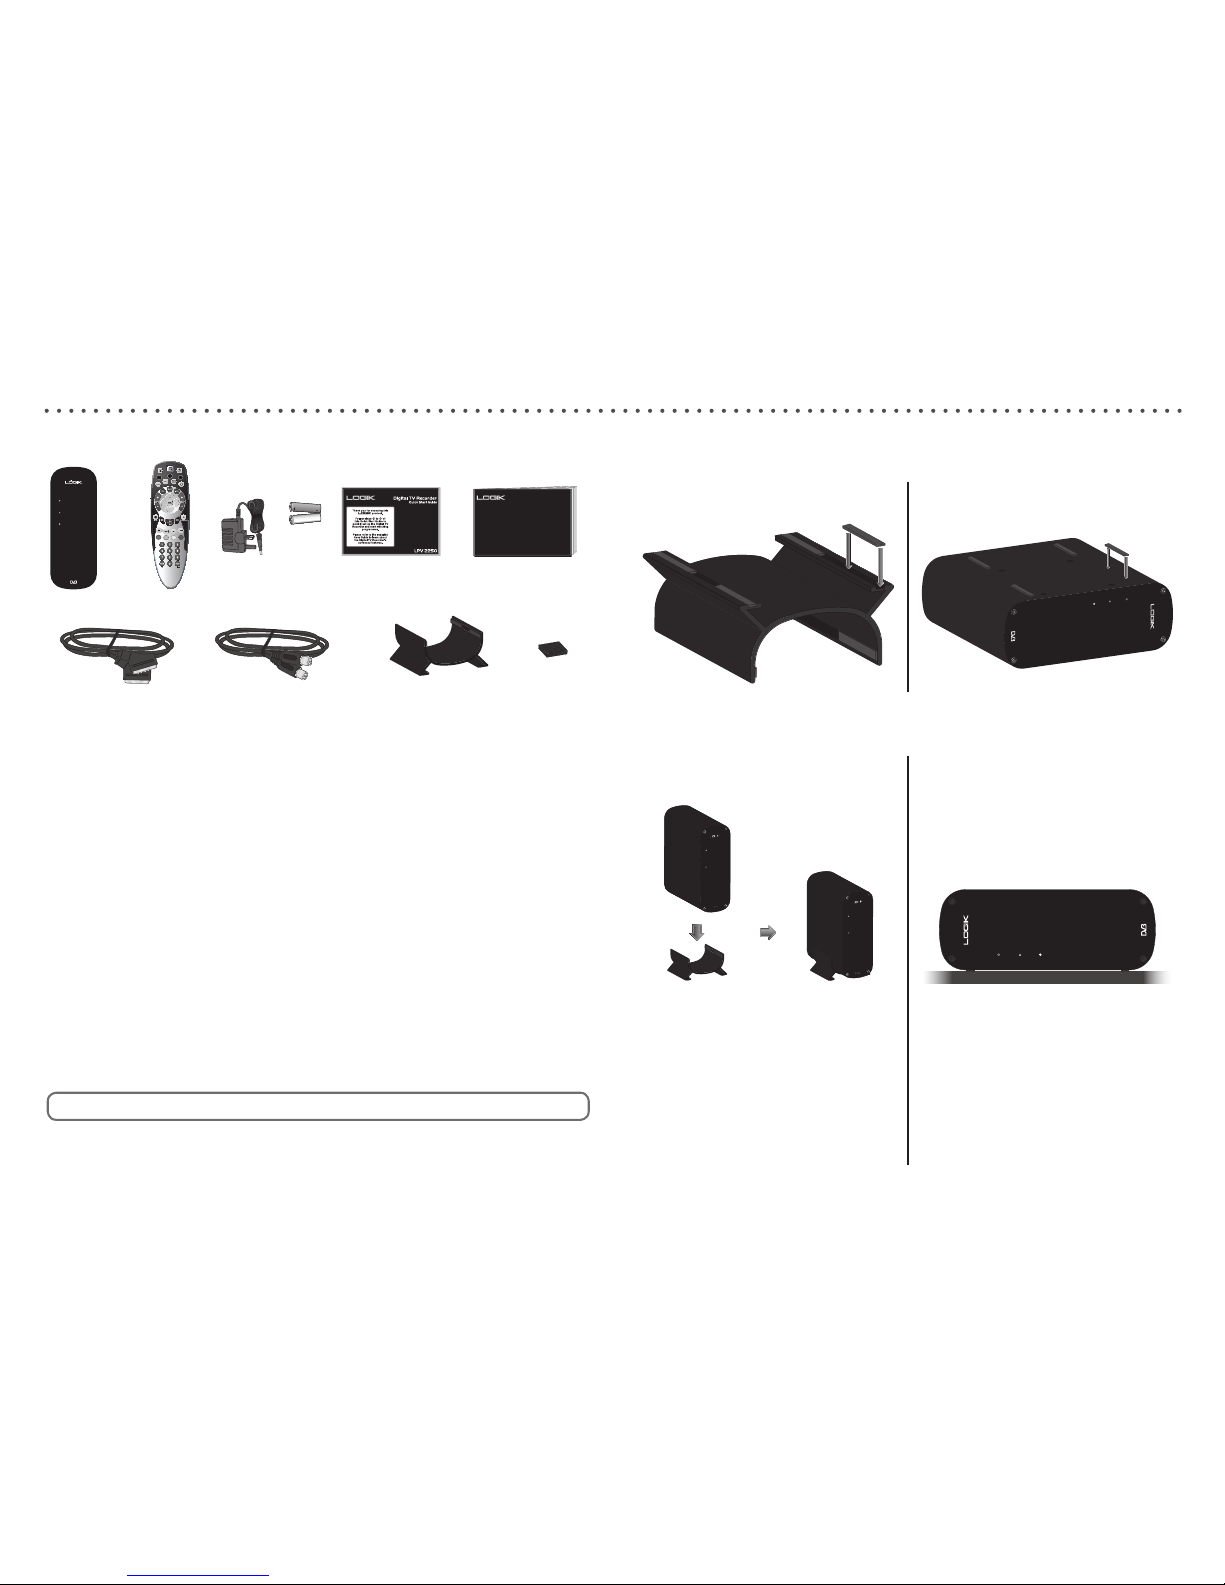
Package contents
1
Digital TV Recorder
2
Remote Control
3
Power Supply
4
2 Batteries (AA/R06)
5
Quick Start Guide
6
User Guide
7
SCART Cable
8
RF (coaxial) Cable
9
Stand
q;
4 Rubber Feet
LPV 2250
LPV 2250
DigitalTV Recorder
DigitalTV Recorder
User Guide
User Guide
1 2
3
5
7 8 9
4
Using this guide
We hope you will nd this Digital TV Recorder easy to set up and use. To
make this user guide as clear as possible, we have designed it so that …
Instructions that you need to follow are preceded by a bullet point - just
like this sentence.
Important information will be in bold text - just like this sentence.
When you have to press a specic button on your remote control, it is
written between brackets [like this].
Useful hints and tips are shown in a box, like this.
If you have any problems with this product, you will nd most
common solutions towards the back of this guide.
•
Attaching the supplied feet
6
q;
Follow the instructions below to attach the supplied feet, according to
which way you wish to install the Digital TV Recorder:
Using the stand
(installing vertically):
Not using the stand
(installing horizontally):
Safe installation
Using the stand
(installing vertically):
Not using the stand
(installing horizontally):
Always use the supplied stand
when installing the Digital TV
Recorder vertically, as shown.
NEVER attempt to install the
Digital TV Recorder vertically
without the supplied stand, or
with any other stand as this may
result in damage to the Digital TV
Recorder.
Always install the Digital TV
Recorder horizontally as shown,
on a stable surface. Failure to do
so may result in damage to the
Digital TV Recorder.
Page 7
7
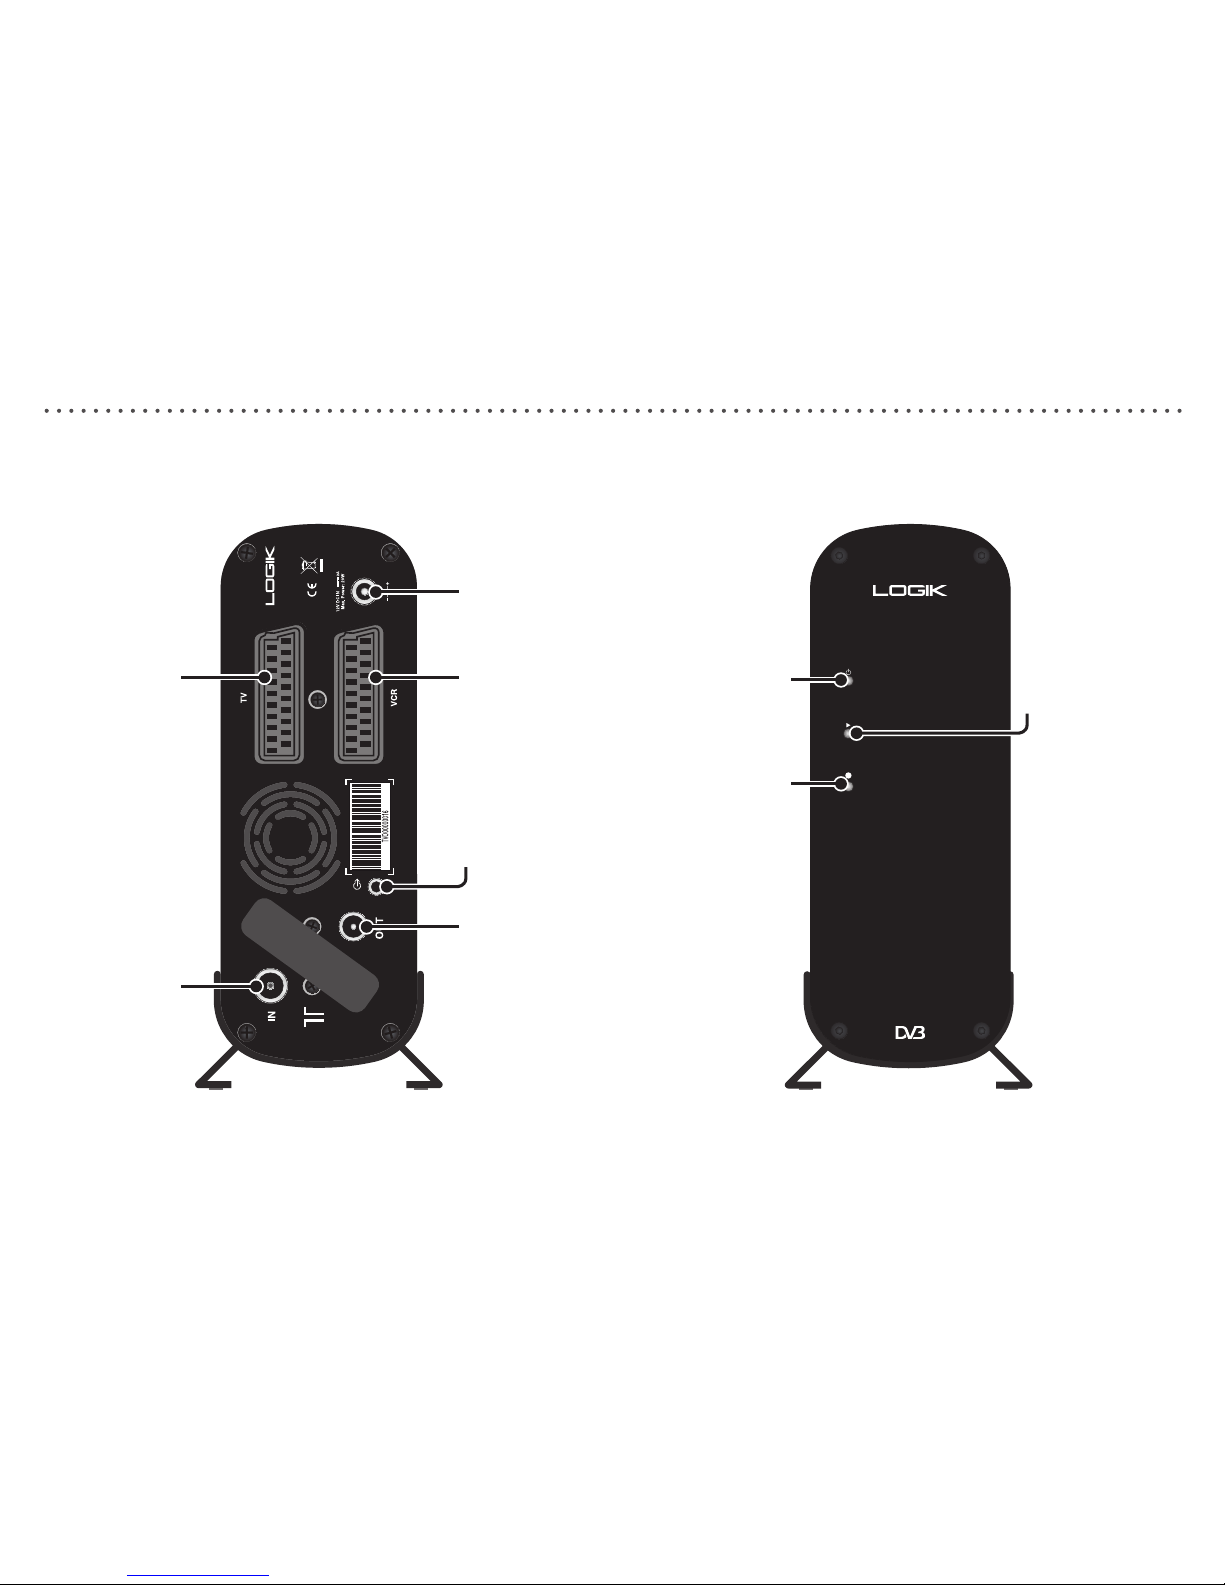
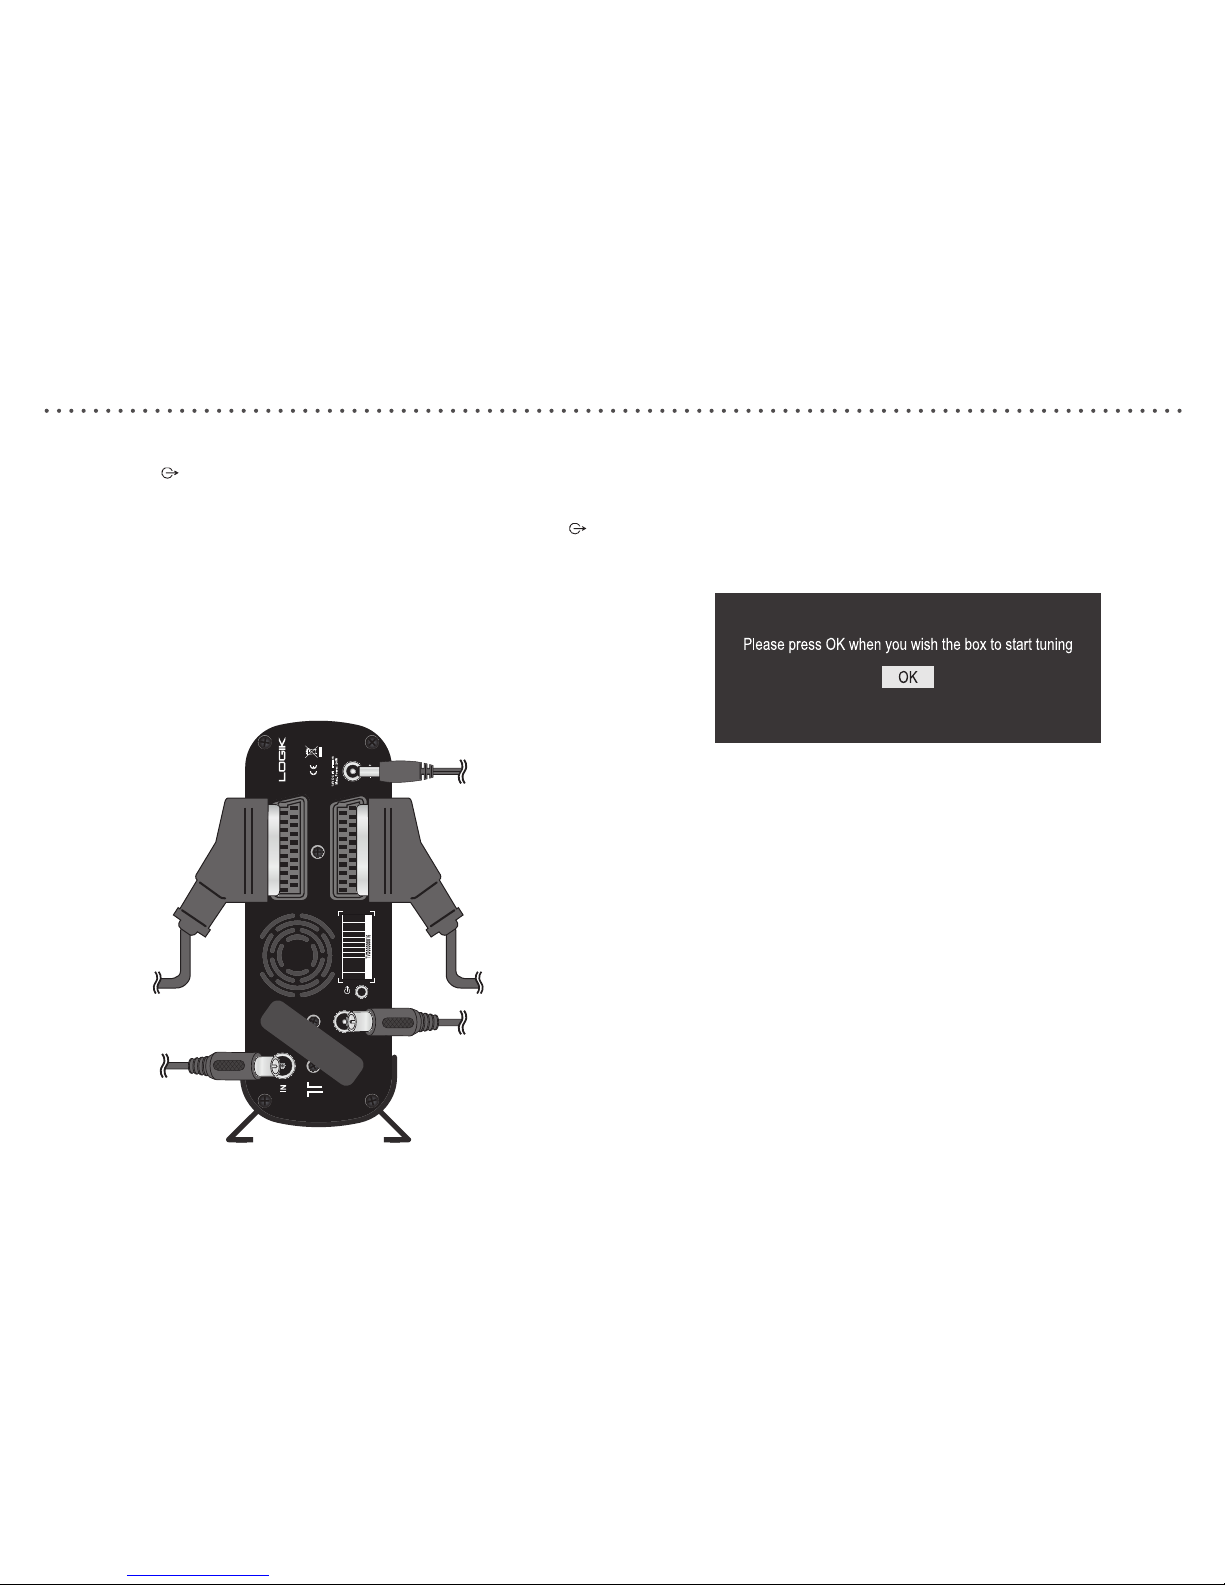
Connections at the rear of your Digital TV Recorder
LPV 2250
DO NOT
OBSTRUCT
FAN
Designed &
Manufactured in UK
From your aerial
To your TV To your VCR/DVD
To your TV
(option 1)
To your VCR/DVD
(option 2)
Power In
To your home
audio system
Symbols on the front of your Digital TV Recorder
Record
(Red=recording
a programme)
Play
(Green=playing a
recorded programme)
Standby
(Red=Standby,
Orange=Initialising,
Green=On)
Page 8
8
Setting up your Digital TV Recorder with a SCART cable
You need a free SCART socket on your TV to set up your Digital TV
Recorder.
SCART connections offer the best picture and sound quality. They can
also tell your TV when the Digital TV Recorder is switched on and off and
whether widescreen pictures are being broadcast.
Before you begin, make sure you have easy access to the connectors on
your TV and any other connected equipment.
1 Unpack the Box:
Unpack the Box and check there are no parts missing. Use the
Package contents page as a reference.
Choose a suitable location for the Digital TV Recorder. Make sure it will
have sufcient ventilation and is not exposed to direct sunlight, heat,
humidity or water. Make sure you can ‘see’ it with the remote control.
2 Insert remote control batteries:
Open the remote control battery compartment - on the under-side of the
remote control.
Insert the batteries supplied in the direction indicated inside the
compartment.
Ret the compartment cover.
•
•
•
•
•
LPV 2250
DO NOT
OBSTRUCT
FAN
Designed &
Manufactured in UK
From your aerial
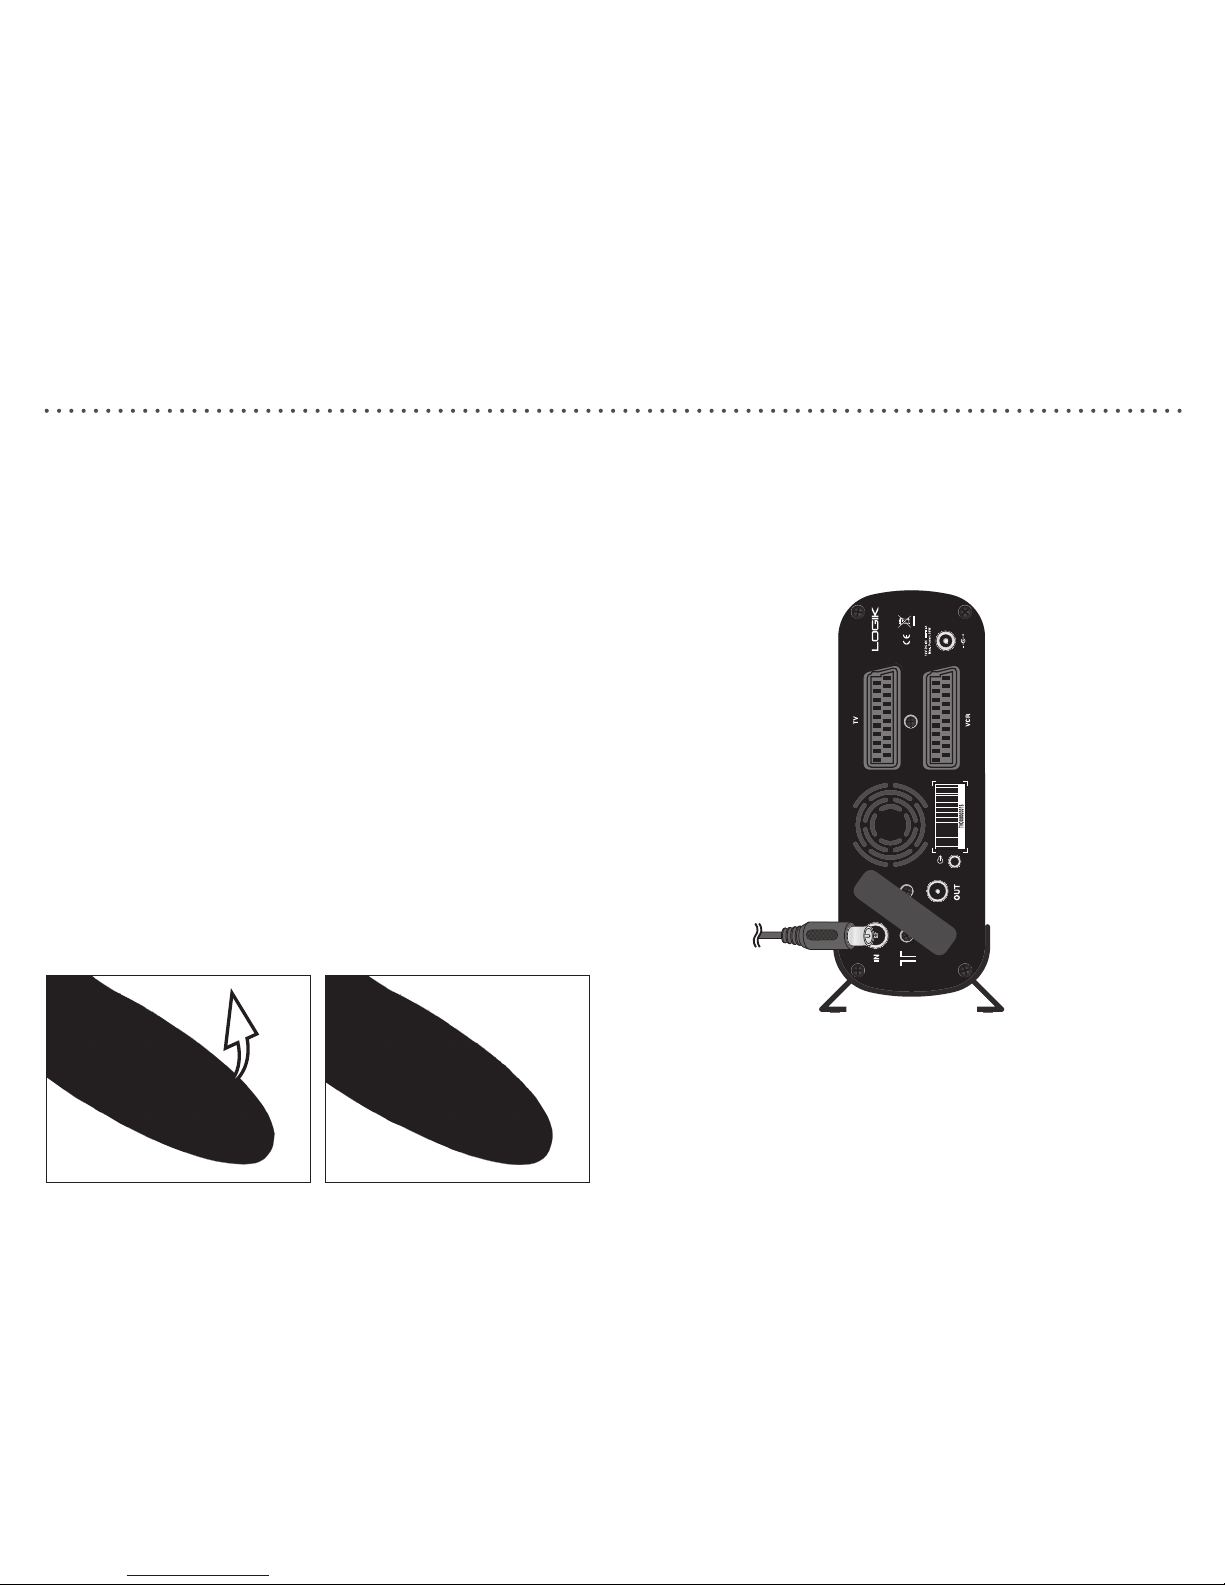
3 Connect your aerial to the Digital TV Recorder:
Make sure your TV is switched off, together with any other equipment
you are connecting to.
Insert the cable from your aerial into the Digital TV Recorder socket
marked ‘8 IN’.
•
•
Page 9
9
Setting up your Digital TV Recorder with a SCART cable - continued
LPV 2250
DO NOT
OBSTRUCT
FAN
Designed &
Manufactured in UK
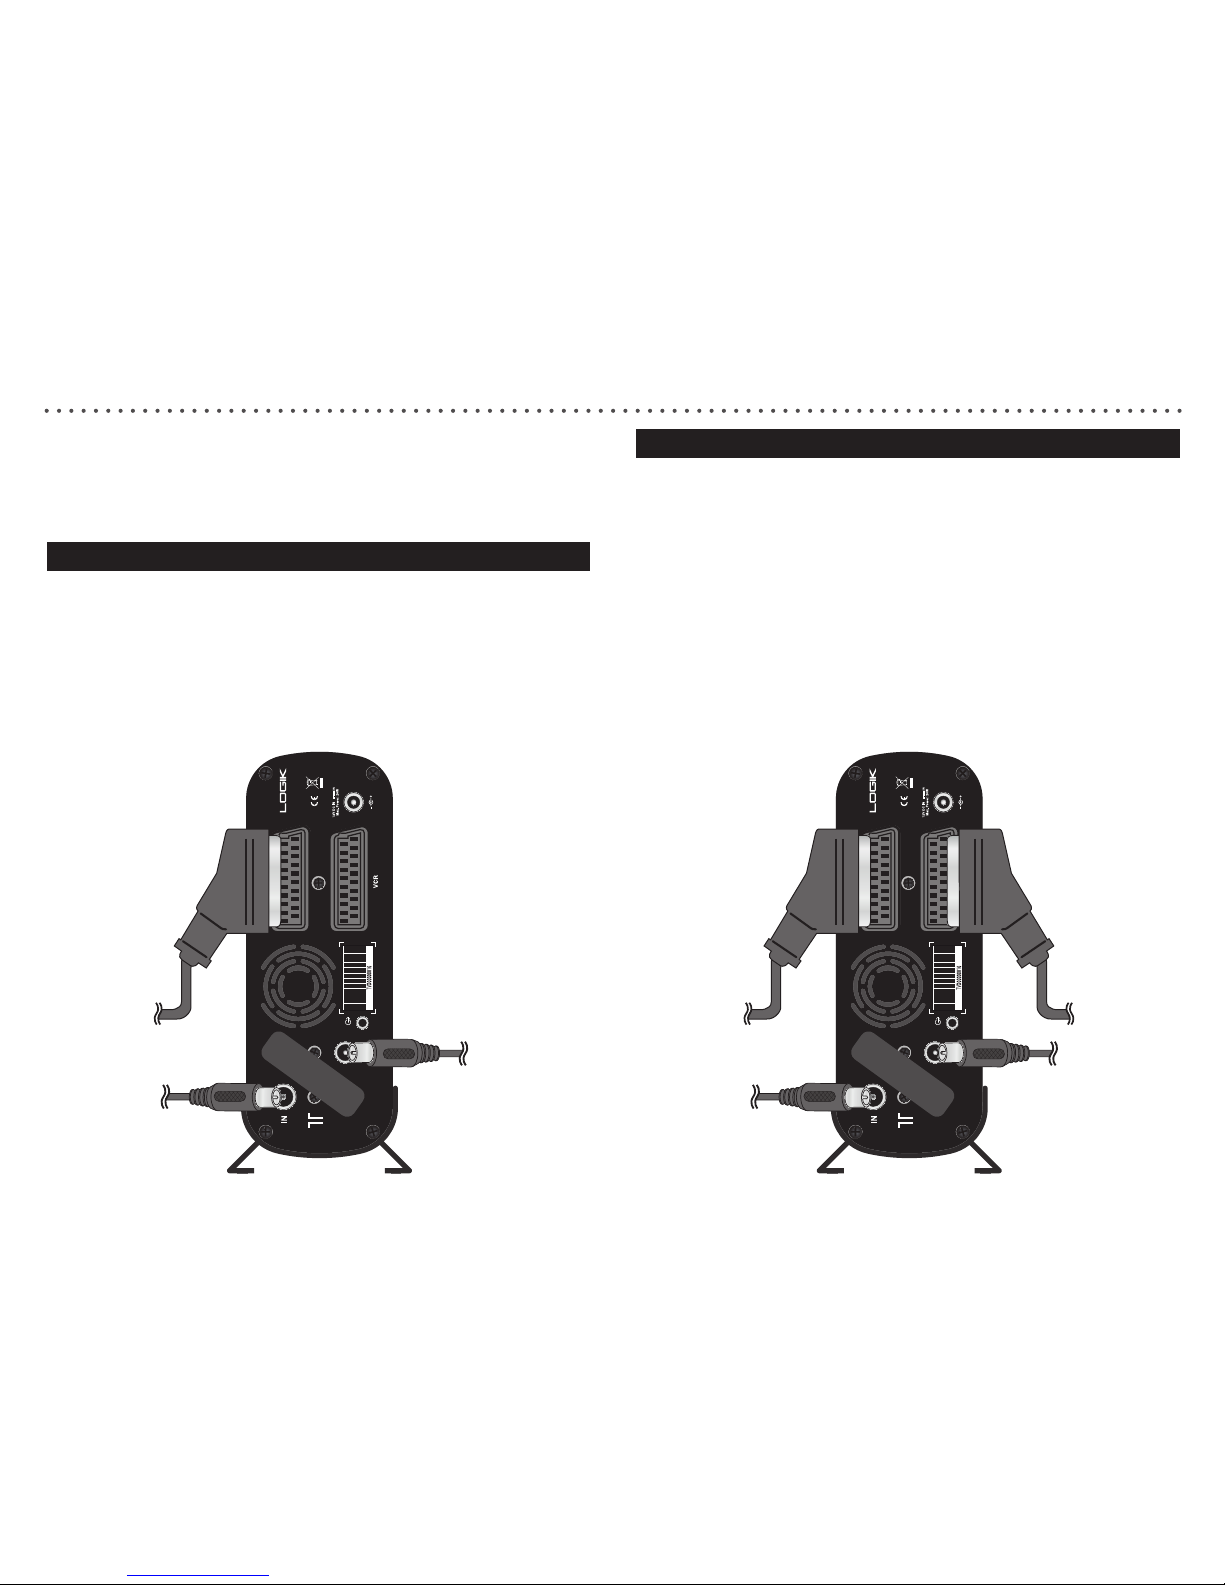
4 Connect the SCART cable:
Choose the option below that best suits your TV (and VCR/DVD, if
you have one). If you need a longer SCART cable, you can buy one at
most TV or electronics retailers.
Option 1 : connecting to a TV only
Connect the supplied SCART cable between the ‘TV’ SCART socket on
your Digital TV Recorder’s rear panel and your TV’s SCART socket.
Connect the supplied RF cable between the ‘8 OUT’’ socket on the
Digital TV Recorder and the RF socket on your TV (where you would
normally connect the aerial).
•
•
To your TV
To your TV
From your aerial
LPV 2250
DO NOT
OBSTRUCT
FAN
Designed &
Manufactured in UK
To your TV
From your aerial
To your VCR/DVD
To your VCR/DVD
Option 2 : connecting to a TV and VCR/DVD
Connect the supplied SCART cable between the ‘TV’ SCART socket on
the back of your Digital TV Recorder and your TV’s SCART socket.
Connect another SCART cable between the ‘VCR’ SCART socket on
your Digital TV Recorder and the SCART socket on your VCR/DVD.
(Refer to your VCR/DVD user guide if necessary.)
Connect the supplied RF cable between the ‘8 OUT’ socket on the
Digital TV Recorder and the RF input socket on your VCR/DVD. (Refer
to your VCR/DVD user guide if necessary.)
If there isn’t already one in place, connect a second RF cable between
the RF output on your VCR/DVD and the RF input socket on your TV.
(Where you normally connect the aerial.)
•
•
•
•
Page 10
10
5 Connecting to an audio system (optional):
Connect the socket on the back of Digital TV Recorder to your home
audio system using either a conventional 3.5mm jack plug lead or an
optical lead (miniTOS). The type of lead required depends on your Hi-Fi
or Surround Sound System. Do not connect your headphones to the
socket.
6 Connect the power supply:
Make sure the mains outlet is switched off.
Connect the supplied power supply to the Digital TV Recorder and
insert the power supply plug into the mains outlet.
•
•
•
7 Switch on your TV:
Switch on your TV and the mains outlet for the Digital TV Recorder.
The green Power light on your Digital TV Recorder should illuminate.
Your TV should switch to the Digital TV Recorder automatically and the
image below will appear.
If you cannot see the picture, refer to the General problem solving section
towards the end of this guide.
You are now ready to tune in to the digital TV service.
•
•
•
LPV 2250
DO NOT
OBSTRUCT
FAN
Designed &
Manufactured in UK
To the mains
power outlet
Page 11

11
Using your Digital TV Recorder for the rst time
The rst time you use your Digital TV Recorder, you will see a screen like
the one below.
The Digital TV Recorder now needs to scan for available Digital TV
channels.
Press [OK] on your Digital TV Recorder’s remote control to begin
searching for digital channels.
Typically, the search will take between 2 and 5 minutes, depending on
the digital TV service in your area. In some areas, however, it may take
a little longer (5 to 7 minutes).
When the scan has nished, the Digital TV Recorder will display a
summary screen. Press [OK] on your Digital TV Recorder’s remote
control to switch to the rst channel.
You can now explore and enjoy the channels available on your Digital TV
service.
•
•
Using Standby:
When you’re not watching TV, you should set your Digital TV Recorder to
Standby.
To do this:
Press [1] to switch between ON (green POWER light on) and Standby
(red POWER light on).
If you plan to leave your Digital TV Recorder unattended for a long
period, put the Box into Standby and wait 20 seconds before switching
it off at the mains. (Don’t worry - all of your settings will be saved.)
Changing channels:
Press [CH.+] or [CH.–] on your Digital TV Recorder remote control to
‘hop’ through the channels.
To choose a particular channel:
Press one of the buttons [0] to [9], then press [OK].
To select 2 or 3 digit channels (10 to 999), press the number buttons
required in succession, then press [OK].
If you do not press [OK], the Digital TV Recorder will change to the
selected channel after approximately 1 second.
Channel hopping:
The [ ] button lets you keep an eye on two TV channels by switching
between the current channel and the last channel you watched for
more than 11 seconds - so you can ‘hop’ between the two channels.
•
•
•
•
•
•
Page 12

12
Using the Electronic Programme Guide
The Electronic Programme Guide shows a full list of available channels
and programmes for up to 8 days (when transmitted by broadcasters). You
can also set programmes to be recorded from the Electronic Programme
Guide.
To view the Electronic Programme Guide:
Press the [EPG] button.
Press [V] or [v] to scroll through the list of channels.
To display the previous 9 channels press [RED].
To display the next 9 channels press [GREEN].
To scroll through the programmes press [B] and [b].
To scroll forwards 24 hours at a time, press [BLUE]. To scroll
backwards, press [YELLOW].
To scroll forwards 4 hours at a time, press [ ] to toggle the scroll
settings, then press [BLUE]. To scroll backwards, press [YELLOW].
To view information for the selected programme press [INFO].
To record the selected programme press [z RECORD].
To preview the highlighted channel in the background, press [OK].
To exit the Electronic Programme Guide and change channel to the
previewed programme, press [OK].
To exit the Electronic Programme Guide without changing channel,
press [EPG] or [BACK].
•
•
•
•
•
•
•
•
•
The Info display gives you information on the current and future
programmes on each channel.
To open the Info display press [INFO]. This displays information on the
programme showing Now.
To see information on future programmes, press [b].
To change the channel you want information for press [V] or [v].
To watch the highlighted channel press [OK].
To record the selected programme press [z RECORD].
To exit the Info display menu without changing channel press [INFO] or
[BACK].
Information for recordings
When watching recordings, the Info display gives you information on the
recording, such as the date and time the recording was made, and how
much of the recording has been watched.
To open the Info display press [INFO]. This displays information on the
recording showing.
To exit the Info display menu press [INFO] or [BACK].
•
•
•
•
•
•
•
•
Info display
Page 13

13
The Channel List
The Channel List displays all the available channels.
To view the Channel List:
Press the [OK] button.
Press [V] or [v] to scroll through the list of channels.
To display the previous 9 channels press [RED].
To display the next 9 channels press [GREEN].
To exit the Channel List and change channel to the selected channel,
press [OK].
To exit the Channel List without changing channel, press [BACK].
•
•
•
•
The Timers screen displays all the programmes that are currently set
to record (timer events). You can also set a manual timer and modify or
cancel an existing timer.
To view the Timers screen:
Press the [TIMER] button.
Press [V] or [v] to scroll through the list of timer events.
Press [B] or [b] to view additional pages (if available).
To exit the Timers screen press [TIMER] or [BACK].
To delete a timer event:
Press [V] or [v] to highlight the required timer event.
Press [RED].
Press [B] or [b] to select Yes.
Press [OK] to delete the timer event.
To change the channel, start time and end time of a timer event:
Press [V] or [v] to highlight the required timer event.
Press [GREEN].
Press [V] or [v] to highlight the Channel, Start time/date or End time/
date.
Press [B] or [b] to change the channel. Press [0-9] to change the start
and end times.
•
•
•
•
•
•
•
•
•
•
•
•
The Timers screen
Page 14

14
To set a timer event to repeat:
You can set the timer event to be repeated once, daily or weekly.
To do this:
Press [V] or [v] to highlight the required timer event.
Press [GREEN].
Press [V] or [v] to highlight Repeat.
Press [B] or [b] to select Once, Daily or Weekly.
A symbol is displayed in the timer screen next to timer events that
have been set to repeat daily or weekly.
To prevent a timer event from being changed or deleted:
You can prevent the timer event from being changed or accidentally
deleted.
To do this:
Press [V] or [v] to highlight the required timer event.
Press [GREEN].
Press [V] or [v] to highlight Change/Delete.
Press [B] or [b] to select Allowed or Disallowed.
When Disallowed is selected, the PIN must be entered correctly
before the timer event can be changed or deleted.
•
•
•
•
•
•
•
•
To prevent a timer event from played:
You can set viewing permissions for the programme recorded by a timer
event.
To do this:
Press [V] or [v] to highlight the required timer event.
Press [GREEN].
Press [V] or [v] to highlight Playback.
Press [B] or [b] to select Allowed, Disallowed or Use parental settings.
Allowed - the recording can be viewed (even if it was recorded from a
locked channel).
Disallowed - the recording can only be viewed once the correct PIN
has been entered.
Use parental settings - if the recording is made from a locked channel
it can only be viewed once the correct PIN has been entered.
To lock channels see Parental Control on page 26.
To manually set a timer:
With the Timers screen displayed, press [YELLOW].
Press [V], [v], [B], [b] and [0-9] to select and set the Channel, Start
time/date, End time/date, Repeat, Change/Delete and Playback
settings.
Press [GREEN] to save the timer.
•
•
•
•
•
•
•
•
•
•
The Timers screen - continued
Page 15

15
The Library menu displays all the recordings currently stored on the hard
disk.
To view the Library menu:
Press the [LIB] button.
Press [V] or [v] to scroll through the list of recordings.
Press [B] or [b] to view additional pages (if available).
To exit the Library menu press [LIB] or [BACK].
To view a recording’s information:
Press [V] or [v] to highlight the required recording.
Press [INFO] and to display the recording’s information.
While viewing a recording’s information you can also start watching
the recording from the last played position or from a specic point.
Press [BACK] to return to the Library menu.
To watch a recording:
Press [V] or [v] until the recording you wish to watch is highlighted.
To start playback from the last played position press the [B] button.
To start playback from a specic position press [OK] and follow the on-
screen instructions.
A symbol is displayed in the Library menu next to recordings that
have been watched.
•
•
•
•
•
•
•
•
•
•
The Library menu
To delete a recording:
Press [V] or [v] until the recording you wish to delete is highlighted.
Press [RED].
Press [B] or [b] to select Yes.
Press [OK] to delete the recording.
To sort the order the recordings are displayed:
Press [BLUE].
Press [RED] to sort the recordings alphabetically.
Press [GREEN] to sort the recordings by length.
Press [YELLOW] to sort the recordings based on whether they have
been watched.
Press [BLUE] to sort the recordings by date.
To prevent a recording from being deleted or played:
You can prevent recordings from being deleted unless the correct PIN is
entered.
Press [V] or [v] to highlight the required recording.
Press [GREEN].
Press [V] or [v] to highlight Delete.
Press [B] or [b] to select Disallowed.
Press [GREEN] to save the changes.
When Disallowed is selected, the PIN must be entered correctly
before the recording can be deleted.
A symbol is displayed in the Library menu next to recordings that
have been protected from deletion.
•
•
•
•
•
•
•
•
•
•
•
Page 16

16
To prevent a recording from being played:
You can prevent recordings from being played unless the correct PIN
is entered. This can be used to prevent children watching unsuitable
recordings.
Press [V] or [v] to highlight the required recording.
Press [GREEN].
Press [V] or [v] to highlight Playback.
Press [B] or [b] to select Disallowed.
Press [GREEN] to save the changes.
When Disallowed is selected, the PIN must be entered correctly
before the recording can be played.
A symbol is displayed in the Library menu next to recordings that
have been protected from playing.
To set a playlist:
You can set multiple recordings to be played one after another in a playlist.
This can be useful when saving multiple recordings to a video tape/DVD,
or just to watch several recordings in one go.
Press [V] or [v] to highlight the required recording.
Press [YELLOW]. A 1 is added by the recording’s name.
Repeat the previous 2 steps to add other recordings to the playlist. The
second recording in the playlist is labelled 2, the third 3 and so on.
With any one of the recordings in the playlist highlighted, press [OK].
•
•
•
•
•
•
•
•
•
Press [V] or [v] to highlight Start playlist.
Press [OK] to start the playlist.
If you are copying recordings to a video tape/DVD, don’t forget to start
recording on your VCR/DVD Recorder.
While the playlist is playing, press [L] to skip to the next recording
in the playlist.
While the playlist is playing, press [l] to skip to the start of the
current recording in the playlist.
•
•
The Library menu - continued
Page 17

17
Recording programmes
Your Digital TV Recorder can record approximately 125 hours of
programming. You can record from the radio channels as well as the TV
channels.
There are four different ways to record programmes:
Instant record – you can record the channel you’re watching at the touch
of a button (unless a programme is already being recorded).
Record using the Electronic Programme Guide – you can use the 8-
day Electronic Programme Guide to quickly choose the programmes you
wish to record.
Record using the Manual Timer – you can use the Manual Timer in the
Timer menu to enter the channel, date and time you wish to record.
Record using the Info display – you can use the Info display choose the
programmes you wish to record.
Please note: the Digital TV Recorder will add a further three minutes to the
recording (unless another recording follows immediately after) in case the
Programme being recorded overruns slightly.
To record a programme that you’re watching or that is about to start:
Press the [z RECORD] button. The Instant Recording menu is
displayed and the recording starts.
While the Instant Recording menu is displayed press the
[z RECORD] button to set subsequent programmes to record.
Please note: while recording, you can change channels but it is not
possible to pause or rewind live TV.
To stop/cancel a recording:
Press the stop [x STOP] button and follow the on-screen instructions.
While recording it is also possible to watch a previously recorded
programme.
To watch a recorded programme:
Press the [LIB] button to display the Library.
Select the programme you wish to watch.
To start playback from the last played position press the [B] button.
To start playback from a specic position press the [OK] button and
follow the on-screen instructions.
•
•
•
•
•
•
•
Instant Record
Page 18

18
Record using the Electronic Programme Guide
The easiest way to schedule a recording is by using the Electronic
Programme Guide. This lets you review 8 days of programmes and
quickly choose the ones you wish to record.
Record using the Electronic Programme Guide:
Press [EPG] to open the Electronic Programme Guide.
Press [V], [v], [B] or [b] to highlight the programme you wish to record.
Press [z RECORD].
If a programme you want to record is, for example, broadcast either
side of the news, you must set the Electronic Programme Guide to
record after the break too.
The chosen programme will be highlighted in red and will be added to your
Timer list.
The Digital TV Recorder will start recording 1 minute earlier and stop
recording 3 minutes later to avoid missing any of the programme.
These times can be adjusted in the menu system - please refer to
DVR Settings on page 24.
For full details on the Electronic Programme Guide please refer to
page 12.
•
•
•
Record using the Manual Timer
You can set the Digital TV Recorder to record any channel at any time.
Record using the the Manual Timer:
Press [TIMER] to open the Timers screen.
Press [YELLOW] to open the Add new timer screen.
Press [V], [v], [B], [b] and [0-9] to select and set the Channel, Start
time/date, End time/date, Repeat, Change/Delete and Playback
settings.
Press [GREEN] to save the timer.
Record using the Info display
You can set the Digital TV Recorder to record a programme using the Info
display.
Press [INFO] to open the Info display.
To see information on future programmes, press [b].
To change the channel you want information for press [V] or [v].
To record the selected programme press [z RECORD].
To exit the Info display press [INFO] or [BACK].
•
•
•
•
•
•
•
•
•
Page 19

19
Watch a recording
Recorded Programmes List:
Your Digital TV Recorder keeps a list of your recordings. It contains
information about each programme, its duration and when it was recorded.
To watch a previously recorded programme:
To open the Library list, press the [LIB] button.
Press [V, v] until the recording you wish to watch is highlighted. Press
[B, b] to view additional pages of recordings (if available).
To start playback from the last played position press the [B] button.
To start playback from a specic position press the [OK] button and
follow the on-screen instructions.
Fast-forward [J] through a recording:
While watching a recording, you can fast-forward through the programme.
To fast-forward:
Press fast-forward [J].
Press fast-forward [J] again to step up through the fast-forward
speeds.
Slow down the speed of fast-forward playback by pressing the rewind
[j] button.
Fast-forward will continue until you press play [B], pause [X] or stop [x
STOP] or until you reach the end of the recording, when it will stop and
the Digital TV Recorder will return to the last channel viewed.
•
•
•
•
•
•
•
•
Rewind [j] through a recording:
While watching a recording, you can rewind through the programme.
To rewind:
Press rewind [j].
Press rewind [j] again to step up through the rewind speeds.
Slow down the speed of rewind playback by pressing the fast-forward
[J] button.
Rewind will continue until you press play [B], pause [X] or stop [x
STOP] or until you reach the beginning of the recording, when it will
pause.
Pause playback:
To pause a recording playback press pause [X]. You may then press
play [B] to resume playback, or choose one of the other playback
options: fast-forward, rewind or stop.
Stop playback:
To stop a recording playback press stop [x STOP], then follow the onscreen instructions.
When watching a recording, press [INFO] to view information about
the recorded programme.
•
•
•
•
•
•
Page 20

20
Timeshifting
Time-shifting, also known as Pause live TV, lets you pause a broadcast
programme and continue watching it later. The maximum length of time
you can pause is 2 hours.
Pause live TV:
While watching TV, Press pause [X].
This will freeze the picture and sound. The Time-shifting banner will be
displayed, indicating how long the programme has been paused.
Resume watching a time-shifted programme:
Press play [B].
The paused programme will begin playing from the point of pausing.
Fast-forward through time-shifted TV:
While watching a time-shifted programme, you can fast-forward it.
To fast-forward:
Press fast-forward [J].
Press fast-forward [J] again to step up through the fast-forward
speeds.
Slow down the speed of fast-forward playback by pressing rewind
[j].
Fast-forward will continue until you press play [B], pause [X] or stop
[x STOP] or until you reach the end of the time-shifted TV, when it will
stop time shifting and return to live TV.
•
•
•
•
•
•
Rewind through time-shifted TV
While watching a time-shifted programme you can rewind it.
To rewind:
Press rewind [j].
Press rewind [j] again to step up through the rewind speeds.
Slow down the speed of rewind playback by pressing fast-forward
[J].
Rewind will continue until you press play [B], pause [X] or stop [x
STOP] or until you reach the beginning of the recording, when it will
start to playback the time-shifted TV.
Pause playback
To pause Time-shift TV:
Press pause [X]. You may then press [B] to resume playback, or
choose one of the other playback options: fast-forward, rewind, or stop.
Slow-motion
To watch Time-shift TV in slow-motion:
Press pause [X].
Press [J] to watch in slow-motion
Slow-motion will continue until you press play [B], pause [X] or stop [x
STOP].
Stop Time-shifting:
Press [x STOP].
•
•
•
•
•
•
•
•
•
Page 21

21
The menu system
The menu system lets you choose and change a wide range of your
Digital TV Recorder’s features.
To view the menu:
Press the [MENU] button.
The menu system is split into several sub menus:
Edit Channel List - lets you rearrange the channel order and hide
unwanted channels.
Settings - lets you choose and change general settings such as picture
mode and subtitle language.
DVR Settings - lets you choose and change recording settings such as
starting and ending recordings early.
Parental Control - lets you set a PIN and lock channels.
Tuning - lets you tune in new channels.
Service - lets you view the software and hardware versions running on
your Digital TV Recorder and check the strength of your TV signal.
Software Upgrade - lets you check if a new software version is
available. As updates are handled automatically by your Digital TV
Recorder it is not recommended that you use this option.
To exit the menu:
Press the [MENU] button.
•
•
•
•
•
•
•
•
•
The Edit Channel List sub menu contains the following options:
Hide Channels - lets you rearrange the channel order.
Sort Channels - lets you hide unwanted channels.
To hide unwanted channels:
Press [MENU] to open the Main Menu.
Press [OK] to open the Edit Channel List sub menu.
Press [OK] to select Hide Channels.
Press [V] or [v] to highlight the channel you wish to hide.
Press [OK] to hide the channel. A ** is displayed to show that the
channel is hidden.
Hidden channels do not appear in the Electronic Programme Guide,
Now and Next information and Channel List. Hidden channels do not
appear when changing channels with the [CH.+] and [CH.–] buttons
but are still available by selecting the channel number with the [0-9]
buttons.
To show a hidden channel:
Press [MENU] to open the Main Menu.
Press [OK] to open the Edit Channel List sub menu.
Press [OK] to select Hide Channels.
Press [V] or [v] to highlight the hidden channel you wish to show.
Press [OK] to show the channel. The ** is removed.
•
•
•
•
•
•
•
•
•
•
•
•
Edit Channel List
Page 22

22
To rearrange the channel order:
Press [MENU] to open the Main Menu.
Press [OK] to open the Edit Channel List sub menu.
Press [v] to highlight Sort Channels.
Press [OK] to select Sort Channels.
Press [V] or [v] to highlight the channel you wish to move.
Press [OK] to select the channel. A is displayed to show that the
channel is selected.
Press [V] or [v] to highlight the new position for the selected channel.
Press [OK] to swap the channels.
•
•
•
•
•
•
•
•
Edit Channel List - continued Settings
The Setting sub menu contains the following options:
Language - lets you choose the menu’s language.
Country - lets you choose the country in which you are using the
Digital TV Recorder. This enables the Digital TV Recorder to display
Teletext correctly.
Subtitle - lets you choose the preferred subtitle language.
Audio - lets you choose the preferred audio language for bilingual
broadcasts.
TV Out - lets you choose the type of picture to send to the TV.
Picture Mode - lets you choose whether to send widescreen or 4:3
pictures to the TV.
Picture Format - lets you choose how the Digital TV Recorder displays
widescreen pictures on 4:3 TV.
Reset - lets you reset the Digital TV Recorder to the factory default
settings.
To choose the menu language (if available):
Press [MENU] to open the Main Menu.
Press [v] to highlight Settings.
Press [OK] to open the Settings sub menu.
With Language highlighted, press [B] or [b] to select the required
language.
•
•
•
•
•
•
•
•
•
•
•
•
Page 23

23
Settings - continued
To choose the country (if available):
Press [MENU] to open the Main Menu.
Press [v] to highlight Settings.
Press [OK] to open the Settings sub menu.
Press [v] to highlight Country.
Press [B] or [b] to select the required country.
To choose the subtitle language (if available):
Press [MENU] to open the Main Menu.
Press [v] to highlight Settings.
Press [OK] to open the Settings sub menu.
Press [v] to highlight Subtitle.
Press [B] or [b] to select the required language.
To choose the audio language (if available):
Press [MENU] to open the Main Menu.
Press [v] to highlight Settings.
Press [OK] to open the Settings sub menu.
Press [v] to highlight Audio.
Press [B] or [b] to select the required language.
•
•
•
•
•
•
•
•
•
•
•
•
•
•
•
To choose the type of picture to send to the TV:
Press [MENU] to open the Main Menu.
Press [v] to highlight Settings.
Press [OK] to open the Settings sub menu.
Press [v] to highlight TV Out.
Press [B] or [b] to select the required setting.
To choose widescreen or 4:3 pictures:
Press [MENU] to open the Main Menu.
Press [v] to highlight Settings.
Press [OK] to open the Settings sub menu.
Press [v] to highlight Picture Mode.
Press [B] or [b] to select the required setting.
To choose how widescreen pictures are displayed on a 4:3 TV:
Press [MENU] to open the Main Menu.
Press [v] to highlight Settings.
Press [OK] to open the Settings sub menu.
Press [v] to highlight Picture Format.
Press [B] or [b] to select the required setting.
Setting Picture Format to Normal lls the TV screen but some of the
widescreen picture is lost. Setting Picture Format to Letterbox displays
all of the picture with black bars visible.
•
•
•
•
•
•
•
•
•
•
•
•
•
•
•
Page 24

24
To reset the Digital TV Recorder to the factory default settings:
Press [MENU] to open the Main Menu.
Press [v] to highlight Settings.
Press [OK] to open the Settings sub menu.
Press [v] to highlight Reset.
Press [OK] and and follow the on-screen instructions.
•
•
•
•
•
Settings - continued DVR Settings
The DVR Setting sub menu contains the following options:
Start Recordings - lets you choose whether recordings are started
earlier than the actual start time to avoid missing the start of a
programme.
End Recordings - lets you choose whether recordings are stoped later
than the actual end time to avoid missing the end of a programme.
Pause Buffer Size - lets you choose the length of time that a
programme can be paused for and how far back you can rewind live
TV.
Auto Delete - lets you choose whether the Digital TV Recorder can
automatically delete old recordings based on their size or if they have
been watched. Programmes will only be deleted when there is not
enough hard disk space available for new recordings.
Format Disk - lets you delete all recordings stored on the hard disk.
To set recordings to start early:
Press [MENU] to open the Main Menu.
Press [v] to highlight DVR Settings.
Press [OK] to open the DVR Settings sub menu.
With Start Recordings highlighted, press [B] or [b] to select the required
setting.
•
•
•
•
•
•
•
•
•
Page 25

25
DVR Settings - continued
To set recordings to end late:
Press [MENU] to open the Main Menu.
Press [v] to highlight DVR Settings.
Press [OK] to open the DVR Settings sub menu.
Press [v] to highlight End Recordings.
Press [B] or [b] to select the required setting.
To set the pause buffer size:
Press [MENU] to open the Main Menu.
Press [v] to highlight DVR Settings.
Press [OK] to open the DVR Settings sub menu.
Press [v] to highlight Pause Buffer Size.
Press [B] or [b] to select the required setting.
To set the Digital TV Recorder to automatically delete old recordings:
Press [MENU] to open the Main Menu.
Press [v] to highlight DVR Settings.
Press [OK] to open the DVR Settings sub menu.
Press [v] to highlight Auto Delete.
Press [B] or [b] to select the required setting.
Programmes will only be automatically deleted when there is not
enough hard disk space available for new recordings.
•
•
•
•
•
•
•
•
•
•
•
•
•
•
•
To format the hard disk and delete all recordings:
Press [MENU] to open the Main Menu.
Press [v] to highlight DVR Settings.
Press [OK] to open the DVR Settings sub menu.
Press [v] to highlight Format Disk.
Press [OK] and follow the on-screen instructions.
•
•
•
•
•
Page 26

26
Parental Control
The Parental Control sub menu contains the following options:
Set PIN - lets you choose a new PIN. The default PIN is 0000.
Lock Channels - lets you lock channels so they can only be viewed
once the correct PIN is entered.
To set a new PIN:
Press [MENU] to open the Main Menu.
Press [v] to highlight Parental Control.
Press [OK].
Enter the current PIN using the [0-9] buttons.
Press [OK] to select Set PIN.
Enter and re-enter the new PIN using the [0-9] buttons.
To lock a channel:
Press [MENU] to open the Main Menu.
Press [v] to highlight Parental Control.
Press [OK].
Enter the current PIN using the [0-9] buttons.
Press [v] to highlight Lock Channels.
Press [OK] to select Lock Channels.
Press [V] or [v] to highlight the channel you wish to lock.
Press [OK] to lock the channel. A ** is displayed to show that the
channel is locked.
•
•
•
•
•
•
•
•
•
•
•
•
•
•
•
•
To unlock a channel:
Press [MENU] to open the Main Menu.
Press [v] to highlight Parental Control.
Press [OK].
Enter the current PIN using the [0-9] buttons.
Press [v] to highlight Lock Channels.
Press [OK] to select Lock Channels.
Press [V] or [v] to highlight the channel you wish to unlock.
Press [OK] to unlock the channel. The ** removed.
•
•
•
•
•
•
•
•
Page 27

27
Tuning
The Tuning sub menu contains the following options:
Automatic Search - lets you automatically tune the Digital TV
Recorder to search for any new channels that may have been
launched.
Manual Search - lets you manually tune the Digital TV Recorder to
search for any new channels that may have been launched.
To automatically tune the Digital TV Recorder:
Press [MENU] to open the Main Menu.
Press [v] to highlight Tuning.
Press [OK].
Enter the current PIN using the [0-9] buttons.
Press [OK] to select Automatic Search.
Press [OK] and follow the on-screen instructions.
To manually tune the Digital TV Recorder:
Press [MENU] to open the Main Menu.
Press [v] to highlight Tuning.
Press [OK].
Enter the current PIN using the [0-9] buttons.
Press [v] to highlight Manual Search.
Press [OK] to select Manual Search.
Enter the channel frequency using the [0-9] buttons. A list of the
channels found is displayed. These channels are automatically stored.
Press [OK]
•
•
•
•
•
•
•
•
•
•
•
•
•
•
•
Service
The Service sub menu contains the following options:
Manufacturers Details - lets you view the software and hardware
versions running on your Digital TV Recorder.
Signal Strength - lets you check the strength of your TV signal.
To view the software and hardware versions:
Press [MENU] to open the Main Menu.
Press [v] to highlight Service.
Press [OK] to open the Service sub menu.
Press [OK] to select Manufacturers Details.
To view the signal strength:
Press [MENU] to open the Main Menu.
Press [v] to highlight Service.
Press [OK] to open the Service sub menu.
Press [v] to highlight Signal Strength.
Press [OK] to select Signal Strength.
Software Upgrade
The Software Upgrade sub menu lets you check if a new software version
is available. As updates are handled automatically by your Digital TV
Recorder it is not recommended that you use this option.
•
•
•
•
•
•
•
•
•
•
•
Page 28

28
Using Interactive TV and Teletext
Your Digital TV Recorder gives you full access to Interactive TV and
Teletext.
Teletext is available on certain channels, and there is a dedicated Teletext
channel - see your TV Guide for more information.
To see the Teletext service on the channel you are watching, press
[TEXT].
Interactive TV lets you interact with some TV programmes and
channels. When a programme is interactive, you will normally see the
Press Red symbol on your TV screen.
To access Interactive TV, press [RED] on your remote control.
To use the service, you will need to use the colour buttons on your
remote. See on-screen instructions for which buttons to press.
•
•
•
Programming the remote control
Your Digital TV Recorder’s remote control can be programmed to operate
certain TVs and DVDs players.
Find the 4 digit code for brand of TV or DVD player from the code list at
the back of this instruction book.
If your brand is not included in the list or the codes for your brand
do not operate your equipment, refer to the following page for an
alternative method of programming the remote control.
If you want to programme the remote control to operate a TV:
Press [TV] on the remote control.
If you want to programme the remote control to operate a DVD
player:
Press [DVD] on the remote control.
Press and hold [ ] for about 3 seconds. The [TV]/[DVD] button ashes
twice.
Enter your brand’s 4 digit code using the [0-9] buttons. The [TV]/[DVD]
button ashes when every digit of the code is entered. If a valid code
has been entered the [TV]/[DVD] button ashes once quickly.
Check that the remote control operates your TV/DVD player by
pressing the standby [1] button. If the remote control does not operate
your TV/DVD player, repeat the above procedure and try another code
for your brand.
The codes you enter may be lost if weak batteries are not replaced
immediately. Even if your TV/DVD player is listed in the code list, in
some instances it may not be possible to operate all of the available
functions.
There is a label inside the remote control’s battery compartment
where you can record your brand codes.
•
•
•
•
•
Page 29

29
Programming the remote control continued
If your TV or DVD brand is not included in the code list or the
brand codes in the list do not operate your equipment it may still
be possible to programme the remote control to operate your
equipment.
If you want to programme the remote control to operate a TV:
Press [TV] on the remote control.
If you want to programme the remote control to operate a DVD
player:
Press [DVD] on the remote control.
Press and hold [ ] for about 3 seconds. The [TV]/[DVD] button ashes
twice.
Enter the code ‘991’ using the [1] and [9] buttons. The [TV]/[DVD]
button ashes when every digit of the code is entered. If the code has
been entered correctly the [TV]/[DVD] button ashes once quickly.
Press the [1] button and note whether the remote control switches off
your TV/DVD player.
If the remote control switches off your TV/DVD player:
The remote control has found your code. Press [ ] on the remote
control to save.
If the remote control does not switch off your TV/DVD player:
Press [CH. +] repeatedly until the remote control switches off your TV/
DVD player. The remote control has now found your code. Press
[ ] on the remote control to save.
•
•
•
•
Finding the remote control’s current codes
If you have used the procedure on the left to programme the remote
control to operate your TV or DVD, it may be useful to know the
correct code for your equipment.
Knowing the codes that operate your equipment will allow you to re-
programme the remote control quickly using the procedure on page
28, should the need arise.
There is a label inside the remote control’s battery compartment
where you can record your brand codes.
If you want to nd out the current TV code:
Press [TV] on the remote control.
If you want to nd out the current DVD code:
Press [DVD] on the remote control.
Press and hold [ ] for about 3 seconds. The [TV]/[DVD] button ashes
twice.
Enter the code ‘990’ using the [0] and [9] buttons. The [TV]/[DVD]
button ashes when every digit of the code is entered. If the code has
been entered correctly the [TV]/[DVD] button ashes once quickly.
Press [1] and count the number of times the [TV]/[DVD] button ashes.
The number of ashes is the rst number of the code.
Press [2] and count the number of times the [TV]/[DVD] button ashes.
The number of ashes is the second number of the code.
Press [3] and count the number of times the [TV]/[DVD] button ashes.
The number of ashes is the third number of the code.
Press [4] and count the number of times the [TV]/[DVD] button ashes.
The number of ashes is the forth number of the code.
•
•
•
•
•
•
•
Page 30

30
Controlling a TV and DVD player
Controlling a TV
Before attempting to control a TV, ensure that the remote control has been
programmed (refer to page 28).
Press the [TV] button.
Use the buttons in the table opposite to operate your TV.
When you have nished controlling your TV, press the [DTV] button to
allow the remote control to operate your Digital TV Recorder again.
Controlling a DVD player
Before attempting to control a DVD player, ensure that the remote control
has been programmed (refer to page 28).
Press the [DVD] button.
Use the buttons in the table opposite to operate your DVD player.
When you have nished controlling your DVD player, press the [DTV]
button to allow the remote control to operate your Digital TV Recorder
again.
•
•
•
•
Button Function in TV Mode Function in DVD Mode
[%]
Mutes the TV - No function -
[1]
Switches the TV on/off
Switches the DVD player
on/off
[VOL. +]/[VOL. −]
Adjusts the volume - No function -
[CH. +]/[CH. −]
Selects the next/previous
channel
- No function -
[V]/[v]/[B]/[b]
- No function - Navigates menus
[OK]
- No function - Makes a selection in menus
[x STOP]
- No function - Stops playback
[j]
- No function - Rewind
[B]
- No function - Play
[X]
- No function - Pause
[J]
- No function - Fast Forward
[0-9]
Selects channels - No function -
[SUB/AV]
Selects the Video Input - No function -
[TEXT/−/−−]
Selects double digit
channels
- No function -
Page 31

31
General Problem Solving
Problem Possible cause/remedy
No picture/distorted picture... Check the Digital TV Recorder is switched on.
Check the aerial is correctly connected to the Digital TV Recorder.
Check all connections between the Digital TV Recorder and the TV.
Check the TV is displaying the correct AV input (refer to your TV manual).
Check the signal strength (refer to ‘To view the signal strength’ on page 27).
•
•
•
•
•
Black and white picture... Digital TV Recorder is set to output Y/C pictures and your TV does no support Y/C. Change the ‘TV Out’ setting
(refer to ‘To choose the type of picture to send to the TV’ on page 23).
•
No sound... Check the TV is not muted.
Check the TV volume is turned up.
Check the aerial is connected correctly and the Digital TV Recorder is switched on.
Check all connections between the Digital TV Recorder and TV/Hi-Fi or Surround Sound System.
•
•
•
•
No power... Check the power supply is correctly connected and the Digital TV Recorder is switched on.•
Digital TV Recorder does not
work...
Check the remote control is in DTV mode.•
Digital TV Recorder takes a long
time to switch on...
The Hard Disk is nearly full. Delete some recordings.•
Remote control does not work...
Check the remote control mode (for example, when trying to operate the Digital TV Recorder, press the [DTV]
button on the remote control and retry).
If the remote control does not operate the TV/DVD player, even when the remtoe control has been set to the
correct mode, re-programme the remote control (refer to ‘Programming the remote control’ on page 28).
Replace the batteries.
•
•
•
Digital TV Recorder does not
record...
Format the Hard Disk. Please note that this should only be done as a last resort as formatting the Hard Disk will
permanently delete all recordings.
•
Should you experience a problem with your Digital TV Recorder which can’t be resolved using the table below,
put the unit into Standby mode, then unplug completely from the mains. Leave the unit unplugged for at least one
minute before connecting again to the mains.
Page 32

32
Helpline details
If you have any problems using your Digital TV Recorder and cannot
nd the solution in this user guide.
For general problems contact the Digital Helpline:
Please contact our Digital Helpline on 0870 010 0484. Lines open
Monday to Friday 8:30am to 8:00pm, Saturday 9am to 6pm, Sunday
9am to 5:30pm (calls charged at the national rate.)
If possible, when calling, you should be close to your TV and have your
Digital TV Recorder and TV switched on.
For general Freeview reception enquiries:
Freeview: 0870 880 9980 or www.freeview.co.uk (calls charged at the
national rate.)
Digital TV Group: www.dtg.org.uk
Please refer to the product specication for further details on power
requirements, etc. This product is for indoor use only.
Partmaster Direct can provide accessories, spares, batteries and
replacement parts with Next Day Delivery available upon request.
Please call: 0870 600 1338 (calls charged at National Rate),
or visit our website at www.partmaster.co.uk
•
•
•
Physical Specications
Size: (W) 184mm x (H) 70mm x (D) 227mm
Weight: 1.85 kg
Power Requirements
Input Voltage: 12V DC ±10% (with supplied power supply)
Power Consumption (On): 14W Typical (25W Max)
Power Consumption (STBY): <3W
Operating Temperature: +10°C to +40°C
Storage Temperature: -20°C to +60°C
Twin Tuners
RF Input /
Output Connectors:
1x IEC (Female) / 1x IEC (Male)
Channel Coverage: UHF (B21 to B68 / 470MHz to 860MHz)
Video Decoder
Video Decoding: MPEG-2 Main Level / Main Prole
Video Formats: 16:9 / 4:3
Video Outputs: RGB / Y/C / CVBS
Audio Decoder
Audio Decoding: MPEG-2 Layer 1
Audio Mode: Stereo / Mono
AV Connectors
Video: 2x 21 Pin SCART
(TV SCART = RGB / Y/C, VCR SCART = CVBS)
Audio: 1x 3.5mm Jack/miniTOS
(Analogue Stereo / PCM Audio Optical SPDIF)
Supplied Accessories
Universal Remote Control
2x AA / R06 Batteries
Instruction Manual
Stand
4 Rubber Feet
Power Supply (12V 2Amp)
SCART Lead
Quick Start Guide
RF Lead
Due to continued product improvement, this specication may change
without notice.
All information correct at time of going to press.
Product technical specications
Page 33

33
Important care and safety advice
This Digital TV Recorder has been manufactured to meet international
safety standards, but you must take care to operate it safely.
It is important that you read these safety instructions. If you have
any doubts about the installation, operation or safety of this Digital TV
Recorder, please contact us.
Electrical warning:
Your Digital TV Recorder contains a high voltage which is sufcient to
cause a dangerous electric shock.
Never remove the cover. There are no user-serviceable parts inside.
Only use the power cable supplied (or manufacturer’s replacement)
with your Digital TV Recorder.
Switch off the power supply from the mains wall socket before you
disconnect any equipment from the Digital TV Recorder.
Never push anything into holes, slots or other openings in the case.
Positioning the Box:
The Digital TV Recorder and cables should be placed so that they are
not likely to be walked on or pinched by items placed upon or against
them.
The mains plug must be readily accessible and operable in order to
disconnect mains power whenever required.
Do not expose your Digital TV Recorder to direct sunlight or to extreme
temperatures (above 40oC or below -5oC), high moisture levels or dust.
Condensation may accumulate on the Digital TV Recorder if it is
subjected to sudden changes in temperature. In this case, allow the
Digital TV Recorder to rest for one hour before use.
Do not block the ventilation holes of the Digital TV Recorder.
Allow at least 10 cm on all sides of the Digital TV Recorder (including
the top, but excluding the base) for ventilation. Do not place the Digital
TV Recorder on top of or underneath other equipment.
•
•
•
•
•
•
•
•
•
•
•
Do not place the Digital TV Recorder on an unstable surface or on
a bed, sofa, rug, or similar surface as this may block air ventilation
and cause it to overheat. Never place the Digital TV Recorder over a
radiator or in an unventilated cabinet.
Do not expose the Digital TV Recorder to drips or splashes and do not
place any objects lled with liquids on the Digital TV Recorder.
Never place the Digital TV Recorder on top of a loudspeaker as the
vibrations and magnetic eld may damage the Digital TV Recorder’s
Hard Disk.
Cleaning:
Always disconnect from the mains supply before cleaning. Wipe with
a lint-free cloth. Never use detergents, liquid cleaners or aerosol
cleaners.
Unplug when not in use:
When not in use for an extended period, unplug the Digital TV Recorder
from the mains outlet. Do not overload wall outlets and extension
adaptors as this can result in a risk of re or electric shock.
Use only authorised servicing. If any of the following occur:
Any of the cables or plugs are damaged.
Liquid has spilled onto, or objects have fallen into, the Digital TV
Recorder.
The Digital TV Recorder has been dropped or the casing damaged.
The Digital TV Recorder does not operate normally
Carefully unplug the Digital TV Recorder from the electrical outlet and
contact the store where you bought this Digital TV Recorder. Alternatively,
contact our Digital Helpline.
•
•
•
•
•
•
•
•
•
Page 34

34
This symbol on the product or in the instructions means that your
electrical and electronic equipment should be disposed at the end of its
life separately from your household waste. There are separate collection
systems for recycling in the EU.
For more information, please contact the local authority or your retailer
where you purchased the product.
Environmental information
End User licence: The hardware and software of this product are licensed to the user as a single
product that cannot be separated. It is intended as a domestic product for the purposes of receiving
and recording digital television services, any other use is done so at the users risk. In relation to the
software the end user is prohibited from copying, transferring to a 3rd party, modifying or otherwise
attempting to derive the source code of any part or whole of the software in the product. The software
is not sold, but licensed for use in the European Union to the owner of the hardware. New software
maybe transmitted to the box by the manufacturer in which case the licence transfers to the new
software.
Remote Control Code List
TV Brand List
Brand Code(s) Brand Code(s)
ADL 1247 BPL 0067, 0586, 0312, 0403
AEG 0636, 1193 Brandt 0655, 0139, 0226, 0317, 0365,
0373, 0590, 1395
Aiwa 1938 Brandt
Electronique
0317, 0365
Akai 0391, 0238, 0401, 0067, 0463,
0221, 0065, 0039, 0102, 0248,
0744, 0193, 0546, 0745, 0632,
0586, 0578, 0510, 0247, 0661,
0246, 0294, 0208, 0407, 0636,
1067, 1938, 0503, 1289
Brother 0294
Akashi 0039 Bush 0698, 0248, 0193, 0379, 0039,
0066, 0067, 0401, 0265, 0312,
0385, 0393, 0404, 0294, 0391,
1067, 0517, 0238, 0247, 0324,
0586, 0744, 1930, 1938, 0808,
1289
Akura 0067, 0586, 0698, 0442, 0039,
0248, 0312, 0294, 0744, 2012
Canton 0248
Alba 0067, 1067, 0586, 0744, 0039,
0448, 0400, 0265, 0401, 0698,
0385, 0248, 0246, 0277, 0193,
0517, 0066, 1938, 0473, 0581
Carrefour 0066, 0100, 0067, 0586
Amstrad 0207, 0039, 0546, 0294, 0401,
0248, 0067, 0586, 0463, 0442,
0392, 1067
Casio 0067, 0586, 0193, 0379
Astra 0067, 0586 Citizen 0090
Baird 0139, 0373, 0102, 0103, 0247,
0238
Crown 0039, 0742, 0400, 0516, 0067,
0586, 0517, 0744, 0636, 0745,
0403, 0448, 0238, 0369, 1067
Bang &
Olufsen
0595, 0117, 0305 Daewoo 0664, 0404, 1939, 0529, 0691,
0067, 0586, 0039, 0246, 0248,
0247, 1167, 1938, 0910
Bauer 0039 Dainichi 0248, 0246
Beko 0744, 0065, 0516, 0400, 0067,
0448, 1067, 0586, 0636, 0745,
0838
Dansai 0067, 0586, 0294, 0065, 0246,
0039, 0066, 0247, 0238
BestarDaewoo
0404 Denko 0294
Binatone 0247 Digivision 0391
Blaupunkt 0221, 0565, 0225, 0230, 0357,
0358, 0485, 0200, 0066,
Dunai 0193
Bosch 0350, 0357 Durabrand 0067, 0586
Page 35

35
Remote Control Code List - continued
TV Brand List
Brand Code(s) Brand Code(s)
Ferguson 0103, 0655, 0317, 0365, 0268,
0139, 05900, 0067, 0586, 0065,
0373, 0134, 0138, 0391, 0578,
0473, 1067
Goodmans 0064, 1289, 1067, 0067, 0529,
0586, 0744, 0698, 1939, 0404,
0066, 0294, 0102, 0546, 0039,
0209, 0517, 0401, 0373, 0265,
0065, 0510, 0590, 0247, 0365,
0248, 1938, 0660, 0691, 1930,
0910, 1338, 0617, 1406
Fidelity 0193, 0542, 0393, 0067, 0586,
0401, 0442, 0561, 0246, 0294,
1938, 0391
Granada 0067, 0586, 0256, 0386, 0075,
0102, 0138, 0238, 0247, 0066,
0369, 0546, 0503, 0365, 0590,
0193, 0393, 0255, 0373, 0578
Finlandia 0238, 0376, 0578, 0391, 0193,
0393, 0102, 0317, 0373, 0075
Grundig 0225, 0538, 0565, 0221, 0100,
0517, 0067, 0473, 0586, 0617,
0039, 0066, 0400, 0770, 1938,
0660, 1253, 1338, 0208, 1406
Finlux 0135, 0134, 0067, 0586, 0744,
0376, 0247, 0102, 0193, 0546,
0745, 0100, 0117, 0209, 0132,
0441, 0661, 0522, 0510, 0503,
0448, 0636
Hauppauge 0067, 0586
Fujitsu 0209, 0236, 0102, 0132, 0247,
0193, 0039, 0382, 0713, 0067,
0586, 0391, 0289, 0883
Hinari 0238, 0067, 0586, 0039, 0248,
0066, 0209, 0193, 0385, 0473,
0517, 0265, 0324, 0294, 1938
Fujitsu
General
0039, 0247, 0236, 0193 HiSense 1393, 0238
Fujitsu
Siemens
1328, 1289 Hitachi 0255, 1255, 0379, 0608, 0066,
0386, 0138, 0503, 0193, 0373,
0226, 0247, 0224, 0546, 0102,
0511, 0529, 0067, 0586, 0139,
0393, 0578, 0664, 0774, 0208,
1167, 0135, 0522, 1511, 0391,
0542, 0510, 0827, 1067, 1606,
1179
Funai 0698, 0209, 0294, 0324, 0333,
0442
Hitachi Fujian 0138, 0255
Galaxis 0400, 0448, 0067, 0132, 0586 HMV 0117
GE 0373, 0765, 0208, 0312, 0590,
0317, 0139, 0365, 0655
Hyundai 0067, 0895, 0586, 1274, 1324,
1311, 1498
GEC 0193, 0391, 0379, 0067, 0546,
0586, 0102, 0247
InFocus 0782, 1194, 1236
Goldstar 0067, 0039, 0400, 0407, 0247,
0208, 0277, 0246, 0586, 0193,
0391, 0139, 0393, 0636, 0744,
0745
ITT 0193, 0510, 0379, 0391, 0503,
0578, 0376, 0369, 0238, 0209,
0640
TV Brand List
Brand Code(s) Brand Code(s)
ITT Nokia 0391, 0578, 0193, 0503, 0510,
0379, 0376, 0238, 0209, 0369,
0636, 0640, 0661, 0393
Maxam 0294
JVC 0638, 0066, 0713, 0401, 0248,
0636, 0448, 0761, 0123
Maxim 2012
Kathrein 0586, 0067 MEI 1067, 0067, 0586
Kenwood 0135 Memorex 0039, 0208, 0090
Kneissel 0067, 0415, 0400, 0640, 0441,
0404, 0529, 0586, 0465, 0289,
0322, 0268, 0392, 1938
Metz 0418, 0477, 0776, 0397, 0117,
1193, 0225, 0565, 0221, 0067,
0586, 0305, 0617, 0698, 1067
LaSat 0516, 0400 Microstar 0838
Leader 0039 Minerva 0517, 0565, 0225, 0100, 0221,
0546, 0138
LG 0067, 0208, 0400, 0039, 0407,
0247, 0586, 0744, 0246, 0193,
0636, 0139, 0745, 1667, 1176,
1221
Mitsubishi 0138, 0123, 0542, 0067, 0208,
0117, 0066, 0565, 0586, 0238,
1067
Loewe 0542, 0663, 0820, 0067, 0586,
0685, 0400, 0117, 0322, 0581,
0392, 0546
Motorola 0123
Logik 0041, 0090, 0039, 0294, 0401,
0910, 1247
NEC 0200, 0617, 1200, 0066, 0350,
0485, 0039, 0404, 0247, 0067,
0586, 0041, 0734, 0275, 0529,
1734, 0691
Logix 0698 Nikkai 0102, 0248, 0067, 0586, 0247,
0294, 0065, 0246, 0039, 0066
Luxor 0224, 1193, 0393, 0510, 0522,
0379, 0391, 0238, 0386, 0578,
0193, 0376, 0503, 0209, 1067,
0247, 0661
Nokia 0391, 0193, 0510, 0379, 0578,
0522, 0503, 0369, 0238, 0404,
0661, 0636, 0376, 0209, 0350,
0640, 0139, 0581
Marantz 00647, 0586, 0442 Nordic 0247
Orion 0067, 0209, 0473, 0385, 0586,
0685, 0744, 0265, 0324, 0207,
0350, 0041, 0039, 0351, 0132,
0294, 0442, 0546, 0561, 1938,
0910, 1226
Matsui 0067, 0586, 0517, 0039, 0265,
0207, 0041, 0385, 0102, 0066,
0247, 0324, 0401, 0463, 0473,
0393, 0485, 0193, 0379, 0546,
0065, 0238, 0075, 0225, 0221,
0365, 0744, 1938, 1067
Pace 1938
Matsushita 0680 Pacic 0067, 0586, 1167, 0744, 1067,
0473
Page 36

36
Remote Control Code List - continued
TV Brand List
Brand Code(s) Brand Code(s)
Panasonic 0680, 1680, 0138, 0256, 0391,
0397, 0546, 0067, 0586, 0193,
0578, 1340, 0883
Roadstar 1067, 0039, 0448, 0067, 0586,
0744, 0698, 0248, 0294, 0312,
1219
Philco 0117, 0114, 0104, 0448, 0277,
0193, 0400, 0067, 0586
Saba 0655, 0139, 0590, 0373, 0317,
0117, 0193, 0546, 0391, 0528,
0226, 0365, 0578, 0744
Philips 0586, 0067, 0268, 0221, 0117,
0373, 0404, 0802, 0039, 0230
Sagem 0640, 0485, 0312, 0860, 1343
Pioneer 0790, 0041, 0196, 0067, 0200,
0586, 1290, 0400, 0373, 0391,
0139, 0193, 0317, 0516, 0542
Saisho 0265, 0546, 0207, 0039, 0041,
0247, 0193, 0294
Premier 0039, 0294 Salora 0024, 0379, 0193, 0386, 0391,
0546, 0393, 0403, 0578, 0369,
0238, 0510
Proline 0067, 0586, 0655, 0664, 0660,
0441, 0351, 0102, 1406
Samsung 0648, 0617, 0067, 0208, 0586,
1279, 0123, 0674, 1265, 0039,
0247, 0512, 0400, 0090, 0294,
0246, 0102, 0238, 0712, 0193,
0655
Prosonic 0067, 0586, 0400, 0404, 0401,
0698, 0744, 0246, 0247
Sanyo 0238, 1238, 0187, 0322, 0066,
0041, 0400, 0369, 0102, 0246,
0247, 0134, 0075, 0585, 0039,
0193, 0403, 0067, 0138, 0586,
0516, 0765, 0200, 0734
Protech 0067, 0586, 0247, 0039, 0277,
0379, 0132, 0294, 0448, 0698,
0312, 0193, 0516, 1067
SEG 0067, 0586, 1067, 0698, 0247,
0517, 0039, 0379, 0193, 0294,
0664, 0066, 0132, 0277, 0392,
0246, 0248, 1939, 1193
Pye 0067, 0586, 0017, 0404, 0379,
0442
Seleco 0236, 0393, 0289, 0392, 0193,
0441, 0581, 0401, 0066, 0294,
0376, 0465
RadioShack 0067, 0586, 0208 Serino 0640, 0485, 0246, 0123
Rank 0100 Sharp 0123, 1223, 0187, 0066, 0324,
0521, 0683, 0546, 0230, 0790,
1423, 1193
RCA 0655, 0123, 0590, 0365, 0373 Siemens 0221, 0565, 0230, 0225, 0357,
0358, 0187, 0067, 0586, 0391
Rediffusion 0391, 0578, 0066, 0376 Sky 0067, 0312, 0910, 02080, 0586
Redstar 0067, 0586 Sony 1535, 1681, 1040, 0041, 1781,
0383, 0066, 0132, 0067, 0586,
0187
Relisys 0895, 0907, 1236, 1237, 1328 Sound &
Vision
0132, 0248, 0404, 0067, 0586
Ricoh 0067, 0586 Ssangyong 0039
TV Brand List
Brand Code(s) Brand Code(s)
Strong 1193, 1179, 1067, 0067, 0586 Thorn-
Ferguson
0134, 0138, 0139, 0268, 0391,
0365, 0529, 0103, 0065
Tandberg 0397, 0441, 0139, 0226, 0392,
0391, 0193
Tiny 1226, 1299
Tandy 0248, 0102, 0247, 0277, 0123,
0193
Toshiba 0538, 0090, 1538, 0065, 1319,
0066, 0100, 0132, 0744, 0271,
0247, 0139, 0225, 0221, 0648,
1938, 0039, 0067, 1194, 1193
Tatung 0067, 0586, 0102, 0546, 0247,
0041, 1938, 1401, 1289
Trident 0546, 0247
Teac 0542, 0067, 1067, 0586, 0742,
0698, 0485, 0247, 0294, 1939,
0208, 0039, 0442, 0379, 0312,
0448, 0200, 0744, 1179, 1785
Tristar 0294, 0248
TEC 0247, 0039, 0277, 0365, 0289,
0067, 0586, 0391, 0193
Triumph 0207, 0546, 0376, 0586, 0067
TechniSat 0685, 0037, 0586, 0193 Universal 0067, 0586
Techwood 1193 Vestel 0067, 0193, 0247, 0586, 0698,
1067, 1193
Teknika 0090, 0209 Vision 0067, 0294, 0586, 0350, 0247
Telecor 0067, 0586, 0193, 0248, 0247,
0289, 0424
Waltham 0247, 0386, 0448, 0317, 0415,
0067, 0586, 0698, 0139, 1067
Telefunken 0655, 0590, 0104, 0617, 0139,
0373, 0742, 0528, 0317, 0114,
0131, 0365, 0103, 0226, 0067,
0586, 0516, 0744
Watson 0067, 0586, 0350, 0193, 0248,
0424, 0039, 0698, 1067, 1938
Tensai 0134, 0248, 0067, 0586, 0247,
0324, 0350, 0039, 0135
Wega 0067, 0586, 0066, 0117
Tevion 1289, 1328, 0067, 0586, 0698,
1167, 0744, 1067, 1278, 1319
Weston 0067, 0586
Thomson 0655, 0590, 0373, 0317, 0139,
0365, 0226, 0067, 0586, 0379
Wharfedale 0067, 0586
Thorn 0138, 0139, 0103, 0255, 0373,
0391, 0268, 1535, 1040, 0104,
0114, 0529, 0565, 0067, 0102,
0586, 0041, 0134, 0365, 0542,
0066, 0075, 0404, 0065, 0100,
0131, 0386
Yamaha 0680, 0827
Zanussi 0236, 0393, 0247
Page 37

37
Remote Control Code List - continued
DVD Brand List
Brand Code(s) Brand Code(s)
Acoustic
Solutions
0760, 0743, 1272 Grundig 0725, 0805, 0569, 0681, 0735,
0820, 0743, 0700, 0753, 1725,
2076, 1034, 1760, 1950, 1466,
1513
AEG 0818, 0800, 0820, 1464 Harman/
Kardon
0732
Aiwa 0671, 0725, 0899, 0563 Hitachi 0694, 0809, 1950, 2024, 0695,
0603, 0887, 0743
Akai 0820, 0809, 0818, 1145, 0928,
0796, 0746, 0914, 0743, 0882,
0735, 1119, 1725, 1263
Hyundai 0813, 0880, 1186, 0796, 1258,
2076
AKI 0883 JBL 0732
Alba 0747, 0729, 0743, 0753, 0725,
0760, 0813, 0569, 0702, 1170,
1081, 1560, 1725
JVC 0653, 0588, 1931, 1970, 1194,
0569, 0533, 0897, 1271
Amstrad 0743, 1145 Kenwood 0564, 0520
Binatone 1953 Kiss 0871, 1553, 0695
Blaupunkt 0747 Koss 0681
Brandt 0681, 0581, 0533 LG 0771, 0621, 1936, 0899, 2032
Bush 0743, 0725, 0863, 1725, 0760,
0861, 0729, 0747, 0808, 0848,
0909, 0914, 0753, 1195, 1466,
1449, 1513
LiteOn 1088, 1486, 1188, 1446
Daewoo 0862, 0863, 1513, 0735, 0800,
0744, 1948, 1466, 0902, 1171,
1471, 0808
Loewe 0569, 0771
Dansai 0800, 0813, 1145, 1725 Luxor 1034, 0743, 1760, 0760, 1275
Denon 0520, 0664, 1664 Marantz 0569
DMTECH 0813, 0820, 2076, 1301 Matsui 0681, 0743, 0702, 0725, 0914,
1760
Durabrand 0861 Maxim 0743, 1272, 1397
Eltax 0796, 1351 Medion 0861, 0813, 1377, 0681, 0746,
1375, 0909, 0660, 2042, 1120,
1195
Ferguson 0681, 1760, 0928 Memorex 0861
Finlux 0771, 0800, 0813, 0621, 0702,
0781, 1177, 1195
MiCO 0753, 0781, 1251, 1253, 1209,
1284
Funai 0725, 0705 Microsoft 0552
GE 0747 Microstar 0861
Goldstar 0621, 0771 Minerva 0735
Goodmans 0743, 1034, 0753, 0791, 0813,
0760, 0681, 0820, 0848
Mitsubishi 0743
DVD Brand List
Brand Code(s) Brand Code(s)
NAD 0771 Sony 0563, 1663, 2011, 1100, 2050,
1933, 0802, 1964, 0603, 2073,
1897, 1854
NEC 0899, 0621, 1948 Strong 0743
Nikkai 1953 Tandberg 0743, 1725
Omni 0729, 0808, 0863, 1134, 1258 Tatung 0800
Orbit 0902 Teac 0747, 0771, 0601, 0798, 0621,
0789, 0820, 0863, 1257, 1195
Orion 0725, 1158, 1725, 1263, 1449 TEC 0928
Pacic 0798, 0820, 0789, 0834, 0743,
0861
Technics 0520, 1935, 1937, 1938
Panasonic 0520, 1938, 1935, 1864, 1937 Technika 0800, 1145, 0861, 1195
Philips 0569, 0676, 0915, 0705, 0533,
1842, 1843, 1848, 1188
Telefunken 0820, 0819, 0818, 1258
Pioneer 0601, 1995, 0661, 0555, 1930,
1601, 1490
Thomson 0581, 0552
Prism 1183, 0861 Tiny 1519
Proline 0681, 0702, 0820, 1034, 1513,
0863, 1945
Toshiba 0533, 1075, 1540, 2036
Pye 0676 Trio 0800
RCA 0552, 0681 Umax 1181
Roadstar 0729, 0743, 0848, 0760, 1081,
0928, 0863, 2044
Universal
Multimedia
0798
Samsung 0603, 0774, 1962, 0850, 1105,
2038, 0520
Vestel 0743, 2024, 1560
Sanyo 0700, 0725, 0820, 0903, 0743 Waltham 1560
Schneider 0813, 0861, 0809, 0735, 0834,
0818, 0743, 0681, 0820, 1183,
1397
Wharfedale 0798, 0753, 0781, 0782
Sharp 0660, 0782, 0743, 0725, 2045,
1286, 1449, 2054
XBox 0552
Sherwood 0747, 0771 Yamada 1034, 0902, 1181, 1446, 1086,
1519, 1188
Skyworth 0928, 0796 Yamaha 0569, 0676, 0520
Page 38

38
Page 39

39
Page 40

U-MAN-001-05 71-800-005-10 Printed in UK
 Loading...