

Page 1
PORTABLE DVD PLAYER
User Guide
LPD850
Playable Format:
DVD/DVD R/DVD RW/Audio CD/MP3/Kodak Picture CD/JPEG Picture CD
82-227-00140
Page 2

Contents
Usage and Safety Information ............ 3
Safety Warnings ............................. 6
Product Overview ...............................6
Remote Control............................7
Battery Pack.................................9
Connection...........................................10
CHATPER 1: DVD Playback ...............13
Basic DVD Playback ................................... 13
Stopping Playback and Returning to the Menu Screen
(If a Menu Screen is Available on the Disc) ..... 13
Stopping Playback ..................................... 13
Pausing Playback ...................................... 13
Frame Advance (Step) ..................................... 13
Fast Forward and Backward ........................ 13
Skipping a Chapter Ahead or Back ............ 13
Muting the Player ................................... 13
Repeating Viewing .................................... 14
Displaying Scene Information .................. 14
Changing Audio Soundtrack Language ...... 14
Changing Subtitle Languages ...................... 14
Viewing from Different Angles ................... 14
Using a DVD Menu ................................... 14
Using the Menu Function ............................. 14
CHAPTER 2: Audio/MP3 CD Playback ... 15
Basic Audio CDs Playback ..................... 15
Stopping Playback .................................... 15
Pausing Playback ............................... 15
Displaying Track Information ................. 15
Skipping a Track Ahead or Back ............ 15
CHAPTER 3: Picture CD Playback .... 16
Basic Picture CDs Playback ....................... 16
Stopping Playback .................................... 16
Pausing Playback ............................... 16
Rotating Pictures ..................................... 16
Viewing the Next or Previous Picture ........ 16
Thumbnail Function ....................................16
CHAPTER 4: MPEG-4 Playback ...... 17
Basic MPEG-4 Playback ............................ 17
Stopping Playback .................................... 17
Pausing Playback ..................................... 17
CHAPTER 5: OSD Setup ................. 18
Language Setup .............................. 18
- OSD Language ....................................... 18
- Audio Language ....................................... 18
- Subtitle Language ....................................... 18
- Menu Language ....................................... 18
Video Setup .......................................... 19
- Video Out ................................................... 19
- TV Type ....................................................... 19
System Setup ..................................... 20
- Screen Saver .............................................. 20
- Parental Control [DVD] ................................ 20
- Password [DVD] ......................................... 21
- Angle Mark ................................................ 21
- Default ......................................................... 22
CHAPTER 6: LCD Setup ................. 23
Panel Setting ............................................. 23
Color Setting ............................................. 23
Brightness Setting ........................................ 23
LCD Setting ................................................ 23
Troubleshooting ........................... 24
Disc Handling and Maintenance .... 25
Specifications ......................... 26
PORTABLE DVD PLAYER USER GUIDE
2
Page 3
Usage and Safety Information
This product incorporates copyright protection technology that is protected by method claims of certain
U.S. patents and other intellectual property rights owned by Macrovision Corporation and other rights
owners. Use of this copyright protection technology must be authorized by Macrovision Corporation, and
is intended for home and other limited viewing uses only unless otherwise authorized by Macrovision
Corporation. Reverse engineering or disassembly is prohibited.
Region Management Information
This unit is designed and manufactured to respond to the Region Management Information
recorded on DVD discs. If the region number of a disc does not correspond to the region
number of this unit, it will not be able to play the disc.
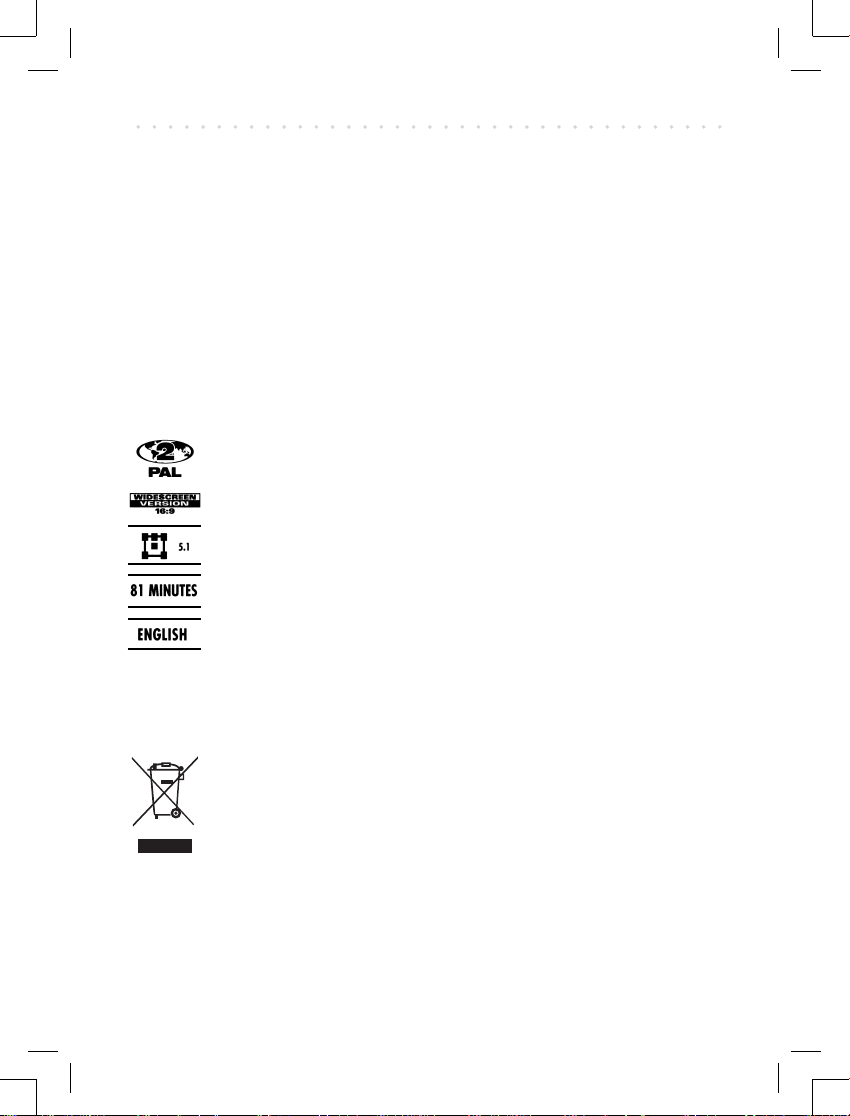
The region number of this product is 2.
Icon used on DVDs (example)
Screen aspect ratio
Stereo sound format
DVD length
Languages
Region code indicator
Never make or change connections with the power switched on.
This symbol on the product or in the instructions means that your electrical and
electronic equipment should be disposed at the end of its life separately from your
household waste.
There are separate collection systems for recycling in the EU.
For more information, please contact the local authority or your retailer where you
purchased the product.
Manufactured under license from Dolby Laboratories. Dolby and the double-D symbol are trademarks of Dolby Laboratories.
Confi dential Unpublished Works. 1992-1997 Dolby Laboratories, Inc. All rights reserved.
PORTABLE DVD PLAYER USER GUIDE
3
Page 4

Safety Warnings
Follow Instructions - All operating and maintenance instructions should be followed and warnings
adhered to.
Screen Burn - ATTENTION! Please note that some programmes are broadcast with a logo that will appear in the corner of your TV screen. Some of these logo’s can be very bright and may cause damage
by permanently marking the logo on the screen. To prevent this, avoid leaving channels displaying a
logo for a prolonged periods of time, particularly when the TV is not being watched.
Car Use - On no account must this unit be used by the driver of a moving motor vehicle. If the unit is
being used by a passenger in your vehicle, make sure that it does not cause distraction to the driver,
is secured or held safely and does not obstruct any safety device (e.g. airbag, seat belt, etc.) that is fi t-
ted. It is advised that this product is installed in the rear of the vehicle only. Make sure that it is always
securely fastened before use. Never place the product in a position where a sudden stop will cause it to
become dislodged.
Standby - The standby button on the remote control doesn’t switch off the DVD completely and the DVD
will continue to draw electricity from the mains supply. Therefore in the interests of safety and to avoid
unnecessary energy consumption, never leave your DVD in standby while unattended for long periods
of time (eg. overnight, while on holiday or while out of the house) and make sure the unit is unplugged
from the mains power supply.
Cleaning - Unplug this product from the wall outlet before cleaning. Do not use liquid or aerosol cleaners.
Accessories - Do not use accessories not recommended in this instruction book as they may be haz-
ardous.
Water and Moisture - Hazard of electric shock. Do not use this product near water or in rainy/moist
situations.
Objects and Liquid - Never allow objects of any kind or liquids to be pushed/spilled into this product
through openings as they may come into contact with dangerous voltage or other hazards. Do not place
objects fi lled with liquids, such as vases, on the unit.
Condensation - Moisture will form in the operating section of the player if the player is brought from cool
surroundings into a warm room or if the temperature of the room rises suddenly. When this happens, the
player’s performance will be impaired. To prevent this, let the player stand in its new surroundings for
about an hour before switching it on, or make sure that the room temperature rises gradually. Condensation may also form during the summer if the player is exposed to the breeze from an air conditioner. In
such cases, change the location of the player.
Placing or Moving - Do not place on an unstable cart, stand, tripod, bracket or table. The product may
fall, causing serious injury to a child or adult, and serious damage to the product. A product and cart
combination should be moved with care. Quick stops, excessive force, and uneven surfaces may cause
the product and cart combination to overturn.
Ventilation - To ensure proper ventilation and proper operation, never cover the unit with a cloth or other
material and make sure there is a gap of at least 10mm around the outside of the unit.
Damage Requiring Service - Disconnect this product from the wall outlet and all power sources including
batteries, and refer servicing to qualifi ed service personnel under the following conditions:
a) When the power-supply cord or plug is damaged.
b) If any liquid has been spilled onto, or objects have fallen into the product.
c) If the product has been exposed to rain or water.
PORTABLE DVD PLAYER USER GUIDE
4
Page 5
Safety Warnings - continued
d) If the product does not operate normally even if you follow the operating instructions. Adjust
only those controls that are covered by the operating instructions. Improper adjustment of
other controls may result in damage and will often require extensive work by a qualifi ed
technician to restore the product to its normal operating condition.
e) If the product has been dropped or the cabinet has been damaged.
f)
Servicing - Do not attempt to service this product yourself as opening or removing covers may expose
you to dangerous voltage points or other hazards. Refer all servicing to qualifi ed service personnel.
Replacement Parts - When replacement parts are required be sure the service technician has used replacement parts that are specifi ed or that have the same characteristics as the original part. Unauthorized
substitutions may result in fi re, electric shock or other hazards.
Safety Check - Upon completion of any service or repairs to this product, ask the service technician to
perform safety checks to determine that the product is in safe operating order.
Overloading – Do not overload wall outlets and extension cords as this can result in risk of fi re or electric
shock.
Lightning - For added protection of this product during a lightning storm, or when it is left unattended and
unused for long periods of time, disconnect it from the wall outlet. This will prevent damage to the product
due to lightning and power-line surges.
Naked fIames - Keep the unit away from naked fIame sources such as fi re and candles, etc and do not
place naked fIames on the unit.
Power Cord Protection - Power cords should be routed so that they are not likely to be walked on or
pinched by items placed upon or against them. Pay particular attention to plugs and the point from which
the cords exit the product.
When the product exhibits a distinct change in performance. This indicates a need for service.
A DVD player is a Class 1 laser product, however this player uses a visible laser beam which
Important Warning
could cause hazardous radiation exposure.
Be sure to operate the player correctly as instructed.
The following caution label is located on the rear panel of the player.
CLASS 1
LASER PRODUCT
z When this player is plugged into the wall outlet, do not place your eyes close to the opening
of the disc tray and other openings to look into the inside of this player.
z Use of controls or adjustments or performance of procedures other than those specifi ed
herein may result in hazardous radiation exposure.
z Do not open covers and do not repair yourself. Refer servicing to qualifi ed personnel.
z To reduce the risk of fi re or electric shock, do not expose this equipment to rain or moisture.
z To reduce the risk of fi re or electric shock and annoying interference, use the recommended
accessories only.
PORTABLE DVD PLAYER USER GUIDE
5
Page 6
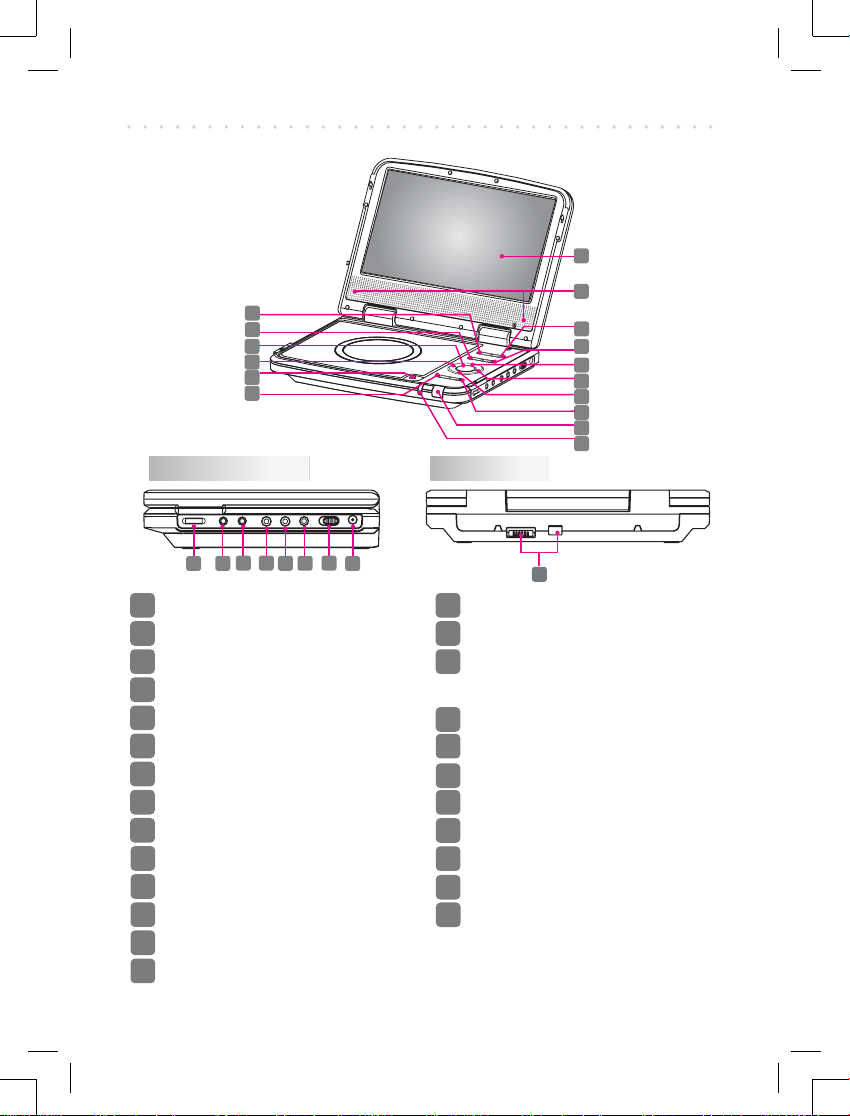
Product Overview
1
2
3
4
5
6
Right Side Panel Back Panel
11
12
10
13
14
15
16
1
7
8
9
20
19
18
17
1
LCD Button
2
MODE Button
3
PLAY/SEL. Button
4
F.BWD/LEFT Button
5
OPEN Button
6
PREVIOUS Button
7
LCD Screen
8
Speakers
9
SETUP Button
MENU Button
10
PAUSE/UP Button
11
F.FWD/RIGHT Button
12
STOP/DOWN Button
13
NEXT Button
14
PORTABLE DVD PLAYER USER GUIDE
6
21
22
23
15
Remote Sensor
16
POWER Indicator
17
Volume Adjustment
Scroll Wheel
PHONE1 Socket
18
19
PHONE 2 Socket
AV OUT Socket
20
AV IN Socket
21
P-SCAN Socket
22
POWER Switch
23
DC IN Socket
24
Battery Connector
25
Page 7

Remote Control
1
INFO. Button
2
SETUP Button
3
MENU Button
4
PAUSE/UP Button
5
F.BWD/LEFT Button
6
PLAY/SEL. Button
7
PREVIOUS Button
8
STOP/DOWN Button
9
Number Buttons
10
LCD Button
11
MODE Button
12
SUBTITLE Button
13
TITLE Button
14
ANGLE Button
15
F.FWD/RIGHT Button
16
AUDIO Button
17
NEXT Button
18
REPEAT 1/ALL Button
19
MUTE Button
1
2
3
4
5
6
7
8
9
10
11
12
13
14
15
16
17
18
19
Remote Control Operation Range
Point the remote control unit no more than 6 meters from
the remote control sensor and within 60° of the front of
the unit. The operating distance may vary according to
the brightness of the room.
30
30
Remote
Sensor
PORTABLE DVD PLAYER USER GUIDE
7
Page 8
Remote Control - continued
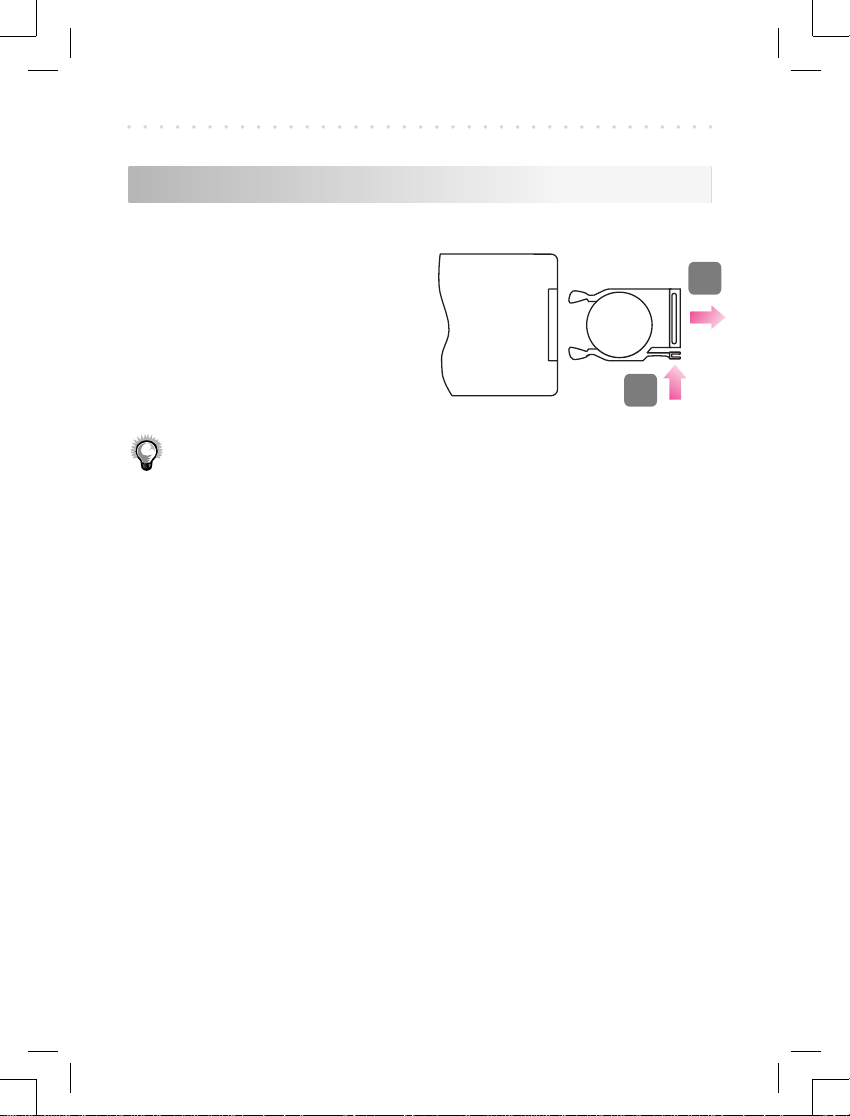
Battery Installation for the Remote Control
Insert the battery and match
the (+) and (-) on battery to
the marks inside the battery
compartment. Remember to
CR2025
Pull
2
+
remove the insulating mylar
strip from the battery if the
battery is fi rst-time used.
1
Push
Note:
• The battery in the Remote Control normally lasts for about one
year, although this depends on how often and for what operations the Remote Control is used.
• If the remote contr ol unit fails to work even when it is operated
near the player, replace the battery.
• Use a 3V lithium battery (No. CR2025 or equivalent).
PORTABLE DVD PLAYER USER GUIDE
8
Page 9
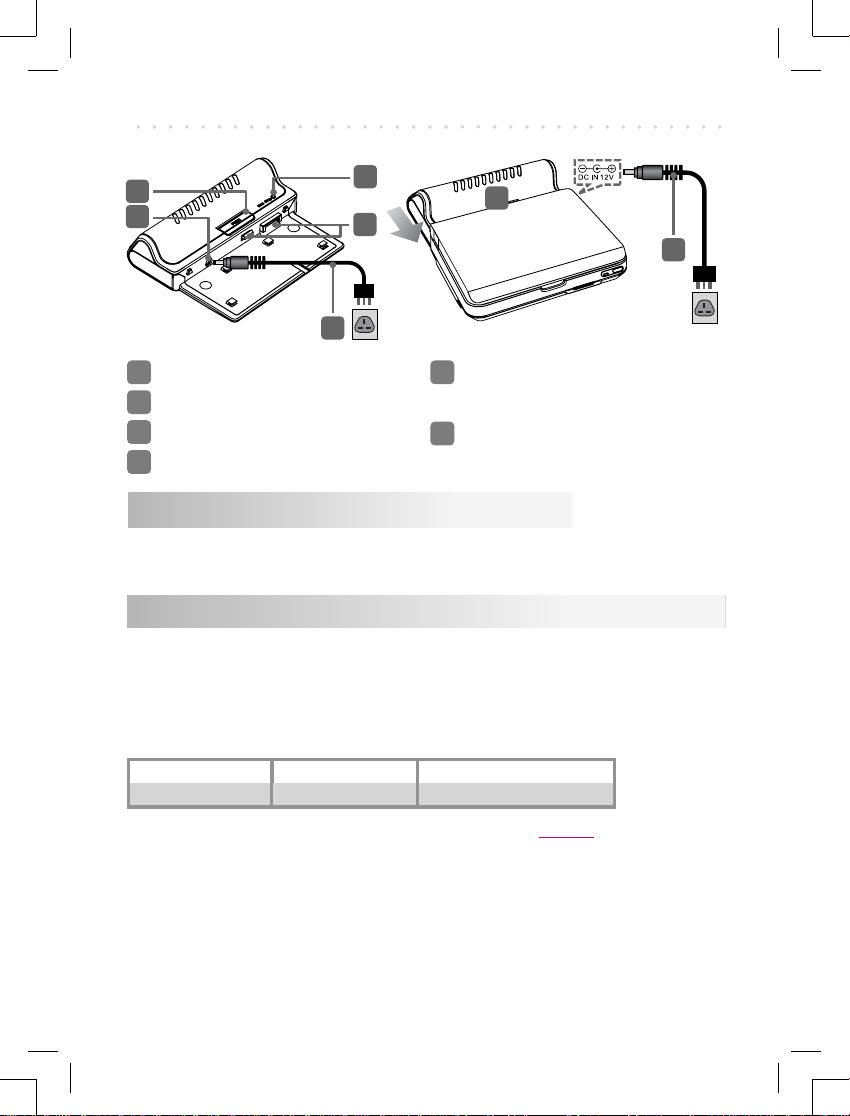
Battery Pack
3
4
1
Battery Charge Indicator
2
Battery Connectors
3
Battery Release Button
4
DC IN Socket
1
7
2
6
5
5
AC Adapter
(Connect to the Battery Pack)
AC Adapter
6
(Connect to the Portable DVD Player)
To charge the battery pack directly
Connect the AC adapter to the DC IN Socket on the battery pack and to power outlet.
To charge the battery pack that attached to the player
Joint the battery connectors of the portable DVD player
and the battery pack. Connect the AC adapter to the DC
IN Socket on the player and to power outlet.
Battery Pack Information (Charge & Playback Time)
Capacity Charge Time (hr) DVD Playback Time (hr)
NiMH 3100mAh 4 2.5
NOTE 1: Ensure the battery is charged for a minimum of 6 hours before fi rst use.
NOTE 2: When the battery is fully charged, the indicator turns to green from red.
NOTE 3: To prolong the battery life, the battery pack should be charged only if the
portable DVD player can not be powered-on with it.
NOTE 4: Use only with the specifi ed power adapter (12Vdc, 1.25A).
PORTABLE DVD PLAYER USER GUIDE
9
Page 10

Connection
Connect TV with Video and Audio Cable
1 Connect the Portable DVD Player to Power.
Please connect the supplied AC adapter to the DC IN Socket
on the right side of the unit.
2 Connect the AV OUT of the DVD Player to the Video In
and Audio In of your TV with an Audio/Video Cable.
AV-OUT
VIDEO
YELLOW
Audio/Video Cable (supplied)
IN
AUDIO
IN
RED
WHITE
R
L
PORTABLE DVD PLAYER USER GUIDE
10
Page 11

Connection - continued
Connect TV with Component and Audio Cable
1 Connect the Portable DVD Player to Power.
Please connect the supplied AC adapter to the DC IN
Socket on the right side of the unit.
2 Connect the P-SCAN Out of the DVD Player to the Pr
Y Pb In of your TV with a Component Cable.
3 Connect the AV Out of the DVD Player to the Audio In
of your TV with an Audio/Video Cable.
4 Select P-SCAN mode in the OSD Setup Menu or press
Mode on the remote control to switch to P-SCAN
mode.
AV-OUT
P-SCAN
Component Cable
(not supplied)
Audio/Video Cable (supplied)
Pr Y Pb IN
Red
Green
Blue
PORTABLE DVD PLAYER USER GUIDE
Pr
Y
Pb
RED
WHITE
AUDIO
IN
YELLOW
R
L
11
Page 12

Connection - continued
Input From External Equipment
1 Connect the Portable DVD Player to Power.
Please connect the supplied AC adapter to the DC IN
Socket on the right side of the unit.
2 Connect the Video/Audio In of the DVD Player to the
Video/Audio Out of external devices.
9,'(2
5
/
25
287
9LGHRWDSH3OD\HU
H[DPSOHRQO\
Audio/Video Cable
$9,1
(supplied)
5('
:+,7(
&DPFRUGHU
H[DPSOHRQO\
<(//2:
$8',2
287
PORTABLE DVD PLAYER USER GUIDE
12
Page 13

DVD Playback
Basic DVD Playback
1 Turn on the player. Press OPEN to
open the disc cover.
2 Hold the edge of the disc to put it in
the disc tray with the printed side up.
3 Close disc cover.
• Close the disc cover and the portable DVD
player starts playback if the disc does not
have any menus recorded on it.
• If the disc has one or more titles recorded on
it, a menu screen will appear on the screen.
4 To play a title, press Up /
Down / Left / Right or Number
Button(s) to highlight it and then press
Play/Sel..
Note:
• If the disc is placed incorrectly, damaged, or in un-
known format , the screen will appear “UNKNOWN
DISC”. If no disc is placed in the tray, the screen
will appear “NO DISC”.
Stopping Playback and Returning
to the Menu Screen
(If a Menu Screen is Available on the Disc)
Press Menu.
Stopping Playback
1 Press Stop once to enter prestop
mode. In prestop status, the disc can
be played from where the playback
has been stopped by pressing
Play/Sel..
2 To completely stop the disc playback,
press Stop again.
Pausing Playback
1 Press Pause.
2 To return to normal playback, press
Play/Sel..
Frame Advance (Step)
1
Press
• The disc is advanced by one frame each
time pressing
Pause to pause playback.
Pause
.
2 To return to normal playback, press
Play/Sel..
Fast Forward and Backward
1 Press Fast Forward or Fast
Backward during playback.
The speed of advance ( x2, x4, x8 and
x20) or reverse ( x2, x4, x8 and x20)
changes for each press of
Fast Backward.
Fast Forward or
2 To return to normal playback, press
Play/Sel..
Skipping a Chapter Ahead or Back
Skipping Ahead
Press Next during play back.
•
Skip a chapter each time pressing the button.
Skipping Back
Press Previous during play back.
• When pressing the button once midway
through a chapter, the player returns to the
beginning of the chapter being played back.
The player skips a chapter each time you
press the button.
Muting the Player
1 Press Mute.
2 To resume the sound, press Mute
again.
PORTABLE DVD PLAYER USER GUIDE
13
Page 14

DVD Playback - continued
Repeat Viewing
During playback, press 1/All Repeat
repeatedly to select the following
options:
REPEAT:[CHAPTER]
REPEAT: [ TITLE ]
REPEAT: [ OFF ]
: Repeat Chapter
: Repeat Title
: Repeat Off
1 Press Angle during play back.
2 Press Angle a number of times
Displaying Scene Information
1 Press Info. during playback
• Press Info. a number of times, the
title number, chapter number, and other
information will show on the screen.
1 Press
To stop displaying scene information,
2
press Info. a number of times until
the information disappears.
2 Press Up / Down / Left /
3 Press Play/Sel. to enter to the
Changing Audio Soundtrack Language
1 Press Audio during play back.
4 To return to the previous menu
2 Press Audio a number of times until
a preferred language is selected.
Note:
• When the preferred language is not selected even
after pressing the button several times, it may indicate that language is not available on the disc.
1 Press
2 Press Up / Down / Left /
Changing Subtitle Languages
3 Press Play/Sel..
1 Press Subtitle during play back.
Viewing from Different Angles
until the preferred viewing angle is
selected.
Note:
• This operation works only with discs on which
multiple viewing angles are recorded.
Using a DVD Menu
Title
menu available on the disc appears.
Right to select the preferred item.
selected item.
screen, press
in stop mode. The DVD
Title
.
Using the Menu Function
Menu
.
Right or Number Button(s) to select
the preferred title.
2 Press Subtitle a number of times
until a preferred language is selected.
3 To clear the subtitle display, press
Subtitle until
appears on the screen.
PORTABLE DVD PLAYER USER GUIDE
14
: [ OFF ]
Page 15

Audio/MP3 CD Playback
Basic Audio CDs Playback
Note:
• If the disc is placed incorrectly, damaged, or in un-
known format , the screen will appear “UNKNOWN
DISC”. If no disc is placed in the tray, the screen
will appear “NO DISC”.
1 Load an Audio CD.
• For audio CDs without playback control, the
DVD player starts playback.
• For audio CDs provided with playback control, a menu appears after a few seconds.
[ ––– CITY JAZZ]01––––––.
01. CITY JAZZ
02. CLASSICAL
03. MOVIE OST
04. ITALIAN OPERA
05. MUSICAL
06. US POP
07. UK POP
08. HEAVY METAL
09. SONATA
10. RAP
01. 01 ––––––
02. 02 ––––––
03. 03 ––––––
04. 04 ––––––
05. 05 ––––––
06. 06 ––––––
07. 07 ––––––
08. 08 ––––––
09. 09 ––––––
10. 10 ––––––
2 To play a music track in the menu,
press Left to enter the folder list
on the left of the screen. Press Up /
Down to highlight a folder and then
press Play/Sel..
[ ITALIAN OPERA]01––––––.
01. CITY JAZZ
02. CLASSICAL
03. MOVIE OST
04. ITALIAN OPERA
05. MUSICAL
06. US POP
07. UK POP
08. HEAVY METAL
09. SONATA
10. RAP
01. 01 ––––––
02. 02 ––––––
03. 03 ––––––
04. 04 ––––––
05. 05 ––––––
06. 06 ––––––
07. 07 ––––––
08. 08 ––––––
09. 09 ––––––
10. 10 ––––––
[ ITALIAN OPERA]08––––––.
01. CITY JAZZ
02. CLASSICAL
03. MOVIE OST
04. ITALIAN OPERA
05. MUSICAL
06. US POP
07. UK POP
08. HEAVY METAL
09. SONATA
10. RAP
01. 01 ––––––
02. 02 ––––––
03. 03 ––––––
04. 04 ––––––
05. 05 ––––––
06. 06 ––––––
07. 07 ––––––
08. 08 ––––––
09. 09 ––––––
10. 10 ––––––
Stopping Playback
Press Stop.
Pausing Playback
1 Press Pause.
2 To return to normal playback, press
Play/Sel..
Displaying Track Information
1 Press Info. during playback.
2 To stop displaying track information,
press Info. again.
Skipping a Track Ahead or Back
Skipping Ahead
Press Next during play back.
• Skip a track each time you press the button.
3 Press Right to enter the fi le list on
the right of the screen. Press Up /
Down to highlight a track and then
press Play/Sel..
Skipping Back
Press Previous during play back.
• When you press the button once midway through
a track, the player returns to the beginning of the
track being played back. The player skips a track
each time you press the button.
PORTABLE DVD PLAYER USER GUIDE
15
Page 16

Kodak and JPEG Picture CDs Playback
Basic Picture CDs Playback
1 Load a Picture CD.
• For Kodak Picture CDs, the DVD player
starts slide show playback.
• For picture CDs with a menu screen, the
menu appears after a few seconds.
2 Press Left to enter the folder list
on the left screen. Press
Down to highlight a folder and then
press
Play/Sel..
[CANADA]001.JPG
01. JAPAN
02. CANADA
03. FRANCE
04. BRAZIL
05. EGYPT
Up /
001. 001
002. 002
003. 003
004. 004
005. 005
006. 006
007. 007
008. 008
009. 009
010. 010
3 Press Right to enter the fi le list
on the right screen. Press
Down to highlight a picture and picture
review is shown on the left screen
[CANADA]001.JPG
Up /
001. 001
002. 002
003. 003
004. 004
005. 005
006. 006
007. 007
008. 008
009. 009
010. 010
.
4 To play picture slide show, press
Play/Sel..
Note:
• Some discs may contain music, picture and
video fi le formats. When the player reads the
disc, Audio CD mode will be selected fi rst.
To select Pictur e CD mode, pr ess Right until the
Picture CD icon is selected and then press
Play/Sel..
• If the disc is placed incorrectly, damaged, or in
unknown format , the screen will appear “UNKNOWN DISC”. If no disc is placed in the tray,
the screen will appear “NO DISC”.
PORTABLE DVD PLAYER USER GUIDE
16
[CANADA]001.JPG
01. JAPAN
02. CANADA
03. FRANCE
04. BRAZIL
05. EGYPT
Select Picture CD icon
001. 001
002. 002
003. 003
004. 004
005. 005
006. 006
007. 007
008. 008
009. 009
010. 010
Stopping Playback
To stop playback and return to the menu
screen, press Stop.
Pausing Playback
1 Press Pause playback.
2 To return to normal playback, press
Play/Sel..
Rotating Pictures
Press Fast Forward during playback to
rotate the picture clockwise by 90° or press
Fast Backward to rotate the picture
counter-clockwise by 90°.
Viewing the Next or Previous Picture
Press Next to view the next picture or
Previous to view the previous picture.
Thumbnail Function
1 Press
Title
.
2 Press Up / Down / Left /
Right to select the preferred picture.
3 Press Play/Sel. to play.
Page 17

MPEG-4 Playback
Basic MPEG-4 Playback
1 Load a disc containing MPEG-4 fi les.
A menu appears on the screen.
2 Press Left to enter the folder list
on the left screen. Press
Down to highlight a folder and then
press
Play/Sel..
[ File Name-1 ]001––––––.
01. File Name-1
02. File Name-2
03. File Name-3
04. File Name-4
05. File Name-5
06. File Name-6
07. File Name-7
08. File Name-8
09. File Name-9
10. File Name-10
Up /
001. 001 –––––
002. 002 –––––
003. 003 –––––
004. 004 –––––
005. 005 –––––
006. 006 –––––
007. 007 –––––
008. 008 –––––
009. 009 –––––
010. 010 –––––
3 Press Right to enter the fi le list
on the right screen. Press Up /
Down to highlight a fi le and then
press Play/Sel..
[ File Name-1 ]001––––––.
01. File Name-1
02. File Name-2
03. File Name-3
04. File Name-4
05. File Name-5
06. File Name-6
07. File Name-7
08. File Name-8
09. File Name-9
10. File Name-10
001. 001 –––––
002. 002 –––––
003. 003 –––––
004. 004 –––––
005. 005 –––––
006. 006 –––––
007. 007 –––––
008. 008 –––––
009. 009 –––––
010. 010 –––––
Stopping Playback
To stop playback and return to the menu
screen, press Stop.
Pausing Playback
1 Press Pause playback.
2 To return to normal playback, press
Play/Sel..
Note:
• Some discs may contain music, picture and
video fi le formats. When the player reads the
disc, Audio CD mode will be selected fi rst. To
select MPEG-4 CD mode, press Right until the
MPEG-4 CD icon is selected and then press
Play/Sel..
[ File Name-1 ]001––––––.
01. File Name-1
02. File Name-2
03. File Name-3
04. File Name-4
05. File Name-5
06. File Name-6
07. File Name-7
08. File Name-8
09. File Name-9
10. File Name-10
Select MPEG-4 CD icon
001. 001 –––––
002. 002 –––––
003. 003 –––––
004. 004 –––––
005. 005 –––––
006. 006 –––––
007. 007 –––––
008. 008 –––––
009. 009 –––––
010. 010 –––––
Note:
• If the disc is placed incorrectly, damaged, or in
unknown format , the screen will appear “UNKNOWN DISC”. If no disc is placed in the tray,
the screen will appear “NO DISC”.
PORTABLE DVD PLAYER USER GUIDE
17
Page 18

OSD Setup
Language Setup
1 Press Setup in stop mode.
2 Press Left / Right to select
LANGUAGE SETUP icon.
LANGUAGE SETUP
OSD
AUDIO
SUBTITLE
MENU
3 Press Up / Down to select an
option and then press Right.
OSD Language
LANGUAGE SETUP
OSD
AUDIO
SUBTITLE
MENU
ENGLISH
GERMAN
SPANISH
FRENCH
PORTUGUESE
ITALIAN
Audio Language
Subtitle Language
LANGUAGE SETUP
OSD
AUDIO
SUBTITLE
MENU
Menu Language
CHINESE
ENGLISH
JAPANESE
FRENCH
SPANISH
PORTUGUESE
GERMAN
OFF
LANGUAGE SETUP
OSD
AUDIO
SUBTITLE
MENU
Press Up / Down to select a
4
preferred language and then press
Play/Sel..
- To leave SETUP MENU, press Setup.
Note: If the language selected is not recorded
on the disc, the player will play the top-priority
language of the disc.
CHINESE
ENGLISH
JAPANESE
FRENCH
SPANISH
PORTUGUESE
ITALIAN
GERMAN
LANGUAGE SETUP
OSD
AUDIO
SUBTITLE
MENU
PORTABLE DVD PLAYER USER GUIDE
18
CHINESE
ENGLISH
JAPANESE
FRENCH
SPANISH
PORTUGUESE
ITALIAN
GERMAN
Page 19

OSD Setup - continued
a
a
a
a
Video Setup
1 Press Setup in stop mode.
2 Press Left / Right to select
VIDEO SETUP icon.
VIDEO SETUP
VIDEO OUTPUT
TV TYPE
TV SYSTEM
Video Output
3 Press Up / Down to select
VIDEO OUTPUT and then press
Right.
VIDEO SETUP
VIDEO OUTPUT
TV TYPE
TV SYSTEM
CVBS
P-SCAN
4 Press Up / Down to select a
preferred option and then press
Play/Sel..
• If you choose “P-Scan”, the following will
show on the screen as a reminder.
If your TV supports P-Scan feature, select
“OK” and press
b
b
If your TV does not support P-Scan feature,
select “NO” and press
- To leave SETUP MENU, press Setup.
Note:
• If you choose P-Scan as the video output setting,
Play/Sel..
Play/Sel..
make sure your TV set supports P-Scan input
feature and the YUV cable be properly connected
to the TV and the portable DVD player.
• If the screen turns black while operating, reboot
this unit to return to CVBS.
TV Type
3 Press Up / Down to select TV
TYPE and then press Right.
VIDEO SETUP
VIDEO OUTPUT
TV TYPE
TV SYSTEM
4:3PS
4:3LB
16:9
4 Press Up / Down to select a
preferred option and then press
Play/Sel..
4:3 Pan Scan : Select “4:3 PanScan”
for a conventional size TV set.
VIDEO SETUP
P_SCAN WARNING
ENABLE PROGRESSIVE
VIDEO OUTPUT
ENSURE YOUR TV SUPPORT
TV TYPE
P_SCAN MODE
TV SYSTEM
IF YOU WANT TO CHANGE TO
P_SCAN PLEASE PRESS OK
- - - - [08]
OK NO
PORTABLE DVD PLAYER USER GUIDE
19
Page 20

OSD Setup - continued
b
b
4:3 Letter Box : Select “4:3 Letter
Box” for a conventional size TV set. Black
bands appear at top and bottom of screen
(letter-box style).
c
c
16:9 Wide : Select “16:9 Wide” for a
wide-screen TV set to played in “FULL” size.
- To leave SETUP MENU, press
Setup.
System Setup
1 Press Setup in stop mode.
2 Press Left / Right to select
SYSTEM SETUP icon.
SYSTEM SETUP
SCREEN SAVER
PARENTAL
PASSWORD
ANGLE MARK
DEFAULT
Screen Saver
3 Press Up / Down to select
SCREEN SAVER and then press
Right.
SYSTEM SETUP
SCREEN SAVER
PARENTAL
PASSWORD
ANGLE MARK
DEFAULT
ON
OFF
4 Press Up / Down to select a
preferred option and then press
Play/Sel..
- To leave SETUP MENU, press
Setup.
Parental
3 Press Up / Down to select
PARENTAL and then press
Right.
SYSTEM SETUP
SCREEN SAVER
PARENTAL
PASSWORD
ANGLE MARK
DEFAULT
1.KID
2.G
3.PG
4.PG-13
5.PG-R
6.R
7.NC-17
8.ADULT
PORTABLE DVD PLAYER USER GUIDE
20
Page 21

OSD Setup - continued
4 Enter 4-digit password and press
Play/Sel..
• Enter factory pre-set password “0000” for
the fi rst time setup.
SYSTEM SETUP
SCREEN SAVER
PARENTAL
PASSWORD
ANGLE MARK
DEFAULT
X
X X X
1.KID
2.G
3.PG
4.PG-13
5.PG-R
6.R
7.NC-17
8.ADULT
5 Press Up / Down to select a
preferred rating and then press
Play/Sel..
- To leave SETUP MENU, press Setup.
Rating Explanations
1. KID: Kid safe; it is safe even for kids.
2. G: General audience; recommended as
acceptable for viewers of all ages.
3. PG: Parental Guidance suggested.
4. PG-13: Material is unsuitable for children
under the age of 13.
5. PG-R: Parental Guidance-restricted;
recommended that parents restrict children
under age 17 from viewing or allow children
to view only when supervised by a parent or
adult guardian.
6. R: Restricted, children under 17 would not
be admitted without an accompanying parent
or adult guardian.
7. NC-17: No children under the age of 17,
not recommended viewing for children under
age 17.
8. ADULT: Adult only.
Note:
• You can use the parental control lock ONLY
with DVD discs featured with the parental lock
function..
• Please keep in mind that discs not encoded with
rating lock protection will play regardless of
rating and content.
Password
3 Press Up / Down to select
PASSWORD and then press
Right.
SYSTEM SETUP
SCREEN SAVER
PARENTAL
PASSWORD
ANGLE MARK
DEFAULT
OLD : _ _ _ _
NEW : _ _ _ _
VERIFY: _ _ _ _
4 Enter the previously set password or
factory pre-set password “0000”.
5 Enter new password.
6 Enter the password again to verify and
then press Play/Sel..
- To leave SETUP MENU, press Setup.
Angle Mark
3 Press Up / Down to select
ANGLE MARK and then press
Right.
SYSTEM SETUP
SCREEN SAVER
PARENTAL
PASSWORD
ANGLE MARK
DEFAULT
ON
OFF
4 Press Up / Down to select a
preferred option and then press
Play/Sel..
- To leave SETUP MENU, press Setup.
PORTABLE DVD PLAYER USER GUIDE
21
Page 22

OSD Setup - continued
Note:
•
Pressing Angle will change camera angles for
movies that support this feature regar dless of whether
the ANGLE MARK feature is “On” or “Off”
.
Default
3 Press Up / Down to select
DEFAULT.
SYSTEM SETUP
SCREEN SAVER
PARENTAL
PASSWORD
ANGLE MARK
DEFAULT
READ
4 Press Right to select READ and
then press Play/Sel..
- To leave SETUP MENU, press Setup.
PORTABLE DVD PLAYER USER GUIDE
22
Page 23

LCD Setup
Panel Setting
1 Press LCD a number of times to
select PANEL.
2 Press Left / Right to choose
a preferred panel setting.
PANEL: <− NORMAL −>
PANEL: <− 4:3 −>
- Press LCD again until the LCD setting box
disappears.
Color Setting
1 Press LCD a number of times to
select COLOR.
2 Press Left / Right to choose
a preferred color setting.
COLOR: <− +3 −>
COLOR: <− +2 −>
COLOR: <− +1 −>
COLOR: <− 0 −>
COLOR: <− -1 −>
COLOR: <− -2 −>
COLOR: <− -3 −>
Brightness Setting
1 Press LCD a number of times to
select BRIGHT.
2 Press Left / Right to choose
a preferred brightness setting.
- Press
BRIGHT: <− +3 −>
BRIGHT: <− +2 −>
BRIGHT: <− +1 −>
BRIGHT: <− 0 −>
BRIGHT: <− -1 −>
BRIGHT: <− -2 −>
BRIGHT: <− -3 −>
LCD again until the LCD setting box
disappears.
LCD Setting
1 Press LCD a number of times to
select LCD.
2 Press Left / Right to choose
“ON” or “OFF“.
LCD: <− OFF −>
LCD: <− ON −>
- Press
disappears.
LCD again until the LCD setting box
- Press LCD again until the LCD setting box
disappears.
PORTABLE DVD PLAYER USER GUIDE
23
Page 24

Troubleshooting
Before requesting service for the DVD Player, check the chart below for a possible cause of the problem
you are ex pe ri enc ing. Some simple checkups or a minor adjustment on your part may eliminate the problem
and restore proper op er a tion.
SYMPTOM (COMMON) REMEDY
No power. • Insert the power plug securely into the power outlet.
• Check if the ON/OFF button on the top of the player is set to on.
• Check if no power at the AC outlet by plugging in another appliance for a test.
The player does not start playback when • Condensation has formed: wait about 1 to 2 hours to allow the player to dry out.
PLAY is pressed. • The player cannot play discs other than DVDs, audio CDs and picture CDs.
• Check if the disc is defective by trying another disc.
• Check the region (local) code.
The player starts playback but stops • The disc may be dirty and may require cleaning.
immediately. • Ensure that the disc is correctly placed in the disc frame.
No picture. • Ensure that the equipment is connected properly.
• Select the same channel and source on the TV as on the player.
No sound. • Ensure that the equipment is connected properly.
Distorted sound. • Ensure that the input settings for the TV and stereo system are proper.
• No sound is heard during still picture (pause) or slow-motion playback.
No audio at Digital Output. • Check the digital connections.
• Check the settings menu to make sure that the digital output is set to on.
•
Distorted picture. • Check the disc for fi ngerprints and clean with a soft cloth, wiping from center to edge.
• Sometimes a small amount of picture distortion may appear. This is not a mal-function.
Completely distorted picture or no color • The disc format is not according to the TV-set used (PAL/NTSC).
in picture.
Picture is distorted during rapid advance • The picture will be somewhat distorted at times: this is normal.
or rapid reverse.
No rapid advance (or rapid reverse) • Some discs may have sections which prohibit rapid advance (or rapid reverse).
playback.
No 4:3 (16:9) picture. • Choose the correct setup “TV Aspect” item.
No operations perform with the remote • Check the batteries are installed with the correct polarities (+ and –).
control. • The batteries are depleted: replace them with new ones.
• Point the remote control unit at the remote control signal sensor and operate.
• Operate the remote control unit at a distance of not more than 6 meters from the
remote control signal sensor.
• Remove the obstacles between the remote control unit and remote control signal sensor.
No subtitles. • Subtitles appear only with discs that contain them.
•
Alternative audio soundtrack (or subtitle) • An alternative language can not be selected may result of no more than one
language available. lan guages cannot be selected.
Angle cannot change. • This function depends on software availability. Even if a disc has a number from
angles recorded, these angles may be recorded for specifi c scenes only.
No sound when connecting to • Check if the disc supports 5.1 Channel.
5.1 Channel speaker • Check if the speaker is properly connected.
• Check if the audio output setting is right.
No key operation (by the DVD Player • Turn the unit off and then back to on. Alternatively, turn off the unit, disconnect
and/or the remote control) is effective. the AC power cord and then re-connect it. (The player may not be operating
properly due to lightning, static electricity or some other external factor.)
Distorted picture or no image • Check if the TV system setting is correct.
• Check If you set output format in “Progressive Scan”, then you have to set
“Com po nent” in the video output setting. The actual output format must match
to the output format setting.
OSD setting • Some setting must be stored by pressing left button.
PORTABLE DVD PLAYER USER GUIDE
24
Check if the audio format of the selected audio language matches your receiver capabilities.
Subtitles are hidden from the TV screen. Press SUBTITLE to display the subtitles.
Page 25

Disc Handling and Maintenance
Handling Precautions
Hold the disc by the edges so the surface will not be soiled with fi nger-
•
prints. (A)
Fingerprints, dirt and scratches can cause skipping and distortion.
Do not write on the label side with a ball-point pen or other writing utensils.
•
Do not use record cleaning sprays, benzine, thinner, static electricity
•
prevention liquids or any other solvent.
Be careful not to drop or bend the disc.
•
Do not install more than 1 disc on the disc tray.
•
Do not try to close the disc tray when the disc is not installed properly.
•
Be sure to store the disc in its exclusive case when not in use.
•
If the surface is soiled (B)
Wipe gently with a soft, damp (water only) cloth.
When wiping discs, always move the cloth from the center hole toward
the outer edge.
(If you wipe the discs using a circular motion, circular scratches are likely
to occur, which will cause noise.)
If the disc is brought from a cold to a warm environment, moisture may
form on the disc
Wipe the moisture off with a soft, dry, lint-free cloth before using the disc.
Improper disc storage
You can damage discs if you store them in the following places:
Areas exposed to direct sunlight
•
Humid or dusty areas
•
Areas directly exposed to a heat outlet or heating appliance
•
Playable disc format
MPEG4, DVD, DVD+RW, DVD+R, DVD-RW, DVD-R, CD-DA, MP3,
•
Mixed CD-DA, JPEG fi le disc and Kodak Picture Disc.
Disc which cannot be played with this player
CD-ROM
•
CVD
•
CD-G
•
Maintenance
Be sure to turn the unit off and disconnect the AC power cord before
•
maintaining the unit.
Wipe this unit with a dry soft cloth.
•
If the surfaces are extremely dirty, wipe clean with a cloth which has
been dipped in a weak soap-and-water solution and wrung out thor-
oughly, and then wipe again with a dry cloth.
Never use alcohol, benzine, thinner, cleaning fl uid or other chemicals.
•
And do not use compressed air to remove dust.
(A)
(B)
PORTABLE DVD PLAYER USER GUIDE
25
Page 26

Rechargeable Battery:
Specifi cations
LPD850
Disk Format. DVD, VCD, CD, CD-R, CD-RW, MP3, Kodak Picture
Video System PAL
Video Decompression MPEG-4, MPEG-2, MPEG-1
Video Output 1.0 Vpp / 75Ω Sync , minus
Aduio:
Audio Characteristic 2-Channel Analog
Analog Output
Frequency Response DVD:48 KHz sampling : 4Hz ¡ª 22 KHz
S / N ratio < = - 65 dB
Dynamic Range < = - 85 dB
Speaker Stereo speakers, 0.5W x 2
Headphone
LCD Display 8.5" wide-screen active-matrix TFT type
Headphone Headphone socket x2
Audio / Video Section AV-Out output socket x1
Power Adaptor :
Line Voltage AC 100 - 240 VAC ± 10% (50/60Hz) Adapter
Power Consumption 15W
Remote Control DC 3V , Infra – red
Dimension 210 x 155 x 43.2 (mm)
Weight 740g (Approx.)
Rechargeable Battery:
Capacity NiMH 3100mAh
Voltage 7.2 V
Charge Time in Full Capacity Approx.4 hours (Note:
Playback Time in Full Capacity Approx. 2.5 hours (Note: Depends on the usage)
Estimate Cycle Life Approx. 180 cycles
PORTABLE DVD PLAYER USER GUIDE
26
Socket
CD
5.1-Channel Digital Output
2.0 V / 10KΩ
96 KHz Sampling : 4Hz
CD : 4Hz
AV-In intput socket x1
P-scan output x1
¡ª 20KHz
6 hours for the fi rst use.)
¡ª 44 KHz
Page 27

Visit Partmaster.co.uk today for the easiest way to buy electrical spares and accessories.
With over 1 million spares and accessories in stock we can deliver direct to your door the
very next day.Visit www.partmaster.co.uk
or call
0870 6001 338
(UK customers only)
Calls charged at National Rate.
 Loading...