

Page 1

Installation /Instruction Manual
Freestanding Dishwasher
GB
LDW60W12N
Installasjons-/Instruksjonsmanual
Frittstående oppvaskmaskin
Installation-/Instruktionsbok
Fristående diskmaskin
Asennus/Käyttöopas
Freestanding-astianpesukone
Installations-/Brugervejledning
Fritstående opvaskemaskine
NO
SE
FI
DK
Page 2

Contents
Safety Warnings ...................................................................................................................................................................7
Unpacking ..........................................................................................................................................................................17
Installation .........................................................................................................................................................................18
Location .........................................................................................................................................................................................................................18
Product Overview ..............................................................................................................................................................23
Front View .....................................................................................................................................................................................................................23
Rear View .......................................................................................................................................................................................................................23
Upper Basket ...............................................................................................................................................................................................................24
Internal View ................................................................................................................................................................................................................24
Lower Basket ................................................................................................................................................................................................................24
Control Panel ...............................................................................................................................................................................................................25
Before Operating ...............................................................................................................................................................26
To Open the Door ......................................................................................................................................................................................................26
To Close the Door .......................................................................................................................................................................................................26
Items Not Suitable for Use in the Dishwasher .................................................................................................................................................26
Adding Detergent Power or Tablet ......................................................................................................................................................................27
Adding Rinse Aid ........................................................................................................................................................................................................28
Adjusting the Rinse Aid Reservoir........................................................................................................................................................................28
Adding Salt ...................................................................................................................................................................................................................29
Adjusting Salt Consumption ..................................................................................................................................................................................30
Loading the Dishwasher ...................................................................................................................................................31
Before Loading the Dishwasher ............................................................................................................................................................................31
Upper Basket ...............................................................................................................................................................................................................32
– Adjusting the Upper Basket .....................................................................................................................................................................32
– Hinged Cup Rack ..........................................................................................................................................................................................32
– Loading the Upper Basket for 9 Place Settings .................................................................................................................................33
Lower Basket ................................................................................................................................................................................................................33
– Hinged Spikes ................................................................................................................................................................................................33
– Loading the Lower Basket for 9 Place Settings ..................................................................................................................................34
Cutlery Basket .............................................................................................................................................................................................................34
Wash Cycle Table ................................................................................................................................................................35
Starting a Wash Cycle ........................................................................................................................................................36
Changing a Programme ....................................................................................................................................................36
At the End of a Programme ...............................................................................................................................................36
Switching O the Unit .......................................................................................................................................................37
Unloading the Dishwasher ...............................................................................................................................................37
Delay Start ..........................................................................................................................................................................37
Half Load ............................................................................................................................................................................37
Cleaning After Use .............................................................................................................................................................38
External Care ................................................................................................................................................................................................................38
– The Door and the Door Seal .....................................................................................................................................................................38
– The Control Panel .........................................................................................................................................................................................38
Internal Care ................................................................................................................................................................................................................38
– Filtering System ............................................................................................................................................................................................38
– Spray Arms ......................................................................................................................................................................................................39
Frost Precaution ................................................................................................................................................................39
Moving the Dishwasher ....................................................................................................................................................39
Maintenance After a Prolonged Period of Non-Operation ............................................................................................39
Hints and Tips ....................................................................................................................................................................40
Technical Problems ...................................................................................................................................................................................................40
Disposal of the Dishwasher ..............................................................................................................................................42
Disposal of Packing Material ............................................................................................................................................42
Specications .....................................................................................................................................................................43
GB
2
Page 3

Innhold
Sikkerhetsadvarsler ............................................................................................................................................................9
Pakke opp ...........................................................................................................................................................................44
Installasjon .........................................................................................................................................................................45
Plassering ......................................................................................................................................................................................................................45
Produktoversikt .................................................................................................................................................................50
Sett forfra ......................................................................................................................................................................................................................50
Sett bakfra ....................................................................................................................................................................................................................50
Øvre kurv ......................................................................................................................................................................................................................51
Sett fra innsiden .........................................................................................................................................................................................................51
Nedre kurv ....................................................................................................................................................................................................................51
Kontrollpanel ...............................................................................................................................................................................................................52
Før du begynner ................................................................................................................................................................53
Åpne døren ..................................................................................................................................................................................................................53
Lukke døren .................................................................................................................................................................................................................53
Gjenstander som ikke egner seg for oppvaskmaskinen ..............................................................................................................................53
Legge til oppvaskpulver eller -tablett ................................................................................................................................................................54
Fylle på glansemiddel ..............................................................................................................................................................................................55
Justere glansemiddelbeholderen ........................................................................................................................................................................55
Fylle på salt ...................................................................................................................................................................................................................56
Justere saltforbruk .....................................................................................................................................................................................................57
Sette inn i oppvaskmaskinen ...........................................................................................................................................58
Før du setter inn i oppvaskmaskinen..................................................................................................................................................................58
Øvre kurv ......................................................................................................................................................................................................................59
– Justere den øvre kurven ............................................................................................................................................................................59
– Hengslet koppstativ ....................................................................................................................................................................................59
– Sette inn 9 kuverter i den øvre kurven .................................................................................................................................................60
Nedre kurv ....................................................................................................................................................................................................................60
– Hengslede spisser ........................................................................................................................................................................................60
– Sette inn 9 kuverter i den nedre kurven ..............................................................................................................................................61
Bestikkurv .....................................................................................................................................................................................................................61
Oppvasktabell....................................................................................................................................................................62
Starte en vaskesyklus ........................................................................................................................................................63
Endre et program...............................................................................................................................................................63
Ved slutten av et program ................................................................................................................................................63
Slå av enheten ....................................................................................................................................................................64
Ta ut av oppvaskmaskinen ...............................................................................................................................................64
Forsinket start ....................................................................................................................................................................64
Halv oppvask .....................................................................................................................................................................64
Rengjøring etter bruk .......................................................................................................................................................65
Utvendig vedlikehold ...............................................................................................................................................................................................65
– Døren og dørpakningen ............................................................................................................................................................................65
– Kontrollpanelet .............................................................................................................................................................................................65
Innvendig ettersyn ....................................................................................................................................................................................................65
– Filtreringssystem ..........................................................................................................................................................................................65
– Spylearmer......................................................................................................................................................................................................66
Forholdsregler ved frost ...................................................................................................................................................66
Flytte oppvaskmaskinen ...................................................................................................................................................66
Vedlikehold etter en lang periode uten bruk ..................................................................................................................66
Råd og tips .........................................................................................................................................................................67
Tekniske problemer ...................................................................................................................................................................................................67
Avhending av oppvaskmaskinen .....................................................................................................................................69
Avhending av emballasje..................................................................................................................................................69
Spesikasjoner ..................................................................................................................................................................70
NO
3
Page 4

Innehållsförteckning
Säkerhetsvarningar ...........................................................................................................................................................11
Packa upp ...........................................................................................................................................................................71
Installation .........................................................................................................................................................................72
Plats .................................................................................................................................................................................................................................72
Produktöversikt .................................................................................................................................................................77
Vy framifrån ..................................................................................................................................................................................................................77
Baksida ...........................................................................................................................................................................................................................77
Övre korg ......................................................................................................................................................................................................................78
Insidan ...........................................................................................................................................................................................................................78
Nedre korgen ...............................................................................................................................................................................................................78
Kontrollpanel ...............................................................................................................................................................................................................79
Innan användning .............................................................................................................................................................80
För att öppna luckan .................................................................................................................................................................................................80
För att stänga luckan ................................................................................................................................................................................................80
Föremål som inte är lämpliga att använda i diskmaskinen ........................................................................................................................80
Lägga till diskmedel eller diskmedelstablett ...................................................................................................................................................81
Sköljmedel ....................................................................................................................................................................................................................82
Inställning sköljmedelsbehållaren .......................................................................................................................................................................82
Lägga till salt ................................................................................................................................................................................................................83
Inställning av saltförbrukningen ..........................................................................................................................................................................84
Ladda diskmaskinen .........................................................................................................................................................85
Innan diskmaskinen laddas ....................................................................................................................................................................................85
Övre korg ......................................................................................................................................................................................................................86
– Justering av övre korgen ...........................................................................................................................................................................86
– Fällbart koppställ ..........................................................................................................................................................................................86
– Ladda den övre korgen med 9 kuvert ..................................................................................................................................................87
Nedre korgen ...............................................................................................................................................................................................................87
– Nedfällbara piggar .......................................................................................................................................................................................87
– Ladda den nedre korgen med 9 kuvert ...............................................................................................................................................88
Bestickkorg ...................................................................................................................................................................................................................88
Diskcykeltabell ..................................................................................................................................................................89
Start av diskcykeln ............................................................................................................................................................90
Byte av program ................................................................................................................................................................90
Vid slutet av programmet .................................................................................................................................................90
Stänga av enheten .............................................................................................................................................................91
Urplockning av diskmaskinen .......................................................................................................................................... 91
Fördröjd start .....................................................................................................................................................................91
Halvfullt ..............................................................................................................................................................................91
Rengöring efter användning ............................................................................................................................................92
Yttre vård.......................................................................................................................................................................................................................92
– Luckan och lucktätningen ........................................................................................................................................................................92
– Kontrollpanelen ............................................................................................................................................................................................92
Inre vård ........................................................................................................................................................................................................................92
– Filtreringssystem ..........................................................................................................................................................................................92
– Sprayarmar .....................................................................................................................................................................................................93
Frostskydd ..........................................................................................................................................................................93
Flyttning av diskmaskinen ...............................................................................................................................................93
Underhåll efter en lång period utan användning ...........................................................................................................93
Tips och råd ........................................................................................................................................................................94
Tekniska problem .......................................................................................................................................................................................................94
Avyttring av diskmaskinen ...............................................................................................................................................96
Avyttring av förpackningsmaterial ..................................................................................................................................96
Specikationer...................................................................................................................................................................97
SE
4
Page 5

Sisältö
Turvallisuusvaroitukset ....................................................................................................................................................13
Pakkauksesta purkaminen ...............................................................................................................................................98
Asennus ..............................................................................................................................................................................99
Paikka .............................................................................................................................................................................................................................99
Tuotteen yleiskatsaus .....................................................................................................................................................104
Näkymä edestä ........................................................................................................................................................................................................ 104
Näkymä takaa ........................................................................................................................................................................................................... 104
Yläkori ......................................................................................................................................................................................................................... 105
Näkymä sisältä ......................................................................................................................................................................................................... 105
Alakori ......................................................................................................................................................................................................................... 105
Ohjauspaneeli .......................................................................................................................................................................................................... 106
Ennen käyttöä ..................................................................................................................................................................107
Luukun avaaminen ................................................................................................................................................................................................. 107
Luukun sulkeminen ................................................................................................................................................................................................107
Astianpesukoneessa käytettäväksi sopimattomat kohteet ..................................................................................................................... 107
Pesuaineen tai pesuainetabletin lisääminen ................................................................................................................................................ 108
Huuhtelukirkasteen lisääminen ......................................................................................................................................................................... 109
Huuhtelukirkastesäiliön säätö ............................................................................................................................................................................ 109
Suolan lisääminen .................................................................................................................................................................................................. 110
Suolan kulutuksen säätö ...................................................................................................................................................................................... 111
Astianpesukoneen täyttö ...............................................................................................................................................112
Ennen astianpesukoneen täyttöä ..................................................................................................................................................................... 112
Yläkori ......................................................................................................................................................................................................................... 113
– Yläkorin säätö ............................................................................................................................................................................................. 113
– Kaatuva kuppiteline ................................................................................................................................................................................. 113
– Yläkorin täyttö 9-paikkaisella asetuksella ......................................................................................................................................... 114
Alakori ......................................................................................................................................................................................................................... 114
– Kaatuvat pidikkeet .................................................................................................................................................................................... 114
– Alakorin täyttö 9-paikkaisella asetuksella ........................................................................................................................................ 115
Ruokailuvälinekori .................................................................................................................................................................................................. 115
Pesuohjelmataulukko .....................................................................................................................................................116
Pesuohjelman käynnistäminen ......................................................................................................................................117
Pesuohjelman muuttaminen ..........................................................................................................................................117
Pesuohjelman lopussa ....................................................................................................................................................117
Koneen sammuttaminen ................................................................................................................................................118
Astianpesukoneen tyhjentäminen ................................................................................................................................118
Viivekäynnistys ................................................................................................................................................................118
Puolitäyttö .......................................................................................................................................................................118
Puhdistus käytön jälkeen ...............................................................................................................................................119
Ulkopuolen ylläpito ................................................................................................................................................................................................119
– Ovi ja oven tiiviste ..................................................................................................................................................................................... 119
– Ohjauspaneeli ............................................................................................................................................................................................ 119
Sisäpuolen ylläpito ................................................................................................................................................................................................. 119
– Suodatusjärjestelmä ................................................................................................................................................................................ 119
– Suihkuvarret ................................................................................................................................................................................................ 120
Jäätymisvarotoimet ........................................................................................................................................................120
Astianpesukoneen siirtäminen ......................................................................................................................................120
Kunnossapito pitkän käyttämättömyysjakson jälkeen ...............................................................................................120
Vihjeitä ja vinkkejä ..........................................................................................................................................................121
Tekniset ongelmat ..................................................................................................................................................................................................121
Astianpesukoneen hävittäminen ...................................................................................................................................123
Pakkausmateriaalin hävittäminen .................................................................................................................................123
Tekniset tiedot .................................................................................................................................................................124
FI
5
Page 6

Indholdsfortegnelse
Sikkerhedsadvarsler .........................................................................................................................................................15
Udpakning .......................................................................................................................................................................125
Installation .......................................................................................................................................................................126
Placering .................................................................................................................................................................................................................... 126
Produktoversigt ...............................................................................................................................................................131
Set forfra ..................................................................................................................................................................................................................... 131
Set bagfra ...................................................................................................................................................................................................................131
Øverste kurv .............................................................................................................................................................................................................. 132
Indeni .......................................................................................................................................................................................................................... 132
Nederste kurv ........................................................................................................................................................................................................... 132
Kontrolpanel ............................................................................................................................................................................................................. 133
Før brug ............................................................................................................................................................................134
Sådan åbnes lågen ................................................................................................................................................................................................. 134
Sådan lukkes lågen ................................................................................................................................................................................................. 134
Emner, der ikke er egnede til vask i opvaskemaskinen ............................................................................................................................. 134
Tilføjelse af opvaskemiddel eller opvaskemiddeltablet............................................................................................................................135
Tilføjelse af skyllemiddel ...................................................................................................................................................................................... 136
Justering af skyllemiddelbeholder ................................................................................................................................................................... 136
Tilføjelse af salt ......................................................................................................................................................................................................... 137
Justering af saltforbrug .........................................................................................................................................................................................138
Fyldning af opvaskemaskinen........................................................................................................................................139
Før opvaskemaskinen fyldes ...............................................................................................................................................................................139
Øverste kurv .............................................................................................................................................................................................................. 140
– Justering af den øverste kurv................................................................................................................................................................ 140
– Hængslet hylde til kopper ......................................................................................................................................................................140
– Fyldning af den øverste kurv til 9 kuverter ...................................................................................................................................... 141
Nederste kurv ........................................................................................................................................................................................................... 141
– Hængslede spyd ........................................................................................................................................................................................ 141
– Fyldning af den nederste kurv til 9 kuverter ................................................................................................................................... 142
Bestikkurv .................................................................................................................................................................................................................. 142
Skema over vaskecyklus .................................................................................................................................................143
Start af vaskecyklus.........................................................................................................................................................144
Skift af program ...............................................................................................................................................................144
Ved programmets afslutning .........................................................................................................................................144
Slukning af enheden .......................................................................................................................................................145
Tømning af opvaskemaskinen........................................................................................................................................145
Udskudt start ...................................................................................................................................................................145
Halv opvask ......................................................................................................................................................................145
Rengøring efter brug ......................................................................................................................................................146
Udvendig pleje ........................................................................................................................................................................................................ 146
– Låge og lågepakning ............................................................................................................................................................................... 146
– Kontrolpanelet ........................................................................................................................................................................................... 146
Indvendig pleje ........................................................................................................................................................................................................146
– Filtersystem ................................................................................................................................................................................................. 146
– Spray-arme .................................................................................................................................................................................................. 147
Frostsikring ......................................................................................................................................................................147
Flytning af opvaskemaskinen ........................................................................................................................................147
Vedligeholdelse efter længere periode ude af drift .....................................................................................................147
Gode råd ...........................................................................................................................................................................148
Tekniske problemer ................................................................................................................................................................................................148
Kassering af opvaskemaskinen ......................................................................................................................................150
Kassering af emballage ...................................................................................................................................................150
Specikationer.................................................................................................................................................................151
DK
6
Page 7

Safety Warnings
GB
For your continued safety and to reduce the risk of injury or electric shock, please follow all the safety
precautions listed below.
• Read all instructions carefully before using the dishwasher and keep them for future reference.
• Retain the manual. If you pass the dishwasher onto a third party, make sure to include this
manual.
• Keep ventilation openings in the dishwasher enclosure clear of obstructions.
• Choose a location for your dishwasher away from heat sources such as radiators or res.
• Children should be supervised to ensure that they do not play with the dishwasher.
• Keep mains cable out of reach from children.
• This appliance can be used by children aged from 8 years and above and persons with reduced
physical, sensory or mental capabilities or lack of experience and knowledge if they have been
given supervision or instruction concerning use of the appliance in a safe way and understand the
hazards involved. Children shall not play with the appliance. Cleaning and user maintenance shall
not be made by children without supervision.
• Keep children away from detergents and rinse aids. These may cause chemical burns in the
mouth, throat and eyes or asphyxiation.
• Keep children away from the dishwasher when the door is open.
• Switch o and disconnect from the mains supply before tting or removing tools/attachments,
after use and before cleaning.
• Keep your ngers away from moving parts and tted attachments.
• Never use a damaged machine.
• If the mains cable is damaged, it must be replaced by the manufacturer, its service agent or a
qualied technician in order to avoid a hazard.
• Keep the mains cable and plug away from water.
• Never exceed the maximum capacities.
• 2 people are required to lift this dishwasher.
• Only use the dishwasher for its intended domestic use.
• This appliance is intended for indoor household use and similar applications such as:
– farm houses and by clients in hotels, motels and other residential type environments;
– bed and breakfast type environments;
– catering and similar non-retail applications.
WARNING
IT IS HAZARDOUS FOR ANYONE OTHER THAN AUTHORISED SERVICE PERSONNEL TO CARRY
OUT SERVICING OF REPAIRS WHICH INVOLVE THE REMOVAL OF COVERS.
TO AVOID THE RISK OF AN ELECTRICAL SHOCK DO NOT ATTEMPT REPAIRS YOURSELF.
• Do not sit or stand on the door or dish rack.
• Do not move your dishwasher by holding the door or its edges. Hold the dishwasher around its
sides or base when moving it.
• Do not touch the heating element during or immediately after use.
7
Page 8

• Do not operate your dishwasher unless all enclosure panels are properly in place. Open the door
very carefully when there is a programme running, as there is a risk of hot water spraying out of
the appliance.
• Do not place any heavy objects on the open door. The appliance could tip.
• When loading items to be washed:
• Locate sharp items so that they will not damage the door seal;
• Warning: Knives and other utensils with sharp points must be loaded in the basket with the
points downwards or placed horizontally.
• Do not allow plastic items to come into contact with heating element.
• Check that the detergent receptacle is empty after completion of the wash cycle.
• Do not wash plastic items unless they are marked dishwasher safe or equivalent.
• Use only detergent and rinse aids designed for an automatic dishwasher.
• Other means for disconnection from the supply must be incorporated in the xed wiring with at
least 3mm contact separation in all poles.
• The door should not be left in the open position since this could present a tripping hazard.
• For energy saving, always remember to switch the dishwasher o when you have nished using
it. The dishwasher should not be left unattended when in use.
• Remove the door to the washing compartment when removing an old dishwasher from service or
discarding it.
• During installation, the power supply cord must not be excessively or dangerously bent or
attened.
• Do not tamper with controls.
• The appliance is to be connected to the water mains using new hose sets.
• The maximum number of place settings to be washed is 12.
• The maximum permissible inlet water pressure is 1Mpa, and the minimum permissible inlet
water pressure is 0.04Mpa.
Earthing Instructions
WARNING: THIS APPLIANCE MUST BE EARTHED.
• This appliance is equipped with a mains cable having an equipment-earthing
conductor and an earthing plug.
• The plug must be plugged into an appropriate outlet that is installed and earthed in
accordance with local standards and requirements.
• Improper connection of the equipment-earthing conductor could result in a risk of
electric shock.
• The wires in the cord are coloured as follows:
• Green and Yellow = Earth,
• Blue = Neutral,
• Brown = Live.
• Check with a qualied electrician or service representative if you are in doubt whether
the appliance is properly earthed or the plug does not t correctly.
• Never modify the plug provided with the appliance.
8
Page 9

Sikkerhetsadvarsler
NO
For din fortsatte sikkerhet, samt for å redusere risikoen for elektrisk støt, vennligst følg alle
sikkerhetsinstruksene som er listet opp under.
• Les alle anvisningene nøye før du bruker oppvaskmaskinen og legg dem til side for senere
oppslag.
• Ta vare på håndboken. Hvis du overleverer oppvaskmaskinen til noen andre, må du sørge for at
denne håndboken følger med.
• Hold ventilasjonsåpningene rundt oppvaskmaskinen fri for hindringer.
• Plasser oppvaskmaskinen på en at overate unna varmekilder som varmeovner og åpne
ammer.
• Barn må overvåkes for å unngå at de leker med oppvaskmaskinen.
• Hold strømledningen utenfor barns rekkevidde.
• Dette apparatet kan brukes av barn fra og med 8 år og personer med reduserte fysiske-,
sensoriske- eller mentale evner eller mangel på erfaring og kunnskap hvis de er under tilsyn eller
mottar anvisning om bruk av apparatet på en sikker måte og forstår farene dette innebærer. Barn
må ikke leke med apparatet. Rengjøring og normalt vedlikehold må ikke utføres av barn med
mindre de er eldre enn 8 år og under tilsyn. Barn må ikke foreta rengjøring og vedlikehold uten
tilsyn.
• Hold barn unna vaskemidler og glansemidler. Disse kan forårsake kjemiske brannsår i munn, hals
og øyne eller kvelning.
• Hold barn unna oppvaskmaskinen når døren er åpen.
• Slå av og koble fra stikkontakten før montering eller erning av verktøy/tillegg, etter bruk og før
rengjøring.
• Hold ngrene unna deler i bevegelse og montert tilbehør.
• Bruk aldri en skadet maskin.
• Hvis strømledningen er skadet, må den skiftes av produsenten, av produsentens
servicerepresentant eller av en kvalisert tekniker for å unngå fare.
• Hold strømledningen og støpslet unna vann.
• Overstig aldri maksimal kapasitet.
• Det kreves to personer for å løfte denne oppvaskmaskinen.
• Denne oppvaskmaskinen må kun brukes som tilsiktet i husholdning.
• Apparatet er kun beregnet på vanlig innendørs husholdningsbruk og lignende bruksområder som:
– bondegårder og i kjøkken som er tilgjengelige for hotellgjester, moteller og lignende
overnattingssteder;
– typiske bed & breakfast-etablissementer;
– catering og steder som ikke har en butikkfunksjon.
ADVARSEL
DET ER FARLIG FOR ALLE ANDRE ENN AUTORISERT SERVICEPERSONELL Å UTFØRE SERVICE
ELLER REPARASJONER SOM INNEBÆRER FJERNING AV DEKSLER.
FOR Å HINDRE ELEKTRISK STØT MÅ DU IKKE FORSØKE Å REPARERE SELV.
9
Page 10

• Ikke sitt eller stå på døren eller stativet.
• Ikke ytt oppvaskmaskinen ved å holde i døren eller dørkantene. Hold oppvaskmaskinen rundt
sidene eller i sokkelen når den yttes.
• Ikke ta på varmeelementet under eller straks etter bruk.
• Ikke bruk oppvaskmaskinen med mindre alle paneler er satt riktig på plass. Vær meget forsiktig
hvis du må åpne døren mens et program kjører, da det er fare for at varmt vann spruter ut av
maskinen.
• Ikke sett tunge gjenstander på den åpne døren. Apparatet kan velte.
• Når du setter inn gjenstander som skal vaskes:
• Plasser skarpe gjenstander slik at de ikke skader dørpakningen,
• Advarsel: Kniver og andre redskaper med skarpe kanter må settes i kurven med spissen ned eller
legges horisontalt.
• Ikke la plastgjenstander komme i kontakt med varmeelementet.
• Kontroller at vaskemiddelrommet er tomt etter at vaskesyklusen er ferdig.
• Ikke vask plastgjenstander med mindre de er merket som oppvaskmaskinsikre eller tilsvarende.
• Bruk kun vaskemidler og glansemidler som er ment for en automatisk oppvaskmaskin.
• Andre måter å koble fra strømforsyningen må være bygd inn i ledningsnettet med minst 3 mm
kontaktatskillelse i alle poler.
• Døren må ikke stå åpen da noen kan snuble i den.
• For å spare strøm, må du huske på alltid å slå av oppvaskmaskinen når du er ferdig med den.
Oppvaskmaskinen må ikke etterlates uten tilsyn når den er i bruk.
• Fjern døren til oppvaskrommet når du slutter å bruke en gammel oppvaskmaskin eller kaster den.
• Strømledningen må ikke bøyes eller klemmes for mye under installasjonen.
• Ikke tukle med kontrollene.
• Apparatet må kobles til vannledningen med et nytt slangesett.
• Det maksimale antallet kuverter som kan vaskes er 12.
• Det maksimalt tillatte inngående vanntrykket er 1 MPa, og det minimalt tillatte vanntrykket er
0,04 MPa.
10
Anvisninger om jording
ADVARSEL: DETTE APPARATET MÅ JORDES.
• Dette apparatet er utstyrt med en strømledning som har en jordleder og et jordet
støpsel.
• Støpslet må kobles til en passende stikkontakt som er installert og jordet i henhold til
lokale standarder og krav.
• Feil tilkobling av jordlederen kan føre til elektrisk støt.
• Ledningene i kabelen har følgende farger:
• Grønn og gul = jord,
• Blå = spenningsførende (nøytral (N) i et TN-system),
• Brun = spenningsførende (fase (L) i et TN-system).
• Spør en kvalisert elektriker eller servicerepresentant hvis du er i tvil om apparatet er
korrekt jordet eller hvis støpslet ikke passer.
• Støpslet som følger med apparatet, må ikke modiseres.
Page 11

Säkerhetsvarningar
SE
För din egen säkerhet och för att minska risken för skador eller elektriska stötar, följ alla
säkerhetsanvisningar nedan.
• Läs noggrant igenom alla instruktioner innan du börjar använda diskmaskinen och spara dem för
framtida bruk.
• Spara bruksanvisningen. Om du överlämnar diskmaskinen till en tredje part se till att denna
manual medföljer.
• Se till att diskmaskinens ventilationsöppningar inte är igentäppta.
• Välj en plats för diskmaskinen som inte är i närheten av värmekällor som element eller öppen eld.
• Barn bör övervakas så att de inte leker med diskmaskinen.
• Håll sladden utom räckhåll för barn.
• Denna apparat kan användas av barn som är minst 8 år och av personer med reducerad fysisk,
sensorisk eller mental förmåga, eller personer utan erfarenhet och kunskap om de är under
uppsikt eller har fått instruktioner för att använda produkten på ett säkert sätt och förstår farorna
som kan uppstå. Barn skall inte leka med apparaten. Rengöring och användarunderhåll skall inte
utföras av barn under 8 år och under uppsikt. Rengöring och användarunderhåll ska inte utföras
av barn utan tillsyn.
• Förvara diskmedlet och sköljmedlet utom räckhåll för barn. Dessa kan orsaka kemiska
brännskador i munnen, halsen och ögonen eller kvävning.
• Håll barnen borta från diskmaskinen när luckan är öppen.
• Stäng av och koppla ifrån elförsörjningen innan du ansluter eller tar bort verktyg/tillsatser, efter
användning och före rengöring.
• Stoppa inte in ngrarna i rörliga delar eller monterade tillsatser.
• Använd aldrig en skadad maskin.
• Om medföljande sladd är skadad måste den bytas ut av tillverkaren, dess serviceombud eller en
kvalicerad tekniker för att undvika faror.
• Håll enheten, nätsladden och kontakten undan från vatten.
• Överskrid aldrig maxkapaciteten.
• 2 personer krävs för att lyfta diskmaskinen.
• Använd endast diskmaskinen för dess avsedda användning i hemmet.
• Den här apparaten är avsedd för användning i hushåll inomhus samt:
– lantbruk och gäster på hotell, motell och andra typer av boendemiljöer;
– t.ex. bed and breakfast;
– catering och liknande icke-återförsäljarändamål.
VARNING
DET ÄR FARLIGT FÖR ALLA UTOM BEHÖRIG SERVICEPERSONAL ATT UTFÖRA REPARATIONER
SOM KRÄVER ÖPPNANDE AV SKYDD.
FÖRSÖK INTE REPARERA SJÄLV, FÖR ATT UNDVIKA RISK FÖR ELCHOCK.
• Sitt inte eller stå på luckan eller diskstället.
• Flytta inte diskmaskinen genom att hålla i luckan eller dess kanter. Håll diskmaskinen runt sidorna
eller basen när den ska yttas.
11
Page 12

• Vidrör inte värmeelementen under eller direkt efter användning.
• Använd inte diskmaskinen såvida inte allt omslutande hölje nns på plats. Öppna luckan mycket
försiktigt när programmet körs eftersom det nns risk för att hett vatten sprutar ut ur apparaten.
• Placera inte tunga föremål på den öppna luckan. Apparaten kan tippa.
• När föremål laddas som skall diskas:
• Placera vassa föremål så att de inte skadar luckans tätning.
• Varning: Knivar och andra redskap med vassa spetsar skall placeras i korgen med spetsen nedåt
eller placeras horisontellt.
• Låt inte plastföremål komma i kontakt med värmeelementet.
• Kontrollera att diskmedelsfacket är tomt när diskningen är avslutad.
• Diska inte plastföremål såvida inte de är märkta att de är diskmaskinssäkra eller liknande.
• Använd endast diskmedel och sköljmedel som skapats för en automatisk diskmaskin.
• Andra sätt att koppla bort från elnätet måste inkorporeras i det fasta ledningsnätet med minst 3
mm kontaktseparation i alla poler.
• Luckan bör inte lämnas öppen eftersom det nns risk att man snubblar över den.
• För att spara energi ska du alltid komma ihåg att stänga av diskmaskinen när du använt den
färdigt. Diskmaskinen bör inte lämnas oövervakad när den är i drift.
• Ta bort luckan när diskmaskinen tas ur bruk eller den skall kastas.
• Under installationen får inte elkabeln böjas överdrivet mycket eller på ett farligt sätt eller plattas
till.
• Mixtra inte med kontrollerna.
• Apparaten skall anslutas till vattenledningen med ny slanguppsättning.
• Maximalt kan 12 kuvert diskas i maskinen.
• Maximalt tillåtet ingående vattentryck är 1Mpa och minimum tillåtet ingående vattentryck är
0,04Mpa.
12
Jordanslutningsinstruktioner
VARNING: DENNA UTRUSTNING MÅSTE ANSLUTAS TILL JORD.
• Denna produkt är utrustad med en sladd med jordledare och jord kontakt.
• Kontakten måste anslutas till lämpligt uttag installerat och jordat i enlighet med lokala
standarder och krav.
• Felaktig anslutning av utrustningens jordledare kan innebära risk för elektriska stötar.
• Ledningarna i sladden är har följande färger:
• grön och gul = jord,
• Blå=neutral
• Brun=ström.
• Rådfråga behörig elektriker eller servicerepresentant om du är osäker på om
utrustningen är ordentligt jordad.
• Modiera aldrig kontakten som medföljer utrustningen.
Page 13

Turvallisuusvaroitukset
FI
Oman turvallisuutesi tähden ja vahinkojen tai sähköiskujen vaaran vähentämiseksi tulee noudattaa
alla annettuja turvallisuusohjeita.
• Lue kaikki ohjeet huolellisesti ennen astianpesukoneen käyttämistä ja säilytä ne myöhempää
käyttöä varten.
• Säilytä käyttöopas. Jos luovutat astianpesukoneen kolmannelle osapuolelle, varmista, että tämä
käyttöopas seuraa mukana.
• Pidä astianpesukoneen tuuletusaukot vapaana kaikista esteistä.
• Valitse astianpesukoneelle paikkaa loitolla lämmönlähteistä kuten lämpöpatteri tai avotuli.
• Lapsia on valvottava, jotta varmistetaan, etteivät he leiki astianpesukoneella.
• Pidä virtajohto poissa lasten ulottuvilta.
• Tätä laitetta saavat käyttää yli 8-vuotiaat ja sellaiset henkilöt, joiden fyysiset, aistimelliset tai
henkiset kyvyt ovat alentuneet tai joilla ei ole kokemusta tai tietoutta laitteen käytöstä, jos heitä
valvotaan ja he saavat ohjeet laitteen turvalliseen käyttöön ja he ymmärtävät, mitä vaaroja
laitteen käyttöön liittyy. Lapset eivät saa leikkiä laitteella. Vain yli 8-vuotiaat lapset saava
puhdistaa laitteen ja suorittaa käyttäjän kunnossapitotehtäviä aikuisen valvonnassa. Lapset eivät
saa suorittaa puhdistamista ja kunnossapitoa ilman valvontaa.
• Älä anna pesuaineiden ja huuhtelukirkasteiden joutua lasten käsiin. Ne voivat aiheuttaa
kemiallisia palovammoja suuhun, kurkkuun tai silmiin tai johtaa tukehtumiseen.
• Pidä lapset loitolla astianpesukoneesta, kun luukku on auki.
• Sammuta ja irrota virtapistoke pistorasiasta ennen kuin lisäät tai poistat työkaluja tai
lisävarusteita sekä käytön jälkeen ja ennen puhdistamista.
• Älä koske liikkuviin osiin tai kiinnitettyihin lisävarusteisiin.
• Älä koskaan käytä vahingoittunutta laitetta.
• Jos virtajohto on vaurioitunut, valmistajan tai huoltoedustajan tai pätevän asentajan täytyy
vaihtaa se vaaran välttämiseksi.
• Pidä virtajohto ja pistoke poissa vedestä.
• Älä koskaan ylitä maksimikapasiteettia.
• Tämän astianpesukoneen nostamiseen tarvitaan kaksi henkilöä.
• Käytä astianpesukonetta vain sen tarkoitettuun kotitalouskäyttöön.
• Tämä laite on tarkoitettu kotitalouksien sisäkäyttöön ja vastaaviin sovelluksiin, kuten:
– maataloissa ja asiakkaiden käytössä hotelleissa, motelleissa ja muissa majoituslaitoksissa;
– majoitus- ja aamiainen -tyyppisissä majoituslaitoksissa;
– catering- ja vastaavissa ei vähittäismyyntiin tarkoitetuissa käytöissä.
VAROITUS
AINOASTAAN VALTUUTETUT HUOLTOHENKILÖT VOIVAT SUORITTAA LAITTEEN SUOJAKUORTEN
POISTAMISTA VAATIVIA KORJAUSTOIMENPITEITÄ.
VAARATILANTEIDEN JA SÄHKÖISKUN VAARAN VÄLTTÄMISEKSI ÄLÄ YRITÄ ITSE KORJATA
LAITETTA.
• Älä istu tai seiso luukun tai astiatelineen päällä.
13
Page 14

• Älä siirrä astianpesukonetta pitämällä kiinni ovesta tai sen reunoista. Pidä astianpesukoneesta
kiinni sivuilta siirtäessäsi sitä.
• Älä kosketa kuumennuselementtiä käytön aikana tai heti sen jälkeen.
• Älä käytä astianpesukonetta, elleivät kaikki suojakannet ole paikoillaan. Avaa luukku varovasti,
kun pesuohjelma on käynnissä, sillä laitteesta saattaa roiskua ulos kuumaa vettä.
• Älä aseta mitään painavia esineitä avoimen luukun päälle. Laite saattaa kaatua.
• Pestäviä kohteita lisättäessä:
• Sijoita terävät kohteet niin, etteivät ne vahingoita luukun tiivisteitä;
• Varoitus: Veitset ja muut teräväkärkiset keittiövälineet on asetettava koriin kärki alaspäin tai
asetettava vaaka-asentoon.
• Älä päästä muoviesineitä kosketuksiin kuumennuselementin kanssa.
• Tarkista, että pesuainelokero on tyhjä pesuohjelman suorittamisen jälkeen.
• Älä pese muoviesineitä, jollei niitä ole merkitty konepesunkestäviksi tai vastaavasti.
• Käytä vain automaattiselle astianpesukoneelle tarkoitettuja pesuaineita ja huuhtelukirkasteita.
• Muut laitteen virransyötöstä irrottamisratkaisut on liitettävä kiinteällä johdotuksella vähintään 3
mm:n kontaktivälillä kaikilla navoilla.
• Luukkua ei saa jättää puoliksi auki, sillä se voi johtaa laitteen kaatumisvaaraan.
• Muista aina energian säästämiseksi kytkeä astianpesukone pois päältä, kun et enää käytä sitä.
Astianpesukonetta tulee pitää aina silmällä, kun sitä käytetään.
• Irrota pesuosaston luukku, kun poistat vanhan astianpesukoneen pois käytöstä.
• Asennuksen aikana virtakaapeli ei saa taipua liikaa tai vaarallisesti eikä litistyä.
• Älä peukaloi säätimiä.
• Laite on liitettävä vesijohtoverkkoon uusilla letkusarjoilla.
• Pesupaikka-asetusten enimmäismäärä on 12.
• Suurin sallittu tulovedenpaine on 1 Mpa, ja pienin sallittu 0,04 Mpa.
14
Maadoitusohjeet
VAROITUS: TÄMÄ LAITE ON MAADOITETTAVA.
• Tässä laitteessa on maadoittava virtajohto ja maadoittava pistoke.
• Pistoke on kytkettävä sopivaan pistorasiaan, joka on asennettu ja maadoitettu
paikallisten standardien ja vaatimusten mukaisesti.
• Maadoituksen virheellinen kytkentä voi aiheuttaa sähköiskun vaaran.
• Johtojen värimerkinnät ovat seuraavat:
• Vihreä ja keltainen = suojamaa,
• Sininen = nolla,
• Ruskea = vaihejohdin.
• Jos olet epävarma laitteen oikeasta maadoituksesta tai jos pistoke ei sovi oikein
pistorasiaan, tarkistuta asia pätevällä sähköteknikolla tai huollolla.
• Älä koskaan muokkaa laitteen mukana tullutta pistoketta.
Page 15

Sikkerhedsadvarsler
DK
For din fortsatte sikkerhed og for at reducere risikoen for skader eller elektrisk stød bedes du følge
angivelserne herunder.
• Læs omhyggeligt alle anvisninger, inden opvaskemaskinen bruges, og gem dem til senere
reference.
• Gem brugervejledningen. Hvis du giver opvaskemaskinen videre til tredjemand, skal du huske
også at give vedkommende brugsvejledningen.
• Opvaskemaskinens ventilationshuller skal holdes fri og uhindrede.
• Vælg en placering for opvaskemaskinen, der ikke er for tæt på varmekilder som radiatorer eller
åben ild.
• Børn skal være under opsyn for at sikre at de ikke leger med opvaskemaskinen.
• Hold el-ledningen væk fra børn.
• Dette apparat må kun bruges af børn over 8 år og personer med nedsatte fysiske, sensoriske
eller mentale evner, eller mangel på erfaring eller viden, hvis de er under opsyn eller er blevet
instrueret i hvordan dette apparat bruges sikkert og forstår risikoen ved at bruge det. Børn
må ikke lege med apparatet. Rengøring og vedligeholdelsesarbejde må ikke udføres af børn,
medmindre de er over 8 år og er under opsyn. Rengøring og vedligeholdelsesarbejde må ikke
udføres at børn, medmindre de er under opsyn.
• Hold opvaskemiddel og skyllemiddel udenfor børns rækkevidde. Midlerne kan medføre kemiske
forbrændinger i mund, svælg og øjne eller kvælning.
• Hold børn på afstand af opvaskemaskinen når lågen er åben.
• Sluk og træk stikket ud af stikkontakten, inden du anbringer eller erner redskaber/tilbehør, efter
brug og før rengøring.
• Hold ngrene væk fra bevægelige dele og monteret tilbehør.
• Brug aldrig en maskine, der er beskadiget.
• Hvis el-ledningen er beskadiget, skal den, for at undgå fare, udskiftes af enten fabrikanten, hans
servicerepræsentant eller af en tilsvarende kvaliceret tekniker.
• Hold ledninger og kontakter væk fra vand.
• Overskrid aldrig maksimumkapaciteten.
• Der kræves 2 personer til at løfte opvaskemaskinen.
• Brug kun opvaskemaskinen til dens tilsigtede brug i hjemmet.
• Dette apparat er beregnet til indendørs brug i hjemmet, og til lignende brug på steder såsom:
– landbrug og af klienter på hoteller, moteller og andre typer indkvartering;
– bed and breakfast type miljøer;
– catering og lignende ikke-detail anvendelser.
ADVARSEL
DET ER FARLIGT FOR ALLE ANDRE END AUTORISERET SERVICEPERSONALE AT UDFØRE
SERVICERING OG REPARATIONER DER INVOLVERER AFTAGELSE AF AFDÆKNINGER.
FOR AT UNDGÅ RISIKO FOR ELEKTRISK STØD MÅ DU IKKE FORSØGE REPARATIONER SELV.
• Sid eller stå ikke på lågen eller opvaskekurvene.
15
Page 16

• Flyt ikke opvaskemaskinen ved at holde i døren eller dens kanter. Hold i opvaskemaskinen ved
holde i siderne eller understykket når den yttes.
• Berør ikke varmelegemet under eller umiddelbart efter brug.
• Opvaskemaskinen må ikke benyttes uden afdækningspanelerne påsat. Åbn lågen meget forsigtigt
hvis der kører et program, da der kan være fare for at der sprøjter varmt vand ud af maskinen.
• Placér ikke nogen tunge genstande på den åbne låge. Maskinen kunne vippe.
• Når der sættes ting i maskinen til vask:
• Læg/sæt skarpe genstande så de ikke beskadiger lågepakningen.
• Advarsel: Knive og andre spidse genstande skal sættes i kurven med spidsen nedad eller lægges
vandret.
• Læg ikke plastikgenstande, så de kommer i kontakt med varmelegemet.
• Kontrollér at opvaskemiddelrummet er tomt efter gennemført vaskecyklus.
• Der må ikke vaskes plastikgenstande i maskinen medmindre de er mærket opvaskemaskinesikre
eller lignende.
• Anvend kun opvaskemiddel og skyllemiddel, der er beregnet til automatisk opvaskemaskine.
• Der skal monteres alternativ frakobling fra strømforsyningen, som skal sidde i den faste
ledningsføring og have mindst 3 mm kontaktadskillelse imellem alle poler.
• Lågen bør ikke efterlades åben, da man kan snuble over den.
• For at spare strøm, bør opvaskemaskinen altid slukkes efter brug. Opvaskemaskinen bør holdes
under opsyn når den er i brug.
• Fjern lågen til opvaskemaskinen ved udskiftning af en gammel opvaskemaskine eller hvis den
skal kasseres.
• Under installation må el-ledningen ikke bøjes eller trykkes for meget eller faretruende adt.
• Der må ikke fuskes med styringen.
• Maskinen skal tilsluttes vandforsyningen med nye slanger.
• Der må ikke vaskes ere kuverter end 12 ad gangen.
• Maksimalt tryk på indløbsvandet er 1 Mpa og minimum er 0,04 Mpa.
16
Anvisninger vedrørende jordforbindelse
ADVARSEL: DETTE UDSTYR SKAL JORDFORBINDES.
• Dette udstyr skal være forsynet med en ledning med en jordforbindelsesleder og et
jordforbindelsesstik.
• Stikket skal skal anbringes i en stikkontakt, installeret og jordforbundet i
overensstemmelse med lokale standarder og krav.
• Forkert tilslutning af jordforbindelseslederen kan give elektrisk stød.
• Ledningens ledere er farvet på følgende måde:
• Grøn og gul = jord,
• Blå = neutral,
• Brun = strømførende.
• Tjek med en kvaliceret elektriker eller servicerepræsentant, hvis du er i tvivl, om
udstyret er korrekt jordforbundet eller hvis stikket ikke passer i din stikkontakt.
• Foretag aldrig ændringer på stikket, som leveres med udstyret.
Page 17
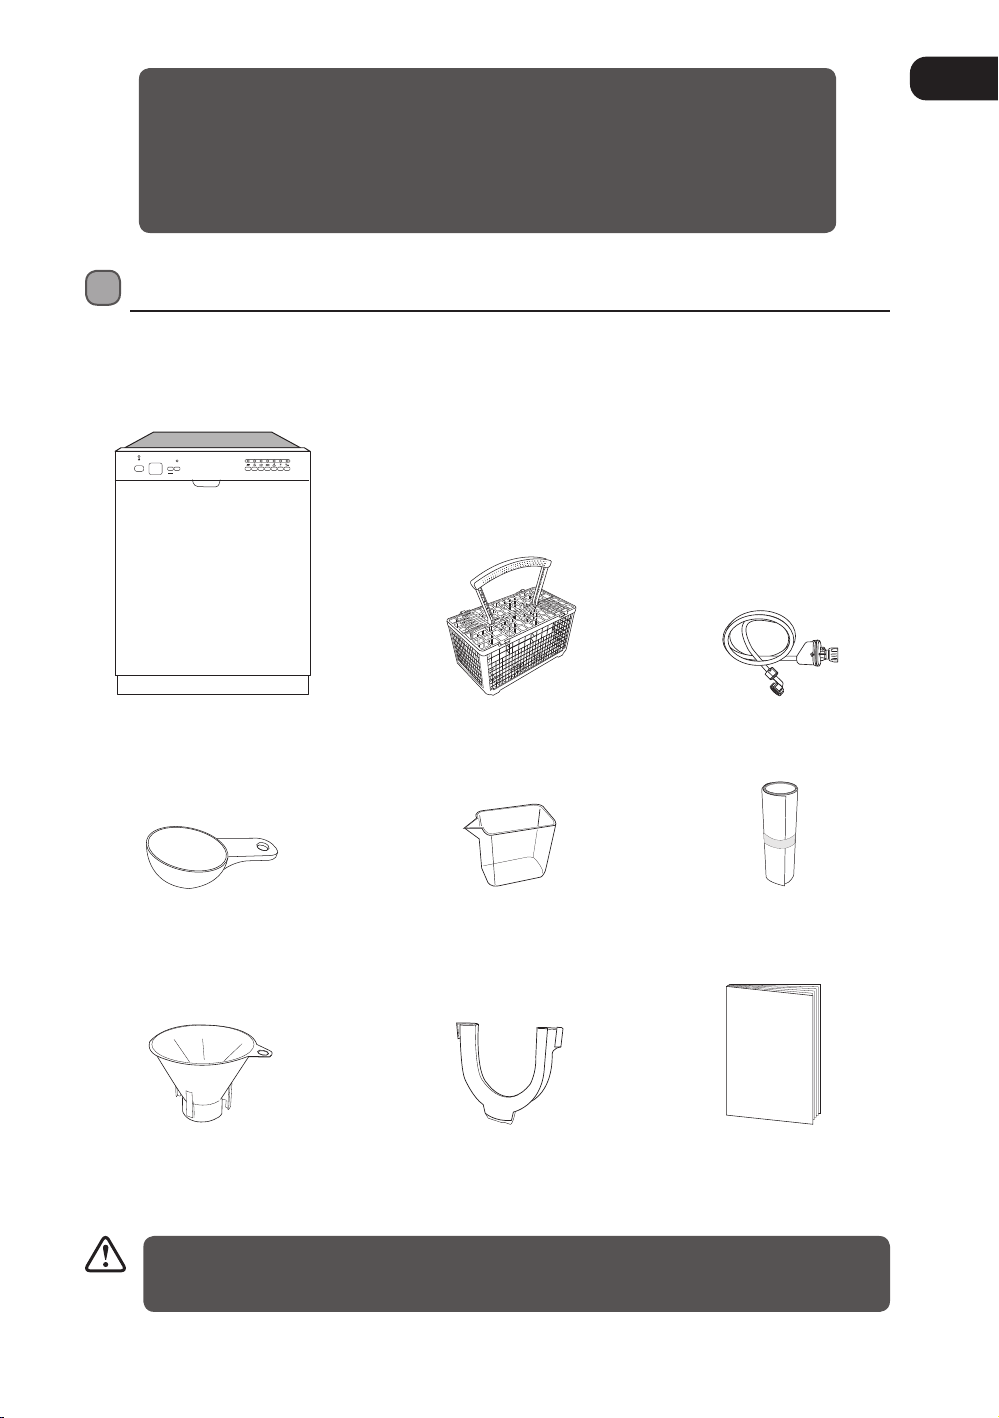
Thank you for purchasing your new Logik Freestanding Dishwasher.
You must spend some time reading this installation/instruction manual in order to
fully understand how to install and operate it.
Read all the safety instructions carefully before use and keep this installation/
instruction manual for future reference.
Unpacking
Remove all items from the packaging. Retain the packaging. If you dispose of it please do so according to
local regulations.
The following items are included:
3
in
Delay
1/2 Load
Power
Start
1
3in1
Intensive
Normal Eco 1 HourGlass Rapid
GB
The Main Unit
Detergent Measuring Spoon
1 full spoon = 20g (approx.)
Cutlery Basket
60ml (approx)
Safety Supply Hose
Condensation StripMeasuring Cup
Instruction
Instruction ManualU-shape Hose HolderSalt Funnel
This product has been wet tested to ensure correct operation. As a result some water may
remain inside the unit. This is normal and safe. Remove any water droplets from the exterior if
necessary.
Manual
1717
Page 18
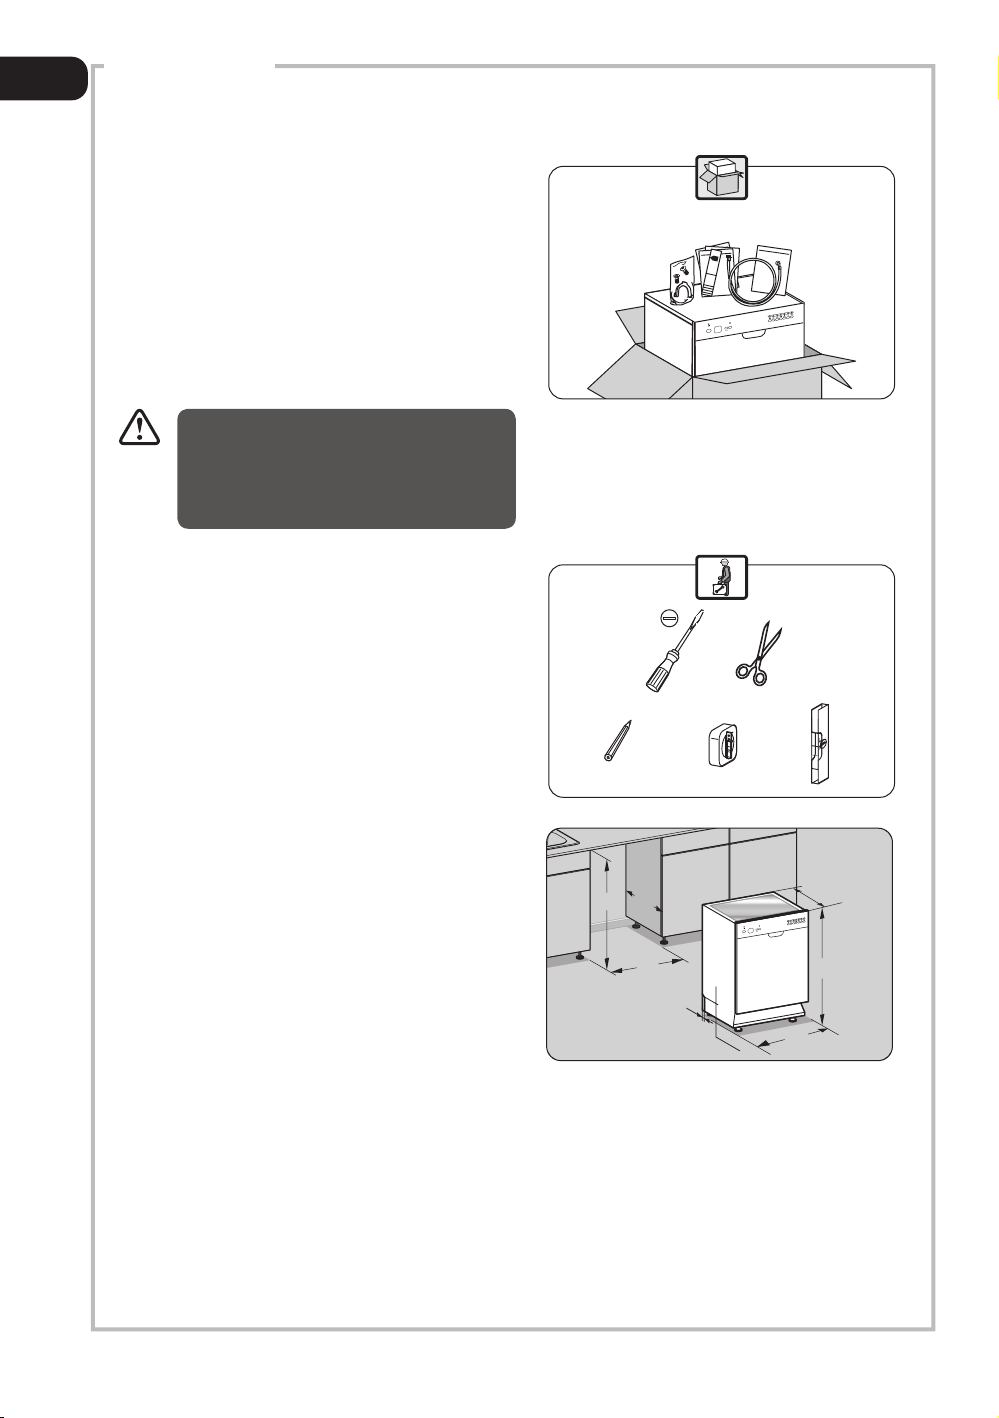
Power
Delay
Start
1/2 Load
3in1 Inten NormalEco 1 HourGlass Rapid
3
in
1
Installation
825
600
580
GB
INSTALLATION
Location
When selecting a position for your dishwasher you
should make sure the installation surface is flat
and firm, and the room is well ventilated. Avoid
locating your dishwasher near a heat source, e.g.
cooker, boiler or radiator. Extreme cold ambient
temperatures may also cause the appliance not to
perform properly. This dishwasher is not designed
for use in a garage or outdoor installation.
Do not drape the dishwasher with any covering.
When installing, ensure that free space is left at the
sides.
1. Please ensure the dishwasher is installed by a
All parts removed must be saved to do
the reinstallation in the future. Ensure
the dishwasher is unplugged and empty.
We recommend that 2 people handle the
dishwasher during installation.
qualified technician. Refer to the tools required.
2. Ensure there is clearance each side of the unit
to allow slight sideways movement for servicing
when required. If required, the worktop of the
dishwasher can be removed. The height without
the worktop is 820 mm. The figure outlines the
minimum dimensions required to accommodate
the dishwasher within fitted kitchen furniture
units.
18
units in mm
540
1
in
3
3in1Inten Normal Eco1 Hour GlassRapid
1/2 Load
Delay
Start
Power
820
80
100
595
Page 19
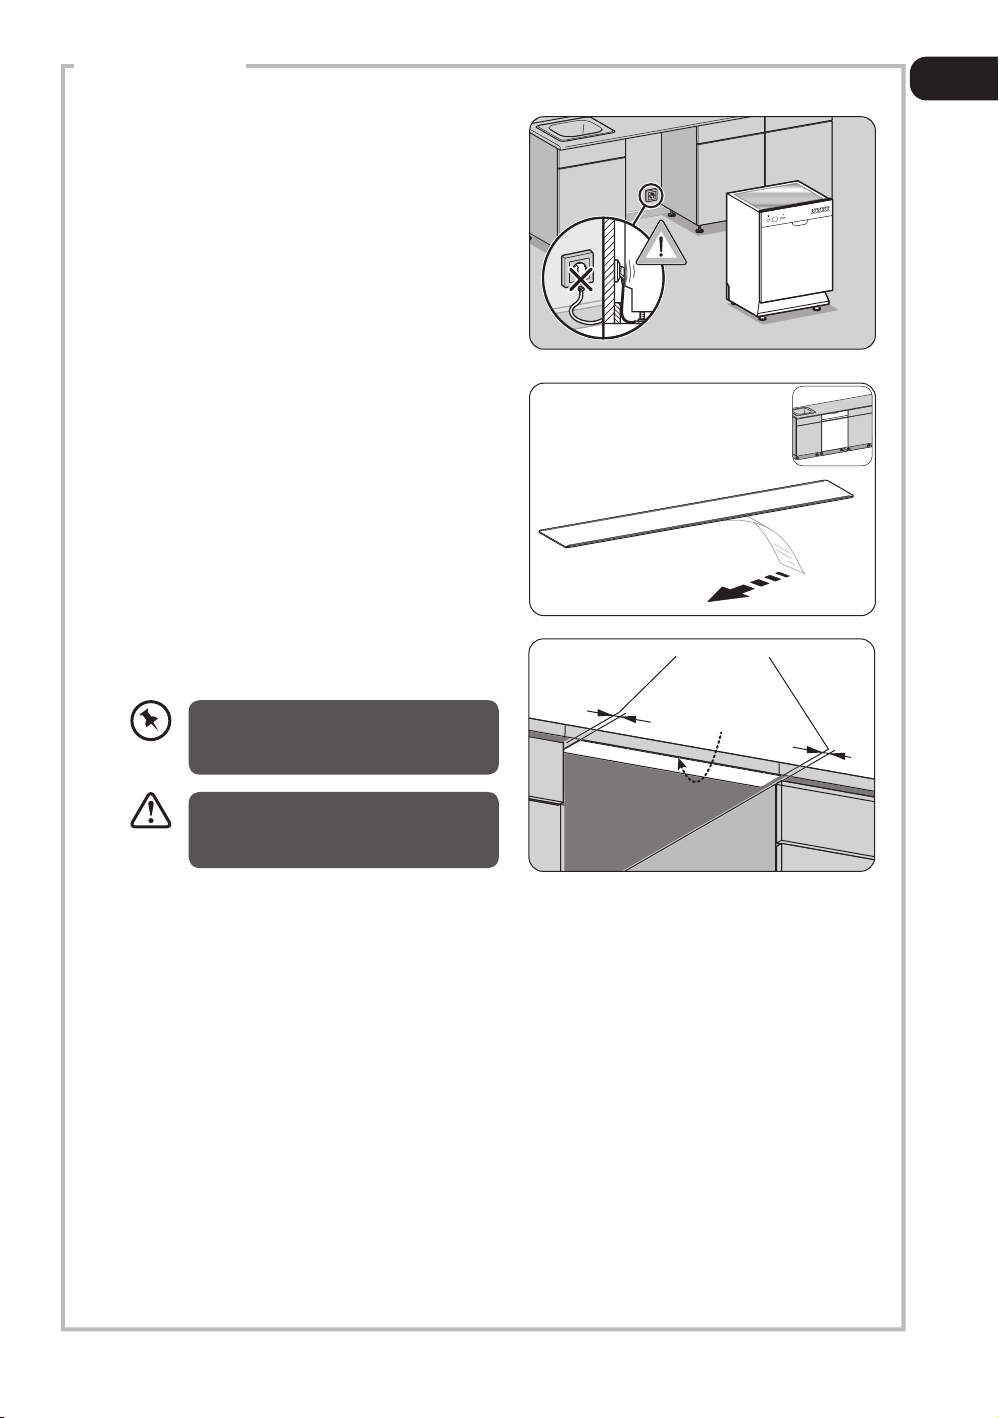
INSTALLATION
3. Do not connect the unit to the mains socket
before installation. Ensure you are not installing
the unit right in front of the mains socket. This
is to avoid potential damage to the back of the
unit.
4. The condensation strip must be fitted to
the underside of the worktop above your
dishwasher to protect it against any moisture. Its
purpose is to protect your worktop’s underside
from steam rising from the dishwasher.
Remove the backing paper from the
condensation strip.
GB
1
in
3
3in1Inten Normal Eco1 Hour GlassRapid
1/2 Load
Delay
Start
Power
5. Stick the condensation strip to the underside of
the worktop.
Ensure the surface is clean prior to
sticking the condensation strip to the
underside of the worktop.
Failure to attach the condensation
strip could result in damage to the
underside of your worktop!
Leave some space
Stick the Condensation
Strip under the worktop,
where you want to install
the dishwasher.
19
Page 20
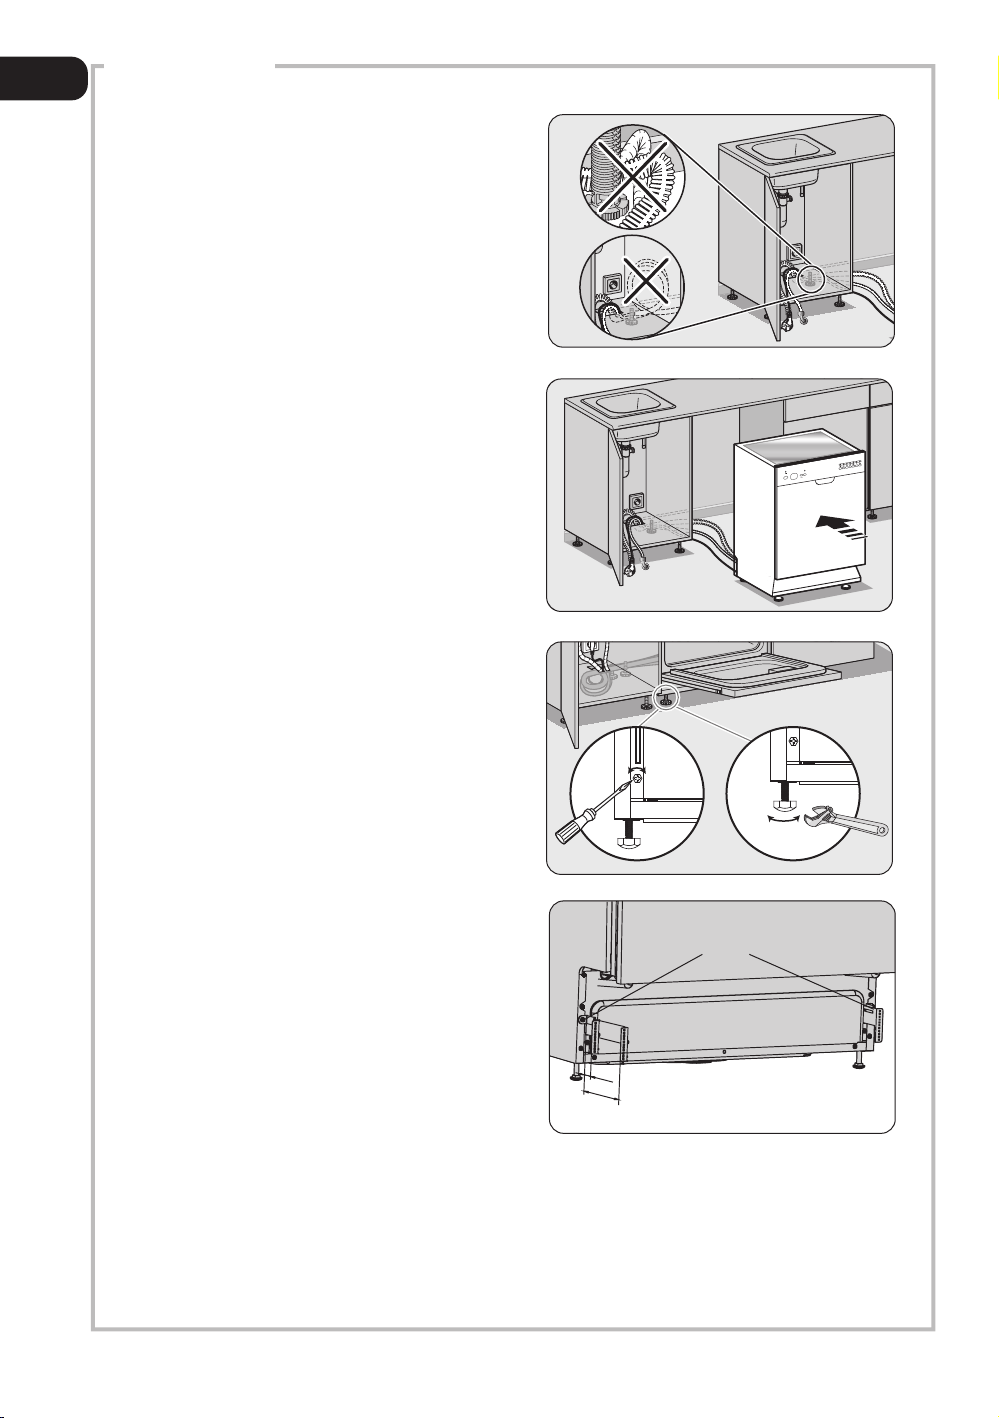
GB
INSTALLATION
6. Position the dishwasher next to a water tap and
a drain. Ensure the water inlet and drain hoses
are not kinked or squashed. The unit must not
stand on the mains cable.
7. Good levelling is essential for correct closure and
sealing of the door. When the unit is correctly
levelled, the door should not catch the inner
liner on either side of the cabinet. Adjust the
adjustable feet to obtain the optimum levelling
of the unit.
1
3
in
3in1Inten NormalEco 1 HourGlass Rapid
1/2 Load
Delay
Start
Power
8. Unscrew the two screws and adjust the distance
of left and right plinth tab to your need. The
adjustable range is from 39mm to 134mm.
20
134
screw
39
Page 21
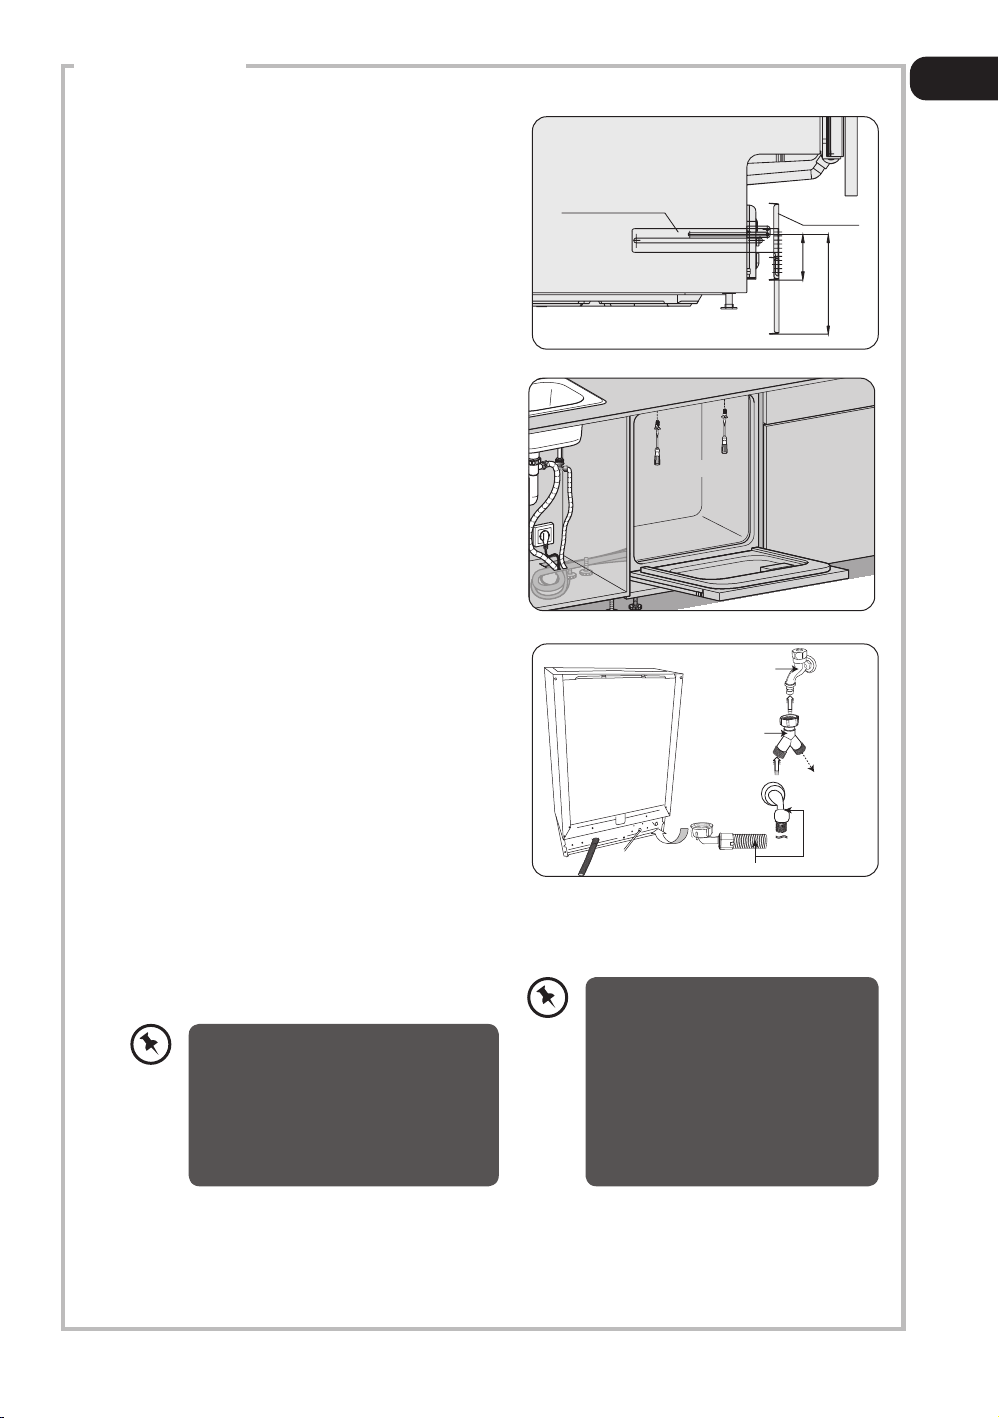
INSTALLATION
9. Fix the plinth on the plinth tab. According
to your need to adjust the plinth height, the
adjustable range is from 56mm to 122mm.
GB
10. To secure the dishwasher under the table top,
tighten the screws through the top sides of the
unit onto the table top.
11. Make sure your plumbing is suitable for use with
the dishwasher. If in doubt contact a qualified
plumber. This unit MUST BE connected to COLD
WATER MAINS using the new water inlet hose.
OLD HOSE SETS MUST NOT BE RE-USED. The
water pressure from the water mains needs to
be at a minimum of 0.04 MPa and a maximum of
1.00MPa.
• Connect one end of the safety water supply
hose to your dishwasher, and then connect
the other end of the hose to your water
mains. Please ensure the black rubber seal is
in place.
• After connecting the hose, turn on your water
mains and check for leaks.
• Connect the dishwasher to the mains socket.
You may use a Y-Adaptor (not
included) for an additional water feed
for another appliance, for example
a washing machine. This is only
applicable for cold water mains. A
Y-Adaptor is available from most DIY
stores.
plinth tab
Water mains
Y-Adaptor
(not included)
Water supply hose
plinth
56
122
Connect
to another
appliance if
required.
About the Safety Supply Hose
The safety supply hose consists of
the double walls. The hose’s system
guarantees its intervention by
blocking the flow of water in case of
the supply hose breaking and when
the air space between the supply
hose itself and the outer corrugated
hose is full of water.
21
Page 22
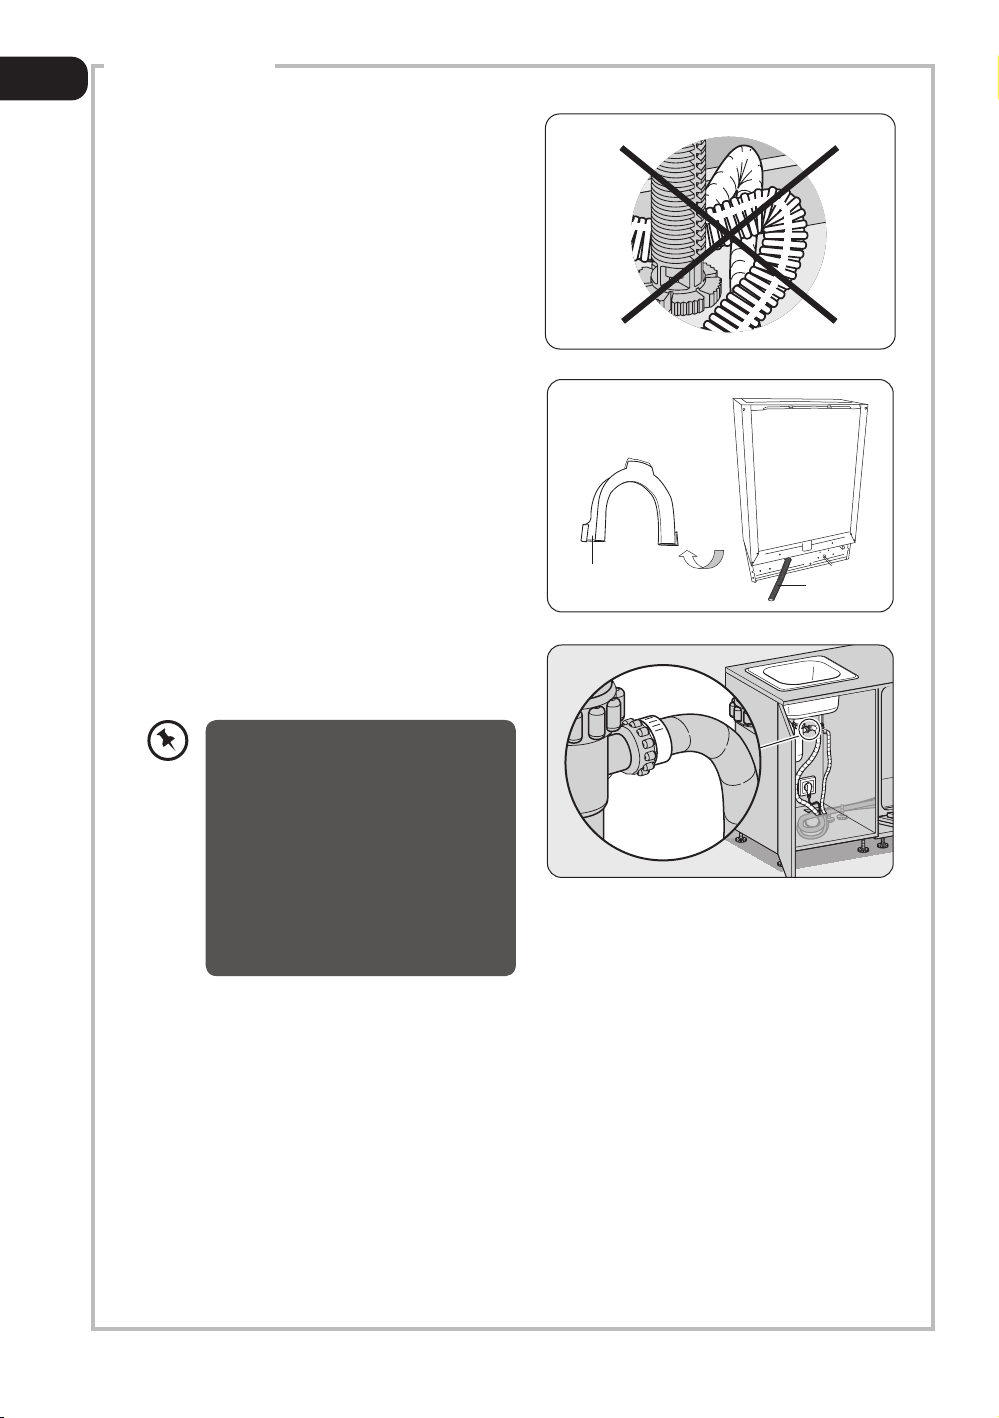
GB
INSTALLATION
• Do not bend your drain hose.
• You may use the U-shaped drain hose holder
to secure your drain hose and to avoid
bending it.
• Secure the water drain hose to the waste pipe
to avoid it coming off during the washing
process.
• The waste pipe must only be
connected to the foul drains and
not the surface water drainage
system.
• The water drain hose should be
placed between 40 cm and 100 cm
from the floor level and must not be
extended, otherwise the unit may
not be able to expel the waste water
properly.
• Please close the hydrant after using.
U-shaped drain
hose holder
water drain
hose
22
Page 23
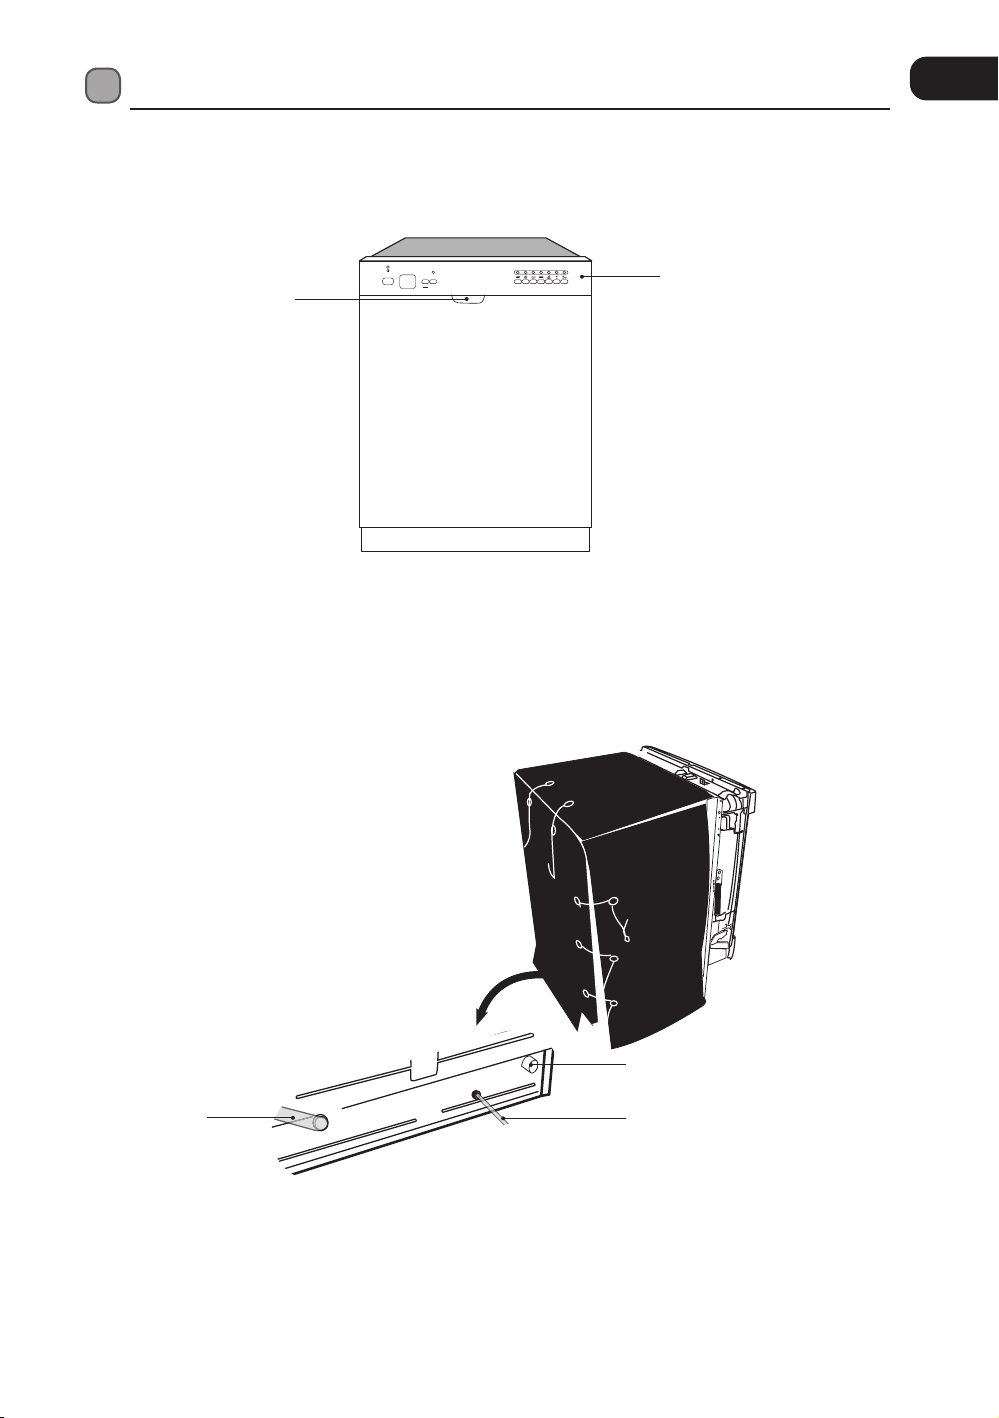
Product Overview
Front View
Door Handle
GB
3
in
Delay
1/2 Load
Power
Start
1
3in1
Intensive
Normal Eco 1 Hour Glass Rapid
Control Panel
Rear View
Drain Hose
Water Inlet
(Connect To Supply Hose)
Mains Cable
(Connect To Electrical Mains
Outlet)
2323
Page 24

GB
Upper Basket Lower Basket
Internal View
Cup Rack
Upper Basket
Salt Reservoir
Lower Basket
Spray Arm
Filtering System
Detergent Dispenser Rinse Aid
Reservoir
2424
Page 25

Control Panel
3
in
1
Delay
Power
1/2 Load
Start
1. Power On Light
Illuminates when Power button is pressed.
2. Power Button
To turn the dishwasher on and off.
3. Display Window
Display programme remaining time, delay time, fault codes, raise aid warning and salt warning etc.
4. Delay Start Button
Press to preset the wash timer and delay the starting time by up to 24 hours.
5. Half Load Function Button
Press to select the Half Load function in washing cycle.
6. Half Load Indicator Light
Illuminates when the half load function is selected.
7. Program Indicator Lights
Show the washing program.
8. Program Button
Press to select your required washing programme.
3in1
Intensive
Normal Eco 1 Hour Glass Rapid
82 4 5 63 71
GB
2525
Page 26
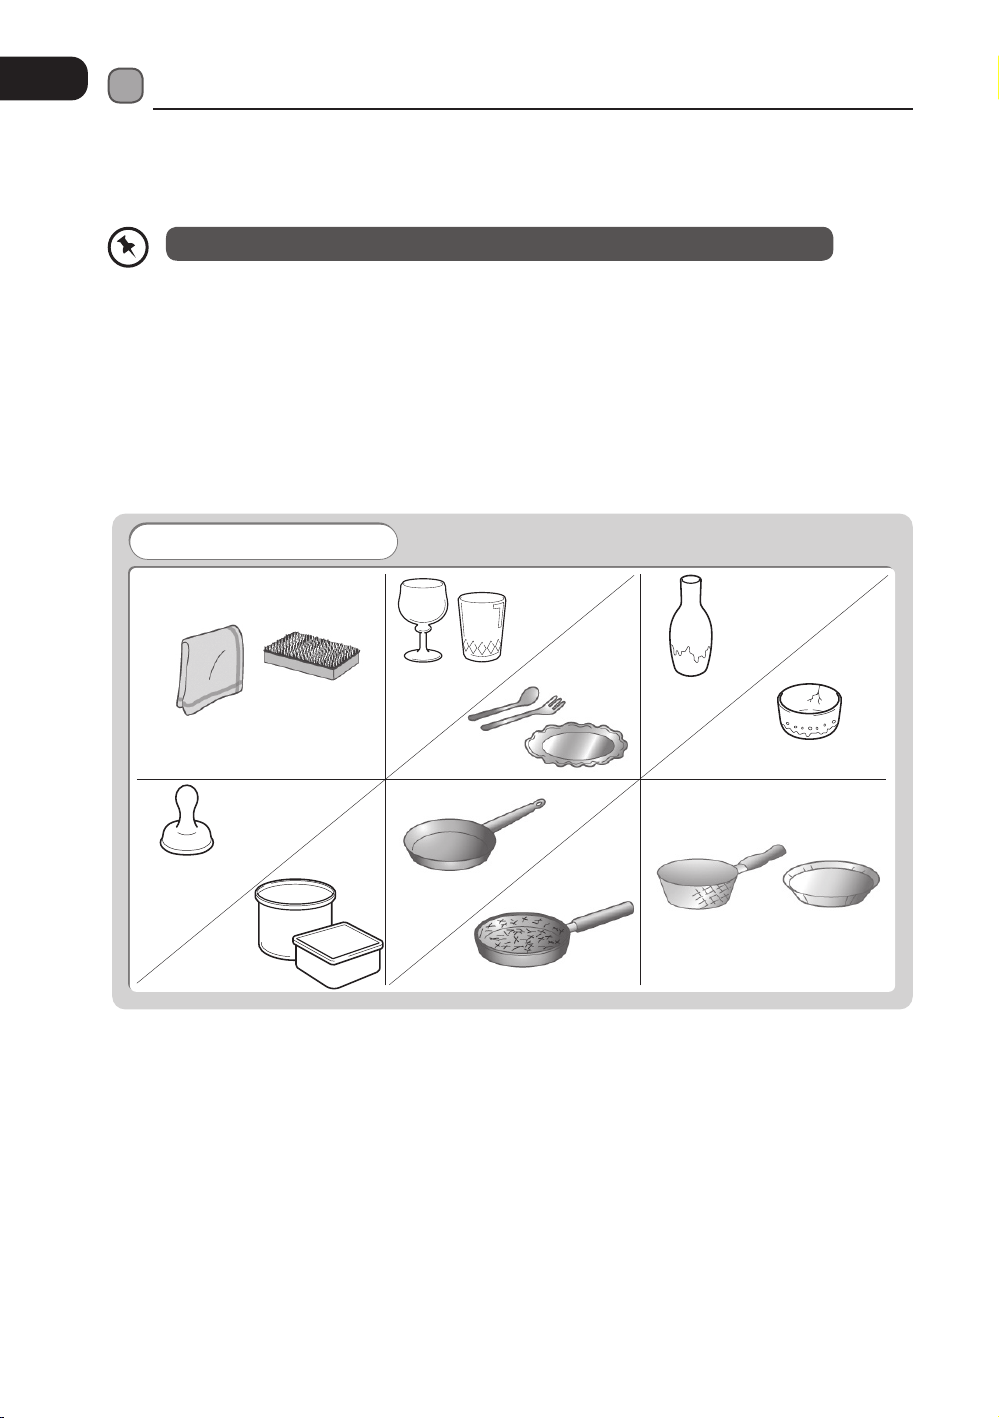
GB
Before Operating
To Open the Door
• First open the door slightly to avoid water spillage.
• Pull the door handle.
If the door is opened during operation all functions are automatically interrupted.
To Close the Door
• After loading the dishes, push the baskets fully into the dishwasher.
• Lift the door upwards and push until it clicks into position.
• Do not slam the dishwasher door.
Items Not Suitable for Use in the Dishwasher
When purchasing new crockery and cutlery, please make sure they are dishwasher-proof. Some items are
not suitable for dishwashers.
The Following Items Are Not Suitable
Crystal glasses
Towels and sponges
Small plastic items
(Milk bottle nipple)
Plastic items that are
not dishwasher safe
Silverware
Cast iron pans
Scratched non-stick cookware
Valuable vases
Cracked / chipped china
Copper pots and pans
• Wooden cutlery and crockery or items with wooden parts may discolour and fade. The glue used in
these items is not dishwasher-proof and wooden handles may come loose after being washed in a
dishwasher.
• Craft items, antiques, valuable vases and decorative glassware are also not suitable for dishwashers.
• Plastic items (e.g. tupperware) which are not heat resistant may melt or loose shape due to the high
temperature in the dishwasher.
• Copper, brass, tin and aluminium items may discolour or become matt.
• Clouding may occur on glasses and delicate glassware after frequent washing. Do not wash delicate
glassware, or glassware containing lead crystal in a dishwasher. Wash delicate glassware by hand
instead.
• Silver and aluminium parts have a tendency to discolour during washing. Residues like egg white, egg
yolk and mustard often cause discolouring and staining on silver. Therefore, please clean the residues
from silver immediately after use.
2626
Page 27
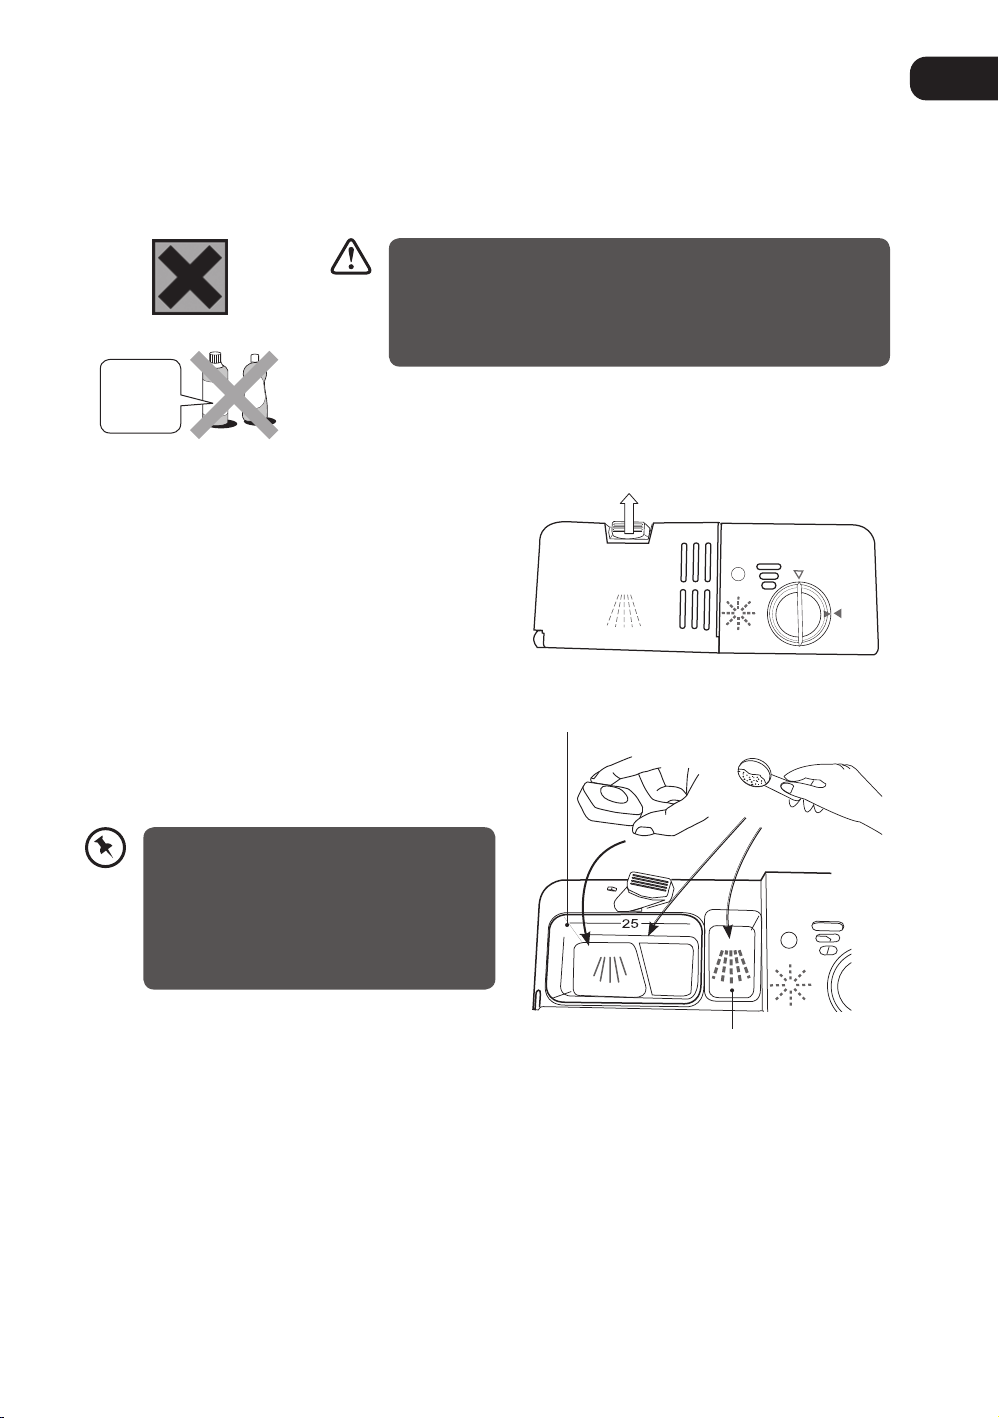
Adding Detergent Power or Tablet
Only use detergents specifically designed for use in dishwashers. To be more environmentally friendly,
please use no more than the correct amount of detergent. Fill the detergent dispenser with detergent
power or tablet. See the detergent manufacturers instructions for the correct amount to use. If using
tablets read the manufacturers recommendations on the tablet packaging in order to determine where the
tablet should be placed (e.g. cutlery basket, detergent compartment etc.)
• WARNING! Keep out of the reach of children.
• Irritating to eyes.
Irritant
Bleach and
Countertop
detergent
Please follow the steps below to fill the detergent dispenser.
1. Push the button on the lid of the detergent
dispenser in the direction of the arrow until the
flap springs open.
• Avoid contact with eyes. In case of contact with eyes, rinse
immediately with plenty of water and seek medical advice.
• If swallowed, seek medical advice immediately.
push up from the right side
GB
2. Fill the detergent dispenser with detergent
powder to both main wash detergent chamber
and pre-wash detergent chamber, or insert the
detergent tablet to the main detergent chamber.
The marking indicates the filling level.
All programmes with pre-wash need an
additional detergent dosage that must be
placed in the pre-wash detergent chamber.
If using tablets please check the detergent
manufacturers instructions. Please refer to
the wash cycle table. This detergent will
take effect during the pre-wash phase.
3. Close the lid firmly so that it clicks into place.
main wash detergent chamber
or
pre-wash detergent chamber
2727
Page 28
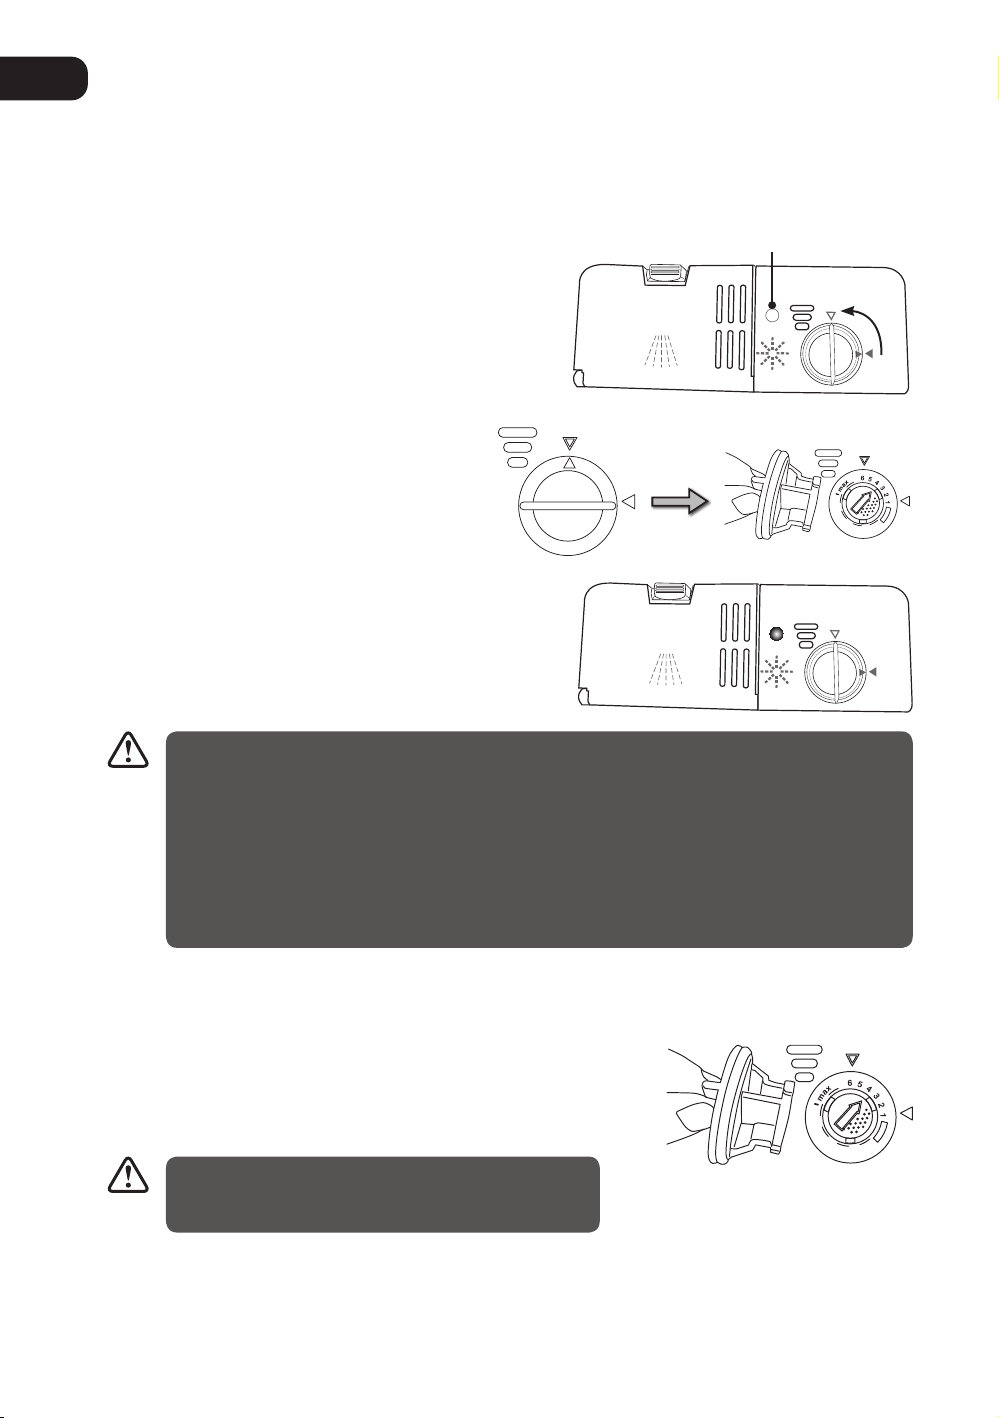
GB
Adding Rinse Aid
Rinse aid helps to ensure water does not cling and leave marks on crockery during the drying phase and
helps crockery dry faster after it has been washed. Only pour rinse aid that is for domestic dishwashers into
the reservoir. This model is designed to use liquid rinse aids only.
Please follow the steps below to pour the rinse aid into the storage reservoir, and the amount will dispense
automatically.
1. Turn the cap and open as indicated.
2. When the cap open marking is aligned, you
may lift the cap up.
3. Pour the rinse aid until the rinse aid indicator
turns completely black in colour and close the
cap.
4. Be careful not to overfill the reservoir. Wipe up
any spills.
rinse aid indicator
open
• If the water hardness in your area is soft, you may not need rinse aid as it may cause white
film to develop on your dishes.
• If you decide to use a detergent tablet, you do not need to add rinse aid into the rinse aid
reservoir.
• Rinse aid refill warning indicator will show on the LED display window when the reservoir is
running out of rinse aid and requires refilling.
• Alternatively, you can judge the amount of rinse aid by checking the rinse aid indicator next to
the reservoirs cap when the indicator is black, it means it is full. When it is clear, it means it is
almost empty.
Adjusting the Rinse Aid Reservoir
The rinse aid reservoir has six settings. Both the recommended
setting and the factory setting is “4”. If the dishes are not drying
properly or are spotted, adjust the dial to the next higher number
until your dishes are spot-free.
If there are some rinse aid residue left in the washing
compartment or your dishes, please turn the rinse aid
dispenser dial to 1.
2828
Page 29
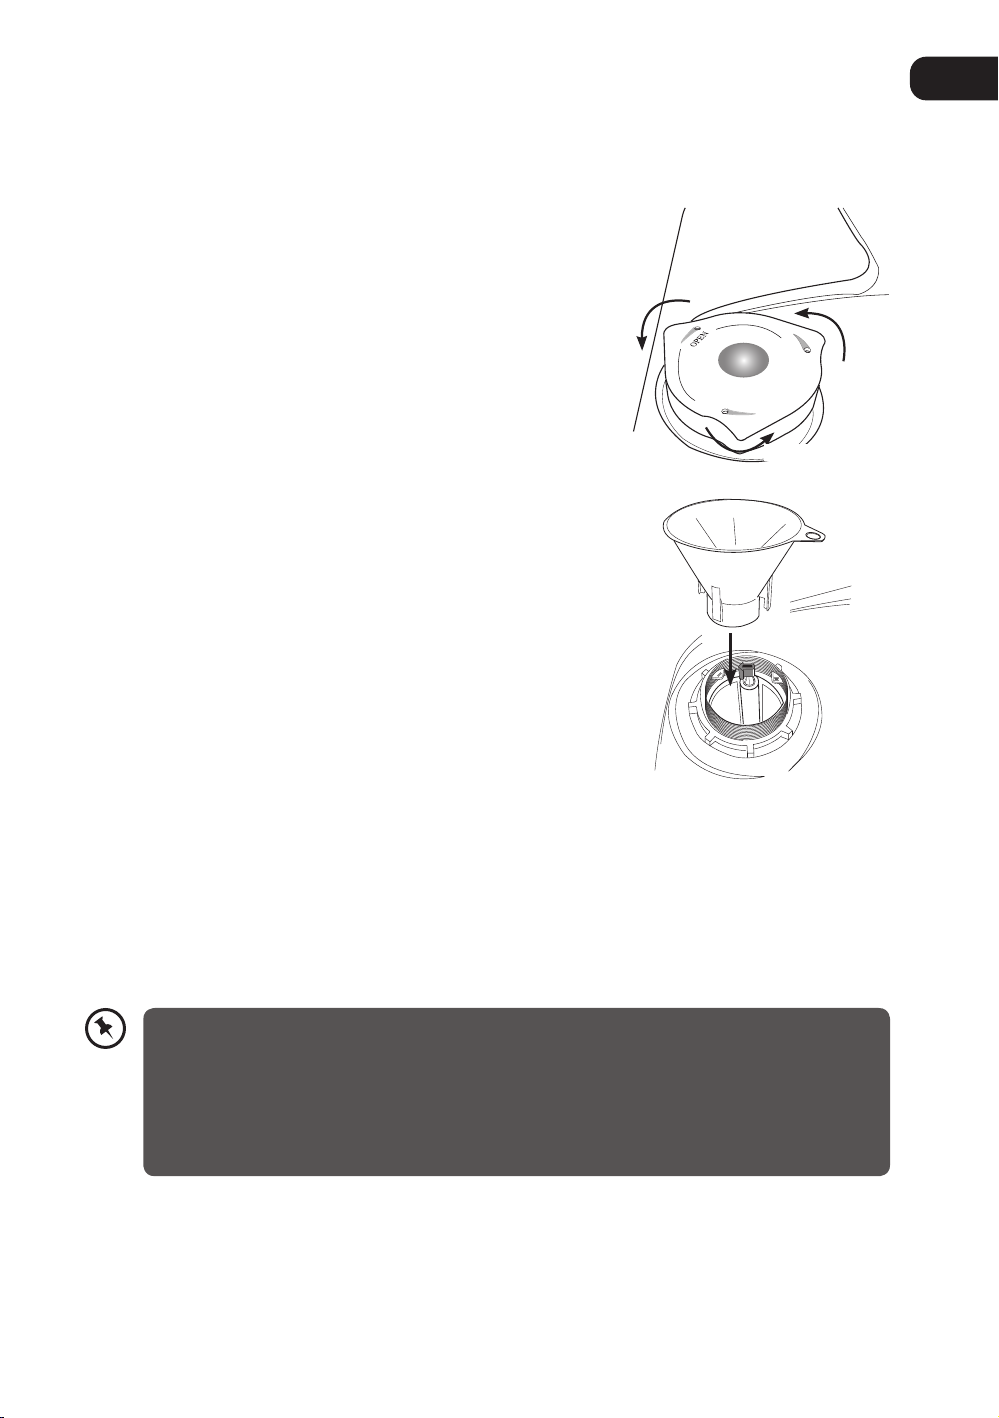
Adding Salt
If the water in your area is hard, deposits will form on your dishes and utensils. As such, this appliance
contains a salt reservoir for you to reduce the hardness of the water.
Please follow the steps below to pour the salt into the salt reservoir and to correspond to the water
hardness level in your area.
1. Remove the lower basket and unscrew the reservoir cap.
open
OPEN
open
2. Place the funnel provided over the salt reservoir. Pour in
approximately 1.2kg of dishwasher salt depending on the brand
used.
GB
open
3. Fill the reservoir with water until it overflows (first use only).
4. Clean any excess salt from around the reservoir opening and then
screw the cap on again firmly.
5. Run the “Rapid” wash programme immediately (without any
crockery in the dishwasher) to remove any traces of salt from the
compartment.
• The salt refill warning indicator will show on the LED display window when the reservoir is
running out of salt and requires refilling.
• The salt refill warning indicator will cease to illuminate within a few days, depending on how
quickly the salt dissolves.
• If you decide to use a detergent tablet, you may not need to add salt, this depends upon the
water hardness in your area and the type of tablet being used. Check with your water supplier
and the detergent tablet manufacturers instructions.
2929
Page 30
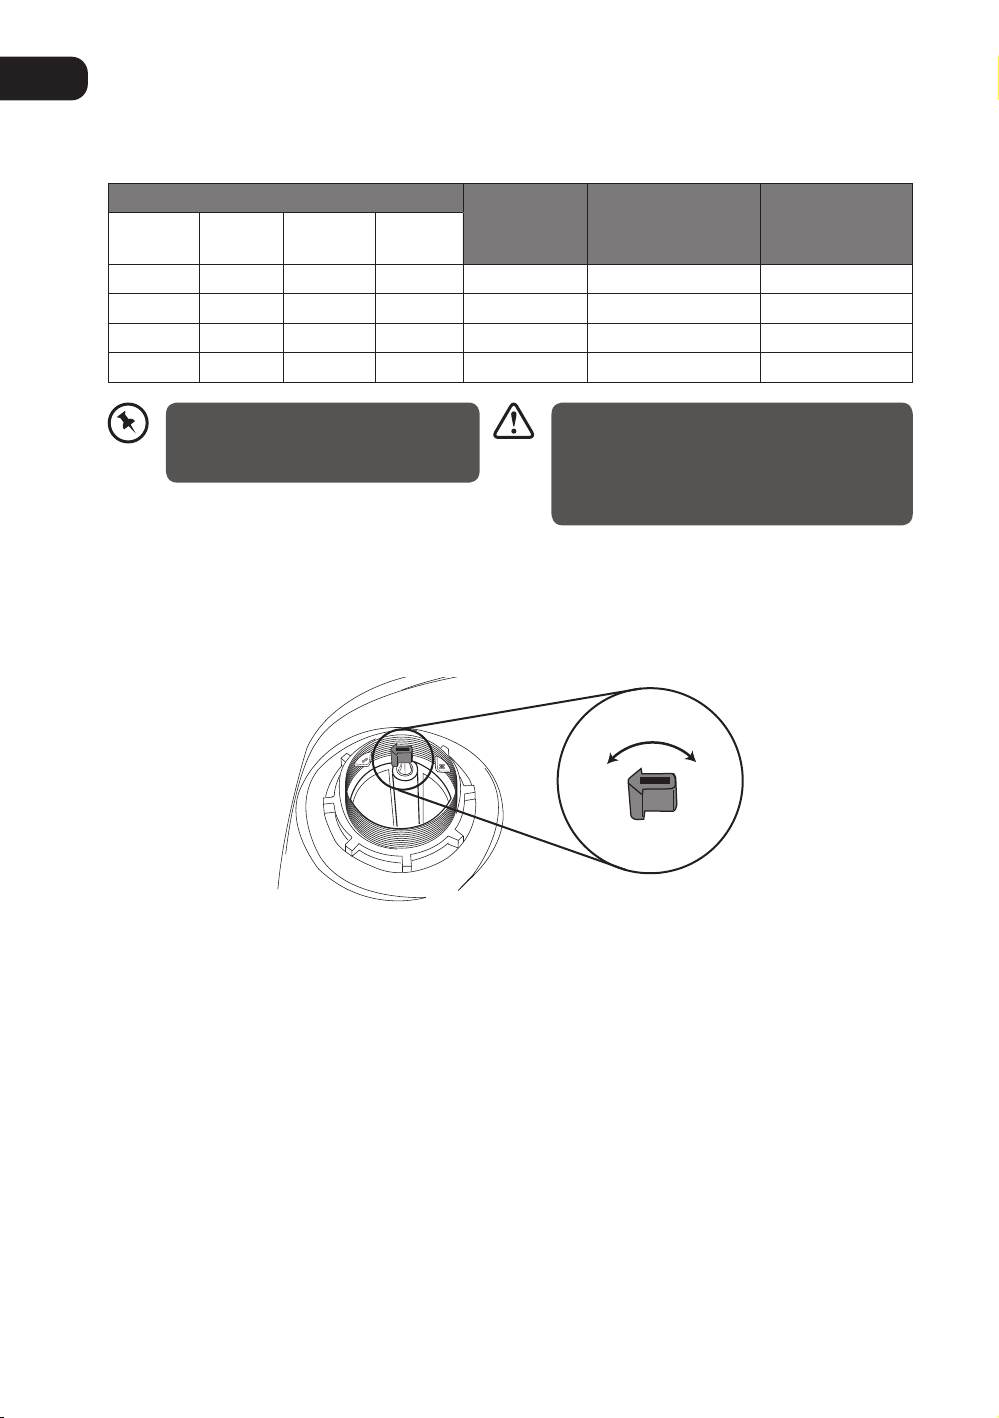
GB
– +
Adjusting Salt Consumption
Salt consumption must be adjusted to correspond to the water hardness level in your area. If you don’t
know how hard the water in your home is, please ask the company that supplies water in your area.
It is recommended that adjustments should be made in accordance with the following chart.
Water Hardness
German
˚dh
0-8 0-14 0-10 0-1.4 / 0 /
8-22 14-39 10-28 1.4-3.9 - 20 60
22-45 39-80 28-56 3.9-8 Mid 40 30
>45 >80 >56 >8 + 60 20
To optimise and customise the level of salt consumption, please follow the steps below.
1. Remove the lower basket and unscrew the reservoir cap.
2. There is an arrow-shaped indicator in the reservoir, which you can turn. You may turn it to the “-” or “+”
settings based on the water hardness in your area.
French
˚fh
1˚dh (German degree) = 0.18 mmol/l
1˚fh (French degree) = 0.1 mmol/l
1˚Clark (British degree) = 0.142 mmol/l
British
˚Clarke
mmol/l
Selector
Position
Salt Consumption
(gram/cycle)
• Do not use everyday table salt or cooking
salt as they contain insoluble substances
which could damage the dishwasher.
• Do not pour detergent into the salt
container. This will damage the dishwasher.
turn
Number of cycle
/ 1.2 kgs
3030
Page 31

Loading the Dishwasher
Before Loading the Dishwasher
In general, please observe the following notes before loading your cutlery and crockery in the basket.
• Remove lipstick stains and any food residues from crockery and dishes. Rinse if necessary.
• Dishes and cutlery must not lay inside one another, or cover each other.
• Load your cutlery and crockery so that water can access all surfaces.
GB
• Ensure all items are securely positioned.
• Hollow items such as cups, glasses, pans, etc. must be placed upside down in the basket.
• Wide based items should be placed at an angle so that water can run off them freely.
• The spray arms must not be blocked by items which are too tall or hang through the baskets. If in
doubt, test for free movement by manually rotating the spray arms.
• Ensure that small items cannot fall through the holders in the baskets.
• For safety reasons, do not operate the dishwasher without the dishwasher basket in place.
• Do not wash items soiled with ash, sand, wax, lubricating grease or paint in the dishwasher.
These items can damage the dishwasher. Ash does not dissolve and will be distributed in the
dishwasher.
3131
Page 32

GB
Upper Basket
We recommend using the upper basket for small and
lightweight items such as cups saucers, glasses, dessert
bowls, etc. Shallow pans or casserole dishes can also be
placed in the dishwasher basket.
Long items such as soup ladles, mixing spoons and long
knives should be placed lying down across the front of the
upper basket.
Adjusting the Upper Basket
More space can be created for large items on the upper or lower baskets by adjusting the height of the
upper basket. There is a lift mechanism for the upper basket (Lift the basket to raise, lift again to lower).
Ensure that basket is stable after adjusting the height.
lift tab
remove rail stop
slide the basket out
from the rail
Hinged Cup Rack
To make room for taller items in the upper basket, raise the cup rack
upwards. You can then lean the tall glasses against it. You can also
remove it when it is not required for use.
adjust basket height,
reinsert
reinsert rail stop
raise upwards
3232
Page 33

Loading the Upper Basket for 12 Place Settings
For optimum placement of crockery in the upper basket, please refer to the follow list and the
accompanying image.
Number Item
44
1 Cups
2 Small serving bowl
3 Large serving bowl
4 Glasses
5 Saucers
6 Small dish
IN
3
3
1
1
4
4
1
1
1
1
44
5
5
7
7
6
6
7 Dessert dishes
To prevent water dripping from the upper basket onto the dishes in the lower basket, we
recommend that you empty the lower basket first and then the upper basket.
Lower Basket
We recommend that large and the most difficult to clean items
are placed in the lower basket, such as plates, serving platters,
saucepans, serving bowls, pots, pans, lids etc. We recommend
placing serving dishes and lids at the side of the basket to avoid
blocking the rotation of the spray arms.
GB
1
1
2
2
1
1
1
1
4
4
Hinged Spikes
The spikes are used for holding plates and a platter. They can be lowered to make more room for large
items. Please refer below for the steps to lower the spikes.
raise upwards
fold backwards
3333
Page 34

GB
Loading the Lower Basket for 12 Place Settings
For optimum placement of crockery in the lower basket, please refer to the following list and image.
Number Item
7 Dessert dishes
8 Oval platter
IN
7
7
77
77
9 Dinner plates
10 Soup plates
11 Cutlery basket
8
8
11
11
Cutlery Basket
To make unloading much easier, cutlery should be grouped in zones and placed in the cutlery basket.
Please refer to the list and image for optimum placement.
2
Number Item
1 Forks
2 Soup spoons
3 Dessert spoons
4 Teaspoons
5 Knives
6 Serving spoons
7 Gravy ladle
8 Serving fork
• Do not let any items extend through the bottom of
baskets.
• To avoid the risk of injury, please load your knives and
forks with handles upwards. Do not hold them by
their sharp edges.
• The cutlery basket comes with covers, and they
are designed for you to load the cutlery into the
appropriate slots. If you use the basket without the
cover, it may reduce the washing results of your
cutlery.
• Please ensure the cover is securely locked to the
basket before operation.
• To comply with Standards of Performance, i.e.
EN50242, all cutlery must be loaded according to the
instructions in this manual.
IN
3 2
5
4 525
4
5 5 5
4
2
1
1
3
1
2
1
1
2
1
3
3
3 3
4
4
4
4
8
1
4
1
1
4
1
4
1
1
4
5 5 5 4
5 5 5
99
99
1010
1010
33
2
3
2
2
3
2
2
4
632367
3434
Page 35

Wash Cycle Table
GB
Programme Cycle Selection information Process
• For normally
3 In 1
Intensive
Normal
Eco*
(EN50242)
1 hour
Glass • For lightly soiled
soiled loads, use
multifunctional
detergent.
• For heaviest soiled
crockery, and normally
soiled pots pans dishes
etc with dried on
soiling.
• For normally soiled
loads, such as pots,
plates,glasses and
lightly soiled pans.
• Standard daily cycle for
normally soiled loads,
such as pots, plates,
glasses.
• For lightly soiled
loads that do not
need excellent drying
efficiency.
crockery and glass.
• Pre-wash (50°C)
• Wash (55°C)
• Rinse
• Rinse (65°C)
• Drying
• Pre-wash (50°C)
• Wash (65°C)
• Rinse
• Rinse
• Rinse (55°C)
• Drying
• Pre-wash (50°C)
• Wash (55°C)
• Rinse
• Rinse (65°C)
• Drying
• Pre-wash
• Wash (50°C)
• Rinse (65°C)
• Drying
• Wash (60°C)
• Rinse
• Rinse (50°C)
• Drying
• Pre-wash
• Wash (40°C)
• Rinse
• Rinse (60°C)
• Drying
Detergent
Amount
• 3 in 1 160 1.35 16.0
• Pre-wash
(5g)
• Main
wash
(25g)
• Pre-wash
(5g)
• Main
wash
(25g)
• Pre-wash
(5g)
• Main
wash
(25g)
• Main
wash
(30g)
• Main
wash
(20g)
Running
Time
(min.)
125 1.36 19.5
160 1.30 16.0
165 1.02 12.0
60 0.95 12.0
95 0.90 16.0
Energy
Consumption
(Kwh)
Water
Consumption
(L)
Rinse
Aid
Rapid
• A shorter wash for
lightly soiled loads that
do not need drying.
• Wash (40°C)
• Rinse
• Rinse (40°C)
• Main
wash
(20g)
30 0.50 11.0
* To comply with Standards of Performance, i.e. EN50242, please ensure to use economy washing cycle for
the test.
3 in 1 function is available only for 3in1 washing cycle.
If you choose to use detergent tablet in these washing cycles, please do not add rinse aid.
Condensing dry technology
Energy is saved by drying the dishes using the remaining heat after the last rinse cycle.
Wash cycle times are extended due to this drying method.
Some wash programmes do not have a drying function, please refer to the Wash Cycle Table for
more details.
3535
Page 36

GB
Starting a Wash Cycle
1. Ensure the unit is connected to the mains power and the water supply is fully opened (water pressure
between 0.04MPa and 1.00MPa).
2. Open the door. Pull out the lower and upper baskets, load the dishes and push the baskets back. It is
recommended that the lower basket is loaded first, and then the upper basket.
3. Pour in the detergent or place the detergent tablet in the detergent compartment and close firmly
afterwards.
4. Close the dishwasher door. A click sound should be heard when the door is closed correctly. Do not
slam the door.
5. Press the Power button, the power indicator light will illuminate.
6. Select the wash cycle programme based on the loading and soil requirements. Please refer to the
section Wash Cycle Table.
7. The indicator light of the selected programme will illuminate.
8. The washing cycle will begin shortly.
9. The display window shows the state of the dishwasher.
a. “--:--” means the unit is on stand by mode.
b. “H:MM” and not flashing means the unit is on pause.
c. “H:MM” and flashing means the unit is running.
If you open the dishwasher’s door during the washing cycle and then close it, the dishwasher
will continue the current washing programme after 10 seconds. However, if the door is not
closed correctly after 1 minute, the dishwasher will beep at 1 minute intervals.
Changing a Programme
To change the programme if the washing cycle has already started, follow the steps below.
1. Open the door slightly to avoid water spillage before opening the door fully. Check if the unit has
dispensed the detergent or detergent tablet. This will depend on how long the washing cycle was
running for.
2. If the detergent dispenser lid is opened, we suggest you to allow the wash cycle to complete.
3. If the detergent dispenser lid is still closed, press and hold down the program button for 3 seconds
to cancel the programme. You can then select the required new programme button and close the
dishwasher door. The unit will start the new washing cycle shortly.
OR
Press the required new programme button for more than 3 seconds to change the running
programme. The unit will start the new washing cycle shortly.
At the End of a Programme
At the end of the programme, the dishwasher will beep.
The condensation strip helps prevent the risk of steam damage to the worktop edging above
the dishwasher. It is advisable to leave the door closed until you are ready to unload the
crockery. Do not leave the door only partially open. Do not leave the appliance unattended with
the door fully open as this could present a trip hazard.
3636
Page 37

Switching O the Unit
To save energy, remember to switch the dishwasher off using the Power button. The dishwasher will
continue to use electricity until it is switched off with the Power button.
If the dishwasher is not going to be used for a long period of time, e.g. whilst on holiday,
disconnect the unit from the mains supply.
Unloading the Dishwasher
Allowing dishes to cool down before unloading is important as dishes tend to break and chip more easily
when they are hot. Therefore, if you open the dishwasher door fully after switching off, it will allow the
dishes to cool down much faster.
Unload the lower basket first, followed by the cutlery basket and then the upper basket. This will
prevent water drops from the upper basket from falling on to the dishes in the lower basket.
Delay Start
The starting time of a washing programme can be delayed and adjusted. Please follow the steps below.
1. Open the dishwasher door and load your soiled dishes and crockery.
2. Close the door. Press the Power button to turn on the dishwasher.
3. Select your preferred programme.
4. Press the Delay Start button repeatedly to select your desired delay period (range up to 24 hours).
GB
Each press of this button increases the delay start time by 1 hour increments.
5. The unit will start the programme at the assigned time automatically.
Half Load
In case you do not have enough dishes for a full load, the half load option can be selected for washing. This
will save hot water and electricity usage. Please follow the steps below.
1. Open the dishwasher door and load your soiled dishes and crockery.
2. Close the door. Press the Power button to turn on the dishwasher.
3. Select your preferred programme.
4. Press the 1/2 Load button.
5. The unit will start the programme shortly.
3737
Page 38

GB
Cleaning After Use
External Care
The Door and the Door Seal
Clean the door seals regularly with a soft damp cloth to remove food deposits.
When the dishwasher is being loaded, food and drink residues may drip onto the sides of the dishwasher
door. These surfaces are outside the wash cabinet and are not accessed by water from the spray arms. Any
deposits should be wiped off before the door is closed.
The Control Panel
If cleaning is required, the control panel should be wiped with a soft damp cloth ONLY.
• To avoid penetration of water into the door lock and electrical components, do not use a
spray cleaner of any kind.
• Never use abrasive cleaners or scouring pads on the outer surfaces because they may scratch
the finish. Some paper towels may also scratch or leave marks on the surface.
Internal Care
Filtering System
The filtering system in the base of the wash cabinet retains coarse debris from the washing cycle. The
collected coarse debris may cause the filters to clog. Check the condition of the filters regularly and clean
them if necessary under running water.
Follow the steps below to clean the filters in the wash cabinet.
1. Ensure the dishwasher is switched off.
2. Turn the coarse filter anti-clockwise and gently lift it out.
3. Gently lift the fine filter with care.
4. Rinse all the filters under running water, including the filter cylinder, and then refit all filters in the
reverse order.
5. Gently refit the main filter back with care.
6. Gently rescrew the coarse filter in clockwise direction. There will be a slight click when located correctly.
3838
Filter cylinder
without the lters
• Do not over tighten the filters. Put the filters back in sequence securely, otherwise coarse
debris could get into the system and cause a blockage.
• NEVER use the dishwasher without filters in place. Improper replacement of the filter may
reduce the performance level of the appliance and damage dishes and utensils.
Page 39

Spray Arms
Particles of food can get stuck in the spray arm jets and
bearings. The spray arms should therefore be checked and
cleaned regularly.
Ensure the dishwasher is switched off. Use a pointed object,
e.g. a cocktail stick, to loosen food particles in the spray arms’
jets.
Do not attempt to remove the spray arms.
Frost Precaution
Avoid placing the dishwasher in a location where the temperature can get below 0˚C. If your appliance is
left in an unheated place over the winter, you are advised to:
1. Disconnect the unit from the water inlet.
2. Turn on the unit. Select any washing cycle and let it run for 1 minute only. This drains out all the
excessive water that remains in the unit.
3. Disconnect from the mains socket.
4. Empty the dishwasher.
5. Close the dishwasher’s door.
6. Disconnect the unit from the water drain. Use a suitable receptacle to catch any residual water in the
pipes.
Should you encounter any difficulties with the above steps, please ask a service technician for assistance.
GB
Moving the Dishwasher
If you have to move the unit, for instance due to moving house, you are advised to:
1. Disconnect the dishwasher from the mains socket.
2. Disconnect the dishwasher from the water inlet and drain. Use a suitable receptacle to catch any
residual water in the pipes.
3. Remove the dishwasher from the current location with the hoses discharged.
4. Pull the unit out together with the hoses.
• Avoid over tilting the unit during transportation.
• We recommend that 2 people handle the dishwasher during installation.
Maintenance After a Prolonged Period of
Non-Operation
If you are not going to use the unit for a prolonged period of time, you are advised to:
1. Disconnect the dishwasher from the mains socket.
2. Disconnect the dishwasher from the water inlet and drain. Use a suitable receptacle to catch any
residual water in the pipes.
3. Slightly open the door to prevent unpleasant smells building up in the compartment.
4. Ensure the washing compartment of the dishwasher is clean.
3939
Page 40

GB
Hints and Tips
Repairs should only be carried out by a qualified technician in strict accordance with current
local and national safety regulations. Unauthorised or incorrect repairs could cause personal
injury or damage to the unit.
Before calling for service, please refer to the section Hints and Tips to solve some general
problems by yourself.
Technical Problems
Technical Problems
Problem Possible Causes Remedy
The dishwasher does not start. The door is not properly
closed.
The unit is not connected to
the mains socket.
The unit is not switched on. Press the Power button and select a
Error code “E1” displayed. Water tap is not turned on. Turn on the water tap.
Low water pressure (<0.04MPa) Turn on the water tap and ensure it is
Flow meter is broken.
The wire terminals which
connect the flow meter are
loose.
Error code “E4” displayed. The tank is leaking.
The hose is leaking.
The float switch is broken or
PCB is faulty.
Normal Programme LED blinks. Unit is overfilling with water. Shut off the water tap, disconnect
Close the door firmly.
Connect the mains plug to the mains
socket.
programme.
in full position.
• Disconnect from the mains.
• Disconnect the water inlet.
• Call a qualified technician.
from the mains and contact a
qualified service agent.
The drain pump is not working
properly.
Problem Possible Causes Remedy
Detergent residue is left in the
dispenser at the end of the
programme.
The detergent dispenser lid
cannot be closed properly.
4040
The anti-flooding system has
operated.
General Problems
The detergent dispenser was
still damp when detergent was
added.
Clogged detergent residue is
blocking the catch.
• Disconnect from the mains socket.
• Disconnect the water inlet.
• Call a qualified technician.
Make sure the dispenser is dry before
adding detergent.
Clean the catch.
Page 41

General Problems
Problem Possible Causes Remedy
GB
Knocking noise in the wash
cabinet.
Smearing appears on
glassware and cutlery.
Dishes, cutlery and glasses are
not dry.
White residue is visible on
cutlery and crockery, clouding
occurs on glassware; film can
be wiped off.
A spray arm is knocking
against an item in a basket.
The rinse aid dosage is set too
high.
The amount of rinse aid may
be insufficient, or the rinse aid
reservoir is almost empty.
Crockery was taken out of the
dishwasher too soon.
Not enough rinse aid was
used.
There is not enough salt in the
salt reservoir.
The salt reservoir cap has not
been screwed on correctly.
Unsuitable detergent has been
used.
Interrupt the programme, and
rearrange the items which are
obstructing the spray arm. See the
section Loading the Dishwasher.
Adjust the dial of the rinse aid
dispenser to a lower setting.
Replenish the reservoir, adjust the
rinse aid dispenser dial to a higher
setting or change the brand of rinse
aid.
Leave the crockery in the dishwasher
until you hear an audible sound.
Replenish the reservoir, adjust the
rinse aid dispenser dial to a higher
setting or change the brand of rinse
aid.
Fill the salt reservoir.
Ensure that it is screwed back on
correctly.
Change your detergent. Use a
dishwasher standard powder
detergent.
Glassware is dull and
discoloured; film cannot be
wiped off.
Tea or lipstick stains have not
been completely removed.
The salt consumption setting
is too low.
The glassware is not
dishwasher proof. The surfaces
are affected.
The wash temperature of the
selected programme was too
low.
The bleaching effect of the
detergent used is too low.
Forgot to pre-rinse or remove
the stains with a napkin prior
to washing.
Select a higher salt consumption
setting.
Wash the non-dishwasher proof
glassware by hand.
Select a programme with a higher
wash temperature.
Change your detergent.
Pre-rinse or remove the stains with a
napkin prior to washing.
4141
Page 42

GB
Disposal of the Dishwasher
• When disposing of your old dishwasher, first make it unusable. Disconnect from the electricity and
water supplies, cut off the cable and the plug from the mains cable. Make the door lock inoperative, so
that children cannot accidentally shut themselves in. Make appropriate arrangements for the disposal
of the dishwasher.
• At the end of its working life, the product must not be disposed of as urban waste. It must be taken to
a local authority waste collection centre or to a dealer providing this service. Disposing of a household
appliance separately avoids possible negative consequences for the environment and health deriving
from an inappropriate disposal and enables the constituent materials to be recovered to obtain
significant savings in energy and resources. As a reminder of the need to dispose of household
appliances separately, the product is marked with a crossed-out wheeled dustbin.
• Please ensure that it presents no danger to children while being stored for disposal.
Disposal of Packing Material
Please dispose of the plastic wrappings and bags safely and keep out of the reach of babies and young
children.
4242
Page 43

Specications
Model LDW60W12N
Dimensions 595mm(W) x 540mm(D) x 820mm(H)
Capacity 12 Place Settings
Water Pressure Required 0.04 - 1.00MPa
Power Consumption 1930W
Rated Voltage 230V~50Hz
Off Mode Power Consumption 0W
Left-on Mode Power Consumption 0.75W
GB
Energy Efficiency Class
Annual Energy Consumption
Energy Consumption of the Standard Cleaning Cycle 1.02 kWh
Annual Water Consumption
Drying Efficiency Class
Standard Cleaning Cycle
Program Duration of the Standard Cleaning Cycle 165 min
Noise Level 49 dB(A) re 1 pW
Mounting Build Under
Could be built-in Yes
Features and specifications are subject to change without prior notice.
Note:
A + + + (highest efficiency) to D (lowest efficiency)
1
Based on 280 standard cleaning cycles using cold water fill and the consumption of the low power
2
modes. Actual energy consumption will depend on how the appliance is used.
A (most efficient) to G (least efficient)
3
This is the program used for the Energy label information and is suitable for cleaning soiled normally
4
soiled tableware. It is the most efficient programme in terms of its combined energy and water
consumption for that type of tableware.
• The device meets the European standards and the directives in the current version at delivery:
- LVD 2006/95/EC
- EMC 2004/108/EC
- ERP 2009/125/EC
• The above values have been measured in accordance with standards under specified operating
conditions. Results may vary greatly according to quantity and pollution of the dishes, water hardness,
amount of detergent, etc.
1
2
2
3
4
A+
291 kWh
3360 litres
A
ECO 50°C
4343
Page 44

NO
Takk for at du kjøpte ny frittstående oppvaskmaskin fra Logik.
Ta deg tid til å lese gjennom denne installasjons-/brukerveiledningen for å bli fullt
fortrolig med installasjon og betjening.
Les alle sikkerhetsanvisningene nøye før bruk og behold denne installasjons-/
brukerveiledningen for framtidig referanse.
Pakke opp
Fjern all emballasje fra enheten. Ta vare på emballasjen. Ta hensyn til lokale forskrifter om avfallshåndtering
hvis du må kaste emballasjen.
Følgende gjenstander er vedlagt:
3
in
Delay
1/2 Load
Power
Start
1
3in1
Intensive
Normal Eco 1 HourGlass Rapid
Hovedenheten
Måleskje for vaskemiddel
1 full skje = 20 g (ca.)
Bestikkurv
60ml (ca.)
Sikkerhetsvannslange
KondensstrimmelMålekopp
Instruction
Manual
BruksanvisningU-formet slangeholderSalttrakt
Dette produktet har blitt testet med vann for å sikre riktig operasjon. Som et resultat av dette,
kan noe vann være igjen i enheten. Dette er normalt og trygt. Fjern eventuelle vanndråper fra
utsiden hvis nødvendig.
44
Page 45

Installasjon
Power
Delay
Start
1/2 Load
3in1 Inten NormalEco 1 HourGlass Rapid
3
in
1
825
600
580
INSTALLASJON
Plassering
Når du skal velge hvor oppvaskmaskinen skal
stå, må du sørge for at underlaget er horisontalt
og stabilt og at rommet er godt luftet. Ikke sett
oppvaskmaskinen i nærheten av en varmekilde,
f.eks. komfyr, varmtvannsbereder eller radiator.
Svært kalde omgivelser kan også føre til at maskinen
ikke yter som den skal. Denne oppvaskmaskinen er
ikke beregnet for bruk i en garasje eller utendørs
installasjon.
Ikke dekk til oppvaskmaskinen med noe slags
materiale. Påse at det er åpent rom på sidene når du
installerer.
Alle deler som fjernes må oppbevares for
å kunne foreta en full installasjon senere.
Sørg for at oppvaskmaskinen er slått av og
tom. Vi anbefaler at to personer håndterer
oppvaskmaskinen under installasjonen.
1. Sørg for at oppvaskmaskinen er installert av en
kvalifisert tekniker. Se hvilke verktøy som kreves.
NO
2. Sørg for at det er nok klarering på hver side av
enheten for å tillate noe sideveis bevegelse for
service når det er nødvendig. Arbeidsflaten på
oppvaskmaskinen kan om nødvendig fjernes.
Høyde uten arbeidsflaten er 820 mm. Figuren
viser minstemålene som kreves for å plassere
oppvaskmaskinen inni monterte kjøkkenskap.
units in mm
540
1
in
3
3in1Inten Normal Eco1 Hour GlassRapid
1/2 Load
Delay
Start
Power
820
80
100
595
45
45
Page 46

NO
INSTALLASJON
3. Ikke koble enheten til stikkontakten før
installasjon. Pass på at du ikke installerer
enheten rett foran stikkontakten. Dette er for å
unngå eventuell skade på baksiden av enheten.
4. Kondensstrimmelen må festes til undersiden
av arbeidsflaten over oppvaskmaskinen for å
beskytte den mot fuktighet. Formålet til denne
stripen er å beskytte undersiden av arbeidsflaten
fra damp som kommer ut fra oppvaskmaskinen.
Fjern bakpapiret fra kondensstrimmelen.
1
in
3
3in1Inten Normal Eco1 Hour GlassRapid
1/2 Load
Delay
Start
Power
5. Klistre kondensstrimmelen til undersiden av
arbeidsflaten.
Sørg for at overflaten er ren før
du klistrer kondensstrimmelen til
undersiden av arbeidsflaten.
Hvis du ikke fester
kondensstrimmelen, kan det oppstå
skade på undersiden av arbeidsflaten!
La det være noe klaring
Klistre kondensstrimmelen
under arbeids aten
der du vil installere
oppvaskmaskinen.
46
Page 47

INSTALLASJON
6. Plasser oppvaskmaskinen ved siden av en
vannkran og et avløp. Sørg for at vanninntaksog avløpsslangene ikke er knekt eller klemt.
Enheten må ikke stå på strømledningen.
7. Riktig rettstilling er viktig for at døren skal lukkes
riktig og at forseglingen skal være riktig. Når
enheten er riktig rettstilt, skal ikke døren ta borti
den indre overflaten på noen av kabinettsidene.
Juster de justerbare føttene for å oppnå optimal
rettstilling av enheten.
NO
1
3
in
3in1Inten NormalEco 1 HourGlass Rapid
1/2 Load
Delay
Start
Power
8. Skru ut de to skruene og juster avstanden til
venstre og høyre plintflik etter behov. Det
justerbare området er fra 39 mm til 134 mm.
134
skrue
39
47
47
Page 48

NO
INSTALLASJON
9. Fest plinten på plintfliken. Juster plinthøyden
etter behov, høyden kan justeres fra 56 til 122
mm.
10. For å sikre oppvaskmaskinen under benken,
stram skruene gjennom de øvre sidene av
enheten og inn i benken.
11. Kontroller at røropplegget ditt passer for bruk
med oppvaskmaskinen. Ta kontakt med en
kvalifisert rørlegger hvis du er i tvil. Denne
enheten Må kobles til en KALDTVANNSKRAN
ved å bruke den nye vanninntaksslangen.
BRUKT SLANGESETT MÅ IKKE BRUKES OM IGJEN.
Vanntrykket fra vannkranen må være minst
0,04 MPa og maksimalt 1,00 MPa.
• Koble én ende av sikkerhetsvannslangen til
oppvaskmaskinen, og koble deretter den
andre enden av slangen til vannkranen. Sørg
for at den svarte pakningen er på plass.
• Etter at du har koblet til slangen, må du slå
på vannkranen og kontrollere at det ikke er
lekkasjer.
• Koble oppvaskmaskinen til stikkontakten.
Du kan bruke en Y-adapter (ikke
vedlagt) for ekstra vanntilførsel til
et annet apparat, for eksempel en
vaskemaskin. Dette gjelder kun for
kaldtvannskran. En Y-adapter er
tilgjengelig i de fleste jernvarebutikker.
plintik
Vannkran
Y-adapter
(ikke vedlagt)
Vannforsyningsslange
plint
56
122
Koble til
et annet
apparat hvis
nødvendig.
Om sikkerhetsvannslangen
Sikkerhetsvannslangen
består av doble vegger. Dette
slangesystemet sørger for å blokkere
vanngjennomstrømningen ved
brudd på tilførselsslangen og når
luftrommet mellom tilførselsslangen
og den ytre korrugerte slangen
fylles med vann.
48
Page 49

INSTALLASJON
• Ikke bøy avløpsslangen.
• Du kan bruke den U-formede
avløpsslangeholderen til å sikre
avløpsslangen og for å unngå å bøye den.
NO
• Fest avløpsslangen godt til avløpsrøret for å
unngå at den kommer løs mens maskinen
går.
• Avløpsrøret må kobles til avløpet
for gråvann og ikke til avløpet for
overflatevann.
• Avløpsslangen må plasseres mellom
40 cm og 100 cm fra gulvnivået og
den må ikke forlenges. I motsatt fall
kan det bli umulig for enheten å
tømme ut det brukte vaskevannet
ordentlig.
• Steng vannkranen etter bruk.
U-formet
avløpsslangeholder
avløpsslange
49
49
Page 50

Produktoversikt
NO
Sett forfra
Sett bakfra
Dørhåndtak
3
in
Delay
1/2 Load
Power
Start
1
3in1
Intensive
Normal Eco 1 Hour Glass Rapid
Kontrollpanel
Avløpsslange
50
Vanninntak
(koble til vannforsyning)
Strømledning
(koble til stikkontakt)
Page 51

Øvre kurv Nedre kurv
Sett fra innsiden
NO
Øvre kurv
Saltbeholder
Nedre kurv
Vaskemiddeldispenser
1. Øvre kurv
2. Saltbeholder
3. Nedre kurv
4. Vaskemiddeldispenser
5. Koppstativ
6. Spylearm
7. Filter
8. Glansemiddelbeholder
Koppstativ
Spylearm
Filtreringssystem
Glansemiddelbeholder
9. Filtreringssystem
10. Spylearm
11. Saltbeholder
51
Page 52

NO
Kontrollpanel
3
in
1
Delay
Power
1/2 Load
Start
1. Strøm på-lampe
Lyser når Strøm-knappen trykkes.
2. Strøm-knapp
For å slå oppvaskmaskinen på og av.
3. Vindu
Vis gjenværende tid i programmet, forsinket starttid, feilkoder, advarsel om skyllemiddel og salt, osv.
4. Forsinket start-knapp
Trykk for å forhåndsinnstille tid for oppvask og forsinke starttiden med opptil 24 timer.
5. Halv oppvask-funksjonsknapp
Trykk på denne for å velge halv oppvask-funksjonen i vaskesyklusen.
6. Indikatorlampe for halv oppvask
Lyser når halv oppvask-funksjonen er valgt.
7. Programindikatorlamper
Viser oppvaskprogrammet.
8. Program-knapp
Trykk for å velge ønsket vaskeprogram.
3in1
Intensive
Normal Eco 1 Hour Glass Rapid
82 4 5 63 71
52
Page 53

Før du begynner
Åpne døren
• Åpne døren på gløtt for å unngå vannsøl.
• Trekk i håndtaket på døren.
Hvis døren åpnes mens maskinen går, avbrytes alle funksjoner automatisk.
Lukke døren
• Etter at serviset er satt inn, skyves kurvene helt inn i oppvaskmaskinen.
• Løft døren oppover og skyv til den klikker på plass.
• Ikke smell igjen oppvaskmaskindøren.
Gjenstander som ikke egner seg for oppvaskmaskinen
Når du kjøper nytt steintøy og bestikk, må du forsikre deg om at det er oppvaskmaskinsikkert. Noen
gjenstander egner seg ikke for oppvaskmaskiner.
Følgende elementer egner seg ikke
Krystallglass
Verdifulle vaser
NO
Håndklær og
svamper
Små plastgjenstander
(melkeaskesmokk)
Plastgjenstander
som ikke kan vaskes i
oppvaskmaskin
Sølvtøy
Støpejernskjeler
Kokekar med ripet slippbelegg
Porselen med sprekker eller hakk
Kobbergryter og -kjeler
• Bestikk og steintøy av tre eller gjenstander med tredeler kan bli misfarget og blekne. Limet som brukes
i disse gjenstandene er ikke oppvaskmaskinsikkert, slik at trehåndtak kan løsne etter at å ha blitt vasket
i oppvaskmaskinen.
• Håndlagde gjenstander, antikviteter, verdifulle vaser og dekorativt glasstøy egner seg heller ikke for
oppvaskmaskiner.
• Plastgjenstander som ikke tåler varme (f.eks. tupperware) kan smelte eller miste fasong på grunn av
den høye temperaturen i oppvaskmaskinen.
• Gjenstander av kobber, messing, tinn og aluminium kan bli misfarget eller matt.
• Drikkeglass og skjøre glassgjenstander kan bli uklare etter mange oppvasker. Ikke vask skjøre
glassgjenstander eller krystallglass i en oppvaskmaskin. Vask skjøre glassgjenstander for hånd i stedet.
• Sølv- og aluminiumsdeler har en tendens til å bli misfarget under oppvask. Rester som eggehvite,
eggeplomme og sennep forårsaker ofte misfarging og flekker på sølvtøy. Derfor bør du skylle av
restene fra sølvtøyet umiddelbart etter bruk.
53
Page 54

NO
Legge til oppvaskpulver eller -tablett
Bruk kun vaskemidler som er spesielt laget for oppvaskmaskiner. For å være miljøvennlig skal du ikke
bruke mer enn riktig mengde vaskemiddel. Fyll vaskemiddeldispenseren med oppvaskpulver eller legg i
oppvasktabletten. Se anvisningene fra vaskemiddelprodusenten når det gjelder riktig mengde å bruke.
Brukes oppvasktabletter, må produsentens anbefalinger studeres for å avgjøre hvor tabletten skal legges
(f.eks. i bestikkurven, vaskemiddelrommet osv.)
• ADVARSEL! Oppbevares utilgjengelig for barn.
• Irriterer øynene.
Irriterende
Blekemidler
og vanlige
oppvaskmidler
Følg trinnene nedenfor for å fylle vaskemiddeldispenseren.
1. Skyv knappen på lokket til
vaskemiddeldispenseren i pilens retning til klaffen
spretter opp.
• Unngå kontakt med øynene. Ved kontakt med øyne, skyll
umiddelbart med store mengder vann og søk medisinsk hjelp.
• Ved svelging må du straks oppsøke medisinsk hjelp.
skyv opp fra høyre side
2. Fyll vaskemiddeldispenseren med oppvaskpulver
både i hovedvaskemiddelrommet og
forvaskemiddelrommet eller legg inn
oppvasktabletten i hovedvaskemiddelrommet.
Markeringen viser fyllnivået.
Alle programmer med forvask trenger
ekstra vaskemiddel som må legges
i forvaskemiddelrommet. Brukes
oppvasktabletter, må produsentens
anvisninger følges. Se oppvasktabellen.
Dette vaskemidlet brukes under forvasken.
3. Lukk lokket ordentlig slik at det klikker på plass.
hovedvaskemiddelrom
eller
forvaskemiddelrom
54
Page 55

Fylle på glansemiddel
Glansemidlet hjelper til med å sikre at vann ikke fester seg og lager merker på steintøy under tørkingen,
og gjør tørkingen raskere etter at steintøyet er vasket. Fyll kun på glansemidler som er beregnet
på husholdningsoppvaskmaskiner i beholderen. Denne modellen er laget for å bruke kun flytende
glansemidler.
Følg trinnene nedenfor for å fylle glansemiddelbeholderen, så vil riktig mengde fordeles automatisk.
1. Vri lokket og åpne som indikert.
2. Når åpningsmerket for lokket er innrettet, kan
du løfte lokket opp.
3. Fyll på glansemiddel til
glansemiddelindikatoren blir helt svart, og
lukk lokket.
4. Ikke fyll for mye i beholderen. Tørk opp
eventuelt søl.
glansemiddelindikator
åpne
NO
• Hvis vannet der du bor er mykt, trenger du kanskje ikke glansemiddel da dette kan føre til at
det dannes en hvit film på serviset.
• Hvis du bestemmer deg for å bruke en oppvasktablett, trenger du ikke fylle på glansemiddel i
glansemiddelbeholderen.
• Advarselsindikatoren for lavt glansemiddelnivå vises på LED-skjermen når beholderen er
nesten tom for glansemiddel og må fylles opp.
• Du kan også vurdere mengden glansemiddel ved å sjekke glansemiddelindikatoren ved siden
av lokket til beholderen. Når indikatoren er svart, betyr det at beholderen er full. Når den er
klar, betyr det at den er nesten tom.
Justere glansemiddelbeholderen
Glansemiddelbeholderen har seks innstillinger. Både den anbefalte
innstillingen og fabrikkinnstillingen er «4». Hvis serviset ikke tørker
ordentlig eller er flekkete, kan du justere skiven til det neste høyere
nummeret til koppene er flekkfrie.
Hvis det er finnes glansemiddelrester i oppvaskrommet
eller på serviset, må du vri glansemiddeldispenserbryteren
til 1.
55
Page 56

NO
Fylle på salt
Hvis vannet der du bor er hardt, dannes det avleiringer av kalk på servise og redskaper. Derfor har dette
apparatet en saltbeholder for å redusere vannets hardhet.
Følg trinnene nedenfor for å fylle saltbeholderen og stille inn forbruket etter hardhetsgraden på vannet der
du bor.
1. Fjern den nedre kurven og skru av lokket på beholderen.
åpne
åpne
OPEN
åpne
2. Sett trakten som følger med over saltbeholderen. Fyll på omtrent 1,2
kg med oppvaskmaskinsalt avhengig av merket du bruker.
3. Fyll beholderen med vann til det renner over (kun første gang).
4. Fjern eventuelt søl fra området rundt beholderåpningen og skru
deretter lokket godt på igjen.
5. Kjør det «hurtige» vaskeprogrammet umiddelbart (uten noe steintøy
i oppvaskmaskinen) for å fjerne alle spor av salt fra maskinen.
• Advarselsindikatoren for lavt saltnivå vises på LED-skjermen når beholderen er nesten tom for
salt og må fylles opp.
• Advarselsindikatoren for lavt saltnivå slutter å lyse etter et par dager avhengig av hvor fort
saltet løses opp.
• Hvis du bestemmer deg for å bruke en oppvasktablett, trenger du kanskje ikke fylle på
salt – dette avhenger av vannets hardhet der du bor og tablettypen du bruker. Spør
vannleverandøren og følg oppvasktablettprodusentens anvisninger.
56
Page 57

Justere saltforbruk
– +
Saltforbruket må justeres etter hardhetsgraden på vannet der du bor. Hvis du ikke vet hvor hardt vannet i
springen er, må du spørre leverandøren av vannet der du bor.
Det anbefales at justeringer gjøres i henhold til følgende skjema.
Vannhardhet
Tysk ˚dh Fransk
˚fh
0-8 0-14 0-10 0-1,4 / 0 /
8-22 14-39 10-28 1,4-3,9 - 20 60
22-45 39-80 28-56 3,9-8 Middels 40 30
>45 >80 >56 >8 + 60 20
Britisk
˚Clarke
mmol/l
Velgerposisjon
Saltforbruk
(gram per syklus)
Antall sykluser à
1,2 kg
NO
1 ˚dh (tysk grad) = 0,18 mmol/l
1 ˚fh (fransk grad) = 0,1 mmol/l
1 ˚Clark (britisk grad) = 0,142 mmol/l
Følg trinnene nedenfor for å optimere og tilpasse saltforbruket.
1. Fjern den nedre kurven og skru av lokket på beholderen.
2. Det er en pilformet indikator i beholderen som du kan vri på. Du kan vri den til «−» eller
«+»-innstillingen basert på vannhardheten der du bor.
• Ikke bruk vanlig bordsalt eller koksalt fordi
de inneholder uoppløselige stoffer som
kan skade oppvaskmaskinen.
• Ikke hell vaskemiddel i saltbeholderen.
Dette vil skade oppvaskmaskinen.
drei
57
Page 58

Sette inn i oppvaskmaskinen
NO
Før du setter inn i oppvaskmaskinen
Følg disse merknadene når du laster kokekar og redskaper i kurvene.
• Fjern alle matrester og flekker fra leppestift fra steintøy og servise. Skyll hvis nødvendig.
• Servise og bestikk må ikke ligge inni hverandre eller dekke til hverandre.
• Sett inn bestikket og steintøyet slik at vannet kan komme til alle overflater.
• Sørg for at alle gjenstander er trygt plassert.
• Hule gjenstander som kopper, glass, kjeler osv. må plasseres opp ned i kurven.
• Større gjenstander må plasseres i en vinkel slik at vann lett kan renne av.
• Spylearmene må ikke blokkeres av gjenstander som er for høye eller som henger gjennom kurvene.
Hvis du er i tvil, kan du forsikre deg om at spylearmene har fri bevegelse ved å rotere dem manuelt.
• Sørg for at små gjenstander ikke faller gjennom holderne i kurvene.
• Av sikkerhetsmessige årsaker må du ikke bruke oppvaskmaskinen uten at
oppvaskmaskinkurven står riktig på plass.
• Ikke vask gjenstander som er tilsmusset med aske, sand, voks, smørefett eller maling i
oppvaskmaskinen. Disse gjenstandene kan skade oppvaskmaskinen. Aske løses ikke opp, men
fordeles i oppvaskmaskinen.
58
Page 59

Øvre kurv
Vi anbefaler å bruke den øvre kurven for små og lette
gjenstander som kopper, tefat, glass, dessertskåler
osv. Flate kjeler eller kasseroller kan også plasseres i
oppvaskmaskinkurven.
Lange gjenstander som suppeskjeer, visper og lange kniver
må legges ned på tvers fremst i den øvre kurven.
Justere den øvre kurven
Du kan lage mer plass for større gjenstander i de øvre og nedre kurvene ved å justere høyden på den øvre
kurven. Den øvre kurven har en heisemekanisme (løft kurven for å heve, løft igjen for å senke). Kontroller at
kurven er stabil etter å ha justert høyden.
juster kurvhøyde, sett
inn igjen
NO
løft ik
ern skinnestopper
skyv kurven ut fra
skinnen
Hengslet koppstativ
Du kan gjøre plass for større gjenstander i den øvre kurven ved å
reise opp koppstativet. Du kan deretter lene de høye glassene mot
det. Du kan også fjerne stativet når det ikke brukes.
sett skinnestopper på igjen
reis opp
59
Page 60

Sette inn 12 kuverter i den øvre kurven
Tabellen nedenfor og det tilhørende bildet viser optimal plassering av steintøy i den øvre kurven.
NO
Nummer Gjenstand
1 Kopper
2 Liten serveringsbolle
3 Stor serveringsbolle
4 Glass
5 Tefat
6 Liten skål
7 Dessertskåler
For å forhindre at vann drypper fra den øvre kurven og ned på serviset i den nedre kurven,
anbefaler vi at du tømmer den nedre kurven først og deretter den øvre.
Nedre kurv
Vi anbefaler at gjenstander som er store og vanskelige å rengjøre,
slik som tallerkener, serveringsfat, sausekjeler, serveringsboller,
gryter, kjeler, lokk osv., plasseres i den nedre kurven. Vi anbefaler at
serveringsfat og lokk plasseres på siden av kurven for å unngå at
spylearmene blir hindret i å rotere.
INN
44
3
3
1
1
4
4
1
1
1
1
44
1
1
2
5
5
7
7
6
6
2
1
1
1
1
4
4
Hengslede spisser
Spissene brukes for å holde tallerkener og et fat. De kan senkes for å gi plass til større gjenstander. Trinnene
for å senke spissene vises nedenfor.
reis opp
60
brett bakover
Page 61

Sette inn 9 kuverter i den nedre kurven
Tabellen nedenfor og det tilhørende bildet viser optimal plassering av steintøy i den nedre kurven.
Nummer Gjenstand
7 Dessertskåler
8 Ovalt fat
INN
7
7
77
77
9 Tallerkener
8
10 Suppefat
8
11
11
11 Bestikkurv
Bestikkurv
For å gjøre det mye enklere å ta ut av maskinen, bør bestikk grupperes inn i soner og plasseres i
bestikkurven. Tabellen nedenfor og det tilhørende bildet viser optimal plassering.
2
Nummer Gjenstand
1 Gafler
2 Suppeskjeer
3 Dessertskjeer
4 Teskjeer
5 Kniver
6 Serveringsskjeer
7 Sausøse
8 Serveringsgaffel
3 2
5
4 525
4
5 5 5
4
2
4
1
1
3
4
1
2
4
1
1
2
4
1
3
8
3
99
99
1010
1010
3 3
1
4
1
1
4
1
4
1
1
4
5 5 5 4
5 5 5
NO
33
2
3
2
2
3
2
2
4
632367
• Ikke la noen gjenstander stikke ut gjennom bunnen
av kurvene.
• For å unngå faren for personskade må du sette inn
kniver og gafler med håndtakene opp. Ikke hold dem
i den spisse enden.
• Bestikkurven leveres med deksler som er laget
for at du skal kunne laste bestikket inn i de riktige
rommene. Hvis du bruker kurven uten lokk, kan dette
føre til at bestikket ikke blir vasket godt nok.
• Sørg for at dekslet er sikkert festet til kurven før bruk.
• For å overholde ytelsesstandarden, dvs. EN50242,
må du sørge for alt bestikk settes inn i henhold til
anvisningene i denne håndboken.
61
Page 62

Oppvasktabell
NO
Program Informasjon om syklusvalg Prosess
• For normalt
3-i-1
Intensiv
Normal
Økonomi*
(EN50242)
1 time
Glass • For lett tilsmusset
Hurtig
tilsmusset innhold,
bruk flerfunksjonelt
vaskemiddel.
• For meget tilsmusset
steintøy og normalt
tilsmussede
kasseroller, gryter,
servise osv. med
inntørket smuss.
• For normalt
tilsmusset innhold,
f.eks. gryter,
tallerkner, glass og
lett tilsmussede
kjeler.
• Standard daglig
oppvask for normalt
tilsmusset innhold,
f.eks. gryter,
tallerkner og glass.
• For lett tilsmusset
innhold som ikke
må tørkes med høy
effektivitet.
steintøy og glasstøy.
• En kortere vask
for lett tilsmusset
innhold som ikke må
tørkes.
• Forvask (50°C)
• Vask (55°C)
• Skylling
• Skylling (65°C)
• Tørking
• Forvask (50 °C)
• Vask (65°C)
• Skylling
• Skylling
• Skylling (55°C)
• Tørking
• Forvask (50°C)
• Vask (55°C)
• Skylling
• Skylling (65°C)
• Tørking
• Forvask
• Vask (50°C)
• Skylling (65°C)
• Tørking
• Vask (60°C)
• Skylling
• Skylling (50°C)
• Tørking
• Forvask
• Vask (40°C)
• Skylling
• Skylling (60°C)
• Tørking
• Vask (40°C)
• Skylling
• Skylling (40°C)
Mengde
Kjøretid
vaskemiddel
• 3-i-1 160 1,35 16,0
• Forvask
(5g)
• Hovedvask
(25g)
• Forvask
(5g)
• Hovedvask
(25g)
• Forvask
(5g)
• Hovedvask
(25g)
• Hovedvask
(30g)
• Hovedvask
(20g)
• Hovedvask
(20g)
Strømforbruk
(min)
125 1,35 19,5
160 1,30 16,0
165 1,02 12,0
60 0,95 12,0
95 0,90 16,0
30 0,50 11,0
(kWh)
Vannforbruk
(L)
Glansemiddel
* For å overholde standarden for ytelse, dvs. EN50242, må du sørge for å bruke økonomivaskesyklusen for
testen.
3-i-1-funksjonen er kun tilgjengelig for 3-i-1-vaskeprogram.
Hvis du velger å bruke oppvasktablett i disse programmene, må du ikke fylle på glansemiddel.
Condensing dry technology
Energy is saved by drying the dishes using the remaining heat after the last rinse cycle.
Wash cycle times are extended due to this drying method.
Some wash programmes do not have a drying function, please refer to the Wash Cycle Table for
more details.
62
Page 63

Starte en vaskesyklus
1. Kontroller at enheten er koblet til stikkontakten og at vannforsyningen er på (vanntrykk mellom 0,04
MPa og 1,00 MPa).
2. Åpne døren. Trekk ut den nedre og den øvre kurven, sett inn serviset og skyv kurvene på plass. Det
anbefales at du fyller den nedre kurven først, og deretter den øvre kurven.
3. Fyll på vaskemidlet eller legg inn oppvasktabletten i vaskemiddelrommet og steng lokket godt.
4. Lukk oppvaskmaskindøren. Du skal høre et klikk når døren er lukket riktig. Ikke smell igjen døren.
5. Trykk på Strø-knappen. Strømindikatorlampen lyser.
6. Velg vaskeprogrammet basert på hva du vasker og hvor tilsmusset det er. Studer avsnittet
Oppvasktabell.
7. Indikatorlampen for det valgte programmet tennes.
8. Vaskesyklusen starter straks.
9. Vinduet viser statusen til oppvaskmaskinen.
a. «--:--» betyr at enheten er i ventemodus.
b. «H:MM» og ingen blinking betyr at enheten er satt på pause.
c. ”H:MM” og blinking betyr at enheten kjører.
Hvis du åpner oppvaskmaskindøren under vaskesyklusen og deretter lukker den igjen, fortsetter
oppvaskmaskinen med det gjeldende vaskeprogrammet etter 10 sekunder. Men dersom døren
ikke lukkes igjen etter omtrent 1 minutt, piper oppvaskmaskinen hvert minutt.
Endre et program
NO
Følg trinnene nedenfor for å endre programmet hvis vaskesyklusen allerede har startet.
1. Åpne døren på gløtt for å unngå vannsøl før du åpner den helt. Kontroller om enheten har sluppet ut
oppvaskepulveret eller -tabletten. Dette vil avhenge av hvor lenge vaskesyklusen har kjørt.
2. Hvis vaskemiddellokket er åpent, foreslår vi at du lar vaskesyklusen bli fullført.
3. Hvis vaskemiddellokket fremdeles er lukket, kan du trykke og holde P-programknappen inne i 3
sekunder for å avbryte programmet. Deretter kan du velge den nye programknappen og lukke
oppvaskmaskindøren. Enheten starter den nye vaskesyklusen straks.
ELLER
Trykk på den nye programknappen i mer enn 3 sekunder to endre det kjørende programmet. Enheten
starter den nye vaskesyklusen straks.
Ved slutten av et program
Oppvaskmaskinen piper når et program er avsluttet.
Kondensstrimmelen hjelper til med å forhindre dampskade på arbeidsflaten over
oppvaskmaskinen. Det anbefales at du lar døren være lukket til du er klar til å ta ut steintøyet.
Ikke la døren stå på gløtt. Ikke etterlat apparatet uten tilsyn med døren helt åpen, fordi dette kan
føre til at noen snubler.
63
Page 64

Slå av enheten
NO
Husk å slå av oppvaskmaskinen med Strøm-knappen for å spare strøm. Oppvaskmaskinen fortsetter å
bruke strøm til den slås av med Strøm-knappen.
Hvis oppvaskmaskinen ikke skal brukes på en lang stund, f.eks. mens du er på ferie, må du koble
enheten fra stikkontakten.
Ta ut av oppvaskmaskinen
Det er viktig å la serviset kjøle seg ned før du tar det ut av maskinen, fordi servise lettere sprekker og får
hakk når det er varmt. Hvis du derfor åpner oppvaskmaskindøren helt etter at oppvasken er ferdig, vil
serviset kjøle seg raskere ned.
Ta ut fra den nedre kurven først, deretter bestikkurven og til slutt den øvre kurven. Dette hindrer
at vann drypper fra den øvre kurven og ned på serviset i den nedre kurven.
Forsinket start
Starttiden til et vaskeprogram kan forsinkes og justeres. Følg trinnene nedenfor.
1. Åpne oppvaskmaskindøren og sett inn tilsmusset servise og steintøy.
2. Lukk døren. Trykk på Strøm-knappen for å slå på oppvaskmaskinen.
3. Velg ønsket program.
4. Trykk på Forsinket start-knappen gjentatte ganger for å velge ønsket forsinkelse (periode opptil 24
timer).
Hvert trykk på denne knappen øker den forsinkede starttiden med 1 time.
5. Enheten vil starte programmet automatisk ved den tilordnede tiden.
Halv oppvask
Hvis du ikke har nok servise for en full vask, kan du velge halv oppvask-alternativet for å vaske bare. Dette
sparer forbruket av varmt vann og strøm. Følg trinnene nedenfor.
1. Åpne oppvaskmaskindøren og sett inn tilsmusset servise og steintøy i den kurven.
2. Lukk døren. Trykk på Strøm-knappen for å slå på oppvaskmaskinen.
3. Velg ønsket program.
4. Trykk på 1/2 Load-knappen.
5. Enheten vil snart starte programmet.
64
Page 65

Rengjøring etter bruk
Power
Delay
Start
1/2 Load
3in1IntenNormal Eco1 HourGlassRapid
3
in
1
Utvendig vedlikehold
Døren og dørpakningen
Rengjør dørpakningen regelmessig med en fuktet klut for å fjerne matrester.
Når du setter inn i oppvaskmaskinen, kan matrester og væske dryppe ned på sidene av
oppvaskmaskindøren. Disse overflatene er utenfor vaskerommet og spyles ikke av vannet fra spylearmene.
Alle rester må strykes av før du lukker døren.
Kontrollpanelet
Hvis det er nødvendig med en rengjøring, må kontrollpanelet KUN tørkes av med en fuktet klut.
• For å unngå at vann kommer inn i dørlåsen og elektriske komponenter, må du ikke bruke
noen form for sprayrengjøring.
• Bruk aldri skurende rengjøringsmidler eller skuresvamper på de ytre overflatene, fordi de
kan lage riper i overflaten. Enkelte tørkepapirer kan også lage riper eller etterlate merker på
overflaten.
Innvendig ettersyn
Filtreringssystem
Filtreringssystemet i bunnen av vaskerommet holder igjen grovt avfall fra vaskesyklusen. En større
ansamling av grovt avfall kan tette filtrene. Kontroller filtrene regelmessig og rengjør dem under rennende
vann hvis nødvendig.
Følg trinnene nedenfor for å rengjøre filtrene i vaskerommet.
1. Sørg for at oppvaskmaskinen er slått av.
2. Skru det grove filteret mot urviseren, og løft det forsiktig ut.
3. Løft finfilteret forsiktig ut.
4. Skyll alle filtrene, inkludert filtersylinderen, under rennende vann og sett dem inn igjen i motsatt
rekkefølge.
5. Sett hovedfilteret forsiktig på plass.
6. Skru det grove filteret forsiktig på igjen med urviseren. Det skal høres et svakt klikk når filteret sitter
riktig.
NO
Filtersylinder uten
ltrene
• Ikke stram filtrene for mye. Sett filtrene tilbake i riktig rekkefølge så de sitter godt på plass. I
motsatt fall kan grove rester komme inn i systemet og forårsake en blokkering.
• IKKE kjør oppvaskmaskinen uten at filtrene er på plass. Hvis filtrene settes feil tilbake, kan
maskinens ytelse bli redusert og servise og redskaper kan bli skadet.
65
Page 66

NO
Spylearmer
Matrester kan sette seg fast i dysene og lagrene til
spylearmene. Du må derfor kontrollere og rengjøre
spylearmene regelmessig.
Sørg for at oppvaskmaskinen er slått av. Bruk en spiss
gjenstand, f.eks. en tannpirker, til å løsne matrester i
spylearmdysene.
Ikke prøv å fjerne spylearmene.
Forholdsregler ved frost
Ikke sett oppvaskmaskinen på et sted hvor temperaturen kan komme under 0 ˚C. Hvis enheten skal stå på
et sted uten varme over vinteren, anbefales følgende:
1. Koble enheten fra vannkranen.
2. Slå på enheten. Velg en hvilken som helst vaskesyklus og la den gå i bare ett minutt. Dette slipper ut alt
overflødig vann som er igjen i enheten.
3. Koble fra stikkontakten.
4. Tøm oppvaskmaskinen.
5. Lukk oppvaskmaskindøren.
6. Koble enheten fra vannavløpet. Bruk en passende beholder til å fange opp eventuelt gjenværende
vann i slangene.
Hvis du møter på problemer med trinnene ovenfor, kan du be en servicetekniker om hjelp.
Flytte oppvaskmaskinen
Hvis du må flytte enheten, for eksempel til et annet hus, må du:
1. Koble oppvaskmaskinen fra stikkontakten.
2. Koble oppvaskmaskinen fra vanninntaket og -avløpet. Bruk en passende beholder til å fange opp
eventuelt gjenværende vann i slangene.
3. Fjern oppvaskmaskinen fra den gjeldende plasseringen med slangene koblet fra.
4. Dra enheten ut sammen med slangene.
• Ikke tipp enheten under transport.
• Vi anbefaler at to personer håndterer oppvaskmaskinen under installasjonen.
Vedlikehold etter en lang periode uten bruk
Hvis du ikke har tenkt å bruke enheten på en lang stund, bør du:
1. Koble oppvaskmaskinen fra stikkontakten.
2. Koble oppvaskmaskinen fra vanninntaket og -avløpet. Bruk en passende beholder til å fange opp
eventuelt gjenværende vann i slangene.
3. Åpne døren på gløtt for å hindre at det oppstår vond lukt i vaskerommet.
4. Sørg for at oppvaskrommet er rent.
66
Page 67

Råd og tips
• Reparasjoner må kun utføres av en kvalifisert tekniker i strengt samsvar med gjeldende
lokale og nasjonale sikkerhetsforskrifter. Uautorisert eller feilaktige reparasjoner kan føre til
personskade eller skade på enheten.
• Før du ringer etter service, bør du studere avsnittet Råd og tips for å løse enkelte vanlige
problemer selv.
Tekniske problemer
Tekniske problemer
Problem Mulige årsaker Løsning
Oppvaskmaskinen starter ikke. Døren er ikke helt lukket. Lukk døren godt.
Enheten er ikke koblet til
stikkontakten.
Enheten er ikke slått på. Trykk på Strøm-knappen og velg et
Feilkode ”E1” vises. Vannkranen er ikke skrudd på. Skru på vannkranen.
Lavt vanntrykk (<0,04 MPa) Skru på vannkranen og påse at den
Strømningsmåleren er ødelagt.
Ledningsterminalene som er
tilkoplet strømningsmåleren
er løse.
Feilkode ”E4” vises. Tanken lekker.
Slangen lekker.
Flottørbryteren er ødelagt eller
kretskortet har en feil.
LED-lampen for det normale
programmet blinker.
Tømmepumpen fungerer ikke
som den skal.
Enheten er overfylt med vann. Steng vannkranen, trekk støpselet
Antioversvømmelsessystemet
har vært i bruk.
Sett støpslet inn i stikkontakten.
program.
er helt åpen.
• Kople fra stikkontakten.
• Koble fra vannkranen.
• Tilkall en kvalifisert tekniker.
ut av stikkontakten og kontakt en
kvalifisert serviceagent.
• Koble fra stikkontakten.
• Koble fra vannkranen.
• Tilkall en kvalifisert tekniker.
NO
Problem Mulige årsaker Løsning
Det er rester av rensemiddel
i dispenseren ved slutten av
programmet.
Kan ikke stenge
vaskemiddellokket ordentlig.
Generelle problemer
Vaskemiddeldispenseren var
fremdeles fuktig da den ble
fylt med vaskemiddel.
En opphopning av
rensemiddelrester blokkerer
låsehaken.
Kontroller at dispenseren er tørr før
du fyller vaskemiddel i den.
Rengjør låsehaken.
67
Page 68

NO
Generelle problemer
Problem Mulige årsaker Løsning
Bankelyd i vaskerommet. En spylearm banker mot noe i
en kurv.
Hinne vises på glass og
bestikk.
Servise, bestikk og glass er
ikke tørre.
Hvite rester er synlig på
bestikk og steintøy, skygger
vises på glass; film som kan
tørkes av.
Glansemiddeldoseringen er
for høy.
Kanskje det brukes for
lite glansemiddel eller
glansemiddelbeholderen er
nesten tom.
Steintøy ble tatt ut av
oppvaskmaskinen for tidlig.
Det ble ikke brukt nok
glansemiddel.
Det er ikke nok salt i
saltbeholderen.
Lokket på saltbeholderen er
ikke skrudd riktig på.
Feil vaskemiddel har blitt
brukt.
Avbryt programmet og omordne
gjenstandene som stenger for
spylearmen. Se avsnittet Sette inn i
oppvaskmaskinen.
Juster skiven på
glansemiddeldispenseren til en lavere
innstilling.
Fyll på glansemiddel, juster skiven
på glansemiddeldispenseren til en
høyere innstilling eller bytt til et
annet glansemiddelmerke.
La steintøyet ligge i
oppvaskmaskinen til du hører et
lydsignal.
Fyll på glansemiddel, juster skiven
på glansemiddeldispenseren til en
høyere innstilling eller bytt til et
annet glansemiddelmerke.
Fyll opp saltbeholderen.
Påse at det er skrudd riktig på.
Skift vaskemiddel. Bruk vanlig
vaskemiddel for oppvaskmaskiner.
Glass er matte og misfargede;
film kan ikke tørkes av.
Te- eller leppestiftflekker har
ikke blitt fullstendig fjernet.
68
Saltforbruksinnstillingen er
for lav.
Glasstøyet er ikke
oppvaskmaskinsikkert.
Overflatene er påvirket.
Vasketemperaturen til det
valgte programmet var for lav.
Vaskemidlet som brukes er for
lite blekende.
Skylling eller fjerning av
flekker på forhånd ble utelatt.
Velg en høyere saltforbruksinnstilling.
Vask glass som ikke er
oppvaskmaskinsikkert for hånd.
Velg et program med en høyere
vasketemperatur.
Skift vaskemiddel.
Forhåndsskyll eller fjern flekkene med
en serviett før oppvask.
Page 69

Avhending av oppvaskmaskinen
• Når du avhender den gamle oppvaskmaskinen, må du først gjøre den umulig å bruke. Koble fra strømog vanntilførsel, klipp av kabelen og fjern støpslet fra strømledningen. Ødelegg dørlåsen, slik at barn
ikke kan stenge seg inne ved et uhell. Sørg for forsvarlig avhending av oppvaskmaskinen.
• Produktet må ikke kastes som husholdningsavfall når det ikke lenger skal brukes. Den må leveres til et
innsamlingssted for elektrisk og elektronisk avfall eller til en forhandler som utfører denne tjenesten.
Separat avhending av et husholdningsapparat avverger eventuelle negative konsekvenser for miljøet
og helsen som kan forekomme ved feilaktig avhending, og gjør det mulig å bruke enkelte deler om
igjen, noe som betyr betydelig redusert energi- og ressursforbruk. Som en påminnelse om å avhende
husholdningsapparater separat fra annet avfall, er produktet merket med en overkrysset søppeldunk.
• Sørg for at den ikke utgjør noen fare for barn mens den oppbevares for avhending.
Avhending av emballasje
Kast plastemballasjen og posene på en forsvarlig måte og hold dem utenfor barns rekkevidde.
NO
69
Page 70

Spesikasjoner
NO
Modell LDW60W12N
Mål 595 mm (B) × 540 mm (D) × 820 mm (H)
Kapasitet 12 kuverter
Nødvendig vanntrykk 0,04 – 1,00 MPa
Strømforbruk 1930 W
Merket spenning 230V 50Hz vekselstrøm
Strømforbruk avslått 0 W
Strømforbruk i ventemodus 0,75W
Energieffektivitetsklasse
Årlig strømforbruk
Strømforbruk i en standard rengjøringssyklus 1,02 kWh
Årlig vannforbruk
Tørkeeffektivitetsklasse
Standard rengjøringssyklus
Programvarighet for standard rengjøringssyklus 165 min
Støynivå 49 dB(A) re 1 pW
1
2
2
3
ØKO 50 °C
4
A+
291 kWh
3360 liter
A
Montasje Under benk
Kan være innebygd Ja
Funksjoner og spesifikasjoner kan endres uten varsel.
Merk:
A + + + (høyeste effektivitet) til D (laveste effektivitet)
1
Basert på 280 standard rengjøringssykluser med tilkobling til kaldt vann og bruk av strømsparende
2
innstillinger. Virkelig strømforbruk avhenger av hvordan apparatet brukes.
A (høyeste effektivitet) til G (laveste effektivitet)
3
Dette er programmet som gir informasjon til energietiketten. Det passer for rengjøring av normalt
4
tilsmusset dekketøy. Det er det mest effektive programmet sett ut fra dets kombinerte forbruk av
energi og vann for denne typen dekketøy.
• Enheten imøtekommer europeiske standarder og EU-direktiver i den gjeldende versjonen ved
leveranse:
- LVD 2006/95/EC
- EMC 2004/108/EC
- ERP 2009/125/EC
• Verdiene ovenfor er målt i samsvar med standarder under angitte driftsbetingelser. Resultater kan
variere sterkt i forhold til mengde og tilsmussing av serviset, vannets hardhet, mengde oppvaskmiddel
osv.
70
Page 71

Tack för att du köpt din nya Logik fristående diskmaskin.
Vi rekommenderar att tar dig tid att läsa igenom denna bruksanvisning för att fullt ut
förstå hur den installeras och hanteras.
Läs noga igenom alla säkerhetsinstruktioner före användning och behåll sedan den
här installations-/bruksanvisningen för framtida bruk.
Packa upp
Ta bort allt förpackningsmaterial från produkten. Behåll förpackningsmaterialet. Om förpackningen kastas
ska du följa gällande lokala föreskrifter.
Följande delar medföljer:
3
in
Delay
1/2 Load
Power
Start
1
3in1
Intensive
Normal Eco 1 HourGlass Rapid
SE
Huvudenhet
Mätsked diskmedel
1 full sked = ca 20 g
Bestickkorg
ca 60 ml
Säkerhetsslang vattentillförsel
KondensremsaMätkopp
Instruction
Manual
BruksanvisningU-formad slanghållareSalttratt
Denna produkt har testats för att garantera korrekt funktion. Som resultat kan det finnas vatten
kvar inuti enheten. Detta är normalt och säkert. Ta bort alla vattendroppar från utsidan om så
behövs.
71
Page 72

Power
Delay
Start
1/2 Load
3in1 Inten NormalEco 1 HourGlass Rapid
3
in
1
Installation
825
600
580
INSTALLATION
Plats
När du väljer en tänkbar plats för din diskmaskin,
ska du se till att installationsytan är plan och fast,
och att rummet är väl ventilerat. Undvik att placera
SE
diskmaskinen i närheten av värmekällor som spis,
varmvattenberedare eller element. Extremt kall miljö
kan också skada produkten så att den inte fungerar
riktigt. Diskmaskinen är inte avsedd att användas i
garage eller i utomhusinstallation.
Täck inte över diskmaskinen. När den installeras, se
till att det finns fritt utrymme kvar på sidorna.
1. Se till att diskmaskinen installeras av en
kvalificerad tekniker. Se vilka verktyg som
behövs.
Alla borttagna delar måste sparas för
att återinstalleras senare. Se till att
diskmaskinen är tom och kontakten
är urdragen. Vi rekommenderar att 2
personer tar hand om diskmaskinen när
den installeras.
2. Se till att det finns spelrum på varje sida av
enheten för att möjliggöra lätt sidoförflyttning
när service krävs. Om så krävs kan bänkskivan
på diskmaskinen tas bort. Höjden på bänkskivan
är 820 mm. Ovanstående figur skissar
minimimåtten för utrymmet som krävs för att
diskmaskinen skall passa in i köksutrustningen.
72
enhet i mm
540
1
in
3
3in1Inten Normal Eco1 Hour GlassRapid
1/2 Load
Delay
Start
Power
820
80
100
595
Page 73

INSTALLATION
3. Anslut inte enheten till eluttaget innan den
installerats. Se till att inte installera enheten
direkt framför eluttaget. Detta för att undvika
eventuella skador på enhetens baksida.
4. Kondensremsan måste placeras på undersidan
av arbetsbänken ovanför diskmaskinen för att
skydda den mot fukten. Dess syfte är att skydda
bänkskivans undersida från ånga som kommer
från diskmaskinen.
Ta bort bakgrundspapperet från kondensremsan.
1
in
3
3in1Inten Normal Eco1 Hour GlassRapid
1/2 Load
Delay
Start
Power
SE
5. Fäst kondensremsan på undersidan av
arbetsbänken.
Se till att ytan är ren innan
kondensremsan fäst på undersidan av
arbetsbänken.
Om inte kondensremsans sätts
på, kan det resultera i skador på
undersidan av arbetsbänken!
Lämna lite utrymme
Fäst kondensremsan
under arbetsbänken
där du vill installera
diskmaskinen.
73
Page 74

SE
INSTALLATION
6. Placera diskmaskinen i närheten av en
vattenkran och ett vattenavlopp. Se till att
vatten- och avloppsslangen inte vrider sig eller
kläms. Enheten får inte stå ovanpå elsladden.
7. Bra avvägning är väsentligt för att luckan skall
kunna stängas och tillslutas korrekt. När enheten
är korrekt avvägd skall luckan inte ta tag i
innerbeläggningen på någon sida av skåpet.
Justera de inställbara fötterna så att enheten står
så plant som möjligt.
1
3
in
3in1Inten NormalEco 1 HourGlass Rapid
1/2 Load
Delay
Start
Power
8. Skruva loss de två skruvarna och ställ in
avståndet på vänster och höger sockel efter dina
behov. Inställbart område är från 39 till 134 mm.
74
134
skruv
39
Page 75

INSTALLATION
9. Fäst sockeln på sockelfliken. Justera
sockelhöjden efter dina behov, justerbart
område är från 56 mm till 122 mm.
10. För att fästa diskmaskinen under bänkskivan, dra
åt skruvarna genom ovansidan av enheten in i
bänkskivan.
11. Se till att ditt rörsystem är lämpligt för att
användas med diskmaskinen. Om du är
tveksam kontakta en rörmokare. Denna enhet
MÅSTE anslutas till KALLVATTEN med den
nya vattenslangen som medföljer. GAMLA
VATTENSLANGAR FÅR INTE ANVÄNDAS.
Vattentrycket från vattenledningarna måste vara
minst 0,04 MPa och maximalt 1,00 MPa.
• Anslut ena änden av säkerhetsvattenslangen
till diskmaskinen och anslut den andra änden
av slangen till vattenledningen. Se till att den
svarta gummiförseglingen finns på plats.
• Efter att slangen anslutits, vrid på
vattenkranen och kontroller om det finns
läckor.
• Anslut diskmaskinens kontakt till
vägguttaget.
sockelstift
Vattentömning
Y-adapter
(medföljer ej)
Vatteninloppsslang
sockel
56
122
Anslut
andra
apparater
om så
behövs.
SE
Du kan använda en Y-adapter
(medföljer inte) för ytterligare
vattenutmatning för någon
annan apparat, exempelvis en
tvättmaskin. Denna är endast lämplig
för anslutning till kallvatten. En
Y-adapter finns tillgänglig i de flesta
byggvaruhusen.
Om säkerhetstilloppsslangen
Säkerhetstilloppsslangen har dubbla
väggar. Slangens system garanterar
att den ingriper genom att blockera
vattenflödet om tilloppsslangen
går sönder och när mellanrummet
mellan tilloppsslangen och den yttre
förstärkta slangen är full med vatten.
75
Page 76

SE
INSTALLATION
• Böj inte avloppslangen.
• Du kan använda den u-formade slanghållare
för att fästa avloppsslangen och för att
undvika att den böjs.
• Fäst avloppsslangen till avloppet för att
undvika att den faller av under diskprocessen.
• Avloppsröret får endast
anslutas till avloppet och inte till
dagvattensystemet.
• Avloppsslangen bör placeras
mellan 40 cm och 100 cm över
golvet och får inte förlängas, i annat
fall kan inte enheten tömma ut
smutsvattnet ordentligt.
• Stäng vattenposten efter
användning.
U-formad hållare
för avloppsslang
avloppsslang
76
Page 77

Produktöversikt
Vy framifrån
Baksida
Luckhandtag
3
in
Delay
1/2 Load
Power
Start
1
3in1
Intensive
Normal Eco 1 Hour Glass Rapid
Kontrollpanel
SE
Avloppsslang
Vattenintag
(Anslut till vattenledning)
Nätsladd
(anslut till eluttaget)
77
Page 78

SE
Övre korg Nedre korgen
Insidan
Koppställ
Övre korg
Saltbehållare
Nedre korgen
Sprayarmar
Filtreringssystem
Diskmedelsbehållare Sköljmedelsbehållare
78
Page 79

Kontrollpanel
3
in
1
Delay
Power
1/2 Load
Start
1. Påslagningslampa
Lyser när Ström-knappen är intryckt.
2. Strömknapp
För att slå på och stänga av diskmaskinen.
3. Displayfönster
Visar programmets kvarvarande tid, fördröjningstid, felkoder, sköljhjälpsvarning och saltvarning etc.
4. Knapp fördröjd start
Tryck för att förinställa disktid och fördröjning av starttid med upp till 24 timmar.
5. Halvfull funktionsknapp
Tryck för att välja funktionen halvfullt i diskcykeln.
6. Indikatorlampa halvfullt
Lyser när funktionen halvfullt valts.
7. Programindikatorlampor
Visar diskprogrammet.
8. Programknapp
Tryck för att välja diskprogram.
3in1
Intensive
Normal Eco 1 Hour Glass Rapid
82 4 5 63 71
SE
79
Page 80

SE
Innan användning
För att öppna luckan
• Öppna först luckan försiktigt för att undvika spill av vatten.
• Dra i luckhandtaget.
Om luckan öppnas under driften kommer alla funktioner att avbrytas automatiskt.
För att stänga luckan
• Efter att fyllt på disk, skjut in korgarna helt i diskmaskinen.
• Lyft luckan uppåt och skjut in den tills den klickar på plats.
• Smäll inte igen diskmaskinens lucka.
Föremål som inte är lämpliga att använda i diskmaskinen
När du köper nytt porslin och matbestick se till att de är godkända för diskmaskinen. Vissa föremål är inte
lämpliga för diskmaskiner.
Följande saker är inte lämpliga
Kristallglas
Små plastföremål
(Nappaskor)
Plastföremål som inte
är diskmaskinsäkra.
Handdukar och
svampar
Silverbestick
Gjutjärnsstekpannor
Repiga teonbehandlade köksredskap
Värdefulla vaser
Porslin som är spräckta
eller med isor borta
Koppargrytor och pannor
• Träredskap och lerkärl eller föremål med träddetaljer kan missfärgas och blekna. Limmet som används i
dessa föremål tål inte maskindisk och trähandtag kan lossna efter att de diskats i en diskmaskin.
• Hantverk, antikviteter, värdefulla vaser och dekorerade glasföremål är inte heller lämpliga för
diskmaskinen.
• Plastföremål (t.ex. tupperware) som inte är värmetåliga kan smälta eller tappa formen på grund av den
höga temperaturen i diskmaskinen.
• Koppar, mässing, tenn och aluminium kan missfärgas eller bli matta.
• Grumlighet kan uppträda på glas och fina glasföremål efter regelbunden diskning. Diska inte fina
glasföremål eller glasförmål som innehåller blykristall i diskmaskinen. Diska fina glasföremål för hand
istället.
• Silver och aluminiumdelar har en tendens att missfärgas under maskindiskning. Rester såsom äggvita,
ägggula och senap ger ofta missfärgning och fläckar på silver. Därför bör dessa rester tas bort från
silver omedelbart efter anvädningen.
80
Page 81

Lägga till diskmedel eller diskmedelstablett
Använd endast diskmedel som speciellt tillverkats för att användas i diskmaskiner. För att vara mer
miljövänlig bör endast korrekt mängd maskindiskmedel användas. Fyll diskmedelsfacket med diskmedel
eller diskmedelstablett. Se tillverkarens instruktioner så att korrekt mängd används. Om tabletter används
läs tillverkarens rekommendationer på tablettens förpackning för att avgöra om var tabletten skall placeras
(t.ex. i bestickkorgen, diskmedelsfacket etc.)
• VARNING! Förvaras utom räckhåll för barn
• Irriterar ögonen.
Irriterande
Blekmedel och
toppmatningsdiskmedel
Följ nedanstående steg för att fylla på diskmedelsfacket.
1. Tryck på knappen på locket till diksmedelsfacket i
pilens riktning tills locket öppnas av fjädern.
• Undvik kontakt med ögon. Vid kontakt med ögonen, skölj
omedelbart med rikligt med vatten och kontakta läkare.
• Om det sväljs kontakta läkare omedelbart.
skjut upp från höger sida
SE
2. Fyll diskmedelsfacket med diskmedel för både
huvuddiskfacket och fördiskfacket eller lägg i en
diskmedelstablett i huvuddiskfacket. Markeringen
indikerar påfyllnadsnivån.
Alla program med fördisk behöver
ytterligare diskmedelsdosering som
måste placeras i fördiskfacket. Om tablett
används följ tillverkarens instruktioner. Se
Diskcykeltabellen. Detta diskmedel får effekt
under fördisken.
3. Stäng locket noga så att det klickar på plats.
diskmedelsfack huvuddisk
eller
diskmedel fördisk
81
Page 82

SE
Sköljmedel
Sköljmedel hjälper till så att vatten inte fastnar och lämnar märken på porslin under torkfasen och hjälper
porslin att torka snabbare efter att de diskats. Häll endast sköljmedel som är till för hushållsdiskmaskiner i
behållaren. Denna modell är konstruerad för att endast använda flytande sköljmedel.
Följ stegen nedan för att hälla sköljmedlet i behållaren och medlet kommer att fördelas automatiskt.
1. Vrid på locket och öppna såsom indikeras.
sköljmedelsindikator
öppen
2. När märkningarna på locket är i linje kan du
lyfta upp locket.
3. Häll i sköljmedlet till sköljhjälpsindikatorn blir
helt svart och stäng locket.
4. Var noga med att inte överfylla behållaren.
Torka upp eventuellt spill.
• Om vattnet i ditt område är mjukt behöver du inget sköljmedel eftersom det kan göra att det
bildas en vit film på disken.
• Om du bestämmer dig för att använda diskmedelstablett behöver du inte tilföra sköljmedel i
sköljmedelsbehållaren.
• Sköljmedlets varningslampa kommer att lysa när behållaren börjar bli tom och behöver fyllas
på.
• Alternativt kan du avgöra mängden med sköljmedel genom att kontrollera
sköljmedelsindikatorn brevid behållarlocket, när den är svart betyder det att den är full. När
den är ljus betyder det att den är nästan tom.
Inställning sköljmedelsbehållaren
Sköljmedelsbehållaren har sex inställningar. Både den
rekommenderade inställningen och fabriksinställningen är "4". Om
disken inte torkar ordentligt eller har fläckar, ställ in skivan på nästa
högre siffra tills din disk är fläckfri.
Om det finns rester av sköljmedel i diskmaskinen eller
på disken vrid sköljhjälpsfördelarratten till 1.
82
Page 83

Lägga till salt
Om vatten i ditt område är hårt kommer avlagringar att bildas på disken och redskapen. Denna apparat har
en saltbehållare som är till för att minska hårdheten hos vattnet.
Följ stegen nedan för att hälla salt i saltbehållaren och så att det motsvarar vattnets hårdhet i ditt område.
1. Ta bort den undre korgen och skruva av behållarens lock.
öppen
öppen
OPEN
öppen
2. Placera den medföljande tratten över saltbehållaren. Häll i ungefär
1,2 kg diskmaskinssalt beroende på vilket varumärke som används.
SE
3. Fyll behållaren med vatten tills den överfylls (endast vid första
användningen).
4. Ta bort överskottssalt runt behållarens öppning och skruva sedan
fast locket igen.
5. Kör “snabbdiskprogrammet ” omedelbart (utan något porslin i
diskmaskinen) för att ta bort alla spår av salt från innandömet.
• Saltpåfyllningens varningslampa kommer att lysa när behållaren börjar bli tom och behöver
fyllas på.
• Saltvarningslampan kommer att sluta att lysa inom fem dagar beroende på hur snabbt saltet
löses upp.
• Om du bestämmer dig för att använda diskmedlestablett kanske du inte behöver använda
salt detta beror på vattnets hårdhet i ditt ormåde och vilket typ av tablett som används.
Kontrollera med vattenleveratören och följ tablettillverkarens instruktioner.
83
Page 84

SE
– +
Inställning av saltförbrukningen
Saltförbrukningen måste ställas in för att motsvara vattnets hårdhetsnivå där du bor. Om du inte vet hur
hårt vattnet är där du bor, kan du fråga företaget som levererar vattnet i ditt område.
Det rekommenderas att inställningarna bör göras i enlighet med följande tabell.
Vattnets hårdhet
Tyskland
˚dh
0-8 0-14 0-10 0-1,4 / 0 /
8-22 14-39 10-28 1,4-3,9 - 20 60
22-45 39-80 28-56 3,9-8 Medelhög 40 30
>45 >80 >56 >8 + 60 20
Frankrike
˚fh
Britiska
˚Clarke
mmol / l
Väljarposition
Saltförbrukning
(gram/cykel)
Antal program /
1,2 kg
1 ˚dh (tysk gradering) = 0,18 mmol/l
1 ˚fh (fransk gradering) = 0,1 mmol/l
1 ˚Clark (brittisk gradering) = 0,142
mmol/l
För att optimera och anpassa nivån på saltförbrukningen följ stegen nedan.
1. Ta bort den undre korgen och skruva av behållarens lock.
2. Det finns en pilformad indikator i behållaren som du kan vrida på. Du kan vrida på den till "-” eller "+”
inställning baserat på vattnets hårdhet i ditt område.
• Använd inte vanligt bordssalt eller
matlagningssalt eftersom de innehåller
olösliga substanser som kan skada
diskmaskinen.
• Häll inte diskmedel i saltbehållaren. Det
kan skada diskmaskinen.
vrid
84
Page 85

Ladda diskmaskinen
Innan diskmaskinen laddas
Observera följande noteringar innan du fyller på med bestick och porslin i korgen.
• Ta bort läppstiftsfläckar och matrester från porslin och skålar. Skölj om så behövs.
• Skålar och bestick bör inte ligga inuti varandra eller täcka varandra.
• Ladda bestick och porslin så att vattnet kan komma åt alla sidor.
SE
• Se till att alla poster är säkert placerade.
• Ihåliga poster såsom koppar, glas, pannor etc måste placeras upp och ned i korgen.
• Poster med bred bas måste placeras i vinkel så att vattnet fritt kan rinna av dem.
• Sprejarmarna får inte blockeras med föremål som är för stora eller hänger ut ur korgen. Om du är
tveksam prova att manuellt rotera på sprejarmarna.
• Se till att små föremål inte faller igenom hållarna i korgen.
• Av säkerhetsskäl skall inte diskmaskinen användas utan att korgen finns på plats.
• Diska inte föremål som är nedsmutsade med aska, sand, vax, smörjfett eller färg i
diskmaskinen. Dessa poster kan skada diskmaskinen. Aska löses inte upp och kan finfördelas i
diskmaskinen.
85
Page 86

SE
Övre korg
Använd den övre korgen för små och lätta föremål såsom
koppar, fat, glas, dessertskålar etc. Platta skålar och grytor kan
också placeras i dsikmaskinskorgen.
Långa föremål såsom soppslevar, slevar och långa knivar bör
placeras liggande på tvären mot fronten i övre korgen.
Justering av övre korgen
Mer utrymme kan skapas för större föremål i den övre korgen eller nedre korgen genom att justera höjden
på den övre korgen. Det finns en lyftmekanism för den övre korgen (lyft korgen för att höja den, lyft igen
för att sänka den). Se till att korgen är stabil efter att höjden justerats.
jsutera korgens höjd,
sätt tillbaka
lyftik
ta bort skenstopp
skjut ut korgen från
skenan
Fällbart koppställ
För att ge plats åt större föremål i den övre korgen lyft upp
koppstället. Du kan luta de stora glasen mot det. Du kan också ta
bort det när det inte behövs.
sätt tillbaka skenstopp
lyft uppåt
86
Page 87

Ladda den övre korgen med 12 kuvert
För optimal placering av porslin i den övre korgen, se följande lista och medföljande bild.
Nummer Alternativ
1 Koppar
IN
3
3
2 Små serveringsskålar
1
3 Stora serveringsskålar
4 Glas
5 Fat
1
4
4
1
1
1
1
6 Små fat
7 Dessertfat
För att förhindra att vatten droppar från den övre korgen ned på den nedre korgen
rekommenderar vi att du först tömmer den nedre korgen och sedan den övre korgen.
Nedre korgen
Vi rekommenderar att stora och de föremål som är svårast
att göra rent placeras i den nedre korgen såsom tallrikar,
serveringsfat, kastruller, serveringsskålar, grytor, pannor, lock etc.
Vi rekommenderar att serveringsskålar och lock placeras på sidan i
korgen för att undvika att sprejarmarna blockeras.
44
44
1
1
2
5
5
7
7
6
6
2
SE
1
1
1
1
4
4
Nedfällbara piggar
Piggarna används för att hålla fast tallrikar och uppläggningsfat. De kan sänkas ned för att göra plats för
större föremål. Se nedan för hur piggarna sänks ned.
lyft uppåt
vik bakåt
87
Page 88

Ladda den nedre korgen med 12 kuvert
För optimal placering av porslin i den övre korgen, se följande lista och medföljande bild.
SE
Nummer Alternativ
7 Dessertfat
8 Ovala uppläggningsfat
IN
7
7
99
99
77
77
9 Mattallrikar
8
10 Sopptallrikar
11 Bestickkorg
8
11
11
1010
1010
Bestickkorg
För att göra urplockningen enklare bör besticken grupperas i zooner och placeras i bestickkorgen. Se listan
och bilden för optimal placering.
Nummer Alternativ
1 Gafflar
2 Soppskedar
3 Dessertskedar
4 Teskedar
5 Knivar
6 Serveringsskedar
7 Såsslevar
8 Serveringsgaffel
IN
2
3 2
5
4 525
4
5 5 5
4
2
4
1
1
3
4
1
2
4
1
1
2
4
1
3
8
3
3 3
1
4
1
1
4
1
4
1
1
4
5 5 5 4
5 5 5
33
2
3
2
2
3
2
2
4
632367
88
• Låt inget föremål sticka ut genom botten på korgen.
• För att undvika risken för skador placera knivar och
gafflar med skaftet uppåt. Håll inte dem i deras vassa
kanter.
• Bestickkorgen levereras med lock som är
konstruerade så att du kan placera besticken i
lämpliga fack. Om du använder korgen utan locket
kan det försämra resultatet för sköljningen av
besticken.
• Se till att locket är fastlåst på korgen innan
diskningen.
• För att uppfylla standardprestandan, d.v.s. EN50242,
måste alla besticken placeras i enlighet med
instruktionen i denna manual.
Page 89

Diskcykeltabell
Program Valinformation cykel Process
Diskmedelmängd
Disktid
(min.)
Energiförbrukning
(Kwh)
Vattenförbrukning
(I)
Sköljmedel
3-i-1
Intensiv
Normal
Eco*
(EN50242)
1 timme
Glas
• För normalt smutsad
disk, använda
flerfunktionsdiskmedel.
• För kraftigt smutsade
porslin och normalt
smutsade grytor, skålar
och karotter etc med
torkade matrester.
• För normalt smutsad
disk, såsom skålar,
tallrikar, glas och lätt
smutsade formar.
• Standard dagligen
normalt smutsad
köksutrustning såsom
grytor tallrikar och glas.
• För lätt smutsad disk
som inte behöver extra
torkeffekt.
• För lätt smutsad porslin
och glas.
• Fördisk (50°C)
• Disk (55°C)
• Sköljning
• Sköljning (65°C)
• Torkning
• Fördisk (50°C)
• Disk (65°C)
• Sköljning
• Sköljning
• Sköljning (55°C)
• Torkning
• Fördisk (50°C)
• Disk (55°C)
• Sköljning
• Sköljning (65°C)
• Torkning
• Fördisk
• Disk (50°C)
• Sköljning (65°C)
• Torkning
• Disk (60°C)
• Sköljning
• Sköljning (50°C)
• Torkning
• Fördisk
• Disk (40°C)
• Sköljning
• Sköljning (60°C)
• Torkning
• 3 i 1 160 1,35 16,0
• Fördisk (5g)
• Huvuddisk
(25)
• Fördisk (5g)
• Huvuddisk
(25)
• Fördisk (5g)
• Huvuddisk
(25)
• Huvuddisk
(30g)
• Huvuddisk
(20g)
125 1,36 19,5
160 1,30 16,0
165 1,02 12,0
60 0,95 12,0
95 0,90 16,0
SE
Snabb
• En kort diskning för lätt
smutsad disk som inte
behöver torka.
• Disk (40°C)
• Sköljning
• Sköljning (40°C)
• Huvuddisk
(20g)
30 0,50 11,0
* För att uppfylla standardprestanda, d.v.s. EN50242, se till att använda ekonomidiskcykeln för testet.
3-i1funktionen är tillgängligt för 3-i-1 diskcykel.
Om du väljer att använda diskmedelstablett i dessa diskcykler, tillför inte sköljmedel.
Kondenstorkteknik
• Sparar energi genom att torka disken med restvärmen från den sista sköljningen.
• Diskprogramtiderna utökas genom denna torkmetod.
• Vissa diskprogram har ingen torkfunktion, se diskprogramtabellen för mer information.
89
Page 90

SE
Start av diskcykeln
1. Se till att enheten är ansluten till elströmmen och att vattenförsörjningen är helt öppnad (vattentryck
mellan 0,04 MPa och 1,00 MPa).
2. Öppna luckan. Dra ut den nedre och övre korgen, ladda disken och skjut tillbaka korgarna. Det
rekommenderas att den nedre korgen fylls först och därefter den övre korgen.
3. Häll i maskindiskmedel eller placera diksmedelstabletten i facket och stäng ordentligt efteråt.
4. Stäng diskmaskinens lucka. Ett klickljud hörs är luckan är stängd korrekt. Smäll inte igen luckan.
5. Tryck på Ström-knappen, strömindikatorn kommer att lysa.
6. Välj diskprogram baserat på kraven efter hur mycket disk det är och hur smutsig den är. Se sektionen
Diskcykeltabell.
7. Indikatorlampan för det valda programmet lyser.
8. Diskcykeln påbörjas inom kort.
9. Displayfönstret visar statusen hos diskmaskinen.
a. “--:--” betyder att en i standby-läge.
b. “H:MM” och inget blinkande betyder att enheten gjort paus.
c. “H:MM” och blinkande betyder att enheten körs.
Om du öppnar diskmaskinens lucka under diskningen och sedan stänger den igen kommer
nuvarande diskprogram att fortsätta diskningen efter 10 sekunder. Om luckan inte stängs
korrekt efter 1 minut kommer diskmaskinen att pipa i intervaller om 1 minut.
Byte av program
För att byta programmet när diskcykeln redan har startat, följ stegen nedan.
1. Öppna luckan försiktigt för att undvika att vatten spills innan luckan öppnas helt. Kontrollera att
enheten har använt diskmedlet eller diskmedelstabletten. Detta beror på hur länge diskningen har
pågått.
2. Om diskmedelsfacket är öppet föreslår vi att du låter diskningen avslutas.
3. Om diskmedelsfacket fortfarande är stängt, tryck in och håll kvar P programknappen i tre sekunder
för att avbryta programmet. Du kan sedan välja önskad ny programknapp och stänga diskmaskinens
lucka. Enheten kommer att starta den nya diskcykeln strax efter.
ELLER
Tryck på knappen för önskat nytt program i minst 3 sekunder för att ändra det pågående programmet.
Enheten kommer att starta den nya diskcykeln strax efter.
Vid slutet av programmet
Vid slutet av programmet kommer diskmaskinen att pipa.
Kondensationsremsan hjälper till att förhindra att ånga skadar bänkskivans kant ovanför
diskmaskinen. Det rekomenderas att låta luckan vara stängd till du är redo att plocka ur
diskmaskinen. Låt inte luckan stå på glänt. Lämna inte apparaten utan uppsikt med luckan helt
öppen då risken finns att någon kan snubbla.
90
Page 91

Stänga av enheten
För energibesparing kom ihåg att stänga av diskmaskinen med Ström-knappen Diskmaskinen fortsätter
att använda elektricitet tills den stängs av med Ström-knappen.
Om diskmaskinen inte kommer att användas under en längre period, t.ex. vid semester, bör
enheten kopplas ur strömuttaget.
Urplockning av diskmaskinen
Att låt disken svalna innan den plockas ut är viktigt eftersom disken tenderar att gå sönder och flisas lättare
när den är het. Därför, om du öppnar diskmaskinens lucka helt efter avstängningen, kommer disken att
svalna mycket fortare.
Plocka ur den nedre korgen först, följt av bestickkorgen och sedan den övre korgen. Detta
kommer att förhindra att vatten droppar från den övre korgen på disken i den nedre korgen.
Fördröjd start
Starttiden för diskprogrammet kan fördröjas och justeras. Följ nedanstående steg.
1. Öppna diskmaskinens lucka och sätt in den smutsiga disken.
2. Stäng luckan. Tryck på Strömknappen för att slå på diskmaskinen.
3. Välj önskat program.
4. Tryck på Fördröjd start-knappen upprepade gånger för att välja önskad fördröjningsperiod (område
upp till 24 timmar).
SE
Varje tryckning på denna knapp ökar den fördröjda starttiden i steg om 1 timme.
5. Enheten kommer att starta programmet med den tilldelade tiden automatiskt.
Halvfullt
Om du inte har tillräckligt med disk för att ladda fullt, kan alternativet halvfullt väljas för att diska. Det
sparar åtgången av varmvatten och elektricitet. Följ nedanstående steg.
1. Öppna diskmaskinens lucka och sätt in den smutsiga disken i den korgen.
2. Stäng luckan. Tryck på Ström-knappen för att slå på diskmaskinen.
3. Välj önskat program.
4. Tryck på 1/2 Load knappen.
5. Enheten kommer strax efter att starta programmet.
91
Page 92

SE
Rengöring efter användning
Yttre vård
Luckan och lucktätningen
Rengör luckans tätning regelbundet med en mjuk fuktad trasa och ta bort matrester.
När diskmaskinen laddas kan matrester och vätska droppa ned på sidan av diskmaskinens lucka. Dessa ytor
på utsidan av diskmaskinens hölje är inte åtkomliga för vattnet från sprejarmarna. Alla beläggningar bör
torkas av innan luckan stängs.
Kontrollpanelen
Om rengöring krävs bör kontrollpanelen ENDAST torkas av med en fuktig trasa.
• För att undvika att vatten tränger in i luckans lås och elektriska komponenter skall inte någon
form av sprejrengöring användas.
• Använd aldrig slipande rengöringsmedel eller skurkuddar på yttre ytor eftersom de kan skrapa
ytans finish. Vissa pappershanddukar kan också skrapa eller lämna märken på ytan.
Inre vård
Filtreringssystem
Filtreringssystemet i basen av diskmaskinen behåller grova smutspartiklar från diskcykeln. De insamlade
grova smutspartiklarna kan gör att filtret sätts igen. Kontrollera filtret regelbundet och rengör om så
behövs under rinnande vatten.
Följ stegen nedan för att göra rent filtret i diskmaskinen.
1. Se till att diskmaskinen är avstängd.
2. Skruva loss det grova filtret moturs och lyft försiktigt ut det.
3. Lyft försiktigt ut det fina filtret.
4. Skölj alla filter under rinnande vatten, inklusive filtercylindern, och sätt sedan tillbaka filtren i motsatt
ordning.
5. Sätt tillbaka huvudfiltret försiktigt.
6. Skruva försiktigt tillbaka grovfiltret i medurs riktning. Det kommer att bli ett lätt klicka när den är
korrekt placerad.
92
Filtercylinder utan
ltret
• Dra inte åt filtren för hårt. Sätt tillbaka filtren ordentligt i filtercylindern, så att inte rester kan
komma in i systemet och täppa till.
• Använd ALDRIG diskmaskinen utan att filtren sitter på plats. Felaktig placering av filtren kan
försämra prestandan hos apparaten och skada porslin och redskap.
Page 93

Sprayarmar
Matpartiklar kan fastna i sprejarmarnas munstycken och
lager. Sprejarmarna bör därför kontrolleras och rengöras
regelbundet.
Se till att diskmaskinen är avstängd. Använd ett spetsigt
föremål t.ex. en tandpetare för att lossa matpartiklar i
sprejarmarnas munstycken.
Försök inte att ta bort sprejarmarna.
Frostskydd
Undvik att placera diskmaskinen på platser där temperaturen kan bli under 0 ˚C. Om apparaten lämnas i ett
ouppvärmt utrymme över vintern bör du:
1. Koppla ifrån enheten från vattenuttaget.
2. Starta enheten. Välj någon diskcykel och låt den köras endast 1 minut. Detta tömmer ut allt
kvarvarande vatten i enheten.
3. Koppla bort den från elnätet.
4. Töm diskmaskinen.
5. Stäng diskmaskinens lucka.
6. Koppla ifrån enheten från vattenavloppet. Använd ett lämpligt uppsamlingskärl för att samla upp
eventuellt kvarvarande vatten i rören.
Skulle du stöta på några svårigheter med ovanstående steg, rådfråga en servicetekniker om hjälp.
SE
Flyttning av diskmaskinen
Om du måste flytta enehten, exempelvis om du flyttar bör du:
1. Koppla bort diskmaskinen från elnätet.
2. Koppla ifrån diskmaskinen från vattenintaget och avloppet. Använd ett lämpligt uppsamlingskärl för
att samla upp eventuellt kvarvarande vatten i rören.
3. Ta bort diskmaskinen från nuvarande placering med slangarna bortkopplade.
4. Dra ut enheten tillsammans med slangarna.
• Undvik att luta enheten under transporten.
• Vi rekommenderar att 2 personer tar hand om diskmaskinen när den installeras.
Underhåll efter en lång period utan användning
Om du inte kommer att använda enheten under en längre period bör du:
1. Koppla bort diskmaskinen från elnätet.
2. Koppla ifrån diskmaskinen från vattenintaget och avloppet. Använd ett lämpligt uppsamlingskärl för
att samla upp eventuellt kvarvarande vatten i rören.
3. Öppna luckan något för att förhindra att obehaglig lukt uppstår i maskinen.
4. Se till att diskmaskinens insida är ren.
93
Page 94

SE
Tips och råd
Reparationer bör endast utföras av en kvalificerad tekniker i strikt överensstämmelse med
nuvarande lokala och nationella säkerhetsbestämmelser. Obehörig eller felaktig reparation kan
orsaka personskador eller skador på enheten.
Innan du ringer efter service se sektionen Råd och tips för att lösa vissa generella problem själv.
Tekniska problem
Tekniska problem
Problem Möjlig orsak Lösning
Diskmaskinen startar inte. Luckan är inte ordentligt
stängd.
Enheten är inte ansluten till
eluttaget.
Enheten är påslagen. Tryck på Ström-knappen och välj ett
Felkod “E1” visas. Vattenkranen är inte öppnad. Öppna vattenkranen.
Lågt vattentryck (<0,04MPa) Vrid på vattenkranen och se till att
Flödesmätaren är trasig.
Ledningsterminalen där
flödesmätaren är ansluten är
lös.
Felkod “E4” visas. Tanken läcker.
Slangen läcker.
Flödesbrytaren är trasig eller
PCB är fel.
Normalprogrammets LED
blinkar.
Tömningspumpen fungerar
inte ordentligt.
Enheten är överfylld med
vatten.
Översvämningsskyddet har
varit igång.
Stäng luckan.
Anslut elkontakten till ett eluttag.
program.
den är helt öppnad.
• Koppla bort den från elnätet.
• Koppla ifrån vattenintaget.
• Ring efter en kvalificerad tekniker.
Stäng av vattenkranen, koppla ifrån
elnätet och kontakta en kvalificerad
servicetekniker.
• Koppla bort den från elnätet.
• Koppla ifrån vattenintaget.
• Ring efter en kvalificerad tekniker.
Problem Möjlig orsak Lösning
Rester av maskindiskmedlet
finns kvar i facket när
programmet är avslutat.
Diskmedelsfackets lucka kan
inte stängas ordentligt.
94
Allmänna problem
Diskmedelsfacket var
fortfarande fuktigt när
diskmedlet hälldes i.
Tilltäppta rester av diskmedel
blockerar haken.
Se till att facket är torrt innan
diskmedlet hälls i.
Rengör haken.
Page 95

Allmänna problem
Problem Möjlig orsak Lösning
Knackande ljud i
diskmaskinen.
Fläckar visas på glas och
bestick.
Tallrikar, bestick och glas är
inte torra.
Vita beläggningar är synliga
på besticken och porslinet,
grumlighet uppstår på
glasföremål, film kan torkas
bort.
Glasföremål är matta och
missfärgade, film kan inte
torkas bort.
Te eller läppstiftsfläckar har
inte tagits bort helt och hållet.
En sprejarm knackar mot
något föremål i korgen.
Sköljmedelsdosen är för högt
inställd.
Mängden sköljmedel kanske
är otillräckligt eller så är
behållaren nästan tom.
Porslinet har tagits ut från
diskmaskinen för tidigt.
Inte tillräckligt med sköljmedel
används.
Det finns inte tillräckligt med
salt i saltbehållaren.
Saltbehållarens lock har inte
skruvats på korrekt.
Fel diskmedel har använts. Byt diskmedel. Använd ett standard
Saltförbrukningen är inställd
för lågt.
Glasföremålet är inte
diskmaskinssäkert. Ytorna är
påverkare.
Disktemperaturen hos det
valda programmet är för låg.
Avbryt programmet och placera om
föremålen som påverkar sprejarmen.
Se avsnittet ladda diskmaskinen.
Ändra ratten för
sköljmedelsdispensern till en lägre
nivå.
Fyll på behållaren, justera mängden
sköljmedel till en högre inställning
eller byt märke på sköljmedlet.
Låt porslinet vara kvar i diskmaskinen
tills du hör ett ljudligt ljud.
Fyll på behållaren, justera mängden
sköljmedel till en högre inställning
eller byt märke på sköljmedlet.
Fyll på saltbehållaren.
Se till att den skruvas tillbaka korrekt.
diskmaskinspulver.
Välj en högre inställning för
saltförbrukningen.
Tvätta glasföremål som inte är
diskmaskinssäkra för hand.
Välj ett program med en högre
disktemperatur.
SE
Blekeffekten som diskmedlet
som används är för låg.
Glömt att skölja bort eller ta
bort fläckar med en servett
innan diskningen.
Byt diskmedel.
Förskölj eller ta bort fläckar med en
servett innan diskningen.
95
Page 96

SE
Avyttring av diskmaskinen
• När du avyttrar din gamla diskmaskin gör den först obrukbar. Koppla ifrån el- och vattenförsörjningen,
klipp av kabel och kontakten från elkabeln. Gör lucklåset obrukbart så att barn inte oavsiktligt kan
stänga in sig själva. Kasta diskmaskinen på ett lämpligt sätt.
• Vid slutet av sin livstid får inte produkten kastas som hushållsavfall. Den måste lämnas in hos ditt
lokala avfallshanteringscenter eller till en återförsäljare som tillhandahåller denna tjänst. Kasseras
en hushållsmaskin separat förhindrar man negativa effekter på miljö och hälsa genom felaktig
avfallshantering och gör det möjligt att återanvända materialet i produkten och spara energi och
naturresurser. Produkten är markerad med en överkryssad soptunna på hjul för att påminna om att den
ska kasseras separat från hushållsavfall.
• Se till att den inte utgör någon fara för barn när den förvaras för avyttring.
Avyttring av förpackningsmaterial
Kassera plastförpackningen/påsarna på ett säkert sätt och håll utom räckhåll för spädbarn och små barn.
96
Page 97

Specikationer
Modell LDW60W12N
Mått 595mm (B) x 540mm (D) x 820mm (H)
Kapacitet:: 12 kuvert
Vattentryck som krävs: 0,04 - 1,00MPa
Strömförbrukning 1930W
Märkspänning 230V~50Hz
Elförbrukning i Av-läge 0W
Strömförbrukning på viloläge 0,75W
SE
Energieffektivitetsklas
Årlig energiförbrukning
Energiförbrukning för normalt diskprogram 0,86 kWh 1,02 kWh
Årlig vattenförbrukning
Torkeffektivitetsklas
Normalt diskprogram
Programmets längd för normalt diskprogram 0,86
kWh
Bullernivå 49 dB(A) re 1 pW
Montering Inbyggnads
Kan byggas in Ja
Egenskaper och specifikationer kan ändras utan föregående meddelande.
Anmärkning:
A + + + (mest effektiv) till D (minst effektiv)
1
Baserat på 280 standarddiskningar med kallvattenanslutning och förbrukning av lågenergilägen.
2
Faktisk energiförbrukning beror på hur produkten används.
A (mest effektiv) till G (minst effektiv)
3
Detta är programmet som användes för informationen på energietiketten och är lämpligt för rengöring
4
av normalt smutsad disk. Det är det effektivaste programmet vad gäller kombination av energi- och
vattenförbrukning för den typen av disk.
• Enheten uppfyller Europeisk standard och direktiven i nuvarande version vid leverans:
- LVD 2006/95/EG
- EMC 2004/108/EG
- ERP 2009/125/EG
• Ovanstående värden har uppmätts i enlighet med standarder under spcificerade arbetsförhållanden.
Resultaten kan variera mycket beroende på mängden och nersmutsningen av disken, vattnets hårdhet,
mängden diskmedel osv.
1
2
2
3
4
A+
291 kWh
3360 liter
A
ECO 50
165 min
°C
97
Page 98

Kiitos, kun valitsit uuden Logik Freestanding -astianpesukoneen.
Sinun on vietettävä hetki tämän käyttöoppaan parissa, jotta ymmärtäisit täysin koneen
asennus- ja käyttöohjeet.
Lue huolellisesti kaikki turvaohjeet ennen käyttöä ja säilytä tämä asennus/käyttöopas
tulevaa käyttöä varten.
FI
Pakkauksesta purkaminen
Poista kaikki pakkausmateriaali laitteesta. Säilytä pakkaus. Jos hävität pakkauksen, tee se paikallisten
säädösten mukaisesti.
Seuraavat nimikkeet kuuluvat toimitukseen:
3
in
Laite
1
3in1
Intensive
Normal Eco 1 HourGlass Rapid
Ruokailuvälinekori
Turvavedensyöttöletku
Delay
1/2 Load
Power
Start
Pesuaineen mittalusikka
1 täysi lusikallinen = 20 g
(noin)
Tämä tuote on märkätestattu oikean toiminnan varmistamiseksi. Sen seurauksena laitteen sisään
on saattanut jäädä hieman vettä. Tämä on normaalia ja turvallista. Poista vesipisarat ulkopinnalta,
jos on tarpeen.
98
Kondensaationauha Mittakuppi
60 ml (noin)
Instruction
Manual
KäyttöopasU-muotoinen letkunpidikeSuolasuppilo
Page 99

Power
Delay
Start
1/2 Load
3in1 Inten NormalEco 1 HourGlass Rapid
3
in
1
Asennus
825
600
580
ASENNUS
Paikka
Kun valitset paikkaa astianpesukoneelle, varmista,
että asennustaso on tasainen ja luja, ja että huone
on hyvin tuuletettu. Älä sijoita astianpesukonetta
lähelle lämmönlähdettä, kuten liesi, boileri tai
lämpöpatteri. Myös hyvin kylmä ympäristö voi saada
koneen toimimaan huonosti. Tätä astianpesukonetta
ei ole tarkoitettu autotalli- tai ulkokäyttöön.
Älä päällystä astianpesukonetta millään peitteellä.
Kun asennat, varmista, että kummallekin puolelle jää
tyhjää tilaa.
Kaikki poistetut osat on säästettävä
uudelleenasennusta varten
tulevaisuudessa. Varmista, että
astianpesukone on kytketty pois päältä ja
tyhjennetty. On suositeltavaa, että kaksi
henkilö käsittelee astianpesukonetta
asennuksen aikana.
1. Varmista, että pätevä asentaja asentaa
astianpesukoneen. Katso lisätietoja vaadittavista
työkaluista.
FI
2. Varmista, että laitteen kummallakin puolella
on riittävästi tilaa, joka sallii tarvittaessa
pienen sivuttaisliikkeen huoltoa varten. Jos on
tarpeen, astianpesukoneen työtaso voidaan
poistaa. Korkeus ilman työtasoa on 820 mm.
Kuvassa esitetään vaaditut minimimitat, joiden
mukaan astianpesukone sovitetaan kiinteisiin
keittiökalusteisiin.
Mitat millimetreinä
540
1
in
3
3in1Inten Normal Eco1 Hour GlassRapid
1/2 Load
Delay
Start
Power
820
80
100
595
99
Page 100

FI
ASENNUS
3. Älä liitä laitetta pistorasiaan ennen asennusta.
Varmista, ettet asenna laitetta aivan pistorasian
eteen. Tällä vältetään laitteen takaosan
mahdollinen vahingoittuminen.
4. Kosteudelta suojaava kondensaationauha on
kiinnitettävä astianpesukoneen päälle, työtason
alapuolelle. Sen tarkoitus on suojata työtason
alapintaa astianpesukoneesta nousevalta
höyryltä.
Poista kondensaationauhan taustapaperi.
1
in
3
3in1Inten Normal Eco1 Hour GlassRapid
1/2 Load
Delay
Start
Power
5. Kiinnitä kondensaationauha työtason
alapinnalle.
Varmista, että pinta on puhdas ennen
kuin kiinnität kondensaationauhan
työtason alapuolelle.
Kondensaationauhan kiinnittämättä
jättäminen voi johtaa työtason
alapinnan vahingoittumiseen!
Jätä hieman tilaa
Kiinnitä
kondensaationauha sen
työtason alapintaan,
jonka alle haluat asentaa
astianpesukoneen.
100
 Loading...