

Page 1
LCX17LN2 LCDTV
INSTRUCTION MANUAL
Page 2
CONTENTS
CAUTIONS 1
REMOTE FUNCTIONS 2A - 2B
SAFETY INSTRUCTION 3
REAR VIEW 4
CONNECTING WITH EXTERNAL EQUIPMENT 5 - 6
BUTTONS ON THE FRONT OF YOUR LCD TV 7 - 8
TUNING YOUR LCD TV 9
CONTROLS AND FUNCTIONS 10 - 16
TROUBLE SHOOTING GUIDE 17
SPECIFICATIONS 18
Page 3
CAUTIONS
NEVER REMOVE THE BACK COVER
Removal of the back cover should be carried out only by qualified personnel.
TO ELIMINATE EYE FATIGUE
Do not use the unit against a bright back ground and where sunlight or other light
sources will shine directly on the monitor.
BE CAREFUL OF HEAVY OBJECT
Neither the monitor itself nor any other heavy object should rest on the power cord.
Damage to a power cord can cause fire or electrical shock.
SCREEN BURN
Please note that some programmes are broadcast
with a logo which will appear in the corner of your TV screen.
Some of these logos can be very bright and may cause.
damage by permanently maeking the logo on the screen.
To prevent this , avoid watching channels displaying a logo
for prolonged periods of time, particularly when the TV is
not being watched. Turning down the brightness/contrast
levels will also help to minimise any damage.
DON’T APPLY PRESSURE TO LCD SCREEN
Do not apply pressure to the LCD screen
since it will damage the screen.
1
INSTRUCTION MANUAL
Page 4
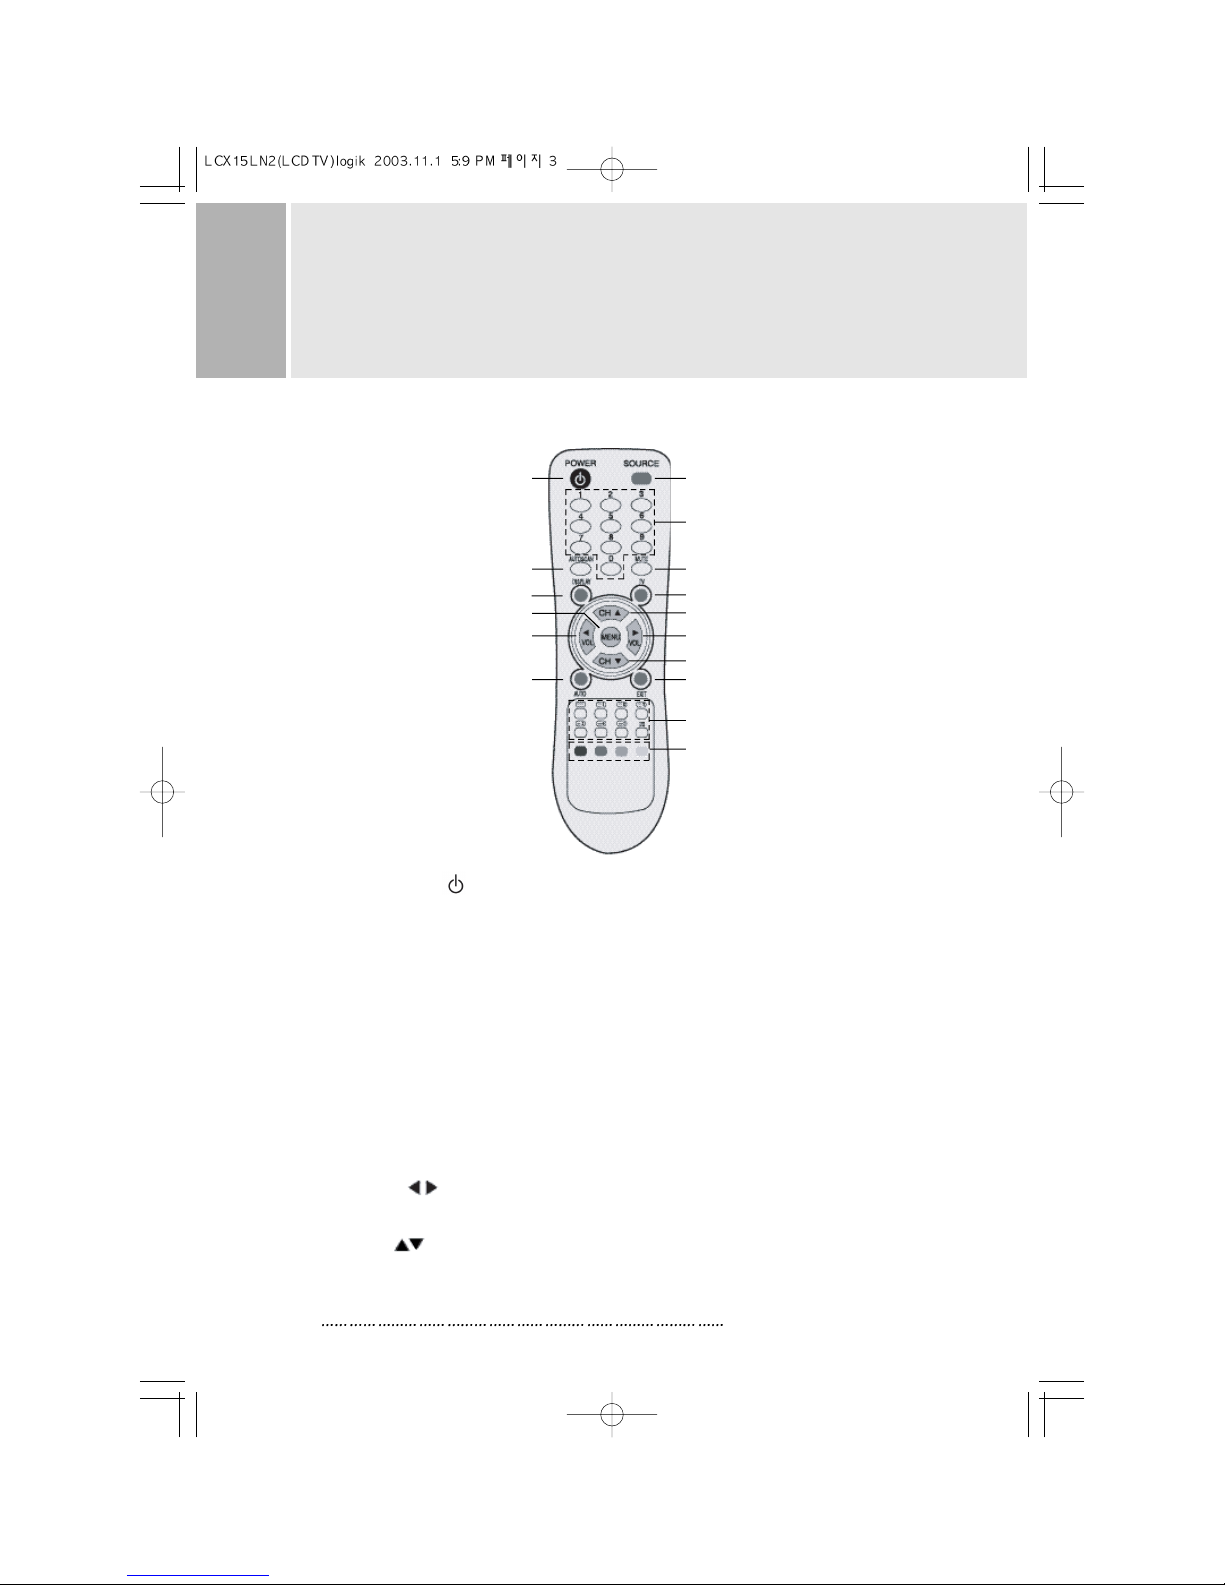
REMOTE FUNCTIONS
2A
INS TR UC T ION MA NUAL
1. POWER( )
Turns the power ON or OFF. There will be a few seconds delay before the
display appears.
2. SOURCE
Select pc or video(TV / Video / S-Video / SCART) sources.
3. MUTE
Mute the sound.
4. AUTOSCAN
Find available channels(programs).
5. MENU
Activates and exits the On Screen Display.
6. VOL( )
Increases or decreases the level of audio volume.
7. CH( )
Increases or decreases the channel number.
Up / Down the teletext page number in teletext mode
A. REMOTE CONTROLLER
1
2
4
8
5
6
10
3
9
7
6
7
11
12~19
21
20
Page 5

8. DISPLAY
Channel display in TV Source.
9. TV
Change Input Source to TV.
10. AUTO
Auto geometry adjustment in PC Source.
11. EXIT
Exit the On Screen Display.
12. TEXT ( )
Select Teletext display / Return to TV picture display.
13. INDEX ( )
Return to index page in teletext mode.
14. CANCEL( )
Display the TV picture on the screen while waiting for the new teletext page.
15. REVEAL( )
Reveal hidden text, such as Solutions of riddles or puzzles in teletext mode.
16. HOLD( )
Toggle hold on or off for current display page in teletext mode.
17. SIZE( )
Page expand in teletext mode.
18. SUBCODE( )
Select Sub page in teletext mode.
If Some page may be multiple in teletext, Select subcode( ) Key and enter
four digits for the page you need.
19. I/II(Multi-Channel TV Sound)
Access I/II Setting(Stereo, Mono, Second Audio Selection) when a TV signal is received.
20. RED / GREEN / YELLOW / CYAN
Change to associated page in the display block according to the acquisition mode
while teletext operating.
21. 0, 1, 2, 3, . . . 9(Number Key)
Using the 0, 1, 2, 3, . . . 9 Keys, the required channel or Teletext page are selected.
*
Teletext, I/II function is optional.
The teletext functions only work in TV and Video.
INSTRUCTION MANUAL
2B
REMOTE FUNCTIONS
!
X
?
Page 6
SAFETY INSTRUCTION
Damage
Never use your LCD TV if it is damaged in
any way. Always place your LCD TV on a
flat level surface avoiding anywhere
which may be subject to strong vibration.
Weather
It is advisable to unplug the aerial
during an electrical storm.
Moisture
Do not allow your LTD TV to be exposed
to rain moisture, dust. If any liquid is
spilt into your LCD TV it can cause serious
damage. If you spill any liquid into
your LCD TV switch it off at the mains
immediately. Contact your store.
Interference
Do not place your LCD TV on or near
appliances which may cause
electromagnetic interference(TV or HiFi speakers). If you do, it may
adversely affect the working of the
unit, and cause a distorted picture or
sound.
Temperature
Avoid extremes of temperature, either
hot or cold, place your LCD TV well away
from heat sources such as radiators or gas/electric
fires.
Ventilation
The LCD TV must be well ventilated. Do not
cover your LCD TV or position in a small
confined space. It is recommended
that you leave a 10cm gap all around
your LCD TV.
Batteries
Batteries are easily swallowed by
young children. Do not allow young
children to play with the remote
control unit.
Covers
Do not remove any fixed covers as
this may expose dangerous voltages.
Standby
Do not leave your LCD TV in standby for
long periods of time e.g. overnight or
while on holiday.
3 INS TR UC T ION MA NUAL
Page 7

REAR VIEW
ACCESSORY
1. POWER CORD
2. REMOTE CONTROL
3. USER’S MANUAL
4. A/V CABLES
A. AC CONNECTOR
Connect the AC connector into the AC inlet
socket on the back of your LCD TV and plug
into the main power supply.
B. D-SUB CONNECTOR
Connect to the video signal cable.
C. ANTENNA(aerial)
Use an RF lead (not supplied) to connect
your LCD TV to on aerial socket.
INS TR UC T ION MANU AL 4
A. AC INLET
B. D-SUB CONNECTOR
C. ANTENNA(aerial)
Page 8

CONNECTING WITH EXTERNAL
EQUIPMENT
CCCCAAAAUUUUTTTTIIIIOOOONN
NN
B e s ure to turn off the power of your computer before c onnecting the monitor.
1. CONNECT THE VIDEO SIGNAL CABLE
A. Connect one end of the signal cable to the back panel of the monitor
and connect the other end to the graphic card on back of the computer.
B. Secure the connection with the screws on the plug.
2. CONNECT THE POWER CORD
Connect the female end of the power cord to the power input socket
on the LCD Monitor.
Then, plug the male end of the power cord to an AC outlet or computer.
3. CONNECT THE A/V CABLE
A. Connect the end of RCA(White, Red) SCART or S-VHS cable to
the terminals on the back of the Monitor.
B. Connect an antenna or CATV cable to the terminal on the back of the Monitor.
(Optional TV Tuner can be purchased from the dealer)
C. Connect one end of stereo audio cable to the stereo jack on the back of the Monitor.
(Connect another end of stereo audio cable to the “Audio(Line) out” terminal of
the sound card on your computer or another audio equipment)
4. TURN THIS MONITOR ON AND START YOUR SYSTEM
5 INS TR UC T ION MA NUAL
Page 9

5. If you have connected your LCD TV to a piece of external equipment
select the correct input on the ‘input source’ screen shown below.
This screen can be accessed by pressing the ‘MENU’ button on
the remote control once.
CONNECTING WITH EXTERNAL
EQUIPMENT
2. OSD MENU DESCRIPTION
: Input Source
Select PC or AV(TV, Video, S-Video, SCART) Source.
INSTRUCTION MANUAL
6
Page 10

BUTTONS ON THE
FRONT OF YOUR LCD TV
A. ON/STANDBY( )
Turns the LCD TV ON or to STANDBY. There will be a few seconds delay before the
display appears.
The power LED(next to the power switch) lights green when the power is turned ON.
The power is turned off by pressing the power switch again and the power
LED goes out.
NOTE:Do not leave your LCD TV in standby for long periods of time e.g. overnight,
while out of the house or while on holiday.
B. MENU (MENU)
Activates and exits the On Screen Display.
This button can also be used to move previous menu or status.
OSD MENU(MAIN) : Input Source, Screen, Audio, OSD, Color, Utility, Exit.
7 INS TR UC T ION MANU AL
B. SOURCE BUTTON
E. VOLUME BUTTONS
(LEFT & RIGHT)
D. CHANNEL BUTTONS
(DOWN & UP)
POWER INDICATOR(LED)
A. POWER SWITCH
REMOCON SENSOR
C. MENU BUTTON
Page 11

BUTTONS ON THE
FRONT OF YOUR LCD TV
C. CHANNEL( CH: DOWN , UP)
Increases or decreases the channel number.
(In PC mode, down key operates as “Auto adjust”)
This button allows user to enter the sub-menu of the activated function
when down key is pressed on the main menu.
D. VOLUME( VOL: LEFT, RIGHT)
Increases or decreases the level of audio volume.
NOTE:When there is no connection, the On Screen Display will show for 3 seconds.
Check input Signal
INSTRUCTION MANUAL
8
Page 12

TUNING YOUR LCD TV
Press the AUTOSCAN button on the remote control.
NOTE:Your LCD TV will now automatically search
for all available channels. Please be patient,
this will take a few minutes.
SORTING YOUR CHANNELS
Press the ‘O’number button.
Press the ‘teletext’ button( )to identify which channel
you are watching (you may need to wait 20 seconds for the
channel information to update).
Press the teletext button ( ) again to return to the TV screen.
Press the ‘MENU’ button and then vol four times to select
the ‘TV channel’ screen.
Press ‘CH ’to highlight Channel Swap and then press the
number button for the channel you found in step . Eg BBC1=1, BBC2=2, etc.
Repeat steps
for all the other channels.
Ch.Auto Searching.......
20%
9
INSTRUCTION MANUAL
Page 13

CONTROLS AND FUNCTIONS
: Screen
: Brightness
Increase or decrease the intensity of the image.
: Contrast
Increase or decrease the intensity(lightness or dimness) of the image.
: H. position (PC Mode Only)
Move image horizontally on screen right or left.
: V. position (PC Mode Only)
Move image vertically on screen up or down.
: Clock (PC Mode Only)
Adjust the vertical noise of screen image.
: Phase (PC Mode Only)
Adjust the number of horizontal picture elements.
: Hue (AV, NTSC Only)
Adjust the tone of color.
: Saturation (AV Only)
Adjust the intensity of color level.
: Sharpness (AV Only)
Adjust the sharpness of video image.
INSTRUCTION MANUAL
10
Page 14

CONTROLS AND FUNCTIONS
: Audio
: Volume
Adjust audio volume.
: Equalizer (Loudspeaker Only)
Boost / Cut specific frequency or compensate for frequency
distortion of the sound
.
Select preferred Sound setting: flat, music, movie, speech and Adjust the
level of the Sound frequency in user mode.
: Balance (Loudspeaker Only)
Adjust the balance of left and right speaker sound
.
: Loudness (Loudspeaker Only)
Compensate the sound to consider the frequency sensitivity of human ear.
11
INSTRUCTION MANUAL
Page 15

CONTROLS AND FUNCTIONS
: OSD
: H. Position
Move the OSD position to right( ) or left( ).
: V. Position
Move the OSD position to up( ) or down( ).
: Transparency
Select the OSD background.
: OSD Timer
Select the OSD display timing.
: Language
Select a language among English, Français, Deutsch, Español,
Danish.
INSTRUCTION MANUAL
12
Page 16

CONTROLS AND FUNCTIONS
: Color (PC Mode)
: Color Temp
Adjust color temperature to 9300, 6500, user.
(note : 9300 is factory default)
: Red
Adjust red color for user.
: Green
Adjust green color for user.
: Blue
Adjust blue color for user.
13
INSTRUCTION MANUAL
Page 17

CONTROLS AND FUNCTIONS
: Utility
: Recall
Select to reset all setting to the factory default values.
: Full Auto (PC Mode Only)
Auto geometry and color adjustment.
: Caption (NTSC Only)
Enable or disable closed caption feature(CC1, CC2, CC3, CC4).
: Vchip (NTSC, US Only)
Initial passwords is “0000”.
The V-chip can block certain rated television shows off
(if chosen) so children cannot watch programs that parents do not approve.
If the rating codes are higher than the preset values, the television signal
will be displayed.
To select V-chip on OSD, Enter 4 digits of number
if you Enter a wrong number, “Invalid number” will be displayed.
INSTRUCTION MANUAL
14
Page 18

CONTROLS AND FUNCTIONS
: TV Channel (Program)
This menu is possible to select, Input Source must be set ‘TV’.
: Auto Search
Find available channels(Program) and save automatically.
: Fine Tuning
Adjust a mismatch between real and programmed channel(Program).
: Store / Clear
Select “Store” to save the channel(Program) or select “Clear” to
remove the channel(Program).
: TV Type (NTSC Only)
Select Air or Cable TV system.
: Channel(Program) Swap (PAL or SECAM Only)
Change current channel number to new channel number user want to
change(Channel number will be different with real channel number
after execute this menu).
: Region
Select a channel system that is being used in your region.
USA, Korea : NTSC(M) W.EU, Scand : PAL B/G
UK. Ireland : PAL I E.EU, CIS : SECAM D/K
M.East : SECAM B/G France : SECAM L/L’
15
INSTRUCTION MANUAL
Page 19

CONTROLS AND FUNCTIONS
: Exit
: Exit
Turn off OSD Menu.
INSTRUCTION MANUAL
16
Page 20

No image on display screen
“Check Input Signal”
message on screen
Display image is not
centered, too small or
too large in PC mode
Vertical or Horizontal noise
is present in the picture in
PC mode
TROUBLE TROUBLESHOOTING TIP
TROUBLESHOOTING GUIDE
1. Check that power cord of the Monitor have
been connected securely into wall outlet
or grounded extension cable or strip.
2. Power switch should be in the ON position
and LED is lit.
3. Check that the Brightness and/or the Contrast
adjustments of the Display have not been
turned down to minimum levels.
1. The signal cable should be completely
connected to the video card/computer.
2. The video card should be completely seated in
its slot and the computer is switched ON.
Push the down key on the front of the LCD TV or
the AUTO button on the remote control.
Adjust Clock and Phase in the OSD.
(See page 10)
17
INSTRUCTION MANUAL
Page 21

SPECIFICATIONS
LCD Type
17.0
Diagonal AM-TFT(Active-Matrix)
DOT PITCH: 0.264mm
BRIGHTNESS: 250cd/ (Typical)
CONTRAST RATIO: 350:1(Typical)
RESPONSE TIME: Tr -5msec, Tf-20msec(Typical)
RESOLUTION(H x V)
1280X1024 @60Hz
FREQUENCY
HORIZONTAL: 31-80KHz
VERTICAL: 56-75Hz
INPUT SIGNAL
VIDEO(Analog 0.7Vp-p / 75 )
SYNC(Separate TTL Level)
SCART, S-VIDEO, AV(Sound L/R)
PC Stereo Sound, RF(Tuner option)
ACTIVE DISPLAY AREA (W x H)
338mm X 270mm
DIMENSIONS (W x D x H)
416mm X 185mm X 430mm
WEIGHT
Net Weight : 4.9Kg
Gross Weight : 6.9Kg
ELECTRICAL RATINGS
INPUT : AC100 - 240V, 50/60Hz (auto switching)
NNOOTTEE ::
Technical s pecifica tions a re s ubject to change without notice.
INS TR UC T ION MA NUAL 18
 Loading...