

Page 1
Built-in Electric Oven
Instruction / Installation Manual
LBMULX10
Page 2

Contents
Before Use ...................................................................................................................................................... 4
Unpacking...................................................................................................................................................................................... 4
Product Overview .......................................................................................................................................................................5
Operation ....................................................................................................................................................... 6
First Time Use of the Oven .......................................................................................................................................................6
Oven On and Off .......................................................................................................................................................................... 6
Setting the Clock .........................................................................................................................................................................6
Natural Convection Oven ......................................................................................................................................................... 6
Settings of the Function Control ...........................................................................................................................................7
Manual Mode ................................................................................................................................................................................ 8
Use of the grill ..............................................................................................................................................................................8
Ū Baking .................................................................................................................................................................................... 9
Ū Roasting Meat .....................................................................................................................................................................9
Programming Your Cooking ..................................................................................................................................................10
Programming Cooking Time .................................................................................................................................................10
Programming Delay Cooking ...............................................................................................................................................10
Cleaning and Maintenance ......................................................................................................................... 11
Operation in Case of Emergency .........................................................................................................................................11
Cleaning and Maintenance ...................................................................................................................................................11
Oven ...............................................................................................................................................................................................11
Replacement of the Oven Lamp ..........................................................................................................................................12
Door Removal .............................................................................................................................................................................12
Removal of the Internal Glass Panel ...................................................................................................................................12
Specification ................................................................................................................................................ 13
Page 3

Installation ................................................................................................................................................... 14
Installation ...................................................................................................................................................................................14
Use as Competent Person or Qualified Electrician ........................................................................................................14
Electrical connection ...............................................................................................................................................................16
Ū Fitting guidelines.............................................................................................................................................................16
Ū Connection Diagram ......................................................................................................................................................16
Ū Wiring Instructions .........................................................................................................................................................16
Safety Warnings ........................................................................................................................................... 17
Page 4
GB-4
Before Use Operation Specication Installation Safety Warnings
Cleaning and Maintenance
Congratulations on the purchase of your new Logik Built-in Electric Oven.
We recommend that you spend some time to read this manual in order to fully
understand how to install and operate it correctly.
This oven must be installed by a competent person if in doubt contact a qualified
electrician. Please allow the installer to view the installation section of this manual.
Read all the safety warnings carefully before use and keep this manual for future reference.
Unpacking
Remove all packaging from the unit. Retain the packaging. If you dispose of it please do so according to
local regulations.
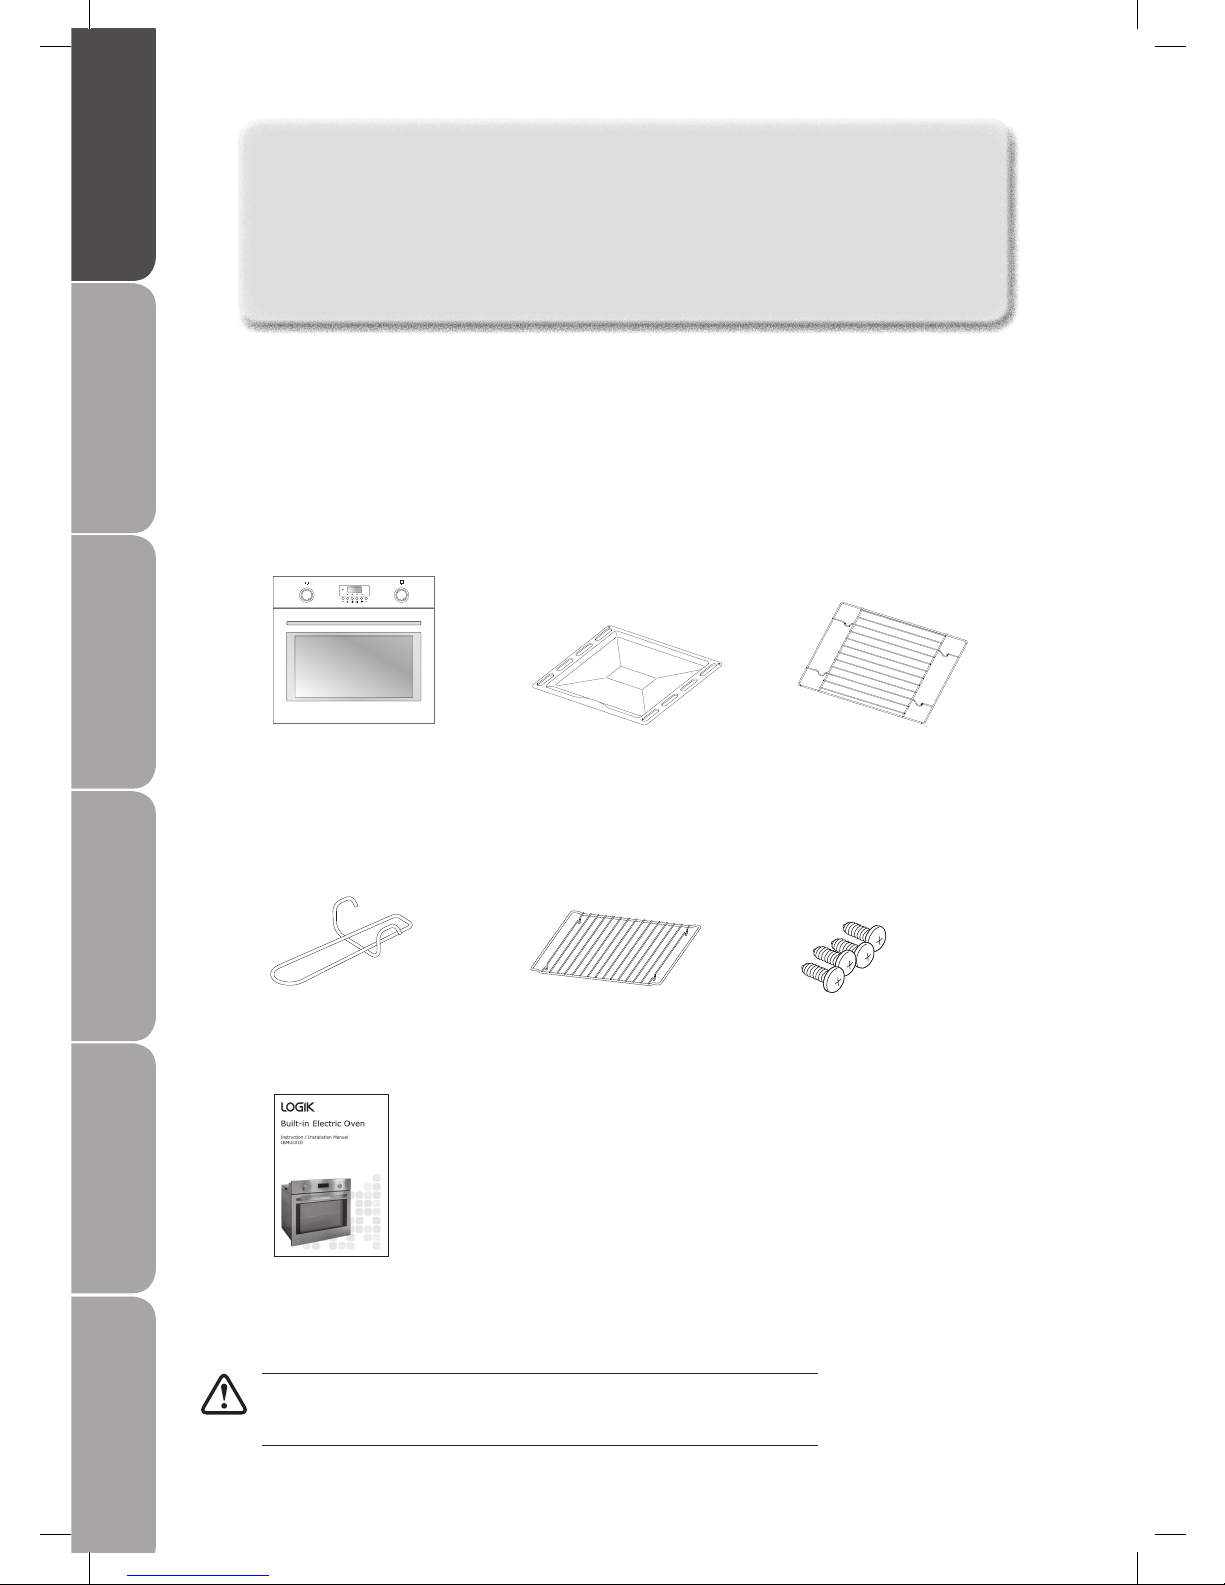
The following items are included:
Baking Tray x 1
(P.N.: VBH-29BM4CBA.FJ-03)
Wire Shelf x 1
(P.N.: VBH-29BM4CBA.FJ-01)
The Main Unit
Grill Pan Handle x 1
(P.N.: VBH-29BM4CBA.FJ-05)
Instruction/Installation Manual
(P.N.: VBS-22BA4CBA-SMS-V3)
Grill Pan Trivet x 1
(P.N.: VBS-22FB4CBA.FJ-03)
Fixing Screws x 4
(P.N.: ST4x35-C-H)
˚C
RUN
If items are missing, or damaged please contact Partmaster (UK only).
Tel: 0844 800 3456 for assistance.
Page 5
GB-5
Before UseOperationSpecicationInstallationSafety Warnings
Cleaning and Maintenance
˚C
RUN
˚C
RUN
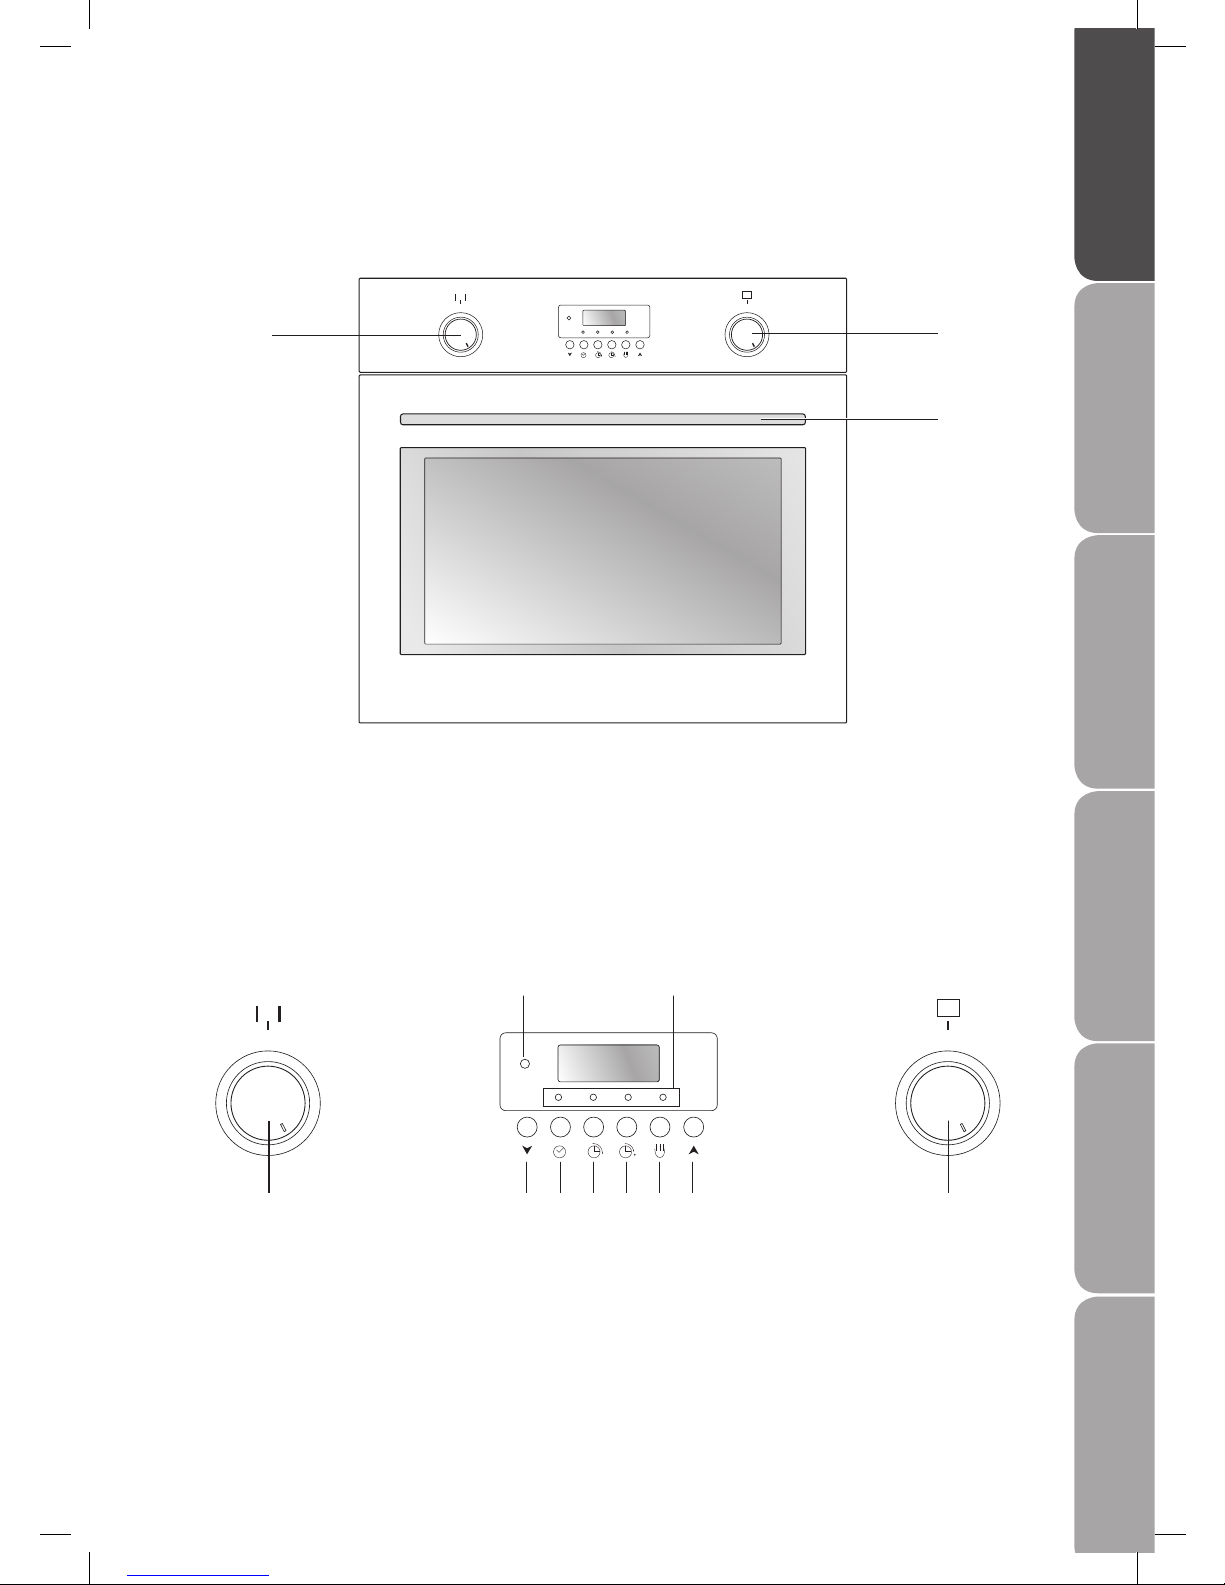
Product Overview
Front View
1. Temperature Control
2. Function Control
3. Oven door handle
2
Control Panel
1. Temperature Control
2. Power indicator light
3. Decrease button
4. Clock button
5. Programming Cooking Time
button
6. Programming Delay Cooking
Time button
7. Manual button
8. Increase button
9. Button indicator lights
10. Function Control
1 3
2 9
64 75 8 10
3
1
Page 6
GB-6
Before Use Operation Specication Installation Safety Warnings
Cleaning and Maintenance
First Time Use of the Oven
Unpack the oven. Remove any insert cards or plastic bags. Use a damp cloth to carefully wipe the interior
and exterior of the oven. Clean all the detachable parts in hot, soapy water before using.
Heat the oven on maximum for 30mins. There may be a little smoke and odour upon initial start up (for
about 15mins). This is normal. It is due to the protective substance on the heating elements which protects
them from the effects of corrosion during shipping from the factory.
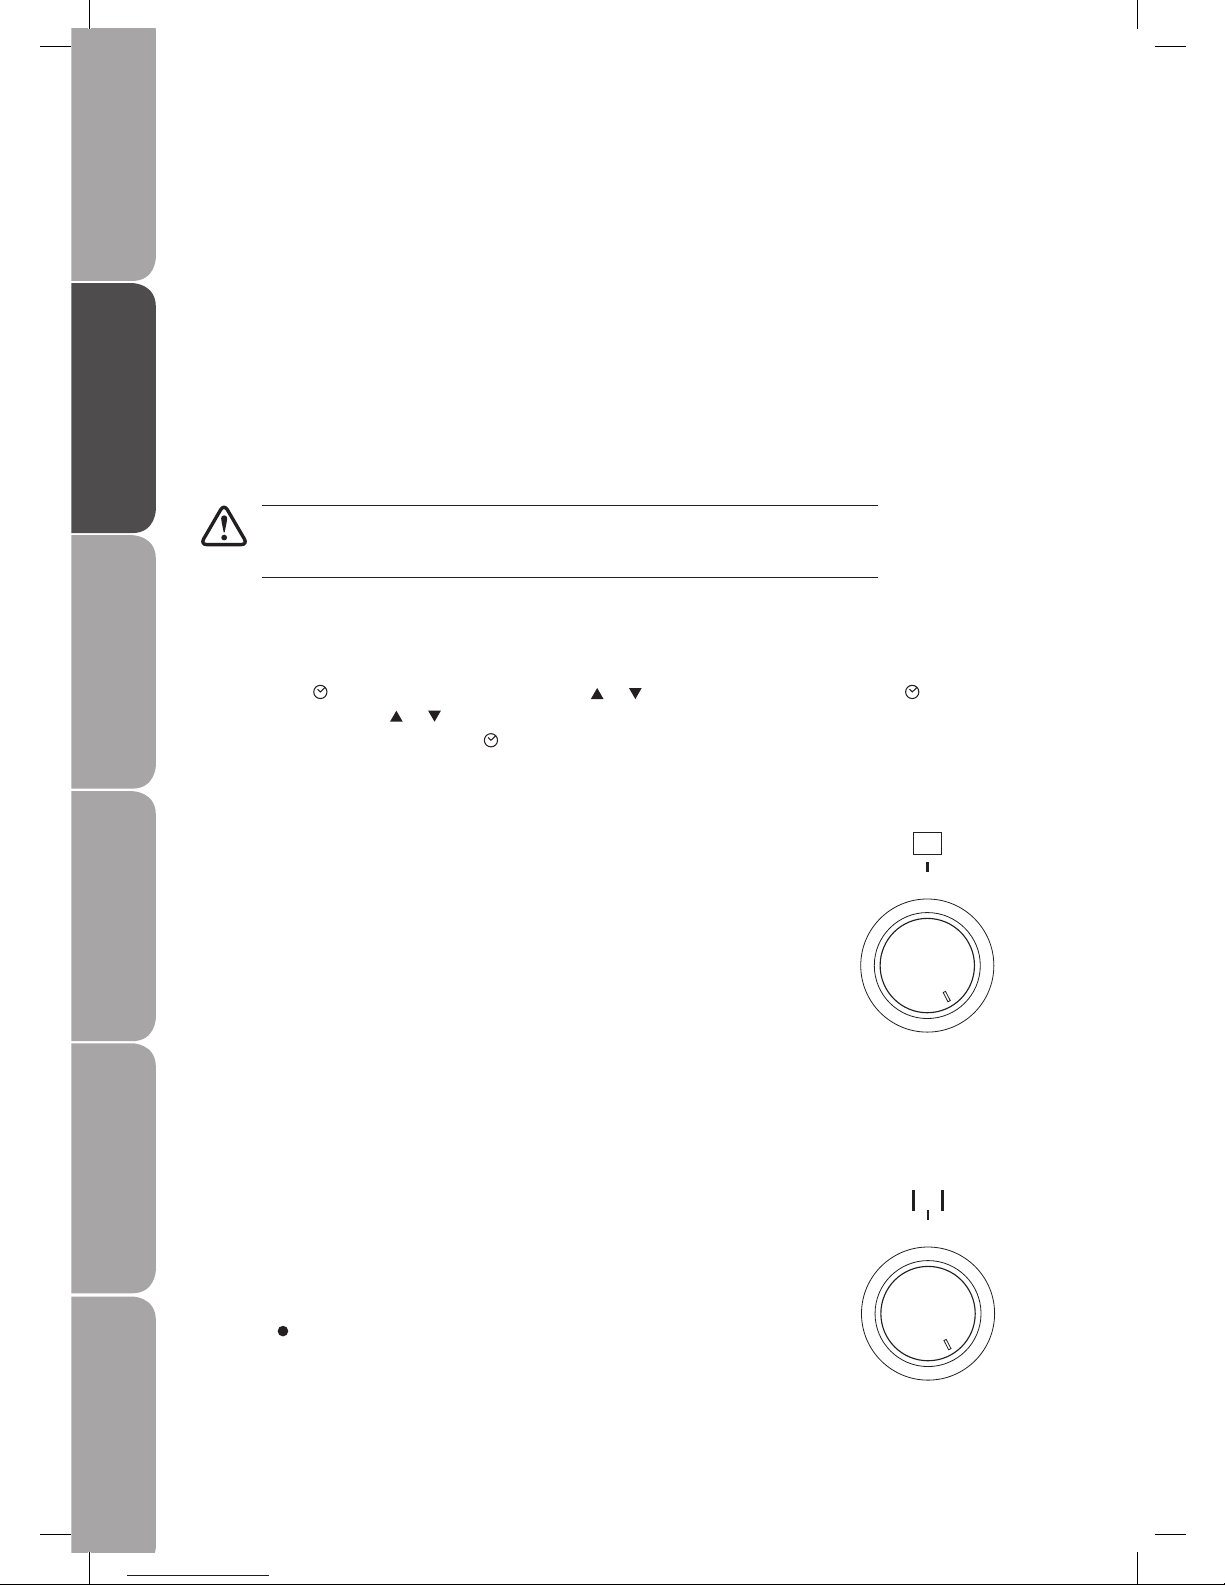
Oven On and Off
In order to switch on the oven you need to:
1. Set required working conditions of the oven, its temperature and a mode of heating.
2. Set the Function Control to the required position, turning it right.
3. Press the Manual button to start the oven. The blue lamp above the button will illuminate, and after
5 seconds the RED RUN lamp will light to show the oven is operating.
During use the appliance become hot. Care should be taken to avoid touching
heating elements inside the oven.
Natural Convection Oven
The oven can be warmed up using the bottom and top heaters, as well as the
grill. Operation of the oven is controlled by the oven Function Control — to
set a required function you should press in to release the Function Control
and then turn to the selected position.
As well as the temperature regulator Temperature Control — to set a
required temperature you should press in to release the Temperature Control
and then turn to the selected position.
The oven can be switched off by setting both of these controls to the off
position "
" / "0".
˚C
Function Control
Temperature Control
Setting the Clock
1. Press the button two times then press the or button to set the hour, press the button again
and then press the or button to set the minutes.
2. Wait for 5 seconds or press the
button again.
Page 7

GB-7
Before UseOperationSpecicationInstallationSafety Warnings
Cleaning and Maintenance
Settings of the Function Control
Separate oven lighting
By setting the Function Control to this position the lighting inside the oven is switched
on.
Bottom and top heaters on
Setting the Function Control to this position allows the oven to be heated
conventionally.
Grill heater on
Setting the Function Control to this position allows food to be grilled on the grate.
Fan , bottom and top heaters on
At this Function Control position the oven activates the conventional oven with a fan.
When the
function has been selected but the Temperature Control is set to
zero only the fan will be on. With this function you can defrost the food in the oven
chamber.
Combined grill (Grill and the top heater)
When the “combined grill” is active it enables grilling with the grill and with the top
heater switched on at the same time. This function allows a higher temperature at the
top of the cooking area, which causes more intense browning of the food and permits
larger portions to be grilled.
Fan and combined grill on
When the Function Control is turned to this position , the oven activates the combined
grill and fan function.
In practice, this function allows the grilling process to be speeded up and an
improvement in the taste of the food. You should only use the grill with the oven door
shut.
Page 8

GB-8
Before Use Operation Specication Installation Safety Warnings
Cleaning and Maintenance
Manual Mode
1. Set the Function Control to the selected heating mode, (see the chapter “Baking”).
2. Press the Manual button to start the oven. The blue lamp above the button will illuminate, and after
5 seconds the RED RUN lamp will light to show the oven is operating.
3. Set the Temperature Control to the required temperature,
• Heat the oven for approximately 10 mins,
• Now put the tray with food into the oven,
Use of the grill
In order to switch on the grill you need to:
• Set the Function Control to the position marked with
(Grill heater on / Combined grill /
Fan and combined grill on
).
• Heat the oven for approximately 5 minutes (with the oven door shut).
• Insert a tray with food onto the appropriate cooking level, and if you are grilling on the wire shelf insert a
tray for dripping on the level immediately below (under the shelf ).
• Close the oven door.
For grilling and combined grill the temperature must be set to 250°C.
• When the fast oven heat-up function has been selected, the chamber should
not contain a baking tray with food or other elements that do not constitute
the oven fittings.
The fast heat-up function is not recommended for use with the programmer
set.
• Please ensure that the manual mode has been selected when not using other
mode.
• DO NOT use the top shelf to grill, it is too hot!
• The grill should be used with the oven door shut.
• When the grill is in use, accessible parts can become hot.
• It is recommended to keep children away from the oven.
• Always turn the grill off immediately after use as fat left behind may catch fire.
• Bread may catch re if the toasting time is too long. Close supervision
is necessary during toasting.
To save energy and to help protect the environment, we recommend these hints:
• Use the oven efficiently, by cooking many trays of food at the same time.
• Cook 2 trays of scones, small cakes or sausage rolls at the same time.
• Select the correct shelf location for food being cooked.
• Do not open the oven door more than necessary.
• After the oven is turned off it retains heat for some time.
• Use this heat to finish custards or to dry bread.
Page 9

GB-9
Before UseOperationSpecicationInstallationSafety Warnings
Cleaning and Maintenance
Baking
• We recommend using the baking trays which were provided with your cooker;
• It is also possible to bake in cake tins and trays bought elsewhere which should be put on the wire
shelf; for baking it is better to use black trays which conduct heat better and shorten the baking time;
• Shapes and trays with bright or shiny surfaces are not recommended when using the conventional
heating method (top and bottom heaters), use of such tins can result in undercooking the cakes;
• Before the cake is taken out of the oven, check if it is ready using a skewer (if the cake is ready the
skewer should come out dry and clean after being inserted into the cake);
• After switching off the oven it is advisable to leave the cake inside for about 5 mins;
• The baking parameters given in the following Tables are as a guide only and can be corrected based
on your own experience and cooking preferences;
• If information given in recipe books is significantly different from the values included in this
instruction manual, please apply the instructions from the manual.
When baking cakes it is necessary to initially heat up the oven chamber, using the
third level from the bottom is recommended for baking.
Roasting Meat
• Cook meat weighing over 1 kg in the oven.
• Use heatproof ovenware for roasting with handles that are also resistant to high temperatures;
• When roasting on shelf we recommend that you place a baking tray with a small amount of water on
the lowest level of the oven;
• It is advisable to turn the meat over at least once during the roasting time and during roasting you
should also baste the meat with its juices or with hot salty water-do not pour cold water over the
meat.
Page 10

GB-10
Before Use Operation Specication Installation Safety Warnings
Cleaning and Maintenance
Programming Your Cooking
Select a cooking mode and temperature before programming. (refer to the "Manual Mode" section on Page
8 – 9)
Programming Cooking Time
1. Press the Programming cooking time button two times then
press the
or button to set the programming hour, press the
Programming cooking time button again and then press
the or button to set minutes if needed.
2. Wait for 5 seconds or press the
Programming cooking time
button, then the oven will set the time automatically.
3. A count down timer will be displayed showing remaining time.
4. When the selected time has elapsed, the oven will stop cooking.
Programming Delay Cooking
1. Set the cooking time using steps 1 and 2 of "Programming
cooking time" section.
2. Press the
Programming delay cooking time button two
times then press the
or button to set the programming
delay cooking hour, press the Programming delay cooking
time button again then press the or button to set the
programming delay cooking minutes if needed.
3. Waiting for 5 seconds or press the
Programming delay
cooking time button, the oven will set the time automatically.
4. When the selected time has elapsed the oven will start and stop
after the programmed cooking time.
For example: it is 10:00 am. A cooking time of 1 hour has been
programmed, and 15 minutes delayed cooking has been
programmed. The programming will start automatically at 10:15am,
and automatically stop at 11:15am.
RUN
RUN
Page 11

GB-11
Before UseOperationSpecicationInstallationSafety Warnings
Cleaning and Maintenance
Cleaning and Maintenance
By ensuring proper cleaning and maintenance of your cooker you can have a significant influence on the
continuing fault-free operation of your appliance.
Before you start cleaning, the cooker must be switched off and isolated from the mains supply and you
should ensure that all controls are set to the off position "
” / “0”. Do not start cleaning until the cooker has
completely cooled.
• It is advisable to use a solution of hot water with a little washing-up liquid or cleaning products for
stainless steel sinks.
• Steam cleaners must never be used.
• Do not use abrasive pads to clean any part of the oven. If using commercially available oven cleaners
ensure they are suitable for the type of oven and follow the manufacturer’s instructions.
Oven
• The oven should be cleaned after every use.
• The oven chamber should only be washed with hot water and small amount of washing-up liquid.
Do not use harsh abrasive cleaners or sharp metal scrapers to clean the
oven door glass since they can scratch the surface, which may result in
shattering of the glass.
• After cleaning the oven chamber wipe it dry.
• Wait for the oven to dry before restoring power.
Operation in Case of Emergency
In the event of an emergency, you should:
• Switch off the oven and disconnect it from the mains supply. Make sure all controls are set to the OFF
position.
• Call the service centre
• Some minor faults can be fixed by referring to the instructions given in the table below. Before calling
the customer support centre or the service centre check the following points that are presented in the
table.
PROBLEM REASON ACTION
The appliance does not work. • Break in power supply
• Manual mode is not
selected
• Check the household fuse
box, if there is a blown fuse
replace it with a new one.
• Select manual mode
The oven lighting does not
work.
The bulb is loose or damaged Tighten up or replace the
blown bulb. (Replacement of
the Oven Lamp)
Page 12

GB-12
Before Use Operation Specication Installation Safety Warnings
Cleaning and Maintenance
• Set all controls to the off position “ ” / “0”.
• Unscrew and wash the lamp cover and then wipe it dry.
• Unscrew the lamp from the socket, replace the lamp with
a new one that is a high temperature lamp (300°C ) with
the following parameters:
– Voltage 230V
– Power 25W
– Thread E14
Ensure that the oven is switched off before replacing
the lamp to avoid the possibility of electric shock.
Replacement of the Oven Lamp
• Screw the lamp in, making sure it is properly inserted.
• Screw in the lamp cover.
Door Removal
In order to obtain easier access to the oven chamber for
cleaning , it is possible to remove the door, To do this, tilt
the safety catch part of the hinge upwards. Close the door
lightly, lift and pull it out towards you. In order to fit the
door back on to the cooker, do the inverse. When fitting,
ensure that the notch of the hinge is correctly placed on
the protrusion of the hinge holder. After the door is fitted
to the oven, the safety catch should be carefully lowered
down again. If the safety catch is not set it may cause
damage to the hinge or the glass when closing the door.
Removal of the Internal Glass Panel
Unscrew and unfasten the plastic latch that is in the corner at the top of the door. Next take out the glass
from the second blocking mechanism and remove. After cleaning, insert the block and glass panel, then
tightened with screws.
Ensure that you do not damage the glass during this operation.
Page 13

GB-13
Before UseOperationSpecicationInstallationSafety Warnings
Cleaning and Maintenance
Specification
Model LBMULX10
Voltage rating 230V–240V ~ 50Hz
Power rating 2900 – 3150 W
Cooker dimensions H/W/D 595(W) x 575(D) x 595(H) (in mm)
Usable capacity of the oven 56 litres
Energy rating A
Weight Approx. 32kg
Features and Specification are subject to change without prior notice.
Page 14

GB-14
Before Use Operation Specication Installation Safety Warnings
Cleaning and Maintenance
Installation
Before using the appliance, please read the instruction manual carefully.
By following these instructions carefully you will be able to avoid any problems in using the appliance.
It is important to keep the instruction manual and store it in a safe place so that it can be consulted at any
time.
It is necessary to follow the instructions in the manual carefully in order to avoid possible accidents.
Use as Competent Person or Qualified Electrician
• This unit must be installed in accordance with the latest local building and wiring regulations.
• Refer to data plate for rating information. The data plate is positioned behind the bottom of the oven
door. The circuit diagram is positioned on the rear panel of the appliance.
• An isolating switch must be provided near the appliance in an accessible position.
• Wiring should be protected against mechanical failure.
• A means of disconnection with a contact separation of at least 3mm must be supplied in the fixed
wiring.
• This appliance must be properly earthed.
• Do not lift the appliance by the door handles.
• Prepare the cupboard opening to match your oven measurements. (See diagrams)
• Slide appliance into the cupboard, ensuring that the mains cable does not kink.
• To prevent tipping, secure your oven into the cupboard by fastening with the screws supplied.
• Where the appliance is built into a cabinet, the cabinet must be capable of withstanding 100°C.
Installation into low temperature tolerant cabinetry (e.g. Vinyl coated) may result in deterioration of
the low temperature coating by discolouring or bubbling.
• The unit panels next to the cooker must be heat resistant. In the case of veneered wood units, glues
must be resistant to a temperature of 100°C.
• We cannot accept responsibility for damage caused by installation into low temperature tolerant
cabinets.
• After installation, test and ensure that the appliance operates correctly before handing it over to the
customer.
The oven is intended for household use only.
The manufacturer reserves the right to introduce changes which do not aect
the operation of the appliance.
Page 15

GB-15
Before UseOperationSpecicationInstallationSafety Warnings
Cleaning and Maintenance
• The kitchen area should be dry and aired and equipped
with sufficient ventilation.
• When installing the oven, easy access to all control
elements should be ensured.
• This is a built-in oven. Coating or veneer used on
fitted furniture must be applied with a heat-resistant
adhesive (100°C). This prevents surface deformation or
detachment of the coating.
• Ensure that the cabinet is designed to be used with
built-in ovens.
• Ensure you have the dimensions given in the diagram for
the oven to be fitted.
• Once the oven is installed, fix with the four screws in the
places shown in the diagram.
59 0
60 0
65 0
56 0
Mi n38
60 0
65 0
56 0
0Mi n6 0
A dedicated power circuit is recommended for the unit. Additional electrical appliances on the same circuit
may exceed the current (amperage) rating for that circuit. If after the installation of your unit the circuit
breaker trips or the fuse fails on a repeated basis, then a dedicated circuit will likely be required.
If a new socket is required to be installed then this must be performed by a qualified electrician.
To avoid any potential hazard, you must follow the instructions when you install your appliance.
Failure to install the appliance correctly could invalidate any warranty or liability claims and lead to
prosecution.
Page 16

GB-16
Before Use Operation Specication Installation Safety Warnings
Cleaning and Maintenance
Electrical connection
Fitting guidelines
The oven is manufactured to work with single-phase alternating
current (230V – 240V/50Hz).The connection diagram is also
found next to the cover of the connection box.
Wiring Instructions
The Earth wire coloured Green/Yellow must be connected to
the Earth terminal marked with
.
The Live Wire coloured Brown must be connected to the live
terminal marked with L.
The Neutral Wire coloured Blue must be connected to the
terminal marked with N.
All electrical work should be carried out by a suitably
qualied and authorised electrician.
No alterations or wilful changes in the electricity supply
should be carried out.
The electricity supply for the oven must have an isolation
switch which enables the power to be cut o in case of
emergency and for maintenance. The distance between the
working contacts of the isolation switch must be at least
3 mm.
Before connecting the oven to the power supply it is
important to read the information on the data plate and
the connection diagram.
Voltage of heating elements 230V – 240V.
This product must be earthed.
For this connection a power with a minimum
specication of H05VV-F (PVC insulated and
sheathed) 3 x 1.5mm
2
should be used.
The connection cable must be secured in the strain-relief clamp.
Connection Diagram
1
2
L
Page 17

GB-17
Before UseOperationSpecicationInstallationSafety Warnings
Cleaning and Maintenance
Safety Warnings
Installation
• The appliance must be installed by a
competent person or a qualied electrician
in compliance with the instructions provided.
Incorrect installation may cause harm to
persons, animals or may damage property.
• Before using the appliance, ensure that all
packing materials are removed from the
appliance.
• In order to avoid any potential hazard, the
enclosed installation instructions must be
followed.
• Ensure that all specied vents, openings and
air spaces are not blocked.
• The panels adjacent to the oven must be made
of heat-resistant material.
• Cabinets with a veneer exterior must be
suitable for use with Built in Ovens.
• Keep combustible materials, such as: curtains,
drapes, furniture, pillows, clothing, linens,
bedding, paper, etc., at least 3 feet(0.9 meters)
from the front sides and rear of theovrn. Do
not use this unit in areas where gasoline, paint
or other ammable liquids or their associated
vapors may be present.
• To reduce the risk of re, do not place or install
this unit in areas where the ventilation or
circulation ducts may become blocked. Keep
some distance on each side of your oven that
you can use that distance following installing
instructions.
• The unit's power cord must be connected to
a properly earthed and protected, 220-240V
electrical outlet. Always use ground fault
protection where required by the electrical
regulations. To reduce the risk of re, avoid
running the power cord under rugs, carpets,
etc. Keep the power cord away from high
trac areas where it may pose a tripping
hazard.
• Avoid the use of an extension cord, which may
overheat and cause a re.
• When transporting or storing the unit, keep
it in a dry location, free from dust, excessive
vibration or other factors, which may damage
the unit.
• Do not operate any oven with a damaged cord
or plug or after the heater malfunctions, has
been dropped or damaged in any manner.
Return oven to authorized service facility
for examination, electrical or mechanical
adjustment, or repaired.
• Only authorized personnel should carry out
servicing. (Certicate of Compliance to be
retained)
• This appliance must be earthed.
• To maintain safe operation, it is recommended
that the product be inspected every ve years
by an authorized service person.
General Warnings
• If the supply cord is damaged, the cord must
be replaced by the manufacturer, its service
agent or similarly qualied persons in order to
avoid a hazard.
• This product has not been designed for any
uses other than those specied in this booklet.
• This appliance must not be used as a space
heater.
• In order to avoid re, the appliance must be
kept clean and vents kept unobstructed.
• Do not spray aerosols within the vicinity of the
appliance during operation.
• Do not store ammable materials in or under
the appliance, e.g. aerosols.
• Do not line the bottom of the oven with foil or
cookware.
• Always use oven gloves when handling hot
items inside the oven.
• Always turn the grill o immediately after use
as fat left behind may catch re.
• Do not leave the cooker unattended when
frying. Oils and fats may catch re due to
overheating or boiling over.
• Do not rest cookware, lean or stand on the
opened oven door.
• Do not use the oven in the event of a
technical fault. Any faults must be xed by an
appropriately qualied and authorized person.
• In the event of any incident caused by a
technical fault, disconnect the power and
report the fault to the service centre to be
repaired.
• The rules and provisions contained in this
instruction manual should be strictly observed.
• Do not allow anybody who is not familiar with
the contents of this instruction manual to
operate the cooker.
Page 18

GB-18
Before Use Operation Specication Installation Safety Warnings
Cleaning and Maintenance
• This appliance is not intended for use by
persons (including children) with reduced
physical, sensory or mental capabilities, or lack
of experience and knowledge, unless they
have been given supervision or instruction
concerning use of the appliance by a person
responsible for their safety.
• Children should be supervised to ensure that
they do not play with the appliance.
• During use this appliance becomes hot.
Care should be taken to avoid touching hot
surfaces, e.g. oven door, heating elements.
• Accessible parts will also become hot when in
use.
• To avoid burns and scalds children should be
kept away.
Oven
• During use the appliance becomes hot. Care
should be taken to avoid touching the hot
surfaces inside the oven.
• Switch the appliance o before removing the
oven light glass for lamp replacement.
• To avoid an accident, ensure that oven shelves
and ttings are always inserted into the
appliance in accordance with the instructions.
• Do not use the door as a shelf.
• Do not push down on the open oven door.
Grill
• Do not cover the grill insert with foil, as fat left
there may catch re.
• Always keep the tray clean as any fat there may
catch re.
• Do not leave the grill on unattended.
• To avoid re, ensure that grill trays and ttings
are always inserted into the appliance in
accordance with the instructions.
• Do not place thick portions of food under the
grill. Foods may curl, catch and ignite.
• Accessible parts may become hot when grill is
in use. Children should be kept away.
Page 19

Page 20

If you require a replacement for any of the items listed below, please quote their
corresponding part numbers:
Replacement Part Part Number
Baking Tray VBH-29BM4CBA.FJ-03
Wire Shelf VBH-29BM4CBA.FJ-01
Grill Pan Handle VBH-29BM4CBA.FJ-05
Grill Pan Trivet VBS-22FB4CBA.FJ-03
Fixing Screws ST4x35-C-H
This symbol on the product or in the instructions means that your
electrical and electronic equipment should be disposed at the end
of its life separately from your household waste. There are separate
collection systems for recycling in the EU.
For more information, please contact the local authority or your
retailer where you purchased the product.
DSGRetailLtd.•MaylandsAvenue•HemelHempstead
Herts•HP27TG•England
(P.N.VBS-22BA4CBA-SMS-V3)
Visit Partmaster.co.uk today for the easiest way to
buy electrical spares and accessories. With over
1 million spares and accessories available we can
deliver direct to your door the very next day. Visit www.partmaster.co.uk or call
0844 800 3456 (UK customers only) Calls charged at National Rate.
 Loading...