

Page 1
L7PDT13E
Instruction Manual
Dual 7” Screen Portable DVD Player
Instruksjonsmanual
7” bærbar dobbel DVD-spiller
Instruktionsbok
7 tums dubbla portabla DVD-spelare
Käyttöopas
7-tuumaisen kannettavan kaksois-DVD-soittimen
Brugervejledning
7” Twin bærbar dvd-afspiller
Návod K Použití
7” dvojitý přenosný DVD přehrávač
Návod S Pokynmi
7” dvojitý prenosný DVD prehrávač
GB
NO
SE
FI
DK
CZ
SK
Page 2

Page 3

Contents
GB
Innhold
NO
Unpacking ............................................................................................... 11
Product Overview ................................................................................... 12
Front View .....................................................................................................................12
Rear View.......................................................................................................................12
Top View ........................................................................................................................13
Right Side View ...........................................................................................................14
Remote Control ....................................................................................... 15
Removing the Insulating Strip from the Remote Control ...................16
Battery Replacement for the Remote Control ......................................16
Remote Control Operation Range ......................................................... 17
Using in a Car .......................................................................................... 18
Using the Car Power Adapter (for in-car use) ..................................................18
Mounting in a Car ......................................................................................................19
Installation Guide .......................................................................................................19
Power Source ..........................................................................................20
Mains Power.................................................................................................................20
Connections ............................................................................................ 21
Using Earphones ........................................................................................................21
Using a USB Flash Drive ...........................................................................................22
Watching a DVD on the DVD Player and the Monitor ..................................22
Compatible Disc Types ........................................................................... 23
Picture Supported Formats ....................................................................................23
Region Code ................................................................................................................23
DVD Playback ..........................................................................................24
Basic DVD Playback ...................................................................................................24
Stop Playback ..............................................................................................................24
Previous and Next ......................................................................................................25
Fast Forward and Fast Reverse ..............................................................................25
Pause Playback............................................................................................................25
Info .................................................................................................................................. 25
Volume Adjustment ..................................................................................................25
All Repeat ......................................................................................................................25
Audio Channel ............................................................................................................26
A–B Repeat ...................................................................................................................26
Subtitle Language .....................................................................................................26
Angle Selection...........................................................................................................26
Audio CD, JPEG Picture CD Playback.....................................................27
Loading a Disc .............................................................................................................27
Playing an Audio CD .................................................................................................27
Playing MPEG4/JPEG Picture CD ..........................................................................28
The Playback Navigator and Settings ................................................... 29
Program Playback ..................................................................................30
Adding les to the Program List ...........................................................................30
Deleting Files from the Program List ..................................................................31
To Return to Browser List ........................................................................................31
Customising the Language Settings ..................................................... 32
OSD Language ............................................................................................................32
Subtitle ..........................................................................................................................32
MPEG4 Subtitle ...........................................................................................................32
Audio ..............................................................................................................................32
DVD menu ....................................................................................................................32
Customising the Video Settings ............................................................33
Aspect Ratio .................................................................................................................33
TV System .....................................................................................................................33
Picture Mode ...............................................................................................................33
Customising the Rating Settings ........................................................... 34
Parental control ..........................................................................................................34
Set Password ................................................................................................................35
Customising the Miscellaneous Settings .............................................. 35
Maintenance ........................................................................................... 36
Handling Discs ............................................................................................................36
Cleaning Discs .............................................................................................................36
Storing Discs ................................................................................................................36
Cleaning the Unit .......................................................................................................36
Hints and Tips.......................................................................................... 37
Specications .......................................................................................... 39
Pakke opp ................................................................................................40
Produktoversikt ...................................................................................... 41
Sett forfra ......................................................................................................................41
Sett bakfra ....................................................................................................................41
Sett ovenfra ..................................................................................................................42
Sett fra høyre ...............................................................................................................43
Fjernkontroll ........................................................................................... 44
Fjerne isoleringsteipen fra ernkontrollen .......................................... 45
Skifte batteriet i ernkontrollen ........................................................... 45
Fjernkontrollens virkeområde ..............................................................46
Bruke i en bil ........................................................................................... 47
Bruke bilstrømadapteren (ved bruk i bil) ..........................................................47
Montering i en bil ......................................................................................................48
Installasjonsveiledning ............................................................................................48
Strømkilde ............................................................................................... 49
Strøm fra stikkontakt ................................................................................................49
Forbindelser ............................................................................................ 50
Bruke øretelefoner .....................................................................................................50
Bruke en USB-ashstasjon ......................................................................................51
Se en DVD-plate på DVD-spilleren og monitoren..........................................51
Kompatible platetyper ........................................................................... 52
Bildeformater som støttes ......................................................................................52
Regionkode ..................................................................................................................52
DVD-avspilling ........................................................................................ 53
Grunnleggende DVD-avspilling ...........................................................................53
Stoppe avspillingen ..................................................................................................53
Forrige og neste .........................................................................................................54
Spole fort forover og fort bakover .......................................................................54
Pause i avspillingen ...................................................................................................54
Info .................................................................................................................................. 54
Volumjustering ...........................................................................................................54
Gjenta alle .....................................................................................................................54
Lydkanal ........................................................................................................................55
Gjenta A–B ....................................................................................................................55
Tekstingsspråk .............................................................................................................55
Valg av vinkel ...............................................................................................................55
Spille av lyd-CD og JPEG bilde-CD ........................................................ 56
Legge inn en plate .....................................................................................................56
Spille av en lyd-CD .....................................................................................................56
Spille av MPEG4/JPEG bilde-CD ............................................................................57
Leservinduet for avspilling og innstillinger ......................................... 58
Programavspilling ..................................................................................59
Legge ler til programlisten ...................................................................................59
Slette ler fra programlisten ..................................................................................60
Tilbake til leserlisten .................................................................................................60
Tilpasse språkinnstillingene .................................................................. 61
Skjermmenyspråk ......................................................................................................61
Teksting .........................................................................................................................61
MPEG4-teksting ..........................................................................................................61
Lyd ................................................................................................................................... 61
DVD-meny ....................................................................................................................61
Tilpasse videoinnstillingene ..................................................................62
Bildeforhåll ...................................................................................................................62
TV-system .....................................................................................................................62
Bildemodus ..................................................................................................................62
Tilpasse innstillingene for aldersgrense............................................... 63
Foreldrekontroll ..........................................................................................................63
Tilpasse andre innstillinger ................................................................... 64
Sett passord .................................................................................................................64
Vedlikehold .............................................................................................65
Håndtere plater ..........................................................................................................65
Rengjøre plater ...........................................................................................................65
Oppbevare plater .......................................................................................................65
Rengjøre enheten ......................................................................................................65
Råd og tips .............................................................................................. 66
Spesikasjoner ....................................................................................... 68
Page 4

Innehåll
SE
Sisältö
FI
Uppackning ............................................................................................. 69
Produktöversikt ...................................................................................... 70
Vy framifrån ..................................................................................................................70
Baksida ...........................................................................................................................70
Vy ovanifrån .................................................................................................................71
Vy från höger sida ......................................................................................................72
Fjärrkontroll ............................................................................................ 73
Ta bort isoleringsremsan från ärrkontrollen...................................... 74
Batteribyte i ärrkontrollen ..................................................................74
Operationsområde för ärrkontrollen .................................................75
Användning i en bil ................................................................................76
Använda bilströmadaptern (endast för användning i bil)...........................76
Montering i bil.............................................................................................................77
Installationsguide ......................................................................................................77
Strömkälla ............................................................................................... 78
Elnät ................................................................................................................................78
Anslutningar ........................................................................................... 79
Använda hörlurar .......................................................................................................79
Använda ett USB-minne ..........................................................................................80
Visa en DVD på DVD-spelaren och bildskärmen ............................................80
Kompatibla skivtyper ............................................................................. 81
Bildformat som stöds................................................................................................81
Regionkod ....................................................................................................................81
DVD-uppspelning ................................................................................... 82
Grundläggande DVD-uppspelning .....................................................................82
Avbryta uppspelningen...........................................................................................82
Föregående och nästa ..............................................................................................83
Snabbspolning framåt/bakåt ................................................................................83
Pausa uppspelningen ...............................................................................................83
Info .................................................................................................................................. 83
Volyminställning ........................................................................................................83
Repetera allt .................................................................................................................83
Ljudkanal ......................................................................................................................84
A-B-upprepning..........................................................................................................84
Språk undertexter ......................................................................................................84
Val av vinkel .................................................................................................................84
Ljud-CD, JPEG bild CD uppspelning ...................................................... 85
Lägga i en skiva ..........................................................................................................85
Spela en ljud-CD .........................................................................................................85
Spela upp MPEG4/JPEG bild-CD ...........................................................................86
Uppspelningsnavigatorn och inställningar ......................................... 87
Programuppspelning ............................................................................. 88
Lägga till ler i programlistan................................................................................88
Radera ler i programlistan ....................................................................................89
Återgå till webbläsarlistan ......................................................................................89
Anpassa språkinställningarna ............................................................... 90
OSD Språk .....................................................................................................................90
Undertext......................................................................................................................90
MPEG4 Undertext ......................................................................................................90
Ljud .................................................................................................................................90
DVD-meny ....................................................................................................................90
Anpassa videoinställningarna ............................................................... 91
Bildkvot ..........................................................................................................................91
TV-System .....................................................................................................................91
Bildläge ..........................................................................................................................91
Anpassa värderingsinställningarna ...................................................... 92
Föräldrakontroll ..........................................................................................................92
Välj lösenord ................................................................................................................93
Anpassa de övriga inställningarna ....................................................... 93
Underhåll................................................................................................. 94
Hantering av skivor ...................................................................................................94
Rengöring av skivor ..................................................................................................94
Skivförvaring ...............................................................................................................94
Rengöra enheten .......................................................................................................94
Tips och råd ............................................................................................. 95
Specikationer........................................................................................ 97
Pakkauksesta purkaminen .................................................................... 98
Tuotteen yleiskatsaus ............................................................................99
Näkymä edestä ...........................................................................................................99
Näkymä takaa ..............................................................................................................99
Näkymä päältä ......................................................................................................... 100
Näkymä oikealta puolelta .................................................................................... 101
Kaukosäädin .........................................................................................102
Eristävän nauhan poistaminen kaukosäätimestä .............................103
Kaukosäätimen pariston vaihto ..........................................................103
Kaukosäätimen toiminta-alue .............................................................104
Käyttö autossa ......................................................................................105
Auton virtasovittimen käyttö (auton sisäkäyttöä varten) ........................ 105
Asentaminen autoon ............................................................................................. 106
Asennusopas ............................................................................................................ 106
Virtalähde..............................................................................................107
Verkkovirta ................................................................................................................ 107
Liitännät ................................................................................................ 108
Korvakuulokkeiden käyttö .................................................................................. 108
USB Flash -aseman käyttäminen ....................................................................... 109
DVD:n katselu DVD-soittimella ja näytöllä .................................................... 109
Yhteensopivat levytyypit ....................................................................110
Tuetut kuvamuodot ............................................................................................... 110
Aluekoodi................................................................................................................... 110
DVD-levyn toisto .................................................................................. 111
Perus-DVD-levyn toisto......................................................................................... 111
Lopeta toisto ............................................................................................................. 111
Edellinen ja seuraava ............................................................................................. 112
Eteenpäin ja taaksepäin kelaus .......................................................................... 112
Toiston keskeyttäminen .......................................................................................112
Info ............................................................................................................................... 112
Äänenvoimakkuuden säätö ................................................................................ 112
Toista kaikki uudelleen ......................................................................................... 112
Audiokanava ............................................................................................................. 113
Toista A-B ...................................................................................................................113
Tekstityskieli .............................................................................................................. 113
Kulman valinta ......................................................................................................... 113
Audio-CD-levyn ja JPEG-kuva-CD-levyn toisto ................................... 114
Levyn lataaminen ................................................................................................... 114
Audio-CD-levyn toisto .......................................................................................... 114
MPEG/JPEG-kuva-CD-levyn toisto .................................................................... 115
Toistonavigaattori ja asetukset ........................................................... 116
Ohjelmatoisto .......................................................................................117
Tiedostojen lisääminen ohjelmaluetteloon .................................................. 117
Tiedostojen poistaminen ohjelmaluettelosta .............................................. 118
Selainluetteloon palaaminen ............................................................................. 118
Kieliasetusten mukautus ..................................................................... 119
Valikkokieli................................................................................................................. 119
Tekstitys ...................................................................................................................... 119
MPEG4-tekstitys....................................................................................................... 119
Aäni .............................................................................................................................. 119
DVD-valikko .............................................................................................................. 119
Videoasetusten mukautus ...................................................................120
Kuvasuhde ................................................................................................................. 120
TV-järjestelmä .......................................................................................................... 120
Kuvatila ....................................................................................................................... 120
Luokitusasetusten mukautus .............................................................. 121
Lapsilukko .................................................................................................................. 121
Erilaisten asetusten mukautus ............................................................ 122
Aseta salasana .......................................................................................................... 122
Kunnossapito ........................................................................................123
Levyjen käsittely ...................................................................................................... 123
Levyjen puhdistaminen ........................................................................................ 123
Levyjen varastointi ................................................................................................. 123
Laitteen puhdistaminen ....................................................................................... 123
Vihjeitä ja vinkkejä ...............................................................................124
Tekniset tiedot ......................................................................................126
Page 5

Indholdsfortegnelse
DK
Obsah
CZ
Udpakning ............................................................................................ 127
Produktoversigt ....................................................................................128
Set forfra ..................................................................................................................... 128
Set bagfra................................................................................................................... 128
Set oppefra ................................................................................................................ 129
Set fra højre side ...................................................................................................... 130
Fjernbetjening ...................................................................................... 131
Fjernelse af isoleringsstrimlen på ernbetjeningen ......................... 132
Udskiftning af batterierne i ernbetjening........................................ 132
Fjernbetjeningens virkningsafstand .................................................. 133
Brug i bil ................................................................................................ 134
Brug af bil-adapter (til brug i bil) ....................................................................... 134
Montering i bil.......................................................................................................... 135
Installationsvejledning ......................................................................................... 135
Strømkilde .............................................................................................136
Stikkontakt ................................................................................................................ 136
Tilslutninger ..........................................................................................137
Brug af øretelefoner ............................................................................................... 137
Sådan bruger du et USB ashdrev .................................................................... 138
Se en dvd på DVD-afspilleren og skærmen ................................................... 138
Kompatible disktyper ..........................................................................139
Understøttede billedformater ............................................................................ 139
Regionskode ............................................................................................................. 139
Afspilning af en dvd .............................................................................140
Normal afspilning af en dvd ................................................................................ 140
Stop afspilning ......................................................................................................... 140
Forrige og næste ..................................................................................................... 141
Spol frem og tilbage .............................................................................................. 141
Sæt afspilningen på pause .................................................................................. 141
info ............................................................................................................................... 141
Indstilling af lydstyrke ........................................................................................... 141
Gentag alle ................................................................................................................ 141
Lydkanal ..................................................................................................................... 142
Gentag A-B ................................................................................................................ 142
Undertekstsprog ..................................................................................................... 142
Valg af vinkel ............................................................................................................. 142
Afspilning af lyd-cd’er, og cd’er med JPEG billeder ............................143
Indlæsning af en disk............................................................................................. 143
Afspilning af en lyd-cd .......................................................................................... 143
Afspilning af MPEG4/JPEG billed-cd ................................................................ 144
Afspilning og indstillinger ...................................................................145
Afspil afspilningsliste ...........................................................................146
Tilføjelse af ler til afspilningslisten ................................................................. 146
Sletning af ler fra programlisten ..................................................................... 147
Vend tilbage til Browser-liste .............................................................................. 147
Tilpasning af sprogindstillingerne ......................................................148
OSD sprog .................................................................................................................. 148
Undertekst ................................................................................................................. 148
MPEG4 undertekster .............................................................................................. 148
Lyd ................................................................................................................................ 148
Dvd-menu.................................................................................................................. 148
Tilpasning af videoindstillinger ..........................................................149
Billedforhold ............................................................................................................. 149
Tv System ................................................................................................................... 149
Billedfunktion ........................................................................................................... 149
Tilpasning af klassiceringsindstillingerne .......................................150
Forældrekontrol ....................................................................................................... 150
Indstil adgangskode .............................................................................................. 151
Tilpasning af forskellige indstillinger .................................................151
Vedligeholdelse ....................................................................................152
Behandling af diske ................................................................................................ 152
Rengøring af diske .................................................................................................. 152
Opbevaring af diske ............................................................................................... 152
Rengøring af enheden .......................................................................................... 152
Gode råd ................................................................................................ 153
Specikationer...................................................................................... 155
Vybalení ................................................................................................156
Přehled výrobku ................................................................................... 157
Pohled zpředu .......................................................................................................... 157
Pohled zezadu .......................................................................................................... 157
Pohled shora ............................................................................................................. 158
Pohled z pravé strany ............................................................................................ 159
Dálkové ovládání ..................................................................................160
Odstranění izolačního pásku z dálkového ovládání ..........................161
Výměna baterie dálkového ovládání ..................................................161
Dosah dálkového ovládání ..................................................................162
Použití v autě ........................................................................................163
Použití autoadaptéru (v autě) .............................................................................163
Upevnění v autě ...................................................................................................... 164
Instalační průvodce ................................................................................................ 164
Napájecí zdroj .......................................................................................165
Síťové napájení ........................................................................................................ 165
Připojení ................................................................................................ 166
Použití sluchátek ..................................................................................................... 166
Používání jednotky USB Flash ............................................................................ 167
Přehrávání DVD na přehrávači DVD a monitoru ..........................................167
Kompatibilní disky ...............................................................................168
Podporované formáty obrázků .......................................................................... 168
Kód regionu .............................................................................................................. 168
Přehrávání DVD ....................................................................................169
Základní přehrávání DVD ..................................................................................... 169
Zastavení přehrávání ............................................................................................. 169
Předchozí a další ...................................................................................................... 170
Převíjení vpřed a vzad ........................................................................................... 170
Pozastavení přehrávání. ........................................................................................170
info ............................................................................................................................... 170
Nastavení hlasitosti ................................................................................................ 170
Opakování všech ..................................................................................................... 170
Zvukový kanál .......................................................................................................... 171
Opakovat A–B ........................................................................................................... 171
Jazyk titulků .............................................................................................................. 171
Výběr úhlu ................................................................................................................. 171
Přehrávání Audio CD, JPEG Picture CD ............................................... 172
Vložení disku ............................................................................................................. 172
Přehrávání Audio CD..............................................................................................172
Přehrávání MPEG4/JPEG Picture CD .................................................................173
Navigátor přehrávání a nastavení .......................................................174
Programové přehrávání .......................................................................175
Přidání souborů na seznam programu ........................................................... 175
Odstranění souborů ze seznamu Program .................................................... 176
Návrat do seznamu prohlížeče .......................................................................... 176
Přizpůsobení nastavení jazyka ............................................................177
Jazyk OSD .................................................................................................................. 177
Titulky .......................................................................................................................... 177
Titulky MP4 ................................................................................................................ 177
Zvuk ............................................................................................................................. 177
Nabídka DVD ............................................................................................................ 177
Přizpůsobení nastavení obrazu ...........................................................178
Poměr stran ............................................................................................................... 178
TV systém ................................................................................................................... 178
Inteligentní obrazu ................................................................................................. 178
Přizpůsobení nastavení rodičovského hodnocení .............................179
Rodičovská kontrola .............................................................................................. 179
Přizpůsobení dalších nastavení ...........................................................180
Nastavit heslo ........................................................................................................... 180
Údržba ................................................................................................... 181
Manipulace s disky ................................................................................................. 181
Čištění disků .............................................................................................................. 181
Skladování disků ..................................................................................................... 181
Čištění přístroje ........................................................................................................ 181
Tipy a triky .............................................................................................182
Specikace ............................................................................................ 184
Page 6

Obsah
Vybalenie ..............................................................................................185
Prehľad výrobku ................................................................................... 186
Pohľad spredu .......................................................................................................... 186
Pohľad zozadu ..........................................................................................................186
Pohľad zhora ............................................................................................................. 187
Pohľad sprava ........................................................................................................... 188
Diaľkové ovládanie ...............................................................................189
Odstránenie izolačného pásika z diaľkového ovládania ...................190
Výmena batérie v diaľkovom ovládaní ...............................................190
Prevádzkový dosah diaľkového ovládania.........................................191
Používanie v automobile .....................................................................192
Použítie napájacieho adaptéra pre automobil (pre použitie v aute) ... 192
Montáž do automobilu ......................................................................................... 193
Návod na inštaláciu ................................................................................................ 193
Zdroj napájania ....................................................................................194
Napájanie zo siete ................................................................................................... 194
Pripájanie zaradení ..............................................................................195
Používanie slúchadiel ............................................................................................ 195
Používanie USB ash pamäťového média ..................................................... 196
Pozeranie DVD na DVD prehrávači a monitore ............................................196
Kompatibilné typy diskov ....................................................................197
Podporované formáty obrázkov........................................................................197
Kód regiónu .............................................................................................................. 197
Prehrávanie DVD ..................................................................................198
Bežné prehrávanie DVD ........................................................................................ 198
Zastavenie prehrávania ........................................................................................ 198
Predchádzajúca a ďalšia kapitola ...................................................................... 199
Rýchlu posun dopredu a späť ............................................................................ 199
Pozastaviť prehrávanie .......................................................................................... 199
Informácie.................................................................................................................. 199
Nastavenie hlasitosti .............................................................................................. 199
Opakovať všetko ..................................................................................................... 199
Zvukový kanál .......................................................................................................... 200
Opakovať A-B............................................................................................................ 200
Jazyk titulkov ............................................................................................................ 200
Výber uhla (záberu) ................................................................................................ 200
Prehrávanie Audio CD, JPEG obrázkov a CD .......................................201
Vkladanie disku ........................................................................................................ 201
Prehrávanie audio CD ............................................................................................201
Prehrávanie MPEG4/JPEG videozáznamu na CD ......................................... 202
Funkcie Navigátor prehrávania a nastavenia ....................................203
Programované prehrávanie .................................................................204
Pridávanie súborov do zoznamu naprogramovaných titulov ................ 204
Vymazanie súborov zo zoznamu naprogramovaných súborov............. 205
Návrat do zoznamu prehliadača ....................................................................... 205
Prispôsobenie jazyka nastavení ..........................................................206
Jazyk OSD .................................................................................................................. 206
Titulky .......................................................................................................................... 206
Titulky MP4 ................................................................................................................ 206
Audio ........................................................................................................................... 206
DVD menu ................................................................................................................. 206
Prispôsobenie nastavení videa ...........................................................207
Pomer šírky k výške obrazu ................................................................................. 207
Televízny systém...................................................................................................... 207
Inteligentný obraz .................................................................................................. 207
Prispôsobenie nastavení hodnotenia .................................................208
Rodičovská kontrola .............................................................................................. 208
Nastaviť heslo ........................................................................................................... 209
Prispôsobenie nastavení Rôzne ..........................................................209
Údržba ................................................................................................... 210
Manipulácia s diskami ........................................................................................... 210
Čistenie diskov ......................................................................................................... 210
Ukladanie diskov ..................................................................................................... 210
Čistenie zariadenia ................................................................................................. 210
Rady a tipy .............................................................................................211
Technické parametre ............................................................................213
SK
Page 7

Safety Warnings
GB
Sikkerhetsadvarsler
NO
• Read all the instructions carefully before using the unit and keep them for future
reference.
• Retain the manual. If you pass the unit onto a third party make sure to include
this manual.
• Check that the voltage marked on the rating label matches your mains voltage.
Damage
• Please inspect the unit for damage after unpacking.
• Do not continue to operate the unit if you are in any doubt about it working
normally, or if it is damaged in any way - switch o, withdraw the mains plug and
consult your dealer.
Location of Unit
• The unit must be placed on a at stable surface and should not be subjected to
vibrations.
• Do not place the unit on sloped or unstable surfaces as the unit may fall o or
tip over.
• The mains socket must be located near the unit and should be easily accessible.
Temperature
• Avoid extreme degrees of temperature, either hot or cold. Place the unit well away
from heat sources such as radiators or gas/electric res.
• Avoid exposure to direct sunlight and other sources of heat.
Naked Flames
• Never place any type of candle or naked ame on the top of or near the unit.
Moisture
• To reduce the risk of re, electric shock or product damage, do not expose this unit
to rain, moisture, dripping or splashing. No objects lled with liquids, such as vases,
should be placed on the unit.
• If you spill any liquid into the unit, it can cause serious damage. Switch it o at the
mains immediately. Withdraw the mains plug and consult your dealer.
Ventilation
• To prevent the risk of electric shock or re hazard due to overheating, ensure that
curtains and other materials do not obstruct the ventilation vents.
• Do not install or place this unit in a bookcase, built-in cabinet or in another
conned space. Ensure the unit is well ventilated.
Safety
• Always disconnect the unit from the mains supply before connecting/
disconnecting other devices or moving the unit.
• Unplug the unit from the mains socket during a lightning storm.
Mains Adapter Cable
• Make sure the unit is not resting on top of the mains adapter cable, as the weight
of the unit may damage the cable and create a safety hazard.
Interference
• Do not place the unit on or near appliances which may cause electromagnetic
interference. If you do, it may adversely aect the operating performance of the
unit, and cause a distorted picture or sound.
Mains Adaptor
• The mains adaptor will continue to draw electricity from the mains supply when
plugged in the mains socket. In the interests of safety and to avoid unnecessary
energy consumption, never leave the adaptor plugged in the mains socket while
unattended for long periods of time. Disconnect the adaptor from the power
supply.
Earphones
• Listening to loud sounds for prolonged periods of time may permanently damage
your hearing.
• Before putting on earphones, turn the volume down then put the earphones on
and slowly increase the volume until you reach a comfortable listening level.
Batteries
• Batteries used in the remote control for this unit are easily swallowed by young
children and this is dangerous.
• Keep loose batteries away from young children and make sure that the battery
holder tray is secure in the remote control. Seek medical advice if you believe a cell
has been swallowed.
• Please dispose of batteries correctly by following the guidance in this manual.
Supervision
• Children should be supervised to ensure that they do not play with the unit and
the remote control.
• Never let anyone especially children push anything into the holes, slots or any
other openings in the case - this could result in a fatal electric shock.
DVD
• Class 1 Laser Product This unit utilises a laser. Use of
controls, adjustments or performance of procedures
other than those specied herein may result in hazardous
radiation exposure.
• Before moving the unit, ensure the disc tray is empty.
• Always remove the disc when the unit is not in use.
• Failure to do so will risk severely damaging the disc and the unit.
• Do not stack devices, heat from other devices may aect the performance of
the unit.
CAUTION
RISK OF ELECTRIC SHOCK
DO NOT OPEN
The lightning ash with arrowhead symbol, within an equilateral triangle, is
intended to alert the user to the presence of uninsulated “dangerous
voltage” within the unit’s enclosure that may be of sucient magnitude to
constitute a risk of electric shock.
The exclamation point within an equilateral triangle is intended to alert the
user to the presence of important operating and maintenance (servicing)
instructions in the manual accompanying the unit.
Service
• To reduce the risk of electric shock, do not remove screws. The unit does not
contain any user-serviceable parts. Please leave all maintenance work to qualied
personnel.
• Do not open any xed covers as this may expose dangerous voltages.
Maintenance
• Ensure to unplug the unit from the power supply before cleaning.
• Do not use any type of abrasive pad or abrasive cleaning solutions as these may
damage the unit’s surface.
• Do not use liquids to clean the unit.
CLASS 1
LASER PRODUCT
• Les alle intruksjonene nøye innen produktet anvendes og oppbevar dem for
videre referanse.
• Oppbevar veiledningen, hvis du gir enheten til en tredje part, påse at denne
veiledningen følger med.
• Kontroller spenningen merket på enheten stemmer med spenningen i
vegguttaket.
Skade
• Undersøk enheten for skader etter den er pakket opp.
• Ikke fortsett bruken av enheten hvis du er i noen som helst tvil om at den fungerer
normalt, eller om den er skadet på en eller annen måte – skru den av, trekk ut
strømkabelen og snakk med forhandleren din.
Plassering av enheten
• Enheten skal plasseres på et att og stabilt underlag, og skal ikke utsettes for
vibrasjoner.
• Ikke sett enheten på skjeve eller ustabile ater ellers kan enheten falle eller
tippe over.
• Veggkontakten må være plassert i nærheten av enheten, og være lett tilgjengelig.
Temperatur
• Unngå ekstreme temperaturer, hverken varmt eller kaldt. Sett enheten med god
avstand til varmekilder så som radiatorer eller gass/elektriske varmekilder.
• Unngå å utsette enheten for direkte sollys eller varmekilder.
Åpen ild
• Plasser aldri ulike typer stearinlys eller annen åpen ild oppå enheten eller i
nærheten av enheten.
Fukt
• For å redusere faren for brann, elektrisk støt eller skader på produktet, skal ikke
denne enheten utsettes for regn, drypp eller sprut. Ingen gjenstander fylt med
væsker, så som vaser, skal plasseres på enheten.
• Hvis du søler væsker på enheten, kan dette forårsake alvorlige skader. Skru
den av ved bruk av hovedbryteren straks. Trekk ut strømkabelen og snakk med
forhandleren din.
Ventilasjon
• For å forhindre faren for elektrisk støt eller brann på grunn av overoppheting, påse
at gardiner og andre materialer ikke blokkerer ventilasjonsåpningene.
• Ikke installer eller plasser denne enheten i en bokhylle, innebygget skap eller på
andre trange steder. Påse at enheten får god ventilasjon.
Sikkerhet
• Koble alltid fra enheten fra veggkontakten innen det utføres tilkobling/ frakobling
av andre enheter eller ytting av enheten.
• Trekk ut enheten fra veggkontakten under tordenvær.
Adapter-kabel
• Påse at enheten ikke hviler på adapter-kabelen, ettersom vekten av enheten kan
skade kabelen og skape en sikkerhetsfare.
Interferens
• Ikke plasser enheten på eller i nærheten av apparater som kan forårsake
elektromagnetisk interferens. Hvis du gjør dette kan det påvirke ytelsen til enheten
negativt, og forårsake forstyrret bilde eller lyd.
Adapter
• Adapteren vil forsette å bruke elektrisitet fra veggkontakten når den står i. Med
hensyn til sikkerhet og for å unngå unødvendig strømforbruk, skal ikke adapteren
sitte i veggkontakten når den ikke er under oppsyn over en lenger periode. Trekk
ut adapteren fra strømtilførselen.
Høretelefoner
• Å lytte til høye lyder over lenger perioder kan skade hørselen din permanent.
• Innen du setter i høretelefonene, påse at volumet er skrudd ned når du setter på
høretelefonene og øk forsiktig volumet til du når et komfortabelt lytte-nivå.
Batterier
• Batteriene som anvendes i ernkontrollen for denne enheten kan lett svelges av
små barn og dette er farlig.
• Hold løse batterier utilgjengelig for barn og påse at batteriholderen sitter godt i
ernkontrollen. Oppsøk lege hvis du har mistanke om at et batteri har blitt svelget.
• Avhend batterier i samsvar med anvisningene i denne veiledningen.
Oppsyn
• Barn skal være under oppsyn for å sikre at de ikke leker med enheten og
ernkontrollen.
• La aldri noen, spesielt barn skyve gjenstander inn i hullene, sporene eller andre
åpninger i kabinettet – dette kan resultere i dødelig elektrisk støt.
DVD
• Klasse 1 Laserprodukt. Denne enheten bruker en laser. Bruk
av kontroller, justeringer eller utførelse av prosedyrer andre
enn de som er spesisert heri kan resultere i farlig stråling.
• Innen enheten yttes skal det sikres at diskskuen er tom.
• Fjern alltid disken når enheten ikke er i bruk.
• Svikt av dette kan resultere veldig alvorlige skader på disken og enheten.
• Ikke stable enheter, varme fra andre enheter kan skade enhetens ytelse.
CAUTION
RISK OF ELECTRIC SHOCK
DO NOT OPEN
Det blinkende lyset med et pil-symbol, innenfor en likesidet trekant, er ment
for å varsle brukeren om tilstedeværelsen av uisolert farlig spenning inni
enhetens deksler som kan være av tilstrekkelig styrke for å fremme faren for
”elektrisk støt”.
Uttropstegnet, innenfor en likesidet trekant er ment for å varsle brukeren
om tilstedeværelsen av viktige bruks- og vedlikeholdsinstruksjoner (service)
i veiledningen som medfølger enheten.
Service
• For å redusere faren for elektrisk støt, skal ikke brukeren erne skruer selv.
Enheten inneholder ingen deler som brukeren kan bytte selv. Overlat alt
vedlikeholdsarbeide til kvalisert personale.
• Do not open any xed covers as this may expose dangerous voltages.
Vedlikehold
• Påse at enheten trekkes ut fra strømtilførselen innen rengjøring.
• Ikke bruk noen typer slipende pads eller slipende rengjøringsmidler ettersom disse
kan skade enhetens overater.
• Ikke bruk ytende væsker for å rengjøre enheten.
CLASS 1
LASER PRODUCT
7
Page 8
Säkerhetsföreskrifter
SE
Turvavaroitukset
FI
• Läs alla instruktioner noggrannt innan du använder enheten och behåll dem för
framtida bruk.
• Behåll den här bruksanvisningen. Om du ger bort enheten till en tredje part se till
att du också vidarebefordrar bruksanvisningen.
• Kontrollera att strömmen markerad på märkplåten överensstämmer med
strömmen som används där du är.
Skada
• Se noggrannt över din enhet för skador innan du packar upp den.
• Fortsätt inte att använda enheten om du är tveksam om den fungerar normalt,
eller om den är skadad på något sätt – stäng av, dra ur sladden och rådgör med
din återförsäljare.
Placering av enheten
• Enheten måste placeras på en plan och stabil yta och bör inte utsättas för
vibrationer.
• Placera inte enheten på en sluttande eller instabil yta eftersom enheten kan ramla
ner eller falla omkull.
• Strömuttaget måste placeras i närheten av enheten och bör vara lätt att nå.
Temperatur
• Undvik extrem temperaturer, både varma och kalla. Placera enheten långt bort från
värmekällor såsom element eller gas/elektriska eldstäder.
• Undvik exponering mot direkt solljus och andra värmekällor.
Flammor
• Placera aldrig någon typ av ljus eller andra öppna värmekällor ovanpå eller i
närheten av enheten.
Fukt
• För att minska risken för brand, elektrisk chock eller skada på produkten, utsätt inte
enheten för regn, fukt, vattendroppar eller stänk. Inga vattenfyllda objekt, såsom
vaser, bör placeras på enheten.
• Om du spiller vätska på enheten, kan det förorsaka allvarlig skada. Stäng av
den från huvudströmmen direkt. Dra ur huvudkontakten och rådgör med din
återförsäljare.
Ventilation
• För att förhindra risk för elektrisk chock eller brand på grund av överhettning, se till
att gardiner och andra material inet täcker ventilerna.
• Installera inte och placera inte enheten i en bokhylla, inbyggt skåp eller i en annan
stängd plats. Se till att enheten är placerad på en välventilerad plats.
Säkerhet
• Dra alltid ut sladden innan du ansluter andra enheter eller yttar på enheten.
• Dra ur sladden ur uttaget om det åskar.
Huvudströmkabel
• Se till att enheten inte står på sladden eftersom vikten på enheten kan skada
kabeln och förorsaka brand.
Störning
• Placera inte enheten på eller i närheten av andra apparater vilka kan förorsaka
elektromagnetisk störning. Om det händer, kan det påverka användningen av
enheten, och förorsaka störning på bild och ljud.
Nätadapter
• Nätadaptern kommer att ta elektricitet från huvudströmmen när den sätts i
uttaget. För säkerhet och för att undevika onödig energikonsumtion, lämna aldrig
adaptern isatt i uttaget utan observation under längre tid. Dra ur adaptern från
huvudströmmen.
Hörlurar
• Om man lyssnar på högt ljud under lång tid kan man skada hörseln permanent.
• Innan du sätter på dig hörlurarna, vrid ner volymen och sätt sedan på dig
hörlurarna och öka volymen långsamt tills dess att du når en behaglig nivå.
Batterier
• Batterier som används i ärrkontrollen för den här enheten kan enkelt sväljas av
små barn och det är farligt.
• Håll lösa batterier borta från små barn och se till att batterifacket sitter säkert i
ärrkontrollen. Sök läkare om du tror att ett cellbatteri har svalts.
• Släng batterierna på rätt sätt genom att följa föreskrifterna i den här
bruksanvisningen.
Tillsyn
• Barn bör övervakas så att de inte leker med enheten och ärrkontrollen.
• Se till att inte peta in något i de små hål som nns på enheten, springor eller andra
öppningar i höljet – det kan leda till elektrisk chock.
DVD
• Klass 1 laserprodukt. Den här enheten använder laser.
Användning av kontroller, justeringar, eller prestanda av
den här produkten annat än vad som är föreskrivet här i
kan resultera i skadlig strålning.
• Innan du yttar enheten, se till att skivtallriken är tom.
• Ta alltid bort skivan när enheten inte används.
• Felaktig användning kan orsaka stor skada på skivan och enheten.
• Stapla inte enheten med andra apparater, värme från andra apparater kan påverka
användningen av enheten.
CAUTION
RISK OF ELECTRIC SHOCK
DO NOT OPEN
Symbolen med blixt och pil innanför en triangel, är tänkt att ge användaren
en signal att det nns ”farlig ström” innanför höljet som kan förorsaka
elektrisk chock.
Symbolen med utropstecken innanför triangeln är tänkt att ge användaren
att det nns viktiga föreskrifter för användning och underhåll (service) och
att instruktioner nns i bruksanvisningen som medföljer enheten.
Service
• För att reducera risken för elektrisk chock, skruva inte ur skruvarna. Enheten
innehåller inga delar möjliga att serva. Lämna allt underhållsarbete till kvalicerad
personal.
• Öppna inte höljet eftersom det kan förorsaka exponering mot farlig ström.
Underhåll
• Se till att dra ur sladden ur enheten innan rengöring.
• Använd ingen typ av rengöringsvätska eller rengöringssvamp eftersom de kan
skada ytan på enheten.
• Använd inga vätskor för att rengöra enheten.
CLASS 1
LASER PRODUCT
• Lue kaikki ohjeet huolellisesti ennen kuin käytät laitetta ja säilytä ne tulevaa tarvetta
varten.
• Säilytä ohjekirja. Jos annat laitteen kolmannelle osapuolelle, tämä ohjekirja tulee
antaa laitteen mukana.
• Tarkista että arvokilpeen merkitty jännite vastaa verkkovirtasi jännitettä.
Vauriot
• Ole hyvä ja tarkasta laite vaurioiden varalta purettuasi pakkauksen.
• Älä jatka laitteen käyttöä, jos olet ollenkaan epävarma sen normaalista toiminnasta tai
jos se on millään tapaa vahingoittunut - sammuta laite, vedä verkkovirtapistoke irti ja
ota yhteyttä jälleenmyyjääsi.
Laitteen sijainti
• Laite tulee asettaa tasaiselle ja vakaalle pinnalle eikä siihen saa kohdistaa tärinää.
• Älä aseta laitetta kaltevalle tai epävakaalle pinnalle, sillä laite saattaa pudota tai
kaatua.
• Verkkovirtapistokkeen tulee sijaita laitteen lähellä ja siihen tulee päästä helposti
käsiksi.
Lämpötila
• Vältä äärimmäisiä lämpötiloja, sekä kylmiä että kuumia. Aseta laite kauaksi lämmön
lähteistä, kuten lämpöpattereista ja kaasu/sähkötulista.
• Vältä altistamasta laitetta suoralle auringonvalolle ja muille kuumuuden lähteille.
Avotulet
• Älä koskaan aseta minkäänlaisia kynttilöitä tai avotulia laitteen päälle tai lähelle.
Kosteus
• Vähentääksesi tulipalon, sähköiskun tai tuotevaurioiden vaaraa, älä altista tätä laitetta
sateelle, kosteudelle, pisaroille tai roiskeille. Laitteen päälle ei saa asettaa mitään
vedellä täytettyjä esineitä, kuten kukkamaljakoita.
• Nesteiden kaataminen laitteen sisälle voi aiheuttaa vakavia vahinkoja. Sammuta
laite heti ja irrota se verkkovirrasta. Vedä verkkovirtapistoke irti ja ota yhteyttä
jälleenmyyjääsi.
Ilmankierto
• Estääksesi ylikuumentumisesta johtuvaa sähköiskun tai tulipalon vaaraa, varmista että
verhot ja muut materiaalit eivät tuki ilmankiertoaukkoja.
• Älä asenna tai aseta tätä laitetta kirjahyllyyn, sisäänrakennettuun hyllykköön tai
muuhun suljettuun tilaan. Varmista, että ilma kiertää laitteessa hyvin.
Turvallisuus
• Irrota aina laite verkkovirrasta ennen kuin liität/irrotat muita laitteita tai siirrät laitetta.
• Vedä laite verkkovirtapistokkeesta ukkosmyrskyjen aikana.
Verkkovirtasovittimen johto
• Varmista että laite ei ole verkkovirtasovittimen johdon päällä, sillä laitteen paino voi
vahingoittaa johtoa ja aiheuttaa turvallisuusriskin.
Häiriöt
• Älä aseta laitetta sellaisten laitteiden päälle, jotka voivat aiheuttaa sähkömagneettisia
häiriöitä. Näin toimiminen saattaa vaikuttaa haitallisesti laitteen suorituskykyyn ja
aiheuttaa vääristyneen kuvan tai äänen.
Verkkovirtasovitin
• Verkkovirtasovitin jatkaa sähkövirran vetämistä sähköverkosta niin kauan kuin se
on liitettynä verkkovirtapistokkeeseen. Turvallisuuden ja turhan energiankulutuksen
välttämiseksi, älä koskaan jätä sovitinta verkkovirtaan kytketyksi kun laite on
käyttämättömänä pitkiä ajanjaksoja. Irrota verkkovirtapistoke sähköverkosta.
Kuulokkeet
• Kovien äänien kuunteleminen pitkien ajanjaksojen ajan saattaa vahingoittaa kuuloasi
pysyvästi.
• Ennen kuin asetat kuulokkeet paikoilleen, alenna äänenvoimakkuutta, laita vasta
sitten kuulokkeet korvillesi ja korota äänenvoimakkuutta hitaasti kunnes saavutat
mukavan kuuntelutason.
Paristot
• Pienet lapset voivat helposti niellä tämän laitteen kaukosäätimessä käytettäviä
paristoja ja tämä on vaarallista.
• Pidä irralliset paristot poissa pienten lasten ulottuvilta ja varmista, että paristolokeron
kansi on kunnolla kiinni kaukosäätimessä. Hae lääkärin apua jos uskot etta
nappiparisto on tullut niellyksi.
• Ole hyvä ja hävitä paristot oikeaoppisesti seuraamalla tässä oppaassa olevia ohjeita.
Valvonta
• Lapsia tulee valvoa, jotta he eivät leikkisi laitteella ja kaukosäätimellä.
• Älä koskaan anna kenenkään, erityisesti lasten, työntää mitään laitteen reikiin,
koloihin tai muihin kotelon aukkoihin - tämä saattaa johtaa kuolettavaan
sähköiskuun.
DVD
• Luokan 1 lasertuote. Tämä laite käyttää laseria. Muiden
kuin tässä oppaassa mainittujen ohjainten, säädösten tai
toimintaohjeiden käyttö voi johtaa altistumiseen vaaralliselle
säteilylle.
• Ennen kuin liikutat laitetta, varmista että levytarjotin on tyhjä.
• Poista levy aina kun laite ei ole käytössä.
• Jos et tee niin, riskeeraat levyn ja laitteen vakavan vahingoittumisen.
• Älä pinoa laitteita, sillä toisista laitteista syntyvä kuumuus saattaa vaikuttaa tämän
laitteen suorituskykyyn.
CAUTION
RISK OF ELECTRIC SHOCK
DO NOT OPEN
Tasasivuisen kolmion sisällä oleva ja nuolenpäällä varustettu salaman kuva
varoittaa käyttäjää laitteen sisällä olevasta eristämättömästä “vaarallisesta
jännitteestä”, joka saattaa olla tarpeeksi vahva aiheuttamaan sähköiskun
vaaran.
Tasasivuisen kolmion sisällä oleva huutomerkki on tarkoitettu ilmoittamaan
käyttäjälle laitteen mukana tulevaan ohjekirjaan painetuista tärkeistä ohjeista
liittyen laitteen toimintaan ja huoltoon (palveluun).
Huolto
• Alentaaksesi sähköiskun vaaraa, älä irrota ruuveja. Laitteessa ei ole mitään osia,
jotka käyttäjä voi huoltaa itse. Ole hyvä ja jätä kaikki huoltotoimenpiteet pätevälle
henkilökunnalle.
• Älä avaa mitään kiinteitä suojia, sillä saatat paljastaa vaarallisen korkeita jännitteitä.
Kunnossapito
• Varmista, että irrotat laitteen verkkovirrasta ennen puhdistusta.
• Älä käytä minkäänlaisia hankaavia tyynyjä tai hankaavia puhdistusnesteitä, sillä nämä
saattavat vaurioittaa laitteen pintaa.
• Älä käytä nesteitä laitteen puhdistukseen.
CLASS 1
LASER PRODUCT
8
Page 9
Sikkerhedsforanstaltninger
DK
Bezpečnostní upozornění
CZ
• Læs alle instruktioner grundigt, før du tager enheden i brug og gem dem til senere.
• Gem denne manual. Hvis du giver afspilleren videre til tredje person, bør du
inkludere denne manual.
• Check at spændingen på klassiceringsmærkaten matcher spændingen I
stikkontakten.
Skade
• Venligst check at afspilleren ikke er ødelagt, så snart du har pakket den ud.
• Hvis du er i tvivl om, hvorvidt den virker, som den skal, eller hvis den er ødelagt,
skal du ikke forsøge at bruge den – sluk med det samme og kontakt forhandleren.
Placering
• Enheden bør placeres på et adt og stabil overade og bør ikke udsættes for
rystelser.
• Placér ikke enheden på en skæv eller ustabil overade, så enheden vælter eller
falder ned.
• Stikkontakten bør sidde i nærheden af enhed og være let tilgængelig.
Temperatur
• Undgå ekstremt høje eller lave temperaturer. Placér afspilleren væk fra varmekilder
så som radiatorer eller gas/elvarmere.
• Undgå udsættelse for direkte sollys eller andre varmekilder.
Åben ild
• Placér aldrig stearinlys eller anden åben ild ovenpå eller i nærheden af afspilleren.
Fugt
• For at undgå brand, elektrisk stød eller ødelæggelse af afspilleren, bør den ikke
udsættes for regn, fugt, dryp eller plask. Der bør ikke stå væskefyldte ting, så som
vaser, ovenpå afspilleren.
• Hvis du spilder væske i afspilleren, kan den blive ødelagt. Sluk den og kontakt
forhandleren.
Ventilation
• For at undgå elektrisk stød eller brand pga. overophedning skal du sørge for, at
gardiner og andre materialer ikke obstruerer ventilationshullerne.
• Placér ikke afspilleren i en reol, indbygget skab eller andre lukkede rum. Enheden
skal holdes ventileret.
Sikkerhed
• Afbryd altid strømmen fra stikkontakten, før du tilslutter/fraslutter andre apparater
eller ytter enheden.
• Tag enhedens stik ud af stikkontakten ved tordenvejr.
Strømadapterledning
• Sørg for at enheden ikke står ovenpå strømadapterledningen, da enhedens vægt
kan ødelægge ledningen og udgøre en sikkerhedsrisiko.
Interferens
• Placér ikke afspilleren på eller i nærheden af apparater, der kan forårsage
elektromagnetisk interferens. Det kan det have indydelse på afspillerens
præstation og give forvrænget lyd.
Strømadapter
• Strømadapteren vil trække elektricitet fra stikkontakten, så længe stikket er isat.
For en sikkerheds skyld og for at spare på strømmen, bør stikket ikke sidde i
stikkontakten i længere tid. Fjern adapterens stik fra stikkontakten.
Hovedtelefoner
• Hvis du lytter til meget høje lyde i længere tid, kan det skade din hørelse
permanent.
• Før du tager hovedtelefoner på, skrues ned for lyden, og først derefter tager
du hovedtelefonerne på og skruer langsomt op for lyden, indtil det når et
komfortabelt niveau.
Batterier
• Batterierne i ernbetjeningen sluges let af små børn, og dette er farligt.
• Løse batterier bør opbevares utilgængeligt for børn og du bør sikre, at
batteriholderen sidder godt fast i ernbetjeningen. Søg straks læge, hvis du er i
tvivl om, at det batteri er blevet slugt.
• Batterier smides væk i henhold til vejledningen i denne manual.
Supervision
• Børn bør være under opsyn, så de ikke leger med enheden og ernbetjeningen.
• Lad aldrig børn og andre putte noget ind i hullerne – dette kan forårsage elektrisk
stød.
DVD
• Klasse 1 Laserprodukt. Denne enhed benytter sig af laser.
Brug af knapper, justeringer andre end beskrevet heri kan
resultere i farlig udsættelse for stråling.
• Før du ytter enheden skal du sørge for, at diskholderen
er tom.
• Tag altid disken ud, når enheden ikke bruges.
• Hvis du ikke følger ovenstående, kan du ødelægge disken og enheden.
• Sæt ikke apparater ovenpå hinanden, da varme fra andre apparater kan have
indydelse på enhedens ydeevne.
CAUTION
RISK OF ELECTRIC SHOCK
DO NOT OPEN
Lynet med pilespidsen indeni en trekant indikerer, at der ndes uisoleret
”farlig spænding” i enhedens lukkede rum, der kan forårsage elektrisk stød.
Udråbstegnet indeni trekanten indikerer, at der sammen med enheden er
leveret vigtige betjenings- og vedligeholdelsesoplysninger (servicering).
Service
• For at undgå elektrisk stød må skruerne ikke ernes. Afspilleren indeholder ikke
dele, der skal serviceres af brugeren. Al reparation og service bør foretages af
autoriserede personer.
• Panelerne må ikke åbnes, da der er farlig spænding bagved.
Vedligeholdelse
• Sørg for at slukke for afspilleren før rengøring.
• Brug ikke skurebørste eller –midler, da disse kan ødelægge afspillerens overade.
• Brug ikke væsker til rengøring af afspilleren.
CLASS 1
LASER PRODUCT
• Před použitím přístroje si přečtěte veškeré pokyny a uschovejte je pro budoucí
použití.
• Uschovejte tento návod. Předáváte-li přístroj třetí straně, nezapomeňte předat
také tento návod.
• Zkontrolujte, zda napětí uvedené na typovém štítku odpovídá napětí ve vaší
elektrické zásuvce.
Poškození
• Po vybalení přístroje zkontrolujte, zda není poškozen.
• Nepoužívejte přístroj, pokud máte pochybnosti o jeho funkci nebo pokud je jakkoli
poškozen - vtakovém případě jej vypněte, vytáhněte koncovku napájecího kabelu
ze zásuvky a obraťte se na prodejce.
Umístění přístroje
• Přístroj umístěte na rovnou a stabilní plochu, kde bude chráněn před vibracemi.
• Nestavte přístroj na šikmý nebo nestabilní povrch, hrozí převrácení nebo pád.
• Elektrická zásuvka musí být v blízkosti přístroje a musí zůstat snadno dostupná.
Teplota
• Přístroj chraňte před extrémním chladem a horkem. Přístroj umístěte dostatečně
daleko od zdrojů tepla, jako jsou radiátory nebo přenosná topidla..
• Přístroj chraňte před přímým sluncem a dalšími zdroji tepla.
Otevřený oheň
• Na přístroj a do jeho blízkosti nestavte svíčky ani jiný otevřený oheň.
Vlhkost
• V zájmu omezení rizika požáru, zásahu elektrickým proudem nebo poškození
zařízení nevystavujte přístroj vlhkosti, dešti, kapající nebo stříkající vodě. Na přístroj
nestavte předměty naplněné kapalinami, například vázy.
• Pokud dojde k polití přístroje kapalinou, může dojít k vážnému poškození.
Okamžitě přístroj odpojte od elektrické zásuvky. Vytáhněte koncovku napájecího
kabelu ze zásuvky a obraťte se na prodejce.
Větrání
• V zájmu prevence rizika požáru nebo zásahu elektrickým proudem v důsledku
přehřátí zajistěte, aby nebyly ventilační otvory blokovány závěsy a dalšími
materiály.
• Přístroj neinstalujte do knihovničky, vestavné skříňky nebo jiného stísněného
prostoru. Zajistěte dostatečné větrání.
Bezpečnost
• Před přesunem nebo před připojováním/odpojováním dalších zařízení vždy
přístroj odpojte od elektrické zásuvky.
• Odpojte zařízení od elektrické zásuvky během bouřky.
Kabel síťového adaptéru
• Zařízení nesmí spočívat na kabelu síťového adaptéru, protože hmotnost zařízení by
mohla kabel poškodit a způsobit ohrožení.
Rušení
• Přístroj neumísťujte do blízkosti jiných zařízení, která mohou vyvolávat
elektromagnetické rušení. Pokud to uděláte, hrozí nesprávná funkce přístroje,
zkreslení obrazu nebo zvuku.
Síťový adaptér
• Síťový adaptér odebírá ze zásuvky proud vždy, když je k ní připojen. V zájmu
bezpečnosti a předcházení zbytečnému odběru energie nenechávejte adaptér
připojený k zásuvce, pokud přístroj delší dobu nepoužíváte. Adaptér odpojte od
napájecí zásuvky.
Sluchátka
• Dlouhodobý poslech při vysoké hlasitosti může trvale poškodit sluch.
• Před nasazením sluchátek snižte hlasitost, poté postupně pomalu zvyšujte
hlasitost až na úroveň umožňující pohodlný poslech.
Baterie
• U baterií v dálkovém ovládání hrozí spolknutí malými dětmi, což může být
nebezpečné.
• Baterie, které nejsou vloženy v dálkovém ovládání, uchovávejte mimo dosah dětí,
a kontrolujte, zda je prostor pro baterii spolehlivě uzavřen. Pokud se domníváte, že
došlo ke spolknutí baterie, vyhledejte lékařskou pomoc.
• Baterie likvidujte přesně podle pokynů v návodu.
Dohled
• Dohlédněte, aby si děti s přístrojem ani dálkovým ovládáním nehrály.
• Nezasouvejte cizí předměty do otvorů vkrytu a zejména zabraňte v tom zabraňte
dětem - hrozí smrtelný zásah elektrickým proudem.
DVD
• Laserový produkt třídy 1. Tento přístroj využívá laser.
Použití ovládacích prvků, seřízení nebo postupů, které
nejsou uvedeny v tomto návodu, může vést k zásahu
nebezpečným zářením.
• Před přemístěním zařízení zkontrolujte, zda není vložen
disk.
• Pokud zařízení nebudete používat, vždy vyjměte disk.
• Při nedodržení pokynu hrozí vážné poškození disku i zařízení.
• Nestohujte zařízení na sebe, teplo vydávané jinými zařízeními může ovlivnit
funkci zařízení.
CAUTION
RISK OF ELECTRIC SHOCK
DO NOT OPEN
Symbol blesku se šipkou v rovnostranném trojúhelníku upozorňuje
uživatele na přítomnost neizolovaného „nebezpečného napětí“ pod krytem
zařízení, jehož velikost může představovat riziko zásahu elektrickým
proudem.
Vykřičník v rovnostranném trojúhelníku upozorňuje uživatele na důležité
pokyny k používání a údržbě v návodu k zařízení
Servis
• V zájmu omezení rizika zásahu elektrickým proudem nedemontujte šrouby. Přístroj
neobsahuje součásti, které by uživatel mohl sám opravit. Veškerou údržbu svěřte
kvalikovaným osobám.
• Nerozebírejte kryty, hrozí zásah nebezpečným napětím.
Údržba
• Před čištěním odpojte přístroj od zdroje napájení.
• Nepoužívejte abrazivní houbičky ani čistící roztoky, hrozí poškození povrchu
přístroje.
• K čištění přístroje nepoužívejte tekutiny.
CLASS 1
LASER PRODUCT
9
Page 10
CAUTION
CLASS 1
LASER PRODUCT
SK
Bezpečnostné výstrahy
• Dôkladne si prečítajte všetky pokyny pred tým, ako začnete používať toto zariadenie
auschovajte ich, aby ste si ich mohli pozrieť neskôr.
• Uschovajte návod na použitie. Ak dáte toto zariadenie tretej osobe, nezabudnite jej
odovzdať aj tento návod.
• Overte si, či sa napätie označené na štítku s menovitými hodnotami zhoduje s napätím
vašej siete.
Poškodenie
• Po vybalení skontrolujte, či zariadenie nie je poškodené.
• Toto zariadenie nepoužívajte, ak máte pochybnosti o jeho normálnej prevádzke, alebo
keď je akokoľvek poškodené - zariadenie vypnite, zástrčku napájacej šnúry vytiahnite z
elektrickej zásuvky a poraďte sa so svojim predajcom.
Umiestnenie zariadenia
• Toto zariadenie sa musí umiestniť na pevnú rovnú plochu a nesmú naň pôsobiť vibrácie.
• Toto zariadenie neklaďte na naklonené alebo nestabilné plochy, pretože by mohol
spadnúť alebo sa prevrátiť.
• Stenová zásuvka musí byť umiestnená blízko zariadenia a musí byť k nej ľahký prístup.
Teplota
• Zabráňte pôsobeniu extrémnym teplotám buď vysoko nad, alebo pod nulou. Toto
zariadenie umiestnite dostatočne ďaleko od tepelných zdrojov, ako sú radiátory alebo
plynové/elektrické pece.
• Tento spotrebič nesmie byť vystavený priamemu slnečnému žiareniu alebo iným
zdrojom tepla.
Otvorený oheň
• Na zariadenie alebo do jeho blízkosti nikdy neklaďte zapálené sviečky.
Vlhkosť
• Aby sa zabránilo nebezpečenstvu požiaru, úrazu elektrickým prúdom alebo poškodeniu
tohto výrobku, nesmie byť vystavené dažďu, vlhkosti, kvapkajúcej alebo striekajúcej
vode. Na toto zariadenie sa nesmú klásť žiadne predmety naplnené vodou ako sú vázy.
• Ak sa na zariadenie rozleje nejaká tekutina, môže to spôsobiť vážnu poruchu. Zariadenie
okamžite vypnite a odpojte od zdroja napájania. Zo zásuvky vytiahnite zástrčku
napájacej šnúry a poraďte sa s predajcom.
Vetranie
• Aby sa zabránilo úrazu elektrickým prúdom alebo požiaru z dôvodu prehriatia, žiadne
predmety, ako sú záclony a iné materiály nesmú blokovať vetracie otvory.
• Toto zariadenie neinštalujte ani neklaďte na knihovničku, vstavané skrinky alebo do
iného obmedzeného priestoru. Zabezpečte správne vetranie zariadenia.
Bezpečnosť
• Pred pripájaním/odpájaním iných zariadení alebo premiestňovaním tohto zariadenia
vždy vytiahnite zástrčku napájacej šnúry zo stenovej zásuvky.
• Počas búrky vytiahnite zástrčku napájacej šnúry zo stenovej zásuvky.
Kábel sieťového adaptéra
• Uistite sa, že zariadenie nie je položené na kábli sieťového adaptéra, pretože zariadenie
môže svojou hmotnosťou poškodiť tento kábel a ohroziť tým bezpečnosť.
Rušenie
• Zariadenie neklaďte na alebo do blízkosti spotrebičov, ktoré môžu vytvárať
elektromagnetické rušenie. V opačnom prípade to môže nepriaznivo vplývať na
prevádzkovú výkonnosť tohto zariadenia a obraz alebo zvuk môže byť skreslený.
Sieťový Adaptér
• Sieťový adaptér odoberá prúd zo siete, ak je v zásuvke. V záujme bezpečnosti a kvôli
spotrebe elektrickej energie adaptér nenechávajte v zásuvke, ak sa nebude dlhší čas
používať. Adaptér odpojte od siete.
Slúchadlá
• Dlhodobým hlasným počúvaním môže dôjsť k trvalému poškodeniu vášho sluchu.
• Skôr než si založíte slúchadlá, znížte hlasitosť a potom si založte slúchadlá a hlasitosť
pomaly zvyšujte, kým sa nedosiahne pohodlná úroveň počúvania.
Batérie
• Batérie, ktoré sa používajú v diaľkovom ovládači, môžu malé deti prehltnúť, čo je veľmi
nebezpečné.
• Keď sa batérie vyberú, uchovávajte ich mimo dosahu detí a uistite sa, že držiak na
batérie je v diaľkovom ovládači zabezpečený. Ak máte podozrenie, že došlo k prehltnutiu
batérie, vyhľadajte lekársku pomoc.
• Batérie likvidujte správnym spôsobom a dodržiavajte pokyny v tomto návode.
Dozor
• Je potrebné dohliadnuť na to, aby sa deti s týmto zariadením a diaľkovým ovládačom
nehrali.
• Nedovoľte nikomu, obzvlášť deťom, aby do otvorov, slotov alebo iných otvorov v kryte
nič nevkladali - mohlo by dôjsť k úrazu elektrickým prúdom.
DVD
• Laserový výrobok triedy 1. V tomto zariadení sa používa laser.
Používanie ovládacích prvkov, nastavovania alebo vykonávanie
iných procedúr, ktoré sa v tomto návode neuvádzajú, môže
viesť k vystaveniu nebezpečnému žiareniu.
• Pred premiestnením zariadenia sa uistite, že v zásobníku nie
sú žiadne disky.
• Keď sa zariadenie nepoužíva, vždy z neho vyberte disk.
• Ak sa disk nevyberie, môže sa poškodiť disk aj zariadenie.
• Zariadenia neklaďte jedno na druhé, pretože teplo z iných zariadení môže vplývať na
výkonnosť tohto zariadenia.
RISK OF ELECTRIC SHOCK
DO NOT OPEN
Symbol blesku v rovnostrannom trojuholníku upozorňuje používateľa na
prítomnosť neizolovaného „nebezpečného napätia“ v kr yte zariadenia, ktoré
môže mať vysoký potenciál rizika úrazu elektrickým prúdom.
Výkričník v rovnostrannom trojuholníku upozorňuje používateľa na prítomnosť
pokynov týkajúcich sa prevádzky a údržby (servisu) v tomto návode, ktorý je k
tomuto zariadeniu priložený.
Servis
• Na zníženie rizika úrazu elektrickým prúdom neodskrutkúvajte skrutky. Toto zariadenie
neobsahuje žiadne používateľom opraviteľné diely. Všetky údr žbárske činnosti zverte
kvalikovaným odborníkom.
• Neodmontúvajte žiadne pevné kryty, pretože by ste sa mohli vystaviť nebezpečnému
elektrickému napätiu.
Údržba
• Pred čistením nezabudnite zariadenie odpojiť od zdroja napájania.
• Nepoužívajte žiadne drsné utierky alebo brúsne čistiace prostriedky, pretože môžu
poškodiť povrch zariadenia.
• Na čistenie tohto zariadenia nepoužívajte tekutiny.
10
Page 11
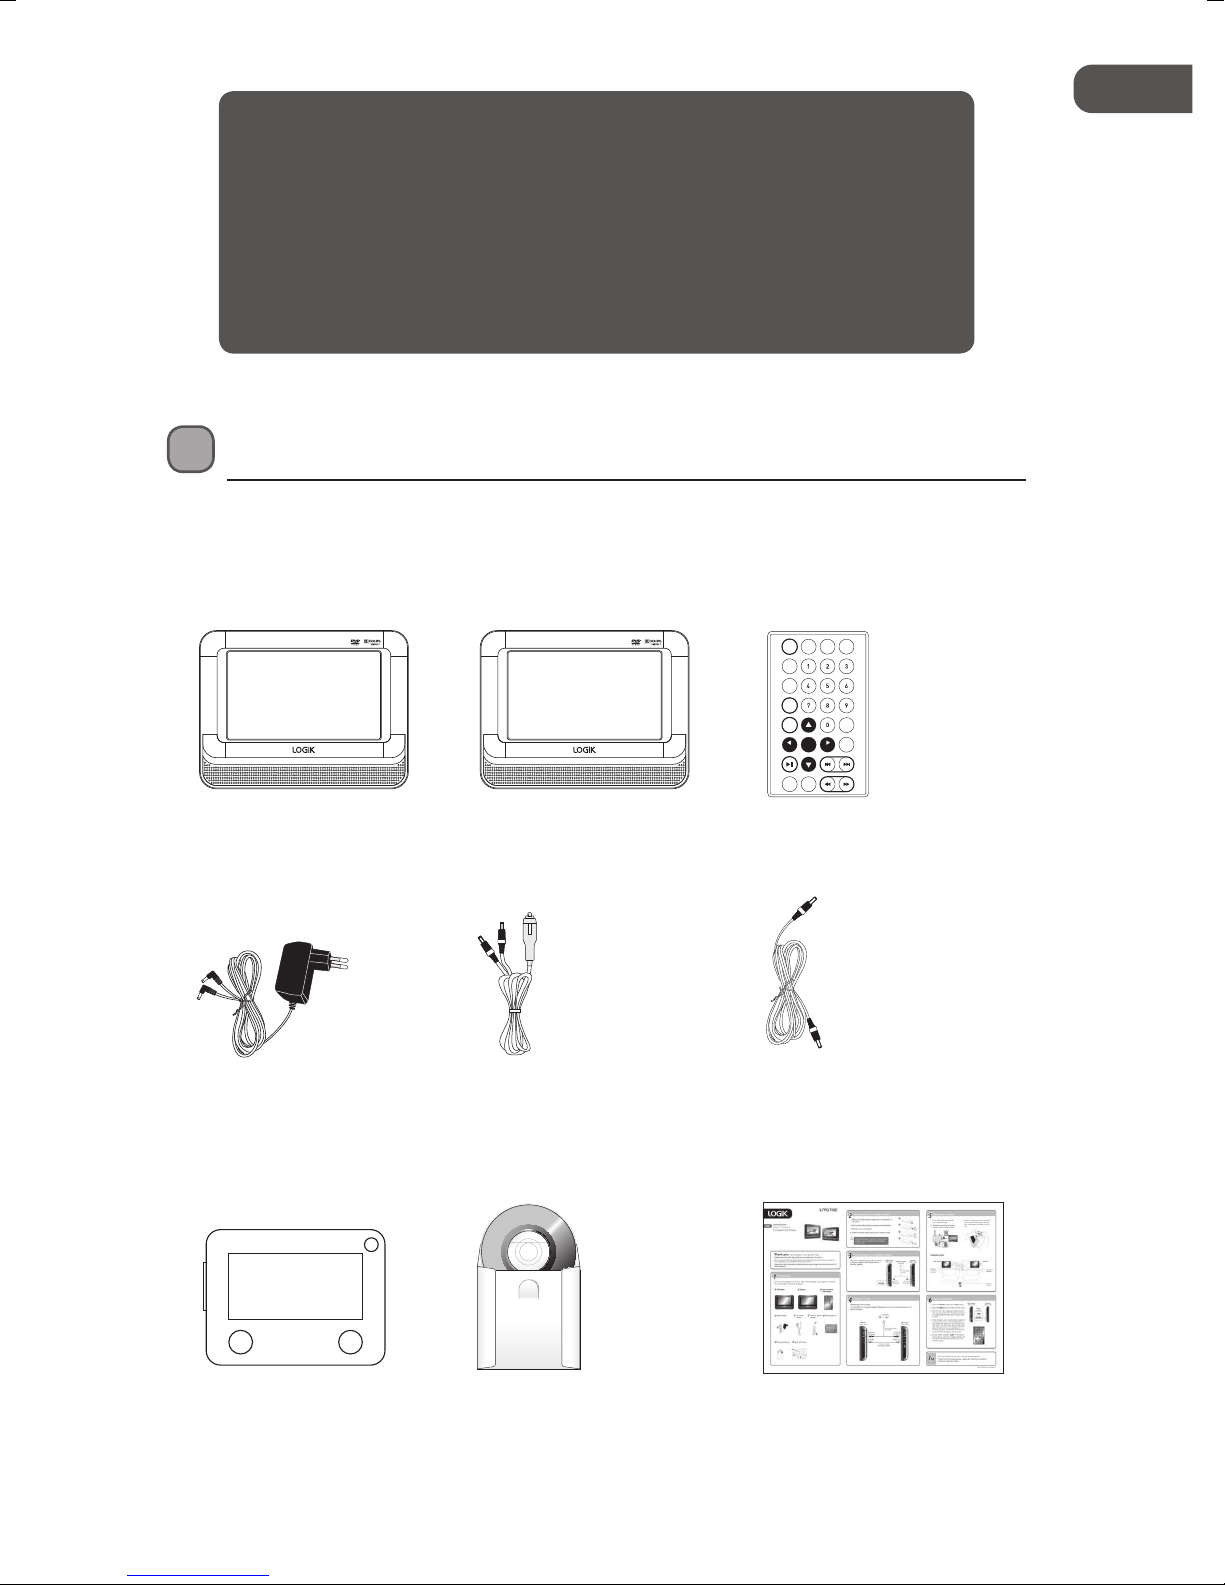
GB
Thank you for purchasing your new Logik Dual 7” Screen
Portable DVD Player.
We recommend that you spend some time reading this instruction
manual in order that you fully understand all the operational features it
oers. You will also nd some hints and tips to help you resolve any issues.
Read all the safety instructions carefully before use and keep this
instruction manual for future reference.
Unpacking
Remove all packaging from the unit. Retain the packaging. If you dispose of it please do so
according to local regulations.
The following items are included:
REPEAT
REPEAT
POWER
DISPLAY
/PROG
A-B
AUDIO/
ANGLE
SUBTITLE/
TITLE
MENU/
ZOOM
STOP/
SETUP
SLOW
GOTOENTER
VOL– VOL+
SOURCE MUTE
DVD player Monitor Remote Control (with battery) x 1
Mains Adapter x 1 3.5mm AV Cable x 1Car Adapter x 1
Instruction Manual x 1Mounting Kit x 2 Quick Start Guide x 2
11
Page 12
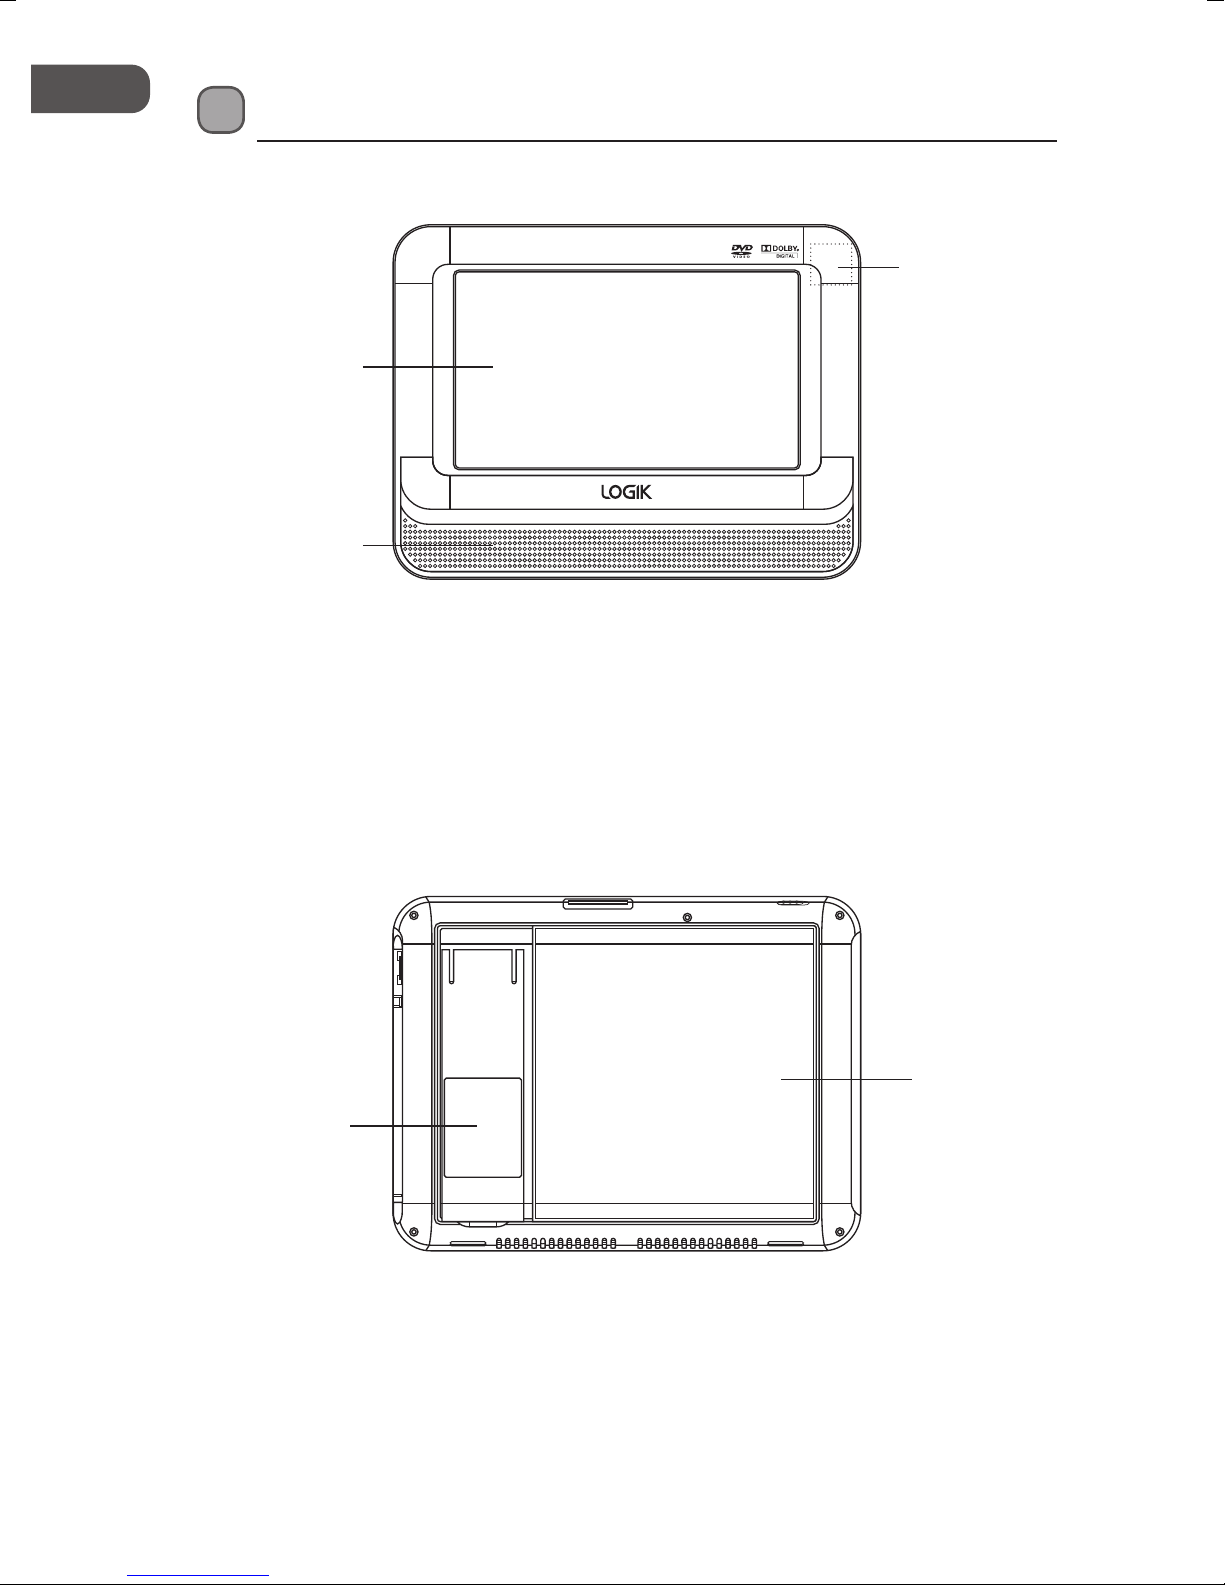
GB
Product Overview
Front View
3
1
2
DVD Player / Monitor
1. LCD Display
2. Speakers
Rear View
1
3. Remote Control Sensor
2
1. Stand
12
DVD Player / Monitor
2. Disc Cover
Page 13
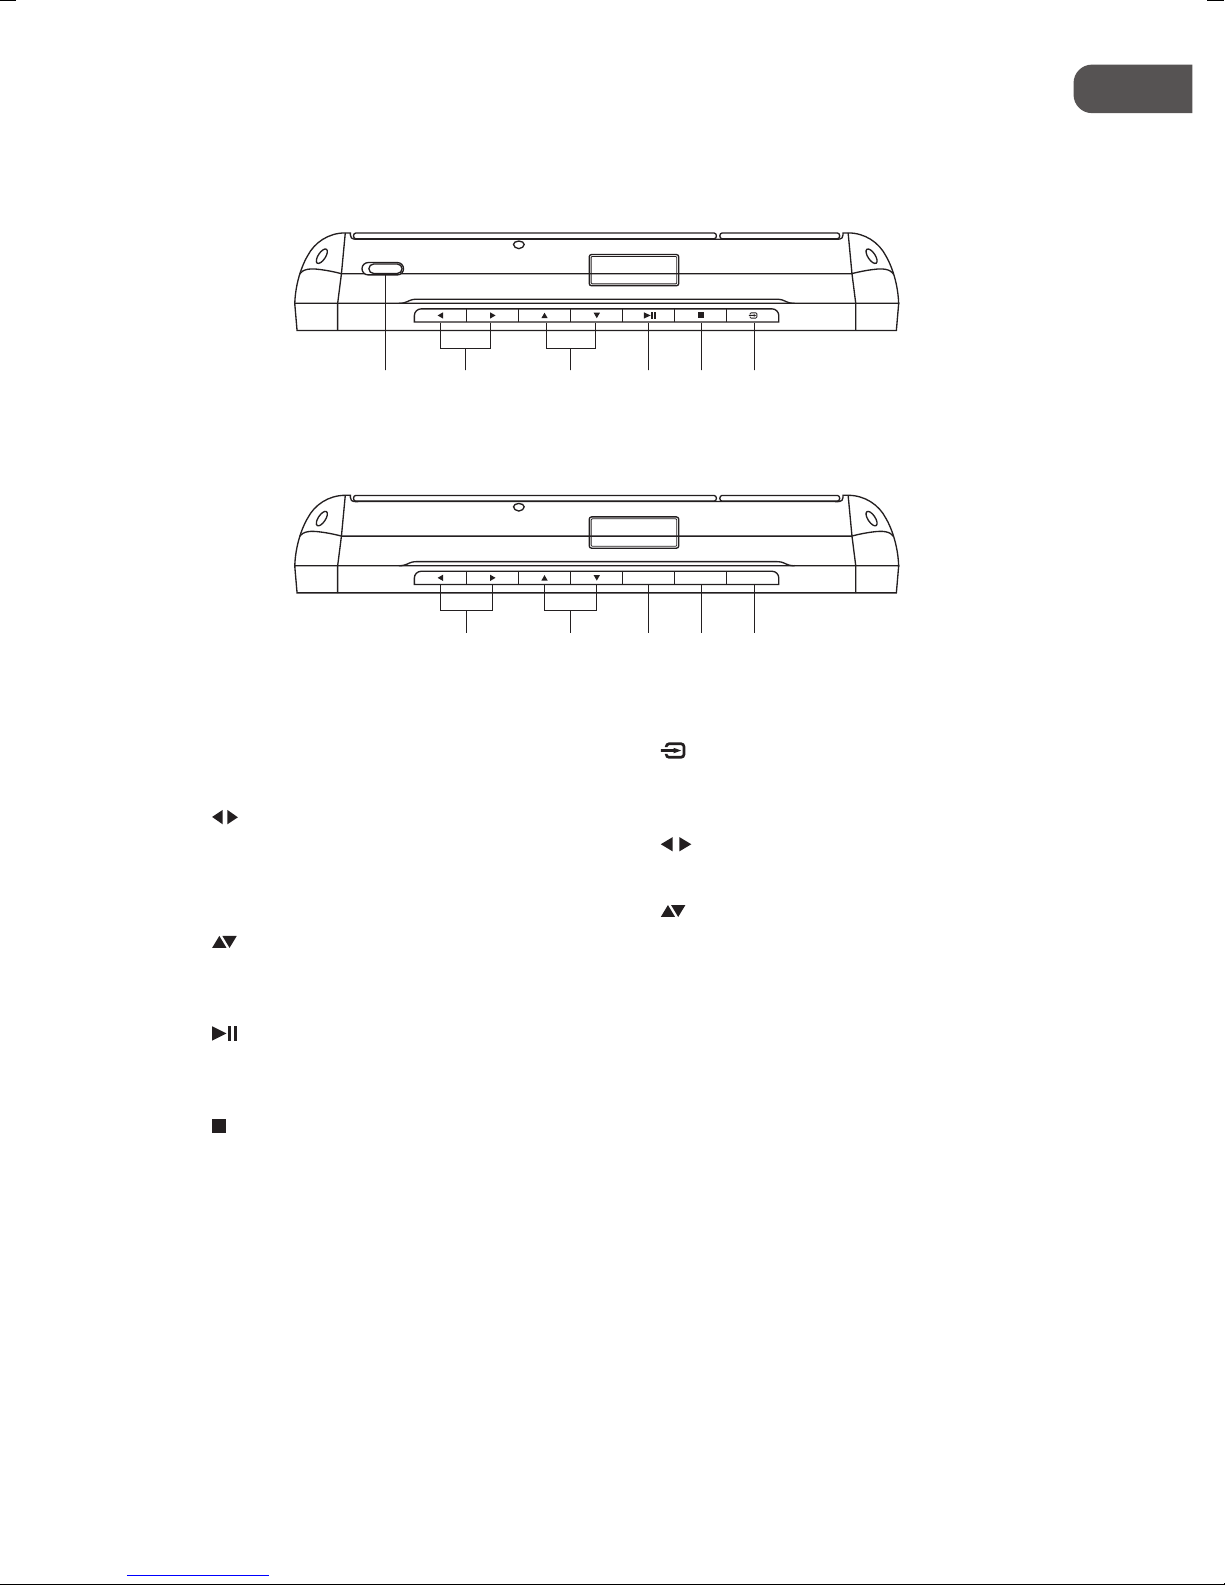
GB
Top View
1 2 3
1. OPEN Switch
Slide to open the disc door.
2.
Buttons
• Navigates Left/Right on the menu
screen and adjust certain settings.
• Increases or decreases the volume.
3.
Buttons
• Navigates Up/Down on the menu
screen and adjusts certain settings.
4.
Button
Starts/pauses/resumes playback of a
disc.
5.
STOP Button
Stops playing a disc.
DVD Player
7 8
4
MUTE TFT MENU
9
Monitor
6. Button
Selects the desired input signal source:
DVD/USB.
7.
Adjust the volume.
8.
Allows you to navigate the menu
screen and adjust certain settings.
9. MUTE Button
Silences the unit or restores the sound.
10. TFT Button
Switch the screen on/o.
11. MENU Button
Displays menu screen.
5
11
10
buttons
buttons
6
13
Page 14

GB
Right Side View
6
USB
AV OUT PHONE • ON
1 4
3
2
DVD Player
AV IN PHONE • ON
3
7
Monitor
DC IN 12V
DC IN 12V
4
OFF •
5
OFF •
5
1. USB Socket
Inserts a USB storage device.
2. AV OUT Socket
3. PHONE Socket
4. DC IN 12V Socket
5. ON/OFF Switch
6. Power LED Indicator
7. AV IN Socket
14
Page 15

GB
Remote Control
1. DISPLAY Button
Displays the disc information during
playback.
2. Power Button
Switches the unit between the ON and
STANDBY modes.
3. AUDIO/ANGLE Button
• Selects one of the audio soundtracks
on a DVD (if more than one is
available) or to select the audio
output mode on a CD.
• Switches between multiple camera
angles when the DVD you are
playing has been programmed with
multiple camera angles.
4. SUBTITLE/TITLE Button
• Selects one of the subtitle languages
programmed on a DVD (if available).
• Press and hold to enter the title
menu (if available).
5. MENU/ZOOM Button
• Displays the main DVD menu (if
available).
• Zoom in/out the display frame.
6. STOP/SLOW Button
• Stops playing a disc.
• Selects slow speed playing and
resume normal playback.
7.
(VOL –/+) Buttons
• Navigates Left/Right on the menu
screen and adjusts certain settings.
• Increases or decreases the volume.
Buttons
• Navigates Up/Down on the menu
screen and adjust certain settings.
1
REPEAT
/PROG
REPEAT
A-B
SETUP
GOTOENTER
DISPLAY
2
3
4
5
6
7
POWER
AUDIO/
ANGLE
SUBTITLE/
TITLE
MENU/
ZOOM
STOP/
SLOW
VOL– VOL+
8
9
10
SOURCE MUTE
10. SOURCE Button
Selects the desired input signal source:
DVD/USB.
11. REPEAT/PROG Button
• Repeat a DVD chapter, title or the
entire disc.
• Repeat a CD track or the entire disc.
• Enter the DVD movie program mode
(not for CD/USB mode).
12. REPEAT A-B Button
Repeat a segment between A and B
on a DVD.
13. Number 0-9 Buttons
Enter parental control password or
locate a title/chapter/track.
14. SETUP Button
Enter the setup menu.
15. GOTO Button
Skips to a specic location on a disc.
11
12
13
14
15
16
17
ENTER Buttons
Conrms a selection on the menu
screen.
8.
Button
Starts/pauses/resumes playback of a
disc.
9. MUTE Button
Silences the unit or restores the sound.
16.
Buttons
• Skips backwards to the previous
chapters/tracks/titles on a disc.
• Skips forwards to next chapters/
tracks/titles on a disc.
17.
Buttons
Allows fast reversing/fast forwarding
of the current track.
15
Page 16

GB
Removing the Insulating Strip from the
Remote Control
Remove the insulating mylar strip from the battery
if the battery is being used for the rst time. It is
located at the bottom rear of the remote control.
Battery Replacement for the Remote Control
The remote control requires a CR2025, 3V Lithium battery.
1. Slide and hold the battery release tab in the
direction of the arrow.
2. Pull out the battery holder and remove the old
battery.
3. Replace with a new battery.
4. Insert the battery holder back into the remote
control.
16
Page 17
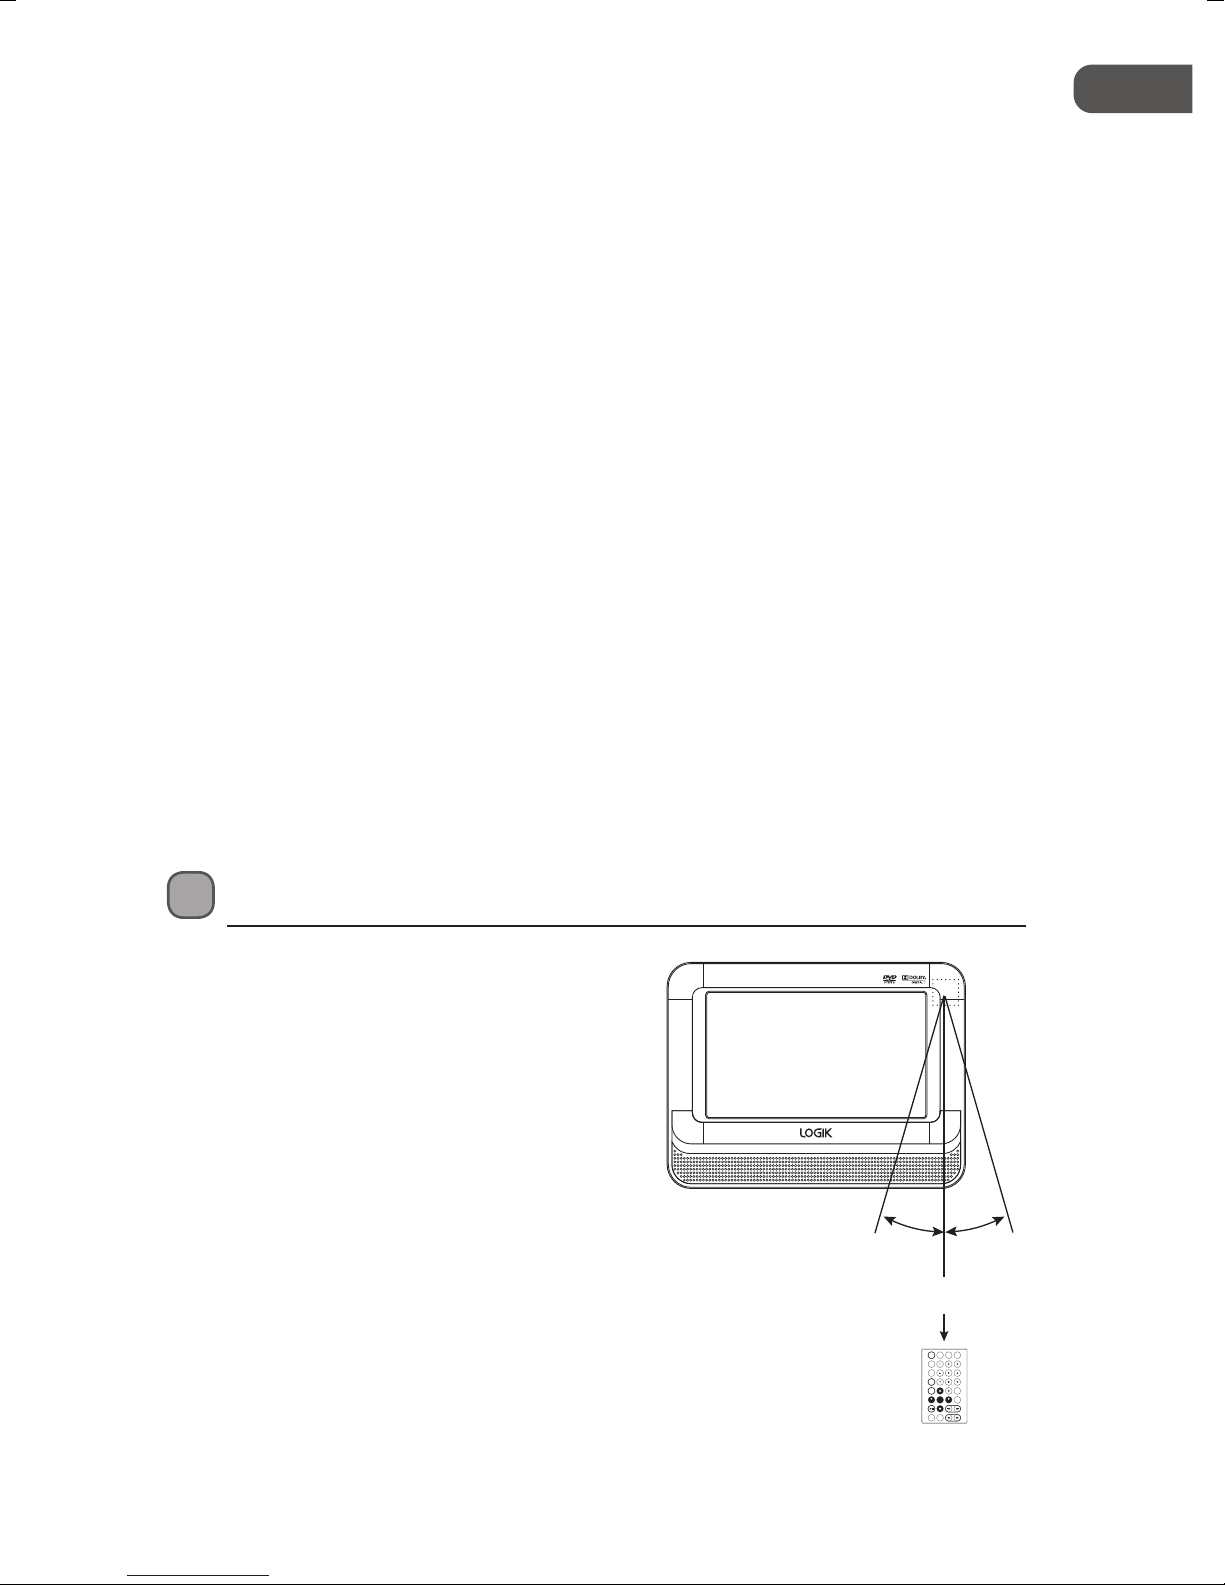
GB
Handling the Battery
• Improper or incorrect use of batteries may cause corrosion or battery leakage, which
could cause re, personal injury or damage to property.
• Install the battery correctly in the battery compartment. Normally the battery’s positive
polarity (+) will face up.
• When the battery is exhausted, the remote control will not function.
• Only use the battery type indicated in this manual.
• Do not dispose of the used battery as domestic waste. Dispose of it in accordance with
local regulations.
• Small button cell batteries such as the one used in the remote control are easily
swallowed by young children and this is dangerous. Keep loose button cells away from
young children and make sure that the battery is secure in the remote control. Seek
medical advice if you believe a battery cell has been swallowed.
Handling the Remote Control
• If you are nding it dicult to remove the battery, use a paperclip to slide the battery tab.
• Do not drop the remote control.
• Do not allow anything to impact the remote control.
• Do not spill water or liquid on the remote control.
• Do not place the remote control on a wet object.
• Do not place the remote control under direct sunlight or near sources of excessive heat.
• Remove the battery from the remote control when not in use for a long period of time,
as corrosion or battery leakage may occur and result in physical injury, and/or property
damage, and/or re.
Remote Control Operation Range
• The remote control sensor on the front unit is
sensitive to the remote control’s commands up
to a maximum of 5 metres away and within a
maximum of a 60° arc.
• Please note that the operating distance may
vary depending on the brightness of the room.
30° 30°
Within about 5m
REPEAT
REPEAT
POWER
DISPLAY
/PROG
A-B
AUDIO/
ANGLE
SUBTITLE/
TITLE
MENU/
ZOOM
STOP/
SETUP
SLOW
GOTOENTER
VOL– VOL+
SOURCE MUTE
17
Page 18
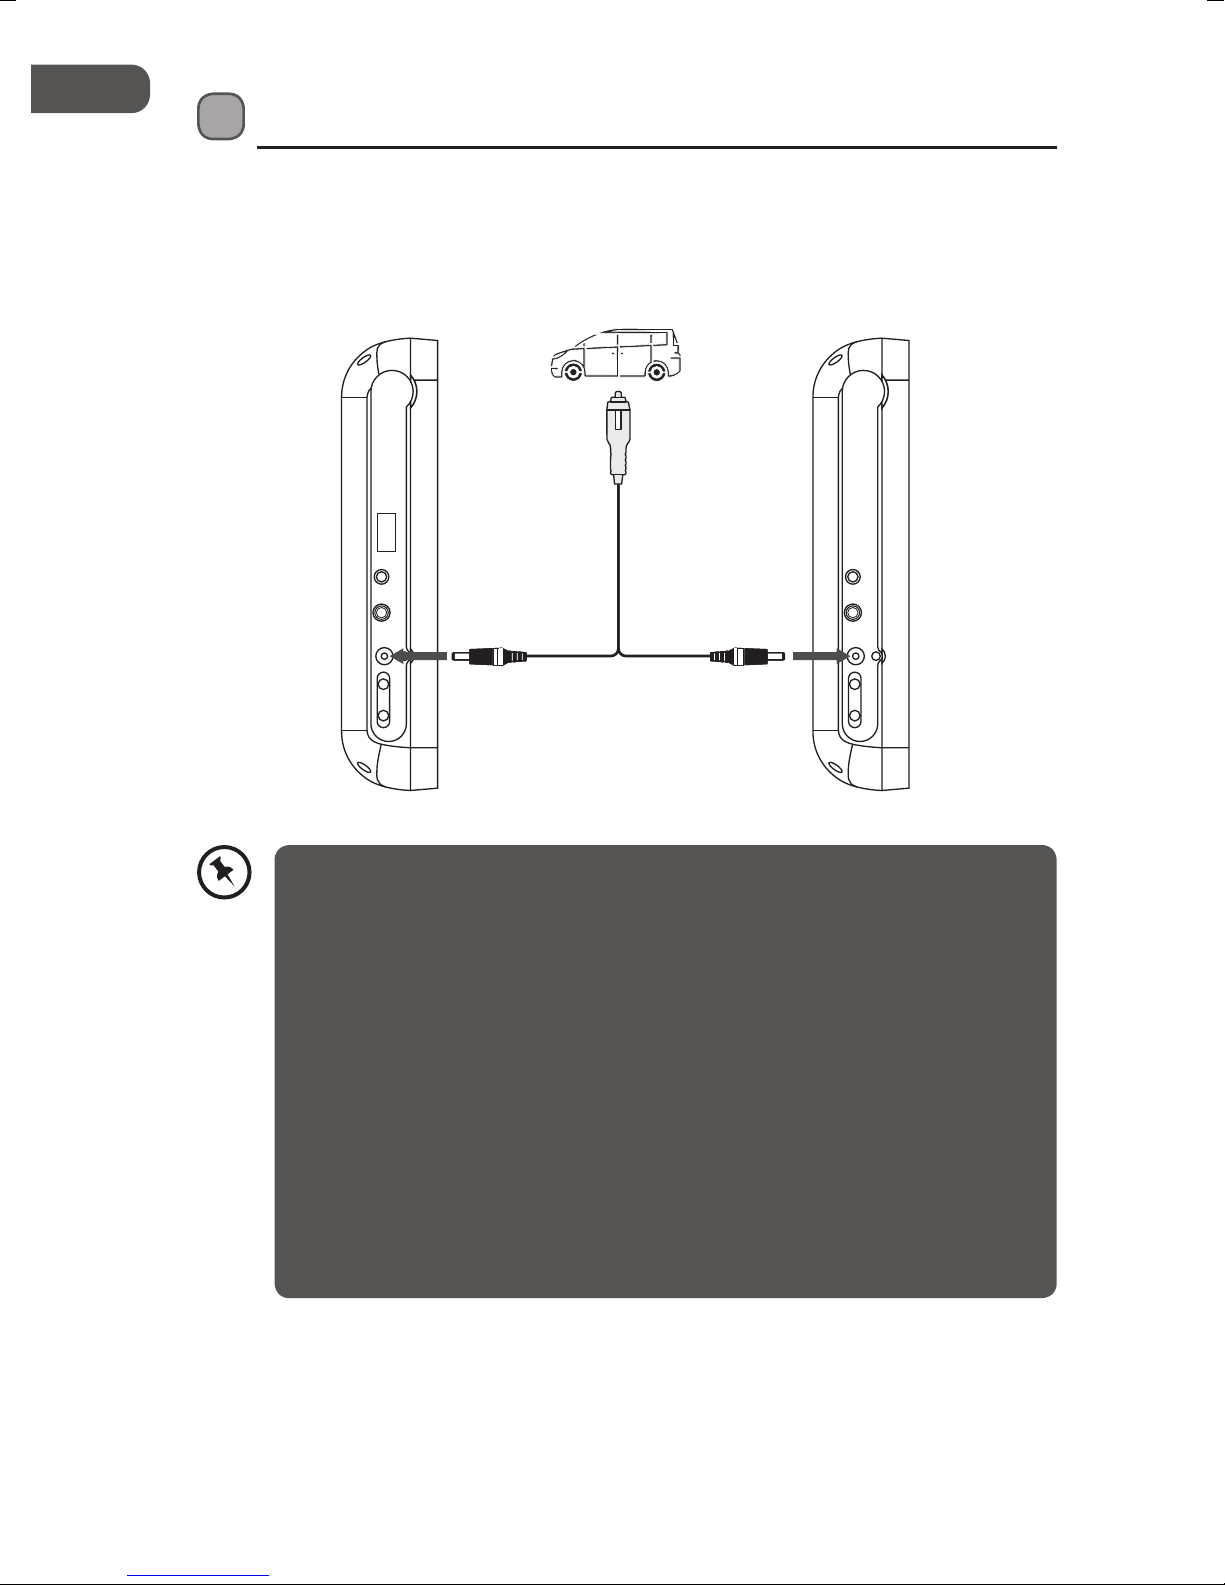
GB
Using in a Car
Using the Car Power Adapter (for in-car use)
The included 12V car power adapter is designed for use with vehicles that have a 12V
electrical system.
USB
AV OUT PHONE • ON
DC IN 12V
OFF •
AV IN PHONE • ON
DC IN 12V
OFF •
• Only use the 12V car power adapter provided with the unit. Do not use in 24V
vehicles. Other car adapters could damage the unit, or even your vehicle.
• Only use the included 12V car power adapter. Do not use it with any other
equipment.
• In the interest of trac safety, drivers should not operate the unit or view
videos while driving.
• When the inside of the 12V car socket is dirty with ash or dust, the plug
section may become hot due to poor contact. Be sure to clean the 12V car
socket before use.
• After use, disconnect the 12V car power adapter from both the unit and
cigarette lighter socket.
• If the unit is not properly attached to a vehicle, it may become airborne in the
event of an accident and cause damage, injury, or death.
• Check your local trac laws for rules governing the use of video devices in
vehicles.
18
Page 19
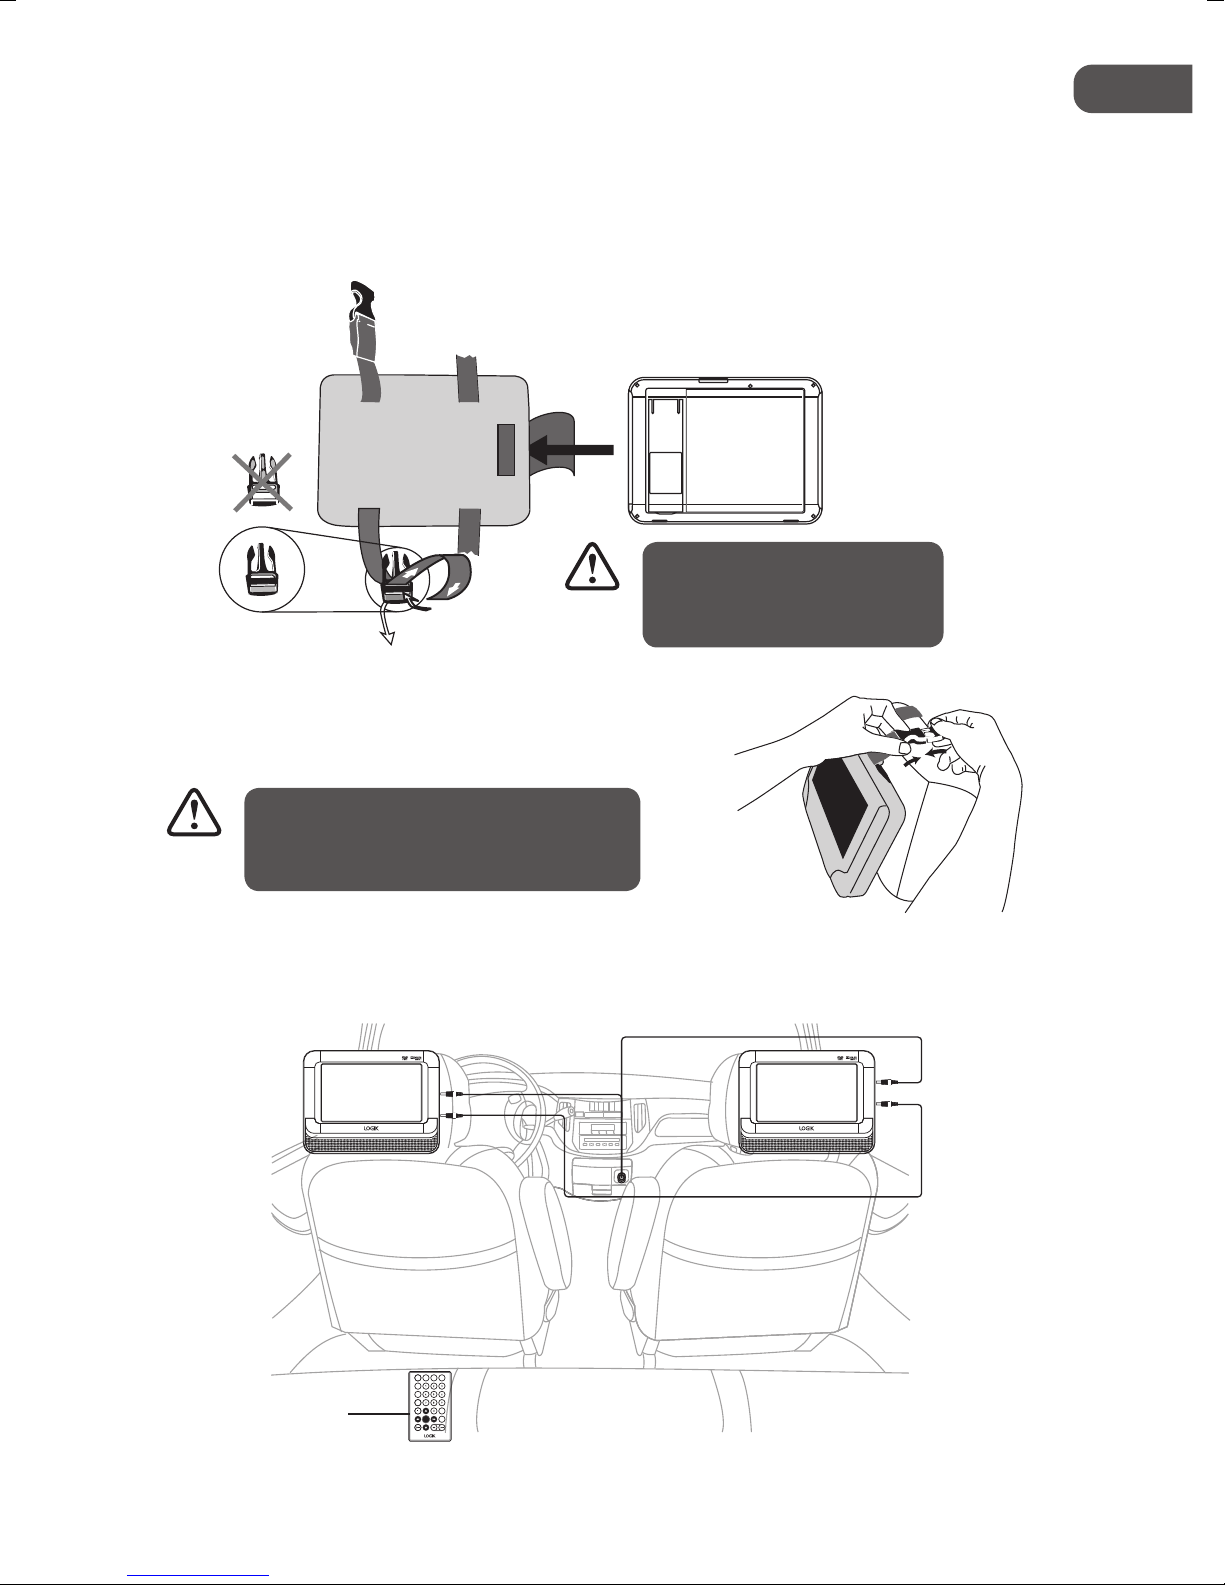
GB
Mounting in a Car
Use the supplied mounting kit to install the DVD Player and Monitor on the back of the
vehicle’s headrests. Tightly wrap the mounting strap around the headrest.
1. Insert DVD Player and Monitor into a designed bags.
2. Thread the mounting kit’s strap ends through the strap eyelets.
Make sure the buckles are
properly assembled to avoid
accidental loosening.
3. Loop the straps around the headrest, with the
DVD Player facing the rear seat, then fasten
the straps with the clip.
Always remember to lock the clips and
tighten the straps to ensure the safety
of your passengers.
Installation Guide
DVD Player Monitor
Car Adapter
AV Cable
Remote Control
REPEAT/
REPEAT
SOURCE
DISPLAY
PROG
A-B
AUDIO/
ANGLE
SUBTITLE/
TITLE
MENU/
ZOOM
/
SETUP
SLOW
GOTOOK
19
Page 20

GB
Power Source
Mains Power
The mains adapter (DC12V output) supplied is only for using the DVD Player and the
Monitor together.
Power adaptor
To the mains
socket
USB
AV OUT PHONE • ON
DC IN 12V
OFF •
AV IN PHONE • ON
DC IN 12V
OFF •
Right side of the DVD Player Right side of the Monitor
• Turn o the unit before unplugging the mains adapter from the unit to avoid
the unit being damaged.
• When the unit is not going to be used for a long period of time, disconnect
the mains adapter from the mains socket.
• The mains socket must be located near the unit and should be easily
accessible. If a malfunction occurs, disconnect the plug from the mains socket
at once.
• When the mains adapter is plugged in, the unit is not completely
disconnected from the main power source, even when the unit is turned o.
20
Page 21
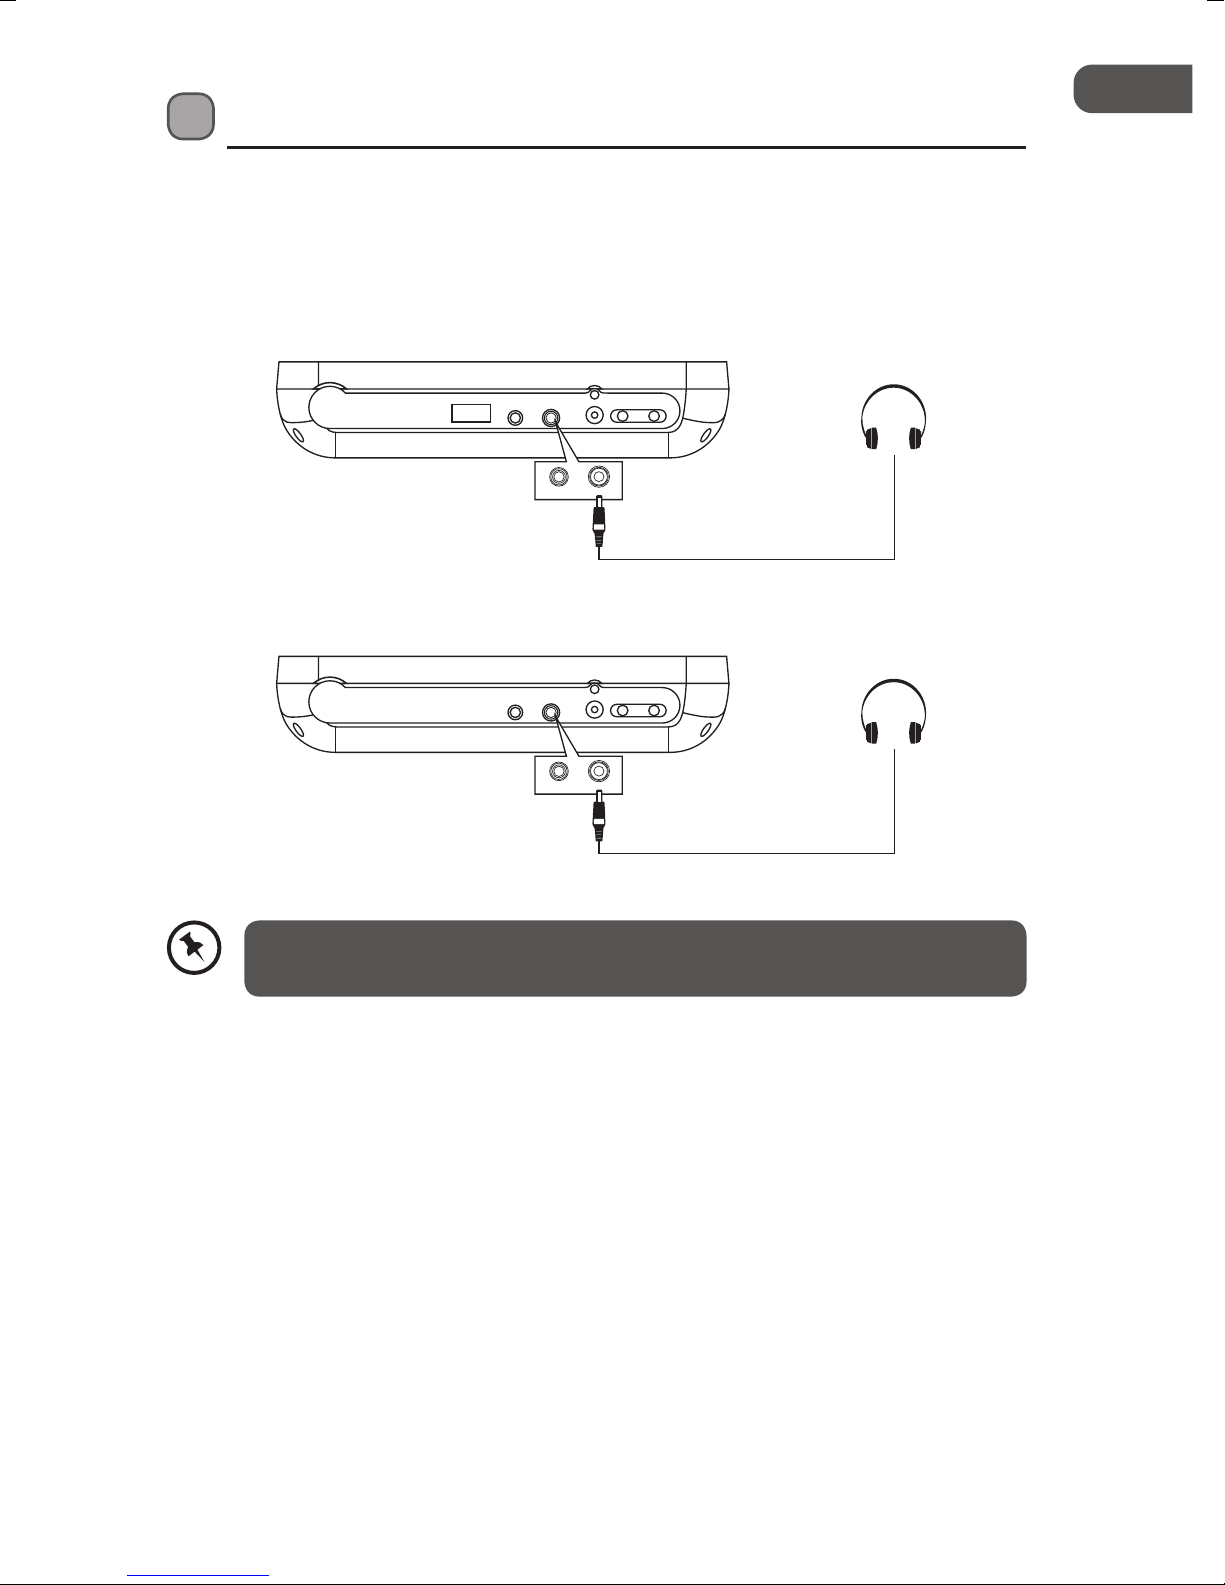
GB
Connections
Using Earphones
Turn down the volume before connecting the earphones. Slowly raise the volume with the
earphones on until you reach your desired volume. When earphones are connected, the
speaker is automatically disabled.
Right side of the DVD Player
USB
AV OUT PHONE • ON
DC IN 12V
AV OUT PHONE
OFF •
Earphones (not included)
Right side of the Monitor
AV IN PHONE • ON
DC IN 12V
AV IN PHONE
OFF •
Earphones (not included)
Avoid excessive volume levels and listening to sound for a long period of time
when using headphones, as this may impair your hearing.
21
Page 22
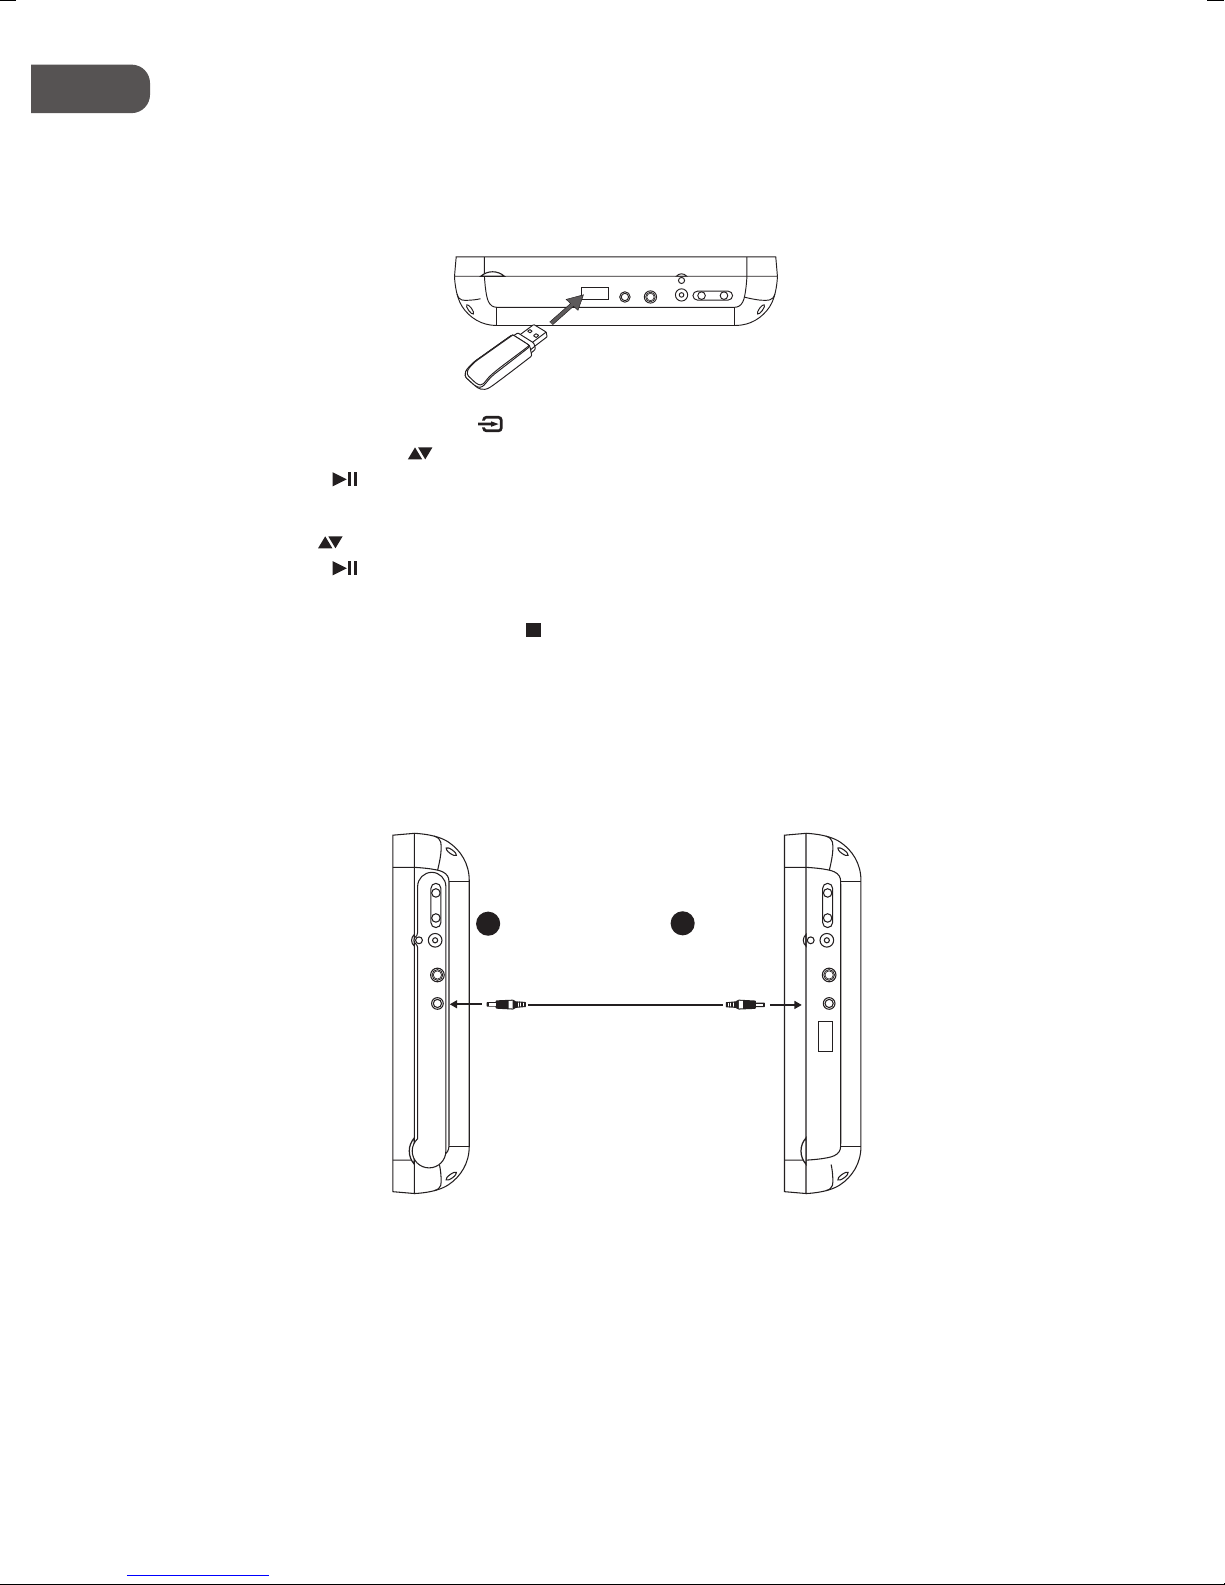
GB
Using a USB Flash Drive
You can play music or view JPEG les from USB ash drives.
1. Connect the USB ash drive directly to the USB Slot on the unit.
Right side of the DVD Player
USB
DC IN 12V
AV OUT PHONE • ON
OFF •
2. In STOP mode, press the button on the unit or the SOURCE button on the remote
control. Press the buttons on the unit or the remote control to select “USB” and then
press the button on the unit or press the ENTER button on the remote control to
access the data in the drive.
3. Use the
press the
buttons on the unit or the remote control to select a desired le and then
button on the unit or press the ENTER button on the remote control to
start playback.
To remove the USB drive, press the
button on the unit or the STOP/SLOW button
on the remote control to stop playback. Remove the USB ash drive, the unit will then
automatically return to disc mode.
Watching a DVD on the DVD Player and the Monitor
You can watch the same DVD on the DVD Player and the Monitor.
Monitor
right side
OFF •
DC IN 12V
AV IN PHONE • ON
1
To A/V IN
Sockets
2
To A/V OUT
Sockets
3.5mm AV cable
(included)
DVD Player
right side
OFF •
DC IN 12V
AV OUT PHONE • ON
USB
1. Connect the DVD Player and the Monitor using the 3.5mm AV Cable (included).
2. Turn on the DVD Player and the Monitor.
3. Play a DVD on the DVD Player; the Monitor will play the same DVD at the same time.
22
Page 23
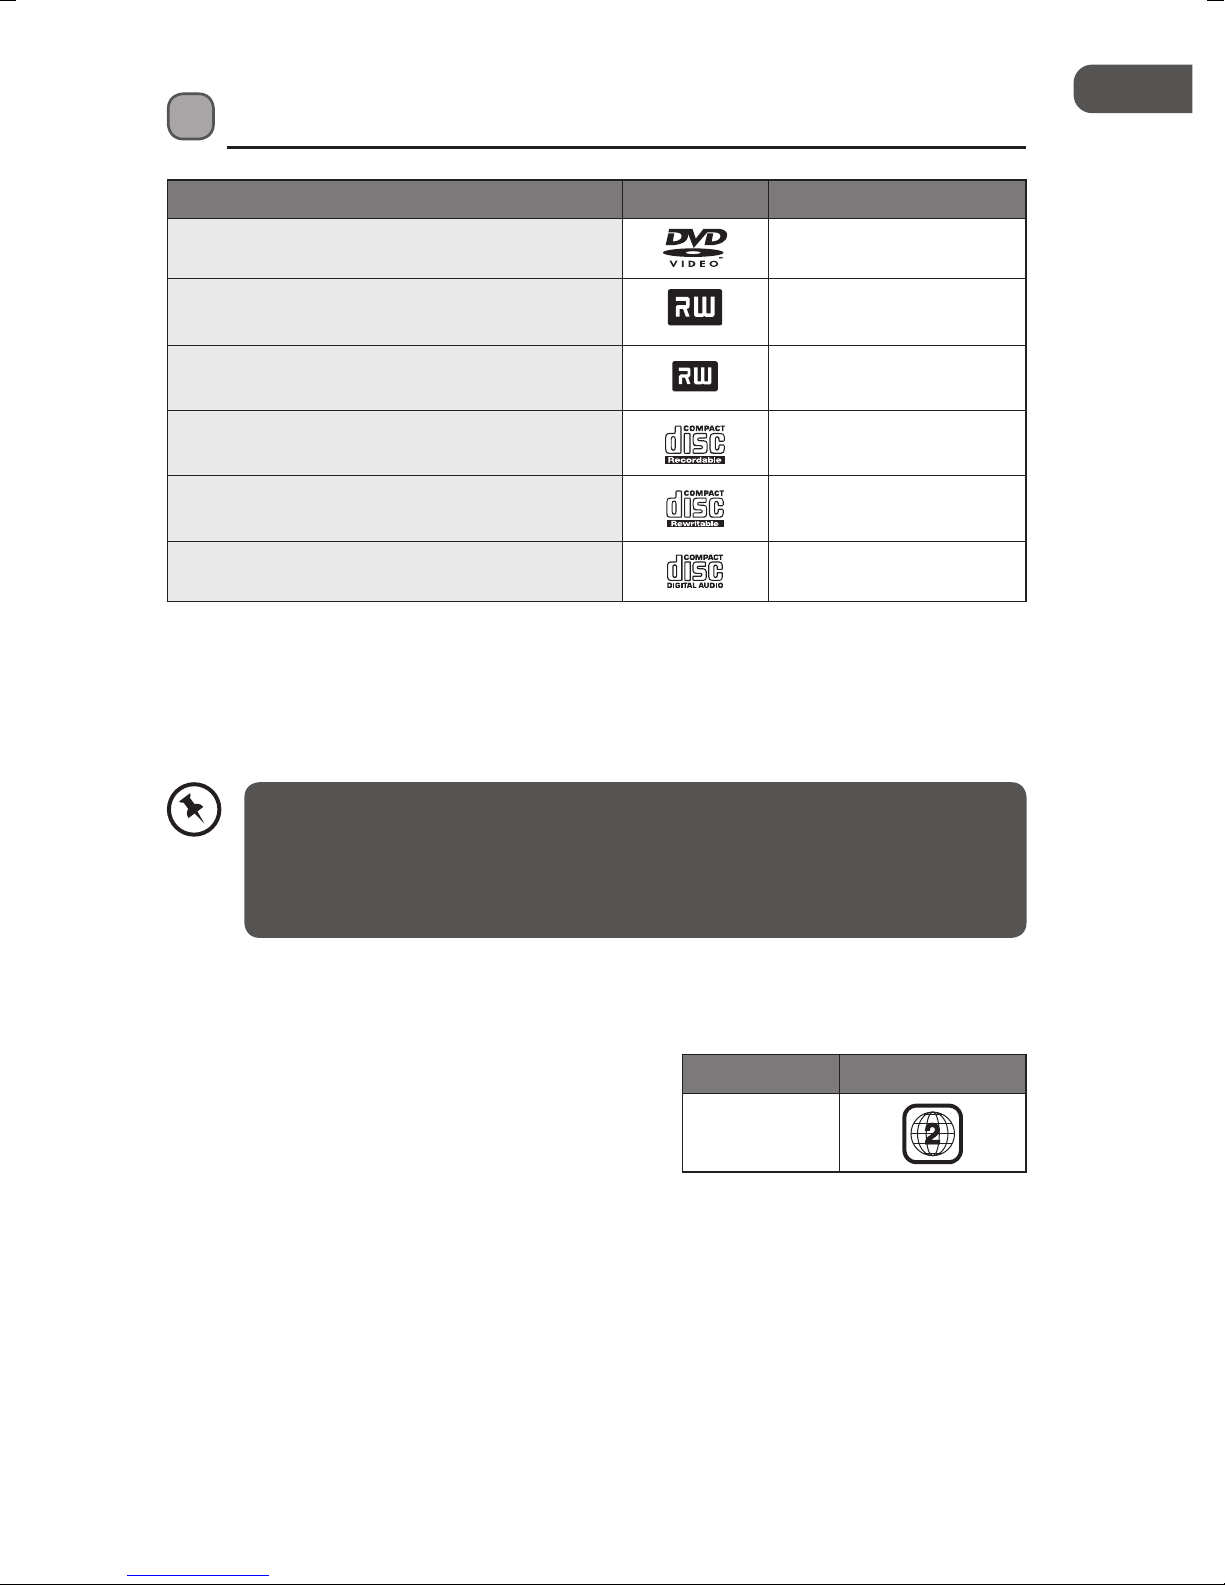
GB
Compatible Disc Types
DVD+ReWritable
DVD+R
Disc Types Disc Logo Recorded Content
DVD-VIDEO (Digital Versatile Disc)
DVD±RW (Audio/Video format or JPEG les)
DVD±R (DVD Recordable - Audio/Video
format or JPEG les)
CD-R (CD Recordable - Audio/Video format or
JPEG les)
CD-RW (CD-Rewritable - Audio/Video format
or JPEG les)
AUDIO-CD (Compact Disc Digital Audio)
Picture Supported Formats
JPEG
• The le extensions has to be .jpg and not .jpeg
• Pictures encoding must comply with JPEG/ISO format.
• Only nalised discs of DVD-R and DVD-RW multi-border are supported.
• Both nalised and un-nalised discs of DVD+R and DVD+RW multi-border are
not supported.
• Some recorded les may not be able to be played due to the type and format
of disc or condition of the recording.
AUDIO + VIDEO
AUDIO + VIDEO + JPEG
AUDIO + VIDEO + JPEG
AUDIO + VIDEO + JPEG
AUDIO + VIDEO + JPEG
AUDIO
Region Code
Both the DVD player and the discs are coded by
region. These regional codes must match in order
to play the disc. If the codes do not match, the disc
will not play.
The Region Number for this DVD player is described
on the bottom of the DVD player.
Disc Type DVD-VIDEO
Region code
23
Page 24
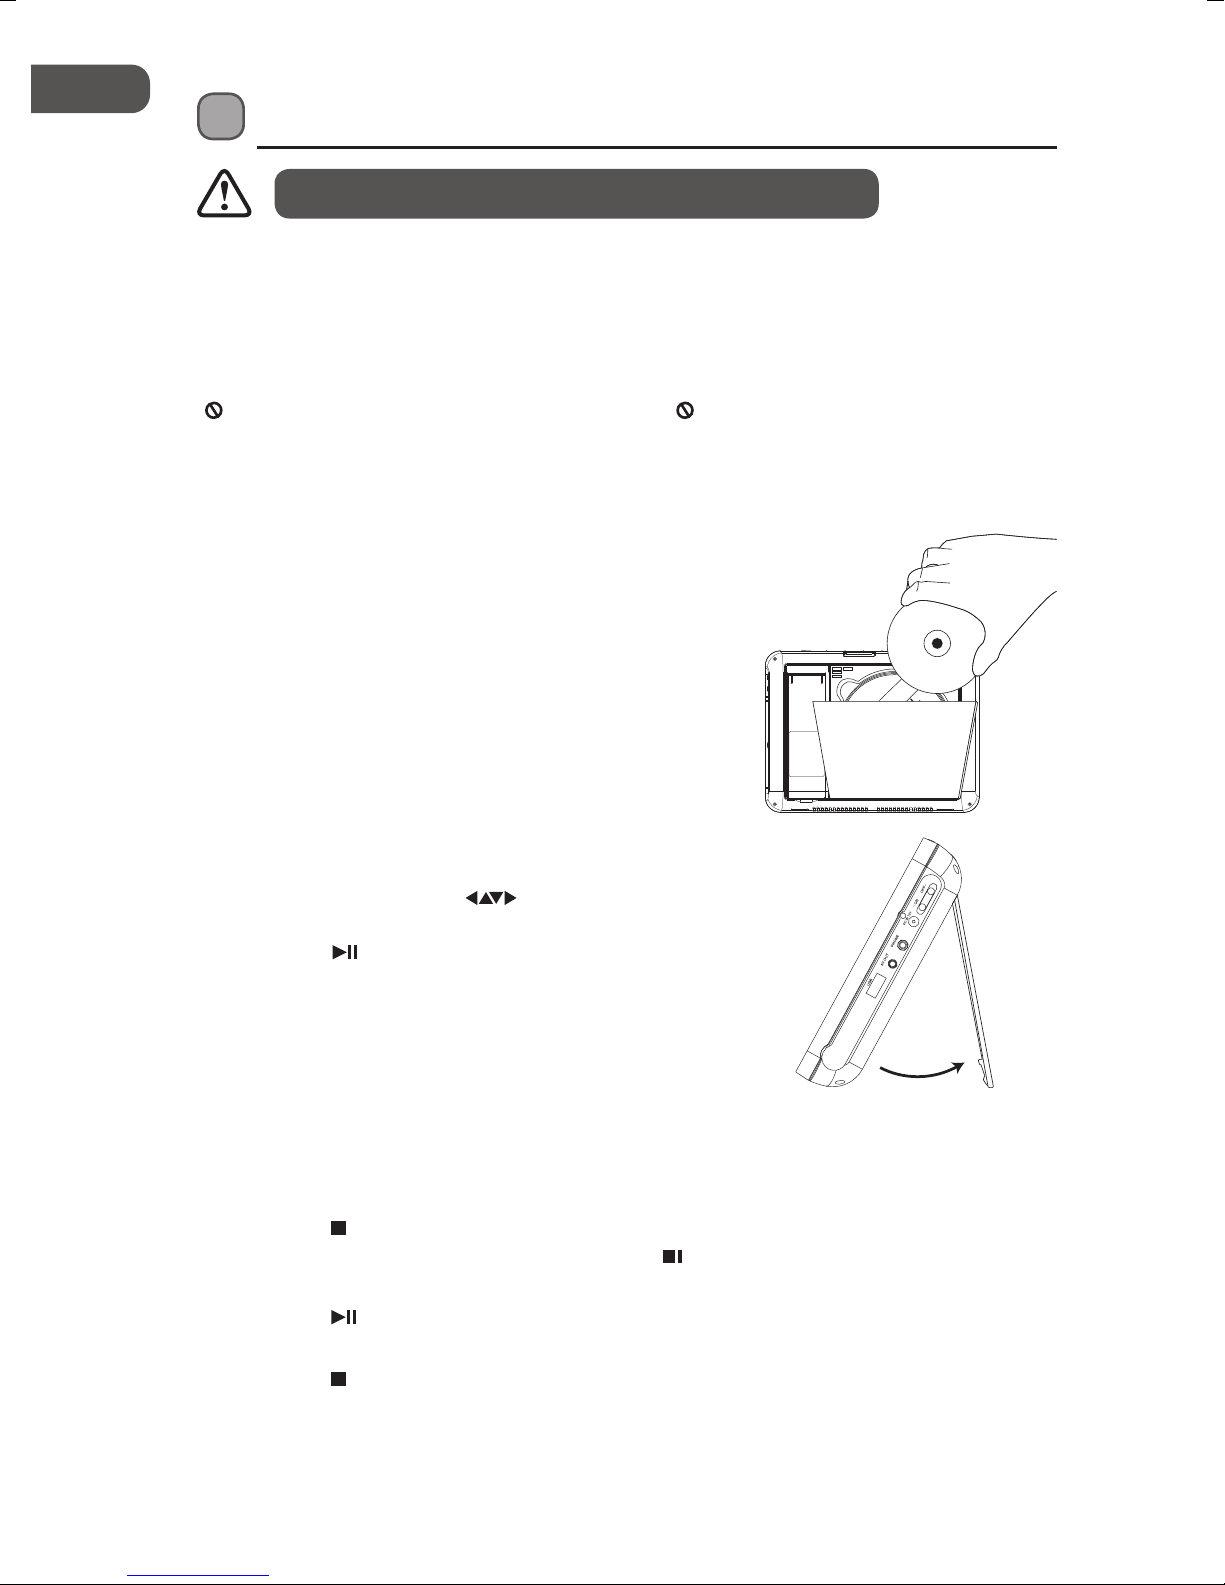
GB
DVD Playback
Ensure that the screen protection lm is removed before use.
This instruction manual explains the basic instructions for operating this unit. Some DVDs
are produced in a manner that allows for specic or limited operation during playback.
Therefore, this unit may not respond to all operating commands. This is not a defect.
Please refer to the instructions accompanying the specic DVD in question for more
information about the options available on that DVD.
“
” may appear on the screen during operation. A “ ” means that the desired operation is
not permitted by the unit or disc.
Basic DVD Playback
1. Slide the ON/OFF switch to the ON position.
2. Slide the OPEN switch to open the disc cover.
3. Hold the disc by its sides and carefully place onto
the disc holder with the label side facing up.
Gently push the disc down until you hear a “click” .
4. Close the disc cover. Use the stand located at the
rear of the unit or hold the DVD player in your
hands (be careful not to touch the unit’s disc
door). The unit starts playback if the disc does not
have any menus recorded on it. If the disc has one
or more titles recorded on it, a menu screen will
appear on the screen.
5. To play a title, press the
the remote control to highlight the title and then
press the button on the unit or the remote
control.
/ 0-9 buttons on
CHG
open to stand
Stop Playback
1. Press the button on the unit or the STOP/SLOW button on the remote control to go
to pre-stop mode, the TV screen will display “ STOP”. With some discs, the unit can
recall the stopped location, such as on DVDs.
2. Press the
location where playback was stopped or from the beginning of the disc.
3. Press the
to stop completely.
24
button on the unit or the remote control to resume playback from the
button on the unit or the STOP/SLOW button on the remote control twice
Page 25
GB
Previous and Next
1. During playing, press the button on the unit or the button on the remote control
to go back to the start of the previous chapter. Each press of this button will skip a
chapter until the start of the disc.
2. Each press the
playing will skip the current chapter and play the next one.
button on the unit or the button on the the remote control during
Fast Forward and Fast Reverse
1. Press the buttons on the remote control to fast reverse / fast forward through
the disc. Each time the buttons on the remote control is pressed, the fast reverse
/ fast forward motion speed changes. There are 4 levels of speed available: x2, x4, x8
and x16.
2. Press the
button on the unit or the remote control to resume normal playback.
Pause Playback
1. Press the button on the unit or the remote control to pause playback (still mode).
The sound will be muted during still mode.
2. Press the
button again to resume normal playback.
Info
While playing the disc, press the DISPLAY button on the remote control to go to the
information menu if this function is available on the disc.
Volume Adjustment
• Press the /VOL– or /VOL+ button on the remote control to adjust the volume on the
unit.
• Press the
• Press the MUTE button on the remote control to switch the sound o, the player will
display “
buttons on the monitor to adjust the volume.
”. Press the MUTE button on the remote control again.
All Repeat
Press the REPEAT/PROG button on the remote control repeatedly to select dierent repeat
modes.
Menu Description
First Press Repeat Chapter
Second Press Repeat Title
Third Press Repeat o
25
Page 26
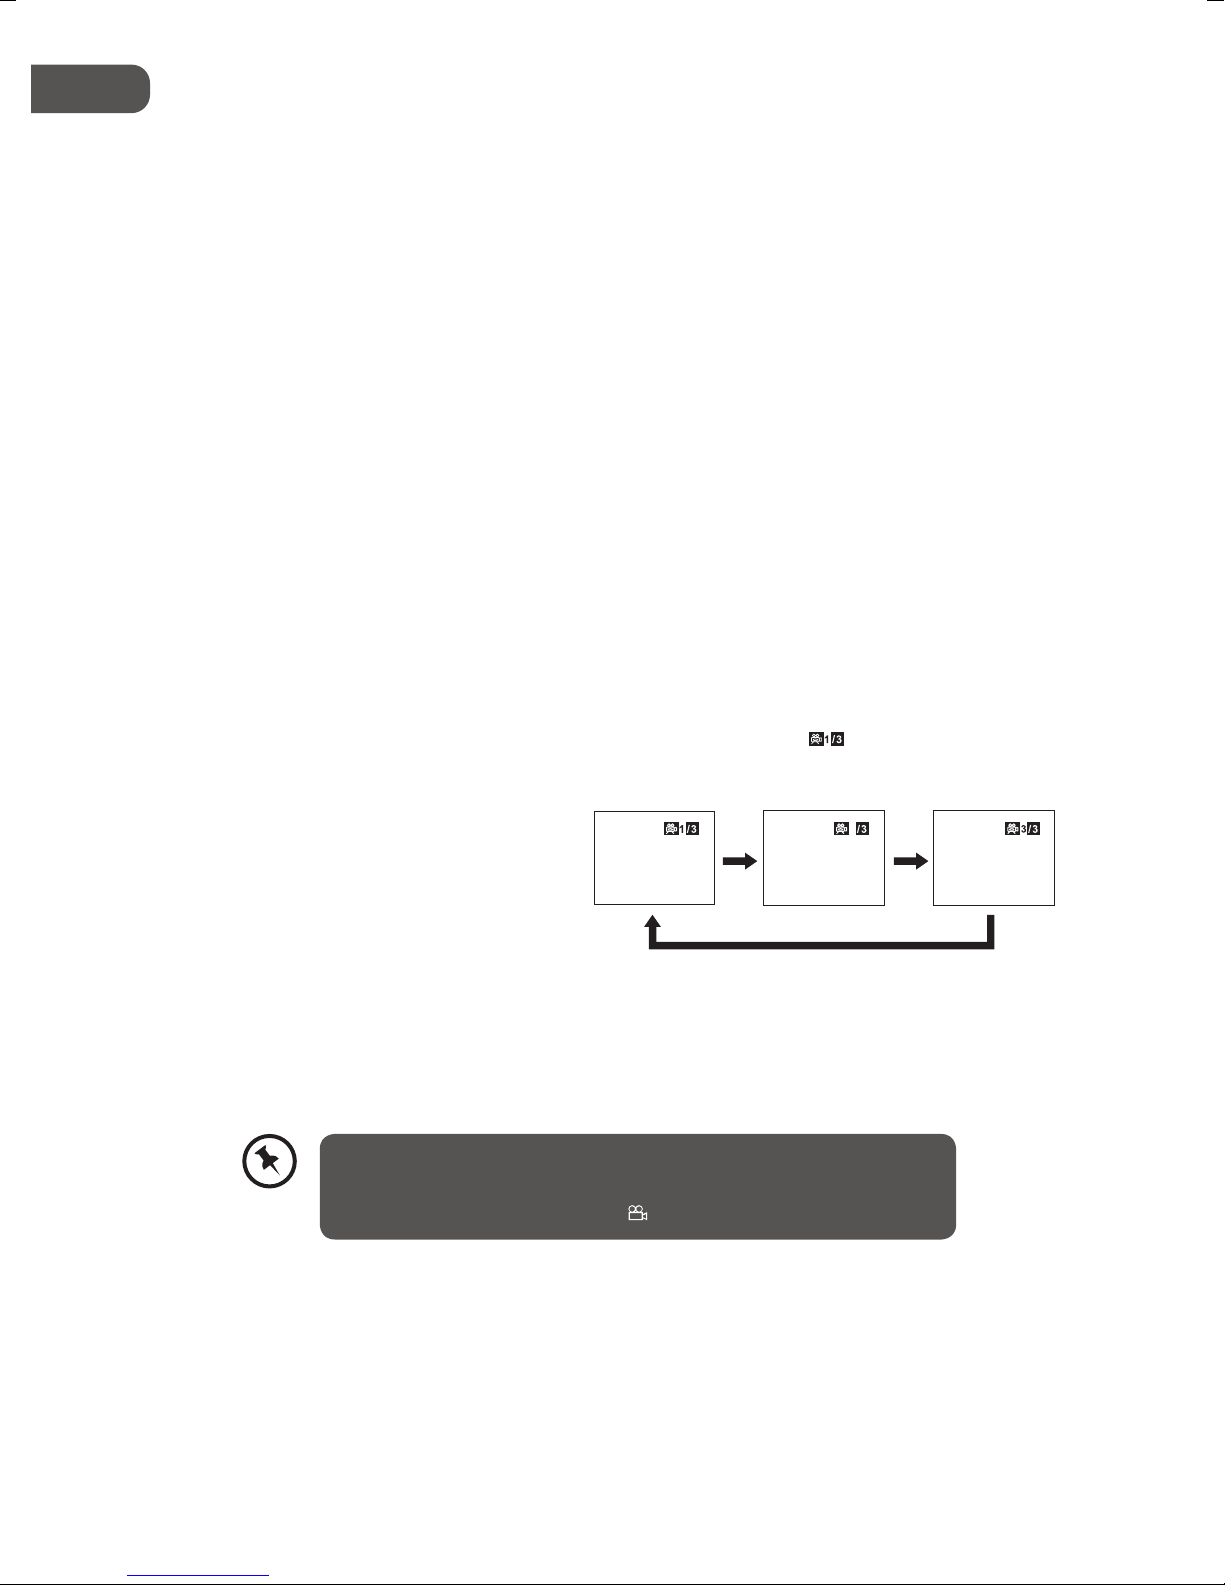
GB
Audio Channel
Press the AUDIO/ANGLE button on the remote control repeatedly to select dierent audio
languages.
A–B Repeat
Repeat a section between points A and B within a Title / Chapter / Track.
1. Press the REPEAT A-B button to choose a starting point A.
2. Press the REPEAT A-B button again to set an ending point B and complete the setting.
The selected section A-B will be repeated.
3. Press the REPEAT A-B button the third time to cancel and exit, the RepAB OFF will
display on the screen.
Subtitle Language
Press the SUBTITLE/TITLE button on the remote control repeatedly to switch between
dierent subtitle languages that are available on the disc.
Angle Selection
Some DVDs contain scenes which have been shot from a number of dierent angles. For
these discs, the same scene can be viewed from each of these dierent angles.
1. While you are playing a DVD with
dierent angles recorded, press
and hold the AUDIO/ANGLE
button on the remote control to
view the number of current angles
available.
2. Press and hold the AUDIO/ANGLE
button on the remote control
button repeatedly to change the
scene to the next recorded angle.
• After approximately two seconds, playback will continue from the new angle you
selected.
• If no button is pressed within 10 seconds, playback continues without changing the
current angle.
• This function can only be used for discs on which scenes shot
from multiple angles have been recorded.
• If only one angle is recorded,
1/1 is displayed.
Sequence of angle shots
(Example)
2
26
Page 27
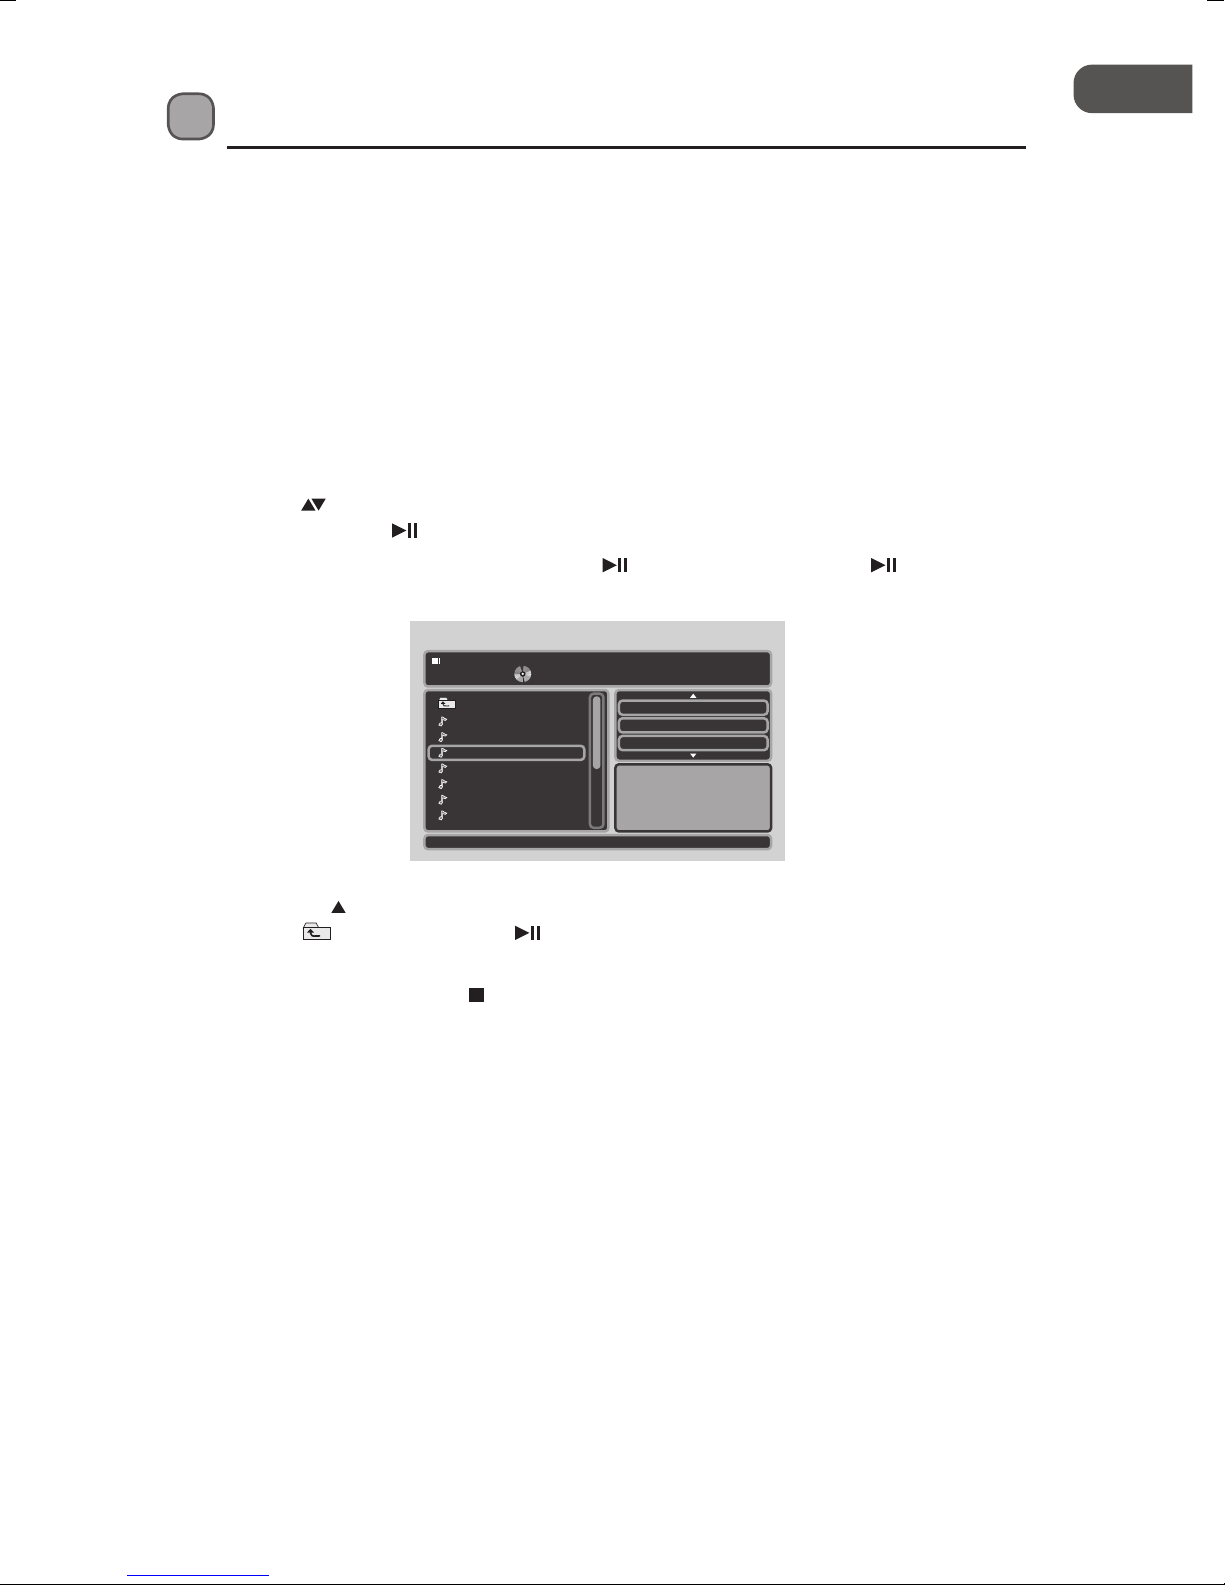
GB
Audio CD, JPEG Picture CD Playback
Loading a Disc
1. Slide the ON/OFF switch to the ON position.
2. Slide the OPEN switch to open the disc cover.
3. Hold the disc by its sides and carefully place onto the disc holder with the label side
facing up. Gently push the disc down until you hear a “click” sound.
4. Close the disc cover. Use the stand located at the rear of the unit or hold the DVD
player in your hands (be careful not to touch the unit’s disc door).
Playing an Audio CD
1. Press the buttons on the unit or the remote control to highlight an audio track le
and then press the button on the unit or the remote control to playback.
• If the les are inside a folder, press the
the remote control to enter into the folder.
4 / 11
..
Track01
Track02
Track03
Track04
Track05
Track06
Track07
• Press the
button on the unit or the remote control repeatedly to select the Root
folder and then press the button on the unit or the ENTER button on the
remote control to return to the upper menu.
2. To stop playback, press the
button on the unit or the STOP/SLOW button on the
remote control.
00:00:03 / 00:04:26
/Track03.CDA
button on the unit or the button on
Repeat : Off
Mode : Normal
Edit mode
Music Playing
27
Page 28
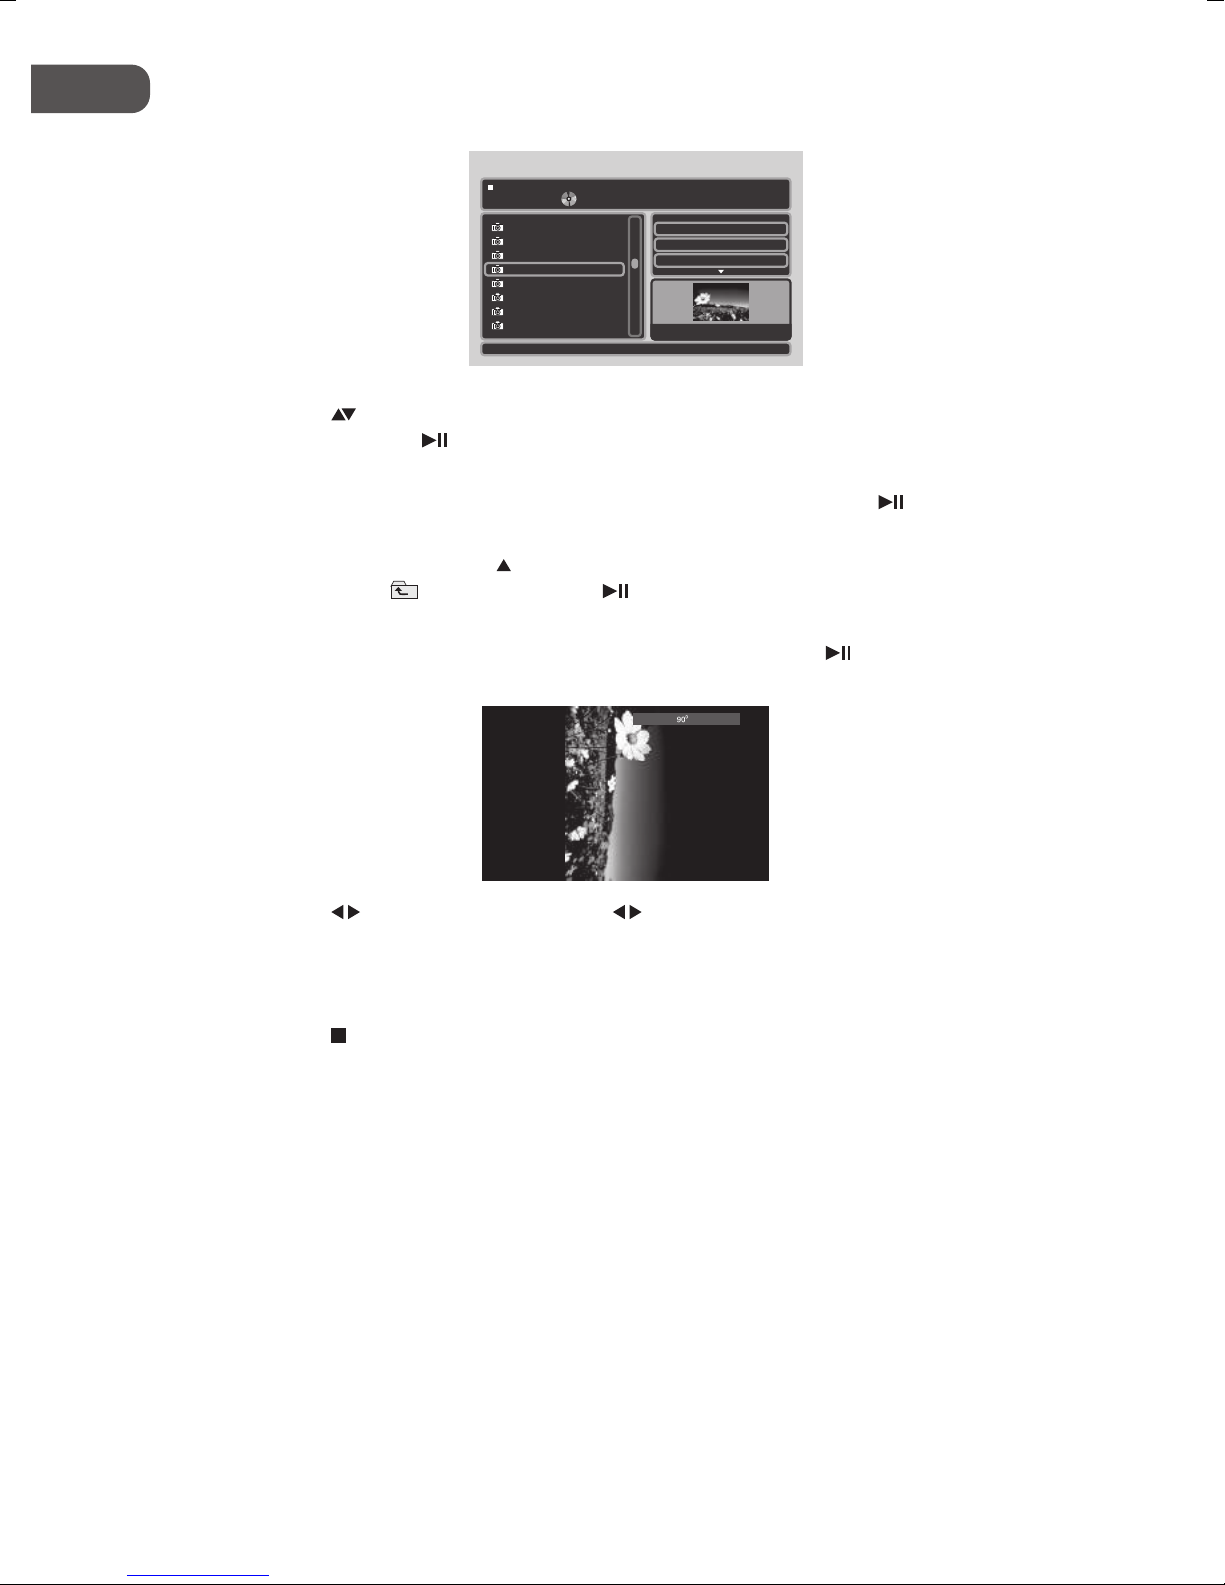
GB
Playing MPEG4/JPEG Picture CD
47 / 115
011101_01
011101_12
011101_13
011101_22
011101_26
011101_31
011101_33
011101_34
011101_22.JPG
Filter
Repeat
Mode : Normal
: Off
W: 1024 H: 768
1. Press the buttons on the unit or the remote control to highlight a MPEG/JPEG le
and then press the button on the unit or the ENTER button on the remote control
to slide show the picture or playback the MPEG4 video.
• If the les are inside a folder, select the folder and then press the
button on the
unit or the ENTER button on the remote control to enter into the folder.
• In stop mode, press the
button on the unit or the remote control to select the
Root folder and then press the button on the unit or the ENTER button on
the remote control to return the upper level.
2. To playback the MPEG4 le or slideshow the picture, press the
button on the unit or
the ENTER button on the remote control.
3. Press the
buttons on the unit or the (VOL -/+) buttons on the remote control
to rotate the photo by 90°/180°/270° clockwise or anti-clockwise during the photo
playback/fast backward or forward during MPEG4 playback.
• All the rotation eects will be cancelled after exiting the slideshow mode.
4. Press the
button on the unit or the STOP/SLOW button on the remote control to
return to the play list browser.
28
Page 29

GB
The Playback Navigator and Settings
Total File Number
Play Status
Playing File
Browser List
4 / 11
..
Track01
Track02
Track03
Track04
Track05
Track06
Track07
00:00:03 / 00:04:26
/Track03.CDA
Filter
Repeat : Off
Mode : Normal
Music Playing
Elapsed Time
Remaining Time
File Path
Playback Settings
Preview Window
1. In stop mode, press the button on the unit or the / VOL + button on the remote
control to enter the right screen of the playback setting of the navigator.
2. Press the
conrm by pressing the
buttons on the unit or the remote control to select the items. Always
button on the unit or the ENTER button on the remote
control.
• For Filter setting, press the
button on the unit or the ENTER button on the
remote control to bring up the drop-down menu, and press the buttons on the
unit or the remote control to select an option, then press the button on the unit
or the ENTER button on the remote control.
Menu Options Description
Filter Audio, Photo, Video • Allows you to sort the le format displayed in the browser list.
• The lter settings will sort out the le types being
displayed in the Browser list on the left screen of the
navigator.
• To leave the settings, press the
button on the unit or
the / VOL- button on the remote control.
Repeat O, Single, Folder • To set the repeat mode of the playing les.
Mode Normal, Shue,
Music Intro
• To set the le playing sequence in the Disc mode.
• Music Intro mode to playback the start of every song. Just like
browsing the music list on the Disc.
Edit Mode — • Allow you to select the les to be programmed in the program list.
• Refer to “Program playback” section on the next page.
Program
View
Program view,
Browser view
• Switch to view all les in the current directory or the selected les in
the program list.
• Refer to “Program playback” section on the next page.
Add to
Program
Add to program,
Clear program
• Add or delete the selected les in the program list.
• Refer to “Program playback” section on the next page.
* In Audio CD mode, the browser will hide the “Filter” function in Repeat mode.
Make sure the playback is stopped completely before using these settings.
29
Page 30
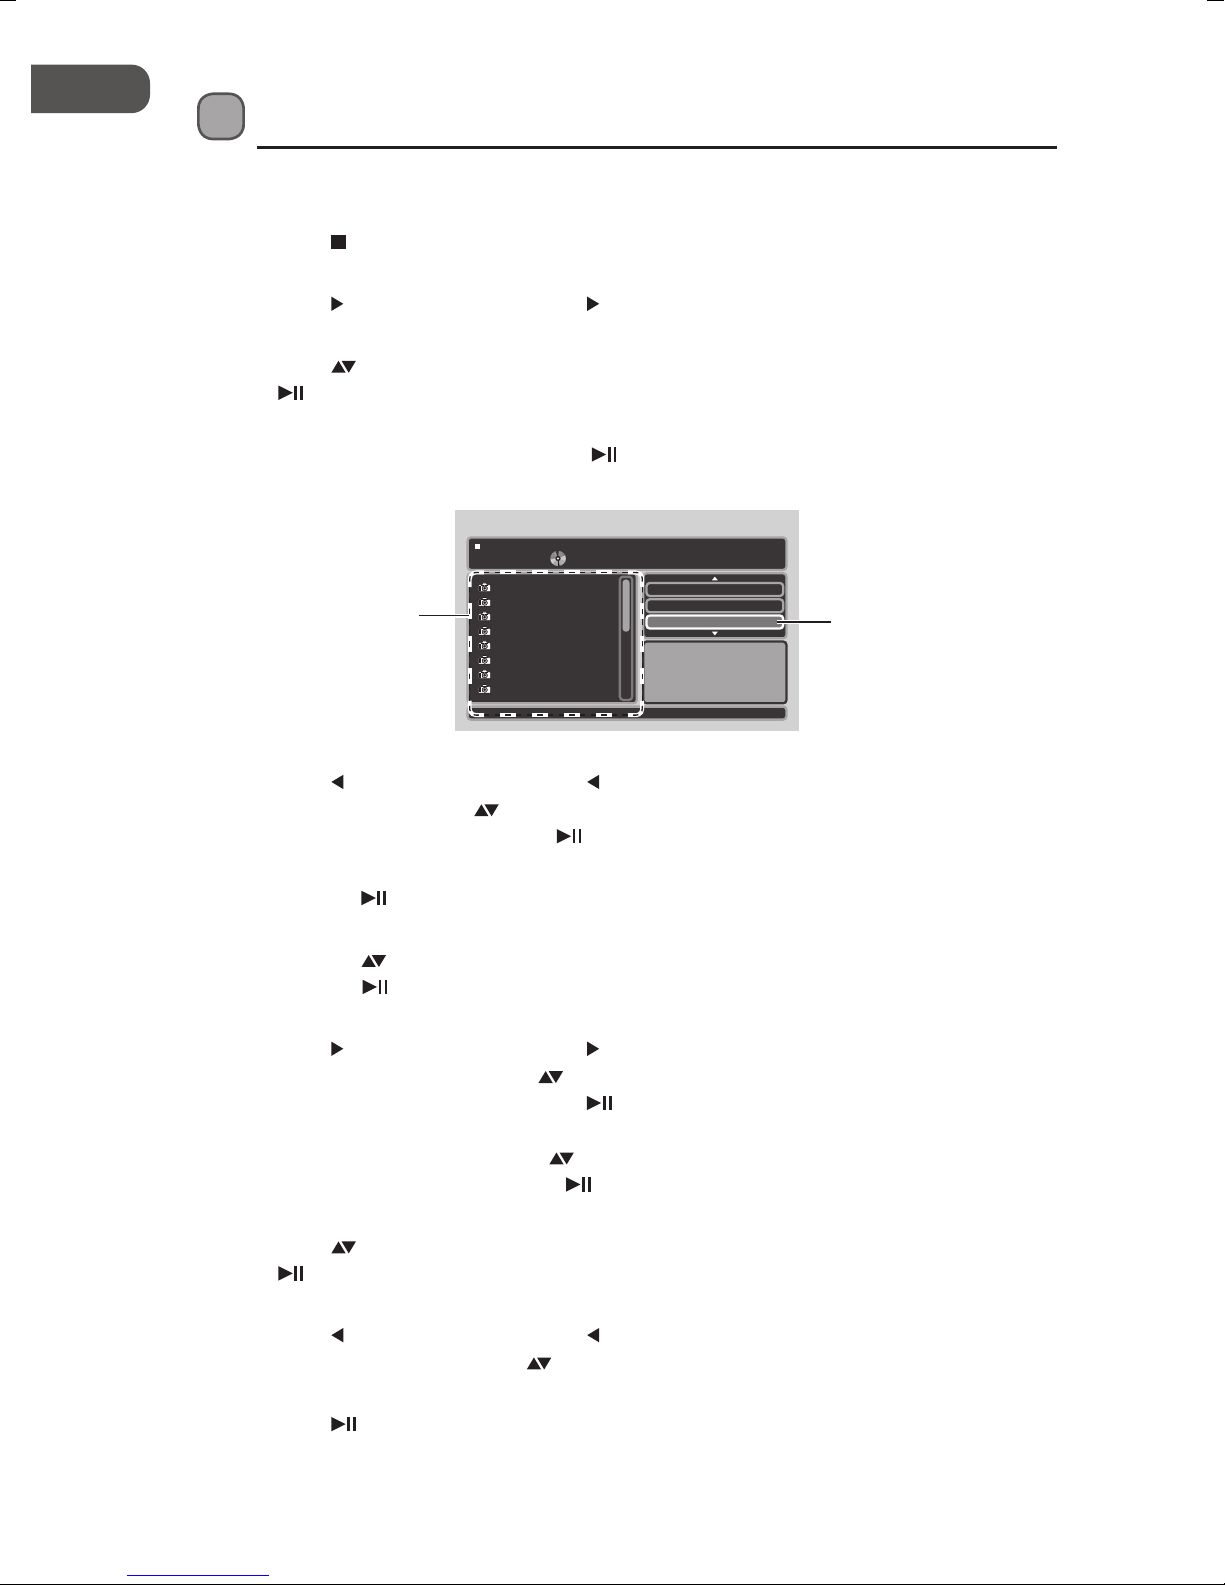
GB
Program Playback
Adding les to the Program List
1. Press the button on the unit or the STOP/SLOW button on the remote control twice
to completely stop playback.
2. Press the
button on the unit or the / VOL + button on the remote control to enter
the right screen of the navigator.
3. Press the
buttons on the unit or the remote control to select Edit mode, then press
the button on the unit or the ENTER button on the remote control to highlight the
Edit mode.
• To leave the Edit mode, press the
button on the unit or the ENTER button on
the remote control again to cancel the highlight.
/
Repeat : Off
Mode : Normal
Edit mode
Browser view
Edit mode
button on the unit or the ENTER button on the
Browser list
4. Press the
button on the unit or the / VOL - button on the remote control to enter
the left screen. Press the
in the preview list, then press the
-
/ 17
011101_01
011101_12
011101_13
011101_22
011101_26
011101_31
011101_33
011101_34
buttons on the unit or the remote control to select a le
remote control to tick the le.
• Press the
button on the unit or the ENTER button on the remote control again
to cancel the tick.
• Press the
buttons on the unit or the remote control to select another le and
press the button on the unit or the ENTER button on the remote control
repeatedly to tick more les.
5. Press the
button on the unit or the / VOL + button on the remote control to enter
the right screen, then press the buttons on the unit or the remote control to select
Add to program and then press the button on the unit or the ENTER button on
the remote control to conrm. Now the ticked les have been programmed in the
Program view, you can press the buttons on the unit or the remote control to select
Program view and then press the button on the unit or the ENTER button on the
remote control to view the ticked les in Browser view.
6. Press the
buttons on the unit or the remote control to select Edit mode, then press
the button on the unit or the ENTER button on the remote control to leave the Edit
mode.
7. Press the
button on the unit or the / VOL - button on the remote control to enter
the left screen. Then press the buttons on the unit or the remote control to select a
le you want to play from the Preview list.
8. Press the
button on the unit or the remote control to play the le.
30
Page 31

GB
Deleting Files from the Program List
1. Repeat steps 1, 2 and 3 as described in “Adding les to the Program List” section.
2. Press the
button on the unit or the / VOL - button on the remote control to enter
the left screen in Program view. Press the buttons on the unit or the remote
control to select a le you want to delete, and then press the button on the unit or
the ENTER button on the remote control to tick the le.
011101_22
Edit mode
Browser view
Clear program
W: 1024 H: 768
Clear Program
3. Press the
4 / 17
011101_01
011101_12
011101_13
011101_22
011101_26
011101_31
011101_33
011101_34
button on the unit or the / VOL + button on the remote control to enter
the right screen, then press the buttons on the unit or the remote control to select
Clear program to delete the ticked les in Program view.
To Return to Browser List
1. Press the buttons on the unit or the remote control to select the Browser view,
then press the button on the unit or the ENTER button on the remote control to
change from “Browser view” to “ Program view”.
• The “Browser view” will display all the tracks available on the disc.
• The “Program view” will display all the selected track after
programming.
1 / 17
2. Press the
011101_01
011101_12
011101_13
011101_22
011101_26
011101_31
011101_33
011101_34
buttons on the unit or the remote control to select Edit mode, then press
Mode : Normal
Edit mode
Browser view
Browser view
Browser view
the button on the unit or the ENTER button on the remote control to leave Edit
mode.
31
Page 32

GB
Customising the Language Settings
1. Press the SETUP button on the remote control
to display the system setup menu.
2. Press the
buttons on the unit or the remote
control to select Language and then press the
Language
Video
Rating
OSD Language : English
Subtitle
MPEG4 Subtitle : Central European
Audio
DVD menu
: Off
: English
: English
button on the unit or the / VOL + button
on the remote control.
3. Press the
buttons on the unit or the remote
Misc
control to select OSD Language / Subtitle
/ MPEG4 Subtitle / Audio / DVD menu and
then press the button on the unit or the
ENTER button on the remote control.
4. Press the
the
buttons on the unit or the remote control to select an option, then press
button on the unit or the ENTER button on the remote control to conrm.
5. Press the SETUP button on the remote control on the remote control to exit the menu.
OSD Language
Select the system display language.
Subtitle
Turn on/o the subtitle feature of the disc.
MPEG4 Subtitle
Select the dierent MPEG4 subtitle language you wish to play on the screen. If the selected
language is not recorded on the disc, the player will play the top-priority language of the
disc.
Audio
Select the default soundtrack you wish to play if your DVD supports multi-language sound
tracks.
DVD menu
Select the default DVD menu language you wish to play on the screen. If the selected
language is not recorded on the disc, the player will play the top-priority language of the
disc.
32
Page 33

GB
Customising the Video Settings
1. Press the SETUP button on the remote
control to display the system setup menu.
2. Press the buttons on the unit or the
remote control to select Video and then
press the button on the unit or the /
VOL + button on the remote control.
Language
Video
Rating
Misc
Aspect Ratio : 16:9
TV System
Picture Mode : User
: PAL
3. Press the buttons on the unit or the
remote control to select Aspect Ratio /
TV System / Picture Mode and then press
the button on the unit or the ENTER
button on the remote control.
4. Press the buttons on the unit or the remote control to select an option, then press
the button on the unit or the ENTER button on the remote control to conrm.
5. Press the SETUP button on the remote control to exit the menu.
Aspect Ratio
Select the aspect ratio of the viewing screen (both internal display or external display) if the
disc has more than one aspect ratio (4:3LB / 4:3PS / 16:9).
4:3: Select “Aspect Ratio: 4:3” for outputting 4:3 ratio video for a conventional size TV.
Black bands might appear on the screen if playing a non 4:3 video.
16:9: Select “Aspect Ratio: 16:9” for outputting 16:9 ratio video for a widescreen TV. Black
bands might appear on the screen if playing a non 16:9 video.
TV System
Select the TV playing system according to the local TV system (NTSC/PAL/Auto).
Picture Mode
Picture Mode setting allows user to adjust the picture’s brightness
(Standard / Bright / Soft / User).
33
Page 34

GB
Customising the Rating Settings
Parental control
1. Press the SETUP button on the remote
control to display the system setup menu.
2. Press the
buttons on the unit or the
remote control to select Rating and then
press the
button on the unit or the /
VOL + button on the remote control.
3. Press the
buttons on the unit or the
Language
Video
Rating
Misc
Parental control
: 1. Kid Safe
Set Password
remote control to select Parental control
and then press the button on the
unit or the ENTER button on the remote
control. A password screen will appear.
4. Press the 0-9 buttons on the remote control to input the old password (The factory
pre-set password is “6666” for the rst time setup) and then press the
button on the
unit or the ENTER button on the remote control.
5. Press the
button on the unit or the ENTER button on the remote control to select
Parental control again for Parent lock levels selection.
The parental lock levels are equivalent to the following ratings:
1. Kid Safe: Kid safe.
2. G: General audience; recommended as acceptable for viewers of all ages.
3. PG: Parental Guidance suggested.
4. PG 13: Material is unsuitable for children under the age of 13.
5. PG R: Parental Guidance-restricted; recommended that parents restrict children
under the age of 17 from viewing or allow children to view only when
supervised by a parent or adult guardian.
6. R: Restricted, children under 17 should not view unless supervised by a parent
or adult guardian.
7. NC 17: No children under the age of 17, not recommended viewing for children
under age 17.
8. Adult: Adult only.
6. Press the
button on the unit or the ENTER button on the remote control to conrm.
(Rating 1 has the most restrictions while rating 8 can virtually playback all DVD’s.)
7. Press the SETUP button on the remote control to exit the menu.
34
Page 35

GB
Set Password
1. Press the SETUP button on the remote
control to display the system setup menu.
2. Press the buttons on the unit or the
Language
Video
Parental control
Set Password
: 1. Kid Safe
remote control to select Rating and then
press the
button on the unit or the /
VOL + button on the remote control.
Rating
Misc
3. Press the buttons on the unit or the
remote control to select Set Password.
4. Press the 0-9 buttons on the remote control to input the old password (The factory
pre-set password is “6666” for the rst time setup) and then press the button on
the unit or the ENTER button on the remote control to conrm. If you input the wrong
password, the screen will show Incorrect Password.
5. Press the button on the unit or the ENTER button on the remote control again, then
press the 0-9 buttons on the remote control to input the new password. Press the
button on the unit or the ENTER button on the remote control to conrm.
6. Enter the new password again to verify. After veried, the screen will show Set
Password Successful.
7. Press the SETUP button on the remote control to exit the menu.
Customising the Miscellaneous Settings
1. Press the SETUP button on the remote control
to display the system setup menu.
2. Press the buttons on the unit or the remote
control to select Misc and then press the
button on the unit or the / VOL + button on
the remote control.
3. Select Use default Setting and then press the
button on the unit or the ENTER button on
the remote control.
4. Press the buttons on the unit or the
(VOL -/+) buttons on the remote control to
select “Yes ” to reset all your settings to the
factory’s default except your own password,
then press the button on the unit or the
ENTER button on the remote control to
conrm.
5. Press the SETUP button on the remote control
to exit the menu.
Language
Video
Rating
Misc
Language
Video
Do you want to use default setting?
Rating
Misc
Yes No
Use Default Settings
Use Default Settings
Use Default Settings
35
Page 36

GB
Maintenance
Handling Discs
Playback side
• Do not touch the playback side of the disc.
• Do not attach paper or tape to the disc.
Cleaning Discs
• Fingerprints and dust on the disc cause picture and sound deterioration. Wipe the disc
from the centre outwards with a soft cloth. Always keep the disc clean.
• If you cannot wipe o the dust with a soft cloth, wipe the disc lightly with a slightly
moistened cloth and nish with a dry cloth.
• Do not use any type of solvent such as thinner, benzine, commercially available cleaners
or antistatic spray. They may damage the disc.
Storing Discs
• Do not store discs in places subjected to direct sunlight or near heat sources.
• Do not store discs in places subjected to moisture and dust such as a bathroom or near a
humidier.
• Storing discs vertically in a case, stacking discs or placing objects on discs outside of their
cases may cause warping.
Cleaning the Unit
Ensure the unit is fully unplugged from the mains socket before cleaning.
• To clean the unit, wipe the case with a slightly moist, lint-free cloth.
• Do not use any cleaning uids containing alcohol, ammonia or abrasives.
• Do not spray an aerosol at or near the unit.
36
Page 37

GB
Hints and Tips
If a problem does occur, it may often be due to something very minor. The following table
contains various tips.
Menu Description
No power. • Ensure the mains adapter is connected.
• Make sure that the unit is turned on.
• Make sure that you select ON mode.
• Make sure the battery is charged up on the DVD player.
The remote
control does
not function.
• Use the remote control near the unit.
• Point the remote control at the remote sensor on the unit.
• Replace the battery in the remote control with a new one.
• Make sure the plastic sheet has been removed from the remote
control.
• Remove any obstacles between the remote control and the unit.
Very little or
no sound is
coming from a
DVD.
No picture. • The region number of the disc doesn’t match the region number of
The picture is
not clear.
Loud hum or
noise is heard.
• Make sure the unit is not paused. Press the
the remote control.
• Make sure the unit is not in fast-forward or fast-reverse mode. Press
the button on the unit or the remote control.
• Make sure the AUDIO/VIDEO input/output connections are correct.
• This unit does not support DTS audio decoding system. Press the
AUDIO/ANGLE button on the remote control to change the audio
setting to 2-Channel Analogue mode.
• The unit has overheated. Shut it o for 30 minutes to allow it to cool
down.
• The volume control is too low. Increase the volume.
this unit.
• The DVD is dirty. Gently clean the disc.
• The disc is scratched.
• Please adjust the LCD display brightness (see Video setting on page
29).
• The plugs and sockets are dirty. Wipe them with a cloth slightly
moistened with alcohol.
• Clean the disc.
• The disc is scratched or the le is corrupt.
button on the unit or
37
Page 38

GB
Menu Description
The disc does
not play.
File from Media
storage device
does not play
The unit does
not respond
when pressing
any buttons
• There is no disc inside the unit (“No Disc” appears on the screen).
• Insert the disc correctly with the graphics facing up.
• Clean the disc.
• A non-valid disc has been inserted, or the disc region number does
not match the region number of the unit.
• Condensation may have formed inside the unit due to a sudden
change in temperature. Wait about an hour for it to clear and try
again.
• Check the le format.
• This product do not support NTFS File system.
• The unit may freeze up during use. Switch the unit o and then on
again to reset the unit.
38
Page 39

GB
Specications
Model L7PDT13E
Disc Format DVD+/–R, DVD+/–RW, CD, CD-R, CD-RW, JPEG Picture CD
Video System PAL, NTSC
Video Decompression MPEG-2, MPEG4 (maximum resolution 720x525@25/30fps)
LCD Screen 7” TFT LCD Panel
Audio:
Audio Characteristic
Dolby Digital Decoding
Speaker 2 Built-in stereo speaker
Terminals: DVD Player – USB 2.0 x 1 (maximum 8GB),
Power Adapter:
Power Supply
Power Consumption
2-Channel Analogue
Yes
AV OUT Socket x 1, Headphone Socket x 1
Monitor – AV IN Socket x 1, Headphone Socket x 1
AC 100-240V 50/60Hz (Mains Adapter)
Max. 12W (Standby ≤ 0.5W)
Remote Control Infra-red with one CR2025 (3V) battery
Weight: DVD Player – 0.6 kg
Monitor – 0.4 kg
Dimensions: DVD Player – 210 mm (L) x 160 mm (W) x 35 mm (H)
Monitor – 210 mm (L) x 160 mm (W) x 35 mm (H)
Features and specications are subject to change without prior notice.
39
Page 40

NO
NO
Takk for at du kjøpte ny Logik 7" bærbar dobbel DVD-spiller.
Vi anbefaler at du tar deg tid til å lese gjennom hele bruksanvisningen for
å bli fortrolig med alle funksjonene som tilbys. Du nner også mange råd
og tips for å løse eventuelle problemer.
Les alle sikkerhetsanvisningene nøye før bruk og oppbevar
bruksanvisningen for fremtidig referanse.
Pakke opp
Fjern all emballasje fra enheten. Ta vare på emballasjen. Ta hensyn til lokale bestemmelser
om avfallshåndtering hvis du må kaste emballasjen.
Følgende elementer er inkludert:
REPEAT
REPEAT
POWER
DISPLAY
/PROG
A-B
AUDIO/
ANGLE
SUBTITLE/
TITLE
MENU/
ZOOM
STOP/
SETUP
SLOW
GOTOENTER
VOL– VOL+
SOURCE MUTE
DVD-spiller Monitor Fjernkontroll (med batteri) x 1
Strømadapter x 1 3,5mm AV-kabel x 1Biladapter x 1
40
Bruksanvisning x 1Monteringssett x 2 Hurtigstartguide x 2
Page 41

NO
NO
Produktoversikt
Sett forfra
1
2
DVD-spiller/monitor
3
1. LCD-skjerm
2. Høyttalere
Sett bakfra
1
3. Fjernkontrollsensor
2
1. Fot
DVD-spiller/monitor
2. Platedeksel
41
Page 42

NO
NO
Sett ovenfra
1 2 3
1. ÅPNE-bryter
Skyv for å åpne plateluken.
2.
-knappene
• Flytter til venstre/høyre på
menyskjermen og justerer bestemte
innstillinger.
• Øker eller senker lydstyrken.
3.
-knappene
• Flytter oppover/nedover på
menyskjermen og justerer bestemte
innstillinger.
4.
-knappen
Starter/pauser/fortsetter avspillingen
av en plate.
DVD-spiller
7 8
4
MUTE TFT MENU
9
Monitor
6. -knappen
Velg ønsket inngangskilde. DVD/USB.
7.
Justere lydstyrken.
8.
-knappene
Lar deg navigere på menyskjermen og
justere bestemte innstillinger.
9. DEMP-knappen
Demper og setter lyden på igjen.
10. TFT-knappen
Slår skjermen på/av.
11. MENY-knappen
Viser menyskjermen.
6
5
11
10
-knappene
5.
STOPP-knappen
Stopper avspillingen av en plate.
42
Page 43

NO
NO
Sett fra høyre
6
USB
AV OUT PHONE • ON
1 4
3
2
DVD-spiller
AV IN PHONE • ON
3
7
Monitor
DC IN 12V
DC IN 12V
4
OFF •
5
OFF •
5
1. USB-kontakt
Passer til en USB-lagringsenhet.
2. AV UT-kontakt for lyd og bilde
3. TELEFON-kontakt
4. DC INN-kontakt for 12V likestrøm
5. PÅ/AV-bryter
6. Strømindikator-LED
7. AV INN-kontakt for lyd og bilde
43
Page 44

NO
NO
44
Fjernkontroll
1. VIS-knapp
Viser informasjon om platen under
avspilling.
2. Strøm-knapp
Veksler enheten mellom PÅ og
VENTEMODUS.
3. LYD/VINKEL-knapp
• Velger et av lydsporene på en DVD
(hvis ere enn ett er tilgjengelig) eller
modus for lydavspilling fra en CD.
• Veksler mellom ere kameravinkler
når DVD-en du ser på er
programmert med mulighet for
dette.
4. TEKSTING/TITTEL-knapp
• Velger et av tekstingsspråkene som
er programmert på DVD-en (hvis
tilgjengelig).
• Trykk og hold for å gå inn i
tittelmenyen (hvis tilgjengelig).
5. MENY/ZOOM-knapp
• Viser DVD-platens hovedmeny (hvis
tilgjengelig).
• Zoomer inn i / ut av bildet.
6. STOPP/SAKTE-knapp
• Stopper avspillingen av en plate.
• Velger sakte avspilling og fortsetter
normal hastighet.
(VOL –/+)-knapper
7.
• Flytter til venstre/høyre på
menyskjermen og justerer bestemte
innstillinger.
• Øker eller senker lydstyrken.
ENTER-knapp
8.
9. DEMP-knapp
-knapper
• Flytter oppover/nedover på
menyskjermen og justerer bestemte
innstillinger.
Bekrefter et valg på menyskjermen.
-knapp
Starter/pauser/fortsetter avspillingen
av en plate.
Demper og setter lyden på igjen.
1
REPEAT
/PROG
REPEAT
A-B
SETUP
GOTOENTER
DISPLAY
2
3
4
5
6
7
POWER
AUDIO/
ANGLE
SUBTITLE/
TITLE
MENU/
ZOOM
STOP/
SLOW
VOL– VOL+
8
9
10
SOURCE MUTE
10. KILDE-knapp
Velger ønsket inngangskilde: DVD/
USB.
11. GJENTA/PROGRAM-knapp
• Gjenta et kapittel, en tittel eller hele
DVD-platen.
• Gjenta et CD-spor eller hele platen.
• Aktiverer programmeringsmodus for
DVD-lm (ikke for CD/USB-modus).
12. GJENTA A–B-knapp
Gjenta et segment mellom A og B på
en DVD.
13. Nummer 0–9-knapper
Angir foreldrekontrollpassordet eller
nner tittel/kapittel/spor.
14. OPPSETT-knapp
Går inn i oppsettmenyen.
15. GÅ TIL-knapp
Hopper til et bestemt sted på en plate.
16.
-knapper
• Hopper tilbake til forrige kapittel/
spor/tittel på en plate.
• Hopper frem til neste kapittel/spor/
tittel på en plate.
17.
-knapper
For å spole fort bakover/forover i det
gjeldende sporet.
11
12
13
14
15
16
17
Page 45

NO
NO
Fjerne isoleringsteipen fra ernkontrollen
Fjern isoleringsteipen fra batteriet hvis dette er
første gang det brukes. Du nner batteriet bakerst
under ernkontrollen.
Skifte batteriet i ernkontrollen
Fjernkontrollen krever et 3 V litiumbatteri av typen CR2025.
1. Skyv og hold batteriets låseik i pilens retning.
2. Trekk ut batteriholderen og ern det gamle
batteriet.
3. Erstatt med et nytt batteri.
4. Skyv batteriholderen tilbake på plass i
ernkontrollen.
45
Page 46

NO
NO
Behandle batteriet
• Skjødesløs eller feil bruk av batterier kan føre til korrosjon eller batterilekkasje, noe som
kan føre til personskade, brann eller annen skade på eiendom.
• Sett batteriet riktig inn i batterirommet. Normalt vender batteriets positive pol (+) opp.
• Når batteriet er tomt, vil ikke ernkontrollen fungere.
• Bruk kun batteritypen som angis i denne håndboken.
• Ikke kast det brukte batteriet som husholdningsavfall. Kast det i henhold til lokale
bestemmelser.
• Små knappebatterier, f.eks. det som brukes i denne ernkontrollen, kan lett svelges av
små barn, noe som er farlig. Hold løse knappebatterier borte fra små barn og påse at
batteridekslet sitter godt fast i ernkontrollen. Ta kontakt med lege hvis du tror at et
knappebatteri er blitt svelget.
Håndtere ernkontrollen
• Hvis du nner det vanskelig å erne batteriet, kan du bruke en binders til å skyve
batteriiken.
• Ikke la ernkontrollen falle ned.
• Ikke utsett ernkontrollen for støt.
• Ikke søl vann eller andre væsker på ernkontrollen.
• Ikke legg ernkontrollen på en fuktig gjenstand.
• Ikke legg ernkontrollen i direkte solskinn eller nær varmekilder.
• Ta batteriet ut av ernkontrollen hvis den ikke skal brukes på en lang stund. I motsatt fall
kan korrosjon eller batterilekkasje oppstå, noe som kan føre til personskade, skade på
eiendom og/eller brann.
Fjernkontrollens virkeområde
• Fjernkontrollsensoren foran på enheten
gjenkjenner signaler fra ernkontrollen opptil 5
meter unna og innenfor en vinkel på maksimum
60°.
• Vær oppmerksom på at bruksavstanden kan
variere avhengig av lysstyrken i rommet.
30° 30°
46
Innenfor cirka 5m
REPEAT
REPEAT
POWER
DISPLAY
/PROG
A-B
AUDIO/
ANGLE
SUBTITLE/
TITLE
MENU/
ZOOM
STOP/
SETUP
SLOW
GOTOENTER
VOL– VOL+
SOURCE MUTE
Page 47

NO
NO
Bruke i en bil
Bruke bilstrømadapteren (ved bruk i bil)
Den medfølgende 12 V bilstrømadapteren er konstruert for å brukes med kjøretøy som har
et 12 V negativt jordet elektrisk system.
USB
AV OUT PHONE • ON
DC IN 12V
OFF •
AV IN PHONE • ON
DC IN 12V
OFF •
• Bruk kun bilstrømadapteren for 12 V som fulgte med enheten. Må ikke
brukes i kjøretøyer med 24 V. Andre biladaptere kan skade spilleren og/eller
kjøretøyet.
• Bruk kun den vedlagte 12V-bilstrømadapteren. Ikke bruk den med noe annet
utstyr.
• Med tanke på trakksikkerhet, må førere ikke bruke spilleren eller se på video
mens de kjører.
• Hvis det er mye aske eller støv inne i sigarettennerkontakten, kan
innstikkspluggen bli varm på grunn av dårlig kontakt. Rengjør 12 V-kontakten
før bruk.
• Etter bruk må du koble bilstrømadapteren fra både enheten og 12
V-kontakten.
• Hvis enheten ikke er godt festet til kjøretøyet, kan den y gjennom luften ved
en eventuell ulykke og forårsake skade på eiendom, personskade eller død.
• Følg bestemmelser i lokale trakkregler om bruken av videoenheter i
kjøretøyer.
47
Page 48

NO
NO
Montering i en bil
Bruk det medfølgende monteringssettet til å installere DVD-spilleren og monitoren på
baksiden av nakkestøttene i kjøretøyet. Bind festereimen stramt rundt nakkestøtten.
1. Sett DVD-spilleren og monitoren inn i tilpassede poser.
2. Træ reimendene til montereringssettet gjennom åpningene.
Kontroller at spennene er satt
riktig sammen så reimene ikke
løsner ved et uhell.
3. Før reimene rundt nakkestøtten og fest dem
med klipsen slik at DVD-spilleren vender
bakover.
Husk alltid på å låse klipsen og
stramme reimene for å ivareta
sikkerheten til passasjerene.
Installasjonsveiledning
DVD-spiller
Monitor
Biladapter
AV-kabel
Fjernkontroll
48
REPEAT/
REPEAT
SOURCE
DISPLAY
PROG
A-B
AUDIO/
ANGLE
SUBTITLE/
TITLE
MENU/
ZOOM
/
SETUP
SLOW
GOTOOK
Page 49

NO
NO
Strømkilde
Strøm fra stikkontakt
Den medfølgende strømadapteren (12V likestrøm ut) skal bare brukes sammen med både
DVD-spilleren og monitoren.
Power adaptor
Til
stikkontakten
USB
AV OUT PHONE • ON
DC IN 12V
OFF •
AV IN PHONE • ON
DC IN 12V
OFF •
Høyre side av DVD-spilleren Høyre side av monitoren
• Slå av enheten før du kopler den fra strømadapteren for å unngå at enheten
skades.
• Når enheten ikke skal brukes i en lengre periode, må du kople strømadapteren
fra stikkontakten.
• Stikkontakten må nnes i nærheten av enheten og være lett tilgjengelig.
Støpslet må tas ut fra stikkontakten straks hvis det oppstår en feil.
• Når strømadapteren er tilkoblet, er enheten ikke fullstendig koplet fra
hovedstrømkilden, selv om enheten er slått av.
49
Page 50

NO
NO
Forbindelser
Bruke øretelefoner
Skru volumet ned før du kobler til øretelefoner. Sett øretelefonene på og skru volumet
langsomt opp til du oppnår ønsket lydstyrke. Høyttaleren er automatisk deaktivert når
øretelefoner er tilkoblet.
Høyre side av DVD-spilleren
USB
AV OUT PHONE • ON
DC IN 12V
AV OUT PHONE
OFF •
Øretelefoner (ikke vedlagt)
Høyre side av monitoren
AV IN PHONE • ON
DC IN 12V
AV IN PHONE
OFF •
Øretelefoner (ikke vedlagt)
Unngå høy lydstyrke og langvarig lytting når du bruker hodetelefoner, fordi
dette kan skade hørselen.
50
Page 51

NO
NO
Bruke en USB-ashstasjon
Du kan spille av musikk eller se på JPEG-ler fra USB-ashstasjoner.
1. Sett USB-ashstasjonen direkte inn i USB-sporet på enheten.
Høyre side av DVD-spilleren
USB
AV OUT PHONE • ON
DC IN 12V
OFF •
2. I stoppmodus, trykk på -knappen på enheten eller på KILDE-knappen på
ernkontrollen. Trykk på -knappene på enheten eller på ernkontrollen for å
velge «USB» og trykk deretter på -knappen på enheten eller ENTER-knappen på
ernkontrollen for å få tilgang til data på stasjonen.
3. Bruk
-knappene på enheten eller på ernkontrollen for å velge en l, og trykk
deretter på -knappen på enheten eller ENTER-knappen på ernkontrollen for å
spille av.
USB-stasjonen ernes ved å trykke på
-knappen på enheten eller på STOPP/SAKTE-
knappen på ernkontrollen for å stoppe avspilling. Når du erner USB ashstasjonen, går
enheten automatisk tilbake til platemodus.
Se en DVD-plate på DVD-spilleren og monitoren
Du kan se den samme DVD-platen på DVD-spilleren og monitoren.
Høyre side
av monitor
OFF •
DC IN 12V
AV IN PHONE • ON
1
Til AV INNkontaktene
3,5mm AV-kabel
2
Til AV UTkontaktene
Høyre side av
DVD-spilleren
OFF •
DC IN 12V
AV OUT PHONE • ON
USB
(vedlagt)
1. Koble sammen DVD-spilleren og monitoren med den vedlagte AV-kabelen (3,5 mm).
2. Slå på DVD-spilleren og monitoren.
3. Når du spiller av en DVD-plate på DVD-spilleren, vises den samtidig på monitoren.
51
Page 52

NO
NO
DVD+ReWritable
DVD+R
Kompatible platetyper
Platetyper Platelogo Innspilt innhold
DVD-VIDEO (DVD = Digital Versatile Disc)
DVD±RW (overskrivbare DVD-plater med lyd/
video eller JPEG-ler)
DVD±R (skrivbare DVD-plater med lyd/video
eller JPEG-ler)
CD-R (skrivbare CD-plater med lyd/video eller
JPEG-ler)
CD-RW (overskrivbare CD-plater med lyd/video
eller JPEG-ler)
LYD-CD (CD = Compact Disc)
LYD + VIDEO
LYD + VIDEO + JPEG
LYD + VIDEO + JPEG
LYD + VIDEO + JPEG
LYD + VIDEO + JPEG
LYD
Bildeformater som støttes
JPEG
• Filtypen må være .jpg – ikke .jpeg
• Bildekomprimeringen må være i samsvar med JPEG/ISO-formatet.
• Kun fullførte erøktsplater av typen DVD-R og DVD-R støttes.
• Flerøktsplater av typen DVD+R eller DVD+RW støttes ikke, enten de er fullført
eller ikke.
• Enkelte innspilte ler kan ikke spilles av som følge av platens type og format
eller opptakets egenskap.
Regionkode
Både DVD-spillere og DVD-plater er regionkodet.
Disse regionkodene må matche før du kan spille av
en plate. Hvis kodene ikke matcher, kan ikke platen
spilles av.
Regionkoden for denne DVD-spilleren er angitt på
bunnplaten til DVD-spilleren.
52
Platetype DVD-VIDEO
Regionkode
Page 53

NO
NO
DVD-avspilling
Kontroller at den beskyttende lmen på skjermen er ernet før bruk.
I denne bruksanvisningen forklares elementær bruk av enheten. Noen DVD-er er produsert
på en måte som bare tillater bestemte eller begrensede operasjoner under avspilling. Av
den grunn kan det være at enheten ikke reagerer på alle kommandoer. Dette er ingen
mangel.
Se instruksjonene som følger med hver enkelt DVD for nærmere informasjon om de
tilgjengelige alternativene på DVD-en.
«
» kan vises på skjermen under drift. En « » betyr at enheten eller platen ikke tillater den
ønskede operasjonen.
Grunnleggende DVD-avspilling
1. Skyv på/av-bryteren til på-posisjonen.
2. Skyve åpne-bryteren for å åpne platedekslet.
3. Hold platen langs kanten og legg den forsiktig
ned på plateholderen med etiketten vendt opp.
Skyv platen forsiktig ned til du hører et «klikk».
4. Lukk platedekslet. Bruk stativet på baksiden av
enheten eller hold DVD-spilleren i hendene (idet
du passer på ikke å berøre enhetens plateluke).
Enheten starter avspillingen hvis platen ikke
er innspilt med noen meny. Hvis det er innspilt
én eller ere titler på platen, vises en meny på
skjermen.
5. For å spille av en tittel, trykk på
0–9-knappene på ernkontrollen for å utheve
tittelen, og trykk deretter på -knappen på
enheten eller på ernkontrollen.
/
CHG
åpne til stående
Stoppe avspillingen
1. Trykk på -knappen på enheten eller STOPP/SAKTE-knappen på ernkontrollen for
å stoppe midlertidig, og se at det står « STOPP» på skjermen. Enkelte plater tillater
enheten å huske hvor platen ble stoppet, f.eks. i en DVD-lm.
2. Trykk på
fra den siste posisjonen eller fra begynnelsen av platen.
3. Trykk på
ganger for å stoppe helt.
-knappen på enheten eller på ernkontrollen for å gjenoppta avspillingen
-knappen på enheten eller STOPP/SAKTE-knappen på ernkontrollen to
53
Page 54

NO
NO
Forrige og neste
1. Trykk på -knappen på enheten eller -knappen på ernkontrollen under avspilling
for å gå tilbake til starten av det forrige kapitlet. Ved hvert trykk hopper avspillingen
tilbake til starten av forrige kapittel helt til starten av platen.
2. Hver gang du trykker på
hopper avspillingen frem til begynnelsen av neste kapittel.
-knappen på enheten eller -knappen på ernkontrollen,
Spole fort forover og fort bakover
1. Trykk på -knappene på ernkontrollen for å spole fort bakover eller fort forover
gjennom platen. Hver gang -knappene på ernkontrollen trykkes, endres
spolehastigheten bakover/forover. Du kan velge mellom 4 hastigheter: x2, x4, x8 og
x16.
2. Trykk på
avspilling.
-knappen på enheten eller på ernkontrollen for å gjenoppta normal
Pause i avspillingen
1. Trykk på -knappen på enheten eller på ernkontrollen for å ta en pause i
avspillingen (og vise stillbilde). Lyden slås av ved visning av stillbilde.
2. Trykk på
-knappen igjen for å fortsette normal avspilling.
Info
Mens avspillingen pågår, kan du trykke på VIS-knappen på ernkontrollen for å gå til
informasjonsmenyen hvis denne funksjonen er tilgjengelig på platen.
Volumjustering
• Trykk på /VOL– eller /VOL+-knappen på ernkontrollen for å justere volumet på
enheten.
• Trykk på
• Trykk på DEMP-knappen på ernkontrollen for å slå av lyden, og se at det står «
skjermen. Trykk på DEMP-knappen på ernkontrollen igjen for å lytte.
knappene på monitoren for å justere lydstyrken.
» på
Gjenta alle
Trykk på GJENTA/PROGRAM-knappen på ernkontrollen gjentatte ganger for å velge
mellom ulike repetisjonsmoduser.
Meny Beskrivelse
Første trykk Gjenta kapittel
Andre trykk Gjenta tittel
Tredje trykk Gjenta av
54
Page 55

NO
NO
Lydkanal
Trykk på LYD/VINKEL-knappen på ernkontrollen gjentatte ganger for å velge mellom
ulike lydspråk.
Gjenta A–B
Du kan gjenta et avsnitt mellom punktene A og B inne i en tittel/kapittel/spor.
1. Trykk på GJENTA A–B-knappen for å velge et startpunkt A.
2. Trykk på GJENTA A–B-knappen igjen for å velge et endepunkt B og fullføre
innstillingen. Det valgte avsnittet A–B spilles av gjentatte ganger.
Den tredje gangen du trykker på GJENTA A–B-knappen avsluttes funksjonen, og «REPAB
AV» vises på skjermen.
Tekstingsspråk
Trykk på TEKSTING/TITTEL-knappen på ernkontrollen gjentatte ganger for å veksle
mellom de ulike tekstingsspråkene som er tilgjengelig på platen.
Valg av vinkel
Noen DVD-er inneholder scener som er lmet fra ere vinkler. Når en slik plate spilles av,
kan den samme scenen betraktes fra hver av disse vinklene.
1. Når du ser på en DVD som har
ere innspilte vinkler, kan du
trykke og holde LYD/VINKEL-
knappen på ernkontrollen for
å se hvor mange vinkler som er
tilgjengelig.
2. Trykk og hold LYD/VINKEL-
knappen på ernkontrollen
gjentatte ganger for å se scenen
fra alternative vinkler.
• Etter rundt to sekunder fortsetter avspillingen fra den nye vinkelen du har valgt.
• Hvis ingen knapp trykkes innen 10 sekunder, fortsetter avspillingen uten at den
gjeldende vinkelen endres.
• Denne funksjonen kan bare brukes dersom det er spilt inn
ere vinkler på den aktuelle platen.
• Hvis det bare er spilt inn én vinkel, vises
Rekkefølge av vinkelscener
(eksempel)
2
1/1.
55
Page 56

NO
NO
Spille av lyd-CD og JPEG bilde-CD
Legge inn en plate
1. Skyv på/av-bryteren til på-posisjonen.
2. Skyve åpne-bryteren for å åpne platedekslet.
3. Hold platen langs kanten og legg den forsiktig ned på plateholderen med etiketten
vendt opp. Skyv platen forsiktig ned til du hører at den «klikker» på plass.
4. Lukk platedekslet. Bruk stativet på baksiden av enheten eller hold DVD-spilleren i
hendene (idet du passer på ikke å berøre enhetens plateluke).
Spille av en lyd-CD
1. Trykk på -knappene på enheten eller på ernkontrollen for å utheve et lydspor eller
en lydl, og trykk deretter på -knappen på enheten eller på ernkontrollen for å
spille av.
• Hvis lene er inne i en mappe, trykk på
på ernkontrollen for å åpne mappen.
/Track03.CDA
• Trykk på
4 / 11
..
Track01
Track02
Track03
Track04
Track05
Track06
Track07
-knappen på enheten eller på ernkontrollen gjentatte ganger for å
velge rotmappen , og trykk deretter på -knappen på enheten eller ENTERknappen på ernkontrollen for å gå tilbake til den øvre menyen.
2. Avspillingen stoppes ved å trykke på
knappen på ernkontrollen.
-knappen på enheten eller -knappen
00:00:03 / 00:04:26
Repetisjon : Av
Funksjon : Normal
Endringsfunksjon
Musikk spilles
-knappen på enheten eller på STOPP/SAKTE-
56
Page 57

NO
NO
Spille av MPEG4/JPEG bilde-CD
47 / 115
011101_01
011101_12
011101_13
011101_22
011101_26
011101_31
011101_33
011101_34
1. Trykk på -knappene på enheten eller på ernkontrollen for å utheve en MPEG/
JPEG-l, og trykk deretter på -knappen på enheten eller ENTER-knappen på
ernkontrollen for å se bildevisningen eller MPEG4-videoen.
011101_22.JPG
Filter
Repetisjon : Av
Funksjon : Normal
W: 1024 H: 768
• Hvis lene er inne i en mappe, velger du den og trykker deretter på
enheten eller ENTER-knappen på ernkontrollen for å åpne mappen.
• I stoppmodus, trykk på
-knappen på enheten eller på ernkontrollen for å velge
rotmappen , og trykk deretter på -knappen på enheten eller ENTER-knappen
på ernkontrollen for å gå tilbake til det øvre nivået.
2. Se på MPEG4-videoen eller bildevisningen ved å trykke på
-knappen på enheten
eller ENTER-knappen på ernkontrollen.
3. Trykk på
-knappene på enheten eller på (VOL -/+)-knappene på ernkontrollen
for å rotere bildet 90°/180°/270° medurs eller moturs under bildevisningen / fort
bakover eller forover under MPEG4-avspilling.
• Alle rotasjonseekter blir opphevet når du avslutter bildevisningen.
4. Trykk på
-knappen på enheten eller STOPP/SAKTE-knappen på ernkontrollen for å
returnere til spillelisten i leseren.
-knappen på
57
Page 58

NO
NO
Leservinduet for avspilling og innstillinger
Totalt antall ler
Avspillingsstatus
Spiller av l
Leserliste
4 / 11
..
Track01
Track02
Track03
Track04
Track05
Track06
Track07
00:00:03 / 00:04:26
/Track03.CDA
Filter
Repetisjon : Av
Funksjon : Normal
Musikk spilles
1. I stoppmodus, trykk på -knappen på enheten eller / VOL + -knappen på
ernkontrollen for å gå til den høyre siden av leservinduets avspillingsinnstillinger.
Forløpt tid
Gjenværende tid
Filbane
Avspillingsinnstillinger
Forhåndsvisningsvindu
2. Trykk på
Trykk alltid på
-knappene på enheten eller på ernkontrollen for å velge elementene.
-knappen på enheten eller ENTER-knappen på ernkontrollen for å
bekrefte.
• Still inn lteret ved å trykke på
-knappen på enheten eller ENTER-knappen på
ernkontrollen for å vise rullegardinmenyen, og trykk på -knappene på enheten
eller på ernkontrollen for å velge et alternativ. Trykk deretter på -knappen på
enheten eller ENTER-knappen på ernkontrollen.
Meny Alternativer Beskrivelse
Filter Lyd, bilde, video • For å sortere listen etter lformat i leserlisten.
• Filterinnstillingene vil skille ut ltypene som vises i
oversikten på den venstre siden av leservinduet.
• Du kan forlate disse innstillingene ved å trykke på
-knappen på enheten eller på / VOL– -knappen på
ernkontrollen.
Gjenta Av, Enkel, Mappe • For å stille inn repetisjon under avspilling av ler.
Modus Normal, Stokket,
Musikkintro
Endringsfunksjon — • Lar deg velge ler som skal programmeres i programlisten.
Programvisning Programvisning,
Utforskerfunksjon
Legg til program Tilføy program,
Slett program
• For å stille inn rekkefølgen under avspilling av plater.
• Musikkintro spiller av begynnelsen av hver sang. Omtrent som å
bla i musikklisten på platen.
• Se avsnittet «Programavspilling» på neste side.
• Bytte til visning av alle ler i den gjeldende mappen eller valgte
ler i programlisten.
• Se avsnittet «Programavspilling» på neste side.
• Legge til eller slette valgte ler i programlisten.
• Se avsnittet «Programavspilling» på neste side.
* Ved Gjenta-avspilling av Lyd-CD skjules «Filter»-funksjonen i leseren.
Kontroller at avspillingen er stoppet fullstendig før disse innstillingene tas
i bruk.
58
Page 59

NO
NO
Programavspilling
Legge ler til programlisten
1. Trykk på -knappen på enheten eller STOPP/SAKTE-knappen på ernkontrollen to
ganger for å stoppe avspillingen helt.
2. Trykk på
-knappen på enheten eller / VOL + -knappen på ernkontrollen for å gå til
den høyre siden av leservinduet.
3. Trykk på
-knappene på enheten eller på ernkontrollen for å velge
Endringsfunksjon, og trykk deretter på -knappen på enheten eller ENTER-knappen
på ernkontrollen for å utheve endringsfunksjonen.
• Endringsfunksjon avsluttes ved å trykke på
-knappen på enheten eller ENTER-
knappen på ernkontrollen igjen for å oppheve uthevingen.
-
/ 17
011101_01
011101_12
011101_13
011101_22
011101_26
011101_31
011101_33
011101_34
4. Trykk på
Leserliste
-knappen på enheten eller / VOL– -knappen på ernkontrollen for å gå
til den venstre siden. Trykk på
velge en l i forhåndsvisningslisten, og trykk deretter på
/
Repetisjon : Av
Funksjon : Normal
Endringsfunksjon
Utforskerfunksjon
Endringsfunksjon
-knappene på enheten eller på ernkontrollen for å
-knappen på enheten eller
ENTER-knappen på ernkontrollen for å merke av len.
• Trykk på
-knappen på enheten eller ENTER-knappen på ernkontrollen igjen for
å oppheve avmerkingen.
• Trykk på
-knappene på enheten eller på ernkontrollen for å velge en annen
l og trykk gjentatte ganger på -knappen på enheten eller ENTER-knappen på
ernkontrollen for å merke av ere ler.
5. Trykk på
-knappen på enheten eller / VOL + -knappen på ernkontrollen for å gå til
det høyre panelet, trykk deretter på -knappene på enheten eller på ernkontrollen
for å velge Legg til program, og trykk deretter på -knappen på enheten eller
ENTER-knappen på ernkontrollen for å bekrefte. Når de merkede lene er blitt
programmert i programvisningen, kan du trykke på -knappene på enheten eller
på ernkontrollen for å velge Programvisning og deretter trykke på -knappen
på enheten eller ENTER-knappen på ernkontrollen for å se de merkede lene i
Utforskerfunksjon (leservisningen).
6. Trykk på
-knappene på enheten eller på ernkontrollen for å velge
Endringsfunksjon, og trykk deretter på -knappen på enheten eller ENTER-knappen
på ernkontrollen for å avslutte endringsfunksjon.
7. Trykk på
-knappen på enheten eller / VOL – -knappen på ernkontrollen for å gå til
den venstre siden. Trykk deretter på -knappene på enheten eller på ernkontrollen
for å velge en l som du vil spille av fra forhåndsvisningslisten.
8. Trykk på
-knappen på enheten eller på ernkontrollen for å spille av len.
59
Page 60

NO
NO
Slette ler fra programlisten
1. Gjenta trinn 1, 2 og 3 som beskrevet i avsnittet «Legge ler til programlisten».
2. Trykk på
til den venstre siden i Programvisning. Trykk på -knappene på enheten eller på
ernkontrollen for å velge en l som du vil slette, trykk deretter på -knappen på
enheten eller ENTER-knappen på ernkontrollen for å merke av len.
-knappen på enheten eller / VOL – -knappen på ernkontrollen for å gå
011101_22
Endringsfunksjon
Utforskerfunksjon
Rense program
W: 1024 H: 768
Rense program
3. Trykk på
4 / 17
011101_01
011101_12
011101_13
011101_22
011101_26
011101_31
011101_33
011101_34
-knappen på enheten eller / VOL + -knappen på ernkontrollen for å gå til
det høyre panelet, trykk deretter på -knappene på enheten eller på ernkontrollen
for å velge Rense program for å slette de merkede lene i Programvisning.
Tilbake til leserlisten
1. Trykk på -knappene på enheten eller på ernkontrollen for å velge
Utforskerfunksjon (leservisning), trykk deretter på -knappen på enheten
eller ENTER-knappen på ernkontrollen for å endre fra «Utforskerfunksjon» til
«Programvisning».
• «Utforskerfunksjonen» viser alle tilgjengelige spor på platen i en
leservisning.
• «Programvisningen» viser alle valgte spor etter programmering.
2. Trykk på
-knappene på enheten eller på ernkontrollen for å velge
Endringsfunksjon, og trykk deretter på -knappen på enheten eller ENTER-knappen
på ernkontrollen for å avslutte Endringsfunksjon.
60
1 / 17
011101_01
011101_12
011101_13
011101_22
011101_26
011101_31
011101_33
011101_34
Funksjon : Normal
Endringsfunksjon
Utforskerfunksjon
Utforskerfunksjon
Utforskerfunksjon
Page 61

NO
NO
Tilpasse språkinnstillingene
1. Trykk på OPPSETT-knappen
på ernkontrollen for å vise
systemoppsettmenyen.
2. Trykk på
ernkontrollen for å velge Språk, og trykk
deretter på -knappen på enheten eller /
VOL + -knappen på ernkontrollen.
-knappene på enheten eller på
Språk
Bilde
Klassifiserin
Diverse
OSD-språk : Norsk
Undertekst
MPEG4-undertekst
Lyd
DVD-meny
: Av
: Sentraleuropeisk
: Engelsk
: Engelsk
3. Trykk på
-knappene på enheten eller på ernkontrollen for å velge OSD-språk
(skjermmenyspråk) / Undertekst (teksting) / MPEG4-undertekst (MPEG4-teksting) /
Lyd / DVD-meny, og trykk deretter på -knappen på enheten eller ENTER-knappen
på ernkontrollen.
4. Trykk på
trykk deretter på
-knappene på enheten eller på ernkontrollen for å velge et alternativ, og
-knappen på enheten eller ENTER-knappen på ernkontrollen for
å bekrefte.
5. Trykk på OPPSETT-knappen på ernkontrollen for å avslutte menyen.
Skjermmenyspråk
Velg språket som systemet skal bruke i menyer på skjermen.
Teksting
Skru på/av platens tekstingsfunksjon.
MPEG4-teksting
Velg et MPEG4-tekstingsspråk som du ønsker vist på skjermen. Hvis en plate mangler det
valgte språket, bruker spilleren hovedspråket på platen.
Lyd
Velg standard lydspor du ønsker å spille av hvis DVD-platen støtter ere språk.
DVD-meny
Velg standard språk du ønsker i DVD-menyen på skjermen. Hvis en plate mangler det valgte
språket, bruker spilleren hovedspråket på platen.
61
Page 62

NO
NO
Tilpasse videoinnstillingene
1. Trykk på OPPSETT-knappen
på ernkontrollen for å vise
systemoppsettmenyen.
Språk
Bilde
2. Trykk på -knappene på enheten eller på
ernkontrollen for å velge Bilde og trykk
deretter på -knappen på enheten eller /
Klassifiserin
Diverse
VOL + -knappen på ernkontrollen.
3. Trykk på -knappene på enheten eller på
ernkontrollen for å velge Bildeforhåll,
TV-system eller Bildemodus, og trykk
deretter på -knappen på enheten eller
ENTER-knappen på ernkontrollen.
4. Trykk på -knappene på enheten eller på ernkontrollen for å velge et alternativ, og
trykk deretter på -knappen på enheten eller ENTER-knappen på ernkontrollen for
å bekrefte.
5. Trykk på OPPSETT-knappen på ernkontrollen for å avslutte menyen.
Bildeforhåll
Bildeforhåll : 16:9
TV-system
Picture Mode : Standard
: PAL
Hvis platen har alternative sideforhold (4:3LB/4:3PS/16:9), velger du det som passer best for
skjermen (både den interne og den eksterne).
4:3: Velg «Bildeformat: 4:3» for å vise video med sideforholdet 4:3 på et standard TV-
apparat. Hvis videoen ikke har sideforholdet 4:3, kan det forekomme svarte bånd på
skjermen.
16:9: Velg «Bildeformat: 16:9» for å vise video med sideforholdet 16:9 på et TV-apparat
med bredformat. Hvis videoen ikke har sideforholdet 16:9, kan det forekomme svarte
bånd på skjermen.
TV-system
Velg TV-avspillingssystemet i henhold til det lokale TV-systemet (NTSC/PAL/Auto).
Bildemodus
Denne innstillingen lar brukeren justere lysstyrken i bildet (Standard/Lys/Myk/Bruker).
62
Page 63

NO
NO
Tilpasse innstillingene for aldersgrense
Foreldrekontroll
1. Trykk på OPPSETT-knappen
på ernkontrollen for å vise
systemoppsettmenyen.
2. Trykk på
-knappene på enheten eller på
Språk
Bilde
Klassifiserin
Foreldre kontroll
: 1. Barnesikker
Bestem passord
ernkontrollen for å velge Klassisering
(aldersgrense), og trykk deretter på
Diverse
-knappen på enheten eller / VOL +
-knappen på ernkontrollen.
3. Trykk på
-knappene på enheten
eller på ernkontrollen for å velge
Foreldrekontroll og trykk deretter
på -knappen på enheten eller
ENTER-knappen på ernkontrollen. En
passordskjerm vises.
4. Trykk på 0–9-knappene på ernkontrollen for å skrive inn det gamle passordet (fra
fabrikken er passordet «6666» ved første oppsett), og trykk deretter på
-knappen på
enheten eller ENTER-knappen på ernkontrollen.
5. Trykk på
-knappen på enheten eller ENTER-knappen på ernkontrollen for å velge
Foreldrekontroll igjen for valg av foreldrelåsnivåer.
Foreldrelåsnivåene tilsvarer følgende aldersgrenser:
1. Barnesikker: Trygt for de minste.
2. G: Kan vises for et generelt publikum i alle aldre.
3. PG: Foreldreveiledning anbefalt.
4. PG 13: Materialet passer ikke for barn under 13 år.
5. PG R: Foreldreveiledning-begrenset. Det anbefales at foreldre nekter visning
for barn under 17 år, eller tillater visning for barn kun i følge med
foreldre eller voksne foresatte.
6. R: Begrenset. Barn under 17 år må overvåkes av foreldre eller voksne
foresatte for å kunne se på.
7. NC 17: Anbefales ikke for barn under 17 år.
8. ADULT: Kun voksne.
6. Trykk på
-knappen på enheten eller ENTER-knappen på ernkontrollen for å
bekrefte. (Nivå 1 har den mest restriktive aldersgrensen, mens nivå 8 åpner for
avspilling av så å si alle DVD-er.)
7. Trykk på OPPSETT-knappen på ernkontrollen for å avslutte menyen.
63
Page 64

NO
NO
Sett passord
1. Trykk på OPPSETT-knappen
på ernkontrollen for å vise
systemoppsettmenyen.
2. Trykk på
-knappene på enheten eller på
ernkontrollen for å velge Klassisering
(aldersgrense), og trykk deretter på
Språk
Bilde
Klassifiserin
Diverse
Foreldre kontroll
Bestem passord
: 1. Barnesikker
-knappen på enheten eller / VOL +
-knappen på ernkontrollen.
3. Trykk på -knappene på enheten eller
på ernkontrollen for å velge Bestem
passord.
4. Trykk på 0–9-knappene på ernkontrollen for å skrive inn det gamle passordet (fra
fabrikken er passordet «6666» ved første oppsett), og trykk deretter på -knappen
på enheten eller ENTER-knappen på ernkontrollen for å bekrefte. Hvis du oppgir feil
passord, vises meldingen Feil passord på skjermen.
5. Trykk på -knappen på enheten eller ENTER-knappen på ernkontrollen igjen, og
trykk deretter på 0–9-knappene på ernkontrollen for å skrive inn det nye passordet.
Trykk på -knappen på enheten eller ENTER-knappen på ernkontrollen for å
bekrefte.
6. Skriv inn det nye passordet igjen for å bekrefte. Når passordet er bekreftet, vises
Passord bestemt på skjermen.
7. Trykk på OPPSETT-knappen på ernkontrollen for å avslutte menyen.
Tilpasse andre innstillinger
1. Trykk på OPPSETT-knappen
på ernkontrollen for å vise
systemoppsettmenyen.
2. Trykk på -knappene på enheten eller på
ernkontrollen for å velge Div., og trykk
deretter på -knappen på enheten eller /
VOL + -knappen på ernkontrollen.
3. Velg Bruk grunninnstillinger
(fabrikkinnstillinger) og trykk deretter på
-knappen på enheten eller ENTER-knappen
på ernkontrollen.
4. Trykk på -knappene på enheten eller
(VOL -/+) -knappene på ernkontrollen for å
velge «Ja» for å tilbakestille alle innstillingene
du har gjort, bortsett fra passordet ditt, til
standard fabrikkinnstillinger. Trykk deretter på
-knappen på enheten eller ENTER-knappen
på ernkontrollen for å bekrefte.
5. Trykk på OPPSETT-knappen på
ernkontrollen for å avslutte menyen.
Språk
Bilde
Klassifiserin
Diverse
Språk
Bilde
Vill du gjenopprette grunninnstillinger?
Klassifiserin
Diverse
Ja Nei
Bruk grunninnstillinger
Bruk grunninnstillinger
Bruk grunninnstillinger
64
Page 65

NO
NO
Vedlikehold
Håndtere plater
Avspillingsside
• Ikke ta på avspillingssiden av en plate.
• Ikke fest klistremerker eller liknende til en plate.
Rengjøre plater
• Hvis det er ngeravtrykk og/eller støv på en plate, kan lyden og bildet bli forvrengt. Tørk
av platen fra sentrum og utover med en myk klut. Hold platen ren til enhver tid.
• Hvis platen ikke blir ren med en myk klut, kan du tørke den forsiktig med en lett fuktet
klut først og en tørr klut etterpå.
• Ikke bruk løsemidler av noe slag, som tynner, bensin, alminnelige rengjøringsmidler eller
antistatisk spray. Slike midler kan skade platen.
Oppbevare plater
• Ikke oppbevar plater der de kan bli utsatt for direkte sollys eller nær varmekilder.
• Ikke oppbevar plater der de kan bli utsatt for støv og/eller fuktighet, som i et baderom
eller nær en luftfukter.
• Oppbevar platene vertikalt i separate omslag. Dersom du stabler plater eller setter
gjenstander på løse plater, kan de bli bøyd.
Rengjøre enheten
Kontroller at støpslet er trukket ut fra stikkontakten før rengjøring.
• Rengjør enheten ved å tørke kabinettet med en lett fuktet, lofri klut.
• Ikke bruk ytende rengjøringsmidler med alkohol, ammoniakk eller skuremidler.
• Ikke bruk aerosoler i nærheten av enheten.
65
Page 66

NO
NO
Råd og tips
Hvis du opplever et problem, er årsaken som regel bagatellmessig. Tabellen nedenfor gir
deg noen tips.
Meny Beskrivelse
Ingen strøm. • Kontroller at strømadapteren er tilkoblet.
• Kontroller at enheten har strøm.
• Kontroller at enheten er slått PÅ.
• Kontroller at batteriet i DVD-spilleren er ladet opp.
Fjernkontrollen
virker ikke.
Det kommer lite
eller ingen lyd fra
en DVD.
Intet bilde. • Platens regionnummer matcher ikke enhetens regionnummer.
• Bruk ernkontrollen nær enheten.
• Rett ernkontrollen mot ernkontrollsensoren på enheten.
• Bytt ut batteriet i ernkontrollen med et nytt.
• Sørg for at den isolerende plastfolien er ernet fra
ernkontrollen.
• Fjern alle hindringer mellom ernkontrollen og enheten.
• Kontroller at enheten ikke står på pause. Trykk på
på enheten eller på ernkontrollen.
• Kontroller at enheten ikke er i ferd med å spole forover
eller bakover. Trykk på
ernkontrollen.
• Kontroller at inn/ut-tilkoblingene for lyd/video er korrekt utført.
• Denne enheten støtter ikke dekodingssystemet for DTS-lyd.
Trykk på LYD/VINKEL-knappen på ernkontrollen for å endre
lydinnstillingen til analog modus med 2 kanaler.
• Enheten er overopphetet. La den være avslått i 30 minutter for
å kjøle den ned.
• Volumkontrollen er justert for mye ned. Øk volumet.
-knappen på enheten eller på
-knappen
Bildet er uklart. • DVD-en er skitten. Rengjør platen varsomt.
Kraftig brum eller
annen lyd høres.
66
• Platen har riper.
• Justere LCD-skjermens lysstyrke (se videoinnstillinger på side
58).
• Plugger og kontakter er skitne. Tørk dem med en klut som er
lett fuktet med alkohol.
• Rengjør platen.
• Platen har riper eller len er skadet.
Page 67

NO
NO
Meny Beskrivelse
Platen spiller ikke
av.
Fil fra
medielagringsenhet
spiller ikke av
Enheten
reagerer ikke på
knappetrykk
• Det er ingen plate inne i enheten («Ingen Disk» vises på
skjermen).
• Legg inn platen riktig med bildesiden opp.
• Rengjør platen.
• Det er lagt inn en ugyldig plate eller platens regionnummer
matcher ikke enhetens regionnummer.
• Det kan ha oppstått kondens i enheten på grunn av rask
temperaturendring. Vent en times tid til kondensen er
fordampet og prøv igjen.
• Kontroller lformatet.
• Dette produktet støtter ikke lsystemet NTFS.
• Enheten ser ut til å ha frosset under bruk. Slå av enheten og slå
på igjen for å tilbakestille den.
67
Page 68

NO
NO
Spesikasjoner
Modell L7PDT13E
Plateformat DVD+/–R, DVD+/–RW, CD, CD-R, CD-RW, JPEG bilde-CD
Videosystem PAL, NTSC
Videodekomprimering MPEG-2, MPEG4 (maksimum oppløsning 720 x 525 ved
25/30 bps)
LCD-skjerm 7" TFT LCD-panel
Lyd:
Lydkarakteristikk
Dolby Digital-dekoding
Høyttaler 2 innebygde stereohøyttalere
Terminaler: DVD-spiller – USB 2.0 x 1 (maksimum 8 GB),
Strømadapter:
Strømforsyning
Strømforbruk
2-kanals analog
Ja
AV UT-kontakt x 1, hodetelefonkontakt x 1
Monitor – AV INN-kontakt x 1, hodetelefonkontakt x 1
100–240V 50/60Hz vekselstrøm (strømadapter)
Maks. 12 W (Ventemodus ≤ 0,5W)
Fjernkontroll Infrarød med ett CR2025-batteri (3 V)
Vekt: DVD-spiller – 0,6 kg
Monitor – 0,4 kg
Mål: DVD-spiller – 210 mm (L) x 160 mm (B) x 35 mm (H)
Monitor – 210 mm (L) x 160 mm (B) x 35 mm (H)
Funksjoner og spesikasjoner kan endres uten varsel.
68
Page 69

SE
Tack för att du köpt din nya Logik 7 tums dubbla portabla
DVD-spelare.
Vi rekommenderar att du tar dig tid att läsa igenom denna bruksanvisning
för att fullt ut förstå alla driftsfunktioner som erbjuds. Du hittar också
några råd och tips som hjälper dig att lösa några problem.
Läs noga igenom alla säkerhetsinstruktioner före användning och behåll
sedan den här bruksanvisningen för framtida bruk.
Uppackning
Ta bort allt förpackningsmaterial från produkten. Behåll förpackningsmaterialet. Om
förpackningen kastas ska du följa gällande lokala föreskrifter.
Följande delar medföljer:
REPEAT
REPEAT
POWER
DISPLAY
/PROG
A-B
AUDIO/
ANGLE
SUBTITLE/
TITLE
MENU/
ZOOM
STOP/
SETUP
SLOW
GOTOENTER
VOL– VOL+
SOURCE MUTE
DVD-spelare Monitor Fjärrkontroll (med batteri) x 1
Nätadapter x 1 3,5 mm AV-kabel x 1Biladapter x 1
Bruksanvisning x 1Monteringssats x 2 Snabbstartsguide x 2
69
Page 70

SE
Produktöversikt
Vy framifrån
1. LCD-skärm
2. Högtalare
Baksida
3
1
2
DVD-spelare / Monitor
3. Fjärrkontrollsensor
1
1. Ställning
70
2
DVD-spelare / Monitor
2. Skivlucka
Page 71

SE
Vy ovanifrån
1 2 3
1. ÖPPNINGS-knapp
Skjut för att öppna skivluckan.
2.
-knappar
• Navigerar vänster/höger på
menyskärmen och justera vissa
inställningar.
• Ökar eller sänker volymnivån.
3.
-knappar
• Navigerar uppåt/nedåt på
menyskärmen och justera vissa
inställningar.
4.
-knapp
Startat/pausar/återupptar
uppspelning av en skiva.
5.
STOPP-knapp
Stoppar uppspelning av en skiva.
DVD-spelare
7 8
4
MUTE TFT MENU
9
Monitor
6.
Välj önskad inmatningssignalkälla:
DVD/USB.
7.
Justera volymen.
8.
Låter dig navigera på menyskärmen
och ändra vissa inställningar.
9. TYSTA -knapp
Tystar enheten eller återställer ljudet.
10. TFT-knapp
Växlar skärmen mellan på/av.
11. MENY-knapp
Visar menyskärmen.
6
5
11
10
Knapp
knappar
knappar
71
Page 72

SE
Vy från höger sida
USB
AV OUT PHONE • ON
6
DC IN 12V
OFF •
1. USB-uttag
Anslut en USB-lagringsenhet.
2. AV UT uttag
3. HÖRLURS uttag
1 4
3
2
DVD-spelare
AV IN PHONE • ON
3
7
Monitor
4. DC IN 12V uttag
5. PÅ/AV-omkopplare
6. Strömindikator LED
7. AV IN uttag
DC IN 12V
4
5
OFF •
5
72
Page 73

SE
Fjärrkontroll
1. DISPLAY knapp
Visar skivinformation under
uppspelning.
2. Strömbrytare
Växlar enheten mellan lägena PÅ och
STANDBY.
3. LJUD/VINKEL knapp
• Välj ett av ljudspåren på en DVD-
skiva (om det nns er än ett) eller
välj ljudutmatningsläge på en CDskiva.
• Växla mellan era olika
kameravinklar när den uppspelade
DVD-skivan har programmerats med
ett ertal olika kameravinklar.
4. UNDERTEXT/TITEL-knapp
• Välj ett av undertextspråken
programmerade på DVD:n (om det
nns tillgängligt)
• Tryck och håll kvar för att gå in i
titelmenyn (om tillgänglig).
5. MENY/ZOOM-knapp
• Visar huvud-DVD-menyn (om
tillgänglig).
• Zoomar in/zoomar ut den visade
bilden.
6. STOPP/LÅNGSAMT-knapp
• Avbryt uppspelning av en skiva.
• Väljer långsam
uppspelningshastighet och återgår
till normal uppspelning.
7.
(VOL –/+) knappar
• Navigerar vänster/höger på
menyskärmen och justerar vissa
inställningar.
• Ökar eller sänker volymnivån.
-knappar
• Navigerar uppåt/nedåt på
menyskärmen och justerar vissa
inställningar.
ENTER-knapp
Bekräftar val på menyskärmen.
8.
-knapp
Startat/pausar/återupptar
uppspelning av en skiva.
1
REPEAT
/PROG
REPEAT
A-B
SETUP
GOTOENTER
DISPLAY
2
3
4
5
6
7
POWER
AUDIO/
ANGLE
SUBTITLE/
TITLE
MENU/
ZOOM
STOP/
SLOW
VOL– VOL+
8
9
10
SOURCE MUTE
9. TYSTA -knapp
Tystar enheten eller återställer ljudet.
10. KÄLL-knapp
Välj önskad inmatningssignalkälla:
DVD/USB.
11. REPETERA/PROG-knapp
• Repeterar ett DVD-avsnitt, titel eller
hela skivan.
• Repetera CD-spår eller hel skiva.
• Öppnar DVD-lmprogramläget (inte
för CD/USB läge).
12. REPETERA A-B knapp
Repetera ett segment mellan A och B
på en DVD-skiva.
13. Sierknappar 0-9
För att ange lösenord för
föräldrakontroll eller för att leta reda på
en titel/avsnitt/spår.
14. INSTÄLLNINGS-knapp
Gå in i inställningsmenyn.
15. GÅ TILL knapp
Hoppar till en specik plats på en skiva.
16.
Knappar
• Hoppar tillbaka till föregående
kapitel/titel/spår på en skiva.
• Hoppar framåt till nästa kapitel/spår/
titel på en skiva.
17.
-knappar
Möjliggör snabbspolning framåt/bakåt
av nuvarande spår.
11
12
13
14
15
16
17
73
Page 74

SE
Ta bort isoleringsremsan från ärrkontrollen
Ta bort isoleringsremsan från batteriet om batteriet
används för första gången. Den är placerad nederst
på ärrkontrollens baksida.
Batteribyte i ärrkontrollen
Fjärrkontrollen kräver ett CR2025, 3 V litiumbatteri.
1. Skjut och håll ned batterilåsiken i pilens
riktning.
2. Dra ut batterihållaren och ta ut det gamla
batteriet.
3. Byt till ett nytt batteri.
4. Sätt tillbaka batterihållaren i ärrkontrollen.
74
Page 75

SE
Hantera batteriet
• Olämplig eller felaktig användning av batterierna kan orsaka korrosion eller
batteriläckage vilket kan orsaka brand, personskador eller skador på egendom.
• Sätt tillbaka batteriet på rätt sätt i batterifacket. Batteriets pluspol (+) är normalt vänd
uppåt.
• När batterierna är förbrukade fungerar inte ärrkontrollen.
• Använd endast den batterityp som anges i denna bruksanvisning.
• Släng inte använda batterier tillsammans med hushållsavfall. Lämna dem till
batteriinsamlingen.
• De små knappbatterier som används i ärrkontrollen kan lätt sväljas av små barn och
detta är farligt. Förvara lösa batterier utom räckhåll för barn och se till att batteriet är
ordentligt isatt i ärrkontrollen. Sök läkarhjälp om du tror att ett batteri har svalts.
Hantering av ärrkontrollen
• Om du tycker att det är svårt att ta bort batteriet, använd ett gem för att skjuta
batteriiken.
• Tappa inte ärrkontrollen.
• Låt inget stöta mot ärrkontrollen.
• Spill inte vatten och andra vätskor på ärrkontrollen.
• Placera inte ärrkontrollen på en våt plats.
• Placera inte ärrkontrollen i direkt solljus eller nära värmekällor.
• Ta ut batterierna när ärrkontrollen inte används under en längre tid, eftersom korrosion
eller batteriläckage kan inträa, vilket kan leda till fysisk skada och/eller skada på
egendom och/eller brand.
Operationsområde för ärrkontrollen
• Fjärrkontrollsensorn på framsida är tar emot
ärrkontrollens kommandon på upp till fem
meters avstånd och med en vinkel på maximalt
60°.
• Observera att användningsavståndet kan
variera beroende på ljuset i rummet.
30° 30°
Inom ca. 5m
REPEAT
REPEAT
POWER
DISPLAY
/PROG
A-B
AUDIO/
ANGLE
SUBTITLE/
TITLE
MENU/
ZOOM
STOP/
SETUP
SLOW
GOTOENTER
VOL– VOL+
SOURCE MUTE
75
Page 76

SE
Användning i en bil
Använda bilströmadaptern (endast för användning i bil)
Den medföljande 12V biladaptern är avsedd att användas med fordon med 12V elsystem.
USB
AV OUT PHONE • ON
DC IN 12V
OFF •
AV IN PHONE • ON
DC IN 12V
OFF •
• Använd endast den bilströmadapter som medföljer enheten. Ej för
användning i 24V-fordon. Användning av andra biladpatrar kan skada enheten
eller t.o.m. fordonet.
• Använd endast medföljande 12V bilströmadapter. Använd inte med annan
utrustning.
• Med hänsyn till traksäkerheten bör förare inte använda utrustningen eller
titta på video vid körning.
• Om insidan av bilens 12V-uttag är smutsigt p.g.a. aska eller damm kan
kontakten hettas upp p.g.a. dålig kontakt. Rengör eluttaget före användning.
• Efter användning, koppla ur strömadaptern från både enheten och
cigarettändaruttaget.
• Om enheten inte är ordentligt fäst vid fordonet kan det yga iväg i händelse
av olycka och orsaka skada eller dödsfall.
• Kontrollera lokala traklagar och bestämmelser rörande användning av
videoenheter i fordon.
76
Page 77

SE
Montering i bil
Använd den medföljande monteringssatsen för att installera DVD-spelaren och
bildskärmen på baksidan av fordonets huvudstöd. Dra åt fästremmen ordentligt runt
huvudstödet.
1. Placera DVD-spelaren och monitorn i en designad väska.
Se till att spännet är korrekt
monterat för att undvika att
det lossnar oavsiktligt.
2. Trä igenom båda remändarna genom remöglorna.
3. Led remmen runt huvudstödet med DVDspelaren riktad mot baksätet, fäst sedan
remmen med fästet.
Kom alltid ihåg att låsa klämmorna
och att dra åt remmarna för att
garantera passagerarnas säkerhet
Installationsguide
DVD-spelare Monitor
Fjärrkontroll
Biladapter
AV-kabel
REPEAT/
REPEAT
SOURCE
DISPLAY
PROG
A-B
AUDIO/
ANGLE
SUBTITLE/
TITLE
MENU/
ZOOM
/
SETUP
SLOW
GOTOOK
77
Page 78

SE
Strömkälla
Elnät
Strömadaptern (DC12V utmatning) som medföljer är endast till för att användas för DVDspelaren och monitorn tillsammans.
Power adaptor
Till nätuttaget
USB
AV OUT PHONE • ON
DC IN 12V
OFF •
AV IN PHONE • ON
DC IN 12V
OFF •
Höger sida av DVD-spelaren Vänster sida av monitorn
• Stäng av enheten innan adaptern kopplas ur från enheten för att undvika att
enheten skadas.
• När enheten inte kommer att användas under en längre period koppla ifrån
strömadaptern från eluttaget.
• Eluttaget måste vara lättåtkomligt och placerat nära utrustningen. Om
funktionsfel uppstår, dra genast ut kontakten ur vägguttaget.
• När strömadaptern är inkopplad är utrustningen inte fullständigt urkopplad
från huvudströmkällan ens när utrustningen är avstängd.
78
Page 79

SE
Anslutningar
Använda hörlurar
Vrid ned volymen innan hörlurarna ansluts. Höj långsamt volymen i hörlurarna tills du når
önskad volym. När hörlurar ansluts avaktiveras högtalarna automatiskt.
Höger sida av DVD-spelaren
USB
AV OUT PHONE • ON
DC IN 12V
AV OUT PHONE
OFF •
Hörlurar (medföljer inte)
Vänster sida av monitorn
AV IN PHONE • ON
DC IN 12V
AV IN PHONE
OFF •
Hörlurar (medföljer inte)
Undvik överdriven volym och att lyssna på ljud under långa perioder när
hörlurar används eftersom det kan påverka hörseln.
79
Page 80

SE
Använda ett USB-minne
Du kan spela musik eller visa JPEG-ler från USB-minnen.
1. Anslut USB-minnet direkt i USB-uttaget på enheten.
Höger sida av DVD-spelaren
USB
AV OUT PHONE • ON
DC IN 12V
OFF •
2. I STOPP-läge tryck på -knappen på enheten eller KÄLL-knappen på ärrkontrollen.
Tryck på -knapparna på enheten eller på ärrkontrollen för att välja “USB” och
tryck sedan på -knappen på enheten eller tryck ENTER på ärrkontrollen för att få
åtkomst till data i enheten.
3. Använd
knapparna på enheten eller på ärrkontrollen för att välja en önskad l och
tryck sedan på -knappen på enheten eller på ENTER-knappen på ärrkontrollen för
att starta uppspelningen.
För att ta bort USB-enheten eller
-knappen på enheten eller knappen STOPP/LÅNGSAMT
på ärrkontrollen för att stoppa uppspelningen. Ta bort USB-minnet och enheten kommer
automatiskt att återgå till skivläge.
Visa en DVD på DVD-spelaren och bildskärmen
Samma DVD-skiva kan visas på DVD-spelaren och bildskärmen.
Monitor
höger sida
OFF •
2
Till A/V OUT
uttag
DC IN 12V
AV IN PHONE • ON
1
Till A/V IN
uttag
3,5 mm AV-kabel
(medföljer)
1. Anslut DVD-spelaren och bildskärmen med 3,5 mm AV-kabeln (medföljer).
2. Slå på DVD-spelaren och bildskärmen.
3. Spela en DVD-skiva i DVD-spelaren så visas den samtidigt på bildskärmen.
DVD-spelare
höger sida
OFF •
DC IN 12V
AV OUT PHONE • ON
USB
80
Page 81

SE
Kompatibla skivtyper
DVD+ReWritable
DVD+R
Skivtyper Skivlogotyp Inspelat innehåll
DVD-VIDEO (Digital Versatile Disc)
DVD±RW (Ljud-/videoformat eller JPEG-ler)
DVD±R (inspelningsbar DVD - ljud/videoformat
eller JPEG-ler).
CD-R (inspelningsbar CD - ljud/videoformat
eller JPEG-ler).
CD-RW (omskrivbar CD - ljud/videoformat eller
JPEG-ler)
LJUD-CD (Compact Disc Digital Audio)
Bildformat som stöds
JPEG
• Filtillägget måste vara .jpg, inte .jpeg
• Bildkodningen måste överensstämma med JPEG/ISO-formatet
• Stöd endast för stängda DVD-R och DVD-RW multiborder-skivor.
• Inget stöd för stängda eller öppna DVD+R och DVD+RW multiborder-skivor.
• Vissa inspelade ler kanske inte kan spelas beroende på skivans typ och
format eller inspelningens kvalitet.
LJUD + VIDEO
LJUD + VIDEO + JPEG
LJUD + VIDEO + JPEG
LJUD + VIDEO + JPEG
LJUD + VIDEO + JPEG
LJUD
Regionkod
Både DVD-spelaren och skivorna är kodade efter
region. Dessa regionkoder måste matcha för att
skivan ska kunna spelas. Om de inte matchar kan
skivan inte spelas.
Regionkoden för den här DVD-spelaren visas på
undersidan av DVD-spelaren.
Skivtyp DVD-VIDEO
Regionkod
81
Page 82

SE
DVD-uppspelning
Se till att skärmens skyddslm är borttagen innan användning.
Denna bruksanvisning förklarar de grundläggande instruktionerna för hantering av denna
enhet. Vissa DVD-skivor produceras på ett sådant sätt som tillåter specik eller begränsad
hantering under uppspelningen. Det innebär att enheten kanske inte reagerar på alla
kommandon. Detta är ingen defekt.
Se instruktionerna som medföljde den specika DVD:n i fråga för ytterligare information om
alternativen som nns tillgängliga på den DVD:n.
“
” kan visas på skärmen vid drift. Ett “ ” innebär att önskad operation inte tillåts av
enheten eller skivan.
Grundläggande DVD-uppspelning
1. Skjut PÅ/AV brytaren till positionen PÅ.
2. Skjut på ÖPPNINGS-omkopplaren för att öppna
skivluckan.
3. Håll skivan i kanterna och placera den försiktigt på
skivhållaren med etiketten uppåt. Tryck försiktigt
ned skivan tills du hör ett ”klick”.
4. Stäng skivlocket. Använd ställningen placerad
på baksidan av enheten eller håll DVD-spelaren i
händerna ( var noga med att inte vidröra enhetens
skivlucka). Enheten börjar uppspelningen om
skivan inte har en menyn inspelad. Om skivan har
en eller era titlar inspelade på den kommer en
menyskärm att visas på skärmen.
CHG
82
5. För att spela en titel tryck på
0-9-knapparna på ärrkontrollen för att markera
titeln och tryck sedan på -knappen på enheten
eller på ärrkontrollen.
/
öppen till ställning
Avbryta uppspelningen
1. Tryck på -knappen på enheten eller STOPP/LÅNGSAMT-knappen på ärrkontrollen
för att gå till förstoppläge, TV-skärmen kommer att visa “ STOPP”. På vissa skivor kan
enheten komma ihåg platsen där skivan stoppades, t.ex. på DVD-skivor.
2. Tryck på
från den plats där uppspelningen avbröts eller från början av skivan.
3. Tryck på
två gånger för att stoppa helt och hållet.
-knappen på enheten eller på ärrkontrollen för att återuppta uppspelning
-knappen på enheten eller STOPP/LÅNGSAMT-knappen på ärrkontrollen
Page 83

SE
Föregående och nästa
1. Under uppspelning tryck på -knappen på enheten eller -knappen på
ärrkontrollen för att gå tillbaka till början på föregående kapitel. Varje tryckning
hoppar över ett kapitel ända tills skivans början.
2. Varje tryckning på
uppspelning kommer att hoppa över nuvarande kapitel och spela nästa.
-knappen på enheten eller -knappen på ärrkontrollen under
Snabbspolning framåt/bakåt
1. Tryck på -knapparna på ärrkontrollen för att snabbspola bakåt/framåt på
skivan. Varje gång som -knappen på ärrkontrollen trycks ned kommer
rörelsehastigheten snabbt framåt/bakåt att ändras. Det nns 4 hastighetsnivåer
tillgängliga: x2, x4, x8 och x16.
2. Tryck på
uppspelning.
-knappen på enheten eller på ärrkontrollen för att återgå till normal
Pausa uppspelningen
1. Tryck på -knappen på enheten eller på ärrkontrollen för att pausa uppspelningen
(stillbildsläge). Ljudet kommer att vara tystat under stillbildsläge.
2. Tryck igen på
-knappen för att återuppta normal uppspelning.
Info
Under uppspelningen av skivan tryck på DISPLAY-knappen på ärrkontrollen för att gå till
informationsmenyn om denna funktion nns tillgänglig på skivan.
Volyminställning
• Tryck på /VOL– eller /VOL+ knappen på ärrkontrollen för att justera volymen.
• Tryck på
• Tryck på TYSTA -knappen på ärrkontrollen för att stänga av ljudet och spelaren kommer
att visa “
-knapparna på monitorn för att justera volymen.
”. Tryck på TYSTA-knappen igen på ärrkontrollen.
Repetera allt
Tryck på knappen REPEAT/PROG -knappen på ärrkontrollen upprepade gånger för att
välja olika upprepningslägen.
Meny Beskrivning
Första tryckningen Repetera kapitel
Andra tryckningen Repetera titel
Tredje tryckningen Repetera av
83
Page 84

SE
Ljudkanal
Tryck på AUDIO/ANGLE-knappen på ärrkontrollen upprepade gånger för att välja olika
ljudspråk.
A-B-upprepning
Upprepa ett avsnitt mellan punkt A och punkt B inom en titel/ett kapitel/ett spår.
1. Tryck på REPETERA A-B knappen för att välja en startpunkt A.
2. Tryck på REPETERA A-B knappen igen för att ställa in en slutpunkt B och fullfölja
inställningen. Det valda avsnittet A-B kommer att repeteras.
3. Tryck på REPETERA A-B knappen en tredje gång för att avbryta och avsluta, RepAB
AV visas på skärmen.
Språk undertexter
Tryck på SUBTITLE/TITLE-knappen på ärrkontrollen upprepade gånger för att växla
mellan de undertextspråk som nns tillgängliga på skivan.
Val av vinkel
Vissa DVD-skivor innehåller scener som spelats in i ett ertal olika vinklar. På sådana skivor
kan samma scen visas i alla de olika vinklarna.
1. När en DVD-skiva med olika
vinklar spelas upp, tryck på och
håll kvar AUDIO/ANGLE-knappen
på ärrkontrollen för att visa hur
många olika vinklar som nns
tillgängliga.
Sekvens av vinkeltagningar
(exempel)
2
2. Tryck på och håll kvar
AUDIO/ANGLE-knappen på
ärrkontrollen upprepade gånger
för att byta till nästa inspelade
vinkel för scenen.
• Efter ungefär två sekunder fortsätter uppspelningen med den nya vinkeln.
• Om ingen knapp trycks på tio sekunder fortsätter uppspelningen utan att vinkeln
ändras.
• Den här funktionen kan endast användas med skivor med
scener inspelade i olika vinklar.
• Om bara en vinkel spelats in visas
1/1.
84
Page 85

SE
Ljud-CD, JPEG bild CD uppspelning
Lägga i en skiva
1. Skjut PÅ/AV brytaren till positionen PÅ.
2. Skjut på ÖPPNINGS-omkopplaren för att öppna skivluckan.
3. Håll skivan i kanterna och placera den försiktigt på skivhållaren med etiketten uppåt.
Tryck försiktigt ned skivan tills du hör ett ”klickljud”.
4. Stäng skivlocket. Använd ställningen placerad på baksidan av enheten eller håll DVDspelaren i händerna (var noga med att inte vidröra enhetens skivlucka).
Spela en ljud-CD
1. Tryck på knappen på enheten eller på ärrkontrollen för att markera en ljudl och
tryck sedan på -knappen på enheten eller på ärrkontrollen för att spela upp.
• Om lerna nns i en mapp tryck på
ärrkontrollen för att öppna mappen.
4 / 11
..
Track01
Track02
Track03
Track04
Track05
Track06
Track07
/Track03.CDA
-knappen på enheten eller -knappen på
00:00:03 / 00:04:26
Repetera : Av
Läge : Normal
Ändra
Musik spelas
• Tryck på
knappen på enheten eller på ärrkontrollen för att välja rotmappen
och tryck sedan på -knappen på enheten eller på ENTER-knappen på
ärrkontrollen för att återgå till den övre menyn.
2. För att stoppa uppspelningen tryck på
LÅNGSAMT-knappen på ärrkontrollen.
-knappen på enheten eller STOPP/
85
Page 86

SE
Spela upp MPEG4/JPEG bild-CD
47 / 115
011101_01
011101_12
011101_13
011101_22
011101_26
011101_31
011101_33
011101_34
011101_22.JPG
Filter
Repetera : Av
Läge : Normal
W: 1024 H: 768
1. Tryck på knappen på enheten eller på ärrkontrollen för att markera en MPEG/
JPEG-l och tryck sedan på -knappen på enheten eller ENTER-knappen på
ärrkontrollen för att visa bildspel med bilden eller uppspelning av MPEG4-video.
• Om lerna nns i en mapp tryck på
-knappen på enheten eller ENTER-knappen
på ärrkontrollen för att öppna mappen.
• I stoppläge tryck på
-knappen på enheten eller på ärrkontrollen för att välja
rotmappen och tryck sedan på -knappen på enheten eller ENTER-knappen
på ärrkontrollen för att återgå till den övre nivån.
2. För att spela upp MPEG4-len eller visa bilden i ett bild spel tryck på
-knappen på
enheten eller ENTER-knappen på ärrkontrollen.
86
3. Tryck på
-knappen på enheten eller tryck på (VOL -/+) -knappen på
ärrkontrollen för att rotera bilden 90°/180°/270° medurs eller moturs under
bildvisningen/snabbspolningen framåt eller bakåt under MPEG4-uppspelning.
• Alla rotationseekter kommer att upphävas när bildspelsläget avslutas.
4. Tryck på
-knappen på enheten eller STOPP/LÅNGSAMT-knappen på ärrkontrollen
för att återgå till spellistebläddraren.
Page 87

SE
Uppspelningsnavigatorn och inställningar
Totalt antal ler
Uppspelningsstatus
Fil som spelas
Webbläsarlista
4 / 11
..
Track01
Track02
Track03
Track04
Track05
Track06
Track07
00:00:03 / 00:04:26
/Track03.CDA
Filter
Repetera : Av
Läge : Normal
Musik spelas
Föruten tid
Kvarvarande tid
Filsökväg
Uppspelningsinställningar
Förhandsgranskningsfönster
1. I stoppläge tryck på -knappen på enheten eller / VOL + -knappen på ärrkontrollen
för att gå in i den högra skärmen för uppspelningsinställning hos navigatorn.
2. Tryck på
-knappen på enheten eller på ärrkontrollen för att välja posten. Bekräfta
alltid genom att trycka på -knappen på enheten eller ENTER-knappen på
ärrkontollen.
• För lterinställning tryck på
-knappen på enheten eller ENTER-knappen på
ärrkontrollen för att ta fram rullgardinsmenyn och tryck på -knappen på
enheten eller på ärrkontrollen för att välja ett alternativ, tryck sedan på
-knappen på enheten eller ENTER-knappen på ärrkontrollen.
Meny Alternativ Beskrivning
Filter Ljud, bild, video • Möjliggör sortering av lformaten som visas i webbläsarlistan.
• Filterinställningen kommer att sortera ltypena som
visas i webbläsarlistan till vänster på skärmen på
navigatorn.
• För att lämna inställningen tryck på
-knappen
på enheten eller tryck på / VOL– -knappen på
ärrkontrollen.
Repetera Av, Enskild,
• För inställning av repetitionsläge av de uppspelade lerna.
Mapp
Läge Normal,
blandad,
musikintro.
• För inställningen av luppspelningssekvens i skivläget.
• Musikintroläget spelar upp början av alla melodier. Precis som att
bläddra i musiklistan på skivan.
Redigeringsläge — • Möjliggör att välja ler som skall programmeras i programlistan.
• Se avsnittet "Programuppspelning” på nästa sida.
Programvy Programvy,
webbläsarvy
• Växla till att visa alla ler i aktuell katalog eller de valda lerna i
programlistan.
• Se avsnittet "Programuppspelning” på nästa sida.
Lägg till i
program
Lägg till i
program, rensa
• Lägg till eller radera de valda lerna i programlistan.
• Se avsnittet "Programuppspelning” på nästa sida.
program
* I Ljud-CD läget kommer webbläsaren att dölja funktionen "lter" i Repetitionsläge.
Se till att uppspelningen stoppats helt och hållet innan dssa inställningar
används.
87
Page 88

SE
Programuppspelning
Lägga till ler i programlistan
1. Tryck på -knappen på enheten eller STOPP/LÅNGSAMT-knappen på ärrkontrollen
två gånger för att helt stoppa uppspelningen.
2. Tryck på
-knappen på enheten eller / VOL + -knappen på ärrkontrollen för att gå in
i den högra skärmen hos navigatorn.
3. Tryck på
knappen på enheten eller på ärrkontrollen för att välja Ändra, tryck
sedan på -knappen på enheten eller ENTER-knappen på ärrkontrollen för att
markera redigeringsläget.
• För att lämna Ändra tryck på
-knappen på enheten eller ENTER-knappen på
ärrkontrollen igen för att avbryta markeringen.
-
/ 17
011101_01
011101_12
Webbläsarlista
4. Tryck på
-knappen på enheten eller / VOL – -knappen på ärrkontrollen för att
011101_13
011101_22
011101_26
011101_31
011101_33
011101_34
öppna den vänstra skärmen. Tryck på
för att välja en l i förhandsgranskningslistan och tryck sedan på
/
Repetera : Av
Läge : Normal
Ändra
Visa bläddrare
Ändra
-knapparna på enheten eller på ärrkontrollen
-knappen på
enheten eller ENTER-knappen på ärrkontrollen för att bocka för len.
• Tryck på
-knappen på enheten eller ENTER-knappen på ärrkontrollen igen för
att ta bort förbockningen.
• Tryck på
-knapparna på ärrkontrollen för att välja en l och tryck sedan
-knappen på enheten eller ENTER-knappen på ärrkontrollen upprepade gånger
för att bocka för er ler.
5. Tryck på
knappen på enheten eller / VOL + -knappen på ärrkontrollen för
att öppna den högra skärmen, tryck sedan på -knapparna på enheten eller på
ärrkontrollen för att välja Lägg till i program och tryck sedan på -knappen på
enheten eller ENTER-knappen på ärrkontrollen för att bekräfta. Nu har de förbockade
lerna programmerats i programvyn, du kan trycka på knapparna på enheten eller
på ärrkontrollen för att välja Programvisning och sedan trycka på -knappen på
enheten eller ENTER-knappen på ärrkontrollen för att visa de förbockade lerna i
Visa bläddrare.
6. Tryck på
knappen på enheten eller på ärrkontrollen för att välja Ändra, tryck
sedan på -knappen på enheten eller ENTER-knappen på ärrkontrollen för att
lämna Ändra.
7. Tryck på
-knappen på enheten eller / VOL – -knappen på ärrkontrollen för att
öppna den vänstra skärmen. Tryck på knapparna på enheten eller på ärrkontrollen
för att välja en l som du vill spela från förhandsgranskningslistan.
8. Tryck på
-knappen på enheten eller på ärrkontrollen för att spela len.
88
Page 89

SE
Radera ler i programlistan
1. Upprepa steg 1, 2 och 3 såsom beskrivs i sektionen "Lägga till ler i programlistan".
2. Tryck på
-knappen på enheten eller / VOL – -knappen på ärrkontrollen för att
öppna den vänstra skärmen i Programvy. Tryck på -knapparna på enheten eller på
ärrkontrollen för att välja en l som du vill radera och tryck sedan på -knappen på
enheten eller ENTER-knappen på ärrkontrollen för att bocka för len.
011101_22
Ändra
Visa bläddrare
Rensa Program
W: 1024 H: 768
Rensa program
3. Tryck på
4 / 17
011101_01
011101_12
011101_13
011101_22
011101_26
011101_31
011101_33
011101_34
-knappen på enheten eller på / VOL + -knappen på ärrkontrollen för
att öppna den högra skärmen, tryck sedan på -knappen på enheten eller på
ärrkontrollen för att välja Rensa program för att ta bort de förbockade lerna i
Programvy.
Återgå till webbläsarlistan
1. Tryck på knapparna på enheten eller på ärrkontrollen för att välja Visa bläddrare,
tryck sedan på -knappen på enheten eller ENTER-knappen på ärrkontrollen för att
ändra från "Visa bläddrare” till "Programvy”.
• "Visa bläddrare" kommer att visa alla tillgängliga spår på skivan.
• "Programvyn" kommer att visa alla valda spår efter
programmeringen.
1 / 17
2. Tryck på
011101_01
011101_12
011101_13
011101_22
011101_26
011101_31
011101_33
011101_34
-knappen på enheten eller på ärrkontrollen för att välja Ändra, tryck
Läge : Normal
Ändra
Visa bläddrare
Visa bläddrare
Visa bläddrare
sedan på -knappen på enheten eller ENTER-knappen på ärrkontrollen för att
lämna Ändra.
89
Page 90

SE
Anpassa språkinställningarna
1. Tryck på knappen SETUP på ärrkontrollen för
att visa inställningsmenyn.
2. Tryck på
-knappen på enheten eller på
ärrkontrollen för att välja Språk och tryck
sedan på
-knappen på enheten eller på /
VOL + -knappen på ärrkontrollen.
3. Tryck på
knapparna på enheten eller
Språk
Bild
Klassificerin
Diverse
OSD Språk : Svenska
Undertexter
MPEG4 Undertexter
Ljud
DVD Meny
: Av
: Mellaneuropeisk
: Engelska
: Engelska
på ärrkontrollen för att välja OSD Språk
/ Undertext / MPEG4 Undertext / Ljud /
DVD-meny och tryck sedan på -knappen
på enheten eller ENTER-knappen på enheten
eller på ärrkontrollen.
4. Tryck på
-knappen på enheten eller på ärrkontrollen för att välja ett alternativ, tryck
sedan på -knappen på enheten eller på ENTER-knappen på ärrkontrollen för att
bekräfta.
5. Tryck på SETUP-knappen på enheten eller ärrkontrollen för att lämna menyn.
OSD Språk
Välj systemets visningsspråk.
Undertext
Stäng av/slå på undertextfunktionen på skivan.
MPEG4 Undertext
Välj annan MPEG4-undertextspråk som du vill visa på skärmen. Om det valda språket inte
nns inspelat på skivan kommer spelare att visa det topprioriterade språket på skivan.
Ljud
Välj det standardljudspår som du vill spela om din DVD stöder erspråkiga ljudspår.
DVD-meny
Välj det standard DVD-menyspråket som du vill visa på skärmen. Om det valda språket inte
nns inspelat på skivan kommer spelare att visa det topprioriterade språket på skivan.
90
Page 91

SE
Anpassa videoinställningarna
1. Tryck på knappen SETUP på
ärrkontrollen för att visa
inställningsmenyn.
Språk
Bild
TV Format : 16:9
TV System
Picture Mode : Standard
: PAL
2. Tryck på -knappen på enheten eller på
ärrkontrollen för att välja Bild och tryck
sedan på -knappen på enheten eller på
Klassificerin
Diverse
/ VOL + -knappen på ärrkontrollen.
3. Tryck på -knappen på enheten eller
på ärrkontrolen för att välja Bildkvot /
TV-System / Bildläge och tryck sedan på
-knappen på enheten eller på ENTER-
knappen på ärrkontrollen.
4. Tryck på -knappen på enheten eller på ärrkontrollen för att välja ett alternativ, tryck
sedan på -knappen på enheten eller på ENTER-knappen på ärrkontrollen för att
bekräfta.
5. Tryck på knappen SETUP på ärrkontrollen för att lämna menyn.
Bildkvot
Välj bildformat för visningsskärmen (både intern och extern visning) om skivan har er än
ett bildformat (4:3LB / 4:3PS / 16:9).
4:3: Välj "Bildförhållande: 4:3" för utmatning av 4:3 videoförhållande för en konventionell
TV-storlek. Svarta band kan visas på skärmen om video som inte är 4:3 visas.
16:9: Välj "Bildförhållande: 16:9" för utmatning av 16:9 förhållande för en bredbilds-TV.
Svarta band kan visas på skärmen om video som inte är 16:9 visas.
TV-System
Välj det TV-uppspelningssystem enligt det lokala TV-systemet (NTSC/PAL/Auto).
Bildläge
Bildlägesinställningen låter användaren justera bildens ljusstyrka (Standard / Ljus / Mjuk /
Användare).
91
Page 92

SE
Anpassa värderingsinställningarna
Föräldrakontroll
1. Tryck på knappen SETUP på
ärrkontrollen för att visa
inställningsmenyn.
2. Tryck på
-knappen på enheten eller på
Språk
Bild
Klassificerin
Klassificering
: 1. Barntillåten
v
Sätt Lösenord
ärrkontrollen för att välja Klassicerin
och tryck sedan på
enheten eller på
-knappen på
/ VOL + -knappen på
Diverse
ärrkontrollen.
3. Tryck på
knapparna på enheten
eller ärrkontrollen för att välja
Föräldrakontroll och tryck sedan
på -knappen på enheten eller
ENTER-knappen på ärrkontrollen. En
lösenordsskärm visas.
4. Tryck på 0-9 knapparna på ärrkontrollen för att mata in det gamla lösenordet (det
förinställda lösenordet från fabrik är "6666” för den första inställningen) och tryck
sedan på
5. Tryck på
-knappen på enheten eller ENTER-knappen på ärrkontrollen.
-knappen på enheten eller ENTER-knappen på enheten eller på
ärrkontrollen för att välja Föräldrakontroll igen för val av Föräldralås.
Föräldrakontrollsnivåerna motsvarar följande klassning.
1. Barnsäkert: Barnsäkert.
2. G: Allmän publik; rekommendedras för tittare i alla åldrar.
3. PG: Föreslagen föräldravägledning.
4. PG 13: Materialet är inte lämpligt för barn yngre än 13 år.
5. PG R: – Föräldravägledning – begränsad. Det är rekommenderat att föräldrar
hindrar barn under 17 att titta eller endast tillåter dem att titta i sällskap av
en förälder eller vuxen tillsynsperson.
6. R: Begränsad, barn under 17 år bör inte tillåtas titta utan sällskap av en
förälder eller vuxen tillsynsperson.
7. NC 17: Inga barn under 17 år, rekommenderas inte för barn under 17 år.
8. Vuxen: Endast vuxna.
6. Tryck på
-knappen på enheten eller ENTER-knappen på ärrkontrollen för att
bekräfta. (Klassning 1 har est restriktioner medan klassning 8 i stort sett visar all DVDskivor.)
7. Tryck på knappen SETUP på ärrkontrollen för att lämna menyn.
92
Page 93

SE
Välj lösenord
1. Tryck på knappen SETUP på
ärrkontrollen för att visa
inställningsmenyn.
2. Tryck på
-knappen på enheten eller på
ärrkontrollen för att välja Klassicerin
och tryck sedan på -knappen på
Språk
Bild
Klassificerin
Diverse
Klassificering
: 1. Barntillåten
v
Sätt Lösenord
enheten eller på / VOL + -knappen på
ärrkontrollen.
3. Tryck på -knappen på enheten eller på
ärrkontrollen för att välja Sätt Lösenord.
4. Tryck på 0-9 knapparna på ärrkontrollen för att mata in det gamla lösenordet (det
förinställda lösenordet från fabrik är "6666” för den första inställningen) och tryck
sedan på -knappen på enheten eller ENTER-knappen på ärrkontrollen för att
bekräfta. Om du matar in fel lösenord kommer skärmen att visa Fel lösenord.
5. Tryck på -knappen på enheten eller ENTER-knappen på ärrkontrollen igen, tryck
sedan på 0-9 knapparna på ärrkontrollen för att mata in det nya lösenordet. Tryck på
-knappen på enheten eller ENTER-knappen på ärrkontrollen för att bekräfta.
6. Mata in det nya lösenordet igen som bekräftelse. Efter veriering kommer skärmen att
visa Inställning av lösenord lyckades.
7. Tryck på knappen SETUP på ärrkontrollen för att lämna menyn.
Anpassa de övriga inställningarna
1. Tryck på knappen SETUP på ärrkontrollen för
att visa inställningsmenyn.
2. Tryck på -knappen på enheten eller på
ärrkontrollen för att välja Misc och tryck
sedan på -knappen på enheten eller på /
VOL + -knappen på ärrkontrollen.
3. Välj Grundåterställning och tryck sedan på
-knappen på enheten eller ENTER-knappen
på ärrkontrollen.
4. Tryck på knappen på enheten eller på
(VOL -/+) knappen på ärrkontrolen
för att välja “Ja” för att återställa
fabriksinställningarna förutom ditt eget
lösenord, tryck sedan på -knappen på
enheten eller ENTER-knappen på enheten
eller på ärrkontrollen för att bekräfta.
5. Tryck på knappen SETUP på ärrkontrollen för
att lämna menyn.
Språk
Bild
Klassificerin
Diverse
Språk
Bild
Klassificerin
Diverse
Grundåterställning
Grundåterställning
Grundåterställning
Do you want to use default setting?
Ja Nej
93
Page 94

SE
Underhåll
Hantering av skivor
Uppspelningssida
• Berör inte skivans uppspelningssida.
• Fäst inte papper eller tejp på skivan.
Rengöring av skivor
• Fingeravtryck och damm på skivan resulterar i försämrad bild- och ljudkvalitet. Torka av
skivan ifrån mitten och utåt med en mjuk trasa. Se till att skivan alltid är ren.
• Om damm inte kan torkas bort med en mjuk trasa, torka skivan försiktigt med en lätt
fuktad trasa och avsluta sedan med en torr trasa.
• Använd inte lösningsmedel som t.ex. tinner, bensen, kommersiellt tillgängliga
rengöringsmedel eller antistatsprej för vinylskivor. Det kan skada skivan.
Skivförvaring
• Förvara inte skivor på plats som står i direkt solljus eller nära värmekällor.
• Förvara inte skivor på fuktig och dammig plats, t.ex. i badrum eller nära en luftfuktare.
• Förvara skivor stående vertikalt i en hylla. Om skivor läggs på varandra eller om föremål
placeras på skivor som inte ligger i sitt fodral kan det få skivorna att bli skeva.
Rengöra enheten
Kontrollera att enheten är fullständigt bortkopplad från nätuttaget före
rengöring.
• Rengör enheten genom att torka av höljet med en lätt fuktad luddfri trasa.
• Använd inte rengöringsmedel som innehåller alkohol, ammoniak eller slipmedel.
• Spreja inte en aerosol på eller i närheten av enheten.
94
Page 95

SE
Tips och råd
Om ett problem uppstår beror det ofta på ett mindre fel. Följande tabell innehåller olika
tips.
Meny Beskrivning
Ingen ström. • Kontrollera att nätadaptern är ansluten.
• Kontrollera att enheten är påslagen.
• Se till att du valt läget PÅ
• Se till att batteriet är laddat i DVD-spelaren.
Fjärrkontrollen
fungerar inte.
Väldigt lite eller
inget ljud hörs på en
DVD-skiva.
• Använd ärrkontrollen nära enheten.
• Rikta ärrkontrollen mot ärrkontrollsensorn på enheten.
• Sätt i ett nytt batteri ärrkontrollen.
• Se till att plastbladet tagits bort från ärrkontrollen.
• Flytta på hinder mellan ärrkontrollen och enheten.
• Kontrollera att enheten inte är i pausläge. Tryck på
på enheten eller på ärrkontrollen.
• Kontrollera att enheten inte är i snabbspolningsläge framåt
eller bakåt. Tryck på -knappen på enheten eller på
ärrkontrollen.
• Kontrollera att LJUD/VIDEO ingång/utgångsanslutningarna är
korrekta.
• Denna enhet stöder inte DTS ljudkodningssystem. Tryck på
AUDIO/ANGLE -knappen på ärrkontrollen för att ändra
ljudinställningen till 2-kanals analogt läge.
• Enheten är överhettad. Stäng av den i en halvtimme och låt den
svalna.
• Volymkontrollen är för låg. Öka volymen.
-knappen
Ingen bild. • Skivans regionnummer överensstämmer inte med enhetens
regionnummer.
Otydlig bild. • DVD-skivan är smutsig. Rengör försiktigt skivan.
• Skivan är repad.
• Justera LCD-skärmens ljusstyrka (se Videoinställning på sidan
87).
Högt brummande
ljud eller oväsen
hörs.
• Kontakterna och uttaget är smutsiga. Rengör dem med en trasa
lätt fuktad med alkohol.
• Rengör skivan
• Skivan är repig eller så är len korrupt.
95
Page 96

SE
Meny Beskrivning
Skivan går inte att
spela.
Fil från
medialagringsenhet
spelar inte
Enheten svarar inte
när knappar trycks
in.
• Det nns ingen skiva i enheten ("Ingen skiva" visas på skärmen).
• Sätt i skivan på rätt sätt med etiketten uppåt.
• Rengör skivan
• En felaktig skiva har satts i eller så överensstämmer inte skivans
och enhetens regionnummer.
• Det kan ha bildats kondens i skivväxlaren, på grund av en
plötslig förändring av temperaturen. Vänta ungefär en timme
för att kondensen ska försvinna, och försök sedan igen.
• Kontrollera lformatet.
• Denna produkt stöder inte NTFS lsystem.
• Enheten kan frysa under användning. Stäng av enheten och slå
sedan på den igen för att återställa enheten.
96
Page 97

SE
Specikationer
Modell L7PDT13E
Skivformat DVD+/–R, DVD+/–RW, CD, CD-R, CD-RW, JPEG bild CD
Videosystem PAL, NTSC
Videodekomprimering MPEG-2, MPEG4 (maximal upplösning 720x525 vid 25/30fps)
LCD-skärm 7 tum TFT LCD-skärm
Ljud:
Ljudkaraktär
Dolby Digital avkodning
Högtalare 2 inbyggda stereohögtalare
Kontakter: DVD-spelare – USB 2.0 x 1 (max 8GB),
Strömadapter:
Strömförsörjning
Strömförbrukning
Fjärrkontroll Infraröd med ett CR2025 (3V) batteri
Vikt: DVD-spelare – 0,6 kg
2-kanal analog
Ja
AV OUT uttag x 1, Hörlursuttag x 1
Monitor – AV IN uttag x 1, Hörlursuttag x 1
AC 100-240V 50/60Hz (nätadapter)
Max. 12W (Standby ≤ 0,5W)
Monitor – 0,4 kg
Mått: DVD-spelare – 210 mm (L) x 160 mm (B) x 35 mm (H)
Monitor – 210 mm (L) x 160 mm (B) x 35 mm (H)
Egenskaper och specikationer kan ändras utan föregående meddelande.
97
Page 98

FI
Kiitos, kun valitsit uuden 7-tuumaisen kannettavan Logik kaksois-
DVD-soittimen.
Suosittelemme, että vietät hetken tämän käyttöoppaan parissa, jotta
ymmärtäisit täysin kaikki laitteen tarjoamat toiminnalliset ominaisuudet.
Saat myös vihjeitä ja vinkkejä mahdollisten ongelmien ratkaisuun.
Lue huolellisesti kaikki turvaohjeet ennen käyttöä ja säilytä tämä
käyttöopas tulevaa käyttöä varten.
Pakkauksesta purkaminen
Poista kaikki pakkausmateriaali laitteesta. Säilytä pakkaus. Jos hävität pakkauksen, tee se
paikallisten säädösten mukaisesti.
Seuraavat nimikkeet kuuluvat toimitukseen:
REPEAT
REPEAT
POWER
DISPLAY
/PROG
A-B
AUDIO/
ANGLE
SUBTITLE/
TITLE
MENU/
ZOOM
STOP/
SETUP
SLOW
GOTOENTER
VOL– VOL+
SOURCE MUTE
DVD-soitin Näyttö Kaukosäädin (pariston kanssa) x 1
Verkkolaite x 1 3,5 mm:n AV-kaapeli x 1Autosovitin x 1
98
Käyttöopas x 1Kiinnityssarja x 2 Pikaopas x 2
Page 99

FI
Tuotteen yleiskatsaus
Näkymä edestä
1
2
3
DVD-soitin/-näyttö
1. LCD-näyttö
2. Kaiuttimet
Näkymä takaa
1
3. Kaukosäätimen anturi
2
1. Jalusta
DVD-soitin/-näyttö
2. Levypesän kansi
99
Page 100

FI
Näkymä päältä
1 2 3
7 8
1. AVAUS-kytkin
Siirrä avataksesi levyn luukun.
2.
-painikkeet
• Valikkonäytössä vasemmalle/oikealle
siirtymiseen ja tiettyjen asetusten
säätämiseen.
• Nostaa tai laskee
äänenvoimakkuutta.
3.
-painikkeet
• Valikkonäytössä ylöspäin/alaspäin
siirtymiseen ja tiettyjen asetusten
säätämiseen.
4.
-painike
Levyn toiston käynnistämiseen,
keskeyttämiseen tai jatkamiseen.
DVD-soitin
Näyttö
6.
7.
8.
9. MYKISTYS-painike
10. TFT-painike
11. VALIKKO-painike
4
MUTE TFT MENU
9
10
6
5
11
-painike
Halutun signaalitulolähteen valintaan:
DVD/USB.
-painikkeet
Äänenvoimakkuuden säätämiseen.
-painikkeet
Valikkonäytössä navigointiin ja
tiettyjen asetusten säätämiseen.
Hiljentää tai palauttaa äänen.
Kytkee näytön päälle/pois.
Näyttää valikkonäytön.
5.
PYSÄYTÄ-painike
Levyn toiston pysäyttämiseen.
100
 Loading...