

Page 1

Instruction Manual
500GB Freeview+
TV recorder
L5SSTB13
L5SSTB13_IB.indd 1 28/08/2014 11:53
Page 2

Contents
Safety Warnings .........................................................................................................................4
Unpacking .................................................................................................................................. 6
Product Overview ...................................................................................................................... 7
Front View .............................................................................................................................................................7
Rear View ............................................................................................................................................................... 7
Remote Control ................................................................................................................................................... 8
Inserting the batteries into the Remote Control...................................................................................10
– Handling the Batteries .......................................................................................................................10
– Handling the Remote Control .........................................................................................................10
Remote Control Operation Range..............................................................................................................10
Initial Set Up .............................................................................................................................13
Plug In and Switch On ....................................................................................................................................13
Auto Standby .....................................................................................................................................................13
First Time Installation ..............................................................................................................14
Basic Features ..........................................................................................................................15
– Switching into Standby .....................................................................................................................15
– Selecting a programme.....................................................................................................................15
– Adjusting the volume ........................................................................................................................15
– Programme Information ...................................................................................................................16
– Audio Channel ......................................................................................................................................16
– Selecting Subtitles ..............................................................................................................................16
– Selecting the Aspect ratio ................................................................................................................16
Pausing Live TV ........................................................................................................................17
– Pausing and playing TV ..................................................................................................................... 17
– Fast Forward .........................................................................................................................................17
– Fast Rewind ..........................................................................................................................................17
– Slow Motion .........................................................................................................................................17
Digital Text ...............................................................................................................................18
– Accessing Digital Text .......................................................................................................................18
Programme Guide ...................................................................................................................18
– Navigating the Programme Guide ...............................................................................................18
– Programme Guide Icons ...................................................................................................................19
– Setting a Programme Reminder ..................................................................................................20
– Setting a Recording ..........................................................................................................................21
– Recording Clashes ...............................................................................................................................21
Main Menu ...............................................................................................................................22
– Recordings Library ..............................................................................................................................22
– Playing a Recording ............................................................................................................................22
– Preview a Recording ...........................................................................................................................22
– Channel Organiser ..............................................................................................................................23
– Delete a Channel .................................................................................................................................23
– Locking a Channel ...............................................................................................................................23
– Hiding a Channel .................................................................................................................................24
– Moving a Channel ...............................................................................................................................24
– Setting Menu ........................................................................................................................................25
L5SSTB13_IB.indd 2 28/08/2014 11:53
Page 3

– Display Settings ...................................................................................................................................25
– Parental Lock .........................................................................................................................................26
– Factory Reset .........................................................................................................................................26
– Advanced Setting ................................................................................................................................27
– Format HDD ...........................................................................................................................................28
– Retune .....................................................................................................................................................28
– System Information ............................................................................................................................29
Hints and Tips .......................................................................................................................... 30
Specications ...........................................................................................................................31
L5SSTB13_IB.indd 3 28/08/2014 11:53
Page 4

4
Safety Warnings
Ventilation
• To prevent the risk of electric shock or re
hazard due to overheating, ensure that
curtains and other materials do not obstruct
the ventilation vents.
• Do not install or place this unit in a
bookcase, built-in cabinet or in another
conned space. Ensure the unit is well
ventilated.
Safety
• Always disconnect the unit from the mains
supply before connecting/disconnecting
other devices or moving the unit.
• Unplug the unit from the mains socket
during a lightning storm.
Mains Adapter Cable
• Make sure the unit or unit stand is not
resting on top of the mains cable, as the
weight of the unit may damage the mains
cable and create a safety hazard.
• If the mains cable is damaged it must be
replaced by the manufacturer, its service
agent, or similarly qualied persons in order
to avoid a hazard.
Interference
• Do not place the unit on or near appliances
which may cause electromagnetic
interference. If you do, it may adversely
aect the operating performance of the
unit, and cause a distorted picture or sound.
Standby
• The button on the remote control does
not switch o the unit completely. The unit
will continue to draw electricity from the
mains supply while in standby.
Batteries
• Batteries used in the remote control for this
unit are easily swallowed by young children
and this is dangerous.
• Keep loose batteries away from young
children and make sure that the battery
holder tray is secure in the remote control.
Seek medical advice if you believe a cell has
been swallowed.
• Please dispose of batteries correctly by
following the guidance in this manual.
• The batteries shall not be exposed to
excessive heat such as sunshine, re or
the like.
• Read all the instructions carefully before
using the unit and keep them for future
reference.
• Retain the manual. If you pass the unit
onto a third party make sure to include this
manual.
• Check that the voltage marked on the rating
label matches your adapter voltage.
Damage
• Please inspect the unit for damage after
unpacking.
• Do not continue to operate the unit if you
are in any doubt about it working normally,
or if it is damaged in any way - switch o,
withdraw the mains adapter and consult
your dealer.
Location of Unit
• The unit must be placed on a at stable
surface and should not be subjected to
vibrations.
• Do not place the unit on sloped or unstable
surfaces as the unit may fall o or tip over.
• The mains socket must be located near the
unit and should be easily accessible.
• This unit is designed for indoor, domestic
use only.
Temperature
• Avoid extreme degrees of temperature,
either hot or cold. Place the unit well away
from heat sources such as radiators or gas/
electric res.
• Avoid exposure to direct sunlight and other
sources of heat.
Naked Flames
• Never place any type of candle or naked
ame on the top of or near the unit.
Moisture
• To reduce the risk of re, electric shock or
product damage, do not expose this unit
to rain, moisture, dripping or splashing. No
objects lled with liquids, such as vases,
should be placed on the unit.
• If you spill any liquid into the unit, it can
cause serious damage. Switch it o at the
mains immediately. Withdraw the mains
adapter and consult your dealer.
L5SSTB13_IB.indd 4 28/08/2014 11:53
Page 5
5
Supervision
• Children should be supervised to ensure
that they do not play with the unit and the
remote control.
• Never let anyone especially children push
anything into the holes, slots or any other
openings in the case - this could result in a
fatal electric shock.
CAUTION
RISK OF ELECTRIC SHOCK
DO NOT OPEN
The lightning ash with arrowhead
symbol, within an equilateral
triangle, is intended to alert the user
to the presence of uninsulated
“dangerous voltage” within the unit’s
enclosure that may be of sucient
magnitude to constitute a risk of
electric shock.
The exclamation point within an
equilateral triangle is intended to
alert the user to the presence of
important operating and
maintenance (servicing) instructions
in the manual accompanying
the unit.
Service
• To reduce the risk of electric shock, do not
remove screws. The unit does not contain
any user-serviceable parts. Please leave all
maintenance work to qualied personnel.
• Do not open any xed covers as this may
expose dangerous voltages.
Maintenance
• Ensure to unplug the unit from the mains
socket before cleaning.
• Do not use any type of abrasive pad or
abrasive cleaning solutions as these may
damage the unit’s surface.
• Do not use liquids to clean the unit.
• The wall socket plug is used as a disconnect
device, the disconnect device should be
readily accessible.
L5SSTB13_IB.indd 5 28/08/2014 11:53
Page 6
6
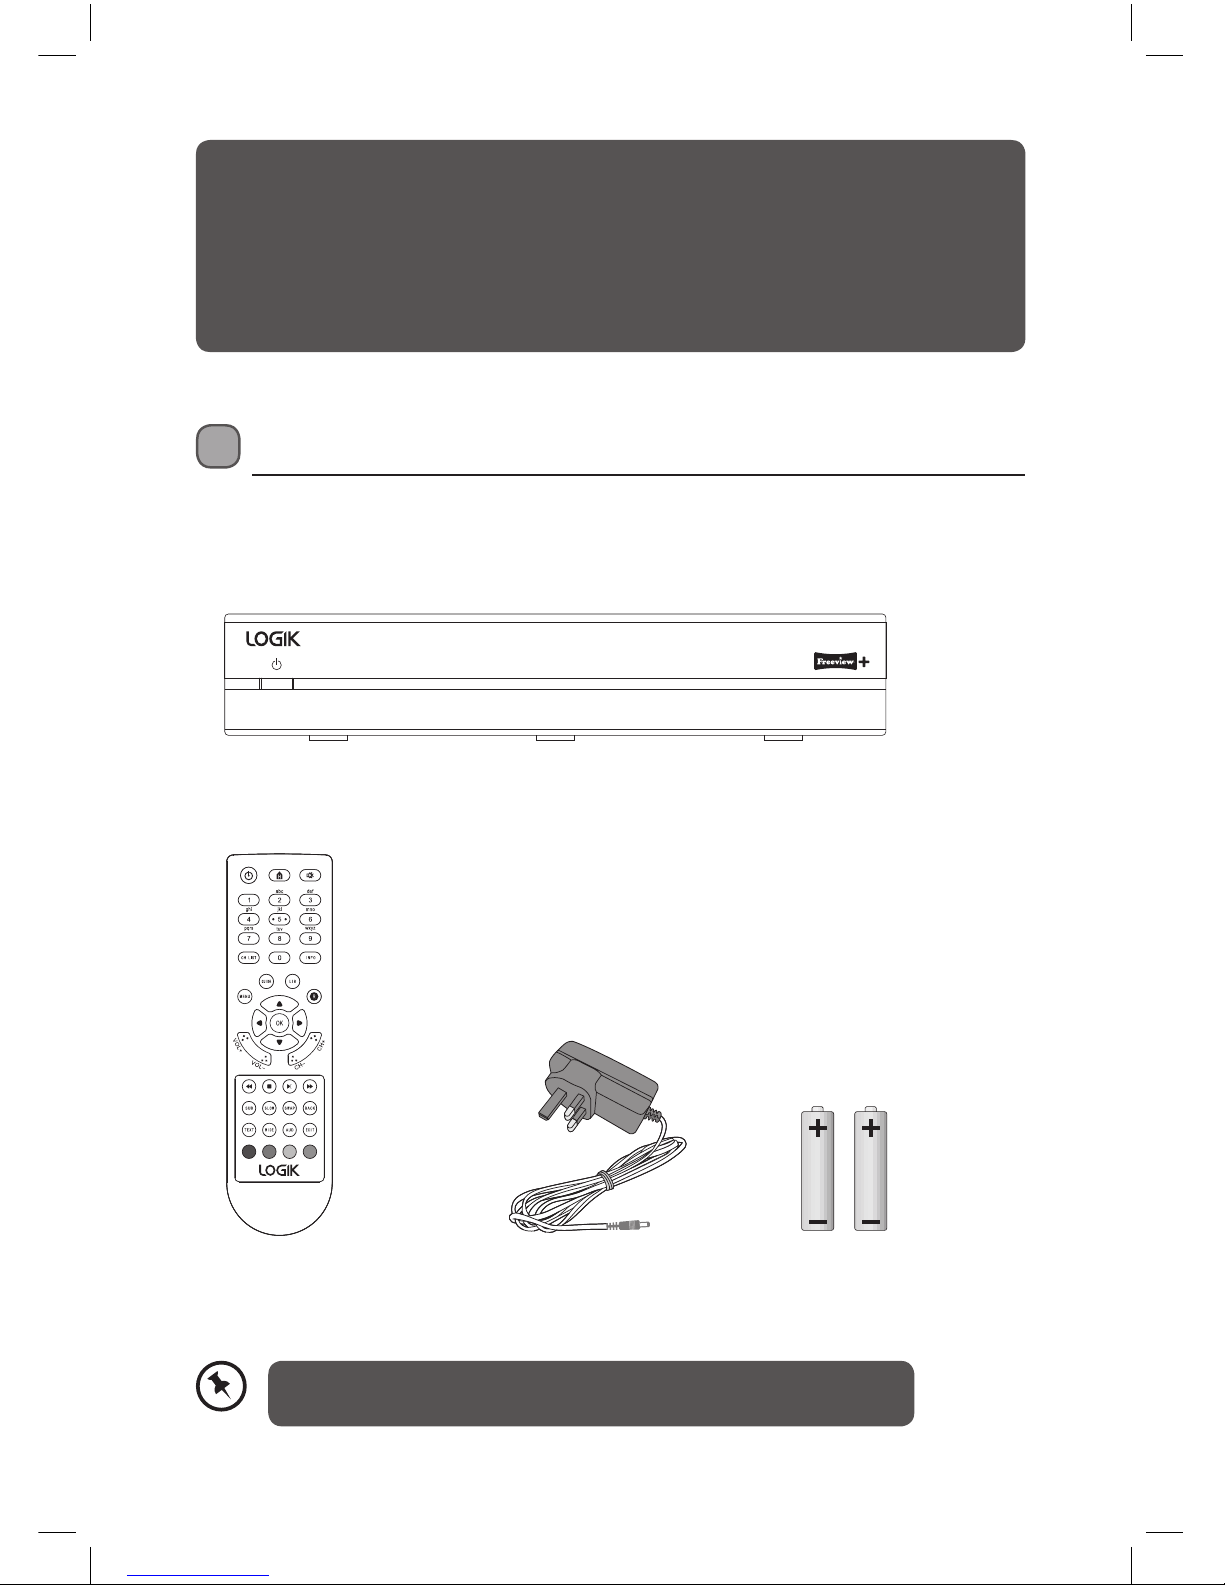
Unpacking
Remove all packaging from the unit. Retain the packaging. If you dispose of it please do so
according to local regulations.
The following items are included:
Thank you for purchasing your new Logik 500GB Freeview+ TV recorder.
We recommend that you spend some time reading this instruction manual in order that
you fully understand all the operational features it oers. You will also nd some hints
and tips to help you resolve any issues.
Read all the safety instructions carefully before use and keep this instruction manual for
future reference.
If items are missing, or damaged please contact Partmaster (UK only).
Tel: 0344 800 3456 for assistance.
Main unit
AAA Batteries X 2Remote Control Mains Adapter
L5SSTB13_IB.indd 6 28/08/2014 11:53
Page 7
7
Rear View
Product Overview
Front View
1
1. Button
• Switches the unit between the ON and STANDBY modes.
1. Aerial IN Socket
2. Aerial OUT Socket
3. SCART TV Socket
4. DC IN Socket
1 2 3 4
• If you already have a Digital TV we recommend that you connect an RF lead from
the RF OUT socket on the set top box to the aerial socket on your TV.
• If you have an Analogue TV then you will NOT need to connect your TV to the Set
top box via an RF lead. Simply connect the scart lead to the set top box and TV.
L5SSTB13_IB.indd 7 28/08/2014 11:53
Page 8
8
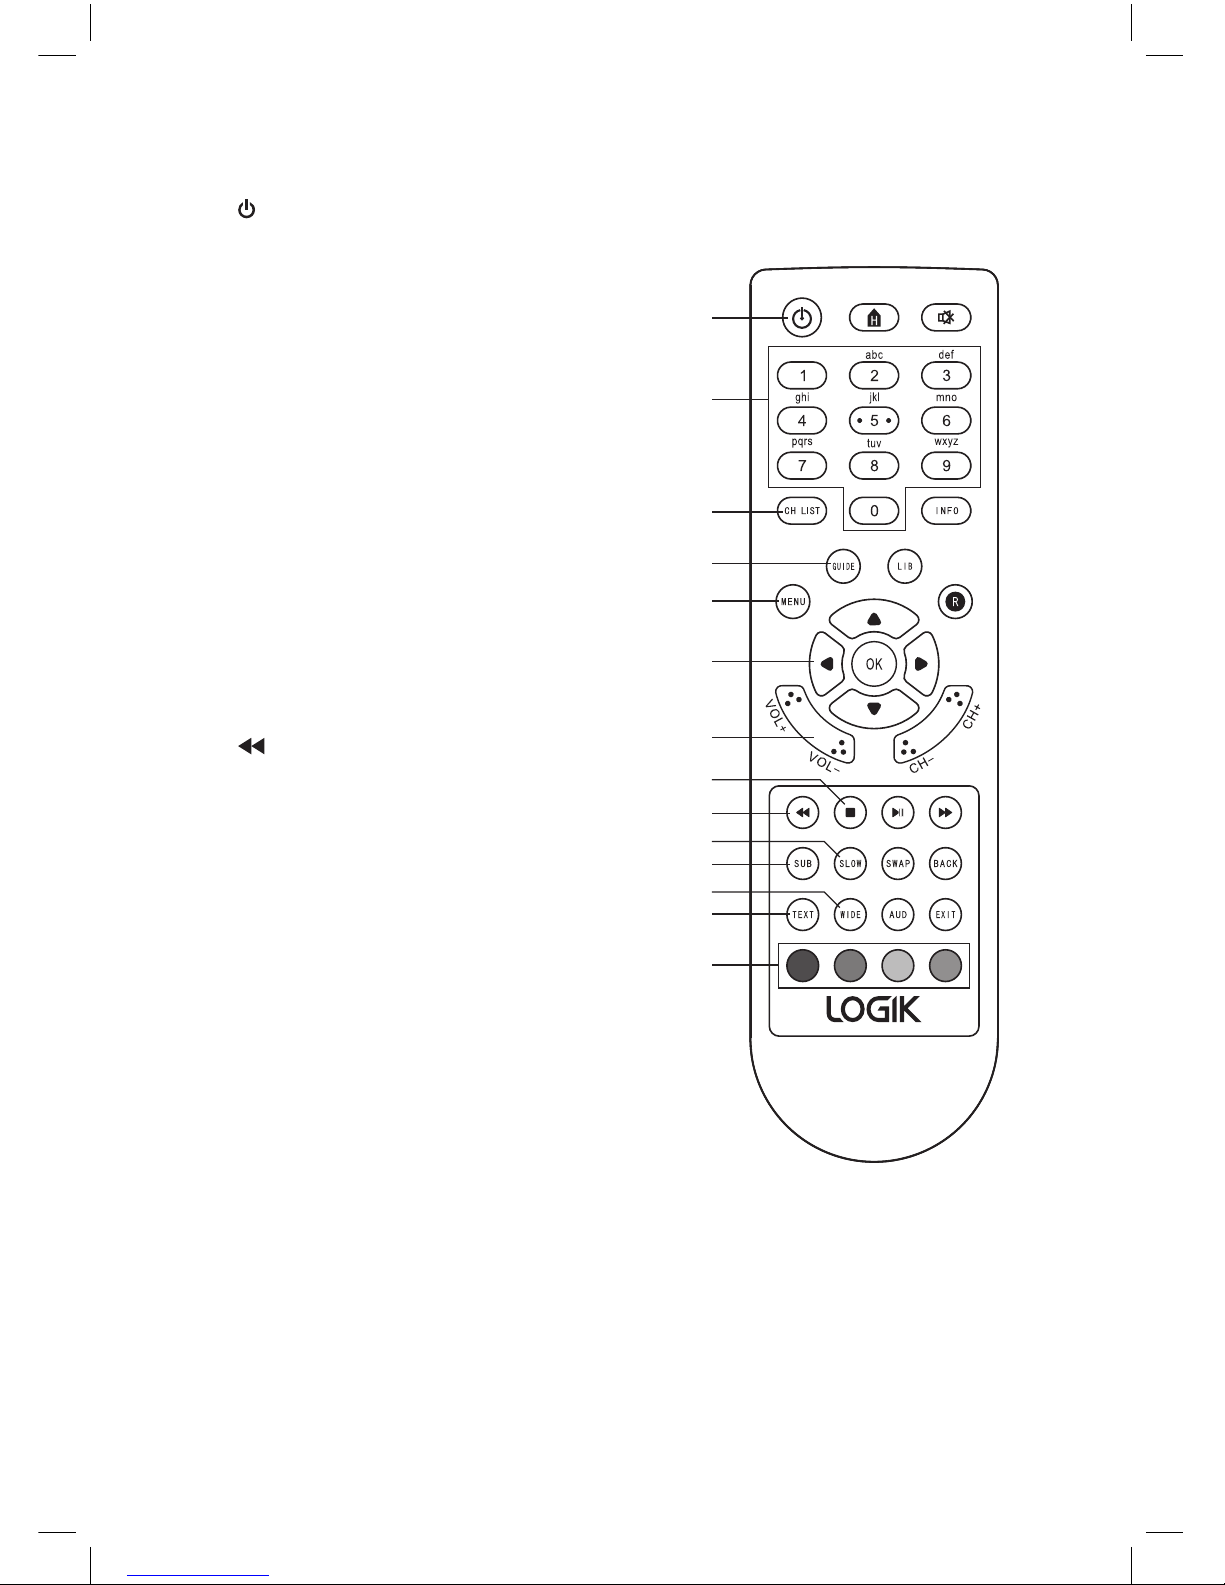
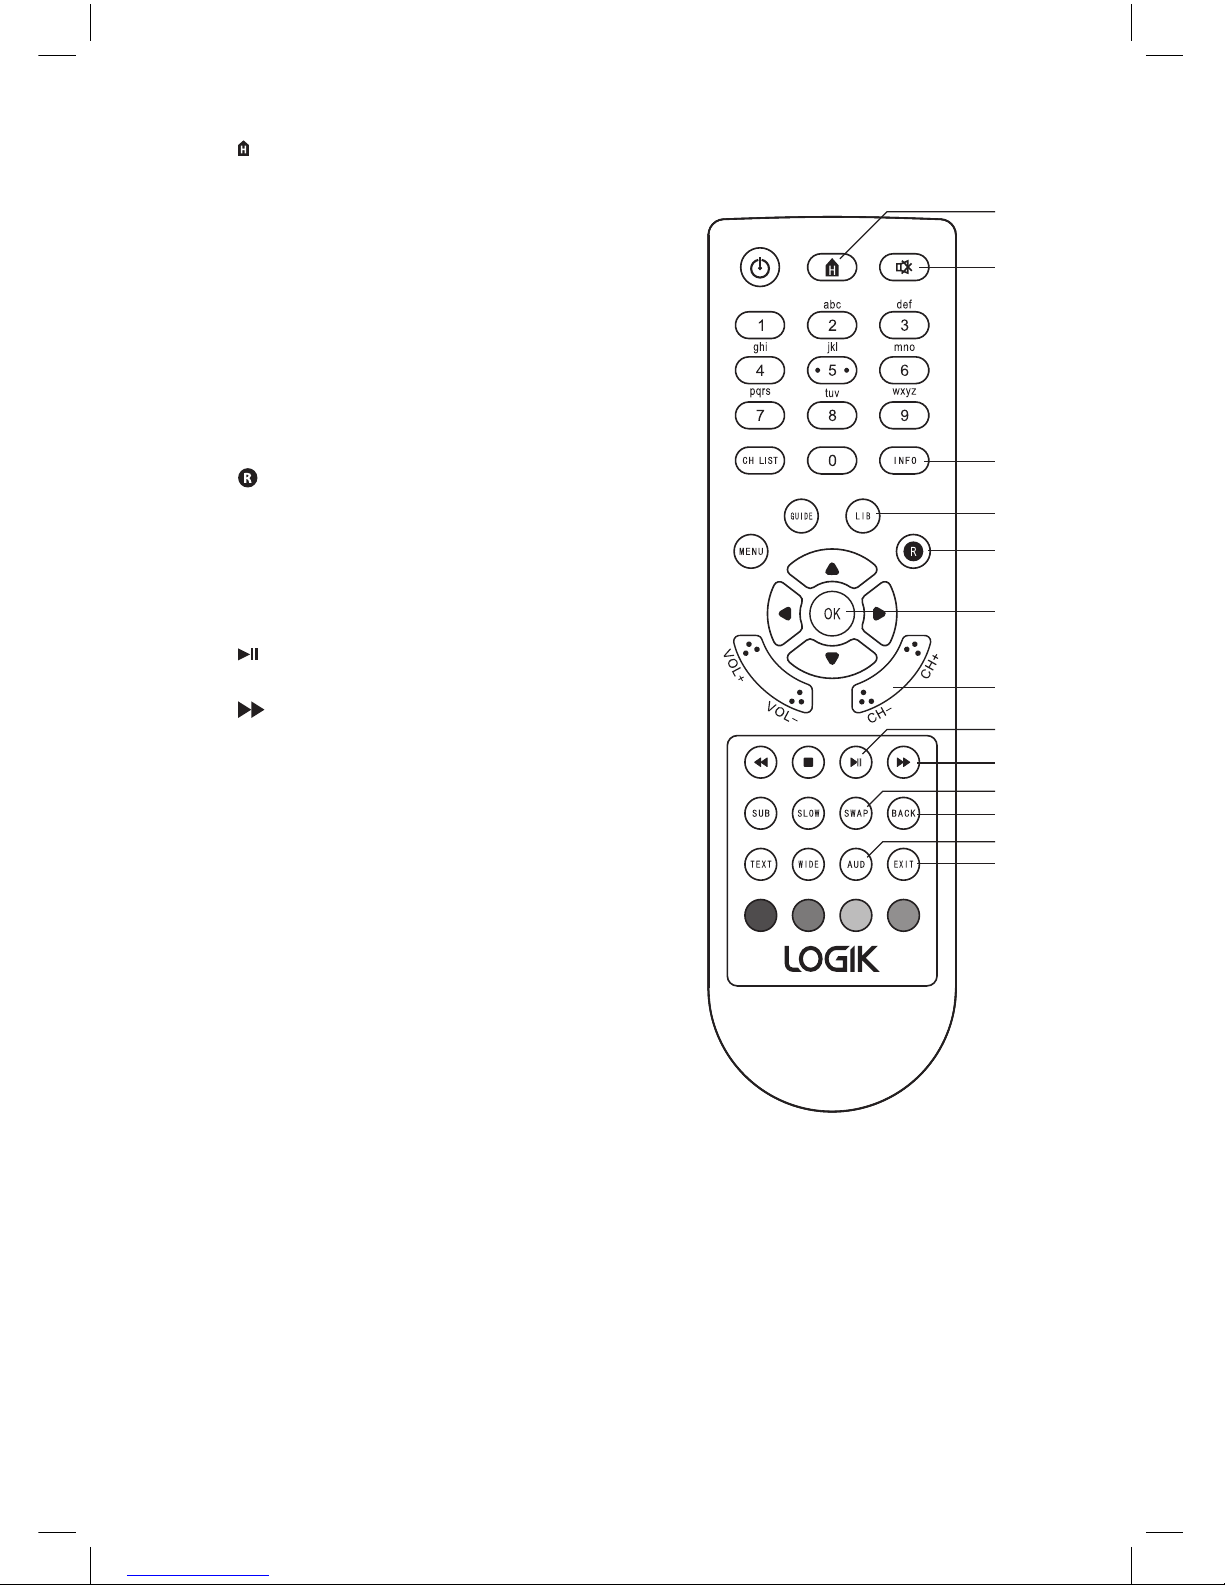
Remote Control
1. Standby Button
• Switches the unit on and into standby.
2. 0-9 Buttons
• Selects a channel.
• Enter numeric values in the set-up
menus.
• Selects characters for renaming.
3. CH LIST Button
• Displays the Channel list menu.
4. GUIDE Button
• Displays the Programme Guide.
5. MENU Button
• Displays the Main Menu.
6. Navigation Buttons
• Navigates around the menus.
7. VOL +/- Buttons
• Adjusts the volume level.
8. STOP Button
• Stops a recording.
9.
Fast Rewind Button
• Rewinds a recording
2X-4X-8X-16X-32X.
10. SLOW Button
• Plays a recording in slow motion
ve dierent speeds (1-2-3-4-5).
11. SUB Button
• Switches subtitles on and o.
12. WIDE Button
• Switches the Aspect Ration between
4:3 - 16:9 and AUTO screen size.
13. TEXT Button
• Displays digital text when available.
14. Coloured Buttons
(Red, Green, Yellow, Blue)
• For interactive use and navigating menus.
1
2
3
4
5
6
7
8
9
10
11
12
13
14
L5SSTB13_IB.indd 8 28/08/2014 11:53
Page 9
9
15. Home Button
• Returns to the rst programme you have
tuned in (usually BBC1).
16. Mute Button
• Mutes the sound.
17. INFO Button
• Displays information on the current and
next programme.
• Press again for more detailed information
about the current programme.
18. LIB Button
• Displays the Library of all your recordings.
19.
Record Button
• Press to record programmes.
20. OK Button
• Press to conrm menu settings.
21. CH Button
• Press to scroll up and down channels.
22.
PLAY/PAUSE Button
• Press the play or pause recordings.
23.
FAST FORWARD
• Fast forwards a recording
2X-4X-8X-16X-32X.
24. SWAP button
• Press to swap between the current
channel and the previously view one.
25. BACK Button
• Press to move backwards through menus.
26. AUDIO Button
• Press to select a dierent audio language,
when available.
27. EXIT Button
• Press to exit menus.
16
15
17
18
19
20
21
22
23
24
25
26
27
L5SSTB13_IB.indd 9 28/08/2014 11:53
Page 10

10
Inserting the batteries into the Remote Control
1. Squeeze the cover lever and lift the
battery cover to access the battery
compartment of the remote control.
2. Insert two AAA size batteries (included).
Ensure the polarities (+ and –) of the
batteries match the (+) and (–) ends
indicated in the battery compartment.
3. Close the battery compartment cover.
Handling the Batteries
• Improper or incorrect use of batteries may cause corrosion or battery leakage, which could
cause re, personal injury or damage to property.
• Only use the battery type indicated in this manual.
• When the batteries are exhausted, the remote will not function. Replace both batteries at
the same time with new ones.
• Do not install new batteries with used ones and do not mix dierent types of batteries.
• Do not dispose of used batteries as domestic waste. Dispose of them in accordance with
local regulations.
Handling the Remote Control
• Take care of your ngernails when you press and hold the battery release tab.
• Do not drop or cause impact to the remote control.
• Do not spill water or any liquid on the remote control.
• Do not place the remote control on a wet object.
• Do not place the remote control under direct sunlight or near sources of excessive heat.
• Remove the battery from the remote control when not in use for a long period of time, as it
could cause corrosion or battery leakage and may result in physical injury and/or property
damage including re.
Remote Control Operation Range
Keep the remote control within approx. 5 metres of the
remote control sensor on the unit and within 60° in front
of the unit. The operating distance may vary depending
on the brightness of the room.
1
3
2
30° 30°
5m
L5SSTB13_IB.indd 10 28/08/2014 11:53
Page 11

11
Connecting to a Digital TV
1. Ensure your TV and any other equipment you are connecting to are switched o.
2. Connect one end of the RF coaxial cable (not supplied) to the aerial socket on the wall
and the other end to the RF IN socket on the rear panel of the unit .
3. Connect another RF coaxial cable (not supplied) to the RF OUT socket on the rear panel
of the unit and the other end to your TV.
4. Connect one end of the SCART cable (not supplied) to the TV socket on the rear panel of
the unit and the other end to the SCART socket on your TV.
Aerial
To aerial wall
socket
To RF IN socket
To SCART socket
RF Coaxial Cable
(not included)
RF Coaxial Cable
(not included)
SCART Cable
(not included)
To Mains Socket
Mains Adapter Cable
(included)
Digital TV
The set top box must be switched on to see a picture on your TV.
If the set top box is switched into STANDBY the aerial signal will not feed
through your set top box into your TV. The words ‘NO SIGNAL’ will be
displayed on your TV. Switch the set top box on to view your TV.
L5SSTB13_IB.indd 11 28/08/2014 11:53
Page 12

12
Connecting to an Analogue TV
Aerial
To aerial wall
socket
To SCART socket
RF Coaxial Cable
(not included)
SCART Cable
(not included)
To Mains Socket
Mains Adapter Cable
(included)
Analogue TV
1. Ensure your TV and any other equipment you are connecting to are switched o.
2. Connect one end of the RF coaxial cable (not supplied) to the aerial socket on the wall
and the other end to the RF IN socket on the rear panel of the unit .
3. Connect one end of the SCART cable (not supplied) to the TV socket on the rear panel of
the unit and the other end to the SCART socket on your TV.
If you require additional assistance please call our UK Call Centre on
0344 561 1234. Our UK Customer Contact Centre is open Monday-Saturday
8am-8pm and Sunday 8am-6pm.
L5SSTB13_IB.indd 12 28/08/2014 11:53
Page 13

13
Initial Set Up
Plug In and Switch On
1. Connect the mains adapter cable to the mains socket after you
have completed all the connections and switch on. At this stage,
the unit switches to standby mode. The red LED indicator will
illuminate on the front panel of the unit.
2. Switch your TV on and select the SCART input.
3. Press the
Standby button to turn the unit on. The red LED
indicator will turn green. The rst installation screen will show on
the television screen.
The unit will take a while to load.
Auto Standby
The unit has an Auto Standby feature which is
designed to save energy. The unit will automatically
switch into standby mode after 3 hours if the unit
hasn’t dectected any activity.
You can switch this feature o or change it to switch
into standby after 4 hours.
1. Press MENU.
2. Press the
buttons to highlight Settings.
Then press OK.
Select ConrmOK
ReturnBACK
Wed 08 Sep 16:52
Main Menu
Exit Menu
EXIT
Retune
System Information
Settings
Library
Channel Organiser
Select ConrmOK
ReturnBACK
Wed 08 Sep 16:52
Settings
Exit Menu
EXIT
Advanced Settings
Format HDD
Factory Reset
Display Settings
Parental Lock
Select
ReturnBACK
Wed 08 Sep 16:52
Advanced Settings
Exit Menu
EXIT
Show HDD Space as Time
Auto Standby 3 Hours
Lip-Sync On
Preferred Language English
Recommendation O
3. Press the buttons to highlight Advanced
Settings. Then press OK
4. Press the
buttons to highlight Auto Standby.
5. Press the
buttons to select
OFF - 3 HOURS - 4 HOURS.
L5SSTB13_IB.indd 13 28/08/2014 11:53
Page 14

14
3. The Retune screen will be displayed, showing
you how many channels have been found and
saved. The tuning may take several minutes to
complete.
First Time Installation
1. When your unit is switched on for the rst time,
it will go straight into the First Time Installation
menu.
Select Start InstallOK
Select Your TV Screen type using the arrow buttons
Press OK to start the installation
16:9 Widescreen
First Time Installation
Please ensure the aerial is connected
Retune
BBC 6 Music
BBC R5SX
BBC R5L
BBC Parliament
CBeebies
BBC 6 FOUR
Channels Transmitter : East Anglia.
Channels Found : 16
Progress
Signal
45%
90%
TV Region Selection Fri 08 Mar 16:52
Select ConrmOK
Please select your preferred region.
“England, London” is your currently selected region.
England Recommended
Cambridgeshire & Bedfordshire
London
✔
Please Wait...
Information
The unit will take a while to load.
2. Press the buttons to select the TV Screen type
and then press the OK button to conrm.
4. When all the channels have been tuned in the
TV Region Selection will be displayed.
Depending where you are, you may be able to
choose a region. Press the
to select a region
and press OK.
5. The Information screen will be displayed for a
short while, then you will see the rst channel
that was tuned in (usually BBC1).
L5SSTB13_IB.indd 14 28/08/2014 11:53
Page 15

15
Select To ViewOK
Exit MenuEXIT
Wed 08 Sep 16:52
Channel List
2 BBC TWO
3 ITV 1
4 Channel 4
5 FIVE
6 ITV 2
7 BBC THREE
9 BBC FOUR
10 ITV 3
1 BBC ONE
BBC ONE
Basic Features
Switching into Standby
• When the unit is on, press the STANDBY button to switch it into standby.
The indicator light is:
Green when the unit is on.
Orange when in standby.
Red when in standby with a recording in operation.
If you leave the unit unattended for a long time. Put the unit in standby, wait 30 second and
switch o at the mains.
Selecting a programme
• You can select a programme in a few dierent
ways. You can select a programme directly by
using the CH -/+ or NUMBER buttons.
OR
• Press CH LIST and then the
buttons to select
a programme. Then press OK to view in the
menu then press EXIT.
Adjusting the volume
1. Press the VOL +/- buttons to increase or
decrease the volume. You may also need to
adjust the volume on your TV as well.
2. To mute the volume press the MUTE button.
The mute symbol will be displayed to show
the sound has been muted. Press MUTE or the
VOL +/- buttons to switch the sound back on.
Remember your unit will NOT record if it is switched o at the mains.
L5SSTB13_IB.indd 15 28/08/2014 11:53
Page 16

16
Select ConrmOK
Audio Selection 1/1
Language
ENG Stereo
Audio Type MPEG
Exit MenuEXIT
Exit MenuEXIT Service Informationi
Extended EPG (Now) Wed 08 Sep 16:52
21:00 - 22:00 New Tricks
1/10 Dead Man Talking: UCOS reinvestigate the death of a
wealthy nancier when a psychic tells his daughter to
resolve his unnished business. [DRAMA] [S] [AD]
Select
Programme Information
You can view information about the current
programme you are watching.
1. Press the INFO button and the Extended
EPG (Now) will be displayed. This gives you a
detailed description of the programme you
are viewing.
2. Press the INFO button again to display the
Service information.
3. Press the INFO button a third time.
A brief description of the current and next
programme with be displayed at the bottom
of the screen.
Audio Channel
Sometimes a dierent audio language is broadcast
with a programme.
1. Press the AUD button to display the Audio
Selection menu. Press the
button to
select the language then press OK.
Selecting Subtitles
1. Press the SUB button to switch subtitles on
and o.
Subtitle
ON
Not all programmes have subtitles.
Check the Extended EPG (Now), if you
see an [S] the programme has subtitles.
Selecting the Aspect ratio
1. Press the WIDE button to select between
16:9 - AUTO - 4:3.
Aspect Ratio
WIDE
L5SSTB13_IB.indd 16 28/08/2014 11:53
Page 17

17
Timeshifting 00:00:00 / 00:01:59
Fast Forward x2 00:00:00 / 00:02:39
Fast Rewind x2 00:00:00 / 00:01:37
Smooth Forward 1 00:00:00 / 00:01:37
Pausing Live TV
With this feature if you need to interrupt what you are watching you can pause the programme
and play it again, from the paused point later.
Pausing and playing TV
1. While watching a programme press the
PLAY/PAUSE button. The Timeshifting
menu will be displayed, and the picture will
pause. The red recording LED will light on the
unit.
2. Press the
PLAY/PAUSE button again to
resume the recorded TV programme.
3. Press the
STOP button to resume watching
LIVE TV.
Fast Forward
1. Press the FAST FORWARD button to fast
forward your recorded programme. Each
press increases the fast forward speed.
x2 - x4 - x8 - x16 - x32
Fast Rewind
1. Press the FAST REWIND button to fast
rewind your recorded programme. Each press
increases the fast rewind speed.
x2 - x4 - x8 - x16 - x32
Slow Motion
1. Press the SLOW button to view your
programme in slow motion. Each press
increases the speed of the slow motion.
Slowest - 1 - 2 - 3 - 4 - 5 - fastest
L5SSTB13_IB.indd 17 28/08/2014 11:53
Page 18

18
Digital Text
Your set top box gives you access to digital text information on news, weather and a variety of
other topics. The digital text service isn’t available on every channel. Some channels show a red
button on the screen when a text service is available. When you see this you can press the RED
button to access the service.
Accessing Digital Text
1. Press the TEXT button to view digital text. If
a text service isn’t available the screen will
display “Teletext not available”.
2. Use the NUMBER buttons to enter page
numbers or you can use the RED, GREEN,
YELLOW and BLUE buttons to access
shortcuts.
3. Press TEXT to exit the digital text menu.
100
News Index 102
Weather 400
Entertainment News 501
CBeebies 5900
INDEX 199
Welcome to RED button services
Monday 11 Feb
Press SELECT for
Sport Home
To exit, press TEXT
Programme Guide
The programme guide shows you the upcoming programmes for the next 8 days. It also
displays programme information about each programme you select. From this menu you can
select a programme to watch, record or set a reminder so you don’t miss the programme.
Navigating the Programme Guide
1. Press the GUIDE button to display the
Programme Guide.
2. Press the
buttons to move around
the Programme Guide and highlight a
programme.
• To move backwards 2 hours press the RED
button.
To move forwards 2 hours press the GREEN
button.
• To move backwards 24 hours press the YELLOW
button.
To move forwards 24 hours press the BLUE
button.
3. Press the OK button to watch the programme
selected. If its not available to watch it will ask
you if you would like to set a reminder.
Wed 08 Sep 16:52
Programme Guide
001 BBC ONE
002 BBC TWO
003 ITV 1
004 Channel 4
005 FIVE
006 ITV 2
Digging for Britian
New Tricks
Paul O’Grady Live
Ultimate Big...
The Mentalist
King Kong
News...
BBC News
ITV News...
Law & Order
Big Brother...
Roger and...
Would...
Two...
Wed 08 Sep
21:00 - 22:00 New Tricks
1/10 Dead Man Talking: UCOS reinvestigate the death of a
wealthy nancier when a psychic tells his daughter to
resolve his unnished business.
[DRAMA] [S] [AD]
Big Brother...
OK
R
- 2 Hours
+ 2 Hours
- 24 Hours + 24 Hours
Rec
Watch
EXIT
Exit Menu
Navigate
21:00 22:00 23:00
L5SSTB13_IB.indd 18 28/08/2014 11:53
Page 19

19
Programme Guide Icons
[S]
This programme has subtitles.
[AD]
This programme has audio description.
[SL]
This programme has sign language.
A reminder has been set for this programme.
This programme has been set to be recorded.
R
L5SSTB13_IB.indd 19 28/08/2014 11:53
Page 20

20
Setting a Programme Reminder
Use this feature to remind you that a programme is about to start. You can only set a reminder
for a programme that hasn’t started yet.
Wed 08 Sep 16:52
Programme Guide
001 BBC ONE
002 BBC TWO
003 ITV 1
004 Channel 4
005 FIVE
006 ITV 2
Digging for Britian
New Tricks
Paul O’Grady Live
Ultimate Big...
The Mentalist
King Kong
News...
BBC News
ITV News...
Law & Order
Big Brother...
Roger and...
Would...
Two...
Wed 08 Sep
21:00 - 22:00 New Tricks
1/10 Dead Man Talking: UCOS reinvestigate the death of a
wealthy nancier when a psychic tells his daughter to
resolve his unnished business.
[DRAMA] [S] [AD]
Big Brother...
OK
R
- 2 Hours
+ 2 Hours
- 24 Hours + 24 Hours
Rec
Watch
EXIT
Exit Menu
Navigate
21:00 22:00 23:00
Reminder
Select
EXIT
Exit Menu
Single Event
Series Event
Wed 08 Sep 16:52
Programme Guide
001 BBC ONE
002 BBC TWO
003 ITV 1
004 Channel 4
005 FIVE
006 ITV 2
Digging for Britian
New Tricks
Paul O’Grady Live
Ultimate Big...
The Mentalist
King Kong
News...
BBC News
ITV News...
Law & Order
Big Brother...
Roger and...
Would...
Two...
Wed 08 Sep
21:00 - 22:00 New Tricks
1/10 Dead Man Talking: UCOS reinvestigate the death of a
wealthy nancier when a psychic tells his daughter to
resolve his unnished business.
[DRAMA] [S] [AD]
Big Brother...
OK
R
- 2 Hours
+ 2 Hours
- 24 Hours + 24 Hours
Rec
Watch
EXIT
Exit Menu
Navigate
21:00 22:00 23:00
4. You now have the choice of setting a reminder
for the Single Event or if the programme is on
every day/week you can choose Series Event.
Press the to highlight Single or Series
Event.
5. Press OK to set the reminder. The clock
symbol will appear next to the programme.
6. To delete a reminder, highlight the
programme with the reminder and press OK.
Select YES and press OK, the reminder will be
deleted.
1. Press the GUIDE button to display the
Programme Guide.
2. Press the
buttons to move around
the Programme Guide and highlight the
programme you want to set the reminder on.
3. Press the OK button. The reminder screen will
be displayed.
7. When the programme is about to start you
will see the reminder screen. Select Watch
to switch over and watch the programme,
Cancel or Remind me later.
Set Reminder
A reminder set is about to start what would you like
to do?
Watch Cancel Remind me later
L5SSTB13_IB.indd 20 28/08/2014 11:53
Page 21

21
Setting a Recording
With this set top box you can record 2 programmes at the same time.
Wed 08 Sep 16:52
Programme Guide
001 BBC ONE
002 BBC TWO
003 ITV 1
004 Channel 4
005 FIVE
006 ITV 2
Digging for Britian
New Tricks
Paul O’Grady Live
Ultimate Big...
The Mentalist
King Kong
News...
BBC News
ITV News...
Law & Order
Big Brother...
Roger and...
Would...
Two...
Wed 08 Sep
21:00 - 22:00 New Tricks
1/10 Dead Man Talking: UCOS reinvestigate the death of a
wealthy nancier when a psychic tells his daughter to
resolve his unnished business.
[DRAMA] [S] [AD]
Big Brother...
OK
R
- 2 Hours
+ 2 Hours
- 24 Hours + 24 Hours
Rec
Watch
EXIT
Exit Menu
Navigate
21:00 22:00 23:00
Recording Options
Select
EXIT
Exit Menu
Single Event
Series Event
Wed 08 Sep 16:52
Programme Guide
001 BBC ONE
002 BBC TWO
003 ITV 1
004 Channel 4
005 FIVE
006 ITV 2
Digging for Britian
New Tricks
Paul O’Grady Live
Ultimate Big...
The Mentalist
King Kong
News...
BBC News
ITV News...
Law & Order
Big Brother...
Roger and...
Would...
Two...
Wed 08 Sep
21:00 - 22:00 New Tricks
1/10 Dead Man Talking: UCOS reinvestigate the death of a
wealthy nancier when a psychic tells his daughter to
resolve his unnished business.
[DRAMA] [S] [AD]
Big Brother...
OK
R
- 2 Hours
+ 2 Hours
- 24 Hours + 24 Hours
Rec
Watch
EXIT
Exit Menu
Navigate
21:00 22:00 23:00
R
3. Press the RECORD button.
4. You now have the choice of setting it to
record the Single Event or if the programme
is on every day/week you can choose Series
Event. This will automatically record all the
programmes in that series. Press the
to
highlight Single or Series Event.
1. Press the GUIDE button to display the
Programme Guide.
2. Press the
buttons to move around
the Programme Guide and highlight the
programme you want to set to record.
5. Press OK to set the recording. The record
symbol will appear next to the programme.
If you see the
symbol you have set a split
recording. This mean the recording it interrupted
by another programme.
6. To delete a set recording, highlight the
programme with the recording and press
RECORD. Select YES and press OK, the set
recording will be deleted.
Recording Clashes
If you try to record more than 2 programmes at the same time you will see a warning on your
screen, if available, it will suggest an alternative viewing time and channel.
Wed 08 Sep 16:52
Overlap Information
18:30 - 19:00 BBC TWO Rec Once
18:30 - 19:00
You are already recording two channels at this time. Press the up or
down arrow buttons to hightlight the programme(s) that you want to
delete and then select it using the left and right arrow buttons.
OK
Delete
BACK
Return
EXIT
Exit Menu
Select
BBC ONE Rec Once
Start-End Time
Service Name Purpose DeleteMode
1. Highlight the recording that you wish to
delete using the buttons. Press the
button to select the recording, a tick will
appear.
2. Press the OK buttons to delete the
programme. Then press the EXIT button to
the exit the menu.
L5SSTB13_IB.indd 21 28/08/2014 11:53
Page 22

22
Main Menu
The main menu give you access to the Library, Channel Organiser, Settings, Retune and System
Information menus.
Select ConrmOK
ReturnBACK
Wed 08 Sep 16:52
Main Menu
Exit Menu
EXIT
Retune
System Information
Settings
Library
Channel Organiser
Select PlayOK
ReturnBACK
Wed 08 Sep 16:52
Library
Delete
Rename
Lock Preview
Exit MenuEXIT
SI.No Record Event Name Date Status
New Tricks
BBC ONE
1/10 Dead Man Talking: UCOS reinvestigate the death of ...
Recorded at 21:00:00
Total Time 01:02:34
0001
0002
0003
0004
New Tricks
Countdown
BBC News
The One Show
07/09/10
07/09/10
06/09/10
02/09/10
Recorded
Recorded
Recorded
Recorded
HDD Information:
Reserved 0%
Used 32% Free 68%
Wed 08 Sep 16:52
Library
SI.No Record Event Name Date Status
New Tricks
BBC ONE
1/10 Dead Man Talking: UCOS reinvestigate the death of ...
Recorded at 21:00:00
Total Time 01:02:34
0001
New Tricks
07/09/10
Recorded
Recordings Library
1. Press the MENU button to view the Main
Menu.
2. Press the
buttons to highlight Library
and press OK button.
OR
Press the LIB button.
Playing a Recording
1. Press the buttons to highlight the
recording that you wish to play.
2. Press the OK button to play the recording.
You can choose to view the recording from the
beginning or resume from the last place viewed.
Also you can watch a recording that hasn’t nished
recording yet.
Preview a Recording
1. Press the buttons to highlight the
recording that you wish to preview.
2. Press the BLUE button, the recording will be
previewed in the top left hand corner of the
screen.
L5SSTB13_IB.indd 22 28/08/2014 11:53
Page 23

23
Select ConrmOK
ReturnBACK
Wed 08 Sep 16:52
Main Menu
Exit Menu
EXIT
Retune
System Information
Settings
Library
Channel Organiser
Select ConrmOK
Exit MenuEXITReturn
Delete Lock
MoveHide
BACK
Wed 08 Sep 16:52
Channel Organiser
2 BBC TWO
4 Channel 4
5 FIVE
6 ITV 2
7 BBC THREE
9 BBC FOUR
10 ITV 3
1 BBC ONE
BBC ONE
3 ITV 1
Warning
This channel will be permanenty
deleted. Do youwant to delete this
channel?
Yes No
!
Channel Organiser
In the Channel Organiser menu you can Delete,
Lock, Hide or Move channels.
1. Press the MENU button to view the Main
Menu.
2. Press the
buttons to highlight Channel
Organiser and press OK button.
Delete a Channel
1. Press the buttons to highlight the
channel that you would like to delete.
2. Press the RED button, then select YES. The
channel will then be deleted.
The only way to get the channel back is to re-tune
the set top box.
Locking a Channel
Channels can be locked to prevent people from
watching them. To watch locked channel the user
will need to know the password.
1. Press the
buttons to highlight the
channel that you would like to lock.
2. Press the GREEN button, the lock symbol will
appear next to the channel.
Select ConrmOK
Exit MenuEXITReturn
Delete Lock
MoveHide
BACK
Wed 08 Sep 16:52
Channel Organiser
2 BBC TWO
4 Channel 4
5 FIVE
6 ITV 2
7 BBC THREE
9 BBC FOUR
10 ITV 3
1 BBC ONE
BBC ONE
3 ITV 1
Select ConrmOK
Exit MenuEXITReturn
Delete Lock
MoveHide
BACK
Wed 08 Sep 16:52
Channel Organiser
2 BBC TWO
4 Channel 4
5 FIVE
6 ITV 2
7 BBC THREE
9 BBC FOUR
10 ITV 3
1 BBC ONE
BBC ONE
3 ITV 1
Password
_ _ _ _ _ _ _ _
3. Press OK. You will be asked for a password.
The default password is ‘0000’.
4. To un-lock the channel press the GREEN
button then press OK. You will be asked for
the password again.
If you try to watch a channel that has been locked
you will be asked to enter the password.
L5SSTB13_IB.indd 23 28/08/2014 11:53
Page 24

24
Hiding a Channel
1. Press the buttons to hightlight the
channel that you would like to Hide.
2. Press the YELLOW button, the magnifying
glass symbol will appear next to the channel.
Press OK to conrm.
You will now not be able to see this channel using
the CH +/- buttons. You will still be able to select
the channel using the NUMBER buttons.
Select ConrmOK
Exit MenuEXITReturn
Delete Lock
MoveHide
BACK
Wed 08 Sep 16:52
Channel Organiser
2 BBC TWO
4 Channel 4
5 FIVE
6 ITV 2
7 BBC THREE
9 BBC FOUR
10 ITV 3
1 BBC ONE
BBC ONE
3 ITV 1
Moving a Channel
1. Press the buttons to hightlight the
channel that you would like to Move.
2. Press the BLUE button, the highlighted
channel will turn black.
3. Press the
buttons to move the channel
to your desired position. Then press OK to
conrm the new position.
The channels possition in the channel list will have
moved but the channel number will stay the same.
Select ConrmOK
Exit MenuEXITReturn
Delete Lock
MoveHide
BACK
Wed 08 Sep 16:52
Channel Organiser
2 BBC TWO
4 Channel 4
5 FIVE
6 ITV 2
7 BBC THREE
9 BBC FOUR
10 ITV 3
1 BBC ONE
BBC ONE
3 ITV 1
L5SSTB13_IB.indd 24 28/08/2014 11:53
Page 25

25
Select ConrmOK
ReturnBACK
Wed 08 Sep 16:52
Main Menu
Exit Menu
EXIT
Retune
System Information
Settings
Library
Channel Organiser
Select
ReturnBACK
Wed 08 Sep 16:52
Display Settings
Exit Menu
EXIT
Aspect Ratio 16:9 Widescreen
Video Output RGB
OSD Theme Theme1
Wed 08 Sep 16:52
Display Settings
Select
ReturnBACK
Exit Menu
EXIT
Aspect Ratio 16:9 Widescreen
Video Output RGB
OSD Theme Theme1
Wed 08 Sep 16:52
Display Settings
Select
ReturnBACK
Exit Menu
EXIT
Aspect Ratio 16:9 Widescreen
Video Output RGB
OSD Theme Theme1
Setting Menu
From the Settings Menu you can access the
following:
• Display Settings
• Parental Lock
• Factory Reset
• Advanced Settings
• Format HDD
1. Press the MENU button to view the Main
Menu.
2. Press the
buttons to hightlight Settings
and press OK button.
Display Settings
From the Display Settings Menu you can access the
following:
• Aspect Ratio
16:9 Widescreen - Auto - 4:3 Normal
You can also press the WIDE button to change the
aspect ratio.
1. Press the
buttons to hightlight Aspect
Ratio and press the buttons the adjust
the setting.
• Video Output
RGB - CVBS
The video output is the video signal that is sent to
your TV via the Scart socket. We recommend RGB if
your TV can’t display RGB then select CVBS.
2. Press the
buttons to hightlight Video
Output and press the buttons the adjust
the setting.
• OSD Theme
Theme1 - Theme2 - Theme3
You can change the look of your on screen
displays.
3. Press the
buttons to hightlight OSD
Theme and press buttons the adjust the
setting.
L5SSTB13_IB.indd 25 28/08/2014 11:53
Page 26

26
Select Digit Entry0..9
ReturnBACK
Wed 08 Sep 16:52
Parental Lock
Exit Menu
EXIT
Parental Pin 1On
Old Password _ _ _ _ _ _ _ _
New Password _ _ _ _ _ _ _ _
Conrm Password _ _ _ _ _ _ _ _
Select Digit Entry0..9
ReturnBACK
Wed 08 Sep 16:52
Parental Lock
Exit Menu
EXIT
Parental Pin On
Old Password _ _ _ _ _ _ _ _
New Password
Conrm Password _ _ _ _ _ _ _ _
Parental Lock
In the Parental Lock menu you can change the set
top boxes password and switch the Parental Lock
ON and OFF.
1. Press the MENU button to view the Main
Menu.
2. Press the
buttons to highlight Settings
and press OK button.
3. Press the
buttons to highlight Parental
Lock and press OK button.
The rst time you set the Password the Old
Password option will be skipped.
4. Press
to switch the Parental Pin ON.
5. Press the
button to highlight New Password,
press the NUMBER buttons to enter a new
password. You will be automatically asked to
conrm it. Make a note of this number and
keep it safe.
Select ConrmOK
ReturnBACK
Wed 08 Sep 16:52
Settings
Exit Menu
EXIT
Advanced Settings
Format HDD
Factory Reset
Display Settings
Parental Lock
Warning
All settings and channels will be
deleted. Would you like to continue?
Yes No
!
Factory Reset
Only choose this if you want to reset your set top
box. The box will be reset back to the state when
you rst took it out of its box.
1. Press the
button select YES the press OK.
If the Parental Lock is ON you will be asked to enter
the Password.
Make a note of the NEW PASSWORD
and keep it safe.
L5SSTB13_IB.indd 26 28/08/2014 11:53
Page 27

27
Select ConrmOK
ReturnBACK
Wed 08 Sep 16:52
Settings
Exit Menu
EXIT
Advanced Settings
Format HDD
Factory Reset
Display Settings
Parental Lock
Select
ReturnBACK
Wed 08 Sep 16:52
Advanced Settings
Exit Menu
EXIT
Show HDD Space as Time
Auto Standby 3 Hours
Lip-Sync On
Preferred Language English
Recommendation O
Advanced Setting
In this menu you can select the following:
• Preferred Language
• Recommendation
• Lip-Sync
• Show HDD Space as
• Auto Standby
1. Press the MENU button to view the Main
Menu.
2. Press the
buttons to highlight Settings
and press OK button.
3. Press the
buttons to highlight Advanced
Settings and press OK button.
• Preferred Language
This is that preferred language that you would
like to set for the subtitle language.
English - Gaelic - Welsh - Irish
• Recommendations
Some broadcasters send recommendations
out. When you set a recording, if this feature is
switched on you might get a recommendation
of another programme you may wish to record/
view.
• Lip-Sync
Sometimes you may notice a delay between the
sound and the picture. You can use the Lip-Sync
feature to correct this.
1. Switch Lip-Sync ON.
2. When watching a programme press the
OK button. Press the
buttons to adjust
the setting, then press OK to conrm the
adjustment.
Select
ReturnBACK
Wed 08 Sep 16:52
Advanced Settings
Exit Menu
EXIT
Show HDD Space as Time
Auto Standby 3 Hours
Lip-Sync On
Preferred Language English
Recommendation O
Select PlayOK
ReturnBACK
Wed 08 Sep 16:52
Library
Delete
Rename
Lock Preview
Exit MenuEXIT
SI.No Record Event Name Date Status
New Tricks
BBC ONE
1/10 Dead Man Talking: UCOS reinvestigate the death of ...
Recorded at 21:00:00
Total Time 01:02:34
0001
0002
0003
0004
New Tricks
Countdown
BBC News
The One Show
07/09/10
07/09/10
06/09/10
02/09/10
Recorded
Recorded
Recorded
Recorded
HDD Information:
Reserved 0%
Used 32%
Free 68%
Lip-Sync 000 ms
• Show HDD Space as
When you are in the Library menu you can see
the amount of space used on the hard drive.
The ‘Show HDD Space as’ feature allows you to
display this information as a time or percentage.
L5SSTB13_IB.indd 27 28/08/2014 11:53
Page 28

28
Select ConrmOK
ReturnBACK
Wed 08 Sep 16:52
Settings
Exit Menu
EXIT
Advanced Settings
Format HDD
Factory Reset
Display Settings
Parental Lock
Warning
Do you want to format the Hard Disk
Drive? Please note that all recordings
will be lost.
Yes No
!
Format HDD
Selecting ‘Format HDD’ will format the hard
drive.
All recording will be lost if you format
the hard drive.
• If the Parental Lock is set you will be
asked for your Password.
• You will NOT be able to retune
the channels if your set top box is
recording.
Retune
The Retune feature is very handy if you have
moved to a dierent area. You will need to retune
the channels to pick up the local channels in your
new area.
Selecting Retune will tune in all of the channels
again and allow you to select your preferred
region. A warning will show. Select YES to retune.
Follow the ‘First Time Installation’ to retune the
channels.
Select ConrmOK
ReturnBACK
Wed 08 Sep 16:52
Main Menu
Exit Menu
EXIT
Retune
System Information
Settings
Library
Channel Organiser
Select ConrmOK
ReturnBACK
Wed 08 Sep 16:52
Main Menu
Exit Menu
EXIT
Retune
System Information
Settings
Library
Channel Organiser
Warning
All channels will be retuned
Yes No
!
L5SSTB13_IB.indd 28 28/08/2014 11:53
Page 29

29
System Information
The System Information menus shows important
information about your set top box.
1. Select System Information from the Main
Menu.
or
2. Press the INFO button twice while watching
any channel to see Service Information.
If you have any problems with your set top box this
information will be useful.
Select ConrmOK
ReturnBACK
Wed 08 Sep 16:52
Main Menu
Exit Menu
EXIT
Retune
System Information
Settings
Library
Channel Organiser
System Information
Manufacturer :
Model Number :
Hardware Version :
Software Version :
Subtitle Status :
Language Status :
Helpline Number :
No of Channels Found :
Logik
L5SSTB13
Main Board V1.1
A30_1F_0102_T3
OFF
English
0844 561 1234
116
Transmitter Name : London
Signal :
Quality :
90%
90%
L5SSTB13_IB.indd 29 28/08/2014 11:53
Page 30

30
Hints and Tips
If a problem does occur, it may often be due to something very minor. The following table
contains various tips. If you require additional assistance please call our UK Call Centre on
0344 561 1234. Our UK Customer Contact Centre is open Monday-Saturday 8am-8pm or
Sunday 8am-6pm.
Problem Possible Cause Solution
Standby Indicator O• Mains adapter disconnected • Check mains adapter connection
on unit and mains socket
“No signal”
message on TV
• Aerial cable is disconnected
• The unit is switched o
• Check the aerial cable
connection at the unit. Consult
your installer if necessary
• Switch the unit on
No picture or
sound
• Unit not switched on
• SCART cable disconnected
• TV not switched to SCART
input
• Switch on unit
• Check SCART cable connections
at the unit and the TV
• Select TV’s SCART input
Picture appears in
wrong ratio
• Mismatched TV screen
aspect ratio
• Change the aspect ration on the
unit and your TV
Picture freeze or
has block eects
• Bad record signal • Reposition the aerial for better
reception
No response with
remote control
• Unit in standby mode
• Remote control not aimed at
the unit correctly
• Remote sensor on the front
of the unit is obstructed
• Out of battery
• Switch on the unit
• Aim remote control at the unit
• Check for obstructions in front of
the unit
• Install new batteries. Ensure that
the batteries are installed with
the correct polarity (+ to +, - to -)
The unit switches
o after 3 hours
• Auto Standby is on • Turn o the Auto Standby mode
Cannot view a
channel
• Wrong channel number
used
• Channel locked
• Choose the channel from the
channel list
• Enter the PIN.
No digital text
or interactive
services
• Services not available on
chosen channel
• Switch to a channel broadcasting
interactive services
Can’t record a
channel
• Insucient hard disc space
• Check that you are not
already recording 2 channels
• Delete some old les.
• Stop recording one of the
channels
L5SSTB13_IB.indd 30 28/08/2014 11:53
Page 31

31
Specications
Model L5SSTB13
Supply Voltage 220-240V AC ~50Hz
Input Frequency 470 Mhz - 862 Mhz
Maximum Power Consumption 12 W
Standby Power Consumption <0.5 W
Hard Disk 500GB
Dimensions 218 x 175 x 44 mm
Weight 0.8 kg
Features and specications are subject to change without prior notice.
L5SSTB13_IB.indd 31 28/08/2014 11:53
Page 32

Notes for battery disposal
The batteries used with this product contain chemicals that are harmful to the environment. To
preserve our environment, dispose of used batteries according to your local laws or regulations.
Do not dispose of batteries with normal household waste.
For more information, please contact the local authority or your retailer where you purchased
the product.
DSG Retail Limited (Registered in England No.504877) Maylands Avenue,
Hemel Hempstead, Hertfordshire HP2 7TG. UK
(IB-L5SSTB13-20140828-V2)
Visit Partmaster.co.uk today for the easiest way to buy electrical spares and accessories. With over
1 million spares and accessories available we can deliver direct to your door the very next day. Visit
www.partmaster.co.uk or call 0344 800 3456 (UK customers only). Calls charged at National Rate.
The FREEVIEW word and logo are trademarks of DTV Services LTD and are used under licence. ©
DTV Services Ltd 2002.
Manufactured under license from Dolby Laboratories. Dolby and the double-D symbol are
trademarks of Dolby Laboratories
All trademarks are the property of their respective owners and all rights are acknowledged.
For general information about this appliance
and handy hints and tips, please visit
www.knowhow.com/knowledgebank or call 0344 5611234.
The symbol on the product or its packaging indicates that this product must not
be disposed of with your other household waste. Instead, it is your responsibility to
dispose of your waste equipment by handing it over to a designated collection point
for the recycling of waste electrical and electronic equipment. The separate collection
and recycling of your waste equipment at the time of disposal will help conserve
natural resources and ensure that it is recycled in a manner that protects human
health and the environment.
For more information about where you can drop o your waste for recycling, please
contact your local authority, or where you purchased your product.
L5SSTB13_IB.indd 32 28/08/2014 11:53
 Loading...