

Page 1
Cordless Digital Phone
with Answer Machine
Instruction Manual
L15DTAM10
L25DTAM10
L35DTAM10
Cordless Digital Phone
with Answer Machine
Instruction Manual
L15DTAM10
L25DTAM10
L35DTAM10
L25DTAM10 - 1 x Additional Handset
L35DTAM10 - 2 x Additional Handset
Page 2

CONTENT
UNPACKING �����������������������������������������������������������������������������7
GETTING STARTED ������������������������������������������������������������������8
Connecting the Base Unit �������������������������������������������������������������������������������������8
Installing and Charging the Batteries ��������������������������������������������������������������� 8
Connecting additional handset(s)����������������������������������������������������������������������9
Handset Range ����������������������������������������������������������������������������������������������������������9
Signal Strength ����������������������������������������������������������������������������������������������������������9
GETTING TO KNOW YOUR PHONE ���������������������������������������10
Handset buttons �����������������������������������������������������������������������������������������������������11
Base Unit ��������������������������������������������������������������������������������������������������������������������11
Display Icons and Symbols ���������������������������������������������������������������������������������12
Menu Structure �������������������������������������������������������������������������������������������������������13
Quick exit a menu ��������������������������������������������������������������������������������������������������13
USING YOUR PHONE �������������������������������������������������������������14
Switch the handset power on/o �������������������������������������������������������������������� 14
Make a call ����������������������������������������������������������������������������������������������������������������14
Preparatory dialling �����������������������������������������������������������������������������������������������14
End a call ��������������������������������������������������������������������������������������������������������������������14
Receiving calls ���������������������������������������������������������������������������������������������������������14
Dialling numbers quickly �������������������������������������������������������������������������������������14
Call timer �������������������������������������������������������������������������������������������������������������������15
Caller display ������������������������������������������������������������������������������������������������������������15
Secrecy �����������������������������������������������������������������������������������������������������������������������15
Adjusting the earpiece volume �������������������������������������������������������������������������15
Redial ��������������������������������������������������������������������������������������������������������������������������15
Display the name or number �����������������������������������������������������������������������������16
Page 3

Delete a number from the redial list ���������������������������������������������������������������16
Delete the entire redial list ����������������������������������������������������������������������������������16
Copy a redial number to the phonebook ������������������������������������������������������16
Keypad lock ��������������������������������������������������������������������������������������������������������������17
Find handset/Paging ���������������������������������������������������������������������������������������������17
PHONEBOOK �������������������������������������������������������������������������18
Using the phonebook �������������������������������������������������������������������������������������������18
Add an entry to the phonebook �����������������������������������������������������������������������18
Entering names �������������������������������������������������������������������������������������������������������19
Dial from the phonebook ������������������������������������������������������������������������������������19
Display the name or number �����������������������������������������������������������������������������19
Edit an entry �������������������������������������������������������������������������������������������������������������20
Delete an entry ��������������������������������������������������������������������������������������������������������20
CALLER DISPLAY & THE CALLS LIST �������������������������������������21
Caller Display �����������������������������������������������������������������������������������������������������������21
Caller information ��������������������������������������������������������������������������������������������������21
Calls List ���������������������������������������������������������������������������������������������������������������������22
View the Calls List ���������������������������������������������������������������������������������������������������23
Dial a number in the Calls List ���������������������������������������������������������������������������23
Copy a number to the phonebook ������������������������������������������������������������������24
Delete an entry ��������������������������������������������������������������������������������������������������������24
Delete the entire Calls Lists ���������������������������������������������������������������������������������24
HANDSET SETTINGS �������������������������������������������������������������25
Handset ringer volume ����������������������������������������������������������������������������������������25
Handset ringer melody ����������������������������������������������������������������������������������������25
Handset name ���������������������������������������������������������������������������������������������������������26
Language ������������������������������������������������������������������������������������������������������������������26
Keypad audible on/o ������������������������������������������������������������������������������������������27
Page 4

Battery low warning tone on/o ����������������������������������������������������������������������27
Out of range warning tone on/o ��������������������������������������������������������������������27
Keypad lock via the menu �����������������������������������������������������������������������������������28
Auto answer �������������������������������������������������������������������������������������������������������������28
Set the date ��������������������������������������������������������������������������������������������������������������28
Set the time ��������������������������������������������������������������������������������������������������������������29
Set the alarm ������������������������������������������������������������������������������������������������������������29
To silence the alarm �����������������������������������������������������������������������������������������������29
BASE UNIT SETTINGS ������������������������������������������������������������30
Change base unit PIN code���������������������������������������������������������������������������������30
Reset ����������������������������������������������������������������������������������������������������������������������������30
Emergency default�������������������������������������������������������������������������������������������������31
Default settings �������������������������������������������������������������������������������������������������������31
ADDITIONAL HANDSETS AND BASES ���������������������������������32
Internal calls �������������������������������������������������������������������������������������������������������������32
Make an internal call ���������������������������������������������������������������������������������������������32
Receive an internal call �����������������������������������������������������������������������������������������32
Transfer an external call ���������������������������������������������������������������������������������������33
3-Way call ������������������������������������������������������������������������������������������������������������������33
Register a new handset to your base unit �����������������������������������������������������34
De-register a handset �������������������������������������������������������������������������������������������35
TELEPHONE ANSWER MACHINE SETTING ��������������������������36
Message Play ������������������������������������������������������������������������������������������������������������36
Telephone answer machine setting ����������������������������������������������������������������37
Answer ON/OFF ������������������������������������������������������������������������������������������������������37
Answer mode �����������������������������������������������������������������������������������������������������������37
Record memo ����������������������������������������������������������������������������������������������������������38
Outgoing message ������������������������������������������������������������������������������������������������38
Page 5

Record Outgoing message ���������������������������������������������������������������������������������38
Check outgoing message ������������������������������������������������������������������������������������39
Delete outgoing message �����������������������������������������������������������������������������������39
Day setting ����������������������������������������������������������������������������������������������������������������39
Answer delay ������������������������������������������������������������������������������������������������������������39
Call Screening ����������������������������������������������������������������������������������������������������������39
GENERAL INFORMATION ������������������������������������������������������40
HELPFUL INFORMATION ������������������������������������������������������42
SPECIFICATION����������������������������������������������������������������������45
SAFETY FIRST ������������������������������������������������������������������������46
CAUTION ��������������������������������������������������������������������������������48
Page 6

Congratulations on the purchase of
your new Logik Cordless Digital Phone
with Answer Machine� We recommend
that you spend some time to read this
Instruction Manual in order to fully
understand how to install and operate it�
Read all the safety instructions carefully
before use and keep this instruction
manual for future reference�
Page 7
GB-7
Before UseOperationHelpful InformationSpecificationSafety Warnings
1
2
Base Unit
PN:L15DTAM10BU
2 x AAA NiMH Rechargeable
Batteries
PN:L15-25-35DTAM10B
Instruction Manual
PN:L15-25-35DTAM10-002
Cordless Telephone
PN:L15-25-35DTAM10CT
Power Adaptor
PN:L15-25-35DTAM10PA
Telephone Line Cord
PN:L15DTAM10TL
If items are missing, or damaged please contact Partmaster
(UK only). Tel: 0844 800 3456 for assistance.
OKC
Menu
Redial
1 2 3
abc def
4 5 6
jklghi mno
7 8 9
tuvpqrs wxyz
IntR
* 0 #
Cordless Digital Phone
with Answer Machine
Instruction Manual
L15DTAM10
L25DTAM10
L35DTAM10
L25DTAM10 - 1 x Additional Handset
L35DTAM10 - 2 x Additional Handset
Cordless Digital Phone
with Answer Machine
Instruction Manual
L15DTAM10
L25DTAM10
L35DTAM10
1 212
2
1
L35DTAM10
L25DTAM10
L15DTAM10
UNPACKING
Remove all packaging from the unit� Retain the packaging� If
you dispose of it please do so according to local regulations�
The following items are included:
Charging Cradle
PN:L25-35DTAM10CC
2 x AAA NiMH
Rechargeable Batteries
PN:L15-25-35DTAM10B
Cordless Telephone
PN:L15-25-35DTAM10CT
Power Adaptor
PN:L15-25-35DTAM10PA
OKC
Menu
Redial
1 2 3
abc def
4 5 6
jklghi mno
7 8 9
tuvpqrs wxyz
IntR
* 0 #
Page 8
GB-8
Before Use Operation Helpful Information Specification Safety Warnings
GETTING STARTED
Connecting the Base Unit
1� Plug the power adaptor & telephone line cord into the base
unit�
2� Plug the other end of the power adaptor & telephone line
cord into their respective wall sockets�
3� Always use the cables provided in the box�
Installing and Charging the Batteries
1� Slide open the battery compartment cover�
2� Insert the two batteries as indicated� Follow the polarity
indicated in the battery compartment�
3� Slide the battery compartment cover back on�
4� Put the handset on the base unit to charge it� The rst time
you charge the handset charge it continuously for 14 hours�
An audible tone indicates that the handset is properly placed
on the base or charger�
OKC
Menu
RP
1 2 3
abc def
4 5 6
jklghi mno
7 8 9
tuvpqrs wxyz
IntR
* 0 #
Use only the power adaptor provided for the base station.
Use only NiMH rechargeable batteries.
The charge capacity of the rechargeable batteries will reduce
with time. As they wear out the talk/standby time will reduce.
Eventually they will need replacing.
Page 9
GB-9
Before UseOperationHelpful InformationSpecificationSafety Warnings
Connecting additional handset(s) :
Place each charging cradle within reach of a mains power wall
socket�
i� Plug the power adaptor into the charging
cradle and plug the other end into the
mains power wall socket�
ii� Insert the two batteries� Follow the polarity
indicated in the battery compartment�
iii� Place the handset(s) on the charging cradle�
The rst time you charge the handset
charge it continuously for 14 hours�
The display will show the time and the
handset number, e�g� 2, to show it is
registered to the base unit�
Your additional handset(s) is now set up to
make and receive calls�
Handset Range
Your telephone has a range of up to 300 metres outdoors when
there is a clear line of sight between the base unit and the
handset� Any obstruction between the base unit and handset
will reduce the range signicantly� When the base unit is
indoors and the handset is either indoors or outdoors, the range
will normally be up to 50 metres� Thick stone walls can severely
aect the range�
Signal Strength
The icon on your handset display indicates when you are in
range of the base� When it ashes and you hear a warning tone,
you are out of range and will need to move closer to the base
unit�
OKC
Menu
RP
1 2 3
abc def
4 5 6
jklghi mno
7 8 9
tuvpqrs wxyz
IntR
* 0 #
(for L25DTAM10 & L35DTAM10 only)
Page 10
GB-10
Before Use Operation Helpful Information Specification Safety Warnings
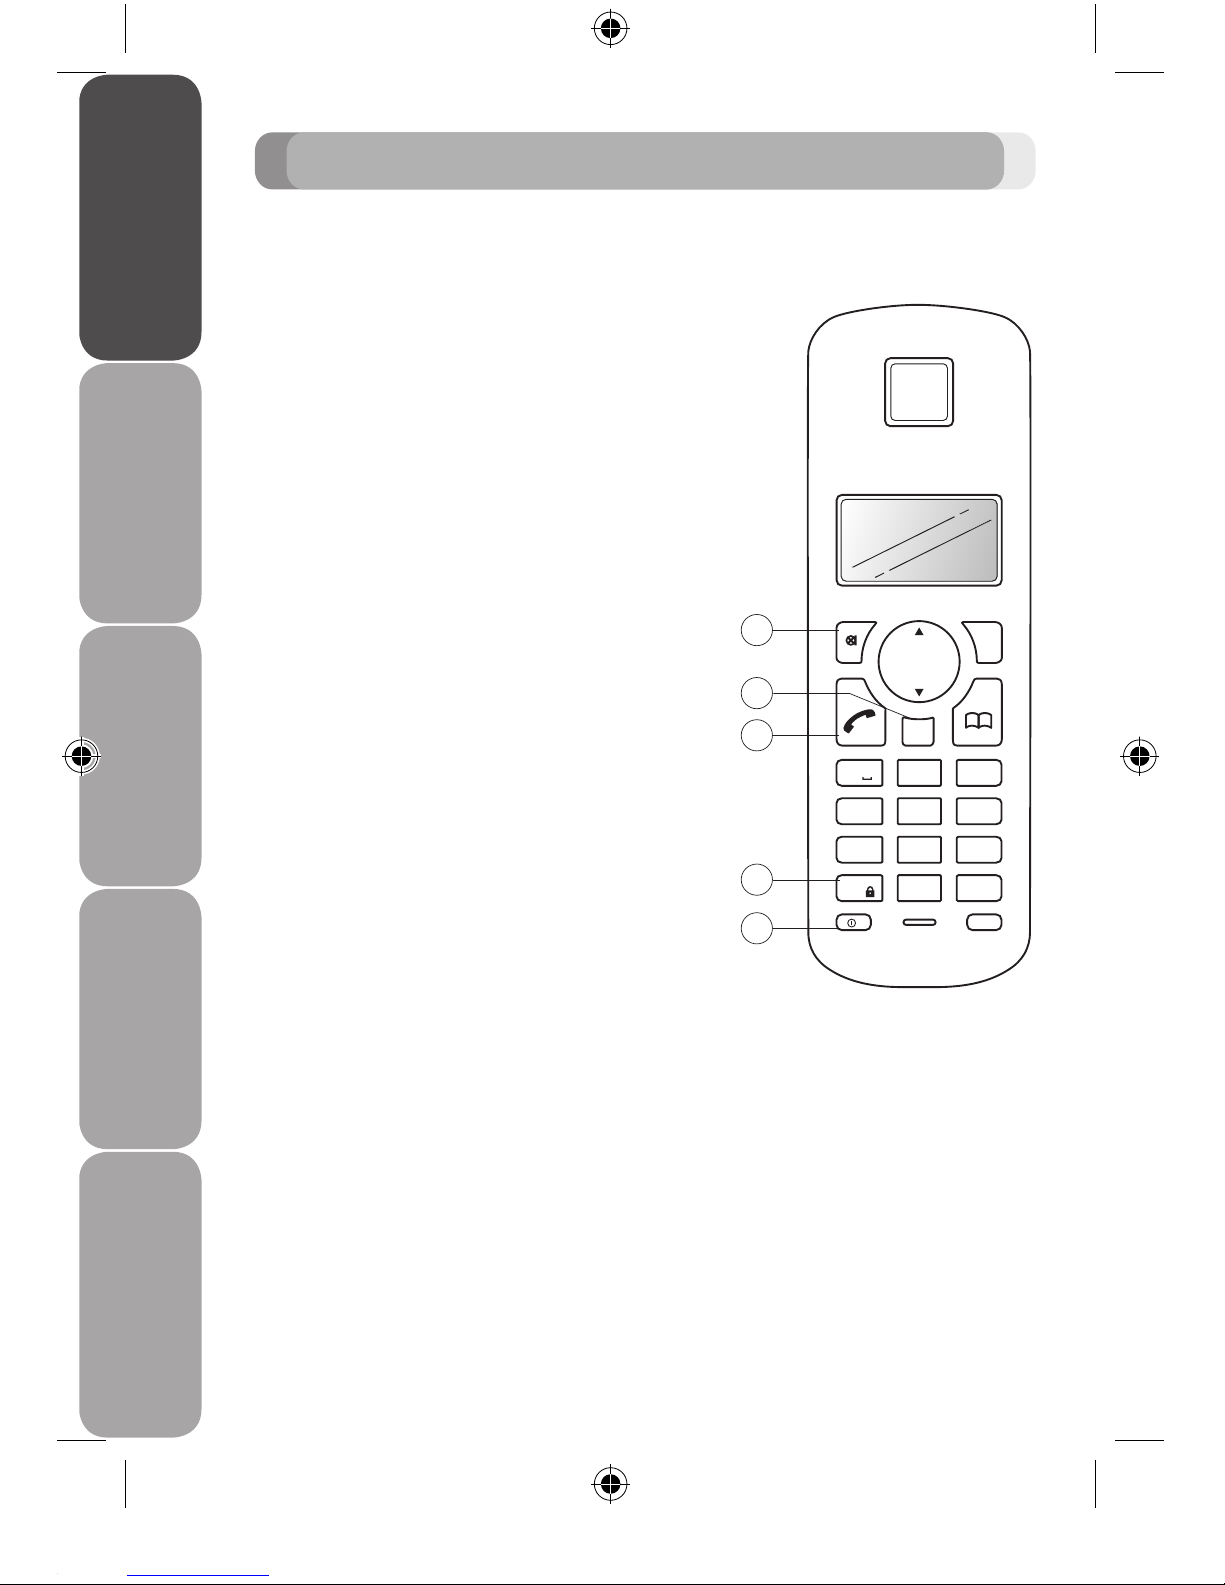
1� Secrecy / Clear / Back
During a call, press to switch
Secrecy on/o�
When on, your voice will be muted
so your caller cannot hear you�
In menu mode, press to return to
the previous menu or press and
hold to exit and return to standby�
In enter/edit mode, press to
delete characters and digits, when
viewing the calls/redial list, press to
delete the displayed entry or press
and hold to delete all entries�
2� Redial / Pause
Press to open the redial list�
When dialling/storing a number,
press to enter a pause�
3� Talk / End call
Press to make, receive and end
calls�
4� * / Keypad lock
Use to lock/unlock the keypad to
prevent accidental dialling�
5� R / Power On O
Use with switchboard services and
some network services�
Press and hold to switch the
handset on/o�
Handset buttons
OKC
Menu
Redial
1 2 3
abc def
4 5 6
jklghi mno
7 8 9
tuvpqrs wxyz
IntR
* 0 #
1
2
4
5
3
GETTING TO KNOW YOUR PHONE
Page 11
GB-11
Before UseOperationHelpful InformationSpecificationSafety Warnings
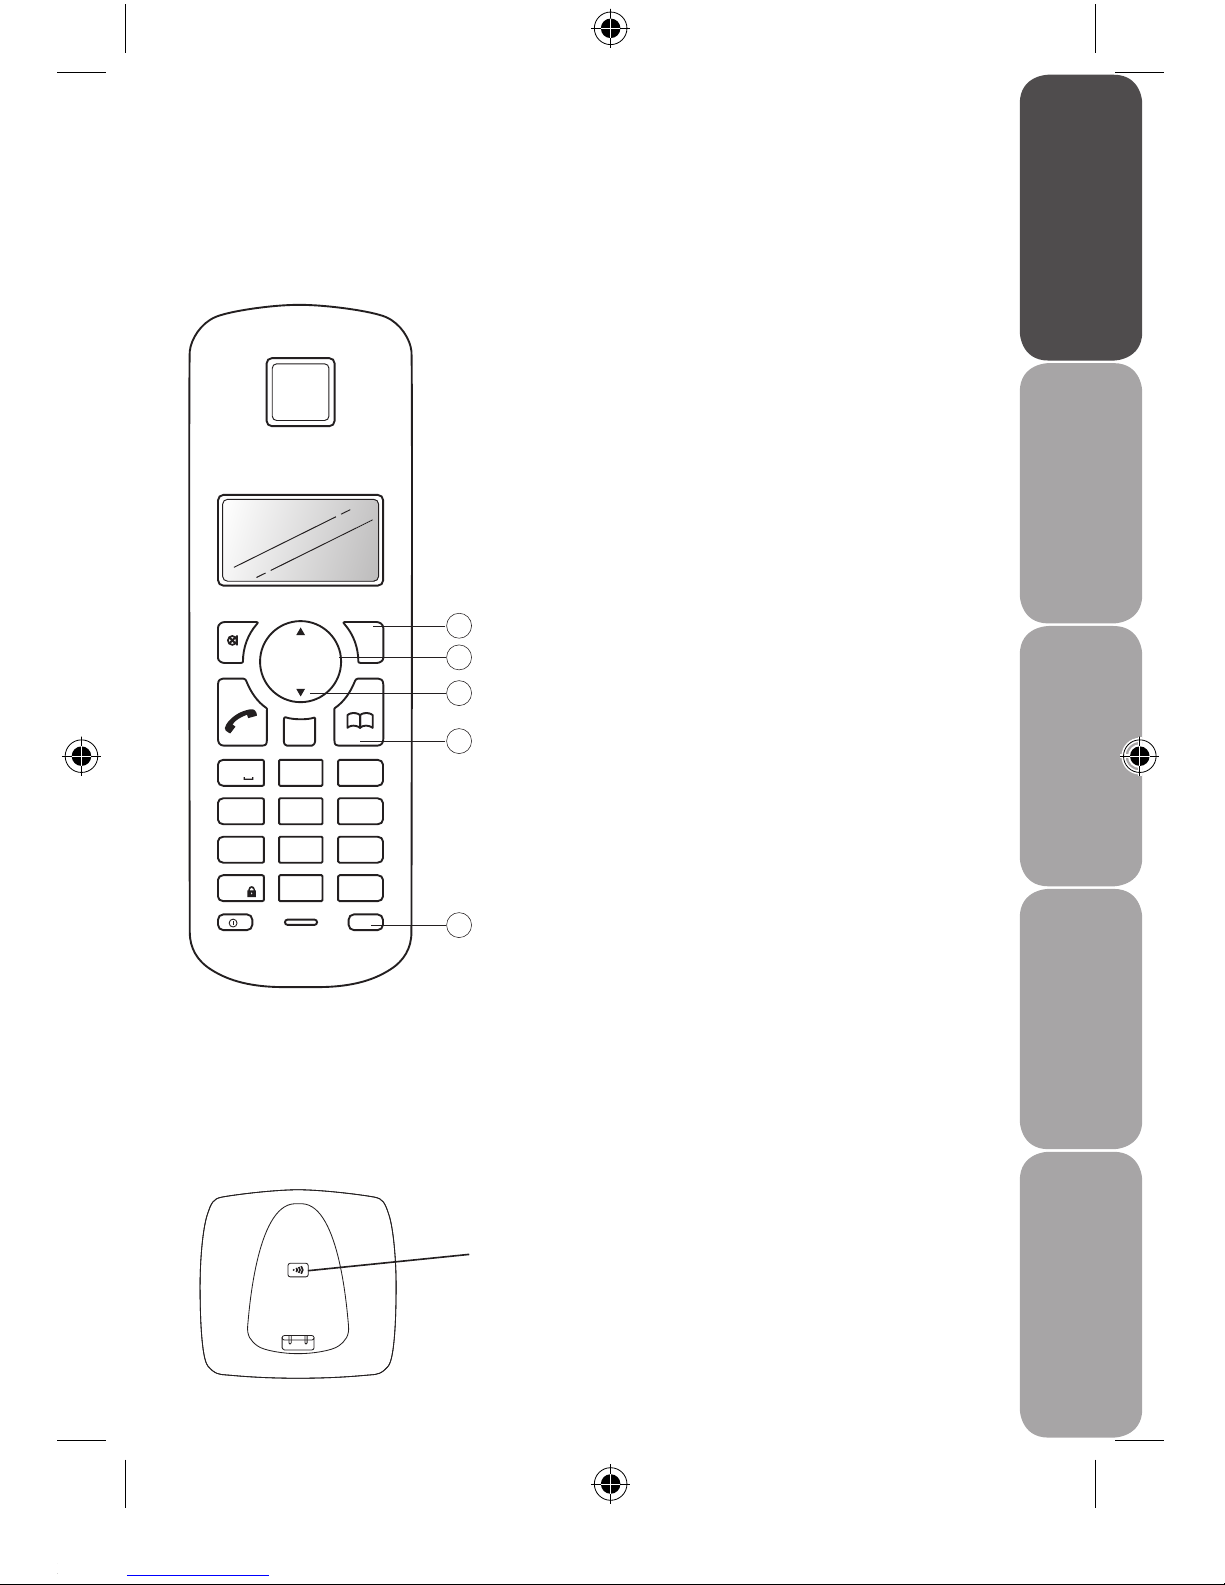
6� Menu / OK
Press to open the menu�
Press to select menu options and
to conrm a displayed option�
7� Scroll
Scroll up or down through menu
options, calls lists, redial lists and
phonebook entries�
During a call, press up or down to
adjust the earpiece volume�
While the telephone is ringing,
press up or down to adjust the
handset ringer volume�
8� Calls
Press to open and scroll through
the Calls list�
9� Phonebook
Press to open the phonebook�
When viewing the redial/Calls list
or when editing, press to exit and
return to standby�
10� Int
Use to make internal calls and
transfer calls to other handsets�
OKC
Menu
Redial
1 2 3
abc def
4 5 6
jklghi mno
7 8 9
tuvpqrs wxyz
IntR
* 0 #
6
9
8
7
10
Base Unit
Press to nd misplaced handsets
registered to the base� Use to register
and de-register handsets�
Page 12
GB-12
Before Use Operation Helpful Information Specification Safety Warnings
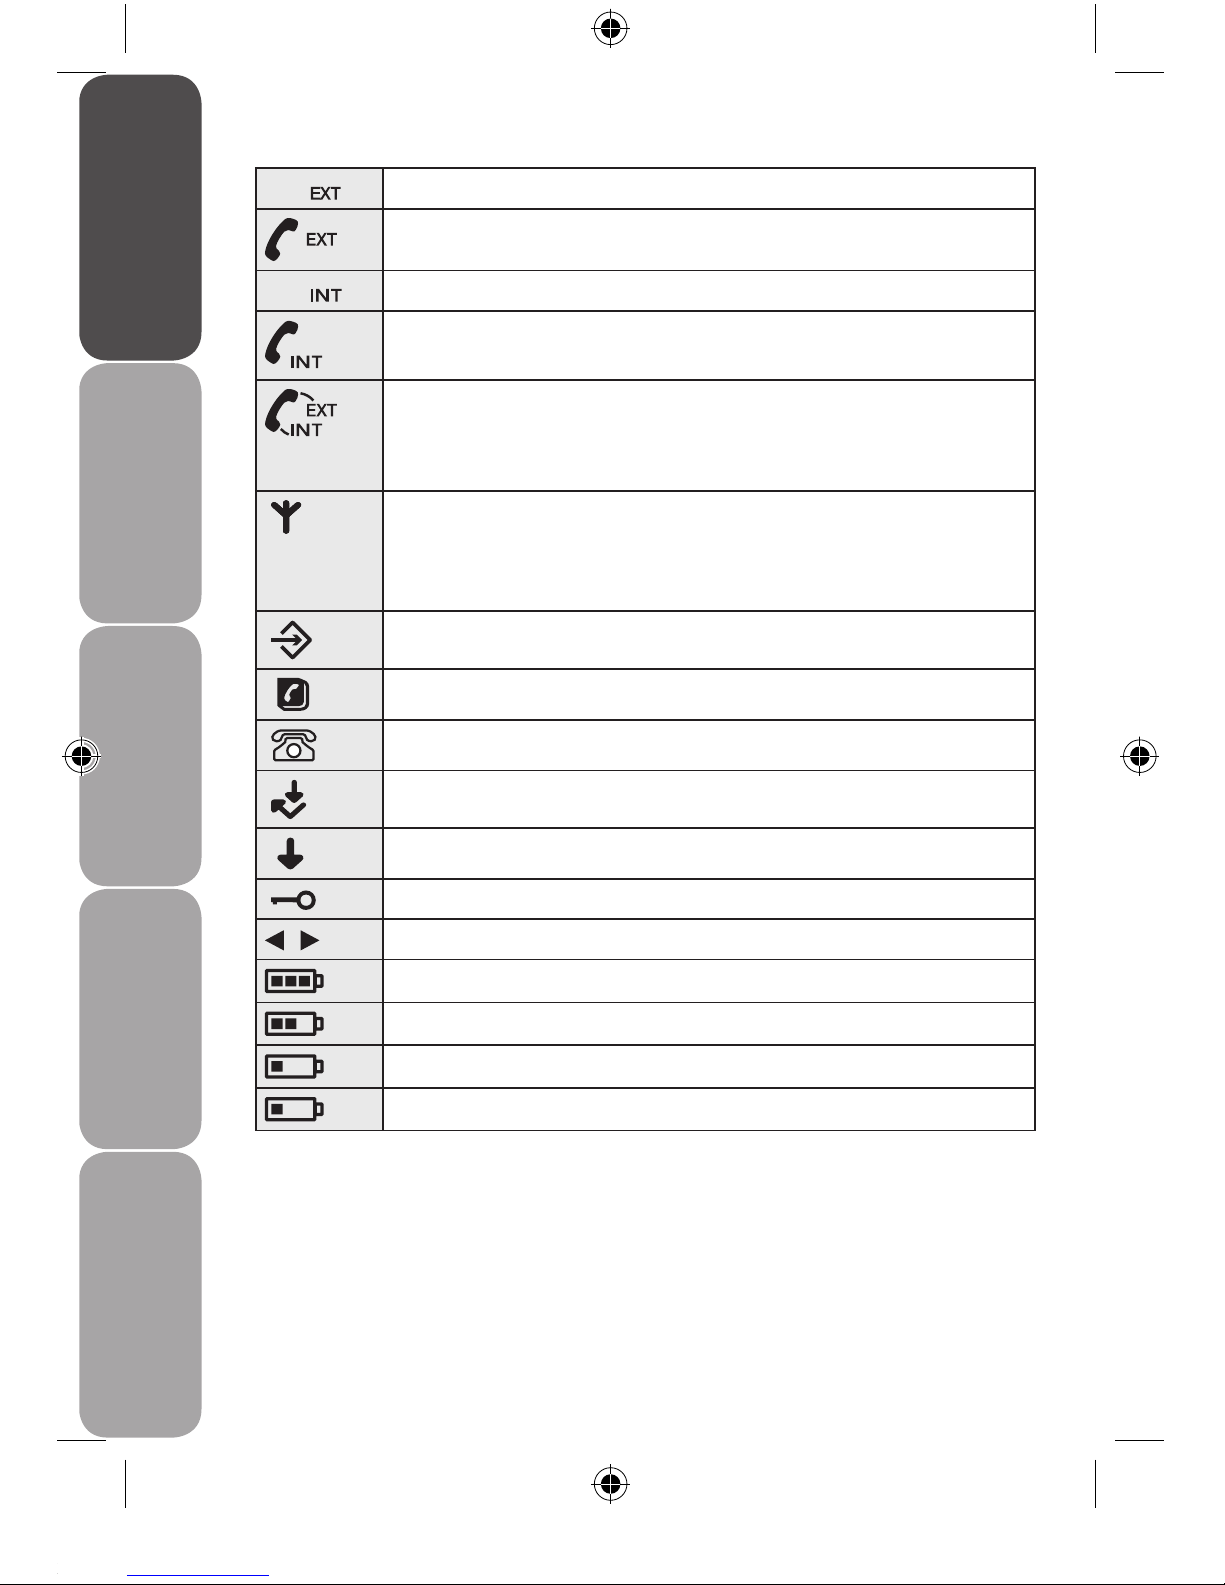
Display Icons and Symbols
Flashes to indicate an incoming external call
External call in progress
Flashes to indicate an incoming internal call
Internal call in progress
3 Way call in progress or transfer external call to
another handset registered to the base unit during
an external call
Indicates signal strength
Flashes when handset is not registered to the base
unit or if you go out of range
Menu open
Phonebook open
Flashes to indicate new calls list entries received*
Answered call (when viewing the Calls list)*
Unanswered call (when viewing the Calls list)*
Keypad locked
The displayed numbers is longer than 12 digits
Battery charge full
Battery charge medium
Battery charge low
Flashing – Battery charge nearly empty
* Subscription to Caller Display service may be required� Please
contact your telephone service provider�
Page 13
GB-13
Before UseOperationHelpful InformationSpecificationSafety Warnings
Menu Structure
All your phone’s functions and settings can be accessed through
the main menu�
Press the button to enter the menu� The icon is
displayed�
Press the or button to scroll through the menu options�
When you reach the end of the list, the rst option is displayed
again and the handset makes an audible tone�
To select an option, press the button�
To return to the previous menu display, press the button�
Quick exit a menu
If you want to exit a menu or cancel an operation at any time
you can press and hold the button to return to the standby
screen�
Page 14
GB-14
Before Use Operation Helpful Information Specification Safety Warnings
USING YOUR PHONE
Switch the handset power on/o
1 To switch o , press and hold the button until the
display goes o �
2 To switch the handset on, press and hold the button�
Make a call
1 Press the button� When you hear the dial tone, dial the
phone number�
Preparatory dialling
1 Enter the phone number rst� The number is shown in the
display�
If you make a mistake as you enter the number, press the
button to delete a digit�
2 Press the button to dial the number�
End a call
1 Press the button, or place the handset back on the
base unit/charging cradle�
Receiving calls
1 When the phone rings, press the button to answer
the call, or if the handset is on the base unit or charging
cradle, simply lift it to answer the call�
If you would rather press the button after lifting the
handset to receive a call, you will need to switch Autoanswer o�
Dialling numbers quickly
Numbers can be dialled directly from the phonebook, the Calls
List, or the redial list�
Page 15
GB-15
Before UseOperationHelpful InformationSpecificationSafety Warnings
Call timer
After the rst 15 seconds of your call, the call timer is displayed�
At the end of your call, the total duration of the call will appear
after 5 seconds�
Caller Display
If you have subscribed to your network’s Caller Display service,
the caller’s number (or name, if an exact number match is found
in the phonebook) will also be displayed�
Secrecy
You can ‘Mute’ your handset to stop your caller from hearing
you while you talk to someone else close by�
1 During a call, press the button� The handset
microphone is muted and MUTE is displayed�
2 Press the button again to resume your call�
Adjusting the earpiece volume
1 During a call, press the button to increase or the
button to decrease the volume�
Redial
1 Press the
Redial
button to open the redial list� The most
recently dialled number is displayed� If the number
matches an entry stored in the handset phonebook, the
name is displayed�
2 Scroll using the or button to the number or name
you want�
3 Press the button to redial the displayed entry�
Page 16
GB-16
Before Use Operation Helpful Information Specification Safety Warnings
Display the name or number
In the redial list, when the name is displayed, you can switch to
the number by pressing the button�
Delete a number from the redial list
1 Press the
Redial
button then scroll using the or
button to the entry you want�
2 Press the button� DELETE ? is displayed� Press the
button to conrm or press the button to cancel�
Delete the entire redial list
1 Press the
Redial
button to open the redial list, then press
and hold the button� DELETE ALL ? is displayed�
2 Press the button to conrm or press the button
to cancel�
Copy a redial number to the phonebook
1 Press the
Redial
button to open the redial list�
2 Scroll using the or button to the number or name
you want�
3 Press the button� ADD? is displayed� Press the
button again�
4 NAME? is displayed , use the keypad to enter the name,
then press the button�
5 The number is then displayed, edit the number if
necessary, each number saved in the redial list can be up
32 digits long� Then press the button� MELODY 1 is
displayed�
6 Scroll using the and button to select a ringtone and
press the button to conrm� The entry is stored�
Page 17

GB-17
Before UseOperationHelpful InformationSpecificationSafety Warnings
Keypad lock
You can lock the handset keypad to prevent accidental dialling
while carrying it around�
You do not need to unlock the keypad to answer a call, just
press the button or lift the handset as normal�
1 To lock the keypad press and hold the button until the
display shows the icon�
2 To unlock the keypad press any button, the display shows
PRESS *�
3 Press the button within 3 seconds�
Find handset/ Paging
You can alert handset users that they are wanted or locate a
missing handset�
1 Press the button on the base unit� All handsets
registered to the base unit will ring� To stop the ringing,
press any button on a handset or press the button
again on the base unit�
Page 18

GB-18
Before Use Operation Helpful Information Specification Safety Warnings
PHONEBOOK
Using the phonebook
You can store up to 50 name and number entries on each
handset registered to your base unit�
Each name can be up to 12 characters long and each number
up to 20 digits long�
Press the button to open the phonebook�
Add an entry to the phonebook
For each entry you store, you can select one of 5 dierent
ringtones� For example, you can assign one ringtone to friends
and family and another to other callers�
1 Press the button� Scroll using the or button to
PHONE BOOK, and then press the button�
2 The displays shows ADD ENTRY. Press the button�
3 The displays shows NAME ?� Use the keypad to enter the
name and press the button�
4 The displays shows NUMBER ?� Use the keypad to enter the
phone number and press the button� It’s best to
enter the full number, including the area code (see ‘Caller
Display’)�
5 The display shows MELODY 1, press the or button to
select the ringtone you want�
To assign a ringtone to a specic caller you must
subscribe to a Caller Display Service from your network
provider�
6 Press the button to conrm� ADD ENTRY is displayed�
You can now enter your next name and number or press
the button twice to return to standby�
Page 19

GB-19
Before UseOperationHelpful InformationSpecificationSafety Warnings
Entering names
Use the keypad to enter the letters shown on each button�
For example to store TOM:
Press the button once to enter T�
Press the button three times to enter O�
Press the button once to enter M�
If the next letter you want to enter is on the same button, wait a
moment then press the button again�
Press the button to delete an incorrect character or digit�
To enter a space press the button�
To enter a dash, press the button twice�
Dial from the phonebook
1
Press the button to open the phonebook� The icon
is displayed�
2 Scroll using the or button to the entry you want, or
search alphabetically by entering the rst letter of the
name� The rst name that starts with this letter or the
nearest letter in the alphabet will be displayed� You can
now rene your search by scrolling using the or
button�
3 Press the button to dial or button to return to
standby�
Display the name or number
When the name is displayed, you can switch between the name
and number by pressing the button�
Page 20

GB-20
Before Use Operation Helpful Information Specification Safety Warnings
Edit an entry
1 Press the button� Scroll using the or button to
PHONE BOOK, press the button�
2 Scroll using the button to MODIFY ENTRY and press the
button�
3 Scroll or to the entry you want edit, or search
alphabetically and press the button�
4 Press the button to delete the name if required, then
enter the new name and press the button�
5 Press the button to delete the number if required, then
enter the new number and press the button�
6 If required, select a new melody then press the
button to conrm�
7 ADD ENTRY is displayed� You can now enter your next name
and number or press the button twice to return to
standby�
Delete an entry
1 Press the button� Scroll using the or button to
PHONE BOOK, press the button�
2 Scroll to DELETE ENTRY and press the button�
3 Scroll using the or button to the entry you want to
delete, or search alphabetically�
4 Press the button� The display shows CONFIRM ?�
5 Press the button to conrm or button to cancel�
Page 21

GB-21
Before UseOperationHelpful InformationSpecificationSafety Warnings
CALLER DISPLAY & THE CALLS LIST
Caller Display
Caller Display shows who is calling and if the caller’s number
matches an entry stored in the phonebook, the number will
alternate with the name�
To use Caller Display you must rst subscribe to your network
provider’s Caller Display service� A fee may be payable�
Caller Display information contains the full telephone number,
including the area code� So when storing numbers in the
phonebook remember to include the area code, otherwise the
caller’s number will not match�
Caller information
The display can show the rst 12 characters of phone numbers
and names� For this feature to work you must subscribe to a
Caller Display Service�
During a call, the caller’s details are replaced by the call timer
after 15 seconds� To review the calls list after the call, press the
button and then press the button to transfer to call
timer from the caller’s details�
With some incoming calls, the telephone number of the caller is
not available and will not be displayed�
In this case some explanatory information will be displayed�
WITHHELD The caller has withheld their number�
UNAVAILABLE The number is unavailable�
RINGBACK Ringback call�
INT NATIONAL International call�
OPERATOR Call from operator�
PAYPHONE Call from a payphone�
Page 22

GB-22
Before Use Operation Helpful Information Specification Safety Warnings
Calls List
The Calls List stores details of your last 40 calls received,
including the phone number and date and time of the call�
The Calls List also alerts you to unanswered calls�
When a new call is received in the Calls list, the icon will ash in
the display when in standby mode to alert you� When you have
viewed the new call, the icon will disappear but the icon
will remain�
The Calls List is shared between all handsets registered to the
base unit� When the Calls List is full, the most recent calls received
automatically replace the oldest calls�
You can open the Calls List with the or button�
Page 23

GB-23
Before UseOperationHelpful InformationSpecificationSafety Warnings
View the Calls List
1 Press the button to open the Calls List� If there are no
calls in the list, the display shows EMPTY�
2 Press the or button to scroll through the list� When
the icon is displayed, this call was answered; when the
icon is displayed, the call was unanswered� When you
reach the end of the list, the handset will make an audible
tone�
If the caller’s number exactly matches an entry stored
in the handset phonebook, the display will alternate
between the name and the number�
Press the button to see the caller’s number�
If the telephone number is longer then 12 digits, the
icon is displayed� Press the button again to see the
complete number�
Press the button again to see the time and date of
the call�
Pressing the button again will give you the option
to add this entry into the phonebook if it’s not already
stored� If it is already stored in the phonebook you can
still add the entry by pressing the button again�
Dial a number in the Calls List
1 Press the button then scroll using the or button
through the list to the entry you want�
2 Press the button to dial the displayed entry�
Page 24

GB-24
Before Use Operation Helpful Information Specification Safety Warnings
Copy a number to the phonebook
1 Press the button then scroll using the or button
through the list to the entry you want�
2 Press the button repeatedly until the displays
shows ADD?�
Press the button again�
3 The display shows NAME?� Use the keypad to enter the
name, then press the button�
4 The number is displayed, edit the number if necessary,
then press the button�
5 Scroll using the and button to select a ringtone and
then press the button to conrm� The entry is now
stored in the phonebook�
Delete an entry
1 Press the button then scroll using the or button
through the list to the entry you want�
2 Press the button� The display will show DELETE ?�
3 Press the button to conrm the cancel�
Delete the entire Calls List
1 Press the button�
2 Press the button and hold� The display will show DELETE
ALL ?�
3 Press the button to conrm or press the button
to cancel�
Page 25

GB-25
Before UseOperationHelpful InformationSpecificationSafety Warnings
HANDSET SETTINGS
Handset ringer volume
You can adjust the ringer volume and set dierent volume
levels for internal and external calls� Choose from 5 levels and
O �
1 Press the button, scroll using the button to
HANDSET and then press the button�
2 Scroll using the button to INT RING VOL or EXT RING VOL and
then press the button�
3 Scroll using the or button to select the volume (1–5
or OFF)�
4 Press the button to conrm or button to return
to the previous menu�
While the phone is ringing you can adjust the ringer volume by
pressing the or button�
Handset ringer melody
You can set dierent ringer melodies for internal and external
calls� Choose from 5 dierent melodies�
1 Press the button, scroll using the button to
HANDSET and then press the button�
2 Scroll using the button to INT MELODY or EXT MELODY and
then press the button�
3 Scroll using the or button to select the MELODY(1-5)�
4 Press the button to conrm or the button to
return to the previous menu�
Page 26

GB-26
Before Use Operation Helpful Information Specification Safety Warnings
Handset name
You can give your handset a name according to use, eg� Kitchen
or Michael� The name will appear in the display�
1 Press the button, scroll using the button to
HANDSET and then press the button�
2 Scroll using the button to NAME and then press the
button�
3 Enter the new handset name and press the button
to conrm�
The handset name will only be displayed for
approximately 20 seconds when no button is pressed�
If you make a mistake, press the button to delete an
incorrect character or digit�
See ‘Entering names’ for help on entering names�
Language
1 Press the button, scroll using the button to
HANDSET and then press the button�
2 Scroll using the button to LANGUAGE and then press the
button�
3 Scroll using the or button to select your preferred
language and then press the button to conrm�
(English is set as the default�)
Page 27

GB-27
Before UseOperationHelpful InformationSpecificationSafety Warnings
Keypad audible on/o
Whenever you press a button on the handset keypad, the
handset gives an audible tone� You can switch this on or o�
1 Press the button, scroll using the button to
HANDSET and then press the button�
2 When BEEP is displayed, press the button�
3 When KEYTONE is displayed, press the button�
4 Scroll using the or button to select ON or OFF and then
press the button to conrm�
Battery low warning tone on/o
1 Press the button, scroll using the button to
HANDSET and then press the button�
2 When BEEP is displayed, press the button�
3 Scroll using the button to LOW BATTERY and then press
the button�
4 Press the or button to select ON or OFF and press the
button to conrm�
Out of range warning tone on/o
1 Press the button, scroll using the button to
HANDSET and then press the button�
2 When BEEP is displayed, press the button�
3 Scroll using the button to OUT RANGE and then press the
button�
4 Press the or button to select ON or OFF and then press
the button to conrm�
Page 28

GB-28
Before Use Operation Helpful Information Specification Safety Warnings
Keypad lock via the menu
You can use the menu to lock the keypad�
1 Press the button, scroll using the button to
HANDSET and then press the button�
2 Scroll using the button to KEYLOCK ? and then press the
button to conrm�
The display will show the icon�
To unlock the keypad, press any button on the keypad,
then press the button within 3 seconds�
Auto answer
Your phone is set to answer calls by lifting the handset o the
base unit or charging cradle� You can switch this feature o so
that calls always have to be answered by pressing �
1 Press the button, scroll using the button to
HANDSET and then press the button�
2 Scroll using the button to AUTO ANSWER and then press
the button�
3 Scroll using the or button to select ON or OFF and then
press the button to conrm�
Set the date
1 Press the button, scroll using the button to DATE-
TIME and then press the button�
2 When DATE SET is displayed, press the button�
3 Use the keypad to enter the date, e�g� 12--08 for 12th
August�
4 Press the button to conrm�
Page 29

GB-29
Before UseOperationHelpful InformationSpecificationSafety Warnings
Set the time
1 Press the button, scroll using the button to DATE-
TIME and then press the button�
2 Scroll using the button to CLOCK SET and then press the
button�
3 Use the keypad to set the time in the 24 hour format, e�g�
18--30 for 6�30 pm�
4 Press the button to conrm�
Note: If you have subscribed to your network’s Caller Display service, the day and time will be
set on the handset automatically�
Set the alarm
1 Press the button, scroll using the button to DATE-
TIME and then press the button�
2 Scroll using the button to ALARM SET and then press the
button�
3 Scroll using the or button to select ON or OFF and then
press the button�
4 If you selected ON, use the keypad to enter the time you
want the alarm to sound, e�g� 07--30 for 7�30 am�
To silence the alarm
When the alarm sounds, press any button to turn it o�
Page 30

GB-30
Before Use Operation Helpful Information Specification Safety Warnings
BASE UNIT SETTINGS
Change base unit PIN code
Some functions are protected by a 4 digit PIN code which must
be entered if you want to change the settings�
The default PIN is 0000�
1 Press the button, scroll using the button to SETUP
and then press the button�
2 Scroll using the button to PIN CODE and then press the
button�
3 Enter the current 4 digit PIN code (default: 0000) and then
press the button�
4 Enter your new 4-digit PIN and then press the
button�
5 Re-enter the new PIN again and then press the
button to conrm�
Reset
You can reset your phone to its default settings�
1 Press the button, scroll using the button to SETUP
and then press the button�
2 Scroll using the button to DEFAULT and then press the
button�
3 Enter the 4 digit PIN code (default: 0000) and then press
the button�
4 The display will show CONFIRM?� Press the button to
conrm or the button to return to the previous menu�
The phone will switch itself o and back on again�
All settings will be reset to their default settings�
Page 31

GB-31
Before UseOperationHelpful InformationSpecificationSafety Warnings
Emergency default
If you have lost your PIN code you can still restore your
telephone to its default settings�
1 Remove the batteries from the handset�
2 Press and hold the button while replacing the
batteries back into the telephone�
The display will show DEFAULT� Press the button�
Default settings
Low battery beeps ������������������������������������������������������������������������������������ON
Out of range warning beeps ����������������������������������������������������������������ON
Key beep �������������������������������������������������������������������������������������������������������ON
Auto answer ������������������������������������������������������������������������������������������������ON
Internal melody ����������������������������������������������������������������������������������������������1
Internal volume ����������������������������������������������������������������������������������������������5
External melody ���������������������������������������������������������������������������������������������1
External volume ���������������������������������������������������������������������������������������������5
Ear volume �������������������������������������������������������������������������������������������������������3
Phonebook �������������������������������������������������������������������������������������������Empty
Call log list ��������������������������������������������������������������������������������������������� Empty
Redial list �����������������������������������������������������������������������������������������������Empty
Pin code ���������������������������������������������������������������������������������������������������� 0000
Dial mode ������������������������������������������������������������������������������������������������� Tone
Keypad lock ����������������������������������������������������������������������������������������������� OFF
Page 32

GB-32
Before Use Operation Helpful Information Specification Safety Warnings
ADDITIONAL HANDSETS AND
CHARGING CRADLES
Up to 5 handsets can be registered and operated from the base
unit�
If you buy new handsets to use with your telephone they will
have to be registered to the base unit before you can use them�
Internal calls
If you have more than one handset registered to your base unit,
you can:
• makeinternalcallsbetweenhandsets
• transferanexternalcallfromonehandsettoanother
• holdaconferencecallbetweentwointernalhandsetsandan
external call
• makeaninternalcallbetweentwohandsetswhileathirdis
on an external call
Make an internal call
1 Press the button then enter the handset number (1–5)
you want to call�
The icon will be displayed to indicate an internal call�
Receive an internal call
1 The
icon is displayed to indicate an internal call and the
number of the handset calling you will also be displayed�
Press the button to answer the call�
Page 33

GB-33
Before UseOperationHelpful InformationSpecificationSafety Warnings
Transfer an external call
You can transfer an external call to another handset registered
to your base unit�
1 During an external call, press the button� Your caller is
put on hold�
2 Enter the number of the handset you want to transfer the
call to�
If the other handset user does not answer:
You can reconnect to your external caller by pressing the
button�
Or, if the other handset user does not answer after 30 seconds
you will be automatically reconnected to your external caller�
3 When the other handset answers press the button to
transfer the call� If the other handset does not answer,
press the button to speak to your external caller again�
3-Way call
You can hold a three-way conversation between an external
caller and another handset user�
1 During an external call, press the button� Your caller is
put on hold�
2 Enter the handset number you want to invite�
3 When the handset answers, press the button to connect
all three callers� The icon will be displayed to indicate
a 3-way call�
4 If the other handset does not answer, press the button
to return to your external caller�
5 Press the button to end the call�
Page 34

GB-34
Before Use Operation Helpful Information Specification Safety Warnings
Register a new handset to your base unit
Note:
Handset batteries must be fully charged and you must be close
to the base unit to register a handset�
Handsets that were supplied with your base unit are already
registered�
1 At the base unit: Press and hold the button for
3 seconds� You now have 90 seconds to register the
handset�
2 At the handset: Press the button, scroll using the
button to REGISTER and then press the button�
3 Scroll using the button to REG BASE and then press the
button�
4 Enter the base unit number (1–4)� The numbers that are
ashing are already in use�
5 The display will show SEARCHING...1 When the handset
nds the base unit signal, SEARCHING and the base unit
identication number is displayed�
6 The display will ask for the PIN to be entered� Enter the
PIN (the default setting: 0000) and press the button
to conrm�
You will hear an audible tone� The handset is now
registered�
If the base unit is not found after a few seconds, the handset
returns to standby� Try registering again�
When a handset is registered to a base unit, it is automatically
assigned a number which is displayed on the handset and must
be used for internal calls�
Page 35

GB-35
Before UseOperationHelpful InformationSpecificationSafety Warnings
If registration does not work:
• Tryagainselectingadierentbaseunitnumber.
• Makesurethereisnootherelectricalequipmentverycloseby
that may interfere with the registration signal�
De-register a handset
You can use one handset to de-register another handset�
You cannot de-register the handset you are using�
1 Press the button, scroll using the to SETUP and
then press the button�
2 Scroll using the button to DEL HANDSET and then press
the button�
3 Enter the PIN code (default setting: 0000) and then press
the button�
4 Enter the handset number� You will hear a conrmation
tone and the display will return to the DEL HANDSET menu�
Page 36

GB-36
Before Use Operation Helpful Information Specification Safety Warnings
TELEPHONE ANSWER MACHINE SETTING
Message Play
Select PLAY MESSAGE from the main menu and then press the button� The
display will show�
• NEW MSG: XX (XX=Total number of new messages)
• ALL MSG: XX (XX=Total number of messages)
Scroll using the or button to select either NEW MSG or ALL MSG�
Press the button to start playback of the messages� During message
playback, the display will indicate the current playback message number such as
MSG 1, MSG 2 ---�
During message playback, it is possible to skip forward or skip backward by
pressing the or button during message playback to replay the current
message�
Press the or button twice within 1 second to skip back to the start of
previous message during message playback�
Press the or button to skip to the next message playing�
Press the button during message playback to delete the message� You will hear
“Message delete” prompt to conrm that the message has been deleted� The
next message will then play� Messages are marked for deletion at this stage but
are only actually deleted after the telephone returns to idle mode�
After message playback, all messages can be deleted by pressing the button
within 8 seconds of the end prompt “End of messages�” The display will then
show DEL ALL?8 and start counting down�
To delete all messages, press the button, the prompt “All messages deleted”
will be announced and all the played messages will be deleted� If no instruction is
received within 8 seconds the telephone will return to idle mode with an audible
tone�
During message playback, press the or button to adjust the play back sound
level�
During message playback, press the button to exit and return to idle� All
deletion marked messages will be deleted�
Page 37

GB-37
Before UseOperationHelpful InformationSpecificationSafety Warnings
Telephone answer machine setting
Press the button, scroll using the or button to TAM SETTING and then
press the button� There are the following sub menus:
• ANS ON/OFF
• ANS MODE
• MEMO REC
• OGM SETTING
• DAY SETTING
• ANS DELAY
• SEC CODE
Answer ON/OFF
Press the button, scroll using the or button to ANS ON/OFF and then
press the button� There are two items under this menu�
• ON
• OFF
The display will show ON and OFF (The current setting will be displayed rst)� To
change to the other setting, scroll using the or button, and then press the
button, the telephone will return to idle mode with an audible tone�
• If ON is selected, the unit will answer the call�
• If OFF is selected, the unit will not answer the call�
(Please see the “Call answering and message recording” section)
Answer mode
The unit has two modes for answering calls� One is answer and record mode and
the other is answer only mode�
Press the button, scroll using the or button select ANS MODE and then
press the button� There are two items under this menu�
• Answer and record
• Answer only
The display will show be ANS & REC and ANS ONLY� (The current setting will be display
rst) To change to the other setting press the or button and then press the
button, the telephone will return to idle mode with an audible tone�
• If “Answer and record” is selected, the unit will be in answer and record mode
and “Answer and Record” OGM will be selected�
Page 38

GB-38
Before Use Operation Helpful Information Specification Safety Warnings
Record Memo
A personal memo may be recorded and left as a message for another user� The
memo must be recorded through the handset�
• Press the button, scroll using the or button to MEMO REC and then
press the button�
• You will hear the prompt “Please speak after the tone, to end recording
press #”� Then start to record a memo�
• Press the or button to end recording�
• After pressing the button, the unit shall return to idle mode�
The menu may be any length up to the available memory capacity�
During recording, the display will ash RECORDING and recording continues until the
button is pressed or the maximum message length is reached�
Memos are played back using the procedure for incoming message play�
Outgoing message
Your telephone is supplied with two pre-recorded announcements�
A&R: Hello, your call cannot be taken at the moment� Please leave your message
after the tone�
AO: Hello, your call cannot be taken at the moment and you cannot leave a
message, so please call later
Press the button, scroll using the or button to TAM SETTING menu, and
then press the button� Scroll using the or button to select OGM SET-
TING, and then press the button to enter the sub menus as follow:
• Play outgoing message (PLAY OGM)
• Record outgoing message (REC OGM)
• Delete outgoing message (DEL OGM)
Press the button to playback the currently selected OGM for recording/
checking and deleting (Answer and record or Answer only)�
Record Outgoing message
• Select RECORD OUTGOING MESSAGE from the OGM SETTING menu (Answer and Record
or Answer Only), and then press the button� You will hear the prompt
“Please speak after the tone� To end recording, press #”� The user is then
informed that recording can commence by a long audible tone� Once recording
has started, the previous OGM cannot be retrieved�
• During recording, the display will ash “RECORDING”�
• Recording continues until the or button is pressed, the maximum OGM
length is reached, or the memory capacity is full (signied by a long audible
tone)� If an incoming call is received during recording, the recording will be
interrupted, the telephone will display the incoming call and progress the call
Page 39

GB-39
Before UseOperationHelpful InformationSpecificationSafety Warnings
as normal� Any OGM already recorded will be retained�
• At the end of recording, the unit will play the recorded outgoing message
through the handset receiver for checking�
Check outgoing message
• Select PLAY OGM from the OGM SETTING menu then choose “Answer and Record” or
“Answer Only”, and then press the button to play the message�
• Press the button again to stop the outgoing message playback�
Delete outgoing message
• Select DELETE OGM from the OGM SETTING menu then select either “Answer and
Record” or “Answer Only”� Then press the button to conrm�
Day Setting
• Select DAY SETTING from the TAM SETTINGS menu�
• The handset displays the current setting�
• Select the desired day by pressing the or button and then press the
button�
Answer Delay
• Select ANSWER DELAY from the TAM SETTINGS menu and then press the
button�
• The handset displays the current setting�
• Scroll using the or button to select the desired answer delay and then
press the button�
Call Screening
When the telephone receives a call, and the answering machine has answered
the call, the handset will display SCREEN? after the TAM takes the line� Press the
button to screen the call� Press the button to take the call�
During the call screening, a call can be taken by pressing the button or stop
screening by pressing the button�
During the call screening, the handset will display SCREEN, other handsets return to
idle screen with the icon on�
When the user stops screening the call, all handsets will display SCREEN? again�
Any valid message already recorded shall be retained�
Remarks: Once the TAM takes the line, simply lifting the handset from the
base unit will not take the line directly, even if the auto answer set to ON.
Page 40

GB-40
Before Use Operation Helpful Information Specification Safety Warnings
GENERAL INFORMATION
This product is intended for connection to analogue public
switched telephone networks and private switchboards in the
United Kingdom�
Safety
• Only use the power adaptor provided� Using an unauthorised power supply
may damage the telephone�
• Only use AAA NiMH batteries with a minimum capacity of 550mAh�
• Never use other batteries or conventional alkaline batteries as this could lead
to a short circuit or destroy the battery casing�
• Do not open the handset (except to replace the handset batteries)� This could
expose you to high voltages or other risks�
• Radio signals transmitted between the handset and the base unit may cause
interference to hearing aids�
• It is recommended that advice from a qualied expert be sought before using
this product in the vicinity of emergency/intensive care medical equipment�
• It is recommended that if you have a pacemaker tted you check with a medical expert before using this product�
• Never dispose of batteries in a re� There is a serious risk of explosion and/or
the release of highly toxic chemicals�
Cleaning
• Simply clean the handset and base unit with a damp (not wet) cloth, or an
antistatic wipe�
• Never use household polish as this will damage the product� Never use a dry
cloth as this may cause a static shock�
Environmental
• Do not expose the product to direct sunlight�
• The product may become warm when the batteries are being recharged� This
is normal� We recommend that you do not place the product on antique/veneered wood to avoid damage�
This equipment is not designed for making emergency telephone
calls when the power fails. Alternative arrangements should be
made for access to emergency services.
Page 41

GB-41
Before UseOperationHelpful InformationSpecificationSafety Warnings
• Do not stand your product on carpets or other surfaces which generate bres�
• Do not submerge any part of your product in water and do not use it in damp
or humid conditions, such as bathrooms�
• Do not expose your product to re, explosive or other hazardous conditions�
• There is a slight chance your phone could be damaged by an electrical storm�
We recommend that you unplug the power and telephone line cord during an
electrical storm�
Connecting to a switchboard
This telephone may be connected to most types of switchboard, however in the
event of any diculties, consult your switchboard Service Provider�
Dialling mode
Your telephone is set to Tone dialling and you can change to
Pulse Dialling�
Recall duration
Your telephone is set to a Recall duration of 100ms�
You cannot change the setting�
Access code and entering a pause
Some internal switchboards may require you to enter an access code (e�g� 9) to get
an outside line� So that the switchboard has time to pick up an outside line before
the rest of the number is dialled, you may need to add a pause in the dialling se-
quence� For example: 9 P0845 833 1673� After the access code, press the button to insert a pause (the display shows P) before entering the telephone number�
Page 42

GB-42
Before Use Operation Helpful Information Specification Safety Warnings
HELPFUL INFORMATION
Most problems are caused by the telephone and mains power
cables being incorrectly connected, not connected at all, or by
the power being turned o �
If you are experiencing a problem with your telephone, check
the following:
•The mains power supply is correctly connected at both the
base unit and at any charging cradles, and that the power is
switched on at the wall socket�
•The telephone line cord is correctly connected�
•The handset batteries are installed correctly and charged�
No display
•Check that the batteries are correctly inserted into the
handset and fully charged�
•Check that the handset is switched on� Press the button�
No dial tone
•Check that the telephone line cord is properly connected�
•Another handset may be using the line� Wait for the other
handset to hang up�
icon ashing
•Handset is out of range� Move closer to the base�
•Check the mains power is connected and switched on�
•Handset not registered to the base�
Base unit or handset does not ring
•Check that the ringer volume has not been set too low or is
o�
Page 43

GB-43
Before UseOperationHelpful InformationSpecificationSafety Warnings
Keypad does not seem to work
•Check that the keypad lock is not on�
•Try removing the batteries and then putting them back in
again�
Incoming caller’s number is not displayed even though
you have Caller Display
•Caller has to allow their number to be seen� It has been
withheld or is unavailable�
Batteries
To reduce the risk of injury, read and follow these instructions:
•Use only the battery(ies) specied� Do not dispose of the
battery(ies) in a re� They may explode� Check with your local
council oce for special disposal instructions� Do not open or
mutilate the battery(ies)�
•Released electrolyte is corrosive and may cause burns
or injury to eyes and skin� The electrolyte may be toxic if
swallowed�
•Take care when handling the battery(ies)� Do not allow
conductive materials such as rings, bracelets or keys to touch
the battery(ies)�
•Otherwise a short circuit may cause the battery(ies) and/or
the conductive material to overheat and cause burns�
Environment
•Place the unit in a room where the temperature is between
0°C and -40°C� Allow 5cm clearance around the unit for
proper ventilation�
•Avoid excessive smoke, dust, mechanical vibration, shock, or
direct sunlight�
Page 44

GB-44
Before Use Operation Helpful Information Specification Safety Warnings
Cleaning
•Wipe the unit with a soft cloth� Do not use benzine, thinner,
or any abrasive cleaners�
If there is no sound
•Disconnect the unit from the telephone line and connect to a
known working phone� If the known phone does not operate
or have sound, then it could be a phone line problem� Please
contact your telephone company for assistance�
Moving your phone
•Carefully pack your unit, preferably in the original packaging�
Disposal
•Old units still have some residual value� An environmentally
friendly method of disposal will ensure that valuable raw
materials can be recovered and used again� Up to date
information concerning the disposal of your old unit and
packaging from the new one can be obtained from your local
council oce�
Page 45

GB-45
Before UseOperationHelpful InformationSpecificationSafety Warnings
SPECIFICATION
Model
L15DTAM10 / L25DTAM10 /
L35DTAM10
Product Dimension
(W x D x H)
110 x 80 x 180 mm
Weight 35g
Dialing Mode Tone (DTMF)/ Pulse
Operating
Environment:
0 - 40°C
Power Source
HANDSET - 2pcs of AAA size 550 mAH
NiMH 1�2 V rechargeable batteries
BASE - Input 230V ~ 50Hz
Output 7�5V 300mA
Features and specications are subject to change without prior
notice�
Page 46

GB-46
Before Use Operation Helpful Information Specification Safety Warnings
SAFETY FIRST
For your continued safety and to reduce the risk of injury or
electric shock, please follow all the safety precautions listed
below�
•Read all instructions carefully before using the telephone and
keep them for future reference�
•Retain the manual� If you pass the telephone onto a third
party, make sure to include this manual�
•Follow all warnings and instructions marked on the
telephone�
•Do not use the product near water for example near a
bathtub, kitchen sink, etc�
•Place the product securely on a stable surface� Serious
damage and/or injury may result if the product falls�
•Do not cover slots and openings on the telephone� They are
provided for ventilation and protection against overheating�
Never place the telephone near radiators, or in places where
proper ventilation is not provided�
•Do not place objects on the telephone cable� Install the
telephone where no one can step or trip on the telephone
line cable�
•To reduce the risk of injury or electric shock, do not
disassemble the telephone� Incorrect reassembly can cause
electric shock when the product is subsequently used�
•During thunderstorms, avoid using telephones except
cordless types� There may be a remote risk of an electric shock
from lightning�
•Do not use the telephone to report a gas leak, when in the
vicinity of the leak�
Page 47

GB-47
Before UseOperationHelpful InformationSpecificationSafety Warnings
•Young children should be supervised to ensure that they do
not play with the telephone�
•The telephone is not intended for use by persons (including
children) with reduced sensory or mental capabilities, or lack
of experience and knowledge unless they have been given
supervision or instructions concerning the use of the phone
by a person responsible of their safety�
Page 48

GB-48
Before Use Operation Helpful Information Specification Safety Warnings
CAUTION
Installation
•Never install telephone wiring during a lightning storm�
•Never install a telephone wall socket in wet locations unless it
is specically designed for wet locations�
•Never touch uninsulated telephone wires or terminals unless
the telephone line has been disconnected at the network
interface�
•Use caution when installing or modifying telephone lines�
•Do not use this product for any applications other than its
intended purpose�
•Do not over tighten the screws�
Page 49

Page 50

Page 51

Page 52

This symbol on the product or in the instructions means that your
electrical and electronic equipment should be disposed at the end
of its life separately from your household waste� There are separate
collection systems for recycling in the EU�
For more information, please contact the local authority or your retailer where
you purchased the product�
DSGRetailLtd.•MaylandsAvenue
HemelHempsteadHerts•HP27TG•England
(P�N� L15-25-35DTAM10-002)
Visit Partmaster�co�uk today for the easiest way to
buy electrical spares and accessories� With over 1
million spares and accessories available we can
deliver direct to your door the very next day� Visit www�partmaster�co�uk or
call 0844 800 3456 (UK customers only) Calls charged at National Rate�
If you require a replacement for any of the items listed below, please quote
their corresponding part numbers:
Replacement Part Part Number
Cordless Telephone L15-25-35DTAM10CT
Base Unit L15DTAM10BU
Power Adaptor L15-25-35DTAM10PA
AA NiMH Rechargeable Batteries L15-25-35DTAM10B
Telephone Line Cord L15DTAM10TL
For L25DTAM10 and L35DTAM10
Cordless Telephone L15-25-35DTAM10CT
Charging Cradle L25-35DTAM10CC
AA NiMH Rechargeable Batteries L15-25-35DTAM10B
DSG International Sourcing declares that the this product complies with the
essential requirements and other relevant provisions of Directive 1999/5/EC�
 Loading...