

Page 1
2GB/4GB/8GB Music and Video
Multimedia Player
Instruction Manual
L2GBMP410
L4GBMP410
L8GBMP410
Page 2

Congratulations on the purchase
of your new Logik Multimedia Player.
It has many exciting features to make
your listening to music experience more
enjoyable.
We recommend that you spend some time
reading this instruction manual in order to
fully understand these features.
You will also nd some tips and help with
troubleshooting common issues.
Read all the safety instructions carefully
before using the Multimedia Player and
keep this instruction manual for future
reference.
Page 3

Contents
Product Overview ...................................................................................................5
Unpacking the Multimedia Player ..........................................................................................5
Features ............................................................................................................................................ 5
Identication of Parts and Controls ....................................................................................... 6
Connecting to a Computer .....................................................................................7
System Requirements ................................................................................................................. 7
Installing the Driver for Windows 98 SE ............................................................................... 7
Loading Files from a Computer to the Multimedia Player ............................................. 7
Disconnecting the USB Cable ..................................................................................................8
Charging the Battery ................................................................................................................... 8
Battery Level Indication ............................................................................................................. 8
Basic Operation ......................................................................................................9
Power On/O the Multimedia Player .................................................................................... 9
Resetting the Multimedia Player ............................................................................................. 9
Key Hold Function ........................................................................................................................ 9
Entering the Main Menu ............................................................................................................ 9
Music Playback .....................................................................................................10
Playing Music ...............................................................................................................................10
Displaying Lyrics .........................................................................................................................11
Entering the Music Setup Menu ...........................................................................................11
– To Set Repeat ....................................................................................................................11
– To Set Equalizer ................................................................................................................12
– To Set 3D Sound Eect ..................................................................................................13
– To Set Play Rate ................................................................................................................13
– To Navigate Music Files .................................................................................................14
Page 4

Voice Recording and Playback ............................................................................15
Entering the Voice Setup Menu.............................................................................................17
– To Set Repeat ....................................................................................................................17
– To Set Equalizer ................................................................................................................18
– To Set 3D Sound Eect ..................................................................................................19
– To Set Play Rate ................................................................................................................19
– To Navigate Recorded Files .......................................................................................... 20
– To Record Voce ................................................................................................................. 20
Photo Playback .....................................................................................................21
Entering the Photo Setup Menu ...........................................................................................21
Movie Playback ..................................................................................................... 22
Deleting Files and Folders ...................................................................................23
E-Book Viewing .....................................................................................................24
Customising Settings ...........................................................................................25
Time ................................................................................................................................................. 25
Power ..............................................................................................................................................26
Language .......................................................................................................................................26
Display ............................................................................................................................................26
Record .............................................................................................................................................27
System Tools .................................................................................................................................27
Hold Time ......................................................................................................................................27
Converting Video to MTV Format ........................................................................ 28
Hints and Tips........................................................................................................29
Specications ........................................................................................................ 30
Safety Warnings ....................................................................................................31
Page 5
Product Overview
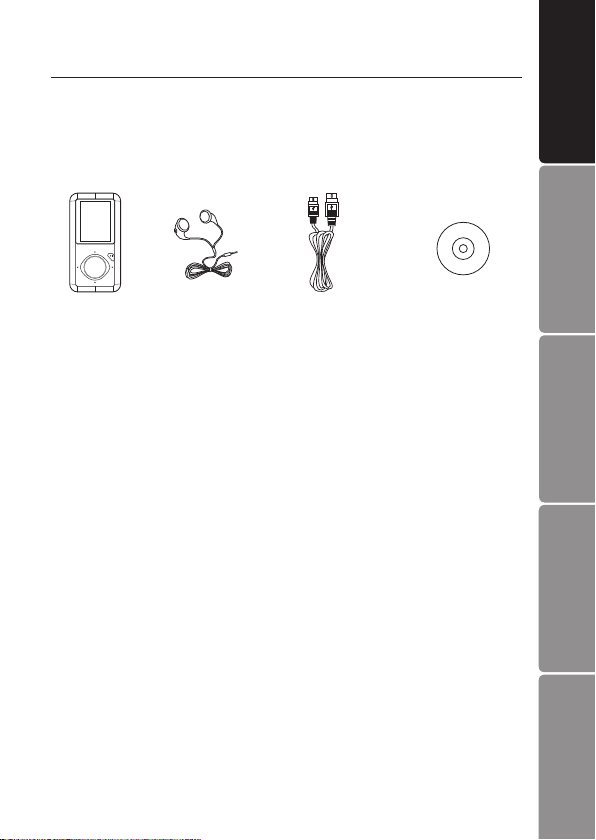
Unpacking the Multimedia Player
Remove all packaging from the unit. Retain the packaging. If you dispose it please do
so according to local regulations.
The following items are included:
Multimedia
Player
If items are missing or damaged, please contact partmaster (UK only).
Tel: 0844 800 3456 for assistance.
Earphones
part number:
50-110-26900119
USB Cable
part number:
38-012-10300019
Installation CD with
Instruction Manual
part number:
54-809-30000209
Product Overview
Computer
Connecting to a
Features
• 1.8 inch colour LCD, 128×160 pixel
• Built-in rechargeable Li-polymer battery
• USB 2.0 high speed transmission
• Supports playback of MP3, WMA, WAV audio les
• Supports multiple equalizer (EQ) and 3D sound eects
• Supports multiple playback mode: section repeat, le repeat, folder repeat and
random
• Supports the basic information of titles, artists and albums of music les(ID3 tag)
• Supports lyrics synchronisation, displayed on screen while music is playing
• Supports viewing of JPEG and BMP picture les
• Supports converted MTV video format (le transformation tool included)
• Supports viewing of e-book in TXT format
• Supports voice recording via the build-in microphone
• Multiple language user’s interface
GB-5
Basic Operation
Hints and Tips
Safety Warning
Specications and
Page 6
Product Overview
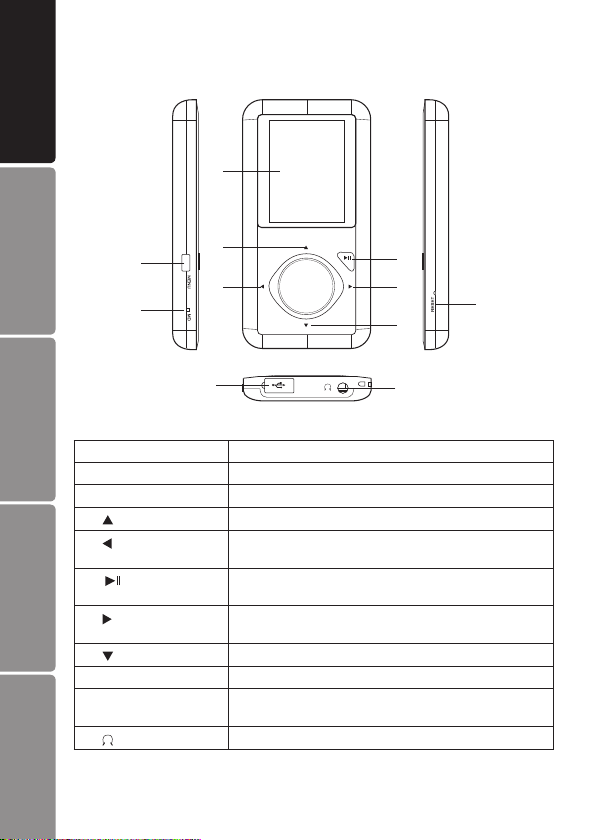
Identication of Parts and Controls
3
Connecting to a
Computer
1
2
4
5
6
7
9
8
10
1 MENU Power on/o; Open or exit sub-menu; Stop recording
2 MIC Microphone for voice recording
3 Screen Screen display area
4
Hints and TipsBasic Operation
5
6
7
8
9 RESET Press the RESET hole/button if a malfunction occurs.
Specications and
10 USB cable connection
Safety Warning
port with cover
Earphones Socket
11
Increase volume; Navigate upwards; Previous picture/line
Previous track/page/screen; Fast backward; Navigate
leftwards; Return to previous screen
Start /Pause playback; Enter main menu; Conrm
selection in the main menu
Next track; Fast forward search; Navigate rightwards;
Conrm and enter next screen.
Decrease volume; Navigate downwards; Next picture/line
Remove the USB cover and connect to the computer with
the supplied USB cable.
Connect with the supplied earphones.
GB-6
11
Page 7
Connecting to a Computer
System Requirements
Your computer system must meet the following requirements:
• Pentium 200MHz or above
• Microsoft Windows 98SE / 2000 / ME / XP / Vista®
• 120MB of available hard disk space
• USB port supported
• CD-ROM drive
Product Overview
Installing the Driver for Windows 98 SE
If your computer is running Windows ME / 2000 / XP / Vista®, no driver is required.
If your computer is running Windows 98 SE, you must install the driver provided on the
CD before connecting the Multimedia player to your computer.
1. Insert the installation CD into the CD-ROM drive.
2. Execute the “USB Disk Win98 Driver Version xxx.exe” le in the CD and follow
the instructions in the pop-up window to complete the installation.
3. Restart the computer.
Make sure the Multimedia player is disconnected from the
computer when installing the driver.
Loading Files from a Computer to the Multimedia Player
Files can be transferred directly into the Multimedia player using the USB data cable.
1. Connect the Multimedia player to the computer using the USB cable.
2. The computer system will detect “New Hardware” and start to install the driver
automatically. Wait for the system to nish the installation. When it has nished, a
new “Removable Disk” will be created in “My Computer”.
3. Select the les on your computer and simply drag and drop them into the
“Removable Disk”.
Please do not disconnect the Multimedia player from the computer during le transfers
as it may cause the le transfer process and Multimedia player to malfunction.
GB-7
Computer
Connecting to a
Basic Operation
Hints and Tips
Safety Warning
Specications and
Page 8
Product Overview
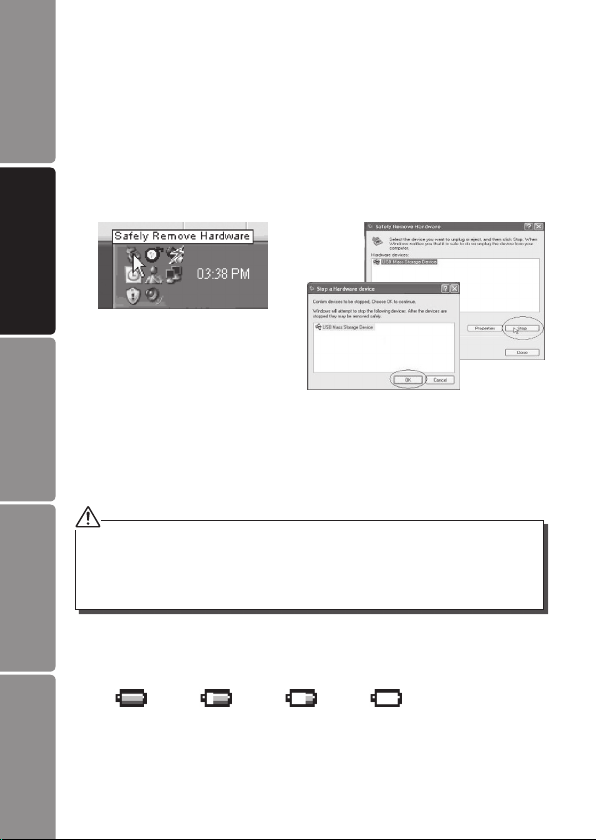
Disconnecting the USB Cable
After completing the le transfer, disconnect the USB cable in the following way:
1. Double click the green arrow “Safely Remove Hardware” in the taskbar on the
bottom right of the window.
2. Select “USB Mass Storage Device” and click “Stop”.
3. The “Stop a Hardware device” pop-up window will appear, select “USB Mass
Storage Device” and click “OK”. Then you can unplug the Multimedia player
safely.
Connecting to a
Computer
Charging the Battery
Your Multimedia player has a built-in rechargeable Li-polymer battery. The battery is
charged automatically whenever the Multimedia player is connected to a computer.
If you charge the Multimedia player while loading les to the Multimedia player, it may
take a longer time.
• Fully charge the Multimedia player before you use it for the rst time (~8 hours) or when you haven’t
Hints and TipsBasic Operation
used it for a long period of time.
• Charge the Multimedia player immediately when the “Low battery” message is displayed.
• Do not overcharge the battery as it may shorten its life.
• The Multimedia player does not function while charging.
Battery Level Indication
The approximate power levels of your battery are indicated as follows:
Specications and
Safety Warning
Full Two-third full Low Empty
GB-8
Page 9
Basic Operation
Power On/O the Multimedia Player
Make sure the battery is sucient and the earphones are connected.
• Press and hold the MENU button to power on.
• Press and hold the MENU button to power o.
Resetting the Multimedia Player
If the user interface is not responding, you will need to use a pointed object to insert
into the RESET hole/button to re-initialise the system of your Multimedia player.
Product Overview
Key Hold Function
The keys will be locked in Music and Voice mode after a set time if no button is pressed.
• To deactivate the lock function, press and hold the
release.
• To lock all buttons of the Multimedia player, see “Hold Time” on page 27 for details.
button for 2 seconds and then
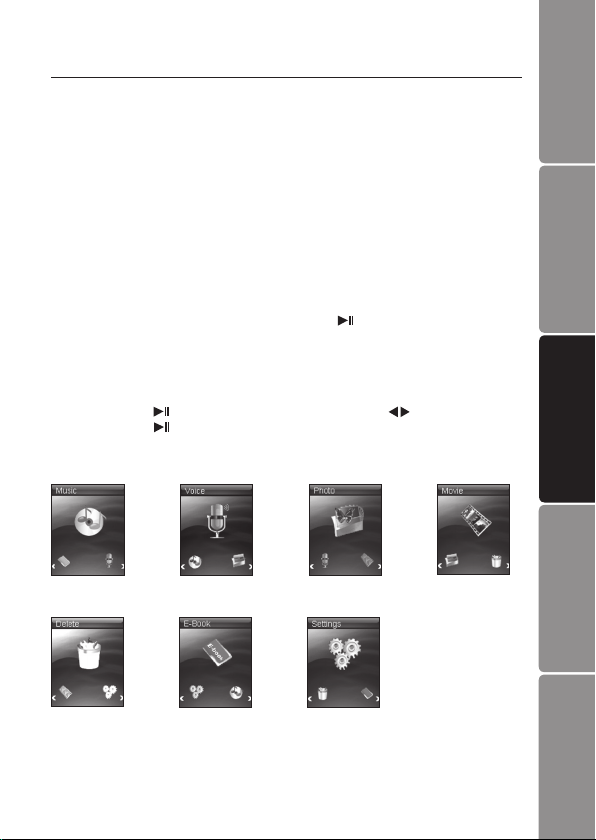
Entering the Main Menu
Press and hold the button to open the main menu. Use the buttons to select an
item and press the button to conrm your selection. All available options are listed
below.
Music playback Photo playback
Deleting les
and folders
Voice recording
playback
E-Book viewing
Customising
settings
Movie playback
GB-9
Computer
Connecting to a
Basic Operation
Hints and Tips
Safety Warning
Specications and
Page 10
Product Overview
Music Playback
Playing Music
Make sure the battery power level is sucient and the earphones are connected correctly.
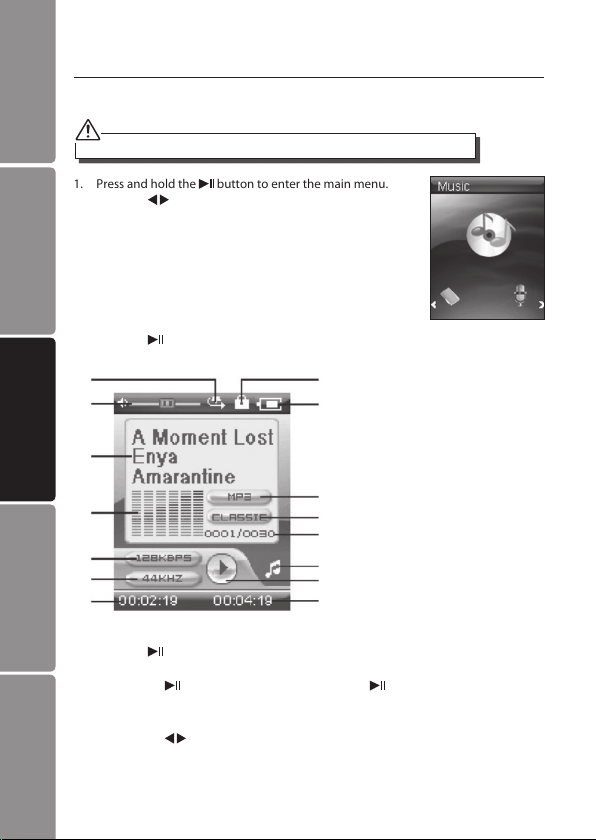
1. Press and hold the button to enter the main menu.
Connecting to a
Computer
Press the buttons to select Music.
2. Press the
1
2
button to display the following screen.
8
9
3
4
Hints and TipsBasic Operation
5
6
7
10
11
12
13
14
15
3. Press the button to play the music. While playing music, you can:
• Pausing/Resume Playing:
Specications and
Safety Warning
• Skipping Tracks:
Press the
playing.
Press the
button to pause playing. Press the button again to resume
buttons to skip to previous / next track.
GB-10
1. Play mode indicator
2. Volume level
3. Playing le name / ID3 tag /Lyrics
4. Spectrum display
5. Bit rate
6. Sampling frequency
7. Elapsed time of the track
8. Key locked indicator
9. Remaining battery power indicator
10. File format
11. Current EQ indicator
12. Current track / Total track number
13. Current mode
14. Play/Pause/Stop/Fast forward/
Rewind
15. Total time of the track
Page 11

• Searching:
Press and hold the buttons to fast rewind / fast forward within a track.
• Adjusting the Volume:
Press the
• Exit:
Press and hold the
buttons to increase / decrease the volume.
button to return to the main menu.
Displaying Lyrics
This Multimedia player supports lyrics display while playing music. Only lyrics in LRC
format can be displayed. To add lyrics to music, perform the following steps:
1. Choose an MP3/WMA le, for example “love music.mp3”.
2. Download the corresponding lyrics with extension “.lrc” from the Internet.
3. Rename the lyrics le. Make sure that the lyrics lename is the same as the music
le name. For example “love music.lrc”
4. Copy both les into the same folder on the Multimedia player.
5. Start playback of the music le. The lyrics will be displayed on screen while the
music is being played.
Entering the Music Setup Menu
1. While playing music, press the MENU button to enter the Music Setup Menu.
2. Press the
Mode, Equalizer, 3D, Play Rate, File.
3. After nishing the music setting, press the
To Set Repeat
The repeat mode setting enables you to play the tracks in a desired order.
1. Press the MENU button while listening to a track. The
Music Setup Menu appears on the screen. Press the
buttons to select Repeat Mode.
buttons and then the button to access the following: Repeat
button to exit the Music Setup Menu.
Music
Repeat Mode
Equalizer
3D
Play Rate
File
Product Overview
Computer
Connecting to a
Basic Operation
Hints and Tips
GB-11
Safety Warning
Specications and
Page 12

Product Overview
2. Press the button to enter the Repeat Mode Menu. Press
the buttons to select the desired mode as below and
then press the button to conrm and exit.
• No Repeat
Play all the saved music les in order once.
• Repeat One
Play the current or selected le repeatedly.
• Repeat All
Connecting to a
Computer
Play all the music les in order repeatedly.
• Folder Normal
Play all the les in the current folder in order once.
• Folder Repeat
Play all the les in the current folder repeatedly.
• Folder Random
Play all the les in the current folder in random order.
To Set Equalizer
The equalizer setting enables you to select an equalizer from the six preset equalizer
settings to suit the type of audio output or customise your personal equalizer eect.
1. Press the MENU button while listening to a track. The
Music Setup Menu appears on the screen. Press the
buttons to select Equalizer.
Hints and TipsBasic Operation
2. Press the
Pop, Rock, Classic, Jazz, Bass and Custom EQ. Press the
Specications and
Safety Warning
button to enter the Equalizer Menu. Press the
buttons to select the desired equalizer from Normal,
button to conrm and exit.
Music
Repeat Mode
No Repeat
Repeat One
Repeat All
Random All
Folder Normal
Folder Repeat
Folder Random
Music
Repeat Mode
Equalizer
3D
Play Rate
File
Music
Equalizer
Normal
Pop
Rock
Classic
Jazz
Bass
Custom EQ
GB-12
Page 13

To customise EQ, select Custom EQ, and press the
appear on the screen.
1. Press the
2. When navigating to a value bar, press the
select it. The blue arrow becomes red.
3. Use the
buttons to navigate between the value bars.
buttons to adjust the value and then press the
button to conrm.
4. After completing the setting, press the
button. The Custom EQ value bars
button to
button to exit.
To Set 3D Sound Eect
1. Press the MENU button while listening to a track. The
Music Setup Menu appears on the screen. Press the
buttons to select 3D.
Music
Repeat Mode
Equalizer
3D
Play Rate
File
Product Overview
Computer
Connecting to a
2. Press the
buttons to select On or O, and then press the button
to conrm and exit.
button to enter the 3D Menu. Press the
To Set Play Rate
1. Press the MENU button while listening to a track. The
Music Setup Menu appears on the screen. Press the
buttons to select Play Rate.
Music
3D
Off
On
Music
Repeat Mode
Equalizer
3D
Play Rate
File
GB-13
Basic Operation
Hints and Tips
Safety Warning
Specications and
Page 14

Product Overview
2. Press the
0.67X and 0.80X. Press the button to conrm and exit.
button to enter the Play Rate Menu. Press the
buttons to select a play rate from 1.00X, 1.14X, 1.33X,
Connecting to a
Computer
To Navigate Music Files
1. Press the MENU button while listening to a track. The
Music Setup Menu appears on the screen. Press the
buttons to select File.
2. Press the button. The music le list appears on the
screen.
3. Use the
press the button to open the folder or play the selected
le.
buttons to select a folder or le and then
Hints and TipsBasic Operation
Music
Play Rate
1.00X
1.14X
1.33X
0.67X
0.80X
Music
Repeat Mode
Equalizer
3D
Play Rate
File
Music
MTPMEDIA
MUSIC
Evergreen.mp3
Say you say me.m
Take me to your h
Specications and
Safety Warning
GB-14
Page 15

Voice Recording and Playback
You can make voice recordings using the integrated microphone.
1. Press and hold the
Press the buttons to select Voice.
button to enter the main menu.
Product Overview
2. Press the
3. Press the button to display the following screen and the Multimedia player starts
recording.
1
2
3
4
5
button and then the MENU button. Press the
buttons to select Record.
6
1. Volume level
2. Recording le name
3. Bit rate
4. Sampling frequency
5. Elapsed time of the track
7
6. Remaining battery power indicator
7. File format
8. Current mode
9. Recording/Pause
8
10. Remaining Time
9
10
Voice
Repeat Mode
Equalizer
3D
Play Rate
File
Record
GB-15
Computer
Connecting to a
Basic Operation
Hints and Tips
Safety Warning
Specications and
Page 16

Product Overview
4. During recording, you can:
• Pausing/Resume Recording:
Press the
recording.
• Stop Recording:
Press the MENU button to save the recordings. The Multimedia player will go to
the Voice playback interface automatically.
Connecting to a
1
Computer
2
3
4
5
The recorded les are saved in the MICIN.DIR folder of the Multimedia player as WAV les (format:
MIC0000X.WAV) and can be listened in the Voice mode.
Voice recording is automatically stopped when the memory of the Multimedia player is full. Data
that has been already recorded is automatically saved.
5. Press the button to play the recording while playing recordings, you can:
Hints and TipsBasic Operation
Safety Warning
• Pausing/Resume Playing:
Press the
playing.
• Skipping Tracks:
Press the
• Searching:
Press and hold the
• Adjusting the Volume:
Specications and
Press the
• Exit:
Press and hold the
button to pause recording. Press the button again to resume
1. Volume level
6
2. Recording le name
3. Bit rate
4. Sampling frequency
5. Elapsed time of the track
6. Remaining battery power indicator
7
7. File format
8
8. Current EQ indicator
9
9. Current track / Total track number
10. Current mode
10
11. Play/Pause/Stop/Fast forward/
11
12
Rewind
12. Total time of the track
button to pause playing. Press the button again to resume
buttons to skip to previous / next track.
buttons to fast rewind / fast forward within a track.
buttons to increase / decrease the volume.
button to return to the main menu.
GB-16
Page 17

Entering the Voice Setup Menu
1. While playing the recording, press the MENU button to enter the Voice Setup
Menu.
2. Press the
Mode, Equalizer, 3D, Play Rate, File, Record.
3. After nishing the music setting, press the
To Set Repeat
The repeat mode setting enables you to play the tracks in a desired order.
1. Press the MENU button while listening to a track. The
Voice Setup Menu appears on the screen. Press the
buttons to select Repeat Mode.
buttons and then the button to access the following: Repeat
button to exit the Music Setup Menu.
Voice
Repeat Mode
Equalizer
3D
Play Rate
File
Record
Product Overview
Computer
Connecting to a
2. Press the button to enter the Repeat Mode Menu. Press
the buttons to select the desired mode as below and
then press the button to conrm and exit.
• No Repeat
Play all the saved music les in order once.
• Repeat One
Play the current or selected le repeatedly.
• Repeat All
Play all the music les in order repeatedly.
• Random All
Play all the music les randomly.
• Folder Normal
Play all the les in the current folder in order once.
• Folder Repeat
Play all the les in the current folder repeatedly.
• Folder Random
Play all the les in the current folder in random order.
Voice
Repeat Mode
No Repeat
Repeat One
Repeat All
Random All
Folder Normal
Folder Repeat
Folder Random
GB-17
Basic Operation
Hints and Tips
Safety Warning
Specications and
Page 18

Product Overview
To Set Equalizer
The equalizer setting enables you to select an equalizer from the six preset equalizer
settings to suit the type of audio output or customise your personal equalizer eect.
1. Press the MENU button while listening to a track. The
Voice Setup Menu appears on the screen. Press the
buttons to select Equalizer.
Connecting to a
Computer
Voice
Repeat Mode
Equalizer
3D
Play Rate
File
Record
2. Press the button to enter the EQ Menu. Press the
buttons to select the desired equalizer from Normal, Pop,
Rock, Classic, Jazz, Bass and Custom EQ. Press the
button to conrm and exit.
To customise EQ, select Custom EQ, and press the
appear on the screen.
1. Press the
2. When navigating to a value bar, press the
select it. The blue arrow becomes red.
3. Use the
Hints and TipsBasic Operation
buttons to navigate between the value bars.
buttons to adjust the value and then press the
button to conrm.
4. After completing the setting, press the
Specications and
Safety Warning
GB-18
Voice
button. The Custom EQ value bars
button to
button to exit.
Equalizer
Normal
Pop
Rock
Classic
Jazz
Bass
Custom EQ
Page 19

To Set 3D Sound Eect
1. Press the MENU button while listening to a track. The
Voice Setup Menu appears on the screen. Press the
buttons to select 3D.
Voice
Repeat Mode
Equalizer
3D
Play Rate
File
Record
Product Overview
2. Press the button to enter the 3D Menu. Press the
buttons to select On or O, and then press the button
to conrm and exit.
To Set Play Rate
1. Press the MENU button while listening to a track. The
Voice Setup Menu appears on the screen. Press the
buttons to select Play Rate.
2. Press the button to enter the Play Rate Menu. Press the
buttons to select a play rate from 1.00X, 1.14X, 1.33X,
0.67X and 0.80X. Press the button to conrm and exit.
Voice
3D
Off
On
Voice
Repeat Mode
Equalizer
3D
Play Rate
File
Record
Voice
Play Rate
1.00X
1.14X
1.33X
0.67X
0.80X
GB-19
Computer
Connecting to a
Basic Operation
Hints and Tips
Safety Warning
Specications and
Page 20

Product Overview
To Navigate Recorded Files
1. Press the MENU button while listening to a track. The
Voice Setup Menu appears on the screen. Press the
buttons to select File.
Connecting to a
Computer
2. Press the button. The recorded le list appears on the
screen.
3. Use the
button to open the folder or play the selected le.
buttons to select a le and then press the
To Record Voice
Please refer to “Voice Recording” on page 15 for details.
Hints and TipsBasic Operation
Voice
Repeat Mode
Equalizer
3D
Play Rate
File
Record
Voice
MIC0001.WAV
MIC0002.WAV
Specications and
Safety Warning
GB-20
Page 21

Photo Playback
This Multimedia player supports the playback of pictures in
JPEG and BMP format.
1. Press and hold the
Press the
button to enter the main menu.
buttons to select Photo.
Product Overview
2. Press the
3. Press the buttons to select a folder or picture and then press the button to
open the folder or view the selected picture. The pictures on the Multimedia player
will start a slide show from the selected picture.
button. The picture list appears on the screen.
Photo
PHOTO
al.jpg
Entering the Photo Setup Menu
The picture menu allows you to select a manner to view the pictures, such as slide
show or manual scan.
1. Press the MENU button while viewing the pictures. The
Picture Setup Menu appears on the screen.
2. Press the
viewing from Slide Show and Manual Scan. Press the
button to conrm and exit.
• Slide Show
• Manual
3. Press the MENU button to return to the previous menu or press and hold the
button to return to the main menu.
buttons to select the desired pictures
Once selected all the pictures on your Multimedia
player will play in a slide show.
To view pictures manually.
Press the
buttons to display the previous or next picture.
Photo
Slide Show
Manual Scan
GB-21
Computer
Connecting to a
Basic Operation
Hints and Tips
Safety Warning
Specications and
Page 22

Product Overview
Movie Playback
This Multimedia player supports the playback of converted videos in MTV format.
1. Press and hold the
Connecting to a
Computer
Press the buttons to select Movie.
button to enter the main menu.
2. Press the
3. Press the buttons to select a folder or movie and then press the button to
open the folder or view the selected movie.
4. While playing the movie, you can:
• Pausing/Resume Playing:
Hints and TipsBasic Operation
Safety Warning
• Skipping Video Files:
• Searching:
• Adjusting the Volume:
• Exit:
Specications and
button. The movie list appears on the screen.
Press the
playing.
Press the
Press and hold the
Press the
Press the MENU button to return to the previous menu or press and hold the
button to pause playing. Press the button again to resume
buttons to skip to the previous / next video le.
buttons to rewind / fast forward within a video le.
buttons to increase / decrease the volume.
button to return to the main menu.
GB-22
Movie
pride.mtv
Page 23

Deleting Files and Folders
In the Delete mode, you can delete the les and folders stored on your Multimedia
player without a computer.
1. Press and hold the
Press the buttons to select Delete.
button to enter the main menu.
Product Overview
2. Press the button. The le list appears on the screen.
Press the buttons to navigate between the les or
folders.
3. To delete a le, select the le and then press the MENU
button. To delete a folder, select the folder and press the
MENU button.
4. Press the
button to conrm. Select No and then press the button
to cancel.
buttons to select Yes and then press the
Delete
Delete
Delete
No
Yes
PHOTO
MOVIE
al.jpg
pride.mtv
GB-23
Computer
Connecting to a
Basic Operation
Hints and Tips
Safety Warning
Specications and
Page 24

Product Overview
E-Book Viewing
This Multimedia player only supports the playback of les in TXT format. Other formats
must be saved as TXT formats before transfering to the Multimedia player.
1. Press and hold the
Connecting to a
Computer
Press the buttons to select E-Book.
button to enter the main menu.
2. Press the button. The E-book list appears on the screen.
3. Press the
press the button to open the folder or view the selected
le.
While reading E-book, you can:
• Move to Previous/Next Page:
• Skip to Next Page Automatically:
• Exit:
Hints and TipsBasic Operation
Specications and
Safety Warning
The last page you read is automatically saved as a bookmark when you exit the E-book mode.
The bookmark page will be displayed on the screen when you switch to E-BOOK mode next time.
buttons to select a folder or le and then
Press the
While viewing text, press the
skip pages. Press the button again to stop the automatic skipping.
Press the MENU button to return to the E-book list or press and hold the
button to return to the main menu.
buttons to move to previous / next page.
button to automatically
GB-24
E-Book
NEWS.TXT
Page 25

Customising Settings
The Multimedia player settings can be customised by accessing the Settings Menu.
The Settings Menu consists of several items where various functions can be selected
concerning language, play mode, recording, contrast, time o, storage, reset, etc.
1. Press and hold the
Press the
the button.
2. Press the
access the followings.
Time
Adjust
To change the current time.
1. Press the
2. Press the
3. Press the
button to enter the main menu.
buttons to select Settings and then press
buttons and then press the button to
buttons to change the setting value.
buttons to navigate between setting eld.
button to conrm the setting and exit.
Settings
Time
Power
Language
Display
Record
System Tools
Hold Time
Settings
2008
05 30
10 00 12 PM
Product Overview
Computer
Connecting to a
Basic Operation
Time Zone
To change the time zone.
1. Press the
2. Press the
buttons to change the time zone.
button to conrm the setting and exit.
Settings
Time Zone
GMT +08
GB-25
Hints and Tips
Safety Warning
Specications and
Page 26

Product Overview
Power
Auto o
To set the auto o time.
The available options include: 15, 30, 60, 90, 120 minutes and
Disable.
Always on
Yes
The Multimedia player will be always on while playing.
Connecting to a
However, it will turn o automatically in any other mode if no
Computer
button is pressed for the set time.
No
The Multimedia player will turn o automatically if no button is pressed for the set
time.
Language
Press the buttons and then the button to select a
desired menu language: English / French / German /
Italian / Spanish / Portuguese / Dutch / Russian
Display
Hints and TipsBasic Operation
To set the LCD o time. The backlight will be o after the set
time if no button is pressed.
1. Press the
Backlight.
2. Press the
desire options: 15, 30 seconds, 1 Minute and Disable.
buttons and then the button to select
buttons and then the button to select the
Settings
Power
Auto off
Always on
Settings
Languages
English
Français
Deutsch
Italiano
Español
Português
Nederlands
Русско
Settings
Display
Blacklight
Specications and
Safety Warning
The backlight will never turn o when viewing pictures, reading
E-books or watching a videos.
GB-26
Page 27

Record
Before starting the recording, you can set the recording quality.
1. Press the
Long Time, Normal Quality and High Quality.
2. Press the
screen.
buttons to select a recording quality from
button to conrm and return to the pervious
Settings
Record
Quality
System Tools
Press the buttons to select the following settings, and
then press the button to conrm and return to the pervious
screen.
Delete
To delete a le in the le list.
Format
To format the Multimedia player, you can select from either
Quick or Complete. After formatting, all the data on the
Multimedia player will be erased.
Reset
To restore all settings of the Multimedia player to factory default settings.
System Info
To check the free memory and rmware version of the Multimedia player.
Delete All
To delete all les in the Multimedia player.
Settings
System Tools
Delete
Format
Reset
System Info
Delete All
Hold Time
To specify the key locked time. The keys will be locked after the set time if no button
is pressed.
Press the
the desire time will be locked after the set time: 10, 30 seconds,
1, 3, 5 minutes and O.
To deactivate the lock function, see Key Hold Function on
page 9 for details.
buttons and then press the button to select
Settings
Hold Time
10 Sec
30 Sec
1 Min
3 Min
5 Min
Off
Product Overview
Computer
Connecting to a
Basic Operation
Hints and Tips
GB-27
Safety Warning
Specications and
Page 28

Product Overview
Converting Video to MTV Format
This Multimedia player supports the playback of videos in MTV format. Other formats
(AVI, WMV, MEPG1, Quick Time, MPEG2, RealMedia, MPEG4, 3GP) must be converted
to MTV format. The “MTVVideo Converter” is supplied on the CD to enable you to
convert the other formats to MTV format.
1. Insert the provided CD in the CD-ROM drive of
your computer.
2. Double-click the le “Video Converter.exe” in
Connecting to a
Computer
Hints and TipsBasic Operation
the folder “MTVVideoConverter”. The Video
Converter V2.9 window appears.
3. Click “Input Video“, and then select the input
source from the Open dialog box.
If your video les (e.g. MP4 le) cannot be found
in the Open dialog box, select All Files (*.*) in the
File of type box.
4. Click “Output Video“ to select an output
directory.
5. Click “Advanced Settings“. Select “128x128“
in the “Output Frame Size“ box and select
“MTV“ in the Output Format box.
6. Click “Start Conversion“.
For detailed operations, click “Help“.
To make your video playable on the Multimedia player, you must select 128x128 or less in the Output
Frame Size box (Advanced Setting). Otherwise, the message “Device Not Support” will appear on the
screen when you play the video le.
Specications and
You have to install the relevant codec package before
Safety Warning
running “Video Converter.exe”. If not, the system will
prompt “Load Video Failed!”. When you attempt to
convert the video les. Click “OK” and follow the prompt
to download and install codec from the web site.
GB-28
Page 29

Hints and Tips
If a problem does occur, it may often be due to something very minor. The following
table contains various tips.
Cannot power on • The battery may be exhausted. Recharge the battery.
Files cannot be
downloaded
No sound from the
earphones
Recording cannot be
done
The buttons do not
work
• Check if the driver is installed correctly in the computer.
• Check the connection between the Multimedia player
and the computer.
• Check that the volume is on.
• Check the connection between the earphones and the
Multimedia player.
• Check if the music le format is supported by the
Multimedia player.
• Check if there is enough memory and battery capacity.
• The key may be locked. Press the
deactivate the lock function.
button to
Product Overview
Computer
Connecting to a
Basic Operation
Hints and Tips
GB-29
Safety Warning
Specications and
Page 30

Product Overview
Specications
Model L2GBMP410 / L4GBMP410 / L8GBMP410
Audio Format MP3 / WMA / WAV
Photo Format JPEG / BMP
Video Format MTV
MP3 bit Rate 8Kbps-320Kbps
Connecting to a
WMA bit rate 5Kbps-320Kbps
Computer
S/N rate ≥85dB
Distortion <0.2%
Size 43 x 84 x 8.3 mm
Weight <40g (without accessories)
Frequency response 20Hz~20KHz
Dynamic current ≤40mA (Play Mp3, backlight o)
Power o current ≤0.30mA
Storage condition Humidity <90%, Normal temperature
Working condition Humidity <85%,-10~40°C
Power out 2 x 1mW(16 ohm load)
Battery 300mAh, up to 8 hours playback for music and 3 hours for
EQ Normal / Rock / Pop / Classic / Jazz / Custom EQ
Support Video
Format to Converter
Hints and TipsBasic Operation
video
AVI(*.avi), WMV(*.wmv, *.asf), MPEG1(*.mpg),
QuickTime(*.mov, *.qt), MPEG2(*.vob),
RealMedia(*.rm, *.rmvb,…), MPEG4, 3GP(*.3gp)
Specications and
Safety Warning
GB-30
Page 31

Safety Warnings
• Retain the manual. If you pass the unit onto a third party make sure to include this
manual.
Damage
• Please inspect the unit for damage after unpacking.
• Do not continue to operate the unit if you are in any doubt about it working
normally, or if it is damaged in any way - switch o and consult your dealer.
Temperature
• Avoid extreme degrees of temperature, either hot or cold. Place the unit well away
from heat sources such as radiators or gas/electric res.
• Avoid exposure to direct sunlight and other sources of heat.
Naked Flames
• Never place any type of candle or naked ame on the top of or near the unit.
Moisture
• Do not expose this unit to rain, moisture, dripping or splashing.
• If you spill any liquid into the unit, it can cause serious damage. Switch it o and
consult your dealer.
Interference
• Do not place the unit on or near appliances which may cause electromagnetic
interference. If you do, it may adversely aect the working of the unit, and cause a
distorted picture or sound.
LCD screen
• The LCD screen is manufactured using high-precision technology. However, some
tiny black points and/or bright points (red, blue or green in colour) may constantly
appear on the LCD screen. These points are generated in the manufacturing process
and are normal.
Earphones
• For trac safety, do not use earphones while driving or cycling.
• Listening to loud sounds for prolonged periods of time may permanently damage
your hearing.
• Before putting on earphones, turn the volume down then put the earphones on and
slowly increase the volume until you reach a comfortable listening level.
Batteries
• Please dispose of the battery correctly by following the guidance in this manual.
Service
• Do not open any xed covers. The unit does not contain any user-serviceable parts.
Please leave all maintenance work to qualied personnel.
Maintenance
• Ensure to switch o the unit before cleaning.
• Do not use any type of abrasive pad or abrasive cleaning solutions as these may
damage the unit’s surface.
• Do not use liquids to clean the unit.
GB-31
Product Overview
Computer
Connecting to a
Basic Operation
Hints and Tips
Safety Warning
Specications and
Page 32

Note: If you require a replacement for any of the items listed below, please quote
their corresponding part numbers:
Replacement Part Part Number
USB Cable 38-012-10300019
Earphones 50-110-26900119
Installation CD with Instruction Manual 54-809-30000209
Visit Partmaster.co.uk today for the easiest way to buy
electrical spares and accessories. With over 1 million
to your door the very next day. Visit www.partmaster.co.uk or call 0844 800 3456 (UK
customers only) Calls charged at National Rate.
This symbol on the product or in the instructions means that your
electrical and electronic equipment should be disposed at the end of its
life separately from your household waste. There are separate collection
systems for recycling in the EU.
For more information, please contact the local authority or your retailer
where you purchased the product.
Important Notice for the battery disposal
The batteries used with this product contain chemicals that are harmful to the
environment. To preserve our environment, disposal of used batteries according to
your local laws or regulations. Do not dispose of batteries with the normal household
waste.
For more information, please contact the local authority or your retailer where you
purchased the product.
Removal of the battery
Always bring your product to a professional to remove/ replace the battery.
Windows is a registered trademark of Microsoft Corporation in the United States and
other countries.
All trademarks are the property of their respective owners and all rights are
acknowledged.
spares and accessories available we can deliver direct
DSG Retail Ltd•Maylands Avenue•Hemel Hempstead
Herts• HP2 7TG •England
(P.N.: 54-809-30000209)
 Loading...