

Page 1
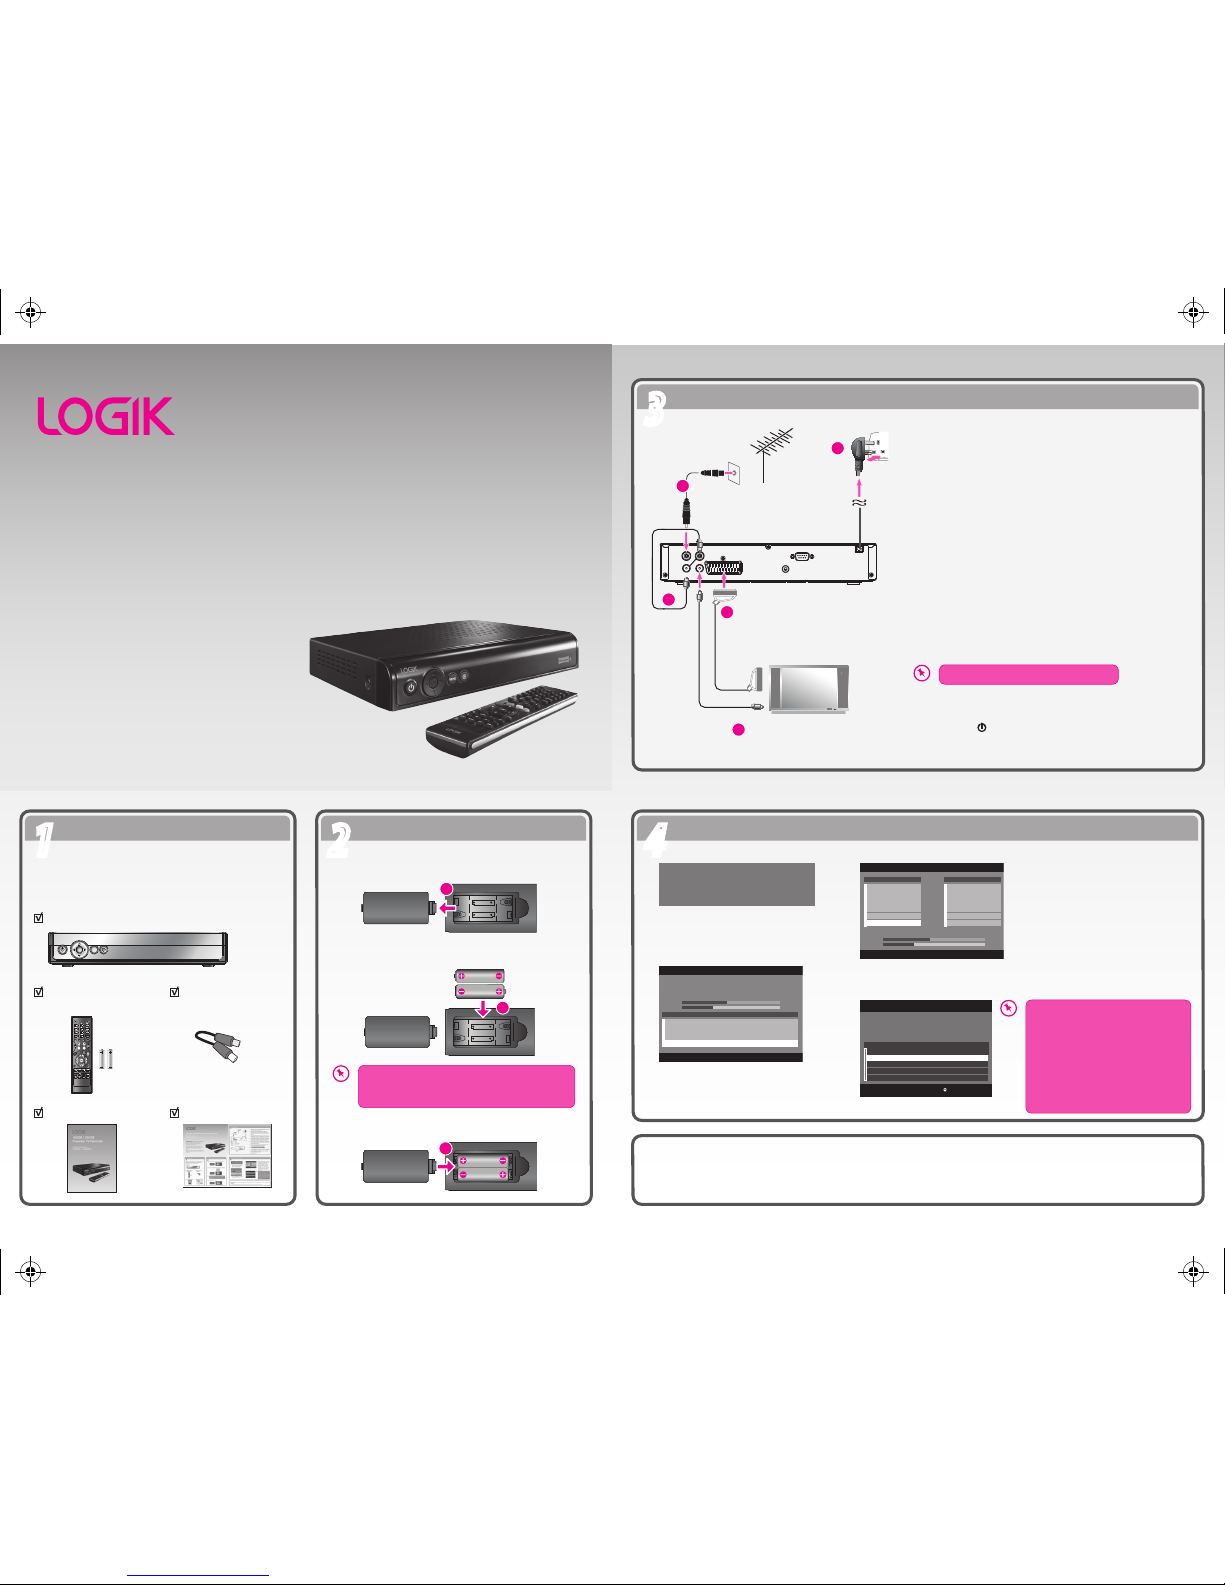
Connection
33
GB
Unpacking
11
Operating Your Remote Control
22
First Time Installation
44
Well done, your new Freeview TV Recorder is now ready to use. You will nd that there are many exciting features
available.
To get to know all these features, please take some time to read the instruction manual provided.
7. The power indicator on the front panel will illuminate
red and “Stby” will be displayed on the LED display.
8. Press the button to turn the unit on, the power
indicator will illuminate green.
9. Turn on your TV.
160GB / 250GB Freeview TV Recorder
Quick Start Guide
L160STB11 / L250STB11
Remove all packaging from the unit. Retain the
packaging. If you dispose of it please do so
according to any local regulations.
1. Make sure your TV and any other equipment you are
connecting to are switched off.
2. Connect one end of the RF coaxial cable (not
supplied) to the aerial socket on the wall and the
other end to the RF IN1 socket on the rear panel of
the unit.
3. Connect the female end of the loop through cable
(included) to the RF OUT1 socket and the male end
to the RF IN2 socket on the rear panel of the unit .
4. Connect one end of the SCART cable (not supplied)
to the SCART socket on the rear panel of the unit
and the other end to the SCART socket on your TV.
5. Connect another RF coaxial cable (not supplied) to
the RF OUT2 socket on the rear panel of the unit and
the other end to your TV.
6. Plug in the mains plug into the mains socket after
you have completed all the connections.
Install the batteries correctly by following the
polarity (+ and -) indications in the battery
compartment.
1. Remove the battery cover of remote control.
Main Unit
Instruction Manual Quick Start Guide
(P.N.: 810-TB11LL-10)
Loop Through
Cable x 1
2. Insert 2 x AAA batteries in the correct position.
3. Close the battery cover.
Remote Control
and Batteries
Thank you f or pu rchasi ng yo ur ne w Lo gik
160GB / 25 0GB F reevie w TV Reco rder.
Pleas e fol low t his q uick start gui de fo r a
succe ssful rst time set up.
We recom mend that you s pend some time
readin g the inst ructi on m anual in o rder t o ful ly
under stand all the o perat ional fea tures it
offers .
Read all t he sa fety instr uctio ns c areful ly be fore
use a nd ke ep th e ins truct ion m anua l for futu re
referen ce.
The unit will take awhile for loading.
During tuning, your unit may receive
signals from more than one
transmitter. If this happens when
you install your unit, the TV Region
Selection screen will appear. Please
select your preferred region. Making
this choice will ensure that you will
receive the correct regional news
programmes.
1. When your unit is switched on
for the rst time, a Welcome
Screen will be displayed.
3. The tuning progress screen will
be displayed, showing you how
many channels have been
found and saved. The tuning
may take several minutes to
complete. When the tuning is
complete, your unit is ready to
use. After tuning is complete,
the channels are arranged in a
preset order.
2. Press the OK button to begin
the channel auto scan.
OK
MENU
R
1
2
3
Welcome!
Please ensure the aerial is connected.
Press OK key to commence automatic tuning.
AUTO TUNE Tue, 1 Jun 00:01
TUNING - PLEASE WAIT
Carriers detected 4
Scanning details UHF 666.000 MHz
Bandwidth 8 MHz Channel no 45
Signal 43%
Band 2 29%
CN Freq(MHz) FFT GI Const FEC
1 514.00 2K 1/32 QAM-64 2/3
2 530.00 8K 1/4 QAM-64 2/3
3 578.00 8K 1/4 QAM-14 3/4
4 650.00 2K 1/32 QAM-64 2/3
Carries detected 4
BACK
TUNE page 1 of 1 Tue, 1 Jun 00:08
666.000 MHz FFT 2K GI 1/32 QAM-16 FEC 3/4
Progress
Signal
TV 6
CBBC Channel
BBC Red Button
BBC NEWS
BBC THREE
BBC TWO
BBC ONE
BACK
0%
71%
Radio 0
BACK
OK: Conrm BACK
Please select your preferred region.
“Gloucestershine, West” is your currently selected region.
TV REGION SELECTION Fri, 4 Jun 10:33
England
Gloucestershire, Central
Gloucestershire, West
Ruritania
Brigadoon
Ruritania, Brigadoon
RS232
SPDIF
SERVICES ONLY
AC 230V~
50Hz 12W
RF IN1 RF IN2
SCART
RF OUT
1
RF OUT
2
To mains
socket
TV
Aerial
OR
Mains Cable
SCART Cable
(not included)
RF Coaxial
Cable
(not included)
RF Cable
(not included)
Loop
Through
Cable
(included)
To SCART socket
To RF IN socket
2
3
4
5
6
L160_250STB11_QSG_110610_Annie.pdf 1 11年6月10日 下午5:00
 Loading...