

Page 1
DAB RADIO
INSTRUCTION MANUAL
GB
DAB RADIO
BRUKERVEILEDNING
DAB RADIO
INSTRUKTIONSMANUAL
DAB RADIO
KÄYTTÖOHJE
DAB RADIO
INSTRUKTIONSMANUAL
NO
SE
FI
DK
L22DAB10E
Page 2

Contents
Unpacking ...............................................................................5
Product Overview ....................................................................6
Power Source ..........................................................................7
Mains Power ..................................................................7
Battery Power .................................................................7
Switching on Your Unit for the First Time.................................7
Basic Operation .......................................................................8
Powering ON/OFF ...........................................................8
Selecting Modes ............................................................8
Adjusting Volume ...........................................................8
DAB Operation.........................................................................9
Memory ..........................................................................9
Storing Stations ..............................................................9
Recalling a Stored Station ...............................................9
Display Modes ..............................................................10
Software Version ...........................................................11
Auto Scan Modes ..........................................................11
Secondary Services .......................................................11
Manual Tuning ..............................................................11
System Reset ................................................................12
FM Operation ........................................................................13
Switching from DAB to FM Mode ..................................13
Auto Scan .....................................................................13
Manual Scan .................................................................13
Storing Stations ............................................................13
Recalling a Stored Station .............................................13
Display Modes ..............................................................14
Software Version ...........................................................15
System Reset ................................................................15
Using Earphones ...........................................................15
Select Sensitivity in FM .................................................15
Maintenance .........................................................................16
Hints and Tips ........................................................................16
Specication .........................................................................16
Safety Warnings ....................................................................65
GB
Innhold
Utpakking .............................................................................17
Produktoversikt .....................................................................18
Strømkilde ............................................................................19
Strømnett .....................................................................19
Batteristrøm .................................................................19
Slå på apparatet første gang .................................................19
Grunnleggende bruk .............................................................20
Slå av / på .....................................................................20
Velge modus .................................................................20
Justere volumet ...........................................................20
Bruk av DAB ..........................................................................21
Minne ...........................................................................21
Lagring av kanaler ........................................................21
Hente frem en lagret kanal ...........................................21
Displaymoduser ............................................................22
Programvareversjon......................................................23
Auto søk moduser .........................................................23
Sekundære tjenester .....................................................23
Manuell Tuning .............................................................23
Tilbakestilling ...............................................................24
Bruk av FM ............................................................................25
Skifter fra DAB til FM-modus.........................................25
Auto søk ........................................................................25
Manuell søk ..................................................................25
Lagring av kanaler ........................................................25
Hente frem en lagret kanal ...........................................25
Displaymoduser ............................................................26
Programvareversjon......................................................27
Tilbakestilling ...............................................................27
Bruk av hodetelefoner ..................................................27
Juster følsomhet for FM-signal .....................................27
Vedlikehold ...........................................................................28
Hint og tips ...........................................................................28
Spesikasjoner ......................................................................28
Sikkerhetsadvarsler ...............................................................65
NO
Page 3

Innehåll
Packa upp..............................................................................29
Produktöversikt .....................................................................30
Strömkälla ............................................................................31
Nätspänning .................................................................31
Batterieekt .................................................................31
Sätt på din enhet för första gången.......................................31
Enkel användning .................................................................32
Sätt på ON/OFF (PÅ/AV) ................................................32
Välj läge ........................................................................32
Anpassa volymen ..........................................................32
Användning av DAB ......................................................33
Minne ...........................................................................33
Spara stationer .............................................................33
Gå tillbaka till en sparad station ...................................33
Visningslägen ...............................................................34
Version av mjukvara......................................................34
Automatiskt sökningsläge ............................................35
Säkundär service...........................................................35
Manuell sökning ...........................................................35
Systemåterställning ......................................................35
Användning av FM ................................................................36
Att gå från DAB till FM läge ...........................................36
Automatisk sökning ......................................................36
Manuell sökning ...........................................................36
Spara stationer .............................................................36
Gå tillbaka till en sparad station ...................................36
Visningslägen ...............................................................37
Version av mjukvara......................................................38
Systemåterställning ......................................................38
Användning av hörlurar ................................................38
Välj känslighet för FM ...................................................39
Underhåll ..............................................................................40
Råd och tips ..........................................................................40
Specikationer ......................................................................40
Säkerhetsföreskrifter .............................................................66
SE
Sisältö
Pakkausmateriaalin poistaminen ..........................................41
Tuotteen yleiskatsaus ............................................................42
Teholähde .............................................................................43
Verkkovirta ..................................................................43
Paristovirta ...................................................................43
Laitteen kytkeminen päälle ensimmäisellä käyttökerralla ....43
Perustoiminnot .....................................................................44
Virta päälle/pois päältä ................................................44
Käyttötilan valitseminen ..............................................44
Äänenvoimakkuuden säätäminen ................................44
DAB-radiovastaanottimen toiminta ......................................45
Muisti ...........................................................................45
Kanavien tallentaminen ...............................................45
Tallennetun kanavan avaaminen ..................................45
Näyttötilat ....................................................................46
Ohjelmistoversio ...........................................................47
Automaattinen haku.....................................................47
Toissijaiset palvelut .......................................................47
Manuaalinen haku ........................................................47
Järjestelmän palauttaminen tehdasasetuksiin .............48
FM-radion toiminta ...............................................................49
DAB-tilasta FM-tilaan vaihtaminen ..............................49
Automaattinen haku.....................................................49
Manuaalinen haku ........................................................49
Kanavien tallentaminen ...............................................49
Tallennetun kanavan avaaminen ..................................49
Näyttötilat ....................................................................50
Ohjelmistoversio ...........................................................51
Järjestelmän palauttaminen tehdasasetuksiin .............51
Korvakuulokkeiden käyttäminen ..................................51
Herkkyyden muokaaminen FM-tilassa..........................51
Maintenance .........................................................................52
Neuvoja ja vinkkejä ...............................................................52
Tekniset tiedot ......................................................................52
Turvavaroitukset ...................................................................66
FI
Page 4

Indholdsfortegnelse
Udpakning ............................................................................53
Produktoversigt.....................................................................54
Strømkilde ............................................................................55
Strømnettet ..................................................................55
Batteristrøm .................................................................55
Første gang du tænder for din apparat ..................................55
Grundlæggende brug ............................................................56
Strøm TÆND/SLUK (ON/OFF) .........................................56
Valg af tilstande ............................................................56
Justering af lydstyrken ..................................................56
DAB- betjening .....................................................................57
Hukommelse ................................................................57
Gemning af stationer ....................................................57
Genkald af en forudindstillet station ............................57
Display-tilstande ..........................................................58
Softwareversion............................................................59
Automatiske scannings-tilstande .................................59
Sekundære services ......................................................59
Manuel tuning ..............................................................59
Systemnulstilling ..........................................................59
FM-betjening ........................................................................60
Skift fra DAB til FM-tilstand ..........................................60
Automatisk scanning ....................................................60
Manuel Scanning ..........................................................60
Gemning af stationer ....................................................60
Genkald af en forudindstillet station ............................60
Display-tilstande ..........................................................61
Softwareversion............................................................62
Systemnulstilling ..........................................................62
Brug af øretelefoner......................................................62
Vælg FM-følsomhed .....................................................63
Vedligeholdelse ....................................................................64
Råd og tips ............................................................................64
Specikationer ......................................................................64
Sikkerhedsforanstaltninger ...................................................67
DK
Page 5
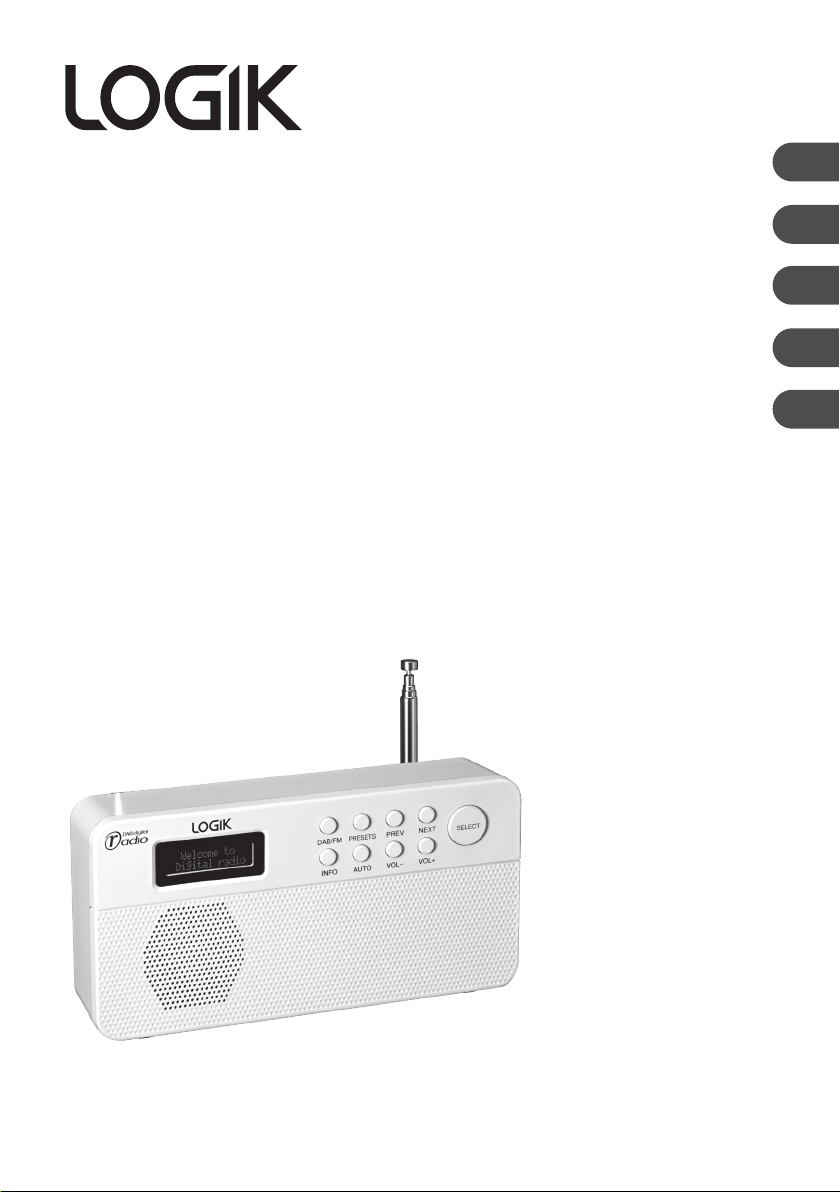
Congratulations on the purchase of your new Logik DAB Radio.
We recommend that you spend some time reading this instruction manual in
order that you fully understand all the operational features it oers. You will
also nd some hints and tips to help you resolve any issues.
Read all the safety instructions carefully before use and keep this instruction
manual for future reference.
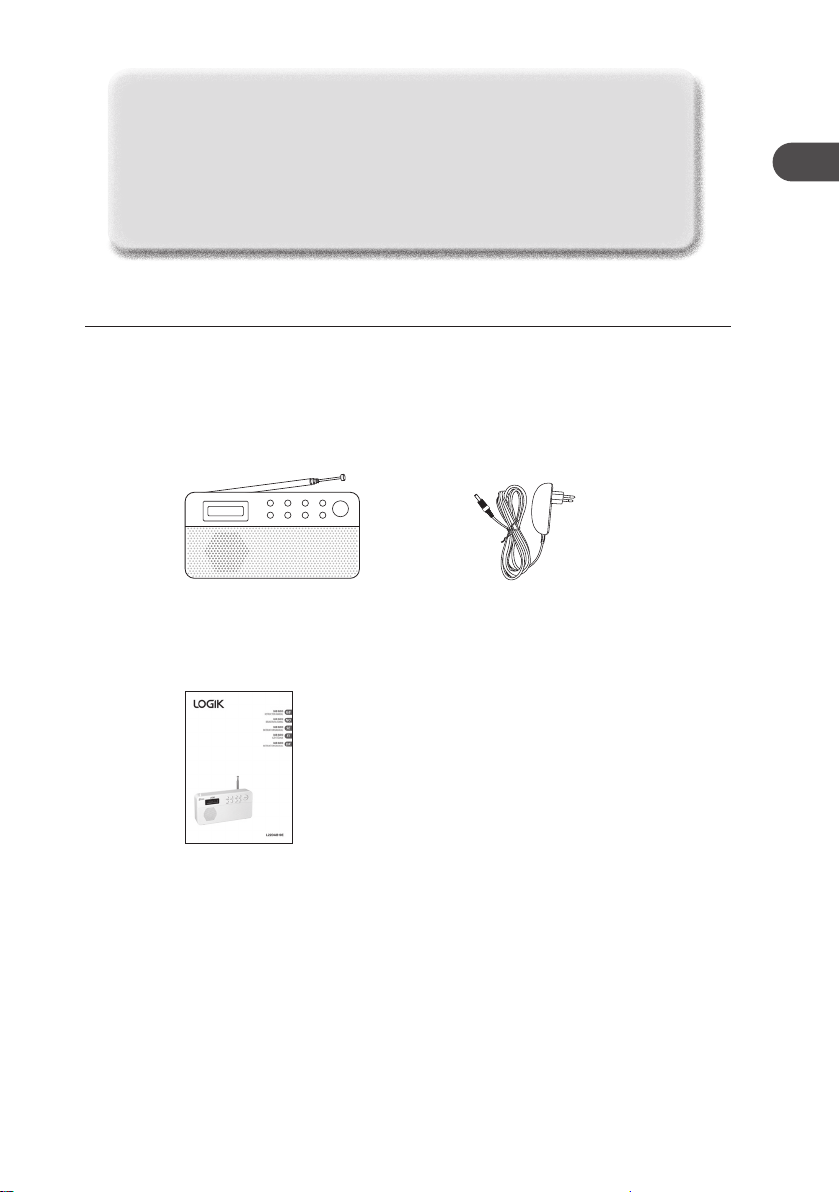
Unpacking
Remove all packaging from the unit. Retain the packaging. If you dispose of it please do so
according to local regulations.
The following items are included:
GB
DAB/FM PRESETS PREV NEXT
INFO AUTO VOL- VOL+
The Main Unit
Instruction Manual
part number
L22DAB10E-002
SELECT
Mains Adapter
part number
EUAD87006-500
If items are missing or damaged, please contact Partmaster (UK only).
Tel: 0844 800 3456 for assistance.
5
Page 6
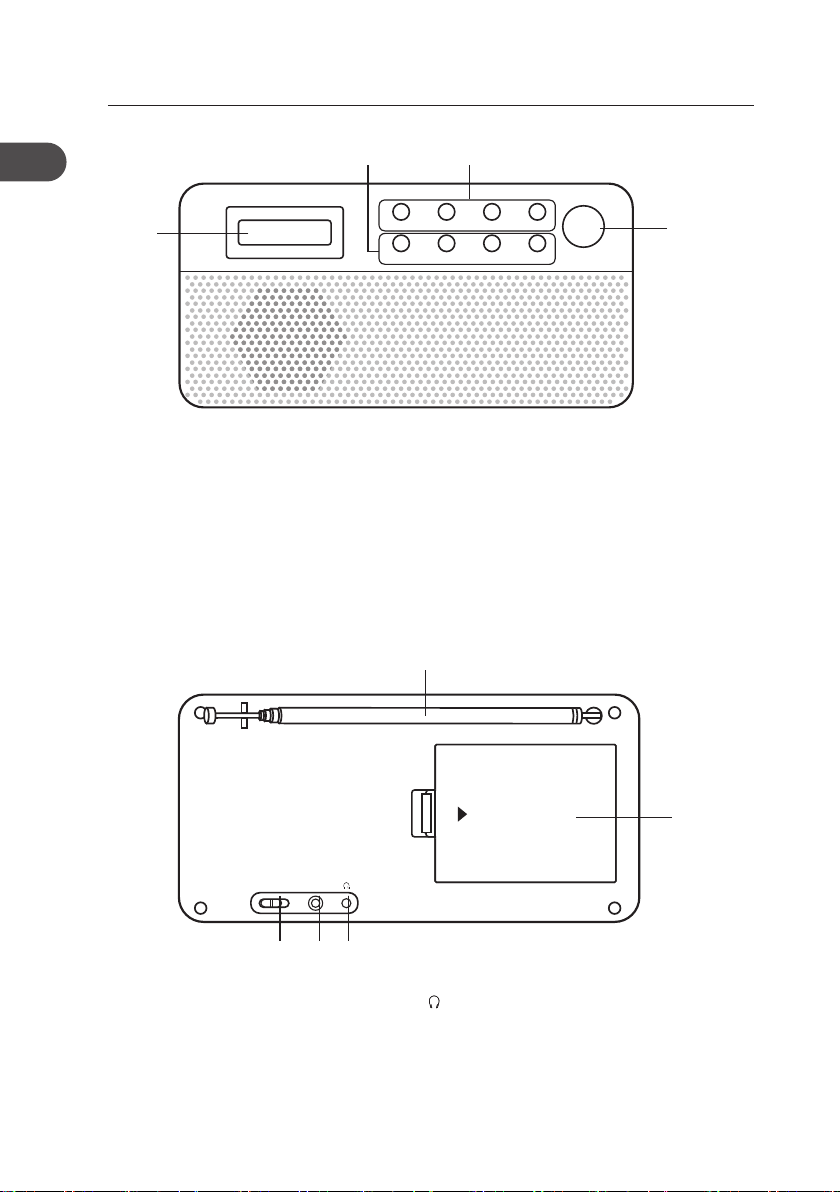
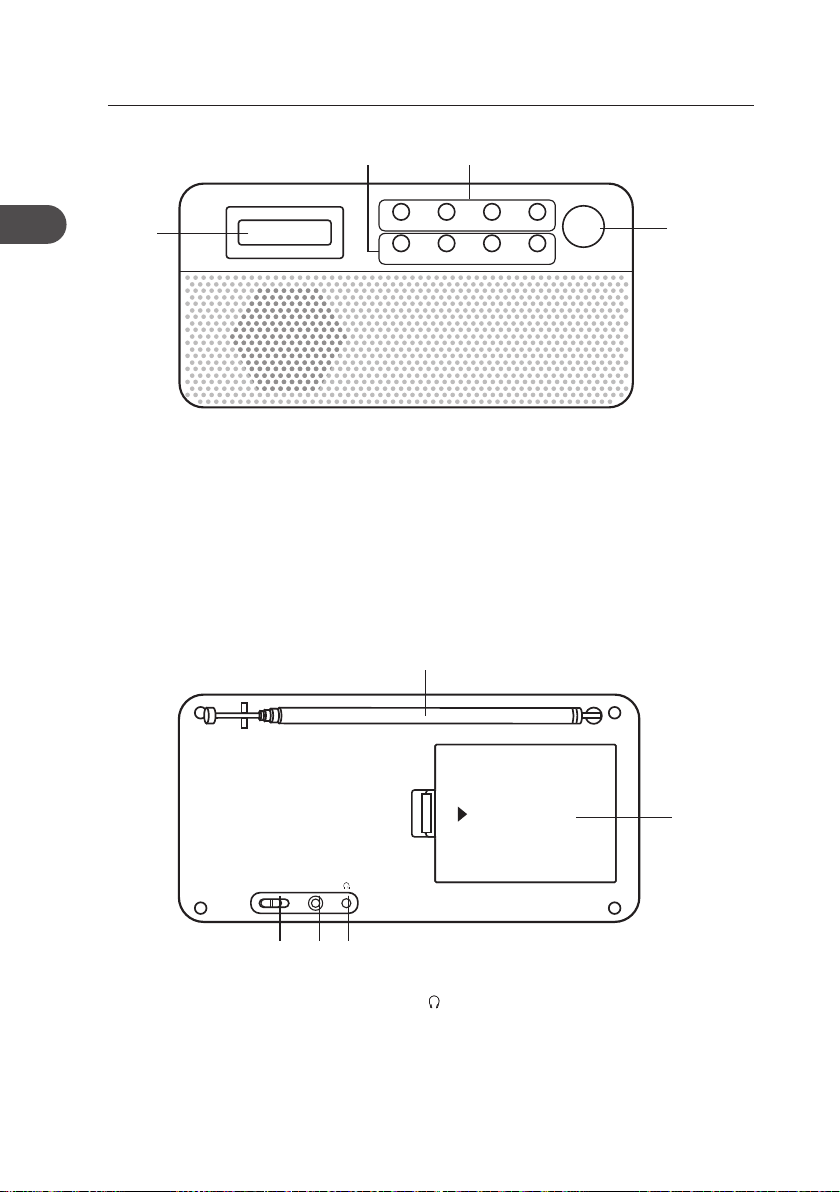
Product Overview
GB
Front View
1
1. LCD Display
2. INFO Button
AUTO Button
VOL– Button
VOL+ Button
Rear View
Window
2 3
DAB/FM PRESETS PREV NEXT
INFO AUTO VOL- VOL+
3. DAB/FM Button
PRESETS Button
PREV Button
NEXT Button
4. SELECT Button
5
SELECT
4
9
OFF ON
OPEN
DC 6V IN
876
5. Telescopic Aerial
6. ON/OFF Switch
8. Earphones Socket
9. Battery compartment
7. DC 6V IN Socket
6
Page 7
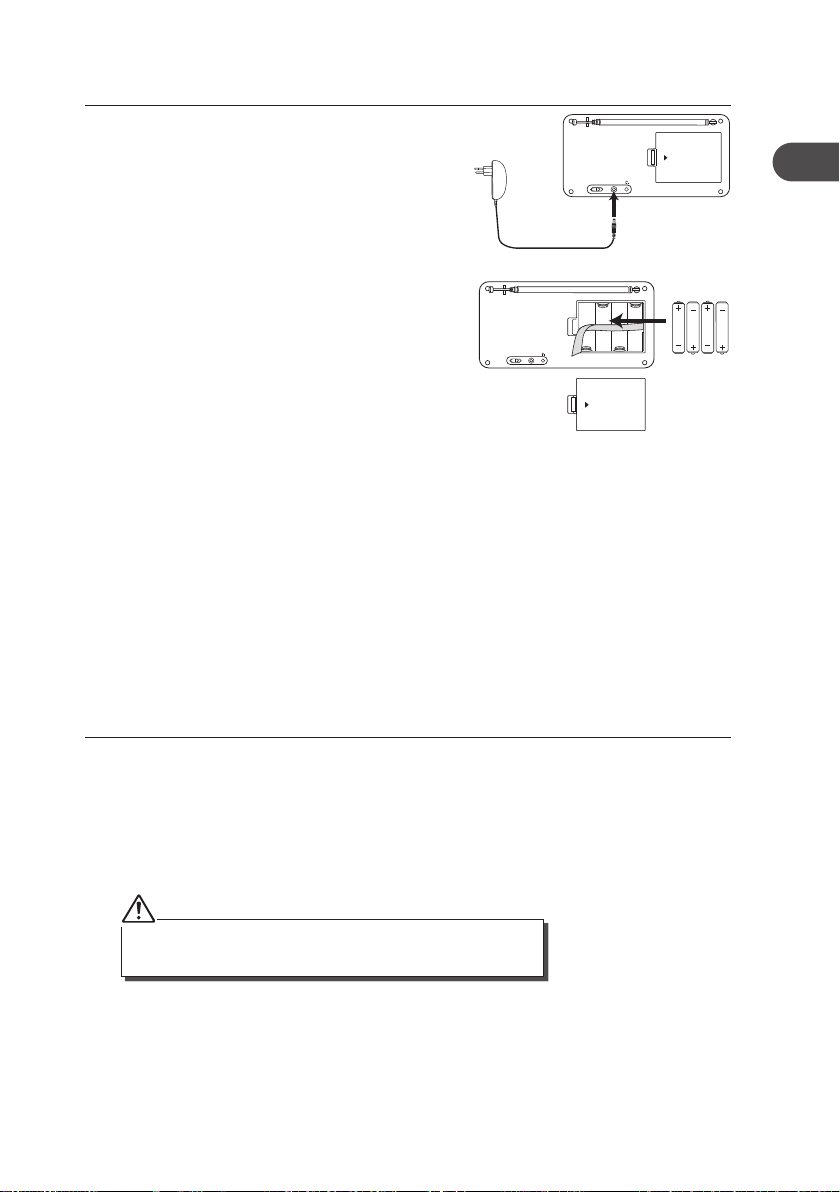
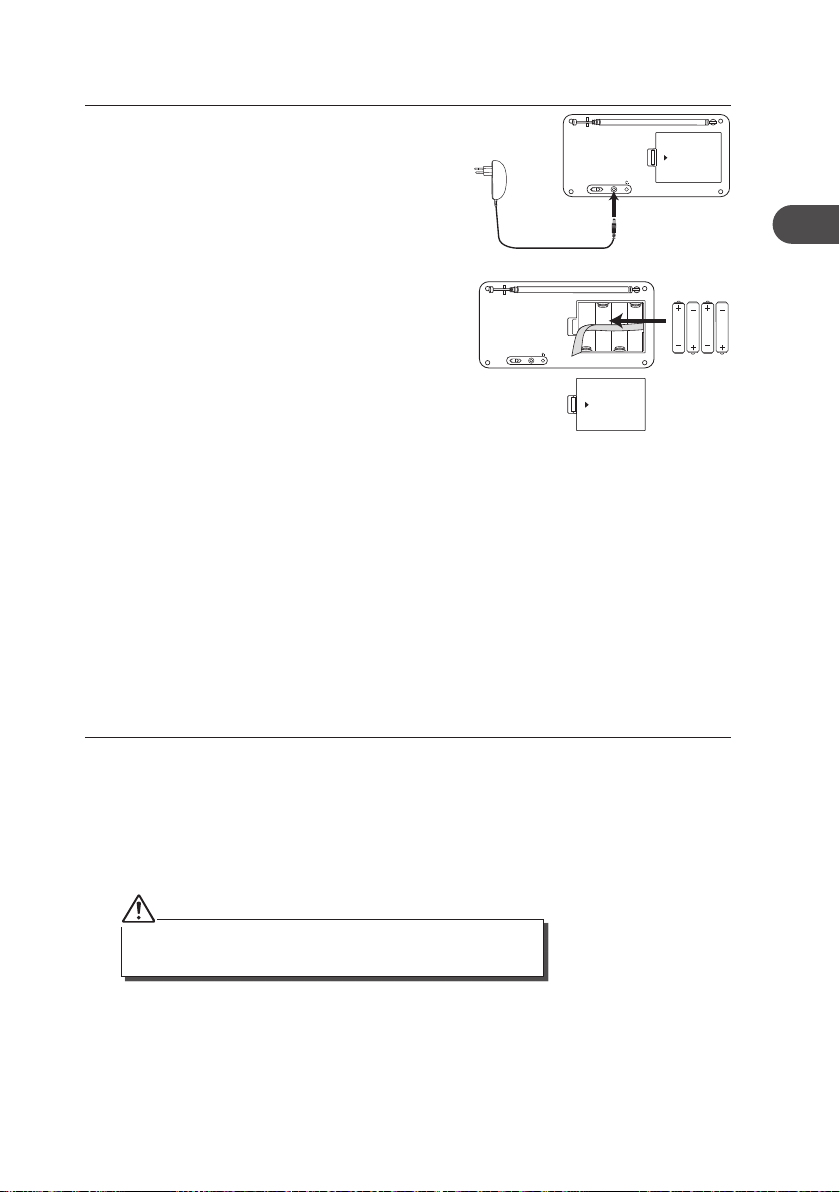
Power Source
Mains Power
Connect the mains adapter (included) to the DC
6V IN socket and the mains socket.
OFF ON
Battery Power
Insert 4 AA batteries (not included) correctly by
following the polarity (+ or –) indications in the
battery compartment.
Handling the Batteries
• Improper or incorrect use of batteries may cause corrosion or battery leakage, which
could cause personal injury or damage to property.
• Install the batteries correctly by following the polarity (+ and -) indications in the battery
compartment.
• Use only the types of the batteries which are indicated in this manual.
• Do not install new batteries with used ones and do not mix dierent types of batteries.
• Do not dispose of the used batteries as domestic waste. Dispose of them in accordance
with local regulations.
DC 6V IN
OFF ON
OPEN
OPEN
DC 6V IN
GB
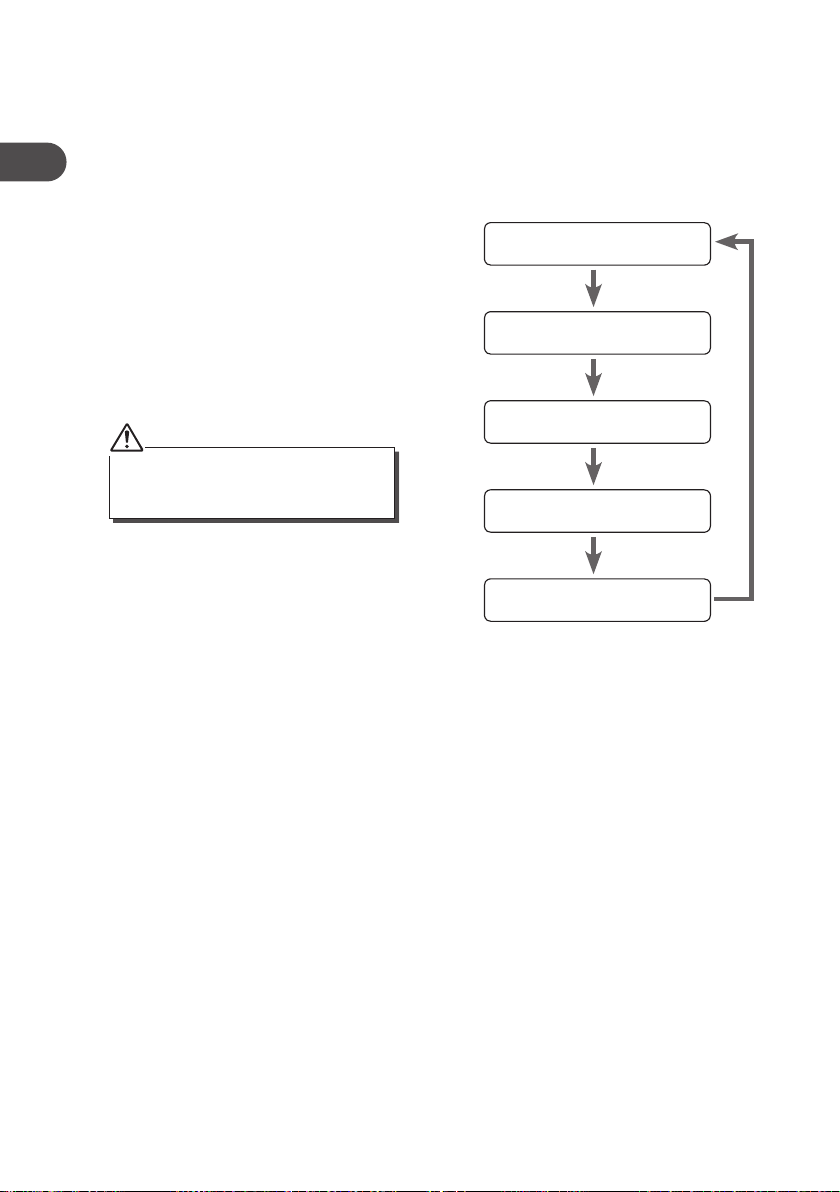
Switching on Your Unit for the First Time
1. Switch the ON/OFF switch at the back of the unit to “ON” position to turn the unit on.
For initial use, the unit will automatically enter the DAB mode and start the auto tune
quick scan for DAB stations.
2. During scanning, the LCD will display a slide bar that indicates the progress of the
scan, and the amount of radio stations that have been found so far. Once the scan has
nished, the unit will select the rst alphanumeric station.
The name of the found group of DAB radio stations will be displayed
on the bottom half of the display.
7
Page 8

GB
Basic Operation
Powering ON/OFF
When you rst connect the unit to the mains socket and switch the ON/OFF switch at the
back of the unit to the “ON” position to switch the unit on.
• Switch the ON/OFF switch to the “OFF” position to turn the unit o.
• Disconnect the power cable of the mains adapter from the mains socket if you want to
switch the unit o completely.
Selecting Modes
Press the DAB/FM button repeatedly to switch between modes (DAB or FM).
Adjusting Volume
Press the Vol+ or Vol– button to increase/decrease the volume.
8
Page 9

DAB Operation
To listen to the tuned stations press either the PREV / NEXT buttons. Each time you press
the PREV / NEXT buttons, you will skip to the previous or next stored station. The unit will
display the station name.
Memory
When you power up the unit again, the unit plays the same mode and station (DAB or FM)
as the last operation.
Storing Stations
You can store up to 10 of your favourite stations to the memory. This will enable you to
access your favourite stations quickly and easily.
1. To store a preset, you must rst be listening to the station that you would like to save,
press and hold the PRESETS button.
2. Press the PREV or NEXT button to select your desired preset station number.
3. Press the SELECT button to conrm the selection.
4. The station will be stored and the LCD will then show “Preset # stored“.
Recalling a Stored Station
1. Once you have saved a station to one of the preset buttons, you can recall it by
pressing the PRESETS button.
2. Press the PREV or NEXT button to select your desired preset station number.
3. Press the SELECT button to conrm the selection.
4. If you choose a preset that hasn’t been allocated a station, the “Preset empty #“ will be
displayed.
GB
9
Page 10
GB
Display Modes
Every time you press the INFO button, the display will cycle through the following display
modes: Programme Type, Multiple Name, Signal Strength, Time/Date, DLS (Scrolling
Text).
The information is displayed on the lower segment of the LCD display.
Programme Type
This describes the “Style” or “genre” of music
that is being broadcast e.g. “Rock” or “Classical”.
Multiplex Name
A multiplex is a collection of radio stations that
are bundled and tranmitted on one frequency.
There are national and local multiplexes. Local
ones contain stations that are specic to that
area e.g. BBC World.
DAB – unlike normal radio, groups together
several radio stations and transmits them on
one frequency.
Time/Date
The broadcaster (Radio station) provides clock
and date information automatically so there’s
no need to manually set this information.
DLS (Dynamic Label Segment)
Dynamic label segment is a scrolling message
that the broadcaster may include with their
transmissions. The message usually includes
information, such as program details etc.
Programme Type
Multiplex Name
Signal Strength
Time/Date
DLS (Scrolling Text)
10
Page 11

Software Version
1. Press and hold the INFO button for 2 seconds and then release it to view the software
version of this unit.
2. The software version will automatically disappear after 5 seconds.
Auto Scan Modes
There are two types of scans, one is Quick scan and the other is Full scan.
• Quick scan:
Searches the stations between channels 10A and 12D.
To activate the quick scan press the AUTO button.
• Full scan:
Searches all DAB channels in the UK DAB Band III.
Press and hold the AUTO button for 2 seconds.
Secondary Services
You may see a “>” symbol after the name of the station, this indicates that there are
secondary services available to that station. These secondary services contain extra
services that are related to the primary station. e.g. a sports station may want to add extra
commentaries. The secondary services are inserted directly after the primary station in the
station list.
To select the secondary station, press the NEXT button when the “>” appears in the LCD
before the station name. When the secondary service ends, the unit will automatically
switch back to the primary station.
Manual Tuning
As well as the auto tune function, you can manually tune the receiver. This can help you
when aligning your aerial or when adding stations that were missed while auto tuning.
1. Press and hold the SELECT button, the LCD display will now show Manual tune.
2. Press the PREV / NEXT buttons to cycle through the DAB channels, which are
numbered from 5A to 13F.
3. After your desired channel number is selected, press the SELECT button to enter the
current multiplex, the top line will now display the rst station in the multiplex.
4. Press the PREV / NEXT buttons to see what stations are present in the found multiplex.
5. Once you have reached the last station in the found multiplex, it will revert back to the
rst station again. If you wish to exit the Manual Tuning mode, just press the SELECT
button.
GB
11
Page 12

GB
System Reset
There may be times when you need to reset your unit back to the factory settings. If you
experience reception problems you may want to reset and try again. If you move the unit
to another part of the country and pick up the local and national DAB stations in that area,
your previously tuned channels may no longer be available.
To do the system reset, press and hold the DAB/FM button. Then press the SELECT
button to start the system reset. The unit will then start the Quick Scan for DAB channels
immediately.
After the system reset, all the tuned stations, DAB & FM preset stations
and alarm settings will be erased.
12
Page 13

FM Operation
Switching from DAB to FM Mode
In order to switch the unit from DAB to FM mode, press the DAB/FM button once. The
display shows “Switching to FM”.
On the top line of the display is the current frequency. On the bottom of the display,
<Programme Type> will show since no channel is tuned in and no RDS (radio data system)
data is available.
Auto Scan
To search for an FM station, you need to press and then release the AUTO button. This will
start scanning up the frequency band. To scan down the frequency band, press and hold
the AUTO button. Once a station has been found, the scanning will stop automatically.
If no station is found, then the tuning will stop once it has cycled through the entire FM
band (87.5-108MHz).
Manual Scan
To search FM stations manually, simply press the PREV or NEXT button repeatedly until
your desired frequency is reached.
Storing Stations
You can store up to 10 of your favourite stations to the memory. This will enable you to
access your favourite stations quickly and easily.
1. To store a preset, you must rst be listening to the station that you would like to save,
then press and hold the PRESETS button.
2. Press the PREV or NEXT button to select your desired preset station number.
3. Press the SELECT button to conrm the selection.
4. The station will be stored and the LCD will then show “Preset # stored“.
GB
Recalling a Stored Station
1. Once you have saved a station to one of the preset buttons, you can recall it by
pressing the PRESETS button.
2. Press the PREV or NEXT button to select your desired preset station number.
3. Press the SELECT button to conrm the selection.
4. If you choose a preset that hasn’t been allocated a station, the display will show
“Preset empty #“.
13
Page 14
GB
Display Modes
Every time you press the INFO button, the display will cycle through the following display
modes: Programme Type, Signal Strength, Time/Date, Channel Frequency, Audio
Mode, Radio Text.
Programme Type
This describes the “Style” or “genre” of music
that is being broadcast e.g. “Rock” or “Classical”.
Signal Strength
The slide bar indicates how strong the signal is,
the stronger the signal, the longer the bar will
be.
Time/Date
The broadcaster (Radio station) provides clock
and date information automatically so there’s
no need to manually set this information. In the
unlikely event that the broadcaster does not
transmit any clock information; the display will
show <Time/Date>.
Channel Frequency
This shows the frequency of the current station
e.g. 89.80MHz.
Audio Mode
When in FM mode, the display will show if the
station being received is in mono or stereo.
The receiver will automatically switch between
Stereo and Mono mode. You can however
override this function, so that you can manually
switch between Stereo and Mono mode, which
is helpful if you’re listening to a poor FM signal.
Programme Type
Signal Strength
Time/Date
Channel Frequency
Audio Mode
Radio Text
To switch between mono and stereo, press the SELECT button once, you will see on
the display “Auto” or “Mono”. To toggle between each mode just press the SELECT
button again.
Radio Text
As with DAB, the broadcaster can include a
scrolling text that displays information about
the current program. If Radio text information
is not available, then the display with show
<Radio Text>.
14
Page 15

Software Version
1. Press and hold the INFO button for 2 seconds and then release it to view the software
version of this unit.
2. Press the INFO button again to display the Program Identication code (PI code).
3. The software version will automatically disappear after 5 seconds.
System Reset
There may be times when you need to reset your unit back to the factory settings. If you
experience reception problems you may want to reset and try again. If you move the unit
to another part of the country and pick up the local and national stations in that area, your
previously tuned channels may no longer be available.
To do the system reset, press and hold the DAB/FM button. Then press the SELECT
button to start the system reset. The unit will then start the Quick Scan for DAB channels
immediately.
After the system reset, all the tuned stations, DAB & FM preset stations and
alarm settings will be erased.
Using Earphones
OPEN
GB
DC 6V IN
OFF ON
Turn down the volume before connecting the earphones. Slowly raise the volume with the
earphones on until you reach your desired volume. When earphones are connected, the
speaker is automatically disabled.
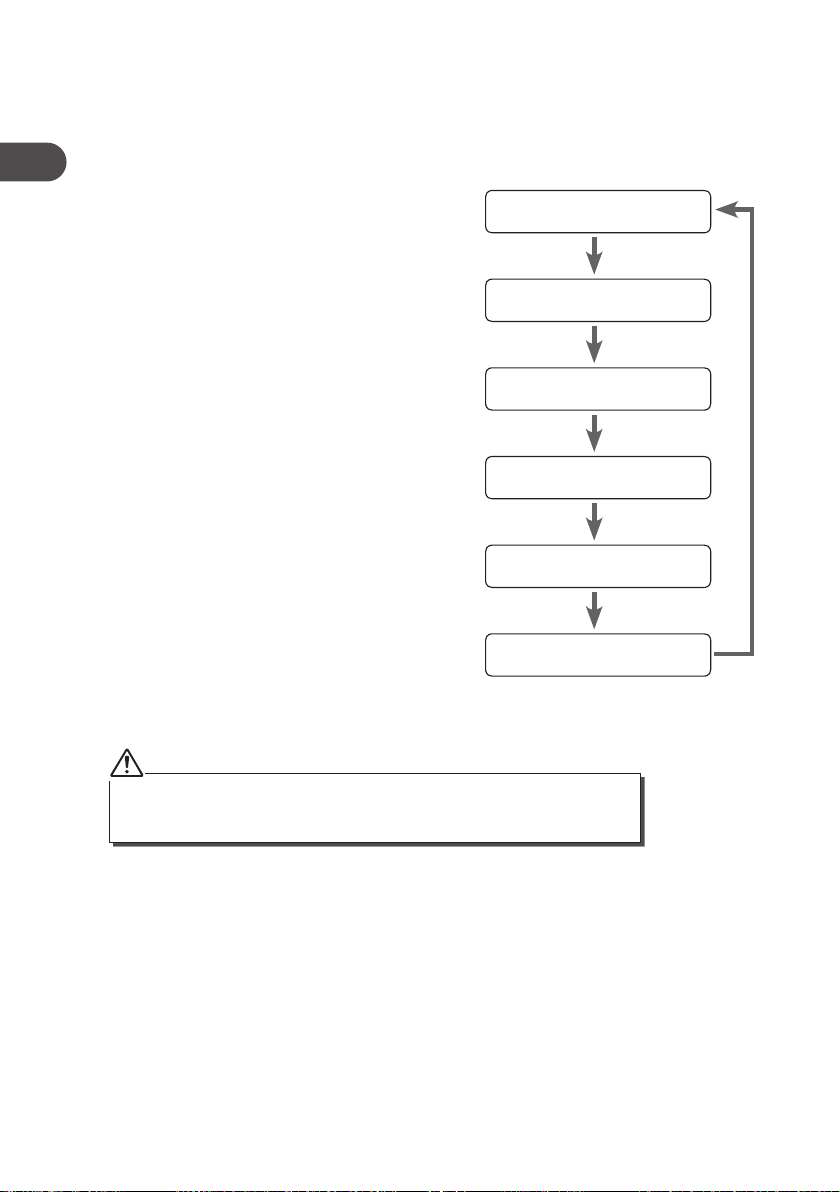
Avoid listening to sound at excessive levels which could be harmful to your
ears. At full power, the prolonged listening can damage the ears of the user.
Select Sensitivity in FM
1. Press and hold the SELECT button for 2 seconds.
2. Show 1-10 level, press the PREV or NEXT button to select the sensitivity manually.
15
Page 16
Maintenance
GB
Ensure to unplug the unit from the mains socket before cleaning.
• To clean the unit, wipe the case with a slightly moist, lint-free cloth.
• Do not use any cleaning uids containing alcohol, ammonia or abrasives.
• Do not spray an aerosol at or near the unit.
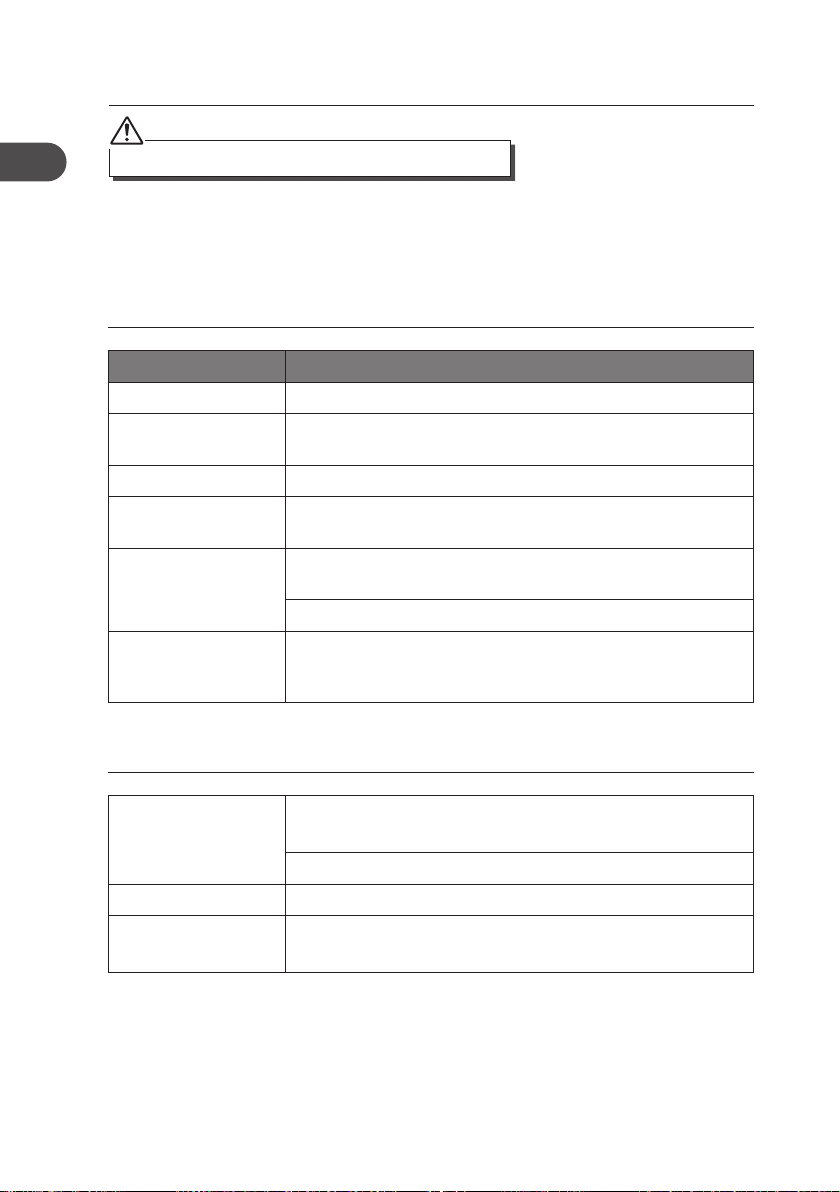
Hints and Tips
Problem Cause / Solution
No Sound Adjust the volume control, it may not be turned up.
Static Sound Signal reception is too low. Adjust the aerial or move the unit to
a stronger signal location.
Sound is distorted Volume is too high. Adjust the volume control.
Desired station not
found
The display shows “Not
available”
The display is blank This may occur if the broadcaster changes the label of a service
Weak signal. Use the Manual Tune function.
No DAB coverage in your area or poor reception. Adjust the
position of the aerial.
Poor reception. Adjust the position of the aerial.
or removes a label while tuned. The unit will try to retune or
perform a scan.
Specication
Mains Supply Mains adapter Input 100-240V ~ 50/60 Hz
Mains adapter Output DC 6V 0.5A
DC battery 4 x AA batteries (not included)
Output Power 1 x 1.0W
Radio Frequency
Range
16
FM87.5 – 108 MHz
DAB Band III 174.928 – 239.200 MHz
Page 17

Gratulerer med kjøpet av ny Logik DAB-radio.
Vi anbefaler at du bruker god tid på å lese denne brukerveiledningen slik at
du fullt ut forstår alle funksjonene den tilbyr. Du nner også hint og tips for å
hjelpe løse eventuelle problemer.
Les alle sikkerhetsinstruksjonene nøye før bruk og behold denne
brukerveiledningen for senere referanse.
Utpakking
Fjern all emballasje fra apparatet. Behold emballasjen. Følg lokale forskrifter hvis du kaster
emballasjen.
Følgende deler følger med:
NO
DAB/FM PRESETS PREV NEXT
INFO AUTO VOL- VOL+
Hovedapparat
Brukerveiledning
delenummer
L22DAB10E-002
SELECT
Strømadapter
delenummer
EUAD87006-500
Hvis det mangler deler eller deler er skadet, ta kontakt med Partmaster (kun UK).
Tlf: ring 0844 800 3456 for assistanse.
17
Page 18
Produktoversikt
NO
Sett forfra
1
1. LCD-display
2. INFO-knapp
AUTO-knapp
–VOL-knapp
+VOL-knapp
Sett bakfra
Skjerm
2 3
DAB/FM PRESETS PREV NEXT
INFO AUTO VOL- VOL+
3. DAB/FM-knapp
PRESETS-knapp
PREV-knapp
NEXT-knapp
4. SELECT-knapp
5
SELECT
4
18
DC 6V IN
OFF ON
5. Antenne
6. ON / OFF-bryter
7. DC 6V IN-kontakt
OPEN
876
8. Kontakt for hodetelefoner
9. Batteribeholder
9
Page 19
Strømkilde
Strømnett
Koble til strømadapter (inkludert) til DC 6V INkontakt til strømnettet.
OFF ON
Batteristrøm
Sett inn 4 AA-batterier (ikke inkludert). Sett
inn batteriene på riktig måte i henhold til
polaritetsindikatorene (+ og -) i batteribeholderen.
Behandling av batterier
• Uriktig bruk av batterier kan forårsake korrosjon eller batterilekkasje som kan forårsake
personskade eller skade på eiendom.
• Sett inn batteriene på riktig måte i henhold til polaritetsindikatorene (+ og -) i
batteribeholderen.
• Bruk kun batteritypene som er spesisert i denne veieledningen.
• Sett ikke inn nye batterier sammen med brukte og bland ikke forskjellige batterityper.
• Kast ikke brukte batterier som husholdningsavfall. Kast batterier i henhold til lokale
forskrifter.
DC 6V IN
OFF ON
OPEN
OPEN
DC 6V IN
NO
Slå på apparatet første gang
1. Sett ON / OFF- bryteren på baksiden av apparatet til “ON” for å slå den på. Apparatet
går automatisk til DAB-modus ved oppstart og slår på auto søk-funksjonen for rask søk
etter DAB-kanaler.
2. Under søket vil LCD-skjermen vise en glidebryter som viser fremdriften i søket, og
antall radiokanaler som har blitt funnet så langt. Så snart søket er fullført velger
apparatet den første alfanumeriske kanalen.
Navnene på DAB-radiokanalene vises på den nederste delen av
skjermen.
19
Page 20

NO
Grunnleggende bruk
Slå av / på
Når du først kobler apparatet til strømnettet og slå på ON / OFF-bryteren på baksiden av
apparatet til “ON” for å slå på apparatet.
• Slå på ON / OFF-bryteren til “OFF” posisjon for å slå av apparatet.
• Koble fra strømkabelen til strømadapteren fra stikkontakten hvis du vil slå av apparatet
helt.
Velge modus
Trykk på DAB / FM-knappen gjentatte ganger for å veksle mellom modiene (DAB eller FM).
Justere volumet
Trykk VOL+ eller VOL- for å øke / senke volumet.
20
Page 21

Bruk av DAB
For å lytte til de innstilte kanaler trykk enten PREV / NEXT knappene. Hver gang du trykker
på PREV / NEXT knappene, vil du hoppe til forrige eller neste lagrede kanal. Apparatet vil
vise kanalens navn.
Minne
Når du slår på apparatet igjen, spiller det i samme modus og kanal (DAB eller FM) som den
var da den sist en sto på.
Lagring av kanaler
Du kan lagre opptil 10 av dine favorittkanaler i minnet. Dette vil gjøre det mulig å få tilgang
til dine favorittkanaler raskt og enkelt.
1. For å lagre en forhåndsinnstilling, må du først lytter til kanalen du vil lagre, trykk og
hold Preset-knappen.
2. Trykk på PREV eller NEXT for å velge ønsket forhåndsinnstilt kanalnummer.
3. Trykk på SELECT-knappen for å bekrefte valget.
4. Kanalen vil bli lagret og skjermen vil da vise “Preset # stored”.
Hente frem en lagret kanal
1. Når du har lagret en kanal til en av de forhåndsinnstilte knapper, kan du hente det ved
å trykke på Preset-knappen.
2. Trykk på PREV eller NEXT for å velge ønsket forhåndsinnstilt kanalnummer.
3. Trykk på SELECT-knappen for å bekrefte valget.
4. Hvis du velger en forhåndsinnstilling som ikke er tildelt en kanal, vises “Preset empty #”.
NO
21
Page 22

Displaymoduser
Hver gang du trykker på INFO-knappen, vil displayet gå gjennom følgende visningsmodus:
Programme Type, Multiplex Name, Signal Strength, Time/Date, DLS (Scrolling Text).
Informasjonen vises på den nedre delen av LCD displayet.
NO
Programme type (programtype)
Denne beskriver “Style” eller “sjanger” av
musikk som blir kringkastet f.eks “Rock” eller
“klassisk”.
Multiplex Name (navn på signalpakke)
En signalpakke er en samling av radiokanaler
som er buntet sammen og overføres på
en frekvens. Det er nasjonale og lokale
signalpakker. De lokale inneholder kanaler som
er spesikk for det området f. eks BBC World.
DAB - i motsetning til vanlig radio, grupperer
sammen ere radiokanaler og sender dem
på én frekvens.
Time / Date (tid / dato)
Kringkasteren (Radiokanal) sender klokke
og dato informasjon automatisk, så det
er ikke nødvendig å manuelt sette denne
informasjonen.
DLS (Dynamic Label Segment) (rulletekst)
Dynamic Label Segment er en rulletekst
som kringkasteren kan inkludere med sine
sendinger. Meldingen inkluderer vanligvis
informasjon, for eksempel opplysninger om
programmet etc.
Programme Type
(programtype)
Multiplex Name
(navn på signalpakke)
Signal Strength
(signalstyrke)
Time/Date
(tid / dato)
DLS (rulletekst)
22
Page 23

Programvareversjon
1. Trykk og hold på INFO-knappen i 2 sekunder og slipp den for å vise programvaren
versjonen av dette apparatet.
2. Programvareversjonen vil automatisk forsvinne etter 5 sekunder.
Auto søk moduser
Det nnes to typer søk, Quick scan og Full scan.
• Quick scan (rask søk):
Søker kanalene mellom kanalene 10A og 12D.
For å aktivere rask søk trykk på AUTO-knappen.
• Full scan (fullt søk):
Søker gjennom alle DAB-kanaler i Storbritannia DAB Band III.
Trykk og hold på AUTO-knappen i 2 sekunder.
Sekundære tjenester
Ser du “>”-symbolet etter navnet på kanalen, tyder det at det er andre tjenester som er
tilgjengelige til denne kanalen. Disse sekundære tjenester inneholder ekstratjenester som
er relatert til den primære kanalen. f. eks kan en sportskanal tilby ekstra kommentarer. De
sekundære tjenestene er satt inn rett etter den primære kanalen i kanallisten.
For å velge den sekundære kanalen, trykker du på NEXT når “>” vises i LCD-skjermen foran
navnet. Når den sekundære tjenesten avsluttes, vil apparatet automatisk bytte tilbake til
den primære kanalen.
Manuell Tuning
I tillegg til autotune-funksjonen, kan du manuelt stille inn mottakeren. Dette kan hjelpe
deg når du justerer antennen, eller når du legger til kanaler som ikke ble funnet under
autotuning.
1. Trykk og hold SELECT-knappen, LCD-skjermen vil nå vise Manual tune.
2. Trykk på PREV / NEXT-knappene for å bla gjennom DAB kanaler, som er nummerert
fra 5A til 13F.
3. Etter at ønsket kanalnummer er valgt, trykker du på SELECT-knappen for å angi
gjeldende signalpakke. Den øverste linje viser den første kanalen i signalpakken.
4. Trykk på på PREV / NEXT-knappene for å se hvilke kanaler er til stede i signalpakken.
5. Når du har nådd den siste kanalen i funnet signalpakke, vil den gå tilbake til den første
kanalen igjen. Hvis du ønsker å gå ut av manuell innstilling modus, trykker du bare på
SELECT-knappen.
NO
23
Page 24

NO
Tilbakestilling
Noen ganger kan det være ønskelig å tilbakestille apparatet til fabrikkinnstillingene. Hvis
du opplever problemer med signalmottak kan det være lurt å restarte og prøve igjen. Hvis
du ytter apparatet til en annen del av landet, og mottar lokale og nasjonale DAB-kanaler i
dette området, kan det hende at tidligere lagrede kanaler ikke lenger er tilgjengelig.
For å tilbakestille systemet, trykk og hold DAB / FM-knappen. Trykk deretter på SELECTknappen for å starte tilbakestillingen. Apparatet vil da starte Quick Scan for DAB kanaler
umiddelbart.
Etter omstart av systemet, blir alle lagrede DAB-og FM-kanaler og
alarminnstillinger slettet.
24
Page 25

Bruk av FM
Skifter fra DAB til FM-modus
For å slå på apparatet fra DAB til FM-modus, trykk på DAB / FM-knappen én gang.
Displayet viser “Switching to FM” (skifter til FM).
På den øverste linjen i displayet vises gjeldende frekvens. Nederst på skjermen, vises
<Programme Type> siden den ikke er innstilt på noen kanal og ingen RDS (Radio Data
System)-data er tilgjengelig.
Auto søk
For å søke etter en FM-kanal, må du trykke og deretter slippe AUTO-knappen. Dette vil
starte søket i frekvensbåndet. Hvis du vil søke lavere på frekvensbåndet, trykk og hold
AUTO-knappen. Når en kanal er funnet, vil søket stanse automatisk.
Hvis ingen kanaler blir funnet, stanser tuningen når den har søkt gjennom hele FM-båndet
(87,5-108MHz).
Manuell søk
For å søke FM kanaler manuelt, trykker du bare på PREV eller NEXT gjentatte ganger til
ønsket frekvens er oppnådd.
Lagring av kanaler
Du kan lagre opptil 10 av dine favorittkanaler i minnet. Dette vil gjøre det mulig å få tilgang
til dine favorittkanaler raskt og enkelt.
1. For å lagre en forhåndsinnstilling, må du først lytter til kanalen du vil lagre, og trykk og
hold knappen ”Preset” (forhåndsinnstillinger).
2. Trykk på PREV eller NEXT for å velge ønsket forhåndsinnstilt kanalnummer.
3. Trykk på SELECT-knappen for å bekrefte valget.
4. Kanalen lagres og skjermen viser “Preset # stored”.
NO
Hente frem en lagret kanal
1. Når du har lagret en kanal med knappen for forhåndsinnstiling, kan du hente det ved å
trykke på Preset-knappen.
2. Trykk på PREV eller NEXT for å velge ønsket forhåndsinnstilt kanalnummer.
3. Trykk på SELECT-knappen for å bekrefte valget.
4. Hvis du velger en forhåndsinnstilling som ikke er tildelt en kanal, vil skjermen vise
“Preset empty #”.
25
Page 26

Displaymoduser
Hver gang du trykker på INFO-knappen, vil displayet gå gjennom følgende visningsmodus:
Programme Type, Signal Strength, Time/Date, Channel Frequency, Audio Mode, Radio
Text.
NO
Programme Type (programtype)
Denne beskriver “Style” eller “sjanger” av
musikk som blir kringkastet f.eks “Rock” eller
“klassisk”.
Signal Strength (Signalstyrke)
Markøren viser hvor sterkt signalet er. Sterkere
signal markeres med en lengre markør.
Time/Date (tid / dato)
Kringkasteren (Radiokanal) sender tid- og
dato-informasjon automatisk, så det er ikke
nødvendig å innstille denne informasjonen
manuelt. I det usannsynlige tilfellet at
kringkasteren ikke sender informasjon om tid vil
displayet vise <Time/Date>.
Channel Frequency (frekvens)
Dette viser frekvensen av gjeldende kanal f. eks
89,80 MHz.
Audio Mode (audiomodus)
Når du er i FM-modus, vil displayet vise om
signalet som mottas er i mono eller stereo.
Mottakeren vil automatisk veksle mellom
stereo og mono-modus. Du kan imidlertid
overstyre denne funksjonen, slik at du manuelt
kan skifte mellom stereo og mono-modus, noe
som er nyttig hvis du lytter til et dårlig FMsignal.
Programme Type
(programtype)
Signal Strength
(signalstyrke)
Time/Date
(tid / dato)
Channel Frequency
(kanalfrekvens)
Audio Mode
(audiomodus)
Radio Text
(radiotekst)
Hvis du vil veksle mellom mono og stereo, trykk på SELECT-knappen en gang, vil du se
på skjermen “Auto” eller “Mono”. Hvis du vil veksle mellom hver modus trykker du bare
på SELECT-knappen igjen.
Radio Text (radiotekst)
Som med DAB, kan kringkastingsselskapet
inkludere en rullende tekst som viser
informasjon om gjeldende program. Dersom
radiotekst ikke er tilgjengelig, vil skjermen vise
<Radio Text>.
26
Page 27

Programvareversjon
1. Trykk og hold på INFO-knappen i 2 sekunder og slipp den for å vise
programvareversjonen av dette apparatet.
2. Trykk på INFO-knappen igjen for å vise programidentikasjonskoden (PI-kode).
3. Programvareversjonen vil automatisk forsvinne etter 5 sekunder.
Tilbakestilling
Noen ganger kan det være ønskelig å tilbakestille apparatet til fabrikkinnstillingene. Hvis du
opplever problemer med signalmottak kan det være lurt å restarte og prøve igjen. Hvis du
ytter apparatet til en annen del av landet, og mottar lokale og nasjonale FM-kanaler i dette
området, kan det hende at tidligere lagrede kanaler ikke lenger er tilgjengelig.
For å tilbakestille systemet, trykk og hold DAB / FM-knappen. Trykk deretter på SELECTknappen for å starte tilbakestillingen. Apparatet vil da starte Quick Scan for DAB kanaler
umiddelbart.
Etter omstart av systemet, blir alle lagrede DAB-og FM-kanaler og
alarminnstillinger slettet.
Bruk av hodetelefoner
OPEN
DC 6V IN
OFF ON
NO
Skru ned volumet før du kobler til hodetelefoner. Øk volumet sakte med hodetelefonene
på til du når ønsket volum. Når hodetelefonene er koblet til, deaktiveres høyttaleren
automatisk.
Unngå å lytte til lyd på høye nivåer som kan være skadelige for ørene. Ved full
eekt, kan langvarig lytting skade ørene til brukeren.
Juster følsomhet for FM-signal
1. Trykk og hold SELECT-knappen i 2 sekunder.
2. Vis 1-10 nivå, trykker du på PREV eller NEXT for å velge følsomheten manuelt.
27
Page 28

NO
Vedlikehold
Sørg for å koble apparatet fra strømnettet før rengjøring.
• For å rengjøre apparatet, tørk det av med en lett fuktig, lofri klut.
• Ikke bruk rengjøringsmidler som inneholder alkohol, ammoniakk eller slipemidler.
• Ikke bruk en sprayboks på eller nær apparatet.
Hint og tips
Problem Årsak / løsning
Ingen Lyd Juster volumkontrollen. Det kan hende at den ikke er skrudd
opp.
Statisk Sound Signalet er for lavt. Juster antennen eller ytt på apparatet til et
sted med sterkere signal.
Lyden er forvrengt Volumet er for høyt. Juster volumkontrollen.
Ønsket kanal ikke
funnet
Displayet viser “Not
available”
Displayet er tomt Dette kan skje hvis kringkasteren endrer rulleteksten eller erner
Svakt signal. Bruk manuell tune-funksjonen.
Ingen DAB dekning i ditt område eller dårlig mottak. Juster
plasseringen av antennen.
Dårlig mottak. Juster plasseringen av antennen.
teksten midlertidig. Apparatet vil forsøke å tune på nytt eller
utføre et søk.
Spesikasjoner
Nettspenning Strømadapter inngang 100-240V ~ 50/60 Hz
Strømadapter spenning DC 6V 0.5A
DC batteri 4 x AA batterier (ikke inkludert)
Utgangseekt 1 x 1,0W
Frekvensrekkevidde FM87,5 - 108 MHz
DAB Band III 174,928 til 239,200 MHz
28
Page 29

Grattis till ditt köp av din nya Logik DAB Radio.
Vi rekommenderar att du spenderar lite tid med att läsa igenom denna
instruktionsmanual för att du fullt ut ska förstå alla de driftsfunktioner som
produkten tillhandahåller. Du kommer också nna en del råd och tips som kan
hjälpa dig att lösa olika problem.
Läs igenom noggrant alla de säkerhetsinstruktioner innan användning och
förvara denna instruktionsmanual för kommande behov.
Packa upp
Avlägsna all paketering från enheten. Behåll paketeringen. Om du trots allt gör dig av med
paketeringen, gör det då i enlighet med lokala bestämmelser.
Följande enheter inkluderas:
SE
DAB/FM PRESETS PREV NEXT
INFO AUTO VOL- VOL+
Huvudenheten
Instruktionsmanual
del nummer
L22DAB10E-002
SELECT
Nätadapter
del nummer
EUAD87006-500
Om det saknas delar eller delar är skadade ombedes du kontakta Partmaster (Endast UK)
Tel: 0844 800 3456 för vidare assistans.
29
Page 30

Produktöversikt
SE
Vy: framsida
1
1. LCD Display
2. INFO Knapp
AUTO Knapp
VOL– Knapp
VOL+ Knapp
Vy: baksida
Fönster
2 3
DAB/FM PRESETS PREV NEXT
INFO AUTO VOL- VOL+
3. DAB/FM Knapp
PRESETS
(FÖRHANDSINSTÄLLNINGS) Knapp
PREV (TIDIAGE) Knapp
NEXT (NÄSTA) Knapp
4. SELECT (VAL) Knapp
5
4
SELECT
30
DC 6V IN
OFF ON
5. Teleskopisk antenn
6. ON/OFF (PÅ/AV)
Strömbrytare
7. DC 6V IN Uttag
876
8. Uttag för hörlurar
9. Batterifack
OPEN
9
Page 31

Strömkälla
Nätspänning
Anslut nätadaptern (medföljer) till DC 6V IN
uttaget och nätuttaget.
OPEN
DC 6V IN
OFF ON
Batterieekt
Sätt i 4 AA batterier (medföljer ej) på ett korrekt
sätt genom att följa polariserings (+ eller –)
DC 6V IN
OFF ON
indikationerna i batterifacket.
OPEN
Skötsel av batterierna
• Olämplig eller felaktig användning av batterierna kan orsaka frätning eller batteri läckage
som kan orsaka att personskada eller skada på egendom uppstår.
• Installera batterierna korrekt genom att följa polariserings (+ eller –) indikationerna i
batterifacket.
• Använd endast de batterityperna som angetts i denna manual.
• Installera inte gamla batterier tillsammans med nya och blanda inte olika typer av
batterier.
• Kasta inte bort använda batterier som vanligt avfall. Kasta bort dem i enlighet med de
lokala bestämmelser.
Sätt på din enhet för första gången
1. Sätt på ON/OFF (ON/OFF) strömbrytaren på baksidan på enheten till “ON” (”PÅ”) läge
för att sätta på enheten. För initial användning, kommer enheten att automatiskt gå in
i DAB läge och starta den snabba automatiska avsökningen för DAB stationer.
2. Medan sökningen pågår kommer LCD displayen att visa en mätare som indikerar
progressen på sökningen och mängden radiostationer som hitintills har hittats.
Då sökningen är klar kommer enheten att välja den första stationen I alfabetisk
nummerordning.
SE
Namnet på den funna gruppen av DAB radiostationer kommer att
visas på den nedre halvan av displayen.
31
Page 32

Enkel användning
Sätt på ON/OFF (PÅ/AV)
När du först ansluter enheten till vägguttaget och sätter på ON/OFF (PÅ/AV) strömbrytaren
på enhetens baksida till ”ON” (”PÅ”) för att sätta på enheten.
• Sätt på ON/OFF (PÅ/AV) strömbrytaren till “OFF” (“AV”) läge för att stänga av enheten.
• Dra ur strömkabeln till nätadaptern om du helt och hållet vill stänga av enheten.
SE
Välj läge
Tryck in DAB/FM knappen upprepade gånger för att välja mellan lägena (DAB eller FM).
Anpassa volymen
Tryck Vol+ eller Vol– knappen för att öka/minska volymen.
32
Page 33

Användning av DAB
För att lyssna på den angivna stationen, tryck antingen på PREV / NEXT (TIDIGARE/
NÄSTA) knapparna. Varje gång du trycker in PREV / NEXT (TIDIGARE/NÄSTA) knapparna
kommer du att hoppa over den tidigare eller den kommande lagrade stationen. Enheten
kommer att visa namnet på stationen.
Minne
När du återigen sätter på enheten kommer enheten att spelas upp i samma läge och från
samma station (DAB eller FM) som den var inställd senaste gången den användes.
Spara stationer
Du kan spara upp till 10 av dina favoritstationer I minnet. Detta kommer göra det möjligt
för dig att ansluta till dina favorit stationer snabbt och enkelt.
1. För att spara en förhandsinställning måste du först lyssna till stationen som du önskar
att spara, tryck därefter in PRESETS (FÖRHANDSINSTÄLLNING) knappen.
2. Tryck in PREV (TIDIGARE) eller NEXT (NÄSTA) knappen för att välja ditt önskade
stationsnummer.
3. Tryck in SELECT (VAL) knappen för att bekräfta ditt val.
4. Stationen kommer att sparas och LCD:n kommer därefter att visa “Preset #
stored“(“Förhandsinställning # lagrad“).
Gå tillbaka till en sparad station
1. Då du har sparat en station till en förhandsinställd knapp kan du gå tillbaka genom att
trycka in PRESETS (FÖRHANDSINSTÄLLNINGS) knappen.
2. Tryck in PREV (TIDIGARE) eller NEXT (NÄSTA) knappen för att välja önskad
förhandsinställnings av stations nummer.
3. Tryck in SELECT (VAL) knappen för att bekräfta ditt val.
4. Om du väljer en förhandsinställning som inte har tilldelats en station kommer “Preset
empty #“ (“Förhandsinställning tom #“) att visas.
SE
33
Page 34

Visningslägen
Varhe gang som du trycker in INFO (INFO) knappen kommer displayen att gå igenom
följande display lägen: Programme Type (Programtyp), Multiple Name (Multipla namn),
Signal Strength (Signalstyrka), Time/Date (Tid/Datum), DLS (Scrolling Text) (DLS
(Rullande text)).
Informationen kommer att visas i den lägre avdelningen av LCD displayen.
SE
Programme Type (Programtyp)
Detta beskriver “Style” (“stilen”) eller “genre”
(“genren”) av musiken som spelas upp som t ex
“Rock” (”Rock”) eller “Classical” (”Klassiskt”).
Multiplex Name (Multipla namn)
En ”multiplex” är en samling rediostationer
som har samlats ihop och sands ut via en
frekvens. Det nns både nationella och lokala
”multiplexes”. Lokala innehåller stationer som är
specika för området som t ex BBC World.
DAB – I motsats till vanlig radio, grupperar
ihop era olika radiostationer och sander
dessa via en frekvens.
Time/Date (Tid/Datum)
Stationen (Radio station) tillhandahåller
automatisk klocka och datums information så
det nns ingen anledning att manuellt ställa in
denna information.
DLS (Dynamic Label Segment) (DLS
(Dynamiskt rubricerings segment))
Dynamiskt rubricerings segment är ett rullande
meddelande som stationen inkluderar i deras
sändning. Meddelandet innehåller normalt sett
information som t ex om programdetaljer etc.
Programme Type
(Programtyp)
Multiplex Name
(Multipla namn)
Signal Strength
(Signalstyryka)
Time/Date
(Tid/Datum)
DLS (Scrolling Text)
(DLS (Rullande text))
34
Page 35

Version av mjukvara
1. Tryck in och håll inne INFO (INFO) knappen i 2 sekunder och släppp därefter upp den
för att se versionen på mjukvaran för den här enheten.
2. Versionen på mjukvaran kommer automatiskt att försvinna efter 5 sekunder.
Automatiskt sökningsläge
Det nns två typer av sökning, en är Quick scan (Snabb sökning) och den andra är Full
scan (Fullständig sökning).
• Quick scan: (Snabb sökning) :
Söker av stationer mellan kanalerna 10A och 12D.
För att aktivera den snabba sökningen tryck in AUTO (AUTO) knappen.
• Full scan: (Fullständig sökning):
Söker av alla DAB kanaler i UK DAB Band III.
Tryck in och håll inne AUTO (AUTO) knappen i 2 sekunder.
Säkundär service
Då kan komma att se en “>” symbol efter namnet på stationen, detta indikerar att det
nns sekundär service för denna station. Denna sekundära service innehåller extra service
som hänvisas till den primära stationen som t ex kan vara en sportkanal som vill lägga
till ytterligare kommentarer. Den sekundära servicen är placerad direkt efter den primära
stationen i stationslistan.
För att välja den sekundära stationen, tryck in in NEXT (NEXT) knappen när “>” visas i
LCD:n innan stationsnamnet. När den sekundära servicen avslutas kommer enheten att
automatiskt gå tillbaka till den primära stationen.
SE
Manuell sökning
Precis som den automatiska avsökningsfunktionen kan du manuellt söka av mottagaren.
Detta kan vara till hjälp då du vill rikta in ditt område eller då du vill lägga till stationer som
har missats att läggas till under tiden för den automatiska avsökningen.
1. Tryck in och håll inne SELECT (VAL) knappen, LCD:n kommer nu att visa den manuella
sökningen.
2. Tryck in PREV / NEXT (TIDIGARE / NÄSTA) knappen för att gå igenom de olika DAB
kanalerna, vilka är numrerade från 5A till 13F.
3. Efter det att dit önskade kanalnummer är valt, tryck in SELECT (VAL) knappen för att
slå in den nuvarande ”multiplex”, den översta delen kommer nu att visa den första
stationen i ”multiplex”.
4. Tryck in PREV / NEXT (TIDIGARE / NÄSTA) knappen för att se vilka stationer som har
förhandsinställts i den funna ”multiplex”.
5. Då du har funnit den sista stationen i den funna “multiplex”, kommer den att återgå
tillbaka igen till den första stationen. Om du önskar att avsluta den Manual Tuning
(Manuella avsökningen) läget, tryck bara på SELECT (VAL) knappen.
35
Page 36

Systemåterställning
Det kan nnas tillfällen då du måste återställa enheten till fabriksinställningarna. Om du
upplever problem med mottagningen kan du behöva att återställa och försöka igen.
Om du yttar enheten till en annan del av landet och söker av de lokala och nationella
DAB-stationerna i området, kan dina tidigare inställda kanaler inte längre vara tillgängliga.
För att göra en systemåterställning, tryck och håll inne DAB / FM knappen. Tryck sedan på
SELECT (VAL) knappen för att starta återställning av systemet. Enheten kommer direkt att
starta Quick Scan (Snabb sökning) för DAB-kanalerna.
SE
Efter att systemåterställningen är gjord kommer alla inställda stationer,
DAB & FM förhandsinstallationen och alarminställningarna att raderas.
36
Page 37

Användning av FM
Att gå från DAB till FM läge
För att gå från DAB till FM läge, tryck in DAB/FM knappe en gång. Displayen visar
“Switching to FM” (”Växla till FM”).
I den övre delen av displayen visas den nuvarande frekvensen. I den nedre delen av
displayen kommer <Programme Type> att visas pga. att inga kanaler söks av och inga RDS
(radio data system) data nns tillgängliga.
Automatisk sökning
För att söka av en FM station kommer du att behöva trycka in och därefter släppa upp
AUTO (AUTO) knappen. Detta kommer att starta sökningen och öka frekvensbandet. För
att söka nedåt på frekvensbandet, tryck in och håll inne AUTO (AUTO) knappen. Då en
station har hittats kommer sökningen att stanna automatiskt.
Om ingen station hittas kommer sökningen att stoppa en gång då den har gått igenom
hela FM bandet (87.5-108MHz).
Manuell sökning
För att söka av FM stationer manuellt, tryck helt enkelt in PREV (TIDIGARE) eller NEXT
(NÄSTA) knappen upprepade gånger till dess att din önskade frekvens är nådd.
Spara stationer
Du kan lagra upp till 10 av dina favorit stationer i minnet. Detta kommer att möjligöra för
dig att få tillgång till dina favoritstationer snabbt och enkelt.
1. För att lagra en förhandsinställning måste du först lyssna på stationen som du önskar
att spara och därefter trycka in och hålla inne PRESETS (FÖRHANDSINSTÄLLNINGS)
knappen.
2. Tryck på PREV (TIDIGARE) eller NEXT (NÄSTA) knappen för att välja ditt önskade
förhandsinställda stationsnummer.
3. Tryck in SELECT (VAL) knappen för att bekräfta ditt val.
4. Stationen kommer att lagras och LCD:n kommer därefter att visa “Preset # stored“
(“Förhandsinställning # lagrad“) .
SE
Gå tillbaka till en sparad station
1. Då du har sparat en station till en av de förhandsinställda knapparna kan du gå tillbaka
till knappen genom att trycka in PRESETS (FÖRHANDSINSTÄLLNINGS) knappen.
2. Tryck in PREV (TIDIGARE) eller NEXT (NÄSTA) knappen för att välja ditt önskade
förhandsinställda stationsnummer.
3. Tryck in SELECT (VAL) knappen för att bekräfta ditt val.
4. Om du väljer en förhandsinställning som inte har tilldelats en station kommer
displayen att visa “Preset empty #“ (“Förhandsinställning tom #“).
37
Page 38

Visningslägen
Varje gång du trycker in INFO (INFO) knappen, kommer displayen att gå igenom
följande displaylägen: Programme Type (Programtyp), Signal Strength (Signalstyrka),
Time/Date (Tid/Datum), Channel Frequency (Kanalfrekvens), Audio Mode (Ljudläge),
Radio Text (Radio Text).
SE
Programme Type (Programtyp)
Detta beskriver “Style” (“stilen”) eller “genre”
(“genren”) av musiken som spelas upp som t ex
“Rock” (”Rock”) eller “Classical” (”Klassiskt”).
Signal Strength (Signalstyrka)
Denna mätare indikerar hur stark signalen är,
desto starkare signal ju längre kommer mätaren
att bli.
Time/Date (Tid/Datum)
Stationen (Radio station) tillhandahåller
automatisk klocka och datums information så
det nns ingen anledning att manuellt ställa in
denna information. Skulle det trots allt föreligga
att stationen inte visar någon klock-information,
kommer displayen att visa <Time/Date> (<Tid/
Datum>).
Channel Frequency (Kanalfrekvens)
Detta visar frekvensen på den nuvarande
stationen, t ex 89.80MHz.
Audio Mode (Ljudläge)
I FM läge kommer displayen att om stationen
som tar emot är i mono eller i stereo.
Mottagaren kommer automatiskt att växla
mellan Stereo (Stereo) och Mono (Mono) läge.
Dock kan du välja att upphäva denna funktion
så att du manuellt kan växla mellan Stereo
(Stereo) och Mono (Mono) läge, vilket kan vara
till hjälp om du lyssnar på en dålig FM signal.
Programme Type
(Programtyp)
Signal Strength
(Signalstyrka)
Time/Date
(Tid/Datum)
Channel Frequency
(Kanalfrekvens)
Audio Mode
(Ljudläge)
Radio Text
(Radio text)
För att växla mellan mono och stereo tryck in SELECT (VAL) knappen en gång. Då
kommer du att se på displayen “Auto” (”Auto”) eller “Mono” (”Mono”). För att växla
mellan varje läge, tryck helt enkelt in SELECT (VAL) knappen återigen.
Radio Text
Liksom DAB, kan mottagaren inkludera en
rullande text som visar information om det
nuvarande programmet. Om det inte nns
någon Radio text att tillgå kommer displayen
att visa <Radio Text> (<Radio Text>).
38
Page 39

Version av mjukvara
1. Tryck in och håll inne INFO (INFO) knappen i 2 sekunder och släppp därefter upp den
för att se versionen på mjukvaran för den här enheten.
2. Tryck in INFO (INFO) knappen igen för att visa program identikationskoden (PI kod).
3. Versionen på mjukvaran kommer automatiskt att försvinna efter 5 sekunder.
Systemåterställning
Det kan nnas tillfällen då du måste återställa enheten till fabriksinställningarna. Om du
upplever problem med mottagningen kan du behöva att återställa och försöka igen. Om
du yttar enheten till en annan del av landet och söker av de lokala och nationella DABstationerna i området, kan dina tidigare inställda kanaler inte längre vara tillgängliga.
För att göra en systemåterställning, tryck och håll inne DAB / FM knappen. Tryck sedan på
SELECT (VAL) knappen för att starta återställning av systemet. Enheten kommer direkt att
starta Quick Scan (Snabb sökning) för DAB-kanalerna.
Efter att systemåterställningen är gjord kommer alla inställda stationer,
DAB & FM förhandsinstallationen och alarminställningarna att raderas.
Användning av hörlurar
OPEN
SE
DC 6V IN
OFF ON
Sänk volymen innan du ansluter hörlurarna. Öka försiktigt volymen i hörlurarna tills dess att du når
önskad volym. Då hörlurarna är anslutna kommer högtalarna att automatiskt vara frånkopplade.
Undvik att lyssna på ljud som har en hög ljudnivå som kan komma till att skada
dina öron. Förlängt lyssnande med full styrka kan komma att skada dina öron.
Välj känslighet för FM
1. Tryck in och håll inne SELECT (VAL) knappen i 2 sekunder.
2. Visning av 1-10 nivå, tryck in PREV (TIDIGARE) eller NEXT (NÄSTA) knappen för att
manuellt välja graden av känslighet.
39
Page 40

SE
Underhåll
Försäkra dig om att dra ur kabeln ur vägguttaget innan rengöring.
• För att rengöra enheten, stryck av höljet med en något fuktad charpifri trasa.
• Använd inte några ytande rengöringsmedel som innehåller alkohol, ammoniak eller
medel som repar ytan.
• Spraya inte över en aerosol mot eller i närheten av enheten.
Råd och tips
Problem Orsak/ Lösning
Inget ljud Anpassa volymkontrollen, den kan komma till att inte gå att höja.
Statiskt ljud Mottagningssignalen är för svag. Anpassa antennen eller ytta
enheten till en plats med en högre signal.
Störningar i ljudet Volymen är för hög. Anpassa volymkontrollen.
Önskad station hittas
inte
Displayen visar “Not
available” (”Inte
tillgängligt”)
Displayen är blank Detta kan komma att ske om sändaren ändrar föreskrifterna
Låg signal. Använd den manuella avsökningsfunktionen.
Ingen täckning för DAB i ditt område eller låg mottagning.
Anpassa positionen för antennen.
Låg mottagning. Anpassa positionen för antennen.
för service eller avlägsnar en föreskrift medan sändningen
föreligger. Enheten kommer att försöka återuppta sändningen
eller genomföra en avsökning.
Specikationer
Nätspänning Ineekt för huvudadaptern 100-240V ~ 50/60 Hz
Uteekt för huvudadaptern DC 6V 0.5A
DC batteri 4 x AA batterier (medföljer ej)
Uteekt 1 x 1.0W
Radiofrekvens
Spann
40
FM87.5 – 108 MHz
DAB Band III 174.928 – 239.200 MHz
Page 41

Onnittelut uuden Logik DAB-radiovastaanottimen hankinnastasi.
Suosittelemme, että käytät aikaa tämän käyttöohjeen lukemiseen, jotta voit
ymmärtää kaikki laitteen ominaisuudet täysin. Käyttöohje sisältää myös
neuvoja ja vinkkejä, jotka auttavat sinua ratkaisemaan ongelmia.
Lue kaikki turvavaroitukset huolellisesti ennen käyttöä ja säilytä käyttöohje
myöhempää tarvetta varten.
Pakkausmateriaalin poistaminen
Poista kaikki pakkausmateriaali laitteen ympäriltä. Säilytä pakkausmateriaali. Mikäli hävität
pakkausmateriaalin, toimi paikallisten määräysten mukaisesti.
Pakkauksen sisältö:
DAB/FM PRESETS PREV NEXT
INFO AUTO VOL- VOL+
Pääyksikkö
Käyttöohje
osa nro.
L22DAB10E-002
SELECT
Verkkovirtamuuntaja
osa nro.
EUAD87006-500
FI
Mikäli pakkauksen sisältö on puutteellinen tai vaurioitunut, ota yhteyttä Partmasteriin
(vain Iso-Britanniassa).
Puh: 0844 800 3456 lisätietoja varten.
41
Page 42

Tuotteen yleiskatsaus
FI
Näkymä edestä
1
1. LCD-näyttö Ikkuna
2. INFO (Tietoja) -painike
AUTO-painike
VOL– (Äänenvoimakkuus – ) -painike
VOL+(Äänenvoimakkuus +) -painike
Näkymä takaa
2 3
DAB/FM PRESETS PREV NEXT
INFO AUTO VOL- VOL+
5
SELECT
4
3. DAB/FM-painike
PRESETS (Esiasetukset) -painike
PREV (Edellinen) -painike
NEXT (Seuraava) -painike
4. SELECT (Valitse) -painike
42
DC 6V IN
OFF ON
5. Teleskooppiantenni
6. ON/OFF-painike
7. DC 6 V virtaliitin
OPEN
9
876
8. Korvakuulokeliitin
9. Paristopesä
Page 43

Teholähde
Verkkovirta
Liitä verkkovirtamuuntaja (sis. pakkaukseen)
virtaliittimeen ja verkkovirtapistokkeeseen.
OFF ON
Paristovirta
Asenna 4 AA-paristoa (ei sis. pakkaukseen) oikeaa
napaisuutta noudattaen (+ tai -) paristopesään.
Paristojen käsitteleminen
• Paristojen sopimaton tai väärä käyttö voi johtaa syöpymiseen tai pariston vuotoon, joka
voi aiheuttaa henkilövahinkoja tai aineellisia vahinkoja.
• Asenna paristot noudattamalla oikeaa napaisuutta paristopesän merkintöjen mukaisesti
(+ tai -).
• Käytä ainoastaan tässä ohjeessa mainittua paristotyyppiä.
• Älä asenna uusia paristoja käytettyjen paristojen joukkoon, äläkä sekoita eri
paristotyyppejä.
• Älä hävitä paristoja talousjätteen seassa. Hävitä paristot paikallisten määräysten
mukaisesti.
DC 6V IN
OFF ON
OPEN
OPEN
DC 6V IN
FI
Laitteen kytkeminen päälle ensimmäisellä
käyttökerralla
1. Käännä laitteen takaosassa sijaitseva virtakytkin ”ON”-asentoon kytkeäksesi laitteeseen
virran. Ensimmäisellä käyttökerralla yksikkö siirtyy automaattisesti DAB-tilaan ja
aloittaa automaattisen DAB-kanavien pikahaun.
2. Haun aikana LCD-näytöllä näkyy haettujen kanavien tämänhetkinen lukumäärä sekä
haun edistymistä ilmaiseva liukupalkki. Kun haku on valmis, laite valitsee ensimmäisen
kanavan aakkosnumeerisesti.
Haetun DAB-radiokanavien ryhmän nimi näkyy ruudun alaosassa.
43
Page 44

FI
Perustoiminnot
Virta päälle/pois päältä
Liitä laite verkkovirtaan ja käännä ON/OFF-virtakytkin ”ON”-asentoon kytkeäksesi
laitteeseen virran.
• Käännä ON/OFF-virtakytkin “OFF”-asentoon sammuttaaksesi laitteen.
• Irrota virtajohto verkkovirtapistokkeesta, mikäli haluat sammuttaa laitteen kokonaan.
Käyttötilan valitseminen
Paina DAB/FM-painiketta valitaksesi joko DAB- tai FM-tilan.
Äänenvoimakkuuden säätäminen
Paina Vol+ tai Vol– -painikkeita lisätäksesi/vähentääksesi äänenvoimakkuutta.
44
Page 45

DAB-radiovastaanottimen toiminta
Selataksesi haettuja DAB-kanavia, paina PREV / NEXT -painikkeita. PREV / NEXT -painikkeita
painamalla siirryt edelliseen tai seuraavaan kanavaan. Laite näyttää kanavan nimen.
Muisti
Kun kytket laitteen virran päälle, laite avaa edellisellä kerralla käytetyn tilan ja kanavan
(DAB- tai FM-tila).
Kanavien tallentaminen
Voit tallentaa enimmillään 10 suosikkikanavaasi laitteen muistiin. Tällä tavoin voit kuunnella
suosikkikanaviasi nopeasti ja helposti.
1. Tallentaaksesi kanavan, sinun tulee ensin avata tallennettava kanava. Paina ja pidä
painettuna PRESETS-painiketta.
2. Paina PREV- tai NEXT-painiketta valitaksesi kanavan, jonka haluat tallentaa.
3. Paina SELECT -painiketta vahvistaaksesi valinnan.
4. Kanava tallennetaan, ja LCD-näytöllä näkyy viesti “Preset # stored” (Esiasetus
tallennettu).
Tallennetun kanavan avaaminen
1. Kun olet tallentanut kanavan jollekin esiasetuspainikkeelle, voit avata kanavan
painamalla PRESETS-painiketta.
2. Paina PREV tai NEXT-painiketta valitaksesi kanavan, jonka haluat tallentaa.
3. Paina SELECT -painiketta vahvistaaksesi valinnan.
4. Jos valitset esiasetuspainikkeen, jolle ei vielä ole tallennettu kanavaa, ruudulla näkyy
“Preset empty #“ -ilmoitus.
FI
45
Page 46

Näyttötilat
Painamalla INFO-painiketta voit selata seuraavia näyttötiloja: Programme Type
(Ohjelmatyyppi), Multiplex Name (Kanavanipun nimi), Signal Strength (Signaalin
vahvuus), Time/Date (Aika/Päivämäärä), DLS (DLS-otsikointi).
Nämä tiedot näkyvät LCD-näytön alaosassa.
FI
Ohjelmatyyppi
Ohjelmatyyppi kuvaa lähetetyn sisällön lajia tai
genreä, musiikkia kuunneltaessa esim. “Rock”
tai “Classical” (klassinen).
Kanavanipun nimi
Kanavanippu on radiokanavista koostuva
ryhmä, jonka sisältöä lähetetään samalla
taajuudella. Kanavaniput voivat olla
valtakunnallisia tai paikallisia. Paikalliset
sisältävät alueellisia radiokanavia, esim. BBC
World.
DAB poikkeaa tavallisesta radiosta siinä, että
se yhdistää useita radiokanavia ja lähettää
ne samalla taajuudella.
Aika/Päivämäärä
Radiokanava lähettää aika- ja päivämäärätietoja
automaattisesti, joten tätä tietoa ei tarvitse
muokata manuaalisesti.
Dynamic Label Segment -otsikointi
Dynamic Label Segment -otsikointi tarkoittaa
liukuvaa viestiä, jota radiokanava voi liittää
lähetyksiinsä. Tämä viesti sisältää yleensä tietoa
ohjelmasta, sekä muita tietoja.
Ohjelmatyyppi
Kanavanipun nimi
Signaalin vahvuus
Aika/Päivämäärä
DLS (DLS-otsikointi)
46
Page 47

Ohjelmistoversio
1. Paina ja pidä painettuna INFO-painiketta 2 sekunnin ajan saadaksesi laitteen
ohjelmistoversion näkyviin.
2. Ohjelmistoversio näkyy ruudulla 5 sekunnin ajan.
Automaattinen haku
Voit valita joko Quick scan (pikahaku) tai Full scan (täyshaku).
• Pikahaku:
Hakee radioasemia kanavien 10A ja 12D väliltä.
Paina AUTO-painiketta käynnistääksesi pikahaun.
• Täyshaku:
Hakee kaikki UK DAB Band III -kaistan kanavat.
Paina ja pidä painettuna AUTO-painiketta 2 sekunnin ajan käynnistääksesi täyshaun.
Toissijaiset palvelut
Radiokanavat jotka sisältävät toissijaisia palveluita on merkitty “>” -symbolilla Toissijaiset
palvelut liittyvät kanavan pääasialliseen palveluun, esim. urheilua lähettävä kanava voi
sisältää ylimääräisiä kommentteja tai selostusta. Toissijaiset palvelut näkyvät pääkanavan
vieressä radiokanavalistalla.
Avataksesi toissijaisen kanavan, paina NEXT-painiketta, kun näet “>”-symbolin
radiokanavan nimen vieressä. Kun toissijainen palvelu päättyy, laite vaihtaa automaattisesti
takaisin pääkanavalle.
Manuaalinen haku
Automaattisen haun lisäksi voit hakea kanavia käsitoimisesti. Tämä toiminto voi olla
hyödyllinen, kun säädät antenniasi tai lisäät kanavia, joita ei löytynyt automaattisen haun
aikana.
1. Paina ja pidä painettuna SELECT-painiketta, jolloin siirry manuaaliseen hakuun.
2. Paina PREV / NEXT-painikkeita selataksesi DAB-kanavia 5A ja 13F välillä.
3. Kun olet valinnut haluamasi kanavanumeron, paina SELECT-painiketta siirtyäksesi
kanavanippuun, jolloin näet ylimmällä rivillä kanavanipun ensimmäisen kanavan.
4. Paina PREV / NEXT-painikkeita selataksesi kanavanipun kanavia.
5. Kun siirryt eteenpäin viimeisen kanavan kohdasta, palaat kanavanipun ensimmäiseen
kanavaan. Voit poistua manuaalisesta hausta painamalla SELECT-painiketta.
FI
47
Page 48

FI
Järjestelmän palauttaminen tehdasasetuksiin
Laite voidaan tarvittaessa palauttaa tehdasasetuksiin. Mikäli koet esimerksiksi
vastaanottohäiriöitä, voit palauttaa järjestelmän tehdasasetuksiin ja yrittää uudelleen.
Mikäli siirrät laitteen eri sijaintiin maan sisällä, laitteesi saattaa vastaanottaa paikallisia
DAB-asemia, jolloin aiemmin hakemasi kanavat eivät välttämättä ole enää saatavilla.
Palauttaaksesi järjestelmän tehdasasetuksiin, paina ja pidä painettuna DAB/FM-painiketta.
Paina sitten SELECT-painiketta aloittaaksesi järjestelmän palauttamisen. Tehdasasetuksiin
palauttamisen jälkeen laite käynnistää DAB-kanavien pikahaun automaattisesti.
Kun järjestelmä on palautettu tehdasasetuksiin, kaikki haetut ja
tallennetut DAB- ja FM-kanavat sekä asetukset poistetaan.
48
Page 49

FM-radion toiminta
DAB-tilasta FM-tilaan vaihtaminen
Vaihtaaksesi DAB-tilasta FM-tilaan, paina DAB/FM-painiketta kerran. Näytöllä näkyy viesti
“Switching to FM” (Vaihdetaan FM-tilaan).
Tämänhetkinen taajuus näkyy näytön ylimmällä rivillä. Näytön alaosassa näkyy
<Programme Type>, mikäli et ole virittänyt kanavaa, eikä RDS-tietoa ole saatavilla.
Automaattinen haku
Hakeaksesi FM-kanavia, paina AUTO-painiketta. Laite aloittaa kanavien haun. Selataksesi
taajuuskaistaa alas, paina ja pidä painettuna AUTO-painiketta. Kun laite löytää kanavan,
haku loppuu automaattisesti.
Mikäli laite ei löydä kanavaa, laite lopettaa selattuaan koko FM-taajuuskaistan läpi
(87,5-108 MHz).
Manuaalinen haku
Hakeaksesi FM-kanavia manuaalisesti, paina PREV tai NEXT-painiketta kunnes löydät
oikean taajuuden.
Kanavien tallentaminen
Voit tallentaa enimmillään 10 suosikkikanavaasi laitteen muistiin. Tällä tavoin voit kuunnella
suosikkikanaviasi nopeasti ja helposti.
1. Tallentaaksesi kanavan, sinun tulee ensin avata tallennettava kanava. Paina ja pidä
painettuna PRESETS-painiketta.
2. Paina PREV tai NEXT-painiketta valitaksesi kanavan, jonka haluat tallentaa.
3. Paina SELECT-painiketta vahvistaaksesi valinnan.
4. Kanava tallennetaan, ja LCD-näytöllä näkyy viesti “Preset # stored“ (Esiasetus
tallennettu).
FI
Tallennetun kanavan avaaminen
1. Kun olet tallentanut kanavan jollekin esiasetuspainikkeelle, voit avata kanavan
painamalla PRESETS-painiketta.
2. Paina PREV tai NEXT-painiketta valitaksesi kanavan, jonka haluat tallentaa.
3. Paina SELECT-painiketta vahvistaaksesi valinnan.
4. Jos valitset esiasetuspainikkeen, jolle ei vielä ole tallennettu kanavaa, ruudulla näkyy
“Preset empty #“ -ilmoitus.
49
Page 50

Näyttötilat
Painamalla INFO-painiketta voit selata seuraavia näyttötiloja: Programme Type
(Ohjelmatyyppi), Signal Strength (Signaalin vahvuus), Time/Date (Aika/Päivämäärä),
Channel Frequency (Kanavan taajuus), Audio Mode (Äänitila), Radio Text (Radioteksti).
FI
Ohjelmatyyppi
Ohjelmatyyppi kuvaa lähetetyn sisällön lajia tai
genreä, musiikkia kuunneltaessa esim. Rock tai
Classical (klassinen).
Signaalin vahvuus
Liukupalkki ilmaisee signaalin vahvuutta: mitä
vahvempi signaali, sitä pidempi palkki.
Aika/Päivämäärä
Radiokanava lähettää aika- ja päivämäärätietoja
automaattisesti, joten tätä tietoa ei tarvitse
muokata manuaalisesti. Mikäli aikatietoja ei
sisälly lähetykseen, näytöllä näkyy <Time/Date>.
Kanavan taajuus
Laite näyttää tämänhetkisen kanavan
taajuuden, esim. 89,80 MHz.
Äänitila
Kun laite on FM-tilassa, laite ilmoittaa,
onko vastaanotettava kanava mono- vai
stereolähetys. Vastaanotin kytkee Stereo- tai
Mono-tilan automaattisesti päälle. Voit myös
ohittaa tämän toiminnon ja valita Stereo- tai
Mono-tilan manuaalisesti, mikä voi parantaa
kuuntelukokemustasi mikäli FM-signaali on
heikko.
Valitaksesi stereo- tai mono-tilan, paina SELECT-painiketta kerran, jolloin näytöllä
näkyy teksti “Auto” tai “Mono”. Voit vaihtaa äänitilaa painamalla SELECT-painiketta
uudelleen.
Ohjelmatyyppi
Signaalin vahvuus
Aika/Päivämäärä
Kanavan taajuus
Radioteksti
Äänitila
Radioteksti
Samoin kuin DAB-lähetyksissä, radioasema
voi lähettää tekstiä, joka näyttää tietoja
kuunneltavasta ohjelmasta. Mikäli radioteksiä ei
ole saatavilla, näytöllä näkyy <Radio Text>.
50
Page 51

Ohjelmistoversio
1. Paina ja pidä painettuna INFO-painiketta 2 sekunnin ajan saadaksesi laitteen
ohjelmistoversion näkyviin.
2. Paina INFO-painiketta uudestaan nähdäksesi ohjelman tunnistekoodin.
3. Ohjelmistoversio näkyy ruudulla 5 sekunnin ajan.
Järjestelmän palauttaminen tehdasasetuksiin
Laite voidaan tarvittaessa palauttaa tehdasasetuksiin. Mikäli koet esimerksiksi
vastaanottohäiriöitä, voit palauttaa järjestelmän tehdasasetuksiin ja yrittää uudelleen.
Mikäli siirrät laitteen eri sijaintiin maan sisällä, laitteesi saattaa vastaanottaa paikallisia
asemia, jolloin aiemmin hakemasi kanavat eivät välttämättä ole enää saatavilla.
Palauttaaksesi järjestelmän tehdasasetuksiin, paina ja pidä painettuna DAB/FM-painiketta.
Paina sitten SELECT-painiketta aloittaaksesi järjestelmän palauttamisen. Tehdasasetuksiin
palauttamisen jälkeen laite käynnistää DAB-kanavien pikahaun automaattisesti.
Kun järjestelmä on palautettu tehdasasetuksiin, kaikki haetut ja
tallennetut DAB- ja FM-kanavat sekä asetukset poistetaan.
Korvakuulokkeiden käyttäminen
OPEN
FI
DC 6V IN
OFF ON
Käännä äänenvoimakkuus matalalle ennen kuin liität korvakuulokkeet laitteeseen.
Nosta äänenvoimakkuutta rauhallisesti, kunnes taso on sinulle sopiva. Kaiutin kytkeytyy
automaattisesti pois päältä, kun korvakuulokkeet liitetään laitteeseen.
Vältä laitteen kuuntelemista hyvin korkealla äänenvoimakkuudella, koska tämä voi johtaa kuulovaurioon.
Laitteen pitkäaikainen käyttö täydellä äänenvoimakkuudella voi aiheuttaa kuulovaurion.
Herkkyyden muokaaminen FM-tilassa
1. Paina ja pidä painettuna SELECT-painiketta 2 sekunnin ajan.
2. Valitse herkkyystaso 1-10 manuaalisesti painamalla PREV- tai NEXT-painiketta.
51
Page 52

Maintenance
Varmista, että laite on irrotettu verkkovirrasta ennen puhdistamista.
• Puhdistaaksesi laitteen, pyyhi ulko-osat kevyesti kostutetulla, nukkaamattomalla liinalla.
• Älä käytä puhdistusaineita, jotka sisältävät alkoholia, ammoniakkia tai hankaavia aineita.
• Älä altista laitetta aerosolille.
Neuvoja ja vinkkejä
FI
Vika Syy / Korjaava toimenpide
Ei ääntä Äänenvoimakkuus saattaa olla liian matalalla, säädä
äänenvoimakkuutta korkeammalle.
Staattinen häiriöääni Signaalin vastaanotto on liian heikko. Säädä antennia tai siirrä
laite paikkaan, jossa on parempi vastaanotto.
Ääni on vääristynyt Äänenvoimakkuus on liian korkealla. Säädä äänenvoimakkuutta.
Haluttua kanavaa ei
löydy
Näytöllä näkyy viesti
“Not available”
(Ei saatavilla)
Näyttö on tyhjä Näin voi tapahtua, mikäli kanava muuttaa palvelun nimeä tai
Heikko signaali. Käytä manuaalista hakutoimintoa.
Alueellasi ei ole DAB-lähetyksiä tai vastaanotto on heikko. Säädä
antennia.
Poor reception. Adjust the position of the aerial.
poistaa nimikkeen tai tekstin lähetyksen aikana. Laite yrittää
säätää kanavaa uudelleen tai suorittaa haun.
Tekniset tiedot
Virtalähde Verkkovirtamuuntajan tuloteho 100-240 V ~ 50/60 Hz
Verkkovirtamuuntajan lähtöteho DC 6 V 0,5 A
4 x AA-paristo (ei sis. pakkaukseen)
Teho 1 x 1,0 W
Radiotaajuus
Kaista-alue
FM 87,5 – 108 MHz
DAB Band III 174,928-239,200 MHz
52
Page 53

Tillykke med købet af din nye Logik DAB Radio.
Vi tilråder at du bruger lidt tid på at læse denne instruktionsmanual, så du
fuldt kan forstå alle de betjeningsvalgmuligheder den har. Du vil også nde
nogle råd og tips til hjælp ved problemløsning.
Læs alle sikkerhedsinstruktionerne grundigt og gem denne instruktionsmanual
til senere opslag.
Udpakning
Fjern al emballage fra apparatet. Gem emballagen. Hvis du smider den væk skal du
overholde de lokale regler.
Følgende ting er inkluderet i pakken:
DK
DAB/FM PRESETS PREV NEXT
INFO AUTO VOL- VOL+
Hovedapparatet
Instruktionsmanual
partnummer
L22DAB10E-002
SELECT
Netadapter
partnummer
EUAD87006-500
Hvis en artikel mangler eller er beskadiget, kontakt da Partmaster (kun Storbritanien).
Telefon: 0844 800 3456 for hjælp.
53
Page 54

Produktoversigt
DK
Forside
1
Bagside
1. LCD Displayvindue
2. INFO-knap
AUTO-knap
VOL– -knap
VOL+ -knap
2 3
DAB/FM PRESETS PREV NEXT
INFO AUTO VOL- VOL+
3. DAB/FM-knap
PRESETS-knap
PREV-knap
NEXT knap
4. SELECT knap
5
SELECT
4
54
DC 6V IN
OFF ON
5. Teleskop-antenne
6. ON/OFF-afbryder
7. DC 6V IN-indgang
OPEN
876
8. Høretelefonindgang
9. Batterirum
9
Page 55

Strømkilde
Strømnettet
Tilslut netadapteren (medfølgende) til DC
6V-indgangen og stikkontakten.
Batteristrøm
Isæt 4 AA batterier (medfølger ikke) korrekt ved at
følge de angivne polariteter (+ or –) i batterirummet.
OPEN
DC 6V IN
OFF ON
DC 6V IN
OFF ON
OPEN
Håndtering af batterierne
• Upassende eller forkert brug af batterier kan medføre korrosion eller at batteriene lækker,
hvilket kan medføre læsioner eller beskadigelse af ejendele.
• Installer batterierne korrekt ved at følge de angivne polariteter (+ or –) i batterirummet.
• Brug kun den type batterier der angivet i manualen.
• Installer aldrig nye batterier sammen med brugte og bland ikke forskellige typer
batterier.
• Afhænd aldrig brugte batterier sammen med husaaldet. Afhænd dem i
overensstemmelse med de lokale regler.
Første gang du tænder for din apparat
1. Sæt ON/OFF-afbryderen på bagsiden af apparatet i “ON”- positionen for at tænde for
apparatet. Ved førstegangsbrug vil apparatet automatisk gå i DAB-tilstand og starte
autotuningens hurtigscan for DAB-stationer.
2. Under scanningen viser LCD displayet en glidebar der angiver forløbet af scanningen,
og hvor mange radiostationer der er blevet fundet indtil det givne tidspunkt. Så snart
scanningen afslutter vælger apparatet den første alfanumeriske station.
Navnet på den fundne gruppe af DAB radiostationer vises i den
nederste halvdel af displayet.
DK
55
Page 56

DK
Grundlæggende brug
Strøm TÆND/SLUK (ON/OFF)
Første gang du tilslutter apparatet til stikkontakten og sætter ON/OFF –afbryderen på
bagsiden i “ON”–positionen, tændes der for apparatet.
• Sæt ON/OFF–afbryderen i “OFF”–positionen for at slukke for apparatet.
• Træk netadapterens strømledning ud af stikkontakten hvis du ønsker at fuldstændigt
slukke for apparatet.
Valg af tilstande
Tryk på DAB/FM –knappen gentagne gange for at skifte mellem tilstandende (DAB or FM).
Justering af lydstyrken
Tryk på Vol+ eller Vol– -knapperne for at forøge/formindske lydstyrken.
56
Page 57

DAB- betjening
For at lytte til de instillede stationer tryk enten på PREV / eller NEXT-knapperne. Hver
gang du trykker på PREV / NEXT-knapperne, springer du over til den næste gemte station.
Apparatets display viser stationens navn.
Hukommelse
Næste gang du tænder for apparatet, spiller apparatet i samme tilstand og samme station
(DAB or FM) som ved sidste brug.
Gemning af stationer
Du kan gemme op til 10 af dine yndlingsstationer i hukommelsen. Dette muliggør at du
hurtigt og nemt får adgang til dine yndlingsstationer.
1. For at gemme en forudinstilling, er det nødvendigt først at lytte til stationen som du
har lyst til at gemme, og tryk derefer på PRESETS-knappen.
2. Tryk på enten PREV eller NEXT–knappen for at vælge det ønskede forudinstillede
stationsnummmer.
3. Tryk på SELECT–knappen for at bekræfte valget.
4. Stationen gemmes og LCD’et viser “Preset # stored“.
Genkald af en forudindstillet station
1. Så snart du har gemt stationen til en forudinstillingsknap, kan du genkalde den ved at
trykke på PRESETS-knappen.
2. Tryk på enten PREV eller NEXT–knappen for at vælge det ønskede forudindstillede
stationsnummer.
3. Tryk på SELECT–knappen for at bekræfte valget.
4. Hvis du vælger forudinstilling der ikke har fået tildelt en station, vises “Preset empty #“.
DK
57
Page 58

Display-tilstande
Hver gang du trykker på INFO-knappen, genneløber displayet følgende cyklus af
display-tilstande: Programme Type, Multiple Name, Signal Strength, Time/Date,
DLS (Scrolling Text).
Informationen vises i LCD-displayets nederste segment.
DK
Programme Type
Beskriver radioudsendelsens musik-“Stil” eller
“genre” f.eks. “Rock” eller “Klassisk”.
Multiplex Name
Et multiplex er en samling af radiostationer der
er bundtet og transmitteret på samme frekvens.
Der ndes nationale og lokale multiplexer. De
lokale indeholder stationer der er specikke for
dette landområde f.eks. BBC World.
DAB – i modsætning til almindelig radio,
grupperes ere radiostationer sammen og
transmitteres på den samme frekvens.
Time/Date
Radiosenderen (Radiostationen) forsyner
klokkeslet- og dato-information automatisk,
så det er ikke nødvendigt at indsætte denne
information.
DLS (Dynamic Label Segment)
Dynamic label segment er en rullende
meddelelse som udsenderen kan inkludere
med deres transmissioner. Meddelelsen
indeholder sædvanligvis information såsom
programdeltaljer etc.
Programme Type
(programtype)
Multiplex Name
(multiplexnavn)
Signal Strength
(signalstyrke)
Time/Date
(tidspunkt/dato)
DLS (Scrolling Text)
(DLS (rulletext))
58
Page 59

Softwareversion
1. Tryk på og hold INFO-knappen nede i 2 sekunder og slip den for at se
softwareversionen for dette apparat.
2. Softwareversionen forsvinder automatisk efter 5 sekunder.
Automatiske scannings-tilstande
Der er to typer slags scanning, den ene er Quick scan (hurtigscanning) og den anden Full
scan (fuld scanning).
• Quick scan (hurtigscanning):
Søger efter stationer I området 10A og 12D.
For at aktivere hurtigscanning tryk da på AUTO-knappen.
• Full scan (fuld scanning):
Søger alle DAB kanalerne I UK DAB Bånd III.
Tryk på og hold AUTO-knappen nede i 2 sekunder.
Sekundære services
Det er muligt at du ser “>”-symbolet efter stationsnavnet. Dette angiver at der er sekundære
services disponible på denne station. Disse sekundære services indeholder ekstra services
der er beslægtet med primærstationen, f.eks. en sportsstation kunne ønske at tilføje ekstra
kommentarer. De sekundære services er tilføjet lige efter primærstationen i stationslisten.
For at vælge den sekundære station, tryk da på NEXT-knappen når “>”’ et vises i LCD’et
før stationsnavnet. Når sekundær-servicen slutter, vender apparatet autmatisk tilbage til
primærstationen.
Manuel tuning
Ligesom du kan auto-tune, kan du også manuelt tune din modtager. Dette kan være
hjælpsomt når du opsætter din antenne eller når du tilføjer stationer der ikke blev
inkluderet ved auto-tuning.
1. Tryk på og hold SELECT-knappen nede. LCD-displayet viser da ”Manual tune”.
2. Tryk på PREV / NEXT-knapperne for at bladre gennem DAB-kanalerne, der er
nummeret fra 5A til 13F.
3. Efter at have valgt det ønskede kanalnummer, tryk da på SELECT-knappen for at åbne
det gældende multiplex; den øverste linie viser nu den første station i multiplexet.
4. Tryk på PREV / NEXT-knapperne for at se hvilke stationer der ndes i det fundne
multiplex.
5. Så snart den sidste station er fundet i multiplexet, vendes der tilbage til den første station
igen. Hvis du ønsker at forlade Manuel Tuning-tilstand, tryk blot på SELECT-knappen.
DK
59
Page 60

DK
Systemnulstilling
Til tider vil det være nødvendigt at nulstille din apparat tilbage til fabriksinstillingerne. Hvis
du har modtagelsesproblemer, ønsker du måske at nulstille og prøve påny. Hvis apparatet
yttes til et andet sted i dit land og opsamler de lokale og nationale DAB-stationer, er dine
tidligere tunede kanaler måske ikke længere disponible.
For at udføre en systemnulstilling, tryk da på og hold DAB/FM-knappen nede. Tryk derefter
på SELECT-knappen for at begynde systemnulstillingen. Apparatet begynder en Quick
Scan (hurtigscanning) af DAB-kanaler øjeblikkeligt.
Efter en systemnulstilling bliver alle de indstillede stationer, DAB og FM
forudindstillede stationer og alarmindstillinger slettet.
60
Page 61

FM-betjening
Skift fra DAB til FM-tilstand
For at omskifte apparatet fra DAB til FM-tilstand, tryk da en gang på DAB/FM-knappen.
Displayet viser “Switching to FM”.
På den øverste linie I displayet vises den aktuelle frekvens. På den nederste del af displayet
vises <Programme Type>, eftersom ingen kanal er blevet indstillet og ingen RDS (radio data
system) data er disponibel.
Automatisk scanning
For at søge efter en FM station, er det nødvendigt at trykke på og slippe AUTO-knappen.
Dette udløser en scanning op af frekvensbåndet. For at scanne ned af frekvensbåndet , tryk
på og hold AUTO-knappen nede. Så snart en station er blevet fundet stopper scanningen
automatisk.
Hvis der ikke ndes nogen station, så vil tuningen stoppe så snart den har gennemløbet
hele FM-båndet (87.5-108MHz).
Manuel Scanning
For at søge efter FM stationer manuelt, trykkes der simpelthen på PREV eller NEXT-knappen
gentagne gange indtil den ønskede frekvens er nået.
Gemning af stationer
Du kan gemme op til 10 af dine yndlingsstationer i hukommelsen. Dette muliggør at du
hurtigt og nemt får adgang til dine yndlingsstationer.
1. For at gemme en forudinstilling, er det nødvendigt først at lytte til stationen som du
har lyst til at gemme, og derefter trykke på PRESETS-knappen.
2. Tryk på enten PREV eller NEXT-knappen for at vælge det ønskede forudinstillede
stationsnummmer.
3. Tryk på SELECT-knappen for at bekræfte valget.
4. Stationen gemmes og LCD’et viser “Preset # stored“.
DK
Genkald af en forudindstillet station
1. Så snart du har gemt stationen til en forudinstillingsknap, kan du genkalde den ved at
trykke på PRESETS-knappen.
2. Tryk på enten PREV eller NEXT-knappen for at vælge det ønskede forudindstillede
stationsnummer.
3. Tryk på SELECT-knappen for at bekræfte valget.
4. Hvis du vælger forudinstilling der ikke har fået tildelt en station, vises “Preset empty #“.
61
Page 62

Display-tilstande
Hver gang du trykker på INFO-knappen, genneløber displayet følgende cyklus af
display-tilstande: Programme Type, Signal Strength, Time/Date, Channel Frequency,
Audio Mode, Radio Text.
DK
Programme Type
Beskriver radioudsendelsens musik-“Stil” eller
“genre” f.eks. “Rock” eller “Klassisk”.
Signal Strength
Glidebaren angiver hvor stærkt signalet er; jo
stærkere signalet er, jo længere bliver baren.
Time/Date
Radiosenderen (Radiostationen) forsyner
klokkeslet- og dato-information automatisk,
så det er ikke nødvendigt at indsætte denne
information. I det usandsyndlige tilfælde
at radiosenderen ikke transmitterer nogen
tidsinformation viser displayet <Time/Date>.
Channel Frequency
Viser frekvensen for den gældende station, f.eks.
89.80MHz.
Audio Mode
Når apparatet er I FM-tilstand, viser displayet
om en station modtages I mono eller stereo.
Modtageren skifter automatisk mellem Stereo-
og Mono-tilstand. Du kan imidlertid negligere
denne funktion, så du manuelt kan skifte
mellem Stereo- and Mono-tilstand, hvilket er
hjælpsomt hvis du lytter til et dårligt FM-signal.
Programme Type
(programtype)
Signal Strength
(signalstyrke)
Time/Date
(tidspunkt/dato)
Channel Frequency
(kanalfrekvens)
Audio Mode
(Audio-tilstand)
Radio Text
(radiotekst)
For at skifte mellem mono og stereo, tryk da på SELECT-knappen en gang; du ser
følgende i displayet “Auto” eller “Mono”. For at skifte mellem hver tilstand, tryk blot på
SELECT-knappen påny.
Radio Text
Ligesom med DAB, kan radiosenderen
inkludere en rulletekst der viser information
om det gældende program. Hvis radiotekstinformationen ikke er disponibel viser displayet
<Radio Text>.
62
Page 63

Softwareversion
1. Tryk på og hold INFO-knappen nede i 2 sekunder og slip den for at se
softwareversionen for dette apparat.
2. Tryk på INFO-knappen påny for at vise Program Identikationskoden (PI koden).
3. Softwareversionen forsvinder automatisk efter 5 sekunder.
Systemnulstilling
Somme tider vil det være nødvendigt at nulstille din apparat tilbage til fabriksinstillingerne.
Hvis du har modtagelsesproblemer, ønsker du måske at nulstille og prøve påny. Hvis apparatet
yttes til et andet sted i dit land og opsamler de lokale og nationale DAB-stationer, er dine
tidligere tunede kanaler måske ikke længere disponible.
For at udføre en systemnulstilling, tryk da på og hold DAB/FM-knappen nede. Tryk derefter
på SELECT-knappen for at begynde systemnulstillingen. Apparatet begynder en Quick
Scan (hurtigscanning) af DAB-kanaler øjeblikkeligt.
Efter en systemnulstilling bliver alle de indstillede stationer, DAB og FM
forudindstillede stationer og alarmindstillinger slettet.
Brug af øretelefoner
OPEN
DK
DC 6V IN
OFF ON
Skru ned for lydstyrkern før du tilslutter dine øretelefoner. Forøg langsomt lydstyrken med
øretelefonerne på, indtil du når den ønskede lydstyrke. Når dine øretelefoner er tilsluttet
holder højttaleren automatisk op med at fungere.
Undgå at lytte til overdrevne lydniveauer som kan være skadelige for dine ører. Ved
fuld styrke over længere tidsrum, kan forårsage beskadigelse af brugerens hørelse.
Vælg FM-følsomhed
1. Tryk på og hold SELECT-knappen nede i 2 sekunder.
2. Viser 1-10 niveauer; tryk på PREV eller NEXT-knappen for at vælge følsomheden manuelt.
63
Page 64

DK
Vedligeholdelse
Forsikker dig om at apparatet er trukket ud af stikkontakten før rengøring.
• For at rengøre apparatet, aftør kabinettet med en letfugtet, fnugfri klud.
• Brug ikke rengøringsmidler der indeholder alkohol (sprit), ammoniak eller slibemidler.
• Sprøjt ikke aerosol på eller nær apparatet.
Råd og tips
Problem Årsag / Løsning
Ingen lyd Juster lydstyrkekontrollen, måske er den ikke skruet op.
Statisk lyd Signalmodtagelsen er for svag. Juster antennen eller yt
apparatet til et sted med stærkere signal.
Lyden er forvrænget Lydstyrken er for høj. Juster lydstyrkekontrollen.
Den ønskede station
kan ikke ndes
Displayet viser “Not
available”
Displayet er blankt Dette kan ske hvis radiosenderen ændrer identikationen for
Svagt signal. Brug den manuelle tunings-funktion.
Ingen DAB dækning i dit område eller dårlig modtagelse. Juster
antennens position.
Dårlig modtagelse. Juster antennens position.
servicen eller erner en identikation under tuning. Apparatet
vil forsøge at retune eller udføre en scanning.
Specikationer
Netstrømforsyning Netadapter indgang 100-240V ~ 50/60 Hz
Netadapter udgang DC 6V 0.5A
DC batteri 4 x AA batterier (medfølger ikke)
Udgangseekt 1 x 1.0W
Radiofrekvensområde FM87.5 – 108 MHz
DAB Bånd III 174.928 – 239.200 MHz
64
Page 65

Safety Warnings
• Read all the instructions carefully before using the unit and keep them for
future reference.
• Retain the manual. If you pass the unit onto a third party make sure to include
this manual.
• Check that the voltage marked on the rating label matches your mains
voltage.
Damage
• Please inspect the unit for damage after unpacking.
• Do not continue to operate the unit if you are in any doubt about it working
normally, or if it is damaged in any way - switch o, withdraw the mains plug
and consult your dealer.
Location of Unit
• The unit must be placed on a at stable surface and should not be subjected
to vibrations.
• Do not place the unit on sloped or unstable surfaces as the unit may fall o
or tip over.
• The mains socket must be located near the unit and should be easily
accessible.
• This unit is designed for indoor use only.
Temperature
• Avoid extreme degrees of temperature, either hot or cold. Place the unit well
away from heat sources such as radiators or gas/electric res.
• Avoid exposure to direct sunlight and other sources of heat.
• Do not expose the battery to direct sunlight or sources of excessive heat.
Naked Flames
• Never place any type of candle or naked ame on the top of or near the unit.
Moisture
• To reduce the risk of re, electric shock or product damage, do not expose
this unit to rain, moisture, dripping or splashing. No objects lled with liquids,
such as vases, should be placed on the unit.
• If you spill any liquid into the unit, it can cause serious damage. Switch it o at
the mains immediately. Withdraw the mains plug and consult your dealer.
Ventilation
• To prevent the risk of electric shock or re hazard due to overheating, ensure
that curtains and other materials do not obstruct the ventilation vents.
• Do not install or place this unit in a bookcase, built-in cabinet or in another
conned space. Ensure the unit is well ventilated.
Safety
• Always disconnect the unit from the mains supply before connecting/
disconnecting other devices or moving the unit.
• Unplug the unit from the mains socket during a lightning storm.
• In the interests of safety and to avoid unnecessary energy consumption,
never leave the unit switched on while unattended for long periods of time,
e.g. overnight, while on holiday or while out of the house. Switch it o and
disconnect the mains plug from the mains socket.
Mains Adapter Cable
• Make sure the unit or unit stand is not resting on top of the mains adapter
cable, as the weight of the unit may damage the cable and create a safety
hazard.
Interference
• Do not place the unit on or near appliances which may cause electromagnetic
interference. If you do, it may adversely aect the working of the unit, and
cause a distorted sound.
Earphones
• Listening to loud sounds for prolonged periods of time may permanently
damage your hearing.
• Before putting on earphones, turn the volume down then put the earphones
on and slowly increase the volume until you reach a comfortable listening
level.
Supervision
• Children should be supervised to ensure that they do not play with the unit
and the remote control.
• Never let anyone especially children push anything into the holes, slots or any
other openings in the case - this could result in a fatal electric shock.
Service
• To reduce the risk of electric shock, do not remove screws. The unit does not
contain any user-serviceable parts. Please leave all maintenance work to
qualied personnel.
• Do not open any xed covers as this may expose dangerous voltages.
Maintenance
• Ensure to unplug the unit from the mains socket before cleaning.
• Do not use any type of abrasive pad or abrasive cleaning solutions as these
may damage the unit’s surface.
• Do not use liquids to clean the unit.
GB
Sikkerhetsadvarsler
• Les alle instruksjonene nøye innen bruk av apparatet og oppbevar dem for
senere referanse.
• Oppbevar veiledningen. Hvis du overgir apparatet til en tredje part, må du
påse at denne veiledningen følger med.
• Kontroller at spenningen på etiketten stemmer med spenningen i
vegguttaket ditt.
Skade
• Vennligst inspiser apparatet for skade etter det er pakket ut..
• Ikke fortsett å bruke apparatet hvis du er i tvil om det fungerer som det skal,
eller om det er skadet på noen måte – slå av, trekk ut kontakten og kontakt
forhandleren
Plassering av apparatet
• Apparatet skal plasseres på en at og stabil overate og skal ikke utsettes
for vibrasjoner.
• Ikke sett apparatet på ujevne eller ustabile overater ettersom apparatet da
kan falle eller velte.
• Veggkontakten må være plassert i nærheten av apparatet og skal være lett
tilgjengelig.
• Denne enheten er kun designet for innendørs bruk.
Temperatur
• Unngå ekstremt høye temperaturer, enten varme eller kalde. Plasser apparatet
med god avstand til varmekilder så som radiatorer eller gass/elektriske
varmere.
• Unngå å utsette apparatet for direkte sollys og andre varmekilder.
• Må ikke eksponeres for direkte sollys eller sterke varmekilder
Åpen ild
• Sett aldri stearinlys eller gjenstander med åpen ild oppå eller i nærheten av
apparatet.
Fuktighet
• For å redusere risikoen for brann, elektrisk støt eller skader på produktet skal
ikke dette apparatet utsettes for regn, drypp eller sprut. Ikke sett objekter
med væsker, så som vaser på apparatet.
• Hvis du søler væske i apparatet, kan dette forårsake alvorlig skade. Slå det av
straks. Trekk ut kontakten og kontakt forhandleren.
Ventilasjon
• For å forhindre risikoen for elektrisk støt eller brannfare på grunn av
overoppheting, påse at gardiner og andre materialer ikke blokkerer
ventilasjonen.
• Ikke installer eller plasser dette apparatet på en bokhylle, innebygget skap
eller på en annen trang plass. Påse at apparatet er godt ventilerert.
Safety
• Trekk alltid apparatets stikkontakt ut før du kobler til/fra andre enheter eller
ytter apparatet.
• Trekk ut apparatets stikkontakt under tordenvær.
• Med tanke på sikkerheten og for å unngå unødvendig energiforbruk, la aldri
apparatet være påslått mens det er ubevoktet i lengre tidsperioder, f.eks. over
natten, mens du er på ferie eller mens du er ute av huset. Slå det av og dra
stikkontakten ut av veggen.
Strømadapterkabel
• Påse at apparatet eller apparatholderen ikke er plassert på toppen av
strømadapterkabelen, da vekten av apparatet kan skade strømkabelen og
forårsake en farlig situasjon.
Interferens
• Ikke plasser apparatet på eller nær enheter som kan forårsake
elektromagnetisk interferens. Dette kan påvirke apparatets ytelse i negativ
retning og føre til fordreid eller lyd.
Hodetelefoner
• Hvis du lytter til høye lyder over lengre tidsperioder, kan det føre til
permanente hørselsskader.
• Før du tar på deg øretelefoner, må du skru ned volumet. Ta deretter på
deg øretelefonene og skru opp volumet gradvis til du når et komfortabelt
lyttenivå.
Tilsyn
• Barn skal holdes under tilsyn for å sikre at de ikke leker med apparatet og
ernkontrollen.
• La aldri noen, spesielt barn, dytte noe inn i hullene, sporene eller andre
åpninger i dekselet – dette kan resultere i livsfarlig elektrisk støt.
Service
• For å redusere risikoen for elektrisk støt skal ikke skruene ernes. Apparatet
har ingen utbyttbare deler. La alt vedlikeholdsarbeid utføres av kvaliserte
personer.
• Ikke åpne deksel som sitter fast ettersom dette kan blotte farlige spenninger.
Vedlikehold
• Påse at apparatets kontakt trekkes ut fra veggkontakten innen rengjøring.
• Ikke bruk slipende rengjøringsartikler eller midler ettersom disse kan skade
apparatets overate.
• Ikke bruk væsker ved rengjøring av apparatet
NO
65
Page 66

Säkerhetsföreskrifter
• Läs igenom alla instruktioner noggrant innan du använder apparaten och
förvara dessa för kommande användning.
• Behåll manualen. Om du lämnar apparaten till en tredje part se till att då
medföra denna manual.
• Kontrollera att spänningen som är angiven på beräkningsetiketten
överensstämmer med din huvudspänning.
Skada
• Var vänlig att inspektera apparaten om skada föreligger efter att du packat
upp apparaten.
• Fortsätt inte att använda apparaten om du på något sätt tvivlar på att den
fungerar normalt eller om den är skadad på något sätt – stäng då av den och
dra ur kontakten och vidare rådfråga det ställe där du inhandlade produkten.
Lokalisering av apparaten
• Apparaten måste placeras på en plan och stabil yta och ska inte utsättas för
någon form av vibration.
• Placera inte apparaten på en lutande och ostabil yta då det kan medföra till
att apparaten välter över.
• Vägguttaget måste vara lokaliserat i närheten av apparaten och bör vara lätt
att komma åt.
• Enheten är anpassad endast för användning inomhus
Temperatur
• Undvik extrema temperaturer som antingen är varma eller kalla. Placera
apparaten på ett föredömligt avstånd från olika värmekällor som t ex element
eller gas/elektriska lågor.
• Undvik att utsätta apparaten för exponering av direkt solljus eller andra
former av värmekällor.
• Utsätt inte batterierna för direkt solljus eller andra former av värmekällor.
Öppen låga
• Placera inte någon form av ljus eller öppen låga på eller i närheten av
apparaten.
Fukt
• För att minska risken för att eld, elektrisk chock eller att produkten skadas på
något sätt undvik därav att utsätta denna apparat för regn, fukt, dropp eller
stänk. Inga föremål fyllda med vätska som t ex vaser ska placeras på eller i
närheten av apparaten.
• Om du råkar spilla någon form av vätska inuti apparaten kan detta komma
till att orsaka allvarlig skada. Stäng av apparaten omedelbart. Dra därefter ur
kontakten och rådfråga med din detaljist.
Ventilering
• För att förhindra risken för att elektrisk chock eller eldsvåda uppstår pga.
överhettning, försäkra dig om att gardiner och andra former av material inte
blockerar ventilationslufthålen.
• Installera eller placera inte denna apparat i en bokhylla, inbyggd kabinett eller
någon annan form av begränsad.
Säkerhet
• Se alltid till att frikoppla enheten från strömuttaget innan anslutning/
frikoppling av annan utrustning eller om du ska ytta enheten.
• Frikoppla enheten från strömuttaget om blixt och åska förekommer.
• För att öka graden av säkerhet och för att undvika onödig energiförbrukning,
lämna aldrig enheten då den är igång och inte är under uppsikt under en
längre tidsperiod som t ex över natten, på semester eller då du lämnar
hemmet. Stäng av den och dra ur nätkabeln från vägguttaget.
Nätspänningskabel
• Försäkra dig om att enheten eller hållaren för enheten inte vilar på
nätspänningskabeln pga. att vikten på enheten kan komma till att skada
kabeln och orsaka fara
Störning
• Placera inte enheten på eller i närheten av apparater som kan orsaka
elektromagnetisk störning. Om du trots allt ändå gör detta kommer
arbetskapaciteten för enheten att påverkas negativt och orsaka
ljudstörningar.
Hörlurar
• Att lyssna på högt ljud under längre perioder kan orsaka permanent skada
på din hörsel.
• Innan du sätter på dig hörlurarna, se till att sänka volymen och därefter
kan du stoppa i hörlurarna och försiktigt öka volymen till dess att du når en
komfortabel avlyssningsnivå.
Uppsikt
• Barn bör övervakas för att försäkra att de inte leker med enheten eller
ärrkontrollen.
• Låt aldrig någon, speciellt barn stoppa ned någonting i hålen, ingångarna
eller någon annan öppning som föreligger – detta kan leda till livsfarlig
elektrisk chock.
Service
• För att reducera risken för elektrisk chock ombedes du ej avlägsna några
skruvar. Med apparaten tillkommer ej några servicedelar. Var vänlig att lämna
allt underhåll till kvalicerad personal.
• Öppna inte fastsatta luckor då det kan leda till att farlig spänning uppstår.
Underhåll
• Försäkra dig om att dra ur apparatens kontakt från vägguttaget innan du
rengör den.
• Använd inte någon form av sträv vadd eller sträv rengöringslösning då det
kan komma till att skada apparatens yta.
• Använd inte vätska för att rengöra apparaten.
SE
Turvavaroitukset
• Lue kaikki ohjeet huolellisesti ennen käyttöä ja säilytä myöhempää käyttöä
varten.
• Säilytä käyttöohje. Jos annat laitteen kolmannelle osapuolelle varmista, että
annat myös tämän käyttöohjeen.
• Varmista, että verkkojännite vastaa etiketissä mainittua jännitettä.
Vaurio
• Ole hyvä ja tarkasta laite vaurioilta pakkausmateriaalin poistamisen jälkeen.
• Älä jatka laitteen käyttöä jos epäilet ettei se toimi normaalisti, tai jos se on
vaurioitunut millään tavalla – sammutta laite, vedä sähköpistoke pois seinästä
ja ota yhteys jälleenmyyjääsi.
Laitteen Sijainti
• Laite tulisi sijoittaa tasaiselle tukevalle alustalle ja sitä ei tulisi altistaa tärinälle.
• Älä aseta laitetta kaltevalle tai epävakaalle pinnalle sillä laite voi pudota tai
kaatua.
• Pistorasian tulisi olla laitteen lähellä ja helposti ulottuvilla.
• Laite on tarkoitettu ainoastaan sisäkäyttöön.
Lämpötila
• Vältä äärimmäisiä lämpötiloja joko kuumaa tai kylmää. Älä sijoita laitetta
lämmönlähteen kuten lämpöpatterin tai kaasu/sähkötulen lähelle.
• Vältä laitten altistumista suoralle auringonvalolle ja muulle lämmönlähteelle.
• Älä altista pattereita suoralle auringonvalolle tai erittäin kuumille
lämmönlähteille.
Avotuli
• Paljasta liekkiä, kuten kynttilää, ei tule sijoittaa laitteen päälle tai lähelle.
Kosteus
• Tulipalon ja sähköiskun vaaran vähentämiseksi laitetta ei saa altistaa sateelle,
kosteudelle, pisaroille eikä roiskeille. Laiteen päälle ei tule laittaa esineitä,
kuten maljakoita, jotka sisältävät nestettä.
• Jos kaadat nestettä laiteen sisälle, se voi aiheuttaa vakavia vaurioita laitteelle.
Kytke virta pois välittömästi. Irrota virtajohto pistorasiasta ja ota yhteys
jälleenmyyjääsi.
Tuuletus
• Välttääksesi sähköiskun tai tulipalon vaaraa laitteen ylikuumenemisesta
johtuen, varmista, että verhot ja muut materiaalit eivät peitä laitteen
ilmanvaihtojärjestelmän aukkoja
• Älä sijoita tätä laitetta kirjahyllyyn, sisäänrakennettuun kaappiin tai muuhun
ahtaaseen tilaan. Varmista, että laiteella on hyvä ilmanvaihto.
Turvallisuus
• Irrota laite pistorasiasta ennen liittämistä / muiden laitteiden irrottamien tai
laitteen siirtäminen.
• Irrota laite pistorasiasta ukkosella.
• Turvallisuuden takaamiseksi sekä tarpeettoman energiankulutuksen
välttämiseksi, älä koskaan jätä laitetta päälle mikäli se on valvomatta pitkään,
esim. yli yön, loman ajaksi tai poistuessasi kotoasi. Sammuta laite ja irrota
virtajohto verkkovirrasta.
Verkkovirtamuuntajan johto
• Varmista, että laite tai laitteen jalka ei ole virtajohdon päällä, koska laitteen
paino voi vahingoittaa virtajohtoa ja luoda turvallisuusriskin.
Häiriö
• Älä aseta laitetta sellaisten laitteiden päälle tai läheisyyteen, jotka voivat
aiheuttaa elektromagneettista häiriötä. Mikäli teet näin, laitteen toiminta
saattaa kärsiä ja laite saattaa tuottaa vääristyneen äänen.
Kuulokkeet
• Pitkäaikainen kovien äänten kuuntelu saattaa vaurioittaa kuuloa.
• Säädä äänenvoimakkuutta pienemmäksi ennen liittämistä, ja säädä siitten
äänentasoa kunnes saavutat haluamasi äänentason.
Valvonta
• Valvo lapsia ja varmista etteivät he eivät leiki laitteella ja kaukosäätimellä.
• Älä anna kenenkään erityisesti lapsien työntää mitään laitten reikiin,
aukkoihin tai mihinkään aukinaiseen laiteen kannessa - tämä voi johtaa
vakavaan sähköiskuun.
Huolto
• Vähentääksesi sähköiskun vaaraa, älä poista ruuveja. Laite ei sisällä käyttäjän
huollettavissa olevia osia. Jätä kaikki kunnossapitotyön pätevälle huollon
asiantutijalle.
• Älä avaa laitteen kanttaa, koska se voi altistaa vaaralliselle jännitteelle.
Kunnossapito
• Varmista, että irrotat laiteen pistorasiasta ennen puhdistusta.
• Älä käytä mitään hiovaa tyynyä tai hankaavaa puhdistusainetta, sillä ne voivat
vahingoittaa laiteen pintaa.
• Älä käytä nestemäistä puhdistusainetta laitteen puhdistukseen.
FI
66
Page 67

Sikkerhedsforanstaltninger
• Læs alle instruktionerne grundigt før du bruger apparatet og gem dem til
senere opslag.
• Behold manualen. Hvis du overdrager apparatet til tredjemand, skal du sørge
for at inkludere denne manual.
• Check at spændingen på rating-mærkatet matcher dit lysnets spænding.
Beskadigelse
• Check venligst apparatet efter udpakning.
• Brug ikke apparatet, hvis du er i tvivl om det virker som det skal, eller er
beskadiget – sluk, tag stikket ud af stikkontakten og kontakt forhandleren.
Placering af Apparatet
• Apparatet skal placeres på en ad og solid overade og bør ikke rystes.
• Sæt ikke apparatet på en skrå eller ustabil overade, da det kan falde ned
eller vælte.
• Stikkontakten skal være placeret tæt på apparatet og være tilgængelig.
• Dette apparat er kun til indendørs brug.
Temperatur
• Undgå ekstreme temperaturer, hverken varme eller kolde. Placér apparatet
langt væk fra varmeapparater såsom radiatorer og gas/elektriske ovne.
• Undgå direkte sollys eller andre varmekilder.
• Udsæt ikke batteriet for direkte sollys eller andre varmekilder.
Åben Ild
• Sæt aldrig et stearinlys eller anden åben ild ovenpå eller nær apparatet.
Fugt
• Risiko for brand, elektrisk stød eller skade på produktet minimeres ved at
undgå at udsætte apparatet for regn, fugt, dråber eller stænk. Der bør ikke stå
f.eks. vaser ovenpå apparatet.
• Hvis du spilder væske i apparatet, kan du ødelægge det. Sluk straks for
strømmen, træk stikket ud og kontakt din forhandler.
Ventilation
• For at undgå elektrisk stød eller brand pga. overophedning, skal du sikre dig,
at gardiner og andre brandbare materiale ikke hindrer ventilationsaftrækkene.
• Installér og placér ikke dette apparat i en reol, indbygget skab eller i andre
lukkede rum. Sørg for at apparatet får ventilation.
Sikkerhed
• Tag altid stikket ud af stikkontakten, før du forbinder eller frakobler andre
apparater eller ytter enheden.
• Tag stikket ud af stikkontakten I tilfælde af tordenvejr.
• For at øge sikkerheden og undgå unødvendig energiforbrug, efterlad aldrig
apparatet tændt når det ikke bruges over længere tidsrum, f.eks natten over,
når du er på ferie eller væk fra din bopæl. Sluk apparatet, og træk stikket ud
af stikkontakten.
Netadapterledning
• Sørg for at enheden ikke står ovenpå strømkablet, da vægten kan ødelægge
kablet og skabe en sikkerhedsfare.
Interferens
• Placér ikke enheden på eller nær apparater, der kan forårsage
elektromagnetisk interferens. Hvis det sker, kan det have en uheldig eekt på
præstationen og give forvrænget billede eller lyd.
Øretelefoner
• Lytning til høje lydstyrker i længere tid kan ødelægge hørelsen.
• Før du tager hovedtelefonerne på, skru ned for lyden og tag derefter
øretelefonerne på, hvorefter lydstyrken forøges indtil du når et komfortabelt
lytteniveau
Overvågning
• Børn bør overvåges for at sikre, at de ikke leger med enheden og
ernbetjeningen.
• Lad aldrig andre, specielt børn, putte noget i hullerne eller andre åbninger på
apparatet – det kan resultere i elektrisk stød.
Service
• For at reducere risikoen for elektrisk stød, ern ikke skruer. Apparatet
indeholder ikke dele, som skal serviceres af brugeren. Overlad al
vedligeholdelse til autoriserede personer.
• Åbn ikke faste paneler, da du kan blive udsat for farlig spænding.
Vedligeholdelse
• Sørg for at trække apparatet ud af stikkontakten før rengøring.
• rug ikke slibemidler, da de kan ødelægge apparatets overade.
• Brug ikke væsker til rengøring af apparatet.
DK
67
Page 68

GB
This symbol on the product or in the instructions means that your electrical and electronic
equipment should be disposed at the end of its life separately from your household waste.
There are separate collection systems for recycling in the EU.
For more information, please contact the local authority or your retailer where you purchased
the product.
NO
Dette symbolet på produktet eller i instruksjonene betyr at det elektriske og elektroniske
utstyret ikke skal kastes sammen med husholdningsavfallet ved endt levetid.
I EU-landene nnes det separate innsamlingssystemer til resirkulering.
Kontakt lokale myndigheter eller forhandleren du kjøpte produktet av for ytterligere
informasjon.
SE
Den här symbolen på produkten eller i instruktionerna betyder att den elektriska och
elektroniska utrustningen ska slängas separat från annat hushållsavfall när den inte fungerar
längre.
Inom EU nns separata återvinningssystem för avfall.
Kontakta lokala myndigheter eller din återförsäljare för mer information.
FI
Tämä tuotteeseen tai ohjeisiin merkitty symboli tarkoittaa, että sähkölaitteet ja elektroniikka
on hävitettävä käyttöikänsä päättyessä erillään kotitalousjätteestä.
EU:ssa on kierrätystä varten erilliset keruujärjestelmät.
Jos haluat lisätietoja, ota yhteys paikallisiin viranomaisiin tai tuotteen myyneeseen liikkeeseen.
DK
Dette symbol på produktet eller i vejledningen betyder, at det udtjente elektriske eller
elektroniske udstyr ikke må bortskaes sammen med husholdningsaald.
I EU-lande ndes der separate indsamlingssystemer til genbrug.
Kontakt de lokale myndigheder eller forhandleren for at få yderligere information.
DSGRetailLtd•MaylandsAvenued•HemelHempstead
Herts•HP27TGd•England
(P.N.: L22DAB10E-002)
 Loading...