

Page 1
L20GSS10E
STAINLESS STEEL MICROWAVE WITH GRILL
INSTRUCTION MANUAL
GB
FORNO A MICROONDE D’ACCIAIO INOSSIDABILE CON GRILL
MANUALE DI ISTRUZIONI
NEREZOVÁ MIKROVLNNÁ TROUBA S GRILEM
NÁVOD
MIKROVLNNÁ RÚRA Z NEHRDZAVEJÚCEJ OCELE S GRILOM
NÁVOD NA OBSLUHU
IT
CZ
SK
Page 2
Contents
GB
Unpacking .........................................................................................................3
Product Overview ..............................................................................................4
Using Aluminium Foil in Your Microwave ..........................................................5
Getting Ready ...................................................................................................6
Introducing Microwave Cooking ........................................................................7
Cooking with a Microwave .........................................................................7
Checking your Cooking Utensils .................................................................8
Microwave Heating Categories ...................................................................9
Steam ......................................................................................................10
Condensation ...........................................................................................10
Checking your Microwave ........................................................................10
Clock Setting ...................................................................................................11
Setting the Child Lock .....................................................................................12
Microwave Cooking .........................................................................................13
Grill or Combination Cooking...........................................................................14
Delay Start Cooking (Programme Set in Advance) ...........................................16
Auto Cooking ...................................................................................................17
Quick Start Cooking .........................................................................................19
Defrosting .......................................................................................................20
Defrost by Weight ....................................................................................20
Querying the Cooking Function .......................................................................21
Cleaning your microwave ................................................................................ 22
Frequently Asked Questions ............................................................................23
Specication ...................................................................................................24
Safety First! .....................................................................................................91
Indice
IT
Disimballaggio ................................................................................................25
Panoramica del prodotto .................................................................................26
Uso della pellicola d’alluminio nel forno a microonde ..................................... 27
Operazioni preliminari ....................................................................................28
Introduzione alla cottura al microonde ...........................................................29
Cucinare con il forno a microonde ............................................................ 29
Controllo degli utensili usati per la cucinare .............................................30
Categorie di cottura al microonde ............................................................ 31
Vapore .....................................................................................................32
Condensa .................................................................................................32
Pulizia del forno a microonde ..................................................................32
Impostazione dell’orologio ..............................................................................33
Impostazione del blocco per i bambini ............................................................ 34
Cottura al microonde .......................................................................................35
Cottura grill o combinata ................................................................................36
Avvio ritardato della cottura (programma impostato in anticipo) ...................38
Cottura automatica .........................................................................................39
Cottura rapida .................................................................................................41
Scongelamento ...............................................................................................42
Scongelamento a peso ............................................................................. 42
Controllo della funzione di cottura ..................................................................43
Pulizia del forno a microonde .......................................................................... 44
FAQ ..................................................................................................................45
Speciche tecniche..........................................................................................46
Prima la sicurezza! ..........................................................................................92
Obsah
CZ
Vybalování ......................................................................................................47
Přehled výrobku .............................................................................................. 48
Použití hliníkové fólie v mikrovlnné troubě .....................................................49
Příprava...........................................................................................................50
Představení vaření v mikrovlnné troubě ..........................................................51
Vaření s mikrovlnnou troubou .................................................................. 51
Kontrola kuchyňského náčiní ...................................................................52
Kategorie mikrovlnného ohřevu ..............................................................53
Pára .........................................................................................................54
Kondenzace .............................................................................................54
Kontrola mikrovlnné trouby ..................................................................... 54
Nastavení hodin ..............................................................................................55
Nastavení dětského zámku .............................................................................56
Mikrovlnné vaření ...........................................................................................57
Gril nebo kombinované vaření ........................................................................58
Vaření s prodlevou (program nastavený předem) ............................................60
Automatické vaření ......................................................................................... 61
Rychlé zahájení vaření.....................................................................................63
Rozmrazování .................................................................................................64
Rozmrazování podle hmotnosti ...............................................................64
Dotazy na funkci vaření ...................................................................................65
Čištění mikrovlnné trouby ...............................................................................66
Často kladené dotazy ......................................................................................67
Technické údaje ...............................................................................................68
Bezpečnost především! ...................................................................................93
Obsah
SK
Rozbalenie ......................................................................................................69
Prehľad výrobku .............................................................................................. 70
Používanie hliníkovej fólie v mikrovlnnej rúre .................................................71
Príprava...........................................................................................................72
Úvod do mikrovlnného varenia .......................................................................73
Varenie pomocou mikrovlnného žiarenia .................................................73
Kontrola riadov na varenie ....................................................................... 74
Kategórie mikrovlnného ohrevu ..............................................................75
Para .........................................................................................................76
Kondenzácia ............................................................................................76
Kontrola mikrovlnnej rúry ........................................................................ 76
Nastavenie hodín ............................................................................................77
Nastavenie rodičovského zámku .....................................................................78
Mikrovlnné varenie .........................................................................................79
Grilovanie alebo kombinované varenie ...........................................................80
Varenie s oneskoreným štartom (nastavenie programu v predstihu) ...............82
Automatické varenie .......................................................................................83
Varenie s rýchlym štartom...............................................................................85
Rozmrazovanie ................................................................................................86
Rozmrazovanie na základe hmotnosti .....................................................86
Otázka ohľadne funkcie varenia ......................................................................87
Čistenie mikrovlnnej rúry ................................................................................88
Často kladené otázky.......................................................................................89
Technické špecikácie .....................................................................................90
Bezpečnosť je na prvom mieste! .....................................................................94
Page 3
3
GB
Congratulations on the purchase of your new Logik Microwave.
These operating instructions will help you use it properly and safely.
Before using your Logik Microwave
• Read these instructions carefully and retain for future reference.
• Remove all packaging labels. Please dispose of them properly.
Before calling for service
• Review the section on Troubleshooting. This will help you to solve some general
problems by yourself and reduce the need to ask for the help of professional
technicians.
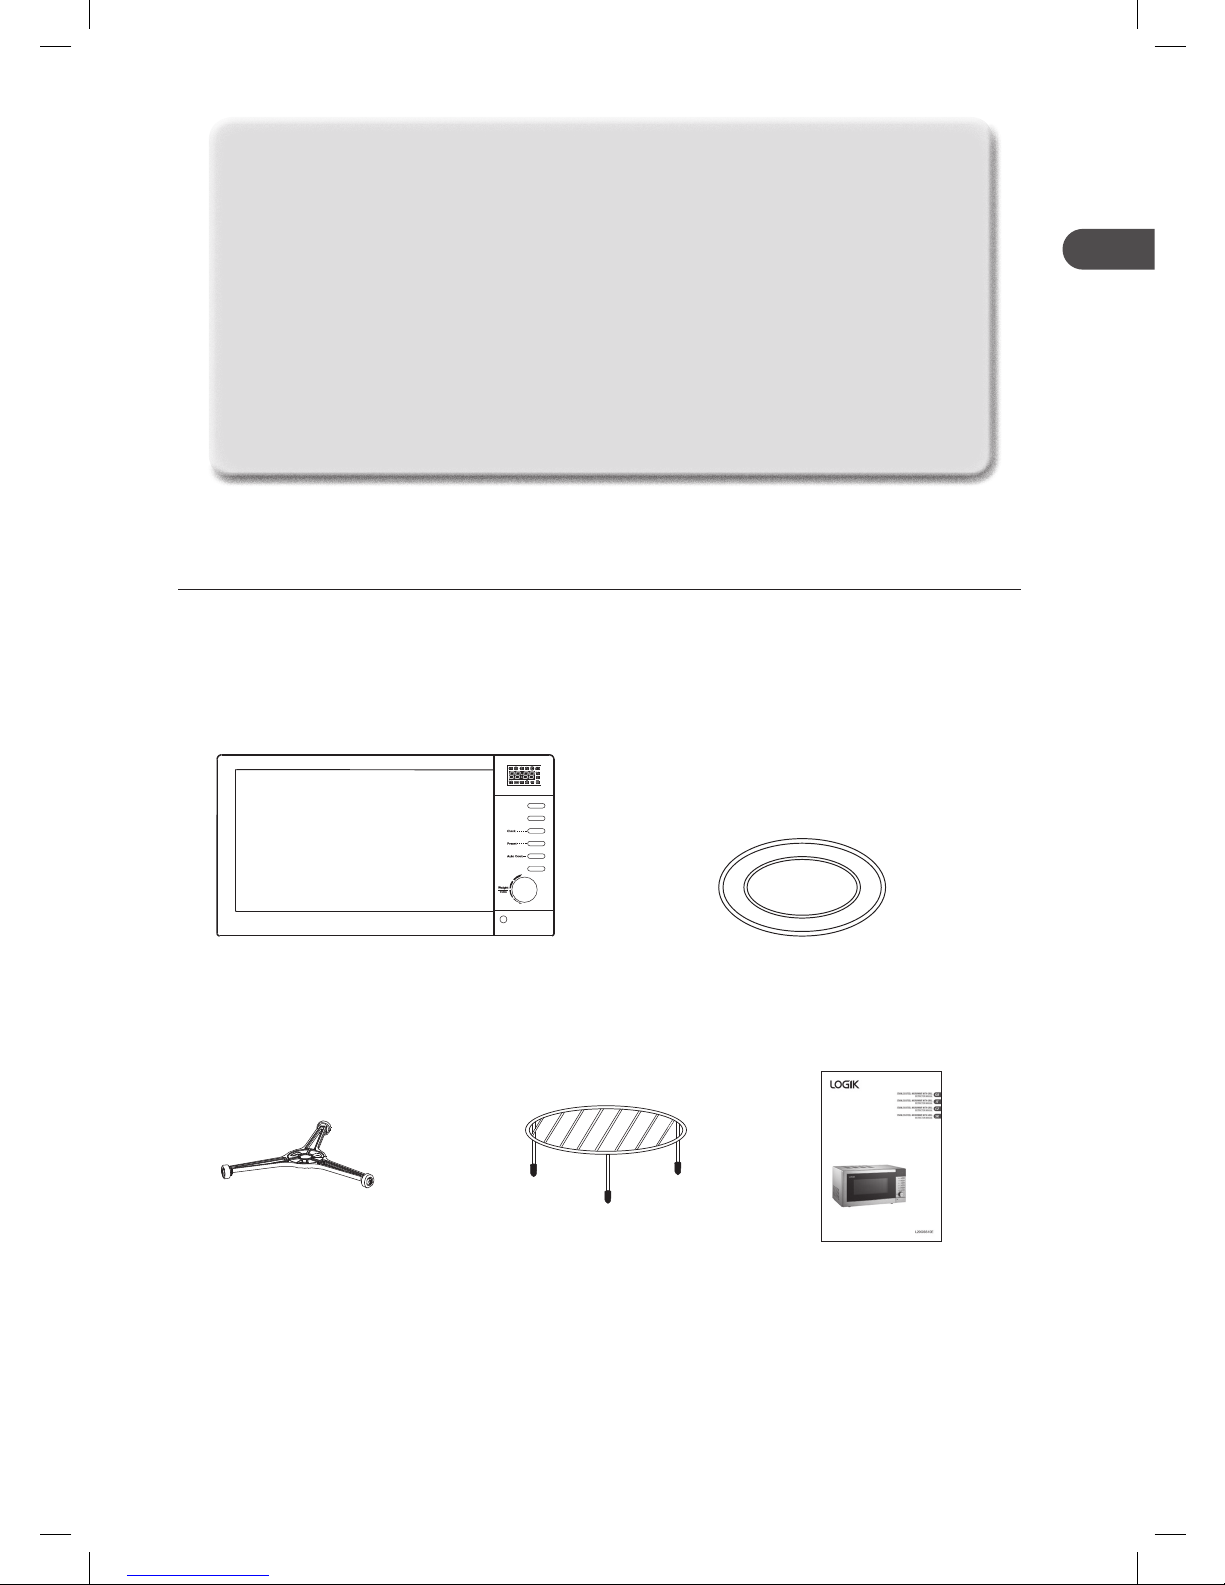
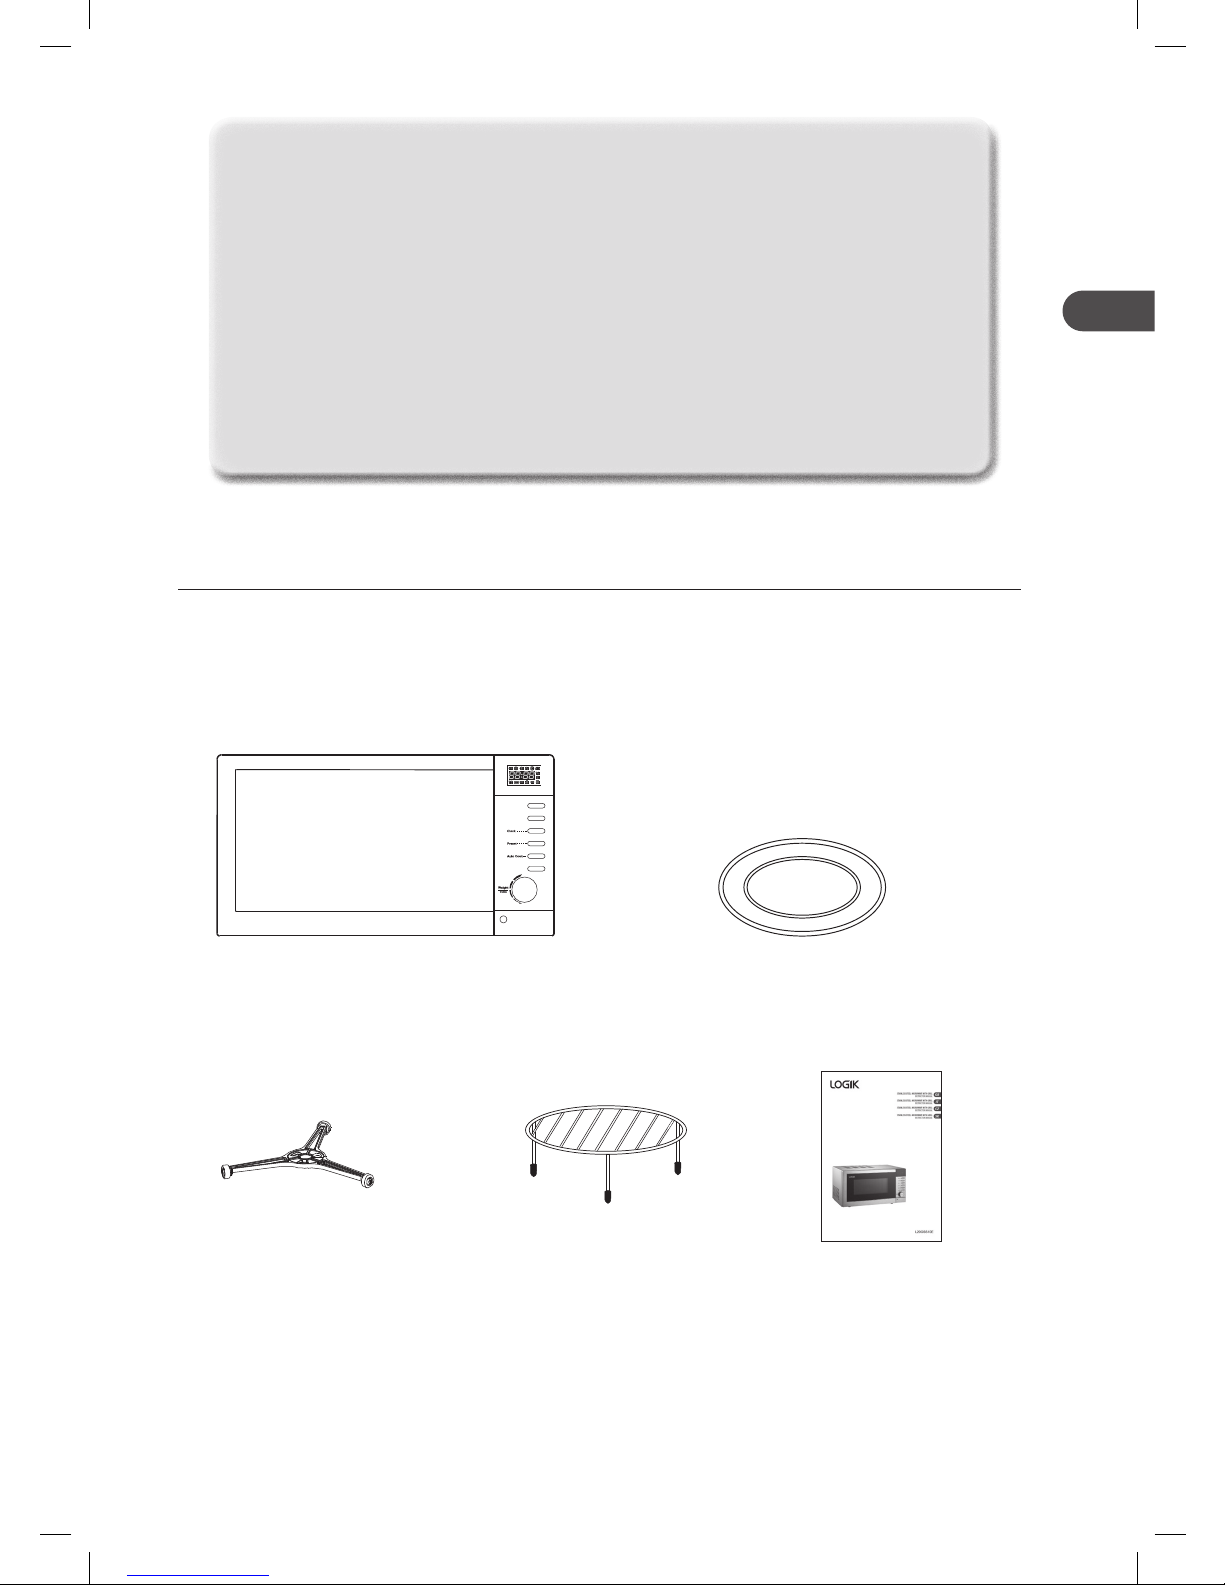
Unpacking
Remove all packaging from the unit. Retain the packaging. If you dispose of it please do so according to
local regulations.
The following items are included:
The Main Unit
Glass Turntable x 1
P.N.: XGALK20MBP11
Turntable Ring x 1
P.N.: XGALK20MBP12
Grill Rack x 1
P.N.: XGALL20GSS10P41
Instruction Manual x 1
P.N.: L20GSS10E-001
Microwave
Grill/Combi
Stop/Clear
Page 4
4
GB
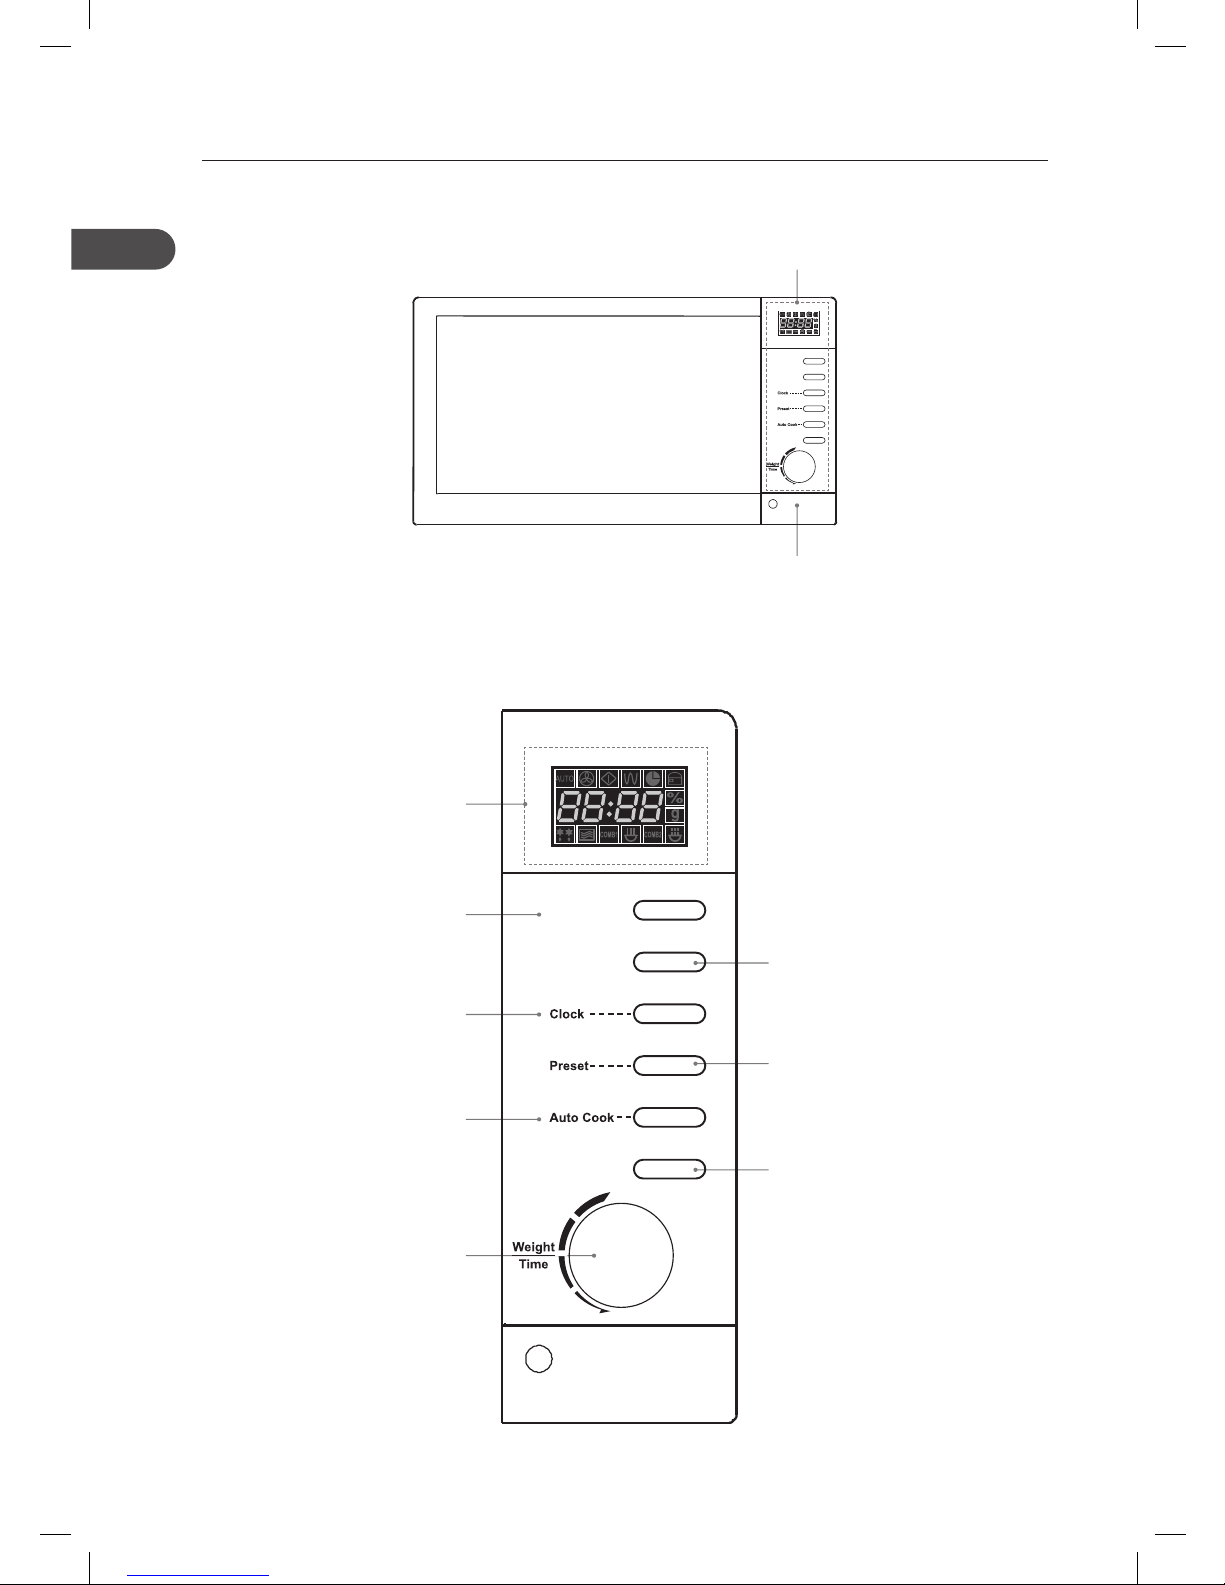
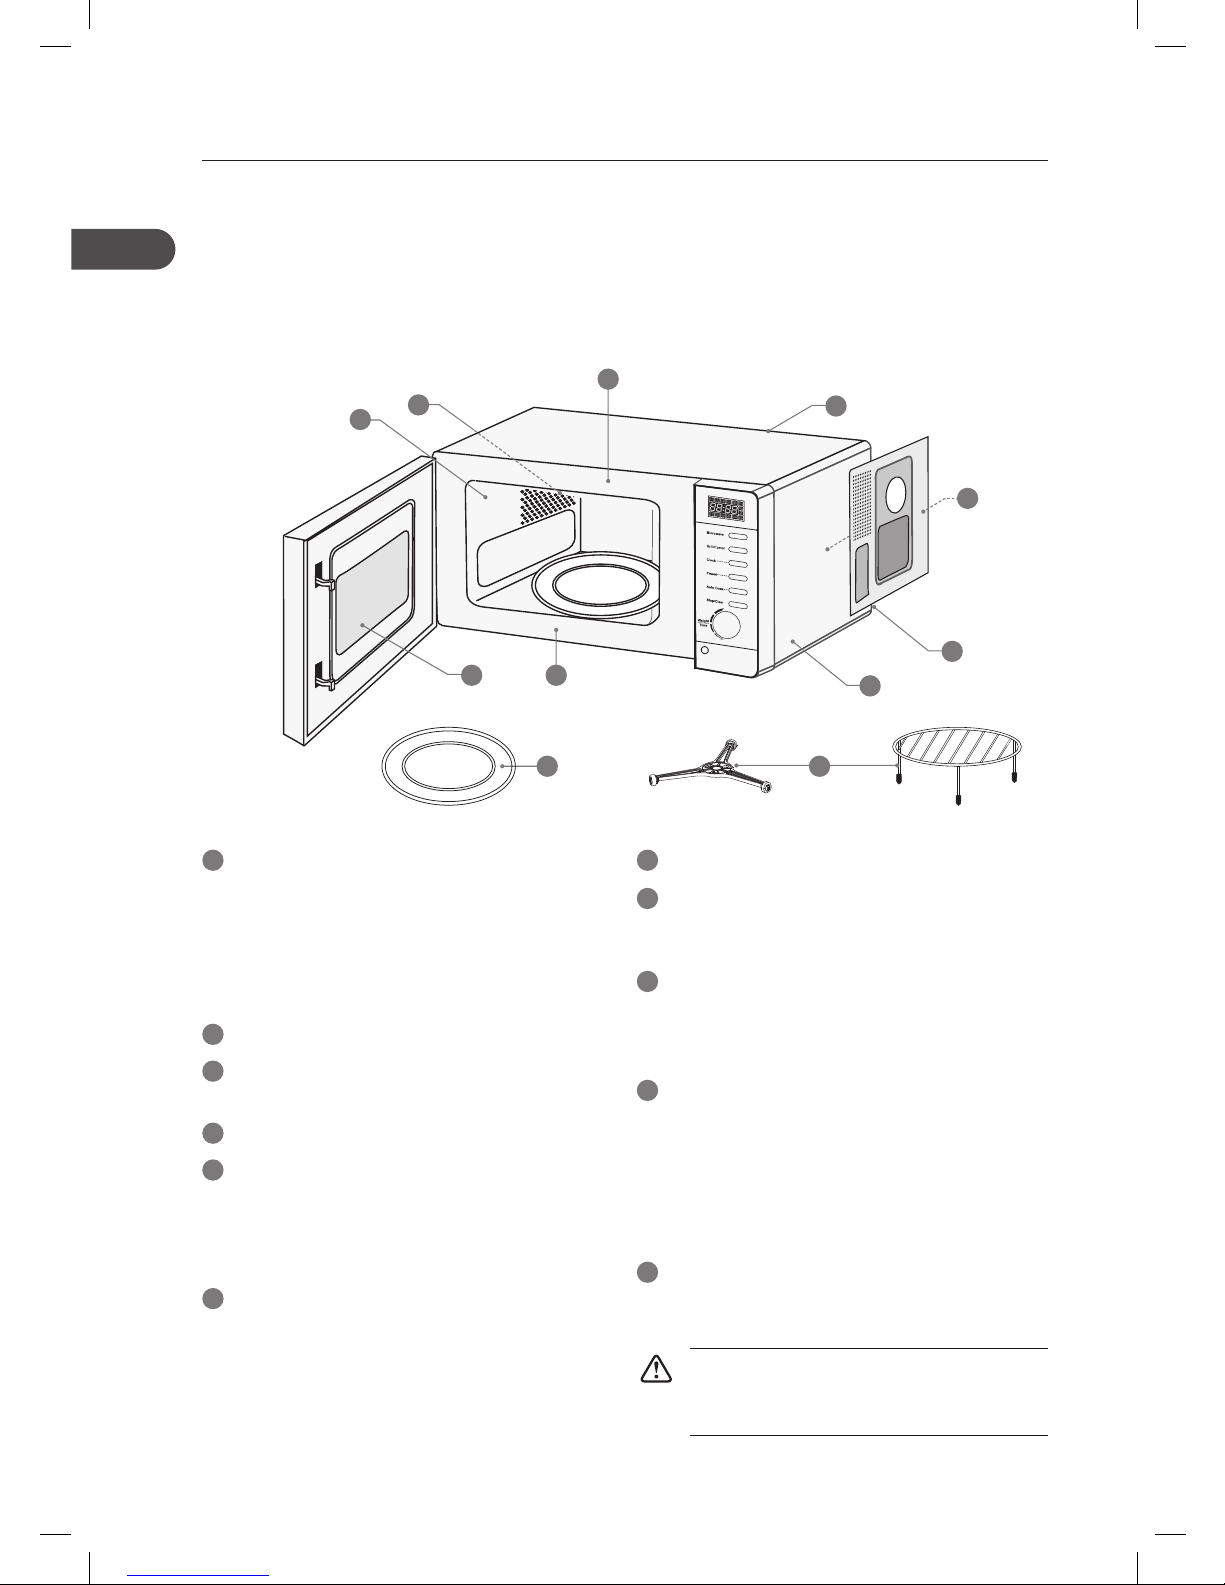
Product Overview
The Main Unit
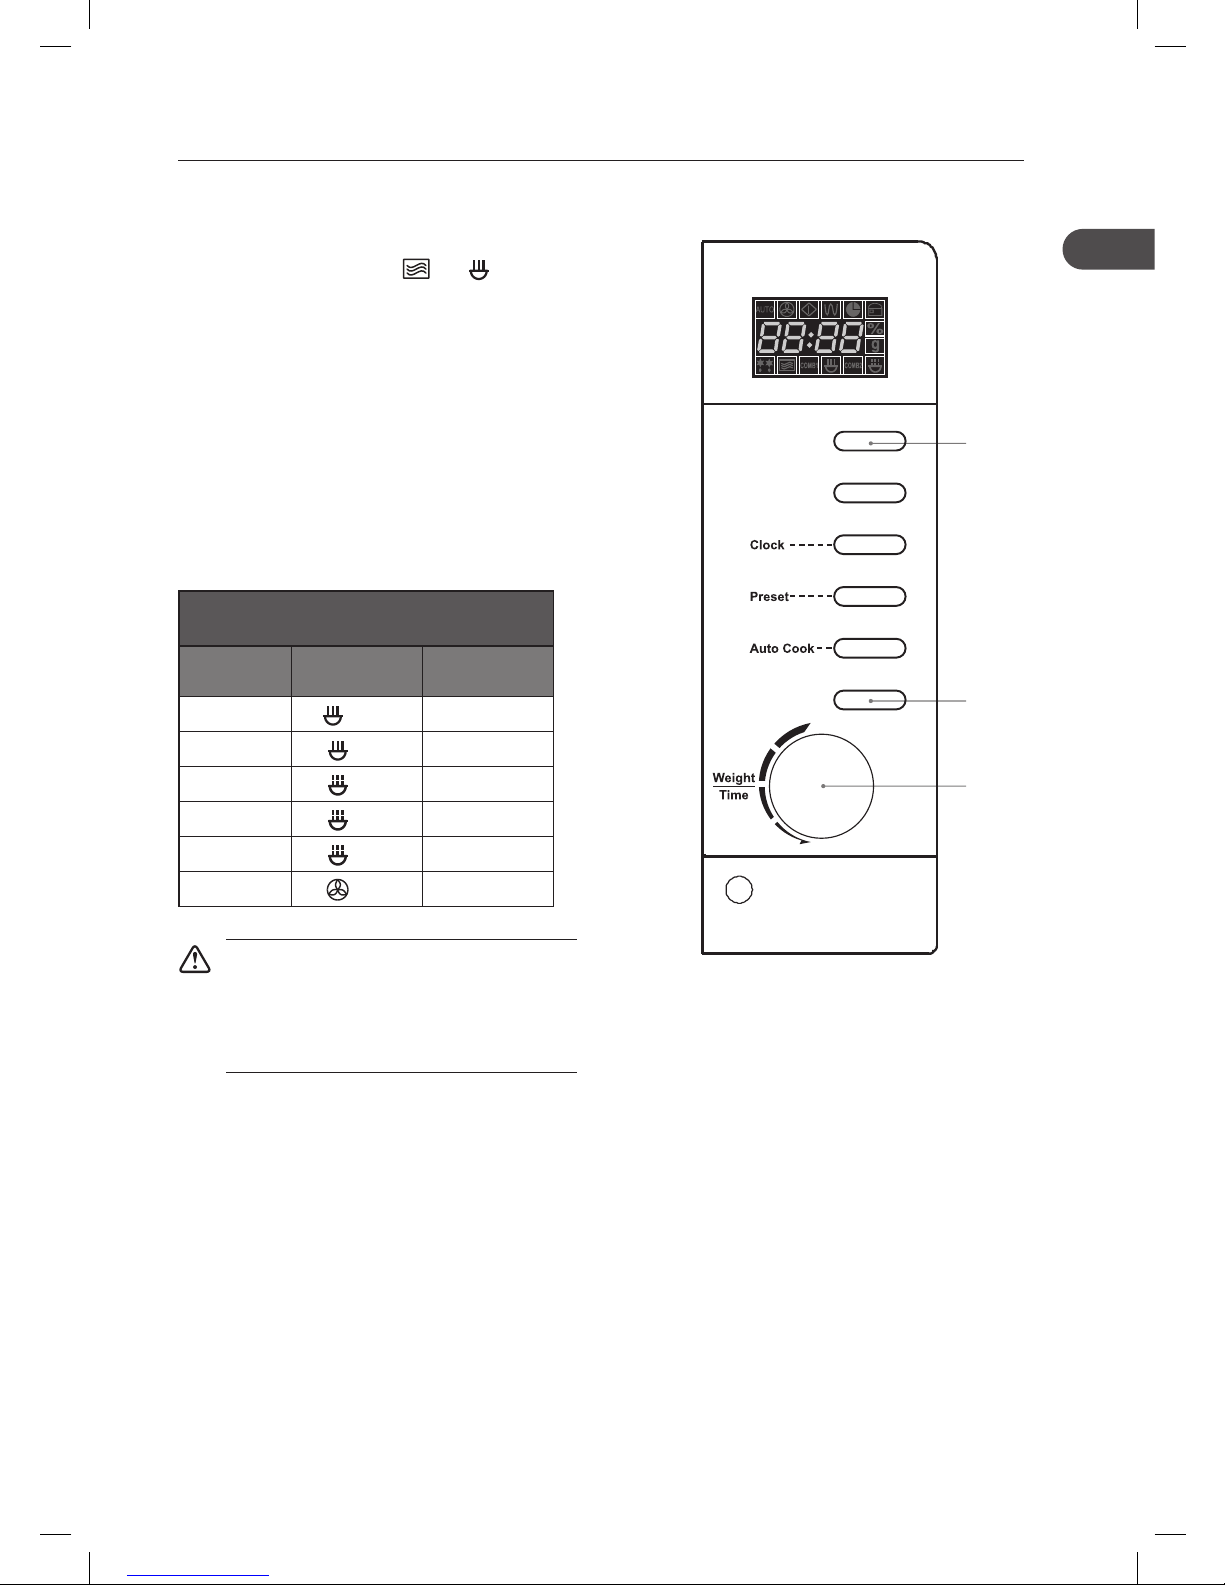
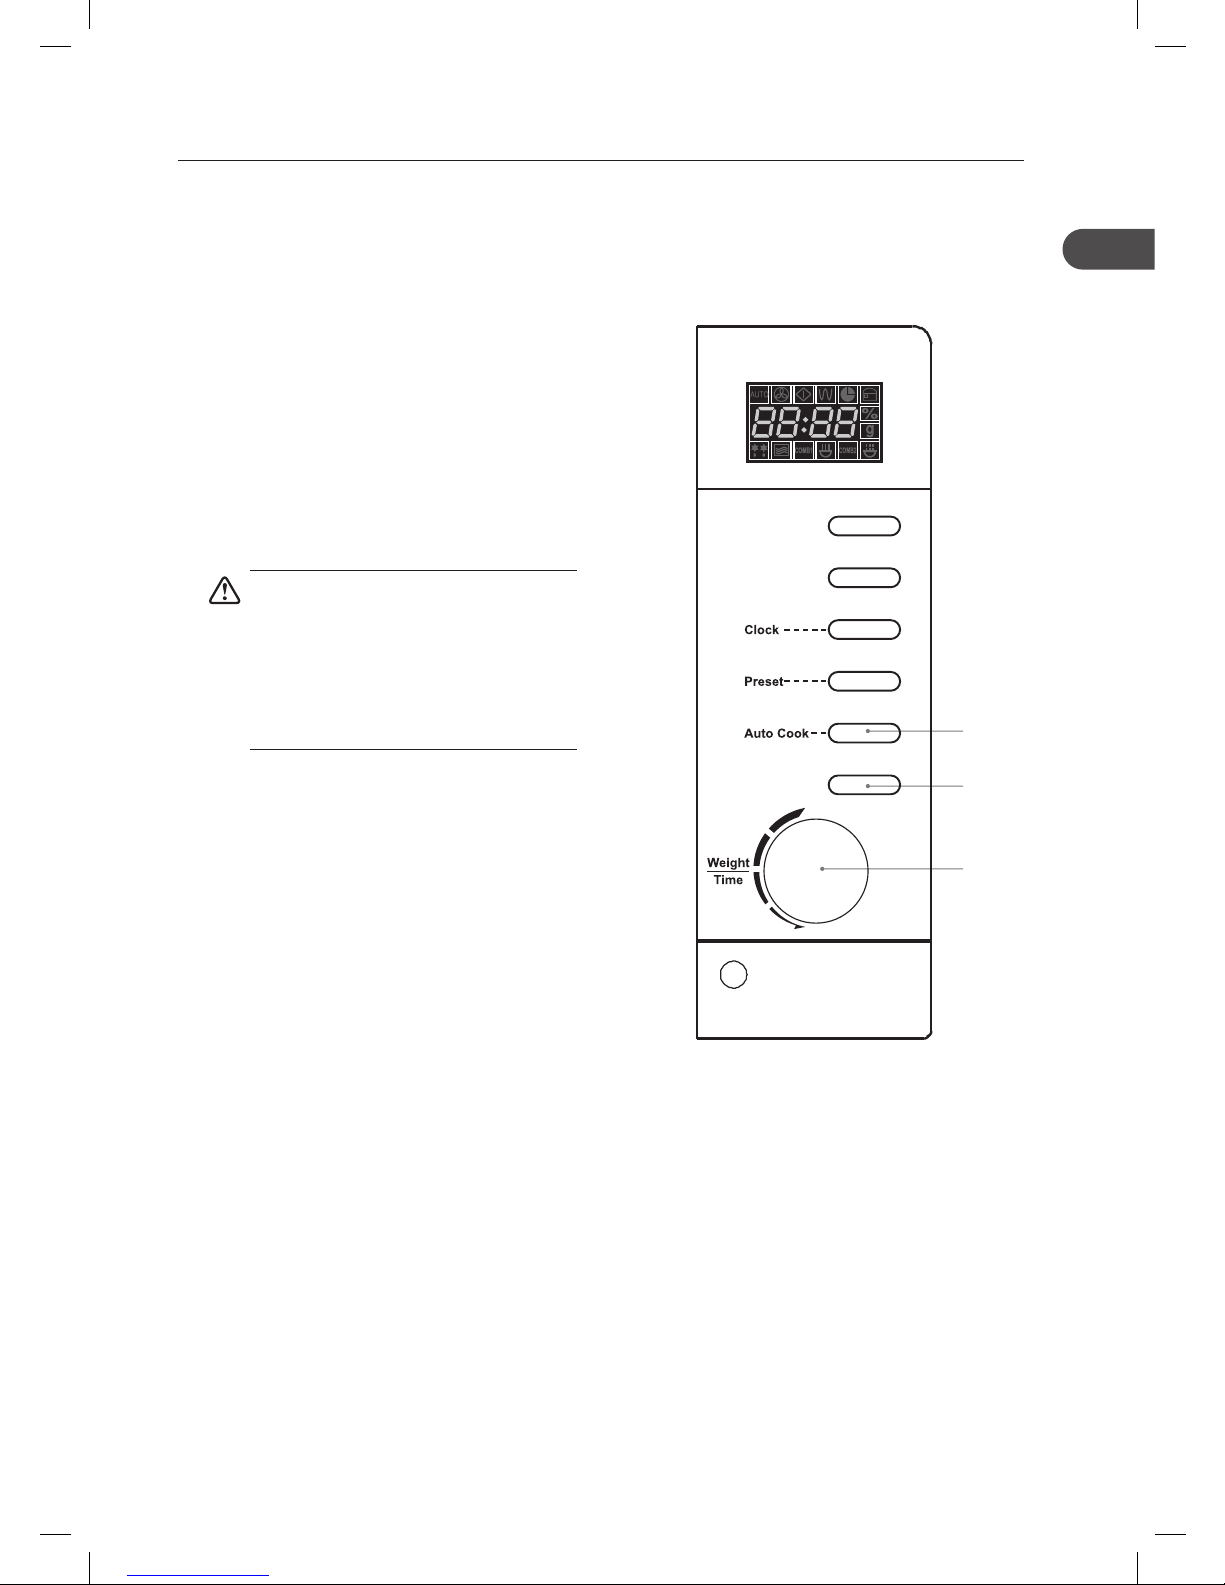
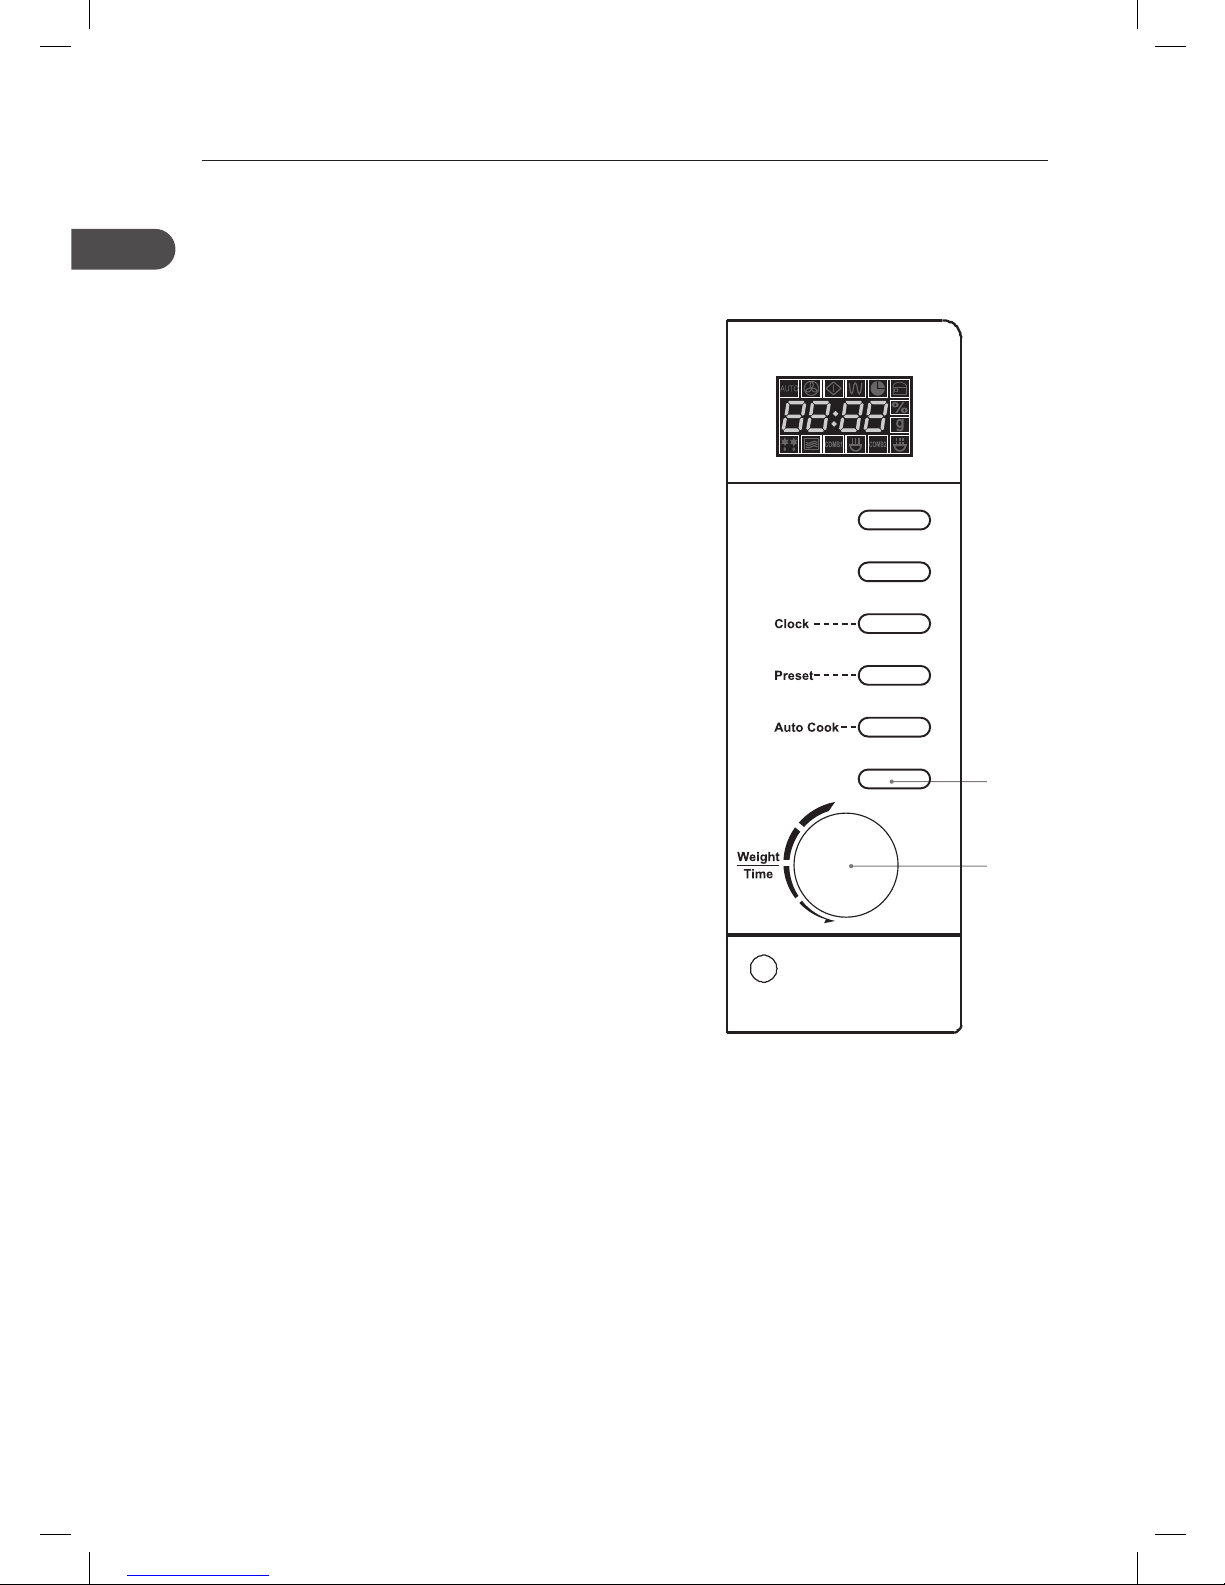
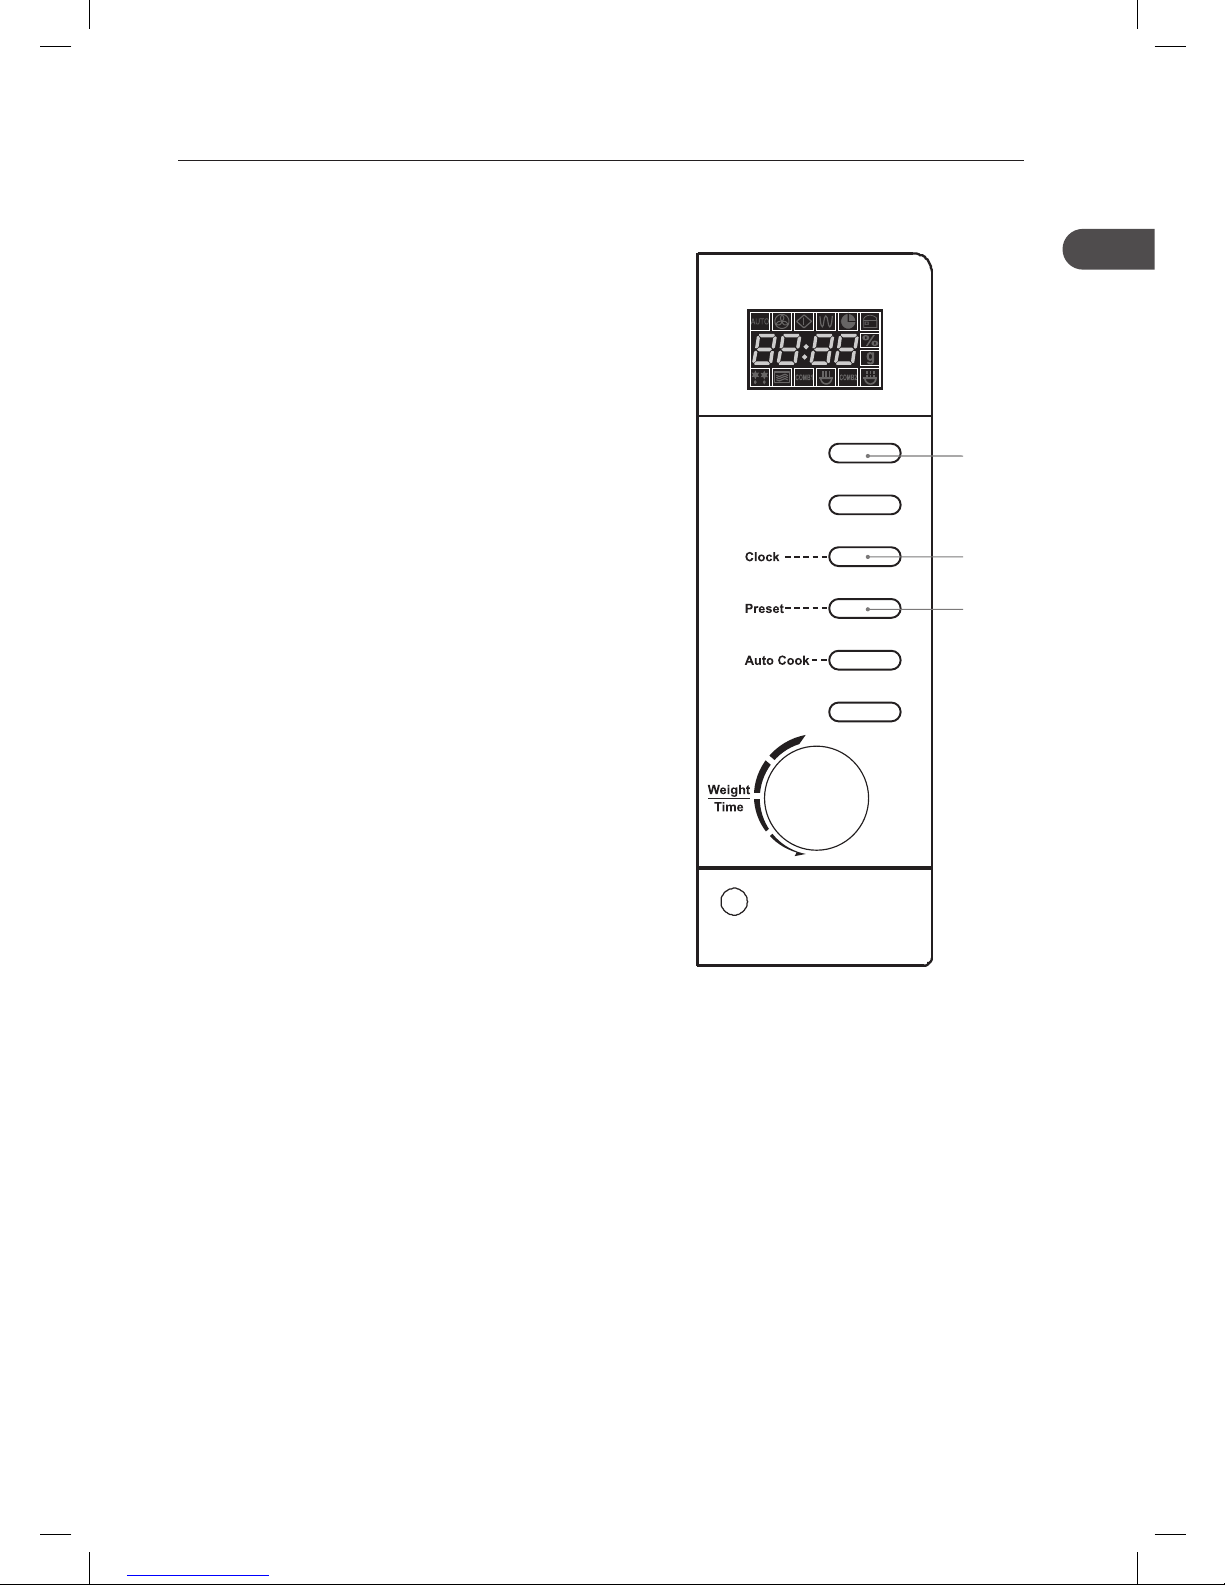
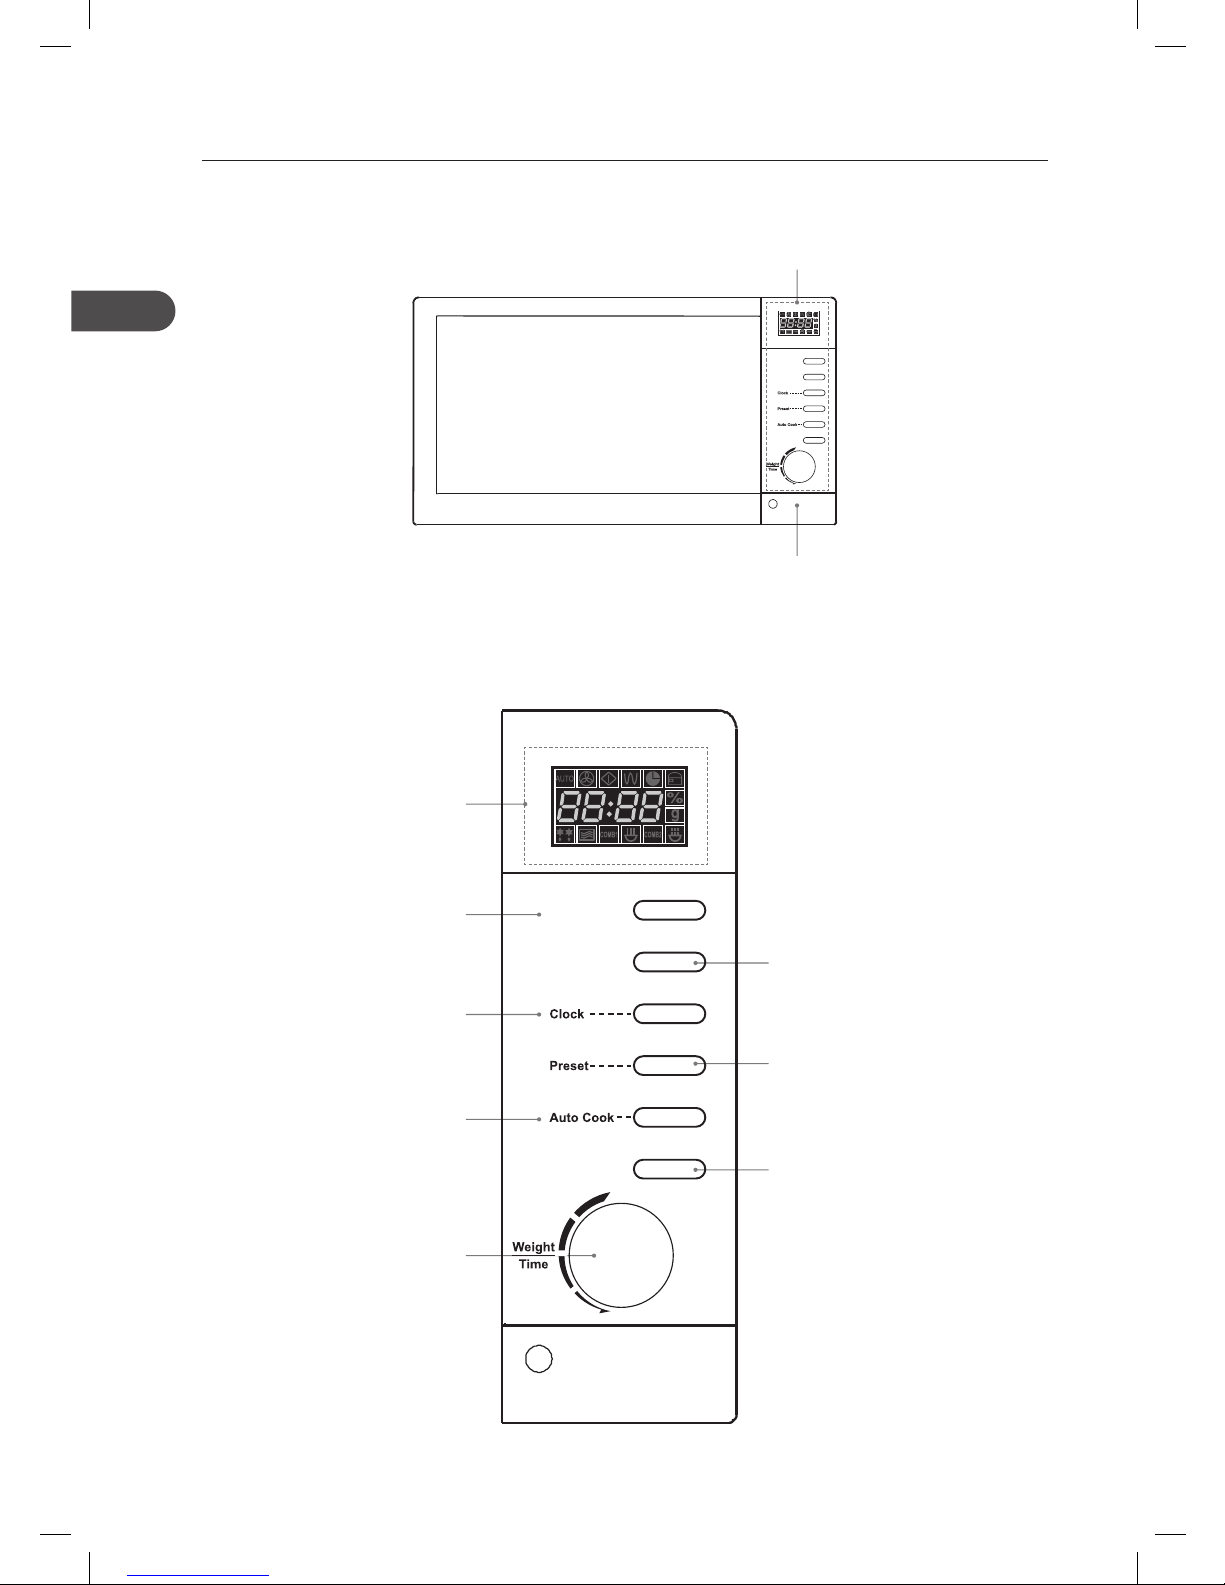
The Control Panel
Control Panel
LED Display
Shows the clock, cooking
time and setting.
Microwave button
Use this button to select the
microwave function.
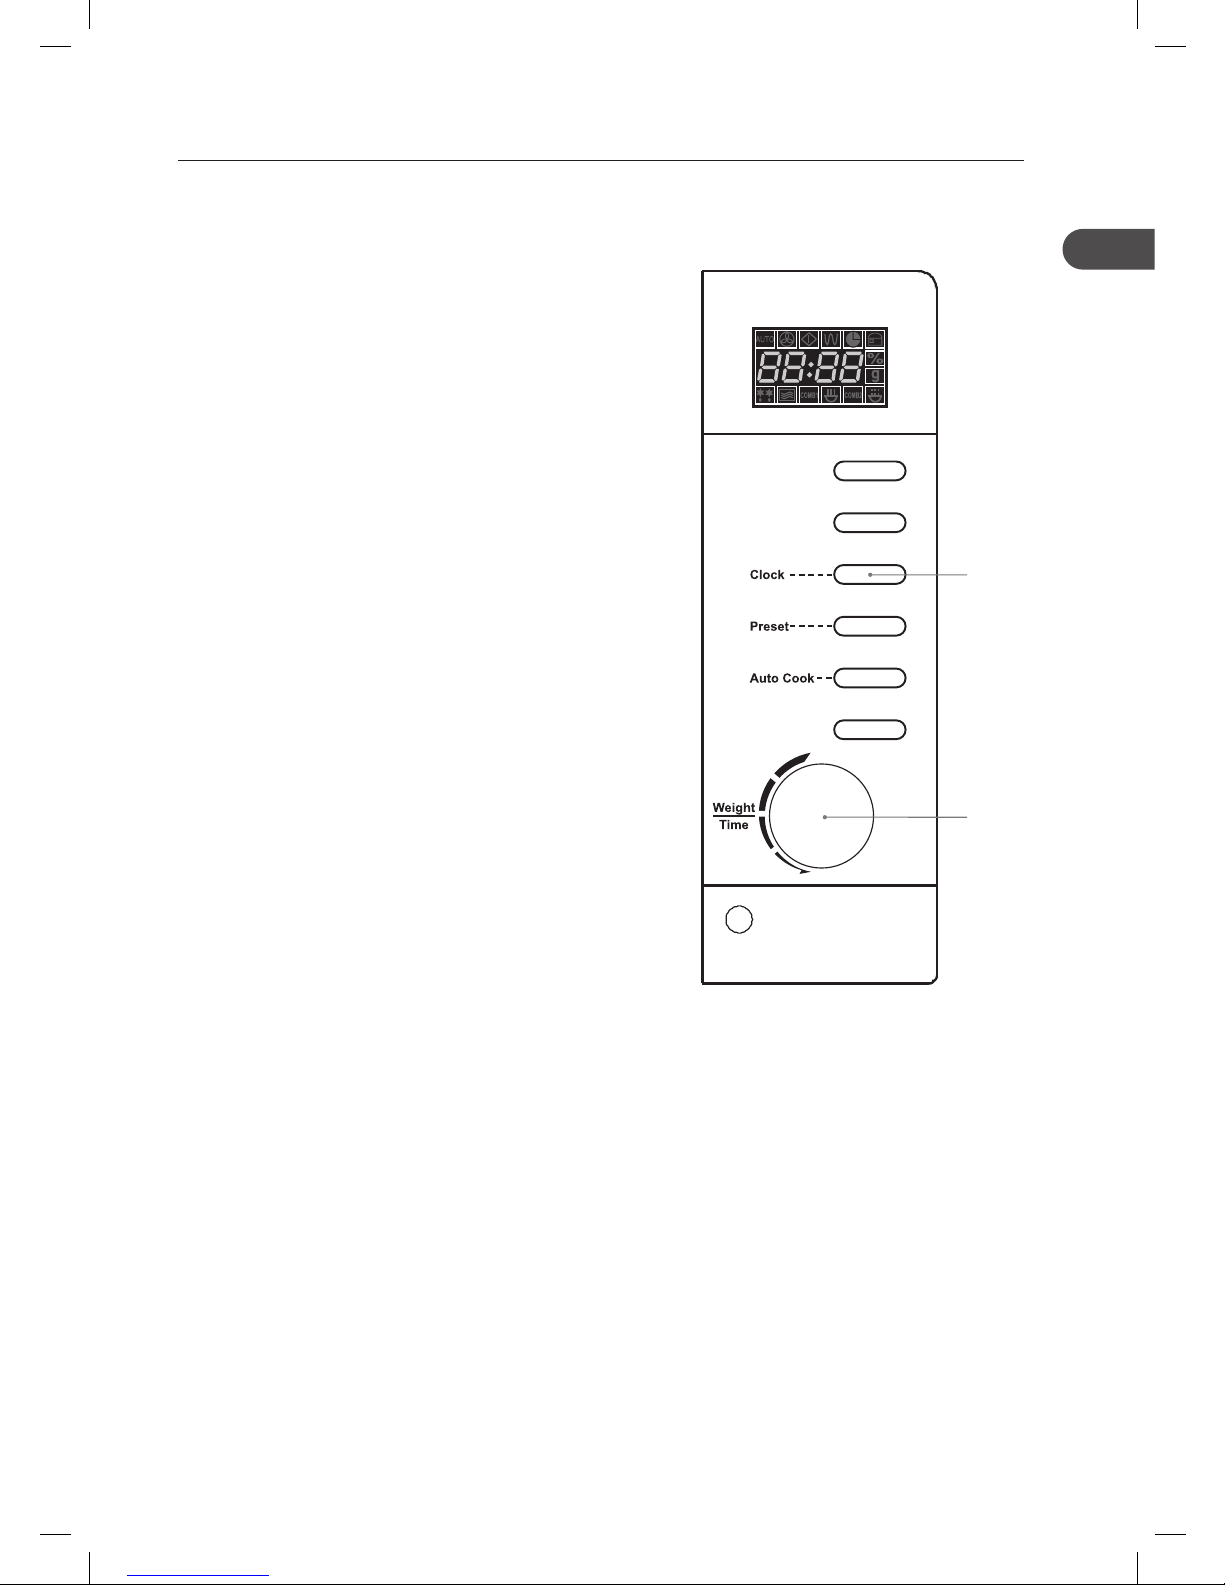
Clock button
Use this button to set the
clock.
Auto Cook button
Use this button to choose
the auto menu programmes.
Weight / Time dial
(Start button)
Use this dial to set weight
and cooking time.
It can also be used to start /
restart cooking.
Grill / Combi button
Use this button to select the
grill, microwave and grill
combination function.
Preset button
Use this button to preset
cooking time.
Stop / Clear button
Use this button to stop cooking
and clear cooking settings.
Door button
Microwave
Grill/Combi
Stop/Clear
Microwave
Grill/Combi
Stop/Clear
Page 5

5
GB
Using Aluminium Foil in your Microwave
It is safe to use aluminium foil in your microwave as long as you follow these safety guidelines.
As with all metal, microwave energy cannot pass through foil, but provided that you keep the foil
away from the side of the microwave it will not cause sparks and there will not be any damage to your
microwave.
Using foil is a good way of shielding parts of food that you do not want to cook as quickly as others –
perhaps where the food is narrower and would otherwise overcook.
Place the foil over the area you want to shield, taking care that the foil will not touch the sides of the
microwave when the turntable rotates. Only use one piece of foil at a time so that you do not get sparks
between the separate pieces.
Follow these guidelines when using foil in your microwave:
• Remove foil lids from containers before using in the microwave. Some lids are made of card with a foil
covering – these should be removed too. Use a microwave safe transparent lid if possible.
• Stir food during cooking if the container has a lid or film cover.
• Always use the glass turntable.
• Use shallow containers with a large surface area. Do not use containers that are more than 1.25in
(3.5cm) deep.
• Use gloves when handling hot foil containers.
• Do not completely cover food with foil. The microwave energy cannot pass through the foil so the food
will not cook.
• Do not let aluminium foil touch the inside of the microwave.
• Do not use more than one piece of foil in the microwave at the same time.
Page 6

6
GB
2. Choose a flat work surface for your microwave
away from heat sources such as radiators or
fires and away from cold areas. You should
allow a 10cm space all around the microwave
and 30cm above so that warm air can
escape from the vents during cooking – This
microwave is not designed to be built in.
Getting Ready
This microwave is designed for home use. It should not be used for commercial catering.
1. After unpacking your microwave, check that it has not been damaged whilst in the box. Make sure
there are no dents, and the door closes properly. A damaged microwave could allow microwave energy
to escape. Make sure that you have taken out all of the packaging from the inside of the microwave.
Please dispose of the plastic wrappings/ bags safely and keep out of the reach of babies and young
children.
3. Plug your microwave into a standard
household electrical socket (230 volt, 13 amp
rated). Avoid using a socket that also has an
adaptor and other equipment plugged in. Do
not use a multi adaptor.
4. Put the turntable ring inside the microwave
and place the glass turntable on top of the
ring. The turntable is shaped to sit securely on
the spindle. You must always use the turntable
and ring whenever you use the microwave.
Underside View
30cm
10cm10cm
Microwave
Grill/Combi
Stop/Clear
5. To protect your work surface, we recommend
that you fix some non-slip cushion pads (not
included) to the underside of the microwave.
Page 7
7
GB
Introducing Microwave Cooking
Always remember the basic safeguards you should follow when using any cooking equipment or handling
hot food.
See below for basic guidelines in microwave cooking.
Cooking with a Microwave
• Cooking with a microwave is much faster than conventional cooking and, whilst you should make sure
that food is fully cooked, you should be careful not to overcook it.
• Microwave energy can heat unevenly so stirring to distribute heat is very important. Always stir from
the outside, inwards.
• If you are cooking a number of individual foods at the same time, such as baked potatoes or small
cakes, arrange them evenly on the turntable so that they cook evenly. Never stack food in your
microwave.
• Turn larger foods such as meat roasts and poultry during cooking so that the top and bottom cook
evenly. It is also recommended to turn pieces of meat or poultry, especially if they have not been
deboned.
• Meat and poultry which is cooked for 15 minutes or more will brown lightly in it’s own fat. Anything
cooked for a shorter time can be brushed with a browning sauce to give an appetising colour.
• Strips of aluminium foil can be used to cover the thinner pieces of food to stop them overcooking
before the thicker parts of the food have had a chance to cook. Use the foil sparingly and wrap around
the food or container carefully to stop it touching the inside of the microwave which could cause
sparks.
• Microwave cook food using microwave energy that is similar to naturally occurring radio waves.
Normally, these “waves” would fade as they dispersed into the atmosphere but in a microwave they are
concentrated onto food causing it to heat up.
• Microwave energy cannot pass through metal – so it cannot escape from inside your microwave – but
it can pass through materials like glass, porcelain, plastic and paper.
These materials are used in the manufacture of microwave safe
cooking equipment.
• Microwave safe cooking equipment will still get hot as the food
it contains heats up.
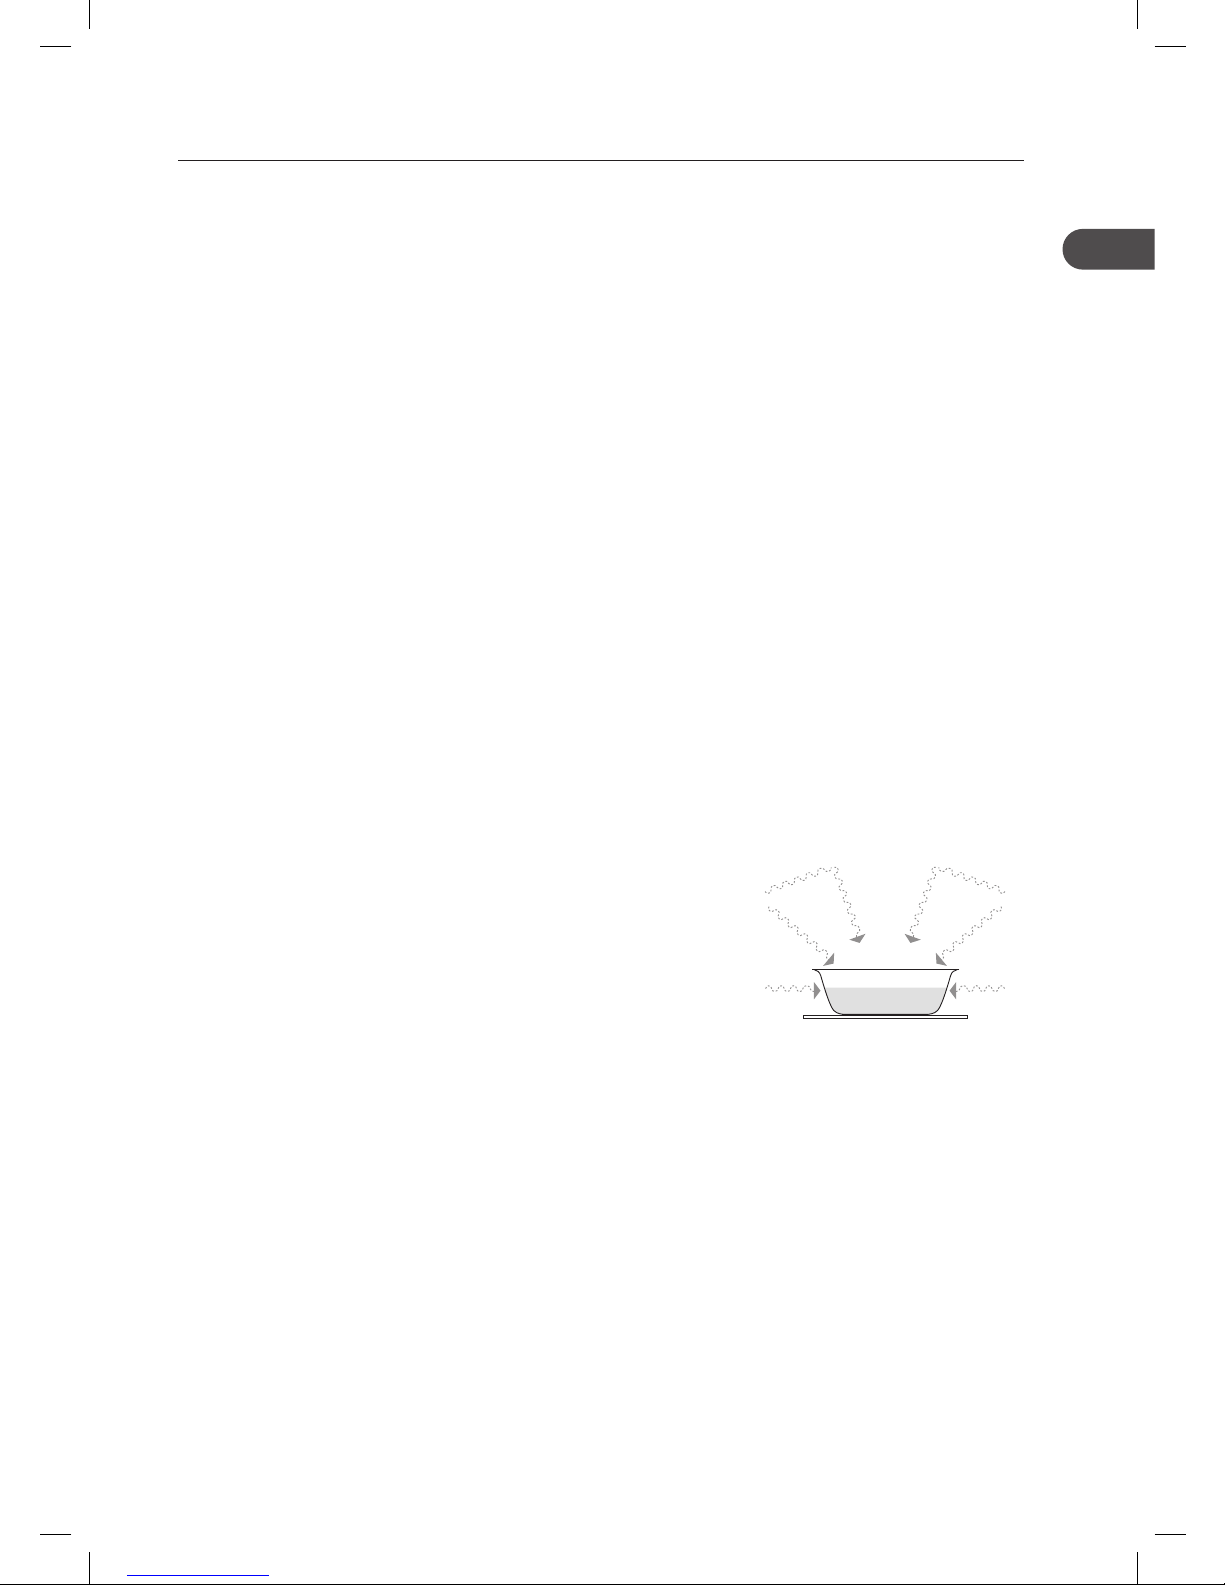
The microwave energy focuses on the moisture in the food
causing lots of tiny vibrations. The vibrations get so great that the
moisture – and the food – heat up.
Page 8

8
GB
Checking your Cooking Utensils
Most heat-resistant, non-metallic cooking utensils are safe to use in your microwave. If you are not sure if
you can use a utensil in your microwave, follow this simple test:
1. Put the utensil into the microwave next to a cup of water – use a cup that you know is microwave safe.
Close the door.
2. Turn the microwave on for 30 seconds only.
3. After 30 seconds, carefully check to see if the water has warmed up.
4. If the water has not warmed up but the utensil has, the utensil is not microwave safe and should not be
used in the microwave.
5. Do not use your hands to touch the utensils as it may already be hot.
Page 9
9
GB
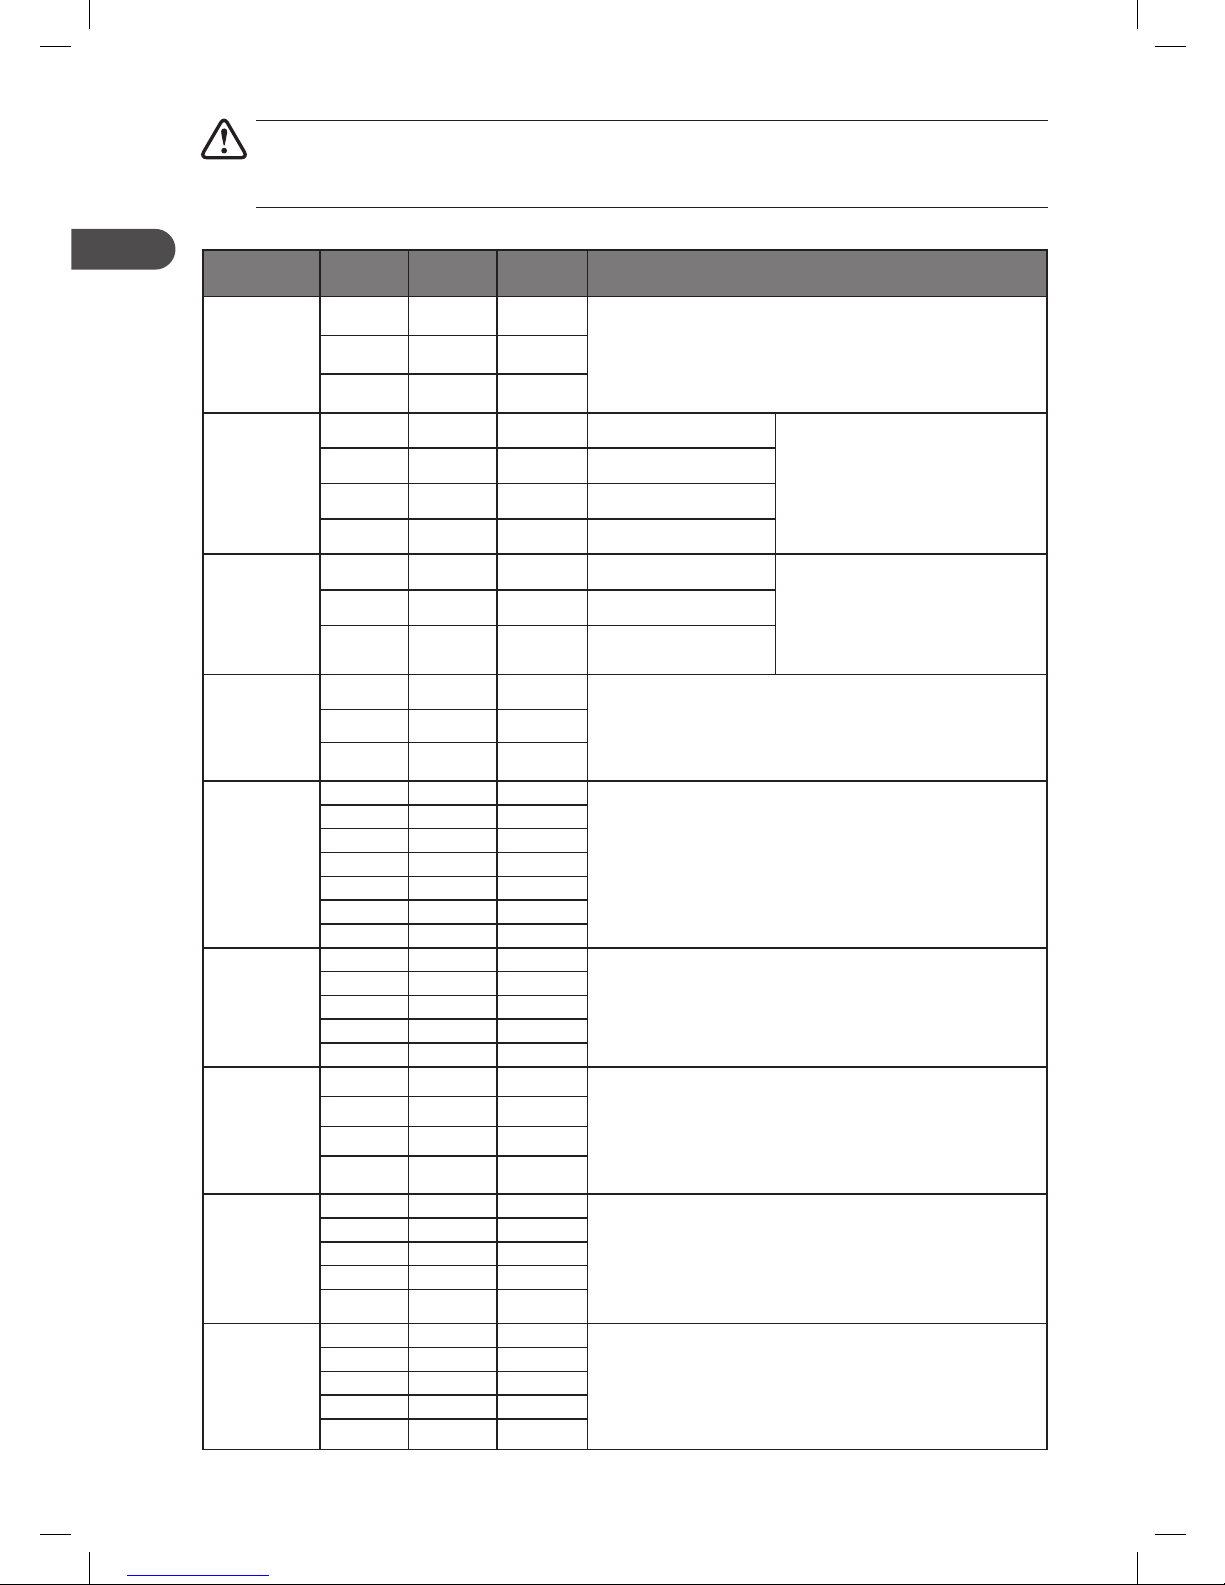
Microwave Heating Categories
Your microwave has been tested and labelled to meet the government’s voluntary agreement on the
reheating of pre-cooked food.
The heating characteristics and output power levels of microwave are usually calculated using a relatively
large portion of food (a 1000 gram load, IEC 705) but many packs of pre-cooked food are sold in smaller
packs, often about 350 grams.
The government, in partnership with food companies and microwave manufacturers, have set up a system
of heating categories to help you choose the reheating time for pre-cooked food.
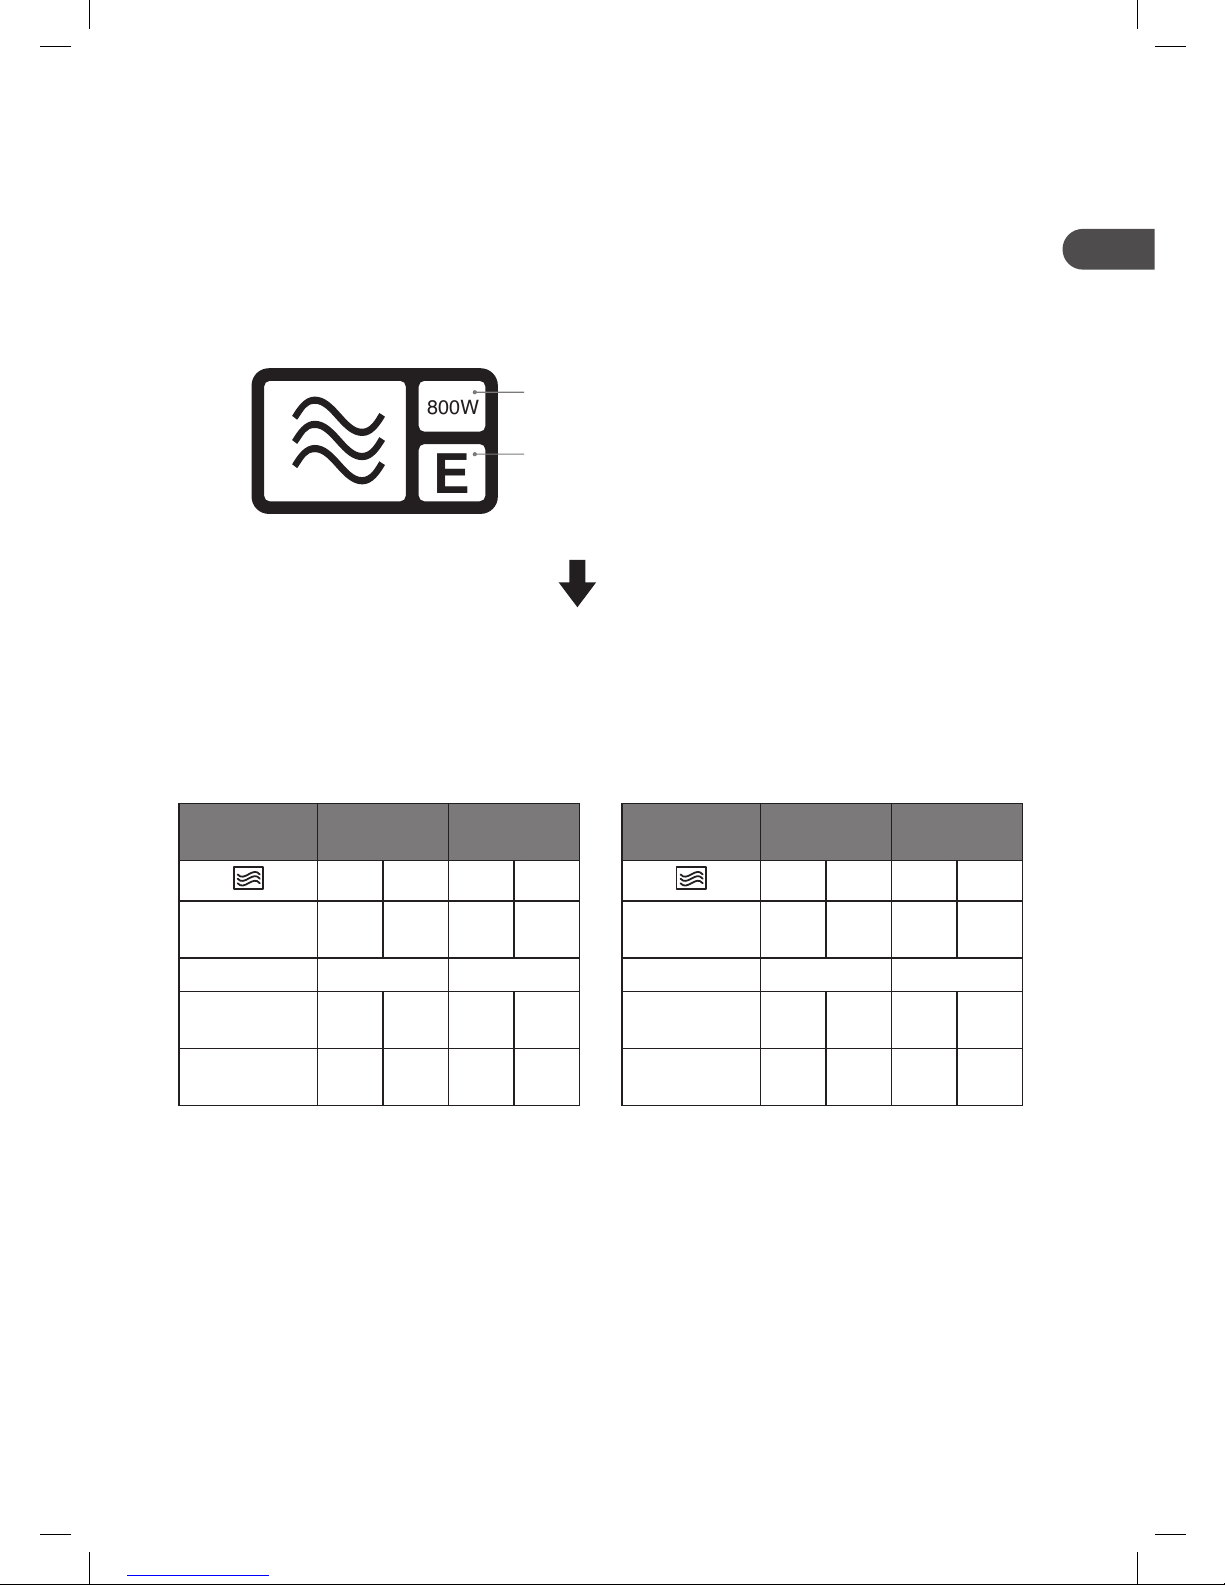
800W
E
800W is the output power of the microwave.
E is the heating category for your microwave.
Check the cooking times for category E on the
food’s packaging to see how long it should be
cooked for. Please see below example for reference.
To Microwave:
1. Remove outer packaging.
2. Pierce film lid SEVERAL TIMES.
3. Place on a microwaveable plate.
4. Heat on full power.
5. Turn halfway through heating.
Heating
Category
Wattage
(IEC705)
B D 650W 750W
Full power (in
minutes)
2 2 2 2
Turn Turn Turn
Full power
(in minutes)
2 1.5 2 1.5
Standing time
(in minutes)
1 1 1 1
To Microwave from frozen:
1. Remove outer packaging.
2. Pierce film lid SEVERAL TIMES.
3. Place on a microwaveable plate.
4. Heat on full power.
5. Turn halfway through heating.
Heating
Category
Wattage
(IEC705)
B D 650W 750W
Full power (in
minutes)
3 2.5 3 2.5
Turn Turn Turn
Full power
(in minutes)
4 3.5 4 3.5
Standing time
(in minutes)
1 1 1 1
Page 10
10
GB
Steam
When you microwave food, steam is created as water in the food heats up and evaporates.
The steam formed during microwave cooking is entirely safe. It has to escape from the microwave to
prevent pressure from building up inside the microwave. It does this through the vents on the back of the
microwave and from around the door.
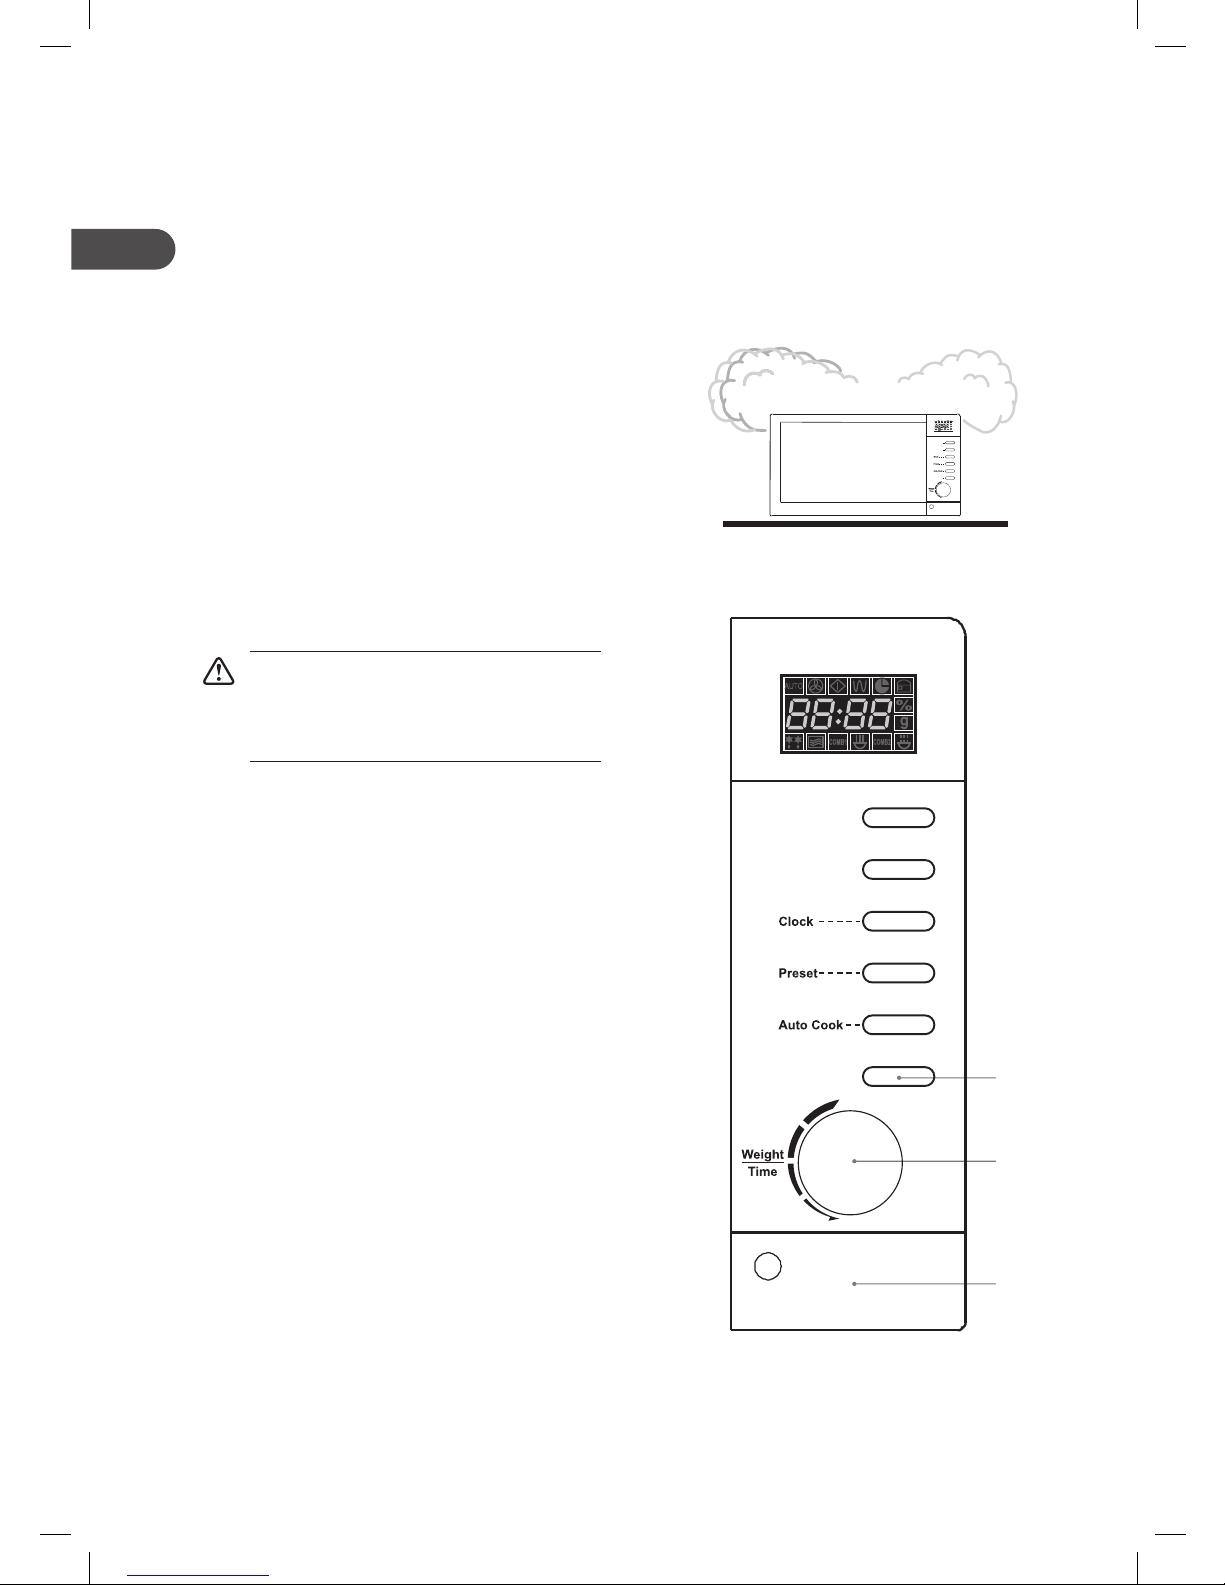
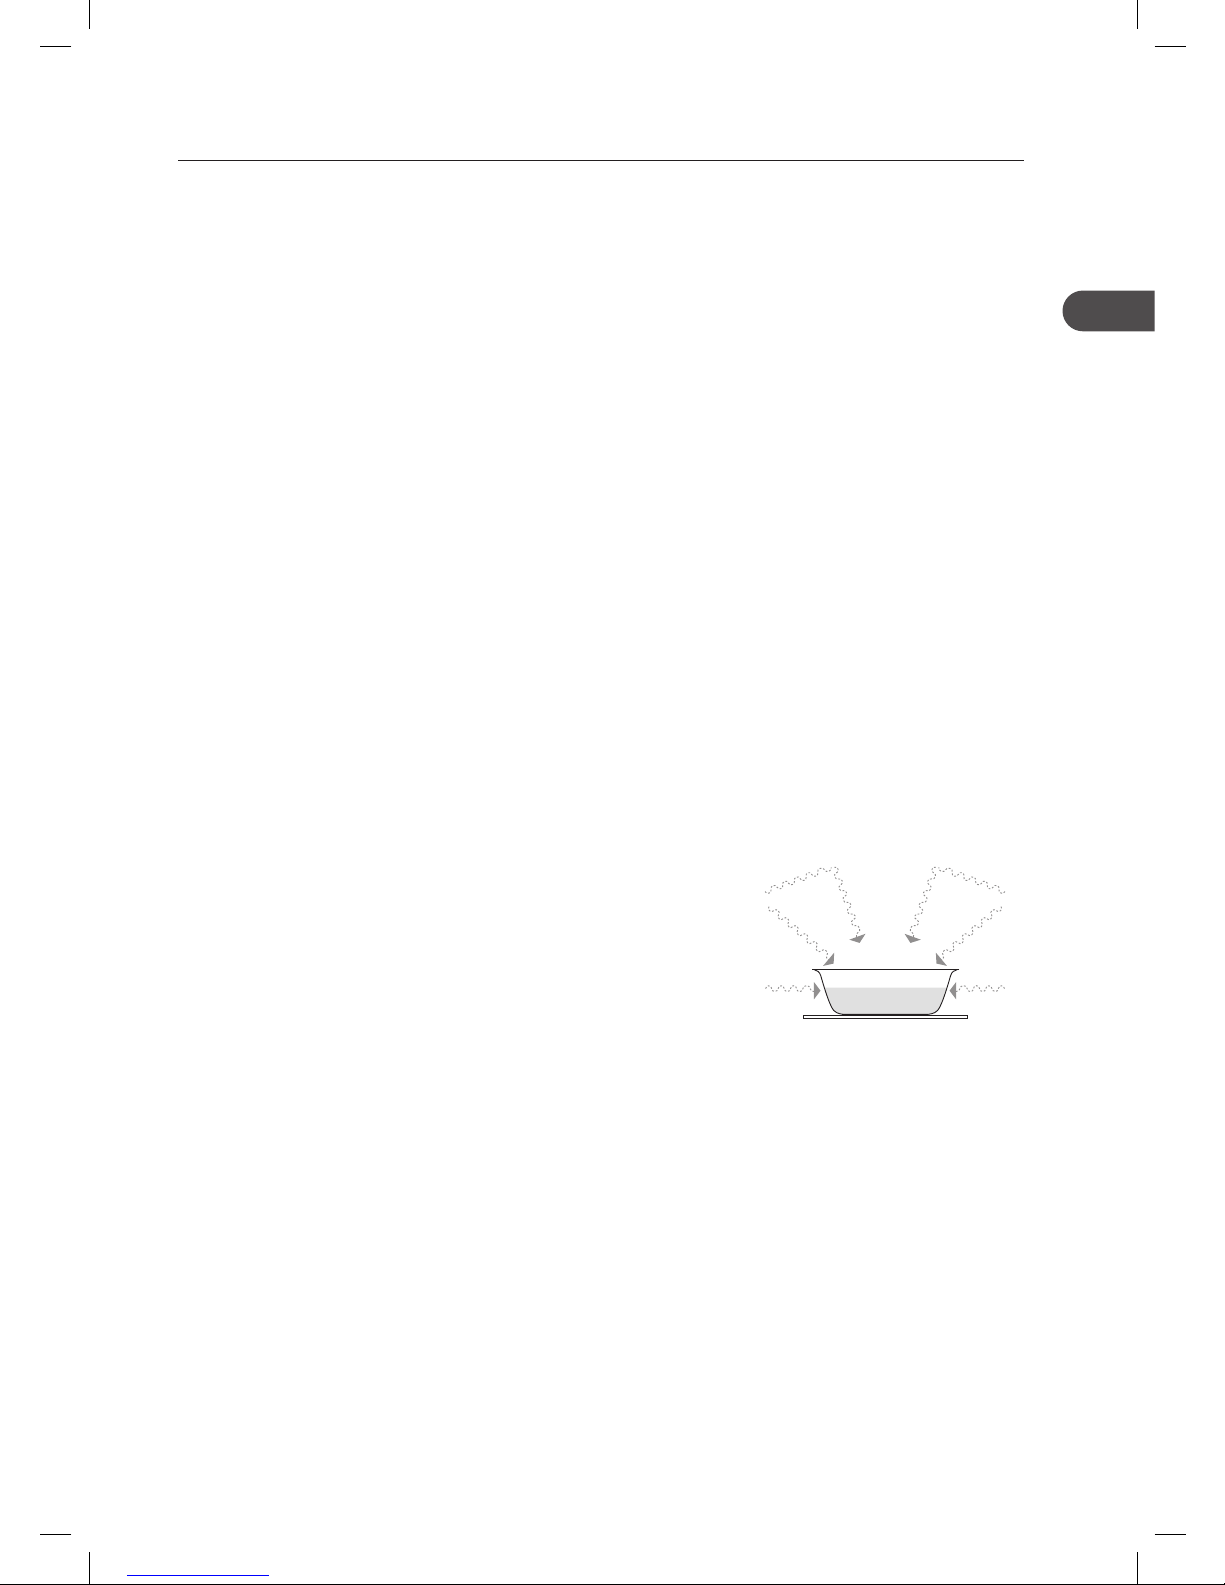
Condensation
As the steam cools, you may find the condensation
gathers in small pools inside your microwave and on the
work surface beneath the door and vents. Always dry
the microwave after cooking foods with a high moisture
content.
Your microwave is designed to let steam escape from the
vents and around the door without microwave energy
escaping. There is no danger of microwave energy
escaping with the steam.
Checking your Microwave
Check your microwave after unpacking.
For your safety, the microwave stops if
the door is opened during cooking. Close
the door and press the Start button to
continue the cooking cycle.
1. Press the Door button to open the door.
Place a cup of water on the glass turntable.
Make sure the cup is microwave safe (it should
not have any decorative metal trim).
2. Close the door.
3. Press the Stop / Clear button to clear any
settings that have already been made.
4. Press the Weight / Time dial once to start a
simple 30-second microwave cooking cycle.
This allows you to check the operation of the
microwave.
5. When the cooking cycle has finished, the
water should be hot (be careful when you take
the cup out of the microwave). Press the Stop
/ Clear button to clear any settings.
3, 5
4
1
Microwave
Grill/Combi
Stop/Clear
Microwave
Grill/Combi
Stop/Clear
Page 11
11
GB
Clock Setting
When the microwave is connected to the mains power, the LED display will show 1:01, and the microwave
will sound once. Please ensure you have set the clock prior to use.
Please follow the steps below to set the clock.
1. Press the Clock button once and the LED
display will also show Hr:12. Press it again
and the LED display will show Hr:24. This
indicate it is in clock setting mode.
2. Turn the Weight / Time dial to adjust the hour
figures. For 12-hour clock (Hr:12), the input
time has to be within 1-12. For 24-hour clock
(Hr:24), the input time has to be within 0-23.
3. Press the Clock button and the minute figures
will flash.
4. Turn the Weight / Time dial to adjust the
minute figures. The input time has to be
within 00-59.
5. Press the Clock button again to complete the
clock setting. “ : ” will start flashing and the
time will illuminate to confirm that the clock
setting is completed.
Microwave
Grill/Combi
Stop/Clear
1, 3, 5
2, 4
Page 12

12
GB
Setting the Child Lock
This feature prevents the electronic operation of the microwave by locking the operation of the control
panel until you have cancelled it.
Please follow the steps below to set the child lock.
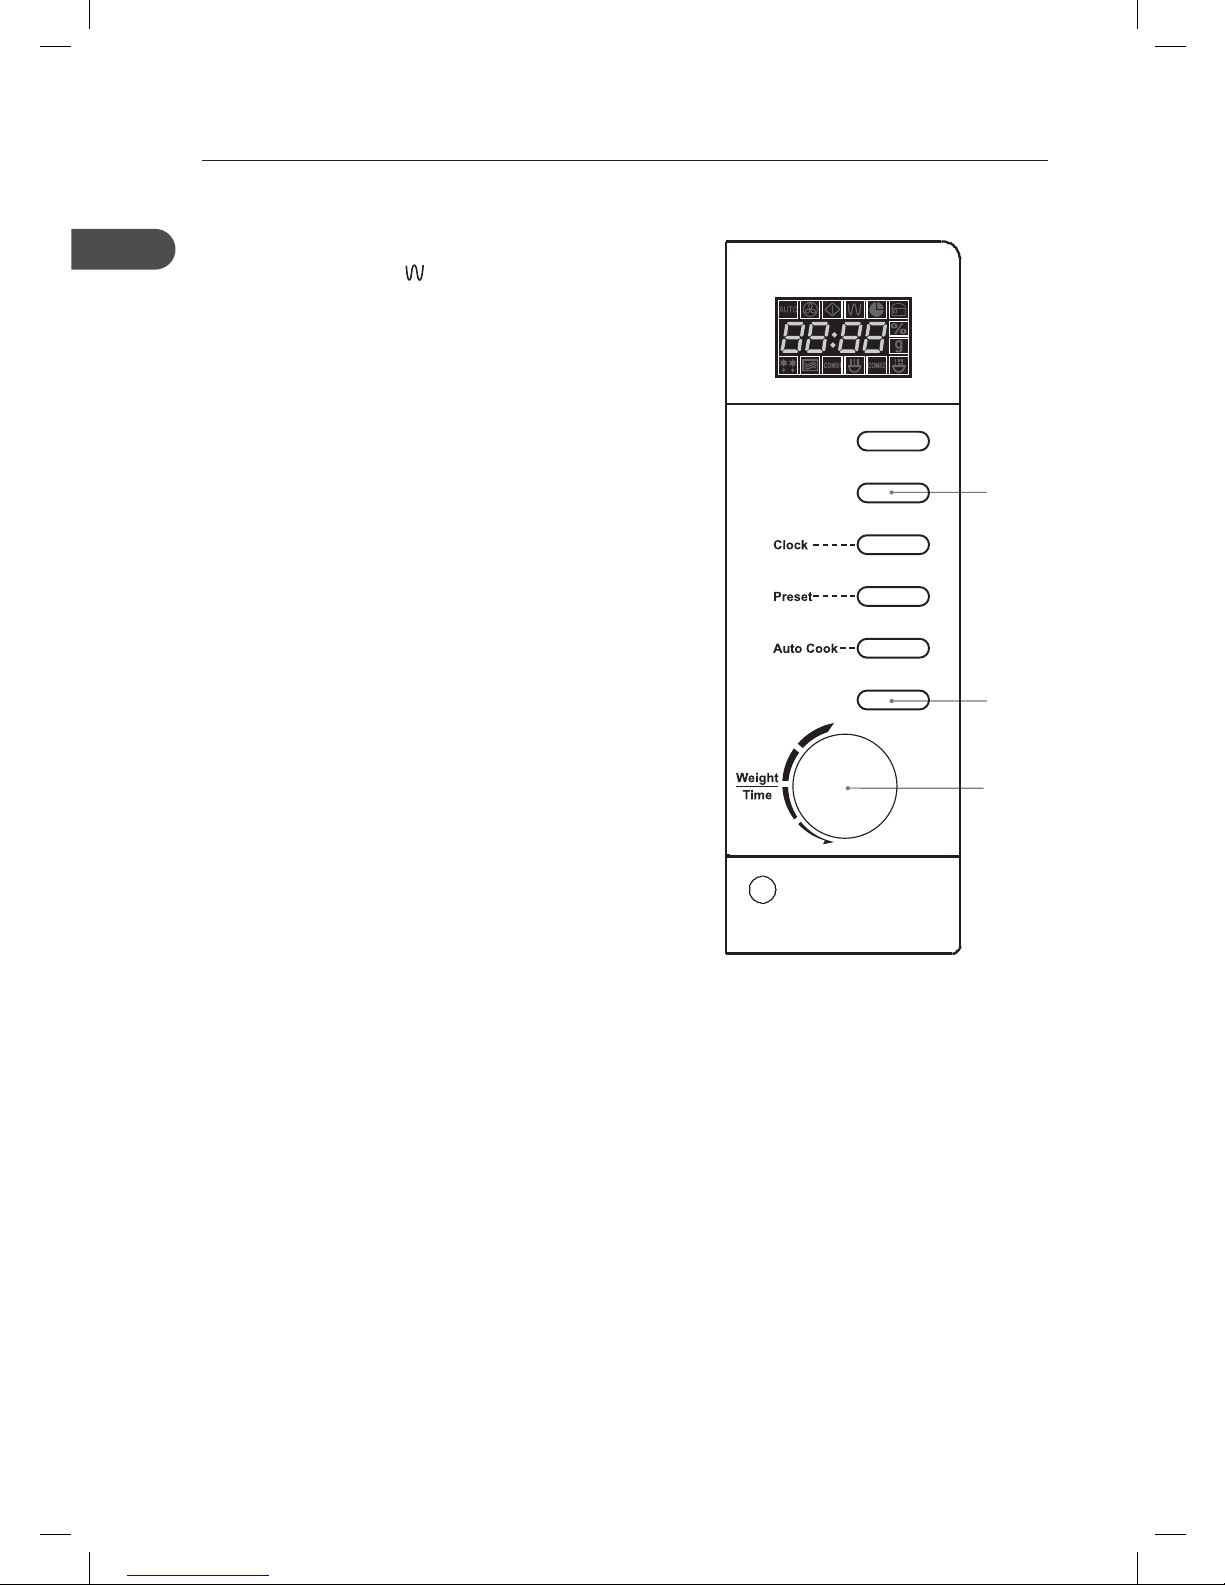
1. Press the Stop / Clear button for 3 seconds
and microwave will sound. The LED display
will also show
to indicate that the
microwave has set the child lock.
2. To release the child lock, press the Stop
/ Clear button again for 3 seconds and the
microwave will sound to indicate that the
microwave has released the child lock.
1, 2
Microwave
Grill/Combi
Stop/Clear
Page 13
13
GB
Microwave Cooking
For simple Microwave Cooking, follow the steps below. For instance, If you want to use 80% microwave
power to cook for 20 minutes.
1. Press the Microwave button once and the LED
display will show 100%,
and .
2. Press the Microwave button again to change
the power level to 80%.
3. Turn the Weight / Time dial to adjust the
cooking time until the LED display shows
20:00.
4. Press the Weight / Time dial once to confirm
and start cooking.
5. Press the Stop / Clear button once to stop
and hold the cooking. Press again to cancel
the setting.
Power Level Control
(For Microwave Cooking)
Order LED Display
Microwave
Power
1
100%
100%
2
80%
80%
3
60%
60%
4
40%
40%
5
20%
20%
6
00%
00%
When removing food from the microwave,
please ensure that the power is switched
off. Operating the microwave without food
in it can result in overheating and damage
the magnetron.
5
3, 4
1, 2
Microwave
Grill/Combi
Stop/Clear
Page 14
14
GB
Grill or Combination Cooking
For Grilling, follow the steps below.
1. Press the Grill / Combi button once and the
LED display will show
.
2. Turn the Weight / Time dial to adjust the
cooking time.
3. Press the Weight / Time dial to confirm and
start the cooking.
4. Press the Stop / Clear button once to stop and
hold the cooking. Press it again to cancel the
setting.
For Combination Cooking, follow the steps below.
1. Press the Grill / Combi button till the LED
display will show COMB1 or COMB2.
2. Turn the Weight / Time dial to adjust the
cooking time.
3. Press the Weight / Time dial to confirm and
start the cooking.
4. Press the Stop / Clear button once to stop and
hold the cooking. Press it again to cancel the
setting.
1
4
2, 3
Microwave
Grill/Combi
Stop/Clear
Page 15
15
GB
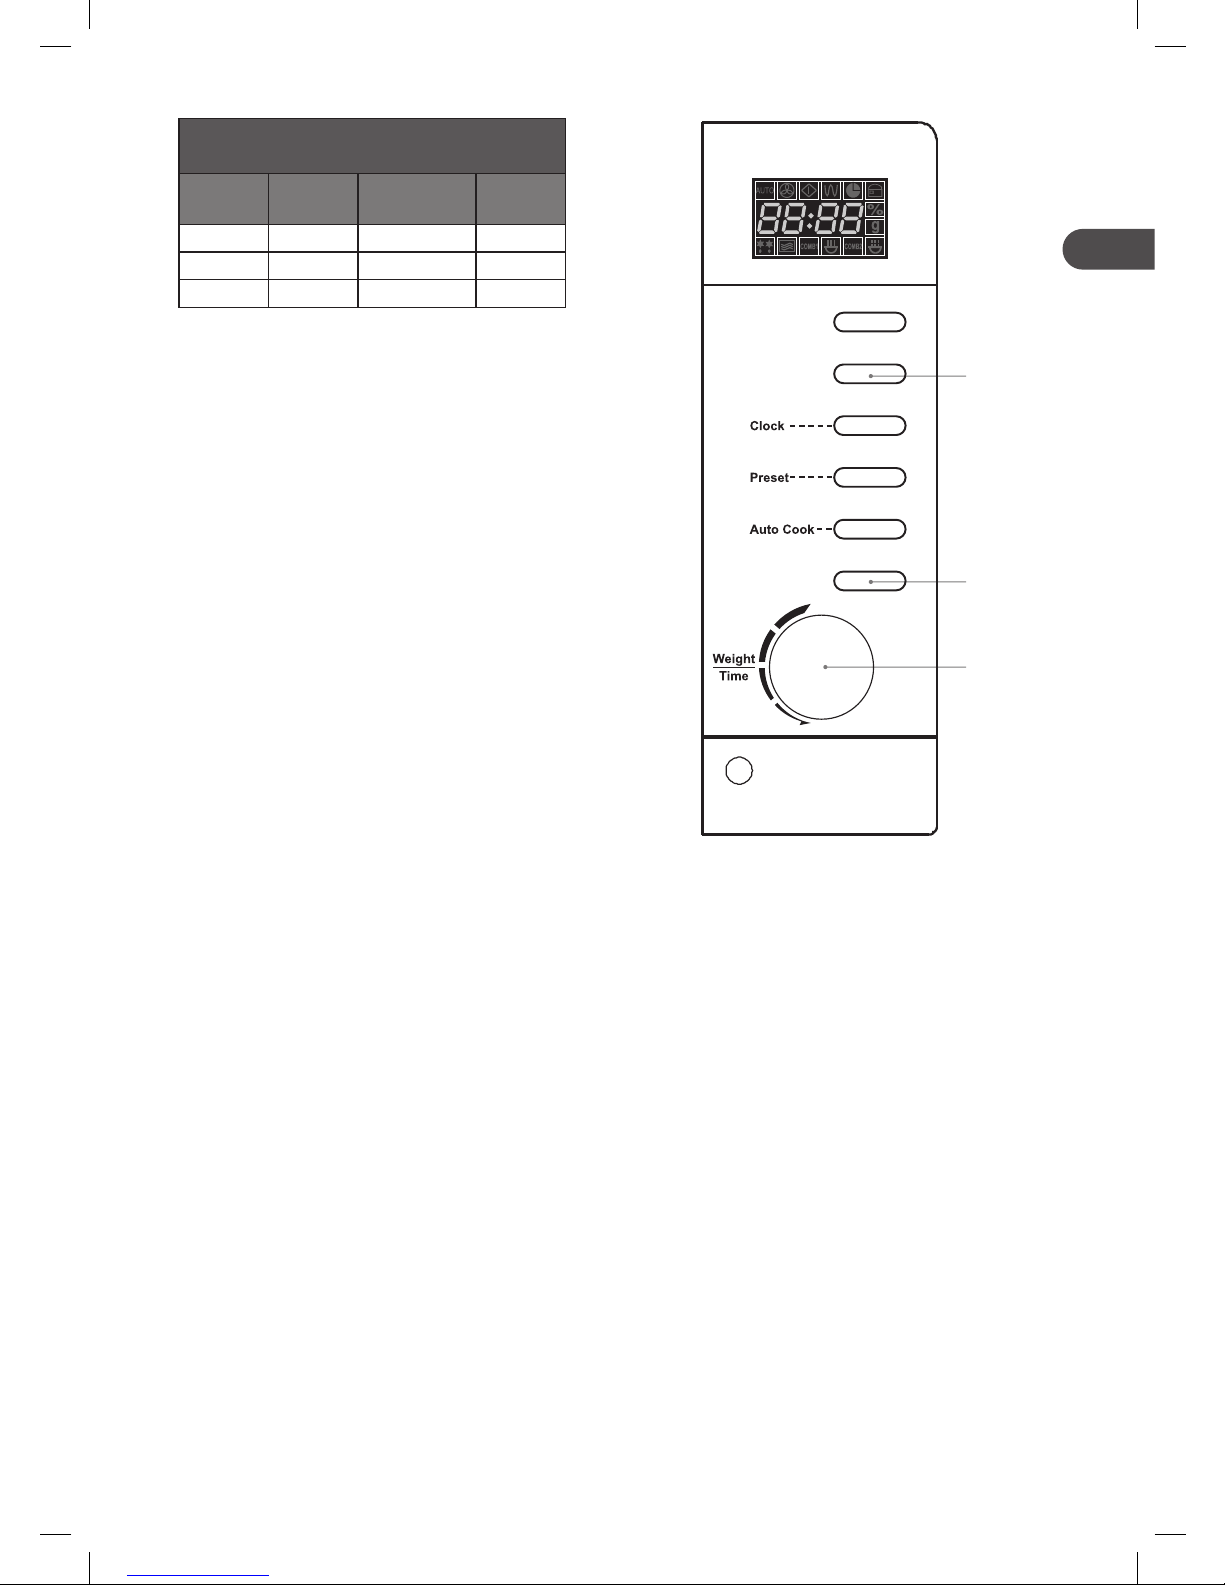
Grill / Combination Button Control
(For Grill and Combination Cooking)
Order
LED
Display
Microwave
Power
Grill
Power
1 G 0% 100%
2 C-1 30% 70%
3 C-2 55% 45%
Please note there are only 2 modes of
combination cooking and their microwave and
grill powers are shown in the table above.
For instance: If you want to do 55% microwave
power and 45% grill power cooking (C-2) for 10
minutes, please follow the steps below.
1. Press the Grill / Combi button till the LED
display will show COMB2.
2. Turn the Weight / Time dial to adjust the
cooking time until the LED display shows
10:00.
3. Press the Weight / Time dial to confirm and
start the cooking.
4. Press the Stop / Clear button once to stop
and hold the cooking. Press again to cancel
the setting.
4
2, 3
1
Microwave
Grill/Combi
Stop/Clear
Page 16
16
GB
Delay Start Cooking (Programme Set in Advance)
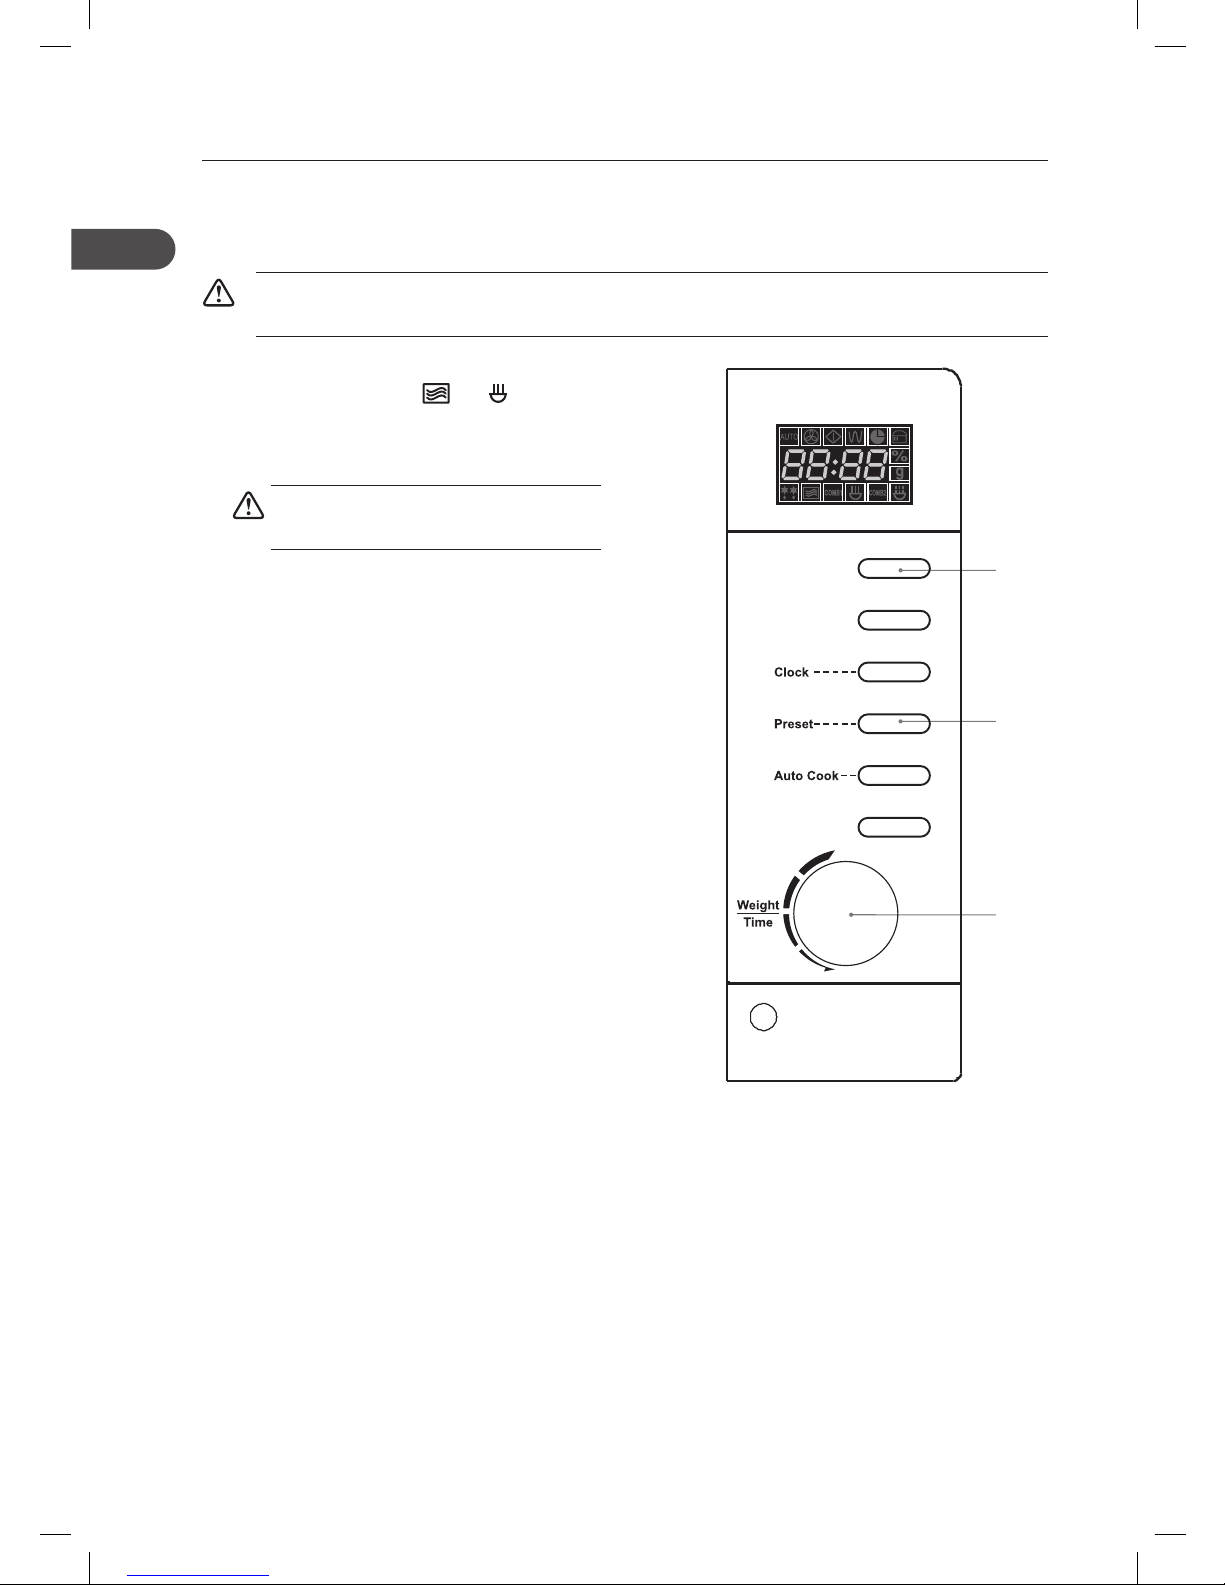
For Delay Start Cooking, follow the steps below.
For instance: The current time is 7 o’clock (morning) and you want to cook with 100% microwave power for
5 minutes at 6 o’clock and 30 minutes (afternoon).
Defrost programme cannot be set in Delay Start Cooking. Ensure the door is closed prior to setting
the programme.
1. Press the Microwave button once and the LED
display will show 100%,
and .
2. Turn the Weight / Time dial to adjust the
cooking time until the LED display shows 5:00.
Do not press the Weight / Time dial to
confirm and start cooking at this point.
3. Press the Preset button to preset the starting
time for the cooking. The hour figure will flash
first.
4. Turn the Weight / Time dial to adjust the
starting time until the LED display shows
6:00 (for 12-hour clock) or 18:00 (for 24-hour
clock).
5. Press the Preset button to preset the starting
time for the cooking. The minute figure will
flash first.
6. Turn the Weight / Time dial to adjust the
starting time until the LED display shows
6:30 (for 12-hour clock) or 18:30 (for 24-hour
clock).
7. Press the Preset button to complete the
setting. The microwave will sound when the
count down reaches the starting time and
cooking will start automatically.
1
3, 5, 7
2, 4, 6
Microwave
Grill/Combi
Stop/Clear
Page 17
17
GB
Auto Cooking
This feature allows you to cook most of your food based on the food category and the weight.
Select the category and choose the default weight of the food. For quick reference of the cooking time and
the default weight, please refer to the Auto Menu table.
Auto Menu
1. Press the Auto Cook button to select Auto
Menu cooking function. The LED display will
show AUTO 01, AUTO 02, AUTO 03 etc.
2. Turn the Weight / Time dial to choose the
default weight for your chosen programme.
Please refer to the Auto Menu table for
information.
3. Press the Weight / Time dial to confirm and
start the cooking.
For AUTO 07-09 programmes, the
microwave will pause and sound after
2/3 of the cooking time has elapsed.
simply, open the door and rotate the
food for better grilling effect. Then, close
the door and press the Weight / Time
dial to continue the cooking.
4. Press the Stop / Clear button once to stop and
hold the cooking. Press it again to cancel the
setting.
For example if you want to cook 300g of fish using
Auto Menu programme. Please follow the steps
below.
• Press the Auto Cook button to select Auto
Menu programme for fish. The LED display will
show AUTO 06 .
• Turn the Weight / Time dial to choose the
default weight until the LED display shows
300.
• Press the Weight / Time dial to confirm and
start the cooking.
• Press the Stop / Clear button once to stop and
hold the cooking. Press it again to cancel the
setting.
4
2, 3
1
Microwave
Grill/Combi
Stop/Clear
Page 18
18
GB
The density and thickness of food can affect its cooking time. Ensure all food is piping hot
and cooked thoroughly before serving. It is essential that food is checked during and after the
recommended cooking time, even if Auto Menu was used.
Auto Menu Table
Menu Weight Display
Cooking
Time
Comments
AUTO 01
Milk / Coffee
1 - cup
(~200ml)
1 1’30”
• Only use suitable microwavable containers and cling
film in the microwave. Pierce the film with a fork before
cooking.
• Check cooking regularly to make sure the water does not
boil over.
2 - cup
(~400ml)
2 2’40”
3 - cup
(~600ml)
3 3’50”
AUTO 02
Rice
150g 150g 19’00”
150g of rice + 300ml
of cold water
• Only use suitable microwavable
containers and cling film in the
microwave. Pierce the film with
a fork before cooking.
• Check cooking regularly to
make sure the water does not
boil over.
300g 300g 22’00”
300g of rice + 600ml
of cold water
450g 450g 25’00”
450g of rice + 900ml
of cold water
600g 600g 28’00”
600g of rice + 1200ml
of cold water
AUTO 03
Spaghetti
100g 100g 22’00”
100g of spaghetti +
800 ml of cold water
• Only use suitable microwavable
containers and cling film in the
microwave. Pierce the film with
a fork before cooking.
• Check cooking regularly to
make sure the water does not
boil over.
200g 200g 27’00”
200g of spaghetti +
1600 ml of cold water
300g 300g 32’00”
300g of spaghetti +
2400 ml of cold water
AUTO 04
Potatoes
1 - potato
(~230g)
1 5’00”
For best results, pierce the potatoes’ skin before cooking.
Once the potatoes are cooked, wrap them in aluminium foil
for at least 5 minutes to ensure they are cooked thoroughly.
2 - potato
(~460g)
2 9’00”
3 - potato
(~690g)
3 13’00”
AUTO 05
Auto reheat
200g 200g 1’30”
Make sure food is cooked thoroughly before consuming.
Additional cooking time may be
required for thicker pieces.
300g 300g 2’00”
400g 400g 2’30”
500g 500g 3’00”
600g 600g 3’30”
700g 700g 4’00”
800g 800g 4’30”
AUTO 06
Fish
200g 200g 3’00”
Make sure food is cooked thoroughly before consuming.
Additional cooking time may be
required for thicker pieces of fish.
300g 300g 4’20”
400g 400g 5’40”
500g 500g 7’00”
600g 600g 8’20”
AUTO 07
Chicken
800g 800g 33’00”
• The microwave will pause and sound after 2/3 cooking
time. Open the door and rotate the chicken for better
grilling effect. Press the Weight / Time dial to continue
the cooking.
• Make sure food is cooked thoroughly before consuming.
Additional cooking time may be required for thicker
pieces of chicken.
1000g 1000g 36’00”
1200g 1200g 39’00”
1400g 1400g 42’00”
AUTO 08
Beef / Mutton
200g 200g 12’00”
• The microwave will pause and sound after 2/3 cooking
time. Open the door and rotate the beef/ mutton for
better grilling effect. Press the Weight / Time dial to
continue the cooking.
• Make sure food is cooked thoroughly before consuming.
Additional cooking time may be required for thicker
pieces of beef / mutton.
300g 300g 15’00”
400g 400g 18’00”
500g 500g 21’00”
600g 600g 24’00”
AUTO 09
Skewered
Meat
100g 100g 9’00”
• The microwave will pause and sound after 2/3 cooking
time. Open the door and rotate the skewered meat for
better grilling effect. Press the Weight / Time dial to
continue the cooking.
• Make sure food is cooked thoroughly before consuming.
Additional cooking time may be required for thicker
pieces of skewered meat.
200g 200g 12’00”
300g 300g 15’00”
400g 400g 18’00”
500g 500g 21’00”
Page 19

19
GB
Quick Start Cooking
This feature allows you to quickly cook your food for 30 seconds with 100% microwave power.
Please follow the steps below.
1. Press the Weight / Time dial to start the quick
start cooking. Press the button again to add
another 30 seconds. You may increase the
cooking time up to 10 minutes.
Microwave
Grill/Combi
Stop/Clear
1
Page 20
20
GB
Defrosting
You may wish to place the frozen food on a microwave safe plate or dish before placing it on the defrost
rack (not supplied in this microwave package). This is to ensure that any liquids released during defrosting
will not spill and dirty the interior of the microwave.
Defrost by weight
1. Turn the Weight / Time dial anticlockwise to
set the weight of your food. The default range
is 100g to 1800g.
2. Press the Weight / Time dial to confirm and
start defrosting.
TIPS: Large items may be icy in the centre.
Therefore, to ensure even thawing, turn them
over from time to time and break them into
smaller pieces during defrosting.
The microwave will sound and pause after
2/3 running time. Open the door and rotate
the food. Close the door and then press the
Weight / Time dial to restart defrosting.
Place roasts fat-side down or whole poultry
breast side down.
Drain liquids during defrosting as the juices
from food can get hot and cook the food.
3. Press the Stop / Clear button once to stop and
hold the defrosting. Press again to cancel the
setting.
3
1, 2
Microwave
Grill/Combi
Stop/Clear
Page 21
21
GB
Querying the Cooking Function
This feature allows you to check and view the current power, time and pre-set time of your selected
cooking program.
To nd out the current cooking power
1. Press the Microwave button once and the LED
display will show the current cooking power
while the microwave is in microwave cooking.
However, this function will not be working in
It will last for 3 seconds and then return to its
original display.
To nd out the time
2. Press the Clock button once and the
LED display will show the time while the
microwave is in microwave cooking. It will last
for 3 seconds and then return to its original
display.
To nd out the pre-set time
3. While the microwave is still in the pre-set
state, press the Preset button once and the
LED display will show the pre-set time. It
will last for 3 seconds and then return to its
original display.
Microwave
Grill/Combi
Stop/Clear
1
2
3
Page 22
22
GB
Cleaning Your Microwave
Cleaning your microwave each time you use it will help to prevent a build up of stubborn marks that can
be difficult to clean.
Unplug your microwave from the mains and wait for it to cool down completely before cleaning.
On the right hand side wall of the cavity is the wave guide cover, microwaves are passed though this to
enable your food to cook. It is important that this wave guide cover is kept clean at all times.
Wipe it with mild detergent and water and leave to dry.
Treat the glass turntable as you would any
glass plate. After you have used it for more
than 15 minutes, allow it to cool down before
you use it again. Do not wash the turntable in
very hot water, doing so could crack it.
Make sure the glass turntable is dry before you
put it back in the microwave.
10
Wash rack and turnable ring in warm water. Do
not use very hot water on them which could
make them warp.
11
The microwave walls have a special enamel
coating which makes cleaning very easy. Use
a soft damp cloth to wipe off any splashes or
a paper towel to mop up any spills. Wipe off
grease with a damp cloth and a little detergent.
Dry thoroughly. As with any, if grease is left to
accumulate, it can smoke and even catch fire.
1
Make sure you keep the outlet grids clean.
2
Keep the front of the microwave clean so that
the door can close properly.
3
Be careful not to spill water into the vents.
4
Do not remove wave guide cover: It is
important to keep the cover clean in the same
manner as the inside of the microwave. If
grease is left to accumulate, it can smoke and
even catch fire.
5
Keep the inside of the door clean with a damp
cloth. Use warm soapy water for stubborn
marks and dry thoroughly.
The inside of the door has a special coating
and must not be cleaned with abrasive pads or
cleaning powders.
6
Clean behind the door ledge.
7
Use warm soapy water to clean the outside of
the microwave. Do not use abrasive pads or
powders that could scratch the surface.
8
Unplug the microwave before cleaning the
power lead and the microwave.
Wipe with a damp cloth and leave to dry
before plugging it back in.
9
Do not remove any fixed parts from the
inside of your microwave during cleaning or
at any other time.
1
4
5
6
8
9
2
3
7
10 11
Page 23
23
GB
Frequently Asked Questions
If a problem does occur, it may often be due to something very minor. The following Q & A may be able to
resolve the problem.
Questions Answers
Why doesn’t the food seem to
cook?
Check that:
• the cooking time has been set
• the door is closed
• the power socket is not overloaded causing the fuse to blow.
Why does the food seem
undercooked or overcooked?
Check that:
• the correct cooking time has been set
• the correct power setting has been used.
How can I stop eggs from popping? When you bake or poach eggs in the microwave, the yolk can
sometimes pop as steam builds up inside it. You can stop the
egg from popping by piercing the yolk with a toothpick before
cooking.
Never cook eggs that are still in their shells.
Why is it so important that I allow
standing time after cooking?
With microwave cooking, many foods build up enough heat
inside them to continue cooking even after they’ve been taken
out of the microwave. Because microwave cooking works from the
outside of food inwards, standing time lets you cook the centre of
the food without the outside being overcooked.
Why does my microwave
sometimes take longer to cook than
it says in the recipe?
First check that the microwave was set just as the recipe said.
Cooking times and heat settings are suggestions to help prevent
overcooking but differences in the weight, size, shape and starting
temperature of food will all affect how long it takes to cook – just
as it does with a conventional microwave. Use your judgement
along with the recipe to check whether the food has been cooked
properly.
Why do I get condensation on the
inside of the door?
Condensation is perfectly normal, especially when you are
cooking food with a high moisture content such as potatoes.
Does the microwave energy get
through the window on the door?
No. The door has a special metal screen with holes in that lets you
see inside but stops microwave energy from getting out.
Steam comes out of the side of the
door and vents. Can microwave
energy get out too?
No. The door and vents are carefully designed to let steam out
during cooking but keep microwave energy in. The gaps are not
big enough for microwave energy to escape.
What happens if the microwave is
switched on while the microwave
is empty?
The microwave will be damaged. Do not switch the microwave
on when there’s nothing inside the microwave. It is a good idea
to keep a cup of water in the microwave just in case someone
accidentally starts the microwave.
Why doesn’t the microwave’s light
illuminate?
Open the door. If the light does not illuminate, the bulb has
probably blown. Call a qualified technician – do not try to change
the bulb yourself.
There are sparks inside the
microwave when I use the
microwave. Will this cause any
damage?
Yes. Make sure that you are not using any metal utensils and that
your containers don’t have a metal trim. You must not use metal
in your microwave when you cook (except aluminium foil).
Light is showing through the vents
and door. Does this mean the
microwave energy can escape?
No. It is normal for the light to be visible and is nothing to be
concerned about.
Why do I get interference on
my TV and radio when I use the
microwave?
Microwaves use radio waves similar to those received by TVs and
radios. You can lessen the interference by moving your microwave
further away from the TV or radio.
Page 24

24
GB
Specication
Model L20GSS10E
Input 230 - 240V~ 50Hz
Microwave Output 700 - 800 Watts
Microwave Frequency 2450MHz
Outside Dimensions
(width x deep x height)
452mm x 370mm x 262mm
Power consumption
Microwave Input 1250 - 1350 Watts
Grill 950 - 1050 Watts
Complies with EEC directives 89/336/EEC and 92/31/EEC.
Because we continually strive to improve our products, we may change specifications without prior notice.
Page 25
25
IT
Congratulazioni per l’acquisto di questo nuovo forno a microonde Logik.
Queste istruzioni operative aiuteranno ad usare il prodotto in sicurezza ed in modo
appropriato.
Prima di usare il forno a microonde Logik
• Leggere accuratamente tutte le istruzioni e conservarle per riferimenti futuri.
• Rimuovere tutti gli imballaggi e le etichette. Smaltirli in modo appropriato.
Prima di chiamare l’assistenza
• Controllare la sezione Risoluzione dei problemi. Le istruzioni aiutano a risolvere alcuni
problemi generici e riducono la necessità di chiamare l’assistenza tecnica.
Disimballaggio
Rimuovere tutti gli imballaggi dall'unità e conservarli. Eseguire lo smaltimento in base alle normative locali.
Sono inclusi i seguenti componenti:
Unità principale
Piatto girevole di vetro x 1
N. art.: XGALK20MBP11
Supporto del piatto girevole x 1
N. art.: XGALK20MBP12
Griglia x 1
N. art.: XGALL20GSS10P41
1 Manuale di istruzioni
N. art.: L20GSS10E-001
Microwave
Grill/Combi
Stop/Clear
Page 26
26
IT
Panoramica del prodotto
Unità principale
Pannello di controllo
Pannello di comando
Display LED
Visualizza l’ora, il tempo di
cottura e l'impostazione.
Tasto Microwave
Usare questo tasto per selezionare
la funzione microonde.
Tasto Orologio
Usare questo tasto per
regolare l'orologio.
Tasto Cottura automatica
Usare questo tasto per scegliere
i programmi del menu di cottura
automatica.
Manopola Peso / Tempo
(tasto Avvio)
Usare questa manopola per
impostare il peso ed il tempo
di cottura.
Può anche essere usato per
avviare / riavviare la cottura.
Tasto Grill / Combinato
Usare questo tasto per selezionare
la funzione grill, o la funzione
microonde e grill combinato.
Tasto Predenito
Usare questo tasto per usare i
tempi di cottura predeniti.
Tasto Stop / Annulla
Usare questo tasto per arrestare la
cottura ed annullare le impostazioni
di cottura.
Tasto Sportello
Microwave
Grill/Combi
Stop/Clear
Microwave
Grill/Combi
Stop/Clear
Page 27

27
IT
Uso della pellicola d'alluminio nel forno a microonde
Fintanto che sono seguite le regole di sicurezza si può usare la pellicola d'alluminio nel forno a microonde.
Come con tutti i metalli, le microonde non possono passare attraverso l'alluminio, fermo restando che
si tenga la pellicola d'alluminio lontana dalle pareti interne del forno non si creeranno scintille e non si
provocheranno guasti al forno.
L'uso della pellicola d'alluminio è un buon modo per schermare quelle parti di cibo che non si vuole
cuocere rapidamente come le altre – ad esempio le parti meno spesse che altrimenti si brucerebbero.
Collocare la pellicola d'alluminio sull'area che si vuole schermare, controllando che la pellicola d'alluminio
non tocchi le parti interne del forno a microonde mentre il piatto gira. Usare un solo foglio d'alluminio alla
volta così da non creare scintille tra i due fogli separati.
Seguire queste istruzioni quando si usa la pellicola d'alluminio nel forno a microonde:
• Rimuovere coperchi di alluminio dai contenitori quando si usa il forno a microonde. Alcuni coperchi
di carta hanno una pellicola d'alluminio –anche questi devono essere rimossi. Se possibile, usare un
coperchio trasparente di materiale sicuro per cottura a microonde.
• Mescolare i cibi durante la cottura se il contenitore ha un coperchio o è coperto da una pellicola.
• Usare sempre il piatto girevole di vetro.
• Usare contenitori bassi ed ampi. Non usare contenitori con una profondità superiore a 1,25 pollici
(3,5 cm).
• Usare ganti da forno quando si maneggiano i contenitori caldi.
• Non coprire completamente il cibo con la pellicola d'alluminio. Le microonde non possono passare
attraverso la pellicola d'alluminio quindi il cibo non si può cucinare.
• Non permettere alla pellicola d'alluminio di toccare la parte interna del forno a microonde.
• Non usare più di un foglio di alluminio per volta.
Page 28

28
IT
2. Scegliere una superficie di lavoro piatta per
il forno a microonde, lontana da sorgenti di
calore come radiatori o caminetti, e lontana da
luoghi molto freddi. Bisogna lasciare 10 cm di
spazio tutto attorno al forno e 30 cm di spazio
sopra al forno per consentire all’aria calda
di dissiparsi dalle aperture di ventilazione
durante la cottura – il forno non è progettato
per l’incasso.
Operazioni preliminari
Questo forno a microonde è progettato per uso domestico. Non deve essere usato in cucine ad uso
commerciali, come ristoranti.
1. Dopo avere disimballato il forno a microonde, verificare non sia stato danneggiato mentre era nella
confezione. Assicurarsi che non ci siano ammaccature e che lo sportello sia chiusa in modo appropriato.
Ammaccature o danni al forno possono consentire la fuoriuscita delle microonde. Assicurarsi di togliere
tutti i materiali d'imballaggio dall'interno del forno a microonde. Sistemare gli imballaggi / sacchetti di
plastica in modo sicuro e tenerli lontani dalla portata di neonati e bambini.
3. Collegare il forno a microonde ad una presa
elettrica standard per elettrodomestici (230
Volt, 13 Ampère). Evitare di usare una presa di
corrente con adattatori che accomodano altri
elettrodomestici. Non usare adattatori.
4. Collocare il supporto del piatto girevole
all'interno del forno e mettere il piatto sopra
il supporto. Il supporto del piatto girevole
è modellato per incastrarsi in sicurezza
sul perno. Ogni volta che si usa il forno a
microonde è obbligatorio usare il supporto del
piatto girevole con il suo piatto.
Veduta inferiore
30cm
10cm10cm
Microwave
Grill/Combi
Stop/Clear
5. Per proteggere la superficie di lavoro, si
raccomanda di attaccare dei feltrini antiscivolo
e antigraffio (non forniti in dotazione) alla
parte inferiore del forno a microonde.
Page 29
29
IT
Introduzione alla cottura al microonde
Ricordarsi sempre le regole basilari di sicurezza che si devono osservare quando si usa qualsiasi utensile
per la cottura o quando si maneggiano i cibi caldi.
Di seguito sono descritte delle linee guida di base per la cottura a microonde.
Cucinare con il forno a microonde
• La cottura con il forno a microonde è molto più rapida che con i forni convenzionali e, mentre è
necessario assicurarsi che il cibo sia cotto completamente, è necessario anche prestare attenzione a
non stracuocere i cibi.
• Le microonde non riscaldano in modo uniforme, quindi è importante mescolare i cibi per distribuire il
calore. Mescolare sempre dall’esterno all’interno.
• Se si cucinano cibi diversi al contempo, come patate al forno e piccoli dolci, arrangiarli equamente sul
piatto girevole così che cucinino uniformemente. Non impilare mai i cibi nel forno a microonde.
• Durante la cottura, girare cibi come gli arrosti ed il pollame così che la parte superiore ed inferiore
si cucinino in modo uniforme. Si raccomanda anche di girare i pezzi di carne o pollame, in modo
particolare se non sono stati disossati.
• La carne ed il pollame che è cotto per 15 minuti o più si rosolerà leggermente nel suo stesso grasso.
Qualsiasi cosa cotta per periodi inferiori può essere scurita con un sugo per dargli un colore appetitoso.
• Si possono usare fogli di alluminio per coprire le parti di cibo meno spesse per impedire che
stracuociano prima che le parti più spesse abbiano la possibilità di cucinarsi. Usare poco alluminio e
coprire accuratamente il cibo o il contenitore in modo che non tocchi alcuna parte interna del forno a
microonde, diversamente si provocheranno scintille.
• I forni a microonde cucinano i cibi usando le microonde che sono simili alle onde radio che si trovano
in natura. Di norma queste “onde” si disperdono nell'atmosfera, però in un forno a microonde sono
concentrate sui cibi provocandone il riscaldamento.
• Le microonde non possono passare attraverso il metallo – quindi non possono uscire dal forno – però
possono passare attraverso materiali come vetro, porcellana, plastica e carta.
Questi materiali sono utilizzati nella produzione di utensili
sicuri per la cottura a microonde.
• Tuttavia questi si scalderanno come il cibo in essi contenuto
inizia a scaldarsi.
L'energia del forno a microonde si concentra sul contenuto
d’acqua dei cibi provocando molte piccole vibrazioni. Le frizioni
diventano così intense che il contenuto idrico – ed il cibo -
si scalda.
Page 30

30
IT
Controllo degli utensili usati per la cucinare
La maggior parte degli utensili resistenti al calore, non metallici, possono essere usati nel forno a
microonde. Se non si è certi di poter usare un utensile nel forno a microonde, eseguire questo semplice
test:
1. Mettere l’utensile nel forno vicino ad una tazza riempita d’acqua – usare una tazza di materiale sicuro
per cottura a microonde. Chiudere lo sportello.
2. Accendere il forno a microonde per soli 30 secondi.
3. Dopo 30 secondi controllare, facendo attenzione, se l’acqua si è riscaldata.
4. Se l’acqua non si è riscaldata mentre l’utensile si è riscaldato, significa che l’utensile non è adatto per il
forno a microonde e quindi non deve essere usato.
5. Non toccare l’utensile a mani nude perché potrebbe essere molto caldo.
Page 31

31
IT
Categorie di cottura al microonde
Il forno è stato controllato ed è stato etichettato in conformità all’accordo volontario del governo sul
riscaldamento dei cibi precotti.
Le caratteristiche di riscaldamento ed i livelli di potenza dei forno a microonde di solito sono calcolati
usando quantità relativamente grandi di cibo (un carico di 1.000 grammi, IEC 705) però molte confezioni di
cibi precotti hanno pesi inferiori, spesso di 350 grammi circa.
Il governo, in collaborazione con le aziende alimentari ed i produttori di forni a microonde, ha impostato
un sistema di categorie che aiuta a scegliere i tempi di riscaldamento dei cibi precotti.
800W
E
La potenza d’uscita del forno a microonde è 800 W.
La categoria di riscaldamento del forno a
microonde è E.
Controllare i tempi di cottura della categoria E sulla
confezione dei cibi per vedere quanto a lungo
devono essere cucinati. Usare l’esempio che segue
come riferimento.
Per cucinare al microonde:
1. Rimuovere la confezione esterna.
2. Bucare il coperchio DIVERSE VOLTE.
3. Collocare su un piatto adatto al forno a
microonde.
4. Scaldare a massima potenza.
5. Girare a metà cottura.
Categoria di
riscaldamento
Wattaggio
(IEC705)
B D 650 W 750W
Massima
potenza
(in minuti)
2 2 2 2
Girare Girare Girare
Massima
potenza
(in minuti)
2 1,5 2 1,5
Tempo di
riposo
(in minuti)
1 1 1 1
Per cucinare i congelati:
1. Rimuovere la confezione esterna.
2. Bucare il coperchio DIVERSE VOLTE.
3. Collocare su un piatto adatto al forno a
microonde.
4. Scaldare a massima potenza.
5. Girare a metà cottura.
Categoria di
riscaldamento
Wattaggio
(IEC705)
B D 650 W 750W
Massima
potenza
(in minuti)
3 2,5 3 2,5
Girare Girare Girare
Massima
potenza
(in minuti)
4 3,5 4 3,5
Tempo di
riposo
(in minuti)
1 1 1 1
Page 32

32
IT
Vapore
Quando si scalda il cibo con il forno a microonde, come l’acqua contenuta nel cibo si scalda si trasforma in
vapore ed evapora.
Il vapore che si forma durante la cottura al forno a microonde è completamente sicuro. Deve uscire dal
forno a microonde per impedire che si crei pressione all'interno del forno. L’uscita avviene dalle aperture di
ventilazione sul retro del forno a microonde e dai bordi dello sportello.
Condensa
Come il vapore si raffredda, si raccoglie in piccole
gocce sulle superfici interne del forno a microonde,
sullo sportello ed attorno alle aperture di ventilazione.
Asciugare sempre il forno dopo la cottura di cibi ad alto
contenuto d’acqua.
Il forno a microonde è progettato per consentire al
vapore di uscire dalle aperture di ventilazione e dai bordi
dello sportello senza tuttavia che ci sia la fuoriuscita
di microonde. Non c'è pericolo che le microonde
fuoriescano insieme al vapore.
Pulizia del forno a microonde
Controllare il forno a microonde dopo averlo
disimballato.
Come misura di sicurezza il forno a
microonde si spegne quando si apre lo
sportello durante la cottura. Chiudere
lo sportello e premere il tasto Start per
continuare il ciclo di cottura.
1. Premere il tasto Door (Sportello) per aprire lo
sportello.
Mettere una tazza con dell’acqua sul piatto
girevole di vetro.
Assicurarsi che la tazza sia di materiale
sicuro per cottura a microonde (non deve
avere decorazioni o finiture metalliche come
dorature).
2. Chiudere lo sportello.
3. Premere il tasto Stop / Clear per annullare
qualsiasi impostazione eseguita in precedenza.
4. Premere una volta la manopola Weight / Time
(Peso / Tempo) per avviare un semplice ciclo
di cottura di 30 secondi. Questo permette
di controllare il funzionamento del forno a
microonde.
5. Al termine del ciclo di cottura, l’acqua deve
essere calda (prestare attenzione quando
si prende la tazza dal forno a microonde).
Premere il tasto Stop / Clear (Stop / Annulla)
per annullare qualsiasi impostazione.
3, 5
4
1
Microwave
Grill/Combi
Stop/Clear
Microwave
Grill/Combi
Stop/Clear
Page 33

33
IT
Impostazione dell’orologio
Quando il forno è collegato alla corrente elettrica, il display LED visualizzerà 1:01 ed il forno a microonde
emetterà un avviso sonoro. Assicurarsi di avere impostato l’ora prima dell’uso.
Attenersi alle istruzioni che seguono per
impostare l’ora.
1. Premere una volta il tasto Clock (Orologio)
ed il display LED visualizzerà Hr:12. Premerlo
di nuovo ed il display LED visualizzerà Hr:24.
Questo indica che l’orologio è in modalità
d’impostazione.
2. Girare la manopola Weight / Time (Peso /
Tempo) per regolare l’ora. Per l’ora nel formato
delle 12 ore (Hr:12) il valore dell’impostazione
deve essere compreso tra 1 e 12. Per l’ora
nel formato delle 24 ore (Hr:24) il valore
dell’impostazione deve essere compreso tra 0
e 23.
3. Premere il tasto Clock (Orologio) ed i minuti
lampeggeranno.
4. Girare la manopola Weight / Time (Peso
/ Tempo) per regolare i minuti. Il valore
dell’impostazione deve essere compreso tra
00 e 59.
5. Premere di nuovo il tasto Clock (Orologio)
per completare l’impostazione. “ : ” inizierà
a lampeggiare e l’ora si illuminerà per
confermare che l’impostazione è stata
completata.
Microwave
Grill/Combi
Stop/Clear
1, 3, 5
2, 4
Page 34

34
IT
Impostazione del blocco per i bambini
Questa funzione previene l’uso del forno a microonde bloccando il funzionamento del pannello di
controllo, che resta attivo finché non è annullato.
Attenersi alle istruzioni che seguono per
impostare il blocco.
1. Premere per 3 secondi il tasto Stop / Clear
(Stop / Annulla), il forno a microonde
emetterà un avviso sonoro. Il display LED
visualizzerà
per indicare che il blocco
è stato impostato.
2. Per annullare il blocco, premere di nuovo
per 3 secondi il tasto Stop / Clear (Stop /
Annulla), il forno a microonde emetterà un
avviso sonoro per indicare che il blocco è stato
annullato.
1, 2
Microwave
Grill/Combi
Stop/Clear
Page 35

35
IT
Cottura al microonde
Attenersi alle istruzioni che seguono per la cottura semplice a microonde. Ad esempio: si vuole usare l’80%
di potenza microonde per una cottura di 20 minuti.
1. Premere una volta il tasto Microwave ed il
display LED visualizzerà 100%,
e .
2. Premere di nuovo il tasto Microwave per
impostare il livello di potenza su 80%.
3. Girare la manopola Weight / Time (Peso /
Tempo) per regolare il tempo di cottura finché
il display LED visualizza 20:00.
4. Premere di nuovo la manopola Weight / Time
(Peso / Tempo) per confermare ed avviare la
cottura.
5. Premere una volta il tasto Stop / Clear (Stop
/ Annulla) per arrestare e sospendere la
cottura. Premere di nuovo per annullare
l’impostazione.
Controllo del livello di potenza
(per la cottura a microonde)
Ordine Display LED
Potenza
microonde
1
100%
100%
2
80%
80%
3
60%
60%
4
40%
40%
5
20%
20%
6
00%
00%
Assicurarsi che il forno a microonde
sia spento prima di rimuovere il cibo. Il
funzionamento del forno a microonde
senza cibo al suo interno si provoca il
surriscaldamento e danni al magnetron.
5
3, 4
1, 2
Microwave
Grill/Combi
Stop/Clear
Page 36

36
IT
Cottura grill o combinata
Attenersi alle istruzioni che seguono per la cottura grill.
1. Premere una volta il tasto Grill / Combi (Grill /
Combinato) ed il display LED visualizzerà
.
2. Girare la manopola Weight / Time (Peso /
Tempo) per regolare il tempo di cottura.
3. Premere la manopola Weight / Time (Peso /
Tempo) per confermare ed avviare la cottura.
4. Premere una volta il tasto Stop / Clear (Stop
/ Annulla) per arrestare e sospendere la
cottura. Premerlo di nuovo per annullare
l’impostazione.
Attenersi alle istruzioni che seguono per la cottura combinata.
1. Premere il tasto Grill / Combi (Grill /
Combinato) finché il display LED visualizza
COMB1 o COMB2.
2. Girare la manopola Weight / Time (Peso /
Tempo) per regolare il tempo di cottura.
3. Premere la manopola Weight / Time (Peso /
Tempo) per confermare ed avviare la cottura.
4. Premere una volta il tasto Stop / Clear (Stop
/ Annulla) per arrestare e sospendere la
cottura. Premerlo di nuovo per annullare
l’impostazione.
1
4
2, 3
Microwave
Grill/Combi
Stop/Clear
Page 37

37
IT
Tasto di controllo Grill / Combi.
(per la cottura grill o combinata)
Ordine
Display
LED
Potenza
microonde
Potenza
grill
1 G 0% 100%
2 C-1 30% 70%
3 C-2 55% 45%
Notare che ci sono solo 2 modalità per la cottura
combinata e le rispettive potenze microonde e
grill sono mostrate nella tabella precedente.
Ad esempio: Attenersi alle istruzioni che seguono
per una cottura di 10 minuti con potenza
microonde del 55% e potenza grill del 45% (C-2).
1. Premere il tasto Grill / Combi (Grill /
Combinato) finché il display LED visualizza
COMB2.
2. Girare la manopola Weight / Time (Peso /
Tempo) per regolare il tempo di cottura finché
il display LED visualizza 10:00.
3. Premere la manopola Weight / Time (Peso /
Tempo) per confermare ed avviare la cottura.
4. Premere una volta il tasto Stop / Clear (Stop
/ Annulla) per arrestare e sospendere la
cottura. Premere di nuovo per annullare
l’impostazione.
4
2, 3
1
Microwave
Grill/Combi
Stop/Clear
Page 38

38
IT
Avvio ritardato della cottura (programma impostato
in anticipo)
Attenersi alle istruzioni che seguono per l’avvio ritardato della cottura.
Ad esempio: Sono le 7 (del mattino) e si vuole cucinare una pietanza col 100% di potenza microonde per 5
minuti alle 6:30 (del pomeriggio).
Il programma di scongelamento non può essere impostato sulla modalità di Avvio ritardato della
cottura. Assicurarsi che lo sportello sia chiuso prima di impostare il programma.
1. Premere una volta il tasto Microwave ed il
display LED visualizzerà 100%
e .
2. Girare la manopola Weight / Time (Peso /
Tempo) per regolare il tempo di cottura finché
il display LED visualizza 5:00.
A questo punto non premere ancora
la manopola Weight / Time (Peso /
Tempo) per confermare ed avviare la
cottura.
3. Premere il tasto Preset (Predenito) per
impostare l’orario d’inizio della cottura. Le ore
inizieranno a lampeggiare.
4. Girare la manopola Weight / Time (Peso /
Tempo) per regolare l’orario d’avvio finché
il display LED visualizza 6:00 (per il formato
delle 12 ore) oppure 18:00 (per il formato
delle 24 ore).
5. Premere il tasto Preset (Predenito) per
impostare l’orario d’inizio della cottura. I
minuti inizieranno a lampeggiare.
6. Girare la manopola Weight / Time (Peso /
Tempo) per regolare l’orario d’avvio finché
il display LED visualizza 6:30 (per il formato
delle 12 ore) oppure 18:30 (per il formato
delle 24 ore).
7. Premere il tasto Preset (Predenito)
per completare l’impostazione. Il forno a
microonde emetterà un avviso sonoro;
quando il conto alla rovescia raggiunge l’orario
d’inizio, la cottura si avvierà automaticamente.
1
3, 5, 7
2, 4, 6
Microwave
Grill/Combi
Stop/Clear
Page 39

39
IT
Cottura automatica
Questa funzione permette di cucinare la maggior parte dei cibi in base alla categoria ed al peso del cibo.
Selezionare la categoria e scegliere il peso predefinito del cibo. Fare riferimento alla tabella Menu di
cottura automatica per un riferimento rapido dei tempi di cottura e dei pesi predefiniti.
Menu di cottura automatica
1. Premere il tasto Auto Cook per selezionare la
funzione di cottura automatica. Il display LED
visualizzerà AUTO 01, AUTO 02, AUTO 03
eccetera.
2. Girare la manopola Weight / Time (Peso /
Tempo) per scegliere il peso predefinito per il
programma selezionato. Fare riferimento alla
tabella del Menu di cottura automatica per
informazioni.
3. Premere la manopola Weight / Time (Peso /
Tempo) per confermare ed avviare la cottura.
Per i programmi AUTO 07-09, il forno
a microonde sospenderà la cottura ed
emetterà un avviso sonoro quando sono
trascorsi 2/3 del tempo di cottura. Aprire
lo sportello e girare il cibo per ottenere
una migliore cottura grill. Poi, chiudere
lo sportello e premere la manopola
Weight / Time (Peso / Tempo) per
continuare la cottura.
4. Premere una volta il tasto Stop / Clear (Stop
/ Annulla) per arrestare e sospendere la
cottura. Premerlo di nuovo per annullare
l’impostazione.
Ad esempio: si vogliono cucinare 300g di pesce
usando il programma di cottura automatica.
Attenersi alle istruzioni che seguono.
• Premere il tasto Auto Cook per selezionare il
programma di cottura automatica per il pesce.
Il display LED visualizzerà AUTO 06 .
• Girare la manopola Weight / Time (Peso /
Tempo) per scegliere il peso predefinito finché
il display LED visualizza 300.
• Premere la manopola Weight / Time (Peso /
Tempo) per confermare ed avviare la cottura.
• Premere una volta il tasto Stop / Clear (Stop
/ Annulla) per arrestare e sospendere la
cottura. Premerlo di nuovo per annullare
l’impostazione.
4
2, 3
1
Microwave
Grill/Combi
Stop/Clear
Page 40

40
IT
La densità e lo spessore del cibo influenzano i tempi di cottura. Assicurarsi che tutto il cibo sia
bollente e completamente cotto prima di servirlo. È essenziale cucinare il cibo per il tempo
raccomandato e controllarlo durante e dopo la cottura, anche se è stato usata la cottura automatica.
Tabella del Menu di cottura automatica
Menu Peso Display
Tempo di
cottura
Commenti
AUTO 01
Latte / Caffè
1 tazza (circa
200 ml)
1 1’30”
• Usare solamente contenitori adatti al microonde e pellicola di
plastica. Forare la pellicola con una forchetta prima della cottura.
• Controllare regolarmente la cottura per accertarsi che il liquido non
esca quando è in ebollizione.
2 tazza (circa
400ml)
2 2’40”
3 tazza (circa
600ml)
3 3’50”
AUTO 02
Riso
150g 150g 19’00”
150 g di riso + 300 ml
di acqua fredda
• Usare solamente contenitori adatti al
microonde e pellicola di plastica. Forare
la pellicola con una forchetta prima della
cottura.
• Controllare regolarmente la cottura per
accertarsi che il liquido non esca quando è
in ebollizione.
300g 300g 22’00”
300g di riso + 600ml
di acqua fredda
450g 450g 25’00”
450g di riso + 900ml
di acqua fredda
600g 600g 28’00”
600g di riso + 1.200ml
di acqua fredda
AUTO 03
Spaghetti
100g 100g 22’00”
100 g di spaghetti
+ 800 ml di acqua
fredda
• Usare solamente contenitori adatti al
microonde e pellicola di plastica. Forare
la pellicola con una forchetta prima della
cottura.
• Controllare regolarmente la cottura per
accertarsi che il liquido non esca quando è
in ebollizione.
200g 200g 27’00”
200g di spaghetti +
1.600 ml di acqua
fredda
300g 300g 32’00”
300g di spaghetti +
2.400 ml di acqua
fredda
AUTO 04
Patate
1 patata
(circa 230 g)
1 5’00”
Forare la buccia delle patate con una forchetta prima della cottura
per ottenere risultati migliori. Dopo la cottura, avvolgere le patate
in pellicola d’alluminio e lasciarle riposare per almeno 5 minuti per
garantire la completa cottura.
2 patate
(circa 460 g)
2 9’00”
3 patata
(circa 690g)
3 13’00”
AUTO 05
Riscaldamento
automatico
200g 200g 1’30”
Assicurarsi che il cibo sia completamente cotto prima di mangiarlo.
Potrebbe essere necessario altro tempo di cottura per i pezzi più
spessi.
300g 300g 2’00”
400g 400g 2’30”
500g 500g 3’00”
600g 600g 3’30”
700g 700g 4’00”
800g 800g 4’30”
AUTO 06
Pesce
200g 200g 3’00”
Assicurarsi che il cibo sia completamente cotto prima di mangiarlo.
Potrebbe essere necessario altro tempo di cottura per i pezzi di pesce
più spessi.
300g 300g 4’20”
400g 400g 5’40”
500g 500g 7’00”
600g 600g 8’20”
AUTO 07
Pollo
800g 800g 33’00”
• Il forno a microonde sospenderà la cottura ed emetterà un avviso
sonoro quando sono trascorsi 2/3 del tempo di cottura. Aprire lo
sportello e girare il pollo per ottenere una migliore cottura grill.
Premere la manopola Weight / Time (Peso / Tempo) per continuare
la cottura.
• Assicurarsi che il cibo sia completamente cotto prima di mangiarlo.
Potrebbe essere necessario altro tempo di cottura per i pezzi di
pollo più spessi.
1.000g 1.000g 36’00”
1.200g 1.200g 39’00”
1.400g 1.400g 42’00”
AUTO 08
Manzo /
Montone
200g 200g 12’00”
• Il forno a microonde sospenderà la cottura ed emetterà un avviso
sonoro quando sono trascorsi 2/3 del tempo di cottura. Aprire lo
sportello e girare il manzo/montone per ottenere una migliore
cottura grill. Premere la manopola Weight / Time (Peso / Tempo)
per continuare la cottura.
• Assicurarsi che il cibo sia completamente cotto prima di mangiarlo.
Potrebbe essere necessario altro tempo di cottura per i pezzi di
manzo/montone più spessi.
300g 300g 15’00”
400g 400g 18’00”
500g 500g 21’00”
600g 600g 24’00”
AUTO 09
Spiedini
100g 100g 9’00”
• Il forno a microonde sospenderà la cottura ed emetterà un avviso
sonoro quando sono trascorsi 2/3 del tempo di cottura. Aprire lo
sportello e girare gli spiedini per ottenere una migliore cottura grill.
Premere la manopola Weight / Time (Peso / Tempo) per continuare
la cottura.
• Assicurarsi che il cibo sia completamente cotto prima di mangiarlo.
Potrebbe essere necessario altro tempo di cottura per i pezzi più
spessi degli spiedini.
200g 200g 12’00”
300g 300g 15’00”
400g 400g 18’00”
500g 500g 21’00”
Page 41

41
IT
Cottura rapida
Questa funzione permette di cucinare rapidamente il cibo per 30 secondi col 100% di potenza microonde.
Attenersi alle istruzioni che seguono.
1. Premere la manopola Weight / Time (Peso /
Tempo) per avviare la cottura rapida. Premere
di nuovo la manopola per aggiungere altri
30 secondi. Il tempo di cottura può essere
aumentato fino a 10 minuti.
Microwave
Grill/Combi
Stop/Clear
1
Page 42

42
IT
Scongelamento
Collocare il cibo congelato in un piatto o contenitore di materiale sicuro per cottura a microonde, oppure
sulla griglia per lo scongelamento (non fornita in dotazione con questo forno a microonde). Questo
per garantire che i liquidi rilasciati durante lo scongelamento non si disperdano all’interno del forno a
microonde, sporcandolo.
Scongelamento a peso
1. Girare in senso antiorario la manopola Weight
/ Time (Peso / Tempo) per impostare il peso
del cibo. L’impostazione predefinita va da 100
g a 1.800 g.
2. Premere la manopola Weight / Time (Peso
/ Tempo) per confermare ed avviare lo
scongelamento.
SUGGERIMENTI: I pezzi di grandi dimensioni
possono essere ghiacciati al centro. Quindi,
durante la procedura, girarli di tanto in tanto e
poi romperli in pezzi più piccoli per garantire
uno scongelamento completo.
Il forno a microonde sospenderà lo
scongelamento ed emetterà un avviso sonoro
quando sono trascorsi 2/3 del tempo di
scongelamento. Aprire lo sportello e girare
il cibo. Chiudere lo sportello e premere la
manopola Weight / Time (Peso / Tempo) per
riavviare lo scongelamento.
Collocare la parte grassa delle carni o la parte
della pelle del petto di pollo rivolta verso il
basso.
Eliminare i liquidi durante lo scongelamento
perché si scaldano e cucinano il cibo.
3. Premere una volta il tasto Stop / Clear
(Stop / Annulla) per arrestare e sospendere
lo scongelamento. Premere di nuovo per
annullare l’impostazione.
3
1, 2
Microwave
Grill/Combi
Stop/Clear
Page 43

43
IT
Controllo della funzione di cottura
Questa funzione permette di controllore e visualizzare la potenza corrente, l’ora ed il tempo impostato del
programma di cottura selezionato.
Controllo della potenza di cottura corrente
1. Premere una volta il tasto Microwave ed il
display LED visualizzerà la potenza di cottura
corrente quando il forno è in modalità di
cottura a microonde. However, this function
will not be working in L’indicazione resterà
visualizzata per 3 secondi, poi il display
tornerà al suo stato originale.
Controllo dell’ora
2. Premere una volta il tasto Clock (Orologio)
ed il display LED visualizzerà l’ora quando il
forno è in modalità di cottura a microonde.
L’indicazione resterà visualizzata per 3 secondi,
poi il display tornerà al suo stato originale.
Controllo del tempo di cottura impostato
3. Premere una volta il tasto Preset (Predefiniti)
ed il display LED visualizzerà il tempo di
cottura impostato quando il forno usa un
programma di cottura. L’indicazione resterà
visualizzata per 3 secondi, poi il display
tornerà al suo stato originale.
Microwave
Grill/Combi
Stop/Clear
1
2
3
Page 44

44
IT
Pulizia del forno a microonde
Pulire il forno a microonde ogni volta che è usato per prevenire l’accumulo di sporcizia che può diventare
difficile da rimuovere.
Scollegare il forno a microonde dalla presa di corrente ed attendere che si raffreddi completamente prima
di pulirlo.
Le microonde passano attraverso la parete destra della cavità del coperchio della guida dell’onda per
permettere al cibo di cucinarsi. È importante che questa guida dell’onda sia sempre pulita.
Usare un detergente neutro ed acqua e lasciare asciugare.
Trattare il piatto girevole come qualsiasi altro
piatto di vetro. Dopo averlo usato per più di 15
minuti, lasciarlo raffreddare prima di usarlo di
nuovo. Non lavare il piatto in acqua bollente
perché potrebbe creparsi.
Assicurarsi che il piatto sia asciutto prima di
rimetterlo nel forno.
10
Lavare la griglia ed il supporto del piatto
girevole in acqua calda. Non usare acqua
bollente perché potrebbe deformarsi.
11
Le pareti del forno hanno una finitura di smalto
speciale che rende la pulizia molto facile. Usare
un panno inumidito per rimuovere tutti gli
schizzi e un tovagliolo di carta per assorbire
tutti i liquidi rovesciati. Rimuovere il grasso con
un panno inumidito e pochissimo detergente.
Asciugare accuratamente. Come con tutti i
forni, se si lascia accumulare il grasso questo
può iniziare a fumare ed anche prendere fuoco.
1
Assicurarsi di tenere pulite le griglie dello
scarico dell’aria.
2
Tenere pulita la parte frontale del forno così
che lo sportello si chiuda in modo appropriato.
3
Prestare attenzione a non versare liquidi nelle
aperture di ventilazione.
4
Non rimuovere la copertura della guida
d’onda: È importante tenere la copertura
pulita allo stesso modo delle parti interne del
forno a microonde. Se si lascia accumulare il
grasso questo può iniziare a fumare ed anche
prendere fuoco.
5
Tenere pulita la parte interna dello sportello
usando un panno inumidito. Usare dell'acqua
saponata tiepida per rimuovere le macchie
difficili ed asciugare accuratamente.
La parte interna dello sportello ha un
rivestimento speciale e non deve essere pulita
con spugne o polveri abrasive.
6
Pulire dietro i contorni dello sportello.
7
Usare dell'acqua saponata tiepida per pulire la
parte esterna del forno. Non usare spugnette
o polveri abrasive che possono graffiare la
superficie.
8
Scollegare il forno a microonde prima di pulire
il cavo d’alimentazione ed il forno a microonde.
Pulire con un panno inumidito e lasciarlo
asciugare prima di collegarlo di nuovo.
9
Non rimuovere nessuna parte fissata
all'interno del forno a microonde durante la
pulizia o in qualsiasi altro momento.
1
4
5
6
8
9
2
3
7
10 11
Page 45

45
IT
FAQ
Se c'è un problema, questo molto spesso può essere causato da qualcosa di poco grave. Le Domande e
Risposte che seguono potrebbero aiutare a risolvere il problema.
Domande Riposte
Perché sembra che il cibo non si
cucini?
Controllare che:
• Sia stato impostato il tempo di cottura
• Lo sportello sia chiuso
• La presa di corrente non sia sovraccarica provocando il salto del
fusibile.
Perché il cibo sembra crudo o
stracotto?
Controllare che:
• Sia stato impostato il tempo di cottura corretto
• Sia stata usata la corretta impostazione di potenza.
Come si fa per non far scoppiare le
uova?
Quando si cucinano le uova nel forno a microonde, il tuorlo a volte
può scoppiare come aumenta il vapore al suo interno. Questo si può
impedire bucando il tuorlo con uno stuzzicadenti prima della cottura.
Non cucinare mai le uova col guscio.
Perché è così importante lasciare
risposare il cibo dopo la cottura?
Con la cottura al microonde molti cibi raggiungono temperature tali
al loro interno che continuano a cucinare anche dopo essere stati
estratti dal forno. Poiché la cottura a microonde funziona dall'esterno
all'interno, i tempi di riposo consentono al centro del cibo di cucinarsi al
punto giusto senza stracuocere le parti periferiche.
Perché a volte il forno impiega
più tempo per cucinare di quanto
indicato dal ricettario?
Per prima cosa controllare che il forno sia impostato esattamente come
indicato nella ricetta.
I tempi di cottura e le impostazioni di riscaldamento sono suggerimenti
che aiutano a non stracuocere però le differenze di peso, dimensioni,
forma e temperatura iniziale del cibo influenzano i tempi di cottura –
esattamente come con i forni convenzionali. Usare il proprio giudizio
insieme ai suggerimenti della ricetta e verificare che il cibo sia cotto in
modo appropriato.
Perché si forma della condensa
all'interno dello sportello?
La condensa è un fenomeno normale, in modo particolare quando si
cucinano cibi con alto contenuto di acqua come le patate.
Le microonde possono passare
attraverso il vetro dello sportello?
No. Lo sportello ha uno speciale schermo metallico che consente di
vedere all'interno però blocca l'uscita del microonde.
Il vapore esce dallo sportello e dalle
aperture di ventilazione. Possono
uscire anche le microonde?
No. Lo sportello e le aperture di ventilazione sono progettate per
consentire al vapore di disperdersi però impediscono l'uscita delle
microonde. Le fessure non sono grandi a sufficienza per consentire alle
microonde di uscire.
Cosa succede se il forno a
microonde è acceso mentre è
vuoto?
Il forno a microonde subirà dei danni. Non accendere il forno a
microonde quando non c’è nulla al suo interno. È una buona regola
tenere una tazza d'acqua nel forno a microonde nel caso qualcuno lo
accenda accidentalmente.
Perché la luce all’interno del forno a
microonde non si accende?
Aprire lo sportello. Se la luce non si accende vuol dire che
probabilmente la lampadina è bruciata. Chiamare un tecnico qualificato
– non tentare di cambiare da sé la lampadina.
Quando si usa il forno a microonde
ci sono delle scintille. Si possono
provocare dei danni?
Sì. Assicurarsi di non usare alcun oggetto metallico e che i contenitori
non abbiano finiture metalliche come dorature. Non bisogna usare
metalli (fatta eccezione per la pellicola d'alluminio) quando si cucina
con il forno a microonde.
La luce è visibile dai bordi dello
sportello e dalle aperture di
ventilazione. Vuole dire che le
microonde possono uscire?
No. È normale che la luce sia visibile e non c'è nulla di cui preoccuparsi.
Perché ci sono delle interferenze
alla TV ed alla radio quando si usa il
forno a microonde?
I forni a microonde usano onde radio simili a quelle ricevute dai
televisori e dalle radio. L'interferenza può essere ridotta allontanando il
forno a microonde dal televisore o dalla radio.
Page 46

46
IT
Speciche tecniche
Modello L20GSS10E
Ingresso 230 - 240V ~ 50Hz
Uscita microonde 700 - 800 Watt
Frequenza microonde 2.450MHz
Dimensioni esterne
(larghezza x profondità x altezza)
452mm x 370mm x 262mm
Consumo energetico
Ingresso microonde 1250 - 1350 Watt
Grill 950 - 1050 Watt
Conforme alle Direttive CEE 89/336/EEC e 92/31/EEC.
Poiché continuiamo a migliorare i nostri prodotti, le specifiche ed il design sono soggetti a modifiche senza
preavviso.
Page 47

47
CZ
Gratulujeme za nákup nové mikrovlnné trouby Logik.
Tento návod k obsluze Vám pomůže ji správně a bezpečně používat.
Před použitím mikrovlnné trouby Logik
• Pečlivě si prostudujte tyto pokyny a uložte si je pro budoucí potřebu.
• Odstraňte veškeré obaly. Řádně je zlikvidujte.
Před zavoláním servisního oddělení
• Prostudujte si kapitolu věnovanou odstraňování poruch. Pomůže vám vyřešit některé
obecné problémy a snížit tak potřebu další pomoci profesionálním technikem.
Vybalování
Sejměte ze zařízení veškeré obaly. Obaly si ponechte. Pokud je budete chtít vyhodit, učiňte tak prosím v
souladu s místními předpisy.
Obsaženy jsou následující díly:
Hlavní jednotka
Skleněný otočný talíř x 1
Číslo dílu: XGALK20MBP11
Kroužek otočného talíře x 1
Číslo dílu: XGALK20MBP12
Police na grilování x 1
Číslo dílu: XGALL20GSS10P41
Návod k obsluze x 1
Číslo dílu: L20GSS10E-001
Microwave
Grill/Combi
Stop/Clear
Page 48

48
CZ
Přehled výrobku
Hlavní jednotka
Ovládací panel
Ovládací panel
Displej LED
Zobrazuje hodiny, čas vaření
a nastavení.
Tlačítko Microwave
Toto tlačítko stiskněte,
pokud chcete použít funkci
mikrovlnné trouby.
Tlačítko Clock
Použijte toto tlačítko pro
nastavení hodin.
Tlačítko Auto Cook
Použijte toto tlačítko pro
výběr programů automatické
nabídky.
Kolečko Weight / Time
(Tlačítko Start)
Použijte toto kolečko pro
nastavení váhy a doby vaření.
Je možné jej také použít pro
zahájení / obnovení vaření.
Tlačítko Grill / Combi
Použijte toto tlačítko pro výběr
grilu, mikrovlnné trouby a
kombinace grilovací funkce.
Tlačítko Preset
Použijte toto tlačítko pro
přednastavení času vaření.
Tlačítko Stop / Clear
Toto tlačítko použijte k
zastavení vaření a vynulování
nastavených parametrů vaření.
Tlačítko dveří
Microwave
Grill/Combi
Stop/Clear
Microwave
Grill/Combi
Stop/Clear
Page 49

49
CZ
Použití hliníkové fólie v mikrovlnné troubě
Hliníkovou fólii je bezpečné používat v mikrovlnné troubě, pokud postupujete podle následujících
bezpečnostních pokynů.
Jako v případě veškerých kovů nemůže mikrovlnná energie procházet ani fólií, nicméně za předpokladu,
že fólie bude mimo bok mikrovlnné trouby, nezpůsobí žádné jiskření a nedojde k poškození mikrovlnné
trouby.
Použití fólie je dobrým způsobem zakrytí částí potravin, které nechcete ohřívat stejně rychle, jako ostatní například pokud je potravina užší a zahřála by se nadměrně.
Umístěte fólii na místo, které chcete zakrýt a ujistěte se, že se nedotýká boků mikrovlnné trouby, když se
talíř začne otáčet. Použijte pouze jeden kus fólie, aby nedošlo k jiskření mezi několika kousky.
Postupujte podle pokynů pro použití fólie v mikrovlnné troubě:
• Před použitím v mikrovlnné troubě sejměte z nádob fóliová víčka. Některá víka jsou zhotovena z
kartónu s fóliovým povlakem - ty je nutné sejmout rovněž. Pokud to je možné, používejte průhledná
víka, bezpečná pro použití v mikrovlnné troubě.
• Během vaření potraviny míchejte, pokud má nádoba víko nebo zakrytí z fólie.
• Vždy používejte skleněný otočný talíř.
• Používejte mělké nádoby s velkým povrchem. Nepoužívejte nádoby, které jsou hlubší než 1,25 in
(3,5 cm).
• Při manipulaci s nádobami s horkou fólií používejte kuchyňské rukavice.
• Potraviny zcela fólií nezakrývejte. Mikrovlnná energie nemůže procházet skrze fólii a potraviny by se tak
neuvařily.
• Zabraňte dotyku hliníkové fólie s vnitřkem mikrovlnné trouby.
• Nepoužívejte více než jeden kus fólie v mikrovlnné troubě najednou.
Page 50

50
CZ
2. Pro mikrovlnou troubu si vyberte rovné
pracovní místo mimo dosah zdrojů tepla,
jako jsou chladiče nebo krby a mimo dosah
studených míst. Měli byste ponechat volný
prostor asi 10 cm okolo mikrovlnné trouby a
30 cm nad ní, aby mohl unikat teplý vzduch
z průduchů během vaření - tato mikrovlnná
trouba není určena pro zástavbu.
Příprava
Tato mikrovlnná trouba je určena pro použití v domácnosti. Neměla by být použita v komerčních
stravovacích provozech.
1. Po rozbalení mikrovlnné trouby si ověřte, že nebyla při přepravě v krabici poškozena. Zkontrolujte, zda
na troubě nejsou žádné vrypy a zda se dveře řádně zavírají. Poškozená mikrovlnná trouba by mohla
mikrovlnné energii umožnit uniknout. Ujistěte se, že jste z vnitřku mikrovlnné trouby vyjmuli veškerý
obalový materiál. Zlikvidujte plastové obaly/sáčky bezpečně a udržujte je mimo dosah kojenců a
malých dětí.
3. Zapojte mikrovlnnou troubu do standardní
domácí elektrické zásuvky (230 voltů, 13
jmenovitých ampér). Nepoužívejte zásuvku
s adaptérem nebo s připojeným jiným
zařízením. Nepoužívejte rozdvojku.
4. Vložte otočný kroužek dovnitř mikrovlnné
trouby a skleněný talíř na něj. Otočný talíř
je tvarován tak, aby se bezpečně usadil na
hřídeli. Vždy při požití mikrovlnné trouby
musíte používat otočný talíř a kroužek.
Pohled zdola
30cm
10cm10cm
Microwave
Grill/Combi
Stop/Clear
5. Abyste ochránili pracovní plochu,
doporučujeme připevnit na spodní stranu
mikrovlnné trouby měkké protiskluzové
podložky (nejsou součástí balení).
Page 51

51
CZ
Představení vaření v mikrovlnné troubě
Vždy si pamatujte základní bezpečnostní poučky, které byste použili při vaření na jiném zařízení nebo při
manipulaci s horkými potravinami.
Níže naleznete základní pokyny pro vaření v mikrovlnné troubě.
Vaření s mikrovlnnou troubou
• Vaření s mikrovlnou troubou je mnohem rychlejší, než konvenční způsoby vaření a i když se musíte
ujistit, zda jsou potraviny zcela uvařené, musíte také zajistit, aby nebyly rozvařené.
• Mikrovlnná energie může potraviny zahřívat nerovnoměrně, proto je míchejte a zajistěte tak rozložení
tepla, je to velmi důležité. Vždy míchejte směrem od okraje dovnitř.
• Pokud vaříte několik samostatných potravin současně, například pečené brambory nebo malé koláče,
rozmístěte je rovnoměrně na otočném talíři, aby se uvařily rovnoměrně. Nikdy v mikrovlnné troubě
potraviny neskládejte na sebe.
• Otáčejte většími kusy potravin, například roštěnci masa a drůbeží, během vaření, aby se ohřály na horní
i dolní straně rovnoměrně. Doporučuje se také otáčet kusy masa a drůbeže, obzvláště pokud nebyly
zbaveny kostí.
• Maso a drůbež, které se vaří 15 minut nebo déle, budou mírně zhnědlé díky obsahu vlastního tuku. Vše
vařené kratší dobu můžete potřít hnědou omáčkou a udělit tak jídlu pěknou barvu.
• K zakrytí tenčích kousků potravin můžete použít hliníkovou fólii a zabránit tak jejich uvaření před
silnějšími kusy potravin, které by se za stejnou dobu nemusely uvařit dostatečně. Fólii používejte
s rozvahou a obalte ji okolo potravin nebo nádoby opatrně, aby se nedotýkala vnitřku mikrovlnné
trouby, což by mohlo způsobit jiskření.
• Mikrovlnné trouby ohřívají potraviny pomocí mikrovlnné energie, které je podobná přirozeně se
vyskytujícím rádiovým vlnám. Normálně se tyto "vlny" ztratí, jakmile se rozptýlí v atmosféře, ale v
mikrovlnné troubě jsou koncentrovány na potraviny a způsobují tak jejich ohřátí.
• Mikrovlnná energie nemůže procházet skrze kov - nemůže tak z vnitřku mikrovlnné trouby uniknout ale může procházet materiály, jako je sklo, porcelán, plasty nebo papír.
Tyto materiály se používají při výrobě mikrovlnných trub,
umožňujících vaření.
• Zařízení pro bezpečné vaření se zahřívá, protože se zahřívají
potraviny.
Mikrovlnná energie se zaměřuje na vlhkost v potravinách a
způsobuje mnoho drobných vibrací. Vibrace se zvyšují natolik, že
se vlhkost a s nimi potraviny zahřívají také.
Page 52

52
CZ
Kontrola kuchyňského náčiní
Většina součástí tepelně odolného nekovového kuchyňské náčiní je bezpečná pro použití v mikrovlnné
troubě. Pokud si nejste jisti, zda je lze používat v mikrovlnné troubě, udělejte tento jednoduchý test:
1. Vložte kuchyňské náčiní do mikrovlnné trouby vedle misky s vodou – použijte misku, která je bezpečná
pro použití v mikrovlnné troubě. Uzavřete dveře.
2. Zapněte mikrovlnnou troubu pouze na 30 sekund.
3. Po 30 sekundách opatrně zkontrolujte, zda se voda ohřála.
4. Pokud se voda nezahřála, ale kuchyňské náčiní ano, není toto náčiní bezpečné pro použití v mikrovlnné
troubě a neměli byste je v ní používat.
5. Nedotýkejte se náčiní rukou, jelikož může být rozpálené.
Page 53

53
CZ
Kategorie mikrovlnného ohřevu
Mikrovlnná trouba byla otestována a označena tak, aby splňovala dobrovolný vládní předpis pro ohřívání
potravinových polotovarů.
Charakteristiky ohřívání a výstupní výkony mikrovlnné trouby jsou obvykle vypočítávány pomocí relativně
velkých kusů potravin (zatížení 1000 gramů, IEC 705), ale mnoho potravinových polotovarů se prodává v
menších baleních, například 350 gramů.
Vláda ve spolupráci s výrobci potravin a mikrovlnných trub stanovila systém kategorií ohřívání, který vám
pomůže zvolit čas ohřívání potravinových polotovarů.
800W
E
Výstupní výkon mikrovlnné trouby je 800 W.
Kategorie ohřevu u Vaší mikrovlnné trouby je E.
Ověřte si časy ohřívání pro kategorii E na obalu
potravin a informujte se, jak dlouho byste je měli
vařit. Níže naleznete referenční příklad.
Vaření v mikrovlnné troubě:
1. Sejměte vnější obal.
2. NĚKOLIKRÁT propíchněte víko z fólie.
3. Uložte na talíř mikrovlnné trouby.
4. Ohřívejte na maximální výkon.
5. V poločase ohřívání otočte.
Kategorie
ohřevu
Wattový
výkon
(IEC705)
B D 650 W 750 W
Plný výkon
(v minutách)
2 2 2 2
Otočte Otočte Otočte
Plný výkon
(v minutách)
2 1,5 2 1,5
Doba odstání
(v minutách)
1 1 1 1
Vaření v mikrovlnné troubě ze zmrazeného
stavu:
1. Sejměte vnější obal.
2. NĚKOLIKRÁT propíchněte víko z fólie.
3. Uložte na talíř mikrovlnné trouby.
4. Ohřívejte na maximální výkon.
5. V poločase ohřívání otočte.
Kategorie
ohřevu
Wattový
výkon
(IEC705)
B D 650 W 750 W
Plný výkon
(v minutách)
3 2,5 3 2,5
Otočte Otočte Otočte
Plný výkon
(v minutách)
4 3,5 4 3,5
Doba odstání
(v minutách)
1 1 1 1
Page 54

54
CZ
Pára
Když vaříte potraviny v mikrovlnné troubě, vytváří se pára, protože se v potravinách zahřívá a odpařuje
voda.
Pára vytvořená během vaření v mikrovlnné troubě je zcela bezpečná. Musí z mikrovlnné trouby unikat,
aby se zabránilo zvýšení tlaku uvnitř trouby. Toto se děje prostřednictvím větracích otvorů na zadní straně
mikrovlnné trouby a v místech okolo dveří.
Kondenzace
Když se pára ochlazuje, můžete si povšimnout
kondenzačních stop shromážděných v prohlubních uvnitř
trouby a na pracovním povrchu pod dveřmi a větracími
otvory. Vždy po vaření potravin s vysokým obsahem vody
mikrovlnnou troubu vysušte.
Mikrovlnná trouba je zkonstruována tak, aby umožnila
únik páry z větracích otvorů a okolo dveří bez úniku
mikrovlnné energie. Nehrozí žádné nebezpečí úniku
mikrovlnné energie společně s párou.
Kontrola mikrovlnné trouby
Po rozbalení mikrovlnnou troubu zkontrolujte.
Pro Vaši bezpečnost se mikrovlnná trouba
vypne, pokud během vaření otevřete
dveře. Pro pokračování vaření zavřete
dveře a stiskněte tlačítko Start.
1. Pro otevření dveří stiskněte tlačítko Door
(Dveří).
Položte na skleněný talíř misku vody.
Ujistěte se, že miska je bezpečná pro použití
v mikrovlnné troubě (nemá žádné kovové
ozdoby).
2. Uzavřete dveře.
3. Stiskněte tlačítko Stop / Clear pro vymazání
všech nastavení, která byla provedena.
4. Stiskněte jednou kolečko Weight / Time pro
zahájení jednoduchého třicetisekundového
cyklu vaření. To umožní zkontrolovat provoz
mikrovlnné trouby.
5. Jakmile je vaření u konce, měla by být voda
horká (dávejte pozor při vyndavání misky z
mikrovlnné trouby). Stiskněte tlačítko Stop /
Clear pro vymazání všech nastavení.
3, 5
4
1
Microwave
Grill/Combi
Stop/Clear
Microwave
Grill/Combi
Stop/Clear
Page 55

55
CZ
Nastavení hodin
Když je mikrovlnná trouba připojena k síťovému napájení, zobrazí se na LED displeji 1:01 a mikrovlnná
trouba vydá jeden zvukový signál. Ujistěte se, že před použitím jsou hodiny řádně nastaveny.
Postupujte podle kroků uvedených níže a hodiny
nastavte.
1. Stiskněte jednou tlačítko Clock a na LED
displeji se také zobrazí Hr:12. Opět jej
stiskněte a na LED displeji se zobrazí Hr:24.
Toto zobrzení udává, že je aktivní režim
nastavení hodin.
2. Otočte kolečkem Weight / Time pro
nastavení hodin. Pro dvanáctihodinový režim
(Hr:12) musí být zadání v rozmezí 1-12. Pro
čtyřiadvacetihodinový režim (Hr:24) musí být
zadání v rozmezí 0-23.
3. Stiskněte tlačítko Clock a ukazatel minut se
rozbliká.
4. Otočte kolečkem Weight / Time pro nastavení
minut. Zadaný čas musí být v rozmezí 00-59.
5. Stiskněte opět tlačítko Clock pro dokončení
nastavení hodin. “ : ” začne blikat a čas se
rozsvítí pro potvrzení dokončení nastavení
hodin.
Microwave
Grill/Combi
Stop/Clear
1, 3, 5
2, 4
Page 56

56
CZ
Nastavení dětského zámku
Tato funkce zabraňuje elektronické funkci mikrovlnné trouby tím, že zablokuje funkci ovládacího panelu,
dokud tuto blokaci nezrušíte.
Postupujte podle kroků uvedených níže a nastavte
dětský zámek.
1. Stiskněte po dobu 3 sekund tlačítko Stop
/ Clear a mikrovlnná trouba vydá zvukový
signál. Na LED displeji se také zobrazí
pro indikaci, že mikrovlnná trouba
aktivovala dětský zámek.
2. Pro vypnutí dětského zámku opět stiskněte
tlačítko Stop / Clear po dobu 3 sekund a
mikrovlnná trouba vydá zvukový signál,
kterým indikuje, že byl dětský zámek
deaktivován.
1, 2
Microwave
Grill/Combi
Stop/Clear
Page 57

57
CZ
Mikrovlnné vaření
Pro jednoduché vaření v mikrovlnné troubě postupujte podle níže uvedených kroků. Pokud chcete
například použít 80 % výkonu mikrovlnné trouby pro vaření po dobu 20 minut.
1. Stiskněte jednou tlačítko Microwave
(mikrovlnné trouby) a na LED displeji se
zobrazí 100%,
a .
2. Stiskněte opět tlačítko Microwave
(mikrovlnné trouby) pro změnu úrovně
výkonu na 80%.
3. Otočte kolečkem Weight / Time pro nastavení
času vaření, dokud se na LED displeji
nezobrazí 20:00.
4. Stiskněte opět kolečko Weight / Time pro
potvrzení a zahájení vaření.
5. Stiskněte jednou tlačítko Stop / Clear pro
zastavení a pozastavení vaření. Pro zrušení
nastavení jej stiskněte ještě jednou.
Ovládání úrovně výkonu
(Pro mikrovlnné vaření)
Pořadí Displej LED
Výkon
mikrovlnné
trouby
1
100%
100%
2
80%
80%
3
60%
60%
4
40%
40%
5
20%
20%
6
00%
00%
Při vyndavání jídla z mikrovlnné trouby se
prosím ujistěte, že je vypnuta. Provozování
mikrovlnné trouby bez potravin může vést
k přehřátí a poškodit magnetron.
5
3, 4
1, 2
Microwave
Grill/Combi
Stop/Clear
Page 58

58
CZ
Gril nebo kombinované vaření
Pro grilování postupujte podle kroků níže.
1. Stiskněte jednou tlačítko Grill / Combi a na
LED displeji se zobrazí
.
2. Otočte kolečkem Weight / Time pro nastavení
doby vaření.
3. Stiskněte kolečko Weight / Time pro potvrzení
a zahájení vaření.
4. Stiskněte jednou tlačítko Stop / Clear pro
zastavení a pozastavení vaření. Pro zrušení
nastavení jej stiskněte ještě jednou.
Pro kombinované vaření postupujte podle kroků níže.
1. Stiskněte tlačítko Grill / Combi dokud se na
LED displeji nezobrazí COMB1 nebo COMB2.
2. Otočte kolečkem Weight / Time pro nastavení
doby vaření.
3. Stiskněte kolečko Weight / Time pro potvrzení
a zahájení vaření.
4. Stiskněte jednou tlačítko Stop / Clear pro
zastavení a pozastavení vaření. Pro zrušení
nastavení jej stiskněte ještě jednou.
1
4
2, 3
Microwave
Grill/Combi
Stop/Clear
Page 59

59
CZ
Ovládání tlačítka Grill / Combination
(Pro grilování a kombinované vaření)
Pořadí
Displej
LED
Výkon
mikrovlnné
trouby
Výkon
grilu
1 G 0% 100%
2 C-1 30% 70%
3 C-2 55% 45%
Mějte prosím na paměti, že pro kombinované
vaření jsou k dispozici pouze 2 režimy a výkony
mikrovlnné trouby a grilu jsou uvedeny ve výše
uvedené tabulce.
Například: Pokud si přejete použít 55 %
mikrovlnného výkonu a 45 % výkonu grilu (C-2)
po dobu 10 minut, postupujte prosím následovně.
1. Stiskněte tlačítko Grill / Combi dokud se na
LED displeji nezobrazí COMB2.
2. Otočte kolečkem Weight / Time pro nastavení
času vaření, dokud se na LED displeji
nezobrazí 10:00.
3. Stiskněte kolečko Weight / Time pro potvrzení
a zahájení vaření.
4. Stiskněte jednou tlačítko Stop / Clear pro
zastavení a pozastavení vaření. Pro zrušení
nastavení jej stiskněte ještě jednou.
4
2, 3
1
Microwave
Grill/Combi
Stop/Clear
Page 60

60
CZ
Vaření s prodlevou (program nastavený předem)
Pro spuštění vaření s prodlevou postupujte podle níže uvedených kroků.
Například: Je sedm hodin (ráno) a chcete po dobu pěti minut vařit výkonem 100 % v šest hodin a třicet
minut (odpoledne).
Program rozmrazování není možné u vaření s prodlevou nastavit. Zajistěte, aby dvířka byla před
nastavením programu uzavřena.
1. Stiskněte jednou tlačítko mikrovlnné trouby
a na LED displeji se zobrazí 100%
a .
2. Otočte kolečkem Weight / Time pro nastavení
času vaření, dokud se na LED displeji
nezobrazí 5:00.
V tuto chvíli nestiskněte kolečko Weight
/ Time pro potvrzení a zahájení vaření.
3. Stiskněte tlačítko Preset pro nastavení času
zahájení vaření. Hodinová hodnota se rozbliká
jako první.
4. Otočte kolečkem Weight / Time pro nastavení
doby spuštění, dokud se na LED displeji
nezobrazí 6:00 (u dvanáctihodinového režimu)
nebo 18:00 (u čtyřiadvacetihodinového
režimu).
5. Stiskněte tlačítko Preset pro nastavení času
zahájení vaření. Minutová hodnota se rozbliká
jako první.
6. Otočte kolečkem Weight / Time pro nastavení
doby spuštění, dokud se na LED displeji
nezobrazí 6:30 (u dvanáctihodinového režimu)
nebo 18:30 (u čtyřiadvacetihodinového
režimu).
7. Stiskněte tlačítko Preset pro dokončení
nastavení. Mikrovlnná trouba vydá tón, když
odpočítávání dosáhne času spuštění a vaření
začne automaticky.
1
3, 5, 7
2, 4, 6
Microwave
Grill/Combi
Stop/Clear
Page 61

61
CZ
Automatické vaření
Tato funkce umožňuje vařit většinu potravin na základě kategorie potravin a jejich hmotnosti.
Vyberte kategorii a zvolte výchozí hmotnost potraviny. Rychlou referenci pro čas vaření a výchozí
hmotnosti naleznete v tabulce Automatická nabídka.
Automatická nabídka
1. Stiskněte tlačítko Auto Cook pro výběr funkce
vaření podle automatické nabídky. Na LED
displeji se zobrazí AUTO 01, AUTO 02,
AUTO 03 atd.
2. Otočte kolečko Weight / Time pro zvolení
výchozí váhy Vámi vybraného programu.
Informujte se také v tabulce Automatická
nabídka.
3. Stiskněte kolečko Weight / Time pro potvrzení
a zahájení vaření.
Pro programy AUTO 07-09 se mikrovlnná
trouba po uplynutí 2/3 doby vaření
pozastaví a vydá zvukový signál.
Jednoduše otevřete dveře a jídlo pro
lepší účinek grilu otočte. Poté zavřete
dveře a stiskněte kolečko Weight / Time
pro pokračování vaření.
4. Stiskněte jednou tlačítko Stop / Clear pro
zastavení a pozastavení vaření. Pro zrušení
nastavení jej stiskněte ještě jednou.
Například pokud chcete vařit 300g rybu pomocí
programu Automatická nabídka. Postupujte podle
kroků níže.
• Stiskněte tlačítko Auto Cook pro výběr funkce
vaření ryby podle automatické nabídky. Na
LED displeji se zobrazí AUTO 06 .
• Otočte kolečko Weight / Time pro volbu
výchozí váhy, dokud se na LED displeji
nezobrazí 300.
• Stiskněte kolečko Weight / Time pro potvrzení
a zahájení vaření.
• Stiskněte jednou tlačítko Stop / Clear pro
zastavení a pozastavení vaření. Pro zrušení
nastavení jej stiskněte ještě jednou.
4
2, 3
1
Microwave
Grill/Combi
Stop/Clear
Page 62

62
CZ
Hustota a tloušťka potravin může ovlivnit dobu vaření. Zajistěte, aby veškeré potraviny byly horké
a důkladně uvařené, než je začnete podávat. Je důležité, aby potraviny byly kontrolovány během
doporučené doby vaření a po ní, i když jste použili Automatickou nabídku.
Tabulka automatické nabídky
Nabídka Hmotnost Displej
Čas
vaření
Poznámky
AUTO 01
Mléko / káva
1 - hrneček
(~200ml)
1 1’30”
• Používejte pouze nádoby pro mikrovlnné trouby a
upevněte na ní fólii pro mikrovlnné trouby. Propíchněte
fólii před vařením vidličkou.
• Často kontrolujte průběh vaření a ujistěte se, že se voda
nevyvaří.
2 - hrneček
(~400ml)
2 2’40”
3 - hrneček
(~600ml)
3 3’50”
AUTO 02
Rýže
150g 150g 19’00”
150g rýže + 300ml
studené vody
• Používejte pouze nádoby pro
mikrovlnné trouby a upevněte
na ní fólii pro mikrovlnné
trouby. Propíchněte fólii před
vařením vidličkou.
• Často kontrolujte průběh
vaření a ujistěte se, že se voda
nevyvaří.
300g 300g 22’00”
300g rýže + 600ml
studené vody
450g 450g 25’00”
450g rýže + 900ml
studené vody
600g 600g 28’00”
600g rýže + 1200ml
studené vody
AUTO 03
Špagety
100g 100g 22’00”
100g špaget + 800 ml
studené vody
• Používejte pouze nádoby pro
mikrovlnné trouby a upevněte
na ní fólii pro mikrovlnné
trouby. Propíchněte fólii před
vařením vidličkou.
• Často kontrolujte průběh
vaření a ujistěte se, že se voda
nevyvaří.
200g 200g 27’00”
200g špaget + 1600 ml
studené vody
300g 300g 32’00”
300g špaget + 2400 ml
studené vody
AUTO 04
Brambory
1 - brambora
(~230g)
1 5’00”
Pro optimální výsledky před vařením propíchněte slupku
brambor. Po uvaření brambory zabalte do hliníkové fólie
alespoň na 5 minut, aby se důkladně dovařily.
2 - brambora
(~460g)
2 9’00”
3 - brambora
(~690g)
3 13’00”
AUTO 05
Automatické
ohřívání
200g 200g 1’30”
Před spotřebováním zkontrolujte, zda jsou potraviny
dokonale uvařené. Pro silnější kusy ryb může být
vyžadován delší čas.
300g 300g 2’00”
400g 400g 2‘30”
500g 500g 3’00”
600g 600g 3’30”
700g 700g 4’00”
800g 800g 4’30”
AUTO 06
Ryba
200g 200g 3’00”
Před spotřebováním zkontrolujte, zda jsou potraviny
dokonale uvařené. Pro silnější kusy ryb může být
vyžadován delší čas.
300g 300g 4’20”
400g 400g 5’40”
500g 500g 7’00”
600g 600g 8’20”
AUTO 07
Kuře
800g 800g 33’00”
• Mikrovlnná trouba se po 2/3 doby vaření dočasně
zastaví a vydá zvukový signál. Otevřete dveře a kuře pro
lepší účinek grilu otočte. Stiskněte kolečko Weight /
Time pro pokračování vaření.
• Před spotřebováním zkontrolujte, zda jsou potraviny
dokonale uvařené. Pro silnější kusy kuřete může být
vyžadován delší čas.
1000g 1000g 36’00”
1200g 1200g 39’00”
1400g 1400g 42’00”
AUTO 08
Hovězí /
skopové
200g 200g 12’00”
• Mikrovlnná trouba se po 2/3 doby vaření dočasně
zastaví a vydá zvukový signál. Otevřete dveře a hovězí/
skopové pro lepší účinek grilu otočte. Stiskněte kolečko
Weight / Time pro pokračování vaření.
• Před spotřebováním zkontrolujte, zda jsou potraviny
dokonale uvařené. Pro silnější kusy hovězího/
skopového může být vyžadován delší čas.
300g 300g 15’00”
400g 400g 18’00”
500g 500g 21’00”
600g 600g 24’00”
AUTO 09
Maso na špízu
100g 100g 9’00”
• Mikrovlnná trouba se po 2/3 doby vaření dočasně
zastaví a vydá zvukový signál. Otevřete dveře a masový
špíz pro lepší účinek grilu otočte. Stiskněte kolečko
Weight / Time pro pokračování vaření.
• Před spotřebováním zkontrolujte, zda jsou potraviny
dokonale uvařené. Pro silnější kusy masa na špízu může
být vyžadován delší čas.
200g 200g 12’00”
300g 300g 15’00”
400g 400g 18’00”
500g 500g 21’00”
Page 63

63
CZ
Rychlé zahájení vaření
Tato funkce umožňuje vařit rychle potraviny po dobu 30 sekund s výkonem mikrovlnné trouby 100 %.
Postupujte podle kroků níže.
1. Stiskněte kolečko Weight / Time pro rychlé
zahájení vaření. Pro přidání dalších 30 sekund
opět stiskněte tlačítko. Dobu vaření je možné
prodloužit až na 10 minut.
Microwave
Grill/Combi
Stop/Clear
1
Page 64

64
CZ
Rozmrazování
Můžete umístit zmrazené potraviny na misku vhodnou pro mikrovlnnou troubu nebo talíř a pak je uložit na
rozmrazovací stojánek (nedodává se společně s mikrovlnnou troubou). Tak tomu je proto, aby se tekutiny
uvolňované během rozmrazování neroztekly a neznečistily vnitřek mikrovlnné trouby.
Rozmrazování podle hmotnosti
1. Otočte kolečko Weight / Time proti směru
hodinových ručiček pro nastavení váhy jídla.
Výchozí rozsah je 100g až 1800g.
2. Stiskněte kolečko Weight / Time pro potvrzneí
a zahájení rozmrazování.
TIPY: Velké kusy potravin mohou být uprostřed
zledovatělé. Proto zajistěte rovnoměrné
rozmrazování tak, že je občas otočíte a
rozdělíte na menší kousky.
Mikrovlnná trouba se po 2/3 doby vaření vydá
zvukový signál a dočasně se zastaví. Otevřete
dveře a jídlo otočte. Zavřete dveře a poté
stiskněte kolečko Weight / Time pro zahájení
rozmrazování.
Umístěte roštěnou tučnou stranou dolů nebo
celé kusy drůbeže prsní stranou dolů.
Během rozmrazování vypouštějte tekutiny,
jako například šťávy z potravin se zahřívají a
pomáhají při vaření potravin.
3. Stiskněte jednou tlačítko Stop / Clear pro
zastavení a pozastavení rozmrazování. Pro
zrušení nastavení jej stiskněte ještě jednou.
3
1, 2
Microwave
Grill/Combi
Stop/Clear
Page 65

65
CZ
Dotazy na funkci vaření
Tato funkce umožňuje ověřit a zobrazit stávající výkon, čas a předvolený čas pro vybraný program vaření.
Pro vyhledání stávajícího výkonu vaření
1. Stiskněte jednou tlačítko Microwave
(mikrovlnné trouby) a na LED displeji se
zobrazí aktuální výkon vaření, když probíhá
mikrovlnné vaření. Nicméně tato funkce
nebude fungovat v Zobrazí se po dobu 3
sekund a poté se displej vrátí zpět do původní
podoby.
Vyhledání času
2. Stiskněte jednou tlačítko Clock a na
LED displeji se zobrazí čas, když probíhá
mikrovlnné vaření. Zobrazení vydrží 3 sekundy
a pak se vrátí k původnímu zobrazení.
Vyhledání přednastaveného času
3. Když je mikrovlnná trouba v přednastaveném
stavu, stiskněte jednou tlačítko Preset a na
LED displeji se zobrazí přednastavený čas.
Zobrazení vydrží 3 sekundy a pak se vrátí k
původnímu zobrazení.
Microwave
Grill/Combi
Stop/Clear
1
2
3
Page 66

66
CZ
Čištění mikrovlnné trouby
Vyčistěte mikrovlnnou troubu po každém jejím použití, abyste zabránili vytváření silných nánosů, které se
obtížně čistí.
Odpojte mikrovlnnou troubu od síťového napájení a vyčkejte na její ochlazení, až poté ji můžete začít čistit.
Na pravé straně dutiny je kryt vlnovodu, skrze který procházejí vlny a umožňují uvaření potravin. Je
důležité tento kryt vlnovodu vždy uchovat v čistotě.
Otřete jej slabým roztokem saponátu a vody a ponechte vyschnout.
Skleněný otočný talíř ošetřujte stejně, jako
každý jiný skleněný talíř. Po použití déle než
15 minut jej ponechte vychladnout, až poté jej
používejte znovu. Neomývejte otočný talíř ve
velmi horké vodě, protože by mohl prasknout.
Ujistěte se, že otočný talíř je před vložením
zpět do mikrovlnné trouby zcela suchý.
10
Stojánek a otočný kroužek umývejte v teplé
vodě. Nepoužívejte příliš horkou vodu, protože
by se mohly deformovat.
11
Stěny mikrovlnné trouby jsou opatřeny
speciálním emailovým nátěrem, který čištění
velmi usnadňuje. Používejte navlhčený měkký
hadr a otřete jím veškeré stopy po odstřikující
kapalině nebo papírový ubrousek k očištění
rozlité kapaliny. Otřete zbytky tuku vlhkým
hadrem a malým množstvím saponátu.
Dokonale vysušte. Stejně jako u kterékoliv
jiné trouby hrozí, že pokud tuk ponecháte
nashromáždit, může kouřit a nebo dokonce
vzplanout.
1
Zkontrolujte, zda je výstupní mřížka čistá.
2
Udržujte přední část mikrovlnné trouby v
čistotě, aby bylo možné dveře řádně zavírat.
3
Buďte opatrní, abyste nerozlili do větracích
otvorů vodu.
4
Nesnímejte kryt vlnovodu: Je důležité tento
kryt vlnovodu vždy uchovat v čistotě stejným
způsobem, jako vnitřek mikrovlnné trouby.
Hrozí, že pokud tuk ponecháte nashromáždit,
může kouřit nebo dokonce vzplanout.
5
Udržujte vnitřek dveří v čistotě pomocí
navlhčeného hadru. K odstranění ulpělých
nečistot použijte měkkou mýdlovou vodu a
dokonale poté vysušte.
Vnitřek dveří má speciální povrchovou ochranu
a nesmí být čištěn abrazivními látkami nebo
čisticími prášky.
6
Vyčistěte za okrajem dveří.
7
K čištění vnějšku mikrovlnné trouby používejte
teplou mýdlovou vodu. Nepoužívejte abrazivní
materiály ani prášky, které by mohly poškrábat
povrch.
8
Před čištěním mikrovlnné trouby a kabelu je
odpojte ze zásuvky.
Otřete vlhkým hadrem a ponechte vyschnout,
než ji znovu připojíte.
9
Nesnímejte žádné pevně namontované
součásti z vnitřku mikrovlnné trouby během
čištění, nebo kdykoliv jindy.
1
4
5
6
8
9
2
3
7
10 11
Page 67

67
CZ
Často kladené dotazy
Pokud se setkáte s problémem, může být mnohdy způsoben něčím velmi jednoduchým. Následující otázky
a odpovědi Vám mohou pomoci problém vyřešit.
Otázky Odpovědi
Proč se potraviny zdánlivě nevaří? Ověřte si následující:
• Byl nastaven čas vaření
• Dveře jsou uzavřeny
• Napájecí zásuvka není přetížena a nedošlo k vypálení pojistky.
Proč jsou potraviny zdánlivě
nedovařené nebo rozvařené?
Ověřte si následující:
• Byl nastaven správný čas vaření
• Je použito správné nastavení výkonu.
Jak mohu zabránit praskání
vajec?
Když pečete nebo vaříte vejce v mikrovlnné troubě, může žloutek
občas prasknout, protože se uvnitř vytváří pára. Tomuto jevu můžete
zabránit propíchnutím žloutku párátkem před začátkem vaření.
Nikdy nevařte vajíčka, která jsou ještě ve skořápkách.
Proč je tak důležité ponechat čas
na odstátí po vaření?
Při vaření v mikrovlnné troubě si mnoho potravin naakumuluje
dostatek tepla, aby se dovařily poté, co je vyjmete z mikrovlnné
trouby. Jelikož vaření v mikrovlnné troubě pracuje směrem z vnějšku
dovnitř, doba odstavení umožňuje uvařit střed potravin, aniž by
vnějšek byl rozvařený.
Proč má mikrovlnná trouba
někdy vaří déle, než je uvedeno v
receptu?
Nejprve si ověřte, zda je mikrovlnná trouba nastavena stejně, jako je
uvedeno v receptu.
Čas vaření a nastavení tepelného výkonu jsou doporučené, mají
zabránit rozvaření, ale odlišnosti ve hmotnosti, velikosti, tvaru a
počáteční teplotě potravin ovlivní dobu vaření - stejně jako u běžné
mikrovlnné trouby. Použijte vlastní úsudek společně s receptem a
ověřte si, zda jsou potraviny řádně uvařeny.
Proč se uvnitř dveří vytváří
kondenzace?
Kondenzace je zcela normální, obzvláště v případě, že vaříte
potraviny s vysokým obsahem vlhkosti, jako jsou například
brambory.
Proniká mikrovlnná energie skrze
okénko ve dveřích?
Dveře jsou opatřeny speciální kovovou mřížkou s otvory, které
umožňují vidět do vnitřku trouby, ale brání pronikání mikrovlnné
energie ven.
Pára uniká okolo dveří a
průduchy. Může mikrovlnná
energie uniknout také?
Ne. Dveře a průduchy jsou pečlivě zkonstruované tak, aby
umožňovaly únik páry během vaření, ale zabraňovaly unikání
mikrovlnné energie. Mezery nejsou dostatečně velké, aby
mikrovlnná energie mohla uniknout.
Co se stane, když mikrovlnná
trouba bude zapnutá a bude
ponechána prázdná?
Mikrovlnná trouba bude poškozena. Nezapínejte mikrovlnnou
troubu, pokud v ní není žádná náplň. Je vhodné v mikrovlnné troubě
ponechávat například misku s vodou pouze pro případ, že by někdo
troubu náhodně zapnul.
Proč se nerozsvěcuje světlo v
mikrovlnné troubě?
Otevřete dveře. Pokud se světlo nerozsvítí, žárovka je
pravděpodobně prasklá. Zavolejte kvalifikovaného technika nepokoušejte se žárovku vyměnit sami.
V mikrovlnné troubě se při
používání vyskytují jiskry. Může
to způsobit poškození?
Ano. Ujistěte se, že nejsou použity žádné kovové součástí
kuchyňského náčiní a že nádoby nemají kovové ozdoby. V
mikrovlnné troubě nesmíte používat při vaření žádné kovové
předměty (kromě hliníkové fólie).
Světlo prochází skrze průduchy
a dveře. Znamená to, že může
unikat mikrovlnná energie?
Je. Je to normální jev, světlo může pronikat ven a nejedná se o nic,
čeho by bylo nutné se obávat.
Proč je rušen můj televizní
přijímač a rádio, když používám
mikrovlnnou troubu?
Mikrovlnné trouby používají rádiové vlny podobné těm, které jsou
přijímány televizory a rádii. Rušení můžete zmenšit přesunutím
mikrovlnné trouby dále od televizoru nebo rádia.
Page 68

68
CZ
Technické údaje
Model L20GSS10E
Vstup 230 - 240V~ 50Hz
Výkon mikrovlnné trouby 700 - 800 wattů
Frekvence mikrovlnné energie 2450MHz
Vnější rozměry
(šířka x hloubka x výška)
452mm x 370mm x 262mm
Spotřeba energie
Příkon mikrovlnné trouby 1250 - 1350 wattů
Gril 950 - 1050 wattů
Splňuje požadavky směrnic EEC 89/336/EEC a 92/31/EEC.
Protože se neustále snažíme zlepšit naše výrobky, můžeme změnit technické údaje bez předchozího
upozornění.
Page 69

69
SK
Blahoželám vám k zakúpeniu novej mikrovlnnej rúry značky Logik.
Tento návod na obsluhu vám pomôže pri jej správnom a bezpečnom používaní.
Skôr, ako začnete mikrovlnnú rúru Logik používať
• Tieto pokyny si dôkladne prečítajte aponechajte ich pre možnú potrebu v budúcnosti.
• Snímte všetky obalové nálepky. Správnym spôsobom ich zneškodnite.
Skôr ako zavoláte servis
• Pozrite si časť týkajúcu sa riešenia problémov. Pomôže vám vyriešiť niektoré
všeobecné problémy vlastnými silami a zredukovať tak počet žiadostí o pomoc
profesionálnych technikov.
Rozbalenie
Z jednotky odstráňte ochranné balenie. Obalový materiál si ponechajte. Ak ho zneškodňujete, dodržte pri
tom všetky miestne nariadenia.
Súčasťou dodávky sú nasledujúce položky:
Hlavná jednotka
Sklenená otočná platňa x 1
Č.S.: XGALK20MBP11
Krúžok otočnej platne x 1
Č.S.: XGALK20MBP12
Grilovací podstavec x 1
Č.S.: XGALL20GSS10P41
Návod na obsluhu x 1
Č.S.: L20GSS10E-001
Microwave
Grill/Combi
Stop/Clear
Page 70

70
SK
Prehľad výrobku
Hlavná jednotka
Ovládací panel
Ovládací panel
LED displej
Zobrazuje hodiny, dobu
varenia anastavenie.
Tlačidlo Mikrovlnné varenie
Toto tlačidlo použite na voľbu
funkcie mikrovlnnej prípravy.
Tlačidlo Hodiny
Toto tlačidlo použite na
nastavenie hodín.
Tlačidlo Automatický
program varenia
Toto tlačidlo použite na
voľbu u automatických
programov prípravy.
Volič Hmotnosť / čas
(tlačidlo Štart)
Tento volič používajte na
nastavenie hmotnosti a doby
prípravy.
Môže sa použiť aj na
spustenie / opätovné
spustenie varenia.
Tlačidlo Gril / kombinovaná
príprava
Toto tlačidlo sa používa na
voľbu prípravy pomocou
grilu, mikrovlnného žiarenia a
kombinácií s použitím grilu.
Tlačidlo Predbežné
nastavenie
Toto tlačidlo sa používa na
predbežné nastavenie doby
prípravy.
Tlačidlo Zastaviť / zrušiť
Pomocou tohto tlačidla
zastavíte varenie avymažete
nastavenia varenia.
Tlačidlo na otvorenie dvierok
Microwave
Grill/Combi
Stop/Clear
Microwave
Grill/Combi
Stop/Clear
Page 71

71
SK
Používanie hliníkovej fólie v mikrovlnnej rúre
Vspojení spoužívaním mikrovlnnej rúry je bezpečné používať hliníkovú fóliu, a to pokiaľ budete
dodržiavať tieto bezpečnostné pokyny.
Ako je to vprípade kovov, mikrovlnná energia nedokáže prechádzať fóliou, ale pokiaľ sa fólia nebude
dotýkať bokov rúry, nebude dochádzať k iskreniu a nedôjde k žiadnemu poškodeniu mikrovlnnej rúry.
Používanie fólie je dobrým spôsobom tienenia potravín, ktoré nechcete variť tak rýchlo ako ostatné - ide o
prípady, kedy sú potraviny tenšie amohlo by dôjsť kich prevareniu.
Umiestnite fóliu nad plochu, ktorú chcete tieniť adávajte pritom pozor, aby sa fólia počas otáčania otočnej
platne nedotýkala bokov mikrovlnnej rúry. Naraz použite iba jeden kus fólie, aby nedochádzalo kiskreniu
medzi oddelenými kusmi.
Pokiaľ vspojení smikrovlnnou rúrou budete používať fóliu, dodržiavajte nasledujúce pokyny:
• Pred používaním v mikrovlnnej rúre odstráňte znádob uzávery z fólie. Niektoré uzávery sú vyrobené
zkartónu, ktorý obsahuje povrch zfólie – takéto uzávery by ste mali taktiež odstrániť. Pokiaľ je to
možné, používajte priehľadný uzáver, ktorý je vhodný pre použitie vmikrovlnnej rúre.
• Pokiaľ je nádoba opatrená uzáverom alebo krytom zblany, stravu počas varenia premiešajte.
• Vždy používajte otočnú sklenenú platňu.
• Používajte plytké nádoby s veľkou povrchovou plochou. Nepoužívajte nádoby, ktoré sú hlbšie ako 1,25
palca (3,5 cm).
• Na manipuláciu shorúcimi nádobami s fóliou používajte rukavice určené na manipuláciu s horúcim
riadom.
• Potraviny úplne fóliou nezakrývajte. Mikrovlnná energia nedokáže prechádzať cez fóliu apreto nebude
dochádzať kvareniu.
• Zabráňte tomu, aby sa hliníková fólia dotýkala vnútra mikrovlnnej rúry.
• Naraz vo vnútri mikrovlnnej rúry nepoužívajte viac ako jeden kus fólie.
Page 72

72
SK
2. Pre svoju mikrovlnnú rúru si vyberte rovnú
pracovnú plochu v dostatočnej vzdialenosti
od zdrojov tepla, ako sú radiátory, alebo od
otvoreného ohňa a zároveň aj v dostatočnej
vzdialenosti od chladných plôch. Okolo
mikrovlnnej rúry by ste mali zabezpečiť 10 cm
medzeru anad hornou časťou rúry by ste mali
ponechať 30 cm medzeru, aby mohol horúci
vzduch počas varenia unikať cez vetracie
otvory – táto mikrovlnná rúra nie je určená na
zabudovanie.
Príprava
Táto mikrovlnná rúra bola navrhnutá na domáce použitie. Nemala by sa používať na komerčnú prípravu
jedál.
1. Po rozbalení mikrovlnnej rúry skontrolujte, či nedošlo k jej poškodeniu, pokiaľ bola zabalená v krabici.
Overte, že na rúre sa nenachádzajú žiadne zárezy aže dvierka sa správne zatvárajú. Poškodená
mikrovlnná rúra by mohla prepúšťať mikrovlnnú energiu. Z vnútra mikrovlnnej rúry vyberte všetok
obalový materiál. Plastový obalový materiál/vrecká bezpečne zneškodnite azabráňte prístupu dojčiat
amalých detí k týmto materiálom.
3. Zástrčku mikrovlnnej rúry zastrčte do
štandardnej domovej elektrickej zásuvky
(menovité hodnoty: 230 voltov, 13 ampérov).
Vyhnite sa používaniu zásuvky s rozvodkou
alebo ku ktorej je pripojený ďalší spotrebič.
Nepoužívajte viacnásobnú rozvodku.
4. Krúžok otočnej platne položte do vnútra
mikrovlnnej rúry asklenenú otočnú platňu
umiestnite na krúžok. Otočná platňa je
vytvarovaná tak, že bezpečne dosadne na
vreteno. Pri každom použití mikrovlnnej rúry
je potrebné používať otočnú platňu akrúžok.
Pohľad zdola
30cm
10cm10cm
Microwave
Grill/Combi
Stop/Clear
5. Aby ste ochránili pracovnú plochu,
odporúčame vám, aby ste na spodnú stranu
mikrovlnnej rúry prilepili protišmykové mäkké
podložky (nie sú súčasťou balenia).
Page 73

73
SK
Úvod do mikrovlnného varenia
Počas používania akéhokoľvek riadu na varenie alebo pri manipulácii shorúcimi potravinami vždy
pamätajte na základné bezpečnostné pravidlá.
Základné princípy mikrovlnného varenia sú uvedené nižšie.
Varenie pomocou mikrovlnného žiarenia
• Varenie pomocou mikrovlnného žiarenia je omnoho rýchlejšie ako bežný spôsob varenia, ale aby
ste zabezpečili úplne uvarenie potravín, mali by ste pritom dávať zároveň aj pozor, aby ste potraviny
neprevarili.
• Mikrovlnná energia môže ohrievať nerovnomerne a preto je miešanie veľmi dôležité pre šírenie tepla.
Vždy miešajte zvonkajšej strany dovnútra.
• Pokiaľ pripravujete väčší počet samostatných potravín v rovnakom čase, ako sú varené zemiaky
alebo malé čajové pečivo, usporiadajte ich rovnomerne na otočnú platňu tak, aby sa pripravovali
rovnomerne. Vo vnútri mikrovlnnej rúry nikdy potraviny neukladajte na seba.
• Počas prípravy väčšie kusy, ako je pečené mäso a hydina otočte, aby tak došlo k rovnomernému
uvareniu hornej aj spodnej strany. Odporúča sa otáčať kusy mäsa alebo hydiny hlavne pokiaľ obsahujú
kosť a neboli vykostené.
• Mäso a hydina pripravované dlhšie ako 15 minút mierne zhnednú, čo je spôsobené vlastným tukom.
Všetky ostatné kusy pripravované počas kratšej doby je možné potierať výpekom s cieľom dosiahnuť
chuť navodzujúcu farbu.
• Na zakrytie tenších kúskov potravín je možné použiť hliníkovú fóliu s cieľom zabrániť ich prevareniu
počas doby, kedy sa hrubšie časti dovaria. Fóliu používajte úsporným spôsobom a obaľte ňou potraviny
alebo nádobu opatrne, a to tak, aby sa nedotýkala vnútra mikrovlnnej rúry aby tak nedochádzalo k
iskreniu.
• Mikrovlnné rúry používajú na prípravu potravín mikrovlnnú energiu, ktorá je podobná prirodzene sa
vyskytujúcim rádiovým vlnám. Bežne tieto „vlny“ po preniknutí do atmosféry zaniknú, ale vo vnútri
mikrovlnnej rúry sú sústredné na potraviny a spôsobujú ich ohrev.
• Mikrovlnná energia nepreniká cez kovy - preto nemôže unikať
z vnútra mikrovlnnej rúry - ale môže prenikať cez materiály ako je
sklo, porcelán, plasty a papier.
Tieto materiály sa používajú na výrobu nádob na varenie, ktoré
sú bezpečné na používanie v mikrovlnnej rúre.
• Riad na varenie v mikrovlnnej rúre sa zohreje, pretože potraviny
nachádzajúce sa v ňom sa ohrievajú.
Mikrovlnná energia sa sústreďuje na vlhkosť vpotravinách
aspôsobuje množstvo malých vibrácií. Vibrácie narastajú úmerne
svlhkosťou apotraviny sa ohrievajú.
Page 74

74
SK
Kontrola riadov na varenie
Väčšina tepelne odolných nekovových kuchynských riadov je bezpečná na používanie v mikrovlnnej rúre.
Pokiaľ si nie ste istí vhodnosťou používania riadu v mikrovlnnej rúre, vykonajte nasledujúci jednoduchý
test:
1. Vložte riad do rúry vedľa šálky vody – použite šálku, ktorá je bezpečná na použite v mikrovlnnej rúre.
Zatvorte dvierka.
2. Zapnite mikrovlnnú rúru iba na 30 sekúnd.
3. Po 30 sekundách dôkladne skontrolujte, či sa voda ohriala.
4. Pokiaľ sa voda neohriala ale riad sa ohrial, riad nie je bezpečný na používanie v mikrovlnnej rúre a
nemal by sa na mikrovlnné varenie používať.
5. Kuchynských riadov sa nedotýkajte rukami, pretože už môžu byť horúce.
Page 75

75
SK
Kategórie mikrovlnného ohrevu
Vaša mikrovlnná rúra bola testovaná aoznačená tak, aby spĺňala nezáväzné vládne dohody oopätovnom
ohreve predbežne uvarených potravín.
Charakteristiky ohrevu a hodnoty výstupného výkonu mikrovlnných rúr sa zvyčajne vypočítajú pri použití
relatívne veľkej dávky potravín (1000 g dávka, IEC 705), avšak mnoho balení vopred uvarených potravín sa
predáva vmenších baleniach, často hmotnosti asi 350 gramov.
Vláda vspolupráci s potravinárskymi spoločnosťami a výrobcami mikrovlnných rúr zaviedla systém
kategórií ohrevu, aby ste mali pomôcku pre stanovenie doby opakovaného ohrevu predbežne uvarených
potravín.
800W
E
800 W je výstupný výkon mikrovlnnej rúry.
E predstavuje kategóriu ohrevu vašej mikrovlnnej
rúry.
Overte si dobu varenia pre kategóriu E na balení
potravín a takto zistíte, ako dlho máte potraviny
variť. Ak pomôcku si pozrite dolu uvedený príklad.
Mikrovlnné varenie:
1. Snímte vonkajší obal.
2. NIEKOĽKOKRÁT prepichnite veko zfólie.
3. Umiestnite na platňu mikrovlnnej rúry.
4. Ohrev vykonávajte pri plnom výkone.
5. V polovici ohrevu otočte.
Kategória
ohrevu
Hodnota
wattov
(IEC705)
B D 650 W 750 W
Plný výkon
(v minútach)
2 2 2 2
Otočte Otočte Otočte
Plný výkon
(v minútach)
2 1,5 2 1,5
Doba státia
(v minútach)
1 1 1 1
Mikrovlnné varenie zmrazenej potraviny:
1. Snímte vonkajší obal.
2. NIEKOĽKOKRÁT prepichnite veko zfólie.
3. Umiestnite na platňu mikrovlnnej rúry.
4. Ohrev vykonávajte pri plnom výkone.
5. V polovici ohrevu otočte.
Kategória
ohrevu
Hodnota
wattov
(IEC705)
B D 650 W 750 W
Plný výkon
(v minútach)
3 2,5 3 2,5
Otočte Otočte Otočte
Plný výkon
(v minútach)
4 3,5 4 3,5
Doba státia
(v minútach)
1 1 1 1
Page 76

76
SK
Para
Pokiaľ pripravujte potraviny vmikrovlnnej rúre, dochádza kunikaniu pary vdôsledku ohrevu vody
vpotravinách akjej odparovaniu.
Para vytváraná počas mikrovlnného varenia je vcelku bezpečná. Je potrebné, aby unikala zmikrovlnnej
rúry scieľom zabrániť zvyšovaniu tlaku vo vnútri mikrovlnnej rúry. Uniká cez vetracie otvory na zadnej
strane rúry aokolo dvierok.
Kondenzácia
Pri ochladení pary môžete nájsť nazhromaždenú
skondenzovanú paru vmalých nádržkách vo vnútri
mikrovlnnej rúry ana pracovnom povrchu pod dvierkami
a vetracími otvormi. Mikrovlnnú rúru vždy vysušte po
varení potravín svysokým obsahom vlhkosti.
Vaša mikrovlnná rúra je navrhnutá tak, aby umožňovala
unikanie pary cez vetracie otvory aokolo dvierok, a to
bez unikania energie. Energia unikajúca sparou nie je
nebezpečná.
Kontrola mikrovlnnej rúry
Po rozbalení svoju mikrovlnnú rúru skontrolujte.
Kvôli vašej vlastnej bezpečnosti sa činnosť
mikrovlnnej rúry preruší, pokiaľ počas
prípravy otvoríte dvierka. Zatvorte dvierka
a stlačte tlačidlo Start (Štart) aby ste
pokračovali v cykle varenia.
1. Dvierka otvoríte stlačením tlačidla na
otvorenie Door (Dvierok).
Na sklenenú otočnú platňu umiestnite šálku
vody.
Overte, že šálka je bezpečná na mikrovlnné
varenie – nemala by obsahovať žiadny
dekoračný kovový okraj.
2. Zatvorte dvierka.
3. Stlačením tlačidla Stop / Clear (Zastaviť /
Zrušiť) vymažte všetky doteraz vykonané
nastavenia.
4. Jedným stlačením voliča Weight / Time
(Hmotnosť / Čas) spustíte jednoduchý
30-sekundový cyklus mikrovlnnej prípravy.
To vám umožní overiť prevádzku mikrovlnnej
rúry.
5. Po dokončení cyklu varenia by mala byť voda
horúca (dávajte pozor pri vyberaní šálky z
rúry). Stlačením tlačidla Stop / Clear (Zastaviť
/ Zrušiť) vymažte všetky nastavenia.
3, 5
4
1
Microwave
Grill/Combi
Stop/Clear
Microwave
Grill/Combi
Stop/Clear
Page 77

77
SK
Nastavenie hodín
Po pripojení mikrovlnnej rúry k sieťovému prívodu sa na LED displeji rúry zobrazí 1:01 a mikrovlnná rúra
vydá jeden zvukový signál. Pred použitím nastavte čas.
Pri nastavení hodín postupujte prosím podľa
nasledujúcich krokov.
1. Stlačte tlačidlo Clock (Hodiny) raz, na LED
displeji sa zobrazí Hr:12. Stlačte ho znova; na
LED displeji sa zobrazí Hr:24. To naznačuje, že
rúra je v režime nastavenia hodín.
2. Otáčaním voliča Weight / Time (Hmotnosť /
Čas) nastavte hodnotu pre hodiny. V prípade
12-hodinových hodín (Hr:12) by mala byť
vstupná hodnota pre čas v rozsahu 1-12. V
prípade 24-hodinových hodín (Hr:24) by mala
byť vstupná hodnota pre čas v rozsahu 0-23.
3. Stlačte tlačidlo Clock (Hodiny); začnú blikať
číslice minút.
4. Otáčaním voliča Weight / Time (Hmotnosť
/ Čas) nastavte hodnotu pre minúty. Zadaná
hodnota pre minúty musí byť vrozmedzí
00-59.
5. Nastavenie hodín ukončíte opätovným
stlačením tlačidla Clock (Hodiny). “ : “ začne
blikať a rozsvieti sa čas, ako potvrdenie o
dokončení nastavenia času.
Microwave
Grill/Combi
Stop/Clear
1, 3, 5
2, 4
Page 78

78
SK
Nastavenie rodičovského zámku
Táto funkcia zabraňuje elektronickej prevádzke rúry zablokovaním používania ovládacie panela, ato až
dokiaľ toto zablokovanie nezrušíte.
Pri nastavení rodičovského zámku postupujte
prosím podľa nasledujúcich krokov.
1. Na dobu 3 sekundy stlačte tlačidlo Stop /
Clear (Zastaviť / Zrušiť); mikrovlnná rúra
vydá zvukový signál. Na LED displeji sa zobrazí
, čo znamená, že pre mikrovlnnú rúru
bol nastavený rodičovský zámok.
2. Pokiaľ chcete rodičovský zámok odblokovať,
opätovne na 3 sekundy stlačte tlačidlo Stop
/ Clear (Zastaviť / Zrušiť); mikrovlnná rúra
signálom upozorní, že došlo k odblokovaniu
rodičovského zámku.
1, 2
Microwave
Grill/Combi
Stop/Clear
Page 79

79
SK
Mikrovlnné varenie
V prípade jednoduchého mikrovlnného varenia postupujte podľa dolu uvedených krokov. Napríklad, ak
chcete využiť 80 % výkon mikrovlnného žiarenia na varenie počas doby 20 minút.
1. Stlačte tlačidlo Microwave raz; na LED displeji
sa zobrazí 100 %,
a .
2. Opätovným stlačením tlačidla Microwave
zmeníte úroveň výkonu na 80 %.
3. Otáčaním voliča Weight / Time (Hmotnosť /
Čas) nastavte dobu prípravy, dokiaľ sa na LED
displeji nezobrazí 20:00.
4. Jedným stlačením voliča Weight / Time
(Hmotnosť / Čas) nastavenie potvrdíte a
spustíte prípravu.
5. Jedným stlačením tlačidla Stop / Clear
(Zastaviť / Zrušiť) prípravu pozastavíte. Jeho
opätovným stlačením nastavenie zrušíte.
Ovládanie úrovne výkonu
(pre mikrovlnné varenie)
Poradie LED displej
Mikrovlnný
výkon
1
100%
100%
2
80%
80%
3
60%
60%
4
40%
40%
5
20%
20%
6
00%
00%
Pri vyberaní potravín z mikrovlnnej rúry
rúru vypnite. Používanie mikrovlnnej
rúry bez potravín môže mať za následok
prehrievanie a poškodenie magnetrónu.
5
3, 4
1, 2
Microwave
Grill/Combi
Stop/Clear
Page 80

80
SK
Grilovanie alebo kombinované varenie
V prípade grilovania postupujte podľa dolu uvedených krokov.
1. Stlačte tlačidlo Grill / Combi (Gril /
kombinovaná príprava) raz; na LED displeji
sa zobrazí
.
2. Otáčaním voliča Weight / Time (Hmotnosť /
Čas) nastavte dobu prípravy.
3. Stlačením voliča Weight / Time (Hmotnosť /
Čas) nastavenie potvrdíte a spustíte prípravu.
4. Jedným stlačením tlačidla Stop / Clear
(Zastaviť / Zrušiť) prípravu pozastavíte.
Opätovným stlačením nastavenie zrušíte.
V prípade kombinovanej prípravy postupujte podľa
dolu uvedených krokov.
1. Stlačte tlačidlo Grill / Combi (Gril /
kombinovaná príprava) raz; na LED displeji
sa zobrazí COMB1 alebo COMB2.
2. Otáčaním voliča Weight / Time (Hmotnosť /
Čas) nastavte dobu prípravy.
3. Stlačením voliča Weight / Time (Hmotnosť /
Čas) nastavenie potvrdíte a spustíte prípravu.
4. Jedným stlačením tlačidla Stop / Clear
(Zastaviť / Zrušiť) prípravu pozastavíte.
Opätovným stlačením nastavenie zrušíte.
1
4
2, 3
Microwave
Grill/Combi
Stop/Clear
Page 81

81
SK
Ovládanie tlačidlom Grill / Combination
(pre kombinovanú prípravu s použitím grilu)
Poradie
LED
displej
Mikrovlnný
výkon
Výkon
grilu
1 G 0% 100%
2 C-1 30% 70%
3 C-2 55% 45%
Uvedomte si prosím, že pre kombinovanú
prípravu sú k dispozícii len 2 režimy a výkony grilu
sú uvedené v tabuľke hore.
Napríklad: Ak chcete realizovať prípravu s
55 % mikrovlnným výkonom a 45 % výkonom
grilovania (C-2) počas doby 10 minút, postupujte
podľa nasledujúcich krokov.
1. Tlačidlo Grill / Combi (Gril / kombinovaná
príprava) stláčajte, dokiaľ sa na LED displeji
nezobrazí COMB2.
2. Otáčaním voliča Weight / Time (Hmotnosť /
Čas) nastavte dobu prípravy, dokiaľ sa na LED
displeji nezobrazí 10:00.
3. Stlačením voliča Weight / Time (Hmotnosť /
Čas) nastavenie potvrdíte a spustíte prípravu.
4. Jedným stlačením tlačidla Stop / Clear
(Zastaviť / Zrušiť) prípravu pozastavíte. Jeho
opätovným stlačením nastavenie zrušíte.
4
2, 3
1
Microwave
Grill/Combi
Stop/Clear
Page 82

82
SK
Varenie soneskoreným štartom (nastavenie programu
vpredstihu)
V prípade varenia soneskoreným štartom postupujte podľa dolu uvedených krokov.
Napríklad: Aktuálny čas je 7 hodín (ráno) a vy chcete variť na 100 % mikrovlnnom výkone počas 5 minút, a
to o 6 hodine a 30 minúte (popoludní).
Program rozmrazovania nemožno nastaviť v prípade varenia s oneskoreným štartom. Pred
nastavením programu zatvorte dvierka rúry.
1. Stlačte tlačidlo Microwave raz; na LED displeji
sa zobrazí 100 %,
a .
2. Otáčaním voliča Weight / Time (Hmotnosť /
Čas) nastavte dobu prípravy, dokiaľ sa na LED
displeji nezobrazí 5:00.
V tomto bode nestlačte volič Weight /
Time (Hmotnosť / Čas), ktorým by ste
nastavenie potvrdili a spustili prípravu.
3. Stlačením tlačidla Preset (Predbežné
nastavenie) vopred nastavte dobu začatia
prípravy. Najprv bude blikať číslica hodín.
4. Otáčaním voliča Weight / Time (Hmotnosť /
Čas) nastavte dobu spustenia, až dokiaľ sa na
LED displeji nezobrazí 6:00 (pre 12-hodinové
hodiny) alebo 18:00 (pre 24-hodinové hodiny).
5. Stlačením tlačidla Preset (Predbežné
nastavenie) vopred nastavte dobu začatia
prípravy. Najprv bude blikať číslica minút.
6. Otáčaním voliča Weight / Time (Hmotnosť /
Čas) nastavte dobu spustenia, až dokiaľ sa na
LED displeji nezobrazí 6:30 (pre 12-hodinové
hodiny) alebo 18:30 (pre 24-hodinové hodiny).
7. Nastavenie dokončíte stlačením Preset
(Predbežné nastavenie). Mikrovlnná rúra
vydá zvukový signál akonáhle odpočítavanie
dosiahne dobu začatia avarenie sa
automaticky spustí.
1
3, 5, 7
2, 4, 6
Microwave
Grill/Combi
Stop/Clear
Page 83

83
SK
Automatické varenie
Táto funkcia vám umožňuje variť väčšinu potravín na základe kategórií potravín ahmotnosti.
Zvoľte kategóriu avyberte predvolenú hmotnosť potravín. Ako jednoduchú pomôcku pre dobu varenia a
predvolenú hmotnosť si pozrite tabuľku Ponuka automatických programov.
Ponuka automatických programov
1. Stlačením tlačidla Auto Cook si vyberte
funkciu prípravy na základe ponuky
automatických programov. Na LED displeji sa
zobrazí AUTO 01, AUTO 02, AUTO 03 atď.
2. Otáčaním voliča Weight / Time (Hmotnosť
/ Čas) si vyberte predvolenú hmotnosť pre
vami vybraný program. Informácie nájdete
vtabuľke Ponuka automatických programov.
3. Stlačením voliča Weight / Time (Hmotnosť /
Čas) nastavenie potvrdíte a spustíte prípravu.
V prípade automatických programov
07-09 mikrovlnná rúra pozastaví
svoju činnosť po ubehnutí 2/3 doby
na prípravu a vydá zvukový signál.
Jednoducho otvorte dvierka a pre
dosiahnutie lepšieho grilovacieho
účinku jedlo otočte. Následne dvierka
zatvorte a stlačením voliča Weight
/ Time (Hmotnosť / Čas) môžete v
príprave pokračovať.
4. Jedným stlačením tlačidla Stop / Clear
(Zastaviť / Zrušiť) prípravu pozastavíte.
Opätovným stlačením nastavenie zrušíte.
Ak chcete napríklad variť 300 g rybu pomocou
programu zponuky automatických programov.
Postupujte podľa dolu uvedených krokov.
• Stlačením tlačidla Auto Cook si z ponuky
automatických programov vyberte program
na prípravu ryby. Na LED displeji sa zobrazí
AUTO 06.
• Otáčaním voliča Weight / Time (Hmotnosť /
Čas) vyberte predvolenú hmotnosť, dokiaľ sa
na LED displeji nezobrazí 300.
• Stlačením voliča Weight / Time (Hmotnosť /
Čas) nastavenie potvrdíte a spustíte prípravu.
• Jedným stlačením tlačidla Stop / Clear
(Zastaviť / Zrušiť) prípravu pozastavíte.
Opätovným stlačením nastavenie zrušíte.
4
2, 3
1
Microwave
Grill/Combi
Stop/Clear
Page 84

84
SK
Hutnosť a hrúbka potravín môže ovplyvniť dobu varenia. Presvedčte sa, že potraviny sú pred
servírovaním dostatočne teplé adôkladne uvarené. Je dôležité potraviny skontrolovať počas apo
ubehnutí odporúčanej doby varenia, ato aj vprípade používania ponuky automatických programov.
Tabuľka ponuky automatických programov
Ponuka Hmotnosť Displej
Doba
varenia
Komentáre
AUTO 01
Mlieko / káva
1 šálky
(~200ml)
1 1’30”
• Vspojení smikrovlnnou rúrou používajte jedine nádoby vhodné na
použitie vmikrovlnnej rúre apriľnavé fólie. Pred varením popichajte
fóliu vidličkou.
• Pravidelne kontrolujte varenie apresvedčte sa, že voda počas varu
nevystrekuje.
2 šálky
(~400ml)
2 2’40”
3 šálky
(~600 ml)
3 3’50”
AUTO 02
Ryža
150g 150g 19’00”
150g ryže + 300ml
studenej vody
• Vspojení smikrovlnnou rúrou
používajte jedine nádoby vhodné na
použitie vmikrovlnnej rúre apriľnavé
fólie. Pred varením popichajte fóliu
vidličkou.
• Pravidelne kontrolujte varenie
apresvedčte sa, že voda počas varu
nevystrekuje.
300g 300g 22’00”
300g ryže + 600ml
studenej vody
450g 450g 25’00”
450g ryže + 900ml
studenej vody
600g 600g 28’00”
600g ryže + 1200ml
studenej vody
AUTO 03
Špagety
100g 100g 22’00”
100g špagiet + 800 ml
studenej vody
• Vspojení smikrovlnnou rúrou
používajte jedine nádoby vhodné na
použitie vmikrovlnnej rúre apriľnavé
fólie. Pred varením popichajte fóliu
vidličkou.
• Pravidelne kontrolujte varenie
apresvedčte sa, že voda počas varu
nevystrekuje.
200g 200g 27’00”
200g špagiet + 1600 ml
studenej vody
300g 300g 32’00”
300g špagiet + 2400 ml
studenej vody
AUTO 04
Zemiaky
1 zemiaky
(~230g)
1 5’00”
Pre dosiahnutie najlepších výsledkov pred prípravou poprepichuje
zemiakovú šupku. Zemiaky po uvarení aspoň na 5 minút zabaľte do
hliníkovej fólie, čím zabezpečíte ich dôkladné uvarenie.
2 zemiaky
(~460 g)
2 9’00”
3 zemiaky
(~690 g)
3 13’00”
AUTO 05
Automatické
ohrievanie
200g 200g 1’30”
Pred konzumáciou sa presvedčte, že jedlo je dôkladne uvarené.
Vprípade hrubších kusov môže byť potrebné dodatočné varenie.
300g 300g 2’00”
400g 400g 2‘30”
500g 500g 3’00”
600g 600g 3’30”
700g 700g 4’00”
800g 800g 4’30”
AUTO 06
Ryba
200g 200g 3’00”
Pred konzumáciou sa presvedčte, že jedlo je dôkladne uvarené.
Vprípade hrubších kusov rýb môže byť potrebné dodatočné varenie.
300g 300g 4’20”
400g 400g 5’40”
500g 500g 7’00”
600g 600g 8’20”
AUTO 07
Kurča
800g 800g 33’00”
• Mikrovlnná rúra po ubehnutí 2/3 doby na prípravu pozastaví svoju
činnosť a vydá zvukový signál. Otvorte dvierka, a pre dosiahnutie
lepšieho ugrilovania kurča otočte. Stlačením voliča Weight / Time
(Hmotnosť / Čas) pokračujte v príprave.
• Pred konzumáciou sa presvedčte, že jedlo je dôkladne uvarené.
Vprípade hrubších kusov kuraťa môže byť potrebné dodatočné
varenie.
1000g 1000g 36’00”
1200g 1200g 39’00”
1400g 1400g 42’00”
AUTO 08
Hovädzina /
baranina
200g 200g 12’00”
• Mikrovlnná rúra po ubehnutí 2/3 doby na prípravu pozastaví svoju
činnosť a vydá zvukový signál. Otvorte dvierka, a pre dosiahnutie
lepšieho ugrilovania hovädzie/baranie mäso otočte. Stlačením voliča
Weight / Time (Hmotnosť / Čas) pokračujte v príprave.
• Pred konzumáciou sa presvedčte, že jedlo je dôkladne uvarené.
Vprípade hrubších kusov hovädzieho/baranieho mäsa môže byť
potrebné dodatočné varenie.
300g 300g 15’00”
400g 400g 18’00”
500g 500g 21’00”
600g 600g 24’00”
AUTO 09
Ražniči
100g 100g 9’00”
• Mikrovlnná rúra po ubehnutí 2/3 doby na prípravu pozastaví svoju
činnosť a vydá zvukový signál. Otvorte dvierka, a pre dosiahnutie
lepšieho ugrilovania ražniči otočte. Stlačením voliča Weight / Time
(Hmotnosť / Čas) pokračujte v príprave.
• Pred konzumáciou sa presvedčte, že jedlo je dôkladne uvarené.
Vprípade hrubších kusov ražniči môže byť potrebné dodatočné
varenie.
200g 200g 12’00”
300g 300g 15’00”
400g 400g 18’00”
500g 500g 21’00”
Page 85

85
SK
Varenie s rýchlym štartom
Táto funkcia vám umožňuje rýchle varenie potravín počas doby 30 sekúnd pri 100 % výkone mikrovlnného
žiarenia.
Postupujte podľa dolu uvedených krokov.
1. Stlačením voliča Weight / Time (Hmotnosť
/ Čas) spustíte varenie s rýchlym štartom.
Opätovným stlačením tlačidla pridáte ďalších
30 sekúnd. Dobu prípravy môžete zvýšiť až na
10 minút.
Microwave
Grill/Combi
Stop/Clear
1
Page 86

86
SK
Rozmrazovanie
Zmrazené potraviny môžete umiestniť na tanier alebo riad, ktorý je vhodný na používanie v mikrovlnnej
rúre a až tak ich umiestnite na rozmrazovaciu tácku (nedodáva sa s touto mikrovlnnou rúrou). Tým sa
zabezpečí, aby sa tekutiny vznikajúce počas rozmrazovania neroztekali anezašpinili tak vnútro mikrovlnnej
rúry.
Rozmrazovanie na základe hmotnosti
1. Otáčaním voliča Weight / Time (Hmotnosť /
Čas) proti smeru hodinových ručičiek nastavte
hmotnosť potravín. Predvolený rozsah je
100 g až 1800 g.
2. Stlačením voliča Weight / Time (Hmotnosť
/ Čas) nastavenie potvrdíte a spustíte
rozmrazovanie.
TIPY: Veľké kusy môžu byť v strede
zľadovatené. Preto aby ste zabezpečili
roztopenie, občas ich otočte a počas
rozmrazovania ich rozdeľte na menšie kúsky.
Mikrovlnná rúra po ubehnutí 2/3 doby
pozastaví svoju činnosť a vydá zvukový
signál. Otvorte dvierka aotočte potraviny.
Rozmrazovanie obnovíte zatvorením dvierok
a stlačením voliča Weight / Time (Hmotnosť
/ Čas).
Pečienku umiestnite stranou s tukom nadol
alebo celú hydinu položte stranou pŕs nadol.
Tekutinu počas rozmrazovania odstraňujte,
pretože šťavy z potravín sa zohrejú a spôsobia
var potravín.
3. Jedným stlačením tlačidla Stop / Clear
(Zastaviť / Zrušiť) rozmrazovanie pozastavíte.
Jeho opätovným stlačením nastavenie zrušíte.
3
1, 2
Microwave
Grill/Combi
Stop/Clear
Page 87

87
SK
Otázka ohľadne funkcie varenia
Táto funkcia vám umožňuje skontrolovať azobraziť aktuálny výkon, čas aprednastavený čas vami
vybraného programu varenia.
Zistenie aktuálneho varného výkonu
1. Jedným stlačením tlačidla Microwave sa
počas mikrovlnnej prípravy na LED displeji
zobrazí aktuálny mikrovlnný výkon. Predsa
len táto funkcia nebude fungovať nepretržite.
Zobrazenie bude trvať 3 sekúnd a následne sa
obnoví pôvodné zobrazenie.
Zistenie času
2. Jedným stlačením tlačidla Clock (Hodiny) sa
počas mikrovlnnej prípravy na LED displeji
zobrazí čas. Ten bude zobrazený počas doby 3
sekúnd; následne rúra prejde do pôvodného
zobrazenia na displeji.
Zistenie prednastaveného času
3. Počas doby, kedy je mikrovlnná rúra v stave
predbežného nastavenia stlačte raz tlačidlo
Preset (Predbežné nastavenie); na LED
displeji sa zobrazí prednastavený čas. Ten bude
zobrazený počas doby 3 sekúnd; následne rúra
prejde do pôvodného zobrazenia na displeji.
Microwave
Grill/Combi
Stop/Clear
1
2
3
Page 88

88
SK
Čistenie mikrovlnnej rúry
Vyčistenie mikrovlnnej rúry po každom jej použití vám pomôže zabrániť v usadzovaní odolných zvyškov,
ktoré sa budú dať ťažko odstrániť.
Pred čistením mikrovlnnú rúru odpojte od prívodu elektrickej energie a počkajte pokiaľ úplne nevychladne.
Na pravej strane vo vnútri rúry sa nachádza kryt vodiča žiarenia; mikrovlnné žiarenie cez neho prechádza a
umožňuje varenie potravín. Je dôležité, aby bol tento kryt vlnového vodiča vždy čistý.
Utrite ho roztokom vody a stredne silného čistiaceho prostriedku a nechajte vyschnúť.
So sklenenou otočnou platňou manipulujte
ako s akoukoľvek inou sklenenou platňou.
Pokiaľ ste ju používali dlhšie ako 15 minút, pred
opätovným použitím ju nechajte vychladnúť.
Otočnú platňu neumývajte vo veľmi horúcej
vode, pretože by mohla prasknúť.
Pred vložením do mikrovlnnej rúry skontrolujte,
či je otočná platňa úplne suchá.
10
Podstavec a krúžok otočnej platne umývajte v
horúcej vode. Nepoužívajte však veľmi horúcu
vodu, ktorá by mohla spôsobiť deformáciu.
11
Steny mikrovlnnej rúry sú opatrené špeciálnym
smaltovým povlakom, ktorý uľahčuje čistenie.
Pomocou mäkkej navlhčenej tkaniny utrite
všetky kvapky alebo papierovou utierkou
utrite všetky zvyšky. Tkaninou navlhčenou
vroztoku vody a malého množstva čistiaceho
prostriedku utrite zvyšky mastnôt. Dôkladne
vysušte. Ak sa vo vnútri rúry nahromadí tuk,
môže dochádzať k dymeniu a aj k vzniku
požiaru.
1
Vyčistite výstupné mriežky.
2
Prednú stranu mikrovlnnej rúry udržiavajte
včistote, aby ste mohli dvierka dobre asprávne
zatvoriť.
3
Dávajte pozor, aby sa do vetracích otvorov
nedostala voda.
4
Neodstraňujte kryt vodiaceho prvku vĺn: je
dôležité kryt udržiavať včistote, a to tým istým
spôsobom ako vnútro mikrovlnnej rúry. Ak sa
vo vnútri nahromadí tuk, môže dochádzať k
dymeniu a aj k vzniku požiaru.
5
Vnútro dvierok očistite navlhčenou tkaninou.
Na odolné škvrny použite horúcu saponátovú
vodu adôkladne vysušte.
Vnútro dvierok má špeciálny povrch anesmie
sa čistiť pomocou drôteniek ani špeciálnych
práškov sabrazívnymi účinkami.
6
Čistite aj za lištou dvierok.
7
Na čistenie vonkajška mikrovlnnej rúry
používajte teplú saponátovú vodu.
Nepoužívajte abrazívne drôtenky ani abrazívne
prášky, ktoré by mohli poškriabať povrch.
8
Pred čistením sieťového kábla amikrovlnnej
rúry odpojte spotrebič od prívodu energie.
Utrite navlhčenou tkaninou apred opätovným
pripojením ksieti nechajte dôkladne vyschnúť.
9
Počas čistenia ani inokedy nedemontujte
žiadne z pevne namontovaných častí z
vnútra mikrovlnnej rúry.
1
4
5
6
8
9
2
3
7
10 11
Page 89

89
SK
Často kladené otázky
Pokiaľ sa vyskytne problém, často môže byť spôsobený maličkosťou. Nasledujúce otázky a odpovede vám
pomôžu problém vyriešiť.
Otázky Odpovede
Prečo sa nezdá, že jedlo sa varí? Skontrolujte že:
• bola nastavená doba varenia
• dvierka sú zatvorené
• sieťová zásuvka nebola preťažená a nedošlo k prepáleniu poistky.
Prečo sa zdá, že jedlo je
nedostatočne uvarené alebo
prevarené?
Skontrolujte že:
• bola nastavená správna doba varenia
• používa sa správne nastavenie výkonu.
Ak môžem zabrániť vytečeniu
vajec?
Pokiaľ pečiete alebo varíte vajcia vmikrovlnnej rúre, žĺtok môže
niekedy vytiecť v dôsledku vytvárania pary vo vnútri. Vytekaniu vajca
môžete zabrániť prepichnutím žĺtka pred varením špáradlom.
Nikdy nevarte vajcia vškrupinách.
Prečo je dôležité nechať po
varení jedlo postáť?
Pri mikrovlnnom varení sa vo vnútri mnohých potravín vytvára
dostatočné teplo na to, aby varenie pokračovalo aj po vybratí
zmikrovlnnej rúry. Pretože mikrovlnné varenie prebieha od
vonkajšieho povrchu potravín smerom dovnútra; doba státia vám
umožňuje uvariť stred potraviny bez prevarenia jej povrchu.
Prečo niekedy trvá varenie v
mikrovlnnej rúre dlhšie ako je to
uvedené vrecepte?
Vprvom rade skontrolujte, či je mikrovlnná rúra nastavená tak, ako je
to uvádzané v recepte.
Nastavenia pre doby varenia aohrevu sú odporúčania, ktoré
pomáhajú predísť prevareniu, avšak rozdielne hmotnosti, veľkosť,
tvar apočiatočná teplota potraviny ovplyvnia doby varenia – presne
tak, ako je to vprípade bežnej mikrovlnnej rúry. Spolu sreceptom
uplatňujte aj svoj úsudok aoverte, či je jedlo uvarené správne.
Prečo na vnútornej strane
dvierok rúry dochádza ku
kondenzácii pár?
Kondenzácia je úplne bežný jav najmä pokiaľ varíte potraviny s
vysokým stupňom vlhkosti, ako sú zemiaky.
Preniká mikrovlnná energia cez
okno dvierok?
Nie. Dvierka sú opatrené špeciálnou kovovou mriežkou sotvormi,
ktoré vám umožňujú sledovať vnútro ale zabraňujú prenikaniu
mikrovlnnej energie von.
Zo strany dvierok a vetracích
otvorov vychádza para. Môže
sa von dostať aj mikrovlnná
energia?
Nie. Dvierka aj vetracie otvory boli dôkladne navrhnuté tak, aby para
počas varenia unikala von, ale aby energia zostávala vo vnútri. Tieto
štrbiny nie sú také veľké, aby nimi mohla unikať mikrovlnná energia.
Čo sa stane ak zapnem
mikrovlnnú rúru, ktorá je
prázdna?
Dôjde kpoškodeniu mikrovlnnej rúry. Pokiaľ vrúre nič nie je,
mikrovlnnú rúru nezapínajte. Je dobré vmikrovlnnej rúre ponechať
šálku svodou pre prípad, že by niekto náhodne mikrovlnnú rúru
spustil.
Prečo sa svetlo vmikrovlnnej
rúre nerozsvieti?
Otvorte dvierka. Ak sa svetlo nerozsvieti, pravdepodobne došlo k
vyhoreniu žiarovky. Zavolajte kvalifikovaného technika - nepokúšajte
sa žiarovku vymeniť vlastnými silami.
Pri používaní mikrovlnnej rúry
dochádza v jej vnútri k iskreniu.
Dôjde k nejakému poškodeniu?
Áno. Presvedčte sa, že nepoužívate žiadne kovové riady aže nádoba
neobsahuje kovový okraj. Počas varenia nesmiete vrúre používať
kovové predmety (okrem hliníkovej fólie).
Cez vetracie otvory advierka
je zreteľne viditeľné svetlo.
Znamená to možnosť úniku
mikrovlnnej energie?
Nie. Je bežné, že môžete vidieť svetlo anemusíte sa obávať.
Prečo dochádza k rušeniu TV
prijímača alebo rádia počas
doby používania mikrovlnnej
rúry?
Mikrovlnné rúry využívajú rádiové vlny podobné vlnám, ktoré
prijímajú TV prijímače arádiá. Rušenie môžete znížiť premiestnením
mikrovlnnej rúry ďalej od TV prijímača alebo rádia.
Page 90

90
SK
Technické špecikácie
Model L20GSS10E
Príkon 230 - 240 V~ 50 Hz
Výkon mikrovlnnej rúry 700 - 800 wattov
Mikrovlnná frekvencia 2450MHz
Vonkajšie rozmery
(šírka x hĺbka x výška)
452mm x 370mm x 262mm
Spotreba energie
Príkon mikrovlnnej rúry 1250 - 1350 wattov
Gril 950 - 1050 wattov
Vyhovuje smerniciam EHS č. 89/336/EHS a 92/31/EHS.
Kvôli našej snahe neustále vylepšovať naše výrobky je možné, že technické špecifikácie sa zmenia bez
predchádzajúceho upozornenia.
Page 91

91
Safety First!
General Safety
• Switch o and unplug before tting or removing tools/attachments,
after use and before cleaning.
• Keep your ngers away from moving parts and tted attachments.
• Never use a damaged machine.
• Never operate the machine when it is empty.
• Keep mains cable out of reach from children.
• Keep power unit, mains cable or plug away from water.
• Never exceed the maximum capacities.
• When using an attachment, read the accompanying safety
instructions.
• Take care when lifting this appliance as it is heavy.
• You should always have your microwave checked by a qualied
technician if it has been dropped or damaged to ensure it is safe to
use.
• This appliance is not intended for use by persons (including children)
with reduced physical, sensory or mental capabilities, or lack of
experience and knowledge, unless they have been given supervision
or instruction concerning use of the appliance by a person
responsible for their safety.
• Children should be supervised to ensure that they do not play with
the appliance.
• Only use the appliance for its intended domestic use. We will not
accept any liability if the appliance is subject to improper use, or
failure to comply with these instructions.
Maintenance of your microwave
WARNING : It is hazardous for anyone other than a qualied technician to
carry out any service or repair operation which involves the removal of a
cover that gives protection against exposure to microwave energy.
WARNING : If the door or door seals are damaged, the microwave must
not be operated until it has been repaired by a qualied technician.
• If smoke is observed, switch o or unplug the appliance and keep the
door closed in order to contain any ames.
• If the mains cable is damaged, it must be replaced by a service agent
or a qualied technician.
• If you have a pacemaker, please contact your doctor before using a
microwave.
Microwave use
• This microwave is not intended for commercial use.
• It should never be used for drying clothes or for other non-food
purposes.
• The appliance is not intended to be operated by means of an external
timer or separate remote-control system.
• The microwave should not be left unattended when in use.
• The temperature of accessible surfaces may be high when the
appliance is operating.
• To prevent high moisture content gathering inside the microwave
cavity, open the door immediately after the cooking function has
stopped to allow steam to escape.
• Only use utensils that are suitable for microwave use.
• Care should be taken when using paper, plastic, wooden or other
combustible materials in the microwave as they can catch re.
• Oil & fat for deep frying should not be heated in the microwave.
• Only use cling lm designed for microwave use and take extra care
when removing the lm to avoid steam burns.
• Only heat popcorn that has been designed for microwave use.
Cooking Use
As the power of dierent microwave ovens can vary considerably, care
must be taken when rst using this appliance as it may cook faster than
expected.
• Do not leave the appliance unattended during use.
• Take care when cooking food with a high sugar or fat content, such as
Christmas pudding or fruitcake. The sugar or fat can overheat and in
some cases catch re.
Fire!
In the event of re:
• Keep the microwave door closed.
• Turn o the power.
• Unplug the appliance from the mains power.
First Aid
Treat scalding by:
• Quickly placing the scald under cold running water for at least 10
minutes.
• Cover with a clean dry dressing. Do not use creams, oils or lotions.
Cleaning your Microwave
• The microwave should be cleaned regularly and food deposits
removed. Failure to maintain the microwave in a clean condition
can aect the life of the appliance and possibly result in a hazardous
situation. (See cleaning your microwave)
GB
Do not use these in your Microwave
• Metal objects are not to be used in the microwave. This include:
Metal cooking utensils. Metal plates or trays
Wine twist ties Crockery with metal trims
Meat thermometer
• Never use equipment made of metal, except foil in your microwave.
The microwave energy cannot pass through the metal so it bounces
o and sparks against the inside of the microwave.
• Stop the microwave straight away if any equipment is causing sparks.
• Remember that some crockery has a metal trim around the edge.
Even this trim can cause sparks.
Containers
WARNING : Pressure will build up in sealed containers and can cause them
to explode. Therefore, do not use the following in your microwave:
Sealed containers Capped bottles
Vacuum containers Sealed jars
Hard-boiled eggs Eggs in their shells
Nuts
• Always pierce the skin of fruit and vegetables, such as potatoes.
• Never use scratched, cracked or damaged glass in a microwave.
Damaged glass can explode.
Delayed Boiling
Liquids heated in a microwave can boil up when removing them from the
microwave.
Take the following precautions :
• Always stir liquids, before and after cooking.
• Allow them to stand.
• Use containers that are wider at the top than at the bottom.
Preparing food for Babies
Extra care must be taken when preparing food or drink for babies and
small children.
• Always test the food or liquid temperature before feeding it to the
baby.
• When using a baby bottle, ensure the teat is removed before heating.
• When warming milk, ensure the bottle is shaken.
Caution!
During cooking the outer surface will become hot. Do not touch the outer
casing of the microwave. Care should be taken not to store any items on
top of your microwave.
Earthing Instructions
WARNING: THIS APPLIANCE MUST BE EARTHED.
• This appliance is equipped with a mains cable having an earthed
plug.
• The plug must be plugged into an appropriate outlet that is installed
and earthed in accordance with all local standard and requirements.
Warning!
• Improper connection of the appliance-earthing conductor can result
in a risk of an electric shock.
• Check with a qualied electrician or service representative if you are
in doubt whether the appliance is properly earthed.
• Never modify the plug provided with the appliance.
• If the plug does not t properly in the mains socket, have a qualied
electrician to install a proper mains socket.
Page 92

92
Prima la sicurezza!
Sicurezza generale
• Spegnere e scollegare il cavo d’alimentazione: prima di installare/
rimuovere attrezzi/accessori, dopo l’uso e prima della pulizia.
• Tenere le dita lontane dalle parti mobili e dagli accessori installati.
• Non usare mai elettrodomestici danneggiati.
• Non usare l’elettrodomestico quando è vuoto.
• Tenere il cavo d’alimentazione lontano dalla portata dei bambini.
• Tenere l’alimentatore, il cavo d’alimentazione e la spina lontani
dall’acqua.
• Non superare mai le capacità massime.
• Quando si usano accessori, leggere le istruzioni di sicurezza che li
accompagnano.
• Prestare attenzione quando si solleva l’elettrodomestico perché è
pesante.
• Se il forno a microonde ha subito cadute o danni è necessario farlo
controllare da un tecnico qualicato per accertarsi che possa ancora
essere usato in sicurezza.
• Questa attrezzatura non è intesa per l’uso da parte di persone (inclusi
i bambini) con capacità siche, sensoriali o mentali ridotte, oppure
con un’esperienza o conoscenza limitata, salvo sia data loro assistenza
e formazione per l’uso dell’attrezzatura da parte di una persona
responsabile per la loro sicurezza .
• I bambini devono essere controllati per assicurarsi che non giochino
con l’attrezzatura.
• Usare l’elettrodomestico esclusivamente per lo scopo domestico
per cui è inteso. Non accettiamo alcuna responsabilità se
l’elettrodomestico è usato in modo inappropriato o se non sono
osservate le istruzioni date.
Manutenzione del forno a microonde
AVVISO: Fatta eccezione per il personale qualicato, è pericoloso
per chiunque eseguire manutenzioni o riparazioni che comportano
la rimozione delle coperture che proteggono dall’esposizione alle
microonde.
AVVISO: Se lo sportello o le sue guarnizioni sono danneggiate, il forno
a microonde non deve essere usato nché non è riparato da un tecnico
qualicato.
• Se si rileva la presenza di fumo, spegnere o scollegare
l’elettrodomestico dalla presa di corrente tenendo lo sportello chiuso
per impedire l’alimentazione di possibili amme.
• Se il cavo d’alimentazione è danneggiato, deve essere sostituito da un
rivenditore o da un tecnico qualicato.
• I portatori di pacemaker devono mettersi in contatto con il proprio
medico prima di usare i forni a microonde.
Uso del forno a microonde
• Questo forno a microonde non è inteso per uso commerciale.
• Non deve mai essere usato per asciugare gli abiti o per altri scopi
diversi dalla cottura o riscaldamento di cibi.
• L’elettrodomestico non è inteso per il funzionamento a mezzo di timer
esterni o sistemi telecomandati separati.
• Il forno a microonde non deve essere trascurato mentre è in uso.
• La temperatura delle superci accessibili può essere alta quando
l’elettrodomestico è in uso.
• Per impedire alla condensa di raccogliersi all’interno del forno a
microonde, aprire lo sportello immediatamente dopo il termine della
cottura per permettere la fuoriuscita del vapore.
• Usare solo utensili adatti per l’uso in forni a microonde.
• Deve essere prestata attenzione quando nel forno sono usati materiali
come carta, plastica, legno o altri materiali combustibili perché
possono prendere fuoco.
• Oli e grassi per frittura non devono essere riscaldati nel forno a
microonde.
• Usare solo la pellicola trasparente specica per l’uso nel forno a
microonde e prestare estrema attenzione quando si rimuove la
pellicola per evitare ustioni provocate dal vapore.
• Riscaldare solo il popcorn che è specico per la cottura al forno a
microonde.
Istruzioni per la cottura
Poiché la potenza dei diversi forni a microonde può variare in modo
considerevole, la prima volta che si usa questo elettrodomestico deve
essere prestata particolare attenzione perché potrebbe cucinare più
rapidamente di quanto previsto.
• Non lasciare l’elettrodomestico trascurato mentre è in uso.
• Prestare attenzione quando si cucinano cibi con alti contenuti di
zucchero e grassi, come il “Christmas pudding” o i “Fruitcake”. Lo
zucchero o il grasso può surriscaldarsi ed in alcuni casi prendere
fuoco.
Incendio!
In caso d’incendio:
• Tenere chiuso lo sportello del forno a microonde.
• Spegnere il forno.
• Scollegare il cavo d’alimentazione dalla presa di corrente.
IT
Primo soccorso
Trattamento delle ustioni:
• Mettere immediatamente la parte ustionata sotto acqua corrente
fredda e lasciarla per almeno 10 minuti.
• Coprire con una garza asciutta e pulita. Non usare creme, oli o lozioni.
Pulizia del forno a microonde
• Il forno a microonde deve essere pulito regolarmente ed i depositi di
cibo devono essere rimossi. Se il forno a microonde non è mantenuto
pulito la durata dell’elettrodomestico potrebbe essere inuenzata ed
eventualmente comportare situazioni di rischio. (Fare riferimento alla
sezione dedicata alla pulizia del forno a microonde)
Da non usare nel forno a microonde
• Gli oggetti di metallo non devono essere usati nel forno a microonde.
Questi includono:
- Utensili metallici -Piatti o vassoi metallici
-Fascette metalliche -Piatti con niture metalliche (dorature)
-Termometri metallici
• Non usare mai oggetti metallici, fatta eccezione per la pellicola
d’alluminio, nel forno a microonde. Le microonde non possono
passare attraverso i metalli e quindi rimbalzano e fanno scintille
quando toccano le pareti interne del forno.
• Fermare immediatamente il forno a microonde se si vedono scintille.
• Ricordare che alcuni piatti hanno niture metalliche (dorature). Anche
queste niture possono provocare scintille.
Contenitori
AVVISO: All’interno dei contenitori chiusi si crea pressione che può portarli
ad esplodere. Quindi, non usare quanto segue nel forno a microonde:
- Contenitori chiusi - Bottiglie tappate
- Contenitori sottovuoto - Vasetti chiusi
- Uova sode -Uova nel guscio
- Noci
• Incidere sempre la buccia di frutta e verdura, come le patate.
• Non usare mai vetro graato, crepato o danneggiato nel forno a
microonde. Il vetro danneggiato può esplodere.
Bollitura ritardata
I liquidi riscaldati in un forno a microonde possono bollire quando sono
rimossi dal forno.
Prendere le precauzioni che seguono:
• Mescolare sempre i liquidi prima e dopo la cottura.
• Lasciarli riposare.
• Usare contenitori che abbiano l’apertura più ampia della base.
Preparazione delle pappe per i neonati
Deve essere usata cautela estrema quando si preparano cibi o bevande
per i neonati ed i bambini piccoli.
Controllare sempre la temperatura del cibo o della bevanda prima di darla
al bambino.
• Quando si usano i biberon, assicurarsi di rimuovere la tettarella prima
di riscaldarlo.
• Quando si scalda il latte, assicurarsi di scuotere il biberon.
Attenzione!
Durante la cottura le superci esterne diventano calde. Non toccare
le coperture esterne del forno a microonde. Prestare attenzione a non
collocare alcun oggetto sopra il forno a microonde.
Istruzioni per la messa a terra
AVVISO: QUESTO ELETTRODOMESTICO DEVE ESSERE FORNITO
DI MESSA A TERRA.
• Questo elettrodomestico è dotato di cavo d’alimentazione con spina
con messa a terra.
• La spina deve essere collegata ad una presa di corrente appropriata
che deve essere installata e dotata di messa terra in conformità a tutte
le norme e requisiti locali.
Avviso!
• Il collegamento inappropriato del conduttore di messa a terra
dell’elettrodomestico può provocare incendi e scariche elettriche.
• In caso di dubbio, far controllare ad un elettricista qualicato o
personale dell’assistenza che l’elettrodomestico abbia l’appropriata
messa a terra.
• Non modicare mai la spina in dotazione all’elettrodomestico.
• Se la spina non entra nella presa di corrente, fare installare una presa
di corrente appropriata da un elettricista qualicato.
Page 93

93
Bezpečnost především!
Obecná bezpečnost
• Vypněte a odpojte zařízení před připojením nebo odebráním
nástrojů/přídavných zařízení, po použití a před čištěním.
• Udržujte prsty mimo pohybující se součásti a namontovaná přídavná
zařízení.
• Nikdy nepoužívejte poškozený přístroj.
• Nikdy přístroj neuvádějte do provozu, pokud je prázdný.
• Udržujte napájecí kabel mimo dosah dětí.
• Udržujte napájecí jednotku, kabel nebo zástrčku mimo dosah vody.
• Nikdy nepřekračujte maximální kapacity.
• Při používání přídavného zařízení si přečtěte přiložené bezpečnostní
pokyny.
• Při zvedání zařízení buďte opatrní, protože je těžké.
• Měli byste vždy nechat mikrovlnou troubu zkontrolovat
kvalikovaným technikem, pokud jste ji upustili nebo poškodili, aby
byla zaručena bezpečnost jejího používání.
• Zařízení není určeno pro použití osobami (včetně dětí) se sníženými
fyzickými, senzorickými nebo duševními schopnostmi, nedostatkem
zkušeností nebo znalostí, pokud nejsou při použití tohoto zařízení
pod dozorem nebo vedením osoby odpovědné za jejich bezpečnost.
• Děti by měly být pod dohledem, aby si nemohly se zařízením hrát.
• Zařízení používejte pouze pro jeho zamýšlený účel v domácnosti.
Neponeseme žádnou odpovědnost v případě, že je zařízení
používáno nesprávně nebo pokud není postupováno v souladu s
těmito pokyny.
Údržba mikrovlnné trouby
VÝSTRAHA: Kromě kvalikovaného technika je pro kohokoliv nebezpečné
provádět servisní zásahy nebo opravy, které vyžadují demontáž krytu
chránícího proti působení mikrovlnné energie.
VÝSTRAHA: Pokud budou poškozeny dveře nebo jejich těsnění,
mikrovlnná trouba nesmí být uváděna do provozu, dokud není
kvalikovaným technikem opravena.
• Pokud pozorujete kouř, vypněte nebo odpojte zařízení a udržujte
dveře uzavřené, abyste zabránili vyšlehnutí plamenů.
• Pokud je poškozen napájecí kabel, musí jej vyměnit servisní zástupce
nebo kvalikovaný technik.
• Pokud používáte kardiostimulátor, kontaktujte před použitím
mikrovlnné trouby svého lékaře.
Použití mikrovlnné trouby
• Tato mikrovlnná trouba není určena pro profesionální použití.
• Nikdy byste ji neměli používat pro sušení oděvů nebo jiných věcí, než
jsou potraviny.
• Zařízení není určeno pro provoz prostřednictvím externího časovače
nebo samostatného systému dálkového ovládání.
• Mikrovlnná trouba by neměla být za provozu ponechána bez dozoru.
• Teplota přístupných povrchů může být vysoká, když je zařízení v
provozu.
• Chcete-li zabránit shromažďování vlhkosti uvnitř mikrovlnné trouby,
otevřete její dveře ihned po vaření a nechte páru uniknout ven.
• Používejte pouze takové nádobí, které je vhodné pro mikrovlnou
troubu.
• Je nutné být opatrný při používání papírových, plastových nebo
dřevěných či jiných hořlavých materiálů v mikrovlnné troubě, protože
mohou vzplanout.
• Olej nebo tuk pro smažení nelze v mikrovlnné troubě ohřívat.
• Při používání varné fólie určené pro mikrovlnné trouby pracujte při
snímání fólie velmi opatrně, vyhnete se tak popáleninám.
• Ohřívejte pouze takový popcorn, který je určen pro přípravu v
mikrovlnné troubě.
Využití pro vaření
Protože výkon různých mikrovlnných trub se může velmi lišit, je nutné
pracovat při prvním použití opatrně, protože zařízení může vařit rychleji,
než očekáváte.
• Neponechávejte během provozu zařízení bez dozoru.
• Buďte opatrní při vaření potravin s vysokým obsahem cukru nebo
tuku, například Vánočního pudinku nebo ovocného koláče. Cukr nebo
tuk se mohou přehřát a v některých případech vzplanout.
Požár!
V případě požáru:
• Udržujte dveře mikrovlnné trouby uzavřené.
• Vypněte napájení.
• Odpojte zařízení od síťového napájení.
První pomoc
Opařeniny ošetřete:
• Rychlým vložením opařeného místa pod studenou tekoucí vodu
minimálně na 10 minut.
• Zakryjte čistým a suchým obinadlem. Nepoužívejte krémy, oleje ani
pleťové vody.
CZ
Čištění mikrovlnné trouby
• Mikrovlnná trouba by měla být pravidelně čištěna a všechny zbytky
potravin odstraněny. Pokud nebudete udržovat mikrovlnnou
troubu v čistém stavu, může to ovlivnit její životnost a vést ke vzniku
nebezpečných situací. (Viz také čištění mikrovlnné trouby)
Nepoužívejte následující předměty v mikrovlnné troubě
• Kovové předměty se v mikrovlnné troubě nesmí používat Mezi ně
patří:
- Kovové náčiní - Kovové mísy nebo tácy
- Drátěné pomůcky - Nádobí z porcelánu s kovovými ozdobami
- Teploměr na maso
• Nikdy v mikrovlnné troubě nepoužívejte zařízení zhotovené z kovu,
kromě fólie. Mikrovlnná energie nemůže procházet kovovými
předměty, takže se odrazí a způsobí jiskření uvnitř mikrovlnné trouby.
• Mikrovlnnou troubu ihned zastavte, pokud některý předmět způsobí
jiskření.
• Nezapomeňte, že některé porcelánové nádobí má kovové ozdoby na
okrajích. I takové drobné ozdoby mohou způsobit jiskry.
Nádoby
VÝSTRAHA: V uzavřených nádobách se vytvoří tlak a může způsobit jejich
výbuch. Proto nepoužívejte v mikrovlnné troubě následující předměty:
- Uzavřené nádoby - Zavíčkované lahve
- Vakuové nádoby - Uzavřené sklenice
- Vejce vařená natvrdo - Vejce ve skořápkách
- Ořechy
• Vždy propíchněte kůru ovoce nebo zeleniny, například brambor.
• Nikdy nepoužívejte v mikrovlnné troubě poškrábané, popraskané
nebo poškozené sklo. Poškozené sklo může vybouchnout.
Zpožděné vaření
Kapaliny zahřívané v mikrovlnné troubě mohou vařit, když je z trouby
vyjmete.
Podnikněte následující opatření:
• Vždy kapaliny před a po vaření zamíchejte.
• Ponechte je odstát.
• Používejte nádoby, které mají hrdlo širší než dno.
Příprava potravin pro děti
Velkou opatrnost je nutné věnovat přípravě potravin nebo nápojů pro
kojence a malé děti.
• Vždy otestujte teplotu potravin nebo tekutin předtím, než je podáte
dítěti.
• Při použití dětské láhve sejměte dudlík před ohříváním.
• Při ohřívání mléka zatřepejte lahví.
Pozor!
Během vaření se ohřeje vnější povrch. Nedotýkejte se vnějšího povrchu
mikrovlnné trouby. Je nutné být opatrný a neukládat žádné předměty na
mikrovlnnou troubu.
Pokyny pro uzemnění
VÝSTRAHA: TOTO ZAŘÍZENÍ MUSÍ BÝT UZEMNĚNO.
• Toto zařízení je vybaveno přívodním kabelem s uzemněnou
zástrčkou.
• Zástrčka musí být připojena do vhodné zásuvky, která je
nainstalovaná a uzemněná v souladu s místními normami a předpisy.
výstraha!
• Nesprávné připojení zemnícího vodiče zařízení může způsobit riziko
úrazu elektrickým proudem.
• Ověřte si u kvalikovaného elektrotechnika nebo servisního zástupce,
pokud jste na pochybách, zda je zařízení řádně uzemněno.
• Nikdy nemodikujte zástrčku dodanou se zařízením.
• Pokud zástrčku nelze zasunout správně do zásuvky, svěřte montáž
správného typu zástrčky kvalikovanému elektrotechnikovi.
Page 94

94
Bezpečnosť je na prvom mieste!
Všeobecná bezpečnosť
• Pred namontovaním alebo demontovanom náradia/príslušenstva,
po použití a pred čistením zariadenie vypnite a sieťový kábel odpojte
zo zásuvky.
• Prsty držte v dostatočnej vzdialenosti od pohybujúcich sa častí a
namontovaného príslušenstva.
• Nikdy nepoužívajte poškodené zariadenie.
• Nikdy zariadenie neprevádzkujte pokiaľ je prázdne.
• Sieťový kábel uschovávajte mimo dosahu detí.
• Zabráňte styku sieťovej jednotky, sieťového kábla alebo zástrčky s
vodou.
• Nikdy neprekračujte maximálne kapacity.
• Pokiaľ používate príslušenstvo, prečítajte si priložené bezpečnostné
pokyny.
• Pri zdvíhaní spotrebiča dávajte pozor, pretože je ťažký.
• Pokiaľ vaša mikrovlnná rúra spadla alebo bola poškodená, nechajte
ju vždy skontrolovať kvalikovaným technikom s cieľom stanoviť
bezpečnosť jej používania.
• Toto zariadenie nie je určené na používanie osobami (vrátane detí) so
zníženými fyzickými, zmyslovými alebo mentálnymi schopnosťami,
alebo osobami s nedostatočnými skúsenosťami a znalosťami, a to
dokiaľ nepracujú pod dozorom alebo na základe pokynov o používaní
zariadenia vydaných od osoby zodpovednej za ich bezpečnosť.
• V prípade detí je treba dohliadať na to, aby sa so spotrebičom nehrali.
• Spotrebič používajte jedine na jeho určené použitie v domácnostiach.
Naša spoločnosť neprevezme žiadnu zodpovednosť v prípade
nesprávneho používania tohto zariadenia alebo opomenutia
dodržiavať tieto pokyny.
Údržba mikrovlnnej rúry
VÝSTRAHA : Pre iné osoby než ako je kvalikovaný technik je nebezpečné
vykonávať údržbu alebo opravy, pri ktorých je potrebné odstrániť kryt
chrániaci proti vystaveniu účinkom mikrovlnného žiarenia.
VÝSTRAHA : Ak sú dvierka alebo ich tesnenie poškodené, mikrovlnná rúra
sa nesmie používať, kým ju neopraví kvalikovaný technik.
• Ak zbadáte dym, vypnite zariadenie alebo ho odpojte od zdroja
energie a nechajte dvierka zatvorené, aby ste uhasili prípadné
plamene.
• Pokiaľ je sieťový kábel poškodený, je potrebné nechať ho vymeniť
servisným zástupcom alebo kvalikovaným technikom.
• Pokiaľ používate kardiostimulátor, spojte sa lekárom skôr, ako začnete
mikrovlnnú rúru používať.
Používanie mikrovlnnej rúry
• Táto mikrovlnná rúra nie je určená na komerčné použitie.
• Nikdy by sa nemala používať na sušenie odevov ani na iné účely, ktoré
nesúvisia s prípravou potravín.
• Zariadenie nie je určené na prevádzku v spojení s externým
časovačom alebo samostatným systémom diaľkového ovládania.
• Mikrovlnnú rúru by ste nemali počas používania ponechať bez
dozoru.
• Teplota prístupných povrchov môže byť počas prevádzky spotrebiča
vysoká.
• Aby ste zabránili vysokej vzdušnej vlhkosti vo vnútri mikrovlnnej rúry,
dvierka rúry otvorte ihneď po ukončení funkcie varenia a nechajte
paru uniknúť.
• Používajte len kuchynské potreby určené na použitie v mikrovlnnej
rúre.
• Pozor dávajte pri používaní papiera, plastových, drevených alebo
iných horľavých materiálov v mikrovlnnej rúre, pretože sa môžu
vznietiť.
• Olej a tuk používaný na fritovanie by sa nemali ohrievať v mikrovlnnej
rúre.
• Používajte jedine priľnavý povlak navrhnutý pre varenie v
mikrovlnných rúrach a dávajte veľký pozor pri jeho odstraňovaní s
cieľom predísť opareniu.
• Ohrievajte jedine pukance určené na prípravu v mikrovlnnej rúre.
Použitie na varenie
Pretože výkon rôznych mikrovlnný rúr sa môže značne odlišovať, dávajte
pozor pri prvom používaní tohto spotrebiča, pretože varenie môže byť
rýchlejšie ako by ste očakávali.
• Nenechávajte spotrebič počas používania bez dozoru.
• Dávajte pozor pri príprave potravín s vysokým obsahom cukru alebo
tuku, ako je napríklad vianočný puding alebo ovocný koláč. Cukor
alebo tuk sa môžu nadmerne ohriať a v niektorých prípadoch vznietiť.
Požiar!
V prípade požiaru:
• Nechajte dvierka rúry zatvorené.
• Vypnite napájanie.
• Odpojte spotrebič od sieťového napájania.
SK
Prvá pomoc
Oparenie ošetrite:
• Rýchlo vložte oparené miesto pod studenú tečúcu vodu na dobu
aspoň 10 minút.
• Prekryte čistou suchou gázou. Nepoužívajte krémy, oleje alebo ani
emulzie.
Čistenie mikrovlnnej rúry
• Mikrovlnnú rúru by ste mali čistiť pravidelne a zvyšky potravín by ste
mali odstraňovať. Opomenutie zachovávať mikrovlnnú rúru v čistom
stave môže ovplyvniť životnosť spotrebiča a možným dôsledkom
môže byť riziková situácia. (Pozrite si časť Čistenie mikrovlnnej rúry.)
Vo vnútri mikrovlnnej rúry nepoužívajte nasledujúce
• V mikrovlnnej rúre sa nesmú používať kovové predmety. Medzi ne
patria:
- Kovové kuchynské riady. - Kovové taniere alebo tácky
- Drôtené stočené uzávery - Keramické nádoby s kovovou úpravou
- Teplomery na meranie teploty mäsa
• V mikrovlnnej rúre nikdy nepoužívajte riady vyrobené z kovu,
okrem fólií. Mikrovlnná energia nedokáže prechádzať cez kov a
preto dochádza k vyžarovaniu iskier smerom k vnútorným plochám
mikrovlnnej rúry.
• Používanie mikrovlnnej rúry zastavte okamžite po tom, ako riad
spôsobuje vznik iskier.
• Nezabudnite na to, že niektorý keramický riad má na okraji kovový
lem. Aj táto úprava spôsobuje iskrenie.
Nádoby
VÝSTRAHA : V uzatvorených nádobách dochádza k nárastu tlaku, čo
môže spôsobiť ich vybuchnutie. Z tohto dôvodu v mikrovlnnej rúre
nepoužívajte:
- Uzatvorené nádoby - Uzatvorené fľaše
- Vákuové nádoby - Uzatvorené džbány
- Vajcia uvarené na tvrdo - Celé vajcia v škrupinách
- Orechy
• Kôru ovocia alebo zeleniny, ako sú napríklad zemiaky vždy
poprepichujte.
• V mikrovlnnej rúre nikdy nepoužívajte poškriabané, prasknuté ani
poškodené sklo. Poškodené sklo môže vybuchnúť.
Oneskorený var
Tekutiny ohrievané v mikrovlnnej rúre môžu začať vrieť po vybratí z
mikrovlnnej rúry.
Dodržiavajte nasledujúce bezpečnostné opatrenia:
• Pred a po varení vždy tekutiny pomiešajte.
• Nechajte ich usadiť sa.
• Používajte nádoby, ktoré sú širšie hore než pri dne.
Príprava stravy pre dojčatá
Veľkú pozornosť je potrebné venovať pri príprave stravy a nápojov pre
dojčatá a malé deti.
• Vždy vyskúšajte teplotu stravy alebo tekutiny skôr, než ich podáte
dieťaťu.
• V prípade používania dojčenskej fľaše pred ohrevom snímte cumlík.
• Počas ohrievania mlieka fľašou potraste.
Upozornenie!
Počas ohrievania sa vonkajší povrch zohreje. Vonkajšieho povrchu
mikrovlnnej rúry sa nedotýkajte. Na hornej ploche ani vo vnútri
mikrovlnnej rúry neskladujte žiadne položky.
Pokyny ohľadne uzemnenia
VÝSTRAHA : TENTO SPOTREBIČ MUSÍ BYŤ UZEMNENÝ.
• Tento spotrebič je vybavený sieťovým káblom s uzemnenou
zástrčkou.
• Zástrčku je potrebné zasunúť do správnej sieťovej zásuvky, ktorá je
nainštalovaná a uzemnená podľa miestnych noriem a požiadaviek.
Výstraha!
• Nesprávne pripojenie uzemňovacieho vodiča spotrebiča môže mať za
následok vznik rizika zasiahnutia elektrickým prúdom.
• Pokiaľ máte pochybnosti o tom, či je spotrebič správne uzemnený,
poraďte sa s kvalikovaným technikom alebo servisným zástupcom.
• Nikdy neupravujte zástrčku dodávanú so spotrebičom.
• Pokiaľ zástrčku nie je možné správne zasunúť do sieťovej zásuvky,
požiadajte kvalikovaného elektrotechnika o nainštalovanie správnej
sieťovej zásuvky.
Page 95

Page 96

(P.N.: L20GSS10E-001)
GB
This symbol on the product or in the instructions means that your electrical and electronic
equipment should be disposed at the end of its life separately from your household waste.
There are separate collection systems for recycling in the EU.
For more information, please contact the local authority or your retailer where you purchased
the product.
IT
Questo simbolo sul prodotto o nelle istruzioni signica che l’apparecchiatura elettrica ed
elettronica va smaltita, alla ne del suo ciclo di durata, separatamente dai riuti domestici.
Nell’UE esistono sistemi di raccolta separati per il riciclaggio.
Per maggiori informazioni, rivolgersi all’autorità locale o al dettagliante presso il quale il
prodotto è stato acquistato.
CZ
Tento symbol na výrobku nebo v instrukcích znamená, že vaše elekrické nebo elektronické
zařízení musí být zlikvidováno na konci své životnosti odděleně od domácího odpadu. V EU
existují oddělené sběrové systémy pro recyklaci.
Více informací získáte na vašem místním úřadě nebo v obchodě, kde jste tento výrobek
zakoupili.
SK
Tento symbol nachádzajúci sa na výrobku, alebo vyskytujúci sa v návode znamená, že
vaše elektrické alebo elektronické zariadenie by malo byť po ukončení svojej životnosti
zlikvidované oddelene od bežného odpadu z domácnosti. V rámci Európskej únie existujú
systémy separovaného zberu s cieľom recyklovania odpadu.
DSGRetailLtd•MaylandsAvenue•HemelHempstead
Herts•HP27TG•England
GB
DSG Retail Limited is responsible for after sales service.
If you have a query about the product please contact our product support line 0844 561 6263 (Currys) and 08700 118 117 (Pixmania).
IT
DSG Retail Limited è responsabile per l’assistenza post-vendita.
Per qualsiasi domanda sul prodotto chiamare il numero per l’assistenza del prodotto 0844 561 6263 (Currys) e 08700 118 117 (Pixmania).
CZ
Za poprodejní servis je odpovědná společnost DSG Retail Limited.
Pokud máte jakékoliv dotazy ohledne výrovku, kontaktujte linku zákaznické podpory 0844 561 6263 (Currys) a 08700 118 117 (Pixmania).
SK
Spoločnosť DSG Retail Limited je zodpovedná za popredajné služby.
Pokiaľ máte otázky týkajúce sa výrobku, zavolajte na našu linku pre podporu výrobkov na čísle 0844 561 6263 (Currys) a 08700 118 117 (Pixmania).
 Loading...