

Page 1
Chocolate Fountain
Instruction Manual
L1CHOC10
Page 2

Contents
Unpacking .............................................................................................................................3
Product Overview .................................................................................................................4
Assembling The Chocolate Fountain ..................................................................................5
Operation ..............................................................................................................................5
Preparing the chocolate ...........................................................................................................................5
Microwave ......................................................................................................................................................5
Hob ...................................................................................................................................................................6
Adding the chocolate to the chocolate fountain ............................................................................6
Some Dipping Ideas to Inspire You .....................................................................................7
Dipping ideas for chocolate .....................................................................................................................7
Dipping ideas for other sauces ................................................................................................................7
Using Dierent Chocolates in The Chocolate Fountain .....................................................8
How To Clean And Care For The Chocolate Fountain .........................................................9
Hints And Tips .....................................................................................................................10
Specication .......................................................................................................................10
Safety Warnings ..................................................................................................................11
Page 3
GB-3
Before UseOperationSpecification Cleaning and MaintenanceSafety Warnings
If items are missing or damaged, please contact Partmaster (UK only).
Tel: 0844 800 3456 for assistance.
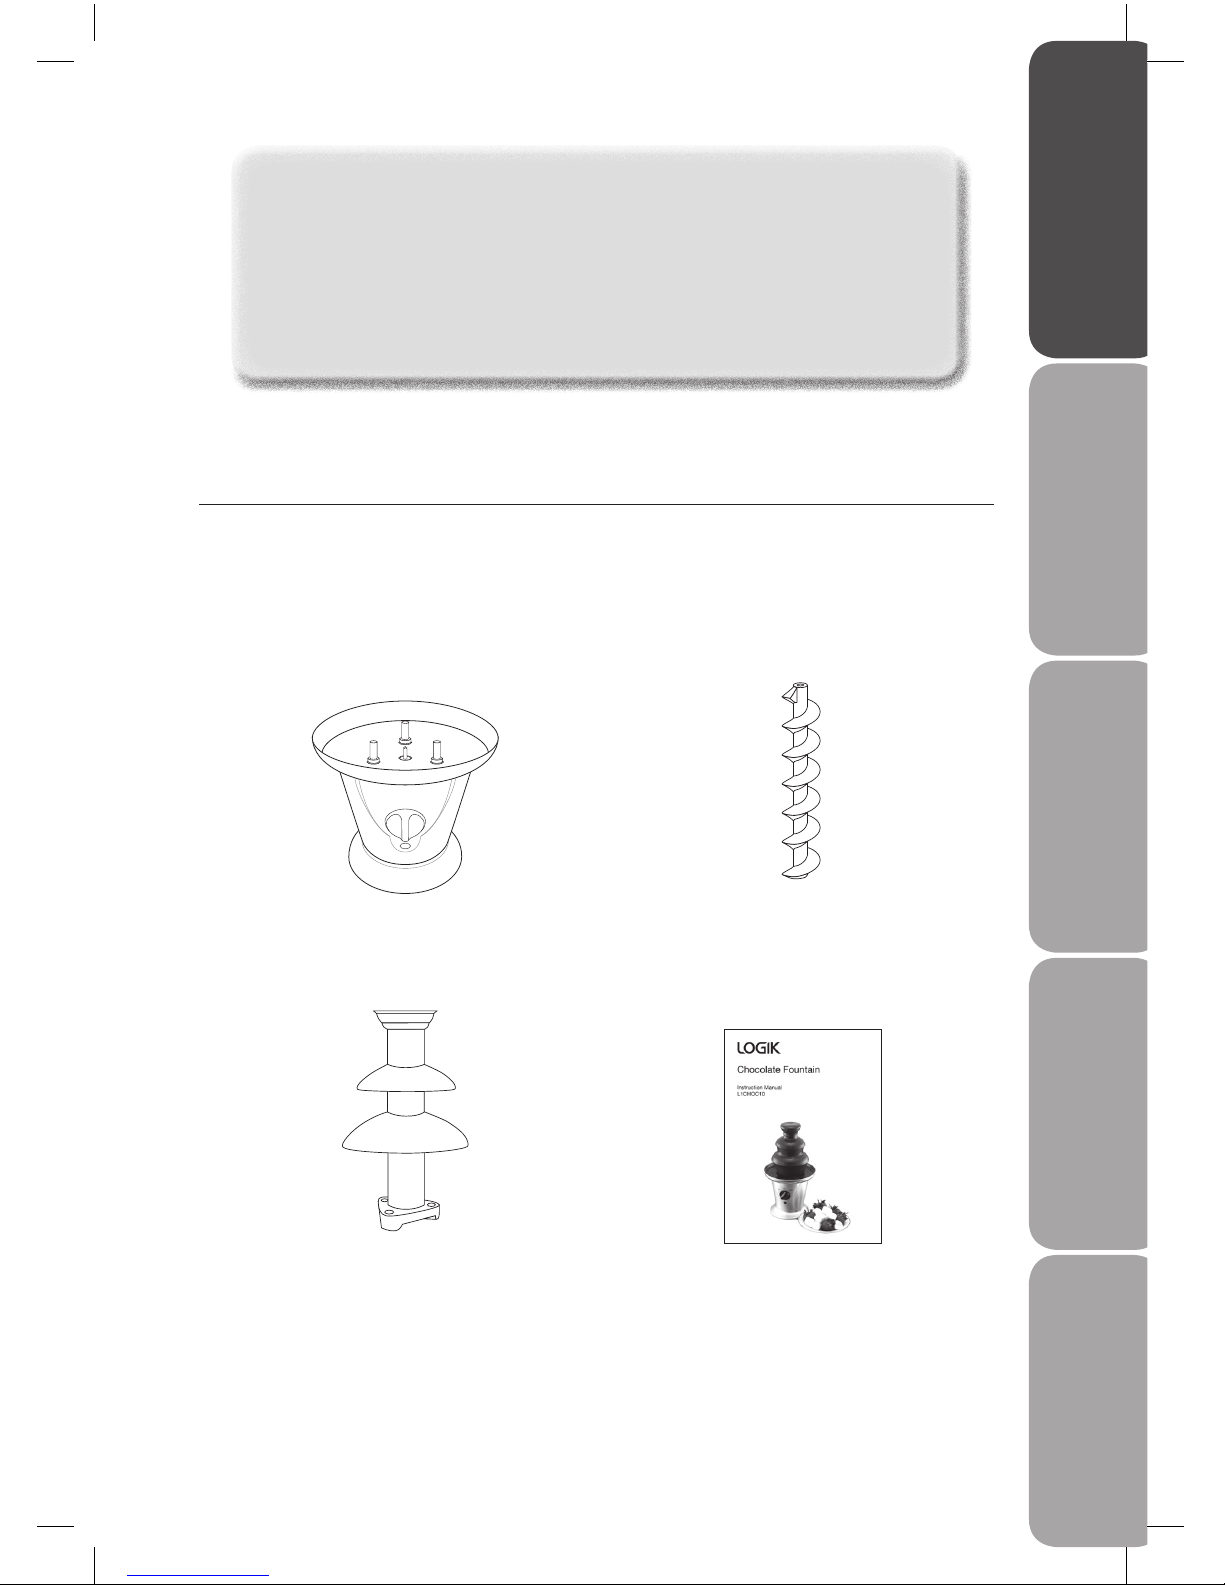
Unpacking
Remove all packaging from the unit. Retain the packaging. If you dispose of it please do so
according to local regulations.
The following items are included:
Congratulations on the purchase of your new Logik Chocolate Fountain.
We recommend that you spend some time reading this instruction manual in
order that you fully understand all the operational features it oers. You will
also nd some hints and tips to help you resolve any issues.
Read all the safety instructions carefully before use and keep this instruction
manual for future reference.
Spiral Drive x 1
P.N.: L1CHOC10-1
Tier System x 1
P.N.: L1CHOC10-2
Instruction Manual
P.N.: L1CHOC10M
The Base Unit
OFF
HEAT/
FLOW
HEAT
Page 4
GB-4
Before Use Operation SpecificationCleaning and Maintenance Safety Warnings
OFF
HEAT/
FLOW
HEAT
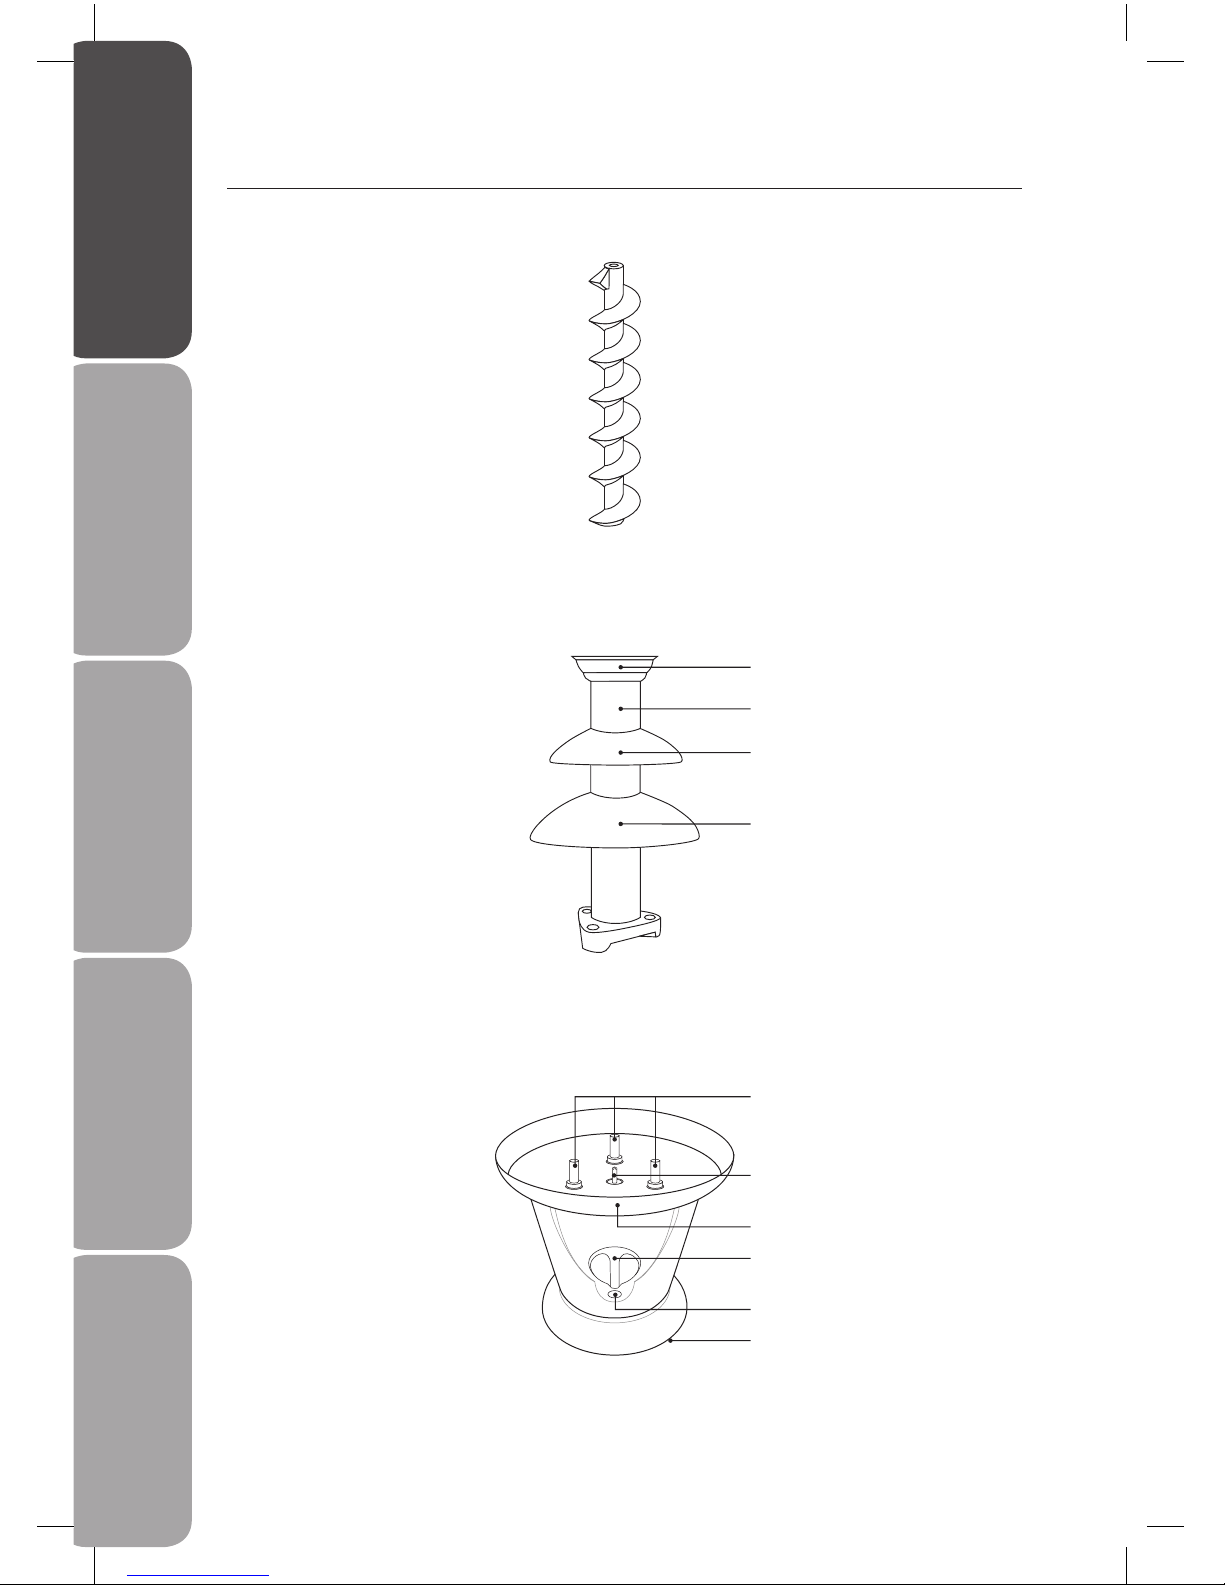
Product Overview
Top hat
Triangular point
where spiral drive ts
Centre column
Top tier
Middle tier
Round pins for tting
the tier system
Fountain Bowl
Non-slip Feet
Operating dial with O /
Heat / Heat & Flow settings
Indicator light
Spiral Drive
Tier System
(in 4 parts)
Base Unit Containing
Heater and Motor
Page 5

GB-5
Before UseOperationSpecification Cleaning and MaintenanceSafety Warnings
Assembling The Chocolate Fountain
The unit is easy to assemble.
After unpacking for the rst time, wipe out the bowl with a damp paper towel or cloth.
1. Rinse the tier system and spiral drive in warm water and dry.
2. Attach the spiral drive to the base unit by inserting the triangular hole at the bottom of
the spiral drive into the driveshaft. Make sure it’s rmly locked in position.
3. Attach the tier system to the base unit by aligning the 3 holes around the bottom of
the tier system with the 3 pins in the bowl. Lock it rmly in position.
Operation
Place the unit on a at and stable surface within reach of a mains socket. The unit must be
completely level to work properly.
Preparing the chocolate
Now it’s time to get the chocolate ready. It needs to be melted before you place it in the
warmed fountain bowl. The quickest and simplest way to do this is in a microwave but you
can also melt the chocolate on a hob. For the best cascading eect, you need at least 800g
of chocolate and ideally 900g of chocolate to start. This is a generous serving for up to 6
people.
Use chocolate that has a maximum of 60% cocoa. If a chocolate with a higher cocoa
percentage is used the chocolate may require the addition of some vegetable oil to
improve its flowing quality.
Microwave
First, break the chocolate into pieces and place 600g of chocolate chips / pieces and 100ml
of vegetable oil in a microwave-safe container and place it in the microwave oven. Heat it
for 1-2 minutes on high power (100%) and then stir. Return it to the microwave for a further
20-30 seconds if neccessary and then check again. The chocolate must be completely
melted and of a thin consistency that ows easily o a spoon.
If desired, other liquids such as liqueurs may now be added (approximately 1/4 cup of
liqueur, depending on your taste.)
Milk chocolate, dark semi-sweet chocolate, or white chocolate may also be used.
Page 6

GB-6
Before Use Operation SpecificationCleaning and Maintenance Safety Warnings
Hob
Place the chocolate in a heat-resistant bowl. Stand the bowl in a large saucepan of hot
water on the hob over a low heat. Stir the chocolate constantly until it’s completely melted,
taking care not to let it stick or burn.
Again, you’ll need to add some vegetable oil. It’s important not to add water or any waterbased liquids to the chocolate as this will make it harden and stop the ow.
Adding the chocolate to the chocolate fountain
Connect the unit to the mains socket. Turn the power switch to the ”Heat “ position to
preheat the bowl for 3-5 minutes.
Let the unit warm up for at least 3 minutes before adding the melted chocolate.
Turn the power switch to the “Heat & Flow“ position. Get the choice of dipping foods ready.
Carefully pour the melted chocolate into the fountain bowl. Do not overll the fountain
bowl, leave at least 1/4 inch of space from the top of the fountain bowl.
Do not overfill the bowl.
The spiral drive inside will draw the chocolate up to the top and then the enticing cascade
will start to ow over the tiers with its irresistible warm chocolate aroma. Then start
dipping!
• To prevent clogging, do not drop food pieces or objects into the chocolate. Also, do
not add cold liquids to the chocolate mixture or it may thicken and prevent proper
fountain operation.
• If chocolate ow becomes inconsistent, turn the power switch to “Heat” position
and allow a few seconds for the chocolate to settle, then turn the power switch
back to “Heat & Flow” position.
Page 7

GB-7
Before UseOperationSpecification Cleaning and MaintenanceSafety Warnings
Some Dipping Ideas To Inspire You
The chocolate fountain is great for parties or events. Chocolate is sure to be a big favourite
as a dipping sauce – but you can also ll the unit with other sweet sauces and savoury
sauces. Here are some ideas to get you thinking.
Dipping ideas for chocolate
• Marshmallows and pieces of Turkish delight, fudge and honeycomb.
• Whole fruits – such as strawberries and cherries.
• Sliced fruits – such as mango, kiwi fruit and orange segments.
• Biscuits – such as amaretti or a similar rm biscuit.
• Proteroles.
Dipping ideas for other sauces
For another sweet idea, try lling the unit with a fruit coulis that you’ve warmed gently in
the microwave or on the hob.
For a completely dierent fountain eating experience, take a cheese, barbecue or sweet
chilli sauce of a thin consistency that you’ve warmed up. Then dip with these:
• Cooked cubes of pork, beef, chicken, rm sh or prawns.
• The same foods in a light batter, Chinese or tempura - style.
• Cooked cubes of vegetables.
• A variety of breads – plain or avoured.
The bowl will be hot, use oven mitts or other hand protection to help prevent a
burn hazard.
Page 8

GB-8
Before Use Operation SpecificationCleaning and Maintenance Safety Warnings
Using Dierent Chocolates In The Chocolate Fountain
Virtually any quality chocolate will work well but for perfect results the rst time and every
time, you’re recommended to use a specially blended fondue chocolate.
To get the best cascading eects, the secret is a chocolate with a high percentage of cocoa
solids. Dark chocolate usually has a higher percentage than milk chocolate. Other cheaper
chocolates can work with the addition of vegetable oil but the oil can obviously aect the
taste and the texture.
Important – please note!
• Microwave timings are based on heating the chocolate on a Medium setting in a
800W microwave oven. If the oven has a dierent wattage, please check with the
manufacturer’s instructions.
• Chocolate burns easily so keep an eye on it and don’t heat it for more than 2 minutes at
a time.
• If you’re melting the chocolate on a hob, follow the instructions on page 5-6.
Page 9

GB-9
Before UseOperationSpecification Cleaning and MaintenanceSafety Warnings
How To Clean And Care For The Chocolate Fountain
The unit is designed to be easy to use and clean. Always switch o the unit and unplug it
before cleaning.
Turn o and unplug the unit. Start by pouring away any remaining liquid chocolate from
the bowl. It’s important to put it into a plastic bag or another disposable container and then
place in a bin. Never pour the chocolate into a drain or the toilet. It could cause blockages
as it hardens.
Wipe o any remaining chocolate in the bowl and on the sides of the base unit with a damp
paper towel or soft cleaning cloth and bu dry. Don’t use abrasive sponges or scourers as
these will damage the surface.
The base unit contains the electrical components and so it must obviously never be placed
in water or in a dishwasher. The spiral drive and the tier system can be safely washed by
hand in warm, soapy water. Then rinse and dry with a paper towel or soft cloth.
• To prevent an electrical shock hazard, do not immerse the base in water or other
liquids, as the base contains the electrical components.
• Do not use steel wool pads or other abrasive cleaners to clean the product, never
spray or apply cleaners directly to the unit.
• To prolong the product’s life, follow the cleaning instructions after every use.
• Never store the chocolate fountain in a fridge. It will damage the unit and the
condensation will cause an electrical slock hazard.
Page 10

GB-10
Before Use Operation SpecificationCleaning and Maintenance Safety Warnings
Hints And Tips
The chocolate fountain is designed for high reliability and trouble - free use. On the rare
occasions when you experience a problem, try these simple solutions:
Problem Possible cause – and solution
Chocolate is dripping, not
owing
Chocolate is too thick. Add a small amount of vegetable oil.
The unit is not level. Check the surface it’s standing on.
Adjust the base unit’s feet as required.
Make sure there’s at least 800g of melted chocolate in the
bowl.
Chocolate is not completely melted. Turn the chocolate
fountain to the “Heat” position and let the chocolate
fountain heat up the chocolate for another 2-3 mintutes,
stir the chocolate. Turn the switch to the “Heat and Flow”
position.
Chocolate is owing
unevenly
The base is not level. Check the surface it’s standing on. The
chocolate should also be evenly distributed in the bowl.
Chocolate ow is
intermittent or interrupted
Food may be blocking the chocolate ow at the base of the
tier system. Remove any pieces found.
Chocolate ow is slow, not
reaching the bottom tier
Air may be caught in the spiral drive or tier system. Turn o
the unit for a few minutes then restart.
Chocolate is too thick to
ow
The room temperature may be too low or the unit may
be in a draught from an open door or window. Thin the
chocolate with a little vegetable oil.
Specication
Model L1CHOC10
Power consumption 230 V ~ 50Hz, 95W
Features and specications are subject to change without prior notice.
Page 11

GB-11
Before UseOperationSpecification Cleaning and MaintenanceSafety Warnings
Safety Warnings
For your continued safety and to reduce the risk of injury or electric shock, please follow all
the safety precautions listed below.
• Read this instruction manual rst.
• The unit must always be level to work properly.
• Keep your ngers and other objects away from the unit bowl while it’s operating. Check
regularly to see if any food has fallen into the bowl as it could cause a blockage.
• Don’t use force when dipping food into the bowl.
• Don’t leave the unit unattended while it’s running.
• Don’t touch or move the spiral drive while it’s working.
• Don’t let children use the unit without adult supervision.
• Don’t move the unit while the motor is running.
• Keep the unit and its mains cable away from hot surfaces.
• The unit isn’t recommended for outdoor use.
• Don’t use the unit for any other purpose than those described in this manual.
• Don’t try to assemble or take apart the tier system or spiral drive when the motor is
running. Switch it o and unplug the unit rst.
• Don’t place the base unit or mains cable in water, any other liquid or in the dishwater.
• Don’t use the unit if the mains cable is damaged.
• This unit is intended to be used for domestic use only.
• This unit is intended for following melted chocolate for human consumption. Do not use
the unit for any other purpose.
• Do not place unit on a gas or electric burner, in a heated oven, or over an open ame.
• The mains cable length is tted to reduce the risk of injury. A longer mains cable or
extension cable is not recommended for use with this unit.
• Switch o the unit before disassembling the unit.
• This unit is not intended for use by persons (including children) with reduced physical,
sensory or mantal capabilities, or lack of experience and knowledge, unless they have
been given supervision or instruction concerning use of the unit by a person responsible
for their safety.
• Children should be supervised to ensure that they do not play with the unit.
• The unit is not intended to be operated with an external timer or separate remote control
system.
• Always unplug the unit from the mains socket when unattended or not in use.
• Do not touch hot surfaces, use protective, heat - resistant, non - ammable oven mitts /
potholders or gloves when handling the unit.
• Unplug the unit from the mains socket and allow it to cool down before cleaning or
removing accessories or attachments.
• Use only manufacturer supplied attachments.
• Use extreme caution when moving an unit containing hot liquids.
• Do not plug or unplug the unit from the mains socket with wet hands.
• To disconnect unit from the mains socket, pull directly on the plug, do not pull on the
power mains cable.
• If the mains cable is damaged, it must be replaced by the manufacturer or its service
agent.
Page 12

NOTE: If you require a replacement for any of the items listed below, please quote their
corresponding part numbers:
Replacement Part Part Number
Spiral Drive L1CHOC10-1
Tier System L1CHOC10-2
Instruction Manual L1CHOC10M
DSGRetailLtd•MaylandsAvenue•HemelHempstead
Herts•HP27TG•England
This symbol on the product or in the instructions means that
your electrical and electronic equipment should be disposed
at the end of its life separately from your household waste.
There are separate collection systems for recycling in the EU.
For more information, please contact the local authority or
your retailer where you purchased the product.
(P.N.: L1CHOC10M)
Visit Partmaster.co.uk today for the easiest way
to buy electrical spares and accessories. With
over 1 million spares and accessories available
we can deliver direct to your door the very next day. Visit www.partmaster.co.
uk or call 0844 800 3456 (UK customers only) Calls charged at National Rate.
 Loading...