

Page 1
Unpackin g
11
Opera ting Your Remote Control
22
Installing the Base Stand
33
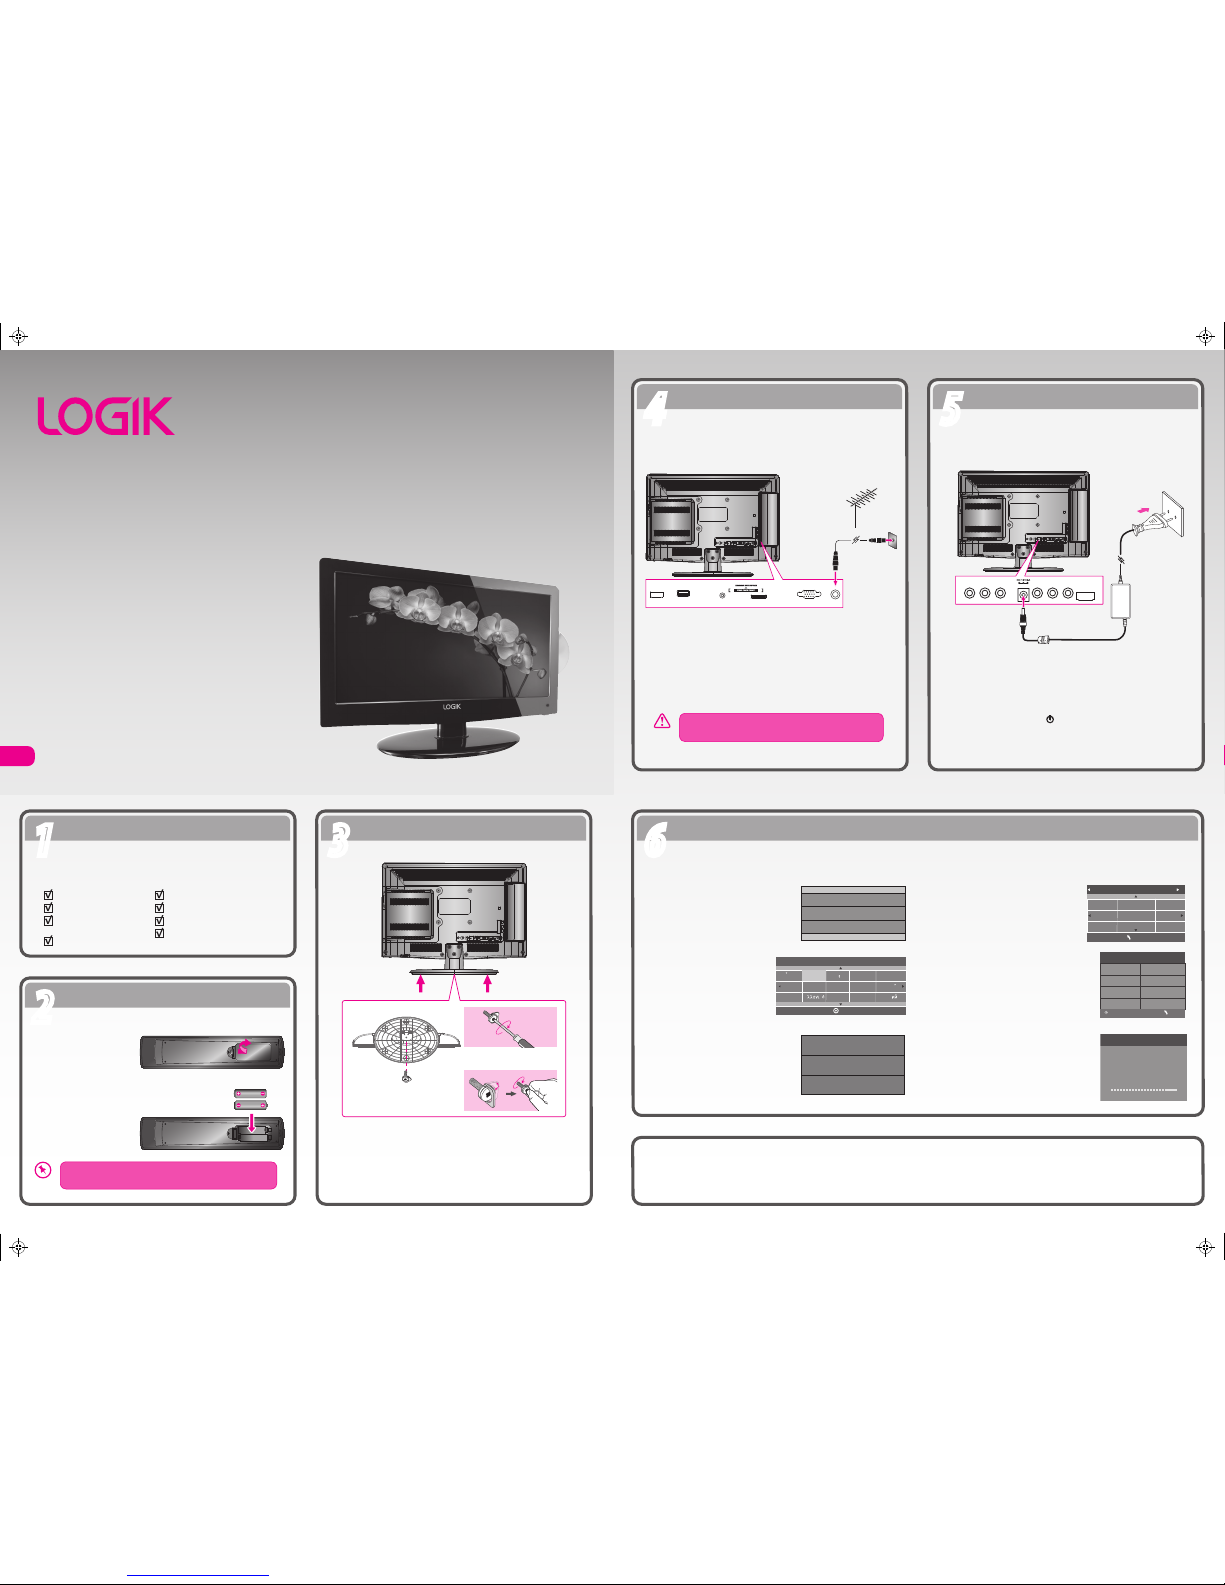
Conne cting to the Mai ns Socket
55
GB
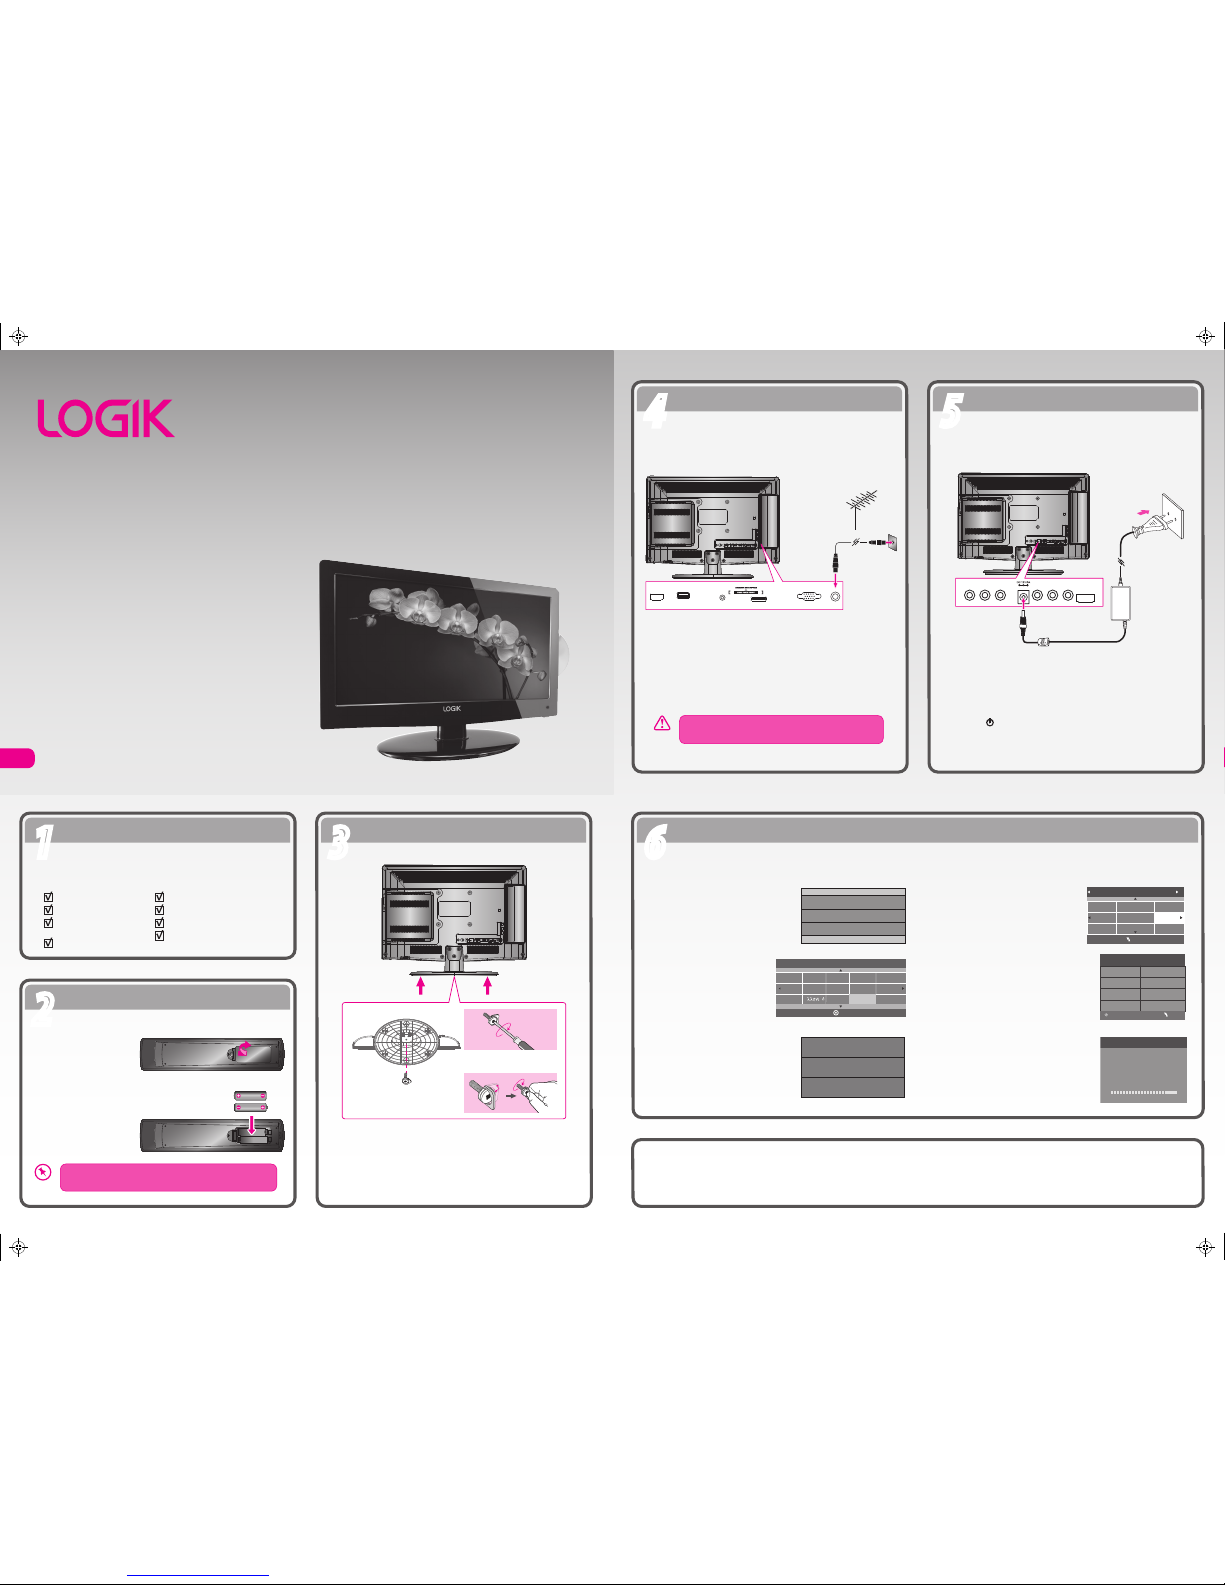
Turning the TV On for t he First Time
66
Conne cting th e Aerial
44
VIDEO L R YPbPr
HDMI2
To mains socket
Mains Adapter
(included)
Quick Start Guide
L19LDVB11E
Thank you for purchasin g your n ew Logik T V.
Your new T V incorpo rates the latest t echnolog y to enha nce your
viewing experie nce. We would suggest that you allow ab out 20 mi ns
for init ial setu p.
Please follow th is guide for a suc cessful rst time installa tion.
Remove all packaging from the TV. Retain the packaging. If you dispose of it
please do so according to any local regulations.
Install the batteries correctly by following the polarity (+ and -)
indications in the battery compartment.
1. Press and lift the back
cover up to open the
battery compartment of
the remote control.
2. Insert two AAA size
batteries. Close the
battery compartment
cover.
19” HD Ready Digital LED TV with DVD Player
LCD TV
Base Stand
Quick Start Guide
Remote Control /
AAA Batteries x 2
Screw A
Instruction Manual
Mains Adapter
SCART Adapter Cable
1. Lay the TV down on a at surface with the back side facing up. Please
make sure to place a soft cushioned material (such as a pillow or thick
piece of foam) beneath the screen.
2. To install the base stand, align the screw hole and then secure the base
stand with the provided 1 screw.
Screw A x 1
(P.N.:
20912223101)
Connect one end of the RF coaxial cable to the aerial socket on the wall and
the other end of the cable to the RF IN (75Ω) socket at the rear right side of
your TV.
Do not connect the TV to the mains supply until you have
completed all the connections.
1. Connect the mains adapter to the mains adapter socket located at the
rear right bottom side of your TV and then connect to the mains socket
after you have completed all the connections.
2. At this stage, the TV switches to standby mode. The red LED indicator
will illuminate on the front panel of the TV.
3. In standby mode, press the button on the right side panel of the TV
or on the remote control to turn the TV on. The red LED indicator will
turn blue.
HDMI1
USB
PC AUDIO
VGA RF
SCART
RF Coxial Cable
(not included)
The rst time you turn the TV on, it will go straight into First Time Installation.
Well done, your new TV is now ready to use. You will nd that there are many exciting features available. To get to know all these features, please
take some time to read the instruction manual provided with your TV.
(P.N.: 4033C193616)
1. Press the OK button to start First Time
Installation.
2. Press
the buttons to
select your desired language to
be displayed on the menu. The
default on-screen menu
language is set as English. Press
the OK button to conrm.
3. Press the
buttons to select DVB-T /
DVB-C and then press the OK button to
conrm.
First Time Installation
Please ensure aerial is plugged in!
Then press OK button.
Dansk
Deutsc h
Hrvats ki
Italia no
OSD Lan guage
OK
Magyar
Nederl ands
Norsk
PolskiEnglis h
Cesky
E k
Espano l
~
Fran ais
Portug ues
Pycck
DVB-C
DVB SELECT TYPE
DVB-T
3a. If you select DVB-T, press the
buttons to select the desired country
and then press the OK button to start
tuning.
3b. If you select DVB-C, the next step is to
congure the DVB-C system (Scan type /
Frequency / Network ID / Symbol(KS/S).
Press the OK button to go to the tune
type add country select menu this step is
the same as DVB-T, select the tune type
(DTV/ATV). Press the
buttons to
select the desired country and then press
the OK button to start tuning.
4. Channel tuning will commence. This operation
may take up to 6 minutes. The display will show
the progress of the tuning and the number of
channels found.
Tune Type DT V+ATV
UK
Austra lia
Austri a
Belgiu m
Bulgar ia
Croati a
Czech
Denmar k
Finlan d
MENU
DVB-C Scan Menu
Scan type Full
610000
Auto
Auto
Frequency
Network ID
Symbol(KS/S)
OK MENU
Channel Tuning
TV : 3 Channel(s)
DTV : 0 Channel(s)
Radio : 0 Channel(s)
Data : 0 Channel(s)
36%... 6 68.75 MHz (TV )
Please press MENU to skip.
screw
screw
or
OR
L19LDVB11E_QSG_5L_final111107_Zell.pdf 1 07/11/2011 2:16 PM
Page 2
Pakke opp
11
Bruke ernkontrol len
22
Installere sokke len
33
Kople til stikko ntakten
55
NO
Slå på TV-apparate t for første gang
66
Kople til ant ennen
44
VIDEO L R YPbPr
HDMI2
Til stikkontakten
Strømadapter
(vedlagt)
Hurtigstartguide
L19LDVB11E
Takk fo r at du k jøpte Log ik TV.
Dette ny e TV-appa ratet har innebygd den nyest e teknol ogien for å gi deg
den bes te seeropp levelsen . Vi anbefa ler at du bruker omtrent 2 0 minutte r
på det første opp settet.
Følg denn e bruksa nvisninge n for å o ppnå en v ellykket install asjon før ste
gangen.
Fjern all emballasje fra TV-apparatet. Ta vare på emballasjen. Hvis du kaster
den, må du ta hensyn til lokale bestemmelser om avhending av avfall.
Sett inn batteriene riktig i henhold til polariteten (+ og -) som
indikeres i batterirommet.
1. Trykk og løft bakdekslet
opp for å åpne batterirommet på ernkontrollen.
2. Sett inn to batterier av
AAA-størrelse. Lukk
batteriromdekslet.
19" HD Ready Digital LED-TV med DVD-spiller
LCD-TV
Sokkel
Hurtigstartguide
Fjernkontroll /
AAA-batterier x 2
Skrue A
Bruksanvisning
Strømadapter
SCART-adapterkabel
1. Legg TV-apparatet ned på en at overate med baksiden vendt opp.
Forsikre deg om at det er et mykt underlag (f.eks. en pute eller en tykk
skumplastmatte) under skjermen.
2. Installer sokkelen ved å innrette skruehullet og feste sokkelen med den
medfølgende skruen.
Skrue A x 1
(Delnr.: 20912223101)
Sett den ene enden av RF-koaksialkabelen inn i antennekontakten på
veggen og den andre enden av kabelen inn i RF IN (75Ω)-kontakten på den
bakre, høyre siden av TV-apparatet.
Ikke kople TV-apparatet til stikkontakten før du er ferdig med
å kople sammen alle signalkablene.
1. Forbind strømadapteren med strømadapterkontakten på den bakre,
høyre, nedre siden av TV-apparatet og deretter med stikkontakten etter
at du har fullført alle de andre forbindelsene.
2. På dette trinnet bytter TV-apparatet til ventemodus. Den røde
LED-indikatoren lyser opp på frontpanelet av TV-apparatet.
3. Trykk på -knappen i det høyre sidepanelet på TV-apparatet eller på
ernkontrollen for å slå på TV-apparatet når det er i ventemodus. Den
røde LED-indikatoren skifter til blått.
HDMI1
USB
PC AUDIO
VGA RF
SCART
RF-koaksialkabel
(ikke vedlagt)
Når du slår på TV-apparatet den første gangen, startes Førstegangsinstallasjon umiddelbart.
Godt gjort, det nye TV-ap paratet er nå klart til bruk. Dette apparate t har mange spennende fu nksjoner å by på. Ta deg tid til å l ese den medfølgende
bruksanvisningen for å få full nytte av alle diss e funksjonene.
(Delnr.: 4033C193618)
1. Trykk på OK-knappen for å starte
førstegangsinstallasjonen.
2. Bruk -knappene for å
velge ønsket språk som skal
vises i menyen. Standard innstilt
menyspråk på skjermen er
engelsk. Trykk på OK-knappen
for å bekrefte.
3. Bruk -knappene for å velge
DVB-T eller DVB-C og trykk deretter på
OK-knappen for å bekrefte.
Førstegangsinstallasjon
Pass på at antennen er tilkoblet!
Trykk deretter på OK-knappen.
Dansk
Tysk
Kroatisk
Italiensk
Språkinnstillinger
OK
Ungarsk
Nederl andsk
Polsk
Tsjekkisk
E k
Spansk
Fransk
Portugisisk
RussiskNorsk
Engelsk
DVB-C
DVB Select type
DVB-T
3a. Velger du DVB-T, bruk -knappene
for å velge ønsket land og trykk deretter
på OK-knappen for å starte søket.
3b. Velger du DVB-C, er det neste trinnet å
kongurere DVB-C-systemet (Scan type /
Frekvens / Network ID / Symbol(ks/s).
Trykk på OK-knappen for å gå til menyen
for valg av Tune-type og land – samme
trinn som for DVB-T – og velg Tune-type
(DTV/ATV). Bruk -knappene for å
velge ønsket land og trykk deretter på
OK-knappen for å starte søket.
4. Kanalsøket starter. Denne operasjonen kan ta
opptil 6 minutter. Skjermen viser framdriften og
hvor mange kanaler som blir funnet.
Tune- Type DTV+ATV
Frankrike
Tyskland
Hellas
Ungarn
Italia
Luxembourg
Nederland
Polen
MENU
Norge
DVB-C Scan Menu
Scan type Full
610000
Auto
Auto
Frekvens
Network ID
Symbol(KS/S)
OK MENU
Kanal-tuning
TV : 3 Program
DTV : 0 Program
Radio : 0 Program
Data : 0 Program
36%... 6 68.75 MHz (TV )
Trykk< Menu> for å hoppe over.
skru
skru
eller
ELLER
L19LDVB11E_QSG_5L_final111107_Zell.pdf 2 07/11/2011 2:16 PM
Page 3

Uppackni ng
11
Använda ärrk ontrollen
22
Installera basställningen
33
Anslu tning till ett eluttag
55
SE
Sätta på TV:n första gå ngen
66
Anslu ta antennen
44
VIDEO L R YPbPr
HDMI2
Till vägguttag
Nätadapter
(medföljer)
Snabbstartguide
L19LDVB11E
Tack för att du kö pt din ny a Logik T V.
Din nya T V innehå ller den senaste tekniken för att förbättra din titt arupplevelse. Vi föreslår att du avsätter m inst 20 minuter fö r att gö ra initia linställ ningarn a.
Följ den här guid en för at t framgån gsrikt s lutföra fö rstagång sinstalla tionen.
Ta bort allt förpackningsmaterial från TV:n. Behåll förpackningen. Om du
kasserar den, följ lokala föreskrifter.
Sätt in batterierna korrekt enligt polaritetsindikeringarna (+ och
-) i batterifacket.
1. Tryck och lyft det bakre
höljet för att öppna
batterifacket på
ärrkontrollen.
2. Sätt in två AAA batterier.
Stäng batterilocket.
19-tums HD klar digital LED-TV med DVD-spelare
LCD-TV
Basställning
Snabbstartguide
Fjärrkontroll /
AAA batterier x 2
Skruv A
Bruksanvisning
Nätadapter
SCART-adapterkabel
1. Lägg TV:n på en plan yta med baksidan vänd uppåt. Var noga med att
lägga ett mjukt vadderat material (t.ex. en kudde eller tjock skumgummi)
under skärmen.
2. För att montera basstället riktas skruvhålet in efter den (1) medföljande
skruven.
Skruv A x 1
(Art.nr.: 20912223101)
Anslut en av RF-koaxialkablarna till antennuttaget i väggen och den andra
änden av kabel i RF IN (75Ω)-uttaget på TV:ns baksida.
Anslut inte TV:n till eluttaget innan du ha kopplat in alla
anslutningar
1. Anslut strömadaptern till strömadapteruttaget på TV:ns undersida och
anslut därefter till vägguttaget när alla anslutningar gjorts.
2. Nu växlar TV:n till standby-läget. Det röda LED-ljuset lyser på TV.ns
frampanel.
3. I standby-läget trycker du på -knappen på TV:ns högra panel eller på
ärrkontrollen, för att sätta på TV:n. Det röda LED-ljuset blir blått.
HDMI1
USB
PC AUDIO
VGA RF
SCART
RF koaxialkabel
(medföljer ej)
Första gången du sätter på TV:n, går den direkt till menyn Förstagångsinstallation.
Bra gjort, din nya TV är nu re do att användas. Du kommer att nna att den har mån ga spännande funktioner. Lär k änna dessa egenskap er genom att ta
dig tid att läsa ige nom instruktionshandboke n som medföljde TV:n.
(Art.nr.: 4033C193618)
1. Tryck på OK-knappen för att starta
Förstagångsinstallationen.
2. Tryck på -knapparna för
att välja språket för menyn. Det
förinställda skärmmenyspråket
är engelska. Tryck på
OK-knappen för att bekräfta.
3. Tryck på -knapparna för att välja
DVB-T / DVB-C och tryck därefter på
OK-knappen för att bekräfta.
Förstagångsinstallation
Var vänlig försäkra dig om att antennen är isatt!
Tryck därefter på OK knappen.
Rumänska Finska Slovakiska
Bulgariska
Slovenska
Serbiska
Språkinställningar
OK
Svenska
DVB-C
DVB Välj typ
DVB-T
3a. Om du väljer DVB-T, tryck på
-knapparna för att välja landet
och tryck därefter på OK-knappen för
att börja ställa in.
3b. Om du väljer DVB-C, är nästa steg att
kongurera DVB-C-systemet
(Sökningstyp / Frevens / Nätverks-ID /
Symbol(KS/S)). Tryck på OK-knappen för
att gå till inställningstypens menyalternativ för att lägga till land, som är samma
steg som DVB-T, välj inställningstypen
(DTV/ATV). tryck på -knapparna
för att välja land och tryck därefter på
OK-knappen för att börja inställningen.
4. Kanalinställningen börjar. Denna funktion kan ta
upp till 6 minuter. Displayen visar inställningens
framsteg och hur många kanaler som hittas.
Tune Type DT V+ATV
UK
Austra lia
Austri a
Belgiu m
Bulgar ia
Croati a
Czech
Denmar k
Finlan d
MENU
DVB-C Sökningsmeny
Sökningstyp Full
610000
Auto
Auto
Frekvens
Nätverks-ID
Symbol(KS/S)
OK MENU
Kanalsökning
TV : 3 Program
DTV : 0 Program
Radio : 0 Program
Data : 0 Program
36%... 6 68.75 MHz (TV )
Tryck <meny> för att hoppa.
skruv
skruv
eller
ELLER
L19LDVB11E_QSG_5L_final111107_Zell.pdf 3 07/11/2011 2:17 PM
Page 4

Pakkauksesta pur kaminen
11
Kauk osäätimen käyttö
22
Jalustan asentami nen
33
Pistorasia an liittäminen
55
FI
TV:n käynnis täminen ensimmäistä kertaa
66
Antennin liittäminen
44
VIDEO L R YPbPr
HDMI2
Pistorasiaan
Verkkolaite (kuuluu
toimitukseen)
Pikaopas
L19LDVB11E
Kiitos, kun osti t uuden L ogik TV-va staanott imen.
Uusi TV: si sisält ää uusin ta tekno logiaa k atsomisko kemukses i
parantam iseksi. Suosittel emme, ett ä käyttä isit vähi ntään 20 minuutti a
ensimmä iseen ase nnukseen .
Tämän oppa an ohjei ta noudat tamalla v armistat onnistun een ensi mmäisen
asennuk sen.
Poista kaikki pakkausmateriaali TV-vastaanottimesta. Säilytä pakkaus. Jos
hävität pakkauksen, tee se kaikkien paikallisten säädösten mukaisesti.
Asenna paristot oikein napaisuusmerkkien (+ ja -) mukaisesti
paristokoteloon.
1. Avaa kaukosäätimen
paristokotelo painamalla
ja nostamalla takaosan
kansi.
2. Asenna kaksi
AAA-paristoa. Sulje
paristokotelon kansi.
19" HD Ready digitaalinen LED TV DVD-soittimella
LCD TV
Jalusta
Pikaopas
Kaukosäädin /
AAA-paristo x 2
Ruuvi A
Käyttöopas
Verkkolaite
SCART-sovitinkaapeli
1. Laske TV tasaiselle pinnalle tausta ylöspäin. Huolehdi, että näytön alle on
asetettu pehmuste (kuten tyyny tai vaahtokumipatja).
2. Asenna jalusta kohdistamalla ruuvin reikä ja kiinnitä sitten jalusta yhdellä
toimitukseen kuuluvalla ruuvilla.
Ruuvi A x 1
(Osanro: 20912223101)
Liitä RF-koaksiaalikaapelin toinen pää antenniseinäpistorasiaan ja toinen
pää RF IN (75Ω) -liitäntään TV-vastaanottimen takana oikealla.
Älä liitä TV-vastaanotinta verkkovirtaan ennen kuin kaikki
liitännät on tehty.
1. Liitä verkkolaite verkkolaiteliitäntään, joka sijaitsee TV-vastaanottimen
takana oikealla alhaalla ja liitä virtajohto pistorasiaan, kun kaikki muut
liitännät on tehty.
2. Tässä vaiheessa TV-vastaanotin kytkeytyy valmiustilaan.
TV-vastaanottimen etupaneelin punainen LED-merkkivalo syttyy.
3. Kytke TV-vastaanotin päälle painamalla valmiustilassa TV:n oikean
sivupaneelin tai kaukosäätimen -painiketta. Punainen
LED-merkkivalo vaihtuu siniseksi.
HDMI1
USB
PC AUDIO
VGA RF
SCART
RF-koaksiaalikaapeli
(ei kuulu toimitukseen)
Kun käynnistät TV-vastaanottimen ensimmäistä kertaa, se menee suoraan Alkuasetukset -tilaan.
Onneksi olkoon, uusi TV-va staanottimesi on nyt käy ttövalmis. Tulet havaitsemaan, että la itteessa on useita jänni ttäviä ominaisuuksia.
Tutustuaksesi kaikk iin näihin ominaisuuksi in käytä hetki aika a TV-vastaanottimesi toimit ukseen kuuluvan käyttöo ppaan lukemiseen.
(Osanro: 4033C193617)
1. Käynnistä ensimmäinen asennus
painamalla OK-painiketta.
2. Valitse valikossa näytettävä
haluamasi kieli painamalla
-painikkeita.
Kuvaruutuvalikon oletuskieliasetus on englanti. Vahvista
OK-näppäintä painamalla.
3. Valitse DVB-T / DVB-C ▲▼-painikkeita
painamalla ja vahvista valinta
painamalla OK-painiketta.
Alkuasetukset
Varmista, että antenni on liitetty!
Paina sitten OK-painiketta.
Slovene
Serbian
Kieliasetukset
OK
Finnish
Romsnian
Ȼɴɥɝɚɪɫɤɢ
Swedish
Slovak
DVB-C
DVB, valitse tyyppi
DVB-T
3a. Jos valitset DVB-T:n, paina
-painikkeita valitaksesi
haluamasi maan ja käynnistä sitten
viritys painamalla OK-painiketta.
3b. Jos valitset DVB-C:n, seuraava vaihe on
määrittää DVB-C-järjestelmä (Hakutapa /
Taajuus / Verkkotunnus /
Symboleja(KS/S)). Paina OK-painiketta
siirtyäksesi viritystyyppiin, lisää maa,
valitse valikko. Tämä vaihe on sama kuin
DVB-T-valinnalla, valitse viritystyyppi
(DTV/ATV). Paina -painikkeita
valitaksesi haluamasi maan ja käynnistä
sitten viritys painamalla OK-painiketta.
4. Kanavien viritys alkaa. Tämä toimenpide voi
kestää noin 6 minuuttia. Näytössä näkyy
virityksen edistyminen ja löydettyjen kanavien
lukumäärä.
Viritystyyppi DTV+ATV
Yhdistynyt kuningas..
Austra lia
Itävalta
Belgia
Bulgar ia
Kroatia
Tsekki
Tanska
MENU
Suomi
DVB-C hakuvalikko
Hakutapa Full
610000
Autom.
Autom.
Taajuus
Verkkotunnus
Symboleja(KS/S)
OK MENU
Kanavan haku
TV : 3 Ohjelma
DTV : 0 Ohjelma
Radio : 0 Ohjelma
Tieto : 0 Ohjelma
36%... 6 68.75 MHz (TV )
Paina< Menu>ohittaaksesi.
ruuvi
ruuvi
tai
TAI
L19LDVB11E_QSG_5L_final111107_Zell.pdf 4 07/11/2011 2:17 PM
Page 5

Udpaknin g
11
Brug af ernbetjening
22
Monte ring af foden
33
Tilsl utning til stikk ontakten
55
DK
Tænding af tv'et for første g ang
66
Tilsl utning af ant enne
44
VIDEO L R YPbPr
HDMI2
Til hovedstik
Strømadapter
(medfølger)
Hurtigstartguide
L19LDVB11E
Tak for k øbet af d it nye Lo gik tv.
Dit nye tv bruge r den sen este tek nologi ti l at forb edre geng ivelsen.
Vi foresl år, at du b ruger ci rka 20 m inutter t il den i ndledend e install ation.
Følg denn e vejledn ing for a t sikre en vellyk ket inst allation .
Fjern alt emballagen fra tv'et. Behold emballagen. Hvis du kasserer den, skal
du gøre det i henhold til lokale regler.
Isæt batterierne korrekt ved at følge polarindikationerne (+ og -)
indeni batterikammeret.
1. For at åbne batterikammeret på ernbetjeningen, skal du trykke og
løfte på låget bagpå.
2. Isæt to AAA batterier.
Sæt låget tilbage på
batterikammeret.
19” HD-kompatibelt digitalt LED TV med dvd-afspiller
LCD-tv
Fod
Hurtigstartguide
Fjernbetjening/AAA
batterier x 2
Skrue A
Brugervejledning
Strømadapter
SCART adapterkabel
1. Læg tv'et ned på en jævn overade med bagsiden vendt opad. Sørg for,
at der placeres et blødt, aedrende materiale (som f.eks. en pude eller et
tykt stykke skumgummi) under skærmen.
2. Foden monteres ved at rette skruehullet ind, og derefter fastgøre foden
med den medfølgende skrue.
Skrue A x 1
(P.N.: 20912223101)
Tilslut en ende af RF-koaksialkablet til antennestikket på væggen, og den
anden ende af kablet til RF IN (75Ω)-stikket på højre bagside af dit tv.
Forbind ikke tv’et til lysnettet, før alle forbindelser er
foretaget.
1. Tilslut strømadapteren til adapterens stik i nederste, højre side af tv'et
og tilslut den anden ende til stikkontakten, efter du har udført alle de
andre tilslutninger.
2. Derefter vil tv'et skifte til standby. Den røde LED-indikator lyser på
tv'ets frontpanel.
3. I standby trykker du på -knappen i højre sidepanel på tv'et eller på
ernbetjeningen for at tænde for tv'et. Den røde LED-indikator vil nu
lyse blåt.
HDMI1
USB
PC AUDIO
VGA RF
SCART
RF-koaksialkabel
(medfølger ikke)
Den første gang du tænder for tv'et, åbnes menuen Installering 1. gang.
Godt klaret, din nye dvd-afsp iller er nu klar til b rug. Du vil opdage, at der er mange spændende funk tioner. Du kan blive bekendt med alle disse
funktioner ved at bru ge lidt tid på at læse b rugervejledningen, der fulgte med tv'et.
(P.N.: 4033C193617)
1. Tryk på OK-knappen for at åbne
menuen Please select an OSD
Language.
2. Tryk på -knapperne for
at vælge dit ønskede sprog for
menuerne. Skærmmenuernes
standard sprog er indstillet til
Engelsk. Tryk på OK-knappen for
at bekræfte.
3. Tryk på -knapperne til at vælge
DVB-T / DVB-C og tryk på OK-knappen
for at bekræfte.
Installering 1. gang
Sørg for at antennen er sat i!
Tryk derefter på OK.
Tysk
Kroatisk
It
aliensk
Sprogindstillinger
OK
Ungarnsk
Hollandsk
Norsk
PolskEngelsk
Tiekkisk
Græsk
Spansk
Fransk
Portugis
Russisk
Dansk
DVB-C
Vælg DVB Type
DVB-T
3a. Hvis du vælger DVB-T, tryk på
-knapperne for at vælge det
ønskede land, og tryk på OK-knappen
for at starte tuning.
3b. Hvis du vælger DVB-C, er det næste trin
at kongurere DVB-C-systemet (Scan
type / Frek vens / Netværks-ID /
Symbol(KS/S)). Tryk på OK-knappen for at
gå til menuen til valg af tune-type og
tilføjelse af land. Dette trin er det samme
som DVB-T. Vælg tune-type (DTV/ATV).
Tryk på -knapperne for at vælge
det ønskede land, og tryk på
OK-knappen for at starte tuning.
4. Tuning af kanaler starter. Denne funktion kan tage
op til 6 minutter. Skærmen viser status af
tuningen og antallet af fundne kanaler.
Indst.-stype DTV+ATV
UK
Austra lien
Østrig
Belgie n
Bulgar ien
Kroatien
Tjekkiet
Finlan d
MENU
Danmar k
DVB-C Scan Menu
Scan type Full
610000
Auto
Auto
Frek vens
Netværks-ID
Symbol(KS/S)
OK MENU
Kanalindstilling
36%... 6 68.75 MHz (TV )
Tryk på <Menu> for spring.
TV : 3 Channel(s)
DTV : 0 Channel(s)
Radio : 0 Channel(s)
Data : 0 Channel(s)
skrue
skrue
eller
ELLER
L19LDVB11E_QSG_5L_final111107_Zell.pdf 5 07/11/2011 2:17 PM
 Loading...