

Page 1
DGS Retail Ltd • Maylands Avenue • Hemel Hempstead •
Herts • HP2 7TG • England
GB-4 GB-5
Visit Partmaster.co.uk today for the easiest way to
buy electrical spares and accessories. With over 1
million spares and accessories available we can
deliver direct to your door the very next day. Visit
www.partmaster.co.uk or call 0870 6001 338 (UK customers only) Calls charged at
National Rate.
This symbol on the product or in the instructions means that your electrical
and electronic equipment should be disposed at the end of its life
separately from your household waste. There are separate collection systems
for recycling in the EU. For more information, please contact the local
authority or your retailer where you purchased the product.
SPECIFICATIONS
Supply voltage: 230-240V~50Hz
Power input: 1200-1400W (1600 MAX)
Dust capacity: 2.5L
We continually strive to improve our products, specications may change without prior
notice.
SAFETY FIRST!
For your continued safety and to reduce the risk of injury or electric shock, please
follow all the safety precautions listed below.
• Read all the instructions carefully before using the appliance and keep them for
future reference.
• Retain the manual. If you pass the appliance onto a third party make sure to include
this manual.
• Check that the voltage marked on the rating label matches your mains voltage.
• Consult your dealer if you are ever in doubt about the installation, operation or
safety of your appliance.
• Do not remove any xed cover as this may expose dangerous voltages.
• Do not allow any electrical appliance to be exposed to dripping or splashing.
• To protect against electrical shock, do not immerse mains cable, mains plug, or any
part of the appliance in water or other liquids.
• Make sure the dust bin is properly installed before use.
• Never vacuum up water or any other liquids. Never vacuum up ammable
substances and do not vacuum up ashes until they are cold.
• Never use the appliance without the motor protection lter. This damages the motor
and shortens the life of the appliance.
• If a blockage is found in the brushes, hoses or tubes, it should be removed before
use.
• Store and use the appliance well away from heat sources such as radiators or gas /
electric res.
• Do not run over the mains cable with the appliance.
• Close supervision is necessary when any appliance is used by or near children.
• This appliance is not intended for use by persons (including children) with reduced
sensory or mental capabilities, or lack of experience and knowledge unless they
have been given supervision or instructions concerning the use of the appliance by
a person responsible for their safety.
• Children should be supervised to ensure that they do not play with the appliance.
• Do not point the hose, tube or any other accessory at the eyes, ears or mouth during
operation.
• Unplug the appliance from the mains socket when it is not in use and before
replacing lter.
• Allow the appliance to cool completely before cleaning or storing.
• Do not use the appliance for other uses than its intended use.
• The use of accessories not recommended by the appliance manufacturer may cause
injuries.
• Do not use the appliance outdoors.
• Do not operate an appliance with a damaged mains cable or mains plug, or in an
abnormal state. If the mains cable is damaged it must be replaced by the
manufacturer, its service agent, or similarly qualied persons in order to avoid a
hazard.
• Do not continue to operate the appliance if you are in any doubt about it working
normally (e.g. abnormal noise, smell, smoke), or if it is damaged in any way - switch
off, withdraw the mains plug and consult your dealer.
• Any maintenance and repair must be handled by a professional technician. Do not
try to repair by yourself.
Bagless Cylinder
Vacuum Cleaner
Instruction Manual
L16VB10
Congratulations
on the purchase of your new Logik
Vacuum Cleaner.
We recommend that you spend some time reading this instruction
manual in order to fully understand all the operational features it
offers.
Read all the safety instructions carefully before use and keep this
instruction manual for future reference.
Page 2
FIRST TIME USE
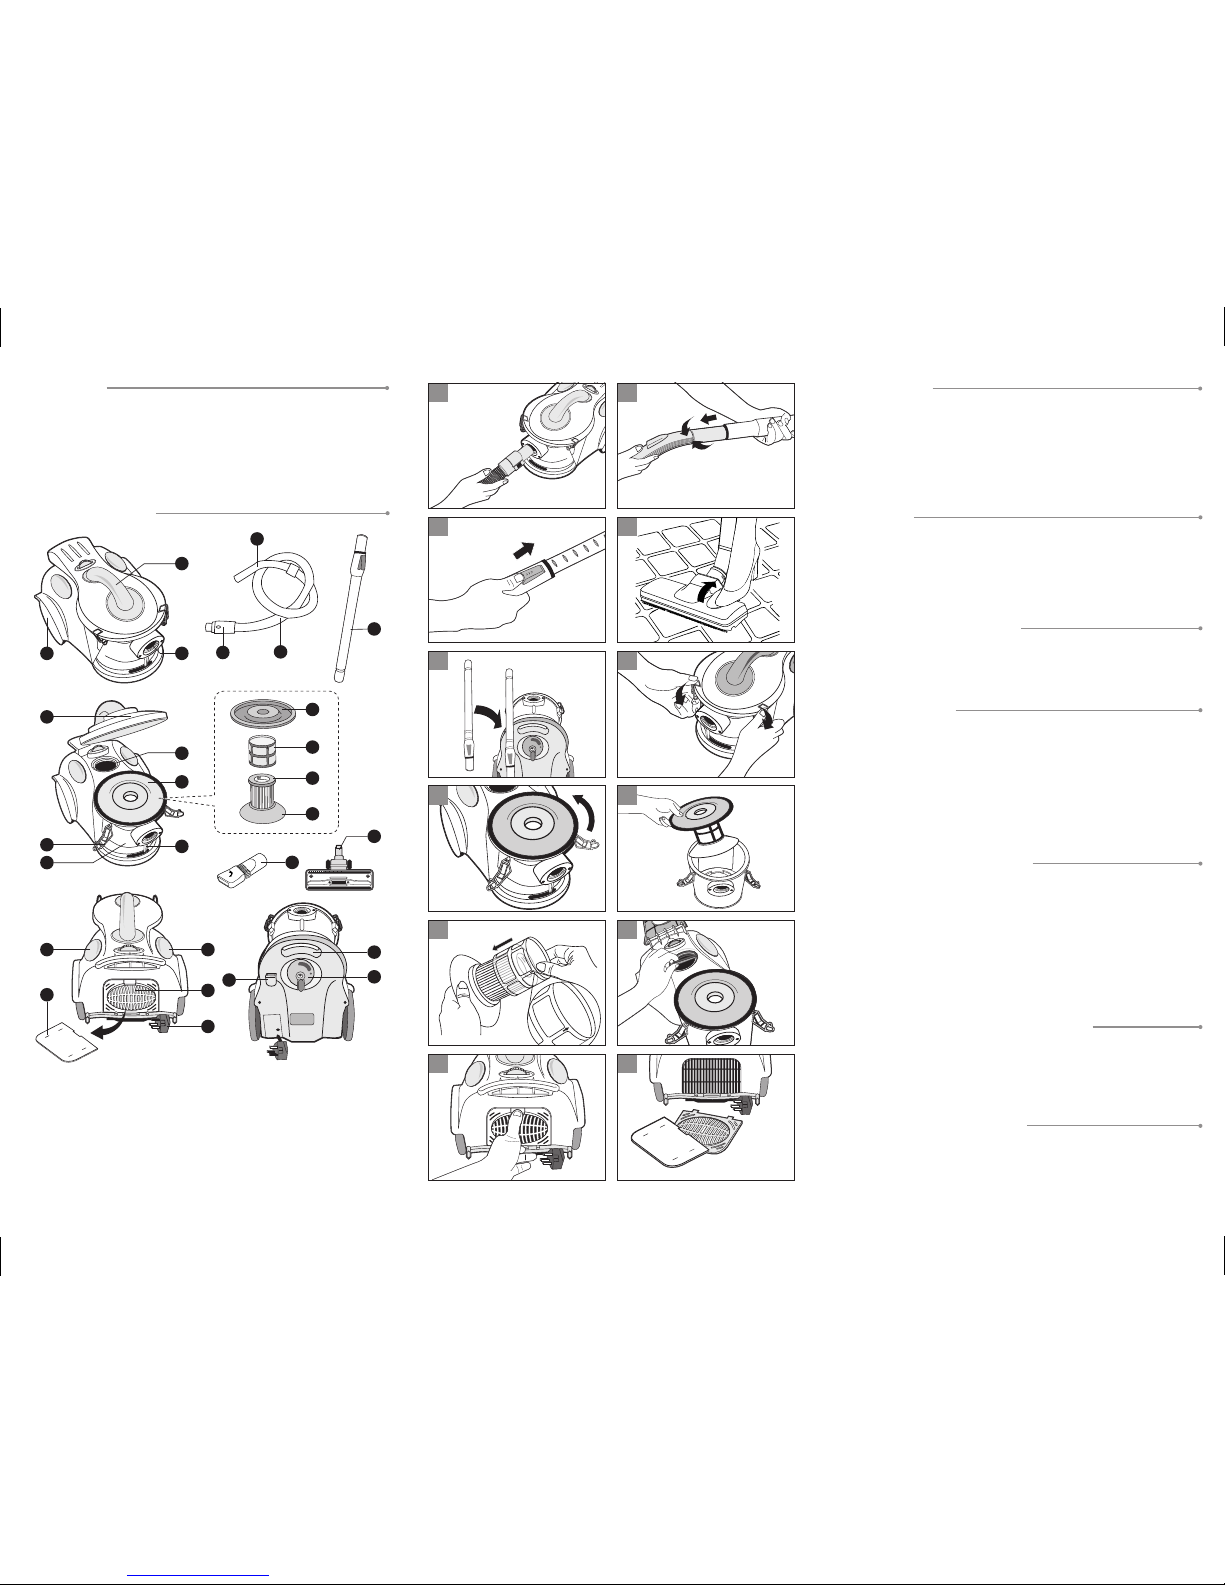
1. To connect the hose, insert the hose connector into the hose connection opening
until you hear ‘click’ sound (Fig 1).
2. To connect the telescopic tubes to the handgrip of the hose, insert the narrow
section into the wider section while turning a little (Fig 2).
3. Extend the telescopic tube to a length you nd the most comfortable by pressing the
button located on the telescopic tube (Fig 3).
4. Connect a nozzle/brush suitable to the oor type to be cleaned. The hard oor brush
can be used with brush strips lowered or raised (Fig 4). You may also connect the
combination nozzle to vacuum corners, slots or grooves. It can also be used as a
brush nozzle by turning the strips out in the direction of the arrow.
GB-1 GB-2 GB-3
UNPACKING
Remove all packaging from the vacuum cleaner. Retain the packaging. If you dispose of
it please do so according to local regulations.
The following items are included:
• One Main Unit • One Hose (P.N.: CH812B-HS)
• One Telescopic Tube (P.N.: CH812B-TB) • One Combination Nozzle (P.N.: CH812B-CN)
• One Hard Floor Brush (P.N.: CH812B-HF) • One Instruction Manual (P.N.: L16VB10-001)
If items are missing, or damaged please contact Partmaster (UK only).
Tel: 0870 6001 338 for assistance.
PRODUCT OVERVIEW
OPERATION
1. Hold the mains plug and pull the retractable mains cable out of the vacuum cleaner.
Connect it to the mains socket. The YELLOW mark indicates the ideal length to extend
the cable. Do not extend the mains cable beyond the RED mark which indicates the
maximum length.
2. Press the ON/OFF button on the top of the vacuum cleaner to turn it on.
3. To move the vacuum cleaner from room to room, you can unplug and carry it by
either the handle or the handgrip. Never use the mains cable to pull the vacuum
cleaner.
POWERING OFF AND STORAGE
1. Press the ON/OFF button on the top of the vacuum cleaner to turn it off and then
remove the mains plug from the mains socket.
2. Press the cord rewind button to rewind the retractable mains cable.
3. Put the vacuum cleaner in an upright position and attach the telescopic tube
to the clip on the vacuum cleaner (Fig 5).
EMPTYING THE BIN
Always unplug the vacuum cleaner from the mains socket before emptying the bin.
1. Remove the hose connector from the cleaner. Unclip the lever clasps and open the
cover
(Fig 6)
.
2. Use the bin handle to turn the bin anti-clockwise till it stops, then lift the bin up
(Fig 7)
.
3. To prevent the dust dispersing, lower the bin into your dustbin. Take out the lter unit
to empty the bin.
4. If you nd the lter unit is blocked or dirty, follow the steps in “Cleaning the HEPA
Filter unit”. If not, skip this step.
5. Relocate the lter unit back into the bin and then put them back to the vacuum
cleaner by aligning the tabs at the bottom of the bin with the slots on the vacuum
cleaner. Turn the bin clockwise with the bin handle until it locks in place.
6. Close the cover and clip the lever clasps.
1. Handle
2. Rear wheels
3. Hose connection opening
4. Handgrip of hose
5. Hose connector
6. Hose
7. Telescopic tube
8. Cover
9. Lever clasps
10. Bin
11. Motor Protection Filter
12. HEPA lter unit
13. Bin handle
14. Top
15. Mesh guard
16. HEPA lter
17. Base
18. Combination nozzle
19. Hard oor brush
20. ON/OFF button
21. Exhaust lter
22. Cord rewind button
23. Grill
24. Mains plug
25. Clip
26. Handgrip
27. Wheel
1
3
11
2
4
5
6
7
18
19
26
8
9
20
10
12
13
22
25
23
24
14
15
16
17
21
27
1 2
3 4
5 6
7 8
9 10
11 12
CLEANING THE HEPA FILTER UNIT
Always unplug the vacuum cleaner from the mains socket before cleaning.
1. To take out the lter unit from the bin, tilt it a bit to get the base past the inlet
(Fig 8)
.
2. Hold the base then untighten the top of the lter unit.
3. Lift the mesh guard from the HEPA lter and shake out the dust accumulated on the
mesh guard gently over your dustbin. You may rinse it gently under a running tap.
4. Shake out the dust accumulated on the HEPA lter. You may soak it in warm soapy
water for a few minutes, and then rinse it under a running tap to remove all traces of
soap. Do not reassemble the lter unit until it is completely dry.
5. To reassemble the lter unit, hold the mesh guard with the arrows pointing up, and
lower it over the HEPA lter
(Fig 9)
.
6. Fit the top of the lter unit to the top of the HEPA lter, and turn it clockwise. Do not
over-tighten it.
7. Relocate the lter unit back in the bin again, tilt it a bit to get the base past the inlet.
CLEANING THE MOTOR PROTECTION FILTER
The motor protection lter should be cleaned twice a year, or when it appears to be
visibly clogged.
Always unplug the appliance from mains socket before replacing the lter.
1. Unclip the lever clasps and open the cover
(Fig 6)
.
2. Take out the motor protection lter
(Fig 10)
.
3. Shake out the dust accumulated on the lter into a dustbin.
4. Relocate the lter back. Close and clip the cover.
CLEANING THE EXHAUST FILTER
Always unplug the appliance from mains socket before replacing the lter.
1. Unclip the grill and take out the exhaust lter (Fig 11 & Fig 12).
2. Shake out the dust accumulated on the lter into a dustbin.
3. Relocate the lter and the grill.
 Loading...