

Page 1

160GB / 250GB
Freeview TV Recorder
Instruction Manual
L160STB11 / L250STB11
Page 2

Page 3

Contents
Unpacking ..................................................................................................................................5
Product Overview ......................................................................................................................6
Front Panel ............................................................................................................................................................ 6
Rear Panel..............................................................................................................................................................6
Remote Control ...................................................................................................................................................7
Battery Replacement of the Remote Control ........................................................................................... 9
– Handling the Batteries .........................................................................................................................9
– Handling the Remote Control ........................................................................................................... 9
Remote Control Operation Range................................................................................................................9
First Time Installation ..............................................................................................................11
Standby Modes ........................................................................................................................12
Active Standby Mode .....................................................................................................................................12
Passive Standby Mode ....................................................................................................................................12
Basic Features ..........................................................................................................................13
Information Bar .................................................................................................................................................13
Volume Adjustment ........................................................................................................................................14
Channel Selection ............................................................................................................................................14
TV/RADIO Selection .........................................................................................................................................14
Teletext Selection .............................................................................................................................................14
Aspect Ratio .......................................................................................................................................................14
Subtitles ...............................................................................................................................................................14
Audio Description ............................................................................................................................................14
Audio Selection .................................................................................................................................................15
Favourite List ......................................................................................................................................................15
TV Guide ...................................................................................................................................16
Switch On/O TV Guide .................................................................................................................................16
Select a Programme ........................................................................................................................................16
Button Functions in a 7 Days Guide ..........................................................................................................16
Planner TV ................................................................................................................................17
Switch On/O Planner TV .............................................................................................................................17
Record Column .................................................................................................................................................17
Button Functions in Planner TV list ............................................................................................................17
Page 4

Recording .................................................................................................................................18
Single Recording ..............................................................................................................................................18
Dual Recording ................................................................................................................................................19
Stop Recording in Planner TV ......................................................................................................................19
Stop Recording in Channel List ...................................................................................................................19
Event Recording ................................................................................................................................................20
Time Shift Recording ......................................................................................................................................21
Play Recorded Programme .....................................................................................................22
Channel Zero ............................................................................................................................23
Channels Menu ........................................................................................................................26
Organise ..............................................................................................................................................................26
Groups ..................................................................................................................................................................27
Install Menu .............................................................................................................................28
Automatic Tune .................................................................................................................................................28
Manual Scan .......................................................................................................................................................29
Restore Factory Default ..................................................................................................................................30
Version ..................................................................................................................................................................31
Format Hard Drive ............................................................................................................................................31
Settings Menu ..........................................................................................................................32
Language ............................................................................................................................................................32
TV ...........................................................................................................................................................................33
Time .......................................................................................................................................................................34
Parental Lock ......................................................................................................................................................35
Updates ................................................................................................................................................................36
Hints and Tips ..........................................................................................................................37
Specication ............................................................................................................................38
Safety Warnings .......................................................................................................................39
Page 5
5
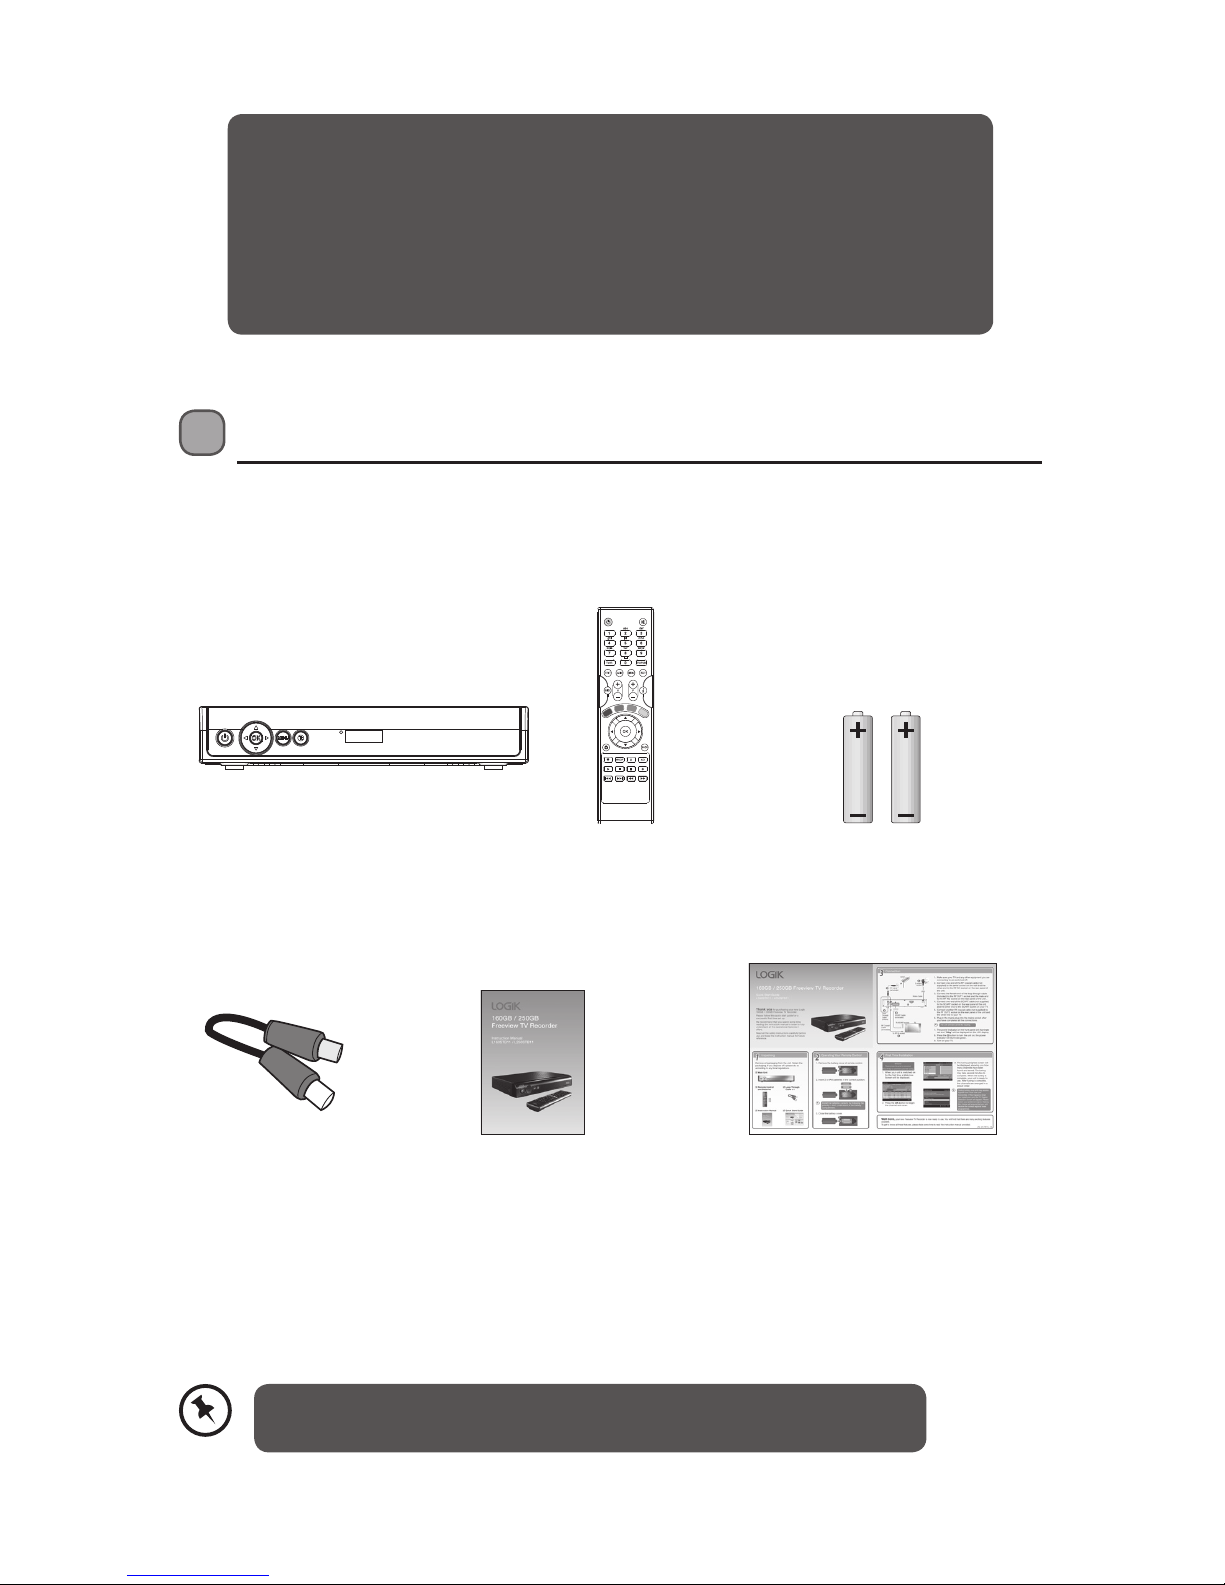
Unpacking
Remove all packaging from the unit. Retain the packaging. If you dispose of it please do so
according to local regulations.
The following items are included:
Main unit AAA Batteries X 2
P.N.: 890-CZ4157-00
Remote Control
P.N.: 880-LH4711-TO
Quick Start Guide
P.N.: 810-TB11LL-10
Instruction Manual
P.N.: 810-TB11LL-00
Loop Through Cable
P.N.: 341-321012-70
Thank you for purchasing your new Logik Freeview TV Recorder.
We recommend that you spend some time reading this instruction manual in
order that you fully understand all the operational features it oers. You will
also nd some hints and tips to help you resolve any issues.
Read all the safety instructions carefully before use and keep this instruction
manual for future reference.
If items are missing, or damaged please contact Partmaster (UK only).
Tel: 0844 800 3456 for assistance.
Page 6
6
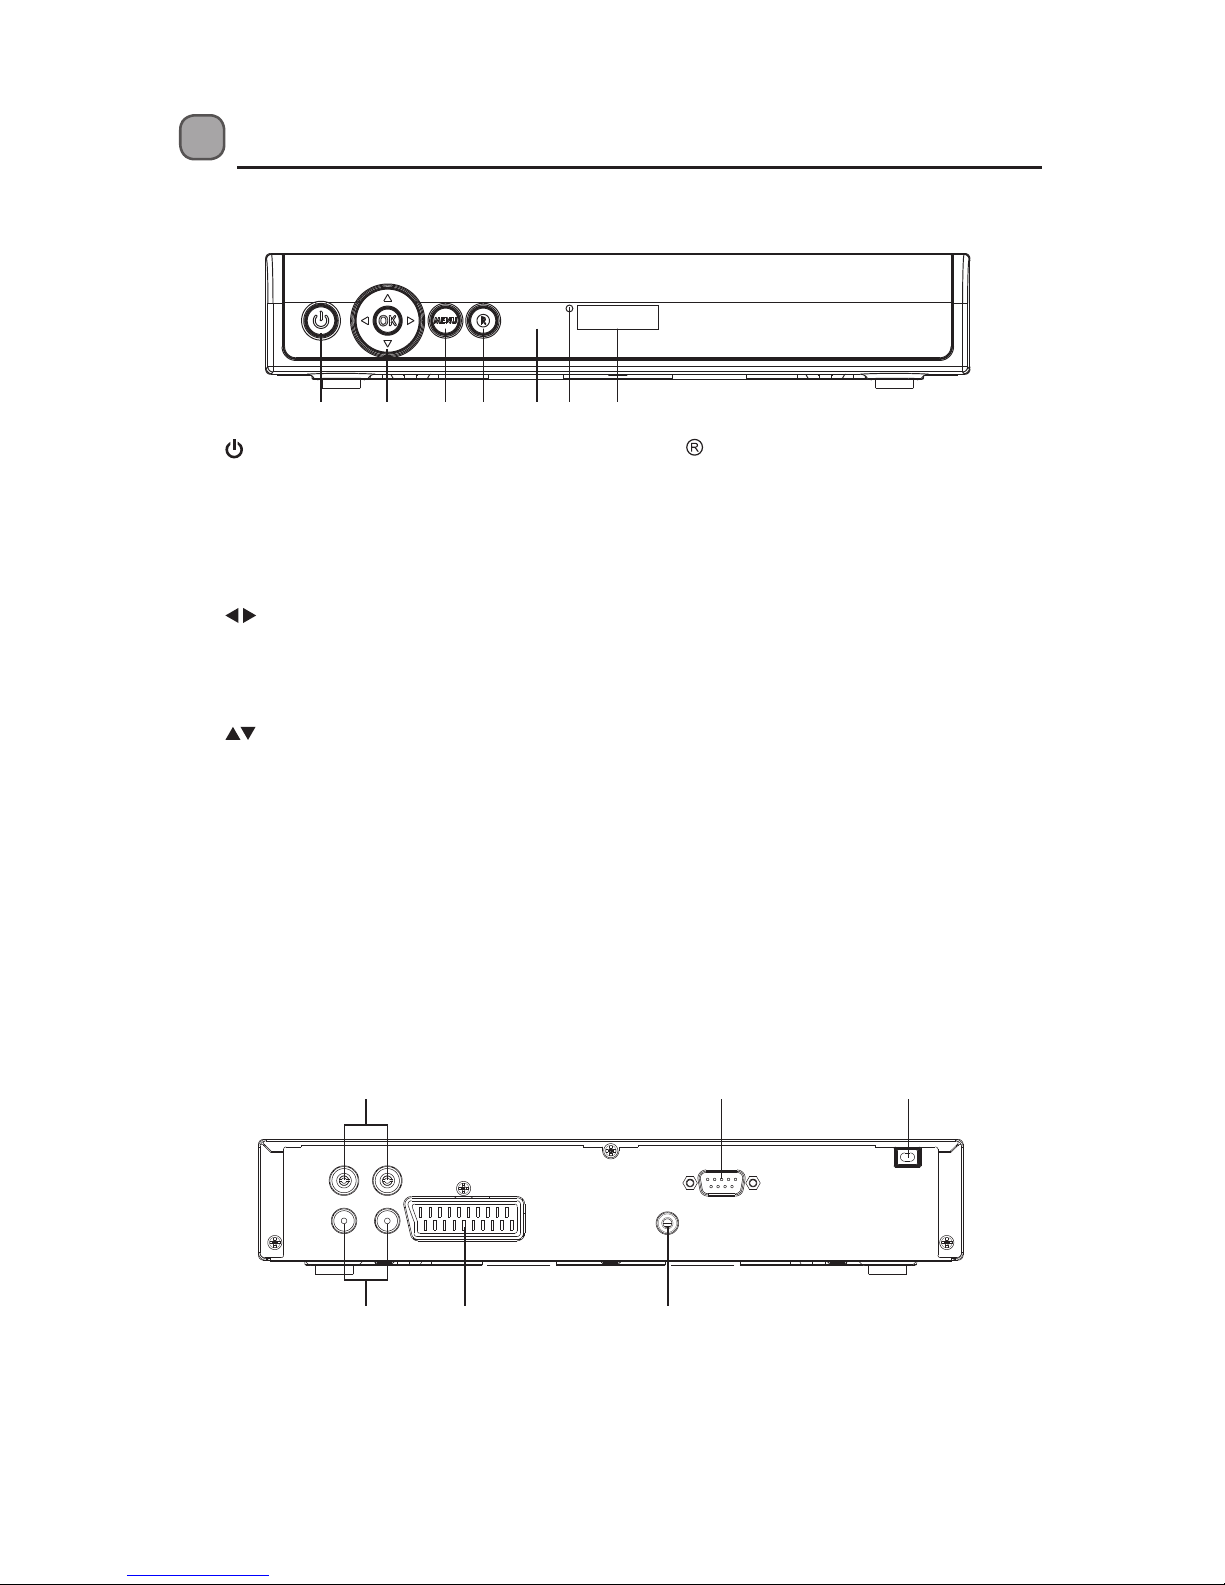
Rear Panel
Product Overview
Front Panel
1 2 3 4 75 6
1. Button
• Switch the unit between on and standby
mode.
• Press and hold this button for three
seconds to display the passive standby
menu.
2. Button
• To increase and decrease the volume.
• Press to navigate left and right within the
menu setup.
Button
• To change channels.
• To navigate up and down in the menu
setup.
OK Button
• To conrm selection in the OSD menu.
• To display the TV channel list.
3. MENU Button
To display the OSD menu.
1. RF IN Socket
2. RF OUT Socket
3. SCART Socket
4.
Button
To record the current programme.
5. Remote Control Sensor
6. Power indicator
• Illuminates red in standby mode.
• Illuminates green in on mode.
• Flashes red when a programme is
recording.
• Alternatively ashes red and green when
two programmes are being recorded at
the same time.
• Illuminates amber when Channel Zero
is loading.
7. LED Display
• Displays the current time in standby
mode.
• Displays the current programme number
after the unit is turned on.
• “rECO” will be displayed when the
currently viewing channel is being
recording.
4. SPDIF Socket
5. RS232 Socket (For services only)
6. AC IN
RS232
SPDIF
SERVICES ONLY
AC IN
230V~50Hz
RF IN1RF IN
2
SCART
RF OUT
1
RF OUT
2
1 65
2 3 4
Page 7
7
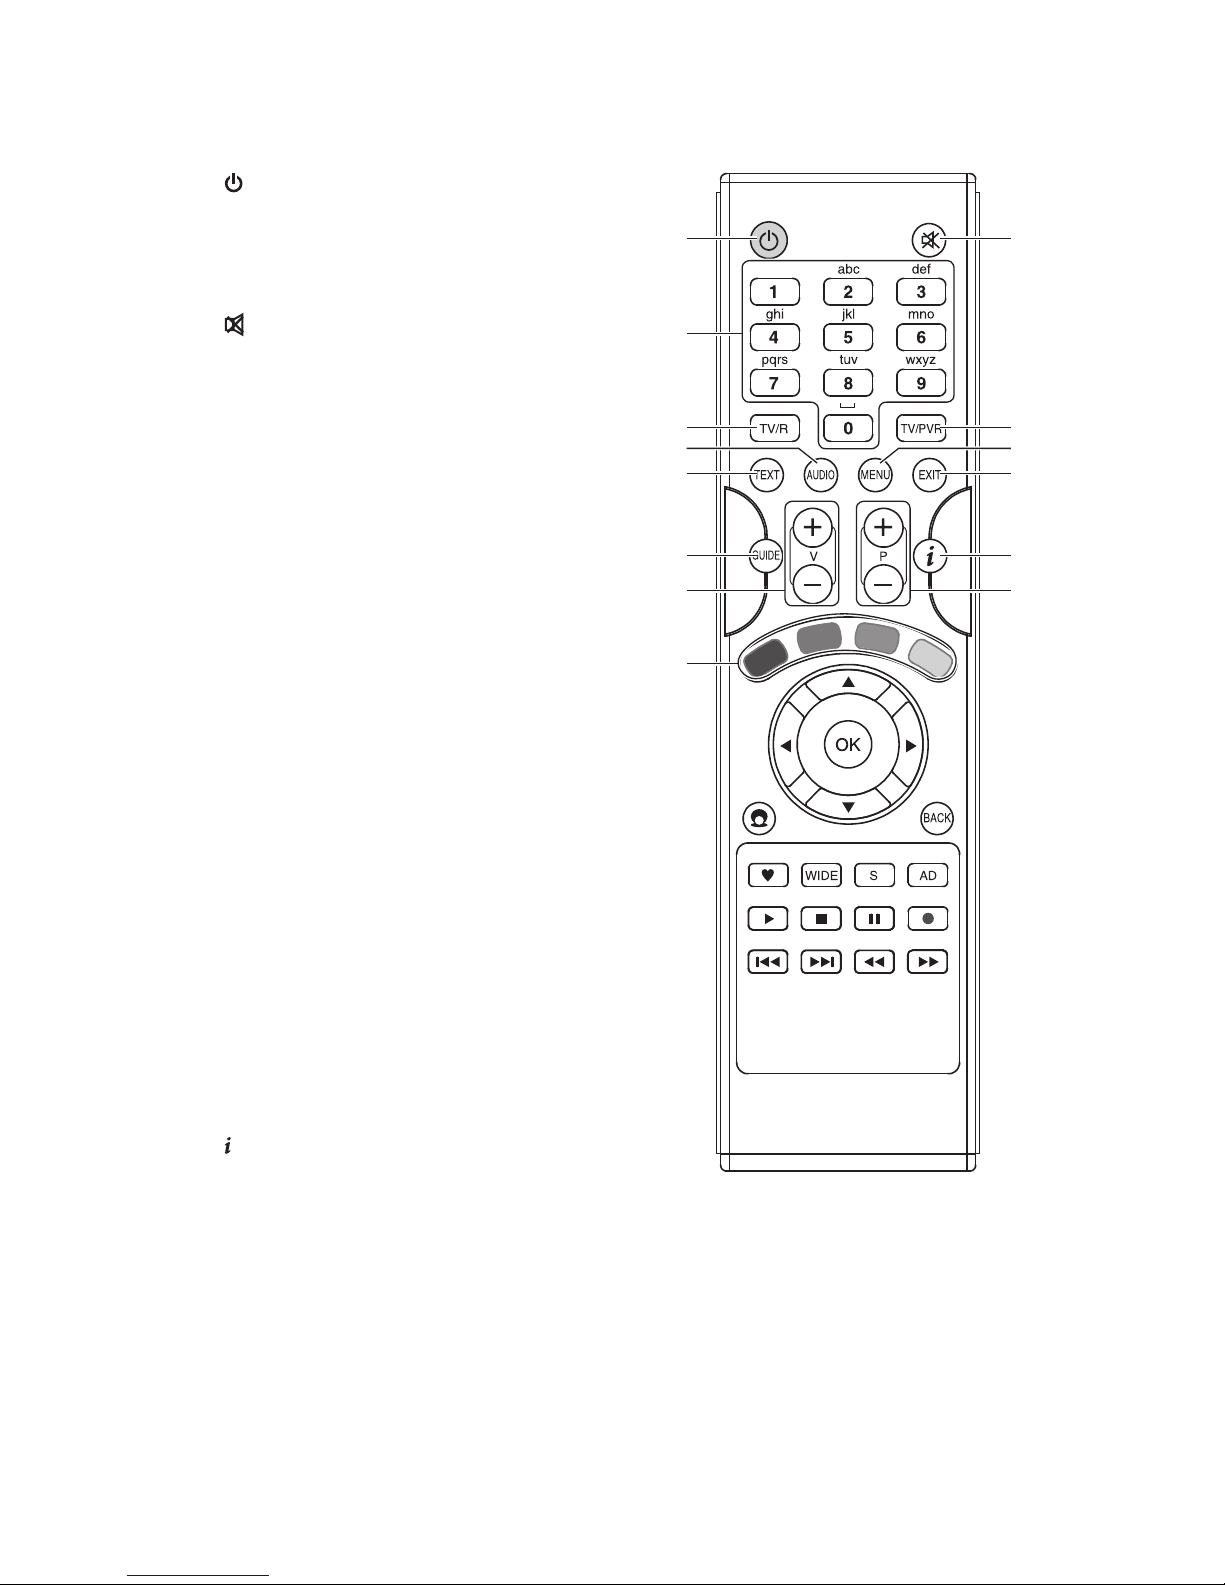
Remote Control
1. Button
• Switch the unit between on and standby
mode.
• Press and hold this button for three seconds
to display the passive standby menu.
2. Button
To mute and restore the sound output.
3. 0-9 Buttons
• To select a programme.
• To select the number item in a menu.
• To select characters for renaming.
4. TV/R Button
Switch between DTV mode and Radio mode.
5. TV/PVR button
To display the Planner TV menu.
6. TEXT Button
To turn the teletext function on / o.
7. AUDIO Button
To display the Audio Channel menu.
8. MENU Button
To display the Main menu.
9. EXIT Button
To exit the menu and return to normal TV
viewing.
10. GUIDE Button
To display the TV Guide.
11. V+ / – Button
To increase and decrease the volume.
12. P+ / – Button
To select channels.
13. Button
T
o display the current channel’s information
such as the current time and channel name.
14. Coloured Buttons
• For interactive functions.
• To access the teletext item or select the
group channel.
1
4
6
10
14
11
7
2
5
9
13
12
8
3
Page 8
8
18
22
26
16
15
19
23
27
21
25
29
17
20
24
28
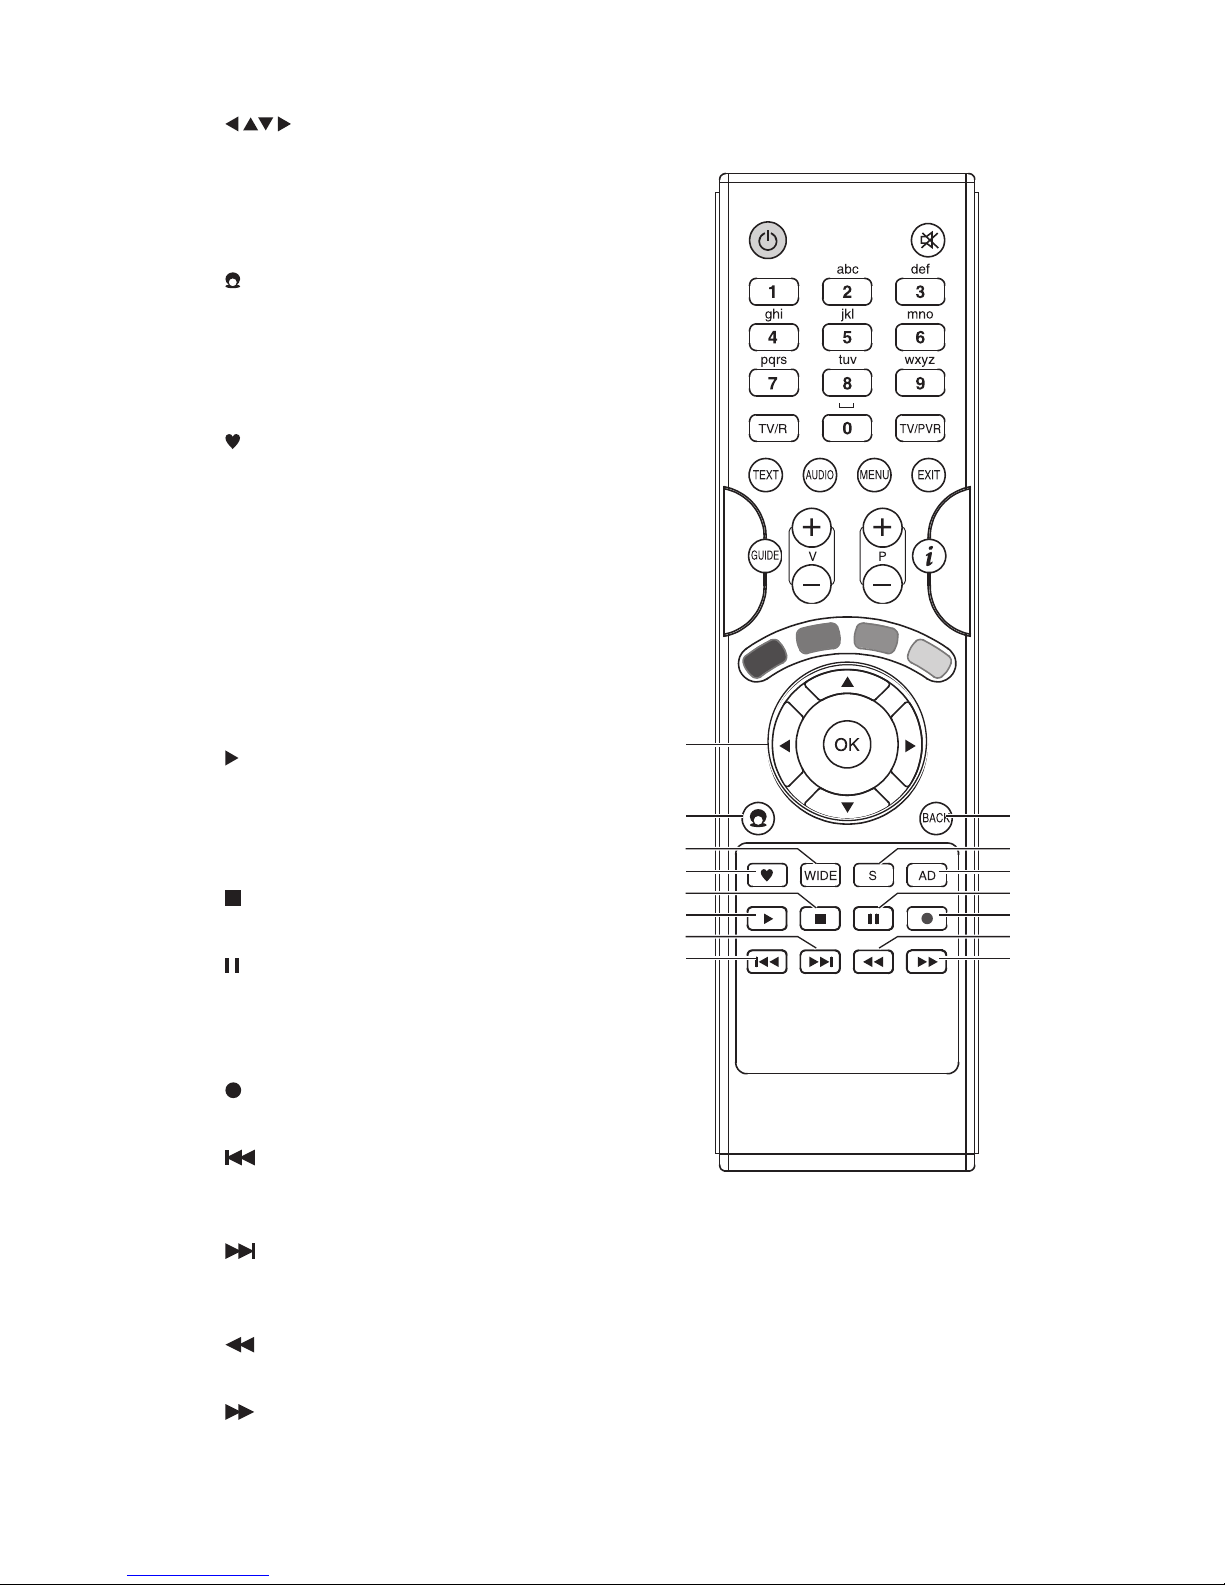
15. Buttons
To navigate in the OSD menu setup
OK Button
To conrm a selection in OSD menu/display
TV channel list.
16. Channel Zero Button
To select the interactive services of the
Channel Zero.
17. BACK Button
To return to the previous menu.
18. Button
To display the favourite menu.
19. WIDE Button
To switch aspect ratio.
20. S Button
To select subtitles which are broadcast with
the programme (if available).
21. AD Button
To switch On/O audio description (if
available).
22. PLAY Button
• Press once to display the Planner TV.
• Press twice to start playback in the
Planner TV menu when you select the
recorded programme.
23. Button
To stop playback or recording.
24. Button
• To pause playback.
• To start timeshifting.
• Press repeatedly to play frame by frame.
25. Button
T
o record the current programme.
26. Button
To skip rewind three minutes during
playback.
27. Button
To skip forward three minutes during
playback.
28. Button
To speed up / slow rewind playback rapidly.
29. Button
To speed up / slow forward playback rapidly.
Page 9
9
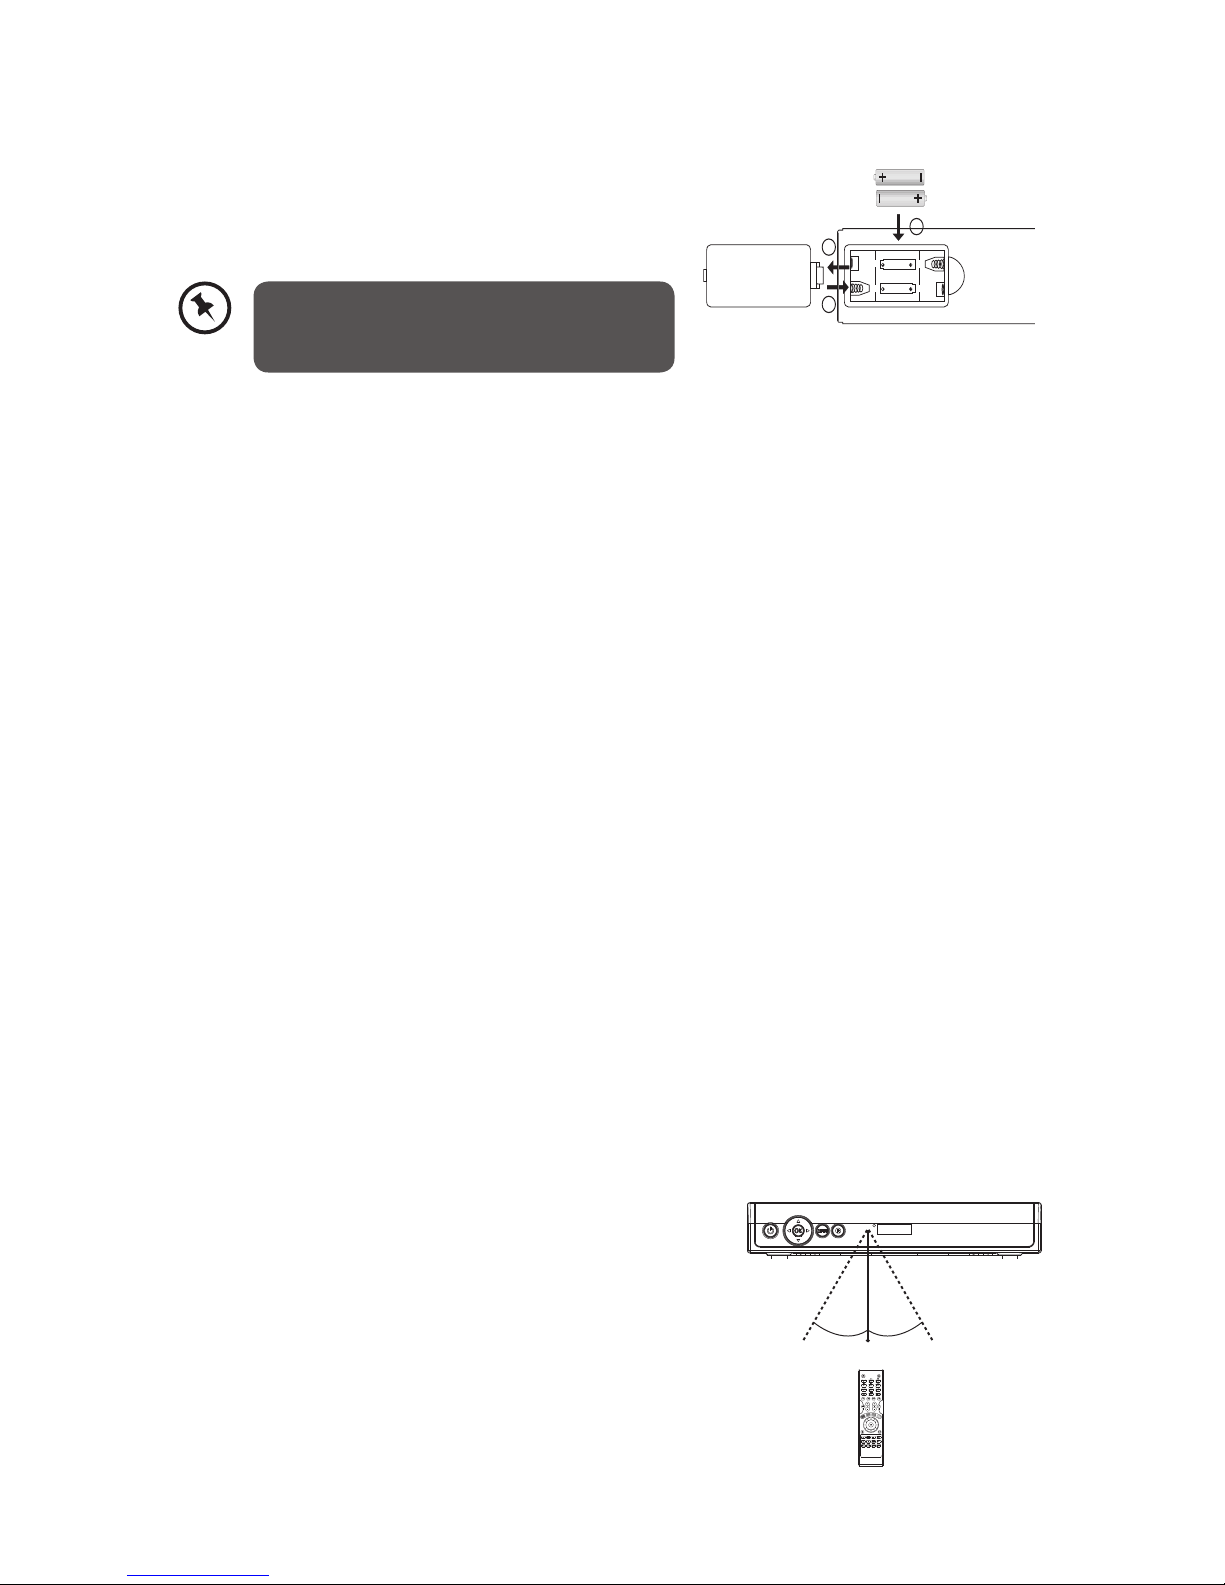
Battery Replacement of the Remote Control
1. Remove the battery compartment cover.
2. Load 2 x AAA (UM-4 or R03) batteries into the battery
compartment. Close the battery compartment cover.
1
3
2
Handling the Batteries
• Take care of your ngernails when you press and hold the battery release tab.
• Improper or incorrect use of batteries may cause corrosion or battery leakage, which could
cause re, personal injury or damage to property.
• Install the batteries correctly by following the polarity (+ and -) indications in the battery
compartment.
• When the batteries are exhausted, the remote will not function. Replace both batteries at
the same time with new ones.
• Use only the types of the batteries which are indicated in this manual.
• Do not install new batteries with used ones and do not mix dierent types of batteries.
• Do not dispose of the used batteries as domestic waste. Dispose of them in accordance with
the local regulations.
• If you are not going to use the unit for a long time, remove the batteries to avoid change
from battery leakage and corrosion.
Handling the Remote Control
• Do not drop or cause impact to the remote control.
• Do not spill water or any liquid on the remote control.
• Do not place the remote control on a wet object.
• Do not place the remote control under direct sunlight or near sources of
excessive heat.
• Remove the battery from the remote control when not in use for a long period of time, as it
could cause corrosion or battery leakage and may result in physical injury and/or property
damage including re.
Remote Control Operation Range
Point the remote control unit within approx. 6 metres
from the remote control sensor on the unit and within
60° in front of the unit. The operating distance may vary
depending on the brightness of the room.
Install the batteries correctly by following
the polarity (+ and -) indications in the
battery compartment.
30° 30°
6M
Page 10
10
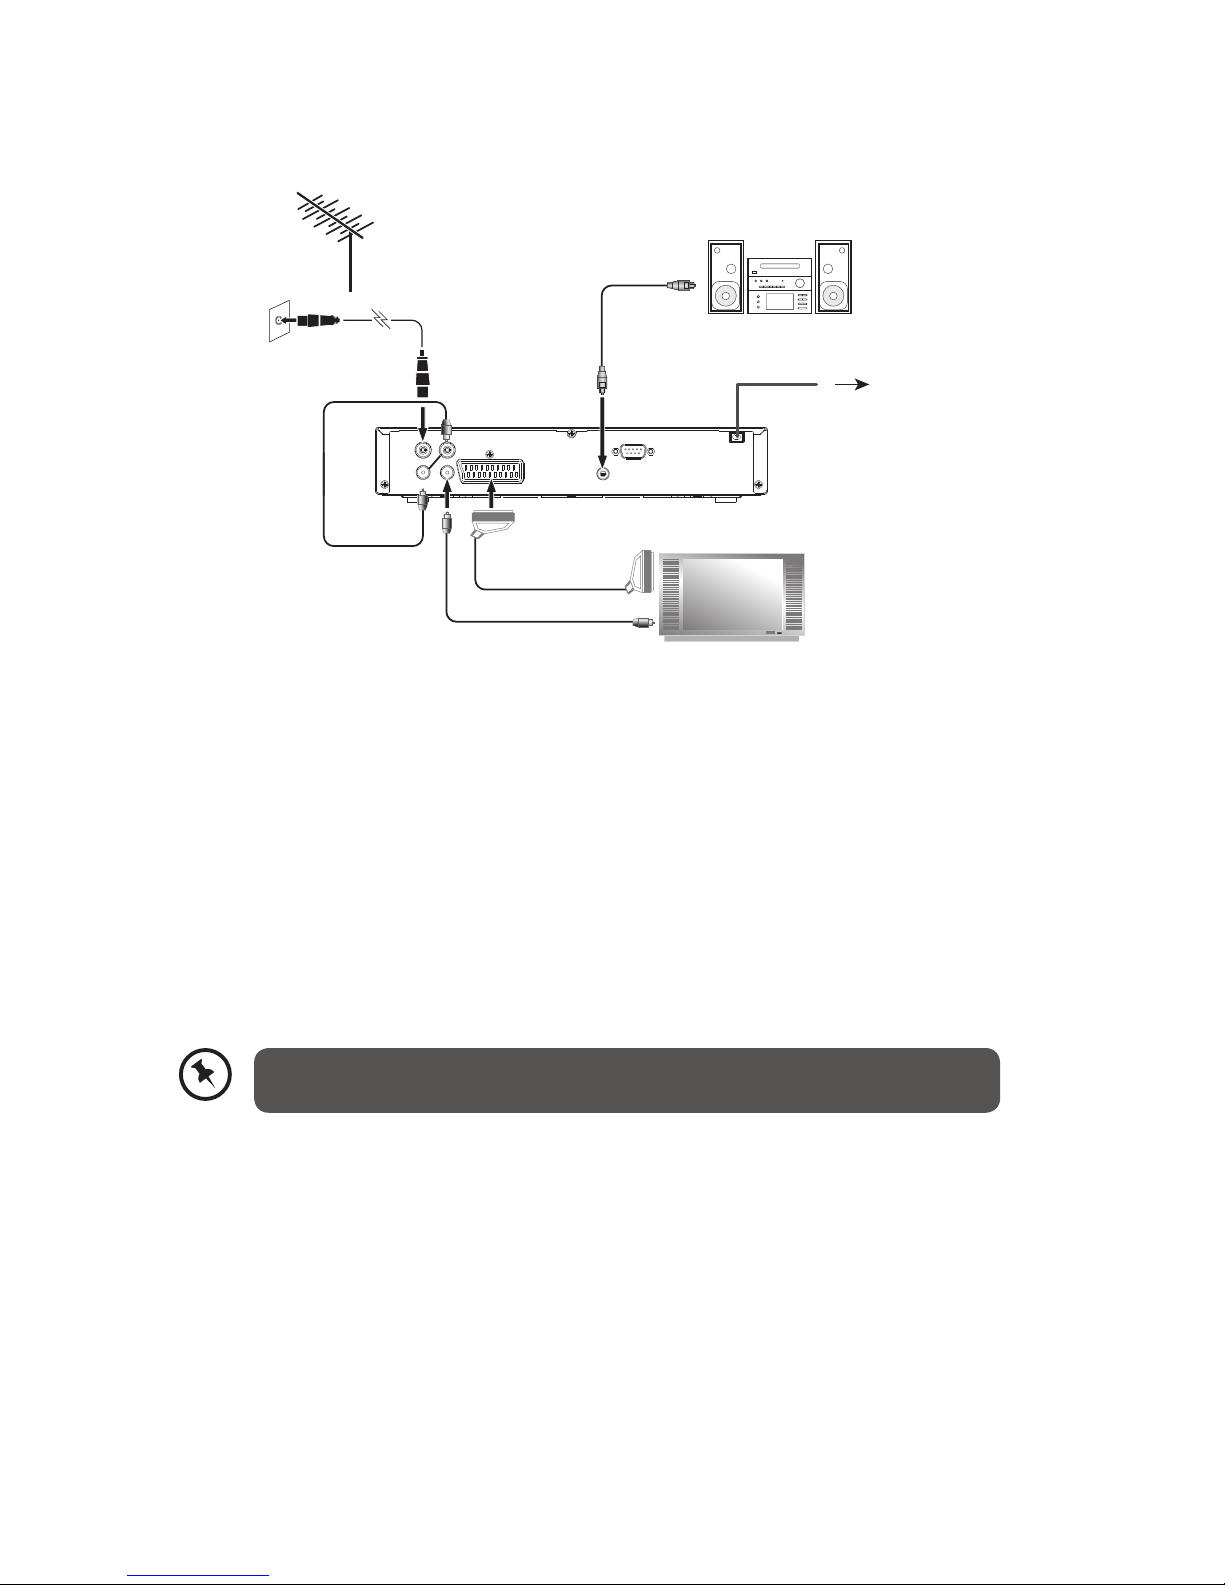
System Connection
RS232
SPDIF
SERVICES ONLY
AC 230V~
50Hz 12W
RF IN1 RF IN2
SCART
RF OUT
1
RF OUT
2
RF coaxial Cable
Mains cable
To Mains socket
SCART cable
To SCART
socket
To SPDIF
socket
Coaxial cable
(not included)
Loop Through
Cable
(included)
Aerial
To aerial wall socket
TV
SS
OR
(not included)
(not included)
RF coaxial Cable
To RF IN Socket
(not included)
Audio System
1. Make sure your TV and any other equipment you are connecting to are switched o.
2. Connect one end of the RF coaxial cable (not supplied) to the aerial socket on the wall
and the other end to the RF IN1 socket on the rear panel of the unit .
3. Connect the female end of the loop through cable (included) to the RF OUT1 socket and
the male end to the RF IN2 socket on the rear panel of the unit .
4. Connect one end of the SCART cable (not supplied) to the SCART socket on the rear panel
of the unit and the other end to the SCART socket on your TV.
5. Connect another RF coaxial cable (not supplied) to the RF OUT2 socket on the rear panel
of the unit and the other end to your TV.
6. If you want to connect to an audio system, connect one end of the coaxial cable (not
supplied) to the SPDIF socket on the rear panel of the unit and the other end to the audio
system.
Your SCART cable must be connected to your TV to watch digital TV from your
unit.
Page 11
11
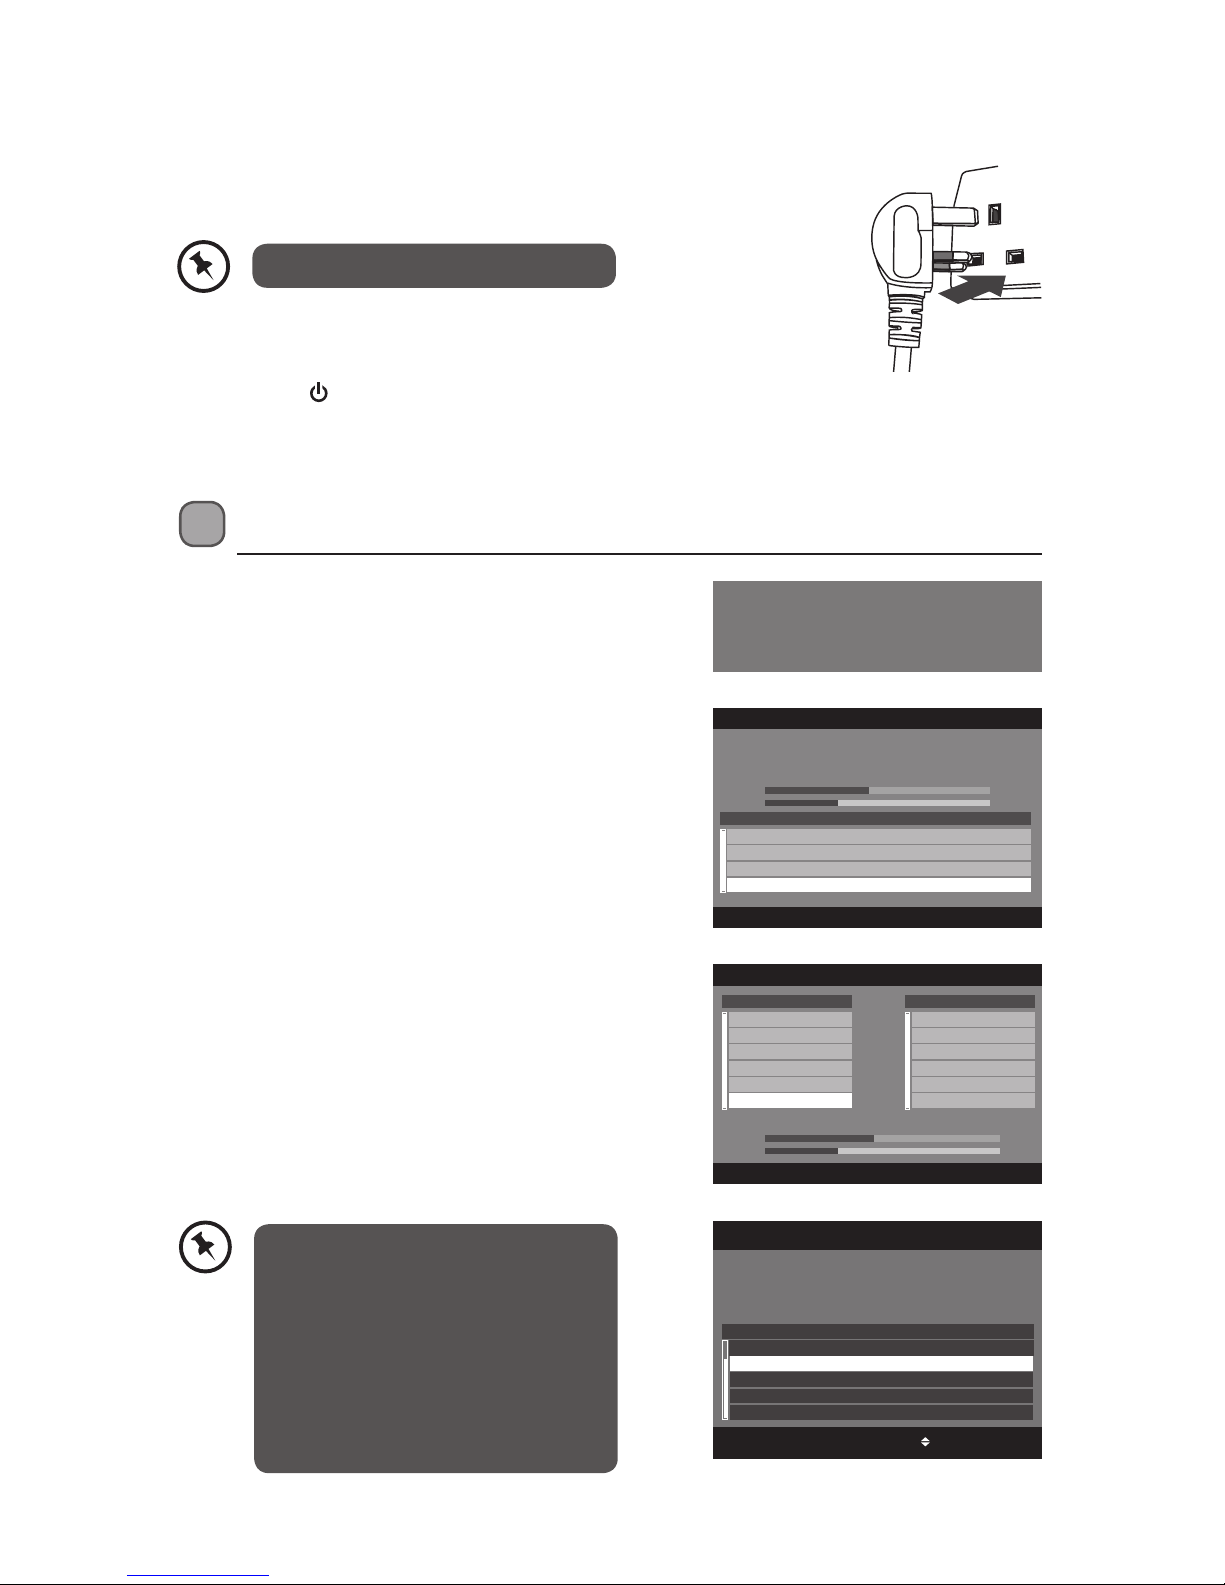
2. Press the OK button to begin the channel auto
tuning.
First Time Installation
1. When your unit is switched on for the rst time, a
Welcome Screen will be displayed.
Welcome!
Please ensure the aerial is connected.
Press OK key to commence automatic tuning.
AUTO TUNE Tue, 1 Jun 00:01
TUNING - PLEASE WAIT
Carriers detected 4
Scanning details UHF 666.000 MHz
Bandwidth 8 MHz Channel no 45
Signal 43%
Band 2 29%
CN Freq(MHz) FFT GI Const FEC
1 514.00 2K 1/32 QAM-64 2/3
2 530.00 8K 1/4 QAM-64 2/3
3 578.00 8K 1/4 QAM-14 3/4
4 650.00 2K 1/32 QAM-64 2/3
Carries detected 4
BACK
BACK
OK: Conrm BACK
Please select your preferred region.
“Gloucestershine, West” is your currently selected region.
TV REGION SELECTION Fri, 4 Jun 10:33
England
Gloucestershire, Central
Gloucestershire, West
Ruritania
Brigadoon
Ruritania, Brigadoon
During tuning your unit may
receive signals from more than one
transmitter. If this happens when
you install your unit, the TV Region
Selection screen will appear. Please
select your preferred region. Making
this choice will ensure that you will
receive the correct regional news
programmes.
TUNE page 1 of 1 Tue, 1 Jun 00:08
666.000 MHz FFT 2K GI 1/32 QAM-16 FEC 3/4
Progress
Signal
TV 6
CBBC Channel
BBC Red Button
BBC NEWS
BBC THREE
BBC TWO
BBC ONE
BACK
0%
71%
Radio 0
3. The tuning progress screen will be displayed,
showing you how many channels have been
found and saved. The tuning may take several
minutes to complete. When the tuning is
complete, your unit is ready to use. After tuning
is complete, the channels are arranged in a preset
order.
Connecting to the Mains Socket
1. Plug in the mains plug into the mains socket after you have
completed all the connections.
The unit will take awhile for loading.
2. The power indicator on the front panel will illuminate red and
“Stby“ will be displayed on the LED display.
3. Press the
button to switch the unit on, the power indicator will
illuminate green.
4. Turn on your TV.
Page 12
12
Standby Modes
This unit contains 2 standby modes.
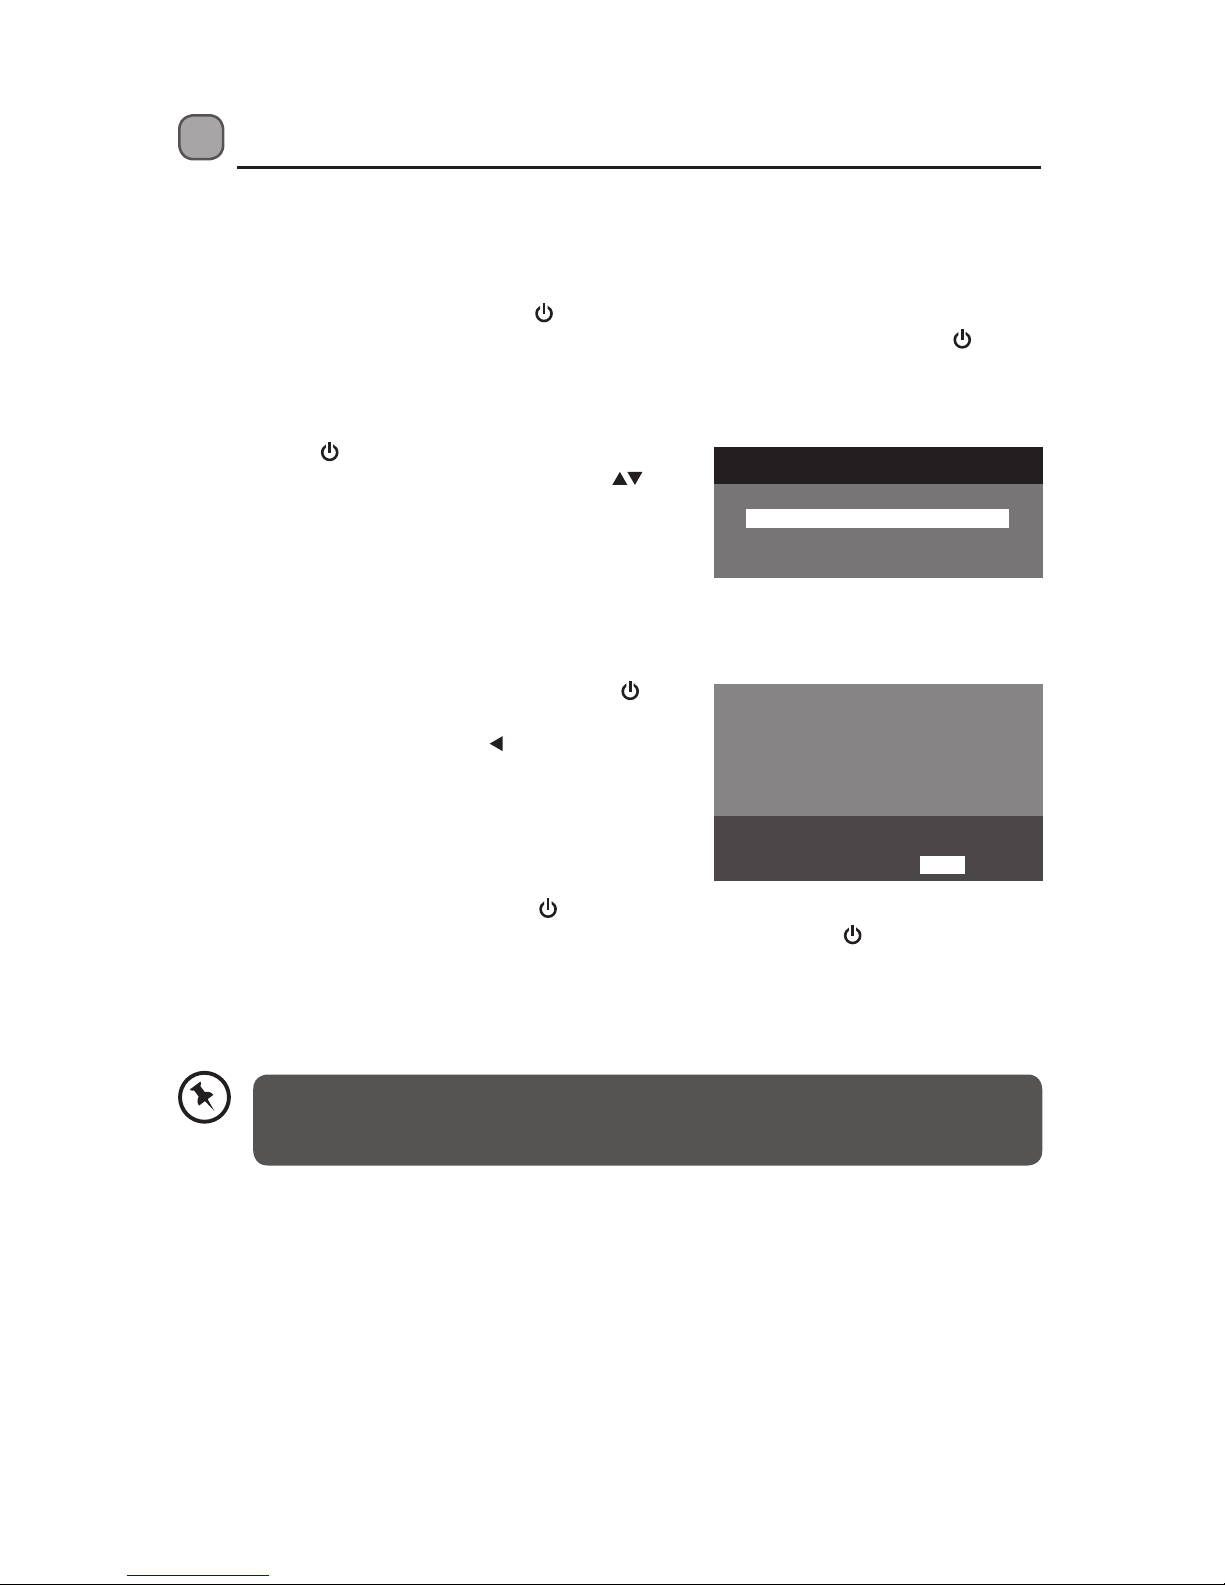
Active Standby Mode
When the unit is in On mode, press the button once, the unit will enter the active standby
mode and the power indicator will illuminate red. To turn the unit on again, press the button
again. The power indicator will illuminate green and the TV Guide will rst display on the
screen. Press the BACK button on the remote control to exit TV Guide and return to normal TV
programme viewing.
If you press the
button during recording, a pop-up
conrmation screen will be displayed. Press the
buttons and then press the OK button to conrm your
selection. The unit will then enter the active standby
mode. If you have selected “IGNORE“ or didn’t make
any decision, the unit will remain recording.
Passive Standby Mode
When the unit is in On mode, press and hold the
button for three seconds. A pop-up conrmation
screen will be displayed. Press the button to select
“YES” and then press the OK button to conrm. The
unit will then enter the passive standby and the power
indicator will illuminate red. In passive standby mode,
less power will be dissipated. The clock will display on
the LED display.
To turn the unit on again, rst press the
button once, the unit will then enter the active
standby mode and “Stby“ will be displayed on the LED display. Press the button again to
turn the unit on, the power indicator will illuminate green and the TV Guide will display on the
screen. Press the BACK button on the remote control to exit TV Guide and return to normal TV
programme viewing.
Switching o your receiver will:
• stop all recordings and reminders
• cause loss of interactive service content
• prevent your receiver from updating its software
To switch on again, press STANDBY.
YES NO
Are you sure?
You have pressed STANDBY while making a
manual recording.
What do you want to do?
CONTINUE RECORDING, GO TO STANDBY
STOP RECORDING, GO TO STANDBY
IGNORE
The TV Guide will always display on the screen everytime when you turn the unit
on, this is to allow you to know about the updated information on the Channel
Zero.
Page 13
13
MASTERCHEF
The contestants who’ve shown the most potential have
to survive the heat of a professional kitchen. Today, they
are cooking at The Living Room. Can they stand the pace
of this frantic kitchen?[S]
2 BBC TWO
20:00 (0:30)
20:18 V.I AD S TXH.O.H
1 2 3 4 5
6
7
8 9 10 11 12 13 14 15
Basic Features
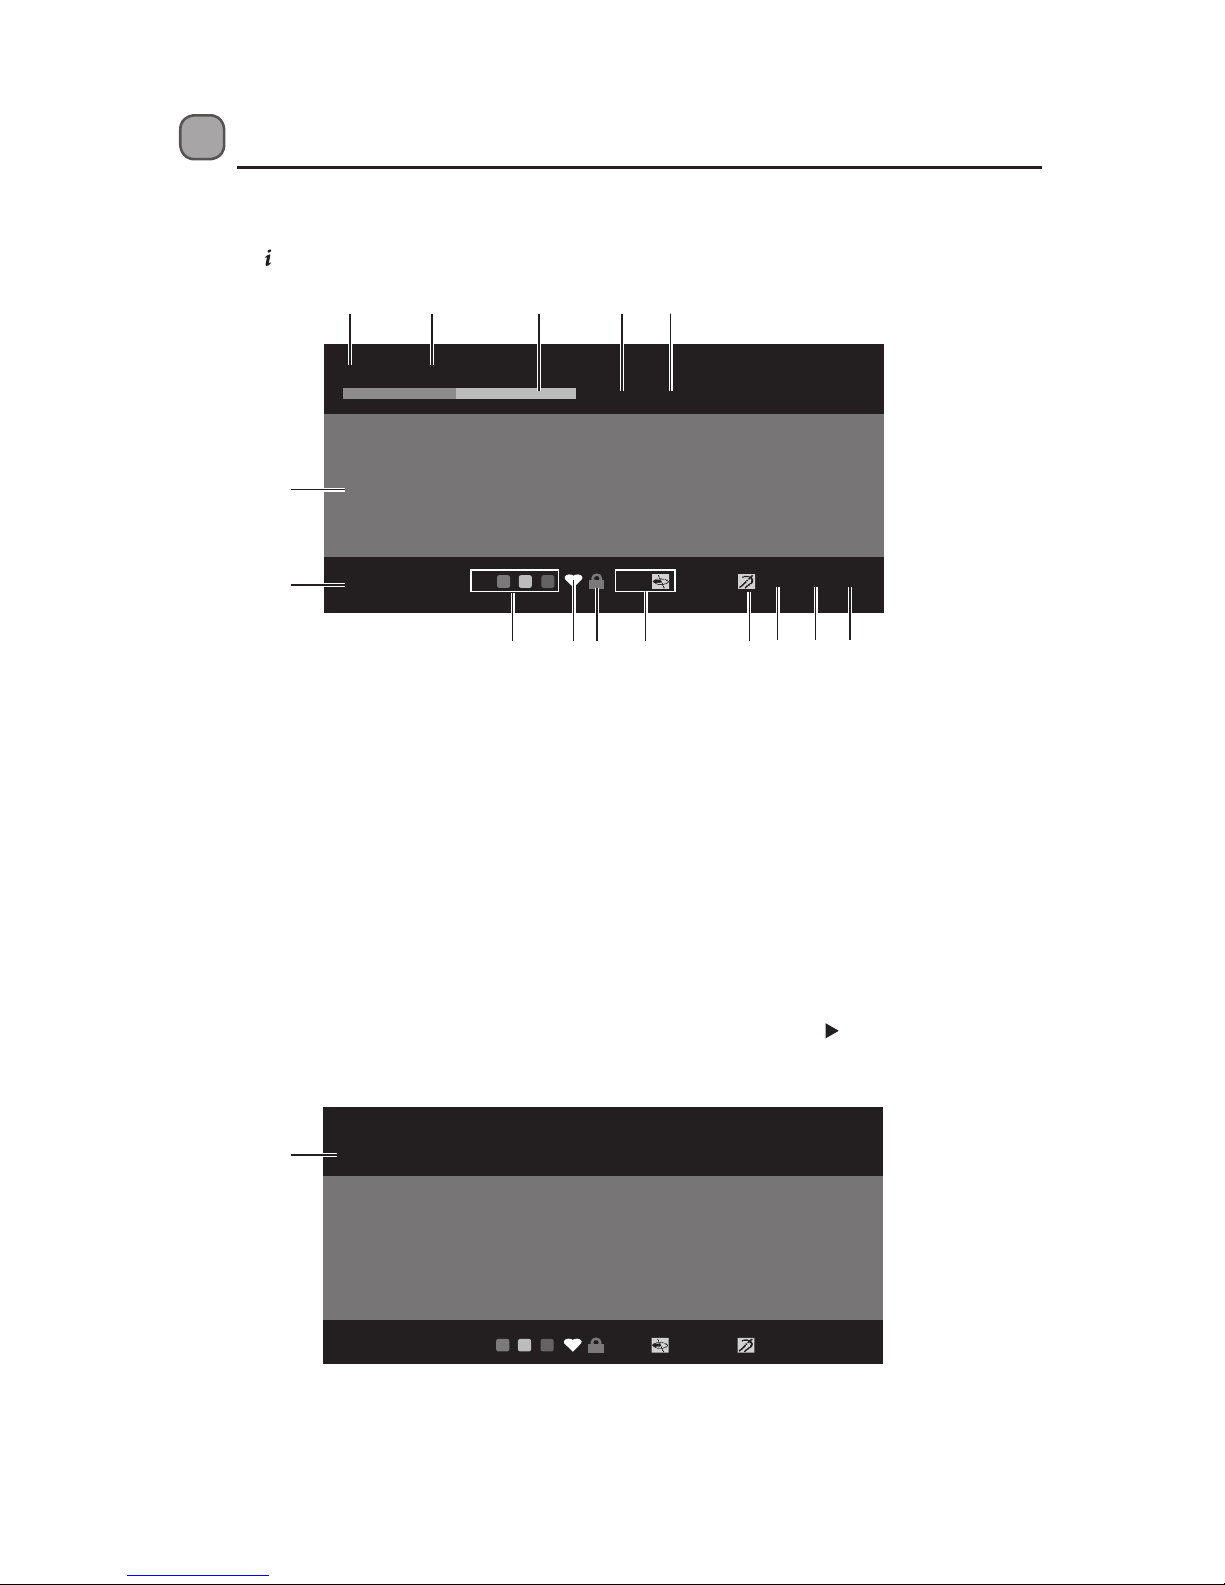
Information Bar
Press the button to display information about the current programme.
When the current programme information displayed you can press the
button to display the
next programme information.
FLOG IT!
The prople of Norfolk pour in to have their antiques
valued by experts Philip Serrell and Mark Stacey. Paul
Martin also hears some heart-warming tales when he
visits the Redwings Horse Sanctuary. [ S ]
2 BBC TWO
NEXT 20:00 (1:30)
13:05 V.I AD S TXH.O.H
16
1. Channel number currently viewed
2. Channel name currently viewed
3. Programme progress bar
4. Programme start time
5. Programme duration
6. Information of channel
7. Current time
8. Channel belongs to a Channel Group.
9. Channel has been selected as a
favourite.
10. Channel is locked.
11. Visual impairment
12. Hard of Hearing (H.O.H);
13. Audio Description
14. Subtitles
15. MHEG-5 service (Teletext)
16. Next programme
Page 14
14
Aspect Ratio
Press the WIDE button on the remote control to select
the menu in 16:9, 4:3 pan scan or 4:3 letter box.
Subtitles
Press the S button on the remote control to switch
subtitles ON / OFF.
Audio Description
Press the AD button on the remote control to switch
Audio Description ON / OFF.
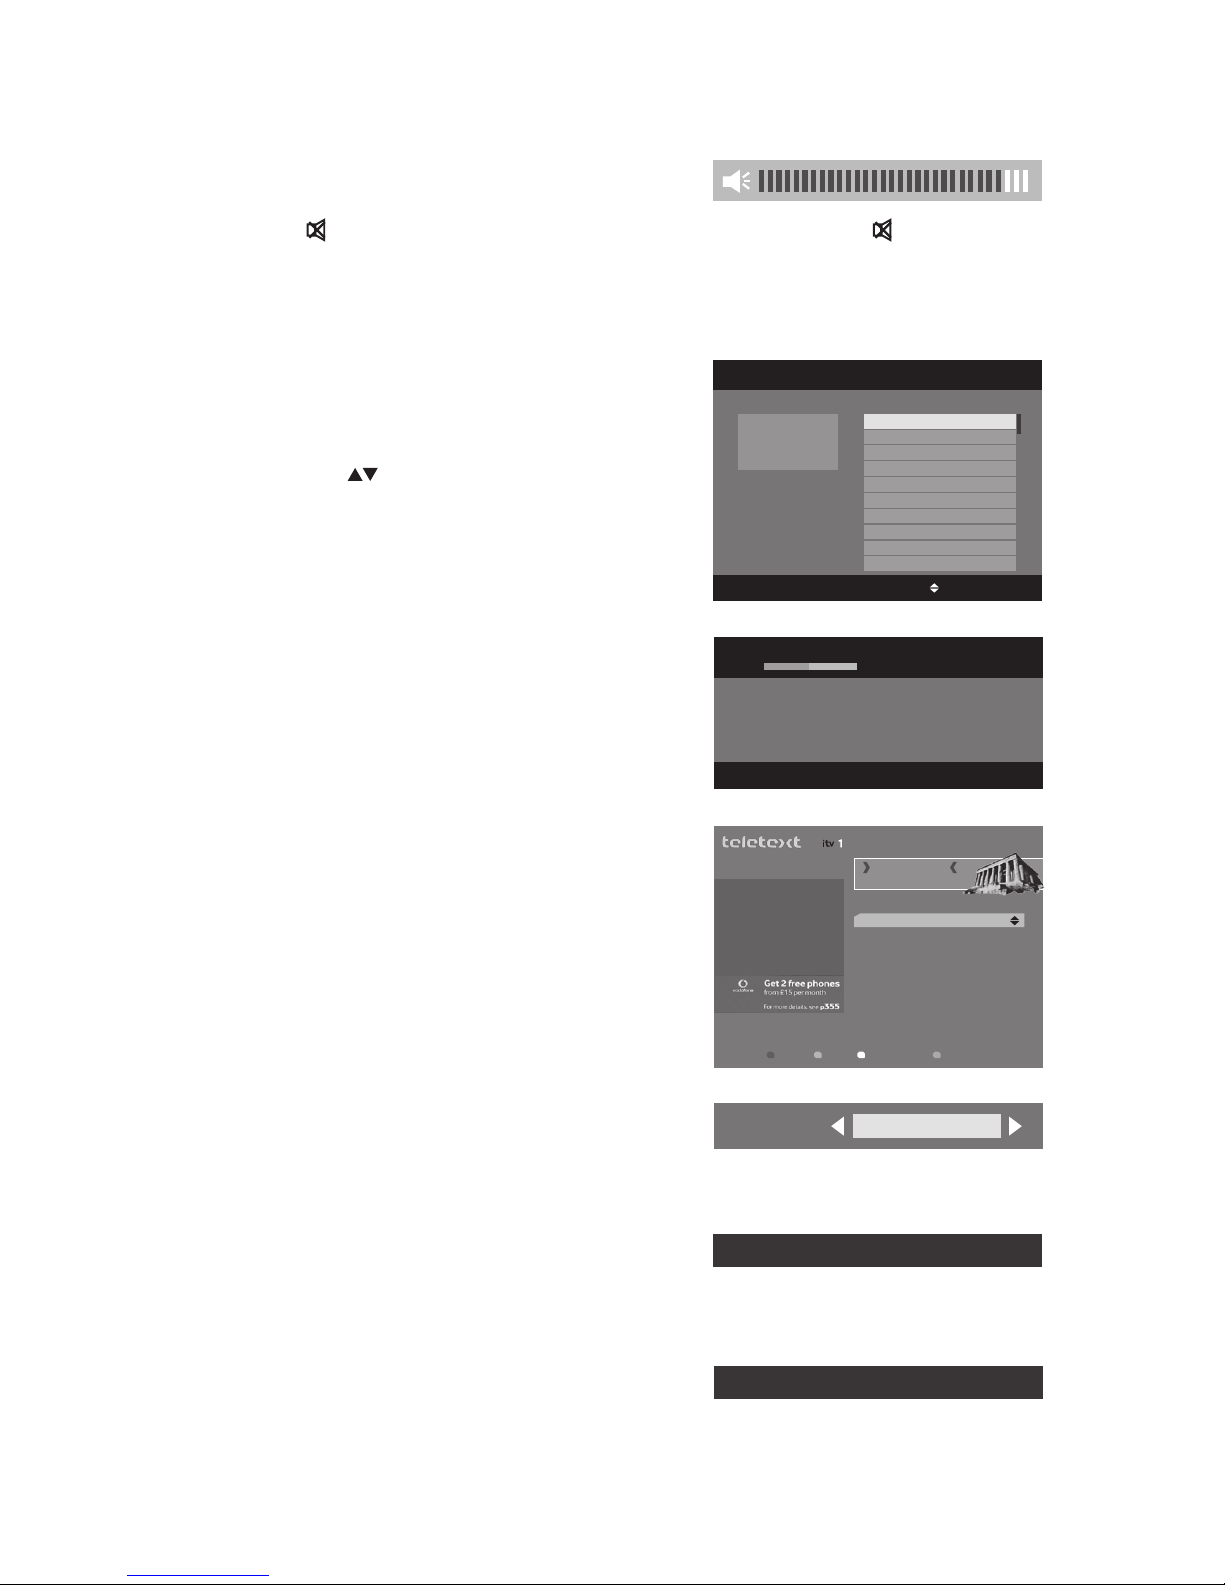
Teletext Selection
1. Press the TEXT button on the remote control to
enter Teletext. (If Teletext is transmitted)
2. Press the TEXT button again or press the EXIT
button on the remote control to exit the Teletext
(TV mode).
Volume Adjustment
1. Press the V+ / – buttons on the remote control to
adjust the volume.
2. Press the button on the remote control to switch the sound o. Press the button again or
press the V+ / – buttons to cancel this function.
Channel Selection
1. Press the P+ / – buttons on the remote control
repeatedly or the 0-9 buttons on the remote
control to select the channel.
2. Press the OK button to enter the Channels List.
Then use the
buttons to select the channel
and then press the OK button to watch.
TV/RADIO Selection
Press the TV/R button on the remote control to switch
between TV and radio mode.
NICK SNAITH
Send in you all-time favourites as Nick Snaith presents
the Lunchtime Playlist.
738 HEART
NOW
Sat, 12 Sep 19:25
TX
300
400
150
200
170
110
800
160
818
News
Sport
Weather
Holidays
Holiday Ideas
TV Guide
Entertainment
Trac/Travel
Night Out listings
Press Text to exit Feb 1
Home
ON
A to Z HELP SHORTCUTS MENU
ESCAPE TO EUROPE
FOR THE WEEKEND!
p200
DVB Subtitle ON(English)
Audio Description ON(English)
Aspect ratio
16:9
OK:TuneGUIDE BACK
Press MENU to group
channels by theme or
user.
CHANNEL LIST Sat, 12 Sep 19:23
1 BBC ONE
2 BBC TWO
7 BBC THREE
Page 15

15
4. After the favourite channels have been created,
press the
button again to display the Channel
Favourites menu. You can then press the
buttons to select any favourite channel. Press
the OK button to tune to your desired favourite
channel.
Audio Selection
1. Press the AUDIO button on the remote control to
display the Audio Channel menu.
2. Press the
buttons to select L (Left), S (Stereo),
R (Right).
3. Press the
buttons to select the desired
language (only applicable when the TV
programme supports this feature).
4. Press the RED button on the remote control to
enter Audio Description menu.
5. Press the
buttons to adjust the settings.
Preferred
Language
Press the
buttons to select English /
Irish / Gaelic and Welsh. (English is default
in the menu.)
Audio Type
Press the
buttons to select Stereo / Left
and Right. (Stereo is default in the menu.)
Volume
Press the
buttons to increase / decrease
the AD soundtrack volume.
Favourite List
1. Press the button on the remote control when
you watching a live programme, a pop-up
conrmation screen will be displayed. Press the
button to select “YES” and then press the OK
button to enter Channel Organiser menu.
2. Press the
buttons to select your desired
channel to be set as favourite. Press the 1 button
on the remote control and then press the OK
button to conrm.
3. Press the EXIT button on the remote control on
the remote control to exit the menu.
OK:Save
AUDIO DESCRIPTION
BACK
AUDIO CHANNEL Sat, 12 Sep 19:42
ENG L S R
OK:Save BACK
AUDIO DESCRIPTION Sat, 12 Sep 19:42
Preferred language English
Audio type Stereo
Volume 30%
YES NO
Do you want to create favourites?
You have no favourite channels
P+/P- OK: Tune BACK
BBC ONE
BBC TWO
BBC THREE
CBBC Channel
BBC NEWS
.SI Test Bench 666.000 MHz
CHANNEL FAVOURITES Sat, 12 Sep 19:20
P+/P- OK: Save
1:Fav 2:Lock 3:Skip 4:Delete 5:Rename
BACK
1 BBC ONE
2 BBC TWO
3 SIT 3
4 SIT 4
5 SIT 5
7 BBC THREE
56 Test HD 1
57 Test HD 2
.SI Test Bench 666.000 MHz
Fav Lock Skip Delete
CHANNEL ORGANISER Sat, 12 Sep 19:21
Page 16

16
TV Guide
This unit has a TV Guide to help you navigate through all the possible viewing options. The TV
Guide supplies information such as programme listings, start and end times for all available
services (the availability and amount of programme information will vary, depending on the
particular broadcaster). The TV Guide displays the programme details for the next 7 days.
Switch On/O TV Guide
• Press the GUIDE button on the remote control to switch on TV Guide.
• Press the GUIDE button again or press the EXIT or BACK button on the remote control to
switch o TV Guide and return to normal TV viewing.
SOUTH TODAY
18:30 - 19:00 (0:30)
BBC ONE
Press i for program details
TV GUIDE Sat, 12 Sep 19:22
P+/P- OK:Tune BACK
Date PLANNERRec
Sat, 12 Sep 18:30
South Today
Ben Fogle’s...
Spendaholics Africa Cup of Nations 2...
This is CBBC!
News 24 Tonight BBC News
Torchwood
The One S... EastEnders
T.
19:00 19:30
BBC ONE
BBC TWO
BBC THREE
CBBC Channel
BBC NEWS 24
BBCi
REMIND
programme date
current date and time
programme information
programme start time
currently selected programme title
currently selected channel name
channel name
Select a Programme
Press the buttons to select the desired channel and then press the buttons to select the
desired programme. Press the OK button to conrm.
Button Functions in a 7 Days Guide
Remote Control Button Function
or
To select a channel
or
To select a channel programme
P+ or P– To display previous or next page
To display the detail Information for the selected programme
OK To conrm and view the selected channel
RED (Rec)
Press the RED button while on the selected programme, the selected
programme will change to red colour. When the preset time is reached,
the TV will start recording automatically. Press the RED button again
to cancel the preset recording. (This is not applicable on the currently
viewing channel.)
GREEN (Date)
Press the GREEN button to change the programme date and view the
schedule of the next 7 days.
YELLOW (Remind)
Press the YELLOW button while on the selected programme, the
selected programme will the change to yellow colour. The TV will
automatically tune to the desired programme when it starts. (This is not
applicable on the currently viewing channel.)
BLUE (Planner)
Press the BLUE button to display the Planner TV menu (Refer to Planner
TV section for details).
GUIDE / EXIT / BACK To exit TV Guide and return to normal TV viewing
Page 17

17
Planner TV
This unit has a Planner TV to help you list out the status of all your recordings. You can see
detailed information in the record column.
Switch On/O Planner TV
• Press the BLUE button on the TV Guide or directly press the TV/PVR button on the remote
control to enter the Planner TV menu.
• Press the EXIT or BACK or TV/PVR button on the remote control to exit the menu.
Record Column
Colour Code Record Column Description
Red
Highlight
Programme name Indicates the programme preset to be recorded.
RECORDING Indicates the programme is currently recording.
Green
Highlight
RECORDED Indicates the programme was completely recorded.
PARTIAL Indicates the programme was partially recorded.
FAILED Indicates the programme failed to be recorded due to power failure.
Button Functions in Planner TV list
Remote Control Button Function
or
To select a programme from the list.
or
To sort the programmes on the list by date order or by alphabetical order.
P+ or P– To display previous or next page
To display the detail Information for the selected programme and the
remaining HDD capacity.
OK
To start the playback of the selected programme (only for the recorded or
currently recording programme)
RED (Delete)
Press the RED button while on the selected programme to delete the
programme from the list, a pop-up conrmation screen will be displayed.
Press the
button to select “YES” and then press the OK button to delete;
or press the button select “NO” and then press the OK button to cancel.
GREEN (Keep)
Press the GREEN button while on the selected programme to lock a
programme, a lock icon will show next to the selected programme. Press
the GREEN button again to cancel and the lock icon will disappear.
BLUE (Guide)
Press the BLUE button to display the TV Guide (Refer to TV GUIDE section
for details)
EXIT / BACK To exit Planner TV and return to normal TV viewing
P+/P- OK:Play BACK
PLANNER TV
Fri, 4 Jun 09:33
GUIDEKEEPDELETE
Ebb and Flo Fri, 4 Jun 09:11
Thu, 12 Oct 13:03
Thu, 12 Oct 13:07
Thu, 12 Oct 13:03
Fri, 4 Jun 09:06
Fri, 4 Jun 09:06
EVENT 9
EVENT 10
EVENT 9
GMTV
GMTV
Recorded 0:03
Recorded 0:03
Failed 0:01
Failed 0:05
Partial 0:00
Partial 0:02
EBB AND FLO
09:05 - 09:15 (0:10)
FIVE
Press i for details, to view alphabet
current date and time
current playback content
programme name
duration
channel name
record column
Page 18

18
3. During recording, if you press the button
on the remote control, a pop-up conrmation
screen will be displayed. Press the button to
select “YES” and then press the OK button to
stop recording. The recorded programme will be
saved into the HDD memory. Then the “successful
stop the recording” message will be displayed
for a short while; or press the button to select
“NO” and then press the OK button to cancel,
recording will resume.
Recording
Use this function to record the DTV
programme you are watching on the main
screen and save them for future viewing.
Make sure that the unit’s built-in HDD has
enough available memory space.
Single Recording
1. Press the button on the unit or press the
button on the remote control while watching
a live programme to start recording, the
power indicator will ash red and “rECO“ will
be displayed on the LED display. A pop-up
conrmation screen will then be displayed. Press
the buttons and then press the OK button to
conrm.
2. A recording progress bar will be displayed on
the screen for a short while. You may press the
button to display the recording progress bar at
any time during recording.
You hace started a recording
What do you want to do?
RECORD UNTIL I PRESS STOP
STOP AT END OF THIS PROGRAMME:
Question Time Extra
STOP AT END OF NEXT PROGRAMME:
BBC NEWS
YES NO
Are you sure you want to stop recording
this progammer?
You have pressed STOP.
Successful stop the recording
When the programme is recording, please do not unplug the unit from the mains
socket as this will damage the unit’s HDD.
2 BBC TWO
0:00 / 0:00
0:50
Natural world
1 2 3
4 5 6 7 8
Recording Progress Bar
1. Channel number currently recording
2. Channel name currently recording
3. Programme total time
4. Recording icon
5. Programme name currently recording
6. Programme status bar
7. Playback time
8. Total time recorded
When you are single recording the
power indicator will ash red on the
front panel.
When you are dual recording the
power indicator will ash alternatively
in red and green on the front panel.
Page 19

19
Dual Recording
This unit can record two dierent channels simultaneously from either 1 multiplex or 2
dierent multiplex’s. For more information on the channels available from dierent multiplex’s,
please visit the DTG website: http://www.dtg.org.uk/industry/dtt_channels.html.
1. Press the
button on the unit or press the button on the remote control to record
the currently viewing programme, the power indicator will ash red and “rECO“ will be
displayed on the LED display.
2. During recording, press the P+/P- buttons to change channel and then press the
button on the unit or press the button on the remote control to start another recording
simultaneously. The power indicator will alternatively ash red and green. You can change
to view another programme in the same multiplex as you are currently recording from.
Stop Recording in Planner TV
1. If you want to stop the recording in the Planner
TV menu, press the TV/PVR button on the
remote control to enter the Planner TV (the
recording programme will be highlighted in red).
Press the buttons to select the programme
and then press the button on the remote
control.
Stop Recording in Channel List
1. If you want to stop the recording in the Channel
List menu, press the OK button to display the
Channel List (the recording programme will
be highlighted in red). Press the buttons to
select the channel and then press the button
on the remote control.
2. A pop-up conrmation screen will be displayed.
Press the
button to select “YES” and then press
the OK button to stop recording; or press the
button to select “NO” and then press the OK
button to cancel, recording will resume.
P+/P- OK:Play BACK
EBB AND FLO
09:05 - 09:15 (0:10)
FIVE
Press i for details
PLANNER TV
Fri, 4 Jun 09:33
GUIDEDELETE
Ebb and Flo Fri, 4 Jun 09:11
Thu, 12 Oct 13:03
Thu, 12 Oct 13:07
Thu, 12 Oct 13:03
Fri, 4 Jun 09:06
Fri, 4 Jun 09:06
EVENT 9
EVENT 10
EVENT 9
GMTV
GMTV
Recording 0:03
Recording 0:03
Failed 0:01
Failed 0:05
Partial 0:00
Partial 0:02
GUIDE BACKOK: TUNE
1 BBC ONE
2 BBC TWO
7 BBC THREE
11 SKY THREE
29 E4+1
37 smile TV3
CHANNEL LIST Sat, 12 Sep 19:24
Press MENU to group
channels by theme or
user
Stop recording:
Captain Apache
Are you sure?
YES NO
Do you want to go to planner?
YES
NO
2. A pop-up conrmation screen will be displayed.
Press the button to select “YES” and then
press the OK button to enter the Planner TV
(follow the previous section to stop recording in
the Planner TV); or press the button to select
“NO” and then press the OK button to cancel,
recording will resume.
Page 20

20
Event Recording
This allows you to preset some programmes to be recorded in standby mode or on mode.
1. Press the GUIDE button on the remote control to
switch on TV Guide. Press the
buttons to
select the desired programme you want to preset
recording.
SOUTH TODAY
18:30 - 19:00 (0:30)
BBC ONE
Press i for program details
TV GUIDE Sat, 12 Sep 19:22
P+/P- OK:Tune BACK
Date PLANNERRec
Sat, 12 Sep 18:30
South Today
Ben Fogle’s...
Spendaholics Africa Cup of Nations 2...
This is CBBC!
News 24 Tonight BBC News
Torchwood
The One S... EastEnders
T.
19:00 19:30
BBC ONE
BBC TWO
BBC THREE
CBBC Channel
BBC NEWS 24
BBCi
SERIES
SOUTH TODAY
18:30 - 19:00 (0:30)
BBC ONE
Press i for program details
TV GUIDE Sat, 12 Sep 19:22
P+/P- OK:Tune BACK
Date PLANNERRec
Sat, 12 Sep 18:30
South Today
Ben Fogle’s...
Spendaholics Africa Cup of Nations 2...
This is CBBC!
News 24 Tonight BBC News
Torchwood
The One S... EastEnders
T.
19:00 19:30
BBC ONE
BBC TWO
BBC THREE
CBBC Channel
BBC NEWS 24
BBCi
SINGLE
SOUTH TODAY
18:30 - 19:00 (0:30)
BBC ONE
Press i for program details
TV GUIDE Sat, 12 Sep 19:22
P+/P- OK:Tune BACK
Date PLANNERRec
Sat, 12 Sep 18:30
South Today
Ben Fogle’s...
Spendaholics Africa Cup of Nations 2...
This is CBBC!
News 24 Tonight BBC News
Torchwood
The One S... EastEnders
T.
19:00 19:30
BBC ONE
BBC TWO
BBC THREE
CBBC Channel
BBC NEWS 24
BBCi
REMIND
2. If the programme you selected is a series event
which has a separate content ID (for example,
a lm consisting two parts), the “REMIND“ box
shown at the bottom of the TV Guide will change
to “SERIES“.
3. Press the YELLOW button on the remote control
to set the series event in the recording list.
4. The
logo will be displayed at the end of the
selected programme name.
5. The “SERIES“ box shown at the bottom of the TV
Guide will change to “SINGLE“.
6. Press the RED button on the remote control to
unselect the event. All the selected programmes
to be preset recording will change to red.
7. After you complete all the preset recording
settings, press the EXIT button on the remote
control to return to normal TV viewing.
Page 21

21
Time Shift Recording
This function allows the unit to virtually record the live viewing broadcast programme.
2 BBC TWO
- 0:15 / 0:30
Captain Apache
1 2
3 4 65 7
Time Shift Progress Bar
1. Channel number
2. Channel name
3. Indicates the status of the currently
displayed programme
4. Programme name
5. Playback location of recording
6. Indicates the time lagging behind the
live broadcast
7. Indicates the total recording time
• Time shift and recording functions may not work if the signal strength is weak.
• Recording will stop automatically when the disk is full.
• During time shift, changing channels will cause time shift to terminate.
During normal TV viewing, you may press the button to virtually pause the live viewing
broadcast programme if you want to go out for a while (e.g. going to the bathroom / kitchen).
“ “ will be shown in the time shift progress bar and display on the screen for a short while.
Press the button to display the time shift progress bar again.
When you have returned, press the
button to play the missed broadcast programme. The
time shift progress bar will display on the screen again.
The video and sound may have a little bit of delay or be out-of-sync for a few seconds when
the unit starts to playback the missed broadcast programme. It will soon turn to normal.
Remote Control Button Function
During playback, press the button to display a still screen and then press
the button again to resume playback.
or
When playing,
• Press the
button repeatedly to speed up x 2 / x 4 / x 8 / x 16. / x32.
• Press the
button repeatedly to speed up x 2 / x 4 / x 8 / x 16 / x32.
• During fast forward / fast backward state, press the
button to return to
normal playback.
or
• Press the button to jump about 3 minutes forward.
• Press
the button to jump about 3 minutes backward.
• Press the button to resume playback from a still screen.
• During fast forward / fast backward state, press the
button to return to
normal playback.
If you want to exit the time shift and return to the current live broadcast,
press the button. A pop-up conrmation screen will be displayed. Press
the button to select “YES“ and then press the OK button to conrm..
Page 22

22
4. Press the button to stop the current playback.
A pop-up conrmation screen will be displayed.
Press the button to select “YES” and then press
the OK button to stop playback and return to the
Planner TV; or press the button to select “NO”
and then press the OK button to cancel, playback
will resume.
Play Recorded Programme
You can play a recorded programme from the recorded programme list on the Planner TV.
1. Press the TV/PVR button on the remote control
to enter the Planner TV.
2. Press the
buttons to select your recorded
programme and then press the OK or the
button on the remote control.
P+/P- OK:Play BACK
EBB AND FLO
09:05 - 09:15 (0:10)
FIVE
Press i for details
PLANNER TV
Fri, 4 Jun 09:33
GUIDEDELETE
Ebb and Flo Fri, 4 Jun 09:11
Thu, 12 Oct 13:03
Thu, 12 Oct 13:07
Thu, 12 Oct 13:03
Fri, 4 Jun 09:06
Fri, 4 Jun 09:06
EVENT 9
EVENT 10
EVENT 9
GMTV
GMTV
Recording 0:03
Recording 0:03
Failed 0:01
Failed 0:05
Partial 0:00
Partial 0:02
3. The playback progress bar will be displayed for
a short while. Press the button to display the
playback progress bar again.
Do you want stop playback?
YES
NO
2 BBC TWO
0:01 / 1:00
1:30
A Tribute to Sir Edmund ...
1 2 3
4 5 6 767
Playback Progress Bar
1. Channel number currently viewing
2. Channel name currently viewing
3. Programme total time
4. Indicates the status of the currently
displayed programme
5. Programme name
6. Playback time
7. Total recorded time
Page 23

23
8. Press the or the 0 button on the remote control
to display the Channel Zero main menu. Press
the button again to exit the Channel Zero main
menu.
7. After the Channel Zero download is successful,
you can nd the Channel Zero information in the
TV Guide menu in the Channel Zero listing.
5. If Channel Zero is supported in your district, a
“Signal found” message will be displayed.
6. After the Channel Zero content is detected, the
Channel Zero can be downloaded automatically
in active standby mode and the process will take
about several hours.
4. If Channel Zero is not supported in your district, a
“No service found“ message will be displayed.
Channel Zero
1. Channel Zero messages are used to provide the
information to you like Channel Zero service
availability or not, you can perform the Channel
Zero scan to search for Channel Zero series.
2. Press the
button on the remote control if the
progress bar does not appear and has not been
downloaded in the past 30 days, a message is
displayed to initiate Channel Zero discovery.
3. Press the OK button to search and a message will
be displayed.
Your interactive content is not available.
Have you unplugged your receiver or recently had a power cut?
To receiver content, leave your receiver in standby and switched
on at the mains when not in use.
Press OK to search for content or BACK to cancel.
To learn more visit www.ch-zero.tv
Searching for a service, please wait...
Pree BACK to cancel.
No service found.
This may be because there is no signal in your area.
Press OK to clear this message.
To learn more visit www.ch-zero.tv
Signal found!
Your interactive content will load automatically over the next
24 hours when your receiver is in standby.
Press OK to clear this message.
To learn more visit www.ch-zero.tv
Channel Zero brings you What’s On TV
magazine, game, weather, news and
much, much more ... no matter whick
channe you are watching!
Press OK for Channel Zero
TV GUIDE Fri, 4 Jun 10:32
P+/P- BACK
+24hrs
Fri, 4 Jun 18:00
BBC News
South Today
This is BBC THREE
Spendaholics
This is CBBC!
Time Warp ...
The One Sh..
Eggheads Ben Fogle’s...
Stupid
A Tribute t...
magazine, games, competitions and other
18:30 19:00
Channel Zero
BBC ONE
BBC TWO
BBC THREE
CBBC Channel
Page 24

24
Page 25

25
Page 26

26
Channels Menu
Organise
1. Press the MENU button and then press the
buttons to select Channels. Press the button or
the OK button to conrm.
2. Press the
buttons to select Organise and
then press the OK button to conrm. The
Channel Organiser menu will displayed.
OK BACK
Channels
Install
Settings
MENU Sat, 12 Sep 19:21
Organise
Groups
3. Press the buttons to select the channel and
then press the 1 - 5 button on the remote control
to select or unselect the below options.
Fav
Press the 1 button and press the OK
button to conrm.
Lock
Press the 2 button and press the OK
button to conrm.
Skip
Press the 3 button and press the OK
button to conrm.
Delete
Press the 4 button and press the OK
button to conrm.
Rename
Press the 5 button. A pop-up
conrmation screen will be displayed.
Press the
button to select “YES” and
then press the OK button to conrm.
The rename channel menu will be
displayed. Press the 0-9 buttons to
rename the channel name and then
press the OK button to conrm.
P+/P- OK: Save
1:Fav 2:Lock 3:Skip 4:Delete 5:Rename
BACK
1 BBC ONE
2 BBC TWO
3 SIT 3
4 SIT 4
5 SIT 5
7 BBC THREE
56 Test HD 1
57 Test HD 2
.SI Test Bench 666.000 MHz
Fav Lock Skip Delete
CHANNEL ORGANISER Sat, 12 Sep 19:21
When a channel is locked, a valid
password must be entered. The default
password is “0000”. If you change the
password, be sure to remember the
new password! If you forget the new
password, press the master password
“2222”.
4. Press the BACK button on the remote control to
return to the previous menu.
5. Press the EXIT button on the remote control to
exit the menu.
Page 27

27
Groups
1. Press the MENU button and then press the
buttons to select Channels. Press the button or
the OK button to conrm.
2. Press the
buttons to select Groups and then
press the OK button to conrm. The Group
Channels menu will displayed.
0:Name BACKOK: Save
1 BBC ONE
2 BBC TWO
7 BBC THREE
11 SKY THREE
29 E4+1
37 smile TV3
70 CBBC Channel
82 SKy News
105 BBC Red Button
Group
Group Name
GROUP CHANNELS Sat, 12 Sep 19:24
Press colour key to
include or remove this
channel.
Press LEFT to select
groups
OK BACK
Channels
Install
Settings
MENU Sat, 12 Sep 19:23
Organise
Groups
3. Press the buttons to select the channels
and then press the Coloured buttons on the
remote control to group the channels. The group
colour will be displayed on the left side and the
channels are displayed on the right side.
4. Press the
button to edit the group name on the
left side and then press the buttons to select
a colour for the group to be renamed. Press the 0
button on the remote control, the rename group
menu will be displayed. Press 0 - 9 buttons on the
remote control to name the group. Press the OK
button to conrm.
5. Press the BACK button on the remote control to
return to the previous menu.
6. Press the EXIT button on the remote control to
exit the menu.
Page 28

28
4. The scanning progress screen will be displayed, showing you how many channels
have been found and saved. The tuning may take a short while to complete. When the
scanning is complete, your unit is ready to use. After scanning is complete, the channels
are arranged in a preset order.
TUNE page 1 of 1 Tue, 1 Jun 00:08
666.000 MHz FFT 2K GI 1/32 QAM-16 FEC 3/4
Progress
Signal
TV 6
CBBC Channel
BBC Red Button
BBC NEWS
BBC THREE
BBC TWO
BBC ONE
BACK
0%
71%
Radio 0
AUTO TUNE Tue, 1 Jun 00:01
TUNING - PLEASE WAIT
Carriers detected 4
Scanning details UHF 666.000 MHz
Bandwidth 8 MHz Channel no 45
Signal 43%
Band 2 29%
CN Freq(MHz) FFT GI Const FEC
1 514.00 2K 1/32 QAM-64 2/3
2 530.00 8K 1/4 QAM-64 2/3
3 578.00 8K 1/4 QAM-14 3/4
4 650.00 2K 1/32 QAM-64 2/3
Carries detected 4
BACK
3. A pop-up conrmation screen will be displayed.
Press the button to select “YES” and then press
the OK button to start automatic tune.
Install Menu
Automatic Tune
1. Press the MENU button and then press the
buttons to select Install. Press the button or
the OK button to conrm.
2. Press the
buttons to select Automatic Tune
and then press the OK button to conrm.
OK BACK
Channels
Install
Settings
MENU Thu, 3 Jun 20:21
Automatic Tune
Manual Scan
Restore Factory Default
Version
Format hard drive
Are you sure?
YES NO
During tuning your unit may receive
signals from more than one transmitter.
If this happens when you install your
unit, the TV Region Selection screen
will appear. Please select your preferred
region. Making this choice will ensure
that you will receive the correct regional
news programmes.
BACK
OK: Conrm BACK
Please select your preferred region.
“Gloucestershine, West” is your currently selected region.
TV REGION SELECTION Fri, 4 Jun 10:33
England
Gloucestershire, Central
Gloucestershire, West
Ruritania
Brigadoon
Ruritania, Brigadoon
Page 29

29
OK BACK
Channels
Install
Settings
MENU Thu, 3 Jun 20:21
Automatic Tune
Manual Scan
Restore Factory Default
Version
Format hard drive
OK:Tune BACK
MENU Thu, 3 Jun 20:29
Channel no
Freq(MHz)
Signal
Quality
45
666
42%
40%
Manual Scan
1. Press the MENU button and then press the
buttons to select Install. Press the button or
the OK button to conrm.
2. Press the
buttons to select Manual Scan and
then press the OK button to conrm.
3. Press the
buttons to choose the Channel No.
or Freq(MHz) and then press the OK button to
start manual scan.
Channel No.
Press the
buttons to select the
channel number and then press the
OK button to start the manual scan.
Frequency
Press the 0-9 button to input the
desired frequency and then press the
OK button to start the manual scan.
4. When the channel is tuned, it will display on the
screen. If no channel is found, the system will
return to the manual scan menu in a short while
and then change to a previously tuned channel if
you have one.
Page 30

30
Restoring to factory default is not
available during recording. “Other
function is running, operation not
allowed“ will be displayed on the screen.
The default password is “0000”. If
you change the password, be sure to
remember the new password! If you
forget the new password, press the
master password “2222”.
Restore Factory Default
1. Press the MENU button and then press the
buttons to select Install. Press the button or
the OK button to conrm.
2. Press the
buttons to select Restore Factory
Default and then press the OK button to
conrm.
OK BACK
Channels
Install
Settings
MENU Thu, 3 Jun 20:21
Automatic Tune
Manual Scan
Restore Factory Default
Version
Format hard drive
Factory reset will reset your receiver to its
original settings.
Your interactive settings will NOT be
changed. Please see www.ch-zero.tv for
details on how to reset these.
Are you sure?
YES NO
Please enter PIN
3. A pop-up conrmation screen will be displayed.
Press the button to select “YES” and then press
the OK button to restore to factory default.
4. A valid password must be entered if you select
“YES”. A pop-up password screen will be
displayed. Press the 0-9 buttons to input the
4-digit password and then press the OK button
to conrm.
5. The Welcome Screen will be displayed. Press the
OK button to begin the channel auto tuning.
Welcome!
Please ensure the aerial is connected.
Press OK key to commence automatic tuning.
Page 31

31
3. A pop-up conrmation screen will be displayed.
Press the button to select “YES” and then
press the OK button to conrm formatting the
memory device; or press the button to select
“NO” and then press the OK button to cancel
and return to normal TV viewing.
Format Hard Drive
1. Press the MENU button and then press the
buttons to select Install. Press the
button or
the OK button to conrm.
2. Press the
buttons to select Format Hard
Drive and then press the OK button to conrm.
OK BACK
Channels
Install
Settings
MENU Thu, 3 Jun 20:21
Automatic Tune
Manual Scan
Restore Factory Default
Version
Format hard drive
H/W: 1.0
S/W: A3I_13_0100
Buid: 13
OK BACK
Channels
Install
Settings
MENU Thu, 3 Jun 20:21
Automatic Tune
Manual Scan
Restore Factory Default
Version
Format hard drive
FORMATTING YOUR MEMORY DEVICE WILL CAUSE
ALL RECORDED PROGAMMER TO BE LOST
Are you sure?
YES NO
This can take several minutes.
DO NOT SWITCH OFF YOUR RECEIVER DURING THIS TIME.
Formatting memory device...
Version
1. Press the MENU button and then press the
buttons to select Install. Press the button or
the OK button to conrm.
2. Press the
buttons to select Version and then
press the OK button to conrm. The version
information will be displayed.
3. Press the EXIT button on the remote control to
exit the menu.
4. It will take some time to format the HDD
depending on the HDD capacity.
All recorded programmes will be deleted
during HDD formatting.
Page 32

32
Settings Menu
Language
1. Press the MENU button and then press the
buttons to select Settings. Press the button or
the OK button to conrm.
2. Press the
buttons to select Language and
then press the OK button to conrm.
OK: Save BACK
Preferred audio
Alternative audio
Preferred Subtitles
MHEG language
Hearing impaired
English
English
English
English
On
LANAUAGE Sat, 12 Sep 19:23
OK BACK
Channels
Install
Settings
MENU Sat, 12 Sep 19:23
Language
TV
Time
Parental Lock
Updates
3. In the Language menu, press the buttons
to choose the options and then press the
buttons to adjust the settings.
Preferred
Audio
Allows you to select your desired primary audio language. (Available for digital
channels if multiple audio languages are broadcast.)
Alternative
Audio
Allows you to select your desired secondary audio language. (Available for digital
channels if multiple audio languages are broadcast.)
Preferred
Subtitles
Allows you to select your desired subtitle language. (Available for digital channels if
multiple subtitle languages are broadcast.)
MHEG
Language
Allows you to select your desired interactive language. (Available for digital
channels if multiple interactive languages are broadcast.)
Hearing
Impaired
Allows you to show more information in subtitles for the hearing-impaired in some
programmes (for digital channels only if available).
4. Press the OK or BACK button on the remote
control to conrm and return to the previous
menu.
5. Press the EXIT button on the remote control to
exit the menu.
Page 33

33
3. In the TV menu, press the buttons to choose
the options and then press the buttons to
adjust the settings.
TV
1. Press the MENU button and then press the
buttons to select Settings. Press the button or
the OK button to conrm.
2. Press the
buttons to select TV and then press
the OK button to conrm.
OK BACK
Channels
Install
Settings
MENU Sat, 12 Sep 19:21
Language
TV
Time
Parental Lock
Updates
OK: Save BACK
Brightness
Contrast
Aspect ratio
Video output
Digital audio
Auto standby
45%
40%
4:3 pan scan
CVBS
Compressed
3 hours
TV Sat, 12 Sep 19:23
Brightness Allows you to increase or decrease the amount of white in the picture.
Contrast Allows you to adjust the dierence between light and dark levels in the picture.
Aspect Ratio
Allows you to select 4:3 Panscan / 4:3 Letterbox / 16:9.
4:3 Pan Scan Widescreen picture shown in the full screen with some part cut.
4:3 Letter box
Widescreen picture shown in the full screen with black bars on
the top and bottom of the screen.
16:9 Widescreen picture shown in the full screen.
Video Output Allows you to select from CVBS / RGB from the SCART socket.
Digital Audio Allows you to select from O / Compressed / PCM
Auto
Standby
Allows you to select from 3 hours / 5 hours / 8 hours / O.
The unit will automatically switch to
standby mode 3 hours (default) after the
last time the remote control was used. A
reminder screen will pop up for 2 minutes
and count down before the unit switches
to standby mode.
If you want to operate the unit for a long period of time, set the auto standby
function to O. To save energy you should always turn the auto standby function
back to “3 hours”.
4. Press the OK or BACK button on the remote
control to conrm and return to the previous
menu.
5. Press the EXIT button on the remote control to
exit the menu.
Your receiver will automatically switch to
standby in 2 : 00
Press any key to continue viewing
Page 34

34
Time Mode
Allows you to select time mode from Auto / Manual.
Auto
Set the Time Mode to “Auto”, the clock is set automatically when
receiving a digital signal.
Manual
You can change the date and time in this mode.
Date
Set the Time Mode to
“Manual” and then press
the
buttons to Date.
Press the buttons to
enter the calendar menu.
Press the buttons to
select the Year / Month /
Date. Press the buttons
to change the Year / Month
/ Date. Press the OK button
to conrm.
Time
Set the Time Mode to “Manual” and then press the
buttons
to Time. Press the 0-9 buttons to input the time and then press
the OK button to conrm. Time should be entered in the 24
hours format.
Local Time Allows you to select the time zone (Auto is set as default).
4. Press the BACK button on the remote control to
return to the previous menu.
5. Press the EXIT button on the remote control to
exit the menu.
3. In the TIME menu, press the
buttons to
select the item you want and then press the
buttons to adjust the setting. Press the OK
button to conrm.
Time
1. Press the MENU button and then press the
buttons to select Settings. Press the button or
the OK button to conrm.
2. Press the
buttons to select Time and then
press the OK button to conrm.
OK: Save BACK
Time mode
Date
Time
Local time
Auto
12 Sep 2009
19:21
Auto
TIME Sat, 12 Sep 19:21
OK: Save BACK
Year
Month Sep
Sun Mon Tue Wed Thu Fri Sat
1 2 3 4 5
6 7 8 9 10 11 12
13 14 15 16 17 18 19
20 21 22 23 24 25 26
27 28 29 30
2009
TIME Sat, 12 Sep 19:26
OK BACK
Channels
Install
Settings
MENU Sat, 12 Sep 19:21
Language
TV
Time
Parental Lock
Updates
Page 35

35
OK BACK
Channels
Install
Settings
MENU Sat, 12 Sep 18:24
Language
TV
Time
Parental Lock
Updates
4. Press the button to select Old PIN, use the
0-9 buttons on the remote control to input the
old password and then input the new 4-digit
password to replace then re-enter new password
to conrm.
3. In the Parental Lock menu, press the
buttons
to select dierent Parental Rating from none, 4,
5, 6, ...16, 17, 18.
OK: Save0 - 9 BACK
Parental rating
Old PIN
New PIN
Conrm new PIN
PARENTAL LOCK Sat, 12 Sep 18:24
None
OK: Save0 - 9 BACK
Parental rating
Old PIN
New PIN
Conrm new PIN
PARENTAL LOCK Sat, 12 Sep 18:30
None
5. Press the BACK button on the remote control to
return to the previous menu.
6. Press the EXIT button on the remote control to
exit the menu.
Parental Lock
1. Press the MENU button and then press the
buttons to select Settings. Press the button or
the OK button to conrm.
2. Press the
buttons to select Parental Lock and
then press the OK button to conrm.
The default password is “0000”. If
you change the password, be sure to
remember the new password! If you
forget the new password, press the
master password “2222”.
Page 36

36
Auto
The unit will automatically detect and
download the updated software to
the unit.
A pop-up conrmation screen will be
displayed. Press the
button select
“YES” and then press the OK button
to start the update.
The update will take a short while,
please wait.
Manual The unit will notify you of updates. You can choose to accept or reject them.
O All updates will be ignored.
4. Press the BACK button on the remote control to
return to the previous menu.
5. Press the EXIT button on the remote control to
exit the menu.
3. In the Updates menu, press the
buttons to
select Update modes from Auto / Manual / O.
A software updated has been found for your
receiver.
WARNING: Do not switch o or unplug your
receiver during the updated!
Do you want to update your receiver?
YES NO
Updates
1. Press the MENU button and then press the
buttons to select Settings. Press the button or
the OK button to conrm.
2. Press the
buttons to select Updates and then
press the OK button to conrm.
OK: Save BACK
Update mode
The receiver will receiver updates automatically.
Select “Manual” if you want to see a notication and approve
each update.
Select “O” if you do not want updates to occur.
Auto
UPDATES Sat, 12 Sep 18:23
OK BACK
Channels
Install
Settings
MENU Sat, 12 Sep 18:23
Language
TV
Time
Parental Lock
Updates
Page 37

37
Hints and Tips
In some regions, the digital terrestrial signal may be weak. Please ensure that your antenna is
suitable for your location.
Problem Possible cause What to do
No signal found • Aerial is disconnected.
• Aerial is damaged/
misaligned.
• Out of a digital signal
area.
• Check aerial connection.
• Check aerial.
• Check with dealer.
No picture or sound The unit is in Standby
mode.
Turn on the unit by pressing the
button of the remote control.
Encrypted
programme message
Channel is encrypted. Select alternative channel.
No response from
remote control
• The unit is o.
• Remote control is not
being aimed at the unit
correctly.
• Front panel is obstructed.
• Batteries are exhausted.
• Plug in and turn on.
• Aim remote control at front panel.
• Check for obstructions.
• Check and replace the batteries in
the remote control.
Forgotten channel
lock code
Delete locked channel and scan
channels again.
Forgotten menu lock
password
Master password : 2222
After moving the
unit to another room
you nd you are no
longer able to receive
digital reception.
The aerial feed to the new
aerial point may come
through a distribution
system which may reduce
the digital signal now
being received by the
unit.
Try a direct feed from the antenna.
Page 38

38
Specication
Model L160STB11 L250STB11
HDD 160 GB 250 GB
Tuner and Channel RF input connector
(IEC-TYPE, IEC 169-2, female)
RF output connector
(IEC-TYPE, IEC169-2, male)
Frequency range :
470MHz ~ 862 MHz (UHF)
Decoder
Transport Stream
Prole Level
Input Rate
Video Formats
Audio Format
Video Output
MPEG-2 ISO/IEC13818-1
MPEG-2 Main Prole @Main Level
Max. 15Mbit/s
4:3/16:9 Switchable
MPEG Layer I & II, 32/44.1/48KHz
RGB, CVBS
Connection
Main Power Cable
Tuner
Video
Audio
Data Port
Fixed type
Antenna input
Single scart
Stereo audio output, digital coaxial audio output
RS-232 ( for service use only )
Power Supply
Input Voltage
Power Consumption
AC 230V~50Hz
MAX. 16W/standby <2W
Features and specications are subject to change without prior notice.
Page 39

39
Safety Warnings
Ventilation
• To prevent the risk of electric shock or re
hazard due to overheating, ensure that
curtains and other materials do not obstruct
the ventilation vents.
• Do not install or place this unit in a
bookcase, built-in cabinet or in another
conned space. Ensure the unit is well
ventilated.
Safety
• Always disconnect the unit from the mains
supply before connecting/disconnecting
other devices or moving the unit.
Mains Cable
• Make sure the unit or unit stand is not
resting on top of the mains cable, as the
weight of the unit may damage the mains
cable and create a safety hazard.
• If the mains cable is damaged it must be
replaced by the manufacturer, its service
agent, or similarly qualied persons in order
to avoid a hazard.
Interference
• Do not place the unit on or near appliances
which may cause electromagnetic
interference. If you do, it may adversely
aect the operating performance of the
unit, and cause a distorted sound.
Standby
• The button does not switch o the unit
completely. The unit will continue to draw
electricity from the mains supply while in
standby. In the interests of safety and to
avoid unnecessary energy consumption,
never leave the unit in standby while
unattended for long periods of time, e.g.
overnight, while on holiday or while out of
the house. Switch it o and disconnect the
mains plug from the mains socket.
• Read all the instructions carefully before
using the unit and keep them for future
reference.
• Retain the manual. If you pass the unit
onto a third party make sure to include this
manual.
• Check that the voltage marked on the rating
label matches your mains voltage.
Damage
• Please inspect the unit for damage after
unpacking.
• Do not continue to operate the unit if you
are in any doubt about it working normally,
or if it is damaged in any way - switch o,
withdraw the mains plug and consult your
dealer.
Location of Unit
• The unit must be placed on a at stable
surface and should not be subjected to
vibrations.
• Do not place the unit on sloped or unstable
surfaces as the unit may fall o or tip over.
• The mains socket must be located near the
unit and should be easily accessible.
• This unit is designed for indoor use only.
Temperature
• Avoid extreme degrees of temperature,
either hot or cold. Place the unit well away
from heat sources such as radiators or gas/
electric res.
• Avoid exposure to direct sunlight and other
sources of heat.
Naked Flames
• Never place any type of candle or naked
ame on the top of or near the unit.
Moisture
• To reduce the risk of re, electric shock or
product damage, do not expose this unit
to rain, moisture, dripping or splashing. No
objects lled with liquids, such as vases,
should be placed on the unit.
• If you spill any liquid into the unit, it can
cause serious damage. Switch it o at the
mains immediately. Withdraw the mains
plug and consult your dealer.
Page 40

40
Batteries
• Batteries used in the remote control for this
unit are easily swallowed by young children
and this is dangerous.
• Keep loose batteries away from young
children and make sure that the battery
holder tray is secure in the remote control.
Seek medical advice if you believe a cell has
been swallowed.
• Please dispose of batteries correctly by
following the guidance in this manual.
Supervision
• Children should be supervised to ensure
that they do not play with the unit and the
remote control.
• Never let anyone especially children push
anything into the holes, slots or any other
openings in the case - this could result in a
fatal electric shock.
Service
• To reduce the risk of electric shock, do not
remove screws. The unit does not contain
any user-serviceable parts. Please leave all
maintenance work to qualied personnel.
• Do not open any xed covers as this may
expose dangerous voltages.
Maintenance
• Ensure to unplug the unit from the mains
socket before cleaning.
• Do not use any type of abrasive pad or
abrasive cleaning solutions as these may
damage the unit’s surface.
• Do not use liquids to clean the unit.
CAUTION
RISK OF ELECTRIC SHOCK
DO NOT OPEN
The lightning ash with arrowhead
symbol, within an equilateral
triangle, is intended to alert the user
to the presence of uninsulated
“dangerous voltage” within the unit’s
enclosure that may be of sucient
magnitude to constitute a risk of
electric shock.
The exclamation point within an
equilateral triangle is intended to
alert the user to the presence of
important operating and
maintenance (servicing) instructions
in the manual accompanying the
unit.
Page 41

How the digital switchover may aect you:
Television in the UK is going digital, bringing
us all more choice and new services. Starting
in late 2007 and ending in 2012, television
services in the UK will go completely digital,
TV region by TV region.
The map shows when your area will
switchover to digital. When the TV switchover
happens in your area, there are at least two
occasions when you will need to re-tune
your unit in order to continue receiving your
existing TV channels, and also to pick up new
ones.
Digital UK, the body leading the digital TV
switchover, will advise you when you need to
re-tune during the switchover.
For re-tuning instructions for this unit
please see page 28-30 of this instruction
manual.
If you nd you can’t receive the extra digital
channels, it may be because your area is not
covered by Freeview yet or that you need an
aerial upgrade.
Visit www.digitaluk.co.uk to check.
If you have any questions, please contact your
equipment supplier or call Digital UK on
0845 6 50 50 50 or visit www.digitaluk.co.uk.
Page 42

Notes for battery disposal
The batteries used with this product contain chemicals that are harmful to the
environment. To preserve our environment, dispose of used batteries according to your
local laws or regulations. Do not dispose of batteries with normal household waste.
For more information, please contact the local authority or your retailer where you
purchased the product.
DSGRetailLtd•MaylandsAvenue•HemelHempstead•
Herts•HP27TG•England
This symbol on the product or in the instructions means that your
electrical and electronic equipment should be disposed at the end of its
life separately from your household waste. There are separate collection
systems for recycling in the EU.
For more information, please contact the local authority or your retailer
where you purchased the product.
NOTE: If you require a replacement for any of the items listed below, please quote their
corresponding part numbers:
Replacement Part Part Number
Remote Control 880-LH4711-TO
AAA Battery X 2 890-CZ4157-00
Loop Through Cable 341-321012-70
(P.N.: 810-TB11LL-00)
Visit Partmaster.co.uk today for the easiest way to buy
electrical spares and accessories. With over 1 million spares
and accessories available we can deliver direct to your door
the very next day. Visit www.partmaster.co.uk or call 0844 800 3456 (UK customers only).
Calls charged at National Rate.
The FREEVIEW word and logo are trademarks of DTV Services LTD and are used under
licence. © DTV Services Ltd 2002.
All trademarks are the property of their respective owners and all rights are acknowledged.
Page 43

Page 44

 Loading...