

Page 1
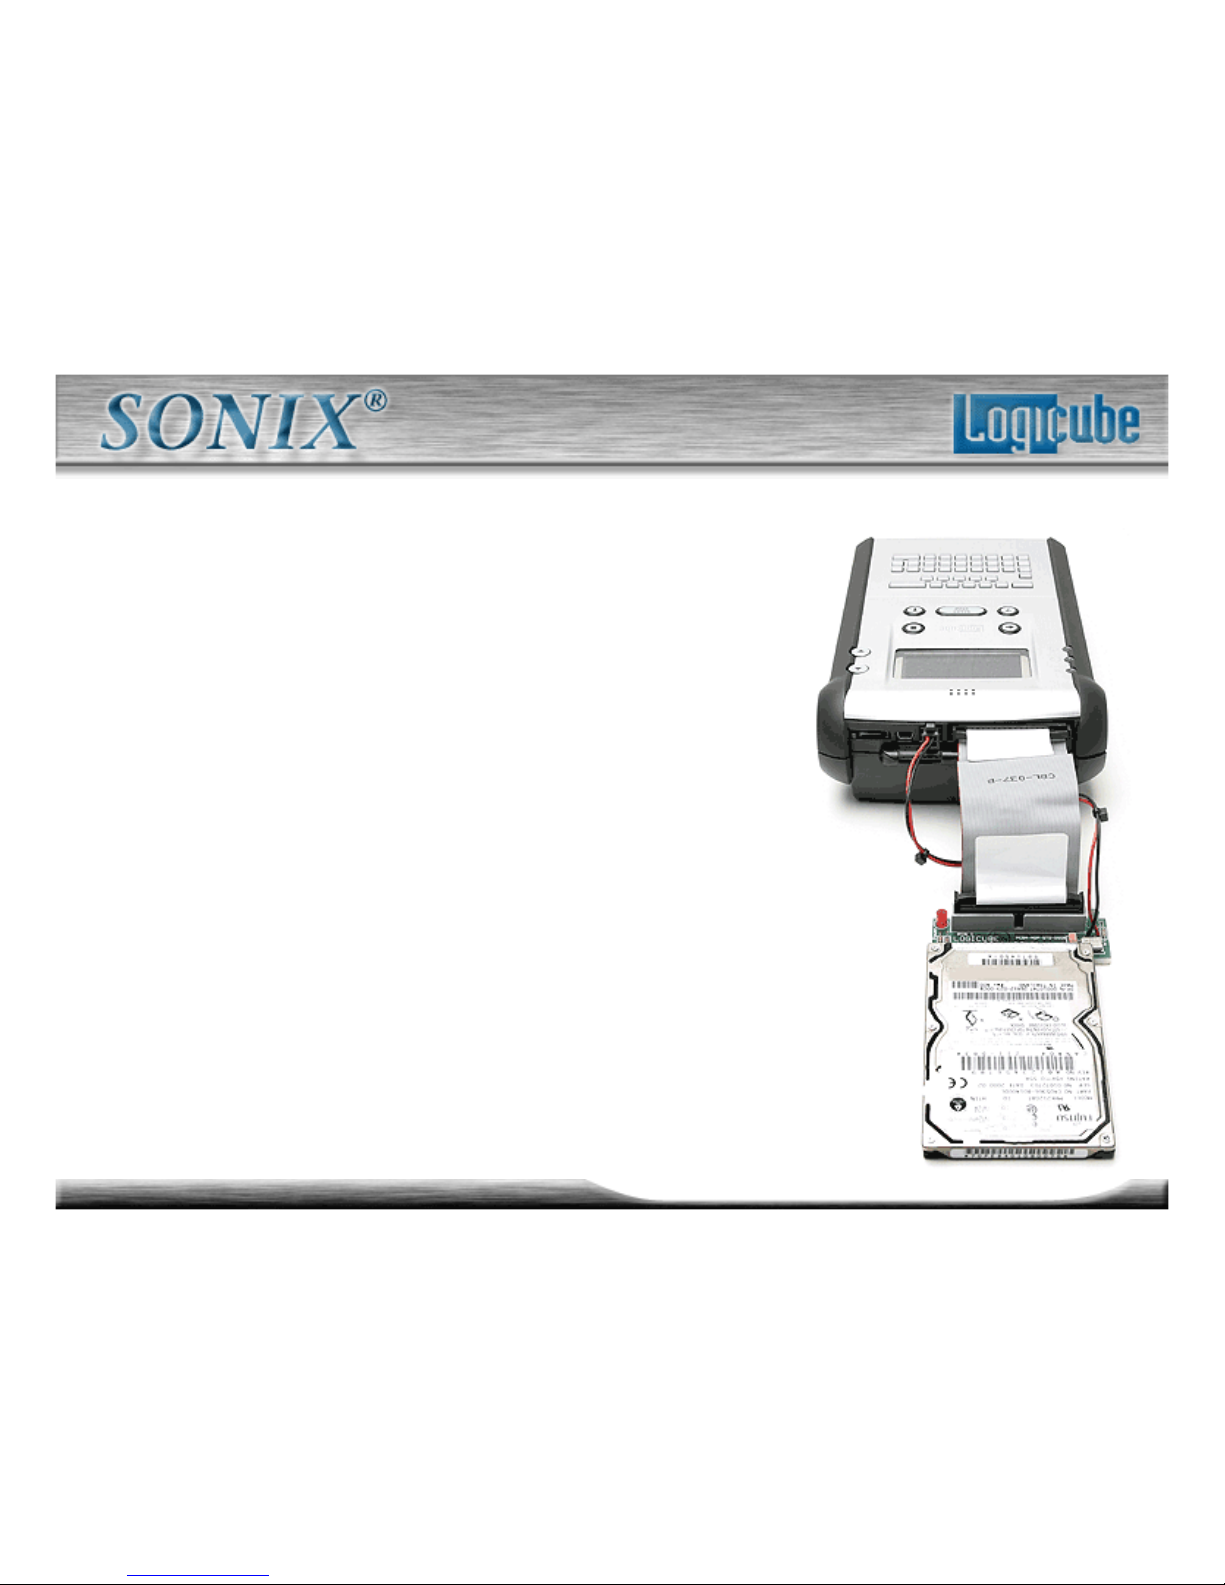
1
Logicube Confidential Information
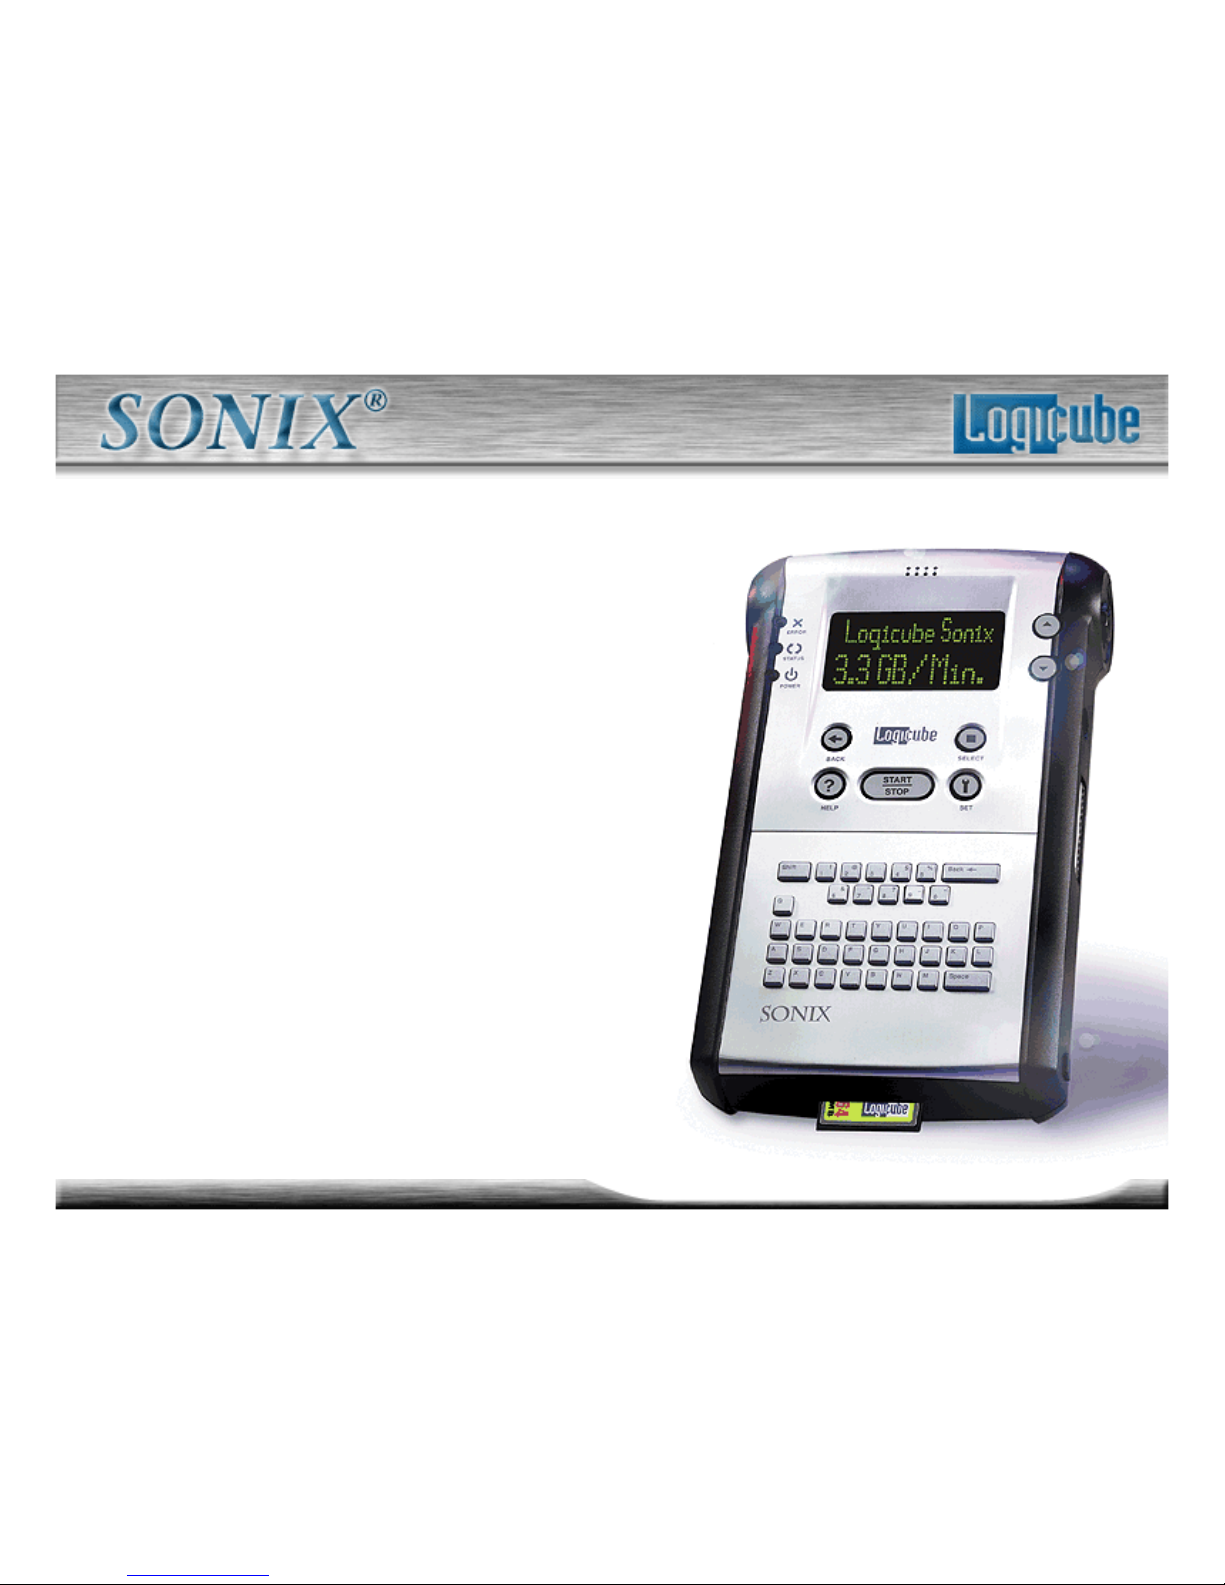
the Best Solution
for Hard Drive
Duplication & Back-Up
Page 2
2
Logicube Confidential Information
Logicube’s Sonix Training
1. INTRODUCTION
2. Attaching Drives
– Parallel (IDE)
– Serial ATA (SATA)
– Other Types
3. User Interface
4. Main Menu Functions
5. Cloning Modes
– Clever Clone
– Verify
– Direction
– CHS Mode
– Speed
– On Error
– Printer
6. Selective Partitions
7. Mirror Clone 100%
8. Master Manager
9. Mirror Clone
10. USB Drive Mode
11. Scan Target Mode
12. Repair Target Mode
13. WipeClean Target Mode
14. Software Setup
– Compact Flash
– Compact Flash To USB
15. Conclusion
Page 3
3
Logicube Confidential Information
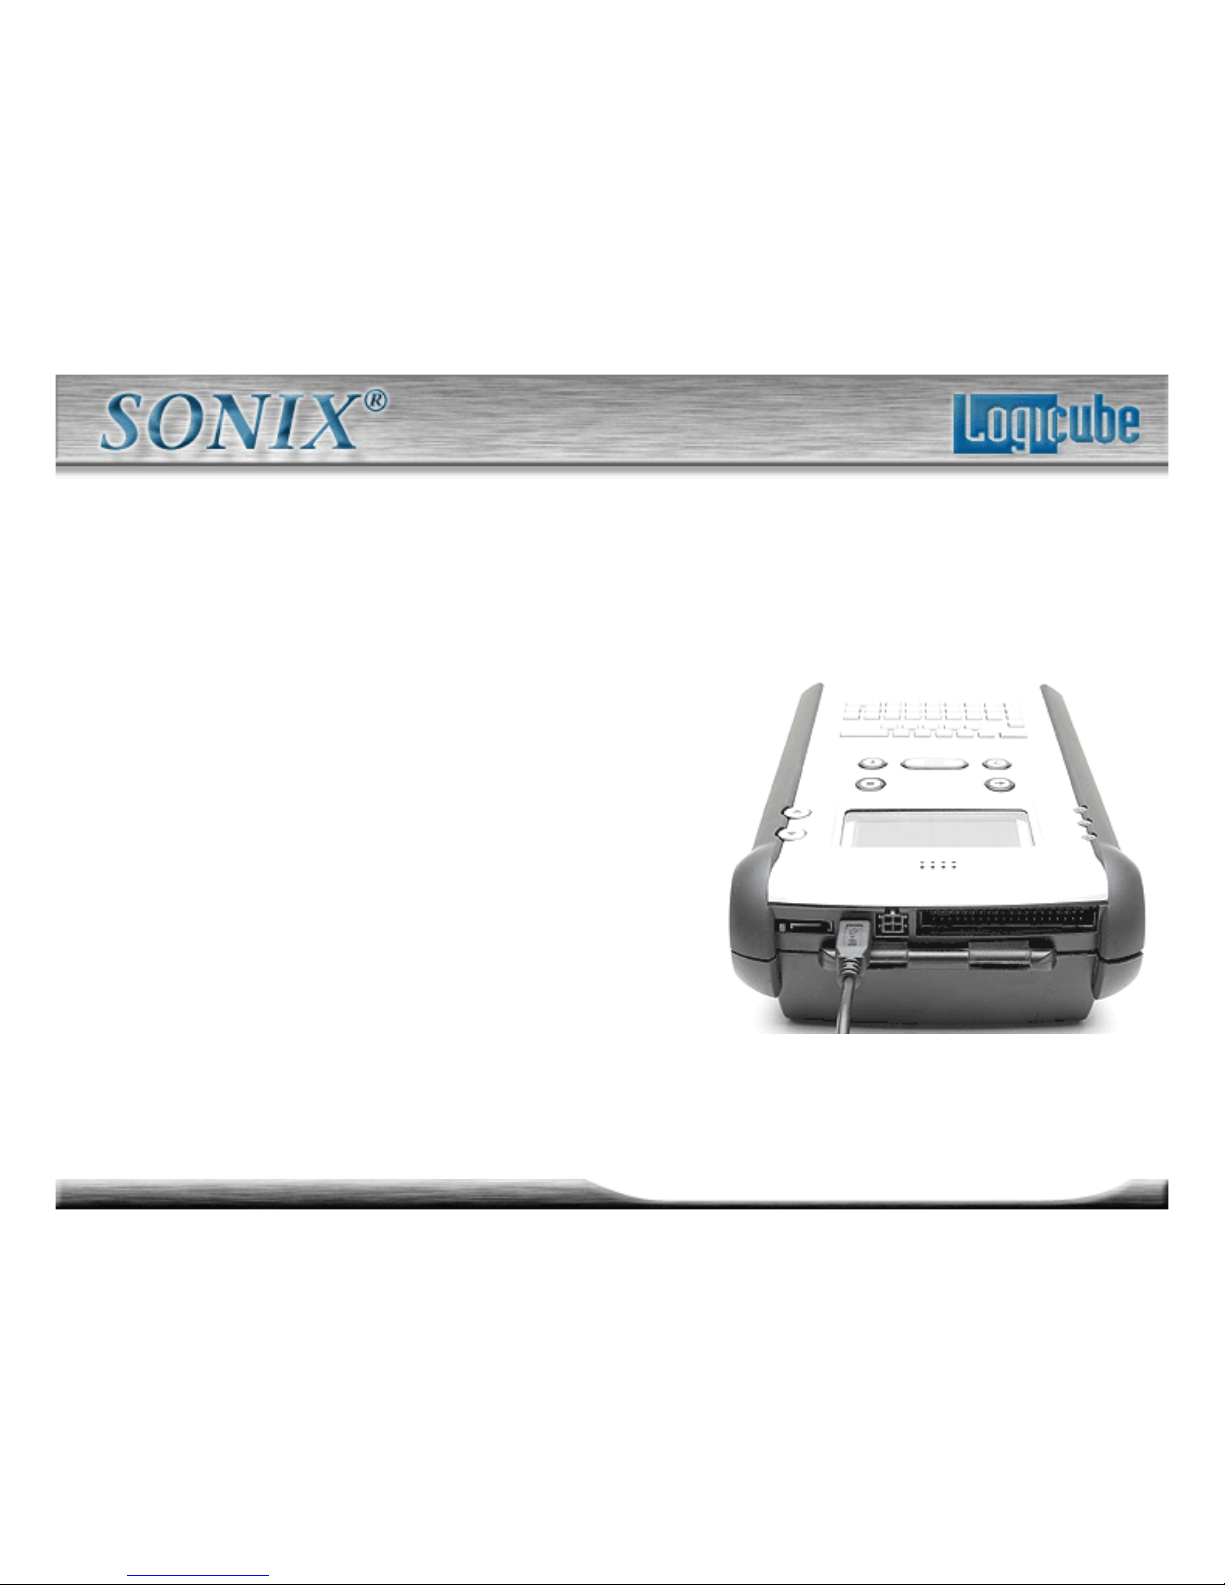
The Sonix™ System provides access to
IDE, EIDE, UDMA, SCSI, SATA, 1.8",
laptop, and Compact Flash drives.
The built-in UDMA 4 Engine allows
direct-to-drive, high-speed (3.3
GB/min.) access through the IDE
and SATA ports.
Gain Access to Anything
Page 4
4
Logicube Confidential Information
Clone Many Different Ways
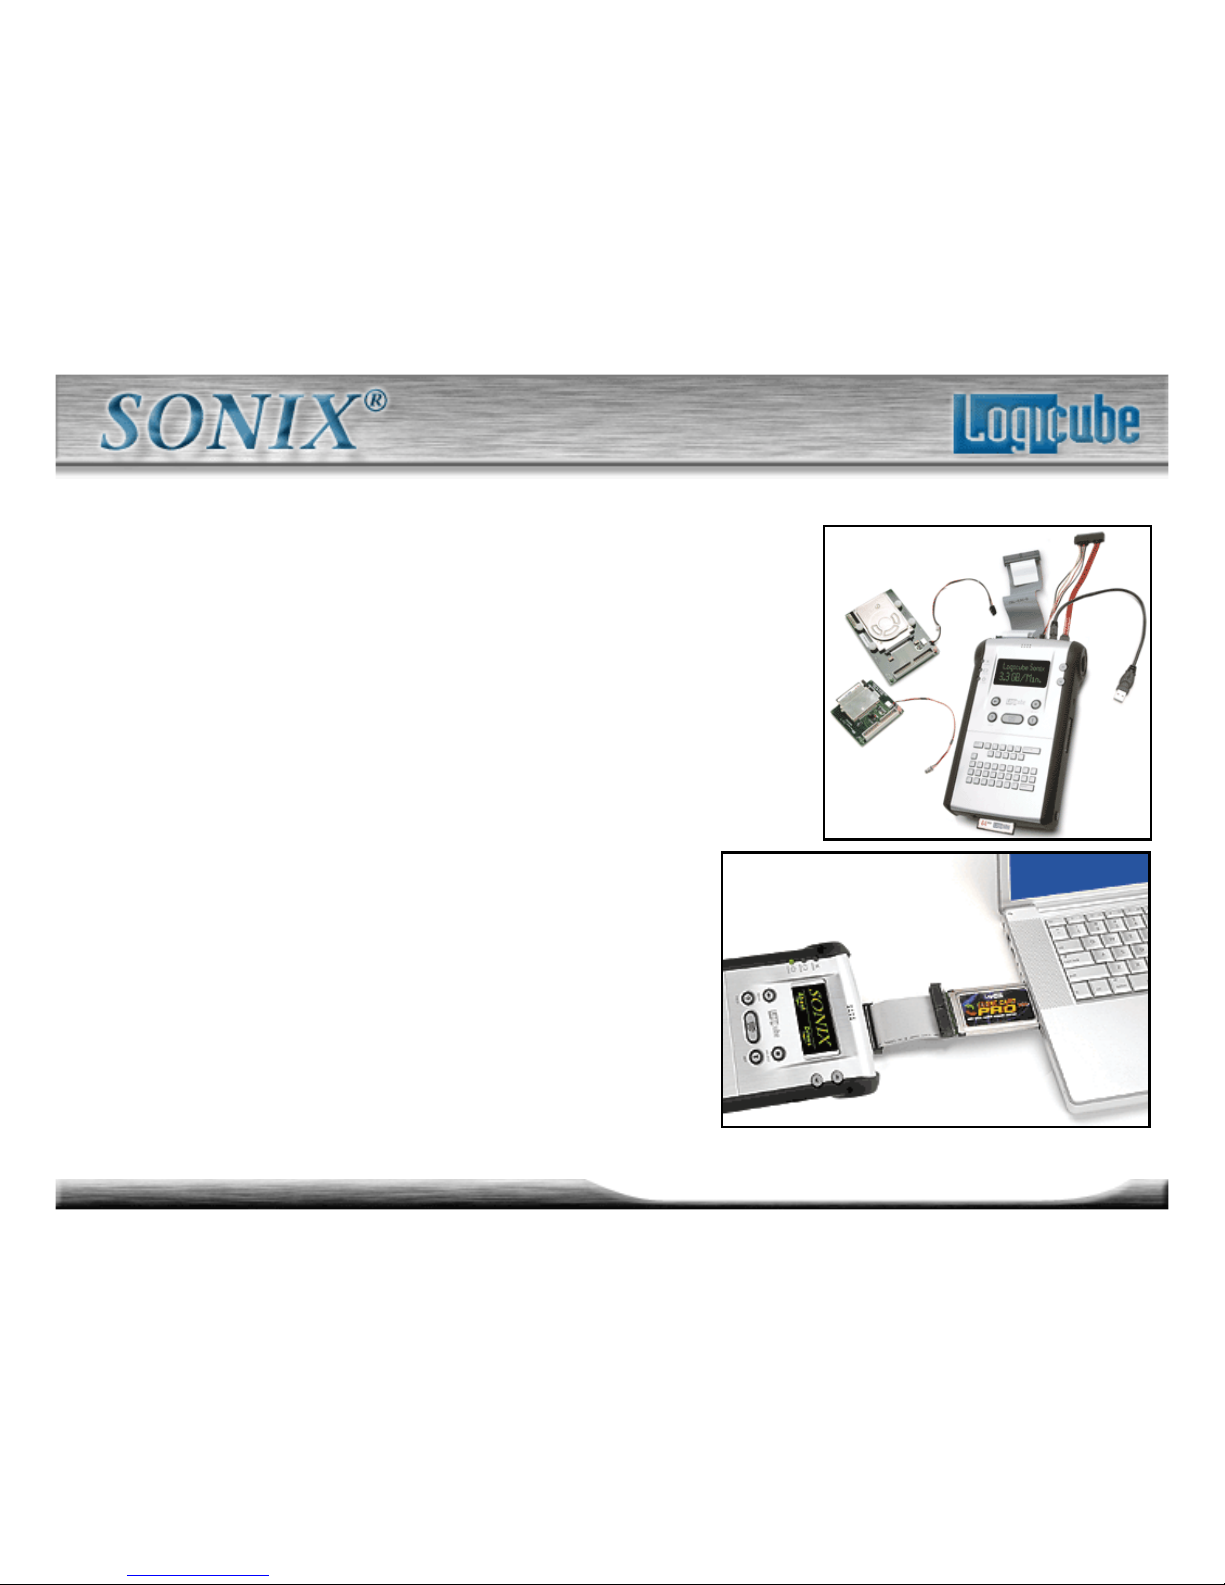
Direct to IDE & SATA drives or thru
USB to IDE & SCSI Drives.
Several optional adapters provide
access to 1.8”, 2.5” and Compact
Flash card drives.
The optional CloneCard PRO
attaches from the Sonix™ IDE port
and provides access to laptop or
notebook drives through the
PCMCIA slot.
Page 5
5
Logicube Confidential Information
Embedded Software
Mirror Copy™
– Produces a straight bit-for-bit clone.
CleverCopy ™
– Copies data areas only, skipping blank sectors.
Scales partitions to fit target. Supports all DOS,
Windows 95, 98, 2000, NT and XP.
MasterManager ™
– Creates a multiple partition (up to 24) master drive
by adding partitions from different sources.
Selective Partitions ™
– Select one, some, or all partitions from your
master drive for endless combinations.
Page 6
6
Logicube Confidential Information
Attaching Drives
The Logicube Sonix™ is able to detect whether an IDE
(parallel) or Serial ATA (SATA) drive is attached to the
Master or Target position. The unit is capable of cloning
to/from a SATA drive to an IDE drive and vice versa (as
well as IDE to IDE and SATA to SATA).
– Note: Never attach both an IDE and SATA drive to the
Master or Target position. The unit can only handle one
drive on each position.
– Important: Before applying power perform the steps
listed in the following exercises:
Page 7
7
Logicube Confidential Information
Attaching Drives - Parallel (IDE) Part 1
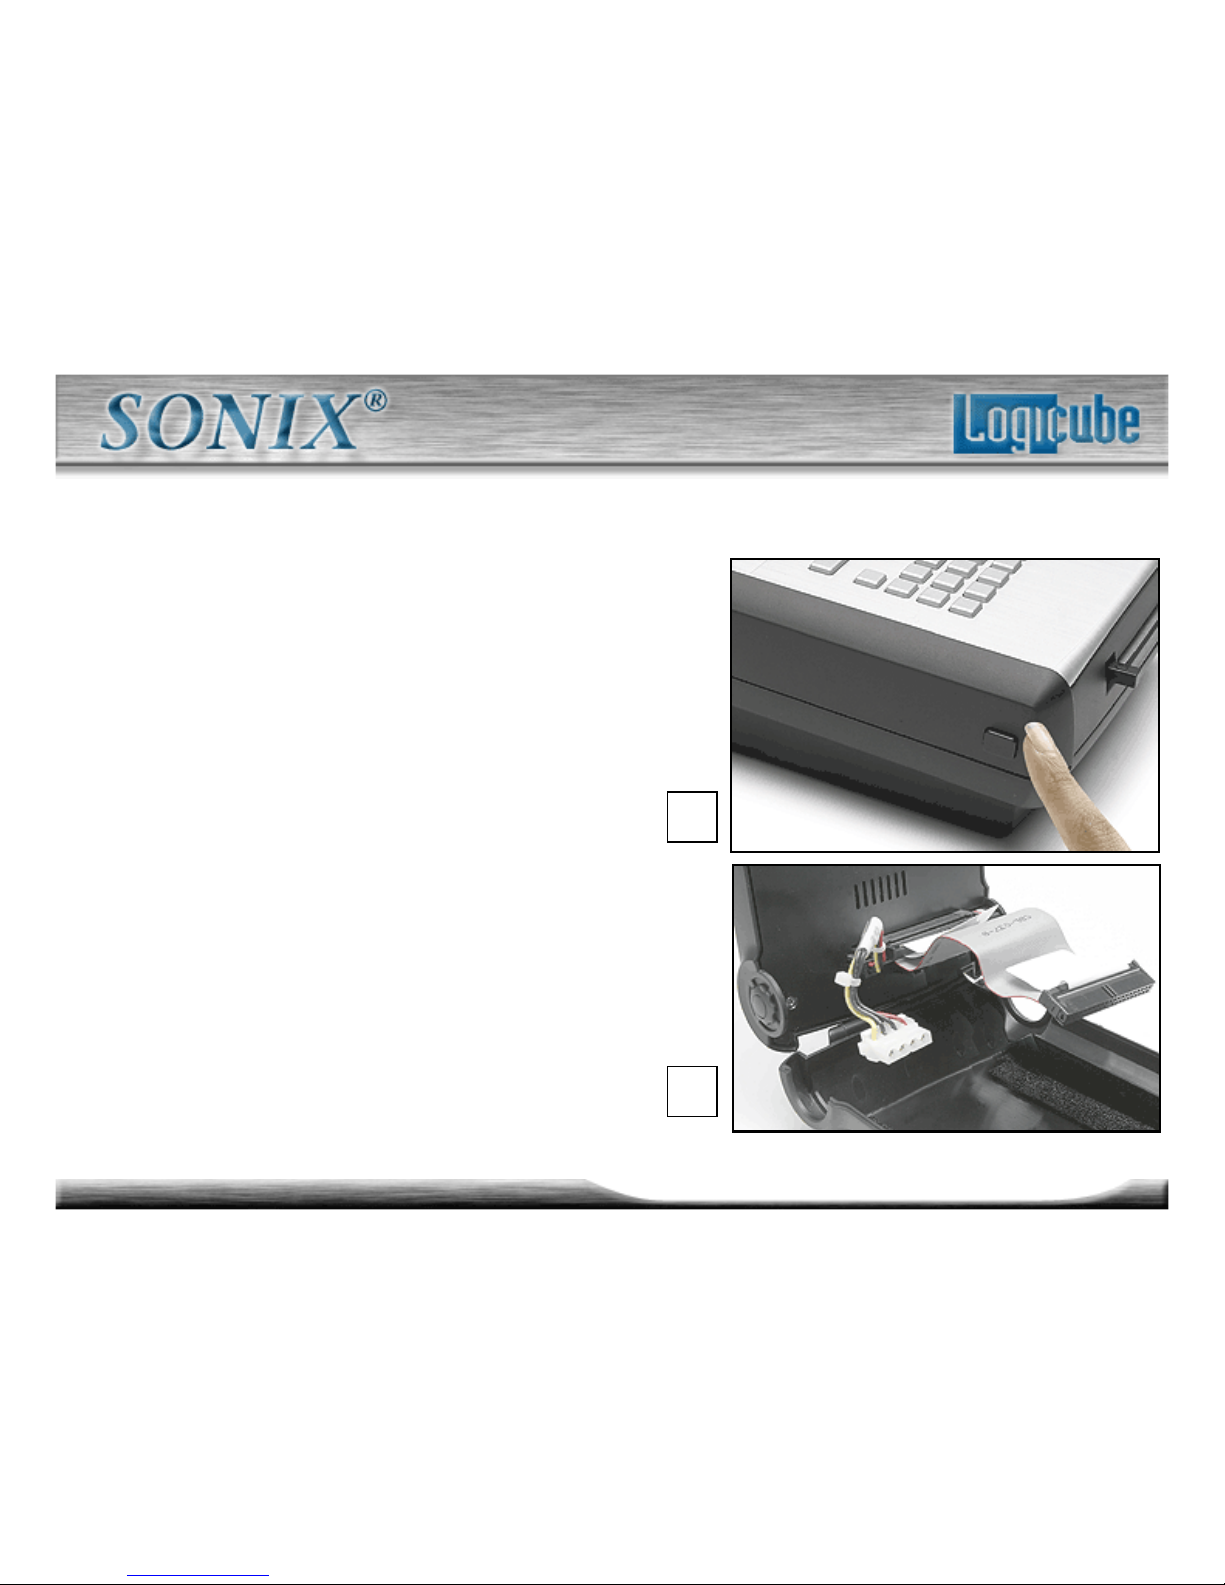
1. Open the Logicube Sonix™ by
pressing on the two latches at the
base of the unit and lifting the top. You
will notice three connections: One for
a flat cable (the drive data cable) and
another for a small drive power cable.
Underneath is the third connector for
the Serial ATA cable.
2. Connect a Master hard drive and
close the Logicube Sonix™ .
3. Plug in the set of 9” cables, to the
connections found on the back of the
Logicube Sonix™ .
1.
2.
Page 8
8
Logicube Confidential Information
Attaching Drives - Parallel (IDE) Part 2
4. Connect the Target drive to these
cables.
– Note: The internal drive is always
referred to as the Master drive and
the outside drive is always referred
to as the Target drive.
5. Connect the external power supply
to the Logicube Sonix™ and powerup the unit. In 2 – 3 seconds, the
main “Splash” screen appears.
Page 9
9
Logicube Confidential Information
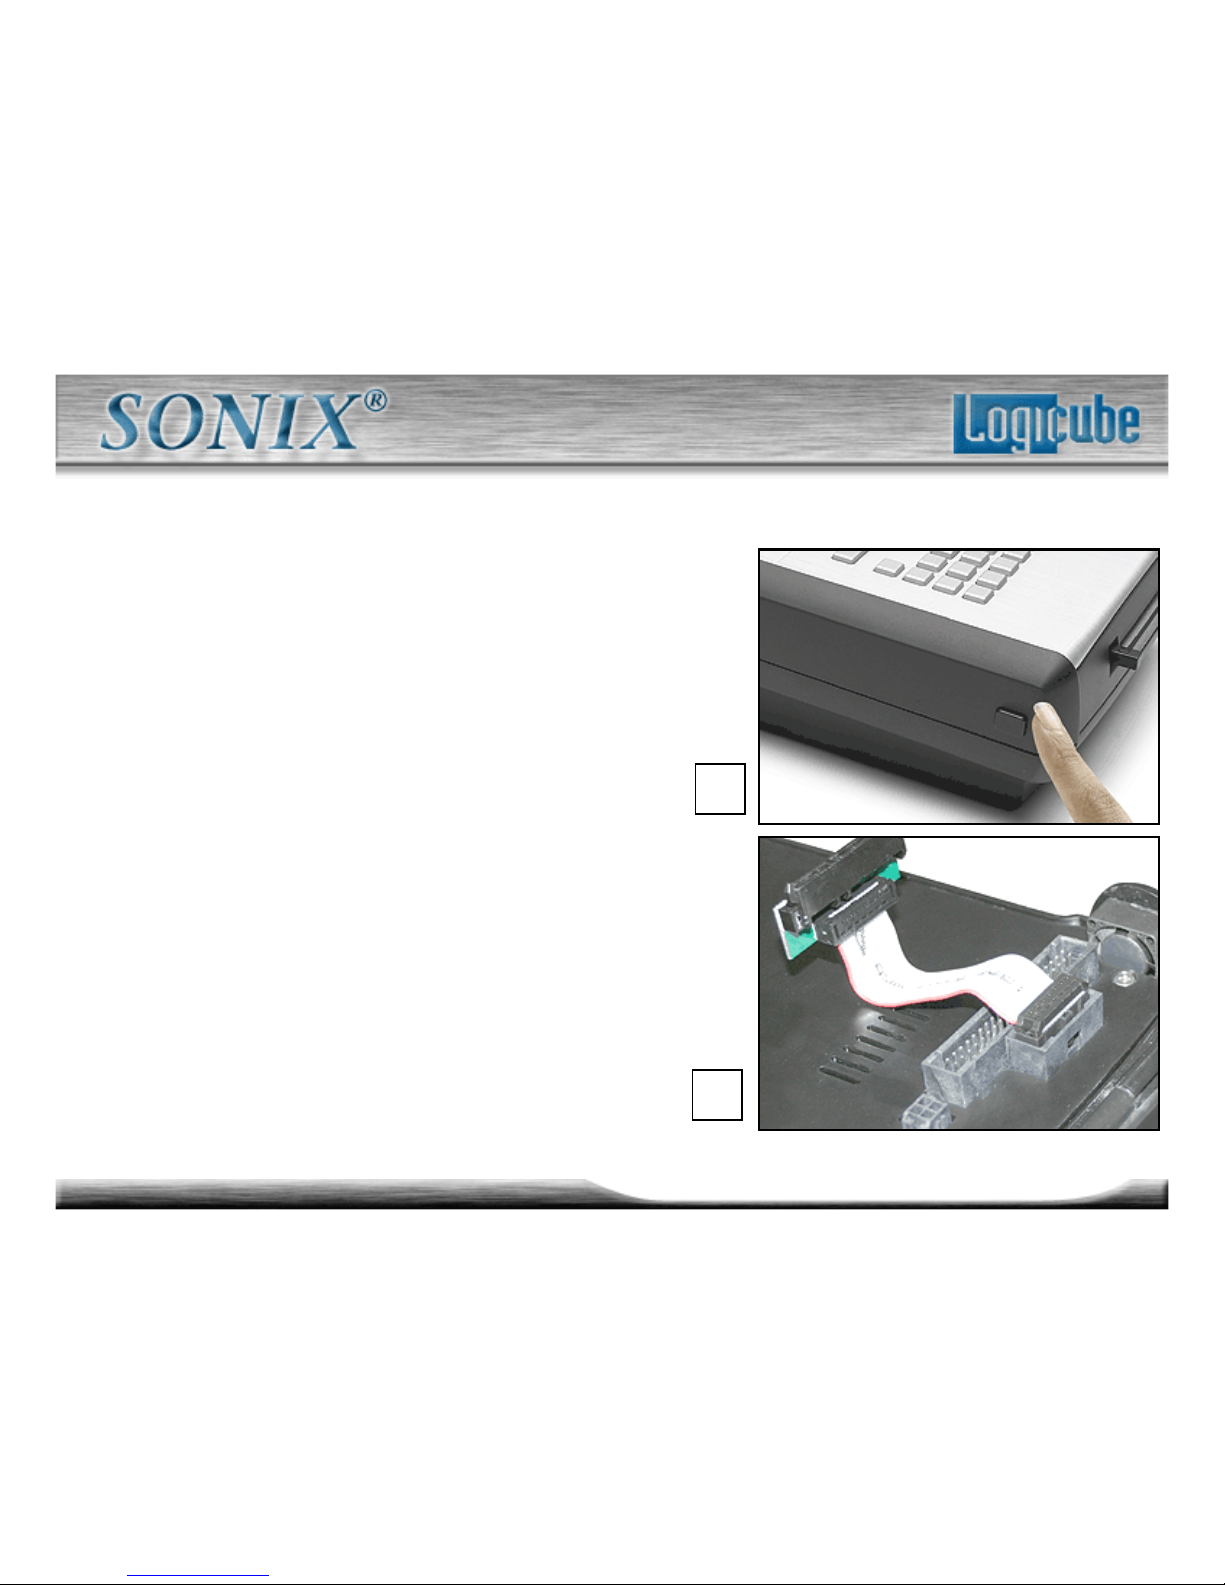
Attaching Drives - Serial ATA (SATA) Part 1
1. Open the Logicube Sonix™ by
pressing on the two latches at the
base of the unit and lifting the top.
2. Connect a Master hard drive and
close the Logicube Sonix™ . Make
sure that Pin 1 (with the Red Stripe)
is properly aligned.
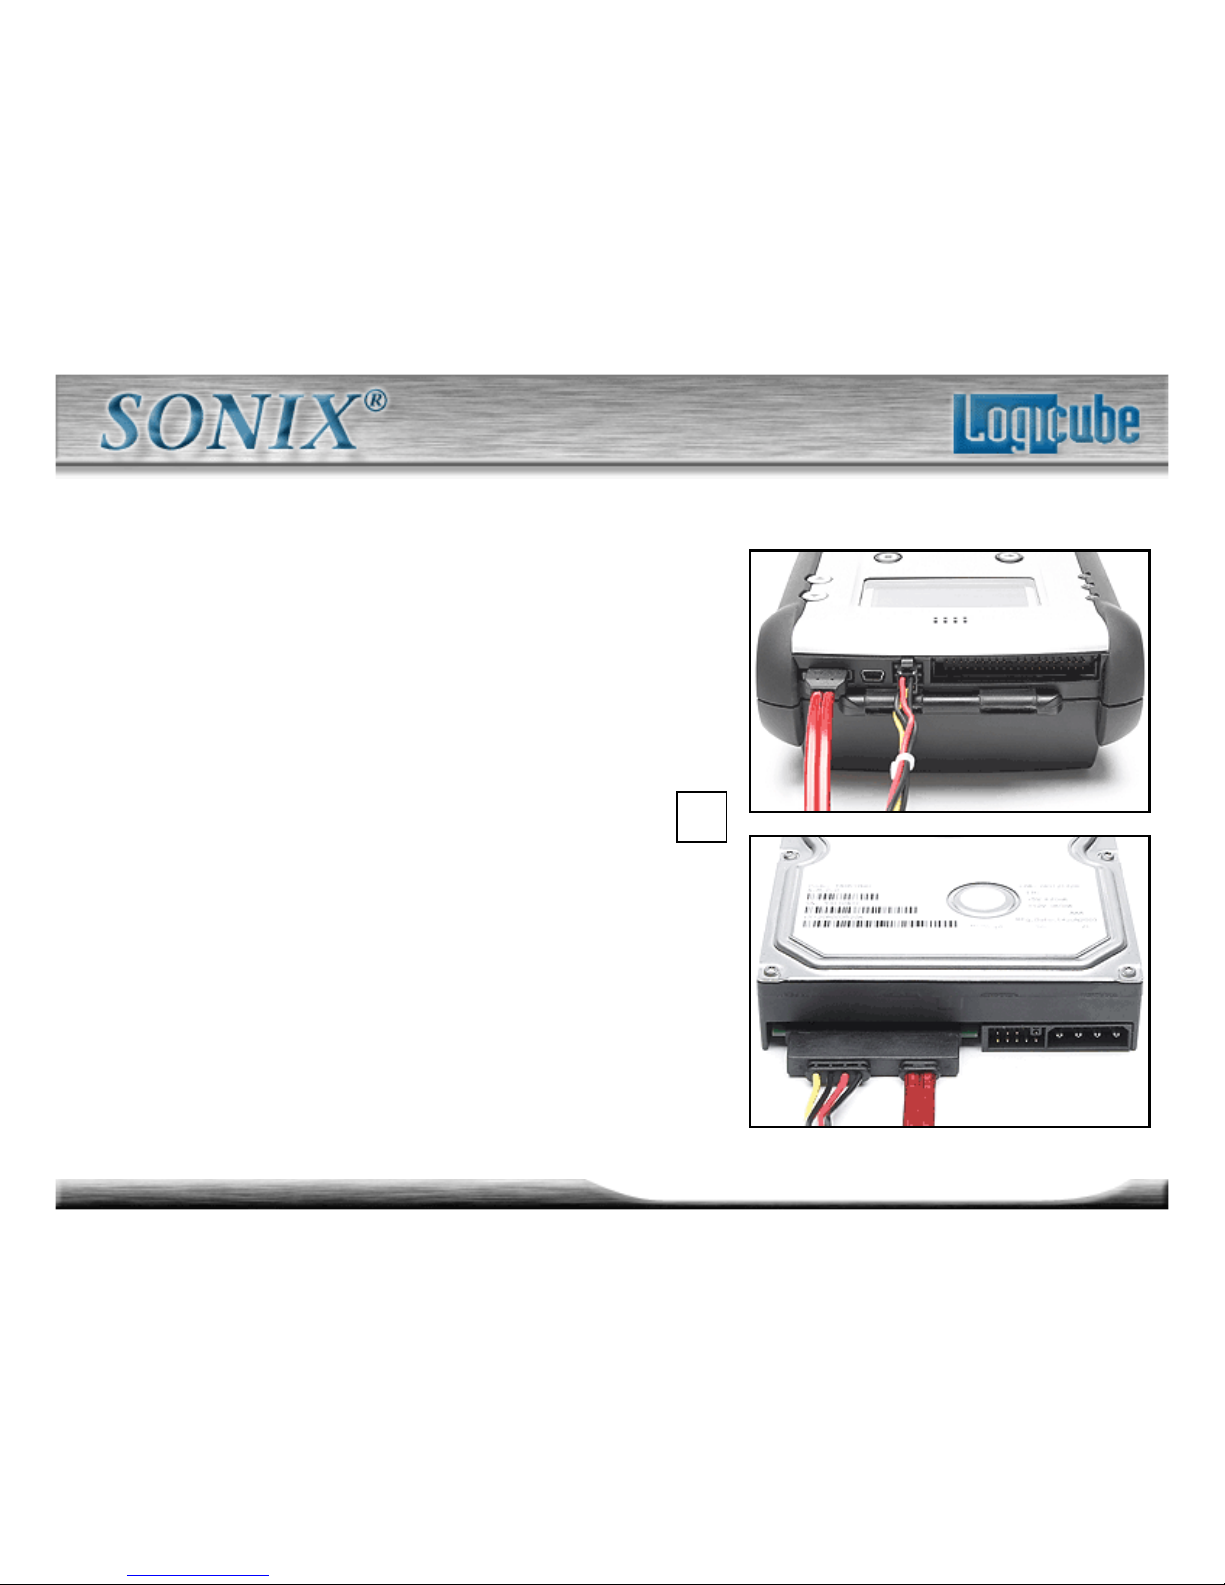
3. Plug in the long SATA cable to
the connections found on the back
of the Logicube Sonix™ .
1.
2.
Pin 1
Page 10
10
Logicube Confidential Information
Attaching Drives - Serial ATA (SATA) Part 2
4. Connect the Target drive to
this cable.
5. Connect the power supply to
the Logicube Sonix™ and
power-up the unit. In 2-3
seconds, the main display
appears.
4.
Page 11
11
Logicube Confidential Information
Attaching Drives -1.8”, 2.5”, Compact Flash Part 1
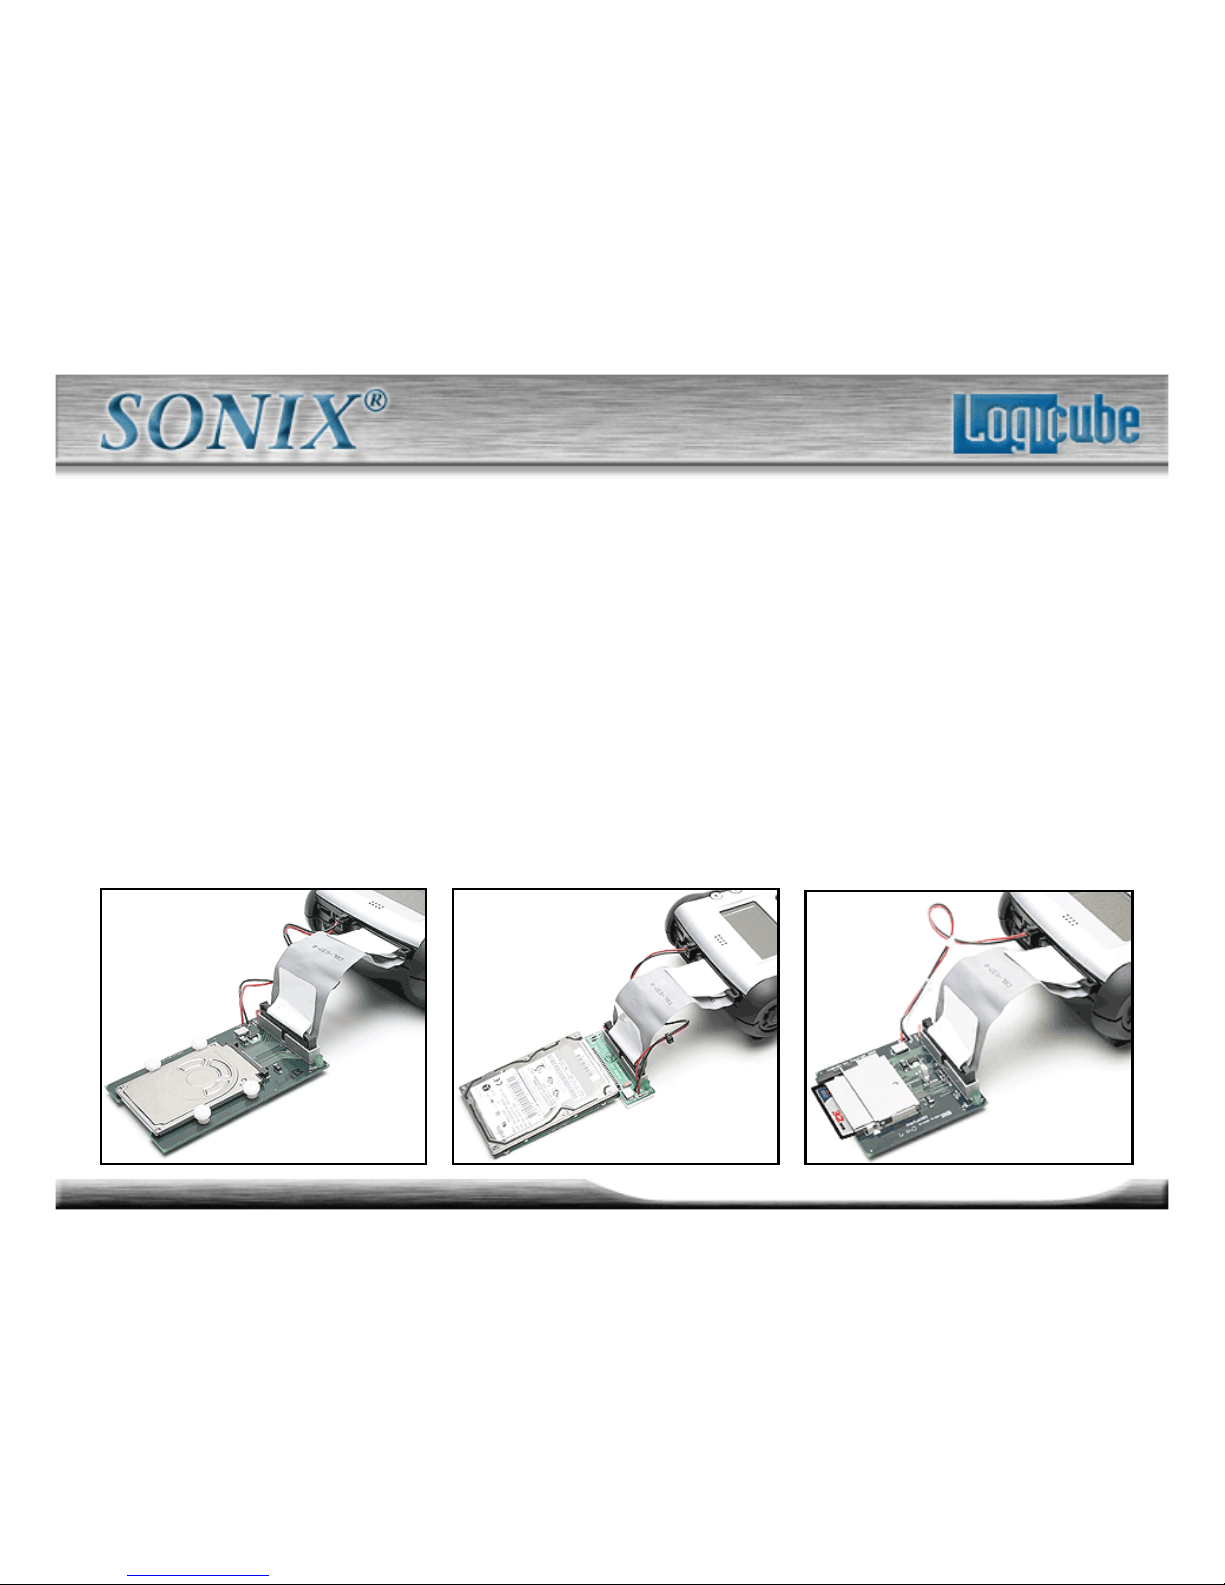
Logicube sells specialized adapters that allow the following types
of drives to be connected to the Logicube Sonix™ :
A. 1.8” Laptop drives, (e.g. Toshiba iPod™ drives).
B. 2.5” Laptop drives (also called Notebook drives).
C. Compact Flash (CF) Drives.
A. B. C.
Page 12
12
Logicube Confidential Information
Attaching Drives -1.8”, 2.5”, Compact Flash Part 2
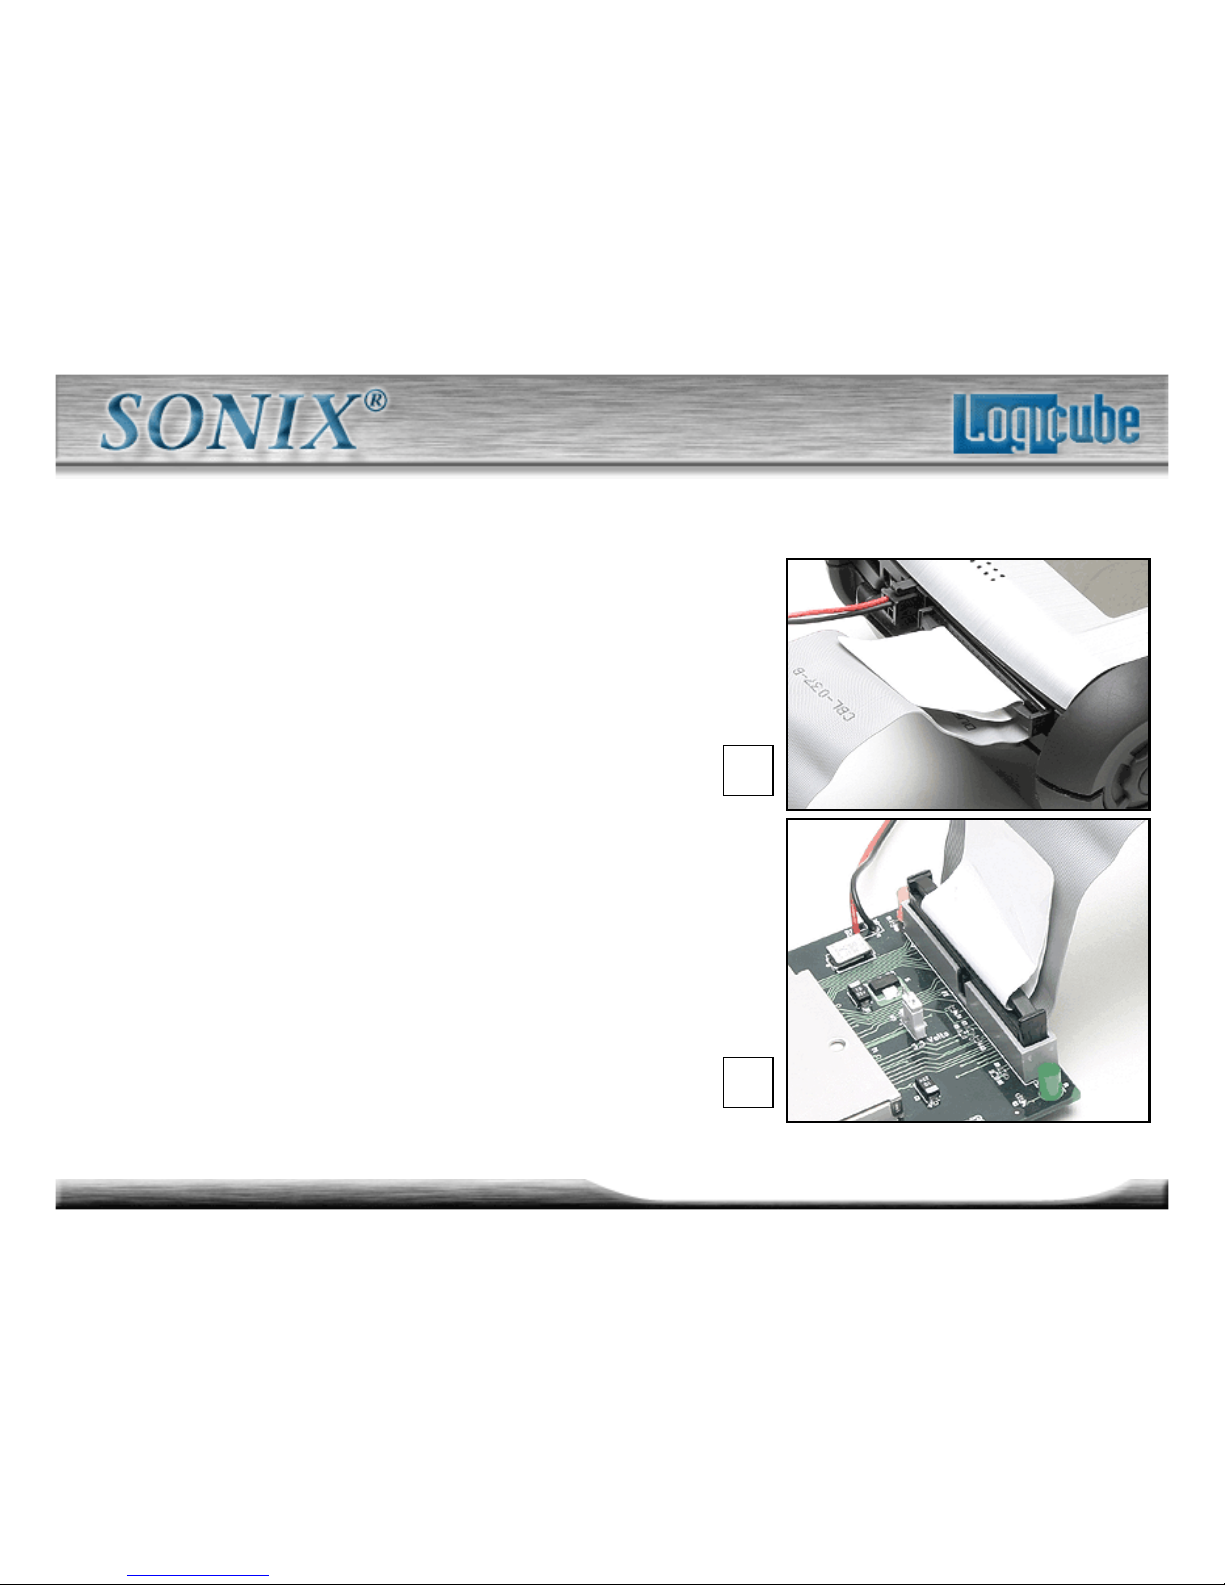
1. Attach one end of the External
IDE cable to the External port on the
Sonix™.
– Important: Make sure the
end labeled “Duplicator Side”
is attached to the port of
the Sonix™.
2. Attach the other end to the port on
the CF, 1.8” or 2.5” adapter. Make
sure the tab is correctly aligned with
the slot on the adapter.
1.
2.
Tab
Page 13
13
Logicube Confidential Information
Attaching Drives -1.8”, 2.5”, Compact Flash Part 3
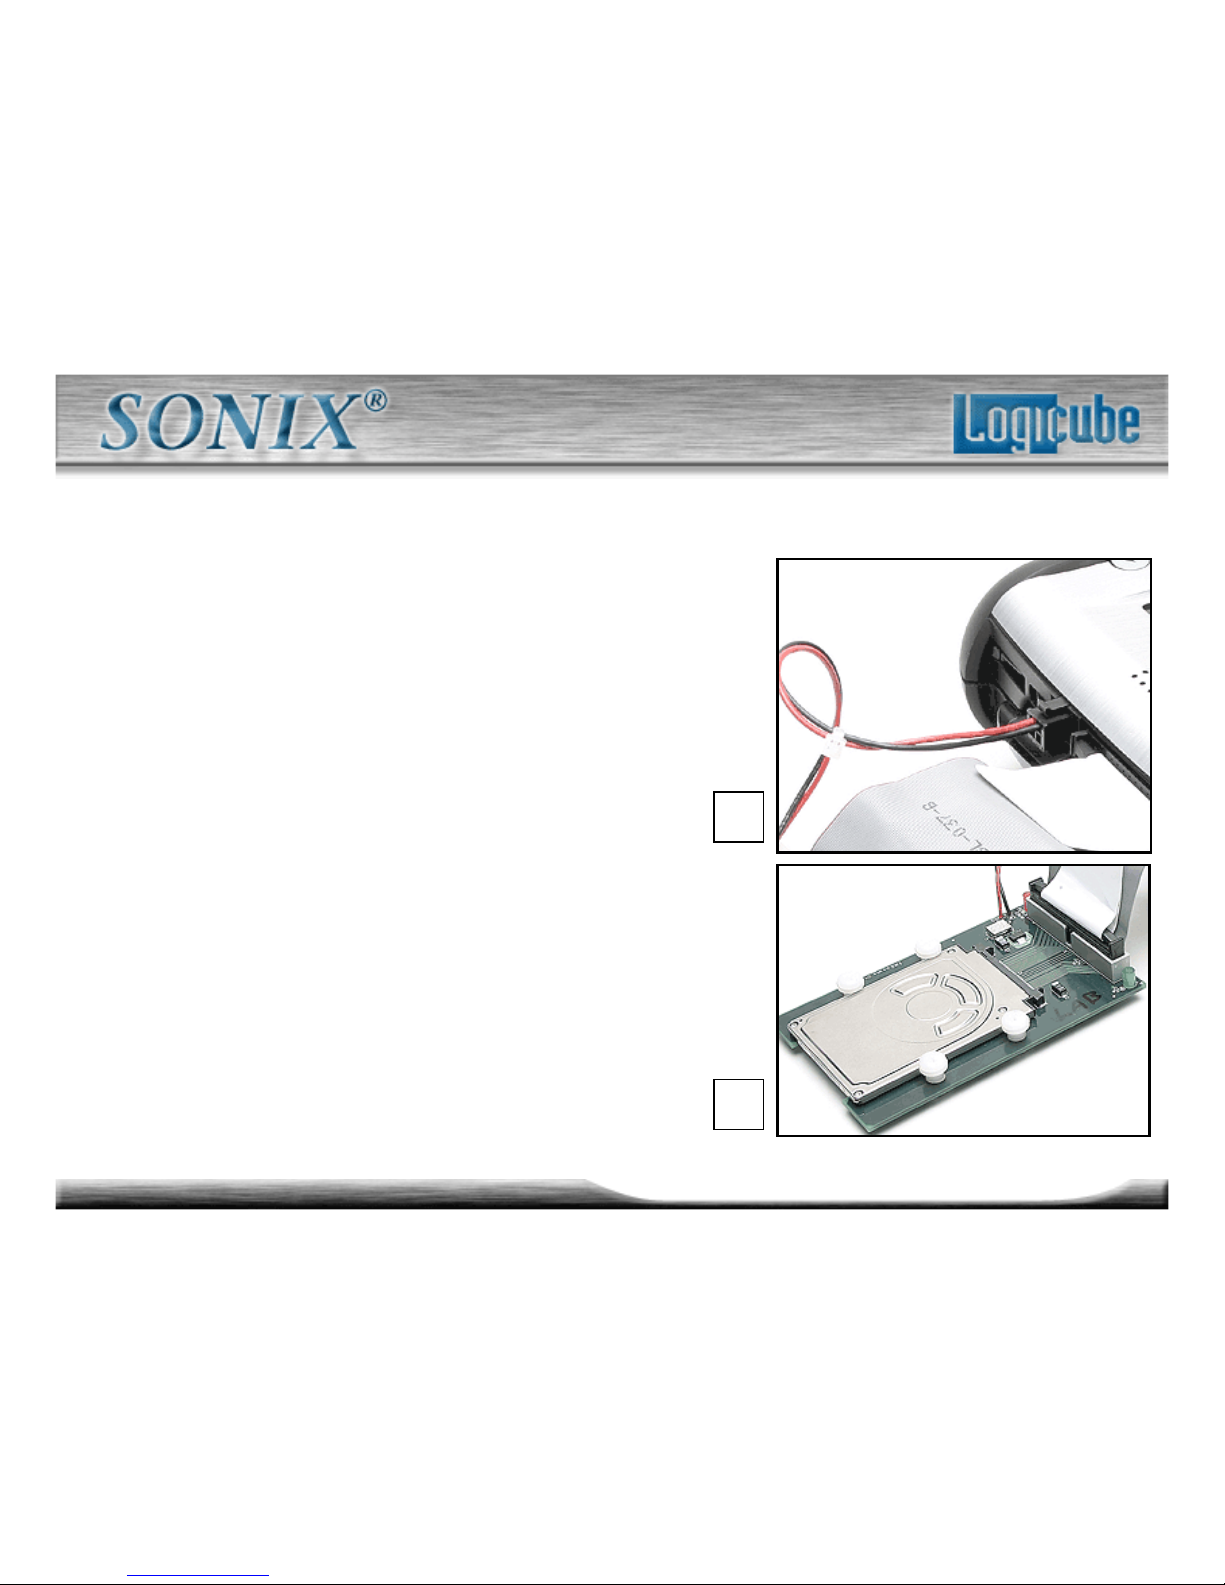
3. Plug in the adapter power cord to
the External power port on the
Sonix™ .
4. Attach the respective drive to the
appropriate adapter;
– CF to CF Adapter
– 1.8” to 1.8” Adapter
– 2.5” to 2.5” Adapter
3.
Power
Cord
1.8” Drive
4.
Page 14
14
Logicube Confidential Information
Attaching Drives - USB to SCSI @ 1.1 GB/min.
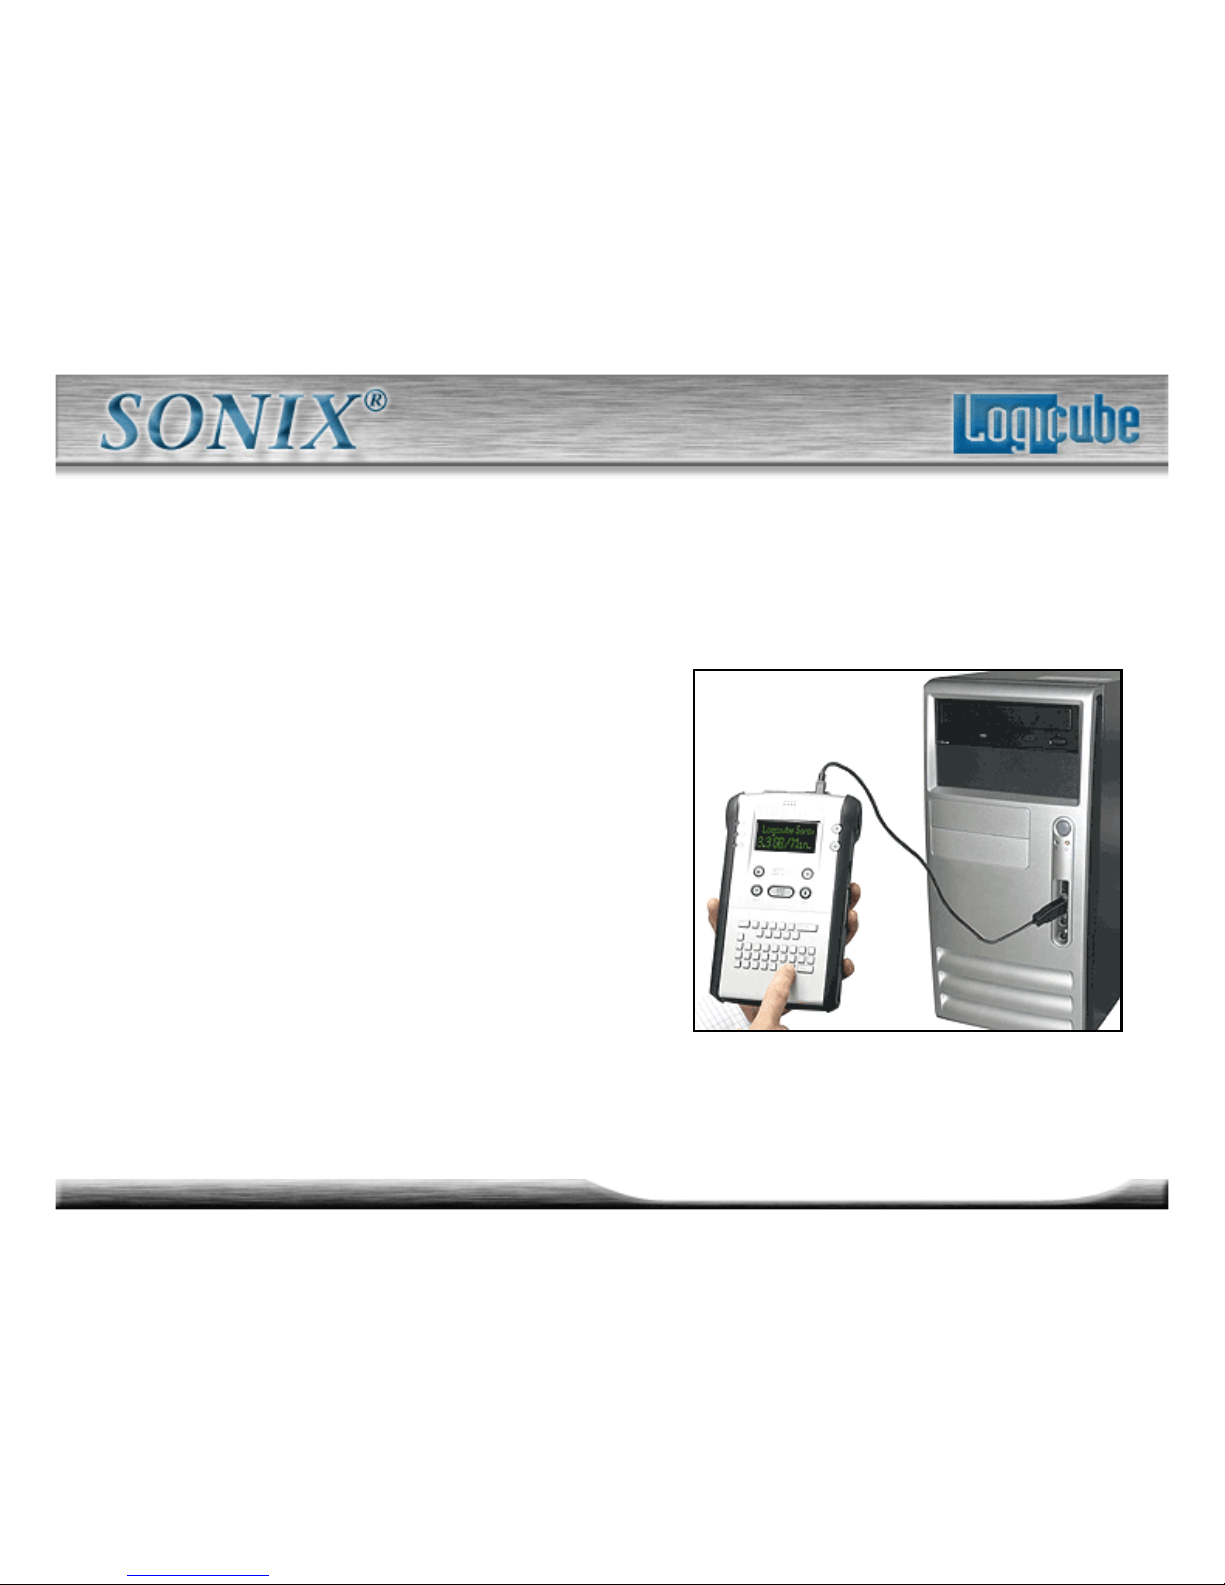
SCSI drives can be connected to
the Logicube Sonix™ by using the
USB Port. This allows SCSI
access at speeds to 1.1 GB/min.
Other specialized adapters are also
available. If you are unsure about
the type of drive that you have,
please contact Logicube Technical
Support for assistance.
Page 15
15
Logicube Confidential Information
The User Interface Part 1
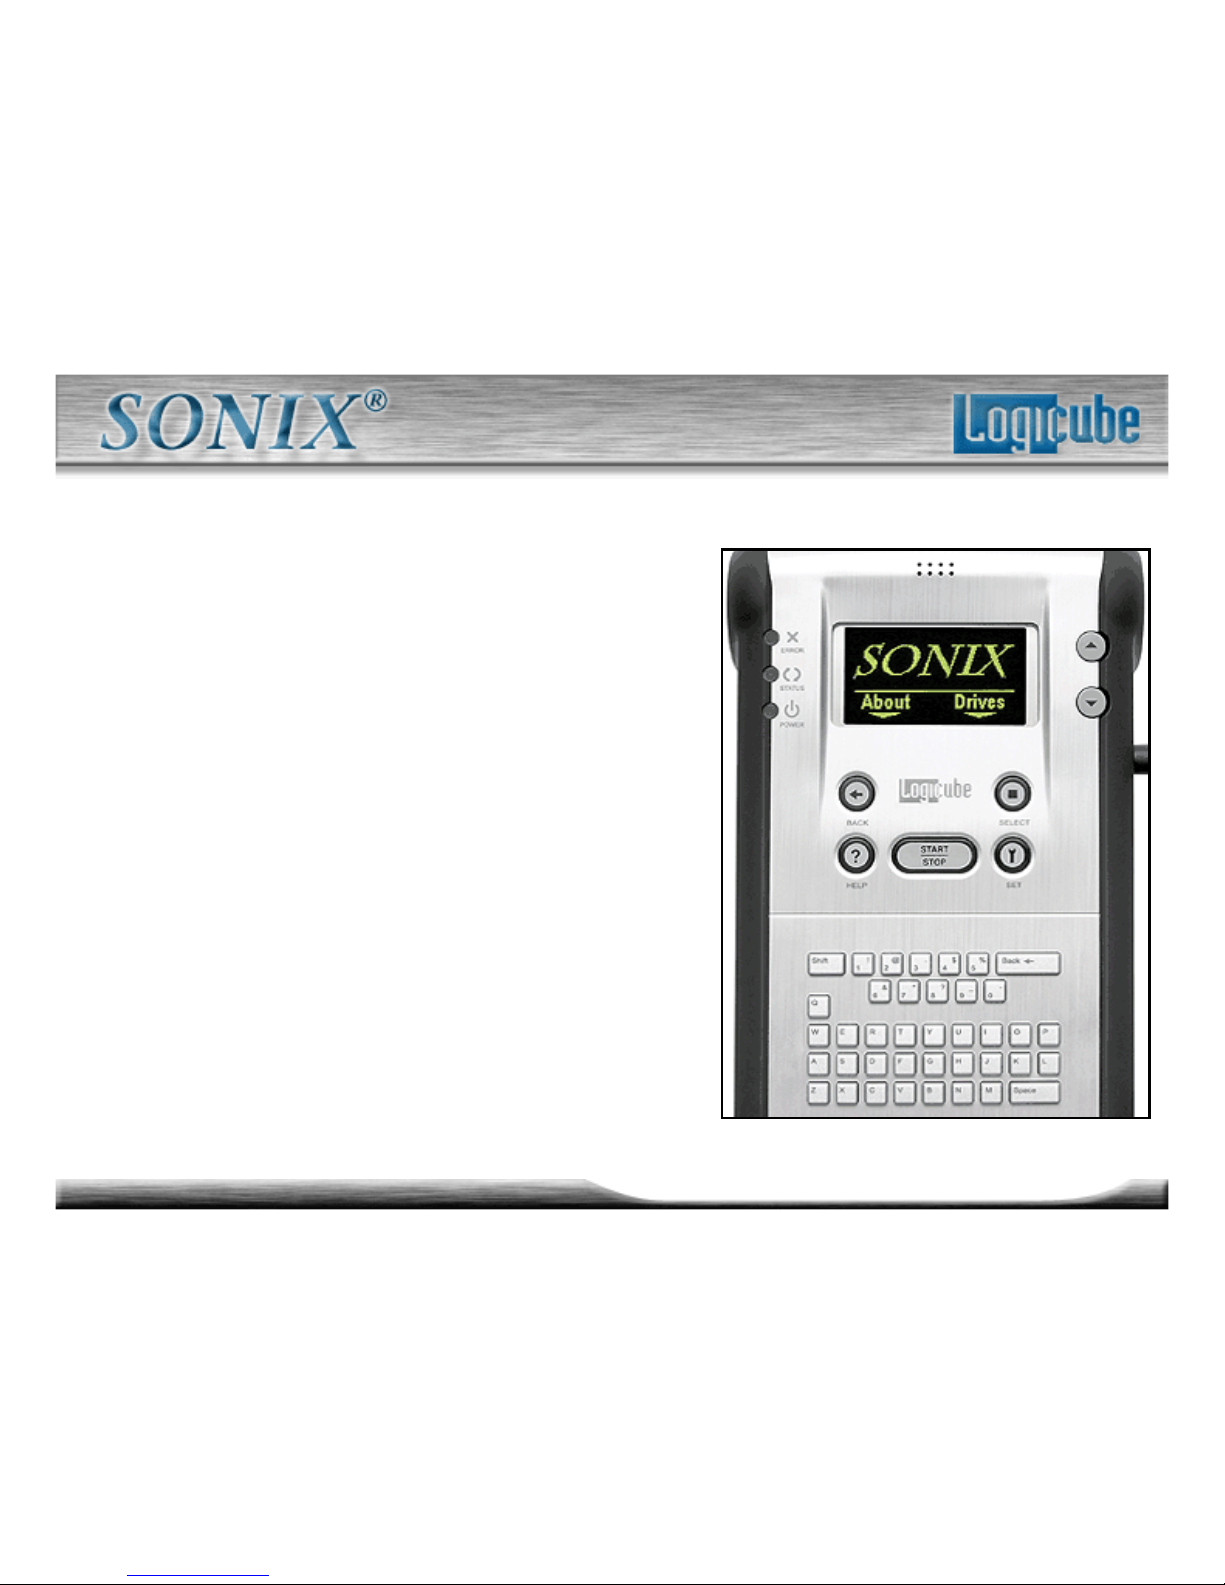
The user interface (UI) has been
designed with the professional in
mind. It is fast, responsive, and to
the point; which means it requires
very few key strokes to achieve a
desired action. It also displays
fewer “are you sure” messages that
may slow down the cloning session.
Page 16
16
Logicube Confidential Information
The User Interface Part 2
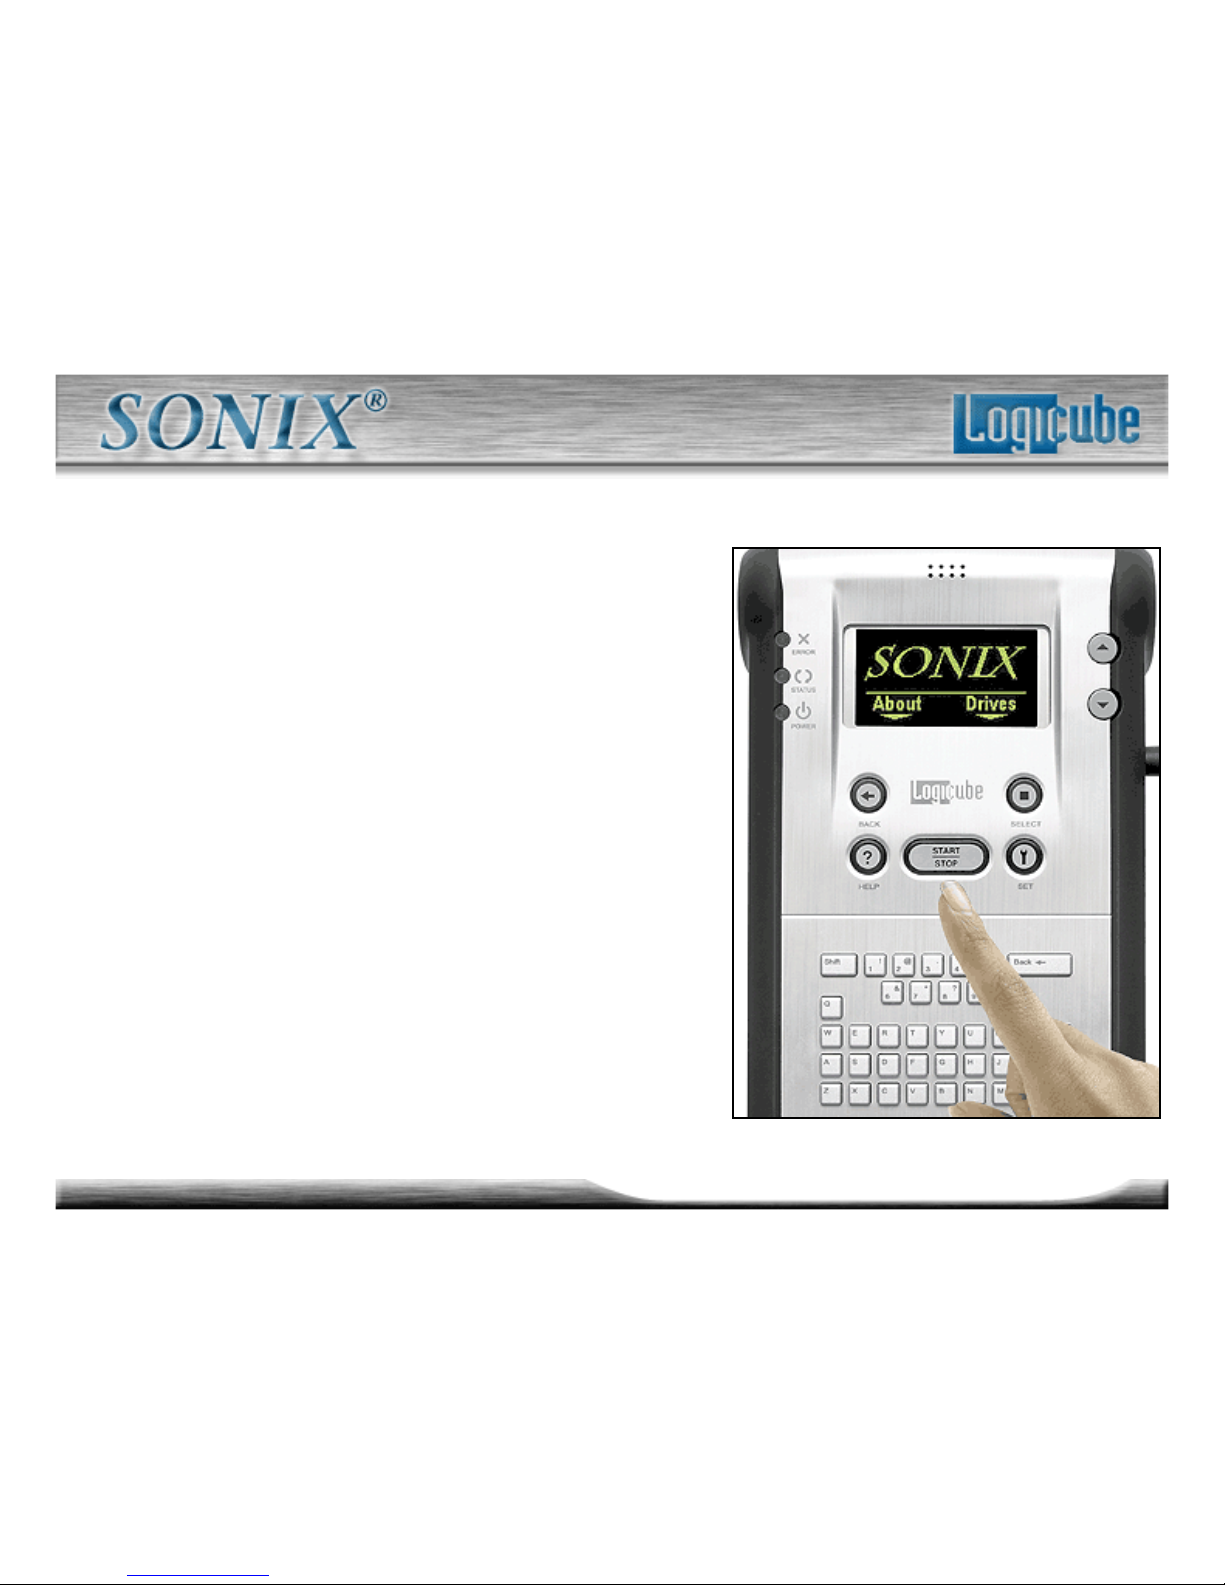
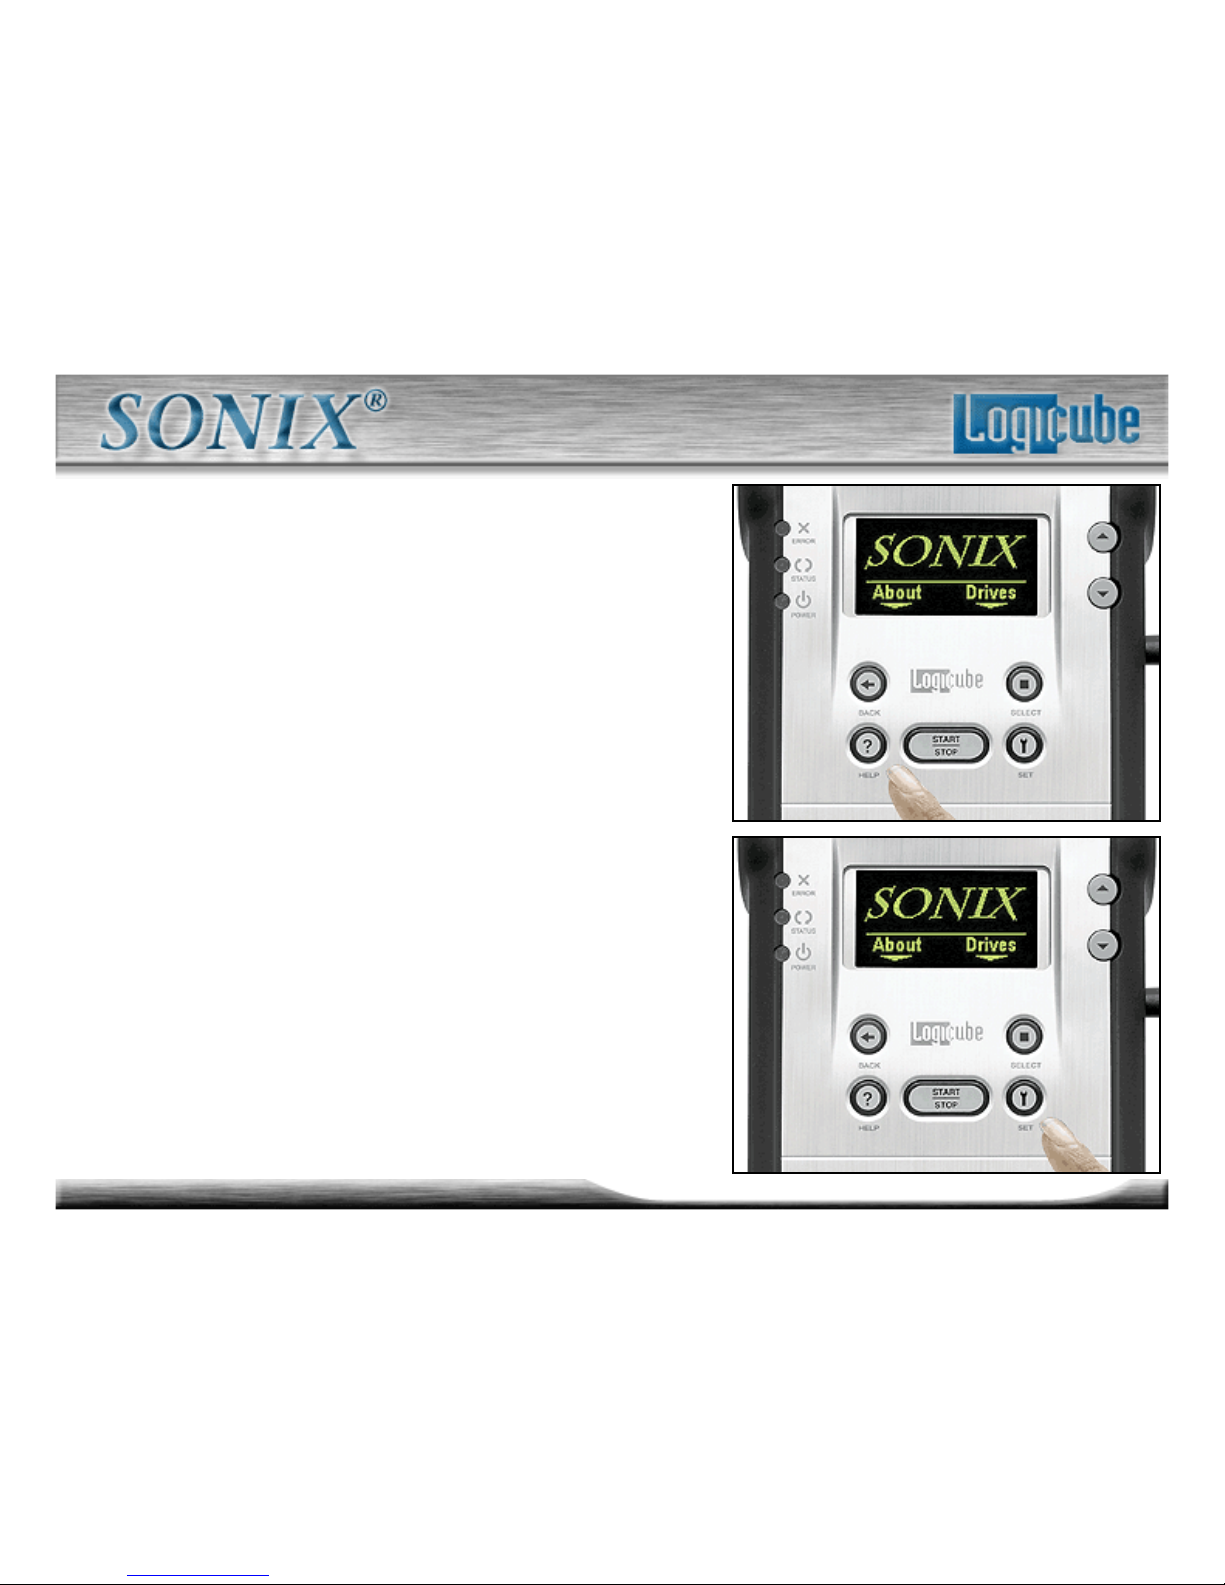
“Shortcut” buttons (available at all times)
– “Start/Stop” Button – Press it
twice to begin a cloning operation
using the current settings; press
the “Start/Stop” button in mid process
to abort it.
A single key stroke presents a
preview screen where you can see the
current setting, and decide whether to
press it again to begin
the capture, or back out to reconfigure.
Page 17
17
Logicube Confidential Information
The User Interface Part 3
“Shortcut” buttons (available at all times)
– The “Help” (”?”) button provides context
sensitive help and is active at all times.
Press it to get specific help on the current
screen. If the selection cursor is on the
screen, pressing the Help button will
retrieve specific help for the item pointed
to. Press the help button again to return
to the current screen.
– The “Set” button is the third “shortcut”
button. It brings you to the settings
screen where you can change capture
modes and other settings of the unit.
Page 18
18
Logicube Confidential Information
The User Interface Part 4
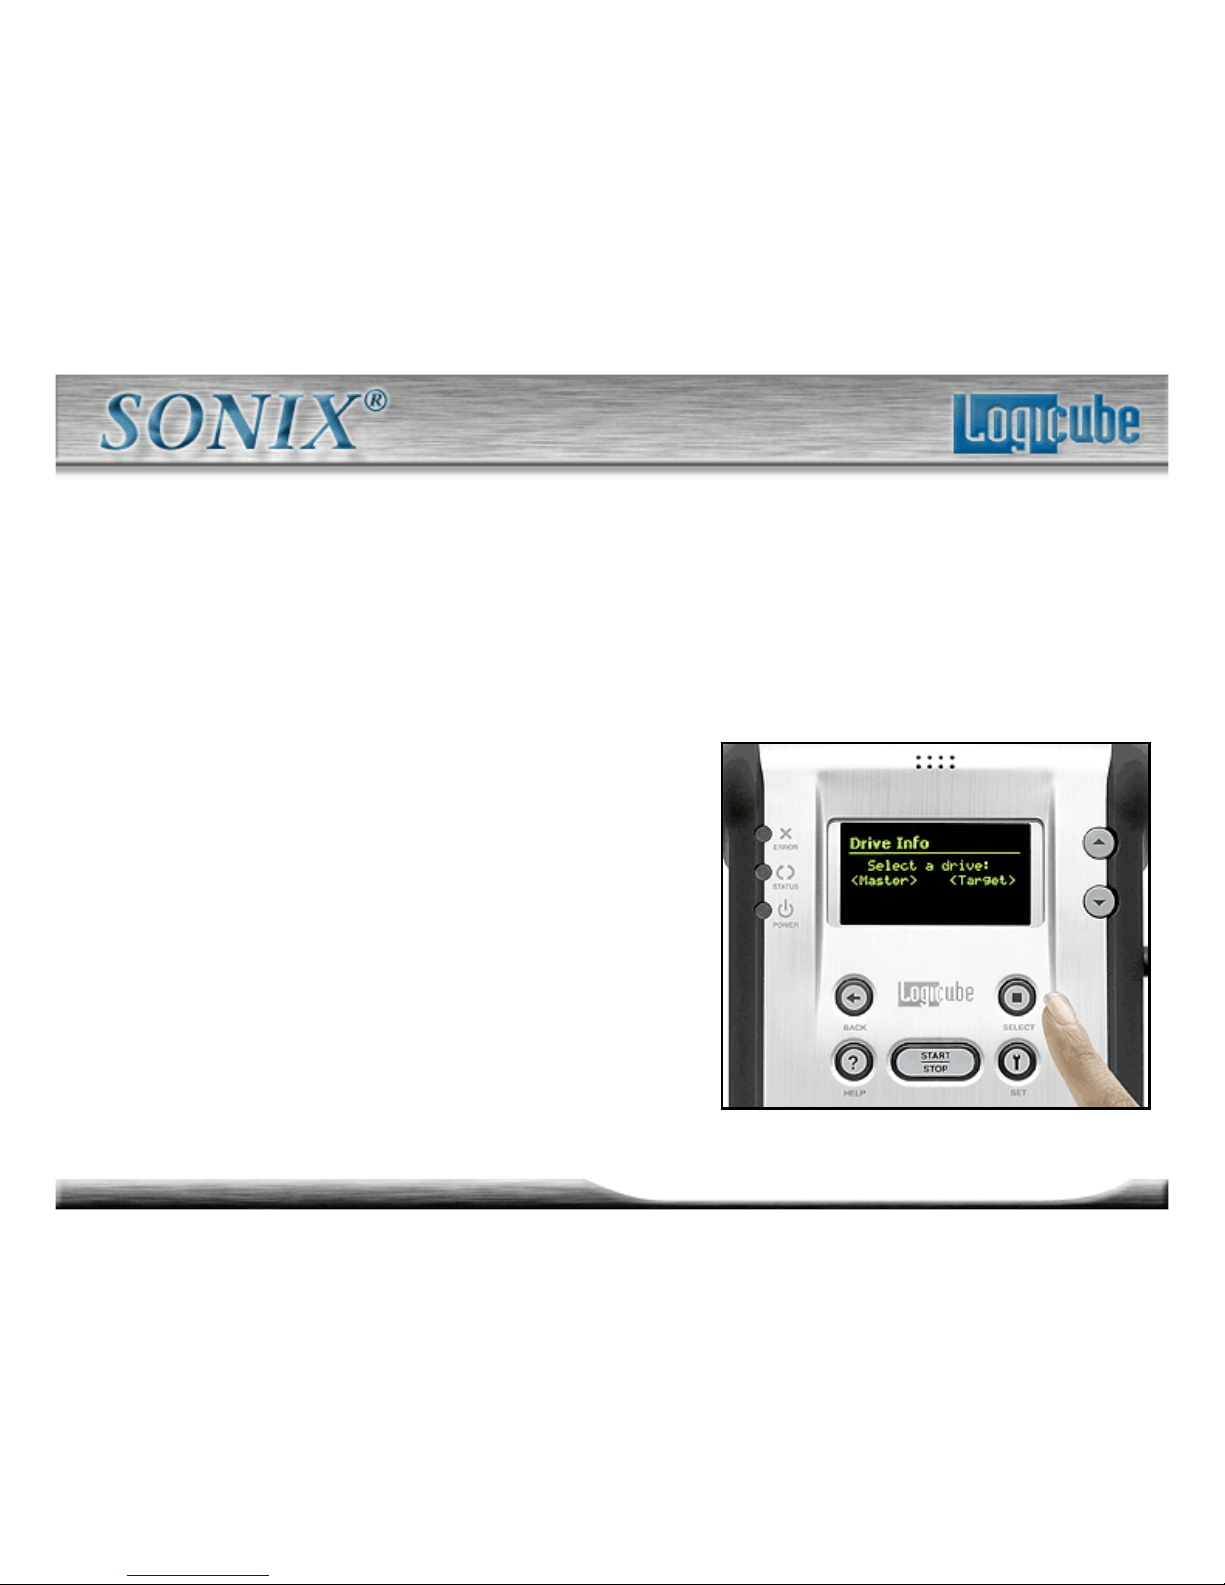
“Soft” buttons (functions change
depending on the labels displayed
above them)
– Note: Labels are always enclosed
by angular brackets (< >). When no
labels are displayed, they function
as navigational buttons.
– The right button functions as
“Select” or “toggle” and is used to
select an option, to move through
multiple available options, or to
select a sub-menu.
Page 19
19
Logicube Confidential Information
The User Interface Part 5
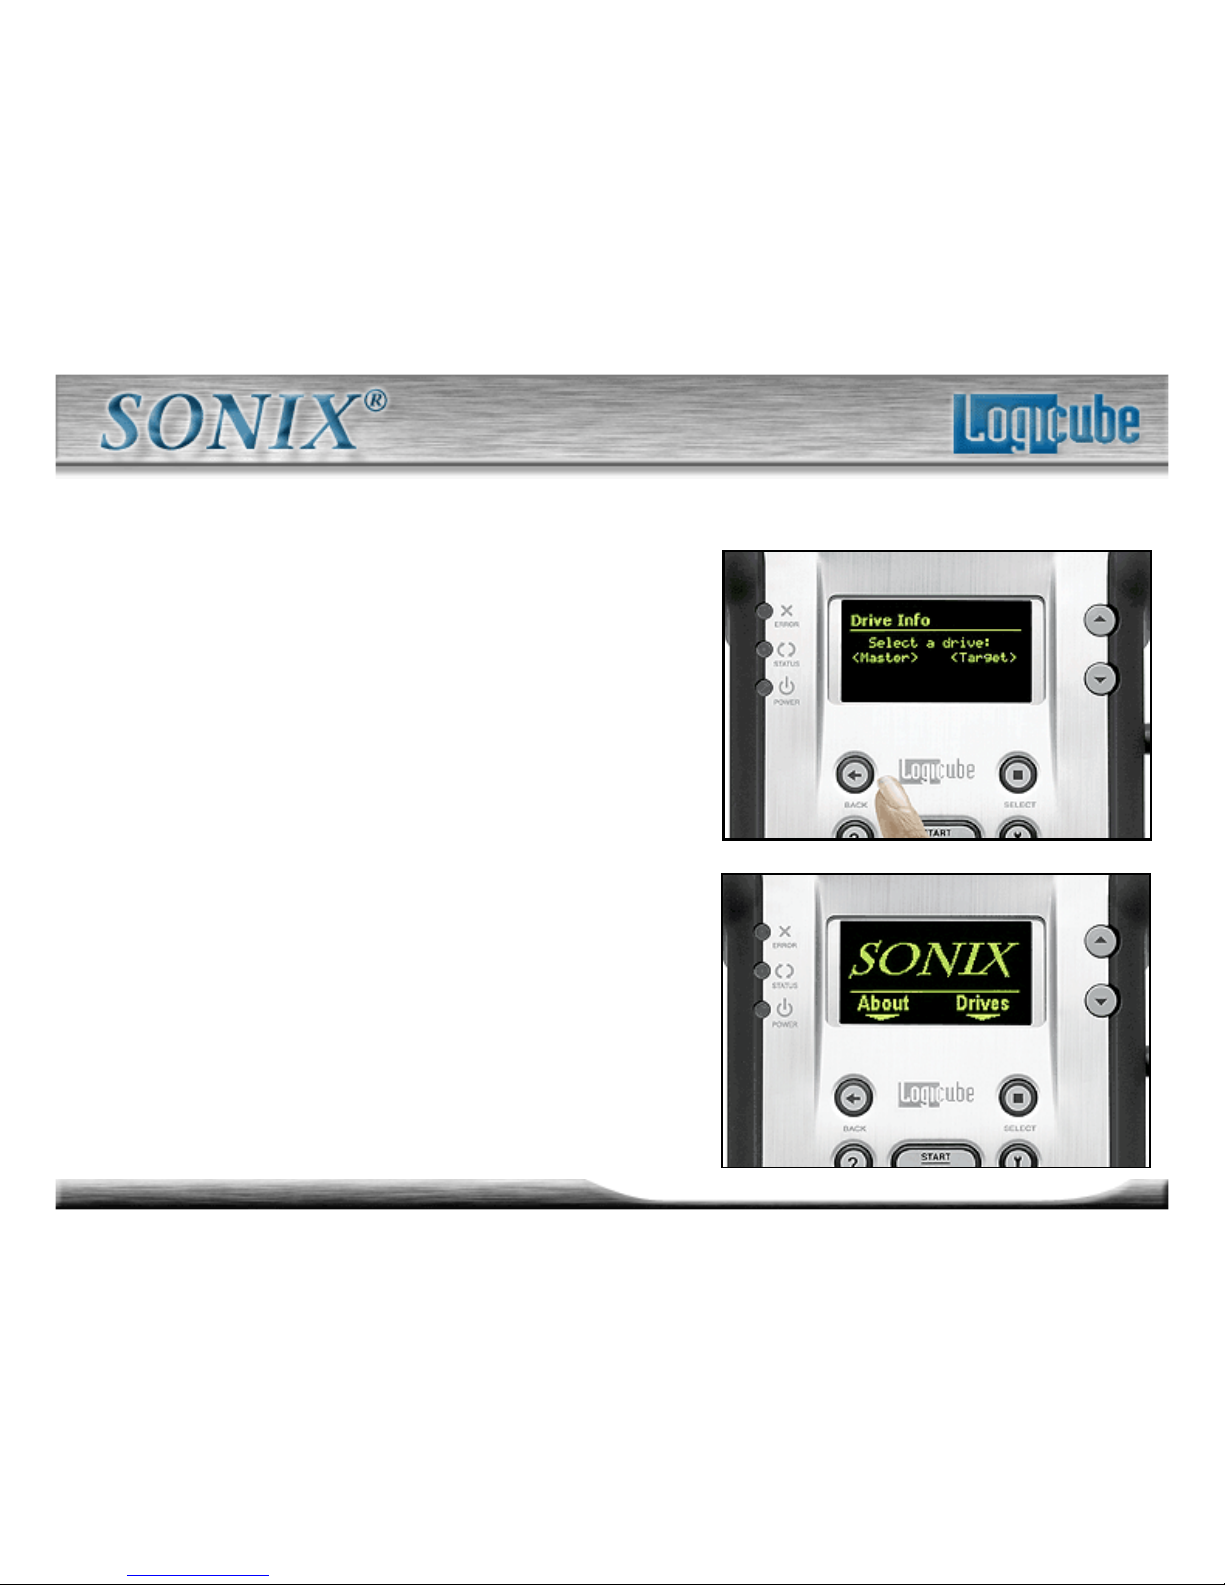
– The left button is the “Back” button.
This button is used to go “up” in the
menu system or to cancel out of a
given operation.
“Scroll Buttons” are active when the
right side of the screen displays the
scroll arrows. This occurs when the
amount of information to display
exceeds the screen size. Menus are
also scrollable.
Page 20
20
Logicube Confidential Information
The User Interface Part 6
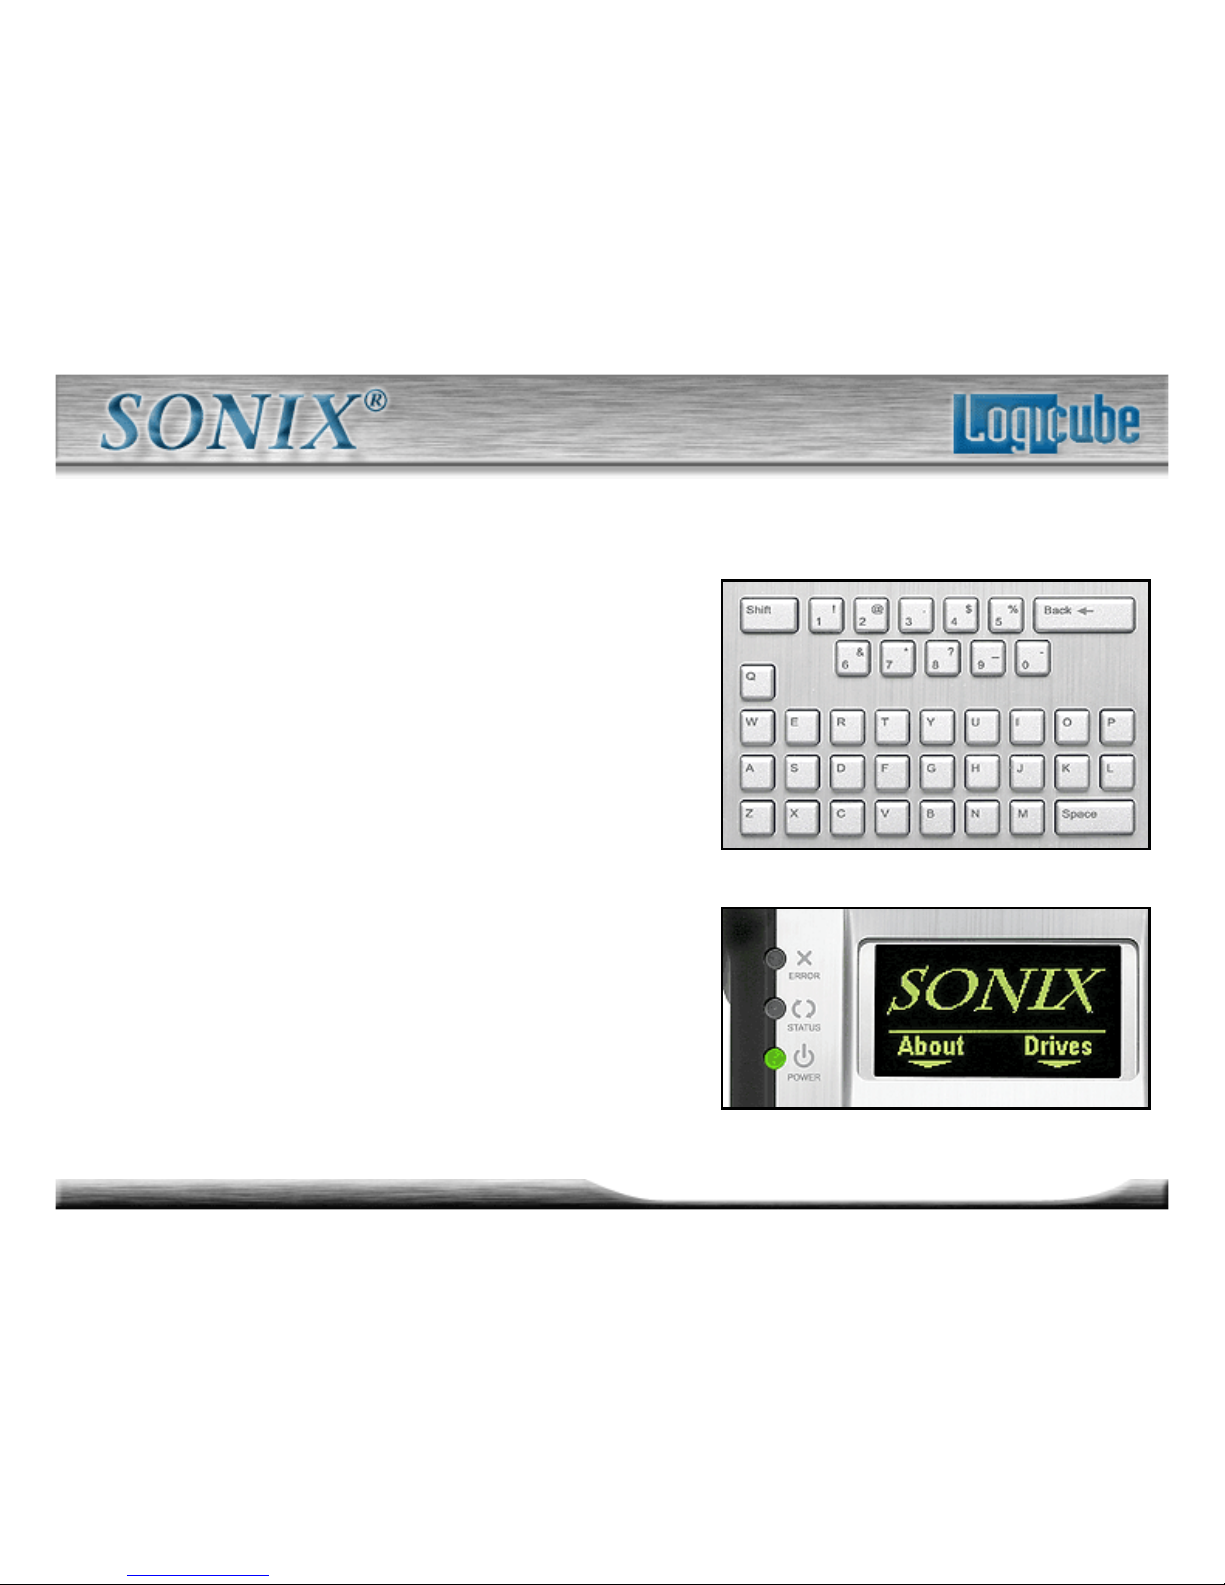
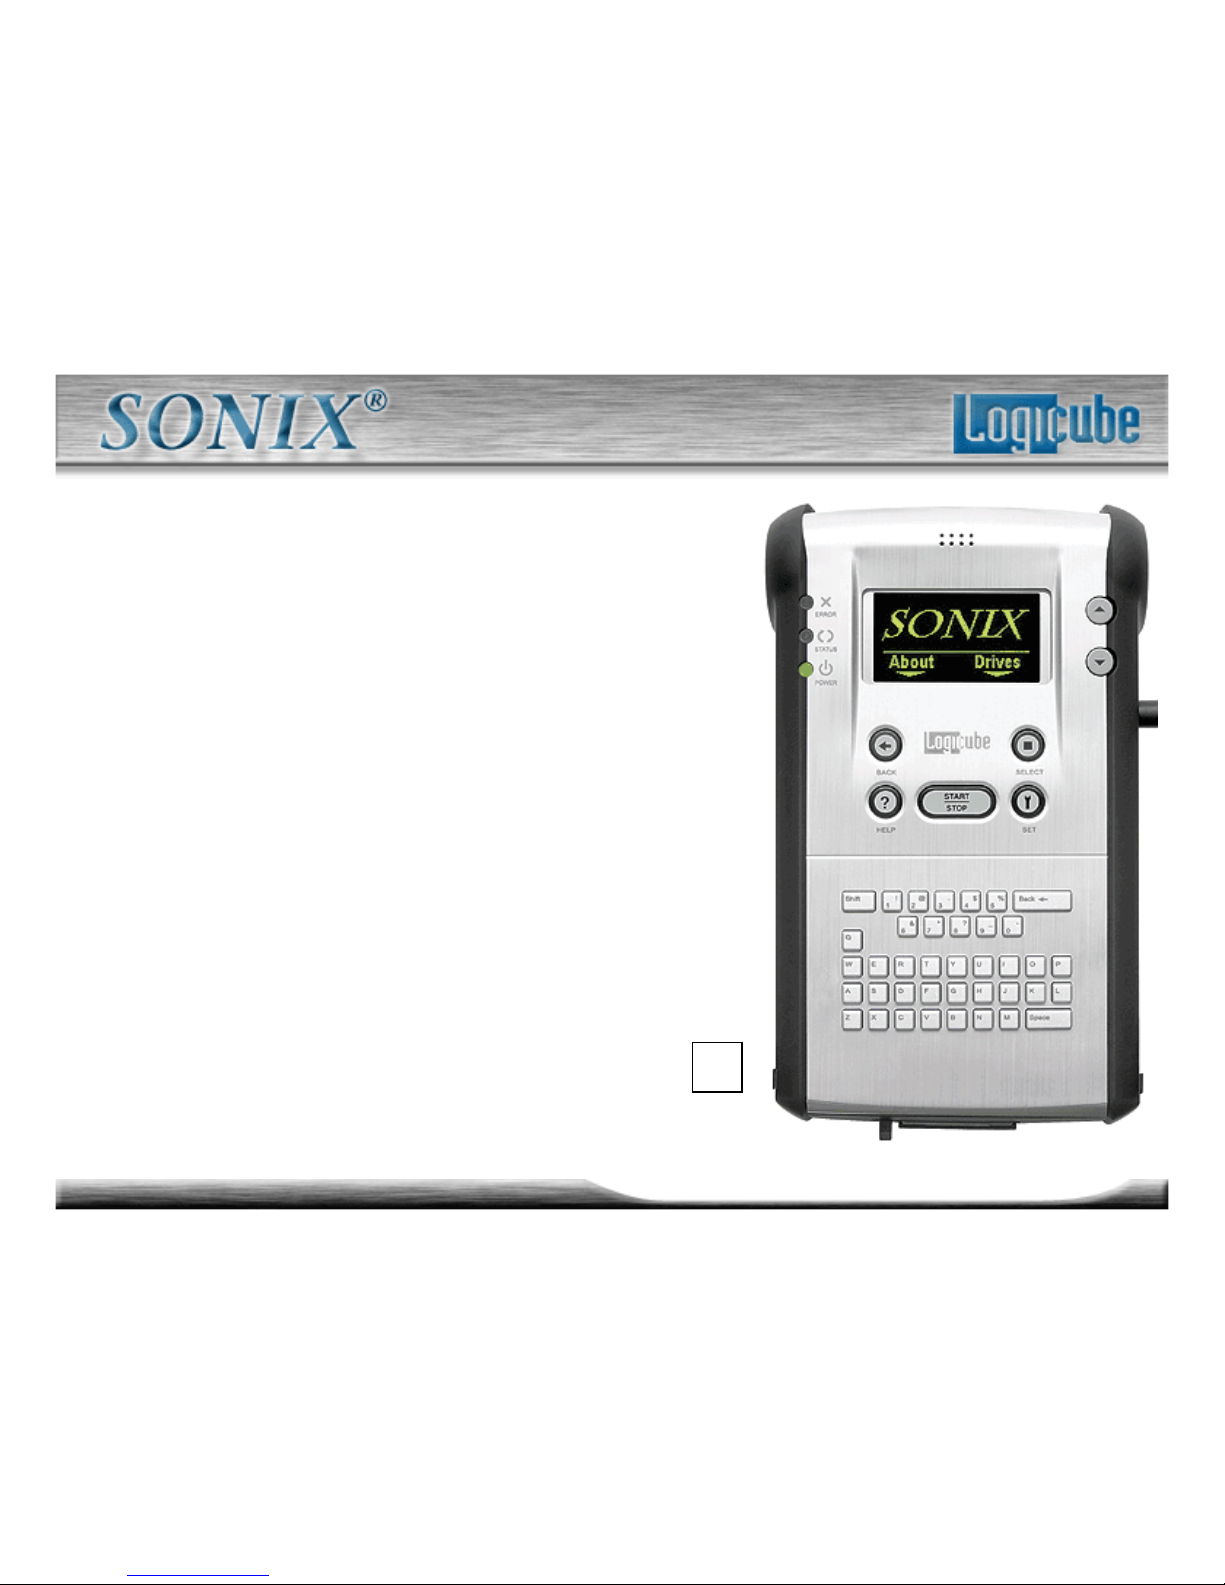
The “Alphanumeric Keypad” is laid out
like the keyboard on your PC or
typewriter. It is used for labeling drive
partitions (in Selective and Master
Manager Modes), entering passwords
and other functions.
The POWER indicator light remains on
while the Logicube Sonix™ is receiving
power.
The STATUS indicator is lit during
cloning operations and any operation
that accesses the Master or Target
drive. It will flash as data is transferred
from one drive to the other.
Page 21
21
Logicube Confidential Information
The User Interface Part 7
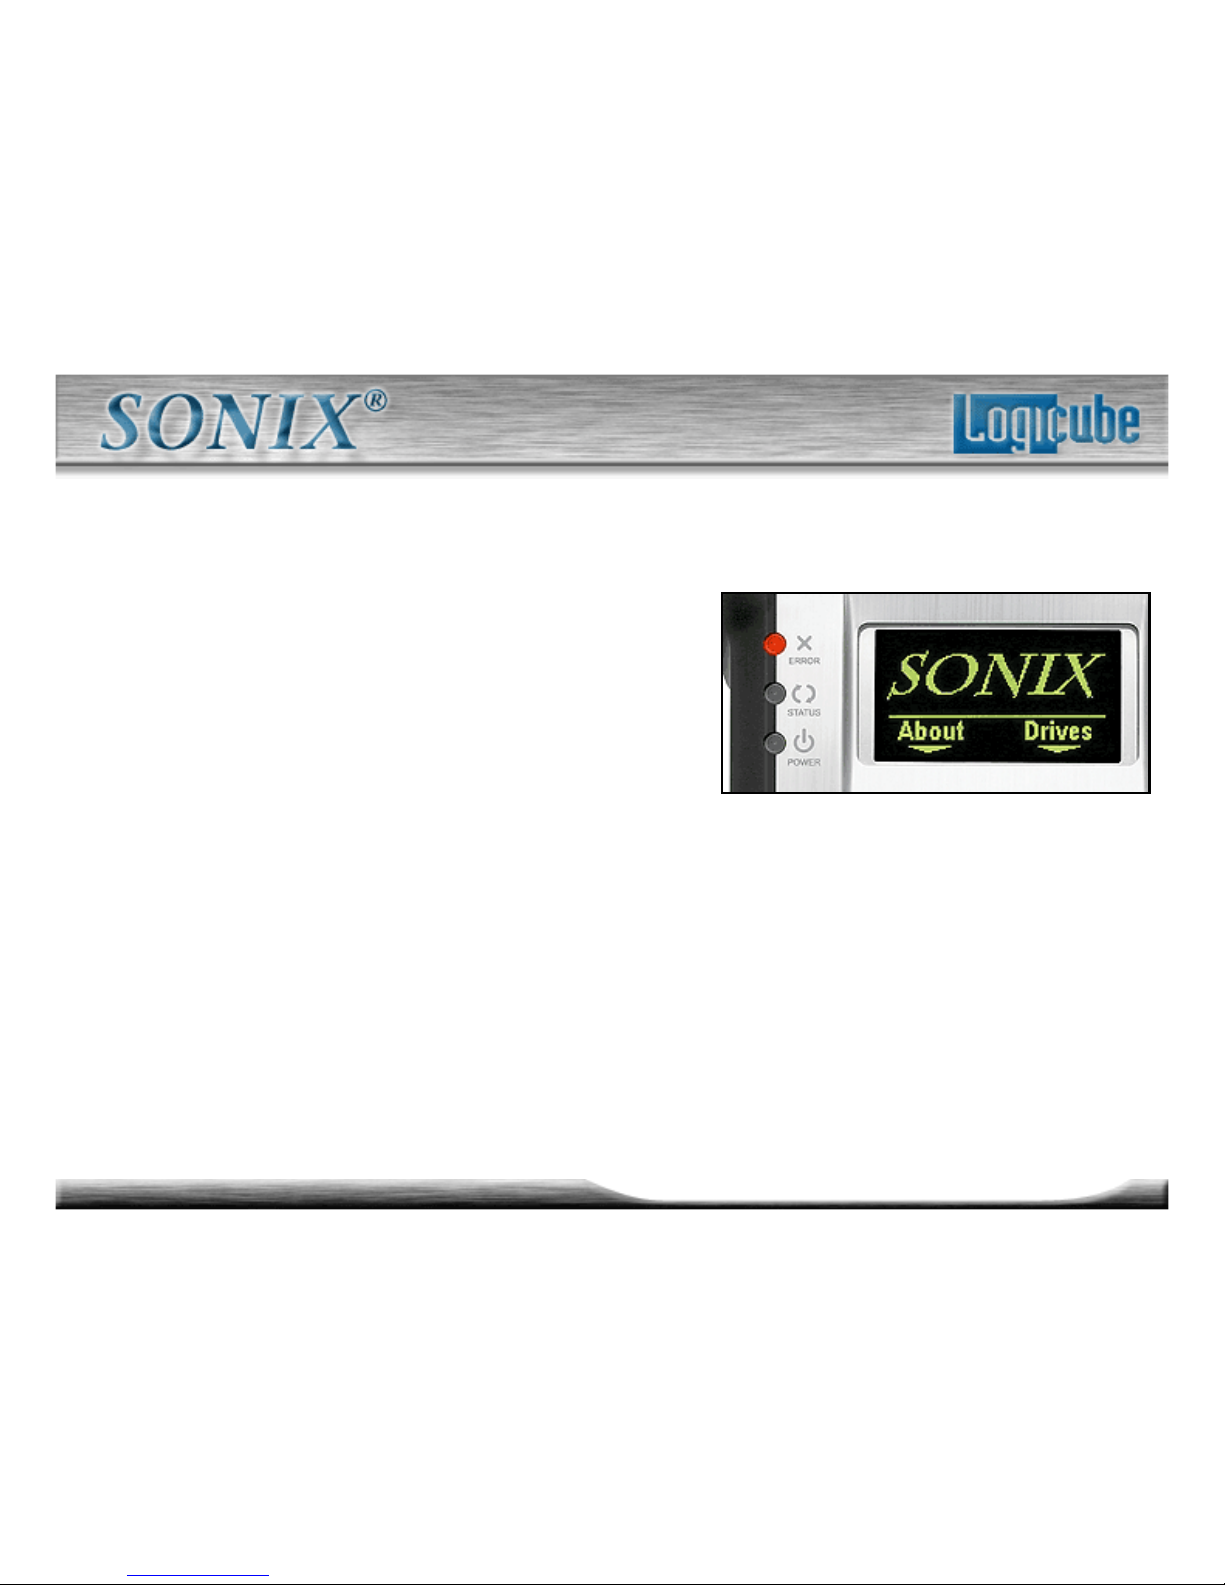
The ERROR light will come on if a
problem is encountered during
cloning or any other operation. If
this occurs, check the screen for an
error message and instructions on
what to do next.
Page 22
22
Logicube Confidential Information
Main Menu Part 1
The Logicube Sonix™ provides
several different modes of operation
for cloning virtually any hard drive
quickly and effectively.
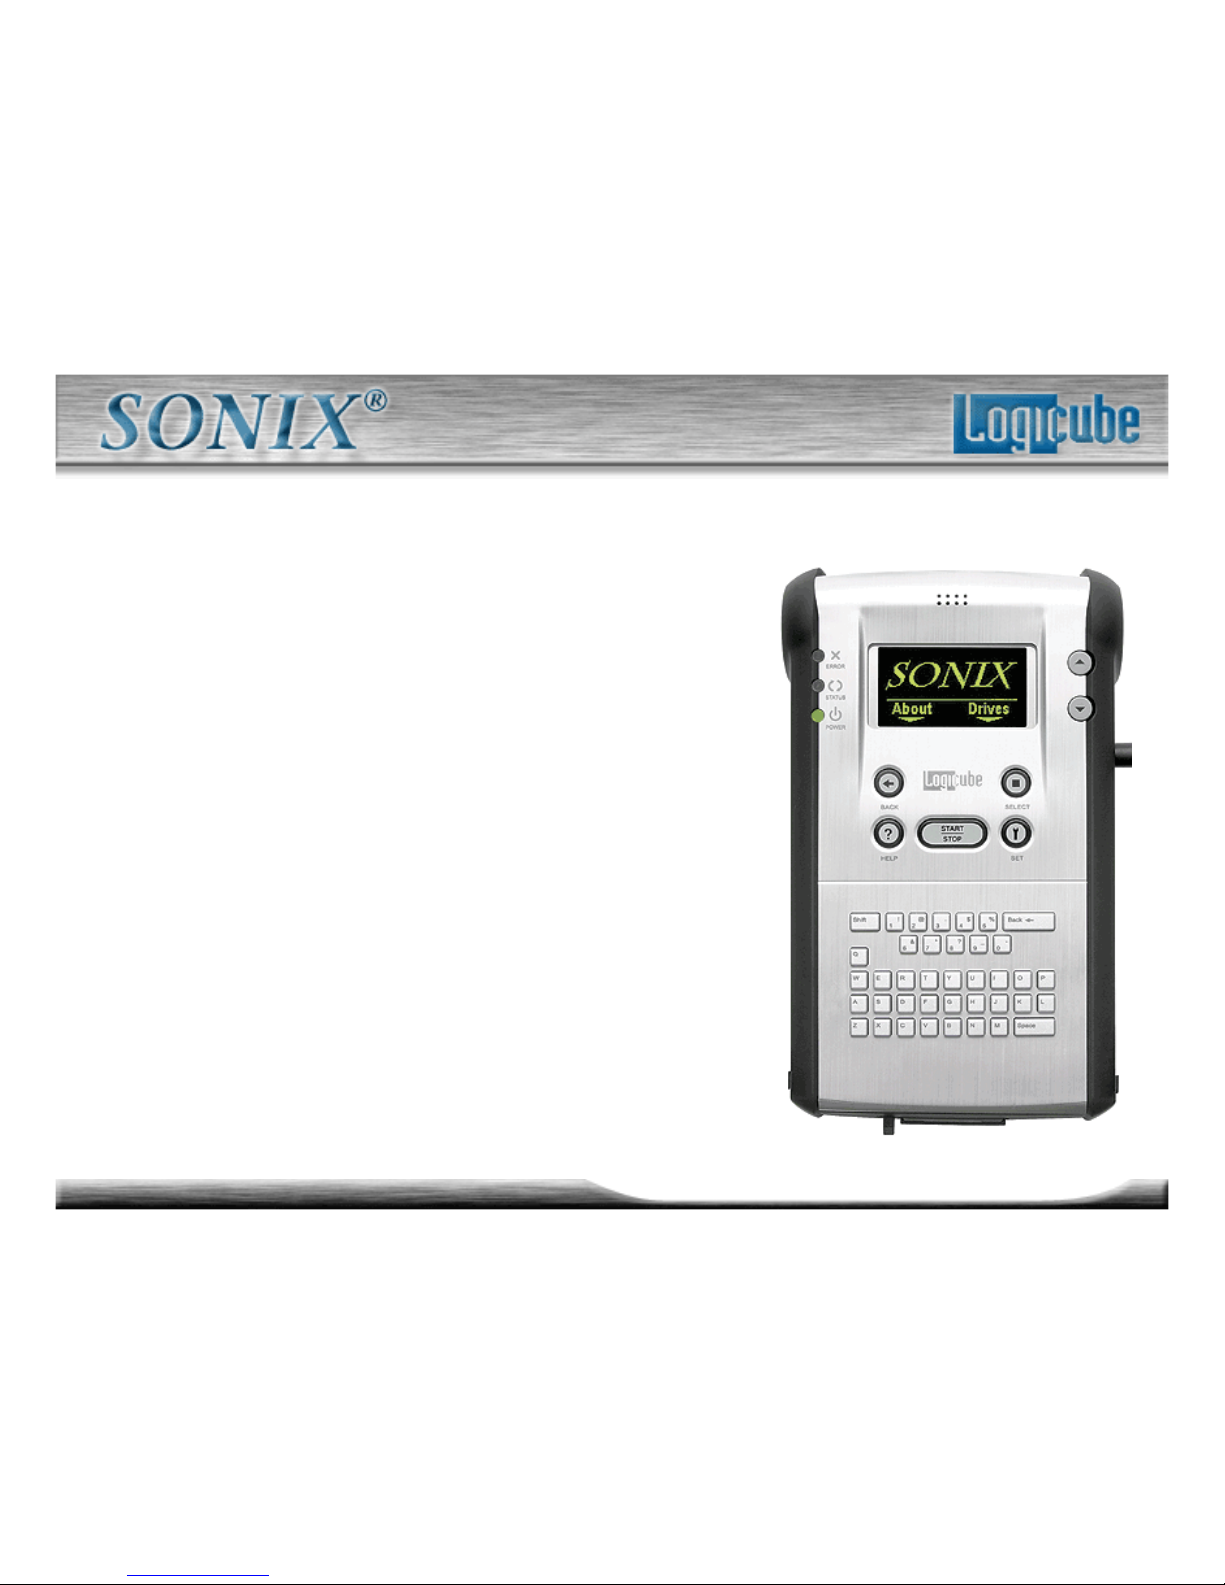
1. The main menu screen appears
when the Logicube Sonix™ is first
powered up. It displays the Title
Screen and two menu options: About
and Drives.
1.
Page 23
23
Logicube Confidential Information
Main Menu Part 2
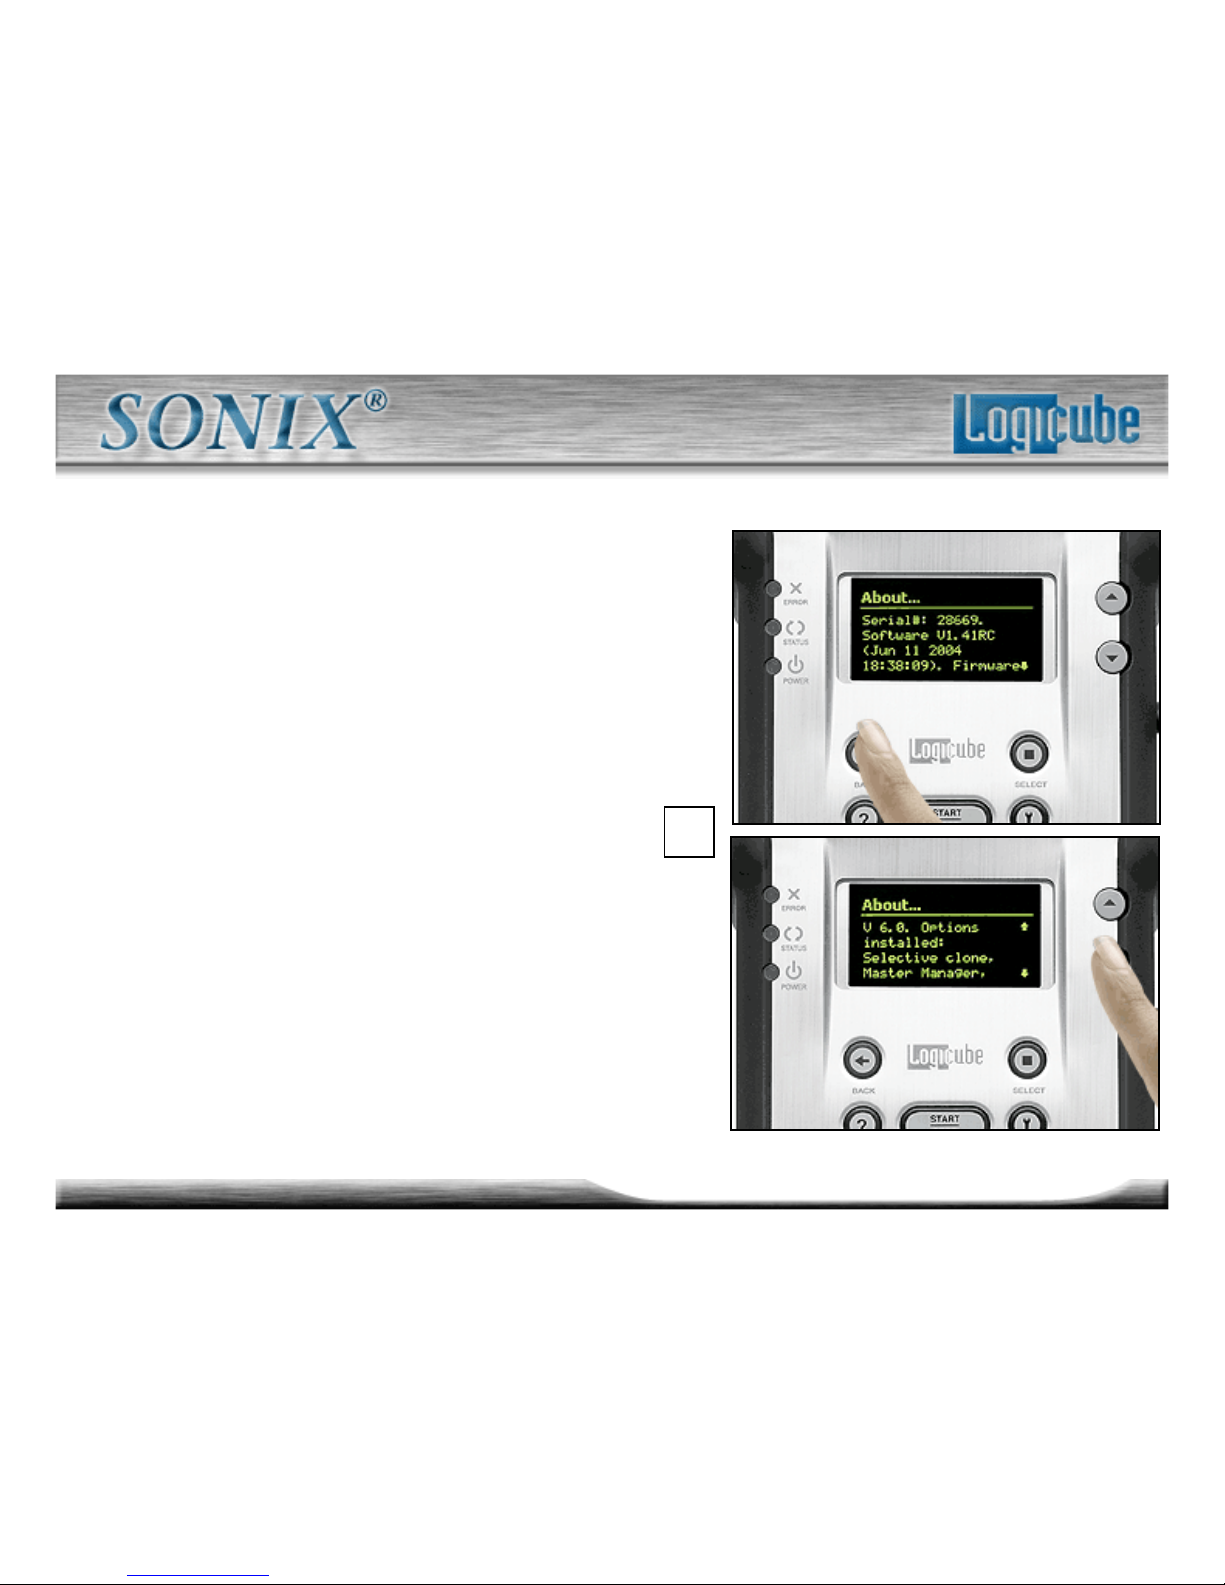
2. Select “About” by pressing the
“Back” button. It will display the
serial number of your unit along
with the software and firmware
versions that are loaded. In
addition, the About screen lists
all options currently enabled on the
unit and provides contact
information for Logicube Technical
Support.
2.
Page 24
24
Logicube Confidential Information
Main Menu Part 3
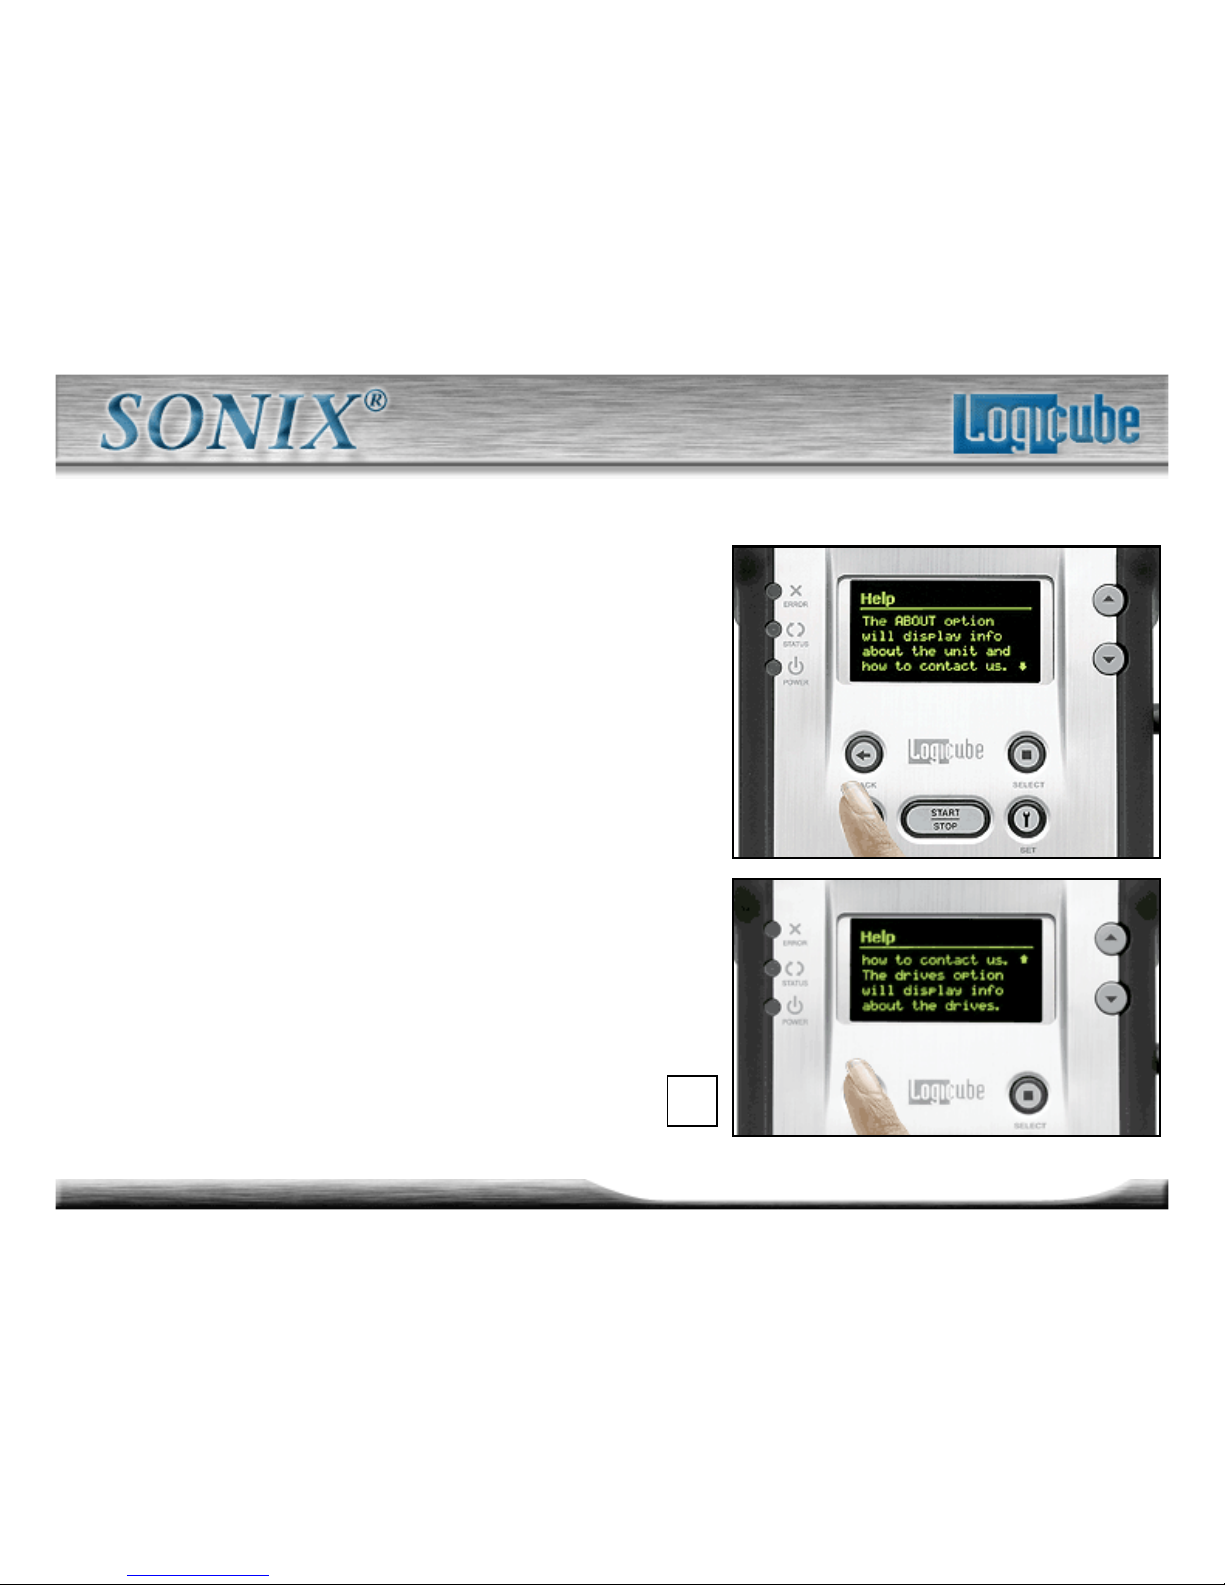
– Note: Pressing the “Help” button
will show you information
pertaining to the setting or
operation you are currently in.
3. Return to the main menu by
pressing the Back button.
3.
Page 25
25
Logicube Confidential Information
Main Menu Part 4
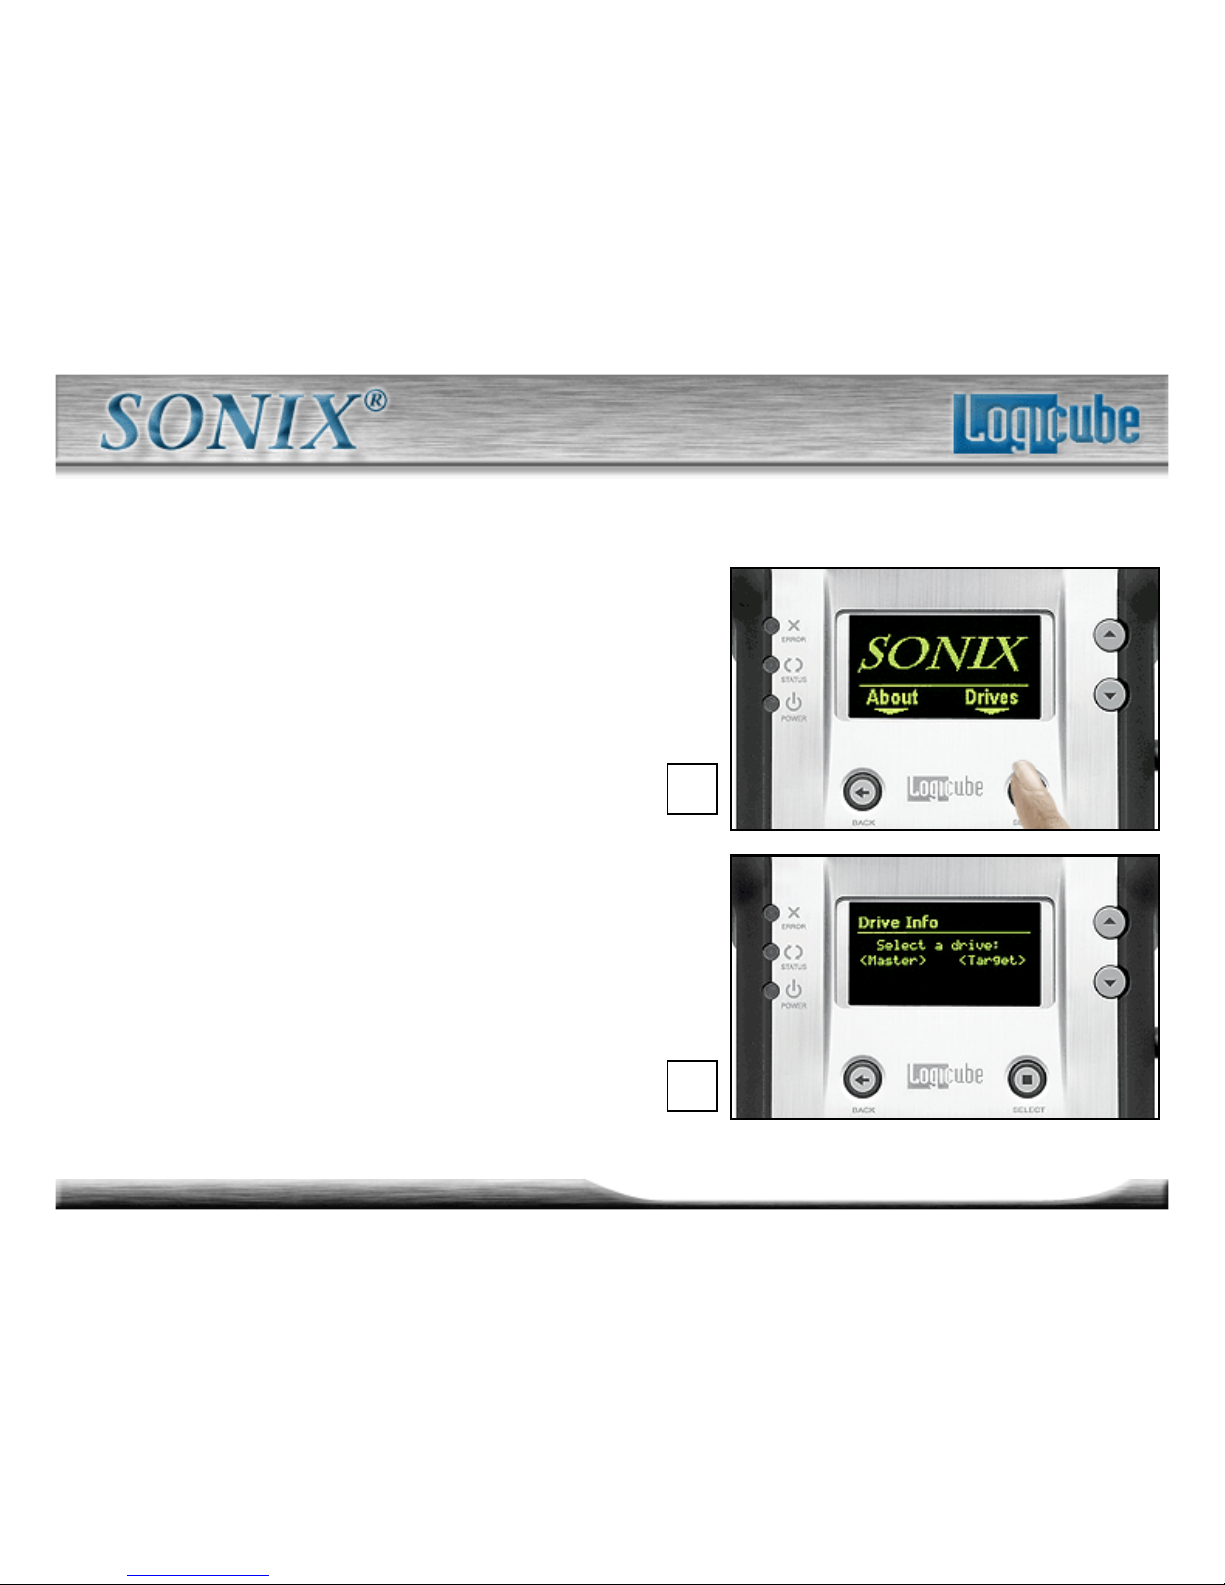
4. Select the “Drive” by pressing
the “Select” button.
5. Another screen will come up
asking you to select either the
<Master> or <Target> drive
(use the “soft” buttons to make
your choice).
The unit will then access the drive
you select.
4.
5.
Page 26
26
Logicube Confidential Information
Main Menu Part 5
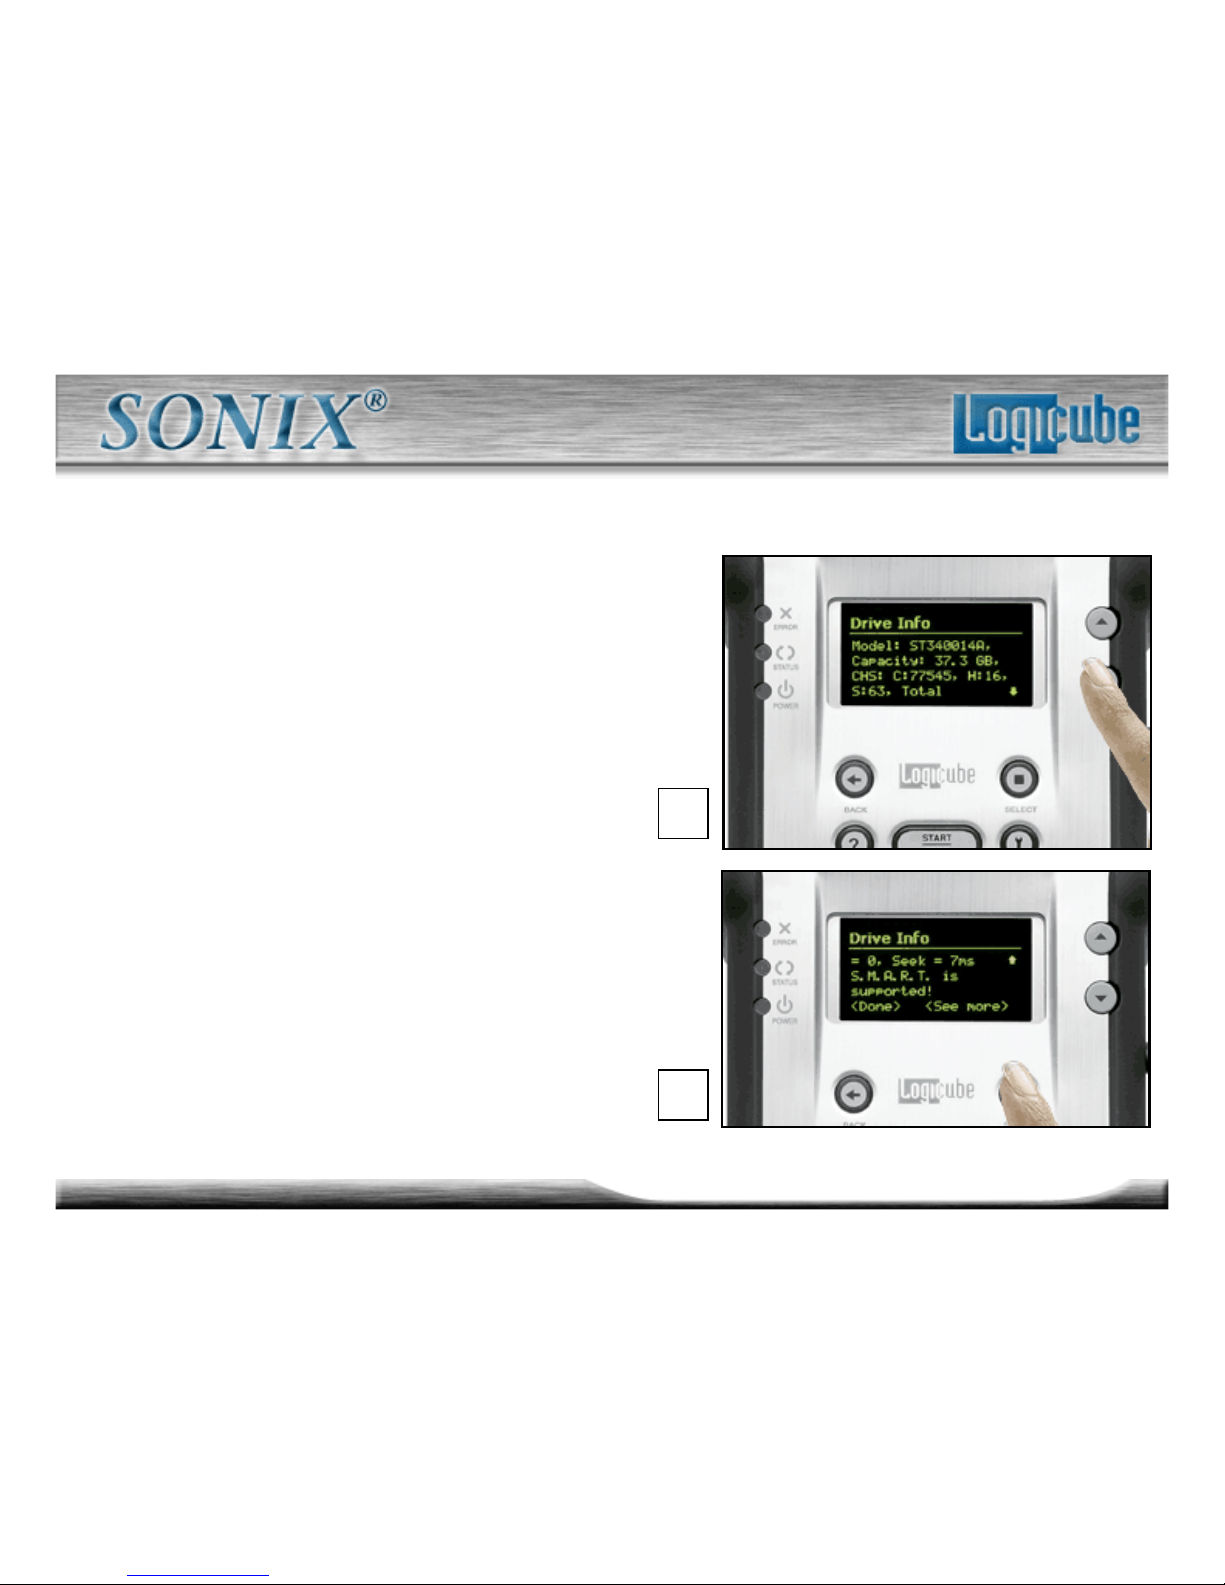
6. The drive’s model number,
capacity, geometry and other
information will be displayed.
7. Scroll down to the end of the
drive information list to access
the “<See more>” option. Press
the “Select” button to display all
of the partitions located on that
drive.
6.
7.
Page 27
27
Logicube Confidential Information
Main Menu Part 6
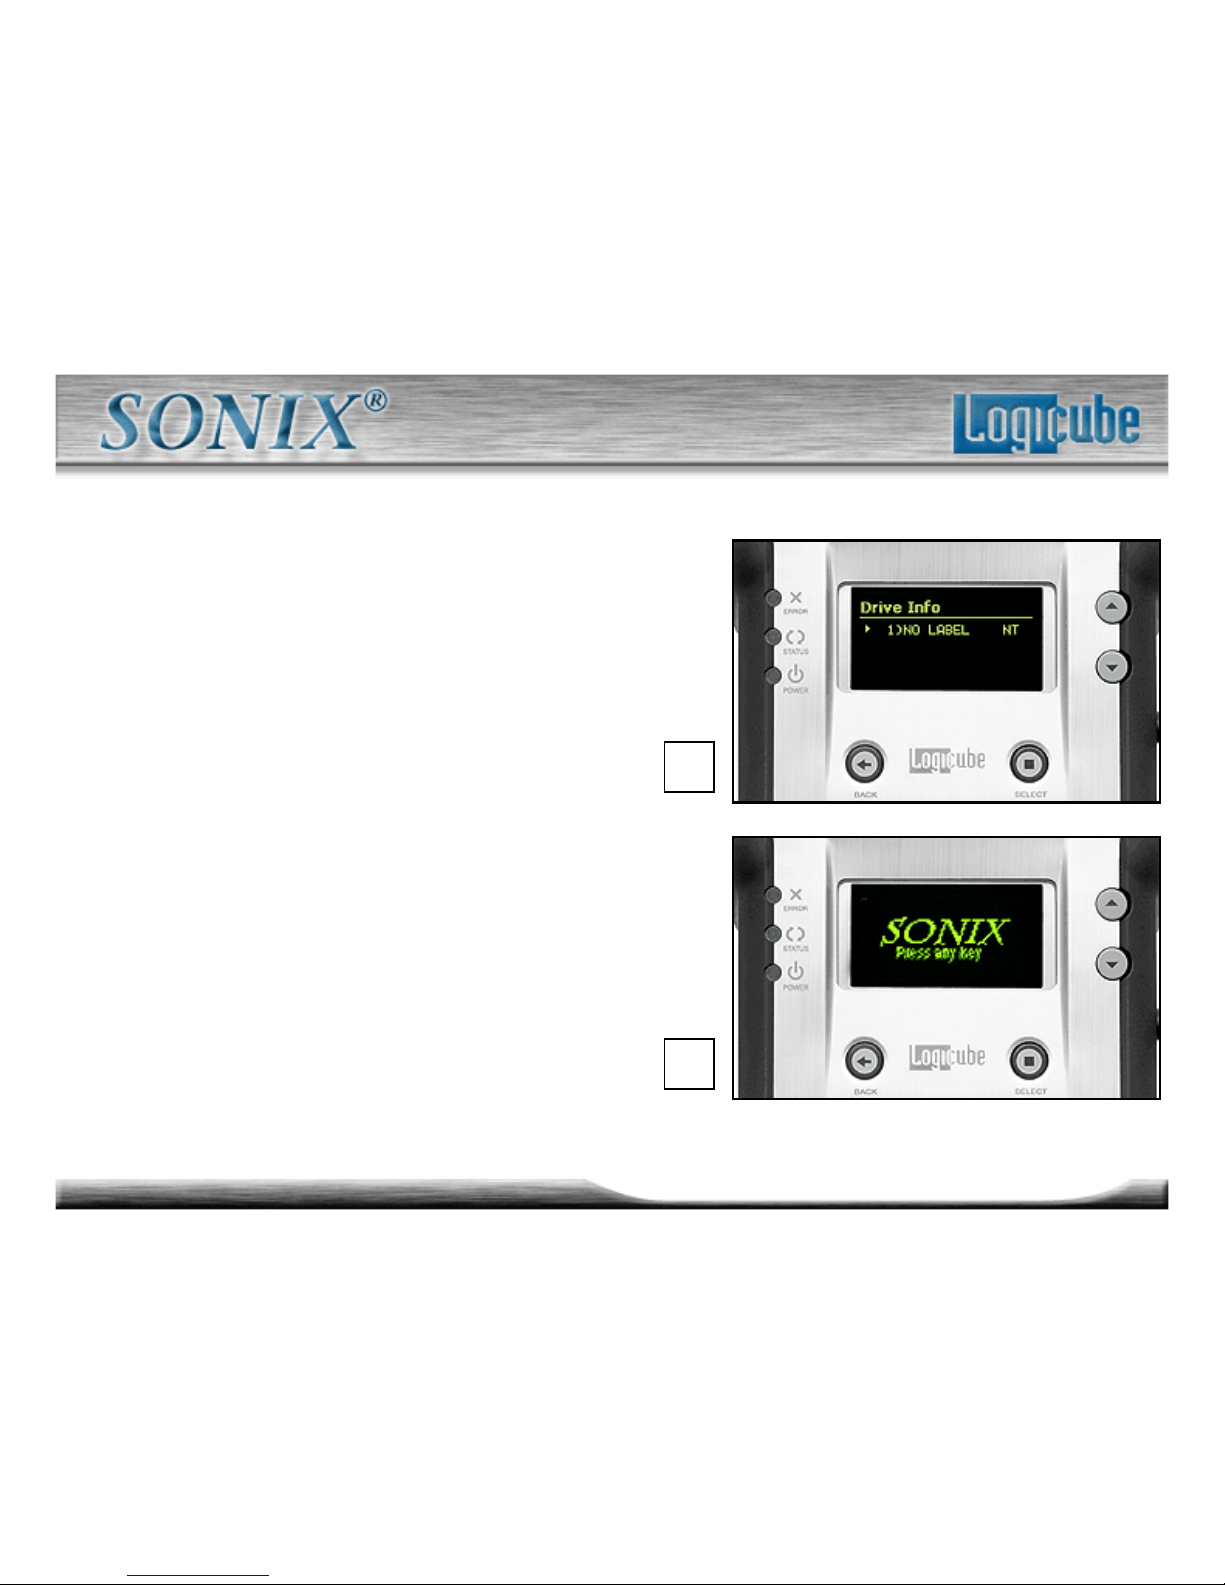
8. The “Drive Info Screen ” shows
the Partition
9. Return to the main menu by
pressing the “Back” button.
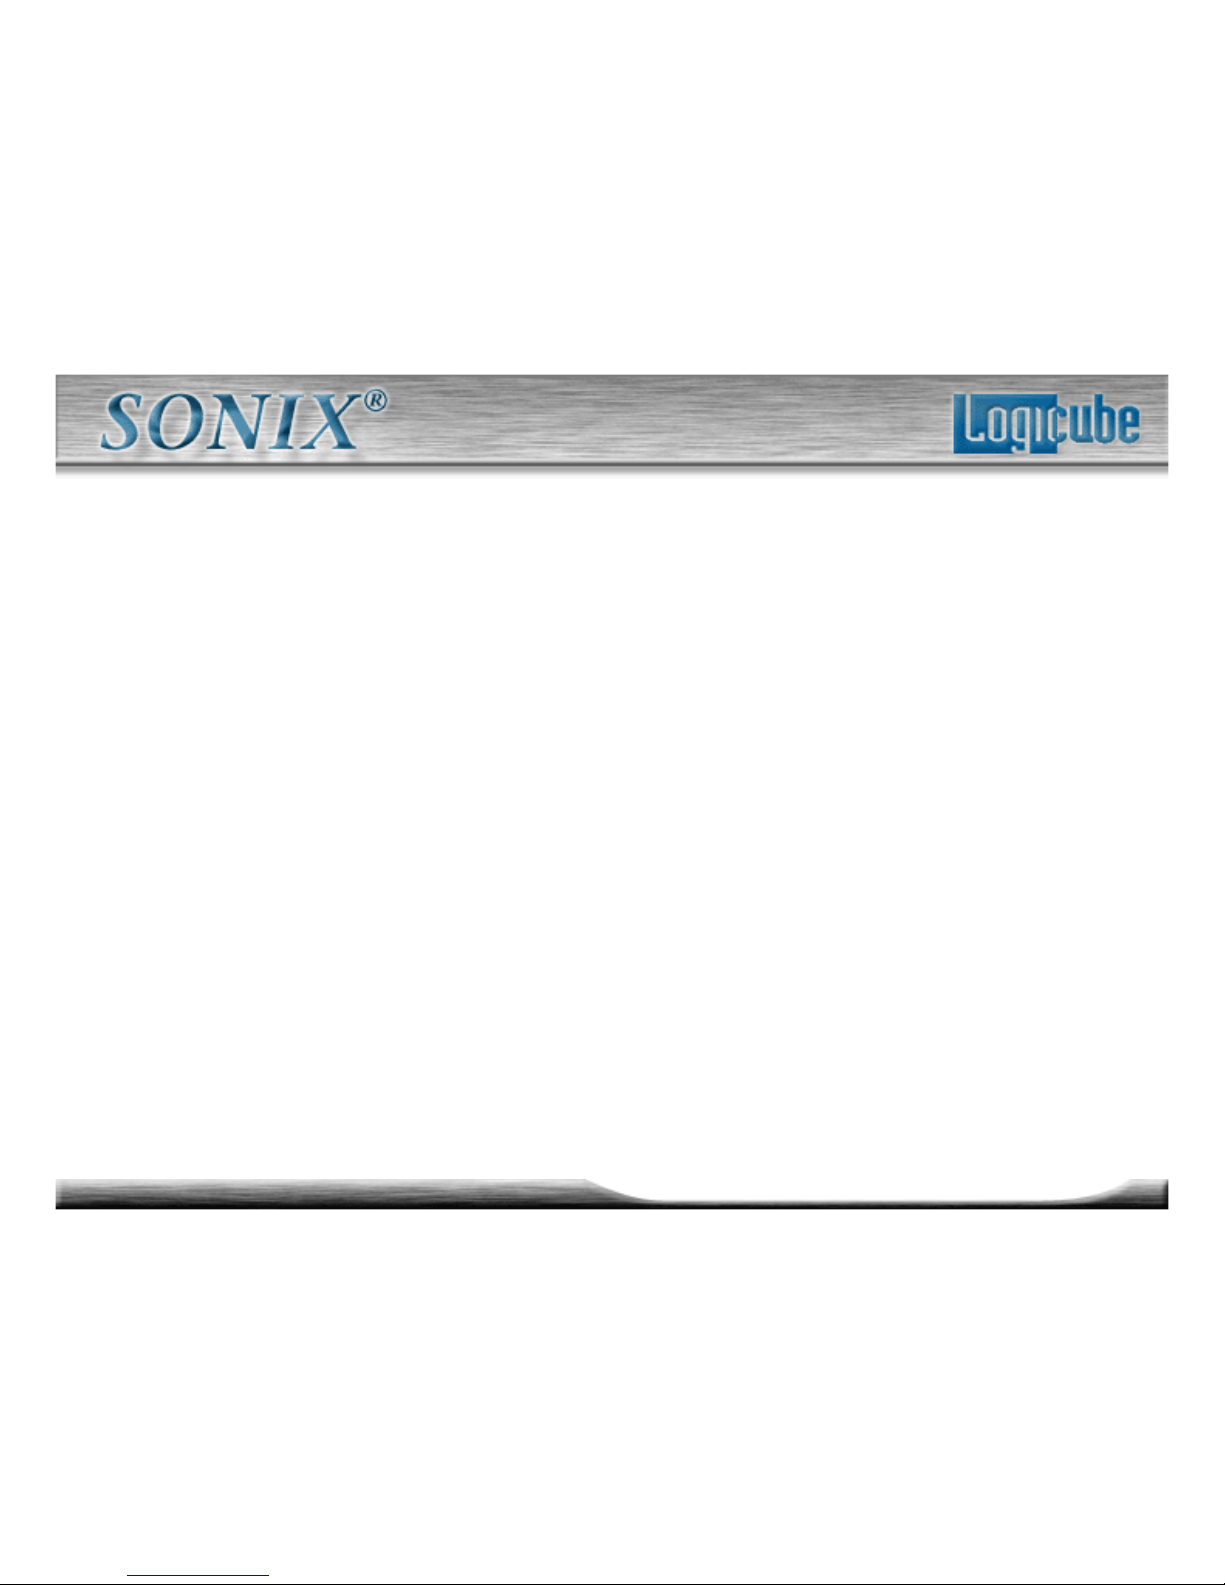
– Note: After 25 seconds of
inactivity, the Logicube Sonix™
display will switch to a screen
saver. This is designed to extend
the life of the OLED display used
by the unit.
8.
9.
Page 28
28
Logicube Confidential Information
Cloning Modes
The Logicube Sonix™ provides several different modes of
operation for cloning virtually any hard drive quickly and effectively.
– Clever Clone™
– Selective Partitions ™
– 100% Clone™ (Also referred to as Mirror Clone™)
– Master Manager™
Note: Each time the Sonix is powered off the cloning mode
and preference settings are returned to their factory defaults.
Page 29
29
Logicube Confidential Information
Cloning Mode - Clever Clone™ Part 1
This is the default operating mode and is recommended for
cloning drives with FAT16, FAT32 and NTFS partitions. It
clones all partitions on the Master drive to the Target drive
and automatically sets the fastest method possible for each
partition.
Clever Clone automatically scales all FAT32 and NTFS
partitions to fill the Target drive in its entirety, and makes all
the necessary adjustments to ensure a valid and bootable
Target drive. It can also scale FAT16 partitions up to 2GB.
– NOTE: When Clever Clone scales down an NTFS partition, it
can only scale it to 55% of the original size.
Page 30
30
Logicube Confidential Information
Cloning Mode - Clever Clone™ Part 2
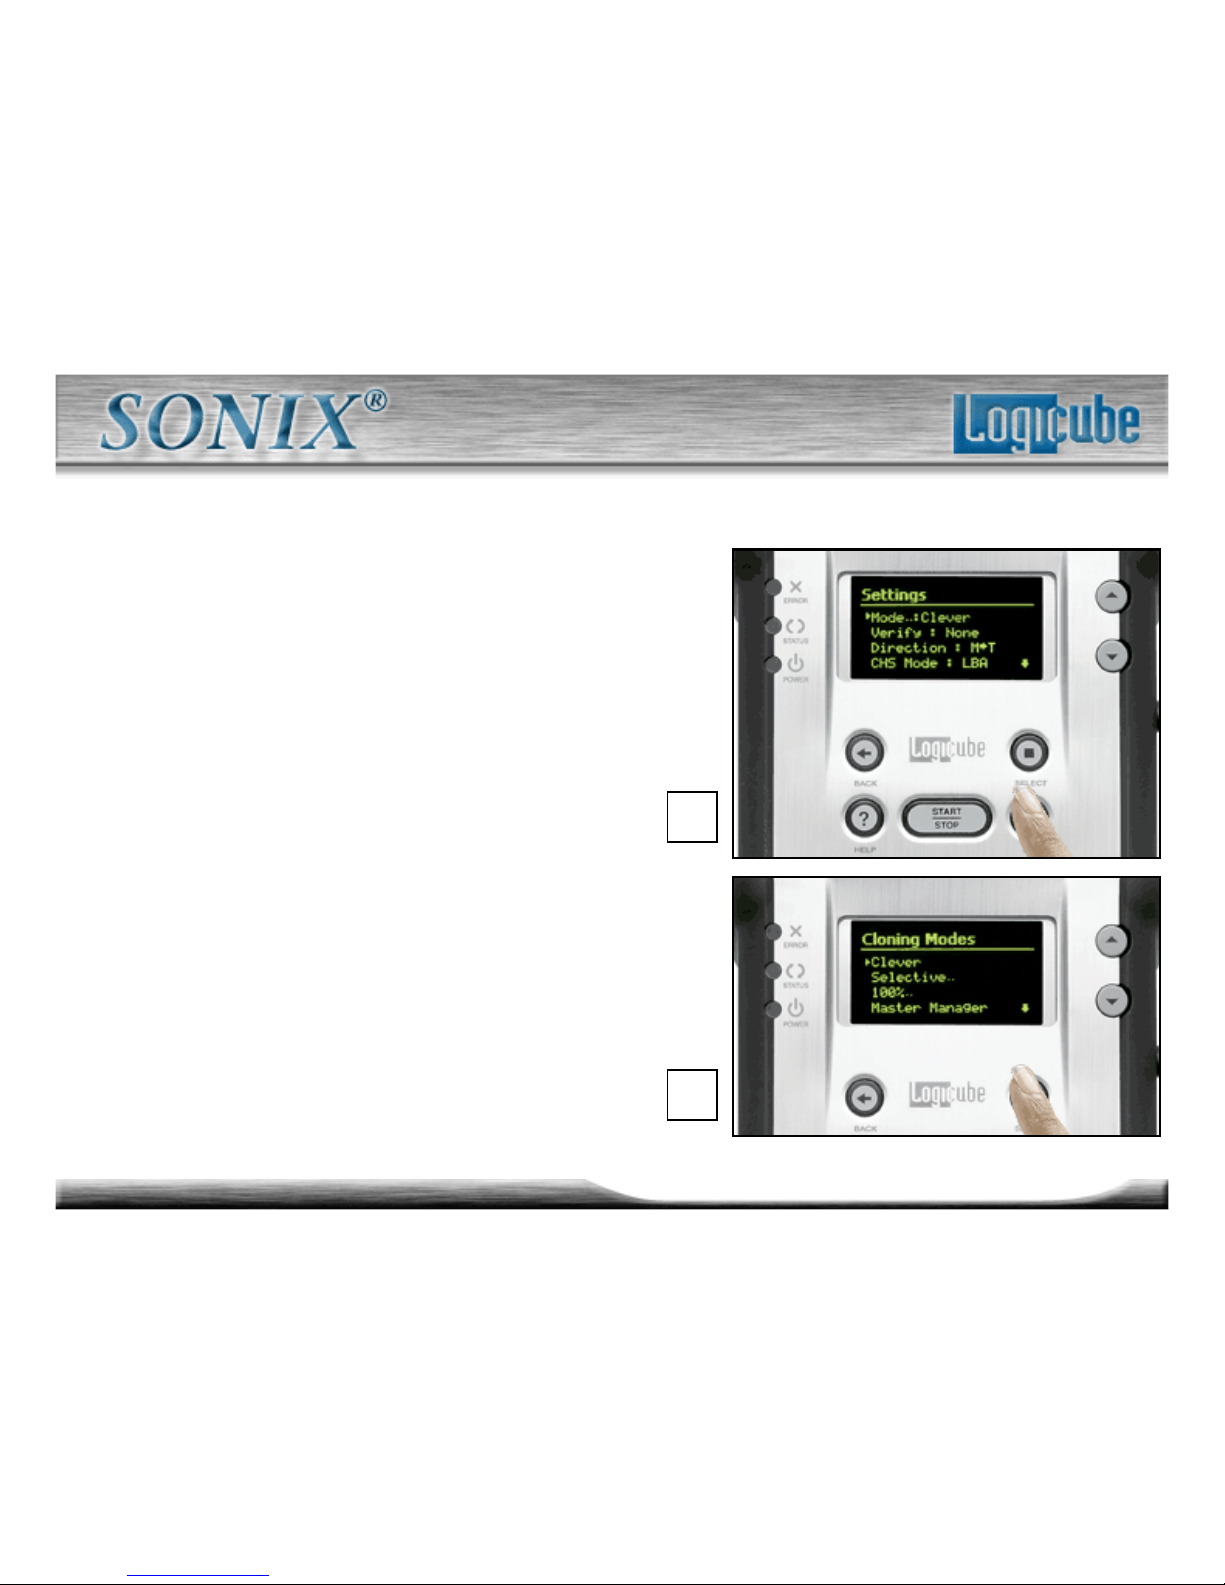
1. From anywhere in the menu
system, press the Set button to enter
the Settings menu.
2. Locate “Mode” in the Settings
menu and press the Select button.
The Mode menu screen appears.
3. Locate “Clever” (short for Clever
Clone) in the Mode menu and
press the “Select” button.
– This will select Clever Clone
mode and return you to the
Settings screen.
1.
3.
Page 31
31
Logicube Confidential Information
Cloning Mode - Clever Clone™ Part 3
The “Verify” preference allows you to choose whether the Logicube
Sonix™ verifies the integrity of the Target drive. With Verify
activated, the Target drive is scanned for bad sectors during cloning.
If a bad sector is detected, the cloning process is aborted.
– None (Default) - No data verification is performed.
– Some - Only 1% of the sectors are verified.
This is faster but less thorough than using the All setting.
– All - Every data sector on the Target drive to which data
has been written is checked.
Page 32
32
Logicube Confidential Information
Cloning Mode - Clever Clone™ Part 4
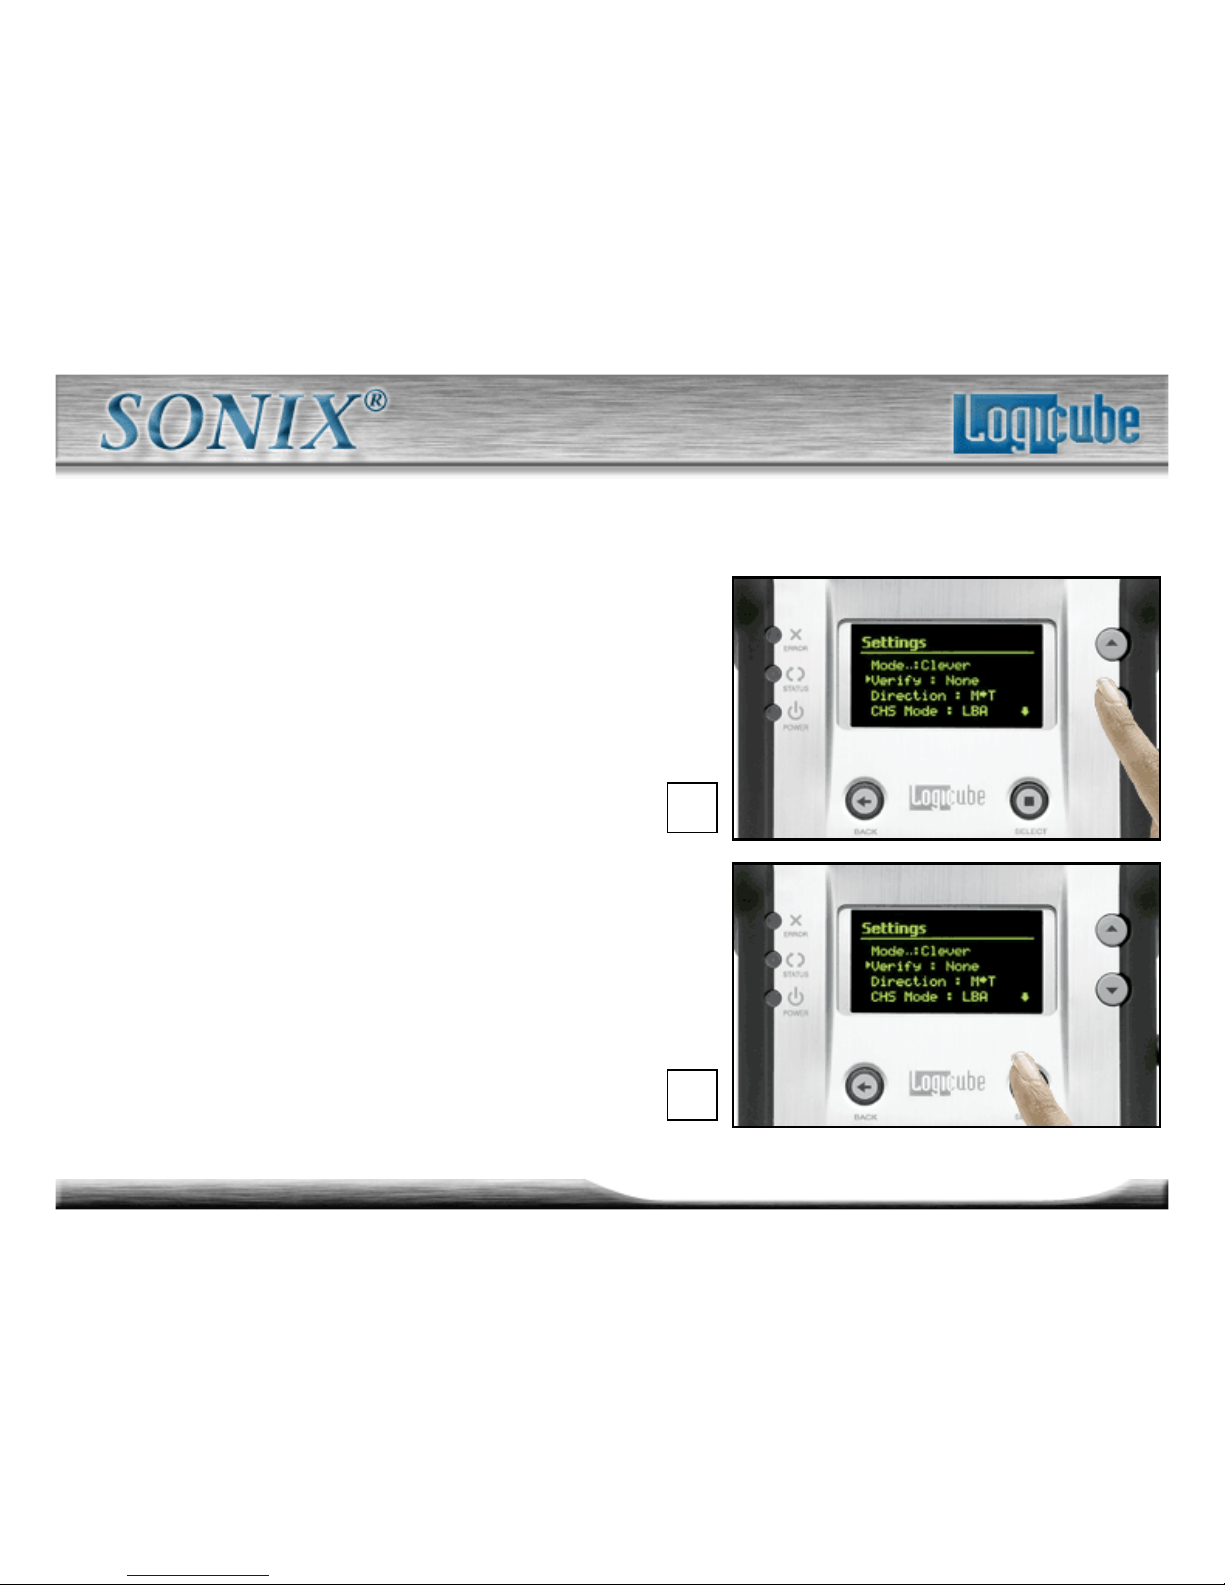
4. Use the Scroll Arrow to move
the pointer “” to the “Verify”
setting.
5. Locate “None” in menu and
press
the “Select” button.
Important: We strongly recommend
against cloning to a hard drive that has
been shown to have bad sectors as
new defects are likely to develop.
4.
5.
Page 33
33
Logicube Confidential Information
Cloning Mode - Clever Clone™ Part 5
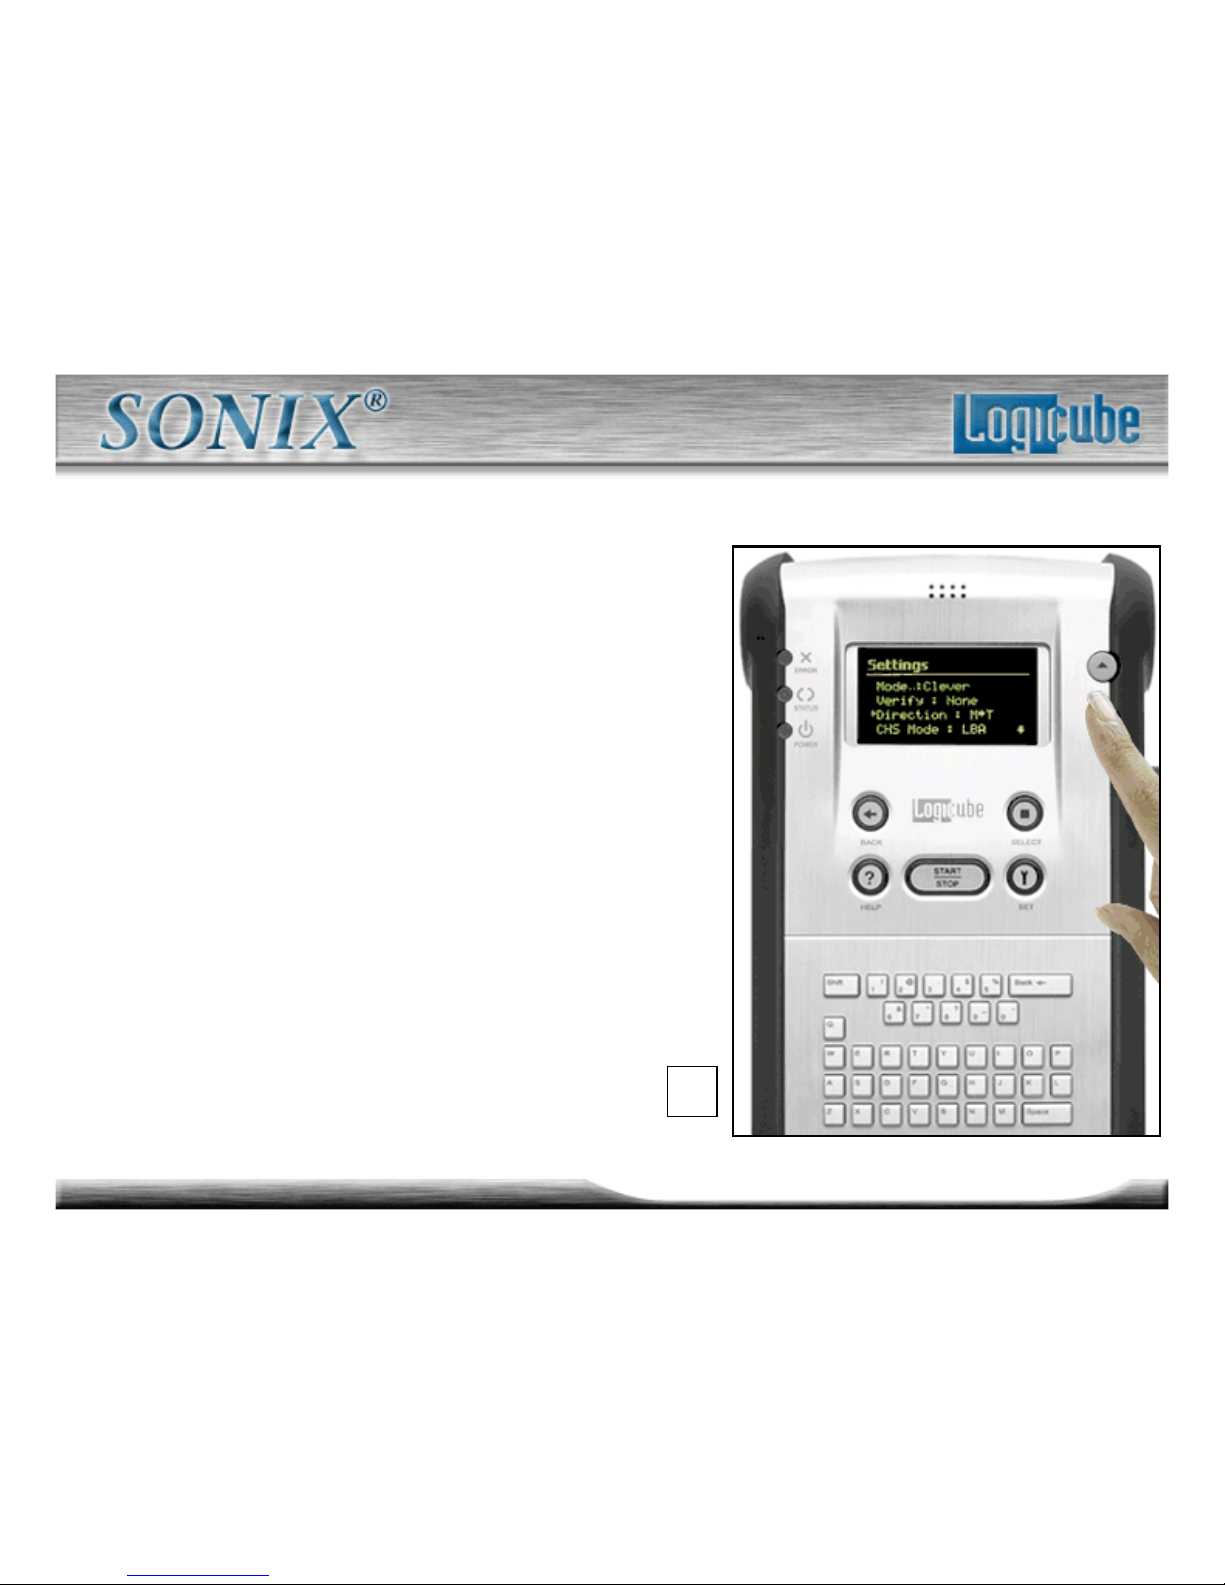
6. Use the Scroll Arrow to move
the pointer “” to the “Direction”
setting.
The “Direction” preference setting
allows you to switch the cloning
direction between Master and
Target drives.
– Note: This is particularly useful
when you need to backup a hard
drive located inside a PC.
6.
Page 34
34
Logicube Confidential Information
Cloning Mode - Clever Clone™ Part 6
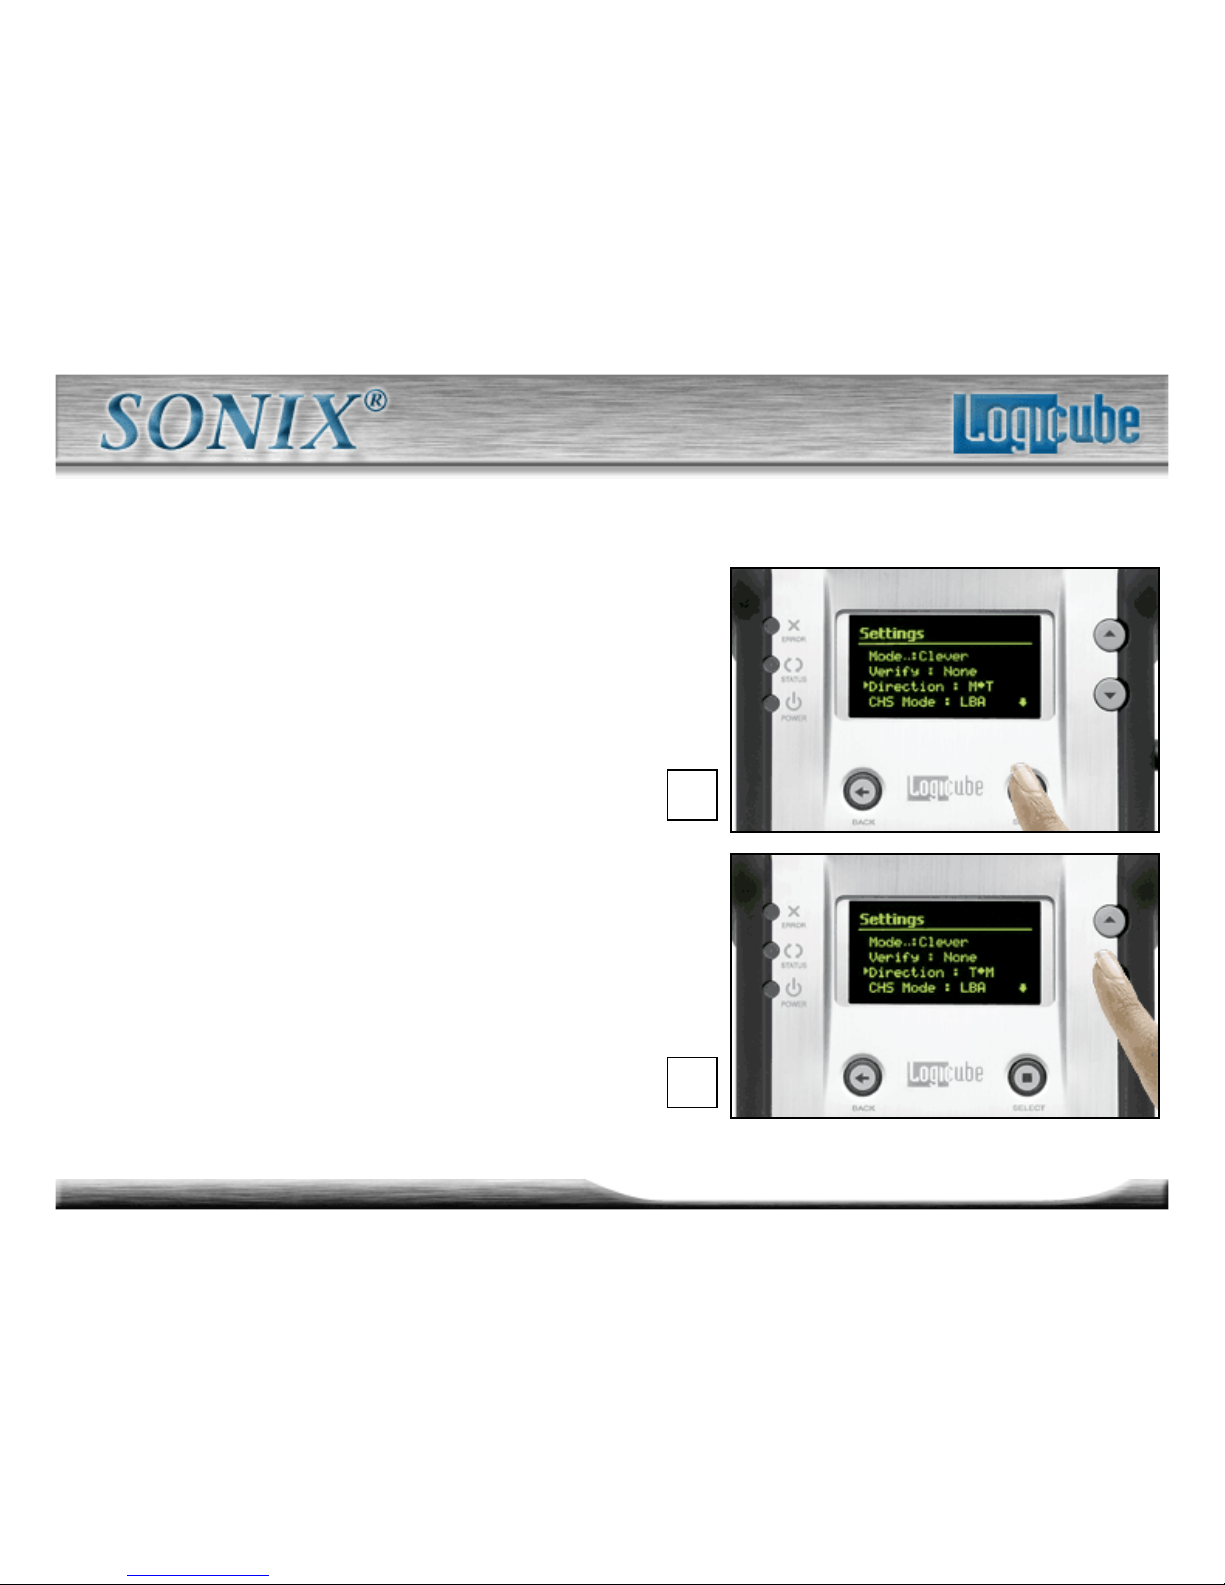
7. MT Master to Target (Default)
– Data is copied from the Master
(internal) drive to the Target
(external) drive.
8. TM Target to Master.
– Copies data from the Target
(external) drive to the Master
(internal) drive.
Note: Use this feature with care as
your Master hard drive can be
overwritten and all the original data on
it will be lost!
9. Press “Select” to enter your choice.
Press the “Down Arrow” to move the
pointer “” to “CHS Mode”.
7.
8.
Page 35
35
Logicube Confidential Information
Cloning Mode - CHS Mode Part 1
“CHS Mode” sets the geometry (Cylinder, Head and Sector)
translation used on the Target drive. CHS information is stored in
the partition table of the hard drive and is used by the BIOS to
determine from which partition to boot.
• The correct setting will depend upon the capacity of the Target
drive and on the BIOS of the PC in which it will be used.
• Check with the hard drive and PC manufacturer to determine
which CHS mode is best as different BIOS systems use different
translation methods for large (over 528 MB)
capacity drives.
Page 36
36
Logicube Confidential Information
Cloning Mode - CHS Mode Part 2
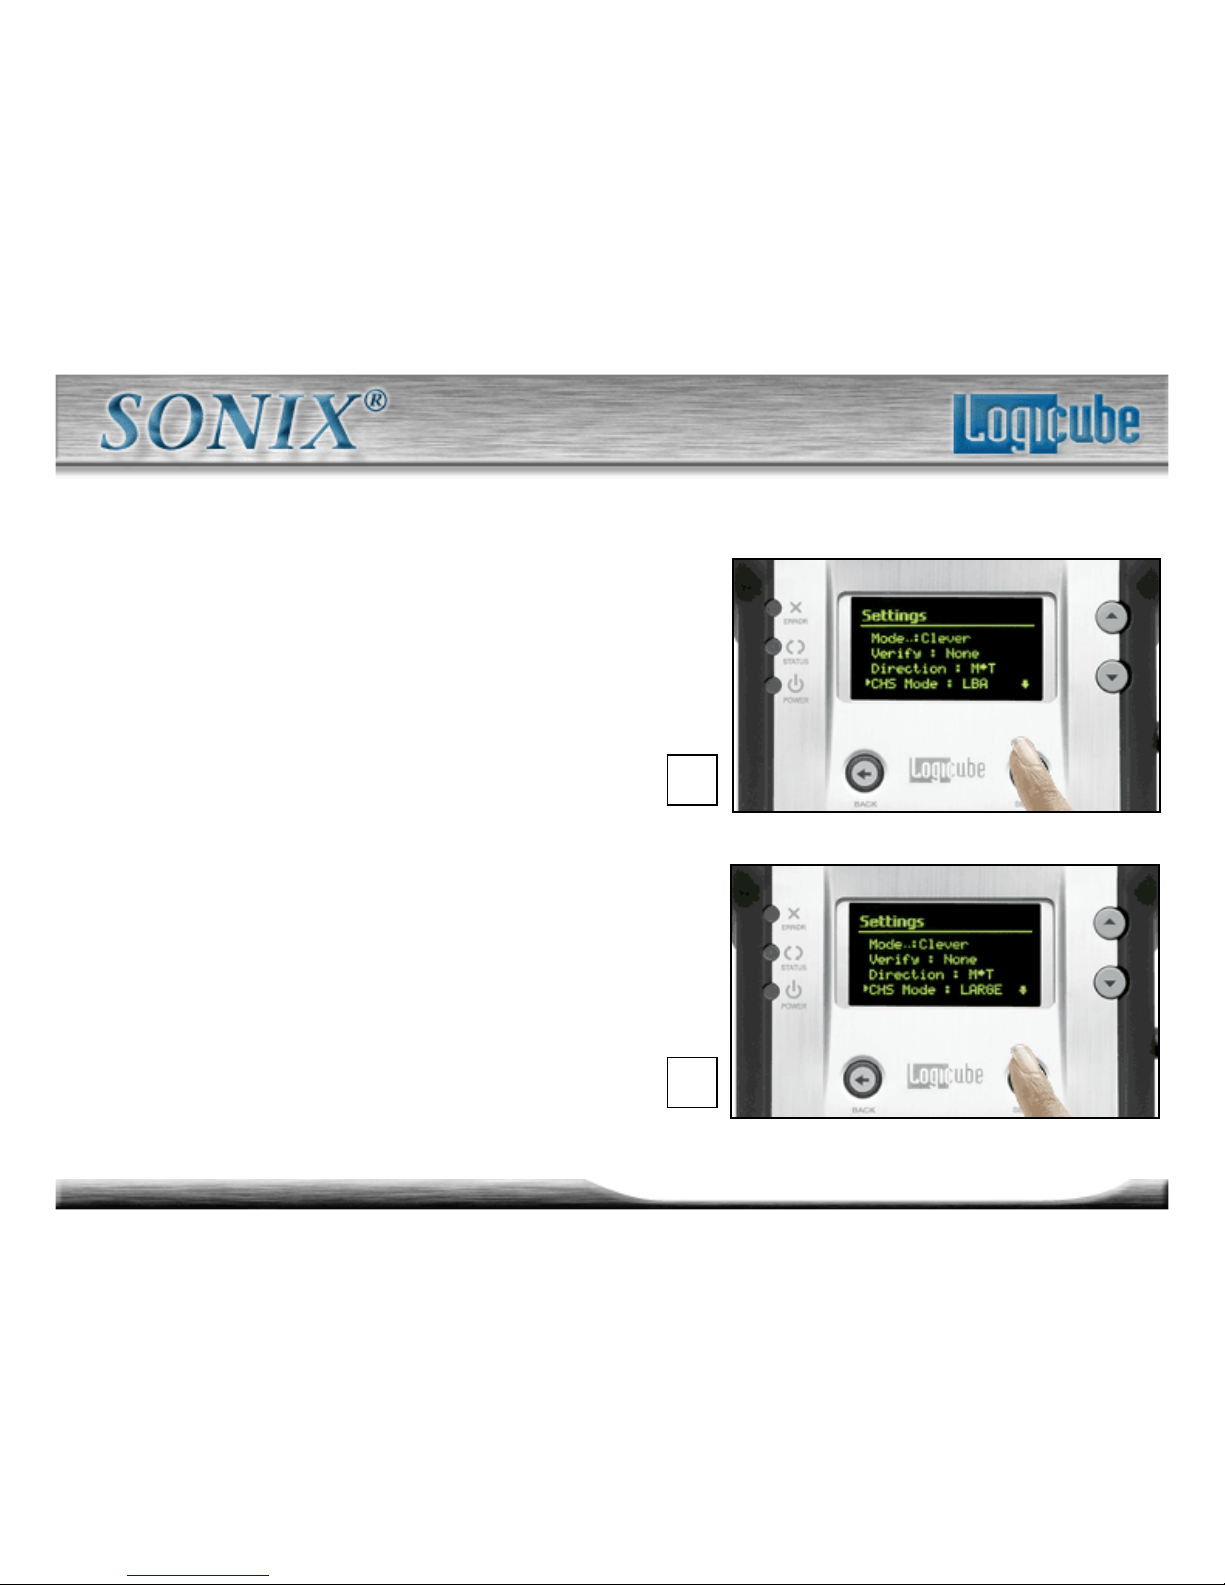
1. With the pointer “” on “CHS Mode” press
“Select” to toggle through the available options.
2. LBA (Default) – This CHS Mode will
work for most hard drive and PC combinations
and should be used
unless otherwise indicated.
3. Large – Also known as Extended CHS
(ECHS) mode. It is used on all Compaq and
HP/Compaq computers, IBM Thinkpad laptops,
and possibly other computers. It should also be
used whenever a Phoenix BIOS version
4.0 or earlier is encountered.
2.
3.
Page 37
37
Logicube Confidential Information
Cloning Mode - CHS Mode Part 3
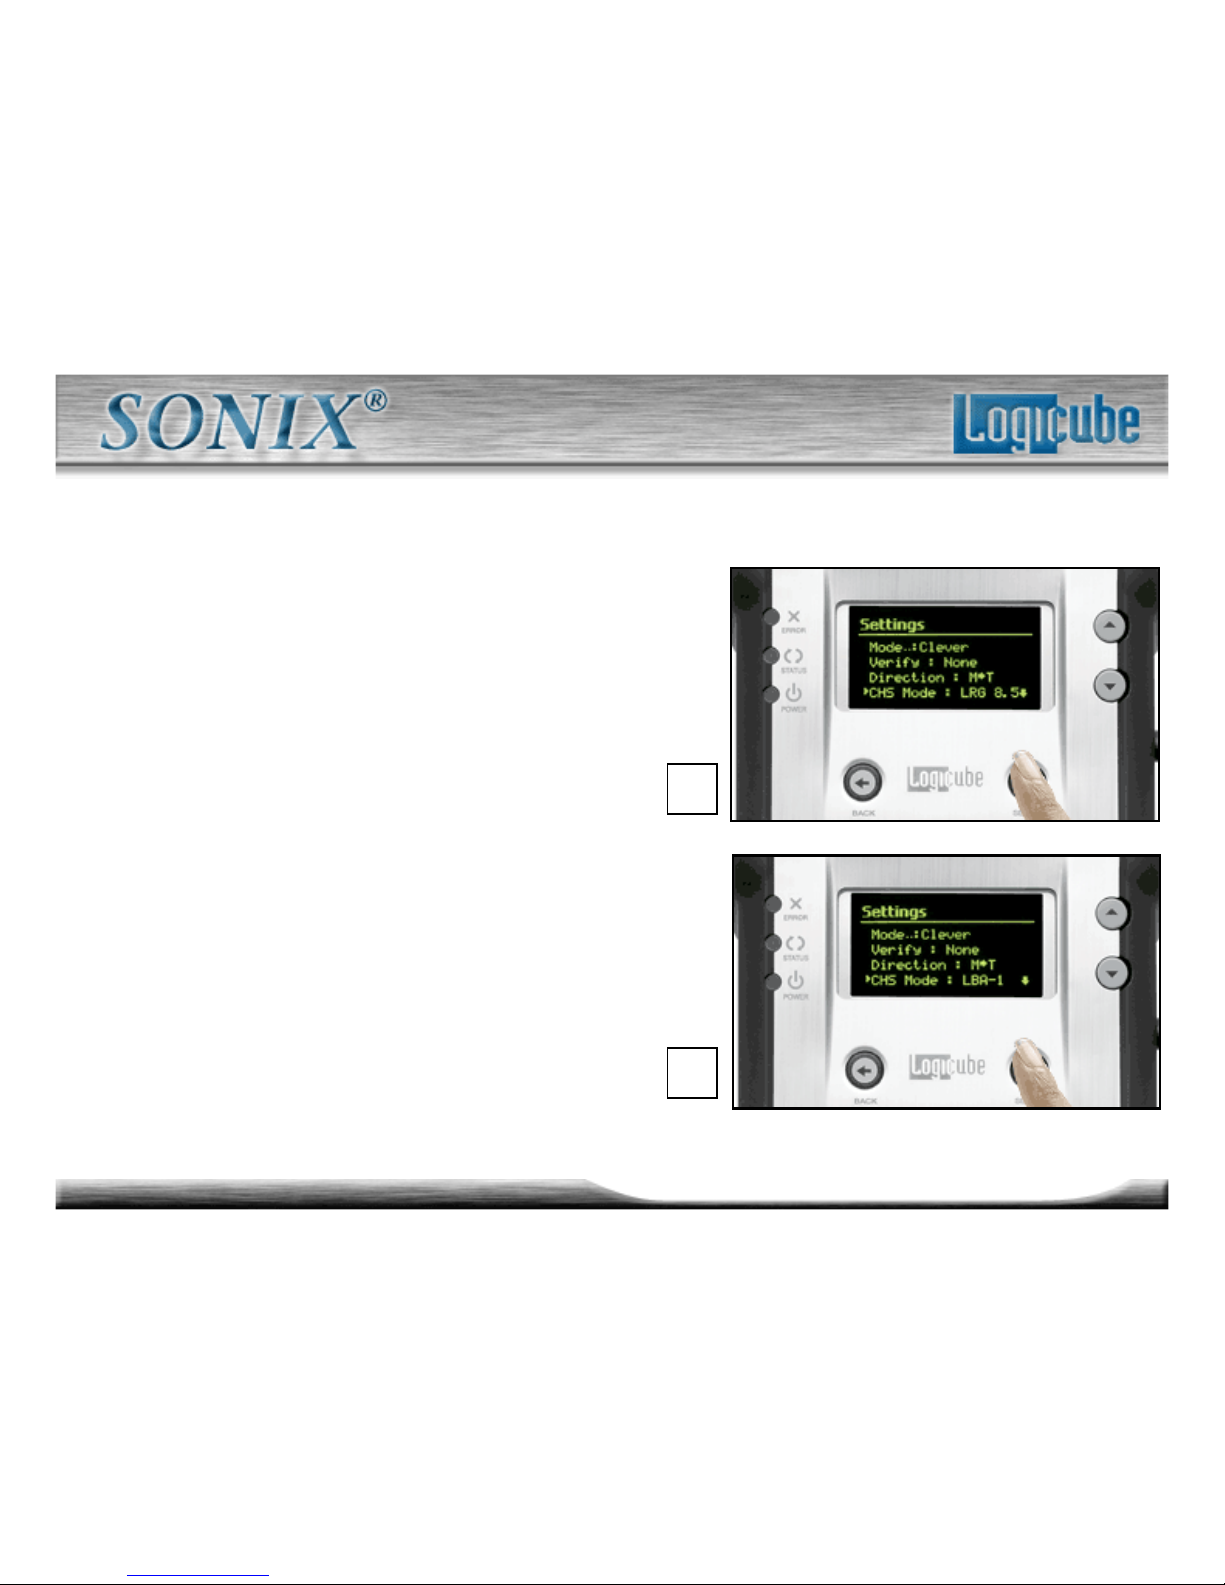
4. LBA 8.5 and Large 8.5 – These
settings force all partitions to remain
below the 8 GB mark. This is useful
with Legacy motherboards that
cannot support drives larger that 8.5
GB.
5. LBA-1, LBA-2, Large-1 and
Large-2 – These settings instruct the
Logicube Sonix™ to “shave off” one
or two cylinders from the total drive
size when constructing the Target
partition tables.
4.
5.
Page 38
38
Logicube Confidential Information
Cloning Mode - CHS Mode Part 4
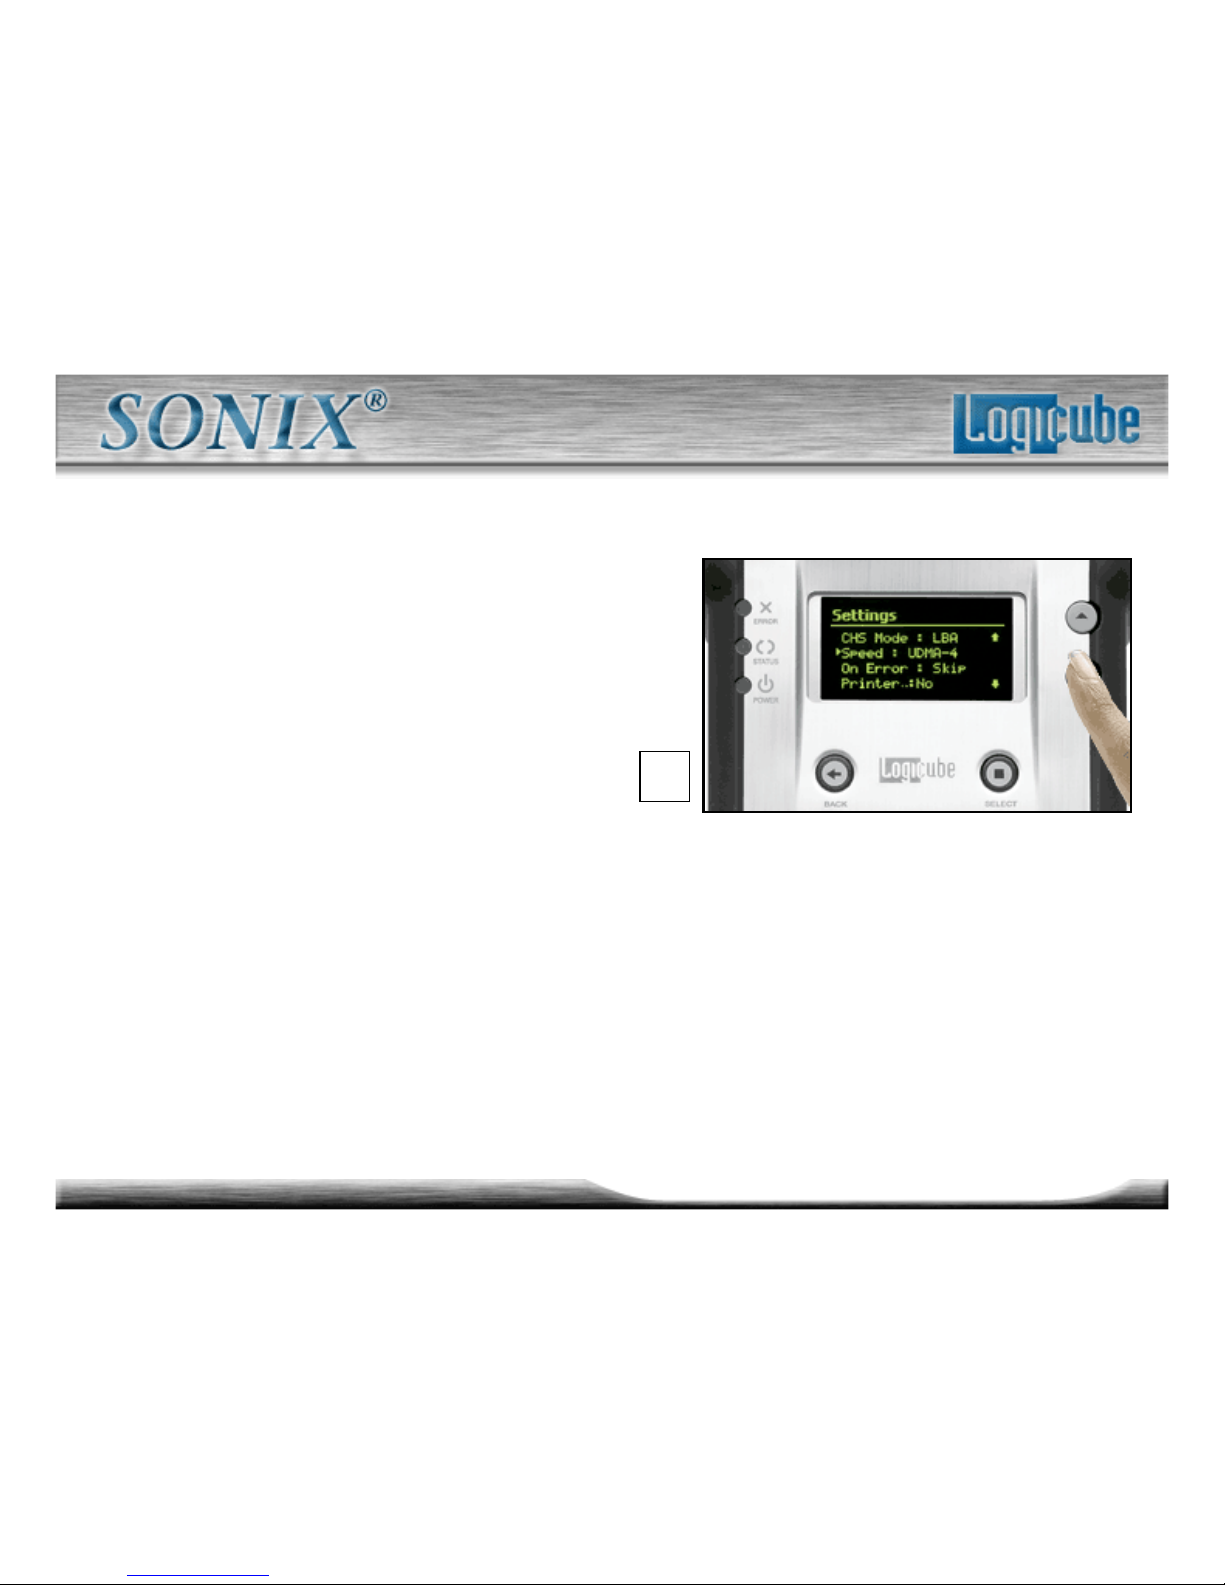
6. Press the “Down Arrow” to move
the pointer “” to “Speed”.
6.
Page 39
39
Logicube Confidential Information
Cloning Mode - Speed Part 1
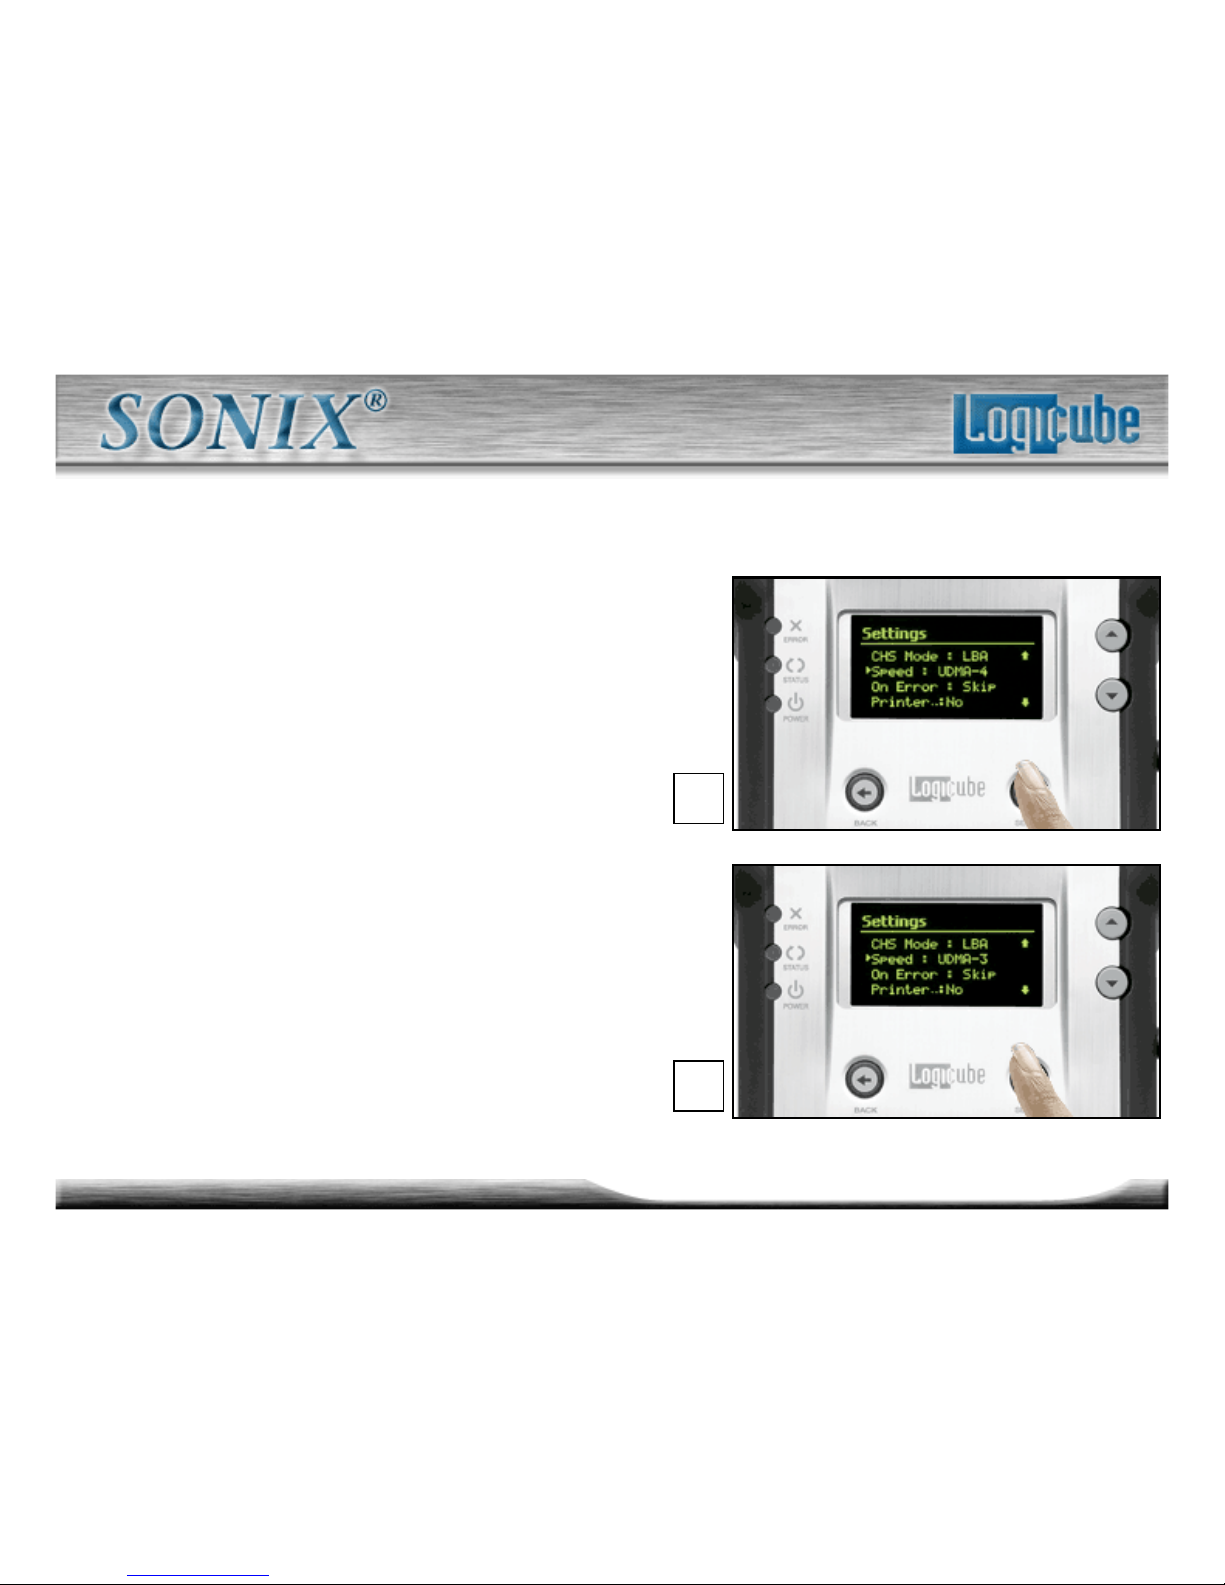
The speed setting provides the
option to set the speed at which
an operation will be performed at.
1. UDMA-4 - The software performs a
test procedure to determine the fastest
setting that the drives will tolerate while
streaming data from one to the other. When
set to UDMA-4, all lower speed grades will
be tested (UDMA 0-4, PIO 0-4).
2. UDMA-3 - Force the unit to use at
most this speed. Set the unit to this
mode in some rare situations where
one or both drives do not support the
higher speeds, and “misbehave”
during automatic speed benchmarking.
1.
2.
Page 40
40
Logicube Confidential Information
Cloning Mode - Speed Part 2
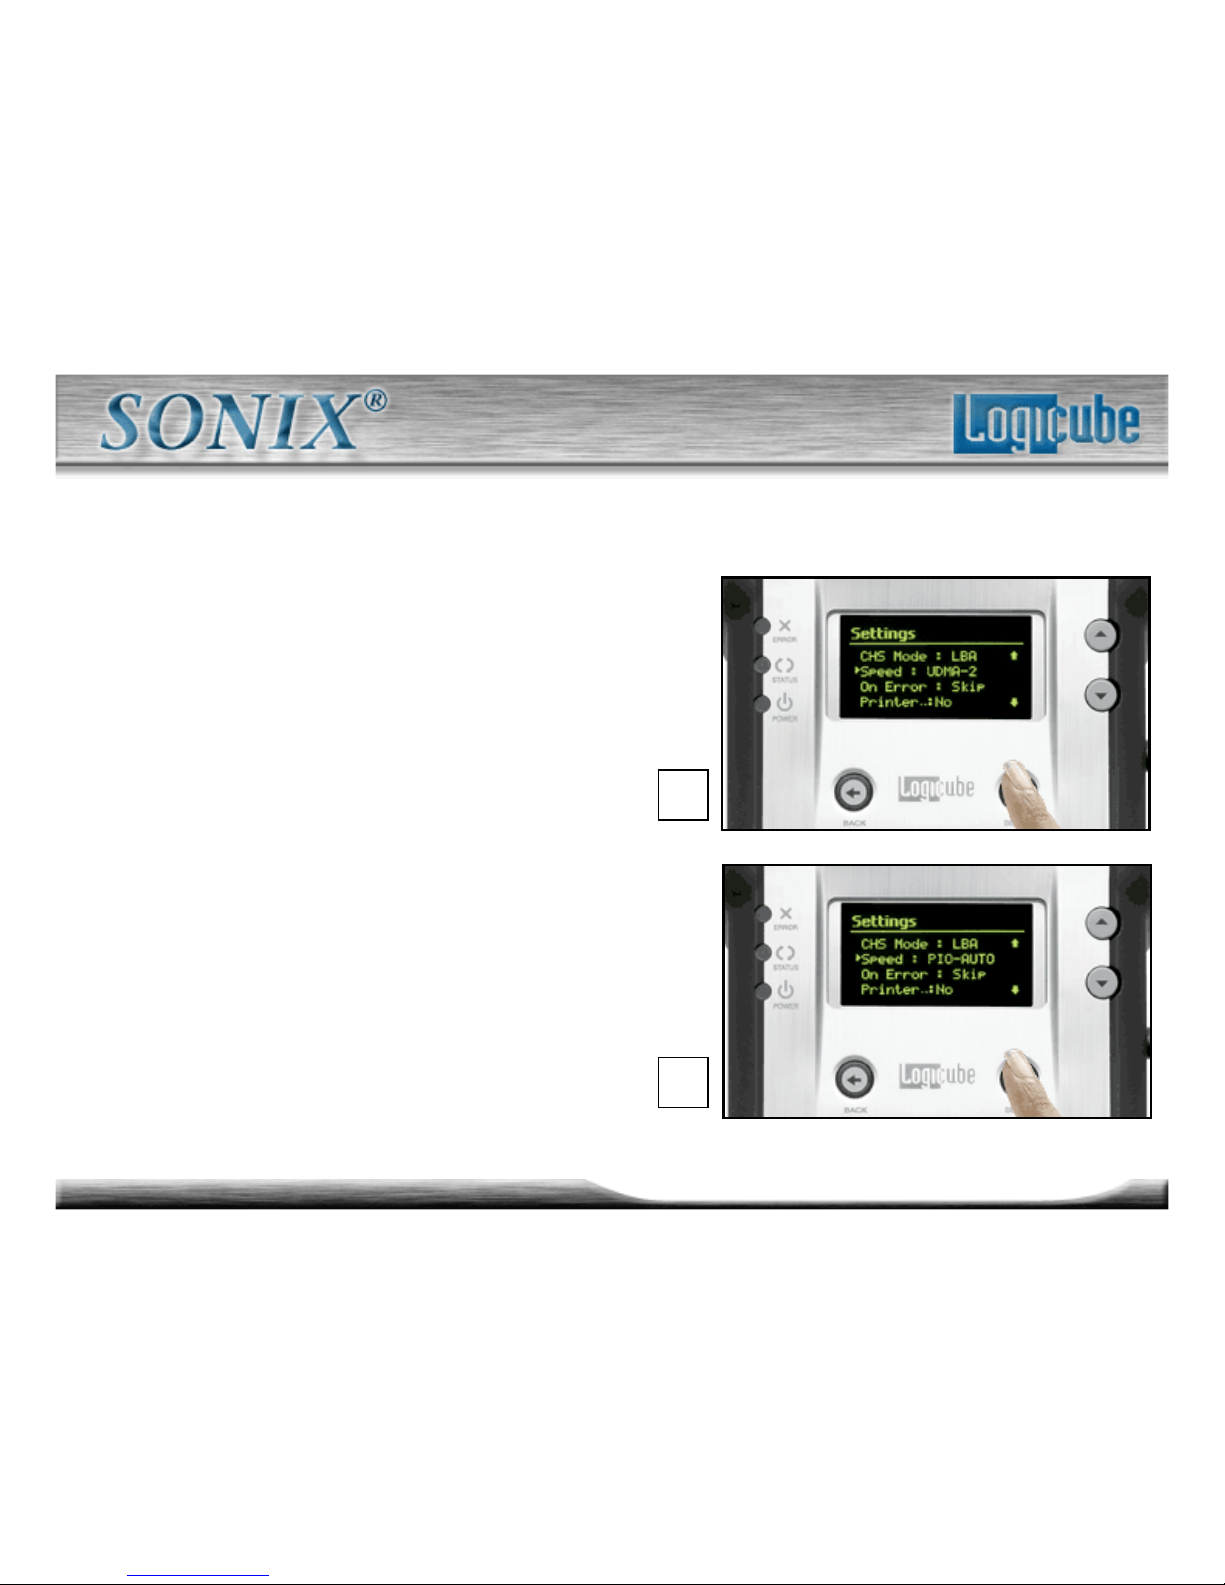
– UDMA-2 - Same as UDMA-3.
– UDMA-1 - Same as UDMA-3.
– UDMA-0 - Same as UDMA-3.
3. PIO-Auto (PIO-4) – Force the unit
to use this as the highest speed
(PIO-4). Set the unit to this mode in
some rare situations where one or
both drives do not support higher
speeds, and “misbehave” during
speed benchmarking.
3.
2.
Page 41
41
Logicube Confidential Information
Cloning Mode - Speed Part 3
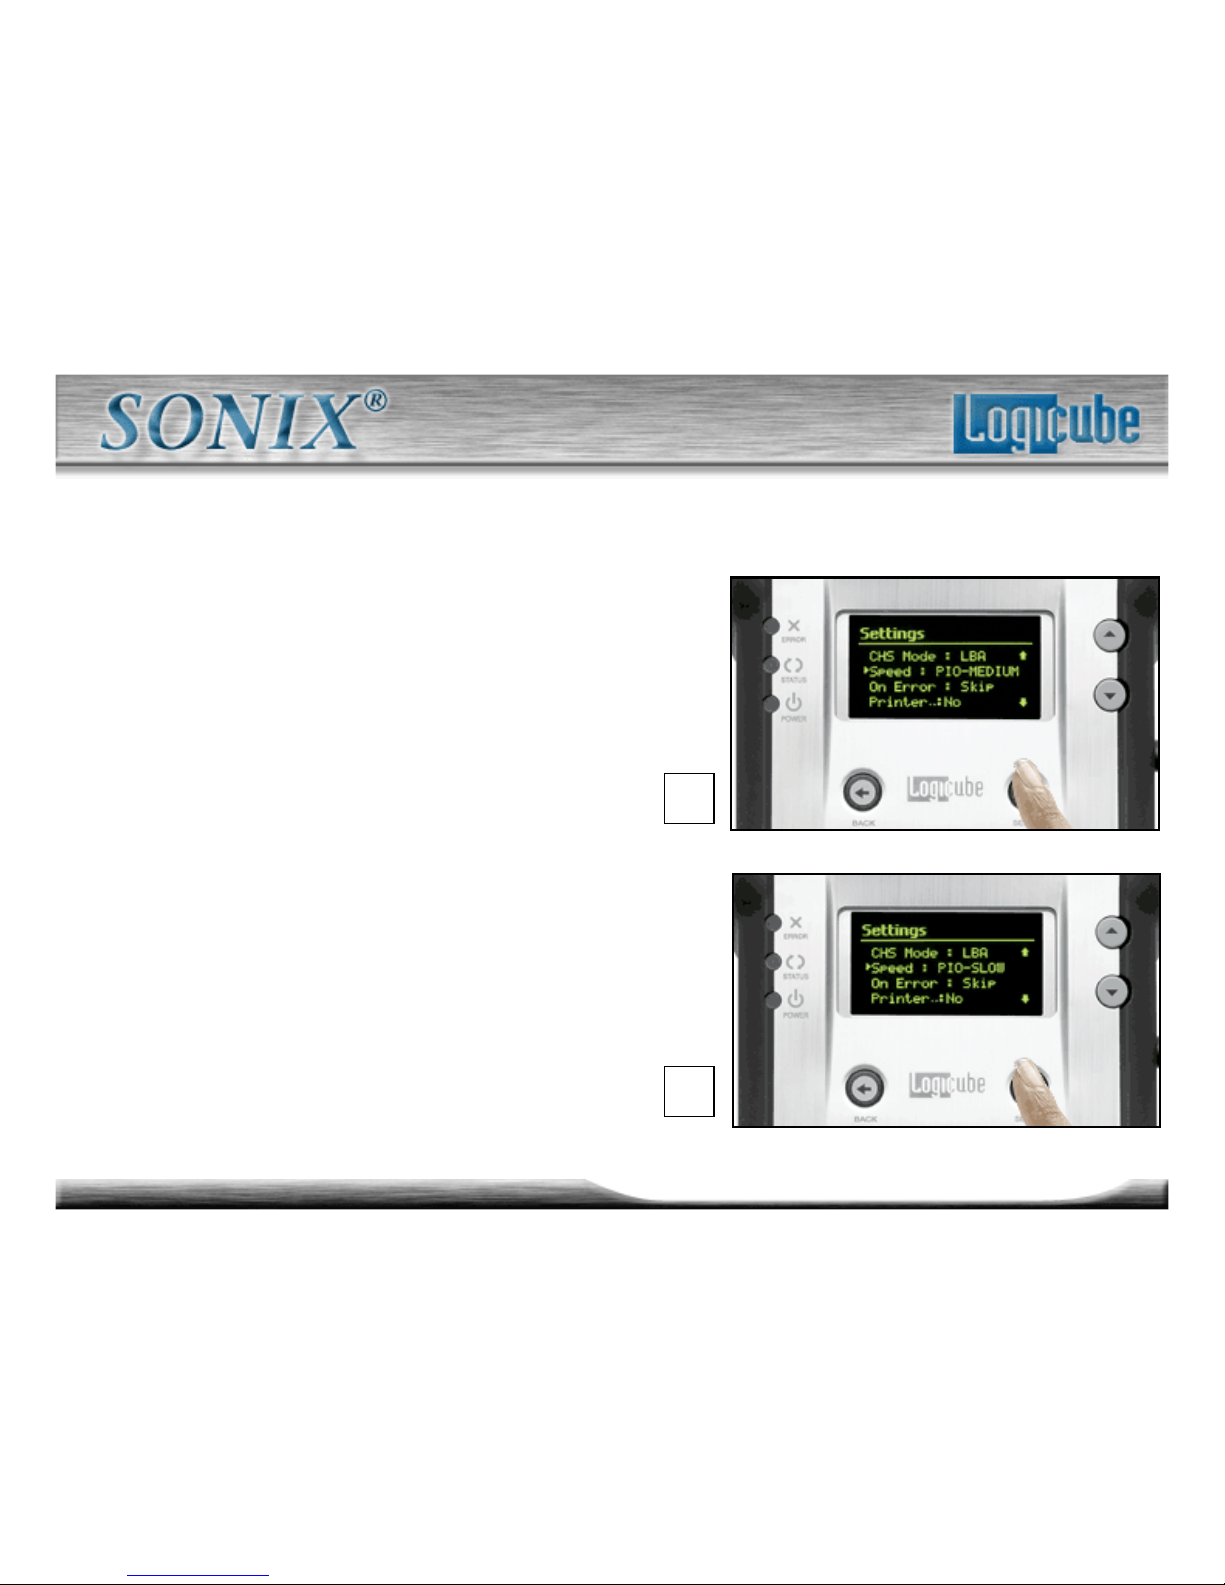
4. PIO-Medium – This is a fixed value
that almost all drives will tolerate. It
will result in copying speeds from
about 200 to over 500 MB per minute
depending upon the characteristics of
the drives.
5. PIO-Slow – This is a speed value
that all drives will be able to tolerate. It
supports copying speeds from 100 to
over 300 MB per minute depending on
the characteristics of the drives.
4.
5.
Page 42
42
Logicube Confidential Information
Cloning Mode - Speed Part 4
6. PIO-CPU – This is an extremely slow
speed value that all drives will be able to
tolerate. It supports copying speeds from
15 to 20 MB per minute.
– Note: CPU speed is designed for
cloning DiskOn Modules, Compact Flash
drives and other solid – state storage
devices. It is only available
in 100% Clone Mode.
Page 43
43
Logicube Confidential Information
Cloning Mode - On Error Part 1
The On Error setting determines the
behavior of the unit in the case where
bad spots are detected on
the Master drive.
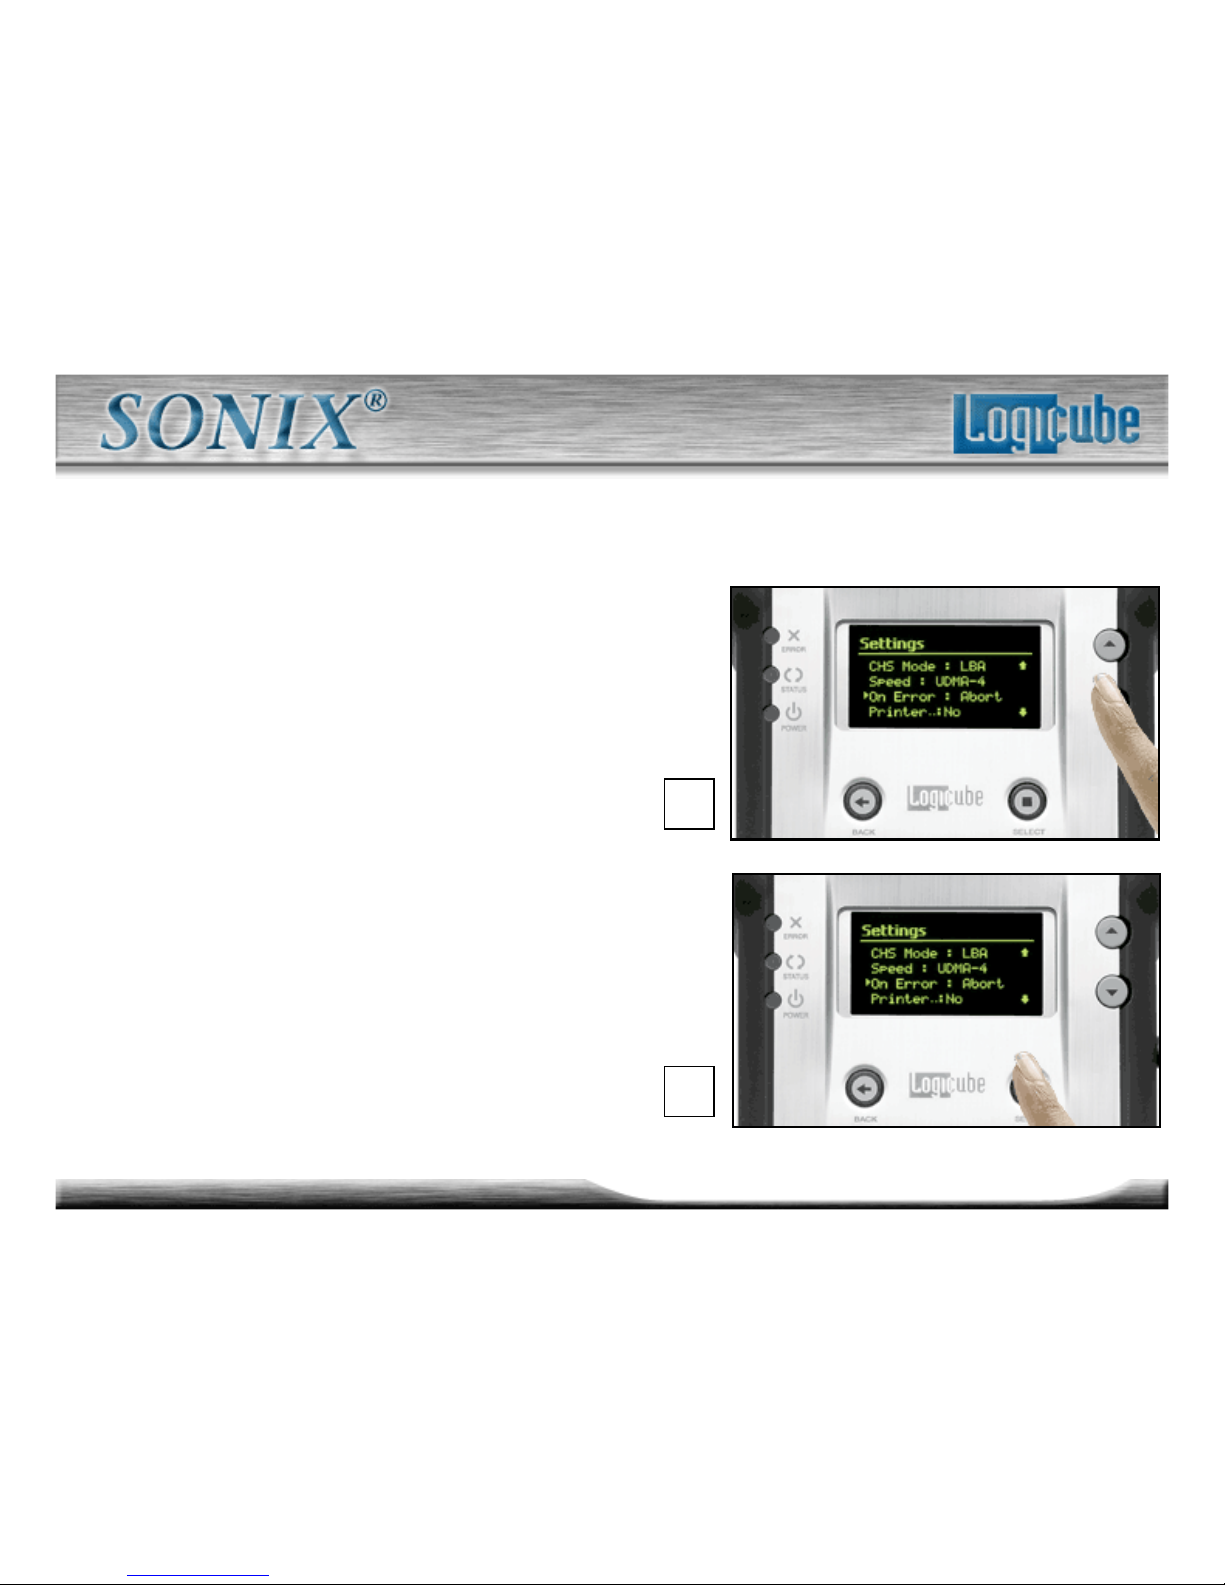
1. Press the “Down Arrow” to
move the pointer “” to “On
Error”. Use the “Select” button
to toggle between the options.
2. Abort - This mode will cause the
Logicube Sonix™ to halt if an error
such as a bad suspect drive
sector is encountered.
1.
2.
Page 44
44
Logicube Confidential Information
Cloning Mode - On Error Part 2
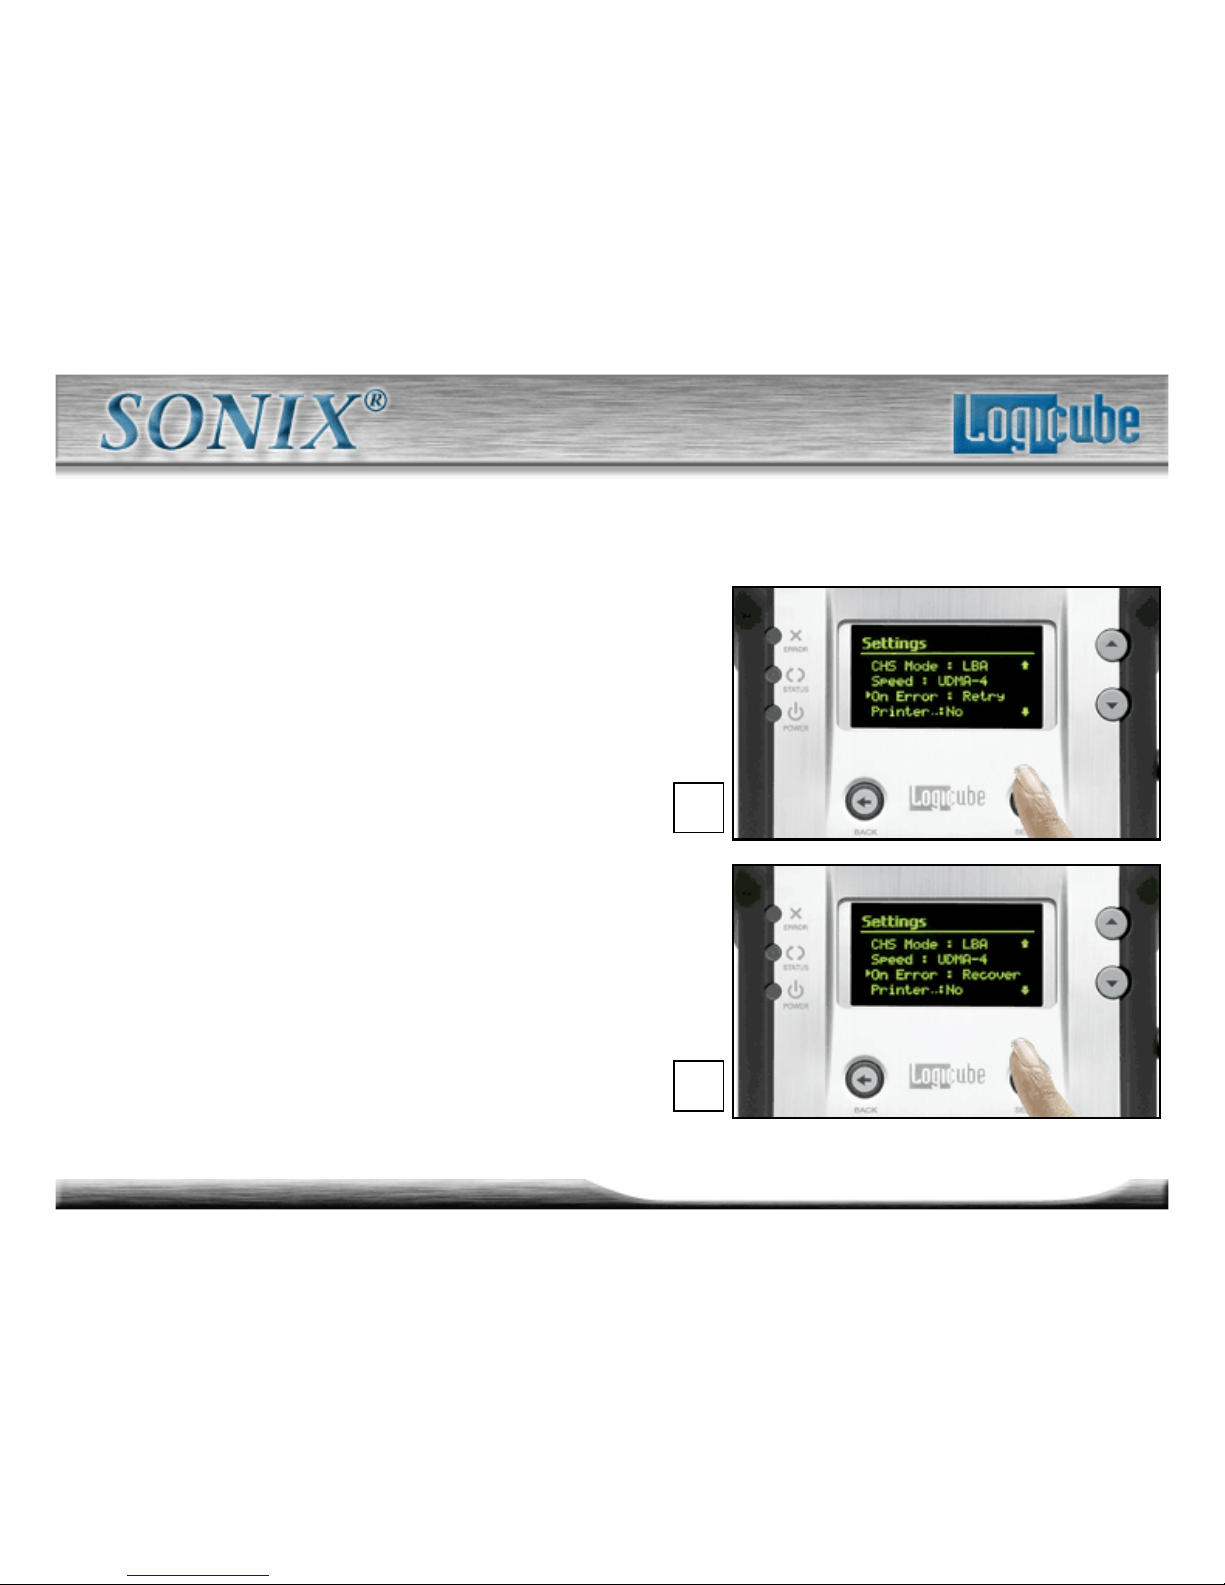
3. Skip - The default setting is Skip.
Skip will allow the Logicube Sonix™
to continue by stepping over the bad
sector.
4. Retry - Retry option will instruct the
Logicube Sonix™ to make
several attempts to read data
from the damaged area of the drive.
5. Recover - Recover will attempt
to recover as many bytes of data
as possible from each bad sector that
is encountered
–Note: data in any skipped sectors
will NOT be copied to the Target
drive.
4.
5.
Page 45
45
Logicube Confidential Information
Cloning Mode - Clever Clone™ Part 6
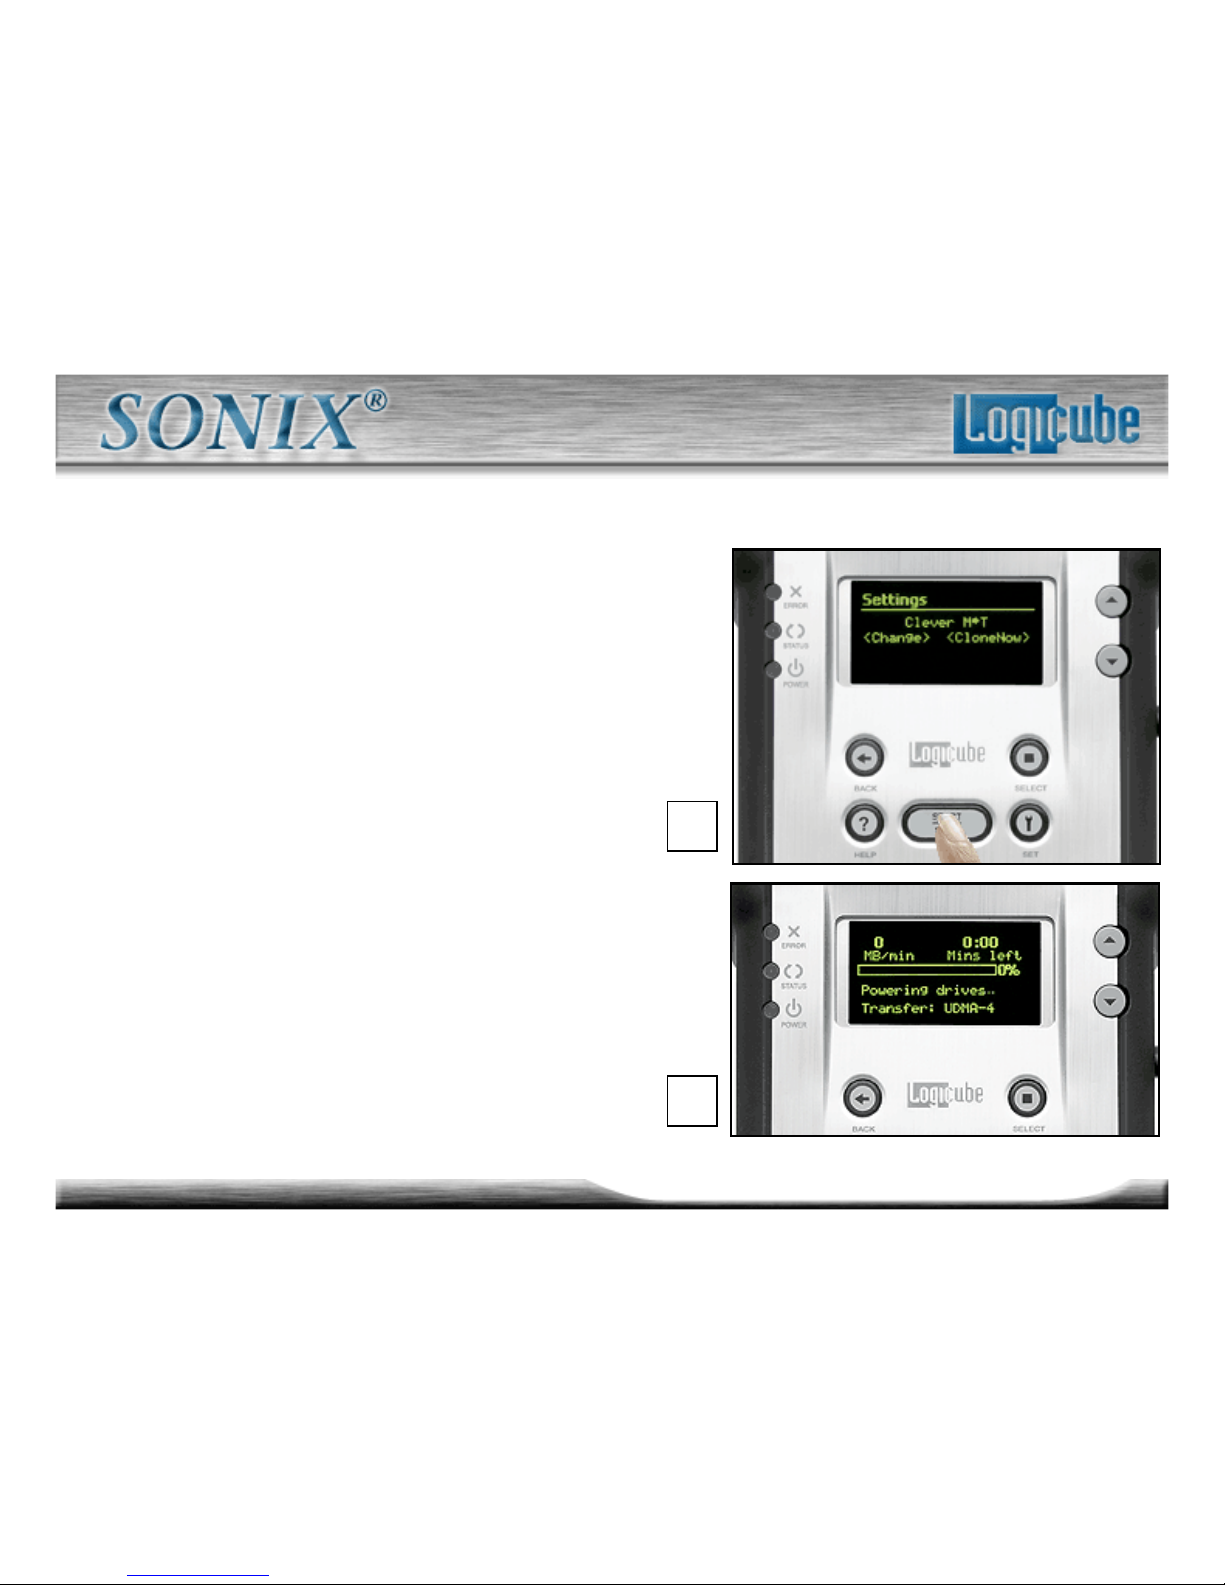
1. Now that all the settings have
been selected, hit “Stop/Start” to
view the “Clone Preview” screen.
2. Press “Stop/Start” again and the
Cloning session starts by powering
the drives.
1.
2.
Page 46
46
Logicube Confidential Information
Cloning Mode - Clever Clone™ Part 7
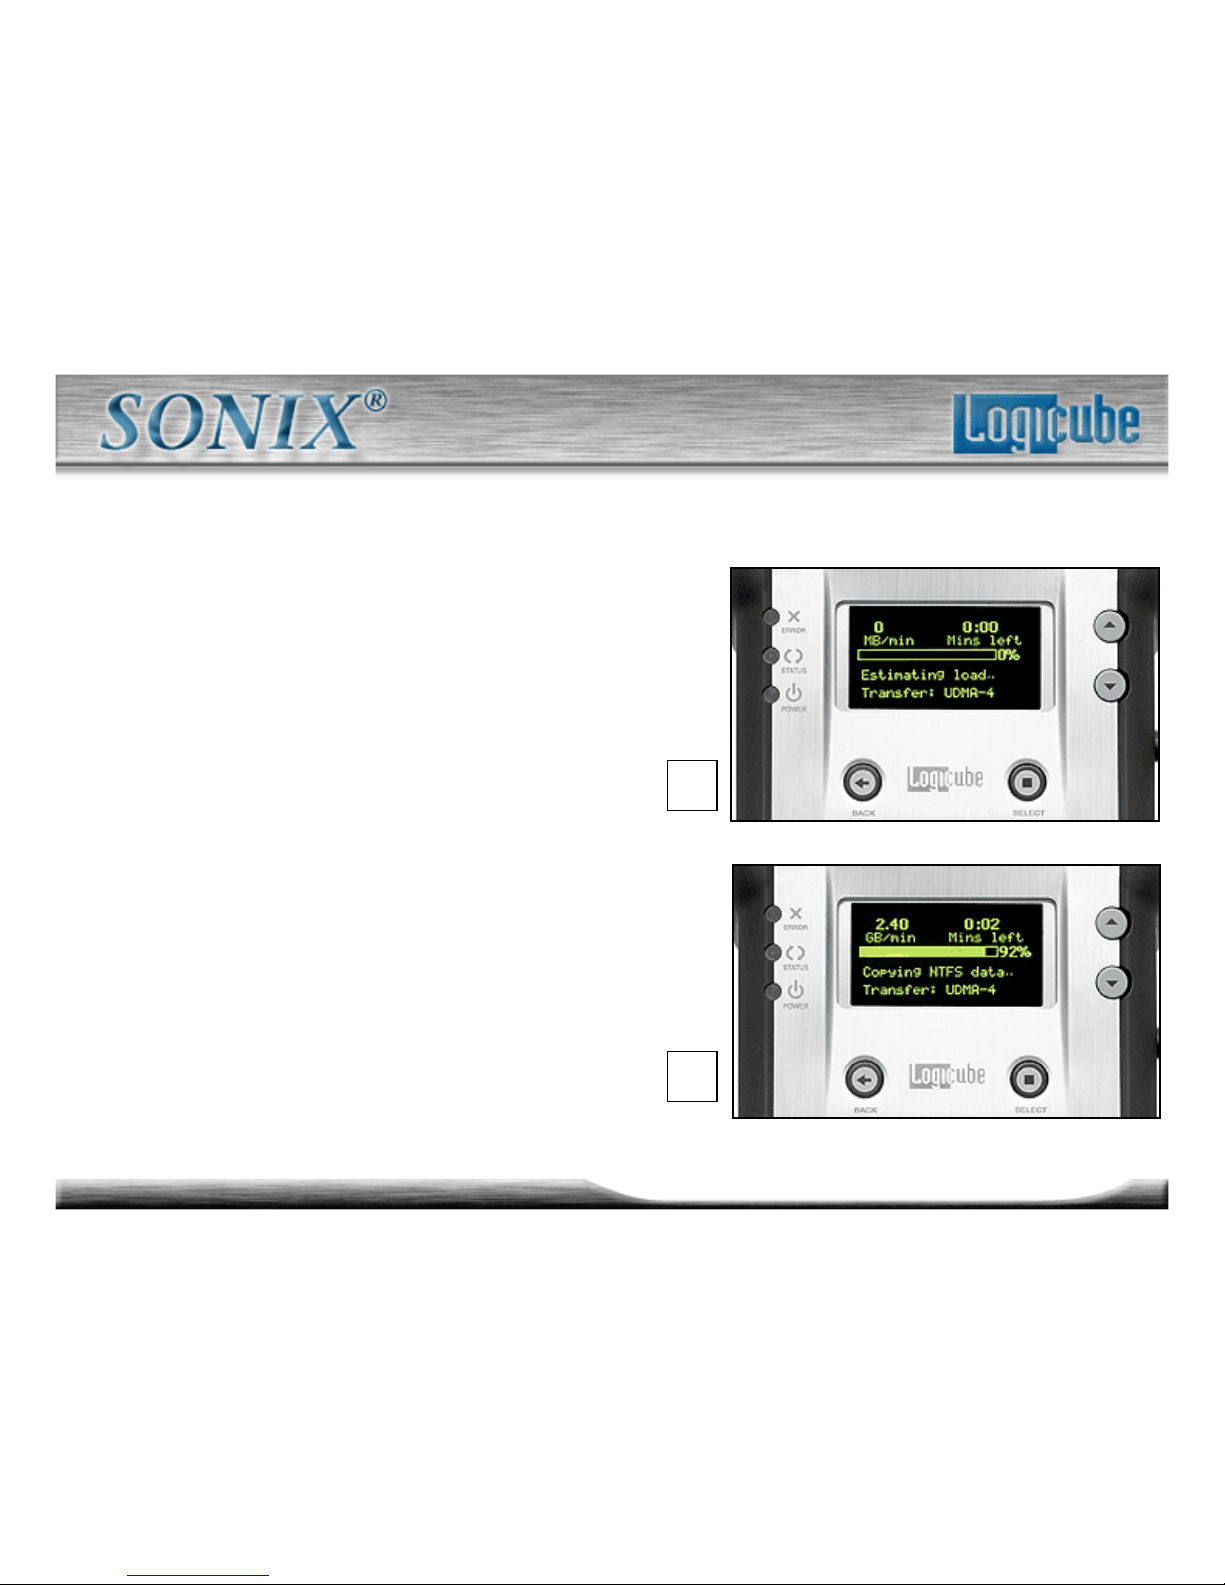
3. Clever Clone estimates the
correct size of the Target Drive’s
partition.
4. A progress bar shows how
much data has been copied, the
speed and time remaining.
3.
4.
Page 47
47
Logicube Confidential Information
Cloning Mode - Clever Clone™ Part 8
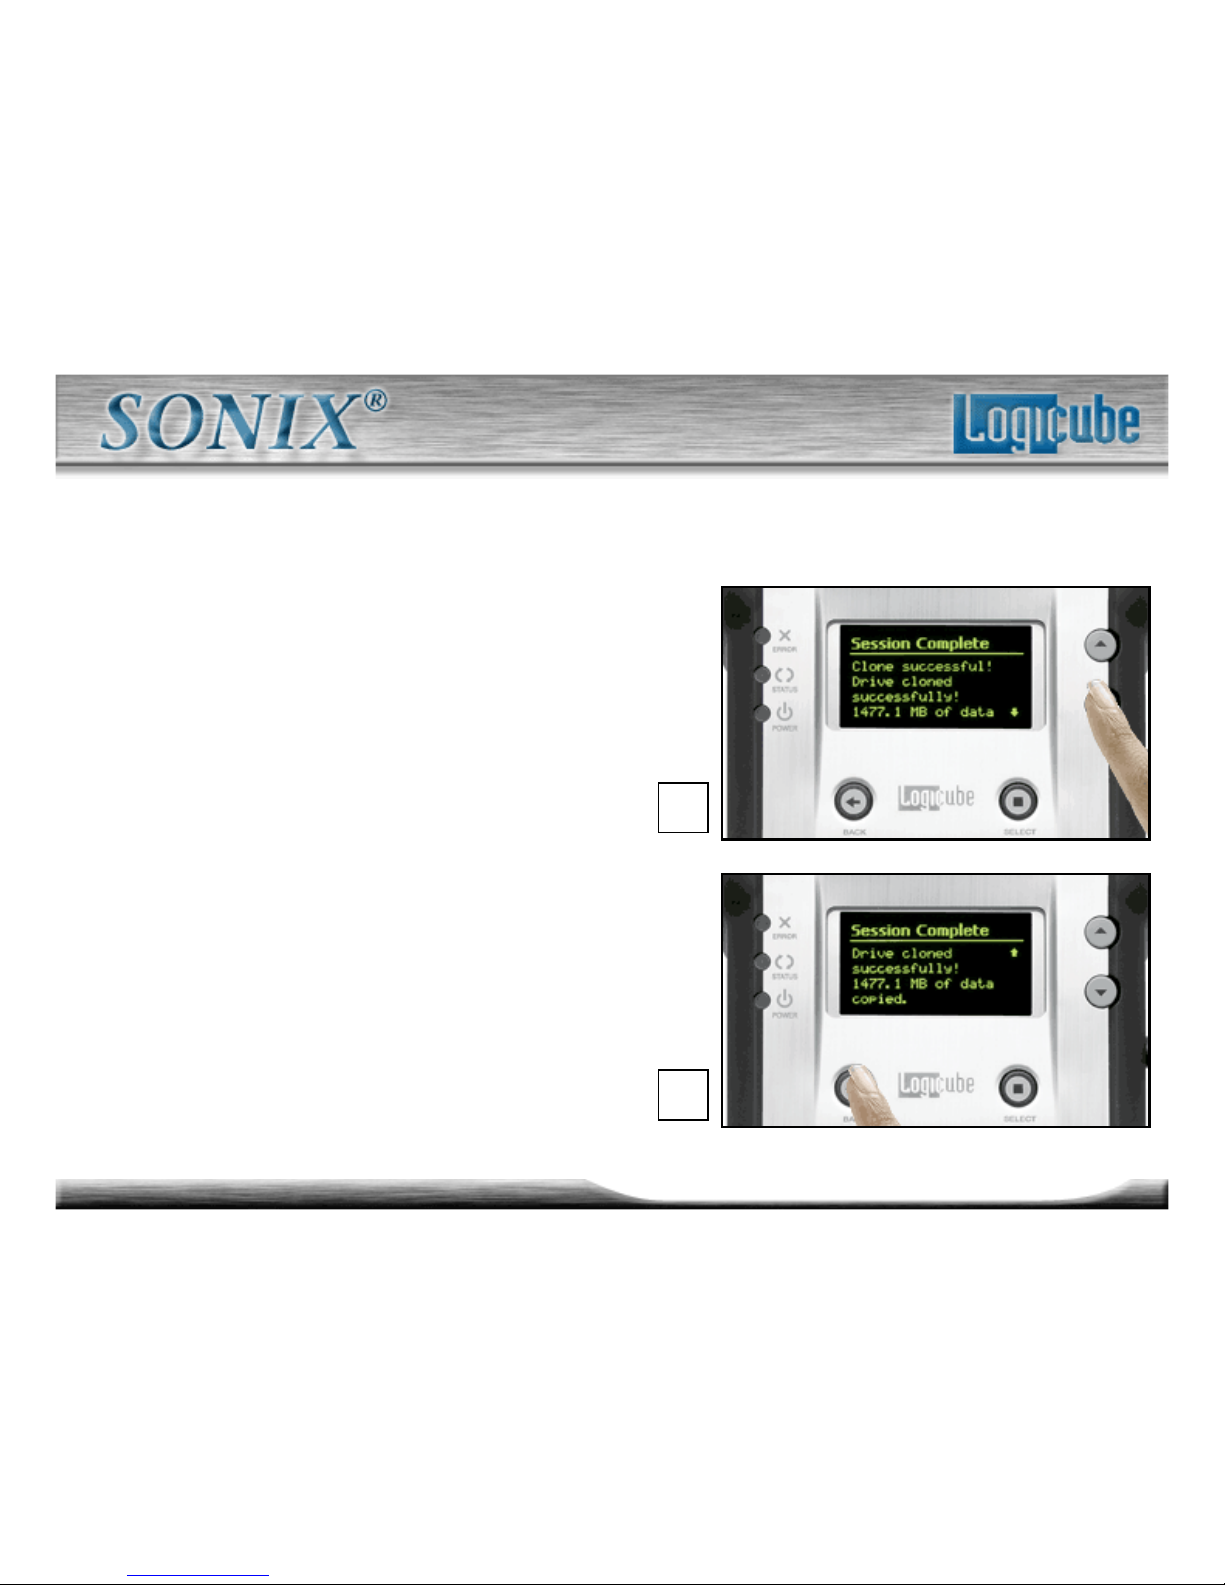
5. The Logicube Sonix™ will
notify you when cloning has
completed.
6. Use the “Down Arrow” to
view all the information.
7. Press the back button to
return to the main menu.
6.
7.
Page 48
48
Logicube Confidential Information
Selective Partitions™ Part 1
Selective Partitions™ is the most
elaborate and most flexible cloning
mode. It provides the highest level
of control over the cloning process,
allowing you to individually select
one or multiple Master drive
partitions.
It also allows you to choose a
unique copy method for each.
– Note: Not all copy methods are
available for all partition types.
Page 49
49
Logicube Confidential Information
Selective Partitions™ Part 2
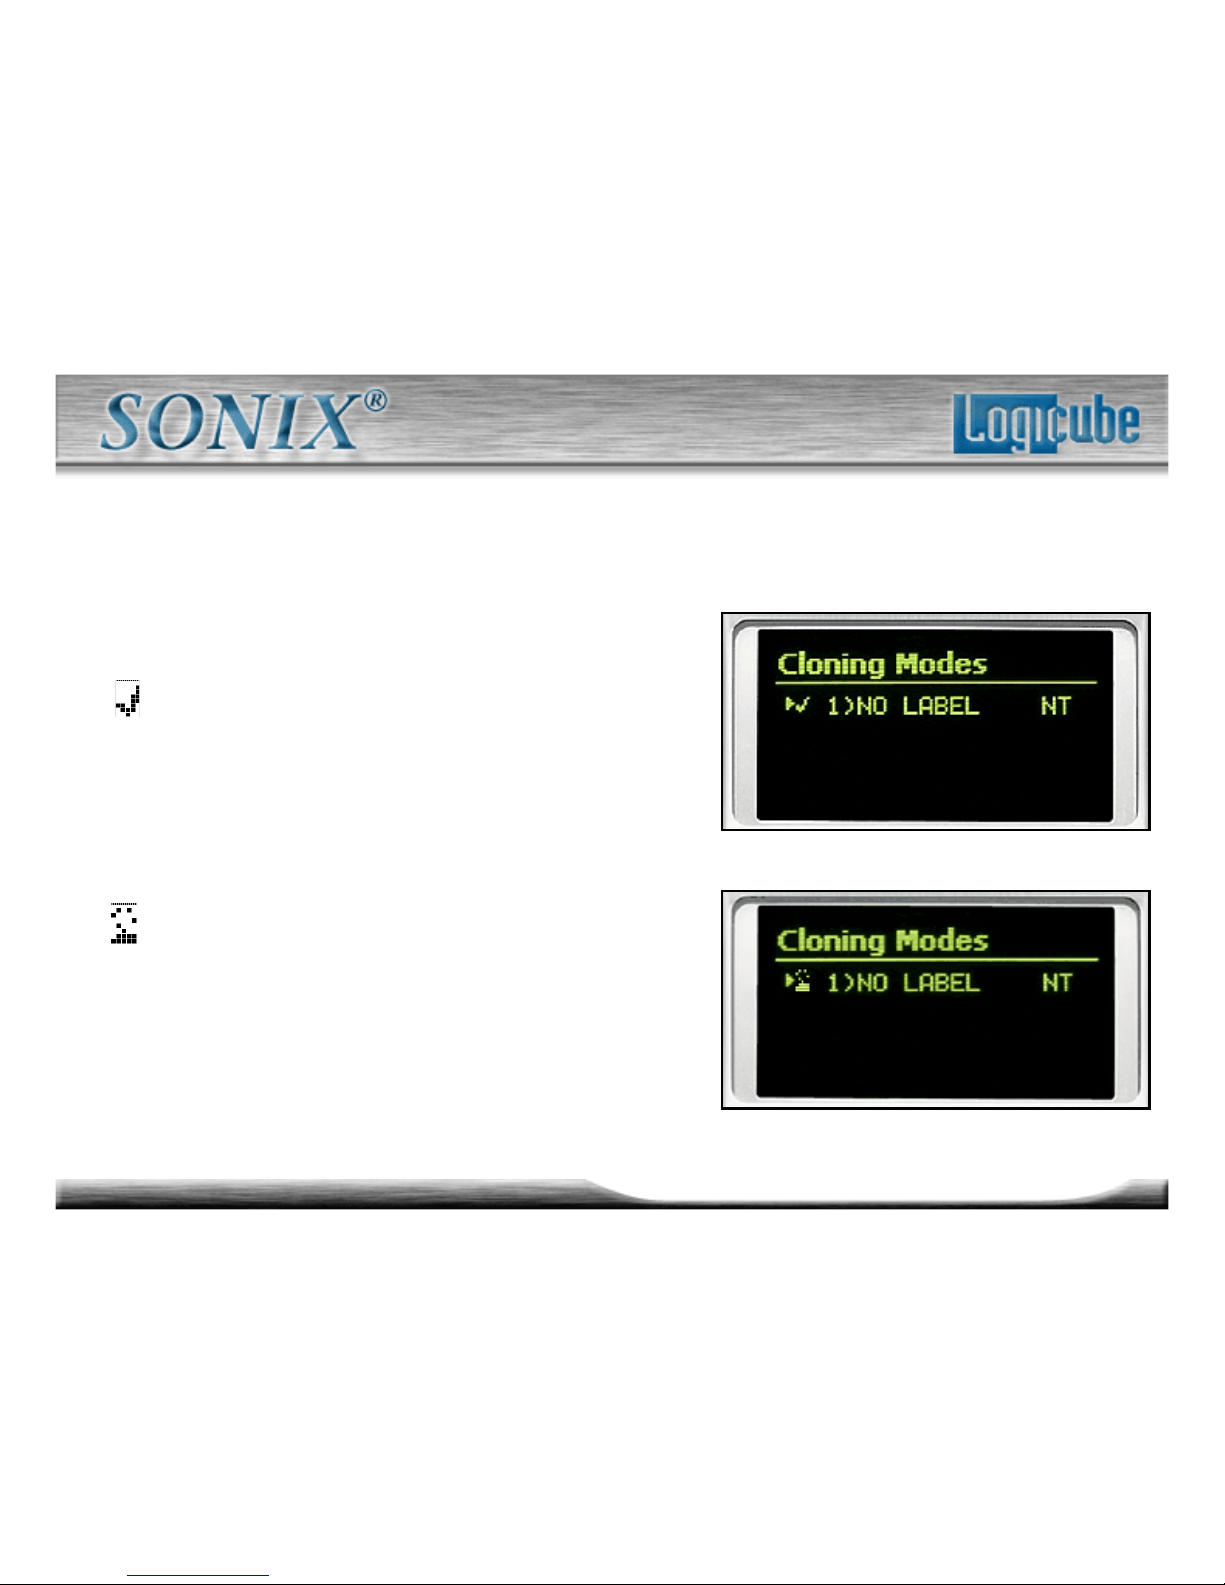
The “checkmark” means that this
partition is set to be Clever Cloned.
Clever Clone™ (Default) – Allows
the Logicube Sonix to determine the
best (and usually fastest) way to clone
a selected partition. It works with all
FAT16, FAT32 and NTFS partitions.
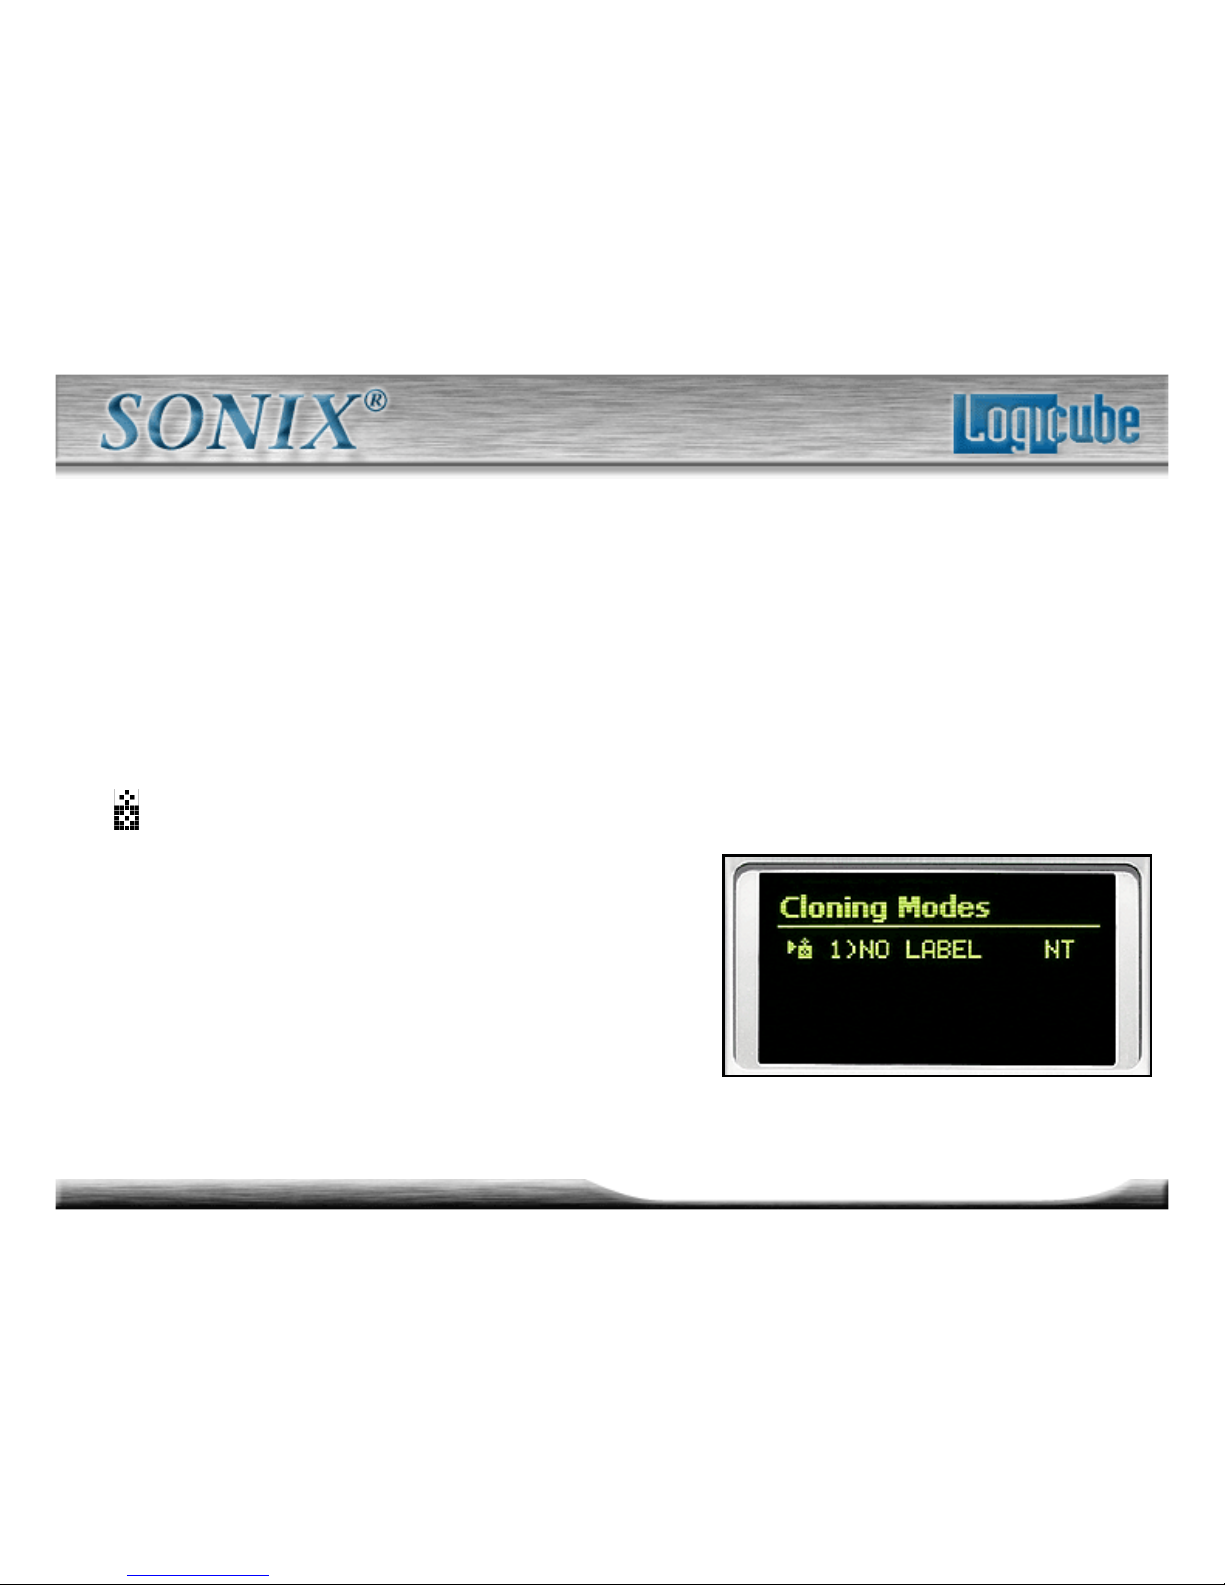
Defragment – Using an advanced
defragmentation algorithm, this copy
method creates a Target partition with
contiguous files and no gaps. Works
with all FAT16 and FAT32 partitions.
Page 50
50
Logicube Confidential Information
Selective Partitions™ Part 3
– Note: The Logicube Sonix™ will resort
to defragment mode if the given partition
is FAT16 and a cluster size change is
required to create a valid Target
partition.
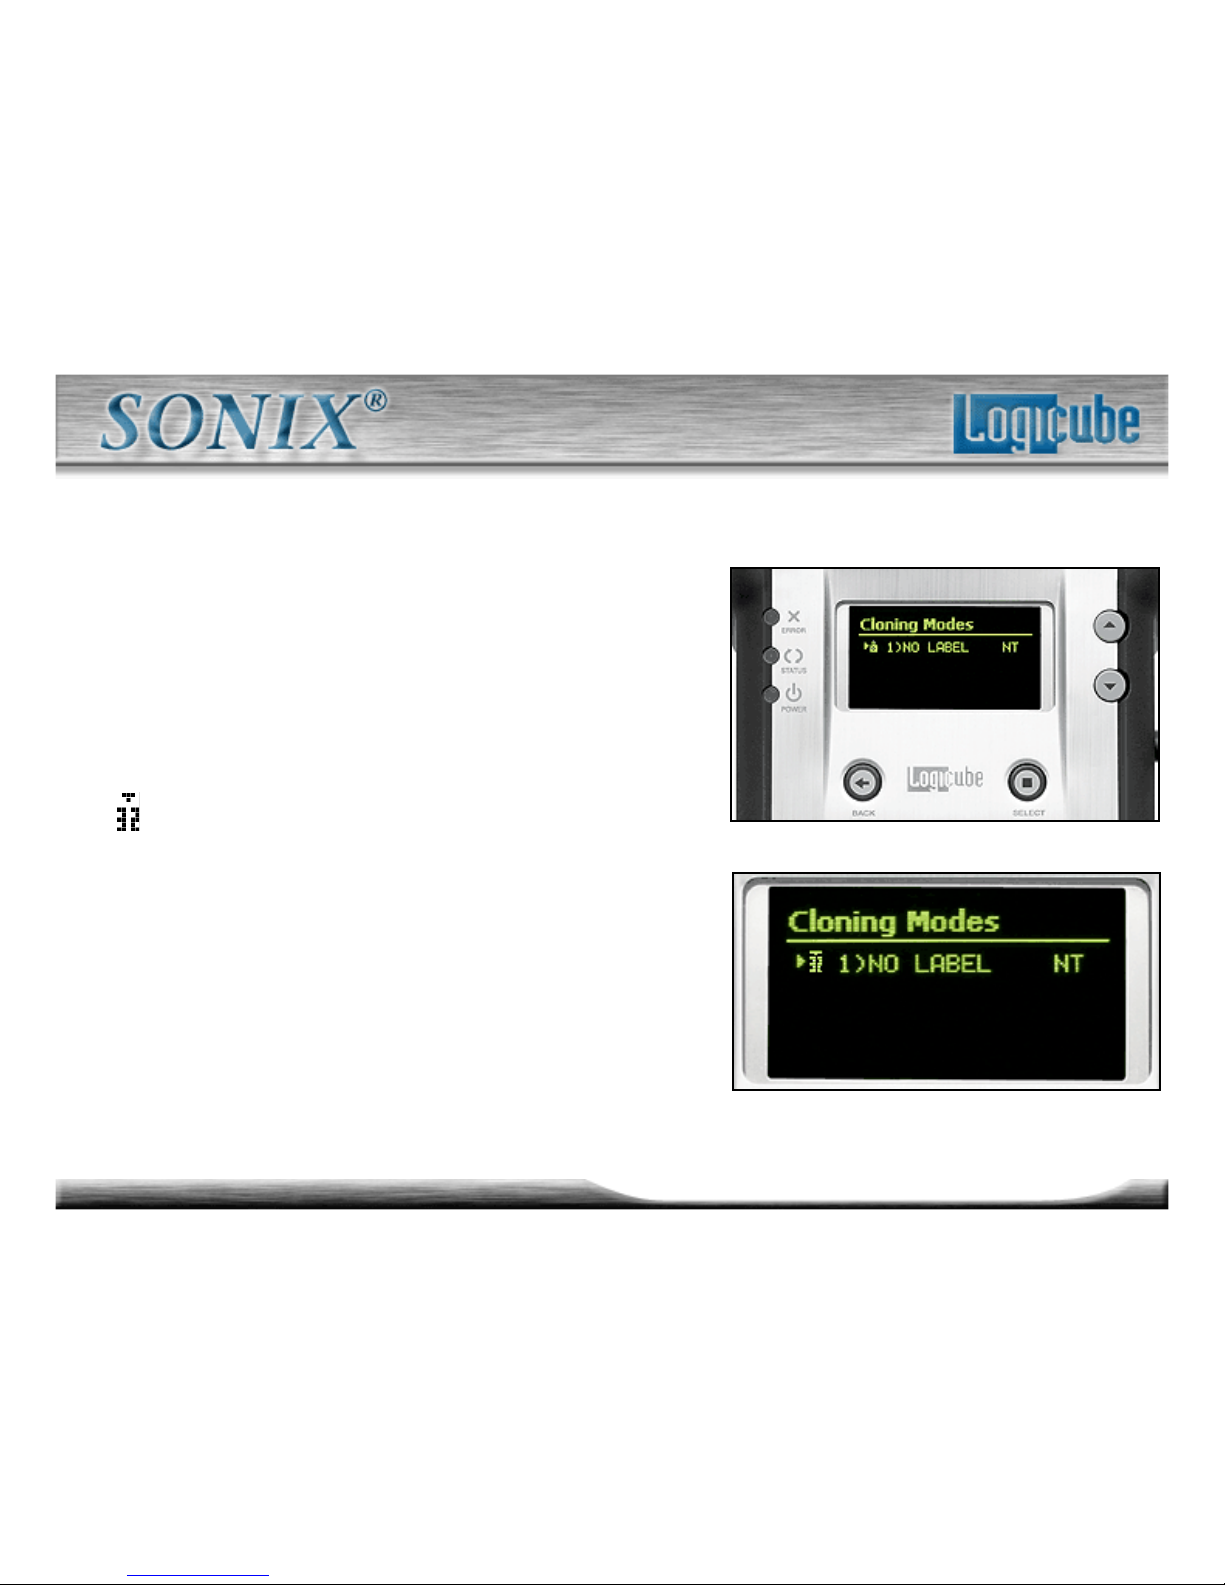
Partition Mirror – This setting
clones the full contents of the
selected partition without any
partition scaling. (This setting is
similar to 100% Clone mode, which
mirrors the entire
Master drive.)
Page 51
51
Logicube Confidential Information
Selective Partitions™ Part 4
–Note: Partition Mirror is available for
any partition type, and is the only
method available to partitions that are
unrecognized by Clever Clone™
mode.
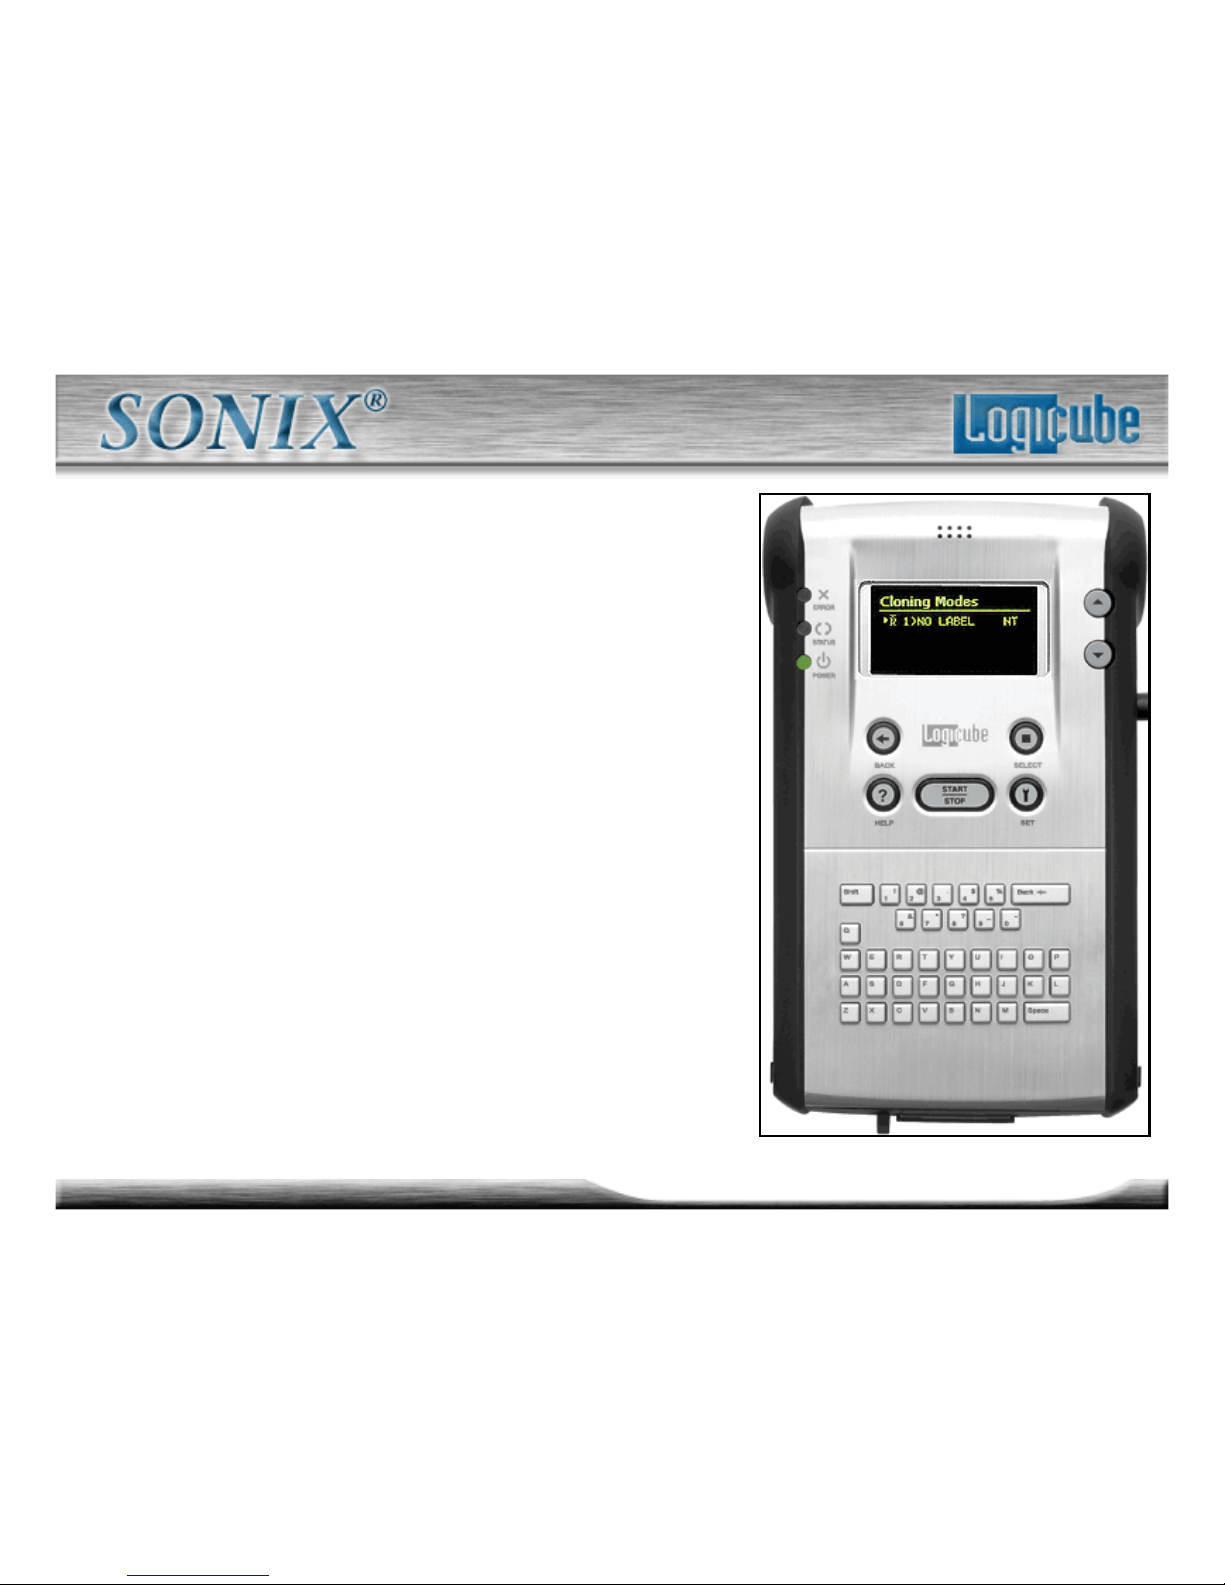
Convert FAT16 to FAT32 - Will
convert the selected partition from
FAT16 to FAT32 format on the fly.
This mode is available for FAT16
partitions only.
Page 52
52
Logicube Confidential Information
Selective Partitions™ Part 5
– Note: Use only when the given
partition is to be used with Windows
98/ME or Windows 2000. The
4.00.950 and 4.00.950a versions of
Windows 95, Windows NT 3.x and
4.0, and some versions of MS-DOS
are incompatible with FAT32
partitions.
Page 53
53
Logicube Confidential Information
Selective Partitions™ Part 6
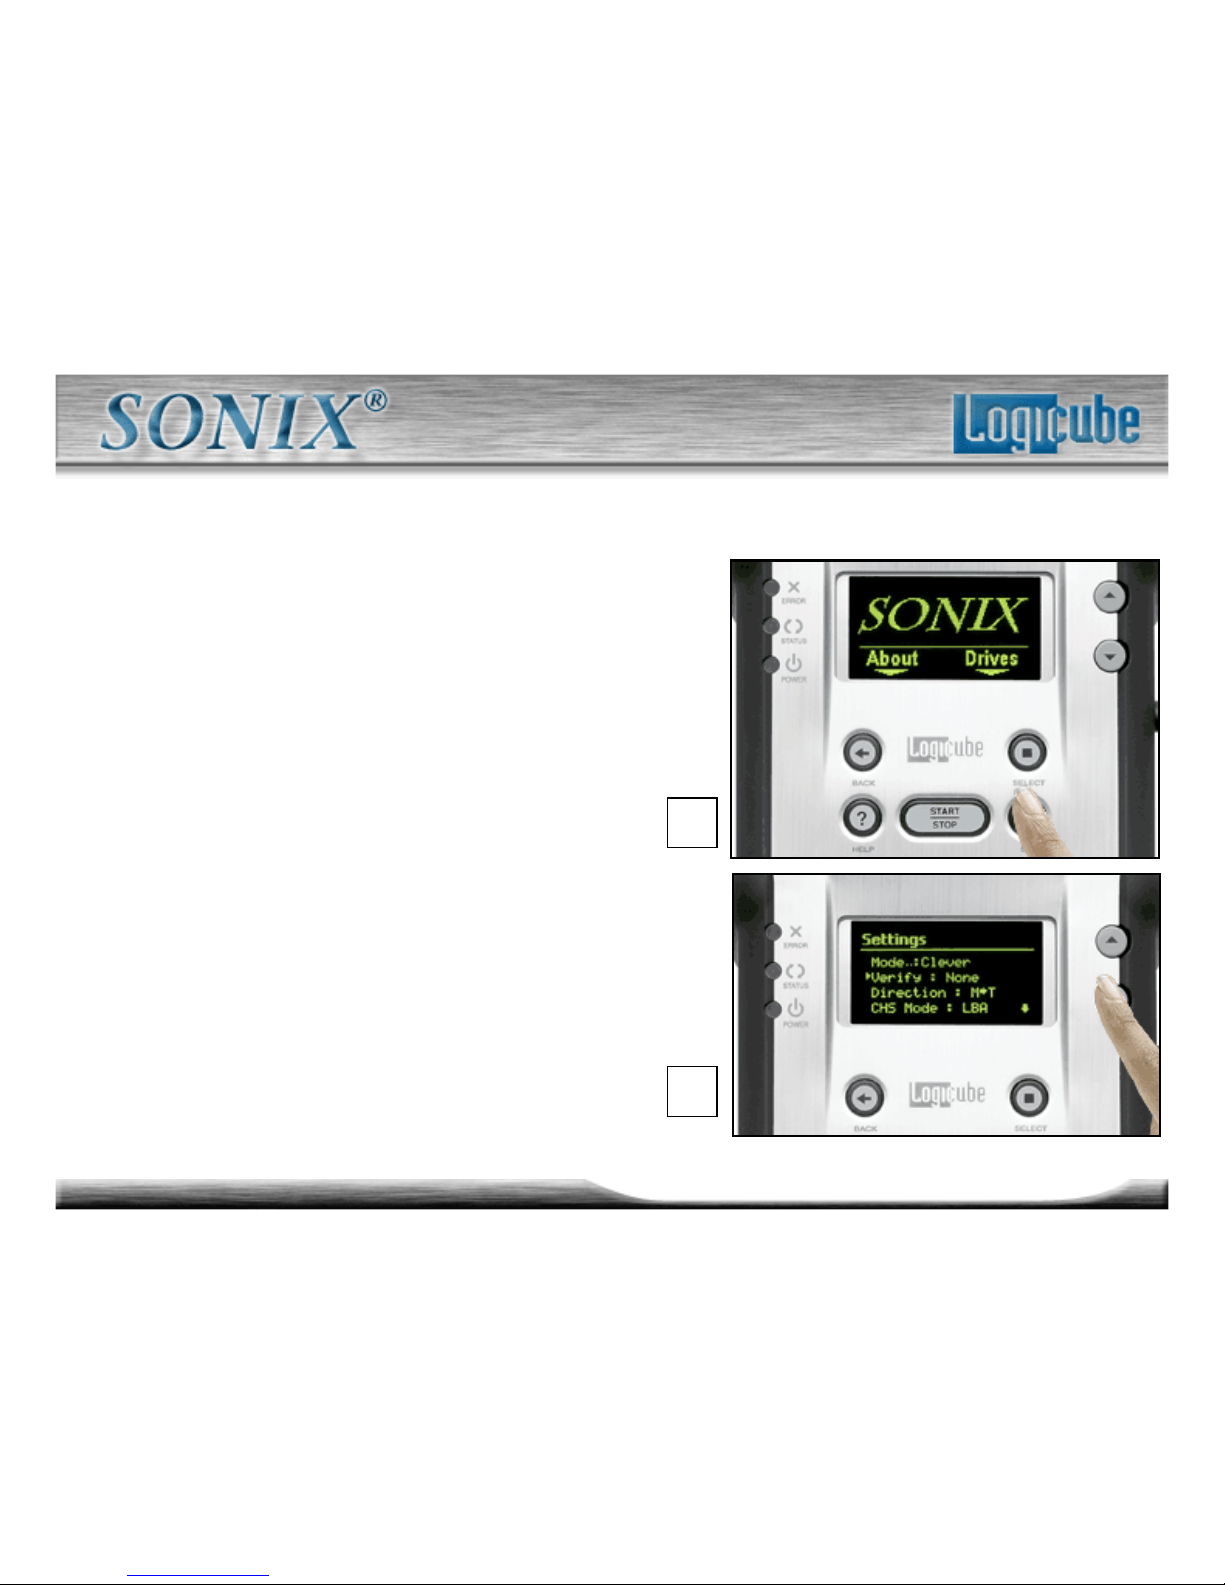
1. From anywhere in the menu system,
press the “Set” button to enter the
Settings menu.
2. Scroll through the optional
preferences – Verify, Direction, CHS
Mode, and Speed - and alter them as
needed using the “Select” button to
toggle between the different settings for
each.
1.
2.
Page 54
54
Logicube Confidential Information
Selective Partitions™ Part 7
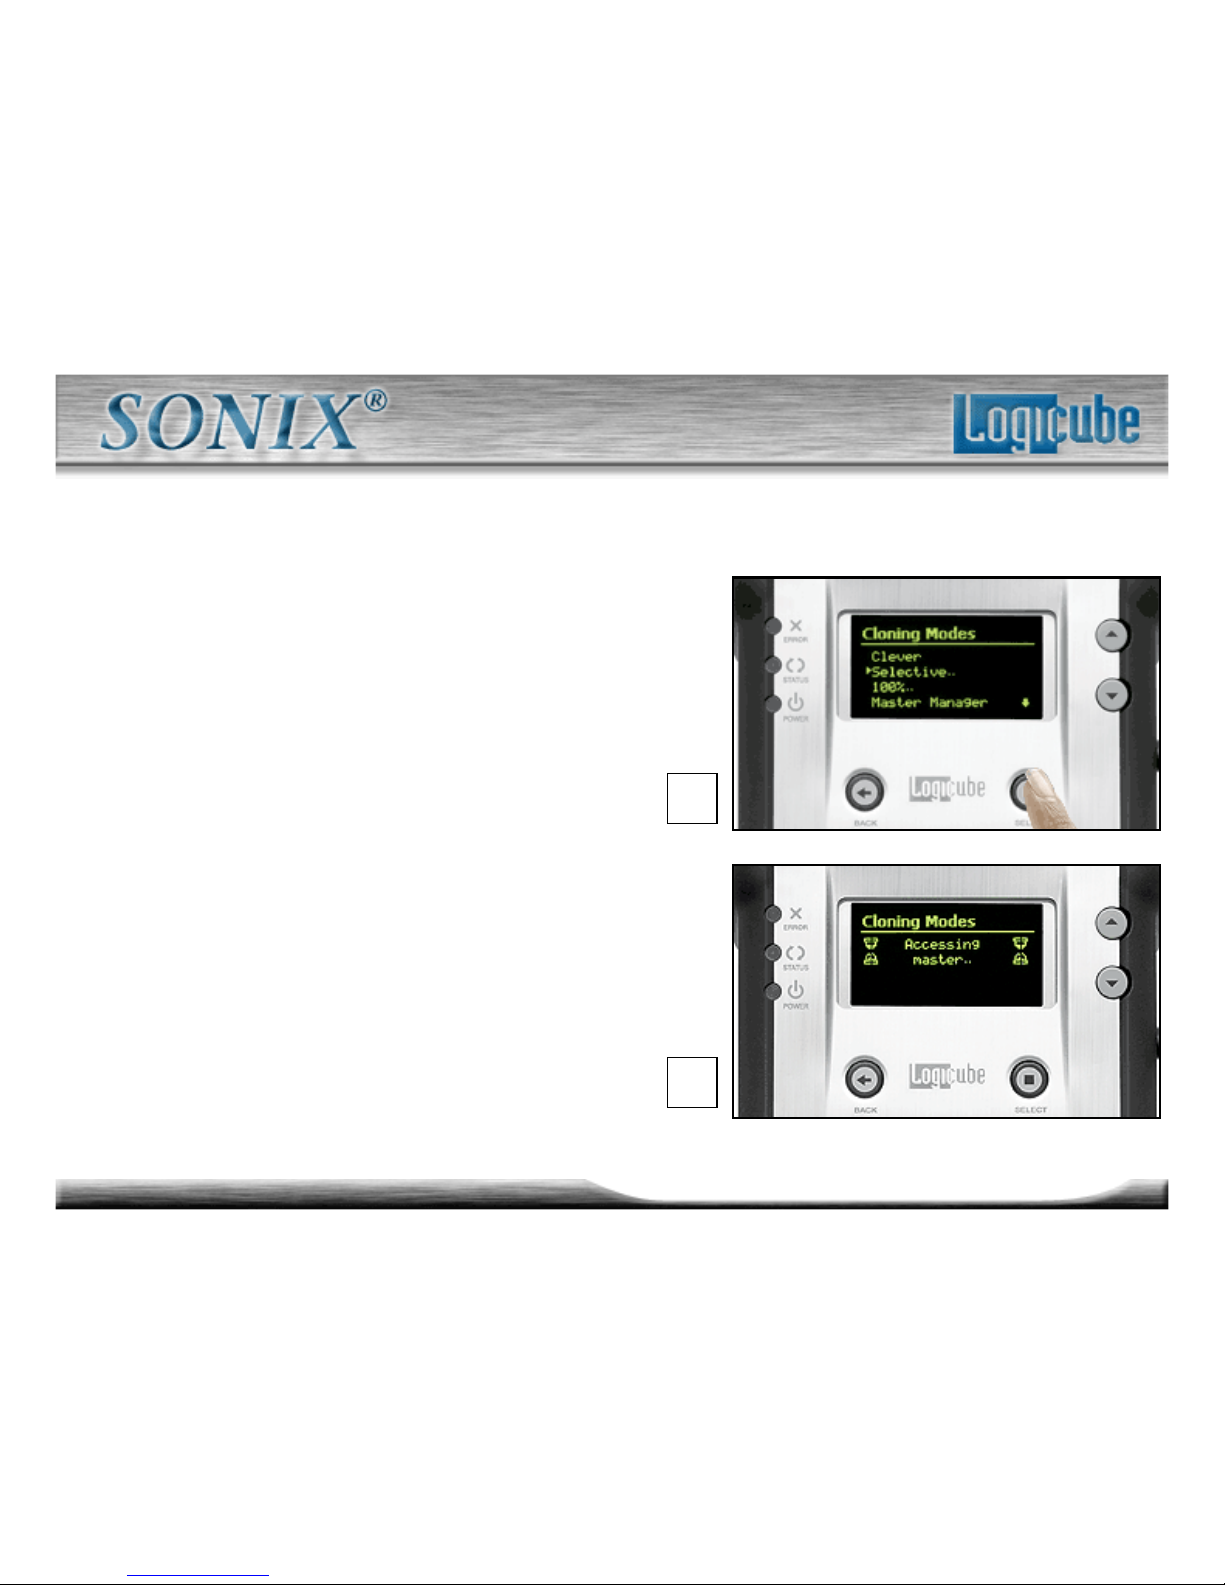
3. Locate “Mode” in the Settings menu
and press the “Select” button. The
Mode menu appears.
4. Scroll to the “Selective” menu
option and press Select. After a few
seconds the Logicube Sonix™ will
display a list of all the partitions found
on the Master drive.
3.
4.
Page 55
55
Logicube Confidential Information
Selective Partitions™ Part 8
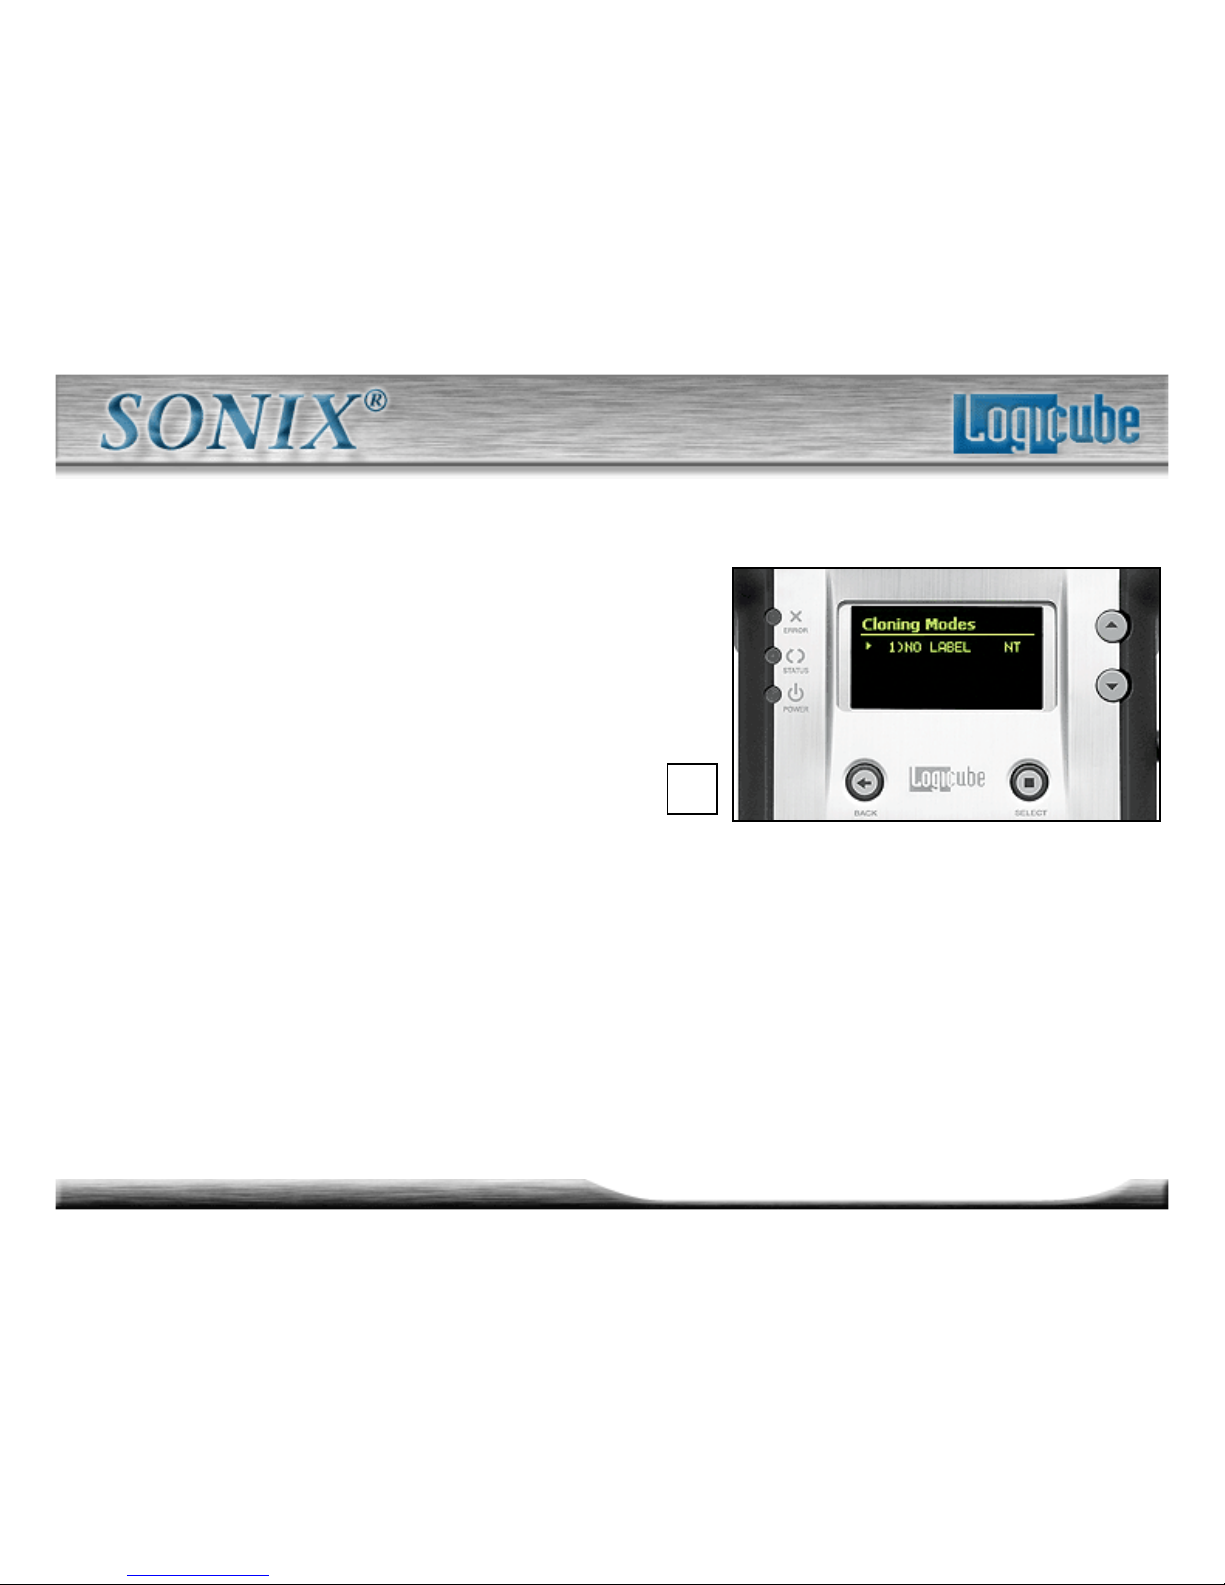
5. Note that to the right of each partition
name, you will see a two-character
designator for the
partition type:
– 16 - FAT16 partition
– 32 - FAT32 partition
– NT - NTFS partition
– CQ - Compaq partition
– DE - Dell utility partition
– PH - Phoenix Recovery partition
– ?? - Unknown partition
5.
Page 56
56
Logicube Confidential Information
Selective Partitions™ Part 9
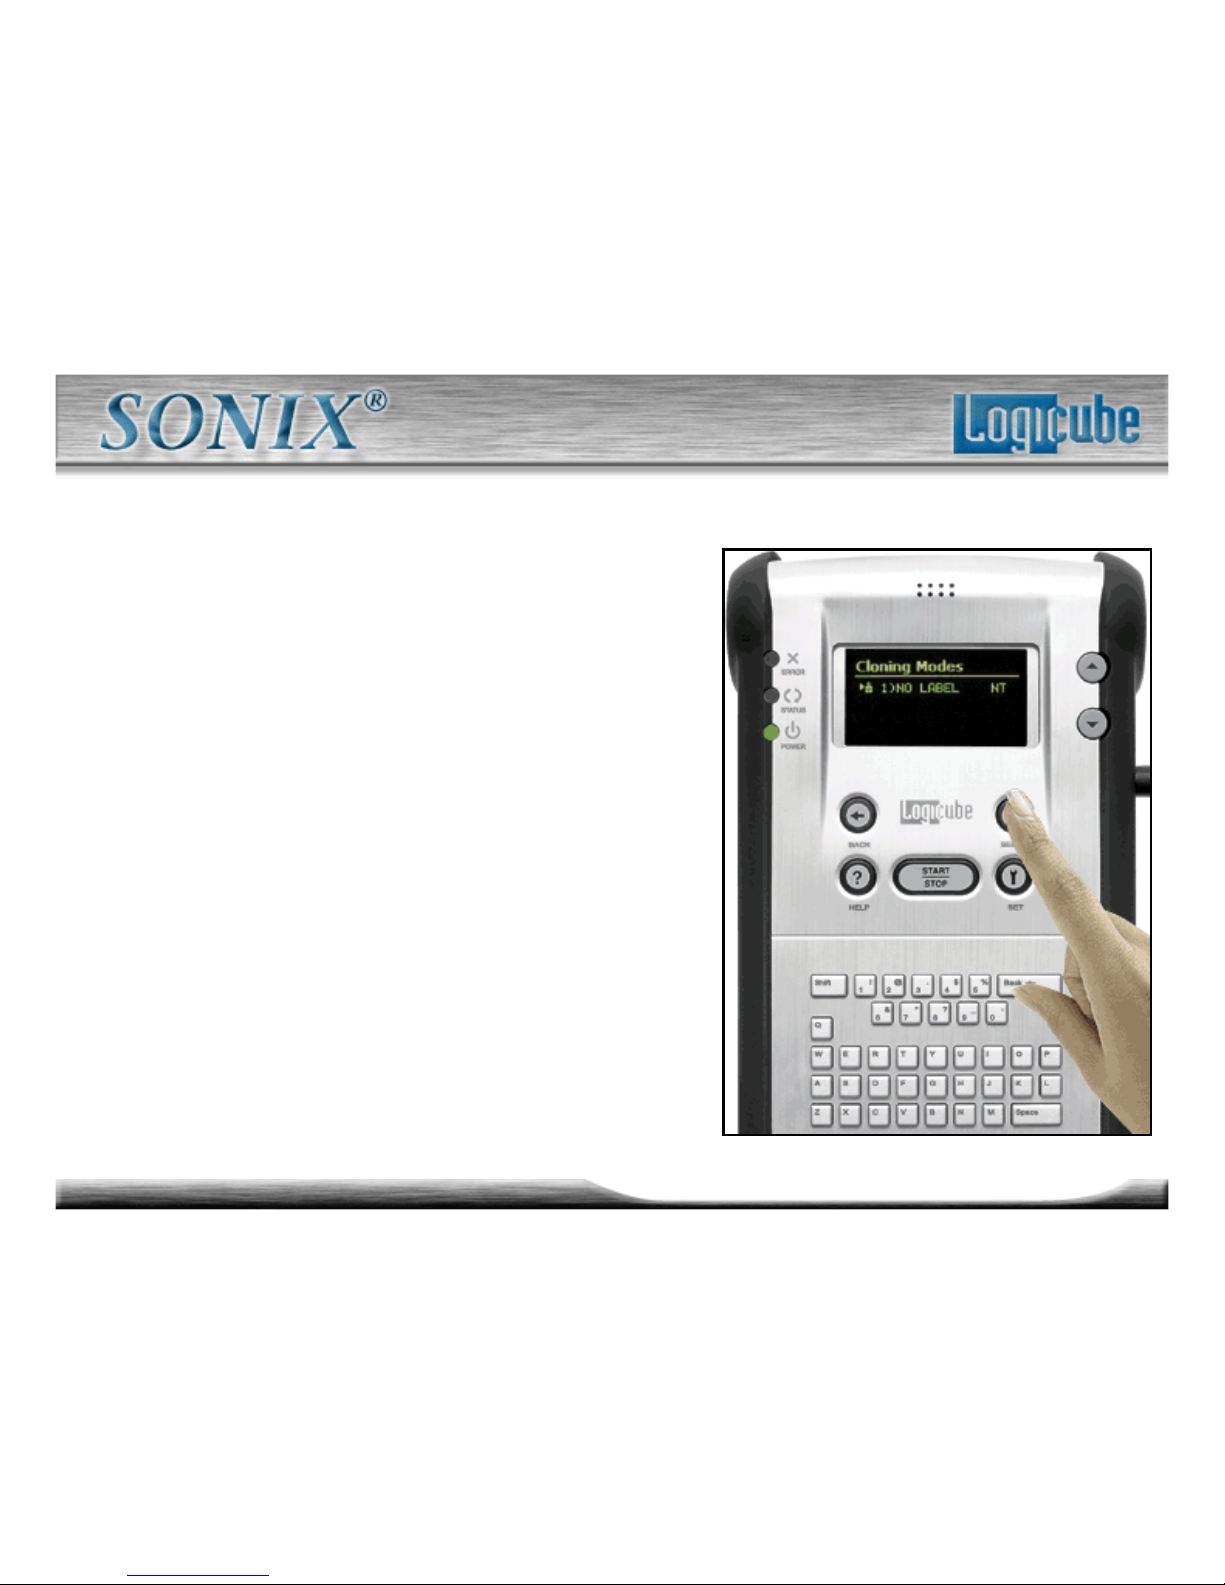
6. Choose a partition to clone and use
the “Select” button to toggle between
the different copying methods
available, (Clever Clone™,
Defragment, Mirror and Convert to
FAT32). Repeat for each partition you
wish to clone.
– Note: If no copy method is
selected, the partition will not
be cloned.
Page 57
57
Logicube Confidential Information
Selective Partitions™ Part 10
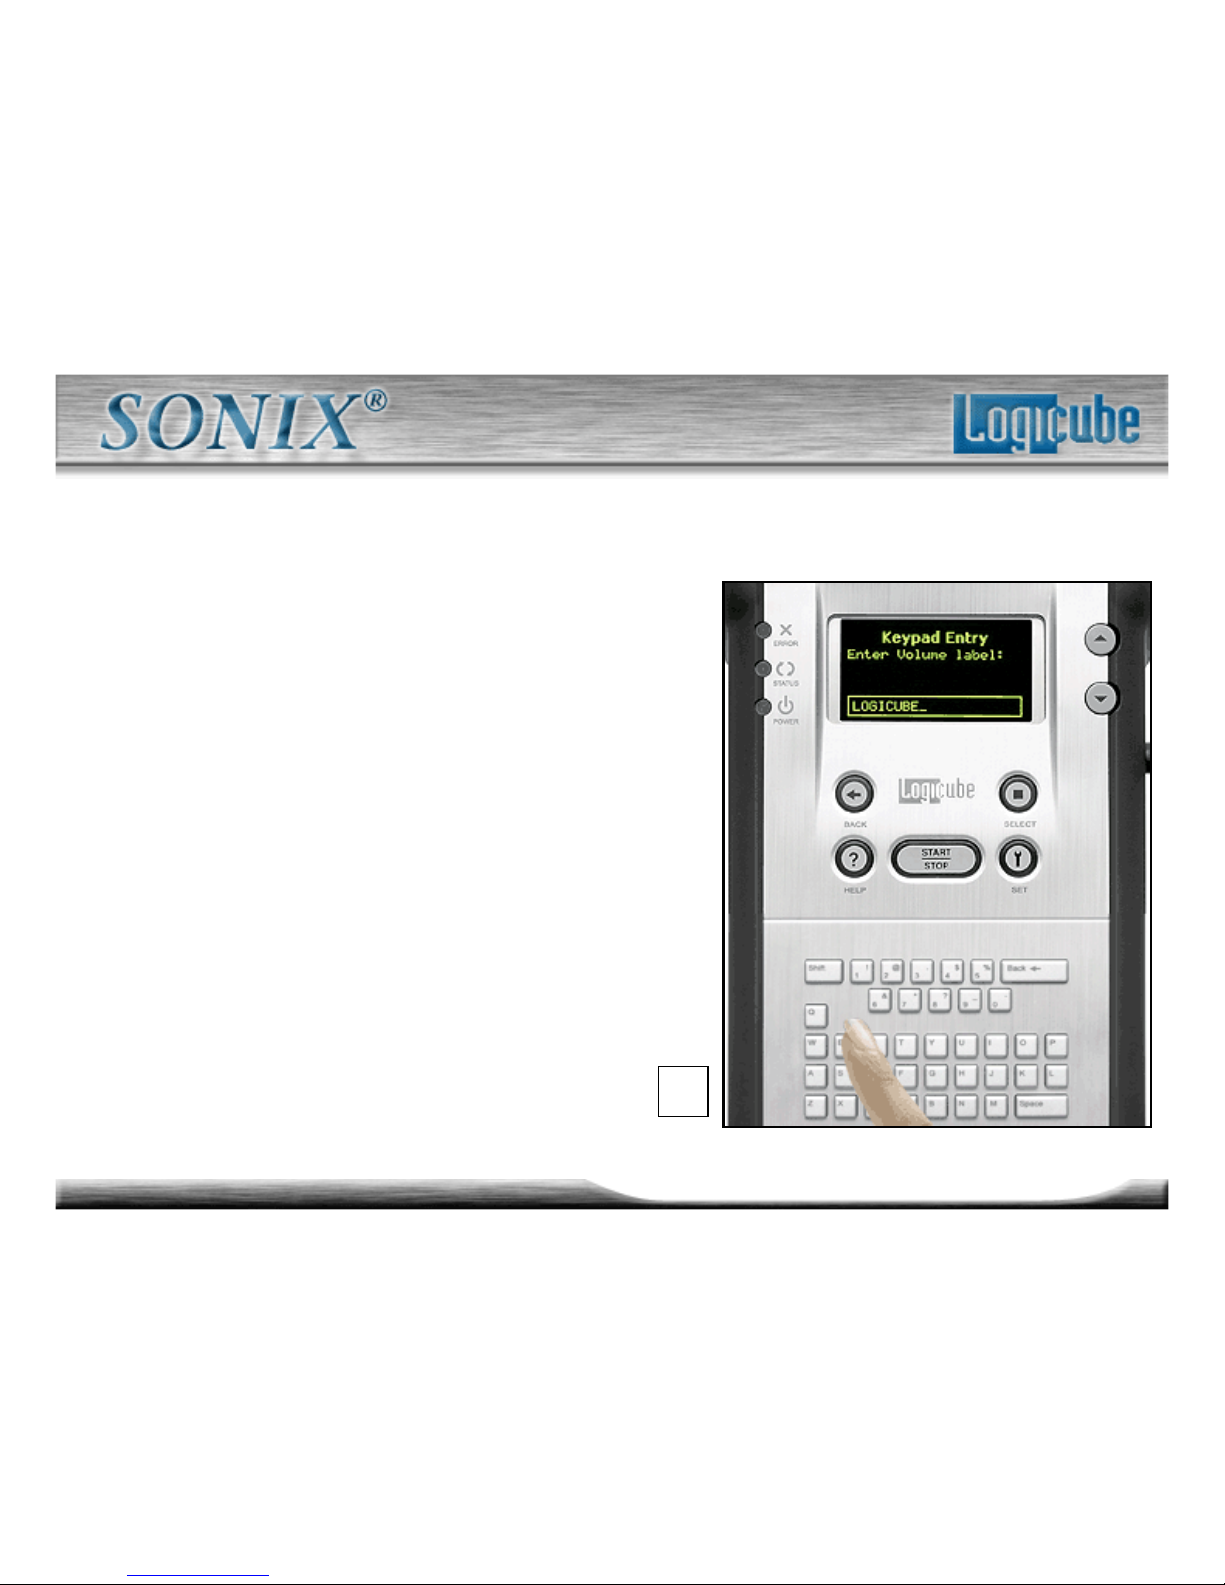
7. With the alphanumeric keypad, you
can change the name of a chosen
partition by pressing the “Set” button,
entering the new label and then
pressing “Select”.
– Note: A partition label can be a
maximum of 10 characters long. No
spaces are allowed.
7.
Page 58
58
Logicube Confidential Information
Selective Partitions™ Part 11
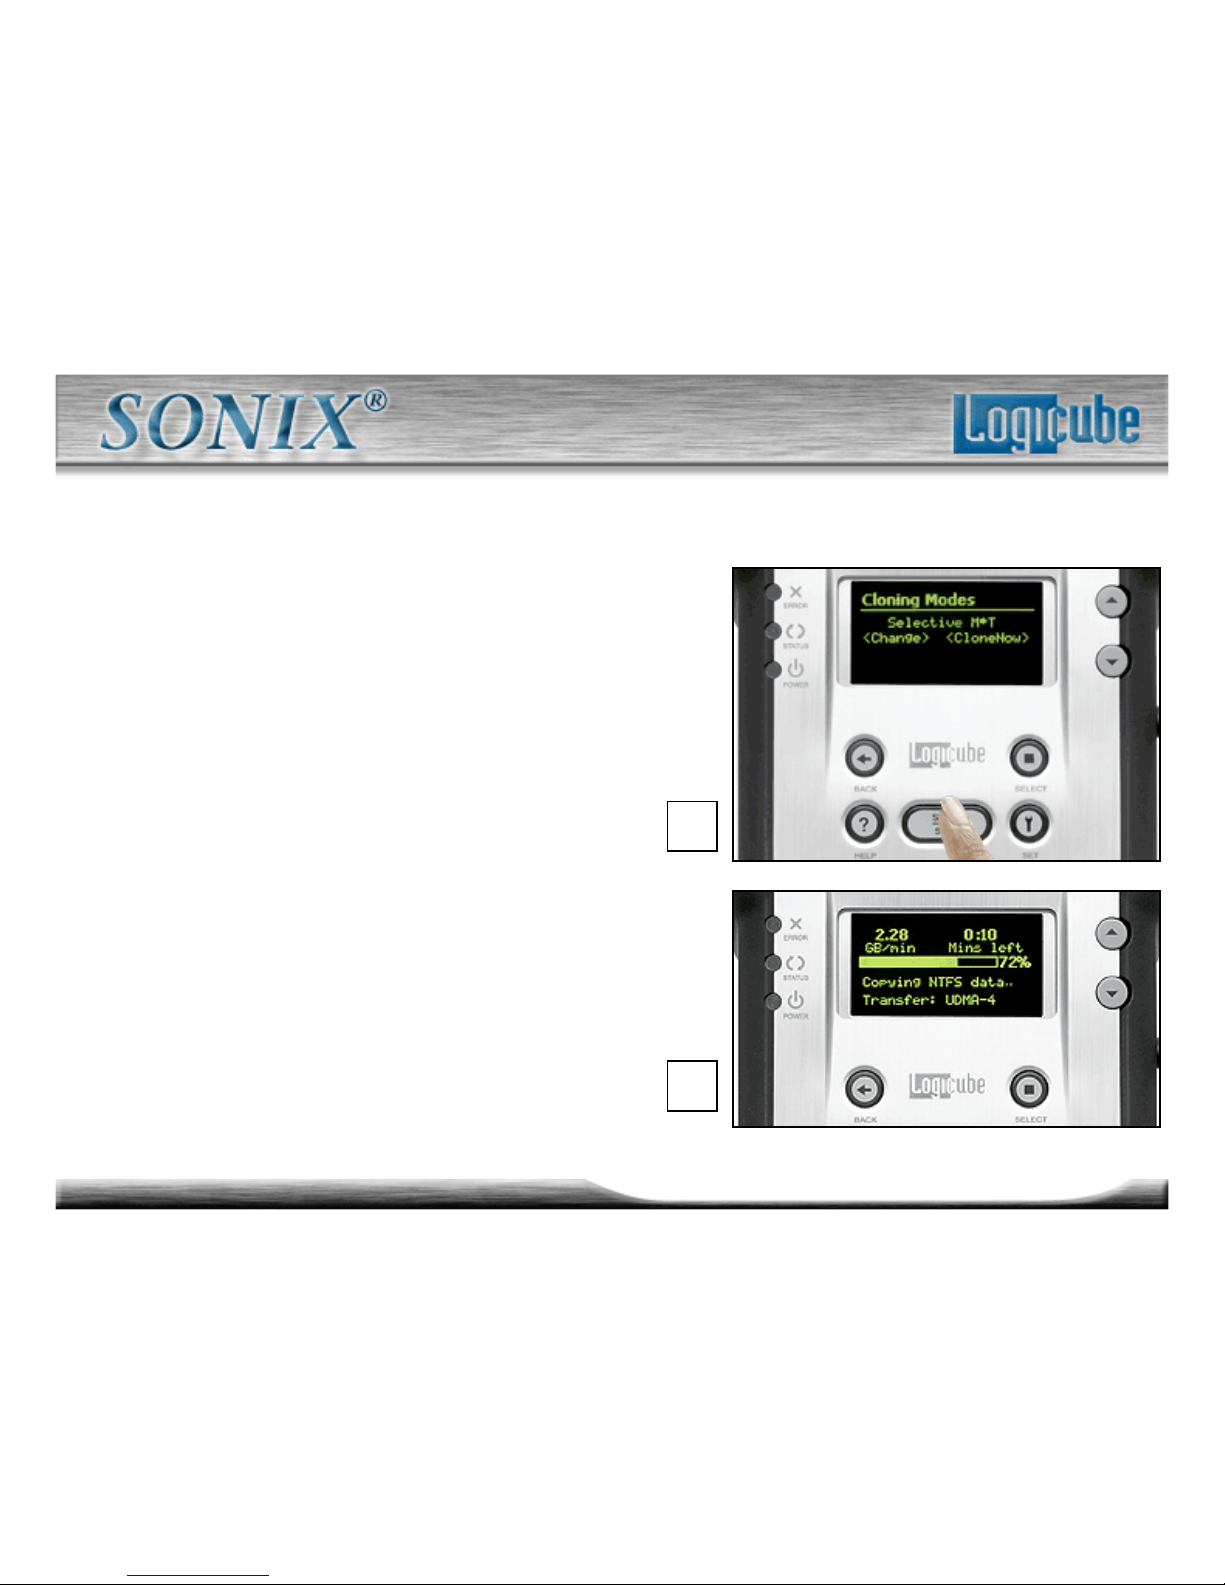
8. Press the “Start/Stop” button
twice to start cloning.
9. The status screen will appear
and cloning will begin.
8.
9.
Page 59
59
Logicube Confidential Information
Selective Partitions™ Part 12
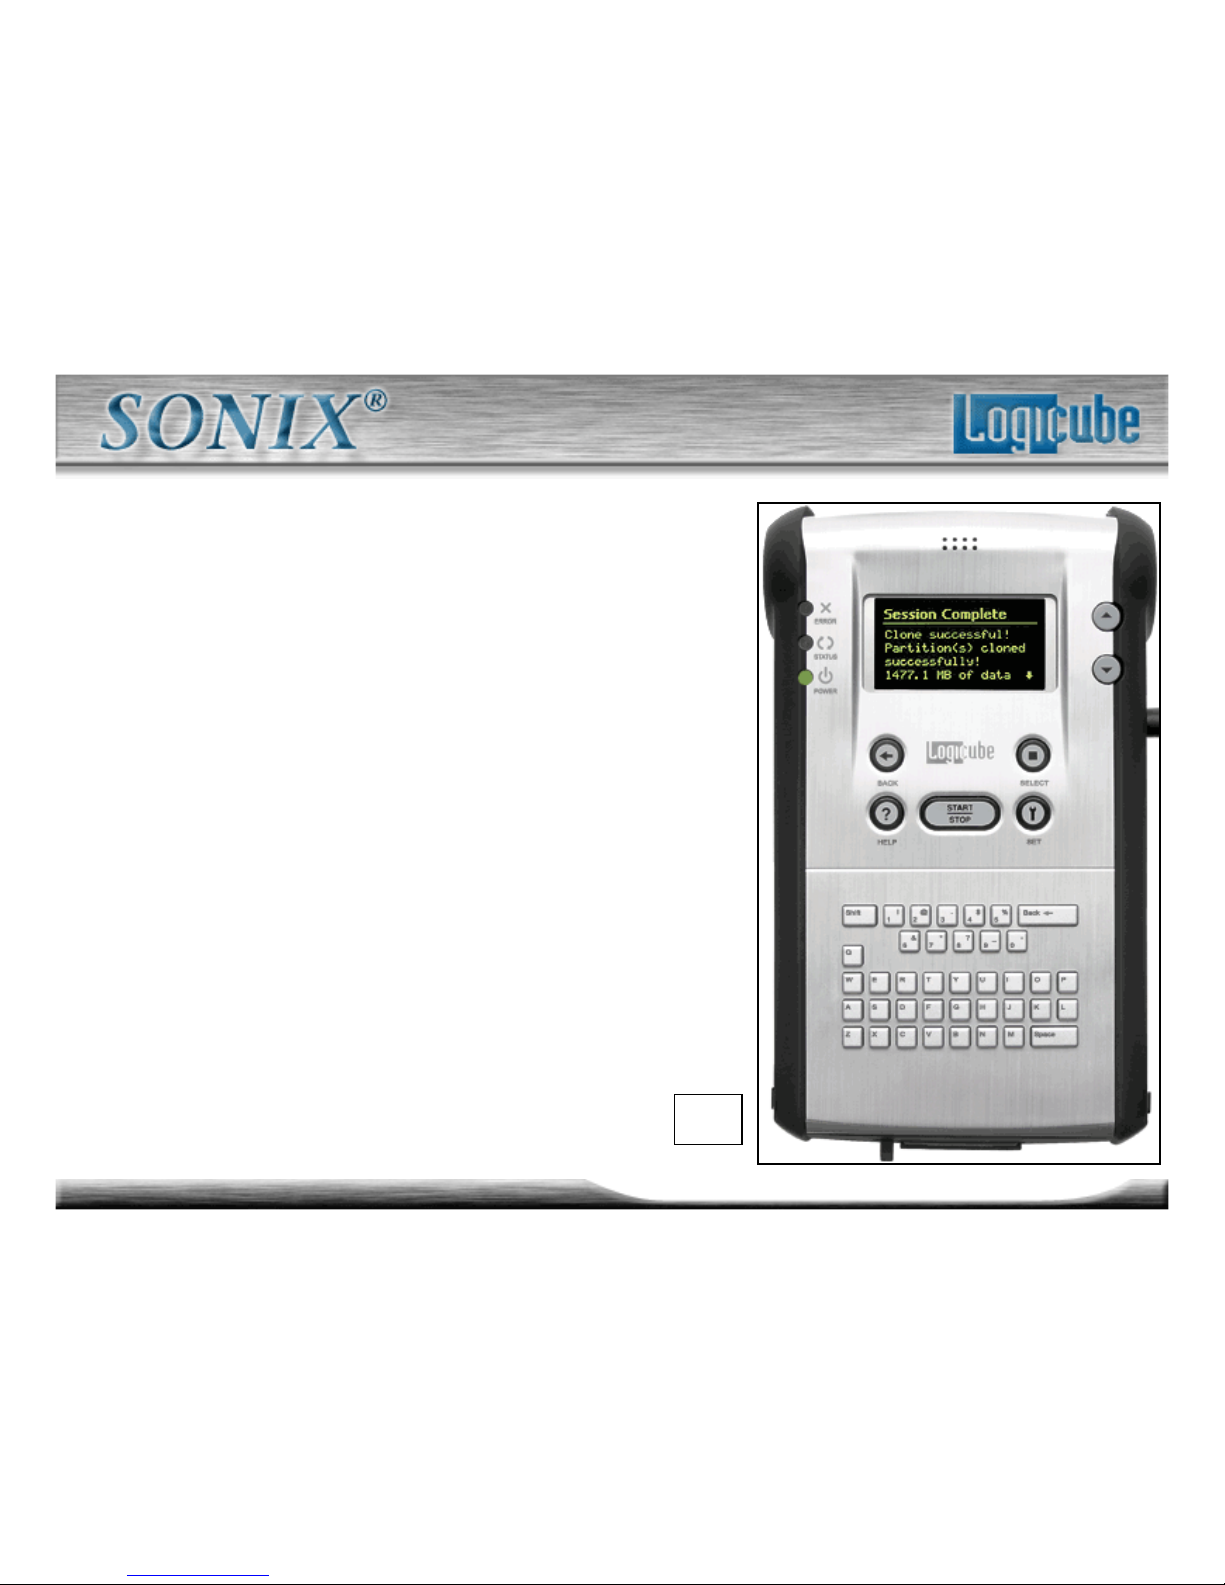
10. The Logicube Sonix™ will notify
you when cloning has been
completed.
Press the “Back” button to return to
the main menu.
10.
Page 60
60
Logicube Confidential Information
Mirror Clone™ Part 1
This cloning mode makes a direct, physical copy of the Master drive. It
does not adjust any values or perform any translation from drive to
drive. It simply copies whatever percentage of the Master drive that is
designated.
– Note: This mode is only recommended when Clever Clone™ is unable to
copy the drive and then only between drives of similar geometry.
100% (Default) – When 100% Clone is selected, the cloning mode
menu will display the percentage of the Master drive that will be copied
to the Target. This percentage can be adjusted in increments of 5%
using the “Up Arrow” and “Down Arrow”, and in increments of 1%
using the alphanumeric keypad.
The percentage of the Master drive to be mirrored is calculated starting
from the first physical sector.
Page 61
61
Logicube Confidential Information
Mirror Clone™ Part 2
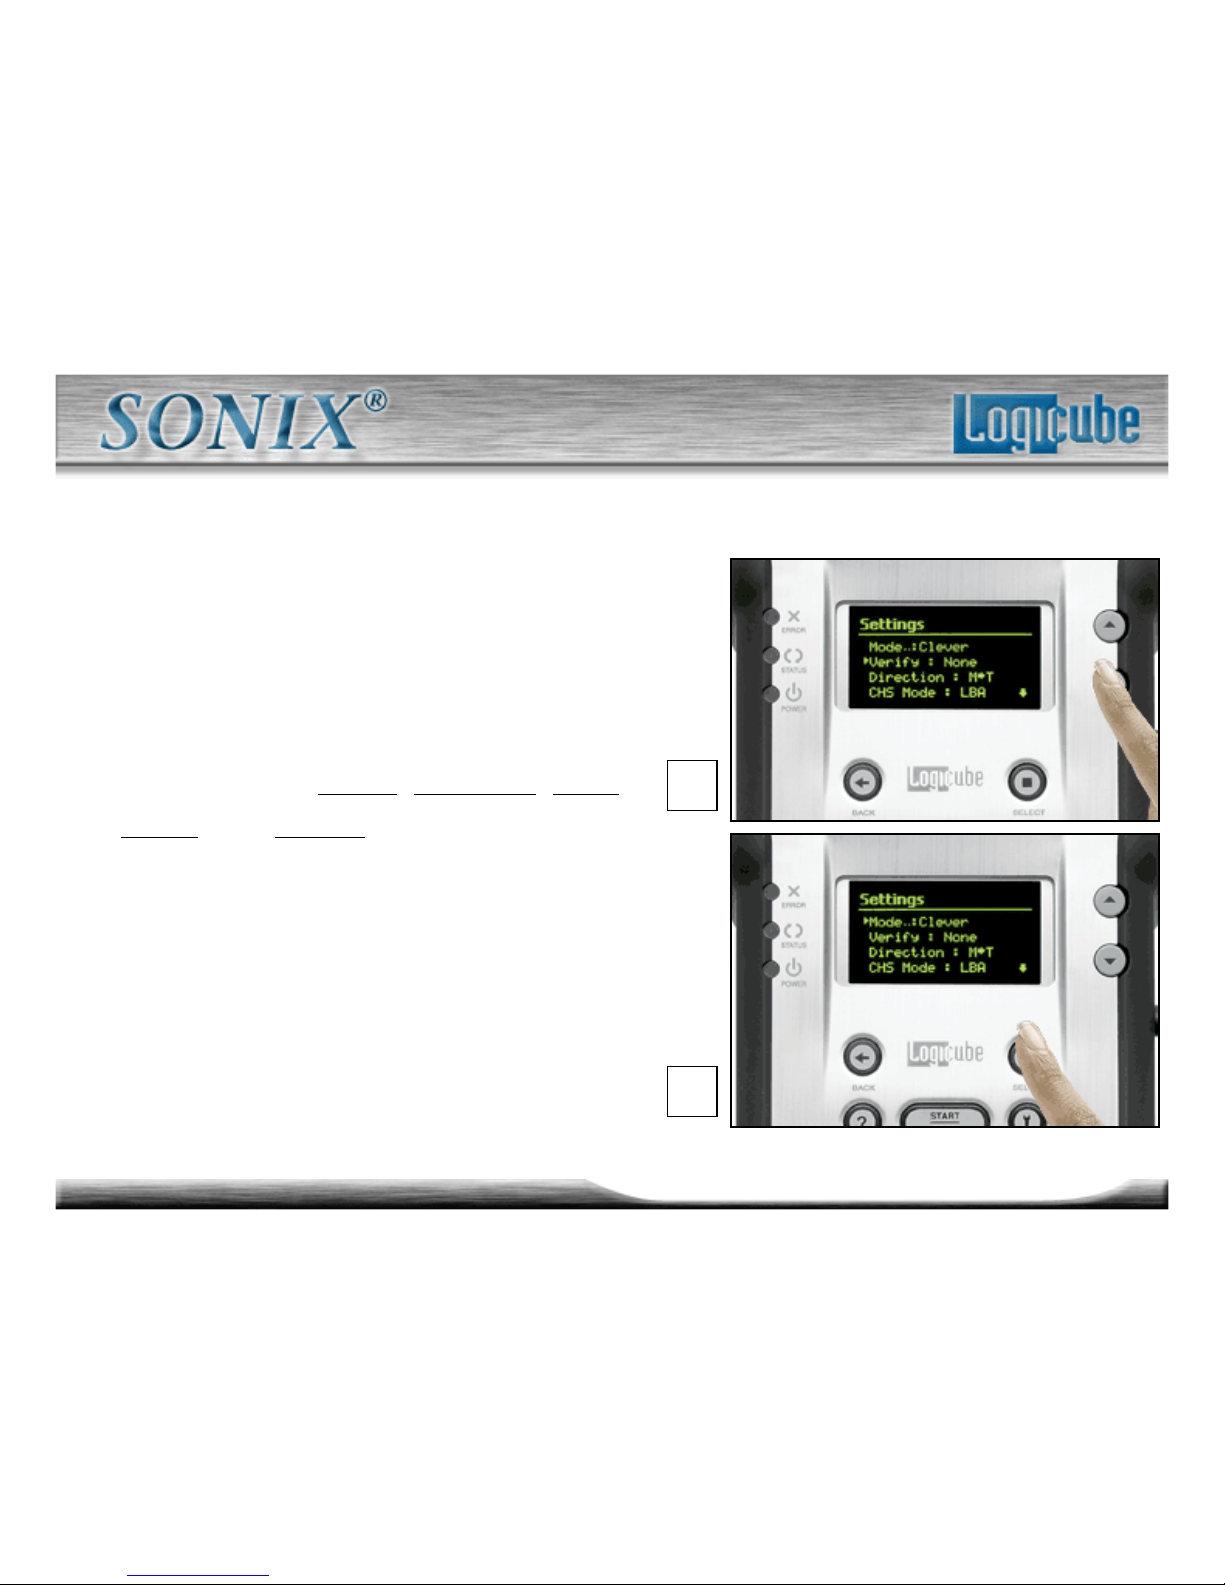
1. From anywhere in the menu
system, press the “Set” button to
enter the Settings menu.
2. Scroll through the optional
preferences – Verify, Direction, CHS
Mode, and Speed - and alter them
as needed using the “Select” button
to toggle between the different
settings for each.
3. Locate “Mode” in the Settings
menu and press the “Select” button.
The Mode menu appears.
2.
3.
Page 62
62
Logicube Confidential Information
Mirror Clone™ Part 3
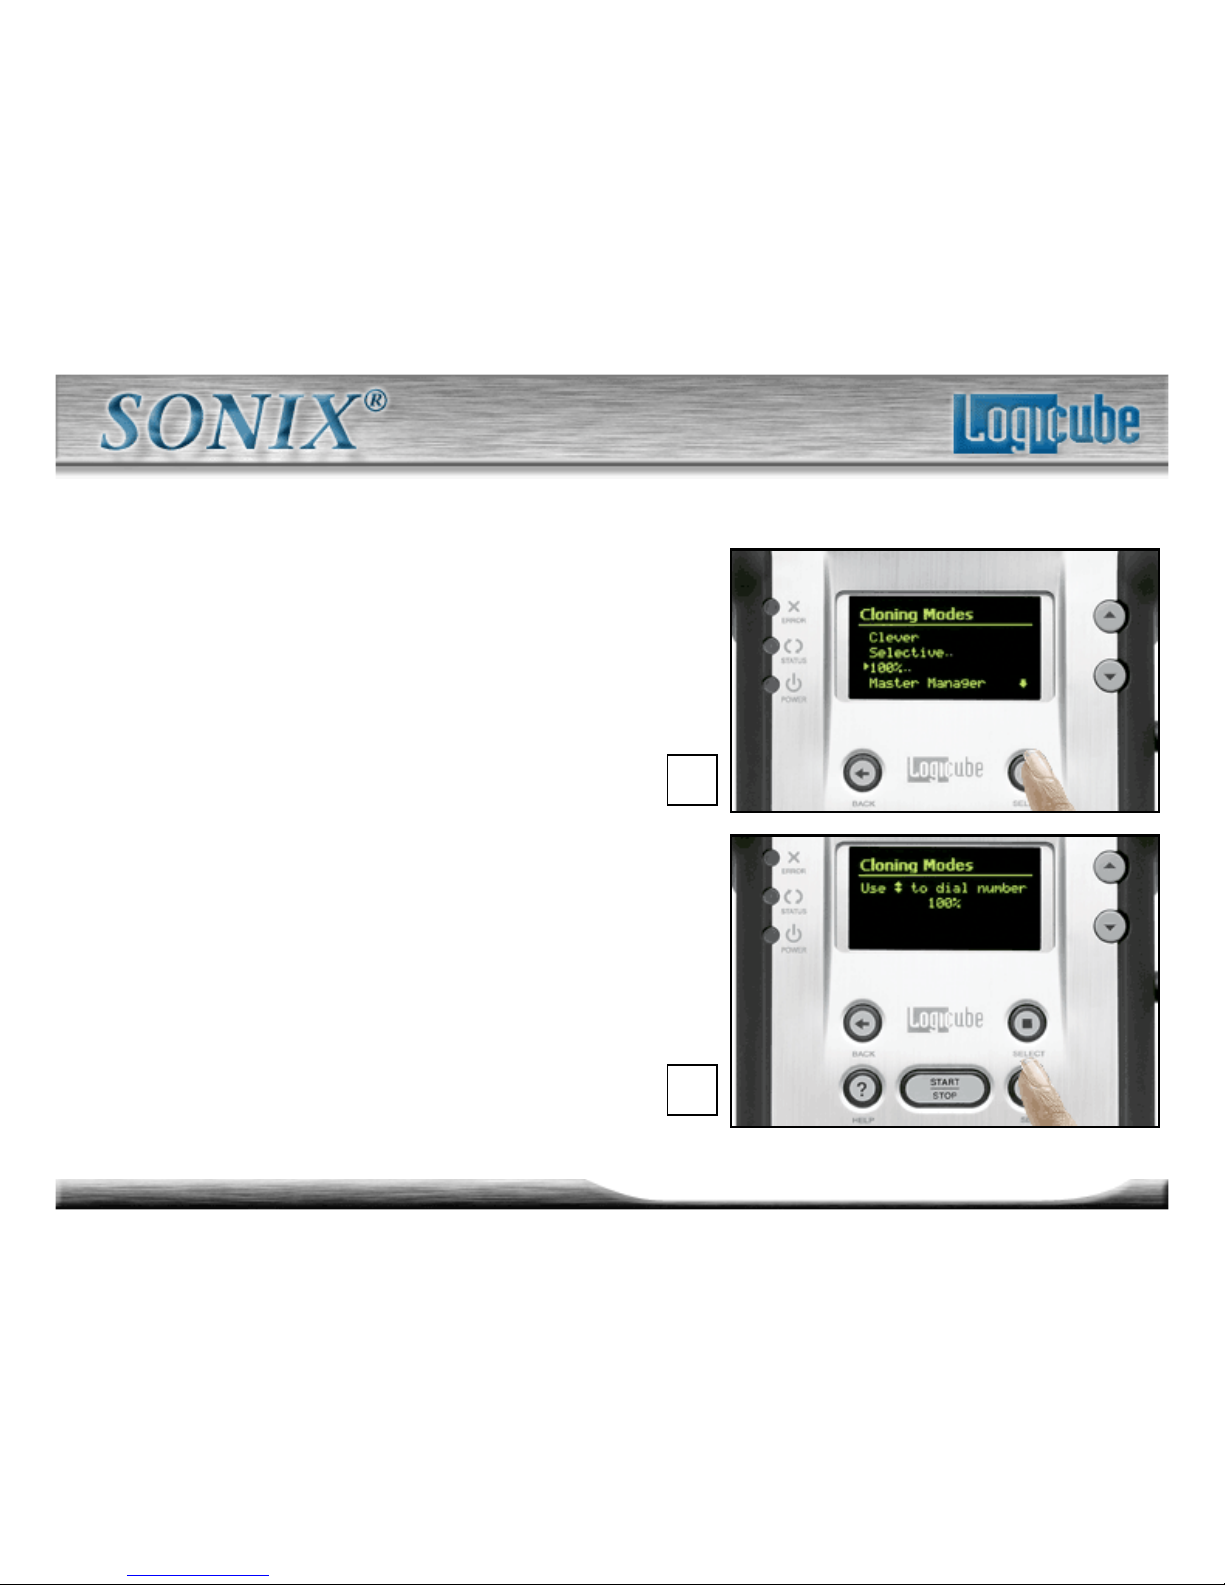
4. When 100% Mode is selected from
the Modes menu, a “percentage
spinner” comes up.
5. It asks for the % of the drive that is
to be cloned.
4.
5.
Page 63
63
Logicube Confidential Information
Mirror Clone™ Part 4
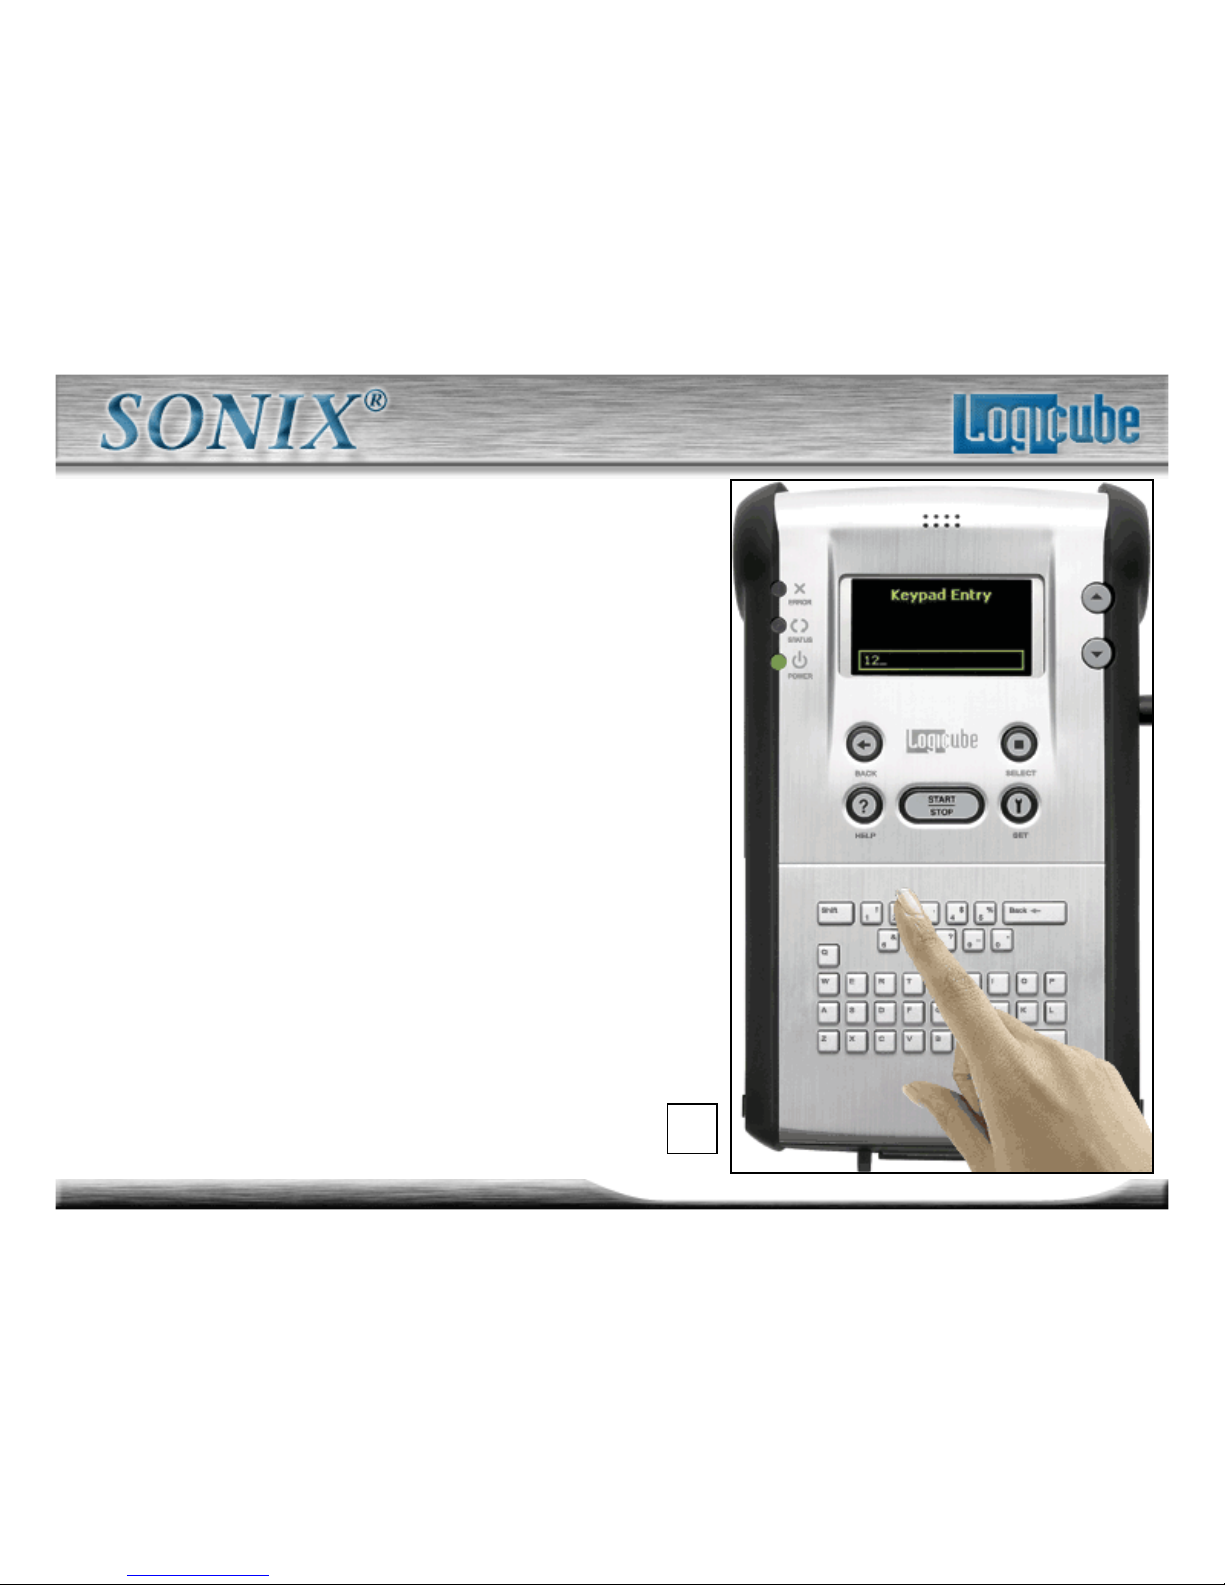
6. If the “Set” button is pressed at the
“percentage spinner” screen, the
user can use the keypad to set a
percentage from 1-100%
7. Press “Select” and you will be
taken back to the “Settings
Menu”.
6.
Page 64
64
Logicube Confidential Information
Mirror Clone™ Part 5
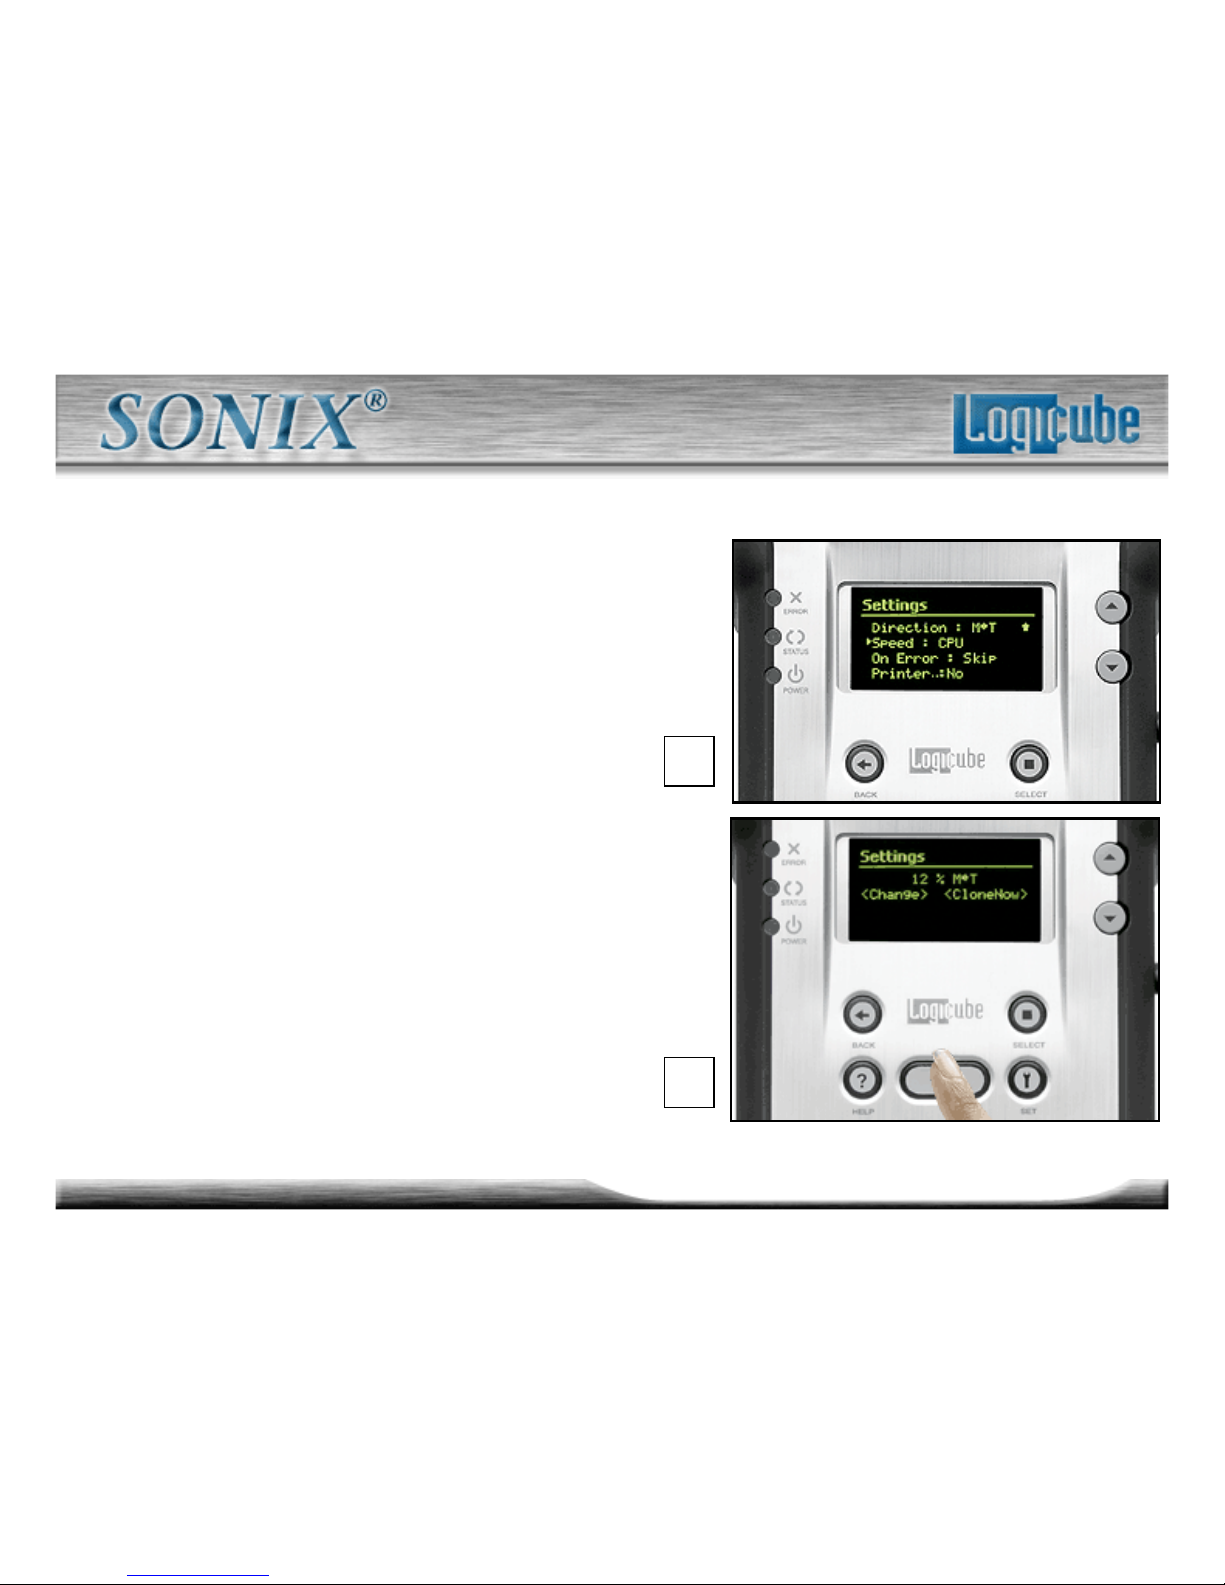
8. All of the settings are the
same as Clever Clone Mode
except for Speed, which
contains an extra speed
setting: PIO-CPU.
9. Press the “Start/Stop” button
twice for cloning to begin. The
Status screen will appear.
8.
9.
Page 65
65
Logicube Confidential Information
Mirror Clone™ Part 6
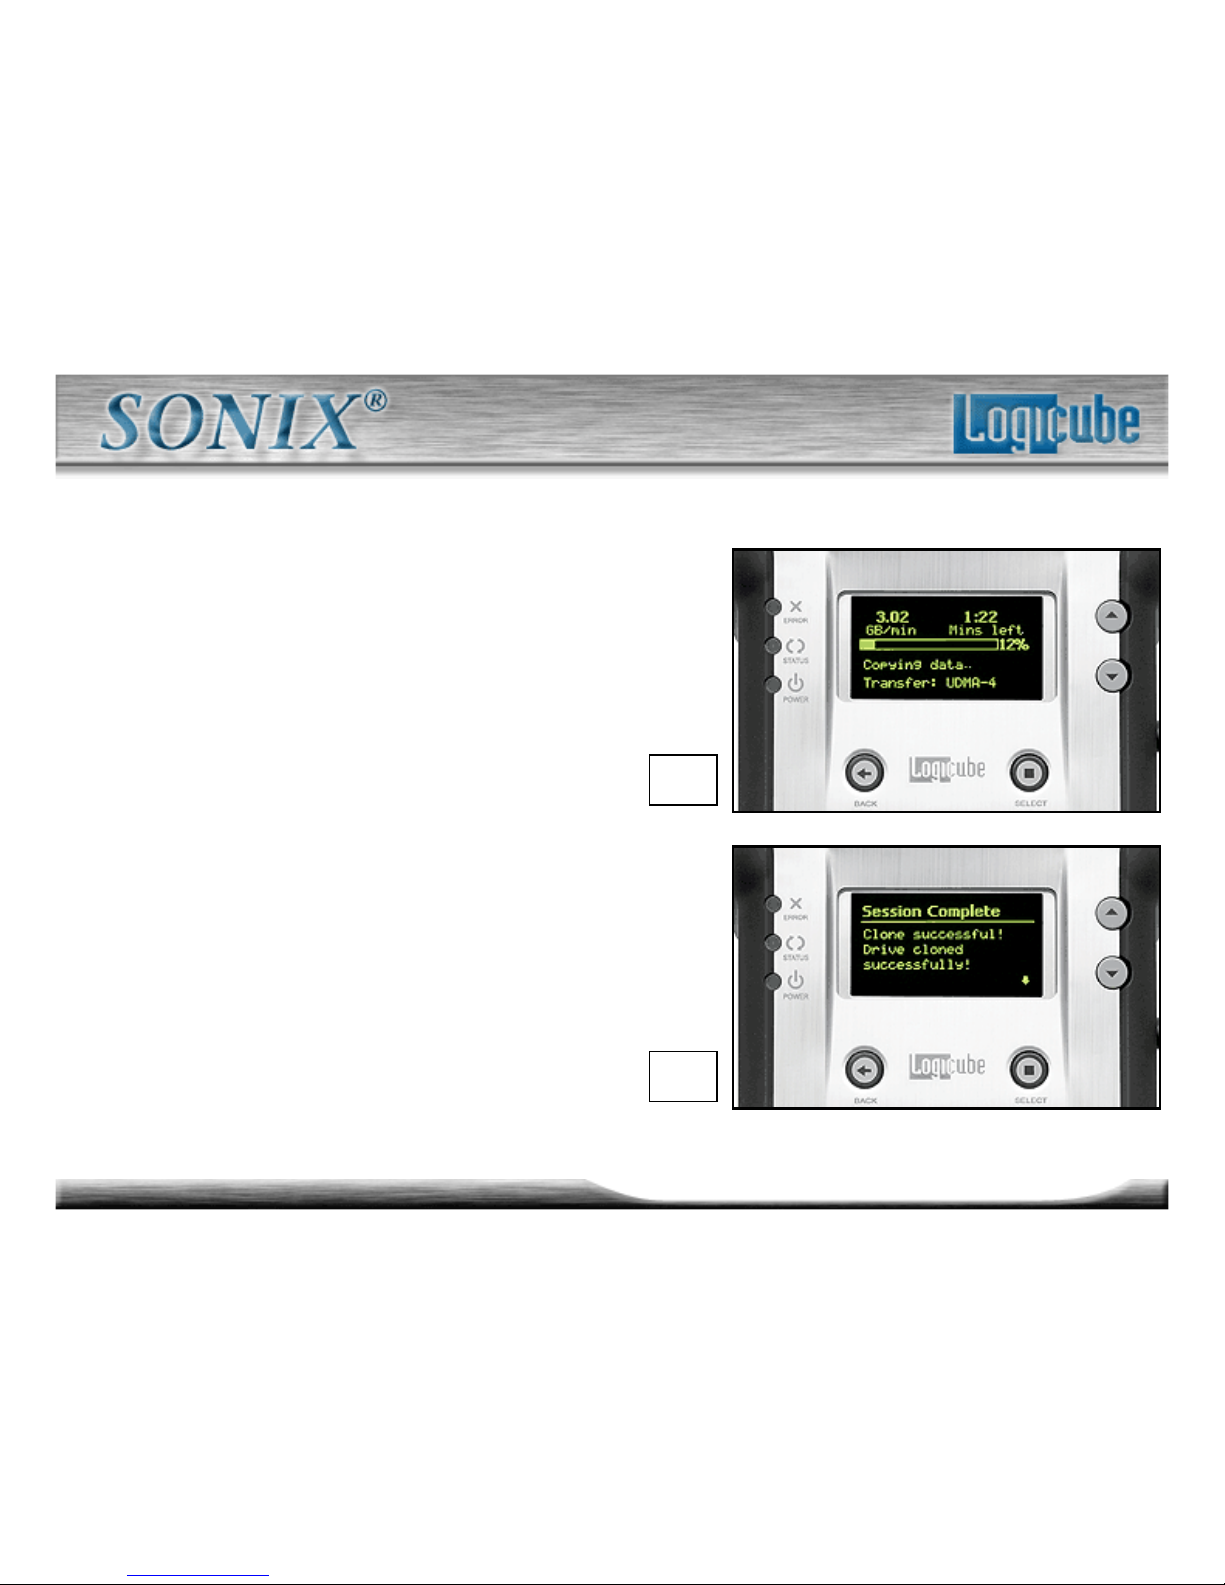
10. The “status screen” displays
the transfer rate, time remaining,
speed & percent copied.
11. When copying is complete
the Logicube Sonix will notify
you that the Drive has been
successfully cloned.
10.
11.
Page 66
66
Logicube Confidential Information
Master Manager™ Part 1
Master Manager™ mode is useful in the creation of a multi-partition Master
drive. Many MIS technicians prefer to store multiple partitions (e.g. one for
accounting, one for marketing, etc.) on a single Master drive. When a new PC
is to be configured or a drive crash occurs, all the technician needs to do is
select that partition and clone it.
The Master Manager™ mode is also useful for creating backups of drive
partitions containing important data. The Logicube Sonix™ can hold up to
24 partitions on one Master drive. Drives up to 500 GB in capacity have been
successfully tested with the Master Manager™ mode.
Page 67
67
Logicube Confidential Information
Master Manager™ Part 2
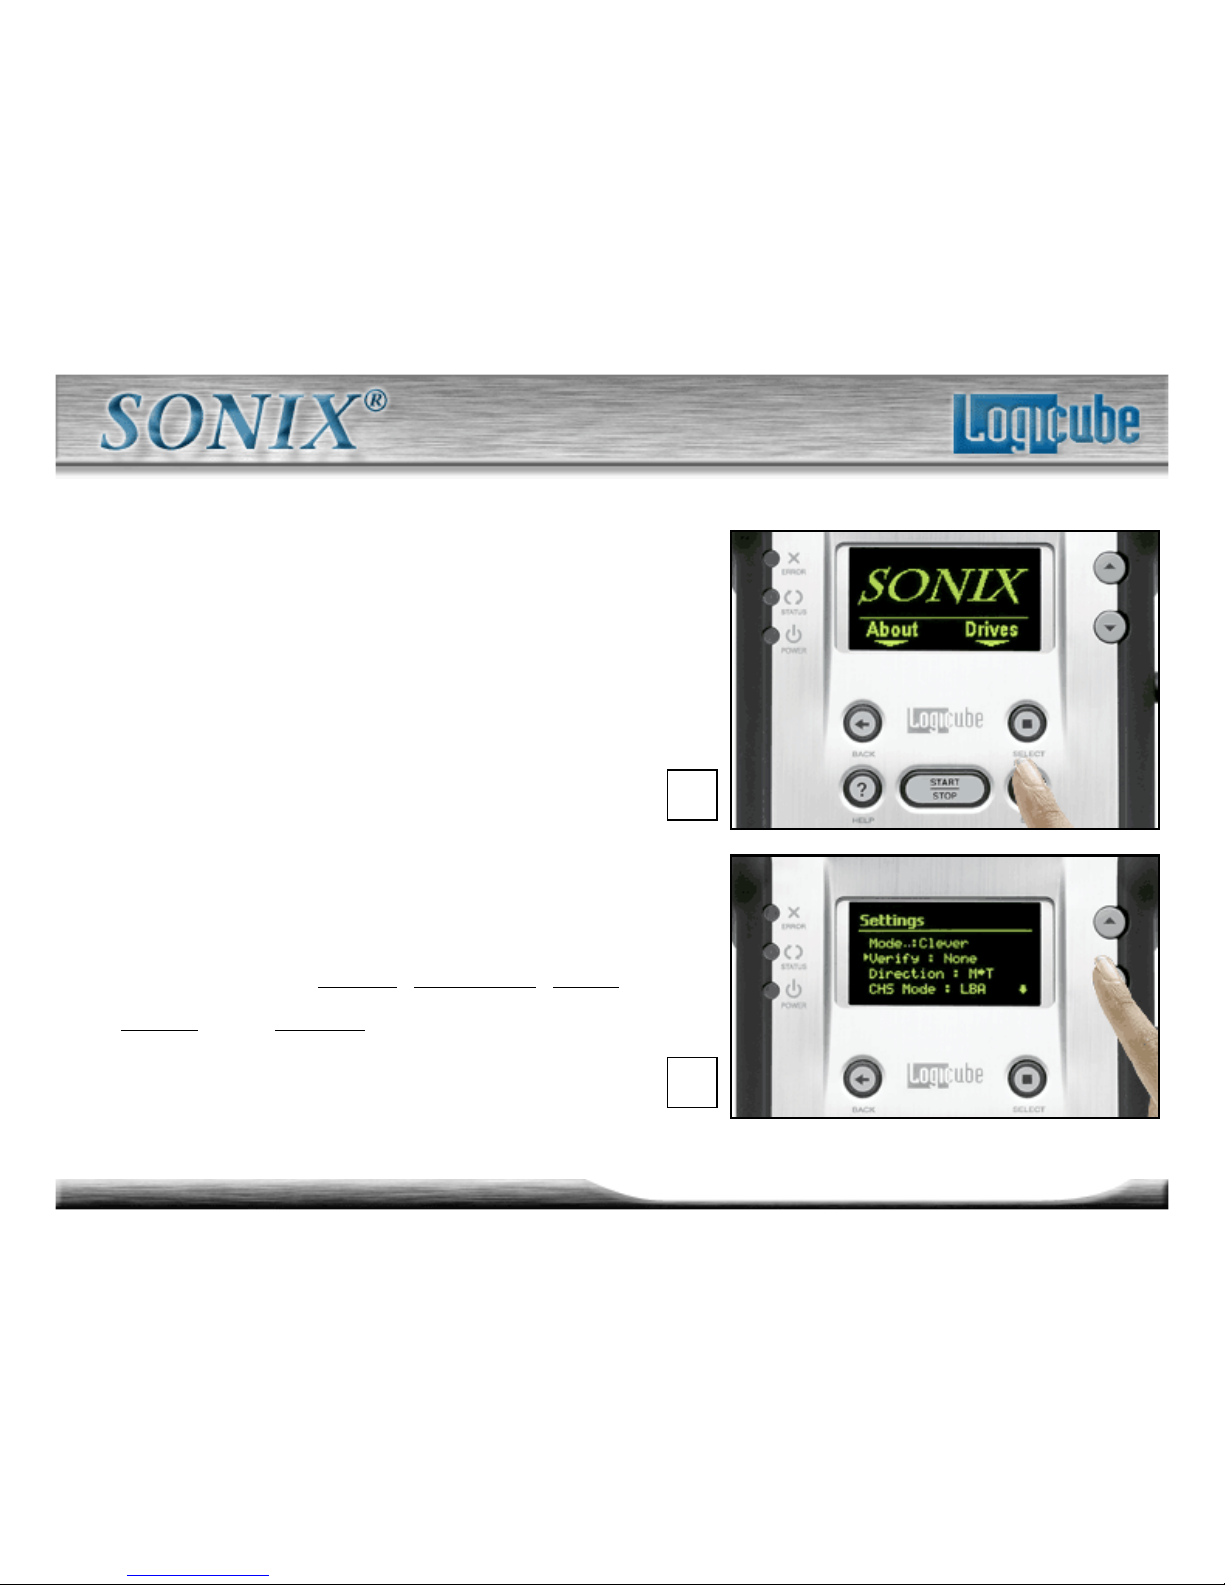
Important!: To create a Master drive
using Master Manager, you must start
with an unformatted drive. (Use
WipeClean™, FDISK or a third party
tool to erase the intended drive.)
1. From anywhere in the menu system,
press the “Set” button to enter the
Settings menu.
2. Scroll through the optional
preferences – Verify, Direction, CHS
Mode, and Speed - and alter them as
needed using the “Select” button to
toggle between the different settings
for each.
1.
2.
Page 68
68
Logicube Confidential Information
Master Manager™ Part 3
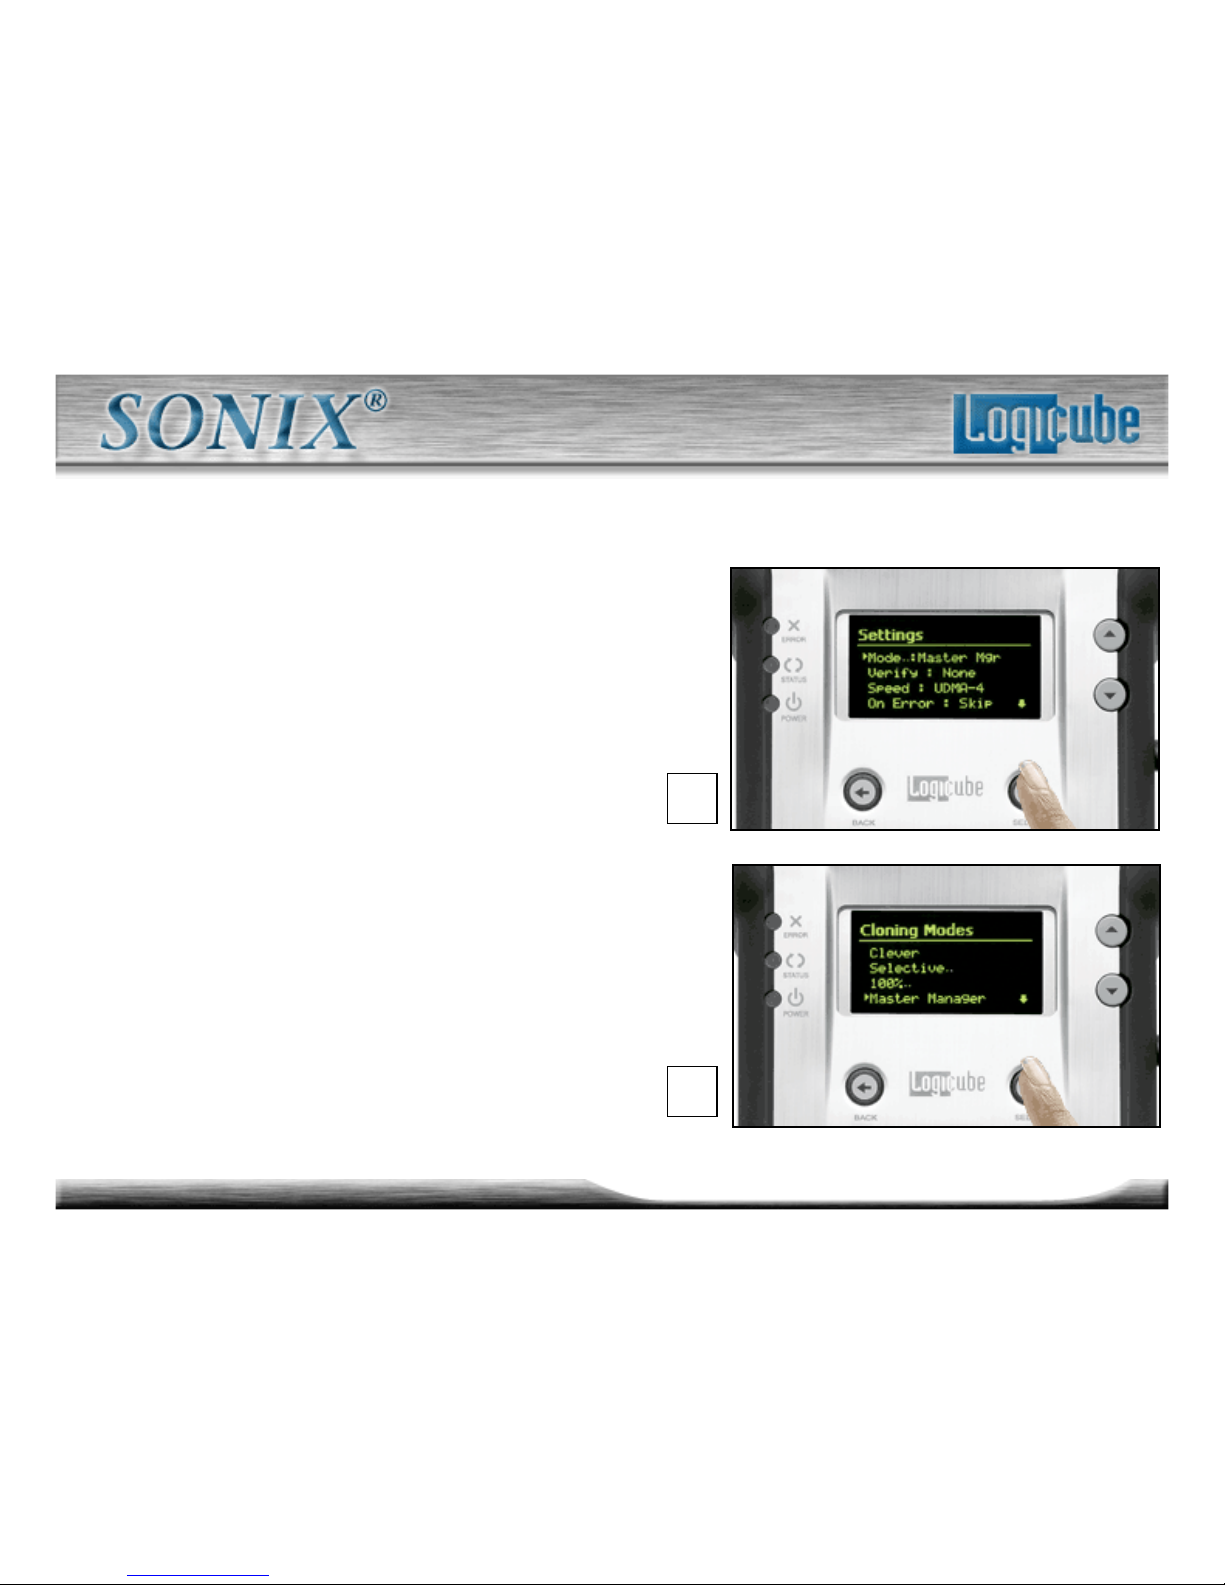
3. Locate “Mode” in the Settings
menu and press the “Select” button.
The Mode menu appears.
4. Locate the “Master Manager”
menu option and press “Select”.
This will select Master Manager™
mode and return you to the Settings
screen.
4.
3.
Page 69
69
Logicube Confidential Information
Master Manager™ Part 4
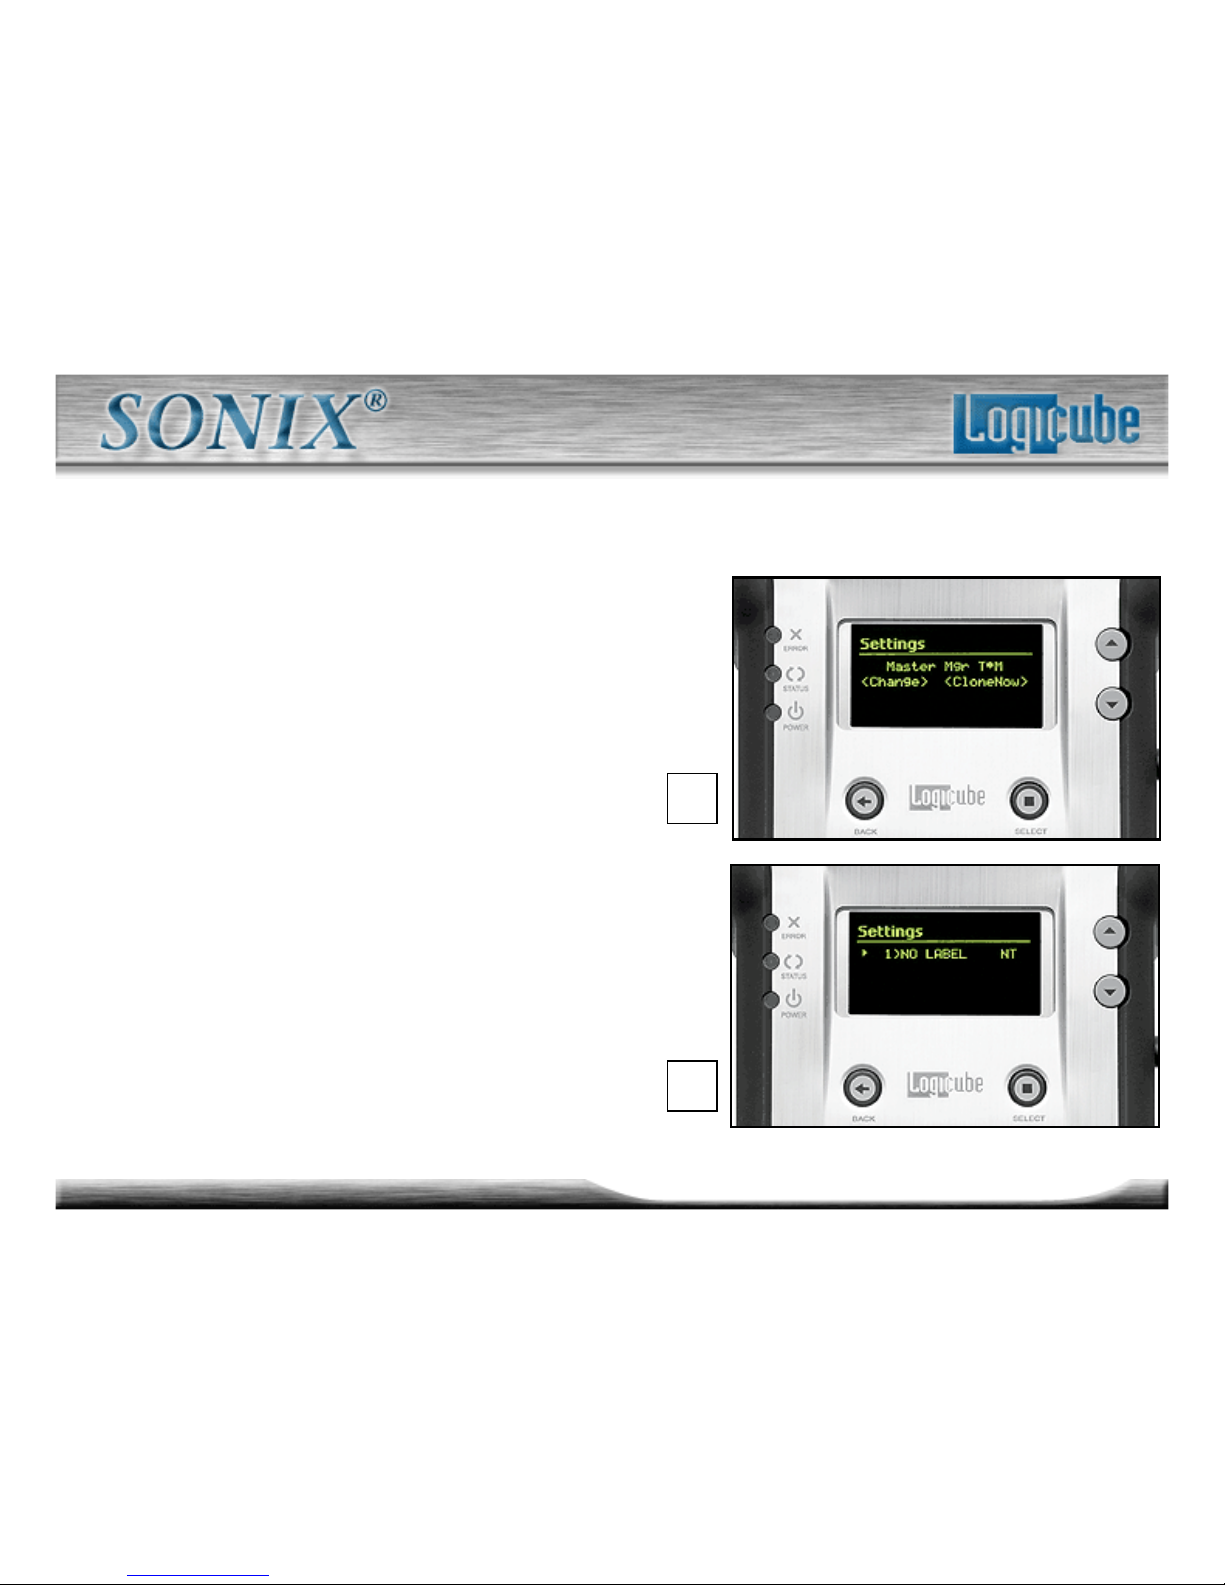
5. Press the “Start/Stop” button will
take you to the “clone preview”
screen.
6. Pressing “Start/Stop” button again
will display a list of all partitions on
the Target drive.
– Note: If you want to change the
Volume Label of the partition, refer to
Section “Selective Partitions” Step #7
(page 58)
5.
6.
Page 70
70
Logicube Confidential Information
Master Manager™ Part 5
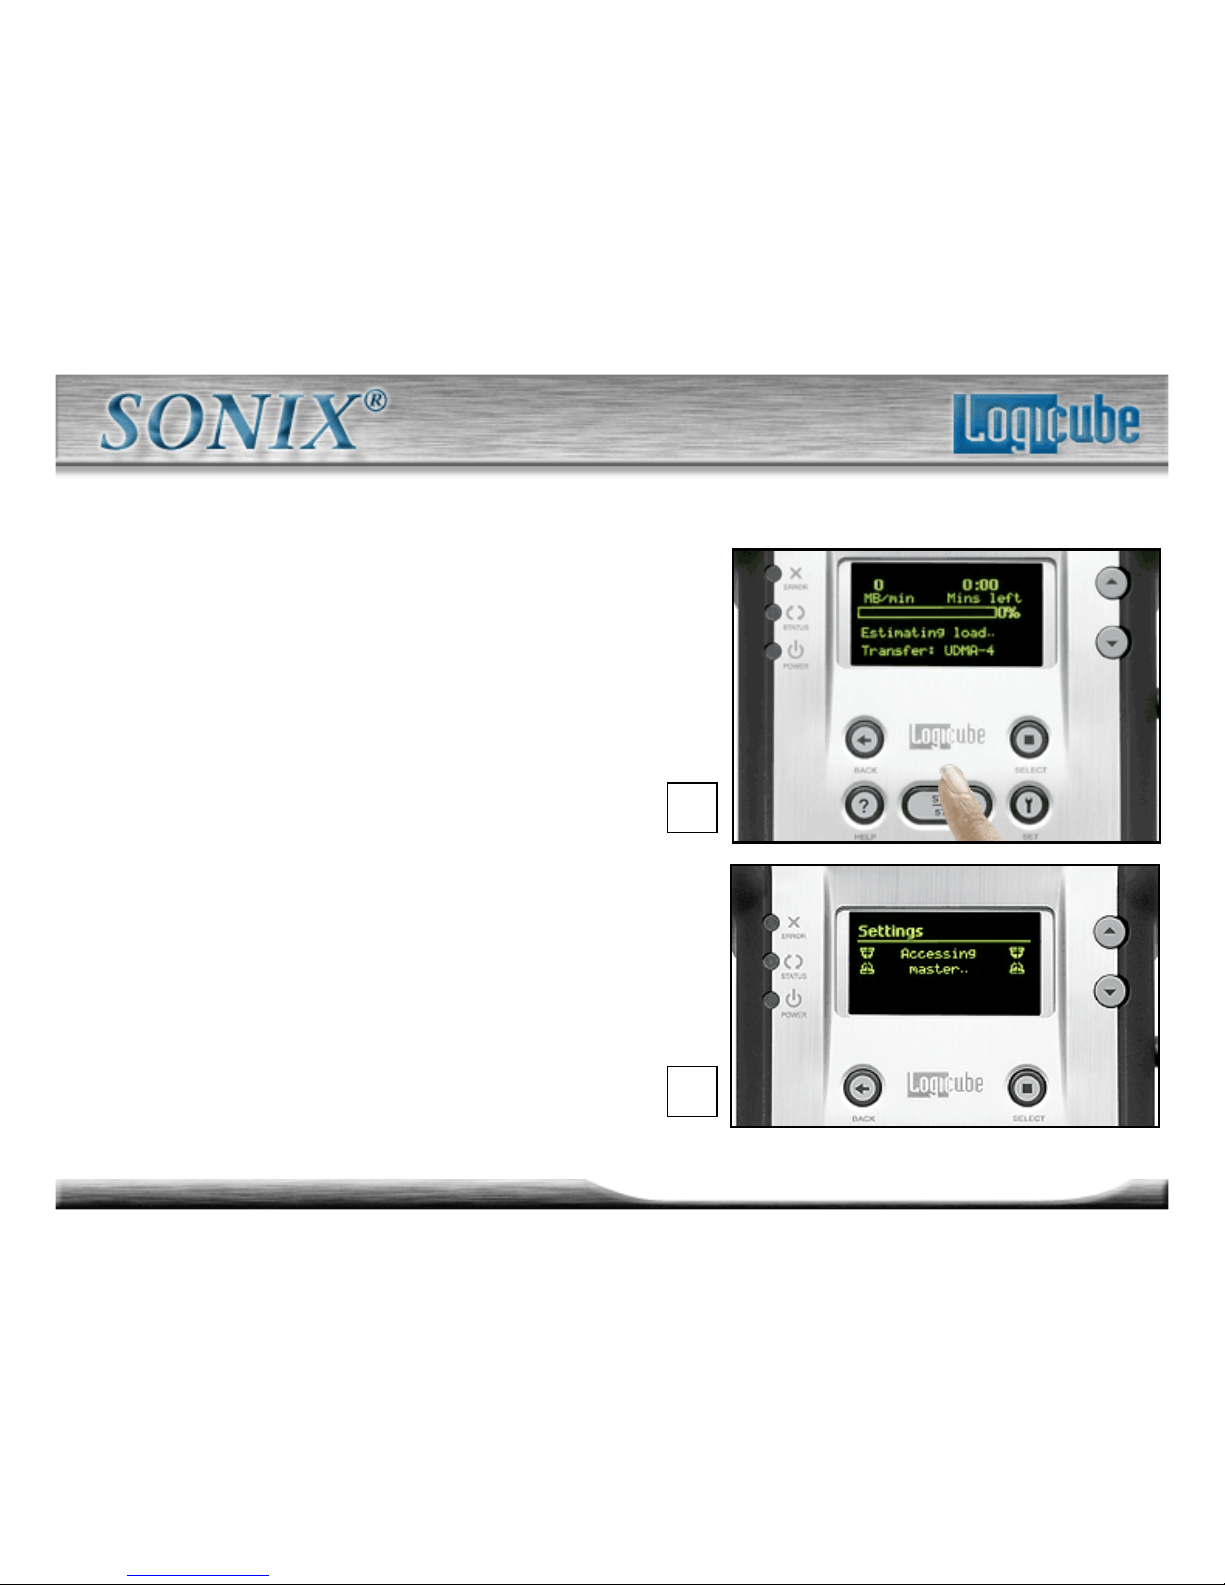
7. Press “Start/Stop” again and the
Sonix™ will estimate the size of the
partitions and determine which will fit
on the master drive.
– Note: Existing Master drive
partitions that are too small to hold
the amount of data selected from
the Target drive will not appear on
the OLED display.
8. Master Manager will then access
the Master drive.
7.
8.
Page 71
71
Logicube Confidential Information
Master Manager™ Part 6
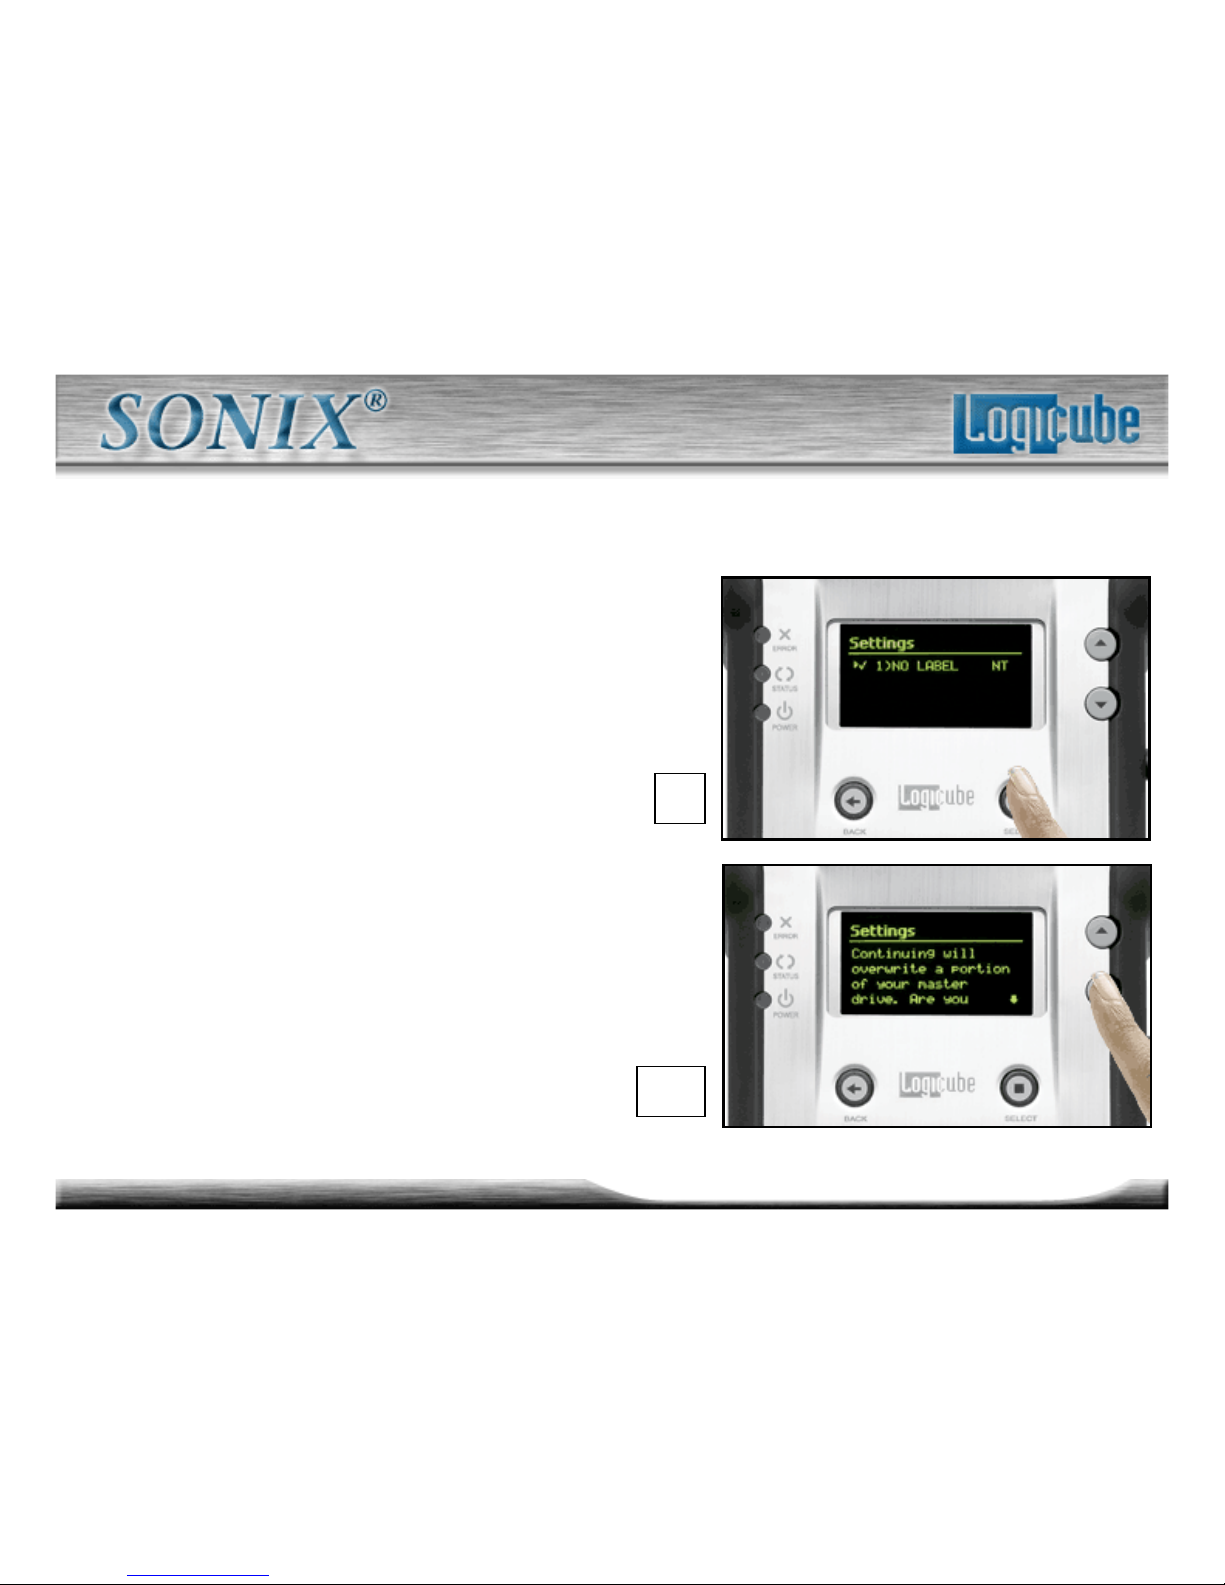
9. Choose the Master partition you
wish to overwrite, or scroll down and
place the cursor next to the “Add
Partition” option. Press the “Select”
button.
10. Press the “Start/Stop” button. A
message will appear warning you
that continuing will overwrite data on
your Master drive. Press the “Down
Arrow” button to scroll down to the
end of the screen.
10.
9.
Page 72
72
Logicube Confidential Information
Master Manager™ Part 7
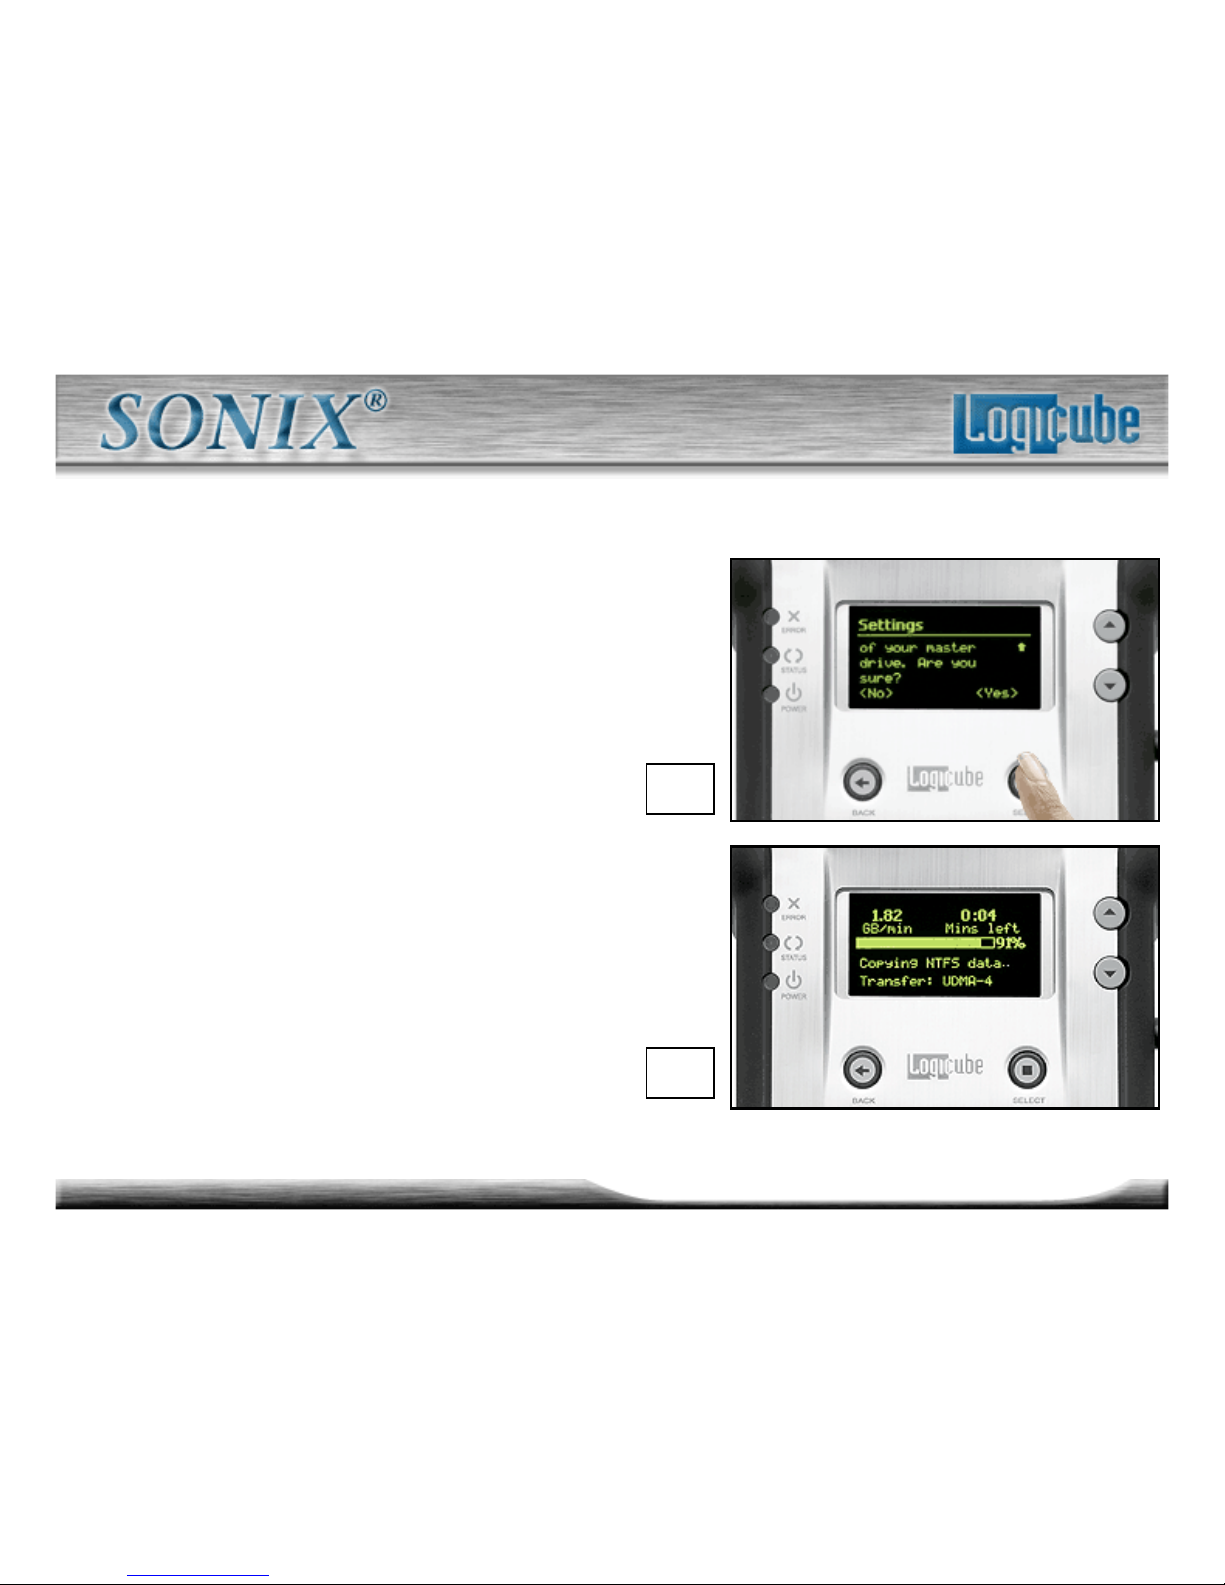
11. If you are prepared to continue,
choose “<Yes>”. (If you wish to abort
the operation, choose “<No>”.)
Choose “<Yes>”.
12. The status screen will appear and
cloning will begin.
11.
12.
Page 73
73
Logicube Confidential Information
Master Manager™ Part 8
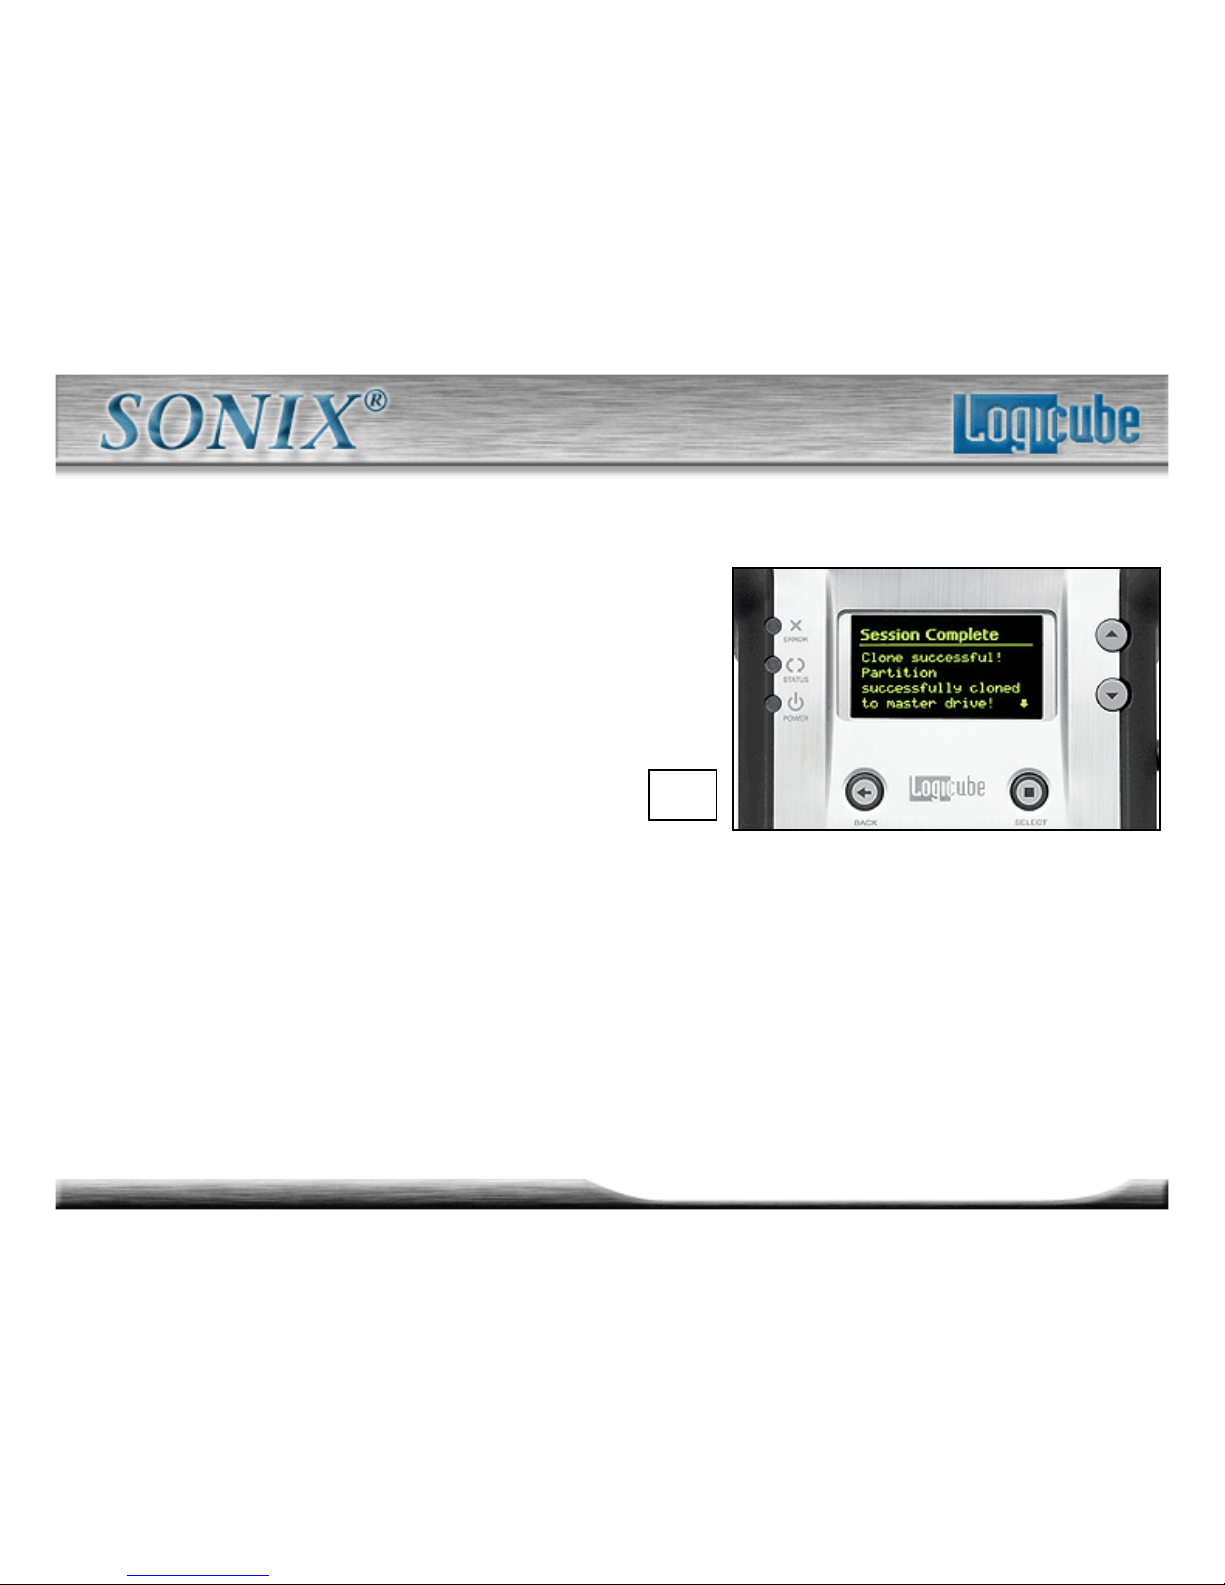
13. The Logicube Sonix™ will notify
you when cloning has been
completed. Press the “Back” button
to return to the main menu.
13.
Page 74
74
Logicube Confidential Information
USB Drive Mode
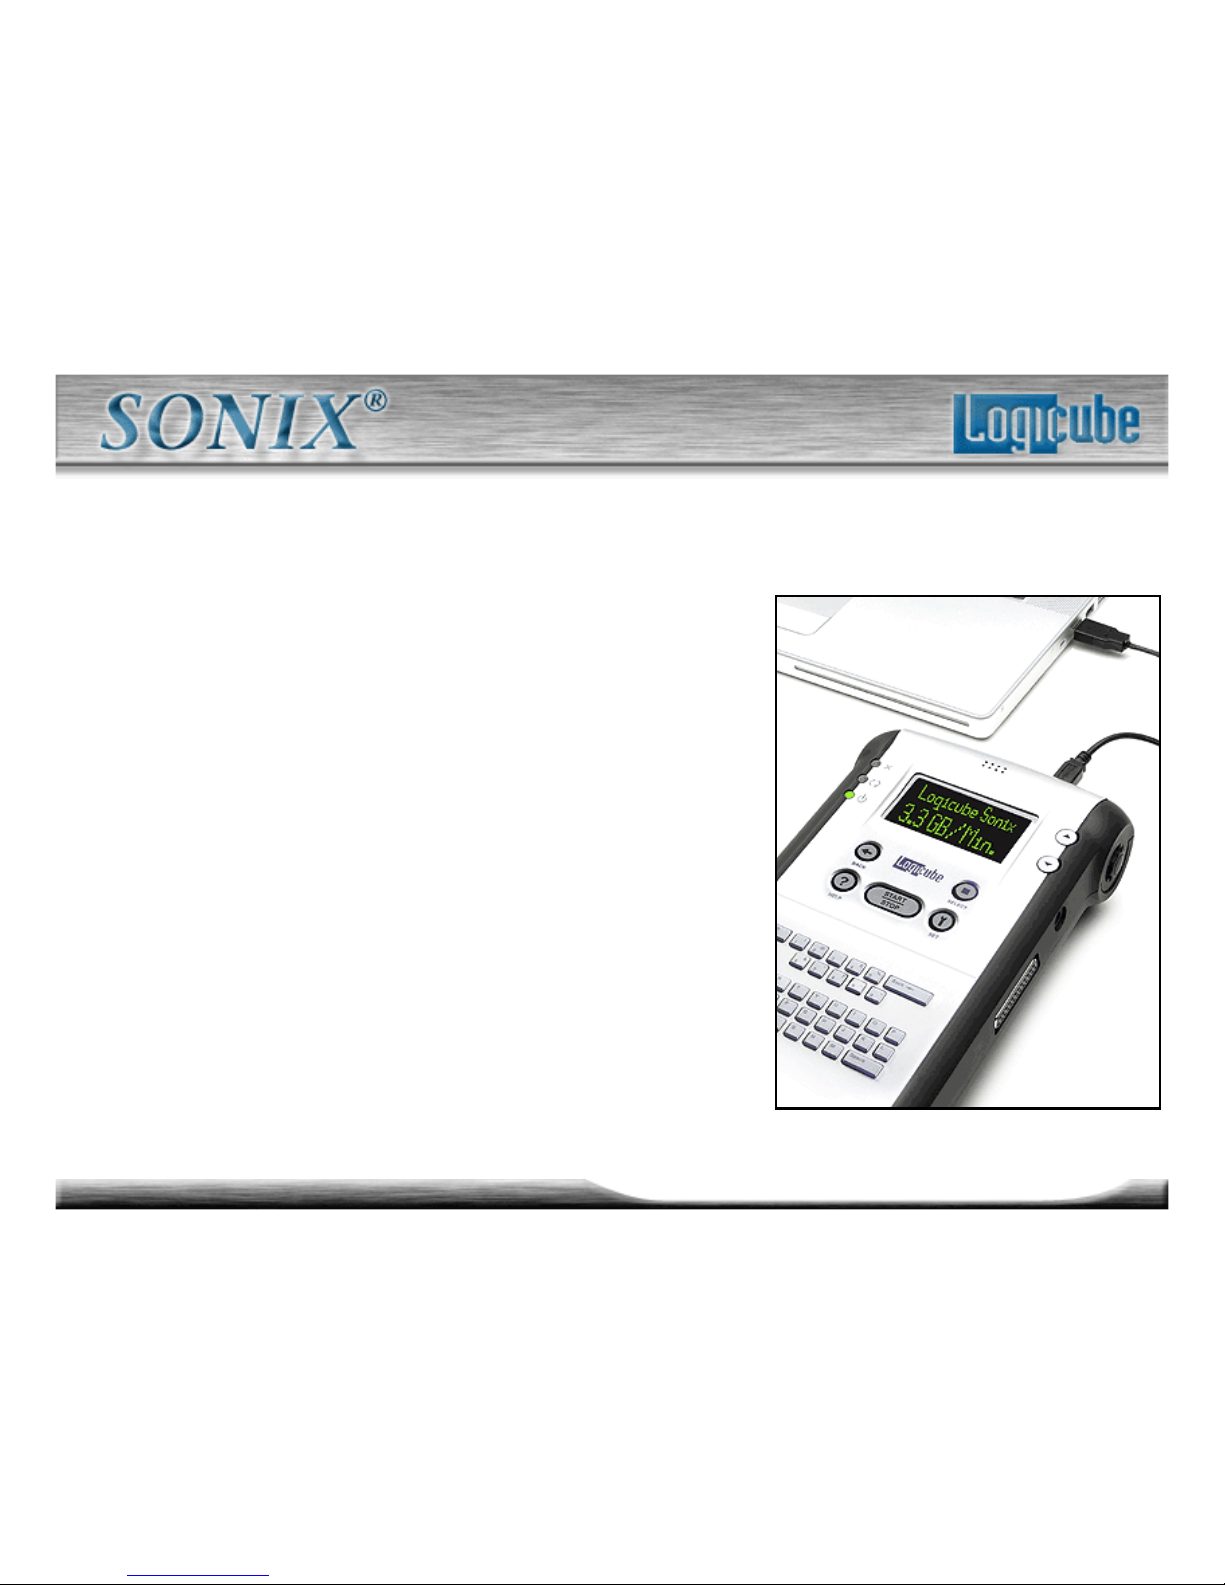
The integral USB port on your Logicube
Sonix™ provides connectivity of your CF
drive or Master hard drive (the unit’s
internal drive) to any USB-enabled PC.
Both USB 1.1 and USB 2.0 are supported.
USB connectivity can be used in two modes
of operation: Drive analysis mode and DOS
capturing mode.
Page 75
75
Logicube Confidential Information
USB Drive Mode Part 1
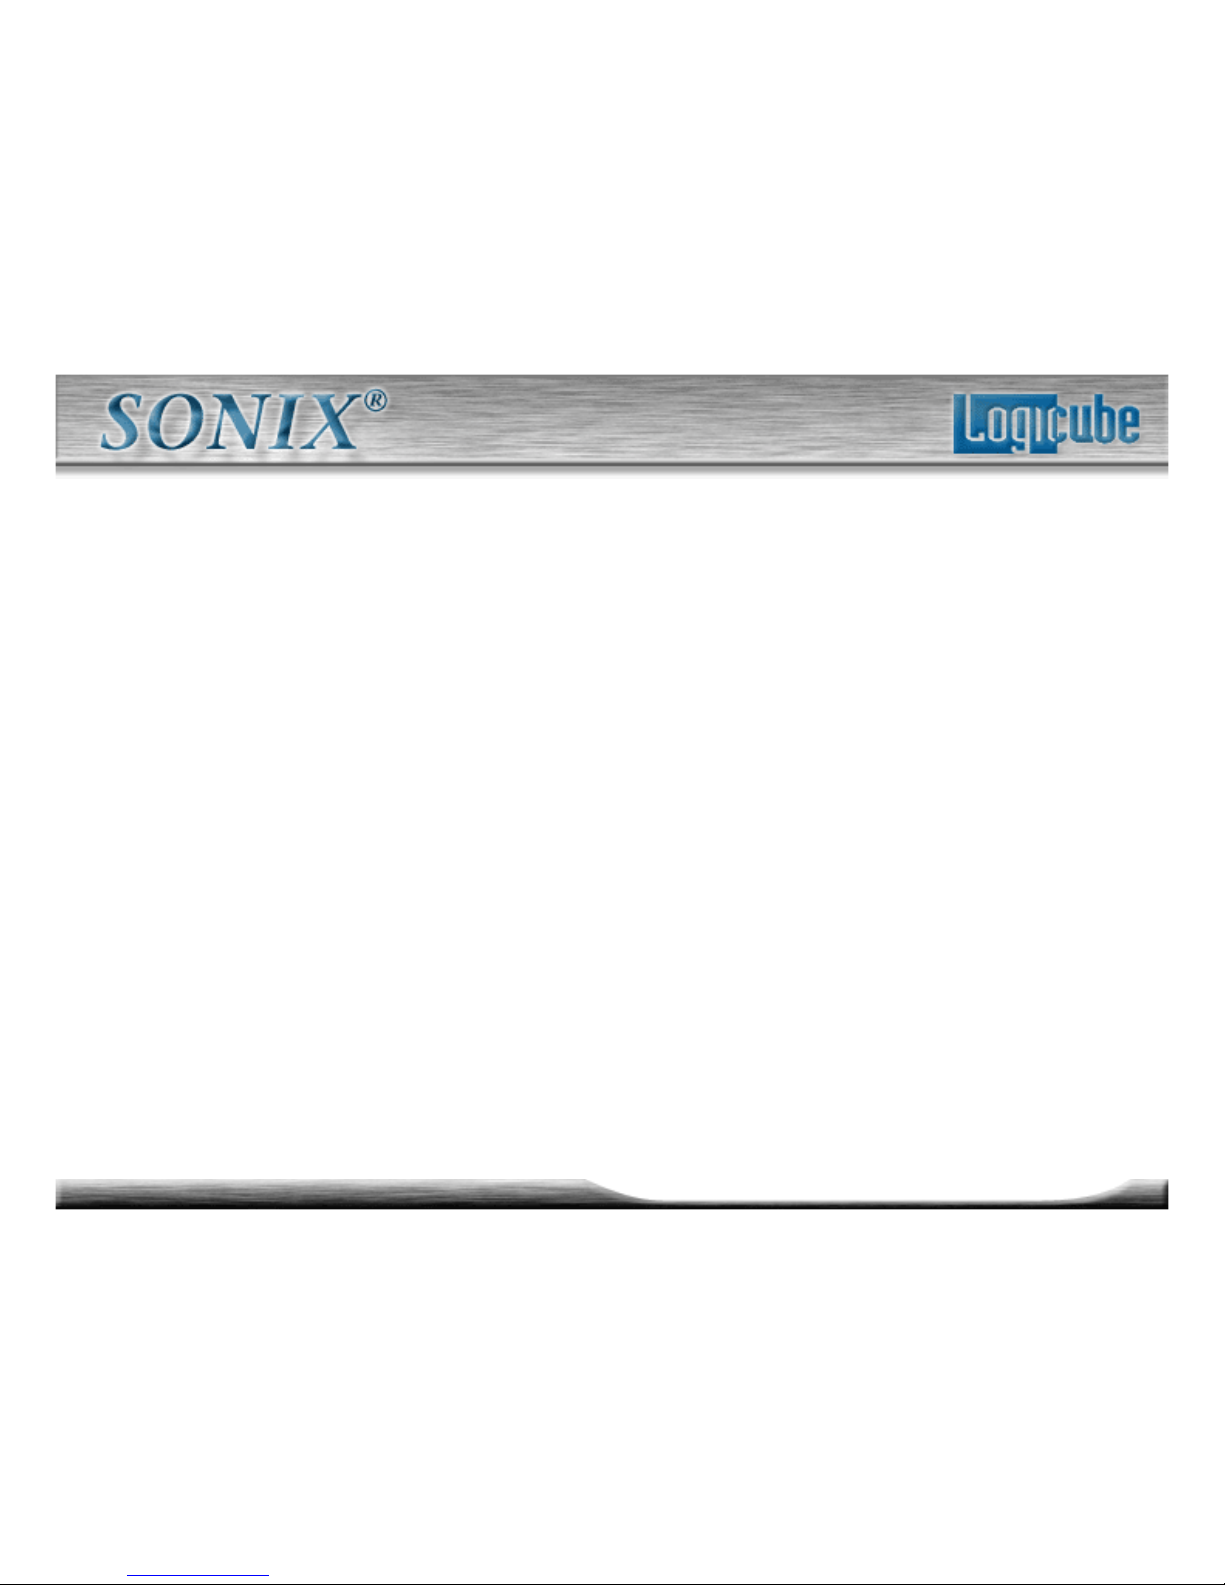
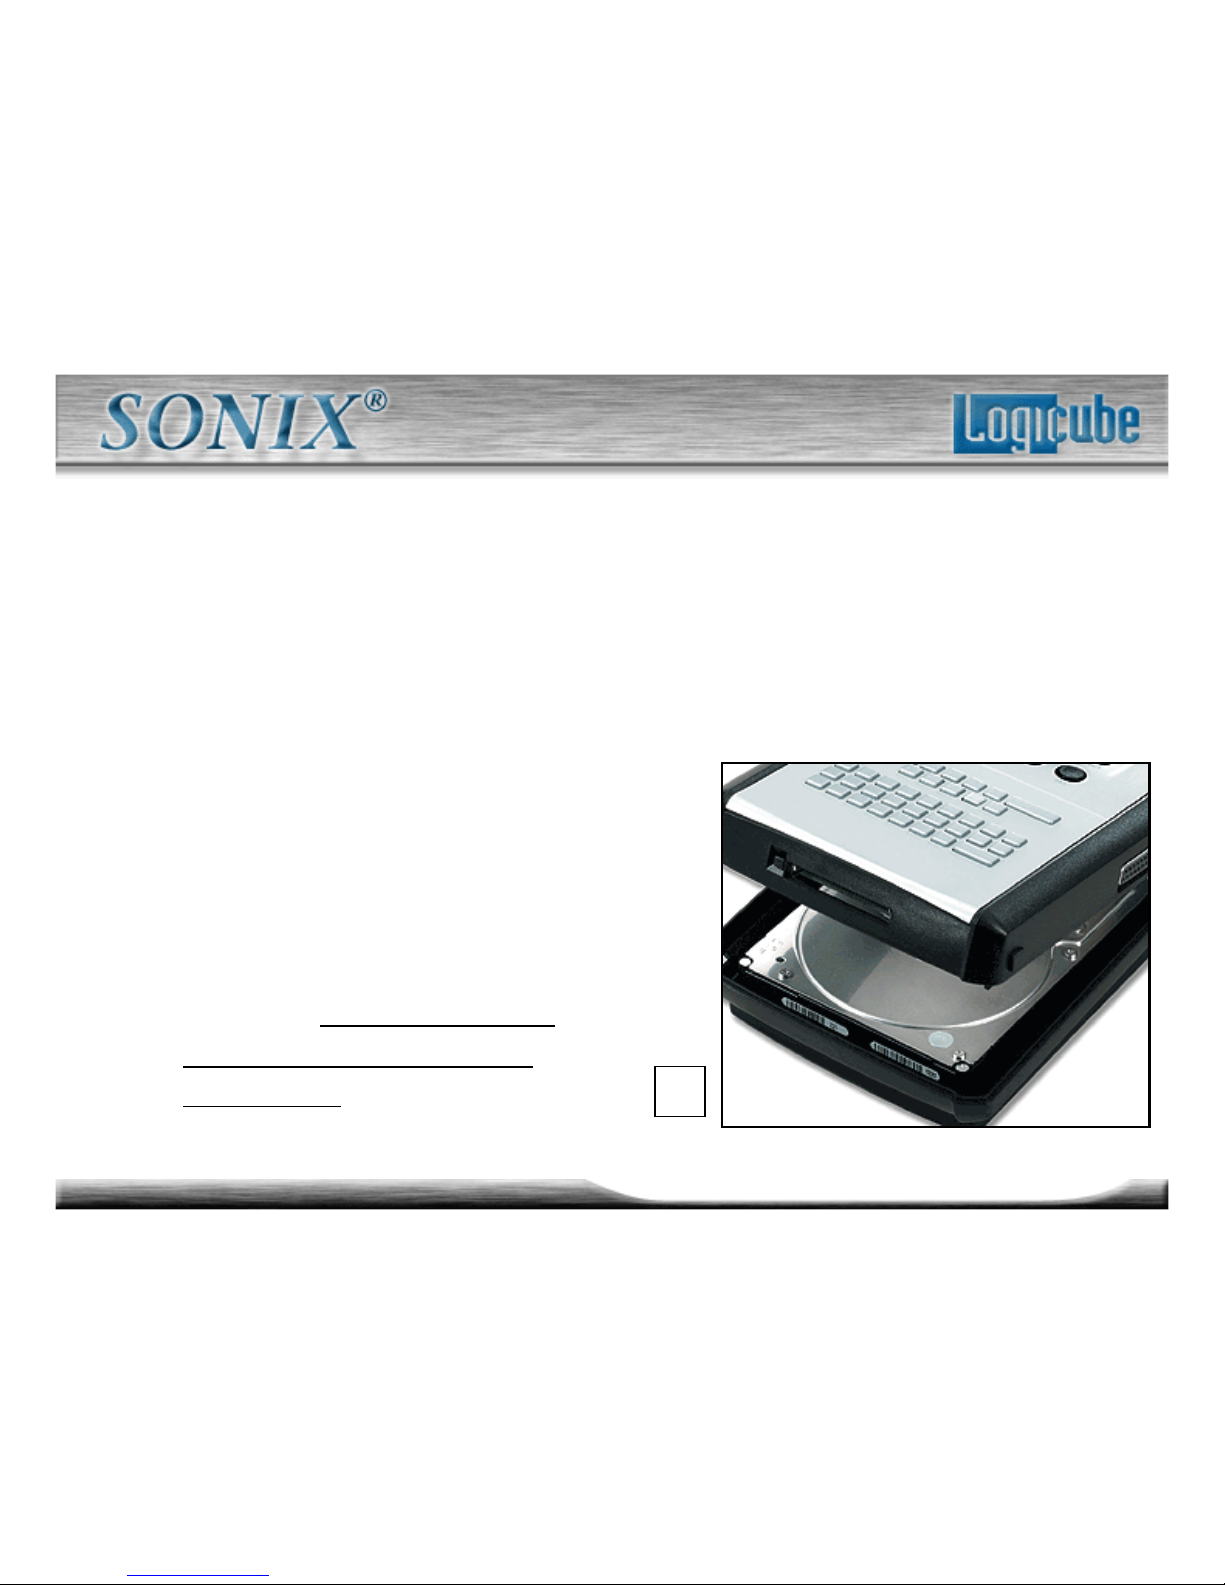
1. Prior to connecting the USB cable
to the Sonix™ you must:
– Make sure a Master drive is
properly attached inside your
Logicube Sonix™ .
– Make sure your PC is running
Win98 or above.
– Connect the USB cable
(provided) to a PC USB slot on
one end. Do not attach the
other end to the Logicube
Sonix™ yet.
1.
Page 76
76
Logicube Confidential Information
USB Drive Mode Part 2
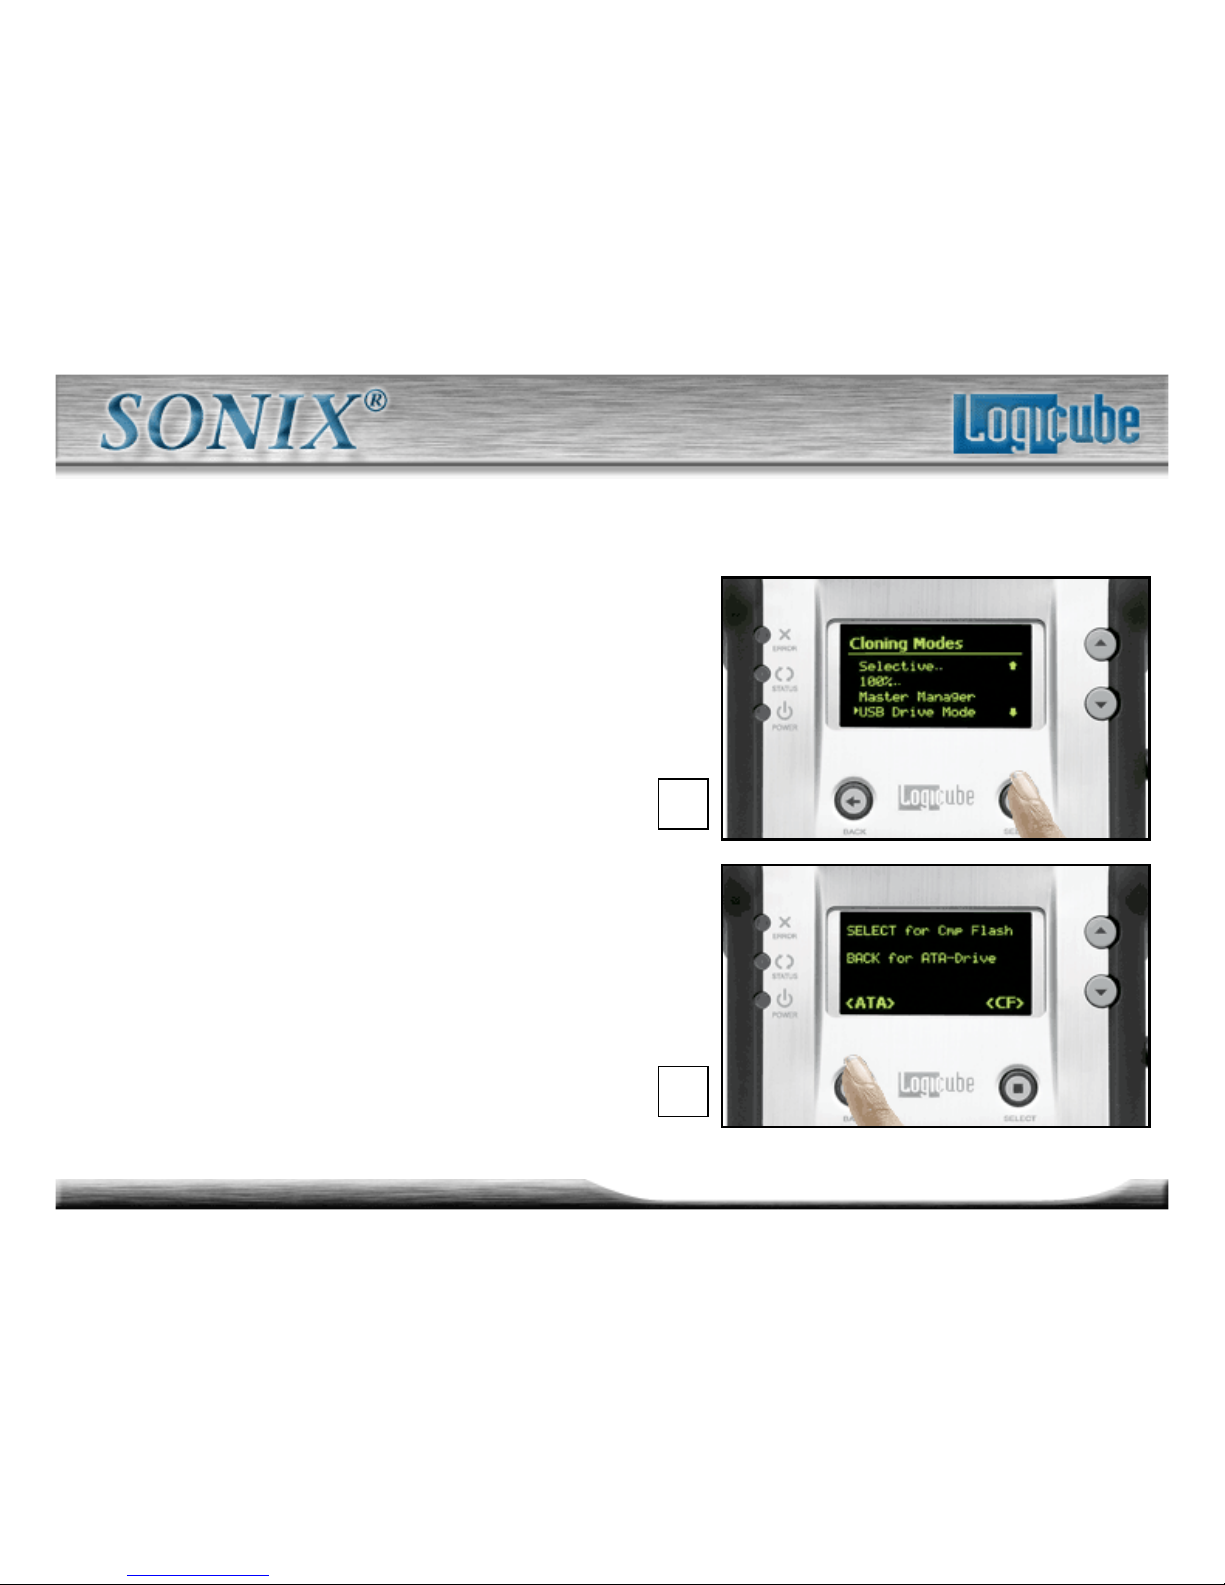
2. Set the Logicube Sonix™ to
USB mode:
3. Press the “Back” button to
choose “<ATA>”; the unit will
access the Master drive. If
“<CF>” is chosen, the unit will
access the Compact Flash
Drive instead.
2.
3.
Page 77
77
Logicube Confidential Information
USB Drive Mode Part 3
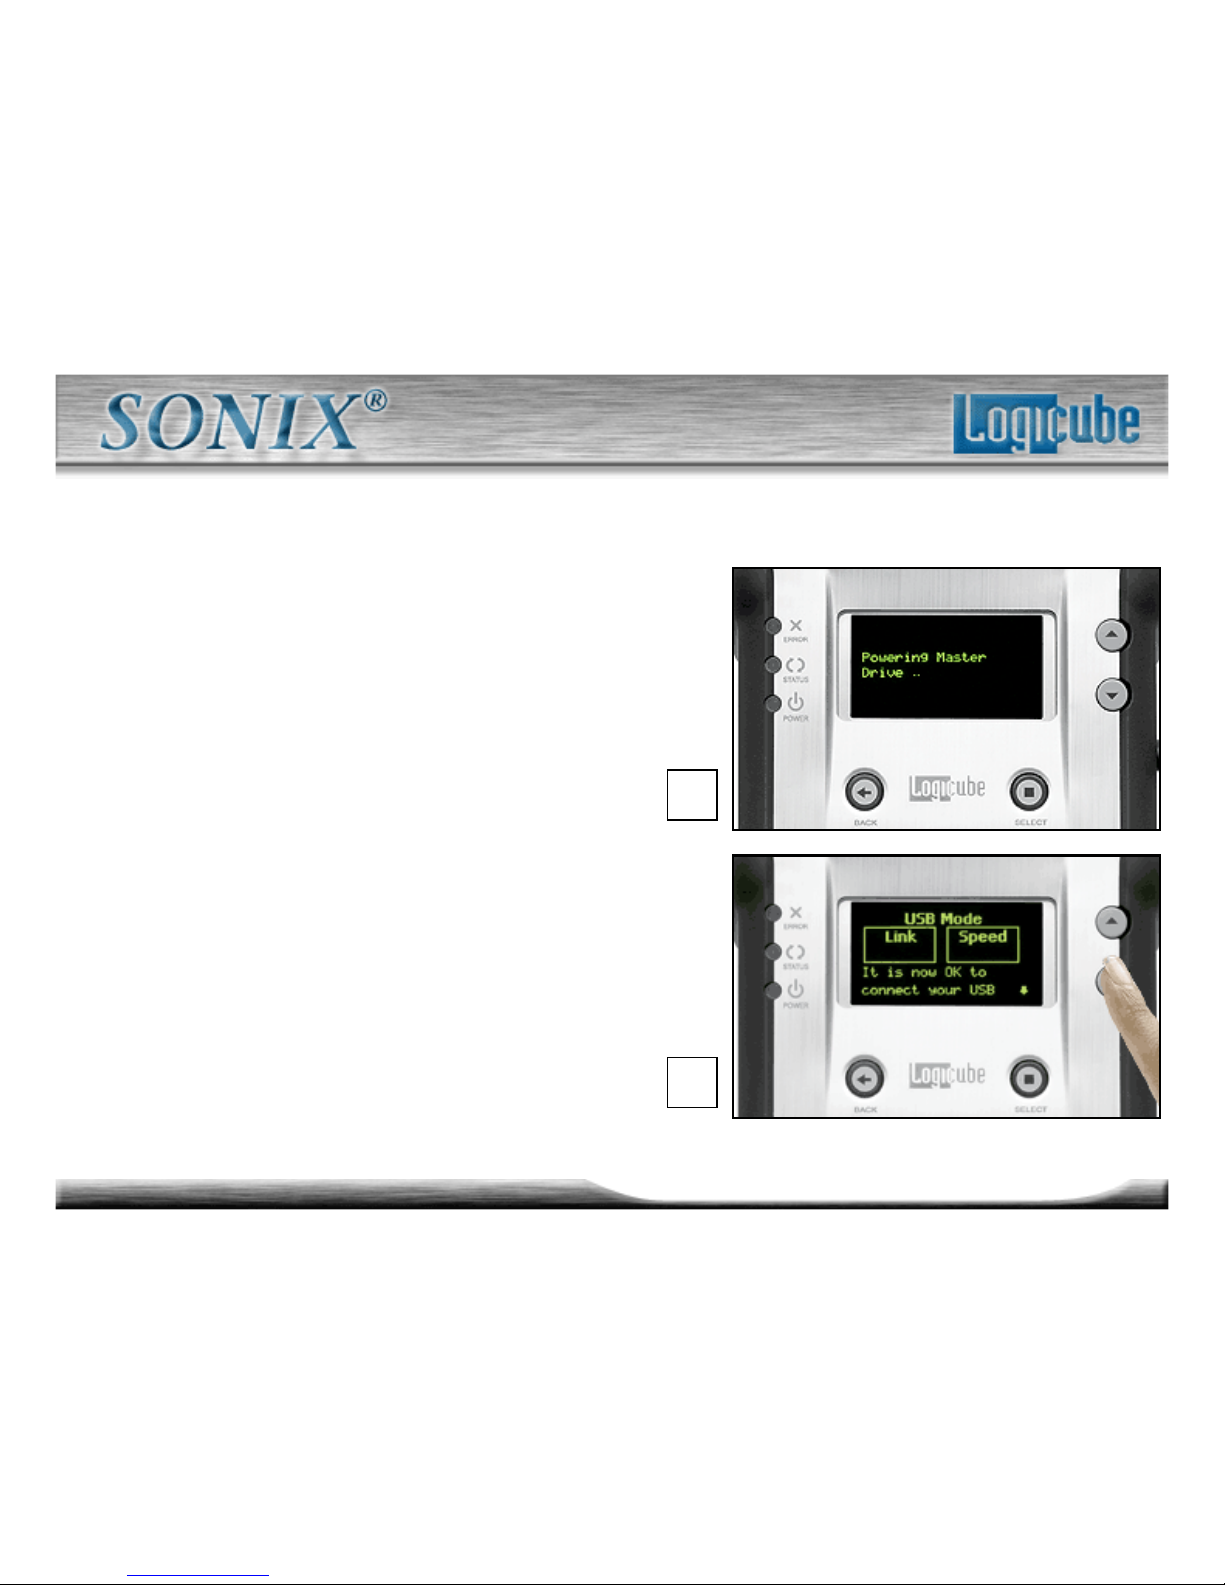
4. Once “ATA” is chosen, the Sonix™
will power the Master Drive.
5. A prompt will appear saying that it is
safe to attach the USB Cable.
6. Attach the USB cable to the
Logicube Sonix™. You should now
see some activity on your PC screen,
which depends on the operating
system.
4.
5.
Page 78
78
Logicube Confidential Information
USB Drive Mode Part 4
• If running ME/2000/XP your drive will automatically be
mounted and drive letters assigned to all recognizable
partitions.
• If running 98/98SE you will be prompted to install drivers. At
the “have disk…” prompt please point the PC to the drivers
CD-ROM (provided), and the installation should complete
smoothly.
7. The Master Drive is now visible on Windows as an external
drive. Any partitions that can be accessed by your Operating
System will be assigned a Drive Letter.
Page 79
79
Logicube Confidential Information
USB Drive Mode Part 5
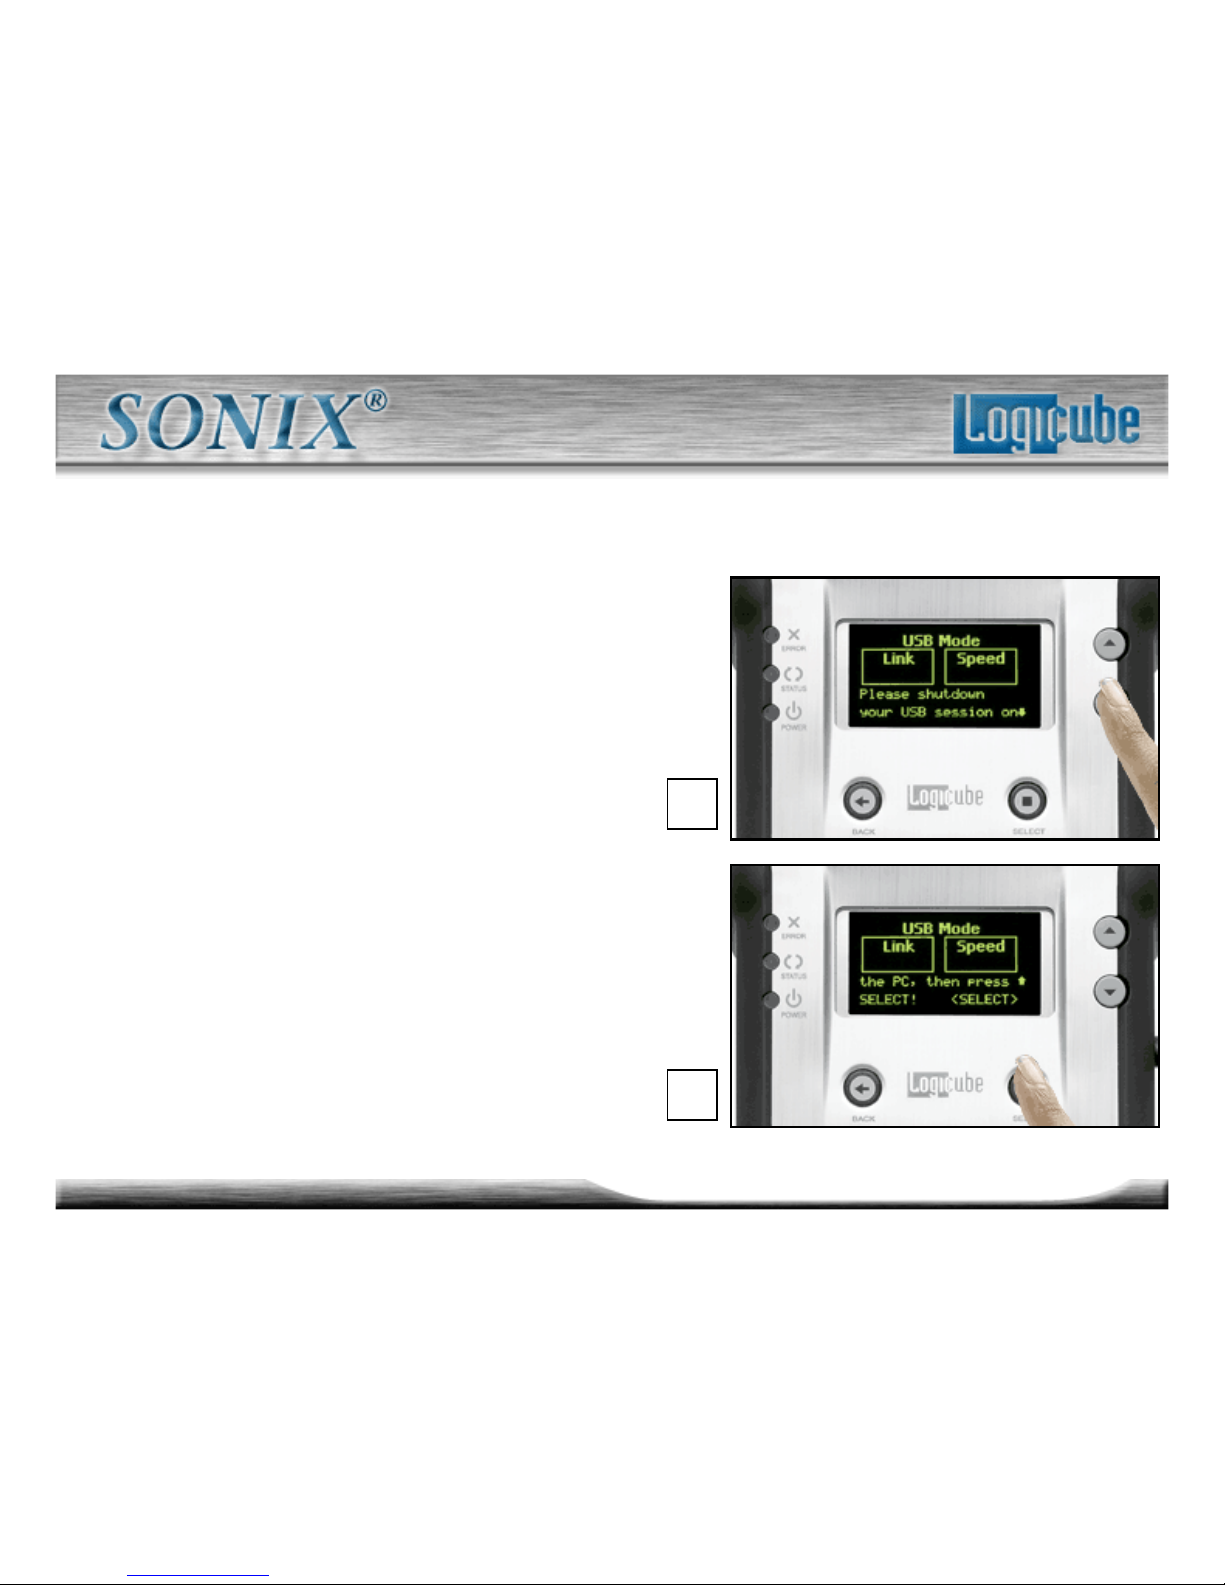
Before physically disconnecting the USB
cloning adapter and/or shutting down
power to the Logicube Sonix™, the unit
has to be properly "unmounted" from
Windows. To do that:
1. Access this screen from the
“USB Ready Screen” by pressing the
“Back” button for “Abort”
2. Press the “Down Arrow” button
to scroll to the end of the screen.
Press “Select” to power down the
Sonix™ and end the USB session.
1.
2.
Page 80
80
Logicube Confidential Information
Cloning Through USB Port
This mode allows the user to clone drives through the USB port
of a PC. The PC drive can be the Master or Target drive.
Both USB 1.x and 2.0 are supported. Typically, the user will
boot the computer from the provided DOS CD. The CD is
equipped with USB drivers, and our client application that
communicates with the hard drive lying inside the Logicube
Sonix™ unit.
Page 81
81
Logicube Confidential Information
Scan Target
Scan Target mode scans the Target drive for weak and bad
data sectors. It uses the Read-Verify command of the ATA
specification to detect bad or weak spots on the Target
drive. When a suspect area of the drive is detected, a
sector-by-sector analysis is performed.
When using Scan Target mode there are two levels of
scanning speed to choose from:
– Fast (Default) – This is the fastest.
– Thorough – This is the most thorough.
Note: “Thorough” writes patterns to some sectors, which can
cause data corruption. Use this setting only when data loss is not
an issue.
Page 82
82
Logicube Confidential Information
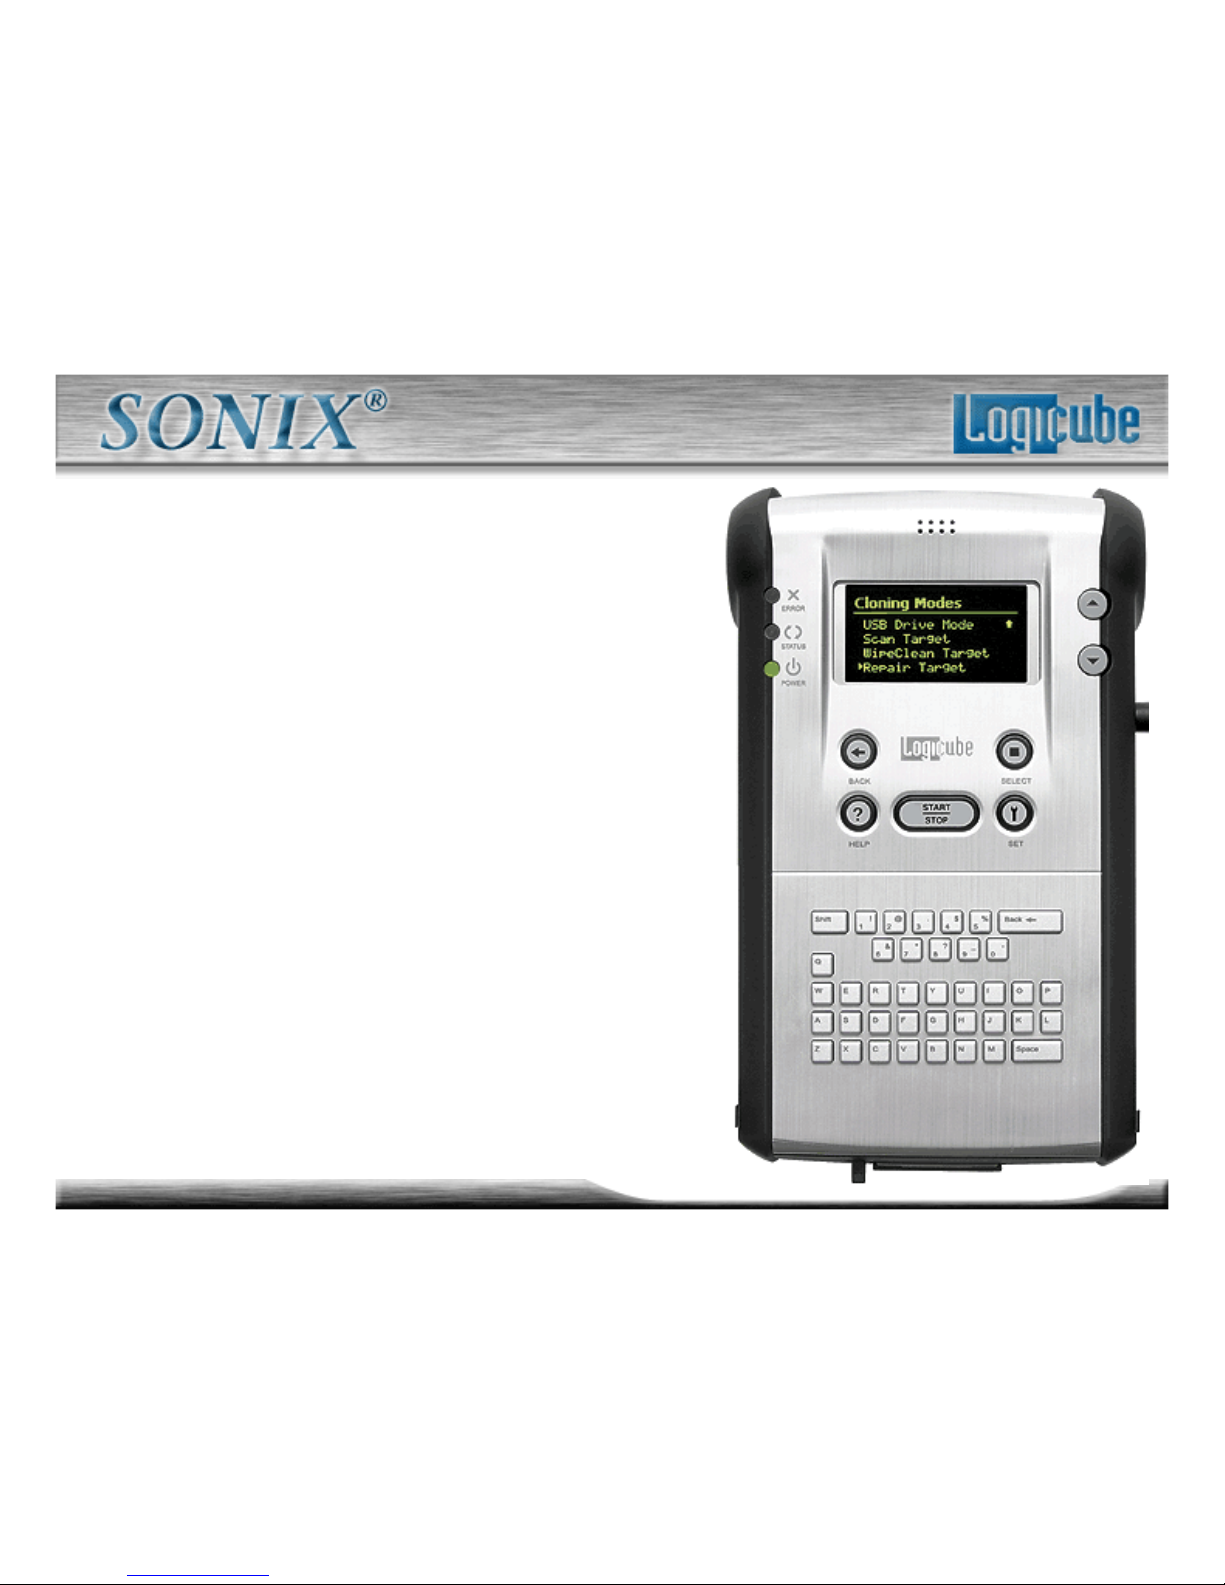
Repair Target Part 1
Repair Target mode scans the Target
drive using a Logicube exclusive
algorithm in an attempt to repair all
weak and bad sectors encountered.
Please note that this process can
take a long time.
The Repair Target operation directly
manipulates the contents of the
Target drive with no effort being
made to retain the original data.
Page 83
83
Logicube Confidential Information
Wipe Clean™ Target Mode Part 1
The WipeClean™ Target mode erases all data on the
Target drive. This may be required when discarding drives
that contain sensitive information to which you do not
want others to have access, e.g. financial information,
trade secrets, etc.
WipeClean™ writes a pattern over the whole Target drive
2 X n+1 times, where n is the selected number of
iterations of all 0’s and all 1’s. The last pass then writes
random values to every byte of the drive.
Page 84
84
Logicube Confidential Information
Wipe Clean™ Target Mode Part 2
The following settings are used in configuring WipeClean™ Target
mode:
– Passes – Determines how many iterations of all 0’s and all 1’s are
performed. The default is 1 for compliance with DoD M-5220.
– Value – Select the value to be written on the last pass. The options
are 0xf6, 0x00, 0xff, and Random (DoD default). (The Random
setting will fill the Target drive with a pseudo random pattern.)
– Master Required – Select “Yes” (default) if a Master drive is present,
otherwise select “No”. Although only the Target drive is erased, the
Logicube Sonix™ reaches its top speed if a Master drive is present.
Page 85
85
Logicube Confidential Information
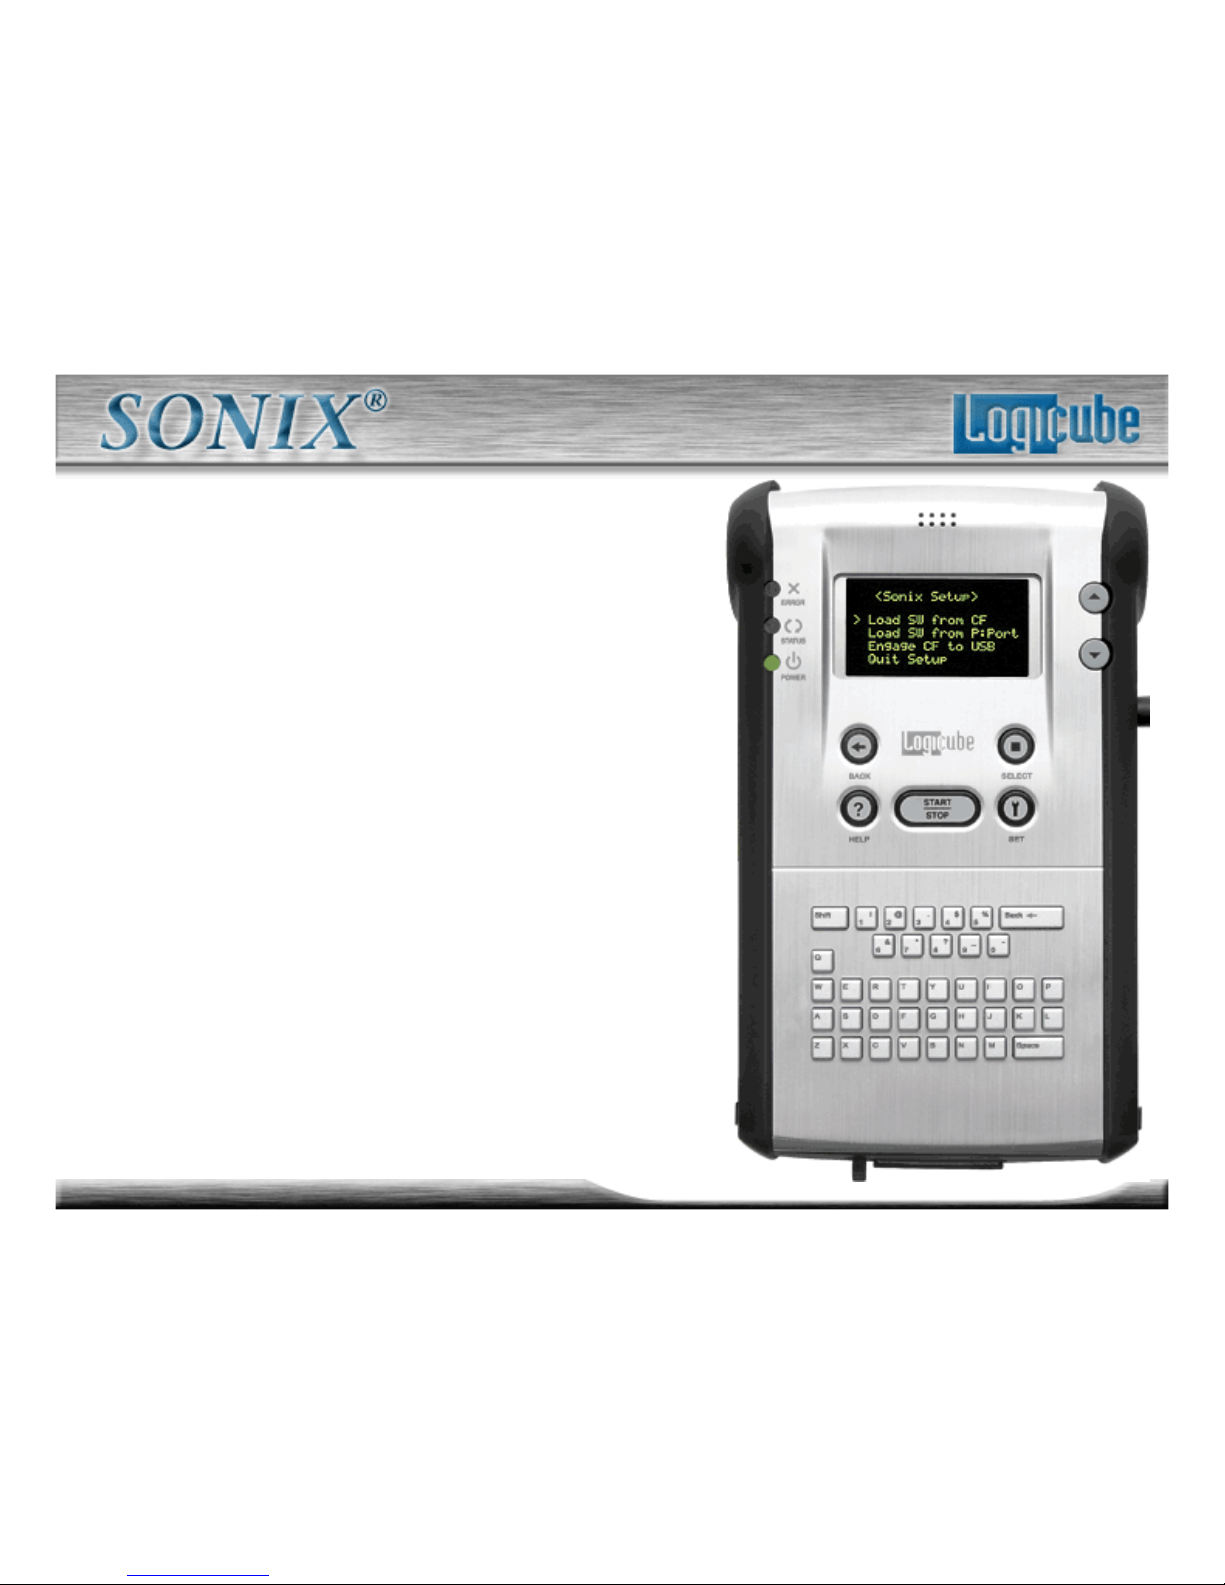
Software Setup
New and improved software will appear from
time to time on our website at
www.logicube.com. It is possible to update the
operating software in the field by a user.
Two common ways are available:
1. Using the Compact Flash card
2. Using a parallel port connection
For this lesson, we will concentrate on loading
from the CF, parallel port instructions are
available in the Sonix manual.
Note: Logicube provides a CD-ROM that
contains a backup copy of the Logicube
Sonix™ software. This software is already
loaded on your unit.
Page 86
86
Logicube Confidential Information
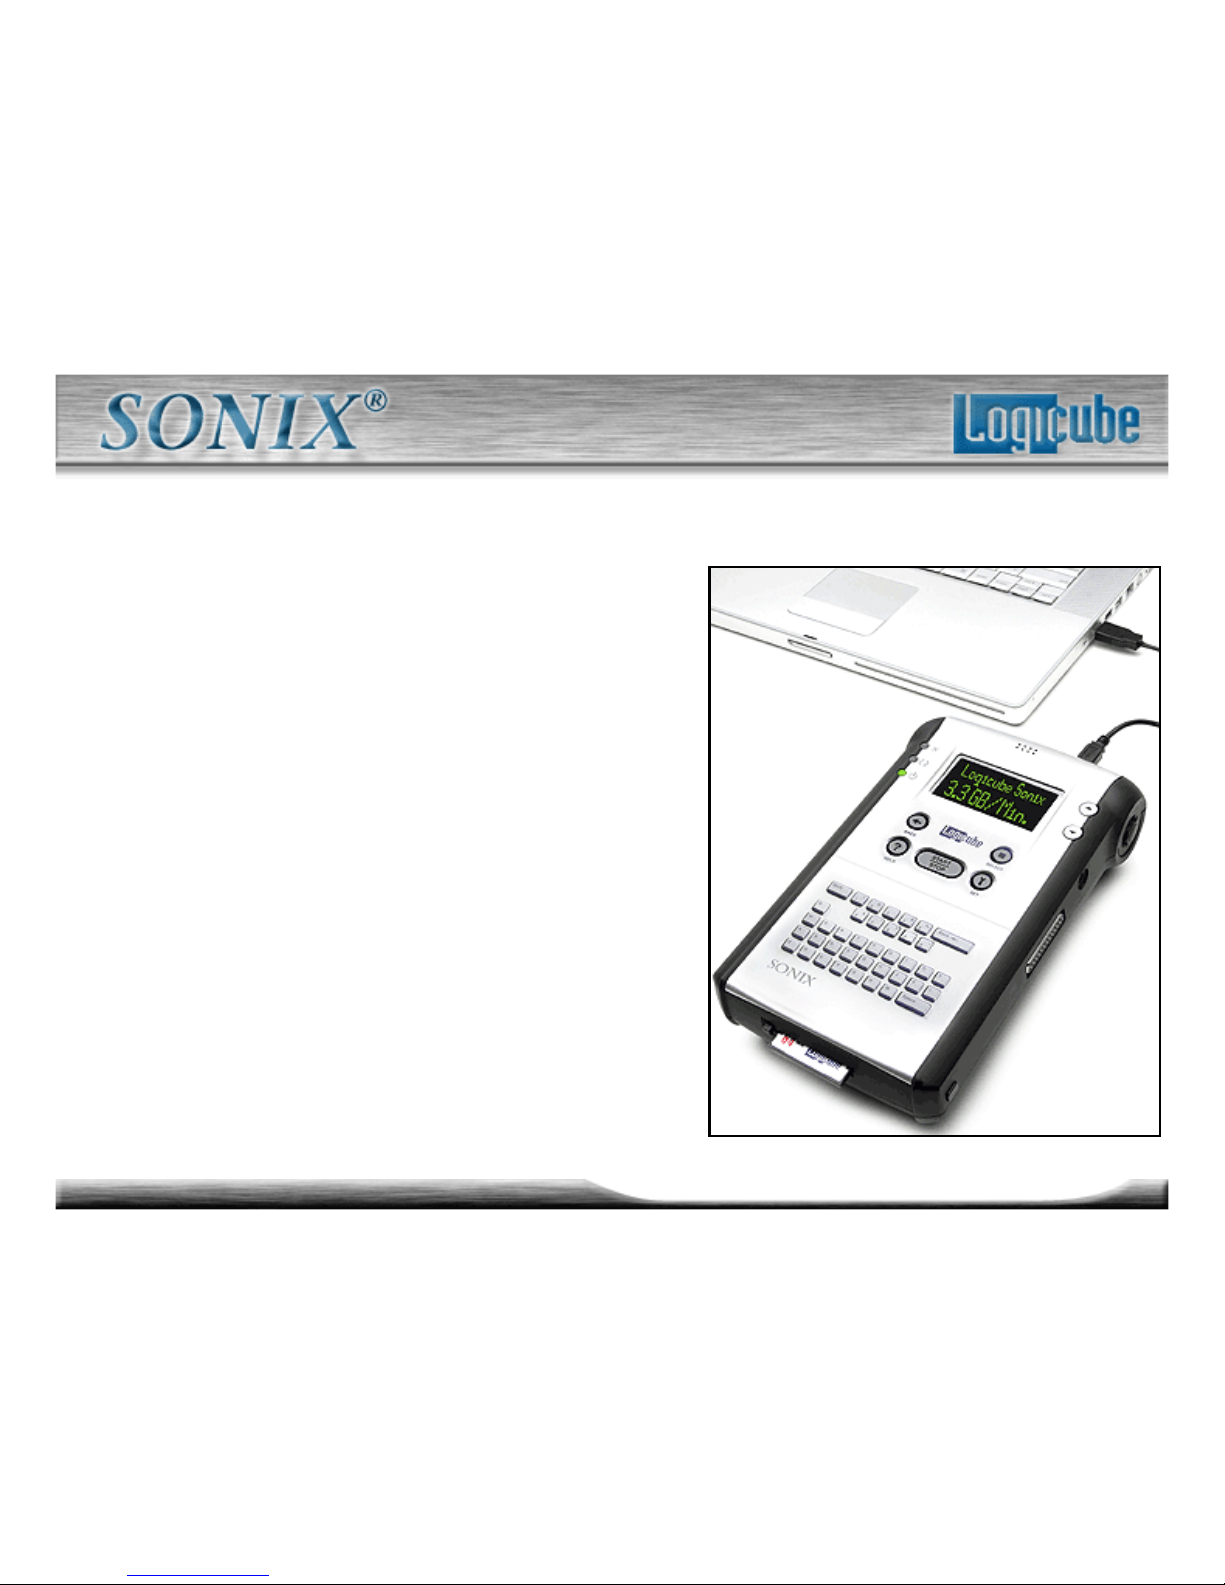
Software Setup - Engage CF to USB Part 1
This is necessary to load new software
files to the CF Drive. There are two
methods to connect the Compact Flash
(CF) Drive to Windows through the USB
Port:
1. USB Mode
2. The Software Setup Menu.
This lesson will cover “Connecting
Through USB Mode”.
Page 87
87
Logicube Confidential Information
Software Setup - Engage CF to USB Part 2
If the software on your Logicube
Sonix™ is corrupt or missing, USB
connectivity is still available for the CF
drive through the “Software Setup
Menu”. This menu resides in the
unit’s Firmware and is not affected by
the software.
Important: Make sure your PC is
running in Windows 98 or above.
Page 88
88
Logicube Confidential Information
Software Setup - Engage CF to USB Part 3
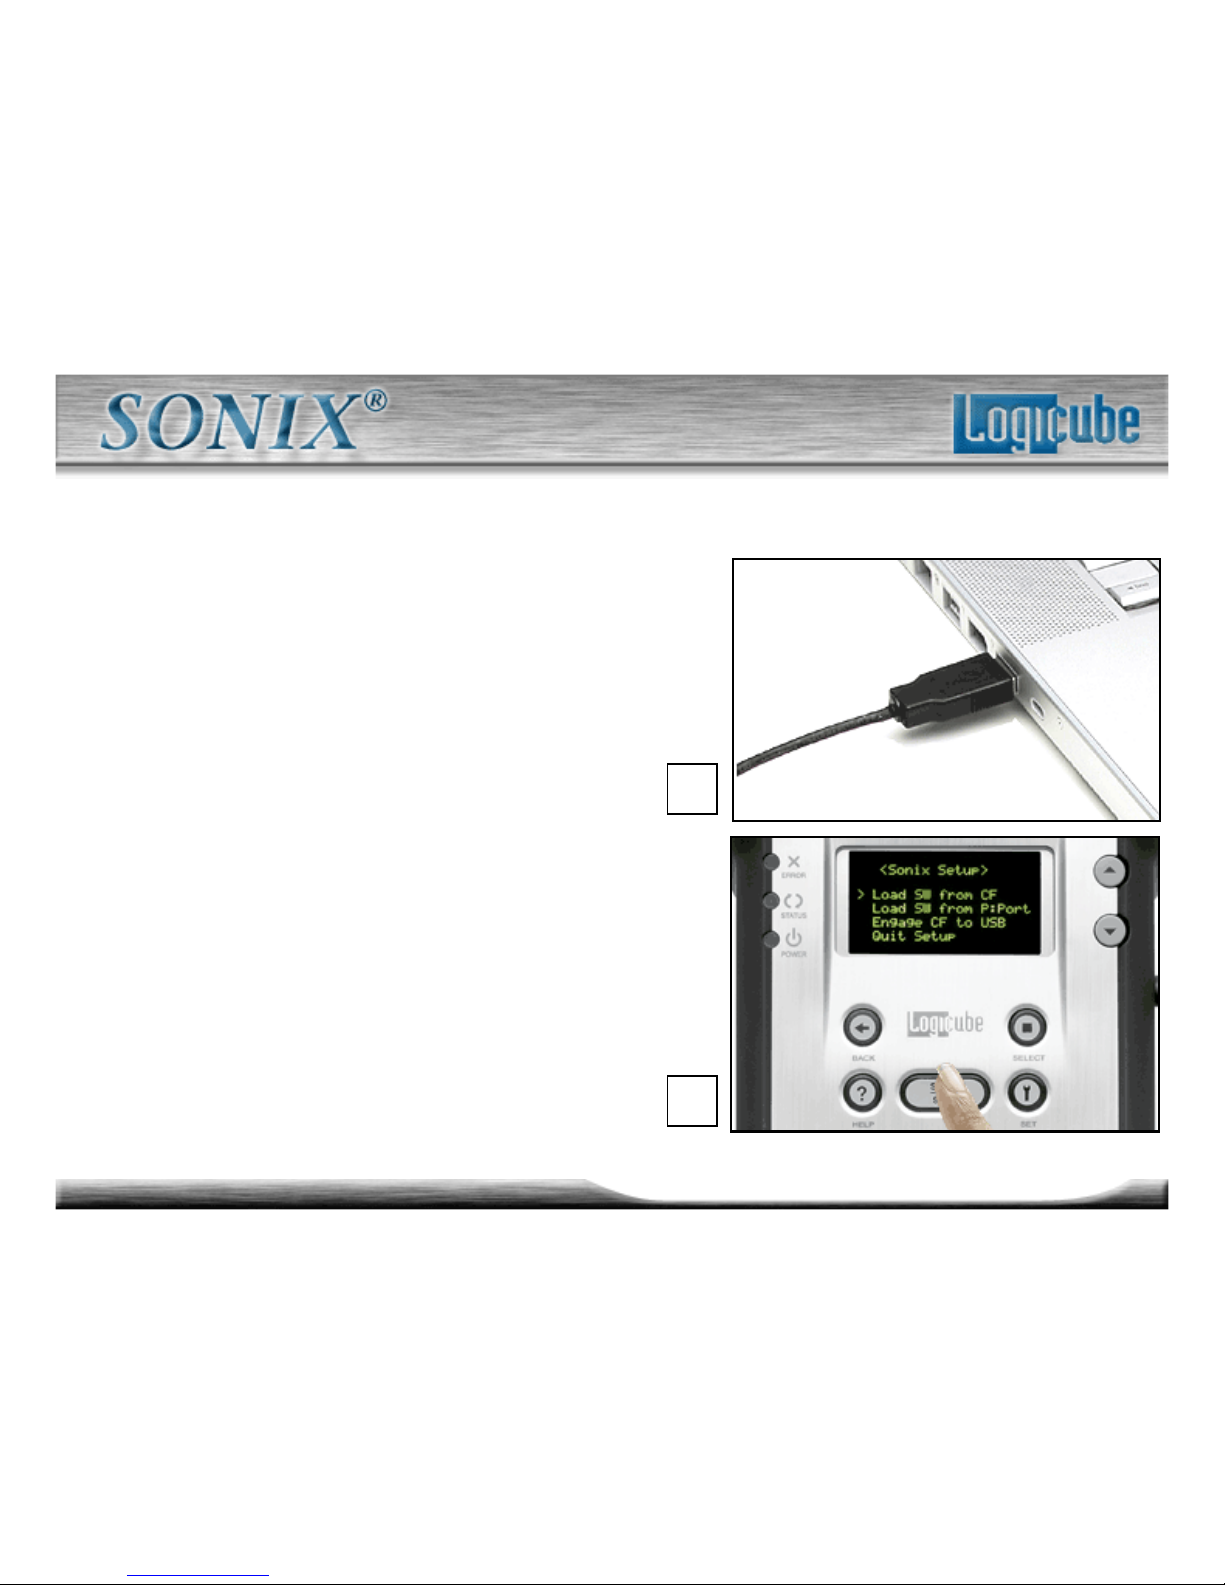
1. Connect the USB cable
(provided) to a PC USB slot on
one end. Do not attach the other
end to the Logicube Sonix™ yet.
2. Power (plug in) the Logicube
Sonix™ while holding down the
“Start/Stop” button to access the
“Sonix Setup” screen.
1.
2.
Page 89
89
Logicube Confidential Information
Software Setup - Engage CF to USB Part 4
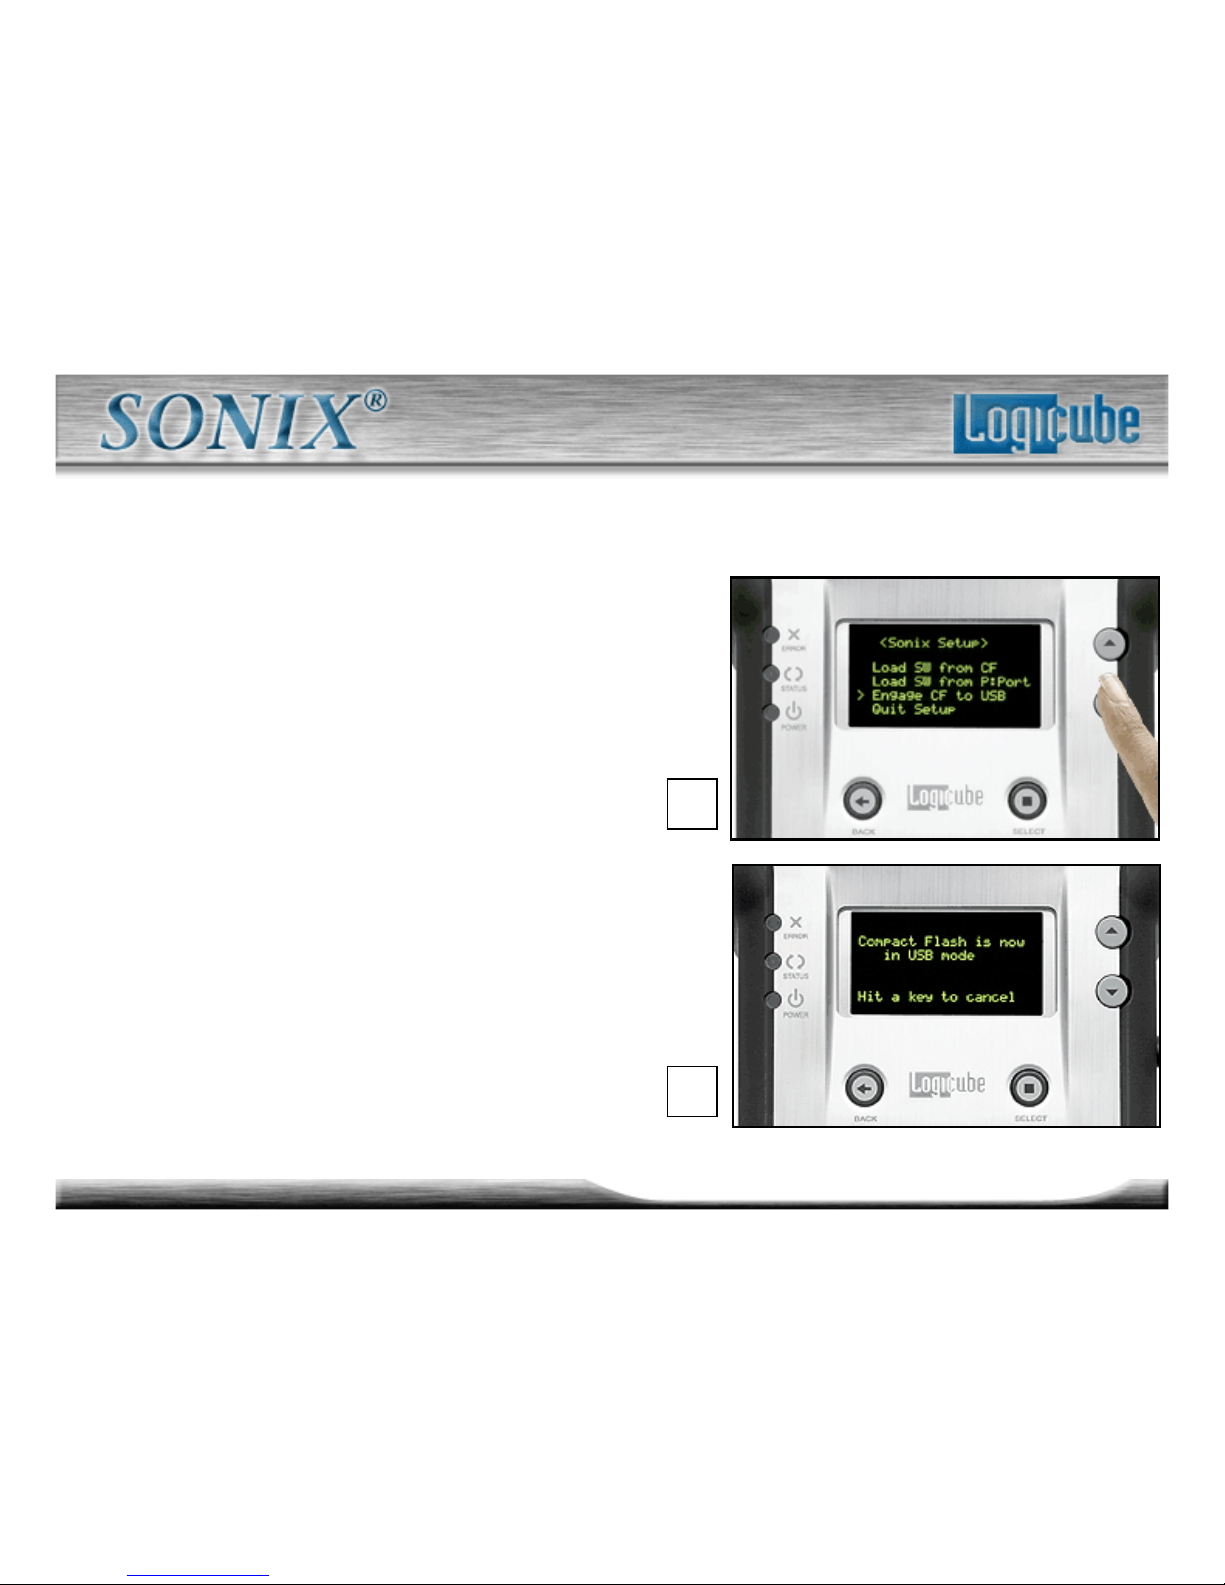
3. Move the pointer “” to
“Engage CF to USB” and press
the “Select” button on the unit.
4. A prompt will appear saying that
it is safe to attach the USB Cable.
5. Attach the USB cable to the
Logicube Sonix™. You should
now see some activity on your PC
screen, which depends on the
operating system.
3.
4.
Page 90
90
Logicube Confidential Information
Software Setup - Engage CF to USB Part 5
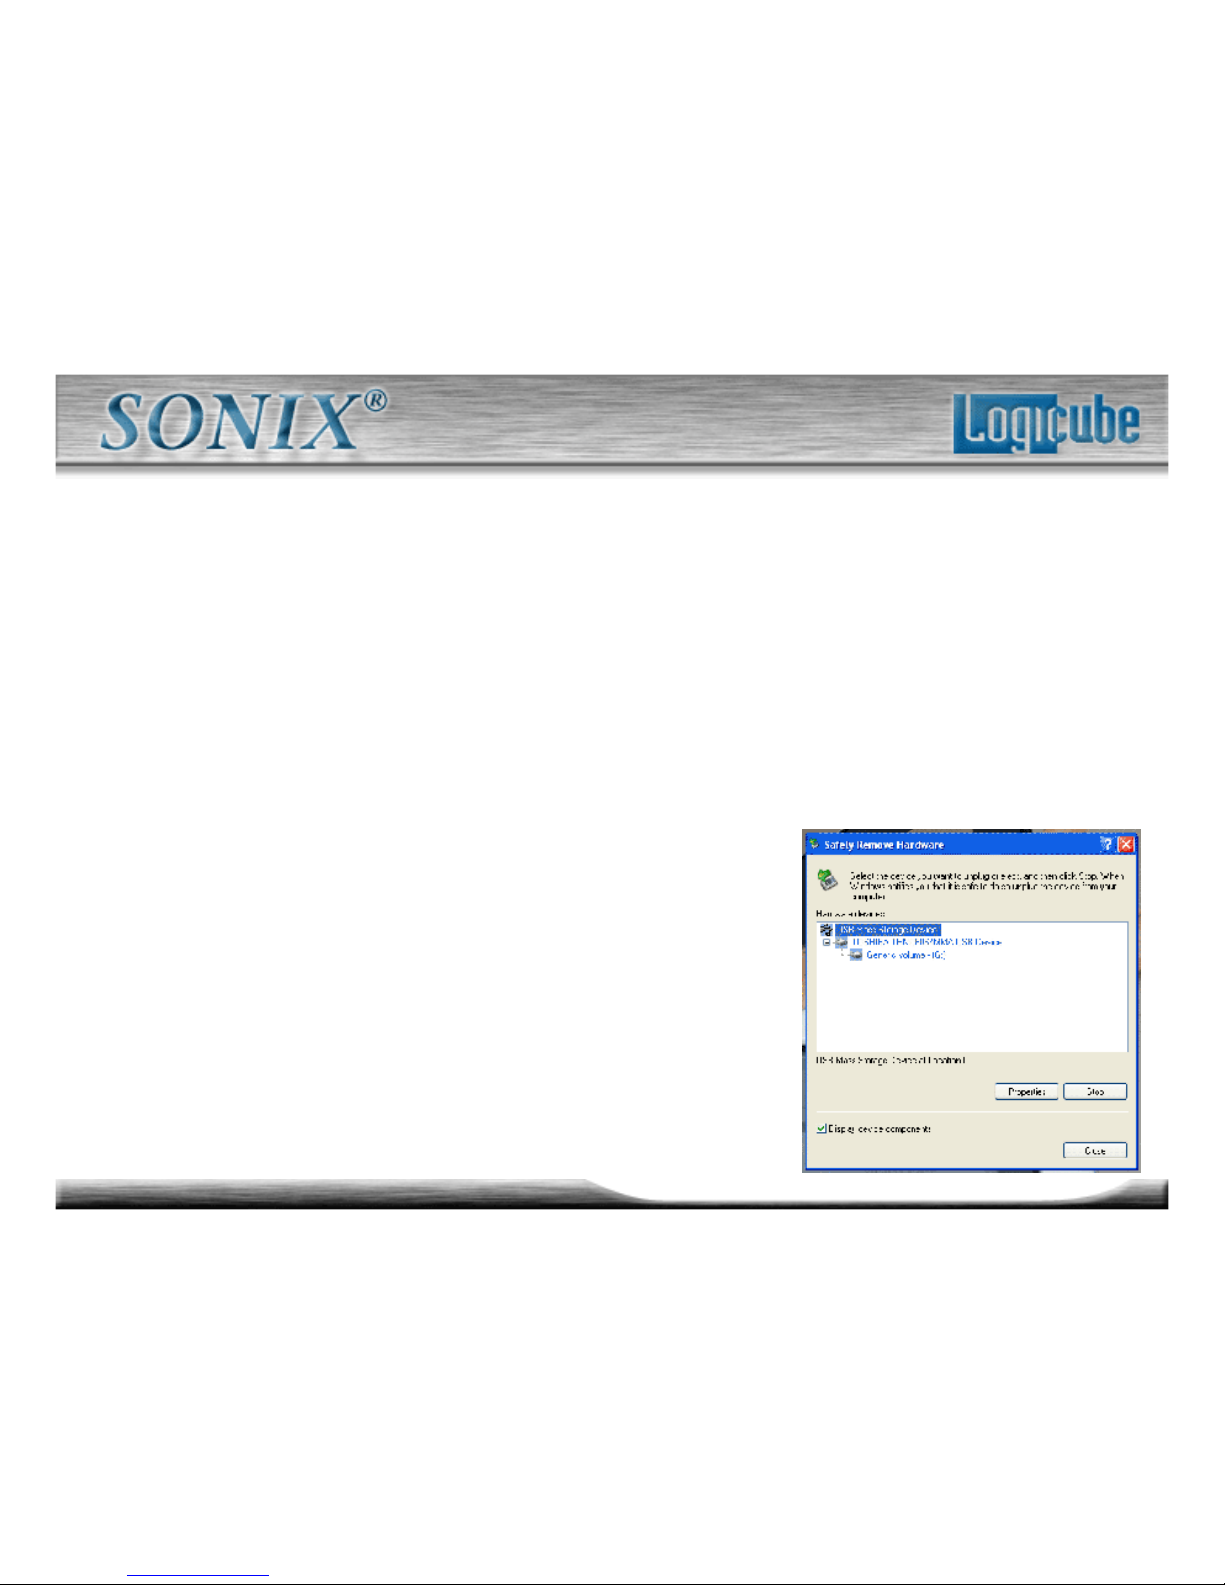
6. If running ME/2000/XP your drive will
automatically be mounted and a drive
letter will be assigned to it.
7. If running 98/98SE you will be
prompted to install drivers. At the “have
disk…” prompt please point the PC to
the drivers floppy (provided), and the
installation should complete smoothly.
8. The CF Drive is now visible on
Windows as an external drive. You can
copy software update files, or anything
else to/from the drive.
Page 91
91
Logicube Confidential Information
Software Setup - Compact Flash Part 1
Important: The new software
needs to be loaded on the unit’s
Compact Flash drive prior to Step
1. See the following section,
“Engage CF to USB”.
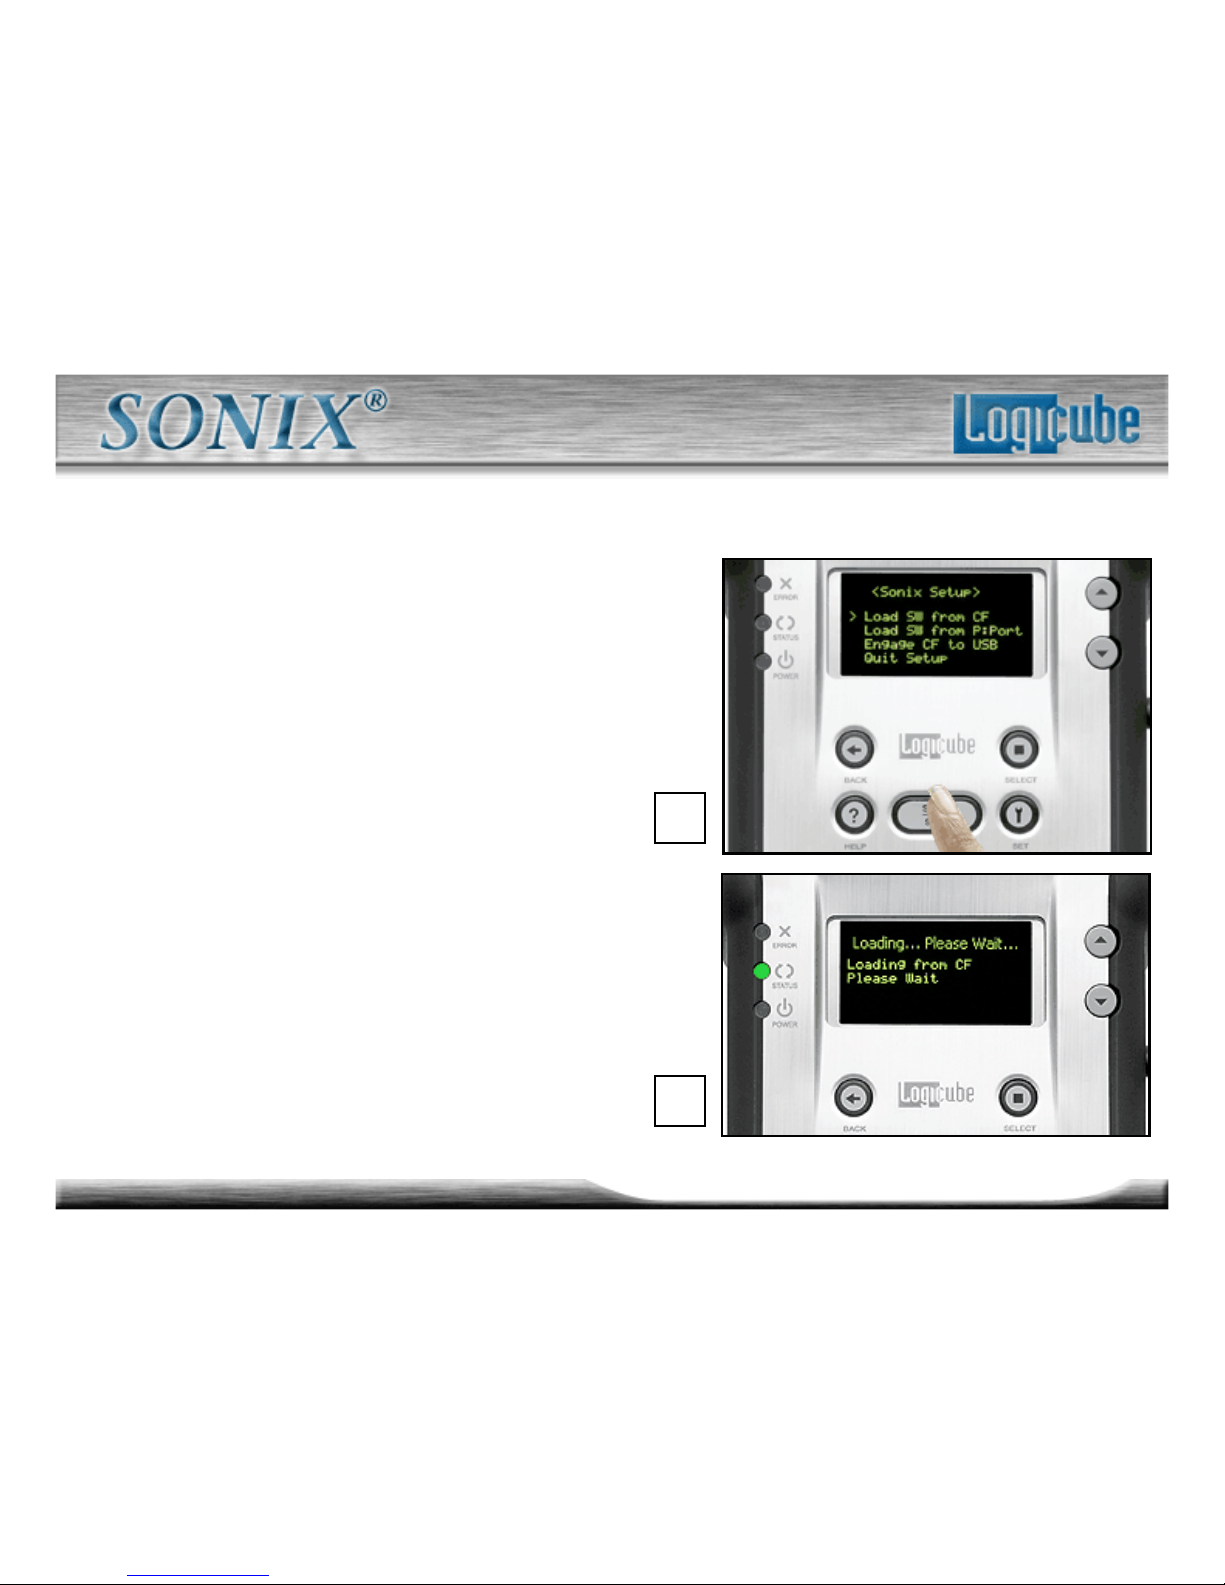
1. Power (plug in) the Logicube
Sonix™ while holding down the
“Start/Stop” button to access the
“Sonix Setup” screen.
2. Select the first option “Load SW
from CF”, and press the “Select”
button. The status light should
start to blink.
1.
2.
Page 92
92
Logicube Confidential Information
Software Setup - Compact Flash Part 2
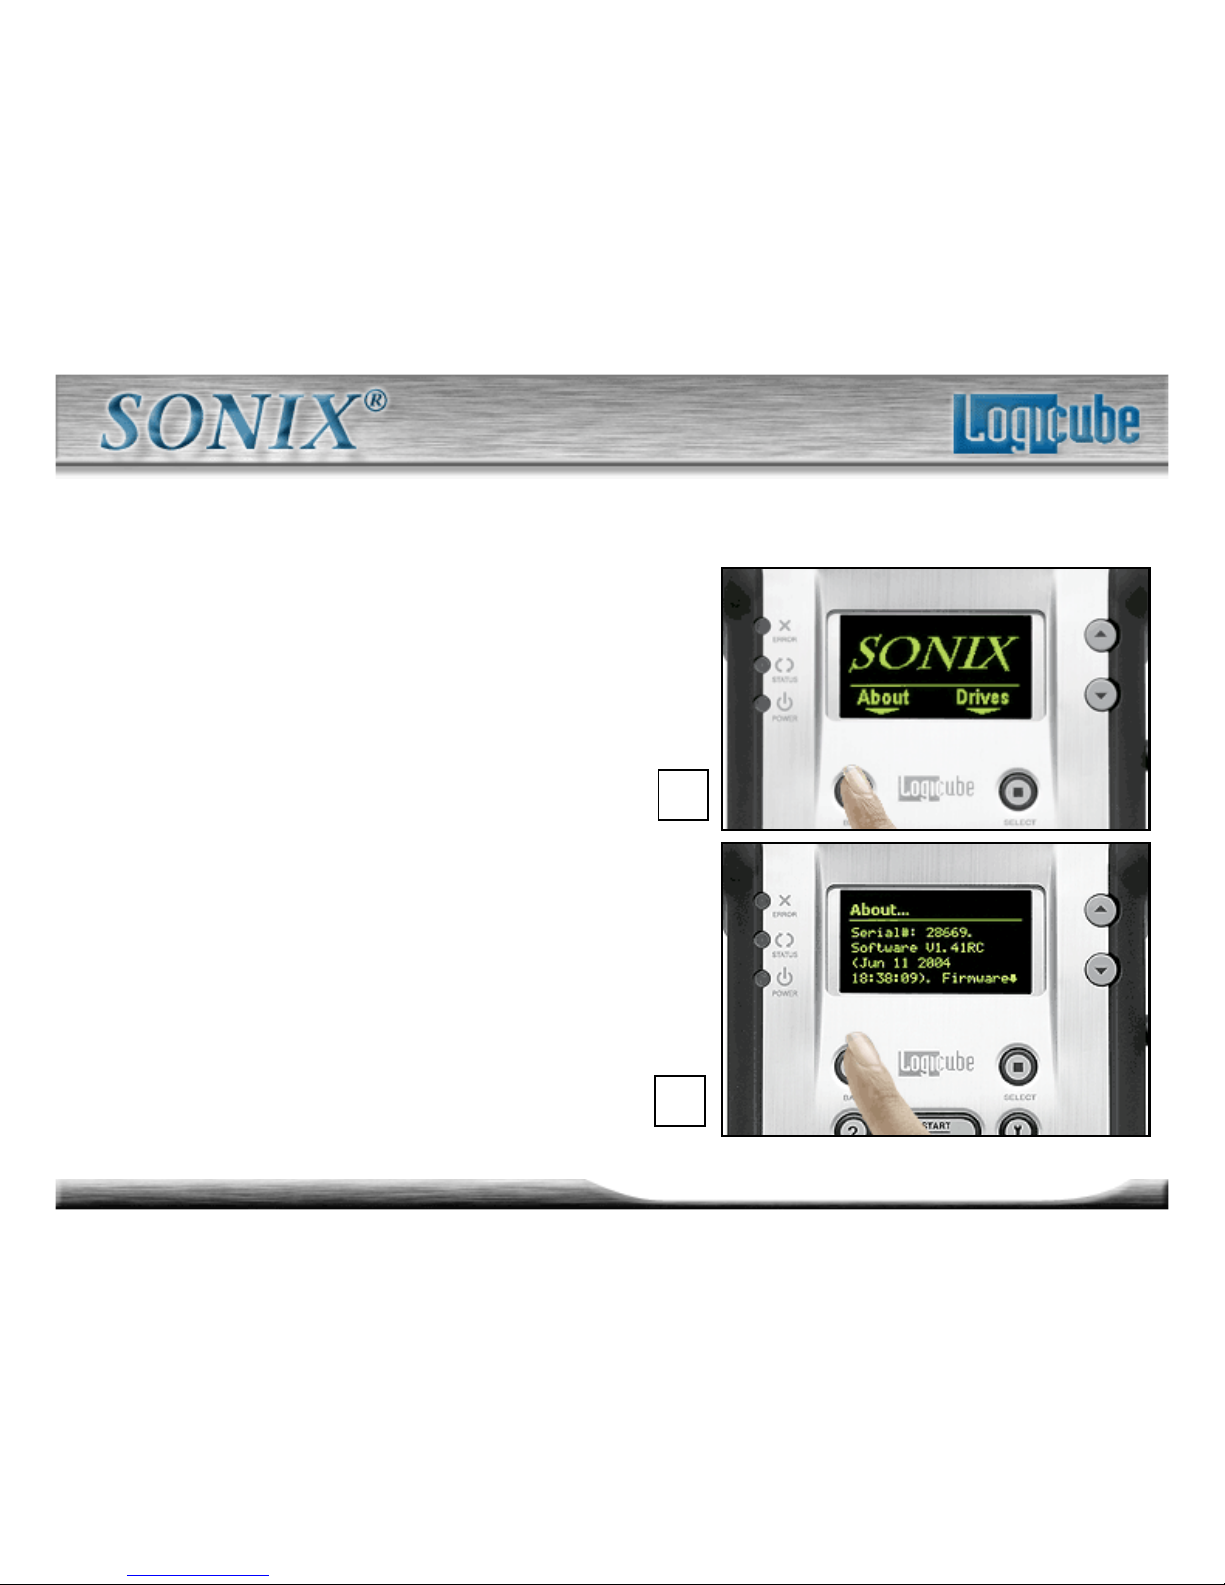
3. After about 30-40 seconds
the unit will re-boot to the new
software.
4. Check the version and date
of this software by pressing
the “About” button at the main
menu screen.
3.
4.
Page 93
93
Logicube Confidential Information
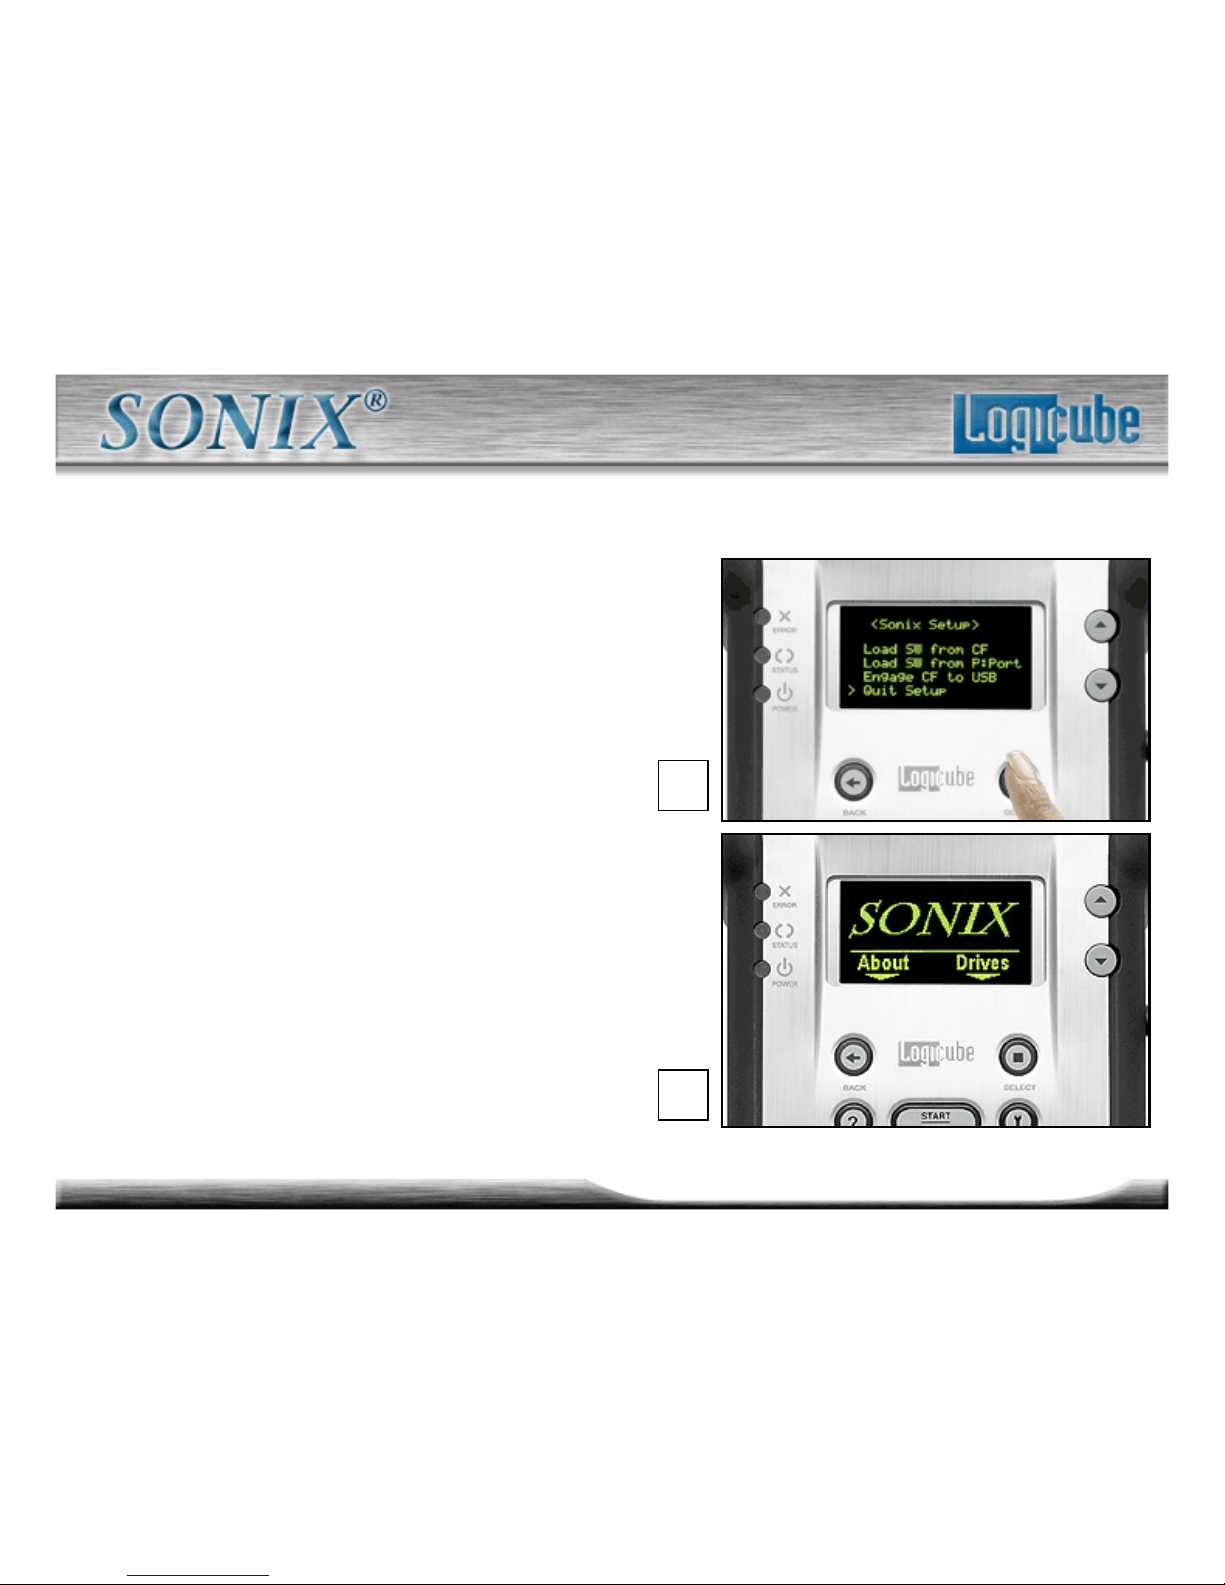
Software Setup - Exit Setup
1. To exit the Sonix™ Software
Setup Screen move the pointer
“” to “Quit Setup”.
2. Press “Select” and the unit will
go to the main screen.
1.
2.
 Loading...