

Page 1
SCSI-NG User’s Manual
Logicube, Inc.
Chatsworth, CA 91311
USA
Phone: 818 700 8488
Fax: 818 700 8466
Version: 1.0
Date: 06/10/19
MAN-SCSI-NG
Logicube SCSI-NG User’s Manual I
Page 2

Limitation of Liability and Warranty Information
Logicube Disclaimer
LOGICUBE IS NOT LIABLE FOR ANY INCIDENTAL OR CONSEQUENTIAL DAMAGES, INCLUDING, BUT NOT
LIMITED TO PROPERTY DAMAGE, LOSS OF TIME OR DATA FROM USE OF A LOGICUBE PRODUCT, OR ANY
OTHER DAMAGES RESULTING FROM PRODUCT MALFUNCTION OR FAILURE OF (INCLUDING WITHOUT
LIMITATION, THOSE RESULTING FROM: (1) RELIANCE ON THE MATERIALS PRESENTED, (2) COSTS OF
REPLACEMENT GOODS, (3) LOSS OF USE, DATA OR PROFITS, (4) DELAYS OR BUSINESS INTERRUPTIONS,
(5) AND ANY THEORY OF LIABILITY, ARISING OUT OF OR IN CONNECTION WITH THE USE OR
PERFORMANCE (OR FROM DELAYS IN SERVICING OR INABILITY TO RENDER SERVICE ON ANY) LOGICUBE
PRODUCT.
LOGICUBE MAKES EVERY EFFORT TO ENSURE PROPER OPERATION OF ALL PRODUCTS. HOWEVER, THE
CUSTOMER IS RESPONSIBLE TO VERIFY THAT THE OUTPUT OF LOGICUBE PRODUCT MEETS THE
CUSTOMER’S QUALITY REQUIREMENT. THE CUSTOMER FURTHER ACKNOWLEDGES THAT IMPROPER
OPERATION OF LOGICUBE PRODUCT AND/OR SOFTWARE, OR HARDWARE PROBLEMS, CAN CAUSE LOSS
OF DATA, DEFECTIVE FORMATTING, OR DATA LOADING. LOGICUBE WILL MAKE EFFORTS TO SOLVE OR
REPAIR ANY PROBLEMS IDENTIFIED BY CUSTOMER, EITHER UNDER WARRANTY OR ON A TIME AND
MATERIALS BASIS.
Warranty
DISCLAIMER
IMPORTANT - PLEASE READ THE TERMS OF THIS AGREEMENT CAREFULLY. BY INSTALLING OR USING
LOGICUBE PRODUCTS, YOU AGREE TO BE BOUND BY THIS AGREEMENT.
IN NO EVENT WILL LOGICUBE BE LIABLE (WHETHER UNDER THIS AGREEMENT, RESULTING FROM THE
PERFORMANCE OR USE OF LOGICUBE PRODUCTS, OR OTHERWISE) FOR ANY AMOUNTS REPRESENTING
LOSS OF PROFITS, LOSS OR INACCURACY OF DATA, LOSS OR DELAYS OF BUSINESS, LOSS OF TIME, COSTS
OF PROCUREMENT OF SUBSTITUTE GOODS, SERVICES, OR TECHNOLOGY, PROPERTY DAMAGE, OR
INDIRECT, CONSEQUENTIAL, OR PUNITIVE DAMAGES OF A PURCHASER OR USER OF LOGICUBE
PRODUCTS OR ANY THIRD PARTY. LOGICUBE’S AGGREGATE LIABILITY IN CONTRACT, TORT, OR
OTHERWISE (WHETHER UNDER THIS AGREEMENT, RESULTING FROM THE PERFORMANCE OR USE OF
LOGICUBE PRODUCTS, OR OTHERWISE) TO A PURCHASER OR USER OF LOGICUBE PRODUCTS SHALL BE
LIMITED TO THE AMOUNT PAID BY THE PURCHASER FOR THE LOGICUBE PRODUCT. THIS LIMITATION OF
LIABILITY WILL BE EFFECTIVE EVEN IF LOGICUBE HAS BEEN ADVISED OF THE POSSIBILITY OF ANY SUCH
DAMAGES.
LOGICUBE MAKES EVERY EFFORT TO ENSURE PROPER OPERATION OF ITS PRODUCTS. HOWEVER, THE
PURCHASER IS RESPONSIBLE FOR VERIFYING THAT THE OUTPUT OF A LOGICUBE PRODUCT MEETS THE
PURCHASER’S REQUIREMENTS. THE PURCHASER FURTHER ACKNOWLEDGES THAT IMPROPER
OPERATION OF LOGICUBE PRODUCTS CAN CAUSE LOSS OF DATA, DEFECTIVE FORMATTING, OR
Logicube SCSI-NG User’s Manual I
Page 3

DEFECTIVE DATA LOADING. LOGICUBE WILL MAKE EFFORTS TO SOLVE OR REPAIR ANY PROBLEMS
IDENTIFIED BY PURCHASER, EITHER UNDER THE WARRANTY SET FORTH BELOW OR ON A TIME AND
MATERIALS BASIS.
LIMITED WARRANTY
FOR ONE YEAR FROM THE DATE OF SALE (THE “WARRANTY PERIOD”) LOGICUBE WARRANTS THAT THE
PRODUCT (EXCLUDING CABLES, ADAPTERS, AND OTHER “CONSUMABLE” ITEMS) IS FREE FROM
MANUFACTURING DEFECTS IN MATERIAL AND WORKMANSHIP. THIS LIMITED WARRANTY COVERS
DEFECTS ENCOUNTERED IN THE NORMAL USE OF THE PRODUCT DURING THE WARRANTY PERIOD AND
DOES NOT APPLY TO: PRODUCTS DAMAGED DUE TO PHYSICAL ABUSE, MISHANDLING, ACCIDENT,
NEGLIGENCE, OR FAILURE TO FOLLOW ALL OPERATING INSTRUCTIONS CONTAINED IN THE OPERATING
MANUAL; PRODUCTS WHICH ARE MODIFIED; PRODUCTS WHICH ARE USED IN ANY MANNER OTHER
THAN THE MANNER FOR WHICH THEY WERE INTENDED, AS SET FORTH IN THE OPERATING MANUAL;
PRODUCTS WHICH ARE DAMAGED OR DEFECTS CAUSED BY THE USE OF UNAUTHORIZED PARTS OR BY
UNAUTHORIZED SERVICE; PRODUCTS DAMAGED DUE TO UNSUITABLE OPERATING OR PHYSICAL
CONDITIONS DIFFERING FROM THOSE RECOMMENDED IN THE OPERATING MANUAL OR PRODUCT
SPECIFICATIONS PROVIDED BY LOGICUBE; ANY PRODUCT WHICH HAS HAD ANY OF ITS SERIAL NUMBERS
ALTERED OR REMOVED; OR ANY PRODUCT DAMAGED DUE TO IMPROPER PACKAGING OF THE
WARRANTY RETURN TO LOGICUBE. AT LOGICUBE’S OPTION, ANY PRODUCT PROVEN TO BE DEFECTIVE
WITHIN THE WARRANTY PERIOD WILL EITHER BE REPAIRED OR REPLACED USING NEW OR REFURBISHED
COMPONENTS AT NO COST. THIS WARRANTY IS THE SOLE AND EXCLUSIVE REMEDY FOR DEFECTIVE
PRODUCTS. IF A PRODUCT IS HAS BECOME OBSOLETE OR IS NO LONGER SUPPORTED BY LOGICUBE THE
PRODUCT MAY BE REPLACED WITH AN EQUIVALENT OR SUCCESSOR PRODUCT AT LOGICUBE’S
DISCRETION. THIS WARRANTY EXTENDS ONLY TO THE END PURCHASER OF LOGICUBE PRODUCTS. THIS
WARRANTY DOES NOT APPLY TO, AND IS NOT FOR THE BENEFIT OF, RESELLERS OR DISTRIBUTORS OF
LOGICUBE PRODUCTS. UNLESS OTHERWISE AGREED IN WRITING BY LOGICUBE, NO WARRANTY IS
PROVIDED TO RESELLERS OR DISTRIBUTORS OF LOGICUBE PRODUCTS.
IN ORDER TO RECEIVE WARRANTY SERVICES CONTACT LOGICUBE’S TECHNICAL SUPPORT DEPARTMENT
VIA PHONE OR E-MAIL. PRODUCTS RETURNED TO LOGICUBE FOR REPAIR UNDER WARRANTY MUST
REFERENCE A LOGICUBE RETURN MATERIAL AUTHORIZATION NUMBER (“RMA”). ANY PRODUCT
RECEIVED BY LOGICUBE WITHOUT AN RMA# WILL BE REFUSED AND RETURNED TO PURCHASER. THE
PURCHASER MUST CONTACT LOGICUBE’S TECHNICAL SUPPORT DEPARTMENT VIA E-MAIL
([email protected]) OR VIA PHONE AT +1-818-700-8488 OPT. 3 TO OBTAIN A VALID RMA#. THE
PURCHASER MAY BE REQUIRED TO PERFORM CERTAIN DIAGNOSTIC TESTS ON A PRODUCT PRIOR TO
LOGICUBE ISSUING AN RMA#. THE PURCHASER MUST PROVIDE THE PRODUCT MODEL, SERIAL NUMBER,
PURCHASER NAME AND ADDRESS, EMAIL ADDRESS AND A DESCRIPTION OF THE PROBLEM WITH AS
MUCH DETAIL AS POSSIBLE. AT LOGICUBE’S SOLE AND ABSOLUTE DISCRETION, REASONABLE
TELEPHONE AND EMAIL SUPPORT MAY ALSO BE AVAILABLE FOR THE LIFE OF THE PRODUCT AS DEFINED
BY LOGICUBE.
EXCEPT AS OTHERWISE SPECIFICALLY PROVIDED IN THIS AGREEMENT, LOGICUBE PRODUCTS ARE
PROVIDED AS-IS AND AS-AVAILABLE, AND LOGICUBE DISCLAIMS ANY AND ALL OTHER WARRANTIES
(WHETHER EXPRESS, IMPLIED, OR STATUTORY) INCLUDING, WITHOUT LIMITATION, ANY WARRANTIES
OF MERCHANTABILITY, FITNESS FOR A PARTICULAR PURPOSE, OR NONINFRINGEMENT OF THIRD PARTY
RIGHTS.
SOME JURISDICTIONS DO NOT ALLOW THE EXCLUSION OR LIMITATION OF INCIDENTAL OR
CONSEQUENTIAL DAMAGES, OR LIMITATIONS ON HOW LONG AN IMPLIED WARRANTY LASTS, SO THE
ABOVE LIMITATIONS OR EXCLUSIONS MAY NOT APPLY TO YOU. THIS WARRANTY GIVES YOU SPECIFIC
Logicube SCSI-NG User’s Manual II
Page 4

LEGAL RIGHTS, AND YOU MAY HAVE OTHER RIGHTS WHICH VARY FROM JURISDICTION TO
JURISDICTION.
RoHS Certificate of Compliance
LOGICUBE PRODUCTS COMPLY WITH THE EUROPEAN UNION RESTRICTION OF THE USE OF CERTAIN
HAZARDOUS SUBSTANCES IN ELECTRONIC EQUIPMENT, ROHS DIRECTIVE (2002/95/EC).
THE ROHS DIRECTIVE PROHIBITS THE SALE OF CERTAIN ELECTRONIC EQUIPMENT CONTAINING SOME
HAZARDOUS SUBSTANCES SUCH AS MERCURY, LEAD, CADMIUM, HEXAVALENT CHROMIUM AND
CERTAIN FLAME-RETARDANTS IN THE EUROPEAN UNION. THIS DIRECTIVE APPLIES TO ELECTRONIC
PRODUCTS PLACED ON THE EU MARKET AFTER JULY 1, 2006.
Logicube Technical Support Contact Information
By website: www.logicube.com
By email: [email protected]
By telephone: +1 - (818) 700 8488 ext. 3 between the hours of 8 a.m. – 5 p.m. PT, Monday
through Friday, excluding U.S. legal holidays.
Logicube SCSI-NG User’s Manual III
Page 5

Table of Contents
SCSI-NG USER’S MANUAL .............................................................................................. I
LIMITATION OF LIABILITY AND WARRANTY INFORMATION ..................................................... I
LOGICUBE DISCLAIMER .................................................................................................................................... I
WARRANTY ................................................................................................................................................... I
ROHS CERTIFICATE OF COMPLIANCE ............................................................................................................... III
LOGICUBE TECHNICAL SUPPORT CONTACT INFORMATION ................................................................................... III
TABLE OF CONTENTS .............................................................................................................. I
1: INTRODUCTION ................................................................................................................ 1
1.0 INTRODUCTION TO THE SCSI-NG ............................................................................................................. 1
1.1 FEATURES ............................................................................................................................................. 1
1.2 IN THE BOX ........................................................................................................................................... 2
1.3 OPTIONS .............................................................................................................................................. 2
1.4 SPECIFICATIONS ..................................................................................................................................... 2
2: GETTING STARTED............................................................................................................ 5
2.0 OVERVIEW OF THE SCSI-NG .................................................................................................................... 5
2.1 TURNING THE SCSI-NG ON AND OFF......................................................................................................... 6
2.2 CONNECTING VARIOUS DRIVE TYPES .......................................................................................................... 6
2.2.1 Connecting Master Drives ......................................................................................................... 6
2.2.2 Connecting Target Drives .......................................................................................................... 7
2.3 THE USER INTERFACE .............................................................................................................................. 7
2.4 FRONT AND REAR PORTS ......................................................................................................................... 8
2.4.1 Front ports ................................................................................................................................. 8
2.4.2 Rear ports .................................................................................................................................. 8
2.4.2.1 DC IN power port ............................................................................................................... 8
2.4.2.2 Gigabit Ethernet port ......................................................................................................... 8
2.5 OPERATING SYSTEM AND SCSI-NG APPLICATION SOFTWARE ........................................................................ 8
3: QUICK START ................................................................................................................... 9
3.0 QUICK START GUIDE ............................................................................................................................... 9
3.1.1 Blank Disk Check ........................................................................................................................ 9
3.1 CLONE ............................................................................................................................................... 10
3.1.1 Step-by-step instructions – Clone ........................................................................................... 10
3.2 HASH ................................................................................................................................................. 11
3.2.1 Step-by-step instructions – Drive Hash ................................................................................... 12
3.3 WIPE / FORMAT .................................................................................................................................. 12
3.3.1 Step-by-step instructions – Wipe ............................................................................................ 13
3.4 LOGS ................................................................................................................................................. 13
3.4.1 Step-by-step instructions – Viewing or exporting logs ............................................................ 14
Logicube SCSI-NG User’s Manual I
Page 6

3.4.2 Viewing and downloading Log Files from the web interface .................................................. 14
3.4.3 Deleting Log Files ..................................................................................................................... 15
3.4.4 Accessing the Logs Over a Network ........................................................................................ 15
3.5 STATISTICS .......................................................................................................................................... 17
3.6 MANAGE REPOSITORIES ........................................................................................................................ 18
3.7 SYSTEM SETTINGS ................................................................................................................................ 18
3.8 NETWORK SETTINGS ............................................................................................................................. 18
3.9 SOFTWARE UPDATES ............................................................................................................................ 19
3.10 POWER OFF ...................................................................................................................................... 19
4: CLONE ............................................................................................................................ 20
4.0 CLONE – INTRODUCTION ....................................................................................................................... 20
4.0.1 Cloning to Smaller Capacity Drives .......................................................................................... 20
4.0.2 Mirror Copy Limitations........................................................................................................... 21
4.0.3 Clever Copy Limitations ........................................................................................................... 22
4.1 MODE ................................................................................................................................................ 22
4.2 MASTER/IMAGE FILE ............................................................................................................................ 22
4.3 SETTINGS ............................................................................................................................................ 22
4.3.1 Job Info .................................................................................................................................... 23
4.3.2 HPA/DCO/ACS3........................................................................................................................ 23
4.3.3 Error Handling ......................................................................................................................... 24
4.3.4 Hash/Verification Method ....................................................................................................... 24
4.3.5 File Image Method Settings ..................................................................................................... 25
4.3.6 Clone Method Settings ............................................................................................................ 25
4.4 TARGET .............................................................................................................................................. 26
4.4.1 Selecting Target drive or images ............................................................................................. 26
4.5 STARTING THE CLONING OPERATION ....................................................................................................... 28
5: TYPES OF OPERATIONS ................................................................................................... 29
5.0 TYPES OF OPERATIONS - INTRODUCTION .................................................................................................. 29
5.1 CLONE ............................................................................................................................................... 31
5.2 HASH ................................................................................................................................................. 31
5.2.1 Target....................................................................................................................................... 32
5.2.2 Settings .................................................................................................................................... 32
5.2.2.1 Hash Settings .................................................................................................................... 32
5.2.2.1.1 Hash Method ................................................................................................................................................................... 33
5.2.2.1.2 Hash Values ...................................................................................................................................................................... 33
5.2.2.1.3 LBA........................................................................................................................................................................................ 33
5.2.3 Job Info .................................................................................................................................... 34
5.3 WIPE / FORMAT .................................................................................................................................. 34
5.3.1 Target....................................................................................................................................... 34
5.3.2 Settings .................................................................................................................................... 34
5.3.2.1 Secure Erase ..................................................................................................................... 35
5.3.2.2 Wipe Patterns .................................................................................................................. 35
5.3.2.2.1 Mode ................................................................................................................................................................................... 36
5.3.2.2.2 HPA/DCO/ACS3 .............................................................................................................................................................. 36
5.3.2.2.3 LBA........................................................................................................................................................................................ 36
5.3.2.2.4 PASSES ................................................................................................................................................................................ 36
5.3.2.3 Format .............................................................................................................................. 37
Logicube SCSI-NG User’s Manual II
Page 7

5.3.3 Job Info .................................................................................................................................... 38
5.4 LOGS ................................................................................................................................................. 38
5.5 STATISTICS .......................................................................................................................................... 38
5.5.1 About ....................................................................................................................................... 38
5.5.2 Adv. Drive Statistics ................................................................................................................. 39
5.5.3 Options .................................................................................................................................... 39
5.5.4 Network Interface Stats ........................................................................................................... 39
5.5.5 Debug Logs .............................................................................................................................. 40
5.5.6 Help ......................................................................................................................................... 40
5.6 MANAGE REPOSITORIES ........................................................................................................................ 41
5.6.1 Add/Remove ............................................................................................................................ 41
5.6.2 iSCSI ......................................................................................................................................... 44
5.7 SYSTEM SETTINGS ................................................................................................................................ 45
5.7.1 Profiles ..................................................................................................................................... 45
5.7.2 Passwords ................................................................................................................................ 47
5.7.2.1 Setting Key Passwords ..................................................................................................... 47
5.7.2.1.1 Config Lock Notes.......................................................................................................................................................... 48
5.7.2.1.2 Forgotten password for any keys ............................................................................................................................ 49
5.7.2.2 User Account Passwords .................................................................................................. 50
5.7.3 Language/Time Zone ............................................................................................................... 51
5.7.3.1 Language .......................................................................................................................... 51
5.7.3.2 Time Zone ......................................................................................................................... 51
5.8 NETWORK SETTINGS ............................................................................................................................. 52
5.8.1 Interfaces ................................................................................................................................. 52
5.8.1.1 Configuring a Static IP address ......................................................................................... 52
5.8.1.2 Enabling/Disabling Network Services .............................................................................. 53
5.8.2 HTTP Proxy ............................................................................................................................... 54
5.8.2.1 Server ............................................................................................................................... 54
5.8.2.2 Username/Password ........................................................................................................ 54
5.9 SOFTWARE UPDATE .............................................................................................................................. 54
5.10 POWER OFF ...................................................................................................................................... 55
6: UPDATING/LOADING/RE-LOADING THE SCSI-NG SOFTWARE .......................................... 56
6.0 UPDATING/LOADING/RE-LOADING SOFTWARE – INTRODUCTION ................................................................ 56
6.1 REQUIREMENTS ................................................................................................................................... 56
6.2 UPDATING/LOADING/RE-LOADING SOFTWARE INSTRUCTIONS .................................................................... 56
6.2.1 From Network (Over the Internet) .......................................................................................... 57
6.2.2 From USB Drive (Through a software file download) .............................................................. 58
6.3 FIRMWARE LOADING INSTRUCTIONS ....................................................................................................... 59
7: REMOTE OPERATION ..................................................................................................... 60
7.0 REMOTE OPERATION - INTRODUCTION .................................................................................................... 60
7.1 WEB INTERFACE .................................................................................................................................. 60
7.2 COMMAND LINE INTERFACE (CLI) ........................................................................................................... 60
7.2.1 Connecting via Telnet .............................................................................................................. 61
7.2.2 Connecting via SSH .................................................................................................................. 61
7.3 ZERO CONFIGURATION NETWORKING (ZEROCONF) ................................................................................... 62
Logicube SCSI-NG User’s Manual III
Page 8

8: FREQUENTLY ASKED QUESTIONS .................................................................................... 63
8.0 FAQS................................................................................................................................................. 63
9: INDEX ............................................................................................................................ 65
TECHNICAL SUPPORT INFORMATION ............................................................................................................... 66
SOFTWARE ATTRIBUTION.............................................................................................................................. 66
Logicube SCSI-NG User’s Manual IV
Page 9

1: Introduction
1.0 Introduction to the SCSI-NG
The SCSI-NG is a compact portable SCSI hard drive duplicator. Efficient cloning makes it easy to copy SCSI
hard drives for back-up, drive testing and all your duplication tasks. The unit features a Gigabit Ethernet
network port to conveniently use the browser-based interface to manage all SCSI-NG operations.
Comprehensive log reports provide detailed information about each task performed. An optional Wipe
feature can securely erase hard drives using a SCSI format command, a custom pass, or a 7-pass DoD
specification wipe.
1.1 Features
Supports cloning of 68-pin SCSI hard drives. One master to one target. Optional adapters are
available to convert 50-pin or 80-pin drives.
Clones all operating systems including Windows 10, Linux and Unix
Use the browser-based user interface to manage all operations including software updates. The
®
.
unit has a Gigabit Ethernet port.
Multi-Image Master. This feature allows you to store multiple SCSI-NG-created images on a SCSI
master drive connected to the SCSI-NG or on a network repository and then clone to selected
targets.
Write-protected master port. The master port is automatically write-blocked to prevent any
alteration to sensitive data on the master drive.
Multiple Cloning Modes:
o Mirror Copy, bit for bit copy. Supports all O/S including Windows and Linux.
o Clever Copy: Copies only data areas, skips blank sectors, scales partitions to target.
Supports FAT16/FAT32/NTFS and Linux (EXT, EXT2, EXT3, EXT4) file systems
o For multiple partition drives, SCSI-NG automatically selects the optimum cloning
method (Clever or Mirror)
Hash/Verification option (SHA1, SHA256 or MD5) allows the user to clone and verify the exact
replication of the master drive. Available with the purchase of an optional software activation
package.
Wipe option allows the user to securely erase target drives using a SCSI format command, a
custom pass or a 7-pass DoD specification wipe. Meets the NIST 800-88 guidelines. Available
with the purchase of an optional software activation package.
Audit trail/log reports provide detailed information on each task. A digital signature is included
in the report for authentication purposes.
Logicube SCSI-NG User’s Manual 1
Page 10
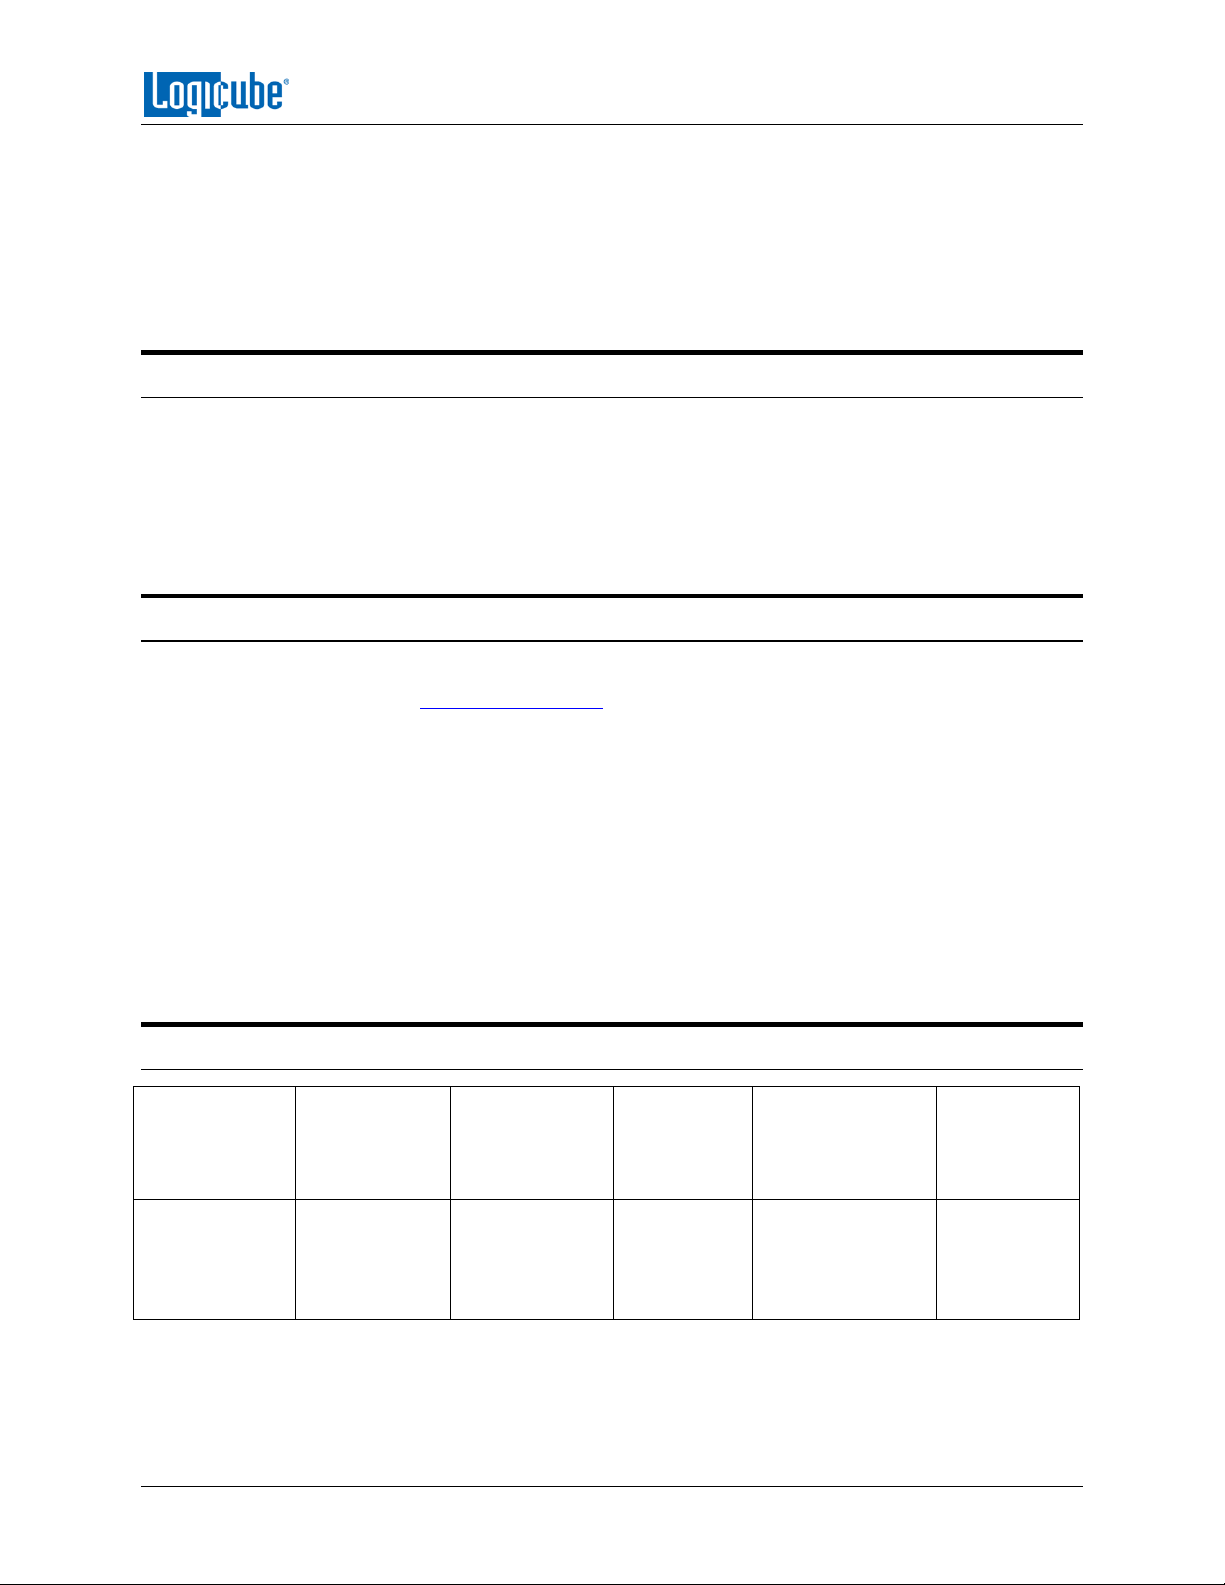
INTRODUCTION
Power
Requirements
Power Supply
Voltage
(DC IN)
Output Voltage
(DC OUT)
Net Weight
Dimensions
Agency
Approvals
90 Watts
+12V DC @
7.5A
+5V DC @
2.5A,
12V DC @ 2.5A
5.2 lbs
(2.3 kg)
14.5” x 9.5” x
3.5”
(36.8 cm x 24.1
cm x 8.8 cm)
RoHs
compliant
Bad sector handling. Scan for bad sectors on the source drive, abort or skip and log for review.
User Profiles. Create user profiles and save configurations for commonly used operations.
Features two USB 2.0 ports for keyboard, mouse, software updates
Additional features include HPA/DCO support, advanced drive statistics and a color touchscreen
with a built-in stylus.
1.2 In the Box
The following items are included with SCSI-NG:
Power supply & power cord
2 68-pin SCSI power & data cables
Users’ Manual on CD-ROM
1.3 Options
There are several options for the SCSI-NG (listed below). To purchase any of the following options,
please contact Logicube Sales: [email protected].
Wipe software option. Provides the ability to securely erase SCSI target drives using a SCSI
format command, a custom pass or a DoD 7 pass specification wipe, meets NIST 800-88
guidelines
Verification/Hash software option allows the user to clone and verify the exact replication of
the master drive during cloning
50-pin to 68-pin SCSI adapter
80-pin to 68-pin SCSI adapter
Extended warranties are available
1.4 Specifications
Logicube SCSI-NG User’s Manual 2
Page 11

INTRODUCTION
WARNINGS:
Avoid dropping the Logicube device or subjecting it to sharp jolts.
When in use, place it on a flat surface.
Keep the unit dry. If the Logicube device needs to be cleaned, use
a lightly damp, lint free cloth. Avoid using soap or other cleaning
agents particularly those containing bleach, ammonia, alcohol or
other harsh chemicals.
Do not attempt to service or open the Logicube device. Doing so
may void the warranty. If the unit requires service, please
contact Logicube Technical Support for assistance.
Logicube SCSI-NG User’s Manual 3
Page 12

Page 13
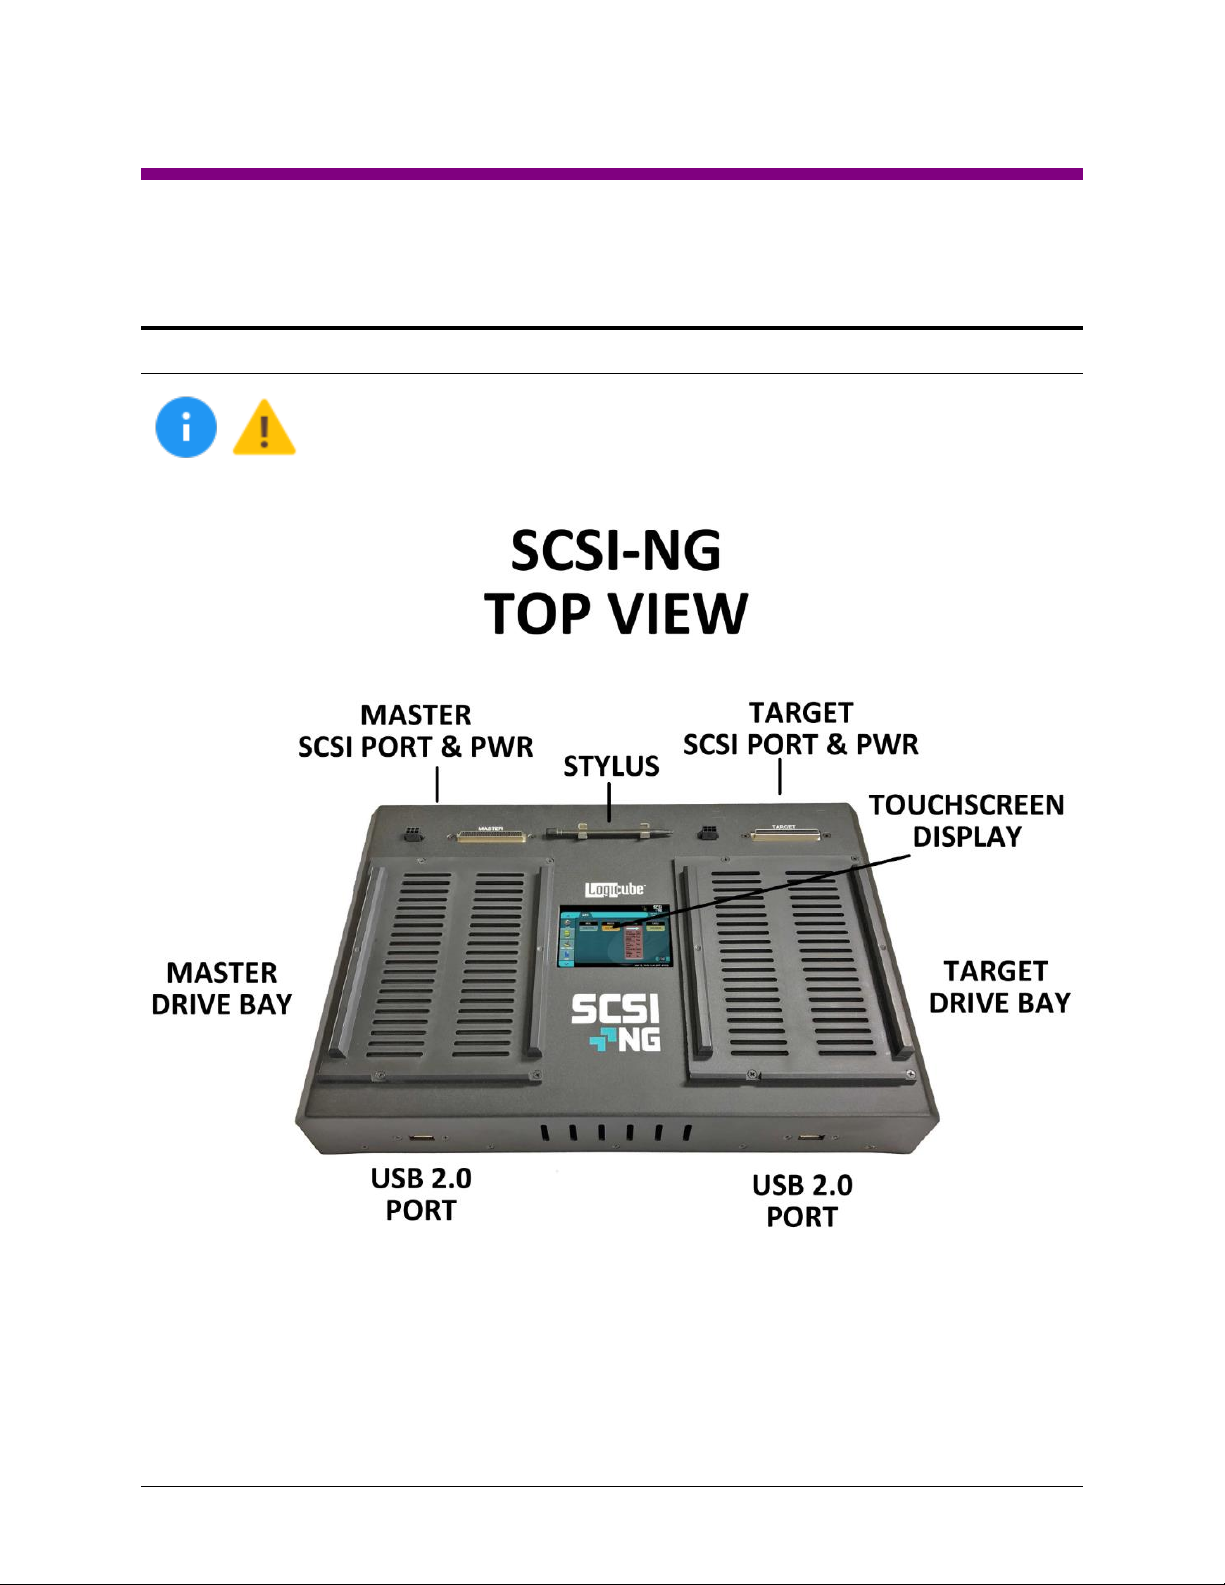
2: Getting Started
2.0 Overview of the SCSI-NG
Special Icons – Throughout this manual, there are two icons that can be seen.
Please pay close attention when any of these two icons are found. These icons
highlight additional information or important warnings on specific topics.
Logicube SCSI-NG User’s Manual 5
Page 14
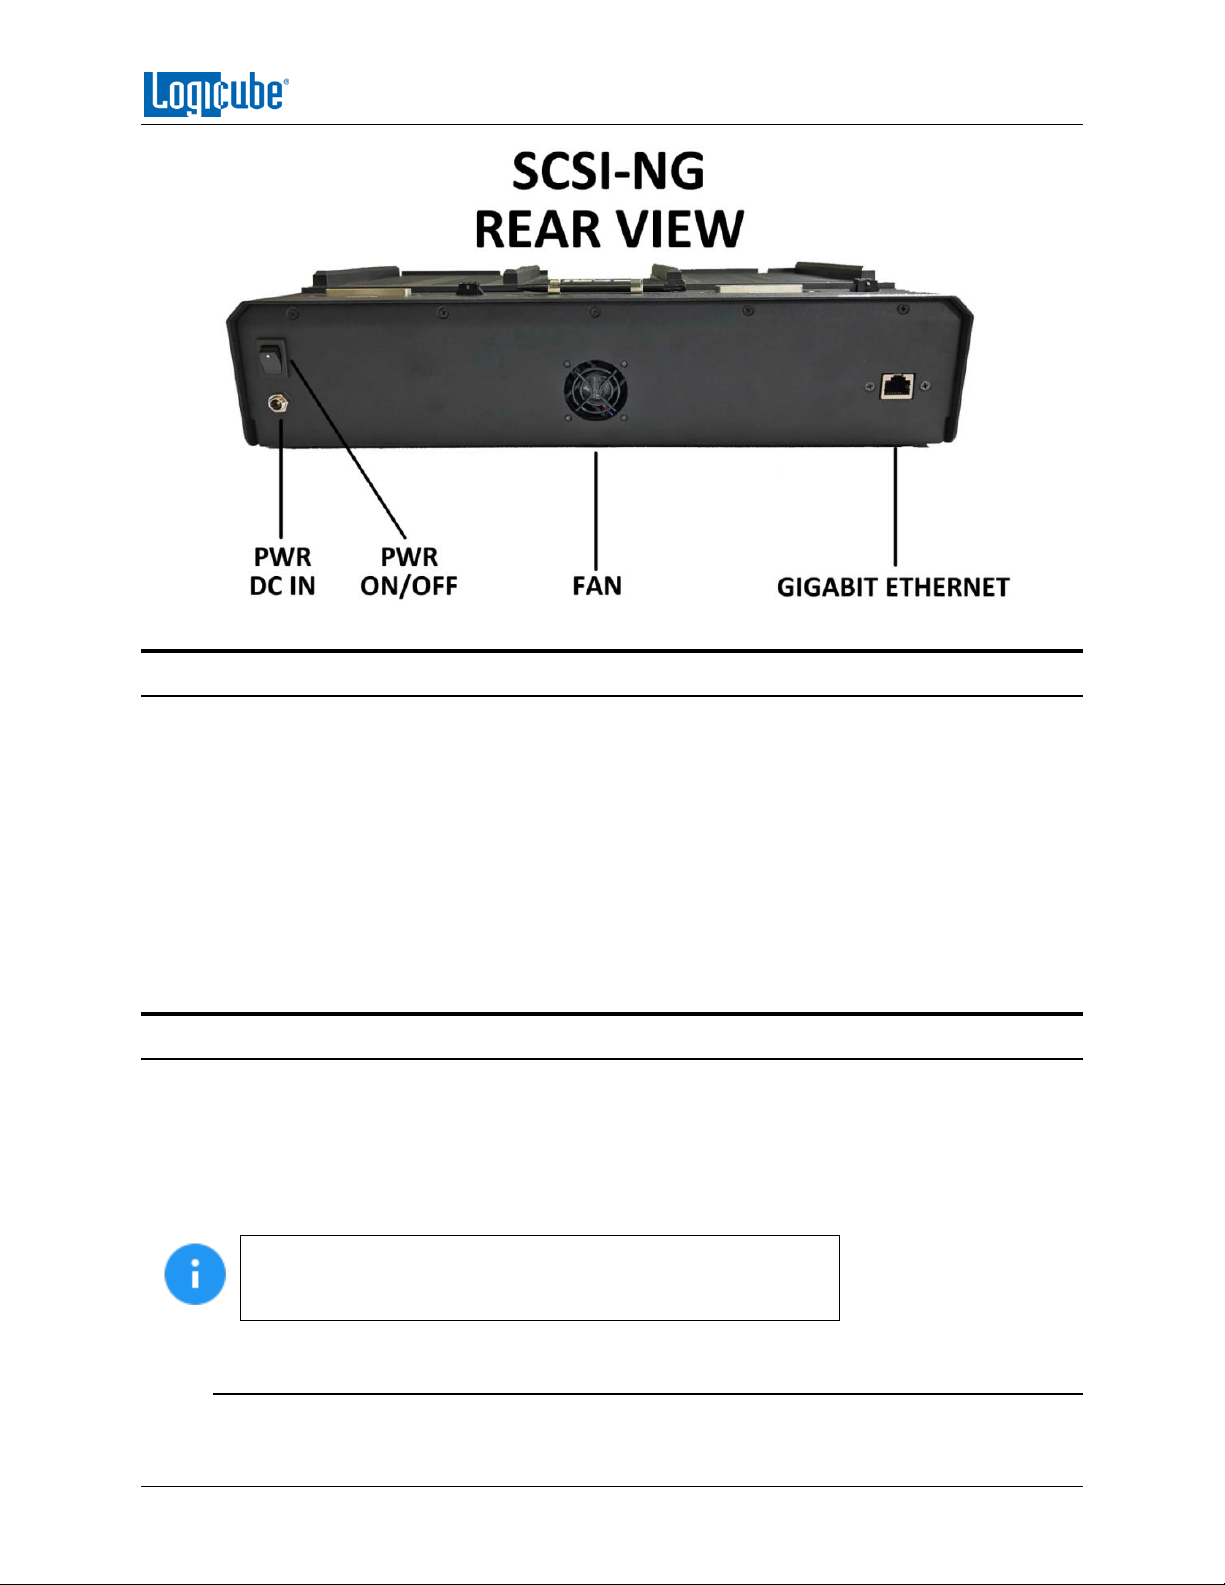
GETTING STARTED
5
2.1 Turning the SCSI-NG on and off
A 12V grounded, 7.5A (output DC) power supply that connects to the back of the unit is included. Attach
the power supply to the DC IN port located in the back of the unit.
To turn the unit on, press and immediately release the power switch located on the back of the unit.
There are two ways of turning the unit off:
1. Press and immediately release the power switch located on the back of the unit. The unit will
begin the shutdown process and after a few seconds, the display and fans will turn off.
2. Using the Graphical User Interface (GUI) either on the touch screen or via a browser through a
remote connection, navigate to the Power Off screen and tap or click the Power Off icon.
2.2 Connecting various drive types
Cables and adapters are available for the following drive types:
68-pin SCSI drives
80-pin Single Connector Attachment (SCA) SCSI drives
50-pin SCSI drives
When connecting/disconnecting drives using drive adapters, it is
recommended to keep the drive connected to the adapter and
cables, then connect/disconnect cables to/from SCSI-NG ports.
2.2.1 Connecting Master Drives
Master drives must be connected to the left bay of the unit. This bay is write-protected.
Logicube SCSI-NG User’s Manual 6
Page 15
GETTING STARTED
The Master bay is hot swappable. Some drives are not hot swappable. Please check with the
drive manufacturer to find out if the drive being used does not support hot swapping.
Never connect a Master drive to the Target
bay of the unit. Data may be overwritten if
a drive is connected to the Target bay.
2.2.2 Connecting Target Drives
Target drives must be connected to the right bay of the unit.
The Target bay is hot swappable. Some drives are not hot swappable. Please check with the
drive manufacturer to find out if the drive being used does not support hot swapping.
When disconnecting drives, it is very important to make sure
the drives are not being used on any task. Disconnecting drives
while the unit is using the drive for a task may cause data loss.
2.3 The user interface
The user interface (UI) has been designed to quickly and easily input commands. It is simple and intuitive
showing common icons such as tasks, modes of operation, and scroll icons on the screen. The UI is
designed to be easily followed, going from left to right across the screen.
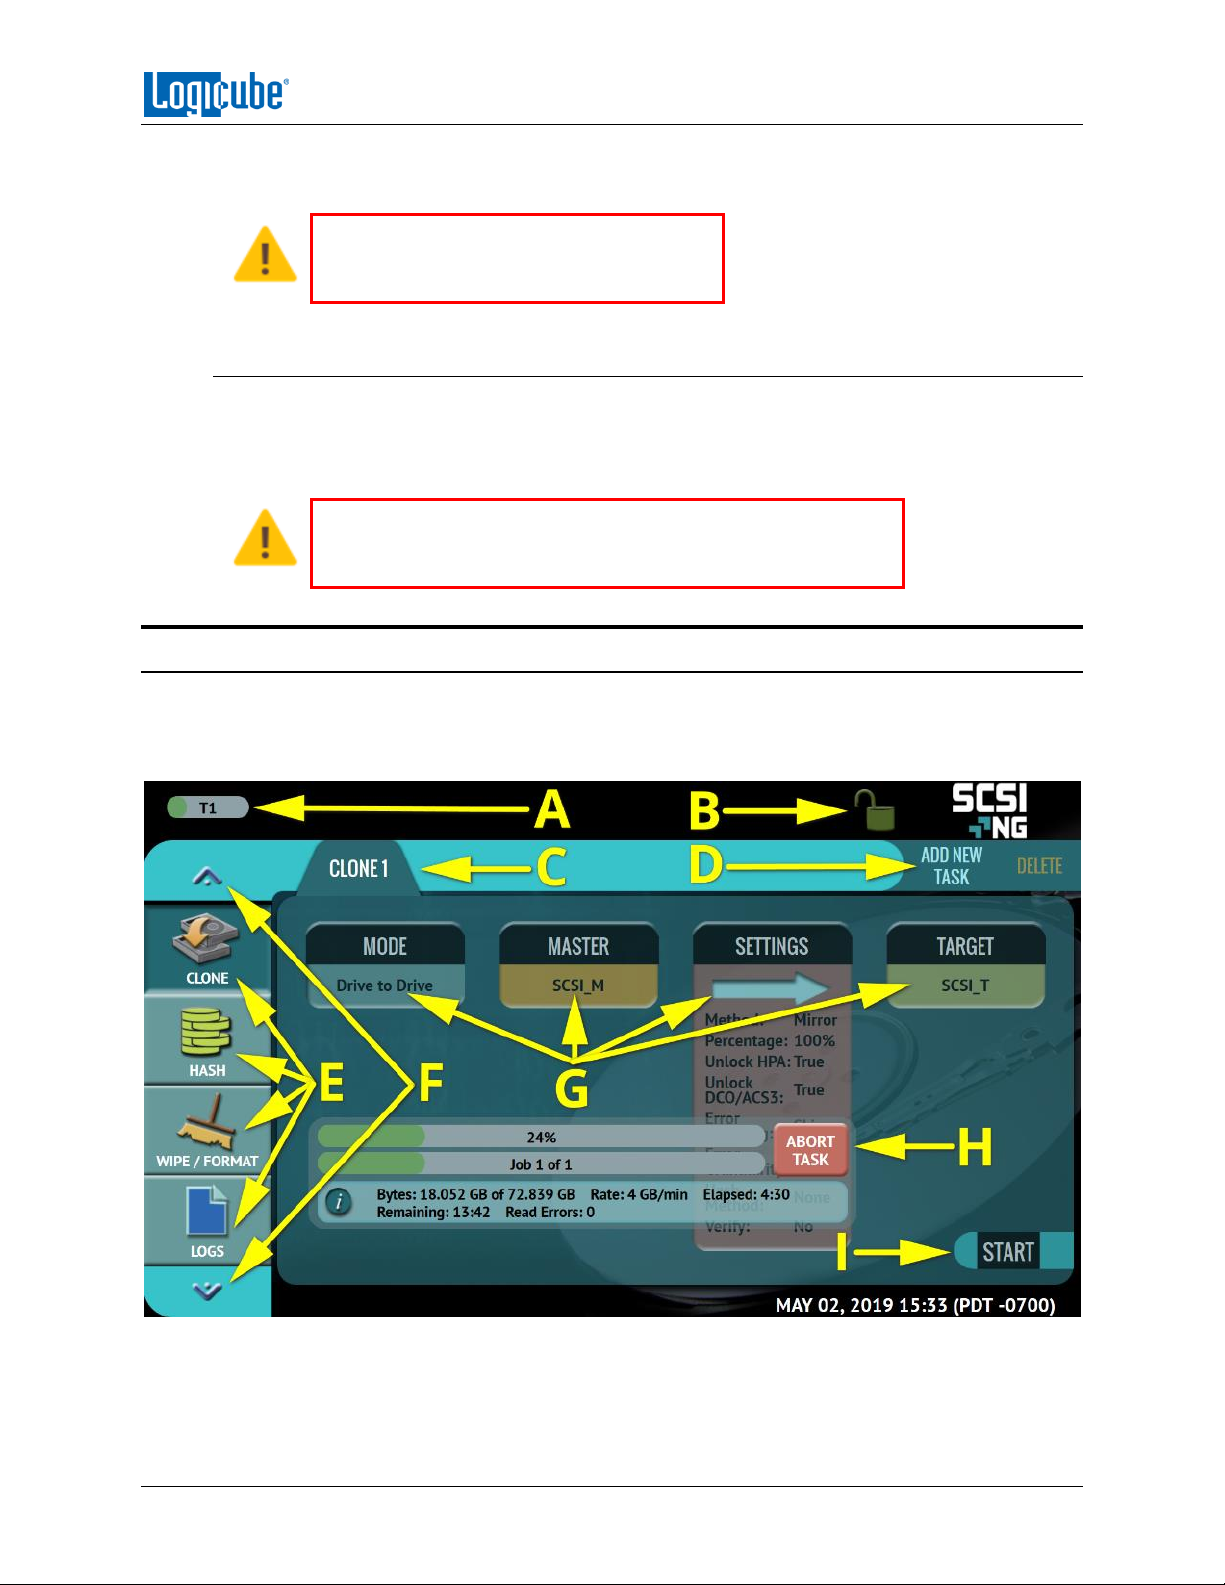
A – Operations/Tasks currently running (displays up to 5 total tasks)
B – Lock indicator/shortcut
C – Operations/Tasks
Logicube SCSI-NG User’s Manual 7
Page 16

GETTING STARTED
D – Add or delete tasks
E – Types of Operations
F – Up and down scroll arrows
G – Operations options and settings
H – Status Bar
I – Start icon
2.4 Front and rear ports
The unit has two USB 2.0 host ports, one DC IN power port, and one Gigabit Ethernet port.
2.4.1 Front ports
There are two USB 2.0 host ports located on the front of the unit.
The left USB port is used for software updates (using the From USB option) and can be used with
peripherals (wired keyboard or mouse).
The right USB port is used for exporting log files and can also be used with peripherals (wired
keyboard or mouse).
2.4.2 Rear ports
There is one DC IN power port and one Gigabit Ethernet port located in the back of the unit.
2.4.2.1 DC IN power port
The unit has one DC IN port. Connect the included AC adapter/power supply to the DC
IN port to provide power to the unit.
2.4.2.2 Gigabit Ethernet port
There is one Gigabit Ethernet port. Some of the possible uses for this port include (but
are not limited to) the following:
Connect a work network to control the SCSI-NG remotely and allow access to a
server as a networked repository.
Connect to a NAS device.
2.5 Operating System and SCSI-NG Application Software
The SCSI-NG has a microSD storage drive that contains the operating system and software. This drive
does not store any data from master drives or target drives.
Logicube SCSI-NG User’s Manual 8
Page 17
3: Quick Start
3.0 Quick Start Guide
This chapter gives a basic overview and steps on how to perform different types of operations using the
SCSI-NG (Clone, Hash, Wipe, etc.). Complete details on each operation, menu, or selection, and the
different screens can be found in Chapter 4: Cloning and Chapter 5: Types of Operation.
The passwords for built-in accounts can be changed.
Instructions on how to change the passwords to the two
built-in user accounts can be found in Section 5.7.2.2.
There are software options available such as:
- Verify option – allows verification of data copied during the clone task.
- Wipe option – allows the ability to wipe drives connected to the Target bay.
To find out if these options are enabled on the unit, tap the Statistics icon from
the navigation menu and select the Options tab.
To purchase any of these options, contact the Logicube Sales Department at
The SCSI-NG clone, hash, and wipe speeds are determined by
several factors including (but not limited to) the following:
The manufacturer specifications of the drive(s) being used
The age of the drive (manufactured date, not purchased date)
How often that drive has been used
3.1.1 Blank Disk Check
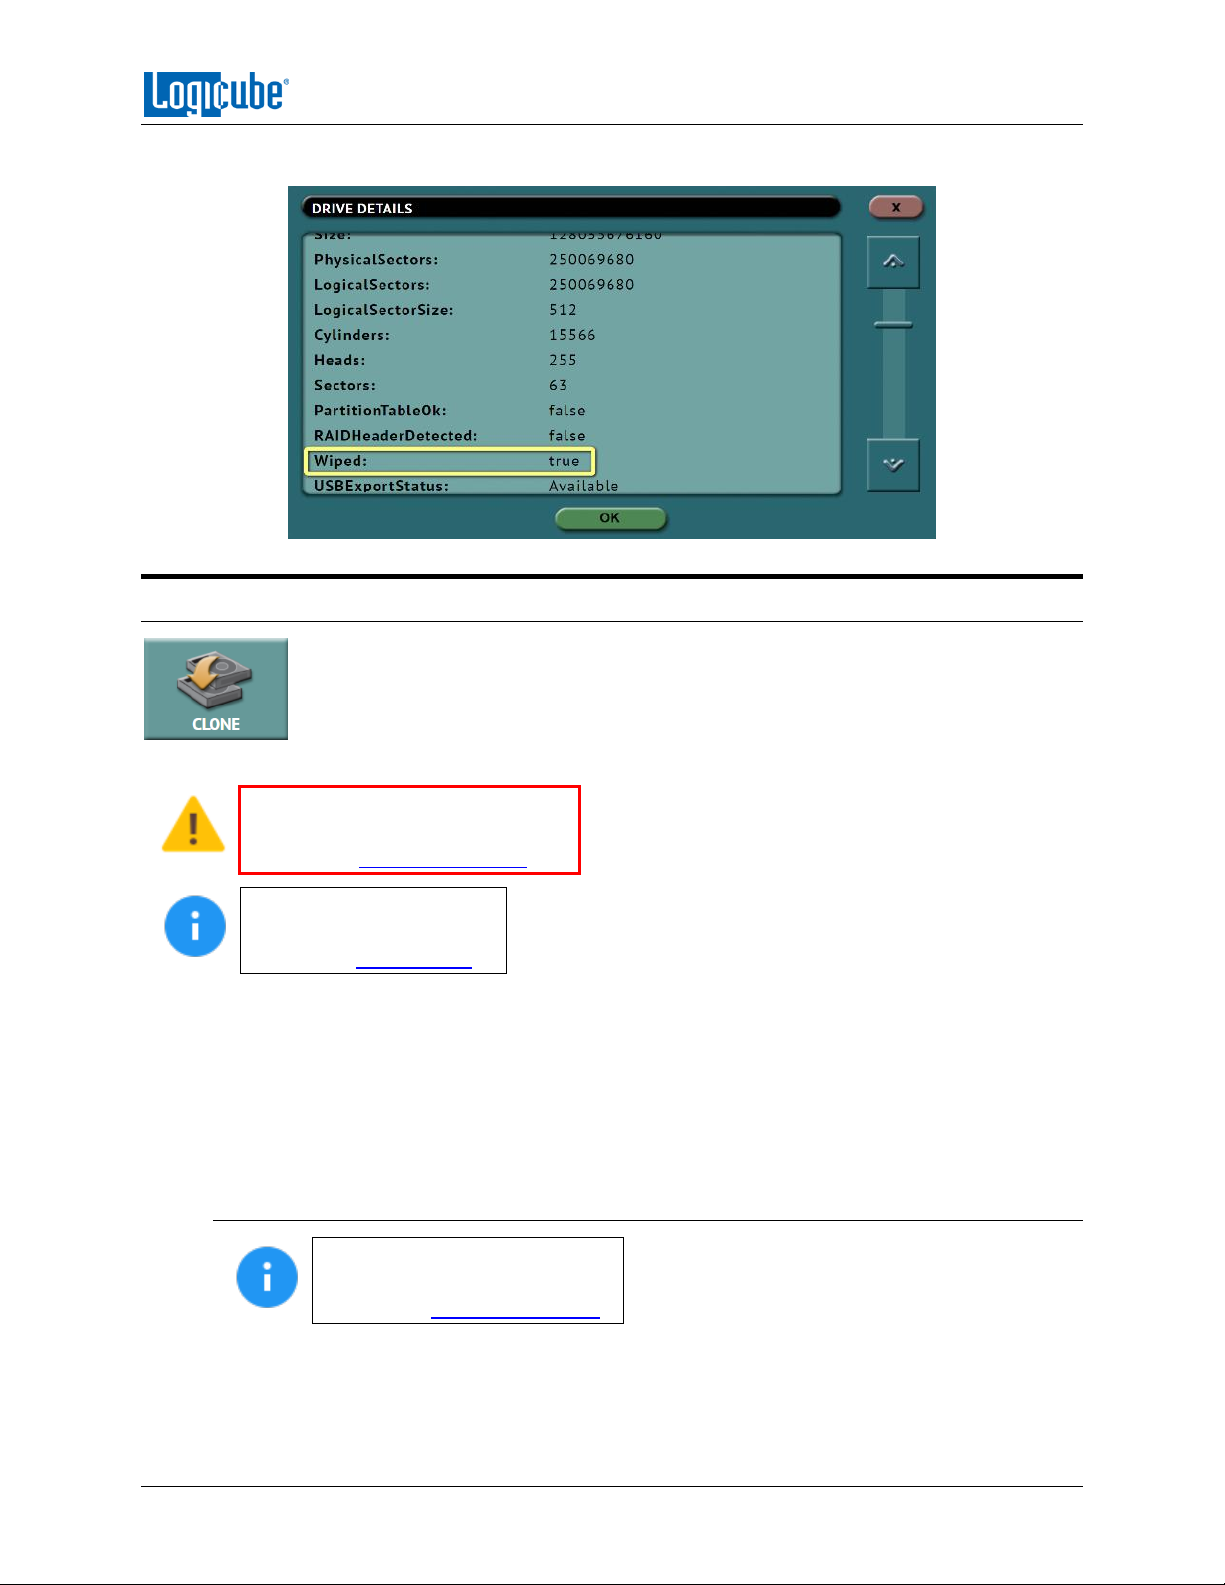
A blank disk check can be performed to see if a drive has been wiped by the unit. This check will
not be accurate if Secure Erase or Pattern Buffers was used to wipe the drive. To perform a
blank disk check:
1. Connect a drive to the unit.
2. Choose Clone, Hash, or Wipe/Format.
3. Go to Master or Target to see the list of connected drives.
4. Tap the More Info icon to the right of the drive to display information about the drive.
5. Tap or click the down arrow located to the right of the screen to scroll down to the
second page of information.
Logicube SCSI-NG User’s Manual 9
Page 18
QUICK START
6. Locate the line that shows “Wiped”. This will either show True (drive is blank) or False.
3.1 Clone
This type of operation allows the imaging of a Master drive or image to a Target drive
or image. There are three different imaging modes and several settings to choose
from. Drives can be cloned using Mirror (bit-for-bit copy) or Clever (copies only data
areas, skips blank sectors, and partitions can be resized to fit larger capacity drives).
These selections should be performed in order from left to right.
Details on the different screens
found in the Imaging operation can
be found in Chapter 4: Cloning.
For details on cloning
drives to a smaller capacity
Target, see Section 4.0.1.
Drive to Drive – Performs a bit-for-bit copy of the Master producing an exact duplicate of the
Master drive. This is also known as a mirror clone.
Image to Drive – Restores an image created by the SCSI-NG to one or more Target drives.
Drive to Image – Creates a Logicube SCSI-NG image file to a network repository or Target drive.
This image file can be restored to a drive using the Image to Drive mode.
3.1.1 Step-by-step instructions – Clone
Details on each selectable
option on the Clone screen can
be found in Chapter 4: Cloning.
1. Select Clone from the types of operation on the left side.
2. Tap Mode and select one of the available modes, then tap the OK icon.
Logicube SCSI-NG User’s Manual 10
Page 19
QUICK START
3. Tap the Master (or Image File) icon and choose the Master from the list of connected
drives then tap the OK icon.
4. Tap the Settings icon and adjust the settings as needed (Job Info, Clone Method
Settings, HPA/DCO/ACS3, Error Handling, Hash/Verification Method, etc.) then tap the
OK icon.
The Verify feature is an option. To find out if this option is
installed, go to the Statistics icon from the navigation menu
on the left and select the Options tab. To purchase the Verify
option, contact our sales team at [email protected].
The Settings screen may be different in each of the modes.
Details on the different Settings screens can be found in
Chapter 5: Types of Operations.
Log file names can be set in Settings in the Job Info screen by
entering a Job Name. See Section 4.3.1 for more information.
5. Tap the Target (or Image File) icon and select the Target or Image File then tap the OK
icon.
For Drive to Image, the SCSI-NG must be used to format
drives. If the Target drive is not formatted by the SCSI-NG,
the Format icon will appear in the Format column. Tap
the (Format) icon to format the Target drive.
3.2 Hash
6. Tap the Start icon to start the cloning task.
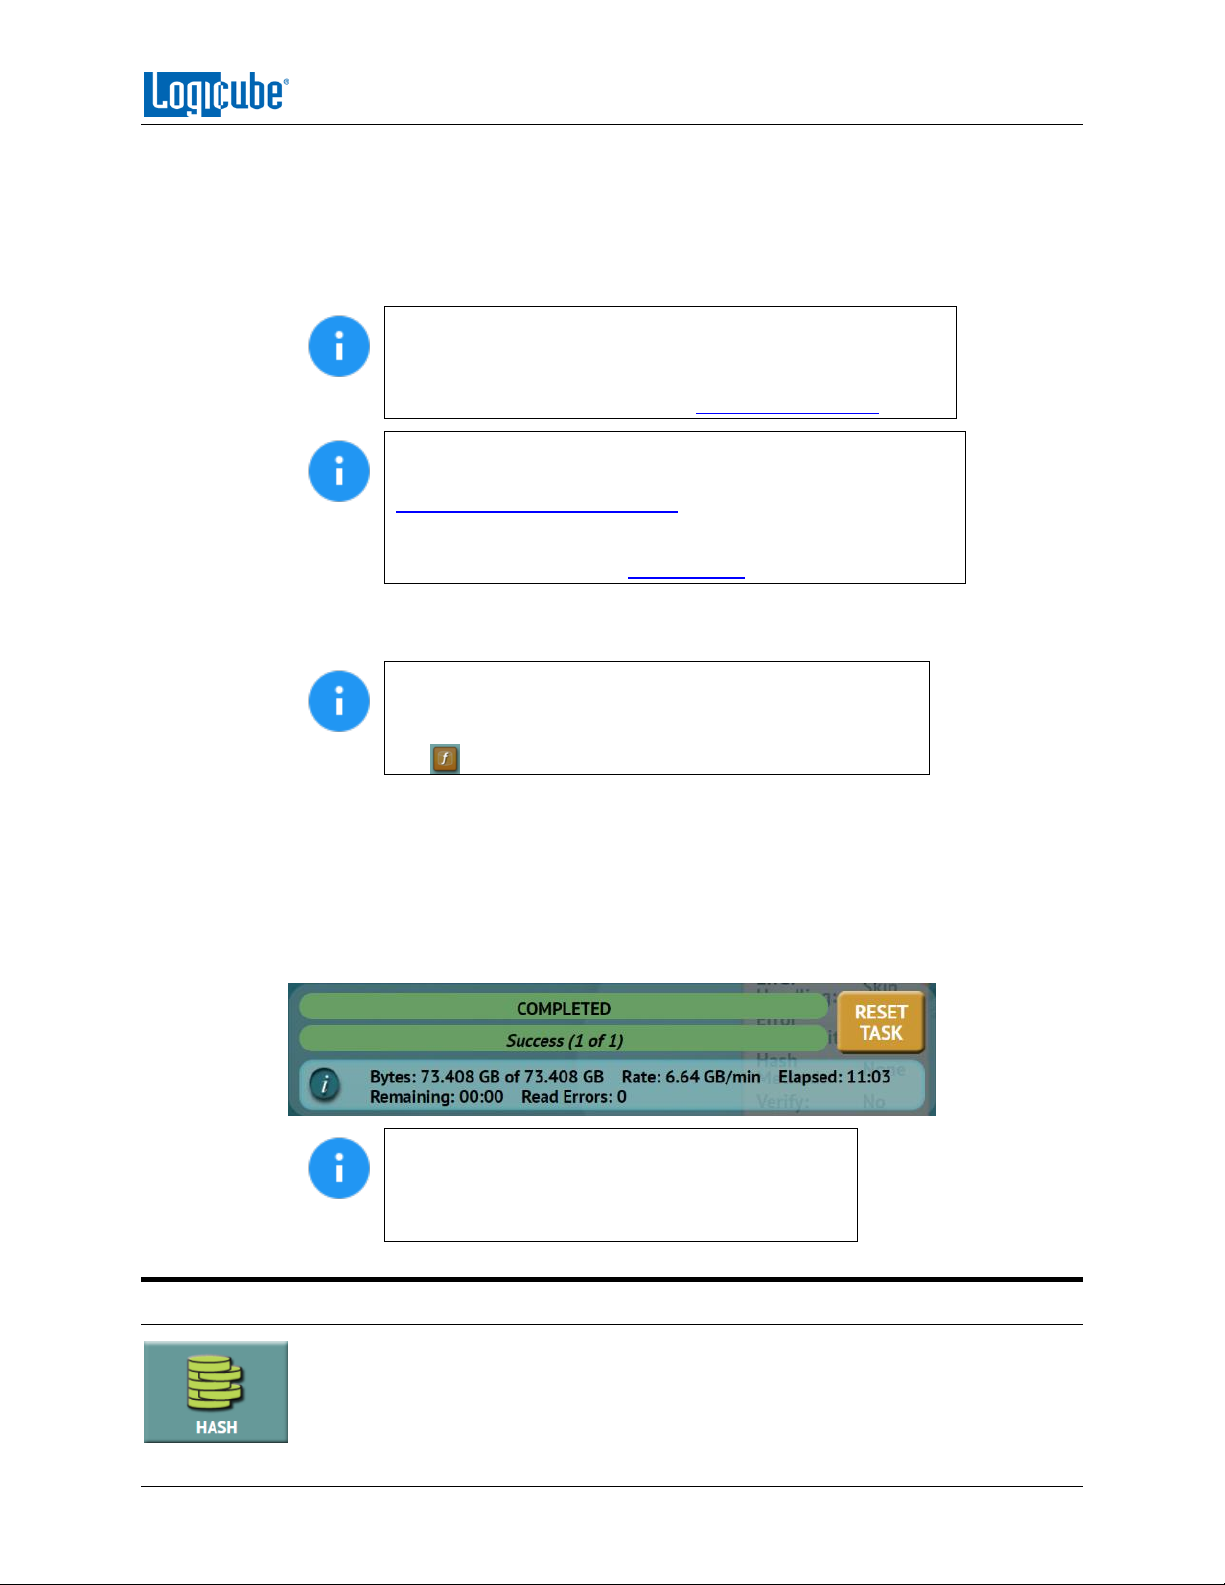
7. A progress bar will appear at the bottom of the screen showing the bytes processed, the
rate (speed), elapsed time, and time remaining.
8. When finished, the status will show “COMPLETED”. At this point, it is recommended to
tap Reset Task to reset the task, so the drive bays properly reset and not show as being
used or assigned for other tasks.
The number of bytes shown on the progress bar is
not the actual size of the drive. This is the actual
bytes being processed. When ‘Verify’ is set to
“Yes”, the reported number will double in size.
A hash or operation can be performed to any connected drive. Performing a hash task
will instruct the unit to calculate the hash for the specified drive or validate the hash
Logicube SCSI-NG User’s Manual 11
Page 20
QUICK START
value for that drive.
Details on the different screens
found in the Hash operation can
be found in Section 5.2: Hash.
This mode will hash any connected drive on an active Master or Target port. This mode is Logical Block
Address (LBA) based and will hash a drive based on the number of LBAs.
3.2.1 Step-by-step instructions – Drive Hash
1. Select Hash from the types of operation on the left side.
2. Tap the Target icon and select the drive to be hashed then tap the OK icon.
3. Tap the Settings icon to choose the different settings based on the Mode. Details for
every setting can be found in Section 5.2.2.
4. Change any of the optional settings (LBA settings or percentage of the drive to be
hashed) if needed.
Optional: Tap Job Info to set the Job Name, Job ID, Operator, Other ID, or Job Notes.
5. Tap the Start icon to start the hash task.
6. When finished, the status will show “COMPLETED”. At this point, it is recommended to
tap Reset Task to reset the task, so the drive bays properly reset and not show as being
used or assigned for other tasks.
3.3 Wipe / Format
The drive connected to the Target bay (right side) can be wiped or formatted. Unless
formatted (with the SCSI-NG), when a drive is wiped, there will be no file system on
the Target drive. The following methods are available in the Wipe menu:
The Wipe/Format feature is an option. To find out if this feature
is installed, go to the Statistics icon from the navigation menu on
the left and select the Options tab. If you need to purchase the
Wipe option, contact our sales team at: [email protected].
Details on the different screens
found in the Wipe operation can be
found in Section 5.3: Wipe / Format.
Secure Erase – Sends the SCSI FORMAT command to the drive instructing it to wipe the drive
based on the hard drive manufacturer’s specifications for the SCSI FORMAT command.
Secure erase instructs the SCSI-NG to send a SCSI FORMAT
command to the drive. If the drive supports this command, it
will perform the task based on the manufacturer’s
Logicube SCSI-NG User’s Manual 12
Page 21
QUICK START
specifications. Please contact the drive manufacturer to find
out if the specific drive being used supports the SCSI FORMAT.
Wipe Patterns – Allows the user to set a specific pattern to use for wiping the drive. The number
of passes is customizable (up to 7 passes) along with the type of data written for each pass. In
addition, a 7-pass DoD wipe can be set with pre-selected pass values.
Format – Formats a drive. Supported file systems are: EXT4, NTFS, exFAT, FAT32.
The unit can perform one, two, or all three methods on the same drive, using the same task. Each
method will be performed in order (Secure Erase, Wipe Patterns, then Format) depending on which
methods are chosen. For example, if both Secure Erase and Wipe Patterns are selected, the unit will
perform a Secure Erase first then a Wipe Patterns wipe.
3.3.1 Step-by-step instructions – Wipe
1. Select Wipe from the types of operation on the left side.
2. Tap the Target icon and select the drive then tap the OK icon.
3. Tap the Settings icon and choose the type of wipe to be performed (Secure Erase and/or
Wipe Patterns). If Wipe Patterns is selected, choose the type of Wipe Pattern to perform
(DoD or Custom).
3.4 Logs
4. If the drive has an HPA, DCO, or ACS3 area that needs to be wiped, tap the
HPA/DCO/ACS3 icon and select Yes to wipe the HPA/DCO/ACS3 area of the drive.
5. Tap the Passes icon to edit the number of passes and what gets written on each pass.
6. If the drive needs to be formatted, tap the Settings icon to change the Format settings
then tap the OK icon.
FORMAT – Select ON to format the drive.
FILE SYSTEM – Select which file system will be used to format the drive.
Optional: Tap Job Info to set the Job Name, Job ID, Operator, Other ID, or Job Notes.
7. Tap the Start icon to start the wipe task. A Secure Erase will be performed first (if
selected), then a Wipe Pattern (if selected), then finally a Format (if selected).
8. When finished, the status will show “COMPLETED”. At this point, it is recommended to
tap Reset Task to reset the task, so the drive bays properly reset and not show as being
used or assigned for other tasks.
Logs of all clone, hash, and wipe operations are stored and saved on the unit. Logs can
be viewed directly on the unit or from a computer’s browser (if the unit is connected
to a network). In addition to viewing, the logs can be exported to an external USB
drive. Logs are exported in PDF, HTML and XML format.
Logicube SCSI-NG User’s Manual 13
Page 22
QUICK START
Details for the Logs
screen can be found
in Section 5.4: Logs.
3.4.1 Step-by-step instructions – Viewing or exporting logs
To view the log files:
1. Select Logs from the types of operation on the left side. A list of log files will appear
sorted by date (newest on top).
2. Select the log file to view by tapping the name of the log file. This will highlight the log
file chosen.
3. Tap the View icon to view the log file on-screen.
The log files can also be exported to a USB drive. To export the log files:
1. Select Logs from the types of operation on the left side. A list of log files will appear
sorted by date (newest on top).
2. Select the log file to export by tapping the name of the log file. This will highlight the log
file chosen.
3. Connect a formatted USB drive (USB flash drive or USB external drive) to the front-right
USB port.
The USB drive connected to the right-front
USB port must be formatted in Windows
using the NTFS, FAT32, or FAT file system.
4. Tap the Export icon to export the log file via USB. The log will be exported/copied to the
attached USB drive and will be in HTML, PDF, and XML formats.
Repeat steps 2 and 3 if other log files need to be exported or viewed. Alternatively, all the log
files can be exported by tapping the Select All button to select all the log files. Once all log files
are selected, they can be exported in a single operation.
Log files can also be
accessed over the network.
See Section 3.4.4 for details.
To print the log files, it is recommended to use the web interface as described in Chapter 7:
Remote Operation and click the print icon on the upper-right corner of the screen. The
browser’s print menu will appear, and the log can be printed to an available printer on
configured on the computer.
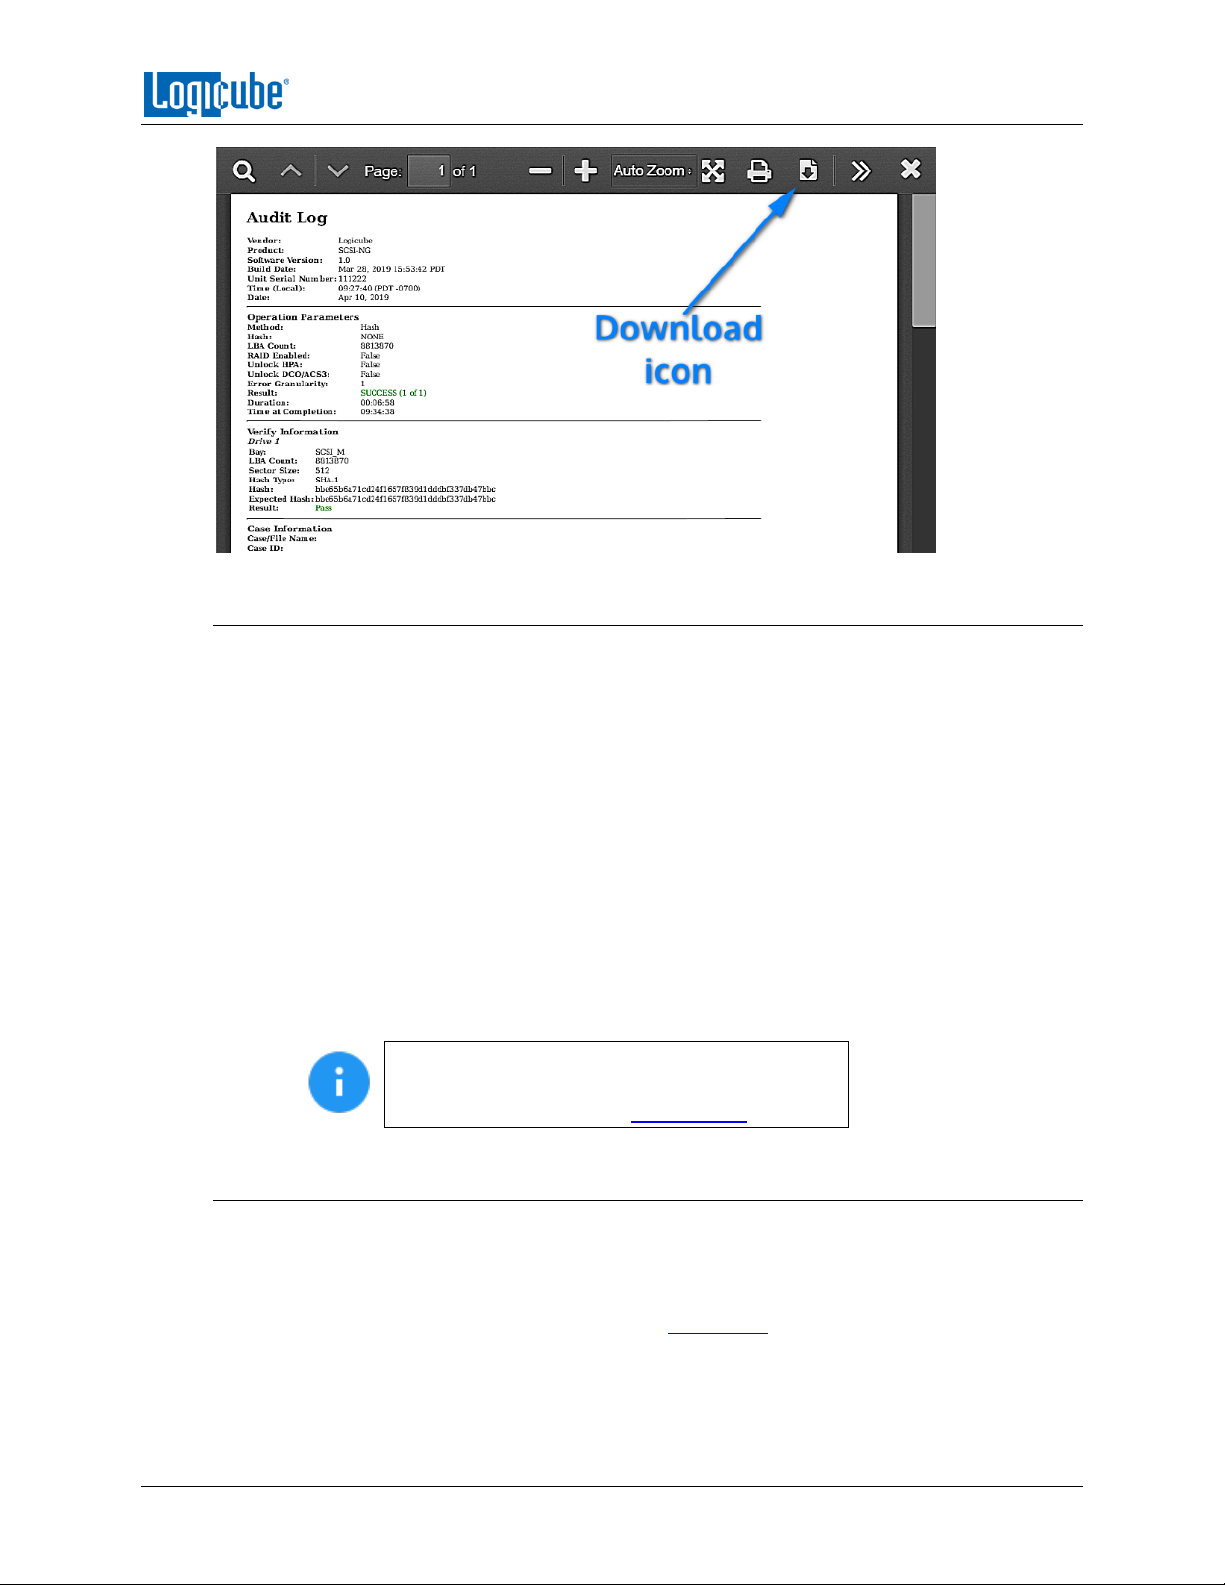
3.4.2 Viewing and downloading Log Files from the web interface
When using the web interface (see Section 7.1 for details on the web interface), the log file will
be viewed on a web browser. There is a download icon on the browser that can be used to
download the log file being viewed.
Logicube SCSI-NG User’s Manual 14
Page 23
QUICK START
3.4.3 Deleting Log Files
Log files can be deleted one at a time or all at once.
To delete a single log file, tap the log file to highlight the log file to be deleted. Tap the
Delete icon to delete the selected log file.
To delete all the log files, tap the Select All icon to select all the log files, then tap the
Delete icon.
A log file deletion password can be set to add a layer of security when deleting log files. If a
password was set, log files cannot be deleted without entering the correct password.
If a log file deletion password was not created, a confirmation screen will appear
confirming to delete the single log file or all log files.
If a log file deletion password was created, a screen will appear prompting to enter the
log file deletion password. Enter the log file deletion password. Tap the OK icon to
delete the single log file or all the log files (depending on which was selected).
The password can be set in the Systems Settings.
More information about the log file deletion
password can be found in Section 5.7.2.
3.4.4 Accessing the Logs Over a Network
The log files can also be accessed through a network on a computer if the unit is connected on
the same network.
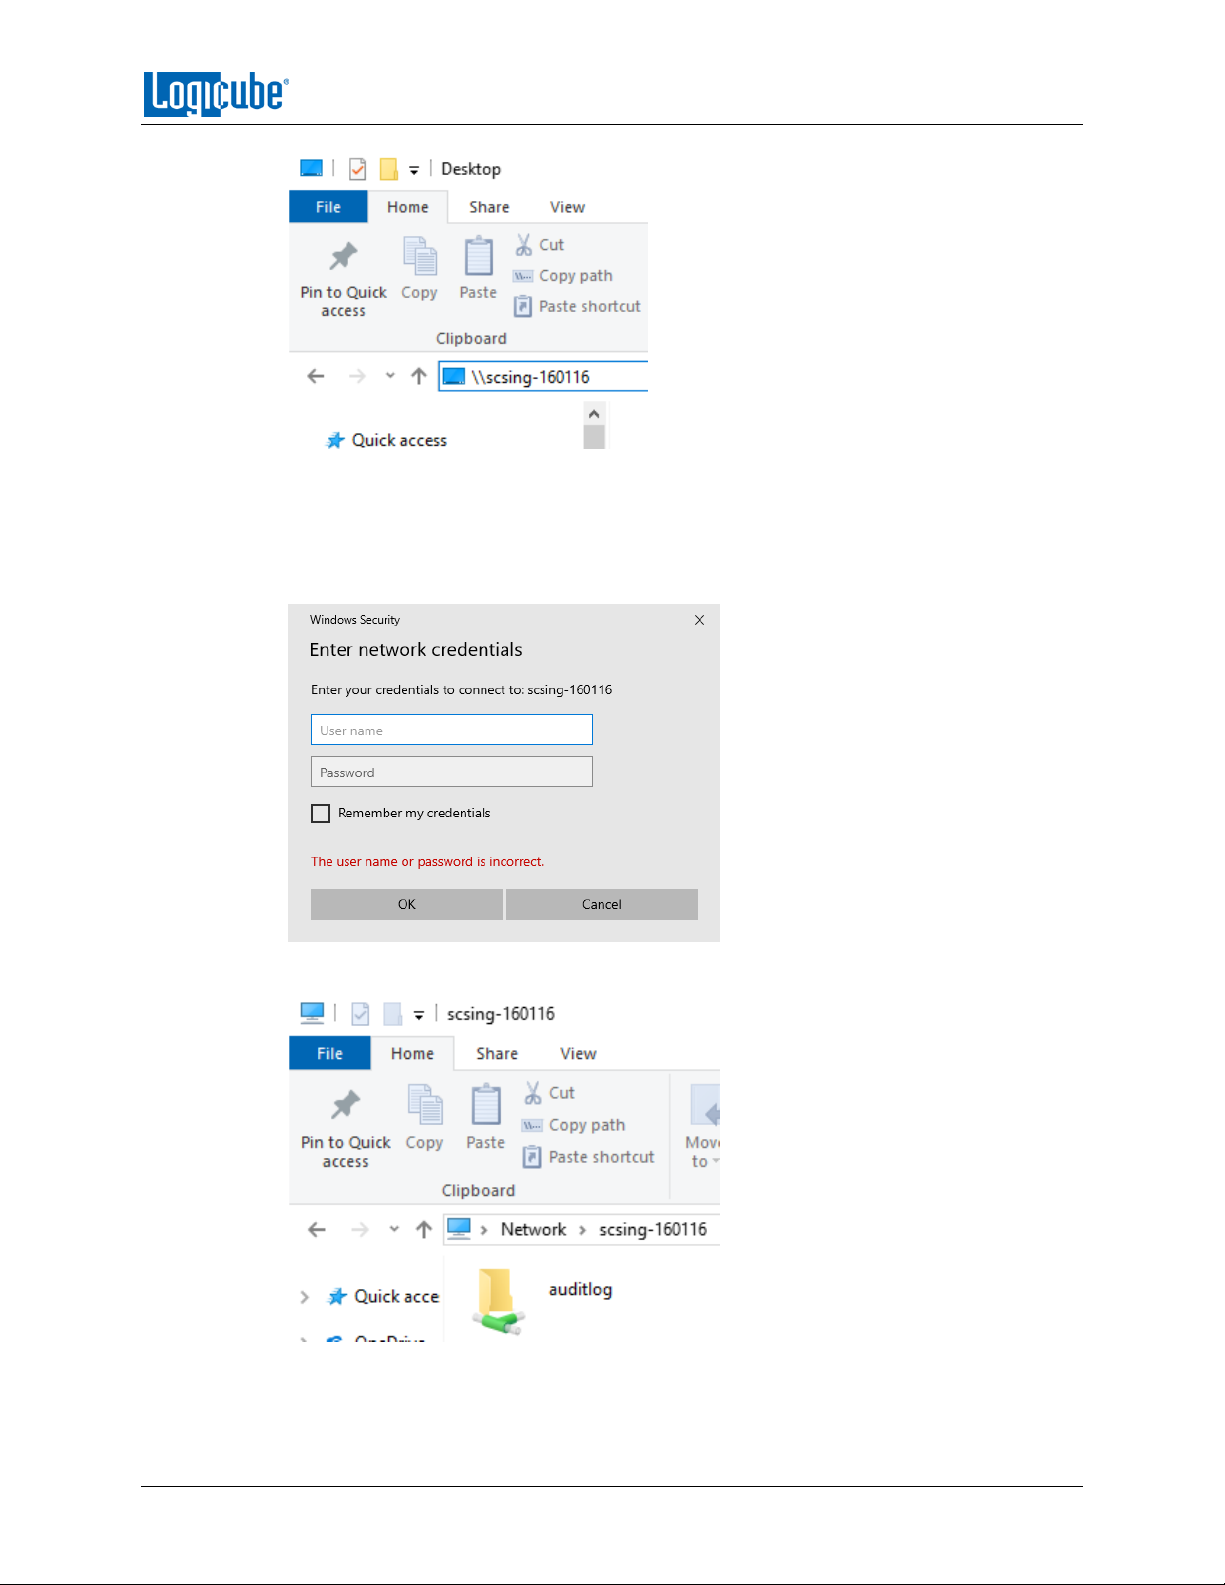
1. Open Windows Explorer or a similar window and browse to the hostname or the IP
address found in the Statistics screen. See Section 5.5 for more information on the
Statistics screen.
Logicube SCSI-NG User’s Manual 15
Page 24
QUICK START
2. A Windows security screen will appear prompting to enter a User name and Password to
connect to the unit. Login with the following credentials:
User name: it
Password it
3. Once connected, an auditlog folder will appear. Open the auditlog folder.
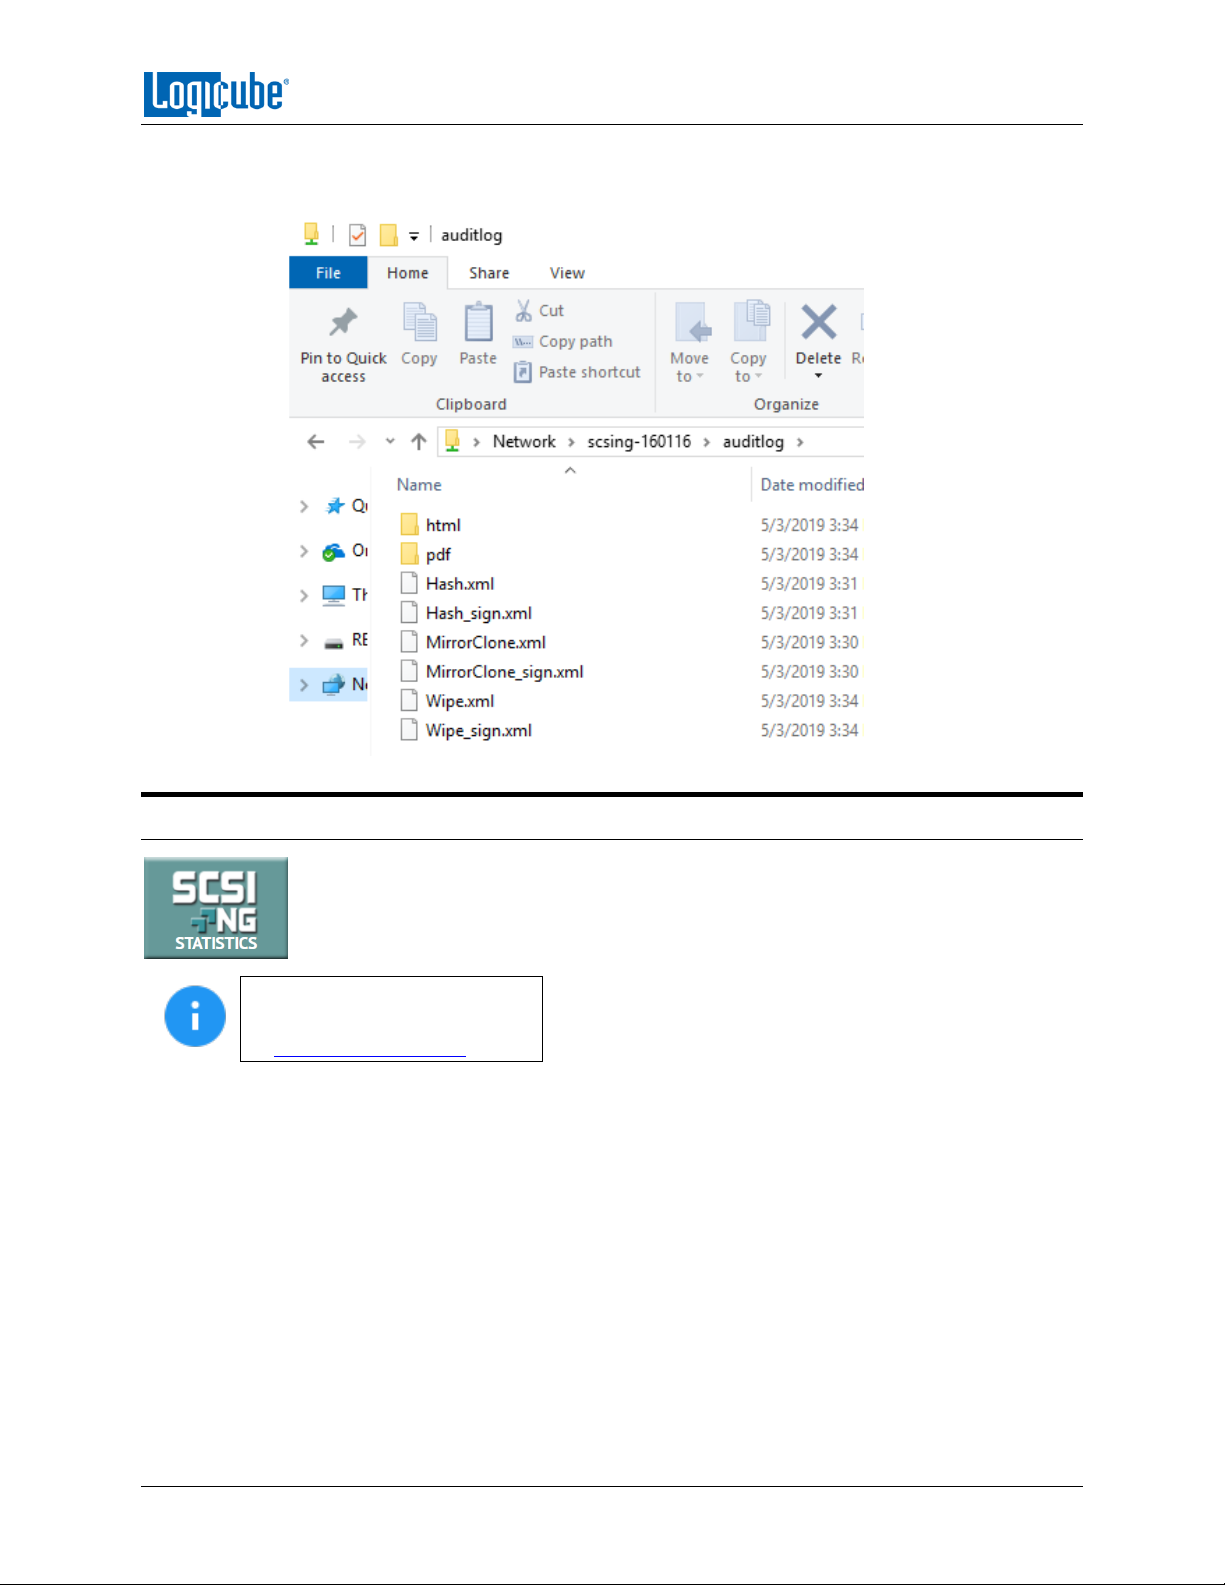
4. The auditlog folder contains the HTML, PDF, and XML files for each of the log files. There
will be two folders (html and pdf) that contain either the HTML or PDF versions of the
Logicube SCSI-NG User’s Manual 16
Page 25
QUICK START
log files. The XML files can be used with any XML viewer which allows for some
customization on how the information can be viewed.
3.5 Statistics
This will display the following tabs: About, Adv. Drive Statistics, Options, Network
Interface Stats, Debug Logs, and Help.
Details on the different
Statistics screens can be found
in Section 5.5: Statistics.
About – This screen will show information about the unit including the current software installed.
Adv. Drive Statistics – Displays S.M.A.R.T. information taken directly from what the drive is reporting.
Options – Displays which optional software is available and what is installed.
Network Interface Stats – Displays the Network Interface statistics (Receive and Transfer bytes, packets,
drops, and errors, and the link status).
Debug Logs – Allows the export of debug logs for support purposes.
Help – Contains a QR code linking to the user’s manual.
Logicube SCSI-NG User’s Manual 17
Page 26
QUICK START
3.6 Manage Repositories
Repositories can be added to the unit in this operation. Repositories can be a drive
connected to the Target bay of the unit (automatically shown) or shared folders over a
network. SMB, CIFS, NFS, and iSCSI protocols are supported.
Details on the different Manage
Repositories screens can be found in
Section 5.6: Manage Repositories.
3.7 System Settings
The System Settings screen allows users to configure different settings for the unit:
Details on the different System
Settings screens can be found in
Section 5.7: System Settings.
Profiles
Passwords
Language/Time Zone
3.8 Network Settings
There following tabs are seen in the Network settings:
Details on the different Network
Settings screens can be found in
Section 5.8: Network Settings.
Interfaces – Allows the configuration of the network interface which include setting a static IP
address and allows certain network services to be enabled or disabled.
HTTP Proxy – For the unit to be able to update software from a network (over the internet),
proxy settings may need to be set. Networks that have a proxy server for internet access will
require proxy settings for devices like this to connect to the Internet. This typically includes a
server (or IP address), a host port, a username and password.
Logicube SCSI-NG User’s Manual 18
Page 27
QUICK START
3.9 Software Updates
New and improved software will be released from time to time. There are two ways to
update the software on the unit: From a network over an Internet connection or from
a USB drive through a software download.
Details on how to perform a software update,
software re-load, or firmware update can be found in
Chapter 6: Updating/Loading/Re-loading Software.
3.10 Power Off
There are two tabs in the Power Off screen:
Details on the different Network
Settings screens can be found in
Section 5.10: Power Off.
POWER OFF – The unit can be remotely turned off or restarted by going to this tab. Additionally
the unit’s screen can be refreshed.
DRIVE POWER – Inactive drives connected to the unit can be set to go to standby mode in this
tab. The default is set to 0 minutes (OFF).
Logicube SCSI-NG User’s Manual 19
Page 28
4: Clone
4.0 Clone – Introduction
This type of operation allows the cloning of a Master drive to a Target drive (or a
repository). There are three different imaging modes and several settings to choose
from. These selections should be performed in order from left to right. Mirror
(Performs a bit-for-bit copy of the Master drive or image) or Clever (Clones only
sectors with data, skips blank sectors, and can expand partitions depending on the settings used) can be
used.
There are four selections when performing a clone:
Mode
Master/Image File
Settings
Target/Image File
4.0.1 Cloning to Smaller Capacity Drives
Regardless of the Operating System, Target drives should be at least the same capacity or larger
than the Master drive. Specifically, each Target drive must have the same number of sectors (or
Logical Block Addresses/LBAs) or a larger number of sectors or LBAs than the Master.
If the Master drive is larger in capacity than the Target drive, it is still possible to clone the drive,
but there are some adjustments that will need to be made to the Master drive. The following
applies to any Operating System:
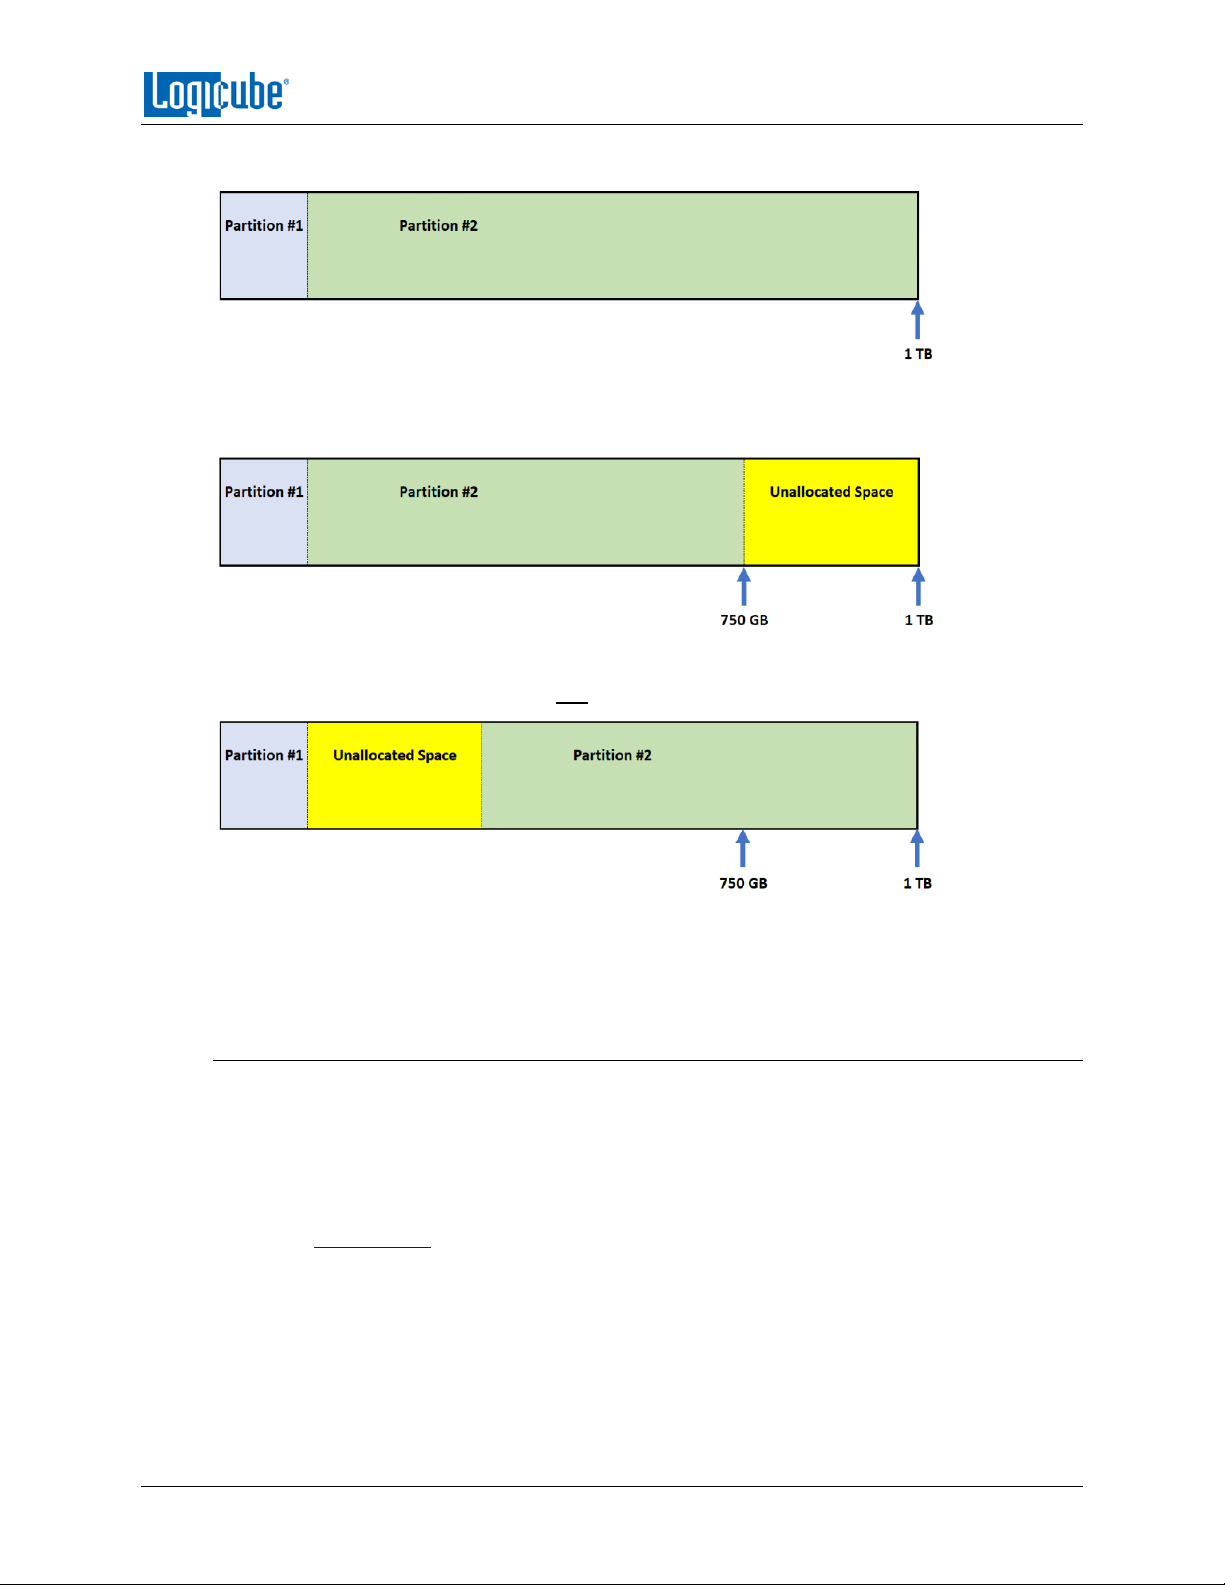
The total partition sizes on the Master drive need to be adjusted to be less than the
capacity/size of the smallest Target drive.
The partitions on the Master drive need to be adjusted so that the free/unallocated
space is at the end of the drive.
Before making any changes to the Master drive, it is highly
recommended to make a backup copy of the Master drive
by performing a Mirror copy of the drive to make sure
there is an exact duplicate backup of the Master drive.
Logicube cannot provide support on how to resize,
shrink, or move partitions. There are several articles
and software/utilities/tools available on the internet
on how to re-size, shrink, or move partitions.
Logicube SCSI-NG User’s Manual 20
Page 29
CLONING
Sample original drive (1 TB drive):
Sample of a properly adjusted drive (from a 1 TB drive to fit a 750 GB drive):
Sample of an adjusted drive that will not work (from a 1 TB drive to fit a 750 GB drive):
Once the partitions have been adjusted to properly fit the Target drive, it can be cloned using
any of the cloning methods. Depending on the Operating System and cloning method used,
there may be limitations to cloning the drive.
4.0.2 Mirror Copy Limitations
Mirror Copy method performs a bit-for-bit copy of the Master drive, producing an exact
duplicate of the Master drive. There are very few possible limitations when using Mirror Copy
(e.g., sector size, drive health, etc.). There is one other possible limitation when using the Mirror
Copy method:
The Target drives should be the same capacity or larger. If the Target drive is smaller in capacity,
please see Section 4.0.1, then set the Clone Method Setting to the proper percentage of the
drive (for example, if the Target drive is 750 GB and the Master is 1 TB, clone no more than 75%
of the drive), or set the number of blocks (LBAs) to match the Target drive’s number of blocks
(LBAs).
Logicube SCSI-NG User’s Manual 21
Page 30
CLONING
4.0.3 Clever Copy Limitations
Clever Copy method copies only data sectors and fills the rest of the drives with zeroes (blank
space) and can expand partitions to fill the rest of the drive or a percentage of the drive. If one
of the partitions (file systems) is not supported by Clever Copy, the Logicube device will
automatically use Mirror Copy for that partition. Here are some limitations when using the
Clever Copy method:
For Windows, all System Restore, Recovery, and OEM partitions should not be
expanded.
The Target drives should be the same capacity or larger. If the Target drive is smaller in
capacity, please see Section 4.0.1.
4.1 Mode
Tap this icon to choose between the following three imaging modes:
Drive to Drive – Clones one Master drive to one Target drive.
Image to Drive – Restores SCSI-NG image files to one drive.
Drive to Image – Creates an image file from the Master drive. The image file can be written to a
connected drive or a network repository.
4.2 Master/Image File
Tap this icon to select the Master drive to be imaged. SCSI-NG will list the drive connected to the Master
position.
When Image to Drive mode is selected, the Image File window will list all available drives that may
contain SCSI-NG image files.
The (More Info) icon displays more information
on the drive. The drive details window will appear
showing information about the drive.
4.3 Settings
Tap the Settings icon to change the image settings. Depending on the selected mode, different screens
will appear.
Job Info – Available in all modes (See Section 4.3.1).
HPA/DCO/ACS3 – Available in the following modes (See Section 4.3.2):
Drive to Drive
Drive to Image
Error Handling – Available in all modes (See Section 4.3.3).
Logicube SCSI-NG User’s Manual 22
Page 31
CLONING
Hash/Verification Method – Available in all modes (See Section 4.3.4). Hash Method is not
available in Image to Drive.
File Image Method Settings – Available in Drive to Image mode (See Section 4.3.5).
Clone Method Settings – Available in the following modes (See Section 4.3.6):
Drive to Drive
Image to Drive
4.3.1 Job Info
Job Info is available in all cloning modes and allows users to enter information about the job. Job
Info is not required to start a clone operation. Information entered here will appear in the logs.
Tap any of the boxes and an on-screen keyboard will appear allowing information to be entered.
After entering the information, tap the OK icon to go back to the previous screen.
Log names and file names can be customized by entering a Job Name.
if a clone operation is performed, and the Job Name is set to TestJob,
the log name and file name will be called TestJob.
Subsequent Job Names that are the same will be identified with a dash,
then the next image number. For example, TestJob-1, TestJob-2, etc.
The unit will convert any non-POSIX portable characters used in Job
Name field to underscores “_“ when creating the log or file names.
POSIX portable characters are:
Uppercase A to Z Period (.)
Lowercase a to z Underscore (_)
Numbers 0 to 9 Hyphen/Dash (-)
4.3.2 HPA/DCO/ACS3
HPA/DCO/ACS3 is available in the following modes: Drive to Drive and Drive to Image.
The HPA/DCO/ACS3 setting allows the user to set whether a drive’s HPA, DCO, or Accessible
Max Address is to be unlocked and cloned or imaged. Select YES to unlock and clone or image a
Host Protected Area (HPA), Device Configuration Overlay (DCO), or Accessible Max Address
(ACS3).
HPA – If supported by the drive, HPA is set by using the SET MAX ADDRESS command, the Host
Protected Area is an area of a drive that is normally not visible to an Operating System, BIOS, or
the user.
DCO – If supported by the drive, DCO is typically set by using the DCO MODIFY or DEVICE
CONFIGURATION SET command, the Device Configuration Overlay limits the size of a drive only.
For example, a 160GB drive can be made to look like a 100GB drive to a computer. Like HPA, this
hidden area is normally not visible to an Operating System, BIOS, or the user.
Logicube SCSI-NG User’s Manual 23
Page 32
CLONING
ACS3 – If supported by the drive, this is set using the ACCESSIBLE MAX ADDRESS command as
specified by the ATA/ATAPI Command Set, this is the maximum LBA that is accessible by read
commands and write commands that return command completion without error.
4.3.3 Error Handling
Error Handling is available in all modes. When bad sectors are encountered on the Master drive,
the unit can either skip the bad sectors or abort the imaging operation. This allows flexibility on
what to do when bad sectors are found on the Master drive.
When bad sectors are encountered, and error
handling is set to Skip, the unit will write a zero on the
corresponding sector or position in the Target drive.
There is also has a setting for error granularity. There are 3 options:
1 sector (512 Bytes)
4096 Bytes (8 sectors)
64 KIB (128 sectors)
When a bad sector on the Master drive is found, by default, it will skip that sector. Changing the
granularity allows more sectors to be skipped.
A cluster size represents the smallest amount of disk space that can be used to hold a file. The
most common cluster size for an NTFS volume, for example, is 4KB (4096 Bytes). This means that
the smallest amount of space that will be used for a file is 4096 Bytes.
As an example, if 4096 Bytes is chosen, and one of the 8 sectors in that cluster size contains a
bad sector, the unit will skip the entire cluster (or 4096 bytes or 8 sectors).
4.3.4 Hash/Verification Method
The Hash/Verification method screen is available in all modes. Hash is not available in Image to
Drive but is available in other modes. Verification is available in all modes.
The Hash Method selection is shown in Image to Drive but is not
selectable. The unit will automatically use the hash method that
was selected when the image was created (using Drive to Image).
Hash – Will hash the Master drive with the selected method. There different hash algorithm
options available, depending on which Imaging mode is selected:
None – No hash of the Master will be performed. This is available only when using the
following mode:
o Drive to Drive
SHA-1 – Uses the SHA-1 algorithm to hash the Master. This is available when using the
following modes:
o Drive to Drive
o Drive to Image
Logicube SCSI-NG User’s Manual 24
Page 33
CLONING
SHA-256 – Uses the SHA-256 algorithm to hash the Master. This is available when using
the following modes:
o Drive to Drive
o Drive to Image
MD5 – Uses the MD5 algorithm to hash the Master. This is available when using the
following mode:
o Drive to Drive
Verification Method/Verify – Available selections are YES or NO. Select YES to hash the Target
and verify that hash with the hash calculated from the Master.
The Verify feature is an option. To find out if this option is
installed, go to the Statistics icon from the navigation menu
on the left and select the Options tab. To purchase the Verify
option, contact our sales team at: [email protected].
4.3.5 File Image Method Settings
The File Image Method Settings screen allows the user to select a file image output mode. The
output modes available are:
Mirror – Creates a bit-for-bit image of the Master.
Clever – Copies only sectors containing data and compresses the image file.
4.3.6 Clone Method Settings
When Drive to Drive or Drive to Image mode is selected, Clone Method Settings will appear on
the top-right of the Settings screen. Depending on the cloning method chosen, the Clone
Method Settings screen has can have different settings:
Mirror – If mirror is selected or used, the following settings are available:
Length – Set the percentage or number of blocks to clone. By default, this is set to
100% of the Master.
Master Start – Set the percentage or number of blocks from the start of the Master.
By default, this is set to 0%, or the beginning of the Master.
Target Start – Set the percentage or number of blocks from the start of the Target.
By default, this is set to 0%, or the beginning of the Target.
The specific number of blocks can
be set for each of the options by
tapping the (edit) icon.
This screen also displays an option to select whether the Master drive is a part of a RAID
configuration or a NON-RAID configuration.
Logicube SCSI-NG User’s Manual 25
Page 34
CLONING
When cloning drives from a RAID configuration, the
Target drives may need to be initialized through the
computer’s RAID controller before being cloned to.
Clever – If clever is selected or used, the following settings are available:
Partition Resize – This screen will show the number of partitions found on the
Master drive and for each supported partition, a resize percentage setting will be
shown.
It is recommended that all System Restore, Recovery, and OEM
partitions should not be expanded. Setting the slider/percentage
to 0% will instruct the unit to keep the same partition size. The
percentage value, when set from 1 to 100 will determine what
percentage of the Target drive will be used. For example, setting
the percentage value to 100% would instruct the unit to use the
entire remainder of the Target drive for that partition.
4.4 Target
Tap the Target or Image File icon to select which drive will be used as the Target drive or which image
file will be used as the image. When Drive to Drive or Image to Drive is chosen from the Mode settings,
this will show the different drives connected to the unit. When Drive to Image is chosen from the Mode
settings, this will show the repository screen which contains the different images located on the unit’s
repository drive.
4.4.1 Selecting Target drive or images
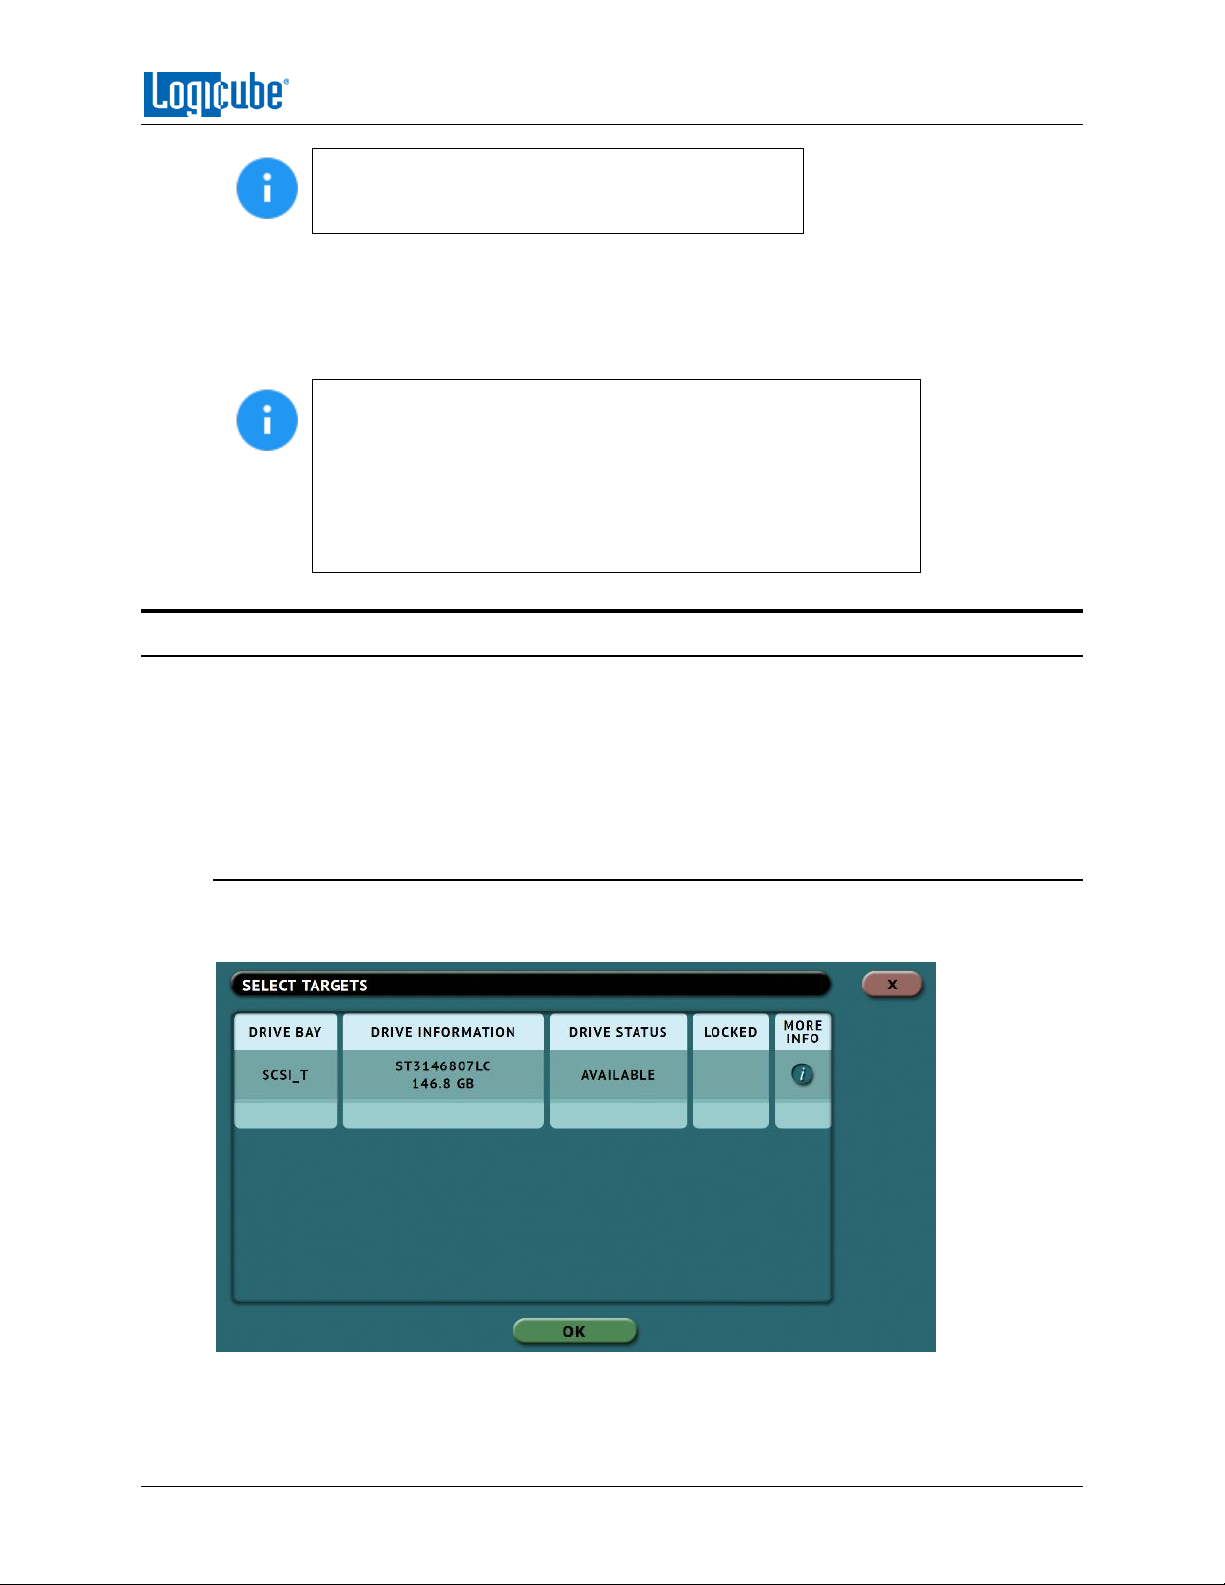
If Drive to Drive or Image to Drive was chosen as the mode, the following screen will appear.
This will allow the selection of the Target. It will display any drive connected to the Target bay.
Logicube SCSI-NG User’s Manual 26
Page 35
CLONING
The (More Info) icon displays more information
on the drive. The drive details window will appear
showing information about the drive.
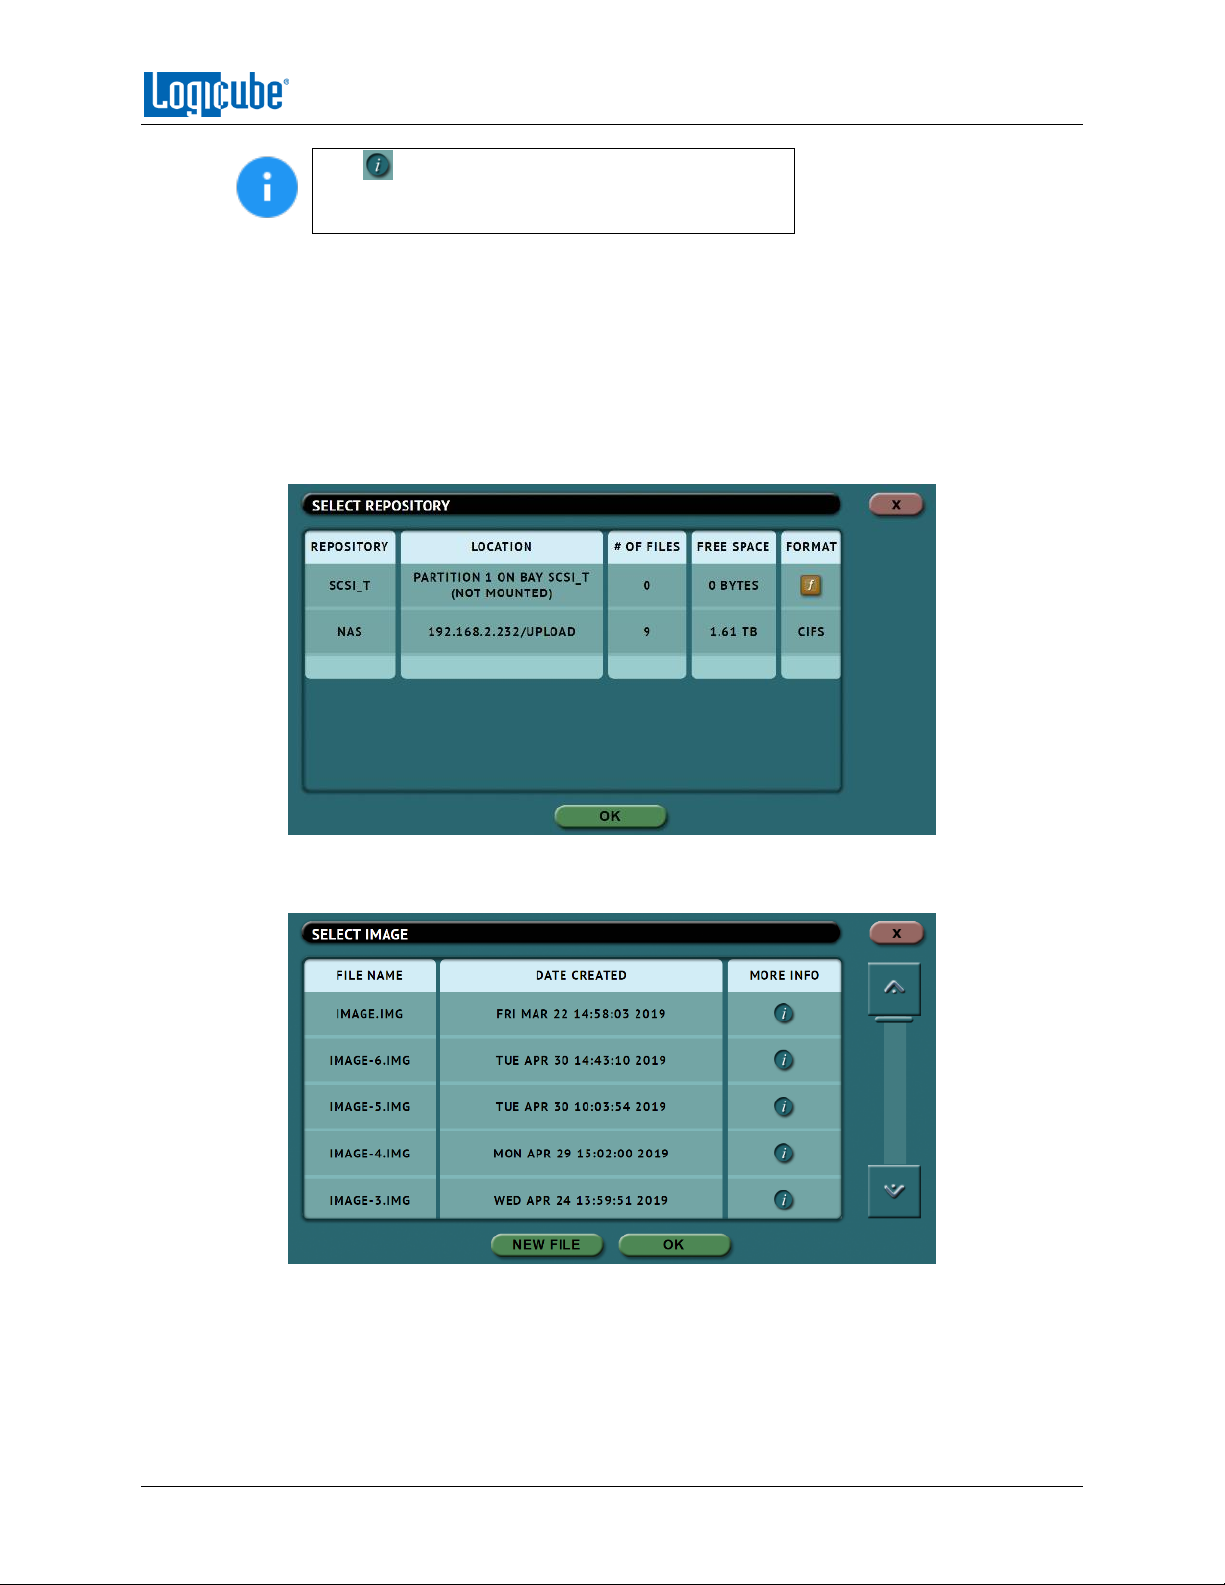
If ‘DRIVE TO IMAGE’ was chosen as the mode, the following screen will appear. This allows the
selection of a repository.
The example below shows the following:
An unformatted drive on SCSI_T that can be formatted to be used as a repository to
store images (the SCSI-NG can format a drive using EXT4, NTFS, exFAT, or FAT32 for
repository purposes)
A network repository (added through the Manage Repositories screen)
Once a repository is selected, a new image file can be created by tapping the New File icon. An
image name can be auto generated, or user specified.
The More Info icon is available to see more information about the image. When selected, a
screen will appear showing details on the selected image file.
Logicube SCSI-NG User’s Manual 27
Page 36
CLONING
4.5 Starting the Cloning Operation
Once all the settings and options have been selected or set, tap the Start icon to begin the Cloning
operation. A confirmation screen will appear. Tap the Yes icon to continue.
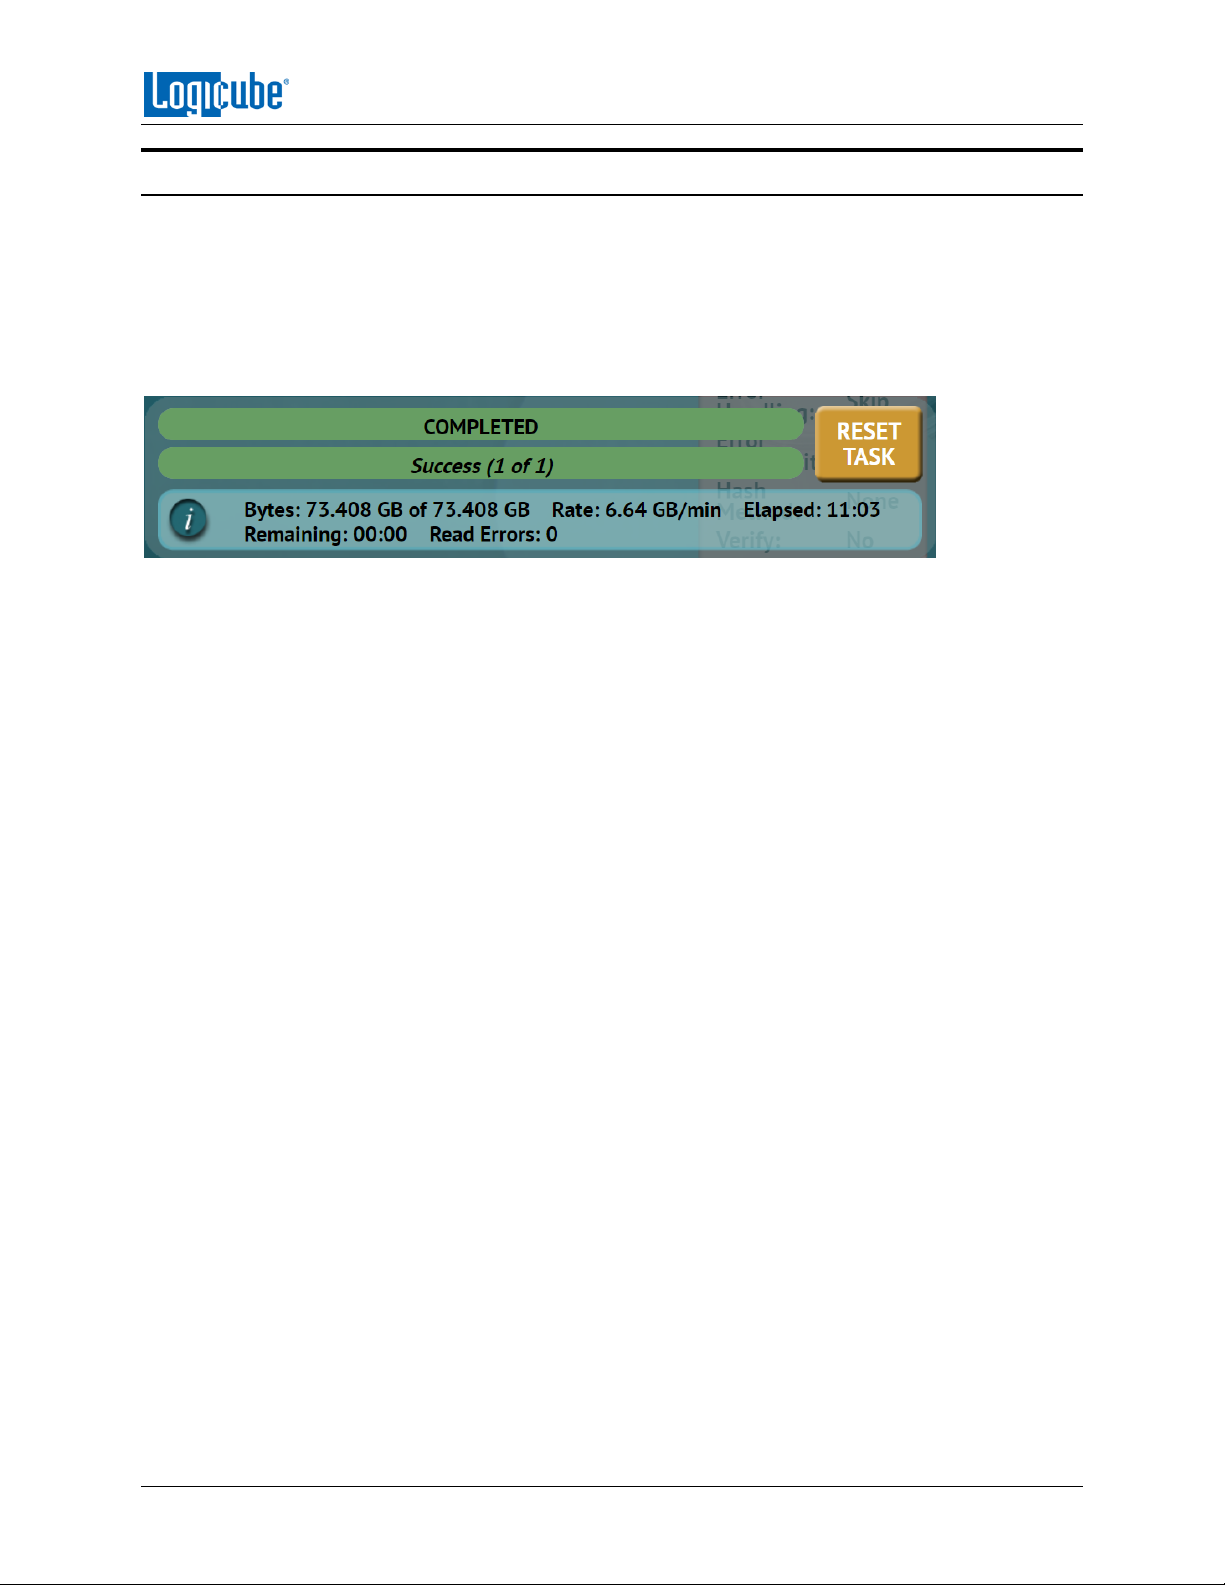
A progress bar will appear at the bottom of the screen showing the bytes processed, the rate (speed),
elapsed time, time remaining, and bad sectors (on the Master drive, if any). When finished, the status
will show “COMPLETED”. At this point, it is recommended to tap Reset Task to reset the task, so the
drive bays properly reset and not show as being used or assigned for other tasks.
Logicube SCSI-NG User’s Manual 28
Page 37
5: Types of Operations
5.0 Types of Operations - Introduction
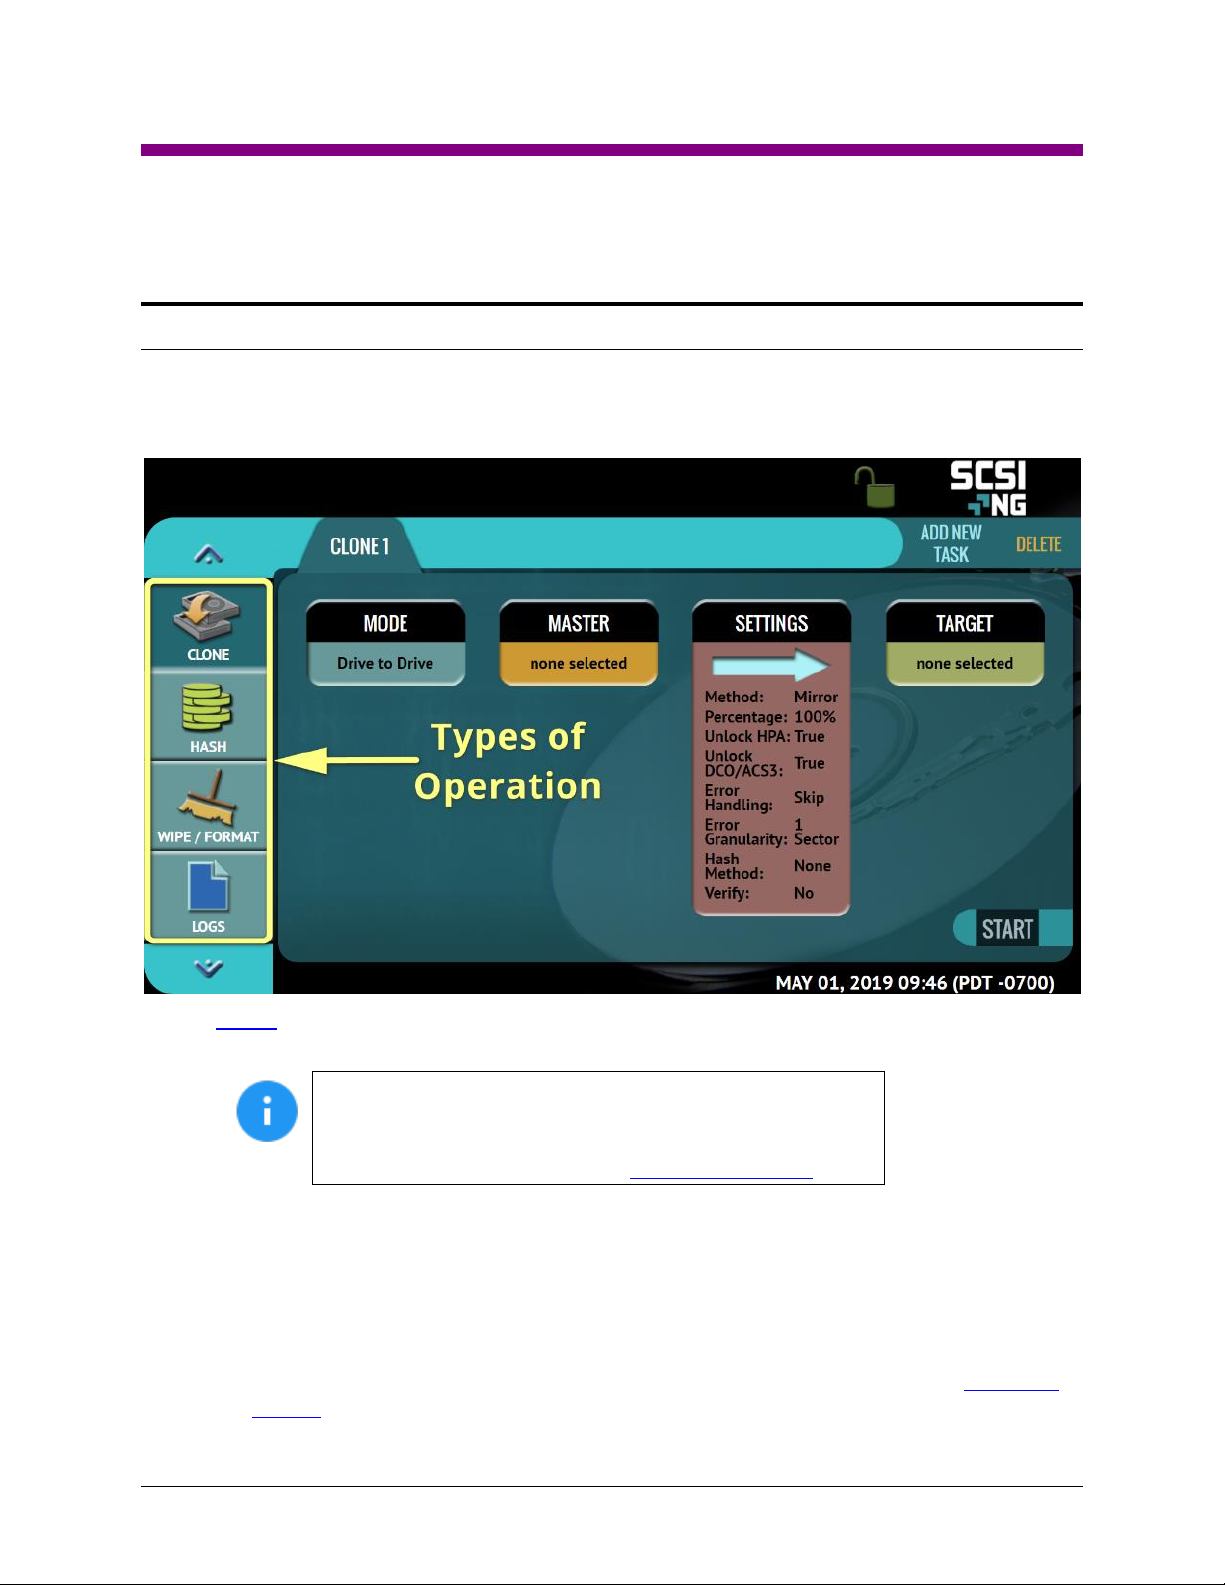
There are 10 types of operations available on the SCSI-NG. The left side of the screen shows the
different operation types that can be set. Detailed information on all the different operations and their
screens can be found in this section.
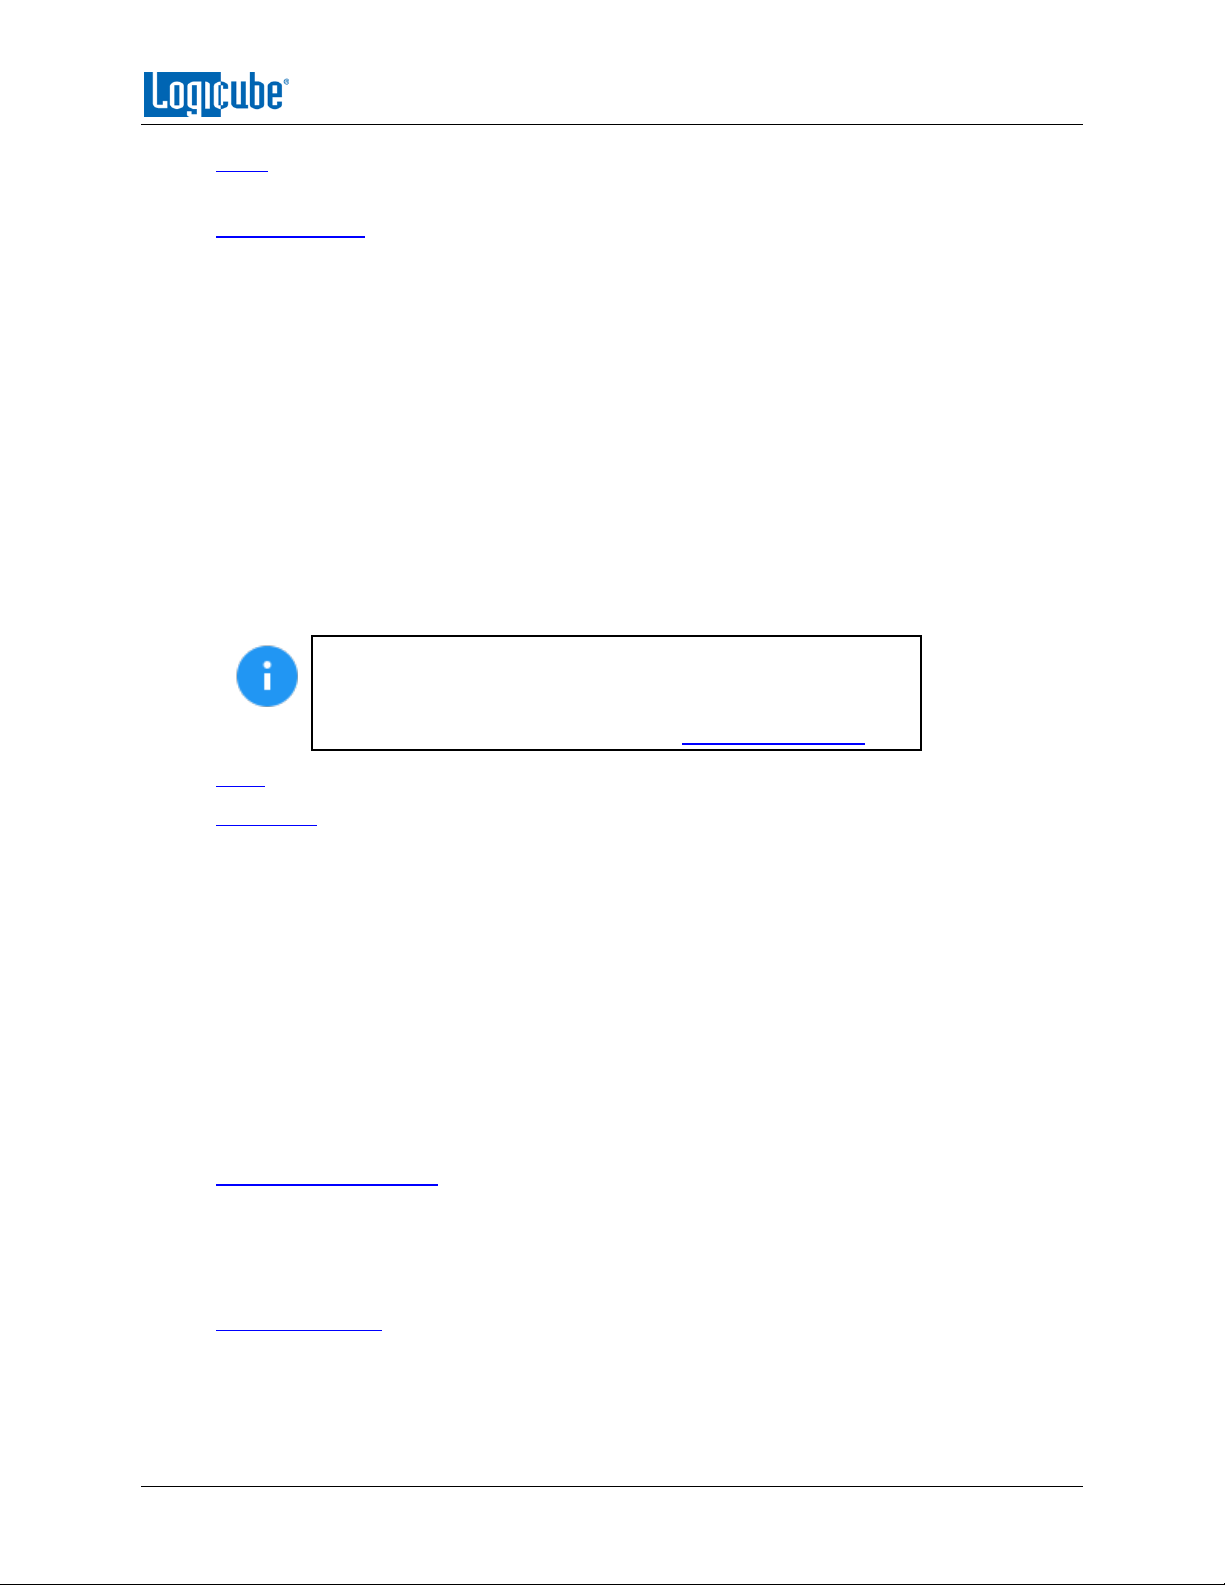
1. CLONE – There are three cloning modes available. Drives can be cloned using Mirror (bit-for-bit
copy) or Clever (copies only data areas, skips blank sectors, and partitions can be resized).
The Verify feature is an option. To find out if this option is
installed, go to the Statistics icon from the navigation menu
on the left and select the Options tab. To purchase the Verify
option, contact our sales team at: [email protected].
a. Drive to Drive – Performs a bit-for-bit copy of the Master producing an exact duplicate
of the Master drive.
b. Image to Drive – Restores an image created by the SCSI-NG to one Target drive.
c. Drive to Image – Creates a Logicube SCSI-NG image file to a Target drive or Repository.
This image file can be restored to a drive using the Image to Drive mode.
Details on the different screens found in the Imaging operation can be found in Chapter 4:
Cloning.
Logicube SCSI-NG User’s Manual 29
Page 38
TYPES OF OPERATIONS
2. HASH – Perform a SHA1, SHA-256, or MD5 hash of a drive. This can also verify the hash of the
drive by entering an “expected value” for the hash.
3. WIPE / FORMAT – This type of operation is used to erase, wipe, and/or format a drive. There
are three main settings:
Secure Erase – Sends a SCSI FORMAT command to the drive instructing it to perform a
format based on the drive manufacturer’s specifications.
Wipe Patterns – Allows the user to set a specific pattern to use for wiping the drive. The
number of passes is customizable (up to 7 passes) along with the type of data written
for each pass. In addition, a 7-pass DoD wipe can be set.
Format – Formats the Target using any of the following file systems:
o EXT4
o NTFS
o EXFAT
o FAT32
The Wipe/Format feature is an option. To find out if this feature
is installed, go to the Statistics icon from the navigation menu on
the left and select the Options tab. If you need to purchase the
Wipe option, contact our sales team at: [email protected].
4. LOGS – Display logs of each task that has been performed on the unit.
5. STATISTICS – This will display tabs that include:
About – This screen will show information about the unit including the current software
installed.
Adv. Drive Statistics – Displays S.M.A.R.T. information taken directly from what the
drive is reporting.
Options – Displays which optional software is available and what is installed.
Network Interface Stats – Displays the Network Interface statistics (Receive and
Transfer bytes, packets, drops, and errors, and the link status).
Debug Logs – Allows the export of debug logs for support purposes.
Help – Contains a QR code to scan, tap, or click linking to the user’s manual.
6. MANAGE REPOSITORIES – Allows the user to add a network location as a repository that can be
used as a Target for cloning. This will display tabs that include:
Add/Remove – Allows the user to add, remove, or edit networked repositories.
iSCSI – Allows the user to set ISCSI protocol settings.
7. SYSTEM SETTINGS – This mode allows changes to the system settings which include the
following:
Profiles – Allows the user to create, save, apply, or delete user profiles.
Logicube SCSI-NG User’s Manual 30
Page 39
TYPES OF OPERATIONS
Passwords – Allows the user to set passwords or keys to lock the unit from any
configuration changes, local access, HTTP access, or log file deletions. Local account
passwords can also be changed in this screen.
Language/Time Zone – Sets the language on the menu and change the system’s Time
Zone.
8. NETWORK SETTINGS – Allows the editing of various network configurations. The following tabs
are available:
Interfaces – Edit TCP/IP and enable or disable certain network services.
HTTP Proxy – Set proxy settings (if required by the user’s network).
9. SOFTWARE UPDATES – Perform software and firmware updates or reloads on the unit. Software
can be updated over an internet connection (from network) or from a USB flash drive. Two tabs
are available:
Software Updates – This is the screen where users can check for new software and
update or reload the software.
Firmware Update – Firmware for the unit (if available) can be updated on this screen.
10. POWER OFF – Turn the unit off, restart the unit or refresh the Graphical User Interface (GUI)
and set a drive timeout, powering down drives when not in use. The following tabs are available:
Power Off – The unit can be restarted or turned off on this screen. This can be useful
when using the web interface. The User Interface can also be refreshed in this screen.
Drive Power – Drives can be powered down automatically when not in use.
5.1 Clone
The SCSI-NG has three modes of operation to clone SCSI drives. Drives can be cloned
using Mirror (bit-for-bit copy) or Clever (copies only data areas, skips blank sectors,
and partitions can be resized).
In-depth details on the different screens found in the Clone operation can be found in
Chapter 4: Clone.
5.2 Hash
Any connected drive can be hashed. Performing a hash operation will instruct the unit
to calculate the hash for the specified drive or compare the hash value to an expected
value entered by the user. Three hash methods are available: SHA-1, SHA-256, and
MD5.
There are three selections when performing a Hash or Verify: Target, Settings, and Job Info.
When the unit finishes hashing the drive, the ‘COMPLETED’ screen will appear showing the task
completed.
Tap the Info icon on the left of the completed screen to see both the expected hash value and the
computed hash value.
Logicube SCSI-NG User’s Manual 31
Page 40
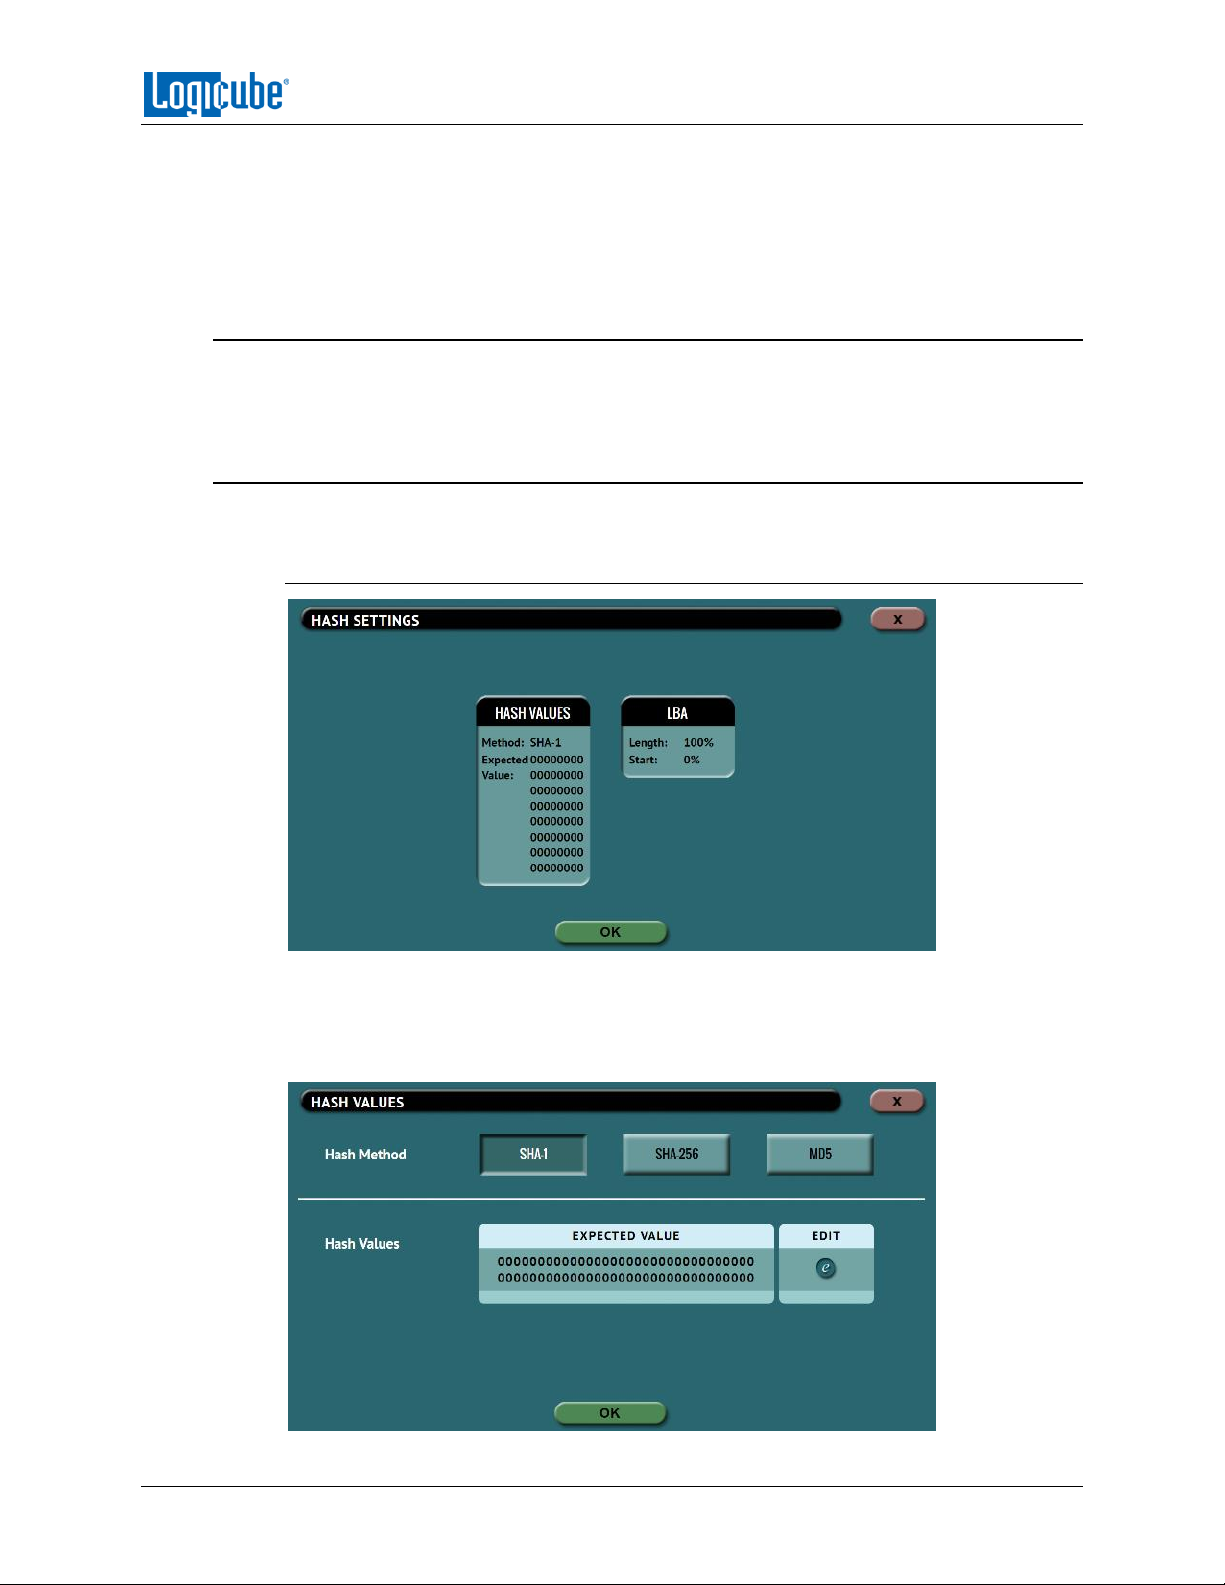
TYPES OF OPERATIONS
When the SCSI-NG finishes hashing the drive, the ‘COMPLETED’ screen will appear showing the task
completed.
Tap the Info icon on the left of the completed screen to see both the expected hash value and the
computed hash value.
5.2.1 Target
Tap this icon to select which drive will be hashed. The unit will show all connected Master and
Target drives. Tap the drive to be hashed then tap OK.
5.2.2 Settings
Tap this icon to choose a drive to adjust the hash settings.
5.2.2.1 Hash Settings
Tap the Hash Values icon to set the hash method (SHA-1, SHA-256, or MD5) and to set
the expected hash value (if desired). Setting the expected hash value instructs the unit
to hash the drive then verify the hash with the expected value set. Each hash task is
Logical Block Address (LBA) based and will has the drive based on the number of LBAs.
Logicube SCSI-NG User’s Manual 32
Page 41
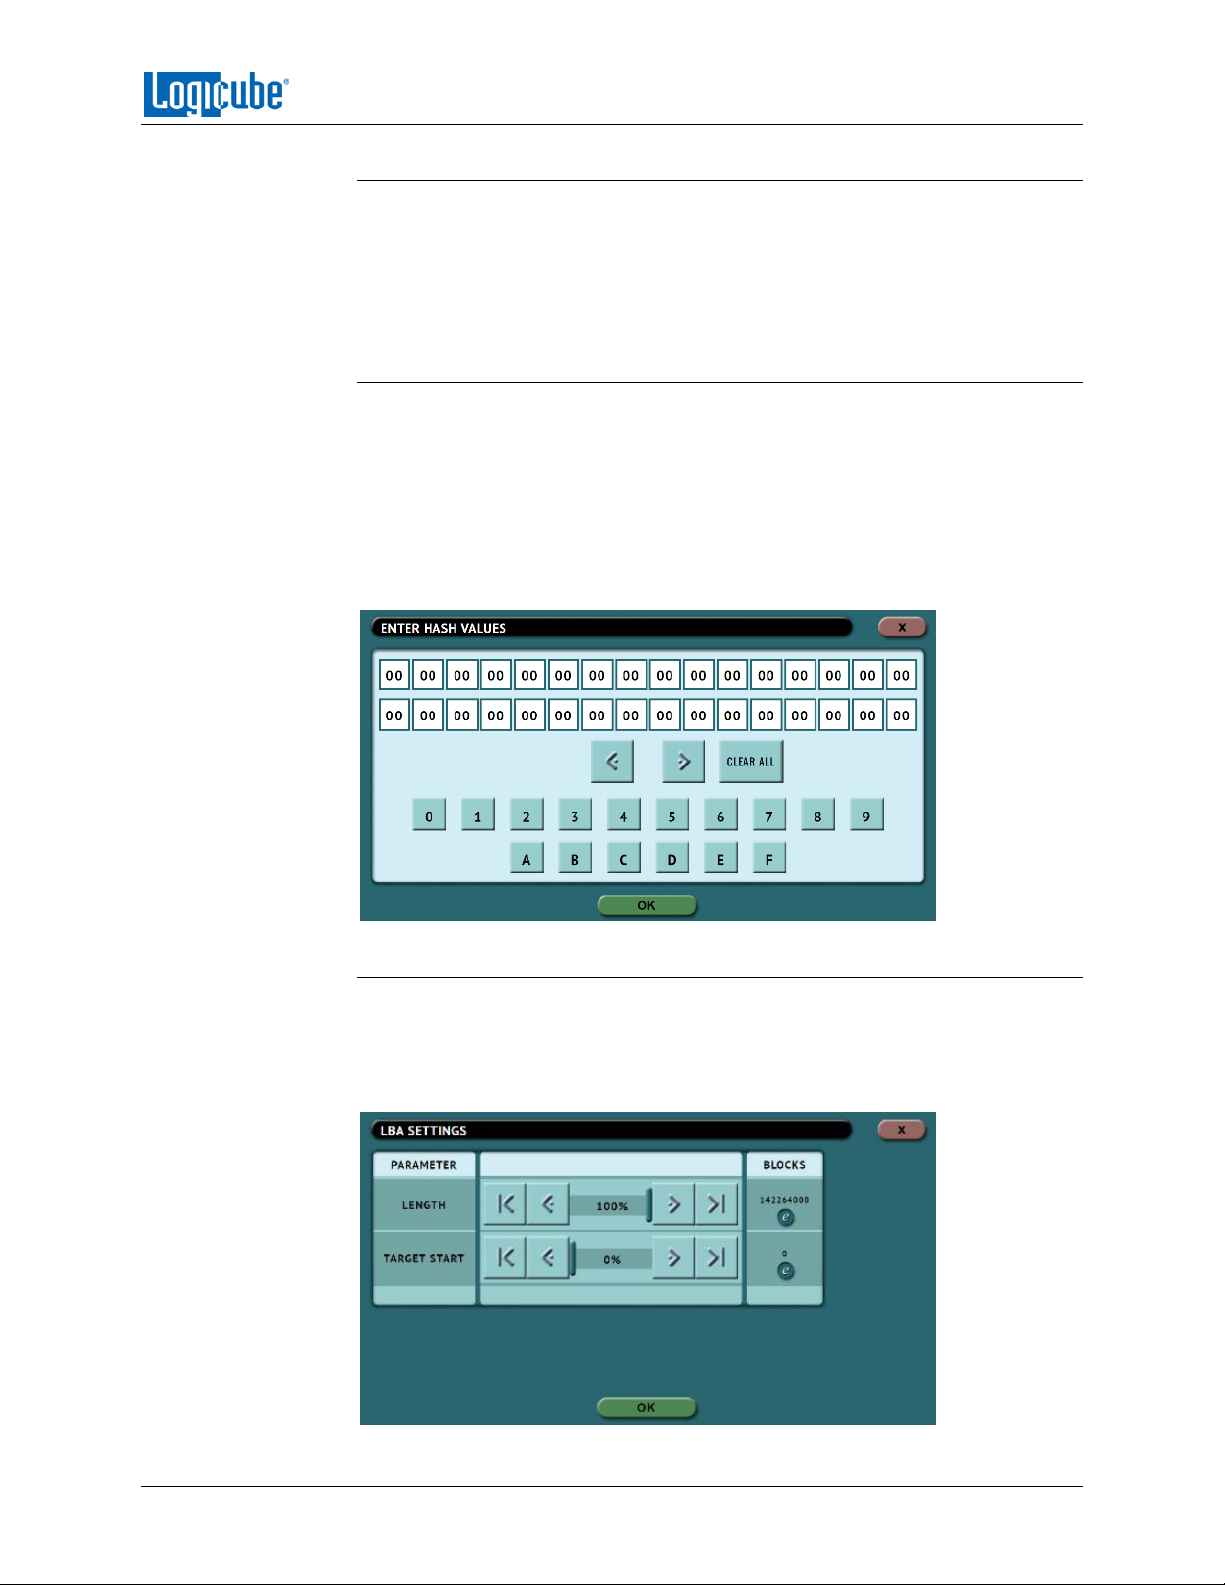
TYPES OF OPERATIONS
5.2.2.1.1 Hash Method
Select one of the following hash methods:
SHA-1
SHA-256
MD5
5.2.2.1.2 Hash Values
By default, this value will have 0s (zeros). If this is not changed, or no value is
entered, this will instruct the unit to hash the drive using the selected algorithm
in the previous step. The result of the hash will be used as the expected value. If
a value is entered, the unit will hash the selected drive and verify hash with the
value entered/edited.
To set the expected value, tap the edit icon. The on-screen keyboard will
appear, and the expected hash value can be set.
5.2.2.1.3 LBA
The LBA icon will bring up the LBA settings screen. The user can adjust the
percentage or the number of blocks of the drive to hash and where to start the
hash. By default, the length is set to 100% (whole drive) and the starting
percentage is set to 0% (start of the drive).
Logicube SCSI-NG User’s Manual 33
Page 42
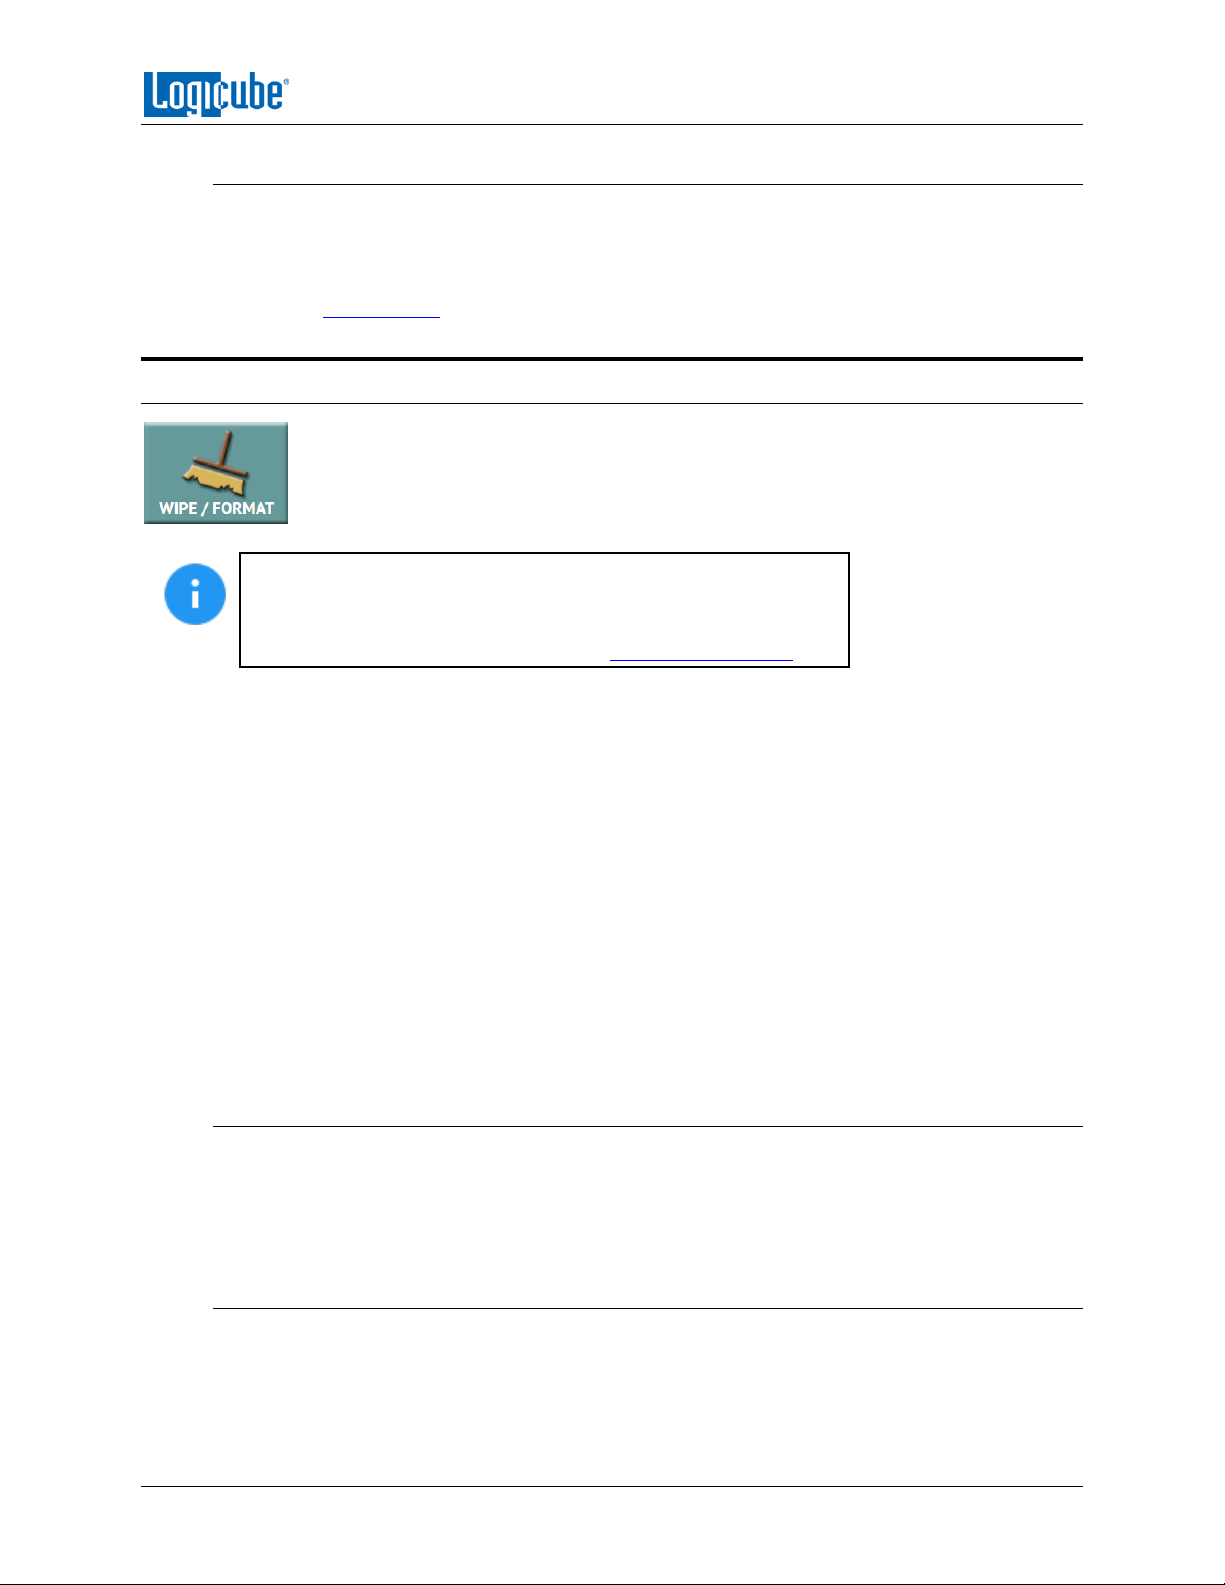
TYPES OF OPERATIONS
5.2.3 Job Info
The Job Info setting allows users to enter some information about the job. Job Info is not
required to start a Clone, Hash, or Wipe/Format operation.
Information entered here will appear in the logs. More information on the Job Info screen can
be found in Section 4.3.1.
5.3 Wipe / Format
This type of operation allows the user to erase, wipe, and/or format a Target drive.
There are three main settings: Secure Erase, Wipe Patterns, and Format.
The Wipe/Format feature is an option. To find out if this feature
is installed, go to the Statistics icon from the navigation menu on
the left and select the Options tab. If you need to purchase the
Wipe option, contact our sales team at: [email protected].
Secure Erase – Sends a command to the drive instructing it to perform a secure erase based on
the drive manufacturer’s specifications for the secure erase command.
Wipe Patterns – Allows the user to set a specific pattern to use for wiping the drive. The number
of passes is customizable (up to 7 passes) along with the type of data written for each pass. In
addition, a 7-pass DoD wipe can be set with pre-selected pass values.
Format – Formats the Target drive with one of the following user selectable file systems (with or
without encryption): EXT4, NTFS, exFAT, FAT32.
There are three selections when performing a wipe:
Target
Settings
Job Info
5.3.1 Target
Tap this icon to choose a drive to erase, wipe, and/or format.
A screen will appear, allowing the selection of the Target drive. Tap the drive to be erased,
wiped, and/or formatted then tap OK.
5.3.2 Settings
Tap this icon to choose the wipe settings for the drive to be wiped. The Wipe Settings screen will
appear.
Logicube SCSI-NG User’s Manual 34
Page 43
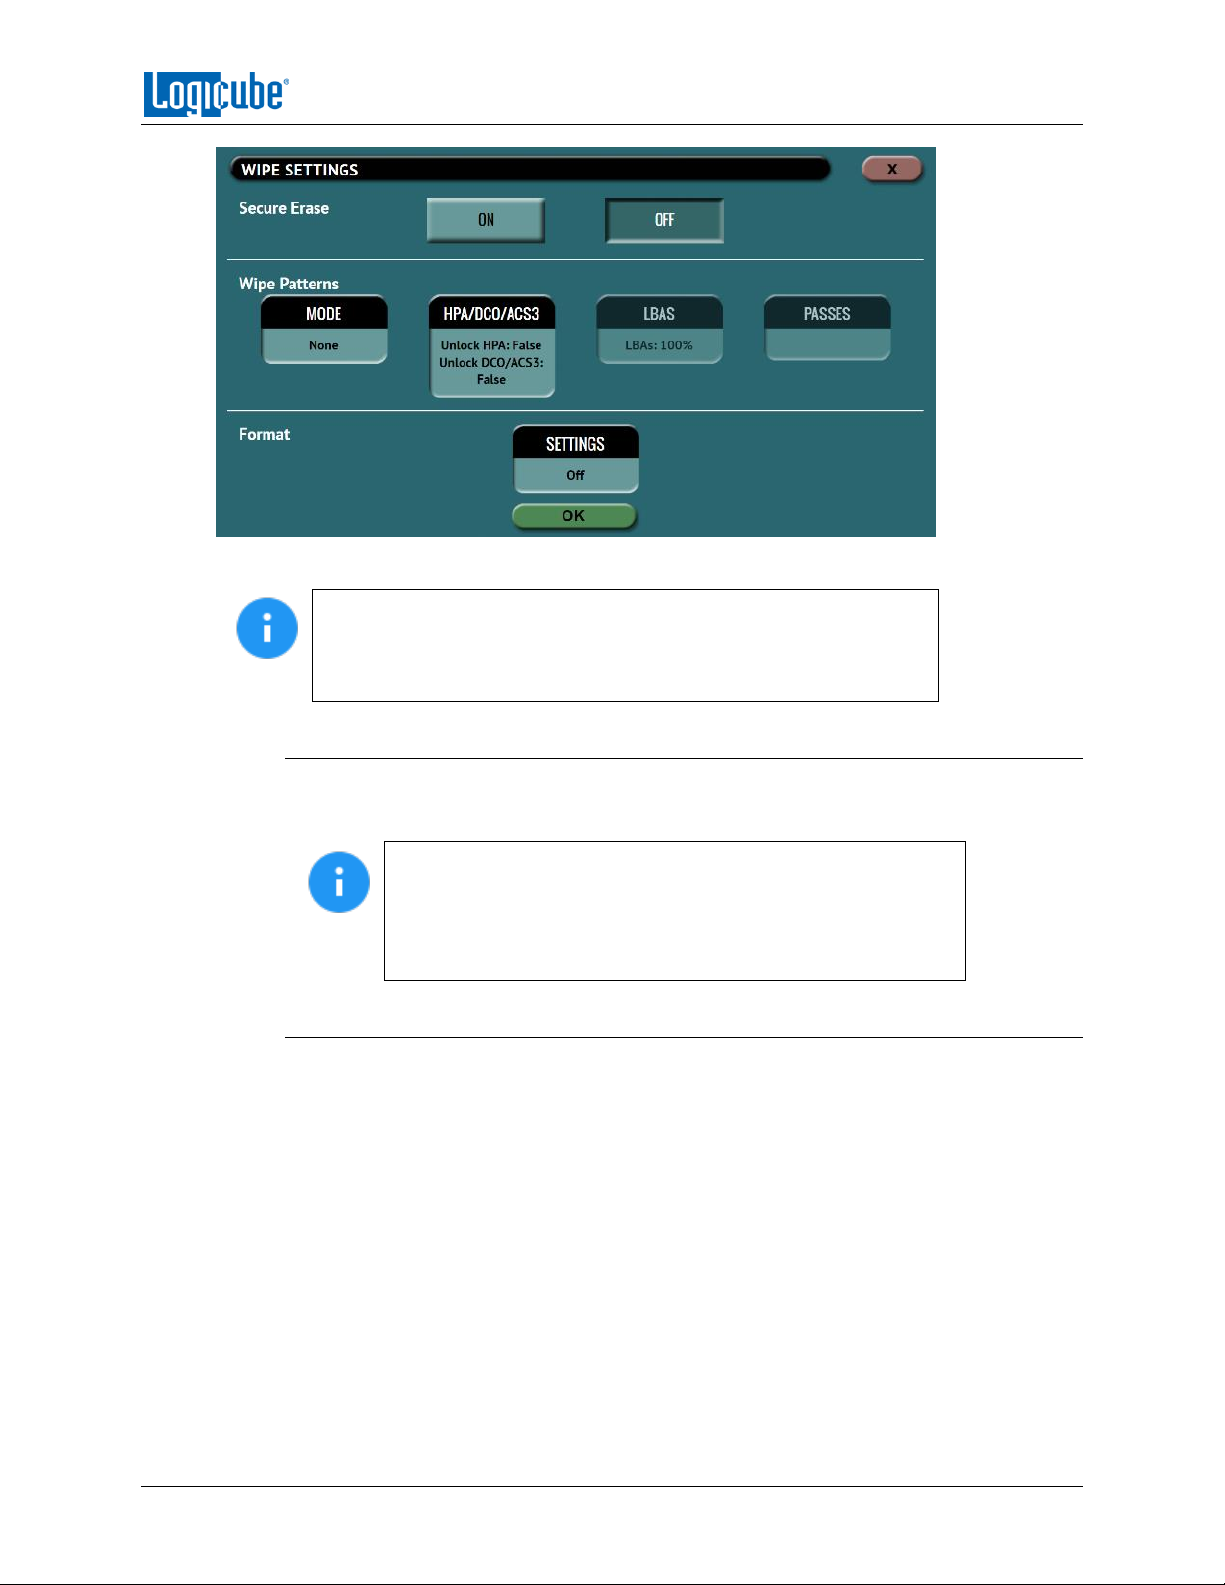
TYPES OF OPERATIONS
There are three sections in the Settings screen: Secure Erase, Wipe Patterns, and Format.
Each setting will be performed sequentially. For example, if Secure
Erase is set to ON, a Wipe Pattern mode is specified, and Format is
set to ON, the unit will first secure erase the drive, then wipe the
drive according to the mode specified, then format the drive.
5.3.2.1 Secure Erase
Choose ON to Secure Erase the selected Target drive. For SCSI drives, the SCSI-NG sends
the SCSI FORMAT command to the drive. Most drives support this function.
Secure erase instructs the SCSI-NG to send a SCSI FORMAT
command to the drive. If the drive supports this command, it
will perform the task based on the manufacturer’s
specifications. Please contact the drive manufacturer to find
out if the specific drive being used supports the SCSI FORMAT.
5.3.2.2 Wipe Patterns
This setting allows the user to set a specific wipe pattern or patterns to use for wiping
the drive. The number of passes is customizable (up to 7 passes) along with the type of
data written for each pass. In addition, a 7-pass DoD wipe can be set with pre-selected
pass values.
There are 4 selections when setting a wipe pattern:
MODE
HPA/DCO/ACS3
LBAS
PASSES
Logicube SCSI-NG User’s Manual 35
Page 44
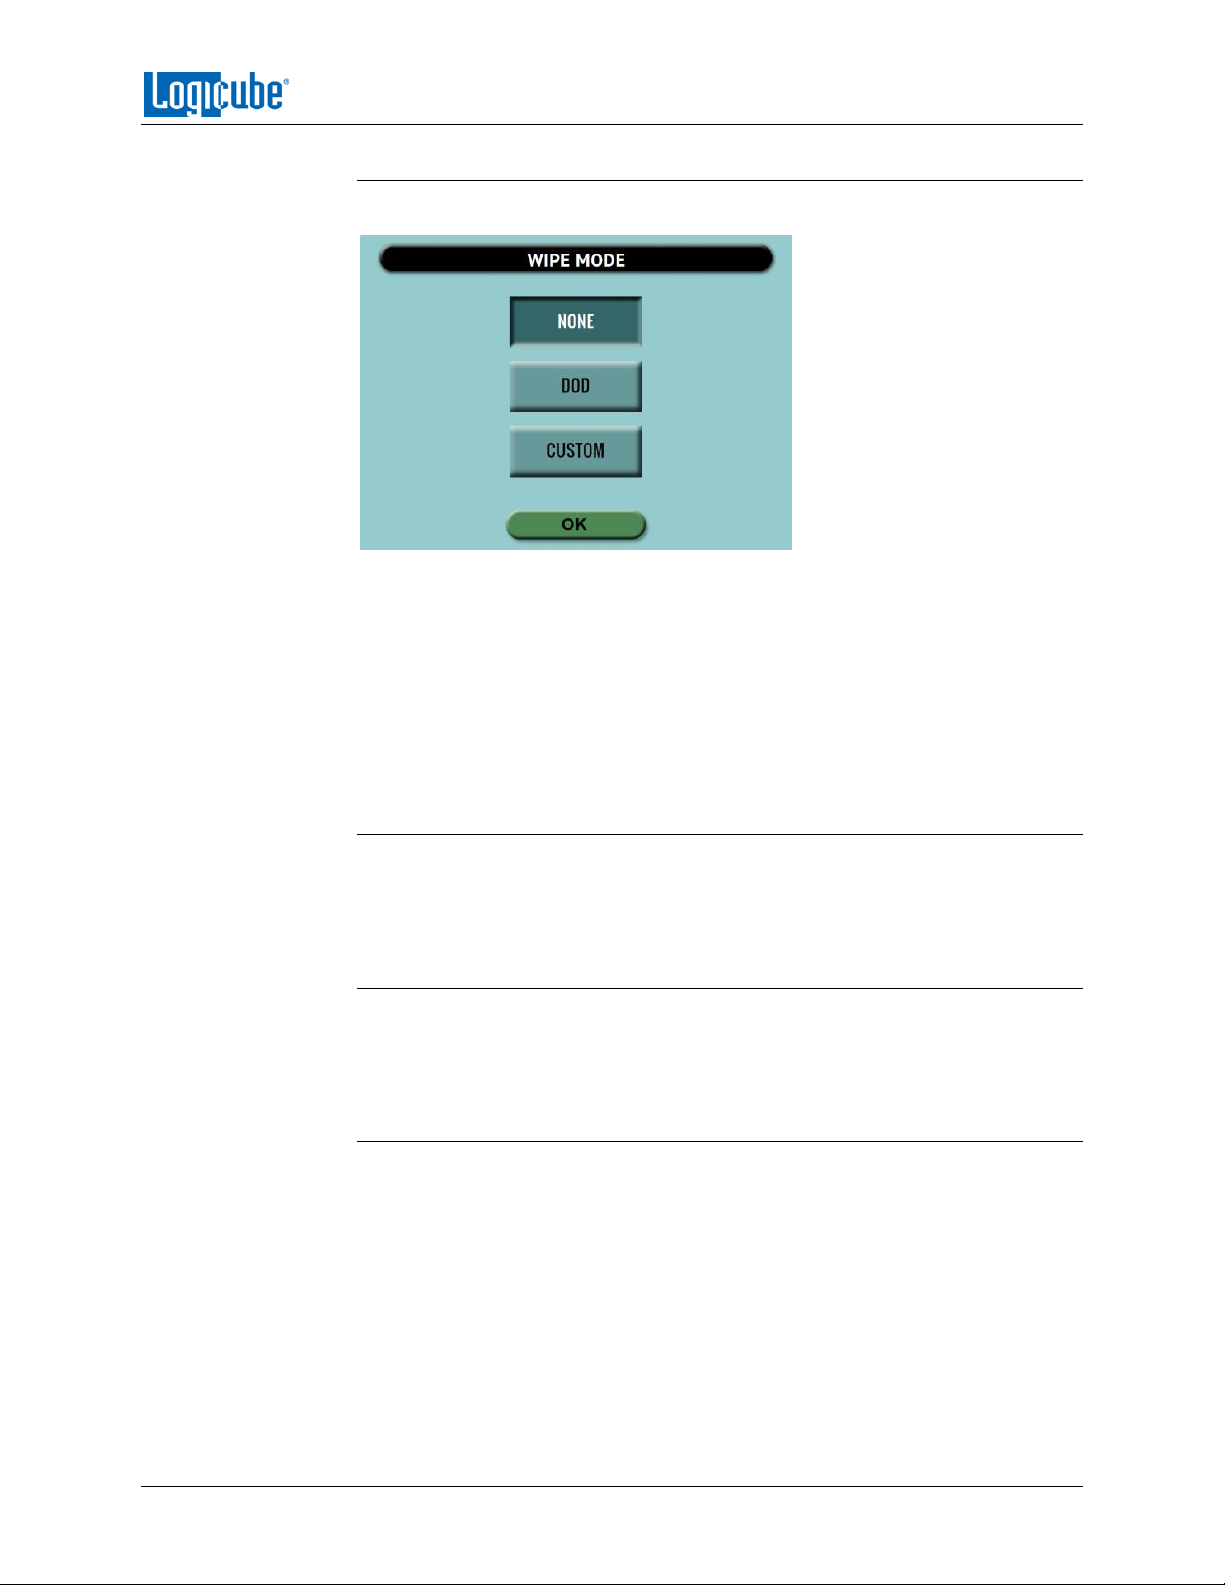
TYPES OF OPERATIONS
5.3.2.2.1 Mode
Selecting Mode will open the Wipe Mode screen showing the following options:
NONE – Choosing this will instruct the unit not to perform a wipe using
Wipe Mode.
DOD – Choosing this will instruct the unit to perform a 7-pass wipe
conforming to the DoD M-5220.22M standards.
CUSTOM – Choosing this will allow the user to specify how many wipe
passes will be performed and what values each pass will be written on
each of the passes selected.
5.3.2.2.2 HPA/DCO/ACS3
The HPA/DCO/ACS3 button will open the HPA/DCO/ACS3 option for wiping. If
the drive to be wiped has HPA, DCO and/or ACS3 that needs to be wiped, select
Yes for the corresponding option.
5.3.2.2.3 LBA
By default, this is set to 100% which will wipe all Logical Block Addresses (LBAs)
and will wipe the entire drive (100%). The LBA count can be adjusted by tapping
the edit icon.
5.3.2.2.4 PASSES
This Wipe Setting will change depending on the Wipe Pattern Mode selected.
If None was selected, Passes is not selectable.
If DoD was selected, all 7 passes will be pre-filled. Users can edit the
pass values by tapping the edit icon. The default values are: 00, 01, 00,
FF, F6, 00, XX (random).
If Custom was selected, one pass will be pre-filled with a specified value.
Users can edit the pass values if desired by tapping the edit icon. The
default value for a custom pass is 00.
Logicube SCSI-NG User’s Manual 36
Page 45
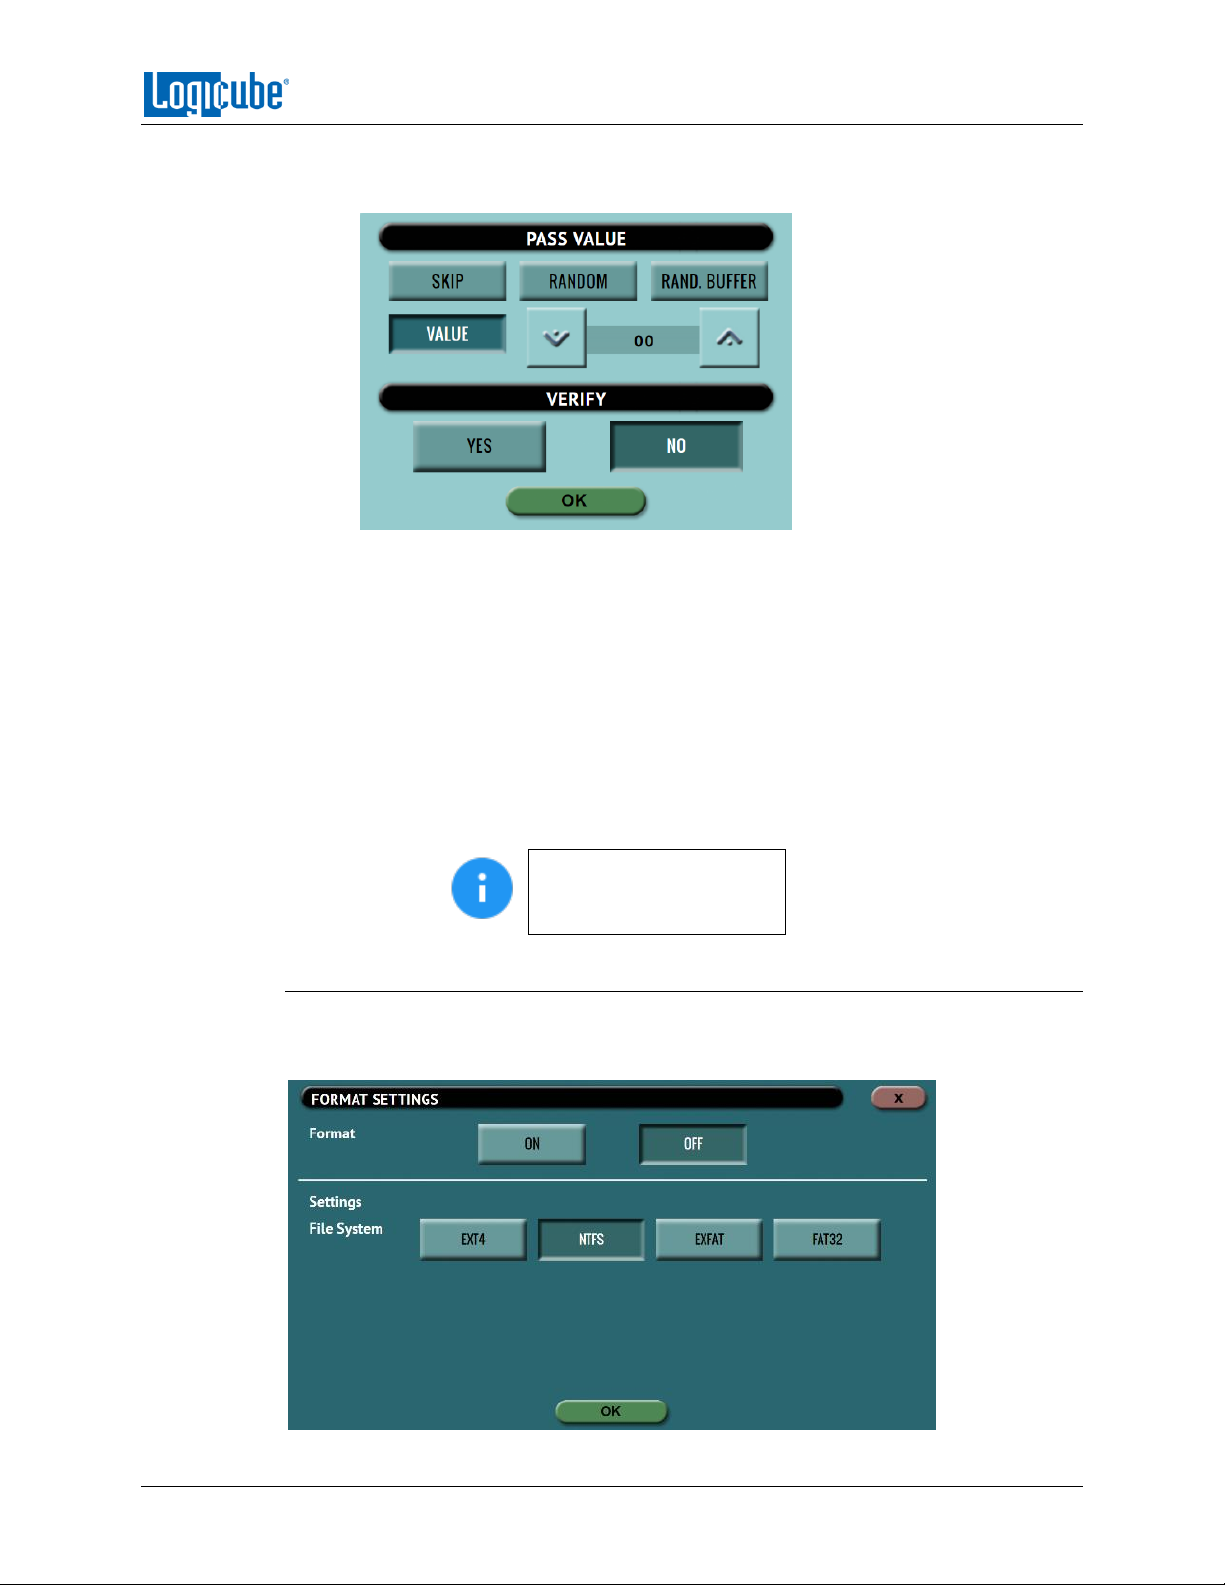
TYPES OF OPERATIONS
Editing one or more of the passes in DOD or CUSTOM mode will bring up this
screen:
SKIP – Instructs the unit to skip the pass.
RANDOM – Writes one random hexadecimal value (from 00 - FF) to all
the selected Logical Block Addresses.
RAND. BUFFER – The unit will create an 8MB block filled with random
values (each byte in the 8MB block will contain a random value). The
8MB block will be written repeatedly to fill the entire drive.
VALUE – Instructs the unit to use the specified hexadecimal value to be
written for the pass. The values can range anywhere from 00 to FF.
VERIFY – Select YES to verify each wipe pass value the unit performs.
When Verify is set to YES,
the total time to wipe the
drive will double.
5.3.2.3 Format
Formats the Target using the EXT4, NTFS, exFAT, or FAT32 file system.
These settings are available:
Logicube SCSI-NG User’s Manual 37
Page 46
5.3.3 Job Info
The Job Info setting allows users to enter some information about the job. Job Info is not
required to start a Clone, Hash, or Wipe/Format operation.
Information entered here will appear in the logs. More information on the Job Info screen can
be found in Section 4.3.1.
5.4 Logs
TYPES OF OPERATIONS
Format – When set to ON, the Target drive will be formatted. The drive will be
formatted with the user’s choice of file system (EXT4, NTFS, exFAT, FAT32).
When set to OFF, the Target drive will not be formatted.
File System – Select the file system to be used to format the Target drive. Users
can select EXT4, NTFS, exFAT, or FAT32.
The SCSI-NG keeps logs of all clone, hash, and wipe operations. Logs can be viewed
directly on the SCSI-NG or from a computer’s browser (if the SCSI-NG is connected to a
network).
In addition to viewing, the logs can be exported to an external USB location such as a
USB flash drive. Logs are exported in PDF, HTML and XML format. From the on-screen display, log files
can also be deleted one at a time or all at once.
The log file may contain several sections, depending on what settings and options were chosen during
the operation, including:
Information on the SCSI-NG and its settings
Job info (if entered)
Master and Target hashes
See Section 3.4.1 for instructions on how to export the log files.
See Section 3.4.2 for instructions on how to view or download the log files.
See Section 3.4.3 for instructions on how to delete the log files.
See Section 3.4.4 for instructions on accessing the logs over a network.
5.5 Statistics
This screen shows several different tabs of information which include: About, Adv.
Drive Statistics, Options, Network Interface Stats, Debug Logs, and Help.
5.5.1 About
The About screen will show information about the unit including the current software installed.
Logicube SCSI-NG User’s Manual 38
Page 47
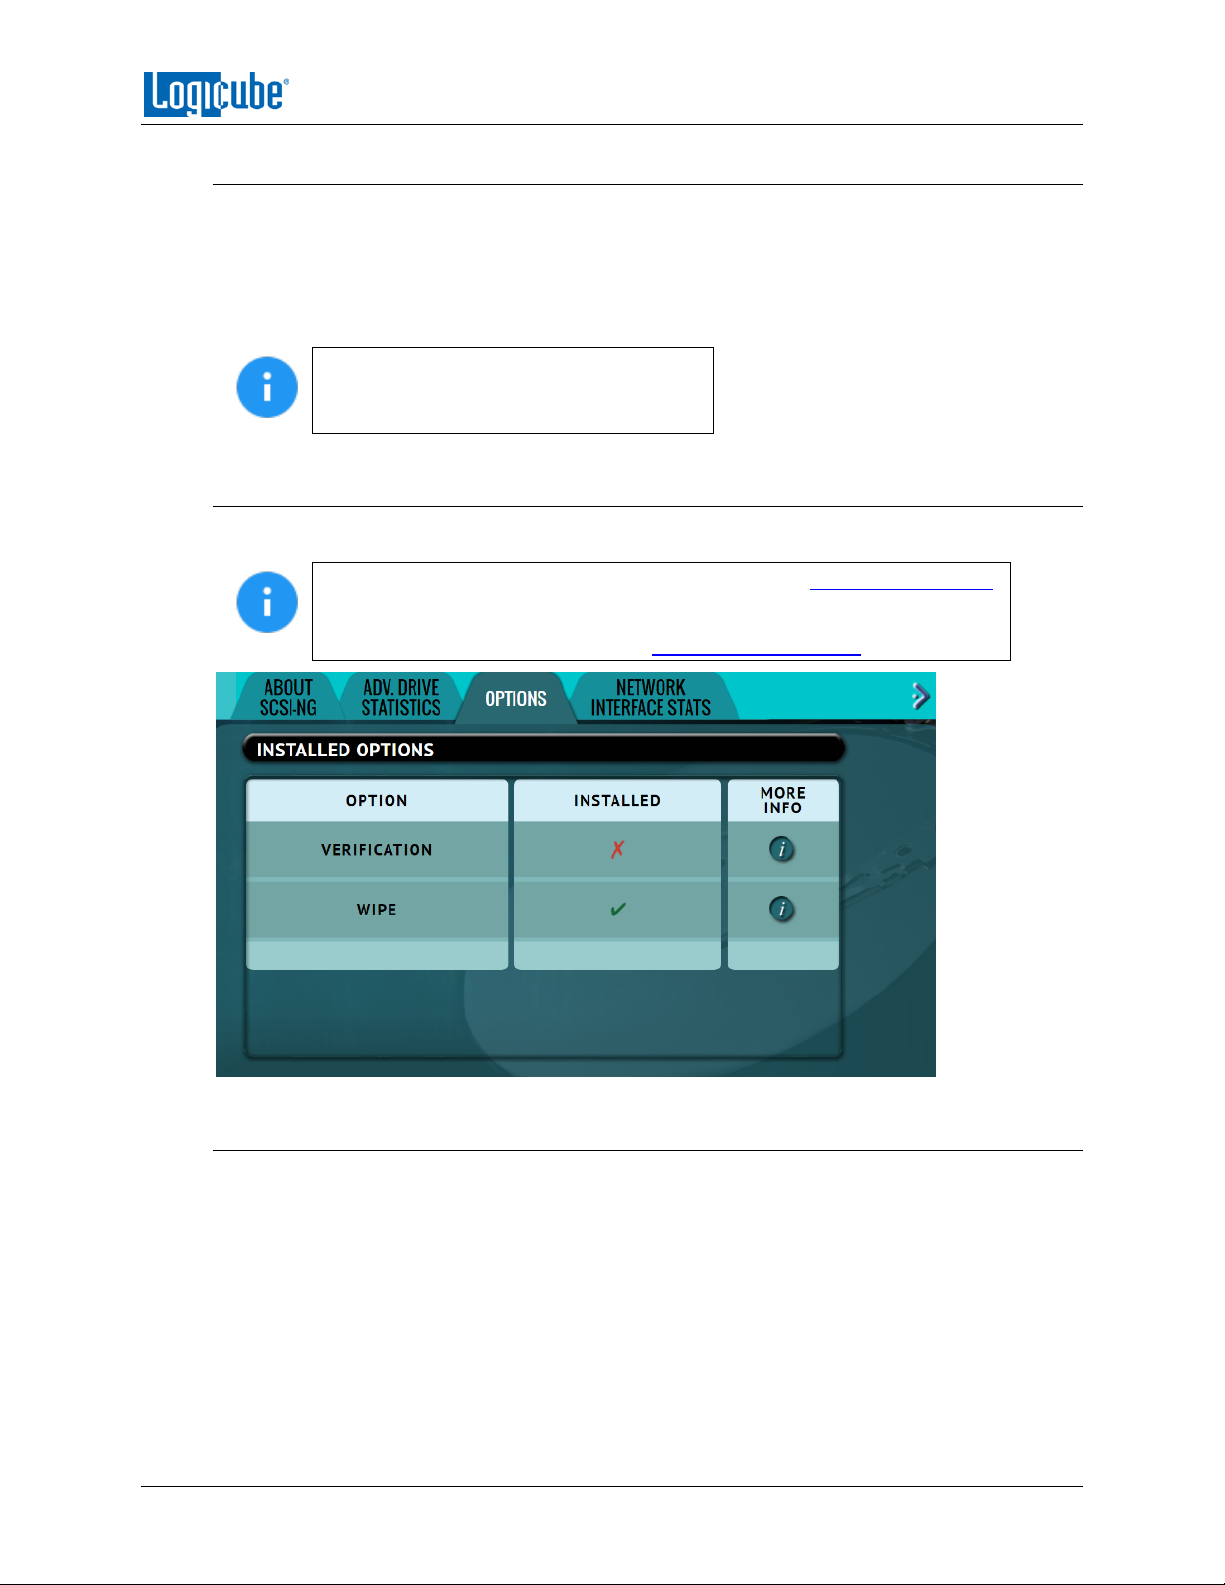
TYPES OF OPERATIONS
5.5.2 Adv. Drive Statistics
The Adv. Drive Statistics tab shows S.M.A.R.T. (Self-Monitoring, Analysis and Reporting
Technology) information taken directly from what the drive is reporting. Navigate between
drives by using the left and right scroll arrows. The up and down scroll arrows scroll through the
different information. The information shown is the raw value tracked by the drive and is not
translated.
Not all drives support S.M.A.R.T. Please
check with the drive manufacturer to find
out if the drive used supports S.M.A.R.T.
5.5.3 Options
The Options tab displays available software options and which options are installed on the unit.
To purchase an option, please contact Logicube Sales: [email protected].
If an option has been purchased but is not showing as installed, please
contact Logicube Technical Support: [email protected].
5.5.4 Network Interface Stats
This screen displays the Network Interface statistics (Receive and Transfer bytes, packets, drops,
errors, and the link status).
Logicube SCSI-NG User’s Manual 39
Page 48
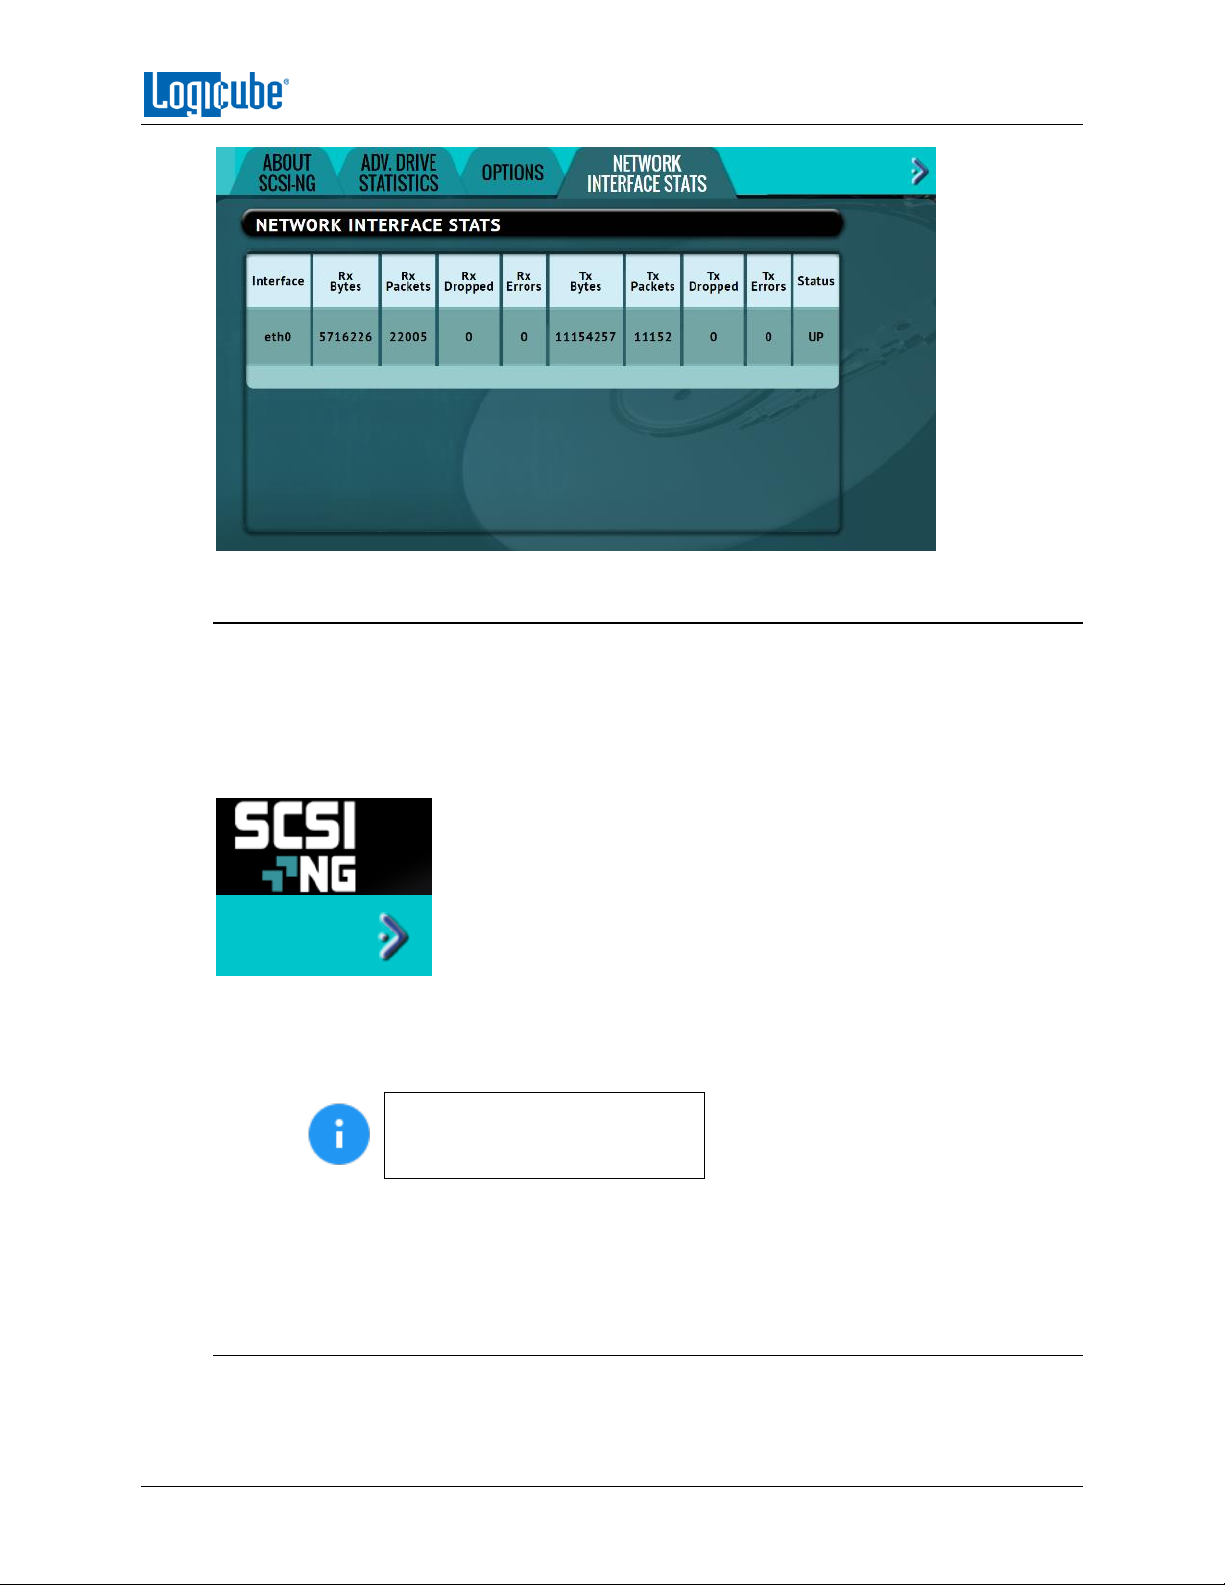
TYPES OF OPERATIONS
5.5.5 Debug Logs
There may be times when Logicube Technical Support will ask for debug logs. This tab allows the
user to export the debug logs to a USB flash drive (connected to the right USB port located on
the front panel of the unit).
To access the Debug Logs tab in the System Settings screen, tap the right navigation arrow
below the SCSI-NG logo (located on the top-right of the screen):
To export the debug logs:
1. Connect a formatted USB flash drive to the right USB port located on the front panel of
the unit.
The USB flash drive must be
formatted in Windows using the
NTFS, FAT32, or FAT file system.
2. From the Debug Logs screen, tap Export.
3. The Debug Logs will be exported to the USB flash drive and can be emailed to Technical
Support.
5.5.6 Help
The help tab contains a QR code that links to the user’s manual online. There are several ways to
view the manual through the QR code such as:
Logicube SCSI-NG User’s Manual 40
Page 49
TYPES OF OPERATIONS
Scan the QR code from a mobile phone or tablet that has internet access.
Through a web browser, when using the web interface (see Section 7.1 for more
information on the web interface), click the QR code.
From the touch screen (if the unit is connected to a network with Internet access),
simply tap the QR code.
To access the Help tab in the System Settings screen, tap the right navigation arrow below the
SCSI-NG logo (located on the top-right of the screen):
5.6 Manage Repositories
This screen allows the user to set up repositories over a network. For example,
repositories can be network shared folders. Once configured, networked repositories
can be used to clone drive images created by the SCSI-NG using the Drive to Image
mode of cloning. Images created by the SCSI-NG to networked repositories can also be
cloned to a drive using the Image to Drive mode of cloning.
Networks are configured differently and may require
the assistance of a Network or Systems Administrator
to ensure proper configuration for sharing.
When Manage Repositories is selected, two tabs are available at the top of the screen:
Add/Remove – Adds a repository using using the SMB, CIFS, or NFS protocol.
iSCSI – Adds a repository using the iSCSI (Internet Small Computer System Interface) protocol.
5.6.1 Add/Remove
A list of repositories will be shown. The user has the option of adding or deleting a repository.
This will include all connected drives and any networked repository.
If a repository location shows (NOT MOUNTED), it is
because the drive attached is not formatted by the unit or
the unit cannot connect to the shared network resource.
Logicube SCSI-NG User’s Manual 41
Page 50
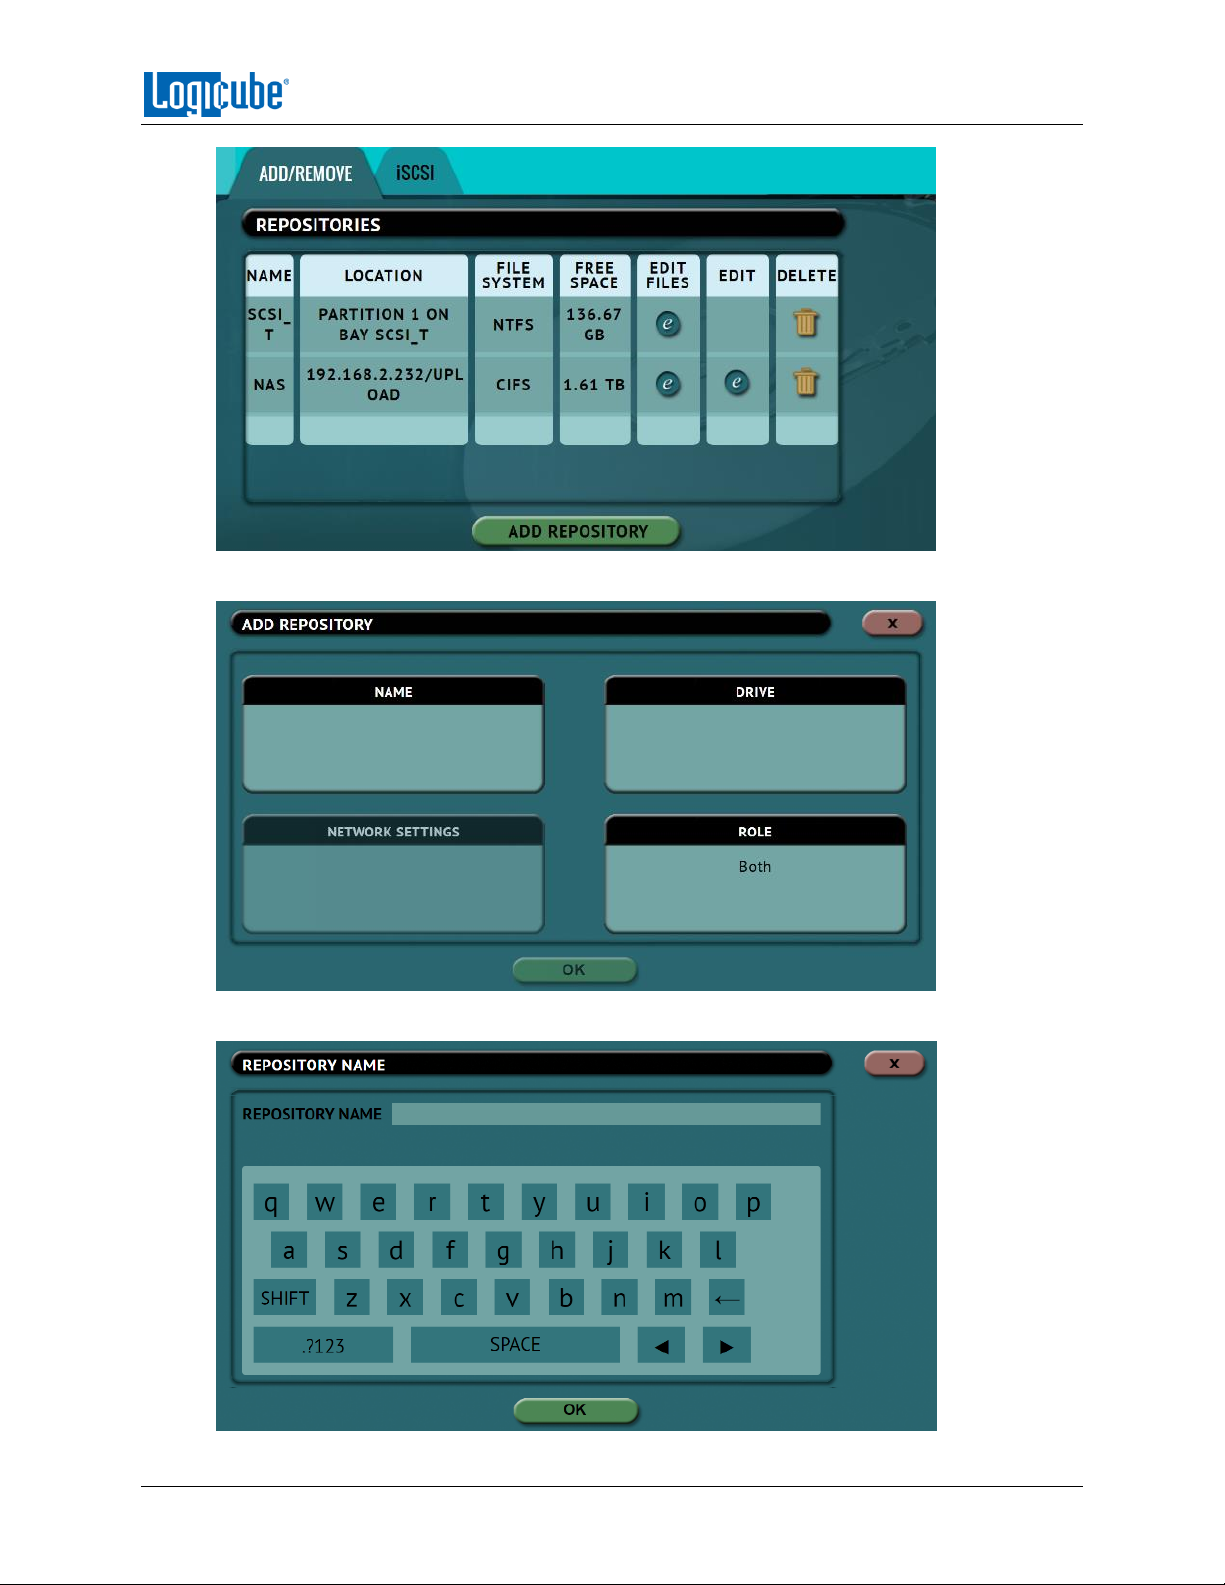
TYPES OF OPERATIONS
Tap Add Repository to add a repository. The Add Repository window will appear.
Tap Name to set the name of the repository. Tap the OK icon when finished.
Logicube SCSI-NG User’s Manual 42
Page 51
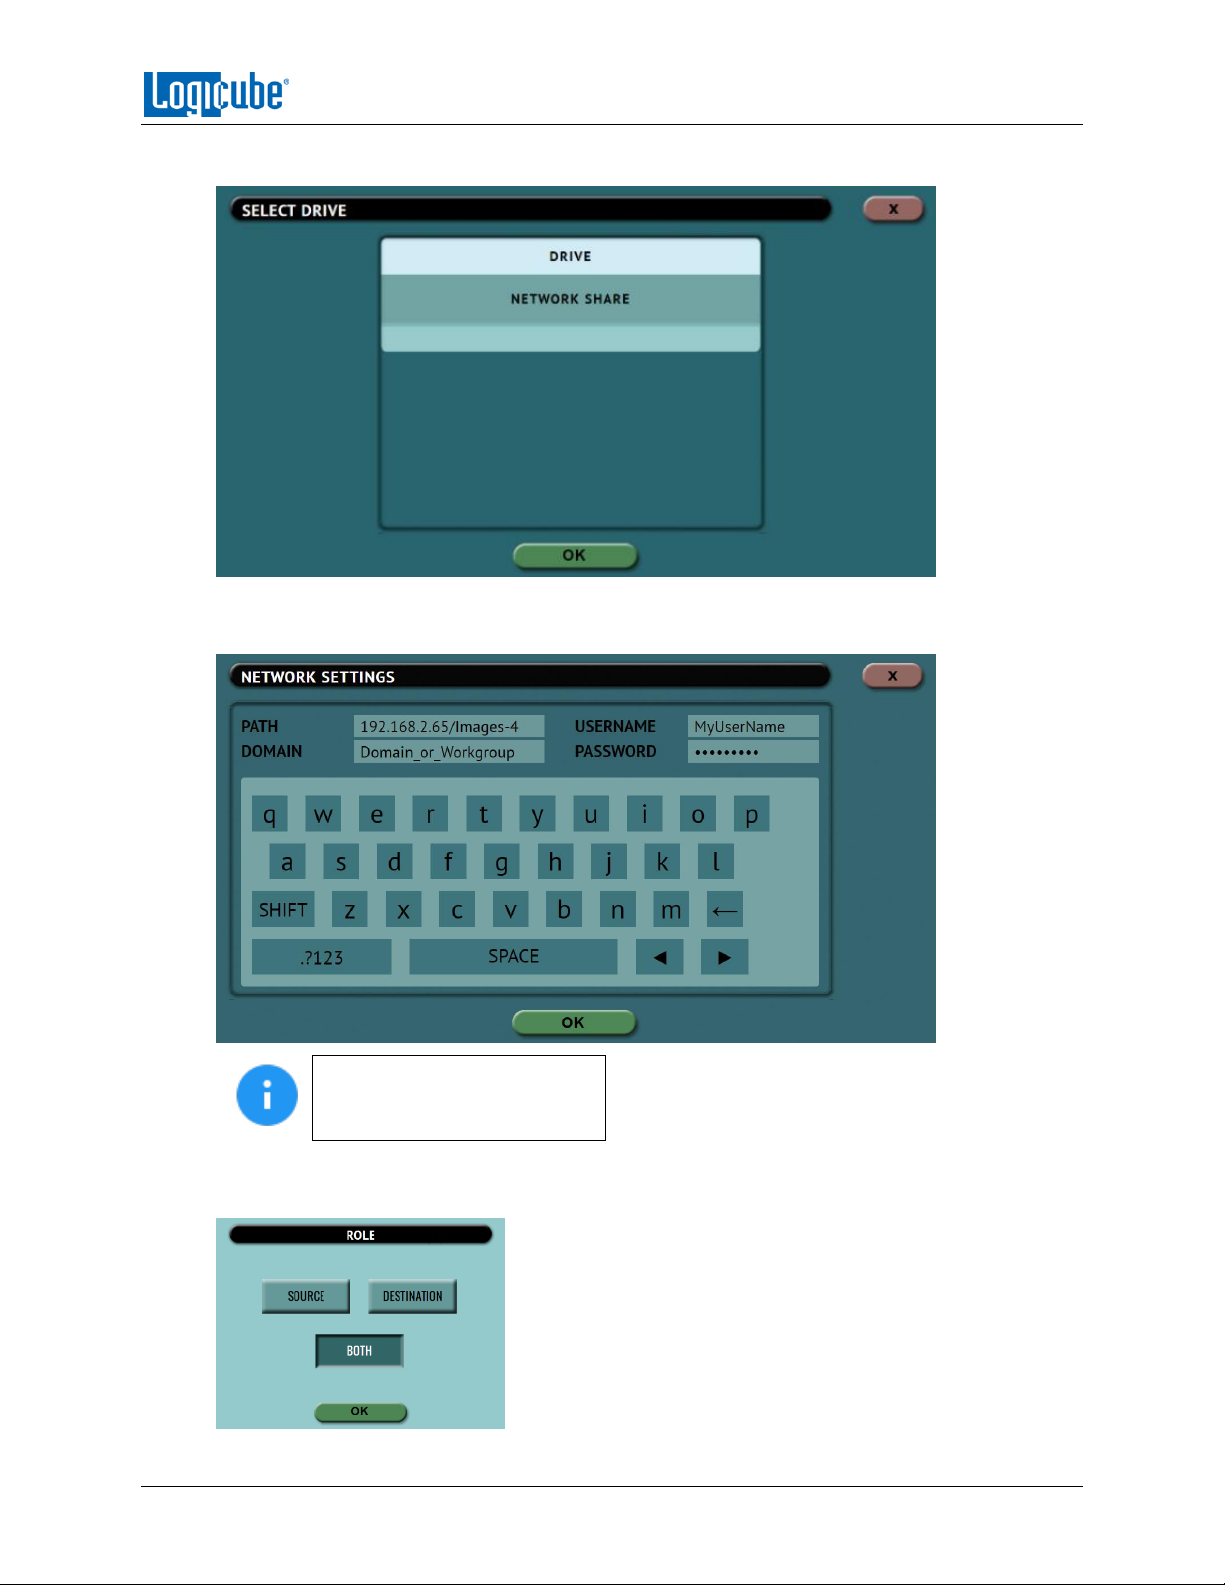
TYPES OF OPERATIONS
Tap Drive to select network share to set as a repository. Tap the OK icon when finished.
Tap Network Settings to enter the network settings. See the example below. Tap the OK icon
when finished.
For the Path, make sure the
forward slash ( / ) is used and
not the backslash symbol ( \ ).
OPTIONAL: Tap Role to select the role for this repository. By default, it is set to “Both” Source
(Master) and Destination (Target). Tap OK when finished.
Logicube SCSI-NG User’s Manual 43
Page 52
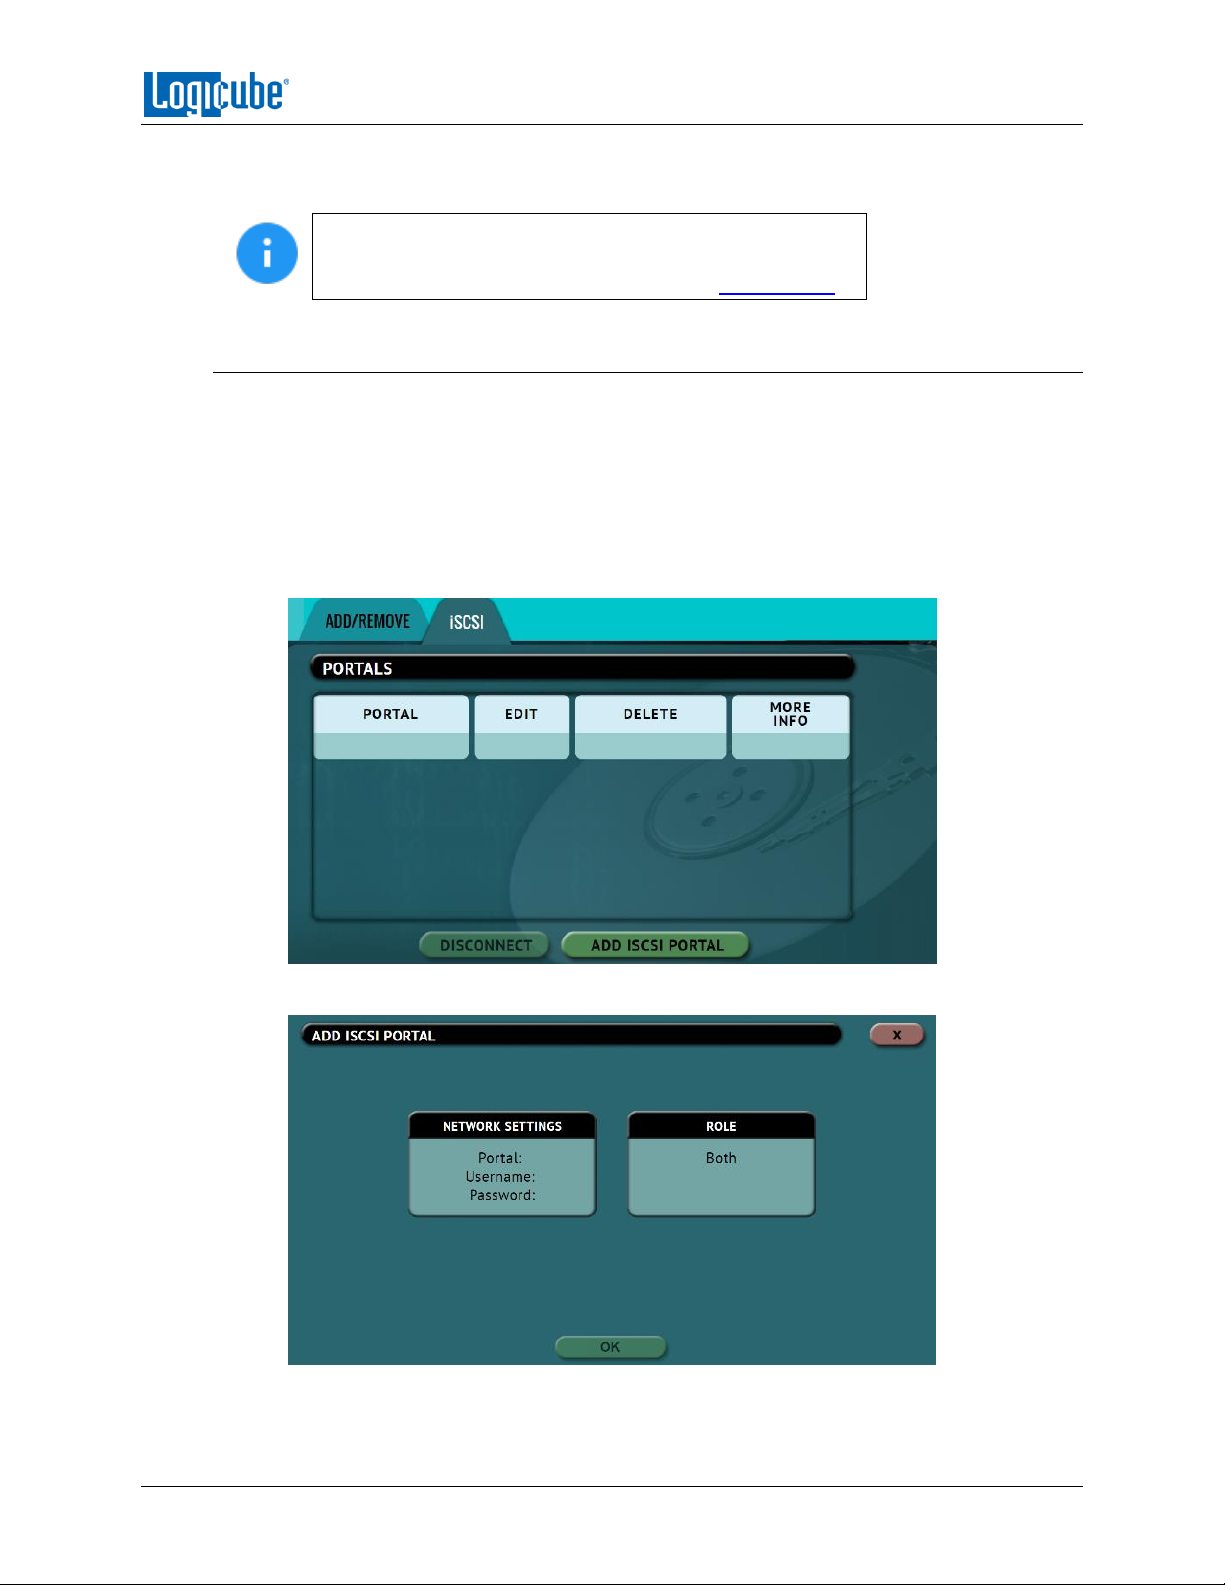
TYPES OF OPERATIONS
To delete a repository, tap the delete icon. A confirmation screen will appear. Tap Yes to
permanently delete the repository from the list.
In order for a repository to remain configured when the
unit is turned off, the changes must be saved and loaded to
a profile. Details on profiles can be found in Section 5.7.1.
5.6.2 iSCSI
This screen allows a user to add repositories using the iSCSI protocol.
To add a repository using the iSCSI protocol, an iSCSI Target must be setup on the remote
system. Since networks are configured differently, a Systems Administrator or Network
Administrator may be needed to set up the iSCSI protocol.
Once the iSCSI Target has been setup:
1. Tap Add iSCSI Portal.
2. The Add iSCSI Portal window should appear:
3. Tap Network Settings and input the Portal (IP address or hostname), Username, and
Password. Tap the OK icon when finished.
Logicube SCSI-NG User’s Manual 44
Page 53
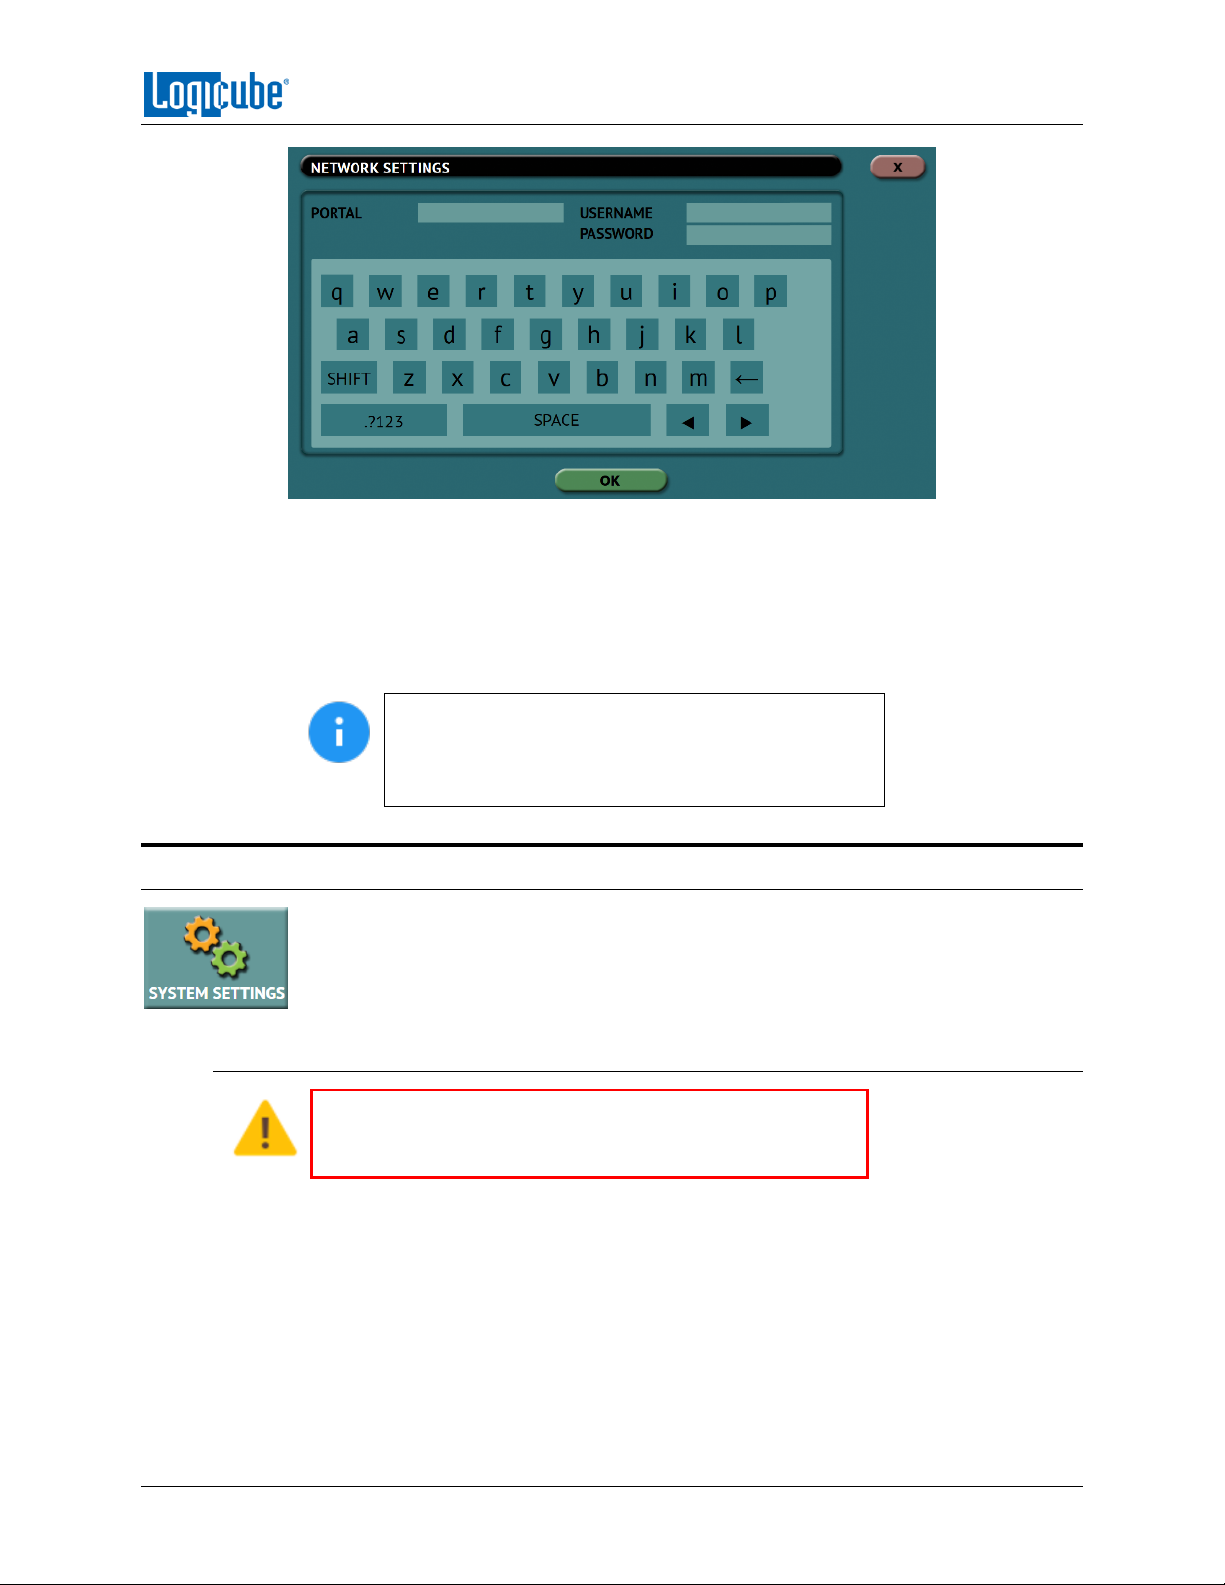
TYPES OF OPERATIONS
Optional: Tap Role and input the role for this repository.
4. Tap OK when finished. The screen will go back to the Portals screen.
5. In the Portals screen, tap the iSCSI portal to highlight it, then tap Connect.
6. The SCSI-NG will attempt to connect to the iSCSI target. If successful, a “connected”
screen will appear. Tap OK to continue.
5.7 System Settings
The System Settings screen allows users to configure several different settings which
include: Profiles, Passwords, and Language/Time Zone.
5.7.1 Profiles
Do not highlight and save over the initial.db configuration.
This is the default configuration of the unit and is used to
reset the unit to the factory default settings.
This screen shows all user profiles. There are three selections in this screen:
New – Allows the user to create a new profile name.
Save – Saves the selected profile.
Multiple iSCSI connections can be added. To
disconnect an iSCSI connection, highlight the portal
to disconnect, then tap Disconnect. To edit or delete
an iSCSI connection, tap the Edit or Delete icon.
Load – Loads the selected profile.
Logicube SCSI-NG User’s Manual 45
Page 54
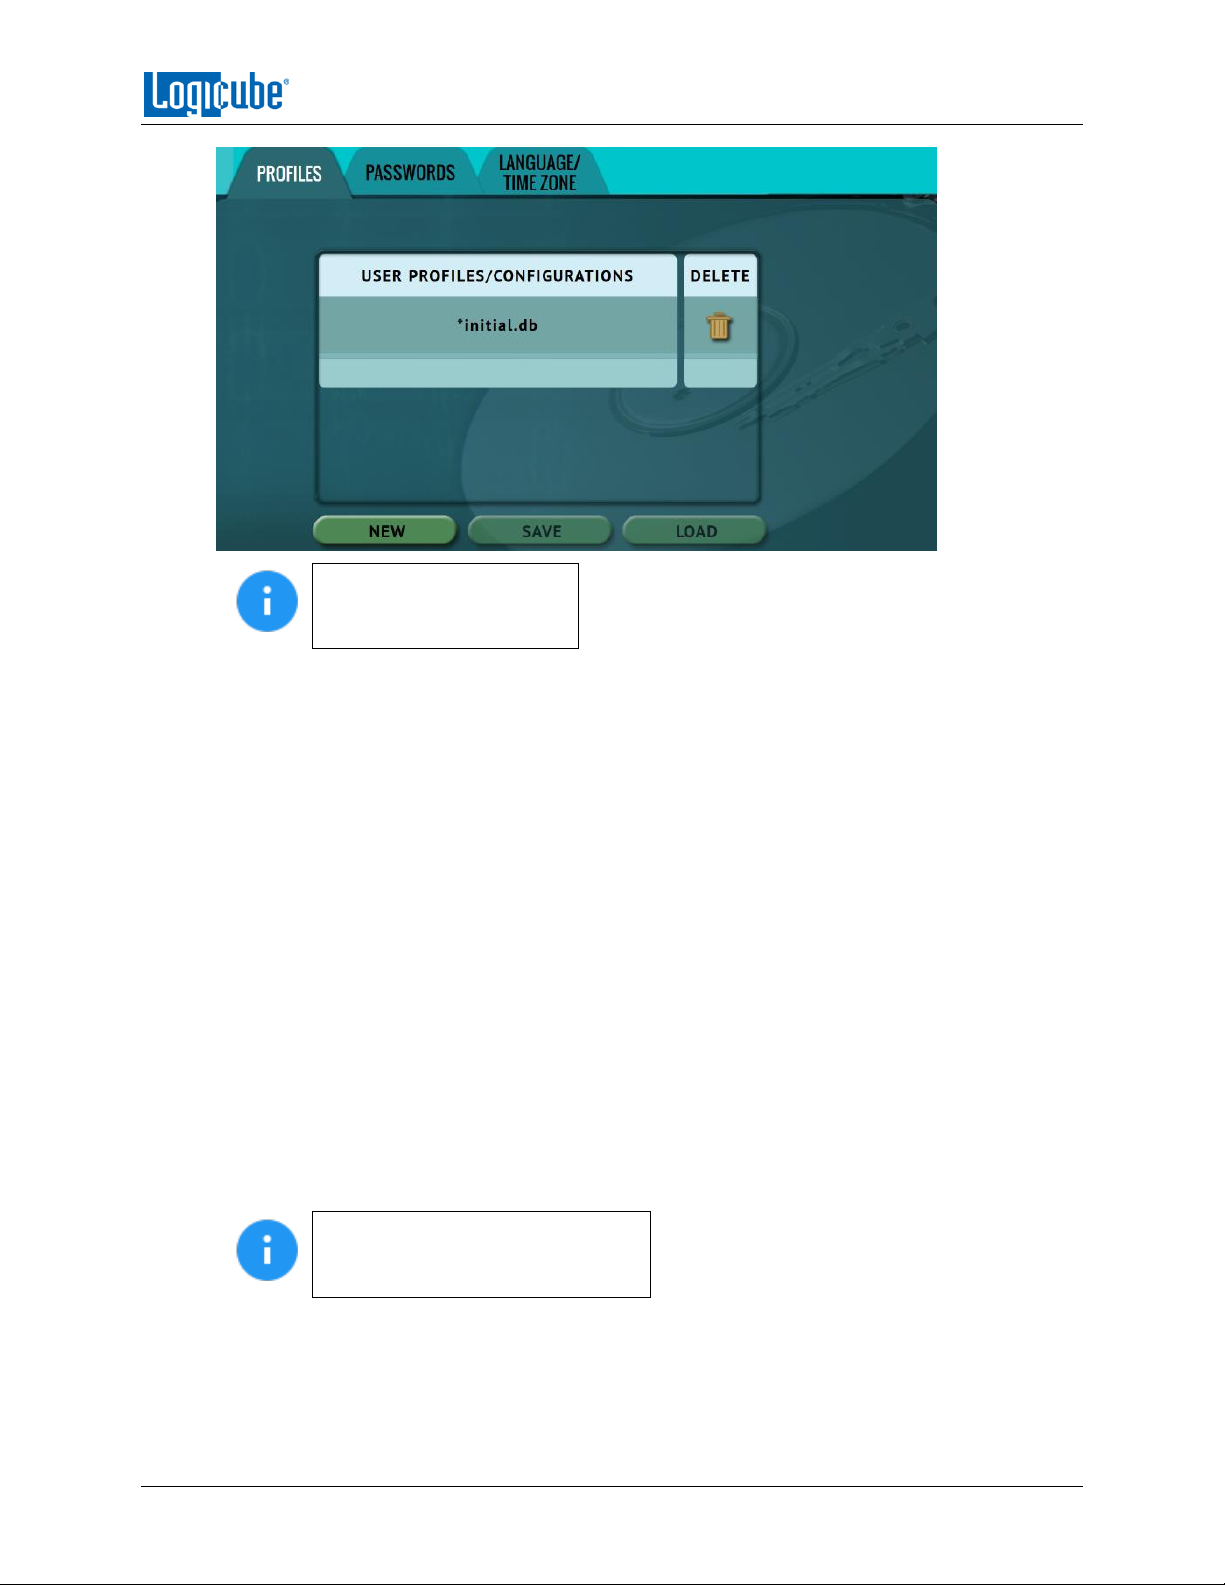
TYPES OF OPERATIONS
The unit will boot with the
profile that has an asterisk
(*) next to the name.
The Profiles tab allows users to create, save, and load different profiles with different
configurations. When a profile is loaded using the Load icon, the unit will load that configuration
during its boot process.
For example, if the user wants the unit to always boot up with the default Clone mode of Image
to Drive:
1. Turn the unit off then back on. This will reset all settings to the loaded profile. This is an
important step to help ensure only the changes desired will be the changes saved.
2. Go to the Clone screen and set the Mode to ‘Image to Drive’.
3. In the System Settings, go to Profiles and tap the New icon.
4. Type a name for this profile. For example, ImageToDrive and tap the OK icon. The profile
name should appear on the screen.
5. Tap the newly saved profile and tap Save. A confirmation screen will appear.
6. Tap the Yes icon to save the profile.
7. Make sure the profile to be loaded (during the boot process) is highlighted (for example
ImageToDrive.DB) and tap the Load icon. A confirmation screen will appear.
8. The next time the unit is turned on it will load ImageToDrive profile.
When loading a profile, the it may
take several seconds to completely
load the different configurations.
To delete a profile, highlight the profile to be deleted then tap the delete icon. A confirmation
screen will appear. Tap the Yes icon to delete the selected profile.
Logicube SCSI-NG User’s Manual 46
Page 55
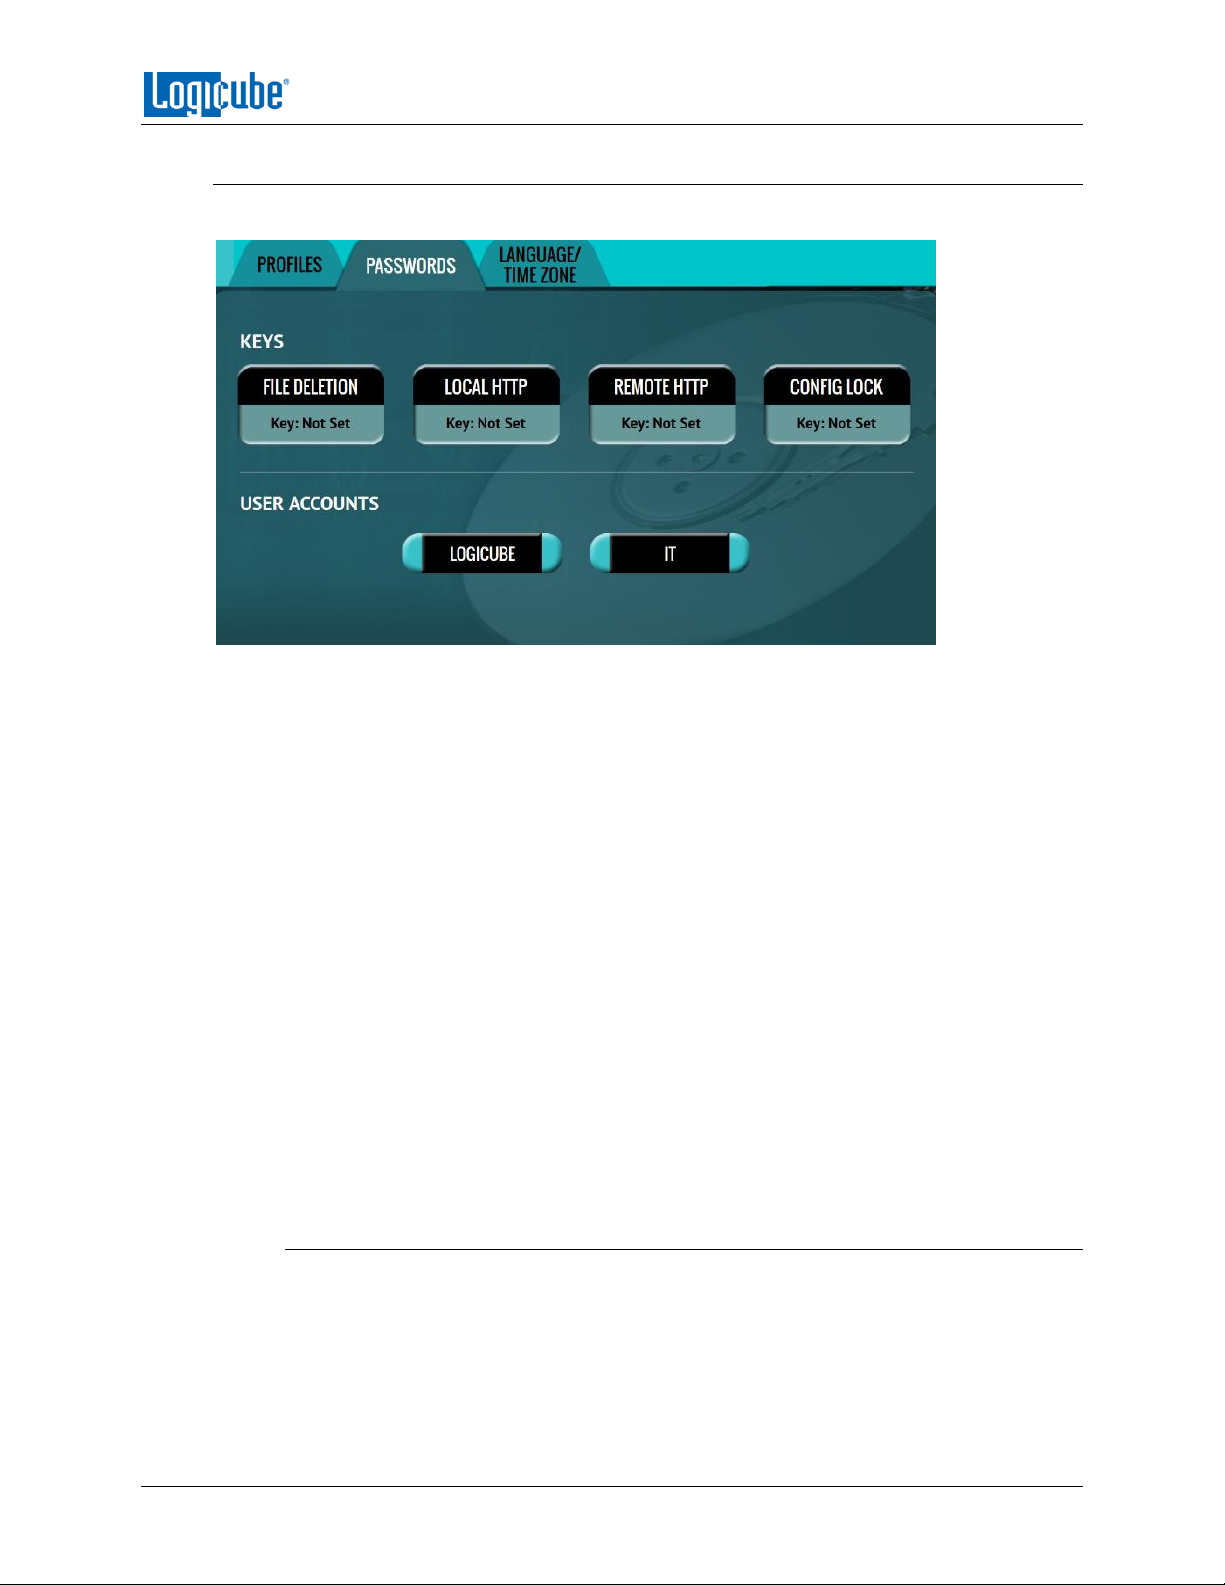
TYPES OF OPERATIONS
5.7.2 Passwords
There are six keys or passwords that can be set or changed.
Key: Log File Deletion – A key can be set as an extra layer of protection when deleting
log files. If this key is set, a key prompt will appear, and the correct key must be entered
before any log files can be deleted.
Key: Local HTTP – A key can be set to lock the local touch screen on the unit. If this key
is set, a key prompt will appear, and the correct key must be entered before allowing
access to the local touch screen.
Key: Remote HTTP – A key can be set to lock remote HTTP access (through a web
browser). If this key is set, a key prompt will appear, and the correct key must be
entered before allowing access through a web browser.
Key: Config Lock – A key can be set to lock out any configuration changes. If this key is
set, changes to the different types of operations cannot be made without entering the
correct key. Different types of operations can still be started.
For example, if the Config Lock key is set, and the CLONE task is configured for Drive to
Image cloning, the user will be unable to change the mode to Drive to Drive but can
start the Drive to Image task.
User Account: LOGICUBE – Allows the user to change the logicube local account.
User Account: IT – Allows the user to change the it local account.
5.7.2.1 Setting Key Passwords
To set a key for Log File Deletion, Local HTTP, Remote HTTP, or Config Lock, tap one of
the buttons. The following screen will appear.
Logicube SCSI-NG User’s Manual 47
Page 56
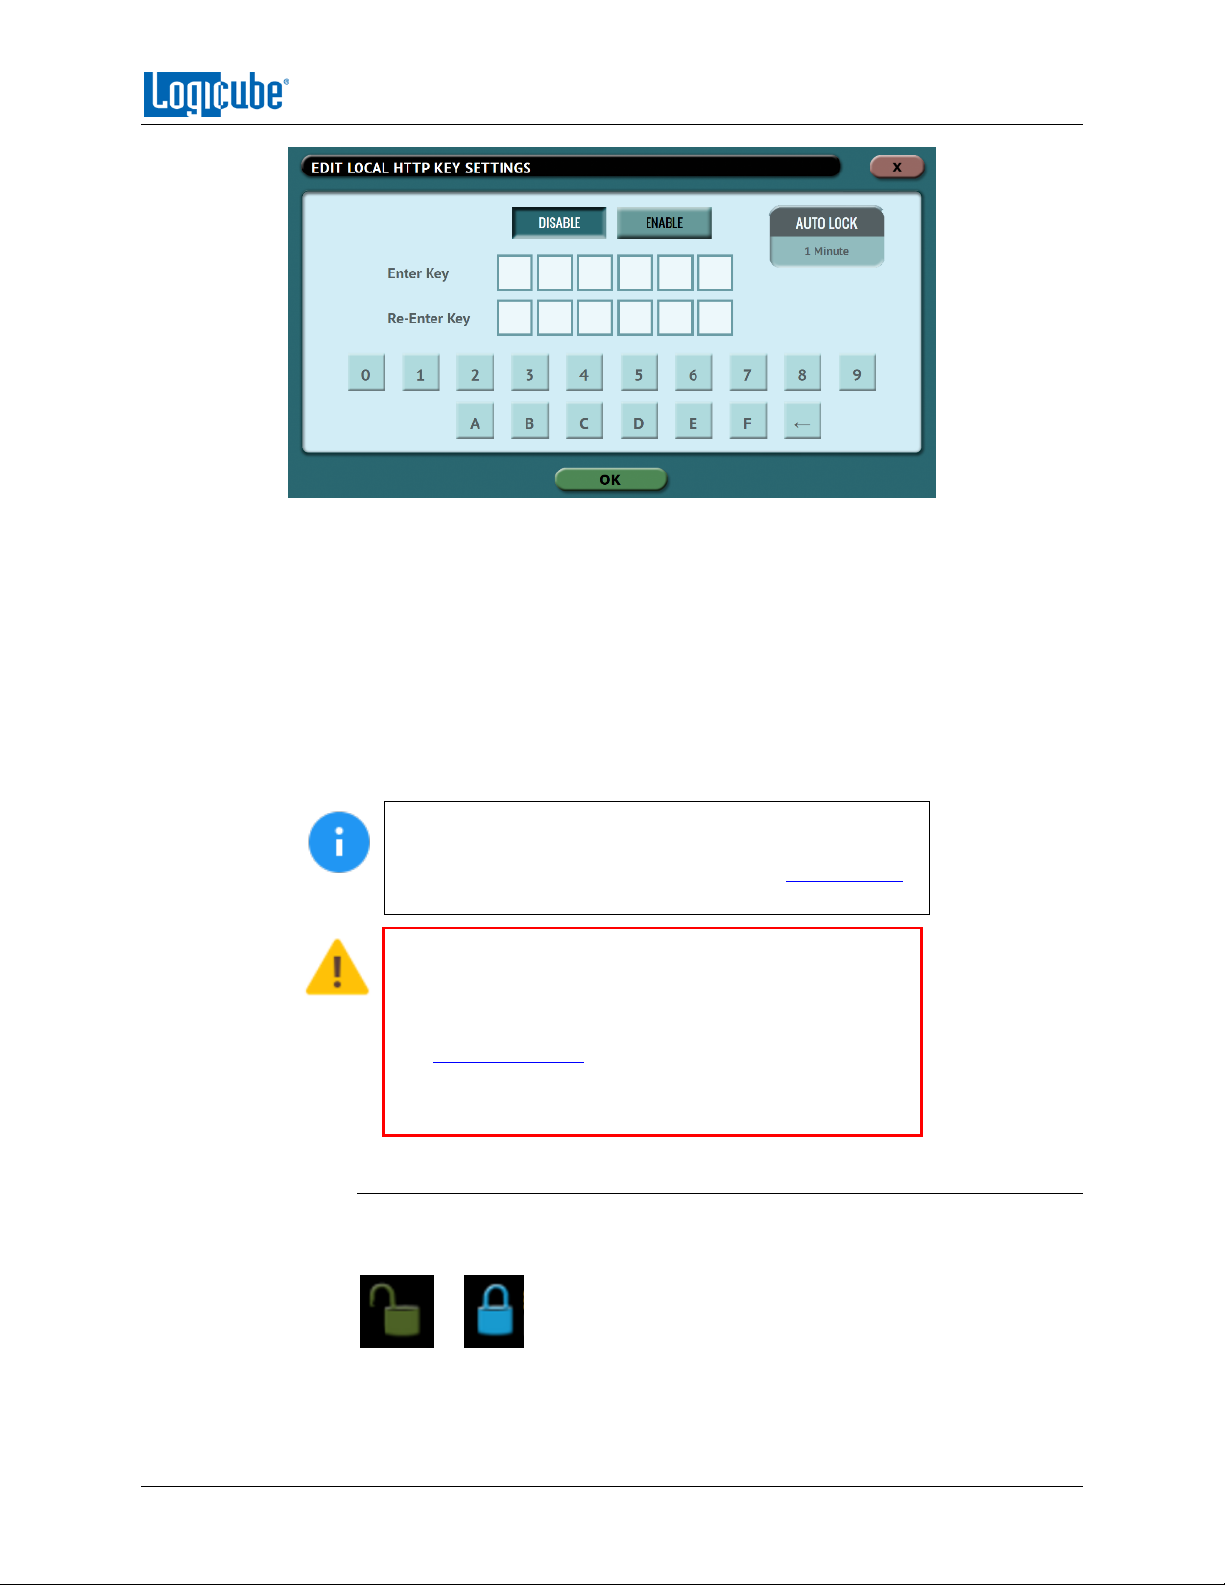
TYPES OF OPERATIONS
Tap the Enable icon to enter a password or key. The available characters are 0 through 9
and A through F.
The Auto Lock button is available for the following keys:
Local HTTP
Remote HTTP
Config Lock
Tap the Auto Lock icon to set the time to automatically lock the configuration and
require a password. By default, this is set to 1 minute.
The keys for Log File Deletion, Local HTTP, Remote HTTP,
and Config Lock can be saved into a user profile and
loaded each time the unit is turned on. See Section 5.7.1
for more information on saving and loading a user profile.
Remember the various keys! If the SCSI-NG is configured
to load a user profile with any key set (enabled) and the
key is forgotten, the only way to reset the key is to load
the initial.db profile using the Command Line Interface.
See Section 5.7.2.1.2 for more information.
If the initial.db has a key configured, and the key was
forgotten, contact Tech Support assistance.
5.7.2.1.1 Config Lock Notes
A shortcut (and indicator) to the config lock can always be seen on the top-right
of the screen next to the logo.
or
While in a locked state, the following operations will be affected as follows:
Logicube SCSI-NG User’s Manual 48
Page 57
TYPES OF OPERATIONS
Clone – A clone task can be started, but no Master, Target, or settings
can be changed. Additionally, no new task can be added, and no task
can be deleted without the Config Lock unlock key.
Hash – A hash task can be started, but no Target or settings can be
changed. Additionally, no new task can be added, and no task can be
deleted without the Config Lock unlock key.
Wipe / Format – A wipe / format task can be started, but no Target or
settings can be changed. Additionally, no new task can be added, and no
task can be deleted without the Config Lock unlock key.
Logs – Logs are not affected by Config Lock.
Statistics – Since there are no settings or configurations for this
operation, it is not affected by Config Lock.
Manage Repositories – A repository cannot be added, edited, or
deleted without the Config Lock unlock key.
System Settings – This entire section cannot be accessed without the
Config Lock unlock key.
Network Settings – This entire section cannot be accessed without the
Config Lock unlock key.
Software Updates – This entire section cannot be accessed without the
Config Lock unlock key.
Power Off – This entire section cannot be accessed without the Config
Lock unlock key.
The unit can still be turned off without
the unlock key by using the power
switch located on the back of the unit.
5.7.2.1.2 Forgotten password for any keys
If any of the keys is forgotten, the INITIAL.DB profile will need to be loaded using
the Command Line Interface (CLI). See Section 7.2 for more information on how
to connect using the CLI.
This method will only work if the INITIAL.DB profile does
not have a Config Lock Key saved. If the INITIAL.DB has a
Config Lock Key configured, and the password was
forgotten, contact Tech Support assistance.
Once connected to the Command Line Interface (CLI):
1. Login with the username “it” (without the quotes) and the password
“it” (without the quotes).
2. From the main prompt, type command, then press the enter key.
3. Type config then press the enter key.
4. Type db list then press the enter key. This will show a list of profiles (or
databases) saved. The unit has one default profile called initial.db. Any
profiles added by users will appear in this list. The example below shows
Logicube SCSI-NG User’s Manual 49
Page 58
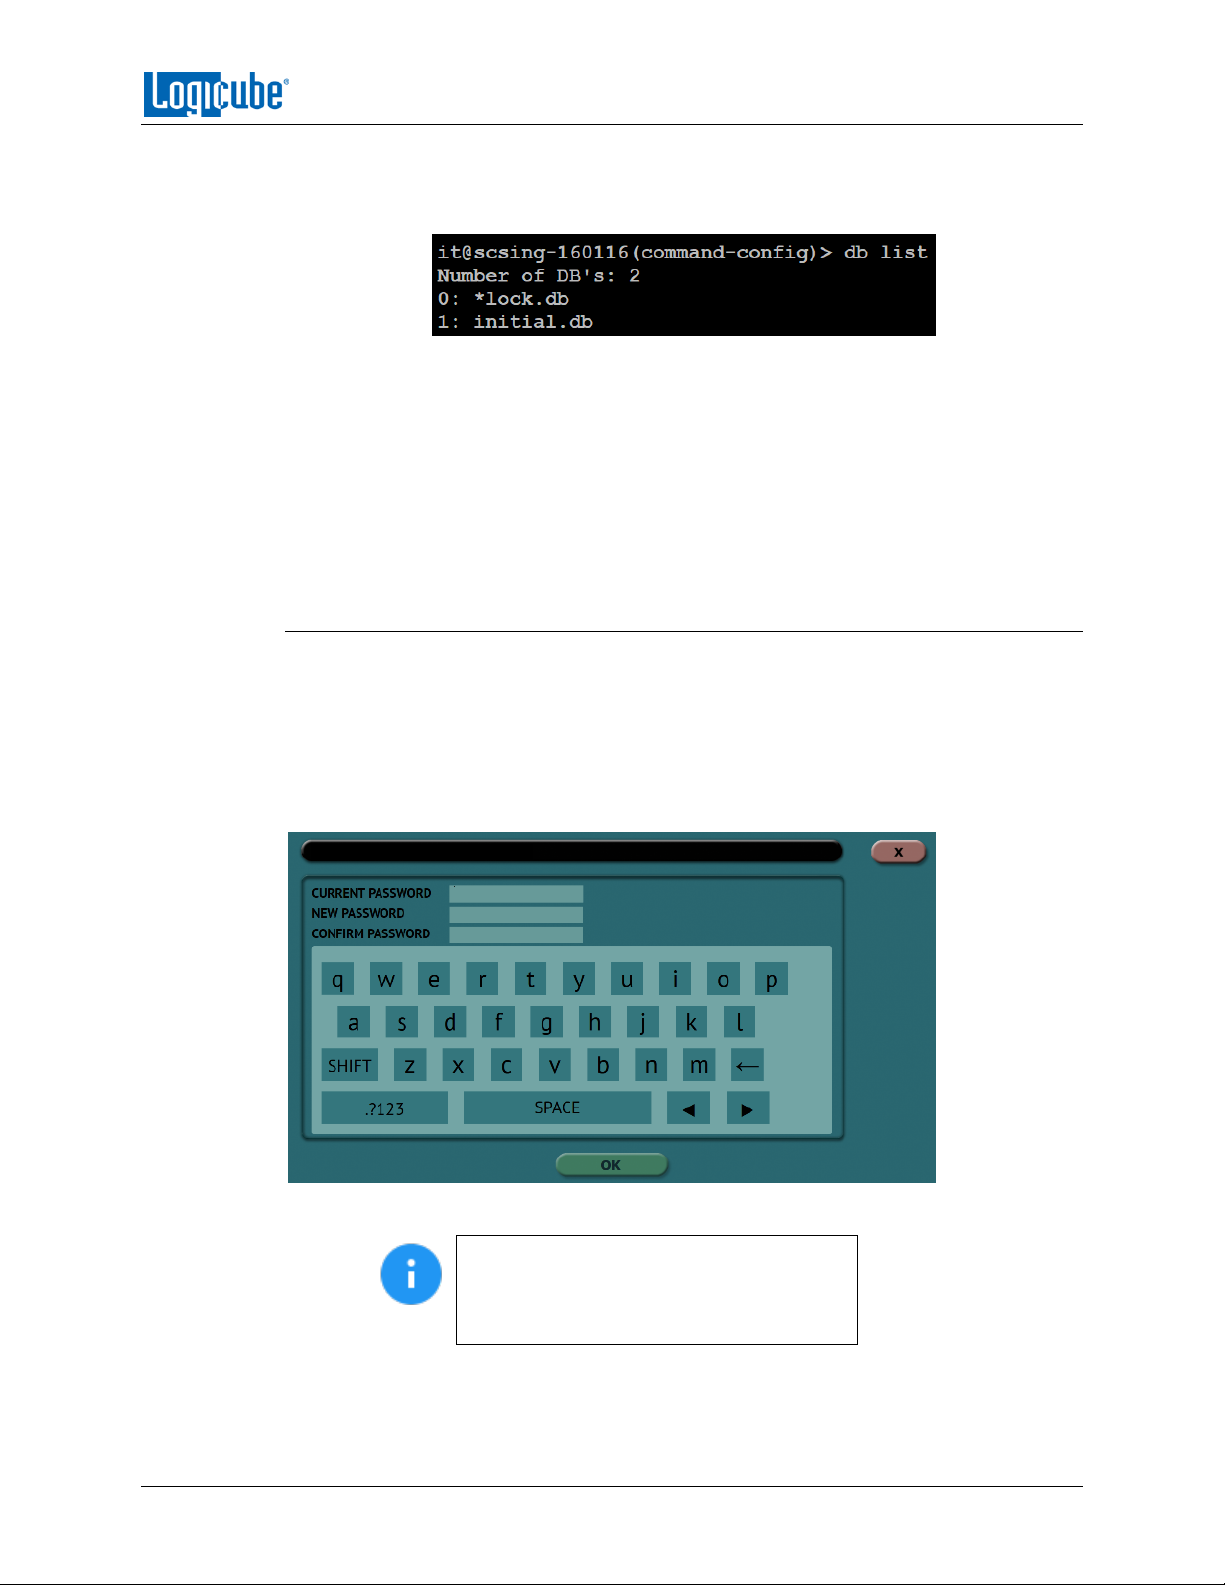
TYPES OF OPERATIONS
two databases (the default initial.db and lock.db). The db that shows an
asterisk (*) before the name is the current database or configuration
being loaded each time the unit is turned on.
5. Type db load initial.db then press the Enter key to load the default
database. There should be a response showing “Command
(DbManagement) Successful”.
6. Type db list again and there should be an asterisk (*) on initial.db.
7. Turn the unit off using the power button, then close the Telnet/SSH
application.
8. Turn the unit on. When the unit boots up, it will load the default
configuration (INITIAL.DB).
5.7.2.2 User Account Passwords
This unit comes with two built-in user accounts:
logicube
it
Both user account passwords can be changed in this screen. To change the password for
either account, tap either the LOGICUBE or IT button. A screen will appear:
1. Enter the current password.
The default password for each account is:
LOGICUBE: logicube
IT: it
2. Enter a new password.
3. Enter the new password again in the ‘confirm password’ box.
Logicube SCSI-NG User’s Manual 50
Page 59
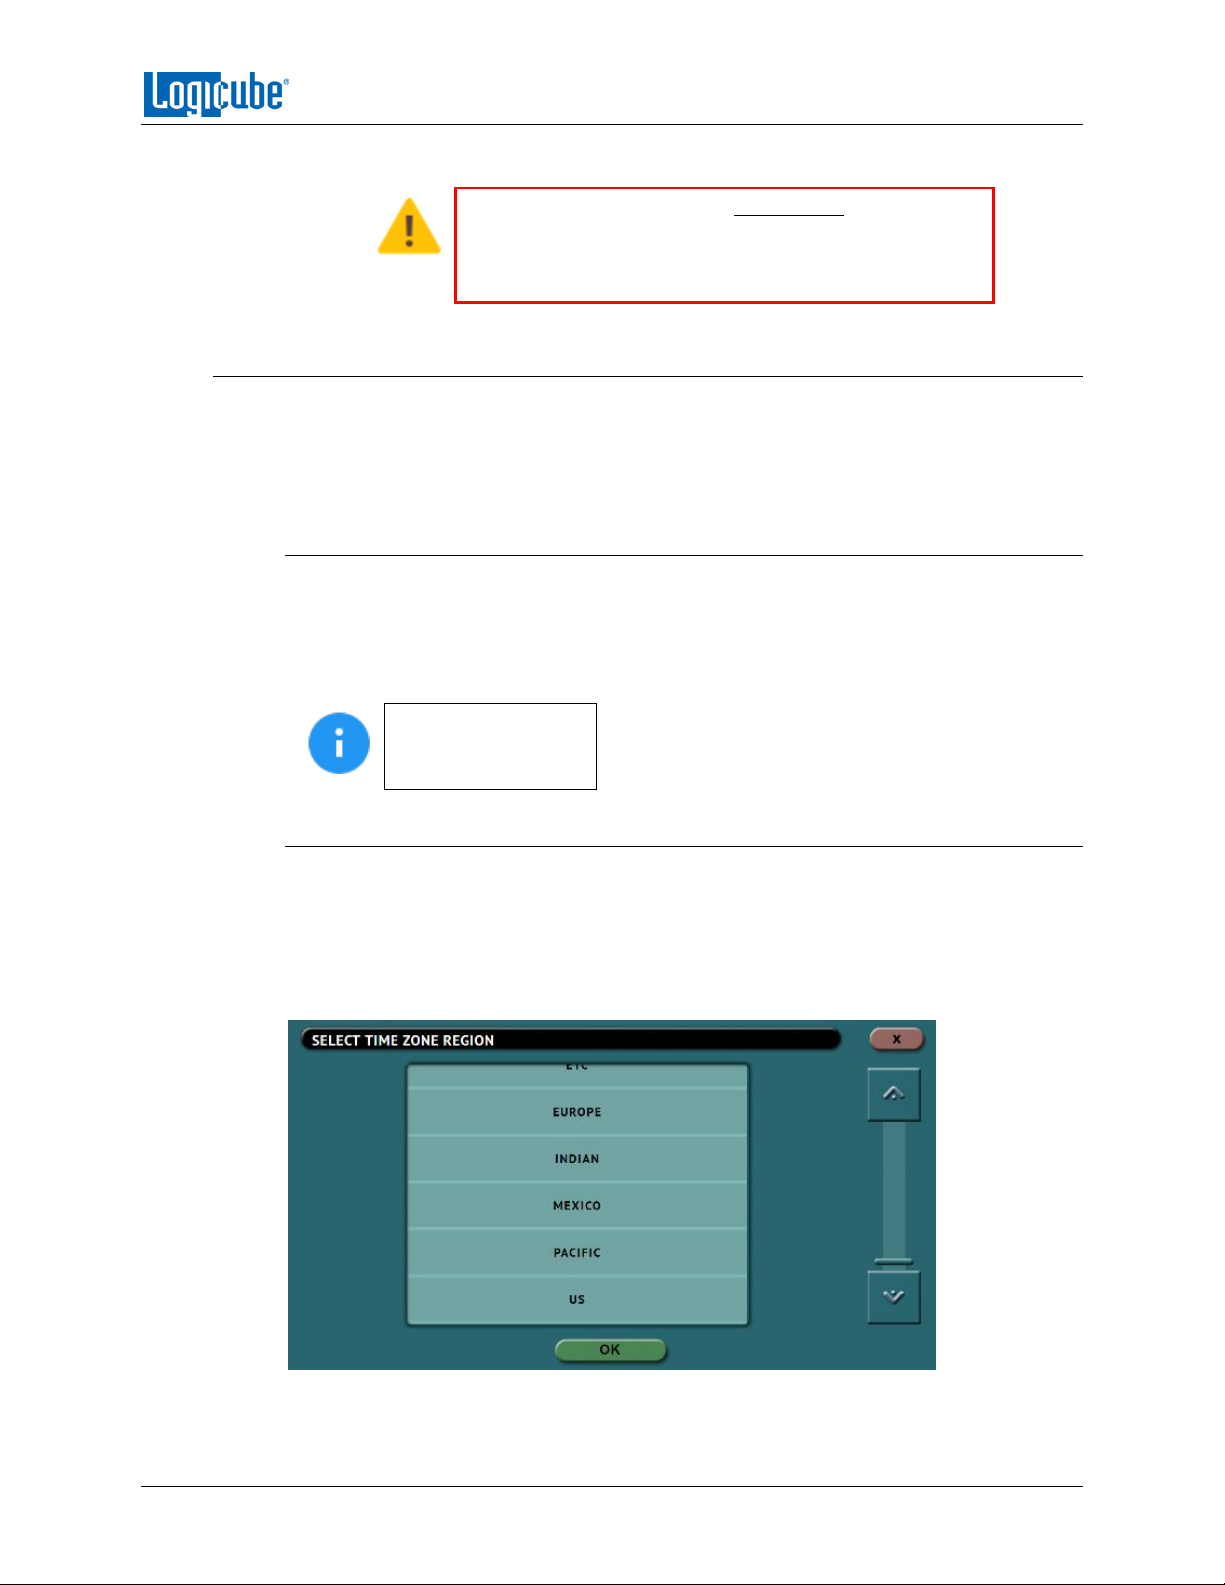
TYPES OF OPERATIONS
4. Tap the OK icon when finished.
The User Account Passwords do not need to be saved
into a user profile. Changing any of these two passwords
will take effect immediately. If the User Account
password is forgotten, contact Tech Support assistance.
5.7.3 Language/Time Zone
The menu system’s language can be changed. The available languages are English, Chinese (中文
), and Korean (한국어).
This screen also allows the time zone to be set.
5.7.3.1 Language
The following languages are available: English, Chinese (中文), and Korean (한국어). To
change the language displayed. As soon as the selection is made, the screen (or the
computer’s Internet browser) will automatically refresh and display the selected
language.
The Custom button
is reserved for future
language releases.
5.7.3.2 Time Zone
The unit utilizes NTP (Network Time Protocol). Each time it is connected to a network
with internet access, it will automatically check for the correct time using NTP and
adjust the time as needed.
The unit also has a time zone setting. Tap Time Zone to select the time zone region. Tap
the OK icon to continue.
After selecting the region, select the desired time zone. Tap the OK icon to set the time
zone.
Logicube SCSI-NG User’s Manual 51
Page 60
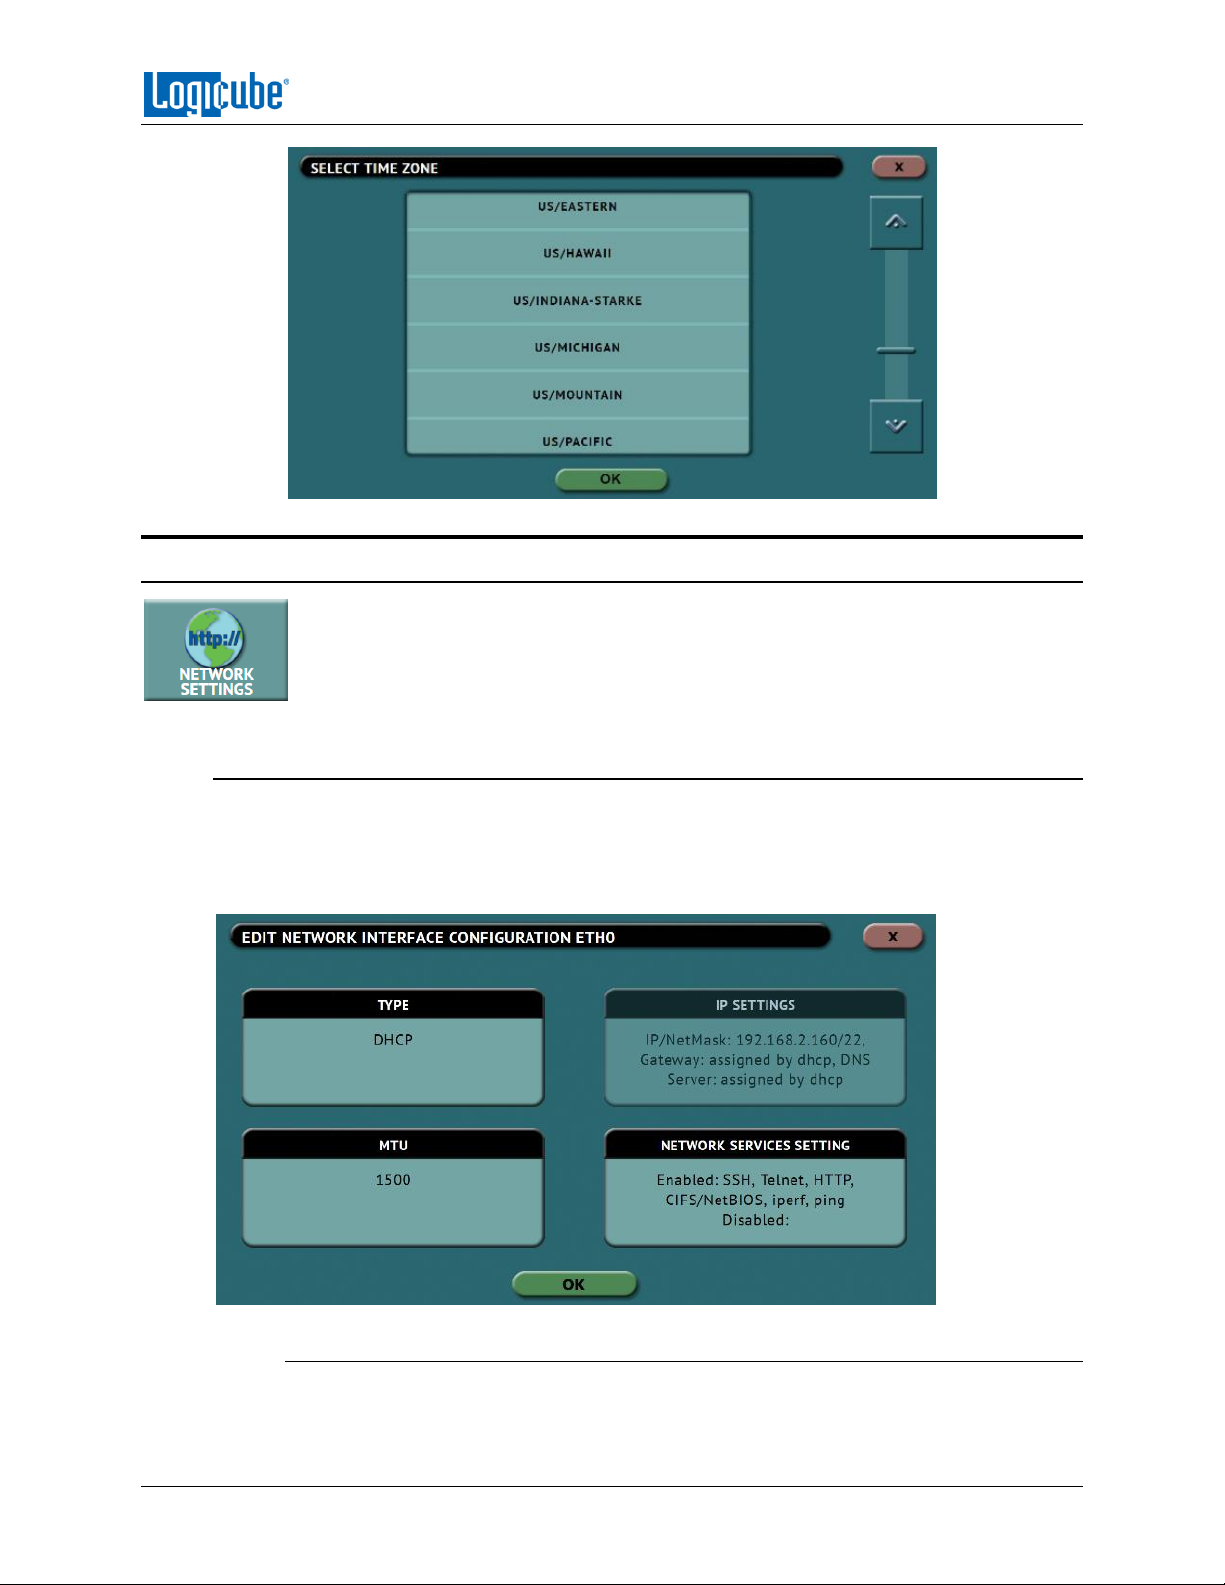
TYPES OF OPERATIONS
5.8 Network Settings
The Network settings screen has two tabs: Interfaces and HTTP Proxy. The Interfaces
tab allows the configuration of the network interface which include setting a static IP
(DHCP is set by default) and allows certain services to be enabled or disabled. There is
also an HTTP Proxy tab where proxy server information can be entered.
5.8.1 Interfaces
The Interfaces tab displays the network interface information (MAC Address, Configuration type
(DHCP or Static), MTU, and the status. This tab also allows enabling or disabling certain services.
To edit the network interface configuration, tap the Ethernet adapter name then tap the Edit
Configuration button. The configuration screen should appear:
5.8.1.1 Configuring a Static IP address
DHCP is enabled by default. Some networks do not support DHCP and require a static IP
address. The steps below outline how to configure the unit with a static IP address.
Logicube SCSI-NG User’s Manual 52
Page 61
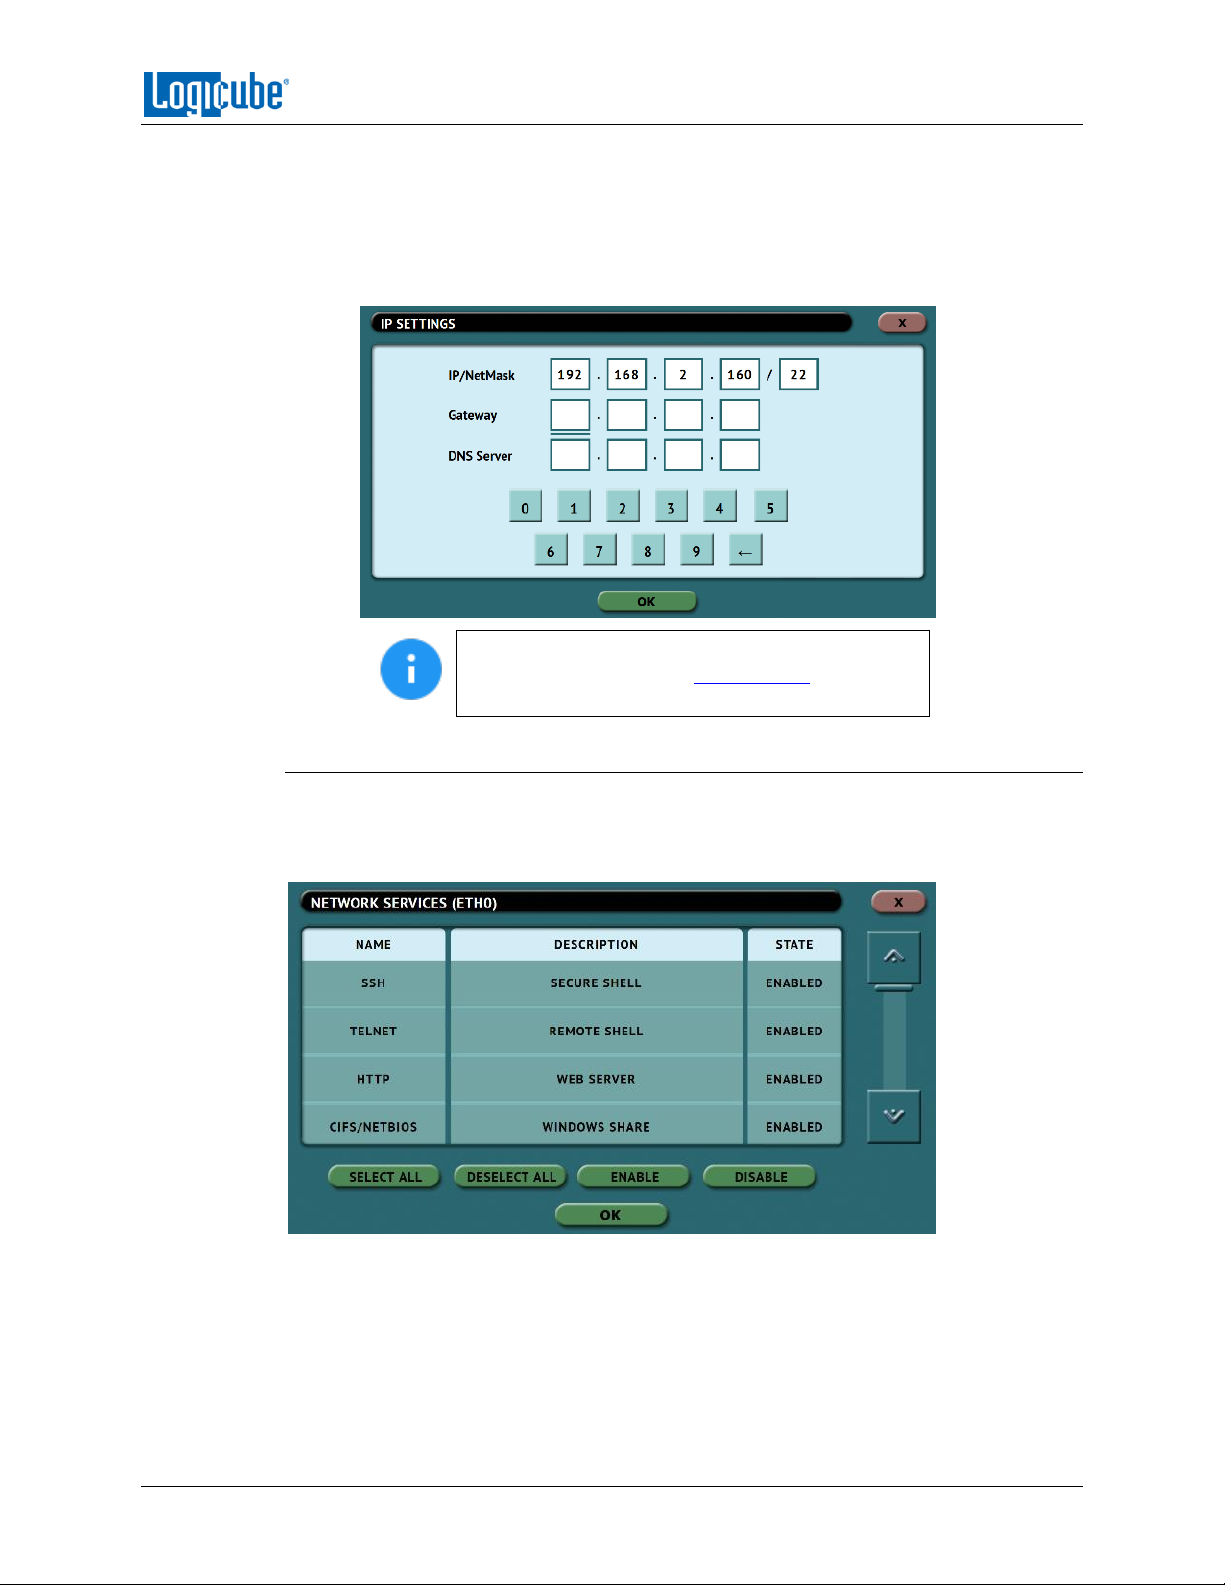
TYPES OF OPERATIONS
1. From the Network Interface Configuration screen (above), tap the Type box
and select STATIC then tap the OK icon. The IP SETTINGS box should now be
selectable.
2. Tap the IP SETTINGS box to manually set the IP address, NetMask, Gateway, and
DNS Server. When finished, tap the OK icon.
To save the settings so that the unit boots up with
the static IP address, see Section 5.7.1 for more
information on saving and loading a user profile.
5.8.1.2 Enabling/Disabling Network Services
Network Services are enabled by default. To enable or disable specific network services,
go to the Network Interfaces Configuration Screen and tap Network Services Setting.
The Network Services screen will appear:
Tap each network service to be enabled or disabled then tap the Enable or Disable icon.
The following services can be disabled (enabled by default):
SSH – Disabling this will block Secure Shell (SSH) traffic.
Telnet – Disabling this will block Telnet traffic.
HTTP – Disabling this will block web browser connections to the unit.
Logicube SCSI-NG User’s Manual 53
Page 62
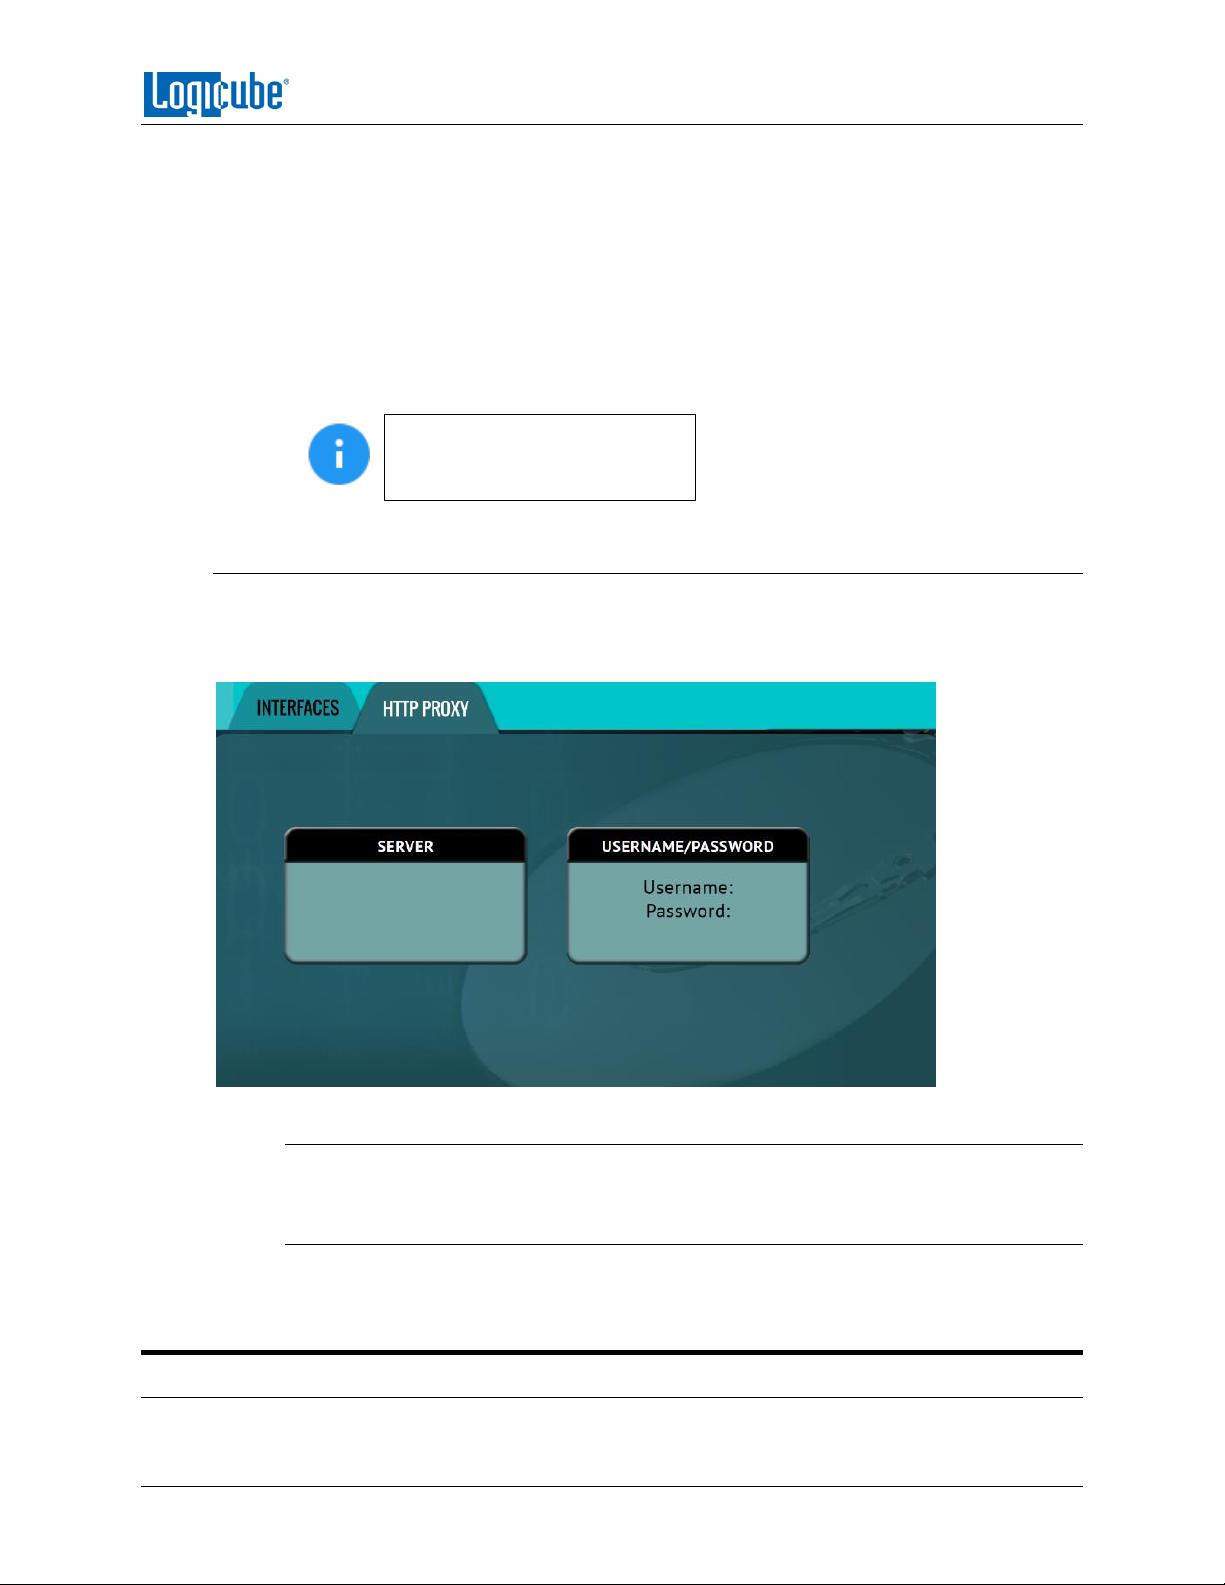
TYPES OF OPERATIONS
CIFS/NETBIOS – Disabling this will block any CIFS or NETBIOS connection to the
unit (for example, Windows Explorer).
Iperf – Disabling this will block Iperf traffic (a network tool to measure
bandwidth performance).
Ping – Disabling this will block ping access to the unit.
Disabling any of the services above will disallow the types of communication controlled
by those services. For example, if HTTP is disabled, users will not be able to see the unit
through a web browser over the network.
Please contact your Network or
Systems Administrator before
changing any of these services.
5.8.2 HTTP Proxy
If the network the unit is connected to uses an HTTP proxy server to access the Internet, proxy
settings may need to be set for to be able to update software from a network (over the
internet). This typically includes a server (or IP address), a host port, a username and password.
5.8.2.1 Server
Tap the Server icon to set the IP address (or server name) and port of the proxy server.
5.8.2.2 Username/Password
If the proxy server requires a username and password for authentication, tap the
Username/Password icon to set this information.
5.9 Software Update
Logicube SCSI-NG User’s Manual 54
Page 63
TYPES OF OPERATIONS
New and improved software will be released from time to time. There are two ways to
update the software: From the web through a network connection or from a USB
drive.
For the latest step-by-step instructions on how to update the software, please
read the SCSI-NG Software readme file located on the SCSI-NG Support page
on the Logicube website at https://www.logicube.com/knowledge/scsi-ng.
In-depth information on updating the SCSI-NG software can be found in
Chapter 6: Updating/Loading/Re-loading Software.
5.10 Power Off
There are two tabs in the Power Off screen:
POWER OFF – The unit can be remotely restarted or turned off by going to this tab. Additionally, the
Graphical User Interface (GUI) can be refreshed.
DRIVE POWER – Connected, inactive drives can be set to go to standby mode in this tab. The default is
set to 0 minutes (Off/Disabled).
Logicube SCSI-NG User’s Manual 55
Page 64
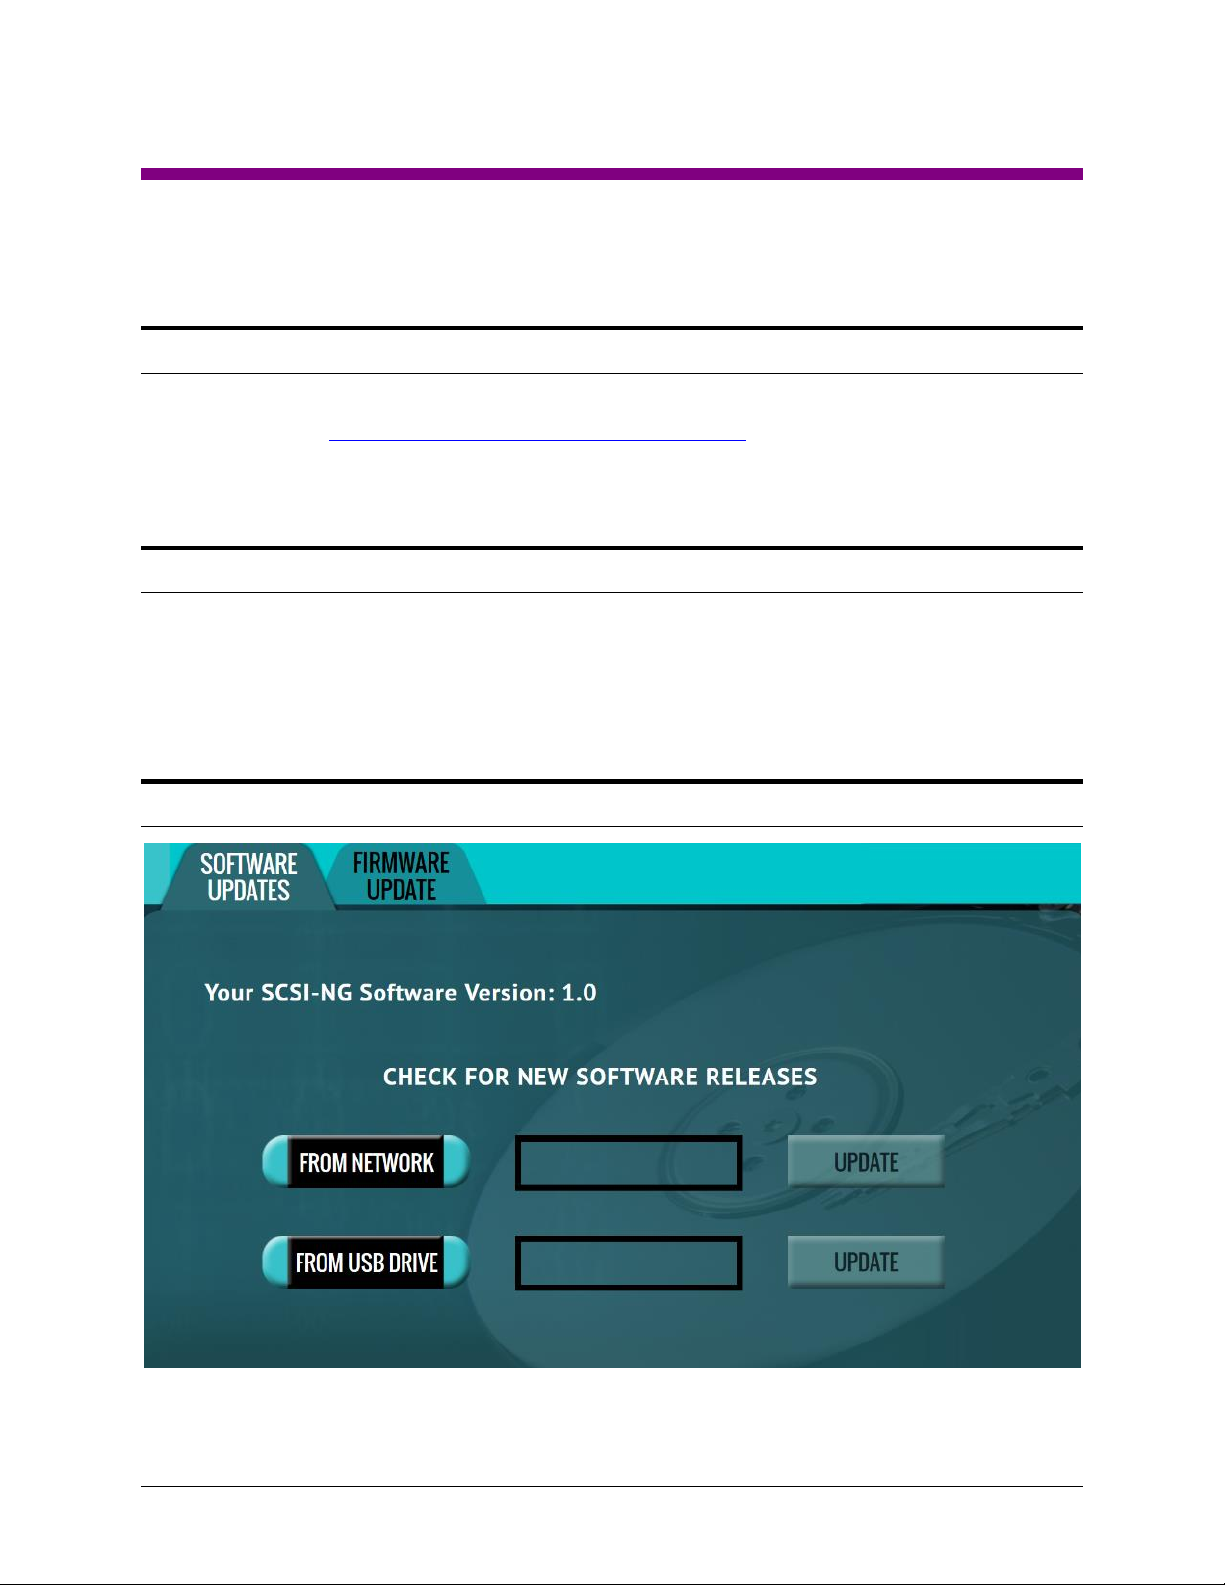
6: Updating/Loading/Re-loading the SCSI-NG Software
6.0 Updating/Loading/Re-loading Software – Introduction
New and improved software will be released from time to time and will always be available on the SCSING support page at: https://www.logicube.com/knowledge/scsi-ng.
The SCSI-NG software release may contain both a software and firmware update. This chapter details
how to update/reinstall the software and firmware.
6.1 Requirements
To perform the software update/reinstall, one of the following is required:
The SCSI-NG connected to a network with Internet access (for updating “FROM NETWORK”), or
The SCSI-NG with your own USB flash drive. The USB flash drive must be formatted FAT32 or
NTFS (for updating “FROM USB DRIVE”)
6.2 Updating/Loading/Re-loading Software Instructions
Logicube SCSI-NG User’s Manual 56
Page 65
UPDATING THE SOFTWARE AND FIRMWARE
There are two methods available to update/reinstall the SCSI-NG software:
A. FROM NETWORK – Over the Internet through a network connection.
B. FROM USB DRIVE – Through a software file download onto a USB flash drive.
6.2.1 From Network (Over the Internet)
The SCSI-NG software can be updated/reinstalled by connecting the SCSI-NG to a network with
Internet access.
It is recommended to disconnect all drives
and drive adapters from the SCSI-NG
before the update/reinstall process.
1. Connect the SCSI-NG to a network with Internet access and turn the SCSI-NG on.
2. From the main menu on the SCSI-NG, locate and tap the Software Updates icon on the
left side.
3. Select From Network. The SCSI-NG will check for software on Logicube’s server. After a
few seconds, one of the following messages will appear:
Newer version available – This message will appear if there is a newer software
version found. Tap the OK icon to continue.
Up to date – This message will appear if the software version found is the same
as the version currently installed. Tap the OK icon to continue.
No new version found – This message will appear if the SCSI-NG does not have
any internet access. Tap the OK icon to continue. If this message is seen, try the
following:
i. Go to the About tab in the Statistics screen and check the N/W
Interfaces to make sure the SCSI-NG is connected to a network and has
a valid IPAddress, or
ii. Make sure the network the SCSI-NG is connected to has Internet access,
or
iii. Try using the “From USB DRIVE” option (see Section 6.2.2).
4. Tap the Update icon to begin the update/reinstall. The SCSI-NG should begin the
update/reinstall process. Do not interrupt this process. It may take several minutes.
Once completed, a screen will appear stating the update is complete and will prompt
you to turn the unit off then back on.
5. Turn the SCSI-NG off. Wait at least 5 seconds then turn the SCSI-NG back on.
6. Verify the software version by going to the Software Updates screen then go to section
6.3 Firmware Update to check if there is a firmware update available.
Logicube SCSI-NG User’s Manual 57
Page 66
UPDATING THE SOFTWARE AND FIRMWARE
6.2.2 From USB Drive (Through a software file download)
Aside from the network option, the latest software can also be downloaded from Logicube’s
website and be placed onto a USB flash drive to perform the software update/reinstall. It is
recommended to use an empty USB flash drive.
It is recommended to disconnect all drives
and drive adapters from the SCSI-NG
before the update/reinstall process.
1. Using a computer, download the latest software from the SCSI-NG product support page
at https://www.logicube.com/knowledge/scsi-ng.
2. Extract the contents of the downloaded zip file to the root of the USB flash drive.
3. Turn the SCSI-NG on. When the main software screen appears, connect the USB flash
drive (that has the extracted software from step 2) to the U1 port (the front USB port).
4. From the main menu on the SCSI-NG, locate and tap the Software Updates icon on the
left side.
5. Select From USB Drive. The SCSI-NG will check for the version of the software on the
USB drive. After a few seconds, one of the following messages should appear:
Software found – A software version is found on the USB flash drive. Tap the OK
icon to continue.
No new version found – The SCSI-NG did not find any software on the USB flash
drive or could not detect the USB flash drive. If this message is seen, try the
following:
i. Make sure the correct software was downloaded and the files were
extracted to the root of the USB flash drive, or
ii. Format and use a different USB flash drive, or
iii. Try using the “From Network” option (see Section 6.2.1)
6. Tap the Update icon to begin the update/reinstall. The SCSI-NG should begin the
update/reinstall process. Do not interrupt this process. It may take several minutes.
Once completed, a screen will appear stating the update is complete and will prompt
you to turn the unit off then back on.
7. Turn the SCSI-NG off. Wait at least 5 seconds then turn the SCSI-NG back on.
8. Verify the software version by going to the Software Updates screen then go to section
6.3 Firmware Update to check if there is a firmware update available.
Logicube SCSI-NG User’s Manual 58
Page 67
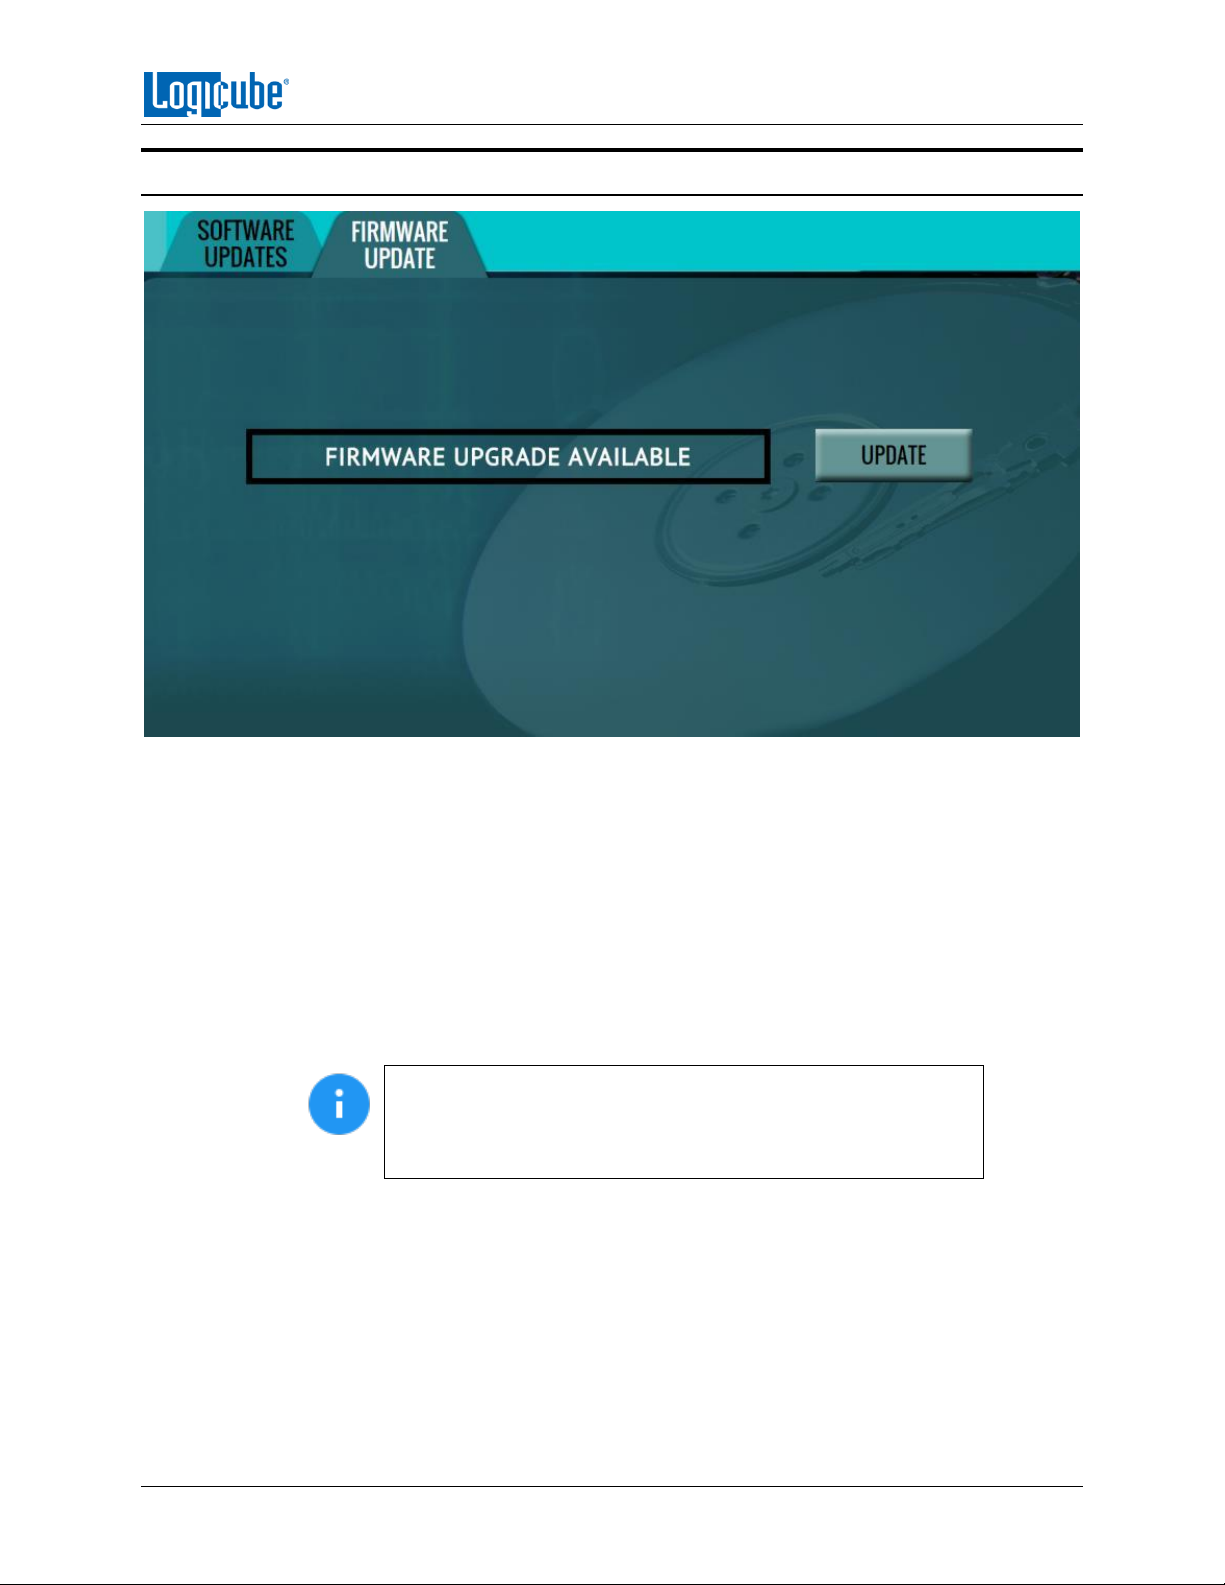
UPDATING THE SOFTWARE AND FIRMWARE
6.3 Firmware Loading Instructions
SCSI-NG software releases may contain a firmware update. This section provides instructions on how to
check if a firmware update is required, and how to perform the firmware update.
1. After the software is updated/reinstalled on the SCSI-NG, locate and tap the Software Updates
icon on the left side.
2. Tap the “Firmware Update” tab. One of two screens will appear:
a. FIRMWARE UPGRADE AVAILABLE – Tap the Update icon. A message will appear:
“FIRMWARE UPDATE COULD TAKE UP TO A FEW MINUTES TO COMPLETE; PLEASE DO
NOT INTERRUPT POWER DURING THIS TIME. ON COMPLETION THE UNIT WILL AUTORESTART AND CONFIRM THE UPDATE.” Tap the OK icon to start the firmware update
process.
When the OK icon is tapped, the screen may appear to do
nothing. Do not keep tapping the OK icon. The firmware update
typically takes no more than 60-120 seconds. When the
firmware update finishes, the SCSI-NG will reboot automatically.
b. FIRMWARE UPGRADE NOT AVAILABLE – This message will appear if the device does not
require a firmware update. No further action is necessary if this message appears.
Logicube SCSI-NG User’s Manual 59
Page 68
7: Remote Operation
7.0 Remote Operation - Introduction
The SCSI-NG comes with a gigabit network connection in the back of the unit. Connecting the SCSI-NG to
a network allows remote access to the SCSI-NG from any computer within the same network.
DHCP is enabled by default. See Section 5.8.1.1 for instructions on how to configure a Static IP address.
Zero Configuration Network (Zeroconf) is also available. There are two ways to access the unit:
Web interface – A graphical interface using an Internet browser where the screens are shown
exactly the way they appear on the unit’s touch screen.
Command Line Interface (CLI) – A text only command line interface that can be accessed one of
two ways:
i. Telnet (via a network connection)
ii. SSH (Secure Shell via a network connection)
BROWSER COMPATIBILITY: Google Chrome and
Mozilla Firefox are recommended. Other browsers may
not display the Graphical User Interface (GUI) properly.
7.1 Web Interface
Using a web browser, go to the IP address or the hostname of the unit. Both IP address and hostname
can be found by going to the Statistics screen. For example, browse to http://192.168.1.100 or
http://scsing-XXXXXX where XXXXXX is the 6-digit serial number of the unit. The web interface will
appear on the browser screen. All screens and operations available on the unit’s screen will be available
on the browser.
On some browsers or Operating Systems,
the unit will need to be accessed by
browsing to http://scsing-XXXXXX.local.
The unit can be controlled by clicking on the icons appearing on the browser window.
7.2 Command Line Interface (CLI)
A CLI or Command Line Interface is also available. This interface has no graphical content and is all
command line (text) based and is for advanced users who have knowledge of command line functions.
This type of connection requires a Telnet or SSH client. There are several Telnet and SSH clients available
from different software companies. Microsoft Windows also has a built-in Telnet client that can be used.
Logicube SCSI-NG User’s Manual 60
Page 69

REMOTE OPERATION
Windows has a built-in Telnet client but may not be installed by default.
Installing the Telnet client may require the assistance of a Network or
Systems Administrator. Other third-party Telnet programs are available.
All versions of Windows do not have a built-in SSH client.
For assistance on the installation of any SSH or Telnet software (including
Microsoft’s Telnet client) please check with your IT administrator.
7.2.1 Connecting via Telnet
Once the Telnet client is installed, follow the steps below to connect using the Windows Telnet
client.
1. Connect the unit to the network by attaching a network cable to any of the RJ45
connectors in the back of the unit.
2. Turn the unit on and allow it to boot up completely.
3. Open the Telnet client.
4. Type open followed by the IP address or hostname of the unit. For example:
open 192.168.1.100 or open scsing-XXXXXX
where XXXXXX is the 6-digit serial number of the unit, then press Enter. A login should
appear.
5. Login with the username “it” (without the quotes) and the password “it” (without the
quotes). A command prompt should appear on the Telnet window.
The unit can now be configured or managed via the command line interface.
7.2.2 Connecting via SSH
Connecting via SSH (Secure Shell) is very similar to connecting via Telnet. Since Windows does
not have a built-in SSH client, a third party SSH client will need to be downloaded and installed
to connect via SSH. For instructions and support on how to use third party SSH clients, please
contact the SSH client’s manufacturer.
1. Connect the unit to the network by attaching a network cable to any of the RJ45
connectors in the back of the unit.
2. Turn the unit on and allow it to boot up completely.
3. Open the SSH client and select an SSH connection.
4. Connect to the unit either by IP address or by hostname. The name of the will be scsing-
XXXXXX where XXXXXX is the 6-digit serial number of the unit).
5. Login with the username “it” (without the quotes) and the password “it” (without the
quotes). A command prompt should appear in the SSH window.
The unit can now be configured or managed via the command line interface.
Logicube SCSI-NG User’s Manual 61
Page 70

REMOTE OPERATION
7.3 Zero Configuration Networking (Zeroconf)
Zero Configuration Networking (Zeroconf) allows devices to automatically create a usable computer
network based on the Internet Protocol Suite (TCP/IP). For example, when the unit is connected
(connected via a network cable) directly to a Windows based computer that is DHCP enabled, both the
unit and the Windows based computer will automatically configure themselves to be seen by each other
using TCP/IP with a 169.254.x.x IP address configuration.
Logicube SCSI-NG User’s Manual 62
Page 71

8: FREQUENTLY ASKED QUESTIONS
8.0 FAQs
Q. How many concurrent tasks can the SCSI-NG run?
A. The SCSI-NG does not support multi-tasking and can run one task at a time.
Q. Why is it when I clone a drive the number of bytes shown is twice the size of my Source drive?
A. The number of bytes shown on the progress bar is not the actual size of the drive. This is the actual
data being processed. When ‘Verify’ is set to “Yes”, the reported number will double in size.
Q. Do Target drives need to be wiped or formatted using the SCSI-NG?
A. For Drive to Image mode, the SCSI-NG must be used to format the Target drive. This helps ensure
that the images and data are written properly to the Target drive.
Q. Can the SCSI-NG clone Linux partitions?
A. Yes. SCSI-NG can clone Linux partitions using Mirror or Clever clone.
Q. Can the SCSI-NG clone the Apple File System (APFS), Hierarchical File System (HFS), or Hierarchical
File System Plus (HFS+)??
A. Yes, SCSI-NG can clone APFS, HFS, and HFS+ using Mirror clone.
Q. Can the SCSI-NG clone to smaller capacity Target drives?
A. Yes. For details on how to clone to smaller capacity Target drives, see Section 4.0.1.
Q. How does the SCSI-NG handle bad sectors on the Master drive?
A. The SCSI-NG will retry the bad sector 7 times. After the 7th attempt, if the sector still cannot be read,
it will skip that sector and list the sector in the log file.
Q. What operating system does SCSI-NG use?
A. The SCSI-NG uses a Linux-based operating system. A Linux-based operating system provides
increased stability and security over Windows-based systems.
Q. What file format does SCSI-NG use when formatting target drives?
A. The SCSI-NG can format destination drives using the following file systems: EXT4, NTFS, exFAT, or
FAT32.
Logicube SCSI-NG User’s Manual 63
Page 72

FAQs
Q. Does the SCSI-NG provide log files?
A. Yes, each operation/task produces a log file. The log file is viewable on the SCSI-NG screen (or
remotely on a PC). The log files can be exported to a thumb drive (the SCSI-NG will export in XML,
HTML and PDF). XML log files can be customized using XML editors. The log files are stored on the
internal drive within SCSI-NG and are accessible by pressing the log file icon from the left-side
navigation bar on the SCSI-NG screen.
Q. Why are the VERIFY buttons on the Clone task Settings greyed out?
A. The Verify function is an option which allows the SCSI-NG to verify the data cloned on the Target
drive against the calculated hash from the Master drive. To find out if this option is installed, go to
the Statistics icon from the navigation menu on the left and select the Options tab. To purchase the
Verify option, contact our sales team at: [email protected].
Logicube SCSI-NG User’s Manual 64
Page 73

9: Index
Blank Disk Check, 9
Browser Compatibility, 60
Clone Settings, 22
Cloning, 10, 20, 31
Cloning Mode, 22
Connecting via SSH, 61
Connecting via Telnet, 61
Device Configuration Overlay (DCO), 23
Disclaimer, Liability Limitation, I
DoD wipe, 13
Drive types, 6
Error Handling, 24
EU, European Union, III
FAQs, 63
Features, 1
Firmware Updates, 59
Format, 37
Hash, 12, 31
Hash/Verification Method, 24
Host Protected Area (HPA), 23
iSCSI, 44
Job Info, 23
Language, 51
Logs, 14, 38
Manage Repositories
Network, 41
Master, 6, 22
Mirror Settings, 25
network connection, 60
Network Settings, 52
Options, 2, 39
Overview, 5
Passwords, 47
Profiles, 45
Proxy Settings, 54
Quick Start, 9
Remote Operation, 60
Remote operation, CLI, 60
Remote Operation, Web Interface, 60
RoHS Directive (2002/95/EC), III
S.M.A.R.T., 39
S.M.A.R.T. (Self-Monitoring, Analysis and
Reporting Technology), 39
Secure Erase, 13, 34, 35
Software Update, 55
Software Updates, 56
Specifications, 2
Static IP Configuration, 52
Statistics, 38
System Settings, 45
Target, 26
Target Drives, 7
Technical Support, Logicube, III
Time Zone, 51
Types of Operation, 29
User interface (UI), 7
Warranty, Parts and Labor, I, III
Website, Logicube, III
Wipe, 12, 13, 34
Wipe Patterns, 34, 35
Zeroconf, 62
Logicube SCSI-NG User’s Manual 65
Page 74

Technical Support Information
For further assistance please contact
Logicube Technical Support:
by phone: (+1) 818.700.8488 8 a.m. – 5 p.m. PT, M-F
(excluding US legal holidays)
or by email: [email protected]
Software Attribution
Debian 8 (Jessie) (https://www.debian.org/)
Linux Kernel (3.10.87-rt80 mips64) (GPL v2) (http://www.kernel.org) (modified)
libcli (1.9.5) (LGPL v2.1) (https://github.com/dparrish/libcli) (modified)
ntfs-3g (1:2013.1.13AR.1-2ubuntu4) (GPL v2) (https://packages.debian.org/source/stretch/ntfs-3g)
(modified)
exfat (1.2.12) (GPL v2) (http://opensource.samsung.com/) modified
PDFJS (1.0.907) (Apache License v2.0) (https://github.com/mozilla/pdfjs-dist) (modified)
blistr (MIT) (http://github.com/idleberg/Bootstrap-Listr) (modified)
jstree (3.3.7) (MIT) (http://jstree.com/) (modified)
Logicube SCSI-NG User’s Manual 66
 Loading...