

Page 1

Zoom™ OMAP35x Development Kit
User Manual
Logic PD // Products
Published: May 2008
Last revised: December 2010
This document contains valuable proprietary and confidential information and the attached file contains source code, ideas, and
techniques that are owned by Logic Product Development Company (collectively “Logic PD’s Proprietary Information”). Logic PD’s
Proprietary Information may not be used by or disclosed to any third party except under written license from Logic Product
Development Company.
Logic Product Development Company makes no representation or warranties of any nature or kind regarding Logic PD’s Proprietary
Information or any products offered by Logic Product Development Company. Logic PD’s Proprietary Information is disclosed herein
pursuant and subject to the terms and conditions of a duly executed license or agreement to purchase or lease equipment. The only
warranties made by Logic Product Development Company, if any, with respect to any products described in this document are set
forth in such license or agreement. Logic Product Development Company shall have no liability of any kind, express or implied,
arising out of the use of the Information in this document, including direct, indirect, special or consequential damages.
Logic Product Development Company may have patents, patent applications, trademarks, copyrights, trade secrets, or other
intellectual property rights pertaining to Logic PD’s Proprietary Information and products described in this document (collectively
“Logic PD’s Intellectual Property”). Except as expressly provided in any written license or agreement from Logic Product
Development Company, this document and the information contained therein does not create any license to Logic PD’s Intellectual
Property.
The Information contained herein is subject to change without notice. Revisions may be issued regarding changes and/or additions.
© Copyright 2010, Logic Product Development Company. All Rights Reserved.
PN 1010047G Logic Product Development Company, All Rights Reserved i
Page 2

Zoom™ OMAP35x Development Kit User Manual
REV
EDITOR
DESCRIPTION
APPROVAL
DATE
Revision History
G JCA Moved all BSP information to their respective User Manuals; JCA 12/17/10
PN 1010047G Logic Product Development Company, All Rights Reserved ii
Page 3

Zoom™ OMAP35x Development Kit User Manual
Table of Contents
1 Introduction ........................................................................................................................................... 1
1.1 What You Will Need ......................................................................................................................... 1
2 Formatting a Bootable SD Card .......................................................................................................... 1
3 Update LogicLoader ............................................................................................................................. 4
3.1 Setup Tera Term .............................................................................................................................. 4
3.2 Connect the Kit to the Host PC ........................................................................................................ 4
3.3 Download New Version of LogicLoader ........................................................................................... 5
3.4 Update LogicLoader Using a Bootable SD card .............................................................................. 6
4 Recover Corrupt Boot NAND Flash .................................................................................................. 11
4.1 Recovery via SD Card Procedure .................................................................................................. 11
5 Software Documentation ................................................................................................................... 12
5.1 LogicLoader ................................................................................................................................... 12
5.2 Windows Embedded CE ................................................................................................................ 12
5.3 Linux ............................................................................................................................................... 12
PN 1010047G Logic Product Development Company, All Rights Reserved iii
Page 4

1 Introduction
This document continues where the Zoom OMAP35x Development Kit QuickStart Guide
concluded. The purpose of this document is to present information that may be useful after you’ve
unpacked your kit, run through the demo, and are ready to begin development work. This
document also points you to other resources depending upon your specific development needs.
1.1 What You Will Need
The following items will be needed for the procedures described in this document:
■ Zoom OMAP35x Development Kit
■ Host PC (this document was written assuming a Windows XP host PC)
■ SD card reader
■ SD card
■ Active Internet connection
■ Serial cable (included in development kit)
■ Terminal emulation program (e.g., Tera Term)
Zoom™ OMAP35x Development Kit User Manual
registered on Logic PD’s website
1
2 Formatting a Bootable SD Card
The OMAP35x processor supports booting from SD and several procedures in this document
walk you through a process using a bootable SD card. This section describes how to format an
SD card so the OMAP35x Development Kit will recognize it as a bootable device.
A requirement of the OMAP processor is that the SD card must be formatted without an extended
partition to boot properly. The built-in Windows formatting tool is not always able to do this. It has
been found that the HP USB Formatting Tool version 2.0.6 appears to be the best tool for
formatting an SD card so it can be used to boot an OMAP35x device. (NOTE: If you are using
Linux or have access to a Linux box, you can find instructions on
2
boot
on the Texas Instruments Embedded Processors Wiki.)
The most recent version of the tool available on HP's site doesn't seem to work as well as version
2.0.6. As such, the tool needs to be downloaded from any number of third-party websites. To find
these websites, perform a Google search for: HP formatting tool 2.0.6. (NOTE: As with
downloading anything from the Internet, use caution in what sites you visit and what you
download. Logic PD has no association with any of these websites and makes no guarantees to
their validity or the usability of downloads from their sites.)
1. After the HP USB formatting tool has been installed on your host PC, insert an SD card into
your USB card reader and open the formatting tool. (IMPORT ANT: Remember that
formatting an SD card will erase its entire contents; back-up the SD card’s contents before
continuing or select a card that doesn’t contain vital information.)
SD/MMC format for OMAP3
1
http://support.logicpd.com/auth/register_product.php
2
http://processors.wiki.ti.com/index.php/MMC_Boot_Format
PN 1010047G Logic Product Development Company, All Rights Reserved 1
Page 5
Zoom™ OMAP35x Development Kit User Manual
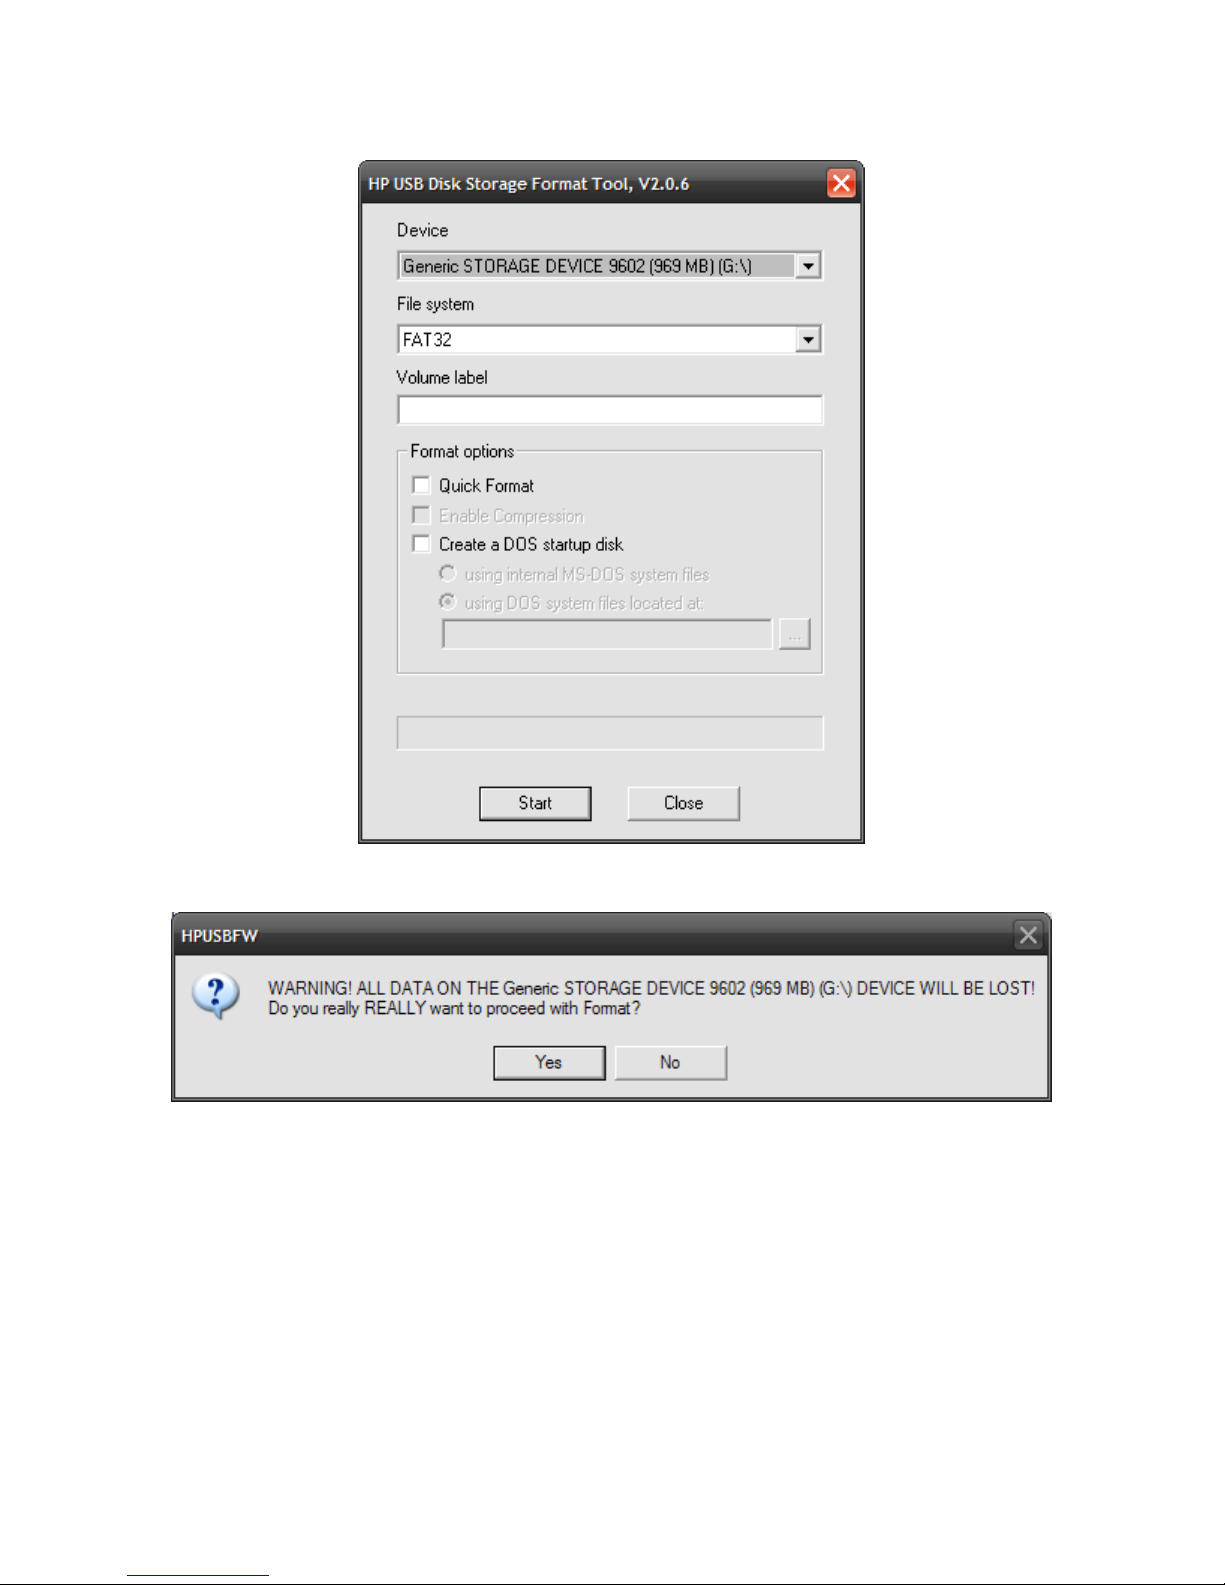
2. Select the SD card device and FAT32 from the File System drop-down menu. Click Start.
3. You will receive a warning that the contents of the card will be erased. Assuming you have
backed-up the contents of the SD card, click Yes.
PN 1010047G Logic Product Development Company, All Rights Reserved 2
Page 6
Zoom™ OMAP35x Development Kit User Manual
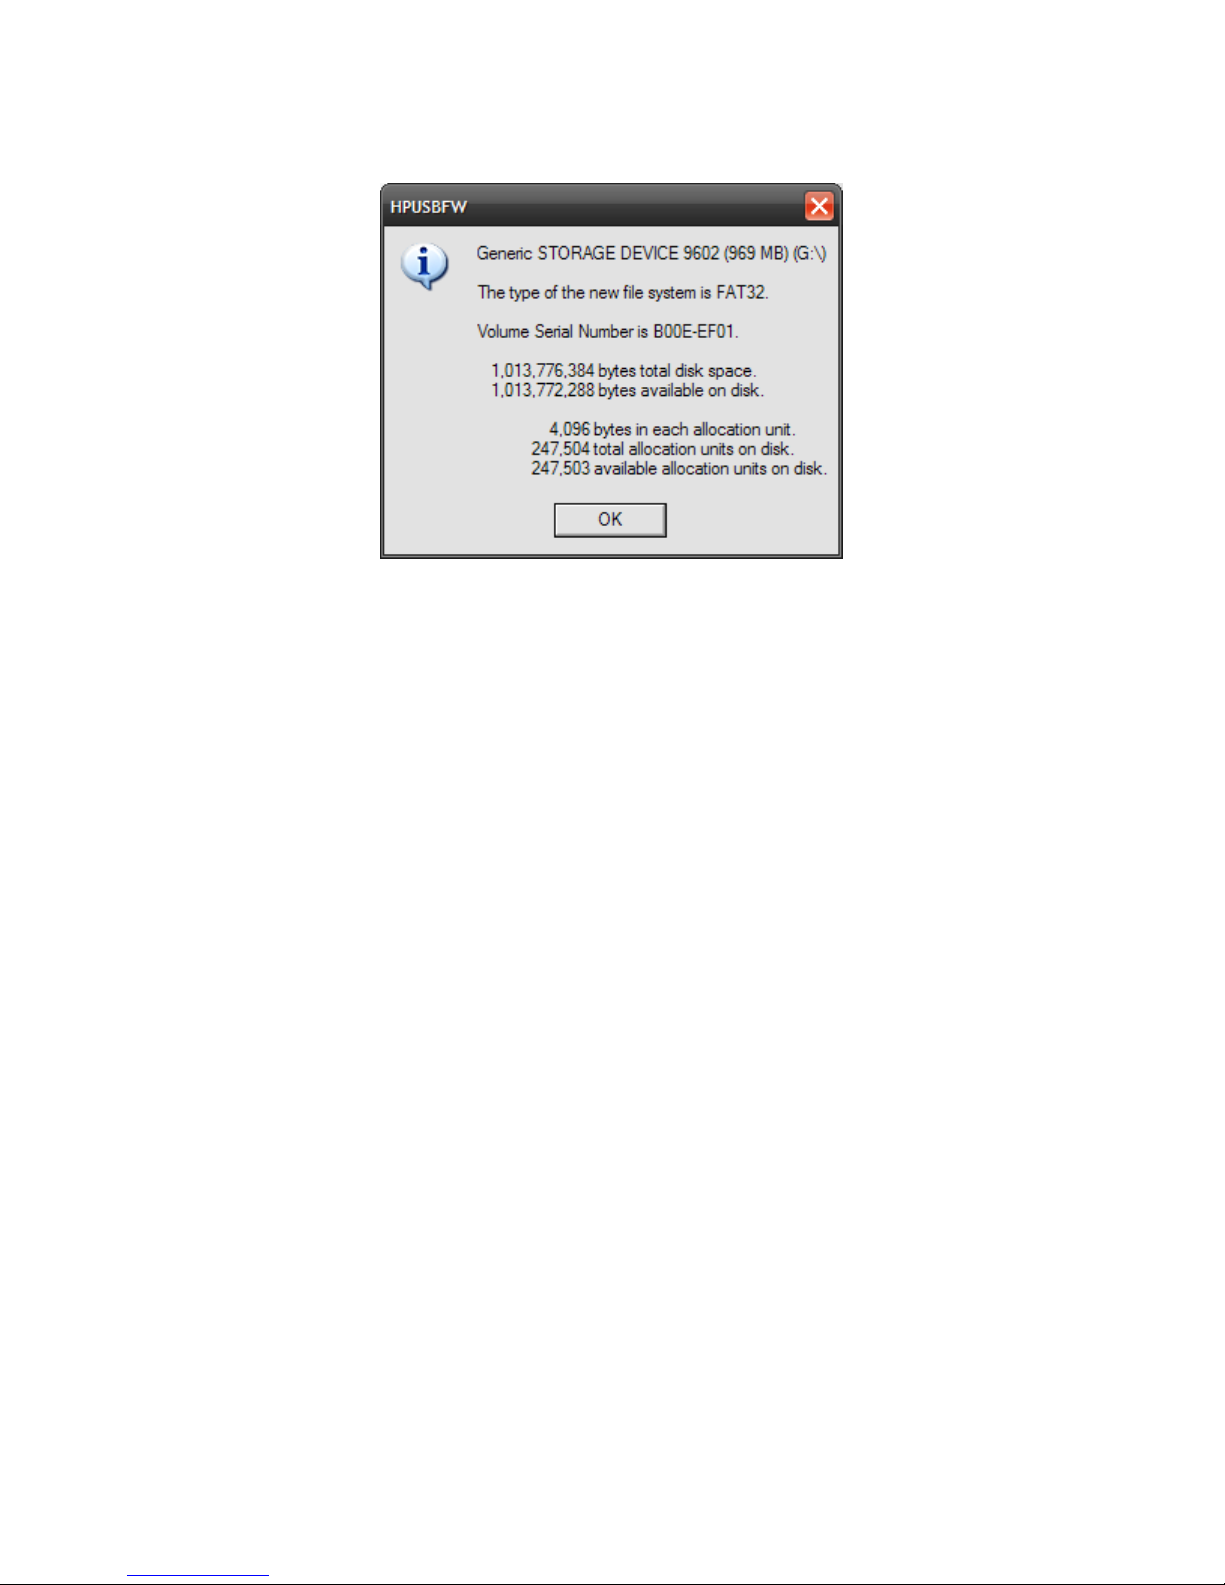
4. When formatting completes, you will receive a confirmation screen with the new file system
type and the space allocation on the card similar to the window shown below.
You are now ready to add LogicLoader files (see Section 3) or the NAND flash recovery files (see
Section 4) to the SD card and boot from SD.
PN 1010047G Logic Product Development Company, All Rights Reserved 3
Page 7
3 Update LogicLoader
This section will walk you through the process for updating the LogicLoader bootloader software
on your OMAP35x SOM-LV.
3.1 Setup Tera Term
Tera Term is a terminal emulation program available as a free download from the Internet. Logic
PD recommends the use of Tera Term over HyperTerminal as it appears to be a more stable
program; the instructions in this document assume the use of Tera Term.
All Tera Term settings are controlled by an .ini file that you can modify as needed to make your
time in Tera Term as efficient as possible. For example you can preset the port settings.
1. Start the Tera Term program
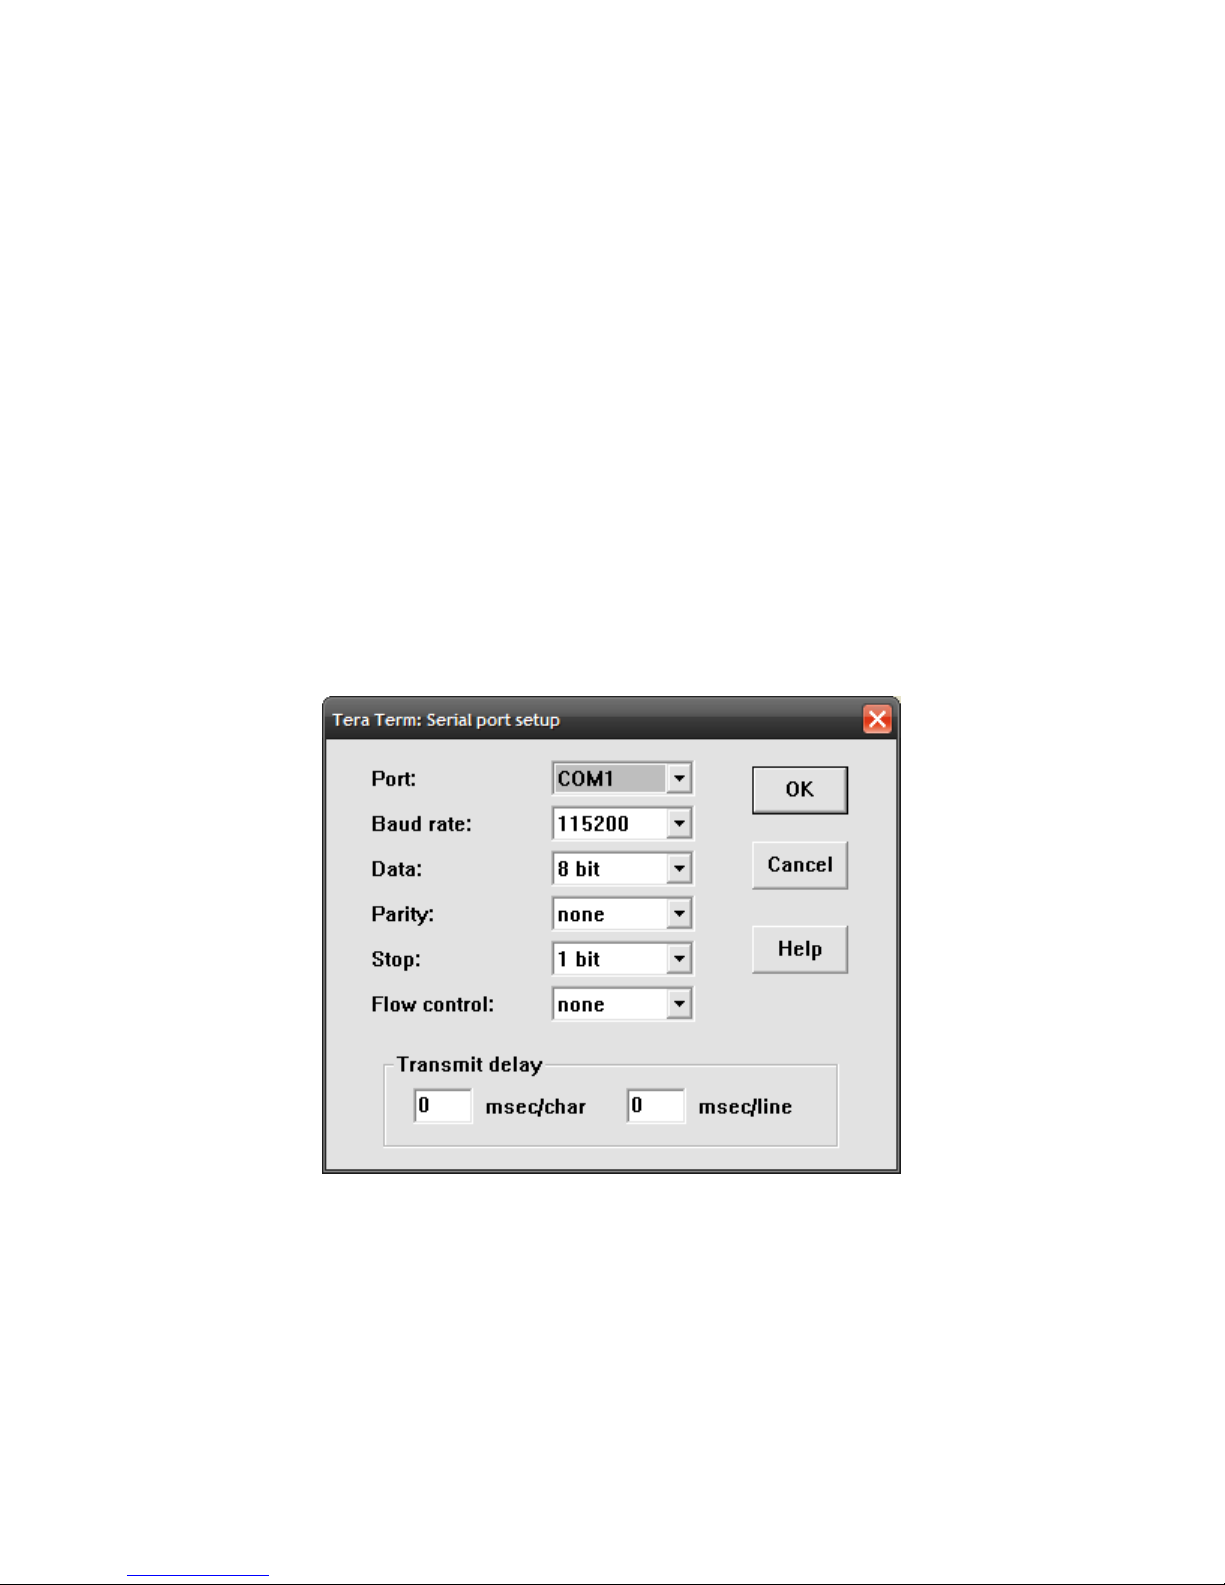
2. From the menu, select Setup > Serial port
3. Select the appropriate COM port for your workstation and then change the port settings to:
a. Baud rate: 115200
b. Data: 8 bit
c. Parity: None
d. Stop: 1 bit
e. Flow control: None
Zoom™ OMAP35x Development Kit User Manual
4. Click OK
3.2 Connect the Kit to the Host PC
1. Use the serial cable included with your kit to connect the serial port on the baseboard to the
appropriate port on your host PC.
PN 1010047G Logic Product Development Company, All Rights Reserved 4
Page 8
Zoom™ OMAP35x Development Kit User Manual
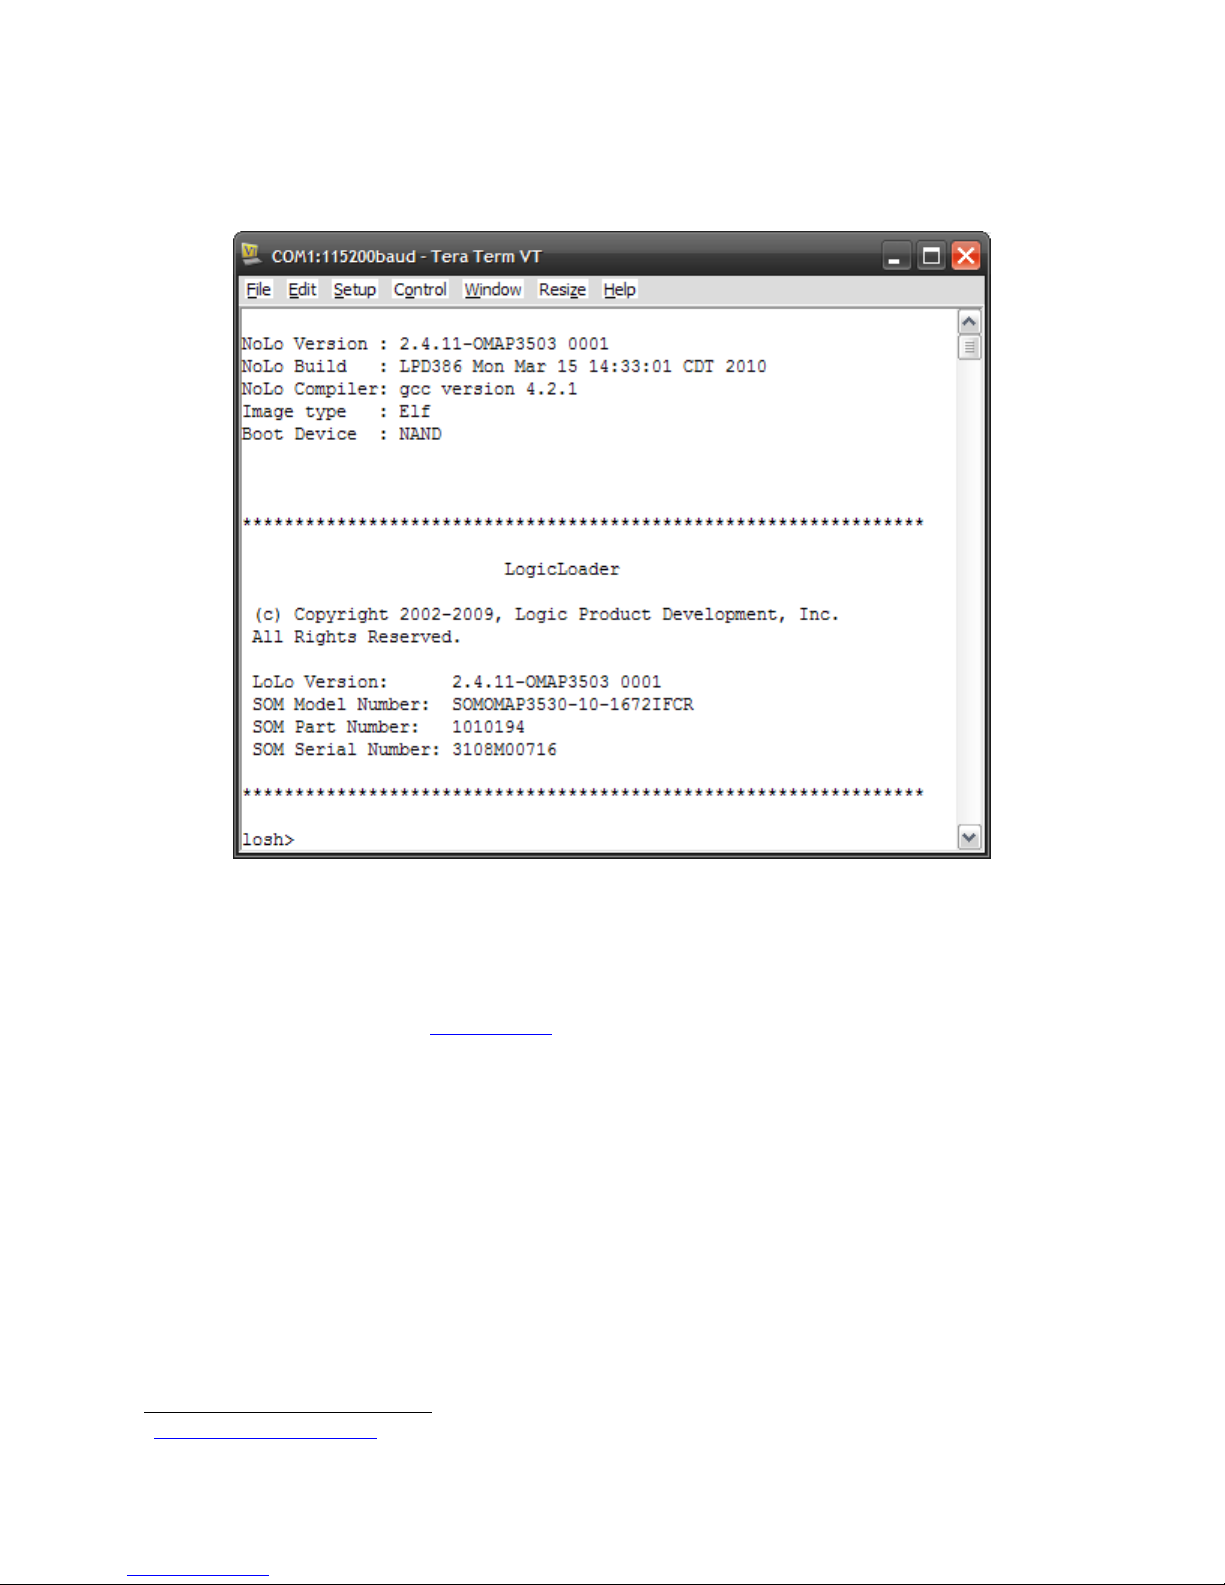
2. Power on your kit and hold down the v key on the keyboard. Doing this will provide specific
boot information in the LogicLoader output. For instance, in the image below you see that the
image type is Elf and it booted from the NAND device. This is a helpful trick to use to
determine if your development kit is booting from the onboard NAND flash or the SD card.
3. Take note of what LoLo Version number appears in this welcome prompt. This will help you
know if you need to upgrade to a new version.
4. Power off your kit.
3.3 Download New Version of LogicLoader
3
1. Log into Logic PD’s download site
2. Click on the All Downloads link for the OMAP35x Zoom Development Kit.
3. Scroll down until you find the section header LogicLoader Bootloader/Monitor.
4. Click on the + icon next to LogicLoader for the OMAP35x SOM-LV link; this expands the list
of all available LogicLoader versions. If the current version is newer than what is on your
OMAP35x SOM-LV, you should update.
5. Click on the version number marked (current) and save the file to your host PC.
6. After the.zip file finishes downloading, extract all files of the folder to a location on your host
PC that you can access later on.
Now that you have downloaded the latest version of LogicLoader to your computer, you can
update LogicLoader on your development kit using a bootable SD card.
3
http://support.logicpd.com/auth/
using your username and password.
PN 1010047G Logic Product Development Company, All Rights Reserved 5
Page 9
Zoom™ OMAP35x Development Kit User Manual
3.4 Update LogicLoader Using a Bootable SD card
1. Prepare a bootable SD card as described in Section 2.
2. Locate the LogicLoader files that you downloaded to your host PC (see Section 3.3).
3. Copy the MLO file from that folder to the SD card. IMPORTANT: This file must be the first
added to the SD card for the kit to boot properly.
4. Next, copy the lboot.elf file to the SD card.
5. Remove the SD card from your USB card reader and insert it into the SD card slot on your
OMAP35x Development Kit.
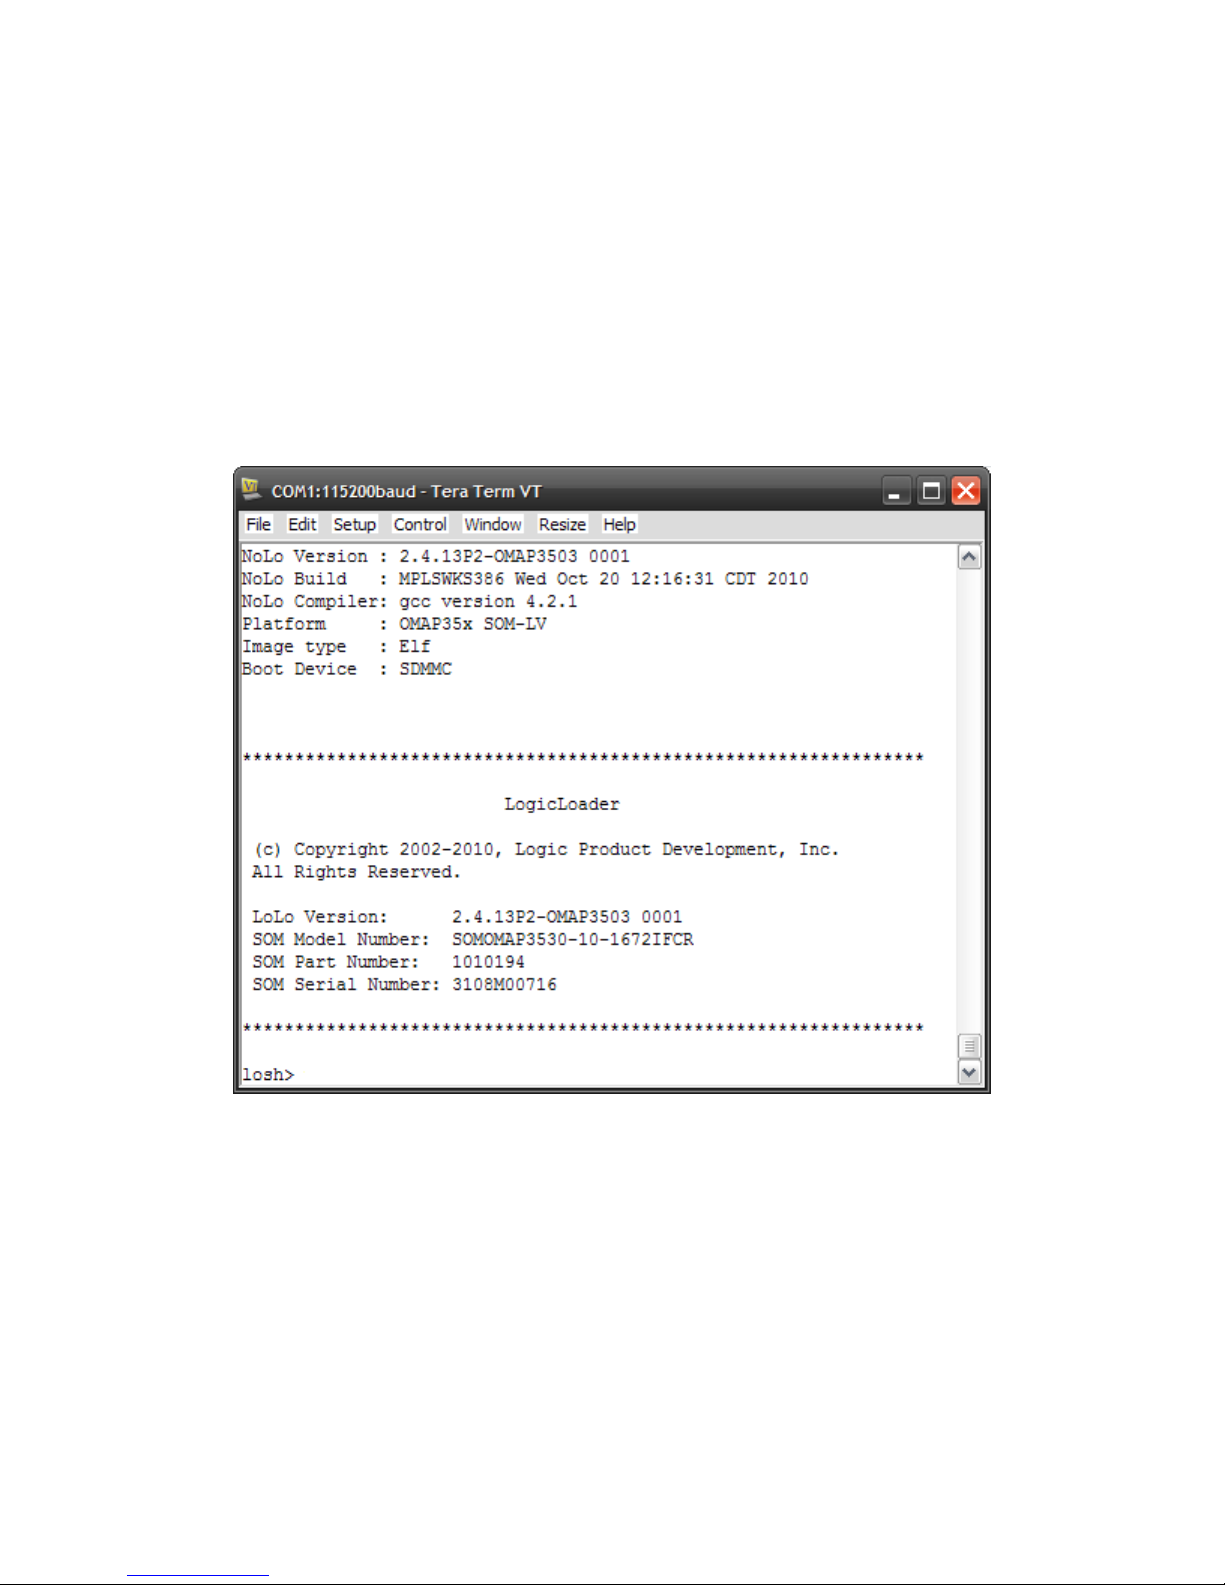
6. Press the POWER ON/OFF button to power the kit on and you should see a screen similar to
what is shown below. (Hint: You can hold down the v key on the keyboard during boot-up to
verify the Boot Device is SDMMC indicating the kit booted from the SD card.)
Notice that the LoLo Version number now shows the version you downloaded from the Logic
PD website. This is because you have booted from the SD card containing that version.
7. Because LogicLoader resides in NAND, it is necessary to erase the old LogicLoader on the
OMAP35x SOM-LV before updating. Type erase /dev/nand0 B0 B2048
Enter key.
PN 1010047G Logic Product Development Company, All Rights Reserved 6
and press the
Page 10
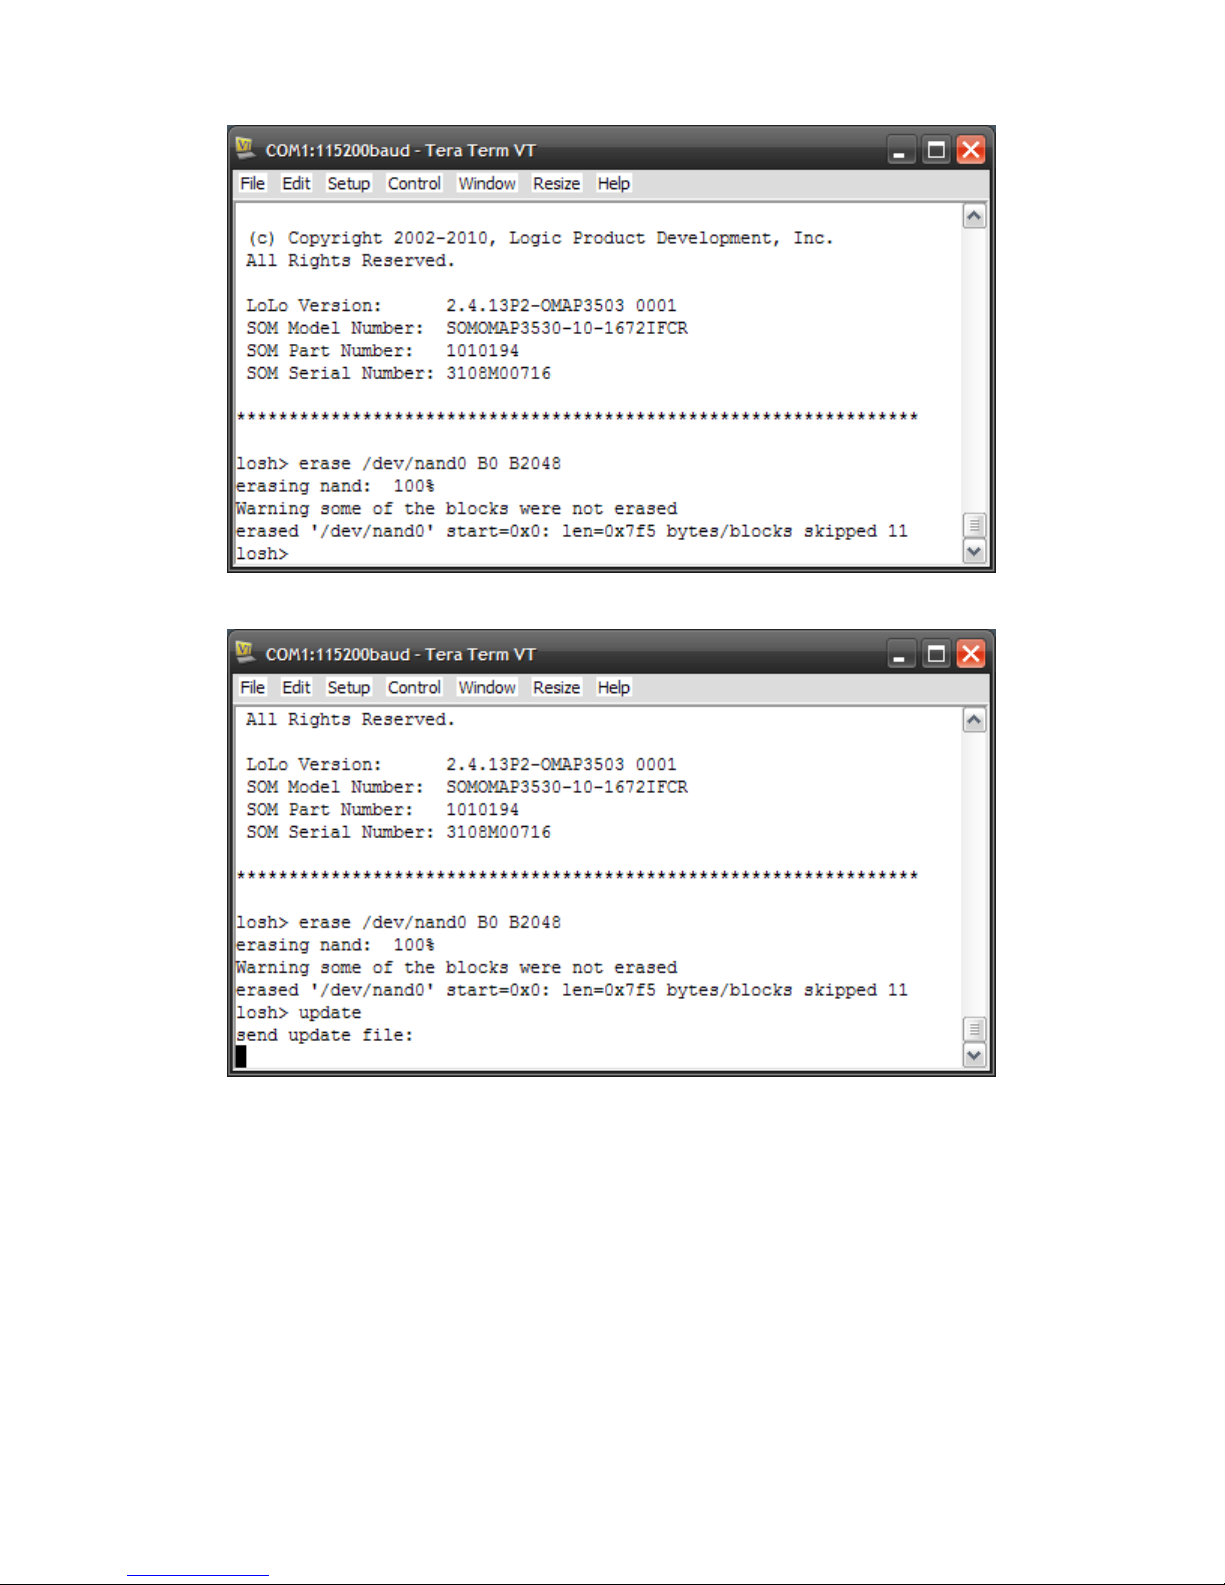
8. Type update and press the Enter key.
Zoom™ OMAP35x Development Kit User Manual
PN 1010047G Logic Product Development Company, All Rights Reserved 7
Page 11
Zoom™ OMAP35x Development Kit User Manual
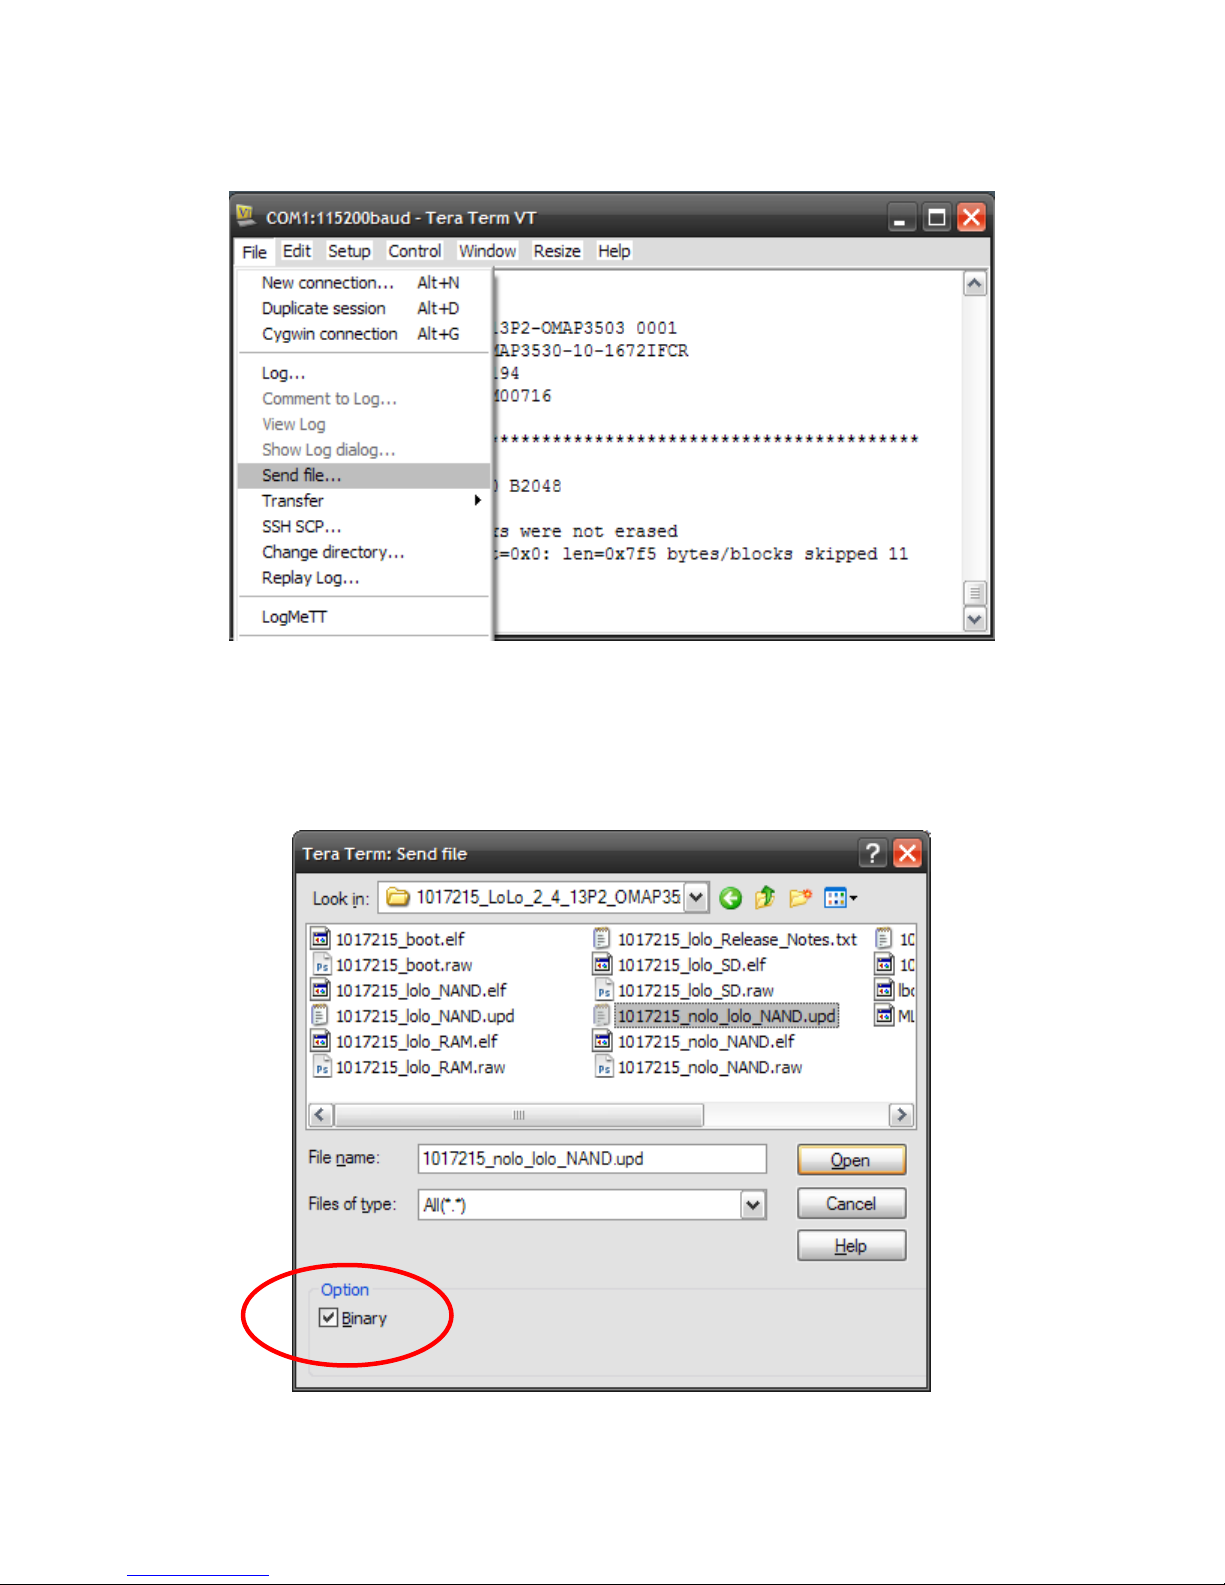
9. LogicLoader is waiting for you to send the new version over the serial port. From the menu,
select File > Send file to send the new LogicLoader version to your OMAP35x SOM-LV.
10. Navigate to the location where you extracted the LogicLoader files and select the file that
includes nolo_lolo_NAND.upd. This file contains both NoLo and LoLo components necessary
for updating LogicLoader. If you do not see a file that includes nolo_lolo_NAND.upd, please
refer to the Release_Notes.txt included in the LogicLoader version download for special
instructions.
11. Verify that the Binary checkbox is checked. Click Open.
PN 1010047G Logic Product Development Company, All Rights Reserved 8
Page 12
Zoom™ OMAP35x Development Kit User Manual
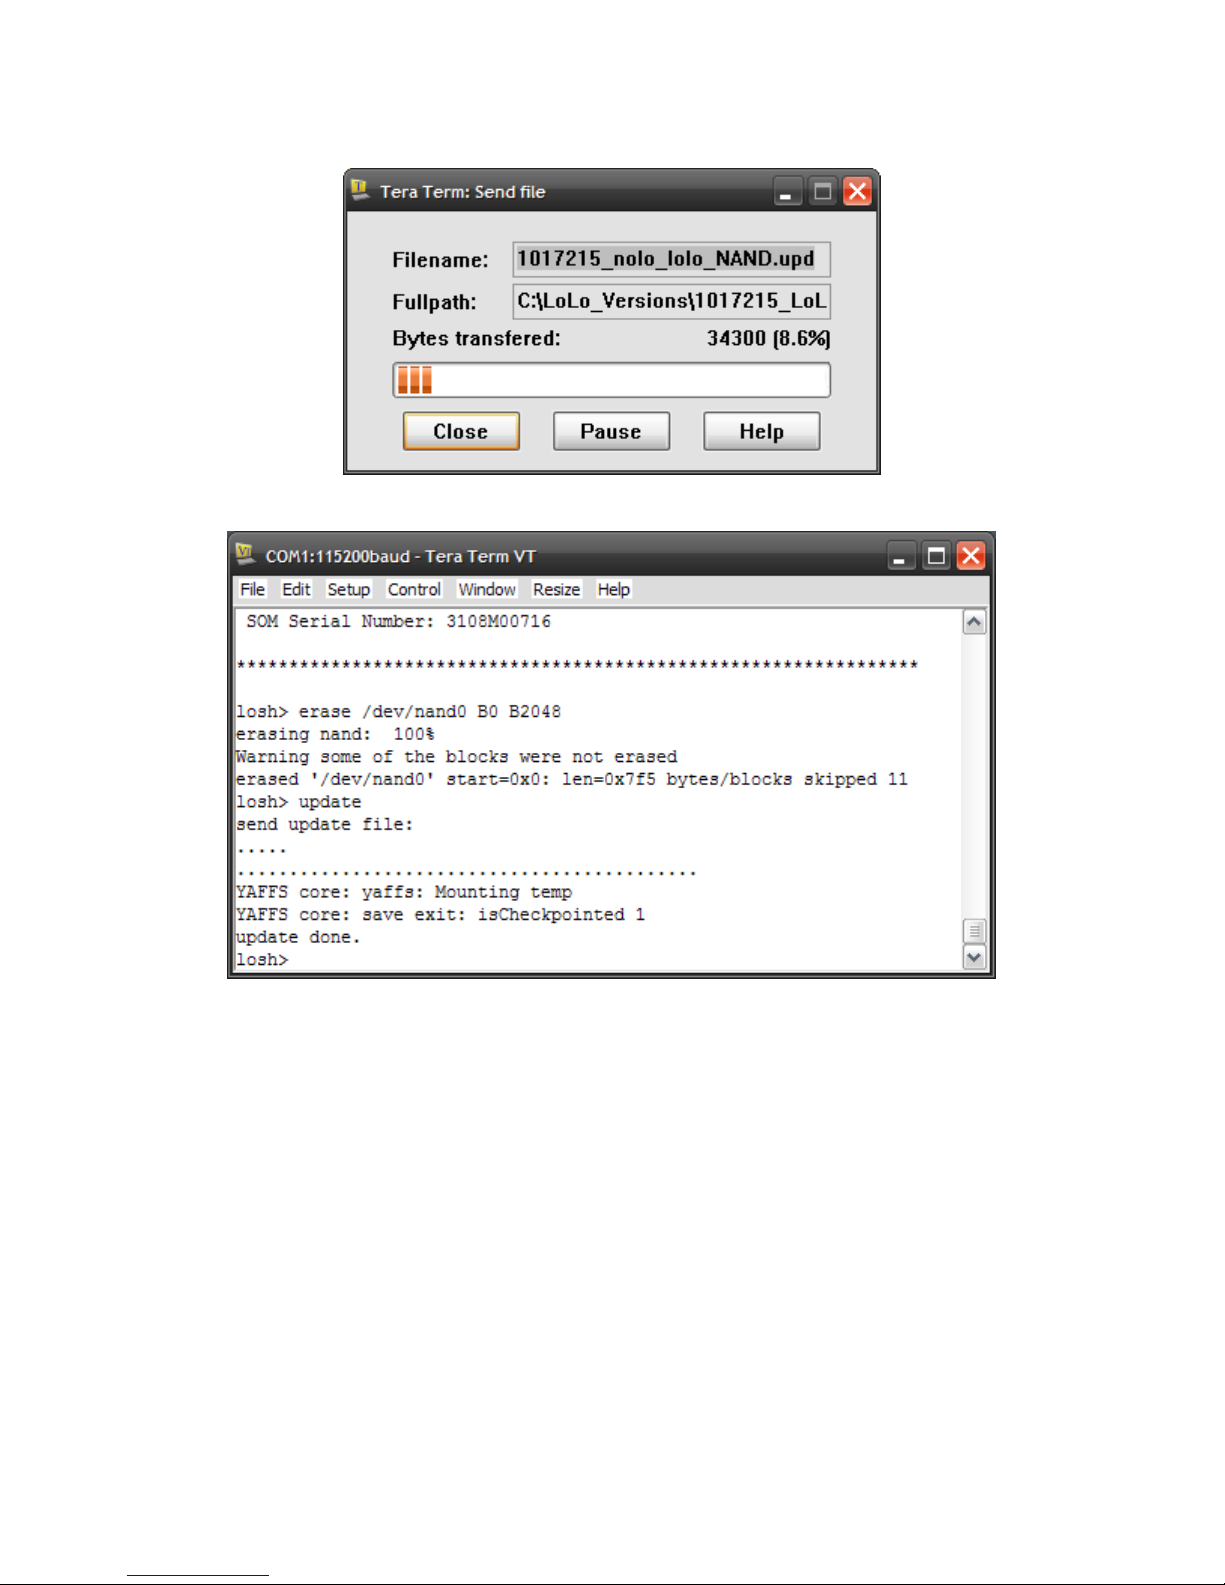
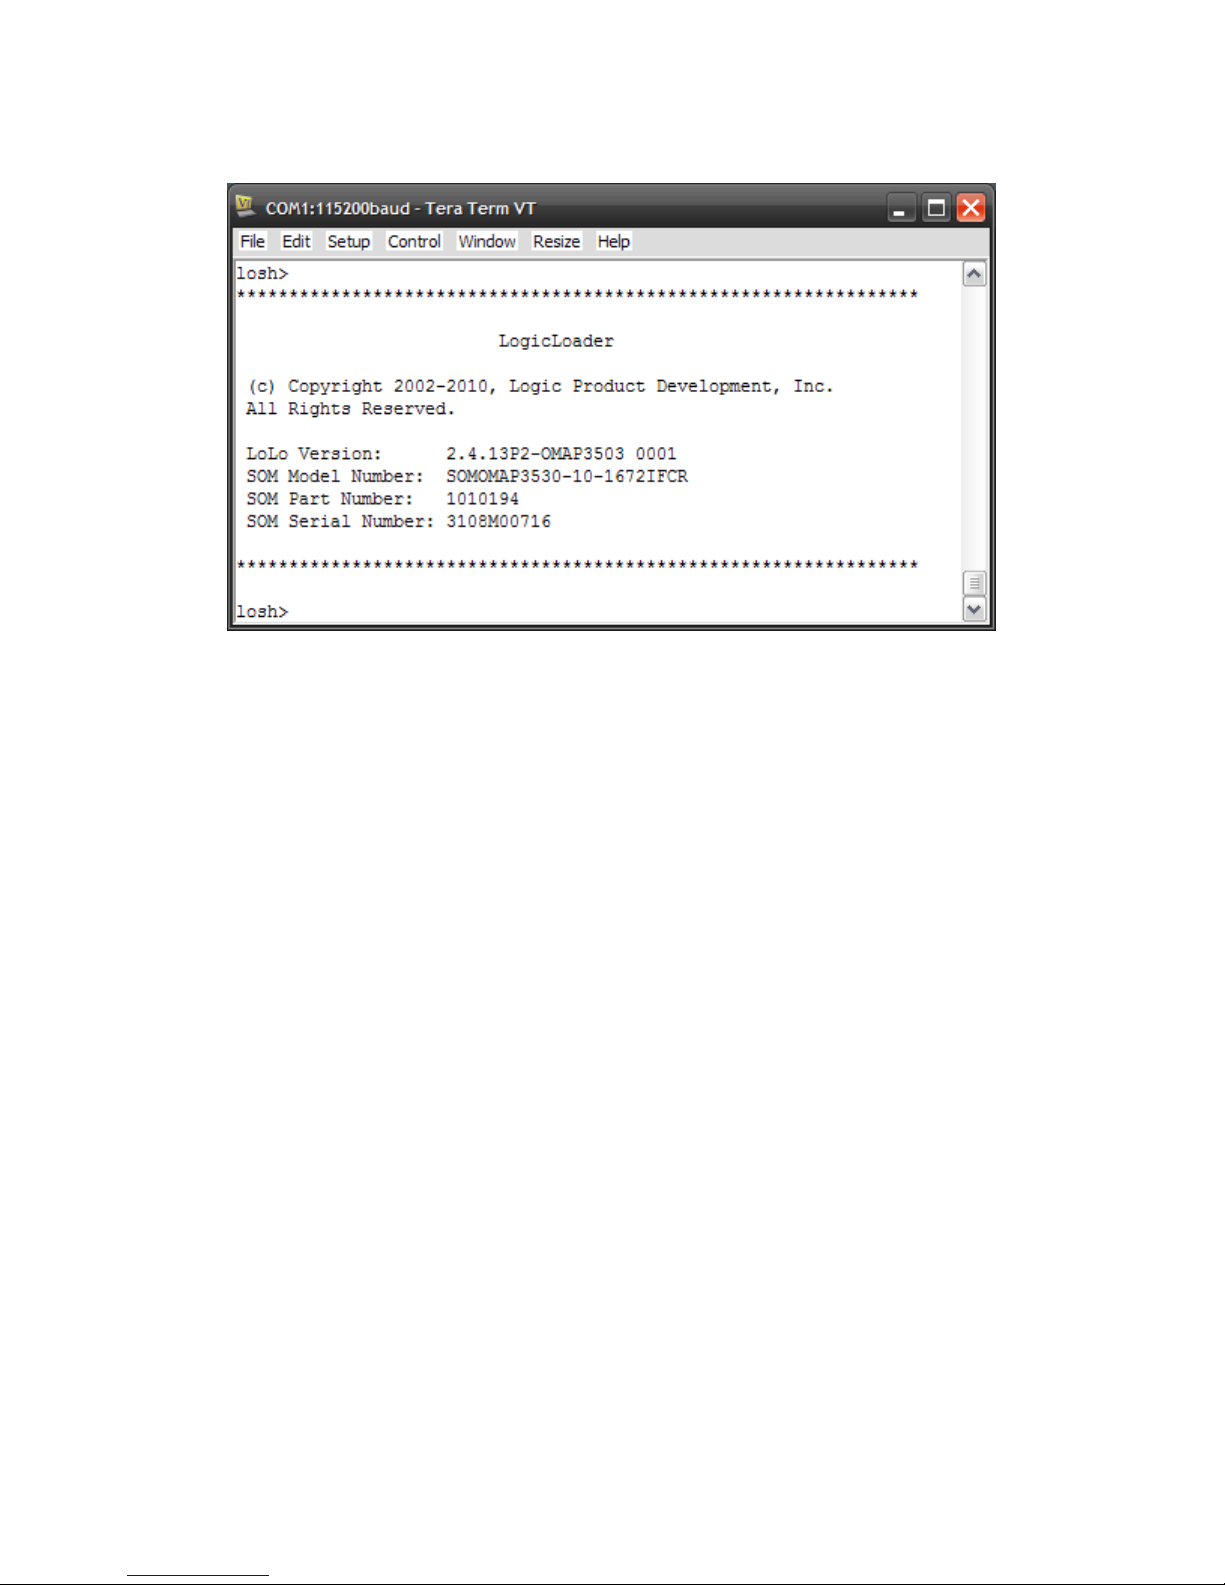
12. Tera Term will begin sending the file to the OMAP35x SOM-LV.
13. Verify that the download was successful by waiting for an update done message to appear.
PN 1010047G Logic Product Development Company, All Rights Reserved 9
Page 13
Zoom™ OMAP35x Development Kit User Manual
14. Remove the SD card from your development kit and press the RESET button on the
baseboard.
15. If the new version number is displayed, you now have the updated version of LogicLoader
installed on your OMAP35x SOM-LV.
PN 1010047G Logic Product Development Company, All Rights Reserved 10
Page 14

Zoom™ OMAP35x Development Kit User Manual
4 Recover Corrupt Boot NAND Flash
This section describes how to recover corrupt boot NAND flash on the OMAP35x Development
Kit by using a bootable SD card.
4.1 Recovery via SD Card Procedure
1. Prepare a bootable SD card as described in Section 2.
2. Log into Logic PD’s
download site using your username and password.
3. Click on the All Downloads link for the OMAP35x Zoom Development Kit.
4. Scroll down until you find the section header LogicLoader Bootloader/Monitor.
5. Click on the NAND Flash Recovery for OMAP35x SOM-LV link and save the ZIP file to your
host PC.
6. Extract all the files contained in the ZIP file; then copy the MLO file from that folder to the SD
card. IMPORTANT: This file must be the first added to the SD card for the kit to boot
properly.
7. Next, copy the remaining files to the SD card.
8. Eject the SD card from the host PC.
9. Power off the development kit and insert the SD card into the SD card socket on the
development kit.
10. Power on the development kit.
11. The development kit shows an image on the 4.3” LCD display while the NAND flash is being
reprogrammed.
12. When the process completes, the LCD display shows an updated image that indicates the
process is complete.
13. Remove the SD card from the development kit and press the RESET button on the
baseboard.
14. Your development kit should now boot from onboard NAND into the latest LogicLoader.
15. If the process fails, copy the entire Tera Term serial output and email the text to technical
support using our
4
http://support.logicpd.com/support/askaquestion.php
Ask A Question
4
web form.
PN 1010047G Logic Product Development Company, All Rights Reserved 11
Page 15

5 Software Documentation
Zoom™ OMAP35x Development Kit User Manual
A number of documents and resources are available from the Zoom OMAP35x Development Kit
downloads page
5
. Below is a listing of the main software documents.
5.1 LogicLoader
LogicLoader User Manual
■
how to use it
■
OMAP35x SOM-LV LogicLoader User Manual Addendum
the OMAP35x SOM-LV
■
LogicLoader Command Description Manual
■
OMAP35x LogicLoader Labs
basics
5.2 Windows Embedded CE
OMAP35x Windows CE 6.0 BSP User Manual
■
BSP for the OMAP35x platforms
5.3 Linux
OMAP35x Linux BSP User Manual
■
OMAP35x platforms
6
:: An overview of the LogicLoader bootloader, its capabilities, and
7
:: LogicLoader details specific to
8
:: Descriptions of all the LogicLoader commands
9
:: A series of informal labs that walk through LogicLoader
10
:: An overview of the Logic PD Windows CE
11
:: An overview of the Logic PD Linux BSP for the
5
http://support.logicpd.com/auth/downloads/OMAP35x%20Zoom%20Development%20Kit/
6
http://support.logicpd.com/downloads/1094/
7
http://support.logicpd.com/downloads/1103/
8
http://support.logicpd.com/downloads/1095/
9
http://support.logicpd.com/downloads/1096/
10
http://support.logicpd.com/downloads/1347/
11
http://support.logicpd.com/downloads/1346/
PN 1010047G Logic Product Development Company, All Rights Reserved 12
 Loading...