

Logicom-sanyo XACTI VPC-WH1EX, XACTI VPC-WH1 User Manual

INSTRUCTION MANUAL
VPC-WH1EX
VPC-WH1
Dual Camera
Important note
This manual explains how to safely operate the VPC-WH1EX, VPC-WH1 and
VPC-WH1GX.
Any information regarding only one of these products will be labeled as such.
Please read these instructions carefully before using the camera.
Make sure to read and understand the separate booklet “SAFETY MANUAL”.
Keep this manual in a safe place for later reference.
VPC-WH1GX

Warning
TO PREVENT THE RISK OF FIRE OR ELECTRIC SHOCK, DO NOT
EXPOSE THIS APPLIANCE TO RAIN OR MOISTURE.
FOR AMERICAN USERS
The following advisory is included in accordance with the laws of the State of
California (USA):
WARNING:
This product contains chemicals, including lead, known to the State of
California to cause cancer, birth defects or other reproductive harm. Wash
hands after handling.
i This equipment has been tested and found to comply with the limits for a
Class B digital device, pursuant to Part 15 of the FCC Rules. These limits
are designed to provide reasonable protection against harmful interference
in a residential installation. This equipment generates, uses and can
radiate radio frequency energy and, if not installed and used in accordance
with the instructions, may cause harmful interference to radio
communications. However, there is no guarantee that interference will not
occur in a particular installation. If this equipment does cause harmful
interference to radio or television reception, which can be determined by
turning the equipment off and on, the user is encouraged to tr y to correct
the interference by one or more of the following measures:
h Reorient or relocate the receiving antenna.
h Increase the separation between the equipment and receiver.
h Connect the equipment into an outlet on a circuit different from that to
which the receiver is connected.
h Consult the dealer or an experienced radio/TV technician for help.
i Changes or modifications not expressly approved by the party responsible
for compliance could void the user’s authority to operate the equipment.
Declaration of Conformity
Model number: VPC-WH1
Trade Name: SANYO
Responsible party: SANYO FISHER COMPANY
Address: 21605 Plummer Street, Chatsworth, California 91311
Telephone No.: (818) 998-7322
This device complies with Part 15 of the FCC Rules. Operation is subject
to the following two conditions:
(1) this device may not cause harmful interference, and
(2) this device must accept any interference received, including interfer-
ence that may cause undesired operation.
i English

FOR CANADIAN USERS
i This Class B digital apparatus complies with Canadian ICES-003.
FOR EU USERS
The symbol mark and recycling systems described below apply to EU
countries and do not apply to countries in other areas of the world.
Your SANYO product is designed and manufactured with high quality
materials and components which can be recycled and/or reused.
The symbol mark means that electrical and electronic equipment, batteries
and accumulators, at their end-of-life, should be disposed of separately from
your household waste.
Note:
If a chemical symbol is printed beneath the symbol mark, this chemical
symbol means that the battery or accumulator contains a heavy metal at a
certain concentration. This will be indicated as follows: Hg: mercury, Cd:
cadmium, Pb: lead
In the European Union there are separate collection systems for used
electrical and electronic equipment, batteries and accumulators.
Please, dispose of them correctly at your local community waste collection/
recycling centre.
Please, help us to conserve the environment we live in!
SANYO FISHER Sales (Europe) GmbH
Stahlgruberring 4, D-81829 München, Germany
SANYO Electric Co., Ltd.
1-1, Sanyo-cho, Daito City, Osaka 574-8534, Japan
FOR RUSSIAN USERS
This product is certified by an official cer tification company
which is authorized by the Russian Federation.
English ii

HOW TO READ THIS MANUAL
For first-time users
Please read the sections on “SETUP” and “SIMPLE” in this manual,
as well as the included “QUICK GUIDE” to familiarize yourself with
your camera’s operation.
↓
To use the various camera features
Please read the sections on “NORMAL” and “OPTION SETTINGS” in
this manual. To view on a TV, please read the section on “OTHER
DEVICES AND CONNECTIONS” in this manual. To connect to a
computer, please see the “Xacti Software CD INSTRUCTION
MANUAL”.
↓
To use additional features
To use a computer to edit the recorded data or to save data to a DVD,
please read the “Xacti Software CD INSTRUCTION MANUAL”.
You may find the answers to questions or problems concerning camera
operation in the sections “COMMONLY ASKED QUESTIONS” (page 146)
and “TROUBLESHOOTING” (page 154).
Symbols used in this manual
HINT Points giving some extended instructions or special points to pay
CAUTION Points that require special attention.
(page xx) Refer to the page indicated for detailed information.
attention to.
iii English
SHOOT, PLAY BACK AND SAVE
Preparing the camera
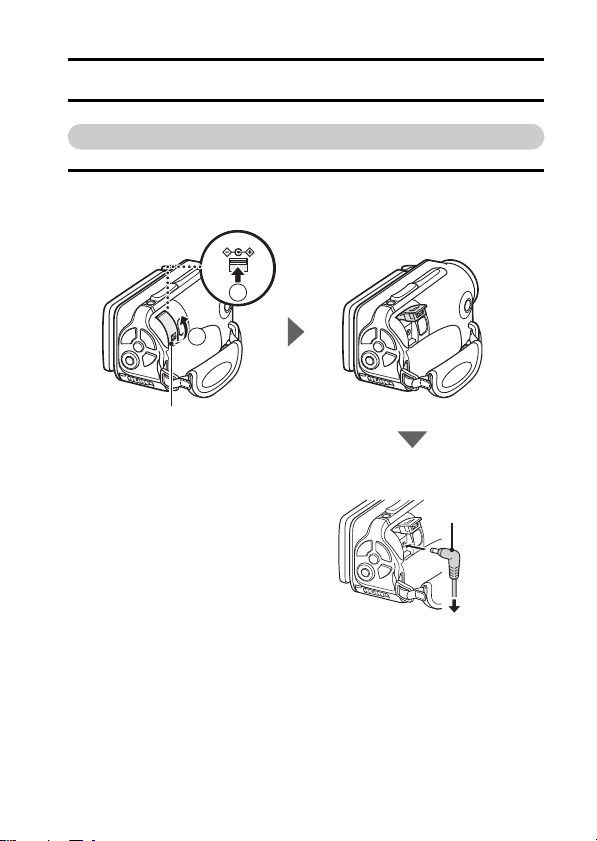
1 Connect the AC adaptor to the camera.
1 Unlock the DC IN terminal cover.
DC IN 5V
1
2
2 Open the DC IN terminal cover.
AC adaptor
To power outlet
English iv
SHOOT, PLAY BACK AND SAVE
Shooting
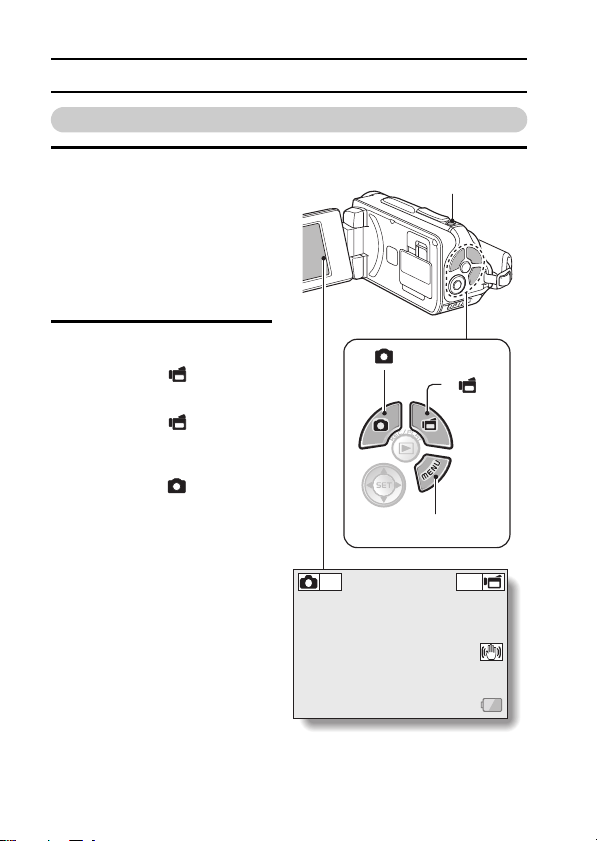
1 Press the ON/OFF button
for at least 1 second to turn
the camera on.
h If the screen to set the
date and time appears,
press the MENU button 2
times to cancel it.
For how to set the date
and time, see page 34.
2 Record.
To record a video clip:
h Press the [ ] button to
begin recording a video
clip.
h Press the [ ] button
again to end the
recording.
To take a photo:
h Press the [ ] button.
h A still image is captured.
ON/OFF
button
[ ] button
[]
button
MENU button
2
M
HD-SHQ
1031 00:55:58
v English
Before capturing those important shots, be sure to first take a
test shot to confirm that your camera is set up and ready to go
i
Sanyo declines any claim for compensation for recorded contents etc. in case
of photographing or recording failure due to a chance camera or card flaw.
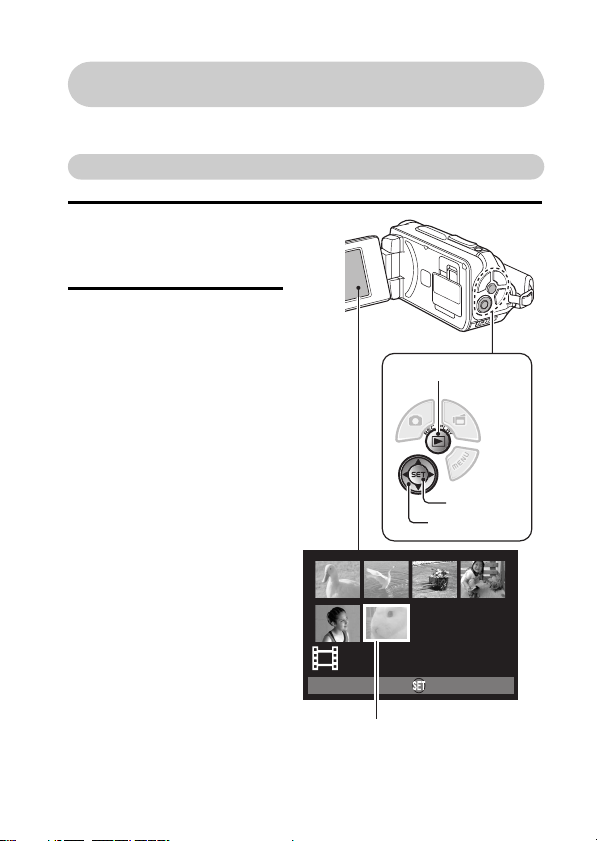
Playback
1
Press the REC/PLAY
button.
h
The display changes to
the Playback Screen.
2
Select the image to play
back.
h Use the arrow keys to
move the orange frame
to the image you wish to
play back.
h The image information
for the framed image is
shown at the bottom of
the screen.
REC/PLAY button
SET button
Arrow keys
100-0006
10.2MB 00:00:08
HD-SHQ
OK
Orange frame
English vi

SHOOT, PLAY BACK AND SAVE
3 Press the SET button.
<Video clip playback>
h Playback begins.
<To return to the recording mode>
h Press the REC/PLAY button.
When you are finished using the camera...
Press the ON/OFF button for at least 1 second to turn the camera off.
To continue to the next operation...
Please confirm that your computer is connected to the Internet.
vii English

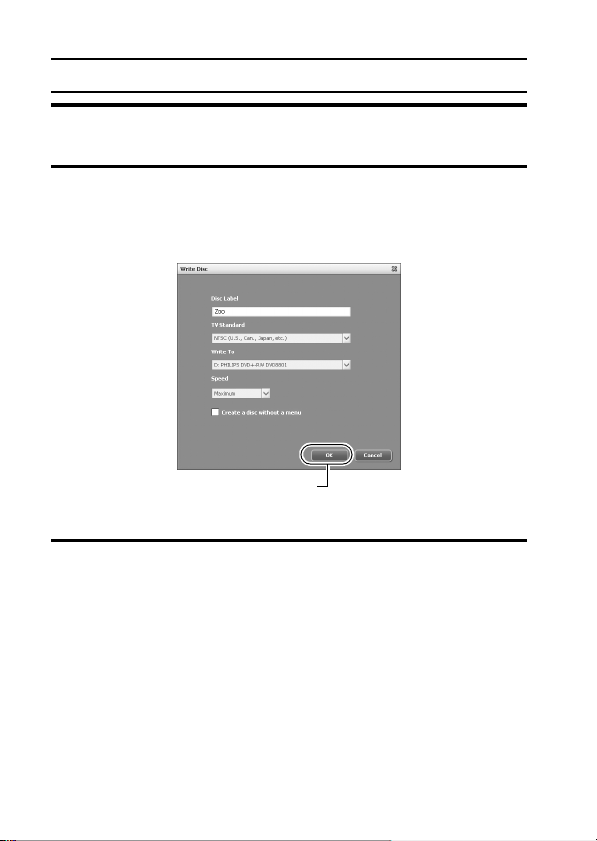
Burn your recorded video clips onto a DVD
(Windows Vista)
Using the supplied CD-ROM (Xacti Software CD), you can store your
captured images on a DVD. Detailed information about the Xacti
Software CD can be found on page 4 in the Xacti Software CD
INSTRUCTION MANUAL.
Install application program
1 Set the supplied CD-ROM in your computer’s DVD drive.
h The installation window opens.
2 Click on [TotalMedia Extreme for SANYO].
h After clicking on the application program, follow the instructions shown
on the monitor to install the program.
h When the window appears requesting to restart your computer, click
the [Finish] button to reboot.
3 Remove the CD-ROM from the computer’s DVD drive.
English viii
SHOOT, PLAY BACK AND SAVE
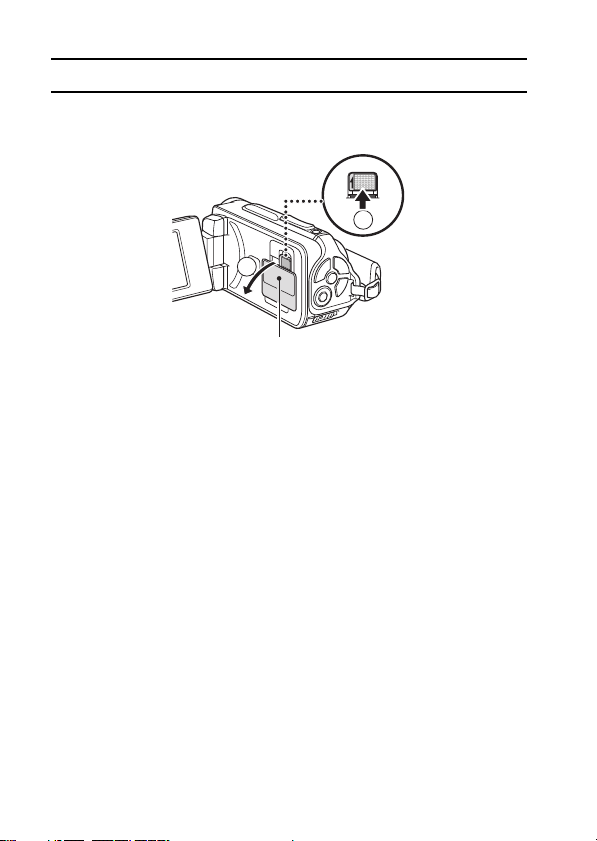
Open the card slot cover
1 With the card slot cover lock pushed toward the [UNLOCK]
side...
2
2 Open the card slot cover
UNLOCK
1
ix English
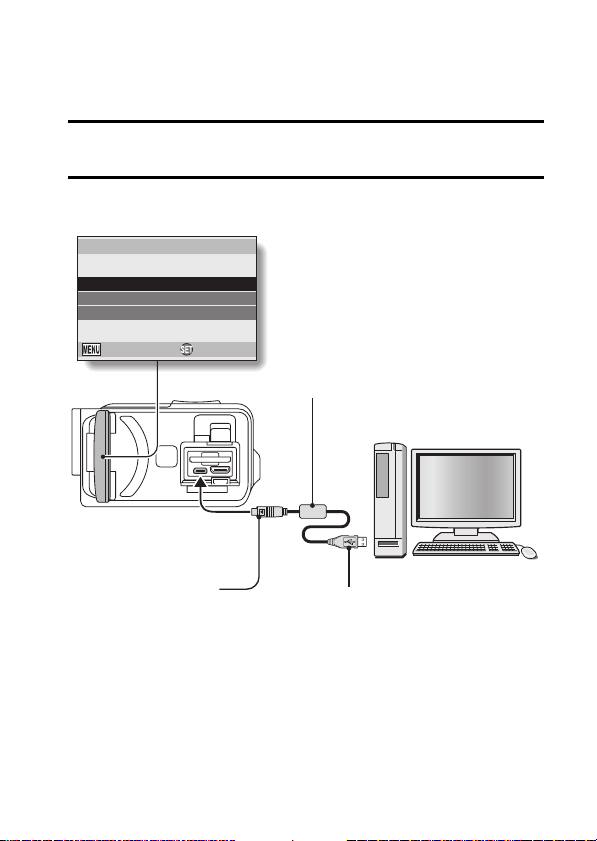
Connect your camera to a computer
Connect your camera to a computer, and copy the desired files to the
computer.
1 Use the supplied dedicated USB interface cable to connect your
camera to the computer.
2 Turn on the camera.
h The USB Connection Screen appears on the camera’s monitor.
USB CONNECTION
COMPUTER
PRINTER
CANCEL
CANCEL
To USB/AV terminal
OK
Supplied dedicated USB
interface cable
To USB connector on the
computer
English x

SHOOT, PLAY BACK AND SAVE
3 Select “COMPUTER”, and press the SET button.
h The screen to select the computer connection mode appears.
4 Select “CARD READER”, and press the SET button.
h The message [Found New Hardware] appears in the task tray,
showing that the camera is recognized as a drive.
h The card is recognized (mounted) as a disk, and the [XACTI (E:)] icon
appears in the [My Computer] window.
h The drive name (E:) may be different on your computer.
5 Copy the files from the card to the computer’s hard disk.
h The data recorded with your camera are stored in the following folder.
You can specify the folder on the hard disk to which to copy the files.
XACTI (E:)\DCIM\***SANYO
(*** represents numbers [page 12 in the Xacti Software CD
INSTRUCTION MANUAL]).
h The drive name (E:) may be different on your computer.
HINT
i For information on how to copy all the camera’s still image and video clip
files at once, please see the support pages at the website below:
http://www.sanyo-dsc.com/
xi English

Burn video clips onto a DVD (For Windows Vista
users)
Here’s how to write your recorded data onto a DVD in the mpeg2 format. For
information on other operations, please see the Help file for TotalMedia
Extreme. To access the TotalMedia Extreme Help file, click the [?] Help button
on the TotalMedia Extreme start screen.
1 Insert a blank DVD in your computer’s DVD drive.
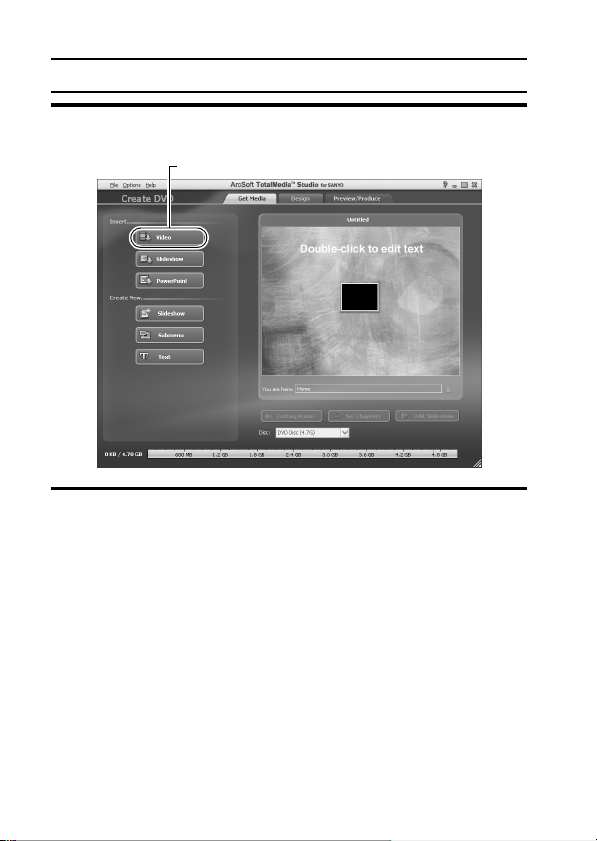
2 Double-click the [TotalMedia Extreme] icon on your desktop.
h The TotalMedia Extreme application starts, and the startup page
appears.
[Create video] icon
English xii
SHOOT, PLAY BACK AND SAVE
3 Click the [Create video] icon.
h The “Create DVD” window appears.
[Video] button
4 Click the [Video] button in the “Insert” field.
h The screen to select the video clip file to write to a DVD appears.
h Click the file you wish to write to a DVD.
h To select multiple files, keep the [Ctrl] key pressed while selecting
files.
xiii English

5 Click on the [Open] button.
h The file(s) selected in step 4 and the DVD file capacity appear in the
“Create DVD” window.
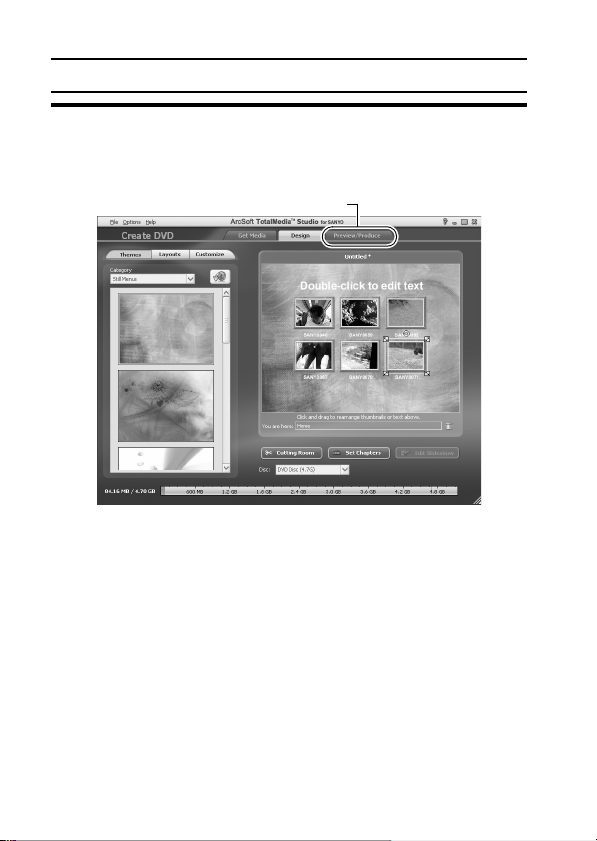
[Design] tab
English xiv
SHOOT, PLAY BACK AND SAVE
6 Click the [Design] tab.
h The window appears to design the title menu for when the DVD is
played back.
h Select the desired design.
[Preview/Produce] tab
xv English
7 Click the [Preview/Produce] tab.
h A warning regarding the image quality of the preview image appears.
8 Click the [OK] button.
h The screen to begin burning to disk appears.
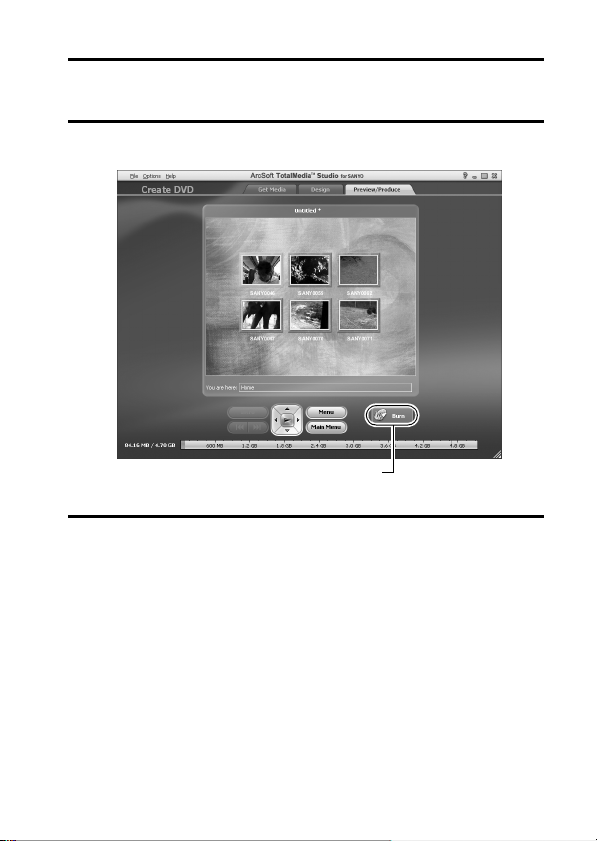
[Burn] button
9 Double-click the [Burn] button.
h The “save project” confirmation window appears.
English xvi
SHOOT, PLAY BACK AND SAVE
10 Click the [Yes] button.
h Enter a name for the project file.
11 Click the [Save] button.
h The “Burn disk” window appears.
[OK] button
12 Click the [OK] button.
h Burning begins.
h Depending on your computer’s capacity, it may take some time to burn
a large file.
h When burning is completed, the DVD is ejected from the DVD drive.
xvii English

13 Click the [OK] button.
14 Click the [×] button to close the “Create DVD” window.
h The TotalMedia Extreme top page appears.
15 Click the [×] button to close the startup page.
h TotalMedia Extreme is exited.
English xviii

SHOOT, PLAY BACK AND SAVE
CAUTION
Does the window requesting confirmation to enable the MPEG-2 Codec
appear?
When using TotalMedia Extreme for the first time, a window requesting you to
confirm activation of the MPEG-2 Codec appears during the procedure. The
MPEG-2 Codec must be activated in order to burn files to a DVD. Complete
the following procedure to activate the MPEG-2 Codec.
i Note that your computer must be connected to the Internet in order to
complete this procedure. Please confirm that your computer is connected
to the Internet.
1 When the window requesting confirmation to activate the MPEG-2
Codec appears, click the [Yes] button.
h The ArcSoft website appears.
2 Click on [Special downloads].
h The window appears for you to enter your email address, name, license
ID, etc.
h Enter the correct information.
3 Click the [Submit] button.
h Soon thereafter, the URL for the download to activate the MPEG-2
Codec will be sent to the email address you entered in step 2.
4 Click the download URL link.
h The program will be downloaded to your computer.
5 Double-click the icon for the downloaded program.
h Follow the instructions to activate the MPEG-2 Codec.
h DVD burning via the TotalMedia Extreme program is now enabled.
h When the procedure above has been completed, continue to the
procedure to burn to DVD.
United States/Canada
Tel: +1-510-979-5599
Web: http://www.arcsoft.com/support/
Email support: http://www.arcsoft.com/public/
content_page.asp?pageID=83
Hours: M-F 9:00am - 5:00pm
(Pacific Standard Time, excluding holidays observed by ArcSoft)
Language: English
xix English

Europe
Tel: +353 (0) 61-702087
Web: http://www.arcsoft.com/en/support
Email support: eurosupport@arcsoft.com
Hours: M-Th 8:30am - 5:30pm GMT
(excluding holidays observed by ArcSoft Affiliates)
F 8:30am - 5:00pm GMT
(excluding holidays observed by ArcSoft Affiliates)
(Adjusted for daylight savings time when applicable)
Languages: English, French, Italian, German, Spanish and Dutch
China
Tel: +86 (0) 571-88210575
Web: http://www.arcsoft.com.cn/support
Email support: support@arcsoft.com.cn
Hours: M-F 8:30am-5:30pm
(Beijing local time) (excluding holidays observed by ArcSoft)
Language: Chinese
English xx

How was that? The convenient accessories not only let you immediately view
images captured with the camera, but you can also upload images to your
computer and create your original DVDs. Read the following explanations to
find out how you can fully enjoy your camera’s digital video feature.
xxi English

Important!
This camera complies with JIS IPX8 (formerly JIS protection grade 8)
waterproof standard and can be used in water. Note, however, that
failing to heed the following precautions may result in damage or injury
that is not covered by the warranty. Please take the time to carefully
read and heed the following cautions.
Concerning your camera’s
waterproof feature
NOTE
k Before using the camera
i
When closing the battery cover, card slot cover, and
DC IN terminal cover, make sure that no foreign object
such as sand, hair, dust, etc. is caught in the rubber
seal.
i
Make sure that the battery cover, card slot cover and
DC IN terminal cover are completely and securely
closed to prevent water from getting inside the camera
and damaging it.
i
Please note that the camera accessories are not
water proof.
k Cautions concerning use in water
i
The waterproof properties of the camera apply to fresh
water and saltwater only; they do not apply to cleaning
substances, chemicals or water from spas, etc. In
case of a splash, immediately wipe off any moisture.
i
Do not immerse in water at a depth greater than 3.0 m
(9.84 ft.).
i
Do not subject the camera to high-pressure water.
i
Do not immerse in water for longer than 60 minutes.
After 60 minutes of use in water, allow it to dry for at
least 10 minutes.
i
Do not immerse in water that is warmer than 40°C
(104
°
F).
i
Do not open and close the battery cover, card slot
cover, or DC IN terminal cover when the camera is wet
or while it is immersed in water.
i
Do not open and close the battery cover, card slot cover, or DC IN terminal
cover with wet hands.
i
Do not open the battery cover, card slot cover, or DC IN terminal cover on
the beach or at the poolside.
i
Do not jolt the camera while it is immersed in water. Doing so may cause the
battery cover, card slot cover, or DC IN terminal cover to open.
English xxii

NOTE
k Storing and maintaining your camera
i Do not leave the camera unwashed after it has been
immersed in salt water or if salt water is adhering to
it. Doing so may cause corrosion and discoloration of
the plating, as well as deterioration of the camera’s
waterproof capability.
i After the camera has been used in water, use fresh
water to wash it. Never use soap or detergent to
clean the camera, as doing so will cause deterioration
of the camera’s waterproof capability.
i After washing the camera, take care to completely
drain it, and use a dr y cloth to wipe off any drops of
water adhering to it (page 67).
i Do not leave the camera in an environment colder than
0 °C (32°F) or warmer than 40 °C (104°F), as doing so
may cause deterioration of the camera’s waterproof
capability.
i Waterproof seals are used in this camera. It is
recommended that the waterproof seals be replaced
every year with new ones. For replacing the seals,
please consult your dealer.
* Please note that there is a fee for replacing the
waterproof seal.
k Other cautions
i Do not subject the camera to severe jolts, as doing so may deform the
battery cover, card slot cover, DC IN terminal cover, or the camera body,
thus compromising its waterproof capability. If the camera has been
subjected to a strong jolt, please consult with your dealer.
HINT
What is “JIS IPX8” (formerly “JIS protection grade 8”)?
i “JIS IPX8” specifies that a device is protected against the effects of
continuous immersion in water.
xxiiiEnglish
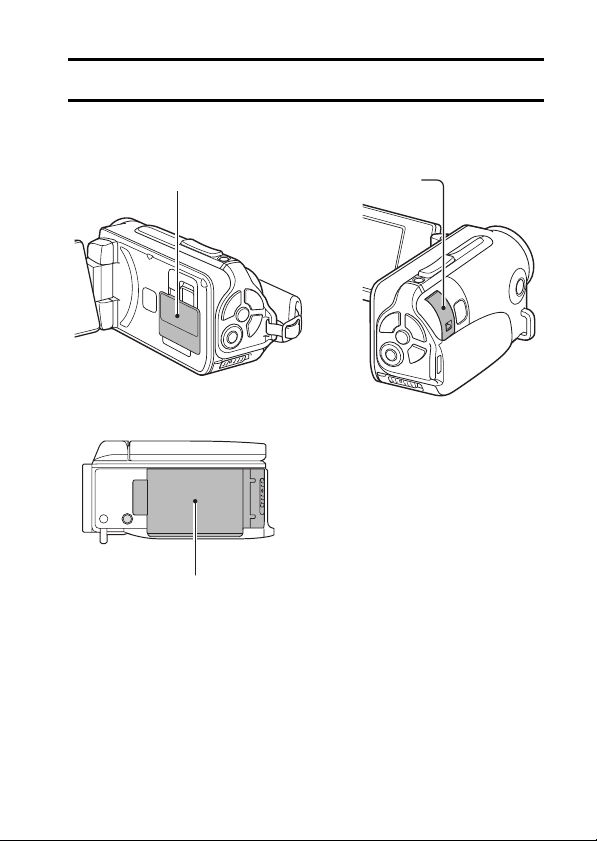
BEFORE RECORDING IN WATER
Make sure that the battery cover (page 25), the card slot cover (page 22),
and the DC IN ter minal cover (page 27) are closed.
If a cover is open, water will get inside the camera and damage it.
Card slot cover
Battery cover
DC IN terminal cover
Englishxxiv

CONTENTS
HOW TO READ THIS MANUAL ............................................................ iii
QUICK SEARCH BY OPERATION ........................................................ 6
CHECKING THE INCLUDED ACCESSORIES .................................... 11
How to use the accessories .......................................................... 12
ABOUT THE SEPARATELY SOLD ACCESSORIES AND
THE CARD ...................................................................................... 13
Separately sold accessories ......................................................... 13
Media cards that can be used with this camera ............................ 13
What “card” means in this manual ................................................ 13
GETTING THE MOST OUT OF YOUR CAMERA ............................... 14
Waterproof capability .................................................................... 14
High-quality images with “High Definition” .................................... 15
Includes SIMPLE mode for quick-and-easy operation .................. 16
Image stabilizer for sharp pictures ................................................ 16
Sharp face shots ........................................................................... 17
Lots of accessories for optimal use of your captured images ....... 18
SYSTEM MAP ..................................................................................... 19
SETUP
PARTS NAMES ................................................................................... 20
INSTALLING THE CARD ..................................................................... 22
CHARGING THE BATTERY PACK ..................................................... 24
About recharging .......................................................................... 30
About the temperature alert icon \ .......................................... 30
TURNING THE CAMERA ON AND OFF ............................................. 31
Turning on the camera .................................................................. 31
Turning on the camera when the power save (sleep) mode is
active ........................................................................................ 32
Turning off the camera .................................................................. 33
DATE AND TIME SETTING ................................................................. 34
SWITCHING BETWEEN THE RECORDING MODE AND PLAYBACK
MODE .............................................................................................. 37
SWITCHING THE OPERATING MODE .............................................. 38
Switching between the SIMPLE and NORMAL modes ................ 38
Accessing/exiting the SIMPLE/NORMAL Mode Menu Screen ..... 39
Overview of the SIMPLE Mode Setting Screen ............................ 43
Overview of the NORMAL Mode Setting Screen .......................... 47
1 English

SIMPLE
SHOOTING
BEFORE TAKING PICTURES .............................................................55
For best results ..............................................................................55
Using the autofocus .......................................................................57
Select the recording size ...............................................................59
Select the focus setting .................................................................60
Hints for taking pictures .................................................................61
VIDEO CLIP RECORDING ...................................................................62
SHOOTING SINGLE SHOTS ...............................................................63
Using the flash ...............................................................................65
SHOOT A STILL IMAGE WHILE RECORDING A VIDEO CLIP ..........67
MACRO-PHOTOGRAPHY (ZOOM) .....................................................69
AFTER USING THE CAMERA IN WATER ..........................................70
PLAYBACK
PLAYING BACK VIDEO CLIPS AND STILL IMAGES ..........................71
How to save one frame from a video clip as a still image .............73
SLIDESHOW PLAYBACK ....................................................................74
PLAYBACK VOLUME ...........................................................................75
DELETING FILES .................................................................................76
Delete single/delete all ..................................................................76
Delete selected ..............................................................................77
PLAYBACK MODES .............................................................................79
21-image display playback ............................................................79
Selecting the playback folder ........................................................80
Magnifying (zooming in) the image ...............................................81
English 2

CONTENTS
NORMAL
SHOOTING
RECORDING MENU 1 ......................................................................... 82
Video setting ................................................................................. 82
Still image setting .......................................................................... 85
Scene select setting ...................................................................... 86
Filter setting .................................................................................. 86
Self-timer setting ........................................................................... 87
RECORDING MENU 2 ......................................................................... 88
Video stabilizer (motion compensation) setting ............................ 88
Focus range setting ...................................................................... 89
Focus mode setting ...................................................................... 90
Light-measuring mode setting ...................................................... 90
ISO sensitivity setting ................................................................... 91
RECORDING MENU 3 ......................................................................... 92
White balance setting ................................................................... 92
Exposure setting ........................................................................... 93
Face chaser setting ...................................................................... 94
High sensitivity mode setting ........................................................ 95
Exposure compensation ............................................................... 96
PLAYBACK
PLAYBACK MENU 1 ........................................................................... 98
Slideshow settings ........................................................................ 98
File protect setting ........................................................................ 99
Rotate ......................................................................................... 100
PLAYBACK MENU 2 ......................................................................... 101
Correcting the image .................................................................. 101
Editing video clips ....................................................................... 102
Printing instructions .................................................................... 111
FILE INFO DISPLAY .......................................................................... 115
3 English

OPTION SETTINGS
DISPLAY THE OPTION SETTING MENU .........................................116
INTRODUCTION TO THE OPTION SETTING MENU .......................117
Storage folder setting ..................................................................123
Shortcut setting ...........................................................................124
TV output setting .........................................................................126
File No. continued setting ............................................................131
Formatting (initializing) ................................................................133
CHECKING THE REMAINING CARD MEMORY ...............................134
Checking the remaining number of images and
video recording time ................................................................134
For audio recordings ...................................................................135
CHECKING THE REMAINING BATTERY PACK CHARGE ..............136
OTHER DEVICES AND CONNECTIONS
CONNECTING TO A TV
CONNECTING TO A TV .....................................................................138
Connecting to a standard video input terminal ............................139
Connect to the 480p/720p terminal .............................................140
Connecting to the HDMI terminal ................................................141
PLAYING BACK ON A TV ..................................................................142
CONNECTING TO A PRINTER
PRINTING ...........................................................................................143
English 4

CONTENTS
APPENDICES
COMMONLY ASKED QUESTIONS ................................................... 146
TROUBLESHOOTING ....................................................................... 154
Camera ....................................................................................... 154
Notes regarding the Scene Select feature and filters ................. 162
SPECIFICATIONS ............................................................................. 164
Camera ....................................................................................... 164
Camera connectors .................................................................... 168
Battery life ................................................................................... 168
Possible No. of Images/Possible Shooting Time/
Possible Recording Time ....................................................... 169
Concerning the multi-indicator .................................................... 170
Supplied AC adaptor ................................................................... 171
Supplied Li-ion battery pack ....................................................... 171
Others ......................................................................................... 172
Before capturing those important shots, be sure to first
take a test shot to comfirm that your camera is set up and
ready to go ............................................................................. 173
HINTS FOR TAKING PICTURES ...................................................... 174
5 English
 Loading...