

Page 1
1
User manual
Non contractual photo
You must read this manual before using the device
You can download these instructions in pdf format at:
www.logicom-europe.com
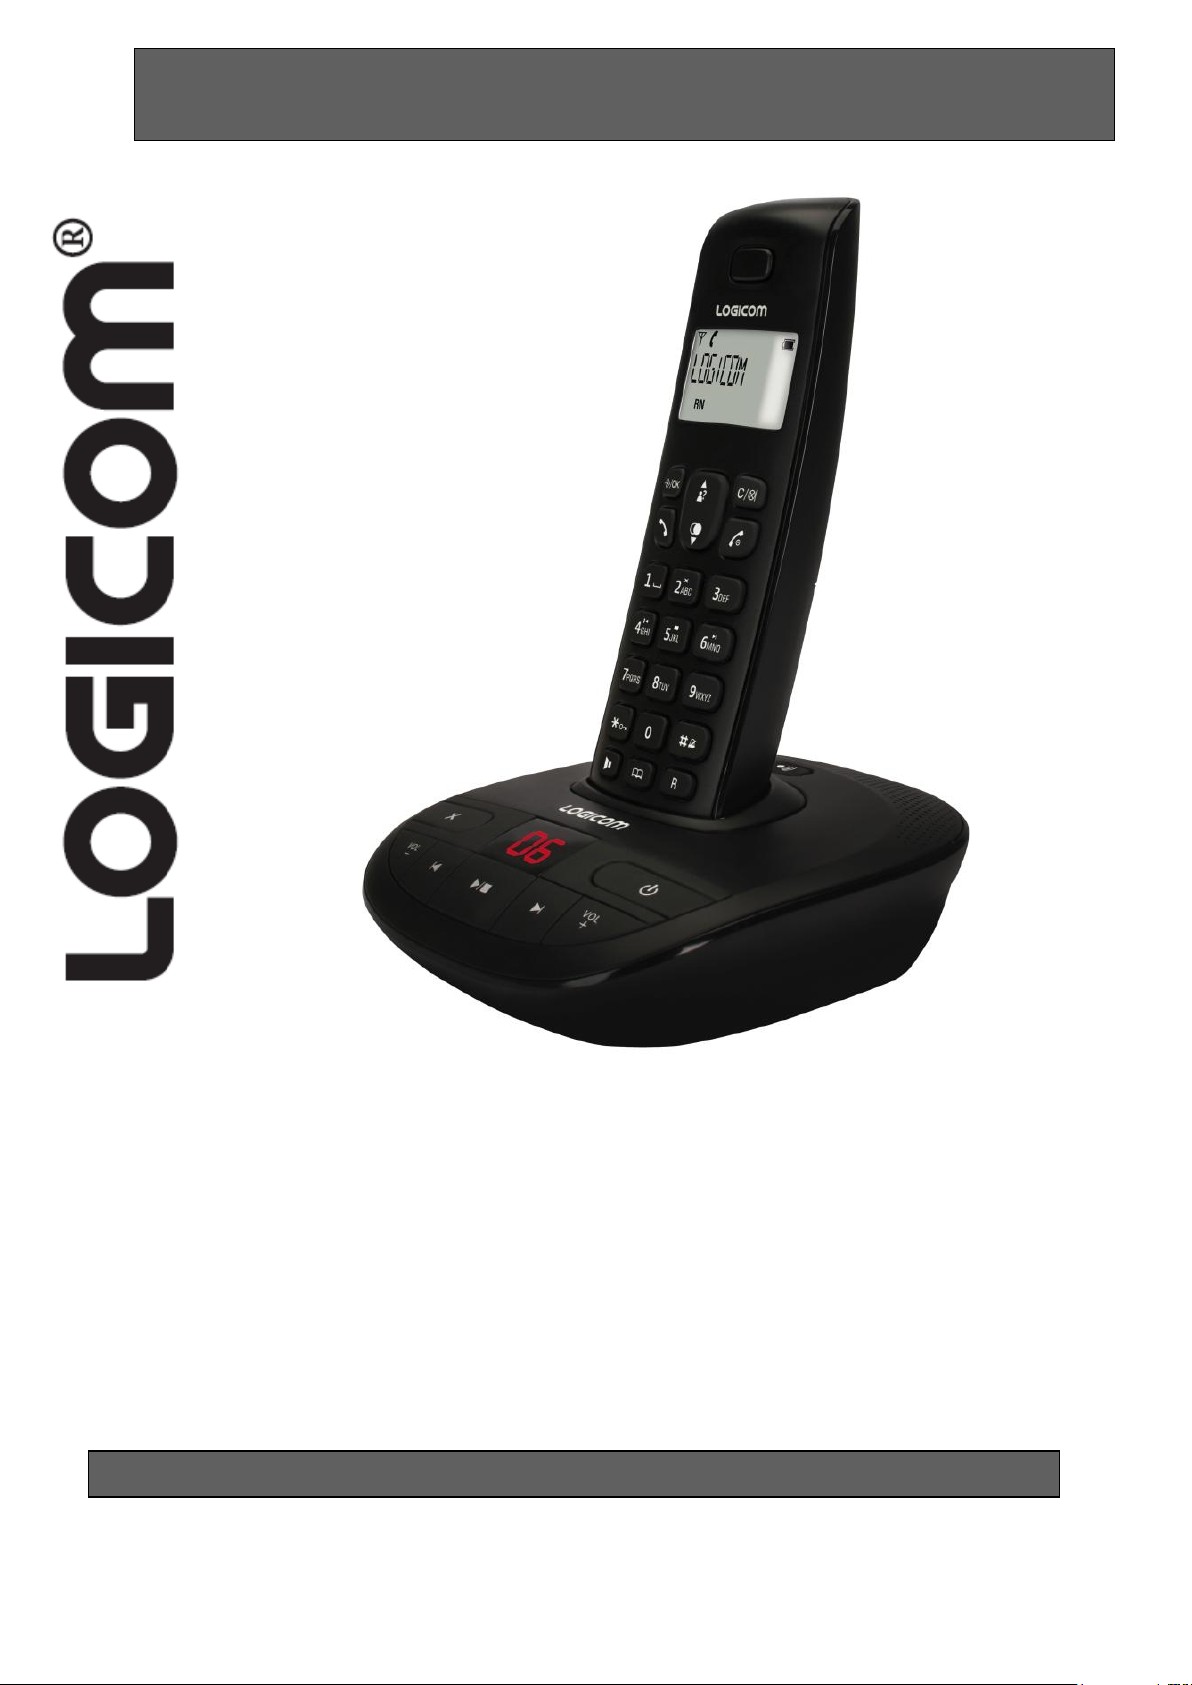
OLEA 550/552/553
DECT telephone with answering machine and hands-free
Page 2

2
We,
LOGICOM
55, rue de Lisbonne
75008 Paris
France
Declare that the LOGICOM OLEA 550, OLEA 552 and OLEA 553 DECT telephone
products with answering machine and hands-free are in compliance with the essential
requirements applicable and in particular the requirements of guideline 1999/5/EC,
which are as follows:
Article 3.1a - (protection of the user's health and security):
- EN 60950-1/ A12:2011
Article 3.1b - (protection requirements concerning electromagnetic compatibility):
- EN 301 489-6 V1.3.1 (2008)
- EN 301 489-1 V1.9.2 (2011)
Article 3.2 – (correct use of the radio frequency spectrum so as to avoid damaging
interferences):
- EN 301 406 V2.1.1 (2009)
- RoHS 2 (2011/65/EU)
We declare that the OLEA 550, OLEA 552 and OLEA 553 products are in compliance
with the requirements related to European Standards for line interfaces.
These devices are designed for use on German public switched telephone networks.
This compliance applies as long as the product for which it is awarded is installed and
used following the instructions provided in the user manual.
Non-authorised modifications to the product cancel this declaration of compliance.
Paris, December 14th, 2012
Bernard Bessis
President
Page 3

3
The device presentation .............................................................................................................. 5
1 – General characteristics ..................................................................................................... 5
2 – Precautions for use ............................................................................................................ 6
3 – Included in box ................................................................................................................... 7
Installation and start-up guide .................................................................................................... 7
1 – Installing your telephone ................................................................................................... 7
2 – Installing and charging rechargeable batteries ............................................................. 8
3 – Basic set-up ........................................................................................................................ 8
4 – Basic use of your telephone ........................................................................................... 10
Diagrams and functions of the telephone ............................................................................... 11
1 – Description of the keypad ............................................................................................... 11
2 – Description of the base ................................................................................................... 12
3 – Description of the LCD display ...................................................................................... 12
4 – Description of the number pad ....................................................................................... 13
5 – Summary of the menus ................................................................................................... 14
Handset functions ....................................................................................................................... 16
1 – Hands-free and listening volume of the handset ........................................................ 16
2 – Locking the keypad .......................................................................................................... 16
3 – Secret function .................................................................................................................. 17
4 – Deactivating/reactivating the handset ringtone ........................................................... 17
5 – The handset ringtone volume ........................................................................................ 17
6 – Handset calling ................................................................................................................. 18
7 – Conversation time counter .............................................................................................. 18
Directory ....................................................................................................................................... 18
1 – Adding a contact .............................................................................................................. 18
2 – Searching in the directory ............................................................................................... 18
3 – Modifying a contact in the directory .............................................................................. 19
4 – Deleting one or all contacts ............................................................................................ 20
Customising the handset ........................................................................................................... 20
1 – Renaming a handset ....................................................................................................... 20
2 – Screen display .................................................................................................................. 21
3 – Key tones .......................................................................................................................... 21
4 – Setting the automatic pick up/hang up function .......................................................... 21
5 – Activate/Deactivate the low battery alert ...................................................................... 21
6 – Activate/Deactivate the out of range alert .................................................................... 22
7 – Handset language ............................................................................................................ 22
8 – Setting time and date ...................................................................................................... 22
9 – Alarm .................................................................................................................................. 24
Advanced telephone settings.................................................................................................... 24
1 – Setting the PIN code ........................................................................................................ 24
2 – Manual registration of a handset with the base .......................................................... 25
3 – Disassociating a handset from the base ...................................................................... 25
4 – Setting the flashing period (R) ....................................................................................... 26
5 – Setting the dialling mode ................................................................................................ 26
6 – Restoring default settings ............................................................................................... 27
Interphone functions ................................................................................................................... 27
1 – Calling another handset .................................................................................................. 27
2 – Calling all other handsets ............................................................................................... 28
3 – Responding to an inter-phone call ................................................................................ 28
4 – Responding to an external call during an inter-phone call ........................................ 28
Page 4

4
5 – Transferring an external call to another handset ........................................................ 28
6 – 3-way conference calling ................................................................................................ 29
Redial list ...................................................................................................................................... 29
1 – Viewing the REDIAL list .................................................................................................. 30
2 – Saving a number from the REDIAL list to the directory ............................................. 30
3 – Deleting a number (or a name) from the REDIAL list ................................................ 30
4 – Deleting the entire REDIAL list ...................................................................................... 30
Call log .......................................................................................................................................... 31
1 – Name and number presentation function ..................................................................... 31
2 – Viewing call logs ............................................................................................................... 31
3 – Saving a number from the call log to the directory ..................................................... 32
4 – Deleting a number (or a name) from the call log ........................................................ 32
5 – Deleting the entire call log .............................................................................................. 33
Using the answering machine .................................................................................................. 33
1 – Activating/disabling the answering machine ................................................................ 33
2 – Date and time of message receipt ................................................................................ 34
3 – Recording a memo .......................................................................................................... 34
4 – Listening to messages .................................................................................................... 34
5 – Deleting all messages and memos ............................................................................... 35
6 – Remote consultation ........................................................................................................ 36
7 – Memory full ........................................................................................................................ 37
Answering machine settings ..................................................................................................... 37
1 – Selecting the answering machine mode (Recorder/Answering machine only) ...... 37
2 – Default recorded messages ........................................................................................... 38
3 – Recording a personal message ..................................................................................... 39
4 – Listen to a recording. ....................................................................................................... 39
5 – Setting the answering machine delay. .......................................................................... 40
6 – Setting the length of a message. ................................................................................... 40
7 – Activate/Deactivate remote consultation ...................................................................... 41
8 – Modifying the remote consultation code ....................................................................... 41
Troubleshooting .......................................................................................................................... 42
1 – Telephone functions ........................................................................................................ 42
2 – Name or number presentation function ........................................................................ 42
3 – Answering machine functions ........................................................................................ 42
General information .................................................................................................................... 43
1 – Replacing the handset batteries .................................................................................... 43
2 – Safety instructions ............................................................................................................ 43
3 – Precautions for use .......................................................................................................... 44
4 – Cleaning ............................................................................................................................ 44
5 – Environment ...................................................................................................................... 44
6 – Product disposal instructions ......................................................................................... 45
7 – Technical information ...................................................................................................... 45
Scope of warranty ....................................................................................................................... 46
Page 5

5
The device presentation
1 – General characteristics
The general characteristics of your OLEA phone are:
Handset
• 3 line LCD screen (1 alphanumeric line + 2 icon lines)
• GAP compatible.
• Possibility of associating up to 5 handsets on 1 base.
• Range: 50 metres inside and 300 metres in open field.
• Battery Life: 100 hours in standby mode. 10 hours of communication.
• Hands-free
• Alphanumeric directory with up to 20 contacts (names and numbers)
• Date and time settings.
• Inter-phone calling between 2 handsets.
• Conference calling up to 3 handsets (2 internal + 1 external).
• Call transfers to other handsets.
• Redial option for the last 5 numbers composed.
• Choice of 10 ringtones for the handset (5 classic and 5 polyphonic).
• Configurable handset ringtone volume (5 levels).
• Configurable handset listening volume (5 levels).
• Sound alerts (keypad, low battery, out of reach tones)
• Keypad lock.
• Conversation time counter.
• Handset calling.
• Secret function.
• Clock or handset name displayed when idle.
• Customisation of handset name.
• Alarm function.
• Tone dialling (by default) or pulse dialling.
• Customisation of the 4 figure PIN code which grants access to certain functions.
Name and number presentation function
Name and number presentation (alternatively)
• Call timestamping
• Call log with up to 10 names and numbers
• Composition of numbers via the call log
• Selective or total deletion of calls
Answering machine base
• Up to 15 minutes recording capacity
• Message reception date and time
• Mode answering machine or recorder only
• 2 default recordings, one for answering machine recorder mode, one for answering
machine only
• Configurable answering machine delay (2, 4, 6, 8 rings or call saver mode)
• Configurable message duration (60s, 120s, 180s or unlimited)
• Remote consultation (activated or deactivated)
• Customised remote consultation code
Page 6

6
• Personal message recording (memo)
• Messages available via the base or handset
• Remote activation/deactivation
• Memory full indicator
• Memory backed up in case of power cuts
2 – Precautions for use
•Carefully read through the instructions provided.
•Only use the power adaptor provided.
•Do not install in a dusty area or prone to vibrations or shocks.
•Do not place your device close to a magnetic source (television, speakers, etc.) as this
may cause interference.
•Do not pour liquid on the device as it may short-circuit.
•Do not place the base in a damp area.
•Do not disassemble the device.
•Disconnect the telephone connection before disconnecting the power-supply.
•Immediately disconnect a faulty device and send it for repair in an approved after-sales
service.
•After moving the device, reconnect the power-supply first.
•Do not place objects or step on the electric cable.
•Avoid connecting too many devices to one same power-supply.
•Do not install during a storm.
•Do not touch exposed telephone wires, unless unplugged.
•Disconnect the device before cleaning, do not use cleaning products or aerosols,
prefer a moist cloth.5
•Do not place the device on an unstable surface, as a fall may cause severe damage.
•In the absence of a mains power-supply or in the event of a power cut, the devise is
not functional. This disables emergency calls both to and from the device.
For this reason, it is recommended that you use a complementary conventional
telephone.
•Keep this instruction manual in a safe place for future reference.
IMPORTANT:
1) Only use the type of battery provided.
2) Do not dispose of batteries in a fire or bin. Ask your local dealer for special
measures concerning recycling.
3) Do not open the batteries, the contained electrolyte is corrosive and may burn
hands, skins and eyes, and is toxic if swallowed.
Page 7

7
Battery performance
A- Connect the mains input socket to the
modular slot behind the base. Then connect the
mains adaptor (S004LB0600045 output 6V
DC/450mA) to the 100-240 V AC 50/60 Hz
power-supply.
Repeat the process with the other adaptors on
the charging bases. (S004LB0600030, output
DC6V/300mA)
B- Connect the telephone cable to the modular
slot behind the base and the other end to the
telephone wall socket
B
A
In OLEA 552 and 553 packs each
additional handset comes with the
following elements:
1 additional charger
2 rechargeable batteries
1 mains adaptor
In ideal conditions, a fully charged battery allows for 10 hours of communication or 100
hours in standby mode.
New batteries perform best after several days of use.
To optimise battery performance, do not leave the handset on the base all day. The
battery's life span will be prolonged by allowing it to fully deplete once per week.
The charge limit for rechargeable batteries decreases over time due to use, also
reducing the handset's communication and standby time. In this case, the batteries
should be replaced. .
After having charged the handset for the first time, the following recharges last 6 to 8
hours per day. It is perfectly normal for the battery and handset to become hot during
charging.
Are you using your OLEA with broadband?
If your telephone must use a broadband connection, ensure that it is connected through
a broadband filter. Using this product with a filter-less broadband connection can cause
problems with your telephone and your broadband connection.
Time and date
If you subscribe to your operator name and number presentation, the date (day/month)
and time will automatically be displayed on all handsets when you receive your first call.
3 – Included in box
1 handset
1 answering machine base
2 400mAh Ni-Mh rechargeable batteries
1 mains adaptor
1 telephone cable
Installation and start-up guide
Before use, choose an appropriate surface on which to place your telephone base.
Ensure that it is not close to another telephone or any other electric devices (computer,
television, etc.) to avoid interference.
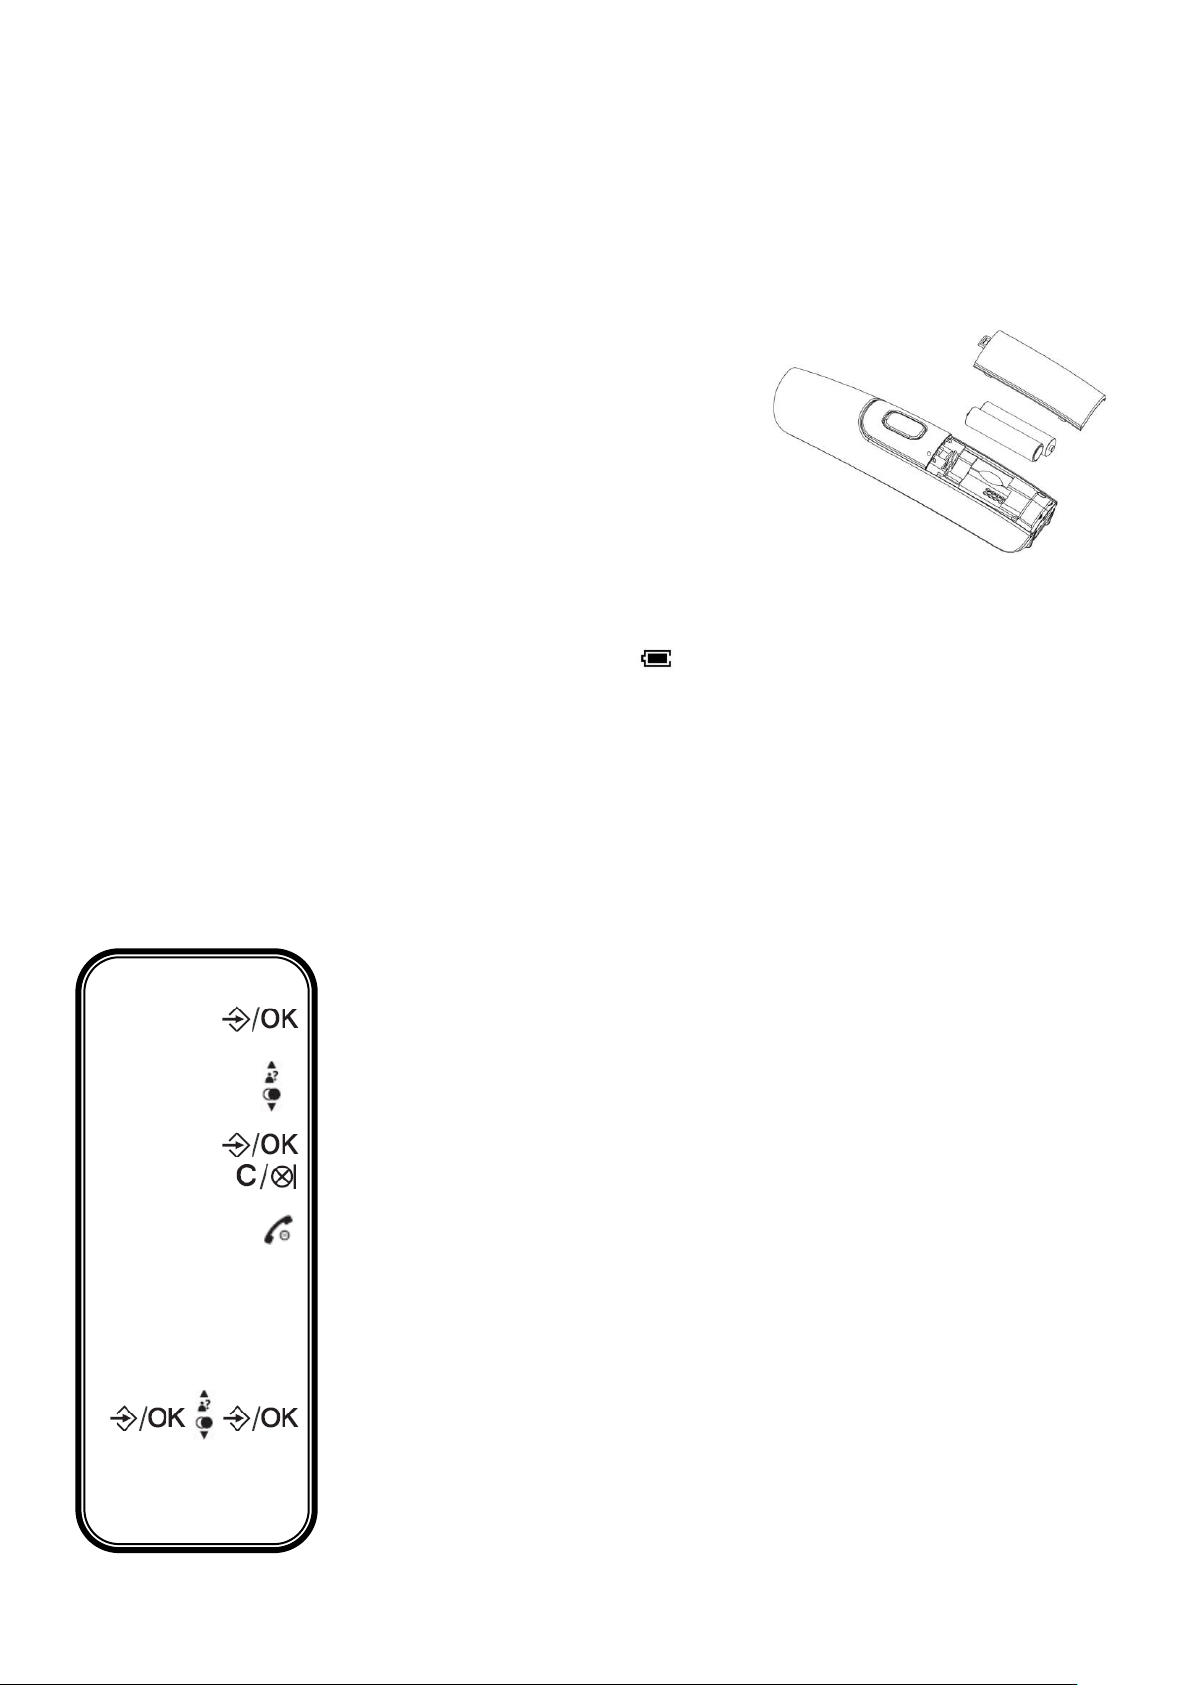
1 – Installing your telephone
Page 8
8
Charging the batteries:
Before use, batteries must be charged (for the first time)
for at least 24 hours.
- Place the handset on the charging base, a confirmation
signal will be heard.
- Leave the batteries to charge uninterrupted for at least
24 hours.
2 – Installing and charging rechargeable batteries
Installation:
- Insert the 2 batteries (Type AAA Ni-MH/400mAh)
into the compartment. Respect the polarity indication.
- Close the battery compartment using the
flap provided with the batteries in the packaging
Note: When the handset is charging the icon flashes permanently.
When the icon stops flashing, the batteries are fully charged.
Caution: If you do not leave the handset to charge for 24 hours for the first time, it will
never reach its full capacity.
The warranty does not cover problems relating to incomplete charging before first use.
Important: When batteries are low, the volume may vary; recharge the batteries to
reset the volume.
3 – Basic set-up
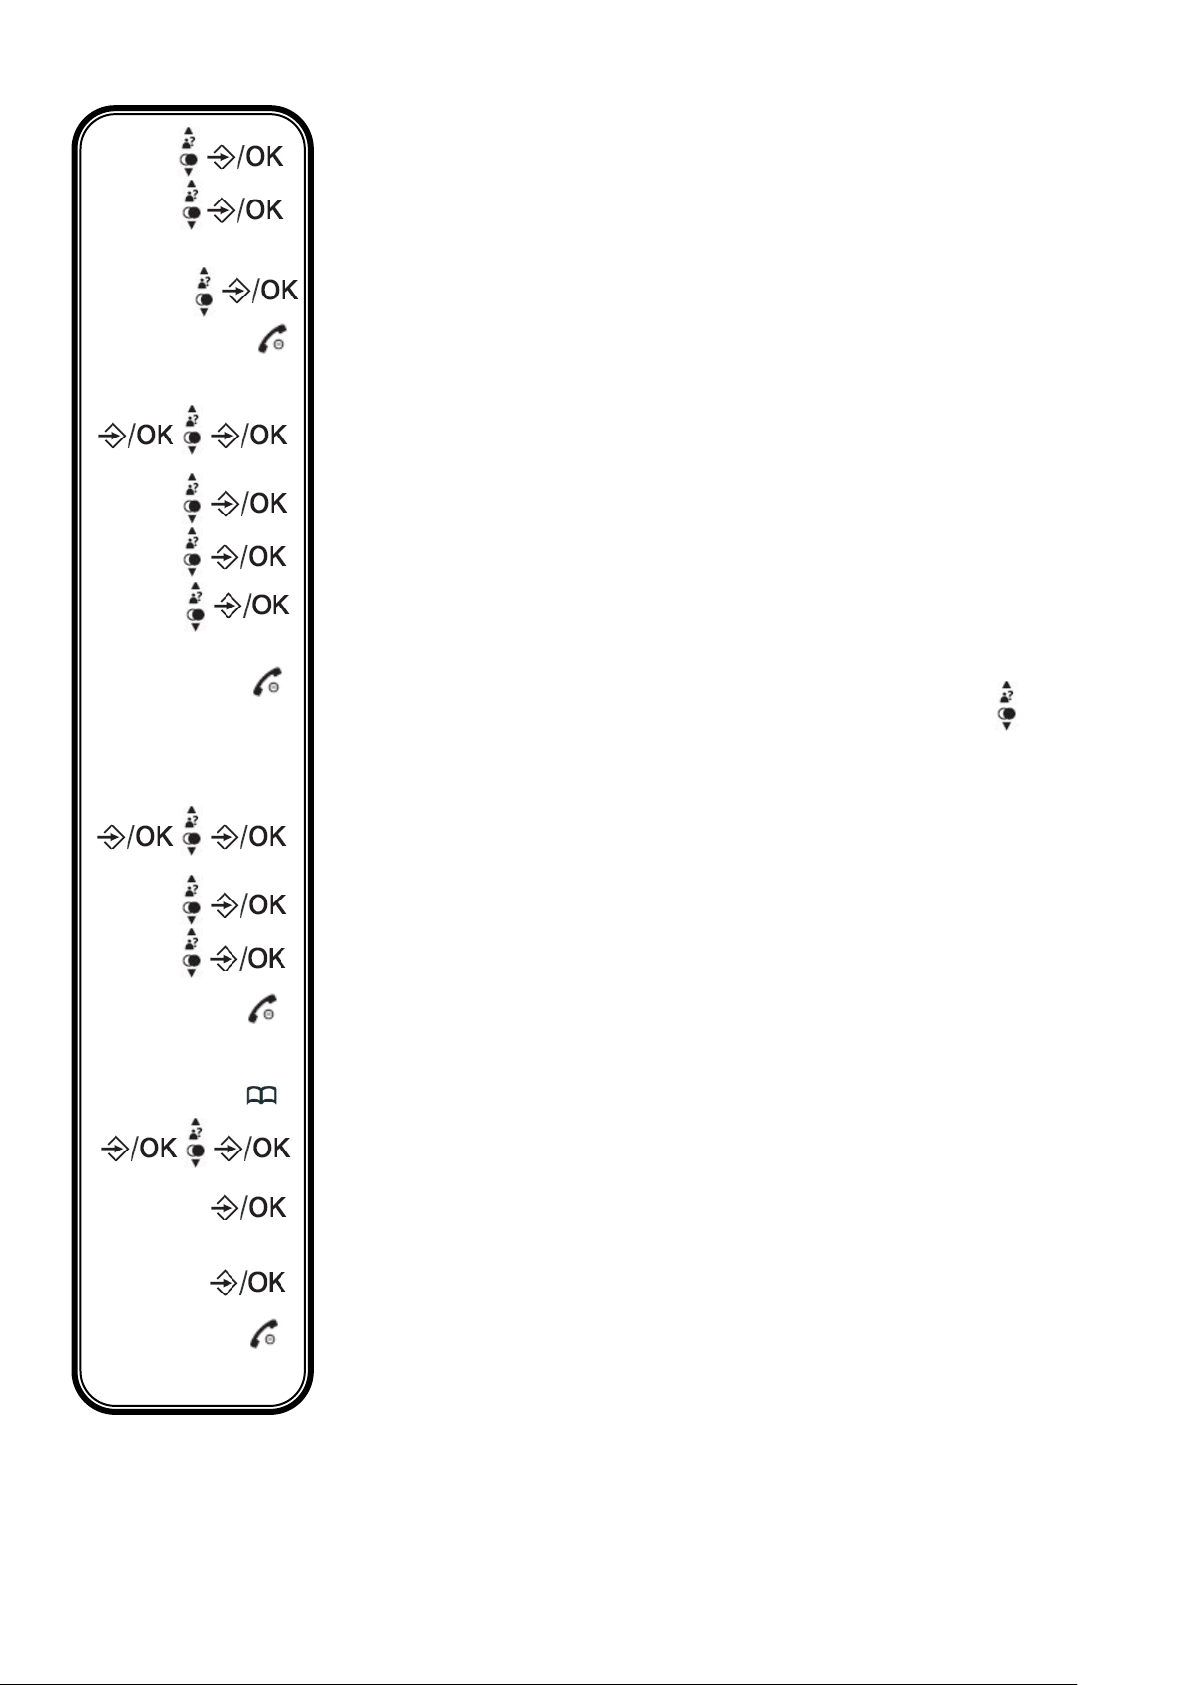
3-1- Navigating through the menus
Set up and customise your telephone, display the menu by clicking
"OK".
Navigate through the list; click on UP and DOWN keys
Confirm your choice or display a sub-menu
Return to the previous menu
Exit the list and return to the home screen
3-2- Modifying the ringtone
You can select a ringtone from the 10 different ringtones available for
external calls and another for internal calls. There are 5 classic and 5
polyphonic ringtones to choose from.
Enter the menu and select the "HS SETTINGS" menu using the
DOWN key
Page 9
9
Using the DOWN key, select "RING SETUP"
ABC
123
Select "EXT RING" to choose the external ringtone or "INT RING" for
the internal ringtone
Select a new ringtone
Return to the home screen
3-3 Modifying the ringtone volume
Enter the menu and select the "HS SETTINGS" menu using the
DOWN key
Using the DOWN key, select "RING SETUP"
Select "RING VOLUME"
Configure the ringtone volume (from 1 to 5) or select "VOLUME OFF"
to mute ringtone
Return to the home screen
Note: during a call, use keys to increase or decrease the ringtone
volume
3-4- Changing the language
Enter the menu and select the "HS SETTINGS" menu using the
DOWN key
Select "LANGUAGE"
Choose the language desired
Return to the home screen
3-5- Adding a contact to the directory
Enter the directory
Select "ADD"
"NAME" will be displayed on the screen, using the alphanumeric
keypad, enter the name of your new contact and click OK to confirm
"NUMBER" will be displayed on the screen, using the alphanumeric
keypad, enter the number of your new contact and click OK to confirm
Return to the home screen
Page 10
10
4 – Basic use of your telephone
123
123
4-1- Calling
Normal dialling:
Pick up the handset, then compose your correspondent's number
Pre-dialling:
Compose your correspondent's number, then pick up the handset
Calling a contact via the directory:
Enter the directory, then select a contact from the list
Pick up your handset
Once the call is finished, hang up your handset
4-2- Answering a call
When the telephone rings, pick up your handset
Once the call is finished, hang up your handset
You can also hang up the handset by placing it on the base (refer to
the "automatic answer" chapter for more information concerning this
function.)
Page 11
11
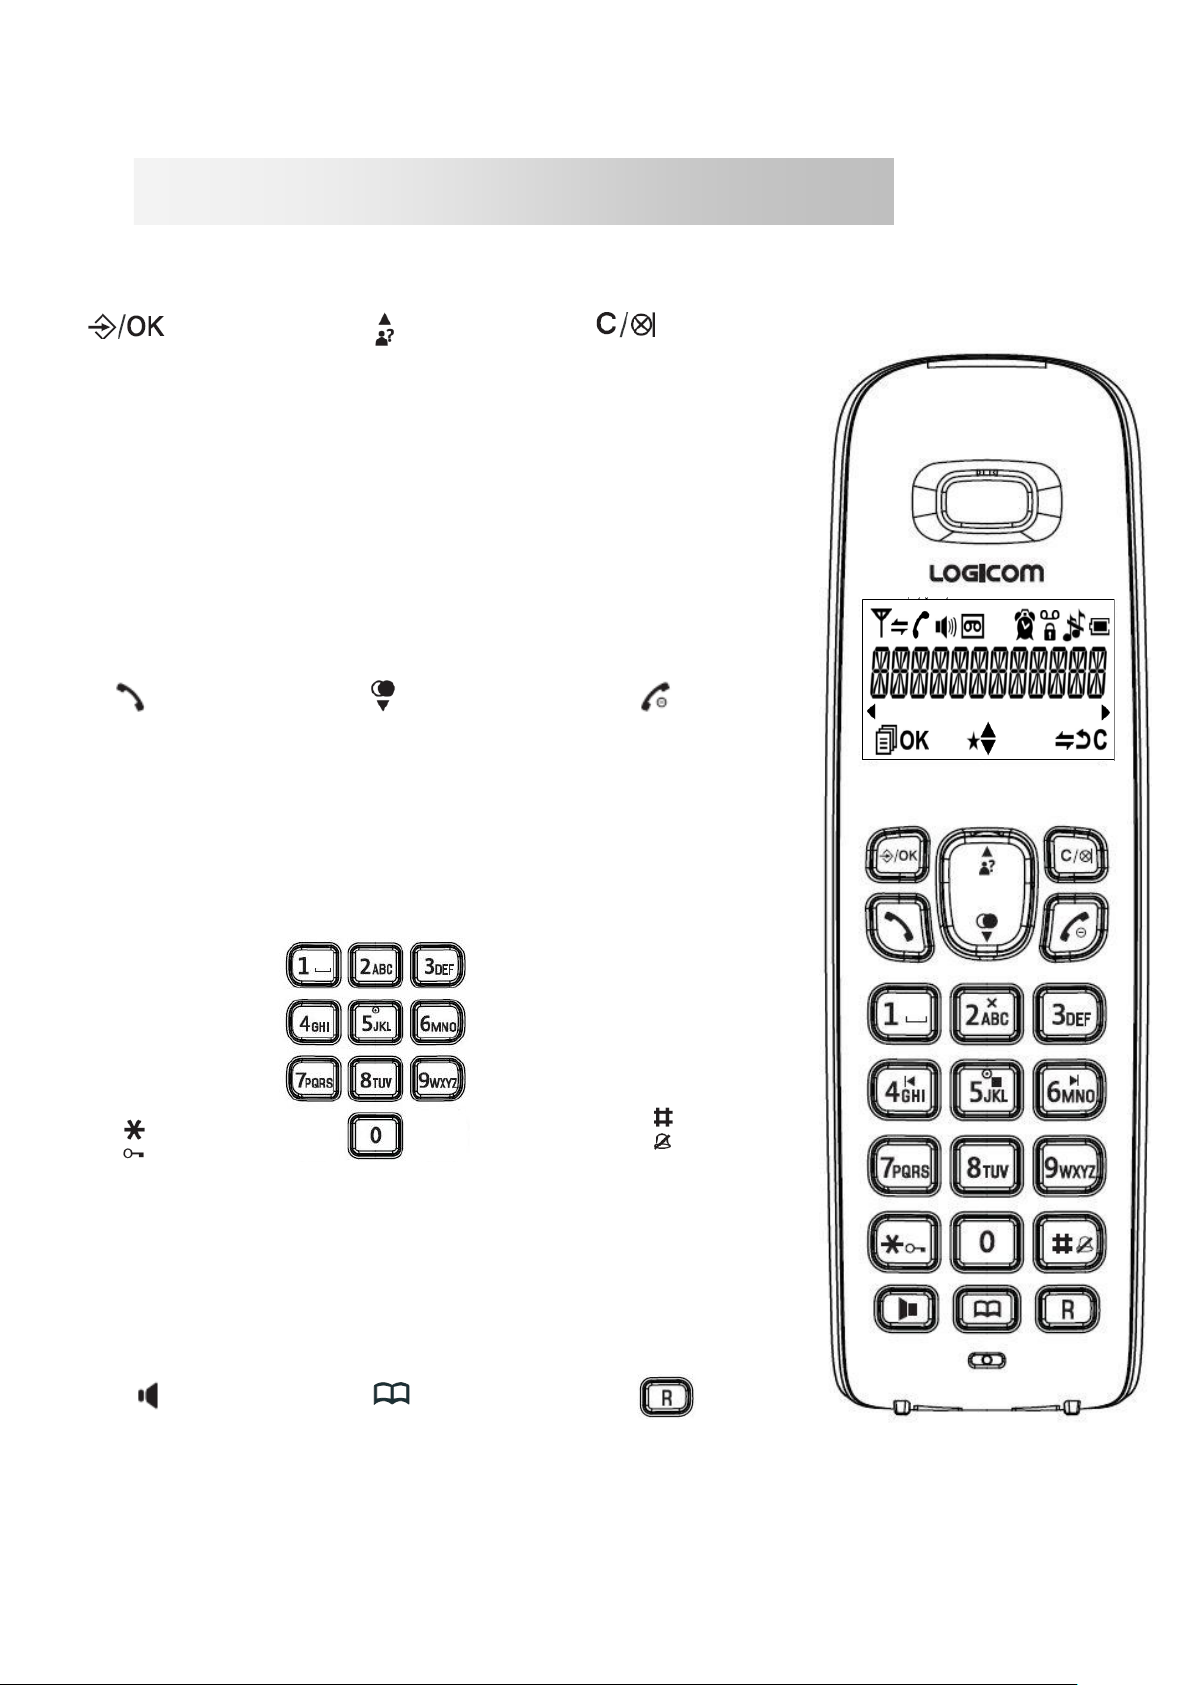
- Allows you to
access a submenu
- Allows you to
validate the
modification of a
function
- Allows you to directly
access the call log
- Allows you to increase
the volume during
communication
- Allows you to navigate
through the menu
- Allows you to return to
the previous menu
- Allows you to erase a
figure or character
- Allows inter-phone
calling
- During communication,
allows you to activate
(stop
the microphone) or
deactivate the secret
function
- Allows you to pick
up the line or answer
a call
- Allows you to directly
access the REDIAL
list
- Allows you to reduce
the volume during
communication
- Allows you to
- Allows you to hang
up
- Allows you to turn off
the handset (press and
- Allows you to
access certain
operator services
- Allows you to lock
and unlock the
keypad (press and
hold down)
- Alphanumeric keypad,
allows you to compose a
number and enter a name
in the directory
- Allows you to turn off
the ringtone (press
and hold down)
- Allows you to activate
or deactivate handsfree
- Allows you to access
the directory
Diagrams and functions of the telephone
1 – Description of the keypad
Page 12
12
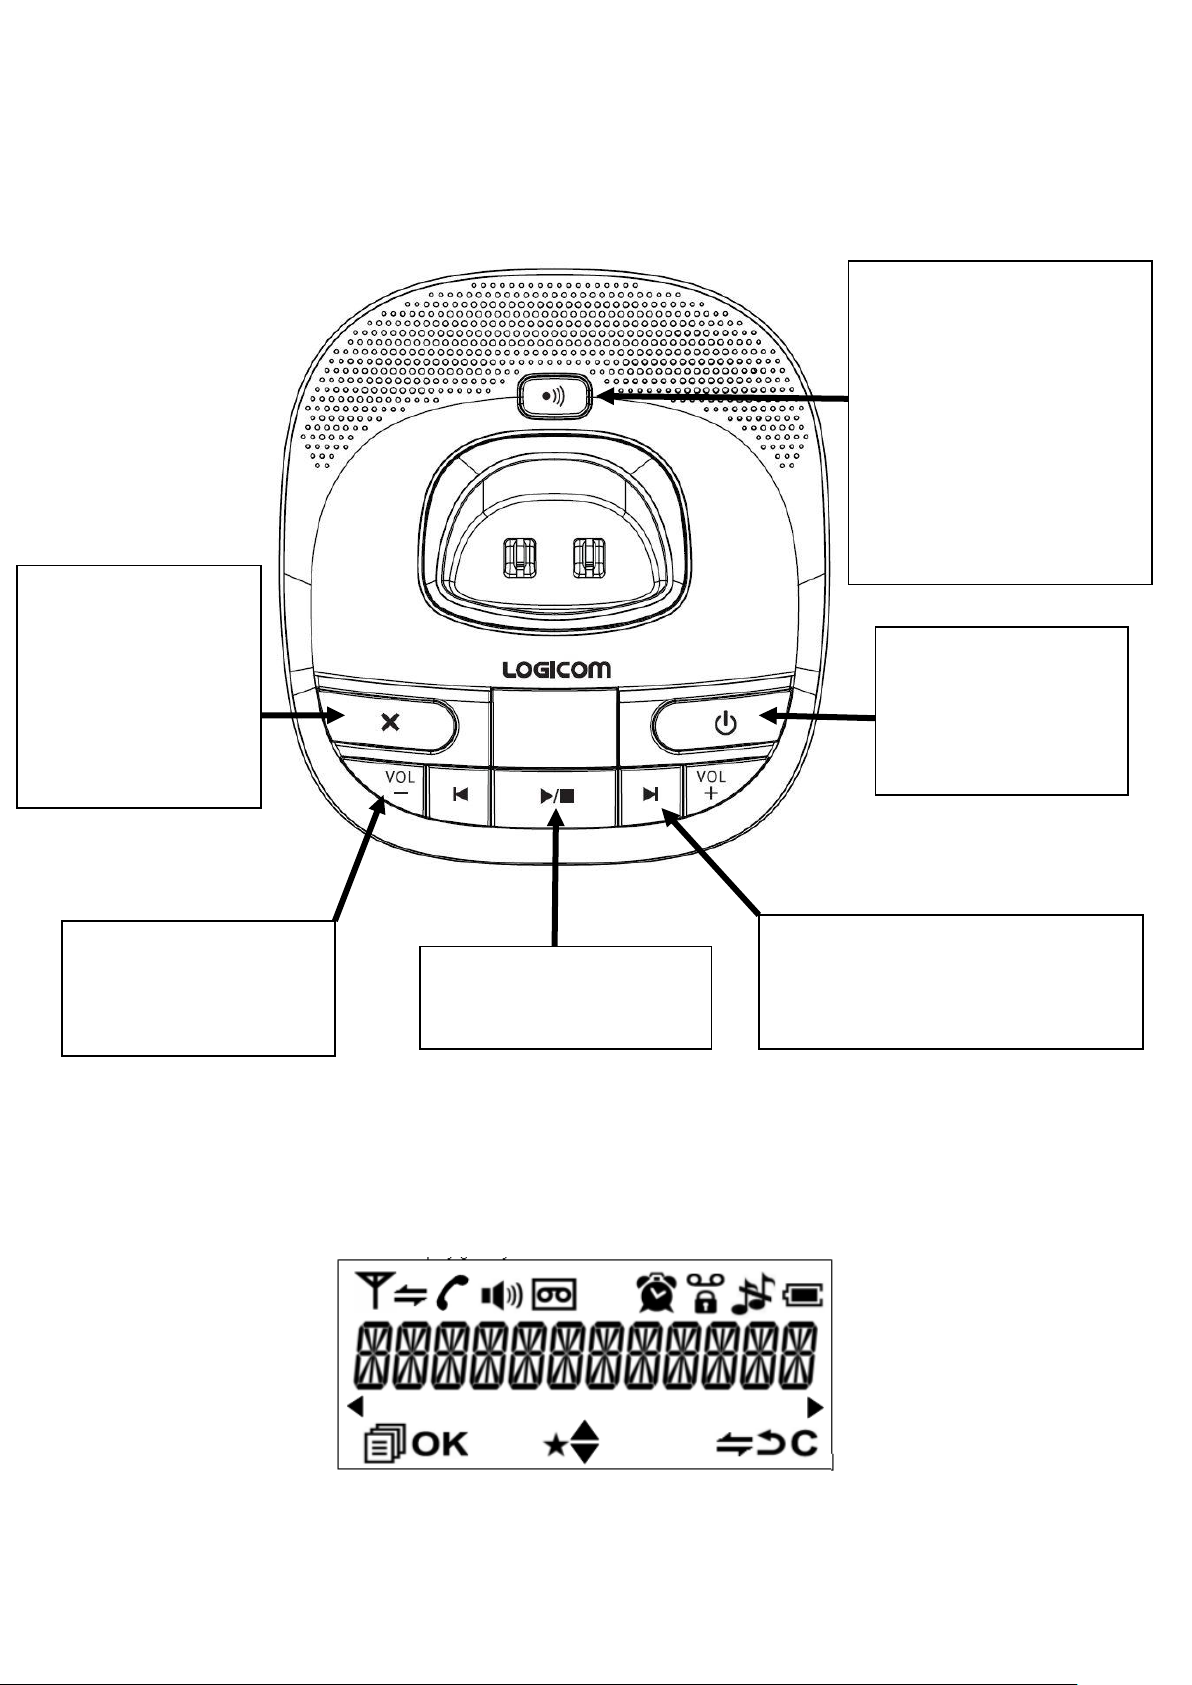
2 – Description of the base
Registration key:
- Allows you to set the
base to handset
registration mode (press
and hold down for 10
seconds)
- Allows you to call all the
handsets configured to
the base (press down
quickly)
Delete key:
- Pressing down
quickly: Deletes the
message displayed
- Pressing and
holding down:
Deletes all
messages
Play/Pause keys:
- Allows you to start or
stop reading messages
ON/OFF key:
Allows you to
activate/deactivate
the answering
machine.
Volume keys:
Allow you to adjust the
base's speaker
volume.
Back/Skip keys:
Allow you to listen to the ongoing
message again or skip to the
next message.
3 – Description of the LCD display
Page 13
13
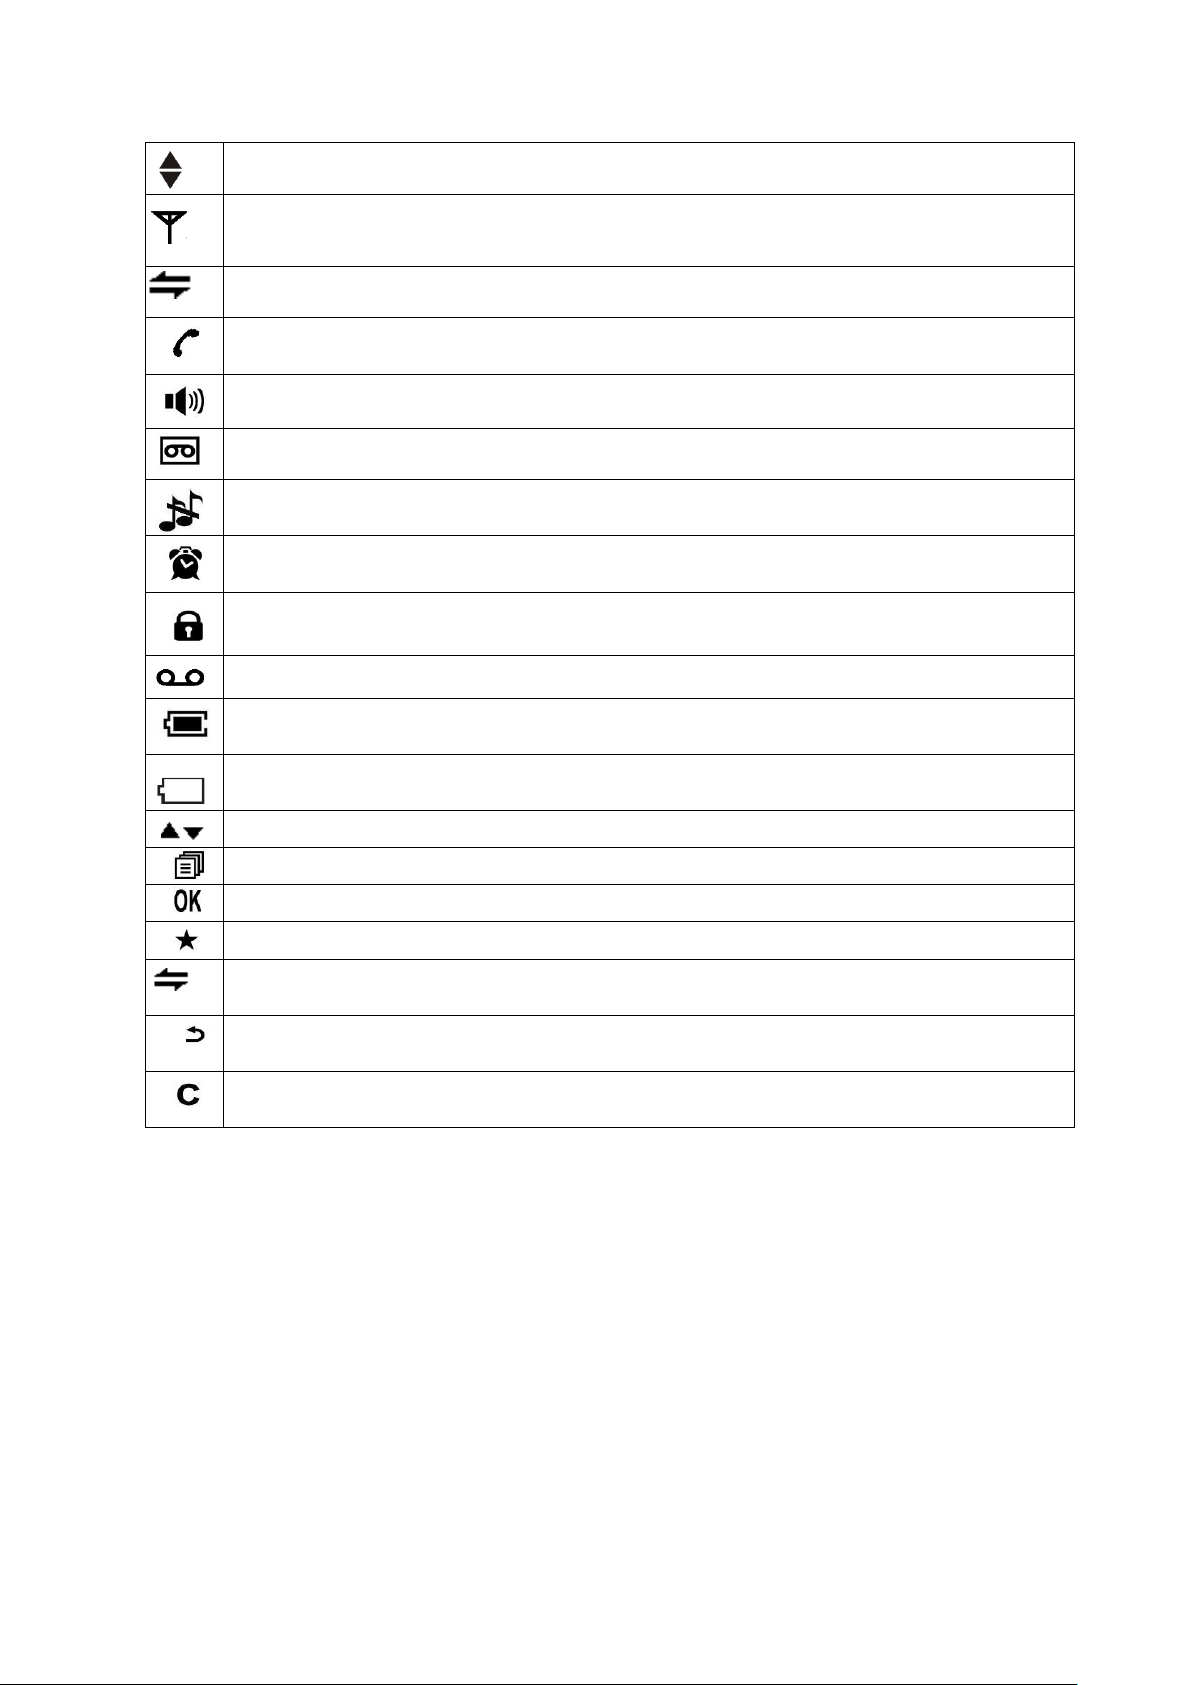
Indicates that a function is accessible via the navigational keys
Flashes when the handset is out of range or not associated to the base
Flashes for incoming internal calls, and remains lit
Indicates an ongoing internal call
Indicates that hands-free is activated
Indicates that there are messages on the answering machine
Indicates that the ringtone has been muted
Is displayed when the alarm is activated
Indicates that the keypad is locked
Indicates the reception of a new message on your operator's voicemail
Indicates that the batteries are charged
Indicates that the batteries are depleted, and require recharging
Indicates that functions are accessible via the menu
Indicates that functions are accessible via the menu
Allows you to validate the function selected
Indicates a missed call (unanswered)
(INT)
Allows you to make an internal call
Allows you to return to the previous menu (press quickly) or to lock the
handset (press and hold down)
Allows you to delete a character, or cancel an alarm, or mute the ringtone
during an incoming call, or return to the previous menu
4 – Description of the number pad
Certain functions such as the directory require use of the alphanumeric keypad. The
keypad automatically sets to alphanumeric when one of these functions is entered.
To enter a letter, press the corresponding key on the keypad as many times as
necessary.
Examples:
- For "A", click on 2 once
- For "B", click on 2 twice
- For "A" then "B", enter an "A" then wait until the cursor has moved to the next
character and enter a "B".
- For a space, click on 1 once.
Page 14
14
Keys
1st Press
2nd Press
3rd Press
4th Press
5th Press
1
SPACE
- 1
2 A B C 2 3 D E F 3 4 G H I 4 5 J K L 5 6 M N O 6 7 P Q R S 7 8 T U V 8 9 W X Y Z 9 0 0
CALL LIST
Display the last incoming/outgoing call
x1
PHONEBOOK
ADD
Add a new contact to the directory
x1
VIEW
Display the contacts saved in the directory
x2
EDIT
Modify the name and telephone number of a saved
contact
x3
DELETE
Delete a contact from the directory
x4
DELETE ALL
Delete all contacts from the directory
x5
PB STATUS
Display the number of entries still available in the
directory.
x2
BS SETTINGS
BS RINGER
Modify the ringtone of the base
x1
RING VOLUME
Modify the volume of the ringtone of the base
x2
DELETE HS
Disassociate a handset from the base
x3
DIAL MODE
Modify the dialling mode.
x4
FLASH TIME
Modify the duration of the Redial signal (R).
x5
CHANGE PIN
Modify the PIN code for your telephone.
x3
HS SETTINGS
ALARM
Activate/Deactivate the alarm.
x1
RING SETUP
INT RING
Modify the ringtone for
calls between handsets.
x1
EXT RING
Modify the ringtone for
external incoming calls.
x2
RING VOLUME
Modify the volume of the
ringtones.
Note: Other characters are available using keys * and #.
5 – Summary of the menus
This is a summary of the telephone's menus accessible via the key on your
handset
Page 15

15
x2
TONE SETUP
KEY TONE
Activate/deactivate the
key tones.
x1
BATTERY TONE
Activate/deactivate the
low battery sound alert.
x2
OUT OF RANGE
Activate/deactivate the
sound when the handset
is too far from the base.
x3
LANGUAGE
Modify the telephone language.
x4
RENAME HS
Modify the name of the handset displayed during
internal calls.
x5
HS DISPLAY
Select the information to be displayed in standby mode
(time or name of the handset).
x6
AUTO ANSWER
Activate/deactivate the automatic answer function for
incoming calls.
x7
DATE & TIME
Set the time and date.
x4
REGISTRATION
Connect a new handset to the base.
x5
DEFAULT
Restore default settings.
x6
ANS MACHINE
MSG PLAYBACK
Listen to saved messages
x1
DELETE ALL
Delete all messages
x2
MEMO
Record a memo
x3
TAM ON/OFF
Activate/deactivate the answering machine
x4
TAM SETTINGS
ANSWER MODE
Modify the answering
machine operating mode
x1
TAM
LANGUAGE
Modify the answering
machine language.
x2
OGM SETTINGS
Save or listen to a
recorded message
x3
ANSWER DELAY
Modify the answering
machine pick up delay
x4
RECORD TIME
Modify the maximal
duration of the messages
x5
REMOTE ACC
Activate/Deactivate
remote consultation
x6
COMPRESSION
Modify the recording
quality of the messages
x7
BS SCREENING
Activate/deactivate
filtering
x8
CHANGE PIN
Modifying the remote
consultation code
Page 16

16
Handset functions
1 – Hands-free and listening volume of the handset
During a telephone conversation, this function allows you to activate the handset
speaker so as to listen and speak to your correspondent without having to hold the
handset.
CAUTION: Prolonged use of the hands-free function leads to important battery
consumption, therefore considerably reducing the device's battery life.
Adjust the listening volume of the handset or hands-free speaker. The
volume can be adjusted to
5 different levels (1 to 5)
Level 5: Highest
Level 1: Lowest
During a telephone conversation, this allows you to activate the handsfree function; the icon appears on the screen
Press again to deactivate the hands-free function, the icon
disappears from the screen
Note: The set volume level stays the same between each call. The listening volume
settings for the handset are not memorised for the volume of the hands-free speaker.
Each volume level setting is memorised separately. For example, you can permanently
set the listening volume to level 5 and level 5 for the hands-free speaker volume.
2 – Locking the keypad
Locking the keypad prevents calling a number by accident. When the keypad is locked,
the icon appears on screen.
Note: When the keypad is locked, it is still possible to answer a call.
Hold down the key until the icon appears on screen to lock your
keypad
When the keypad is locked, hold down the key until the icon
disappears from the screen
Page 17

17
3 – Secret function
This function allows you, during communication, to talk to a third person without being
heard by your correspondent.
The message "VOLUME OFF" appears on screen and indicates that
you are in secret mode
When the secret function is activated, when you deactivate the function,
the message "VOLUME OFF" disappears from the screen
4 – Deactivating/reactivating the handset ringtone
If you desire, you can temporarily deactivate (stop) the handset ringtone.
When you receive a call, the handset will not ring, but the screen will display the
incoming call.
You can then reactivate the ringtone and the set volume level will be automatically
restored.
Hold down the key until the icon appears at the top of the screen
and indicates that the telephone ringtone is deactivated
When the ringtone is deactivated, hold down the key until the icon
disappears from the screen. Your telephone's ringtone is
reactivated.
5 – The handset ringtone volume
You can set the ringtone volume for external or internal calls to 5 levels (1 to 5) or to
silent (OFF).
The setting for internal call volume is the same for external calls.
To modify the ringtone volume setting via the menu, refer to chapter "Modifying the
ringtone volume".
You can also set the ringtone volume when receiving a call.
When the handset rings, press key to stop the ringtone. "VOLUME OFF" appears
on the screen, or use keys to select the ringtone volume.
The last setting selected is memorised.
Page 18

18
ABC
6 – Handset calling
This function allows you to call all handsets associated to a base.
This is useful if you have misplaced a handset.
• All handsets must be idle (no tone).
• Quickly press the REGISTRATION key located on the base (Refer to chapter
"Description de la base").
• All handsets associated to the base emit a beep and
"PAGING" appears on the screens of all the handsets.
• To stop the beep, press any key on the handsets or press the registration key
located on the base.
7 – Conversation time counter
The conversation time counter is automatically activated when dialling or after 15
seconds of conversation after receiving a call, in hours:minutes:seconds (e.g. 01:34:45
for 1 hour 34 minutes and 45 seconds)
After the call, the conversation time remains on the screen for 5 seconds.
Directory
To configure or modify the directory, the handset must be idle (no tone).
1 – Adding a contact
You can save up to 20 contacts in the alphanumeric directory.
Each contact can include up to 12 characters per name and 20 figures per number.
Note: - A name must be entered.
- If you try to save a contact under an existing name, "NAME EXISTED"
will appear to indicate that you must change the name.
To save a new contact (name and number) in the directory, follow the instructions
described in chapter "Adding a contact to the directory" in the "Installation and
start-up guide"
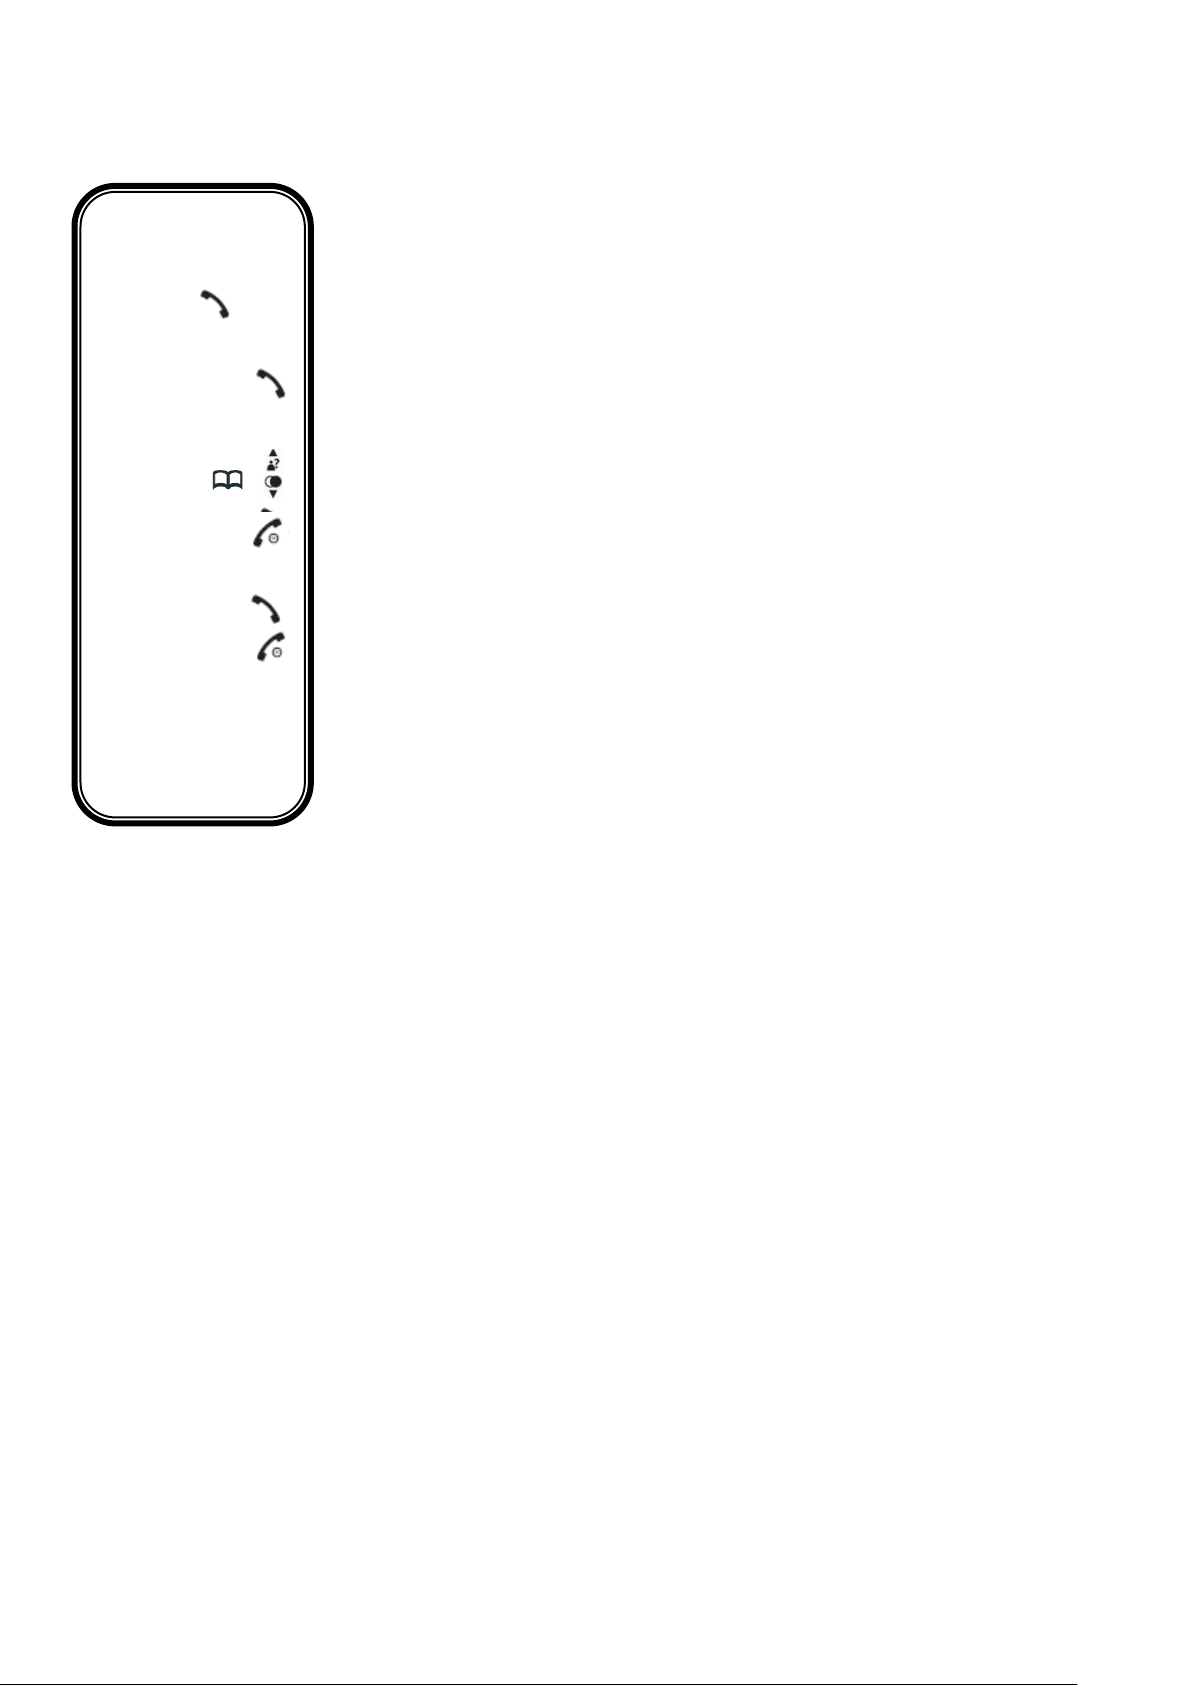
2 – Searching in the directory
Direct access
Enter the directory; the first contact appears on screen
Navigate through the contacts
You can enter the first letter of the name desired; the telephone will take
you directly to the first name in the list which starts by that letter.
Allows you to see the telephone number saved for that contact
Allows you to call the selected contact
Page 19

19
Access via the menu
ABC
ABC
123
Enter the PHONEBOOK" menu
Navigate through the contacts
You can enter the first letter of the name desired; the telephone will take
you directly to the first name in the list which starts by that letter.
Allows you to see the telephone number saved for that contact
Allows you to call the selected contact
3 – Modifying a contact in the directory
Enter the PHONEBOOK" menu
Select "EDIT"
Select the contact for whom you wish to modify information
The name of your contact will appear on the left on the screen
Delete the contact's current name
Use the alphanumeric keypad to enter the contact's new name
The number of your contact will appear on the left on the screen
Delete the contact's current number
Use the alphanumeric keypad to enter the contact's new number
"MELODY X" is displayed on the screen.
Select the ringtone you would like to associate with the contact. A beep
with inform you that the changes you have made have been
successfully saved.
Page 20

20
ABC
4 – Deleting one or all contacts
Deleting a contact
Enter the PHONEBOOK" menu
Select "DELETE"
Select the contact that you would like to delete.
Validate the deletion of the contact; a beep confirms the deletion of the
contact
Deleting all contacts
Enter the "PHONEBOOK" menu
Select "DELETE ALL"
If there are no saved numbers in the directory, "EMPTY" appears on
screen
"CONFIRM?" appears on screen to confirm the deletion of all contacts
Validate the deletion of all contacts, a beep confirms the deletion.
Customising the handset
For all handset customisation, your handset must be idle (no tone)
1 – Renaming a handset
This function allows you to name your handset. This name appears on the handset
screen when idle. The default name displayed is "HANDSET".
The handset name can include up to 10 characters.
Enter the menu and, using the DOWN key, select the menu "HS
SETTINGS "
Select "RENAME HS"
"HANDSET" is displayed on the screen
Delete the current handset name letter by letter
Use the alphanumeric keypad to enter the handset's new name.
A beep confirms that the handset's name has been changed.
Page 21

21
2 – Screen display
You can choose the information displayed on screen when your handset is idle.
There are two possibilities: the handset's name or the time.
Enter the menu and, using the DOWN key, select the menu "HS
SETTINGS"
Select "HS DISPLAY"
Select "TIME" or "HANDSET NAME" to choose the display you desire
for idle mode
3 – Key tones
You can activate and deactivate the key tones.
Enter the menu and, using the DOWN key, select the menu "HS
SETTINGS"
Select "TONE SETUP"
Select "KEY TONE"
Activate or deactivate the handset's key tones.
4 – Setting the automatic pick up/hang up function
When this function is activated, it allows you to answer a call by simply picking up the
handset from the base or charger, and to end a call by simply putting the handset back
on the base or charger, without having to press keys and .
Enter the menu and, using the DOWN key, select the menu "HS
SETTINGS"
Select "AUTO ANSWER"
Activate or deactivate the handset's key tones.
5 – Activate/Deactivate the low battery alert
When activated, this function allows you to hear a beep, indicating low battery.
Page 22

22
Enter the menu and, using the DOWN key, select the menu "HS
SETTINGS"
Select "TONE SETUP"
Select "BATTERY TONE"
Activate or deactivate the handset's key tones.
6 – Activate/Deactivate the out of range alert
When activated, this function allows you to hear a beep, indicating that the handset is
out of range.
Enter the menu and, using the DOWN key, select the menu "HS
SETTINGS"
Select "TONE SETUP"
Select "OUT OF RANGE"
Activate or deactivate the handset's key tones.
7 – Handset language
There are 4 possible languages: English (default), French, Spanish and Dutch.
To choose a language on the handset, follow the instructions described in chapter:
"Installation and start-up guide – 3- Basic set-up – 3-4- Changing the language".
8 – Setting time and date
Note: If you have subscribed to name or number presentation with your operator,
the date and time of your telephone will be automatically updated by the network
after every received call. Otherwise, you must set the date and time manually.
8-1- Choice of format
Select the date display format
You can choose to display the date in "DD-MM-YY " or "MM-DD-YY"
format.
Enter the menu and, using the DOWN key, select the menu "HS
SETTINGS "
Page 23

23
123
123
123
Select "DATE & TIME"
Select "DATE FORMAT"
Select a format. A beep confirms the validation of the format.
Select the time display format
You can choose 24 hour clock format (e.g. "23H14") or 12 hour clock
format (the time will be displayed as follows: "11H14 P" for "23H14" and
"11H14 A" for "11H14"
Follow the instructions above, selecting "TIME FORMAT" instead of
"DATE FORMAT"
8-2- Date and time
Enter the menu and, using the DOWN key, select the menu "HS
SETTINGS"
Select "DATE & TIME"
Date setting:
Select "SET DATE"
The date saved on the handset will appear on screen. If it is correct,
press OK, if not you can modify it in the following order:
Day/Month/Year using the alphanumeric keypad.
Time setting:
Select "SET TIME"
The time saved on the handset will appear on screen. If it is correct,
press OK, if not you can modify it in the following order: Hour/Minutes
using the alphanumeric keypad.
A beep confirms the validation of the changes to the date and time.
CAUTION: Time is set manually in the following order: hours then minutes, you can
move from one figure to another using keys and .
When setting the time, the telephone will not accept numbers of "23".
If you wish to modify the time on your telephone from "15H00" to "20H00", you must
change the second figure before changing the first, e.g.:
"15H00" is displayed on the screen,
Select the second figure from the hour section, "15H00"
Modify this figure using the alphanumeric keypad from "5" to "0".
"10H00" is displayed on the screen,
Page 24

24
123
x2
123
Select the first figure from the hour section, "10H00"
Modify this figure using the alphanumeric keypad from "1" to "2".
"20H00" is displayed on the screen,
Validate the modification.
This process must be used to set a time between "20H00" and "23H00" when the
telephone displays a time between "14H00" and "19H00".
9 – Alarm
If the alarm is activated, it will be triggered every day at the set alarm time.
If the Snooze function is activated, when the alarm is triggered, even if you stop it, it will
still be triggered every 7 minutes.
Configuring the alarm function
Enter the menu and, using the DOWN key, select the menu "HS
SETTINGS»
Select "ALARM"
Activate or deactivate the alarm function
Enter the desired alarm time; a beep will confirm that the alarm is
activated.
"SNOOZE" is displayed on the screen
Activate or deactivate the SNOOZE function, a beep indicates that the
alarm time has been saved. The icon appears on the idle screen,
indicating that the alarm is activated.
Advanced telephone settings
For all handset settings, your handset must be idle (no tone)
1 – Setting the PIN code
It is necessary to enter the PIN code to access certain functions. The default pin code
is: 0000
WARNING: If you wish to modify the default PIN code, be sure to write down the
new PIN code. If forgotten, the warranty will not cover such an oversight.
Enter the menu and, using the DOWN key, select the menu "BS
SETTINGS"
Page 25

25
123
123
123
123
Select "CHANGE PIN"
"PIN? -----" appears on screen, enter the PIN code using the
alphanumeric keys (the default PIN code is 0000)
"NEW PIN? -----" is displayed on the screen, type in the new PIN code.
"CONFIRM? ----- " is displayed on the screen, type in the new PIN code
a second time, a beep confirms the PIN code change.
Note: When restoring the factory settings, the default PIN code (0000) is automatically
reactivated.
2 – Manual registration of a handset with the base
You can associate up to 5 handsets with the base.
• Press down the registration key located on the base for 10 seconds (Refer to
chapter "Description de la base"). Your base is now in registration mode. Follow the
registration procedure for the handset to be associated.
Procedure for manual registration of a OLEA handset with the
base
Enter the menu and use the DOWN key to select the "REGISTRATION"
menu
"PIN? -----" appears on screen, enter the PIN code using the
alphanumeric keys (the default PIN code is 0000)
"WAIT" is displayed on the screen. When "HANDSET X" appears on the handset
screen (X corresponds to the number of the handset on the base), the additional
handset is associated to the base.
Note:
- Once the handset has been associated to the base, the base automatically stops the
association mode. To associate other handsets, follow the same procedure.
- If you do not associate a handset within a 2 minute period, the association mode will
automatically stop.
3 – Disassociating a handset from the base
This function will allow you to delete a handset saved on your base, so as to replace it.
If there is only one handset saved to the base, it cannot be deleted.
A handset can only be removed using another handset saved to the same base.
Enter the menu and, using the DOWN key, select the menu "BS
SETTINGS"
Select "DELETE HS"
Page 26

26
123
"PIN?-----" appears on screen, enter the PIN code using the
alphanumeric keys (the default PIN code is 0000)
"HANDSET 1" is displayed on the screen
Select the handset to be disassociated
"REGISTER" appears on the disassociated handset
4 – Setting the flash time (R)
The R key allows you to access certain services provided by your operator.
Contact your operator for more information concerning these services.
WARNING: Default settings depend on your country of residence. In England, the
flashing period is set to "SHORT" (100ms).
Certain services may not operate for a short or long period, such as your operator's call
signal management, for example.
Nevertheless, for telephones installed with certain PABX standards, setting it to
MEDIUM or LONG may be essential.
LONG: 600ms
MEDIUM: 270ms
SHORT: 100ms
Enter the menu and, using the DOWN key, select the menu "BS
SETTINGS"
Select "FLASH TIME"
Select a period ("LONG", "MEDIUM" or "SHORT"), a beep confirms the
validation
5 – Setting the dialling mode
You can select the type of call dialling from your telephone. We strongly recommend
using the "TONE" tone dialling mode (default mode) which is fast and practical
(moreover, pulse dialling does not permit certain answering machine functions, bank
card services or voicemail).
Enter the menu and, using the DOWN key, select the menu "BS
SETTINGS"
Select "DIAL MODE"
Select a dial mode ("TONE" or "PULSE") a beep will confirm the
validation
Page 27

27
6 – Restoring default settings
123
PIN code: 0000
Dialling mode: Tone dialling
R key: SHORT (100ms)
Time format: 24 Hour
Handset name: HANDSET
Automatic answer: Activated (ON)
123
You can reset your telephone (bases and handsets) to their default settings.
WARNING: Restoring to default settings deletes the list of callers (list of calls received)
and the REDIAL list (list of last numbers called), but does not delete the contents of the
directory.
The PIN code is reset to 0000.
The telephone's default settings are:
Language: English
External ringtone: 1
Internal ringtone: 2
Ringtone volume: 3
Key tones: Activated (ON)
Low battery alert: Activated (ON)
Out of range alert: Deactivated (OFF)
Alarm deactivated (OFF)
Time: 00:00
Enter the menu and use the DOWN key to select the "DEFAULT" menu
"PIN?-----" appears on screen, enter the PIN code using the
alphanumeric keys (the default PIN code is 0000)
"CONFIRM?” appears on screen, a beep will confirm the validation
Interphone functions
The following functions are only available if 2 handsets are associated to the base (e.g.
if the product is sold with several handsets)
1 – Calling another handset
Note: if only 2 handsets are linked to the base, you do not have to select a handset.
Simply press the button to automatically call the other handset.
If several handsets are linked to the base:
Example: 3 handsets are registered with the base and you want to use
the inter-phone with the first handset.
"HS23 9" is displayed on the screen (2 corresponds to the second
handset registered with the base 3 corresponds the third registered
handset)
Enter the number of the handset that you would like to call
Page 28

28
123
"CALLING HS X" is displayed on the handset screen (X corresponds to the number of
the handset you would like to call). For example: "CALLING HS 3")
"CALL FR HS X" is displayed on the handset receiving the call (X corresponds to the
number of the handset making the call. For example: "CALL FR HS23").
2 – Calling all other handsets
"HS23 9" is displayed on the screen (2 corresponds to the second
handset registered with the base 3 corresponds the third registered
handset)
Press the 9 button on the alphanumeric keypad to call all other
handsets
"CALL ALL HS" is displayed on the handset screen
"CALL FR HS CBX" is displayed on the screen of each handset receiving the call (X
corresponds to the number of the handset making the call. For example: "CALL FR
HS1")
3 – Responding to an inter-phone call
When you receive and inter-phone call, the handset rings.
"CALL FR HSX" is displayed on the screen. (X corresponds to the
number of the handset making the call. For example: "CALL FR HS 1")
Speak to the caller.
End the conversation; place the handset back onto the base.
4 – Responding to an external call during an inter-phone call
If you receive an external call during an inter-phone call, beep are
issued through the earpieces of the handsets in the inter-phone call
You are in an inter-phone conversation. Respond to the external call.
The inter-phone call is automatically ended.
At the end of the conversation, place the handset back onto the base.
5 – Transferring an external call to another handset
You are in a conversation with an external caller
"INTERCOM" is displayed on the screen
Page 29

29
"HS23 9" is displayed on the screen (2 corresponds to the second
123
123
handset registered with the base 3 corresponds the third registered
handset)
Enter the number of the handset to which you would like to transfer the
call.
"CALLING HS X" is displayed on the handset screen (X corresponds to
the number of the handset you would like to call). For example:
"CALLING HS 3")
"CALL FR HS CBX" is displayed on the handset receiving the call (X
corresponds to the number of the handset making the call. For
example: "CALL FR HS 23"
.
When the internal correspondent picks up the handset receiving the
call, hang up your handset and the internal correspondent will be in
communication with the external correspondent.
6 – 3-way conference calling
It is possible to establish simultaneous contact with an internal correspondent and an
external correspondent.
You are in a conversation with an external caller
"INTERCOM" is displayed on the screen
"HS23 9" is displayed on the screen (2 corresponds to the second
handset registered with the base 3 corresponds the third registered
handset)
Enter the number of the handset that you would like to call
"CALLING HS X" is displayed on the handset screen (X corresponds to the number of
the handset you would like to call). For example: "CALLING HS 3")
"CALL FR HS CBX" is displayed on the handset receiving the call (X corresponds to
the number of the handset making the call. For example: "CALL FR HS 2
When the internal correspondent responds, hold down the button for 3 seconds.
"CONFERENCE" is displayed on the screen
This begins the 3-way conference call.
Redial list
The REDIAL list allows you to memorise the last 5 numbers entered. If the number has
already been saved in the directory, the name linked to it is displayed.
To have full access to or to modify the REDIAL list on the handset, the handset must be
in idle mode (no tones)
Page 30

30
ABC
1 – Viewing the REDIAL list
Access the REDIAL list
The last number entered is displayed on the screen
Find the desired number amongst the last entered numbers in the
REDIAL list
Call the selected number
2 – Saving a number from the REDIAL list to the directory
Access the REDIAL list
The last number entered is displayed on the screen
Select the number that you would like to save in the directory.
Enter the menu on the REDIAL list and select "ADD"
"NAME" is displayed on the screen
Enter the name to be put in the memory using the alphanumeric keypad
The number that you would like to save is displayed on the screen.
"MELODY X" is displayed on the screen.
Select the ringtone you would like to associate with the contact. A beep
with inform you that the changes you have made have been
successfully saved.
3 – Deleting a number (or a name) from the REDIAL list
Access the REDIAL list
The last number entered is displayed on the screen
Select the number that you would like to delete.
Enter the menu on the REDIAL list and select "DELETE" A beep
confirms that the number has been deleted from the REDIAL list
4 – Deleting the entire REDIAL list
Access the REDIAL list
The last number entered is displayed on the screen
Enter the menu in the REDIAL list and select "DELETE ALL"
"CONFIRM?" is displayed on the screen. A beep confirms that the
REDIAL list has been deleted
Page 31

31
Call log
The call log allows you to memorise the last 10 calls received.
To have full access to or to modify the Call log on the handset, the handset must be in
idle mode (no tones)
CAUTION: To benefit from all of the following functions, you need to have a
subscription to your phone operator name or number identification service
subject to technical availability from your operator.
1 – Name and number presentation function
When receiving a call, the number of the line making the call is compared with
the numbers memorised in the directory. If the number is found in the directory,
the handset replaces the number received with the name memorised in the
directory.
The handset allows you to identify the name and number of your callers as well
as the date and time of their calls.
When "X NEW CALL" is displayed in idle mode, indicating that you have
received X new missed calls in the log. These calls are represented by the icon
in viewing.
When the caller does not wish to divulge their number, the call is not saved in the
call log. "WITHHELD" is displayed on the screen when the caller does not wish
to divulge their number.
On certain "BOX" hubs, masked calls ("WITHHELD ") may not be displayed and
therefore may not be taken into account in the call log
When receiving a call with the name, the handset displays the name and the
number of the caller alternately.
Answered calls are saved in the log but are considered as read.
When answering a call, the number or the name is replaced by the length of the
conversation after 15s of communication.
The name and the number are only displayed when you are online if you are also
a subscriber to your operator call signal service.
2 – Viewing call logs
The call log can hold the last 10 calls received.
Beyond that, the most recent call replaces the oldest.
IMPORTANT: When viewing the log, an unread missed call is indicated with the icon
displayed on the screen. This icon disappears when you view it using the keys and
.
Page 32

32
ABC
Access the call log
The most recent name or number save in the log is displayed on the
screen
Navigate to view other names or numbers in the log
View the number if the name is displayed in the log
Enter the log menu and select "DETAIL" to view the time and date of
the call.
Call back the selected number
3 – Saving a number from the call log to the directory
Access the call log
The last number entered is displayed on the screen
Select the number that you would like to save in the directory.
Enter the menu on the call log and select "ADD"
"NAME" is displayed on the screen
Enter the name to be put in the memory using the alphanumeric keypad
The number that you would like to save is displayed on the screen.
"MELODY X" is displayed on the screen.
Select the ringtone you would like to associate with the contact. A beep
with inform you that the changes you have made have been
successfully saved.
4 – Deleting a number (or a name) from the call log
Access the call log
The last number entered is displayed on the screen
Select the number that you would like to delete.
Enter the menu on the call log and select "DELETE" A beep confirms
that the number has been deleted from the call log
Page 33

33
5 – Deleting the entire call log
Access the call log
The last number entered is displayed on the screen
Enter the call log and select "DELETE ALL"
"CONFIRM?" is displayed on the screen. A beep confirms that the
content has been deleted from the call log
Using the answering machine
This device incorporates a numeric answering machine capable of saving entire
messages up to a limit of around 15 minutes combined. You can access the answering
machine from the base or the handset.
For all answering machine operations, your handset must be in idle mode (no tones)
1 – Activating/disabling the answering machine
1.1- With the handset
Enter the menu and use the DOWN key to select the "ANS MACHINE"
menu
Select "TAM ON/OFF"
Select one of the following options:
"ON to activate the answering machine
"OFF to disable the answering machine
"*" An asterisk indicates that your choice has been confirmed.
Note: When the answering machine is activated, the icon is displayed on the
handset screen.
1.2- With the base
Push the key for activate or deactivate the answering machine.
- If the answering is activated, the number of unread messages appears on the
base display or “00” if you don’t have new messages
- If the answering machine is deactivated, the “--“icon appears permanently on
the display.
Page 34

34
2 – Date and time of message receipt
Warning: You must set the date (day/month) and the time to be able to use the
message receipt date and time display function (refer to the sub chapter "Setting
time and date"), unless you have subscribed to the number and name
presentation service with your operator
3 – Recording a memo
You can record a memo (personal message) of a maximum length of 1 minute.
You can record a memo even when the answering machine is disabled.
Speak clearly whilst positioning the microphone 5cm from your mouth.
Recording a memo:
Enter the menu and use the DOWN key to select the "ANS MACHINE"
menu
Select "MEMO"
"RECORDING" is displayed on the screen whilst recording.
End the recording.
Note: The recording ends automatically after 1 minute
Note: Memos are saved on the answering machine after received messages according
to the time and date of the recording in the same way as externally received voice
messages. To listen to a recorded memo, see the following chapter on listening to
messages.
4 – Listening to messages
When you have new messages on the answering machine, the light on the base (see
chapter "Description of the base") flashes red and the icon flashes on the handset
screen.
Listening to messages and memos always begins with the new messages
4-1 Listening using the base
Press the key to begin listening
New messages are played back through the base's loudspeaker.
Messages are automatically played back from the most recent to the oldest.
Press once on the key to stop listening to the messages before the
end.
Press the or for adjust the listening volume
Press the X key if you would like to delete the message you are listening to,
after which the answering machine will move on to the next message.
Page 35

35
2
5
4
44
6
Note: When all new messages have been played back, the light on the base will
go out. The old messages are still available to be listened to by pressing the
key.
4-2 Listening using the handset
Caution: When listening to messages on the handset, hands-free mode is automatically
activated. To return to the normal listening mode (ear on handset) press the key on
your handset.
Enter the menu and use the DOWN key to select the "ANS MACHINE"
menu
Select "MSG PLAYBACK"
New messages are then played back.
The date and time of the message being played back is displayed on
the screen as follows (Day--Month Hour-- Minutes)
There are 5 different levels of volume for listening to messages
Level 5: Highest
Level 1: Lowest
Use the keys on the alphanumeric keypad to carry out the following
functions:
Delete the message currently being played
Stop playback
Restart the current message
Replay the previous message (Press twice quickly on the 4 key)
Listen to the next message
5 – Deleting all messages and memos
Enter the menu and use the DOWN key to select the "ANS MACHINE"
menu
Select "DELETE ALL"
"CONFIRM?" is displayed on the screen
"EMPTY" is displayed on the screen when all messages have been
deleted.
Page 36

36
6 – Remote consultation
Key
Function
2
Delete the message currently being played
4
Listen again to the current message or press twice for the previous
message
5
Listen to messages
6
Listen to the next message
7
Activate the answering machine service (see next chapter)
8
Stop message playback
9
Disable the answering machine service (see next chapter)
6-1 Using remote consultation
Caution: Remote consultation can only be used if this function is activated (see
Activating/Disabling remote consultation in Answering machine settings)
NOTES:
- The remote consultation function may not work on certain "BOX" hubs
- Telephoning from a direct tone dial line
- If you are using a switchboard, you must use a beeper (not provided)
If the telephone line is using pulse dialling, a beeper must be used (not included).
To consult your messages:
• Enter your telephone number
• While the message is playing, press key * on your telephone, then compose your 4-
figure remote consultation code (0000 by default)
A short beep is emitted
Press key 5 to start listening to messages and/or press the key corresponding to the
desired function:
Note:
After 5 seconds of key inactivity, the answering machine automatically cuts off
communication.
6-2 Remote activation/deactivation of the answering machine
If you have forgotten to turn on your answering machine, this function allows you to
activate it remotely (from a phone box, etc.). You can also deactivate it remotely.
Remote activation
The answering machine is deactivated.
Enter your telephone number
The answering machine is triggered upon the 10th ringtone and plays the
recording corresponding to the answering machine only mode.
While the message is playing, press key * on your telephone, then compose your
4-figure remote consultation code (0000 by default)
A short beep is emitted
Press key 7 to activate the answering machine
Hang up
Page 37

37
CAUTION: If you have activated your operator's voicemail service, it will automatically
be triggered before the 10th ringtone and the answering machine only mode.
Remote deactivation
The answering machine is activated.
Enter your telephone number
The answering machine is triggered (depending on the settings) and plays the
recording corresponding to the mode set (recorder or answering machine only)
While the message is playing, press key * on your telephone, then compose your
4-figure remote consultation code (0000 by default)
A short beep is emitted
Press key 9 to deactivate the answering machine
Hang up
7 – Memory full
The answering machine possesses a recording capacity of 15 minutes maximum.
Once the limit has been reached during the recording of a message, the answering
machine immediately stops the call and hangs up.
If you receive a call when the answering machine memory is already full, the recorded
message played invites your correspondent to call back later.
«PB FULL " is then displayed on the handset screen
To free up space on the answering machine, you must listen to your new messages and
delete them as indicated in chapters "Listening to messages" and "Deleting all
messages and memos".
Answering machine settings
For all answering machine settings, your handset must be in idle mode (no tones)
1 – Selecting the answering machine mode (Recorder/Answering
machine only)
There are two answering machine modes:
Recorder mode: Allows your correspondent to leave a message
Answering machine only: Does not allow your correspondent to leave a message, but
invites them to call back later. (This mode is automatically activated when the memory
is full)
Enter the menu and use the DOWN key to select the "ANS MACHINE"
menu
Select "TAM SETTINGS"
Select "ANSWER MODE"
Choose between "ANSWER ONLY" and "ANS & REC", a beep will
confirm your choice
Page 38

38
2 – Default recorded messages
There are 2 default recorded messages (pre-recorded) in French and English, one for
the recorder and the other for the answering machine only. These recorded messages
are automatically activated if you do not record a personal message for the selected
mode.
The default message for the recorder is: "Hello, your call cannot be taken at the
moment, so please leave your message after the tone"
The default message for the answering machine only is: "Hello, your call cannot be
taken at the moment and you can’t leave a message, so please call later"
To hear the default recorded messages, follow the procedure "Listen to a recording" if
you have not recorded a personal message.
2-1 Choosing the language for the default recorded messages
The default answering machine messages are available in 2 languages: French and
English. The recorded message played will be in the selected language.
The default language is French.
Enter the menu and use the DOWN key to select the "ANS MACHINE"
menu
Select "TAM SETTINGS"
Select "LANGUAGE TAM"
Choose between "FRENCH" and "ENGLISH", a beep will confirm your
choice
2-2 Restoring default recorded messages
The default recorded messages (pre-recorded) remain in the device's memory.
While the personal message (see following chapter "Listen to a recording ")
corresponding to the selected mode (Recorder/Answering machine only) is
playing, press key "C"to delete it.
The default message corresponding to the selected mode will automatically be reset
Page 39

39
3 – Recording a personal message
If you do not wish to use the default messages, you can record your own for both
answering machine modes (Recorder/Answering machine only).
Recording a personal message automatically deletes and replaces the default or
previously recorded message.
Note: A recorded message cannot be any longer than 60 seconds. When recording,
speak 5 cm away from the microphone in a clear and steady voice.
Enter the menu and use the DOWN key to select the "ANS MACHINE"
menu
Select "TAM SETTINGS"
Select "OGM SETTINGS"
Choose between:
"ANSWER ONLY": To select the recording corresponding to the
recording answering machine mode
"ANS & REC": To select the recording corresponding to the answering
machine mode
Select "RECORD MESS"
A long beep confirms the start of the recording.
"RECORDING" is displayed on the screen whilst recording
Finish the recording
The recording is automatically played
4 – Listen to a recording.
With this menu, you can listen to the played recording when you switch on your
answering machine in the desired mode.
Enter the menu and use the DOWN key to select the "ANS MACHINE"
menu
Select "TAM SETTINGS"
Select "OGM SETTINGS"
Choose between:
"ANS & REC": To select the recording corresponding to the recording
answering machine mode
"ANSWER ONLY ": To select the recording corresponding to the
answering machine mode
Page 40

40
Select "PLAYBACK"
The recording is selected and played
"PLAYING OGM" is displayed on the screen
Stops the recording and is used to return to the main menu
5 – Setting the answering machine delay.
When activated, the answering machine is prompted after 2, 4, 6 or 8 rings, depending
on the setting.
The answering machine can also be prompted when in the Call saver mode ("TIME
SAVER").
The Call saver mode is used to prompt the answering machine, using remote
consultation, after 2 rings if there are messages saved on it and after 6 rings if there are
no messages. Therefore, if the answering machine does not start after the second ring,
you can hang up and save the cost of a useless call.
Enter the menu and use the DOWN key to select the "ANS MACHINE"
menu
Select "TAM SETTINGS"
Select "ANSWER DELAY"
Select either "2 RINGS", "4 RINGS", "6 RINGS", "8 RINGS" or "TIME
SAVER", a beep will confirm your choice
6 – Setting the length of a message.
This setting allows you to determine the maximum length of a message left by the
caller.
Enter the menu and use the DOWN key to select the "ANS MACHINE"
menu
Select "TAM SETTINGS"
Select "RECORD TIME"
Select either "60s", "120s", "180s" or "UNLIMITED"; a beep will confirm
your choice
Page 41

41
7 – Activate/Deactivate remote consultation
123
123
123
Enter the menu and use the DOWN key to select the "ANS MACHINE"
menu
Select "TAM SETTINGS"
Select "REMOTE ACC"
Choose either:
"ON": to activate remote consultation
"OFF": to deactivate remote consultation
A beep will confirm your choice
8 – Modifying the remote consultation code
The default remote consultation code is 0000. (Not to be mixed up with the base's PIN
code)
CAUTION: If you modify the remote consultation code, be sure to keep it written
down. If forgotten, the warranty will not cover such an oversight.
Enter the menu and use the DOWN key to select the "ANS MACHINE"
menu
Select "TAM SETTINGS"
Select "CHANGE PIN"
"PIN? ----- " is displayed on the screen, type in the 4-number remote
consultation code using the alphanumeric keys (0000 by default)
"NEW PIN? ----- " is displayed on the screen, type in the new remote
consultation code.
"CONFIRM? ----- " is displayed on the screen, type in the new remote
consultation code a second time, a beep confirms the remote
consultation code change.
Note: When restoring the factory settings, the default remote consultation code (0000)
is automatically reactivated.
Page 42

42
Troubleshooting
Check the following items before contacting the after-sales service:
1 – Telephone functions
Nothing displayed:
Check that the handset batteries and correctly installed (polarity).
Place the handset on the base to charge the batteries.
Take the batteries out of the handset and put them back again.
The batteries are not charged:
Check the battery polarities.
Clean the handset and base charging strips.
Charge once more.
The icon remains displayed on the screen:
Check that there are no new messages in your operator's voicemail
Erase the messages in your operator's voicemail.
CAUTION: In certain cases, after having listened to all your operator's voicemail
messages, the icon remains displayed on the screen. To make it disappear, simply
follow the instructions described in chapter "Deleting the entire call log" and this
procedure will also allow you to erase the call log and erase the icon .
A beep will be heard during or after the call:
Recharge the handset batteries.
Stand closer to the base.
The handset cannot detect the base:
You are out of range; you must stand closer to the base.
Reattach the base's power cord correctly.
Take the batteries out of the handset and put them back again.
Disconnect the mains adaptor from the base, then reconnect it.
The dialling tone is not audible:
Check that the telephone line is correctly connected to the base.
2 – Name or number presentation function
Access to the Name presentation service is subject to subscription registration
with your operator (subject to your operator's technical availability).
Access to the Number presentation service is subject to subscription
registration with your operator (subject to your operator's technical availability).
If you have subscribed to name or number presentation, the date (day/year) and
time will be updated by the network after every received call.
3 – Answering machine functions
Faulty sound:
Record the message again, this time louder.
The answering machine no longer accepts any messages:
Check that the answering machine is in service.
Page 43

43
Some messages have not been entirely recorded:
The caller's voice was too low, the machine stopped recording.
The caller stopped speaking for over 5 seconds during the recording of the
message, so the machine automatically stopped the recording.
The caller started speaking before the beep.
The answering machine's memory reached full capacity during the conversation.
For remote use (consultation, activation, etc.), be sure to follow these
instructions:
A direct line at voice frequency (VF) must be used.
If you call via a switchboard, a beeper must be used (not included).
If the telephone line is using pulse dialling, a beeper must be used (not included).
The remote consultation code is not typed in properly or is incorrect.
The answering machine cannot be activated remotely:
The memory is full (the viewer displays "FF"), all messages must be listened to
and deleted.
The remote consultation code is not typed in properly or is incorrect.
"PB FULL" is permanently displayed on the handset:
The answering machine's memory is full; you must listen to all the messages
then delete them to be able to record new massages.
General information
IMPORTANT
This telephone was not made to place emergency calls during a power cut. Please
ensure you make alternative arrangements.
1 – Replacing the handset batteries
After a certain amount of time, the handset batteries may discharge faster. This is due
to normal use. The batteries must be replaced.
1. Open the battery cover.
2. Take the batteries out and replace them with new Ni-Mh batteries.
3. Push the battery cover back on until you hear the click.
WARNING
Do not dispose of the batteries in fire or water. Do not dispose of them as household
waste.
Find out how you can recycle them.
2 – Safety instructions
The telephone set cannot be connected to an IT power plan.
The set is powered by an AC/DC mains adaptor, in compliance with the EN 60950
norm, plugged into a 230 V AC 50 Hz socket.
The adaptor, used as a sectioning device, and the electrical outlet must be installed
close to the telephone set so as to be easily accessible.
The connection to the telephone line meets the TRT-3 safety level requirements.
The power supply socket meets the TBTS safety level requirements.
Electric safety complies with the EN 60950 checks.
The highest temperature in use is 35°C.
Page 44

44
This telephone set uses radio frequency bands, the use of which is coordinated
across the whole European Community.
The marking for terminal equipment certified as compliant is located under the base.
The SAR test is not necessary for products with a power rating lower than or equal to
20 mW. As this product's power rating is lower than this limit, it is not concerned by
this test.
3 – Precautions for use
• Only use the power supply that came with your OLEA. Use of a non authorised power
supply will invalidate your guarantee and may damage the telephone (or the power
supplies provided for the chargers)
• Only use the approved rechargeable batteries provided.
• Do not attempt to open the handset (except to replace the batteries) or the base. This
could expose you to high voltages or other risks. Contact the Helpline for all repairs.
• If the telephone is locked, you cannot make calls.
• The radio signal transmitted between the handset and the base may cause
interference with hearing aids.
• It is wise to ask for professional advice before using this device in proximity to
intensive care or emergency medical equipment.
• If you have a pacemaker, we recommend asking your doctor for advice before using
this device.
• Your telephone may interfere with other electrical equipment, e.g. televisions and
radio sets, clock/alarms and computers if placed too close.
It is recommended that you place your telephone at least one metre away from such
appliances to minimise any risk of interference.
• Do not dispose of batteries in fire. There is a serious risk of explosion and/or release
of highly toxic chemicals.
4 – Cleaning
Clean the handset and the base (or charger) with a moist cloth or anti-static wipe.
Note: Never use cleaning products. They may damage the telephone. Never use a dry
cloth. This may cause a build up of static.
5 – Environment
• Do not expose to direct sunlight.
• The handset may become hot when the battery is on charge or during prolonged use.
This is perfectly normal. However, to avoid any form of damage, it is wise to not place
the device on veneered or aged wood.
• Do not stand your product on carpets or other surfaces which generate fibres, or place
it in locations preventing the free flow of air over its surfaces.
• Do not submerge any part of your product in water and do not use it in damp or humid
conditions, such as bathrooms.
• Do not expose your product to fire, explosive or other hazardous conditions.
• Your telephone may be damaged during a storm. It is wise to unplug the power supply
and telephone cable during a storm.
Page 45

45
This logo indicates that this is electrical or electronic equipment containing hazardous
substances that may have an effect on the environment and human health.
These products should therefore be treated as waste under EU Directive 2012/19/EU, of
January 27, 2003, on electrical and electronic equipment waste. They should not be disposed of
with unsorted household waste and instead should be returned to a waste disposal company or
disposed of through a community collection or recovery program.
6 – Product disposal instructions
Product disposal instructions for residential users
If you no longer use the device, remove and dispose of the batteries, as well as the
device, in compliance with the local recycling procedures. For more information please
contact your local authority or the retailer where the product was purchased.
Product disposal instructions for business users
• Business users should contact their suppliers and check the terms and conditions of
the purchase contract and ensure that this product is not mixed with other commercial
waste for disposal.
7 – Technical information
Inserting a pause
After having composed the prefix, certain switchboards need time to accommodate an
external line. In this case, you must insert a pause when composing the number.
Press key 0 and hold down to insert a pause (P) before entering the telephone number.
Pauses are also used when saving international numbers.
Redial
You may need to use the redial function if you are connected to a switchboard or PABX.
For more information, contact your PABX provider.
Page 46

46
Scope of warranty
The LOGICOM provider warranty is valid for normal use of the device, as described as
part of the instructions.
This warranty excludes the batteries and damage caused by external circumstances.
Specifically, the warranty does not apply if the device is damaged as a result of a drop
or fall, an operating error, a connection that does not comply with these instructions or
your operator's recommendations, lightening, a surge, or inadequate protection against
heat, humidity, or freezing temperatures. The warranty is applicable only in mainland
England.
The legal warranty for hidden defects applies in compliance with Articles 1641 et seq. of
the French Civil Code.
LOGICOM S.A.
55, rue de Lisbonne
75008 Paris, FRANCE
This equipment is in compliance with directive R&TTE 1999/5/EC of the European
Parliament and of the Council concerning the Pan-European single terminal
connection to the public-switched telephone network (PSTN).
However, as there are differences from one country to another between PSTNs, their
conformity alone does not constitute absolute guaranteed optimal operation within
each PSTN termination point.
In the event of problems, first contact your provider.
This device is intended for use in England.
 Loading...