

Page 1
Scuderia FS1 Air (2LFS002)
User Manual
AirPlay wireless speaker system
Page 2

Safety Instructions
1. Read these instructions – All the safety and operating instructions should be read before this
product is operated.
2. Keep these instructions – The safety and operating instructions should be retained for future
reference.
3. Heed all warnings – All warnings on the appliance and in the operating instructions should be
adhered to.
4. Follow all instructions – All operating and use instructions should be followed.
5. Do not use this apparatus near water – The appliance should not be used near water or moisture
– for example, in a wet basement or near a swimming pool, and the like.
6. Clean only with dry cloth.
7. Do not block any ventilation openings. Install in accordance with the manufacture’s instructions.
8. Do not install near any heat sources such as radiators, heat registers, stoves, or other apparatus
(including amplifiers) that produce heat.
9. Do not defeat the safety purpose of the polarized or grounding plug. A polarized plug has two
blades with one wider than the other. A grounding plug has two blades and a third grounding
prong. The wide blade or the third prong is provided for your safety. If the provided plug does
not fit into your outlet, consult an electrician for replacement of the obsolete outlet.
10.
Protect the power cord from being walked on or pinched particularly at the plugs, convenience
receptacles, and at the point where they exit from the apparatus.
Only use attachments/accessories specified by the manufacturer.
11.
Use only with the cart, stand, tripod, bracket, or table specified by the manufacturer, or sold with
12.
the apparatus. When a cart or rack is used, use caution when moving the cart/apparatus
combination to avoid injury from tip-over.
Unplug the apparatus during lightning storms or when unused for long periods of time.
13.
14.
Refer all servicing to qualified personnel. Servicing is required when the apparatus has been
damaged in any way, such as power supply cord or plug is damaged, liquid has been spilled or
objects have fallen into the apparatus has been exposed to rain or moisture, does not operate
normally, or has been dropped.
15.
Please keep the unit in a good ventilation environment.
16.
CAUTION: These servicing instructions are for use by qualified service personnel only. To reduce
the risk of electric shock, do not perform any servicing other than that contained in the operating
instructions unless you are qualified to do so.
This equipment is a Class II or double insulated electrical appliance. It has been designed in
17.
18.
such a way that it does not require a safety connection to electrical earth.
19.
20.
21.
22.
English
AVERTISSEMENT:RISQUE DE CHOC ELECTRIQUE-NE PAS OUVRIR
- This lightning flash with arrowhead symbol within an equilateral triangle is intended to alert
the user to the presence of non-insulated “dangerous voltage” within the product’s enclosure
that may be of sufficient magnitude to constitute a risk of electric shock.
- Warning: To reduce the risk of electric shock, do not remove cover (or back) as there are no user
-serviceable parts inside. Refer servicing to qualified personnel.
- The exclamation point within an equilateral triangle is intended to alert the user to the presence
of important operating and maintenance instructions in the literature accompanying the appliance.
No naked flame sources, such as lighted candles, should be placed on the apparatus.
Attention should be drawn to environmental aspects of battery disposal.
Use of the apparatus in moderate climates.
To assure continued compliance, any changes or modifications not expressly approved by the party
responsible for compliance could void the user’s authority to operate this equipment.
2
Page 3

FCC Statement
This equipment has been tested and found to comply with the limits for a Class B digital device, pursuant
to part 15 of the FCC Rules. These limits are designed to provide reasonable protection against harmful
interference in a residential installation. This equipment generates, uses and can radiate radio frequency
energy and, if not installed and used in accordance with the instructions, may cause harmful interference
to radio communications. However, there is no guarantee that interference will not occur in a particular
installation. If this equipment does cause harmful interference to radio or television reception, which can
be determined by turning the equipment off and on, the user is encouraged to try to correct the
interference by one or more of the following measures:
—Reorient or relocate the receiving antenna.
—Increase the separation between the equipment and receiver.
—Connect the equipment into an outlet on a circuit different from that to which the receiver is connected.
—Consult the dealer or an experienced radio/TV technician for help.
FCC Radiation Exposure Statement
This equipment complies with FCC RF radiation exposure limits set forth for an uncontrolled environment.
This equipment should be installed and operated with a minimum distance of 20 centimeters between the
radiator and your body.
This equipment complies with Part 15 of the FCC Rules. Operation is subject to the following two
conditions:
(1) This device may not cause harmful interference, and
(2) This device must accept any interference received, including interference that may cause undesired
operation.
Caution!
The manufacturer is not responsible for any radio or TV interference caused by unauthorized
modifications to this equipment. Such modifications could void the user authority to operate the
equipment.
IC Statement
This device complies with Industry Canada RSS-210. Operation is subject to the following two conditions:
(1) this device may not cause interference, and
(2) this device must accept any interference, including interference that may cause undesired operation
of the device.
Le présent appareil est conforme aux CNR d'Industrie Canada applicables aux appareils radio RSS-210.
L'exploitation est autorisée aux deux conditions suivantes :
(1) l'appareil ne doit pas produire de brouillage, et
(2) l'utilisateur de l'appareil doit accepter tout brouillage radioélectrique subi, même si le brouillage est
susceptible d'en compromettre le fonctionnement.
The device meets the exemption from the routine evaluation limits in section 2.5 of RSS 102 and
compliance with RSS-102 RF exposure, users can obtain Canadian information on RF exposure and
compliance.
Le dispositif rencontre l'exemption des limites courantes d'évaluation dans la section 2.5 de RSS 102 et la
conformité à l'exposition de RSS-102 rf, utilisateurs peut obtenir l'information canadienne sur l'exposition
et la conformité de rf.
This equipment should be installed and operated with a minimum distance of 20 centimeters between
the radiator and your body.
Cet équipement devrait être installé et actionné avec une distance minimum de 20 centimètres
entre le radiateur et votre corps.
English
3
Page 4

Welcome to Use the Scuderia FS1 Air
The player offers the latest experience in home audio entertainment allowing users to stream
Wi-Fi from iTunes, iPad, iPhone and iPod touch. The player enables fidelity audio that is truly wireless.
You can use the player to:
Stream music directly from iTunes on your Mac or PC using your home Wi-Fi network.
Stream your favorite music from your iPad, iPhone, or iPod touch from your iPod library.
Dock, charge, and play audio with your iPhone and iPod.
D
ownload and enjoy apps available on the App Store.
Stream music from your iPad, iPhone and any phones with Bluetooth feature.
Support Composite Video output with video connector.
Support the audio from your sound sources (Eg. TV, CD player) input with 3.5 mm stereo cable.
Provide a 5V charging connector with USB type ‘A’.
Compatibility
audiodigital over
AirPlay works with:
iTunes, iPod touch (2nd, 3rd, and 4th generation), iPhone 4GS, iPhone 4, iPhone 3GS, iPad 3, iPad 2, and iPad.
For AirPlay, the player must be connected to Wi-Fi with networked access to a Mac or PC running iTunes 10.
touch running iOS
5.0 or later.
5 or later; or an iPad, iPhone, or iPod
Maintenance
Place the player on a level surface away from sources of direct sunlight or excessive hear.
Protect your furniture when placing your player on a natural wood and lacquered finish. A cloth or other protective material should be placed
een it and the furniture.
betw
Clean your player with a soft cloth moistened only with mild soap and water. Stronger cleaning agents, such as Benzene thinner or similar
materials can damage the surface of the player.
English
4
Page 5

Controls
Power /Pairing / Function
Airplay(Not light) / iPod(Red)
/ Bluetooth(Blue) / AUX(Green)
indicator
TOP PANEL
Docking Connector
Volume - Volume +
FRONT PANEL
Remote sensor
Pairing indicator
AC jack
Composite video jack
AUX jack
USB charge port
Play / Pause
Next
Previous
BOTTON
PANEL
REMOTE CONTROL
Power
Function
Volume +
Volume -
Remote control batteries
1. Open the batter door with the with the side the arrowhead
pointed.
2. Fit the battery observing polarity as shown with the same
CR2025 type specified.
English
CR2025
3V
+
5
Page 6

Quick Start
Powering your unit ON
To power the player ON:
Plug AC cord into AC jack , and plug into a live AC wall outlet.
1
P
ress the button on the top panel or the Power button on the remote control to switch the player to
2
ON mode.
Power/Pairing/Function
P
3
to switch the player to Standby mode.
Note: To save power, the player will enter Standby mode from ON mode automatically if there is no audio input for 15 minutes.
!
button on the top panel for 2s or press the Power/Pairing/Function
Power
button on the remote controlress and hold the
AirPlay Wireless Audio Mode
Verify that your player is successfully
1 2 3
connected to your Wi-Fi network.
S
elect the “Ferrari Scuderia AirPlay Speaker
4 5
Dock” as your Airplay audio speaker.
Press the Power/Pairing/Function
button on the top panel or press the
button to select the Airplay mode.
No light indicates.
Press buttons on the player or use
your iTunes, iPad, iPhone, or iPod
touch controls directly.
Adjust volume on the player or wirelessly
control volume on your AirPlay source
device.
Launch iTunes or use your iPad, iPhone,
iPad touch. Verify player and Airplay
source device is on same Wi-Fi network.
Note: for AirPlay streaming:
!
iPad, iPhone, and iPod touch support
point-to-point audio streaming to one
AirPlay enabled speaker.
iTunes supports point-to-multipoint aud
streaming to up to three AirPlay enabled
speakers (performance depends on your
Wi-Fi network and environment).
io
Bluetooth Audio mode
Bluetooth Audio mode
Acticate Bluetooth on your device.
1
Press the button to play the music.
4
English
Press the Power/Pairing/Function
2
button on the top panel or press the
button to select the Bluetooth
mode. Blue light indicates.
Search the device name “Scuderia FS1
3
Air” on your bluetooth device listed and
select it as your audio speaker.
6
Page 7

Quick Start
Line in connection
Connect a sound sources with a Line or
1
headphone analogue output to play
through your unit as below hookup
diagram shown.
Headphone socket
iPod models that cannot be docked to unit
•
MP3 players
•
CD walkman players
•
•
Tape walkman players
•
Personal computers or laptops
Press the Power/Pairing/Function
2 3
button on the top panel or press the
button to select the AUX mode.
Green light indicates.
3.5mm jack cable (included)
Charging your device with USB port
Charge your device using the USB Type
1
“A” connector.
Noted: USB port will stop charging your
!
device when docking the iPhone/iPad/
iPod on the Docking Connector.
On the left of the bottom panel
To AUX jack
On the left of the bottom panel
Set your personal audio player/
computer to PLAY.
USB cable (Not included)
To USB port
English
7
Page 8
Quick Start
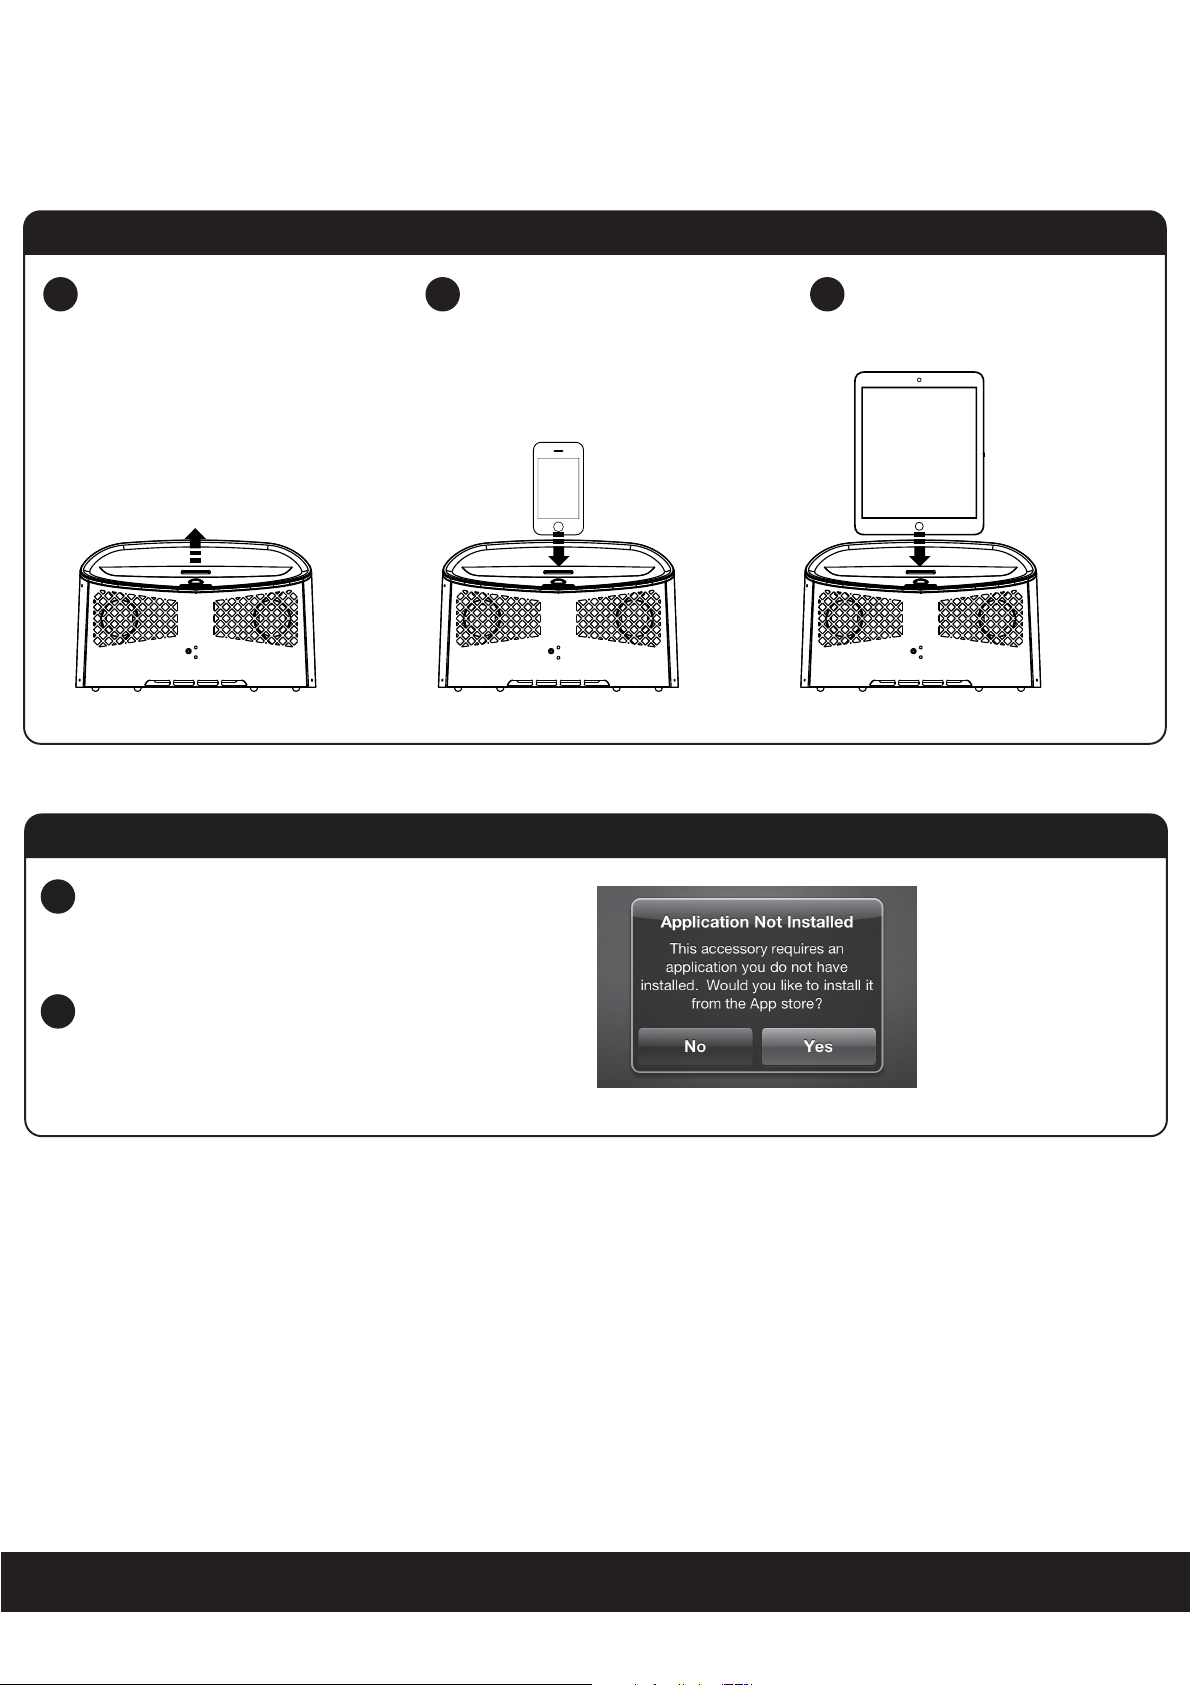
Docking an iPhone/iPad/iPod
Remove the cover from the iPod dock.
1
Locate the iPhone/iPad/iPod on the
2
Docking Connector and press it gently
home.
Download the Apps from App store.
The player will switch to iPod mode
3
and iPhone/iPad/iPod start to play.
Red light indicates for iPod mode.
If an iPhone/iPad/iPod(some models only) is
1
connected the first time, a window will be
display. By pressing YES on the iPhone/iPad/
iPod screen, the App store will be opened.
Select “Install” and wait for it to download to
2
complete the installation.
English
8
Page 9
Quick Start
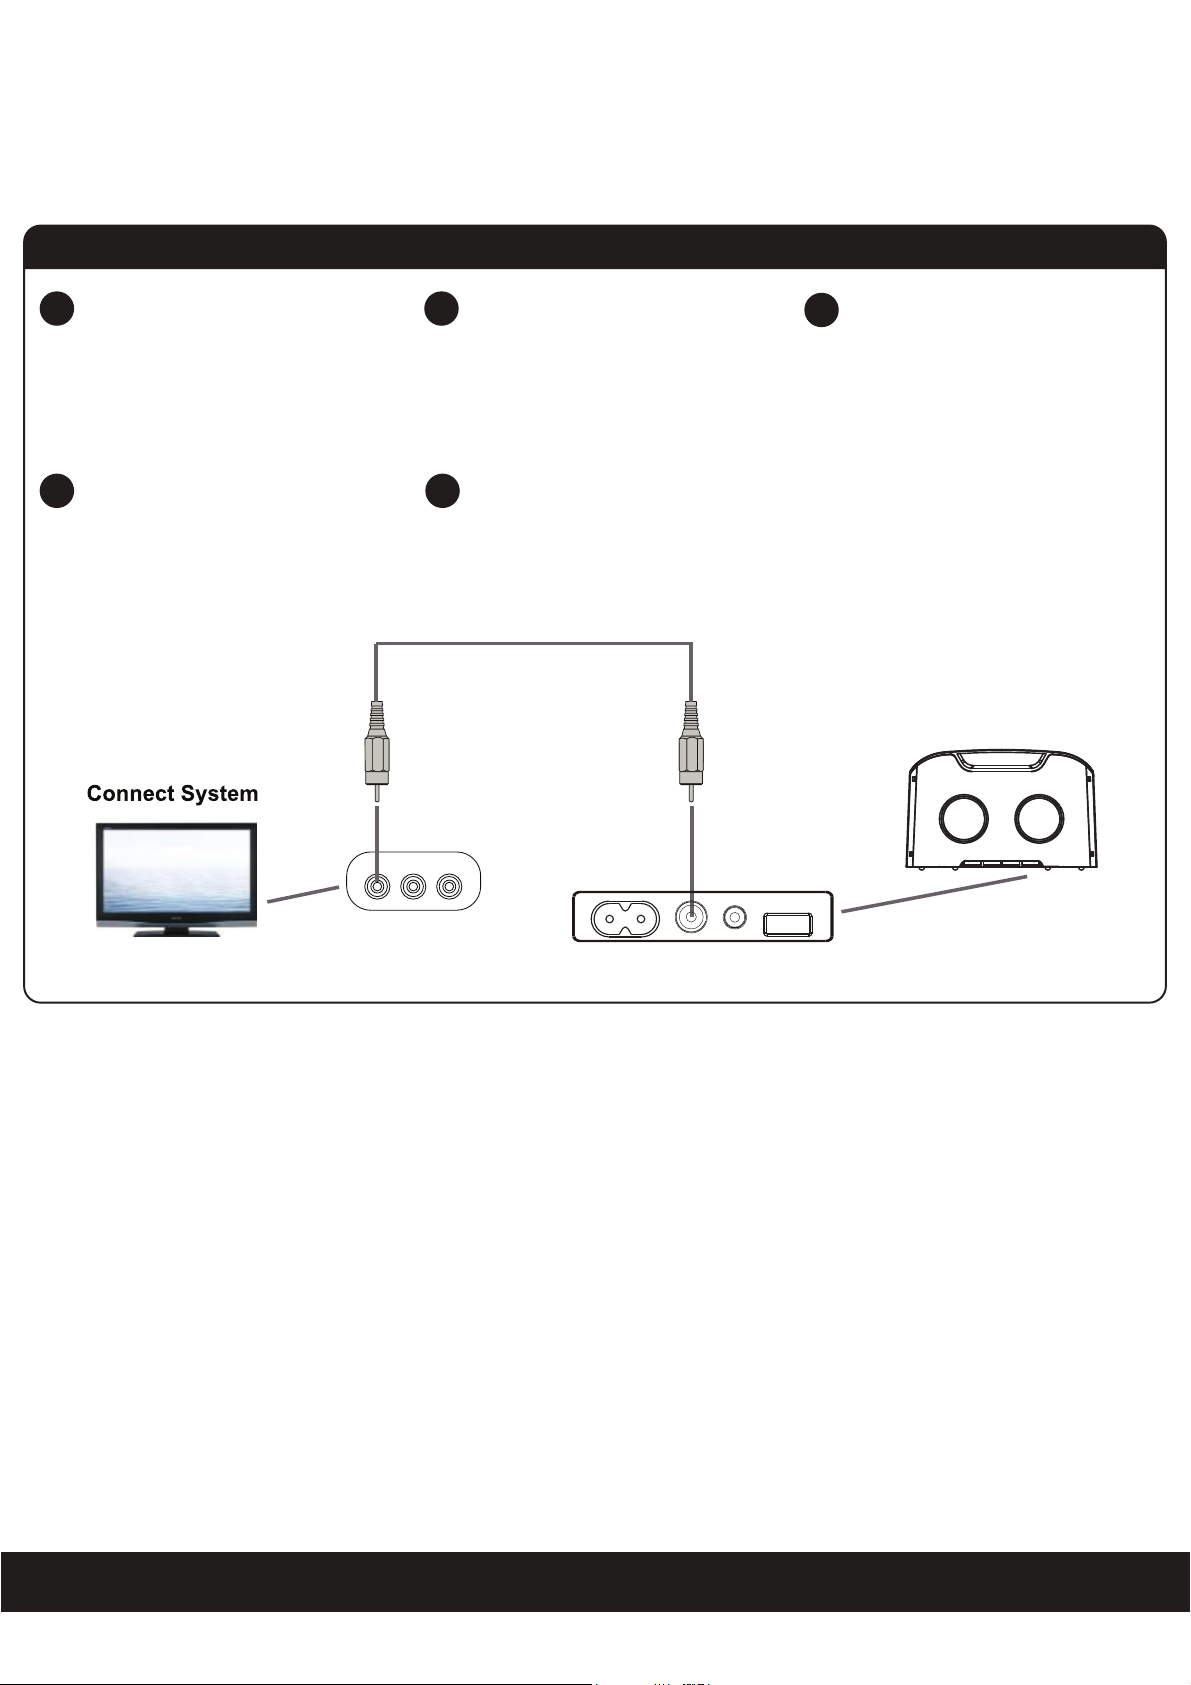
Connecting to TV with Video cable (Not included)
Plug the video connector into the
1
composite video port on the player
as below hookup diagram shown.
Please remember to push the “Line” or
3
“input” or “Video/TV” button on your TV
remote to switch the TV’s input source
to “Composite Video” to view the video
video with composite signal.
2
4
Video R L
Plug the video connector into the
composite input (CVBS) port on the
TV as below hookup diagram shown.
Docking the iPad/iPhone/iPod on the
dock and set it to video view.
On the left of the bottom panel
Note: Never force a connector into a
!
port. If the connector and port don’t
join with reasonable ease, they probably
don’t match. Make sure the connector
matches the port and is positioned
correctly in relation to the port.
English
9
Page 10

Wi-Fi Network Setup for AirPlay
Check list
Please verify the following steps before attempting to connect your unit to a Wi-Fi network:
To enjoy AirPlay wireless audio, you must have the following:
- iTunes or an iOS device (iPod touch, iPhone, or iPad).
- A functioning home network with Wi-Fi.
Download the latest software updates for iTunes and your iOS device to ensure that you are able to enjoy the latest A
ments and compatibility.
Download the apps for iPod touch, iPhone and iPad.
Have your Wi-Fi network name (SSID) and password (if applicable) available for reference.
Note: AirPlay requires iTunes 10.5 (Mac and PC) or later; OR an iPad, iPad 2, iPhone 4, iPhone 3GS, iPod touch (4th, 3rd, and 2nd
generations)
with iOS 5.0 or later.
Connecting to Wi-Fi network with your iPod touch, iPhone, or iPad
I
f you have an iPod touch, iPhone, or iPad with iOS 5.0 or later, to connect your player to a Wi-Fi network using an iOS device
follow these steps:
Activate Wi-Fi connection on your device accoording to the device’s user manual to link to a available networks and
1.
enter password if prompted.
irPlay enhance-
2.
D
ock your iOS device to the iPod dock on the top panel
and set the player to Airplay mode.
3. Press and hold the Volume - button on the top panel for
10 seconds to join the Wi-Fi network. Pairing light flashes
and a window about Share Wi-Fi Settings will be displayed.
4.
Press
ALLOW on the iPhone/iPad/iPod screen, the
player will connect to the same Wi-Fi network with your
iOS deivce. Pairing light will stop flashing for successfully
connected.
Note: Connecting to a network may take up to 60 seconds. If
network connection is unsuccessful reset the player or disconnect
your iOS device and reconnect and repeat the above steps.
S
uccess!
C
ongratulations, you have successfully connected your player to your
anywhere in your home or office.
: To begin using AirPlay wireless streaming, your AirPlay source
Note
touch, iPhone or iPad) must be connected to the same Wi-Fi
network that the unit is connected to.
wireless netw
devices (Mac or PC with your iTunes library as well as your iPod
ork and now you can start enjoying wireless au
Restart the Wi-Fi network from player
To restart the current network from player for s
for 10 seconds when the iOS device is docked to the iPod dock which have joined the other network.
elect the other network, press and hold the Volume - button on the top panel
dio
English
10
Page 11

Music Connectivity
Connecting to the player
You can connect to your player six different ways:
1. Using AirPlay to stream wirelessly from iTunes on your Mac or PC (iTunes can stream to multiple AirPlay speakers).
2. Using AirPlay to stream wirelessly from your iPad, iPhone, and iPod touch (iOS devices stream to only one AirPlay speaker at a time).
3. Using the iPod docking port on the top panel for audio and charging your iPhone/iPad/iPod.
4. U
sing the Bluetooth to stream wirelessly from your Bluetooth device such as iPad, iPhone, iPod touch.
5.
Support Composite Video output with Video connector.
6.
Support the audio from your sound sources (Eg. TV, CD player) input with 3.5 mm stereo cable.
AirPlay & iPod touch, iPhone, or iPad
Using an iOS device:
Connect your iOS device to the same Wi-Fi network . Go to Settings --> Wi-Fi on your iOS device.
1.
2.
Tap on iPod , look for the AirPlay button next to the iPod music transport controls.
3.
T
ap on the AirPlay icon and choose “Ferrari Scuderia AirPlay Speaker Dock” from the list of speakers. If the “Ferrari Scuderia
Airplay Speaker Dock” speaker is not
the same Wi-Fi network.
Press play.
4.
available,restart your iOS device and verify
that the unit is
powered on and connected to
AirPlay & iTunes
Using a Mac or PC with iTunes:
Connect your Mac or PC to the same Wi-Fi network as unit.
1.
Open iTunes on your computer.
2.
Within iTunes open “Preferences”, Select the “Devices” tab, and activate the following option:
3.
“Allow iTunes control from remote speakers”
Click OK, close iTunes preferences.
4.
Look for the AirPlay icon in the bottom right corner of the iTunes window.
5.
Click the AirPlay icon and choose “Ferrari Scuderia AirPlay Speaker Doc
6.
to select additional
on and connected
Press play.
7.
AirPlay sp
to the same Wi-Fi network.
eakers.
If the “Scuderia F1 Air” speaker i
k” from the list of speakers. Click "Multiple Speakers..."
s not available, restart iTunes and verify that the unit i s powered
AirPlay Wireless Audio Mode
Enjoy AirPlay audio anywhere:
1. Press to exit Standby mode and power the player ON.
2. Press the
mode. Orange light indicates.
3.
Press the button on the remote control to play your iOS device.
4
.
Press the button on the remote control to skip the next track.
5
.
Press the button on the remote control to skip back to the beginning of the track currently play. Press the button again
immediately to skip the previous track.
Press the button on the remote control again to pause play; Press again to resume it.
6.
Press the Volume +/- button on the top panel or remote control to adjust the system volume.
7.
Power/Pairing/Function button on the top panel or press the button on the remote control to select the Airplay
English
11
Page 12

Music Connectivity
Using Bluetooth: Paring Your Device
Before your start
Your Bluetooth device (cellphone, MP3 player, computer, ect.) must support the A2DP Bluetooth profile (Commonly known
as stereo audio profile) to work with the player. Many of the latest mobile phones and PCs with built-in Bluetooth functionality
will support this profile. For accurate information about your product, please refer to your bluetooth device’s user manual
for details on the bluetooth profiles it supports and on how to set the device’s Bluetooth pairing/searching/setup mode.
Pairing your Bluetooth device with the player
Press and hold the Power/Pairing/Function button for 10 seconds at Standby mode to begin pairing operation. Blue light flashes.
1.
Activate Bluetooth on your device according to the device’s use
2.
found on the device’s tools or settings menu. Turn on Bluetooth connectivity and make your device “discoverable”.
Search the device name “Scuderia FS1 Air” on your bluetooth device listed and select it as your audio speaker.
3.
Once paired with a device, the Blue light will stop flashing and glow steadily.
4.
Pairing remains intact when the player or the Bluetooth device is powered off or is taken out of link range. The player will auto
5.
link with the last linked device when that device is in range.
Note: Connecting to a bluetooth device may take up to 60 seconds. If the pairing is unsuccessory repair your bluetooth device with
the player and repeat the above steps.
Pairing your other Bluetooth device
r manual to link to the player. Typically, Bluetooth controls are
To restart the current connection from player for s
button for 10 seconds and repeat the above steps for pairing your other Bluetooth.
P
laying Bluetooth Music
Once your device and the player are linked you can start to play Bluetooth music through the player.
1.
Turn on the player and press the Power/Pairing/Function
2.
control to select the Bluetooth mode. Blue light indicates for Bluetooth mode.
Press the button on the remote control to play your Bluetooth-enable device. (Depending on the Bluetooth device you
3.
are using, you may need to manually go into media player mode on your device to make it work properly)
4
.
Press the button on the remote control to skip the next track.
5
.
Press the button on the remote control to skip back to the beginning of the track currently play. Press the button again
immediately to skip the previous track.
Press the button on the remote control again to pause play; Press again to resume it.
6.
Press the Volume +/- button on the top panel or remote control to adjust the system volume.
7.
Please remember to turn off Bluetooth device manually.
elect the other bluetooth device, press and hold the Power/Pairing/Function
button on the top panel or press the button on the remote
Local iPod Audio Mode
Dock, Charge, & Play using iPod dock:
1. Connect your Apple device to iPod dock.
2. Press the
mode for iPhone/iPad/iPod charging and audio playback. Red light indicates for iPod mode.
3.
Press the button on the remote control to play your iPhone/iPad/iPod.
4
.
Press the button on the remote control to skip the next track.
5
.
Press the button on the remote control to skip back to the beginning of the track currently play. Press the button again
immediately to skip the previous track.
Press the button on the remote control again to pause play; Press again to resume it.
6.
Press the Volume +/- button on the top panel or remote control to adjust the system volume.
7.
Power/Pairing/Function button on the top panel or press the button on the remote control to select the iPod
English
12
Page 13

Troubleshooting
Quick tips for problems with network setup
Verify that your router is discoverable (must broadcast itself and not require user to type in the exact name).
Verify that the firmware of your router is up-to-date.
Must use WPA/WPA2 security (not WEP, or WPA/WPA2 enterprise).
Sometimes moving the unit closer to your access point (within 10-6 ft) during network setup. *this can happen sometimes when
multiple Wi-Fi networks are creating interference.
Use the safari browser (Apple’s software tends to work best with it’s own technology).
Make sure that the SSID name of your home router consists of normal characters or digits, with no space or special characters
like %/#/* inserted.
Reset your router and start network setup over again.
Player Reset: Sometimes you simply need to reset the player and sta
- Unplug the AC adaptor from wall outlet.
- Repeat Wi-Fi Network Setup process if necessary.
There is no power to the player
Ensure that the Power Switch of wall socket is physcially set to the ON position.
Ensure that the AC plug is securely connected to the player and proper wall outlet.
There is no power to the player
Remove the iPhone/iPod from the dock and check for obstruction on the connectors in the dock and on
your iPhone/iPod. Then reseat it in the dock.
Upgrade your software on your iPhone/iPod. For details visit http://www.apple.com or use iTunes on your
computer. Check the volume setting, make sure your iPhone/iPad/iPod is working properly before docking
into the player. Please refer to your iPhone/iPod manual for details on how to perform a reset.
There is no picture
Ensure that the TV set has been powered on and is set to the correct AV mode.
Ensure that the connections between the player and the TV are secure and correct.
Check if the connection cables are damaged.
rt network setup over again.
The Picture is noisy or distorted
The iPhone/iPod may be damaged or dirty. Clean the iPhone/iPad/iPod or try anther one.
Reset your TV’s color system.
Ensure that the player is connected directly to the TV (and not through a VCR, cable box, satellite receiver, etc.)
Trouble pairing device/computer with the player
Make sure you have the latest firmware for your iPhone/iPad/iPod.
Make sure your device is working properly. Check your device’s manual for details on Bluetooth pairing and linking.
Make sure your device supports the A2DP and AVRCP Bluetooth profiles before linking/pairing. The player
defaults to the last linked device, so a new device may need to be linked by press and hold the Power/Paring/
Play/Pause button for pairing other device.
Specification
Power supply : AC 100-240V, 50/60Hz
Power consumption : 80W
AUX in jack : 3.5mm (included)
USB Charging Port : Full Size USB Type “A” connector
Video output : Composite Video
English
13
 Loading...