

Page 1

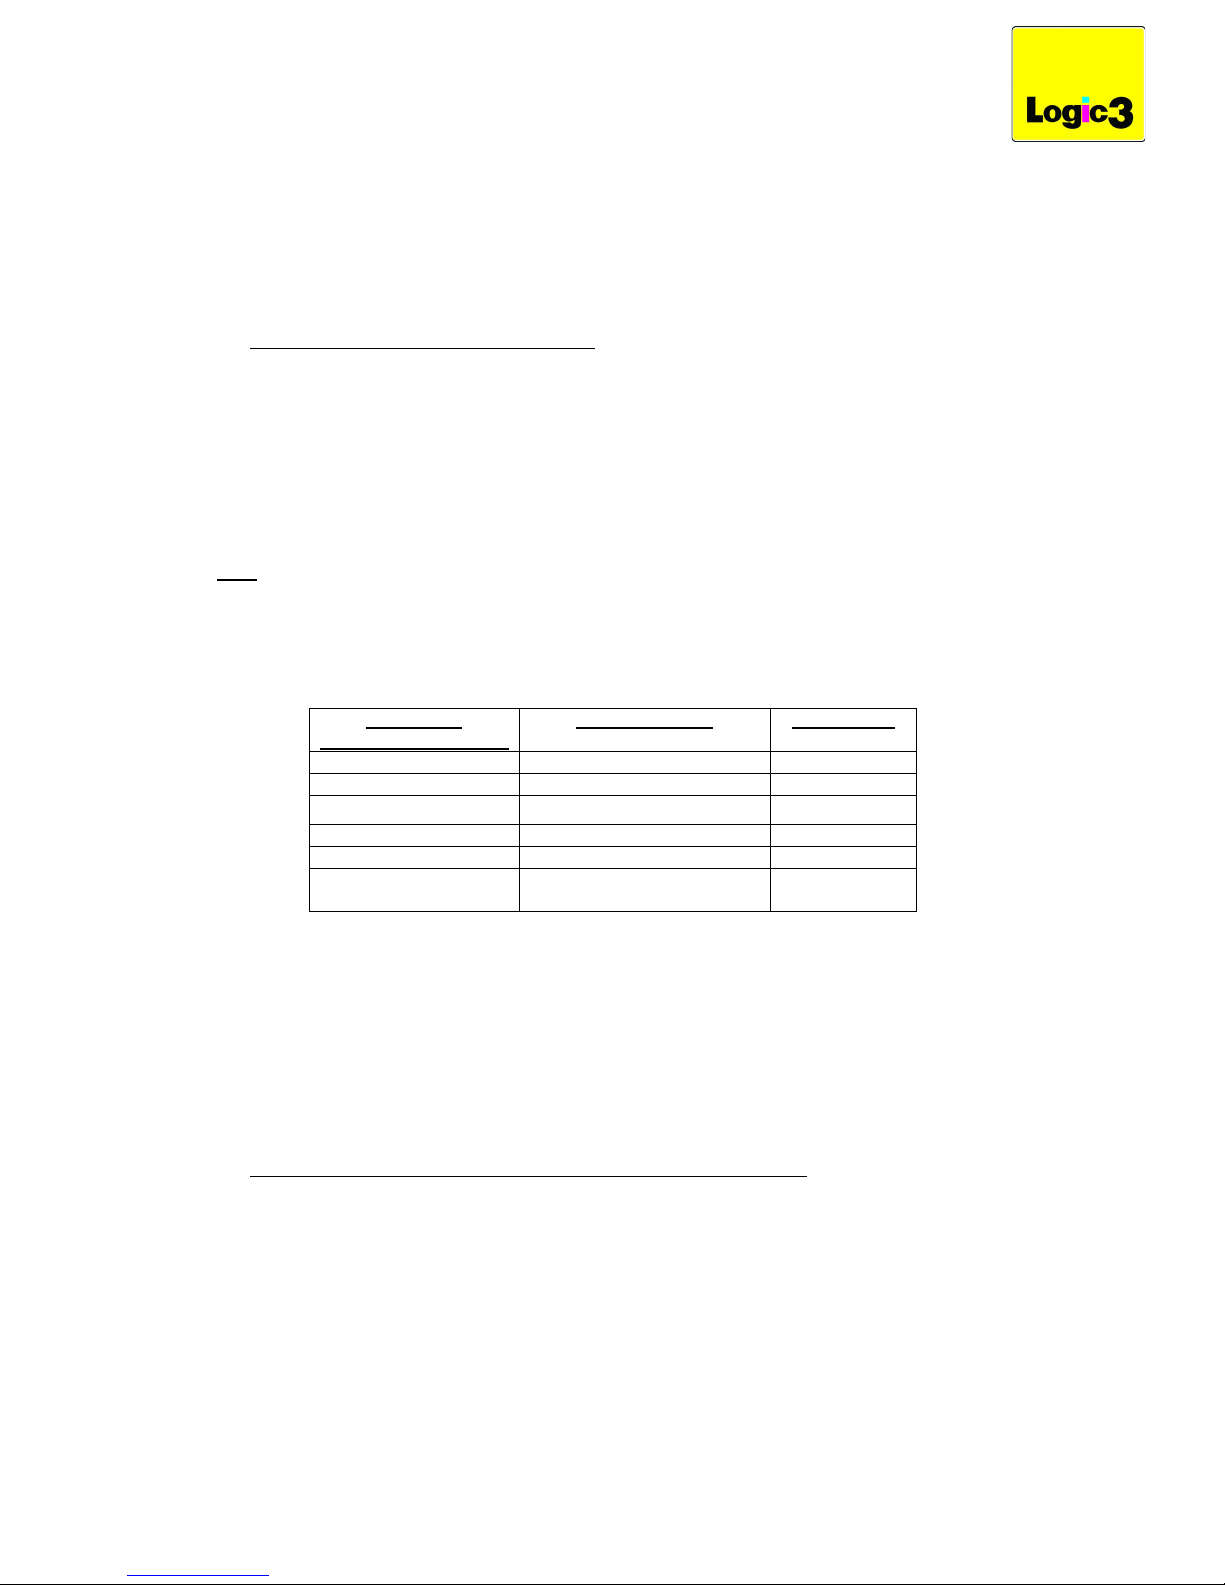
STANDBY : Power the unit ON/OFF
MUTE: Mute the speaker volume
SOURCE: Select the input source
VOL. UP: Volume Up
DIMMER: Adjust the LCD backlight
RW/ TUNER-: Skip backwards the iPod track, or scan backwards in radio mode.
PLAY/ PAUSE: Play and Pause the iPod
FF/ TUNER+: Skip forwards the iPod track, or scan forwards in radio mode.
REPEAT: Set the iPod to Repeat one/ Repeat all/ No Repeat.
VOL.DOWN: Volume Down
SHUFFLE: Play iPod songs randomly.
SLEEP/TIME: Set the time / sleep.
ALARM 1: Turn alarm 1 ON/OFF.
ALARM 2: Turn alarm 2 ON/OFF.
PRESET: Recall a preset radio station.
MEMORY: Store the radio station in memory.
MIP190 – i-Station Clock Dock
INSTRUCTION MANUAL
Thank you for purchasing the Logic3 MIP190. As with all Logic3 products the MIP190 has been
built to the highest manufacturing standards and testing throughout its development to ensure
you get the best possible product. Please read through and familiarise yourself with this manual
before you use the product.
CONTENTS
i-Station Clock Dock
AC Adaptor
Remote Control
3.5mm to 3.5mm Audio-In cable
Universal Dock Cradles
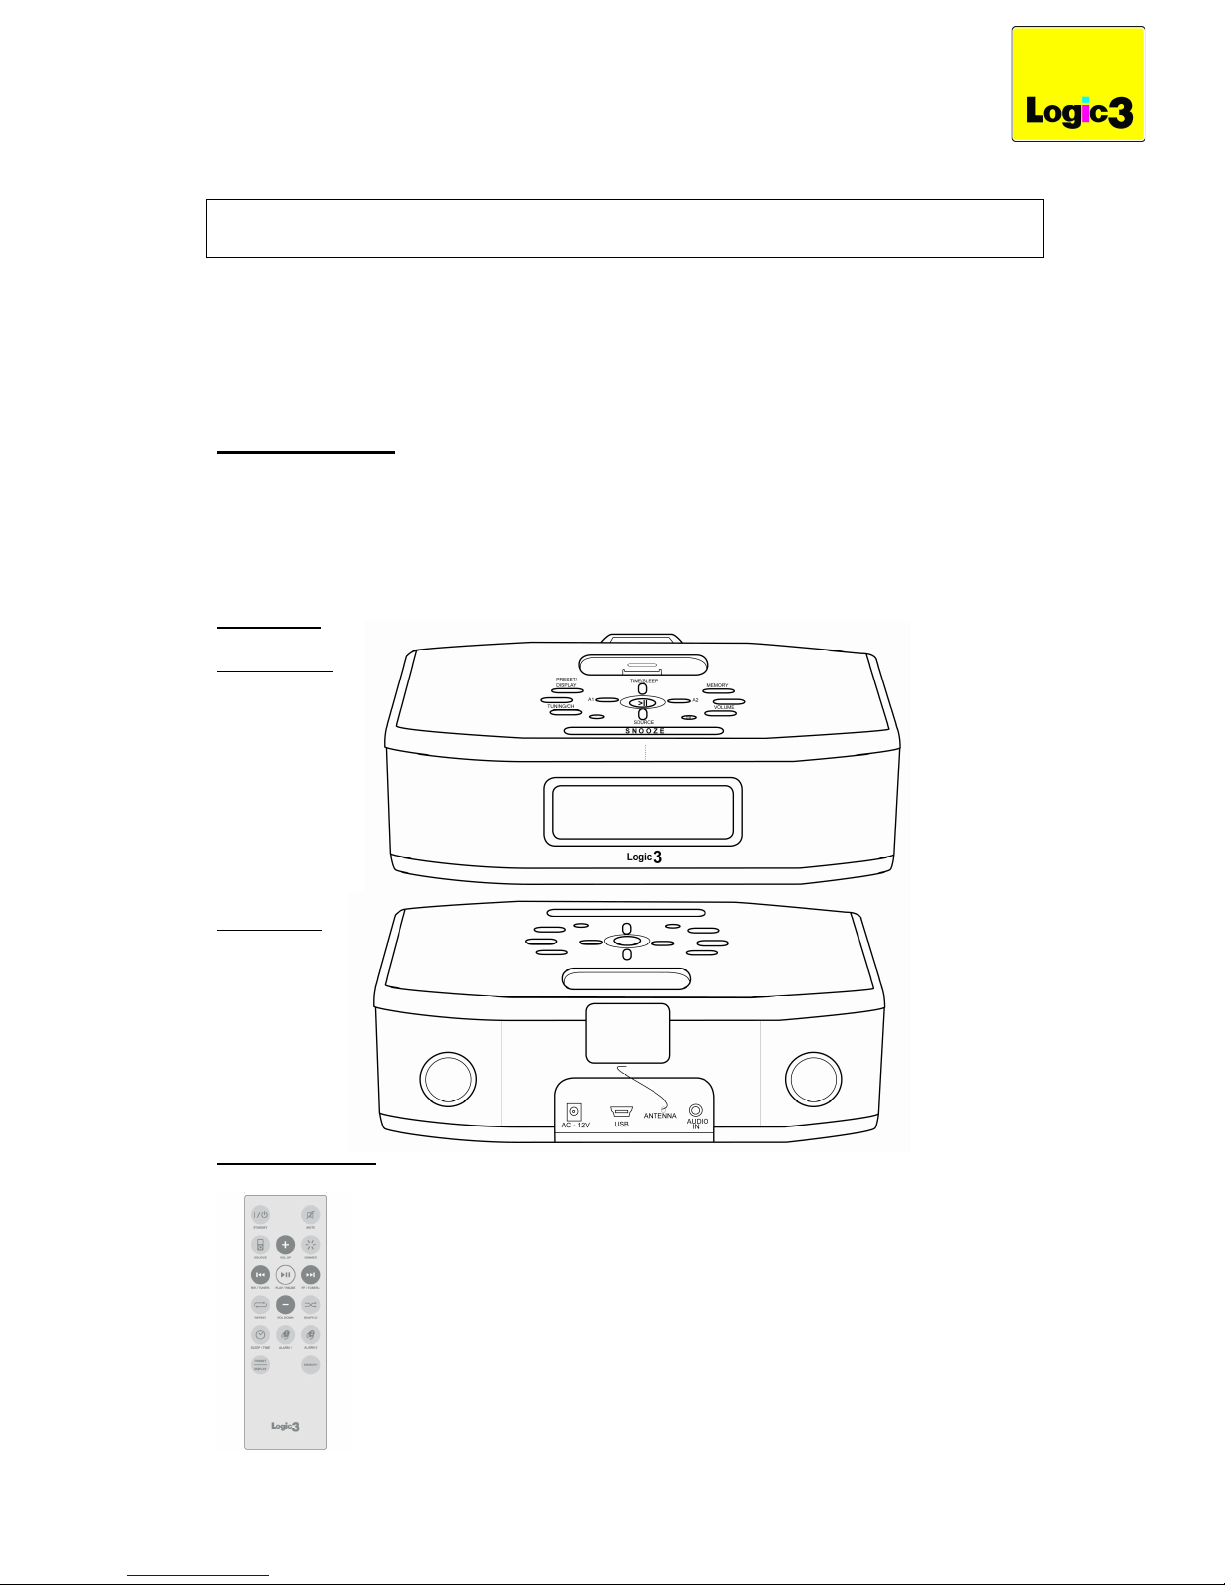
PRODUCT OVERVIEW
FRONT/ TOP
BACK
REMOTE CONTROL
Page 2

POWER
1. Connect the AC Adaptor to the ‘AC-12V’ connection on the back of the MIP190 and to
your AC mains power socket.
2. Press the button on the top of the unit or the ‘I/ STANDBY’ button on the remote
control to switch the unit ON / OFF.
SET CLOCK / TIME
1. Switch the unit OFF
2. Press and hold the TIME/SLEEP button on the unit or remote control, the hours display
will begin to flash
3. Press the TUNING/CH ▲▼ buttons on the unit or the ‘FF/TUNER+’, ‘RW/TUNER-’
buttons on the remote control to adjust the hours.
4. Press the TIME/SLEEP button and the minutes display will begin to flash
5. Press the TUNING/CH ▲▼ buttons on the unit or the ‘FF/TUNER+’, ‘RW/TUNER-’
buttons on the remote control to adjust the minutes
6. Press and hold the PRESET/DISPLAY button to switch between 12 and 24 hours clock
mode
7. Press and the TIME/SLEEP button on the unit or the remote control to set the time or if
the unit is left idle for 15 seconds the selected time will be set automatically.
RADIO
1. With the unit switched ON, press the SOURCE button on the unit or remote control to
select the FM or AM Radio mode.
2. To automatically scan through the radio frequencies. Press and hold the TUNING/CH
▲▼ buttons on the unit or the ‘RW/TUNER+’, ‘FF/TUNER–’ buttons on the remote
control. The scan will automatically stop when a strong signal is found.
3. To manually scan through the radio frequencies, repeatedly press the TUNING/CH ▲▼
buttons on the unit or the ‘RW/TUNER+’, ‘FF/TUNER–’ buttons on the remote control.
4. To adjust the volume press the VOLUME ▲▼ buttons on the unit or ‘VOL UP’, ‘VOL
DOWN’ on the remote control.
5. The display will automatically show the set time if the unit is left idle for 5 seconds, to
briefly view the current radio station press the PRESET/DISPLAY button on the unit or
remote control.
6. The unit has a built in FM Antenna, use the aerial wire at the back of the unit for the
clearest possible FM signal.
STORING THE RADIO STATION INTO MEMORY
The MIP190 can store up to 10FM and 10AM radio stations.
1. Select the frequency you want to store into the memory.
2. Press the ‘MEMORY’ button on the unit or remote control, ‘P01’ will begin to flash on the
front display. Press the TUNING/CH ▲▼ button on the unit or the ‘RW/TNUER-’,
‘FF/TUNER+’ buttons on the remote control to select between presets ‘P01’ ‘P10’.
3. Press the ‘MEMORY’ button to store the frequency. The display will stop flashing to
indicate the frequency is now stored into the memory.
4. Press the SOURCE button to switch to the AM and FM bands and repeat the above
procedure to store up to 10AM or 10 FM frequencies into the memory.
Page 3

RECALLING PRESET STATIONS
1. Press the ‘SOURCE’ button to select AM Radio or FM Radio.
2. Press and hold the PRESET/DISPLAY button for 2 seconds
3. Press the TUNING/CH ▲▼ buttons on the unit or ‘RW/TNUER-’, ‘FF/TUNER+’ buttons
on the remote control to select between the preset frequencies.
4. The stored radio frequency will be automatically selected after 2 seconds.
iPod
1. Remove the dock blanking plate on the top of the unit.
2. Fit the appropriate dock cradle required for your iPod. The MIP190 is provided with a
selection of different universal dock cradles and 1 blanking plate for use with other
portable audio devices..
3. Dock your iPod onto the 30pin dock connection. Press the ‘SOURCE’ button to select the
‘iPod’ function. The iPod symbol will appear on the front display.
4. The iPod will automatically begin to recharge.
5. Use the iPod click wheel to navigate between the iPod menu screens.
6. Press the TUNING/CH ▲▼ buttons on the unit or the ‘RW/TUNER-’, ‘FF/TUNER+’
buttons on the remote control to select between songs.
7. Press the VOLUME ▲▼ buttons on the unit or the ‘VOL+’, ‘VOL-’ buttons on the remote
control to adjust the volume level.
8. Use the remote control to control the play/pause, repeat, shuffle functions of the iPod
wirelessly.
MUTE CONTROL (REMOTE CONTROL ONLY)
1. Press the ‘MUTE’ button on the remote control, the audio music will switch off and the
MUTE indicator will appear on the front display.
2. To cancel the Mute function and restore the music press the MUTE button again or press
the VOLUME ▲▼ buttons on the unit or ‘VOL+’ , ‘VOL-‘ on the remote control. The
MUTE indicator will disappear.
IPOD SYNCHRONIZATION
The MIP190 offers the facility to allow data synchronization to your iPod by using a mini-USB
to USB Cable (not supplied).
1. Connect a mini USB cable into the mini-‘USB’ port on the back of the MIP190.
2. Connect the USB connector to an available USB port on your PC.
3. The iPod will now be recognised as an external device to allow you to synchronize your
iPod
Adaptor Cradle
Number
iPod Model
Capacity
3 iPod mini 4GB & 6GB
4 4G iPod & U2 iPod 20GB
5 4G iPod 40GB
6 iPod Photo 20GB & 30GB
7
iPod Photo
40GB & 60GB
U1 Universal blanking plate
Please use cradle
supplied with iPod
iPod nano 1stGen
iPod nano 2ndGen
2GB, 4GB &
8GB
Please use cradle
supplied with iPod
5thGen iPod with Video 30GB, 60GB &
80GB
Page 4

SET ALARM 1 OR ALARM 2
1. Switch the unit OFF.
2. Press the A1 button on the unit or the ‘Alarm1’ button on the remote control to display the
current alarm time set.
3. Press the PRESET button on the unit or remote control, the display will begin to flash.
4. Press the TUNING/CH ▲▼ buttons on the unit or the ‘RW/TUNER-’, ‘FF/TUNER+’
buttons on the remote control to adjust the hours.
5. Press the PRESET button the minutes display will begin to flash.
6. Press the TUNING/CH ▲▼ buttons on the unit or the ‘RW/TUNER-’, ‘FF/TUNER+’
buttons on the remote control to adjust the minutes.
7. Press the SOURCE button to choose to wake up to either iPod, AM/FM Radio or buzzer.
(If the alarm wake up source is set to iPod but no iPod connected, the MIP190 will
automatically default the wake up source to Buzzer.)
8. Press the VOLUME▲▼ buttons on the unit or ‘VOL+’, ‘VOL-‘ buttons on the remote
control to adjust the alarm volume.
9. Press the PRESET button on the unit or Remote Control to store the set alarm.
10. Once the alarm activates it will sound for 60 minutes and then switch OFF automatically,
to reset the alarm press the ‘STANDBY’ button on the unit or remote control.
11. Repeat the procedure above to set the second alarm using the ‘A2’ button on the unit or
the ‘Alarm2’ button on the remote control.
SNOOZE
Press the ‘SNOOZE’ button on the unit to temporally pause the alarm for 8 minutes, the
alarm symbols will flash to indicate it is set to Snooze.
TOGGLE ALARM ON/OFF
1. Press the A1 or A2 buttons on the unit or the ‘Alarm1’, ‘Alarm2’ buttons on the remote
control to display the set alarm time for 2 seconds
2. Press and hold the A1 or A2 button on the unit or the ‘Alarm1’, ‘Alarm2’ buttons on the
remote control to toggle the alarms ON/OFF, the alarm symbols will appear in the bottom
right corner of the LCD when the alarm is set ON.
DIMMER
The MIP190 has a 3 level dimmer for the front display when the unit is active. To control the
brightness of the light press the ‘DIMMER’ button on the unit or remote control.
AUDIO IN
The MIP190 can also be used as a speaker system in conjunction with a number of other
portable audio devices such as iPod shuffle, MiniDisc, MP3 Players or Portable CD Players.
1. Connect the included 3.5mm Audio-In cable into the headphone socket of your audio
device and to the ‘AUDIO IN’ connection on the back of the unit.
2. Press the ‘SOURCE’ button to select the ‘AUX’ function. The ‘AUX’ symbol will appear on
the front display.
3. You can now use the MIP190 to play sound from your external audio devices.
SLEEP
When the unit is switched ON, to activate the sleep mode press the ‘SLEEP’ button on the unit or
remote control. You can choose from 15, 30, 45, 60, 75 or 90 minutes before the unit
automatically switches OFF.
Should you have any connection or setup problems with the Logic3 MIP190 please contact our Technical
Support Hotline on +44 01923 471 000– National call rates apply or E-mail support@logic3.com
Page 5

STANDBY : pour allumer et éteindre le système.
MUTE : coupure du son des haut-parleurs.
SOURCE : sélectionne la source.
VOL. UP : augmente le volume.
DIMMER : réglage du rétroéclairagede l’écran LCD.
RW/ TUNER- : retour arrière dans les morceaux de l’iPod ou passage en revue arrière en mode radio.
PLAY/ PAUSE : lecture de l’iPod et pause.
FF/ TUNER+ : avancedanslesmorceauxdel’iPodou passage en revue en mode radio.
REPEAT : règle l’iPod pour la répétition d’un morceau, la répétition de tous les morceaux, la
suppression de la répétition et le retour à un mode de lecture normal.
VOL.DOWN : diminue le volume.
SHUFFLE : lecture aléatoire des morceaux de l’iPod.
SLEEP : réglage du délai d’arrêt.
ALARM 1 : activation ou désactivation de l’alarme 1.
ALARM 2 : activation ou désactivation de l’alarme 2.
PRESET : rappel d’une station radio prédéfinie.
MEMORY : mémorisation d’une station radio.
Radio-réveil i-Station – MIP190
MANUEL D’UTILISATION
Nous vous remercions d’avoir acheté la dernière née de notre gamme réputée de longue date de
haut-parleurs, l’MIP190 Logic3, utilisable avec un iPod. Comme tous les produits Logic3, l’iStation a été élaborée selon les normes de fabrication les plus exigeantes, pour vous offrir les
technologies les plus récentes et les plus avancées qui soient disponibles. Ce produit a été
spécifiquement conçu pour fonctionner avec un iPod et a été certifié conforme aux normes de
performance d’Apple par Logic3.
CONTENU DE L’EMBALLAGE
i-Station
Adaptateur secteur
Câble stéréo d’entrée auxiliaire 3,5 mm/3,5 mm
Socles d’accueil universels
Télécommande
PRODURT
AVANT
DOS
TELECOMMANDE
Page 6

MISE SOUS TENSION
1. Connectez l’adaptateur AC à la prise de connexion AC-12V à l’arrière du MIP190 et à
votre prise d’alimentation secteur AC.
2. Appuyez sur le bouton sur le dessus de l’unité ou sur le bouton I/ STANDBY
(VEILLE) sur la télécommande pour ALLUMER/ÉTEINDRE l’unité (ON / OFF).
RÉGLAGE RÉVEIL / HEURE
1. Éteignez l’unité (OFF)
2. Maintenez le bouton TIME/SLEEP (HEURE/SOMMEIL) enfoncé sur l’unité ou sur la
télécommande : l’affichage de l’heure se met à clignoter.
3. Appuyez sur les boutons TUNING/CH ▲▼ (RÉGLAGE/CHAÎNE) sur l’unité ou sur les
boutons FF/TUNER+ et RW/TUNER- sur la télécommande pour régler l’heure.
4. Appuyez sur le bouton TIME/SLEEP (HEURE/SOMMEIL): l’affichage des minutes se met
à clignoter.
5. Appuyez sur les boutons TUNING/CH ▲▼ sur l’unité ou sur les boutons FF/TUNER+ et
RW/TUNER- sur la télécommande pour régler les minutes.
6. Pour changer le Forma d’Heure 12 ou bien 24 appuyez et maintenez les touches
PRESET/DISPLAY au même temps
7. Appuyez sur le bouton TIME/SLEEP (HEURE/SOMMEIL) sur l’unité ou sur la
télécommande pour régler l’heure ou laissez l’unité au repos pendant 15 secondes et
l’heure sélectionnée sera réglée automatiquement.
RADIO
1. Avec l’unité allumée (ON), appuyez sur le bouton SOURCE sur l’unité ou sur la
télécommande pour sélectionner le mode radio FM ou AM.
2. Pour parcourir automatiquement les fréquences radio, maintenez enfoncés les boutons
TUNING/CH ▲▼ (RÉGLAGE/CHAÎNE) sur l’unité ou les boutons RW/TUNER+ et
FF/TUNER– sur la télécommande. La recherche de fréquence s’arrêtera
automatiquement lorsqu’un signal fort est perçu.
3. Pour parcourir manuellement les fréquences radio, appuyez à plusieurs reprises sur les
boutons TUNING/CH ▲▼ (RÉGLAGE/CHAÎNE) situés sur l’unité ou sur les boutons
RW/TUNER+ et FF/TUNER– situés sur la télécommande.
4. Pour régler le volume, appuyez sur les boutons VOLUME ▲▼ situés sur l’unité ou sur
les boutons VOL UP (AUGMENTER LE VOLUME) et VOL DOWN (DIMINUER LE
VOLUME) sur la télécommande.
5. L’écran affichera automatiquement l’heure réglée si vous laissez l’unité au repos pendant
5 secondes. Pour un bref aperçu de la station de radio que vous êtes en train d’écouter,
appuyez sur le bouton PRESET/DISPLAY (PRÉSÉLECTION/AFFICHAGE) situé sur
l’unité ou sur la télécommande.
6. L’appareil est doté d’une antenne FM. Ajustez l’antenne à l’arrière de l’appareil pour
obtenir le signal FM le plus clair possible.
MÉMORISATION DE LA STATION RADIO
L’MIP190 peut enregistrer jusqu’à 10 stations radio FM et 10 stations radio AM.
1. Sélectionnez le canal que vous souhaitez mémoriser.
2. Appuyez sur le bouton MEMORY (MÉMOIRE) sur l’unité ou la télécommande. P01 se
met à clignoter sur l’écran principal. Appuyez sur le bouton TUNING/CH ▲▼
(RÉGLAGE/CHAÎNE) sur l’unité ou sur les boutons RW/TUNER- et FF/TUNER+ sur la
télécommande pour présélectionner les stations allant de P01 à P10.
Page 7

3. Appuyez sur la touche « MEMORY » pour enregistrer le canal. L’affichage cesse de
clignoter pour indiquer que le canal est maintenant enregistré en mémoire.
4. Appuyez sur le bouton SOURCE pour passer de la bande AM à la bande FM et suivez à
nouveau la procédure ci-dessus pour enregistrer jusqu’à 10 fréquences AM ou FM dans
la mémoire.
RAPPELER LES STATIONS PRÉSÉLECTIONNÉES
1. Appuyez sur le bouton SOURCE pour sélectionner la radio AM ou la radio FM.
2. Maintenez enfoncé le bouton PRESET/DISPLAY pendant 2 secondes.
3. Appuyez sur les boutons TUNING/CH ▲▼ (RÉGLAGE/CHAÎNE) sur l’unité ou sur les
boutons RW/TUNER- et FF/TUNER+ sur la télécommande pour choisir parmi les
fréquences présélectionnées.
4. La fréquence radio présélectionnée sera sélectionnée automatiquement après 2
secondes.
iPod
1. Retirez le cache de la station d’accueil au sommet du système.
2. Placez le socle d’accueil adapté à votre iPod. L’MIP190 est fournie avec plusieurs socles
d’accueil universels et 1 cache pour l’utilisation d’autres appareils audio portables.
3. Branchez votre iPod sur la prise d’accueil à 30 broches. Appuyez sur la touche
« SOURCE » pour sélectionner la fonction « iPod ». Le symbole iPod s’affiche à l’écran
avant.
4. L’iPod se recharge alors automatiquement.
5. Utilisez la roulette de l’iPod pour naviguer dans les menus de l’iPod.
6. Appuyez sur les boutons TUNING/CH ▲▼ (RÉGLAGE/CHAÎNE) sur l’unité ou sur les
boutons RW/TUNER- et FF/TUNER+ sur la télécommande pour sélectionner les
morceaux.
7. Appuyez sur les boutons VOLUME ▲▼ sur l’unité ou sur les boutons VOL+, VOL- sur la
télécommande pour régler le niveau du volume.
8. Utilisez la télécommande pour utiliser à distance les fonctions lecture/pause, répétition et
lecture aléatoire.
COMMANDE MUTE (SILENCE) (SEULEMENT SUR LA TÉLÉCOMMANDE)
1. Appuyez sur le bouton MUTE (SILENCE) sur la télécommande, le son est coupé et
MUTE s’affiche sur l’écran principal.
2. Pour annuler la fonction Mute et rétablir la musique, appuyez à nouveau sur le bouton
MUTE ou appuyez sur les boutons VOLUME ▲▼ sur l’unité ou VOL+ et VOL- sur la
télécommande. L’affichage MUTE disparaît.
Numéro de socle
d’adaptation
Modèle d’iPod
Capacité
3 Mini iPod 4 Go et 6 Go
4 iPod 4G et iPod U2 20 Go
5 iPod 4G 40 Go
6 iPod Photo 20 Go et 30 Go
7 iPod Photo 40 Go et 60 Go
U1 Cache universel
Page 8

IPOD SYNCHRONISATION
Le MIP190 vous permet de synchroniser les données avec votre iPod grâce à un câble mini-
USB à USB (non fourni).
1. Branchez la prise mini USB dans le port USB à l’arrière de l’MIP190.
2. Branchez la prise USB dans un port USB disponible de votre PC.
3. L’iPod sera désormais reconnu comme périphérique externe, ce qui vous permettra de le
synchroniser.
RÉGLER L’ALARME 1 OU L’ALARME 2
1. Éteignez l’unité (OFF).
2. Appuyez sur le bouton A1 sur l’unité ou sur le bouton Alarm1 (alarme 1) sur la
télécommande pour afficher le réglage actuel de l’alarme.
3. Appuyez sur le bouton PRESET (PRÉSÉLECTION) sur l’unité ou sur la télécommande:
l’affichage se met à clignoter.
4. Appuyez sur les boutons TUNING/CH ▲▼ (RÉGLAGE/CHAÎNE) sur l’unité ou sur les
boutons RW/TUNER-, FF/TUNER+ sur la télécommande pour régler l’heure.
5. Appuyez sur le bouton PRESET (PRÉSÉLECTION) : l’affichage des minutes commence
à clignoter.
6. Appuyez sur les boutons TUNING/CH ▲▼ (RÉGLAGE/CHAÎNE) sur l’unité ou sur les
boutons RW/TUNER- et FF/TUNER+ sur la télécommande pour régler les minutes.
7. Appuyez sur le bouton SOURCE pour sélectionner votre mode de réveil, iPod, radio
AM/FM ou buzzer.
(Si le mode de réveil est réglé sur iPod mais aucun iPod n’est connecté, le MIP190 se
réglera automatiquement sur le mode de réveil Buzzer.)
8. Appuyez sur les boutons VOLUME▲▼ sur l’unité ou sur les boutons VOL+ et VOL- sur
la télécommande pour régler le volume de l’alarme.
9. Appuyez sur le bouton PRESET (PRÉSÉLECTION) sur l’unité ou la télécommande pour
enregistrer le réglage de l’alarme.
10. Quand l’alarme se met en marche, elle fonctionne pendant 60 minutes puis elle s’éteint
automatiquement. Pour régler à nouveau l’alarme, appuyez sur le bouton STANDBY
(VEILLE) sur l’unité ou sur la télécommande.
11. Suivez à nouveau la procédure ci-dessus pour régler la seconde alarme en utilisant le
bouton A2 sur l’unité ou le bouton Alarm2 sur la télécommande.
PAUSE
Lorsque l’alarme se déclenche, appuyez sur la touche « SNOOZE » du système ou de la
télécommande pour stopper temporairement l’alarme pendant 8 minutes.
ALLUMER/ÉTEINDRE ALARME (ON/OFF)
1. Appuyez sur les boutons A1 ou A2 sur l’unité ou sur les boutons Alarm1 (alarme 1) et
Alarm2 (alarme 2) sur la télécommande pour afficher l’heure de l’alarme sélectionnée
pendant 2 secondes.
2. Maintenez enfoncé le bouton A1 ou le bouton A2 sur l’unité ou les boutons Alarm1
(alarme 1), et Alarm2 (alarme 2) sur la télécommande pour ALLUMER/ÉTEINDRE
(ON/OFF) les alarmes ; les symboles des alarmes apparaissent en bas à droite de
l’écran LCD lorsque l’alarme est activée.
Page 9

DIMMER
The MIP190 has a 3 level dimmer for the front display when the unit is active. To control the
brightness of the light press the ‘DIMMER’ button on the unit or remote control.
Entrée auxiliaire
’MIP190 peut aussi être utilisée comme système de haut-parleurs associé à plusieurs autres
appareils audio portables comme l’iPod Shuffle, le MiniDisc, les lecteurs MP3 ou les lecteurs de
CD portables.
1. Branchez le câble d’entrée auxiliaire de 3,5 mm dans la prise écouteurs de votre appareil
audio et dans la prise « AUDIO IN » à l’arrière de l’MIP190.
2. Appuyez sur la touche « SOURCE » pour sélectionner la fonction « AUX ». Le symbole
« AUX » s’affiche à l’écran avant.
3. Utilisez l’MIP190 pour écouter le contenu de vos appareils audio externes.
SILENCE
Pour activer le mode silence, appuyez sur la touche « SLEEP » du système ou de la
télécommande. Vous pouvez choisir d’arrêter l’MIP190 dans un délai de 15, 30, 45, 75 ou 90
minutes.
En cas de problème de réglage ou d’utilisation de
l’MIP190 Logic3, veuillez contacter notre service d’assistance technique
en envoyant un courriel à l’adresse support@logic3.com ou en composant le
(01923) 471 000 (tarifs d’appel nationaux applicables)
Page 10
STANDBY: Gerät ein / ausschalten
MUTE: Lautsprecher auf Mute stellen
SOURCE: Musikabspielgerät auswählen
VOL. UP: Lautstärke lauter
DIMMER: Einstellung LCD-Hintergrundbeleuchtung
RW/ TUNER-: Bei iPod ein Musikstück zurück, Radio: ein Sender zurück
PLAY/ PAUSE: iPod abspielen oder anhalten
FF/ TUNER+: Bei iPod ein Musikstück nach vorne, Radio: ein Sender nach vorne
REPEAT: iPod ein / alle Musikstücke wiederholen / nicht wiederholen und zurück zum Anfang
VOL.DOWN: Lautstärke leiser
SHUFFLE: Zufällige Wiedergabe der iPod-Musikstücke
SLEEP: Einstellung automatisches Abschalten
ALARM 1: Alarm 1 ein / ausschalten
ALARM 2: Alarm 2 ein / ausschalten
PRESET: Vorprogrammierten Radiosender aufrufen
MEMORY: Radiosender speichern
MIP190 – i-Station Clock Dock
BEDIENUNGSANLEITUNG
Vielen Dank dass Sie sich für den Kauf einer iPod-kompatiblen Logic3 MIP190 entschieden
haben. Diese Station ist Spitzenreiter in unserem erfolgreichen, vielseitigen
Lautsprechersortiment. Wie alle Logic3 Produkte wurde die MIP190 entsprechend den höchsten
Qualitätsanforderungen hergestellt und garantiert Ihnen damit die modernste und hochwertigste
Technologie auf dem Markt. Dieses Produkt wurde speziell für Benutzung mit iPods entwickelt
und sein Leistungsstandard mit Geräten von Apple wurde von Logic3 zertifiziert
PACKUNGSINHALT:
i-Station
AC-Adapter
3,5 mm – 3,5 mm Stereo AUDIO-IN Kabel
Universal Dock Cradles
Fernbedienung
PRODUCKT
FRONTSIETE
RUCKSIETE
FERNBEDIENUNG
Page 11

EINSCHALTEN
1. Stecken Sie Ihren AC-Adapter in den AC-12V-Anschluss auf der Rückseite Ihres MIP190
und in die Steckdose.
2. Drücken Sie die Taste auf der Oberseite Ihres Gerätes oder die Taste ‘I/ STANDBY’
auf Ihrer Fernbedienung, um es EIN-/AUSZUSCHALTEN.
UHR/ZEIT EINSTELLEN
1. Schalten Sie das Gerät AUS.
2. Drücken Sie die Taste TIME/SLEEP [ZEIT/SCHLAFMODUS] am Gerät oder auf der
Fernbedienung und halten Sie diese gedrückt. Die Stundenanzeige blinkt auf.
3. Drücken Sie die Tasten TUNING/CH ▲▼ [ABSTIMMEN/KANÄLE ▲▼] am Gerät oder
die Tasten FF/TUNER+, RW/TUNER- [VOR/TUNER+, ZURÜCK/TUNER] auf der
Fernbedienung, um die Stunden einzustellen.
4. Drücken Sie die Taste TIME/SLEEP [ZEIT/SCHLAFMODUS]. Die Minutenanzeige blinkt
auf.
5. Drücken Sie die Tasten TUNING/CH ▲▼ [ABSTIMMEN/KANÄLE ▲▼] am Gerät oder
die Tasten FF/TUNER+, RW/TUNER- [VOR/TUNER+, ZURÜCK/TUNER] auf der
Fernbedienung, um die Minuten einzustellen.
6. Um zwischen 12 oder 24 Stunden Anzeige der Uhr zu wechseln, drücken und halten Sie
die PRESET/DISPLAY Tasten
7. Drücken Sie die Taste TIME/SLEEP [ZEIT/SCHLAFMODUS] am Gerät oder auf der
Fernbedienung. Wenn das Gerät 15 Sekunden lang inaktiv ist, wird die ausgewählte Zeit
automatisch eingestellt.
RADIO
1. Im eingeschalteten Zustand können Sie den FM- oder AM-Radiomodus durch Drücken
der Taste SOURCE [QUELLE] auswählen.
2. Zum automatischen Sendersuchlauf. Drücken Sie die Tasten TUNING/CH ▲▼
[ABSTIMMEN/KANÄLE ▲▼] am Gerät oder die Tasten FF/TUNER+, RW/TUNER[VOR/TUNER+, ZURÜCK/TUNER] auf der Fernbedienung. Bei gutem Empfang wird der
Suchlauf automatisch angehalten.
3. Drücken Sie die Tasten TUNING/CH ▲▼ [ABSTIMMEN/KANÄLE ▲▼] am Gerät oder
die Tasten FF/TUNER+, RW/TUNER- [VOR/TUNER+, ZURÜCK/TUNER] auf der
Fernbedienung, um einen manuellen Sendersuchlauf zu starten.
4. Drücken Sie die Tasten VOLUME ▲▼ [LAUTSTÄRKE ▲▼] am Gerät oder VOL UP,
VOL DOWN [LAUTSTÄRKE HOCH, LAUTSTÄRKE RUNTER] auf der Fernbedienung.
5. Wenn das Gerät fünf Sekunden inaktiv ist, wird die eingestellte Zeit auf dem Display
automatisch angezeigt. Drücken Sie die Taste PRESET/DISPLAY
[VOREINSTELLEN/DISPLAY] am Gerät oder auf der Fernbedienung, um sich den
aktuellen Radiosender anzeigen zu lassen.
6. Richten Sie die Antenne auf der Geräterückseite aus, damit Sie ein möglichst
rauscharmes FM-Signal erhalten.
RADIOSENDER SPEICHERN
Die MIP190 kann bis zu 10 FM und 10 AM Radiosender speichern.
1. Wählen Sie den Radiosender aus, den Sie speichern möchten.
2. Drücken Sie die Taste MEMORY [SPEICHER] am Gerät oder auf der Fernbedienung.
P01 blinkt auf dem Front-Display auf. Drücken Sie die Taste TUNING/CH ▲▼
[ABSTIMMEN/KANÄLE ▲▼] am Gerät oder die Tasten FF/TUNER+, RW/TUNER[VOR/TUNER+, ZURÜCK/TUNER] auf der Fernbedienung, um zwischen den
Voreinstellungen P01 P10 auszuwählen.
Page 12

3. Drücken Sie den „MEMORY”-Knopf, um den Sender zu speichern. Sobald die Anzeige
aufhört zu blinken, ist der Radiosender gespeichert.
4. Drücken Sie die Taste SOURCE [QUELLE], um zwischen AM- und FM-Band
auszuwählen und wiederholen Sie die oben genannten Schritte, um bis zu zehn AModer zehn FM-Frequenzen im Speicher abzulegen.
GESPEICHERTE SENDER ABRUFEN
1. Drücken Sie die Taste SOURCE [QUELLE], um zwischen AM- oder FM-Radio
auszuwählen.
2. Drücken Sie die Taste PRESET/DISPLAY [VOREINSTELLEN/DISPLAY] und halten Sie
diese zwei Sekunden gedrückt.
3. Drücken Sie die Taste TUNING/CH ▲▼ [ABSTIMMEN/KANÄLE ▲▼] am Gerät oder die
Tasten FF/TUNER+, RW/TUNER- [VOR/TUNER+, ZURÜCK/TUNER] auf der
Fernbedienung, um zwischen den voreingestellten Frequenzen auszuwählen.
4. Die gespeicherte Radiofrequenz wird nach zwei Sekunden automatisch ausgewählt.
iPod
1. Entfernen Sie den Docking-Verschlussstreifen an der Oberseite des Gerätes.
2. Stecken Sie die für Ihren iPod passenden Dock Cradle auf. Eine Auswahl verschiedener
universeller Dock Cradles und ein Verschlussstreifen für andere Musikabspielgeräte
liegen der MIP190 bei.
3. Setzen Sie den iPod in die 30pin-Dockingstation ein. Drücken Sie den „SOURCE”-Knopf
und wählen Sie iPod. Das iPod-Symbol erscheint auf der Anzeige des Gerätes.
4. Der iPod lädt sich nun automatisch auf.
5. Benutzen Sie das iPod Click Wheel, um durch die Menüs des iPod zu navigieren.
6. Drücken Sie die Tasten TUNING/CH ▲▼ [ABSTIMMEN/KANÄLE ▲▼] am Gerät oder
die Tasten FF/TUNER+, RW/TUNER- [VOR/TUNER+, ZURÜCK/TUNER] auf der
Fernbedienung, um zwischen Liedern auszuwählen.
7. Drücken Sie die Tasten VOLUME ▲▼ [LAUTSTÄRKE ▲▼] am Gerät oder VOL UP,
VOL DOWN [LAUTSTÄRKE HOCH, LAUTSTÄRKE RUNTER] auf der Fernbedienung,
um die Lautstärke einzustellen.
8. Benutzen Sie die Fernbedienung um Abspielen/Pause, Wiederholen oder die zufällige
Wiederholung einzustellen.
STUMMSCHALTUNG (NUR BEI FERNBEDIENUNG)
9. Drücken Sie die Taste MUTE [STUMM] auf der Fernbedienung. Die Musik schaltet sich
aus und auf dem Front-Display wird MUTE [STUMM] angezeigt.
10. Drücken Sie die Taste MUTE [STUMM] erneut oder drücken Sie die Tasten VOLUME
▲▼ [LAUTSTÄRKE] am Gerät oder VOL+ , VOL- [LAUTSTÄRKE+, LAUTSTÄRKE-] auf
der Fernbedienung, um die Stummschaltung zu unterbrechen und die Musik wieder
abzuspielen. Die Anzeige MUTE [STUMM] erlischt.
Adaptor Cradle
Number
iPod Model
Capacity
3 iPod mini 4GB & 6GB
4 4G iPod & U2 iPod 20GB
5 4G iPod 40GB
6 iPod Photo 20GB & 30GB
7 iPod Photo 40GB & 60GB
U1 Universal blanking plate
Page 13

IPOD SYNCHRONISIEREN
Der MIP190 ermöglicht mit Hilfe eines USB- Anschlusskabels A-Stecker B-Stecker (nicht im
Lieferumfang enthalten) eine Datensynchronisierung Ihres iPods.
1. Stecken Sie den Mini USB-Stecker in den USB-Port an der Rückseite Ihrer MIP190.
2. Stecken Sie das USB-Kabel in den USB-Port an Ihrem PC ein.
3. Der iPod wird nun als externes Gerät erkannt und ist zum Synchronisieren bereit.
ALARM 1 ODER ALARM 2 EINSTELLEN
1. Schalten Sie das Gerät aus.
2. Drücken Sie die Taste A1 auf dem Gerät oder die Taste Alarm1 auf der Fernbedienung,
um die derzeit eingestellte Weckzeit anzuzeigen.
3. Drücken Sie die Taste PRESET [VOREINSTELLEN] am Gerät oder auf der
Fernbedienung, die Anzeige blinkt auf.
4. Drücken Sie die Tasten TUNING/CH ▲▼ [ABSTIMMEN/KANÄLE ▲▼] am Gerät oder
die Tasten FF/TUNER+, RW/TUNER- [VOR/TUNER+, ZURÜCK/TUNER] auf der
Fernbedienung, um die Stunden einzustellen.
5. Drücken Sie die Taste PRESET [VOREINSTELLEN]. Die Minutenanzeige blinkt auf.
6. Drücken Sie die Tasten TUNING/CH ▲▼ [ABSTIMMEN/KANÄLE ▲▼] am Gerät oder
die Tasten FF/TUNER+, RW/TUNER- [VOR/TUNER+, ZURÜCK/TUNER] auf der
Fernbedienung, um die Minuten einzustellen.
7. Drücken Sie die Taste SOURCE [QUELLE], um die Weckart einzustellen (iPod, AM-/FMRadio oder Summer).
(Wenn Sie Ihren iPod als Weckart eingestellt haben, aber kein iPod angeschlossen ist,
wird der MIP190 den Summer automatisch als Standardeinstellung auswählen).
8. Drücken Sie die Tasten VOLUME ▲▼ [LAUTSTÄRKE ▲▼] am Gerät oder ‘VOL UP’,
VOL DOWN [LAUTSTÄRKE HOCH, LAUTSTÄRKE RUNTER] auf der Fernbedienung,
um die Wecklautstärke einzustellen.
9. Drücken Sie die Taste PRESET [VOREINSTELLEN] am Gerät oder auf der
Fernbedienung, um den eingestellten Wecker zu speichern.
10. Wenn der Wecker aktiviert wird, ertönt er 60 Minuten lang und schaltet sich dann
automatisch aus. Drücken Sie die Taste STANDBY am Gerät oder auf der
Fernbedienung, um den Wecker zurückzusetzen.
11. Wiederholen Sie das obige Verfahren, um den zweiten Wecker mit der Taste A2 am
Gerät oder mit der Taste Alarm2 auf der Fernbedienung einzustellen.
SNOOZE
Wenn der Alarm ertönt, können Sie durch Drücken des „SNOOZE”-Knopfes am Gerät oder
der Fernbedienung den Alarm für 8 Minuten unterbrechen.
WECKFUNKTION EIN-/AUSSCHALTEN
1. Drücken Sie die Tasten A1 oder A2 auf dem Gerät oder die Taste Alarm1, Alarm2 auf der
Fernbedienung, um die derzeit eingestellte Weckzeit zwei Sekunden lang anzuzeigen.
2. Drücken Sie die Taste A1 oder A2 am Gerät oder die Tasten Alarm1, Alarm2 auf der
Fernbedienung, um die Weckfunktion ein-/auszuschalten. Wenn der Wecker
eingeschaltet ist, erscheint unten rechts auf dem LCD-Display das Wecksymbol.
Page 14

DIMMER
Die MIP190 verfügt über eine LCD Hintergrundbeleichtung, wenn das Gerät angeschaltet ist. Um
die Helligkeit einzustellen, benutzen Sie den „DIMMER“-Knopf am Gerät oder der
Fernbedienung.
AUDIO IN
Die MIP190 lässt sich ebenfalls als Lautsprechersystem mit vielen anderen mobilen
Musikabspielgeräten wie dem iPod Shuffle, MiniDisc, MP3-Spielern und tragbaren CD-Spielern
benutzen.
1. Stecken Sie das beiliegende 3,5 mm AUDIO-IN Kabel in den Kopfhöreranschluss Ihres
Musikabspielgerätes ein und verbinden Sie es mit dem „AUX IN“-Anschluss an der
Rückseite der MIP190.
2. Drücken Sie den „SOURCE”-Knopf um die „AUX”-Funktion einzustellen. Das „AUX“Symbol erscheint auf der Leuchtanzeige.
Spielen Sie nun über die MIP190 Musik Ihrer externen Musikabspielgeräte ab.
SLEEP
Um die „SLEEP”-Funktion zu aktivieren, drücken Sie den entsprechenden Knopf am Gerät oder
Ihrer Fernbedienung. Sie können zwischen 15, 30, 45, 60, 75 oder 90 Minuten auswählen, bevor
sich die MIP190 automatisch abschaltet.
Sollten Sie irgendwelche Fragen zur Einrichtung und Bedienung der Logic3 MIP190 haben, wenden
Sie sich bitte an unseren Kundendienst, E-Mail: support@logic3.com oder rufen Sie an unter:
0044 1923 471 000 (landesübliche Telefongebühren)
Page 15

STANDBY: Accende/spegne il sistema
MUTE: Mette il dispositivo in muto
SOURCE: Seleziona la fonte d’ingresso
VOL. UP: Alza il volume
DIMMER: Regola la retroilluminazione dell’LCD
RW/ TUNER-: Passa alla traccia dell’iPod precedente, o scorre all’indietro i canali in modalità radio.
PLAY/ PAUSE: Funzione di play e pausa dell’iPod
FF/ TUNER+: Passa alla traccia successive dell’iPod, o scorre in avanti i canali in modalità radio.
REPEAT: Imposta l’iPod su Ripeti uno/Ripeti tutti/Non ripetere, e indietro.
VOL.DOWN: Abbassa il volume.
SHUFFLE: Esegue canzoni dell’iPod in sequenza casuale.
SLEEP: Imposta il tempo di spegnimento automatico.
ALARM 1: Accende/spegne la sveglia 1.
ALARM 2: Accende/spegne la sveglia 2.
PRESET: Recupera una stazione radio preimpostata.
MEMORY: Memorizza la stazione radio.
MIP190 – Dock orologio i-Station
MANUALE D’ISTRUZIONI
Grazie per aver acquistato la MIP190 Logic3 per iPod, l’ultimo prodotto della nostra lunga e
affermata gamma di amplificatori. Come con tutti i prodotti Logic3, l’MIP190 è stato costruito
secondo gli standard di fabbricazione più elevati, per garantire ai nostri clienti la tecnologia più
avanzata attualmente disponibile. Questo prodotto è stato progettato appositamente per
funzionare con l’iPod, ed è certificato Logic3 per soddisfare i livelli di prestazione Apple.
CONTENUTI DELLA CONFEZIONE:
i-Station
Adattatore CA
Cavo Audio-IN Stereo 3,5 mm – 3,5 mm
Alloggiamenti per dock universali
Telecomando
PRODOTTO
ANTERIORE
PARTE
TELECOMANDO
Page 16

ACCENSIONE
1. Collegare l’adattatore CA fra la presa “AC-12V” che si trova sul retro dell’MIP190 e la
presa della corrente di rete.
2. Premere il tasto sul dispositivo, oppure il tasto “I/ STANDBY” del telecomando, per
accendere o spegnere il dispositivo.
IMPOSTAZIONE DELL’OROLOGIO / DELL’ORA
1. Spegnere il dispositivo.
2. Tenere premuto il tasto TIME/SLEEP [ora/riposo] sul dispositivo o sul telecomando: il
display dell’ora inizia a lampeggiare.
3. Premere i tasti TUNING/CH ▲▼ [sintonizzazione/canale] sul dispositivo o FF/TUNER+,
RW/TUNER- [rispettivamente: sintonizza indietro - sintonizza avanti] sul telecomando per
regolare le ore.
4. Premere il tasto TIME/SLEEP [ora/riposo]: il display dei minuti inizia a lampeggiare.
5. Premere i tasti TUNING/CH ▲▼ sul dispositivo o FF/TUNER+, RW/TUNER- sul
telecomando per regolare i minuti.
6. Per scegliere tra la modalità 12 o 24 ore sul display orario tenere premuto il pulsante
PREST/DISPLAY
7. Premere nuovamente il tasto TIME/SLEEP [ora/riposo] del dispositivo o del telecomando,
per impostare l’ora. Se il dispositivo resta inattivo per 15 secondi, l’ora selezionata si
imposta automaticamente.
RADIO
1. Quando il dispositivo è acceso, premere il tasto SOURCE [sorgente] sul dispositivo
stesso o sul telecomando per selezionare la modalità di radio FM o AM.
2. Per scorrere automaticamente fra le frequenze radio, tenere premuti i tasti TUNING/CH
▲▼ [sintonizzazione/canale] sul dispositivo o FF/TUNER+, RW/TUNER[rispettivamente: sintonizza indietro - sintonizza avanti] del telecomando. Lo scorrimento
delle frequenze si arresta automaticamente non appena viene captato un segnale forte.
3. Per scorrere manualmente fra le frequenze radio, premere i tasti TUNING/CH ▲▼
[sintonizzazione/canale] sul dispositivo o FF/TUNER+, RW/TUNER- [rispettivamente:
sintonizza indietro - sintonizza avanti] del telecomando.
4. Per regolare il volume, premere i tasti VOLUME ▲▼ sul dispositivo o di VOL UP, VOL
DOWN [volume su – volume giù] sul telecomando.
5. Il display mostra automaticamente l’ora selezionata se lasciato inattivo per 5 secondi. Per
visualizzare brevemente la stazione radio, premere il tasto di PRESET/DISPLAY sul
dispositivo o sul telecomando.
6. Il dispositivo è dotato di antenna FM. Regolare l’antenna, situata sul retro
dell’apparecchio, per ottenere il segnale radio migliore.
SALVATAGGIO DELLE STAZIONI RADIO NELLA MEMORIA
L’MIP190 può memorizzare un massimo di 10 frequenze FM e 10 frequenze AM.
1. Selezionare il canale che si desidera memorizzare.
2. Premere il tasto MEMORY [memoria] sul dispositivo o sul telecomando: P01 inizia a
lampeggiare sul display frontale. Premere il tasto TUNING/CH ▲▼
[sintonizzazione/canale] dal dispositivo o i tasti RW/TUNER-, FF/TUNER+
[rispettivamente: sintonizza indietro - sintonizza avanti] dal telecomando per effettuare la
propria selezione fra P01 e P10.
Page 17

3. Premere il tasto “MEMORY” (memori) per salvare il canale. Il display smette di
lampeggiare, indicando che il canale è stato memorizzato.
4. Premere il tasto SOURCE [sorgente] per passare fra la banda AM e la banda FM, e
ripetere la procedura descritta sopra per salvare fino a 10 frequenze per banda nella
memoria del dispositivo.
SINTONIZZAZIONE SU STAZIONI PREIMPOSTATE
1. Premere il tasto SOURCE [sorgente] per selezionare la radio AM o la radio FM.
2. Tenere premuto il tasto PRESET/DISPLAY per 2 secondi.
3. Premere i tasti TUNING/CH ▲▼ [sintonizzazione/canale] del dispositivo o i tasti
RW/TUNER-, FF/TUNER+ [rispettivamente: sintonizza indietro - sintonizza avanti] del
telecomando per selezionare una delle frequenze pre-impostate.
4. La frequenza radio salvata viene selezionata automaticamente dopo 2 secondi.
iPod
1. Togliere la piastra di protezione della stazione dock posta sulla parte superiore del
dispositivo.
2. Inserire l’alloggiamento dock più adatto all’iPod in vostro possesso. L’MIP190 è dotato di
una serie di alloggiamenti per dock universale e di una piastra di protezione da utilizzare
con altri dispositivi audio portatili.
3. Collegare l’iPod nell’apposita connessione per dock a 30 poli. Premere il tasto
“SOURCE” (sorgente) per selezionare la funzione di “iPod”. L’icona dell’iPod appare sul
pannello frontale.
4. L’iPod inizia automaticamente a ricaricarsi.
5. Usare la ruota di selezione dell’iPod per scorrere i vari menu.
6. Premere i tasti TUNING/CH ▲▼ [sintonizzazione/canale] del dispositivo o i tasti
RW/TUNER-, FF/TUNER+ [rispettivamente: sintonizza indietro - sintonizza avanti] del
telecomando per selezionare una canzone.
7. Per regolare il volume, premere i tasti VOLUME ▲▼ sul dispositivo o di VOL+, VOL[volume su – volume giù] sul telecomando.
8. Utilizzare il telecomando per controllare a distanza le funzioni di play/pause, ripeti,
shuffle.
Numero
alloggiamenti
adattatore
Modello di iPod
Potenza
3
iPod mini
4GB & 6GB
4
iPod 4G e iPod U2
20GB
5 iPod 4G 40GB
6
iPod photo
20GB & 30GB
7 iPod photo 40GB & 60GB
U1 Piastra di protezione
universale
Page 18

COMANDO DI MUTO (SOLO SUL TELECOMANDO)
1. Premere il tasto MUTE [muto] sul telecomando: la musica si spegne e l’indicatore MUTE
appare sul display frontale.
2. Per annullare la funzione di muto e ripristinare la musica, premere nuovamente il tasto
MUTE [muto] o premere i tasti VOLUME ▲▼ del dispositivo o quelli VOL+, VOL- sul
telecomando. L’indicatore MUTE [muto] scompare.
IPOD SINCRONIZZAZIONE
L’MIP190 offre la possibilità di sincronizzare i dati con l’iPod mediante un cavo mini-USB -
USB (non in dotazione).
1. Collegare la mini-spina USB nella porta “USB” sul retro dell’MIP190.
2. Collegare la spina USB ad una porta omonima del PC.
3. L’iPod viene riconosciuto come dispositivo esterno e può essere sincronizzato.
IMPOSTAZIONE SVEGLIA 1 O SVEGLIA 2
1. Spegnere il dispositivo.
2. Premere il tasto A1 sul dispositivo o il tasto “Alarm1” [sveglia 1] sul telecomando per
visualizzare l’ora della sveglia impostata.
3. Premere il tasto di PRESET sul dispositivo o sul telecomando. Il display inizia a
lampeggiare.
4. Premere i tasti TUNING/CH ▲▼ [sintonizzazione/canale] del dispositivo o i tasti
RW/TUNER-, FF/TUNER+ [rispettivamente: sintonizza indietro - sintonizza avanti] sul
telecomando per regolare le ore.
5. Premere il tasto di PRESET: il display dei minuti inizia a lampeggiare.
6. Premere i tasti TUNING/CH ▲▼ [sintonizzazione/canale] del dispositivo o i tasti
RW/TUNER-, FF/TUNER+ [rispettivamente: sintonizza indietro - sintonizza avanti] sul
telecomando per regolare i minuti.
7. Premere il tasto SOURCE per scegliere se svegliarsi al suono dell’iPod, della radio
AM/FM o del buzzer. (Se la sorgente del suono della sveglia è l’iPod, ma questo non è
collegato, l’MIP190 passa per difetto sul buzzer).
8. Premere i tasti del VOLUME▲▼ sul dispositivo o quelli di VOL+, VOL- sul telecomando
per regolare il volume della sveglia.
9. Premere il tasto PRESET sul dispositivo o sul telecomando per salvare la sveglia
selezionata.
10. Quando la sveglia si attiva, suona per 60 minuti per poi spegnersi automaticamente. Per
annullare la sveglia premere sul STANDBY del dispositivo o del telecomando.
11. Ripetere la procedura per impostare la seconda sveglia utilizzando questa volta il tasto
A2 del dispositivo o “Alarm2” [sveglia 2] del telecomando.
SNOOZE (ripetizione della sveglia)
Quando la sveglia suona, premendo il tasto “snooze” (ripeti) sul dispositivo o sul
telecomando la sveglia viene messa in pausa per 8 minuti.
ACCENSIONE/SPEGNIMENTO SVEGLIA
1. Premere i tasti A1 o A2 sul dispositivo o “Alarm1”, “Alarm2” [sveglia 1 – sveglia 2] sul
telecomando. L’ora della sveglia appare sul display per 2 secondi.
2. Tenere premuto il tasto A1 o A2 sul dispositivo o “Alarm1”, “Alarm2” [sveglia 1 – sveglia
2] sul telecomando per accendere/spegnere le sveglie: i simboli della sveglia appaiono
nell’angolo in basso a destra dell’LCD quando la sveglia è accesa.
Page 19

VARIATORE DI LUMINOSITA
L’MIP190 è dotato di LCD a retroilluminazione, in funzione quando il dispositivo è attivo. Premere
il tasto “DIMMER” (regola luminosità) sul dispositivo o sul telecomando per regolare la luminosità.
AUDIO IN
L’MIP190 può essere inoltre utilizzato come sistema d’amplificazione di vari dispositivi audio
portatili, quali iPod Shuffle, MiniDisc, lettori MP3 o lettori cd portatili.
1. Collegare il cavo di AUDIO-IN di 3,5 mm incluso nella presa delle cuffie del dispositivo
audio e nella presa “AUX-IN” sul retro dell’MIP190.
2. Premere il tasto “SOURCE” (sorgente) per selezionare la funzione di “AUX”. L’icona
“AUX” appare sul pannello frontale.
3. L’MIP190 può essere utilizzato per ascoltare la musica caricata su dispositivi audio
esterni.
SLEEP (spegnimento automatico)
Premere il tasto “SLEEP” (spegni automaticamente) sul dispositivo o sul telecomando. E’
possibile scegliere fra tempi di 15, 30, 45, 60, 75 o 90 minuti prima dello spegnimento automatico
dell’MIP190
In caso di problemi di collegamento o impostazione dell’MIP190 Logic3, contattare il
nostro Reparto di di assistenza tecnica inviando un’email a support@logic3.com o
chiamando il numero (01923) 471 000 (tariffe nazionali in vigori)
Page 20

POWER ON: Ligar/desligar o sistema
MUTE: Silencia o volume das colunas
SOURCE: Selecciona a origem da entrada
VOL UP (AUMENTAR VOLUME): Aumentar volume
DIMMER Ajustaa retroiluminaçãodoLCD
RW/ TUNER-: Salta para a faixa anterior do iPod ou procura para trás no modo rádio.
PLAY/PAUSE (REPRODUZIR/PAUSAR) Reproduze interrompe o iPod
FF/ TUNER+: Salta para a faixa seguinte do iPod ou procura para a frente no modo rádio.
REPEAT (REPETIR): Configura o iPod para Repetir uma/ Repetir todas/ Não repetir e sair.
VOL.DOWN: Diminuir volume
SHUFFLE (ALEATÓRIO): Reproduz músicas do iPod de forma aleatória.
SLEEP: Define o tempo sleep.
ALARM 1: Liga/desliga o alarme 1.
ALARM 2: Liga/desliga o alarme 2.
PRESET: Selecciona uma estação de rádio predefinida.
MEMORY: Guarda a estação de rádio na memória.
MIP190 – i-Station Dock de Relógio
MANUAL DE INSTRUÇÕES
Obrigado por ter adquirido o MIP190 da Logic3 para utilização com o iPod, o mais recente da
nossa variada gama de altifalantes. Como todos os produtos da Logic3, o MIP190 foi produzido
de acordo com os padrões de fabrico mais elevados, disponibilizando a tecnologia mais recente
e mais avançada. Este produto foi concebido especificamente para trabalhar com o iPod e foi
certificado pela Logic3 para corresponder às normas de desempenho da Apple.
Conteúdo da embalagem:
i-Station
Adaptador CA
Cabo de Audio in estéreo de 3,5 mm a 3,5 mm
Carregadores de ancoragem universais
Controlo remoto
PRODUCTO
DIANTEIRA
TRASEIRA
CONTROLO REMOTO
Page 21

ALIMENTAÇÃO
1. Ligue o adaptador CA à ligação ‘AC-12V’ na traseira do MIP190 e à sua tomada de
corrente eléctrica.
2. Prima o botão no topo da unidade ou o botão do o botão ‘I/ STANDBY’ no controlo
remoto para ON / OFF [LIGAR/DESLIGAR] a unidade.
CONFIGURAÇÃO DO RELÓGIO/HORA
1. Desligue a unidade
2. Prima e mantenha premido o botão TIME/SLEEP [HORA/SUSPENSÃO] na unidade ou
no controlo remoto, a hora começa a piscar.
3. Prima os botões TUNING/CH ▲▼ [SINTONIZAR/C]na unidade ou ‘FF/TUNER+’,
‘RW/TUNER-’ [AVANÇAR RÁPIDO/SINTONIZAR+ RETROCEDER/SINTONIZAR -] no
controlo remoto para ajustar a hora.
4. Prima o botão TIME/SLEEP [HORA/SUSPENSÃO] e os minutos começam a piscar.
5. Prima os botões TUNING/CH ▲▼ [SINTONIZAR/C] na unidade ou ‘FF/TUNER+’,
‘RW/TUNER-’ [AVANÇAR RÁPIDO/SINTONIZAR+ RETROCEDER/SINTONIZAR -] no
controlo remoto para ajustar os minutos.
6. Para alterar o modo como as horas são apresentadas no ecrã, 12 ou 24 Horas,
pressione os botões PRESET/DISPLAY
7. Prima o botão TIME/SLEEP [HORA/SUSPENSÃO] na unidade ou no controlo remoto
para guardar a hora ou se a unidade for deixada inactiva durante 15 segundos a hora
seleccionada será guardada automaticamente.
RÁDIO
1. Com a unidade ligada, prima o botão SOURCE [ORIGEM] na unidade ou controlo
remoto para seleccionar as funções de rádio FM ou AM.
2. Para procurar automaticamente pelas frequências de rádio. Prima e mantenha premido
os botões TUNING/CH ▲▼ [SINTONIZAR/C] na unidade ou ‘RW/TUNER+’,
‘FF/TUNER-’ [AVANÇAR RÁPIDO/SINTONIZAR+ RETROCEDER/SINTONIZAR -] no
controlo remoto. O processo de procura de frequências pára automaticamente quando
encontra um sinal forte.
3. Para procurar manualmente pelas frequências de rádio, prima repetidamente os botões
TUNING/CH ▲▼ [SINTONIZAR/C] na unidade ou ‘RW/TUNER+’, ‘FF/TUNER-’
[AVANÇAR RÁPIDO/SINTONIZAR+ RETROCEDER/SINTONIZAR -] no controlo remoto.
4. Para ajustar o volume de som prima os botões VOLUME ▲▼ na unidade ou os botões
‘VOL UP’ [AUMENTAR VOLUME], ‘VOL DOWN’ [DIMINUIR VOLUME] no controlo
remoto.
5. O LCD mostra automaticamente a hora se a unidade for deixada inactiva durante 5
segundos, para ver durante alguns instantes a estação de rádio corrente prima o botão
PRESET/DISPLAY [PREDEFINIR/MOSTRAR] na unidade ou no controlo remoto.
6. A unidade tem construída na antena de FM, usa o fio aéreo na parte traseira da unidade
para o sinal possível o mais desobstruído de FM
ARMAZENAR A ESTAÇÃO DE RÁDIO NA MEMÓRIA
O MIP190 pode guardar até 10 estações de rádio FM e 10 AM.
1. Seleccione o canal que deseja guardar na memória.
2. Prima o botão ‘MEMORY’ [MEMÓRIA] na unidade ou no controlo remoto, começa a
piscar ‘P01’ no LDC frontal. Prima os botões TUNING/CH ▲▼ [SINTONIZAR/C] na
unidade ou ‘FF/TUNER+’, ‘RW/TUNER-’ [AVANÇAR RÁPIDO/SINTONIZAR+
RETROCEDER/SINTONIZAR -] no controlo remoto para seleccionar entre as prédefinições ‘P01’ ‘P10’.
Page 22
3. Prima o botão “MEMORY” para guardar o canal. O visor pára de piscar para indicar que
o canal está agora guardado na memória.
4. Prima o botão SOURCE [ORIGEM] para alternar entre as bandas de AM ou FM e repita
os procedimentos acima para guardar até 10 frequências de AM ou 10 frequências de
FM na memória.
CHAMAR UMA ESTAÇÃO MEMORIZADA
1. Prima o botão ‘SOURCE’ [ORIGEM] para seleccionar rádio AM ou rádio FM.
2. Prima e mantenha premido o botão PRESET/DISPLAY [PREDEFINIR/MOSTRAR]
durante 2 segundos
3. Prima os botões TUNING/CH ▲▼ [SINTONIZAR/C] na unidade ou ‘FF/TUNER+’,
‘RW/TUNER-’ [AVANÇAR RÁPIDO/SINTONIZAR+ RETROCEDER/SINTONIZAR -] no
controlo remoto para seleccionar entre as frequências guardadas.
4. A frequência armazenada é seleccionada automaticamente após 2 segundos.
iPod
1. Remova a placa de cobertura de ancoragem na parte superior da unidade.
2. Colocar o carregador de ancoragem adequado ao seu iPod. O MIP190 é fornecido com
diferentes carregadores de ancoragem universais e 1 placa de cobertura para utilizar
com outros dispositivos de áudio portáteis.
3. Encaixe o seu iPod na ligação de ancoragem de 30 pinos. Prima o botão “SOURCE”
para seleccionar a função “iPod”. Surge o símbolo iPod no painel frontal.
4. O iPod começa imediatamente a carregar.
5. Utilize a roda do iPod para navegar entre os ecrãs do menu do iPod.
6. Prima os botões TUNING/CH ▲▼ [SINTONIZAR/C] na unidade ou ‘RW/TUNER+’,
‘FF/TUNER-’ no controlo remoto para seleccionar a canção.
7. Para ajustar o volume de som prima os botões VOLUME ▲▼ na unidade ou os botões
‘VOL +’, ‘VOL -’ no controlo remoto.
8. Utilize o controlo remoto para controlar, sem fios, as funções reproduzir/pausa, repetir,
misturar.
CONTROLO DE SILÊNCIO [SOMENTE NO CONTROLO REMOTO]
1. Prima o botão ‘MUTE’ [SILÊNCIO] no controlo remoto, o som de áudio será desligado e
o indicador de MUTE aparece no LCD frontal.
2. Para cancelar a função Mute [Silêncio] e restaurar o som prima o botão MUTE
[SILÊNCIO] novamente ou prima os botões VOLUME ▲▼ na unidade ou os botões
‘VOL +’, ‘VOL -’ no controlo remoto. O indicador MUTE desaparecerá .
Número de
carregador adaptador
Modelo do iPod
Capacidade
3 iPod mini 4GB e 6GB
4 iPod 4G e iPod U2 20GB
5 iPod 4G 40GB
6 iPod Photo 20GB e 30GB
7 iPod PhotO 40GB e 60GB
U1 Placa de cobertura
universal
Page 23

IPOD SINCRONIZAÇÃO
O MIP190 oferece a capacidade de sincronização de dados com o seu iPod utilizando um
cabo de dados mini-USB [não fornecido].
1. Ligue o mini USB à porta “USB” na parte de trás do MIP190.
2. Ligue o USB numa porta USB livre do seu PC.
3. O iPod é reconhecido como dispositivo externo para permitir a sincronização do iPod
CONFIGURAR O ALARME 1 OU ALARME 2
1. Desligue a unidade.
2. Prima o botão A1 na unidade ou o botão ‘Alarm1’ no controlo remoto para apresentar a
hora de alarme actualmente configurada.
3. Prima o botão PRESET [PREDEFINIR] na unidade ou no controlo remoto, o LCD
começa a piscar.
4. Prima os botões TUNING/CH ▲▼ [SINTONIZAR/C] na unidade ou ‘FF/TUNER+’,
‘RW/TUNER-’ [AVANÇAR RÁPIDO/SINTONIZAR+ RETROCEDER/SINTONIZAR -] no
controlo remoto para acertar a hora.
5. Prima o botão PRESET [PREDEFINIR], os minutos começam a piscar.
6. Prima os botões TUNING/CH ▲▼ [SINTONIZAR/C] na unidade ou ‘FF/TUNER+’,
‘RW/TUNER-’ [AVANÇAR RÁPIDO/SINTONIZAR+ RETROCEDER/SINTONIZAR -] no
controlo remoto para acertar os minutos.
7. Prima o botão SOURCE [ORIGEM] para escolher entre Buzzer, iPod, rádio FM ou rádio
AM para o alarme.
[Se a origem de alarme for iPod, mas este não estiver ligado, o MIP190 muda
automaticamente a origem de alarme para Buzzer.]
8. Para ajustar o volume de som prima os botões VOLUME ▲▼ na unidade ou os botões
‘VOL +’, ‘VOL -’ no controlo remoto.
9. Prima o botão PRESET [PREDEFINIR] na unidade ou no controlo remoto para guardar o
alarme definido
10. Quando o alarme for activado vai soar durante 60 minutos e depois desliga-se
automaticamente, prima o botão ‘STANDBY’ na unidade ou controlo remoto para repor o
alarme.
11. Repita o procedimento em cima para configurar o segundo alarme usando o botão ‘A2’
na unidade ou o botão ‘Alarm2’ no controlo remoto.
SNOOZE
Quando o alarme soar, prima o botão “snooze” na unidade ou controlo remoto para
interromper temporariamente o alarme durante 8 minutos.
LIGAR/ DESLIGAR O ALARME
1. Prima o botão A1 ou A2 na unidade ou o botão ‘Alarm1’ ou ‘Alarm2’ no controlo remoto
para apresentar a hora de alarme actualmente configurada durante 2 segundos.
2. Prima e mantenha premido o botão A1 ou A2 na unidade ou o botão ‘Alarm1’ ou ‘Alarm2’
no controlo remoto para LIGAR ou DESLIGAR os alarmes, os símbolos de alarme vão
aparecer no canto inferior direito do LCD quando estes estiverem LIGADOS.
Page 24

DIMMER
O MIP190 tem um LCD retroiluminado quando a unidade está activa. Para controlar a
intensidade da luz, prima o botão “DIMMER” na unidade ou controlo remoto.
AUDIO IN
O MIP190 também pode ser utilizado como sistema de som em conjunção com vários outros
dispositivos de áudio portáteis como, por exemplo, iPod shuffle, MiniDisc, Leitores MP3 ou
Leitores de CD portáteis.
1. Ligue o cabo 3,5mm AUDIO-IN incluído à ficha de auscultadores do dispositivo de áudio
e à ficha “AUDIO IN” na parte posterior do MIP190.
2. Prima o botão “SOURCE” para seleccionar a função “AUX”. Surge o símbolo “AUX” no
painel frontal.
3. Utilize o MIP190 para reproduzir o som dos seus dispositivos áudio externos.
SLEEP
Para activar o modo sleep prima o botão “SLEEP” na unidade ou controlo remoto. Pode escolher
entre 15, 30, 45, 60, 75 ou 90 min antes de o MIP190 desligar automaticamente.
Se tiver algum problema com a configuração e funcionamento do
MIP190 da Logic3 contacte o Departamento de assistência
técnica por email para support@logic3.com, ou por telefone usando o número
(01923) 471 000 (Aplicam-se as taxas nacionais em vigor)
Page 25

STANDBY : Enciende/apaga el sistema
MUTE: Desactiva el volumen del altavoz
SOURCE: Selecciona la fuente de entrada
VOL. UP: Sube el volumen
DIMMER: Ajusta la retroiluminación de la pantalla LCD
RW/ TUNER-: Retrocede la pista del iPod, o busca hacia atrás en el modo radio.
PLAY/ PAUSE: Reproduce o pausa el iPod
FF/ TUNER+: Avanza la pista del iPod, o busca hacia delante en el modo radio.
REPEAT: Programa el iPod para Repetir una/Repetir todo/Desactivar repetición o volver al inicio.
VOL.DOWN: Baja el volumen
SHUFFLE: Reproduce las canciones del iPod en orden aleatorio.
SLEEP: Programa el temporizador.
ALARM 1: Enciende o apaga la alarma 1.
ALARM 2: Enciendo o apaga la alarma 2.
PRESET: Recupera una estación de radio preprogramada.
MEMORY: Store the radio station in memory.
MIP190 – Base de acoplamiento del reloj de la i-Station
MANUAL DE INSTRUCCIONES
Gracias por adquirir la MIP190 de Logic3 para utilizar con iPod, la última novedad en nuestra
extensa y consolidada gama de altavoces. Al igual que todos los productos de Logic3, la MIP190
ha sido creada siguiendo los procesos de fabricación de más alta calidad para ofrecerle la
tecnología más puntera y avanzada disponible. Este producto ha sido diseñado específicamente
para funcionar con iPod y certificado por Logic3 para cumplir con la normativa de rendimiento de
Apple.
CONTENIDO DE LA CAJA:
i-Station
Adaptador CA
Cable estéreo de entrada auxiliar de 3,5mm/3,5mm
Bases Universal Dock
Mando a distancia
PRODUCTO
FRENTE
POSTERIORA
MANDO A DISTANCIA
Page 26

ENCENDIDO
1. Conecte el adaptador de CA a la conexión ‘AC-12V’ de la parte posterior de la MIP190 y
a la toma de red para suministro de CA.
2. Pulse el botón de la parte superior de la unidad o el botón ‘I/ STANDBY’ [‘I/ EN
ESPERA’] del mando a distancia para encender/apagar la unidad.
AJUSTAR RELOJ / HORA
1. Apague la unidad.
2. Mantenga pulsado el botón TIME/SLEEP [HORA/DESCONEXIÓN PROGRAMADA] de la
unidad o del mando a distancia, el indicador de las horas comenzará a parpadear.
3. Pulse los botones TUNING/CH ▲▼ [SINTONIZACIÓN/EMISORA] de la unidad o los
botones ‘FF/TUNER+’ [AVANCE RÁPIDO/SINTONIZADOR+], ‘RW/TUNER-’
[RETROCESO/SINTONIZADOR-] del mando a distancia para ajustar la hora.
4. Pulse el botón TIME/SLEEP [HORA/DESCONEXIÓN PROGRAMADA] y el indicador de
los minutos comenzará a parpadear.
5. Pulse los botones TUNING/CH ▲▼ [SINTONIZACIÓN/EMISORA] de la unidad o los
botones ‘FF/TUNER+’[AVANCE RÁPIDO/SINTONIZADOR+], ‘RW/TUNER-’
[RETROCESO/SINTONIZADOR-] del mando a distancia para ajustar los minutos.
6. Para cambiar entre modo 12 y 24 horas en el reloj, pulse y mantenga pulsados los
botones PRESET/DISPLAY-
7. Pulse el botón TIME/SLEEP [HORA/DESCONEXIÓN PROGRAMADA] de la unidad o del
mando a distancia para ajustar la hora o si la unidad está inactiva durante 15 segundos
la hora seleccionada se establecerá automáticamente.
RADIO
1. Con la unidad encendida, pulse el botón SOURCE [FUENTE] de la unidad o del mando a
distancia para seleccionar el modo de Radio FM o AM.
2. Para explorar automáticamente las frecuencias de radio, mantenga pulsados los botones
TUNING/CH ▲▼ [SINTONIZACIÓN/EMISORA] de la unidad o los botones
‘RW/TUNER+’ [RETROCESO/SINTONIZADOR-], ‘FF/TUNER–’ [AVANCE
RÁPIDO/SINTONIZADOR+] del mando a distancia. La exploración se detendrá
automáticamente cuando se encuentre una señal fuerte.
3. Para explorar manualmente las frecuencias de radio, pulse repetidamente los botones
TUNING/CH ▲▼ [SINTONIZACIÓN/EMISORA] de la unidad o los botones
‘RW/TUNER+’ [RETROCESO/SINTONIZADOR-], ‘FF/TUNER–’ [AVANCE
RÁPIDO/SINTONIZADOR+] del mando a distancia.
4. Para ajustar el volumen pulse los botones de volumen VOLUME ▲▼ [VOLUMEN] de la
unidad o ‘VOL UP’ [MÁS VOLUMEN], ‘VOL DOWN’ [MENOS VOLUMEN] en el mando a
distancia.
5. La pantalla mostrará automáticamente la hora establecida si la unidad está inactiva
durante 5 segundos, para ver brevemente la emisora de radio actual pulse el botón
PRESET/DISPLAY [PRESINTONÍA/MOSTRAR] de la unidad o del mando a distancia.
6. Ajuste la antena en la parte trasera de la unidad para obtener la señal FM más clara
posible.
GUARDAR LA ESTACIÓN DE RADIO EN LA MEMORIA
La MIP190 puede almacenar hasta 10 estaciones FM y 10 estaciones AM
1. Seleccione el canal que quiere guardar en la memoria.
2. Pulse el botón ‘MEMORY’ [MEMORIA] de la unidad o del mando a distancia, ‘P01’
comenzará a parpadear en la pantalla frontal. Pulse el botón TUNING/CH ▲▼
[SINTONIZACIÓN/EMISORA] en la unidad o los botones ‘RW/TUNER-’
Page 27

[RETROCESO/SINTONIZADOR-], ‘FF/TUNER+’ [AVANCE RÁPIDO/SINTONIZADOR+]
del mando a distancia para seleccionar entre las presintonías ‘P01’ ‘P10’.
3. Pulse el botón “MEMORY” para guardar el canal. La pantalla dejará de parpadear para
indicar que el canal se encuentra ahora almacenado en la memoria.
4. Pulse el botón SOURCE [FUENTE] para cambiar entre las bandas AM y FM y repita el
procedimiento anterior para almacenar hasta 10 frecuencias AM y 10 frecuencias FM en
la memoria.
SELECCIÓN DE EMISORAS PRESINTONIZADAS
1. Pulse el botón ‘SOURCE’ [FUENTE] para seleccionar Radio AM o Radio FM.
2. Mantenga pulsado el botón PRESET/DISPLAY [PRESINTONÍA/MOSTRAR] durante 2
segundos.
3. Pulse los botones TUNING/CH ▲▼ [SINTONIZACIÓN/EMISORA] de la unidad o los
botones ‘RW/TUNER-’ [RETROCESO/SINTONIZADOR-], ‘FF/TUNER+’ [AVANCE
RÁPIDO/SINTONIZADOR+] del mando a distancia para seleccionar entre las
frecuencias presintonizadas.
4. La frecuencia de radio almacenada se seleccionará automáticamente después de 2
segundos.
iPod
1. Extraiga la placa de protección de la base de conexión en la parte superior de la unidad.
2. Ajuste la base dock adecuada para su iPod. La MIP190 dispone de una selección de
bases dock universales diferentes y una placa de protección para utilizar con otros
dispositivos de audio portátiles.
3. Conecte su iPod al conector de 30 pin. Pulse el botón “SOURCE” para seleccionar la
función iPod. El símbolo de iPod aparecerá en la pantalla.
4. El iPod comenzará a cargarse automáticamente.
5. Utilice la rueda de clic para navegar por las pantallas del menú de iPod.
6. Pulse los botones TUNING/CH ▲▼ [SINTONIZACIÓN/EMISORA] de la unidad o los
botones ‘RW/TUNER-’ [RETROCESO/SINTONIZADOR-], ‘FF/TUNER+’ [AVANCE
RÁPIDO/SINTONIZADOR+] del mando a distancia para seleccionar las canciones.
7. Pulse los botones VOLUME ▲▼ [VOLUMEN] de la unidad o los botones ‘VOL+’ [MÁS
VOLUMEN], ‘VOL-’ [MENOS VOLUMEN] del mando a distancia para ajustar el nivel del
volumen.
8. Utilice el mando a distancia para controlar las funciones de reproducción/pausa, repetir,
orden aleatorio de forma inalámbrica.
Número de la base
del adaptador
Modelo iPod
Capacidad
3 iPod mini 4GB & 6GB
4 4G iPod & U2 iPod 20GB
5 4G iPod 40GB
6 iPod Photo 20GB & 30GB
7 iPod Photo 40GB & 60GB
U1 Placa de protección
Universal
Page 28

SILENCIAMIENTO (SOLO MANDO A DISTANCIA)
1. Pulse el botón ‘MUTE’ [SILENCIAMIENTO] del mando a distancia, la música se apagará
y el indicador MUTE aparecerá en la pantalla frontal.
2. Para cancelar la función Mute y restablecer la música pulse el botón MUTE
[SILENCIAMIENTO] de nuevo o pulse los botones VOLUME ▲▼ [VOLUMEN] de la
unidad o ‘VOL+’ [MÁS VOLUMEN], ‘VOL- ‘[MENOS VOLUMEN] del mando a distancia.
El indicador MUTE desaparecerá.
IPOD SINCRONIZACIÓN
La MIP190 ofrece la capacidad de permitir la sincronización de datos a su iPod utilizando un
cable mini-USB to USB (no suministrado).
1. Conecte la mini conexión USB en el puerto USB de la parte posterior de la MIP190.
2. Conecte la conexión USB a un puerto USB disponible de su ordenador.
3. El iPod será reconocido ahora como un dispositivo externo que le permitirá sincronizar el
iPod.
AJUSTE DEL DESPERTADOR 1 O DESPERTADOR 2
1. Apague la unidad.
2. Pulse el botón A1 de la unidad o el botón ‘Alarm1’ [Despertador 1] del mando a distancia
para mostrar la hora actual del despertador.
3. Pulse el botón PRESET [PRESINTONÍA] de la unidad o del mando a distancia, la
pantalla comenzará a parpadear.
4. Pulse los botones TUNING/CH ▲▼ [SINTONIZACIÓN/EMISORA] de la unidad o los
botones ‘RW/TUNER-’ [RETROCESO/SINTONIZADOR-], ‘FF/TUNER+’ [AVANCE
RÁPIDO/SINTONIZADOR+] del mando a distancia para ajustar las horas.
5. Pulse el botón PRESET [PRESINTONÍA], el indicador de minutos comenzará a
parpadear.
6. Pulse los botones TUNING/CH ▲▼ [SINTONIZACIÓN/EMISORA] de la unidad o los
botones ‘RW/TUNER-’ [RETROCESO/SINTONIZADOR-], ‘FF/TUNER+’ [AVANCE
RÁPIDO/SINTONIZADOR+] del mando a distancia para ajustar los minutos.
7. Pulse el botón SOURCE [FUENTE] para elegir entre despertarse con el iPod, la radio
AM/FM o con el timbre.
(Si ha seleccionado el iPod como fuente del despertador pero no hay un iPod conectado,
la MIP190 automáticamente seleccionará de manera predeterminada el timbre como
fuente del despertador.)
8. Pulse los botones VOLUME▲▼ [VOLUMEN] de la unidad o los botones ‘VOL+’, [MÁS
COLUMEN] ‘VOL-‘ [MENOS VOLUMEN] del mando a distancia para ajustar el volumen
del despertador.
9. Pulse el botón PRESET [PRESINTONÍA] de la unidad o del mando a distancia para
almacenar la hora seleccionada para el despertador.
10. Cuando se active el despertador sonará durante 60 minutos y después se desconectará
automáticamente, para restaurar el despertador pulse el botón ‘STANDBY’ [EN
ESPERPA] de la unidad o del mando a distancia.
11. Repita el procedimiento anterior para establecer el segundo despertador utilizando el
botón ‘A2’ de la unidad o el botón ‘Alarm2’ [Despertador 2] del mando a distancia.
SNOOZE
Cuando suene la alarma pulse el botón “snooze” en la unidad o el mando a distancia para
detener temporalmente la alarma durante ocho minutos.
Page 29

CONEXIÓN/DESCONEXIÓN DEL DESPERTADOR
1. Pulse los botones A1 o A2 de la unidad o los botones ‘Alarm1’ [Despertador 1], ‘Alarm2’
[Despertador 2] del mando a distancia para establecer la hora del despertador durante 2
segundos.
2. Mantenga pulsado el botón A1 o A2 de la unidad o los botones ‘Alarm1’ [Despertador 1],
‘Alarm2’ [Despertador 2] del mando a distancia para conectar/desconectar los
despertadores, los símbolos de despertador aparecerán en la esquina inferior derecha
de la pantalla LCD cuando el despertador esté conectador.
CONTROL DE ILUMINACIÓN
La MIP190 dispone de retroiluminación LCD cuando la unidad está en activo. Para controlar el
brillo de la luz pulse el botón “DIMMER” en la unidad o en el mando a distancia.
ENTRADA AUDIO
La MIP190 se puede utilizar también como sistema de altavoces junto con otro tipo de
dispositivos de audio como iPod shuffle, MiniDisc, Reproductores MP3 o Reproductores de CD
portátiles.
1. Conecte el cable de entrada auxiliar de 3,5 mm, que se adjunta, en la ranura para
auriculares de su dispositivo de audio y en la ranura “AUDIO IN” en la parte posterior de
la MIP190.
2. Pulse el botón “SOURCE” para seleccionar la función “AUX”. El símbolo “AUX”
aparecerá en la pantalla.
3. Utilice la MIP190 para reproducir el sonido desde su dispositivo de audio externo.
DESACTIVACIÓN AUTOMÁTICA
Para activar la desactivación automática pulse el botón “SLEEP” en la unidad o el mando a
distancia. Puede escoger desde 15, 30, 45, 60, 75 ó 90 min. para que la MIP190 se detenga
automáticamente.
Si tiene algún problema con la configuración de la MIP190 de Logic 3, contacte con nuestro
Departamento de Asistencia Técnica
enviando un correo electrónico a support@logic3.com, o llame a
(01923) 471 000 (Se aplicarán las tarifas de llamada nacional)
 Loading...