

Page 1
Action Pad (JP284) – EN User Manual
Thank you for purchasing the Logic3 Action Pad. As with all Logic3 products it has been built to the highest
manufacturing standards and tested throughout its development, to ensure you get the best possible
product. Please read through and familiarize yourself with this manual before you use the Action Pad.
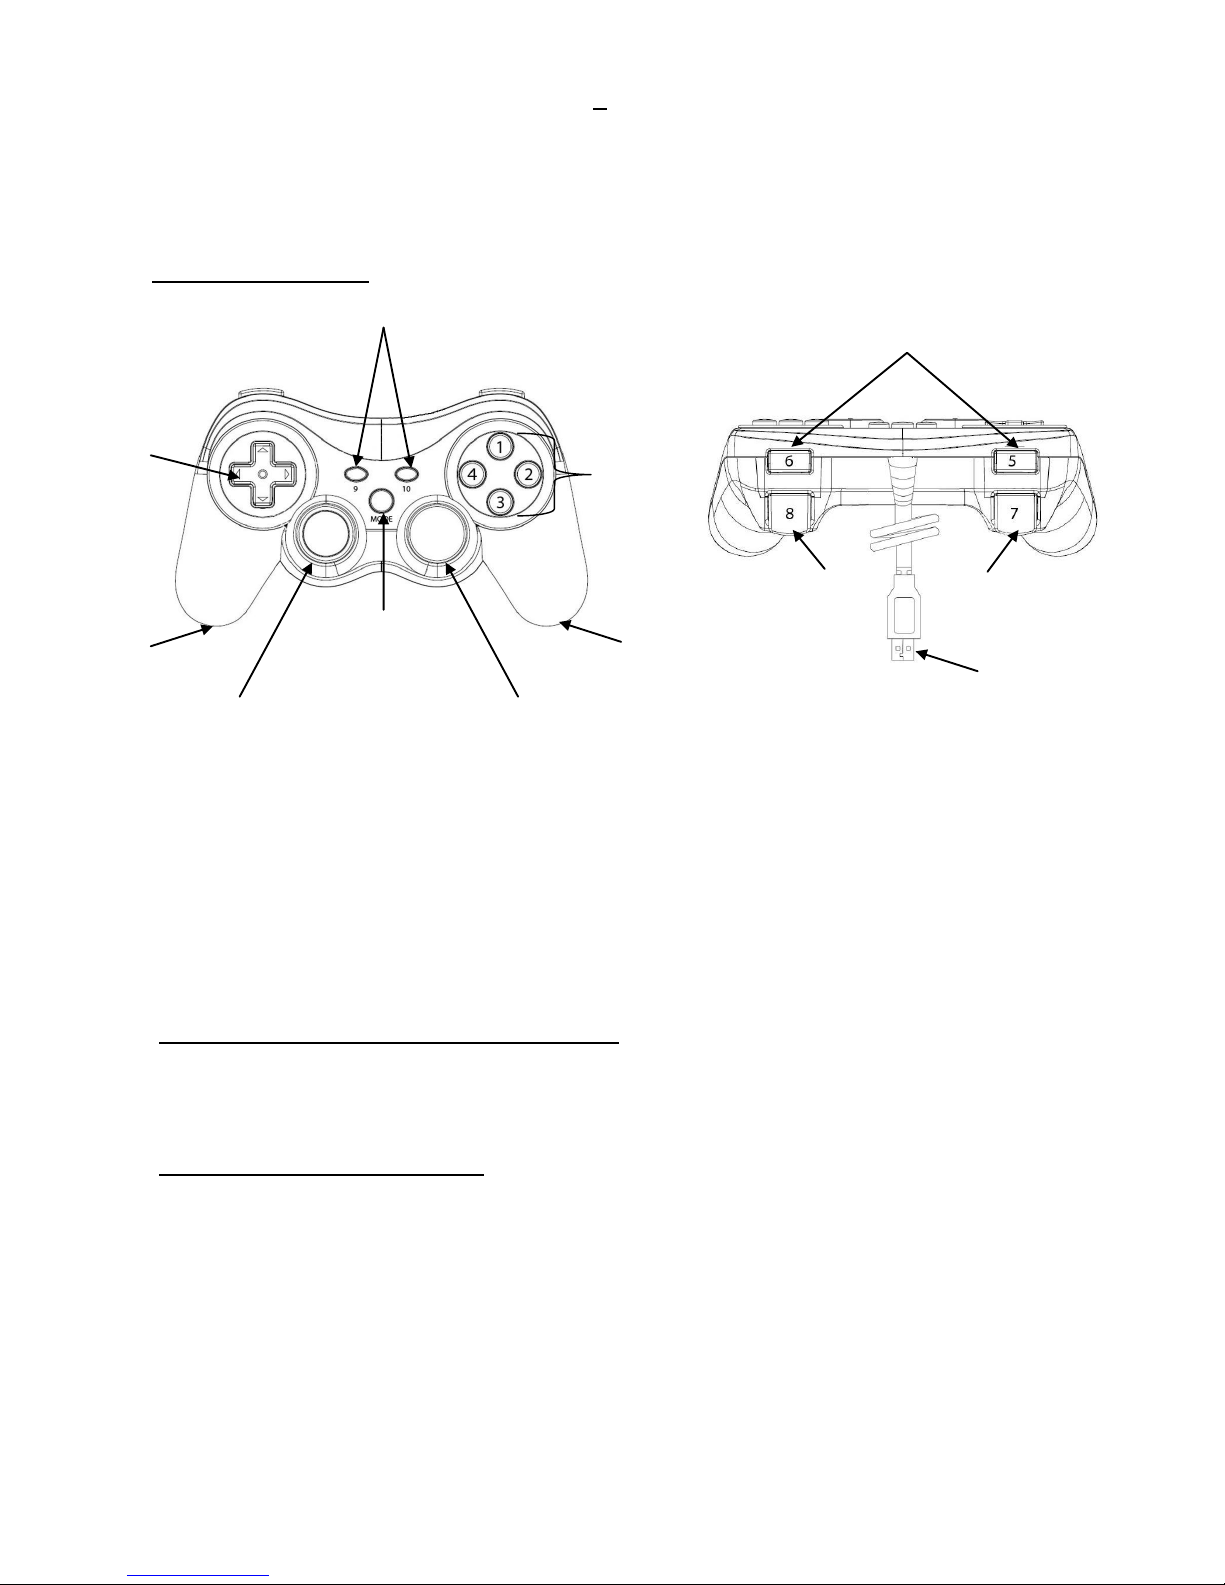
Action Pad Controls
A.10 action/fire buttons (Buttons 11 & 12 are activated by depressing the L & R mini sticks)
B.Two analog triggers (7 & 8)
C. 8-way D-pad that can work as a hat switch or as a digital direction control
D. 2 analog mini sticks with auto-calibration and auto-centering
E. 2 high grade built-in motors for vibration feedback
F. Mode Button for Dual (Digital) / Hat Switch (Analog) mode selection
Hat Switch (Analog) Mode: (Press the mode button)
Left Mini Stick associates with X & Y axes, Right Mini Stick associates with Throttle & Rudder axes (Z & Rz)
D-pad works as 8-way POV (Point of View)
Dual (Digital) Mode: (Default setting)
X, Y directional axes can be controlled by both the D-pad or left mini stick
Right analogue stick will act as button 1,2,3,4
A & D
A & D
B
A
C
F
A
B
E
E
A
USB
Page 2

Vibration Driver Installation for PC
(1) Installing the dedicated Vibration Driver (For PC vibration feedback only)
Note: You must install the driver before connecting your Action Pad
1. Turn on your computer and log onto Windows.
2. Insert the driver disk to your selected CD drive. The Set-up screen will pop up automatically.
3. Follow the instructions on screen. Restart your computer if prompted.
4. Plug the Action Pad into a spare USB port on your computer.
5. Installation is completed.
(2) Verifying Installation:
1. Click “Start” in the lower left corner of your desktop.
2. Click “Setting” and then “Control Panel”
3. Now Double Click the “Game Controllers” icon (different Windows platforms may have different names).
You should see the driver named “PC Twin Shock” under Controller Tab with an “OK” status.
4. Select “PC Twin Shock” and then click the properties tab, you will now enter the “Driver Test” screen.
5. Go to the “Function Test” Tab and test all of the axes/ buttons/switches on the Test screen by activating
the corresponding axes/buttons/switches of the pad.
6. Go to the “Vibration Test” screen by clicking the “Vibration Test” Tab on the top part of the screen.
Different kinds of vibration effects can be tested.
7. Your installation is successful if you can go through all the above points without any problems.
8. Click “OK” to exit.
System Requirements
PC with a USB port
Windows 98SE / ME / 2000 / XP / Vista / Windows 7 (32 & 64 bit)
Over 200MB free hard disc space
CD ROM driver
32MB or higher memory
Support DirectX VGA card
PC platform: Pentium (R) - 1.8GHz/ RAM: 256M
Should you have any setup problems with the Action Pad (JP284) please contact our Technical Support Hotline
on +44 (01923)471000 – National/International call rates apply or Email support@logic3.com - Spare parts
are available for some models at our website www.logic3.com
Page 3
PC Action Pad (JP284) – FR Guide d’utilisation
Merci d’avoir choisi le PC Action Pad de Logic3. À l’instar des autres produits Logic3, il répond aux
standards de fabrication les plus élevés. Les tests qu’il a subits tout au long de son développement vous
garantissent en outre le meilleur produit possible. Veuillez vous familiariser avec ce guide avant d’utiliser le
PC Action Pad.
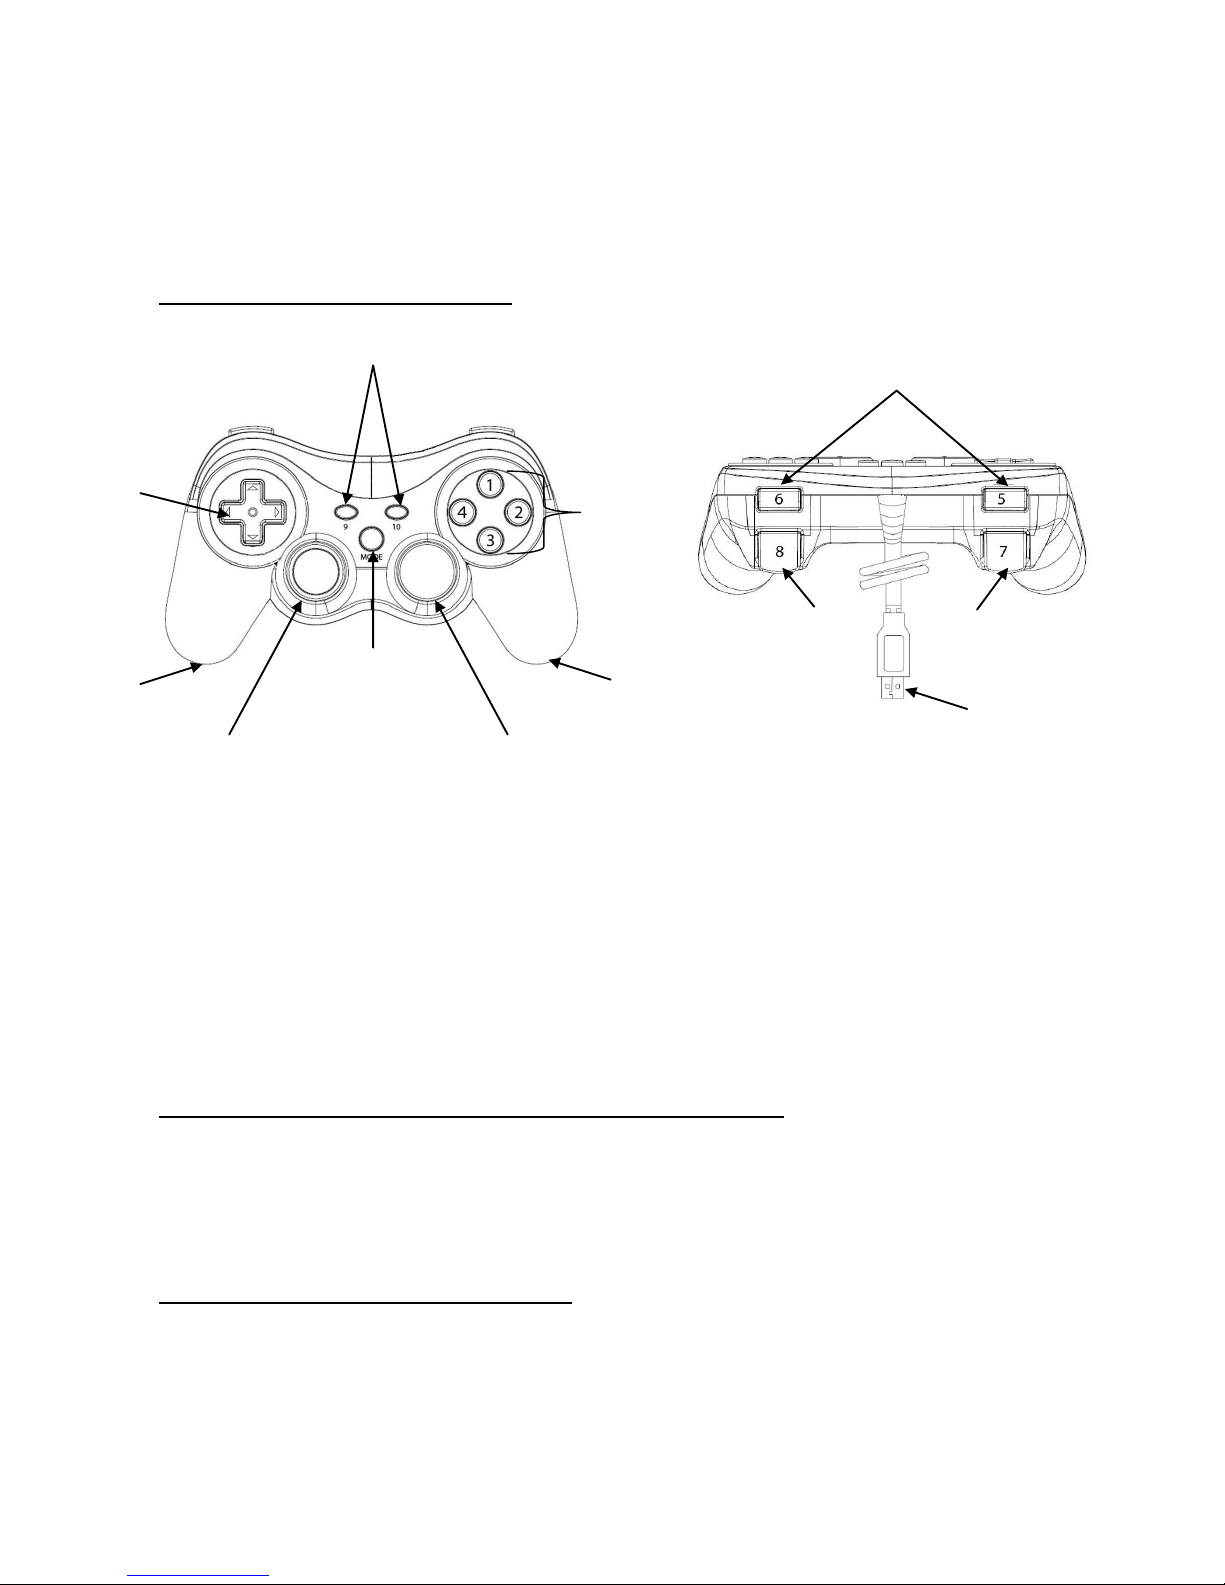
Commandes Action Pad pour PC
A.10 boutons d’action/de tir (les boutons 11 et 12 s’activent en appuyant sur les mini-sticks L et R)
B. Deux gâchettes analogiques (7 et 8)
C. Croix directionnelle à 8 directions s’utilisant comme bouton principal ou comme commande directionnelle
numérique
D. 2 mini sticks analogiques avec auto-calibration et auto-centrage
E. 2 moteurs de retour de vibrations intégrés de haute qualité
F. (1) Mode Dual (numérique) / Mode Bouton principal (analogique)
Mode Bouton principal analogique : (appuyez sur le bouton de mode)
Le mini-stick gauche correspond aux axes X et Y, Le mini-stick droite correspond aux axes Manette des gaz
et Palonnier (Z & Rz)
La croix directionnelle s’utilise comme un POV (Point of View) à huit directions
Mode Dual numérique: (paramètre par défaut)
Les axes directionnels X et Y se commandent à l’aide de la croix directionnelle ou du mini-stick gauche
Le stick analogique droit agira en tant que bouton 1,2,3,4
A & D
A & D
B
A
C
F
A
B
E
E
A
USB
Page 4

Pilote d’installation pour PC
(1) Installation du Dedicated Vibration Driver (uniquement pour le retour de vibrations sur PC)
Remarque : Pour brancher votre Action Pad, vous devez d’abord installer votre pilote.
1. Allumez votre ordinateur et connectez-vous à Windows.
2. Insérez le disque du pilote dans le lecteur CD de votre choix. L’écran de configuration apparaît
automatiquement.
3. Suivez les instructions qui s’affichent à l’écran et redémarrez votre ordinateur, le cas échéant.
4. Branchez votre Action Pad dans l’un des ports USB de votre ordinateur.
5. L’installation est terminée.
(2) Vérification de l’installation :
1. Cliquez sur Démarrer, en bas à gauche de votre bureau.
2. Cliquez sur Paramètres puis sur Panneau de configuration
3. À présent, cliquez deux fois sur l’icône des Manettes de jeu (Les noms diffèrent selon les plateformes
Windows utilisées). Vous trouverez le pilote Manettes de jeu PC Twin Shock sous l’onglet de commande
au statut OK.
4. Sélectionnez Commande de jeu PC Twin Shock puis cliquez sur l’onglet Propriétés pour accéder à
l’écran Test de pilote.
5. Testez les axes, les boutons et les interrupteurs de l’écran de test en activant les axes, les boutons et
les interrupteurs de la manette correspondants.
6. Cliquez sur l’onglet Effet situé en haut de l’écran pour accéder à l’écran Effet. De nombreux effets de
vibrations peuvent être testés Antibiotique.
7. Si vous parvenez à suivre toutes les étapes précédentes, votre installation est terminée.
8. Cliquez sur OK pour quitter l’application.
Configuration requise
PC avec un port USB
Windows 98SE / ME / 2000/ XP / Vista / Windows 7 (32 & 64 bit)
Plus de 200 Mo d'espace libre sur le disque dur
Lecteur de CD ROM
32 Mo de mémoire ou plus
Compatible avec une carte VGA DirectX
Si vous avez le moindre problème d’installation avec le PC Action Pad (JP284), veuillez contacter notre Service
d’assistance technique au :+441923 471 000 – tarifs d’appels nationaux/internationaux en vigueur ou
envoyez un e-mail à support@logic3.com. Des pièces de rechange sont disponibles pour certains modèles sur
notre site Web www.logic3.com
Page 5
PC Action Pad (JP284) – DE Benutzerhandbuch
Vielen Dank, dass Sie sich für das Action Pad von Logic3 entschieden haben. Wie alle Produkte von Logic3
wurde es mit den höchsten Produktionsstandards hergestellt und während der gesamten Entwicklung
gründlich getestet, um sicherzustellen, dass wir Ihnen das bestmögliche Produkt bieten können. Lesen Sie
dieses Handbuch gründlich durch und machen Sie sich mit dem Inhalt vertraut, bevor Sie das Action Pad
verwenden.
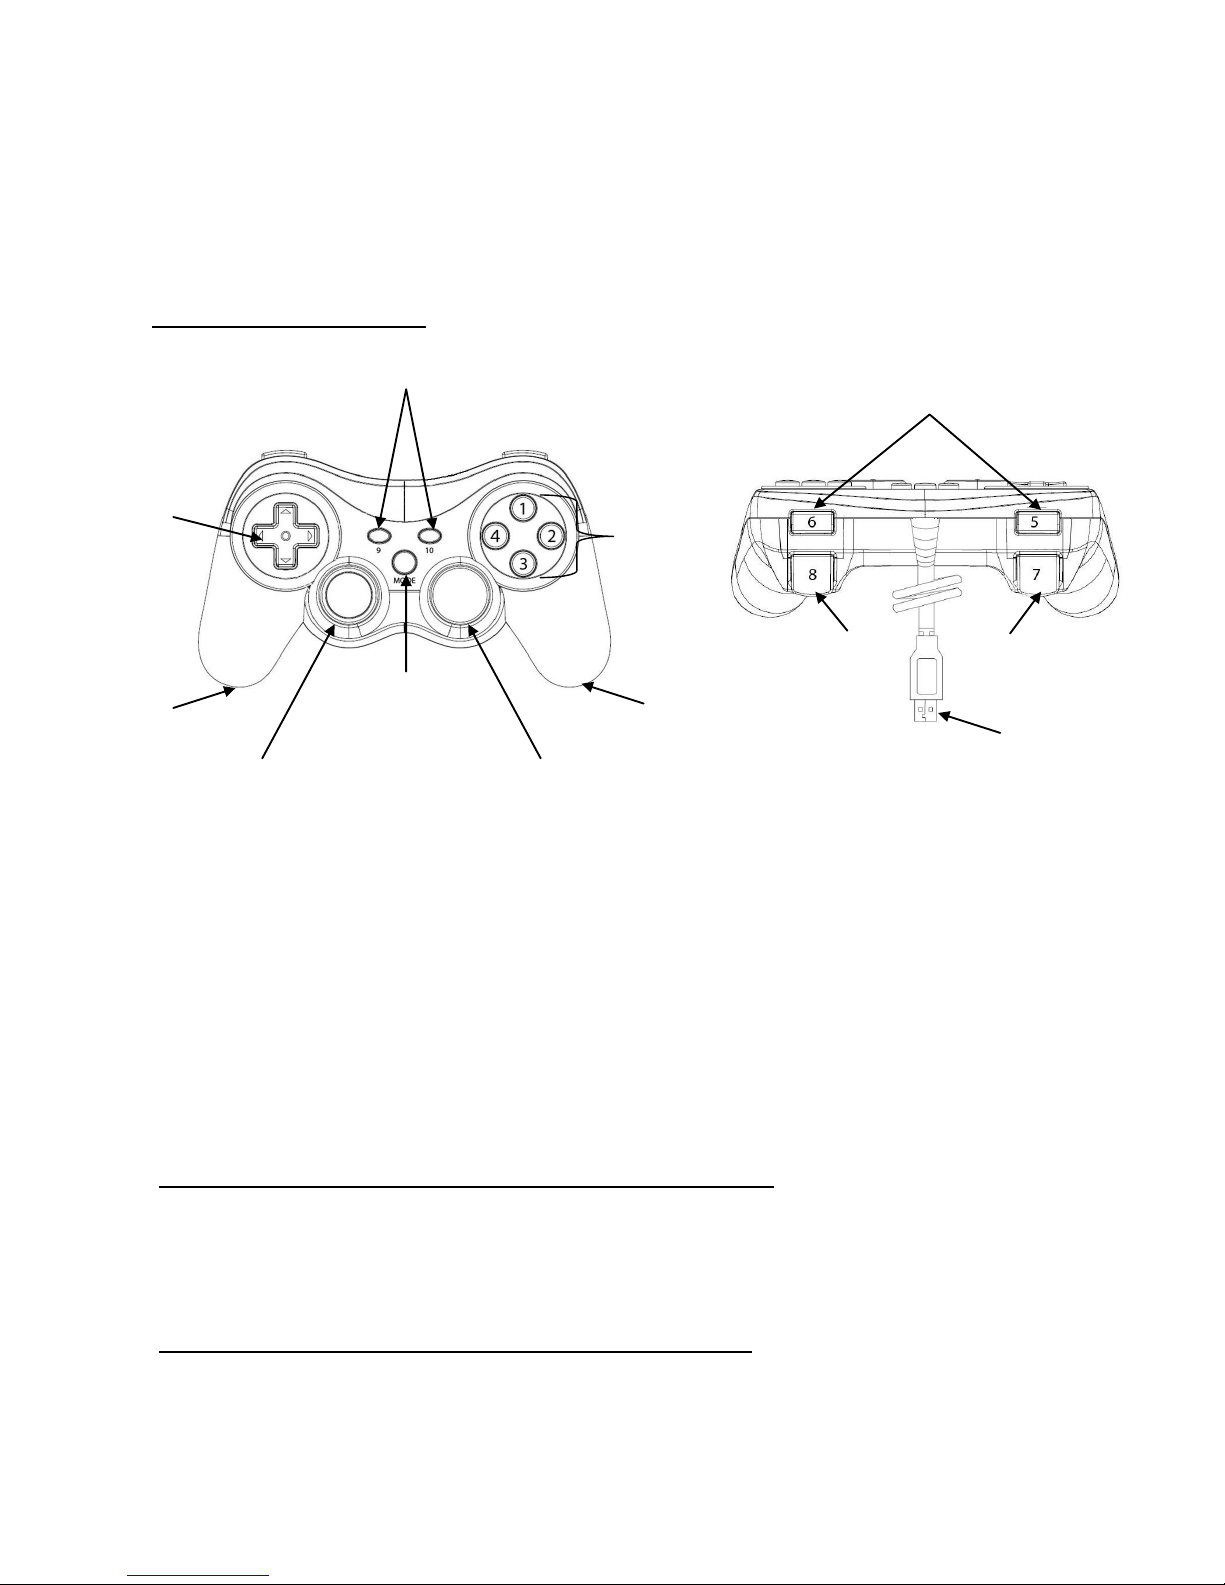
PC-Steuerung Action Pad
A.10 Aktions-/ Feuertasten (Tasten 11 & 12 werden durch Herabdrücken des linken und rechten Mini-Sticks
aktiviert)
B. Zwei analoge Schalttasten (7 & 8)
C. Steuertaste mit 8 Richtungen, die zur Ansichtssteuerung oder zur digitalen Bewegungssteuerung
verwendet werden kann
D. 2 analoge Mini-Sticks mit automatischer Kalibrierung und automatischer Zentrierung
E. 2 hochwertige eingebaute Motoren für Vibrationseffekte
F. Modus-Umschalttaste zum Wählen des Modus zwischen Bewegungssteuerung (Digital/ Dual) /
Ansichtssteuerung (Analog)
Modus Ansichtssteuerung (Analog): (Modus-Umschalttaste drücken)
Der linke Mini-Stick steuert die X- und Y-Achse, der rechte Mini-Stick steuert Schub- und Drehregler (Z & Rz)
Die Steuertaste dient zur Ansichtssteuerung mit 8 Richtungen
Modus Bewegungssteuerung (Digital/ Dual): (Standardeinstellung)
Bewegungssteuerung der X- und Y-Achsen kann sowohl über die Steuertaste als auch über den linken MiniStick erfolgen
Rechter Analogstick hat die Funktion der Tasten 1,2,3,4
A & D
A & D
B
A
C
F
A
B
E
E
A
USB
Page 6

Vibration-Treiber Installation für PC
(1) Installation der Vibrations-Treiber (Nur für PC-Vibrationseffekte)
Hinweis: Die Installation der Treiber muss vor Anschluss des Action Pad erfolgen
1. Schalten Sie den Computer ein und melden Sie Sich bei Windows an.
2. Legen Sie die Treiber-CD in das CD-ROM-Laufwerk. Der Setup-Bildschirm wird automatisch erscheinen.
3. Folgen Sie den Bildschirmanweisungen. Starten Sie den Computer neu, wenn Sie dazu aufgefordert
werden.
4. Schließen Sie das Action Pad an einen freien USB-Anschluss am Computer an.
5. Installation abgeschlossen.
(2) Installation überprüfen:
1. Klicken Sie links unten auf dem Desktop auf „Start“.
2. Klicken Sie auf „Einstellungen“ und dann „Systemsteuerung“
3. Klicken Sie nun doppelt auf das Symbol „Gamecontroller“ (je nach Windows-Version können die
Bezeichnungen abweichen). Der Treiber mit dem Namen „PC Twin Shock“ sollte in der Controller-Spalte
mit dem Status „OK“ aufgelistet sein.
4. Wählen Sie „PC Twin Shock“ und klicken Sie dann auf die Eigenschaften, um den Bildschirm
„Treibertest“ aufzurufen.
5. Überprüfen Sie unter „Function Test“ alle Achsen/ Tasten/ Schalter auf dem Test-Bildschirm, indem Sie
die entsprechenden Achsen/ Tasten/ Schalter am Pad betätigen.
6. Wechseln Sie zum Bildschirm „Vibration-Effekt“, indem Sie in der oberen Leiste auf „Vibration Test“
klicken. Verschiedene Vibrationseffekte können getestet werden.
7. Die Installation war erfolgreich, falls Sie alle oberen Schritte problemlos durchführen können.
8. Klicken Sie zum Verlassen auf „OK“.
Systemanforderungen
PC mit USB-Anschluss
Windows 98SE / ME / 2000/ XP / Vista / Windows 7 (32 & 64 bit)
Mindestens 200 MB freier Festplattenspeicher
CD-ROM-Laufwerk
Mindestens 32 MB Speicher
DirectX-VGA-Karten-Unterstützung
Sollten Sie irgendwelche Probleme mit der Inbetriebnahme Ihres Action Pad (JP284) haben, wenden Sie sich
bitte an unsere Technische Support-Hotline, Tel. +44 (01923) 471 000 – Es gelten die Gebühren für Inlands-
/Auslandsgespräche – oder senden Sie uns eine E-Mail an support@logic3.com. Für einige Modelle können
Page 7

PC Action Pad (JP284) – IT Manuale per l’utente
Grazie per aver acquistato il Action Pad prodotto da Logic3. Come tutti i prodotti Logic3, è stato
realizzato seguendo i più alti standard di produzione e testato durante tutta la sua realizzazione
per assicurare un prodotto di elevata qualità. Consigliamo di leggere attentamente questo manuale
prima di utilizzare il Action Pad.
Comandi Action Pad per PC
A.10 tasti azione/spara (i tasti 11 & 12 si attivano premendo i joystick L e R)
B. Due levette analogiche (7 & 8)
C.Tasto direzionale a 8 direzioni che funziona sia come Hat switch che come comando direzionale digitale
D. 2 joystick analogici autocalibranti e autocentranti
E. 2 motori interni per la funzione vibrazione
F. Tasto di selezione della modalità, Dual (digitale) / POV (analogica)
Modalità POV (analogica): (premere il tasto per la selezione della modalità)
Il joystick sinistro è associato agli assi X e Y, il joystick destro è associato agli assi acceleratore e timone (Z
& Rz)
Il tasto direzionale funziona da POV (punto di vista) a 8 direzioni
Modalità Dual (digitale): (impostazione automatica)
Gli assi direzionali X e Y possono essere controllati sia con il tasto direzionale che con il joystick sinistro
Il stick analogico diritto agirà come bottone 1,2,3,4
A & D
A & D
B
A
C
F
A
B
E
E
A
USB
Page 8

Installazione del driver su PC
(1) Installazione del driver di Dedicated Vibration (solo per la funzione di vibrazione per PC)
Attenzione: devi installare il driver prima di connettere il Action Pad
1. Accendi il tuo computer e avvia Windows.
2. Inserisci il disco drive nell'unità CD. La schermata delle impostazioni si aprirà automaticamente.
3. Segui le istruzioni a schermo. Riavvia il tuo computer se necessario.
4. Collega il Action Pad a una porta USB libera del tuo computer.
5. L'installazione è completa!
(2) Verificare l'installazione:
1. Fai click su "Start" nell'angolo in basso a sinistra sullo schermo.
2. Scegli "Impostazioni" e quindi "Pannello di controllo”
3. Ora fai doppio click sull'icona “Periferiche di gioco" (il nome potrebbe variare a seconda della piattaforma
Windows). Lo stato del driver “PC Twin Shock” nella scheda periferiche di gioco dovrebbe risultare "OK".
4. Seleziona “PC Twin Shock”, clicca sulla scheda Proprietà e accederai alla schermata "Test dispositivo".
5. Testa tutti gli assi, i tasti e gli interruttori nella schermata di test attivando sul controller gli
assi/tasti/interruttori corrispondenti.
6. Vai alla schermata "Effetti" cliccando la scheda Effetti in alto sullo schermo. Puoi anche testare diversi
tipi di vibrazione.
7. Se riesci a eseguire tutti i passaggi descritti senza problemi, 'installazione è avvenuta con successo.
8. Clicca “OK” per uscire.
System Requirements
PC con porta USB
Windows 98SE / ME / 2000/ XP / Vista / Windows 7 (32 & 64 bit)
200MB di spazio libero su disco rigido
Lettore CD ROM
Memoria RAM 32MB o superiore
Supporto scheda VGA DirectX
Per eventuali problemi di impostazione del Action Pad (JP284), rivolgersi alla hotline di assistenza tecnica, al n.
+44 (01923) 471 000 (Si applicano le tariffe telefoniche nazionali / internazionali) o inviare un’email a
support@logic3.com - Le parti di ricambio sono disponibili per alcuni modelli nel nostro sito Web www.logic3.com
Page 9

PC Action Pad (JP284) – ES Manual del usuario
Gracias por adquirir el Action Pad de Logic3. Como todos nuestros productos, se ha sometido a
pruebas exhaustivas que garantizan su calidad. Antes de usarlo, te recomendamos que leas con
detenimiento este manual.
Controles de Action Pad para PC
A: 10 botones de acción (los botones 11 y 12 se activan al pulsar las pequeñas palancas L y R)
B: 2 gatillos analógicos (7 y 8)
C: cruceta de ocho direcciones que puede funcionar como cruceta digital o botón POV (punto de vista)
D: 2 pequeñas palancas con función de autocalibración y autocentrado
E: 2 motores internos vibradores de alta calidad
F: Botón de modo dual (digital) / botón POV (analógico)
Botón POV (modo analógico): pulsa el botón de modo
La palanca izquierda se asocia a los ejes X e Y, mientras que la palanca derecha se asocia a los ejes
acelerador y timón. (Z & Rz)
La cruceta funciona como un POV (punto de vista) de ocho direcciones.
Modo dual (digital): configuración predeterminada
Los ejes direccionales X e Y pueden controlarse mediante la cruceta o la palanca pequeña izquierda.
El stick analógico derecho actuará como botón 1,2,3,4
A & D
A & D
B
A
C
F
A
B
E
E
A
USB
Page 10

Instalación de controladores de dispositivo para PC
(1) Instalación de los controladores de dispositivo de Dedicated Vibration (solo para la función de
vibración en PC)
Aviso: ha de instalar los controladores de dispositivo antes de conectar el Action Pad
1. Encienda su ordenador y arranque Windows.
2. Introduzca el disco con los controladores en su lector de CD. La pantalla de instalación aparecerá
automáticamente.
3. Siga las instrucciones que se muestran en pantalla, y reinicie el ordenador si es necesario.
4. Conecte el Action Pad a un puerto USB de su ordenador.
5. La instalación ha finalizado.
(2) Verificación de la instalación:
1. Haga clic en “Inicio”, en la esquina inferior izquierda de su escritorio.
2. Seleccione “Configuración” y, después, “Panel de control”.
3. Haga doble clic en el icono “Dispositivos de juego” (el nombre puede variar según la versión de
Windows que tenga instalada). Debería de aparecer un controlador llamado “PC Twin Shock” en la
pestaña Dispositivo, y su estado debería de ser “OK”.
4. Seleccione el “PC Twin Shock” y haga clic en la pestaña de propiedades, mediante la cual accederá a la
pantalla de “Verificación de dispositivo”.
5. En la pantalla de verificación de dispositivo podrá comprobar que los ejes y botones del mando
funcionan correctamente.
6. Acceda a la pantalla “Efecto” haciendo clic en la pestaña Efecto, en la parte superior de la pantalla. Se
pueden comprobar diferentes modos de vibración.
7. Si no ha tenido ningún problema en los apartados anteriores, la instalación se ha llevado a cabo con
éxito.
8. Haga clic en OK para salir.
Requisitos del sistema
PC con un puerto USB
Windows 98SE / ME / 2000/ XP / Vista / Windows 7 (32 & 64 bit)
Más de 200 MB de espacio libre en el disco duro
Unidad de CD-ROM
32MB de memoria o más
Tarjeta VGA compatible con DirectX
Si experimenta problemas de configuración con el Action Pad (JP284), por favor, póngase en contacto
con nuestra Hotline de Apoyo Técnico al +44 (01923) 471 000 – Se aplicarán las tarifas telefónicas
nacionales/internacionales, o envíe un e-mail a support@logic3.com - En nuestro sitio web
www.logic3.com encontrará recambios disponibles para algunos modelos.
Page 11

PC Action Pad (JP284) – PT Manual do Utilizador
Obrigado por adquirir o Logic3 Action Pad. Como todos os produtos Logic3, foi construído
segundo os mais altos padrões de fabrico e testado durante o seu desenvolvimento, para
assegurar que é o melhor produto possível. Por favor leia este manual e familiarize-se com ele,
antes de utilizar o Action Pad.
Controlos do Action Pad para PC
A. 10 botões para acção/disparar (os botões 11 e 12 são activados carregando nos mini-manípulos
esquerdo e direito).
B. Dois gatilhos analógicos (7 e 8).
C. D-pad de 8 direcções que pode funcionar como teclado direccional ou controlo digital de direcção.
D. 2 mini-manípulos analógicos com calibração e centragem automáticas.
E. 2 sofisticados motores incorporados para resposta de vibração.
F. botão de selecção de modo para modo duplo (digital)/teclado direccional (analógico).
Modo de teclado direccional (analógico): (carregue no botão do modo)
O mini-manípulo analógico esquerdo associa-se aos eixos X e Y, o mini-manípulo direito associa-se aos
eixos aceleração e direcção (Z & Rz)
O D-pad funciona como ângulo de visão de oito direcções.
Modo duplo (digital): (predefinição)
Os eixos direccionais X e Y podem ser controlados pelo D-pad ou pelo mini-manípulo esquerdo
Stick analógico direito agirá como botão 1,2,3,4
A & D
A & D
B
A
C
F
A
B
E
E
A
USB
Page 12

Instalação do controlador para PC
(1) Instalar o controlador de vibração dedicado (apenas para resposta de vibração em PC)
Nota: Tem de instalar o controlador antes de ligar o Action Pad.
1. Ligue o computador e inicie o Windows.
2. Introduza o disco do controlador na unidade de CD seleccionada. Aparece automaticamente o ecrã de
configuração.
3. Siga as instruções que aparecem no ecrã. Reinicie o computador se isso lhe for solicitado.
4. Ligue o Action Pad a uma porta USB livre do seu computador.
5. A instalação está concluída.
(2) Verificar a instalação:
1. Clique em “Iniciar” no canto inferior esquerdo do ambiente de trabalho.
2. Clique em “Definições” e depois em “Painel de controlo”.
3. A seguir, fala duplo clique no ícone “Controladores de jogos” (outras versões do Windows podem ter
nomes diferentes). Deve conseguir ver o controlador intitulado “PC Twin Shock” no separador
“Controladores” com um estatuto “OK”.
4. Seleccione “PC Twin Shock” e depois clique no separador “Propriedades” para entrar no ecrã “Teste de
controlador”.
5. Teste todos os eixos/botões/interruptores no ecrã de teste activando os eixos/botões/interruptores
correspondentes do comando.
6. Entre no ecrã “Efeitos” clicando no separador “Efeitos” na parte de cima do ecrã. É possível testar
diferentes tipos de efeitos de vibração.
7. A instalação será bem sucedida se conseguir percorrer todos os passos anteriores sem problemas.
8. Clique em “OK” para sair.
Requisitos do Sistema
PC com uma porta USB
Windows 98SE / ME / 2000/ XP / Vista / Windows 7 (32 & 64 bit)
Mais de 200MB de espaço livre no disco
Unidade CD-ROM
32MB ou mais de memória
Placa VGA com suporte DirectX
Se tiver algum problema de configuração com o Action Pad (JP284), contacte a nossa Linha de
Suporte Técnico +44 (01923) 471 000 – Vigoram as tarifas de ligação nacionais e internacionais.
Ou contacte-nos por e-mail para support@logic3.com Para alguns modelos, as peças para
substituição podem ser obtidas a partir do nosso website www.logic3.com
Page 13

PC Action Pad (JP284) – NL gebruikershandboek
Hartelijk dank voor de aankoop van Logic3 Action Pad. Zoals bij alle Logic3 producten is deze
volgens de hoogste kwaliteits- en fabrieksnormen ontworpen en getest om het best mogelijke
product te kunnen bieden. Lees deze handleiding aandachtig door voordat je de Action Pad in
gebruik neemt
Action Pad-besturing voor de pc
A.10 actie/schiet knoppen (de knoppen 11 en 12 worden geactiveerd door de linker- en rechter ministicks in
te drukken)
B. twee analoge trekkers (7 & 8)
C. 8-wegse richtingsknop die als een hat-switch of een digitale besturingsknop kan worden gebruikt
D. 2 analoge ministicks met automatisch kalibreren en centreren
E. 2 geavanceerde ingebouwde motoren voor trillingondersteuning
F. (1) selectiemodus voor Dual (digitaal) / Hat-switch (analoog)
Hat-switch (analoog): (druk op de modusknop)
Linker ministick komt overeen met de X en Y assen en de rechter ministick met de gaspedaal- en roerassen
(Z & Rz)
Richtingsknop werkt als een 8-wegse POV (overzicht)
Dual (digitaal) modus: (standaard instelling)
De X, Y richtingsassen kunnen met de richtingsknop of de linker ministick worden bestuurd
De rechter analoge stick doet dienst als knop 1,2,3,4
A & D
A & D
B
A
C
F
A
B
E
E
A
USB
Page 14

Vibratie driver installatie voor de pc
(1) De driver voor de trillingsfunctie installeren (alleen voor trillingsfunctie op de pc)
Let op: u moet eerst de driver installeren voor u de Action Pad aansluit
1. Zet uw computer aan en log in op Windows.
2. Plaats de driverdisk in het geselecteerde cd-station. Het instellingsscherm wordt automatisch
weergegeven.
3. Volg de instructies op het scherm. Start de computer opnieuw op als daar om wordt gevraagd.
4. Sluit de Action Pad aan op de USB-poort van uw computer.
5. De installatie is voltooid.
(2) Installatie verifiëren:
1. Klik op “Start” links onderop uw bureaublad.
2. Klik op “Instellingen” en dan “Configuratiescherm”.
3. Dubbelklik nu op het “Spelbesturingen” icoontje (kan per Windowsversie een andere naam hebben). Un
ziet dan een driver genaamd “PC Twin Shock” onder het controllertabblad met de “OK” status.
4. Selecteer “PC Twin Shock” en klik op het tabblad eigenschappen. Het scherm met “Driver Test” wordt nu
geopend.
5. Ga naar de 'Function Test' tabblad en test alle assen/knoppen/schakelaard op het testscherm d.m.v. Het
activeren van de bijhorende assen/knoppen en schakelaars op de pad.
6. Ga naar het “Effect” scherm door op het tabblad “Effect” bovenin het scherm te klikken. Er kunnen
verschillende soorten trillingseffecten worden getest.
7. De installatie is voltooid als u alle bovenstaande punten zonder problemen kunt doorlopen.
8. Klik op “OK” om af te sluiten.
Systeemvereisten
PC met een USB-aansluiting
Windows 98SE / ME / 2000/ XP / Vista / Window 7 (32 & 64 bit)
Meer dan 200MB vrije harddiskruimte
CD ROM driver
Geheugen van 32MB of hoger
Compatibel met DirectX VGA kaart
Mocht u problemen hebben bij het instellen van de Action Pad (JP284), raadpleeg dan onze technische
hulplijn via +44 (0)19 23 47 10 00 (internationaal beltarief) of via e-mail support@logic3.com. Voor
sommige modellen zijn reserveonderdelen verkrijgbaar op onze website, www.logic3.com
Page 15

Warning
Follow all operating and usage instructions
Do not submerge or use the Action Pad in or near water
Do not disassemble any part of the Action Pad Do not place heavy objects on top of the Action Pad
Do not allow small children to play with the Action Pad unsupervised
Keep Action Pad away from extreme temperatures and store away from dust and humidity
Unplug this product from the power source before cleaning
Do not use liquid or aerosol cleaner, use only a damp cloth for cleaning
For Spares/ Prices visit our website at www.logic3.com
Logic3 International Ltd. of Watford, UK is the owner of the Logic3 registered trademarks as well as registered and unregistered design
rights and copyright subsisting in various products within its range. “Made for iPod” means that an electronic accessory has been
designed to connect specifically to iPod and has been certified by the developer to meet Apple performance standards. Apple is not
responsible for the operation of this device or its compliance with safety and regulatory standards. iPod is a trademark of Apple Inc.,
registered in the U.S. and other countries. All other trademarks, copyrights and trade names are registered properties of their respective
owners.Logic3 are continually updating their products in the interest of improving the quality and design. As a result, some features and
the appearance of the product may vary from those shown on this packaging. Copyright in this manual is owned by Logic3 International
Ltd. Rhodes Way,
Rhodes Way, Watford
WD24 4YW UK
Tel: +44 (0) 1923 471 000
Email: support@logic3.com
www.logic3.com
Logic3 plc WEEE Statement
Please help us to minimize the effect we have on the environment by recycling your waste electrical goods. For advise on all
aspects of recycling, including recycling of waste electronic equipment, please visit www.recycle-more.co.uk where you can find out
the locations of collection points near to you.
 Loading...