

Page 1
EN
i-Station Tower (WIS019) – EN User Manual
Thank you for purchasing the Logic3 i-Station Tower. As with all Logic3 products it has been built to the
highest manufacturing standards and tested throughout its development, to ensure you get the best possible
product. Please read through and familiarize yourself with this manual before you use the i-Station Tower.
Contents
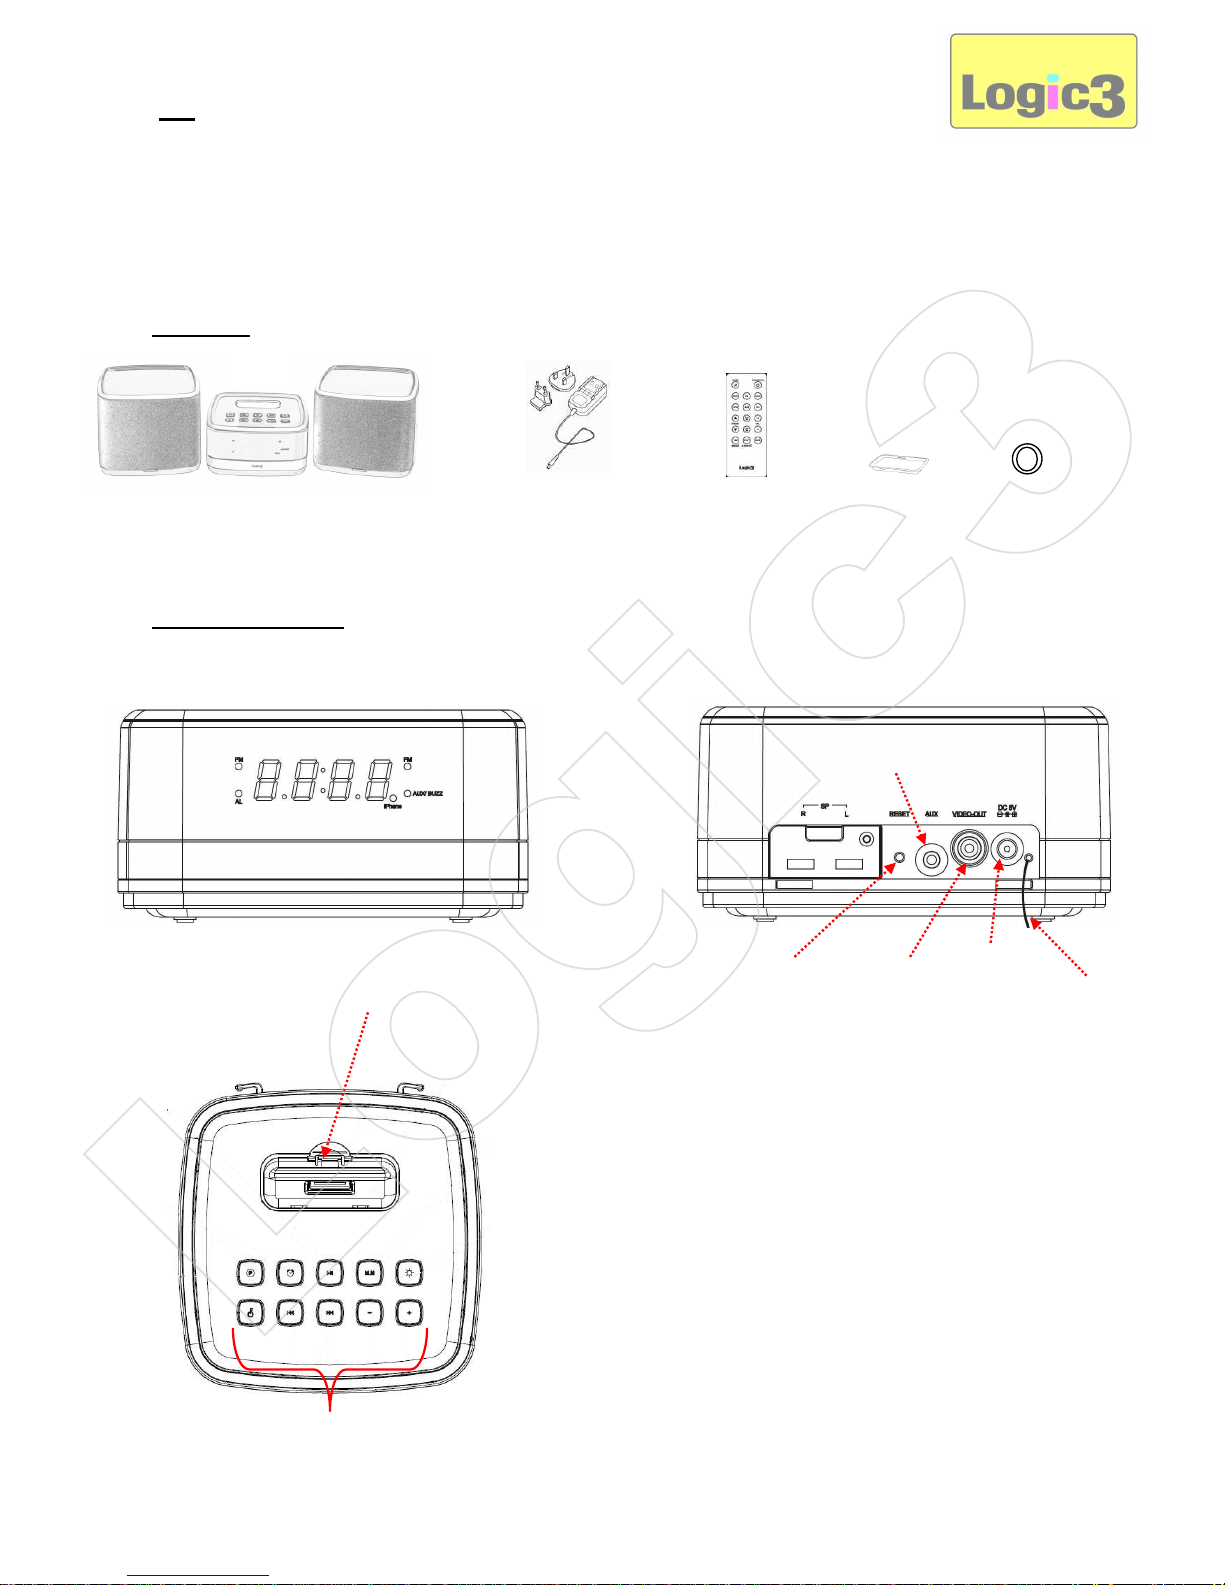
Product Overview
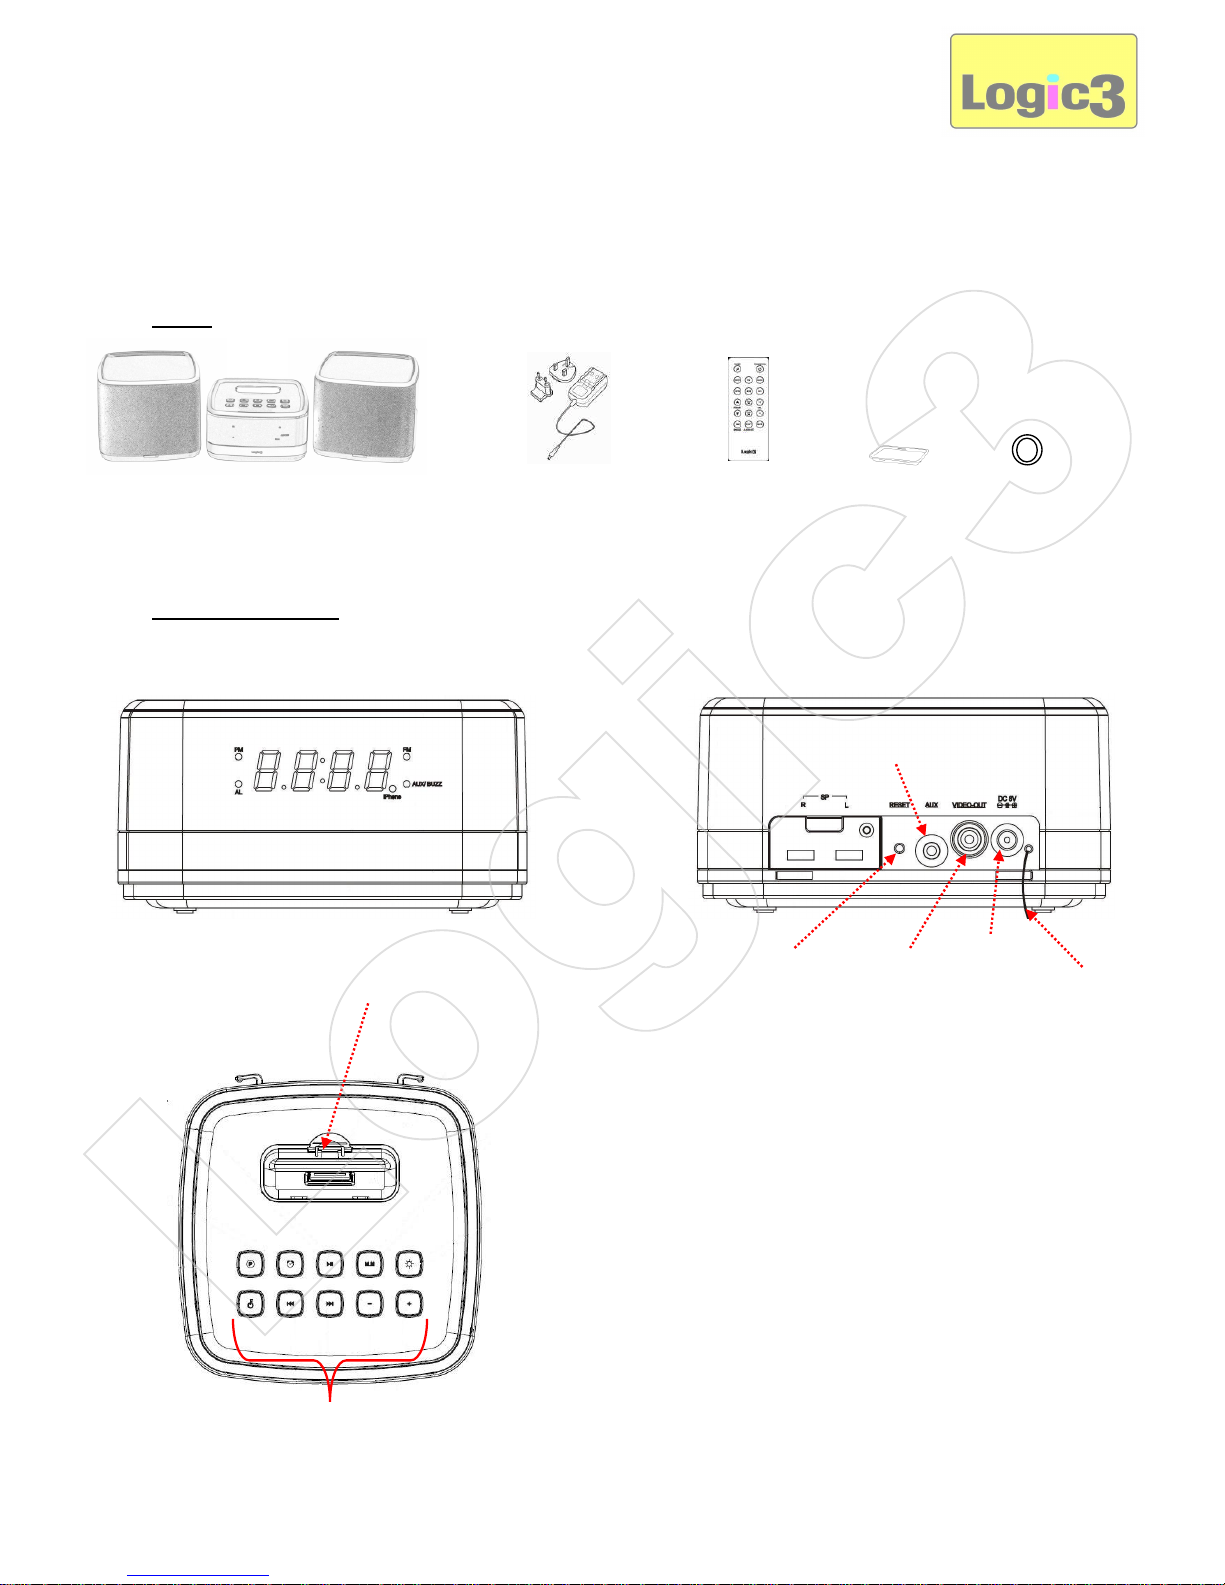
i-Station Tower with Speakers
AC Adapter with
Interchangeable Plugs
(Euro 2pin and BS 3pin)
Battery
(CR2025)
Remote
Control
Front
Back
Video Out
Aux Input
Reset Button
AC Adapter
Socket
FM Antenna
Blank Cradle
Dock Connector
Controls
Logic3
Page 2

Battery Back Up
The i-Station Tower has a Back Up battery to retain the clocks settings in case of a Power Shortage.
1. Remove the battery lid from the bottom of the i-Station Tower.
2. Insert the 2 x AAA batteries (not included).
WARNING: Please ensure that the batteries are inserted correctly. If the batteries are inserted
incorrectly (reversed polarity), this may cause personal injury as well as damage to your i-Station
Tower.
3. Replace the battery lid.
Note: The Battery back up will only retain the clocks memory; it will not illuminate the clocks display.
Set up of i-Station Tower
1
2
A
B
3
4
Logic3
Page 3
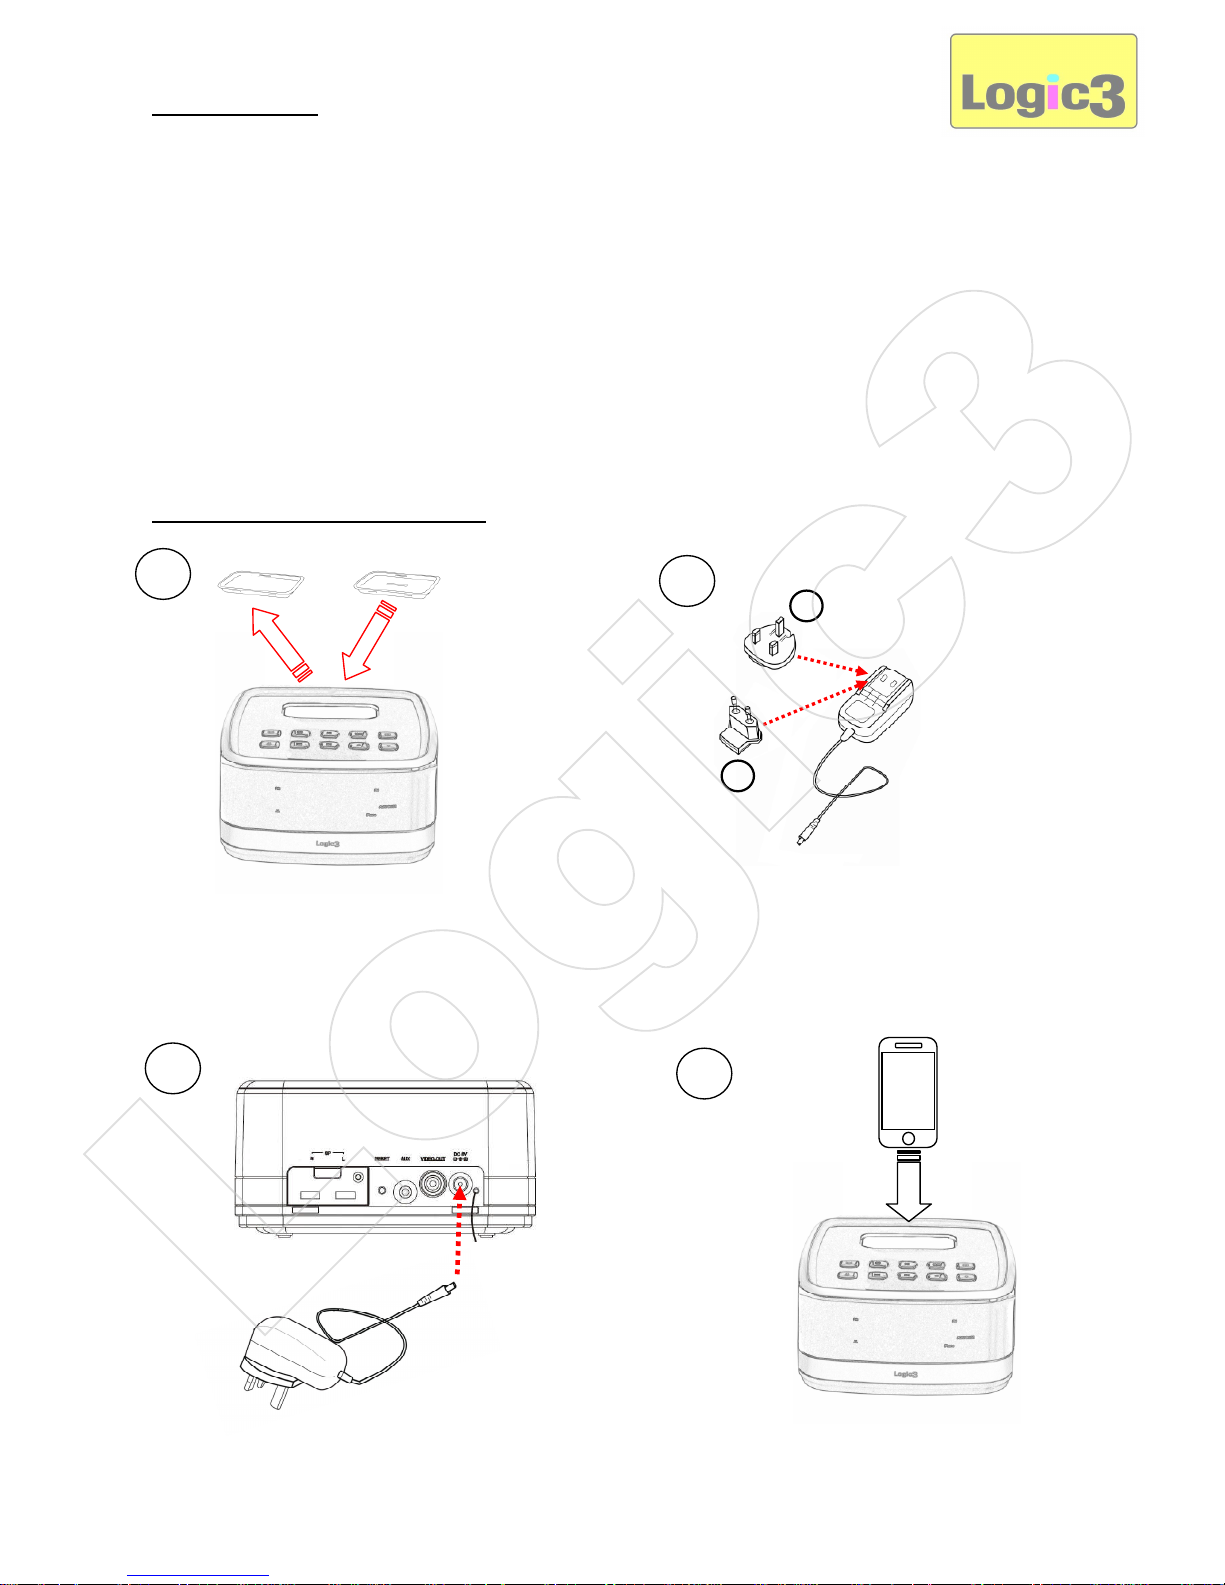
1. Remove the blank cradle and insert the Appropriate cradle (supplied with your iPod) into the docking base.
2. Select and fit the correct plug adapter to suit your power supply (A - UK 3pin / B – Euro 2 Pin).
3. Connect the mains AC Adapter to the i-Station Lite (DC 8V 2A), plug the power supply into your mains
socket and switch the mains socket ON.
4. Dock the iPhone/iPod onto the dock connector.
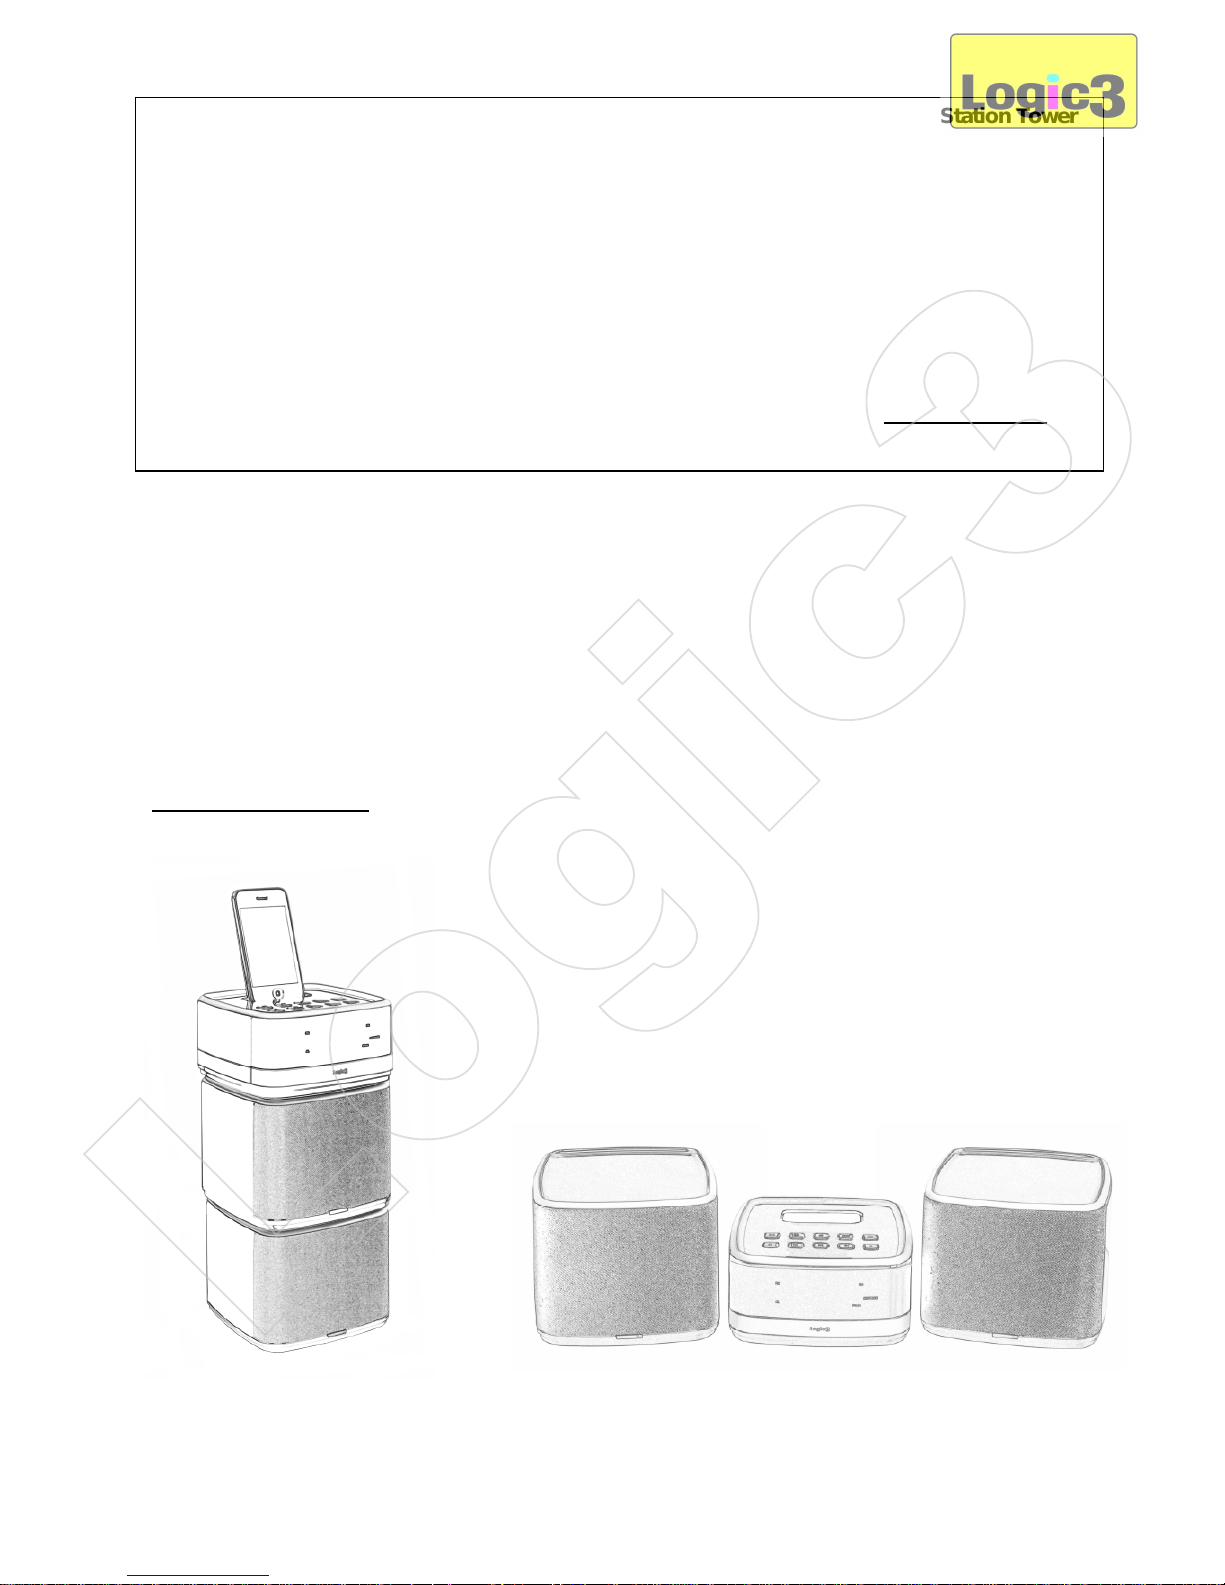
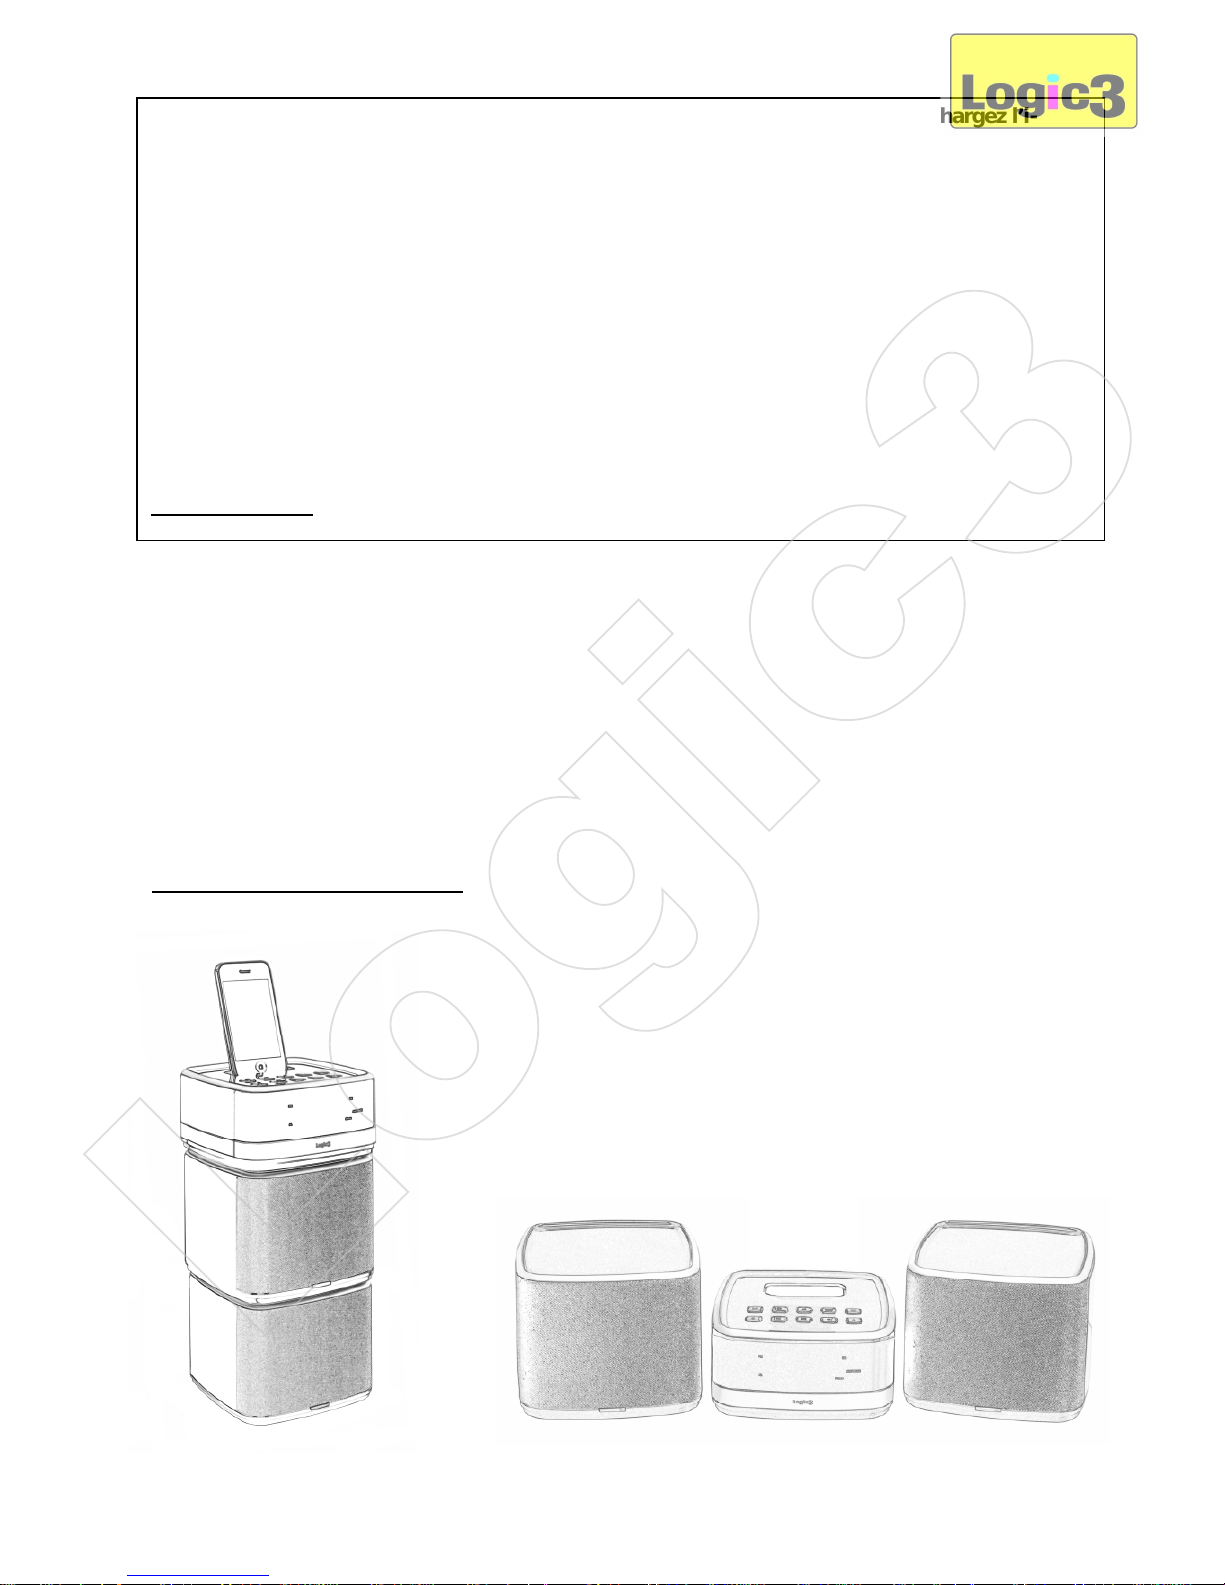
Choosing the set up
The i-Station Tower is designed so the unit can be stacked or set up as standard.
NOTE: For all iPhone/iPod touch models, please go to itunes and download the i
-
Station Tower
APP before proceeding to set up.
Note: Once the App has been launched the following functions change:-
a. The App time display will override the i-Station Tower’s time display (i-Station Tower
time display will be blank, time on the App will be used)
b. App Alarms will override the i-Station Tower’s Alarm settings ( i-Station Tower Alarm
settings will not function)
c. App will override all remote control functions (Except Volume controls)
For the i-Station Tower APP manual/instructions, please go to our website (www.logic3.com)
and download the manual (PDF) from the FAQ section
Logic3
Page 4
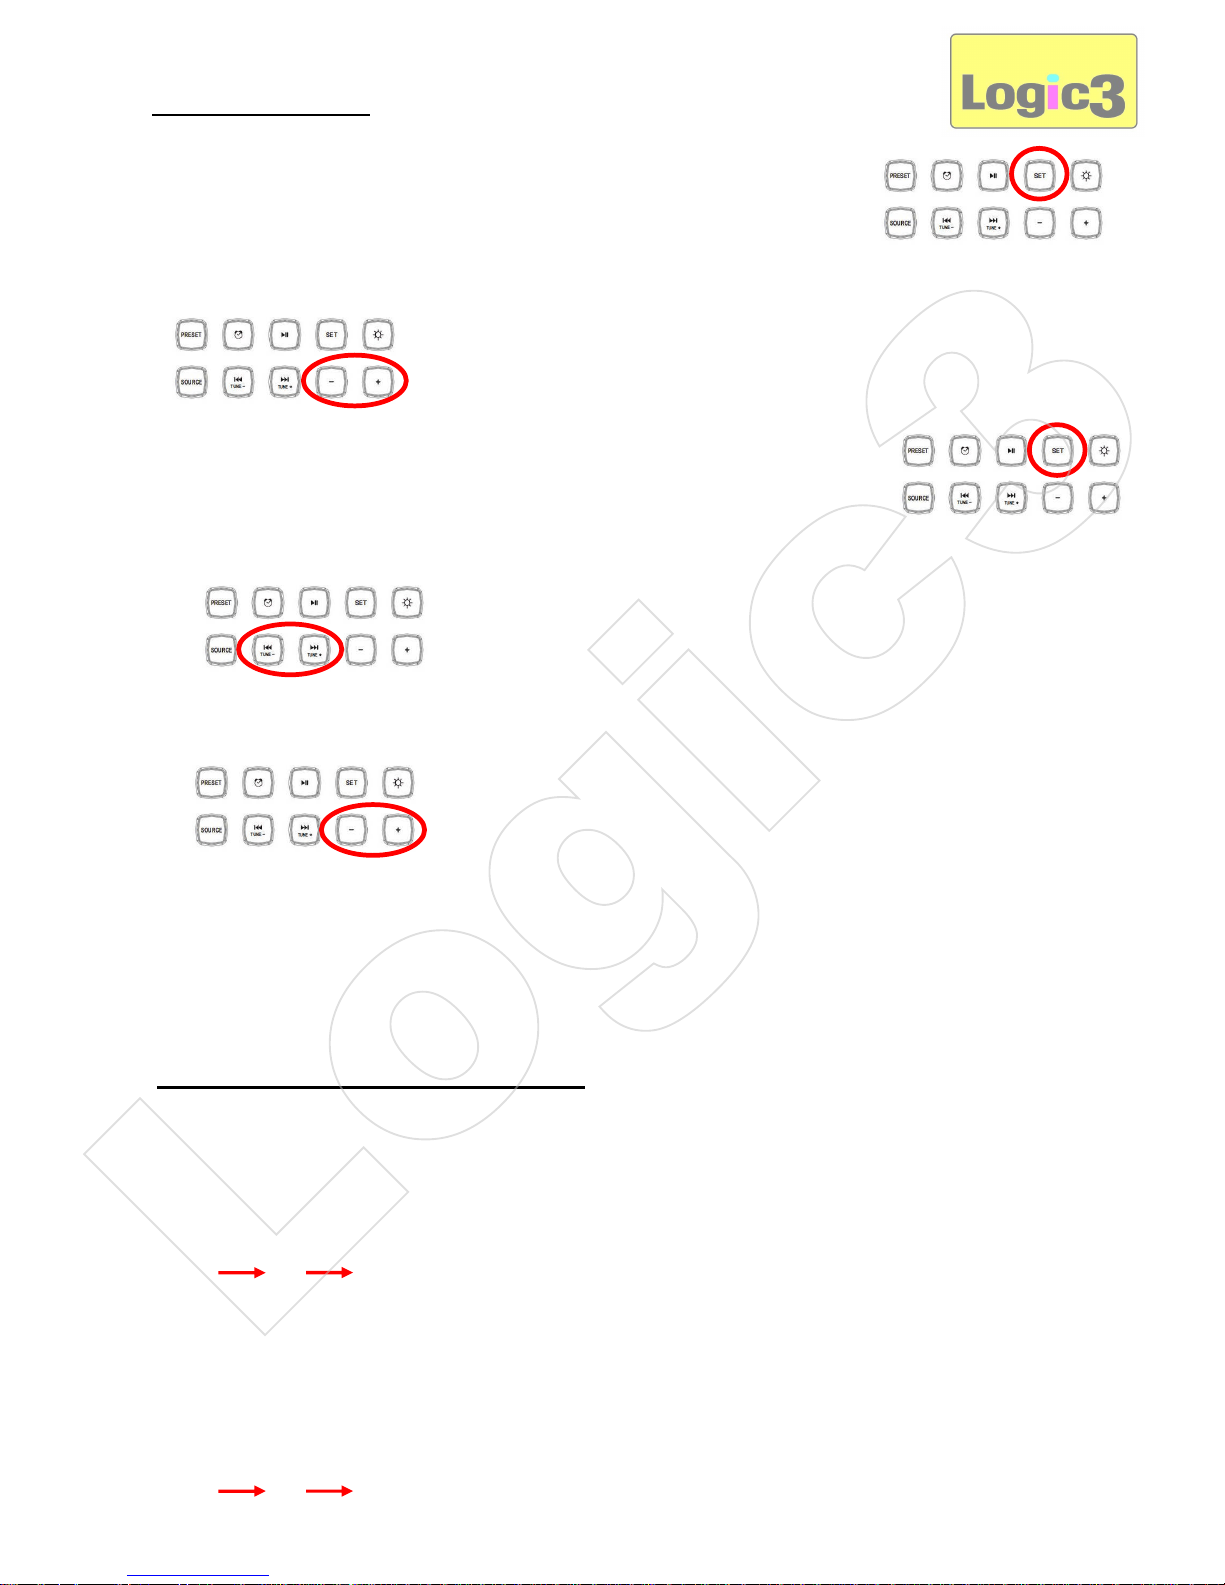
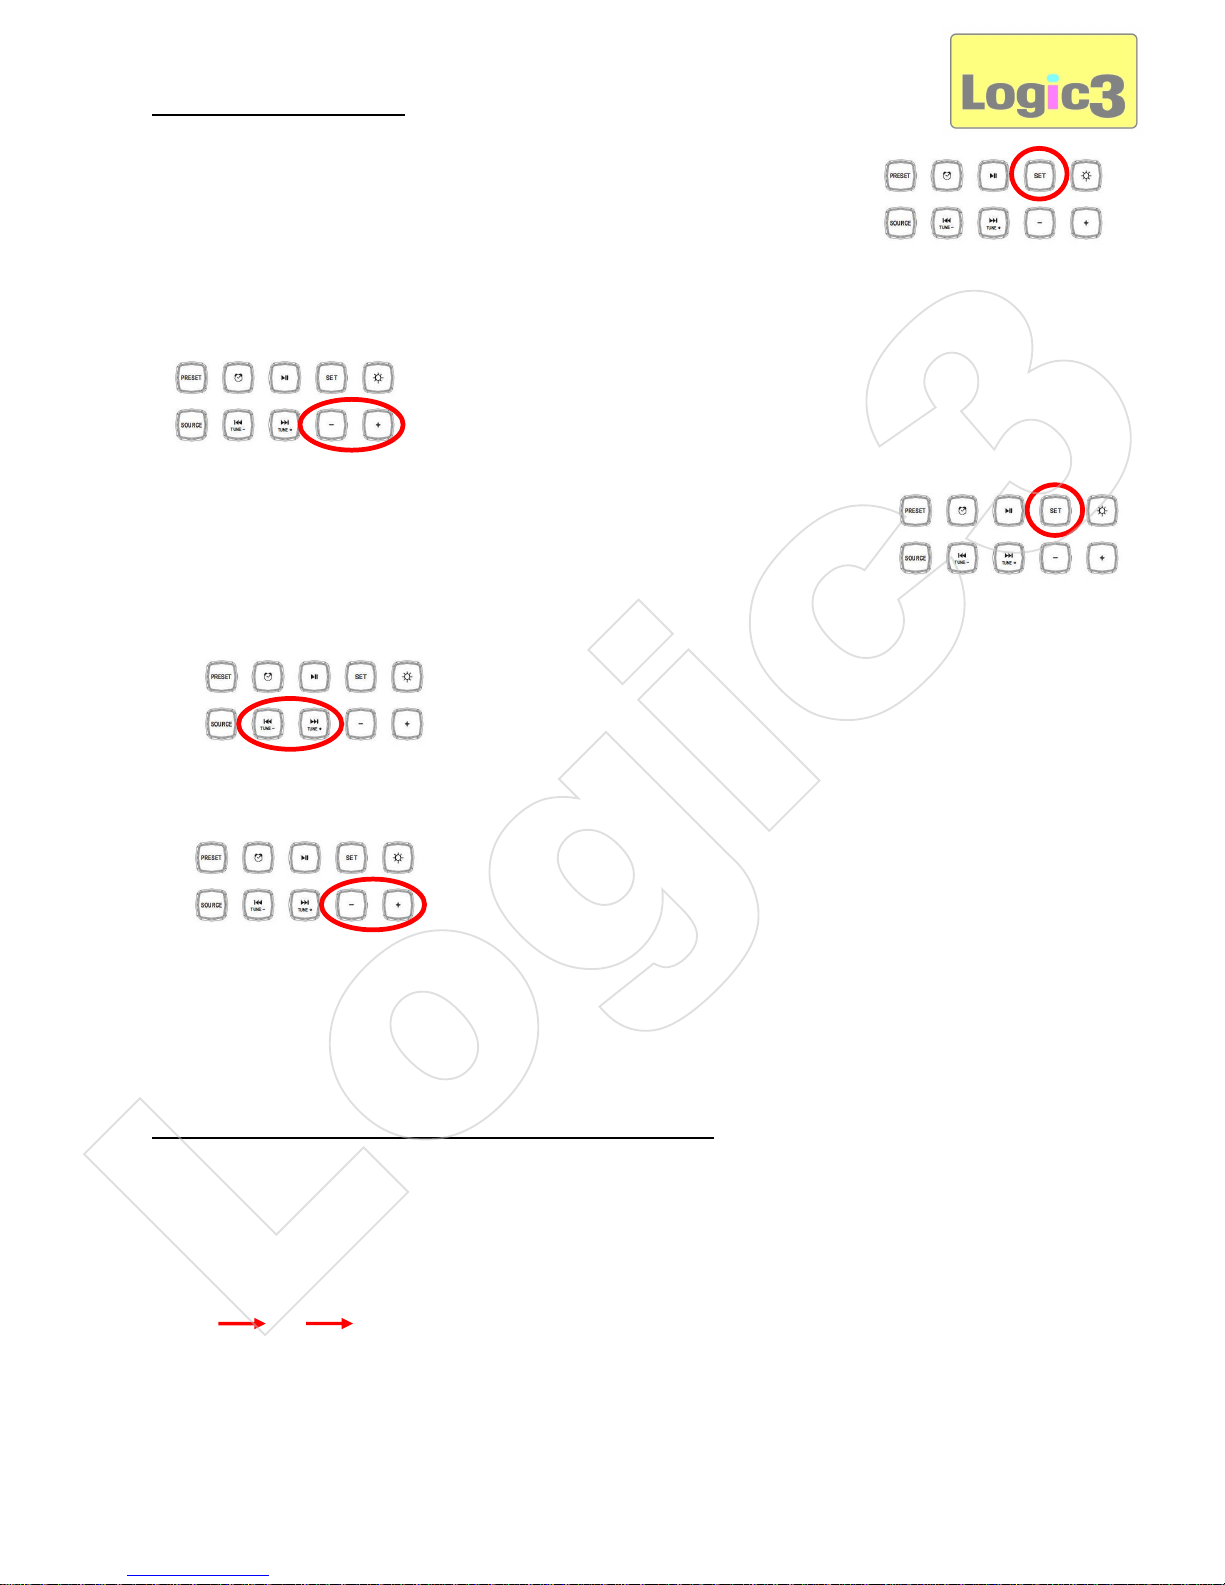
Setting of Time/Date
A. In Stand By Mode:-
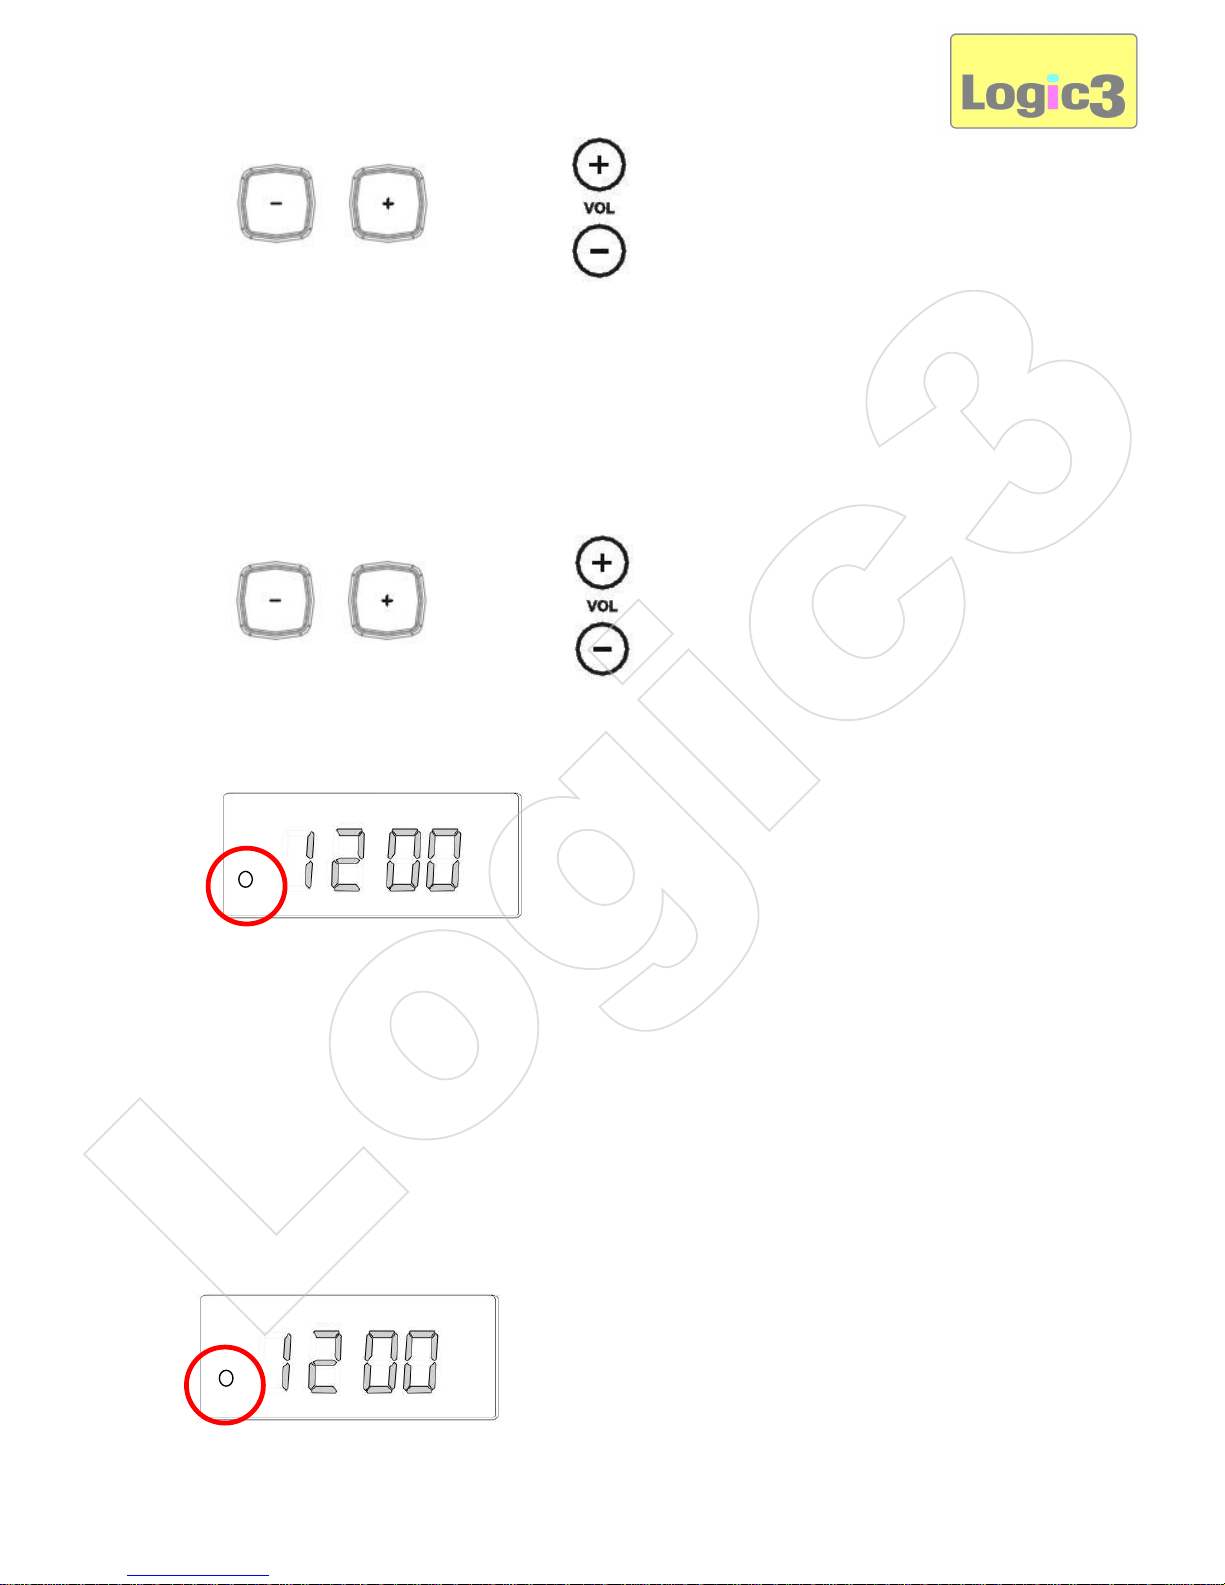
1. Press the ‘Set’ button on the i-Station Tower/Remote Control (Time will display 12hr)
2. Using the ‘Volume buttons’ on the i-Station Tower/Remote Control set the time format (12hr/24hr).
3. Press the ‘Set’ button on the i-Station Tower/Remote Control (Time display will flash).
4. Using the ‘Tune - / Tune +’ buttons on the i-Station Tower/Remote Control buttons set the Hour.
5. Using the ‘Volume’ buttons on the i-Station Tower/Remote Control buttons set the Minutes.
6. Leave for 5 seconds and the settings will be saved automatically and the display will return to the current
time display.
Note: In the setting mode if no buttons are pressed for 5seconds the display will return to the current
time display.
Selecting a source (iPod, AUX or Radio)
There are two ways to select the source:-
1. Via the i-Station Tower
A. Press the ‘Source’ button on the i-Station Tower this wlll switch on the i-Station Tower.
B. By pressing the ‘Source’ button again will toggle through the Source list.
2. Via the Remote Control
A. Press the ‘Stand By’ button on the Remote Control, this wlll switch on the i-Station Tower.
B. By pressing the ‘Source’ button on the Remote Control will toggle through the Source list.
iPod
AUXFMiPod
AUX
FM
Logic3
Page 5
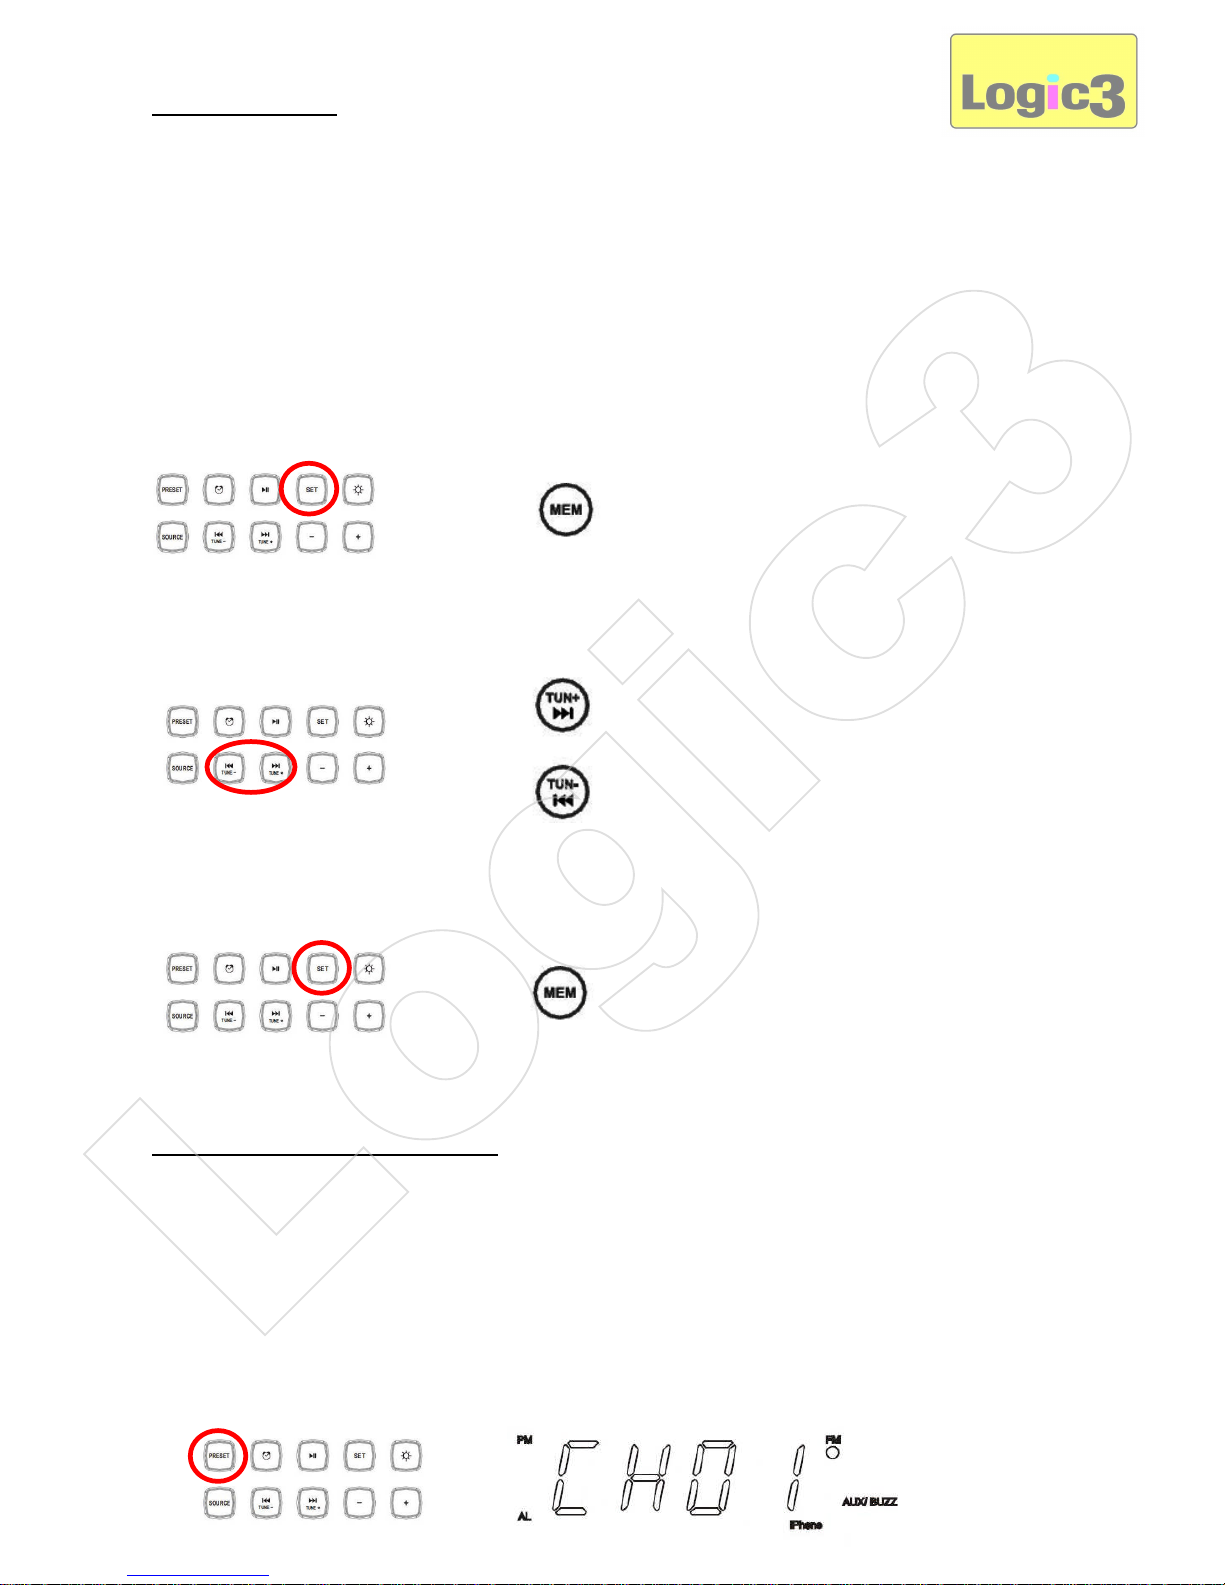
Setting the Radio
Only 20 Presets can be saved at any one time.
1. Un- tie the FM antenna cable and position the antenna as high up as possible.
2. Turn on the i-Station Tower and select the FM Radio via the Source button.
3. Using the ‘TUNE- / TUNE+’ buttons on the i-Station Tower/Remote Control set the required radio frequency.
(Pressing the ‘TUNE- / TUNE+’ button once will manually Tune the radio, Press and Hold the ‘Tuning’ button
will Auto search the radio)
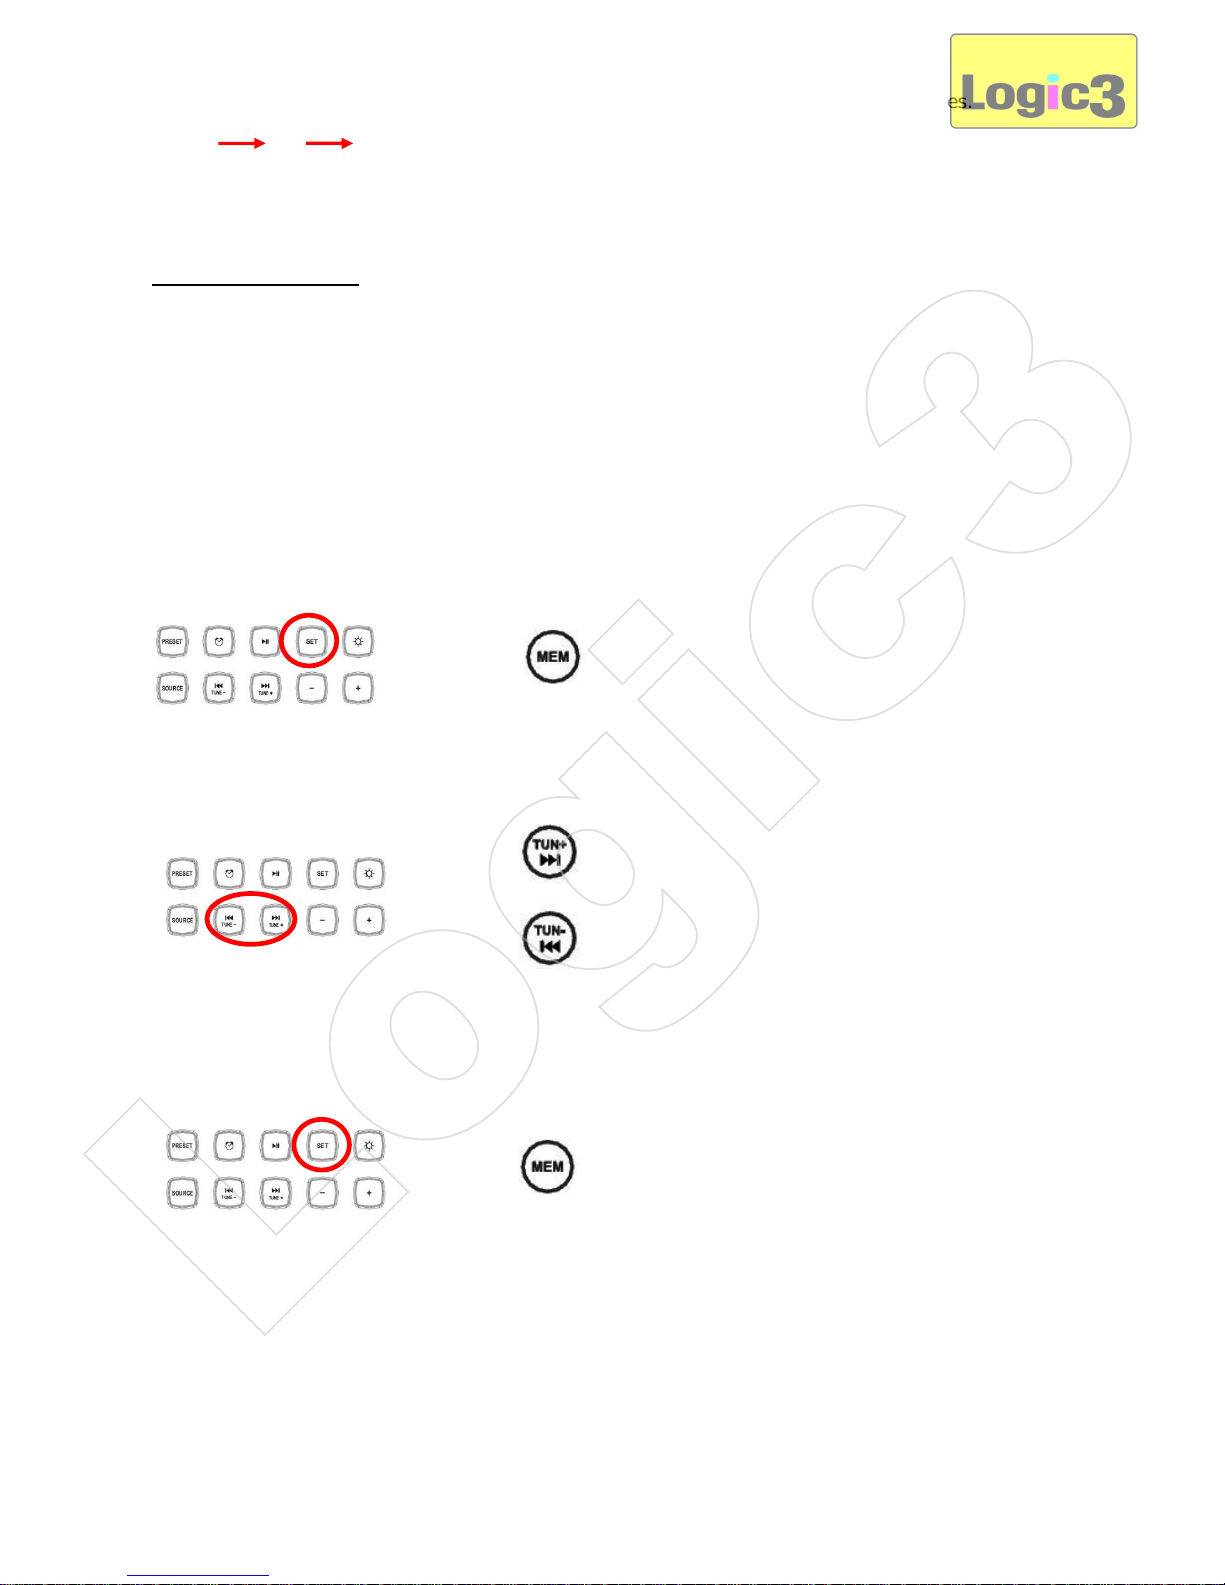
4. Press the ‘Set’ button on the i-Station Tower or the ‘Mem’ button on the Remote Control (Channel number
will then flash)
5. Using the ‘Tune - / Tune +’ buttons select the Channel number you wish to save the radio station to.
6. Press the ‘Set’ button on the i-Station Tower or the ‘MEM’ button on the Remote Control to save the settings.
Note: In the setting mode if no buttons are pressed for 5 seconds the display will return to the
current display.
To Recall a Preset Radio Station
The i-Station Tower works in conjunction with the downloaded App (i-Station Tower), which can be
downloaded via iTunes.
This Application will allow you to recall the APP radio presets on the speaker via the iPhone.
There are two ways to recall your radio stations:-
1. Using the i-Station Tower
A. Press the ‘Preset’ Button on the i-Station Tower and the Program number will Appear on the
display.
OR
OR
OR
Logic3
Page 6
B. Using the ‘Tune - / Tune +’ to select your Preset Channel.
C. Alternatively, you can press the ‘Preset +/Preset –‘button on the Remote Control to select your Preset
Channel.
D. Once the preset has been selected, the i-Station Tower will be set to the preset and the frequency of the
selected channel will be displayed on the display.
Note: If no buttons are pressed for 5seconds the display will return to the current time display
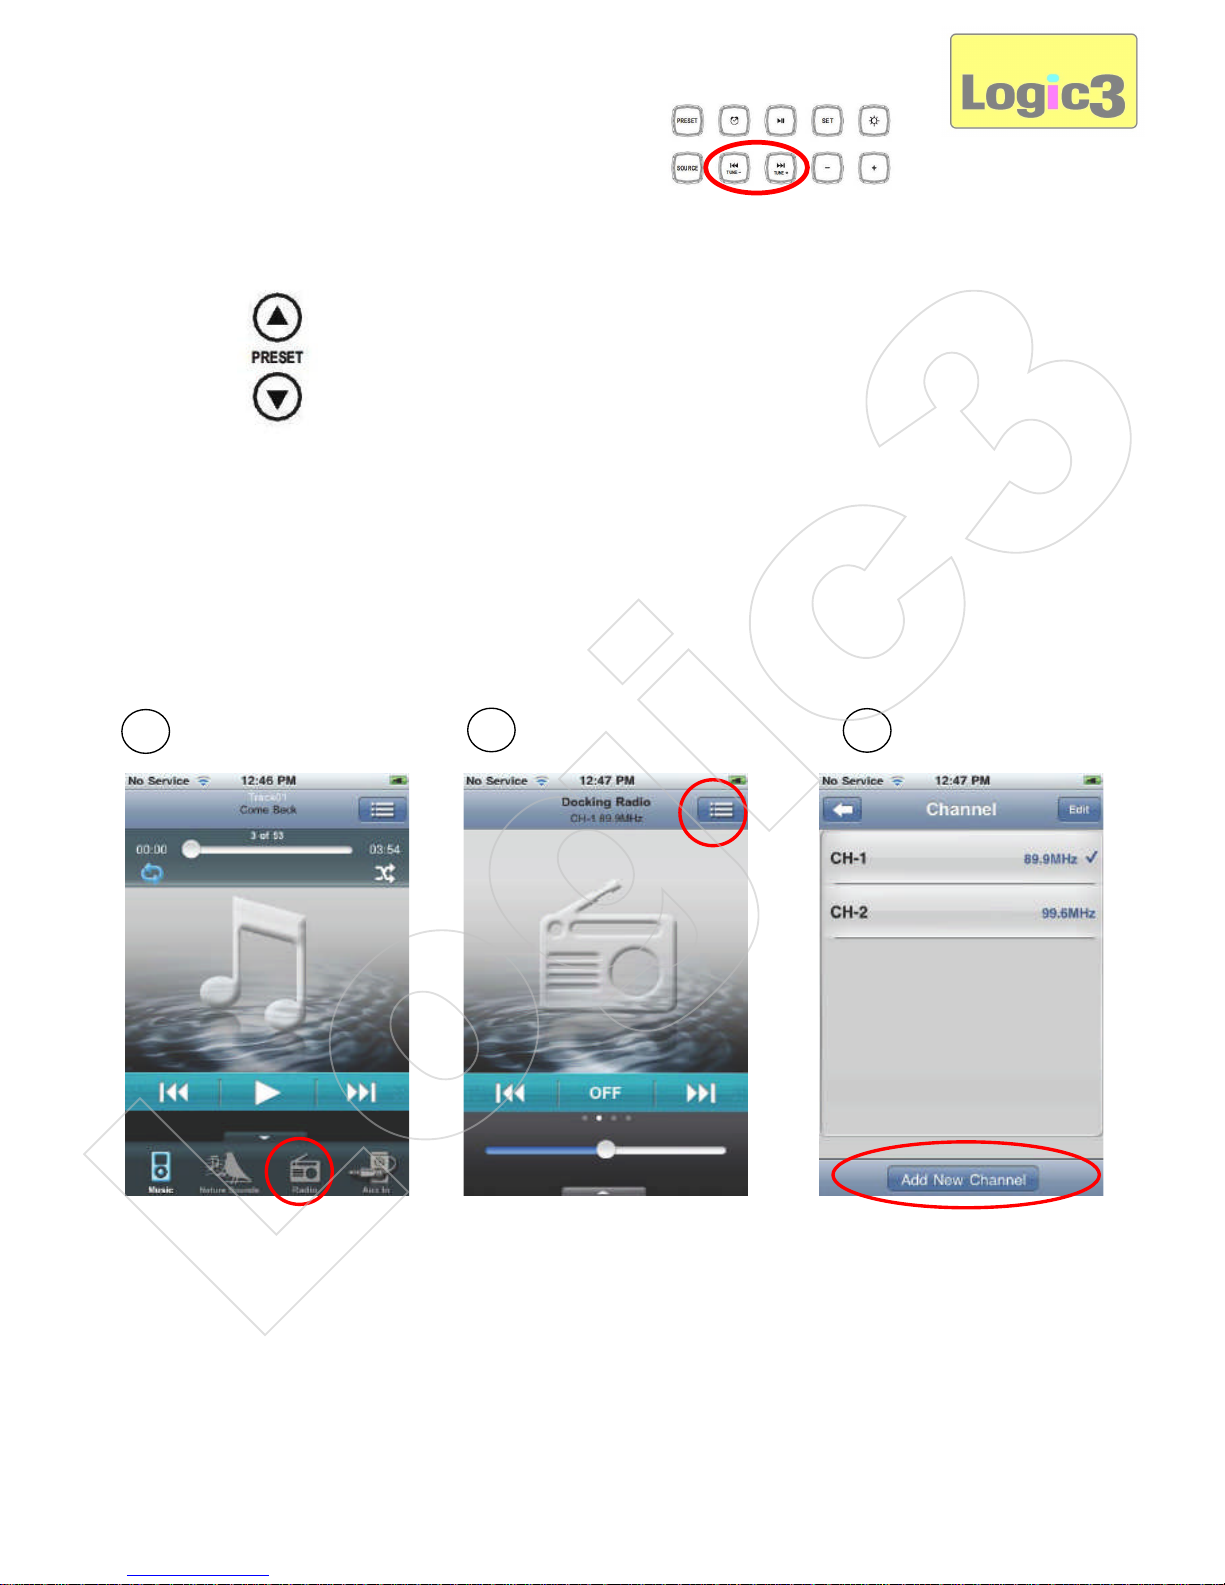
2. Using the i-Station Tower APP (Storing and Renaming presets)
1
2
3
Logic3
Page 7
1. Select the Radio Source.
2. Select presets channel list.
3. Select ‘ Add New Channel ’.
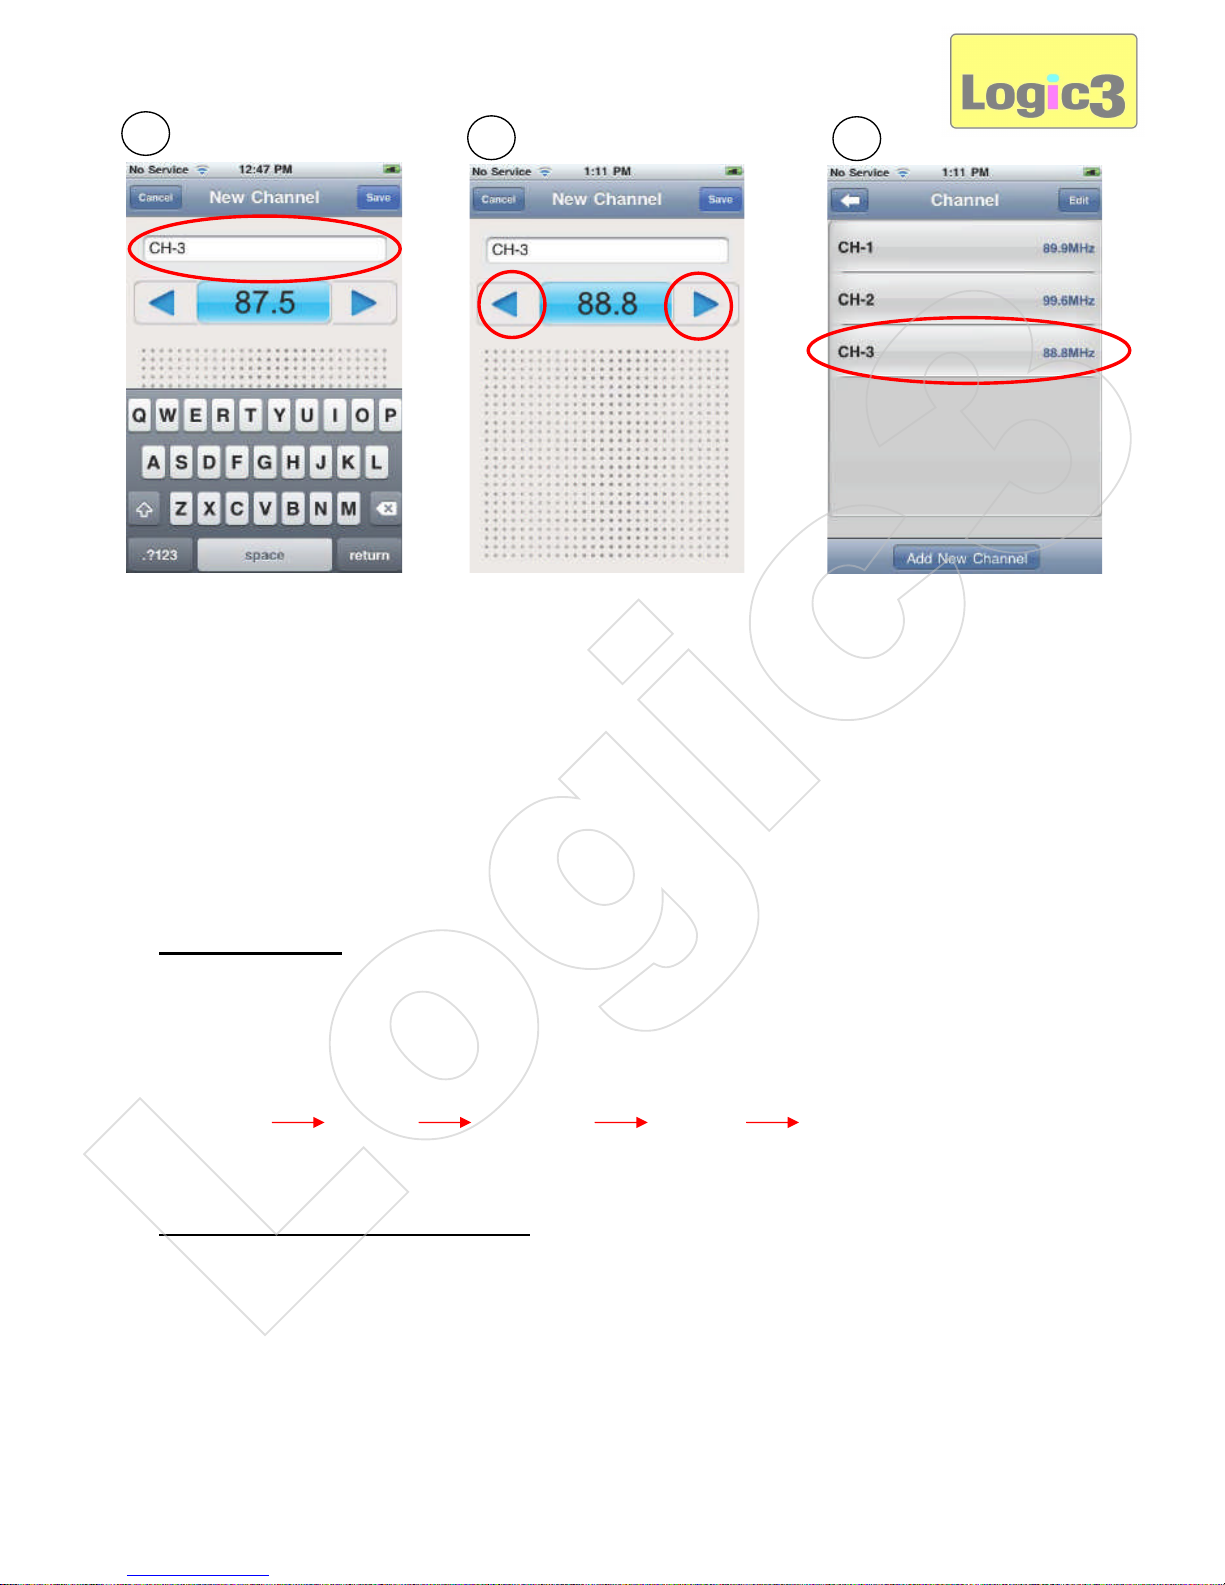
4. Modify preset channel name, if necessary.
5. Tune the radio to the prefered frequency then press the save button to save the new station.
6. Select the desired preset channel for listening.
Setting of the EQ
The i-Station Tower has 5 EQ settings:-
1. Press the EQ button on the i-Station Tower Remote Control and the EQ setting will change and the EQ
number will be displayed.
2. Pressing the EQ button again will toogle through the EQ settings.
E:0 NORMAL E:1 JAZZ E:2 CLASSIC E:3 ROCK E:4 POP
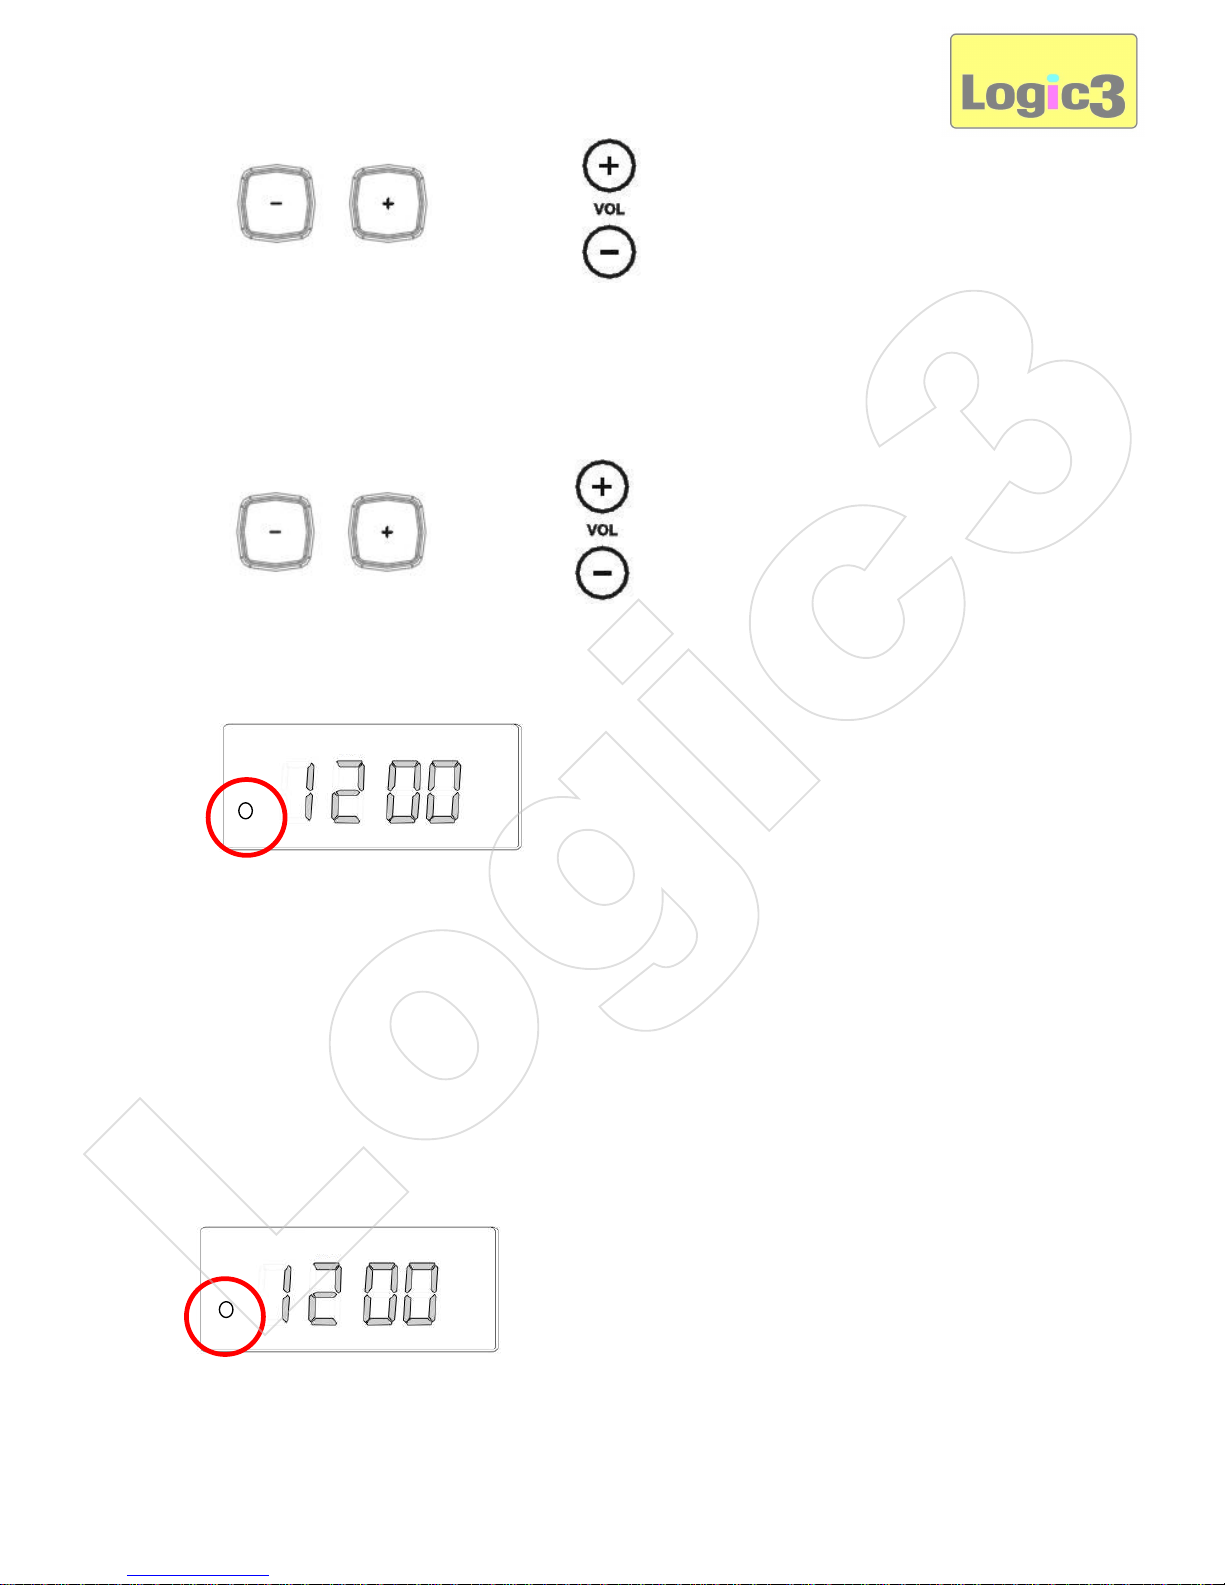
Loudness and Bass Boost Feature
Loudness setting:-
1. In Stand by mode Press the ‘SET’ button 3 times on the i-Station Tower / Remote Control
2. OFF will be flashing on the display, using the ‘Volume’ buttons on the i-Station Tower / Remote Control, you
can swtich the Loudness from OFF to ON.
Bass Boost setting:-
1. In a source mode press the ‘DBBS’ button on the Remote Control, this will toggle the DBBS ON/OFF.
4
5
6
Logic3
Page 8

Setting the Sleep Mode
The Sleep feature allows the unit to operate in iPhone/iPod or FM Radio mode for up to 90 minutes before
switching off automatically.
The Sleep time can be adjusted to the user’s preference.
1. Switch on the i-Station Tower, in any source mode Press the ‘Sleep’ button on the i-Station Tower Remote
Control.
2. Pressing the ‘Sleep’ button again will toogle through the Sleep times (15, 30, 45, 60, 90, 00)
3. Once you have selected your Sleep time, ‘SL’ and the minutes you have selected would Appear on the
display.
4. To swtich OFF the ‘Sleep’ mode before it has reached the set sleep time, Press and Hold the Source button.
5. The Sleep time will be counted down, to show the remaining Sleep time press the ‘Sleep‘button.
To swtich OFF the ‘Sleep’ mode before it has reached the set sleep time, Press and Hold the Source button
on the i-Station Tower or Press the Standby button on the Remote Control.
Note: If you have connected an external device to your AUX input, the ‘sleep’ timer will only turn OFF the
i-Station Tower, it will not turn OFF your external device.
To Set the Alarm
1. In the Stand By mode Press and hold the Alarm Button on the i-Station Tower / Remote Control until the
Hour and minutes units will flash (AL will also be indicated on the bottom left of the display)
2. Using the ‘Tune - or Tune +’ buttons on the i-Station Tower / Remote Control, set the Hour.
OR
OR
AL
Logic3
Page 9
3. Using the ‘Volume’ buttons on the i-Station Tower / Remote Control, set the Minutes.
4. Press the ‘Alarm’ button on the i-Station Combo / Remote Control to skip to the next stage.
5. Using the ‘Volume’ buttons on the i-Station Tower / Remote Control select which source you wish to set to.
6. Press the ‘Alarm’ button to confirm all settings and the display will return to the current time display and AL
will be indicated on the bottom left of the display to show the ’Alarm’ is active.
To swtich the Alarm ON/OFF: –
A. Via the i-Station Tower
To Switch ON the Alarm
1. Press and hold the Alarm Button on the i-Station Tower / Remote Control until the hour and minutes units
flash.
2. Leave until the display returns to the orignal time display, Alarm icon (AL) will be indicated on the bottom left
of the display to show the ’Alarm’ is active.
OR
OR
AL
AL
Logic3
Page 10

To Swtich OFF the Alarm
1. Press the ‘Alarm’ button once on the i-Station Tower and the indicator on the AL icon on the bottom left of
the display will disAppear.
B. Via the Remote Control
1. Press the Alarm button on the remote control this wil toggle the indicator on the AL icon on the bottom left of
the display
Switching OFF the Alarm after activation
Waking to Buzzer
1. When the Alarm is sounded press the ‘Alarm’ Button on the i-Station Tower / Remote Control, alarm will be
switched OFF and the alarm will be reset for the following day.
2. If the Alarm is not switched OFF after 1minute it will automatically go into ‘snooze’ (Approx 9minues), the
alarm will then sound again after 9 minutes. This will be repeated 5 times within 60 minutes.
Waking to iPod/radio
1. When the Alarm is sounded press the ‘Alarm’ Button on the i-Station Tower / Remote Control, alarm will be
switched OFF and the alarm will be reset for the following day.
2. If the Alarm is not switched OFF after 60 minutes, it will switch OFF and the alarm will be reset for the
following day.
Snooze Function
1. When the Alarm is sounded press the ‘Snooze’ Button on the i-Station Tower / Snooze button on the
Remote Control, the alarm will be in ‘snooze mode’ (Approx 9 minutes).
2. The alarm will then sound again after 9 minutes. This will be repeated 5 times (at 12minute intervals) within
60 minutes.
AL
Logic3
Page 11
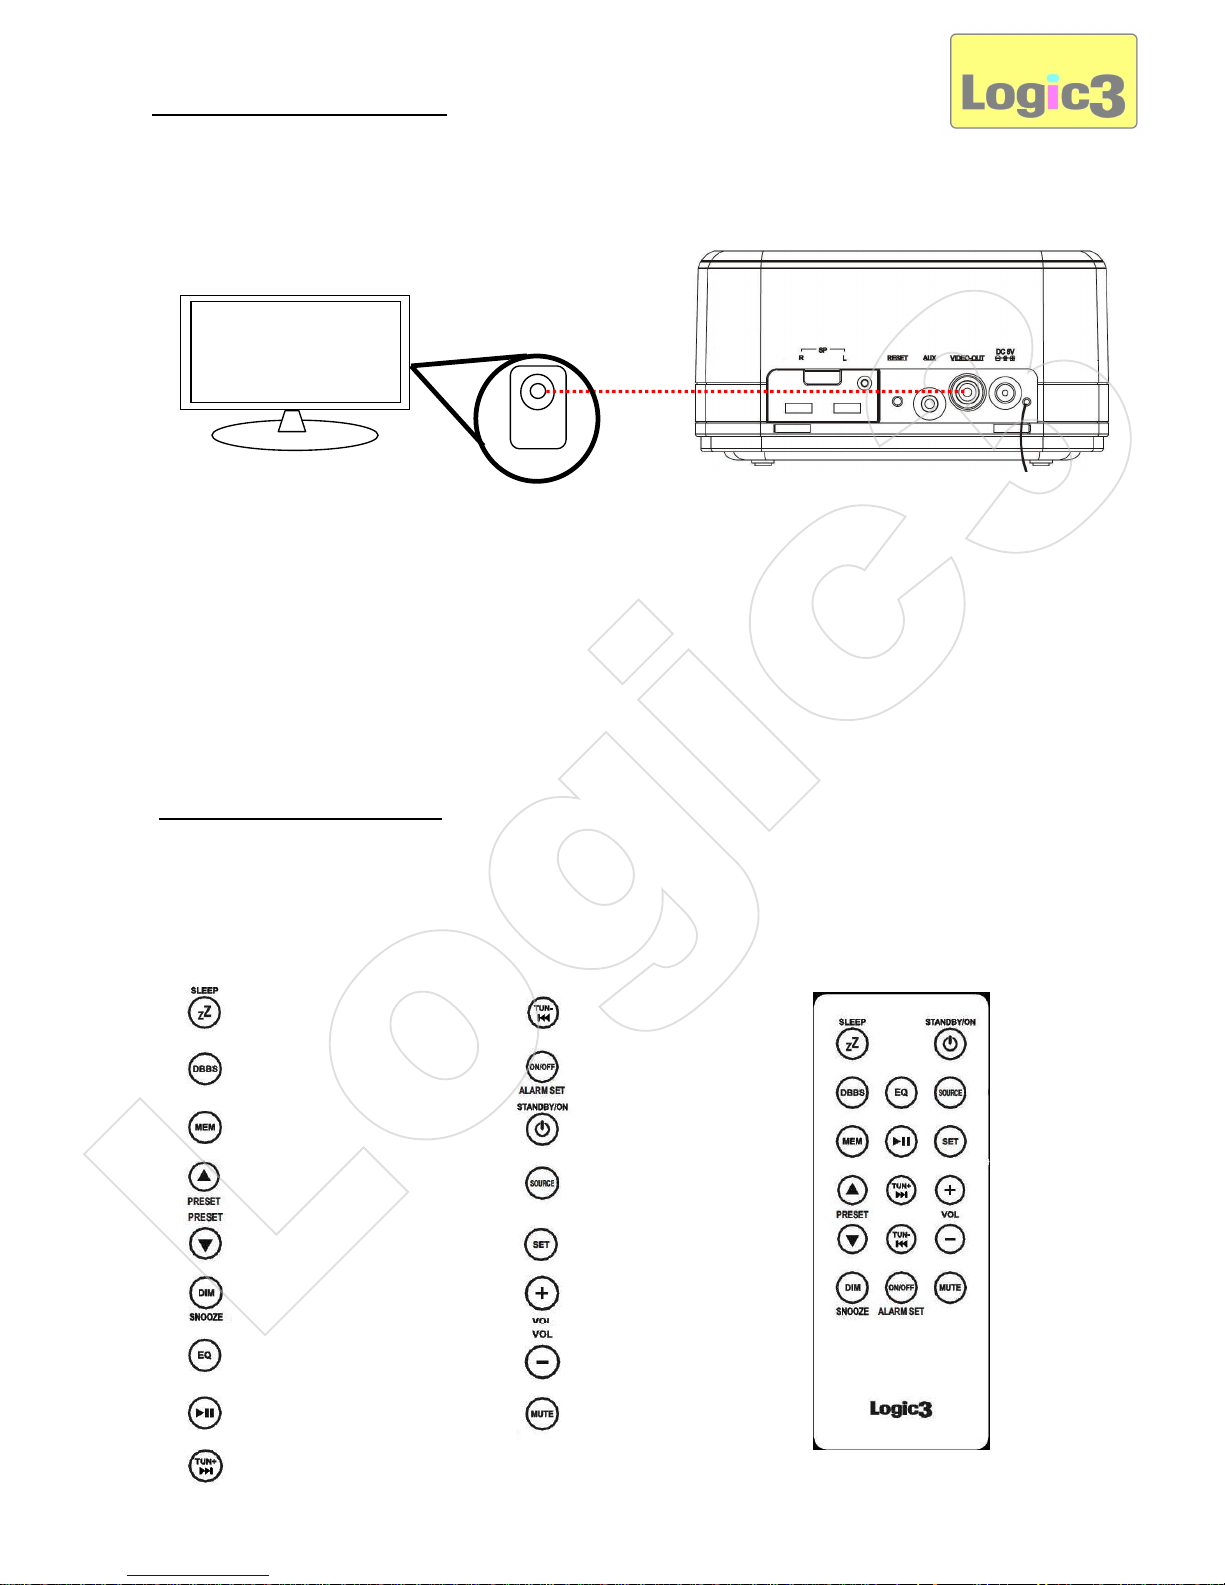
Set up of Video Connection
1. Connect the Video Composite Cable (not included) to the back of the i-Station Tower (Video Out).
2. Connect the other side of the Video Composite Cable to the Input Video terminal of the TV.
3. Select iPod/iPhone source on your i-Station Tower.
4. Dock your iPod/iPhone on the i-Station Tower.
5. Select your Video on your iPod/iPhone and press play.
6. Please ensure your Video settings on your iPod are set to ‘TV OUT’.
Note: Video Output is iPod Model dependant
Remote Control Functions
1. Insert the battery into the back of the Remote Control.
WARNING: Please ensure that the batteries are inserted correctly. If the batteries are inserted
incorrectly (reversed polarity), this may cause personal injury as well as damage to your remote
control i-Station Tower.
Sleep RW/Rewind / Tune -
DBBS Alarm Setting ON/OFF
MEM Stand By
Preset UP Source
Preset Down Set
Dim/Snooze Volume Up
EQ Volume Down
Play/Pause Mute
FF/Next / Tune+
AV IN
VIDEO
Logic3
Page 12
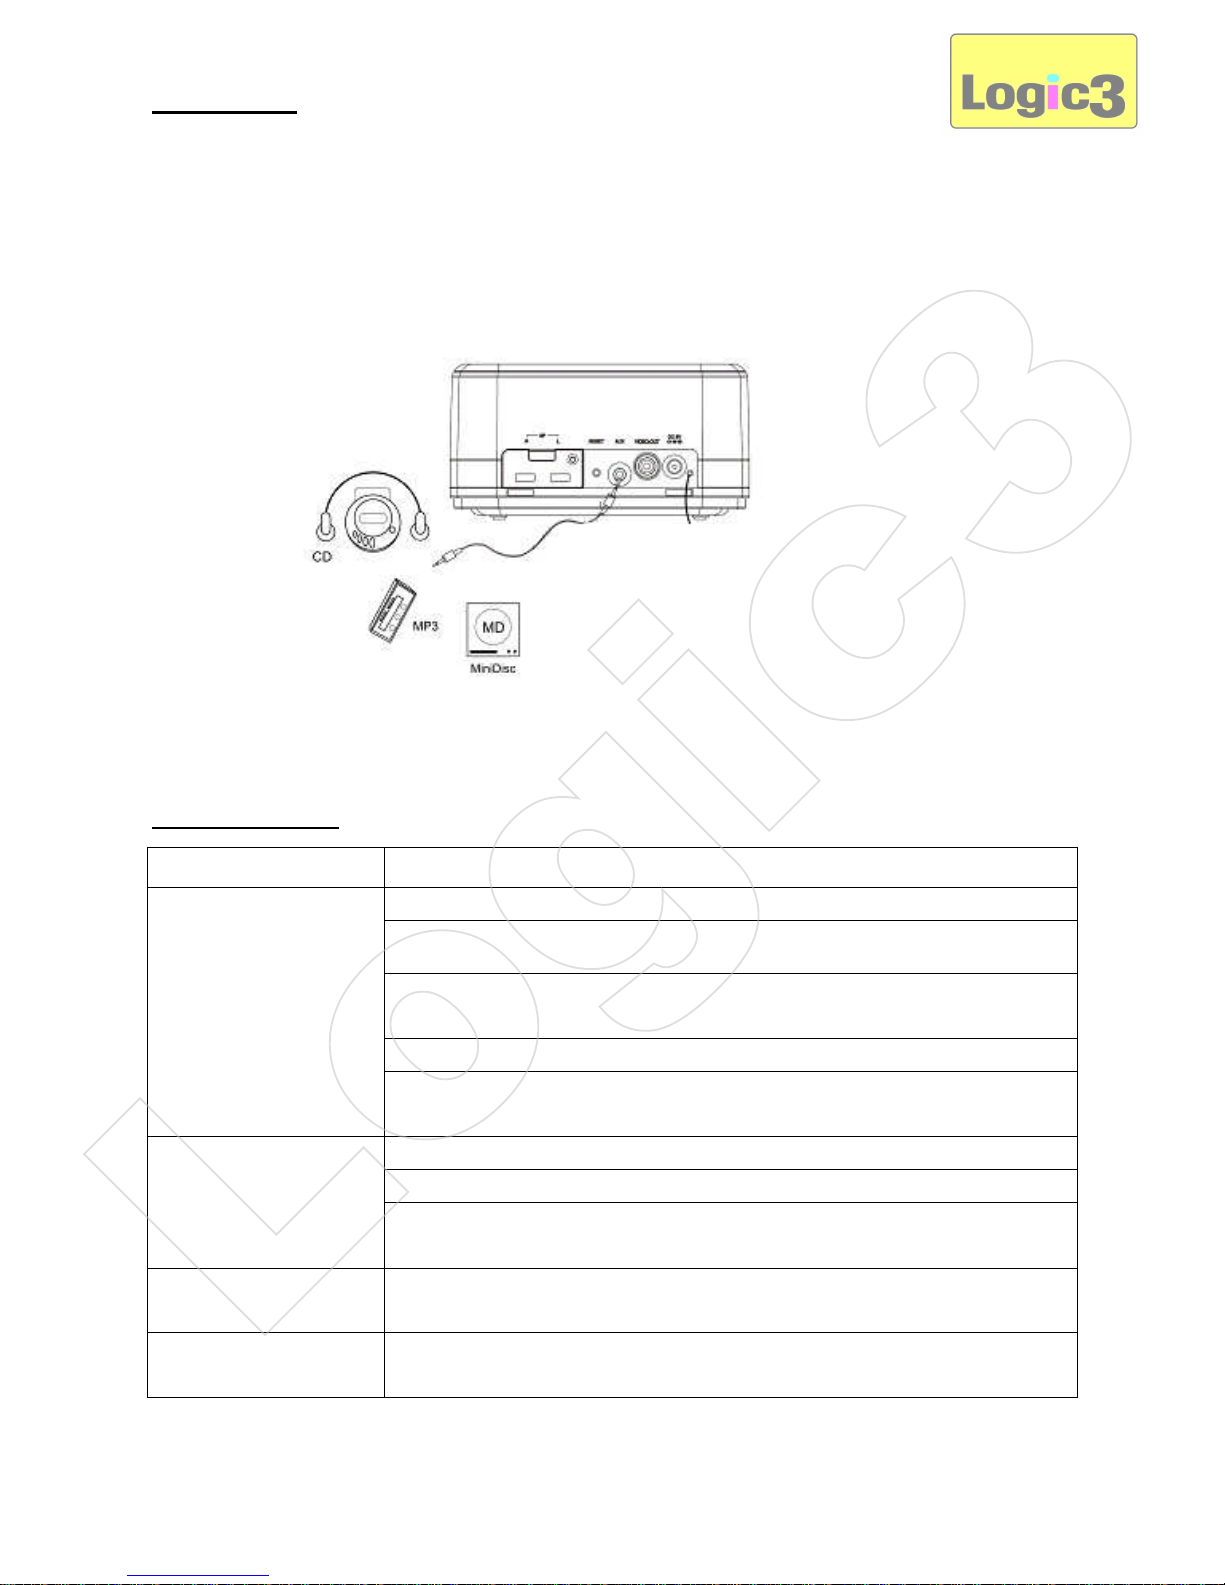
Set up of Aux
The i-Station Tower also offers the ability to allow other portable audio devices such as iPod shuffle, MP3,
MiniDisc and other audio devices with a 3.5mm headphone socket to be connected via the Auxilary.
1. Plug in a line in cable (not included) into the rear of the i-Station Tower (Aux Socket).
2. Connect the other end of the line in cable to your devices headphone socket.
3. Set your device volume to Maximum.
4. Press the ‘Source’ button on the i-Station Tower / the ‘Standby’ button on the Remote Control to turn on the
unit.
5. Press the ‘Source‘ button on the i-Station Tower / Remote Control to toggle through the source until you
have selected AUX.
Note: Remember to remove the line in cable when not using the i-Station Tower via line-in, as the line
in cable will override any sound coming from the docking station.
Trouble Shooting
Problem What Should I do?
No Sound/Picture
Check play status on the iPhone/iPod
Please try updating the software for your iPhone/iPod using the latest version of
iTunes.
Check that you have connected the i-Station Tower correctly (see Set Up of
Video Connection)
Check your iPod is set to TV out (refer to your iPod manual for settings)
Check your format settings (PAL, NTSC refer to your iPhone/iPod manual for
settings)
Remote Control is not
working
Replace battery
Check the battery is inserted correctly (Polarity)
Ensure the remote control operating range is within 6metres from the i-Station
Tower
FM Radio not clear /
Radio station not found
Re-position the FM antenna cable until the radio station sounds clearer
i-Station does not
respond to any controls
Press the Reset button on the rear of the i-Station Tower
Logic3
Page 13

Spare Part List
Part
No.
Item code Item Name Price
1 YAD019 AC Adapter (Interchageable Power Plugs)
For prices visit
our website at
www.logic3.com
2 YRM019 Remote Control
3 YCB000K Line in Cable (Black)
Please use Item Codes above, when searching for Spare Parts on our Website
www.logic3.com
Should you have any setup problems with the i-Station Tower (WIS019) please contact our Technical Support
Hotline on +44 (01923) 471000 – National/International call rates Apply or Email support@logic3.com - Spare
parts are available for some models at our website www.logic3.com
Logic3
Page 14

Warning
Follow all operating and usage instructions
Please remove all batteries from the i-Station and the remote control when not in use or when stored for long periods of time.
Do not submerge or use the i-Station in or near water
Do not disassemble any part of the i-Station
Do not place heavy objects on top of the i-Station
Do not allow small children to play with the i-Station unsupervised
Keep i-Station away from extreme temperatures and store away from dust and humidity
Unplug this product from the power source before cleaning
Do not use liquid or aerosol cleaner, use only a damp cloth for cleaning
Do not block or obstruct the ventilation vents as this may cause overheating or damage.
For Spares/ Prices visit our website at www.logic3.com
Logic3 International Ltd. of Watford, UK is the owner of the Logic3 and i-Station registered trademarks as well as registered and
unregistered design rights and copyright subsisting in various products within its range. “Made for iPod” means that an electronic
accessory has been designed to connect specifically to iPod and has been certified by the developer to meet Apple performance
standards. Apple is not responsible for the operation of this device or its compliance with safety and regulatory standards. iPod is a
trademark of Apple Inc., registered in the U.S. and other countries. All other trademarks, copyrights and trade names are registered
properties of their respective owners.Logic3 are continually updating their products in the interest of improving the quality and design.
As a result, some features and the Appearance of the product may vary from those shown on this packaging. Copyright in this manual is
owned by Logic3 International Ltd. Rhodes Way,
Rhodes Way, Watford
WD24 4YW UK
Tel: +44 (0) 1923 471 000
Email: support@logic3.com
www.logic3.com
Logic3
Page 15

i-Station Tower (WIS019) – FR Guide d’utilisation
Merci d’avoir choisi le i-Station Tower de Logic3. À l’instar des autres produits Logic3, il répond aux
standards de fabrication les plus élevés. Les tests qu’il a subits tout au long de son développement vous
garantissent en outre le meilleur produit possible. Veuillez vous familiariser avec ce guide avant d’utiliser le iStation Tower.
Contenu
Vue d’ensemble du produit
i-Station Tower avec haut-parleurs
Adaptateur Secteur avec
prises interchangeables (Euro
à 2 broches et BS à 3
broches)
Piles X2
(CR2025)
Télécommande
Avant
Arrière
Sortie vidéo
Entrée Aux
Bouton de
réinitialisation
Prise
adaptateur CA
Antenne FM
Socle de
synchronisation
factice
Connecteur Dock
Commandes
Logic3
Page 16
Pile de secours
L’i-Station Tower possède une pile de secours en vue de garder l’heure réglée en cas de panne de courant.
1. Retirez le couvercle du compartiment de la pile sur le bas de l'i-Station Tower.
2. Insérez la pile 2 x AAA (non inclus).
AVERTISSEMENT : Veillez à ce que la pile soit bien insérée. Si la pile n’est pas bien insérée (polarité
inversée), cela risque de vous blessez y compris d'endommager votre i-Station Tower.
3. Remettez le couvercle du compartiment de la pile.
Remarque : La pile de secours ne fera que conserver la mémoire de l'horloge ; elle n'illuminera pas
les écrans des horloges.
Installation de l’i-Station Tower
1
2
A
B
3
4
Logic3
Page 17
1. Retirez le socle de synchronisation factice et insérez le socle adéquat (fourni avec votre iPod) dans la base
de connexion.
2. Sélectionnez et installez la fiche d’adaptation convenant à votre alimentation électrique (A – Royaume-Uni 3
tiges/B - Europe 2 tiges).
3. Connectez la fiche d’adaptation CA sur l'i-Station Tower (CC 8V 2A), branchez le cordon d’alimentation dans
la prise murale et allumez la prise principale.
4. Positionnez l’iPhone/’iPod sur le connecteur de la base de connexion.
Sélectionner la configuration
L’i-Station Tower est conçue de manière à ce que l'unité puisse être empilée ou bien placée en modules séparés.
REMARQUE : pour tous les modèles iPhone/iPod Touch, allez sur iTunes et téléchargez l’i
-
Station Tower APP avant de continuer l’installation.
Remarque : Lorsque l’App est lancée, les fonctions suivantes changent :
a. L’affichage horaire de l’App remplace celui de l’i-Station Tower (l’affichage horaire de l’i-
Station Tower étant vide, on utilise celui de l’App.)
b. Les alarmes de l’App remplacent les paramètres d’alarme de l’i-Station Tower (les
paramètres d’alarme de l’i-Station Tower sont désactivés).
c. L’App a priorité sur toutes les fonctions de commande à distance (sauf la commande du
volume sonore).
Pour les instructions/le manuel de l’i-Station Tower APP, allez sur notre site Web
(www.logic3.com) et téléchargez le manuel (PDF) dans la section de la Foire aux Questions.
Logic3
Page 18
Réglage de l'heure/date
A. Dans le mode de veille :-
1. Appuyez sur le bouton « Set » (Réglage) sur l’i-Station Tower ou sa télécommande
(l’heure sera affiché au format de 12 heures).
2. A l’aide des boutons de réglage du volume sur l’i-Station Tower ou sa télécommande, réglez le format de
l’heure souhaité (12h/24h).
3. Appuyez sur « Set » (Configurer) sur l’i-Station Tower ou sa télécommande (l’heure
clignotera).
4. Avec les boutons « Tune - / Tune + » sur l’i-Station Tower ou sa télécommande, réglez l'heure.
5. Avec les boutons du volume sur l’i-Station Tower ou sa télécommande, réglez les minutes.
6. Attendez 5 secondes et le réglage sera automatiquement sauvegardé. L'écran affichera de nouveau l'heure.
Remarque : Dans le mode de réglage, si vous n'appuyez sur aucun bouton pendant 5 secondes,
l'écran reviendra à l'affichage de l'heure validée.
Sélection d’une source (iPhone/iPod, Radio ou AUX)
La source peut être sélectionnée de deux manières :-
1. Via l’i-Station Tower
A. Appuyez sur « Source » sur l’i-Station Tower et elle s'allumera alors.
B. En appuyant de nouveau sur « Source », la liste des sources apparaîtra.
2. Via la télécommande
A. Appuyez sur le bouton de veille « Stand By » sur la télécommande. L’i-Station Tower s’allumera alors.
iPod
AUX
FM
Logic3
Page 19
B. Le fait d’appuyer sur le bouton « Source » de la télécommande fera apparaître la liste de sources.
Réglage de la radio
Seulement 20 stations préréglées peuvent être sauvegardées en même temps.
1. Décrochez le câble de l’antenne FM et positionnez l’antenne aussi haut que possible.
2. Allumez l’i-Station Tower et sélectionnez la radio FM à l’aide du bouton de sélection de la source « Source ».
3. A l’aide des boutons « TUNE- / TUNE+ » sur l’i-Station Tower ou sa télécommande, réglez la fréquence
radio désirée. (Appuyer une fois sur « TUNE- / TUNE+ » syntonisera manuellement la radio. Appuyez et
maintenez appuyé le bouton « Tuning » (Syntonisation) pour lancer une recherche automatique des stations
de radio.)
4. Appuyez sur « Set » (Configurer) sur l’i-Station Tower ou bien sur « Mem » sur la télécommande (le numéro
de canal clignotera alors).
5. Avec les boutons « Tune - / Tune + » choisissez le numéro de canal radio que vous souhaitez sauvegarder.
6. Appuyez sur le bouton « Set » (Configurer) sur l’i-Station Tower ou sur « MEM » sur la télécommande pour
sauvegarder le réglage.
Remarque : Dans le mode de réglage, si vous n'appuyez sur aucun bouton pendant 5 secondes,
l'écran reviendra à l'affichage de l'heure validée.
OU
iPod
AUX
FM
OU
OU
Logic3
Page 20

Pour rappeler une station de radio préréglée
L’i-Station Tower fonctionne avec l’APP téléchargée (i-Station Tower) via iTunes.
Cette application vous permet de rappeler les pré-réglages radio APP sur le haut-parleur via l’iPhone.
Vos stations radio peuvent être rappelées de deux manières :-
1. A l’aide de l’i-Station Tower
A. Appuyez sur le bouton « Preset » (Pré-réglage) sur l’i-Station Tower et le numéro de programme
s’affichera à l’écran.
B. Utilisez « Tune - / Tune + » pour choisir votre canal pré-réglé.
C. Sinon, vous pouvez appuyer sur le bouton « Preset +/Preset – » (Pré-réglage +/Pré-réglage -) sur la
télécommande pour sélectionner votre canal pré-réglé.
D. Une fois le pré-réglage sélectionné, l’i-Station Tower sera réglée sur le pré-réglage et la fréquence du canal
choisi s'affichera à l'écran.
Remarque : Dans le mode de réglage, si vous n'appuyez sur aucun bouton pendant 5 secondes,
l'écran reviendra à l'affichage de l'heure validée.
2. A l’aide de l’i-Station Tower APP (Pré-réglages de stockage et de changement de nom)
1
2
3
Logic3
Page 21

#
1. Sélectionnez la radio comme source.
2. Sélectionnez la liste des canaux pré-réglés.
3. Sélectionnez « Add New Channel » (Ajouter nouveau canal).
4. Changez le nom du canal pré-réglé le cas échéant.
5. Syntonisez la radio sur la fréquence voulue puis appuyez sur le bouton de sauvegarde pour sauvegarder la
nouvelle station.
6. Choisissez le canal pré-réglé souhaité à écouter.
Configuration de l’EQ
L’i-Station Tower a 5 configurations d’EQ :-
1. Appuyez sur le bouton « EQ » sur la télécommande de l’i-Station Tower et la configuration de l’EQ
changera. Le numéro d’EQ s’affichera.
2. Appuyez de nouveau sur le bouton « EQ » pour basculer vers les réglages de l’EQ.
E:0 NORMAL E:1 JAZZ E:2 CLASSIC E:3 ROCK E:4 POP
Fonctions d’intensité du son et d’amplification des basses fréquences
Réglage de l’intensité du son :-
1. Dans le mode de veille, appuyez 3 fois sur le bouton « SET » (Configurer) sur l’i-Station Tower ou sa
télécommande.
2. OFF clignotera sur l’écran. Avec les boutons du volume sur l’i-Station Tower ou sa télécommand,e vous
pouvez activer ou désactiver l’intensité du son.
Réglage de l’amplification des basses fréquences :-
1. Dans un mode source, appuyez sur le bouton « DBBS » sur la télécommande. Ainsi DBBS pourra être
activée ou désactivée.
4
5
6
Logic3
Page 22

Réglage du mode de mise en veille
La fonction de mise en veille permet à l’unité de fonctionner en mode iPhone/iPod ou FM Radio pendant 90
minutes maximum avant de s’éteindre automatiquement.
La durée de la mise en veille peut être ajustée en fonction des préférences de l'utilisateur.
1. Allumez l’i-Station Tower, dans quelconque mode source et appuyez sur le bouton « Sleep » (Mise en veille)
sur la télécommande de l’i-Station Tower.
2. Le fait d’appuyer à nouveau sur le bouton de mise en veille « Sleep » fera changer les durées de mise en
veille (15, 30, 45, 60, 90, 00).
3. Une fois la durée de la mise en veille choisie, « SL » et les minutes sélectionnées s’affichent à l’écran.
4. Pour éteindre le mode « Sleep » avant la fin de la mise en veille, appuyez et maintenez appuyé le bouton
« Source ».
5. La durée de la mise en veille sera décomptée. Pour afficher la durée restante de mise en veille appuyez sur
le bouton « Sleep ».
Pour éteindre le mode de mise en veille avant la durée choisie, appuyez et maintenez appuyé le bouton
« Source » sur l’i-Station Tower ou bien appuyez sur le bouton de veille « Standby » sur la télécommande.
Remarque : si vous avez connecté un appareil externe à votre entrée AUX, le temporisateur de la mise en
veille ne fera qu'éteindre l'i-Station Tower et n’éteindra pas l’appareil externe.
Réglage de l’alarme
1. Dans le mode de veille, appuyez et maintenez appiuyé le bouton de l'alarme sur l'i-Station Tower ou sa
télécommande jusqu’à ce que les unités des heures et des minutes clignotent (AL s’affichera également en
bas à gauche de l’écran).
2. A l’aide des boutons « Tune - ou Tune + » sur l’i-Station Tower ou sa télécommande, réglez l’heure.
O
U
OU
AL
Logic3
Page 23
3. A l'aide des boutons du volume sur l'i-Station Tower ou sa télécommande, réglez les minutes.
4. Appuyez sur le bouton « Alarm » sur l’i-Station Combo ou sa télécommande pour passer à l'étape suivante.
5. A l’aide des boutons du volume sur l’i-Station Tower ou sa télécommande, sélectionnez sur quelle source
vous souhaitez qu'elle soit réglée.
6. Appuyez sur le bouton de l'alarme pour confirmer tous les réglages. L'écran reviendra à l'affichage de l'heure
actuel et AL apparaîtra en bas à gauche de l’écran pour montrer que l’alarme est encore active.
Pour allumer/éteindre l’alarme : –
A. Via l’i-Station Tower
Pour allumer l’alarme
1. Appuyez et maintenez appiyé le bouton de l'alarme sur l'i-Station Tower ou sa télécommande jusqu’à ce que
l’heure et les minutes se mettent à clignoter.
2. Attendez que l’écran revienne à l’affichage original de l’heure. AL s’affichera en bas à gauche de l’écran
pour montrer qu’elle est active.
O
U
OU
AL
AL
Logic3
Page 24

Pour éteindre l’alarme
1. Appuyez sur le bouton de l'alarme une fois sur l'i-Station Tower et AL en bas à gauche de l’écran disparaîtra.
B. Via la télécommande
1. Appuyez sur le bouton de l'alarme sur la télécommande. AL s’affichera en bas à gauche de l'écran.
Eteindre l’alarme après son activation
Se réveiller au son de l’avertisseur sonore
1. Lorsque l’alarme retentit, appuyez sur « Alarm » (Alarme) sur l’i-Station Tower ou sa télécommande.
L’alarme sera éteinte et sera prête pour le jour suivant.
2. Si l’alarme ne s’éteint pas après 1 minute, elle passera immédiatement au mode de rappel d'alarme (environ
9 minutes). Elle sonnera de nouveau au bout de 9 minutes et sera répétée 5 fois en 1 heure.
Se réveiller au son de l’iPod/ la radio
1. Lorsque l’alarme a sonné, appuyez sur le bouton « Alarm » (Alarme) sur l’i-Station Tower ou sa
télécommande. L’alarme sera éteinte et elle sera prête pour le jour suivant.
2. Si l’alarme n’est pas éteinte après 60 minutes, elle s’éteindra et sera prête pour le jour suivant.
Fonction de rappel d’alarme
1. Lorsque l’alarme retentit, appuyez sur « Snooze » sur l’i-Station Tower ou sa télécommande.
L’alarme sera alors en mode de rappel d’alarme (environ 9 minutes).
2. L’alarme retentira de nouveau au bout de 9 minutes. Cela sera répété 5 fois (à des intervalles de 12
minutes) en 1 heure.
A
L
Logic3
Page 25

Installation de la connexion vidéo
1. Branchez le câble composite vidéo (non inclus) à l’arrière de l’i-Station Tower (sortie vidéo).
2. Branchez l’autre extrémité du câble composite vidéo à la borne de l'entrée vidéo de la télévision.
3. Sélectionnez iPod/iPhone comme source sur votre i-Station Tower.
4. Placez votre iPod/iPhone sur l’i-Station Tower.
5. Sélectionnez votre vidéo sur votre iPod/iPhone et appuyez sur « Play » (Lecture).
6. Veillez à ce que la vidéo sur votre iPod soit configurée sur « TV OUT » (Sortie télé).
Remarque : la sortie vidéo dépend du modèle d’iPod.
Fonctions de la télécommande
1. Insérez la pile dans le dos de la télécommande.
AVERTISSEMENT : Veillez à ce que la pile soit bien insérée. Si la pile n’est pas bien insérée (polarité inversée),
cela risque de vous blessez y compris d'endommager votre télécommande.
Sleep (Mise en veille) RW/Rewind / Tune - (Arrière rapide/retour/Tune -)
DBBS (Amplification basses fréquences) Alarm Setting ON/OFF (Réglage alarme ON/OFF)
MEM Stand By (Veille)
Preset UP (Pré-réglage HAUT) Source
Preset Down (Pré-réglage BAS) Set (Configurer)
Dim/Snooze (Réduire/Rappel d’alarme) Volume Up (Monter volume)
EQ Volume Down (Baisser volume)
Play/Pause (Lecture/Pause) Mute (Silencieux)
FF/Next / Tune+ (Avance rapide/suivant/Tune+)
AV IN
VIDEO
Logic3
Page 26

Configuration d’Aux
L’i-Station Tower offre également la possibilité de connecter d’autres appareils audio portatifs tels qu’un iPod
shuffle, lecteur MP3, MiniDisc et autre avec une prise de casque de 3,5 mm devant être connectée via la
sortie auxiliaire.
1. Branchez un câble d’entrée de ligne (non inclus) à l’arrière de l’i-Station Tower (prise Aux).
2. Branchez l’autre extrémité du câble d’entrée de ligne à la prise de casque de votre appareil.
3. Réglez le volume de votre appareil sur « Maximum ».
4. Appuyez sur le bouton « Source » de l’i-Station Tower / le bouton « Standby » de la télécommande pour
activer l’unité.
5. Appuyez sur le bouton « Source » sur l’i-Station Tower ou sa télécommande pour choisir AUX comme
source.
REMARQUE : N’oubliez pas de retirer le câble d’entrée ligne lorsque vous utilisez la base i-Station Tower
pour iPhone/iPod car ce câble écrasera le son provenant de la base de connexion.
Dépannage
Problème Que dois-je faire ?
Aucun son/aucune image
Vérifiez le statut de lecture sur l'iPhone/iPod.
Essayez de mettre à jour le logiciel de votre iPhone/iPod utilisant les derniers
iTunes.
Assurez-vous d'avoir correctement branché l'i-Station Tower (voir Installation de
la connexion vidéo)
Vérifiez que votre iPod est branché au TV out (consultez les réglages du manuel
de votre iPod)
Vérifiez vos paramètres de format (PAL, NTSC, consultez les réglages sur le
manuel de votre iPhone/iPod)
La télécommande ne
fonctionne pas
Remplacez les piles
Vérifiez que les piles sont insérées correctement (+/-)
Assurez-vous que la télécommande et i-Station Tower se situent à moins de 6
mètres de distance
Station de radio brouillée /
Station de Radio
introuvable
Repositionnez le câble de l’antenne jusqu’à ce que la station soit plus nette.
i-Station ne répond à
aucune commande
Appuyez sur le bouton de réinitialisation à l’arrière de l’i-Station Tower
Logic3
Page 27

Liste des pièces de rechange
Pièce
No.
Code produit Nom produit Tarif
1 YAD019 ADAPTATEUR AC
Pour en savoir
plus sur les tarifs,
veuillez consulter
notre site Web :
www.logic3.com
2 YRM019 TÉLÉCOMMANDE
3 YCB000K Line in Cable (Black)
Pour les Liste des pièces de rechange/Prix, consultez notre site Web www.logic3.com
Si vous rencontrez des difficultés lors de l'installation de l'i-Station Tower (WIS019), veuillez
contacter notre service d'assistance téléphonique en appelant le +44 (01923) 471 000 – Des tarifs
d'appels nationaux ou internationaux devront être appliqués - ou contactez-nous par courrier
électronique : support@logic3.com - Pièces de rechange disponibles pour certains modèles sur
notre site Web : www.logic3.com
Logic3
Page 28
i-Station Tower (WIS019) – DE Benutzerhandbuch
Vielen Dank, dass Sie sich für die i-Station Tower von Logic3 entschieden haben. Wie alle Produkte von
Logic3 wurde es mit den höchsten Produktionsstandards hergestellt und während der gesamten Entwicklung
gründlich getestet, um sicherzustellen, dass wir Ihnen das bestmögliche Produkt bieten können. Lesen Sie
dieses Handbuch gründlich durch und machen Sie sich mit dem Inhalt vertraut, bevor Sie das i-Station
Tower verwenden.
Inhalt
Produktübersicht
i-Station Tower mit Lautsprechern
AC
-Adapter mit auswechselbaren
Steckern (Euro 2-Pin und BS 3Pin)
Batterien
(CR2025)
Fernbedienung
Vorderseite
Rückseite
Video-Ausgang
Aux
-Eingang
Reset
AC Adapter
-
buchse
FM Antenne
Leere Ladestation
Dock-Anschluss
Bedientasten
Logic3
Page 29

Zusatzbatterie
Die i-Station Tower verfügt über eine Zusatzbatterie, um im Falle eines Stromausfalls die Uhrzeit weiterhin
anzuzeigen.
1. Die Batterieabdeckung von der Unterseite der i-Station Tower entfernen.
2. Die mitgelieferte Batterie X2 nicht eingeschlossen.
WARNUNG: Die Batterie muss korrekt eingelegt werden. Falls die Batterie falsch eingelegt wird
(umgekehrte Polarität), kann es zu Personenschäden sowie Schäden an der i-Station Tower kommen.
3. Die Batterieabdeckung wieder anbringen.
Hinweis: Die Zusatzbatterie sichert nur den Uhrzeitenspeicher und beleuchtet nicht das Uhrendisplay.
Einrichten des i-Station Tower
1
2
A
B
3
4
Logic3
Page 30

1. Entfernen Sie die leere Ladestation und stecken Sie die passende Ladestation (im Lieferumfang Ihres iPod
enthalten) in die Dockingstation ein.
2. Wählen Sie das korrekte Netzteil für Ihre Steckdose aus (A – UK, 3 Stifte / B – Euro, 2 Stifte)
3. Schließen Sie das Netzteil an die i-Station Tower an (DC 8V 2A (Gleichstrom, 8 V, 2 A)). Stecken Sie die
andere Seite des Netzteils in die Steckdose.
4. Setzen Sie das iPhone / den iPod auf den Dockinganschluss.
Aufbauoptionen
Die i-Station Tower kann auf zwei Arten aufgebaut werden: übereinander stehend als Turm oder einzeln
nebeneinander als Standardaufbau.
Hinweis für alle Modelle iPhone/iPod Touch: Bitte gehen Sie zu itunes und laden Sie vor dem
Einrichten die i-Station Tower APP herunter.
Hinweis: Nach Start der App ändern sich folgende Funktionen:
a. Die App-Zeitanzeige hebt die Zeitanzeige des i-Station Tower auf (die Zeitanzeige des i-
Station Tower bleibt leer, die Zeit der App wird verwendet)
b. Der App-Alarm hebt die Alarmeinstellungen des i-Station Tower auf (die
Alarmeinstellungen des i-Station Tower funktionieren nicht)
c. Die App hebt alle Funktionen der Fernbedienung auf (außer Lautstärkeregelung)
Die Bedienungsanleitung für i-Station Tower finden Sie auf unserer Website (www.logic3.com) im
Abschnitt FAQ zum Herunterladen als PDF-Datei.
Logic3
Page 31

Einstellen von Uhrzeit/Datum
A. Im Modus Stand By:-
1. Drücken Sie die Taste "Set" an der i-Station Tower oder auf der Fernbedienung
(in der Anzeige erscheint 12hr).
2. Wählen Sie mit den “Volume”-Tasten (Lautstärke) an der i-Station Tower oder auf der Fernbedienung das
Anzeigeformat für die Uhrzeit aus (12hr/24hr).
3. Drücken Sie an der i-Station Tower oder auf der Fernbedienung „Set“ (Zeitanzeige blinkt).
4. Stellen Sie mit den Tasten „Tune -/Tune +“ an der i-Station Tower oder auf der Fernbedienung die Stunde
ein.
5. Stellen Sie mit “Volume”-Tasten (Lautstärke) an der i-Station Tower oder auf der Fernbedienung die Minuten
ein.
6. Nach 5 Sekunden werden die Einstellungen automatisch gespeichert und im Display wird wieder die aktuelle
Uhrzeit angezeigt.
Hinweis: Wenn im Einstellungsmodus 5 Sekunden lang keine Taste gedrückt wird, kehrt das Display
zur Zeitanzeige zurück.
Auswählen einer Quelle (iPhone/iPod, Radio oder AUX)
Es gibt zwei Möglichkeiten zur Auswahl der Quelle:-
1. Über die i-Station Tower
A. Drücken Sie an der i-Station Tower die Taste “Source” (Quelle), um die i-Station Tower einzuschalten.
B. Drücken Sie die Taste “Source” (Quelle) erneut, um durch die Liste der möglichen Quellen zu blättern.
iPod
AUX
FM
Logic3
Page 32

2. Über die Fernbedienung
A. Drücken Sie auf der Fernbedienung die Taste “Stand By”, um die i-Station Tower einzuschalten.
B. Drücken Sie die Taste “Source” (Quelle) auf der Fernbedieunung, um durch die Liste der möglichen Quellen
zu blättern.
Einstellen des Radios
Es können 20 Voreinstellungen gespeichert werden.
1. Lösen Sie das UKW-Antennenkabel und positionieren Sie es so hoch wie möglich.
2. Schalten Sie die i-Station Tower ein und wählen Sie mit der Taste “Source” FM Radio aus.
3. Stellen Sie mit den Tasten “TUNE- / TUNE+” an der i-Station Tower oder auf der Fernbedienung die
gewünschte Radiofrequenz ein. (Einmaliges Drücken der Taste “TUNE- / TUNE+” ermöglicht die manuelle
Sendereinstellung; wird die Taste gedrückt gehalten, startet der automatische Suchlauf.)
4. Drücken Sie an der i-Station Tower die Taste “Set” oder die Taste “Mem” auf der Fernbedienung (Senderzahl
beginnt zu blinken)
5. Wählen Sie mit den Tasten „Tune - / Tune +” den Speicherplatz für den Radiosender.
6. Drücken Sie an der i-Station Tower die Taste “Set” oder “MEM” auf der Fernbedienung, um die Einstellungen
zu speichern.
Hinweis: Wenn im Einstellungsmodus 5 Sekunden lang keine Taste gedrückt wird, kehrt das Display
zur Zeitanzeige zurück.
ODER
iPod
AUX
FM
ODER
ODER
Logic3
Page 33

Aufrufen einer gespeicherten Radiofrequenz
Die i-Station Tower funktioniert zusammen mit der heruntergeladenen App (i-Station Tower), die über iTunes
heruntergeladen werden kann.
Sie können damit die APP Radioeinstellungen am Soundsystem über das iPhone aufrufen.
Es gibt zwei Möglichkeiten, Ihre Radiosender aufzurufen:-
1. Über die i-Station Tower
A. Drücken Sie auf der i-Station Tower die Taste “Preset”. Im Display erscheint die Programmnummer.
B. Wählen Sie mit den Tasten “Tune - / Tune +” den eingespeicherten Sender.
C. Sie können den eingespeicherten Sender auch mit der Fernbedienung über die Tasten “Preset +/Preset –“
auswählen.
D. Nach der Auswahl des eingespeicherten Senders ist die i-Station Tower auf diesen Sender eingestellt. Im
Display wird die Frequenz des ausgewählten Senders angezeigt.
Hinweis: Wenn 5 Sekunden lang keine Taste gedrückt wird, kehrt das Display zur Zeitanzeige zurück.
Logic3
Page 34

2. Mit der i-Station Tower APP (Speichern und Umbenennen eingespeicherter Sender)
1. Wählen Sie die Radioquelle.
2. Wählen Sie die Liste der eingespeicherten Sender.
3. Wählen Sie „Add New Channel“ (Neuer Sender).
4. Ändern Sie ggf. den Sendernamen.
5. Stellen Sie die gewünschte Frequenz ein und drücken Sie dann auf “Save” (Speichern), um den neuen
Sender einzuspeichern.
6. Wählen Sie den gewünschten eingespeicherten Sender aus, den Sie anhören möchten.
1
2
3
4 5 6
Logic3
Page 35

Einstellen des Equalizer
Die i-Station Tower hat 5 Equalizer-Einstellungen:-
1. Drücken Sie auf der Fernbedienung der i-Station Tower die Taste EQ. Die EQ-Einstellung wird geändert und
im Display wird die Nummer des ausgewählten Equalizers angezeigt.
2. Durch erneutes Drücken der Taste EQ können Sie durch die EQ-Einstellungen blättern.
E:0 NORMAL E:1 JAZZ E:2 CLASSIC E:3 ROCK E:4 POP
Lautstärke und Bass Boost
Einstellen der Lautstärke:-
1. Drücken Sie die Taste „SET“ an der i-Station Tower / auf der Fernbedienung dreimal, wenn das Gerät im
Stand By Modus ist
2. Im Display blinkt die Anzeige OFF. Drücken Sie die Tasten “Volume” an der i-Station Tower / auf der
Fernbedienung, um die Lautstärke von OFF auf ON zu ändern.
Einstellen von Bass Boost:-
1. Drücken Sie im Quellmodus auf der Fernbedienung die Taste “DBBS”, um zwischen DBBS ON/OFF (DBBS
ein/aus) zu wechseln.
Einstellen der Schlaffunktion
Mit der Schlaffunktion kann das Gerät im iPhone/iPod-Modus oder im FM Radio Modus bis zu 90 Minuten
laufen, bevor es sich automatisch abschaltet.
Die Ausschaltzeit kann individuell verändert werden.
1. Schalten Sie die i-Station Tower ein. Drücken Sie in einem beliebigen Quellmodus auf der Fernbedienung
des i-Station Tower die Taste “Sleep“ (Schlaf).
2. Durch erneutes Drücken der Taste “Sleep” (Schlaf) können Sie die Laufzeiten durchblättern (15, 30, 45, 60,
90, 00).
3. Wenn Sie die gewünschte Laufzeit eingestellt haben, erscheint im Display die Anzeige "SL" und die
eingestellten Minuten.
4. Um die „Sleep”-Funktion vor Ablauf der eingestellten Minuten auszuschalten, halten Sie die Taste der
Musikquelle gedrückt.
5. Die Laufzeit wird heruntergezählt. Zum Anzeigen der verbleibenden Minuten drücken Sie die Taste “Sleep”.
Um die „Sleep”-Funktion vor Ablauf der eingestellten Minuten auszuschalten, halten Sie die Taste der
Musikquelle an der i-Station Tower gedrückt oder drücken Sie auf der Fernbedienung die Taste Standby.
Hinweis: Wenn Sie ein externes Gerät an den AUX-Eingang angeschlossen haben, wird mit der
Schlaffunktion nur die i-Station Tower ausgeschaltet, das externe Gerät jedoch nicht.
Logic3
Page 36

Einstellen des Alarms
1. Wenn das Gerät im Stand By Modus ist, halten Sie die Alarm-Taste an der i-Station Tower / auf der
Fernbedienung gedrückt, bis die Stunden und Minuten blinken (unten links im Display erscheint die Anzeige
AL)
2. Stellen Sie mit den Tasten “Tune –“ oder “Tune +” an der i-Station Tower / auf der Fernbedienung die
Stunden ein.
3. Stellen Sie mit den Tasten “Volume” an der i-Station Tower / auf der Fernbedienung die Minuten ein.
4. Drücken Sie an der i-Station Tower / auf der Fernbedienung die Taste “Alarm”, um zur nächsten
Programmstufe vorzuspringen.
5. Wählen Sie mit den Tasten „Volume“ an der i-Station Tower / auf der Fernbedienung die Quelle aus, die Sie
einstellen möchten.
6. Drücken Sie zum Bestätigen aller Einstellungen die Taste „Alarm“. Im Display erscheint wieder die aktuelle
Uhrzeit und unten links erscheint die Anzeige AL als Zeichen dafür, dass der Alarm eingestellt ist.
ODER
ODER
AL
ODER
ODER
AL
Logic3
Page 37

Einschalten/Ausschalten des Alarms: –
A. Über die i-Station Tower
Einschalten des Alarms
1. Halten Sie die Alarm-Taste an der i-Station Tower / auf der Fernbedienung gedrückt, bis die Stunden- und
Minutenanzeigen blinken.
2. Warten Sie, bis im Display wieder die aktuelle Uhrzeit angezeigt wird. Unten links im Display wird das
Symbol AL als Zeichen dafür angezeigt, dass der Alarm eingestellt ist.
Ausschalten des Alarms
1. Drücken Sie an der i-Station Tower einmal die Taste “Alarm”. Die Anzeige des Symbols AL unten links im
Display erlischt.
B. Über die Fernbedienung
1. Drücken Sie auf der Fernbedienung die Alarm-Taste, um den Alarm auszuschalten und die Anzeige des
Symbols AL unten links im Display zu löschen.
Ausschalten des Alarms nach Aktivierung
Wecken mit Summer
1. Wenn der Alarm ertönt, drücken Sie an der i-Station Tower / auf der Fernbedienung die Taste “Alarm”. Der
Alarm wird ausgeschaltet und für den nächsten Tag erneut eingestellt.
2. Wenn der Alarm nicht innerhalb 1 Minute ausgeschaltet wird, wird automatisch die Funktion “Snooze”
(Schlummern) aktiviert (etwa 9 Minuten). Der Alarm ertönt erneut nach 9 Minuten. Dieser Vorgang wird in 60
Minuten 5 Mal wiederholt.
Wecken mit iPod/Radio
1. Wenn der Alarm ertönt, drücken Sie an der i-Station Tower / auf der Fernbedienung die Taste “Alarm”. Der
Alarm wird ausgeschaltet und für den nächsten Tag erneut eingestellt.
AL
AL
Logic3
Page 38

2. Wenn der Alarm nicht innerhalb von 60 Minuten ausgeschaltet wird, wird er automatisch ausgeschaltet und
für den nächsten Tag erneut eingestellt.
Schlummerfunktion
1. Wenn der Alarm ertönt, drücken Sie "Snooze" an der i-Station Tower / auf der Fernbedienung. Der
Alarm ist nun im Schlummermodus (etwa 9 Minuten).
2. Der Alarm ertönt erneut nach 9 Minuten. Dieser Vorgang wird in den nächsten 60 Minuten 5 Mal wiederholt
(in Abständen von 12 Minuten).
Einrichten der Videoverbindung
1. Stecken Sie das Composite-Videokabel (Kabel nicht enthalten) an der Rückseite der i-Station Tower ein
(Video Out).
2. Stecken Sie das andere Ende des Composite-Videokabels am Video-Eingang Ihres Fernsehgeräts ein.
3. Wählen Sie an der i-Station Tower iPod/iPhone als Quelle.
4. Docken Sie Ihr iPod/iPhone an die i-Station Tower ein.
5. Wählen Sie Ihr Video auf Ihrem iPod/iPhone und drücken Sie Play.
6. Die Videoeinstellungen auf Ihrem iPod müssen auf “TV OUT” stehen.
Hinweis: Video ist abhängig vom iPod-Modell
AV IN
VIDEO
Logic3
Page 39

Funktionen der Fernbedienung
1. Legen Sie die Batterie in die Rückseite der Fernbedienung ein.
WARNUNG: Die Batterie muss korrekt eingelegt werden. Falls die Batterie falsch eingelegt wird (umgekehrte
Polarität), kann es zu Personenschäden sowie Schäden an der Fernbedienung kommen.
Sleep Zurück spulen/Zurück / Tune -
DBBS Alarm Setting ON/OFF
MEM Stand By
Preset + Source
Preset - Set
Dim/Snooze Lautstärke erhöhen
EQ Lautstärke verringern
Wiedergabe/Pause Stumm
Vorwärts spulen/Weitert/ Tune+
Einrichten von Aux
An die i-Station Tower können auch andere tragbare Geräte wie iPod shuffle, MP3, MiniDisc und andere
Audiogeräte mit einer 3,5mm Kopfhörerbuchse über den Auxiliary-Anschluss angeschlossen werden.
1. Stecken Sie das Line-in-Kabel (Kabel nicht enthalten) auf der Rückseite der i-Station Tower ein (AuxBuchse).
2. Stecken Sie das andere Ende des Line-in-Kabels in die Kopfhörerbuchse Ihres Geräts ein.
3. Stellen Sie die Lautstärke an Ihrem Gerät auf das höchste Level ein.
4. Drücken Sie an der i-Station Tower die Taste “Source” (Quelle) bzw. auf der Fernbedienung die Taste
“Standby”, um das Gerät einzuschalten.
5. Drücken Sie an der i-Station Tower / auf der Fernbedienung die Taste “Source” (Quelle), um die Quellen bis
zu AUX zu durchblättern.
Logic3
Page 40

HINWEIS: Um den Dockinganschluss der i-Station Tower für iPhone/iPod nutzen zu können, muss das
Line In-Kabel abgezogen werden, da es jeden Ton von der Dockingstation überlagert.
Fehlerbehebung
Ersatzteilliste
Teil
Nr.
Artikelcode Artikelname Preis
1 YAD019 WECHSELSTROMADAPTER
Preise erfahren Sie
auf
www.logic3.com
2 YRM019 FERNBEDIENUNG
3 YCB000K LINE-IN-KABEL (SCHWARZ)
Die aktuellen Ersatzteilistliste/Preise finden Sie auf unserer Website www.logic3.com
Bei Problemen bei der Einrichtung der i-Station Tower (WIS019) setzen Sie sich bitte mit unserer
technischen Kundendienst-Hotline unter +44 (01923) 471 000 in Verbindung Nationale/internationale Gebühren fallen an - oder schicken Sie eine E-Mail an
support@logic3.com - Ersatzteile für manche unserer Modelle sind erhältlich unter
www.logic3.com
Problem Lösung
Kein Ton/Bild
Überprüfen Sie den Wiedergabestatus des iPhone/iPod.
Versuchen Sie, die Software Ihres iPhone/iPod mithilfe der aktuellsten iTunes zu
aktualisieren.
Prüfen Sie, ob Sie die i-Station Tower korrekt angeschlossen haben (siehe
Einrichtung des Videoanschlusses)
Prüfen Sie, ob Ihr iPod auf TV-Ausgabe eingestellt ist (für die Einstellungen
siehe iPod-Handbuch)
Überprüfen Sie Ihre Formateinstellungen (PAL, NTSC; für die Einstellungen
siehe Ihr iPhone/iPod-Handbuch)
Die Fernbedienung
funktioniert nicht
Ersetzen Sie die Batterie
Stellen Sie sicher, dass die Batterie richtig (mit korrekter Polarität) eingelegt ist
Sicherstellen, dass sich das ProDock in der Reichweite des i-Station Tower der
Fernbedienung befindet (6 Meter)
FM-Radio nicht
störungsfrei /
Radiosender nicht
gefunden
Richten Sie das Antennenkabel neu aus, bis der Sender besser empfangen
werden kann
i-Station reagiert auf
keine Tasten
Drücken Sie an der Rückseite der i-Station Tower die Taste “Reset“.
Logic3
Page 41

i-Station Tower (WIS019) – IT Manuale per l’utente
Grazie per aver acquistato il i-Station Tower prodotto da Logic3. Come tutti i prodotti Logic3, è stato
realizzato seguendo i più alti standard di produzione e testato durante tutta la sua realizzazione per
assicurare un prodotto di elevata qualità. Consigliamo di leggere attentamente questo manuale
prima di utilizzare il i-Station Tower.
Sommario
Descrizione del prodotto
i-Station Tower con altoparlanti
Adattatore CA con spine
intercambiabili (Euro
2pin e BS 3pin)
Batteria
(CR2025)
Telecomando
Parte anteriore
Parte posteriore
Video Out
Aux Input
Pulsante
Reimposta
Presa
adattatore AC
Antenna FM
Alloggiamento
neutro
Connettore Dock
Controlli
Logic3
Page 42

Batteria di back-up
L’i-Station Tower è dotato di una batteria di back-up per conservare le impostazioni degli orologi in caso di
interruzione dell’alimentazione.
1. Rimuovere il coperchio del vano batteria dalla parte inferiore dell’i-Station Tower.
2. Inserire la 2x AAA batteria (non incluso).
AVVISO: verificare che la batteria sia inserita correttamente. L’errato inserimento della batteria
(polarità inversa) potrebbe causare lesioni personali e danni all’i-Station Tower.
3. Riposizionare il coperchio del vano batteria.
Nota: la batteria di back-up serve solo per conservare la memoria degli orologi, non per illuminarne il
display.
Configurazione dell'i-Station Tower
1
2
A
B
3
4
Logic3
Page 43

1. Rimuovere l’alloggiamento neutro e inserire l’alloggiamento idoneo (fornito con l’iPod) nella docking base.
2. Scegliere e installare l’adattatore corretto in base all’alimentazione in uso (A – Regno Unito 3 poli / B –
Europa 2 poli).
3. Collegare l’adattatore AC di alimentazione all’i-Station Tower (DC 8V 2A) e inserire l’alimentatore nella
presa.
4. Inserire l’iPhone/iPod sul connettore dock.
Scelta della configurazione
L’i-Station Tower è progettato in modo che l’unità possa essere impilata o posizionata in modo tradizionale.
NOTA: per tutti i modelli di iPhone/iPod touch, aprire itunes e scaricare l'APP per i
-
Station
Tower prima di proseguire con la configurazione.
Nota: Una volta lanciata l'applicazione, cambiano le seguenti funzioni:-
a. Il display tempo applicazione prevarrà sul display tempo i-Station Tower (il display
tempo i-Station Tower non verrà visualizzato e verrà usato il tempo dell'applicazione)
b. Gli allarmi dell'applicazione prevarranno sulle impostazioni di allarme della i-Station
Tower (le impostazioni dell'allarme i-Station Tower non funzioneranno)
c. L'applicazione prevarrà su tutte le funzioni di controllo a distanza (fatta eccezione per i
controlli del volume)
I manuali/le istruzioni dell’APP per i-Station Tower sono scaricabili in formato PDF dal nostro
sito Web (www.logic3.com) nella sezione delle Domande frequenti (FAQ).
Logic3
Page 44

Impostazione di ora/data
A. In modalità Stand By:
1. Premere il pulsante ‘Set’ (Imposta) sull’i-Station Tower/sul telecomando (ora in formato 12 ore)
2. Utilizzare i pulsanti ‘Volume’ sull’i-Station Tower/sul telecomando per impostare il formato dell’ora (12/24
ore).
3. Premere il pulsante ‘Set’ (Imposta) sull’i-Station Tower/sul telecomando (l’ora lampeggia).
4. Utilizzare i pulsanti ‘Tune - / Tune +’ (Ricerca manuale) sull’i-Station Tower/sul telecomando per impostare
l’ora.
5. Utilizzare i pulsanti ‘Volume’ sull’i-Station Tower/sul telecomando per impostare i minuti.
6. Attendere 5 secondi. Le impostazioni verranno salvate automaticamente e il display torna alla
visualizzazione dell’ora corrente.
Nota: in modalità impostazione, se non viene premuto alcun pulsante per 5 secondi, il display torna
alla visualizzazione dell'ora corrente.
Selezionare un’origine (iPhone/iPod, radio o AUX)
È possibile selezionare l’origine in due modi:
1. Mediante l’i-Station Tower
A. Premere il pulsante ‘Source’ (Origine) sull’i-Station Tower per accendere l’i-Station Tower.
B. Premere di nuovo il pulsante ‘Source’ per scorrere l’elenco Source.
2. Mediante il telecomando
A. Premere il pulsante ‘Stand By’ sul telecomando per accendere l’i-Station Tower.
iPod
AUX
FM
Logic3
Page 45

B. Premere il pulsante ‘Source’ sul telecomando per scorrere l'elenco Source (Origine).
Impostazione della radio
1. È possibile salvare solo 20 impostazioni predefinite alla volta.
2. Srotolare il cavo dell’antenna FM e posizionare l’antenna più in alto possibile.
3. Accendere l’i-Station Tower e selezionare la radio FM mediante il pulsante Source (Origine).
4. Utilizzare i pulsanti ‘TUNE- / TUNE+’ (Ricerca manuale) dell’i-Station Tower/del telecomando per impostare
la frequenza radio desiderata. (Premere il pulsante ‘TUNE- / TUNE+’ una volta per impostare manualmente
la frequenza radio; premere e tenere premuto il pulsante ‘Tuning’ (Sintonizzazione) per eseguire la ricerca
automatica)
5. Premere il pulsante ‘Set’ (Imposta) dell’i-Station Tower o il pulsante ‘MEM’ del telecomando (il numero del
canale lampeggia)
6. Utilizzare i pulsanti ‘Tune - / Tune +’ (Ricerca manuale) per selezionare il numero di canale che si desidera
assegnare alla stazione radio.
7. Premere il pulsante ‘Set’ (Imposta) dell’i-Station Tower o il pulsante ‘MEM’ del telecomando per salvare le
impostazioni.
Nota: in modalità impostazione, se non viene premuto alcun pulsante per 5 secondi, il display torna
alla visualizzazione dell'ora corrente.
O
iPod
AUX
FM
O
O
Logic3
Page 46

Per richiamare una stazione radio predefinita
L’i-Station Tower funziona in congiunzione con l'App per i-Station Tower che può essere scaricata tramite
iTunes.
Questa applicazione consente di richiamare le preselezioni APP sull’altoparlante tramite iPhone.
È possibile richiamare le preselezioni in due modi:
1. Mediante l’i-Station Tower
A. Premere il pulsante ‘Preset’ (Preselezioni) sull’i-Station Tower e il numero del programma apparirà sul
display.
B. Utilizzare ‘Tune - / Tune +’ (Ricerca manuale) per selezionare il canale preselezionato.
C. In alternativa, è possibile premere il pulsante ‘Preset +/Preset‘ (Preselezioni) sul telecomando per
selezionare il canale preselezionato.
D. Una volta selezionato il canale preselezionato, l’i-Station Tower verrà impostato sul canale preselezionato e
la frequenza del canale selezionato verrà visualizzata sul display.
Nota: in modalità impostazione, se non viene premuto alcun pulsante per 5 secondi, il display torna
alla visualizzazione dell'ora corrente.
2. Mediante l’APP per i-Station Tower (Memorizzazione e ridenominazione delle preselezioni)
1
2
3
Logic3
Page 47

1. Selezionare l’origine radio.
2. Selezionare l’elenco dei canali preselezionati.
3. Selezionare ‘Add New Channel ’ (Aggiungi nuovo canale).
4. Modificare il nome del canale preselezionato, se necessario.
5. Sintonizzare la radio sulla frequenza preferita, quindi premere il pulsante ‘Save' (Salva) per salvare la nuova
stazione.
6. Selezionare il canale preselezionato desiderato per l’ascolto.
Impostazione dell’EQ
L’i-Station Tower dispone di 5 impostazioni EQ:
1. Premere il pulsante EQ sul telecomando dell’i-Station Tower; le impostazioni EQ cambieranno e il numero
EQ verrà visualizzato sul display.
2. Premere di nuovo il pulsante EQ per scorrere le impostazioni EQ.
E:0 NORMAL E:1 JAZZ E:2 CLASSIC E:3 ROCK E:4 POP
Loudness e funzione incremento bassi
Impostazioni Loudness:
1. In modalità Stand by premere il pulsante ‘SET’ (Imposta) 3 volte sull’i-Station Tower/sul telecomando
2. Sul display lampeggia la scritta OFF; utilizzare i pulsanti ‘Volume’ sull’i-Station Tower/telecomando per
attivare (ON) o disattivare (OFF) la Loudness.
Funzione incremento bassi (Bass Boost):
1. In una modalità Source (Origine), premere il pulsante ‘DBBS’ sul telecomando per attivare (ON) o disattivare
(OFF) il sistema DBBS (Dynamic Bass Boost System).
4
5
6
Logic3
Page 48

Impostazione della modalità Sleep
La funzione Sleep (Sospensione) consente all’unità di funzionare in modalità iPhone/iPod o Radio FM per 90
minuti al massimo prima di spegnersi automaticamente.
È possibile impostare l’ora della sospensione in base alle preferenze dell’utente.
1. Accendere l’i-Station Tower, in qualsiasi modalità Source (Origine). Premere il pulsante ‘Sleep’
(Sospensione) sul telecomando dell’i-Station Tower.
2. Premere di nuovo il pulsante ‘Sleep’ (Sospendi) per scorrere gli orari di sospensione (15, 30, 45, 60, 90, 00)
3. Una volta selezionato l’orario di sospensione, sul display vengono visualizzati la scritta ‘SL’ e i minuti
selezionati.
4. Per disattivare (OFF) la modalità ‘Sleep’ (Sospensione) prima che abbia raggiunto l’orario prestabilito di
sospensione, premere e tenere premuto il pulsante Source (Origine).
5. Inizia il conto alla rovescia; per mostrare il tempo di sospensione restante premere il pulsante ‘Sleep’.
Per disattivare (OFF) la modalità ‘Sleep’ (Sospensione) prima che abbia raggiunto l’orario prestabilito di
sospensione, premere e tenere premuto il pulsante Source (Origine) sull’i-Station Tower o premere il
pulsante Standby sul telecomando.
Nota: se all’entrata AUX è stato collegato un dispositivo esterno, il timer della sospensione spegnerà solo
l’i-Station Tower, non spegnerà il dispositivo esterno.
Per impostare la sveglia
1. In modalità Stand By, premere e tenere premuto il pulsante della sveglia sull’i-Station Tower/sul
telecomando finché le unità dell’ora e dei minuti lampeggiano (nell’angolo inferiore sinistro del display viene
inoltre visualizzata la scritta AL)
2. Utilizzare i pulsante ‘Tune - or Tune +’ (Ricerca manuale) sull’i-Station Tower/sul telecomando per impostare
l’ora.
O
O
AL
Logic3
Page 49

3. Utilizzare i pulsante ‘Volume’ sull’i-Station Tower/sul telecomando per impostare i minuti.
4. Premere il pulsante ‘Alarm’ (Sveglia) sull’i-Station Combo/sul telecomando per passare alla fase successiva.
5. Utilizzare i pulsante ‘Volume’ sull’i-Station Tower/sul telecomando per selezionare l’origine che si desidera
utilizzare.
6. Premere il pulsante ‘Alarm’ (Sveglia) per confermare tutte le impostazioni; il display tornerà alla
visualizzazione dell’ora corrente e la scritta AL apparirà nell’angolo inferiore sinistro del display per indicare
che la sveglia è stata attivata.
Per attivare (ON) e disattivare (OFF) la sveglia:
A. Mediante l’i-Station Tower
Per attivare (ON) la sveglia
1. Premere e tenere premuto il pulsante della sveglia sull'i-Station Tower/sul telecomando finché le unità
dell’ora e dei minuti lampeggiano.
2. Attendere finché il display torna alla visualizzazione dell’ora originale; l’icona della sveglia (AL) verrà
visualizzata nell’angolo inferiore sinistro del display per indicare che la sveglia è stata attivata.
O
O
AL
AL
Logic3
Page 50

Per disattivare (OFF) la sveglia
1. Premere il pulsante della sveglia una volta sull’i-Station Tower e l’icona della sveglia (AL) nell’angolo
inferiore sinistro non verrà più visualizzata.
B. Mediante il telecomando
1. Premere il pulsante della sveglia sul telecomando per alternare la visualizzazione dell’icona della sveglia
(AL) nell’angolo inferiore sinistro del display.
Disattivazione della sveglia
Sveglia con cicalino
1. Quando suona la sveglia, premere il pulsante della sveglia sull’i-Station Tower/sul telecomando; la sveglia
verrà disattivata e ripristinata per il giorno seguente.
2. Se la sveglia non viene disattivata dopo 1 minuto, si attiverà automaticamente la funzione ‘Snooze’
(Posponi) (9 minuti circa); la sveglia suonerà di nuovo dopo 9 minuti per cinque volte in 60 minuti.
Sveglia con iPod/radio
1. Quando suona la sveglia, premere il pulsante della sveglia sull’i-Station Tower/sul telecomando; la sveglia
verrà disattivata e ripristinata per il giorno seguente.
2. Se non viene disattivata dopo 60 minuti, la sveglia si spegnerà e verrà ripristinata per il giorno seguente.
Funzione Snooze
1. Quando suona la sveglia, premere il pulsante ‘Snooze’ (Posponi) sull’i-Station Tower/sul
telecomando per attivare la modalità ‘snooze’ (9 minuti circa).
2. La sveglia suonerà di nuovo dopo 9 minuti per cinque volte (a intervalli di 12 minuti) in 60 minuti.
Configurazione della connessione video
1. Connettere il cavo composito video (non incluso) nella parte posteriore dell’i-Station Tower (Video Out).
2. Connettere l’altra estremità del cavo composito video al terminale Uscita video del televisore.
AV IN
VIDEO
AL
Logic3
Page 51

3. Selezionare l’origine iPod/iPhone sull’i-Station Tower.
4. Inserire l’iPod/iPhone sull’i-Station Tower.
5. Selezionare il video su iPod/iPhone e premere Play (Riproduci).
6. Verificare che le impostazioni video sull’iPod siano regolate su ‘TV OUT’.
Nota: l’uscita video dipende dal modello di iPod
Funzioni del telecomando
1. Inserire la batteria nella parte posteriore del telecomando.
AVVISO: verificare che la batteria sia inserita correttamente. L’errato inserimento della batteria (polarità inversa)
potrebbe causare lesioni personali e danni al telecomando.
Sleep (Sospensione) RW/Rewind / Tune –
(RW/Prec./Ricerca manuale -)
DBBS (Dynamic Bass Boost System) Impostazione Sveglia ON/OFF
MEM Stand By
Preset UP (Presel. su) Source (Origine)
Preset Down (Presel. giù) Set (Imposta)
Dim/Snooze (Riduci lumin./Posponi Volume Up (Aumento volume)
EQ Volume Down (Riduzione volume)
Play/Pause (Riproduci/Pausa) Mute (Disattiva microfono)
FF/Next / Tune+ (FF/Succ./Ricerca man.+)
Configurazione delle Aux
L’i-Station Tower può essere connesso ad altri dispositivi audio portatili, come iPod shuffle, MP3, MiniDisc
ecc. tramite le entrate Auxiliary con una presa cuffia da 3,5 mm.
1. Inserire il cavo ingresso audio (non incluso) nella parte posteriore dell’i-Station Tower (presa Aux).
2. Collegare l’altra estremità del cavo line-in alla presa cuffia del dispositivo.
3. Impostare il volume del dispositivo al massimo.
4. Premere il pulsante ‘Source’ (Origine) sull’i-Station Tower/il pulsante ‘Standby’ sul telecomando per
accendere l’unità.
Logic3
Page 52

5. Premere il pulsante ‘Source’ (Origine) sull’i-Station Tower/sul telecomando per scorrere l’origine fino a
selezionare AUX.
NOTA: ricordarsi di rimuovere il cavo line-in quando si utilizza il connettore dock dell’i-Station Tower per
l’iPhone/iPod in quanto il cavo line-in prevarrebbe sul suono proveniente dalla docking station.
Risoluzione dei problemi
Problema Cosa devo fare?
Nessun suono/nessuna
immagine
Verificare lo stato della riproduzione sull’iPhone/iPod.
Provare ad aggiornare il software dell’iPhone/iPod utilizzando l’iTunes più
recente.
Verificare di aver eseguito correttamente la connessione dell’i-Station Tower
(vedere Installazione della connessione video)
Verificare che l’iPod sia impostato su Uscita TV (per le impostazioni, consultare
il manuale dell’iPod)
Verificare le impostazioni del formato PAL o NTSC (per le impostazioni,
consultare il manuale dell’iPhone/iPod)
Il telecomando non
funziona
Sostituisci le batterie
Controlla che le batterie siano inserite correttamente (polarità)
Accertatevi che il telecomando venga utilizzato ad una distanza massima di 6
metri dal i-Station Tower
Radio FM disturbata/
stazione radio non
trovata
Muovere il cavo dell'antenna fino ad avere una ricezione è chiara
i-Station non risponde
ai controlli
Premere il pulsante Reset (Ripristina) nella parte posteriore dell’i-Station Tower
Logic3
Page 53

Lista dei pezzi di ricambio
Nr.
pezzo
Codice
articolo
Nome articolo Prezzo
1 YAD019 ADATTATORE CA
Per maggiori
informazioni sui
prezzi, visita il sito
www.logic3.com
2 YRM019 TELECOMANDO
3 YCB000K CAVO DI LINEA (NERO)
Per i Elenco delle parti di ricambio/Prezzi visitare il nostro sito Web www.logic3.com
In caso di problemi di installazione della i-Station Tower (WIS019) contatta il nostro Centro di assistenza
tecnica al numero +44 (01923) 471 000 – La tariffa applicata è per telefonate nazionali/internazionali
oppure scrivi un'email all'indirizzo support@logic3.com - Per alcuni modelli, i pezzi di ricambio sono
disponibili sul sito www.logic3.com
Logic3
Page 54

i-Station Tower (WIS019) – ES Manual del usuario
Gracias por adquirir Logic3 i-Station Tower. Como todos los productos de Logic3, se ha fabricado de acuerdo
con los estándares más exigentes y se ha sometido a diversas pruebas durante todo su desarrollo, para
garantizar que tengas el mejor producto posible. Lee atentamente este manual antes de usar i-Station Tower
Contenido
Descripción general del producto
i-Station Tower con altavoces
Adaptador de corriente con
machos intercambiables
(europeo de 2 clavijas y BS
de 3 clavijas)
Pilas
(CR2025)
Mando a
distancia
Parte delantera
Parte trasera
Salida de
vídeo
Entrada auxiliar
Botón ‘Reset’
(Restablecer)
Conector para
adaptador de CA
Antena FM
Soporte genérico
Conector Dock
Controles
Logic3
Page 55

Batería de reserva
La estación i-Station Tower dispone de una batería de reserva para conservar los ajustes del reloj en caso de
producirse un corte de suministro eléctrico.
1. Retire la tapa de la batería situada en la parte inferior de la i-Station Tower.
2. Introduzca la batería 2 x AAA (no incluido).
ADVERTENCIA: asegúrese de introducir la batería de forma correcta. Si se introduce la batería de
forma incorrecta (polaridad invertida), se pueden producir lesiones personales así como daños en su
i-Station Tower.
3. Vuelva a colocar la tapa de la batería.
Nota: la batería de reserva únicamente conservará la memoria del reloj, no iluminará la pantalla del
reloj.
Instalación de i-Station Tower
2
A
B
3
4
1
Logic3
Page 56

1. Retire el soporte genérico e introduzca el soporte adecuado (suministrado con su iPod) en la base Dock.
2. Seleccione y conecte el adaptador de corriente adecuado que se corresponda con su fuente de alimentación
(A: 3 clavijas del Reino Unido/B: 2 clavijas de Europa).
3. Conecte el adaptador de alimentación de CA a la estación i-Station Tower (CC 8V 2 A), conecte la fuente de
alimentación a la toma de corriente y enciéndala.
4. Acople el iPhone o iPod en el conector de acoplamiento.
Selección de la forma de instalación
El sistema i-Station Tower está diseñado de modo que la unidad se pueda apilar o instalar de la forma estándar.
NOTA:
Para consultar todos los modelos de iPhone e iPod touch, acceda a iTunes y descá
rguese la
aplicación para i-Station Tower antes de continuar con la instalación.
Nota: una vez que se ha lanzado la aplicación, cambian las siguientes funciones:
a. La visualización de la hora de la aplicación anula la visualización de la hora de la torre de la
i-Station (la hora de la torre de la i-Station se pone en blanco y se utiliza la de la aplicación).
b. Las alarmas de la aplicación anulan las configuraciones de alarma de la torre de la i-Station
(las configuraciones de la torre de la i-Sation no funcionarán).
c. La aplicación anulará todas las funciones de control remoto (excepto los controles de
volumen)
Si desea consultar el manual o las instrucciones de la aplicación para i-Station Tower, visite nuestro
sitio web (www.logic3.com) y descárguese el manual (PDF) de la sección Preguntas frecuentes.
Logic3
Page 57

Configuración de hora y fecha
A. En modo de espera:
1. Pulse el botón ‘Set’ (Configurar) situado en el sistema i-Station Tower o en el mando a distancia (la hora se
mostrará en formato de 12 h)
2. Mediante los botones ‘Volume’ (Volumen) del i-Station Tower o del mando a distancia, configure el formato de
hora (12 o 24 h).
3. Pulse el botón ‘Set’ (Configurar) situado en el i-Station Tower o en el mando a distancia (el formato de hora
parpadeará).
4. Con los botones ‘Tune-/Tune+’ (Canción-/Canción+) situados en el i-Station Tower o en el mando a distancia
configure la hora.
5. Con los botones ‘Volume’ (Volumen) situados en el i-Station Tower o en el mando a distancia configure los
minutos.
6. Espere cinco segundos y la configuración se guardará automáticamente y la pantalla volverá a mostrar la
hora actual.
Nota: si no se pulsa ningún botón durante diez segundos en el modo de ajuste, la pantalla volverá a
mostrar la hora actual.
Cómo seleccionar una fuente (iPhone/iPod, Radio o AUX)
Existen dos formas de seleccionar la fuente:
1. A través del i-Station Tower
A. Pulse el botón ‘Source’ (Fuente) situado en el i-Station Tower para encenderlo.
B. Si vuelve a pulsar el botón ‘Source’ (Fuente) cambiará de una fuente de la lista a otra.
iPod
AUX
FM
Logic3
Page 58

2. A través del mando a distancia
A. Pulse el botón ‘Stand By’ (Modo de espera) situado en el mando a distancia para encender el i-Station Tower.
B. Si pulsa el botón ‘Source’ (Fuente) situado en el mando a distancia cambiará de una fuente de la lista a otra.
Cómo ajustar la radio
Únicamente se pueden guardar seis programaciones cada vez.
1. Desate el cable de antena FM y colóquela tan alto como le sea posible.
2. Encienda el i-Station Tower y seleccione Radio FM mediante el botón ‘Source’ (Fuente).
3. Con los botones ‘TUNE-/TUNE+’ (CANCIÓN-/CANCIÓN+) del i-Station Tower o del mando a distancia,
establezca la frecuencia de radio que desee. (Si pulsa una vez el botón ‘TUNE-/TUNE+’ (CANCIÓN/CANCIÓN+) la radio se sintonizará automáticamente. Mantenga pulsado el botón de sintonización y la radio
realizará una exploración automática)
4. Pulse el botón ‘Set’ (Configurar) situado en el i-Station Tower o el botón ‘Mem’ (Memorizar) del mando a
distancia (a continuación parpadeará el número de canal).
5. Mediante los botones ‘Tune-/Tune+’ (Canción-/Canción+), seleccione el número de canal en el que desee
guardar la emisora de radio.
6. Pulse el botón ‘Set’ (Configurar) situado en el i-Station Tower o el botón ‘MEM’ (MEMORIZAR) del mando a
distancia para guardar la configuración.
Nota: si no se pulsa ningún botón durante diez segundos en el modo de ajuste, la pantalla volverá a
mostrar la hora actual.
O
O
O
iPod
AUX
FM
Logic3
Page 59

Para mostrar una emisora de radio programada
El i-Station Tower funciona junto con la aplicación descargada (i-Station Tower), que se puede obtener a
través de iTunes.
Esta aplicación le permitirá recuperar las presintonías de radio de la aplicación en el altavoz mediante el
iPhone.
Existen dos formas de recuperar sus emisoras de radio:
1. Con el i-Station Tower
A. Pulse el botón ‘Preset’ (Presintonía) situado en el i-Station Tower y el número de programa aparecerá en la
pantalla.
B. Usar ‘Tune-/Tune+’ (Canción-/Canción+) para seleccionar su canal presintonizado.
C. Otra opción es pulsar los botones ‘Preset +/Preset -‘ (Canción -/Canción +) situados en el mando a distancia
para seleccionar su canal presintonizado.
D. Una vez seleccionada la presintonía, el i-Station Tower se establecerá en la misma, y la frecuencia del canal
seleccionado se mostrará en la pantalla.
Nota: si no se pulsa ningún botón durante diez segundos en el modo de ajuste, la pantalla volverá a
mostrar la hora actual.
Logic3
Page 60

2. Usar la aplicación para i-Station Tower (cómo guardar y cambiar el nombre de presintonías)
1. Seleccione la fuente Radio (Radio).
2. Seleccione la lista de canales presintonizados.
3. Seleccione ‘Add New Channel’ (Añadir nuevo canal).
4. Modifique el nombre del canal presintonizado si fuera necesario.
5. Sintonice la frecuencia de radio que desee y, a continuación, pulse el botón ‘Save' (Guardar) para guardar la
nueva emisora.
6. Seleccione el canal presintonizado que desee escuchar.
1
2
3
456
Logic3
Page 61

Configuración del ecualizador
El i-Station Tower dispone de cinco configuraciones para el ecualizador:
1. Pulse el botón 'EQ’ (Ecualizador) situado en el mando a distancia del i-Station Tower, y cambiará la
configuración del ecualizador y se mostrará el número del mismo.
2. Si pulsa el botón ‘EQ’ (Ecualizador) de nuevo cambiará de una configuración del ecualizador a otra.
E:0 NORMAL E:1 JAZZ E:2 CLASSIC E:3 ROCK E:4 POP
Función de sonoridad y de potenciación de graves
Configuración de sonoridad:
1. En modo de espera, pulse el botón ‘SET’ (CONFIGURAR) tres veces en el i-Station Tower o en el mando a
distancia
2. Parpadeará OFF (Desactivado) en la pantalla, y mediante los botones ‘Volume’ (Volumen) en el i-Station
Tower o el mando a distancia, puede cambiar de OFF (Desactivado) a ON (Activado).
Configuración de potenciación de graves:
1. Tras seleccionar una fuente, pulse el botón ‘DBBS' del mando a distancia para activar o desactivar la función
DBBS.
Configuración del modo de suspensión
La función de suspensión permite a la unidad funcionar en modo iPhone/iPod o Radio FM durante un máximo
de 90 minutos antes de apagarse automáticamente.
El tiempo para la suspensión se puede ajustar en función de las preferencias del usuario.
1. Encienda el i-Station Tower, tras seleccionar cualquier fuente, y pulse el botón ‘Sleep’ (Suspensión) situado
en el mando a distancia del i-Station Tower.
2. Si pulsa de nuevo el botón ‘Sleep’ (Suspensión) cambiará de tiempo para la suspensión (15, 30, 45, 60, 90,
00)
3. Una vez seleccionado el tiempo para la suspensión, en la pantalla aparecerán ‘SL’ (Susp.) y los minutos que
haya seleccionado.
4. Para desactivar el modo ‘Sleep’ (Supensión) antes de que transcurra el tiempo establecido para la
suspensión, mantenga pulsado el botón 'Source’ (Fuente).
5. Se realizará una cuenta atrás del tiempo para la suspensión. Si desea consultar el tiempo restante para la
suspensión, pulse el botón ‘Sleep’ (Suspensión).
Para desactivar el modo 'Sleep' (Suspensión) antes de que transcurra el tiempo establecido para la
suspensión, mantenga pulsado el botón ‘Source’ (Fuente) del i-Station Tower o pulse el botón ‘Stand By'
(Modo de espera) situado en el mando a distancia.
Nota: Si ha conectado un dispositivo externo a la entrada auxiliar, el temporizador ‘Sleep’ (Suspensión)
únicamente apagará el i-Station Tower, y no el dispositivo externo.
Logic3
Page 62

Cómo configurar la alarma
1. En modo de espera, mantenga pulsado el botón ‘Alarm’ (Alarma) del i-Station Tower o del mando a distancia
hasta que las unidades de hora y minutos parpadeen (también se indicará AL en la parte inferior izquierda de
la pantalla)
2. Con los botones ‘Tune- o Tune+’ (Canción- o Canción+) situados en el i-Station Tower o en el mando a
distancia configure la hora.
3. Con los botones ‘Volume’ (Volumen) situados en el i-Station Tower o en el mando a distancia configure los
minutos.
4. Pulse el botón ‘Alarm’ (Alarma) de i-Station Combo o del mando a distancia para pasar a la siguiente fase.
5. Con los botones ‘Volume’ (Volumen) situados en el i-Station Tower o en el mando a distancia, seleccione la
fuente en el que desea configurar la alarma.
6. Pulse el botón ‘Alarm’ (Alarma) para confirmar toda la configuración y la pantalla volverá a mostrar la hora
actual y se mostrará AL en la parte inferior izquierda de la pantalla para indicar que la Alarma está activa.
O
OALO
O
AL
Logic3
Page 63

Para activar o desactivar la alarma: –
A. A través del i-Station Tower
Para activar la alarma
1. Mantenga pulsado el botón 'Alarm’ (Alarma) del i-Station Tower o del mando a distancia hasta que las
unidades de hora y minutos parpadeen.
2. Espere hasta que la pantalla vuelva a mostrar la hora original. Se mostrará el icono de la alarma (AL) en la
parte inferior izquierda de la pantalla para indicar que la alarma está activa.
Para desactivar la alarma
1. Pulse una vez el botón ‘Alarm’ (Alarma) del i-Station Tower y desaparecerá el indicador del icono AL situado
en la parte inferior izquierda de la pantalla.
B. A través del mando a distancia
1. Pulse el botón ‘Alarm’ (Alarma) del mando a distancia para que aparezca y desaparezca el icono AL situado
en la parte inferior izquierda de la pantalla
Cómo desactivar la alarma tras la activación
Cómo despertarse con un zumbido
1. Cuando suene la alarma, pulse el botón 'Alarm’ (Alarma) del i-Station Tower o del mando a distancia para que
la alarma se desactive y se restablezca al día siguiente.
2. Si no se desactiva la alarma transcurrido un minuto, pasará automáticamente a la función de retraso
(alrededor de nueve minutos), y la alarma sonará de nuevo después de nueve minutos. Este proceso se
repetirá cinco veces en un período de 60 minutos.
Cómo despertarse con el iPod o la radio
1. Cuando suene la alarma, pulse el botón 'Alarm’ (Alarma) del i-Station Tower o del mando a distancia para que
la alarma se desactive y se restablezca al día siguiente.
2. Si no se desactiva la alarma transcurridos 60 minutos, la alarma de desactivará y se restablecerá al día
siguiente.
AL
AL
Logic3
Page 64

Función de retraso
1. Cuando suene la alarma, pulse el botón ‘Snooze’ (Retrasar) situado en el i-Station Tower o en el
mando a distancia y la alarma entrará en modo de retraso (aproximadamente nueve minutos).
2. A continuación, la alarma sonará de nuevo transcurridos nueve minutos. Este proceso se repetirá cinco veces
(en intervalos de 12 minutos) en un período de 60 minutos.
Instalación de la conexión de vídeo
1. Conecte el cable de vídeo compuesto (no incluído) a la parte trasera del i-Station Tower (salida de vídeo).
2. Conecte el otro extremo del cable de vídeo compuesto al terminal de entrada de vídeo de la televisión.
3. Seleccione iPod o iPhone como fuente en su i-Station Tower.
4. Coloque su iPod o iPhone en el i-Station Tower.
5. Seleccione su vídeo en el iPod o iPhone y pulse el botón de reproducción.
6. Asegúrese de que la configuración de vídeo en su iPod esté establecida en ‘TV OUT’ (Salida de TV).
Nota: La salida de vídeo depende del modelo de iPod
Entrada
auxiliar AV
VIDEO
Logic3
Page 65

Funciones del mando a distancia
1. Introduzca la batería en el reverso del mando a distancia.
ADVERTENCIA: asegúrese de introducir la batería de forma correcta. Si se introduce la batería de forma
incorrecta (polaridad invertida), se pueden producir lesiones personales así como daños en el mando a distancia.
Sleep (Suspensión) RW/Rewind / Tune –(RW/Retroceder/Canción-)
DBBS Alarm Setting ON/OFF (Activar/desactivar alarma)
MEM (MEMORIZAR) Stand By (Modo de espera)
Preset UP (Siguiente presintonía) Source (Fuente)
Preset Down (Presintonía anterior ) Set (Configurar)
Dim/Snooze (Atenuar/Retrasar ) Volumen Up (Subir volumen)
EQ (Ecualizador) Volumen Down (Bajar volumen)
Play/Pause (Reproducir/pausar) Mute (Silenciar)
FF/Next / Tune+ (FF/Siguiente /Canción+ )
Instalación de entrada auxiliar
El i-Station Tower también ofrece la posibilidad de que se conecten otros dispositivos de audio portátiles,
tales como iPod shuffle, MP3, MiniDisc y otro tipo de dispositivos de audio con un conector de auriculares de
3,5 mm a través de la entrada auxiliar.
1. Conecte un cable de entrada de línea (no incluído) a la parte trasera del i-Station Tower (conector auxiliar).
2. Conecte el otro extremo del cable de entrada de línea al conector de auriculares de su dispositivo.
3. Establezca el volumen de su dispositivo al máximo.
4. Pulse el botón ‘Source’ (Fuente) situado en el i-Station Tower o el botón ‘Stand By’ (Modo de espera) del
mando a distancia para encender la unidad.
5. Pulse el botón ‘Source‘ (Fuente) situado en el i-Station Tower o en el mando a distancia para cambiar de una
fuente a otra hasta que seleccione AUX (AUXILIAR).
NOTA: no olvide retirar el cable de entrada de línea al utilizar el conector de la base de la i-Station Tower
para iPhone/iPod, puesto que el cable de entrada de línea cancelará cualquier sonido que provenga de la
estación de acoplamiento.
Logic3
Page 66

Solución de problemas
Lista de piezas de repuesto
Referencia
Código de
artículo
Nombre de artículo Precio
1 YAD019 ADAPTADOR CA
Visite la página
web si quiere
consultar precios:
www.logic3.com
2 YRM019 MANDO A DISTANCIA (NEGRO)
3 YCB000K CABLE DE LINE IT (NEGRO)
Para Lista de piezas de recambio / precios visite nuestro sitio web en www.logic3.com
Problema ¿Qué debo hacer?
No hay Sonido/Imagen
Compruebe el estado de reproducción en el iPhone o iPod
Intente actualizar el software de su iPhone o iPod con la última versión de iTunes.
Verifique haber conectado el i-Station Tower correctamente (ver Instalación de la
Conexión de Video)
Verifique que su iPod esté configurado en TV out (lea el manual de su iPod para
informarse sobre configuraciones)
Verifique las configuraciones de su formato (PAL, NTSC; lea el manual de su
iPhone/iPod para informarse sobre configuraciones)
El mando a distancia no
funciona
Cambia las pilas
Comprueba que las pilas están colocadas correctamente (polaridad)
Asegúrese de que el alcance de funcionamiento operativo se encuentra a 6 metros
del i-Station Tower
La radio FM no se oye
bien/no se ha encontrado
una frecuencia
Vuelva a colocar el cable de la antena hasta que se oiga mejor la frecuencia.
i-Station no responde a
ningún botón de control
Pulse el botón ‘Reset’ (Restablecer) situado en la parte trasera del i-Station Tower
En caso de tener algún problema con la configuración de i-Station Tower (WIS019), llama a nuestra
línea de servicio técnico al +44 (01923) 471 000 (coste de la llamada según tarifa nacional o
internacional) o envíanos un correo electrónico a la dirección support@logic3.com - En nuestro sitio
web www.logic3.com hay disponibles piezas de repuesto para algunos modelos
Logic3
Page 67

i-Station Tower (WIS019) – PT Manual do Utilizador
Obrigado por adquirir o Logic3 i-Station Tower. Como todos os produtos Logic3, foi construído segundo os
mais altos padrões de fabrico e testado durante o seu desenvolvimento, para assegurar que é o melhor
produto possível. Por favor leia este manual e familiarize-se com ele, antes de utilizar o i-Station Tower.
Conteúdo
Visão Geral do Produto
i-Station Tower com Colunas
Adaptador CA com tomadas
intercambiáveis (Euro2
pinos e BS 3 pinos)
Pilhas
(CR2025)
Controlo
Remoto
Frente
Traseira
Video Out
(saída de
video)
Aux Input
(entrada Aux)
Botão
“Reset”
(Reiniciar)
Ficha de
Adaptador AC
Antena FM
Descanso vazio
Conector de
Suporte
Controlos
Logic3
Page 68

Pilha de Segurança
O i-Station Tower possui uma pilha de segurança que mantém a configuração do relógio em caso de falta de
alimentação eléctrica.
1. Retire a tampa do compartimento da pilha na parte inferior do i-Station Tower.
2. Insira a pilha x2 AAA (não incluído).
AVISO: Certifique-se de que a pilha é inserida de forma correcta. Se a pilha for inserida de forma
incorrecta (polaridade invertida), poderá correr o risco de danos pessoais assim como danos ao seu
i-Station Tower.
3. Substitua a tampa da pilha.
Nota: a pilha de segurança mantém apenas a memória do relógio; não ilumina o respectivo ecrã.
Preparação da i-Station Tower
1
2
A
B
3
4
Logic3
Page 69

1. Retire o descanso vazio e insira o descanso adequado (fornecido com o seu iPod) na base do suporte.
2. Seleccione e insira o adaptador de ficha correcto de forma a ajustar-se à respectiva fonte de alimentação (A
- Reino Unido 3 pinos / B – Europa 2 Pinos).
3. Ligue o Adaptador AC da rede de alimentação ao i-Station Tower (DC 8V 2A), ligue a fonte de alimentação
à tomada eléctrica, e coloque na posição ON (ligado).
4. Coloque o iPhone/iPod sobre o conector da base móvel.
Escolha de definições
A i-Station Tower foi concebida para que a unidade possa ser empilhada ou colocada em modo padrão.
NOTA: no âmbito de todos os modelos iPhone/iPod touch, consulte o itunes e proceda ao
download do i-Station Tower APP antes de continuar a configuração.
Nota: logo que a App seja lançada, as funções seguintes são alvo de alteração:
a. O ecrã das horas da App sobrepõe-se ao ecrã das horas da i-Station Tower (o ecrã das
horas do i-Station Tower passa a estar em branco, sendo utilizada a informação horária
da App).
b. Os Alarmes da App sobrepõem-se às definições de alarme da i-Station Tower (as
definições de Alarme da i-Station Tower deixam de funcionar)
c. A App sobrepõe-se a todas as funções de controlo remoto (excepto os comandos do
Volume)
Para obter o manual/instruções sobre a i-Station Tower APP, consulte o nosso Website
(www.logic3.com) e proceda ao download do manual (PDF) a partir da secção FAQ (Perguntas
Frequentes).
Logic3
Page 70

Definição de Hora/Data
A. Em Modo Stand By (alerta):
1. Prima o botão “Set” (definir) na i-Station Tower/Controlo Remoto (hora em formato de 12 h)
2. Utilize os Botões de Volume da i-Station Tower/Controlo Remoto para definir o formato da hora (12h/24h).
3. Prima o botão “Set” (definir) na i-Station Tower/Controlo Remoto (o ecrã da hora fica intermitente).
4. Defina a Hora utilizando os botões “Tune -/ Tune +” (sintonizar - ou +) da i-Station Tower/botões do Controlo
Remoto.
5. Defina os Minutos utilizando os botões de Volume da i-Station Tower/botões do Controlo Remoto.
6. Aguarde durante 5 segundos para que as definições sejam guardadas automaticamente e o ecrã voltará à
apresentação da hora actual.
Nota: No modo de selecção, caso não sejam premidos botões durante 5segundos, o ecrã volta a
apresentar a imagem da hora actual.
Seleccionar uma fonte (iPhone/iPod, Rádio ou AUX)
Existem duas formas para seleccionar a fonte:
1. Através da i-Station Tower
A. Prima o botão “Source” (fonte) da i-Station Tower para ligar a i-Station Tower.
B. Ao premir no botão “Source” (fonte) uma vez mais, ser-lhe-á apresentada a lista de Fontes.
2. Através do Controlo Remoto
A. Prima o botão “Stand By” (modo alerta) do Controlo Remoto para ligar a i-Station Tower.
B. Ao premir o botão “Source” (fonte) do Controlo Remoto poderá percorrer a lista de Fontes.
iPod
AUXFMiPod
AUX
FM
Logic3
Page 71

Configuração do Rádio
Apenas podem ser guardados 20 Selecções de cada vez.
1. Desate o cabo de antena FM e posicione a antena de forma mais elevada possível.
2. Ligue a i-Station Tower e seleccione o Rádio FM através do botão “Source” (fonte).
3. Utilize os botões “TUNE- / TUNE+” (sintonizar - ou +) da i-Station Tower/Controlo Remoto para definir a
frequência de rádio desejada (ao premir o botão “TUNE- / TUNE+” (sintonizar - ou +) uma vez fará sintonizar
o rádio de forma manual, prima e mantenha premido o botão “Tuning” (sintonizar) para proceder à pesquisa
automática da estação de rádio).
4. Prima o botão “Set” (definir) da i-Station Tower ou o botão “Mem” (memória) do Controlo Remoto (o número
do canal fica intermitente).
5. Ao usar os botões “Tune - / Tune +” (sintonizar - ou +), seleccione o número do Canal no qual deseja
guardar a sua estação de rádio.
6. Prima o botão “Set” (definir) da i-Station Tower ou o botão “MEM” (memória) do Controlo Remoto para
guardar as suas definições.
Nota: No modo de selecção, caso não sejam premidos botões durante 5 segundos, o ecrã volta a
apresentar a imagem da hora actual.
OU
OU
OU
Logic3
Page 72

Revogar uma Estação de Rádio Seleccionada
A i-Station Tower funciona em conjunto com a App (i-Station Tower) descarregada através do iTunes.
Esta aplicação permitir-lhe-á recuperar as predefinições de rádio APP na coluna através do iPhone.
Existem duas formas de recuperar as suas estações de rádio:
1. Utilizando a i-Station Tower
A. Prima o botão “Preset” (predefinir) da i-Station Tower e o número do Programa surgirá no ecrã.
B. Seleccione o seu Canal Programado utilizando “Tune - / Tune +” (sintonizar - ou +).
C. Alternativamente, pode premir o botão “Preset +/Preset –“ (programar + ou -) no Controlo Remoto para
seleccionar o seu Canal Predefinido.
D. Logo que a programação tenha sido seleccionada, a i-Station Tower será definida como programada e a
frequência do canal seleccionado será apresentado no ecrã.
Nota: No modo de selecção, caso não sejam premidos botões durante 5 segundos, o ecrã volta a
apresentar a imagem da hora actual.
2. Utilização da i-Station Tower APP (predefinições para Armazenamento e Renomeação)
1
2
3
Logic3
Page 73

1. Seleccione a Fonte de Rádio.
2. Seleccione a lista de canais pré-seleccionados.
3. Seleccione “Add New Channel” (adicionar novo canal).
4. Modifique o nome do canal programado, caso seja necessário.
5. Sintonize o rádio para a frequência preferida e a seguir prima o botão “Save” (guardar) para guardar a nova
estação.
6. Seleccione o canal programado desejado para o ouvir.
Definição de EQ
A i-Station Tower possui 5 definições EQ:
1. Prima o botão EQ do Controlo Remoto da i-Station Tower para que a definição EQ se altere e o número de
EQ surja no ecrã.
2. Ao premir o botão EQ uma vez mais dar-lhe-á acesso às definições EQ.
E:0 NORMAL E:1 JAZZ E:2 CLASSIC E:3 ROCK E:4 POP
Modo de Sonoridade e Impulso de Graves
Definição de sonoridade:
1. Em modo “Stand by” (em alerta) prima o botão “SET” (definir) da i-Station Tower/Controlo Remoto 3 vezes.
2. A palavra “OFF” (desligado) fica intermitente no ecrã, deverá usar os botões de “Volume” da i-Station
Tower/Controlo Remoto para passar a Sonoridade de “OFF” (desligado) para “ON” (ligado).
Definição de Impulso de Graves:
4
5
6
Logic3
Page 74

1. Em modo de fonte, prima o botão “DBBS” no Controlo Remoto para definir o DBBS como ON/OFF
(ligado/desligado).
Definição do Modo de Inactividade
O modo de Inactividade (Sleep) permite que a unidade funcione no modo iPhone/iPod ou Rádio FM até 90
minutos antes de se desligar automaticamente.
O tempo de inactividade pode ser ajustado de acordo com as preferências do utilizador.
1. Ligue a i-Station Tower em qualquer modo de fonte e prima o botão “Sleep” (inactivo) no Controlo Remoto
da i-Station Tower.
2. Ao voltar a premir o botão “Sleep” (inactivo) terá acesso aos tempos de inactividade (15, 30, 45, 60, 90, 00).
3. Logo que seleccione o tempo de Inactividade surge no ecrã o “SL” e os minutos seleccionados.
4. Para desligar o modo Inactivo antes de atingir o tempo inactivo definido, prima e mantenha premido o botão
“Source” (fonte).
5. O tempo de inactividade será contado de forma decrescente; para apresentar o tempo de inactividade
restante prima o botão “Sleep” (inactivo).
Para desligar o modo de Inactividade antes de atingir o tempo inactivo definido, prima e mantenha premido
o botão “Source” (fonte) da i-Station Tower ou prima o botão “Standby” (em alerta) do Controlo Remoto.
Nota: se tiver um dispositivo externo ligado à sua entrada AUX, o temporizador de inactividade desliga
apenas a i-Station Tower, não desliga o seu dispositivo externo.
Definir o Alarme
1. No modo “Stand By” (em alerta) prima e mantenha premido o botão “Alarm” (alarme) da i-Station
Tower/Controlo Remoto até as unidades da Hora e Minutos ficarem intermitentes (AL surgirá no canto
inferior esquerdo do ecrã).
2. Utilize os botões “Tune - ou Tune +” (sintonizar - ou +) da i-Station Tower/Controlo Remoto para definir a
Hora.
OU
O
U
AL
Logic3
Page 75

3. Utilize os botões de “Volume” da i-Station Tower/Controlo Remoto para definir os Minutos.
4. Prima o botão “Alarme” do i-Station Combo/Controlo Remoto para passar à próxima fase.
5. Utilize os botões de “Volume” da i-Station Tower/Controlo Remoto para seleccionar qual a fonte que deseja
definir.
6. Prima o botão “Alarm” (alarme) para confirmar todas as definições e o ecrã voltará à hora actual, sendo AL
indicado no canto inferior esquerdo do ecrã para demonstrar que o Alarme se encontra activado.
Ligar/Desligar o Alarme:
A. Através da i-Station Tower
Ligar o Alarme
1. Prima e mantenha premido o botão "Alarm" (alarme) da i-Station Tower/Controlo Remoto até as unidades
de hora e minutos ficarem intermitentes.
2. Aguarde até o ecrã voltar à hora original, o ícone de Alarme (AL) surge então no campo inferior esquerdo do
ecrã para demonstrar que o Alarme se encontra activado.
O
U
AL
AL
O
U
Logic3
Page 76

Desligar o Alarme
1. Prima o botão “Alarm” (alarme) uma vez da i-Station Tower e o indicador do ícone AL no campo inferior
esquerdo do ecrã desaparecerá.
B. Através do Controlo Remoto
1. Prima o botão “Alarm” (alarme) do controlo remoto para activar o indicar do ícone AL no campo inferior
esquerdo do ecrã.
Desligar o Alarme após a sua activação
Acordar ao Som do Alarme
1. Quando o Alarme soar, prima o botão “Alarm” (alarme) da i-Station Tower/Controlo Remoto e o alarme será
desligado, sendo redefinido para o dia seguinte.
2. Se o Alarme não for desligado após 1 minuto, passa automaticamente ao modo “snooze” (dormitar)
(aproximadamente 9 minutos), o alarme volta a soar após 9 minutos. Isto é repetido 5 vezes no espaço de
60 minutos.
Acordar ao som do iPod/rádio
1. Quando o Alarme soar, prima o botão “Alarm” (alarme) da i-Station Tower/Controlo Remoto e o alarme será
desligado, sendo redefinido para o dia seguinte.
2. Se o Alarme não for desligado após 60 minutos, desliga-se e é redefinido para o dia seguinte.
Função “Snooze” (dormitar)
1. Quando o Alarme soar, prima o botão “Snooze” (dormitar) da i-Station Tower/botão “Snooze” do
Controlo Remoto; o alarme passa a estar em modo “snooze” (dormitar) (aproximadamente 9 minutos).
2. O alarme volta a soar ao fim de 9 minutos. Isto repete-se 5 vezes (com intervalos de 12 minutos) no espaço
de 60 minutos.
AL
Logic3
Page 77

Definição da Ligação de Vídeo
1. Ligue o Cabo de Vídeo Composto (não incluído) à traseira da i-Station Tower (Video Out (saída de vídeo).
2. Ligue a outra extremidade do Cabo de Vídeo Composto ao terminal de Entrada de Vídeo do televisor.
3. Seleccione a fonte iPod/iPhone na sua i-Station Tower.
4. Coloque o seu iPod/iPhone no suporte da i-Station Tower.
5. Seleccione o Vídeo desejado no seu iPod/iPhone e prima “Play” (reproduzir).
6. Certifique-se de que as definições de Vídeo no seu iPod estão configuradas como “TV OUT”.
Nota: a Saída de Vídeo depende do Modelo de iPod utilizado
Funções do Controlo Remoto
1. Insira a pilha na parte traseira do Controlo Remoto.
AVISO: Certifique-se de que a pilha é inserida de forma correcta. Se a pilha for inserida de forma incorrecta
(polaridade invertida), poderá correr o risco de danos pessoais assim como danos ao seu controlo remoto.
Sleep (inactivo) RW/Rewind / Tune - (retroceder/anterior/Sintonizar -)
DBBS Alarm Setting ON/OFF (Desligar/ Ligar Alarme)
MEM (memória) Stand By (em alerta)
Preset UP (predefinição ascendente) Source (fonte)
Preset Down (predefinição descendente) Set (definir)
Dim/Snooze (diminuir/dormitar) Volume Up (aumentar volume)
EQ Volume Down (diminuir volume)
Play/Pause (reproduzir/pausa) Mute (inactivo)
FF/Next / Tune+ (Avançar/Seguinte/Sintonizar +)
AV IN
VIDEO
Logic3
Page 78

Definição de Aux
A i-Station Tower também oferece a capacidade de permitir a ligação de outros dispositivos de áudio
portáteis, como iPod shuffle, MP3, MiniDisc, etc., com uma ficha para auriculares de 3.5 mm que deverá ser
ligada através do Auxiliar.
1. Ligue um cabo alinhado (não incluído) na traseira da i-Station Tower (Aux Socket (entrada Aux)).
2. Ligue a outra extremidade do cabo à entrada para auriculares do outro dispositivo.
3. Defina o volume do seu dispositivo no Máximo.
4. Prima o botão “Source” (fonte) da i-Station Tower/botão “Standby” (em alerta) do Controlo Remoto para ligar
a unidade.
5. Prima o botão “Source” (fonte) da i-Station Tower/Controlo Remoto para seleccionar a fonte, neste caso
AUX.
NOTA: Lembre-se de retirar o cabo quando estiver a utiliza o conector da base móvel do i-station Tower
para o iPhone/iPod, visto que o cabo anula qualquer som provindo da estação móvel.
Resolução de Problemas
Problema O que devo fazer?
Sem Som/Imagem
Verifique o estado de reprodução do iPhone/iPod
Tente actualizar o software do seu iPhone/iPod utilizando o último iTunes.
Verifique se ligou a i-Station Tower correctamente (consultar Configurar Ligação
Vídeo)
Verifique se o iPod está definido para saída de TV (consulte o manual do seu
iPod para obter mais informações sobre definições)
Verifique as suas definições de formato (PAL, NTSC, consulte o manual do seu
iPhone/iPod para obter mais informações sobre definições)
O Controlo Remoto não
está a funcionar
Substitua a Pilha
Assegure-se de que a Pilha está inserida correctamente (Polaridade)
Certifique-se de que o controlo remoto se encontra dentro do raio de
funcionamento de 6 metros de distância do i-Station Tower
Som do rádio FM sem
nitidez/não encontra
estação de rádio
Reposicione o cabo da antena até ouvir as estações com maior nitidez.
A i-Station não
responde a nenhum
comando
Prima o botão "Reset” (reiniciar) localizado na traseira da i-Station Tower
Logic3
Page 79

Lista de Peças Sobresselentes
ParteNºCódigo do
objecto
Nome do Objecto Preço
1 YAD019 ADAPTADOR AC
Para informações
sobre os preços,
visite o nosso
website em
www.logic3.com
2 YRM019K CONTROLO REMOTO (PRETO)
3 YCB000K CABO LINE IN (PRETO)
Para informações sobre os Lista de Peças/Preços, visite o nosso website www.logic3.com
Se tiver algum problema de configuração com a i-Station Tower (WIS019), Por favor contacte a
nossa Linha de Assistência Técnica: +44 (01923) 471 000 – Aplicam-se preços de chamada
nacional/internacional, ou envie-nos um E-mail para support@logic3.com – No nosso website
estão disponíveis partes sobresselentes para alguns modelos em www.logic3.com
Logic3
Page 80

i-Station Tower (WIS019) – NL gebruikershandleiding
Hartelijk dank voor de aankoop van de Logic3 i-Station Tower. Zoals bij alle Logic3 producten is dit
product volgens de hoogste kwaliteits- en fabrieksnormen ontworpen en getest om u het best
mogelijke product te kunnen bieden. Lees deze handleiding aandachtig door voordat u de i-Station
Tower in gebruik neemt.
Inhoud
Productoverzicht
i-Station Tower met luidsprekers
Wisselstroomadapter
met twee opzetstekkers
(Euro 2pin en BS 3pin)
Batterij
(CR2025)
Afstandsbediening
Voorzijde
Achterzijde
Video Out
Aux Input
Resetknop
AC adapter ingang
FM antenne
Blanco cradle
Dock-connector
Bedieningspaneel
Logic3
Page 81

Reservebatterij
De i-Station Tower heeft een reservebatterij om de klokinstellingen te bewaren wanneer de stroom uitvalt.
1. Verwijder de batterijklep aan de onderkant van de i-Station Tower.
2. Plaats de meegeleverde batterij 2 x AAA (niet inbegrepen).
WAARSCHUWING: Zorg ervoor dat u de batterij correct plaatst. Als u de batterij met omgekeerde
polariteit plaatst, kan dit zowel persoonlijke verwondingen als schade aan uw i-StationTower tot gevolg
hebben.
3. Plaats de batterijklep weer terug.
Opmerking: De reservebatterij bewaart alleen de klok; de schermverlichting zal niet werken.
Installeren van de i-Station Tower
1
2
A
B
3
4
Logic3
Page 82

1. Verwijder de blanco cradle en plaats de juiste in de (met uw iPod meegeleverde) docking base.
2. Kies en plaats de juiste opzetstekker voor uw stopcontact (A - UK 3pin / B – Euro 2 Pin).
3. Sluit de wisselstroomadapter aan op de i-Station Tower (DC 8V 2A), steek de stekker in een stopcontact en
zorg dat er stroom op het stopcontact staat.
4. Plaats de iPhone/iPod in de dockinglade.
Instellingen kiezen
De i-Station Tower is zo ontworpen dat de unit standaard kan worden gestapeld of opgesteld.
N.B.: ga voor alle iPhone/iPod touchmodellen naar itunes en download de i
-
Station Tower APP
voordat u met de installatie verder gaat.
Opmerking: De volgende functies veranderen wanneer de App is gestart:-
a. De tijdweergave van de App annuleert de tijdweergave van de i-Station Tower (de
tijdweergave van de i-Station Tower is leeg, de tijd van de App zal worden gebruikt)
b. Het alarm van de App annuleert de alarminstellingen van de i-Station Tower (de
alarminstellingen van de i-Station Tower werken niet)
c. De App annuleert alle functies van de afstandbediening (M.u.v. het volume)
Ga voor de handleiding/instructies vor de i-Station Tower APP naar onze website
(www.logic3.com) en download de handleiding (PDF) in het onderdeel FAQ
Logic3
Page 83

Tijd/datum instellen
A. In stand-by modus:-
1. Druk op de ‘Set’ knop van het bedieningspaneel van de i-Station Tower (Tijd geeft 12hr weer)
2. Stel met de ‘Volume’ knoppen van het bedieningspaneel van de i-Station Tower het tijdformaat in (12hr/24hr).
3. Druk op de ‘Set’ knop van het bedieningspaneel van de i-Station Tower
(Tijdweergave knippert).
4. Stel het uur met behulp van de ‘Tune - / Tune +’ knoppen van het bedieningspaneel van de i-Station Tower in
5. Stel de minuten met behulp van de ‘Volume’ knoppen van het bedieningspaneel van de i-Station Tower in.
6. Wacht 5 seconden en de instellingen worden automatisch opgeslagen. De display geeft opnieuw de huidige tijd
weer.
Opmerking: Als u in de instellingsmodus 5 seconden geen toetsen indrukt, keert het scherm terug naar
de tijdweergave.
Een bron selecteren (iPhone/iPod, Radio of AUX)
U kunt op twee manieren de bron selecteren:-
1. Met de i-Station Tower
A. Druk op de ‘Source’ knop van de i-Station Tower. Hiermee zet u de i-Station Tower aan.
B. Door nogmaals op de ‘Source’ knop te drukken doorloopt u de bronnenlijst.
iPod
AUX
FM
Logic3
Page 84

2. Met de afstandsbediening
A. Druk op de ‘Stand By’ knop van de afstandsbediening. Hiermee zet u de i-Station Tower aan.
B. Door op de ‘Source’ knop van de afstandsbediening te drukken doorloopt u de bronnenlijst.
De radio instellen
U kunt 20 voorkeuzezenders tegelijkertijd bewaren.
1. Wind de kabel van de FM-antenne af en plaats de antenne zo hoog mogelijk.
2. Zet de i-Station Tower aan en selecteer met de ‘Source’ knop de FM radio.
3. Stel met de ‘TUNE- / TUNE+’ knoppen van de het bedieningspaneel van de i-Station Tower de gewenste
radiofrequentie in. (Door één keer op de ‘TUNE- / TUNE+’ knop te drukken stelt u de radio met de hand in, door
de ‘Tuning’ knop ingedrukt te houden wordt automatisch gezocht)
4. Druk op de ‘Set’ knop van de i-Station Tower of op de ‘Mem’ knop van de afstandsbediening (kanaalnummer
gaat knipperen)
5. Selecteer met de ‘Tune - / Tune +’ knoppen het kanaalnummer waaronder u het radiostation wilt opslaan.
6. Druk op de ‘Set’ knop van de i-Station Tower of op de ‘MEM’ knop van de afstandsbediening om de instellingen
op te slaan.
Opmerking: Als u in de instellingsmodus 5 seconden geen toetsen indrukt, keert het scherm terug naar
de tijdweergave.
OF
iPod
AUX
FM
OF
OF
Logic3
Page 85

Om een voorkeurszender op te roepen
De i-Station Tower werkt samen met een te downloaden App (i-Station Tower), die via iTunes kan worden
gedownload.
Met deze toepassing kunt u via de iPhone de op de luidspreker ingestelde APP radio oproepen.
Er zijn twee manieren waarop u uw radiostations kunt oproepen:-
1. Met de i-Station Tower
A. Druk op de ‘Preset’ knop van de i-Station Tower en het programmanummer wordt op de display
weergegeven.
B. Met de ‘Tune - / Tune +’ om uw ingestelde kanaal te selecteren.
C. Ook kunt u op de ‘Preset +/Preset –‘ knop van de afstandsbediening drukken om uw ingestelde kanaal te
selecteren.
D. Nadat het ingestelde kanaal is geselecteerd, wordt de frequentie van het geselecteerde kanaal op de display
van de i-Station Tower weergegeven.
Opmerking: Als u in de instellingsmodus 5 seconden geen toetsen indrukt, keert het scherm terug naar
de tijdweergave.
2. Met de i-Station Tower APP (Ingestelde opties opslaan en een andere naam geven)
1
2
3
Logic3
Page 86

1. Selecteer de radiobron.
2. Selecteer de lijst met ingestelde kanalen.
3. Selecteer ‘Nieuw kanaal toevoegen’.
4. Pas, indien nodig, de ingestelde kanaalnaam aan.
5. Stel de radio op de voorkeursfrequentie af en druk vervolgens op de ‘Save’ knop op het nieuwe station op te
slaan.
6. Selecteer het gewenste ingestelde kanaal voor luisteren.
Instelling van de EQ
De i-Station Tower heeft 5 EQ-instellingen:-
1. Druk op de EQ-knop van de afstandsbediening van de i-Station Tower en de EQ-instelling en het EQ-nummer
worden weergegeven.
2. Door nog een keer op de EQ-knop te drukken doorloopt u de EQ-instellingen.
E:0 NORMAL E:1 JAZZ E:2 CLASSIC E:3 ROCK E:4 POP
Loudness en Bass Boost
Instelling van loudness:-
1. Druk in de stand-bymodus 3 keer op de ‘SET’ knop van het bedieningspaneel van de i-Station Tower
2. OFF knippert nu op de display. Met de ‘Volume’ knoppen van het bedieningspaneel van de i-Station Tower kunt
de loudness van OFF op ON zetten.
Instelling van Bass Boost:-
1. Druk in een bronmodus op de ‘DBBS’ knop van de afstandsbediening. Hiermee kan de DBBS ON/OFF gezet
worden.
4
5
6
Logic3
Page 87

De sleepmodus instellen
Met de sleepfunctie kan de unit maximaal 90 minuten met de iPhone/iPod of FM-radio in werking zijn voordat hij
automatisch uitschakelt.
De sleeptijd kan aan de wensen van de gebruiker worden aangepast.
1. Zet de i-Station Tower aan. Druk ongeacht de bronmodus op de ‘Sleep’ knop van de afstandsbediening van de
i-Station Tower.
2. Door nog een keer op de ‘Sleep’ knop te drukken doorloopt u de sleeptijden (15, 30, 45, 60, 90, 00)
3. Nadat u de sleeptijd hebt geselecteerd, worden ‘SL’ en de door u geselecteerde minuten op de display
weergegeven.
4. Om de ‘Sleep’ modus uit te zetten voordat de ingestelde sleeptijd is bereikt, houd u de bronknop ingedrukt.
5. De sleeptijd telt af. Om de resterende sleeptijd te zien drukt u op de ‘Sleep‘ knop.
Om de ‘Sleep’ modus op OFF te zetten voordat de sleeptijd wordt bereikt, houd u de bronknop op de i-Station
Tower ingedrukt of drukt u op de stand-byknop op de afstandsbediening.
N.B.: als u een extern apparaat op uw AUX input aangesloten hebt, zal de ‘sleep’ timer alleen uw i-Station Tower
OFF zetten, niet uw externe apparaat.
Het alarm instellen
1. Houd in de stand-by modus de alarmknop van de i-Station Tower / afstandsbediening ingedrukt totdat de
eenheden uur en minuten beginnen te knipperen (links onderaan de display wordt AL weergegeven)
2. Stel met de ‘Tune - of Tune +’ knoppen van het bedieningspaneel van de i-Station Tower het uur in.
3. Stel met de ‘Volume’ knoppen van het bedieningspaneel van de i-Station Tower de minuten in.
O
F
OF
AL
O
F
Logic3
Page 88

4. Druk op de ‘Alarm’ knop van het bedieningspaneel van de i-Station Tower om naar de volgende fase te gaan.
5. Selecteer met de ‘Volume’ knoppen op het bedieningspaneel van de i-Station Tower de bron die u wilt instellen.
6. Druk op de ‘Alarm’ knop om alle instellingen te bevestigen en de display geeft opnieuw de huidige tijd aan.
Links onderaan de display ziet u AL om aan te geven dat het ’Alarm’ is geactiveerd.
Om het alarm ON/OFF uit te zetten: –
A. Met de i-Station Tower
Het alarm ON zetten
1. Houd de alarmknop van het bedieningspaneel van de i-Station Tower ingedrukt totdat zowel uur als minuten
beginnen te knipperen.
2. Wacht totdat de display weer de originele tijd laat zien. Het alarmpictogram (AL) zal links onderaan de display
worden weergegeven om te laten zien dat het ’Alarm’ is geactiveerd.
Het alarm OFF zetten
1. Druk één keer op de ‘Alarm’ knop van de i-Station Tower en het symbool boven AL links onderaan de display
zal verdwijnen.
O
F
AL
AL
AL
Logic3
Page 89

B. Met de afstandsbediening
1. Druk op de alarmknop op de afstandsbediening. Hiermee wijzigt u het AL-symbool links onderaan de display
Het alarm OFF zetten na activering
Wakker worden met de zoemer
1. Wanneer het alarm afgaat, drukt u op de ‘Alarm’ knop van het bedieningspaneel van de i-Station Tower.
Het alarm wordt op OFF gezet en voor de volgende dag opnieuw ingesteld.
2. Als het alarm niet na 1 minuut op OFF wordt gezet, gaat hij automatisch over op ‘snooze’ (ongeveer 9 minuten).
Het alarm gaat na 9 minuten opnieuw af. Dit wordt in 60 minuten 5 keer herhaald.
Wakker worden met de iPod/radio
1. Wanneer het alarm afgaat, drukt u op de ‘Alarm’ knop van het bedieningspaneel van de i-Station Tower.
Het alarm wordt op OFF gezet en voor de volgende dag opnieuw ingesteld.
2. Als het alarm niet na 60 minuten op OFF gezet wordt, zal hij op OFF worden gezet en voor de volgende dag
opnieuw worden ingesteld.
Snoozefunctie
1. Druk wanneer het alarm afgaat op de ‘Snooze’ knop van het bedieningspaneel van de i-Station Tower.
Het alarm is in ‘snoozemodus’ (ongeveer 9 minuten).
2. Het alarm zal dan na 9 minuten opnieuw afgaan. Dit wordt in 60 minuten 5 keer herhaald (met intervallen van
12 minuten).
Instelling van de videoaansluiting
1. Doe de samengestelde kabel voor video (niet inbegrepen) achter in de i-Station Tower (Video Out).
2. Sluit de andere kant van de samengestelde kabel voor video op de input videoterminal van de tv aan.
3. Selecteer de iPod/iPhone-bron op uw i-Station Tower.
4. Dok uw iPod/iPhone op de i-Station Tower.
5. Selecteer uw video op uw iPod/iPhone en druk op play.
6. Zorg er voor dat uw video-instellingen van uw iPod op ‘TV OUT’ zijn ingesteld.
N.B: de video-output is afhankelijk van het iPod-model
AV IN
VIDEO
Logic3
Page 90

Functies van de afstandsbediening
1. Plaats een batterij in de achterkant van de afstandsbediening.
WAARSCHUWING: Zorg ervoor dat u de batterij correct plaatst. Als u de batterij met omgekeerde polariteit plaatst,
kan dit zowel persoonlijke verwondingen als schade aan uw afstandsbediening tot gevolg hebben.
Sleep RW/Rewind / Tune -
DBBS Alarm Setting ON/OFF (Alarm ON/OFF)
MEM Stand-by
Preset UP (Preset omhoog) Source (Bron)
Preset Down (Preset omlaag) Set (Instellen)
Dim/Snooze Volume Up (Volume omhoog)
EQ Volume Down (Volume omlaag)
Play/Pause Mute
FF/Next / Tune+
Instelling van Aux
Met de i-Station Tower kunt u ook andere draagbare audio-apparaten zoals iPod shuffle, MP3, MiniDisc en
andere audio-apparaten met een koptelefoonaansluiting van 3,5 mm via de aux aansluiten.
1. Doe een line in cable (niet inbegrepen) in de achterzijde van de i-Station Tower (Aux-ingang).
2. Sluit het andere uiteinde van de line in cable op de koptelefooningang van uw apparaat aan.
3. Zet de volume van het apparaat op maximum.
4. Druk op de ‘Source’ knop van de i-Station Tower / de ‘Standby’ knop van de afstandsbediening om de unit aan
te zetten.
5. Druk op de ‘Source‘ knop van de i-Station Tower / afstandsbediening om de bron te doorlopen totdat u AUX
hebt geselecteerd.
OPMERKING: Vergeet de line-in-kabel niet te verwijderen wanneer u de i-Station Tower wilt gebruiken voor
de iPhone/iPod, want de line-in-kabel heeft voorrang op geluid dat afkomstig is van de dockingstation.
Logic3
Page 91

Problemen oplossen
Lijst reserveonderdelen
Onderdeelnr. Itemcode Itemnaam Prijs
1 YAD019 WISSELSTROOMADAPTER
Bezoek voor
prijzen onze
website op
www.logic3.com
2 YRM019K Afstandsbediening
3 YCB000K Line-in-kabel (zwart)
Kijk voor Lijst reserveonderdelen/Prijzen op onze website, www.logic3.com
Probleem Wat moet ik doen?
Geen geluid/beeld
Controleer of uw iPhone/iPod geluid aan het afspelen is
Probeer de software van uw iPhone/iPod bij te werken met de nieuwste versie
van iTunes.
Controleer dat u het i-Station Tower correct hebt aangesloten (zie instellen van
de video-aansluiting)
Controleer dat uw iPod is ingesteld op tv-uit (raadpleeg uw iPod handleiding
voor instellingen)
Controleer uw formaat-instellingen (PAL, NTSC raadpleeg uw iPhone/iPod
handleiding voor instellingen)
De afstandsbediening
werkt niet
Vervang de batterij
Controleer of de batterij juist geplaatst is (polariteit)
Zorg dat u de afstandsbediening binnen 6 meter van de i-Station Tower gebruikt
FM Radio niet helder /
Radiozender niet
gevonden
Wijzig de positie van de FM-antennekabel totdat het geluid goed is
i-Station reageert op
geen enkele
bedieningsopdracht
Druk op de ‘Reset’ knop aan de achterzijde van de i-Station Tower
Als u enige installatieproblemen ondervindt met de i-StationTower (WIS019), neem dan contact op met onze
Klantenservice Hotline op +44 (01923) 471000 – Nationale/internationale tarieven zijn van toepassing of stuur
een e-mail naar support@logic3.com - Voor bepaalde modellen zijn reserveonderdelen beschikbaar op onze
website www.logic3.com
Logic3
Page 92

INTE RNET RA DIO & MY MU SIC
Ente r to sign u p "My Mus ic" to st ream yo ur own
PC mus ic coll ectio n and int ernet r adio.
Free s ign up in terne t radio a nd tria l My Musi c
lite , or subs cribe f ull My Mu sic ser vice.
Depe nds on th e local M y Music s ervic e provi der
the si gn up int erfac e may var y by regi on:
Afte r sign up
Enjo y your pe rsona l music c ollec tion
and pl aylis t store d in your c omput er.
Inte rnet ra dio
Pers onal se tting s.
More n ew serv ices wo uld be
upgr aded by s ervic e provi der.
Sign u p My Musi c
& inte rnet ra dio
User nam e
Passwor d
Enter
Sign u p
Regist er for
free My Mu sic lit e,
free Int ernet Ra dio,
subscr ibe ful l My Musi c servi ce.
Sign in no w
Welcome t o My Musi c
1. Fol low the o n scree n guide t o
sign i n your em ail add ress.
2. You wil l recei ve an ema il
from t he loca l servi ce
prov ider. Fo llow th e email t o
comp lete th e regis trati on at
your c omput er.
3. Onl y for use rs' who h ave
subs cribe d full My M usic
serv ice, do wnloa d My Musi c
Sync s oftwa re from t he
serv ice's w eb site t o the
comp uter in o rder to s ync
your m usic co llect ion fro m
your c omput er to the s erver.
4. Ent er this a pp agai n, inpu t
your r egist ered us er name
and pa sswor d, pres s Enter.
Alert
Docking R equir ed to use t his
Feature
OK
Valid D ockin g
Besi des the u sers th at have s ubscr ibed fu ll
My Mus ic serv ice, th is app re quire d the iPh one
conn ects to t he vali d docki ng stat ion to ex ecute
the in terne t radio a nd free M y Music l ite. (U sers
that h ave sub scrib ed My Mus ic are no t limit ed
to thi s requi remen t)
For a fr ee user a ttemp t to
use th ese fea tures i f a valid
dock ing sta tion is n ot
dete cted, a n alert w indow
will d ispla y on the iP hone
scre en. Con nect th e iPhon e
to a val id dock ing, pr ess OK
to con tinue .
My Mu sic is a clo ud base pe rson al netw ork mus ic stre aming su bscr iptio n
serv ice, au to sync yo ur mus ic coll ectio n and pla ylist s that st ored in yo ur
comp uter to yo ur mob ile, ta blet, i ntern et radi o playe r seaml essly, n ot havi ng
dire ct conn ectio n or file co nver satio n betwe en devi ces and t he comp uter.
Sign up free tr ial My Mu sic lit e and fre e inter net rad io work s with
Dock ing Par tner co mpati ble doc king st ation .
My Mus ic is pow ered by P lay Anyw here .
®
Pres s the ico n on the de vice to o pen the a pp.
Scro ll left a nd righ t to acce ss the fo ur func tion ma in scre ens.
i-St ation
HOME
AUDI O
Home
Audi o
Phot o
Inte rnet ra dio & My Mu sic
USER'S GUIDE
MY PHO TO
Alar m statu s
Date
Cloc k
Weath er
Pres s to refr esh wea ther
Func tion ic ons
Sched uled ev ent
Add eve nt:
Selec t "Alar m to Mess age" at
"Voice M essag e" to rec ord you r
own voi ce alar m sound .
Edit al arm
Add new a larm:
Selec t "Alar m to Mess age" at
"Alar m sound " to reco rd your
own voi ce alar m sound
Alarm O n/Off
Alarm s ettin gs
Set tim er:
The doc king wi ll auto matic
power o ff.
Sleep t imer st atus
Sleep O n/Off
Set aud io equa lizer
Selec t city
Selec t
tempe ratur e unit
iPod p layer
Audi o docki ng func tions m enu
(iPo d, Natu re Soun d,
Radi o, Aux-i n)
Voice M essag e Al arm S leep Settin g
iPod m usic Nature S ounds
Dock ing Rad io
(if the d ockin g has bui lt in FM)
Dock ing Aux I n
Slide t o adjus t volum e
Playb ack sta tus
Music i nvent ory
Playb ack con trol
Slide t o adjus t volum e
Docki ng Aux In
chann el On/o ff
Curre nt soun d
Prese t chann el sett ings
Slide t o adjus t volum e
Docki ng tune r On/Of f,
selec t chann el, See k
IMP ORTANT N OTICE
Natu re Soun d, Radi o, Aux-i n
oper ates on ly when t he devi ce is doc ked to th e
asso ciati ng audi o docki ng unit .
Natur e Sound s opera te only
when th e devic e is dock ed to the
assoc iatin g docki ng stat ion.
FM radi o opera tes onl y when th e
devic e is dock ed to the a ssoci ating
docki ng stat ion tha t built i n FM.
Aux In op erate s only wh en the
devic e is dock ed to the a ssoci ating
docki ng stat ion tha t built i n Aux-I n.
Add ph oto fro m
devi ce's me mory.
Slid e show
Came ra shot
TRO UBLES HOOTI NG
App no t found
No sou nd at
devi ce
App sh ould be d ownlo aded
from Ap p Store . Searc h
"i-S tatio n" at
App St ore and f ree ins tall.
Subs cribe M y Music
full v ersio n, My Mus ic
and in terne t radio c an
oper ate wit hout th e docki ng.
No sou nd at
the do cking
Some f eatur es of thi s app
work w ith
comp atibl e docki ng only :
- Natu re soun d
- Full f uncti on alar m
- Slee p timer
- Dock ing rad io
- Dock ing Aux- in
- Free s ign in in terne t radio
- Free M y Music l ite
i-St ation
Subs cribe M y Music
full v ersio n, My Mus ic
and in terne t radio c an
oper ate wit h other d ockin g.
No FM ou tput The do cking d oes not h ave
buil t in FM tun er.
Exte nd the FM a ntenn a of
the do cking .
Weath er repo rt
does n ot upda te
3G or Wi Fi inte rnet is n ot
conn ected , conne ct inte rnet.
Netw ork bus iness a t peak
hour s, try ag ain lat er.
App re spond s low De vice' s resou rces is
exha used. P ower off a nd on
the de vice.
Cop yrigh ts(c) 2010 Do cking P artne r
iPhone/i Pad d ock ing s tation app
Slee p statu s
(3G or Wi Fi inte rnet
must be c onnec ted)
(Voice M essag e,
Alarm, S leep, S ettin g)
(Pres s to edit t he even t)
Save ti mer
Curre nt soun d
Natur e sound l ist
Slide t o adjus t volum e
Playb ack con trol
iPho ne vers ion
TM
Inst al l Lo gic 3 i- St ati on
Gett in g st art ed
Some f eatur es of thi s app
only w ork whe n the dev ice is
dock ed to the
comp atibl e docki ng stat ion:
- Natu re soun d
- Full f uncti on alar m
- Slee p timer
- Dock ing rad io
- Dock ing Aux- in
- Free s ign in in terne t radio
- Free M y Music l ite
i-St ation
No Aux- iin out put Th e docki ng does n ot have
buil t in Aux-i n.
Exte rnal au dio dev ice is no t
conn ected t o the Aux- in
sock et prop erly.
Alar m does no t
fire
is clo sed.i-St ation
Keep ope n.i-St ation
TM
Inst all :
1. Ope n "App St ore" at y our iPh one, iP od Touch or i Pad.
2. Sea rch " ".
3. In th e searc h resul ts, pre ss the icon
i-St ation
i-St ation
i-St ation
FRE E
4. Pre ss to ins tall th e app.
TM
Log ic3 i-S tatio n is a fr ee app fo r iPhon e, iPod Tou ch and iP ad.
It emb eds exp anded f uncti ons wor king wi th your i -Stat ion
comp atibl e docki ng stat ion.
Logic3
 Loading...