

Logic L7DUAMM16, 7? Dual Instruction Manual

Instruction Manual
7˝ Dual
Portable DVD Player
L7DUAMM16


Contents
Safety Warnings ..................................................................................................................................... 5
Unpacking .............................................................................................................................................. 7
Product Overview .................................................................................................................................. 8
DVD Players A & B ..............................................................................................................................................................8
Remote Controls A & B ..........................................................................................................................9
Removing the Plastic Strips from the Remote Controls ...................................................................11
Battery Replacement for the Remote Control ...............................................................................................11
Remote Control Operation Range ......................................................................................................12
In-Car Use .............................................................................................................................................13
Using the DVD Players A and B Together (in-car use) ........................................................................................ 13
Mounting the DVD in a Car ......................................................................................................................................... 14
Installation Guide............................................................................................................................................................15
Using the DVD Players A and B Indoors .............................................................................................16
Using the Mains Adapter (for indoor use) .............................................................................................................. 16
Charging the battery ........................................................................................................................... 17
Connections .........................................................................................................................................17
Watching a DVD on the DVD Player A and B ........................................................................................................17
Connecting to a TV ......................................................................................................................................................... 18
Connecting to a Stereo Receiver or Amplier ......................................................................................................18
Using Earphones ............................................................................................................................................................. 19
Using The Stand For Indoor Use .........................................................................................................20
Using a USB Device .................................................................................................................................................20
Compatible Disc Types ........................................................................................................................21
Supported Formats ........................................................................................................................................................ 21
Region Code .....................................................................................................................................................................21
Turning On the DVD Player .................................................................................................................22
Basic Playback......................................................................................................................................22
Basic DVD Playback ........................................................................................................................................................ 22
Playback Pausing ............................................................................................................................................................22
Selecting Chapter / Title time / Chapter time (for DVD) ................................................................................... 23
Selecting Disc GOTO / Track GOTO / Select Track (for CD) ...............................................................................23
Stop Playback ................................................................................................................................................................... 23
Previous and Next ...........................................................................................................................................................23
Fast Forward and Fast Rewind ...................................................................................................................................23
Repeat Mode .................................................................................................................................................................... 23
Slow Playback...................................................................................................................................................................24
Angle Selection ...............................................................................................................................................................24
Audio Channel ................................................................................................................................................................. 24
Subtitle Language .......................................................................................................................................................... 24
Info ....................................................................................................................................................................................... 24

Programmable Memory ............................................................................................................................................... 25
Zoom Selection ............................................................................................................................................................... 25
Title ......................................................................................................................................................................................25
Menu ................................................................................................................................................................................... 25
Customising the General Settings......................................................................................................26
Customising the Audio Settings .........................................................................................................28
Customising the Video Settings .........................................................................................................29
Customising the Preference Settings ................................................................................................. 29
Customising the Password Settings ................................................................................................... 31
Maintenance ........................................................................................................................................32
Cleaning the Unit ............................................................................................................................................................ 32
Handling Discs ................................................................................................................................................................. 32
Cleaning Discs .................................................................................................................................................................. 32
Storing Discs ..................................................................................................................................................................... 32
Hints and Tips ......................................................................................................................................33
Specications ....................................................................................................................................... 35

Safety Warnings
• Read all the instructions carefully before
using the unit and keep them for future
reference.
• Retain the manual. If you pass the unit
onto a third party make sure to include this
manual.
• Check that the voltage marked on the
rating label matches your mains voltage.
Damage
• Please inspect the unit for damage after
unpacking.
• Do not continue to operate the unit if you
are in any doubt about its normal function,
or if it is damaged in any way - switch o,
withdraw the mains adapter and consult
your dealer.
Location of Unit
• The unit must be placed on a at stable
surface and should not be subjected to
vibrations.
• Do not place the unit on sloped or unstable
surfaces as the unit may fall o or tip over.
• The mains socket must be located near the
unit and should be easily accessible.
Temperature
• Avoid extreme degrees of temperature,
either hot or cold. Place the unit well away
from heat sources such as radiators or gas/
electric res.
• Avoid exposure to direct sunlight and other
sources of heat.
• Attention should be drawn to the use of
apparatus in moderate climates.
Naked Flames
• Never place any type of candle or naked
ame on the top of or near the unit.
Moisture
• To reduce the risk of re, electric shock or
product damage, do not expose this unit
to rain, moisture, dripping or splashing. No
objects lled with liquids, such as vases,
should be placed on the unit. Do not
operate the unit with wet hands, near water
or other liquid.
• If you spill any liquid into the unit, it can
cause serious damage. Switch it o at the
mains immediately. Withdraw the mains
adapter and consult your dealer.
Ventilation
• To prevent the risk of electric shock or
re hazard due to overheating, ensure
that curtains and other materials do not
obstruct the ventilation vents.
• A minimum distance of 5cm around the
unit should be maintained to allow for
sucient ventilation.
• Do not install or place this unit in a
bookcase, built-in cabinet or in another
conned space. Ensure the unit is well
ventilated.
Safety
• Always disconnect the unit from the mains
supply before connecting/ disconnecting
other devices or moving the unit.
• Unplug the unit from the mains socket
before a lightning storm.
• In the interests of safety and to avoid
unnecessary energy consumption,
never leave the unit switched on while
unattended for long periods of time, e.g.
overnight, while on holiday or while out of
the house. Switch it o and disconnect the
mains plug from the mains socket.
Mains Adapter
• The mains adapter will continue to draw
electricity from the mains supply when
plugged in the mains socket. In the
interests of safety and to avoid unnecessary
energy consumption, never leave the
adapter plugged in the mains socket
while unattended for long periods of time.
Disconnect the adapter from the power
supply.
Mains Adapter Cable
• Make sure the unit is not resting on top of
the mains adapter cable, as the weight of
the unit may damage the cable and create a
safety hazard.
Use only power supplies listed in the
user instructions.
Interference
• Do not place the unit on or near appliances
which may cause electromagnetic
interference. If you do, it may adversely
aect the operating performance of the
unit, and cause a distorted picture or sound.
5
Earphones
• Listening to loud sounds for
prolonged periods of time may
permanently damage your hearing.
• Before putting on earphones, turn the
volume down then put the earphones on
and slowly increase the volume until you
reach a comfortable listening level.
Batteries
• Batteries used in the remote control for this
unit are easily swallowed by young children
and this is dangerous.
• Keep loose batteries away from young
children and make sure that the battery
holder tray is secure in the remote control.
Seek medical advice if you believe a cell has
been swallowed.
• Please dispose of batteries correctly by
following the guidance in this manual.
• Do not expose the battery to direct sunlight
or sources of excessive heat.
• Attention should be drawn to the
environmental aspects of battery disposal.
Supervision
• Children should be supervised to ensure
that they do not play with the unit and the
remote control.
• Never let anyone especially children push
anything into the holes, slots or any other
openings in the case - this could result in a
fatal electric shock.
CAUTION
RISK OF ELECTRIC SHOCK
DO NOT OPEN
The lightning ash with arrowhead
symbol, within an equilateral triangle,
is intended to alert the user to the
presence of uninsulated “dangerous
voltage” within the unit’s enclosure
that may be of sucient magnitude to
constitute a risk of electric shock.
The exclamation point within an
equilateral triangle is intended to
alert the user to the presence of
important operating and maintenance
(servicing) instructions in the manual
accompanying the unit.
Service
• To reduce the risk of electric shock, do not
remove screws. The unit does not contain
any user-serviceable parts. Please leave all
maintenance work to qualied personnel.
• Do not open any xed covers as this may
expose to dangerous voltages.
Maintenance
• Ensure to unplug the unit from the power
supply before cleaning.
• Do not use any type of abrasive pad or
abrasive cleaning solutions as these may
damage the unit’s surface.
• Do not use liquids to clean the unit.
Class 1 Laser Product
• This unit utilises a
laser. Use of controls,
adjustments or
CLASS 1
LASER PRODUCT
performance of
procedures other than those specied
herein may result in hazardous radiation
exposure.
• Before moving the unit, ensure the disc tray
is empty.
• Always remove the disc when the unit is
not in use.
• Failure to do so will risk severely damaging
the disc and the unit.
• Do not stack devices; heat from other
devices may aect the performance of the
unit.
6
Thank you for purchasing your new product.
These operating instructions will help you use it properly and safely.
We recommend that you spend some time reading this instruction
manual in order that you fully understand all the operational features
it oers.
Read all the safety instructions carefully before use and keep this
instruction manual for future reference.
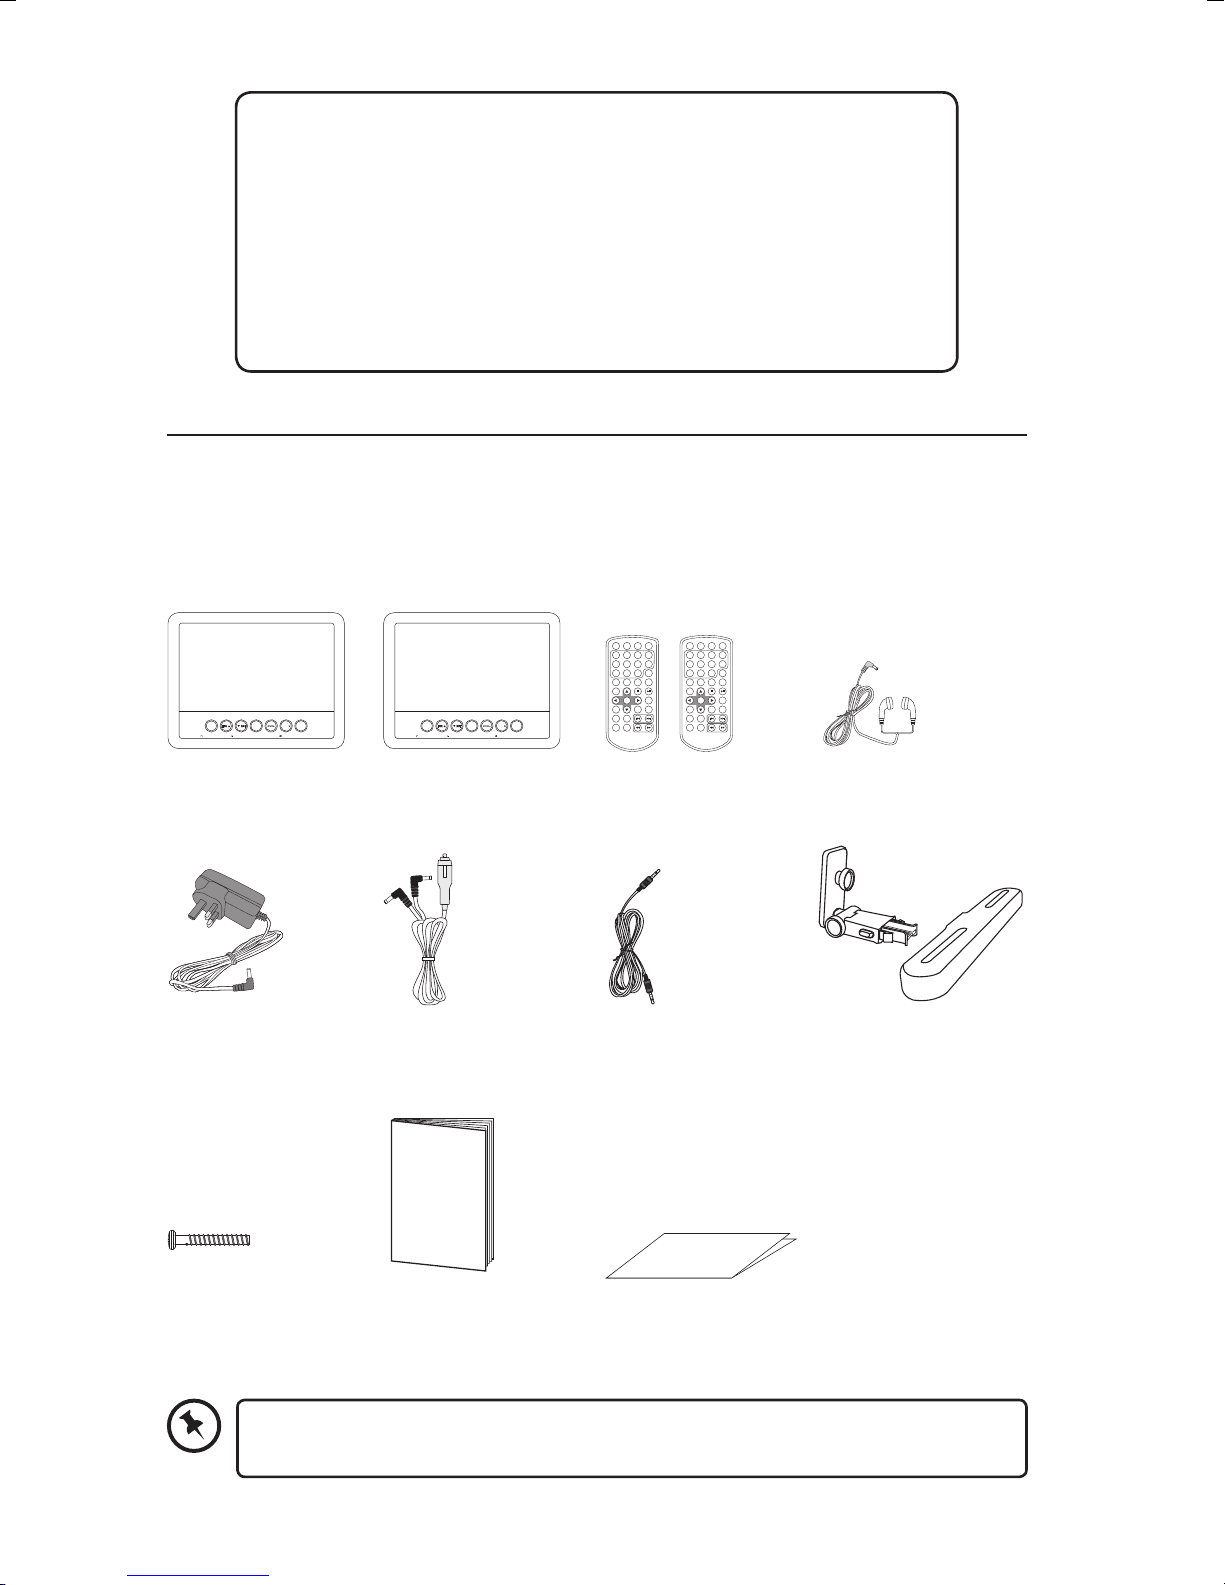
Unpacking
Remove all items from the packaging. Retain the packaging. If you dispose of it please do so
according to local regulations.
The following items are included:
SETUP ENTER
\
\
STEP SEARCH MUTE SOURCE
1 2 3 4
5 6 7 8
9 0 10+
SUBTITLE
ANGLE AUDIO MENU
TITLE
ENTER MODE
SETUP VOL - VOL +
SOURCE
VOL+\
SETUP ENTER
\
SOURCE
VOL+\
\
REPEAT SLOW
PROGRAM
ZOOM
STEP SEARCH MUTE SOURCE
1 2 3 4
5 6 7 8
DISPLAY
9 0 10+
SUBTITLE
ANGLE AUDIO MENU
TITLE
ENTER MODE
SETUP VOL - VOL +
REPEAT SLOW
PROGRAM
ZOOM
DISPLAY
DVD Player A DVD Player B Remote Control A & B
Mains Adapter × 2
Car Power Adapter 3.5mm to 3.5mm Stereo
Audio Cable
Instruction
Manual
Earphones × 2
Mounting support × 2
Screws × 4 (ø4 × 25 mm) Quick Start Guide
Instruction Manual
If items are missing, or damaged please contact Partmaster (UK only).
Tel: 0344 800 3456 for assistance.
Quick Start Guide
7
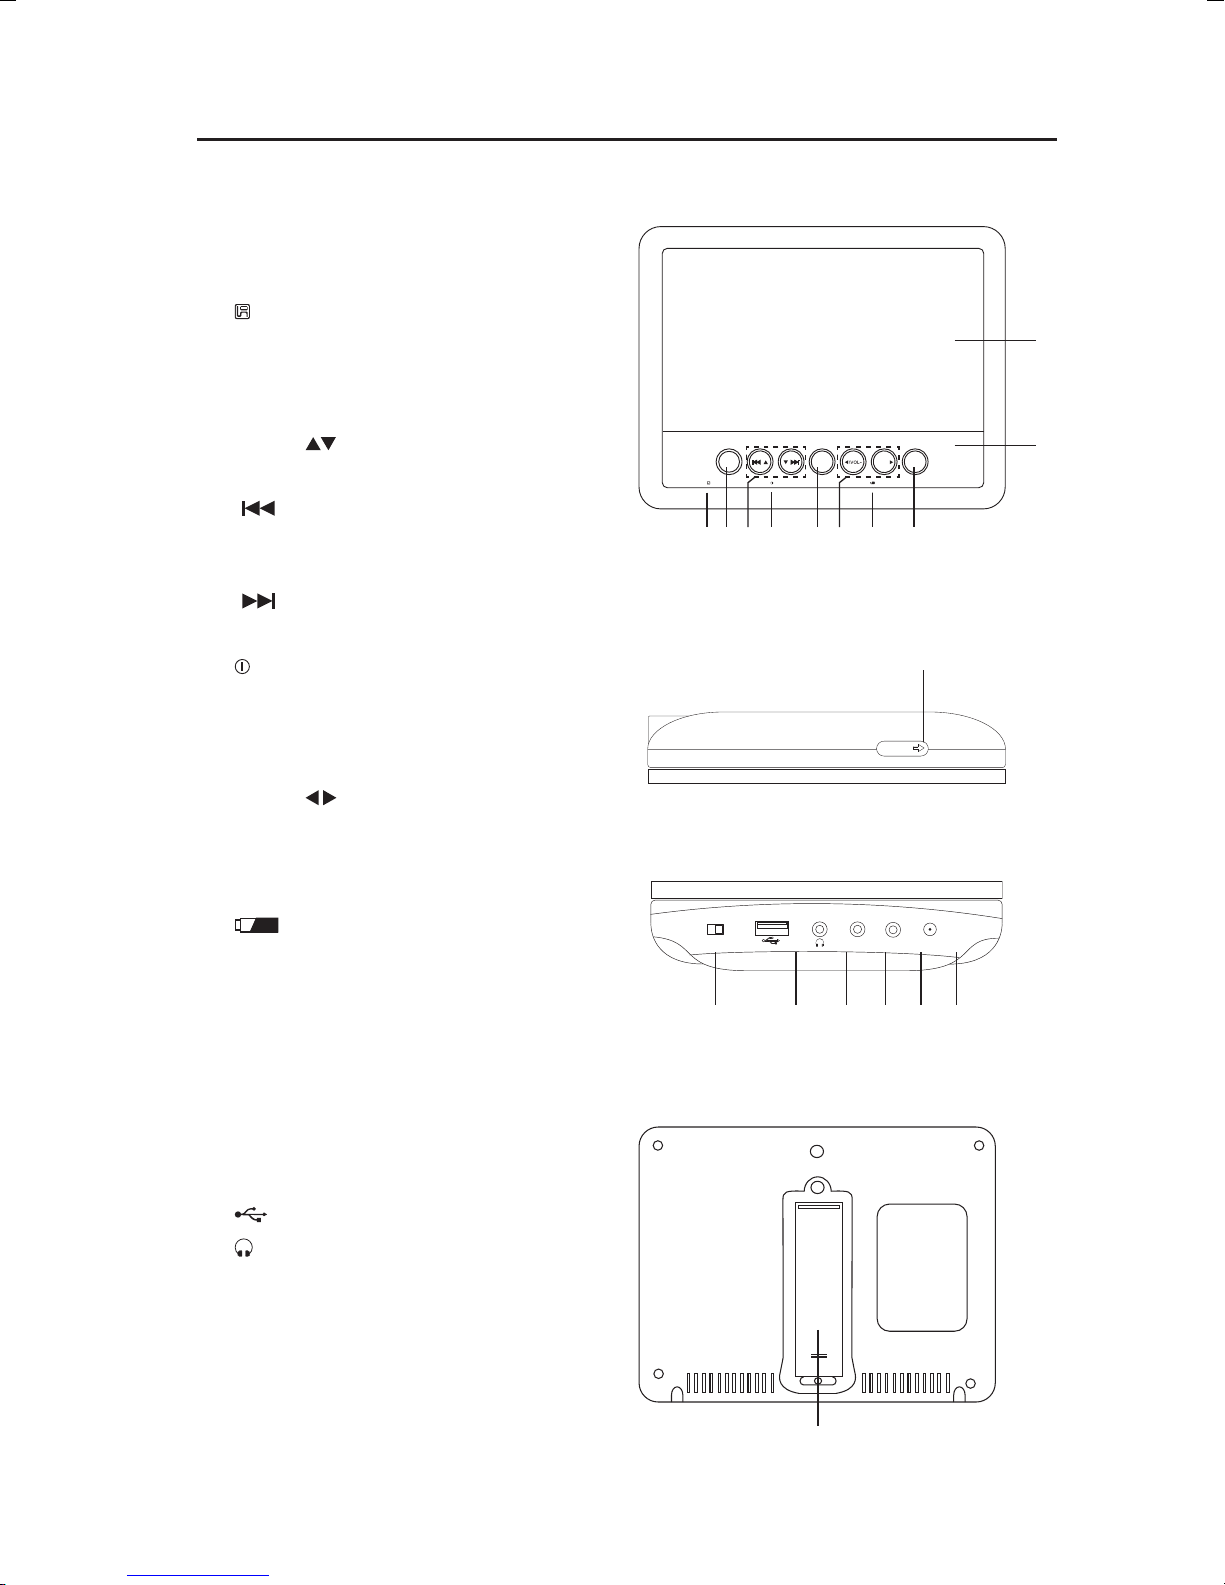
Product Overview
DVD Players A & B
1. Display
2. Speakers
3. Remote Control Sensor
Receive signals from the remote control.
4. Setup Button
Display the Setup menu.
5. Cursor Button
Move up and down in the menu screen.
Button: previous track
Skip backwards to the beginning of the
track or to the previous track.
Button: next track
Skip forwards to the next track.
6. Power Indicator
Light up red when the unit is on.
7. ENTER Button
Conrm selection on a menu screen.
Front View
SETUP ENTER
Top View
1
SOURCE
\
\
VOL+\
8 97
103 4 65
2
11
OPEN
8. Cursor Button
Move left and right in the menu screen.
VOL + / – Button
Adjust the volume.
9. Battery Indicator
• Flash green when charging.
• Light up green when fully charged.
10. SOURCE Button
Select the desired input signal source:
DVD / AV In / Media.
11. OPEN Latch
Switch right to open the disc door.
12. ON / OFF Switch
13. USB Slot
14. Earphones Socket
15. AV OUT Socket
16. AV IN Socket
17. DC IN 9-12V Socket
Left Side View
ON
OFF
12 13 14 15 16 17
Rear View
AV OUT
AV IN
DC IN 9-12V
18. Stand
8
18
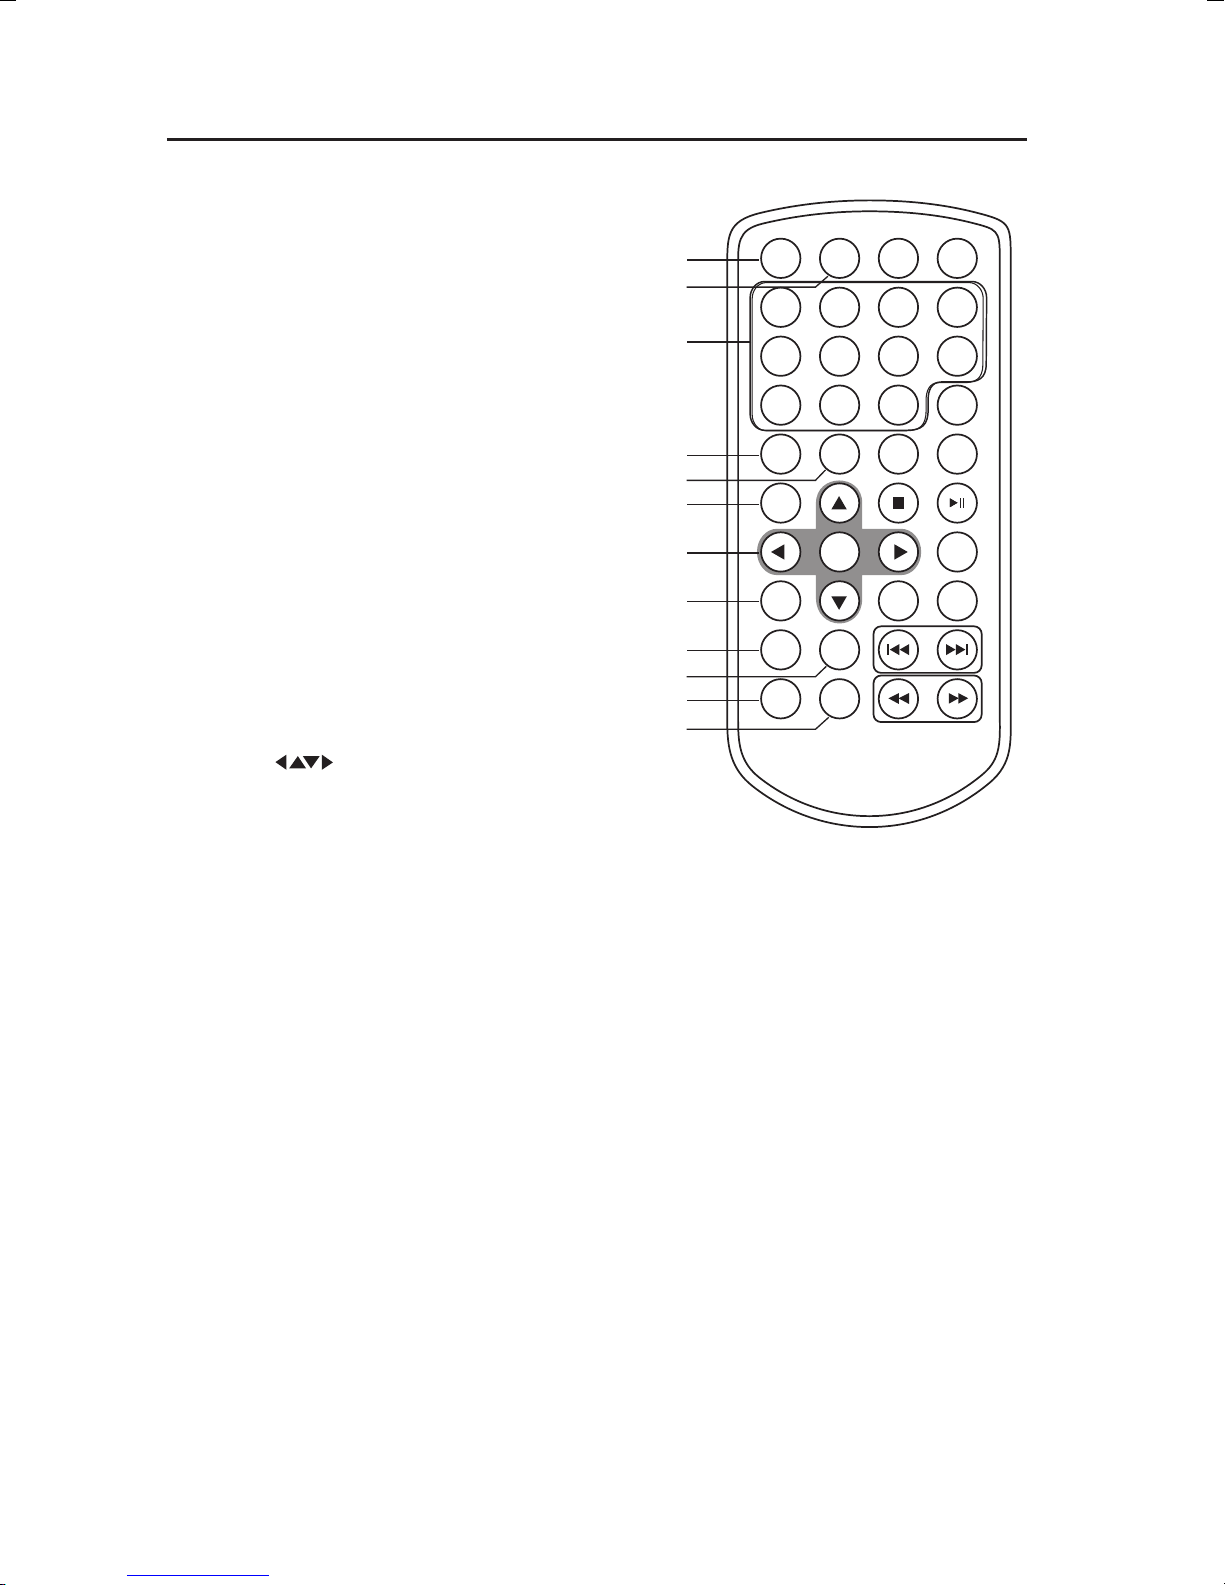
Remote Controls A & B
1. STEP Button
Frame Advance in DVD mode.
2. SEARCH Button
Search and start playback from a selected
point on the disc.
3. 0-9, 10+ Number Buttons
Create programme or locate a title/
chapter/track or specic time.
4. SUBTITLE Button
Selects one of the subtitle languages
programmed on a DVD (if available).
5. ANGLE Button
Switch between multiple camera angles
when the DVD you are playing has been
programmed with multiple camera
angles.
6. TITLE Button
Return to DVD Title Menu.
7. Cursor Buttons
Navigate between selections on a menu
screen and adjust certain settings.
ENTER Button
Conrm selection on a menu screen.
10
11
12
1
2
3
4
5
6
7
8
9
STEP SEARCH MUTE SOURCE
1 2 3 4
5 6 7 8
9 0 10+
SUBTITLE
REPEAT SLOW
PROGRAM
ANGLE AUDIO MENU
TITLE
ENTER MODE
SETUP VOL - VOL +
ZOOM
DISPLAY
8. SETUP Button
Display the GENERAL SETUP PAGE.
9. REPEAT Button
• Repeat a DVD chapter or title.
• Repeat a CD track or the entire disc.
10. SLOW Button
Enter slow playback, and cycle between
dierent speeds (1/2, 1/4, 1/8, 1/16 and
normal).
11. PROGRAM Button
• Programmes the playback of favourite
titles/chapters/tracks from the disc in
DVD / CD mode.
• Select the slide show mode for scrolling
through JPEG pictures.
12. ZOOM Button
Zooms in during DVD playback. (2×, 3×, 4
×, 1/2 ×, 1/3 ×, 1/4 ×)
9
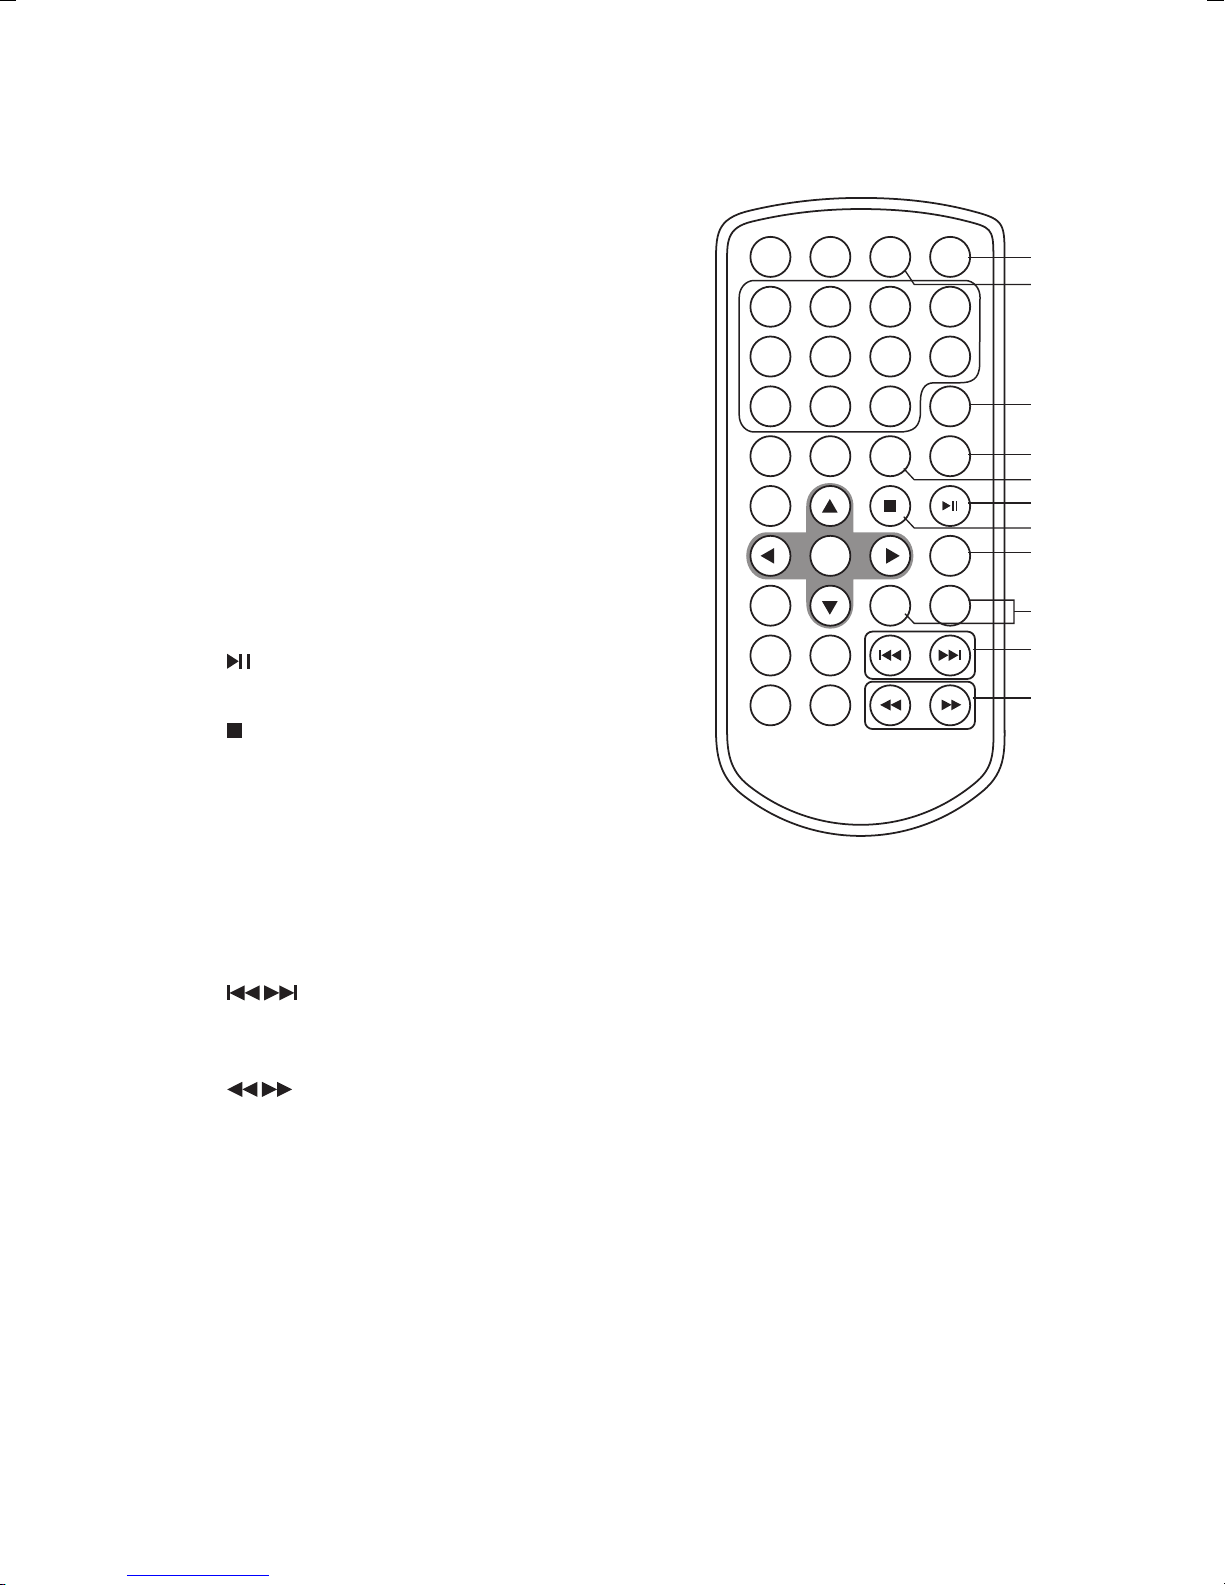
13. SOURCE Button
Selects an input source: DVD / AV In /
Media.
14. MUTE Button
Mute or restore the sound output.
15. DISPLAY Button
Display the playtime and shows the status
information on the screen.
16. MENU Button
Enter and exit the main DVD menu.
17. AUDIO Button
Select one of the audio sound tracks on
a DVD (if more than one is available) or
select the audio output mode on a CD.
18. Button
Start/Pause/Resume playback.
19. STOP Button
Stop playing a disc.
20. MODE Button
STEP SEARCH MUTE SOURCE
1 2 3 4
5 6 7 8
9 0 10+
SUBTITLE
REPEAT SLOW
PROGRAM
ANGLE AUDIO MENU
TITLE
ENTER MODE
SETUP VOL - VOL +
ZOOM
DISPLAY
13
14
15
16
17
18
19
20
21
22
23
Press to show the VIDEO SETUP PAGE for
adjusting BRIGHTNESS, CONTRAST, HUE
and COLOUR of the display.
21. VOL + / – Buttons
Adjust the volume.
22. Buttons
Move forward to the next or backward to
the previous titles/chapters/tracks.
23. Buttons
Start fast forward/reverse playback at 5
speed levels (2×, 4×, 8×, 16×, 32×).
10
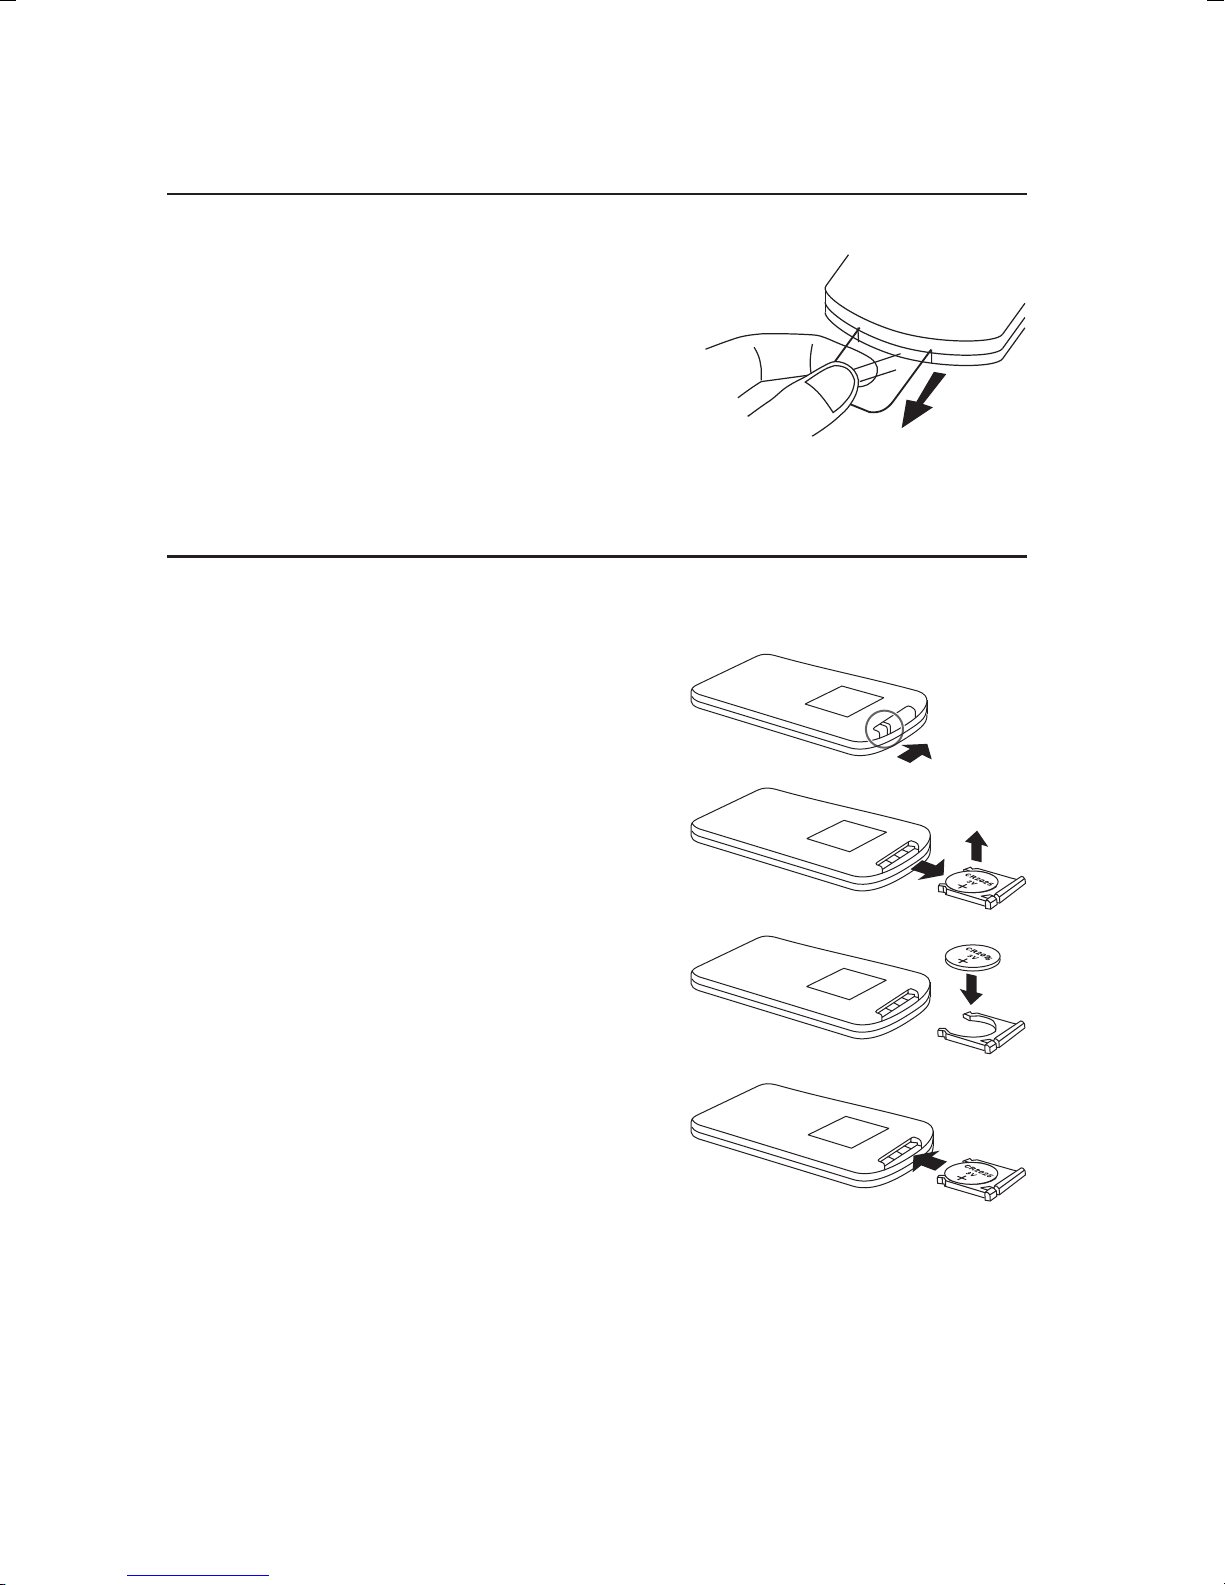
Removing the Plastic Strips from the Remote
Controls
Remove the plastic strips from the batteries if
the batteries are being used for the rst time. It
is located at the bottom rear side of the remote
controls.
Battery Replacement for the Remote Control
The remote control requires a CR2025, 3V Lithium battery.
1. Slide and hold the battery release tab in the
direction of the arrow.
2. Pull out the battery compartment and remove the
old battery.
3. Replace with a new battery.
4. Insert the battery compartment back into the
remote control.
11
 Loading...