

26” LCD HD Ready 1080p TV
Instruction Manual
L26DIGB21
L26DIGB21_IB_111003_Annie.indd 1 11年10月3日 下午4:22

L26DIGB21_IB_111003_Annie.indd 2 11年10月3日 下午4:22

Contents
Preparation .........................................................................................................................................................................................5
Unpacking the TV ...............................................................................................................................................................................................................5
Installing / Removing the Base Stand .........................................................................................................................................................................6
Front View and Controls ...................................................................................................................................................................................................7
Rear View and Sockets ......................................................................................................................................................................................................8
Installing Batteries in the Remote Control ................................................................................................................................................................9
Remote Control Operation Range ................................................................................................................................................................................9
Remote Control .................................................................................................................................................................................................................10
Connections ......................................................................................................................................................................................13
Making Video and Audio Connections .....................................................................................................................................................................13
Connecting an AV Device with an HDMI Cable .....................................................................................................................................................13
Connecting a Computer with a VGA Cable .............................................................................................................................................................14
Connecting an AV Device with a Component (YPbPr) Cable ...........................................................................................................................14
Connecting an AV Device with a SCART Cable ......................................................................................................................................................15
Connecting an AV Device with Composite Cable .................................................................................................................................................15
Initial Setup ......................................................................................................................................................................................16
Turning the TV on for the First Time ..........................................................................................................................................................................16
− Selecting the Input Source................................................................................................................................................................................17
− Channel Selection ...............................................................................................................................................................................................17
− Display Channel Information ...........................................................................................................................................................................17
− Volume Adjustment .............................................................................................................................................................................................17
Customising TV Settings .................................................................................................................................................................18
Channel Setting (TV, DTV or Radio Mode) ...............................................................................................................................................................18
− Auto Tuning ............................................................................................................................................................................................................18
− DTV Manual Tuning..............................................................................................................................................................................................19
− ATV Manual Tuning ..............................................................................................................................................................................................19
− Channel Edit (ATV / DTV Mode) ...................................................................................................................................................................... 20
− Signal Information (DTV Mode) .......................................................................................................................................................................21
− CI (Common Interface) (DTV Mode) .............................................................................................................................................................. 22
− Software Update (Over Air Download)........................................................................................................................................................ 23
− Software Update (USB) ...................................................................................................................................................................................... 23
Picture Setting .................................................................................................................................................................................................................. 24
Sound Setting ................................................................................................................................................................................................................... 26
− Stereo / Dual Sound Reception (ATV Mode) .............................................................................................................................................. 27
Time Settings..................................................................................................................................................................................................................... 27
Option Setting .................................................................................................................................................................................................................. 28
− OSD Language ......................................................................................................................................................................................................28
− Audio Language (DTV Mode) .......................................................................................................................................................................... 29
− Subtitle Language (DTV Mode) ......................................................................................................................................................................30
− Hearing Impaired ................................................................................................................................................................................................. 30
− Country .................................................................................................................................................................................................................... 30
− PVR File System (DTV Mode) .............................................................................................................................................................................31
− CEC (Consumer Electronics Control) ............................................................................................................................................................ 32
− Restore Factory Default ..................................................................................................................................................................................... 32
LOCK Setting ...................................................................................................................................................................................................................... 33
− Lock System ........................................................................................................................................................................................................... 33
− Set Password ......................................................................................................................................................................................................... 34
− Block Channel ....................................................................................................................................................................................................... 35
− Parental Guidance ............................................................................................................................................................................................... 36
L26DIGB21_IB_111003_Annie.indd 3 11年10月3日 下午4:22

Using the Features ...........................................................................................................................................................................37
EPG (Electronic Programme Guide) (DTV Mode) .................................................................................................................................................37
− Switch On / O EPG ............................................................................................................................................................................................. 37
− Select a Programme ........................................................................................................................................................................................... 37
Teletext (ATV Mode) ........................................................................................................................................................................................................ 38
− To Turn on Teletext Function........................................................................................................................................................................... 38
Digital Teletext (DTV Mode) ......................................................................................................................................................................................... 39
− Teletext within Digital Service ........................................................................................................................................................................ 39
Entertainment ..................................................................................................................................................................................40
Connecting a USB Storage Device ............................................................................................................................................................................. 40
Viewing Photos ................................................................................................................................................................................................................. 40
Listening to Music .............................................................................................................................................................................................................41
Viewing Movies ................................................................................................................................................................................................................ 42
Viewing Texts .................................................................................................................................................................................................................... 43
PVR (Personal Video Recorder) .......................................................................................................................................................44
Time Shift Function .........................................................................................................................................................................................................44
Recording DTV Programme onto a USB Storage Device .................................................................................................................................. 45
Timer Programming ....................................................................................................................................................................................................... 45
Play Recorded Programme .......................................................................................................................................................................................... 46
Maintenance .....................................................................................................................................................................................47
Display Modes ..................................................................................................................................................................................49
YPbPr Mode ....................................................................................................................................................................................................................... 49
PC Mode ..............................................................................................................................................................................................................................49
HDMI Mode .......................................................................................................................................................................................................................49
Specifications ...................................................................................................................................................................................50
Safety Warnings ...............................................................................................................................................................................52
L26DIGB21_IB_111003_Annie.indd 4 11年10月3日 下午4:22
GB
5
Preparation
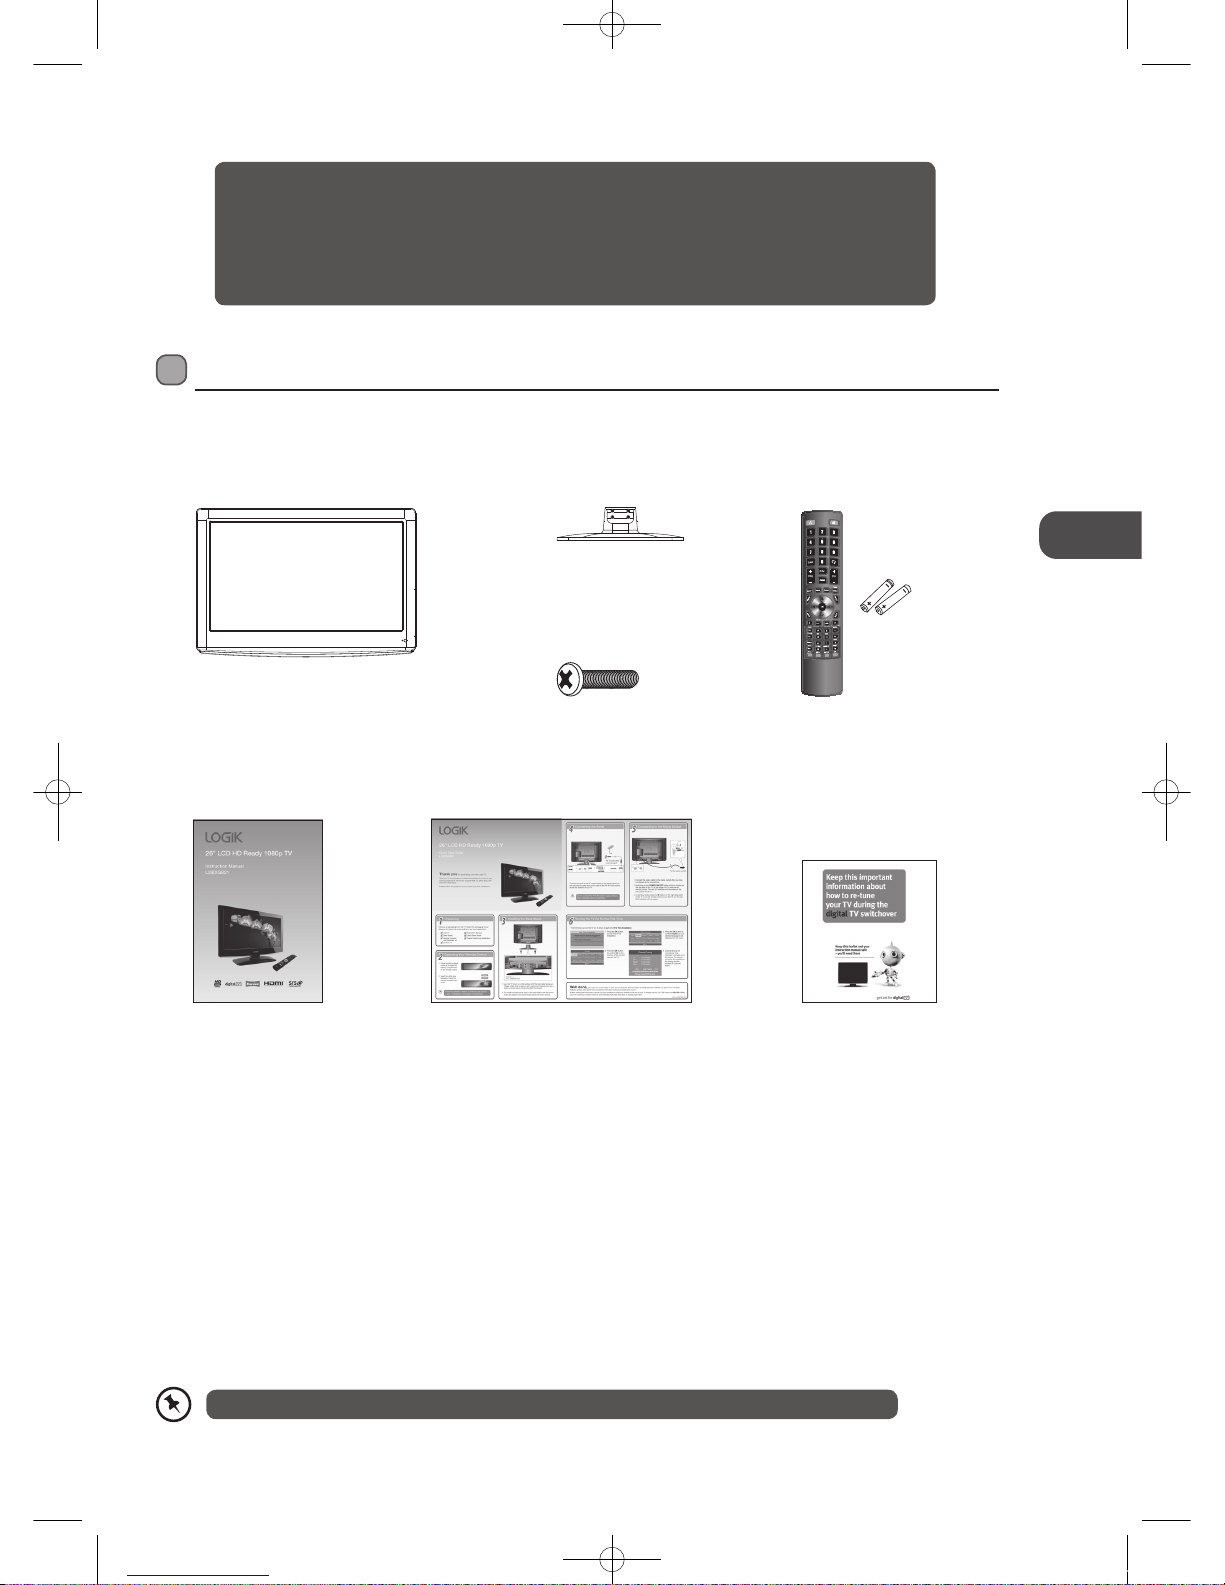
Unpacking the TV
Remove all packaging from the TV. Retain the packaging. If you dispose of it please do so according to local regulations.
The following items are included:
Remote Control / AAA Batteries x 2
(P.N.: 504C2436103 & 32200007158)
Screws x 4
(P.N.: 209030427B1)
Thank you for purchasing your new Logik 26” LCD HD Ready 1080p TV.
Your new TV has many features and incorporates the latest technology to enhance your viewing
experience. We recommend that you spend some time reading this instruction manual in order that you
fully understand these features. You will also find some hints and tips to help you resolve any issues.
Read all the safety instructions carefully before use and keep this instruction manual for future reference.
If items are missing, or damaged please contact Partmaster (UK only). Tel: 0844 800 3456 for assistance.
Preparation
TV
Base Stand
(P.N.: 102C2611111)
Instruction Manual
(P.N.: 4031C261259)
Quick Start Guide
(P.N.: 4033C261214)
Digital TV Switchcover Addendum
(P.N.: 4031C241307)
L26DIGB21_IB_111003_Annie.indd 5 11年10月3日 下午4:22
GB
6
Preparation
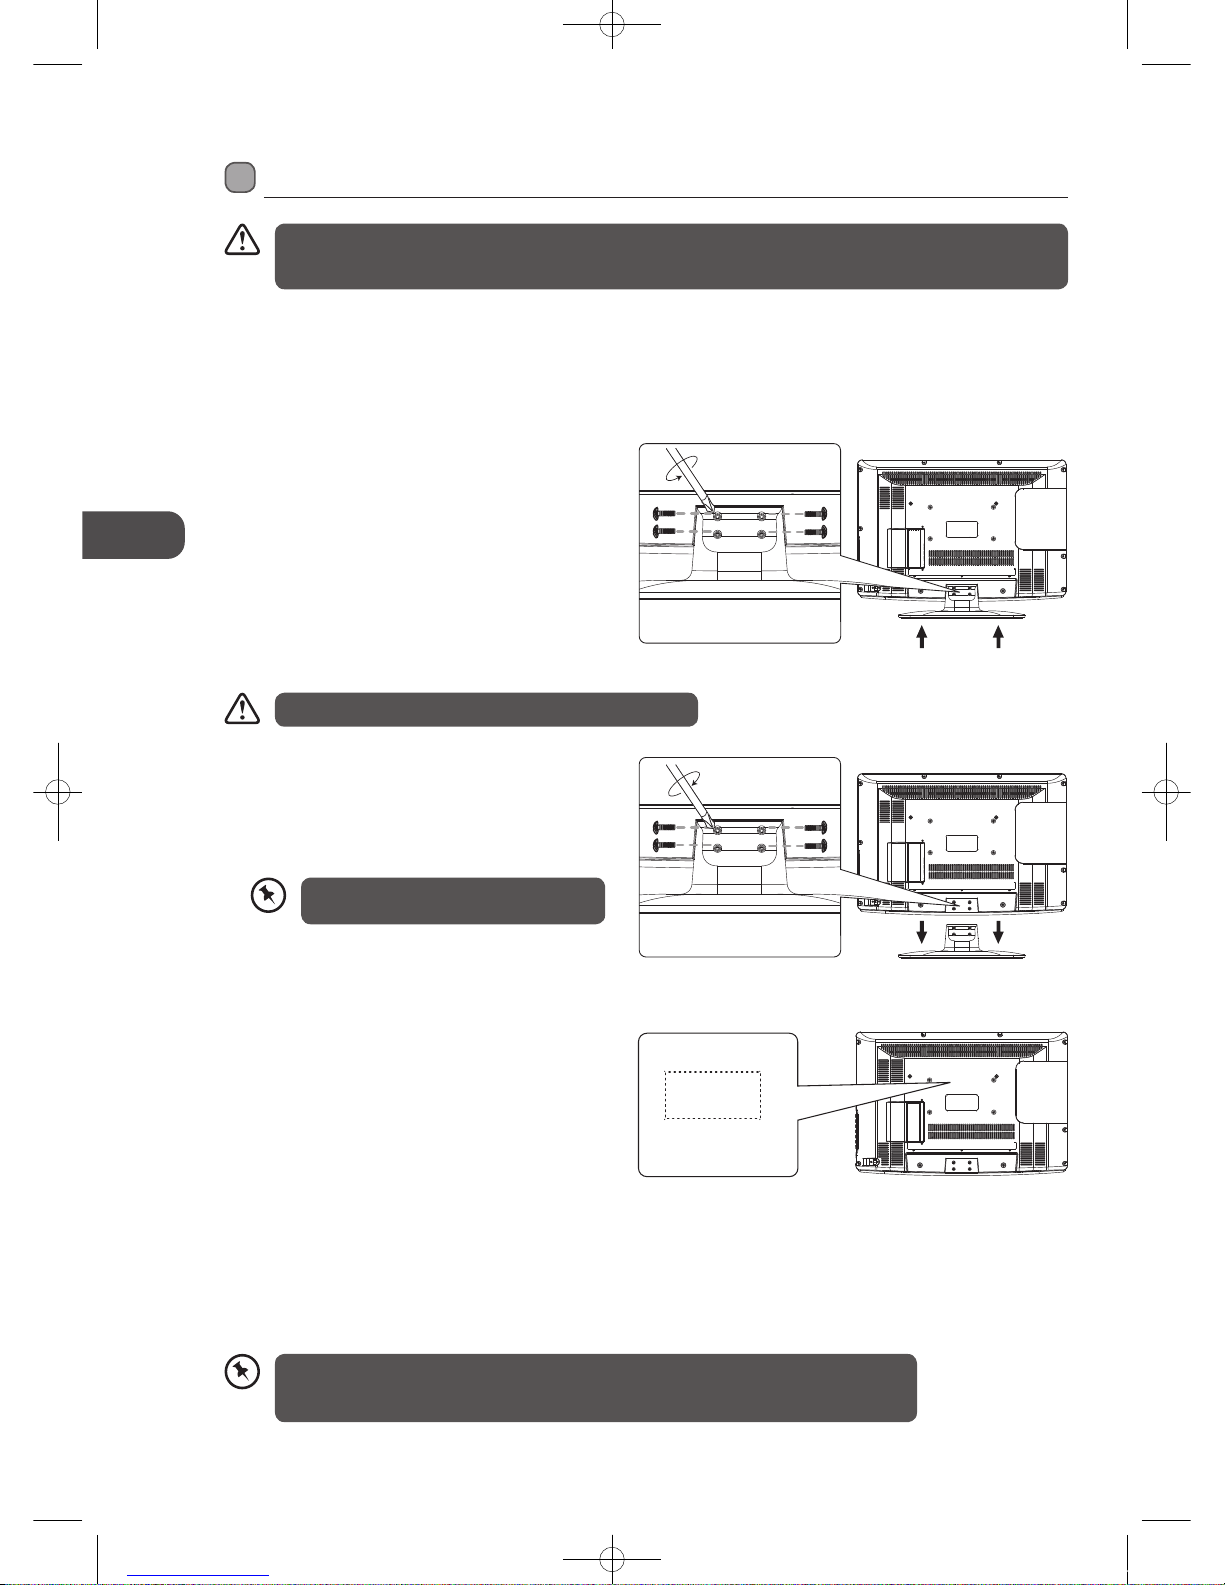
4. To remove the base stand, lay the TV down on a flat
surface with the back side facing up. Please make sure
to place a soft cushioned material (such as a pillow or
thick piece of foam) beneath the screen. Untighten
the 4 screws that hold the base stand to the rear of
the TV. Slide the base stand out.
1. Disconnect all cables connected to the TV.
2. Lay the TV down on a flat surface with the back side
facing up. Please make sure to place a soft cushioned
material (such as a pillow or thick piece of foam)
beneath the screen.
3. To install the base stand, slide in the base stand until
the screw holes are aligned. Secure the base stand
with the 4 screws.
5. Mounting on the wall. This TV is designed to be wallmounted with a standard 200 mm x 100 mm mounting
kit designed for flat-panel TVs (sold separately).
Mount this TV according to the instructions included
in the mounting kit. Due to space restrictions, we
recommend that you make all connections (refer to
page 13-15 & page 40 for details) before mounting on
to the wall.
Installing / Removing the Base Stand
• Please read this instruction manual carefully while setting up your TV.
• If you require additional assistance please call our UK Call Centre on 0844 561 1234. Our UK
Customer Contact Centre is open Monday-Saturday 8am-8pm or Sunday 8am-6pm.
Keep all the screws. You will need them if
you want to use the base stand option.
The LCD display is very fragile, and must be protected at all times when installing and removing the base stand. Be
sure that no hard or sharp object, or anything that could scratch or damage the LCD display, comes into contact with
it. DO NOT exert pressure on the front of the TV at any time because the screen could crack.
Slide out
unscrew
Slide in
screw
Screws x 4
(P.N.: 209030427B1)
Screws x 4
(P.N.: 209030427B1)
200 mm
100 mm
Four mounting holes
(size M4x27 screw)
Remove the base stand before mounting the TV onto the wall.
L26DIGB21_IB_111003_Annie.indd 6 11年10月3日 下午4:22
GB
7
Preparation
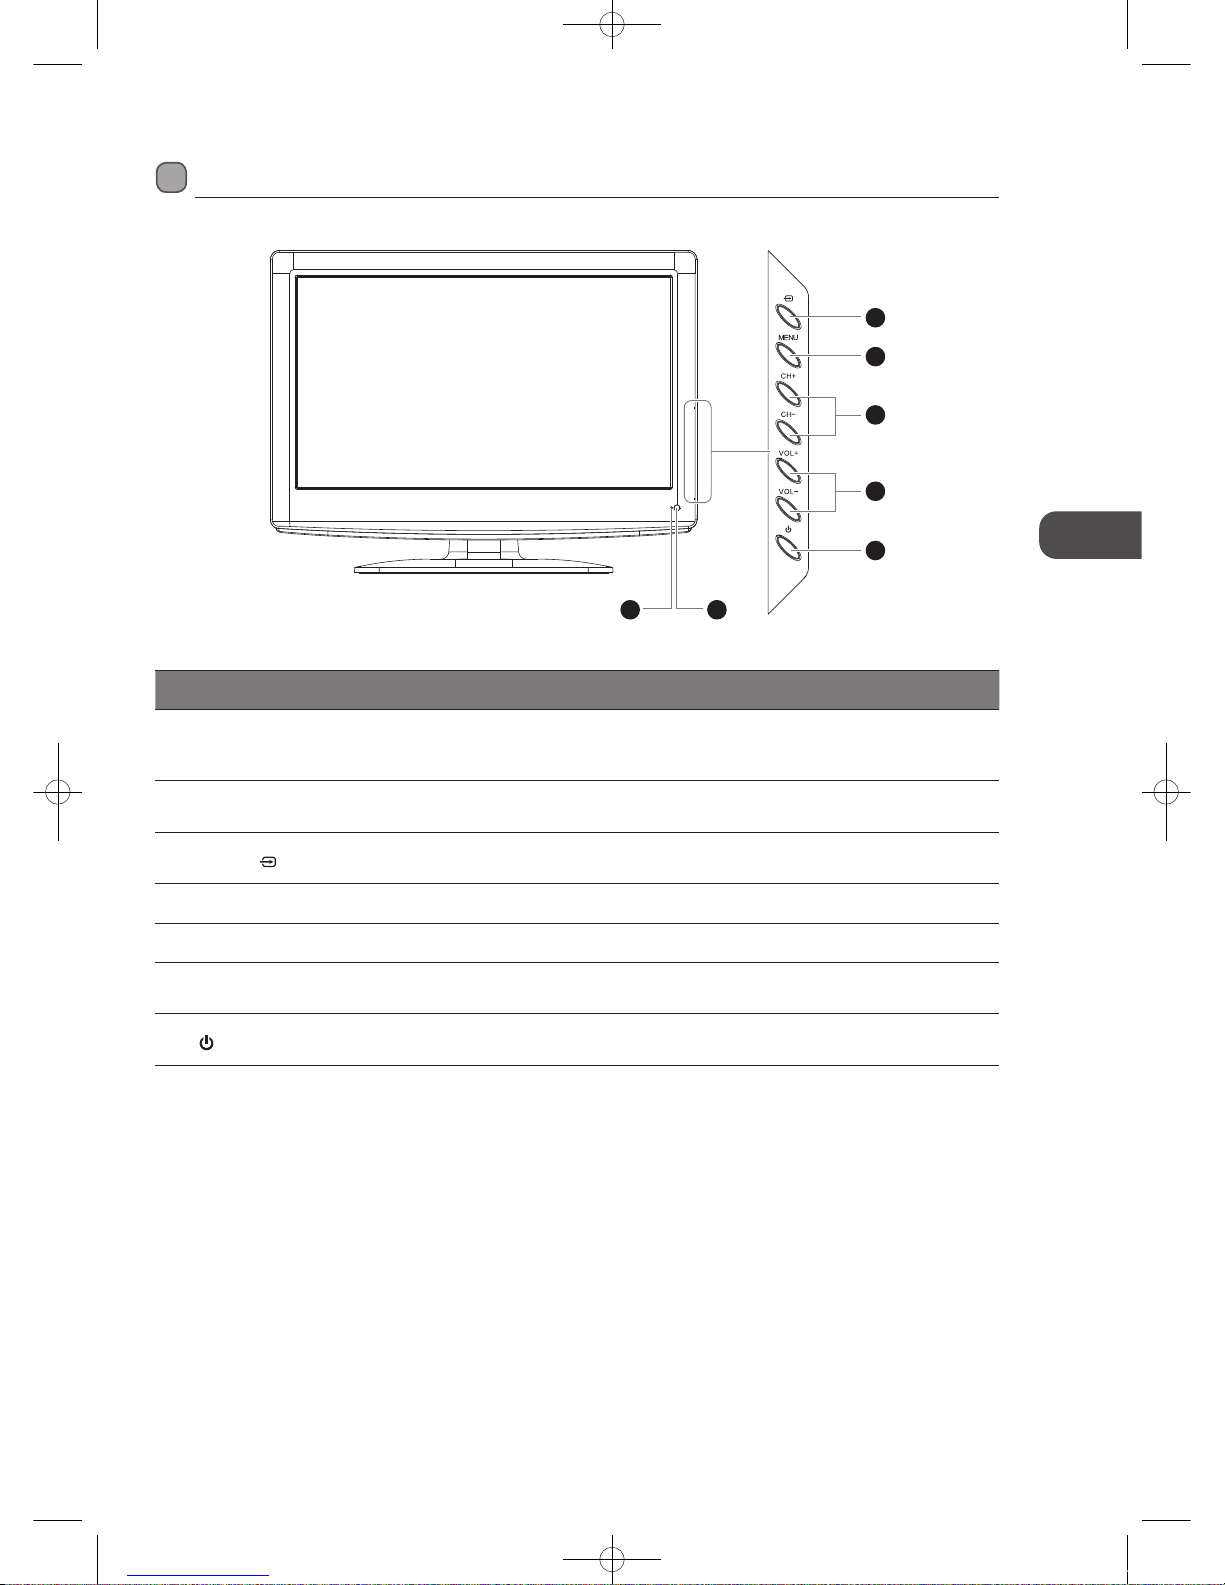
Front View and Controls
Item Description
1 POWER LED
Illuminates green when the TV is turned on. Illuminates red when the TV is in standby
mode. The LED will flash green and red when the timer programming has started in
the standby mode.
2 IR (Infrared Receiver)
Receives IR signals from the remote control.
Do not put anything near the sensor, as its function may be affected.
3 SOURCE
Press to select among different input signal sources:
DTV / ATV / SCART / YPbPr / PC / HDMI1 / HDMI2 / AV1 (REAR) / AV2 (SIDE) / DMP.
4 MENU Displays the OSD (on screen display) menu.
5 CH + / – Press to select a channel or select a sub-menu from the OSD menu.
6 VOL + / –
Adjusts the volume.
Press to select and adjust a setting in the OSD menu.
7
Switches the TV on from standby mode.
Switches the TV back to standby mode.
3
4
6
7
5
1 2
L26DIGB21_IB_111003_Annie.indd 7 11年10月3日 下午4:22
GB
8
Preparation
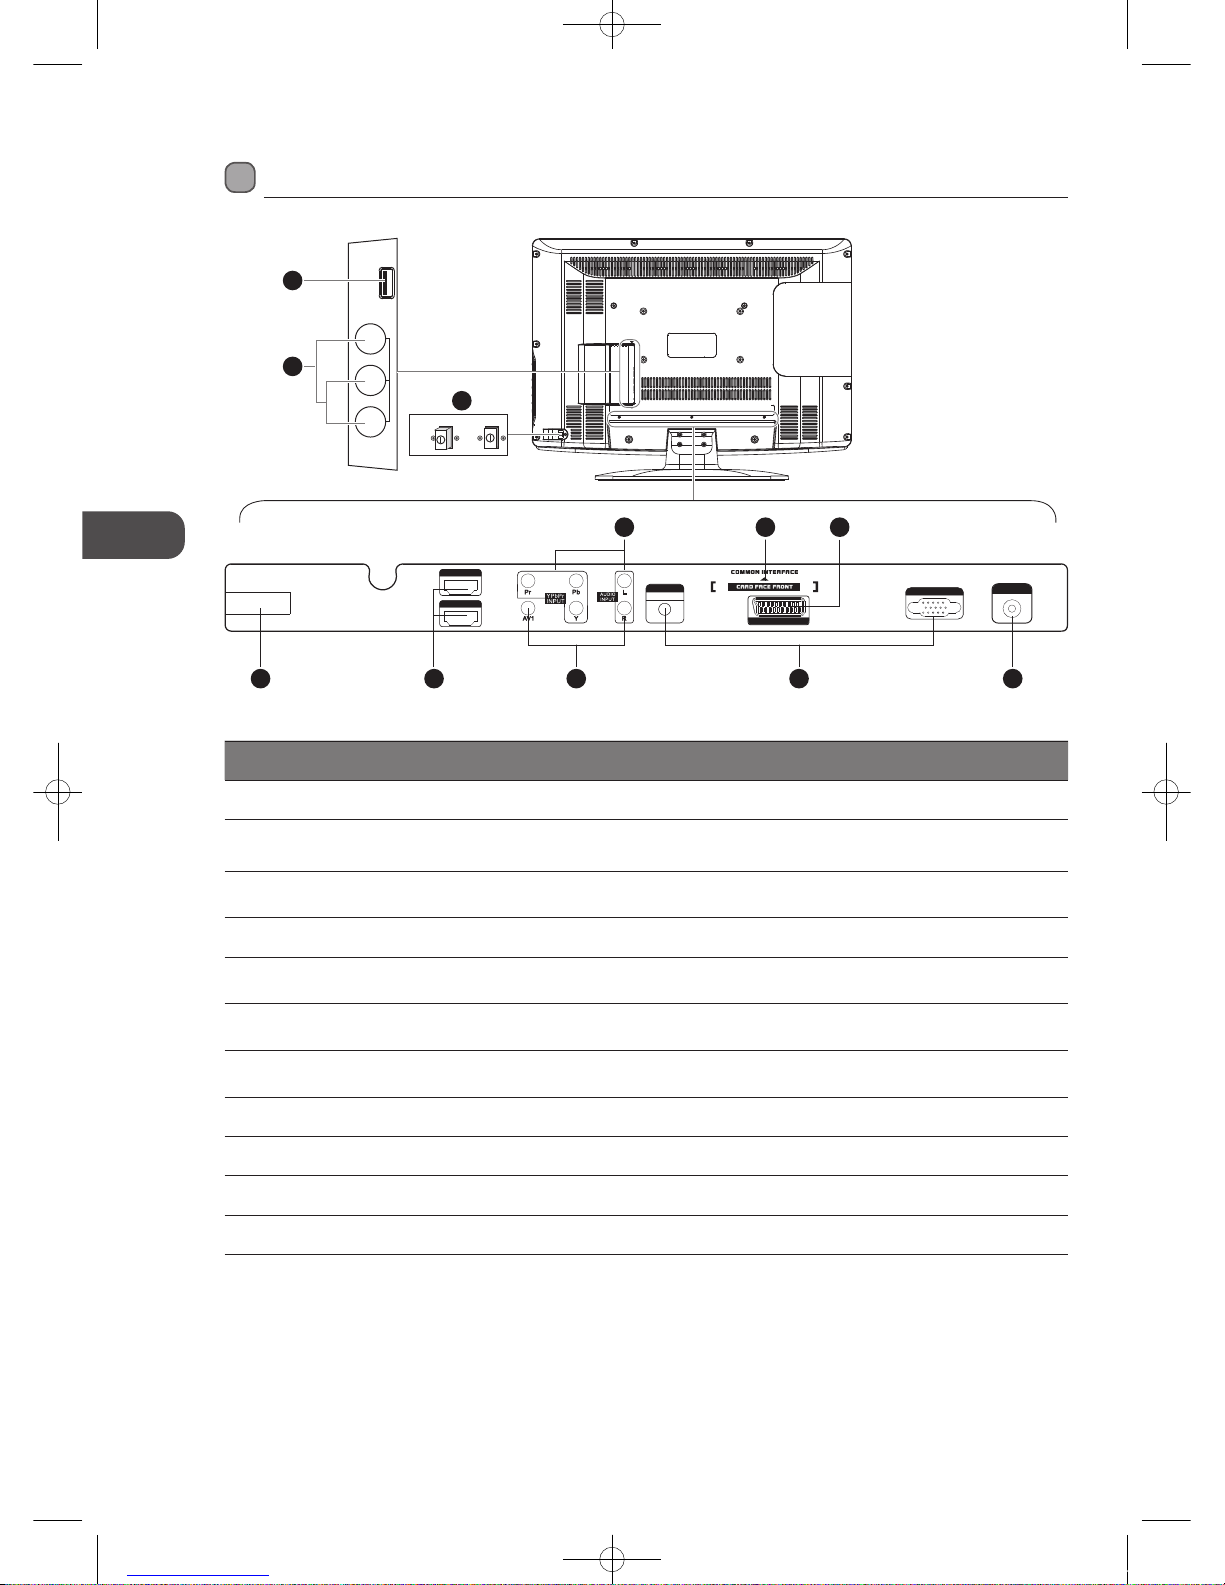
Rear View and Sockets
VGA I NPUT
RF INP UT
PC
AUDIO INPUT
SCAR T
100- 240V~ 50/60 Hz
AC-I NPUT
HDMI 1
HDMI 2
Item Description
1 Power ON/OFF button Press the POWER ON/OFF button to turn the TV to standby or off mode.
2 USB
Allows the insertion of a USB storage device to play video, audio, photo and text files
(DMP mode) and record DTV programmes on to a USB storage device.
3 AV2 VIDEO / AUDIO (L/R)
To connect to the Composite VIDEO and AUDIO (L/R) output sockets on external video
devices.
4 AC~INPUT Connects the mains cable to the mains socket.
5 HDMI1 / HDMI2
To connect to a High-Definition (HD) signal output device, such as a set-top box, blu-ray
disc player or AV receiver.
6 AV1 VIDEO / AUDIO (L/R)
To connect to the Composite VIDEO and AUDIO (L/R) output sockets on external video
devices.
7 Y, PB, PR / AUDIO (L/R)
To connect to a DVD player, Digital Set-Top-Box, or other AV devices with component
(YPbPr) video and audio output sockets.
8 VGA INPUT / PC AUDIO To connect to a computer or other devices with a VGA interface.
9 COMMON INTERFACE Allows the insertion of a Common Access Module. (Refer to page 22 for details)
10 SCART To connect to a VCR, DVD Player, or other AV device with a SCART output socket.
11 RF INPUT To connect to the aerial socket on the wall with the RF coaxial cable.
4 5
7 9 10
6 8 11
Video
AV2
L
R
USB
OFF ON
2
1
3
L26DIGB21_IB_111003_Annie.indd 8 11年10月3日 下午4:22
GB
9
Preparation
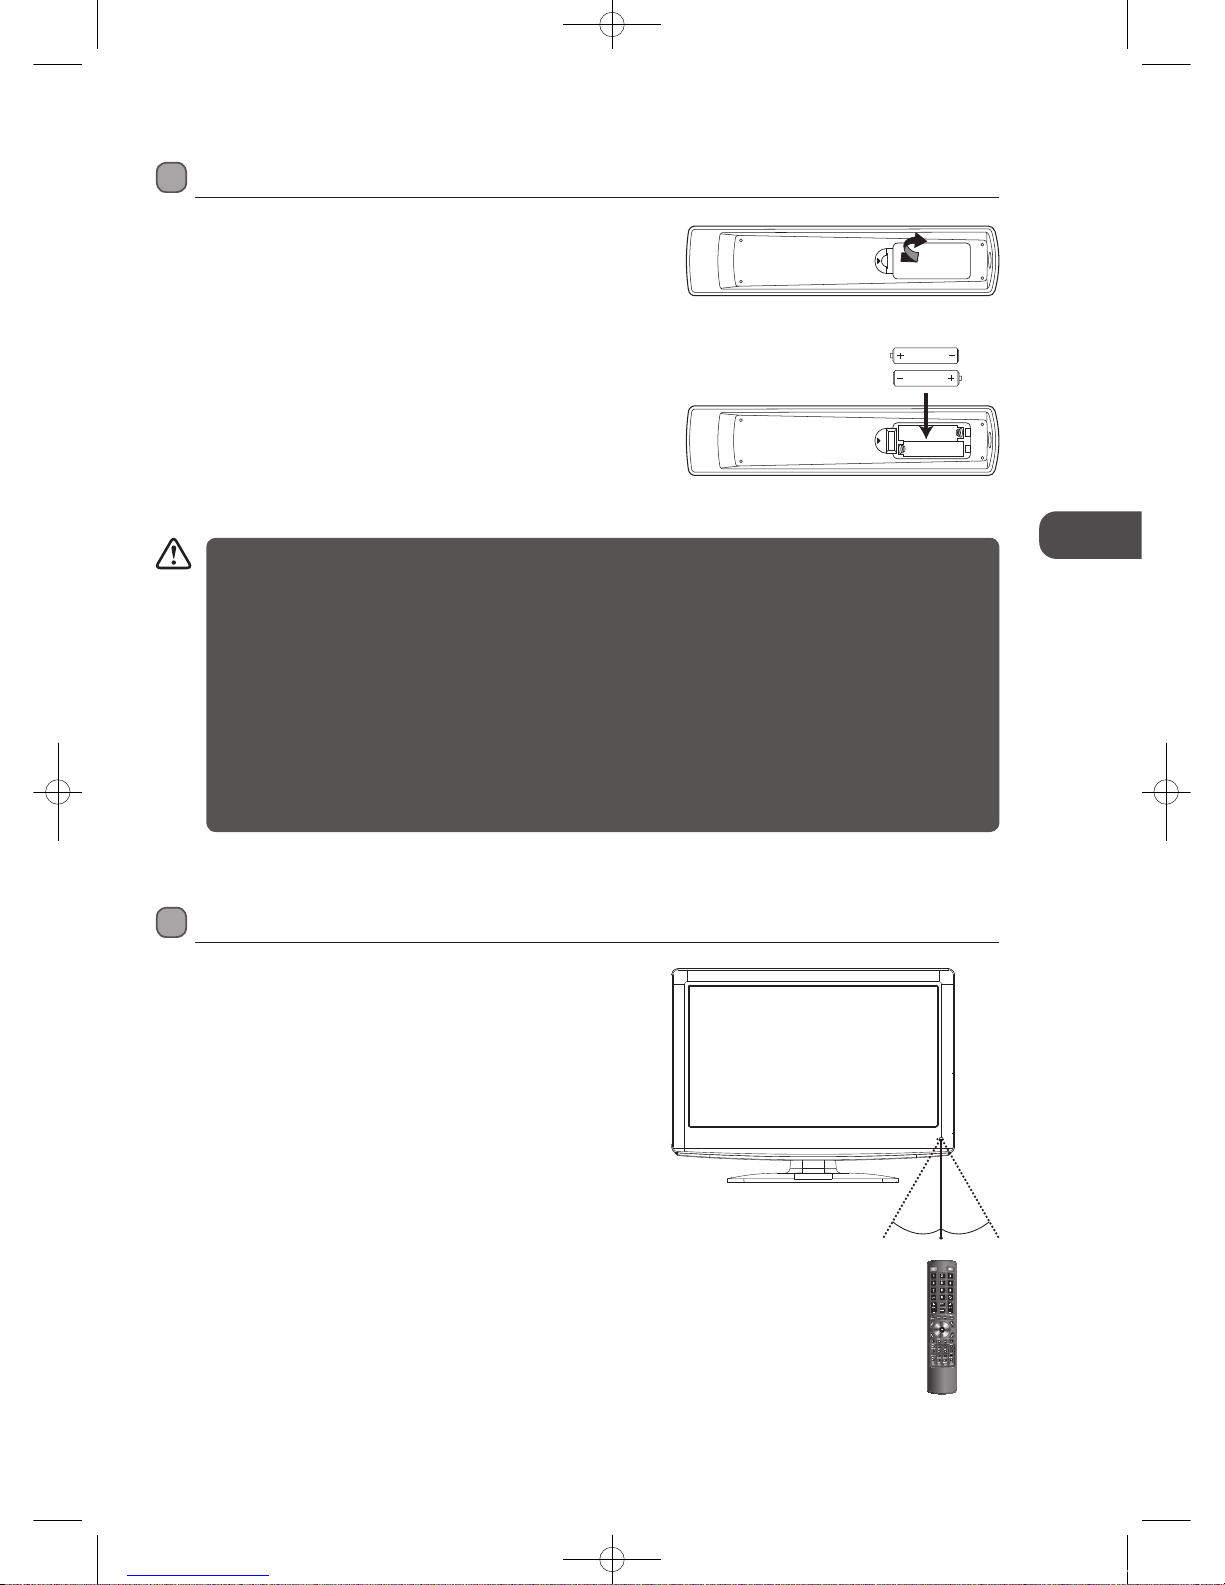
Remote Control Operation Range
Point the remote control at the TV no more than 5 metres from the
remote control sensor on the TV and within 60° in front of the TV.
The operating distance may vary depending on the brightness of the
room.
Installing Batteries in the Remote Control
1. Press and lift the back cover to open the battery compartment of the
remote control.
2. Insert two AAA size batteries. Make sure to match the (+) and ( - ) ends
of the batteries with the (+) and ( - ) ends indicated in the battery
compartment.
3. Close the battery compartment cover.
Handling the Batteries
• Improper or incorrect use of batteries may cause
corrosion or battery leakage, which could cause
fire, personal injury or damage to property.
• Only use the battery type indicated in this manual.
• When the batteries are exhausted, the remote will
not function. Replace both batteries at the same
time with new ones.
• Do not install new batteries with used ones and do
not mix different types of batteries.
• Do not dispose of used batteries as domestic
waste. Dispose of them in accordance with local
regulations.
Handling the Remote Control
• Take care of your fingernails when you press and
hold the battery release tab.
• Do not drop or cause impact to the remote control.
• Do not spill water or any liquid on the remote
control.
• Do not place the remote control on a wet object.
• Do not place the remote control under direct
sunlight or near sources of excessive heat.
• Remove the battery from the remote control
when not in use for a long period of time, as it
could cause corrosion or battery leakage and may
result in physical injury and/or property damage
including fire.
30° 30°
5M
L26DIGB21_IB_111003_Annie.indd 9 11年10月3日 下午4:22
GB
10
Preparation
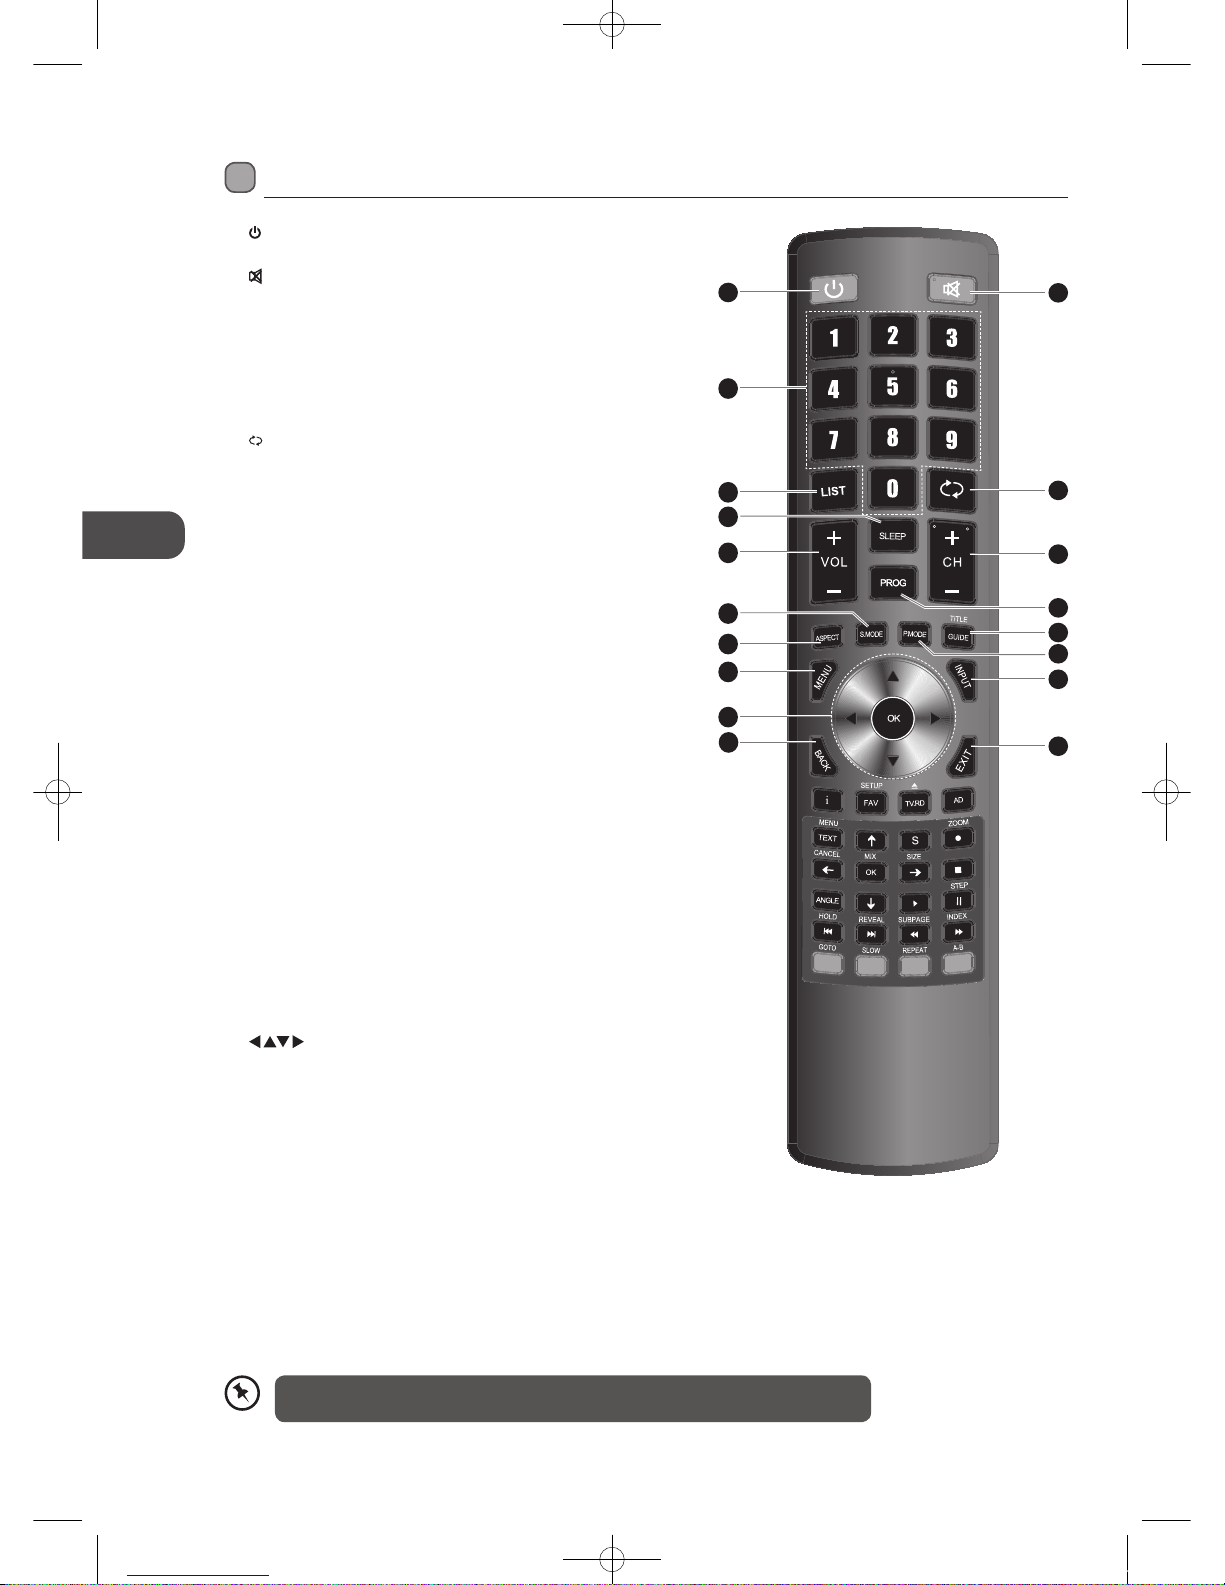
1.
Switches the TV between on and standby mode.
2.
MUTE
Mutes and restores your TV sound.
3. 0-9 Number Button
• Press to select a programme.
• Select numbered items in a menu. (DVD mode)
4. LIST
• Display the channel list. (ATV / DTV mode)
• Display the text page on the teletext screen. (ATV mode)
5.
RECALL
• Return to the previous viewing channel. (ATV / DTV mode)
• Return to menu (DVD mode)
6. SLEEP
Sets the TV sleep timer: OFF / 10 / 20 / … / 180 / 240 min.
7. VOL + / –
Adjusts the volume.
8. CH + / –
Select a channel.
9. PROG
• Display the channel edit menu. (ATV / DTV mode)
• Programme the DVD. (DVD mode)
10. S.MODE
Select sound mode: Standard / Music / Movie / Sports / User.
11. ASPECT
Allows you to watch the screens in various formats: Auto / 4:3 /
16:9 / Zoom / Subtitle / Smart Zoom / Dot to Dot.
12. GUIDE
Displays the EPG electronic Programme guide. (DTV mode)
TITLE
Displays the DVD title content. (DVD mode)
13. P.MODE
Select picture mode: Standard / Mild / User / Dynamic.
14. MENU
Display the OSD (On Screen Display) menu.
15. INPUT
Select among the dierent input signal sources:
DTV / ATV / SCART / YPbPr / PC / HDMI1 / HDMI2 / AV1 (REAR) /
AV2 (SIDE) / DMP
16.
Allows you to navigate the OSD menus and adjust the system
settings to your preference.
OK
Conrm the selection in the OSD menus.
17. BACK
Return to the previous menu in the OSD menus.
18. Exit
Exit the OSD menu.
Remote Control
1
2
5
8
12
15
18
9
13
3
4
7
11
14
16
17
6
10
Please note that the DVD mode functions on the remote control only operate on TV
models with a built-in DVD player.
L26DIGB21_IB_111003_Annie.indd 10 11年10月3日 下午4:22
GB
11
Preparation
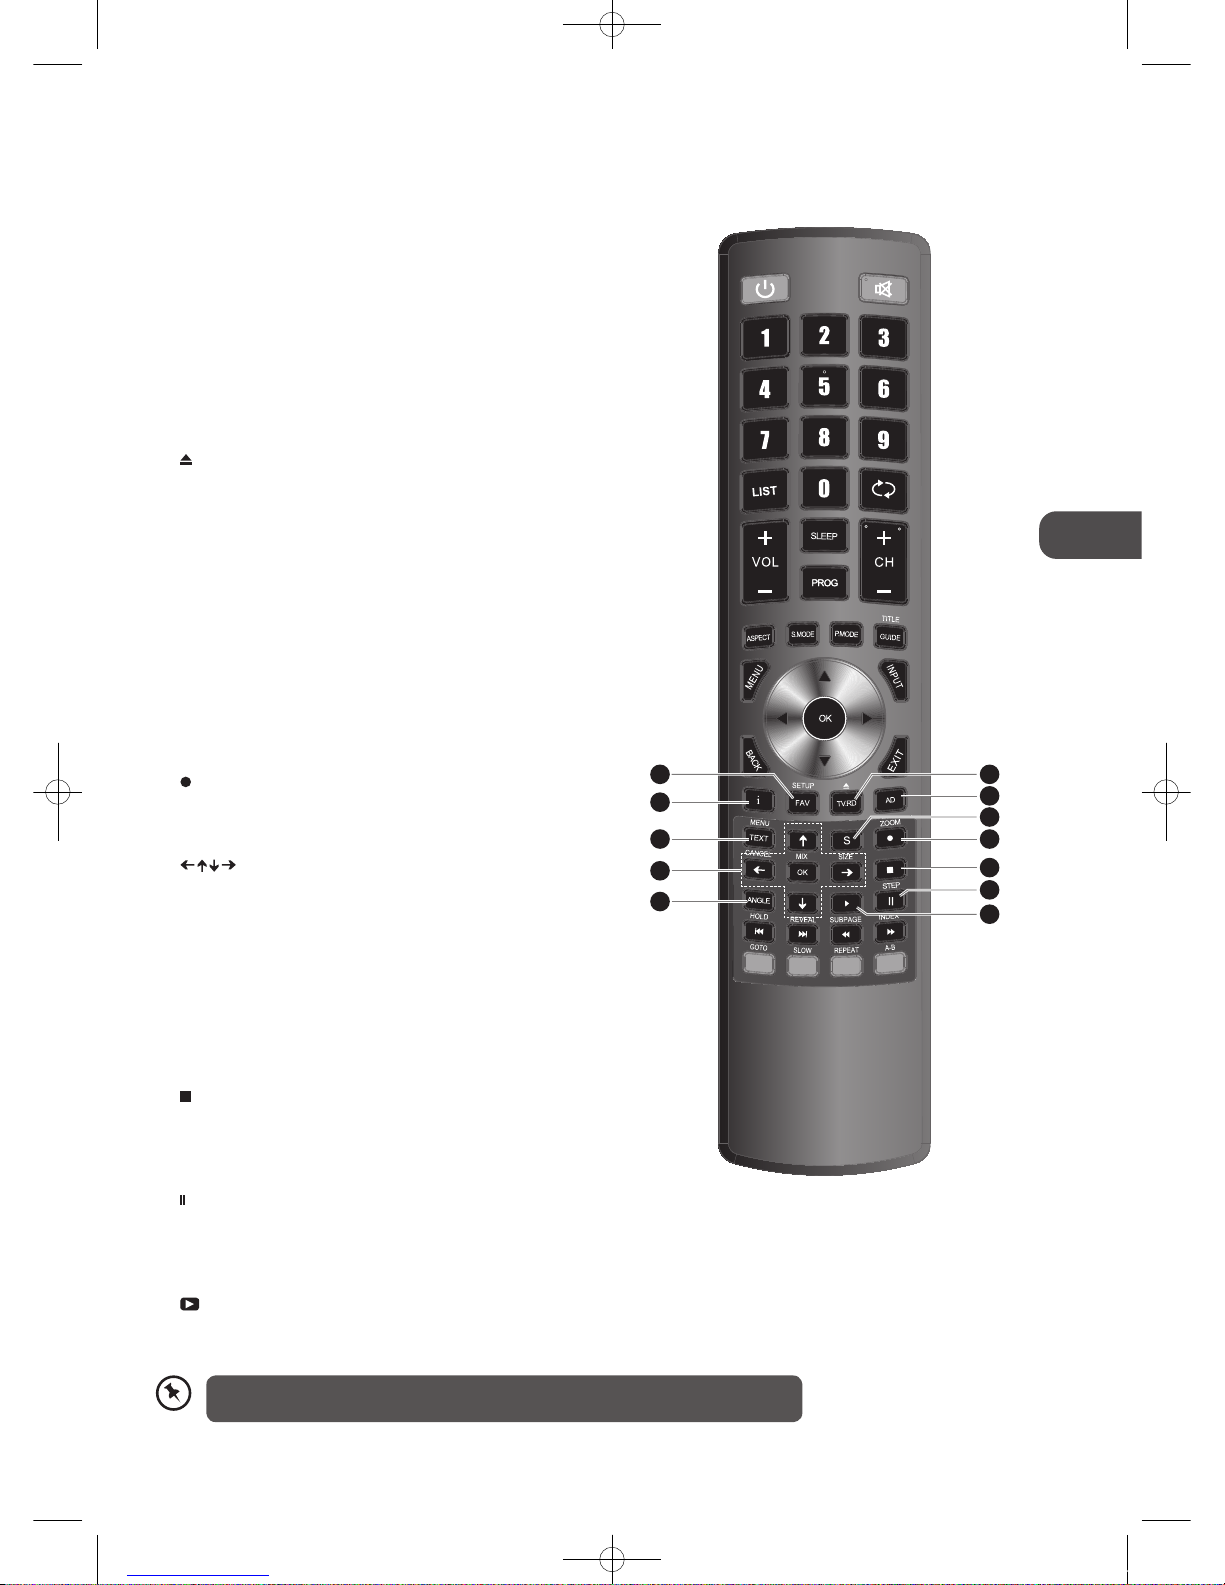
19. FAV
Display the favourite channel list. (ATV / DTV mode)
SETUP
Display and exit the DVD setup menu. (DVD mode)
20. i
Display the present screen information such as the current
channel on ATV / DTV mode and the input source except
ATV / DTV mode.
21. TV.RD
To switch input source to TV / Digital radio channels. (DTV
mode)
Eject a disc. (DVD mode)
22. AD (Audio Description)
• To turn on / o the Audio Description (AD) function (only
applicable when the TV programme has this feature).
(DTV mode)
• Select dierent Audio mode on DVD mode. (DVD mode)
• Select Stereo / Dual Sound Reception. (ATV mode)
23. TEXT
Turns on and o the teletext function. (ATV / DTV mode)
MENU
Display the DVD menu. (DVD mode)
24. S (Subtitle)
• Displays subtitles which are broadcast with the
programme. (DTV mode).
• Displays subtitles on the DVD. (DVD mode)
25.
REC
Record the current programme. (DTV mode).
ZOOM
Zoom in on the displayed frame. (DVD mode)
26.
Allows you to navigate the DVD menu and adjust the
system settings to your preference. (DVD mode)
OK
Conrm the selection in the DVD menus. (DVD mode)
CANCEL
To exit the teletext mode. (ATV mode)
MIX
Select TELETEXT with a TV programme. (ATV mode)
SIZE
To enlarge the picture on the TV in teletext. (ATV mode)
27.
Stop
To stop the playback or recording. (DVD / DMP / DTV
mode)
28. ANGLE
Select dierent angles for the video. (DVD mode)
29.
Pause
• To pause playback. (DVD / DMP mode)
• Start the time-shift function (DTV mode)
STEP
To play the playback forward frame by frame. (DVD mode).
30.
PLAY
To start playback. (DVD / DMP mode)
25
27
29
30
23
24
26
28
22
20
2119
Please note that the DVD mode functions on the remote control only operate on TV
models with a built-in DVD player.
L26DIGB21_IB_111003_Annie.indd 11 11年10月3日 下午4:22
GB
12
Preparation
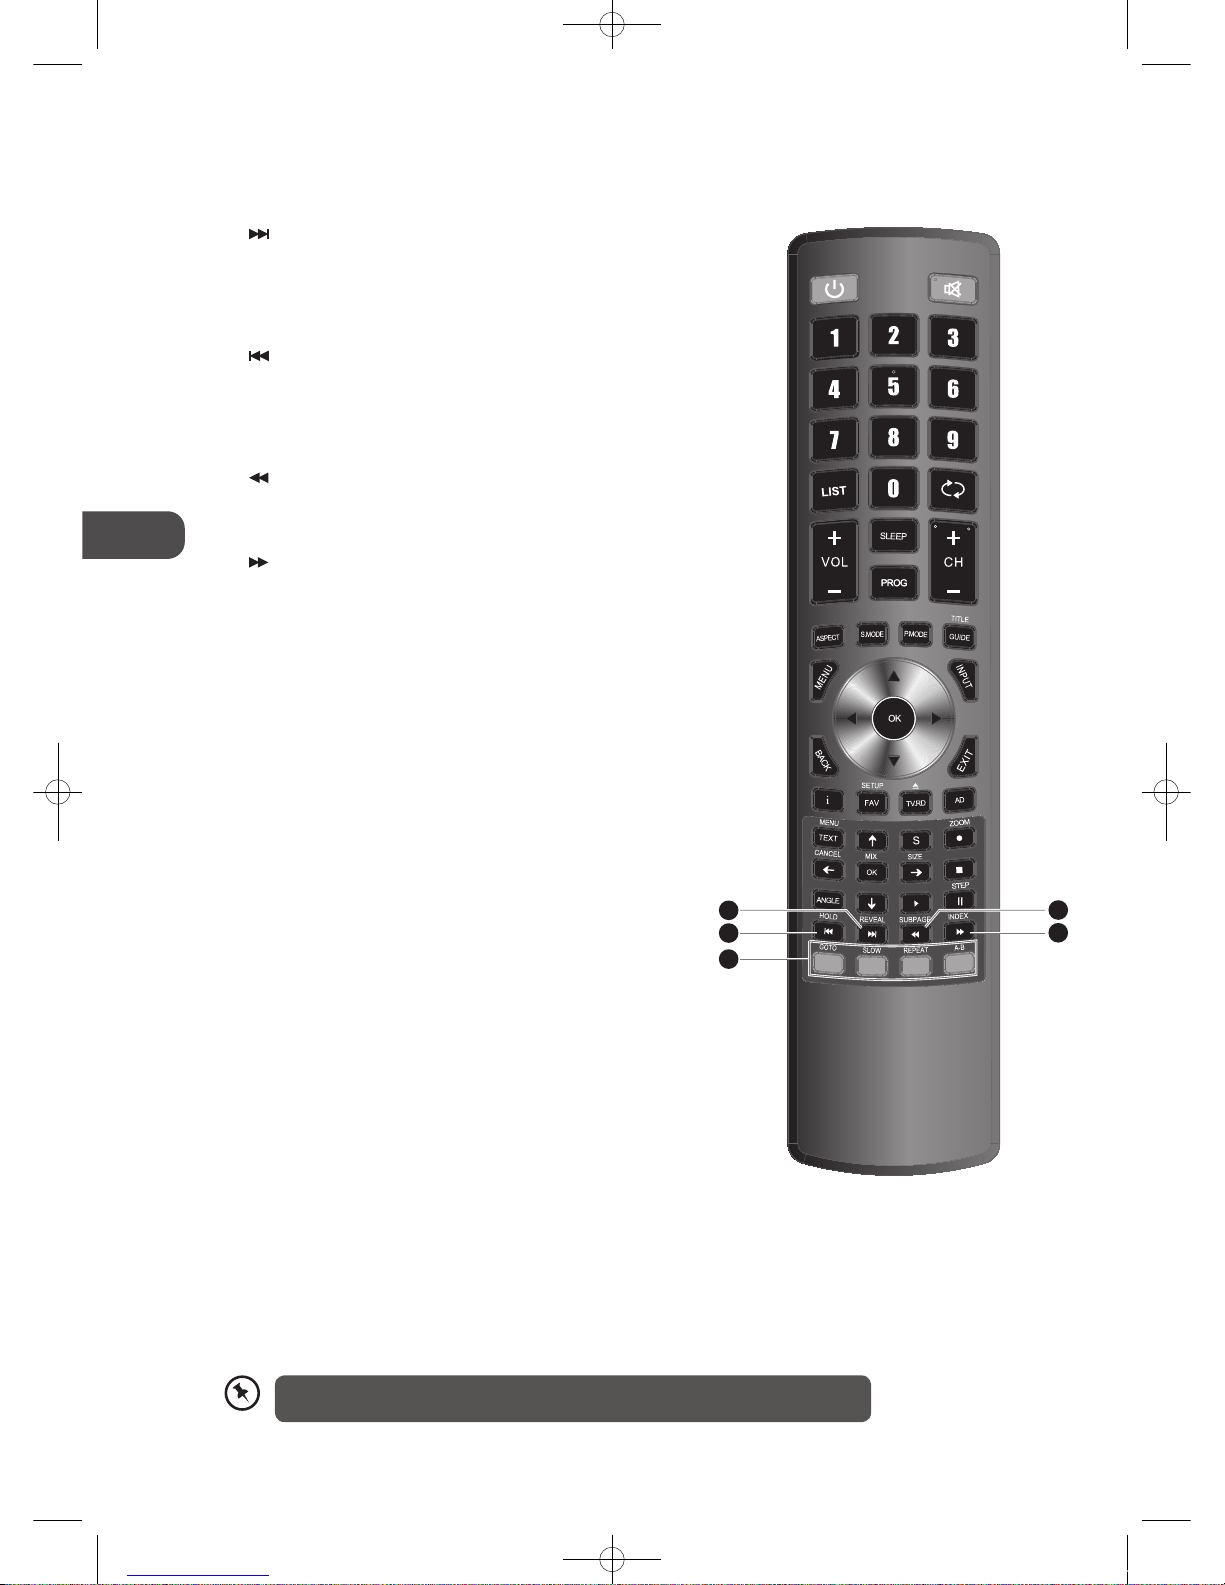
31.
To skip to the beginning of the next chapter / track /
photo.
REVEAL
Reveals hidden information such as the answer to a quiz
in teletext. (ATV mode).
32.
To skip to the beginning of the previous chapter / track
/ photo.
HOLD
Freezes a multi-page passage on screen in teletext. (ATV
mode)
33.
To reverse playback rapidly.
SUBPAGE
Displays the subpage on the teletext screen. (ATV mode)
34.
To advance playback rapidly.
INDEX
To select the page number of the index from teletext.
(ATV mode)
35. Coloured buttons
Access the TELETEXT items or channel edit when using
Digital / Freeview TV Channels. (ATV / DTV mode)
GOTO (RED)
To skip to a specic location on a DVD / CD. (DVD mode)
SLOW (GREEN)
Play video slow. (DVD mode)
REPEAT (YELLOW)
Select between dierent repeat modes. (DVD mode)
A–B (BLUE)
Repeat a segment between A and B. (DVD mode)
34
33
32
35
31
Please note that there are DVD mode functions on the remote control only operate on
TV models with a built-in DVD player.
L26DIGB21_IB_111003_Annie.indd 12 11年10月3日 下午4:22
GB
13
Connections
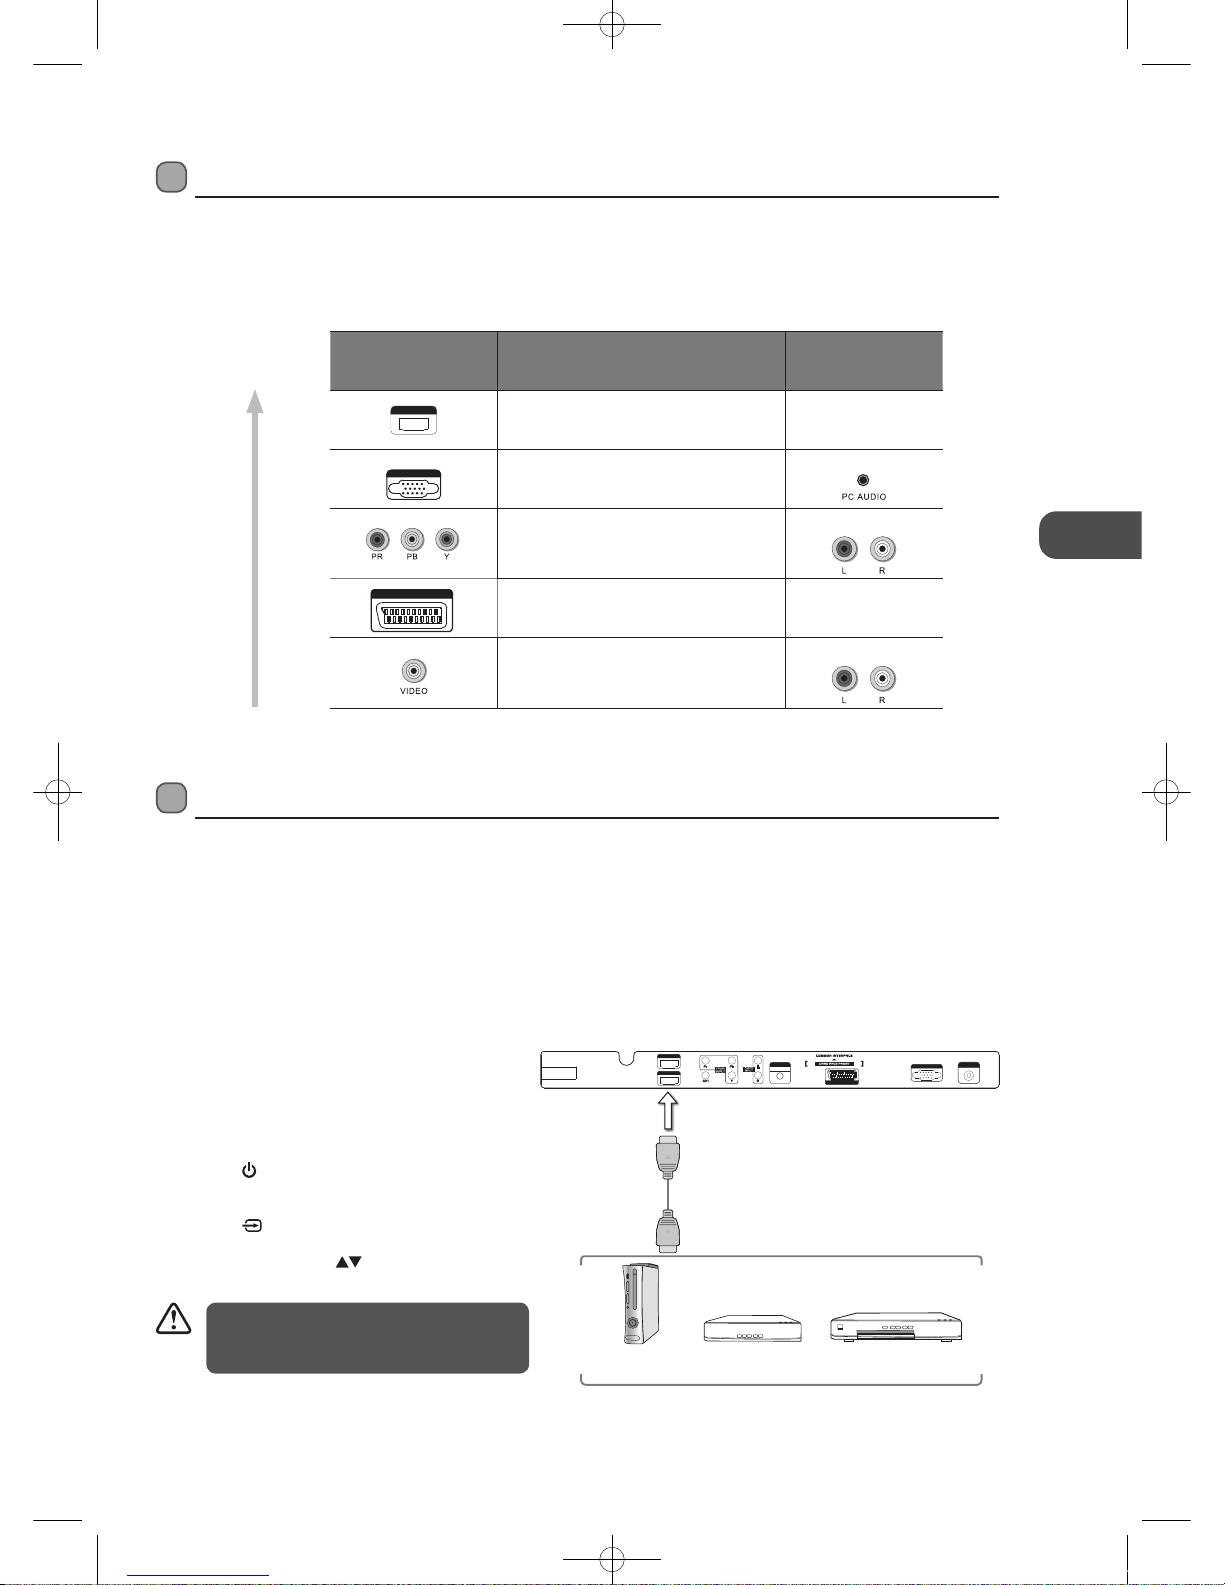
Connecting an AV Device with an HDMI Cable
• This TV can accept High-Definition Multimedia Interface (HDMI) supports HDCP (High-Bandwidth Digital Content Protection)
Protocol.
• The TV has a total of 2 HDMI input sockets, please make sure the correct input source is selected corresponding to your
connected HDMI input socket.
• When you connect to the output of an HD ready player (blu-ray disc player, game console, set-top box or computer) switch to
the HDMI function and the TV will automatically detect the resolution used by the HDMI source.
• To get the best picture quality, adjust the blu-ray disc player, game console or set-top box output resolution up to 1920 x
1080p.
1. Use an HDMI cable to connect the TV’s HDMI input
socket to the external AV device’s HDMI output socket.
2. Plug the connected devices into the mains socket
before switching on the POWER ON/OFF button
which is located at the rear side of the TV.
3. Press the
button on the right side panel of the TV
or on the remote control to turn on your TV.
4. Press the
button on the right side panel of the TV
or the INPUT button on the remote control to display
the Source List. Use the
buttons to select HDMI1
/ HDMI2 and then press the OK button to confirm.
Making Video and Audio Connections
Not all AV devices have the ability to connect to a TV, please refer to the owner’s manual of your AV device for compatibility and
connection procedures.
When connecting any external AV device, do not connect the mains cable to the mains socket until all other connections are
complete.
Signal Type
Separate Audio
Connection Required
HDM I
HDMI
(480i/480p/576i/576p/720p/1080i/1080p)
No
VGA I NPUT
VGA
Yes
Component Video
(480i/480p/576i/576p/720p/1080i/1080p)
Yes
SCA RT
SCART (RGB Input) No
Composite Video
Yes
Best Video
Performance
Although this TV is able to connect to an
HDMI device, it is possible that some devices
may not operate correctly.
Connections
Rear Bottom View of TV
VGA INPU T
RF INPUT
PC
AUDIO INPU T
SCART
100-240 V~ 50/ 60Hz
AC-INPU T
HDMI 1
HDMI 2
HDMI Cable
(not included)
Blu-ray Player / DVD Player /
Recorder
Set-top BoxGame Console
L26DIGB21_IB_111003_Annie.indd 13 11年10月3日 下午4:22
GB
14
Connections
Connecting an AV Device with a Component (YPbPr) Cable
1. Use a component cable to connect the TV’s YPbPr
input sockets to an external AV device’s component
output sockets.
2. Use an AV cable to connect the TV’s AUDIO(L/R) input
sockets to the external AV device’s component audio
output sockets. (Audio Left = white, and Audio Right
= red)
Component port on the TV Y Pb Pr
Video output ports on DVD
player
Y Pb Pr
Y Cb Cr
3. Plug the connected devices into the mains socket
before switching on the POWER ON/OFF button
which is located at the rear side of the TV.
4. Press the
button on the right side panel of the TV
or on the remote control to turn on your TV.
5. Press the
button on the right side panel of the TV
or the INPUT button on the remote control to display
the Source List. Use the
buttons to select YPbPr
and then press the OK button to confirm.
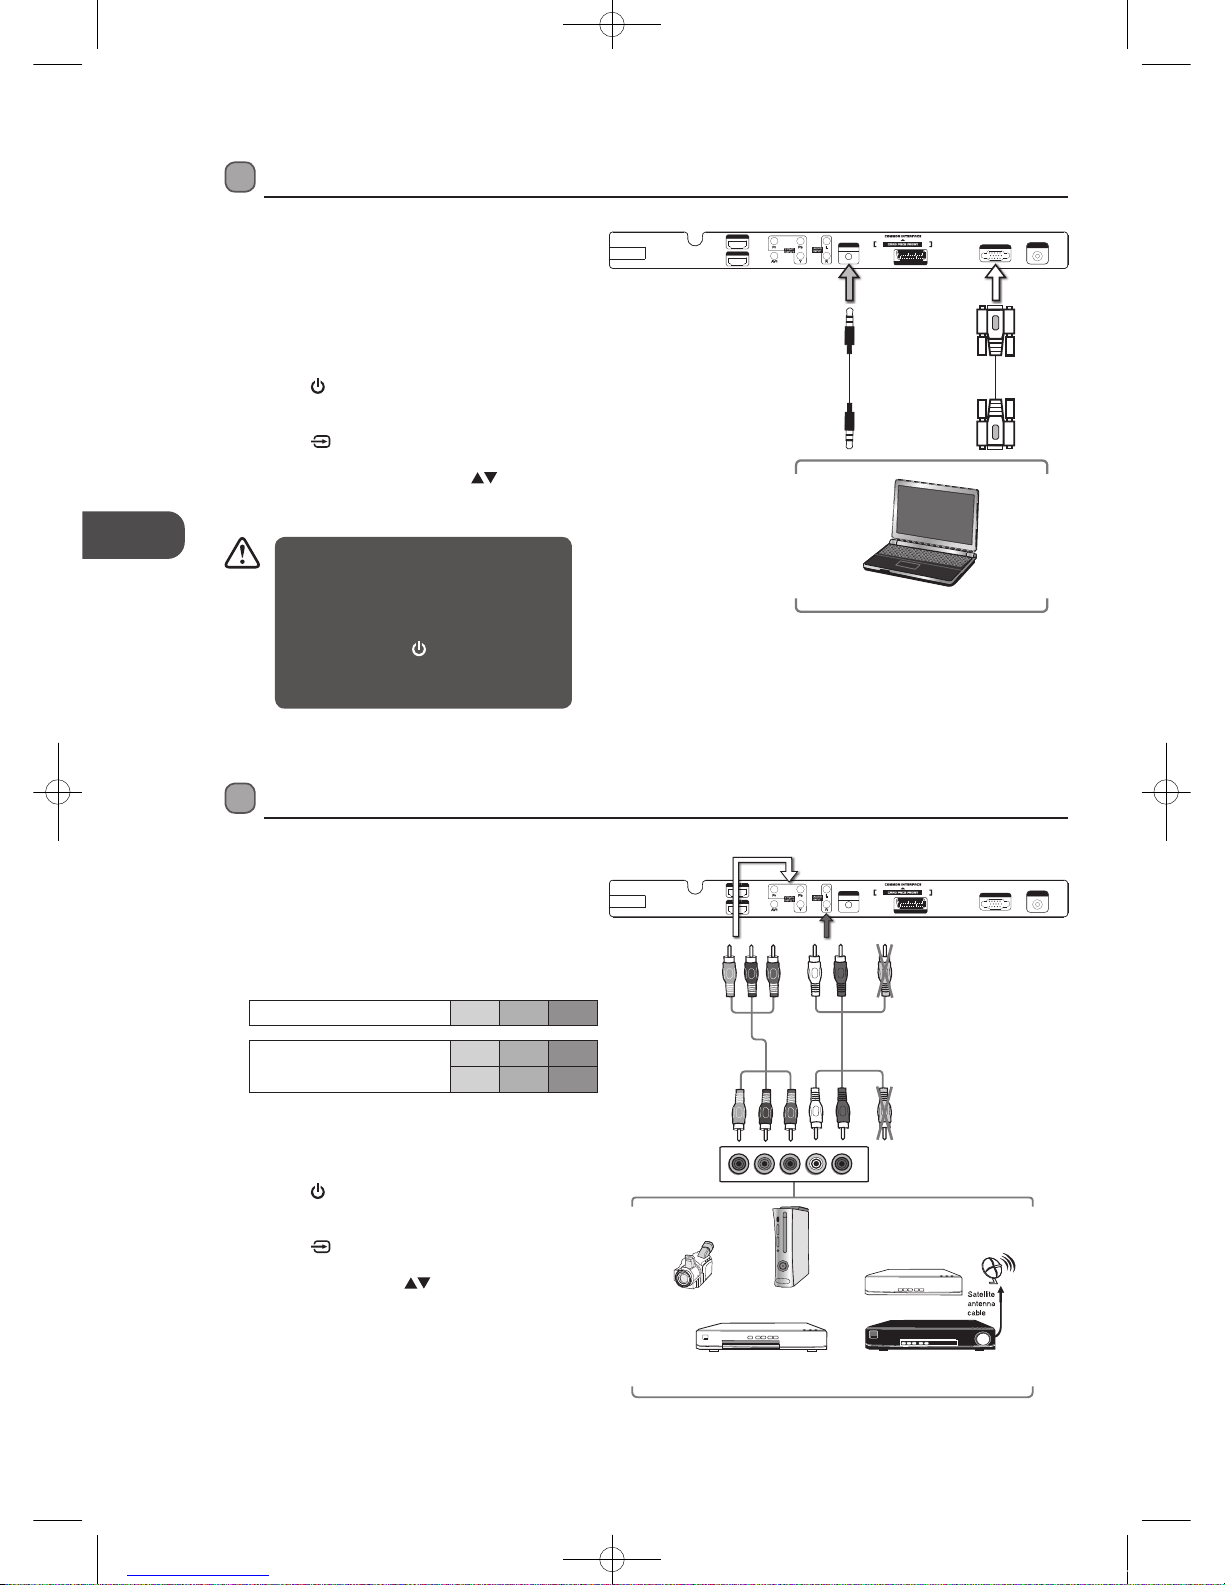
Connecting a Computer with a VGA Cable
1. Use a VGA cable to connect the TV’s VGA input
socket to a computer’s VGA output socket. Use an
audio cable to connect the TV’s PC AUDIO input
socket to the computer’s audio output socket.
2. Plug the connected devices into the mains socket
before switching on the POWER ON/OFF button
which is located at the rear side of the TV.
3. Press the
button on the right side panel of the
TV or on the remote control to turn on your TV.
4. Press the
button on the right side panel of the
TV or the INPUT button on the remote control
to display the Source List. Use the
buttons
to select PC and then press the OK button to
confirm.
• The best resolution is 1920 x 1080.
• If your computer is set to shut down
after a few minutes of idle mode, the
TV will also switch to standby due to
no signal being received, this is to save
energy. Press the
button on the right
side panel of the TV or on the remote
control to restart the TV.
Rear Bottom View of TV
VGA INPU T
RF INPUT
PC
AUDIO INPU T
SCART
100-240 V~ 50/ 60Hz
AC-INPU T
HDMI 1
HDMI 2
Computer
VGA Cable
(not included)
Audio Cable
(not included)
Rear Bottom View of TV
VGA INPU T
RF INPUT
PC
AUDIO INPU T
SCART
100-240 V~ 50/ 60Hz
AC-INPU T
HDMI 1
HDMI 2
Satellite Receiver
Video Camera
Blu-ray Player / DVD Player /
Recorder
Set-top Box
Game Console
L
R
COMPONENT
OUT
Y
Pr
Pb
AV Cable
(not included)
Yellow (Video)
Red (R)
White (L)
Yellow (Video)
Red (R)
White (L)
Component Cable
(not included)
Pb/Cb
Pr/Cr
Y
Pb/Cb
Pr/Cr
Y
L26DIGB21_IB_111003_Annie.indd 14 11年10月3日 下午4:22
GB
15
Connections
Connecting an AV Device with a SCART Cable
1. Use a SCART cable to connect the TV’s SCART input
socket to an external AV device’s SCART output
socket.
2. Plug the connected devices into the mains socket
before switching on the POWER ON/OFF button
which is located at the rear side of the TV.
3. Press the
button on the right side panel of the TV
or on the remote control to turn on your TV.
4. The TV will change the input source to SCART
automatically once the AV device is switched on.
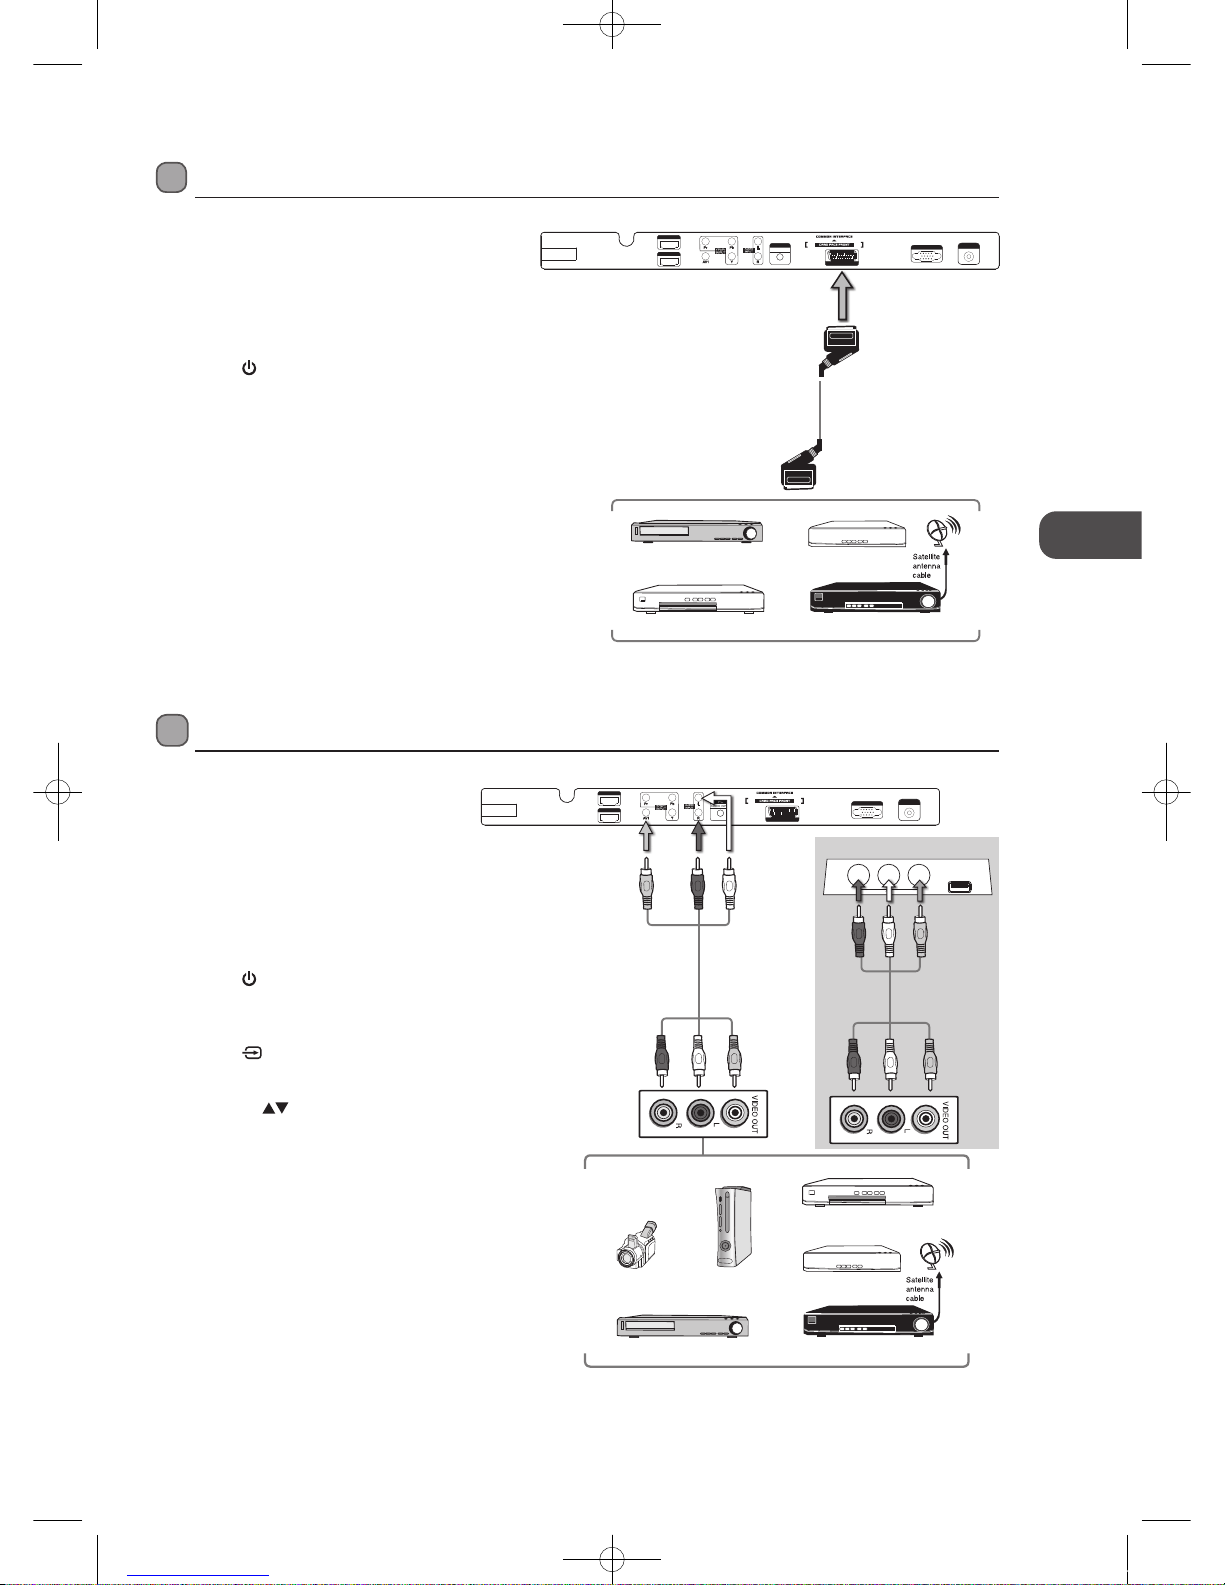
Connecting an AV Device with Composite Cable
1. Use an AV cable to connect the TV’s
AUDIO(L/R) / VIDEO input sockets to the
external AV device’s composite audio /
video output sockets. (VIDEO = yellow,
Audio Left = white, and Audio Right = red)
2. Plug the connected devices into the mains
socket before switching on the POWER
ON/OFF button which is located at the
rear side of the TV.
3. Press the
button on the right side panel
of the TV or on the remote control to turn
on your TV.
4. Press the
button on the right side
panel of the TV or the INPUT button on
the remote control to display the Source
List. Use the
buttons to select AV1
(REAR) / AV2 (SIDE) and then press the
OK button to confirm.
Rear Bottom View of TV
SCART Cable
(not included)
VGA INPU T
RF INPUT
PC
AUDIO INPU T
SCART
100-240 V~ 50/ 60Hz
AC-INPU T
HDMI 1
HDMI 2
Satellite Receiver
VCR
DVD Player / Recorder
Set-top Box
VGA INPU T
RF INPUT
PC
AUDIO INPU T
SCART
100-240 V~ 50/ 60Hz
AC-INPU T
HDMI 1
HDMI 2
Satellite Receiver
Video Camera
VCR
DVD Player / Recorder
Set-top Box
Game Console
AV Cable
(not included)
Yellow (Video)
Red (R)
White (L)
Yellow (Video)
Red (R)
White (L)
Rear Bottom View of TV
Video
AV2
L
R
USB
Rear Left Side of TV
AV Cable
(not included)
Yellow (Video)
White (L)
Red (R)
Yellow (Video)
Red (R)
White (L)
OR
L26DIGB21_IB_111003_Annie.indd 15 11年10月3日 下午4:22
16
GB
Initial Setup
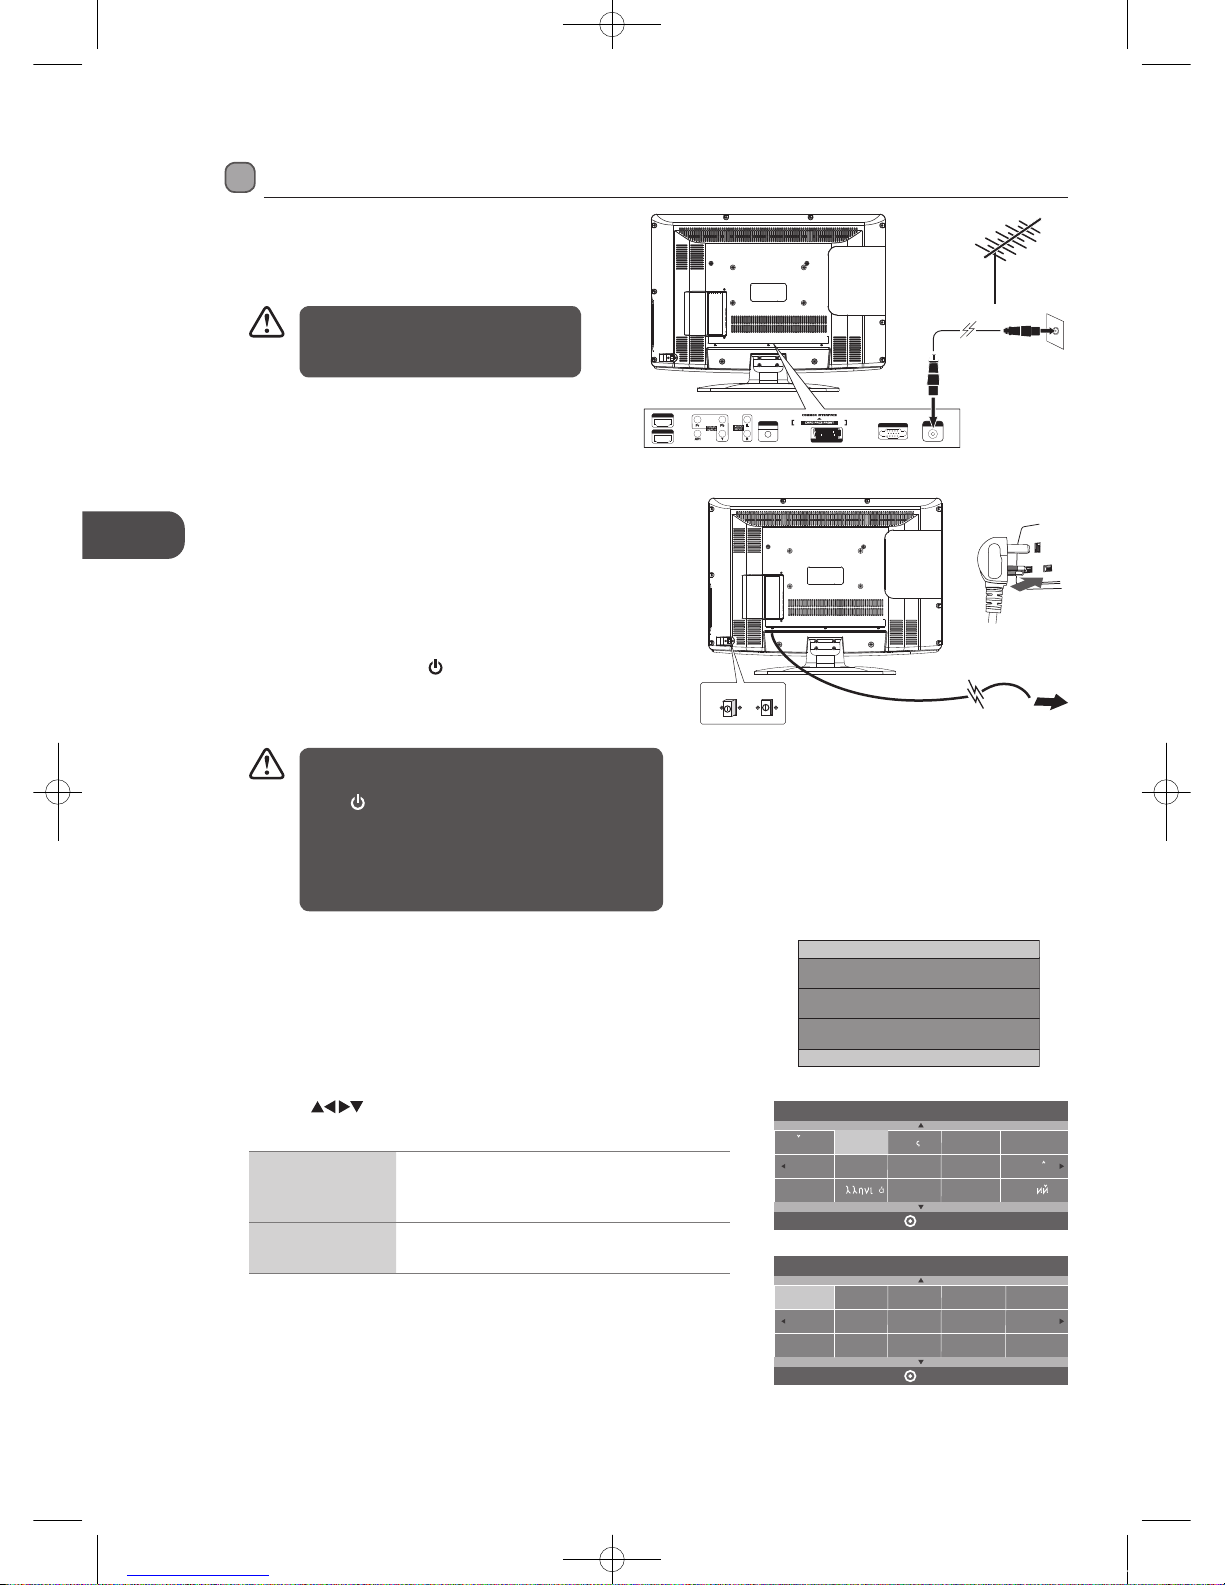
2. Connect the mains cable to the mains socket after
you have completed all the connections.
3. Switching on the POWER ON/OFF button which
is located at the rear side of the TV. At this stage,
the TV switches to standby mode. The red LED
indicator will illuminate on the front panel of the
TV.
4. In standby mode, press the
button on the right
side panel of the TV or on the remote control to
turn the TV on. The red LED indicator will turn
green.
Do not connect the TV to the mains
supply until you have completed all the
connections.
6. Press the buttons to navigate the menu and change the
settings. Press the OK button to confirm.
OSD Language Select your desired language to be displayed on
the menu. The default on-screen menu language
is set as English.
Country Select the country where you will operate the TV.
The default country is set as UK.
Dan sk
Deu tsch
Hrv atski
Ita liano
OSD L anguage
OK
Mag yar
Ned erlan ds
Nor sk
Pol skiEng lish
Ces ky
E k
Esp anol
~
Fra n ais
Por tugue s
Pyc ck
Fra nce
Gre ece
UK
Aus trali a
Aus tria
Cze ch
Den mark
Fin land
Cou ntry
OK
Bel gium
Bul garia
Cro atia
Hun gary
Ita ly
Lux embou rg
Ger many
Turning the TV on for the First Time
1. Connect one end of the RF coaxial cable to the
aerial socket on the wall and the other end of the
cable to the RF (75Ω) socket at the rear bottom
side of your TV.
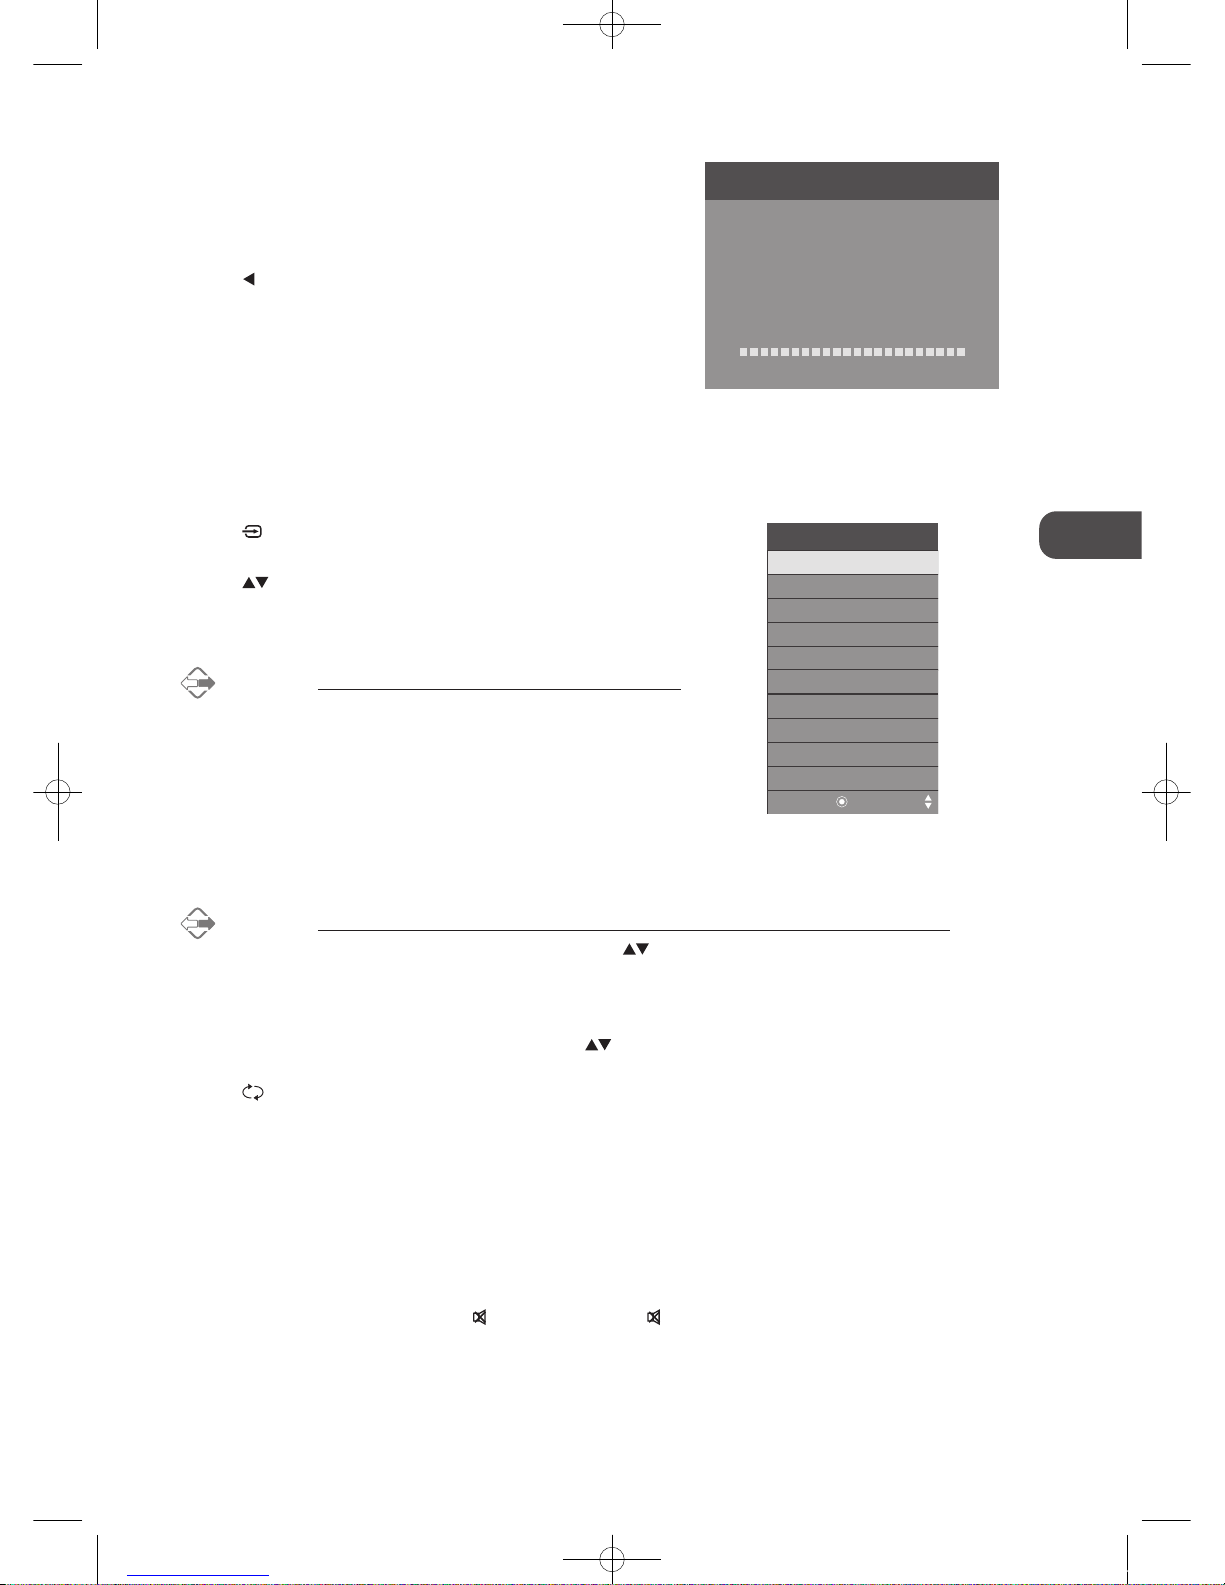
5. The first time you turn the TV on, it will go straight into the First
Time Installation menu. Please ensure the aerial is plugged in
and then press the OK button. (If you have already installed the
TV using the Quick Start Guide, please go to the “Selecting the
Input Source” section on the next page.)
First Time Installation
Please ensure aerial is plugged in!
Then press OK button.
• Always disconnect the TV from the mains socket
when not in use for a long period of time.
• The
button on the right side panel of the TV or
on the remote control is only used for switching
the TV into standby, it does not disconnect the TV
from the mains power. To completely disconnect
the mains power, please remove the mains plug
from the mains socket.
Initial Setup
VGA INPU T
RF INPUT
PC
AUDIO INPUT
SCART
HDMI 2
HDMI 1
OR
RF coaxial cable
(not included)
OFF ON
To the mains
socket
L26DIGB21_IB_111003_Annie.indd 16 11年10月3日 下午4:23
17
GB
Initial Setup
7. Channel tuning will commence. This operation may take up to 6
minutes. The display will show the progress of the tuning and the
number of channels found.
8. If you want to skip the ATV tuning, press the MENU button to
interrupt the tuning half way. A pop-up screen will be displayed,
press the
button to select YES to confirm. You will then go
straight to DTV tuning. You may repeat the above step if you also
want to skip the DTV tuning. An installation reminder will appear
the next time you turn on the TV.
9. After tuning is complete, the channels are arranged in a preset
order. If you wish to skip channels, modify the preset order or
rename channels, select Channel Edit under the Channel menu
(refer to page 20-21 for details).
Selecting the Input Source
1. Press the button on the right side panel of the TV or the INPUT button
on the remote control to display the Input source list.
2. Press the
buttons to select the input source that you want: DTV / ATV /
SCART / YPbPr / PC / HDMI1 / HDMI2 / AV1 (REAR) / AV2 (SIDE) / DMP.
3. Press the OK button to confirm your selection.
Alternative
Press the TV.RD button to switch to TV / digital radio channels directly
(DTV mode).
Channel Selection
• Press the CH + / – buttons on the remote control repeatedly or the 0-9 buttons to select the channel.
Alternative
Press the LIST button to enter the Channel List. Then use the buttons to highlight and select the channel.
Press the OK button to view the selected channel.
• If a blocked channel is selected, the password screen will be displayed. Press the 0-9 buttons to enter the password, the
channel will then be unlocked (refer to page 35 for details on Block Channel).
• Press the FAV button to view the Favourite List. Then use the
buttons to highlight and select the channel. Press the OK
button to view the selected channel (refer to page 20-21 for details on Channel Edit).
• Press the
button to return to the previously viewed channel.
Display Channel Information
• Press the i button to view the current information.
Volume Adjustment
• Press the VOL + or – button on the side panel of the TV or on the remote control to adjust the volume.
• If you wish to switch the sound off, press the
MUTE button. Press the MUTE button again or the VOL + button to resume
audio listening.
Input Source
OK
DTV
ATV
SCART
YPbPr
PC
HDMI1
HDMI2
AV1 (REAR)
AV1 (SIDE)
DMP
Channel Tuning
TV : 3 Channel(s)
DTV : 0 Channel(s)
Radio : 0 Channel(s)
Data : 0 Channel(s)
36%... 668. 75 MH z (T V)
Please press MENU to skip.
L26DIGB21_IB_111003_Annie.indd 17 11年10月3日 下午4:23

18
GB
Customising TV Settings
4. Channel tuning will commence. This operation may take up to 6 minutes.
The display will show the progress of the tuning and the number of
channels found.
5. If you want to skip the ATV tuning, press the MENU button to interrupt
the tuning half way. A pop-up screen will be displayed, press the
button to select YES to confirm. You will then go straight to DTV tuning.
You may repeat the above step if you also want to skip the DTV tuning.
An installation reminder will appear the next time you turn on the TV.
6. After tuning is complete, the channels are arranged in a preset order. If
you wish to skip channels, modify the preset order or rename channels,
select Channel Edit under the channel menu (refer to page 20-21 for
details).
3. In the Tune Type menu, press the
buttons to select ATV / DTV /
DTV + ATV. Press the
button and then press the buttons to
select the country where you will operate the TV. Press the OK button to
confirm.
2. Press the
buttons to select Auto Tuning and then press the OK
button.
Channel Setting (TV, DTV or Radio Mode)
Auto Tuning
Use this to automatically find and store all available channels. This is normally recommended if some channels have been added
or removed by the broadcaster or if you have moved house.
1. Press the MENU button and then press the
buttons to select the
CHANNEL menu and then press the OK button.
Channel Tuning
TV : 3 Channel(s)
DTV : 0 Channel(s)
Radio : 0 Channel(s)
Data : 0 Channel(s)
36%... 668. 75 MH z (T V)
Please press MENU to skip.
CHANNEL
PICTURE
SOUND
TIME
OPTION
LOCK
EXIT
EXIT
Aut o Tun ing
DTV Manu al Tu ning
ATV Manu al Tu ning
Sig nal I nform ation
CI Infor matio n
Sof tware Upda te(OA D)Off
Sof tware Upda te(US B)
Cha nnel Edit
Tun e Type D TV +ATV
UK
Austr al ia
Austr ia
Belgi um
Bulga ri a
Croat ia
Czech
Denma rk
Finla nd
MENU
Customising TV Settings
L26DIGB21_IB_111003_Annie.indd 18 11年10月3日 下午4:23

19
GB
Customising TV Settings
3. The DTV Manual Tuning screen will pop up. Press the buttons
to select the desired UHF channel and then press the OK button to
commence the search of that channel. When the signal has been tuned,
the picture and signal strength will be displayed on the screen.
4. Press the MENU button to return back to the main menu.
5. Press the EXIT button to exit the menu.
2. Press the
buttons to select ATV Manual Tuning and then press the
OK button.
2. Press the
buttons to select DTV Manual Tuning and then press the
OK button.
DTV Manual Tuning
Allows you to make manual fine tuning adjustments of the channel under DTV mode.
1. Press the MENU button and then press the
buttons to select the
CHANNEL menu and then press the OK button.
CHANNEL
PICTURE
SOUND
TIME
OPTION
LOCK
EXIT
EXIT
CHANNEL
PICTURE
SOUND
TIME
OPTION
LOCK
EXIT
EXIT
Aut o Tun ing
DTV Manu al Tu ning
ATV Manu al Tu ning
Sig nal I nform ation
CI Infor matio n
Sof tware Upda te(OA D)Off
Sof tware Upda te(US B)
Cha nnel Edit
Aut o Tun ing
DTV Manu al Tu ning
ATV Manu al Tu ning
Sig nal I nform ation
CI Infor matio n
Sof tware Upda te(OA D)Off
Sof tware Upda te(US B)
Cha nnel Edit
DTV Ma nual Tuning
VHF CH 5
Bad N om al Go od
Press OK to sea rc h
ATV Manual Tuning
Allows you to make manual fine tuning adjustments if the channel reception is poor under ATV mode.
1. Press the MENU button and then press the
buttons to select the
CHANNEL menu and then press the OK button.
L26DIGB21_IB_111003_Annie.indd 19 11年10月3日 下午4:23

20
GB
Customising TV Settings
a. Delete
Press the RED button to delete the selected channel.
b. Rename (ATV channels)
Press the GREEN button to rename the selected channel. Press
the
buttons to select the characters to represent the station
name. Press the
buttons to move to the next character and
then press the GREEN button again to confirm the new name.
3. A Channel Edit screen will pop up. Press the
buttons to select
the programme you want to edit.
2. Press the
buttons to select Channel Edit and then press the OK
button.
3. The ATV Manual Tuning screen will pop up. Use the buttons to select
the following options and the
buttons to adjust the setting.
Storage To Presets the channel number.
Sound System
Selects the sound system: I / DK / BG / L (for
SECAM).
Current CH Displays the current channel number.
Search
Press the
buttons to start the manual
tuning.
Fine-Tune
Press the
buttons to make manual fine
tuning adjustments.
Frequency Displays the current tuned frequency.
4. After finishing the manual tuning adjustment of a channel, press the
RED button to save your channel before tuning the next channel.
5. Press the MENU button to return back to the main menu.
6. Press the EXIT button to exit the menu.
Channel Edit (ATV / DTV Mode)
Allows you to edit TV programmes in the Channel List.
1. Press the MENU button and then press the
buttons to select the
CHANNEL menu and then press the OK button.
ATV Ma nu al Tuni ng
Storage To 1
Sound System I
Current CH 1
Search
Fine-Tune
Frequency 2 55 .2 5 MHz
Save ME NU
CHANNEL
PICTURE
SOUND
TIME
OPTION
LOCK
EXIT
EXIT
Aut o Tun ing
DTV Manu al Tu ning
ATV Manu al Tu ning
Sig nal I nform ation
CI Infor matio n
Sof tware Upda te(OA D)Off
Sof tware Upda te(US B)
Cha nnel Edit
Channel Edit
OK
Delete Re name Move
Skip
FAV
MENU
800 SZTVM 01
DTV
800 SZTV M02
800 SZTV M03
800 SZTV M04
804 Date
1C- 51
2C- 53
3C- 61
DTV
DTV
DTV
DTV
ATV
ATV
ATV
All channels (DTV and ATV) are listed, please ensure
that you edit the correct channel.
L26DIGB21_IB_111003_Annie.indd 20 11年10月3日 下午4:23

21
GB
Customising TV Settings
Care should be taken when editing the position of digital
channels as this may affect EPG and reminder settings.
c. Move
Press the YELLOW button and then press the
buttons to
move to the selected channel. Press the YELLOW button or the
OK button to conrm.
d. Skip
Press the BLUE button to skip the selected channel. Press the BLUE
button again to undo it.
e. FAV (Favourite)
Press the FAV button to set the selected channel as one of the
favourite programmes. Press the FAV button again to undo it.
4. Press the MENU button to return back to the main menu.
5. Press the EXIT button to exit the menu.
3. Press the BACK button to return to the previous menu or press the
MENU button to return back to the main menu.
4. Press the EXIT button to exit the menu.
Signal Information (DTV Mode)
Allows you to view the signal information.
1. Press the MENU button and then press the
buttons to select the
CHANNEL menu and then press the OK button.
CHANNEL
PICTURE
SOUND
TIME
OPTION
LOCK
EXIT
EXIT
Aut o Tun ing
DTV Manu al Tu ning
ATV Manu al Tu ning
Sig nal I nform ation
CI Infor matio n
Sof tware Upda te(OA D)Off
Sof tware Upda te(US B)
Cha nnel Edit
Channel 5 2
Network SZ TV M
Modulation 16QAM
Quality 99
Signal In fo rm ation
Strength 81
2. Press the buttons to select Signal Information and then press the
OK button to view the signal information.
L26DIGB21_IB_111003_Annie.indd 21 11年10月3日 下午4:23

22
GB
Customising TV Settings
3. A CI Information Main menu will pop up. Press the buttons to
display the module information, smart card information, language,
software download. Press the OK button to confirm.
4. Press the EXIT button to return to the previous menu. Press the EXIT
button again to exit the menu.
This feature is not available in all countries.
To insert the Common Access Module
1. Before you insert the Common Access Module, ensure that the TV is
switched off and the viewing card is inserted in accordance with the
Service Provider’s instructions.
2. Insert the Common Access Module into the slot. Flip the Common Access
Module to another side and try again if you feel resistance.
3. Switch the TV on.
To remove the Common Access Module
1. Before you remove the Common Access Module, ensure that the TV is
switched off.
2. Pull the Common Access Module from the slot.
3. Switch the TV on.
To view the module information
1. Press the MENU button and then press the buttons to select the
CHANNEL menu and then press the OK button.
2. Press the
buttons to select CI Information and then press the OK
button.
CI (Common Interface) (DTV Mode)
The common interface allows the use of a Common Access Module to enable you to view scrambled (pay to view) services. These
services are provided by TopUp TV (UK only) and others. The Common Access Module and viewing card can be obtained from the
service provider.
Common Access
Module
Do not repeatedly insert or remove
the Common Access Module as this
may damage the interface and cause a
malfunction.
CHANNEL
PICTURE
SOUND
TIME
OPTION
LOCK
EXIT
EXIT
Aut o Tun ing
DTV Manu al Tu ning
ATV Manu al Tu ning
Sig nal I nform ation
CI Infor matio n
Sof tware Upda te(OA D)Off
Sof tware Upda te(US B)
Cha nnel Edit
Main me nu
Pre ss Ok to s elect ,or E xit to q uit
CI In fo rmati on
Modu le in forma tion
Smar t car d inf ormat ion
Lang uage
Soft ware Downl oad
This screen is for illustration only.
VGA INPU T
RF INPUT
PC
AUDIO INPU T
SCART
100-240 V~ 50/ 60Hz
AC-INPU T
HDMI 1
HDMI 2
Rear Bottom View of TV
CI (Common Interface)
Allows the Common Access Module
to be inserted and access the content
that has been encrypted.
L26DIGB21_IB_111003_Annie.indd 22 11年10月3日 下午4:23

23
GB
Customising TV Settings
5. During normal DTV viewing, if the TV detects the latest firmware from the
DTV signal, the Over Air Download screen will appear. Press the
buttons
to select Yes / No for upgrade procedure.
6. If you select Yes, the over air download will start. Press the EXIT button if
you want to stop the download and exit the menu.
7. When the download is complete, the TV will automatically upgrade the
software.
8. When the update is complete, the TV will return to standby mode.
9. Press the
button on the right side panel of the TV or on the remote
control to switch on the TV.
2. Press the
buttons to select Software Update(OAD) and then press
the OK button to select On.
3. Press the BACK button to return to the previous menu or press the
MENU button to return back to the main menu.
4. Press the EXIT button to exit the menu.
Software Update (Over Air Download)
The TV auto detects the latest firmware through the DTV signal and allows you to accept or refuse the firmware upgrade service.
1. Press the MENU button and then press the
buttons to select the
CHANNEL menu and then press the OK button.
CHANNEL
PICTURE
SOUND
TIME
OPTION
LOCK
EXIT
EXIT
Aut o Tun ing
DTV Manu al Tu ning
ATV Manu al Tu ning
Sig nal I nform ation
CI Infor matio n
Sof tware Upda te(OA D)Off
Sof tware Upda te(US B)
Cha nnel Edit
Yes No
New FW is available for upgrading
TV Version V0.01
Stream Version v0.03
Yes to upgrade.
No to ignore this upgrade.
EXI T
Download
20%
Software Update(OAD)
71%
During the download, please do not turn off or unplug your TV.
If you experience difficulties after the software update, we recommend
that you restore your TV to the factory default settings. To do this, follow
the steps below:
1. Press the MENU button to go to the MAIN menu. Press the
buttons
to select OPTION and then press the OK button.
2. Press the
buttons to select Restore Factory Default and then press
the OK button. Press the
button to select Yes to reset the setting.
3. The TV will restore all settings and go to the First Time Installation.
Follow the First Time Installation steps (refer to page 16-17 for details).
Software Update (USB)
This function is only for servicing purposes. Any update information for this TV (if any) will be available at the following website:
http://knowhow.com/ or call our UK Call Centre on 0844 561 1234. Our UK Customer Contact Centre is open Monday-Saturday
8am-8pm or Sunday 8am-6pm.
L26DIGB21_IB_111003_Annie.indd 23 11年10月3日 下午4:23

24
GB
Customising TV Settings
2. Press the buttons to select the following picture options and then
press the OK button.
3. Press the
buttons to select the options. Press the OK button and then press the buttons to adjust each option’s
setting.
Picture Mode Cycles among picture mode: Standard / Mild / User / Dynamic.
Alternative
You may press the P.MODE button to select the picture mode directly.
Contrast Adjusts the difference between light and dark levels
in the picture. (for User mode)
Pict ure Mode Standard
Co ntr as t 82
Br igh tn ess 50
Colour 50
Sh arp ne ss 5 0
Tin t 50
BACK MENU
EXIT
Brightness Increases or decreases the amount of white in the
picture. (for User mode)
Colour Controls the colour intensity. (for User mode)
Sharpness Adjusts the level of crispness in the edges between
light and dark areas of the picture. (for User mode)
Tint (For NTSC
format)
Adjusts the balance between red and green levels.
(Tint is only available for NTSC signal reception.)
Colour
Temperature
Cycles among colour temperature: Medium / Cool / User / Warm.
Adjusts the colour components independently to achieve a warm or cool.
(for User mode)
• Red: Increases red tint
• Green: Increases green tint
• Blue: Increases blue tint
Colour Temperature Medium
Red 40
Gre en 31
Blue 50
BACK MENU
EXIT
Picture Setting
Allows you to set your preferred picture mode.
1. Press the MENU button and then press the
buttons to select the
PICTURE menu and then press the OK button.
CHANNEL
PICTURE
SOUND
TIME
OPTION
LOCK
EXIT
EXIT
Pic ture Mode Stand ard
Col our T emper ature
Asp ect R atio
Noi se Re ducti on
Scr een
L26DIGB21_IB_111003_Annie.indd 24 11年10月3日 下午4:23

25
GB
Customising TV Settings
Aspect Ratio Allows you to watch the screen in various picture formats: Auto / 4:3 / 16:9 / Zoom / Subtitle / Smart
Zoom / Dot to Dot.
Input Signal 4:3 Input Signal 16:9
Auto This selection will display
the picture according to
the aspect ratio of the
input source.
This selection will display
the picture according to
the aspect ratio of the
input source.
4:3 This selection will allow
you to view a picture with
an original 4:3 aspect
ratio. Black bars will
appear on both the left
and right of the screen.
This selection will allow
you to adjust the picture
horizontally, in linear
proportion. Black bars will
appear on both the left
and right of the screen.
16:9 This selection will allow
you to adjust the picture
horizontally, in linear
proportion, to fill the entire
screen.
This selection will allow
you to view a picture with
an original 16:9 aspect
ratio.
Zoom This selection will allow
you to zoom in the
picture without any
alteration, while filling the
entire screen. However,
the top and bottom
of the picture will be
cropped.
This selection will allow
you to zoom in the
picture without any
alteration, while the 4
sides of the picture will
be cropped.
Subtitle This selection will allow
you to zoom in the picture
without any alternation,
while filling the entire
screen with subtitles
shown at the bottom of the
screen.
This selection will
allow you to zoom in
the picture without
any alternation, while
showing subtitles at the
bottom of the screen.
Smart Zoom This selection is similar to
16:9 mode, but the picture
slightly stretches vertically
and clips off a little from
the top and bottom.
This selection is similar
to 16:9 mode, but the
picture slightly stretches
vertically and clips off a
little from the top and
bottom.
Dot by Dot
(HDMI mode, PC
mode and YPbPr
mode only)
This selection will detect
the resolution of the HDMI
signal and display an image
with the same number of
pixels.
This selection will detect
the resolution of the
HDMI signal and display
an image with the same
number of pixels.
Noise Reduction Select to reduce the noise level of the connected device: Off / Low / Middle / High. (ATV mode)
Screen Allows you to adjust the PC desktop content. (PC mode only)
Auto Adjust Allows you to synchronise a PC signal automatically.
Scree n
Auto Adjus t
Horiz ont al Po s. 50
Verti cal P os. 5 0
Size 50
Phase 38
BACK MENU
EXIT
Horizontal Pos. Adjusts the position of the picture left and right in
the window.
Vertical Pos. Adjusts the position of the picture up and down in
the window.
Size Allows you to adjust the picture horizontally, in linear
properties
Phase Controls the signal phase, which can improve focus
clarity and image stability based on the PC mode.
4. Press the BACK button to return to the previous menu or press the
MENU button to return back to the main menu.
5. Press the EXIT button to exit the menu.
L26DIGB21_IB_111003_Annie.indd 25 11年10月3日 下午4:23

26
GB
Customising TV Settings
2. Press the buttons to select the following sound options and then
press the OK button.
Sound Setting
Allows you to select an audio-enhancement technique.
1. Press the MENU button and then press the
buttons to select the
SOUND menu and then press the OK button.
CHANNEL
PICTURE
SOUND
TIME
OPTION
LOCK
EXIT
EXIT
Sou nd Mo de St andar d
Bal ance
AD Switc h
Aut o Vol ume
SRS TruS urrou nd HD Off
3. Press the buttons to select the options. Press the OK button and then press the buttons to adjust each option’s
setting.
Sound Mode Allows the selection of an audio-enhancement technique: Standard / Music / Movie / Sports / User.
Alternative
You may press the S.MODE button to select the sound mode directly.
Treble Controls the relative intensity of higher pitched sounds. (for User mode)
Bass Controls the relative intensity of lower-pitched sounds. (for User mode)
Balance Adjusts the relative volume of the speakers in a multiple speaker system.
Auto Volume Volume levels are automatically controlled. (e.g. advertisements tend to be louder than the
programmes)
SRS TruSurround HDSRS TruSurround HD™ (TS HD) is a robust multichannel virtualisation technology developed by SRS
Labs that provides an enhanced listening experience unlike any other technology that has been
offered for a two speaker playback environment. TruSurround HD builds upon its predecessor,
the industry leading surround sound virtualiser, SRS TruSurround XT®. Not only does TruSurround
HD process up to 6.1 channels for playback over two speakers or headphones, but it also utilises
additional proprietary algorithms from SRS Labs to optimise bass performance, for deep rich bass,
dialogue clarity for better intelligibility of vocals, and definition control for maximum high-frequency
clarity. Press the OK button to select On / Off.
AD Switch
(for DTV mode)
Audio Description is an auxiliary audio function that provides an additional audio track for visually
challenged persons. This function handles the Audio Stream for the AD (Audio Description), when it is
sent along with the main audio from the broadcaster.
• Set to “Off” for normal broadcasting sound coming out from speakers.
• Set to “On” to activate the description sound track if available. The availability of Audio Description
sound track is indicated by the visually impaired icon "V.I." in the information banner.
4. Press the BACK button to return to the previous menu or press the
MENU button to return back to the main menu.
5. Press the EXIT button to exit the menu.
L26DIGB21_IB_111003_Annie.indd 26 11年10月3日 下午4:23

27
GB
Customising TV Settings
2. Press the buttons to select the following time options and then
press the OK button.
Time Settings
Allows you to adjust power on / off time, sleep timer, auto standby and time zone.
1. Press the MENU button and then press the
buttons to select the
TIME menu and then press the OK button.
CHANNEL
PICTURE
SOUND
TIME
OPTION
LOCK
EXIT
EXIT
Clo ck-- -- -- - -
Off Time
On Time
Sle ep Ti mer
Aut o Sta ndby
Tim e Zon e
Stereo / Dual Sound Reception (ATV Mode)
When a programme is selected, press the AD button to display the sound information for the selected station.
Broadcast On Screen Display
Mono
Stereo
Dual
MONO / NICAM MONO
MONO / NICAM STEREO
MONO / NICAM DUAL I, NICAM DUAL II, NICAM DUAL I+II
Mono sound selection
If the stereo signal is weak in stereo reception, you can switch to mono by pressing the AD button. In mono reception, the clarity
of sound is improved. To switch back to stereo, press the AD button again.
Language selection for dual language broadcast
If a programme can be received in two languages (dual language), you can switch to NICAM DUAL I, NICAM DUAL II, NICAM
DUAL I+II or MONO by pressing the AD button repeatedly.
NICAM DUAL I
Sends the primary broadcast language to the loudspeakers
NICAM DUAL II
Sends the secondary broadcast language to the loudspeakers
NICAM DUAL I+II
Sends the primary and secondary broadcast languages to the
loudspeakers
L26DIGB21_IB_111003_Annie.indd 27 11年10月3日 下午4:23

28
GB
Customising TV Settings
Option Setting
OSD Language
Allows you to select your desired on screen menu language.
1. Press the MENU button and then press the
buttons to select the
OPTION menu and then press the OK button.
CHANNEL
PICTURE
SOUND
TIME
OPTION
LOCK
EXIT
EXIT
3. Press the buttons to select the options. Press the OK button and then press the buttons to adjust each option’s
setting.
Clock The clock is set automatically when receiving a digital signal.
Off Time Allows you to set the off time that will automatically switch off the TV. Cycle through and
select from the following off time options: Off / Once / Every Day / Mon.~Fri. / Mon.~Sat. /
Sat.~Sun. / Sunday.
On Time Allows you to set the on time that the TV will automatically switch on the TV and tune to the
source, channel and volume you select. Cycle through and select from the following on time
options: Off / Once / Every Day / Mon.~Fri. / Mon.~Sat. / Sat.~Sun. / Sunday.
Sleep Timer
The sleep timer automatically switches the TV to standby after the preset time has elapsed.
The clock will be set automatically when receiving a digital signal. Time must be set before
using Sleep Timer function.
Press the
buttons to select a period of time after which the TV automatically switches to
standby mode: OFF / 10 / 20 / … / 180 / 240 min. The timer begins to count down from the
number of minutes selected.
Alternative
1. You may press the SLEEP button repeatedly to select the number of
minutes: OFF / 10 / 20 / … / 180 / 240 min directly.
2. To cancel the sleep time, press the SLEEP button repeatedly until Off
appears.
Auto Standby The unit will automatically switch to standby mode
4 hours after the last time the remote control was
used. A reminder screen will pop up and count
down before the unit switches to standby mode.
To turn off the auto standby function, press the MENU
button to display the main menu. Press the
buttons to select the Time option and then press the
OK button. Press the
buttons to select the Auto Standby option and then press the OK
button to select "Off". Press the EXIT button exit the main menu. To save energy you should
always turn the auto standby function back to "3H" or "4H".
Time Zone When you select a Time Zone city, the TV time is set by the time offset information based on
Time Zone and GMT (Greenwich Mean Time) which is received with the broadcast signal and
the time is set automatically by a digital signal.
4. Press the BACK button to return to the previous menu or press the
MENU button to return back to the main menu.
5. Press the EXIT button to exit the menu.
OK
The unit will automatically switch to standby
mode in 5 minutes.
Press the OK button to continue viewing.
If you turn the TV off after setting the sleep timer, the sleep timer setting
will be erased.
L26DIGB21_IB_111003_Annie.indd 28 11年10月3日 下午4:23

29
GB
Customising TV Settings
3. Press the buttons to navigate the menu and change the
settings. Press the OK button to confirm.
4. Press the BACK button to return to the previous menu or press the
MENU button to return back to the main menu.
5. Press the EXIT button to exit the menu.
Audio Language (DTV Mode)
Allows you to select your desired audio language. (Available for digital channels if multiple audio languages are broadcast.)
1. Press the MENU button and then press the
buttons to select the
OPTION menu and then press the OK button.
CHANNEL
PICTURE
SOUND
TIME
OPTION
LOCK
EXIT
EXIT
Dansk
Deuts ch
Hrvat ski
Itali ano
OSD Languag e
Cesky
Engli sh
E k
Espan ol
~
Fran ai s
BACK MENU
EXIT
3. Press the buttons to select the Primary / Secondary Audio Language.
Press the
button and then press the buttons to select your
desired audio language. Press the OK button to confirm.
4. Press the BACK button to return to the previous menu or press the
MENU button to return back to the main menu.
5. Press the EXIT button to exit the menu.
2. Press the
buttons to select Audio Language and then press the OK
button.
OSD Lang uage
Aud io La nguag e Eng lish
Hea ring Impai red
Cou ntry
PVR File Syst em
CEC
Res tore Facto ry De fault
Sub title Lang uage
Audio Language
Dan sk
Deu tsch
Hrv atski
Ita li ano
Ces ky
Eng li sh
E k
Esp an ol
~
Fra n ai s
Prima ry
BACK ME NU
EXIT
2. Press the buttons to select OSD Language and then press the OK
button. The default on-screen menu language is set as English.
Hea ring Impai red
PVR File Syst em
CEC
Res tore Facto ry De fault
OSD Lang uage Engli sh
Aud io La nguag e
Cou ntry
Sub title Lang uage
L26DIGB21_IB_111003_Annie.indd 29 11年10月3日 下午4:23

30
GB
Customising TV Settings
CHANNEL
PICTURE
SOUND
TIME
OPTION
LOCK
EXIT
EXIT
Subtitle Language (DTV Mode)
Allows you to select your desired subtitle language or turn off the subtitle. (Available for digital channels if multiple subtitle
languages are broadcast.)
1. Press the MENU button and then press the
buttons to select the
OPTION menu and then press the OK button.
2. Press the
buttons to select Subtitle Language and then press the
OK button.
3. Press the
buttons to select the Primary / Secondary Subtitle
Language. Press the
button and then press the buttons to
select your desired subtitle language. Press the OK button to confirm.
4. Press the BACK button to return to the previous menu or press the
MENU button to return back to the main menu.
5. Press the EXIT button to exit the menu.
Hea ring Impai red
PVR File Syst em
CEC
Res tore Facto ry De fault
OSD Lang uage
Aud io La nguag e
Cou ntry
Sub title Lang uage Engli sh
2. Press the buttons to select Hearing Impaired and then press the
OK button to select On / Off.
3. Press the BACK button to return to the previous menu or press the
MENU button to return back to the main menu.
4. Press the EXIT button to exit the menu.
Hearing Impaired
Shows information for the hearing-impaired in some programmes. (For DTV channels only if available.)
1. Press the MENU button and then press the
buttons to select the
OPTION menu and then press the OK button.
Hea ring Impai red O n
PVR File Syst em
CEC
Res tore Facto ry De fault
OSD Lang uage
Aud io La nguag e
Cou ntry
Sub title Lang uage
CHANNEL
PICTURE
SOUND
TIME
OPTION
LOCK
EXIT
EXIT
Dan sk
Deu ts ch
Hrv at ski
Ita li ano
Subti tle L ang ua ge
Ces ky
Eng li sh
E k
Esp an ol
~
Fra n ai s
Prima ry
BACK MENU
EXIT
Country
This shows the country where you have selected in auto tuning. If you want to change the country, please refer to Auto Tuning
on page 18.
While watching a DTV programme, you can press the S button
on the remote control to display the Subtitle Language
List and then press the
buttons to select the Subtitle
Language OFF. Press the OK button to confirm. (Only
applicable when the TV programme has this feature)
L26DIGB21_IB_111003_Annie.indd 30 11年10月3日 下午4:23

31
GB
Customising TV Settings
Hea ring Impai red
PVR File Syst em
CEC
Res tore Facto ry De fault
OSD Lang uage
Aud io La nguag e
Cou ntry
Sub title Lang uage
2. Press the buttons to select PVR File System and then press the OK
button.
3. Press the
buttons to select the following PVR File System options
and then press the OK button.
Select Disk Select the disk where you want to store your recorded content.
Check PVR File
System
Press the OK button, the system will now
check your USB device's suitability for PVR.
The system will show "Checking". Upon
the completion the system will show either
"SUCCESS" or "FAIL".
USB Disk If no USB storage device is connected, it will show "No USB Disk". If the Check PVR File System has a
"SUCCESS" it will show "Pass".
Format
Press the OK button, a File System Size menu will pop-up. Press the
buttons to select your
preferred file type between FAT32 and HiSpeed FS. If you select HiSpeed FS, press the
button and
then press the
buttons to select your preferred file size. Press the OK button to confirm and then
press the
button to start formatting.
Warn ing! All d ata wil l be lost .
Sta rt Exit
For mat dis k
For mat dis k
File System Size
PVR File System Type
PVR File System Size
Duration 104 Mins
FAT32
All
MENU
Do not u nplug U SB devi ce.
Form attin g,ple ase wai t
Form at disk
Time Shift Size After formatting the Time Shift Size menu will appear if you have
selected HiSpeed FS in PVR File System Type. Press the
buttons
to select your preferred file size. Press the OK button to confirm.
This option cannot be chosen if you have selected FAT32 in PVR File
System Type.
Speed This shows you the transfer rate of your USB storage device.
Free Record Limit Press the
buttons to set the recording time limit from 1-4 hours.
Check PVR File System
USB Disk
Select Disk
Format
Time Shift Size
Speed
Free Record Limit
Start
C:
6 Hr.
Check PVR File System
USB Disk
Select Disk
Format
Time Shift Size
Speed
Free Record Limit
SUCCESS
Pass
Pass
All
2048 KB/s
HD support
C:
6 Hr.
Time Shift Size
Time Shift Disk Size
Duration 84 Mins
3GB
PVR File System (DTV Mode)
Allows you to select your preferences in the PVR File System.
1. Press the MENU button and then press the
buttons to select the
OPTION menu and then press the OK button.
CHANNEL
PICTURE
SOUND
TIME
OPTION
LOCK
EXIT
EXIT
L26DIGB21_IB_111003_Annie.indd 31 11年10月3日 下午4:23

32
GB
Customising TV Settings
2. Press the buttons to select CEC and then press the OK button to
select On / Off.
3. Press the BACK button to return to the previous menu or press the
MENU button to return back to the main menu.
4. Press the EXIT button to exit the menu.
CEC (Consumer Electronics Control)
Allows you to command and control two or more CEC-enabled devices, that are connected through HDMI, by using only one of
the TV remote controls (e.g. controlling a TV set, set-top box and DVD player using only the remote control of the TV). CEC also
allows individual CEC-enabled devices to command and control each other without user intervention.
Make sure that your CEC compliant device is connected to your TV using a HDMI cable and the correct HDMI input source is
selected prior to using this function. (Some HDMI cables may not support HDMI-CEC functions.)
1. Press the MENU button and then press the
buttons to select the
OPTION menu and then press the OK button.
OSD Lang uage
Aud io La nguag e
Hea ring Impai red
Cou ntry
PVR File Syst em
CEC Off
Res tore Facto ry De fault
Sub title Lang uage
CHANNEL
PICTURE
SOUND
TIME
OPTION
LOCK
EXIT
EXIT
Restore Factory Default
Restores all settings to the factory defaults.
1. Press the MENU button and then press the
buttons to select the
OPTION menu and then press the OK button.
CHANNEL
PICTURE
SOUND
TIME
OPTION
LOCK
EXIT
EXIT
2. Press the buttons to select Restore Factory Default and then press
the OK button.
Hea ring Impai red
PVR File Syst em
CEC
Res tore Facto ry De fault
OSD Lang uage
Aud io La nguag e
Cou ntry
Sub title Lang uage
• This unit can only communicate with HDMI-CEC compatible
devices.
• To be sure that the HDMI-CEC device has this feature, check to
see if there is HDMI-CEC compatible logo on it.
• Some HDMI-CEC compliant devices may not support this
function.
• HDMI-CEC function only works when the AV device supporting
CEC is turned on.
L26DIGB21_IB_111003_Annie.indd 32 11年10月3日 下午4:23

33
GB
Customising TV Settings
2. Press the buttons to select Lock System and then press the OK
button.
LOCK Setting
To access the LOCK menu, you must enter the password. Enter the default password “6666” for first time use. To change the
password, refer to “Change Password” (see below).
Lock System
The Lock System is designed to prevent accidental retuning of the TV / losing channels and prevent children watching unsuitable
programmes.
The Lock System must be set to On for this function to operate. If the Lock System is set to On, a valid password must be entered
when you access Auto Tuning / Manual Tuning / Restore Factory Default.
1. Press the MENU button and then press the
buttons to select the
LOCK menu and then press the OK button.
CHANNEL
PICTURE
SOUND
TIME
OPTION
LOCK
EXIT
EXIT
Loc k Sys tem
Set Pass word
Blo ck Ch annel
Par ental Guid ance Off
4. Press the buttons to select Lock System and then the OK buttons to
select On / Off.
If the Lock System is set to On, a valid password must be entered when you
access Auto Tuning / Manual Tuning / Restore Factory Default.
5. Press the BACK button to return to the previous menu or press the
MENU button to return back to the main menu.
6. Press the EXIT button to exit the menu.
3. Use the 0-9 buttons to input a 4-digit password to enter the LOCK menu.
Cle ar
Cancel
Ple as e e nt er pas sw ord
The default password is “6666”.
If you change the password, be sure to remember the new
password! If you forget the new password, press the master
password“9527”.
3. Press the button to select “Yes”. The TV will turn off and restart after a
few seconds.
Press the
button to select "No" to cancel and return to the main menu.
Yes No
Are you sure?
All channel and user settings will be lost and the TV will
revert to "First Time Installation".
L26DIGB21_IB_111003_Annie.indd 33 11年10月3日 下午4:23

34
GB
Customising TV Settings
3. Use the 0-9 buttons to input a 4-digit password to enter the LOCK menu.
Loc k Sys tem
Set Pass word
Blo ck Ch annel
Par ental Guid ance Off
Cle ar
Cancel
Ple as e e nt er pas sw ord
The default password is “6666”.
If you change the password, be sure to remember the new
password! If you forget the new password, press the master
password“9527”.
Set Password
1. Press the MENU button and then press the buttons to select the
LOCK menu and then press the OK button.
CHANNEL
PICTURE
SOUND
TIME
OPTION
LOCK
EXIT
EXIT
2. Press the buttons to select Lock System and then press the OK
button.
5. Use the 0-9 buttons to input the old password and then input the new
4-digit password. Re-enter new password for confirmation.
4. Press the
buttons to select Set Password and then press the OK
button.
6. Press the
button to return to the previous menu. Press the MENU
button to return back to the main menu.
7. Press the EXIT button to exit the menu.
The default password is “6666”.
If you change the password, be sure to remember the new
password! If you forget the new password, press the master
password“9527”.
Loc k Sys tem
Set Pass word
Blo ck Ch annel
Par ental Guid ance Off
Confirm new password
Please enter new password
Please enter old password
L26DIGB21_IB_111003_Annie.indd 34 11年10月3日 下午4:24

35
GB
Customising TV Settings
3. Use the 0-9 buttons to input a 4-digit password to enter the LOCK menu.
Block Channel
Block Channel is designed to prevent children watching unsuitable programmes.
When a channel is blocked, a valid password must be entered.
1. Press the MENU button and then press the
buttons to select the
LOCK menu and then press the OK button.
CHANNEL
PICTURE
SOUND
TIME
OPTION
LOCK
EXIT
EXIT
Loc k Sys tem
Set Pass word
Blo ck Ch annel
Par ental Guid ance Off
5. A Block Channel screen will pop up. Press the buttons to select a
channel. Press the GREEN button on the remote control to block or
unblock the programme. Press the GREEN button again to unblock.
6. Press the MENU button once to return to the previous menu. Press the
MENU button again to return back to the main menu.
7. Press the EXIT button to exit the menu.
Block Channel
OK
Lock
MENU
800 SZ TVM 01
DTV
800 S ZTV M0 2
800 S ZTV M0 3
800 S ZTV M0 4
804 D ate
1C- 51
2C- 53
3C- 61
DTV
DTV
DTV
DTV
ATV
ATV
ATV
2. Press the buttons to select Lock System and then press the OK
button.
Loc k Sys tem
Set Pass word
Blo ck Ch annel
Par ental Guid ance Off
Cle ar
Cancel
Ple as e e nt er pas sw ord
The default password is “6666”.
If you change the password, be sure to remember the new
password! If you forget the new password, press the master
password“9527”.
4. Press the buttons to select Block Channel and then press the OK
button.
L26DIGB21_IB_111003_Annie.indd 35 11年10月3日 下午4:24

36
GB
Customising TV Settings
3. Use the 0-9 buttons to input a 4-digit password to enter the LOCK menu.
5. Press the
buttons to select an age rating: Off, 4-18. Then press the OK
button to confirm.
6. Press the BACK button to return to the previous menu or press the
MENU button to return back to the main menu.
7. Press the EXIT button to exit the menu.
4. Press the
buttons to select Parental Guidance and then press the
OK button.
Parental Guidance
This function allows you to set up blocking schemes to block specific channels and ratings. It operates according to information
from the broadcasting station, therefore if the signal has incorrect information, this function will not operate.
This TV is programmed to remember which option it was last set to even if you switch the TV off.
When a programme is locked or rated with delayed state, a valid password must be entered.
1. Press the MENU button and then press the
buttons to select the
LOCK menu and then press the OK button.
CHANNEL
PICTURE
SOUND
TIME
OPTION
LOCK
EXIT
EXIT
Loc k Sys tem
Set Pass word
Blo ck Ch annel
Par ental Guid ance Off
Par ental Guid ance
Off
4
5
6
7
8
BACK MENU
EXIT
Loc k Sys tem
Set Pass word
Blo ck Ch annel
Par ental Guid ance Off
Cle ar
Cancel
Ple as e e nt er pas sw ord
The default password is “6666”.
If you change the password, be sure to remember the new
password! If you forget the new password, press the master
password“9527”.
2. Press the buttons to select Lock System and then press the OK
button.
L26DIGB21_IB_111003_Annie.indd 36 11年10月3日 下午4:24

37
GB
Using the Features
EPG (Electronic Programme Guide) (DTV Mode)
This system has an Electronic Programme Guide (EPG) to help you navigate through all the possible viewing options.
The EPG supplies information such as programme listings, start and end times for all available services. In addition, detailed
information about the programme is often available in the EPG (the availability and amount of programme information will vary,
depending on the particular broadcaster).
This function can be used only when the EPG information is broadcast by broadcasting companies.
The EPG displays the programme details for the next 7 days.
Switch On / Off EPG
1. Press the GUIDE button to switch on EPG.
2. Press the GUIDE button or the EXIT button again to switch off EPG and return to normal TV viewing.
EXIT Info
Schedule
Record
Date
Reminder
OK
800 Fr anc e 2
801 Fr anc e 4
802 Fr anc e 5
803 ART E
804 LC P
805 Fr anc e 3
Inf orm ati on
Mov ie 1
Pro gra mme 2
Pro gra mme 3
Pro gra mme 4
Pro gra mme 5
DTV
17 Jan
17: 0016 :00
PROGR AMME GUIDE
2011 17/ Jan 22:07 15:55.16:25 Movie 1
801 SZTVM02
current date and time
current channel
number and name
programme title
programme date
programme time
programme information
channel no.
channel name
Select a Programme
Press the buttons to select the desired channel and then press the buttons to select the desired programme. Press the
OK button to confirm.
Button Functions in a 7 Days Guide
Remote Control Button Function
RED (Record)
• Timer Programming
See page 45 for details on Timer Programming.
• Press the RED button in the Schedule list to delete the selected preset reminder.
GREEN (Schedule)
Press the GREEN button to view
the preset reminders or scheduled
recordings in the
Schedule list. Press the GREEN button
again to return to the EPG.
YELLOW (Date)
Press the YELLOW button and then press the
buttons to view the schedule of the previous /
next day. Press the YELLOW button again to return to the EPG.
BLUE (Remind)
Press the BLUE button while on the selected programme,
the Reminder setting menu will be displayed.
Press the
buttons to adjust the settings and
then press the OK button to confirm the settings. After
confirmation, the Schedule list will then be displayed with
your preset reminders shown. Press the GREEN button to
return to the EPG. The TV will automatically tune to the
selected programme when it starts.
INFO Displays detailed information of the selected programme (if available).
or
Press to select a channel.
or
Press to select a programme.
OK Press to confirm and view the selected channel.
GUIDE / EXIT Press to switch off the EPG.
Sch edule l ist 19 :31 29 th Dec Del ete
Time Date
Prog ramme Title
Chan nel Na me
Return
802 S ZTVM0 3
08 Mi nute
05 Ho ur
Apr M ont h
28 Da te
Onc e Mode
Remin der set ting
BAC K
OK
_
+
Using the Features
L26DIGB21_IB_111003_Annie.indd 37 11年10月3日 下午4:24

38
GB
Using the Features
Teletext (ATV Mode)
Teletext is a free service broadcast by some TV stations which gives up-to-the-minute information on news, weather, television
programmes, share prices and many other topics. Using the Teletext control buttons you can view pages of information that are
listed in the teletext index.
To Turn on Teletext Function
Make sure the TV channel you are watching transmits teletext.
“No Teletext” sign will show on the screen if teletext is not available.
In ATV mode, press the TEXT button to enter Teletext mode. Press the INDEX button to display the index page.
Press the TEXT button once to exit and the TV will return to the channel you were watching.
To select a page of text
Find the number of the page in the index and enter it using the 0-9 buttons. The number of the page will appear on the top left
corner of the screen.
The page counter will search for your page. When it finds it, the page will be displayed.
To move to the next page of text, press the CH + button.
To move to the previous page, press the CH – button.
To return to the index page, press the INDEX button.
Mix
Press the TEXT button to display the teletext page and then press the MIX button. The text will be superimposed over the TV
programme.
Press the MIX button again to return to the text page.
Double height text
If you have difficulty reading the text on the TV you can double the height of the text.
Press the SIZE button. The top half of the page will be displayed in double height text.
Press the SIZE button again. The bottom half of the page will be displayed in double height text.
Press the SIZE button again to return to the full page.
Page STOP
If the page of text you have selected contains subpages, these subpages will automatically be displayed in order with a delay to
allow you to have enough time to read the page.
Press the HOLD button. “
” will appear on the top left corner of the screen.
While the page is on-hold, press the
buttons to scroll through the subpages in your own time.
Alternatively, press the SUBPAGE button, use the colour buttons to scroll through the subpages.
To Reveal Information
Press the REVEAL button to reveal concealed information (quiz answers etc.).
Press the REVEAL button again to conceal the information again.
Fasttext
At the bottom of the teletext screen is a row of subject headings in red, green, yellow and blue.
The remote control has a row of colour buttons corresponding to the row of coloured subjects on the screen.
Pressing one of the colour buttons will take you directly to the page corresponding to the subject heading.
L26DIGB21_IB_111003_Annie.indd 38 11年10月3日 下午4:24

39
GB
Using the Features
Digital Teletext (DTV Mode)
Digital teletext can access special digital teletext services and specific services which broadcast digital teletext. You will need to
turn off Subtitle Function before using teletext (refer to page 30 for details).
Teletext within Digital Service
1. In DTV mode, press the LIST button to display the Channel List. Press the
buttons and then press the OK button to select the teletext channel. Press
the LIST button to exit the Channel List and the teletext page will be displayed
after a few seconds.
Alternative
Press the TEXT button while watching some programmes to reveal the
teletext page (MHEG).
2. Follow the instructions on digital teletext and move onto the next step by
pressing OK,
, RED, GREEN, YELLOW, BLUE or 0-9 buttons etc.
3. To change digital teletext service, select a different service by pressing the 0-9
buttons.
L26DIGB21_IB_111003_Annie.indd 39 11年10月3日 下午4:24

40
GB
Entertainment
3. Press the buttons to select your storage device and then press the
OK button.
Viewing Photos
1. Press the button on the right side panel of the TV or the INPUT
button on the remote control then press the
buttons to select the
DMP mode and then press the OK button.
2. Press the
buttons to select PHOTO and then press the OK button.
File format supported: JPG.
Entertainment
Connecting a USB Storage Device
1. Switch off the TV before connecting any USB storage device.
2. Connect your USB storage device to the USB port of your TV.
3. Plug the connected devices into the mains socket before
switching on the POWER ON/OFF button which is located at
the rear side of the TV.
4. Press the
button on the right side panel of the TV or on
the remote control to turn on your TV and your USB storage
device.
5. Press the
button on the right side panel of the TV or the
INPUT button on the remote control to display the Source
List. Use the
buttons to select DMP and then press the
OK button to confirm.
• If a hard disk is used, make sure its mains adapter is connected to the mains supply.
• If a USB hub is used, make sure its mains adapter is connected to the mains supply as the total current consumption
may exceed 500mA.
• The maximum supported storage space of the hard disk is 250 GB.
• The file system only supports FAT32 format.
• If you want to store the video streaming of a DTV programme, the transfer rate of the USB storage device must not
be less than 5MB/s, otherwise the picture and sound of the programme will be affected and a warning statement
will be shown on the screen. If this happens, please upgrade your USB storage device.
• The TV screen will be blank temporarily as it will take time to start up and stabilise the connected hard disk. This is
normal and the starting time may vary depending on the brand and the memory size of the connected hard disk.
• Disconnect the USB storage device if it is not in use.
Video
AV2
L
R
USB
Rear Left Side of TV
USB Cable
(not included)
Adapter
Portable
hard Disk
USB Hub
USB
L26DIGB21_IB_111003_Annie.indd 40 11年10月3日 下午4:24

41
GB
Entertainment
4. Press the buttons to navigate in the music folder. Select the
music you want to play and then press the
PLAY button to play it.
4. Press the
buttons to navigate in the picture folder. Select the
picture file and then press the
PLAY button to view.
5. Press the i button to display the function bar. Press the
buttons and
then press the OK button to select the function: Pause / Prev. / Next /
Stop / Repeat All / Music / Playlist / Info / Rotate clockwise / Rotate anticlockwise / Zoom In / Zoom Out / Move View.
6. Press the EXIT button to return back to the previous menu.
3. Press the
buttons to select your storage device and then press the
OK button.
Listening to Music
1. Press the button on the right side panel of the TV or the INPUT
button on the remote control then press the
buttons to select the
DMP mode and then press the OK button.
2. Press the
buttons to select MUSIC and then press the OK button.
• Some audio file formats will not be supported.
• Supported file formats: mp3 / wma
5. Press the buttons to navigate in the music folder. Select the
music you want to play, it will show the music information (Album / Title
/ Bit Rate / Artist / Sampling / Year / Size). Then press the
PLAY button
to play.
6. Press the i button to display the function bar. Press the
buttons and
then press the OK button to select the function: Pause / FB / FF / Prev /
Next / Stop / Repeat All / Playlist / Goto Time.
7. Press the EXIT button to return back to the previous menu.
L26DIGB21_IB_111003_Annie.indd 41 11年10月3日 下午4:24

42
GB
Entertainment
4. Press the buttons to navigate in the movie folder. Select the
movie file and then press the
PLAY button to playback.
5. Press the i button to display the function bar. Press the
buttons and
then press the OK button to select the function: Pause / FB / FF / Prev. /
Next / Stop / Repeat All / Set A / Playlist / Info / Aspect Ratio.
6. Press the EXIT button to return back to the previous menu.
3. Press the
buttons to select your storage device and then press the
OK button.
Watching Movies
1. Press the button on the right side panel of the TV or the INPUT
button on the remote control then press the
buttons to select the
DMP mode and then press the OK button.
2. Press the
buttons to select MOVIE and then press the OK button.
• Some audio file formats will not be supported.
• Supported file formats: MPEG1/2
L26DIGB21_IB_111003_Annie.indd 42 11年10月3日 下午4:24

43
GB
Entertainment
4. Press the buttons to navigate in the text folder. Select the text
file and then press the
PLAY button to view.
5. Press the i button to display the function bar. Press the
buttons and
then press the OK button to select the function: Prev. page / Next page /
Prev. / Next / Stop / Music / Playlist / Info.
6. Press the EXIT button to return back to the previous menu.
3. Press the
buttons to select your storage device and then press the
OK button.
Viewing Texts
1. Press the button on the right side panel of the TV or the INPUT
button on the remote control then press the
buttons to select the
DMP mode and then press the OK button.
2. Press the
buttons to select TEXT and then press the OK button.
L26DIGB21_IB_111003_Annie.indd 43 11年10月3日 下午4:24

44
GB
PVR (Personal Video Recorder)
PVR (Personal Video Recorder)
Time Shift Function
This function allows the TV to virtually record the live viewing broadcast programme.
Using the Remote Control
You can shift playback to any point of the virtually recorded programme.
or
When playing,
• Press the
button repeatedly to speed up x 2 / x 4 / x 8 / x 16.
• Press the
button repeatedly to speed up x 2 / x 4 / x 8 / x 16.
• During fast forward / fast backward state, press the
PLAY button to return to normal playback.
or • Press the button to jump about 10% forward.
• Press the
button to jump about 10% back.
PLAY or • During playback, press the button to display a still screen and then press the PLAY button
again to resume playback.
• During fast forward / fast backward state, press the
PLAY button to return to normal playback.
If you want to exit the PVR Time Shift progress bar and return to the current live broadcast, press the
button.
The ‘PVR Time Shift Progress Bar’
1 Indicates the status of the currently
displayed video (
/ / / )
2 Indicates the time lagging behind
the live broadcast (DVR reviewing)
3 Indicates the available recording
time on your USB storage device
4 Indicates the current time
2
3
4
1
If the transfer rate of the USB storage device is too slow
for recording or time shift function, a warning statement
will be shown on the screen. If this happens, please
upgrade your USB storage device.
During normal TV viewing, you may press the button to virtually pause the live viewing broadcast programme if you want to
go out for a while (e.g. going to the bathroom / kitchen). When you have returned, press the
PLAY button to play the missed
broadcast programme. The PVR Time Shift progress bar will be displayed on the screen.
There may be a few seconds delay in video and sound when the units starts to playback the missed broadcast programme. It will
return to normal.
• Time Shift Mode and Recording functions
may not work if the signal strength is weak.
• Stop the time-shift function before
switching to another input source.
L26DIGB21_IB_111003_Annie.indd 44 11年10月3日 下午4:24

45
GB
PVR (Personal Video Recorder)
Recording DTV Programme onto a USB Storage Device
Use this function to record the DTV programme you are watching on the main screen and save it for future viewing.
The recording from timer programme or direct recording may have a little bit of delay when it starts to record the broadcast
programme.
Please make sure the USB device is inserted. If not, a warning message will pop up.
1. Press the
REC button to record the programme that you are currently
watching.
2. Press the
REC button again, the recording progress bar will disappear.
3. Press the
Stop button to stop recording.
Recording will stop automatically when the disk is full.
If you want to turn off your TV during recording, press the
button. The screen will turn off but the recording will still
continue, the LED indicator will alternatively flash red and
green.
2. Press the RED button on the remote control while on the selected
programme, the RECORDER menu will be displayed. Press the
buttons to select the settings in the RECORDER menu for the Channel, Start
time, End time and Mode.
Channel Press the buttons to select the channel that you
wanted to record.
Start time
(for Mode Once,
Every Day,
Weekly)
Press the
buttons to select the Minutes / Hour
/ Month / Date and then press the
buttons to
adjust the start time.
End time
(for Mode Once,
Every Day,
Weekly)
Press the
buttons to select the Minutes / Hour
/ Month / Date and then press the
buttons to
adjust the end time.
Mode Press the
buttons to select the Auto / Once /
Every Day / Weekly.
Timer Programming
This function is used to perform scheduled recording.
The recording from timer programme or direct recording may have a little bit of delay when it starts to record the broadcast
programme.
Please make sure the USB device is inserted. If not, a warning message will pop up.
1. Press the GUIDE button on the remote control. The EPG menu will appear.
EXIT Info
Schedule
Record
Date
Reminder
OK
800 Franc e 2
801 Franc e 4
802 Franc e 5
803 ARTE
804 LCP
805 Franc e 3
Inf ormati on
Mov ie 1
Pro gramme 2
Pro gramme 3
Pro gramme 4
Pro gramme 5
DTV
17 Jan
17: 0016: 00
PRO GRA MME GU IDE
2011 17/ Jan 22:07 15:55.16:25 Movie 1
801 SZTVM02
802 S ZTVM0 3
Sta rt Time
59 Mi nute
19 Ho ur
Dec M onth
29 Da te
RECOR DER
BAC K
OK
_
+
End Ti me
29 Mi nute
20 Ho ur
Dec M onth
29 Da te
Mod e A UTO
L26DIGB21_IB_111003_Annie.indd 45 11年10月3日 下午4:24

46
GB
PVR (Personal Video Recorder)
Play Recorded Programme
You can play a recorded programme from the recorded programme list or from a USB Storage Device.
1. Press the INPUT button then press the
buttons to select the DMP mode
and then press the OK button.
2. Press the
buttons to select MOVIE and then press the OK button.
3. Press the
buttons to select your storage device and then press the OK
button.
4. Press the buttons to select the "MY PVR" folder and then press the
OK button. Press the
buttons to navigate in the "MY PVR" folder.
Select your recorded programme and then press the
PLAY button to
view.
5. Press the i button to display the function bar.
6. Press the
buttons and then press the OK button to select the function:
Pause / FB / FF / Prev. / Next / Stop / Repeat All / Set A / Playlist / Info /
Aspect Ratio.
7. Press the EXIT button to return back to the previous menu.
3. After finishing all the recorder adjustments, press the OK button to confirm
your settings.
• After confirmation, you can press the GREEN button to view
your scheduled recording in the Schedule list.
• If a programme recording starts when the TV is in standby
mode, the green / red LED indicator will flash.
L26DIGB21_IB_111003_Annie.indd 46 11年10月3日 下午4:24

47
GB
Maintenance, Hints and Tips, Specication
1. Use a soft dry cloth to wipe away the dust from the screen and surfaces.
2. If the surfaces are extremely dirty, clean the TV with a cloth which has been
dipped in a weak soapy water. Wring the cloth until it is almost dry, then use it to
wipe the TV.
3. Ensure there is no excess water on the screen. Allow any water or dampness to
evaporate before switching the TV on.
Maintenance
Careful and regular cleaning can prolong the life of your TV.
Be sure to switch off the button on the side panel of the TV or on the
remote control and then switch off the POWER ON/OFF button which
is located at the rear side of the TV. Disconnect the mains cable from the
mains socket before any cleaning.
Never use alcohol, benzine, paint-thinner, cleaning fluid or other chemicals.
Do not use compressed air to remove dust.
Maintenance
Hints and Tips
The following table contains various hints and tips to get the best performance from your TV. If you require additional assistance
please call our UK Call Centre on 0844 561 1234. Our UK Customer Contact Centre is open Monday-Saturday 8am-8pm or Sunday
8am-6pm.
The TV does not operate properly.
The TV does not respond when
pressing any buttons
• The TV may freeze up during use. Disconnect the mains cable from the mains socket
for a few minutes. Reconnect the mains cable and try to operate it again as usual.
TV cannot be switched on
• Check that the TV is connected to the mains supply and the POWER ON/OFF
button which is located at the rear side of the TV is switched on.
• Make sure all connected AV devices are switched off before switching on your TV.
The remote control does not work
• Check to see if there are any objects between the TV and the remote control
causing an obstruction. Ensure that you are pointing the remote control directly at
the TV.
• Ensure that the batteries are installed with the correct polarity (+ to +, - to -).
• Install new batteries.
Power is suddenly turned off
• Check the power of the TV. The mains supply maybe interrupted.
• Check if the sleep timer is set.
• Check whether the Auto Standby is activated.
The video function does not work.
No Picture & No Sound
• Check whether the TV is switched on.
• Try another channel. The problem may be caused by the broadcaster.
Picture appears slowly after
switching on
• This is normal, the image is muted during the TV startup process. Please contact
your service centre, if the picture has not appeared after five minutes.
No or poor colour or poor picture
• Adjust the settings in the PICTURE menu.
• Try another channel. The problem may be caused by the broadcaster.
• Check if the video cables are connected properly.
Horizontal / Vertical bar or picture
shaking
• Check for local interference such as an electrical appliance or power tool.
Poor reception on some channels
• Station or cable channel may be experiencing problems, tune to another station.
• Station signal is weak, reposition the aerial for better reception.
• Check for sources of possible interference.
Lines or streaks in pictures • Check aerial (Change the position of the aerial.)
No pictures when connecting HDMI • Check if the input source is HDMI1 / HDMI2.
Picture appears in wrong ratio • Adjust the Aspect Ratio settings in the PICTURE menu.
L26DIGB21_IB_111003_Annie.indd 47 11年10月3日 下午4:24

48
GB
Maintenance, Hints and Tips, Specication
The audio function does not work.
Picture OK but no sound
• Press the VOL + / - buttons.
• Sound muted? Press the
MUTE button.
• Try another channel. The problem may be caused by the broadcaster.
No output from one of the speakers • Adjust the Balance settings in the SOUND menu.
Unusual sound from Inside the TV
• A change in ambient humidity or temperature may result in an unusual noise when
the TV is switched on or off and does not indicate a fault with the TV.
No sound when connecting HDMI • Check if the input source is HDMI1 / HDMI2.
Audio noise • Keep the RF coaxial cable away from the other connected cables.
Password
Lost password
• Select the Set Password setting in the LOCK menu, then enter the following master
password “9527”. The master password clears your previous password and allows
you to enter a new password.
There is a problem in PC mode.
The signal is out of range (Invalid
format)
• Adjust the resolution, horizontal frequency, or vertical frequency.
Vertical bar or stripe on background
& Horizontal Noise & Incorrect
position
• Use Auto configure or adjust clock, phase, or H/V position.
Screen colour is unstable or single
colour
• Check the signal cable.
• Reinstall the PC video card.
FAQs (Frequently Asked Questions)
Why have I lost some / all of my
channels?
• It happens sometimes, if you have a weak signal. Usually it just means you’ll need
to rescan your digital box or TV. Don’t worry, it easy to do. And once you’ve done it,
you should get all the Freeview channels available to you. If problems persist you
may need to get your aerial checked. Talk to your retailer or contact your local aerial
installer.
Why do I get ‘blocking’ on my digital
picture?
• In most cases, blocking is caused by a reception problem – either the signal is too
weak or there is some kind of interference. Talk to your retailer or contact your local
aerial installer.
• Blocking can also be caused by a digital signal that is too strong. If you are still
experiencing blocking and the signal is strong, consult your local aerial installer for
advice.
Can I watch Freeview using a
portable set-top aerial?
• Some, but only a few, homes may be able to use a set top aerial. However, for a
much better reception, we strongly recommend that you use a rooftop aerial.
• If you do not have access to a rooftop aerial – for example, if you rent a flat and
the aerial is the responsibility of your landlord, or if you’re using a second TV in
the bedroom and don’t want the hassle and expense of using extension cables,
a set – top aerial may be your only option.
What type of aerial do I need?
• If you are installing a new aerial, we recommend a wideband rooftop aerial rather
than a loft aerial. Loft aerials generally receive a weaker digital signal and are more
likely to get interference from other electrical devices in the home. We suggest you
have an aerial survey done before getting an aerial upgrade.
• Talk to your retailer or contact your local aerial installer.
L26DIGB21_IB_111003_Annie.indd 48 11年10月3日 下午4:24

49
GB
Maintenance, Hints and Tips, Specication
Display Modes
The screen resolution has been optimised during production for the display modes listed below.
Whilst the TV is capable of accepting a 1080p input, it is not capable of displaying this screen resolution and therefore the display
will be scaled to fit the native resolution of the screen automatically.
YPbPr Mode
Resolution Vertical Frequency (Hz) Aspect Ratio
480I: 720 x 480
60
Auto / Smart Zoom / Subtitle /
Zoom / Dot to Dot / 16:9 / 4:3
480P: 720 x 480
576I: 720 x 576
50
576P: 720 x 576
720P: 1280 x 720
50
60
1080I: 1920 x 1080
50
60
1080P: 1920 x 1080
50
60
PC Mode
Please check the display settings of your computer before connecting to the TV. If the display setting of your computer does not
match the TV, there may be no video.
Resolution Vertical Frequency (Hz) Aspect Ratio
640 x 480
60
4:3 / 16:9 / Dot to Dot
72
75
800 x 600
60
72
75
1024 x 768
60
70
75
1360 x 768 60
1920 x 1080 60
HDMI Mode
Resolution Vertical Frequency (Hz) Aspect Ratio
480I: 1440 x 480 60
Auto / Smart Zoom / Subtitle /
Zoom / Dot to Dot / 16:9 / 4:3
480P: 720 x 480 60
576I: 1440 x 576 50
576P: 720 x 576 50
720P: 1280 x 720
50
60
1080I: 1920 x 1080
50
60
1080P: 1920 x 1080
50
60
Display Modes
L26DIGB21_IB_111003_Annie.indd 49 11年10月3日 下午4:24

50
GB
Maintenance, Hints and Tips, Specication
Specifications
Specications
Model L26DIGB21
Panel System 26 inch LCD Panel
Display Resolution 1920 pixels (horizontal) x 1080 pixels (vertical)
Television System PAL I / BG / DK SECAM L / BG / DK
Brightness 400 cd/m
2
Contrast Ratio 800:1
Energy Efficiency Class D
Screen Size (measured diagonally) Approx. 66 cm (26 inch)
Power Consumption (In HOME /
STANDBY mode)
63W
Average Annual Energy Consumption 92kWh
Standby Power Consumption 0.49W
Operating Temperature 0°C – 40°C
Operating Humidity 10% – 80%
Mercury Content (mg) <100 mg
Presence of Lead √
Reference Period 2010/1062 – 2011
Power Source 100-240V~ 50/60Hz
Dimension (W x D x H) with base 660 x 215 x 500 mm
Weight (Net) 8.0 kg
Inputs / Output
SCART 1
HDMI 2
VGA 1
PC AUDIO 1
YPbPr 1
Common Interface 1
AV 2
USB 1
AUDIO IN (RCA) 2 (L + R)
RF (75 ) 1
Speaker Power 3 W + 3 W
Features and specifications are subject to change without prior notice.
L26DIGB21_IB_111003_Annie.indd 50 11年10月3日 下午4:25

51
GB
Maintenance, Hints and Tips, Specication
D D
A
B
C
D
E
F
G
ENERG
YIEIJA
IA
2010/1062 - 2011
92
kWh/annum
63
Wa
66
cm
26
inch
L26DIGB21
L26DIGB21_IB_111003_Annie.indd 51 11年10月3日 下午4:25

52
GB
Safety Warnings
Safety Warnings
• Read all the instructions carefully before using the unit
and keep them for future reference.
• Retain the manual. If you pass the unit onto a third
party make sure to include this manual.
• Check that the voltage marked on the rating label
matches your mains voltage.
Damage
• Please inspect the unit for damage after unpacking.
• Do not continue to operate the unit if you are in any
doubt about it working normally, or if it is damaged
in any way - switch off, withdraw the mains plug and
consult your dealer.
Location of Unit
• The unit must be placed on a flat stable surface and
should not be subjected to vibrations.
• Do not place the unit on sloped or unstable surfaces as
the unit may fall off or tip over.
• The mains socket must be located near the unit and
should be easily accessible.
• This unit is designed for indoor use only.
Temperature
• Avoid extreme degrees of temperature, either hot or
cold. Place the unit well away from heat sources such
as radiators or gas / electric fires.
• Avoid exposure to direct sunlight and other sources of
heat.
Naked Flames
• Never place any type of candle or naked flame on the
top of or near the unit.
Moisture
• To reduce the risk of fire, electric shock or product
damage, do not expose this unit to rain, moisture,
dripping or splashing. No objects filled with liquids,
such as vases, should be placed on the unit.
• If you spill any liquid into the unit, it can cause serious
damage. Switch it off at the mains immediately.
Withdraw the mains plug and consult your dealer.
Ventilation
• To prevent the risk of electric shock or fire hazard
due to overheating, ensure that curtains and other
materials do not obstruct the ventilation vents.
• Do not install or place this unit in a bookcase, built-in
cabinet or in another confined space. Ensure the unit is
well ventilated.
• Make sure that there is a gap of at least 10 cm on both
sides and a gap of 20 cm at the top.
Safety
• Always disconnect the unit from the mains supply
before connecting / disconnecting other devices or
moving the unit.
• Unplug the unit from the mains socket during a
lightning storm.
Mains Cable
• Make sure the unit or unit stand is not resting on top of
the mains cable, as the weight of the unit may damage
the mains cable and create a safety hazard.
• If the mains cable is damaged it must be replaced
by the manufacturer, its service agent, or similarly
qualified persons in order to avoid a hazard.
Interference
• Do not place the unit on or near appliances which may
cause electromagnetic interference. If you do, it may
adversely affect the operating performance of the unit,
and cause a distorted picture or sound.
Optimum viewing
• View the unit in moderate light to prevent eye strain. It
is recommended to watch the unit from a distance
3-7 times that of the screen height.
LCD screen
• The LCD screen is manufactured using high-precision
technology. However, some tiny black points and /
or bright points (red, blue or green in colour) may
constantly appear on the LCD screen. These points
are generated in the manufacturing process and are
normal.
Screen Burn
• A characteristic of Plasma and TV Panels is that
displaying the same image for a long time may cause
a permanent after-image to remain on the screen. This
is called screen burn. Most pictures shown on the unit
will be constantly moving and fill the screen.
• Examples of images that you need to watch out for are
as follows (this is not an all-inclusive list):
1. Black Bars: If black bars appear at the left / right or
top / bottom of the screen, it is recommended to
change the format so that the picture fills the entire
screen.
2. TV Channel Logos: e.g. Shopping channel logos
and pricing displays - especially if they are bright
and stationary. Moving or low-contrast graphics are
less likely to cause ageing of the screen.
3. Time Displays
4. Teletext: Do not view a stationary page for long
periods of time.
5. TV Menus
6. Pause Mode: Do not leave the screen in pause
mode for long periods of time, e.g. when watching
videos.
• To prevent screen burn if viewing any of the above for
long periods of time, reduce contrast and brightness
when viewing. Once burn-in occurs it will never
disappear completely.
Safety Warnings
10 cm 10 cm
20 cm
10 cm
L26DIGB21_IB_111003_Annie.indd 52 11年10月3日 下午4:25

53
GB
Safety Warnings
Standby
• The
button on the remote control does not switch
off the unit completely. The unit will continue to draw
electricity from the mains supply while in standby. In
the interests of safety and to avoid unnecessary energy
consumption, never leave the unit in standby while
unattended for long periods of time, e.g. overnight,
while on holiday or while out of the house. Switch it off
and disconnect the mains plug from the mains socket.
Batteries
• Batteries used in the remote control for this unit
are easily swallowed by young children and this is
dangerous.
• Keep loose batteries away from young children and
make sure that the battery holder tray is secure in the
remote control. Seek medical advice if you believe a
cell has been swallowed.
• Please dispose of batteries correctly by following the
guidance in this manual.
Supervision
• Children should be supervised to ensure that they do
not play with the unit and the remote control.
• Never let anyone especially children push anything
into the holes, slots or any other openings in the case this could result in a fatal electric shock.
CAUTION
RISK OF ELECTRIC SHOCK
DO NOT OPEN
The lightning flash with arrowhead symbol,
within an equilateral triangle, is intended to
alert the user to the presence of uninsulated
“dangerous voltage” within the unit’s
enclosure that may be of sufficient
magnitude to constitute a risk of electric
shock.
The exclamation point within an equilateral
triangle is intended to alert the user to the
presence of important operating and
maintenance (servicing) instructions in the
manual accompanying the unit.
Service
• To reduce the risk of electric shock, do not remove
screws. The unit does not contain any user-serviceable
parts. Please leave all maintenance work to qualified
personnel.
• Do not open any fixed covers as this may expose
dangerous voltages.
Maintenance
• Ensure to unplug the unit from the mains socket before
cleaning.
• Do not use any type of abrasive pad or abrasive
cleaning solutions as these may damage the unit’s
surface.
• Do not use liquids to clean the unit.
L26DIGB21_IB_111003_Annie.indd 53 11年10月3日 下午4:25

This symbol on the product or in the instructions means that your electrical and
electronic equipment should be disposed at the end of its life separately from your
household waste. There are separate collection systems for recycling in the EU.
For more information, please contact the local authority or your retailer where you
purchased the product.
Notes for battery disposal
The batteries used with this product contain chemicals that are harmful to the environment. To
preserve our environment, dispose of used batteries according to your local laws or regulations.
Do not dispose of batteries with normal household waste.
For more information, please contact the local authority or your retailer where you purchased the
product.
HDMI, the HDMI logo and High-Definition Multimedia Interface are trademarks or registered
trademarks of HDMI Licensing LLC.
The FREEVIEW word and logo are trademarks of DTV services Ltd and are used under licence.
©DTV Services Ltd 2002
The “HD Ready” logo is a trademark of DIGITALEUROPE.
SRS TruSurround HD™ creates an immersive, feature-rich surround sound experience from two
speakers, complete with rich bass, high frequency detail and clear dialogue.
TruSurround HD, SRS and the
symbol are trademarks of SRS Labs, Inc.
All trademarks are the property of their respective owners and all rights are acknowledged.
DSG Retail Ltd • Maylands Avenue • Hemel Hempstead
Herts • HP2 7TG • England
(P.N.: 4031C261259)
Visit Partmaster.co.uk today for the easiest way to buy electrical
spares and accessories. With over 1 million spares and accessories
available we can deliver direct to your door the very next day. Visit
www.partmaster.co.uk or call 0844 800 3456 (UK customers only). Calls charged at National Rate.
If you require a replacement for any of the items listed below, please quote their corresponding
part numbers:
Replacement Part Part Number
Base Stand 102C2611111
Remote Control 504C2436103
AAA Batteries 32200007158
Screws 209030427B1
L26DIGB21_IB_111003_Annie.indd 54 11年10月3日 下午4:25

L26DIGB21_IB_111003_Annie.indd 55 11年10月3日 下午4:25

L26DIGB21_IB_111003_Annie.indd 56 11年10月3日 下午4:25
 Loading...