

Logan Graphic Products 550-1, 560-1 User Manual
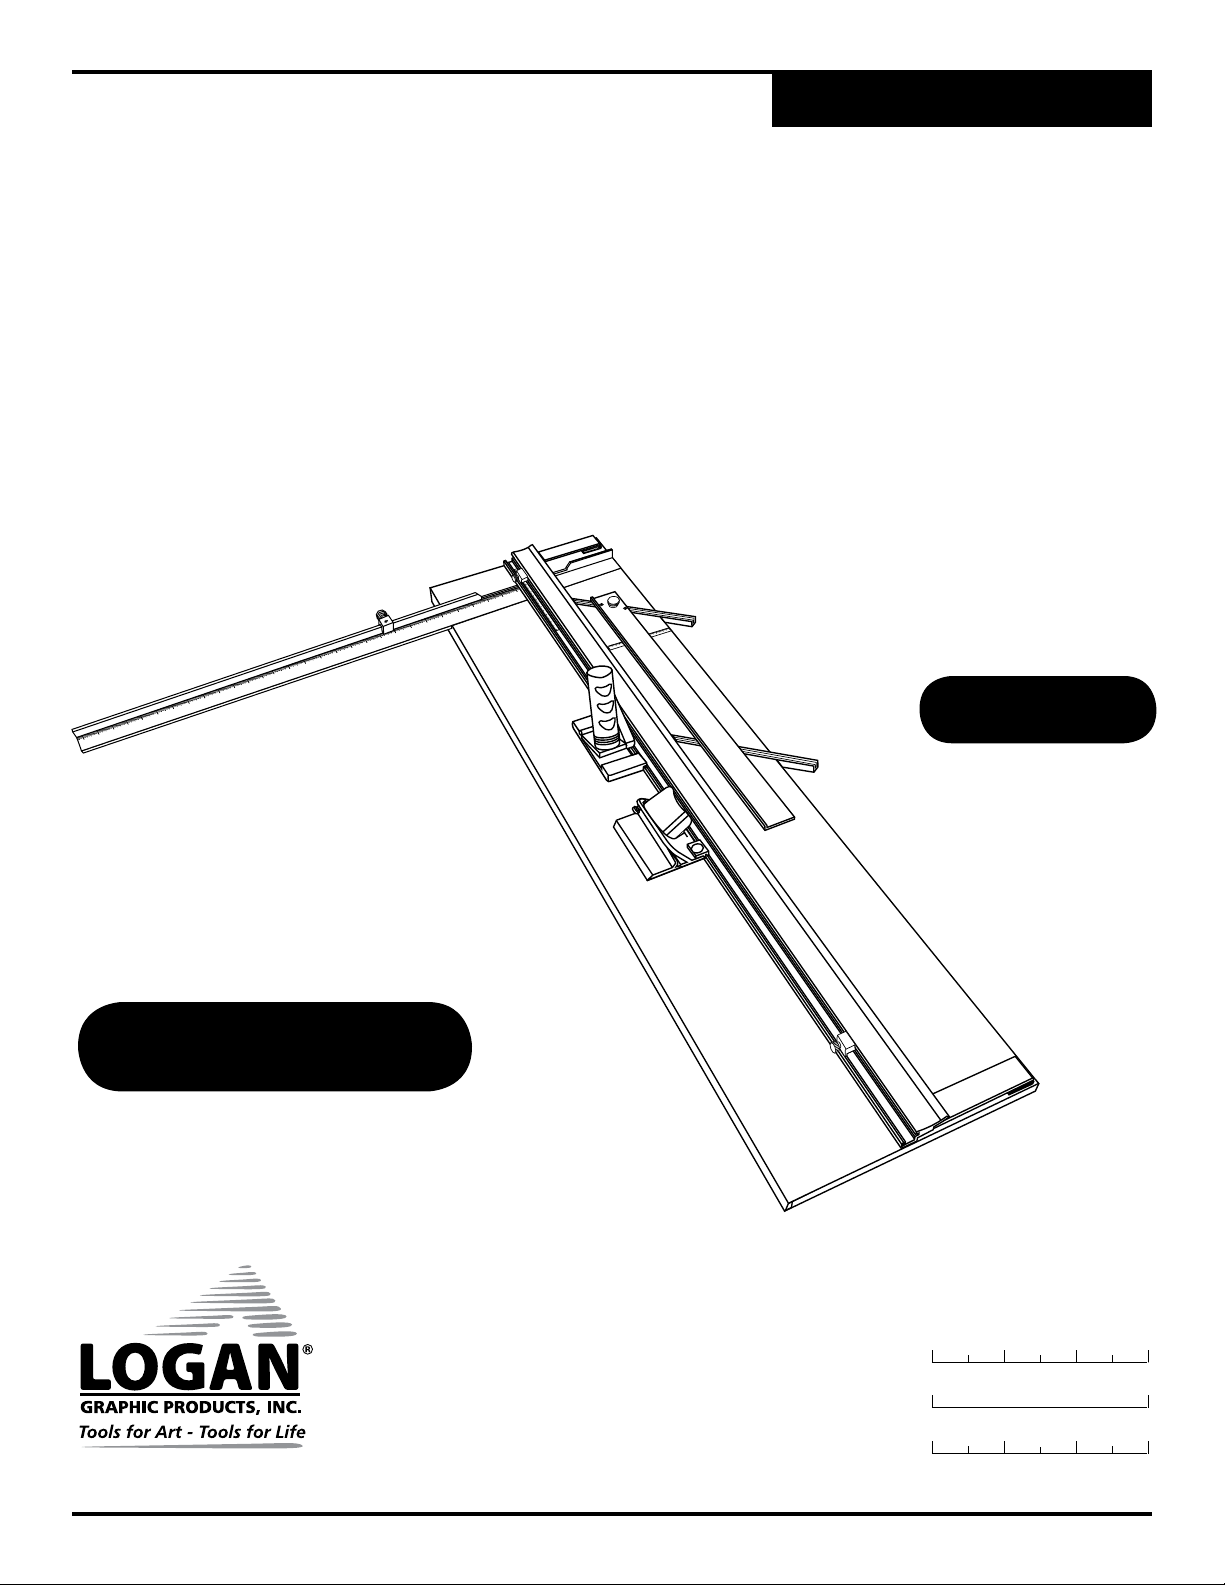
INSTRUCTION MANUAL
SIMPLEX CLASSIC
MAT CUTTER
INSTRUCTIONS AND OPERATION MANUAL
40 in (101 cm) mat cutting system with
bevel & straight cutters, production stops,
MODEL 550-1 / 560-1
27 in (68 cm) squaring arm & stop.
View How-To Videos Online
at LoganGraphic.com/videos
For best results use only
authentic Logan blades
Uses Logan Replacement
Blade #270
LoganGraphic.com
Purchase Date
ID Number (on bottom of board)
Date (on bottom of board)
L759DN4 8/11
Instruction Manual
Simplex Classic Mat Cutter
Model 550-1/560-1
Fig. 1
Orientation
The procedures detailed in the
following instructions refer to the
right & left sides and top & bottom
of the machine as shown (Fig. 1).
Top
Left Right
Bottom
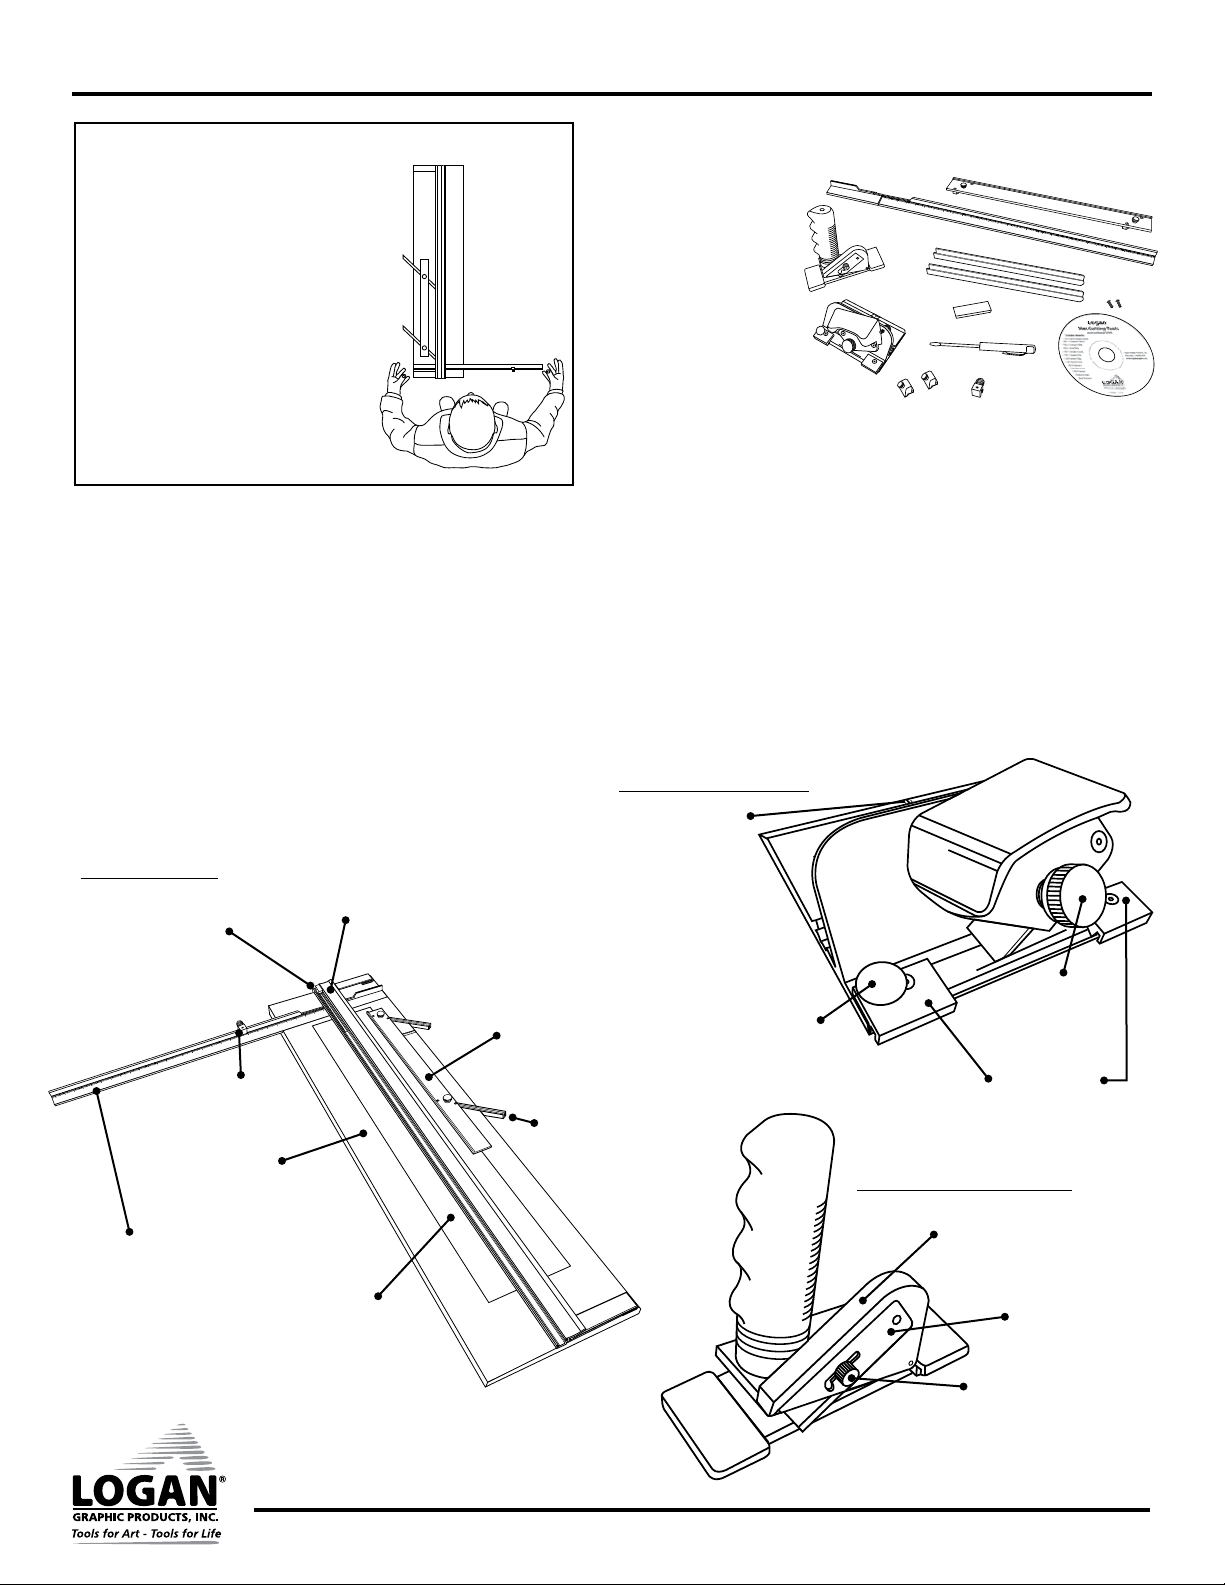
Carton Contents
1. Straight Cutter
2. Bevel Cutter
3. Squaring Arm
4. Squaring Arm Stop
5. Mat Guide
6. Mat Guide Channels (2)
7. Channel Screws (2)
8. Screwdriver
9. Rail Stops
10. Blade Pack
3
1
6
10
2
9
8
4
5
7
11
11. DVD
Congratulations on your purchase of the Logan Simplex Classic Mat Cutter.
The Simplex Classic is a well-designed mat cutter, combining the best of what Logan mat cutters have to offer. Features like heavy duty pull style
bevel cutter with anti-crawl pin, pivot & pull straight cutter, production stops, squaring arm, parallel mat guide, plus the flexibility to add additional
accessories like the glass cutter or surface V-groovers make the Simplex Classic a cost effective and useful tool for artists, crafters, photographers
and framers. This instruction manual is written to familiarize you with the product. Please take some time to review the instructions before cutting.
You will find that the time taken will be well worth it, and you will be cutting professional mats in no time.
PRODUCT DESCRIPTION
550-1 / 560-1 Simplex Classic- 40 in vinyl covered cutting board with mat guide in aluminum channels, two production stops, 27 in squaring arm,
straight and bevel cutting heads, slip sheet, screwdriver, DVD and one 5-pack of Logan #270 blades.
Identification of Machine Components
Cutting Board
Rail Stop
Squaring Arm Stop
Cutting Board
Vinyl covered base
board of machine
Squaring Arm
27 in board mounted
90° bar used to hold
mats square when
straight cutting and as a
stop when bevel cutting
Guide Rail
Used to guide cutting
heads while in use
Slip Sheet
A Slip Sheet is a piece of
scrap mat board that is
placed beneath the mat
when bevel cutting
Bevel Cutting Head
Start and Stop Indicator
(not visible in this drawing located on opposite side) Line
which shows where to begin
and end cut
Mat Guide
Used to set the border
width of a mat and
keep the mat in position
Mat Guide Channel
Anti-Crawl Pin
Prevents cutting head
from creeping forward when
insterting blade into mat
Blade Screw
Holds blade in
place for cutting
Nylon Guides
Guides which allow Bevel
Cutting Head to hook
onto Guide Rail
Straight Cutting Head
Blade Holder
Block which holds blade in place
while cutting. Has three separate
depth settings.
Blade Cover
Covers blade
on Blade Holder
Blade Screw
Holds blade in
place inside
Blade Holder
Lo g a n G r aphic Produc t s I n c ., 1 1 0 0 B rown Street, Wa u conda, IL 60084 847-52 6 - 5 515
2
Lo ganGraphic. com
Instruction Manual
Simplex Classic Mat Cutter
Model 550-1/560-1
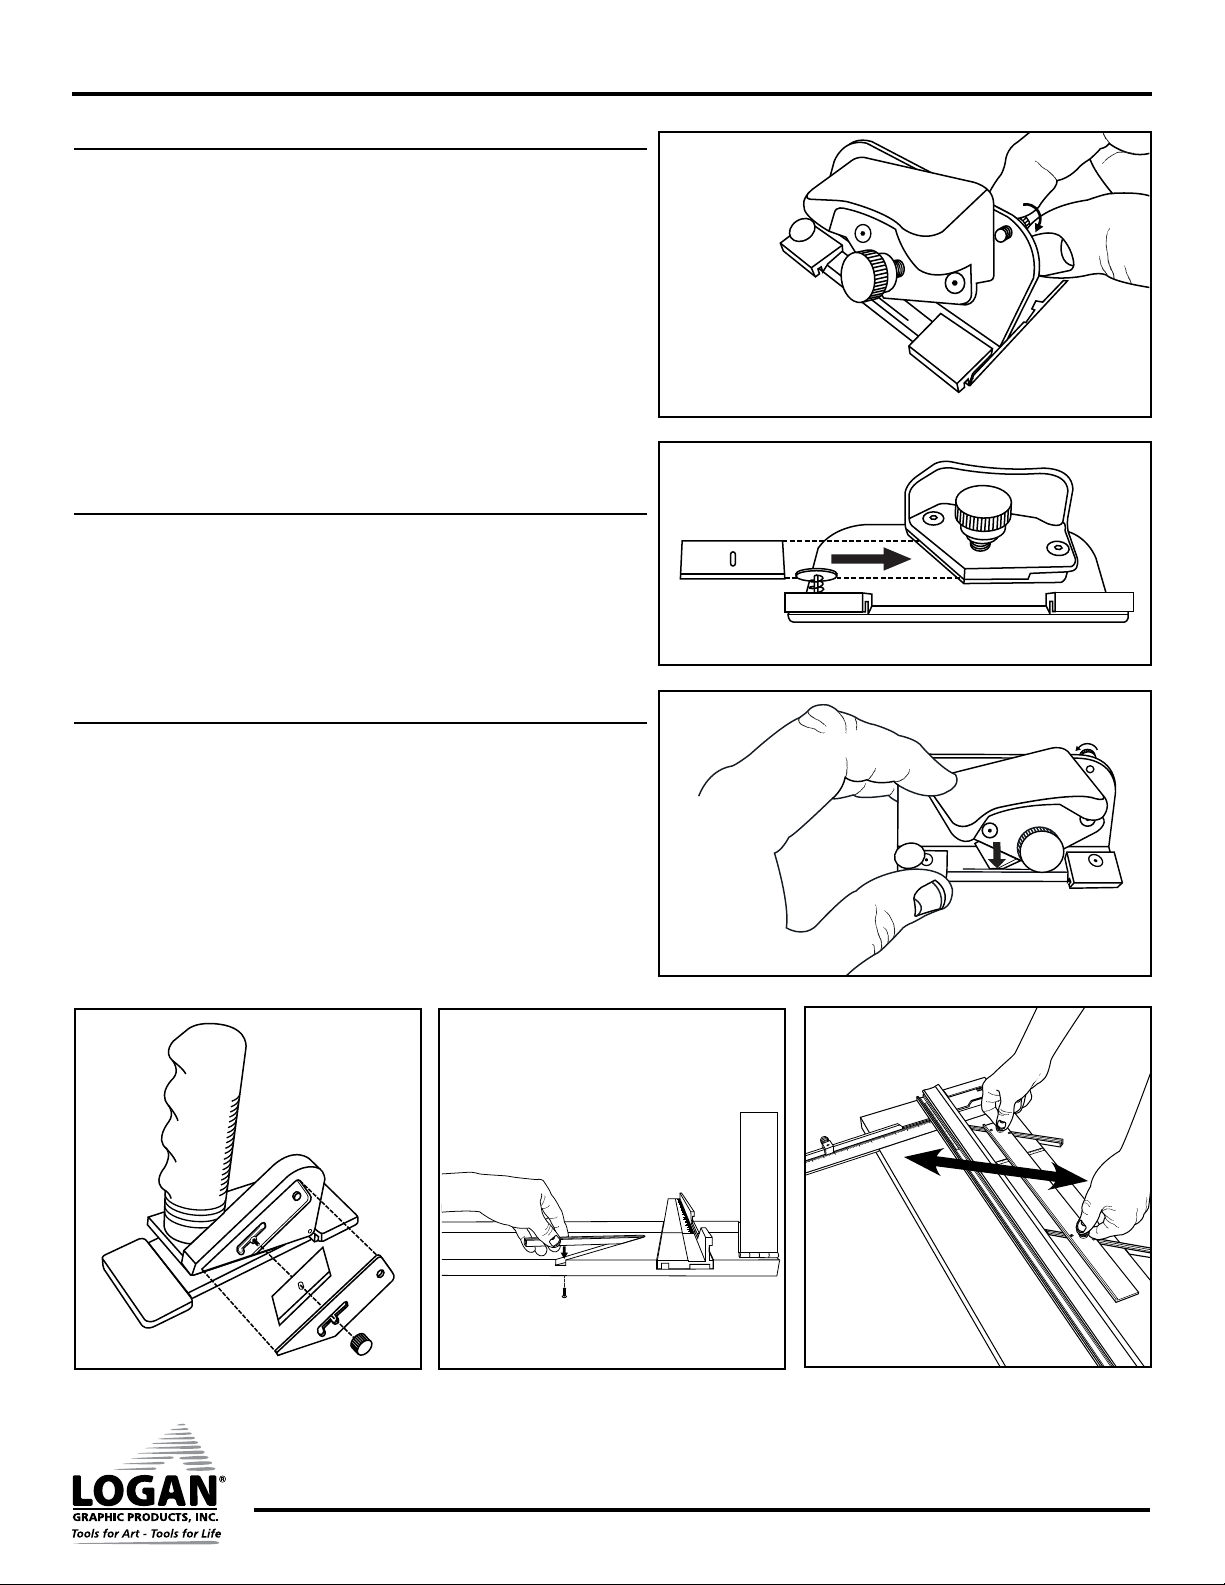
Blade Installation
1. Loosen blade retaining screw enough to allow blade holder to tilt back
(Fig. 2). Loosen the blade holding knob.
2. Remove one blade from the package of five.
NOTE: Because the blades are packed with a small amount of oil, they may stick
together. Be certain that only one blade is being inserted into the blade slot.
3. Slide blade, sharp edge down, fully into blade holder (Fig. 3).
NOTE: The hole in the blade is not designed to line up with the blade screw.
4. Tighten blade screw.
5. Tilt blade holder down, allowing tip of blade to enter into the blade slot
and retighten retaining screw (Fig. 4).
Blade Installation - Model 701-1 Straight Cutter Elite
1. Remove blade knob and blade cover.
2. Align blade hole over thread. Be sure sharp edge of blade is facing down.
3. Reassemble blade cover and blade knob (Fig. 5).
NOTE: Adjust blade to foamboard (fully extended), standard 4-ply mat board
(middle setting) or safety (fully retracted).
Mat Guide Assembly
Fig. 2
Fig. 3
Fig. 4
1. Press each Mat Guide Channel into board slots with rounded end towards
guiderail. (Fig. 6).
2. Insert two channel screws from the UNDERSIDE of board and tighten (Fig. 6).
3. Loosen each mat guide knob three full turns.
4. Hold mat guide at ends with your thumbs on the loosened knobs with
raised edge facing guiderail and evenly drop mat guide into channels.
5. Slide to adjust and tighten knobs to lock mat guide (Fig. 7).
Fig. 5
Fig. 6
Fig. 7
Lo g a n G r aphic Produc t s I n c ., 1 1 0 0 B rown Street, Wa u conda, IL 60084 847-52 6 - 5 515
3
Lo ganGraphic. com
 Loading...