


LGIP3552
L-I1720-B
LGIP720HD1
USER MANUAL
English / Español


INDEX
LAN – WAN Settings
• Network Setup with Logan Cam
• Setup on a Computer
Motion Detection
• Setup on Smart Phone
• Setup on a PC
SD Recording
• Setup on Smart Phone
• Setup on a PC
PC Recording
Backup Record
Image Settings
• Setup on Smart Phone
• Setup on a PC
4
6
10
13
14
16
18
19
20
21
23
25
26
28

LAN – WAN Settings

The following steps describe the configuration required for your
LGIP3552 camera from the comfort of your home.
You must connect the power supply of your camera and the
network cable has to be directly connected to the router where
you want the camera to make the connection.

1. Download the Logan Cam application (Blue Logo) through Play
Store for Android or App Store for iPhone
2. Run the application and enter the LAN option located at the
bottom of the screen:
Network Setup with Logan Cam
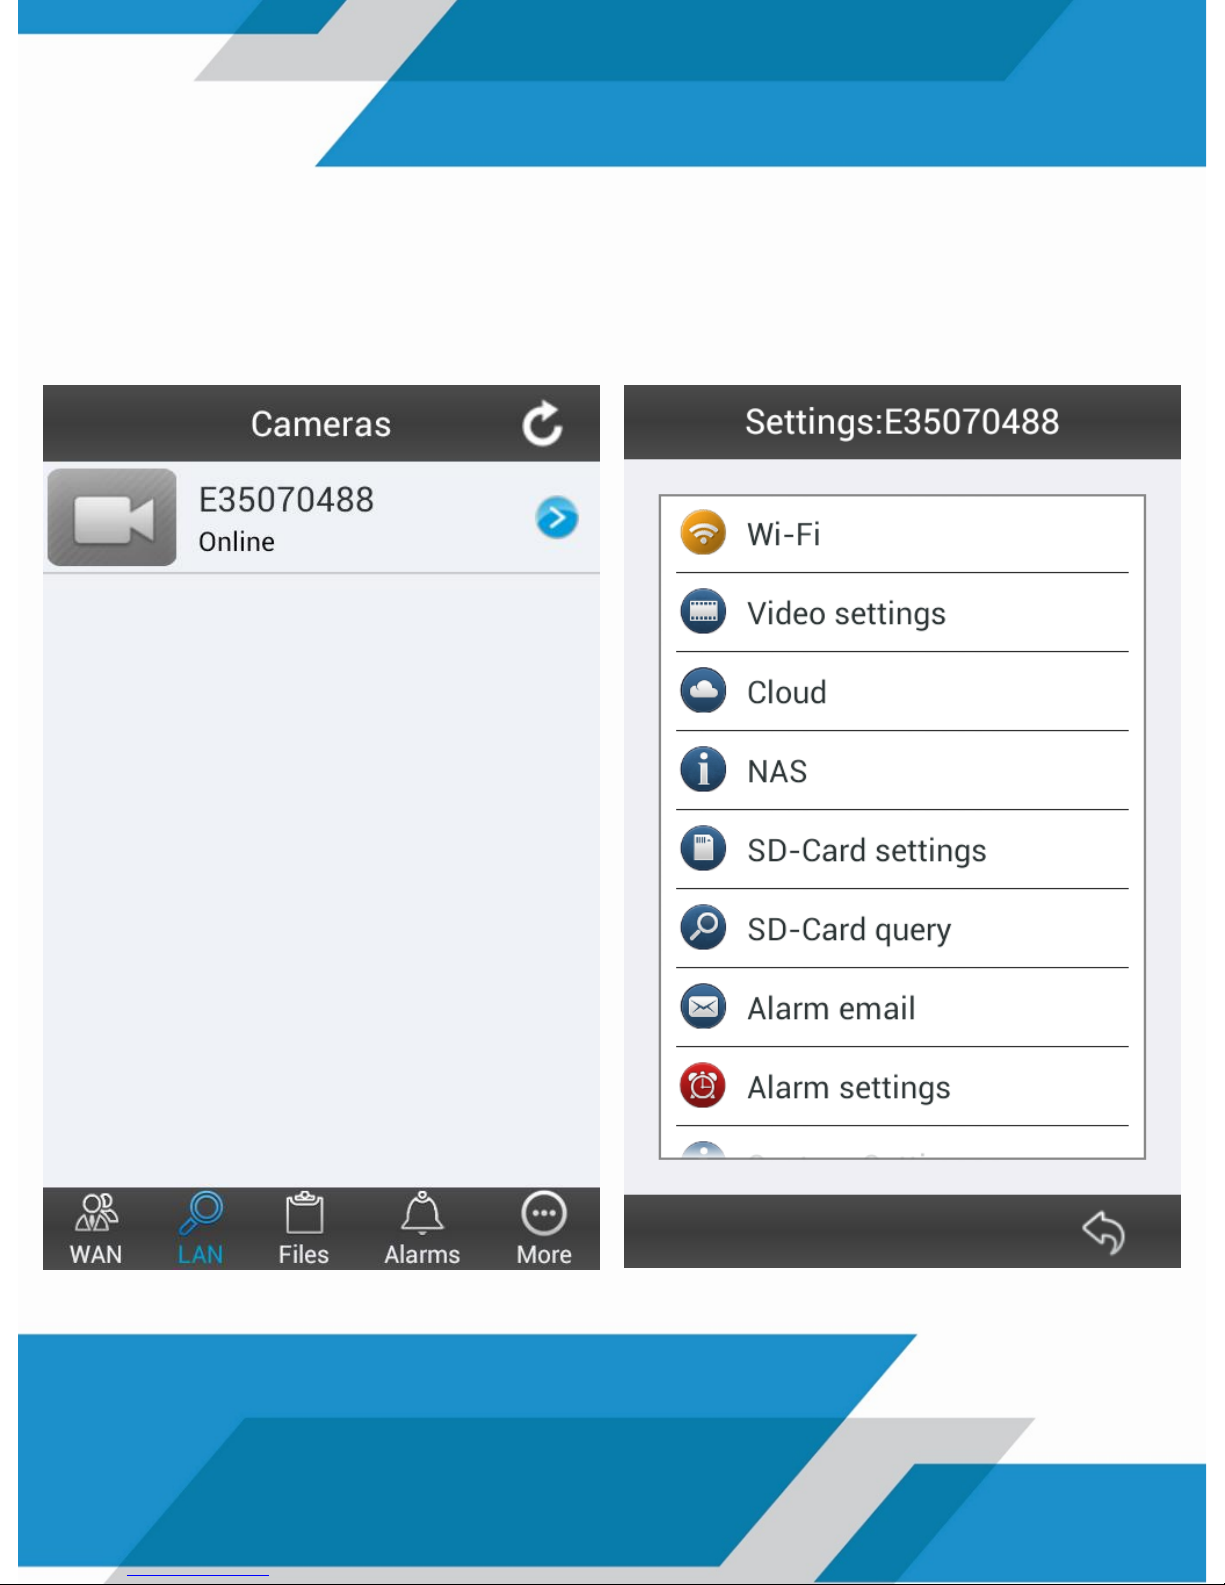
3. The camera should appear in your application as ONLINE. Press
the blue icon on the right side to enter setup and press the Wi-Fi
option
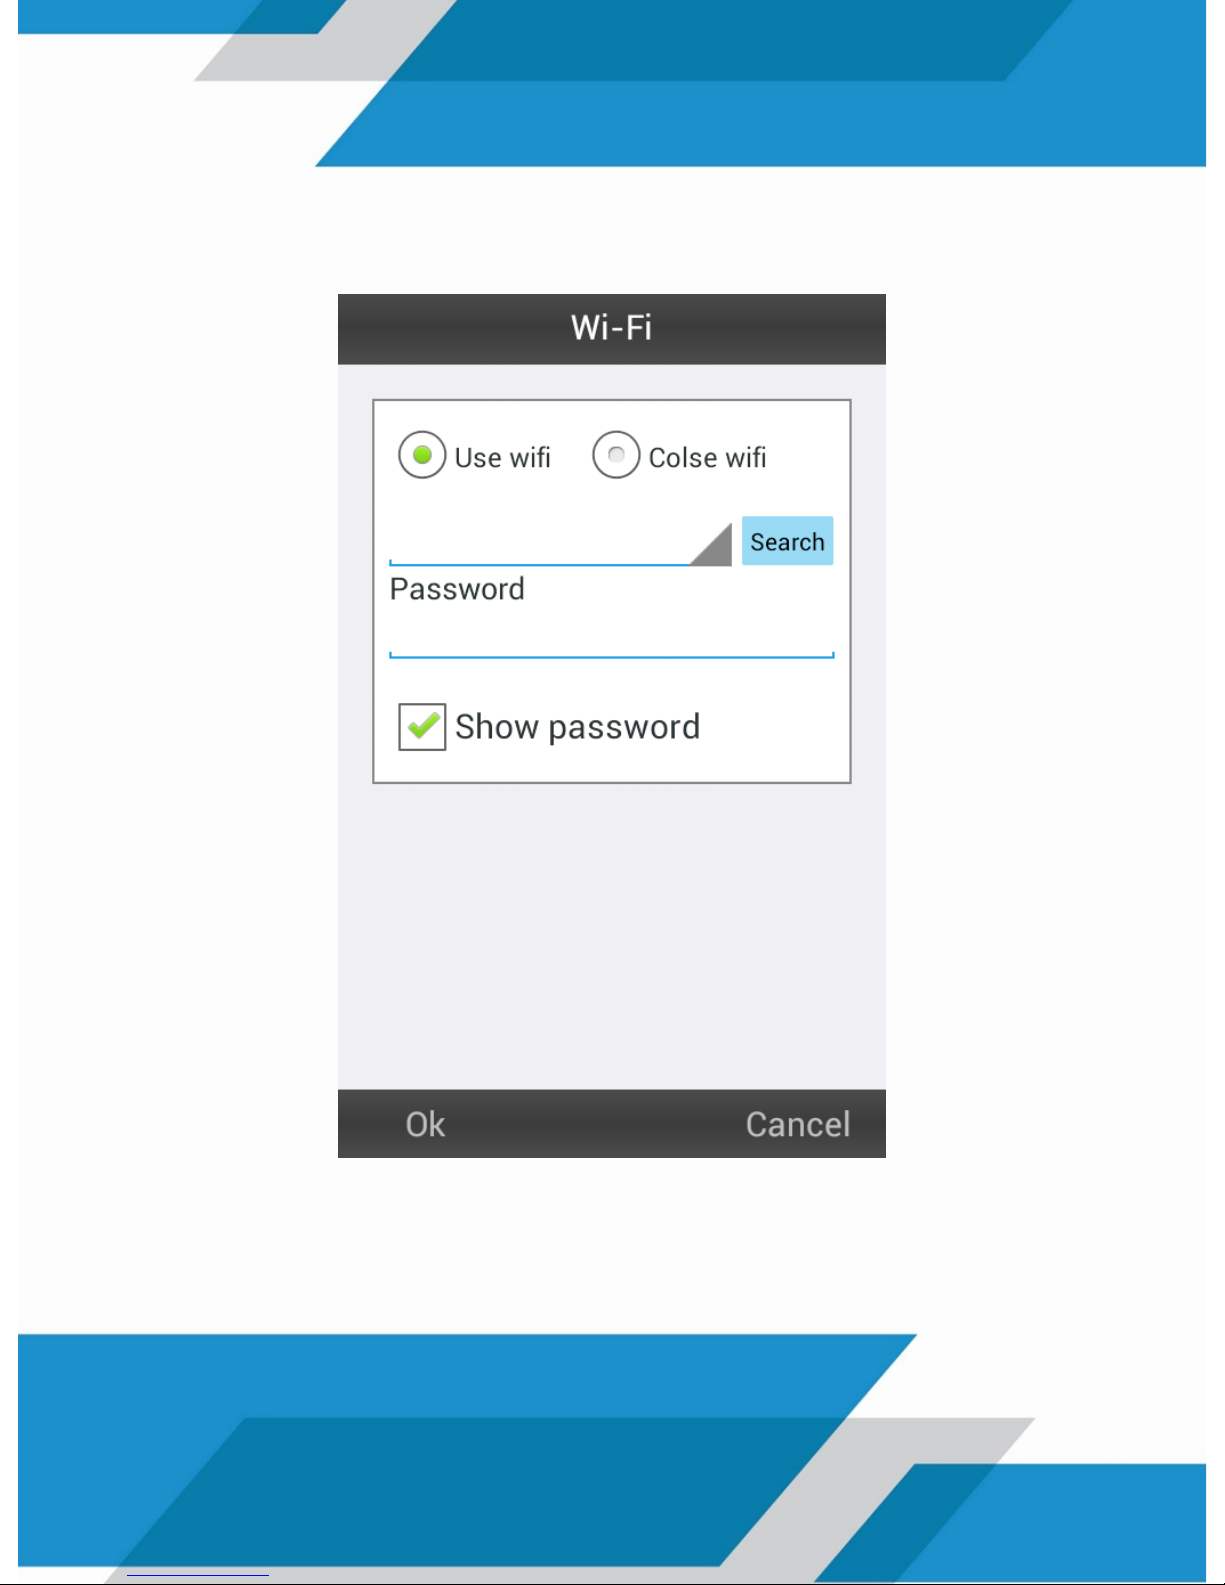
4. Add the wireless network setup at your current location and
enter the WIFI Password then Press OK
5. A reboot of your camera will be automatically performed.
Disconnect the network cable from your camera and log back
into the application

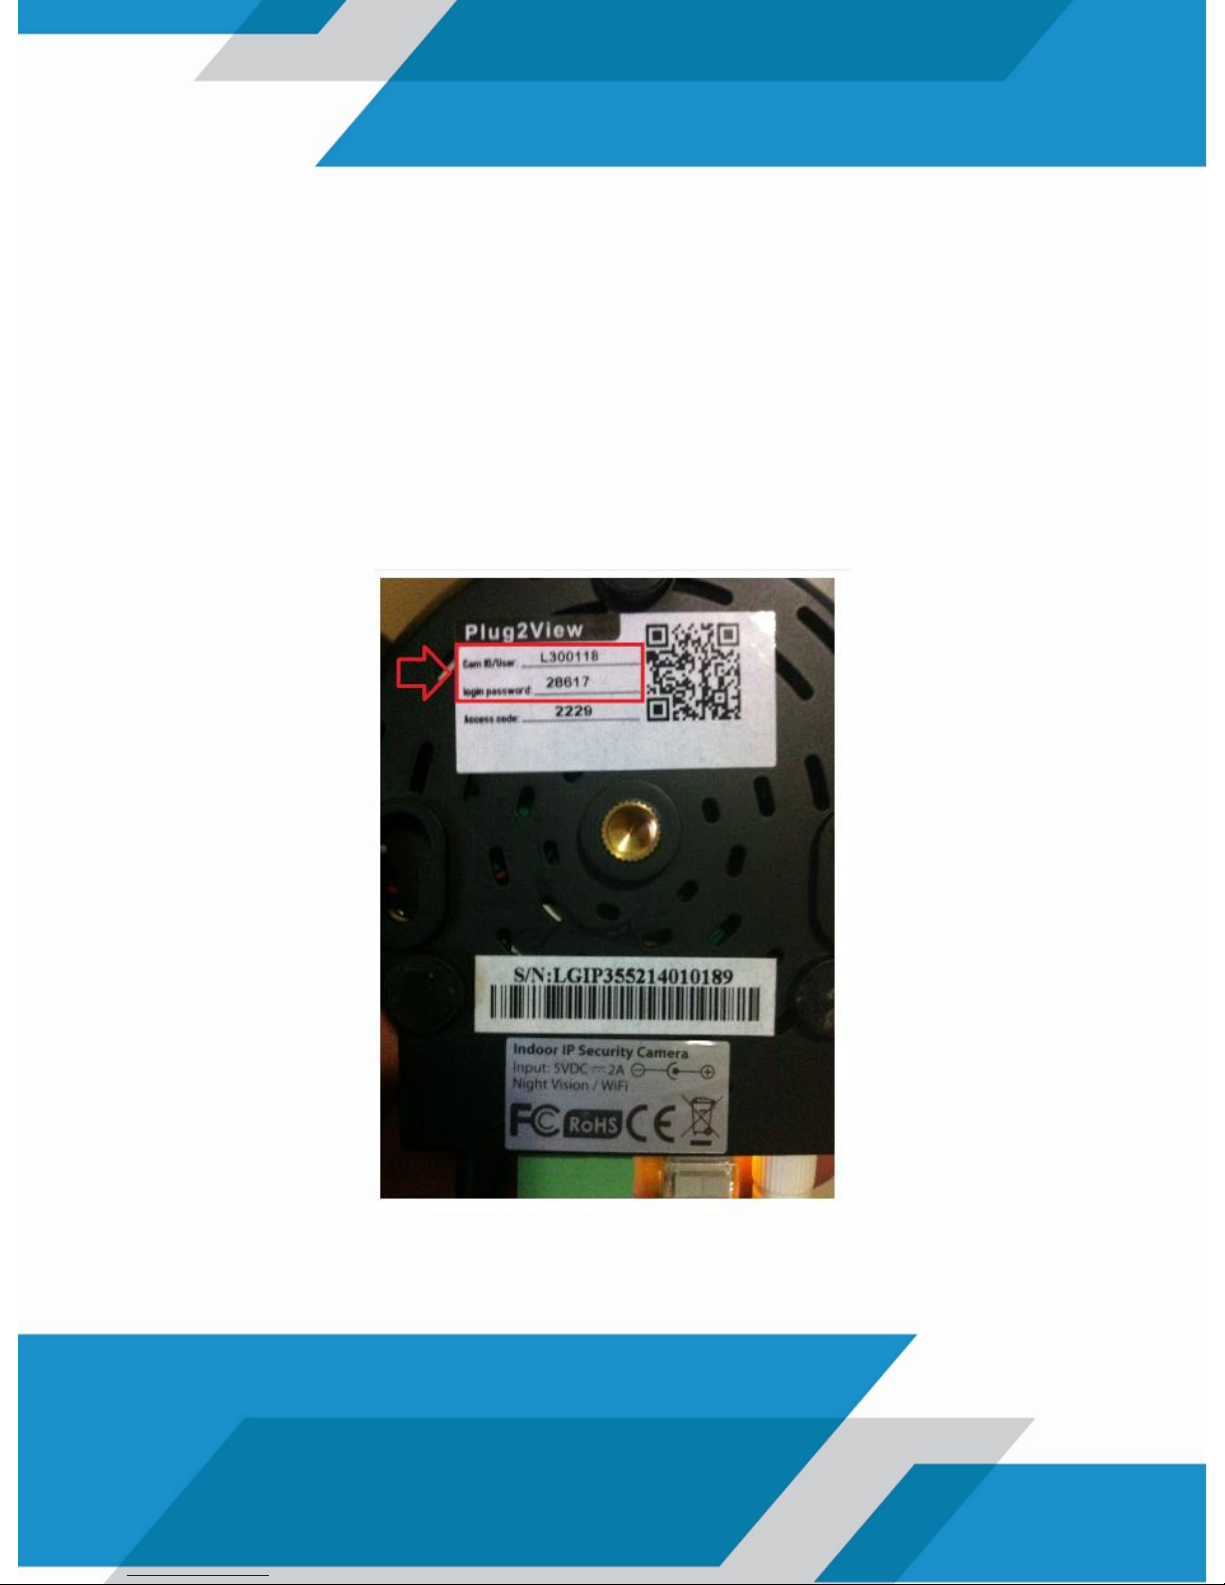
6. Enter the data from your camera, located on the label on the
back, as shown in the example below (or you can scan the QR
code)
7. You have finished the configuration of your Camera and you
can enjoy both local and remote connection.

1. Download the Logan Cam PC application on our website
through the link http://www.logan-cam.com/articulo-softwares
2. Run the application and log in at the top right of the screen
LAN option:
Setup on a Computer
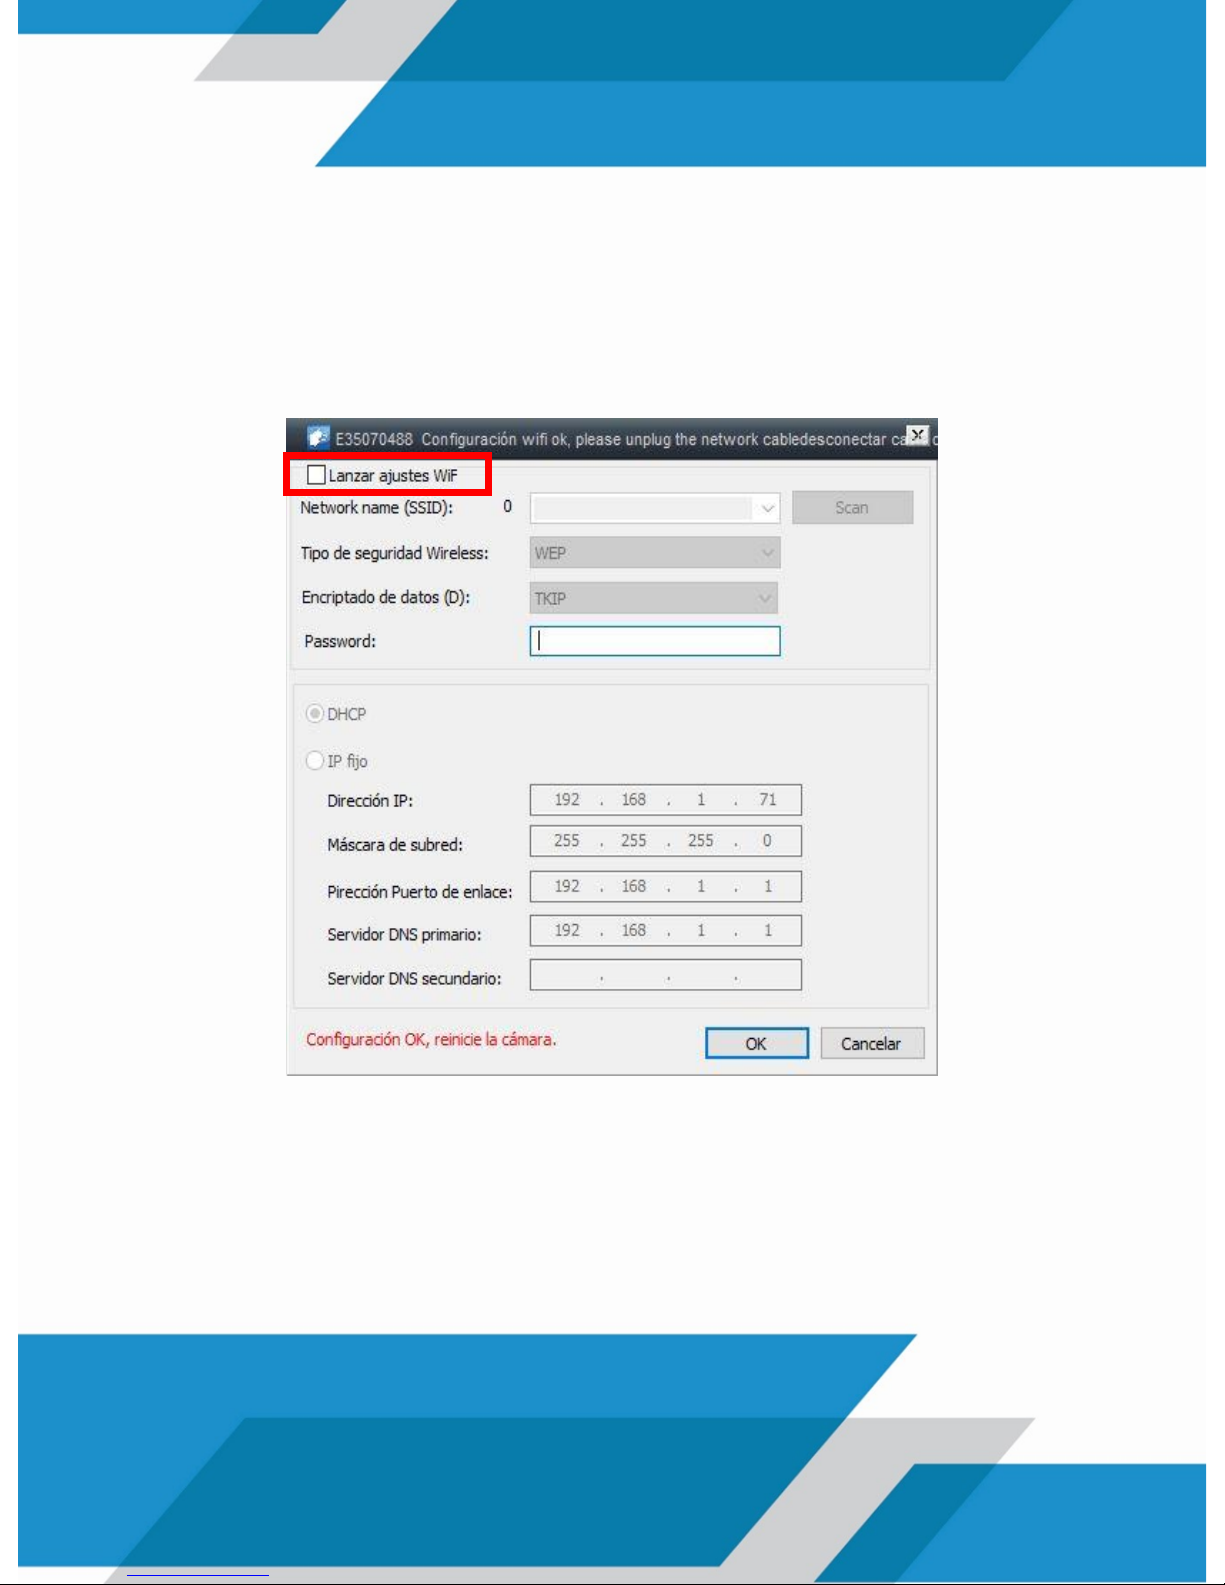
3. The camera should appear in your application in blue. Press the
right button on the camera to enter setup and select the Set
WiFi option
4. Activate the Wifi Launch Settings option and add the wireless
network set up on your current location and enter the security
key of it. Press OK
5. A reboot of your camera will be automatically performed.
Disconnect the network cable from your camera and log back
into the application in the WAN section
6. Enter the data from your camera, located on the label on the
back, as shown in the example below (or you can scan the QR
code):
7. You have finished the configuration of your computer and you
can enjoy both local and remote connection.
Motion Detection
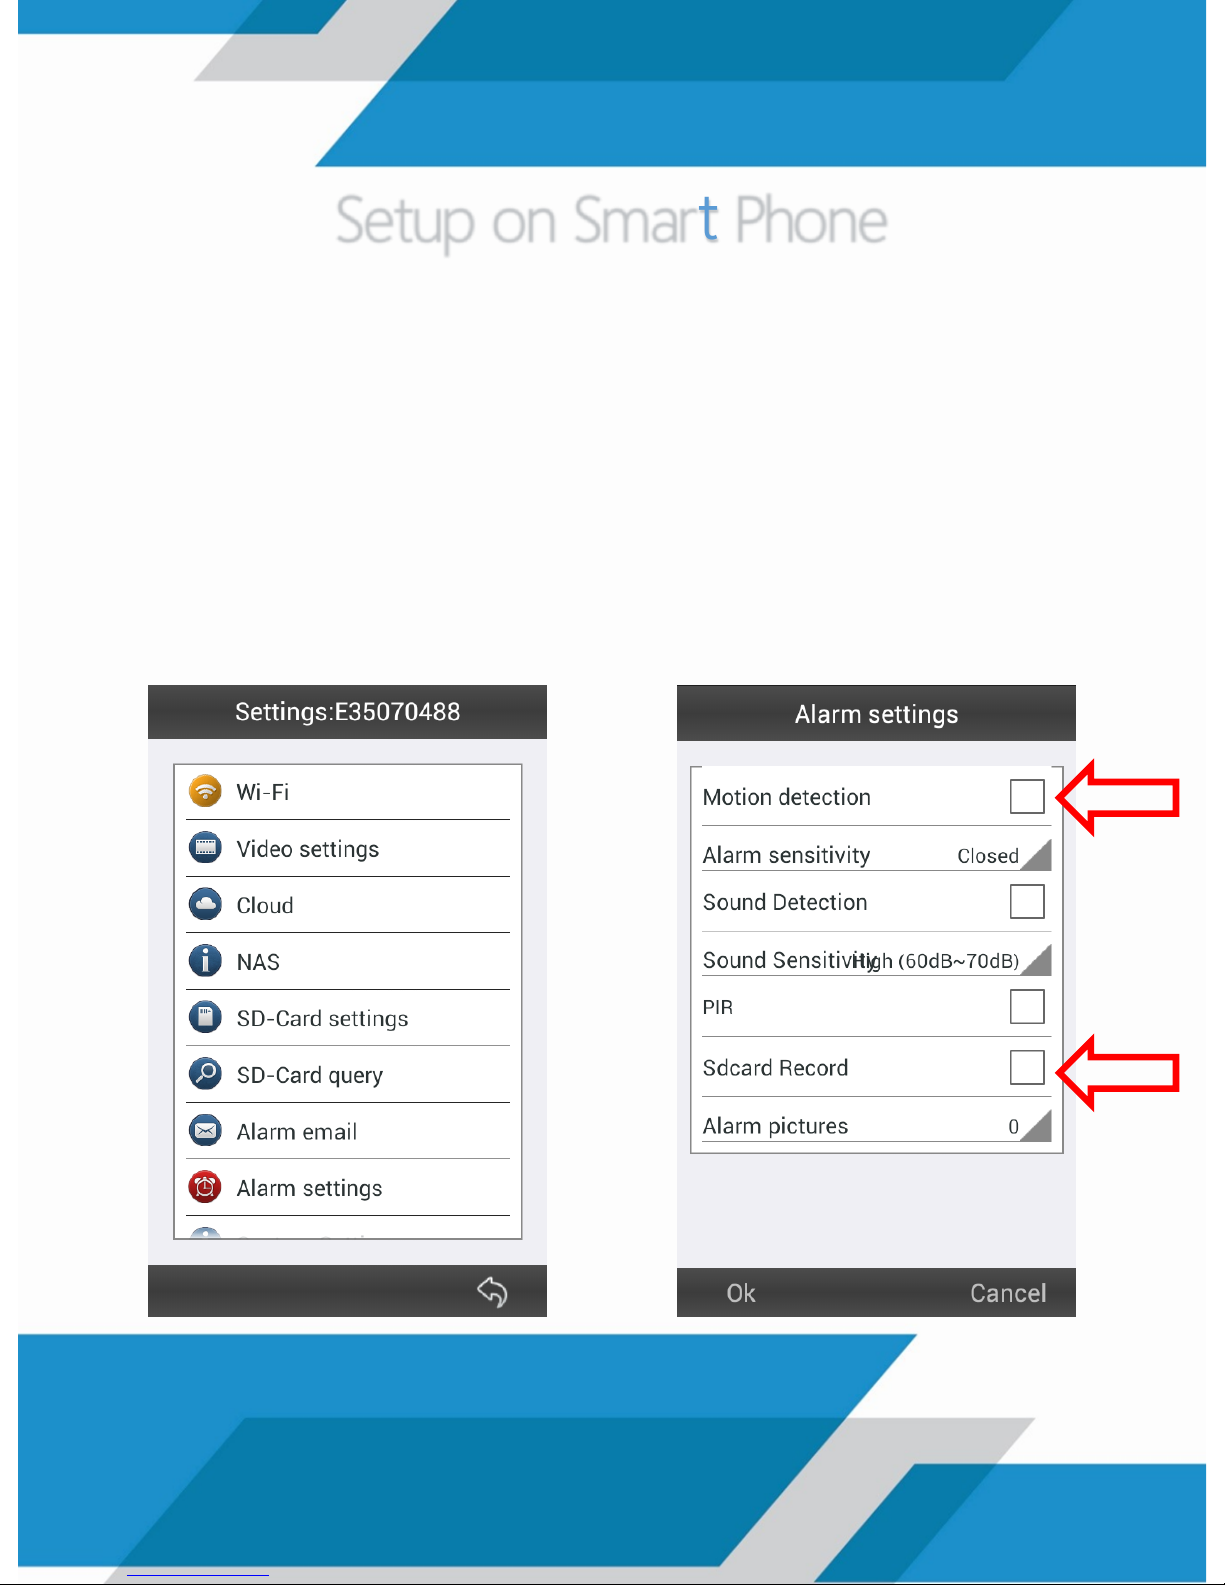
1. Enter the configuration of the computer and select the Alarm
Settings option
2. Active Motion Detection and SD Card Record. Specify the
sensitivity level of the sensor option in the Alarm (Alarm
Sensitivity). Then press OK
Setup on Smart Phone

If additionally you want to receive notification via email, you
must enter the following fields:
Receiver E-mail: mail you will receive alerts
Sender E-mail: mail that will send alerts
SMTP Server: Gmail (smtp.gmail.com) - Hotmail (smtp.live.com)
Encryption: SSL
SMTP Port: Gmail (465) - Hotmail (25)
SMTP User: mail sender, no special characters
SMTP Password: mail password
To verify, press the button “Send Test Email”. Press OK
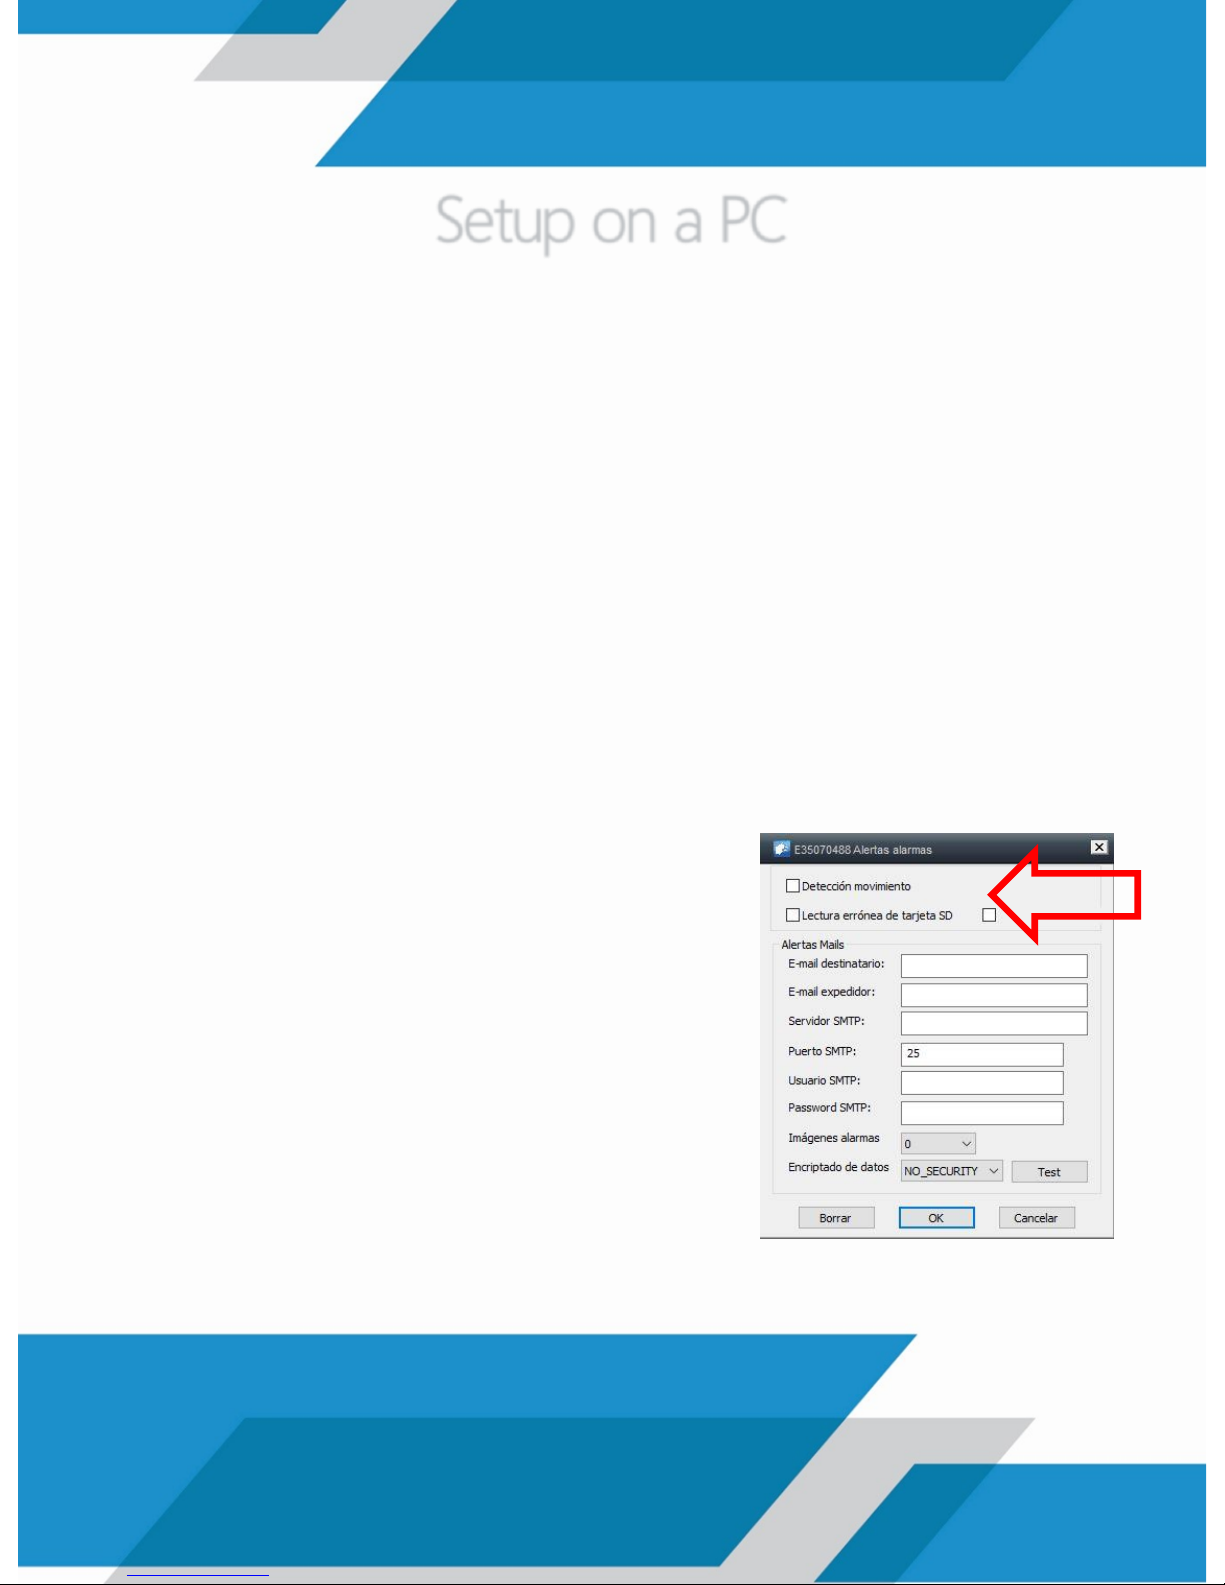
1. Presione el botón derecho para ingresar a la configuración y
seleccionar la opción Alertas de Alarma (Email)
2. Active la opción de Detección de Movimiento e ingrese los
siguientes campos:
E-mail Destinatario: correo que recibe las alertas
E-mail Expedidor: correo que envía las alertas
Servidor SMTP: Gmail (smtp.gmail.com) - Hotmail (smtp.live.com)
Puerto SMTP: Gmail (465) - Hotmail (25)
Usuario SMTP: correo remitente, sin caracteres especiales
Encriptado de Datos: SSL
Password SMTP: contraseña del correo
Para verificar, presione el botón Test (Prueba). Presione OK
Setup on a PC

As an additional recommendation we tell you that if you use
your Gmail account you should enable access to applications,
as indicated by the images below:

SD Card Recording

1. Enter the configuration of the computer and select the SDCard Settings option
2. Select the option Automatic Start Recording. Press OK
Setup on Smart Phone

1. Press the right button to enter setup and select the Settings
option SD Card
2. Activate the Automatic Recording Coverage Cycle. Press
Apply
Setup on a PC

PC Recording

1. Press the Setup option at the top left of the screen, the icon
2. Go to the video section and select the option of Loop
Recording.
Press OK

Backup Record

1. Press the Setup option at the top left of the screen, the icon
2. Go to the video section and press the Open Folder button.
Press OK.

Image Settings

1. Enter your computer through Logan Cam application, select
the display of your camera and press the Settings Image
Setup on Smart Phone

2. Make changes to your preference corresponding to
brightness, saturation, among others. If you want to set the
values of the default image, you must press the button

1. Enter your computer through Logan Cam application, select
the display of your camera and press the right button on the
image and select the Camera Settings.
Setup on a PC

2. Make changes to your preference corresponding sharpness,
hue, brightness, saturation, contrast, among others. If you want
to set the values of the default image, you must press the
Settings button Default. Click Apply.


32
34
38
41
42
44
46
47
48
49
51
53
54
56
INDICE
Configuración LAN y WAN
• Configuración por Smart Phone
• Configuración por PC
Detección por Movimiento
• Configuración por Smart Phone
• Configuración por PC
Grabación por Tarjeta SD
• Configuración por Smart Phone
• Configuración por PC
Grabación por PC
Extracción de Videos
Configuración de Imagen
• Configuración por Smart Phone
• Configuración por PC

Configuración LAN y WAN

A continuación se describen los pasos necesarios para la
configuración de su cámara LGIP3552 desde la comodidad de su
hogar.
Debe realizar la conexión de alimentación de su cámara, así
como el cable de red que esté a su vez, conectado
directamente al router donde desee que su cámara realice la
conexión.

1. Descargue la aplicación Logan Cam (logo azul) a través de
Play Store para teléfonos inteligentes Android o por App Store
para IPhone
2. Ejecute la aplicación e ingrese en la opción LAN ubicada en la
parte inferior de la pantalla:
Configuración por Smart Phone

3. Debe aparecer la cámara en su aplicación como ONLINE.
Presione el ícono azul al lado derecho para ingresar a la
configuración y presionar la opción Wi-Fi

4. Agregue la red inalámbrica establecida en su casa o ubicación
actual e ingrese la clave de seguridad de la misma. Presione OK
5. Se realizará automáticamente un reinicio de su cámara.
Desconecte el cable de red de su cámara e ingrese
nuevamente a la aplicación

6. Ingrese los datos de acceso de su cámara, ubicados en la
etiqueta en la parte posterior, tal como se muestra en el
ejemplo a continuación (o puede escanear el código QR):
7. Ha finalizado la configuración de su equipo y ya puede
disfrutar de la conexión tanto local como remota.

1. Descargue la aplicación Logan Cam para PC en nuestra página
web a través del enlace http://www.logan-cam.com/articulo-
softwares
2. Ejecute la aplicación e ingrese en la opción LAN ubicada en la
parte superior derecha de la pantalla:
Configuración por PC

3. Debe aparecer la cámara en su aplicación en color azul.
Presione el botón derecho para ingresar a la configuración y
seleccionar la opción Ajustar Conexión Wi-Fi
4. Active la opción Lanzar Ajustes Wifi y agregue la red
inalámbrica establecida en su casa o ubicación actual e ingrese
la clave de seguridad de la misma. Presione OK

5. Se realizará automáticamente un reinicio de su cámara.
Desconecte el cable de red de su cámara e ingrese
nuevamente a la aplicación en la sección WAN
6. Ingrese los datos de acceso de su cámara, ubicados en la
etiqueta en la parte posterior, tal como se muestra en el
ejemplo a continuación (o puede escanear el código QR):
7. Ha finalizado la configuración de su equipo y ya puede
disfrutar de la conexión tanto local como remota.

Detección por Movimiento

1. Ingrese en la configuración del equipo y seleccione la opción
Alarm Settings (Configuración de Alarma)
2. Active las opciones de Motion Detection (Detección de
Movimiento) y SD Card Record (Grabación en Tarjeta SD).
Especifique el nivel de sensibilidad del sensor en la opción Alarm
Sensitivity (Sensibilidad de la Alarma). Presione OK
Configuración por Smart Phone

Si adicionalmente desea recibir una notificación vía correo
electrónico, debe ingresar establecer los siguientes campos:
Receiver E-mail: correo que recibe las alertas
Sender E-mail: correo que envía las alertas
SMTP Server: Gmail (smtp.gmail.com) - Hotmail (smtp.live.com)
Encryption: SSL
SMTP Port: Gmail (465) - Hotmail (25)
SMTP User: correo remitente, sin caracteres especiales
SMTP Password: contraseña del correo
Para verificar, presione el botón Send a Test Email (Envíe un
correo de prueba). Presione OK

1. Presione el botón derecho para ingresar a la configuración y
seleccionar la opción Alertas de Alarma (Email)
2. Active la opción de Detección de Movimiento e ingrese los
siguientes campos:
E-mail Destinatario: correo que recibe las alertas
E-mail Expedidor: correo que envía las alertas
Servidor SMTP: Gmail (smtp.gmail.com) - Hotmail (smtp.live.com)
Puerto SMTP: Gmail (465) - Hotmail (25)
Usuario SMTP: correo remitente, sin caracteres especiales
Encriptado de Datos: SSL
Password SMTP: contraseña del correo
Para verificar, presione el botón Test (Prueba). Presione OK
Configuración por PC

Como recomendación adicional le indicamos que si va a hacer
uso de su cuenta Gmail debe activar el acceso de aplicaciones,
tal como lo indican las imágenes a continuación:
Grabación por Tarjeta SD
1. Ingrese en la configuración del equipo y seleccione la opción
SD-Card Settings (Configuración de Tarjeta SD)
2. Active la opción de Start Automatic Recording (Inicio de
Grabación Automática). Presione OK
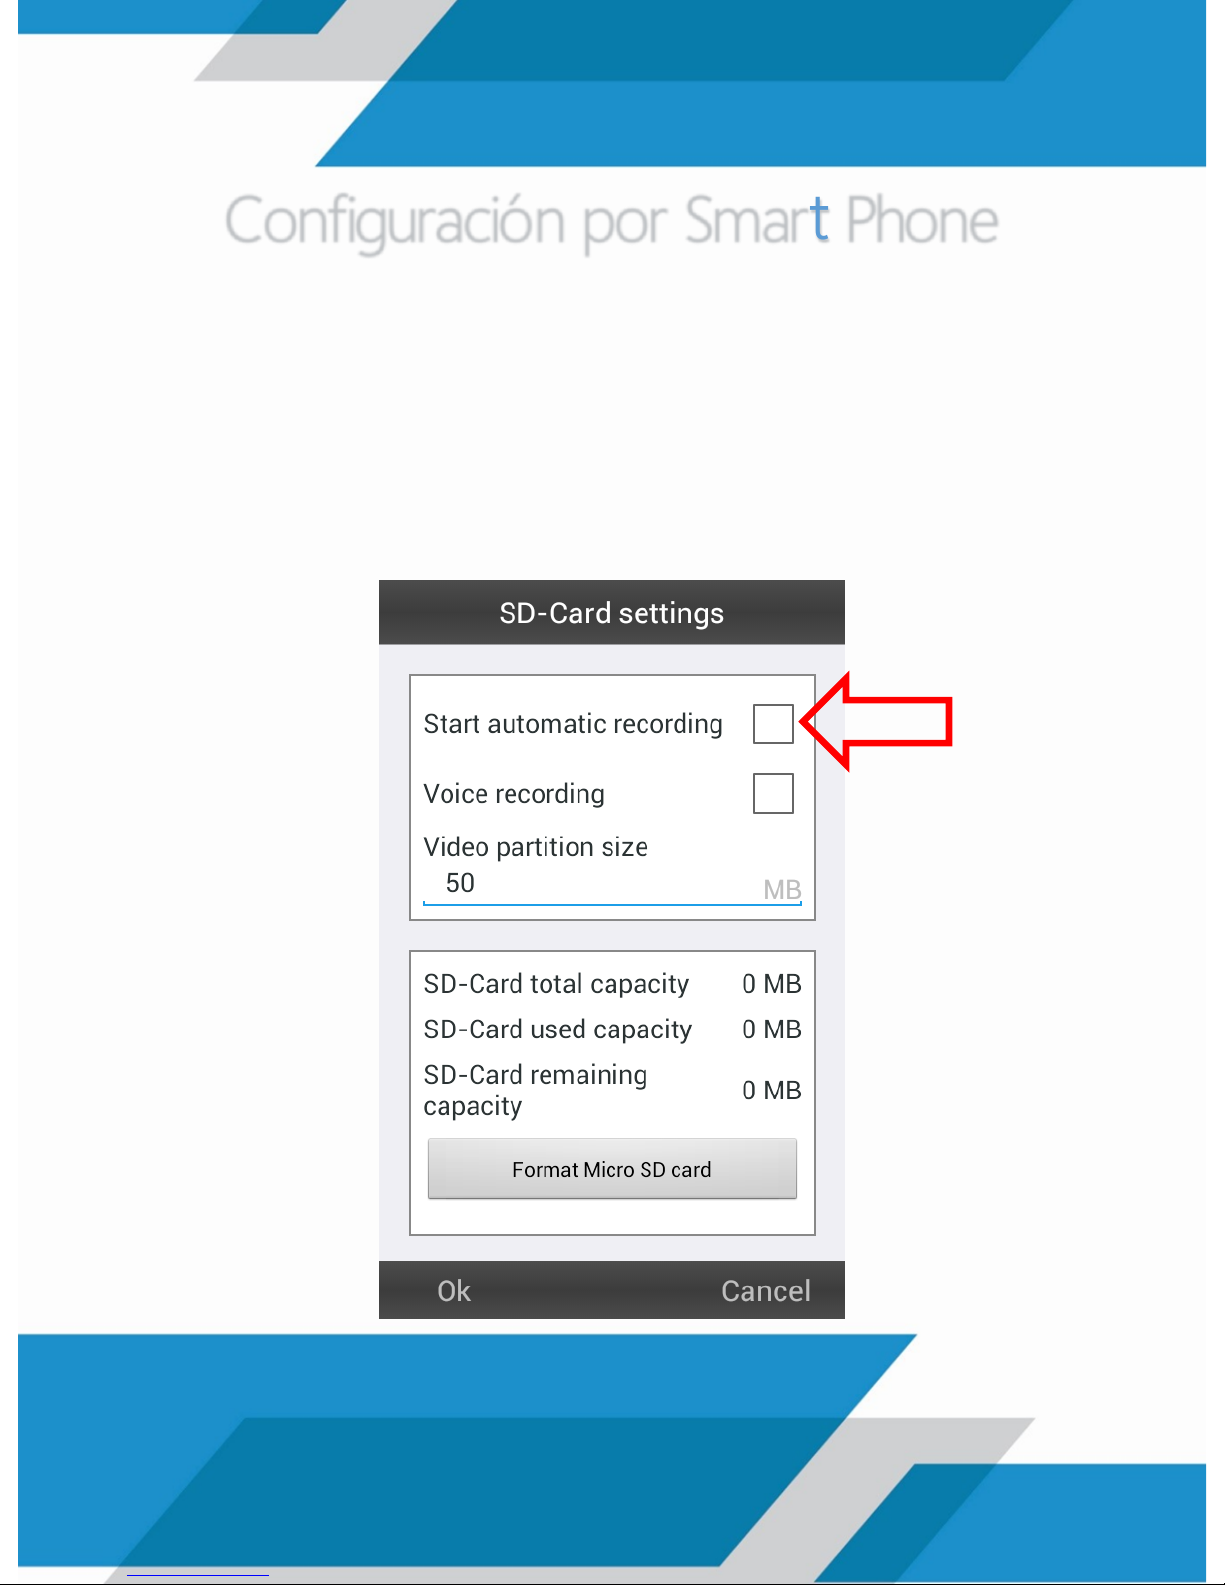
Configuración por Smart Phone

1. Presione el botón derecho para ingresar a la configuración y
seleccionar la opción Configuración Tarjeta SD
2. Active la opción de Grabación Automática de Cobertura
Ciclo. Presione Aplicar
Configuración por PC

Grabación por PC

1. Presione la opción de la configuración ubicado en la parte
superior izquierda de la pantalla, en el ícono
2. Diríjase a la sección de Video y active la opción de Grabación
en Bucle.
Presione OK

Extracción de Videos

1. Presione la opción de la configuración ubicado en la parte
superior izquierda de la pantalla, en el ícono
2. Diríjase a la sección de Video y presione el botón de Abrir
Carpeta.
Presione OK

Configuración de Imagen

1. Ingrese en su equipo a través de la aplicación Logan Cam,
seleccione la visualización de su cámara y presione la opción de
Configuración de Imagen
Configuración por Smart Phone

2. Realice los cambios de su preferencia correspondientes a
brillo, saturación, entre otros. Si se desea establecer los valores
de la imagen por defecto, se debe presionar el botón

1. Ingrese en su equipo a través de la aplicación Logan Cam,
seleccione la visualización de su cámara y presione el botón
derecho en la imagen y seleccione la opción de Cámara
Ajustes
Configuración por PC

2. Realice los cambios de su preferencia correspondientes a
nitidez, matiz, luminosidad, saturación, contraste, entre otros. Si se
desea establecer los valores de la imagen por defecto, se debe
presionar el botón Configuración por Defecto. Presione Aplicar.

http://www.logan-cam.com/
Cualquier otra consulta se puede comunicar al
departamento de soporte técnico por medio
del correo: support@logan-cam.com
Any other questions you may contact to our
technical support department by the email:
support@logan-cam.com
 Loading...