

Page 1

User Manual
1/183
Page 2

User Manual
2/183
Page 3

User Manual
3/183
Page 4

User Manual
4/183
Menu
1. Production Introduction .......................................................................... 6
2. Installation ..................................................................................... 6
2.1. HDD Installation ............................................................................. 6
2.2. 2.1 Front panel .............................................................................. 6
2.2 2.2Rear panel ............................................................................... 5
2.3. Previewing window Icon Description ........................................................... 6
3. Fast Operation ................................................................................. 7
3.1. Login ........................................................................................ 7
3.1.1. Normal Login ............................................................................... 7
3.1.2. Temporary Login ........................................................................... 10
3.2. Menu Operation ............................................................................... 8
3.2.1. View Layout ................................................................................ 9
3.2.2. Sequence Interval .......................................................................... 10
3.2.3. Video Adjust ............................................................................... 10
3.2.4. PTZ ...................................................................................... 12
3.2.5. Clients .................................................................................... 15
3.2.6. Snapshot .................................................................................. 16
3.2.7. Record Function ............................................................................ 18
3.2.8 Clear Alarm ................................................................................ 25
3.2.9 Shutdown .................................................................................. 25
4 System Setup .................................................................................. 26
4.1 Functional Structure ........................................................................ 26
4.2 General ..................................................................................... 27
4.2.2 Time ...................................................................................... 29
4.2.3 User....................................................................................... 30
Page 5

User Manual
5/183
4.3 Channel ..................................................................................... 34
4.3.1 Preview setting ............................................................................. 34
4.3.2 Stream setting .............................................................................. 43
4.3.3 Audio setting ............................................................................... 46
4.4.1 Network setting ............................................................................. 50
4.4.2 Network service ............................................................................. 53
4.5 Alarm ....................................................................................... 57
4.5.1 Motion detection ............................................................................ 57
4.5.2 No video ................................................................................... 60
4.5.3 Alarm device ............................................................................... 62
4.5.4 Alarm task ................................................................................. 64
4.5.5 E-mail alert ................................................................................. 65
4.6 System ...................................................................................... 66
4.6.1 Log: ....................................................................................... 66
4.6.2 Maintenance ............................................................................... 68
4.6.3 Information: ................................................................................ 73
4.7 Device ...................................................................................... 73
4.7.1 Storage .................................................................................... 73
4.7.2 PTZ ....................................................................................... 76
4.7.3 Other devices .............................................................................. 81
5 Appendices .................................................................................... 85
5.5 Calculate hard disk capacity ................................................................. 85
5.5.1 Hard disk capacity convert ................................................................... 85
5.5.2 Required capacity for video recording. ......................................................... 86
Page 6

User Manual
6/183
1. Production Introduction
Network DVR is a monitoring product that allows audio and video synchronized. It adopts embedded and micro processor, so system runs more steadily. This product
integrates functions such as video & audio, network transmission, alarming management, etc. Meanwhile, it has the features of DVR and DVS. It can not only work alone, but
also can be networked to a powerful security monitoring network. It is widely used in school, factory, supermarket, bank, traffic, water conservancy facilities, residential area,
and warehouse department, etc.
2. Installation
2.1. HDD Installation
1. Ensure Power supply has been disconnected, open the case cover;
2. Connect HDD data line, power line first , then fix the HDD in the case;
3. Install the cover, connect the power, which with adaptor, press the power switch;
4. Formatting the HDD (Please check details from : System Setup—Device—Storage —Formatting ;
5. Network DVR can normally make snapshot and video.
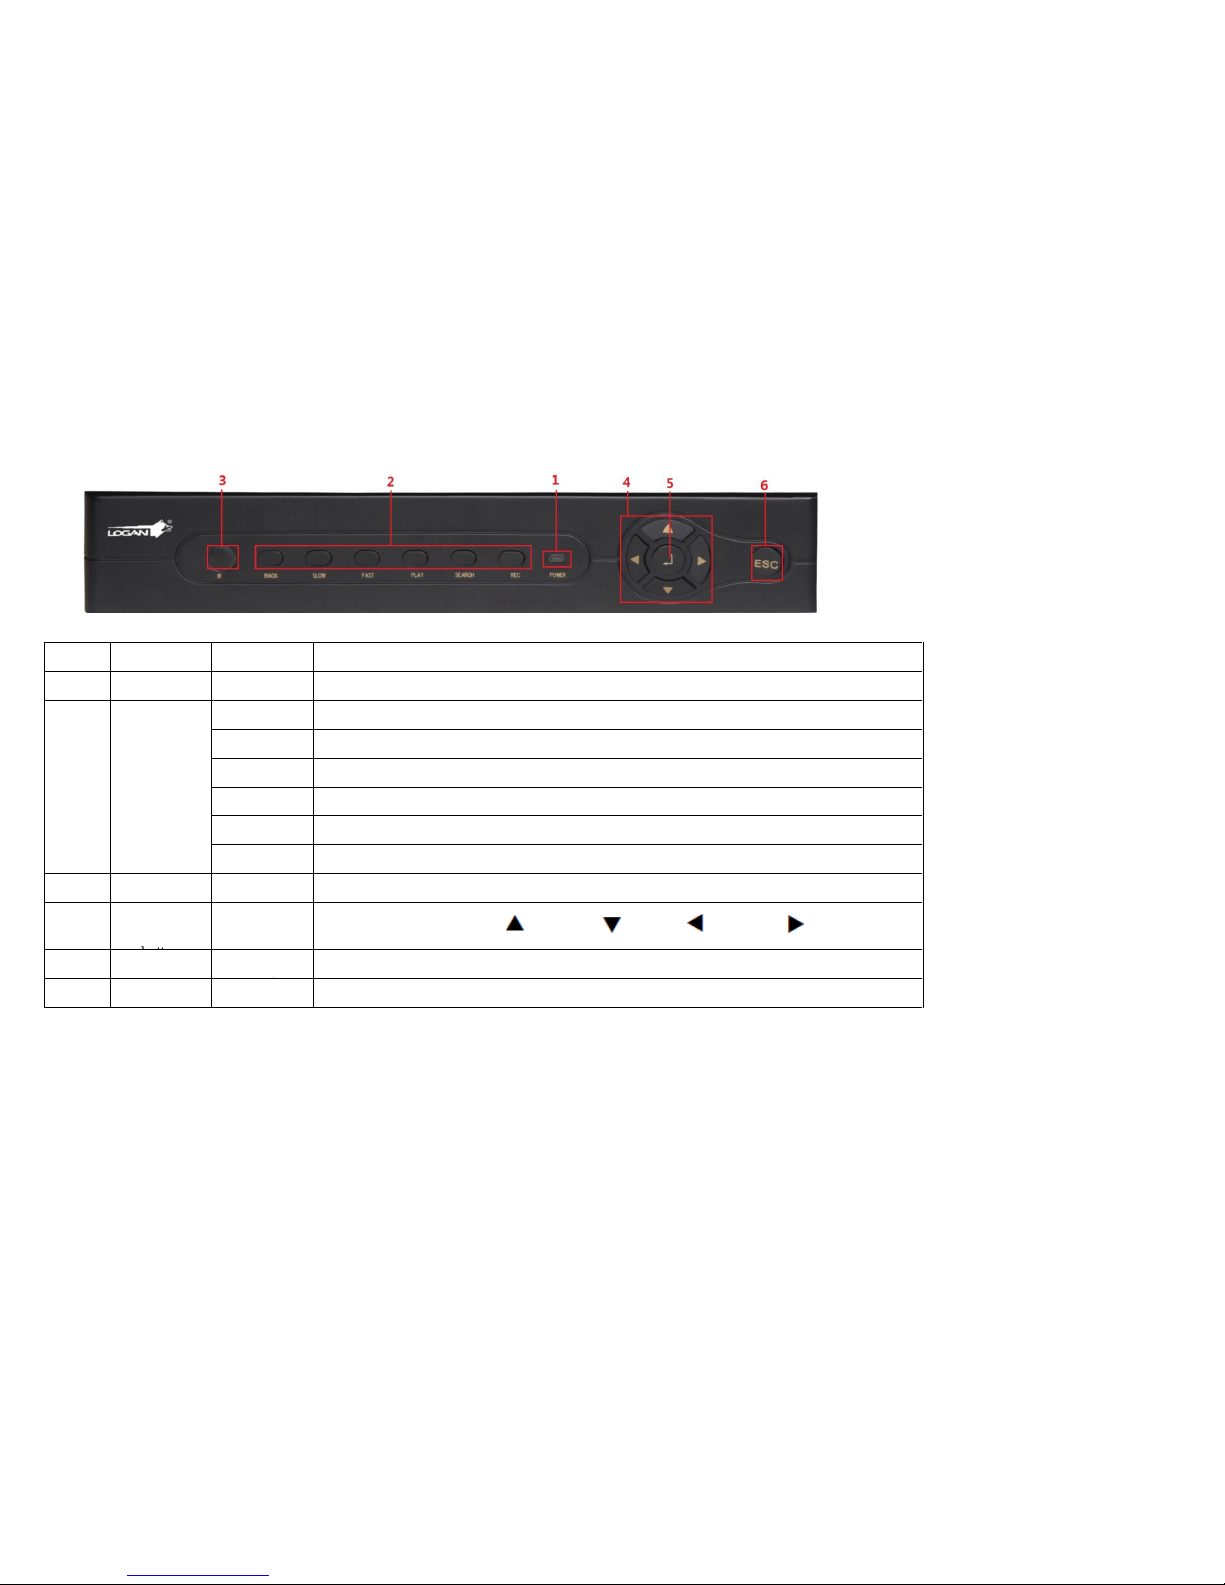
2.2. 2.1 Front panel
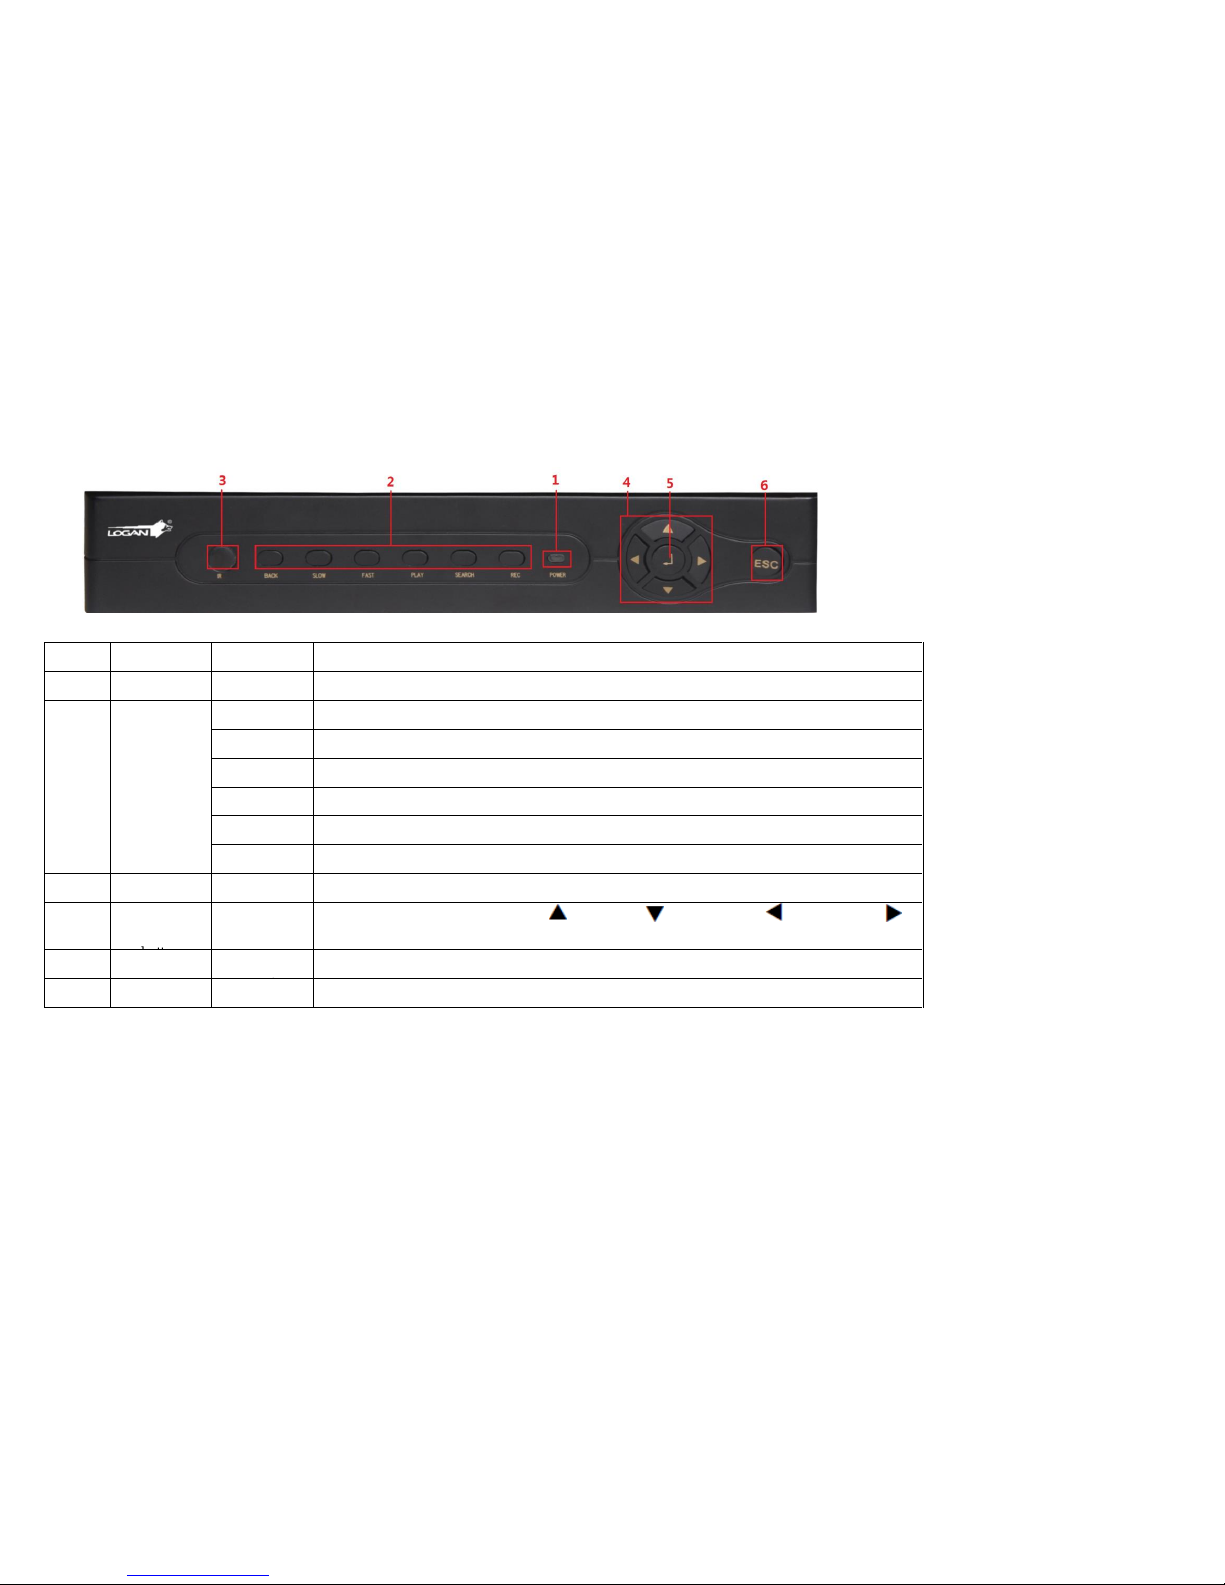
The front panel of A series
Page 7
User Manual
7/183
NO.
TYPE
NAME
Instruction
1
Power
POWER
Power indicator
2
Function
keys
Menu
REC
Recording control buttons
Search
Search video files
play
Playback/play
Fast
Fast playback
Slow
slow playback
Back
Slowly playback
3
IR receiver
IR
Remote control receiver
4
Control
Direction key
direction key include: up【 】、down【 】、left【 】、right 【 】four buttons.
5
OK
Confirm
Enter
6
ESC
esc
Esc,exit
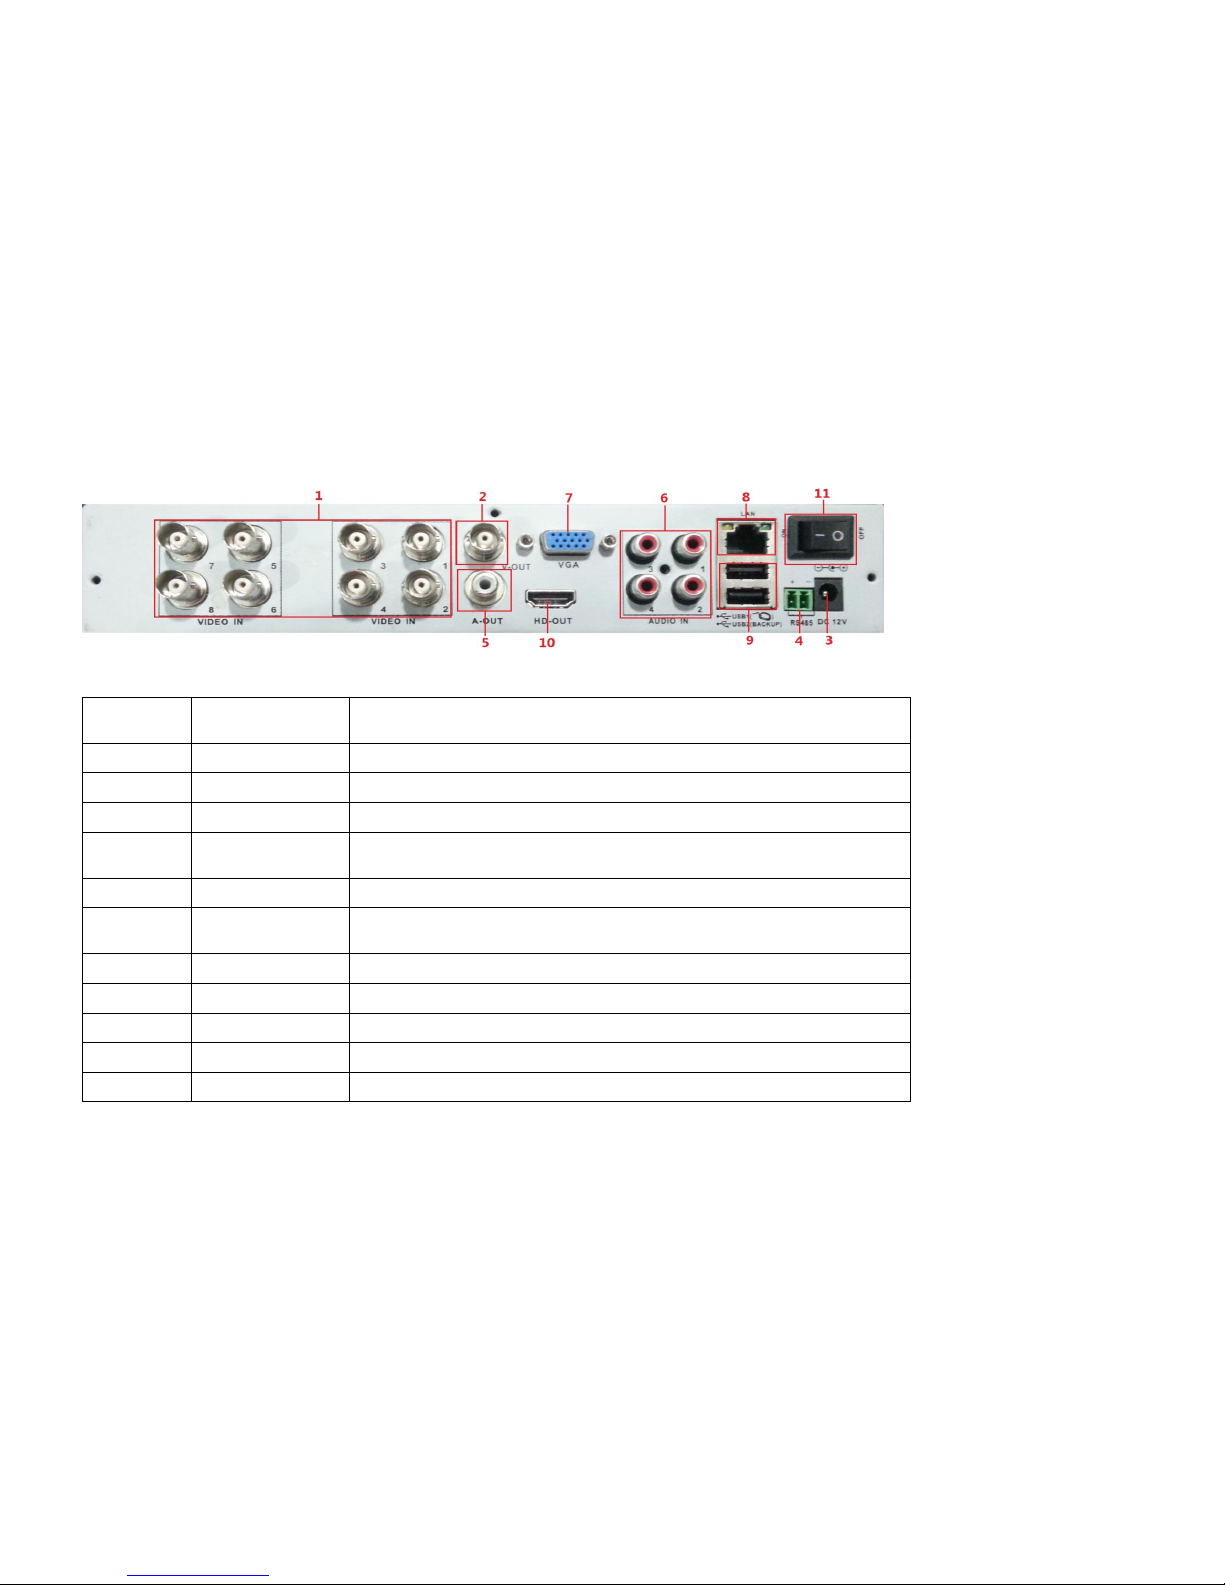
2.2 2.2Rear panel
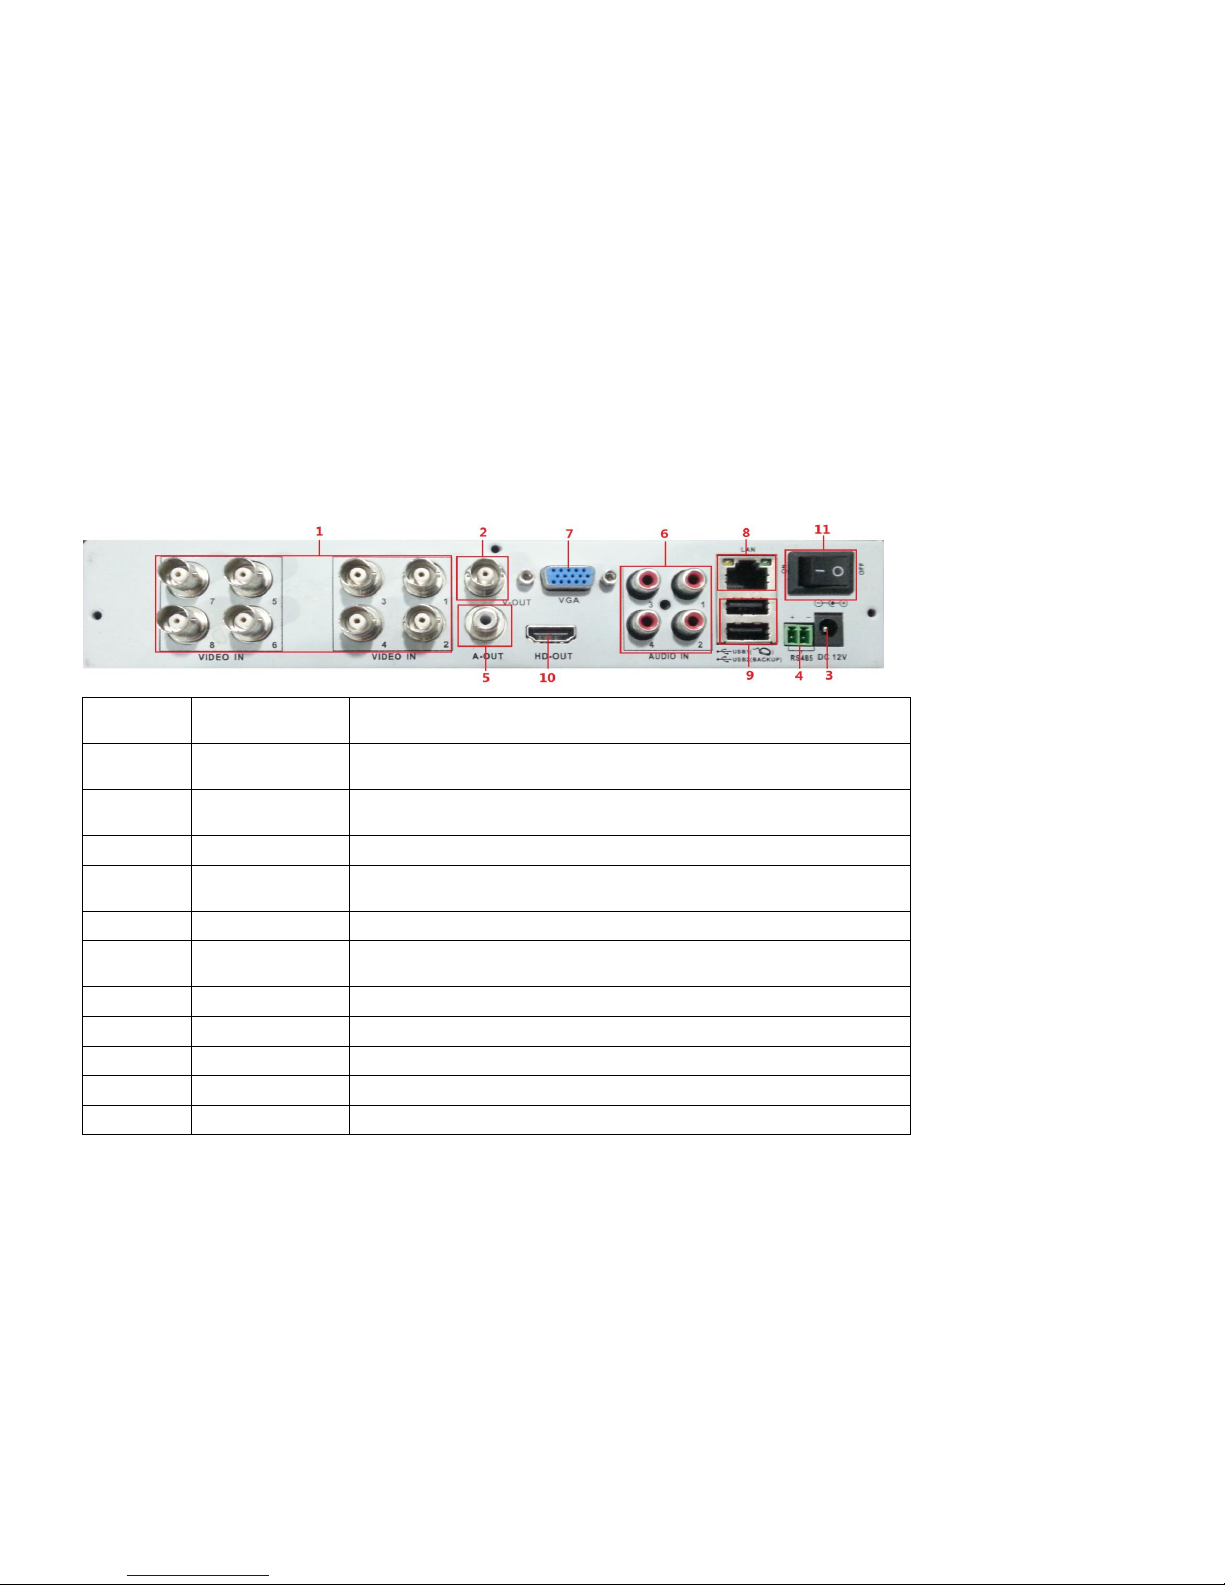
The rear panel of 8CH serie
Page 8
User Manual
8/183
Item
Physical
connector
Connector description
1
Video In
For connecting analog video signal input (BNC)
2
V-OUT
Video output for connecting TV or monitor (BNC)
3
DC12
DC 12V
4
RS485+
RS485-
RS 485 for connecting PTZ
5
A-OUT
For connection audio output
6
Audio In
(A-IN)
For connecting audio signal
7
VGA
For connecting VGA monitor
8
Net
For connecting Ethernet
9
USB
USB2.0/USB mouse
10
HDMI
For connecting HDMI monitor
11
Power switch
For DVR on/off power
Page 9
User Manual
9/183
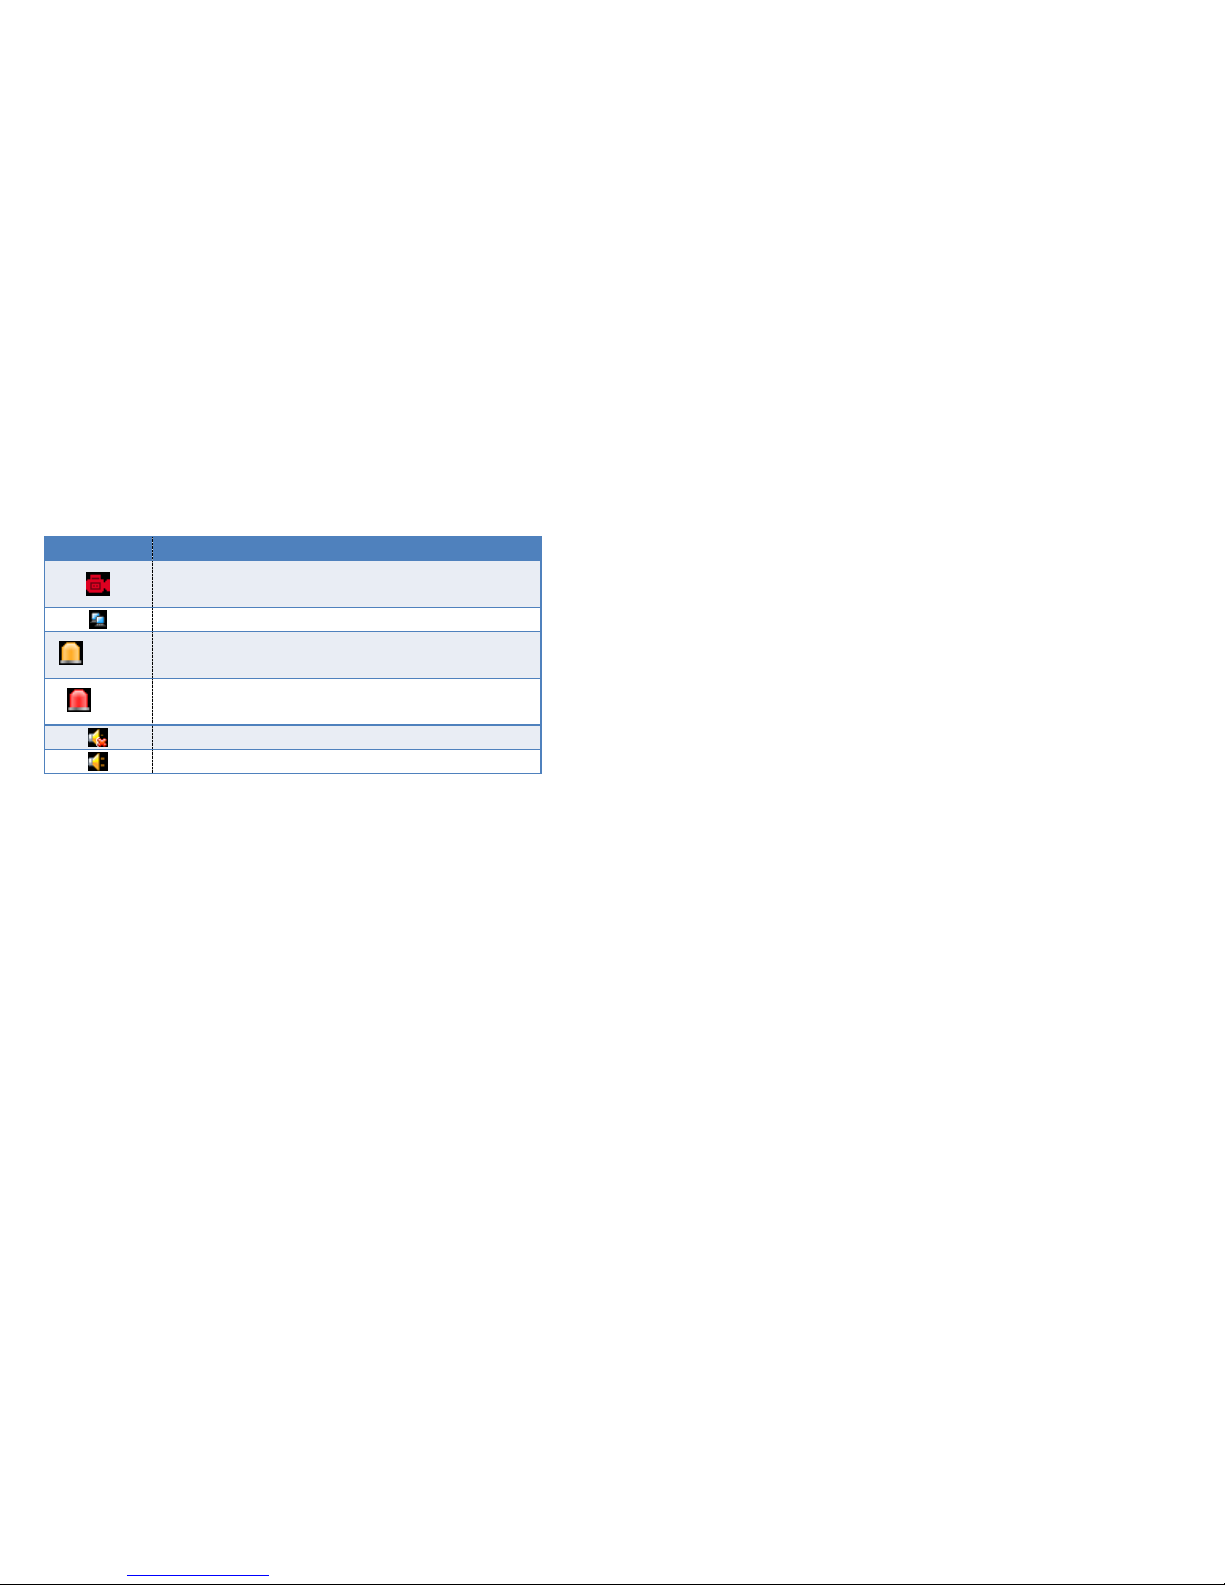
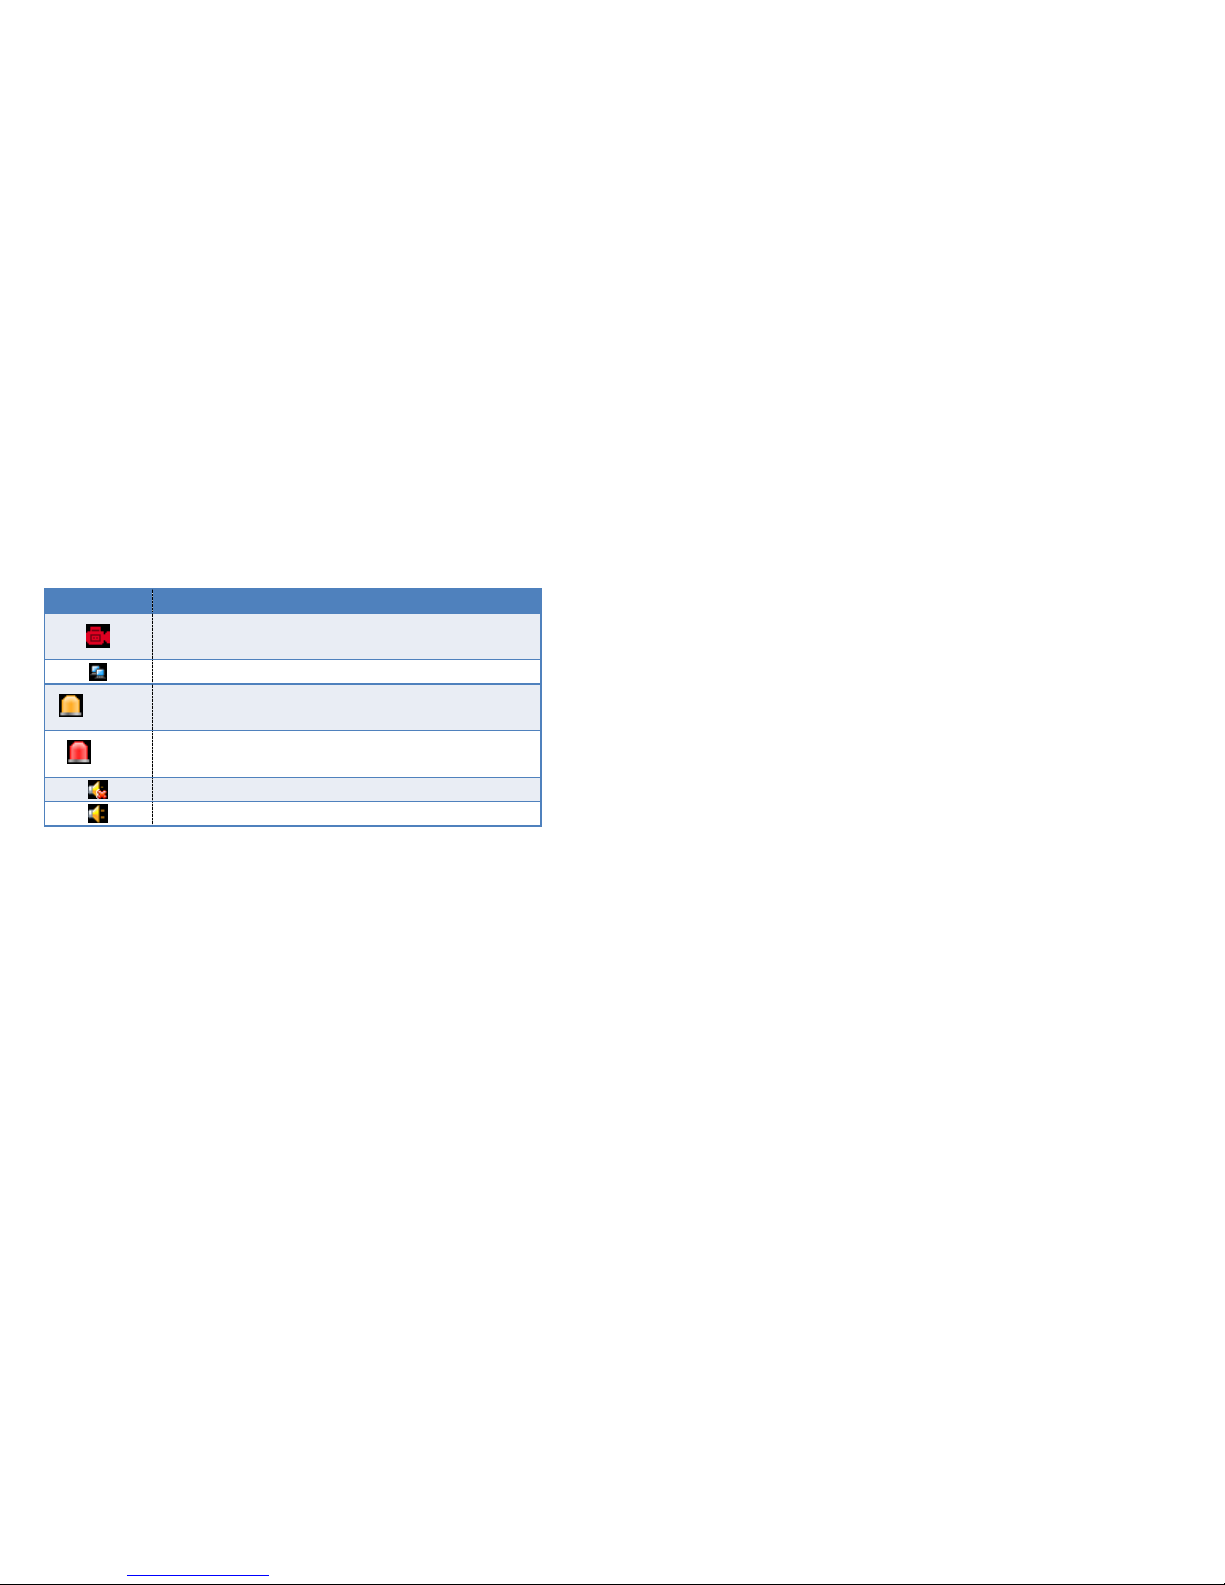
2.3 Previewing window Icon Description
Icon
Description
Means recording
Means client-end is linking this channel.
(Yellow)
means that this channel is set alarm, but is not triggered
(Red)
Means the alarm is triggered.
Means this window voice monitoring close.
Means this window voice monitoring open.
3.Fast Operation
3.1 Login
3.1.1 Normal Login
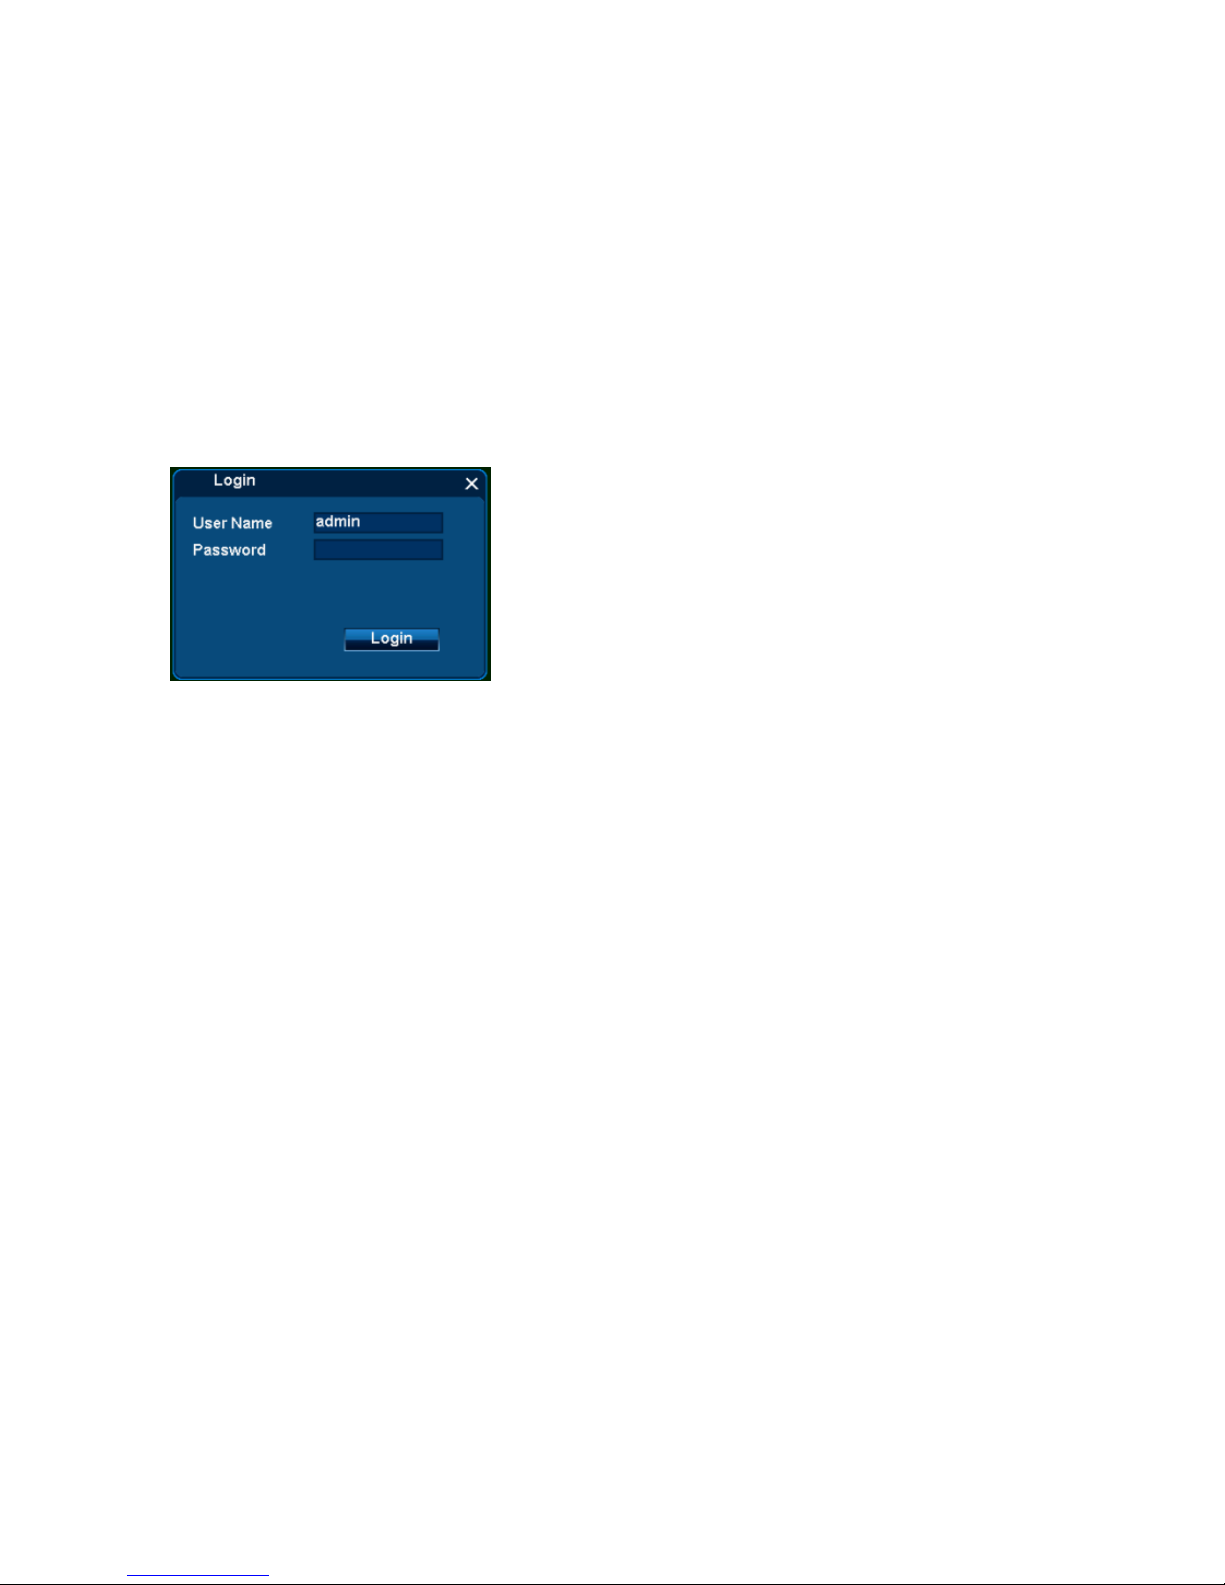
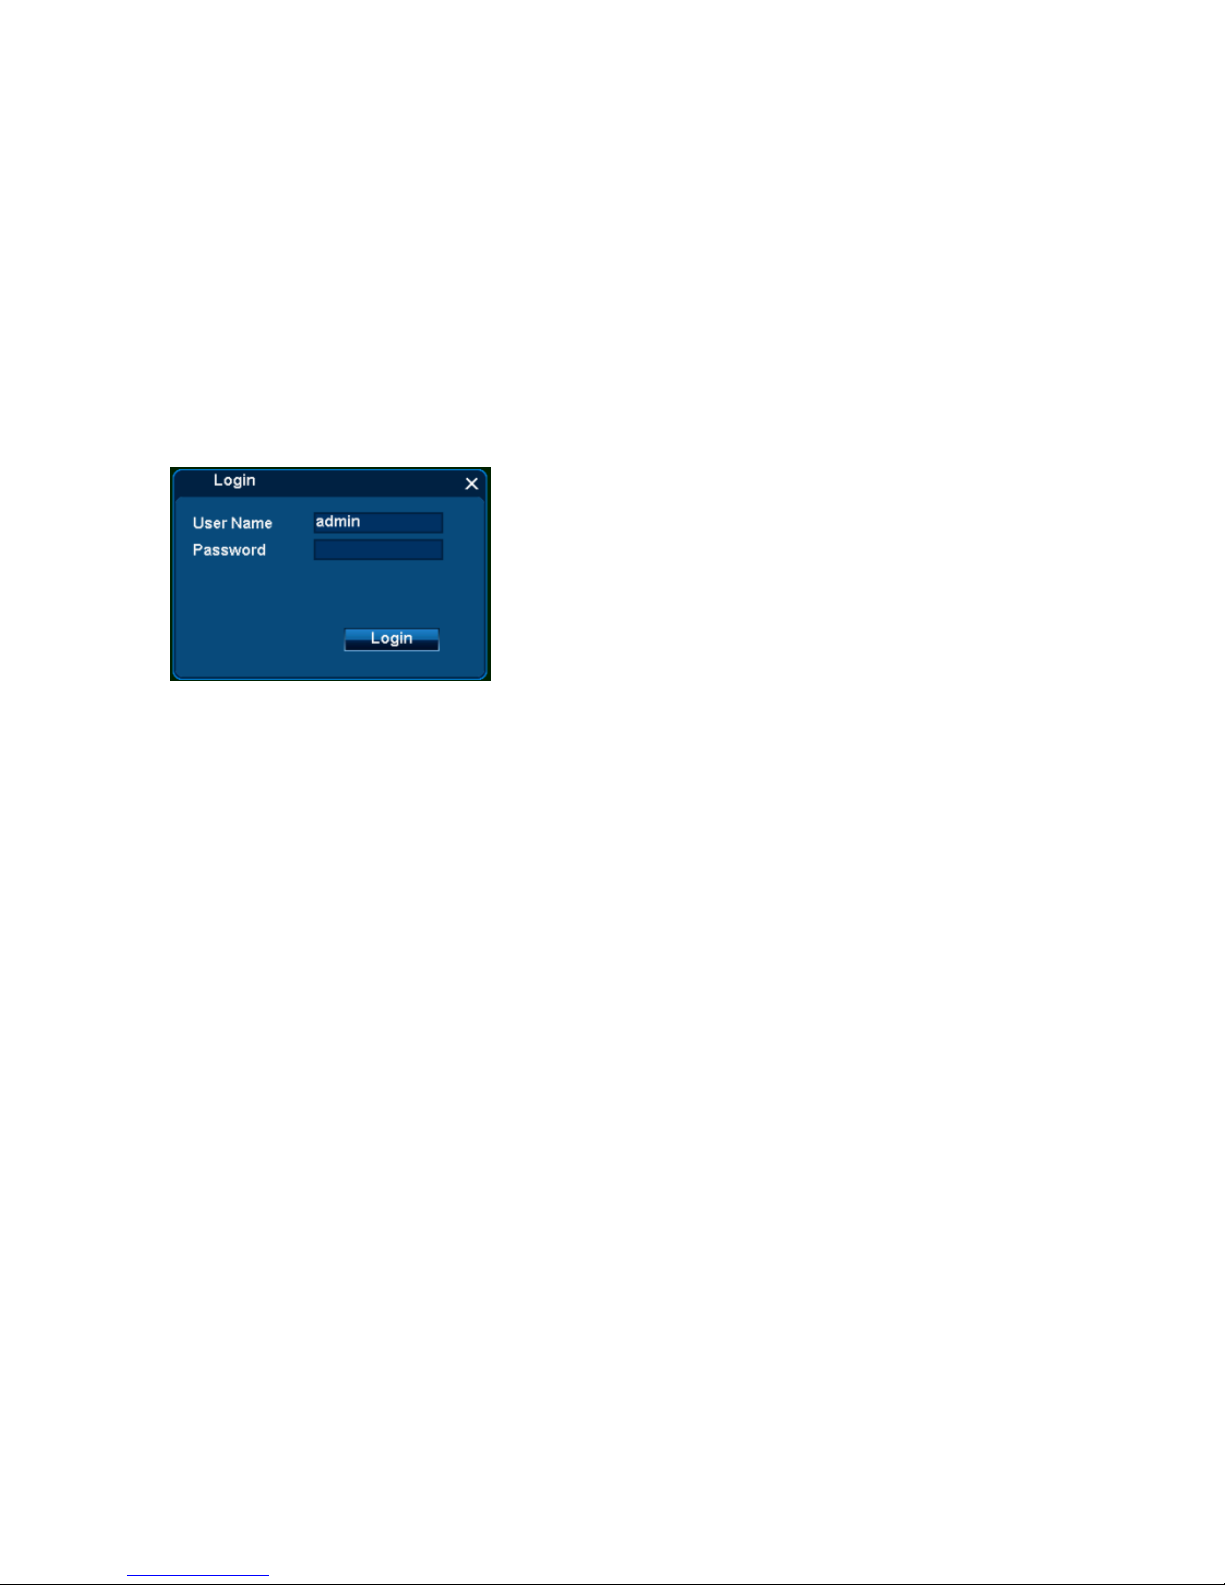
After starting system, it will popup [Login] screen, after user login can make other operation.
Remarks: If cancel [System Setup/General/General/Display Wizard] function, the login prompt won‟t given unless users operate the DVR.
Page 10
User Manual
10/183
Steps:
1. [User Name] input default user name „admin‟;
2. [Password] is empty, that is nothing input;
3. Single click [Login], then finish login operation.
Remarks: If login failure for 3 times, mouse will be locked for 10 seconds, DVR will alarm until login successfully .
3.1.2 Temporary Login
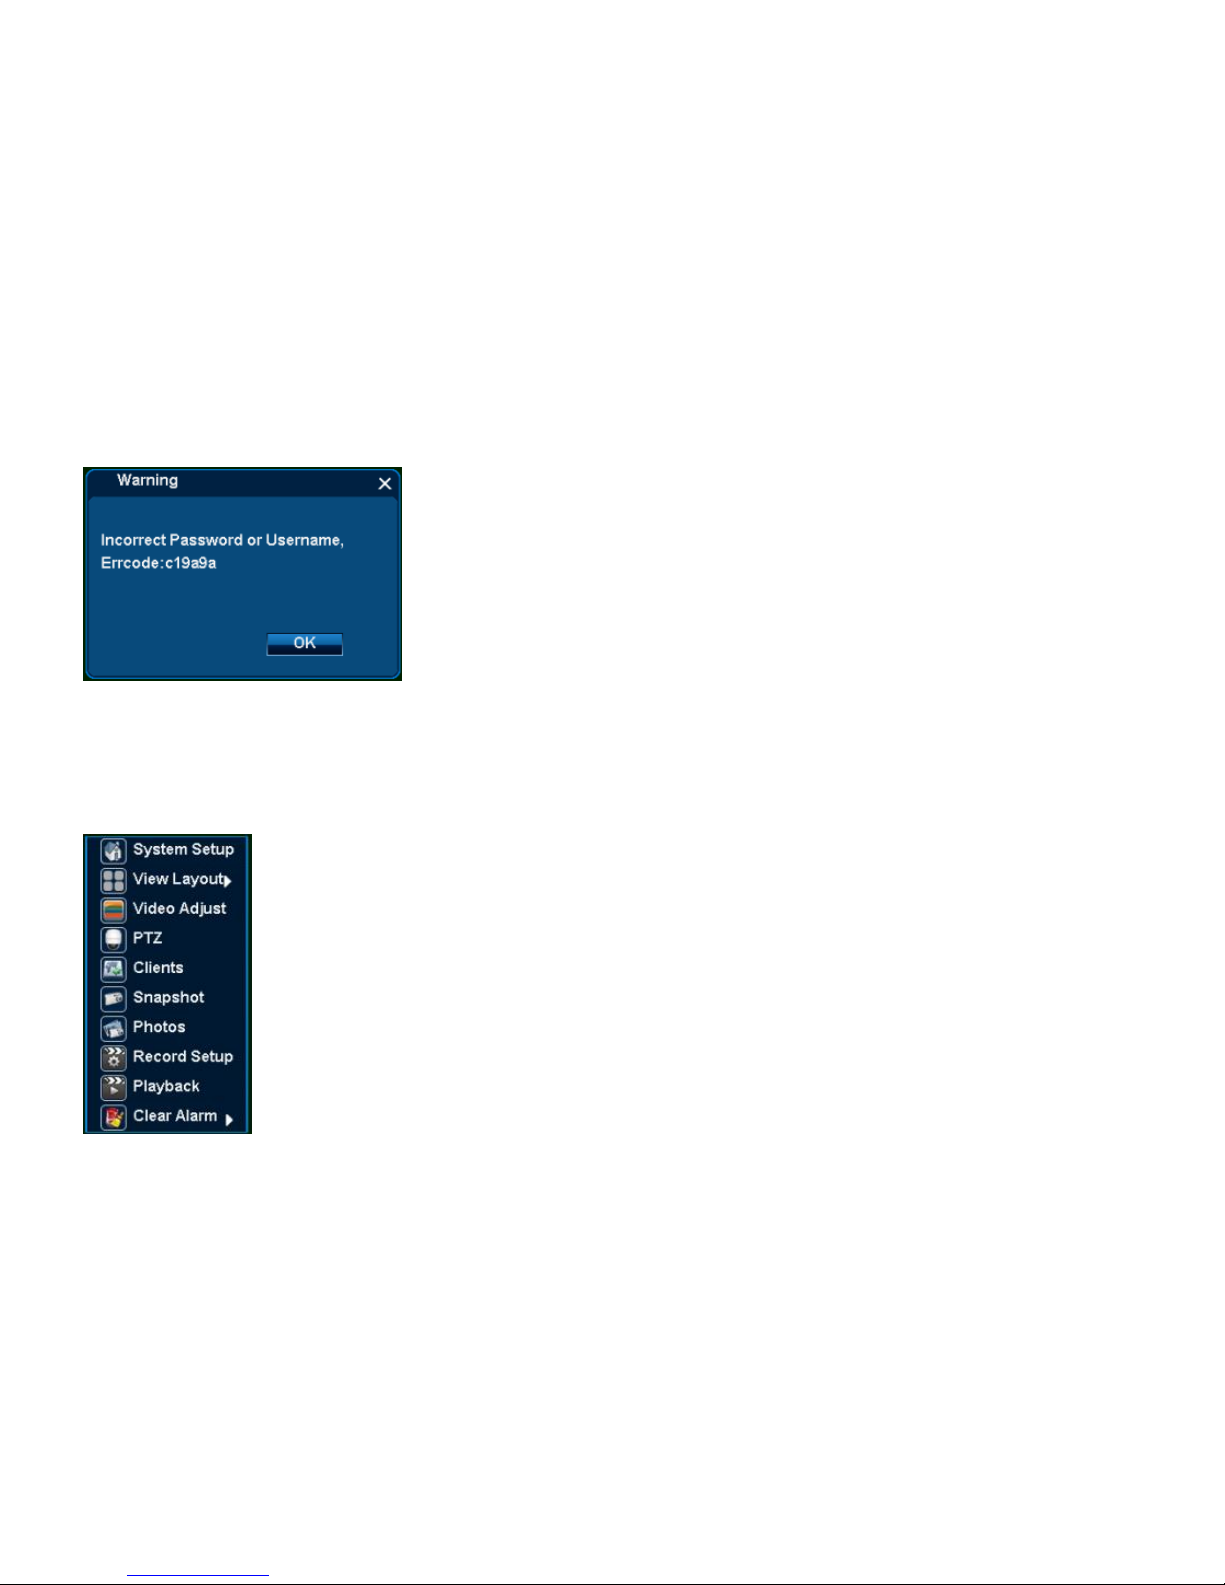
If forget user name and password and make login failure, can use temporary login.
Steps:
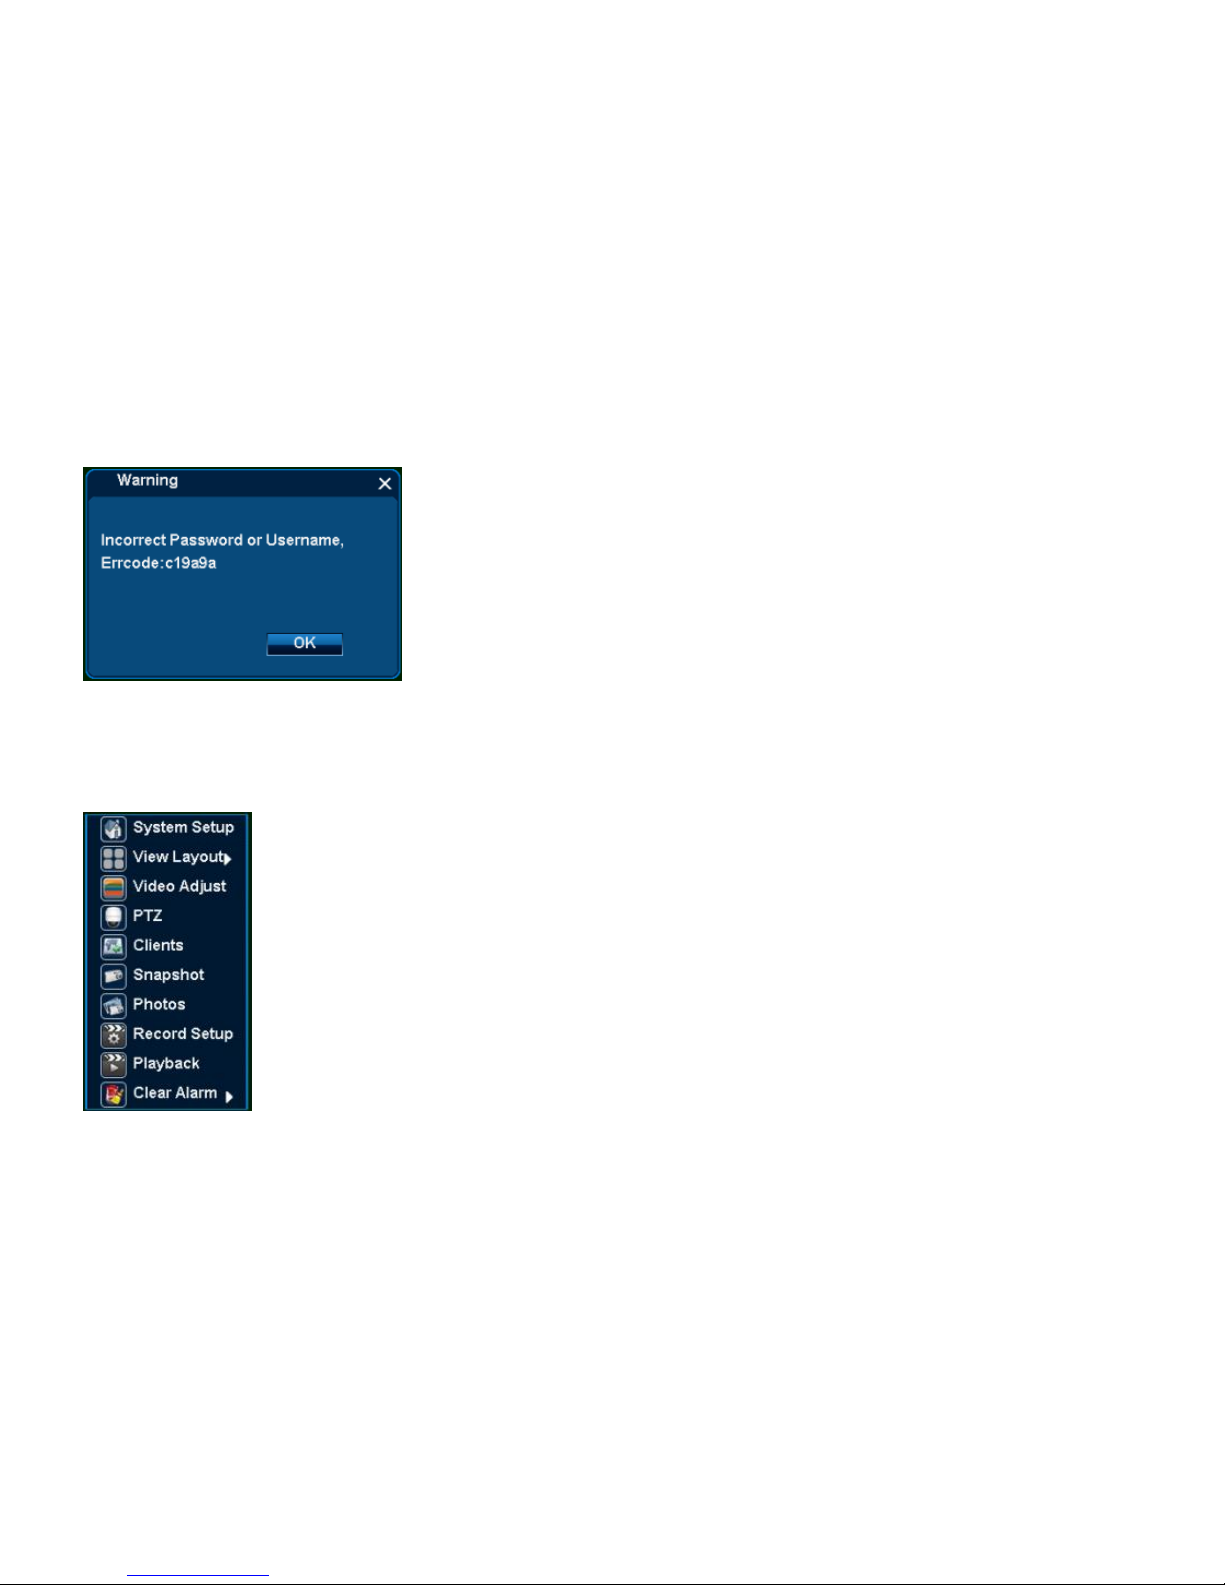
a) Error login again, note [Errcode],
b) Contact with customer service, they will tell a temporary user name and password.
Page 11
User Manual
11/183
3.2 Menu Operation
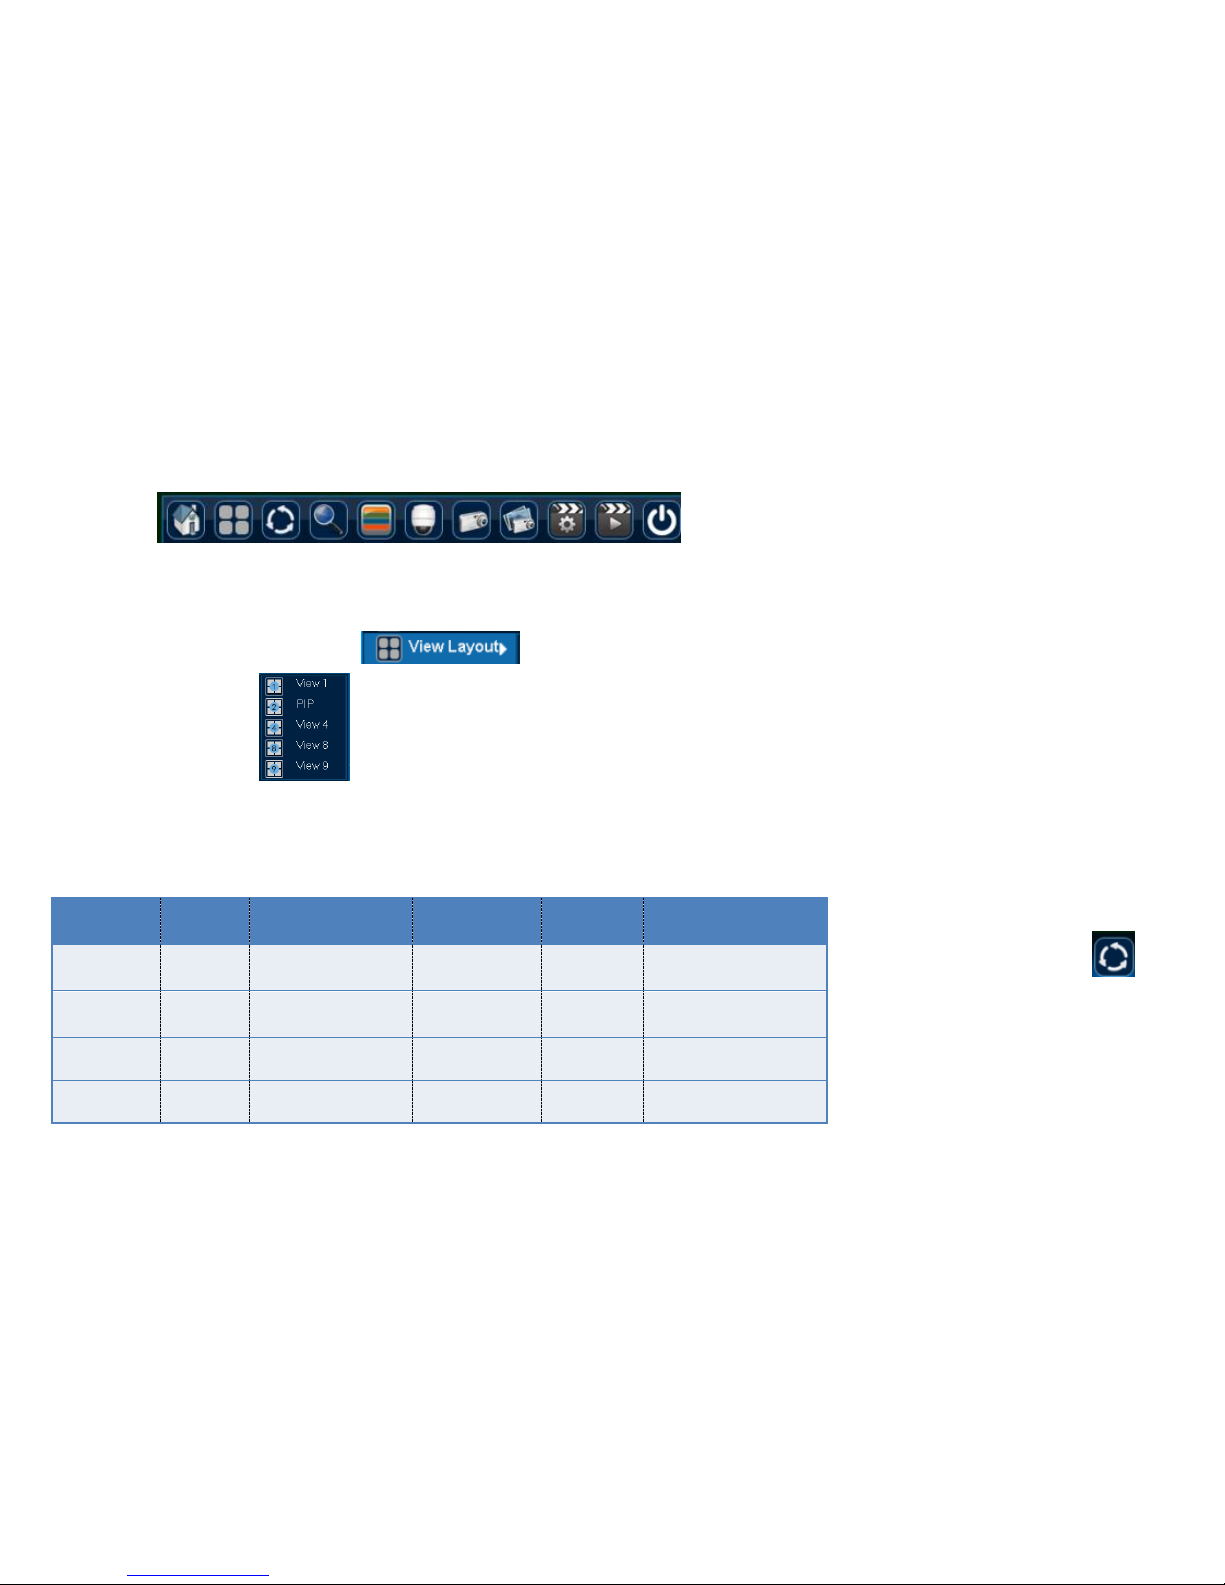
Menu Operation is functions at [Right Click Menu] and [Main Menu],in order to make operation more easily.
Menu function as follows:
Page 12
User Manual
12/183
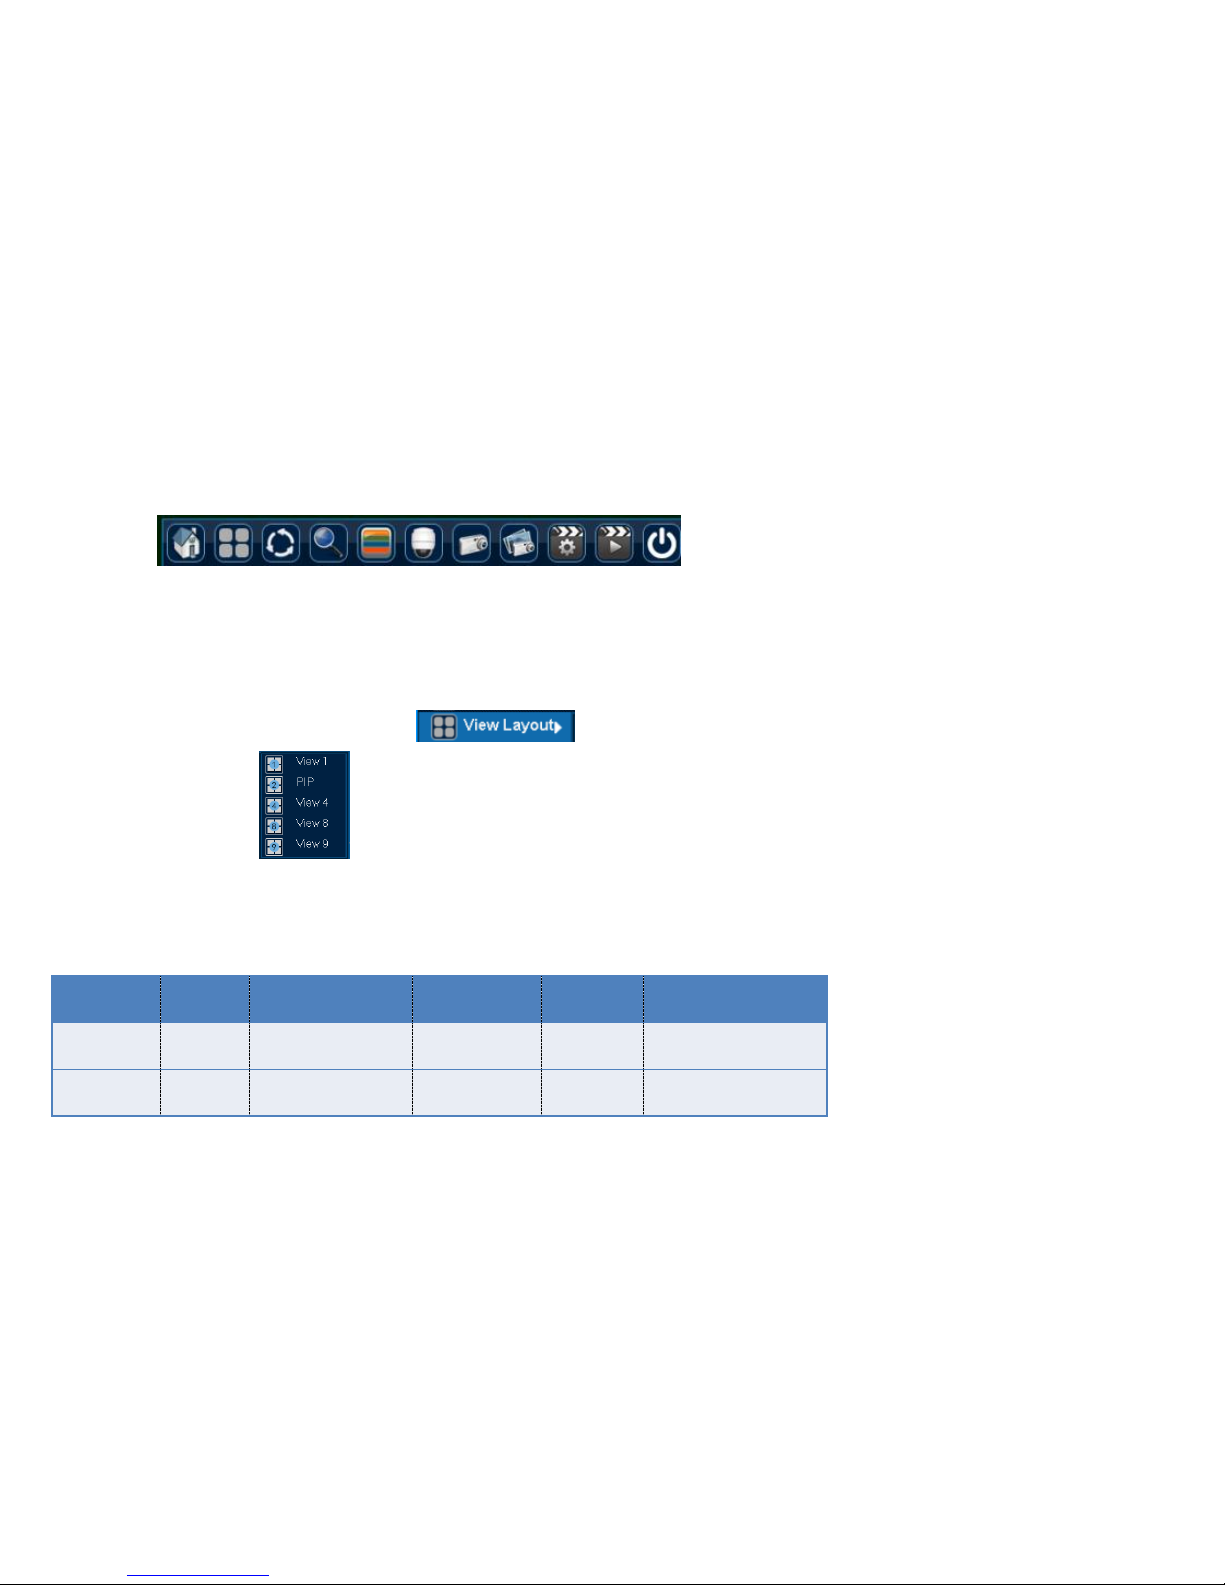
Right Click Menu: System Setup, View Layout , Video Adjust, PTZ, Clients, Snapshot, Photos, Record Setup, Playback, Clear Alarm
Main Menu: :System Setup, View Layout(3 layout), Sequence Interval, Zoom, Video Adjust, PTZ, Snapshot, Photos, Record Setup, Playback, Shutdown.
3.2.1 View Layout
Function Location: Right Click Menu:
Main Menu:
Function Summary: while previewing, it can adjust screen distribution mode, can choose View1, View2 (Picture in Picture), View4, etc.
Function Introduction:
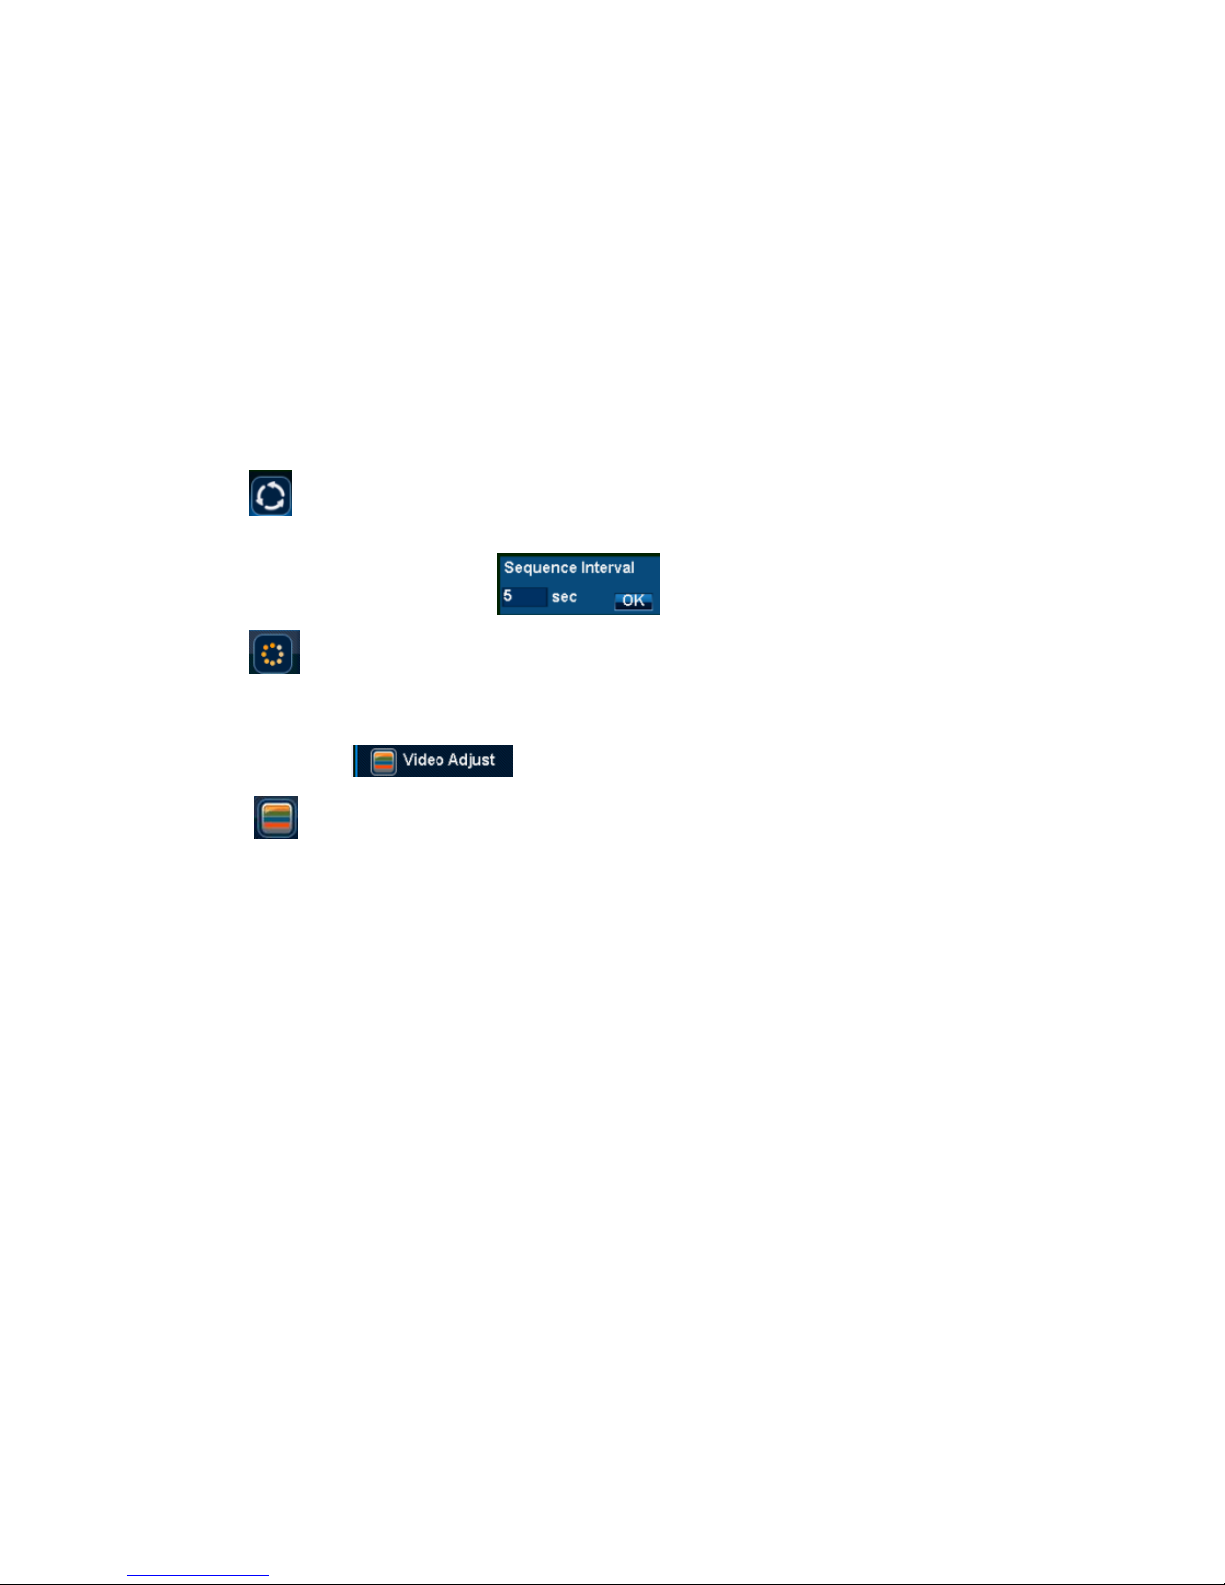
3.2.2 Sequence Interval
Function Location: Main Menu:
Function Summary: [Sequence interval]
can show the previewing screen in turns, after
finishing Sequence Interval, the screen layout will
be the same with that before this function.
Steps:
Mode
Screen
No.
Picture Changes
Display Order
Full Screen
Remark
1View
1
Select „Channel No.‟
1,2,3、4、5、
6、7、8
/ / 4View 4 Click „View4‟
1~4,
Double click
/
8View 8 Click „View8‟
1~8
Double click
/
9View 9 Click „View9‟
1~9
Double click
/
Page 13
User Manual
13/183
1. Single click at main menu to start Sequence Interval function ;
2. Setup how time interval ;
3. Single click [OK], then start „Sequence Interval‟
4. Single click button, can stop Sequence interval function.
3.2.3 Video Adjust
Function Location: Right Click Menu:
Main Menu:
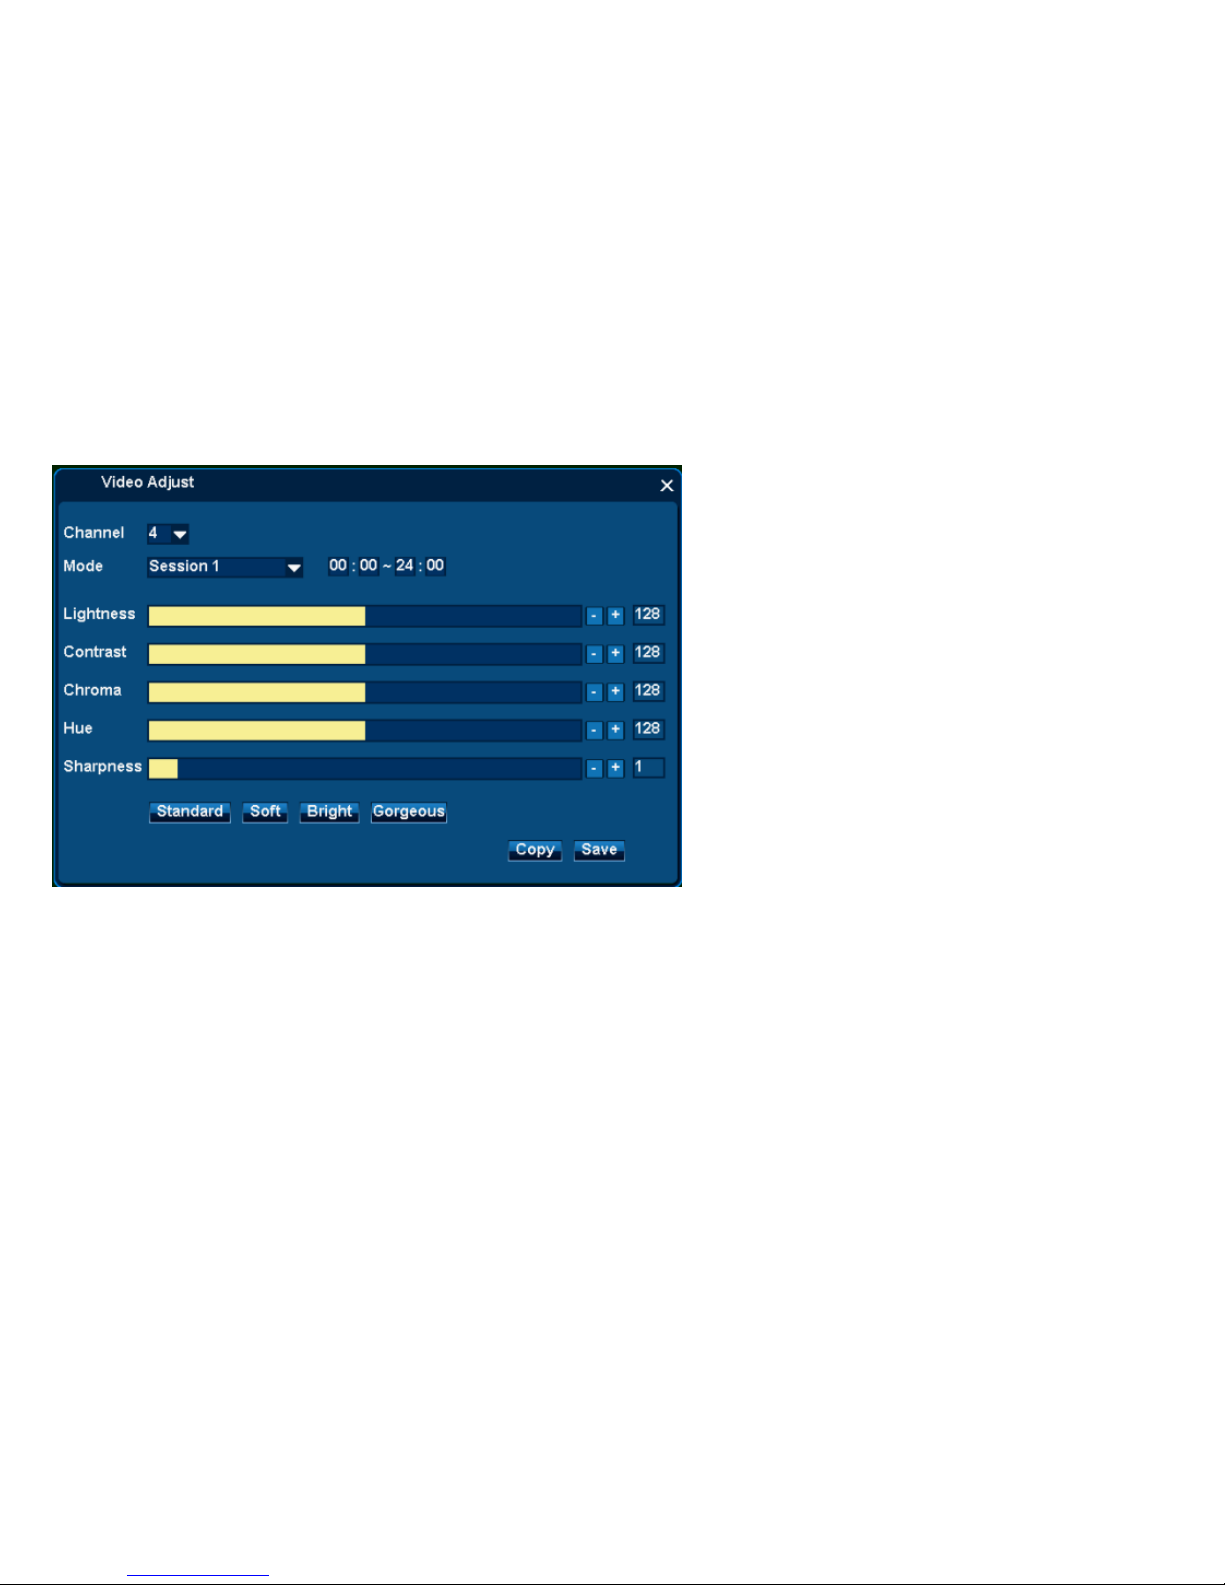
Function Summary: can setup different video effects during different time range.
For Example: Session1 can setup as Day effect, Session2 setup as Night effect.
3.2.3.1 Session1
Page 14
User Manual
14/183
Steps:
1. From Right Click Menu or Main Menu, Single click video Adjust Icon;
2. Select channel need adjusting ;
3. Mode select [Session 1], setup the effective time range;
Remarks: Session 1 default as the whole day
4. Manually Adjust [Contrast, Chroma, Hue, Sharpness] ;
Remarks: Also can single click [Standard, Soft, Bright] for speedy settings.
5. Single Click [Save] to take effect.
Remarks: [Copy] can copy this setup to all channels.
3.2.3.2 Session 2
Page 15
User Manual
15/183
Steps:
Setup steps of Session2 is the same with Session1.
Remarks: change Session2 valid time range into Night (for example 17:30~06:00), it will be night mode.
3.2.4 PTZ
Function Location: Right Click Menu:
Main Menu:
Function Summary:
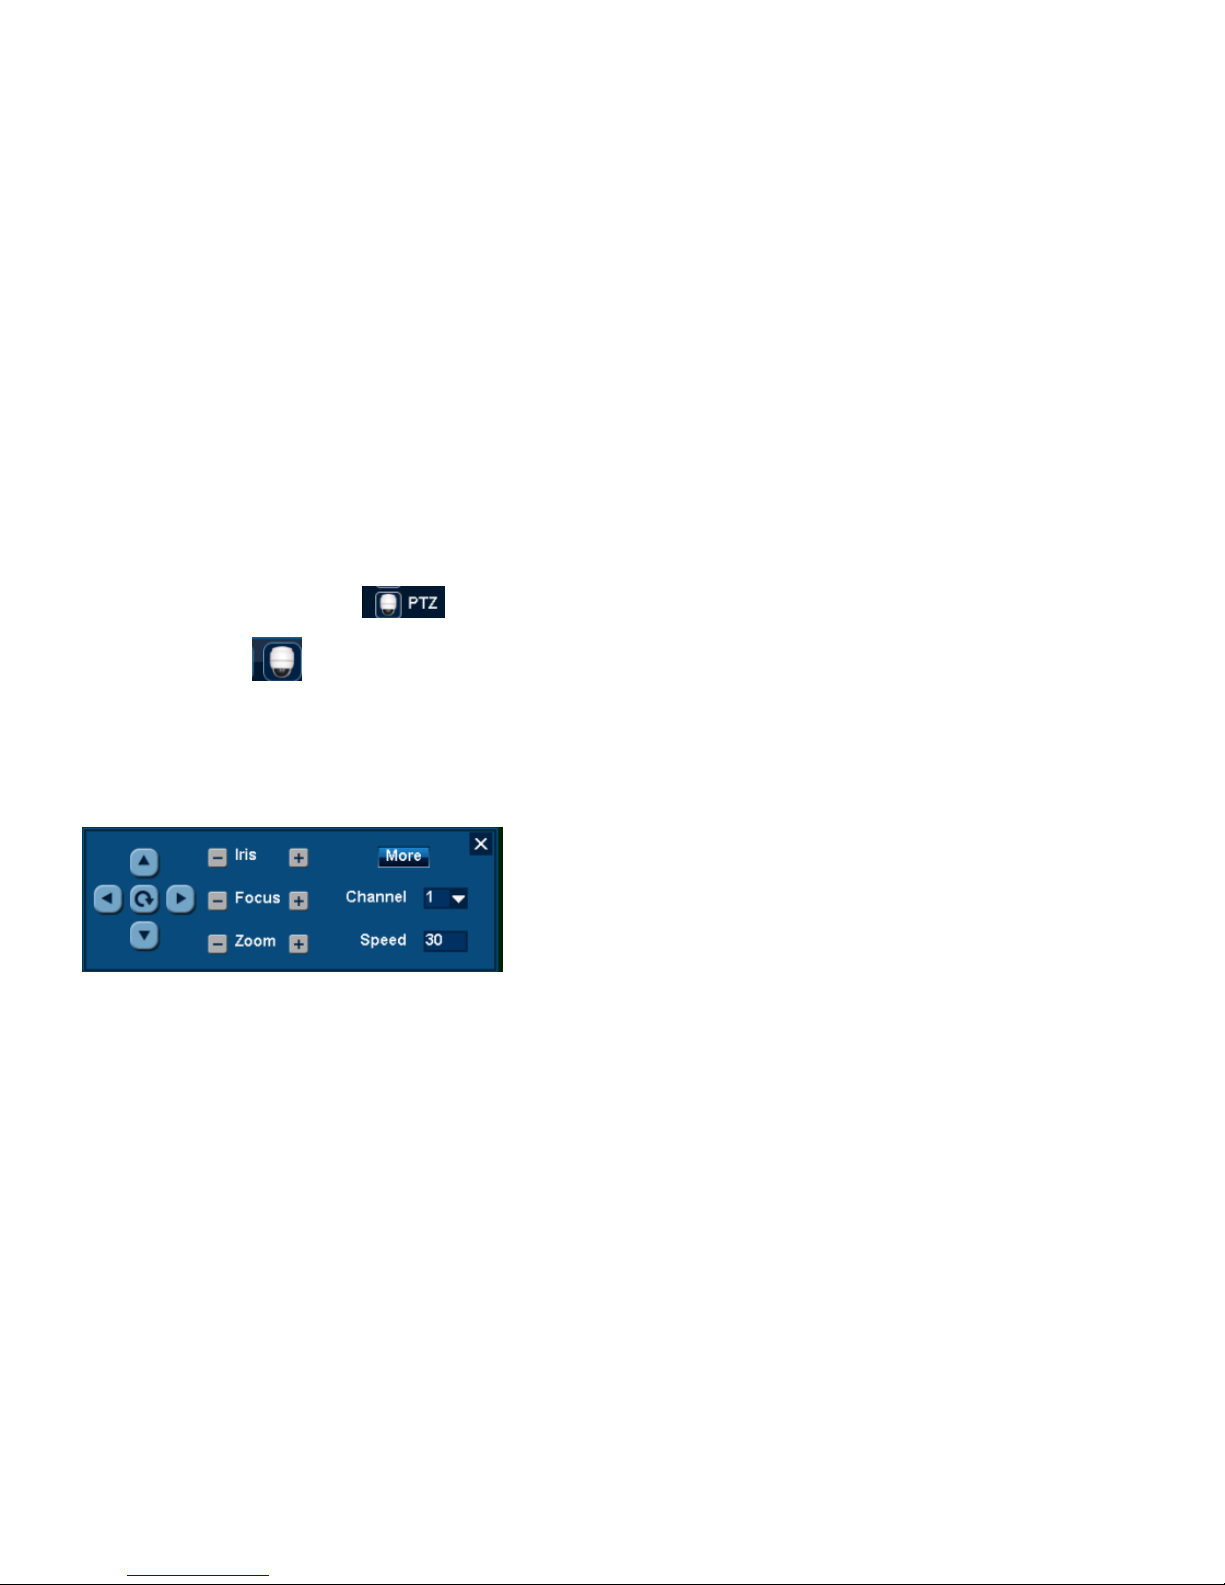
1. [PTZ Adjust] can adjust PTZ lens direction, Iris, Focus, Zoom, Speed.
2. [Preset positions Cruise] can adjust Preset Positions, Cruise Line, Aux.
3.2..4.1 PTZ Adjust
PTZ Adjust Steps:
1. Right Click Menu or Main Menu select [PTZ Control];
2. Change Channel No. into PTZ Channel;
Remarks: After selecting, it will be full screen showing; single click [16 View] can get multi-screen;
3. Change PTZ moving speed;
4. Single click up/down/right/left button to adjust PTZ lens direction;
Remarket: [Auto] can make PTZ Horizontal roll.
Page 16
User Manual
16/183
5. Single click [Iris/Focus/Zoom] can adjust brightness, focus, and image resizing.
Single Click [More] enter „3.4.5.2 Preset point Cruise‟
3.2.4.2 Preset Point Cruise
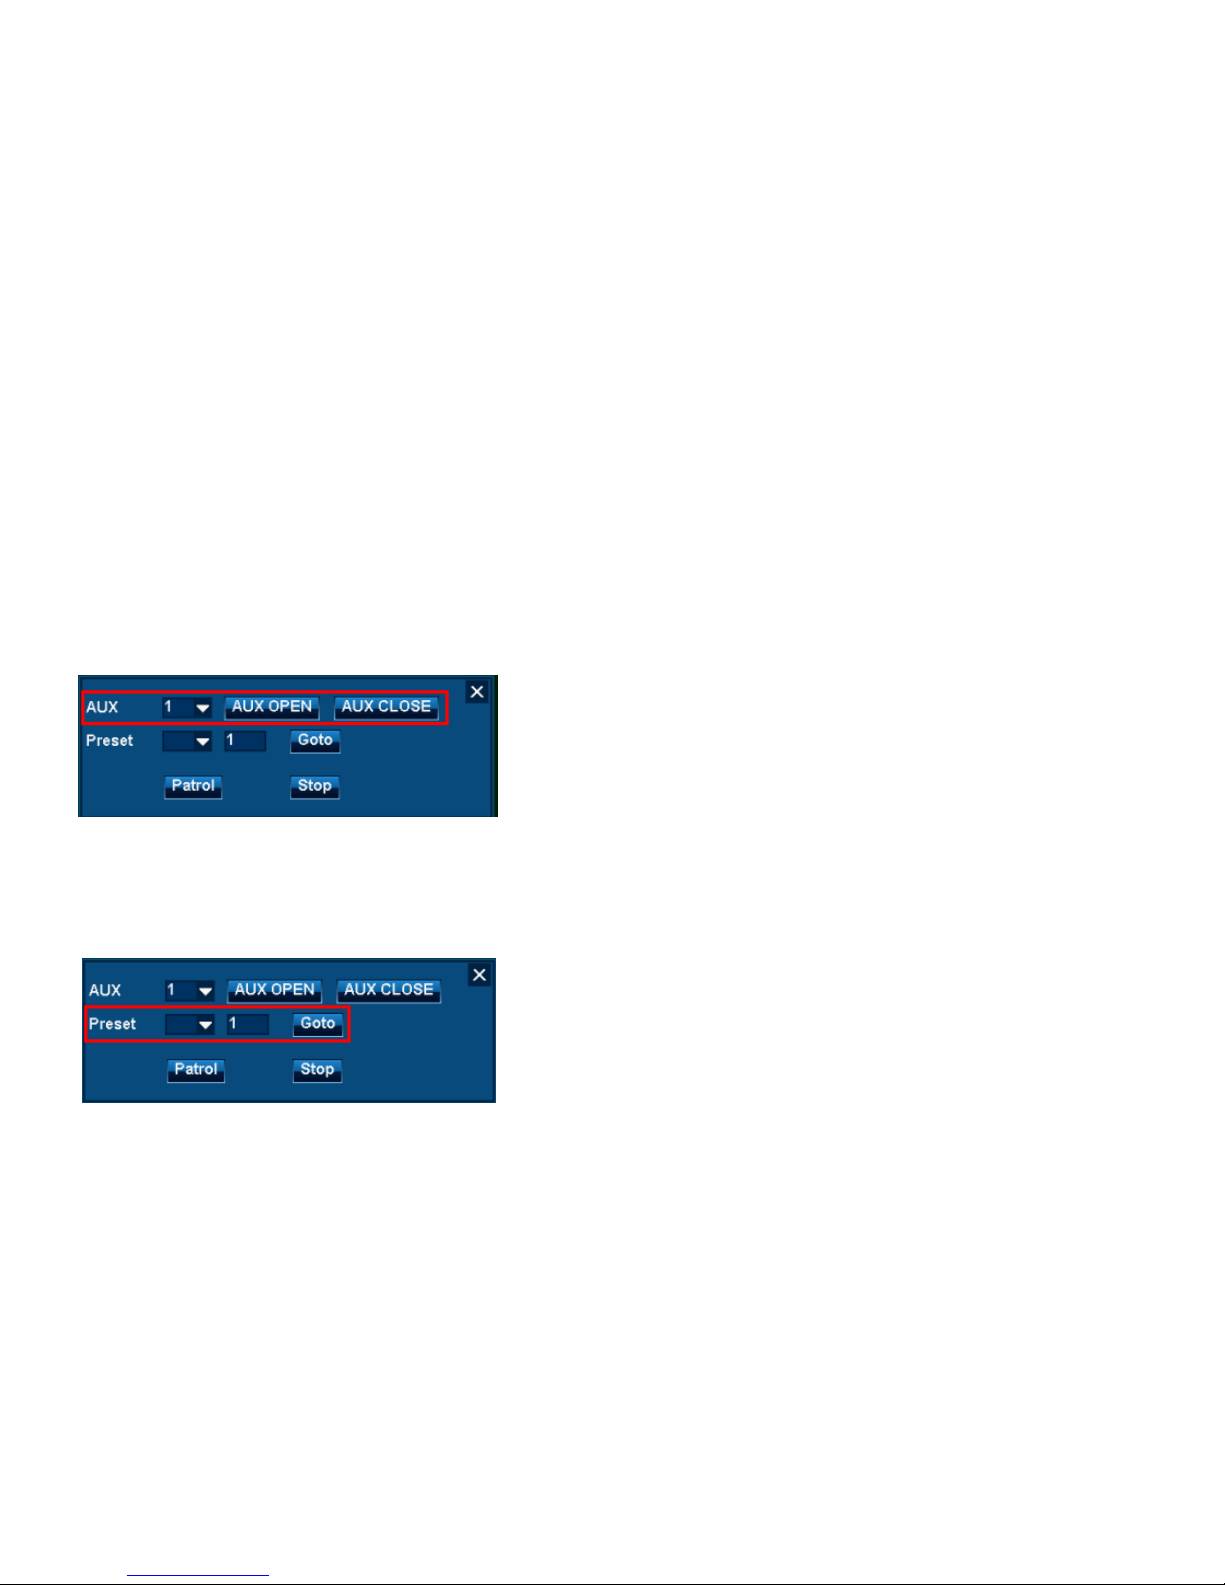
Include Aux function, Preset, Patrol.
3.2.4.3 Aux Function
1. Choose „AUX‟ function No;
2. Single click [AUX OPEN] can open corresponding function, for example wiper;
3. Single click [AUX CLOSE] can close the function.
3.2.4.4 Preset
1. Choose „Preset No.‟ , for example :1;
Page 17
User Manual
17/183
2. Single click [Goto] can invoke the preset point.
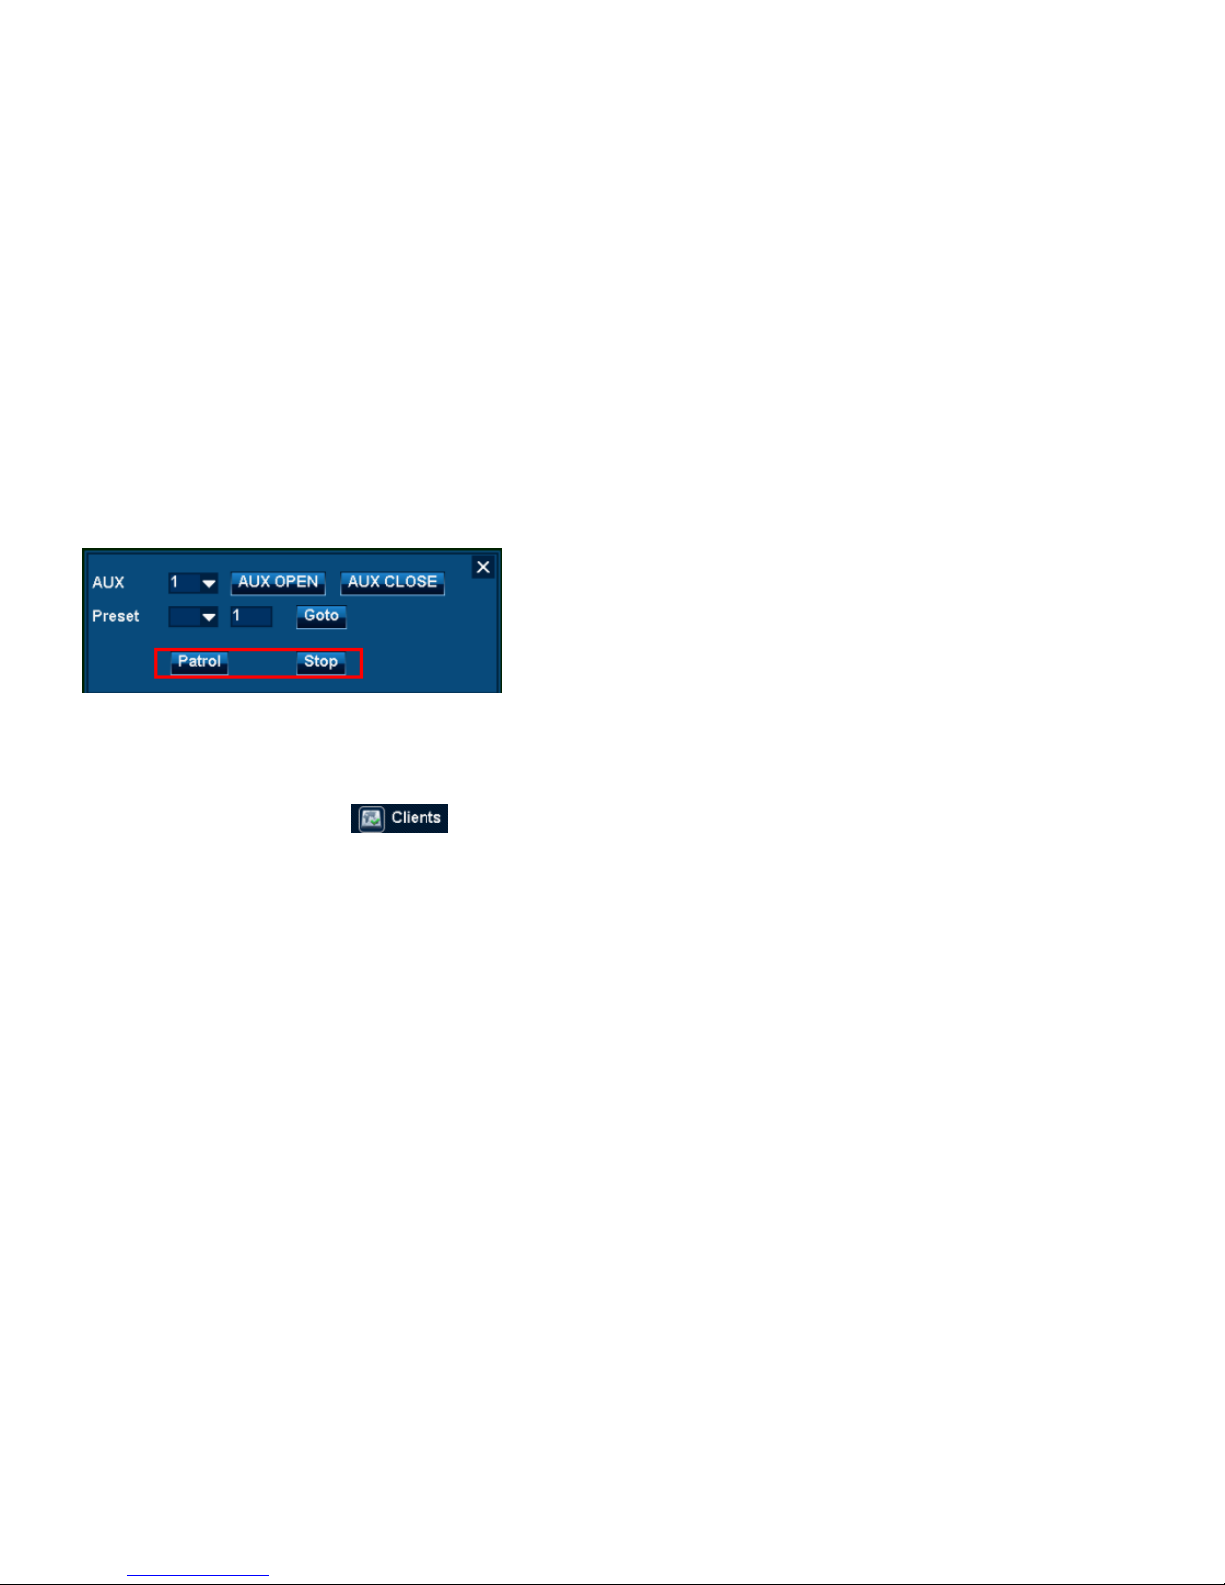
3.2.4.5 Patrol
1. Single click [Patrol] , PTZ enter cruising condition;
2. Single click [Stop] , PTZ stop cruising.
3.2.5 Clients
Function Location: Right Click Menu:
Function Summary:
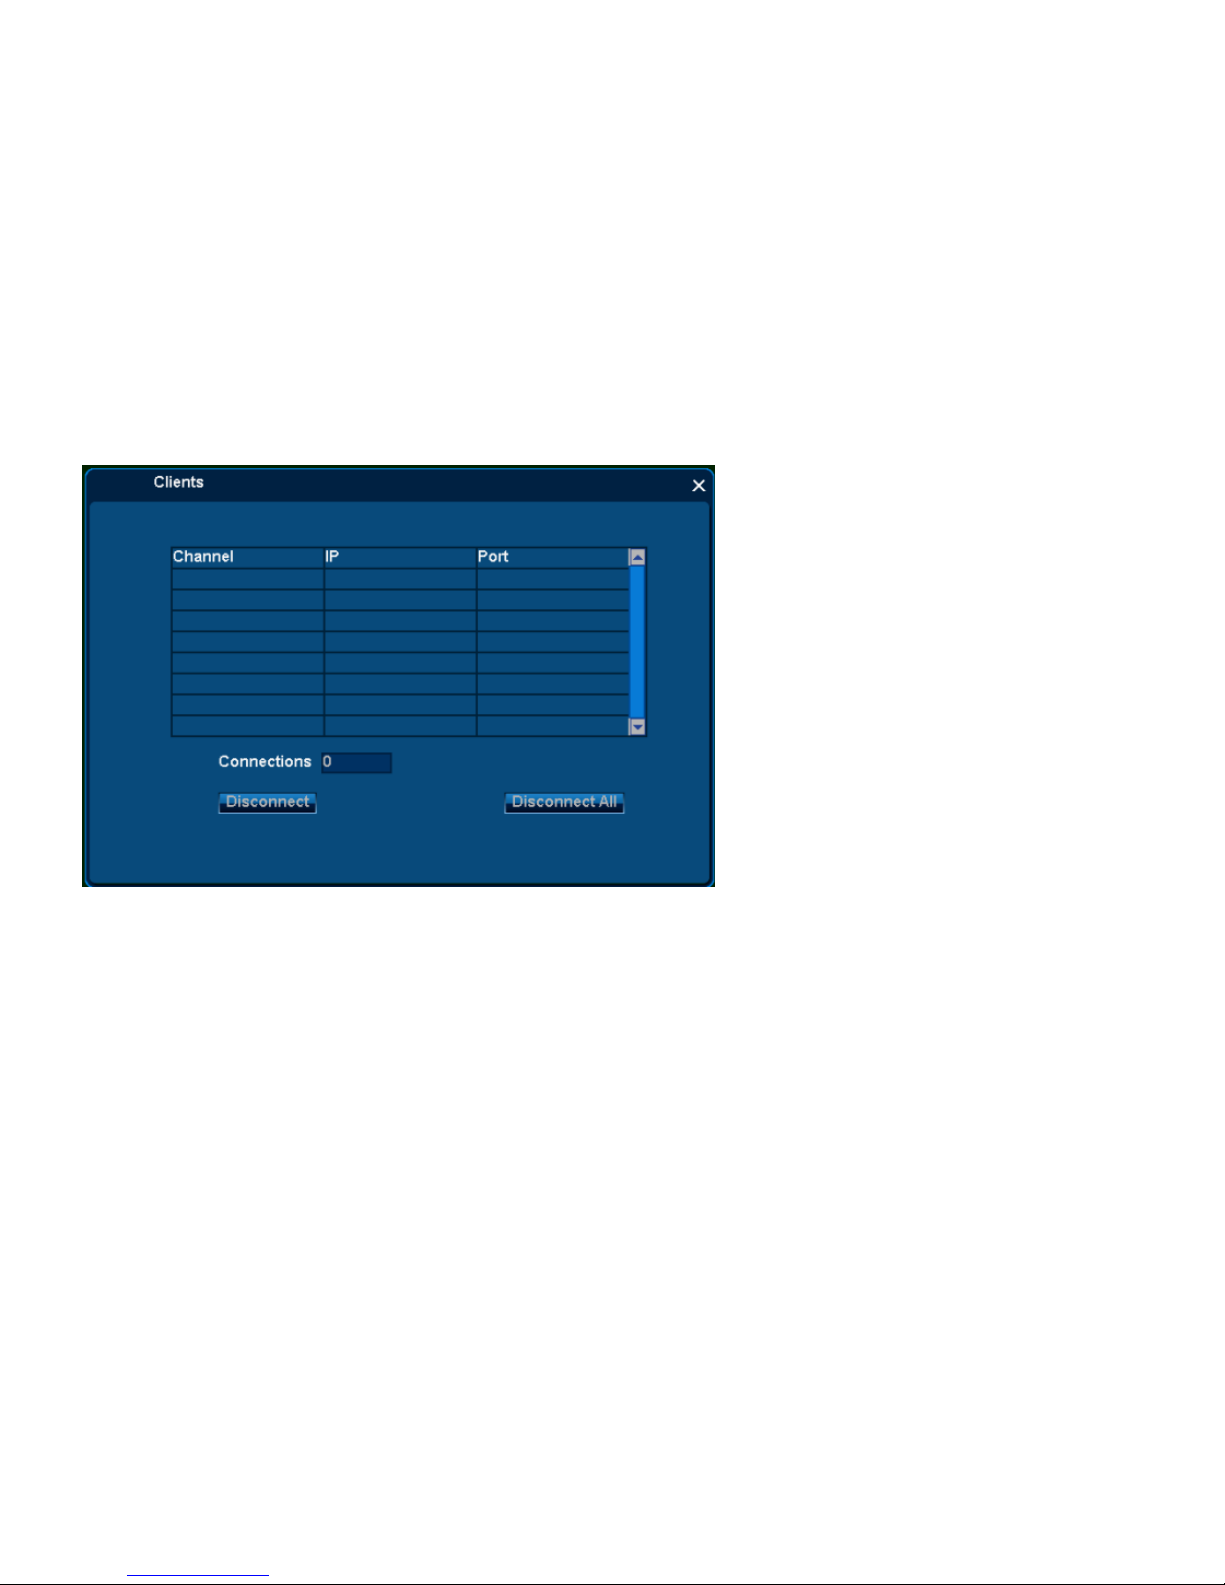
1. Count client-end numbers that connecting with the DVR;
2. Disconnect any connection, or disconnect all connections.
Page 18
User Manual
18/183
All client-end connection information: channel, IP, Port, and Connections all information can check here.
Disconnect Steps:
1. From the list, select any channel to connect;
2. Single click [Disconnect] , can disconnect the remote connection;
3. Single click [Disconnect All], can disconnect all remote connection.
3.2.6 Snapshot
Snapshot function includes [Snapshot], [Photos] two functions.
Page 19
User Manual
19/183
3.2.6.1 Snapshot
Function Location: Right Click Menu:
Main Menu:
Function Summary: :can make snapshot of object image and store into the HDD.
Steps:
1. Right click Right Click Menu or Main Menu [Snapshot];
Remarks: enter snapshot condition; the mouse icon will change into camera icon.
2. Move into snapshot screen, single left click can get the snapshot, check the picture for prompt;
3. Right click can cancel snapshot condition.
3.2.6.2 Photos
Function Location: Right Click Menu:
Main Menu:
Function Summary:
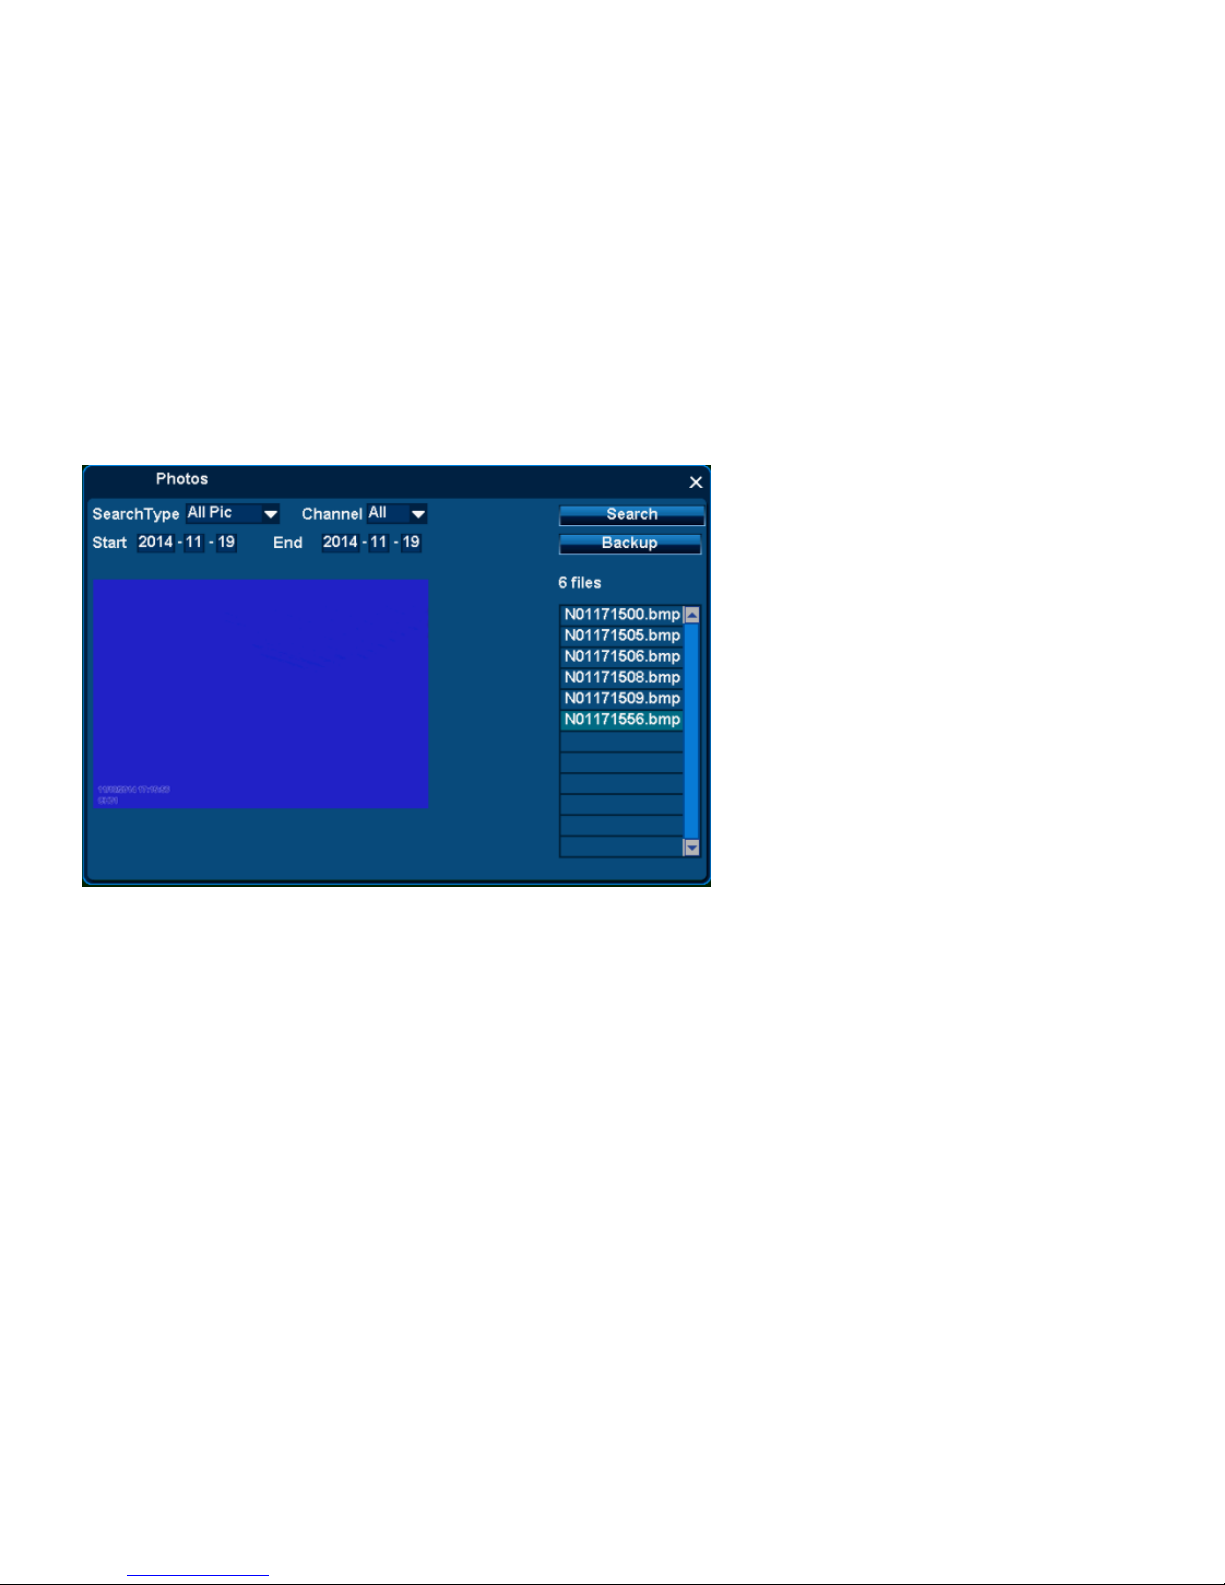
1. Can query the snapshot stored in the DVR, include Manual Snapshot, Alarm Snapshot, Record Snapshot.
2. Can copy the snapshot into USB disk.
Page 20
User Manual
20/183
3.2.6.3 Snapshot Query
Steps:
1. [Search Type] choose snapshot type, default is All Picture;
2. [Channel] choose the channel for snapshot, default is All channels;
3. [Start] ~[End] is snapshot time range (Longest is 1 month), default is „today‟ ;
4. [Search] button, single click, then the right list can show the eligible snapshot.
Remarks: single click can show the snapshot contents.
Page 21

User Manual
21/183
3.2.6.4 Picture Backup
Steps:
1. Connect FAT32 format U disk into the DVR USB port;
2. Single click to choose a picture and it can only choose one;
3. Single click [Backup to USB], after the prompt shown backup successfully can take away the U disk.
3.2.7. Record Function
Record function includes:
1. Record Setup: open/close Manual Record (default is open ), open/close Scheduled Record;
2. Playback: Query, Playback, Backup.
3.2.7.1 Record Setup
Function Location: Right Click Menu:
Main Menu:
Function Summary:
1. Can open/close each channel Manual Record;
2. Can open/close each channel Scheduled Record?
3.2.7.2 Manual Record
Page 22
User Manual
22/183
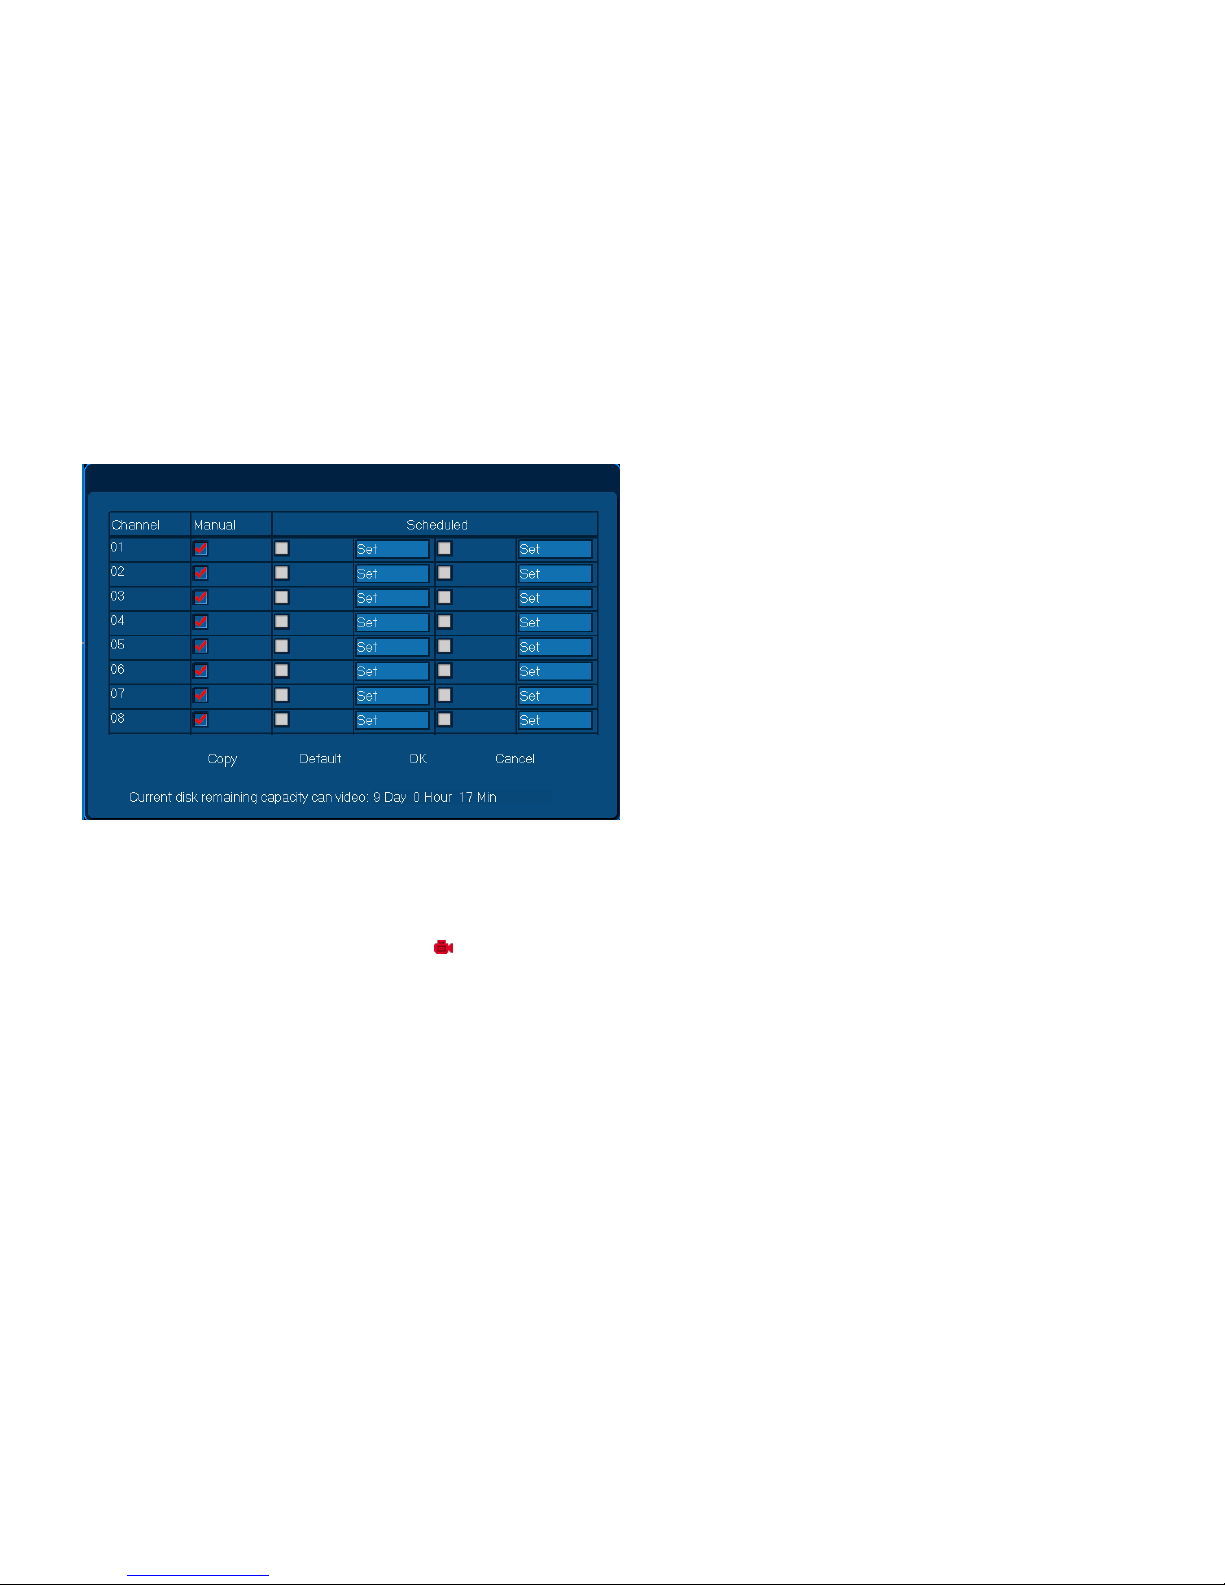
Step I: Open Manual Record
1. Right Click Menu or Main Menu .Select [Record Setup];
2. Select channel, and choose „Manual‟ option;
Remarks: [Copy] can make the settings apply to all channels
3. Single click [OK] to open Manual Record ;
Remarks: Recording channel has the icon: , Manual Record default is open .
Steps II: Close Manual Record
1. Choose the channel, cancel „Manual‟ Option;
Remarks: [Copy] can apply the settings to all channels.
2. Single click [OK] TO CLOSE Manual Record function.
3.2.7.3 Scheduled Record
Page 23
User Manual
23/183
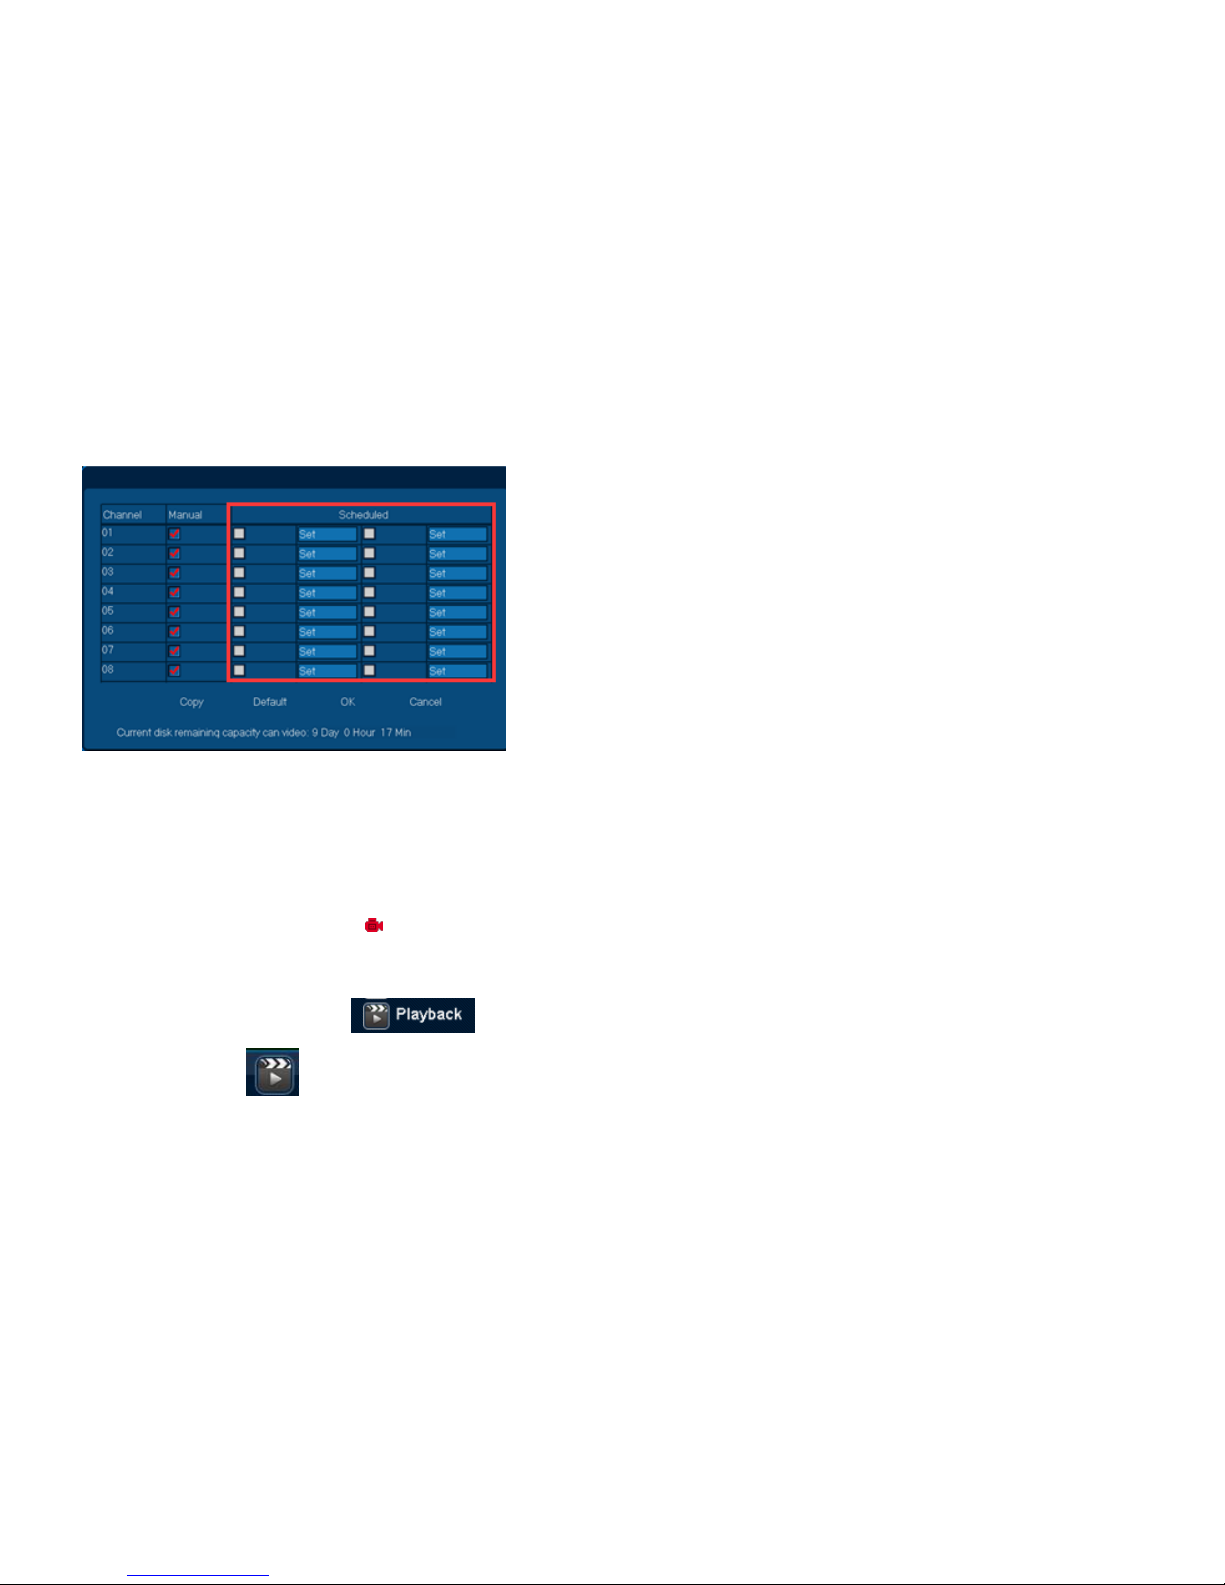
Step I: Open and Setup Scheduled Record
1. Right Click Menu or Main Menu. Select [Record Setup];
2. Select channel, and choose „Scheduled‟ option;
Remarks: [Copy] can make the settings apply to all channels
3. Single click [Set] to modify Scheduled Record time range;
Remarks: Scheduled Record can be divided into 2 time ranges.
4. Single click [OK] to OPEN Scheduled Record
Remarks: channel has the icon: .
3.2.7.4 Playback
Function Location: Right Click Menu:
Main Menu:
Function Summary:
Page 24
User Manual
24/183
1. It can query, playback record file of any channel;
2. It can backup file into U disk.
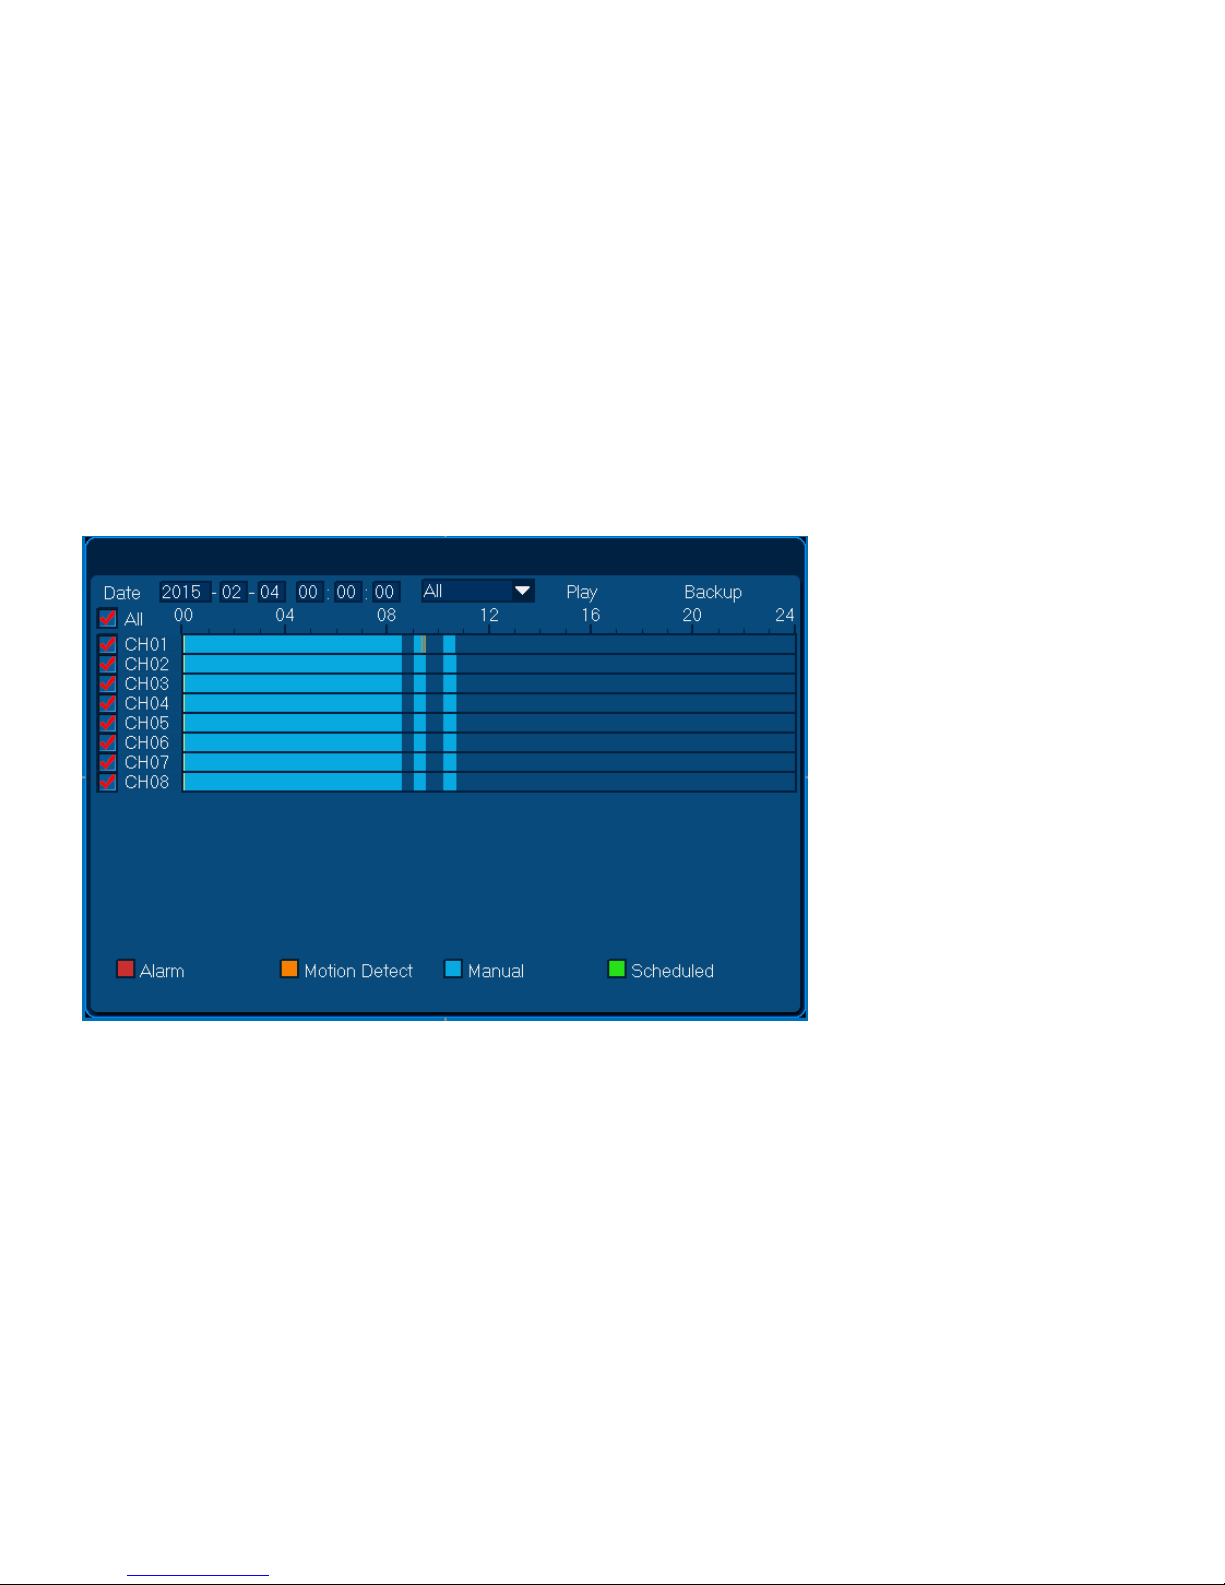
3.2.7.4.1 Query Playback
Operation Steps:
1. Right Click Menu or Main Menu[Playback] ;
2. Modify playback starting date and time
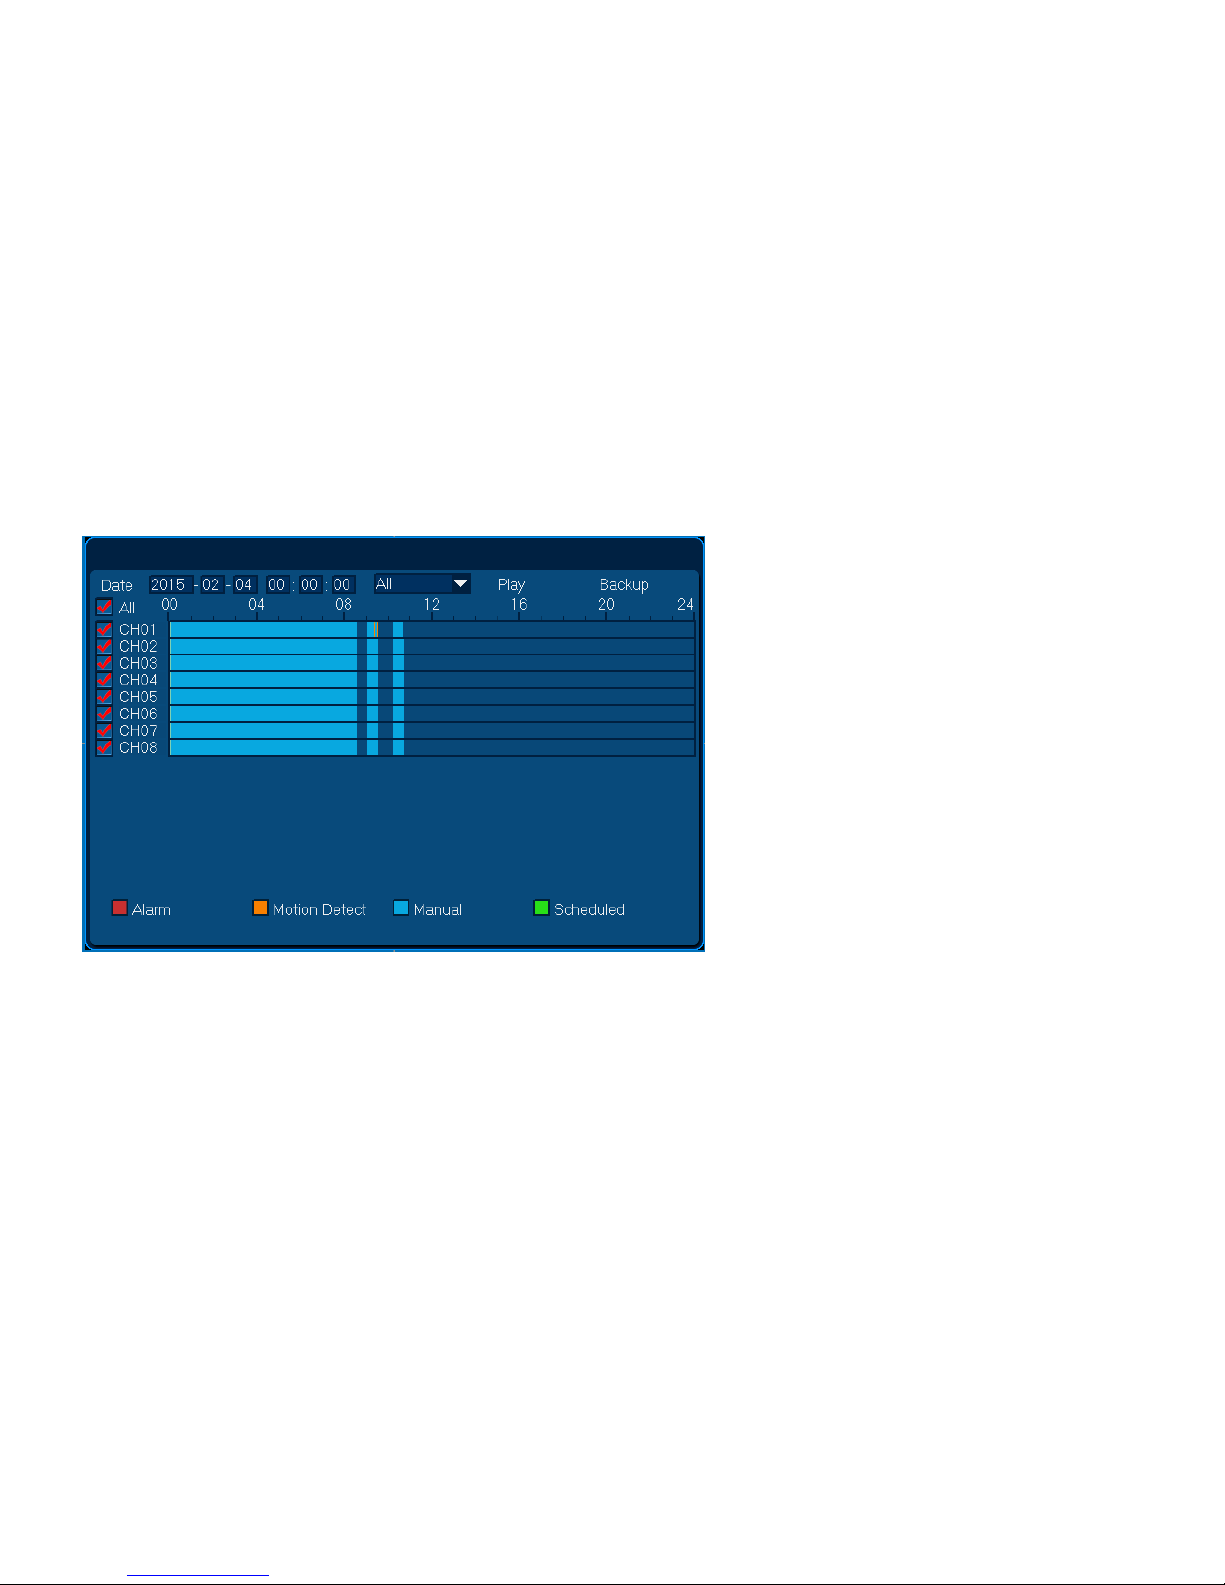
Remark: Also can click to choose playback position, double click open minute view as follows, double click again back to hour view.
Page 25
User Manual
25/183
3. Choose video type: Scheduled/ Manual/ Alarm/ Motion Detection ;
4. Choose playback channel , can multi-select or all select;
5. Single click [Play] button, can display the video.
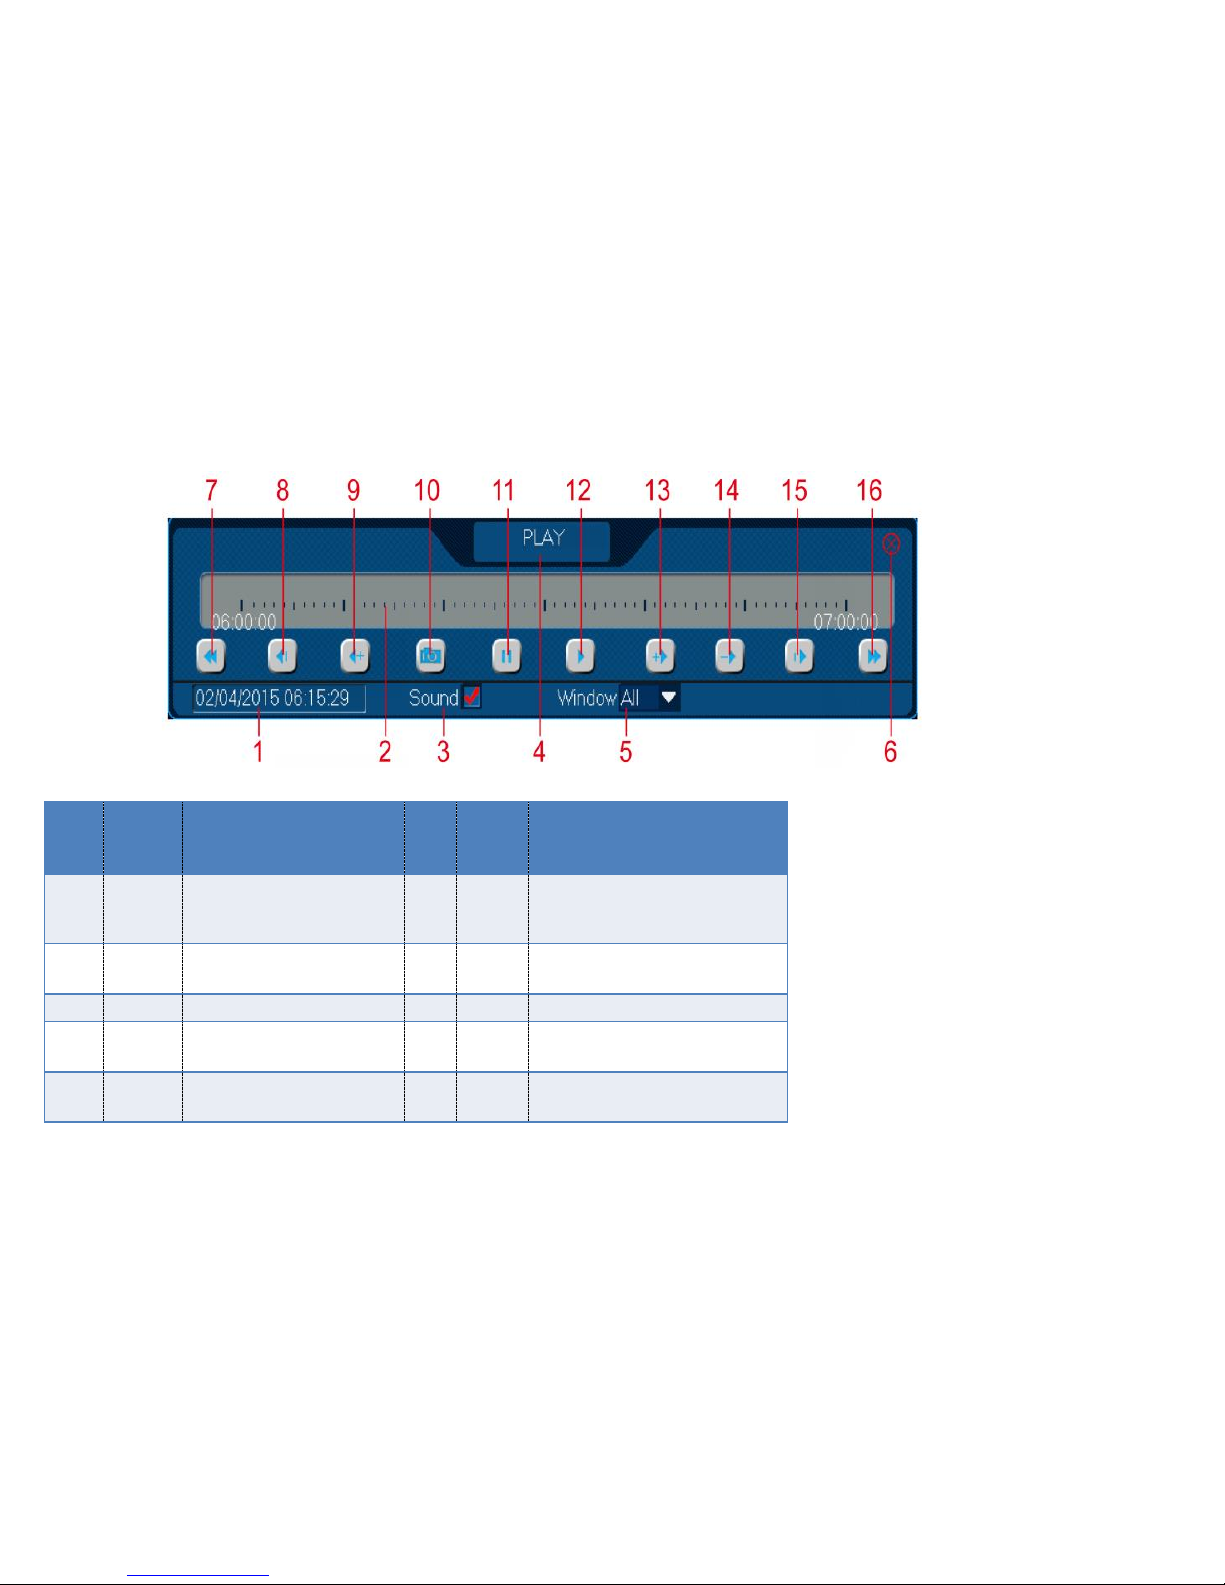
3.2.7.4.2 Playback Adjusting
When playback, users can adjust the speed and progress.
Page 26
User Manual
26/183
Serial
No.
Name
Description
Seri
al
No.
Name
Description
1
Playback
time
Current playback time
9
Fast
Backwa
rd
Fast backward display, single click
to switch X8/X16
2
Progress
Bar
Progress of the current
playback file in 1 hour
10
Snapsh
ot
Snapshot for object screen
3
Sound
Open/close sound playback
11
Pause
Pause display
4
Conditio
n
Playback Condition
12
Display
Display the video
5
Window
Choose the operation window
13
Fast
Display
Accelerate display , single click to
switch X2/X4/X8/X16
Page 27
User Manual
27/183
6
Shutdow
n
Exit the playback
14
Slow
Display
Decelerate display, single click to
switch X1/2 X1/4 X1/8 X1/16
7
A Hour
Ago
Choose the window and
playback the video a hour ago
15
Single
Frame
Each single click can go ahead
1frame
8
Backwar
d
Each single click chosen
widow ,it will back up 2S
16
Next a
Hour
Choose the window and display the
video next hour
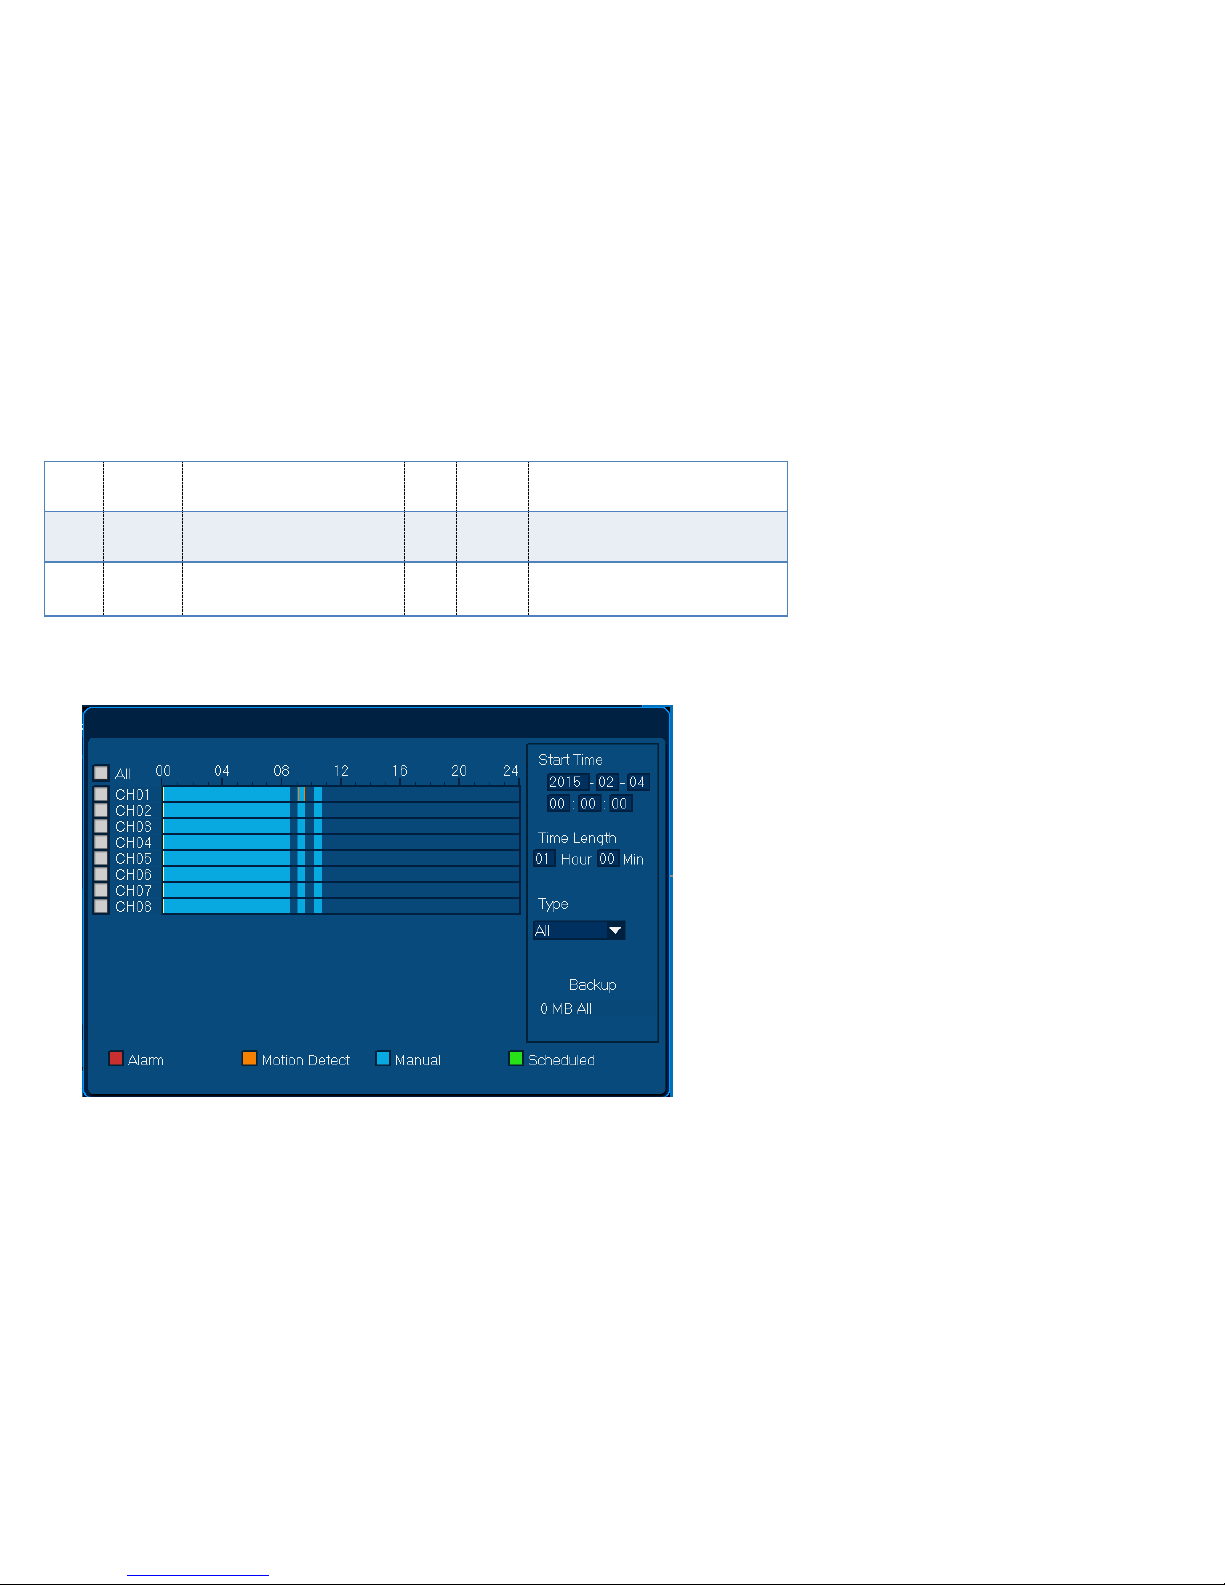
3.2.7.5 Backup
It can backup the record file into U disk.
Operation Steps:
Page 28
User Manual
28/183
1. Single click [Backup] , open the backup interface;
2. Modify the backup start time;
3. Modify the backup time range;
4. Choose Record Type, Scheduled/ Manual/Alarm/ Motion detection record;
5. Choose backup channel;
6. Single click [Backup] to backup the file selected into U disk;
7. Install the display plug-in, then can use Media Player to display the backup file.
3.2.8 Clear Alarm
Function Location: Right Click Menu:
Function Summary: can clear some channel or all channel Alarm effect.
Operation Steps:
1. Right click alarming channel, choose [Clear Alarm/ Current] can clear alarming of current channel;
2. Right click all channels, choose [Clear Alarm/ Clear All] can clear alarming of all channels.
3.2.9 Shutdown
Function Location: Main Menu:
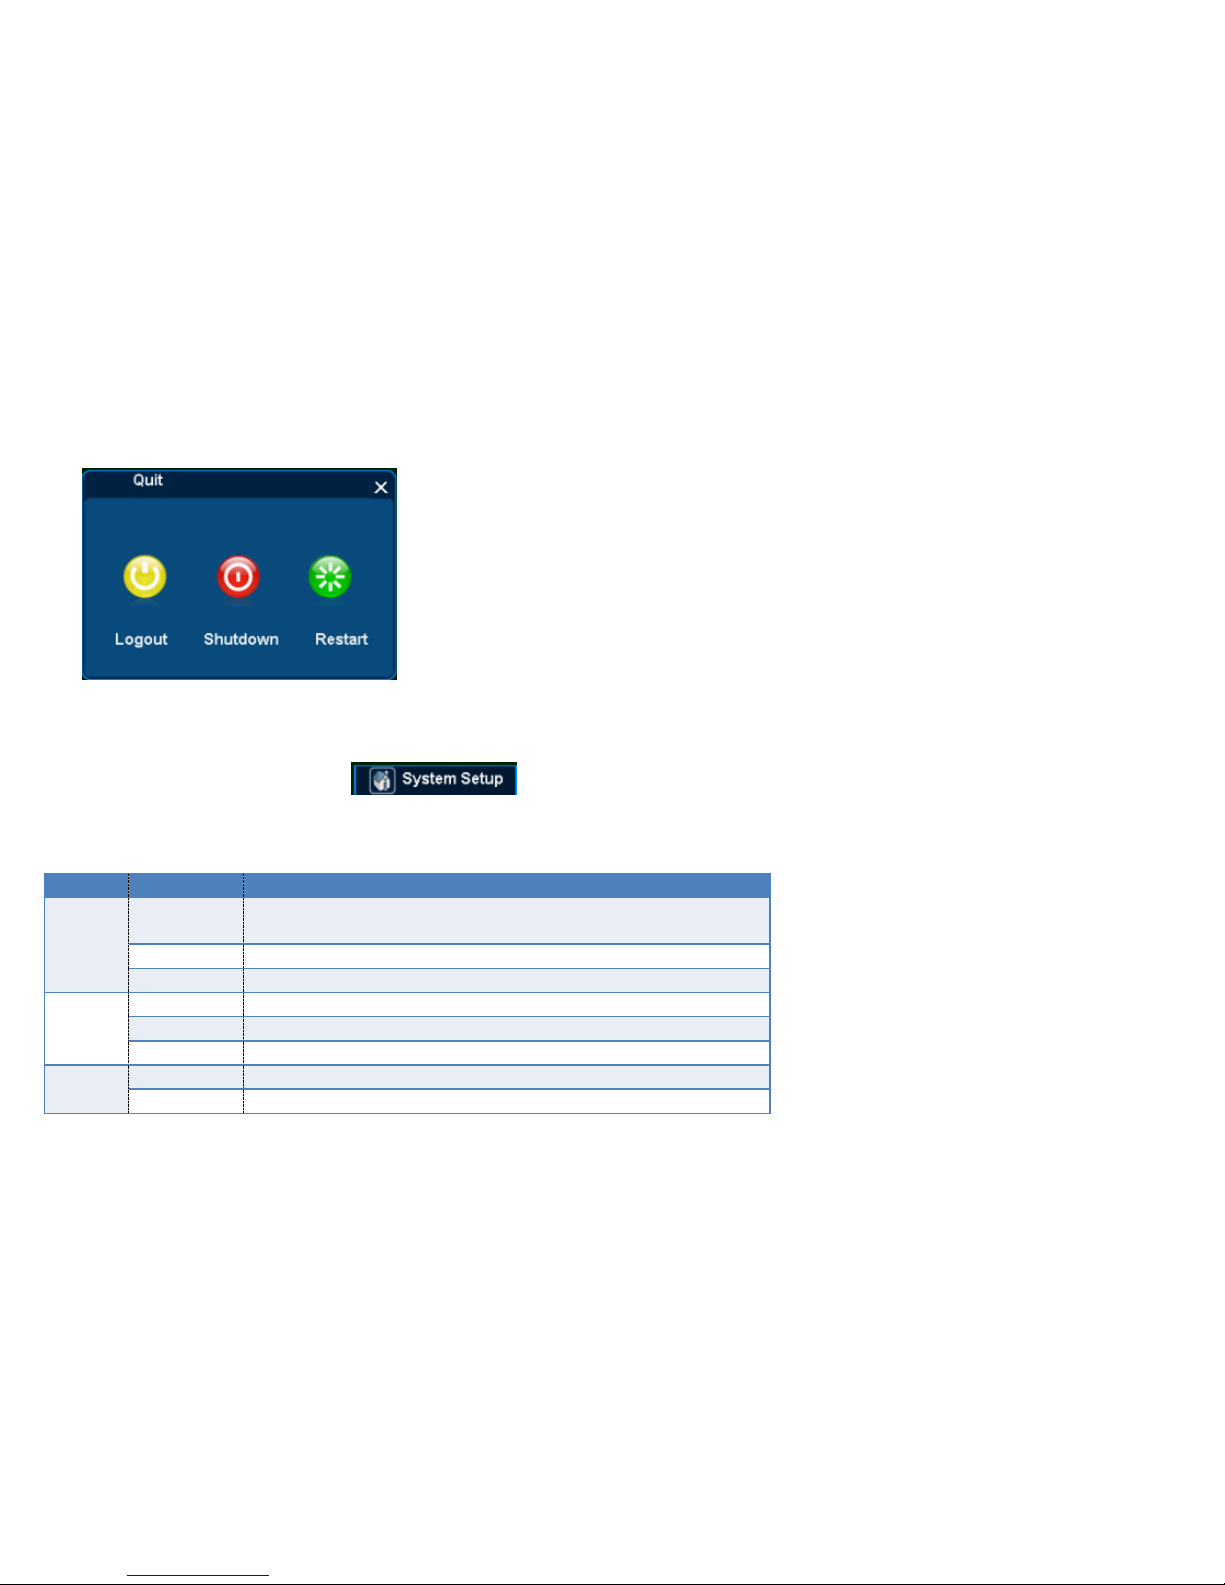
Function Summary: can Logout, Shutdown and Restart.
Page 29
User Manual
29/183
4 System Setup
Function Location: Right Click Menu:
4.1 Functional Structure
Category
Group
Function Point
General
General
Language, NTSC/PAL, Transparency, VGA Resolution, Wizard, Speedy
Function
Time
Date, Time, Auto Synchronize Time, Time zone Setting
User
Local user, Network User, Automatic Logout
Channel
Preview
Ch Name, OSD Position, Hide Video, Privacy Mask
Stream
Main Stream, Minor Stream
Audio
Audio Compress, Audio Monitoring, Bind with Video
Network
Setting
Dialing Setting, IP Setting
Service
WebCC, Bi-directional Talk
Page 30

User Manual
30/183
Alarm
Motion
Detection
Motion Detection Alarm Setup, Alarm Output
No Video
Video Loss Alarm Setup, Alarm Output
Alarm Device
Alarm Device Alarm Input Setup, Alarm Output
Alarm Task
Motion Detection, No Video, Alarm Device, Start Time/ End Time Setting of
Alarm input
E-mail
Alarming E-mail Server, Sender Setting, Receiver Setting
System
Log
Log Query, Backup
Maintenance
Reboot Setup, Update, Reset Factory, Import Setting, Export Setting
Information
Product Model, Serial Number, Software Version, Hardware Version
Software Release Time
Device
Storage
Storage device condition, Format
PTZ
PTZ Setting, Preset, Patrol
Other Device
Width of Monitor, Height of Monitor, Device ID, Main Display Device
4.2 General
Functions:
General: for example: Language, NTSC/PAL, Transparency, VGA Resolution, Display Device ID, Wizard, etc.;
Time: for example date format, Set Date/Set Time, Auto Synchronize Time, Time zone setting;
User: Local User, Network User Add/Delete/ Edit.
4.2.1.1 NTSC/PAL
Function Location: General—General—NTSC/PAL
Function Summary: change the current video standard, supports standard PAL/NTSC.
Remark: It takes effect after restarting.
Page 31
User Manual
31/183
4.2.1.2 VGA Resolution
Function Location: General/General/VGA Resolution
Function Summary: Modify resolution of the DVR output to display.
Remarks: After modifying the resolution, if not confirm in 10 seconds, it will automatically cancel in order to avoid problem of display doesn‟t support large
resolution
4.2.1.3 Wizard
Page 32

User Manual
32/183
Function Location: General/General/Wizard
Function Summary: choose this function, while starting the DVR, it will display as startup
Remarks: click Wizard button can enter wizard screen at any time.
4.2.1.4 Function Demo
Function Location: General/General/Function Demo
Function Summary: display as a demo, guide the user to make speedy setup
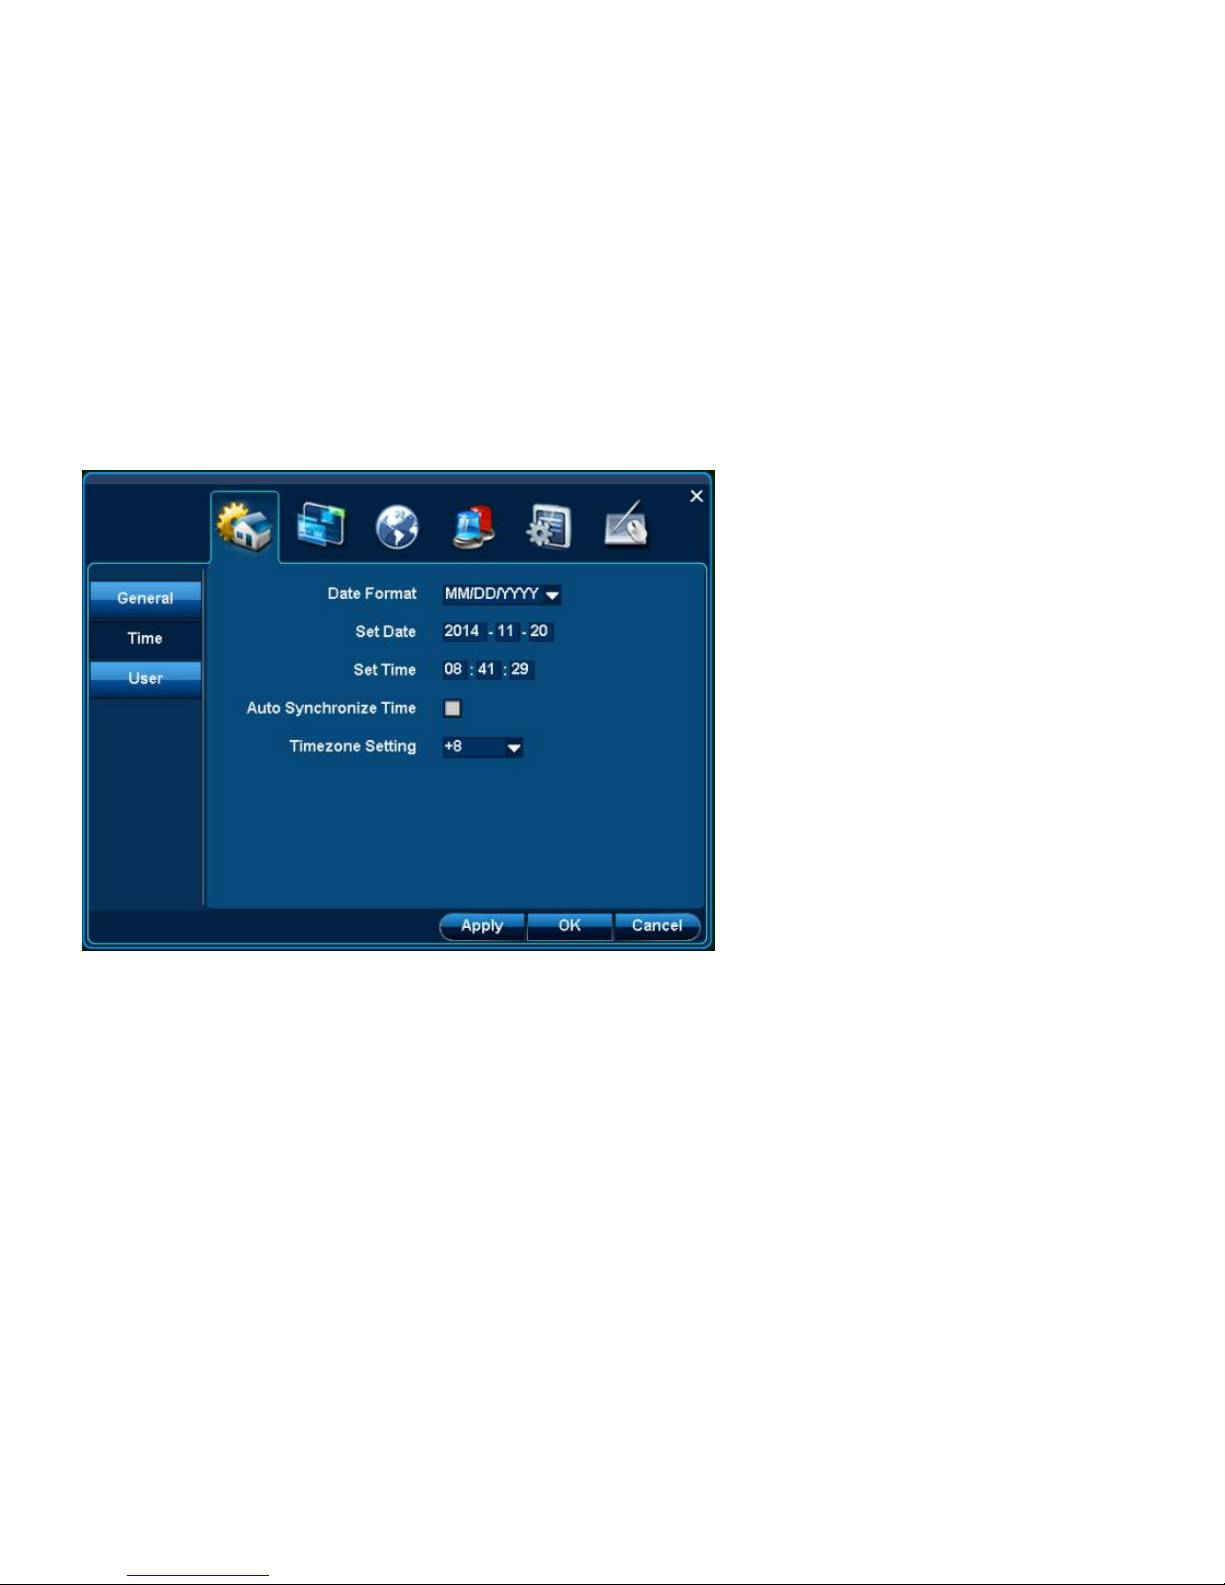
4.2.2 Time
Function Location: General/Time
Function Summary: Setup system time, for example Set date, Set Time, Timezone Setting, Auto Synchronize Time, etc.
Page 33
User Manual
33/183
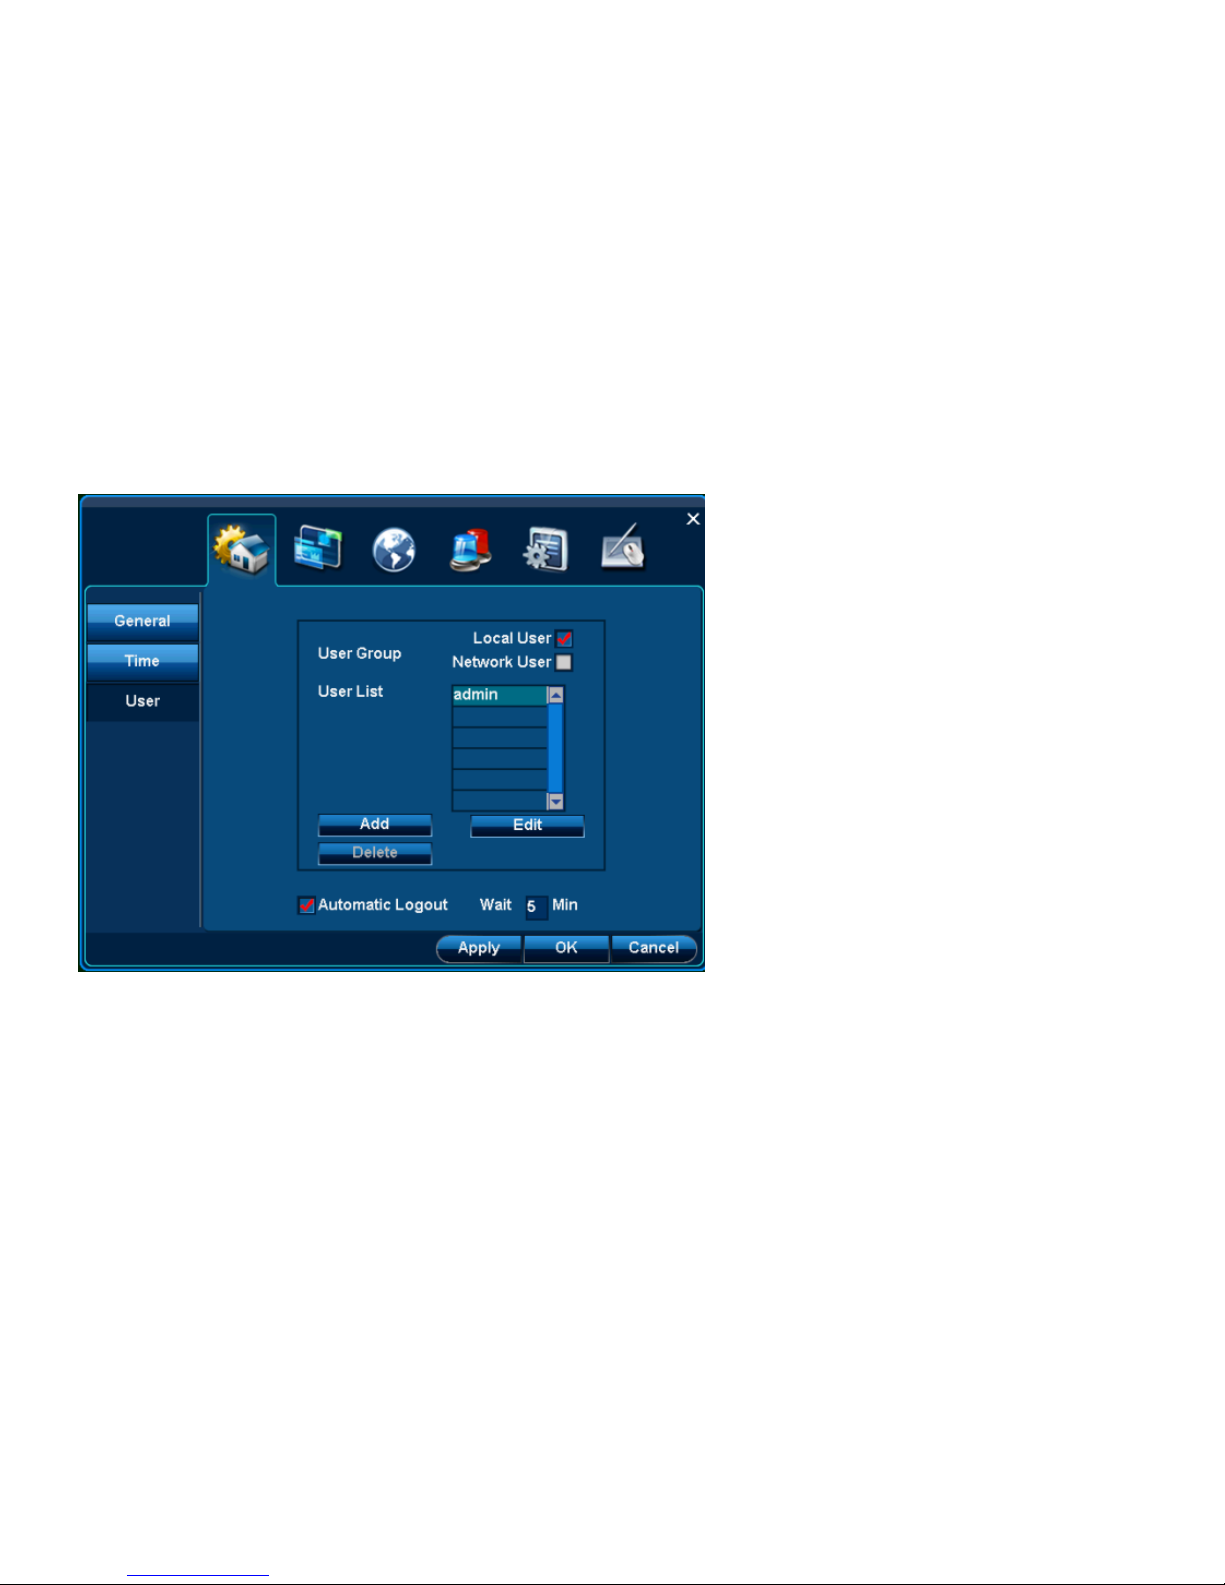
4.2.3 User
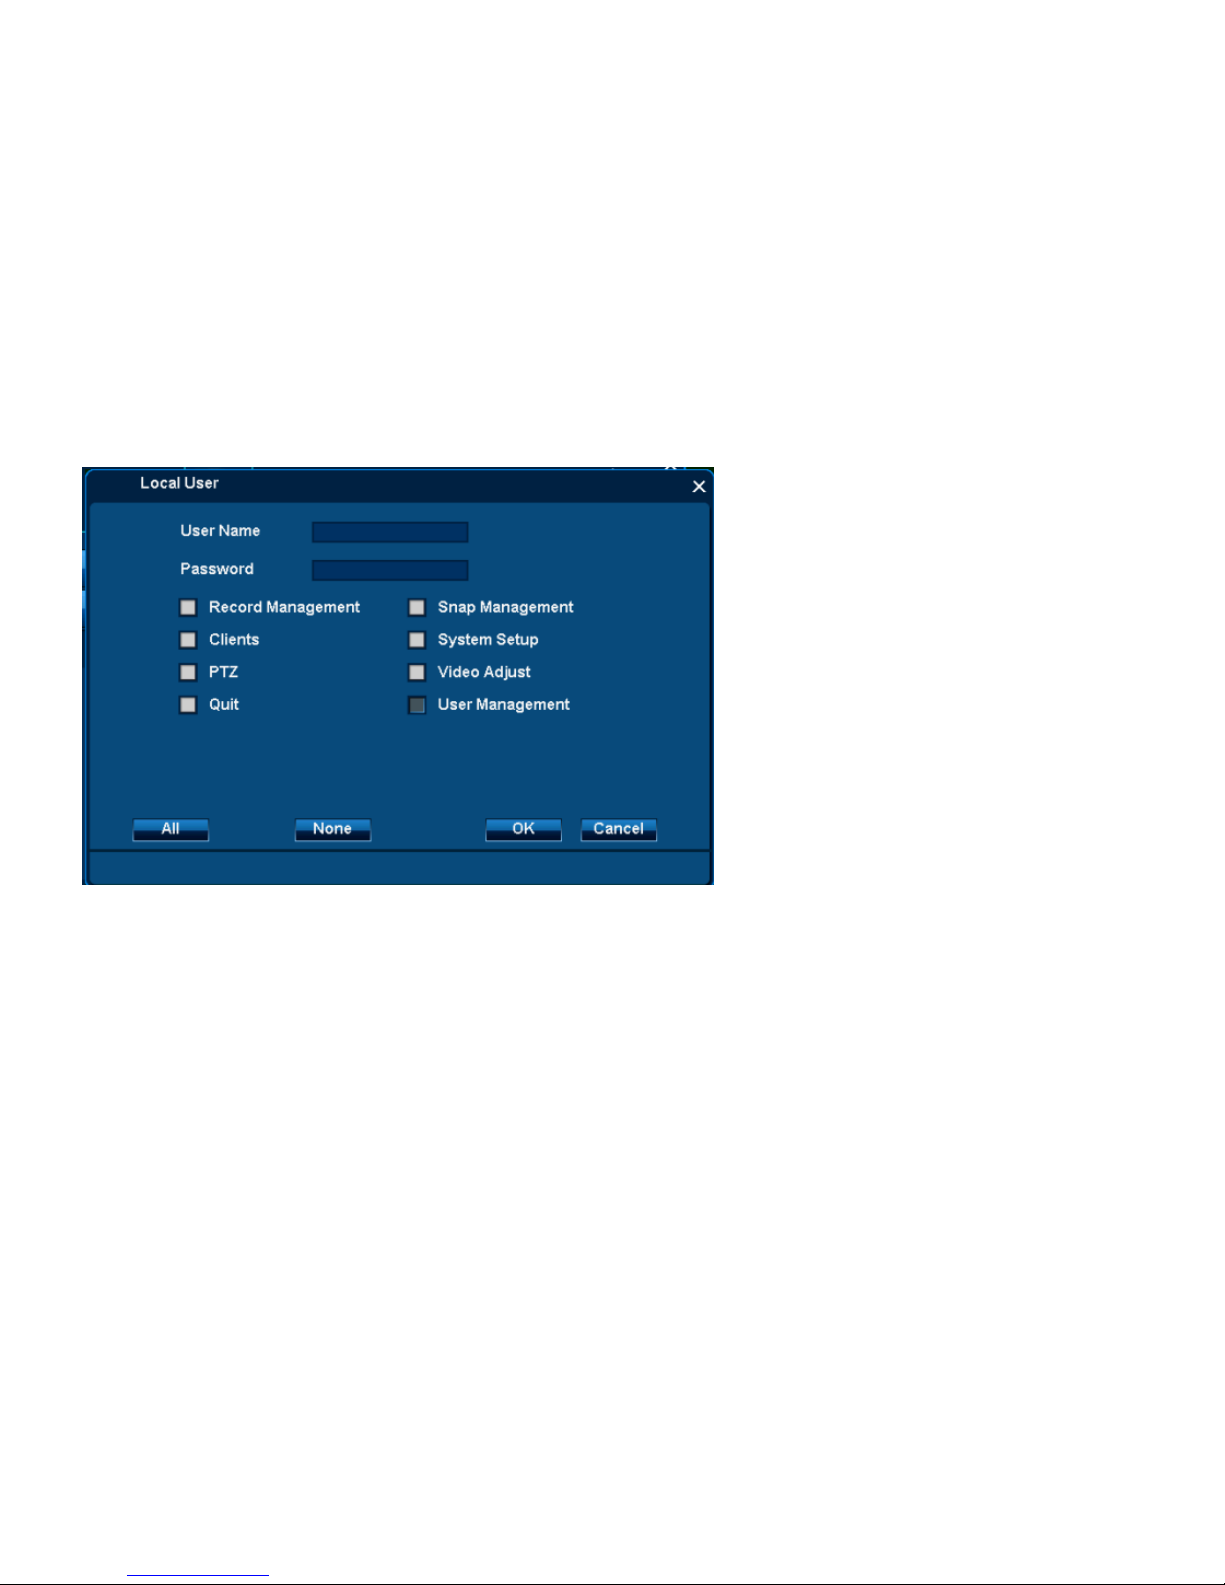
4.2.3.1 Local User
Function Location: General/ User/ Local User
Function Summary:
1. It allows local users login the DVR and make allowed operation;
Page 34
User Manual
34/183
2. It allows add/edit/delete local users.
Page 35
User Manual
35/183
4.2.3.1.1 Automatic Logout
Function Location: General/ User/ Automatic Logout
Function Summary:
1. As User operation upto the duration set, it will automatically logout (1-99 mins);
2. Users need to login again to continue the operation t, this function in order to improve the safety.
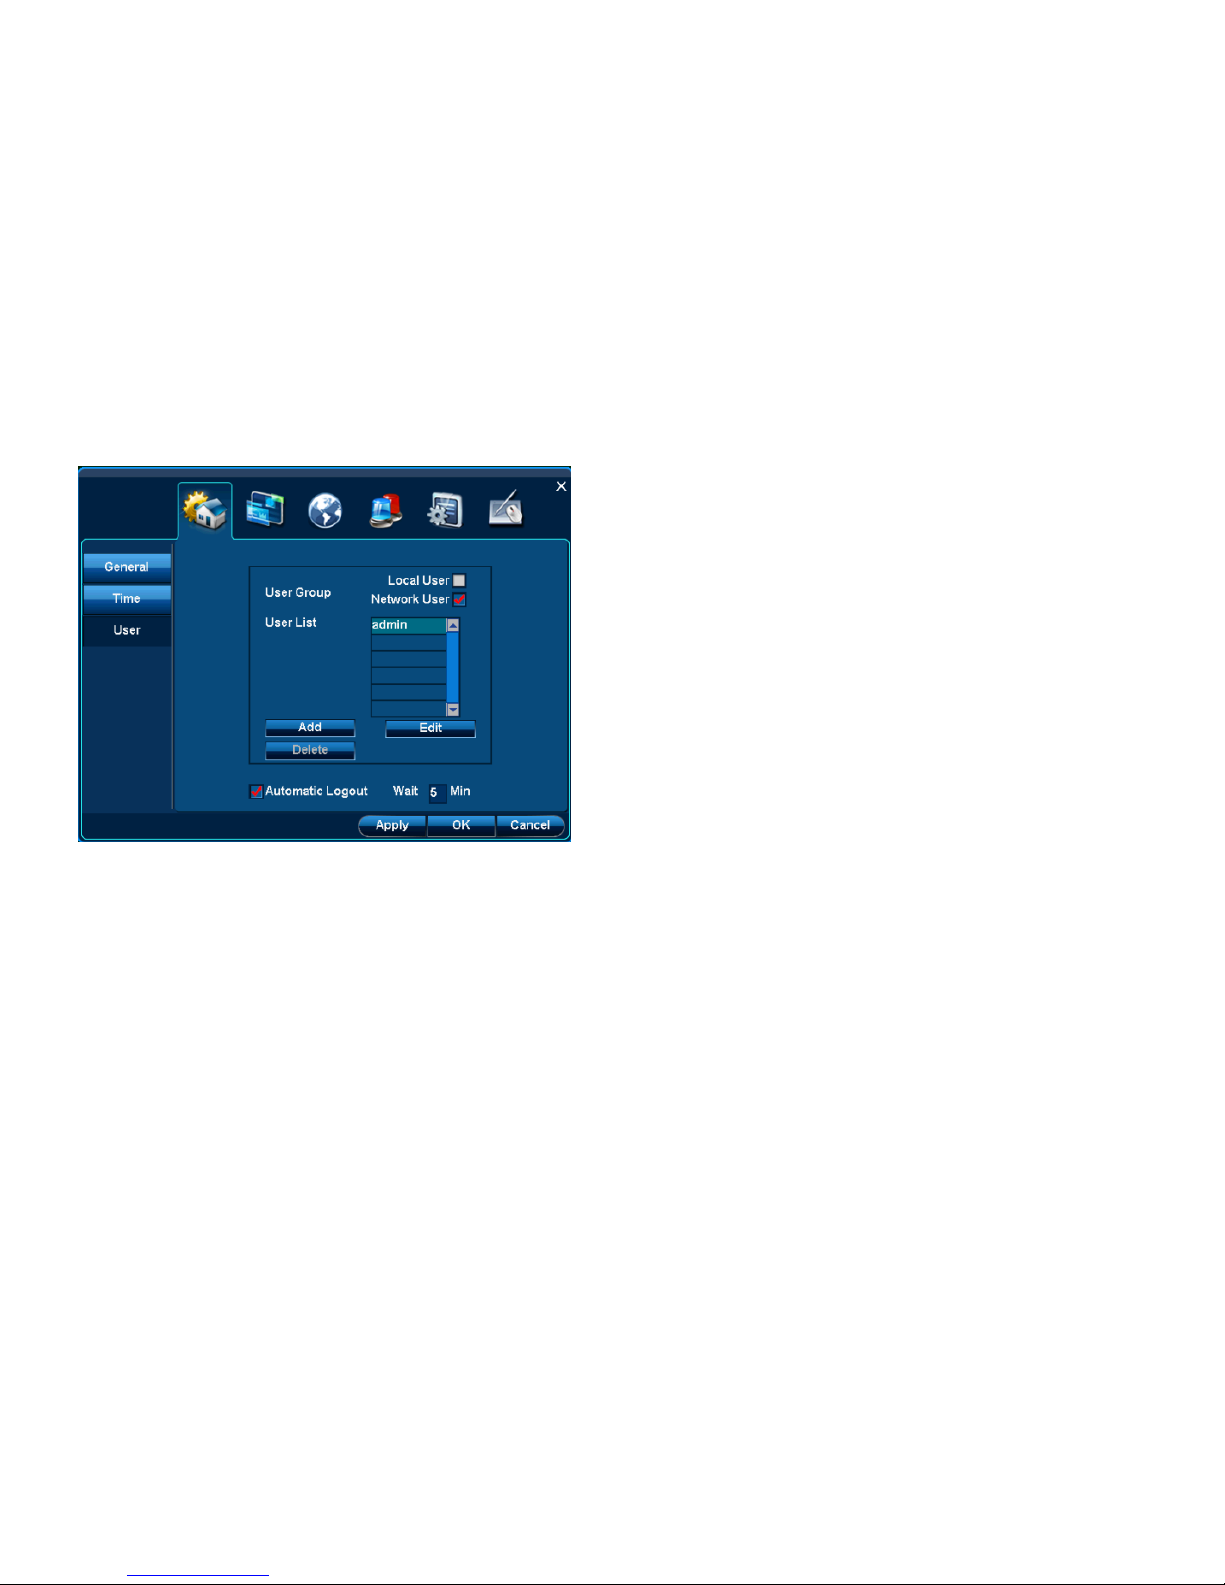
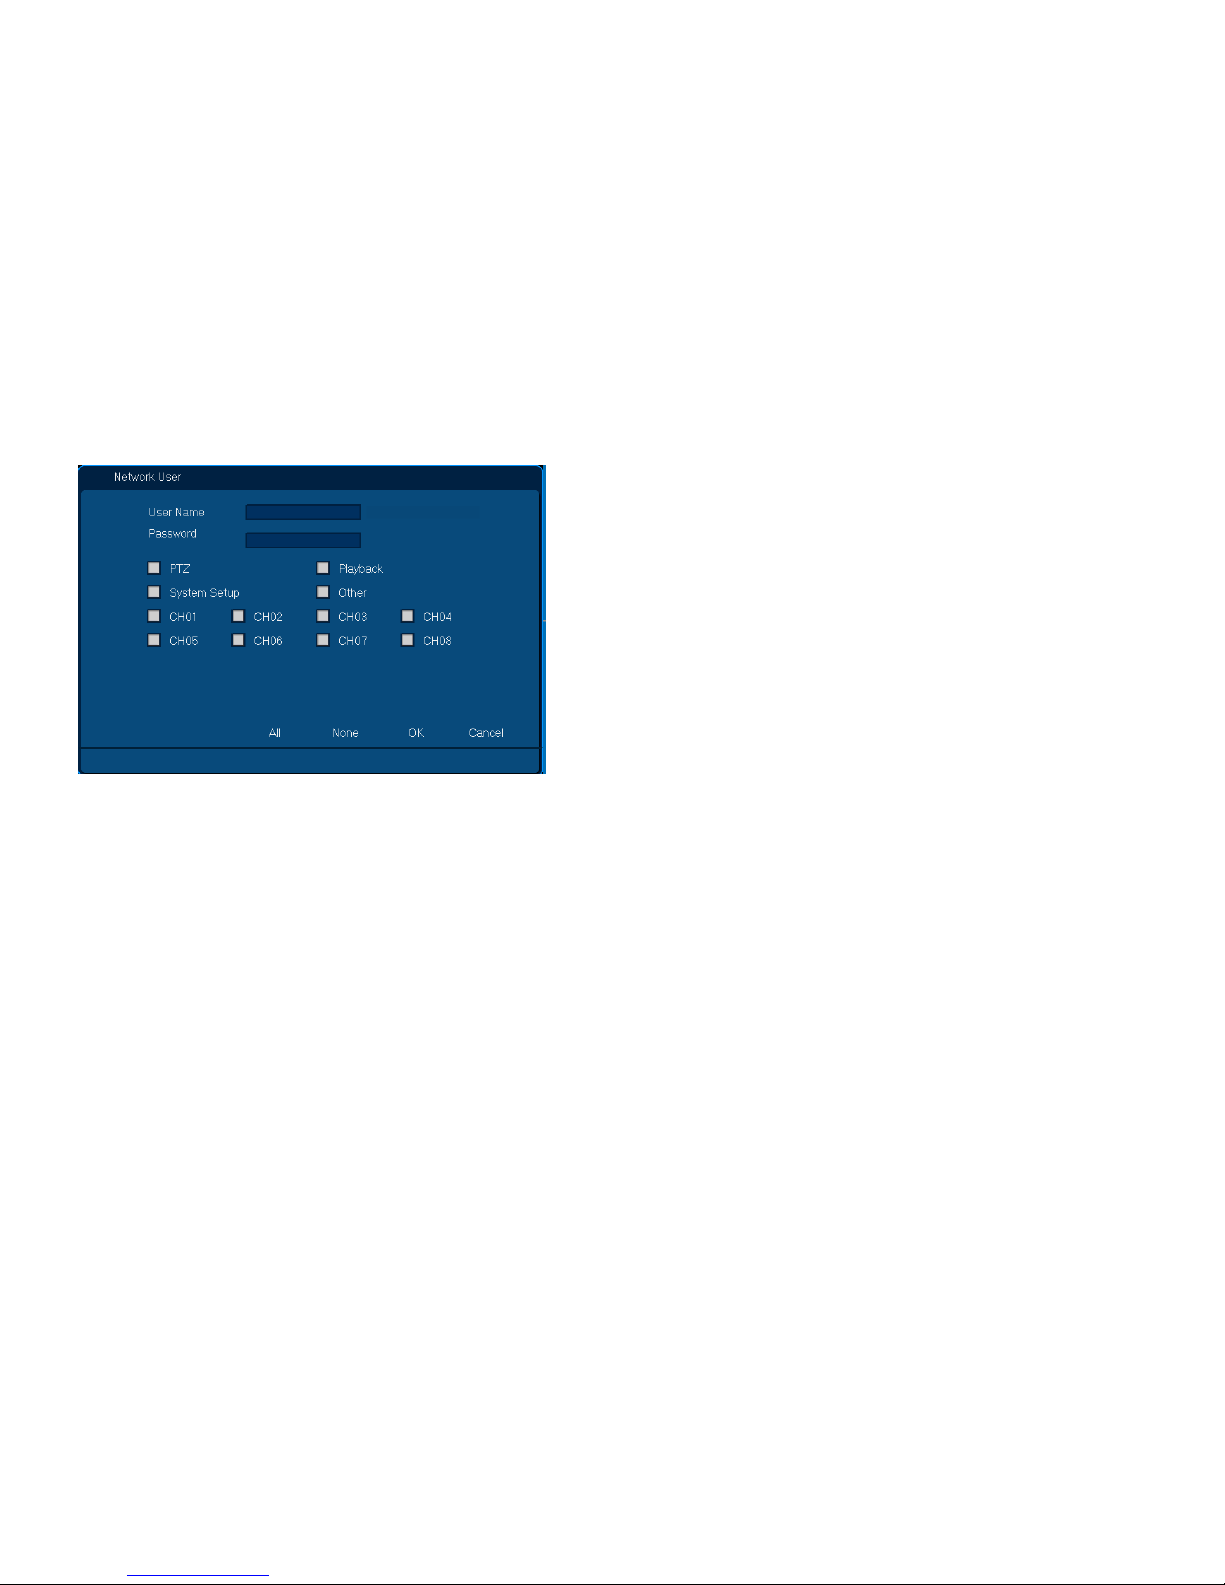
4.2.3.2 Network User
Function Location: General/ User/ Network User
Function Summary: while remote monitoring, this setting will be as the user name and password in client-end.
Page 36
User Manual
36/183
Page 37
User Manual
37/183
4.3 Channel
Function:1.Preview setting:Channel name, OSD position, Hide video, Privacy mark;
2.Code stream setting:Main code stream image size and code rate; minor code stream image size, kbps, fluency 3.Audio setting:Audio
compression, Audio monitoring
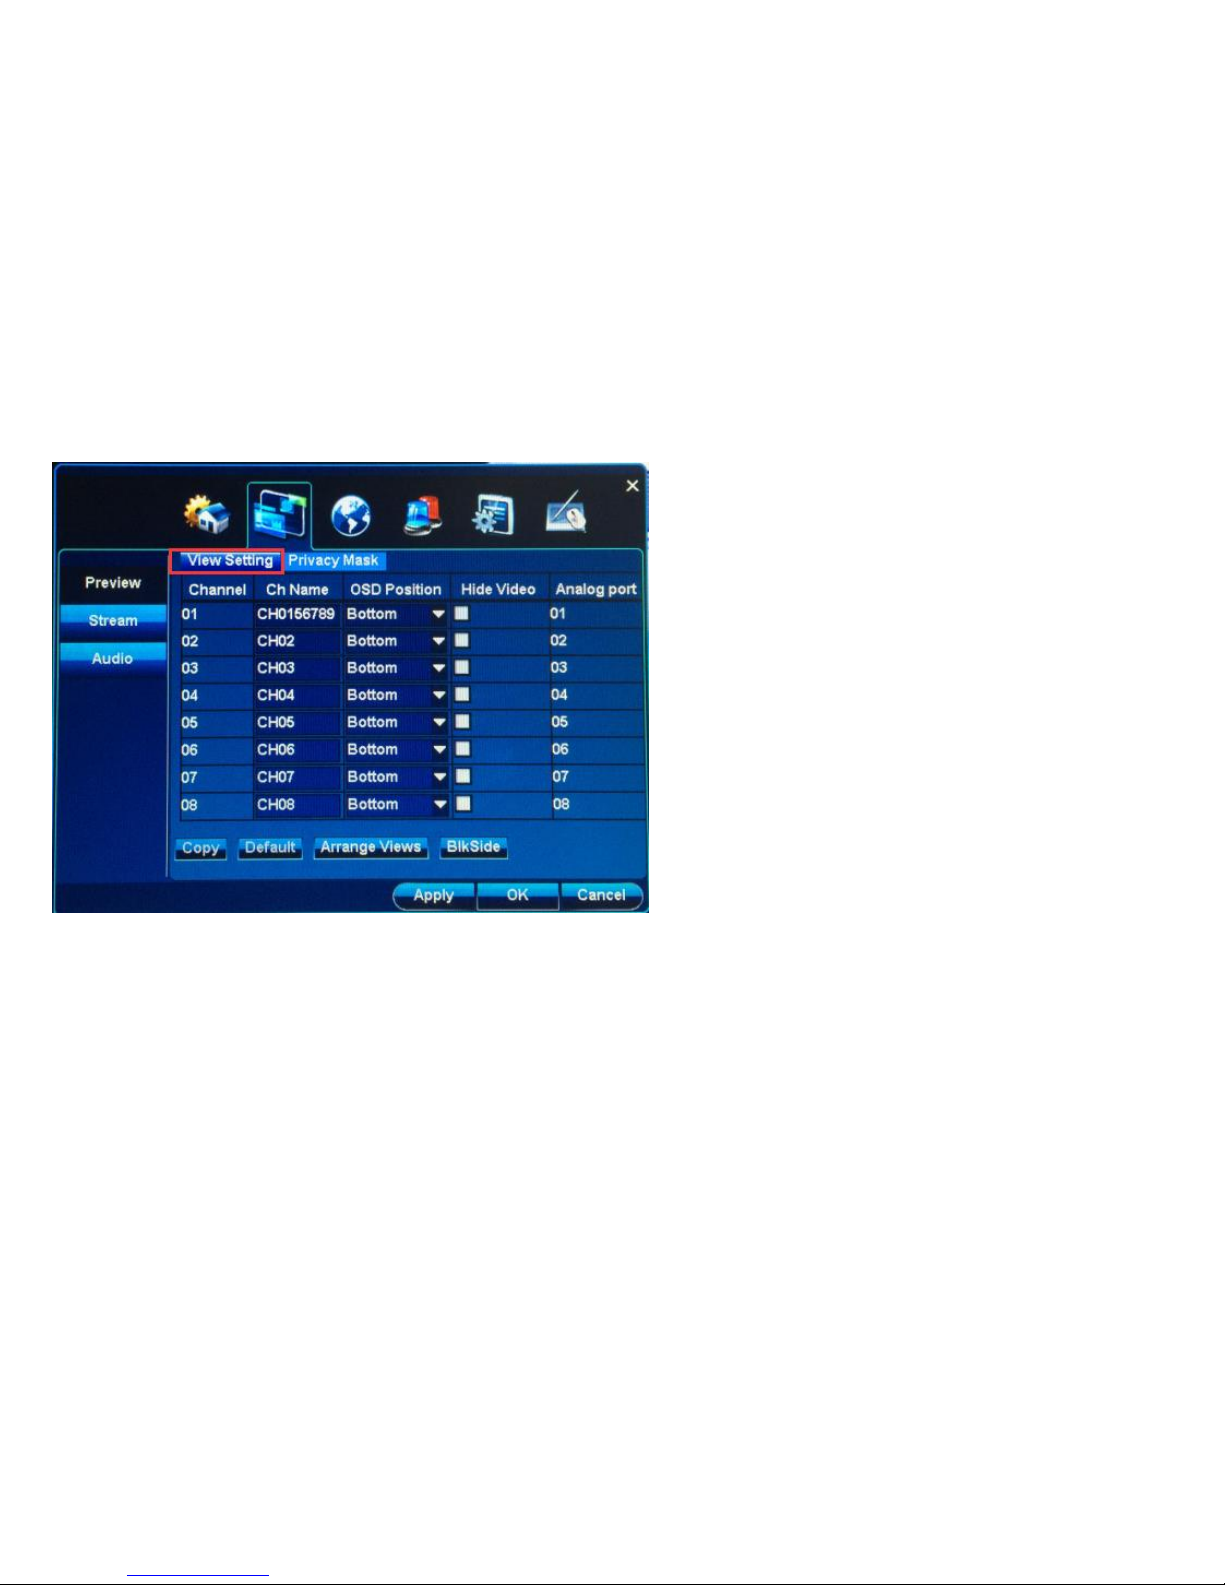
4.3.1 Preview setting
4.3.1.1 Preview adjustment
Function position:Channel| Preview setting
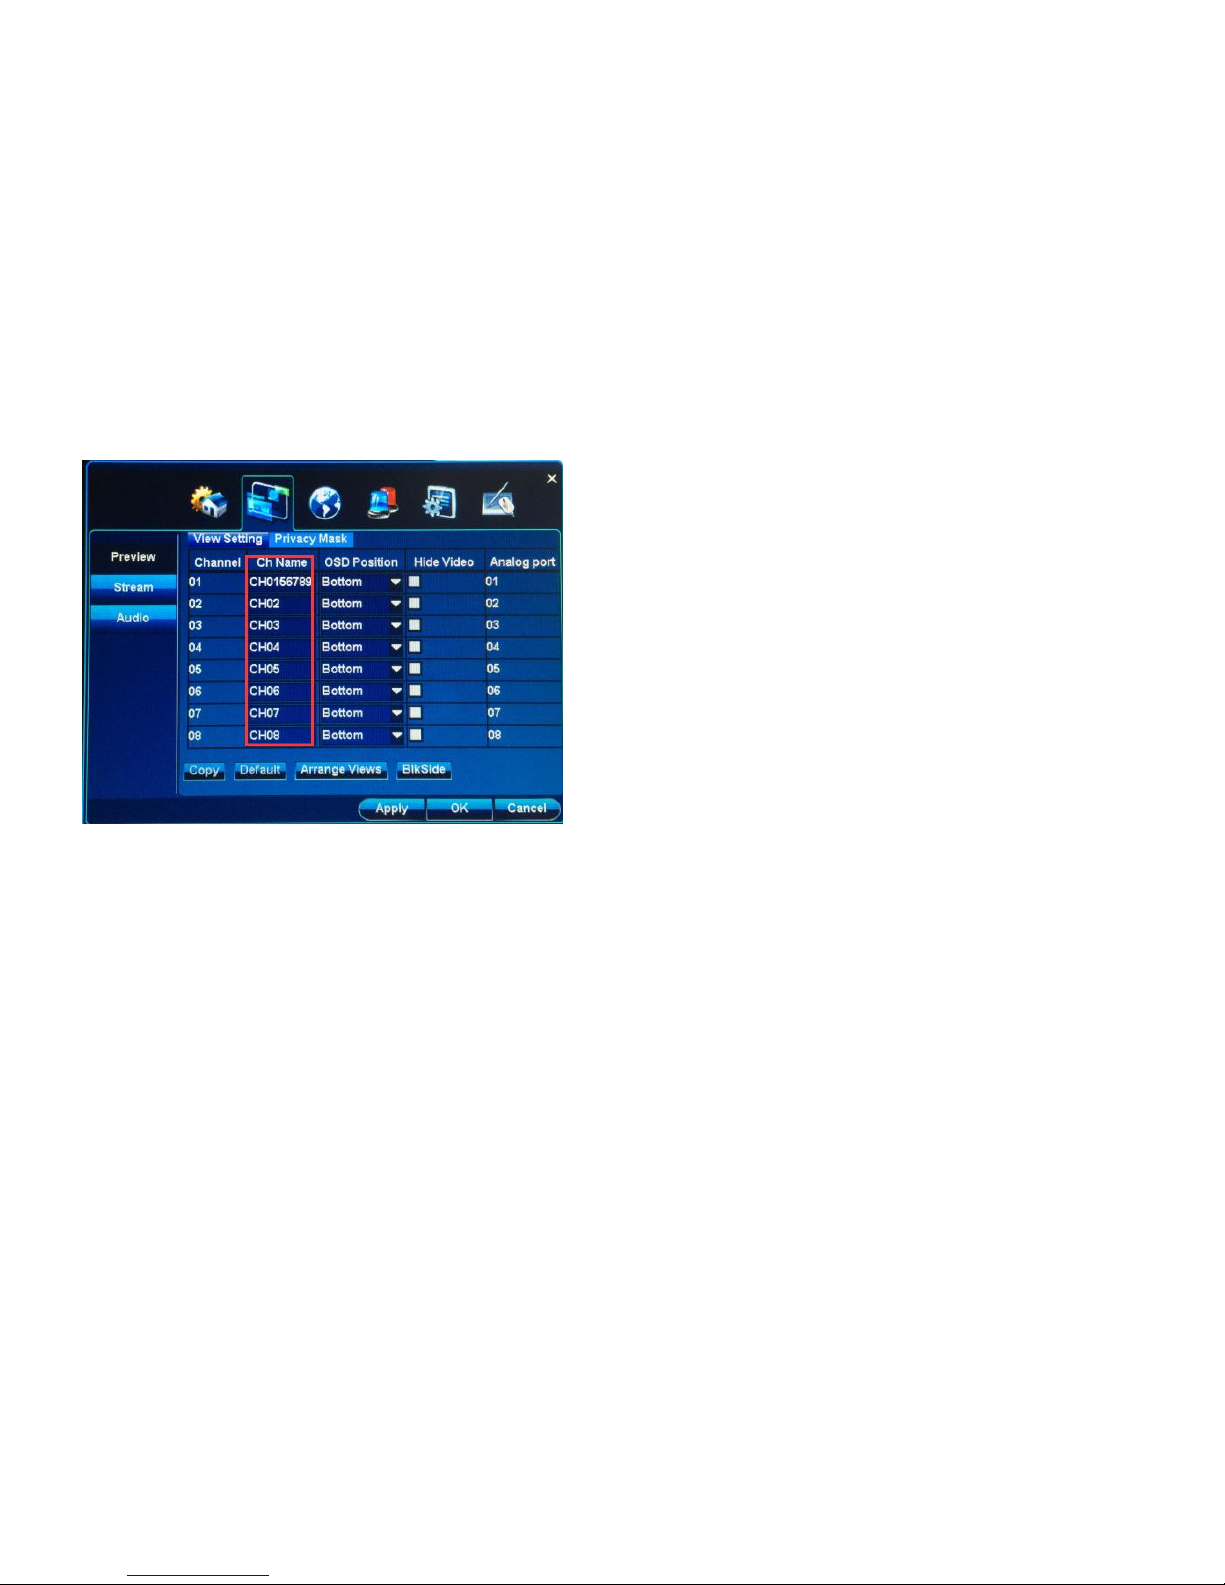
Function introduction: 1.Modify channel name;
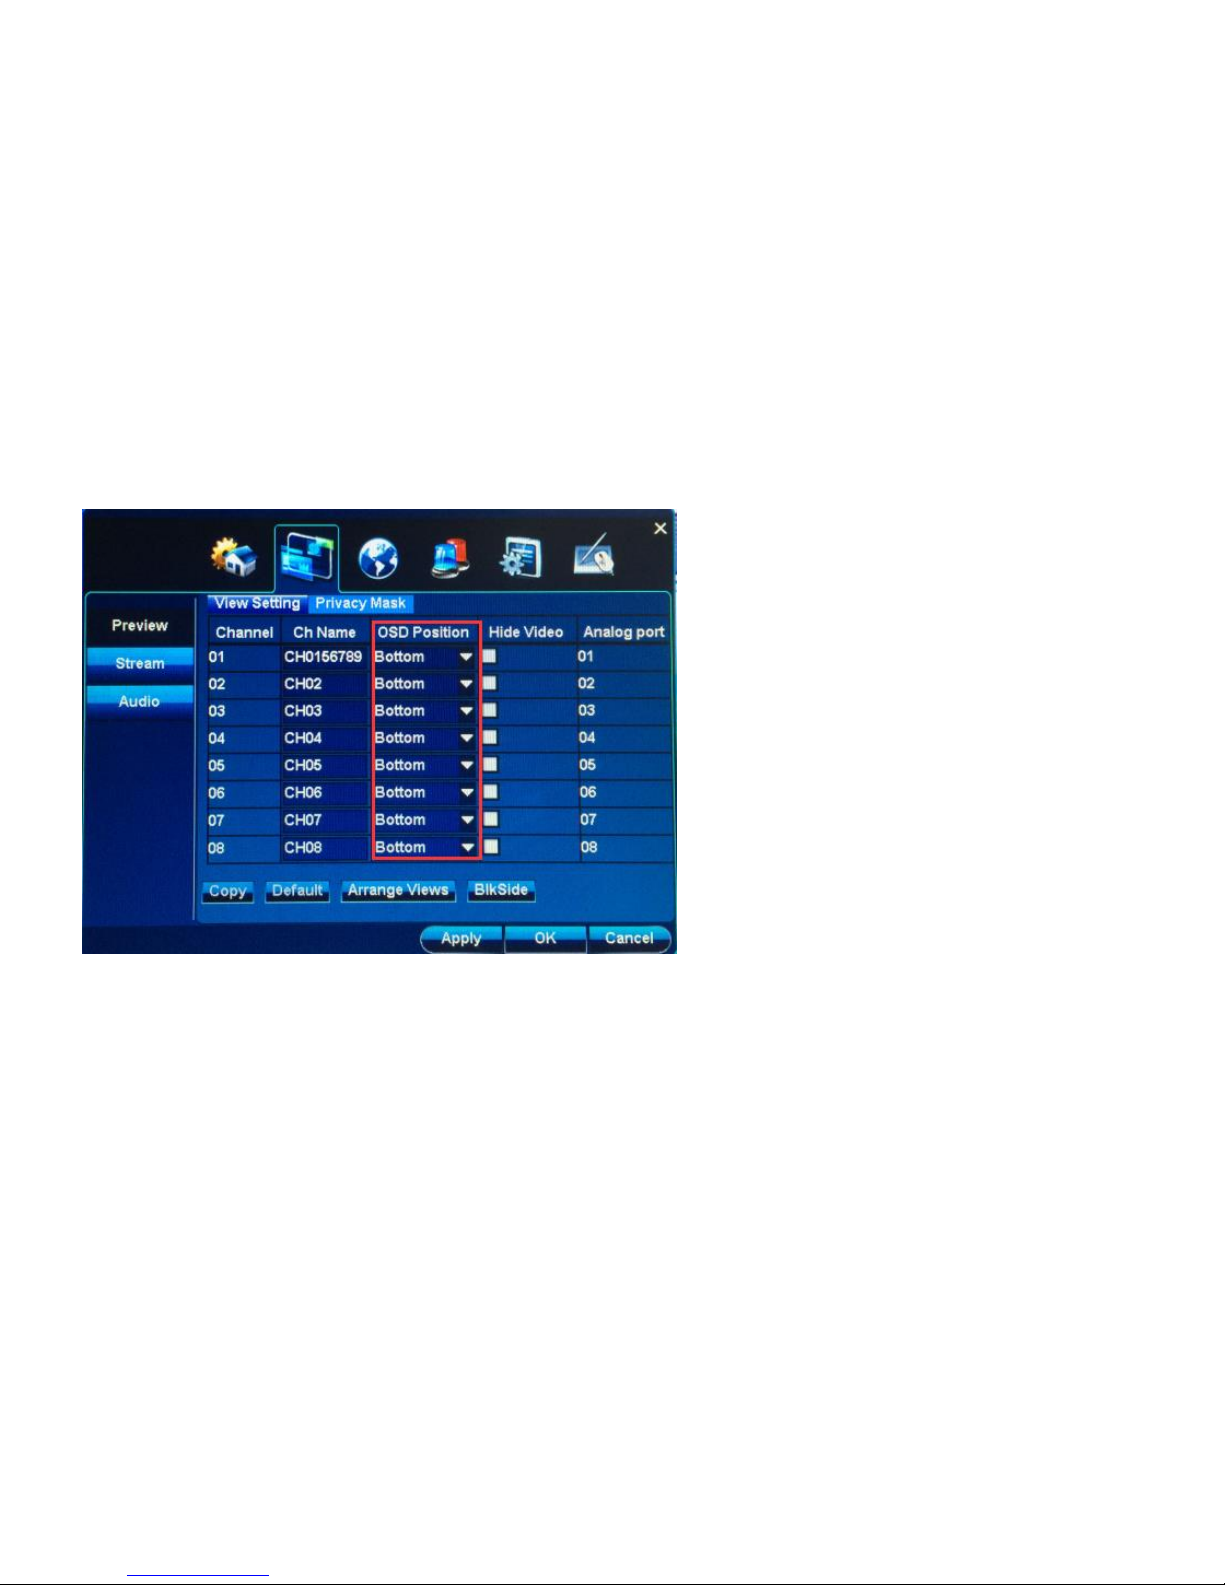
2. Modify OSD position
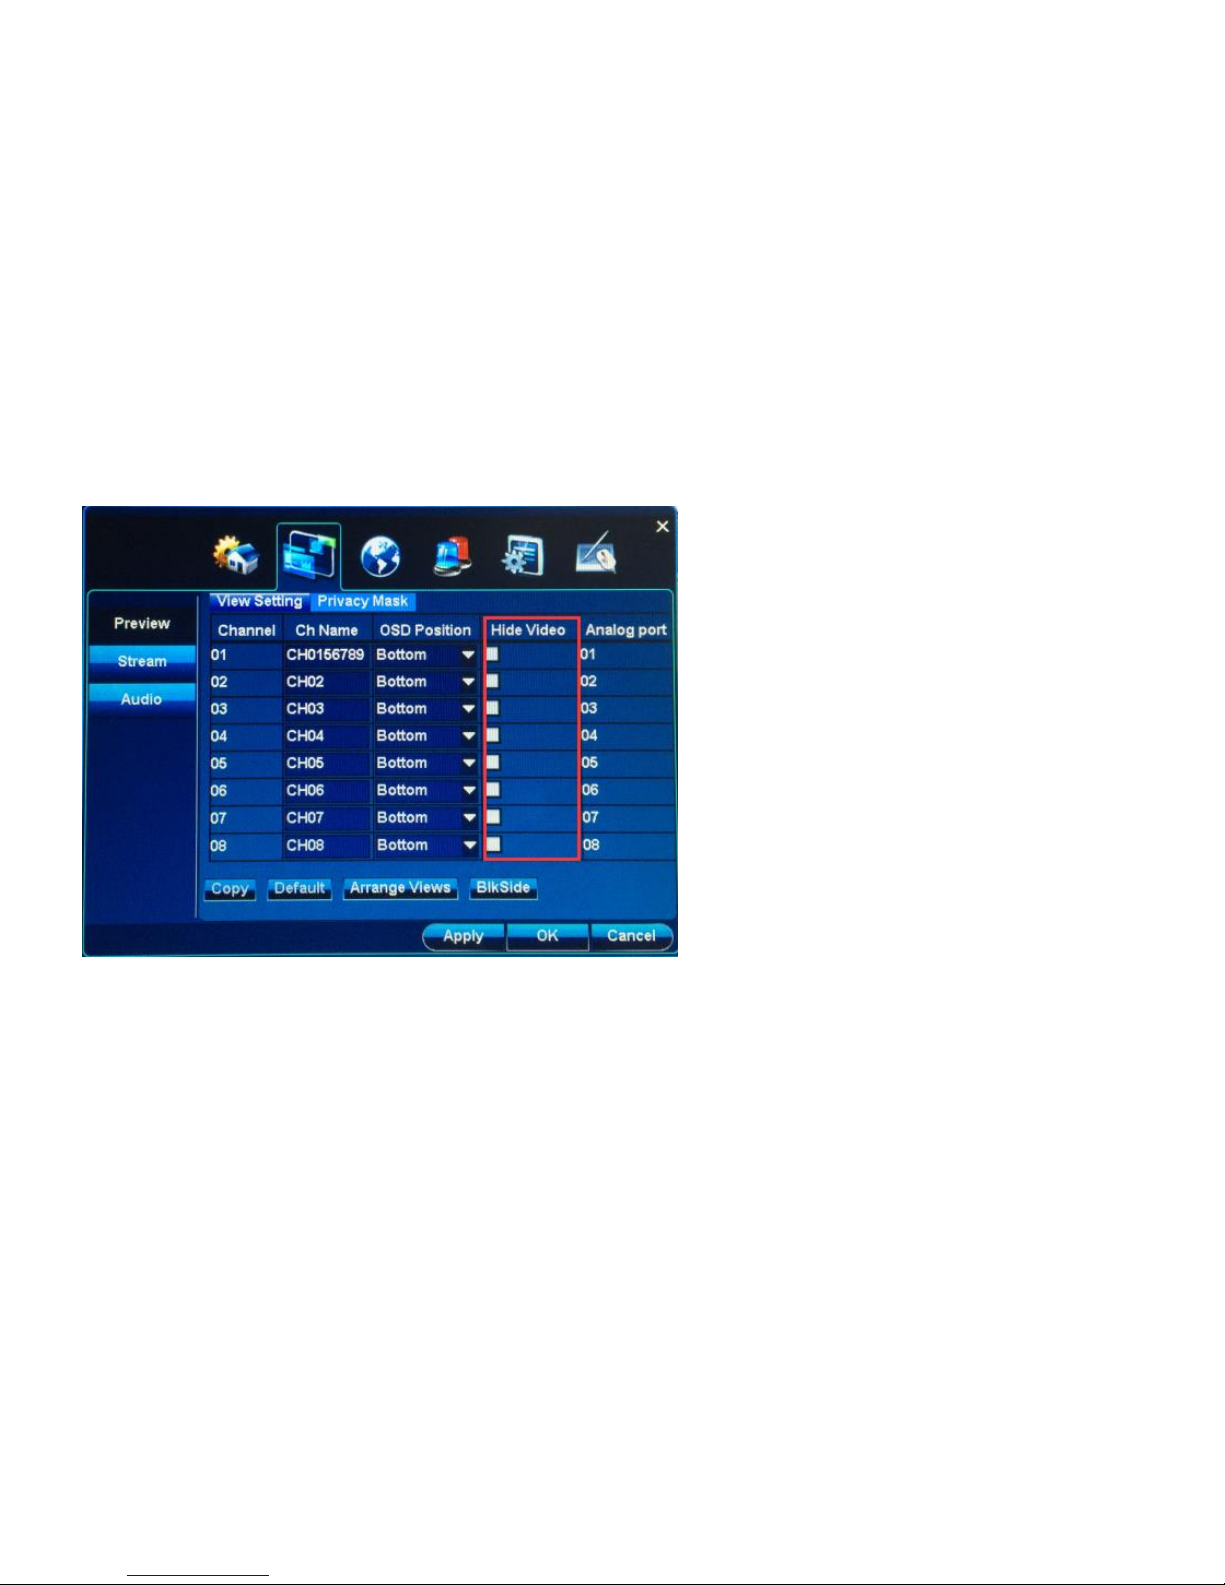
3. Hide video
Page 38
User Manual
38/183
4.3.1.1.1 Modify channel name
Page 39
User Manual
39/183
Page 40
User Manual
40/183
4.3.1.1.2 Modify OSD position
Page 41
User Manual
41/183
4.3.1.1.3 Hide video
Steps:
1. Left lick the box after “Hide Video”
Click【Apply】or【ok】,then preview the selected channel, that has been hided。
Page 42
User Manual
42/183
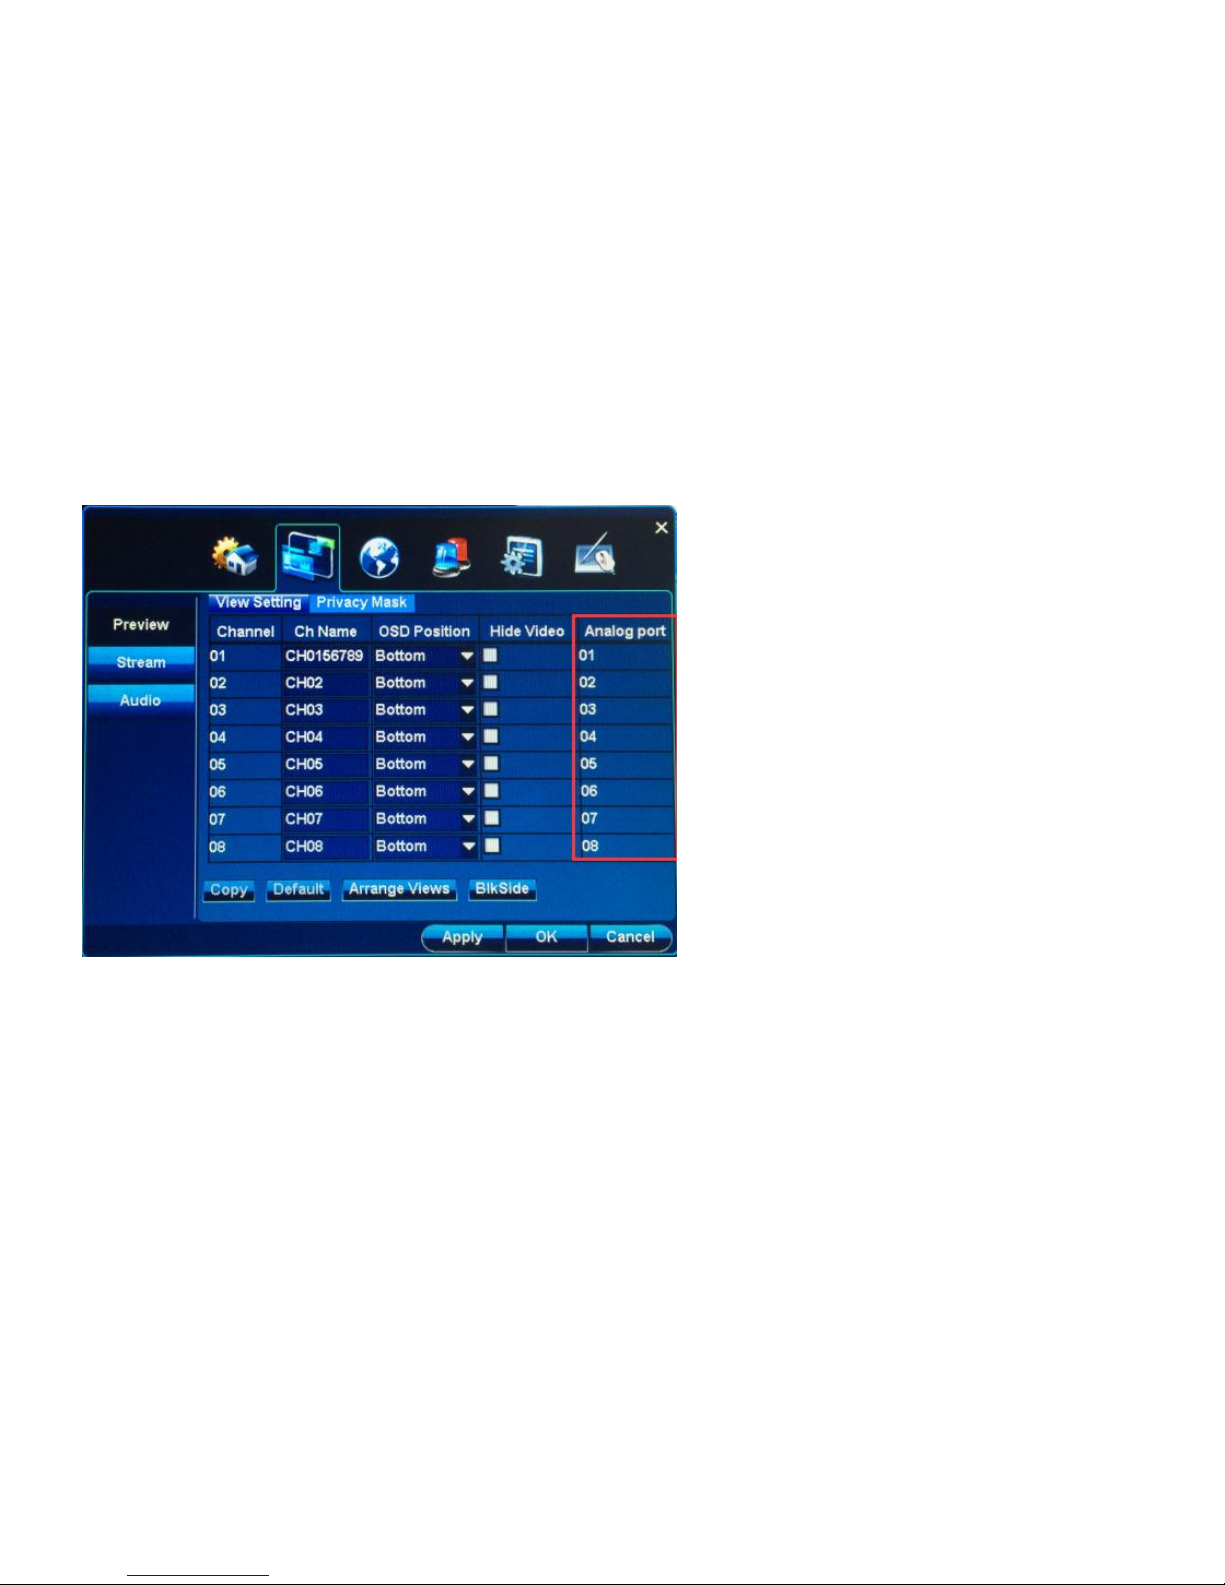
4.3.1.1.4 Analog Port
Steps:
1. Left lick the box after“Analog port”;
Click【Sort chn】Preview the channel 1,that show “Sort chn 1”,then drag the channel to sort
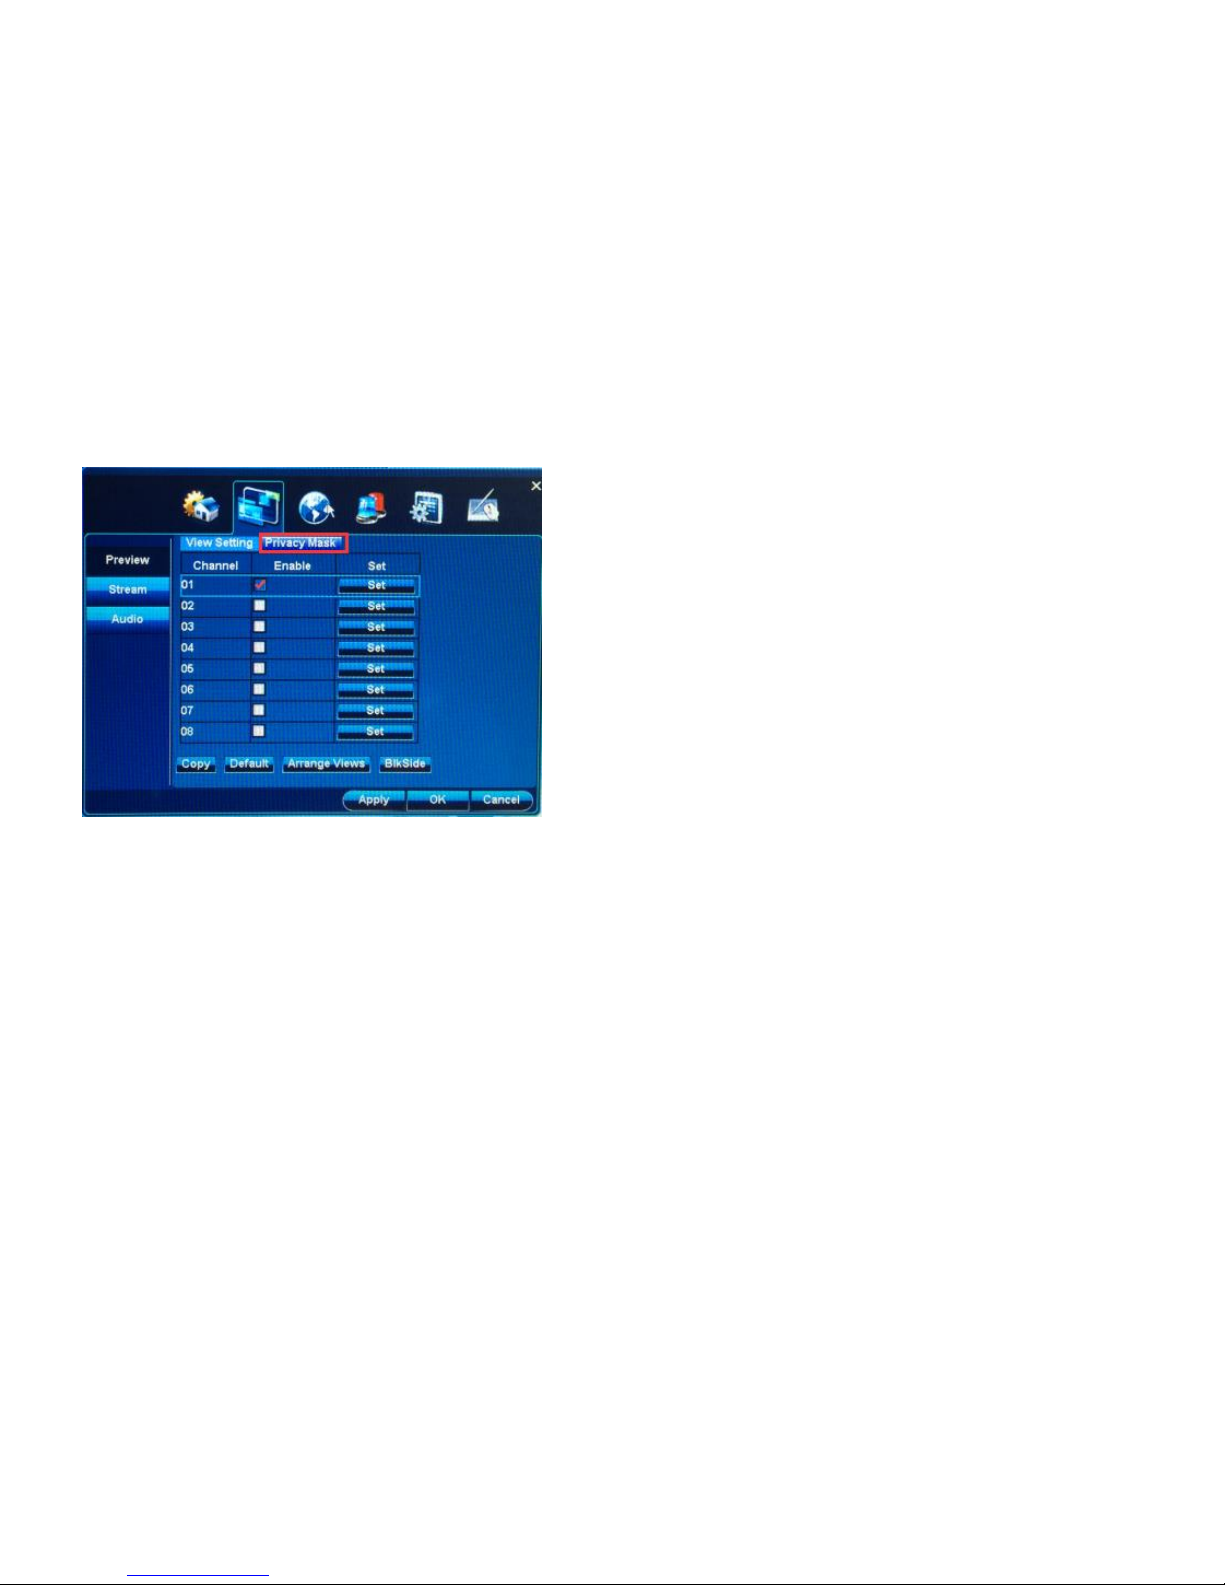
4.3.1.2 Privacy mask
Function position: Channel| Preview setting| Privacy mark
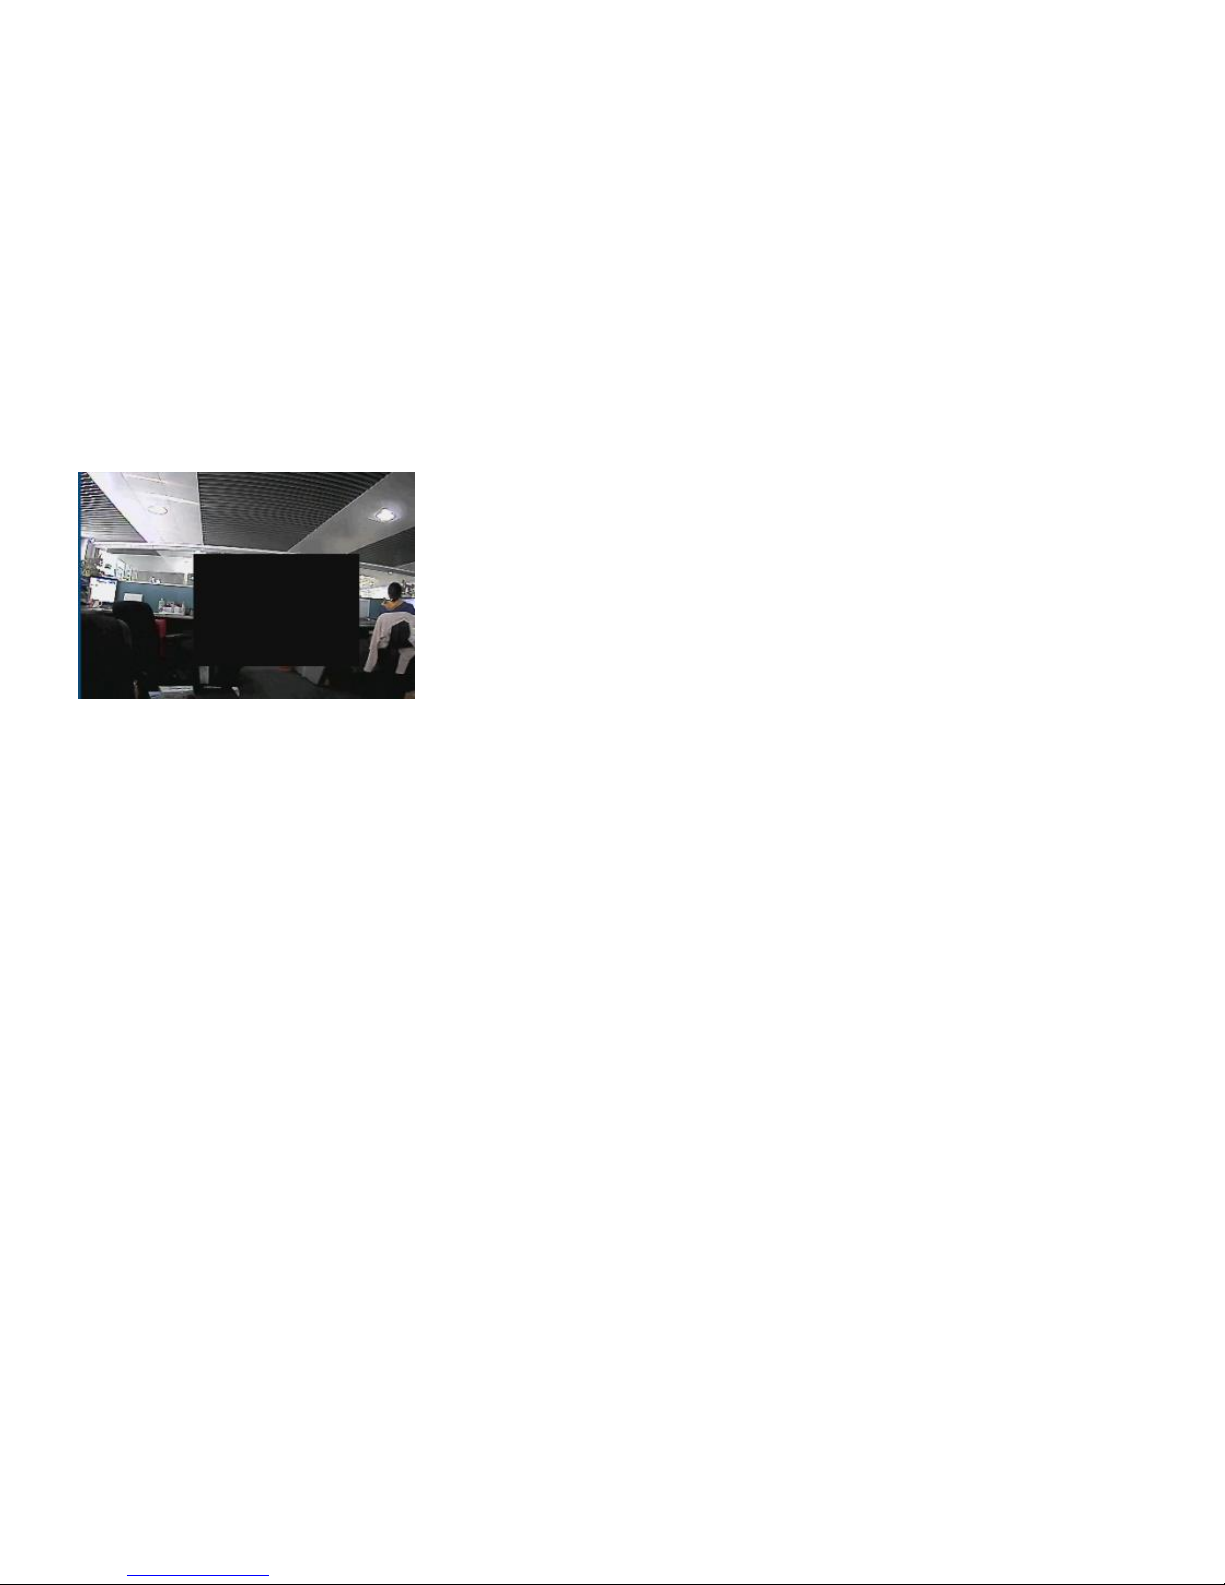
Function introduction: Hide the part of channel, max 4 privacy mark.
Page 43
User Manual
43/183
Step 1: Open privacy market, and start this function
Page 44
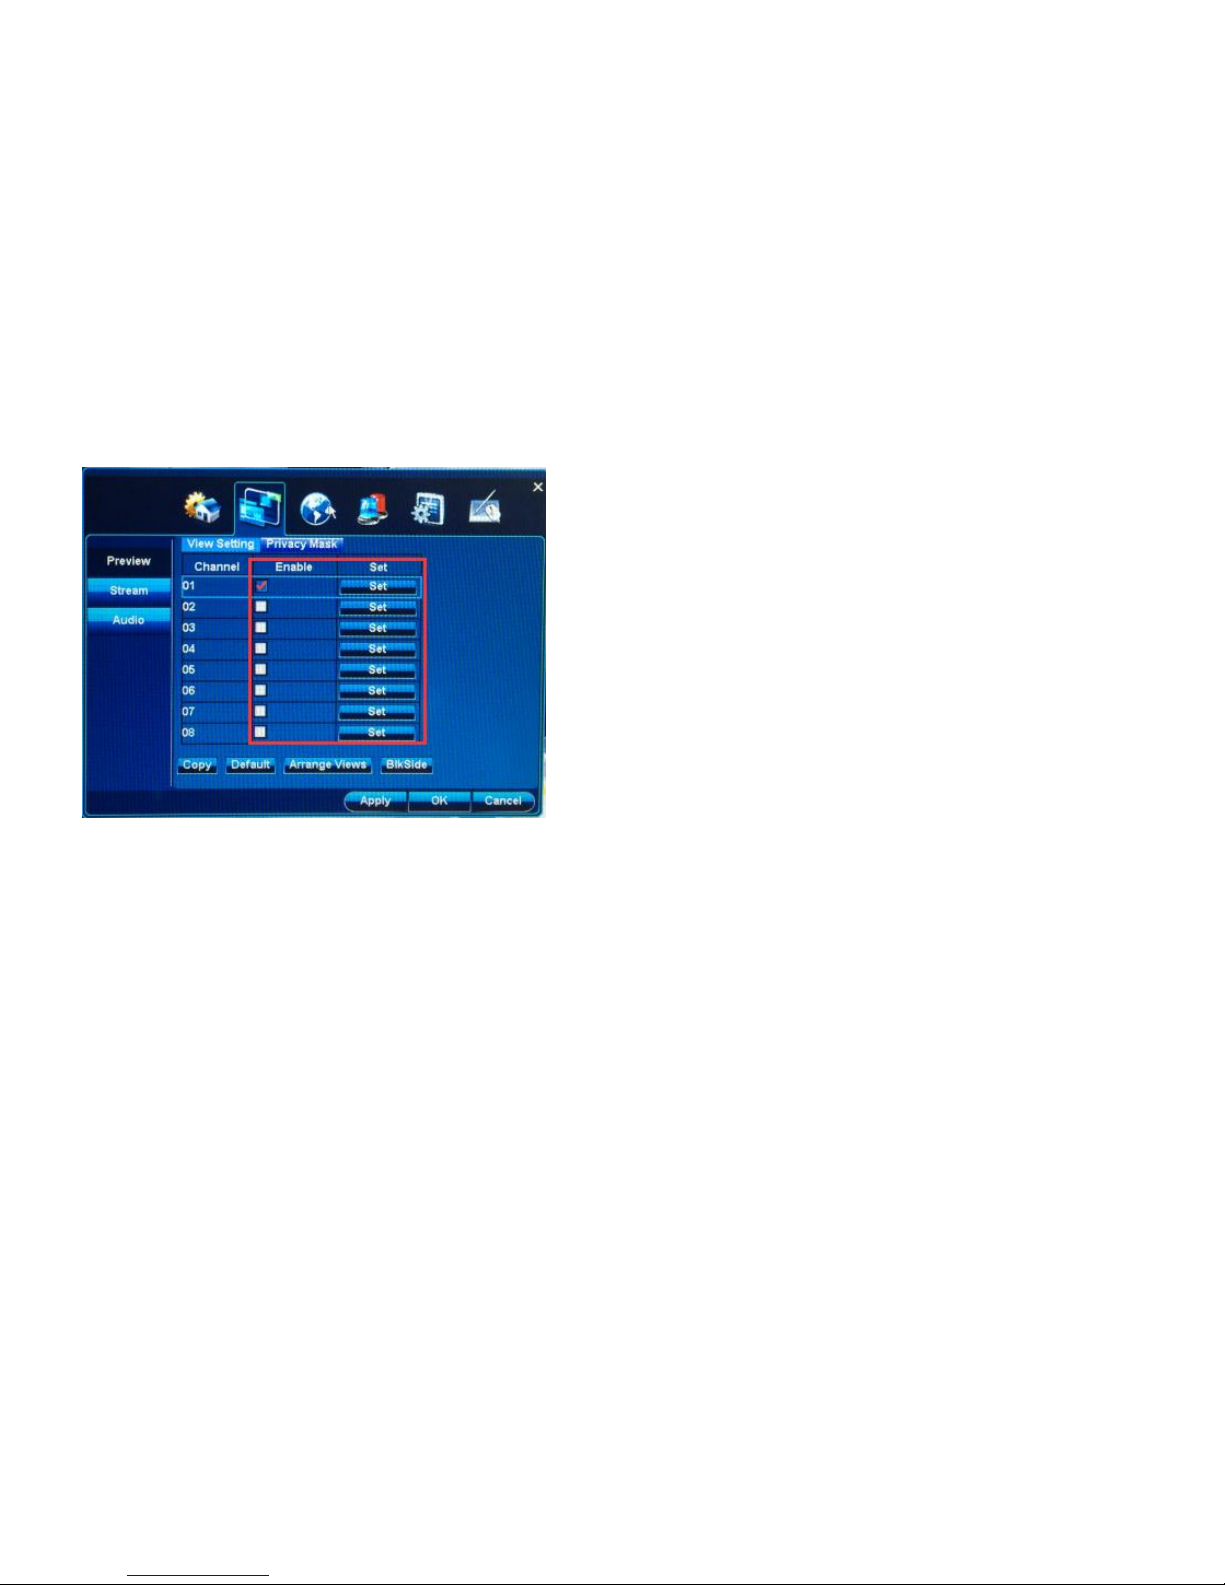
User Manual
44/183
1. Click 【Privacy mark】;
2. Choose“Enable”;
Note:【 Copy】,other channels can have same setting。
3. Click【setting】
Step 2:Setting part of privacy mask
Page 45
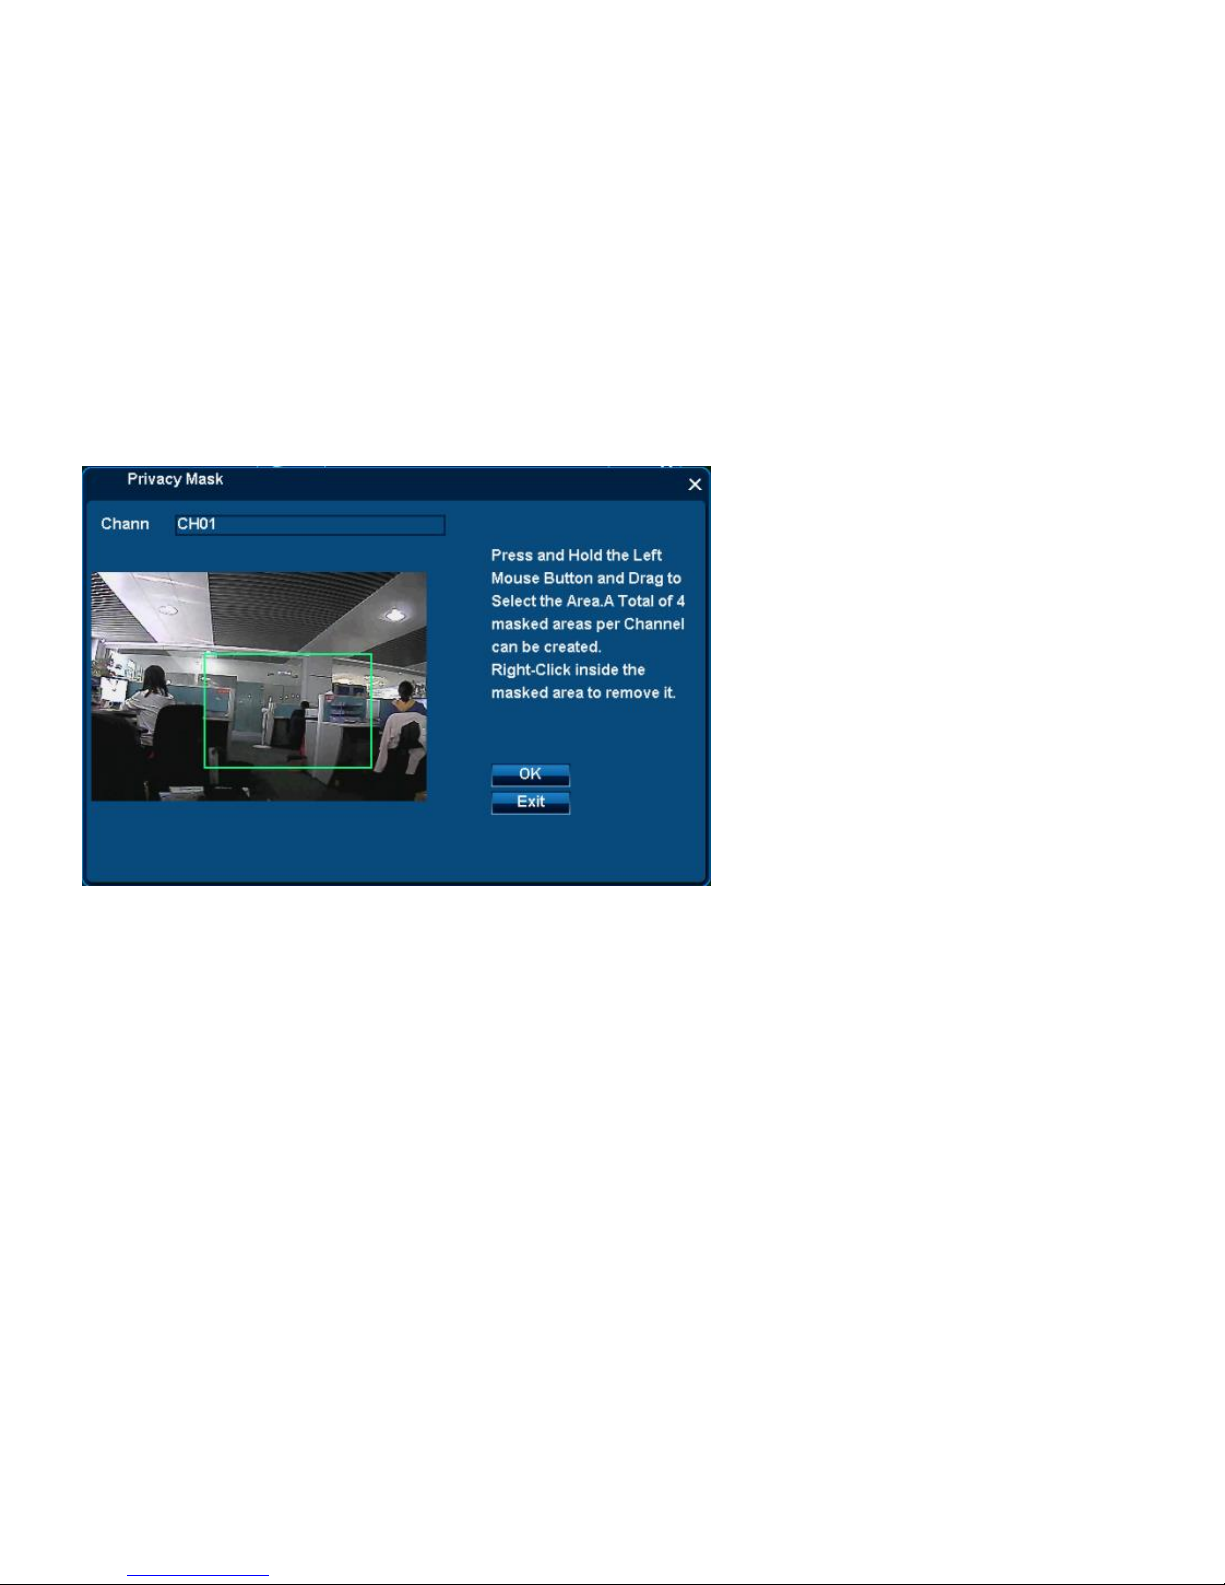
User Manual
45/183
Step 3:Ok; Apply
1. Click【ok】, then【Apply】or【ok】。
Page 46
User Manual
46/183
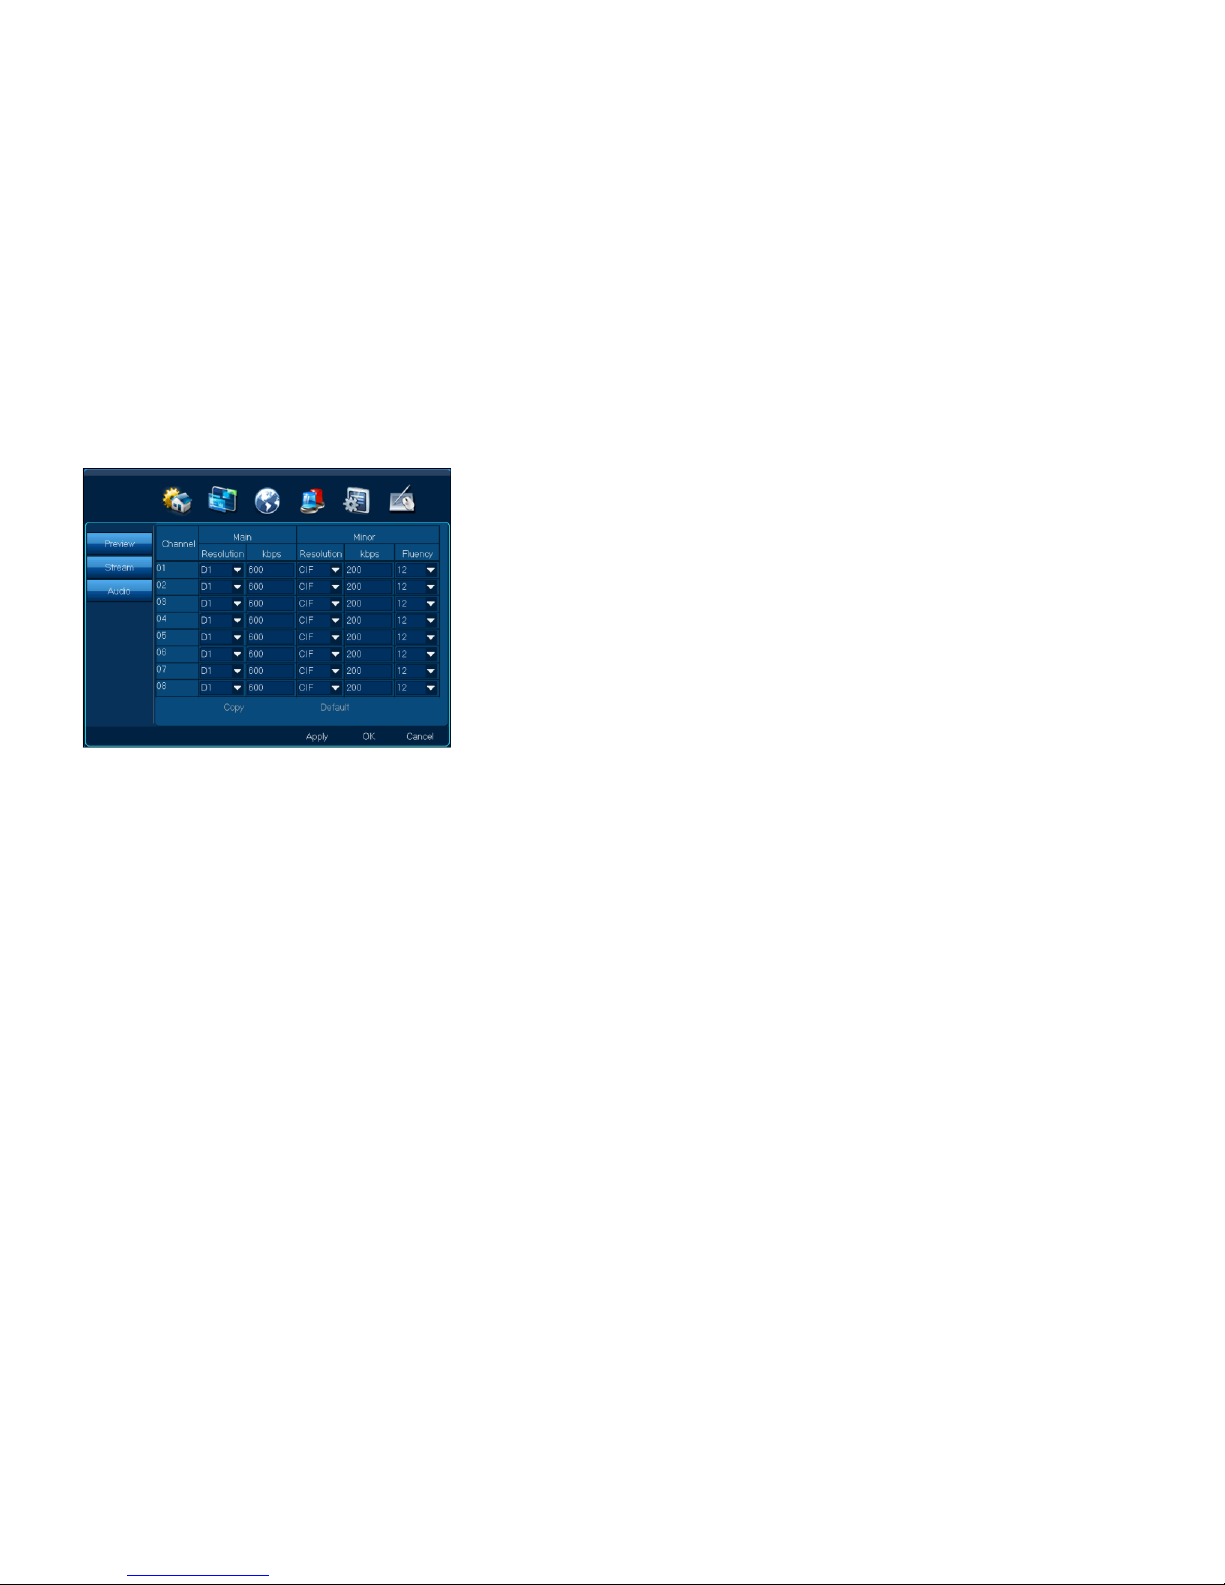
4.3.2 Stream setting
Function position:Channel| Stream setting
Function introduction: 1.Main stream setting—stream for local record;
2. Minor stream setting—stream for network transmission
Page 47
User Manual
47/183
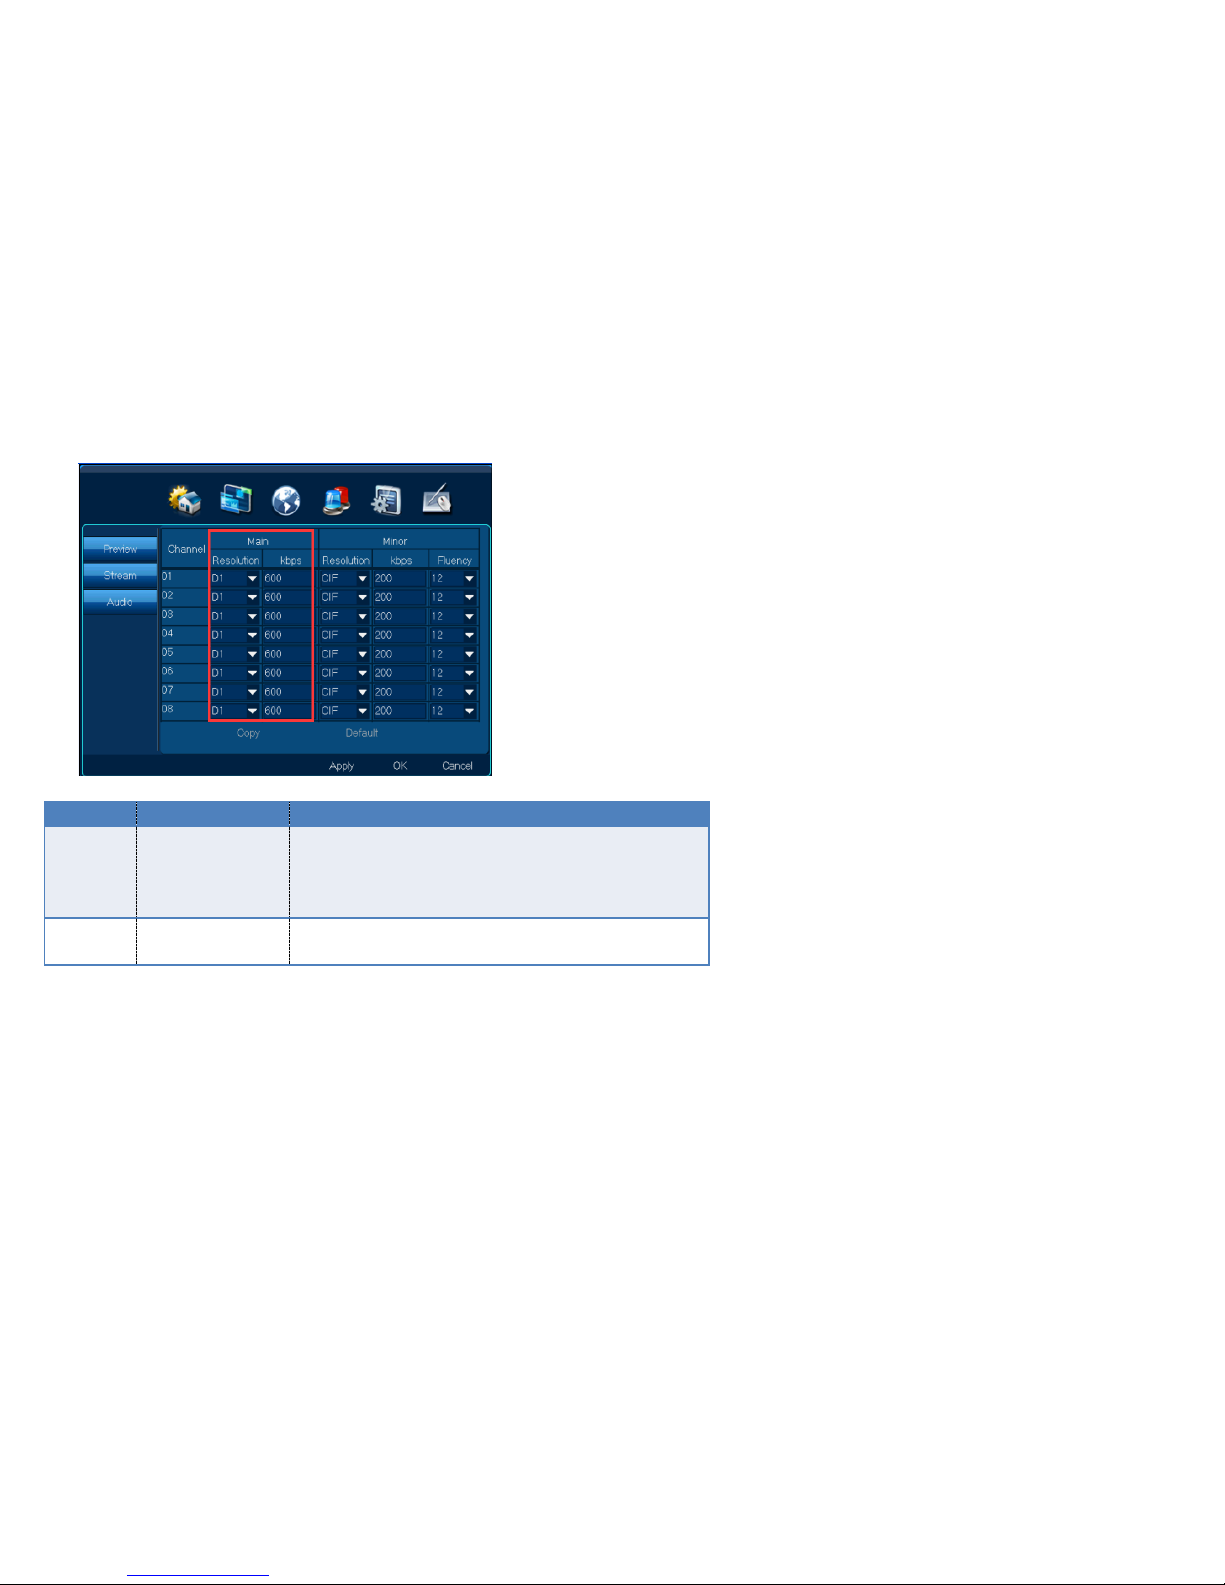
4.3.2.1 Main stream
Function position:Channel| stream| Main stream
Function:Main stream: stream for local record;Resolution can choose No/D1/CIF,kbps can be adjusted。
Page 48
User Manual
48/183
Name
Choice
Introduction
Resolution
D1/CIF
D1: PAL video standard—image resolution 704*576;
NTSC video standard,image resolution 640*480。
CIF:PAL video standard—image resolution 352*288;
NTSC video standard,image resolution 320*240。
kbps
D1(600kbps)
CIF(400kbps)
The more the number, the higher the image quality, the
larger HDD it will take
Steps:
1. Modify” Resolution”:NO/CIF/D1;
2. Modify“Kbps”;
Note:【 Copy】,other channels can have same setting
3. Click【Apply】or【ok】
Note: Please take compression frame rate in parameter form for reference to setting local
Page 49
User Manual
49/183
Compression frame rate
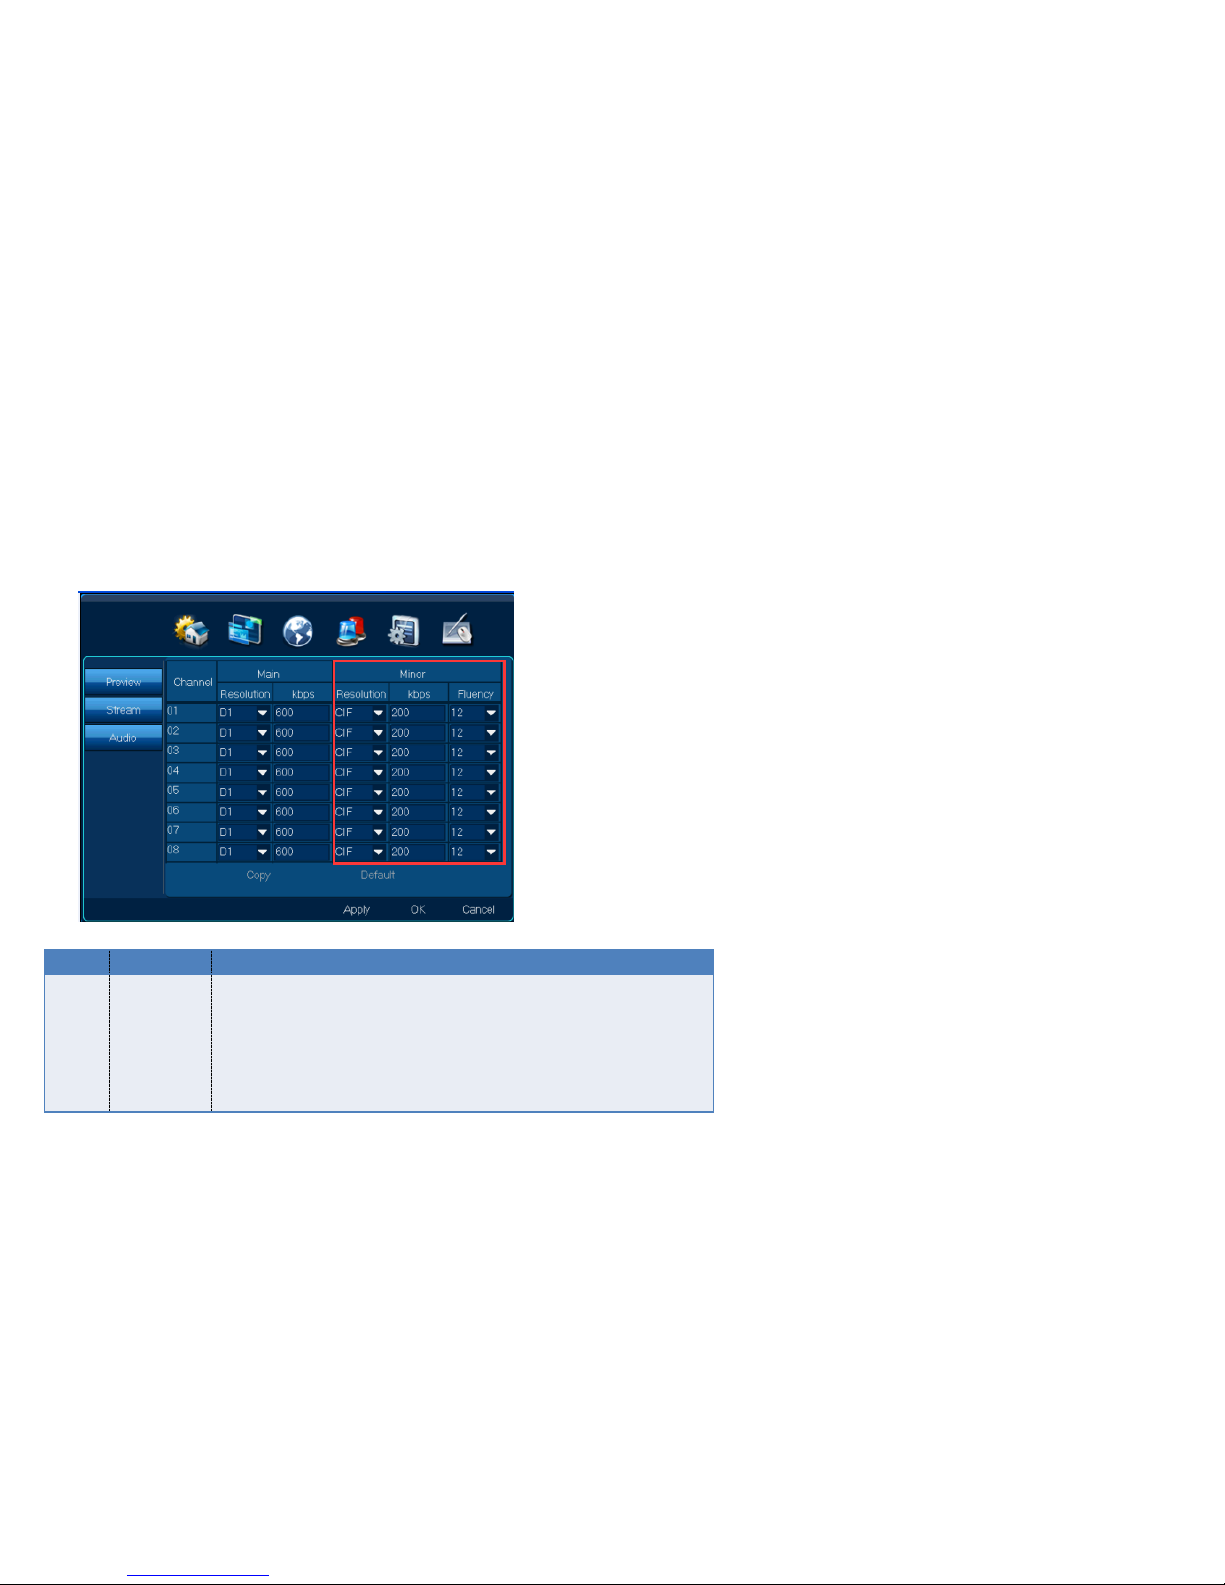
4.3.2.2 Minor stream
Function position:Channel| stream| Minor stream
Function introduction:Minor stream: stream for network transmission;resolution choice No/QCIF/CIF,kbps can be adjusted,fluency choice High/Middle/low
Name
Choice
Instruction
Resolu
tion
No/QCIF/CI
F
No:Close minor code stream,and make net work transmission by main
stream
QCIF:PAL video standard—image resolution 176*144;
NTSC video standard,image resolution 160*120。
CIF:PAL video standard—image resolution 352*288;
NTSC video standard,image resolution 320*240。
Page 50
User Manual
50/183
(kbps)
Close
QCIF(200kb
ps)
CIF(200kbp
s)
The more kbps, the higher image quality, the more network source that
will be took up
Fluenc
y
High/Middl
e/low
The more fluency, the higher image quality, the more network source
that will be took up
Please take compression frame rate in parameter form for reference
Note:Default fluency “low”,support 14 D1 playback
Fluency “Close”, support 16 D1 playback
Fluency “High”, support only 12 D1 playback
Steps:
1. Modify“Resolution”No/QCIF/CIF;
2. Modify“kbps”;
3. Modify” Fluency” High/Middle/low
Note:【 Copy】,other channels can have same setting
4. Click【Apply】or【ok】
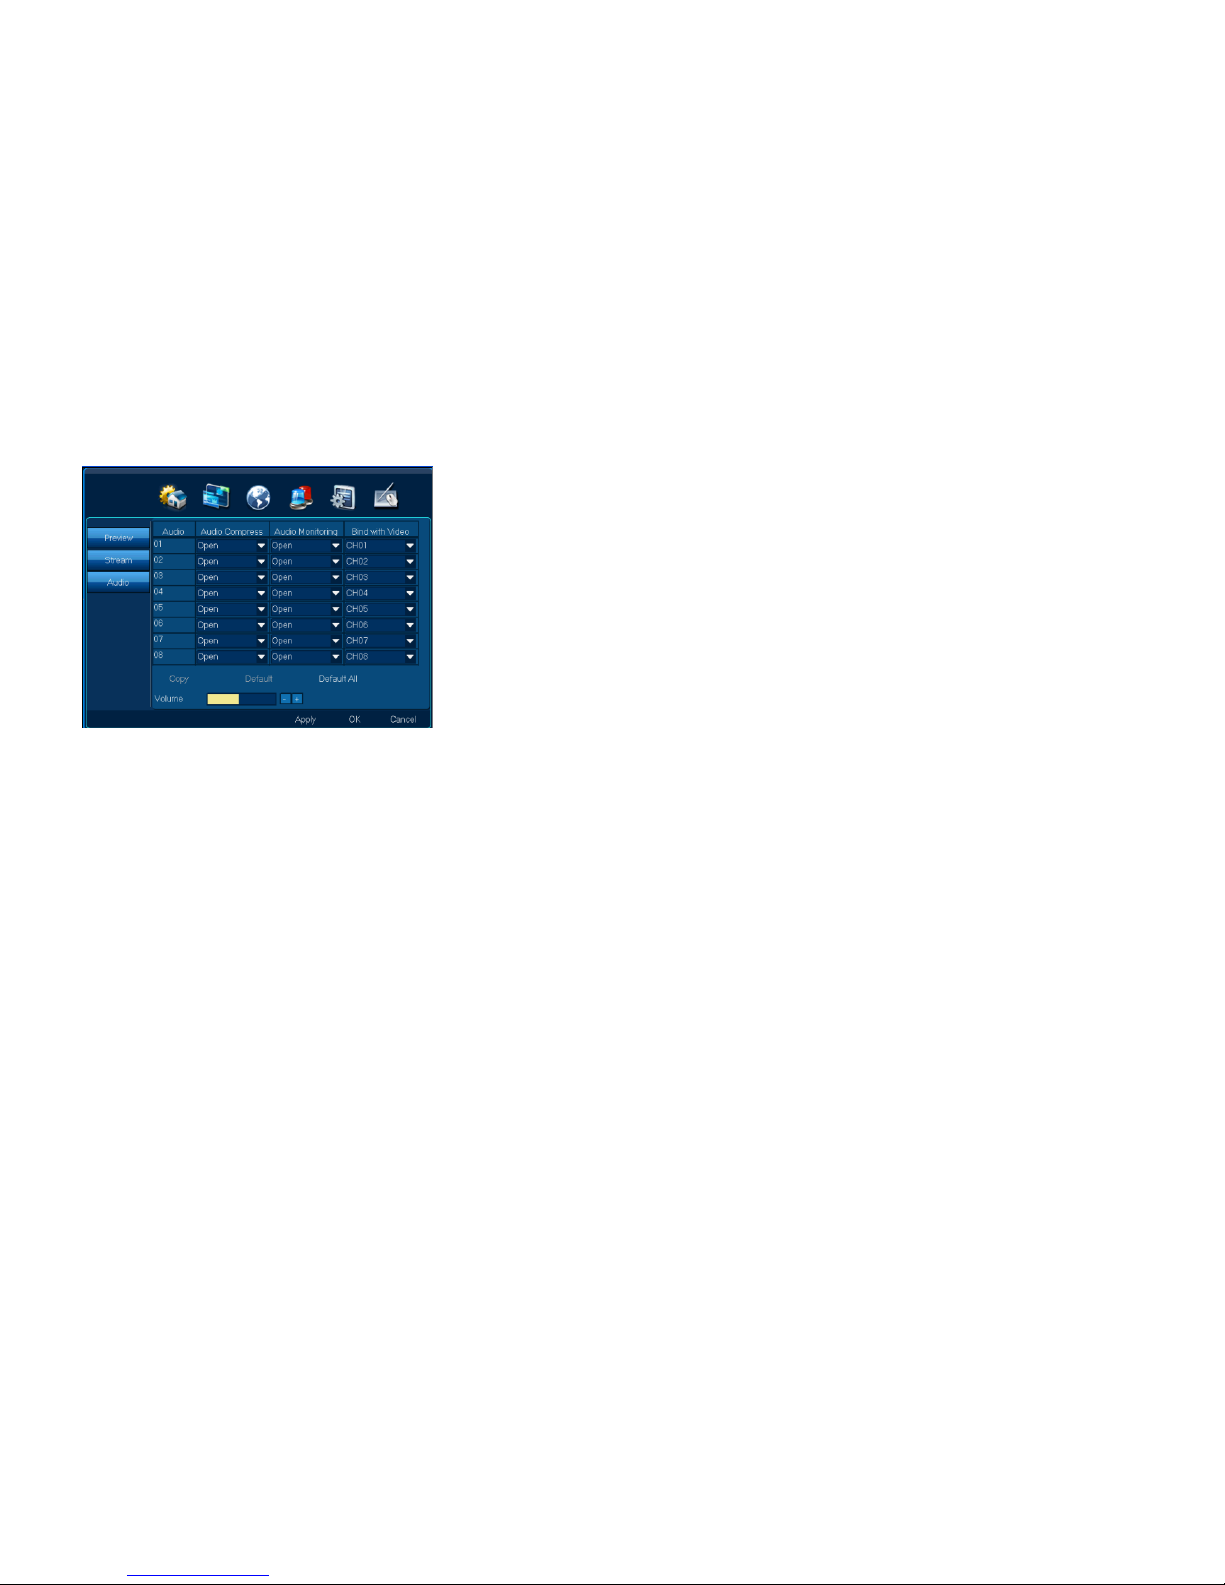
4.3.3 Audio setting
Function position:Channel| Audio setting
Function introduction: 1.Audio monitoring:Hear channel sound locally
2.Audio compression:Audio/video record, network monitoring. Remote view.
Page 51
User Manual
51/183
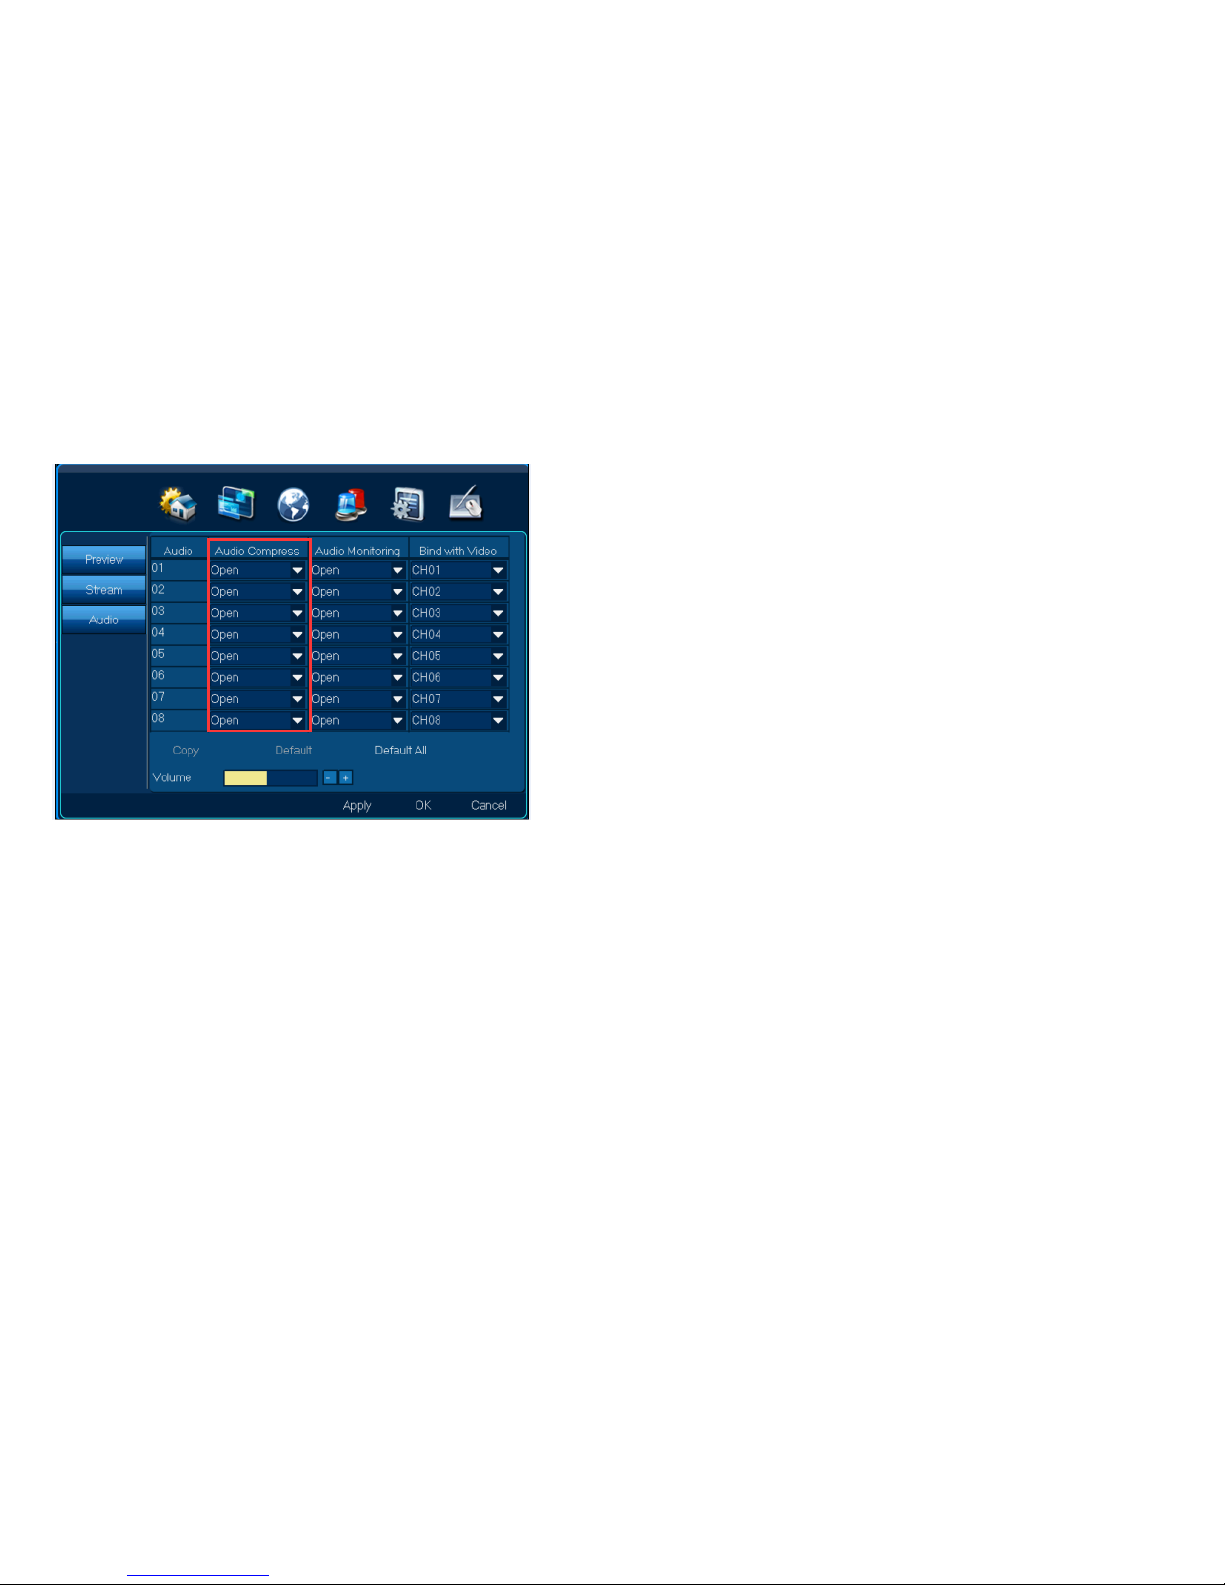
4.3.3.1 Audio compression
Function position:Channel| Audio| Audio compression
Function introduction: 1.Chooose“Audio compression”, will record both sound and video
2. Choose “Audio compression” Network monitoring and remote record will be audio and video
Page 52
User Manual
52/183
Step:
1. Choose” Audio compress”, “open”;
Note:【 Copy】,other channels can have same setting
2. Click【Apply】or【ok】
3. local record, network monitoring and remote record will be audio and video
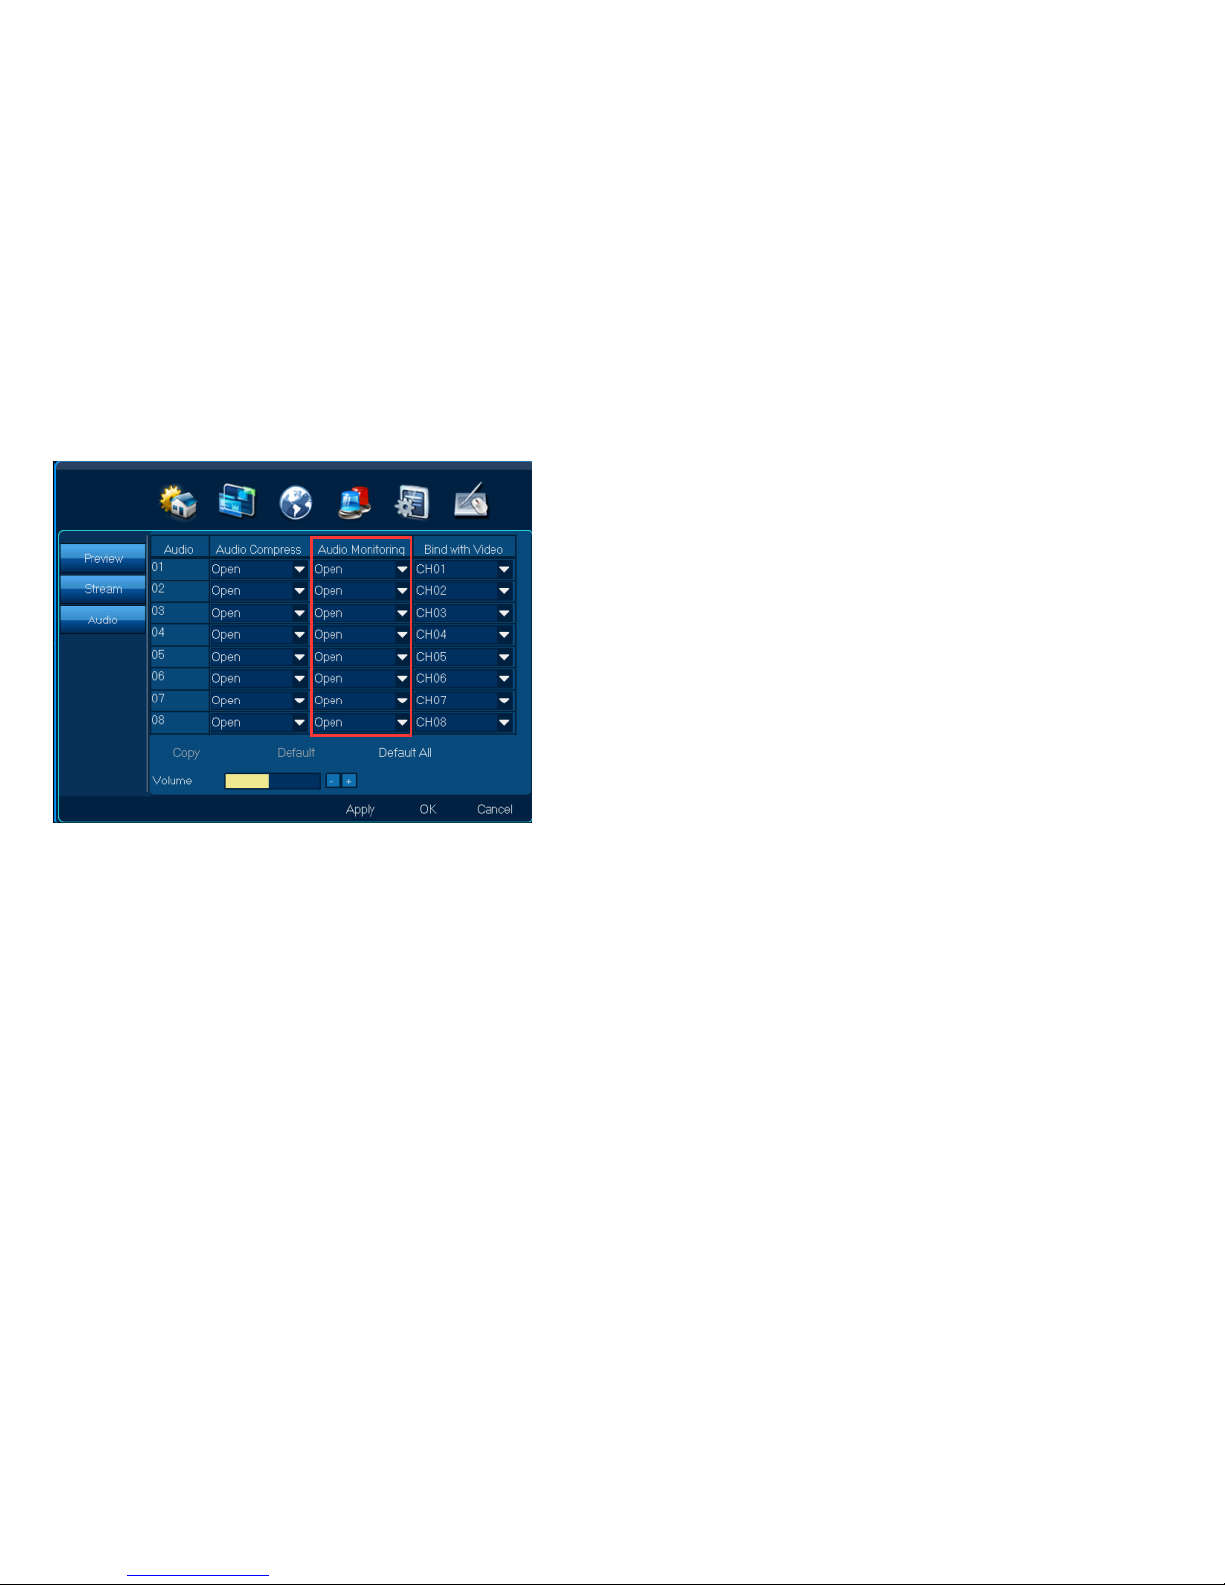
4.3.3.2 Audio monitoring
Function position:Channel| Audio| Audio monitoring
Function introduction: 1.Choose“Audio monitoring”, support local audio;
2. Audio volume can be adjusted
Page 53
User Manual
53/183
Steps:
1.Choose“Audio monitoring”, “open”;
Note:【 Copy】,other channels can have same setting
2.Click【Apply】or【ok】,connect audio out, can hear sound
3. Audio volume can be adjusted。
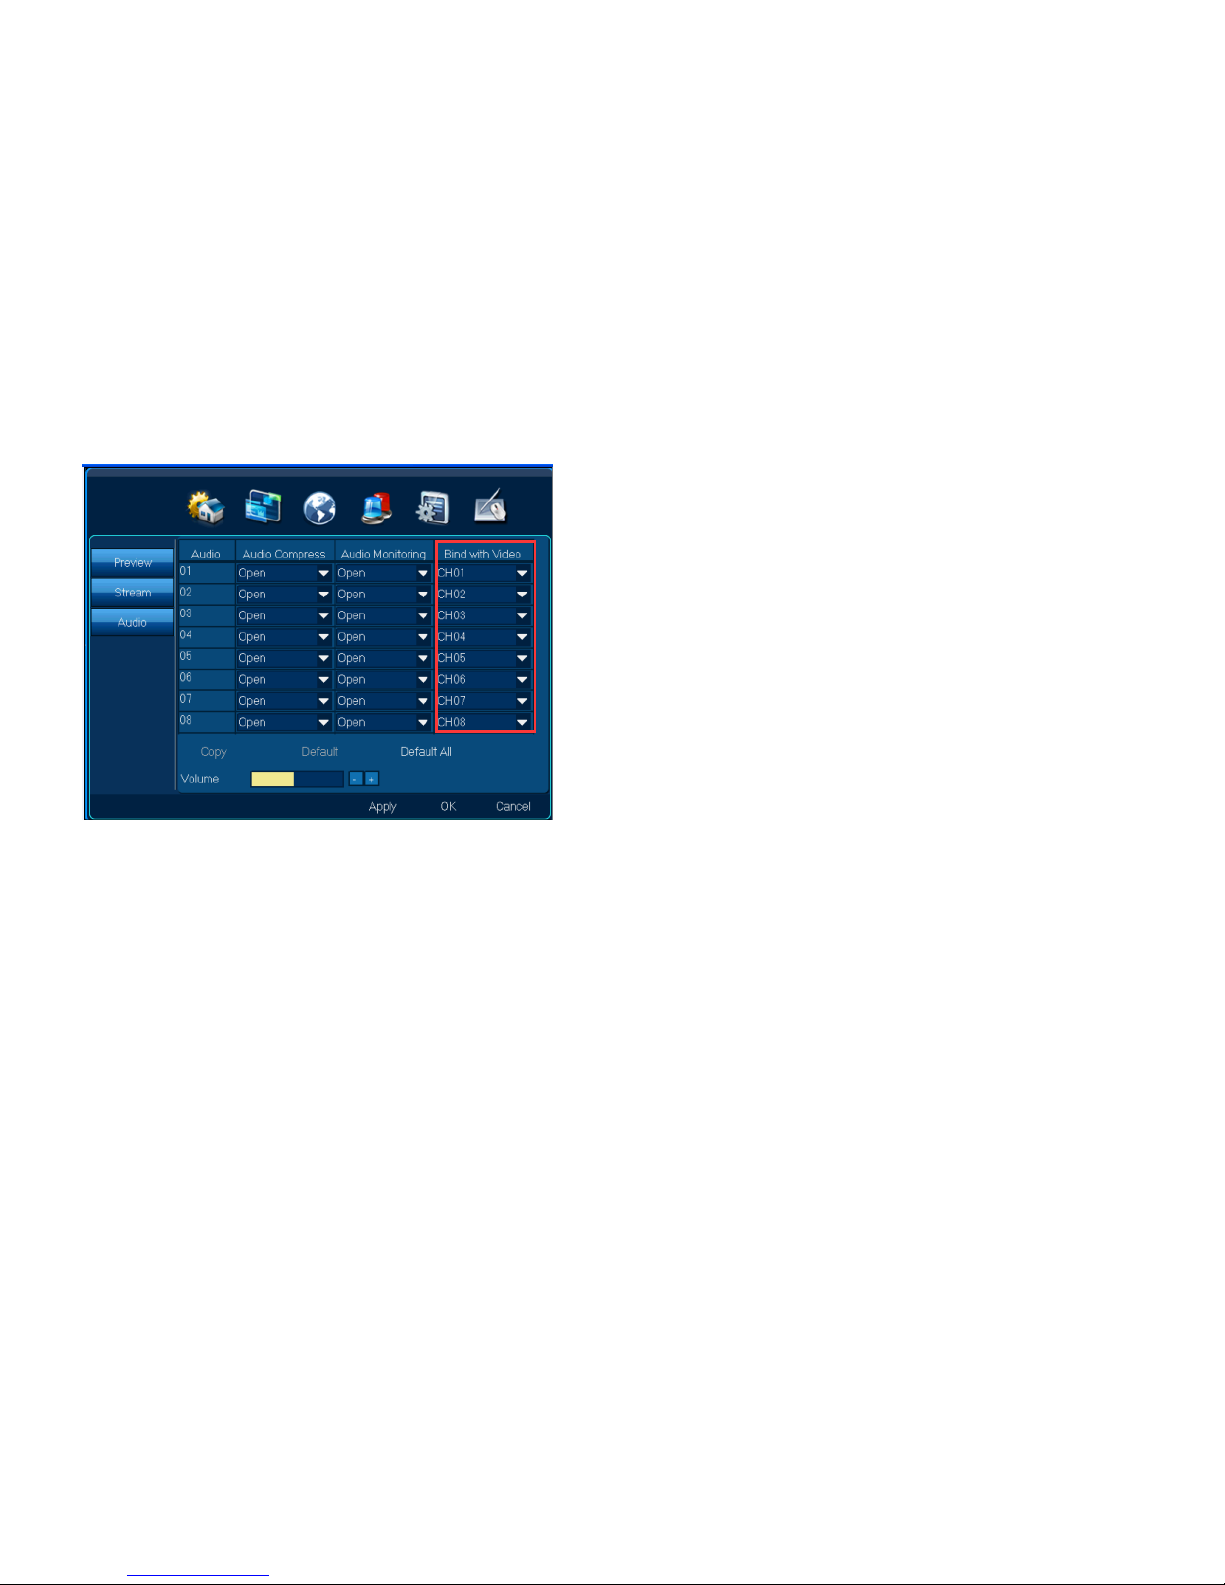
4.3.3.3 Bind with video
Function position:Channel| Audio| Bind with video
Function introduction: 1.Choose“Bind with video”,when see video, can hear the bind audio
2.Audio volume can be adjusted
Page 54
User Manual
54/183
Steps:
1. Choose” Bind with video”, then choose“CH01”;
Note:【 Copy】,other channels can have same setting
Click【Apply】or【ok】when see channel 1 video, can hear the bind audio accordingly.
4.4 Network
Function:1.Network setting:Choose ADSL dial-up, wireless dial-up, DHCP gets IP automatically in LAN, Manual setting IP in LAN.
2. Network service: WebCC, Bi-directional talk function
4.4.1 Network setting
Function:Network| network setting
Function introduction: 1.Dial-up setting;
Page 55
User Manual
55/183
2. DHCP gets IP automatically,Manual setting IP;
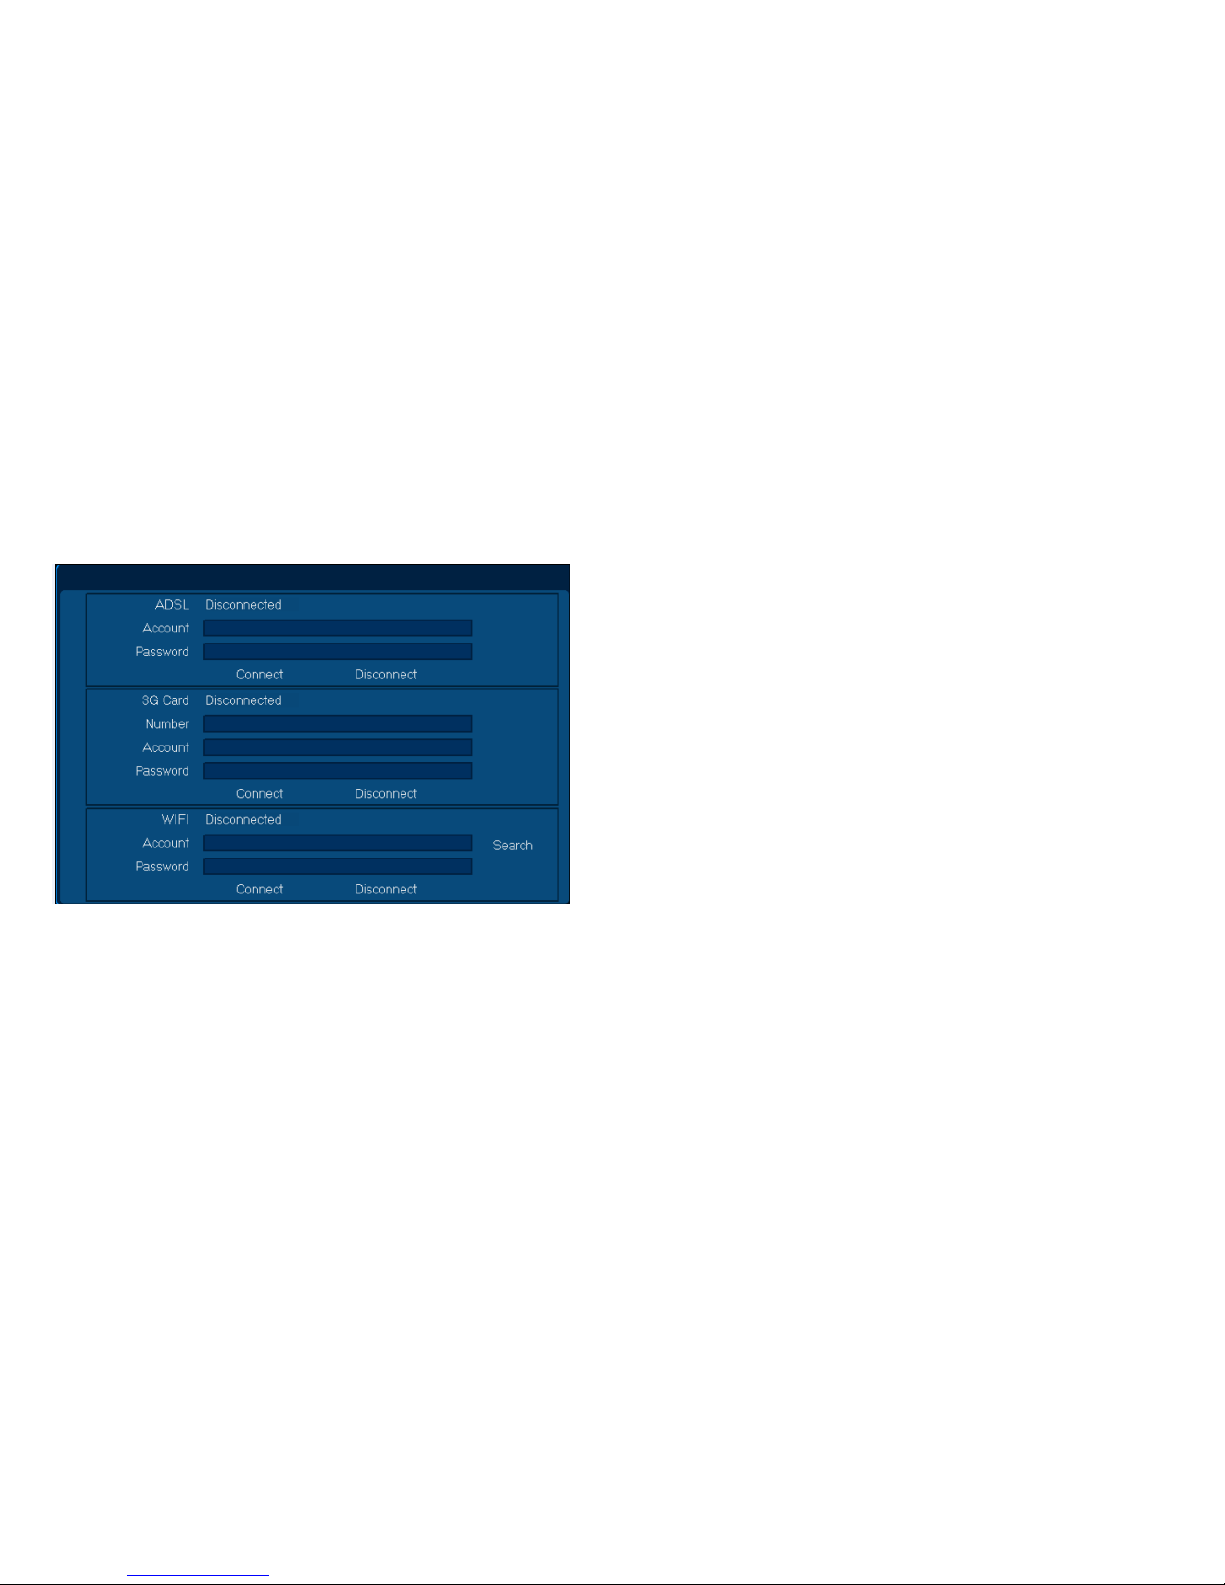
4.4.1.1 Dial-up
ADSL dial-up,or 3G card dial-up。
4.4.1.2 ADSL dial-up
Function position:Network| Network setting| PPPoE
Function introduction: ADSL dial-up;
Step 1:ADSL dial-up
1. Click【setting】
2. Write ADSL dial-up account name and password;
3. Click【connect】
Note: After successful dial-up, it can dial-up automatically after restart DVR or outage.
Page 56

User Manual
56/183
Step 2:Disconnect ADSL dial-up
1. Click【disconnect】
4.4.1.3 3G card dial-up
Function position:Network| Network setting|PPPoE
Function introduction: 3G card dial-up
Step 1:3G card dial-up
1. Click【setting】
2. Write card number/account/password
Please take 5.2 3G card dial-up for reference for number/account/password setting
4. Click【connect】
Note: After successful dial-up, it can dial-up automatically after restart DVR or outage.
Step 2:Disconnect 3G network card dial-up
1. Click【disconnected】。
4.4.1.4 DHCP gets IP automatically
Function position:Network| network setting
Function introduction:DHCP gets IP automatically in LAN
Open DHCP steps:
1. Confirm route to open DHCP, that can be used normally
2. Choose” Automatic IP(DHCP)”;
3. Click【Apply】or【ok】 It can get IP automatically
Note: when using DHCP function, it can not make manual IP etc parameters setting
4.4.1.5 Manual setting IP
Function position:Network| network setting
Function introduction:Manual setting IP in LAN.
Page 57

User Manual
57/183
Manual setting steps:
1. Cancel” Automatic IP(DHCP)”function;
2. Manual writing IP/ NetMask / Gateway/DNS
3. Click【Apply】or【ok】
4.4.2 Network service
Function position:Network| network service
Function introduction: 1. Realize web monitoring by WebCC
2. Realize Bi-directional talk between local and remote monitoring
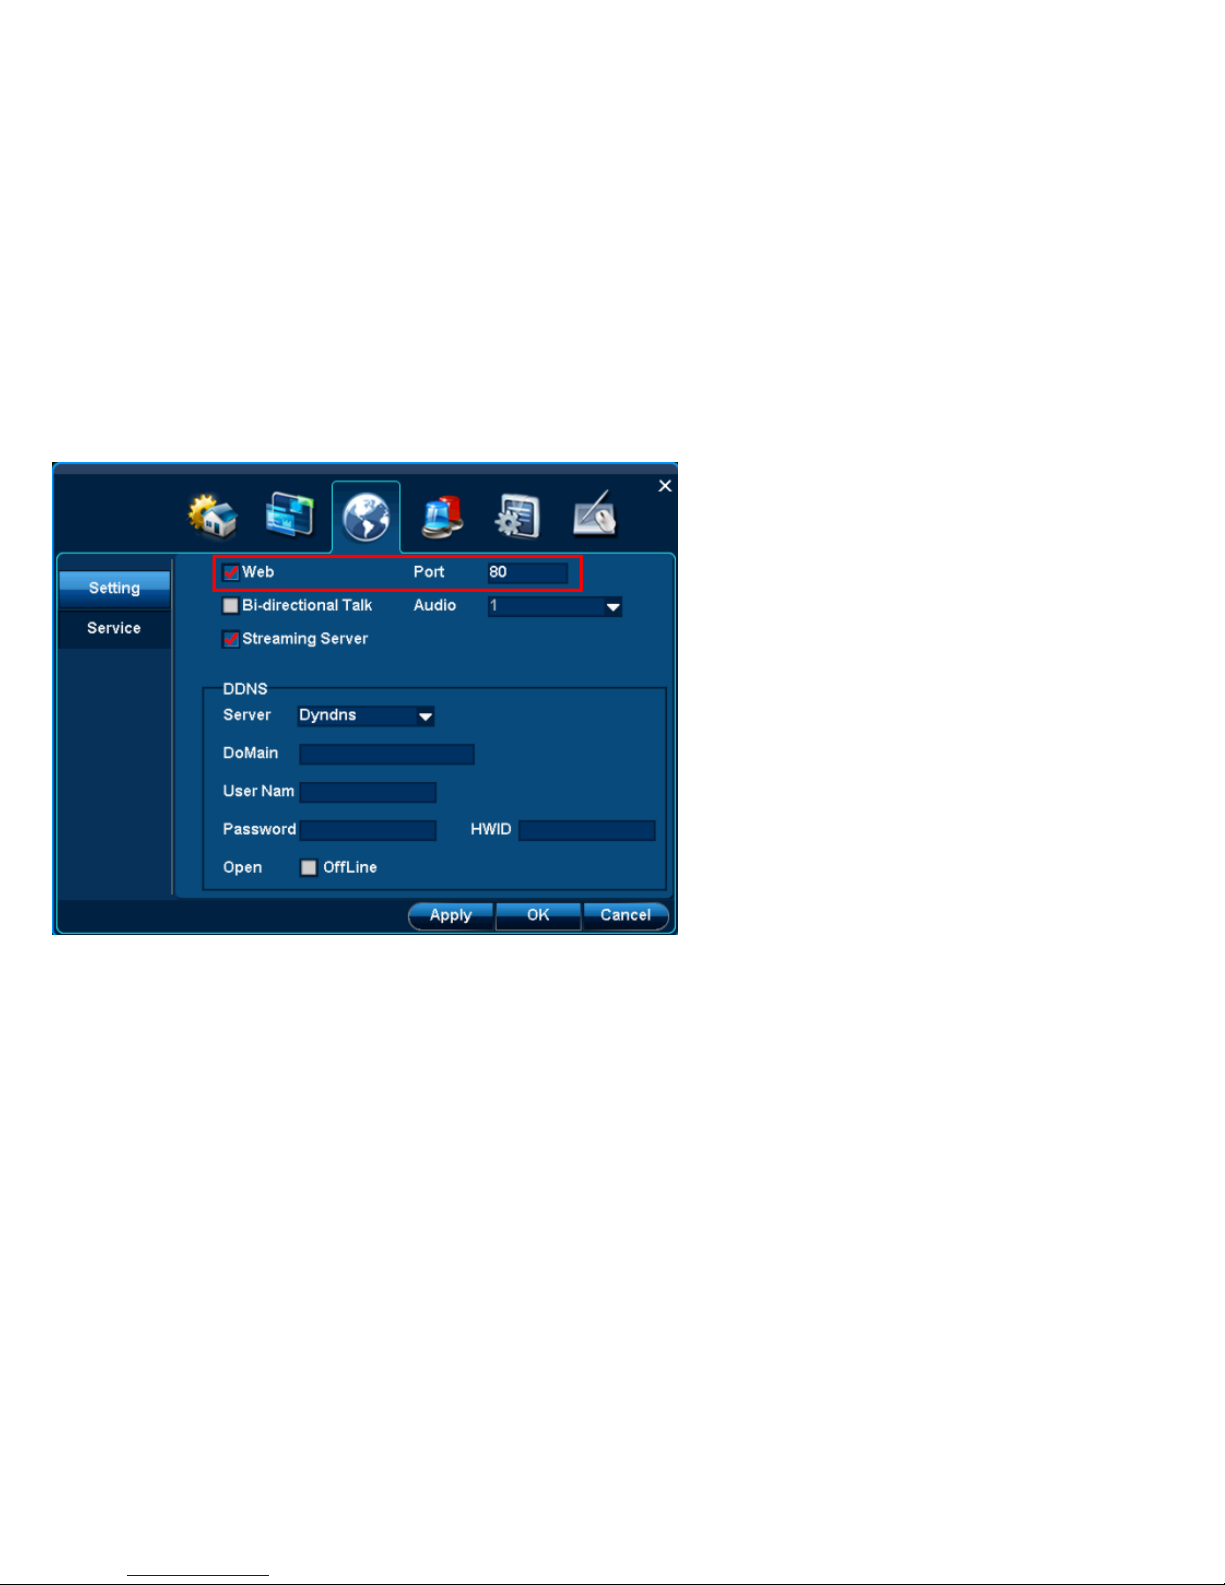
4.4.2.1 WebCC
Function position:Network|Network service|WebCC
Function introduction: Realize web monitoring by WebCC; Connect with DVR by device IP
Page 58
User Manual
58/183
Step 1:Open WebCC function
1. Choose“WebCC”;
If 80 port has been took up, pls Modify port number。
2. Click【Apply】or【ok】to save setting
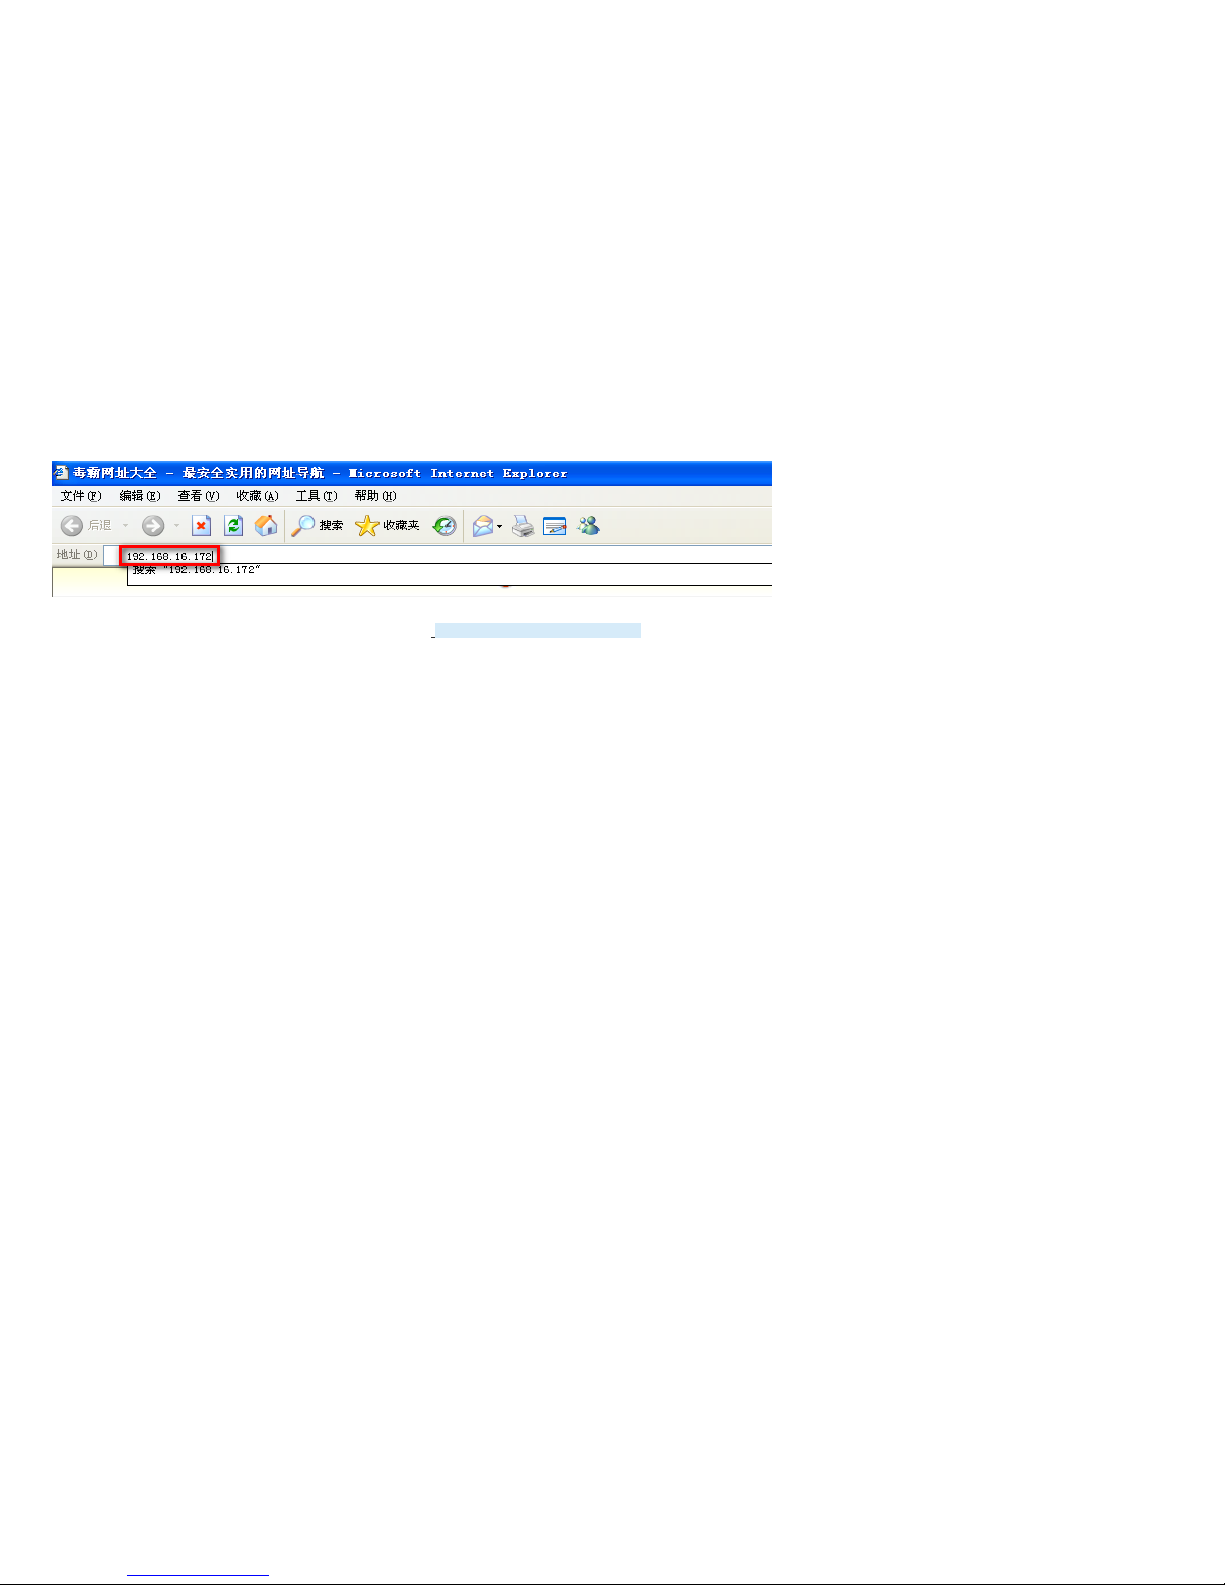
Step 2: Client-end use Webccc to connect with DVR
1. The users open IE browser, and write DVR IP and port number
Page 59
User Manual
59/183
Note: IE setting: Tool/internet choice/Safe/Internet/ customization, open ActiveX plug-in
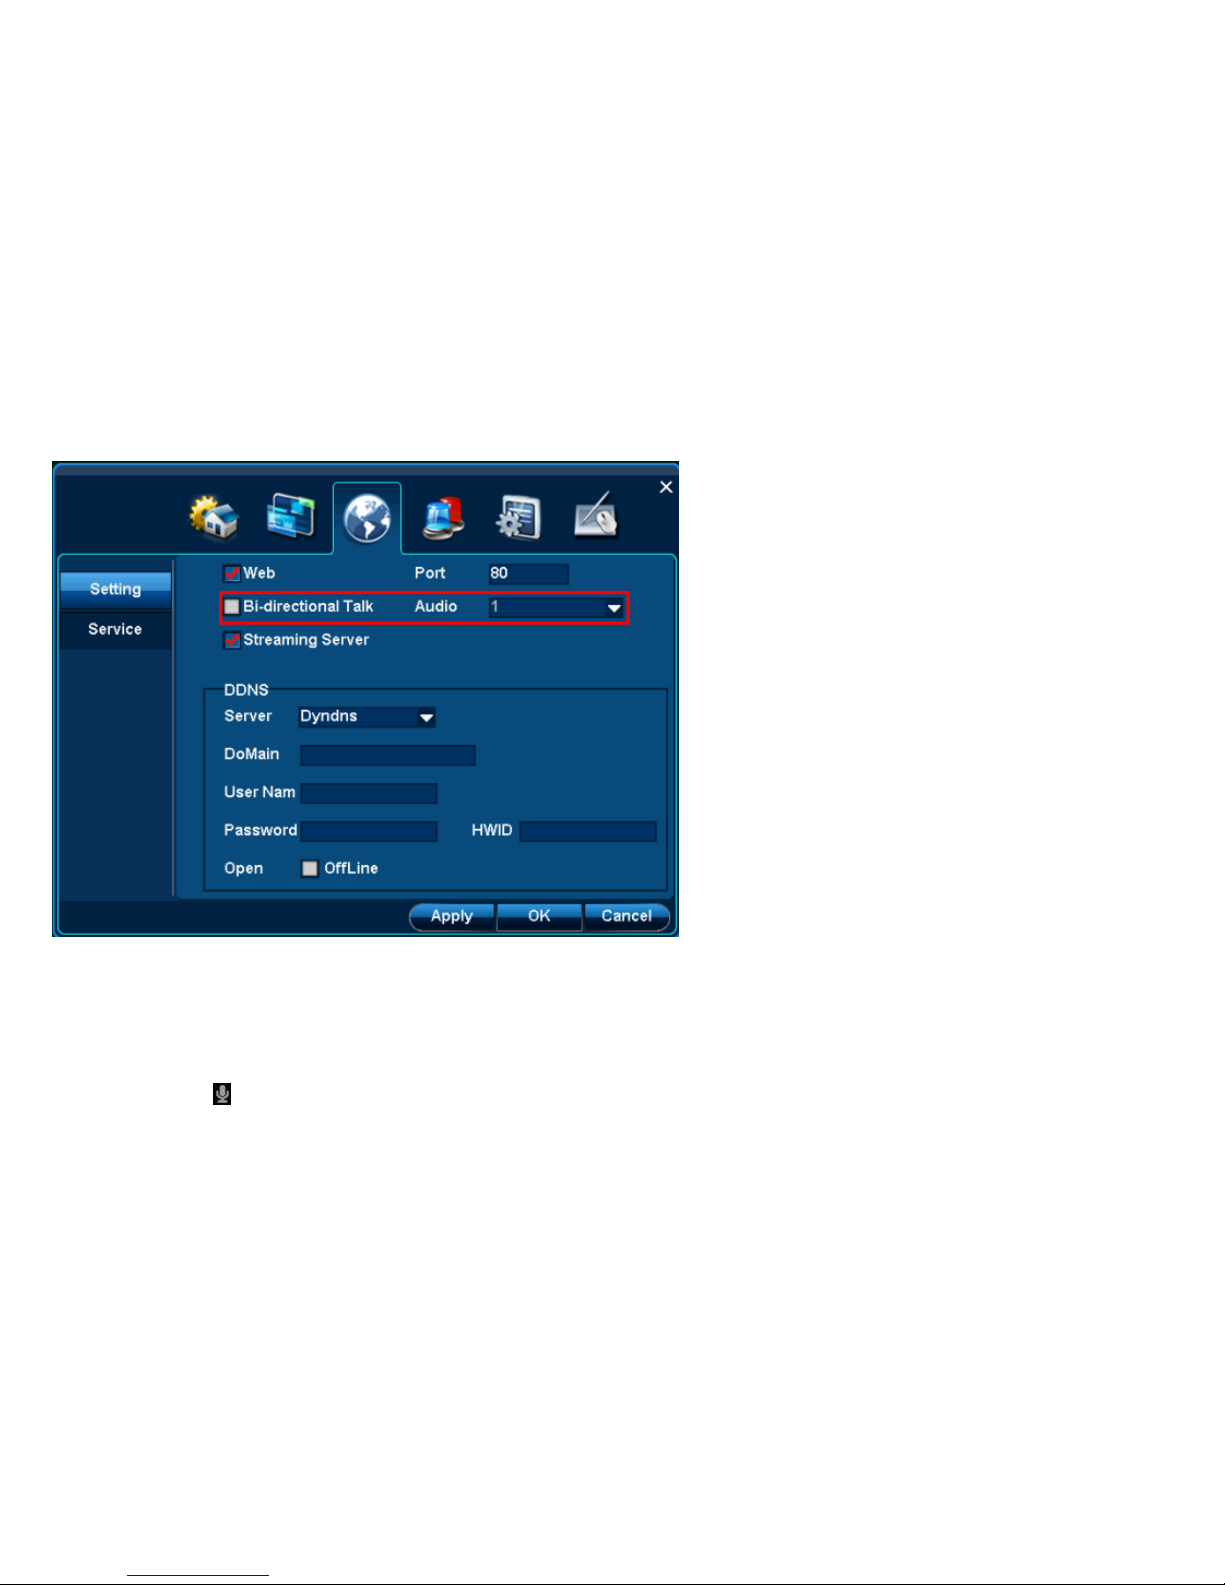
4.4.2.2 Bi-directional talk
Function position:Network|Network service| Bi-directional talk
Function introduction:Realize Bi-directional talk between local and remote monitoring
Page 60
User Manual
60/183
Step 1:Open Bi-directional talk
1. Choose“Bi-directional talk”;
2. choose“channel”,example“CH04”;
Step 2:Client-end open bi-directional talk
1. Client-end connect with DVR
2. Right click the linking window, choose Bi-directional talk
Note: Click in WebCC, and can do Bi-directional talk
Page 61
User Manual
61/183
4.5 Alarm
Function position:System setup| Alarm
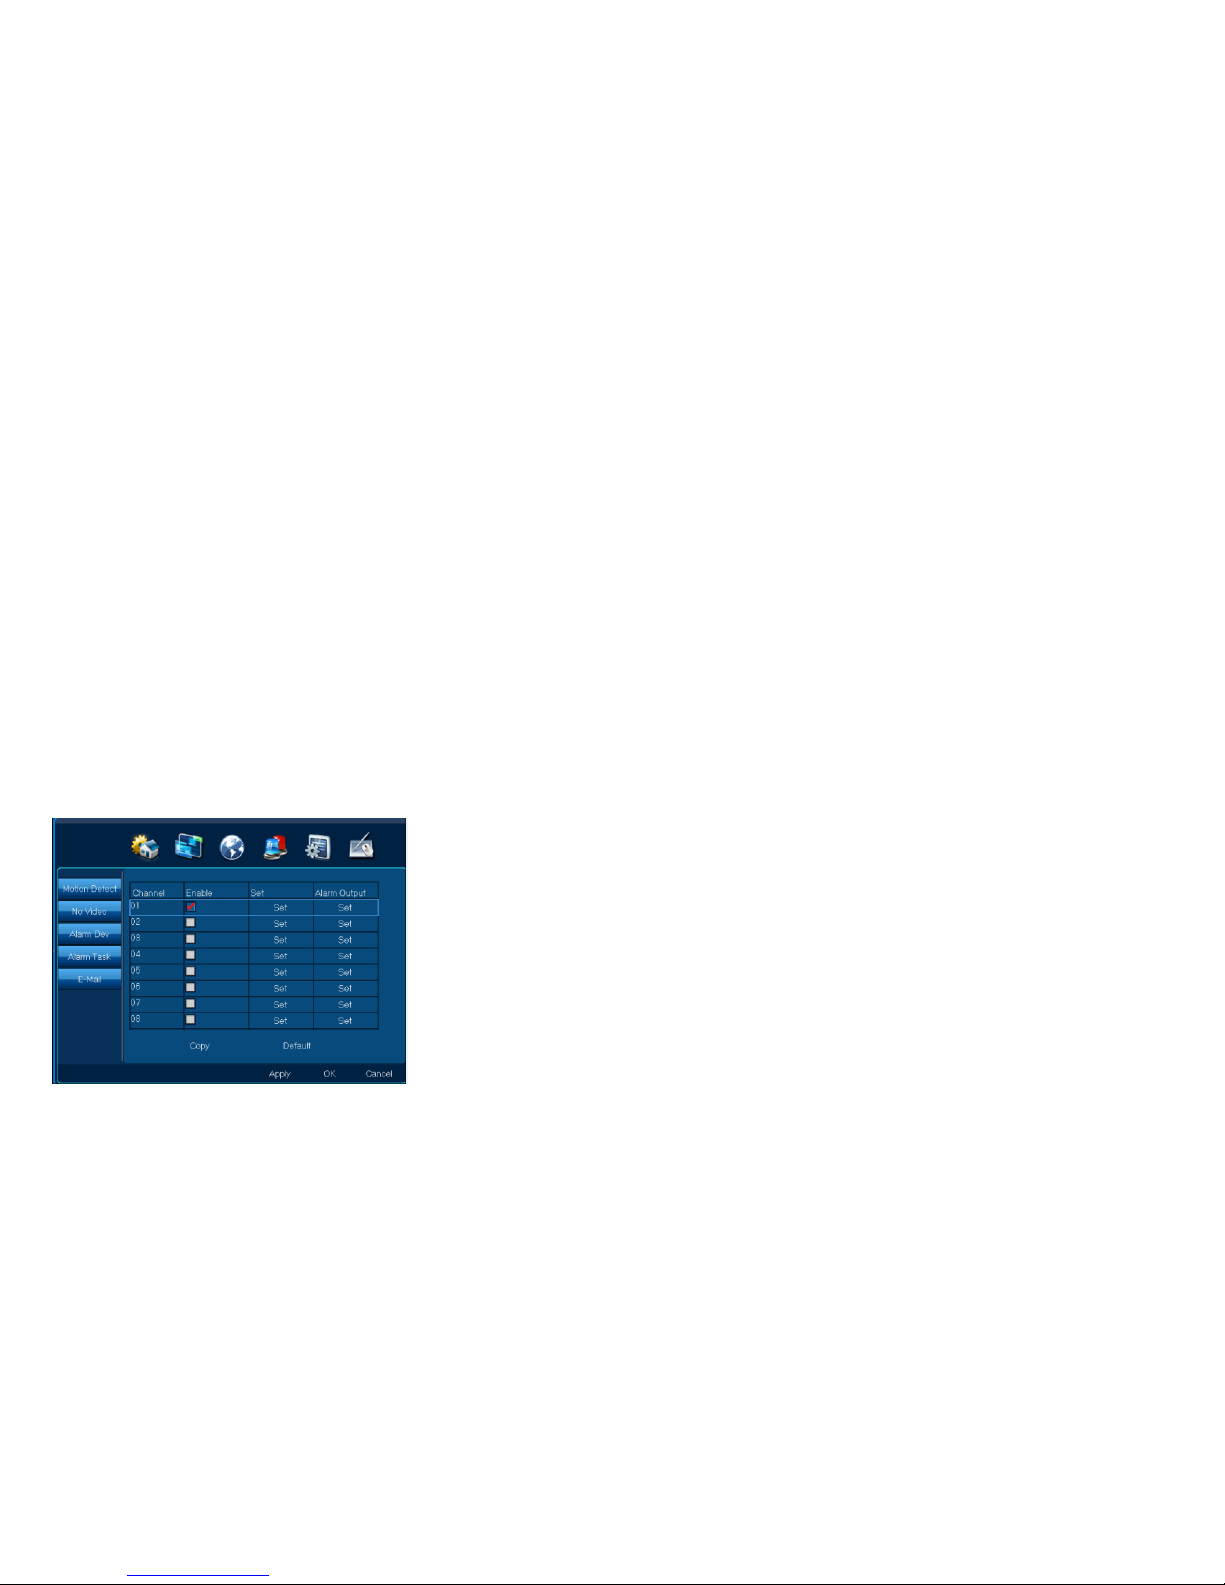
Function introduction: 1. Open motion detection alarm, and set alarm out
2. Open No video alarm, and set alarm out
3. Open alarm device, and set alarm out
4. Set Alarm task
5. Set E-mail alert
6. Set Alarm pre-record
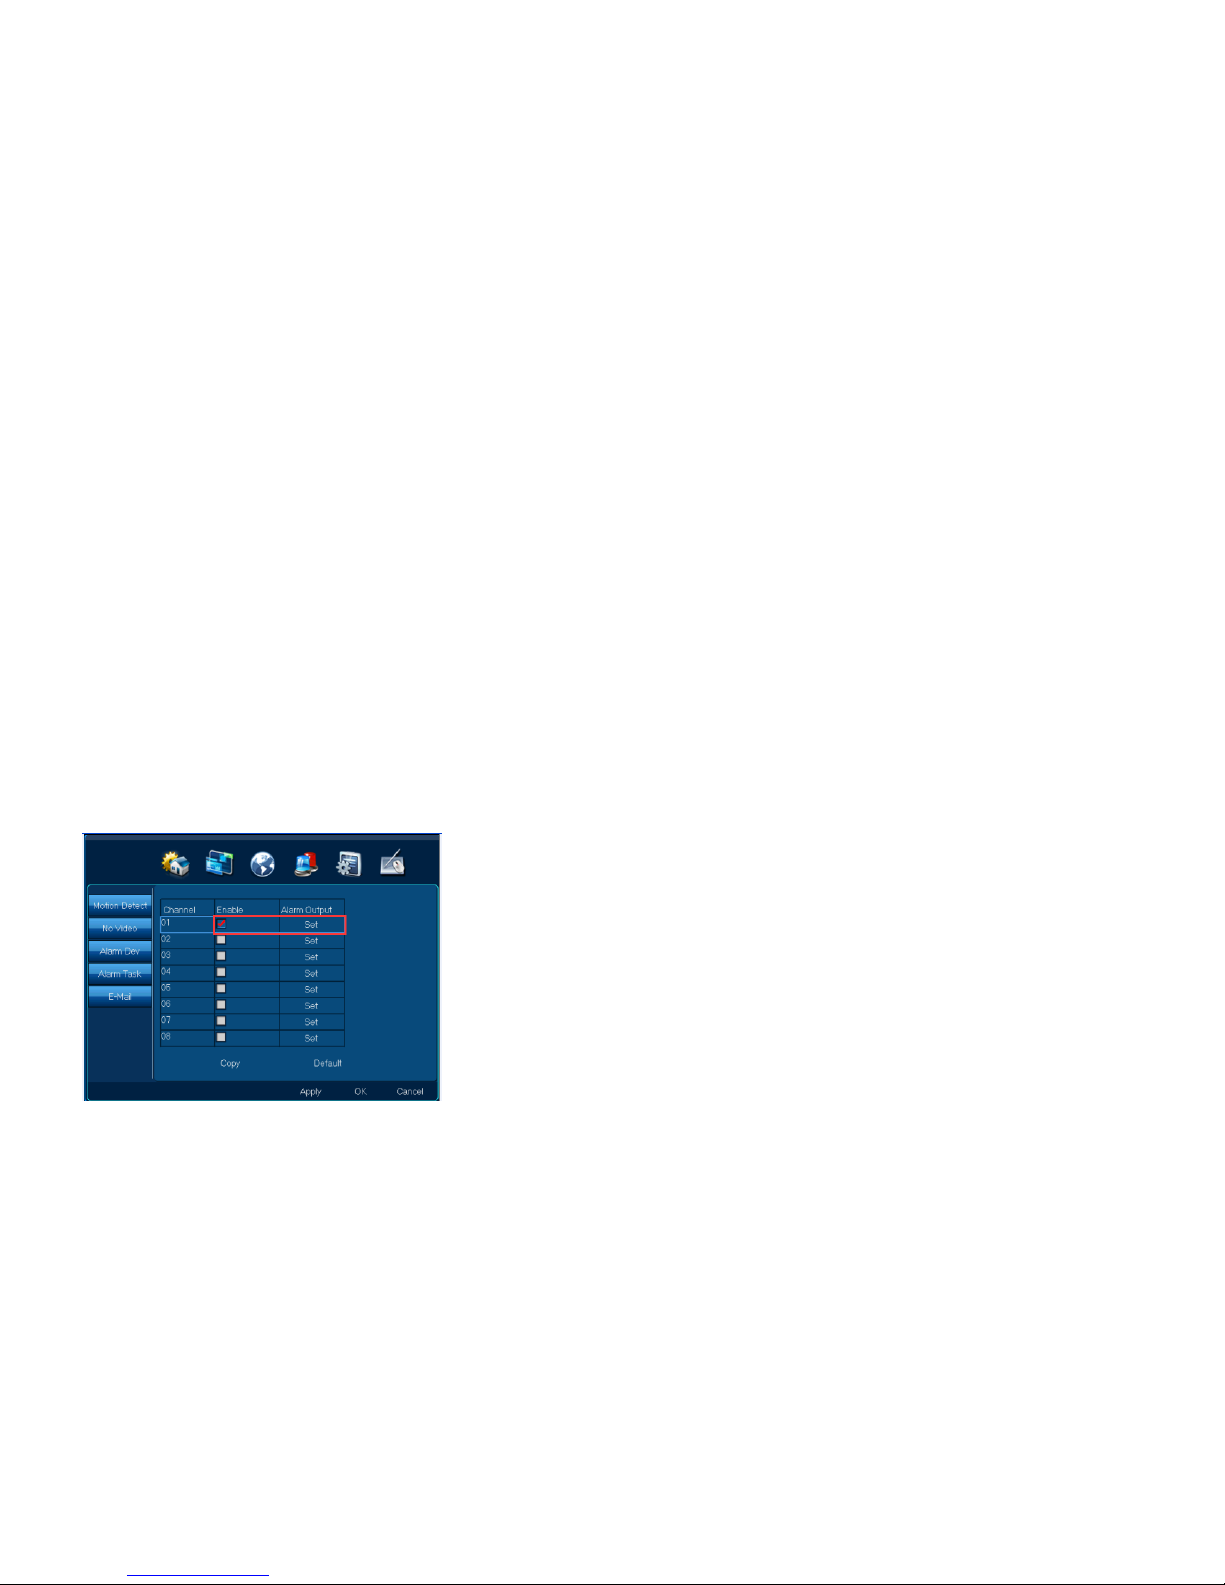
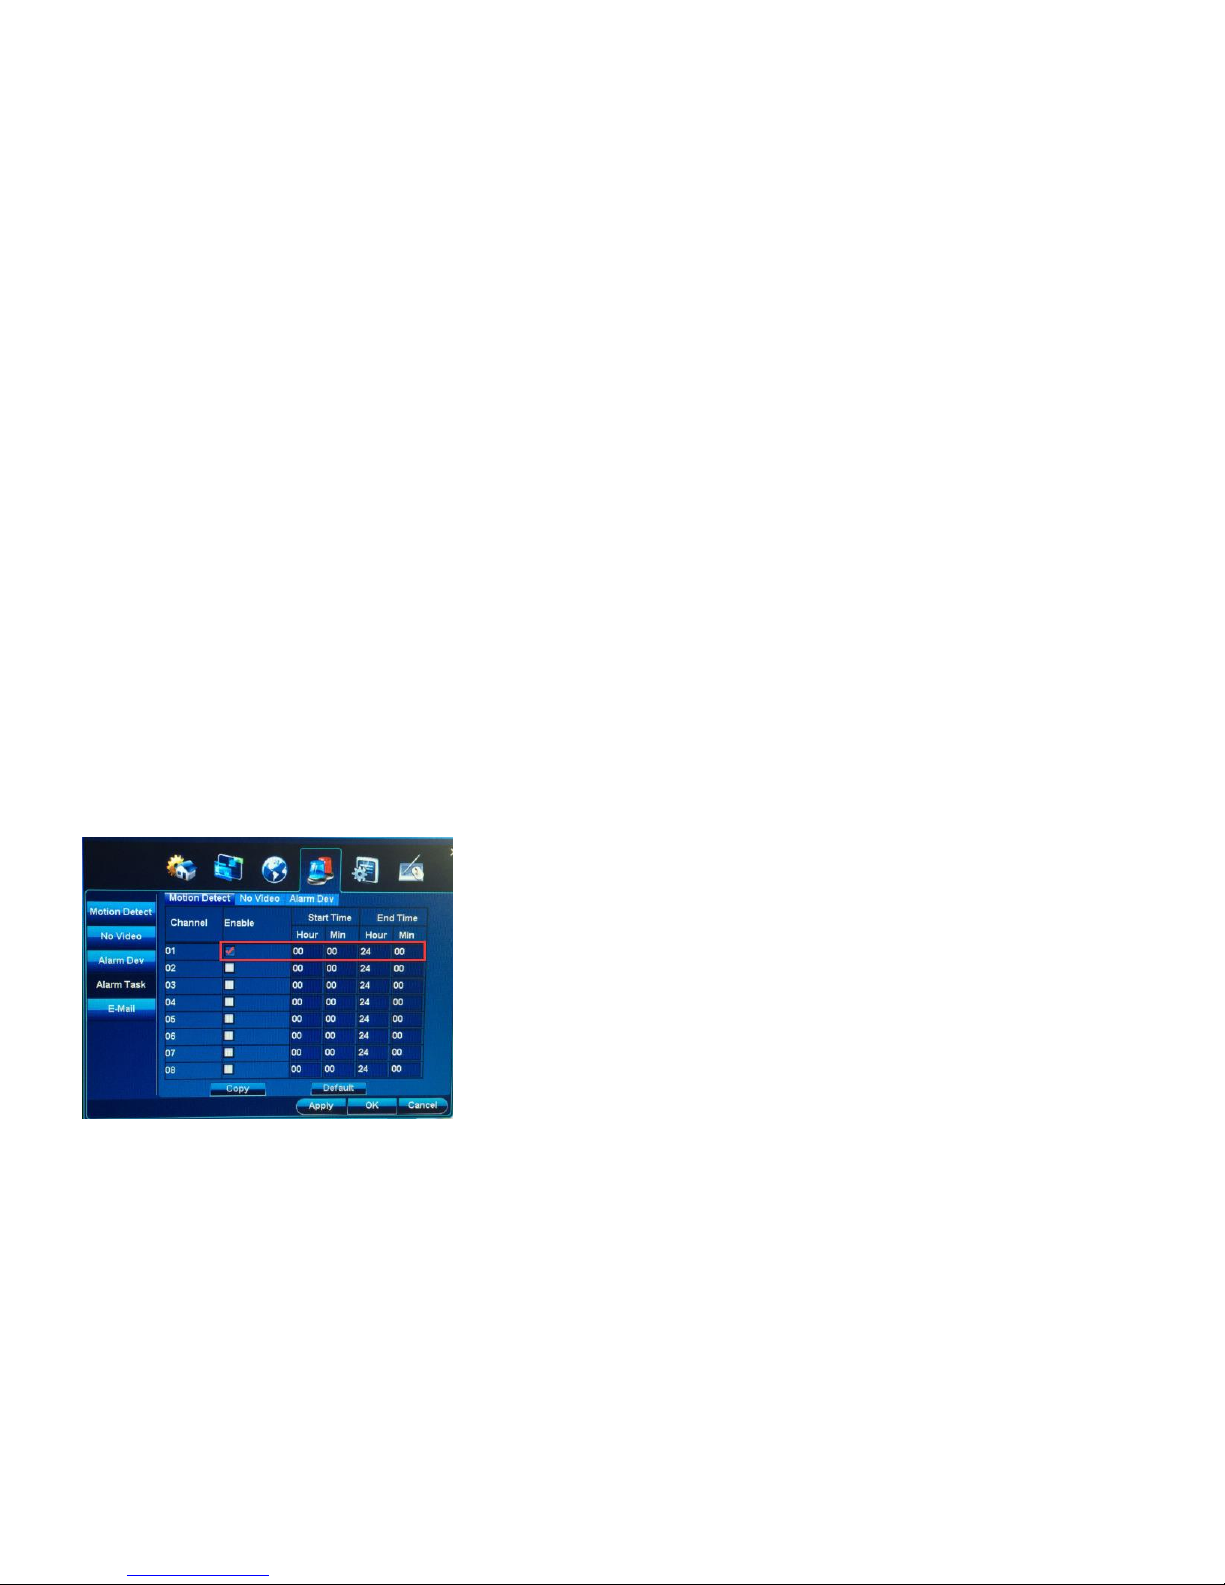
4.5.1 Motion detection
Function position:System setup| Alarm| Motion detection
Function introduction: When there is a move object, it can alarm and send alarm-out
Step 1: Choose channel, open motion detection
1. Choose” Enable”;
Note:【 Copy】,other channels can have same setting
Page 62
User Manual
62/183
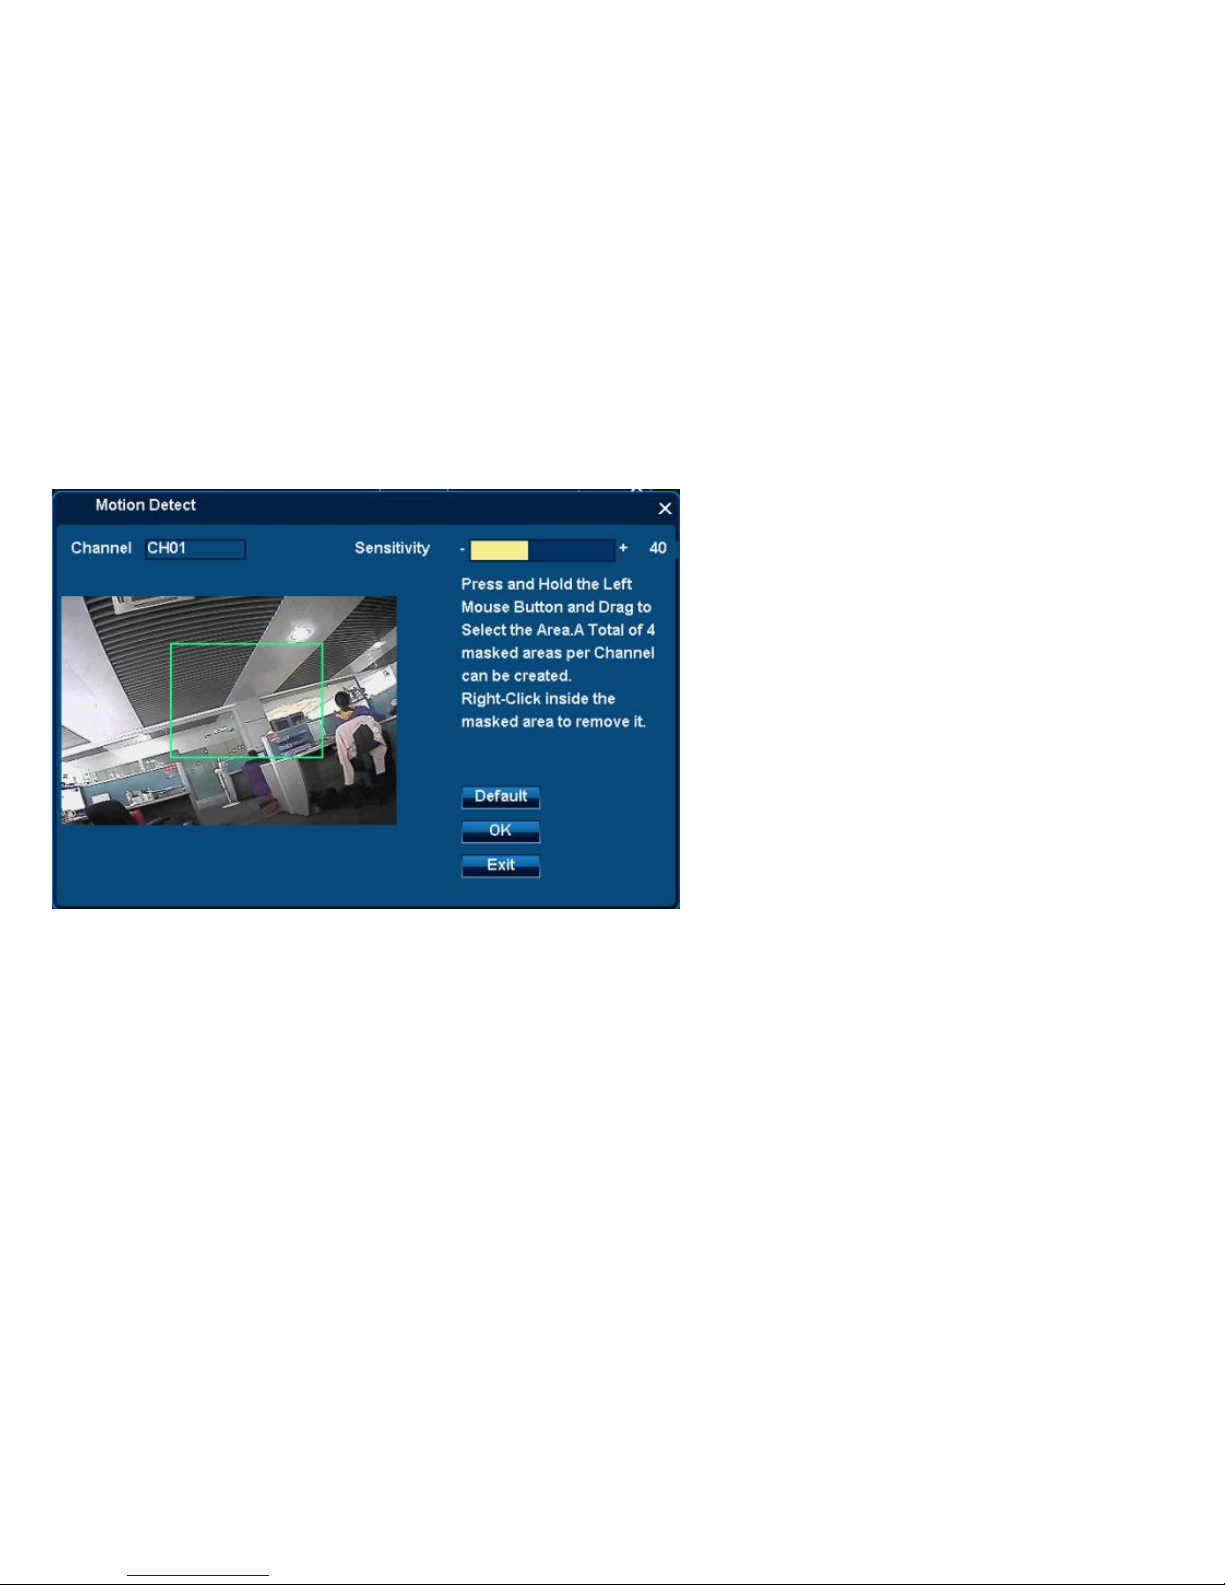
2. Click【setting】
Step 2: Set motion detection part
1. Left click image as starting
2. Left click and move mouse at the same time to choose motion detection part
3. Release left click to finish setting
Note: It only can make motion detection in selected part.
4. Repeat 1—3,and the Max motion detection parts are 4
5. Click【ok】,save setting
Step 3: Adjust sensibility of motion detection
1. Left click can adjust “Sensibility”
Page 63
User Manual
63/183
Note: The more number, the more sensible, the much easier to detect the move object
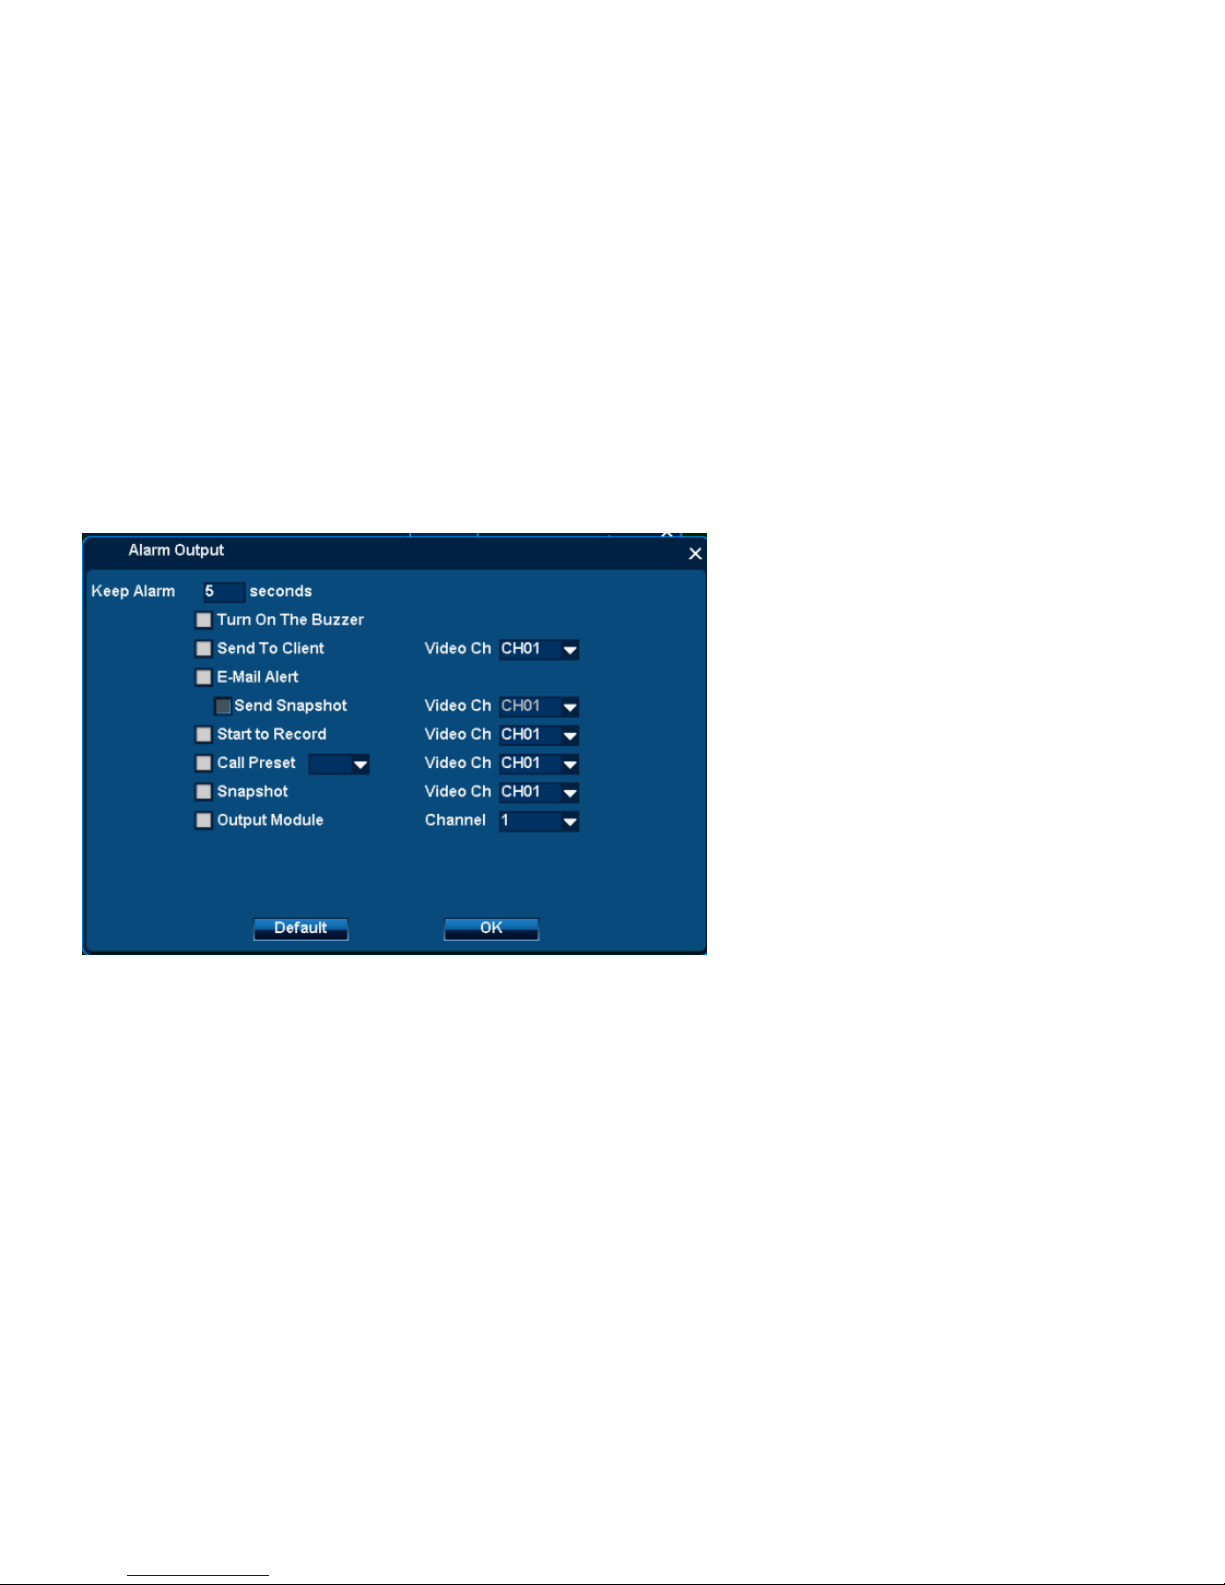
Step 4:Choose Alarm out
1. Click Alarm output【setting】
2. Setting parameters:
◆Keep Alarm:1-999s available
◆Turn on the Buzzer: DVR will send out buzzer alarm
◆Send to Client: It will send alarm to Client-end
◇Video channel: the Client-end connect with this channel
◆E-mail alert: It will send emails to collection box
Page 64
User Manual
64/183
◇Send picture in attachment
◆Start record: It will record the selected channels
◆Call preset: It will adjust selected preset of PTZ channel
◆Snapshot: It will snapshot the selected channel and save images.
◆Output Module: It will open alarm for the relative device (normal close)
3. Click【ok】,save setting
Step 5:Detect alarm setting
1. Touch selected channel motion detection, and it can send out alarm alert
2. Selected alarm out parameter setting work normally
3. Top menu will popup alarm coin, and record log at same time
4.5.2 No video
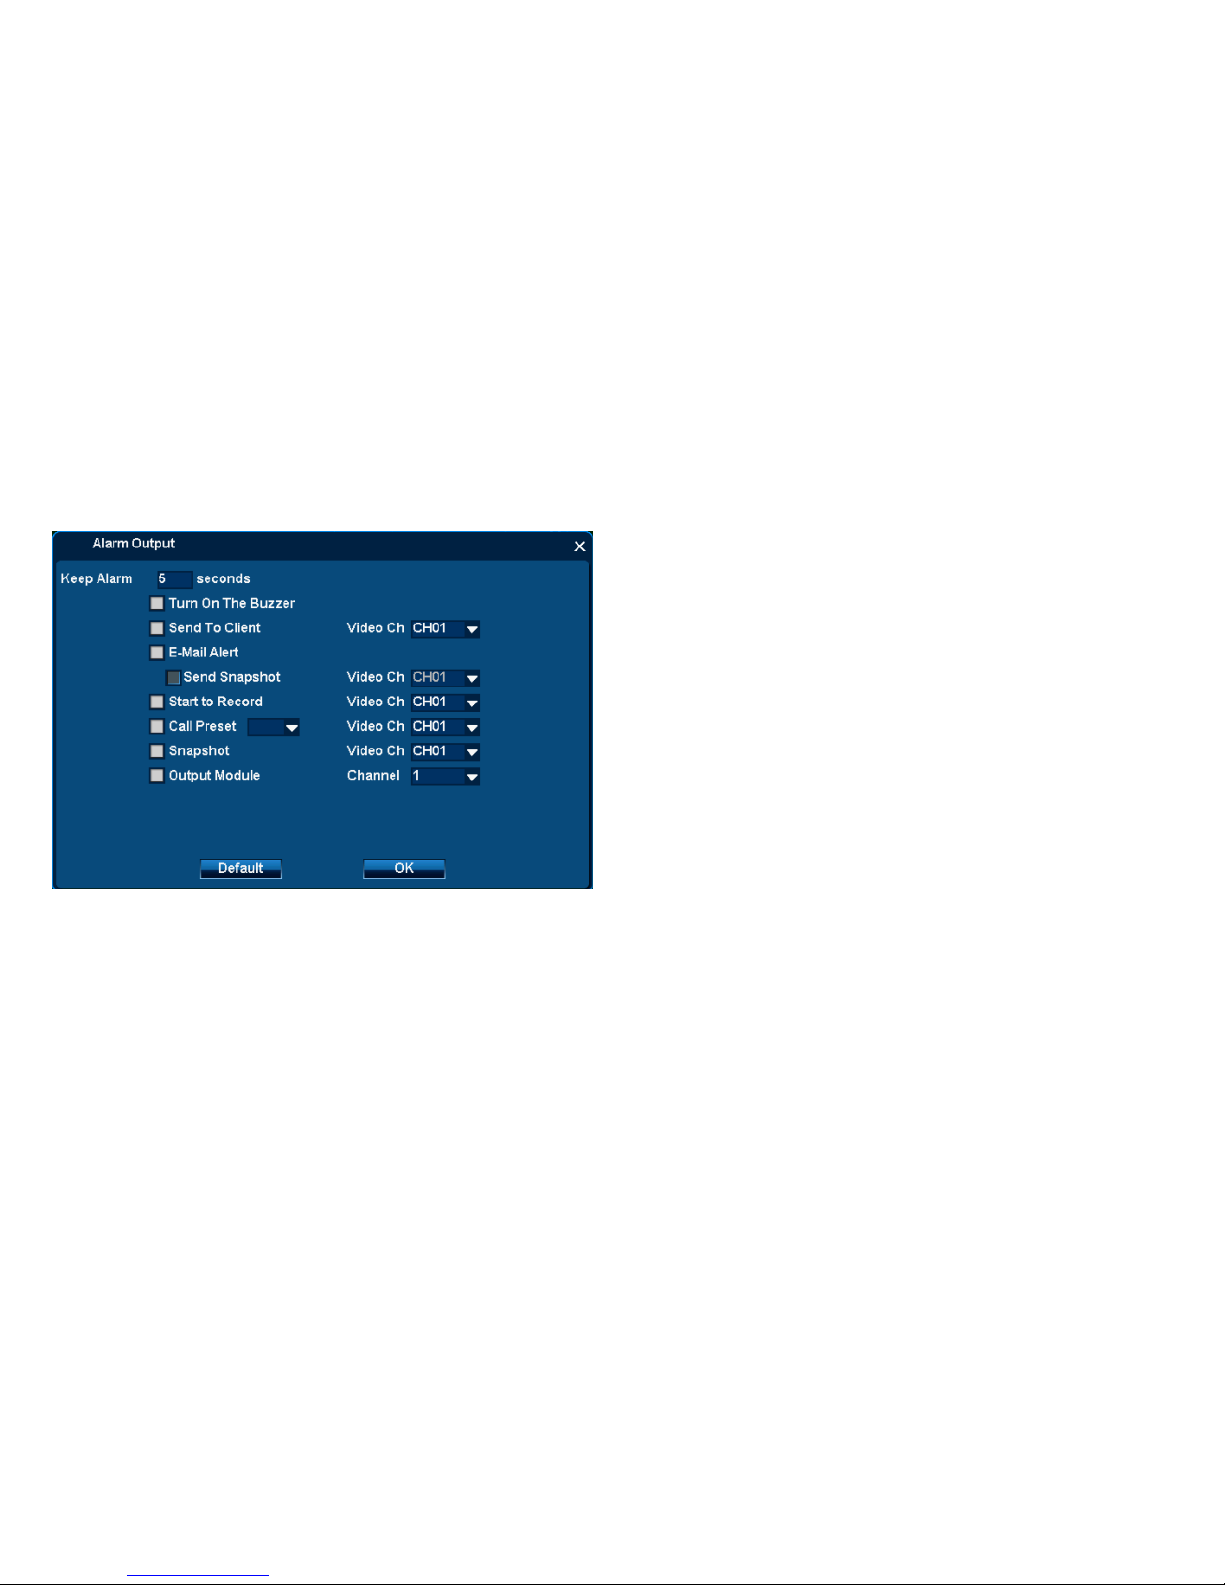
Function position:System setup| Alarm| No video
Function introduction: When detect no video, it will send alarm alert
Step 1: Choose channel, and open no video detection
1. Choose” Enable”;
Page 65
User Manual
65/183
Note:【 Copy】,other channels can have same setting
2. Click【set】
Step 2:Setting parameter
1.Setting parameters:
◆Keep Alarm:1-999s available
◆Turn on the Buzzer: DVR will send out buzzer alarm
◆Send to Client: It will send alarm to Client-end
◇Video channel: the Client-end connect with this channel
◆E-mail alert: It will send emails to collection box
◇Send picture in attachment
◆Start record: It will record the selected channels
◆Call preset: It will adjust selected preset of PTZ channel
◆Snapshot: It will snapshot the selected channel and save images.
Page 66
User Manual
66/183
◆Output Module: It will open alarm for the relative device (normal close)
2.Click【ok】,save setting
Step 3:Detect Alarm setting
1. Disconnected with the selected channel
2. Selected alarm out parameter setting work normally
3. Top menu will popup alarm coin, and record log at same time
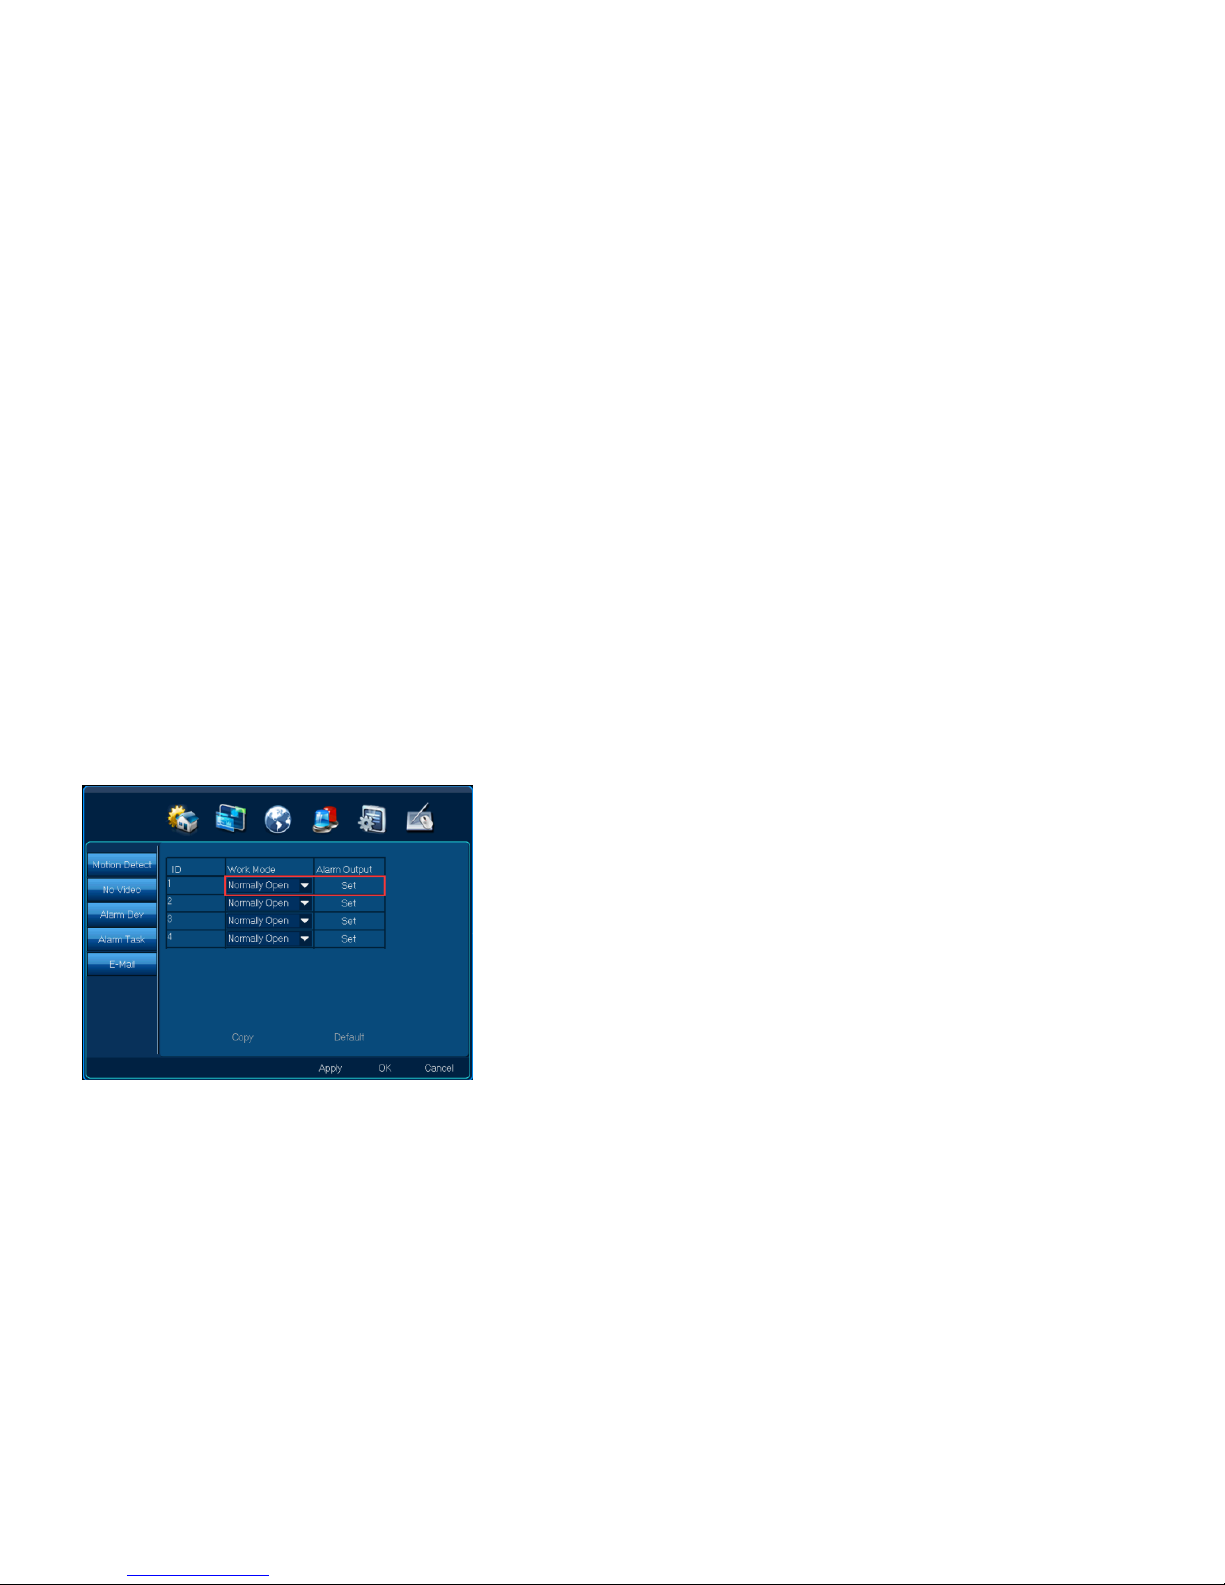
4.5.3 Alarm device
Function position:System setup| Alarm| Alarm device
Function introduction:When touch alarm device, it will send alarm out.
Step 1:Choose “Alarm output”
Click【set】
Page 67
User Manual
67/183
Step 1:Setting alarm output parameter 2
1. Click【set】
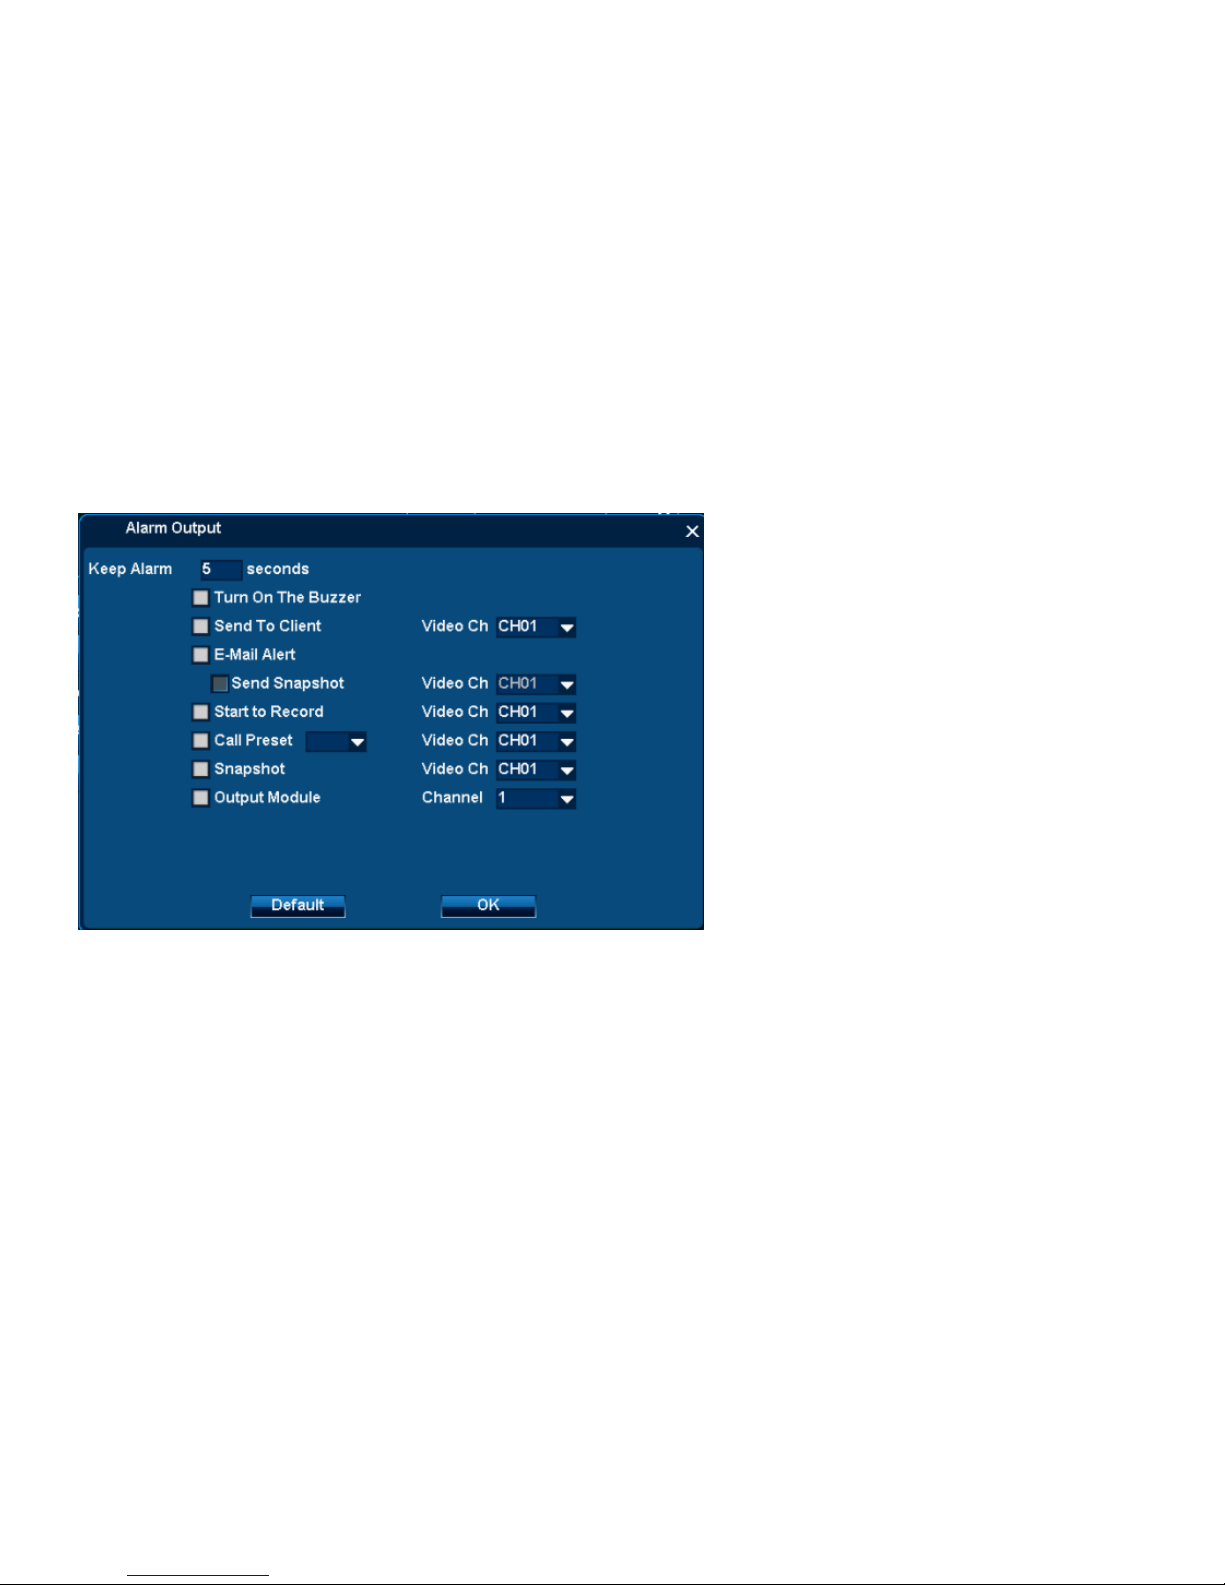
2. Setting Alarm output parameters:
◆Keep Alarm:1-999s available
◆Turn on the Buzzer: DVR will send out buzzer alarm
◆Send to Client: It will send alarm to Client-end
◇Video channel: the Client-end connect with this channel
◆E-mail alert: It will send emails to collection box
◇Send picture in attachment
Page 68
User Manual
68/183
◆Start record: It will record the selected channels
◆Call preset: It will adjust selected preset of PTZ channel
◆Snapshot: It will snapshot the selected channel and save images.
◆Output Module: It will open alarm for the relative device (normal close)
2.Click【ok】,save setting
Step 4:Detect Alarm device
1. Touch alarm device
2. Selected alarm out parameter setting work normally
3. Top menu will popup alarm coin, and record log at same time
4.5.4 Alarm task
Function position:System setup| Alarm| Alarm task
Function introduction:It only send alarm output in preset time
Page 69
User Manual
69/183
Steps:
1. Choose” Alarm types”;”Motion detect/no video/Alarm Device” are available
2. Choose” Enable”
3. Modify” Start time”,” End time”;
Note: It only send alarm output in preset time.
4. Click【Apply】or【ok】,save setting
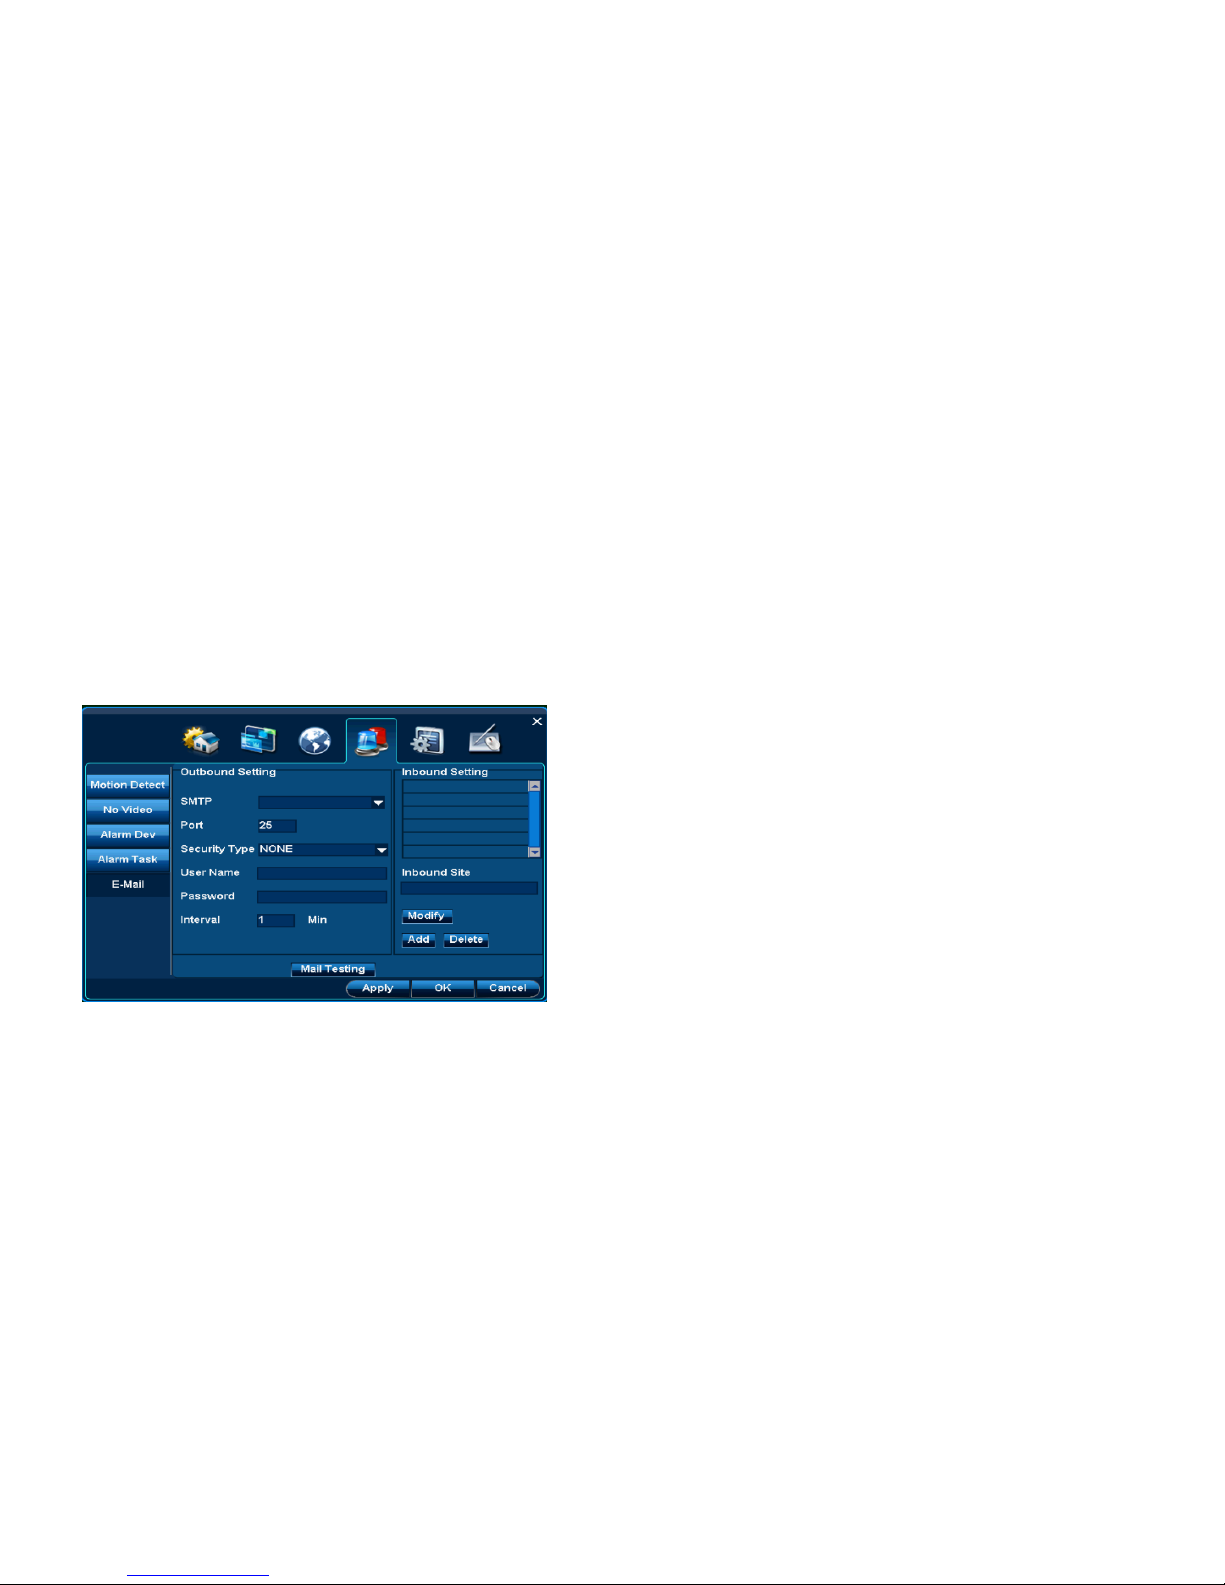
4.5.5 E-mail alert
Function position:System setup| Alarm| E-mail
Function introduction: setting email alert parameters: sender setting, receiver setting, Interval etc
Step 1:Sender setting
1. Choose“SMTP”;
Note: can manual writing or choose exist email server
2. Write user name and password
3. Modify” Interval”(1~99Min);
Page 70

User Manual
70/183
4. Click【Apply】,save setting
Step 2:Receiver setting
1. Write email address in “Receiver Site”
2. Click【Add】, then can add new receiver into list
3. Click【Apply】or【ok】,save setting
Step 3:Mail Testing
1. Click【Mail Testing】;
2. Detect the emails in collection box
4.6 System
Function position:System setup| System
Function introduction: 1.Log:Search, DVR log backup;Log:
2. Maintenance: Reboot setup, software update, import/export setting
3.Informatoin: Search DVR hardware/software information
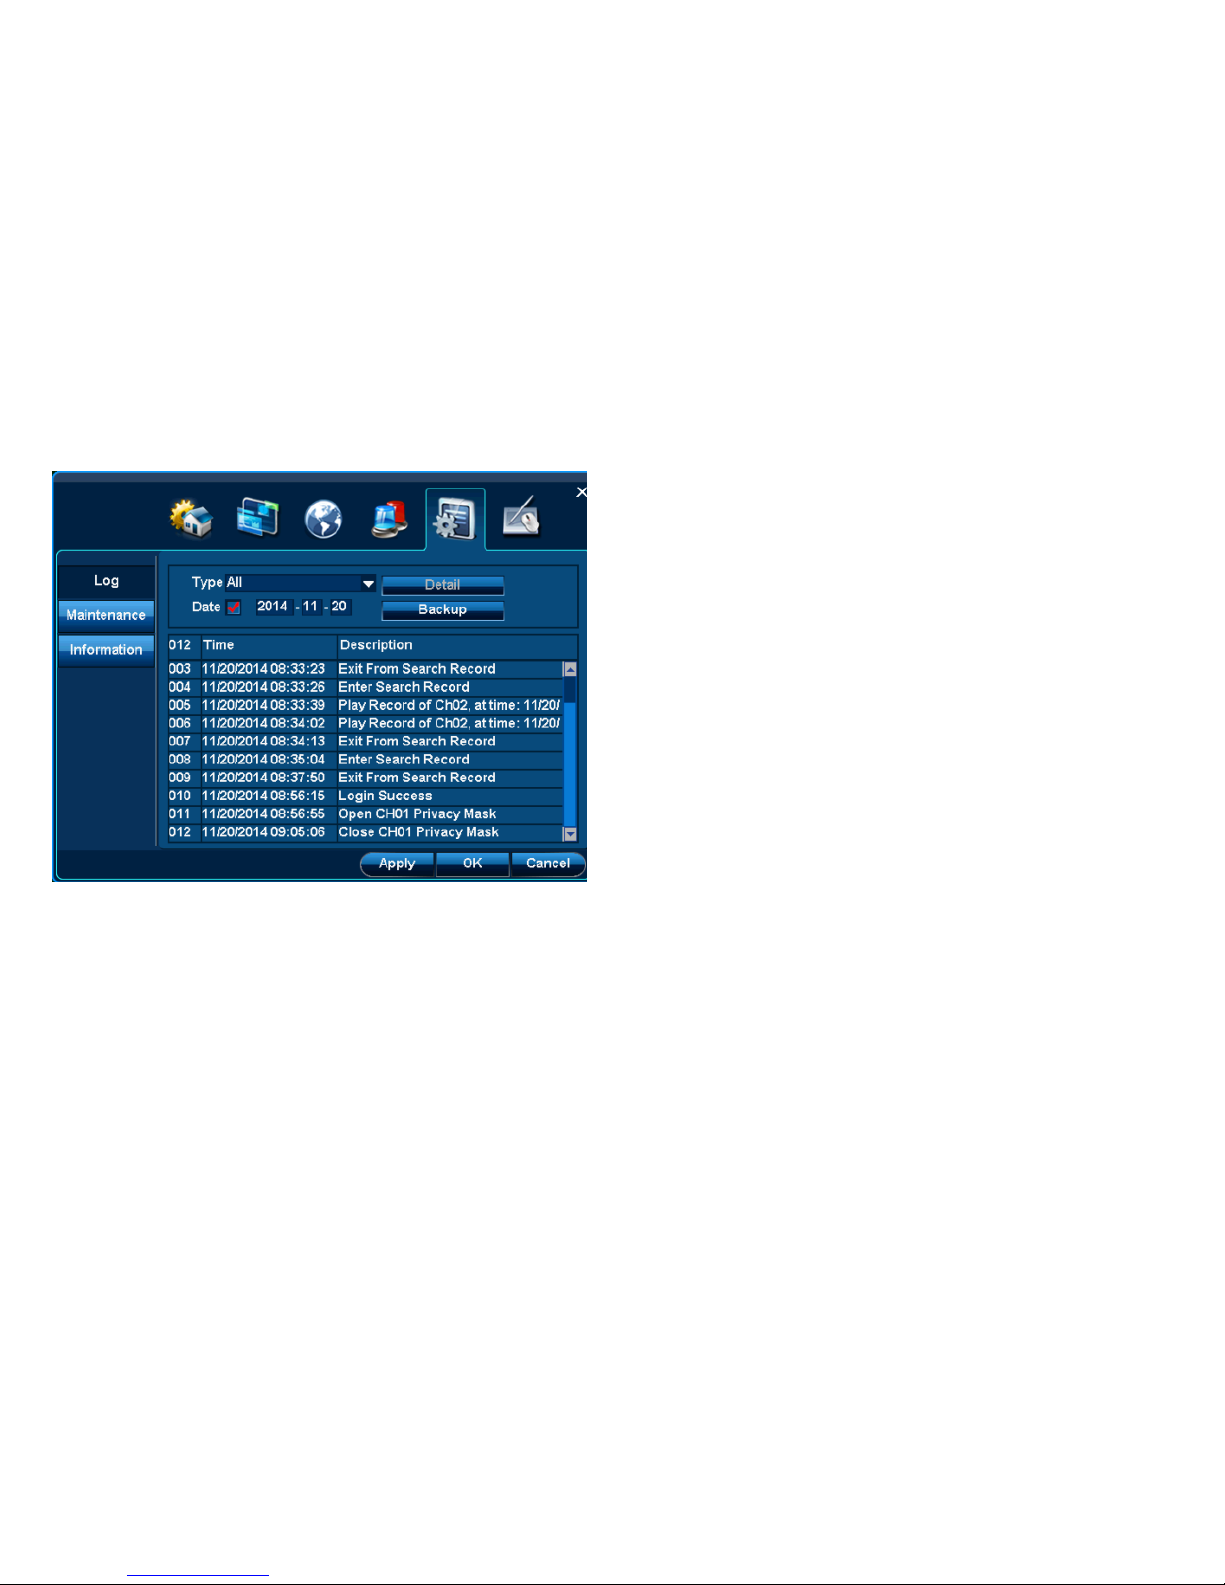
4.6.1 Log:
Function position:System| Log
Function introduction: 1. Search DVR operation log
2. Save the eligible logs into U disk
Page 71
User Manual
71/183
4.6.1.1 Log query
Step: Query this DVR’s log
1. Select log type, eg system operation, login, etc.
2. Change query time
Note: Don‟t select above “Time”, it will query all logs.
3. Click and select log, Single-click” Detail” to read more information.
4.6.1.2 Log backup
Page 72

User Manual
72/183
Step: Backup log into U-disk.
1. Insert FAT32 format U-Disk
2. Query qualified log.
3. Click “Backup” button to backup the log into U-Disk.
4.6.2 Maintenance
Function:
1. Time reboot: This DVR can be set reboot.
2. Software update: U-Disk, FTP server or website can be selected for update.
3. Import/Export setting: Export this DVR‟s setting into U-Disk. Import U-Disk‟ setting into this DVR.
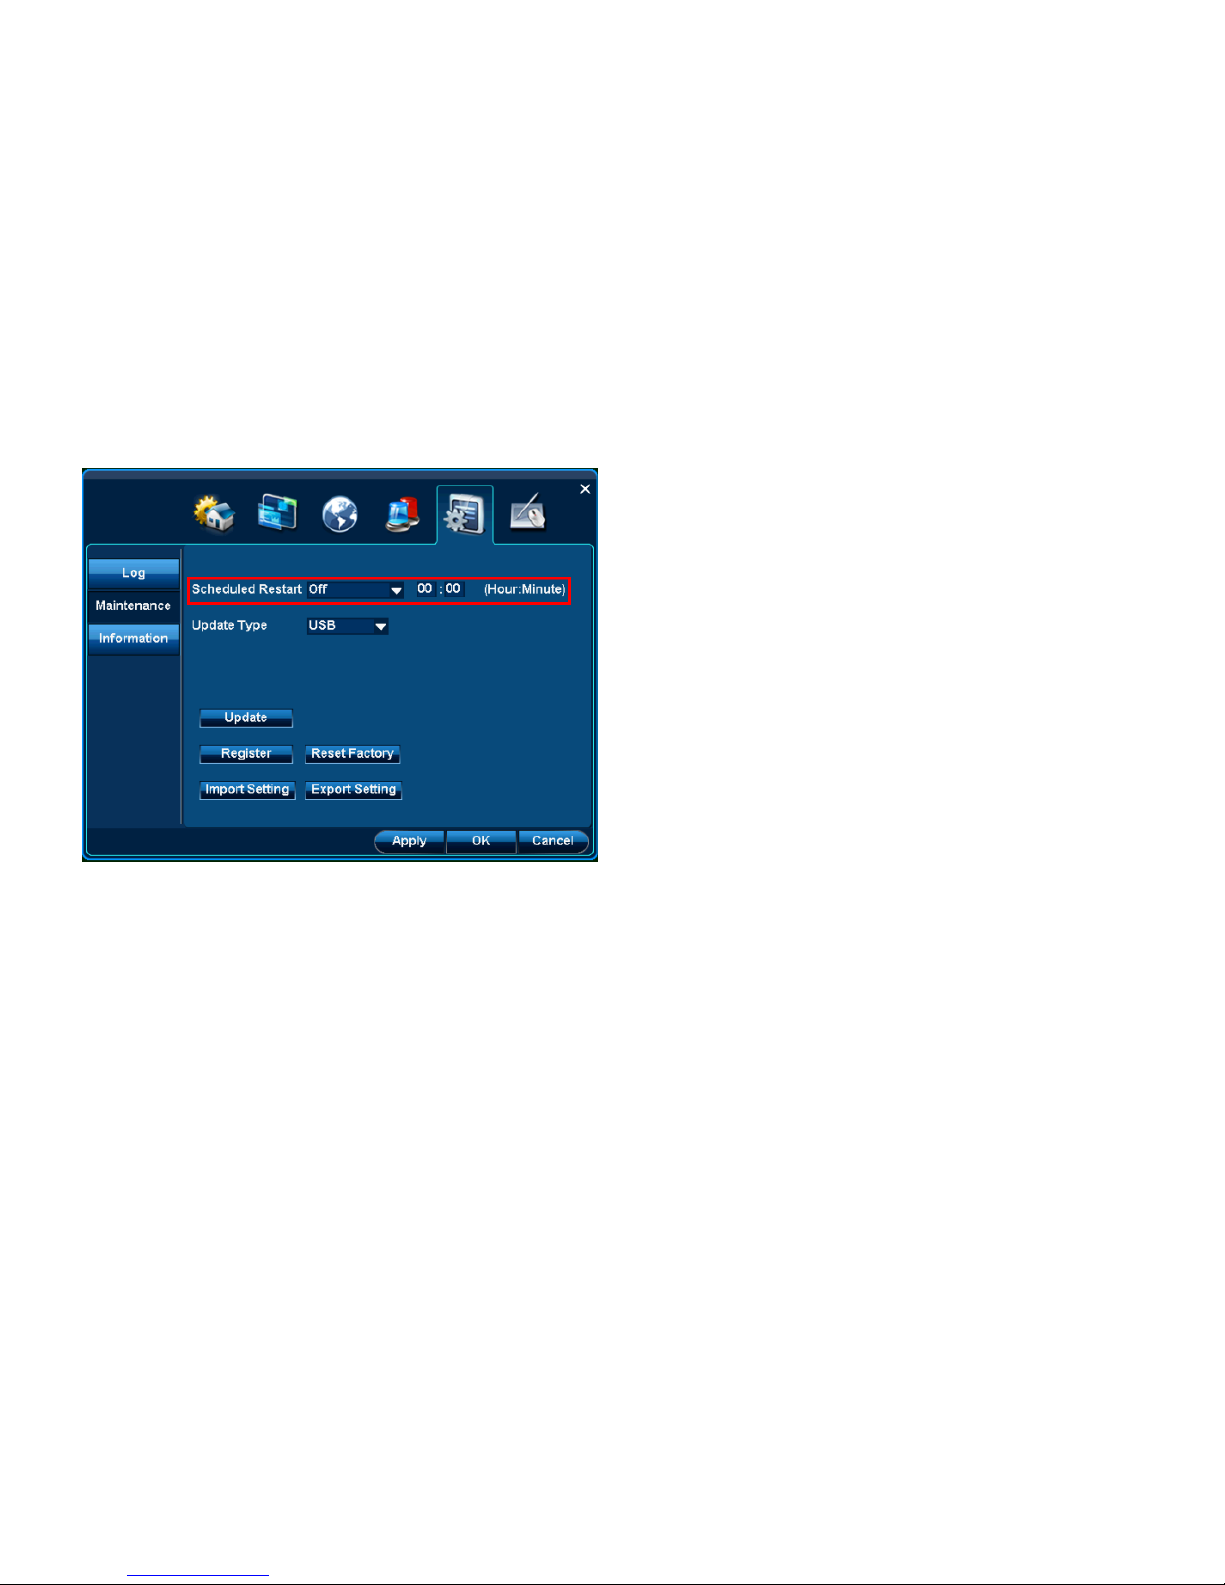
4.6.2.1 Time Reboot
Location:System Setup|Maintenance|Reboot
Function: The reboot function is used to prevent from overmuch file fragments. There will be lots of file fragments at DVR system when it is in long-time running.
Page 73
User Manual
73/183
Step: Enable Time Reboot function
1. Select reboot date at”Reboot Setup”. It takes week as standard.
2. Set reboot time,eg,23:00.
3. Click“Apply”or “OK”to save setting.
4.6.2.2 Software update
Location:System Setup|Mantenace|UPdate
Function: The software can be updated through USB, FTP or online update.
Note: When it is updated, the electric power can not be powered off , otherwise it will make the DVR unable to work..
Page 74
User Manual
74/183
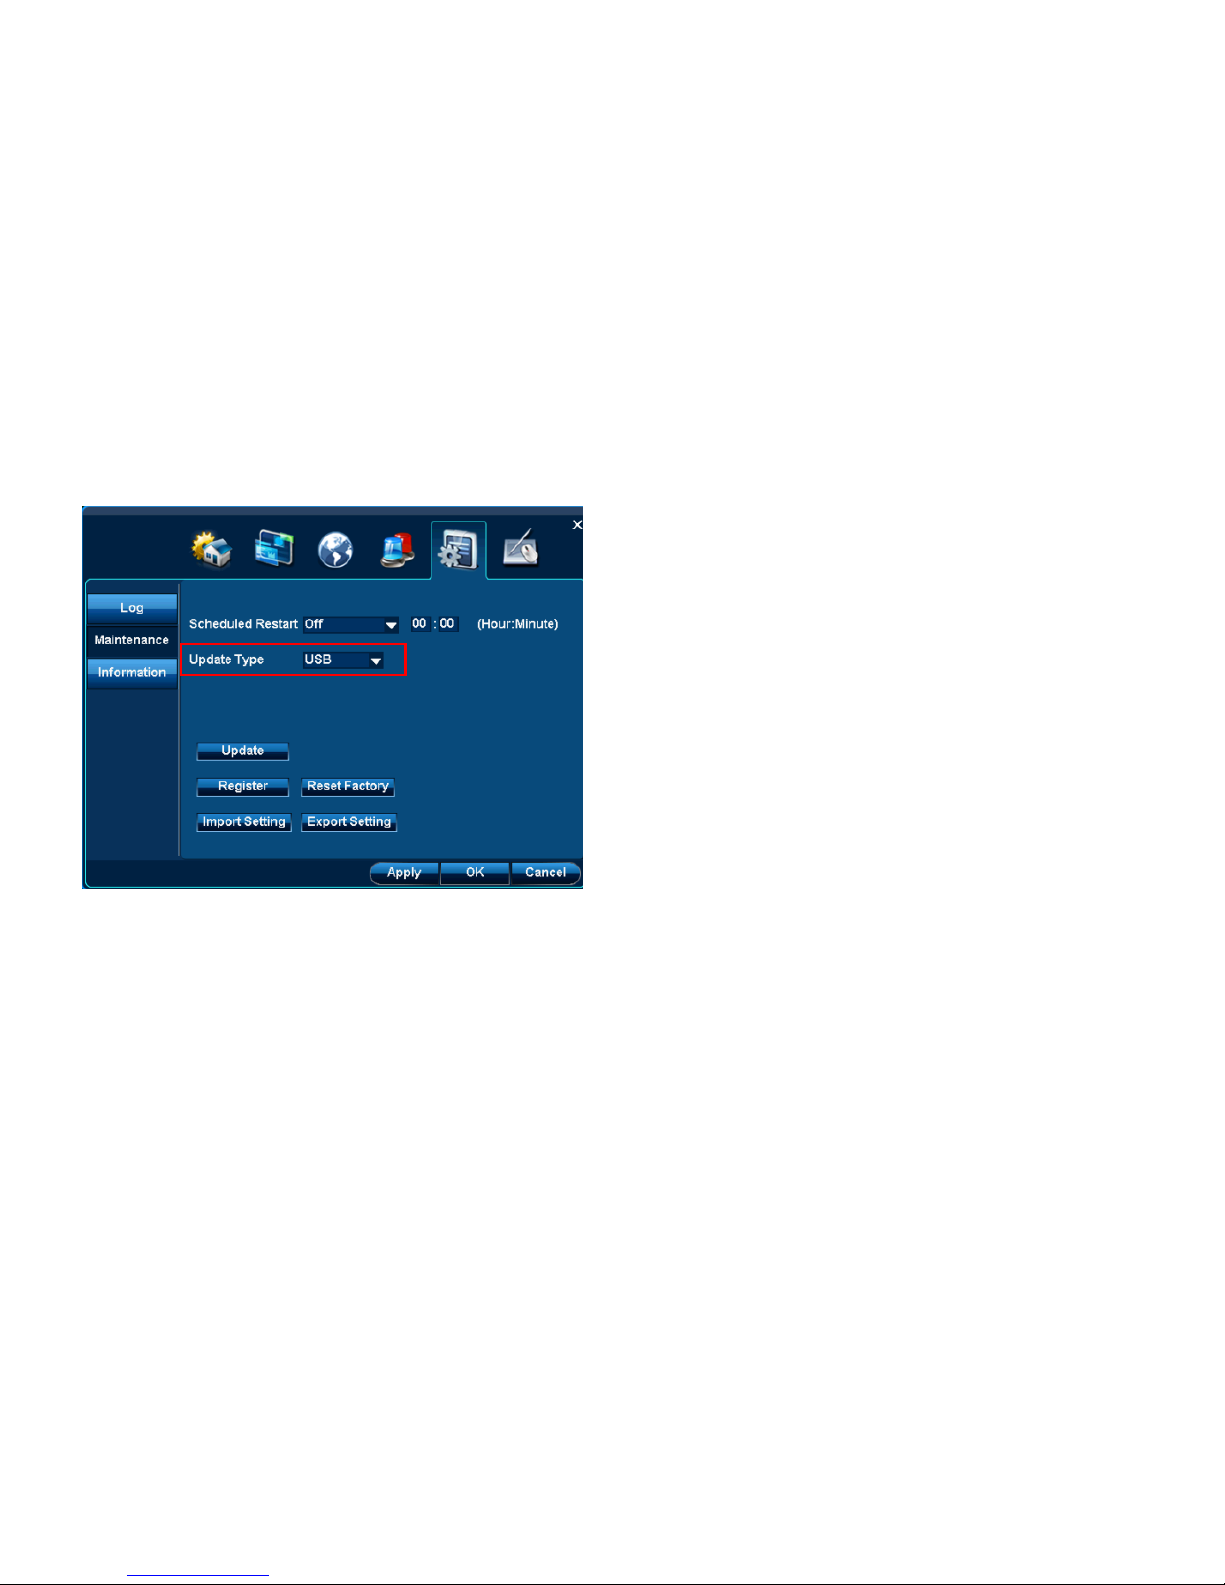
4.6.2.2.1 USB update
Step:
1. Put updated files at FAT32 format U-Disk. These two files should be placed at root directory at U-Disk. Then insert the U-Disk into DVR‟s
USB port.
2. Select USB at “Update type”.
3. Click “Update” button to finish this work.
Note: After update is finished, it will automatically reboot the DVR. When the DVR is started, it is the latest version.
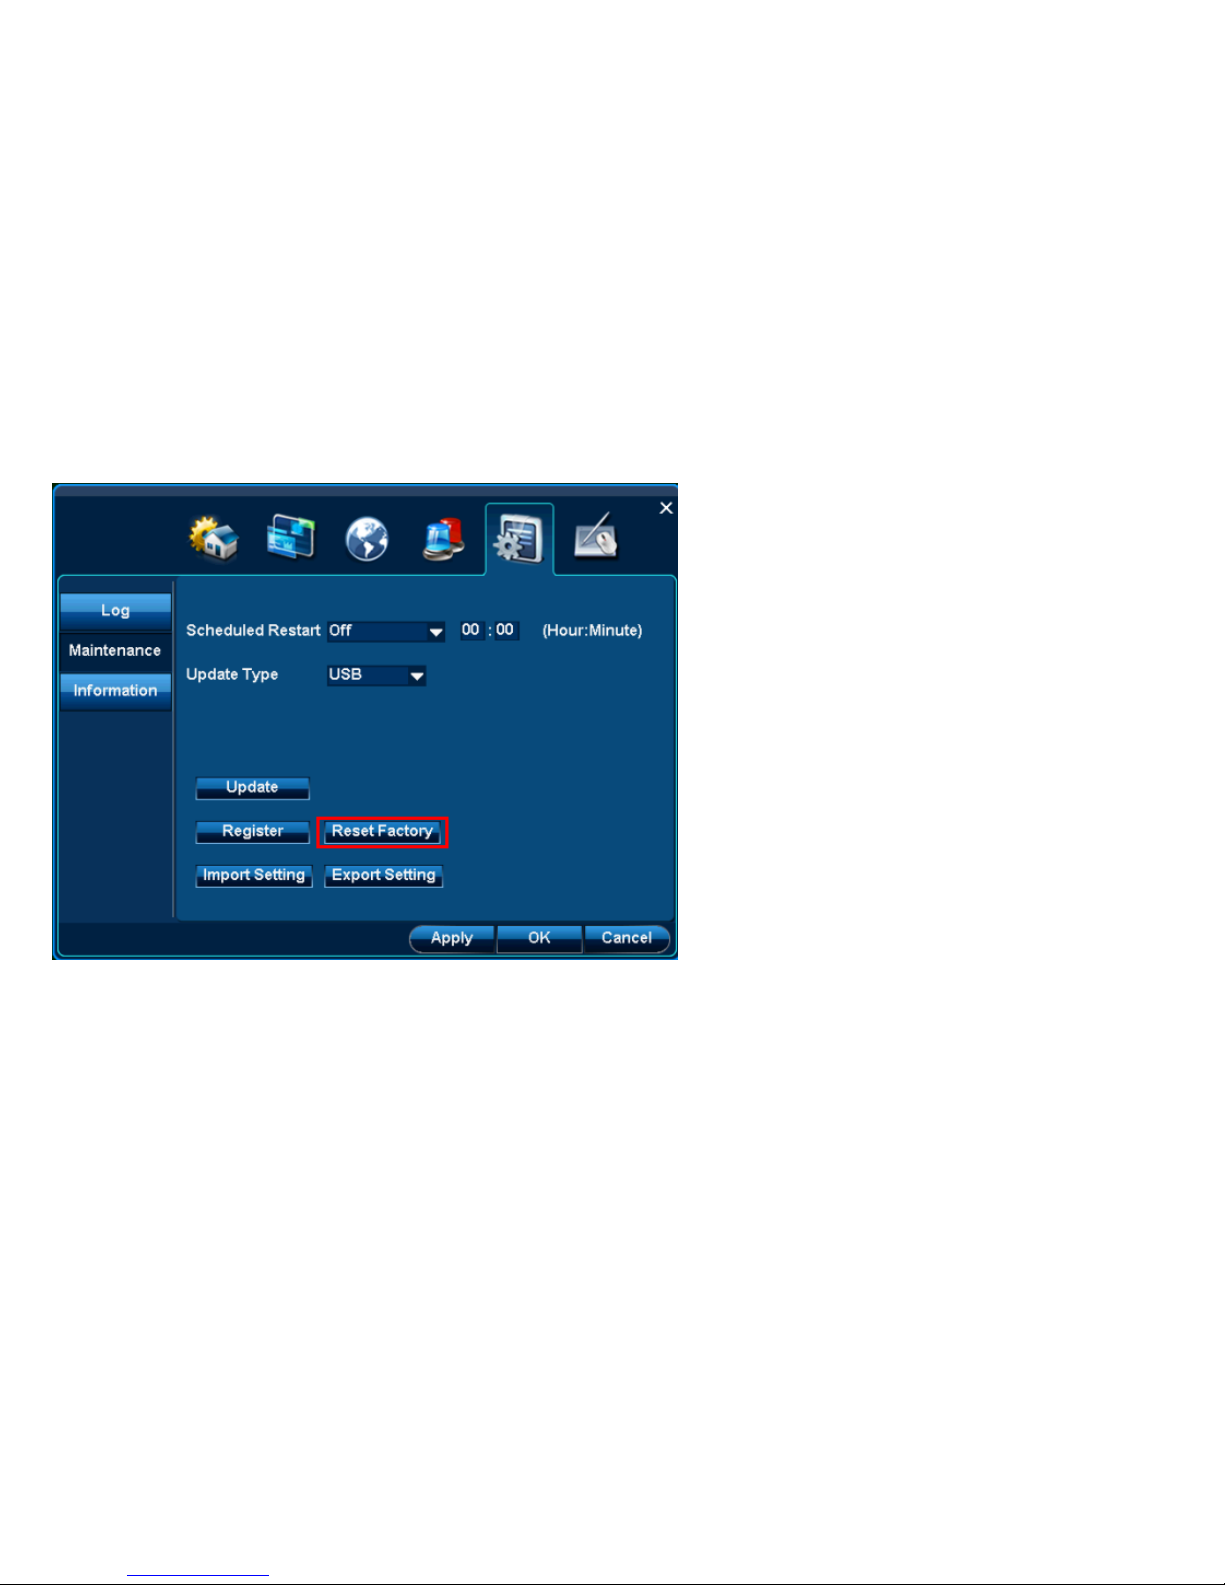
4.6.2.3 Reset factory
Location: System Setup |Maintenance| Reset factory
Page 75
User Manual
75/183
Function: All setting at this DVR can be restore factory setting.
Step: 1. Click “Reset Factory”.
2. Click”Ok” at confirmation interface to reboot the DVR and then all original factory settings are restored.
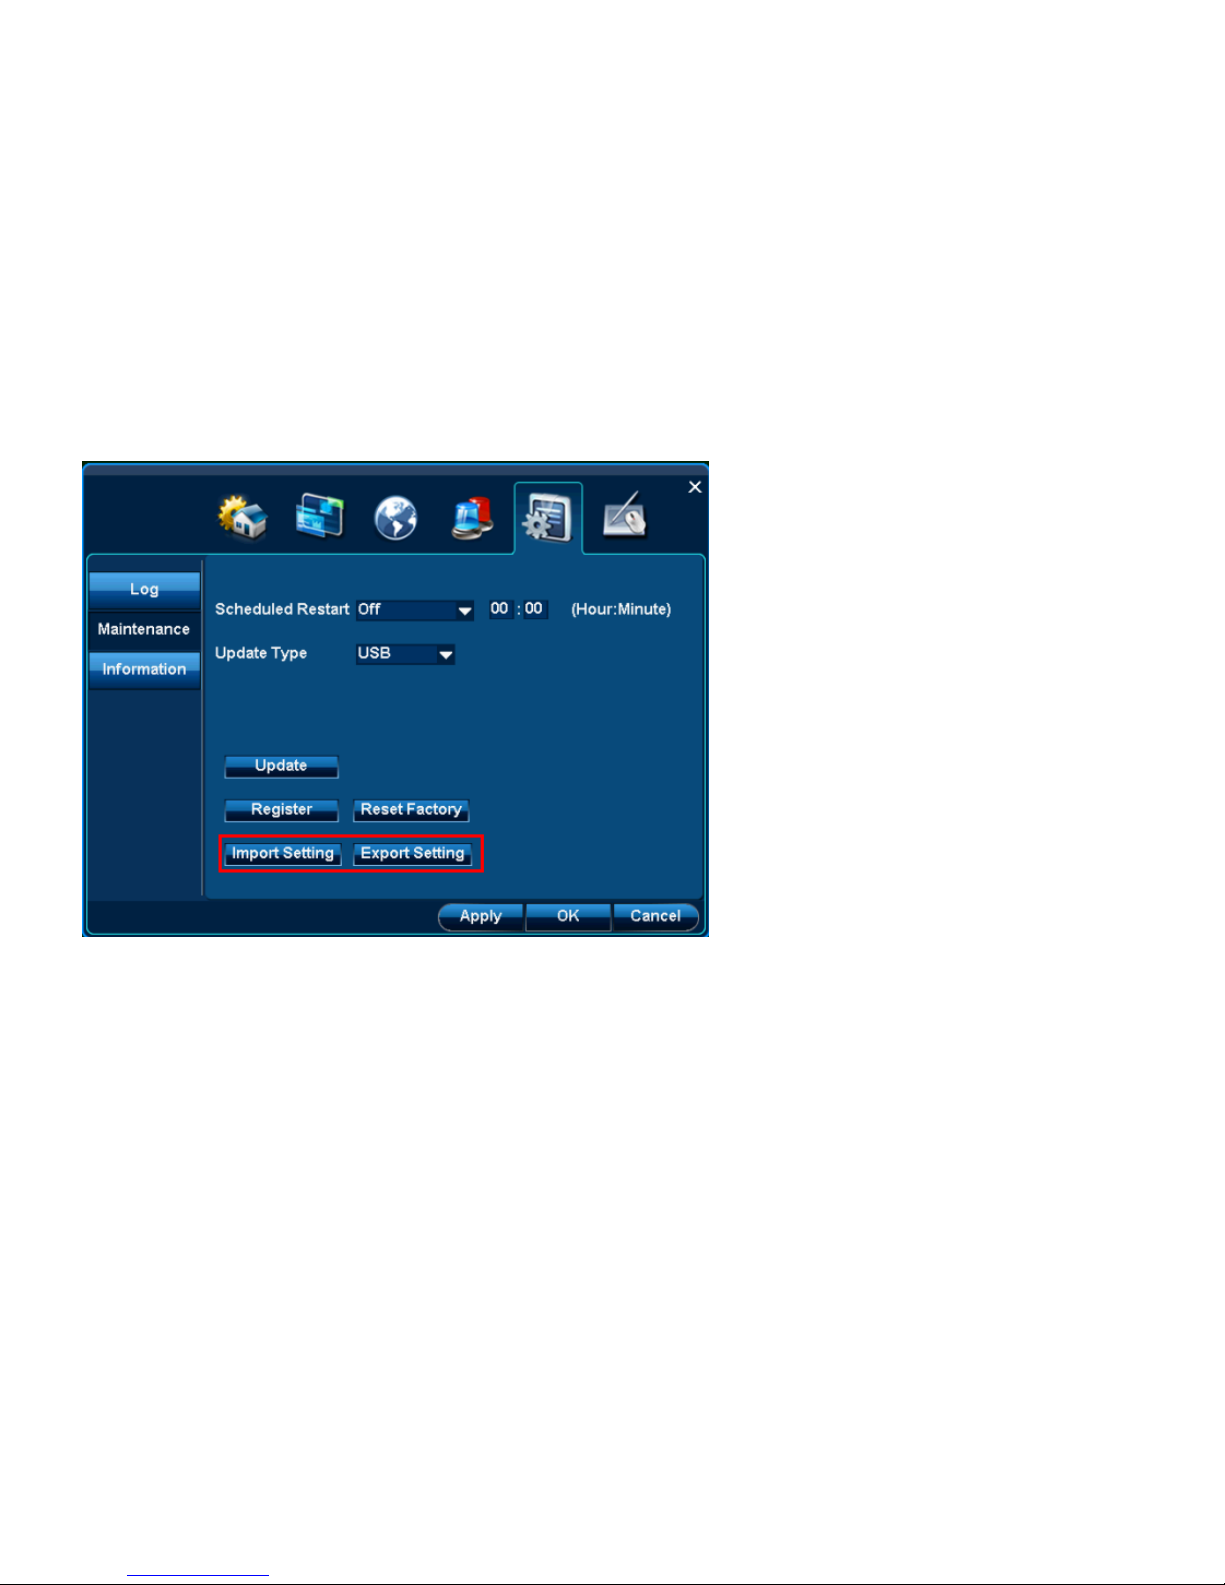
4.6.2.4 Setting import/export
Location: Location: System Setup| Maintenance| export/import Setting
Function: 1.Export DVR‟s setting to U-Disk for backup.
2. Import the same setting from U-Disk to this DVR.
Page 76
User Manual
76/183
Step of Exporting:
1. Insert U-Disk with FAT32 format into DVR
2. .Click export setting
Step of Importing:
1. Insert U-Disk with FAT32 format into DVR and there are the settings of same model DVR at U-Disk.
2. Click” Import setting” button to import the setting from U-Disk to this DVR.
Note: The imported setting will be valid after the DVR is rebooting.
Page 77
User Manual
77/183
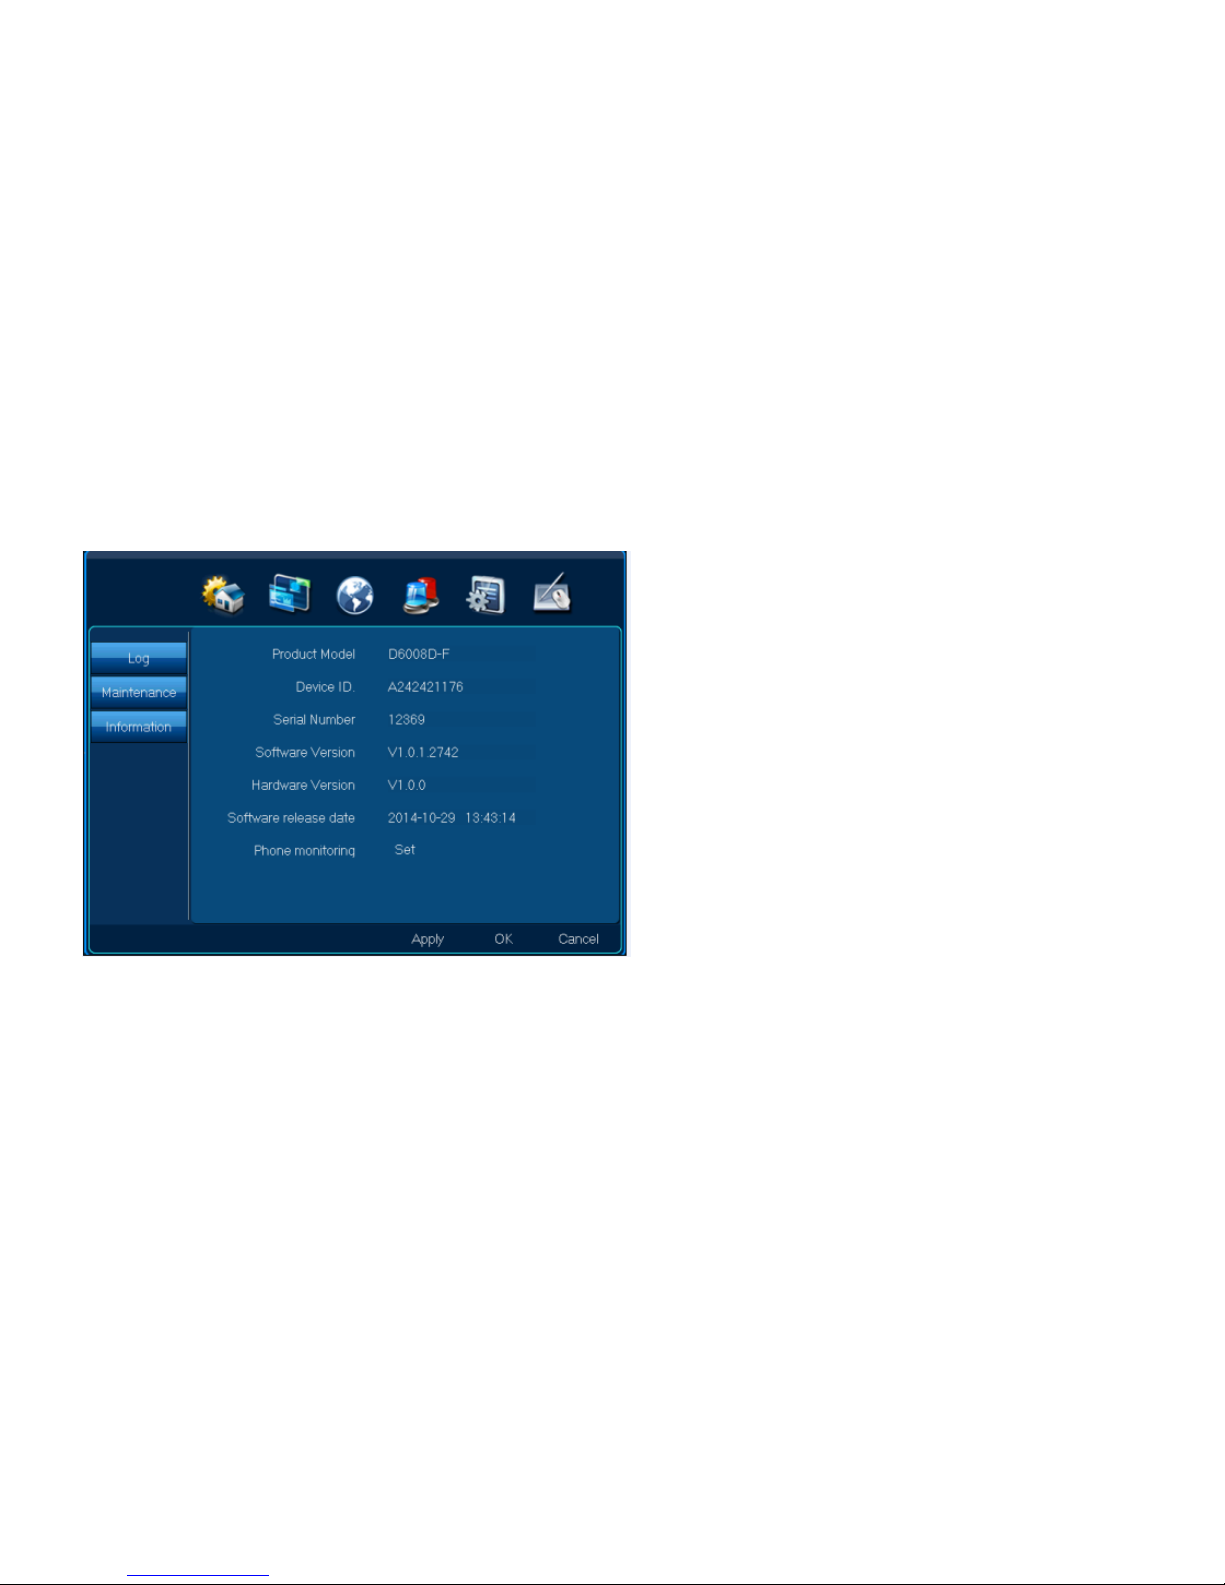
4.6.3 Information:
Location: System Setup|Maintenance|Information
Function: It can be used to query this DVR‟s serial number, software version‟s information or hardware version‟s information.
4.7 Device
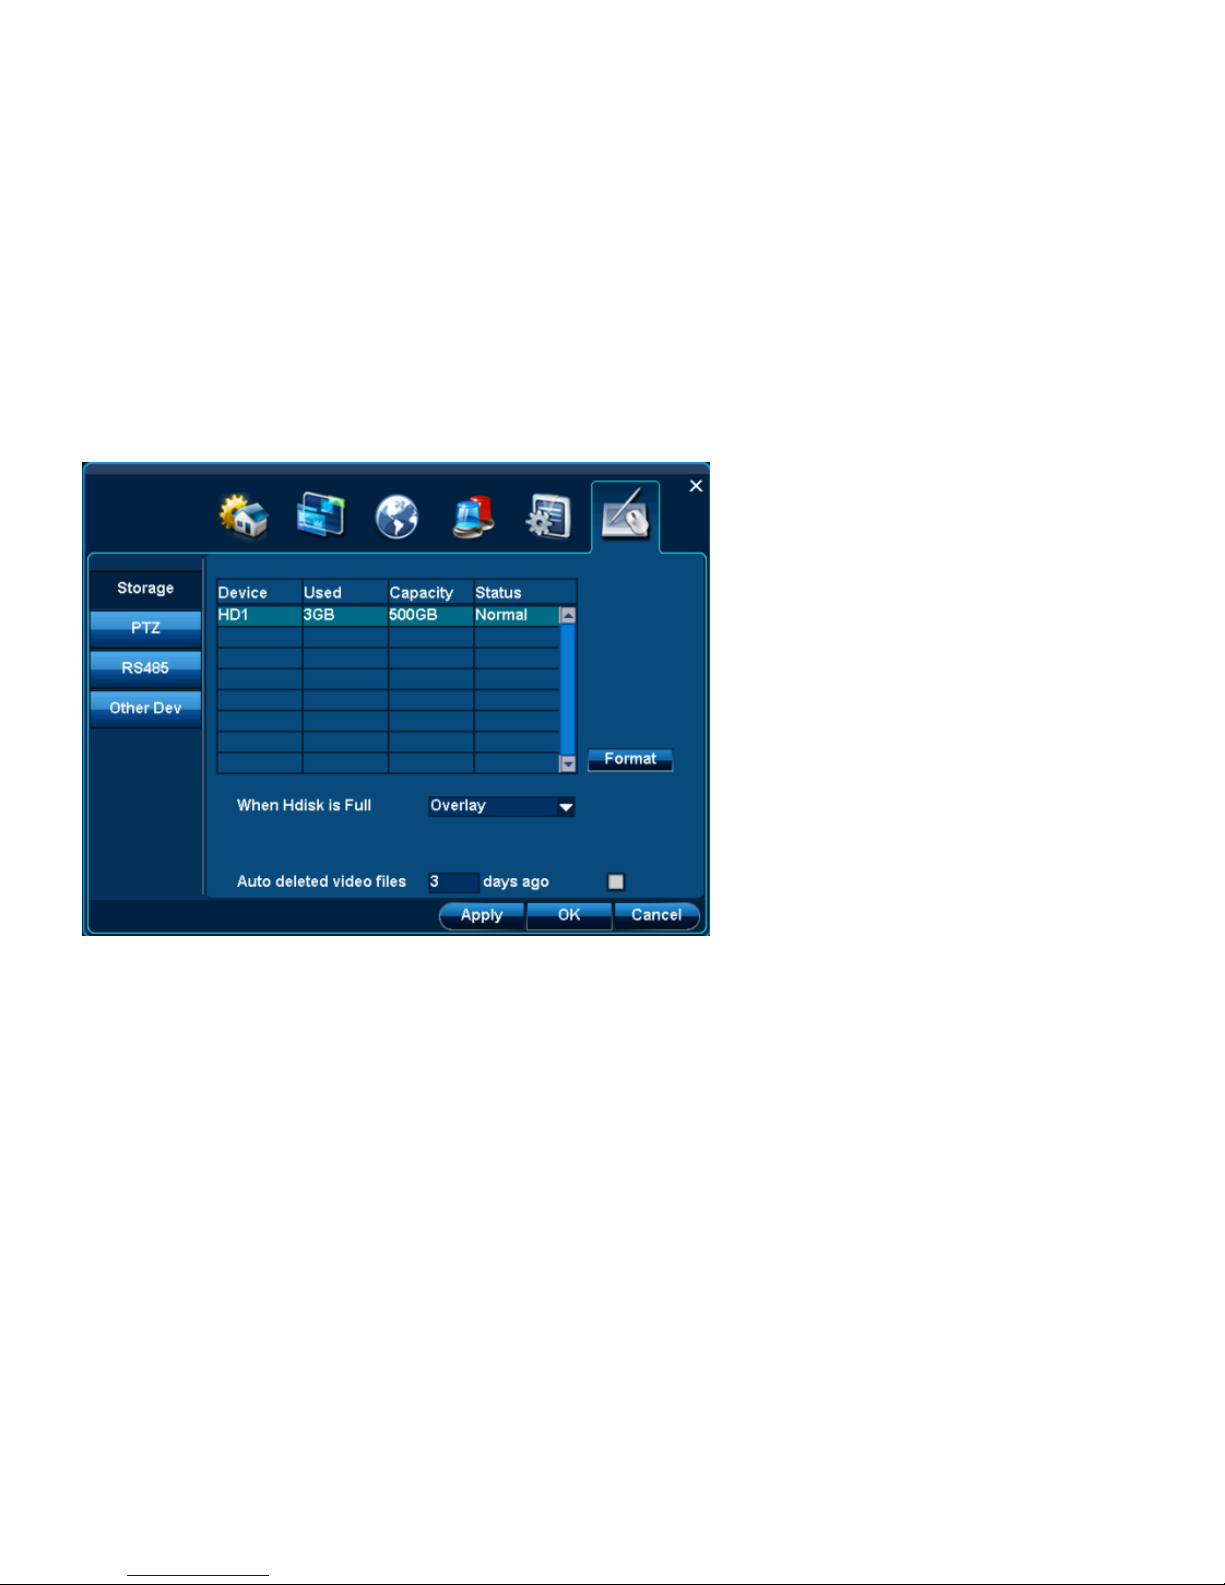
4.7.1 Storage
Location: Device|Storage
Function: 1.Query the inserted magnetic disk or hard disk‟s working mode.
2.Formate inserted hard disk or U-Disk.
Page 78
User Manual
78/183
4.7.1.1 Hard disk(Hdisk is named in interface) working mode
Page 79
User Manual
79/183
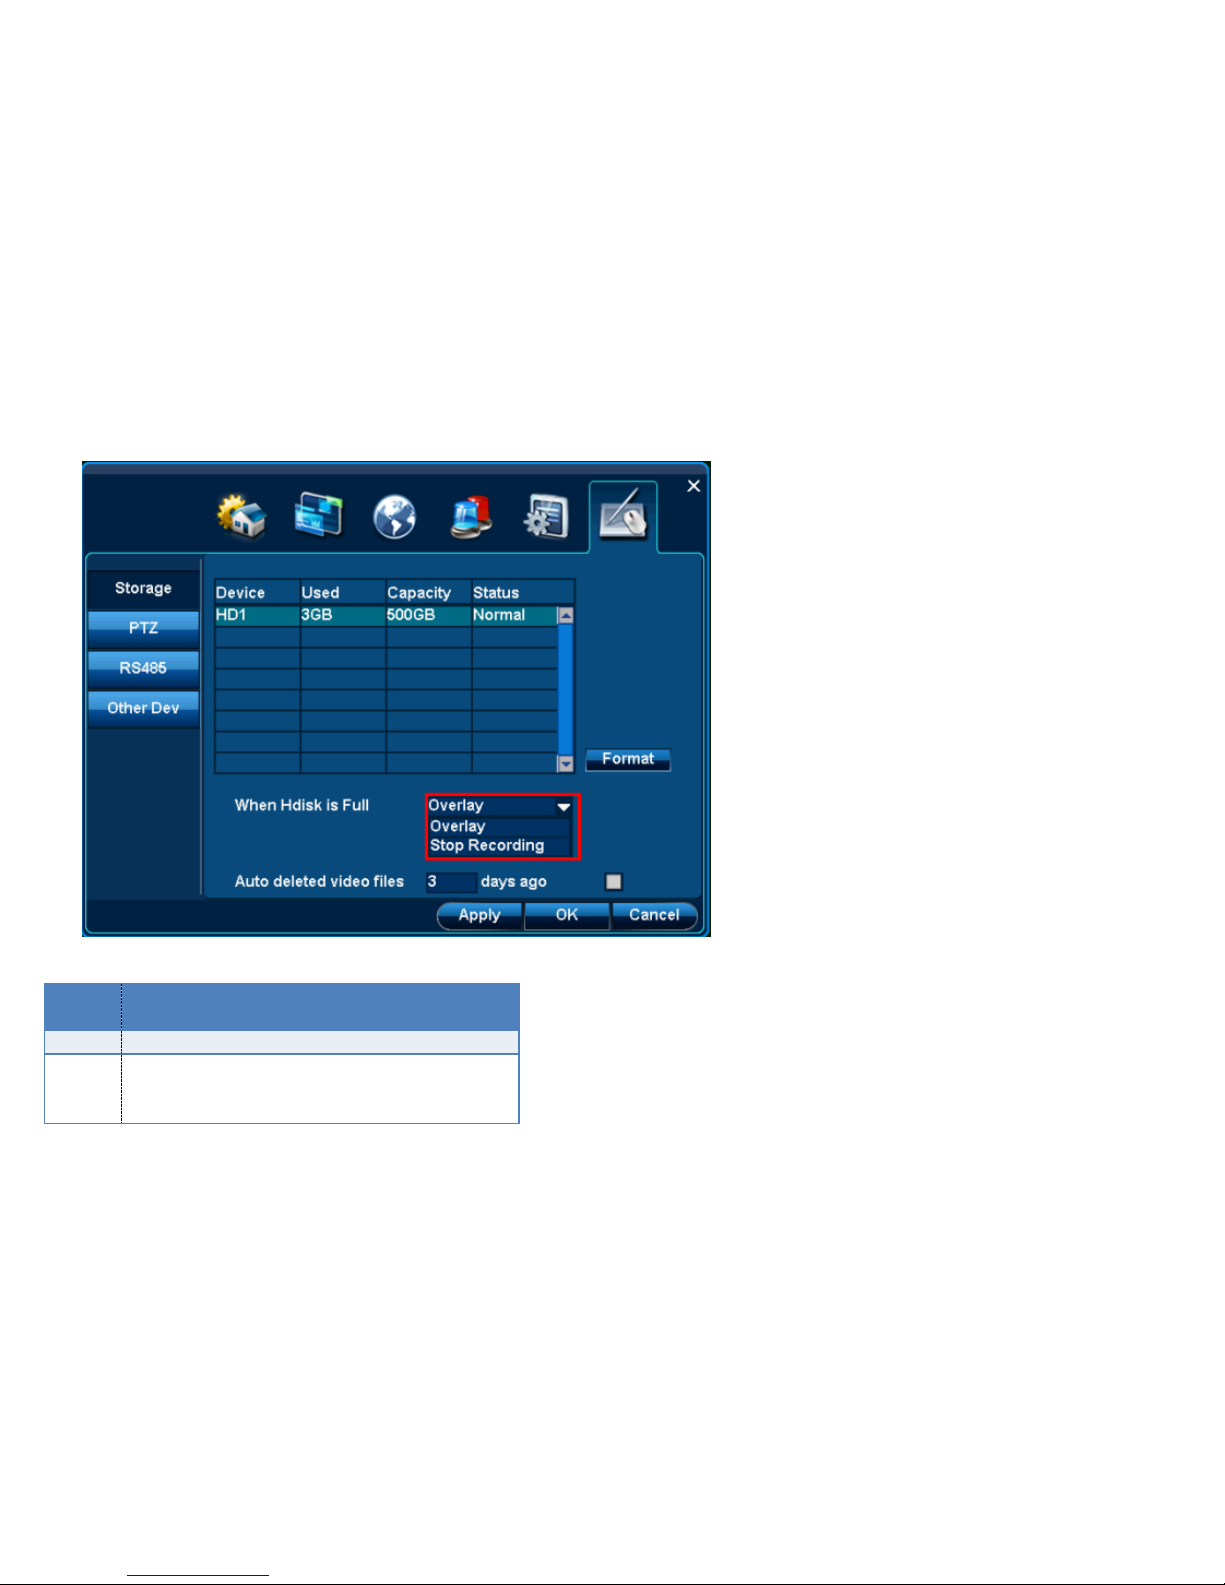
When it is“Hdisk is full”, please select “Overlay”or “Stop Recording”.
Explaination of Hard disk working model
Working
mode
explaination
Overlay
When capacity is not enough, delete earlier video files.
Stop
recordin
g
The reserved capacity can be set. When it is not enough,
the video recording will be stopped.
Page 80
User Manual
80/183
4.7.1.2 Format
Step:
1. Click and select magnetic disk in the list.
2. Click “Format”.
3. Click”OK”at confirmation interface.
4. The formatted magnetic disk can be used for storage or backup.
4.7.2 PTZ
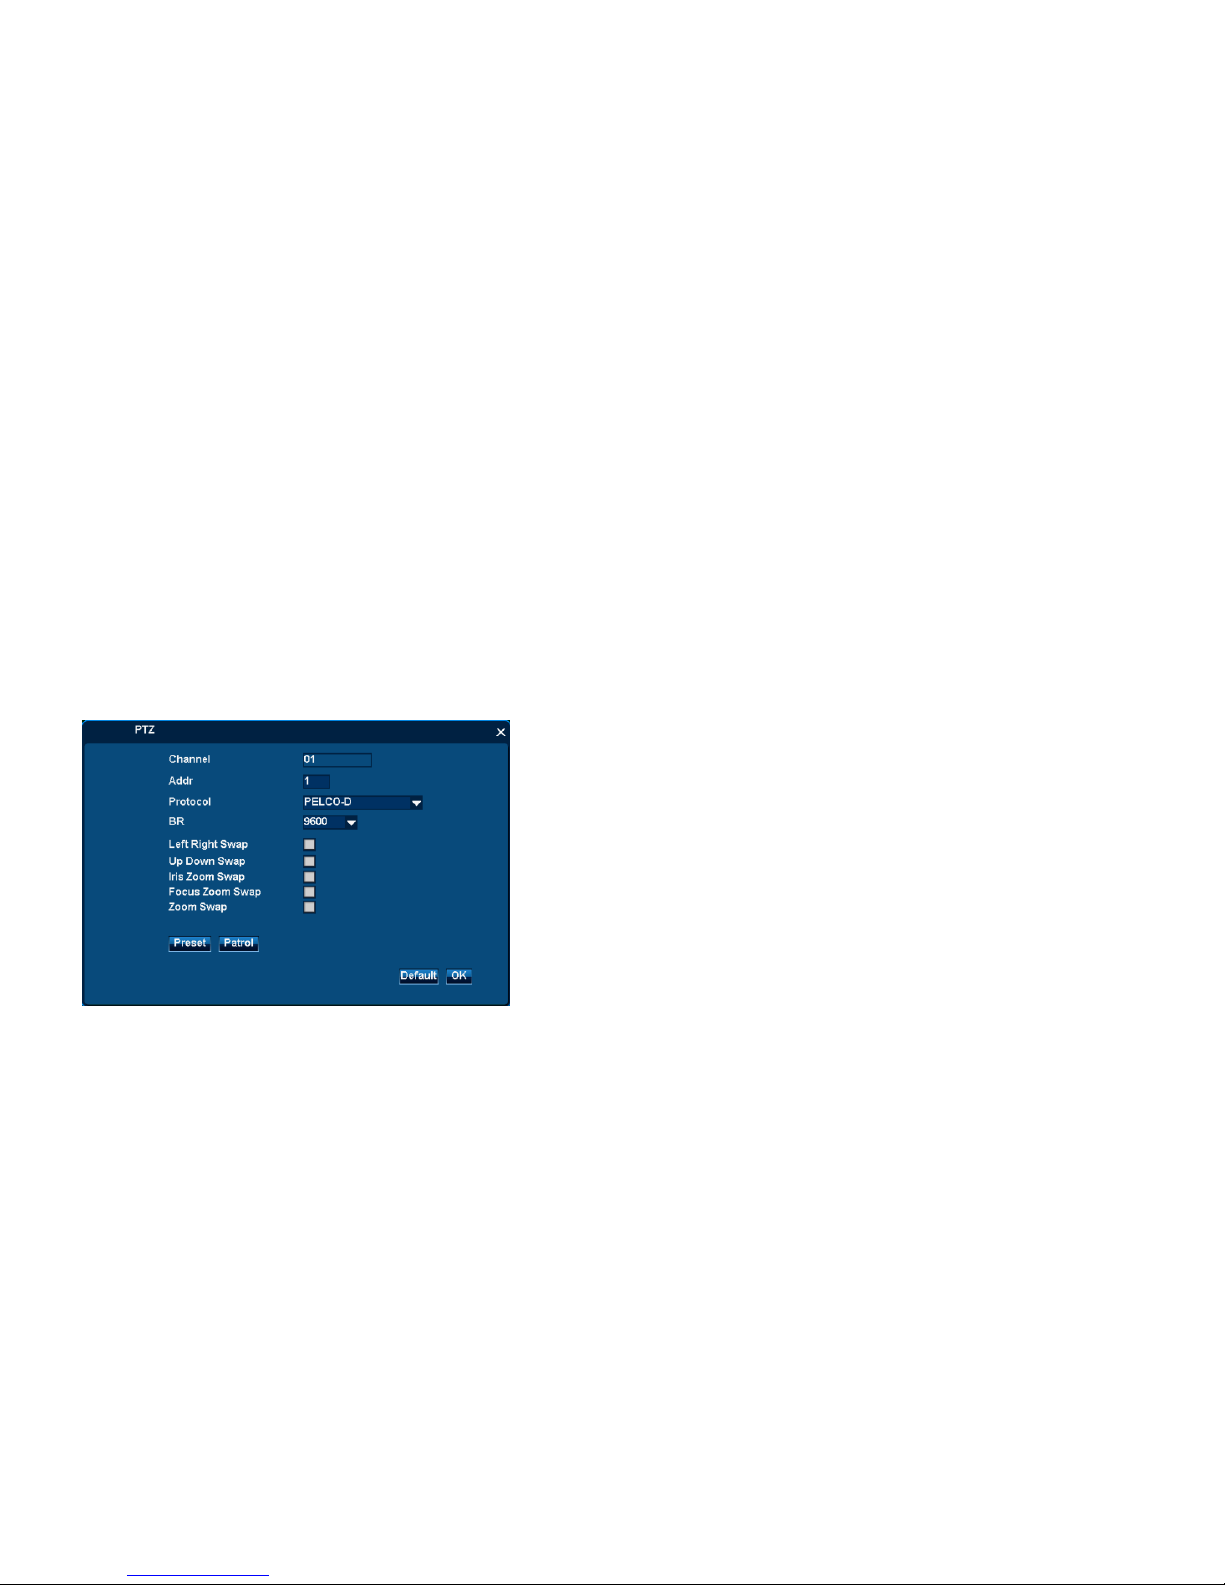
4.7.2.1 PTZ adjustment
Step 1:
1. Click “Seting” at each channel to open the setting interface.
2. Input PTZ‟s address, protocol and BP.
3. Click “OK”to save above setting.
Page 81
User Manual
81/183
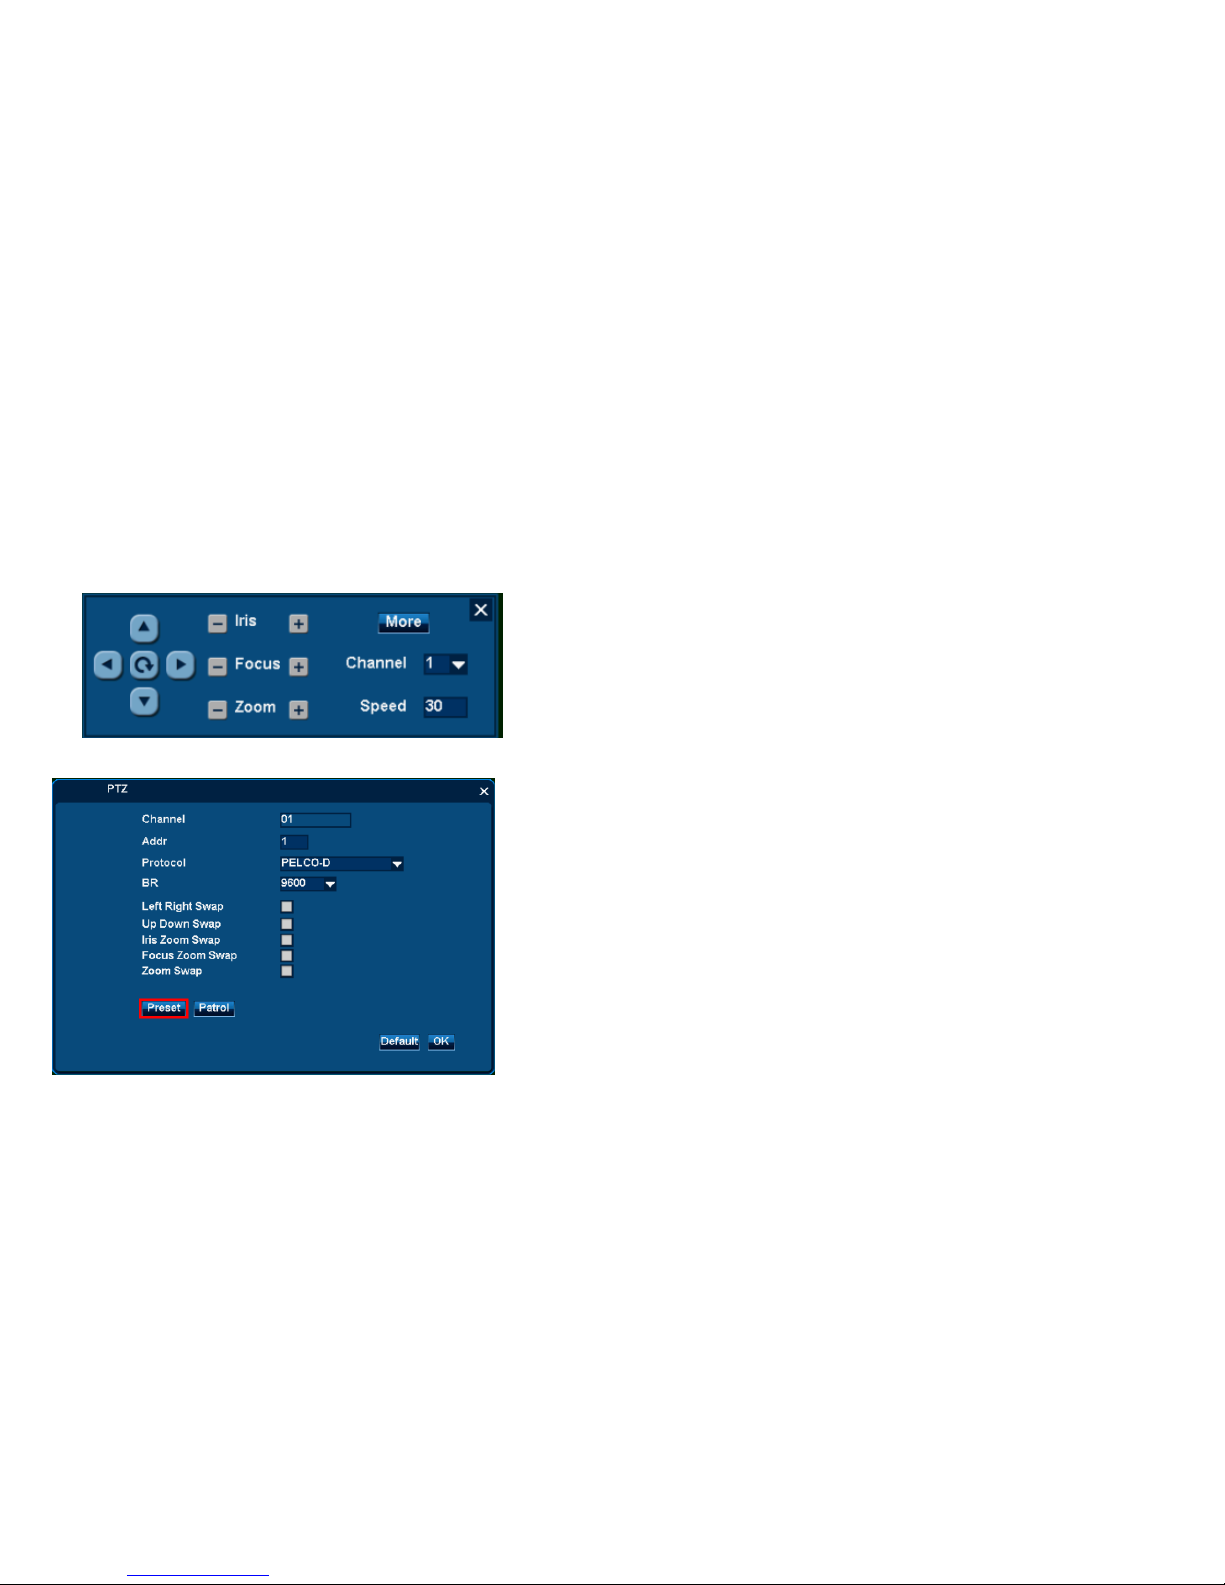
Step2: PTZ control interchange
4.7.2.2 Presetting point
Step1:Open presetting interface.
1. Select PTZ channel.
2. Click”Setting” |”Preset” to open presetting interface.
Page 82
User Manual
82/183
Step 2:Add presetting point
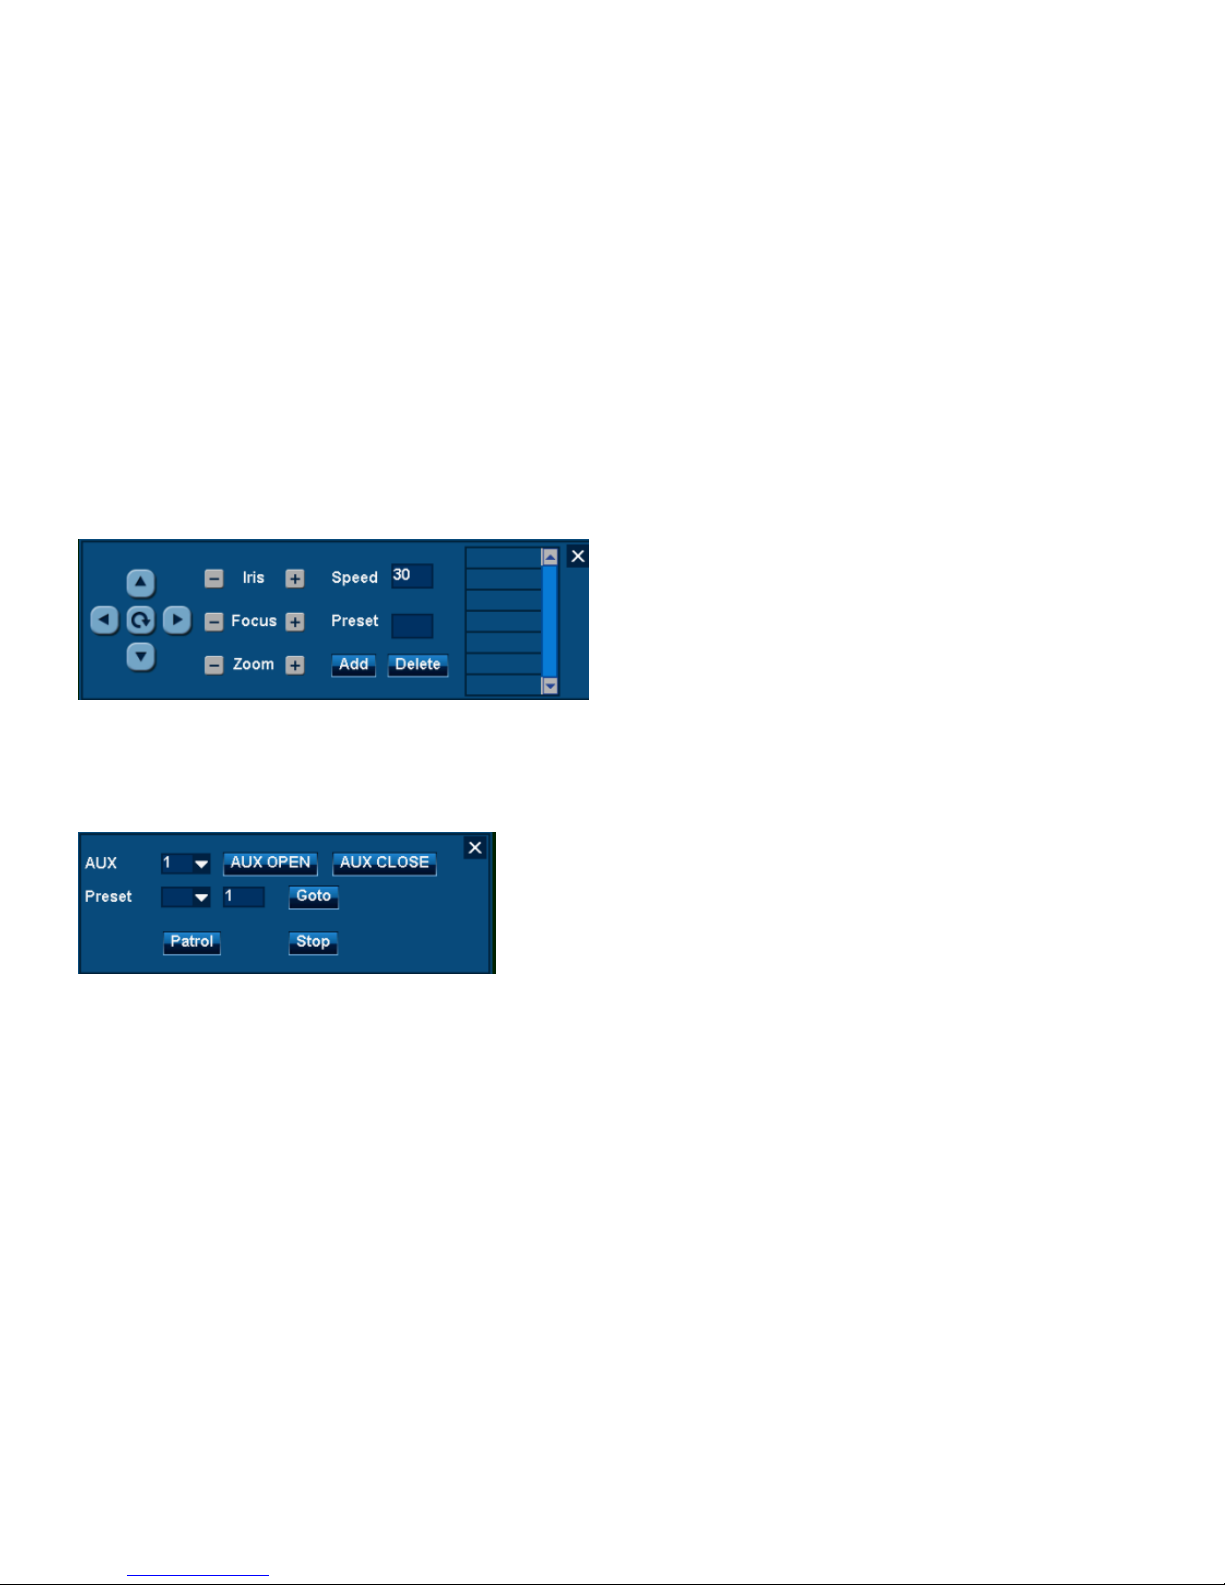
1. Click PTZ direction button and select visual angle.
2. Input new preset series number at “Preset”.
3. Click “Add” to add new preset point into the list.
Note:Click existing preset point in the list. Click“Delete” to delete selected point.
Step3:Call preset point(Menu function)
1. righ-click menu or main menu to open “PTZ control” |”More”.
2. Select preset point from preset point list.
3. Click”Goto”to make PZT visual angle turn to this point location.
4.7.2.3 Patrol
Page 83
User Manual
83/183
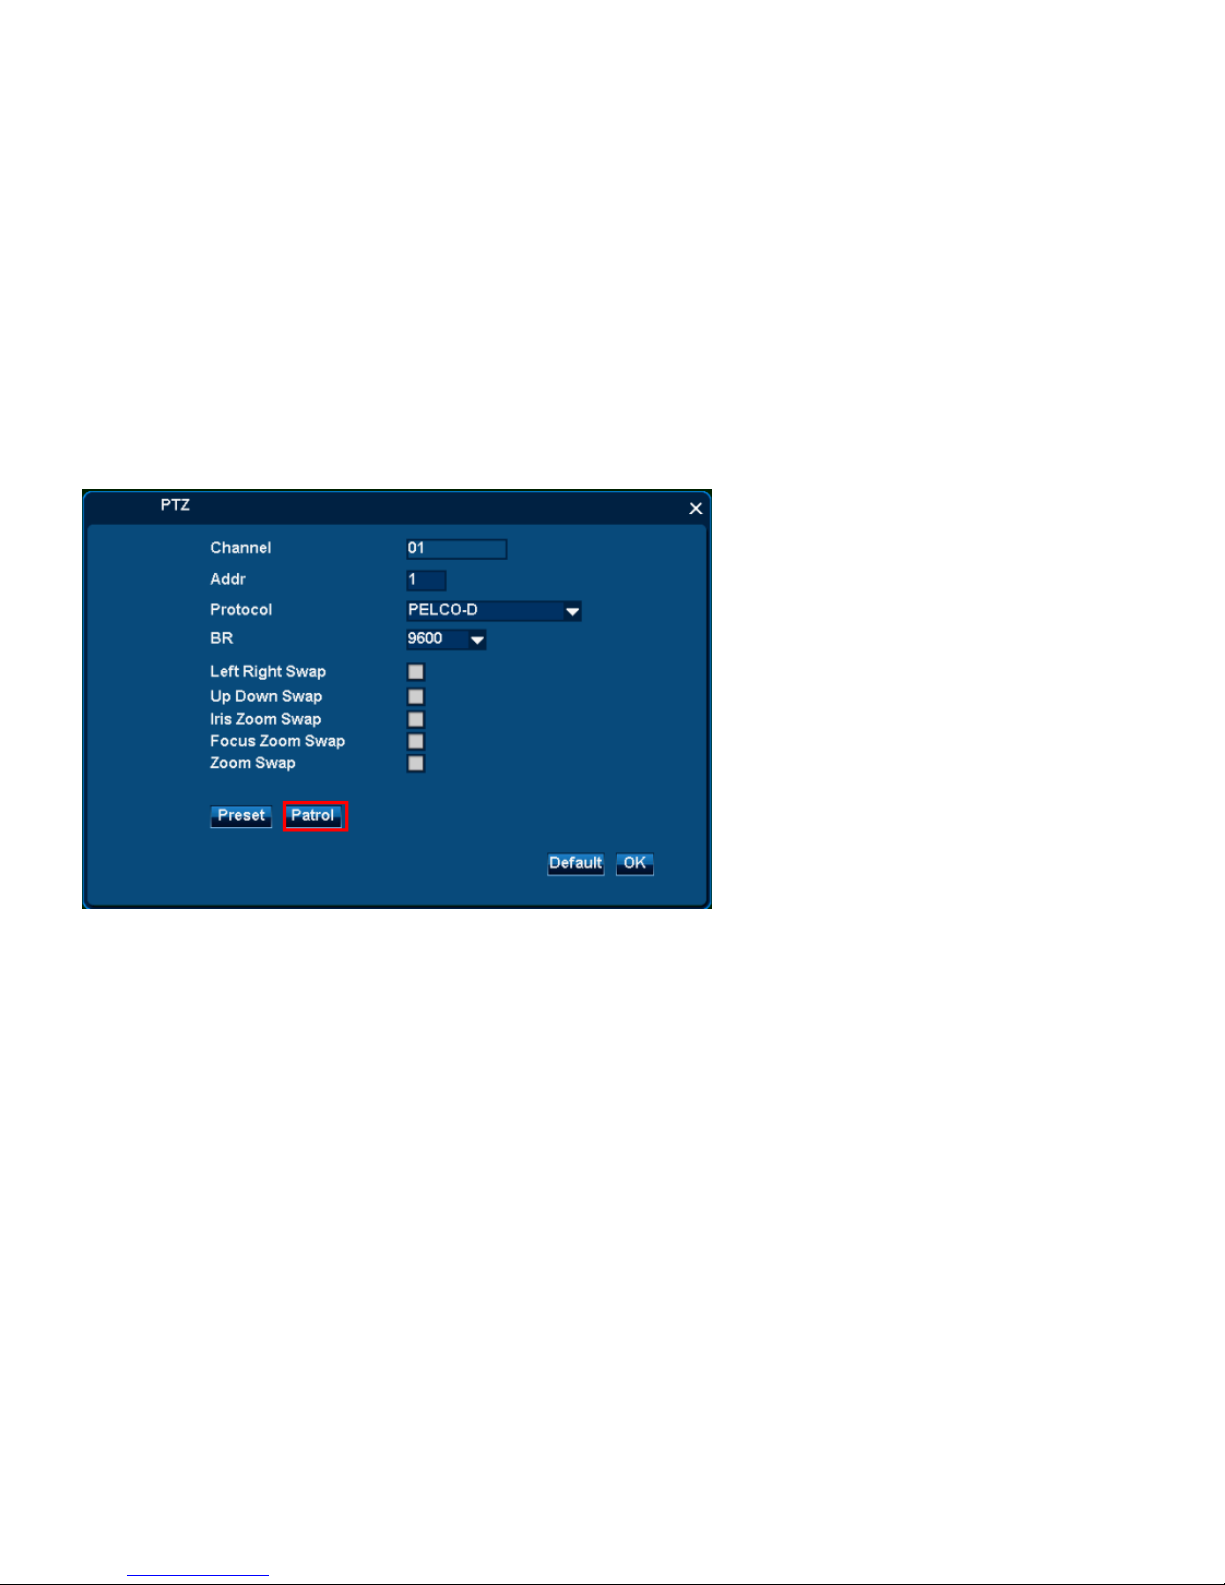
Step 1: Open patrol setting interface.
1. Select PTZ channel
2. Click”Set” |”Patrol” to open patrol interface.
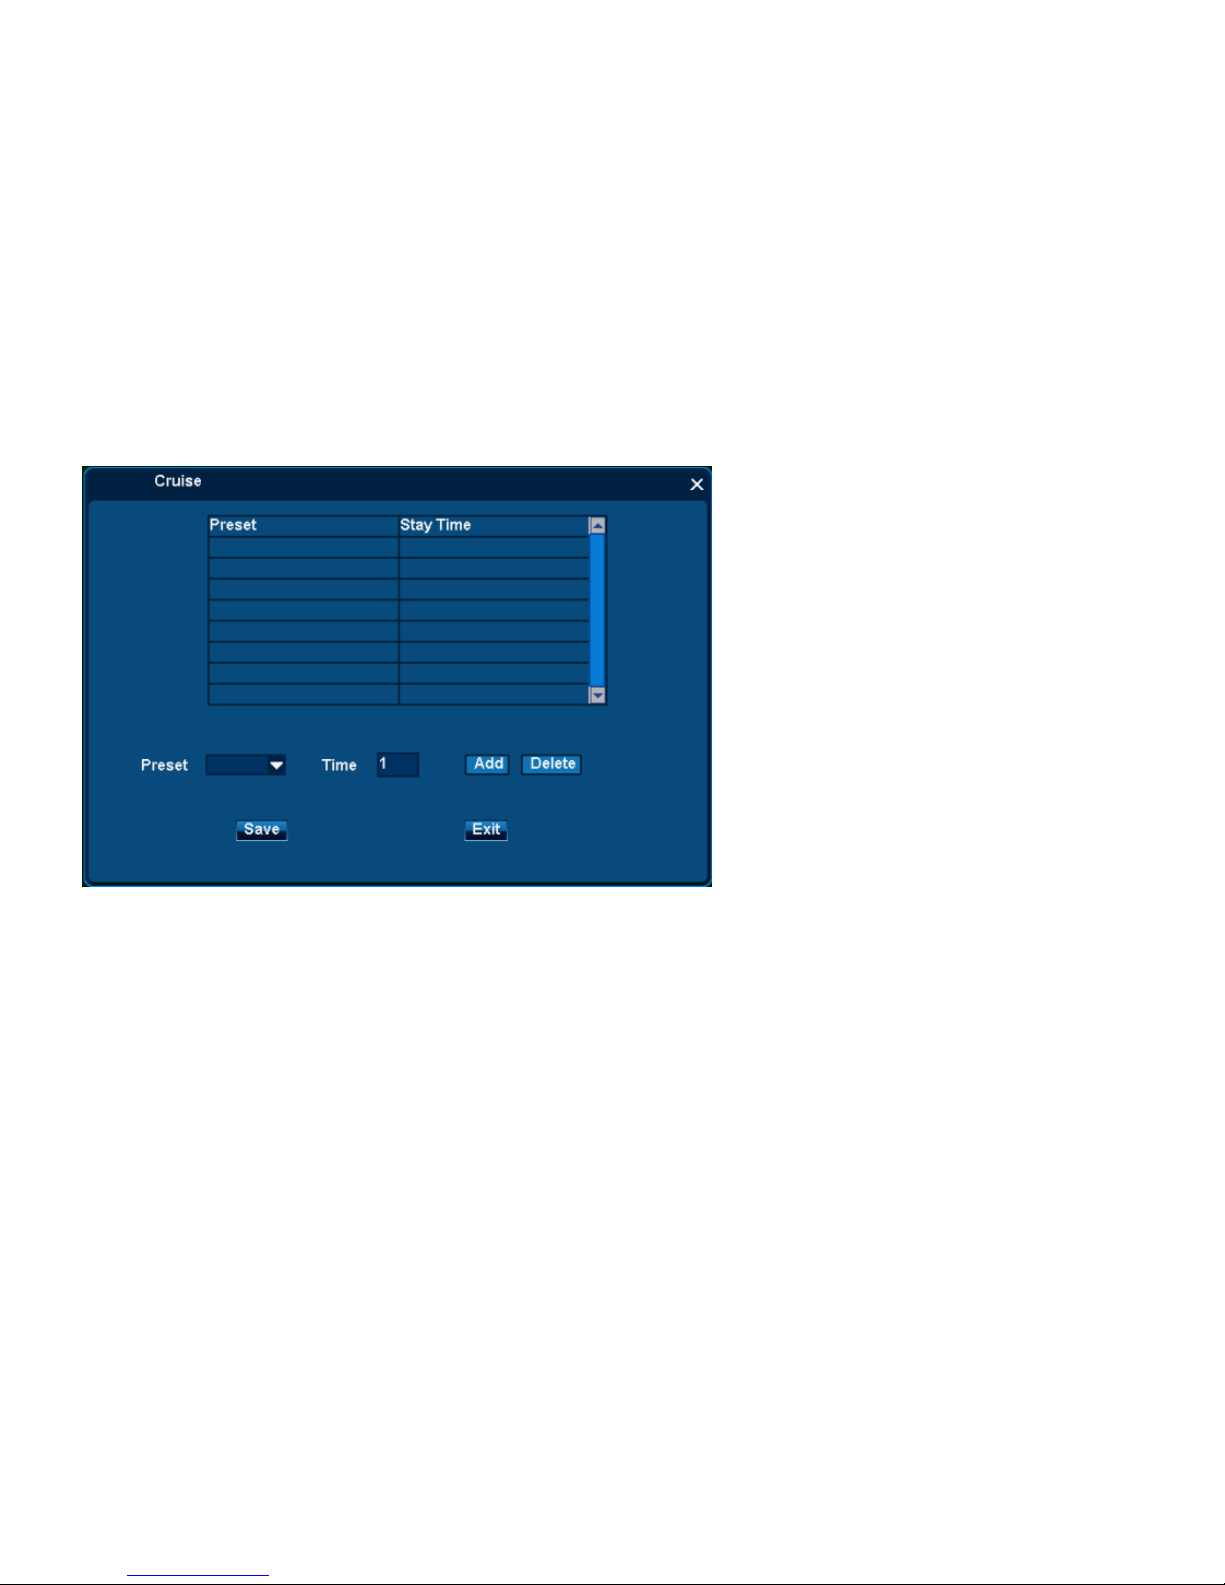
Step 2: Add preset point into patrol
Page 84
User Manual
84/183
1. Select preset point from preset point list.
Adjust detention time at this preset point
2. Click”Add” to add this preset point into patrol.
3. Note:Click existing preset point in the list. Click“Delete” to delete selected point.
4. Click”Save”to save above setting.
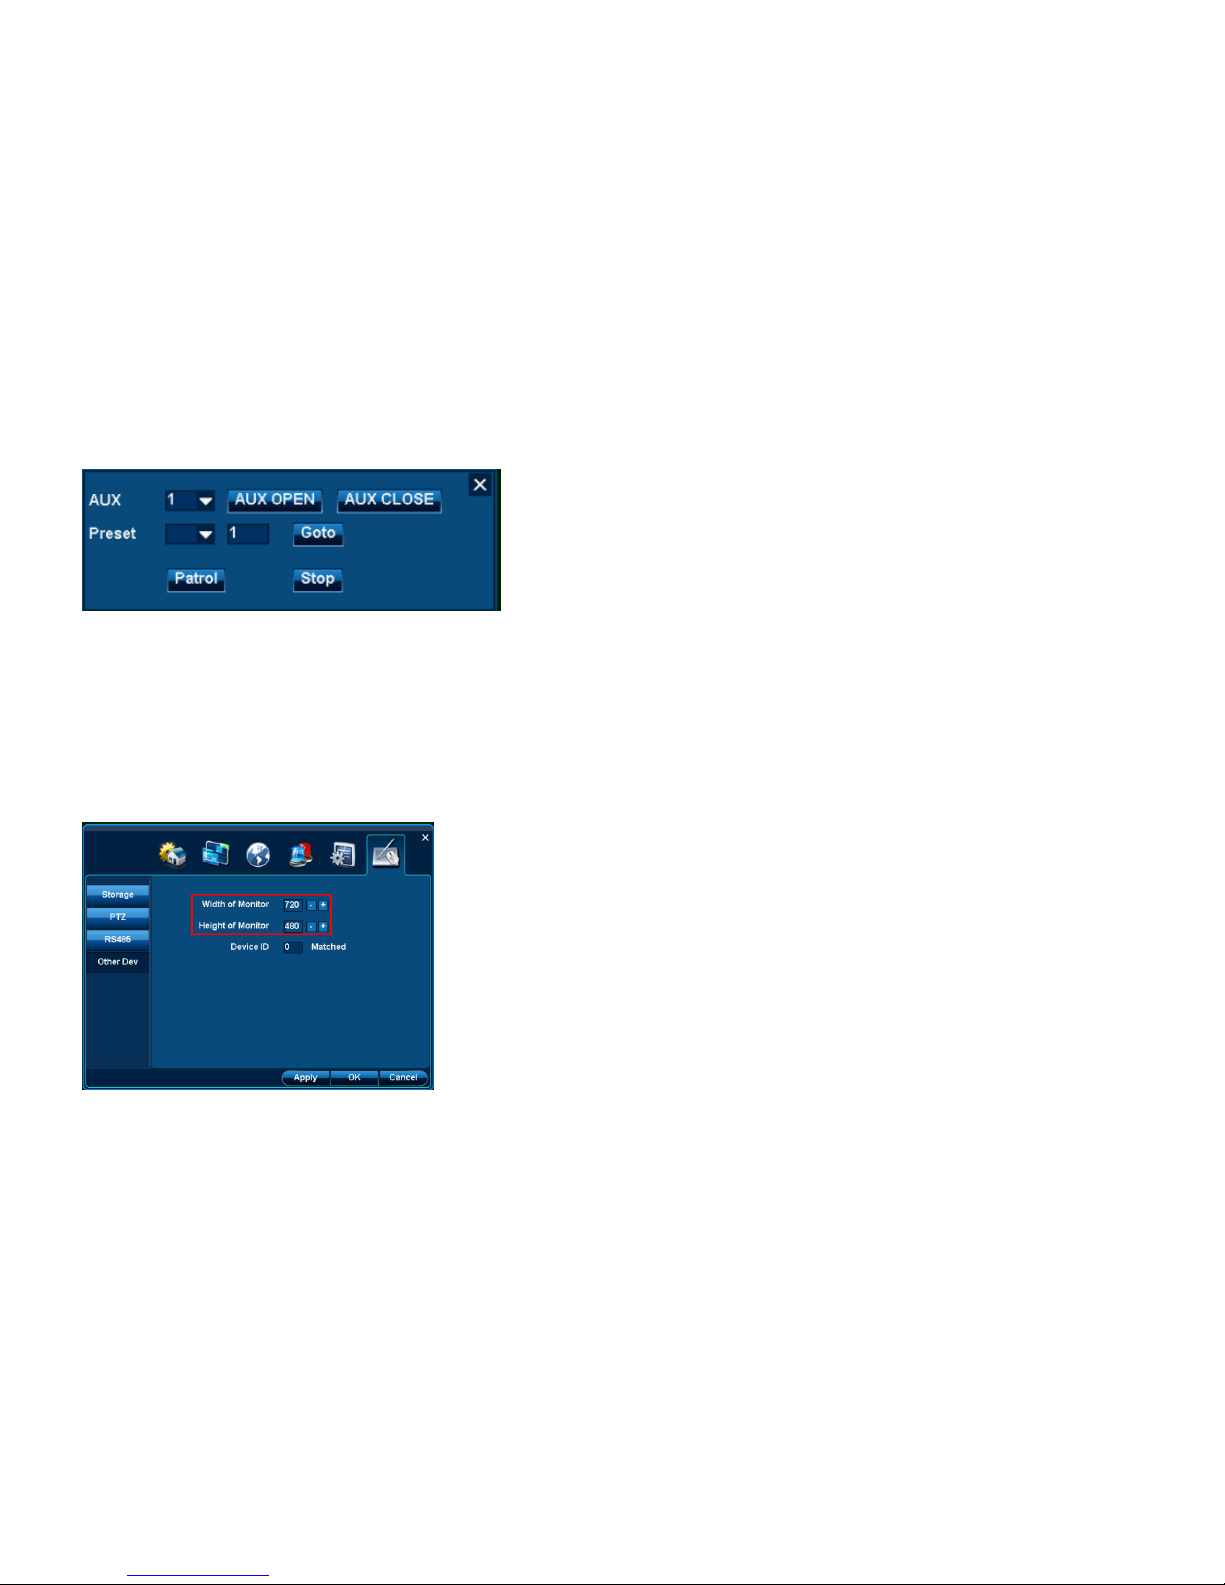
Step 3:Call patrol to cruise
Page 85
User Manual
85/183
4.7.3 Other devices
4.7.3.1 Monitor’s width and height
Location:Other Device| video ouput
Function: Width or height of output image can be adjusted on monitor
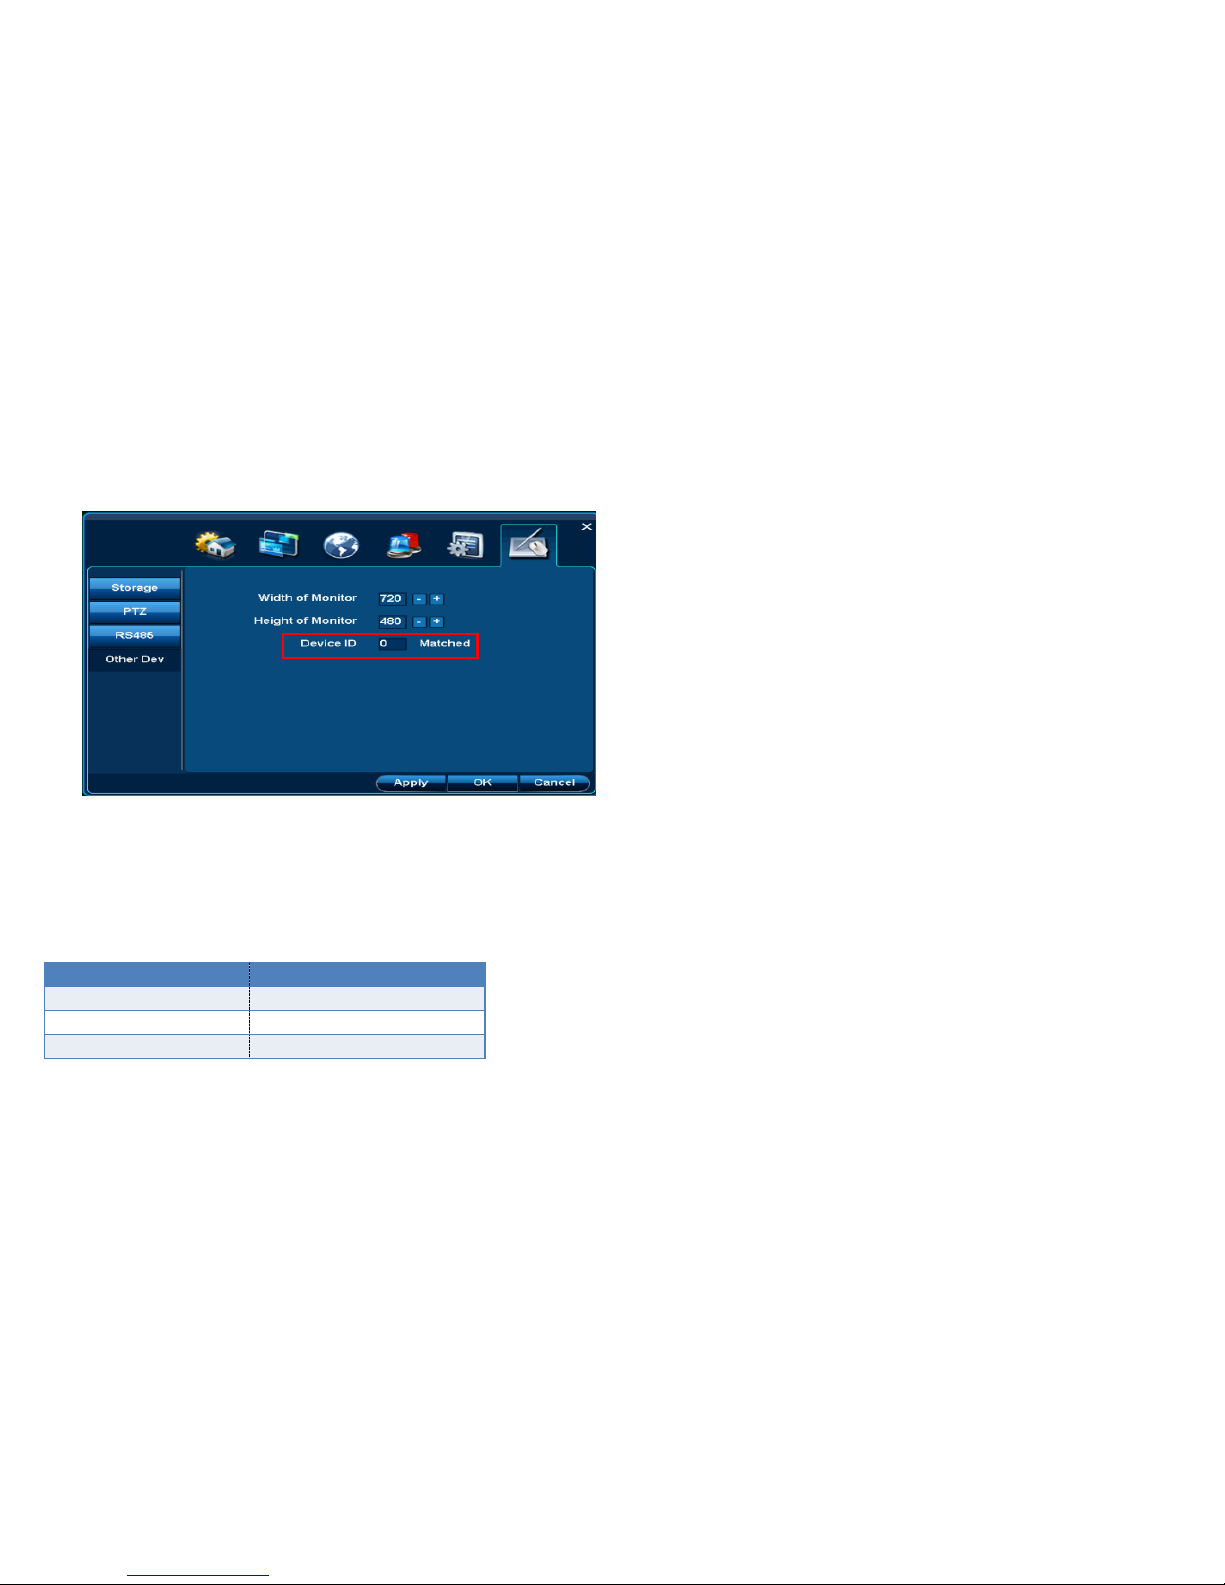
4.7.3.2 Device ID
Page 86
User Manual
86/183
Location :Device |Other Device|Device ID
Function:This DVR‟s device ID can be modified at range of 1~255. When the ID is matched with controller, the controller can control this DVR one to one.
Step of match device ID
1. Modify this DVR‟S device ID.
2. Match device ID: Press following keys on controller gradually: 【DEV】+【5】+【OK】.
Note: At the time, the controller can only be used to control this DVR and it is invalid to others.
4.8 Calculate hard disk capacity
Code rate
Video file capacity /hour
Min 113kbps
51MB
Default 600kbps
270MB
Max 1365kbps
614MB
Page 87

User Manual
87/183
4.8.1 Hard disk capacity convert
capacity convert at this DVR
capacity convert at operational
system
B
1 B = 8 b
B
1 B = 8 b
MB
1 MB = 1000 KB
MB
1 MB = 1024 KB
GB
1 GB = 1000 MB
GB
1 GB = 1024 MB
TB
1 TB = 1000 GB
TB
1 TB = 1024 GB
Note: On capacity convert at this DVR, hard disk manufacturer must be the same one and both adopt 1GB=1000MB mode. It is not 1GB=1024MB mode which is
used on operational system.
4.8.2 Required capacity for video recording.
1. The video file for one channel‟s image at each hour.
A=B÷8÷1000×3600
2. The video file for N channels‟ image at each day.
A=B÷8÷1000×3600×24×N
3. Video file for N channels‟ image for D days
A=B÷8÷1000×3600×24×D×N
Note: A indicates the required hard disk capacity. N indicates channel‟s quantity. D indicates days for video recording.
Page 88

User Manual
88/183
4 Appendices
4.5 Calculate hard disk capacity
Code rate
Video file capacity
/hour
Min 113kbps
51MB
Default
600kbps
270MB
Max 1365kbps
614MB
4.5.1 Hard disk capacity convert
capacity convert at
this DVR
capacity convert at
operational system
B
1 B = 8 b
B
1 B = 8 b
M
B
1 MB = 1000
KB
M
B
1 MB = 1024
KB
G
B
1 GB = 1000
MB
G
B
1 GB = 1024
MB
T
B
1 TB = 1000
GB
T
B
1 TB = 1024
GB
Note: On capacity convert at this DVR, hard disk manufacturer must be the same one and both adopt 1GB=1000MB mode. It is not 1GB=1024MB mode which is
used on operational system.
4.5.2 Required capacity for video recording.
1. The video file for one channel‟s image at each hour.
Page 89

User Manual
89/183
A=B÷8÷1000×3600
2. The video file for N channels‟ image at each day.
A=B÷8÷1000×3600×24×N
3. Video file for N channels‟ image for D days
A=B÷8÷1000×3600×24×D×N
Note: A indicates the required hard disk capacity. N indicates channel‟s quantity. D indicates days for video recording.
5.Appendices
5.5Calculate hard disk capacity
Code rate
Video file capacity
/hour
Min 113kbps
51MB
Default
600kbps
270MB
Max 1365kbps
614MB
5.5.1Hard disk capacity convert
capacity convert at
this DVR
capacity convert at
operational system
B
1 B = 8 b
B
1 B = 8 b
M
B
1 MB = 1000
KB
M
B
1 MB = 1024
KB
G
B
1 GB = 1000
MB
G
B
1 GB = 1024
MB
T
1 TB = 1000
T
1 TB = 1024
Page 90

User Manual
90/183
B
GB B GB
Note: On capacity convert at this DVR, hard disk manufacturer must be the same one and both adopt 1GB=1000MB mode. It is not 1GB=1024MB mode which is
used on operational system.
5.5.2 Required capacity for video recording.
1. The video file for one channel‟s image at each hour.
A=B÷8÷1000×3600
2. The video file for N channels‟ image at each day.
A=B÷8÷1000×3600×24×N
3. Video file for N channels‟ image for D days
A=B÷8÷1000×3600×24×D×N
Note: A indicates the required hard disk capacity. N indicates channel‟s quantity. D indicates days for video recording.
5.2 3G Network card dial-up
Number User
name
password
Unic
om
*99#
Tele
com
#777
card
card
<The End>
Page 91

User Manual
91/183
Page 92

User Manual
92/183
Menu
1. Producción Introducción ......................................................................... 6
2. Instalacion ..................................................................................... 6
2.1. Instalacion HDD .............................................................................. 6
2.2. 2.1 Panel Frontal ............................................................................ 6
2.2 2.2Panel Trasero ............................................................................ 5
2.3. Vista previa de la ventana Icono Descripción ..................................................... 6
3. Operación Rápida .............................................................................. 7
3.1. Iniciar Sesión ................................................................................ 7
3.1.1.Inicio de Sesion normal ....................................................................... 7
3.1.2.Inicio de sesion Temporal .................................................................... 10
3.2. Menu de Operaciones .......................................................................... 8
3.2.1. Ver Diseño ................................................................................. 9
3.2.2.Intervalo de Secuencia ...................................................................... 10
3.2.3. Adjuste de Video ........................................................................... 10
3.2.4. PTZ ...................................................................................... 12
3.2.5. Clientes ................................................................................... 15
3.2.6. Snapshot .................................................................................. 16
3.2.7. Funcion de Grabado ........................................................................ 18
3.2.8 Borrar la alarma ............................................................................ 25
3.2.9 Apagar .................................................................................... 25
4 Configuracion de Sistema ....................................................................... 26
4.1 Estructura Funcional ........................................................................ 26
4.2 General ..................................................................................... 27
4.2.2 Tiempo .................................................................................... 29
4.2.3 Usuario .................................................................................... 30
4.3 Canales ..................................................................................... 34
4.3.1 Configuración de vista previa ................................................................. 34
4.3.2 Ajuste de Corriente ......................................................................... 43
Page 93

User Manual
93/183
4.3.3Configuracion de Audio ....................................................................... 46
4.4.1 Configuración de red ........................................................................ 50
4.4.2 Servicio de red ............................................................................. 53
4.5 Alarma ...................................................................................... 57
4.5.1 Detección de movimiento .................................................................... 57
4.5.2 No video ................................................................................... 60
4.5.3 Dispositivo de alarma ........................................................................ 62
4.5.4 Tarea de alarma ............................................................................ 64
4.5.5 E-mail alerta ................................................................................ 65
4.6 Sistema ..................................................................................... 66
4.6.1 Iniciar sesión: .............................................................................. 66
4.6.2 Mantenimiento ............................................................................. 68
4.6.3 Informacion: ................................................................................ 73
4.7 Dispositivo ................................................................................. 73
4.7.1 Almacenamiento ............................................................................ 73
4.7.2 PTZ ....................................................................................... 76
4.7.3 Otros dispositivos ........................................................................... 81
5 Anexos ....................................................................................... 85
5.5 Calcular la capacidad del disco duro ............................................................ 85
5.5.1 Disco duro de capacidad de conversión ....................................................... 85
5.5.2 Capacidad requerida para la grabación de vídeo. ............................................... 86
Page 94

User Manual
94/183
3. Producción Introducción
Red DVR es un producto de monitoreo que permite que el audio y el vídeo sincronizado. Adopta incrustado y micro procesador, por lo que el sistema funciona de manera más
constante. Este producto integra funciones tales como vídeo y audio, transmisión de la red, la gestión alarmante, etc. Mientras tanto, tiene las características de DVR y DVS.
No sólo puede trabajar solo, pero también puede ser conectado en red a una poderosa red de monitoreo de seguridad. Es ampliamente utilizado en la escuela, fábrica,
supermercado, banco, tráfico, instalaciones de conservación de agua, zona residencial, y el departamento de almacén, etc.
4. Instalacion
4.1. Instalacion HDD
1. Asegúrese de alimentación ha sido desconectada, abra la cubierta de la caja;
2. Conecte la línea de datos del disco duro, la línea eléctrica en primer lugar, a continuación, fijar el disco duro en el caso;
3. Instale la cubierta, conecte el poder, que con adaptador, pulse el interruptor de encendido;
4. Formatear el disco duro (Por favor, consulte los detalles en: Configuración del sistema-dispositivo de almacenamiento -Formatting;
5. Red DVR normalmente puede hacer instantáneas y vídeo.
4.2. 2.1 Panel Frontal
El panel frontal de una serie
Page 95
User Manual
95/183
NO.
TIPO
NOMBRE
Instrucciones
1
Poder
PODER
Indicador de Poder
2
Function
keys
Menu
REC
Boton de controles de Grabacion
Busqueda
Buscar archivos de video
Reproducir
Reproduccion
Rapido
Reproducción rápida
Slow
Reproducción lenta
Atras
Poco a poco la reproducción
3
Receptor IR
IR
Receptor del mando a distancia
4
Control
Direction key
teclas de dirección incluyen: arriba【 】、abajo【 】、izquierda【 】、derecha 【 】
cuatro botones.
5
OK
Confirm
Entrada
6
ESC
esc
Salida
Page 96
User Manual
96/183
2.2 2.2Panel Trasero
Panel trasero de un 8CH serie
Item
Conector
Fisico
Descripcion del conector
1
Entrada de
video
Para la conexión de entrada de señal de vídeo analógica (BNC)
2
V-OUT
Salida de vídeo para la televisión o el monitor de conexión
(BNC)
3
DC12
DC 12V
4
RS485+
RS485-
RS 485 para conexion de la PTZ
5
A-OUT
Para la conexión de salida de audio
6
Audio In
(A-IN)
Para la conexión de señal de audio
7
VGA
Para la conexión de monitor VGA
8
Net
Para la conexión de Ethernet
9
USB
USB2.0/USB raton
10
HDMI
Para la conexión de monitor HDMI
11
Power switch
para DVR on/off power
Page 97
User Manual
97/183
2.3 Vista previa de la ventana Icono Descripción
Icon
Description
Significa que esta grabando
Significa el cliente final es la vinculación de este canal.
(Yellow)
significa que este canal está configurado de alarma, pero
no se desencadena
(Red)
Se refiere a la alarma se dispara.
Significa esta ventana monitoreo voz cercana.
Significa esta ventana voz monitoreo abierta.
3.Operaciones Rapidas
3.1 Inicio de Sesion
3.1.1 Inicio de Sesion Normal
Después de iniciar el sistema, será popup pantalla [Inicio de sesión], después de la conexión del usuario puede hacer otra operación.
Observaciones: Si cancelar la función [/ / Asistente de instalación del sistema de pantallas General General /], no será dado el aviso de la conexión a menos que
los usuarios operan el DVR.
Page 98
User Manual
98/183
Pasos:
1. [Nombre de usuario] nombre de usuario predeterminado de entrada 'admin';
2. [Contraseña] está vacía, es decir nada de entrada;
3. Un solo clic [Inicio], luego terminar la operación de inicio de sesión.
Observaciones: Si iniciar sesión fracaso por 3 veces, el ratón se bloquean durante 10 segundos, el DVR de alarma hasta entrada con éxito.
3.1.2 Entrada Temporal
Si se olvide el nombre de usuario y contraseña y hacer que el fracaso de inicio de sesión, puede usar entrada temporal.
Pasos:
c) Error de inicio de sesión de nuevo, tenga en cuenta [Errcode],
d) El contacto con el servicio al cliente, que le dirá un nombre de usuario y una contraseña temporal.
Page 99
User Manual
99/183
3.2 Menu de Operaciones
Funcionamiento del menú es en funciones [Right Click Menu] y [Menú Principal], con el fin de hacer la operación más fácilmente.
La función de menú de la siguiente manera:
Page 100
User Manual
100/183
Haga clic (derecho) en Menú: Configuración del sistema, Vista Diseño, Video Adjust, PTZ, Clientes, Instantánea, Fotos, Configuración de grabación,
reproducción, Borrar alarma
Menú Principal: Configuración del sistema, Vista Diseño (3 layout), Secuencia Intervalo, Zoom, Video Adjust, PTZ, Instantánea, Fotos, Configuración de grabación,
reproducción, Apagar.
3.2.1 Ver Diseños
Función Ubicación: Haga clic derecho Menú:
Main Menu:
Resumen Función: durante la vista previa, se puede ajustar el modo de distribución de la pantalla, puede elegir View1, View2 (Picture in Picture), View4, etc..
Modo
Screen
No.
Cambios de imagen
Orden de
muestra
Pantalla
completa
Remark
1Ventana
1
Selecciona el num de
canal‟
1,2,3、4、5、
6、7、8
/
/
4Ventanas
4
Click „Ver 4‟
1~4,
Double click
/
 Loading...