

Page 1
■
Aconda 9272
■
Aconda 9372
■
Aconda 9281 HD
■
Aconda 9381 HD
Neu für 3.Auflage:
S11, 14, 16, 17, 18, 19, 24
Operating Instructions.
TV.
233–31308.020
BAQ2550H_31308_020_3_GB2 07.05.2004, 10:58 Uhr1
1
Page 2

Contents
Remote control – TV functions 3
Control panel 4
Rear connections 5
Welcome 6
Thank you
TV equipment
Setup
Cleaning
For your own safety 7 – 8
Initial installation 9
Batteries – remote control
Connection
Switching on
Initial installation
Daily handling 10
Switching on/off 10
Changing channels 10
General menu operation 11
Adjusting the sound 11
Adjusting the picture 11
Operation on the set 11
Modes of operation 12 – 17
TV mode 12
Picture in picture 13
EPG mode 14 –15
Teletext mode 16
Video mode 17
Operating additional equipment 18 – 20
Logging in and connecting
AV equipment 18
Video playback 19
Loewe video recorders and direct
operation of Loewe DVD players 20
What to do if … 21 – 22
Technical data 23
Mechanical data
Electrical data
Accessories 24
Service addresses 24
2
BAQ2550H_31308_020_3_GB2 07.05.2004, 10:58 Uhr2
Page 3
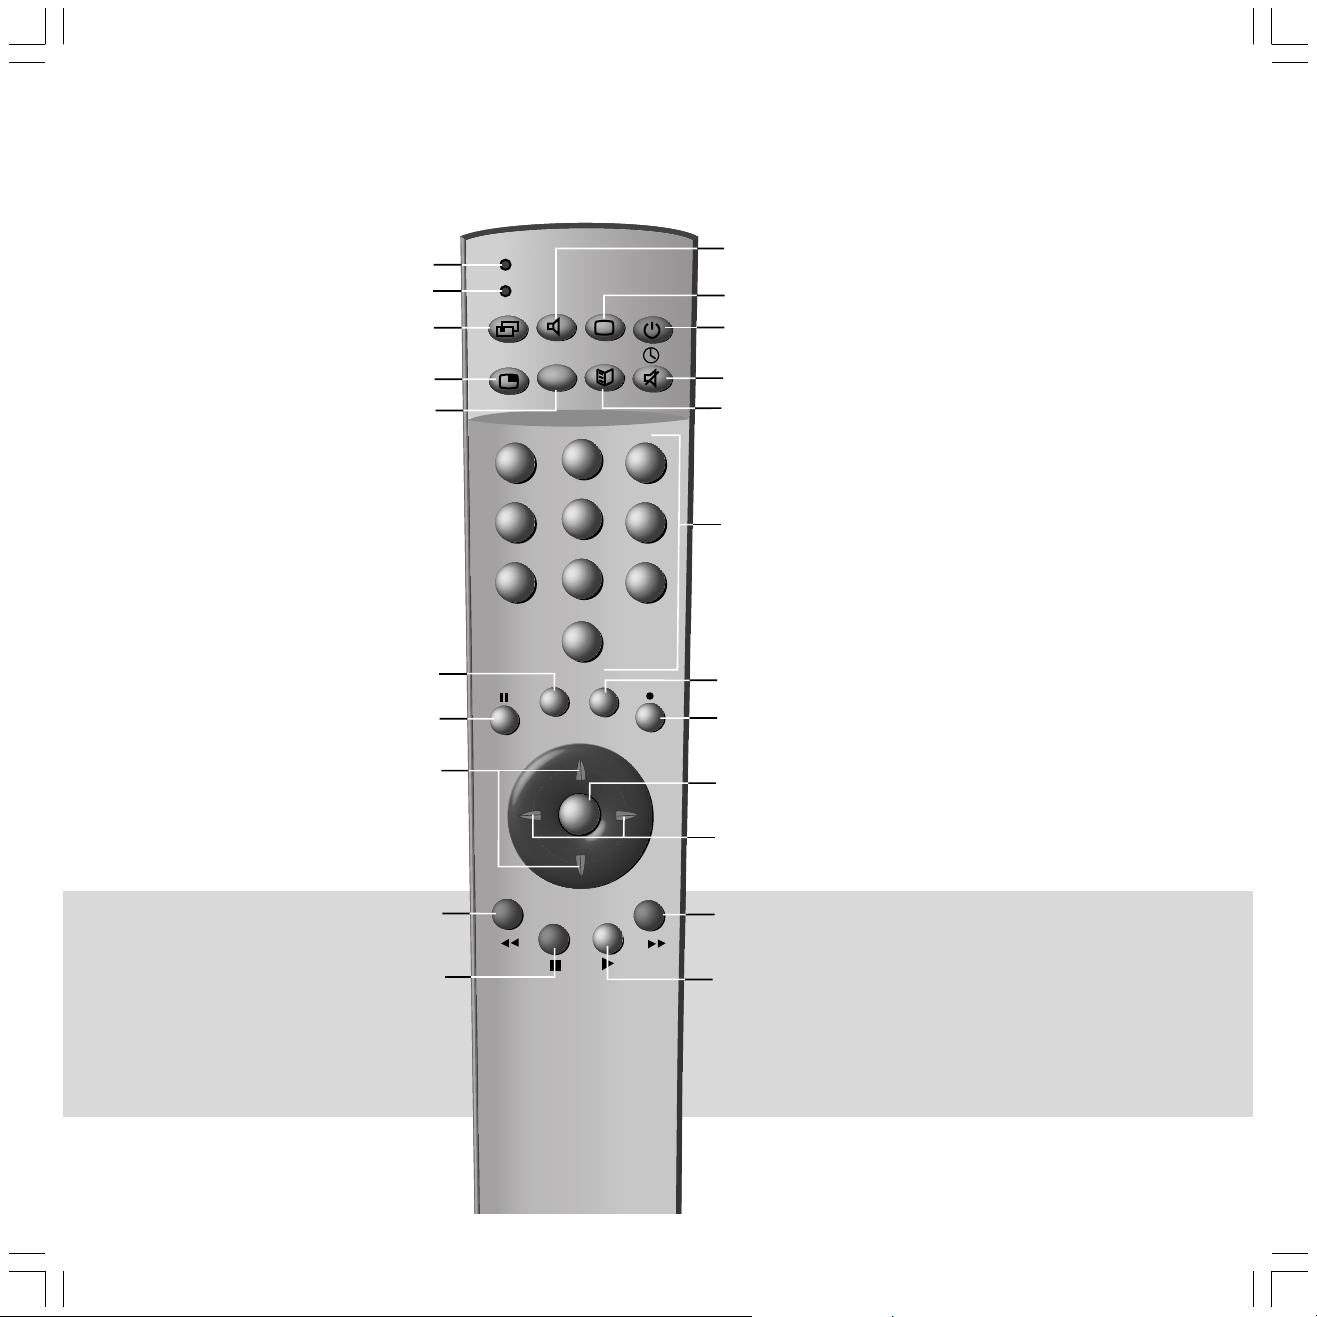
Remote control – TV functions
Indicator: Operate VCR
Indicator: operate DVD
Direct operation
select for VCR/DVD/TV
PIP operation on/off
Video operation with
video operating line
on/off
Call up menu
/in the menu: back
Teletext mode on/off
Select programme up/down
/in the menu: select up/down
Radio mode on/off
Picture menu
Switch on/off
– in standby mode
Sound off/on (Mute)
EPG operation on/off
Select programme directly
/in the menu: numeric input
SV
LP
=
V
Control 150
000
2
5
8
3
6
9
VTR
DVD
1
4
7
0
Blend in programme, time, title of the broadcast
M
E
T
OK
OK
i
/in the menu: blend out menu
Call up main information
/in the menu: switch info texts on/off
Call programme overview
/in the menu: confirm
Set volume – / +
/in the menu: select or adjust
left/right
Personal teletext pages
Set picture format
BAQ2550H_31308_020_3_GB2 07.05.2004, 10:58 Uhr3
Programme info on/off
on/off
Last programme
You can assign other functions to these keys
for TV operation. Assign these functions in the
TV menu under – Settings – Function Keys.
33
Page 4
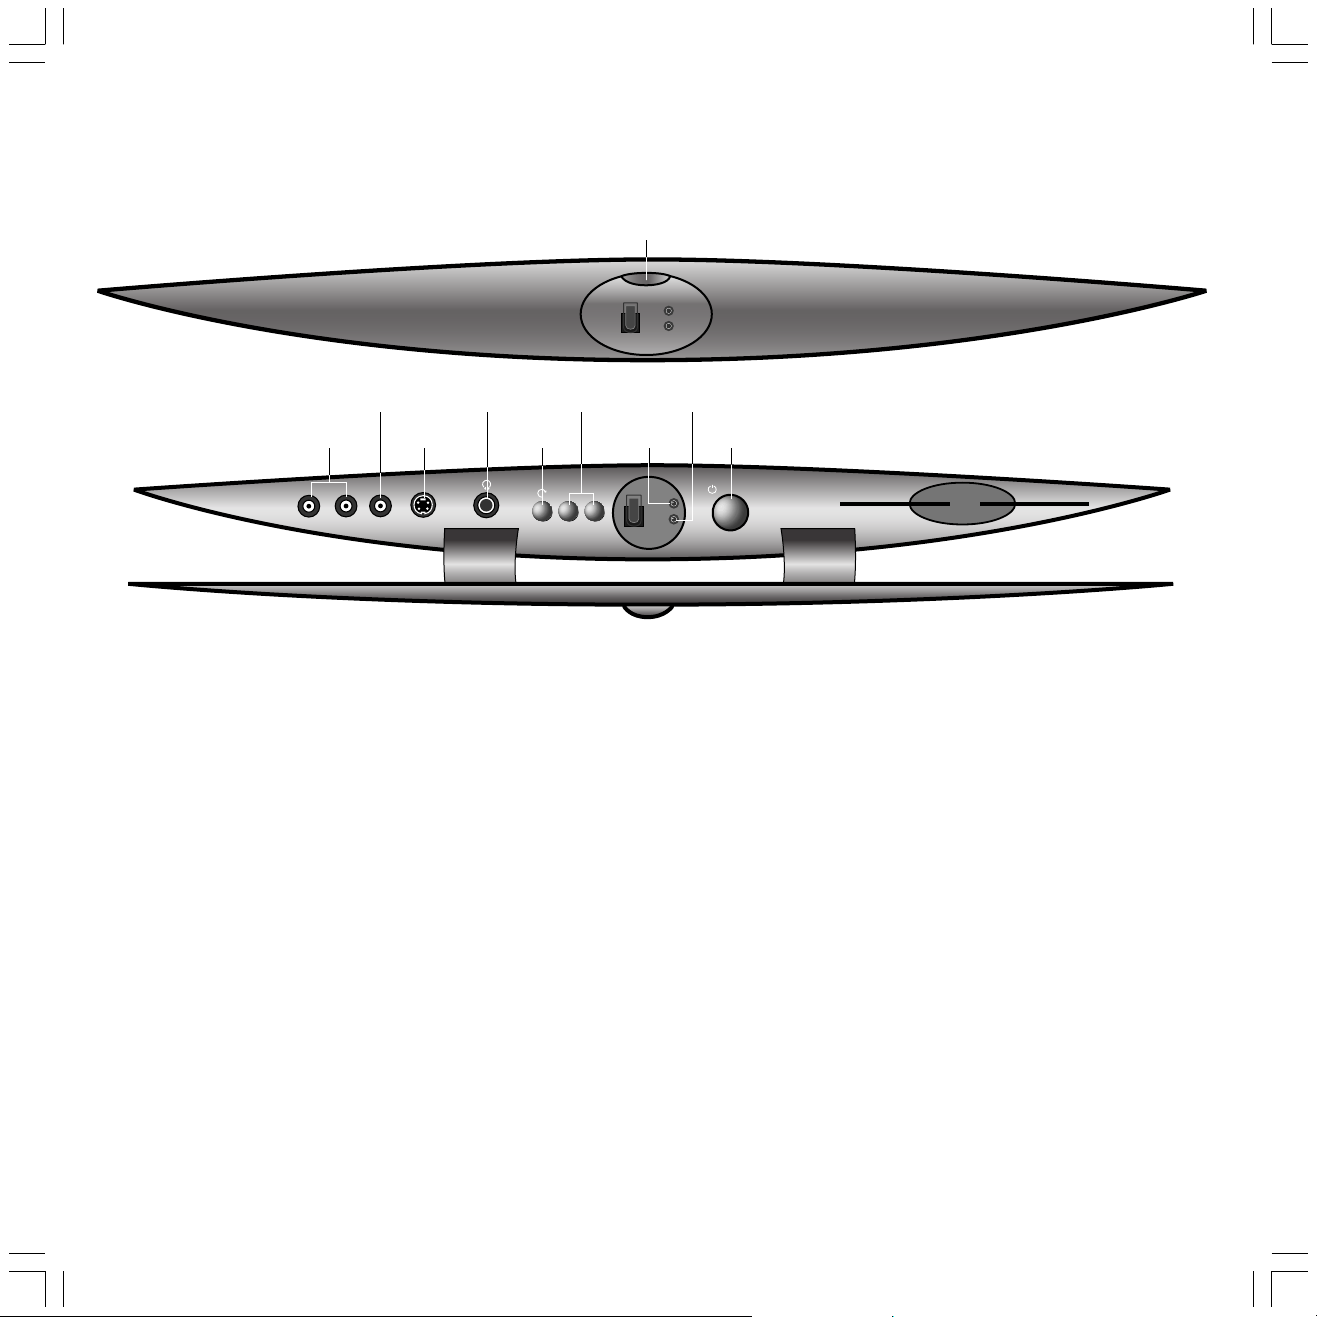
Control panel
Open control panel
Video input AVS
Audio input
(white=left,
(CVBS)
red= right)
LR
AUDIO
Headphones socket
Video input AVS
(Y/C, CVBS)
AV-SV IN
Channel up/down
/In a menu: adjust
To display
menu
Standby indicator
Operating
indicator
+
—
On/Off key
12
4
BAQ2550H_31308_020_3_GB2 07.05.2004, 10:58 Uhr4
Page 5
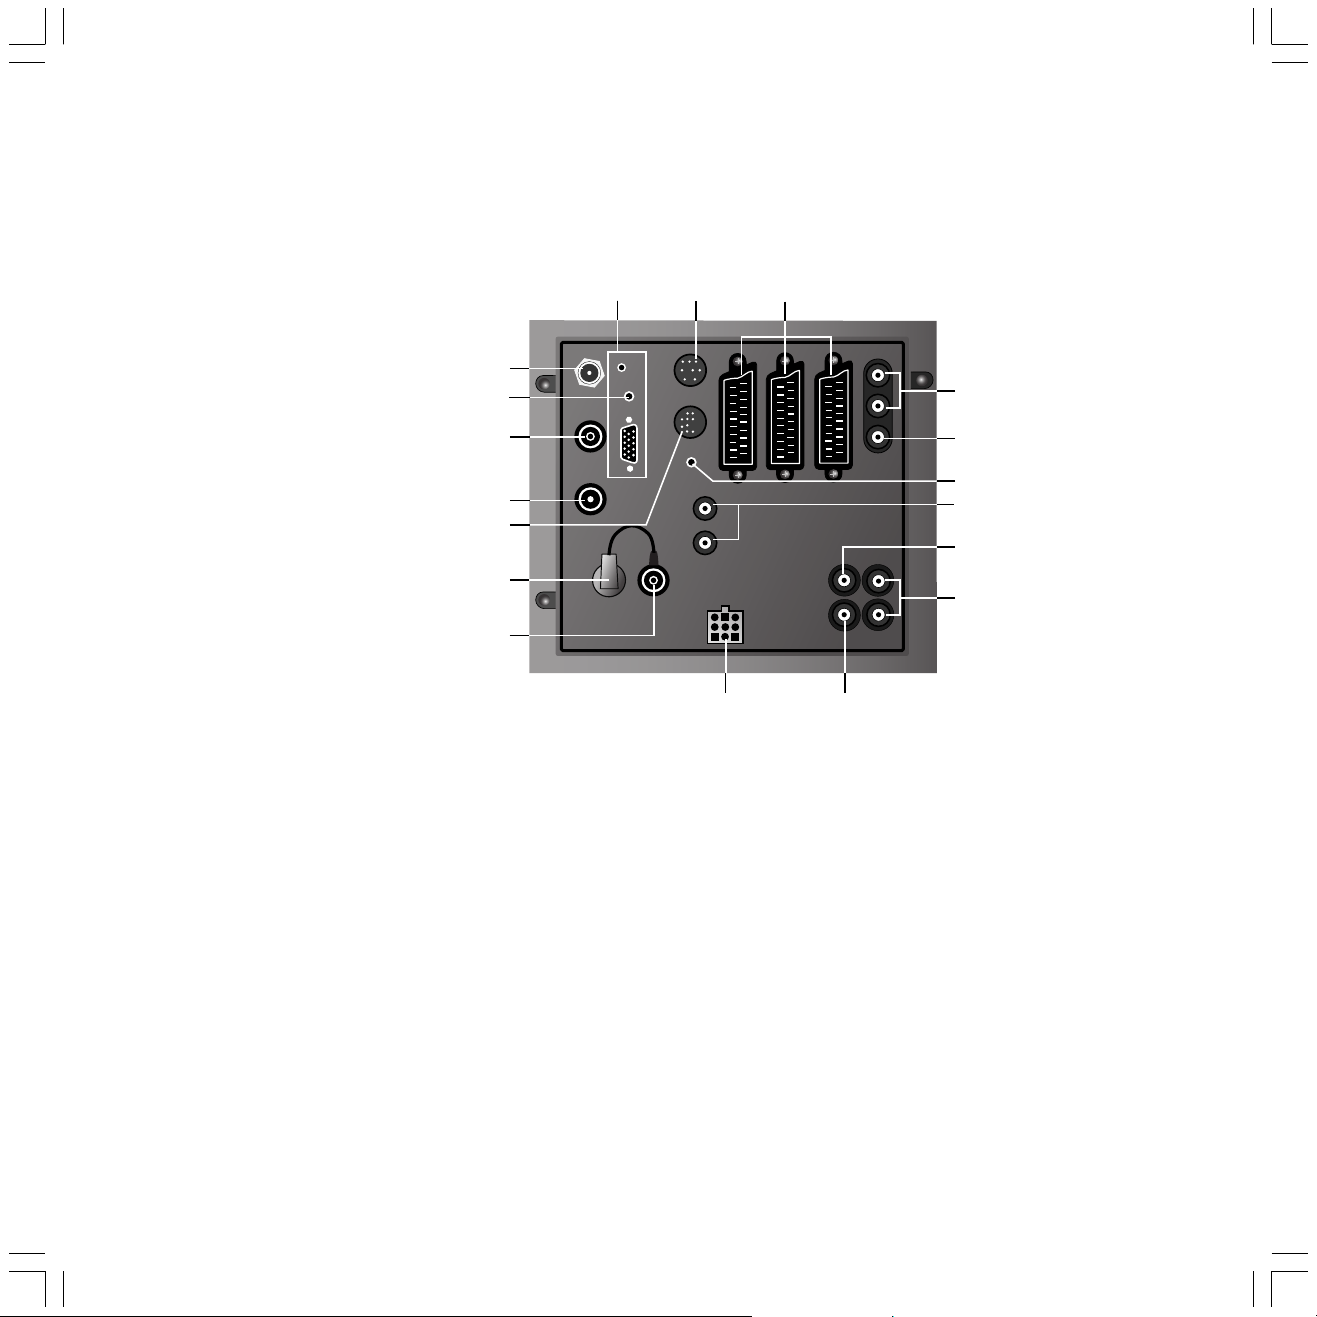
Rear connections
✳
can be retrofitted
✳
Antenna socket of satellite tuner
in Twin-Sat: antenna socket of the 2nd satellite tuner
✳
✳
Antenna socket of the terrestrial digital TV tuner
Connection for IR link
/Insert antenna cable here
in Twin-Sat: antenna socket of the 1st satellite tuner
✳
Antenna output of the terrestrial Digital-TV tuner
/Connect with the antenna socket of the PIP tuner
Connection for rotating foot control
Antenna socket of the antenna/cable tuner
/Insert the antenna plug of the IP tuner
(distributor) here
Antenna socket of the PIP tuner
/Insert antenna cable here
/or connect with the output of
the terrestrial Digital-TV tuner
✳
VGA-input
and output for
remote control signal
(RC5/RC6)
SAT
RC5/RC6
IN
VHF/UHF
OUT
VHF/UHF
Service
socket/
ConnectionLoewe
audio systems (L-Link)
SERVICE
IR
CTRL
VGA
AUDIO IN
AUDIO OUT
Connection for subwoofer in the stand,
Loewe active loudspeaker systems
or Home Automation
Sockets for video
recorder, DVD,
AV1
R
L
SUBWOOFER
STAND
decoder etc.
(Euro-AV)
AV3
AV2/RGB
C
SUB
Connection for
special subwoofer
Dolby digital module
DIG IN
1
2
DIG OUT
SUR
Digital tone inputs
Dolby digital module
Digital tone output
Dolby digital module
✳
✳
External audio input
Audio output sockets
Connection for active
center speaker
Dolby digital module
R
L
Connection for active
surround speakers
Dolby digital module
✳
✳
✳
BAQ2550H_31308_020_3_GB2 07.05.2004, 10:58 Uhr5
5
Page 6

Welcome
Thank you,
for choosing a Loewe product.
We are very happy to have you as a customer.
Loewe combines high quality in technology,
design and user friendliness. This applies
equally for TV, video and accessories.
Neither the technology nor the design are an
end in themselves but serve to give our
customers pure watching and listening
enjoyment.
We have not allowed ourselves to be led astray
by short-lived fashion trends in the design. You
have, after all, purchased a high-quality piece
of equipment which you don’t want to get tired
of looking at tomorrow or the day after .
About the set
We have designed the TV set in such a way
that it is easy to operate with menus. If
you need information about how to
operate it, just display the info texts with
the i button, you will soon get a grasp of
the relationships.
You will find the answers to many
technical questions in the index of your TV
set. If it’s a matter of operating the TV, you
can access a function directly from the
index. This saves you from having to read
through detailed operating instructions
and is the reason why this operating
manual you are reading only explains the
most important operating steps.
TV equipment
This operating manual describes the maximum
equipment.
Functions marked by S are not available in all TV
sets.
The illustrated menu contents may vary
depending on the TV equipment.
You can find out what equipment your TV has
in the main information – Technical spec. of TV
set.
Setup and cleaning
Please note that the feet of the TV set could
leave marks on soft wood furniture (e.g. deal,
pine, fir etc.) due to the weight and moving the
set about.
The plastic material of the feet contains
softeners which could in some cases etch the
surfaces of furniture.
In such cases you should place a firm underlay
about the same size as the base of the TV set
underneath it.
Please also read and observe the safety
instructions on the following pages.
Make sure no bright light or sunlight falls on
the screen and impairs the picture by
reflections.
Cleaning
Clean the TV set and the remote control only
usingwith only a damp, soft, clean cloth (never
use aggressive or abrasive cleaning agents).
Disposal
Packing and box
You have chosen a very high-quality, long-
lasting piece of technical equipment. In
compliance with national regulations, we have
paid a fee to authorized disposal companies
who will collect the packing from the dealers.
Nevertheless we recommend that you keep the
original box and packing material so that the
TV set has optimum protection if you have to
transport it.
The TV set
Please consult your dealer for environmentally
friendly disposal of the TV set.
With the remote control, you can operate three
Loewe units, this TV, a Loewe video recorder
and a Loewe DVD player.
6
BAQ2550H_31308_020_3_GB2 07.05.2004, 10:58 Uhr6
Page 7
For your own safety
For your own safety and in order to avoid
unnecessarily damaging your TV set, please
read and observe the following safety
instructions:
•This TV set is designed exclusively for
receiving and reproducing audio and visual
(AV) signals.
• It is designed for the home or office and
may not be used in rooms with high
humidity (e.g. bathroom, sauna) or a high
concentration of dust (e.g. workshops).
If the unit is used in the open air ensure
that it is protected against moisture (rain,
dripping or splashing water, or dew). Do not
place containers filled with water, such as
vases, on the TV set. High moisture and dust
concentrations produce creep currents in
the set which can lead to danger of electric
shock or fire.
The manufacturer’s warranty is only valid
for use of the TV set in the specified
permissible environment.
•This set may only be connected to a power
supply with the voltage and frequency
specified on the rating plate using the
enclosed power cable. The wrong voltages
can damage the set.
• If the set is moved from a cold environment
to a warm room, condensation forms on all
parts of the set. Moisture produces creep
currents in the set which can cause a fire. In
this case, you should leave the set for a
reasonable time to acclimatize (when the
condensation on the screen has evaporated)
before switching it on.
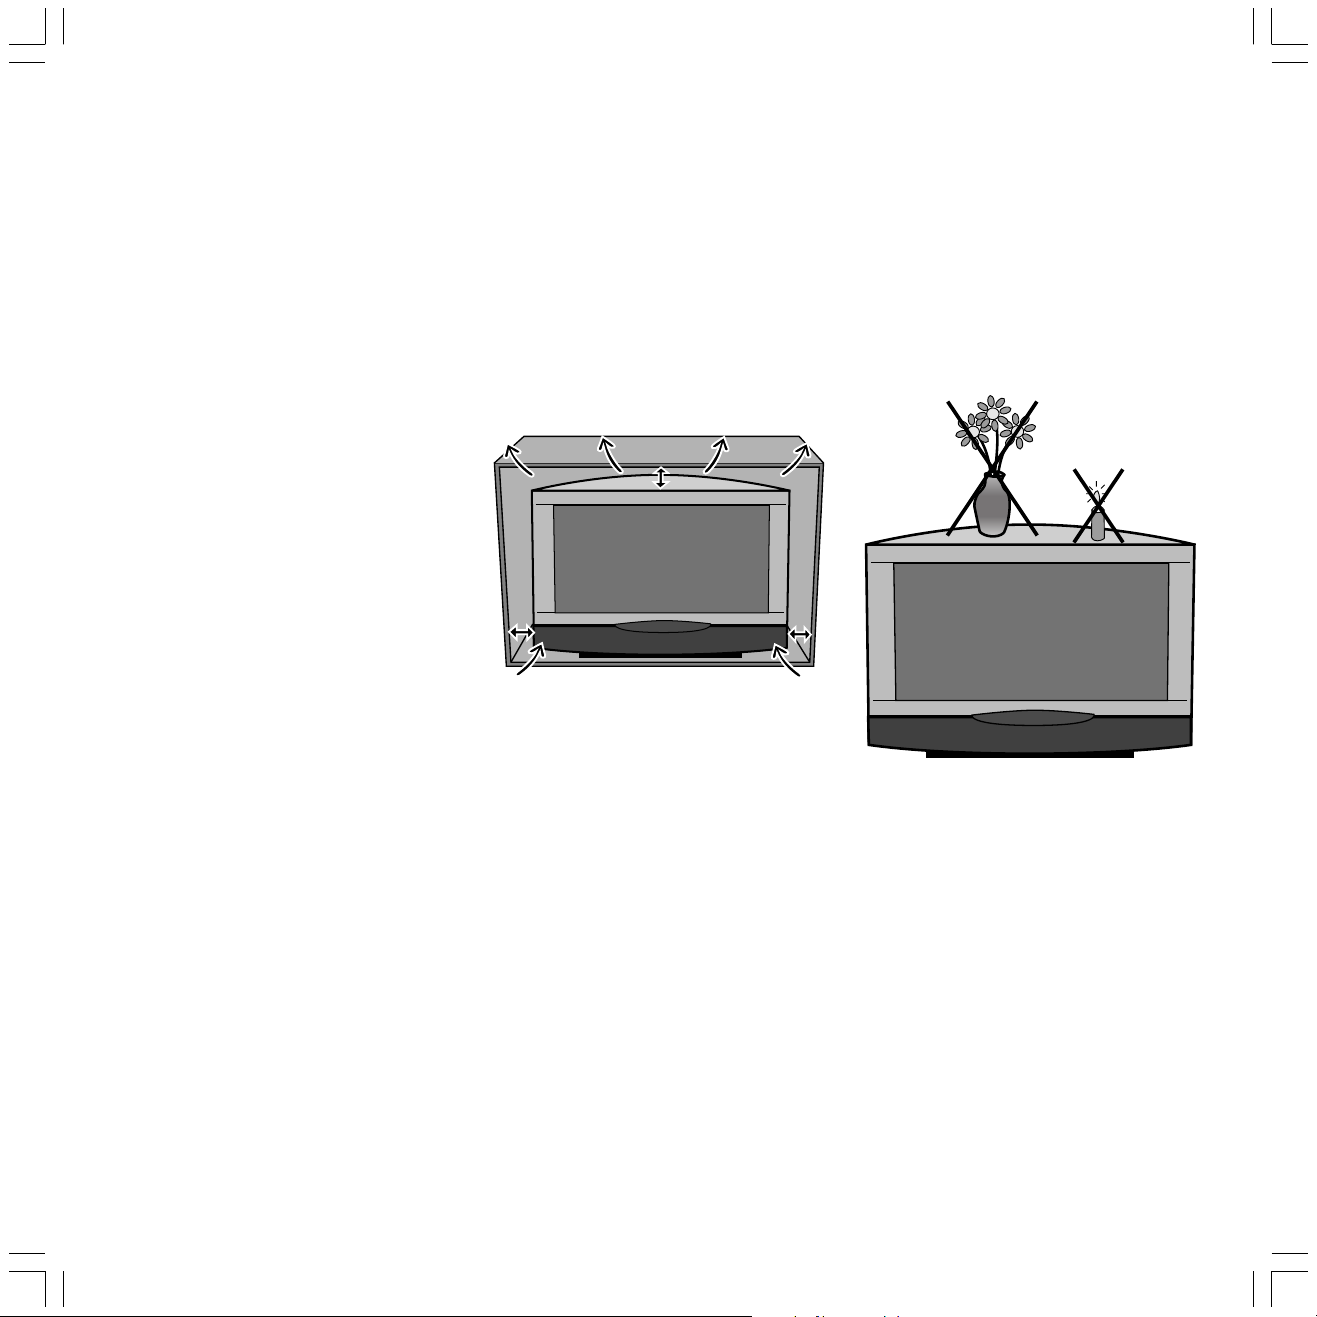
• Like every piece of electronic equipment,
your TV needs air for cooling. Obstructing
the air supply to the set can cause fires. The
air vents on the back of the TV set must
always be kept free. Do not leave
newspapers or cloths lying on the TV set.
The air supply is also impaired when the TV
set is placed on a blanket or a thick pile
carpet.
10 cm
5 cm
If the TV set is placed in a cabinet or on a
shelf, at least 5 cm clearance at the sides
and at least 10 cm at the top must be left to
allow air to circulate.
Stand the TV set in a place where it is not
exposed to direct sunlight or additional
heating from radiators.
• Magnetic fields influence the picture quality
of the TV set. Therefore, dDo not place
loudspeakers or other magnetic sources
immediately next to the TV set.
5 cm
• Avoid dropping metal objects, needles,
paper clips, liquids, wax or similar into the
air vents at the back of the set. This causes
short circuiting of the set and could start a
fire. If anything should get inside the set,
switch it off immediately, pull out the plug
and call the after-sales service to check it.
Do not place vases filled with water, lighted
candles etc. on the top of the TV set.
BAQ2550H_31308_020_3_GB2 07.05.2004, 10:58 Uhr7
7
Page 8
For your own safety
•You should never attempt to remove the
rear panel of the TV yourself. The set
operates with high voltages which could be
fatal. Leave repairs and servicing of your TV
set to authorized TV technicians.
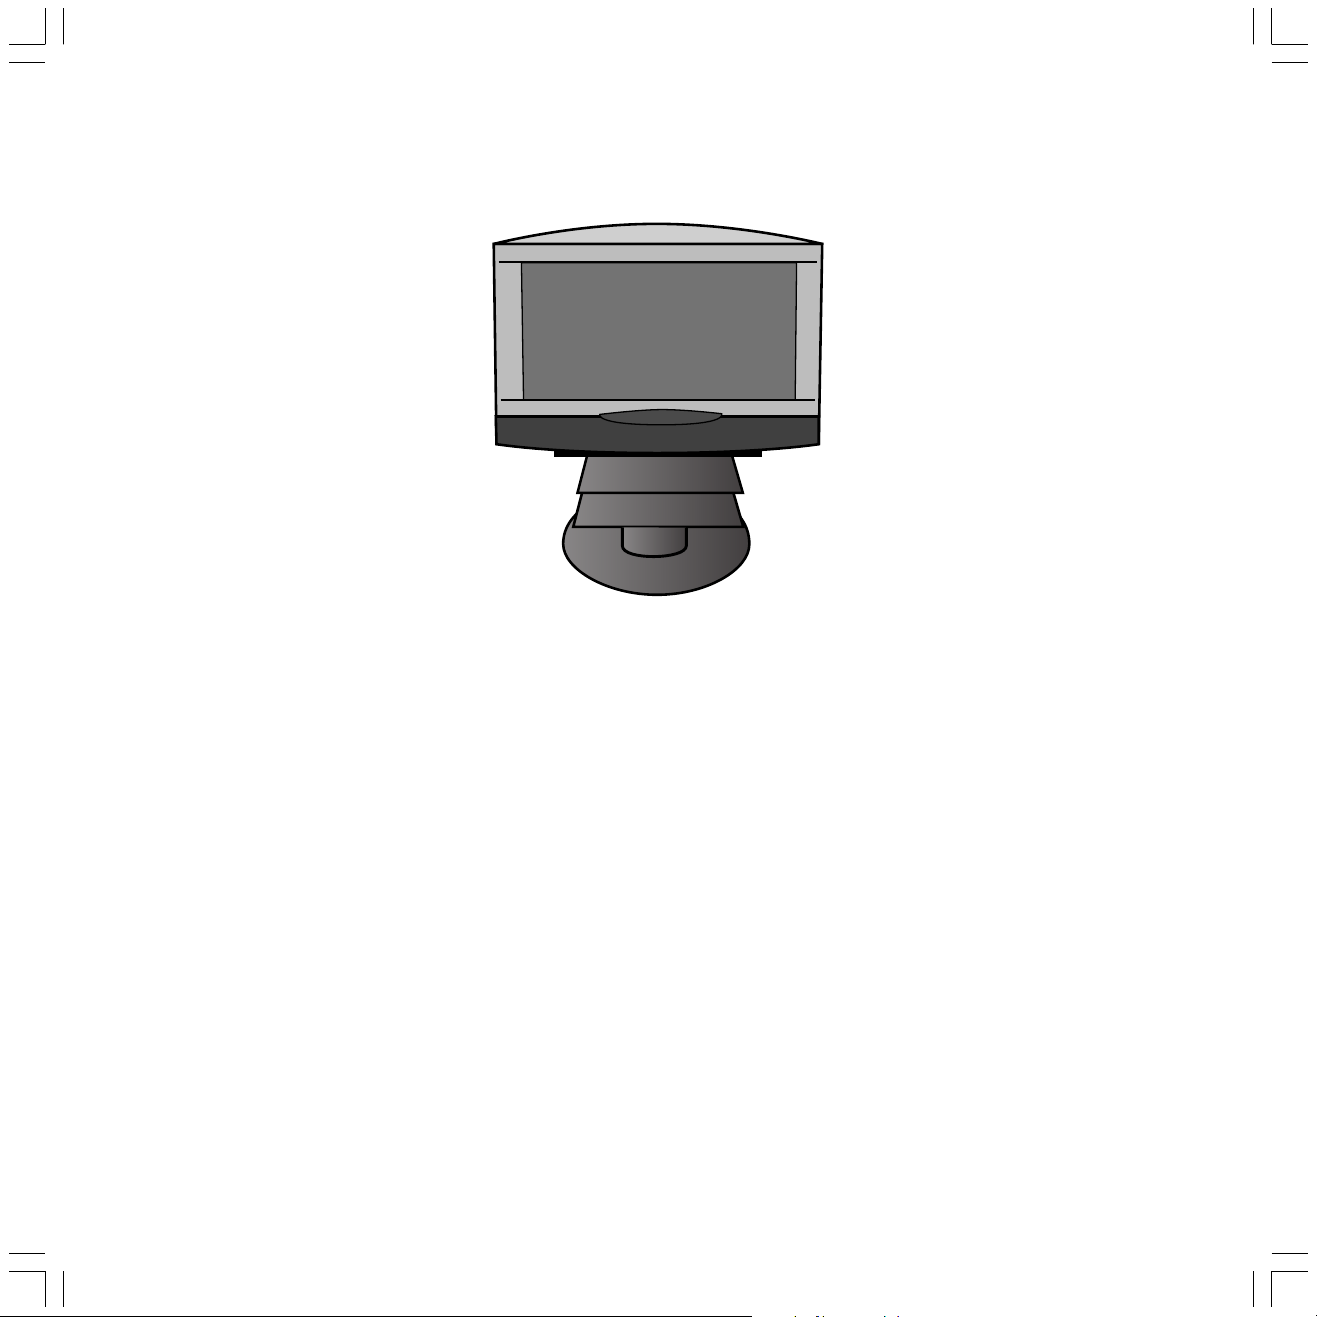
• Due to the picture tube, TV sets have their
center of gravity fairly near to the front. The
TV set therefore has a tendency to tip
forward relatively easily which could cause
injury to persons.
Only stand the TV set on a level, firm base.
The set must stand on all feet. The TV
should not overhang particularly when it is
placed in a cabinet or on a shelf.
If the TV is placed on a stand, makes sure
this is larger than the surface area of the
base of the TV.
When using turntables and drawer shelves,
make sure they have a sufficient load
capacity.
We recommend you to use only original
parts, e.g. Loewe racks and stands.
If the TV set is placed on a console with
castors, move the console carefully because
the console and the TV could tip over.
Consoles with castors may considerably
reduce the stability of the sets placed on
them so only use consoles specially
designed and approved for the TV.
Never allow children to handle the TV set
unsupervised.
• Do not place the TV anywhere where it may
be exposed to vibrations because this can
lead to overloading of materials.
• Do not leave the TV on unsupervised.
• Pull out the antenna and mains plugs
during a thunderstorm. Surge voltages from
lighting strikes can damage the set both
through the antenna system and the mains.
You should also pull out the antenna and
mains plugs during long periods of absence.
•The mains plug of the TV must be easily
accessible so that it can be disconnected
from the mains quickly at any time.
• Lay the power cable so that it cannot be
damaged. The power cable may not be
kinked or laid over sharp edges, and may
not be walked over or exposed to chemicals;
the latter applies for the entire TV set. A
power cable with defective insulation can
lead to electric shocks and is a fire risk.
• When you pull out the mains plug, do not
tug the cable but hold the housing of the
plug. The cables in the mains plug could be
damaged and cause a short circuit the next
time it is plugged in.
8
BAQ2550H_31308_020_3_GB2 07.05.2004, 10:58 Uhr8
Do not allow children to play close to the TV
set, they could knock, push or pull it from
the stand and injure someone.
Page 9
Initial installation
Batteries – Remote
control
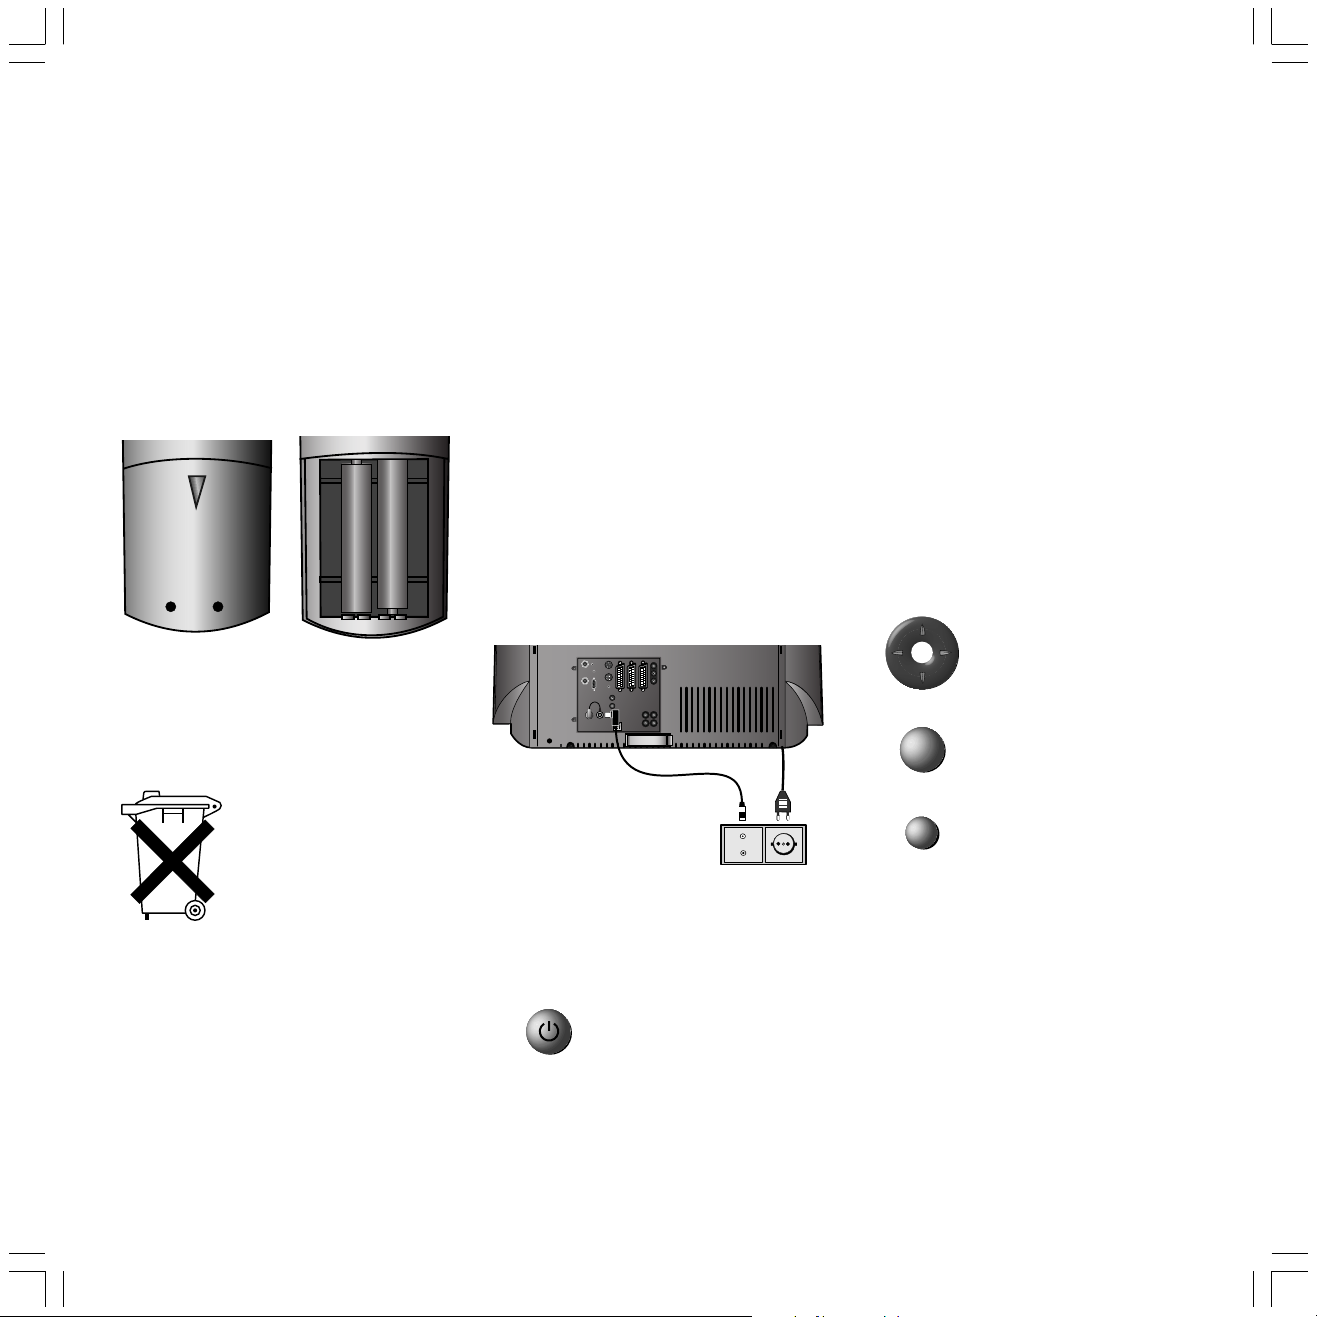
To insert or change the batteries, press the
point marked by an embossed arrow. Push the
cover of the battery compartment down and
remove it. Insert the batteries of the alkaline
manganese type LR 03 (AAA) with the correct
polarity (+/–).
+
+
Then push the cover back on.
Note on disposal of batteries:
The original batteries do not
contain any pollutants such as
cadmium, lead and mercury.
Used batteries do not belong in
the domestic waste. They must
be taken to the appropriate
collection points according to
the national laws. Ask your
dealer.
Connection
Mains
Connect the TV set to a 230V/50–60 Hertz
outlet.
Antennae
Connect your antenna or cable system to the
antenna socket of the PIP tuner.
Plug the antenna plug protruding from above
the PIP tuner into the antenna socket of the
VHF/UHF tuner.
If your TV set is equipped with a DVB-T module,
connect your antenna or cable systems to the
top socket of the DVB-T module (IN) and connect the bottom socket (OUT) to the antenna
input of the PIP tuner. If equipped with one or
two satellite tuners, connect the SAT antennae
to the SAT sockets (see figure on page 5).
DIG IN
RC5/RC6
SAT
SAT A/D
1
SERVICE
IR
2
CTRL
VGA
DIG OUT
AUDIO IN
AV3
AV2/RGB
AV1
R
AUDIO OUT
L
VHF/UHF
SUR
R
C
SUBWOOFER
L
STAND
SUB
Switching on
The On/Off switch on the TV set is located
behind the control panel. Open the flap of the
control panel.
Press the On/Off button so that
it is pressed in.
Initial installation
Automatic programming of the TV set is started
the first time you switch it on. Follow the
menus.
First you have to select the menu language for
your set. Then you specify which antenna you
have connected to your TV and in what country
you are using it. Then you start the station
search. The TV set searches for, stores and sorts
all the stations which your antenna system
receives. You then see a list of the stored
stations in which you can mark your favorites.
Finally log in your video recorders, decoders,
Loewe audio system and Home Automation
with the connection wizard and connect these
to the TV set according to the illustrated
connection plan.
Select the settings with the
arrows on the ring ...
... confirm the settings with
OK
i
You can repeat initial installation at any time,
e.g. after moving house. Call the index in the
main information (i button). Then select the
item ”Repeat initial installation”. Then start
”Initial installation” with OK.
OK. You then move on to the
next menu ...
... press this button if you want
information about the settings.
BAQ2550H_31308_020_3_GB2 07.05.2004, 10:58 Uhr9
9
Page 10
Daily handling
Switching on/off
Your TV set is equipped with an eco-standby
power supply unit. The power consumption drops
to low power in standby mode. If you want to
save even more energy, switch the set off with
the On/Off switch. However, please note that
EPG data are then lost and timer recordings
programmed on the TV set will not be carried
out.
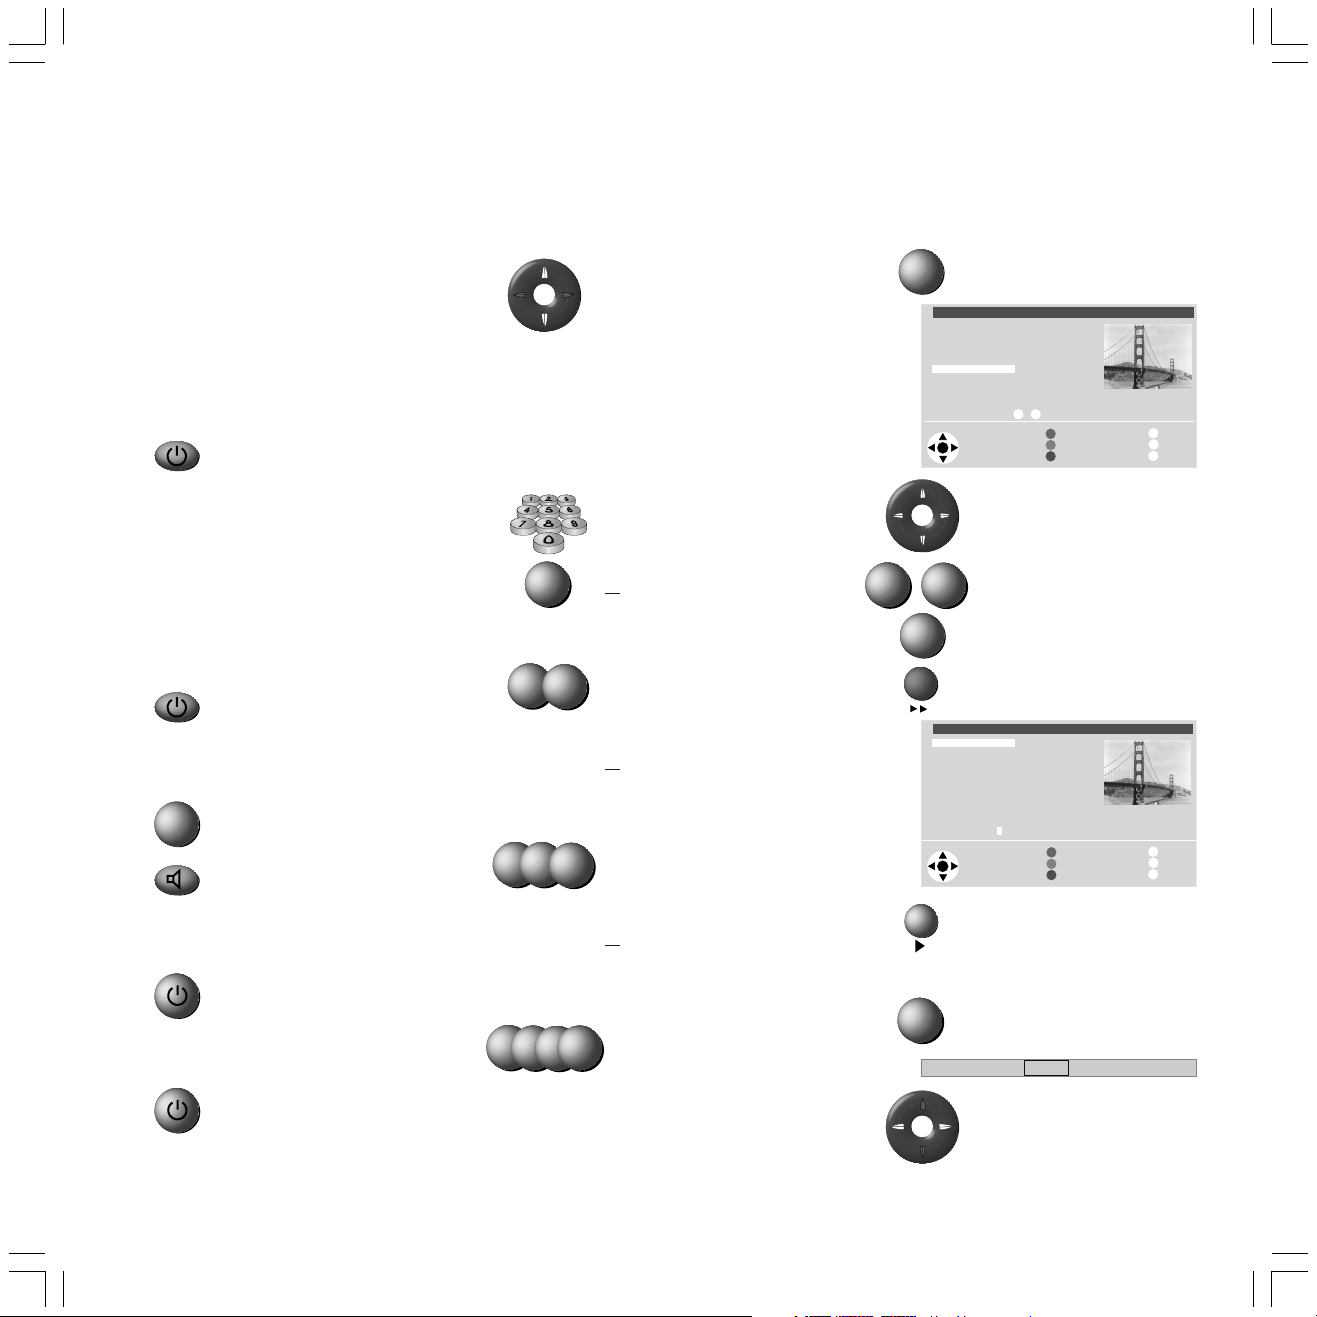
If the TV is switched on, you can
switch it off with the blue On/
Off button on the remote
control. The red standby LED on
the set lights up. If the green
LED also lights, a timer
recording is in progress on the
VCR or built-in digital recorder,
EPG data is being acquired or
radio mode without screen
display is active.
From standby it is best to switch
back on with the blue On/Off
button or with a numeric key
(station 0-9). The green
operating LED then lights up.
OK
The On/Off switch on the TV set is located behind the control panel.
When you switch on the TV with
OK, you see the station table
and can choose a station.
Switch on in the radio mode.
None of the indicators lights up
when you switch off the TV set
with the On/Off button on the
set.
Switch on the TV set with the
On/Off button on the set when it
is switched off.
Changing channels
Channels up/down (only favorite
stations if these are shown in the
station table).
With the numeric keys on the remote control
The set has a dynamic memory with 220/with DVB
1470 memory slots. If up to 9 stations are stored,
you only need to enter one number, up to 99 two
numbers, up to 999 three numbers and above 999
four numbers (please look in the station table to
find out how many stations have been stored).
1-digit stations
Keep the button 0 – 9 pressed for
one second, the channel then
changes immediately.
7
long
2
short long
1
2
short short long
1
278
all short
Depending on how many stations have been
stored, you can place one or more zeros in front of
the number and select for example station 7 = 07
or 007 or 0007.
or press the button 0 – 9 briefly,
the channel then changes after 2
seconds (immediately when up to
9 stations are stored).
2-digit stations
7
Keep the second numeric key
pressed for one second, the
channel then changes immediately.
or press both numeric keys briefly,
the channel then changes after 2
seconds (immediately when up to
99 stations are stored).
3-digit stations
7
Keep the third numeric key pressed
for one second, the channel then
changes immediately.
or press the three numeric keys
briefly, the channel then changes
after 2 seconds (immediately when
up to 999 stations are stored).
4-digit stations
Press the four numeric keys briefly,
the channel then changes
immediately.
With the station table
OK
Call the station table with OK
Channel overview: TV Numerical
AVS
AV3
AV2
AV1
0 VIDEO
1 ARD
2 ZDF
3 SAT.1
4 RTL
5 VOX
Select and
press OK to proceed
OK
6 S–RTL
7 N–TV
8 DSF
9 TM3
10 PRO7
11 RTL 2
12 WDR 3
13 BR 3
14 HR
15 MDR 3
0 9
... Select program:
Change programs
Favourite programs
Change sorting
i
Info
Menu
M
End
E
Mark the station (the marked
station is shown in the PIP
S
)
picture
or
0
9
...
OK
Mark with numeric keys
Call the marked station
Sort alphabetically/numerically
(blue button)
Channel overview: TV Alphabetical
ARD
BR-ALPHA
BR3
CNN INT.
CAM
DSF
DVD
Select and
press OK to proceed
OK
EUROSPRT
HOT
HR
KIKA
MDR 3
N–TV
✳ABCDEFGHIJKLMNOPQRSTUVWXYZ
Change programs
Favourite programs
Change sorting
Info
i
Menu
M
End
E
Display favorite stations only
(yellow button)
Call Audio/Video programs – AV selection
for playing AV equipment (see
0
also page 19).
AV Selection
VIDEO AV1 AV2 AV3 AVS
Select AV socket or VIDEO for
VCR station.
10
BAQ2550H_31308_020_3_GB2 07.05.2004, 10:58 Uhr10
Page 11
Daily handling
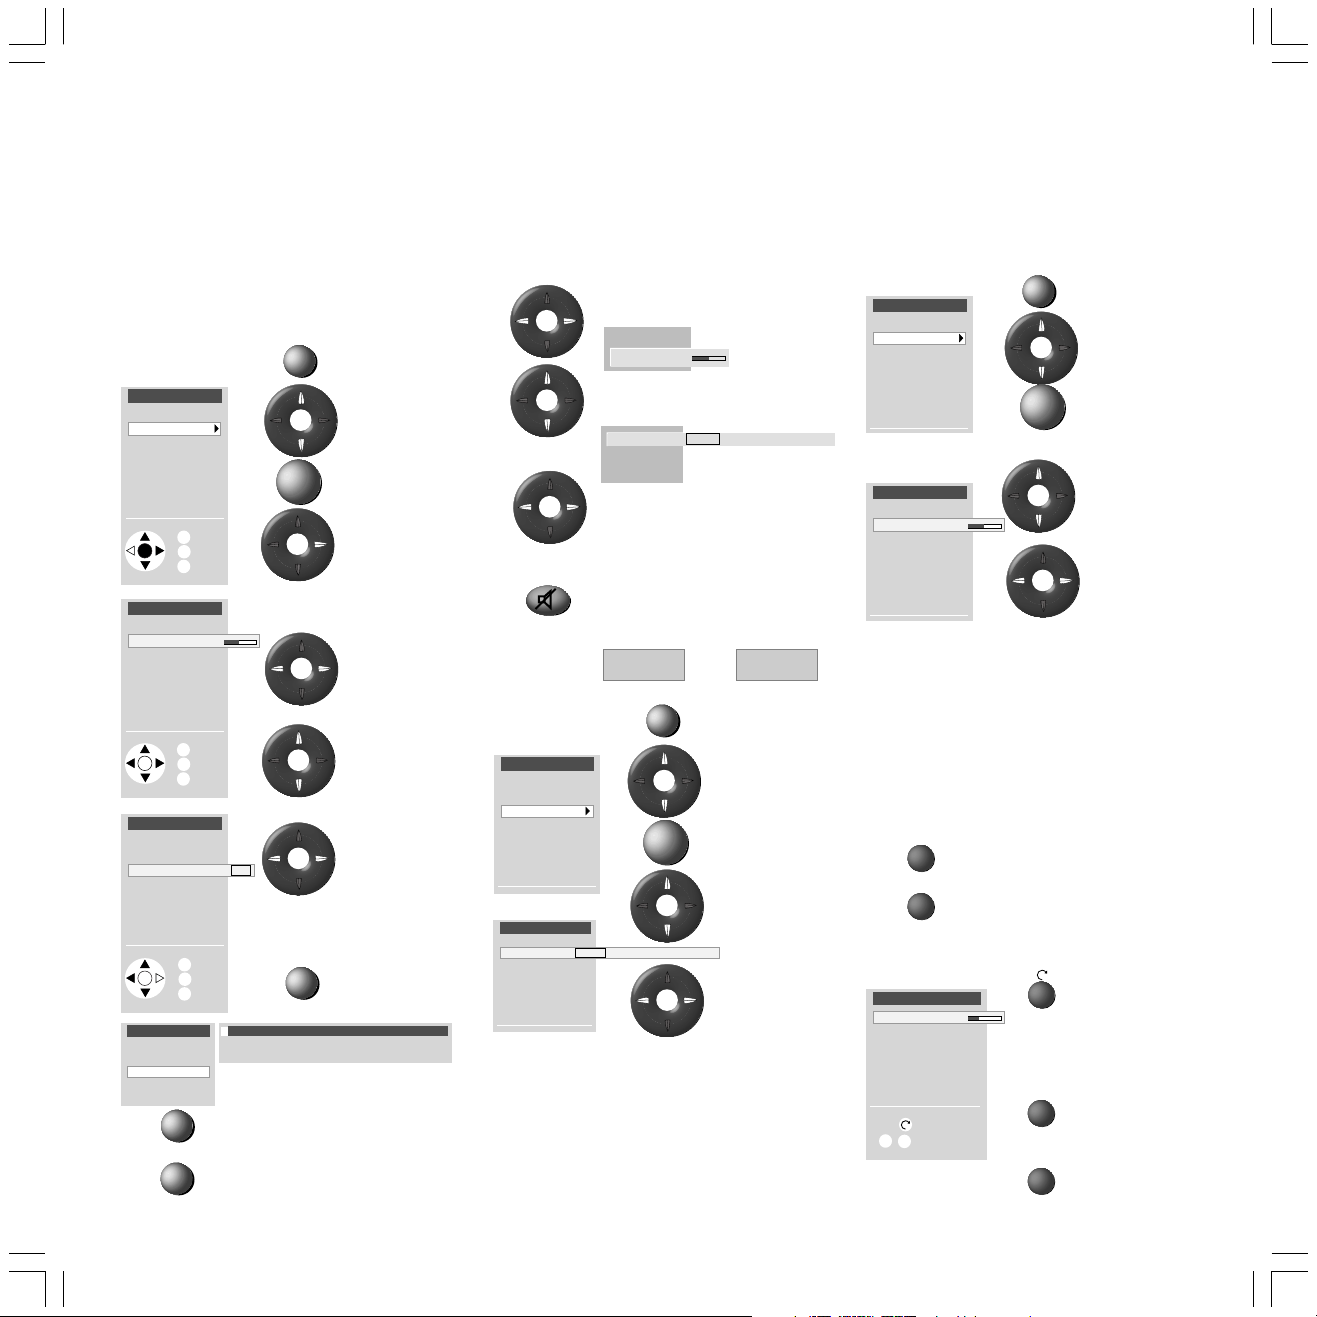
General menu operation
With the TV and picture menus, we show you how
to navigate within the menus. Which buttons you
can use for operation is shown at the bottom of
the appropriate menu.
Call the TV menu
M
TV menu
Standard settings
Picture
Sound
zap2text
Connections
Settings
i
Info
OK
Back
M
End
E
Picture
Contrast
Colour 32
Brightness
Picture format
Sharpness
Tint
other ...
i
Info
OK
Back
M
End
E
Picture
other ...
Picture format
DNC off on
DMI Plus
AMD
i
Info
OK
Back
M
End
E
Picture
other ...
Picture format
DNC
DMI Plus
AMD
i
With DNC you can eliminate or reduce picture
interference, e.g. due to poor reception.
M
E
OK
Grey menu items cannot be
selected
DNC (Digital Noise Control)
Back to the previous menu level
Hide all menus
i
Mark
(white field)
Call the menu
with OK
or
>
Set
(setting value
and bar)
Mark other
menu items
Select
(frame)
Show/hide
info texts
Adjusting the sound
Set the volume
Set the volume
other ...
Volume 36
with ”others ...” you can select
and ...
Listening mode Stereo Panorama Dolby Virtual
Loudness
Sound adjust
Volume
... set other sound settings.
Mute
Sound off;
Sound on: press button again
or adjust volume
Sound off
Other sound settings:
M
TV menu
Standard settings
Picture
Sound
zap2text
Connections
Settings
Sound
Sound via
Listening mode Stereo Panorama Dolby Virtual
Sound adjust
Treble
Bass
Loudness
other ...
Sound settings: Sound via the loudspeakers of the
TV set or another system. Sound adjust, treble,
bass, loudness and balance. Sound select for
loudspeakers and headphones, AV output sound.
Volume of the headphones, automatic volume
and max. volume.
OK
Sound on
Call
TV menu
Mark ”Sound”
Call sound
functions
Mark sound
function
Set/
select
Adjusting the picture
Call the Picture menu
TV menu
Standard settings
Picture
Sound
zap2text
Connections
Settings
M
OK
Call the TV menu
Mark ”Picture”
Call picture
functions
Select picture settings
Picture
Contrast
Colour 32
Brightness
Picture format
Sharpness
Tint
other ...
Mark picture
function
Set/
select
Picture settings: contrast, colour, brightness,
picture format, focus, colour tone, picture
adjustment, noise reduction (DNC), movement
compensation (DMI), automatic picture size
adaptation (AMD) and rotate picture in large
picture tubes.
Operation on the TV set
Changing channels on the TV set
+
Channel up
–
Volume, contrast and color
Direct control on TV
Volume 16
Contrast
Colour
Station –/+
Service
–
+
Mark
Change
Channel down
+
–
Press the
function button
until the desired
function is
marked
More volume,
contrast or color
Less volume,
contrast or color
11
BAQ2550H_31308_020_3_GB2 07.05.2004, 10:58 Uhr11
Page 12
Modes of operation
TV mode
In initial installation and daily operation, the TV
set is in TV mode. This is also the case when none
of the other modes of operation such as EPG,
Teletext, PIP, Video or Radio is selected.
Every one of these modes of operation has a
menu which you can call with the M-button and
with some color button assignments.
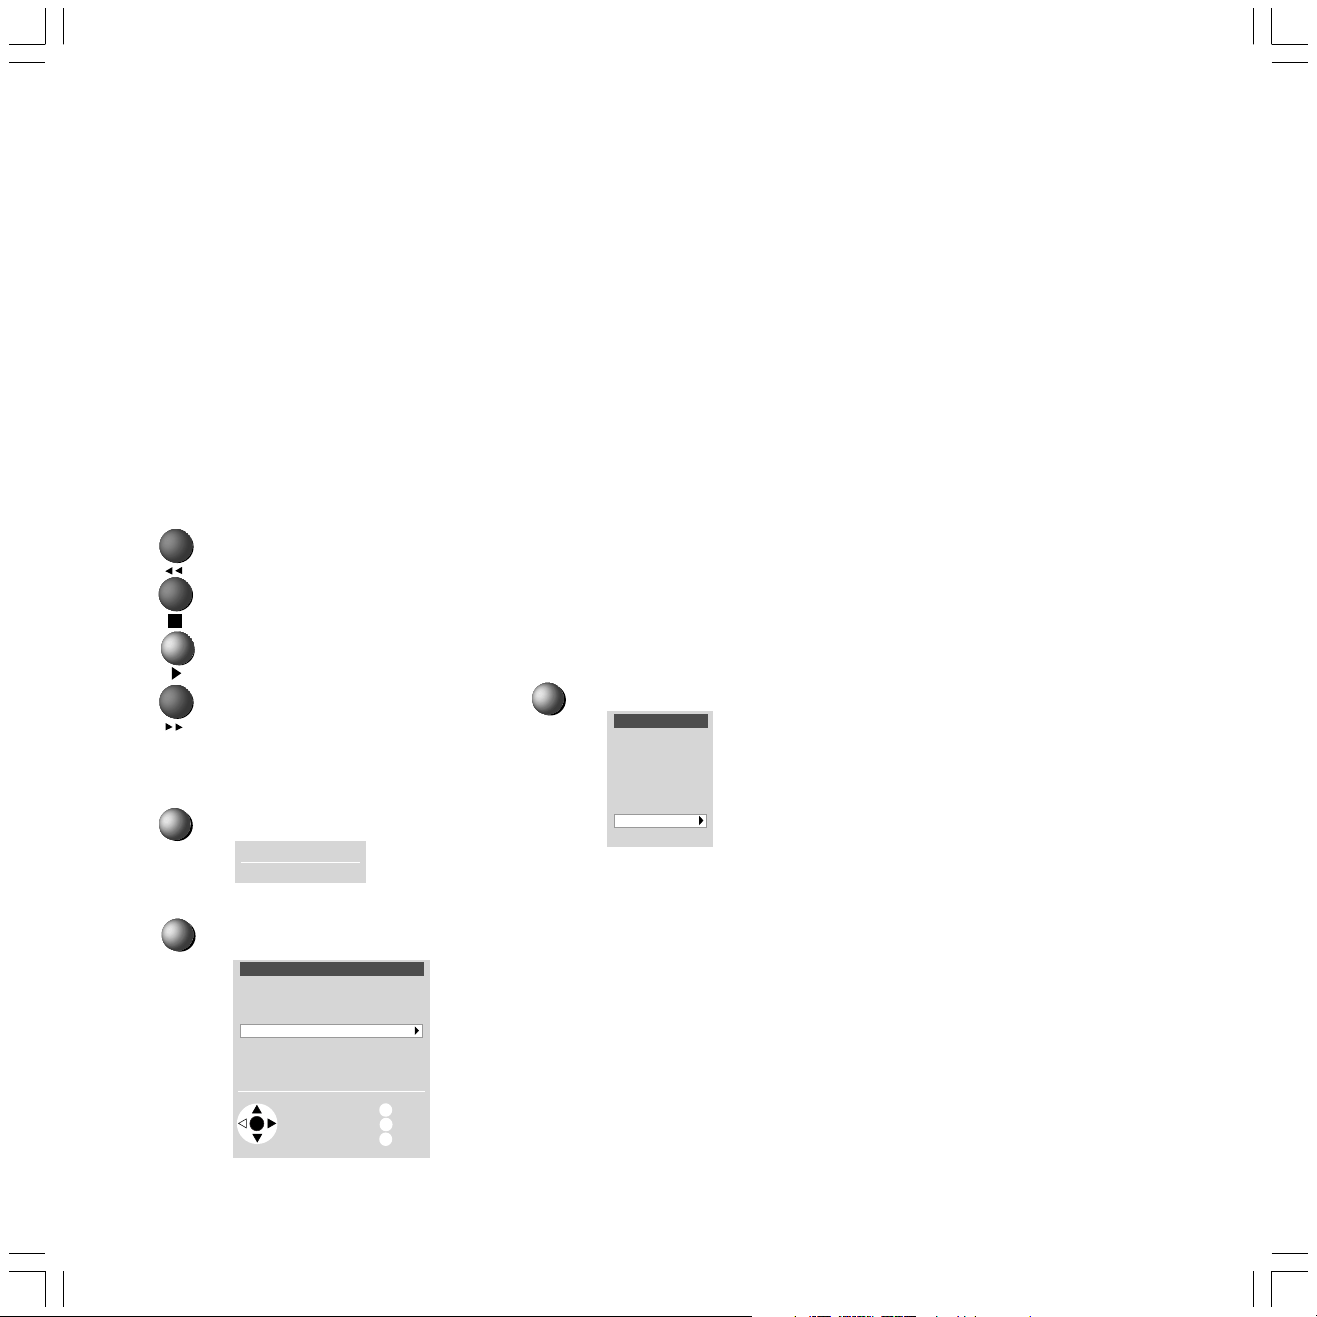
Function of the color buttons in TV mode
You can assign the functions of the four color
buttons yourself. The following functions are set
at the factory:
red: list or call personal teletext
pages
green: call picture format setting
yellow: call last viewed station
blue: call station info
You can assign other functions to the buttons in
the TV menu ”Settings” – ”Function keys”.
Status display
E
Main information
Show/hide status
Clock 20:15
1 ARD Stereo
Call main information
i
Main information
Autom. channel search
Connections
Explanation of the remote control
Index
Technical spec. of TV set
Select control level
Select and call up
OK
with OK
i
Info
Back
M
End
E
The explanation of the remote control shows
the function of every button in different modes
of operation of the TV set and the remote control.
The index answers many questions regarding all
aspects of the TV. If it is a question about the
operation, you have direct access to the operating function from the index.
Loewe TV sets are supplied in different models
with different equipment. You can find out what
equipment your TV has under the menu item
”Technical spec. of the TV set”.
When you have made all the settings and
connections, you can switch over to ”Simplified
control” using ”Select Mode”. Then the
”Settings” and ”Connections” can no longer be
launched in all modes of operation menus.
Switch ”Simplified control” back off when you
want to make settings.
Call the TV menu
M
Launch the TV menu
TV menu
Standard settings
Picture
Sound
zap2text
Connections
Settings
zap2text
Some stations use this service. If teletext pages
are referred to during a program, the TV set
saves and/or displays this page number. You
call the teletext page with the T button from
the display during the program or from this
menu.
Standard values
You can save the setting for picture and sound
you have made in this menu and launch them
again later.
Connections
You will find information about this in the
chapter ”Logging in and connecting AV equipment” on page 18.
Some settings in the TV menu:
Child lock
Use the child lock if you want to prevent your
children watching after a certain time, once or
daily, all or certain programs.
On-screen displays
You can define duration and position of the
displays, the content of the program and status
display and activate or deactivate zap2text as a
display.
Timer functions
You can have your TV switch on and off at specific times or have yourself reminded by a signal
tone.
Time and date
When you receive teletext, the TV records the
right date and time settings. The time serves as
information for timer recordings, timer functions
and EPG. If you do not receive teletext you
should set the date and time and not switch the
TV off with the mains button as the settings will
then be lost.
Language
If ”your” menu language is not set, you have to
select the ”Language” menu in a language you
cannot understand:
Press the M-button (TV menu), mark the last
menu item (settings), press the OK button and
mark the last menu item (Language) under
”other ...” and press the OK button.
Now select the right language and confirm with
OK.
12
BAQ2550H_31308_020_3_GB2 07.05.2004, 10:58 Uhr12
Page 13
Modes of operation
Picture in Picture (PIP)
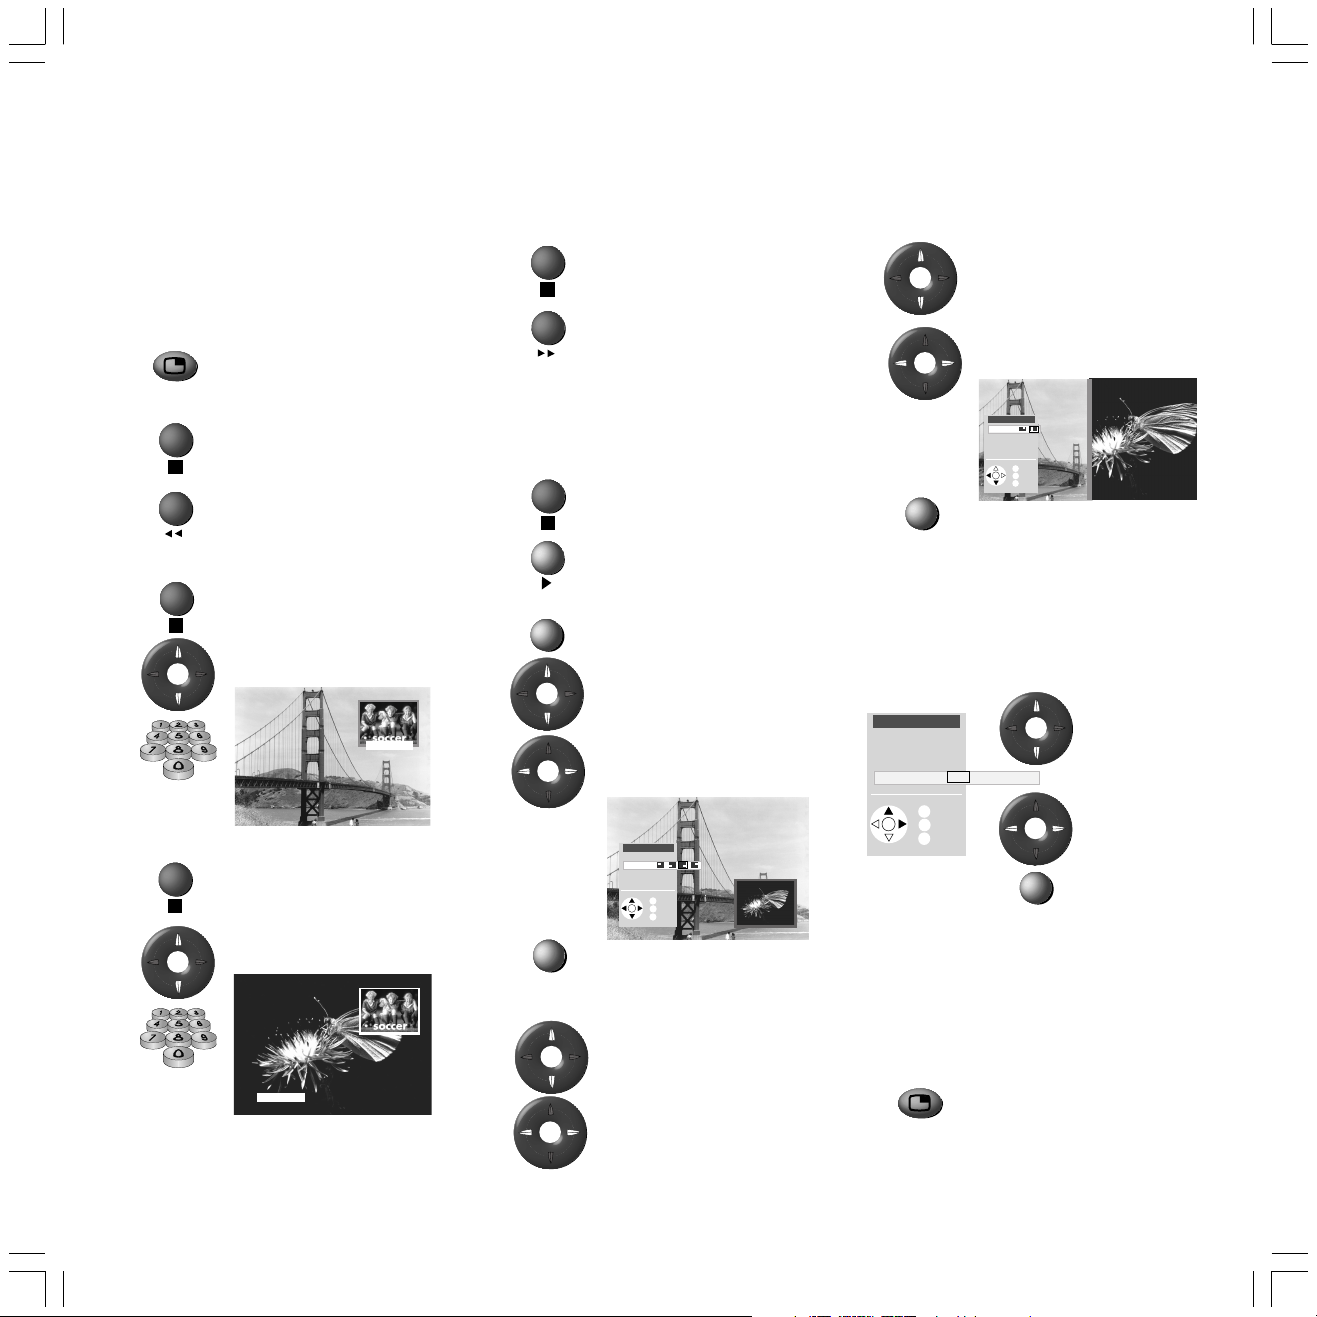
Standard PIP functions:
In standard PIP, a PIP picture is displayed in the
current TV picture. The frame round the PIP
picture is initially green in standard PIP.
Show/hide PIP picture
PIP picture as still frame
The frame around the PIP picture
must be green. If it is not, press
the green button.
Press the red button to freeze
the PIP picture.
Press again – moving picture.
Changing the station of the PIP picture
The frame around the PIP picture
must be green. If not, press the
green button.
Then select the station as
normal.
3 WDR3
Changing the station of the TV picture
The frame around the PIP picture
must be white. If it is not, press
the green button.
Then select the station as
normal.
2 ZDF
Station scan
The frame around the PIP picture
must be green. If it is not, press
the green button.
Start the station scan with the
blue button. The PIP frame turns
blue.
The programs now change automatically.
Stop the program scan with the blue button. The
PIP frame turns green again.
Changing PIP picture/TV picture
The frame around the PIP picture
must be green. If it is not, press
the green button.
Change the pictures with the
yellow button.
Position of the PIP picture
M
Call the PIP menu with the M-
button.
Select ”Position”
Select the symbols for the
position
PIP menu
Type
Position
Size
Functionality
i
Info
OK
Back
M
End
E
E
Hide the PIP menu
Resolution of the PIP picture
In the PIP menu, select
”Resolution”
Set to ”large” or ”small”
Split screen (for 16:9 screen only)
In the PIP menu, select ”Type”
Select the symbol for Split Screen.
PIP menu
Type
Position
Size
Functionality
i
Info
OK
Back
M
End
E
E
Hide the PIP menu
The picture on the right is the PIP picture and has
no sound. The vertical line represents the colour of
the frame around the PIP picture.
Setting ”iPIP”
Switch on PIP, call the PIP menu with the M
button.
PIP menu
Type
Position
Size
Functionality iPIP Standard-PIP
i
Info
OK
Back
M
End
E
E
Mark
”Functionality”
Select ”iPIP”
Hide menu
iPIP function:
In iPIP the TV picture currently displayed becomes
the PIP picture. Select another program for the TV
picture and keep your eye on the PIP picture. In
this way you can temporarily ”ban” commercials
or parts of programs to the PIP picture. In iPIP, the
frame round the PIP picture is orange.
PIP picture on/off
The PIP picture becomes a TV picture again when
you switch off PIP.
BAQ2550H_31308_020_3_GB2 07.05.2004, 10:58 Uhr13
13
Page 14
Modes of operation
EPG mode
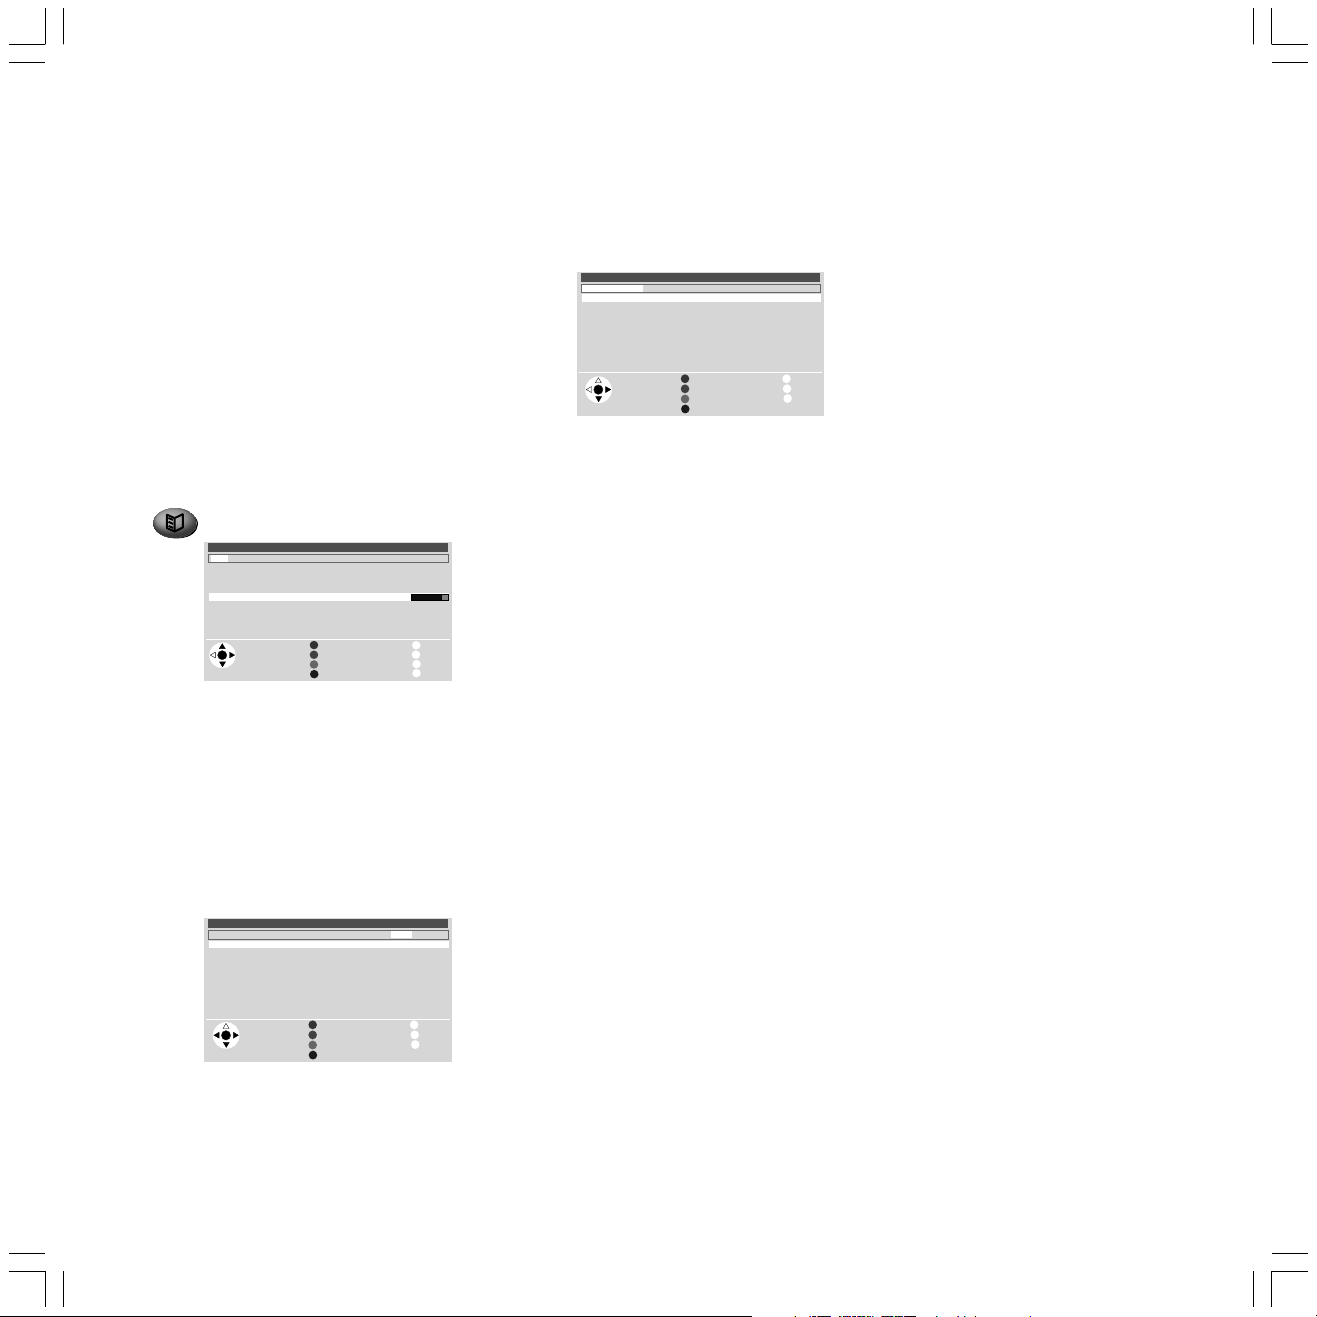
EPG is the electronic program guide for TV
programs. With this system, you can easily find
the stations that interest you (sorted according to
time, day, topics and programs). You can
memorize stations and station recordings.
A wizard is activated the first time you use EPG
(not with DVB) which guides you through the
necessary settings. Then run the data acquisition
(see page 15).
Using the EPG
Switch EPG on/off
EPG Current: Fri 03.08./20:08
now soon 21:00 22:00 23:00 00:00 01:00 02:00 03:00 04:00 05:00 ...
19:15 VOX Zurück in die Vergangenheit
19:30 ZDF WISO
19:30 BR3 Immer weiter, immer höher und dann?
19:40 SAT1 echt wahr!
19:40 RTL Gute Zeiten, schlechte Zeiten –20:15
19:50 MDR Mach dich ran
20:00 ARD Tagesschau
20:00 HR3 Tagesschau
20:00 NDR Tagesschau
20:00 WDR Tagesschau
Select
OK
and press
OK to view
The first line is framed initially in green.
The green frame stands for time and date,
with the green button you switch between time
and day or, if the frame has a different color,
back to the green frame. With the arrow buttons
< > you select: now, later, the time or day for
starting stations. The list of stations below is
updated accordingly. With the buttons g h you
mark a station you want to watch (now running),
memorize or record.
EPG Current: Fri 03.08./20:08
person. topics all - ... Hobby Sport Child Knowledge Music ...
12:00 NDR WunschBox -13:00
14:03 ARD WunschBox
20:45 MDR Das deutsche Schlagermagazin
21:00 NDR Bi uns to Hus
01:25 NDR Bi uns to Hus
12:00 NDR WunschBox
14:03 ARD WunschBox
Select
and view
OK
with OK
The frame turns yellow when you press the yellow button. The yellow frame means you can
select topics. With the arrow buttons < > you
choose between personal topics, all topics and
the individual main topics such as Film, News,
Show, Music etc. The list of stations below is
updated accordingly. With the g h buttons, you
14
Record
Day (Fri 3.8./now)
Topics (all topics)
Programmes (all)
Record
Day (Sat 3.8./12:00)
Topics (music)
Programs (all)
mark a station you want to watch (currently
running), memorize or record.
EPG Current: Fri 03.08./20:08
Favorite programs all ARD ...
14:03 ARD WunschBox -15:00
20:45 MDR Das deutsche Schlagermagazin
14:03 ARD WunschBox
Calling detailed information
If detailed information about the selected
station is available, you will see the T-button
displayed additionally. You can call the detailed
information with this button.
Other functions in the EPG menu:
Select and
memorize
OK
with OK
Record
Time (Sat 4.8./14:03)
Topics (Music)
Programs (fav.)
i
Info
Menu
M
End
E
The frame turns blue when you press the blue
button. The blue frame signifies station selec-
tion. Use the arrow buttons < > to choose
between your favourite stations, all stations or
the station just set. You can select another individual station by moving to “...” with >, marking
a station in the list and storing it with OK.
The respective current settings are shown next to
the operating notes for the color buttons.
i
Info
T
Detail
Menu
M
E
End
Direct input of time
You can also enter the time directly with the
numeric keys of the keypad. After entering the
first digit, the time is displayed first next to the
symbol of the green button by asterisks and is
then replaced by the entered numbers, e.g. 2100.
If the entered time has already passed, its entry is
used for the following day.
Watch or memorize a station
You memorize the station marked with the g h
buttons by pressing the OK-button. A + sign is set
List of memorized stations
You will find the stations you have memorized in
a list, also DVB radio stations.
Switch on TV at memo
You can have the TV switched on automatically
from standby at the time of the memorized
station. If you are not in at the time, a safety
prompt makes sure the TV switches off again
after 5 minutes.
Indicate/start memorized station
If the TV is already on when the memorized
station starts you can have the start of the
station indicated or the TV switched over
immediately.
Short info lines
Short infos are broadcast for many programs. Set
how many lines this information should have or
switch the short info lines off.
EPG entry
If you want to start EPG operation, you can
retain your last settings for topic and program
selection or start with all topics and all
programs.
in front of the program title for noting. At the
start of the broadcast, this program is switched fo
or you see a massage.
Programming a VCR or Digital Recorder (DR)
recording
i
Info
Menu
M
End
E
You prepare the program marked with the g h
buttons for recording by pressing the red button.
For ”Timer recording” select DR (Digital Recorder”) or VCR and whether a single recording is
to be made or a serial is to be recorded. A red dot
is displayed in front of the program title.
If a program is already marked by a red dot, you
can delete the timer data again (the red dot disappears).
BAQ2550H_31308_020_3_GB2 07.05.2004, 10:58 Uhr14
Page 15
Modes of operation
EPG settings
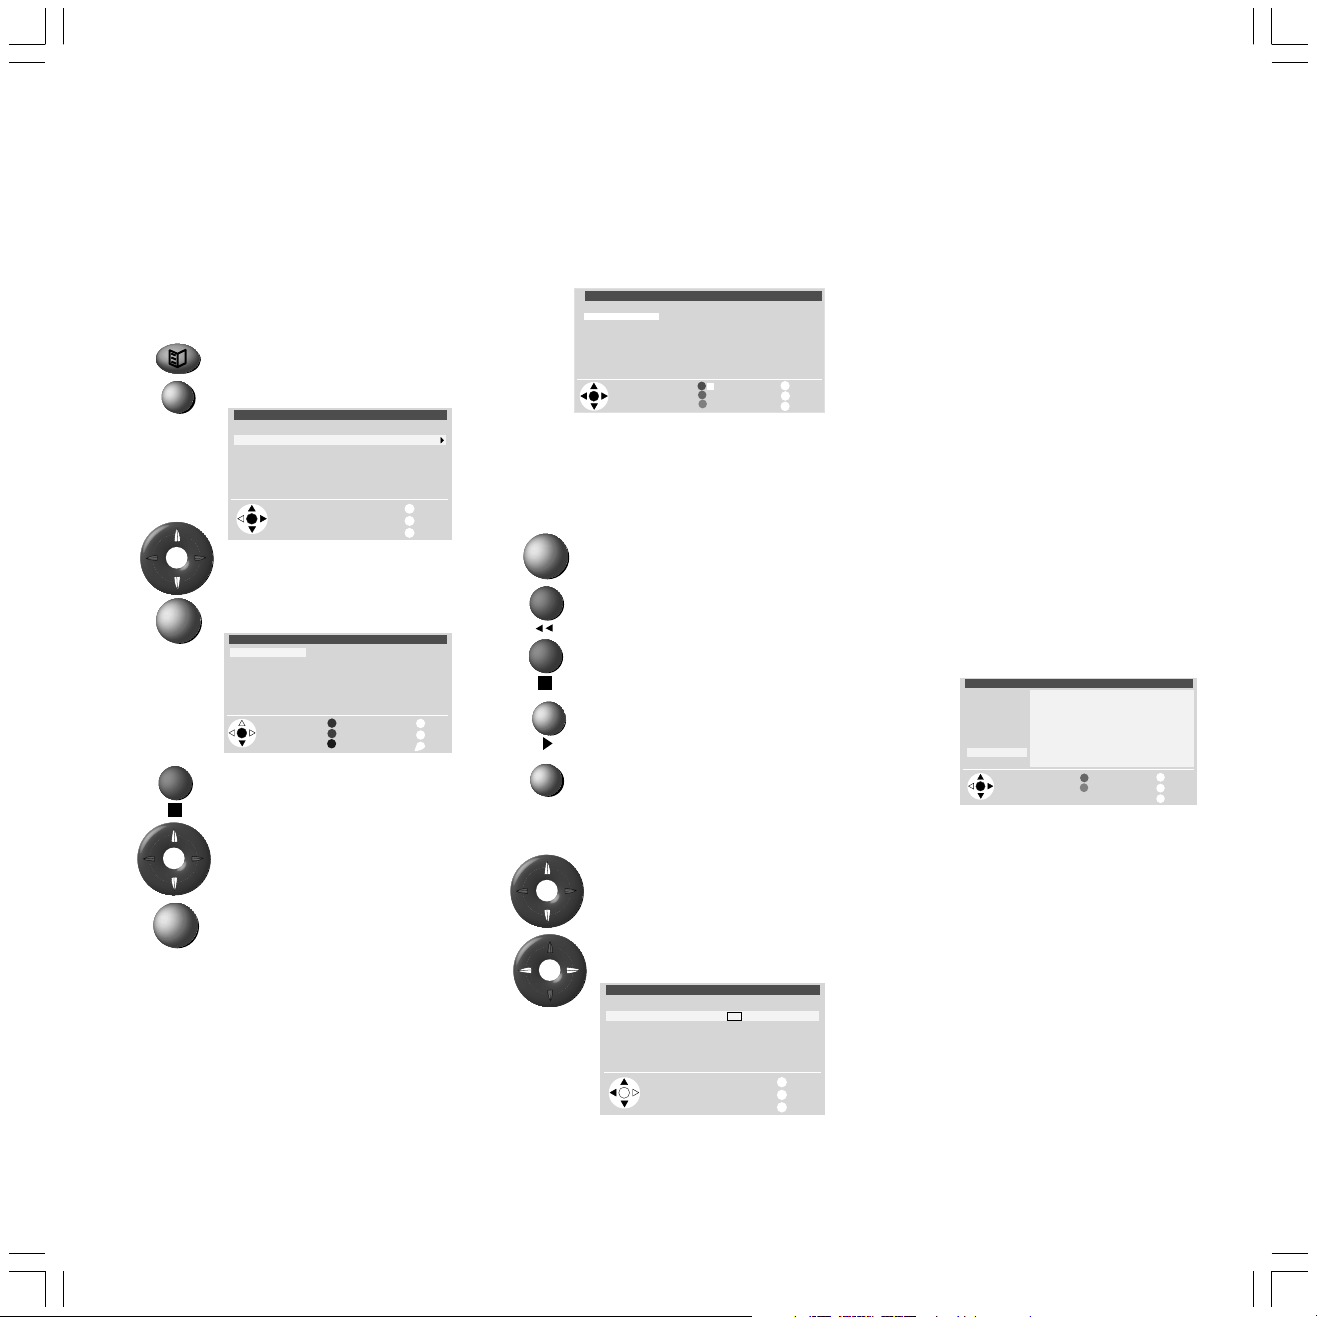
If you want to change the provider or want to
have other programs evaluated, you can do this
in the EPG menu.
Provider search
EPG on/off
M
Call EPG menu
EPG menu
List of memorized stations
Select provider/program
Favorite programs
Select personal topics
Switch on TV when marked yes
Memorized stations first report
other ...
OK
Info
i
Back
M
End
E
Mark ”Provider/Select station”
OK
Call
Select provider
3SAT
PRO7
RTL2
TV 5
TRT 1
Select provider
OK
and confirm
with OK
Provider search
Change provider list
Program selection
Info
i
Back
M
End
E
Start provider search (green
button). This may take some
time.
Mark the provider
OK
Save the provider
This is followed by a station search and a list of
TV stations is displayed which transmit data.
Move on to the provider selection with the OK-
button. If the stations offered are what you
want, move on to the station selection with the
blue button.
Selecting stations for EPG
Select the stations here for which information is
to be collected.
Program selection: 3SAT
0 VIDEO
1+ARD E
2+ZDF E
3+SAT.1 E
4+RTL E
5 VOX
6+S–RTL E
7+N–TV
8 DSF
Select programs
OK
and mark
with OK
9+S–RTL E
10+MDR 3
11 DSF
12 TM3
13+PRO7 E
14+RTL 2 E
15+WDR 3 E
16+BR 3 E
17+HR 3 E
+ Mark
Mark all
Mark only
18 KIKA
19 PHOENIX E
20 EUROSPRT
21 KABEL 1
22 MTV
23 CNN INT.
24 HOT
25 TV 5
26 VIVA
i
Info
Back
M
End
E
Stations marked by + are favorite stations. The
provider supplies information for stations marked
by E (terrestrial, cable and analog satellites) and
D (digital), these are already marked (blue
letters).
OK
Mark the station/Remove the
marking
red: Only mark favorite stations
green: Mark all stations
yellow: Only mark this station
M
Back to the EPG menu
Switching data acquisition on/off
Mark ”Data acquisition” in the
EPG menu under ”other”
Select data acquisition off/on
EPG menu
other ...
Data acquisition off on
Short info lines none
EPG entry last setting
Info
OK
i
Back
M
End
E
If, for example, you cannot receive any EPG
providers and no DVB is installed in the TV set,
you should switch off the data acquisition.
Performing data acquisition
The data must be collected first after these
settings or every time the TV is switched off. To
do this, select the program which you have
defined as a provider and leave it switched on
for about one hour or switch the TV set to
standby mode. The green LED lights up in
addition to the red LED after about two minutes.
Data acquisition takes about one hour, in sets
with a DVB module a little longer. The data are
automatically collected between 2 and 5 in the
morning when the TV is switched off to standby.
Defining personal topics
You will find the programs that interest you
faster when you define your personal topics.
Mark ”Select personal topics” in the EPG menu
and put together your list of personal topics.
Select personal topics
Film
News
Show
Hobby
Sport
Child
Knowledge
Music
Culture
and mark with OK
OK
General music
Jazz
Rock/Pop
Classical
Folk/Easy listening
Musicals/Opera
Other
mark all
Mark only
InfoSelect topics
i
Back
M
End
E
Radio mode
You can switch the radio mode on and off with
button. If at least one satellite tuner and
the
L
possibly a DVB module are installed in your TV
set, you will be able to receive radio stations. If
none of these additional modules is installed,
you can only select the audio inputs and play
back through these with the station table or the
g h buttons.
BAQ2550H_31308_020_3_GB2 07.05.2004, 10:58 Uhr15
15
Page 16
Modes of operation
d
223
Teletext mode
Teletext transmits information such as News,
Weather, Sport, Program Previews and Subtitles.
T
Many stations use the TOP operating system,
some use FLOF. Your TV supports both these
systems. The pages are divided into general
topics and topics. After switching on the
teletext, up to 3500 pages are stored for fast
access.
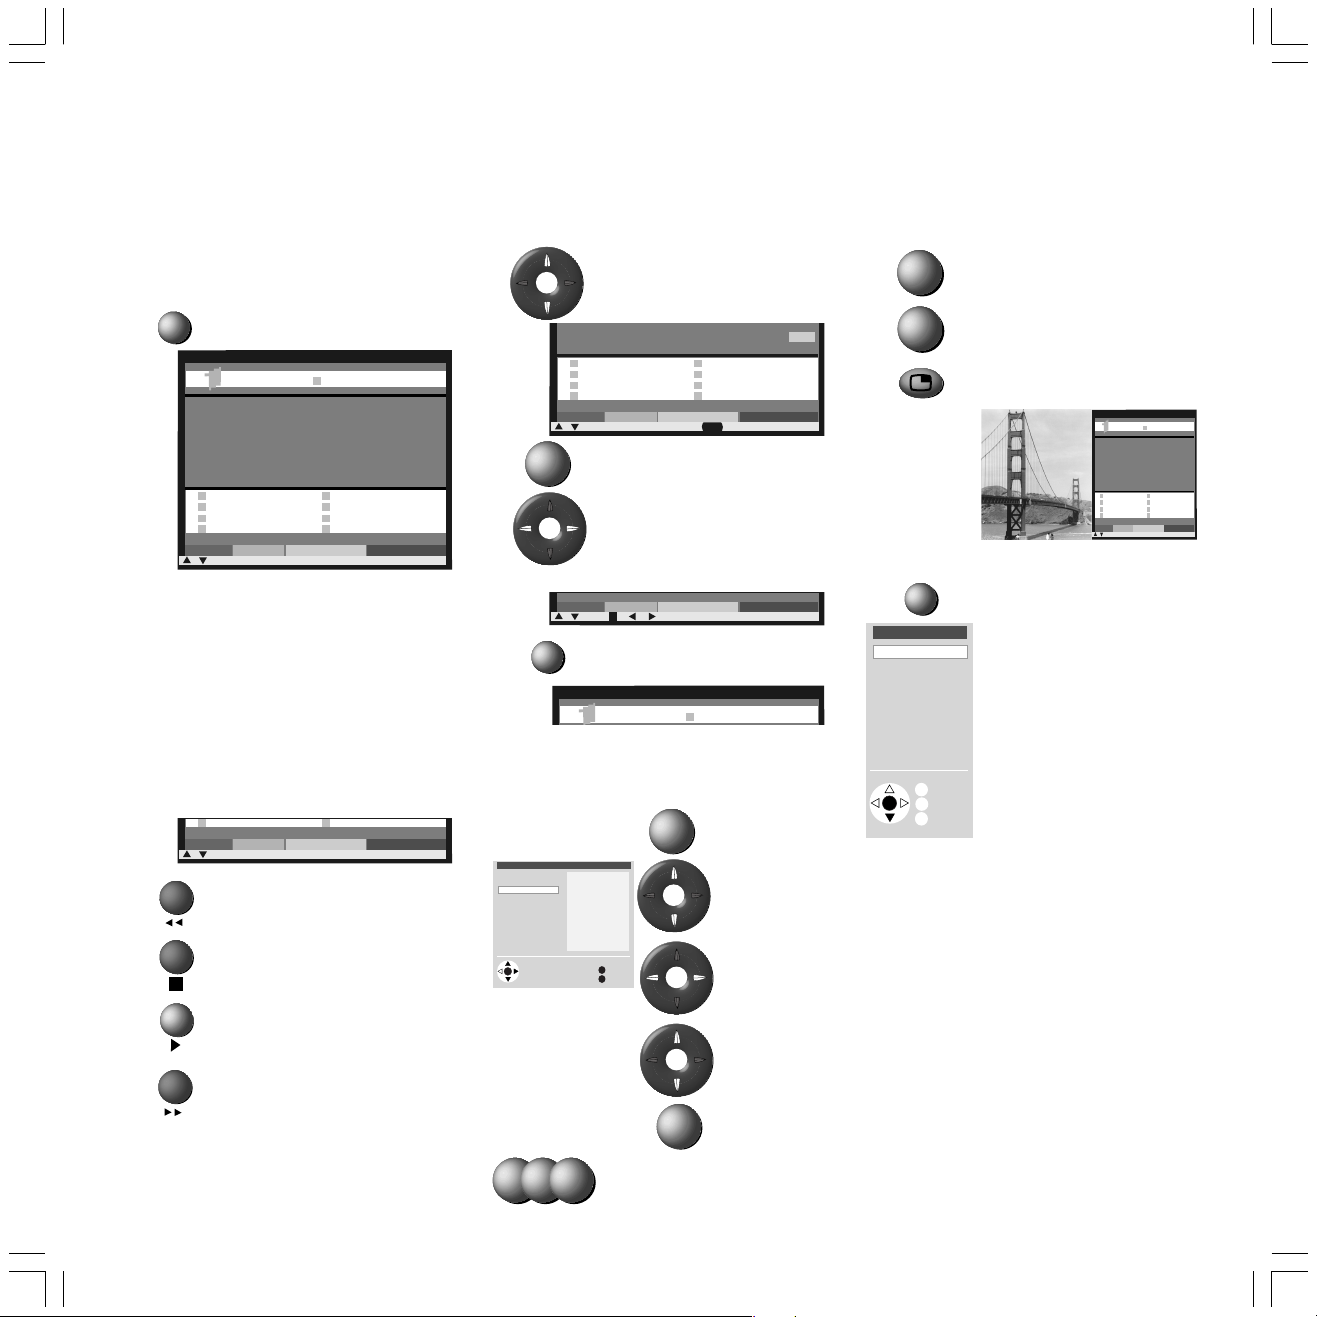
Selecting pages with the colored buttons
The colored bars (in TOP) or the colored writing
(in FLOF) show you which colored buttons to
use to scroll to general topics and topics.
Teletext on/off
1OO 1OO ARD-Text O1.O7.O1 1O:3O:42
ARD-Text Teletext im Ersten
Letzte Meldung: Libyscher Botschafter
in London schließt Entschädigung für
Lockerbie-Opfer nicht mehr aus
Fußball: Rolf Hüssmann soll neuer
Sportdirektor beim VfB Stuttgart
werden . . . . . . . . . . . . . . . . . . . . . . . . . . . . . . . . 223
1O.3O Ein Zwilling zu viel . . . . . . . 314
12.OO Tagesschau um zwölf
tagesschau. . . . 11O TV Guide. . 3OO/4OO
Wetter. . . . . . . . . 17O Kultur. . . . . . . . . 5OO
Sport. . . . . 2OO/6OO TXT-Quiz. . . . . . . 555
Lotto/Toto. . . . . 666 Wirtschaft. . . . . . 7OO
Index. . . . . . . . . . 1O1 Impressum. . . . . .1O7
– +
Page selection
Lotto/Toto. . . . . 666 Wirtschaft. . . . . . 7OO
Index. . . . . . . . . . 1O1 Impressum. . . . . .1O7
– +
Page selection
Inhalt tagesschau
Inhalt tagesschau
red: back to previously viewed
page (not with FLOF)
green: forward to next page
(not with FLOF)
yellow: to the next topic (only
in TOP and FLOF)
blue: to the next topic (only in
TOP and FLOF)
More functions for page selection
Mark a specified page number on
the page (Page Catching)
wer
en . . . . . . . . . . . . . . . . . . . . . . . . . . . . . . . .
1O.3O Ein Zwilling zu viel . . . . . . . 314
12.OO Tagesschau um zwölf
tagesschau. . . . 11O TV Guide. . 3OO/4OO
Wetter. . . . . . . . . 17O Kultur. . . . . . . . . 5OO
Sport. . . . . 2OO/6OO TXT-Quiz. . . . . . . 555
Lotto/Toto. . . . . 666 Wirtschaft. . . . . . 7OO
Index. . . . . . . . . . 1O1 Impressum. . . . . .1O7
– +
Page selection OK view
OK
Launch
Inhalt tagesschau
Scrolling in stored sub-pages. In
the bottom line you will see
which sub-pages you can already
launch.
– +
1 2 3 4 5 6 7 8 9 1O
i
Launch contents page 100
1OO 1OO ARD-Text O1.O7.O1 1O:3O:42
Geld Optionen 2
ARD-Text Teletext im Ersten
The TOP table is a general list of teletext. You can
only launch the table on channels which use the
TOP operating system.
Launch the TOP
Table of Pages (TOP)
Übersicht
tagesschau
Wetter
Sport 1
TV Guide
ARD heute
ARD morgen
FS-Sendungen
TV Guide 2
Kultur
Gesellschaft
weitere . . .
Select page and
press OK
OK
to view
Wetter
Vorhersage
Städte
Regional
Reisen
int. Städte
Biowetter
OK
Back
M
End
E
table
Mark a general
topic
Select the Topics
column
Mark
menu items
Display page
OK
Displaying teletext pages
0
9
Stop self-turning pages (HOLD)
zoom: top half– bottom half –
normal size
TV picture on/off (Split text)
1OO 1OO ARD-Text O1.O7.O1 1O:3O:42
ARD-Text Teletext im Ersten
Letzte Meldung: Libyscher Botschafter
in London schließt Entschädigung für
Lockerbie-Opfer nicht mehr aus
Fußball: Rolf Hüssmann soll neuer
Sportdirektor beim VfB Stuttgart
werden . . . . . . . . . . . . . . . . . . . . . . . . . . . . . . . . 223
1O.3O Ein Zwilling zu viel . . . . . . . 314
12.OO Tagesschau um zwölf
tagesschau. . . . 11O TV Guide. . 3OO/4OO
Wetter. . . . . . . . . 17O Kultur. . . . . . . . . 5OO
Sport. . . . . 2OO/6OO TXT-Quiz. . . . . . . 555
Lotto/Toto. . . . . 666 Wirtschaft. . . . . . 7OO
Index. . . . . . . . . . 1O1 Impressum. . . . . .1O7
Inhalt tagesschau
– +
Page selection
Teletext menu
M
Menu
News flash
Show
Station –/+
Sub-page
Recording
Timer
TOP table
Settings
OK
M
E
Launch teletext menu
Here you will find functions such
as ”New message”, ”Reveal”
hidden information, switch to
other, enter 4-digit sub-page
number directly, programme
video timer recordings via
teletext and launch the Timer
overview.
i
Info
Bck
In the settings you will find
End
menus to define the preview
pages, subtitle pages and
personal teletext pages.
Set volume
You can adjust the volume in teletext mode after
pressing the sound off/on button
t
.
16
BAQ2550H_31308_020_3_GB2 07.05.2004, 10:58 Uhr16
1 0 7
Enter the page number directly
Page 17
Modes of operation
Video mode
You can operate Loewe video recorders and DVD
players with the video control bars even if they
are hidden. The VCR’s must be connected to the
Euro AV sockets (Scart) and logged in under the
”Connections” menu.
Digital Link must be switched on on the Loewe
video recorder. Only then can you use the
control bar. You also need Digital Link or Digital
Link Plus for timer recordings of satellite
programs controlled by the TV set.
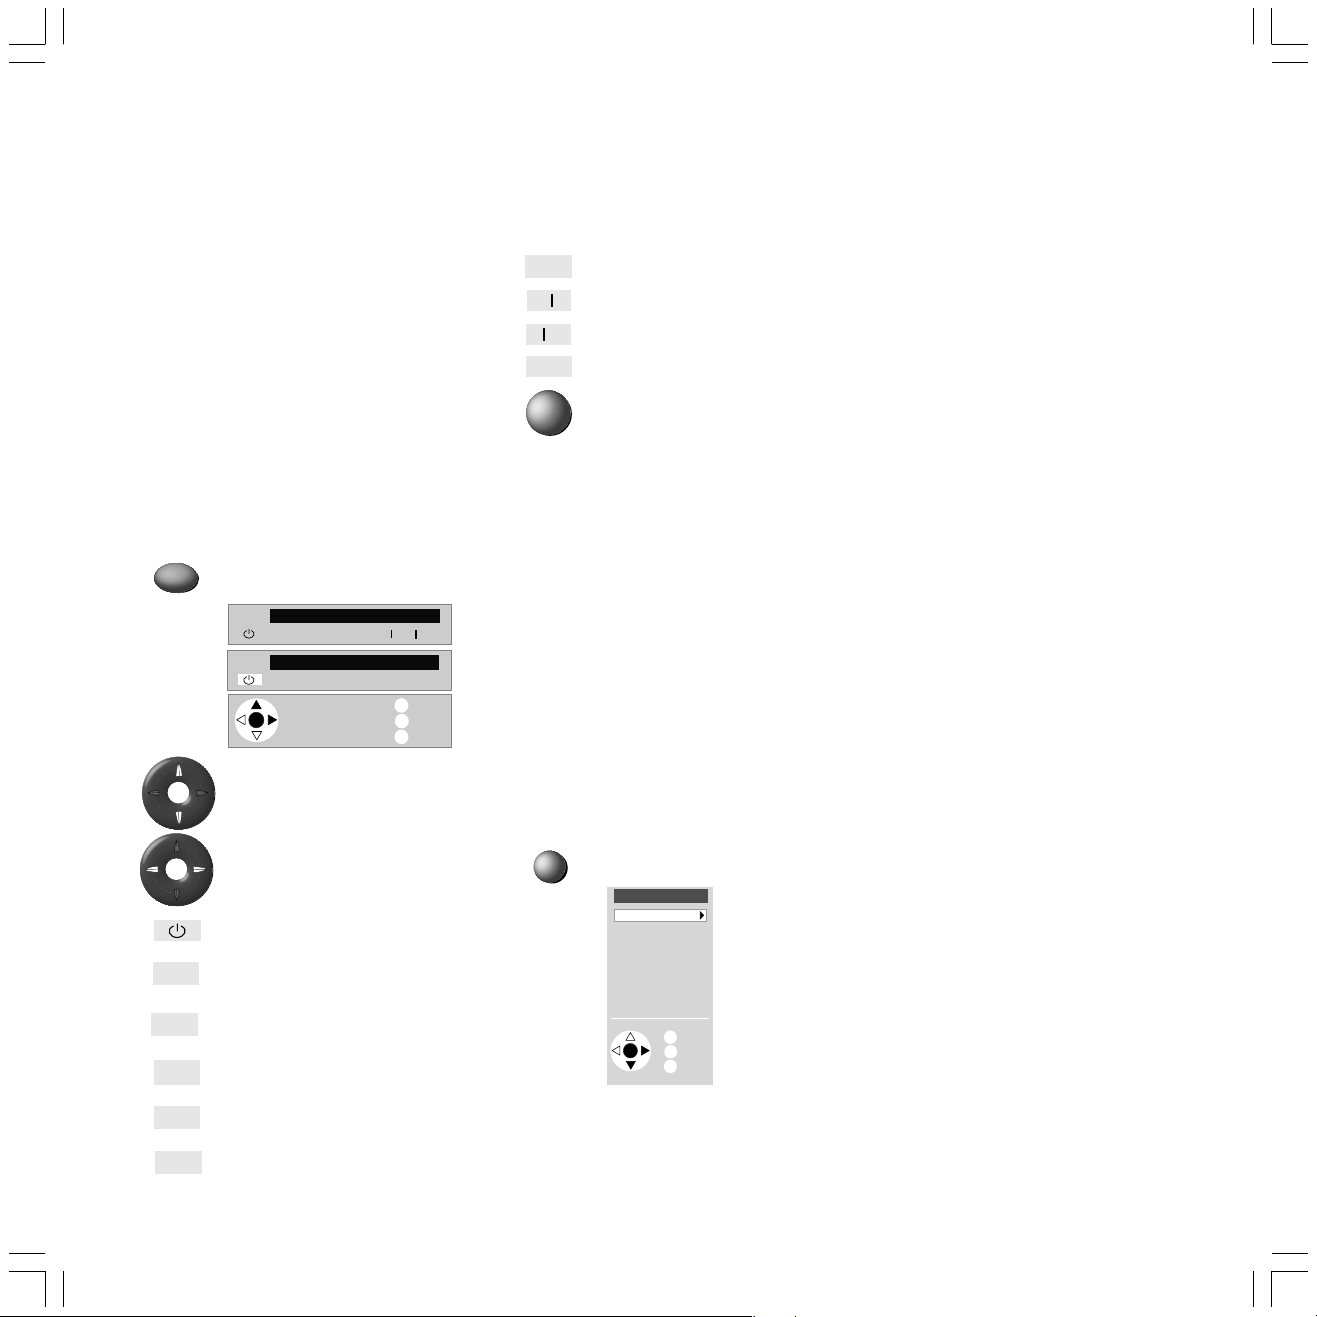
You can display up to three control bars but they
are only displayed by logged in VCR’s and DVD
players.
Show/hide video
=
V
AUX
▼
■
control bar
DVD
▼
▼
■
VCR STOP
▼
▼
■
OK
Select the video control bar if
several VCR’s or a DVD player
and a VCR are connected.
Select function
Switch VCR/DVD on/off
Select video input (Euro-AV
socket) for the VCR
▼
Rewind (only for VCR) or Scan in
rewind
Stop (STOP)
STOP
▼
❚❚
▼
▼▼▼
❚❚
●
AUX
▼▼▼
i
Info
Menu
M
End
E
❚❚
▼
●
OK
Pause (PAUSE)
▼
Next chapter (only for DVD)
Previous chapter (only for DVD)
Record
Perform selected function.
When you start a recording, the program you
have just selected is recorded. You cannot switch
over to another channel, it is locked. You can
only switch over when the recording has
finished.
Exceptions:
1. You have installed several tuners (not PIP
tuners) in the TV set, then you can watch
another channel with the second tuner.
2. You can also watch the signal via an AV
connection (e.g. DVD player or a second
VCR).
3. In a VCR with Digital Link Plus the VCR tuner
is used for the recording (not for satellite
programs).
Video menu
M
Show the Video menu
Video menu
Timer
Recording
DR archive
Connections
Settings
i
Info
OK
Back
M
End
E
You can change and delete timer data or program
new recordings in the ”Timer” menu.
The ”Record” menu gives you the option for
timer programming by EPG, teletext or manually.
You can call the archive list with ”DR Archive” if
a Digital Recorder is built in.
In the ”Connections” menu you can log other AV
equipment on or off. In the ”Digital Link Plus
transfer” menu the station data of the TV set (not
satellite stations) are transmitted to the Digital
Link Plus VCR.
In the Settings menu you can enter the record
lead and follow on time and serial recording
tolerance.
Digital Link Plus VCRs have the possibility for
transferring the station data from the TV set to
the VCR via the Euro-AV cable (not for satellite
stations). Every time you change the station
memory of the TV, you are asked whether you
want to make a data transfer.
The receiver unit of the VCR is always used for
recording with a Digital Link Plus video recorder
(not satellite stations) and the tuner of the TV set
is available for watching TV.
Loewe VCRs also have Digital Link, a system for
controlling Loewe VCRs via the Euro-AV cable. If
the Loewe VCR only has Digital Link, the TV tuner
is used for recording. If you have installed your
Loewe VCR in a concealed place, you can operate
the Loewe VCR with the remote control. Operation with the control bar also works with Digital
Link.
Digital Link must be switched on on the
video recorder.
Only use fully wired Euro-AV cables, otherwise
Digital Link or Digital Link Plus will not work.
Playback (PLAY)
▼
Fast forward (only for VCR) or
▼
▼
Scan in fast forward
BAQ2550H_31308_020_3_GB2 07.05.2004, 10:58 Uhr17
The Video menu provides you with the following options:
17
Page 18
Operating additional equipment
Logging in equipment
You have already logged in and connected all
connected devices (video recorders, camcorders,
DVD player, DVD recorder, Loewe audio system,
Pay-TV decoders, Loewe home automation, door
intercom) with the connection wizard when you
put it into operation for the first time. If you
want to connect further or different devices, you
have to call the connection wizard in the TV
menu – ”Connections”.
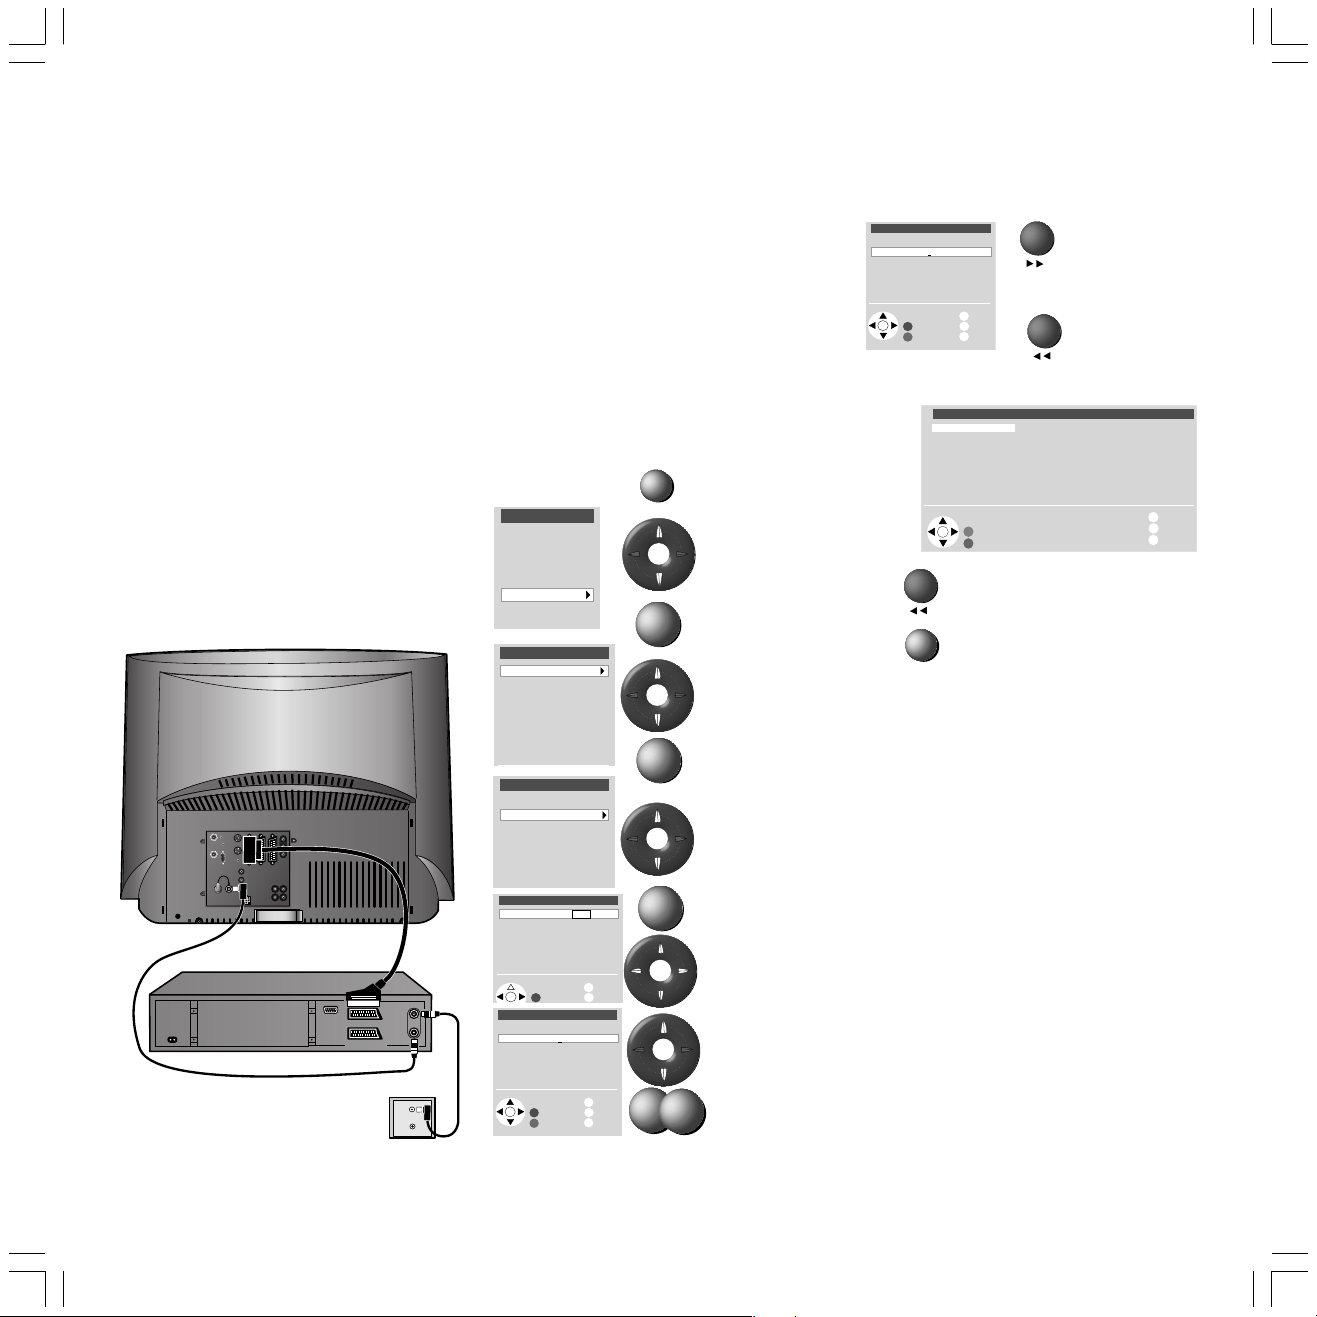
Connecting VCR equipment
In addition to the connection via the Euro-AV
socket, you also have to connect the antenna
(only for antenna or cable systems) through the
VCR to the TV set. The antenna signal is then
available both to the tuner in the VCR and the
TV tuner. If a DVB-T module is installed, connect
the VCR to the IN socket of this module.
DIG IN
1
RC5/RC6
SAT
SERVICE
IR
2
CTRL
VGA
SAT A/D
VHF/UHF
AUDIO IN
AUDIO OUT
DIG OUT
AV3
AV2/RGB
AV1
R
L
SUR
R
C
SUBWOOFER
L
STAND
SUB
RFin
AV1/TV
RFout
AV2/Dec
Search for and store the VCR station (if
there is no Euro AV cable)
Switch on the test station on the VCR or insert a
recorded tape and start playback.
Then call program 0 on the TV set (set ex-factory
to channel 36). Select the first menu item (VCR)
in the AV selection list.
To prevent ”normal” TV stations being found in
the search, pull out the antenna plug from the
antenna input of the VCR temporarily (the plug
attached to the cable to the antenna system).
0
Call the TV
menu
Mark
”Settings”
Call
Mark
”Stations”
Call
Mark ”Manual
setting”
Call
Mark ”Range”
and
Select ”UHF”
Mark
”Channel”
Enter channel
30
TV menu
Standard settings
Picture
Sound
Connections
Settings
Settings
Stations
AV settings
Child lock
On-screen displays
Timer functions
Time and date
other ...
Stations
Automatic search
Manual adjustment
Sort
Delete
Enter/change name
Preferred stations
Manual adjustment
Range VHF UHF Cable
Channel E36
Frequency 591.25 MHz
Name VIDEO
TV stand. B/G
Col. st. Autom.
Search
0-9:Entry
Search
Store
i
M
i
M
E
OK
Manual adjustment
Range UHF
Channel E30 (E21...E69)
Frequency 543.25 MHz
Name E30
TV stand. B/G
Col. st. Autom.
OK
Info
Back
Info
Back
M
OK
OK
OK
3
End
Manual adjustment
Range UHF
Channel E37 (E21...E69)
Frequency 599.25 MHz
Name E37
TV stand. B/G
Col. st. Autom.
0-9:Entry
OK
Search
Store
When the station is found:
i
Info
Back
M
End
E
Search for
channel (blue
button)
Store (red
button)
A list of the stored stations is displayed
Store
0 VCR
1 ARD
2 ZDF
3 SAT.1
4 RTL
5 VOX
6 S–RTL
7 N–TV
8 DSF
OK
Insert station
Overwrite station
9 S–RTL
10 N–TV
11 DSF
12 TM3
13 PRO7
14 RTL 2
15 WDR 3
16 BR 3
17 HR 3
18 KIKA
19 PHOENIX
20 EUROSPRT
21 KABEL 1
22 MTV
23 CNN INT.
24 HOT
25 TV 5
26 VIVA
i
M
E
Info
Back
End
Overwrite program (program 0
marked)
E
Hide menus
Plug the antenna plug back into the VCR.
If you now get interference because a TV
station is transmitting on the same channel as
the VCR station, you have to change the
transmitting station on the VCR (see operating
instructions of the VCR) and search for the VCR
station on the TV again.
18
BAQ2550H_31308_020_3_GB2 07.05.2004, 10:58 Uhr18
Page 19
Operating additional equipment
Video playback
There are several ways to see the picture and
hear the sound of the VCR, DVD player or
camcorder on your TV:
1. Use the Euro-AV sockets on the TV and VCR.
This is the best way to get a good picture and
sound quality. For camcorders it is best to use
the front sockets AVS.
If you are playing back from a VCR with
Digital Link Plus, the VCR picture is shown on
the current station slot.
If you are playing back from a standard VCR,
DVD player or camcorder, select the AV
socket to which the video signal is connected
in the AV selection list or the station table.
Video recorders emit a switching voltage
during playback which the TV set can decode
(can be activated for every VCR in the
connection wizard or set Settings – AV
Settings – Allow switching voltage to ”Yes”
in the TV menu). Then the VCR picture is
shown on the current station slot as in Digital
Link Plus VCR’s.
2. You can also control logged-in Loewe VCRs
and DVD players with the video menu bar.
See page 17 for more details.
3. Use the antenna connection between the
VCR and the TV. The sound is only transmitted
in mono. Select the first menu item, e.g.
VIDEO, in the AV selection.
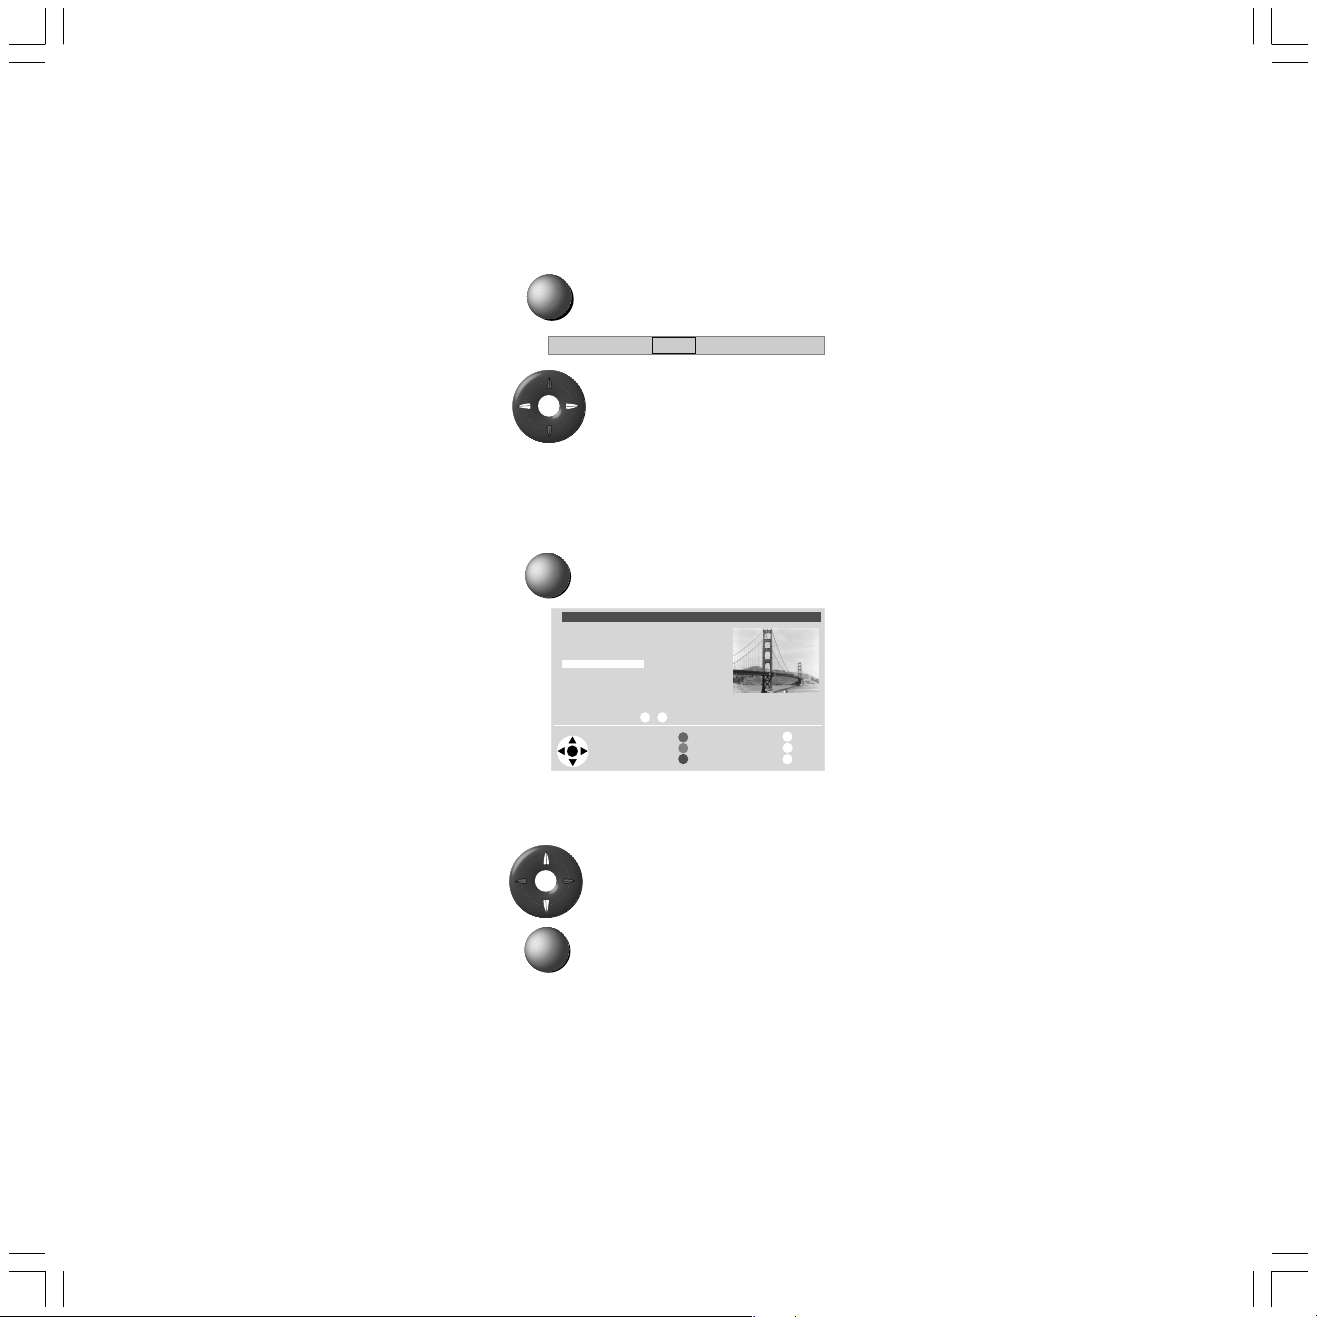
Calling an AV program in the AV selection
list
0
Call AV selection list
VIDEO AV1 AV2 AV3 AVSAV Selection
Select AV socket or VIDEO for
VCR transmitter.
Now you will see the playback from the
connected AV unit.
Calling an AV in the station table
OK
Call the station table
Channel overview: TV Numerical
AVS
AV3
AV2
AV1
0 VIDEO
1 ARD
2 ZDF
3 SAT.1
4 RTL
5 VOX
Select and
press OK to proceed
OK
6 S–RTL
7 N–TV
8 DSF
9 TM3
10 PRO7
11 RTL 2
12 WDR 3
13 BR 3
14 HR
15 MDR 3
0 9
... Select program:
Change programs
Favourite programs
Change sorting
i
Info
Menu
M
End
E
In the numeric sorting you will always find the
AV sockets at the top of the list without station
numbers.
Mark the AV socket
BAQ2550H_31308_020_3_GB2 07.05.2004, 10:58 Uhr19
OK
Call the marked AV socket
Now you will see the playback from the
connected AV unit.
19
Page 20
Operating additional equipment
Operating Loewe video recorders and
Loewe DVD players directly
You can switch over the remote control of the
TV set to operate Loewe video recorders and
Loewe DVD players. These devices can be
operated directly or, in the case of equipment
installed in a concealed place, by the TV set. In
this case the Digital Link function of the VCR
must be switched on.
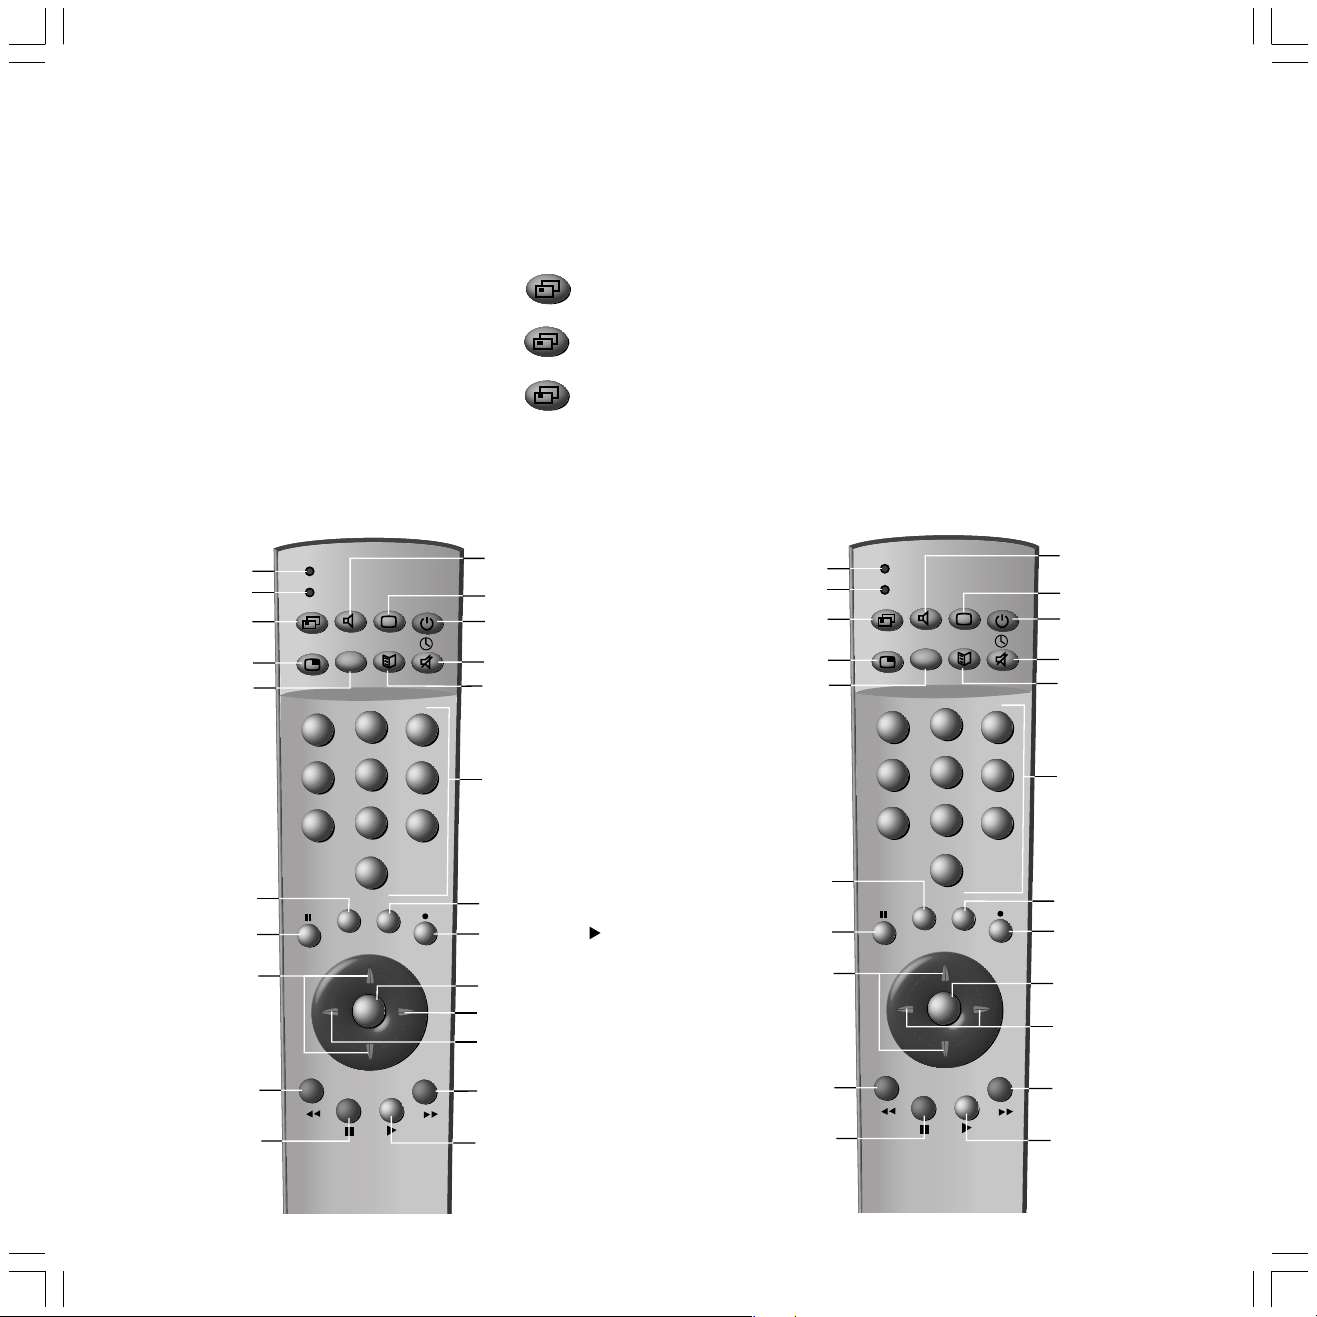
Functions for Loewe video recorders
Indicator: control VCR
Indicator: control DVD
Select set to be
operated TV/DVD/VCR
Display/close
ShowView timer Menu
Switch to Long Play
/Standard Play
SV
1
4
7
VTR
DVD
LP
=
V
Control 150
000
2
5
8
3
6
9
Select the device to be operated:
for VCR:
the VTR indicator on the
remote control lights up ...
press again, the DVD indicator
lights up ...
press again, none of the
indicators lights, the TV is then
activated.
Functions for Loewe DVD players
Select sound
/station language
selection
Select picture and
sound source
Switch on/off
in Standby
Display/close Timer list
Counter reset
Select station directly
/in menu: enter digits
Indicator: VCR control
Indicator: DVD control
Select direct operation
select camera position active
for TV/VCR/DVD
Menu bar on,
Menu bar on,
Repeat active
The TV cannot be operated if VTR or DVD is
switched on. In this case switch back to TV or wait
20 seconds until the remote control automatically
switches back to TV mode (none of the indicators
lights).
Loewe VCRs VV3600H, VV8500H and VV5000M
cannot be controlled with this remote control.
Please use the original remote control or the
video bar.
Control 150
VTR
DVD
LP
SV
1
4
7
000
=
V
2
3
5
6
8
9
Set marker
Menu bar on,
Zoom active
Switch on/off
in standby
User interface of
loaded DVD on
Menu bar on,
Select Chapter active
Select Chapter
/in menu: enter digits
Call up VCR Menu
Pause (still frame)
/frame-by-frame
advance
Station selection
up/down
/manual tracking
/in menu:
select position
Rewind
/search backwards
Stop tape
20
BAQ2550H_31308_020_3_GB2 07.05.2004, 10:58 Uhr20
T
0
Status display
M
E
i
OK
OK
/in menu: close menu
Start recording (+ )
Call up station list
/in menu: call up/confirm
Slow motion forwards
/in menu: select/set
Reverse play
/in menu: select/set
Fast forward
/search forwards
Start playback
/single frame, slow motion
DVD menu on
/in menu: close menu
Pause
Next chapter (up)
Beginning of chapter or
previous chapter (down)
in menu: select up/down
Beginning of chapter or
previous chapter
/search back
Stop
0
M
E
T
OK
OK
i
Status display on
/in menu: close menu
Menu bar on, previous
function active
/in menu: info on/off
Title/Chapter Table
/in menu: cofirm the menu
selection
Search
/in menu: select right/left
Next chapter
/search forward
Playback
Page 21
What to do when ...
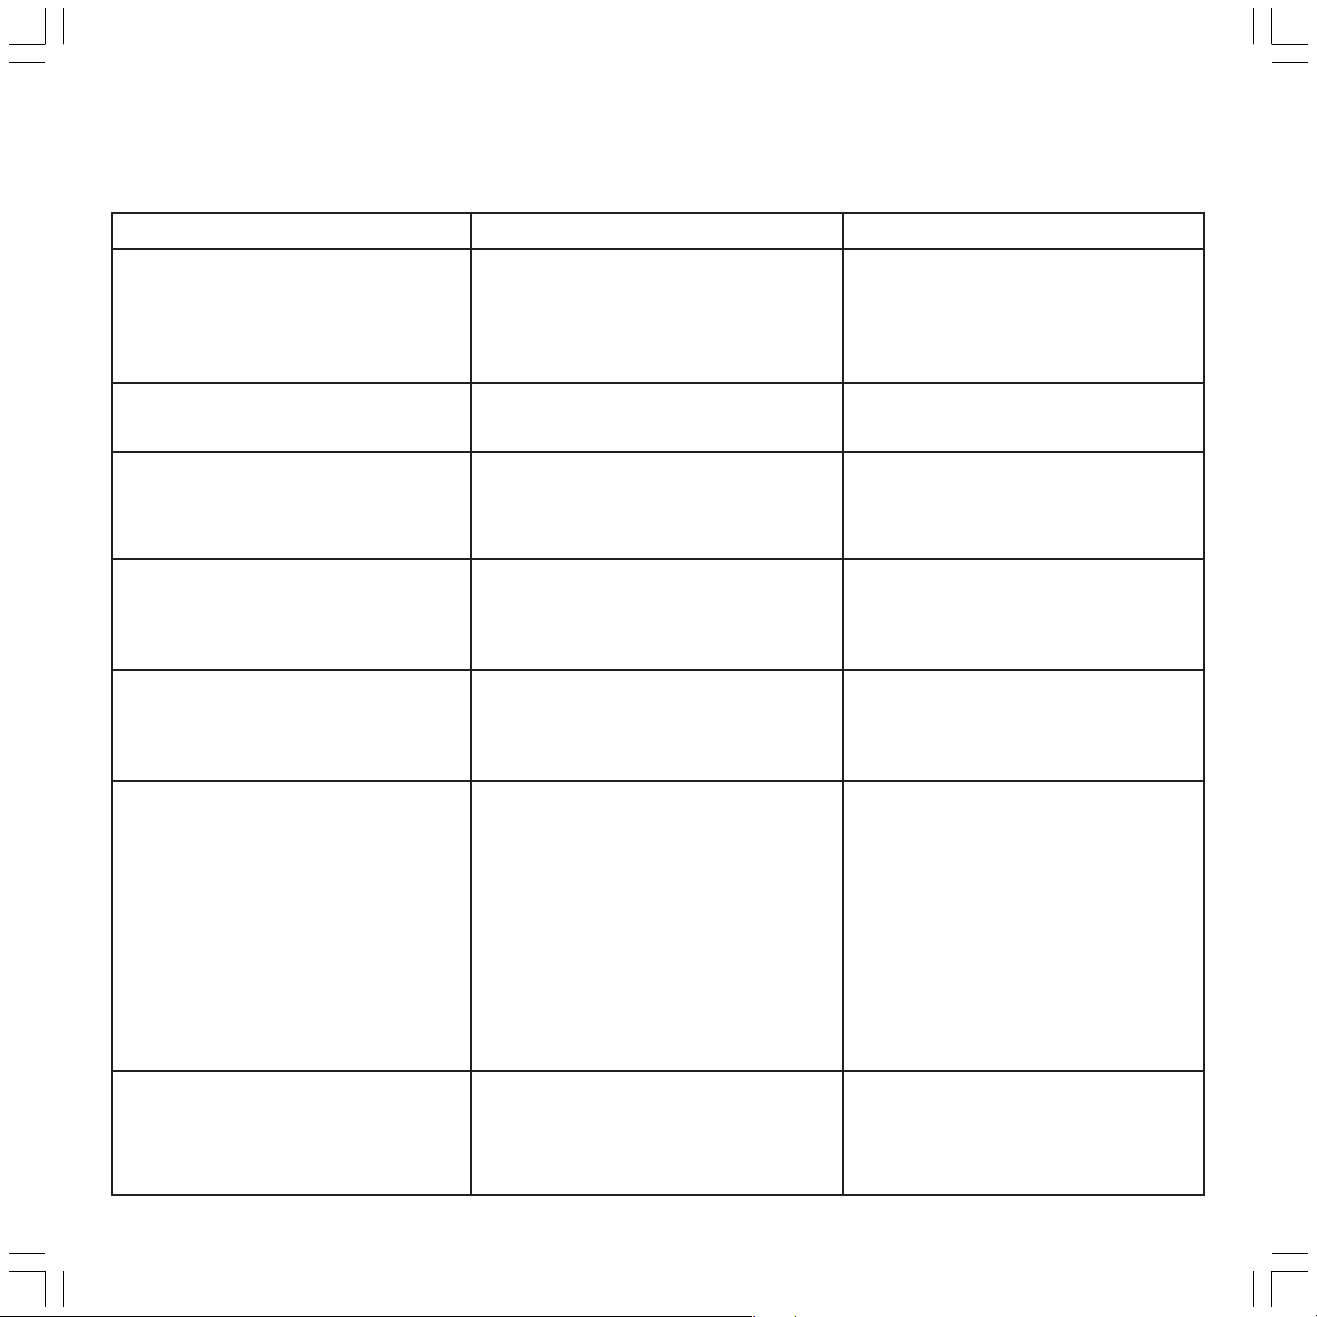
Problem
Various menu items cannot be called (shown in
gray) or the menus for the EPG and teletext
modes of operation cannot be called
Timer recording, Change timer and Clear timer
are not shown in the Video menu
”Connections” cannot be called in the Video
menu (shown in gray)
The ”Stations” item in the TV menu and the
”Automatic station search” item in the main
information cannot be called
Control of the Loewe VCR with the video
control bar and the timer does not work or
does not work properly
General problems with connecting external
devices through an AV input
Possible cause
”Simplified control” activated in main
information
No video recorder logged in
a) A timer recording is currently in progress
b) You are recording from the TV set with the
video bar
The child lock is activated. If these menus were
accessible, children could still set the programs.
a) The VCR’s Digital Link function is not activated
or not possible
b) Euro-AV cable not connected
c) Video recorder not logged in
a) The device is not logged in in the
”Connections” menu or is connected
differently to shown in the connection dia-
gram
b) The AV norm is set incorrectly
c) The AV signal is set incorrectly
Remedy
Deactivate ”Simplified control” in the main
information. Press the i-button, select ”Select
control level” and call with OK. Set the
”Simplified control” to ”no”.
Log in VCR in the TV menu – Connections.
a) Wait until the timer recording has ended or
clear the timer.
b) Wait until you stop recording.
Deactivate program-related child lock: Switch off
child lock or enter PIN in the TV menu - Settings.
a) Activate Digital Link in the VCR (see operating
instructions of the VCR)
b) Connect the Euro-AV cable
c) Log in the VCR
a) Compare the connection diagram with the
actual installation in the ”Main information”
under ”Connections” and connect as shown if
necessary.
b) Set the correct norm.
c) Set the correct AV signal.
If ”Automatic” is set for AV norm or AV signal,
this can lead to wrong detection in the case of
non-standardized signals. In this case the norm
and signal must be set according to the operating
instructions of the external device.
Picture shifted horizontally
BAQ2550H_31308_020_3_GB2 07.05.2004, 10:58 Uhr21
The TV set is in the Southern hemisphere (e.g.
Australia, South Africa)
Set the horizontal position:
1. Call the main information with i
2. Call Index – Set picture – Horizontal
displacement
3. Set horizontal picture position.
21
Page 22
What to do when ...
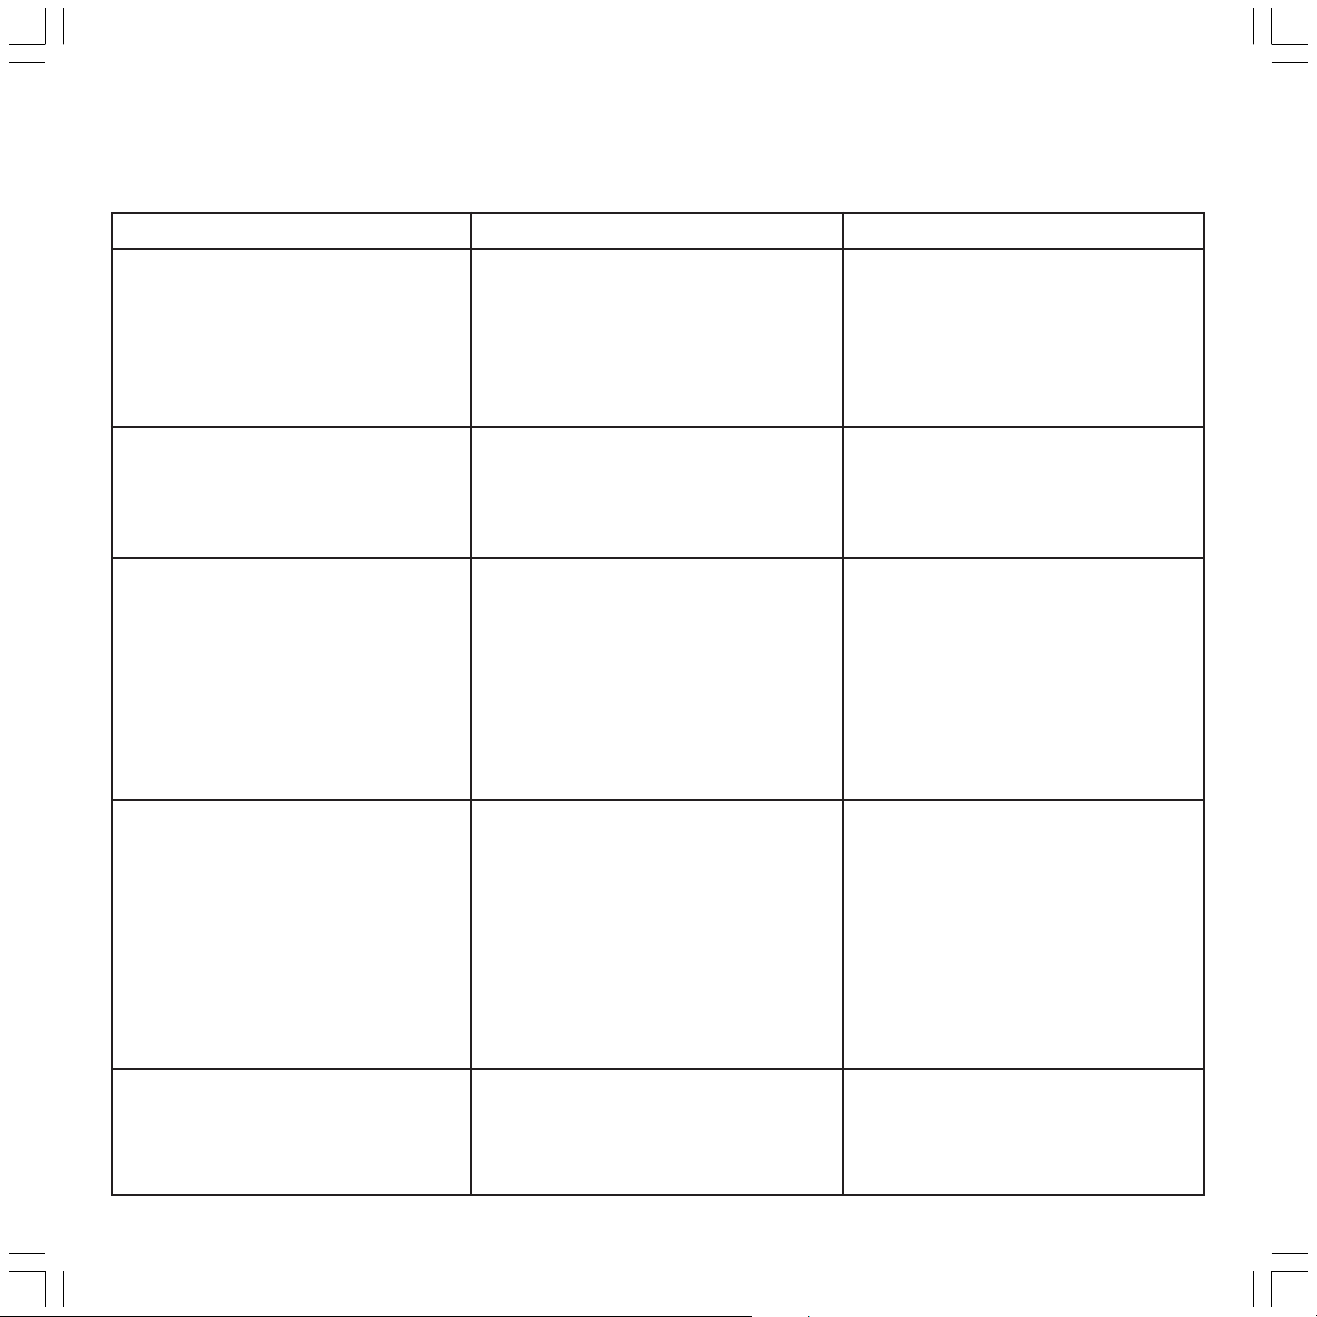
Problem
Connection of a decoder does not work or does
not work properly
No sound through the TV loudspeakers
All menus appear in the wrong language
Possible cause
a) The signal is not decoded because the correct
decoder programs have not been selected in
the TV menu - Connections
b) The sound is missing in decoder mode
because the wrong decoder sound is
allocated in the TV menu - Connections
a) The item ”Sound from...” in the Sound menu
under ”Sound” is not set to ”TV”
b) Nothing is inserted in the 9-pole cube socket
on the back of the set
The wrong menu language has been set
Remedy
a) Follow the instructions in the TV menu –
Connections again and select the
appropriate decoder programs.
b) Follow the instructions in the TV menu –
Connections again and select the right sound
source (decoder, TV or Autom.), see
instructions of the decoder.
a) Change the setting to ”TV”.
b) Either a dummy plug with bridges, Loewe
Concertos, the transmitter for the home
automation or a subwoofer must be plugged
into the cubic socket.
Set your menu language:
1. Switch off picture-in-picture (PIP) and switch
off all on-screen displays, press the E button
2. Call the TV menu (press the M button)
3. Select the last menu item and press OK
4. Select the last menu item on the last page
and press the OK button
5. Now select the right language and....
6. ... confirm with OK.
Digital Link Plus does not work
Various characters are displayed incorrectly in
teletext
22
BAQ2550H_31308_020_3_GB2 07.05.2004, 10:58 Uhr22
a) The VCR has not been logged in as a Digital
Link Plus device or has been connected to the
wrong socket
b) The Euro-AV cable is not fully wired (Pin 10
not wired)
c) Some video recorders can only take over the
stations from the TV in initial installation
d) All or some terrestrial or cable stations are
stored at station slots ≥ 99
The wrong character set is set in the teletext
menu
a) Log in the Digital Link Plus VCR under
”Connections” and connect according to the
diagram.
b) Change the Euro-AV cable
c) Reinstate the original state (ex-factory) of
the VCR (see operating instructions of the
VCR)
d) Sort the terrestrial and cable stations so that
they are between 1 and 99.
Set the right character set: Teletext menu –
Settings – Character set – Standard or the
appropriate character set.
Page 23

Technical data
Mechanical data
Aconda 9272 Part number 63460
Aconda 9372) Part number 63461
Dimensions (cm) 80,5x59x54,5 (wxhxd)
Weight (kg) 44
Picture tubes Real Flat-Line
Format 4:3
Screen size 72 cm, visible 68 cm
Aconda 9281 HD Part number 63462
Aconda 9381 HD Part number 63463
Dimensions (cm) 85,5x62,5x57,5 (wxhxd)
Weight (kg) 55
Picture tubes Real Flat-Line HD
Format 16:9
Screen size 81 cm, visible 76 cm
Electrical data
Chassis name Media Plus (Q2550/H)
Image refresh frequency PAL/Secam 100 Hz
PAL 60/NTSC 60 Hz proscan
Full Digital 100 AMD
Power supply 220V up to 240V/50–60Hz
Power consumption in operation approx.145 Watt
Sat-Record-Mode <60 Watt
Ambient temperature 5º – 40º Celsius
Tuner VHF/UHF/ cable
(Hyperband 8 MHz) 42 MHz – 860 MHz
Station memory
✳
TV norms B/G, I, DK, L, L‘, M, N
Color norms PAL, SECAM,
Sound norm
✳
Audio rated output 2 x 15 Watt / 4 Ohm
Audio music output 2 x 40 Watt / 4 Ohm
Teletext HiText (Level 2.5)
✳
/DMI/DMM/DNC
Standby <2.5 Watt
220/with DVB:1470
NTSC, NTSC 4.,43
FM, AM, Nicam
mono/stereo/2-sound
Connections
Mini-DIN (Front) Video IN Y/C (S-VHS/Hi8)
Cinch (Front) Video IN CVBS (VHS/8mm)
Cinch (Front) Audio IN L+R
Jack 6.3mm (Front) headphones 32–200 Ohm
IEC sockets 75 Ohm antenna/cable/DVB-T
F-sockets 75 Ohm
✳
SAT and SAT A/D
AV 1 Video IN/OUT Y/C (S-VHS/Hi8)
Video IN/OUT CVBS (VHS/8mm)
Audio IN/OUT L+R
AV 2 Video IN/OUT
✳✳
Y/C (S-VHS/Hi8)
Video IN/OUT CVBS (VHS/8mm)
Video IN RGB
Audio IN/OUT L+R
AV 3 Video IN Y/C (S-VHS/Hi8)
✳✳✳
Video IN/OUT
Video IN RGB or YUV
Audio IN/OUT
CVBS (VHS/8mm)
✳✳✳
L+R
Cinch Audio OUT level adjustable/fixed
Jack 3,5mm Audio IN L+R
Jack 3,5mm
Jack 2,5 mm
D-Sub 15-pole
✳
✳
✳
IR-Link OUT
RC5/RC6 OUT
VGA IN
9-pole cube socket active loudspeaker systems
Mini-DIN 9 pole Turning foot
Mini-DIN 8-pole Service or Loewe audio systems
(L-Link)
Cinch
Cinch
Cinch
✳
Centre OUT Centre Signal
✳
Subwoofer OUT LFE Signal
✳
Surround OUT L+R
Cinch✳Dig. Audio IN 1 Multichannel Signal
✳
Cinch
Dig. Audio IN 2 Multichannel Signal
Cinch✳ Dig. Audio OUT Multichannel Signal
✳
depending on equipment and type of set or
retrofittable
✳✳
OUT only in Digital Link Plus video recorders
✳✳✳
OUT monitoring picture and sound
✳
BAQ2550H_31308_020_3_GB2 07.05.2004, 10:58 Uhr23
23
Page 24

Accessories available
Racks
Ask your dealer, he will be able to offer you the
right rack from the Loewe range to suit your TV
set.
Loewe audio systems and active
loudspeaker systems
A combination of a Loewe TV set, a Loewe
audio system and a Loewe loudspeaker system
provides an excellently adapted Home Cinema
system with the advantages of high operating
comfort, matching design and adapted technology.
Digital Recorder Plus
Hard disk installed in the TV set for recording
and playing TV broadcasts. Depending on the
selected recording quality, up to 100 hours
recording capacity is available.
You can program the timer to make recordings
on the hard disk and copy then to a VCR or
DVD recorder later.
You can record while a program is on. Then you
can retrack the programs up to 2 hours and
watch something you might have missed or
watch the program again. The current program
continues recording in the meantime.
You can change a current program into an
archive recording.
Operation with the remote control RC2/RC3
(included with the Digital Recorder Plus
upgrade kit).
Can only be installed if no online module is
installed.
Wireless Home Automation
Wireless controlling of electrical installation
components, such as light, canopies and
shutters via the remote control.
RC1 Remote control
Bi-directional system remote control to operate
all Loewe products, such as TVs, VCRs, DVDs and
audio systems. You can also operate the wireless
electrical installation components.
Single-/Twin-Sat-Tuner und Digital-TV
Decoder (satellite or terrestrial)
Your TV set can be retrofitted with the integrated SAT-6 or TWIN-SAT 6 and a digital TV
decoder.
Connecting both components allows reception
of analog and digital satellite programs. With
the Digital-TV upgrade kit 1 Sat/Twin-Sat all
uncoded digital programs can be received. The
Digital-TV upgrade kit 2 Sat/Twin-Sat-CI P
suitable for Premiere is also available and the
Digital-TV upgrade kit 2 T-CI for terrestrial
digital TV programs.
Dolby Digital Decoder
for multichannel playback from DVD players in
Dolby Digital cinema quality. A Dolby Digital is
integrated.
Online module
for convenient internet and email access. Everything can be accessed via the remote control or
the optional infrared keyboard.
Can only be installed if no Digital Recorder is
installed.
VGA connection upgrade for a PC
This transforms your TV set into a VGA monitor
(not possible when used in conjunction with
the online module).
IR-Link
This enables you to operate a concealed video
recorder from another manufacturer or the Dbox, via the television using the original remote
control.
Loewe Video Recorders
Loewe video recorders are specially adapted in
design, user guidance and technical characteristics to Loewe TV sets with the result that daily
handling of the equipment is made much simpler.
Loewe DVD-Players
The DVD-Players from Loewe are characterised
by form and colour which match Loewe TV sets,
adapted user guidance and technology. A combination of the two devices forms a system
which offers many advantages.
24
BAQ2550H_31308_020_3_GB2 14.05.2004, 9:41 Uhr24
Page 25

Service addresses
Australia
International Dynamics Australasia Pty Ltd.
129 Palmer Street
AUS - Richmond, Victoria 3121
Tel. 03–94 29 08 22
Fax 03–94 29 08 33
Austria
Loewe Austria GmbH
Parkring 10
A–1010 Wien
Tel 01–51 63 33 034
Fax 01–51 63 33 032
Benelux
Loewe Opta Benelux NV/SA
Uilenbaan 84
B–2160 Antwerpen
Tel. 0902–88 00 2
Tel. 03–270 99 30
Fax 03–271 01 08
Loewe Opta Nederland B.V.
Ravenswade, 54A1
NL–3439 LD Nieuwegein (Utrecht)
Tel. 0900–20 20 180
Fax 030–280 33 27
CIS
Service Center Loewe
ul. Verkhnyaya Maslovka, d. 29
RUS–125083 Moscow
Tel. 095–212 50 43, 956 67 64
Fax 095–212 47 10
Cyprus
L&M Euroappliances Ltd
P.O. Box 23426
Kennedy Avenue 1A&B
CY–Nicosia
Tel. 02–42 05 10
Fax 02–42 87 70
Czech Republic
TIPA sdruzení
Dolní nám. 9
CZ–746 01 Opava 1
Tel: 0553-62 49 44
Fax: 0553-62 31 47
Denmark
Kjaerulff 1 Development A/S
Vestre Stationsvej 9
DK–5000 Odense C
Danmark
Tel. 0661–354 80
Fax 0661–354 10
France
Loewe France S.A.
11 rue de la Durance
F–67100 Strasbourg Cédex 1
Tel. 03–88 79 72 50
Fax 03–88 79 72 59
Germany
Loewe Opta GmbH
Kundendienst Zentrale
Indurstriestraße 11
D–96317 Kronach
Tel. 09261–990
Fax 09261–95411
Great Britain
LinnSight Ltd.
PO Box 8465
Prestwick
UK – KA 7 2YF
Tel. 01292–47 15 52
Fax 01292–47 15 54
Greece
SOUND HELLAS S.A.
Kleanthous Str. 10
GR–54642 Thessaloniki
Tel. 2310–856 100
Fax 2310–856 300
Hungary
Basys Magyarorszagi KFT
Epitok utja 2–4
H–2040 Budaörs
Tel. 023–415 637/121
Fax 023–415 182
Israel
RIF TRADING LTD
29 Izhak Sade Street
ISR–Tel Aviv 67213
Tel. 03–62 40 555
Fax 03–62 40 303
Italy
Loewe Italiana srl
Lago del Perlar, 12
I–37135 Verona
Tel. 045–82 51 611
Fax 055–82 51 622
Malta
Mirage Holdings Ltd
Flamingo Complex
Cannon Road
M–Qormi
Tel. 22 79 40 00
Fax 21 44 59 83
Marocco
SOMARA S.A.
377, Rue Mustapha El Maani
MA–20000 Casablanca
Tel. 02–22 20 308
Fax 02–22 60 006
Norway
CableCom AS
Østre Kullerød 5
N–3214 Sandefjord
Tel. 033–48 33 48
Fax 033–44 60 44
Poland
Piotech
ul. Boh. Getta Warszawskiego 18
PL–81-609 Gdynia
Tel./Fax 058–62 43 467 / 058–62 45 009
Portugal
Videoacustica
Comercio e Representacoes de
Equipamentos Electronicos S.A.
Estrada Circunvalacao
Quinta do Paizinho, Arm. 5
P–2795-632 Carnaxide
Tel. 21–42 41 770
Fax 21–41 88 093
Slowenia
Jadran Trgovsko Podjetje
Partizanska cesta 69
SL–6210 Sezana
Tel. 057–310 441
Fax 057–310 442
South Africa
THE SOUNDLAB PTY LTD
P.O. Box 31952
Kylami 1684
Republic of South Africa
Tel. 011–46 64 700
Fax 011–46 64 285
Spain
Gaplasa S.A.
Conde de Torroja, 25
E–28022 Madrid
Tel. 91–748 29 60
Fax 91–329 06 71
Sweden
Canseda AB
Amalia Jönssons Gata 19
S–421 31 Västra Frölunda
Tel. 031–70 93 760
Fax 031–47 65 15
Switzerland
Telion AG
Rütistrasse 26
CH-8952 Schlieren
Tel. 01–732 15 11
Fax 01–730 15 02
Turkey
Enkay Elektronik Servis Müdürlügü
Alemdag Cad: Site Yolu No.: 10
Ümraniye/ Istanbul
Tel. 0216–523 15 94/96
Fax 0216–523 16 58
Printed in Germany
3/05.04/1,0
Subject to modification.
25
BAQ2550H_31308_020_3_GB2 07.05.2004, 10:58 Uhr25
Page 26

The code number 3001 cancels out a secret
✄
code and with it the child lock.
Please keep it in a
safe place.
26
BAQ2550H_31308_020_3_GB2 07.05.2004, 10:59 Uhr26
 Loading...