

Page 1
C
/
X
/ / /
Montageanleitung
Wandhalter WM 64
Sicherheitshinweise
Die Montage sollte nur von Fachpersonal vorgenommen
werden.
Loewe übernimmt keine Haftung für Schäden, die bei nicht
fachgerechter Montage entstehen.
Montieren Sie Ihr Gerät so, dass es z.B. von spielenden
Kindern nicht beschädigt werden kann und für diese keine
Gefahr darstellt.
Verlegen Sie die Anschlußleitungen so, dass diese keine
Stolpergefahren darstellen.
Wandhalter (und geeignete Adapter), sind nur für die Montage
an senkrechten Wänden ausgelegt. Sie dürfen nur hierfür
verwendet werden.
Greifen Sie, oder weitere Personen, nicht in den Bereich der
Halteschienen des an der Wand montierten TV-Gerätes. Es
besteht dort Quetschgefahr.
Des weiteren haben die Sicherheitshinweise für unsere TVGeräte auch hier Gültigkeit.
Wichtiger Hinweis
Bevor der Bildschirm am WM 64 montiert werden kann, muss die
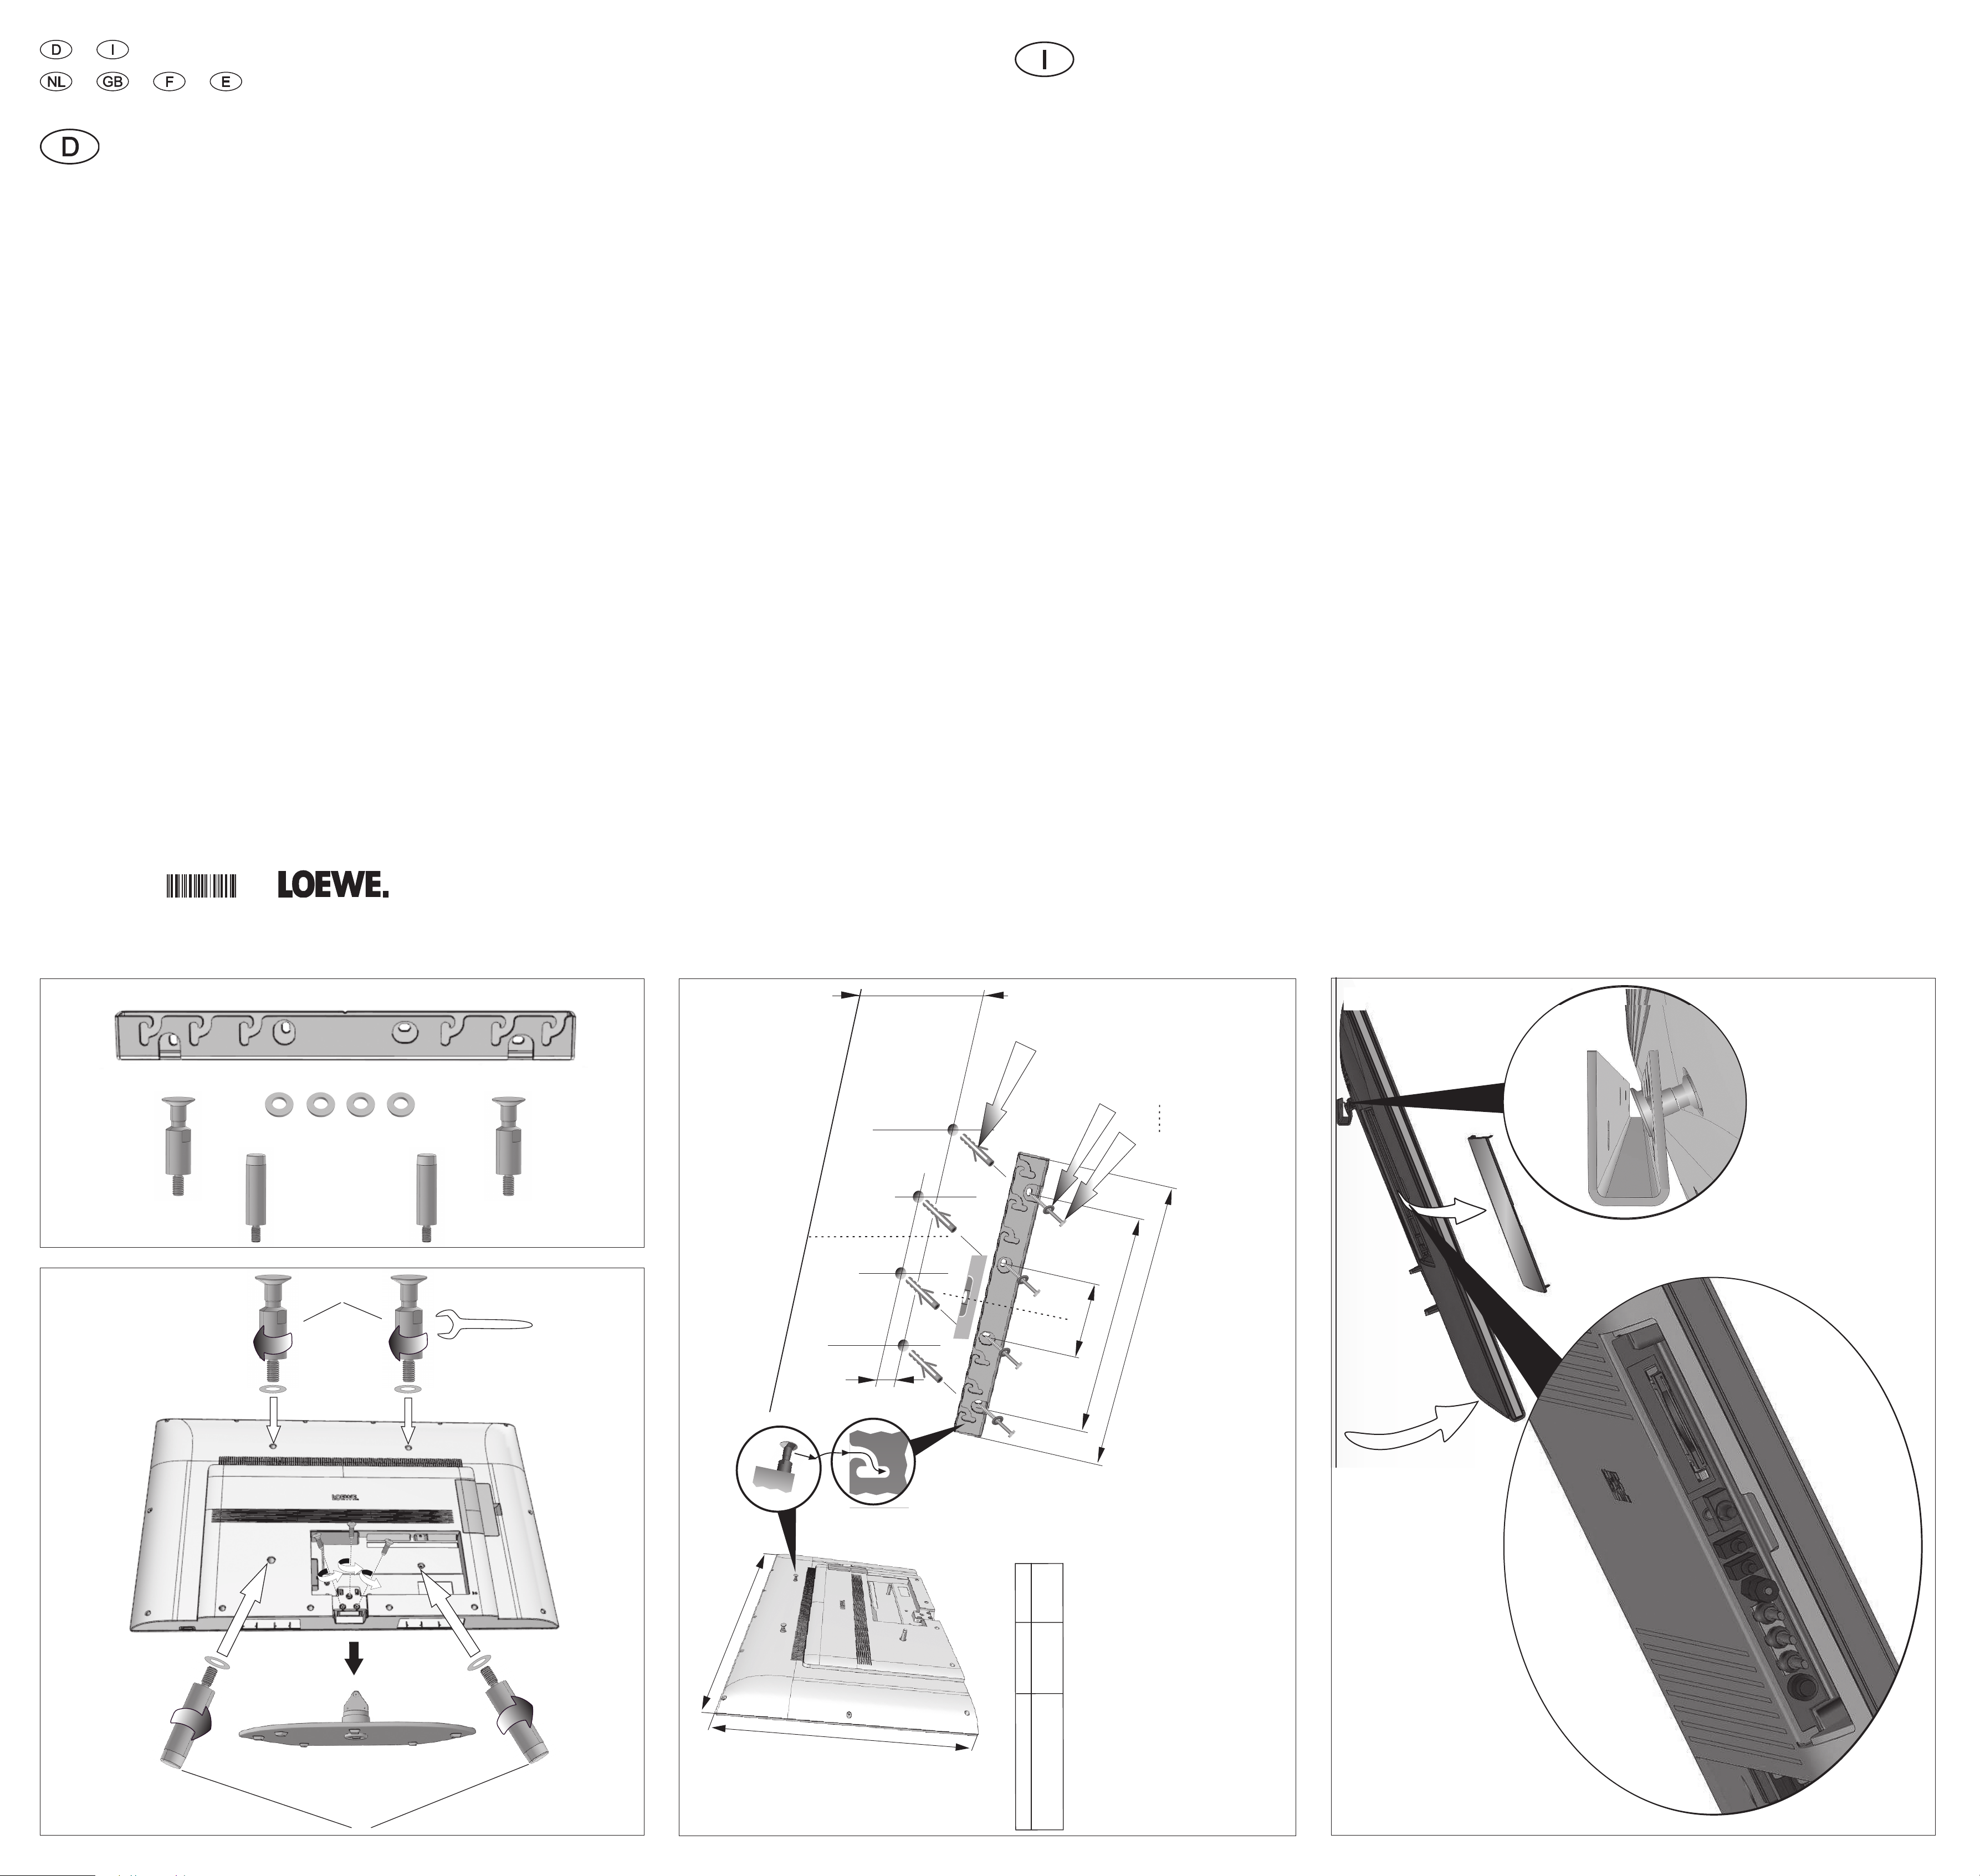
vorhandene Aufstelllösung demontiert werden (Skizze 2, Teil A).
Montage
Die Tragfähigkeit der Wand und die Befestigung des
Wandhalters liegen in Ihrer Verantwortung.
Auf Grund der vielfältigen Wandbaustoffe und der damit
unterschiedlichen Befestigungsarten haben wir kein
Befestigungsmaterial beigelegt.
Besorgen Sie sich das für Ihre Wand geeignete
Befestigungsmaterial im Fachhandel.
Ziehen Sie gegebenenfalls einen Bausachkundigen zu Rate.
Vergewissern Sie sich, dass im Bereich der Bohrungen keine
Leitungen / Rohre liegen.
Beachten Sie die Skizzen 1 bis 3.
Skizze 1 : Lieferumfang
Skizze 2 : TV-Gerät vorbereiten
Skizze 3 : Montage an der Wand
Skizze 4 : Verstellung/ Neigemöglichkeit an der Wand
Die Angaben in der Skizze 3, zur Befestigung des Wandhalters
stützen sich als Beispiel auf eine gemauerte Wand.
Den Wandhalter befestigen Sie, wie dargestellt mit den 4 möglichen Befestigungsstellen.
TV-Gerät vorbereiten
Vor dem Arbeiten am TV-Gerät ist der Netzstecker aus der Steckdose zu ziehen.
Legen Sie auf die Ablageäche für das TV-Gerät ein Vlies oder
eine weiche Decke. Sie schützen damit das TV-Gerät vor etwaigen
Beschädigungen.
An der Vorderseite des TV-Gerätes bendet sich unten in der Mitte
das empndliche Sensorauge/ IR Auge. Legen Sie das TV-Gerät
mit der Vorderseite so auf die vorbereitete Ablageäche, dass das
Sensorauge und der Fuß (wenn anmontiert), gerade noch nicht auf
der Ablageäche liegen.
Lösen und entfernen Sie, wenn vorhanden den Fuß vom TV-Gerät.
Aufhängebolzen
Drehen Sie die beiden mitgelieferen Aufhängebolzen (mit Kontakt-
scheiben) in die Rückwand des TV-Gerätes ein (Skizze 2, Teile B).
Ziehen Sie die Aufhängebolzen mit einem Maulschlüssel der
Schlüsselweite 12mm fest. Drehmoment ca. 5 Nm (mit mittlerer
Kraft).
(Maulschlüssel nicht im Lieferumfang enthalten).
Abstandsbolzen
Drehen Sie die beiden mitgelieferen Abstandsbolzen (mit Kontakt-
scheiben), mit der Hand in die Rückwand des TV-Gerätes ein (Skizze
2, Teile C).
Durch hinein bzw. herausdrehen dieser Abstandsbolzen kann die
Auage des TV-Gerätes an der Wand optimiert werden.
Stecker am TV-Gerät anschließen
Solange das TV-Gerät noch nicht an der Wand montiert ist, ist der
Anschlussbereich an der Rückwand leicht zugänglich.
Die Kabel schließen Sie, soweit möglich an dem dafür vorgesehenen
Anschlußbereich der Rückwand an.
Weitere Informationen hierzu nden Sie in der Bedienungsanleitung
des TV-Gerätes.
Einhängen und Neigen des TV-Gerätes
Je nach Gerätetype, wiegt Ihr TV-Gerät bis ca. 40 kg.
Nehmen Sie zum Einhängen eine zweite Person zur Hilfe.
Zum Einhängen halten Sie das TV-Gerät möglichst senkrecht (siehe
Skizze 3).
Hängen Sie das TV-Gerät mit den Aufhängebolzen in die Aussparungen am Wandhalter (Skizze 3, Pfeile und Teilausschnitt) ein.
Ihr TV-Gerät kann am Wandhalter auf zwei Positionen geneigt
werden.
Sie können die Neigung des TV-Gerätes, mit 0° (TV-Gerät hängt
senkrecht an der Wand), 2,5° (TV-Gerät hängt leicht nach vorne
geneigt an der Wand), wählen.
Zur Neigungsänderung das TV-Gerät, zunächst an einer Seite, leicht
anheben und oben nach vorne bzw. nach hinten drücken.
Die Rastung, und somit die Neigung, können Sie entsprechend Ihrem
Wunsch wählen.
Zugang für CI Slot und Anschlüsse erleichtern
Beachten Sie hierzu Abb. 4.
Heben Sie die eine Seite des TV-Gerätes (wo sich der CI-Slot nicht
bendet) etwas an und drücken diese gleichzeitig nach hinten.
Die andere Seite des TV-Gerätes (mit dem CI-Slot) heben Sie auch
etwas an und ziehen gleichzeitig nach vorne.
Die Geräteseite mit dem CI Slot ist somit weiter von der Wand entfernt.
Neigen Sie das TV-Gerät, wie in Abb. 4 dargestellt unten etwas von
der Wand weg. Die Anschlußbereiche werden so leicht zugänglich.
Des weiteren kann die seitliche Abdeckung am TV-Gerät auch ganz
abgenommen werden.
Hierzu öffnen Sie die Abdeckung ein wenig und ziehen mit geringer
Kraft an der geöffneten Abdeckung an.
Die Abdeckung rastet aus der Halterung und der Steckerbereich ist
frei.
Zum Einsetzen der Abdeckung drücken Sie diese in die Rastungen
einfach wieder zurück.
Bei der Ausführung der beschriebenen Neigebewegungen
des TV-Gerätes am Wandhalter, könnte fälschlicherweise der
Eindruck entstehen, dass das TV-Gerät dabei von der Wand
fallen könnte. Dies ist unbegründet.
Das TV-Gerät kann nur vom Wandhalter abgenommen
werden, wenn Sie das TV-Gerät an beiden Seiten gleichzeitig
anheben und dabei nach rechts oben ziehen/ schieben oder
drücken.
Istruzioni di montaggio
Supporto a parete WM 64
Indicazioni di sicurezza
Il montaggio deve essere eseguito esclusivamente da
personale esperto.
Loewe declina qualsiasi responsabilità relativa a danni
provocati da errori di montaggio.
Installare il proprio apparecchio in modo tale che non possa
essere danneggiato, ad es. da bambini che giocano, e che non
possa quindi costituire un pericolo.
Posare i cavi in modo tale che non siano d’intralcio al
passaggio.
I supporti a parete (e l’adattatore coordinato) sono strutturati
unicamente per il montaggio su pareti verticali Possono essere
utilizzati esclusivamente per questo scopo.
Non intervenire o consentire a terzi di intervenire in prossimità
delle guide di sostegno dell‘apparecchio TV ssato alla parete.
Pericolo di schiacciamento.
Anche in questo caso valgono le norme di sicurezza relative ai
nostri apparecchi TV.
Nota importante
Prima di poter montare lo schermo sul WM 64 è necessario smontare
la soluzione di supporto presente (disegno 2, componenti A).
Montaggio
Spetta all’utilizzatore nale determinare la capacità portante
della supercie e ssare il supporto a parete.
Il materiale delle pareti e di conseguenza i tipi di ssaggio
possono variare notevolmente, nella fornitura non è stato
pertanto incluso alcun tipo di materiale di ssaggio.
Procurarsi il materiale di ssaggio adatto alla propria parete
presso un rivenditore specializzato.
Eventualmente richiedere la consulenza di un esperto in
materia.
Accertarsi che in prossimità dei fori non passino cavi / tubi.
Osservare le gure da 1 a 4.
Figura 1: Dotazione
Figura 2: Preparazione dell’apparecchio TV
Figura 3: Montaggio a parete
Figura 4: regolazione/possibilità di inclinazione rispetto alla parete
Le indicazioni nel disegno 3 per il ssaggio del supporto da parete
fanno riferimento ad una parete in muratura.
Fissare il supporto a parete come illustrato con i 4 punti di ssaggio
possibili.
Preparazione dell’apparecchio TV
Prima di maneggiare l’apparecchio TV, staccare il connettore di rete
dalla presa.
Predisporre un panno sofce o una coperta sulla supercie di
appoggio dell’apparecchio TV. In questo modo si protegge
l’apparecchio da eventuali danneggiamenti.
Sul lato anteriore dell’apparecchio TV, in basso al centro è predisposto l’occhio sensoriale sensibile. Poggiare l’apparecchio TV con il
lato frontale sulla supercie d’appoggio così predisposta, in modo
tale che l’occhio sensoriale e il piede (se montato), non appoggino
sulla supercie.
Allentare e togliere, se previsto, il piede dall’apparecchio TV.
Perni di sospensione
Avvitare i due perni di sospensione (con rondelle di contatto) forniti
nel pannello posteriore dell’apparecchio TV (disegno 2, componenti
B).
Avvitare i perni di sospensione con una chiave da circa 12 mm.
Coppia di circa 5 Nm.
(Avvitare i perni di sospensione con la chiave esercitando una forza
intermedia, la chiave non è compresa nella fornitura).
Perni distanziali
Avvitare a mano i due perni distanziali (con rondelle di contatto)
forniti nel pannello posteriore dell’apparecchio TV (disegno 2,
componenti C).
Svitando o avvitando questi perni distanziali si adatta la posizione di
appoggio dell’apparecchio TV sulla parete.
Collegamento del connettore all‘apparecchio TV
Fintanto che l’apparecchio TV non è montato sulla parete, la zona
di collegamento sul pannello posteriore rimane facilmente accessibile.
Avvicinare il più possibile i cavi al pannello posteriore.
Ulteriori informazioni in merito sono riportate nel manuale
d‘istruzioni dell‘apparecchio TV.
Come appendere e regolare l‘inclinazione
dell‘apparecchio TV
Secondo il tipo, l‘apparecchio TV può arrivare a pesare ca. 40 kg.
Per appendere l‘apparecchio TV farsi aiutare da un‘altra persona.
Per appenderlo, tenere l’apparecchio TV il più possibile in posizione
verticale (vedere schizzo 3).
Appendere l‘apparecchio TV con i ganci nei fori del supporto da
parete (schema 3, frecce e sezione).
L‘apparecchio TV può essere inclinato in due posizioni.
È possibile scegliere tra due gradi diversi di inclinazione
dell’apparecchio TV: 0° (apparecchio perpendicolare alla parete) e
2,5° (apparecchio leggermente inclinato in avanti).
Per modicare l’inclinazione, sollevare leggermente prima un lato
dell’apparecchio e spostare la parte superiore in avanti (o indietro).
L‘inclinazione è regolata da un inserimento a scatto che può essere
scelto a piacere.
Come facilitare l’accesso allo slot CI e ai collegamenti
A questo proposito prestare attenzione alla g. 4.
Sollevare leggermente un lato del televisore (quello sul quale non si
trova lo slot CI) spingendolo contemporaneamente all‘indietro.
Sollevare leggermente anche l‘altro lato del televisore (con lo slot CI)
tirandolo contemporaneamente in avanti.
In questo modo il lato del televisore con slot CI viene allontanato
dalla parete.
Inclinare l‘apparecchio TV come rappresentato in g. 4, distanziandolo leggermente dalla parete, rendendo in questo modo le zone di
contatto facilmente accessibili.
Ѐ possibile togliere anche la copertura laterale dell’apparecchio TV.
Per farlo, aprire leggermente la copertura e tirare senza esercitare
una forza eccessiva sul pannello.
La copertura si sgancia dal supporto e la zona di connessione risulta
libera.
Per applicare la copertura, spingerla in corrispondenza dei punti di
inserimento.
Inclinando l‘apparecchio TV in corrispondenza del supporto
da parete si potrebbe avere erroneamente l’impressione che
l’apparecchio possa cadere. Questa impressione è infondata.
A questo punto il televisore può essere staccato dal supporto
a parete solo sollevandolo contemporaneamente da entrambi
i lati e tirandolo/spostandolo o spingendolo verso l‘alto e a
destra.
240 - 35231000
1
03 - 2012
1
3
Prolongación línea borde
superior del televisor
10 mm x 60 mm
6,6 mm x 12mm x 1,6mm
6 mm x 60 mm
TV-Mitte
Center of the Tv set
Milieu de la télévision
Midden van het
TV-toestel
Mezzo del televisore
Medio de la TV
4
2
Bovenkant van
het tv-toestel
B
12
350 mm
120 mm
Top edge Tv set
Oberkante TV-Gerät
456 mm
13mm
A
X
91
131
B
T V
B x H
970 x 623
1103 x 698
WM 64, (Art. 52495)
H
TV
Xelos 40 SL
Xelos 46 SL
Printed in Germany 03.12 AP
Änderungen vorbehalten.
Con riserva di modiche.
Wijzigingen voorbehouden.
Subject to modications
Modications reservée.
Reservado el drecho a modicaciones.
Page 2
/
/ / /
Montage-instructies
Wandhouder WM 64
Veiligheidsvoorschriften
De montage mag uitsluitend worden uitgevoerd door
vaklieden.
Loewe kan niet aansprakelijk worden gesteld voor schade die
voortvloeit uit een ondeskundige montage.
Installeer uw toestel zo dat het bijv. niet kan worden
beschadigd door spelende kinderen en geen gevaar inhoudt
voor kinderen.
Leg de aansluitingskabels zo dat niemand er over kan
struikelen.
Wandhouders (en passende adapters) zijn uitsluitend bestemd
voor montage aan loodrechte wanden. Ze mogen alleen
daarvoor worden gebruikt.
U of een andere persoon mag niet in het bereik van de
klemlijsten van het tegen de wand te bevestigen tv-toestel
grijpen. Er bestaat daar gevaar voor kneuzingen.
Verder gelden hier ook de veiligheidsvoorschriften voor onze
tv-toestellen.
Belangrijke opmerking
Alvorens het beeldscherm op de WM 64 kan worden gemonteerd,
moet het aanwezige opstellingssysteem worden gedemonteerd.
(tekening 2, onderdelen A).
Montage
U draagt zelf de volledige verantwoordelijkheid voor het
draagvermogen van de wand en voor de bevestiging van de
wandhouder.
Op grond van de grote verscheidenheid in bouwmaterialen en
de daarbij behorende bevestigingsmethoden hebben wij geen
bevestigingsmateriaal bijgeleverd.
Koop het passende bevestigingsmateriaal voor uw wand in
een gespecialiseerde winkel.
Doe eventueel een beroep op een bouwexpert.
Vergewis u ervan dat er ter hoogte van de boringen geen
leidingen / buizen lopen.
Kijk naar de guren 1 tot 4.
Figuur 1 : Inhoud van de levering
Figuur 2 : Tv-toestel voorbereiden
Figuur 3 : montage aan de wand
Figuur 4 : verstelling/neigmogelijkheid aan de wand
De informatie in tekening 3 betreffende de bevestiging van de
wandhouder is bij wijze van voorbeeld gebaseerd op een gemetselde wand.
Bevestig de wandhouder zoals getoond op de 4 mogelijke bevestigingspunten.
Tv-toestel voorbereiden
Alvorens aan het tv-toestel te werken, moet de stekker uit het stopcontact worden getrokken.
Bedek het oppervlak waar u het tv-toestel op gaat leggen met een
vlies of een deken. Op die manier beschermt u het tv-toestel tegen
eventuele beschadigingen.
Op de voorkant van het tv-toestel, onderaan in het midden, bevindt
zich het gevoelige sensoroog. Leg het tv-toestel zo met de voorkant
op het voorbereide oppervlak, dat het sensoroog en de voet (indien
gemonteerd) van het tv-toestel het oppervlak net niet raken.
Maak de eventueel geïnstalleerde voet van het tv-toestel los en
verwijder hem.
Ophangbouten
Draai de twee bijgeleverde ophangbouten (met contactringen) in de
achterwand van het tv-toestel (tekening 2, onderdelen B).
Draai de ophangbouten vast met een steeksleutel van 12mm. Aanhaalmoment ca. 5 Nm.
(Draai de ophangbouten met gemiddelde kracht vast; sleutel niet
bijgeleverd).
Afstandsbouten
Draai de twee bijgeleverde afstandsbouten (met contactringen) met
de hand in de achterwand van het tv-toestel (tekening 2, onderdelen C).
Door het in- of uitdraaien van deze afstandsbouten kan de positie
van het tv-toestel tegen de wand worden geoptimaliseerd.
Aansluiten van de stekker op het tv-toestel
Zolang het tv-toestel nog niet tegen de wand gemonteerd is, is de
aansluitzone op de achterwand gemakkelijk bereikbaar.
De kabels sluit u voor zover mogelijk op de achterwand aan.
Meer informatie hierover vindt u in de handleiding bij het tv-toestel.
Ophangen en kantelen van het tv-toestel
Naargelang van de uitvoering weegt uw tv-toestel maximaal
ca.40kg.
Roep de hulp in van een tweede persoon om het tv-toestel op te
hangen.
Voor het inhangen houdt u het tv-toestel zo verticaal mogelijk (zie
tekening 3).
Hang het tv-toestel met de ophangbouten in de uitsparingen aan
de wandhouder (tekening 3, pijlen en detail).
Eenmaal opgehangen aan de wandhouder kan uw tv-toestel in
twee posities worden gekanteld.
U kunt de helling van het tv-toestel regelen op 0° (tv-toestel hangt
loodrecht tegen de wand), of op 2,5° (tv-toestel hangt lichtjes
voorover hellend tegen de wand).
Om de hellingshoek van het tv-toestel te veranderen, tilt u het eerst
langs één kant lichtjes op om het vervolgens bovenaan naar voren
(naar achteren) te drukken.
U kunt de hellingshoek van het scherm geheel naar wens kiezen.
Bereikbaarheid van CI-slot en
aansluitingen vergemakkelijken
Let hiertoe op afb. 4.
Hef de ene zijde van het TV-toestel (waar de CI-slot zich niet bevindt)
een beetje omhoog en druk deze tegelijkertijd naar achteren.
De andere zijde van het TV-toestel (met het CI-slot) heft u ook een
beetje omhoog en trekt u tegelijkertijd naar voren.
De toestelzijde met het CI-slot is bijgevolg verder van de wand verwijderd.
Kantel het tv-toestel, zoals getoond in afb. 4, onderaan een beetje
van de muur weg. Op die manier worden de aansluitzones gemakkelijk bereikbaar.
Verder kan de zijafdekking van het tv-toestel ook helemaal worden
verwijderd. Daarvoor opent u de afdekking een beetje en trekt u er
met geringe kracht aan.
Daardoor zal de afdekking losklikken waardoor de stekkerzone
vrijkomt.
Om de afdekking weer aan te brengen, drukt u ze opnieuw in haar
bevestigingen.
Bij het uitvoeren van de beschreven kantelbewegingen van
het tv-toestel op de wandhouder kunt u de indruk krijgen dat
het tv-toestel daarbij van de muur zou kunnen vallen. Dat is
echter een verkeerde indruk.
Het TV-toestel kan alleen van de wandhouder afgenomen
worden als u het TV-toestel aan beide zijden tegelijkertijd
omhoogheft en daarbij naar rechts boven trekt/schuift of
drukt.
Installation instructions
Wall holder WM 64
Safety instructions
Installation should only be carried out by specialised
personnel.
Loewe will accept no liability for damage caused by incorrect
installation.
Install your equipment in such a way that it cannot be
damaged by or pose a danger to children at play.
Lay the connecting cables so that no-one can trip over them.
Wall holders (and suitable adapters) are only designed for
installation on vertical walls. They may only be used for this
purpose.
Never reach or allow anyone else to reach into the area of the
holding rails of the TV set mounted on the wall. There is a
danger of crushing.
The safety instructions for our TV sets also apply here.
Important note
Before the screen can be mounted on the WM 64, the existing installation solution must be removed (sketch 2, part A).
Installation
You are responsible for the wall‘s load bearing capacity and
the fastening of the wall holder.
Because of the different wall materials and different types of
fastenings we have not included any fastening material.
Buy suitable fastening material for your wall from a dealer.
Consult a building expert if necessary.
Make sure that there are no cables / pipes near to where you
drill the holes.
See sketches 1 to 4.
Sketch 1 : Scope of delivery
Sketch 2 : Preparing the TV set
Sketch 3 : Installation on the wall
Sketch 4 : Adjustment/tilt facility on the wall
The data in sketch 3, for mounting the wall holder
is based on a masonry wall as an example.
Fasten the wall holder with the 4 possible mounting positions, as
shown.
Preparing the TV set
Pull the mains plug out of the wall socket before working on the
TV set.
Place a piece of felt or a soft blanket on the surface on which
you want to place the TV set. This protects the TV set from being
damaged.
The sensitive sensor eye is located in the centre of the bottom
of the TV set front. Place the TV set face down on the prepared
surface in such a way that the sensor eye and the foot of the TV
set (if tted) is protruding just over the edge.
Loosen and remove the foot from the TV set, if tted.
Hanging bolts
Screw the two hanging bolts (with the contact washers) supplied
into the rear panel of the TV set (sketch 2, part B).
Tighten the hanging bolts using an open-end spanner with a
width across ats of 12 mm. Torque approx. 5 Nm.
(Tighten the hanging bolts with a medium force using the spanner; spanner not included in scope of supply).
Spacing bolts
Screw the two spacing bolts (with the contact washers) supplied
into the rear panel of the TV set by hand (sketch 2, part C).
The support for the TV set on the wall can be optimised by screwing these spacing bolts in or out.
Connect the plug to the TV set
The connection area on the rear panel is easily accessible as long
as the TV set is not mounted on the wall.
Connect the cables to the rear panel, insofar as possible.
You will nd further information in the TV set’s user guide.
Hanging in and tilting the TV set
Depending on the type of set, your TV may weigh up to approx.
40kg.
Get a second person to help you to hang in the TV set.
Hold the TV set as vertically as possible for hanging it in (see
sketch 3).
Hang the TV set into the recesses on the wall holder using the
hanging bolts (sketch 3, arrows and partial cut-out).
Your TV set can be tilted at two positions on the wall holder.
You can choose the tilt of the TV set with 0° (TV set hangs vertically on the wall), 2.5° (TV set hangs tilted slightly forward).
To change the tilt of the TV set, rst lift slightly on one side and
push forward (back) at the top.
You can choose the locking and thus the angle as you wish.
Improving access for CI slot and connections
Please refer to Fig. 4.
Lift one side of the TV set (where the CI slot is not located) slightly
and simultaneously push this to the rear.
Also lift the other side of the TV set (with the CI slot) slightly and
simultaneously pull to the front.
The side of the set with the CI slot is now further away from the
wall.
Tilt the TV set somewhat away from the wall, as shown in g. 4.
This makes the connection areas easily accessible.
Furthermore, the side cover of the TV set can also be completely
removed. To do this, open the cover slightly and pull the opened
cover gently.
The cover detaches from the holder and the plug area is free.
To replace the cover, push it until it latches back into place.
When tilting the TV set away from the wall holder as
described, you could get the impression that the TV set could
fall off the wall. However, this is not the case.
The TV set can only be removed from the wall bracket if the
TV set is lifted at both sides at the same time and pulling/
sliding or pushing to the top right.
240 - 35231 000
Instructions de montage
Support mural WM 64
Instructions de sécurité
Le montage doit être effectué uniquement par un personnel
spécialisé.
Loewe décline toute responsabilité pour les dommages
consécutifs à un montage qui n’aurait pas été effectué de
manière professionnelle.
Montez votre appareil de manière à ce qu’il ne puisse pas être
endommagé, par exemple par des enfants en train de jouer, et
qu’il ne représente également aucun danger pour ces derniers.
Posez vos câbles de raccordement de manière à ce qu’ils ne
représentent pas de risques de faire trébucher.
Les supports muraux (et adaptateur approprié) sont conçus
pour le montage sur murs verticaux. Ils ne doivent être utilisés
que pour ceci.
Ne touchez pas, ainsi que d’autres personnes, à la zone des
rails de xation de l’écran du téléviseur monté sur le mur. Vous
risquez de vous coincer les doigts.
Par ailleurs, les instructions de sécurité relatives à nos
téléviseurs sont également valables ici.
Indication importante
Avant d‘installer l‘écran sur le WM 64, la solution d’installation existante doit être démontée (illustration 2, pièces A).
Montage
Vous êtes responsable de la force portante du mur et de la
xation du support mural.
Nous n’avons joint aucun matériel de xation en raison de la
multitude de matériaux de construction utilisés pour les murs
et ainsi, des différents types de xation correspondants.
Veuillez vous procurer le matériel de xation approprié à votre
mur dans un magasin spécialisé.
Demandez éventuellement conseil à un expert en construction.
Assurez-vous qu’aucune conduite et aucun tuyau ne se
trouvent dans la zone de perçage.
Observez les schémas 1 à 4.
Schéma 1 : Contenu de la livraison
Schéma 2 : Préparation du téléviseur
Schéma 3 : Montage au mur
Schéma 4 : réglage/possibilité de l‘incliner par rapport à la paroi
Les indications dans l’illustration 3, pour xer le support mural
s’appuient, à titre d’exemple, sur une paroi murée.
Vous xez le support mural, comme cela est représenté, aux quatre
points de xation possibles.
03 - 2012
Préparation du téléviseur
Avant d’intervenir sur le téléviseur, vous devez débrancher la che
réseau de la prise de courant.
Posez un tissu ou une couverture molle sur la surface de pose de
votre téléviseur. Ainsi, vous protégez votre téléviseur d’éventuels
dommages.
La sonde sensible se trouve au centre de la partie inférieure de la
face avant du téléviseur. Posez la face avant du téléviseur sur la
surface de pose préparée de manière à ce que la sonde et le pied (si
monté) ne touchent pas encore la surface de pose.
Dévissez et enlevez, le cas échéant, le pied du téléviseur.
Boulon d’accrochage
Vissez les deux boulons d’accrochage fournis (au moyen de
rondelles de contact) avec l’ensemble dans la paroi arrière du téléviseur (illustration 2, pièces B).
Serrez à fond les boulons d’accrochage avec une clé plate de
largeur de clé 12mm. Couple de serrage de 5 Nm environ.
(Serrez à fond, avec une force moyenne, les boulons d’accrochage
avec la clé à molette, la clé à molette n’est pas contenue dans
l’ensemble livré).
Entretoises
Vissez les deux entretoises fournies (au moyen de
rondelles de contact) avec l’ensemble dans la paroi arrière du téléviseur (illustration 2, pièces C).
On peut optimiser le support du téléviseur sur le mur en vissant ou
en dévissant des entretoises.
Raccorder la che au téléviseur
Tant que le téléviseur n’est pas encore monté sur le mur, la zone de
raccordement sur la paroi arrière est légèrement accessible.
Les câbles sont, dans la mesure du possible, raccordés à la paroi
arrière.
Pour de plus amples informations, consultez la notice d’utilisation
du téléviseur.
Suspension et inclinaison du téléviseur
Selon le type d’appareil, votre téléviseur pèse jusqu’à environ 40 kg.
Pour le suspendre, demander l’aide d’une personne supplémentaire.
Tenez le téléviseur le plus droit possible pour l’accrocher (voir
l’illustration 3).
Accrochez le téléviseur avec les boulons d’accrochage dans les
réservations sur le support mural (illustration 3, èches et découpe).
Votre téléviseur, lorsqu’il se trouve sur le support mural, peut être
incliné dans deux positions.
Vous pouvez choisir l’inclinaison du téléviseur : 0° (le téléviseur est
accroché perpendiculairement au mur), 2,5° (le téléviseur penche
légèrement vers l’avant par rapport au mur).
Pour modier l’inclinaison du téléviseur, soulevez-le d’abord légèrement sur un côté et appuyez sur le haut de l’appareil vers l’avant
(vers l’arrière).
L’enclenchement, et donc l’inclinaison, peuvent être choisis selon
vos désirs.
Faciliter l‘accès de la che CI et des raccordements
Faites attention à l‘image 4.
Soulevez légèrement le côté du téléviseur (sans le slot CI) et poussez-
le vers l‘arrière.
Soulevez légèrement l‘autre côté du téléviseur (avec le slot CI) et
tirez-le vers l‘avant.
Le côté du téléviseur avec le slot CI est ainsi éloigné de la paroi.
Inclinez légèrement la partie inférieure du téléviseur comme indiqué
sur l‘ill. 4 pour la détacher du mur. La zone des raccordements est
ainsi plus facilement accessible.
Par ailleurs, le couvercle latéral du téléviseur peut être aussi entièrement retiré. Ouvrez pour cela légèrement le couvercle et tirez sans
forcer sur le couvercle ouvert.
Celui-ci se décroche du support pour libérer la zone des prises.
Pour remettre le couvercle en place, rappuyez celui-ci dans les encoches.
La description de l’exécution des mouvements d‘inclinaison
du téléviseur sur le support mural pourrait donner la fausse
impression que le téléviseur puisse tomber du mur. Ceci n‘est
cependant aucunement fondé.
Le téléviseur peut être détaché du support pour paroi
seulement en le soulevant en même temps des deux côtés
et en le tirant/faisant glisser ou en le poussant vers le haut à
droite.
Instrucciones de montaje
Soporte de pared WM 64
Advertencias de seguridad
El montaje debe ser realizado únicamente por personal
especializado.
Loewe no se hará responsable de daños derivados de un
montaje no realizado por profesionales.
Monte el aparato de manera que no pueda sufrir daños, p.
ej., por niños que estén jugando cerca, y que no represente
ningún peligro para ellos.
Coloque los cables de conexión de manera que no representen
un peligro de tropiezo.
Los soportes de pared (y el adaptador adecuado) han sido
diseñados exclusivamente para su montaje en paredes
verticales. Sólo deben usarse con esta nalidad.
No toque el área de las guías soporte del televisor montado
en la pared, ya que podría pillarse los dedos.
Por lo demás, las advertencias de seguridad de nuestros
televisores también tienen validez en este caso.
Nota importante
Antes de que pueda montarse la pantalla en el WM 64, deberá desmontarse el elemento de colocación existente (g. 2, piezas A).
Montaje
Usted es responsable de determinar la capacidad de carga de
la pared y la jación del soporte de pared.
Debido a la variedad de materiales de construcción de las
paredes y, por lo tanto, a los diferentes tipos de jación, no
hemos adjuntado ningún material de jación.
Debe adquirir el material de jación adecuado para su pared
en un comercio especializado.
En caso necesario, consulte a un experto en construcción.
Asegúrese de que no hay ningún cable o tubo en la zona de
los oricios.
Observe las ilustraciones de la 1 a la 4.
Ilustración 1: Volumen de suministro
Ilustración 2: Preparación del televisor
Ilustración 3: Montaje en la pared
Ilustración 4: Regulación/ posibilidad de inclinación en la pared
Las indicaciones de la ilustración 3 para la jación del soporte de
pared se basan en el ejemplo de una pared de mampostería.
Para la jación del soporte de pared están disponibles 4 posibles
puntos de jación, como se muestra en la ilustración.
Preparación del televisor
Antes de trabajar en el televisor, desenchufe el cable de red.
Utilice un eltro o una manta mullida como base para colocar el
televisor. Así protegerá el televisor de posibles daños.
En el medio de la parte inferior delantera del televisor se encuentra
el sensible ojo sensor. Coloque el televisor en la supercie preparada para este n apoyándolo sobre la cara frontal, de modo que ni
el ojo sensor ni el pie (si está colocado) queden apoyados en dicha
base.
Suelte y retire el pie del televisor, si existe.
Pernos de suspensión
Enrosque los dos pernos de suspensión (con las arandelas de
contacto) que se adjuntan en el panel posterior del televisor (g. 2,
piezas B).
Apriete estos pernos con una llave de boca de 12 mm de ancho.
Par de 5 Nm aprox.
(Aplique una fuerza media al apretar los pernos de suspensión con
la llave de ajuste. Esta llave no se incluye en el volumen de suministro.)
Pernos espaciadores
Enrosque con la mano los dos pernos espaciadores (con las arandelas de contacto) que se adjuntan en el panel posterior del televisor
(g. 2, piezas C).
Enroscando y desenroscando estos pernos se puede ajustar el televisor en la pared hasta conseguir un apoyo perfecto.
Conectar el enchufe del televisor
Mientras el televisor no se haya montado en la pared, puede acce-
derse fácilmente a las conexiones del panel posterior.
Conecte el cable al panel posterior mientras sea posible.
Encontrará más información en el manual de instrucciones del
televisor.
Colgar e inclinar el televisor
Dependiendo del modelo, el televisor puede pesar hasta aprox.
25kg.
Para colgar el televisor, pida ayuda a una segunda persona.
Para colgar el televisor, sujete el aparato, a ser posible, en posición
vertical (véase la ilustración 3)
Cuelgue los pernos de suspensión del televisor en las cavidades del
soporte de la pared (véase la ilustración 3, echa y detalle de las
partes)
El televisor puede inclinarse en el soporte de pared en dos posiciones.
Puede elegir la inclinación del televisor: 0° (el televisor está colgado
de la pared en posición vertical), 2,5° (el televisor está colgado en la
pared inclinado ligeramente hacia adelante).
Para modicar la inclinación del televisor deberá, primero de un
lado, levantarlo ligeramente y empujar por la parte de arriba hacia
adelante o hacia atrás.
Puede elegir la posición y, por tanto, la inclinación que desee.
Fácil acceso a la ranura CI y a las conexiones
Obsérvese a este respecto la gura 4.
Eleve ligeramente uno de los lados del televisor (donde no se encu-
entra la ranura CI) y, simultáneamente, presiónelo hacia atrás.
Eleve ligeramente también el otro lado del televisor (con la ranura CI)
y, simultáneamente, tire de él hacia delante.
Ahora, el lado del aparato con la ranura CI estará más alejado de la
pared.
Incline el televisor retirándolo un poco de la pared por debajo, como
se muestra en la g. 4. Así será fácil acceder a la zona de conexiones.
Además, la cubierta lateral del televisor también podrá retirarse
por completo. Abra la cubierta ligeramente y tire de ella sin ejercer
mucha fuerza.
La cubierta se soltará del soporte y la zona de conexiones quedará
descubierta.
Para colocar la cubierta, vuelva a encajarla en las posiciones correspondientes y presione.
La ilustración de la descripción de los movimientos de
inclinación del televisor en el soporte de pared puede dar la
falsa impresión de que el televisor podría caerse de la pared.
Únicamente puede retirarse el televisor del soporte de pared
si levanta dicho televisor simultáneamente por ambos lados y
tira de él o lo empuja o presiona hacia arriba a la derecha.
 Loading...