

Page 1
Table Stand I 40/46
Table Stand I 55
Zubehör TV, Accessori TV, Toebehoren TV,
Accessories TV, Accessoires TV, Accesorios TV
240–34485 000
Montageanleitung, Istruzioni sul montaggio, Montage-instructis,
Installation Instructions, Instructions d´intallation, Instrucciones de montaje
Page 2
Table Stand I 40/46
Art. Nr. 69476xxx
Table Stand I 55
Art. Nr. 69464xxx
Printed in Germany KB 03.10
Änderungen vorbehalten.
Con riserva di modifi che.
Wijzigingen voorbehouden.
Subject to modifi cations.
Modifi cations reservée.
Reservado el drecho
a modifi caciones.
2
Deutschland
Loewe Opta GmbH
Customer Care Center
Industriestraße 11
D-96305 Kronach
D-96317 Kronach
Telefon 01801/22256393
Telefax (09261) 99500
Page 3
Table Stand I 40/46, Table Stand I 55
Liebe Kundin,
lieber Kunde,
wir gratulieren Ihnen zum Kauf
dieses hochwertigen Produktes.
Loewe steht seit vielen Jahren für
innovatives Design, für hervorragende Qualität und Funktionalität.
Damit Ihrem Produkt diese Eigenschaften lange erhalten bleiben,
beachten Sie bitte die Montageund Sicherheitshinweise dieser
Anleitung.
Ihr Table Stand I 40/46
Art. Nr. 69476xxx
ist verwendbar für die TV-Geräte:
Individual 40 LED
Individual 46 LED
Ihr Table Stand I 55
Art. Nr. 69464xxx
ist verwendbar für das TV-Geräte:
Individual 55 LED
In der Montageanleitung wird, für
den Table Stand I 40/46 und
I 55, der Begriff Table Stand verwendet.
Gentile Cliente,
Congratulazioni per l’acquisto di
questo pro-dotto di qualità Loewe.
Da molti anni Loewe è sinonimo di
design innovativo, qualità eccellente e funzionalità.
Affi nché anche il Suo prodotto
conservi a lungo queste caratteristiche, La preghiamo di leggere
attentamente le indicazioni d’uso e
di sicurezza del presente manuale.
Il Table Stand 40/46
Cod. art. 69476xxx
è utilizzabile per gli apparecchi TV:
Individual 40 LED
Individual 46 LED
Il Table Stand I 55
Cod. art. 69464xxx
è utilizzabile per gli apparecchi TV:
Individual 55 LED
Nelle istruzioni di montaggio, per i
Table Stand I 40/46 e
I 55, verrà adoperato il termine
Table Stand.
Beste klant,
Wij feliciteren u met de aankoop
van dit kwaliteitsproduct. De naam
Loewe staat al vele jaren lang
garant voor innovatief design en
uitstekende kwaliteit en functionaliteit.
Om ervoor te zorgen dat uw product deze eigenschappen gedurende lange tijd blijft behouden, dient
u de bedienings- en veilig-heidsinstructies in deze handleiding in
acht te nemen.
Uw Table Stand I 40/46
Artikelnr. 69476xxx
kan worden gebruikt voor de tvtoestellen: Individual 40 LED
Individual 46 LED
Uw Table Stand I 55
Artikelnr. 69464xxx
kan worden gebruikt voor het tvtoestel: Individual 55 LED
In de montagehandleiding wordt
de Table Stand I 40/46 en I 55 aangeduid met “Table Stand”.
3
Page 4
Table Stand I 40/46, Table Stand I 55
Dear
customer,
Congratulations on your purchase
of this high quality product. For
many years Loewe has stood for
innovative design, excellent quality
and functionality.
Please follow the installation and
safety instructions in this manual
to ensure that your product retains
these properties for many years to
come.
Your Table Stand I 40/46
Art. No. 69476xxx
can be used for the following TV
sets: Individual 40 LED
Individual 46 LED
Chère cliente,
cher client,
nous vous félicitons de l’achat de
ce produit de haute qualité. Depuis
de nombreuses années, Loewe
représente un design innovateur,
une excellente qualité et la fonctionnalité.
Afi n que votre appareil conserve
ces qualités pendant longtemps,
veuillez respecter les instructions
de commande et de sécurité de
cette notice.
Votre Table Stand I 40/46
N° art. 69476xxx
est utilisable pour les téléviseurs :
Individual 40 LED
Individual 46 LED
Estimada cliente,
estimado cliente:
Le felicitamos por la compra de este
producto de alta calidad. En Loewe
apostamos, desde hace muchos
años, por un diseño innovador y una
excelente calidad y funcionalidad.
Si desea que su producto conserve
todas estas características durante
mucho tiempo, le rogamos respete
siempre las advertencias de este
manual relativas a su seguridad y
montaje.
Su Table Stand I 40/46
Nº. de ref. 69476xxx
puede utilizarse con los siguientes
televisores: Individual 40 LED
Individual 46 LED
Your Table Stand I 55
Art. No. 69464xxx
can be used for the following TV
sets: Individual 55 LED
The term „Table Stand“ will be
used for the Table Stand I 40/46
and I 55 in the installation instructions.
4
Votre Table Stand I 55
N° art. 69464xxx
est utilisable pour les téléviseurs :
Individual 55 LED
Dans les instructions de montage,
pour le Table Stand I 40/46 et
I 55, on utilise le concept de Table
Stand.
Su Table Stand I 55
Nº. de ref. 69464xxx
puede utilizarse con los siguientes
televisores: Individual 55 LED
En estas instrucciones de montaje
se empleará el término Table Stand
para hacer referencia al Table Stand I
40/46 e I 55.
Page 5
Table Stand I 40/46, Table Stand I 55
Inhalt
Sicherheitshinweise 6
Lieferumfang 8
TV-Gerät Anschlusskabel 10
TV-Gerät befestigen 12
TV-Gerät auf dem Table Stand 14
Reinigung und Pfl ege 16
Verkabelung mit Gewebeschlauch 18
Contents
Safety instructions 6
Scope of delivery 9
TV set connecting cables 11
Fastening the TV set 13
TV set on the Table Stand 15
Cleaning and care 17
Cabling with braided hose 19
Indice
Indicazioni di sicurezza 6
Dotazione 8
Cavo di collegamento
dell‘apparecchio TV 10
Fissaggio dell’apparecchio TV 12
Fissaggio dell‘apparecchio TV
sul Table Stand 14
Pulizia e cura 16
Cablaggio con tubo di tessuto 18
Contenu
Instructions de sécurité 6
Contenu de la livraison 9
Câble de raccordement au téléviseur 11
Fixation du téléviseur 13
Téléviseur sur le Table Stand 15
Nettoyage et entretien 17
Câblage avec gaine en tissu 19
Inhoud
Veiligheidsvoorschriften 6
Inhoud van de levering 9
Tv-toestel aansluitkabel 11
Tv-toestel bevestigen 13
Tv-toestel op de Table Stand 15
Reiniging en onderhoud 17
Bekabeling met textielslang 19
Índice
Advertencias de seguridad 6
Volumen de suministro 9
Cable de conexión del televisor 11
Fijación del televisor 13
El televisor sobre el Table Stand 15
Limpieza y mantenimiento 17
Cableado con un tubo de tela 19
5
Page 6
Table Stand I 40/46, Table Stand I 55
Sicherheitshinweise
Beachten Sie die Informationen der
Anleitung.
Lassen Sie im Umgang mit Werkzeug die nötige Vorsicht walten.
Die Aufstellfl äche für Ihren Table
Stand muss eben und waagerecht
sein.
Stellen Sie Ihre Gerätekombination
so auf, dass sie, z. B. von spielenden Kindern, nicht umgeworfen
werden kann und für diese keine
Gefahr darstellt.
Des weiteren haben die Sicherheitshinweise für unsere TV-Geräte
auch hier Gültigkeit.
Norme di sicurezza
Osservare le informazioni riportate
nelle istruzioni.
Utilizzare gli attrezzi con la dovuta
cautela.
La superfi cie di installazione dello
Screen Table deve essere piana e
orizzontale.
Installare la combinazione di
apparecchi in modo tale che non
possa essere rovesciata, ad es. da
bambini che giocano costituendo
un pericolo..
Inoltre, anche in questo caso si
applicano le norme di sicurezza
relative ai nostri apparecchi TV.
Veiligheidsvoorschriften
Neem de aanwijzingen in de handleiding in acht.
Wees voorzichtig bij het werken
met gereedschap.
Uw Table Stand moet op een effen
en perfect horizontaal oppervlak
worden geplaatst.
Installeer uw toestelcombinatie
zo dat ze niet omver kan worden
gestoten door en geen gevaar
inhoudt voor spelende kinderen.
Verder gelden hier ook de veiligheidsvoorschriften voor onze
tv-toestellen.
6
Page 7
Table Stand I 40/46, Table Stand I 55
Safety Instructions
Observe the information in the
instructions.
You should always take care when
using tools.
The surface for installing the Table
Stand must be level and horizontal.
Install the equipment combination
so that it cannot be knocked over
by children at play for example and
presents no danger to them.
In addition, the safety instructions
for our TVs also apply here.
Instructions de sécurité
Veuillez observer les informations
du mode d’emploi.
Soyez prudent lors de l’utilisation
d’outils.
La surface sur laquelle est posé
votre Table Stand doit être plane et
horizontale.
Placez votre ensemble téléviseur et
pied de telle sorte qu’il ne puisse
être renversé par vos enfants lorsqu’ils jouent, et ne représente ainsi
aucun danger pour eux.
En outre, toutes les autres consignes de sécurité de nos téléviseurs
conservent toute leur validité.
Advertencias de seguridad
Respete las instrucciones del manual.
Manipule las herramientas con las
precauciones necesarias.
La superfi cie de colocación del
Table Stand debe ser plana y estar
nivelada horizontalmente.
Instale la combinación de aparatos
de manera que no pueda ser volcado, p. ej., por niños que estén
jugando cerca, y no represente
ningún peligro para ellos.
Por lo demás, las advertencias de
seguridad de nuestros televisores
también tienen aquí validez.
7
Page 8
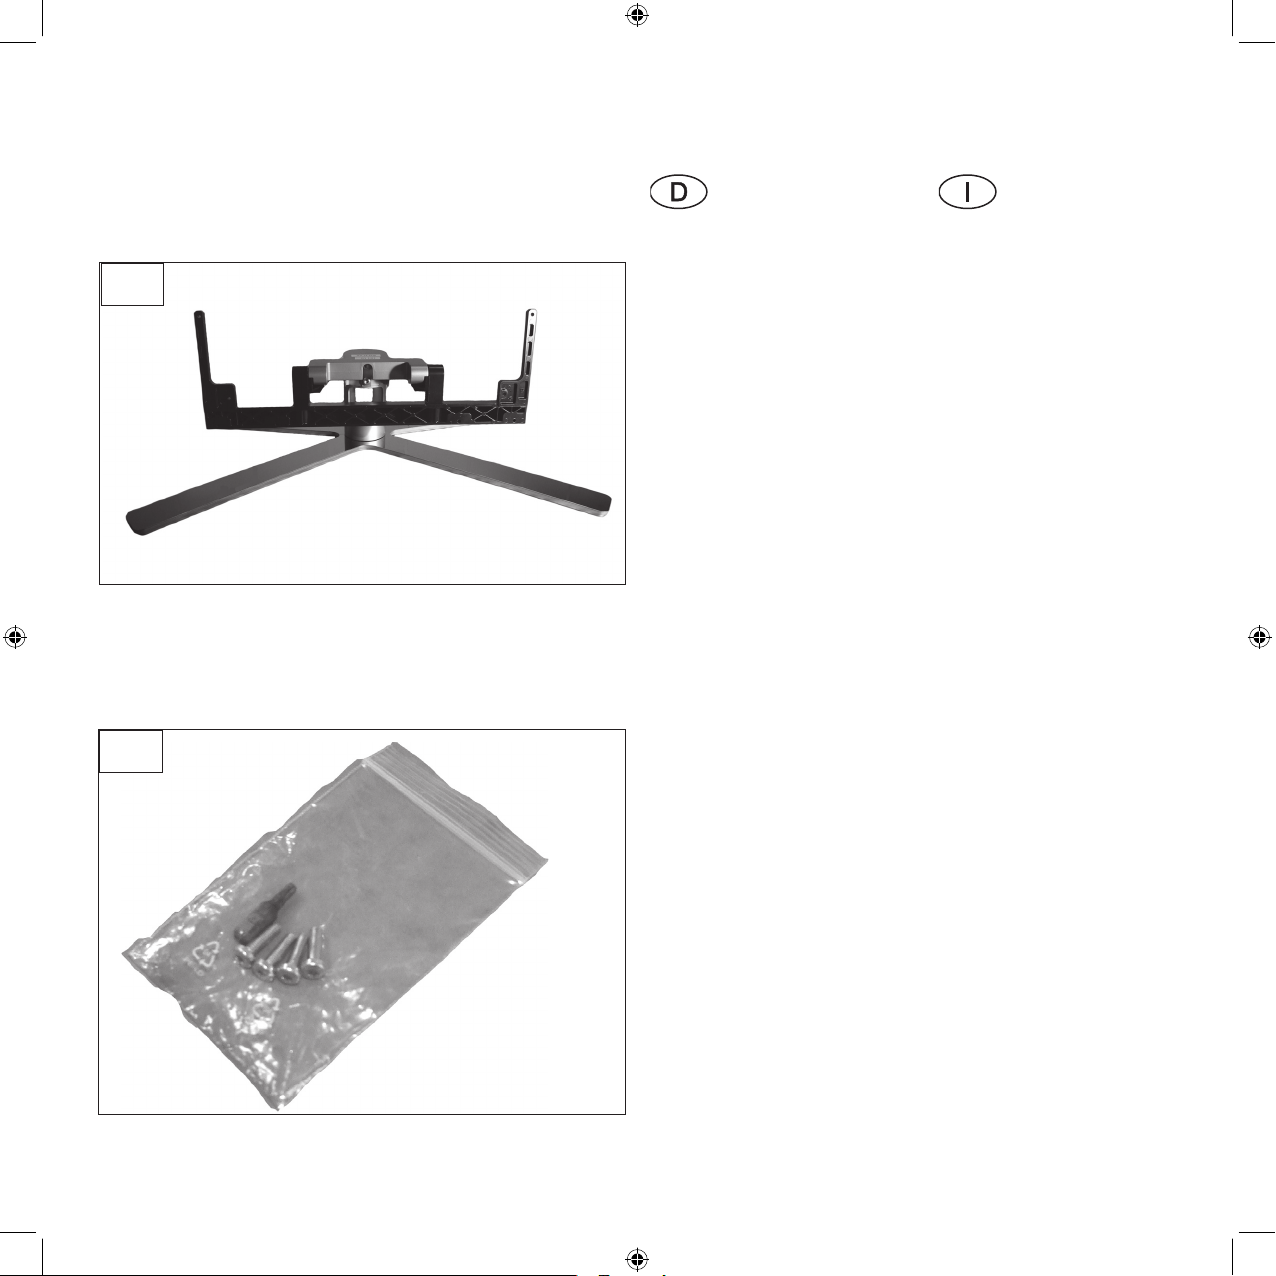
Table Stand I 40/46, Table Stand I 55
a
b
Lieferumfang
„a“
Table Stand
„b“
Beipack,
bestehend aus:
Schraubereinsatz, T20
4 Schrauben
Dotazione
„a“
Table Stand
„b“
Confezione
composta da:
Set di viti, T20
4 viti
Montageanleitung, 1 Stück
(nicht im Bild)
8
Istruzioni di montaggio, 1
pz. (non in fi gura)
Page 9
Table Stand I 40/46, Table Stand I 55
Inhoud van de levering
„a“
Table Stand
„b“
Nevenverpakking,
bestaande uit:
Hoekschroevendraaier, T20
4 schroeven
Scope of delivery
”a”
Table Stand
”b”
Accessories kit,
consisting of
Screwdriver bit, T20
4 screws
Eléments fournis à la
livraison
« a »
Table Stand
« b »
Complément
Celui-ci comporte :
Embout de tournevis, T20
4 vis
Volumen de suministro
„a“
Table Stand
„b“
Paquete adjunto
Contenido:
Broca T20
4 tornillos
Montagehandleiding, 1
stuk (niet afgebeeld)
Installation instructions,
1piece (not illustrated)
Notice de montage, 1 pièce
(non représentée)
Instrucciones de montaje,
1 unidad (no aparece en la
ilustración)
9
Page 10
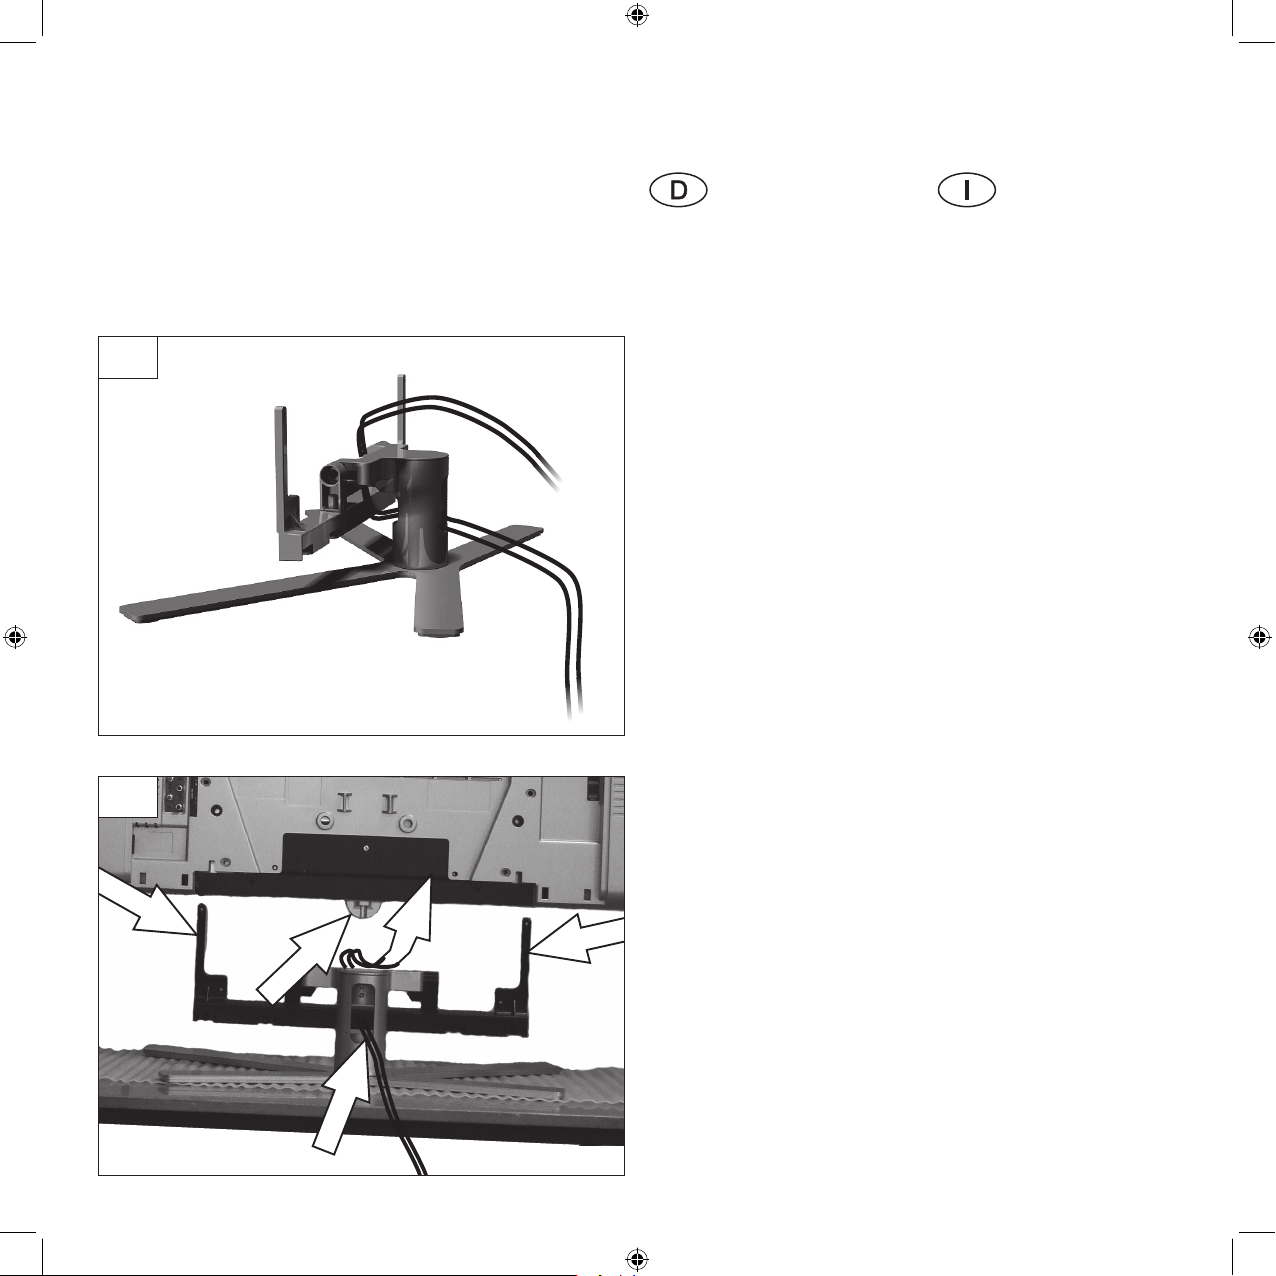
Table Stand I 40/46, Table Stand I 55
10
1
2
2
A
K
K
1
TV-Gerät
Anschlusskabel
Verwenden Sie zur Montage einen Tisch mit einer Decke oder
das Vlies vom Verpackungsmaterial.
Stellen Sie auf den Tisch den
Table Stand, wie in Abb. 1
dargestellt. Die Anschlusskabel
zum TV-Gerät führen Sie durch
den Table Stand, wie hier im
Beispiel mit Kabel dargestellt,
Abb. 1 und 2, Pfeile K.
Sie haben auch die Möglichkeit
die Anschlusskabel in einem
Gewebeschlauch zu verlegen,
das sieht eleganter aus.
Eine Abbildung hierzu fi nden
Sie auf der Seite 18, Abb. 7
und 8.
Ihr TV-Gerät wiegt, je nach
Größe bis ca. 40 kg.
Mit Hilfe einer weiteren Person
heben Sie das TV-Gerät über
den Table Stand (Abb. 2).
Achten Sie darauf, dass das TVGerät an den entsprechenden
Stellen über die Arme (Abb. 2,
Pfeile 1 und 2) des Universalträgers vom Table Stand geschoben werden kann.
Die Arme müssen in die Geräteunterseite eintauchen.
Achten Sie auf das Bedienauge
(Abb. 2, Pfeil A), dieses darf
nicht beschädigt werden.
Apparecchio TV
Cavo di collega-
mento
Come base per il montaggio
utilizzare un tavolo rivestito con
una coperta o un telo tolto dal
materiale di imballaggio.
Appoggiare sul tavolo il Table
Stand come raffi gurato nella
fi g. 1. Fissare i cavi di collegamento all’apparecchio TV passando attraverso il Table Stand,
come qui rappresentato con un
solo cavo, fi g. 1e 2, frecce K.
È possibile far passare i cavi in
un tubo di tessuto.
Questo accorgimento consente
di ottenere un effetto di maggiore eleganza.
Questa soluzione è raffi gurata
a pagina 18, fi g. 7 e 8.
A seconda del modello,
l’apparecchio TV può arrivare a
pesare circa 40 kg.
Con l’aiuto di una seconda persona, posizionare l’apparecchio
TV sul Table Stand (fi g. 2).
Accertarsi che l’apparecchio TV
venga fatto scorrere nel posto
giusto attraverso i bracci (fi g.
2, frecce 1 e 2) del supporto
universale del Table Stand.
I bracci devono risultare
affondati nella parte inferiore
dell’apparecchio.
Fare attenzione a non danneggiare il pannello frontale (fi g. 2,
freccia A).
Page 11
Table Stand I 40/46, Table Stand I 55
TV-toestel
Aansluitkabel
Gebruik voor de montage een
tafel met daarop een deken of
het vlies dat deel uitmaakt van
het verpakkingsmateriaal.
Plaats de Table Stand op de
tafel, zoals getoond in afb.
1. De aansluitkabels naar het
tv-toestel leidt u door de Table
Stand, zoals hier in het voorbeeld met één kabel wordt geïllustreerd, afb. 1 en 2, pijlen K.
U hebt ook de mogelijkheid de
aansluitkabels door een textielslang te leiden, wat eleganter
oogt.
Een afbeelding daarvan vindt u
op pagina 18, afb. 7 en 8.
Uw tv-toestel weegt ongeveer
40 kg, afhankelijk van het type.
Met de hulp van een tweede
persoon tilt u het tv-toestel tot
boven de Table Stand (afb. 2).
Let erop dat het tv-toestel op
de betreffende plaats over de
armen (afb. 2, pijlen 1 en 2)
van de universele drager van
de Table Stand kan worden
geschoven.
De armen moeten in de onderkant van het toestel verdwijnen.
Let op het bedieningsoog (afb.
2, pijl A), dat mag niet beschadigd worden.
TV set
connecting cables
Use a table with a blanket or
the felt from the packaging
material for assembly.
Place the Table Stand on the
table, as shown in Fig. 1. Route
the connecting cables to the
TV set through the Table Stand,
as shown here in the example
with a cable, Figs. 1 and 2,
arrow K.
You can also lay the connecting
cables in a braided hose.
This looks more elegant.
You can see this illustrated on
page 18, Figs. 7 and 8.
Your TV set can weigh up to 40
kg, depending on the size.
Get help from another person
to lift the TV set onto the Table
Stand (Fig. 2).
Make sure the TV set can be
pushed at the corresponding
location over the arms (Fig. 2,
arrows 1 and 2) of the universal base of the Table Stand.
The arms must dip into the
bottom of the set.
Pay attention to the operating
eye (Fig. 2, arrow A), as this
must not be damaged.
Câble de raccordement au téléviseur
Veuillez utiliser pour le montage une table recouverte d’une
couverture ou d’un morceau de
matériel d’emballage non-tissé.
Posez le Table Stand sur la table, comme représenté sur l‘ill.
1. Faites passer les câbles de
raccordement du téléviseur à
travers le Table Stand, comme
représenté avec un câble dans
l’exemple, ill. 1 et 2, fl èche K.
Vous pouvez également faire
passer les câbles de raccordement dans une gaine en tissu.
Ceci est plus esthétique.
Vous trouverez une illustration à
ce sujet à la page 18, ill. 7 et 8.
Le téléviseur pèse, selon sa taille, jusqu’à environ 40 kg.
Avec l’aide d’une autre personne, soulevez le téléviseur audessus du Table Stand (ill. 2).
Veillez à ce que le téléviseur
puisse être inséré à l’endroit
voulu sur les branches (ill. 2,
fl èches 1 et 2) du support universel du Table Stand.
Ceux-ci doivent s’insérer dans la
partie inférieure de l‘appareil.
Faites attention à ne pas endommager l’anneau de commande (ill. 2, fl èche A).
Cable de conexión del televisor
Para realizar el montaje, coloque
sobre la mesa una manta o el
fi eltro del material de embalaje
como base.
Coloque el Table Stand sobre
la mesa como se muestra en la
fi g. 1. Dirija el cable de conexión
hasta el televisor a través del
Table Stand, como se muestra
en el ejemplo de la fi g. 1 y la fi g.
2, fl echas K.
También puede utilizar un tubo
de tela para el tendido del cable
de conexión,
que resulta mucho más elegante.
Encontrará una ilustración con
el tubo de tela en la página 18,
fi gs. 7 y 8.
Dependiendo del tamaño, el
televisor puede pesar hasta 40
kg aprox.
Con ayuda de otra persona, levante el televisor y colóquelo en
el Table Stand (fi g. 2).
Asegúrese de que el televisor se
lleva hasta el lugar correspondiente por encima de los brazos
(fi g. 2, fl echas 1 y 2) del soporte
universal del Table Stand.
Los brazos deben introducirse
por el lado inferior del aparato.
Tenga cuidado con el anillo de
mando (fi g. 2, fl echa A) para
que no sufra ningún daño.
11
Page 12
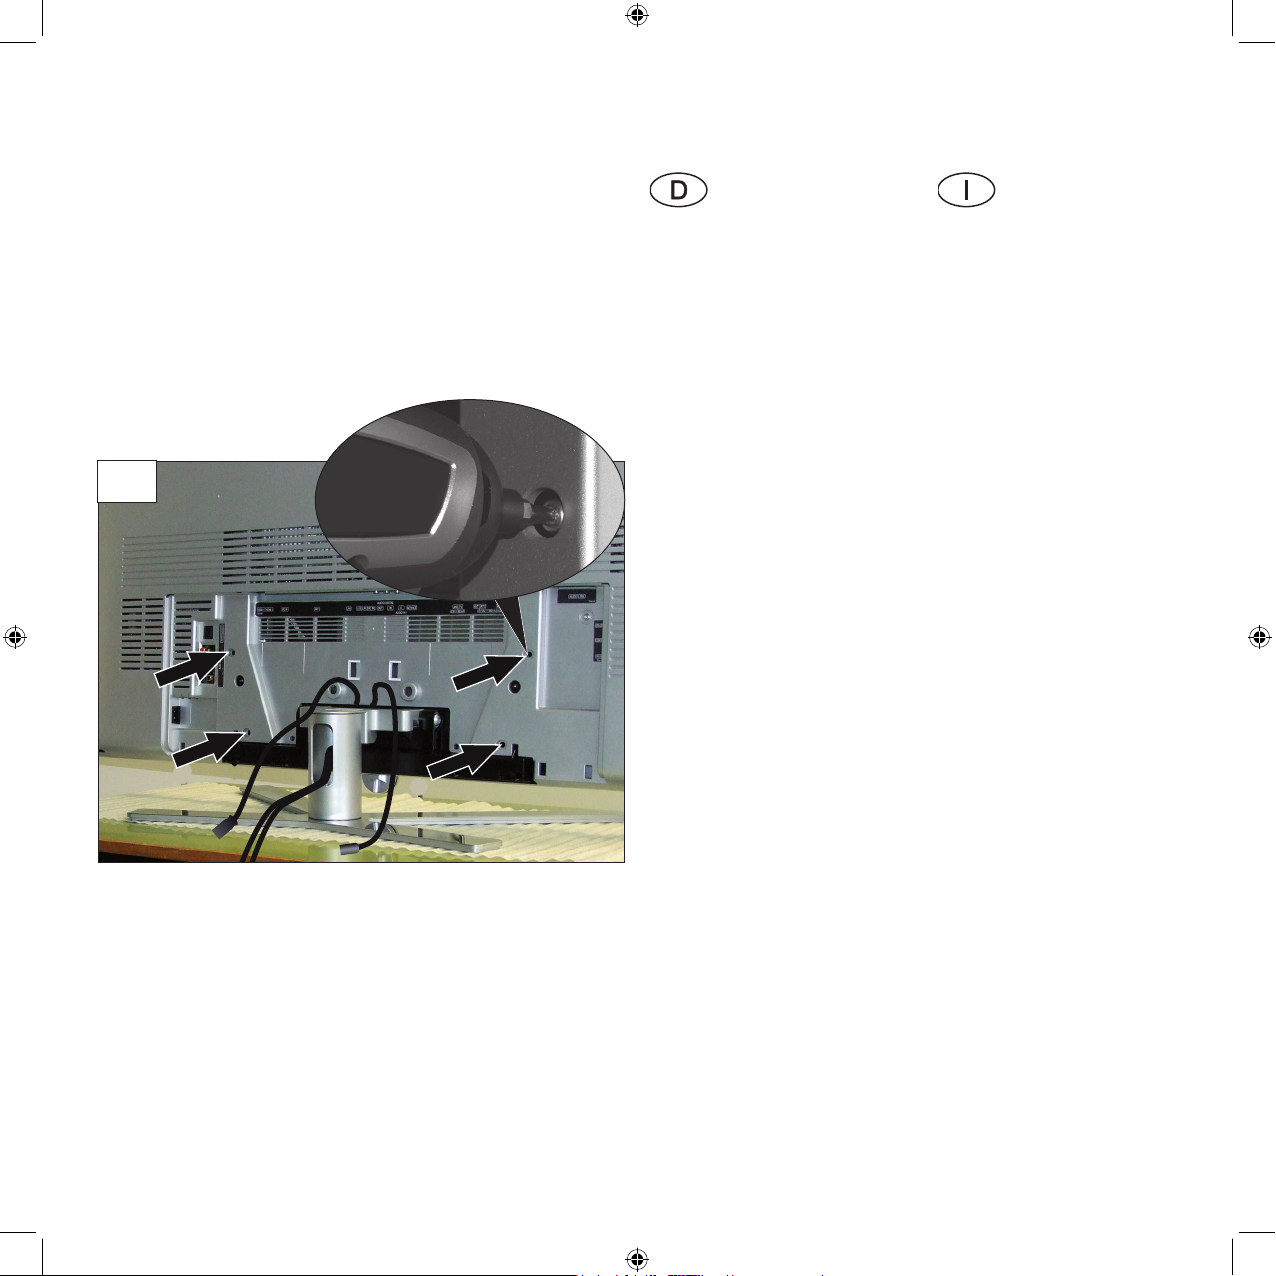
Table Stand I 40/46, Table Stand I 55
3
TV-Gerät
befestigen
Die zur Befestigung verwendeten Schrauben (Seite 8, Abb. b)
sind selbst schneidend/ selbst
formend.
Wir empfehlen hierzu folgende
Hilfsmittel und Vorgehensweise.
Hilfsmittel:
Akku-Schrauber oder geeigneten stabilen Torx- Schraubendreher T20.
Vorgehensweise, mit Beispiel
Akkuschrauber:
Im Lieferumfang ist ein Schraubbit T20 enthalten.
Setzen Sie diesen in Ihren AkkuSchrauber ein.
Stellen Sie Ihren Akkuschrauber
auf sehr langsame Drehzahl.
Stecken Sie die Schraube auf
den Bit.
Die Schraube an einer Bohrung
(Siehe Abb. 3, Pfeile) ansetzen
und mit etwas Andruck eindrehen.
Achten sie darauf, dass Sie die
Drehbewegung der Schraube
rechtzeitig stoppt. Die Schraubverbindung könnte sonst
beschädigt werden. Schrauben
leicht fest ziehen (2 Nm).
Mit den anderen 3 Schrauben
verfahren Sie in gleicher Weise.
Fissaggio
dell’apparecchio
TV
Le viti utilizzate per il fi ssaggio
(pagina 8, fi g. b) sono autofi let-
tanti e autosagomanti.
consigliabile utilizzare i seguenti strumenti e procedere nel
modo indicato.
Strumenti:
Avvitatore a batteria oppure
cacciavite per viti Torx stabile
adeguato con punta T20.
Procedura, con l’avvitatore a
batteria:
La fornitura comprende una
punta T20.
Infi lare la punta nell’avvitatore a
batteria.
Impostare l’avvitatore su un numero di giri molto basso.
Infi lare la vite sulla punta.
Inserire la vite in un foro (vedi
fi g. 3, frecce) e avvitarla esercitando una leggera pressione.
Assicurarsi di bloccare la rotazione della vite nel momento giusto. In caso contrario si potrebbe
danneggiare il collegamento.
Serrare leggermente le viti (2
Nm).
Procedere nello stesso modo
con le altre 3 viti.
12
Page 13
Table Stand I 40/46, Table Stand I 55
Tv-toestel
bevestigen
De schroeven voor de bevestiging (pagina 8, afb. b) zijn
zelftappend.
Wij bevelen daarvoor de
volgende hulpmiddelen en
werkwijzen aan.
Hulpmiddelen:
schroefmachine of geschikte
stabiele Torx-schroevendraaier
T20.
Werkwijze, met schroefmachine:
In de verpakking vindt u een
schroefbit T20.
Steek die in uw schroefmachine.
Stel de schroefmachine in op
een zeer laag toerental.
Steek de schroef op de bit.
Zet de schroef tegen een boring
aan (zie afb. 3, pijlen) en draai
ze in door er een beetje druk op
uit te oefenen.
Zorg ervoor dat u de schroefmachine tijdig doet stoppen.
Anders kan de schroefverbinding beschadigd raken. Draai de
schroef lichtjes aan (2 Nm)
Ga voor de overige 3 schroeven
op dezelfde manier te werk.
Fastening the TV
set in place
The screws used for fastening
(page 8, Fig. b) are self-tapping/
self-forming.
We recommend the following
tool accessories and procedure
for this.
Tool accessories:
Cordless screwdriver or suitable
sturdy Torx screwdriver T20.
Procedure, with cordless
screwdriver:
The scope of supply includes a
screwdriver bit T20.
Place this in your cordless screwdriver.
Set your cordless screwdriver to
a very low speed.
Insert the screw onto the bit.
Place the screw on a drill hole
(see Fig. 3, arrows) and screw in
with a little pressure.
Make sure you stop the screw
from turning in suffi cient time.
The screwed joint could otherwise be damaged. Tighten the
screws slightly (2 Nm)
Repeat the procedure for the
other 3 screws.
Fixation du téléviseur
Les vis utilisées pour la fi xation
(page 8, ill. b) sont auto coupantes / auto formantes
Nous vous recommandons
l’utilisation des accessoires suivants et l’application de la procédure suivante.
Accessoires :
Tournevis électrique ou tournevis Torx stable adapté T20.
Procédure, avec tournevis
électrique :
Le contenu de livraison comprend un embout de tournevis
T20.
Insérez-le dans votre tournevis
électrique.
Réglez votre tournevis électrique
sur une très petite vitesse.
Placez la vis sur l‘embout.
Appliquez la vis sur un orifi ce
(voir ill. 3, fl èche) et vissez en
appliquant une certaine pression.
Faites attention à arrêter le
mouvement de rotation des
vis à temps. Le raccord vissé
risquerait autrement d’en être
endommagé. Serrez légèrement
les vis (2 Nm)
Procédez de manière identique
avec les trois autres vis.
Fijación del
televisor
Los tornillos de fi jación (página
8, fi g. b) son autocortantes.
Recomendamos las siguientes
herramientas y procedimiento.
Herramientas auxiliares:
Atornilladora con batería o
destornillador Torx T20 con la
resistencia adecuada.
Procedimiento con atornilladora
con batería:
El volumen de suministro incluye
una broca T20.
Fíjela en la atornilladora con
batería.
Ajuste la atornilladora a muy
poca velocidad.
Coloque el tornillo en la broca.
Introduzca el tornillo en un orifi cio (véase la fi g. 3, fl echas) y
gire ejerciendo algo de presión.
Asegúrese de detener a tiempo
la atornilladora. En caso contrario, la unión atornillada podría
sufrir algún daño. Apriete los
tornillos ligeramente (2 Nm).
Proceda del mismo modo con
los otros 3 tornillos.
13
Page 14
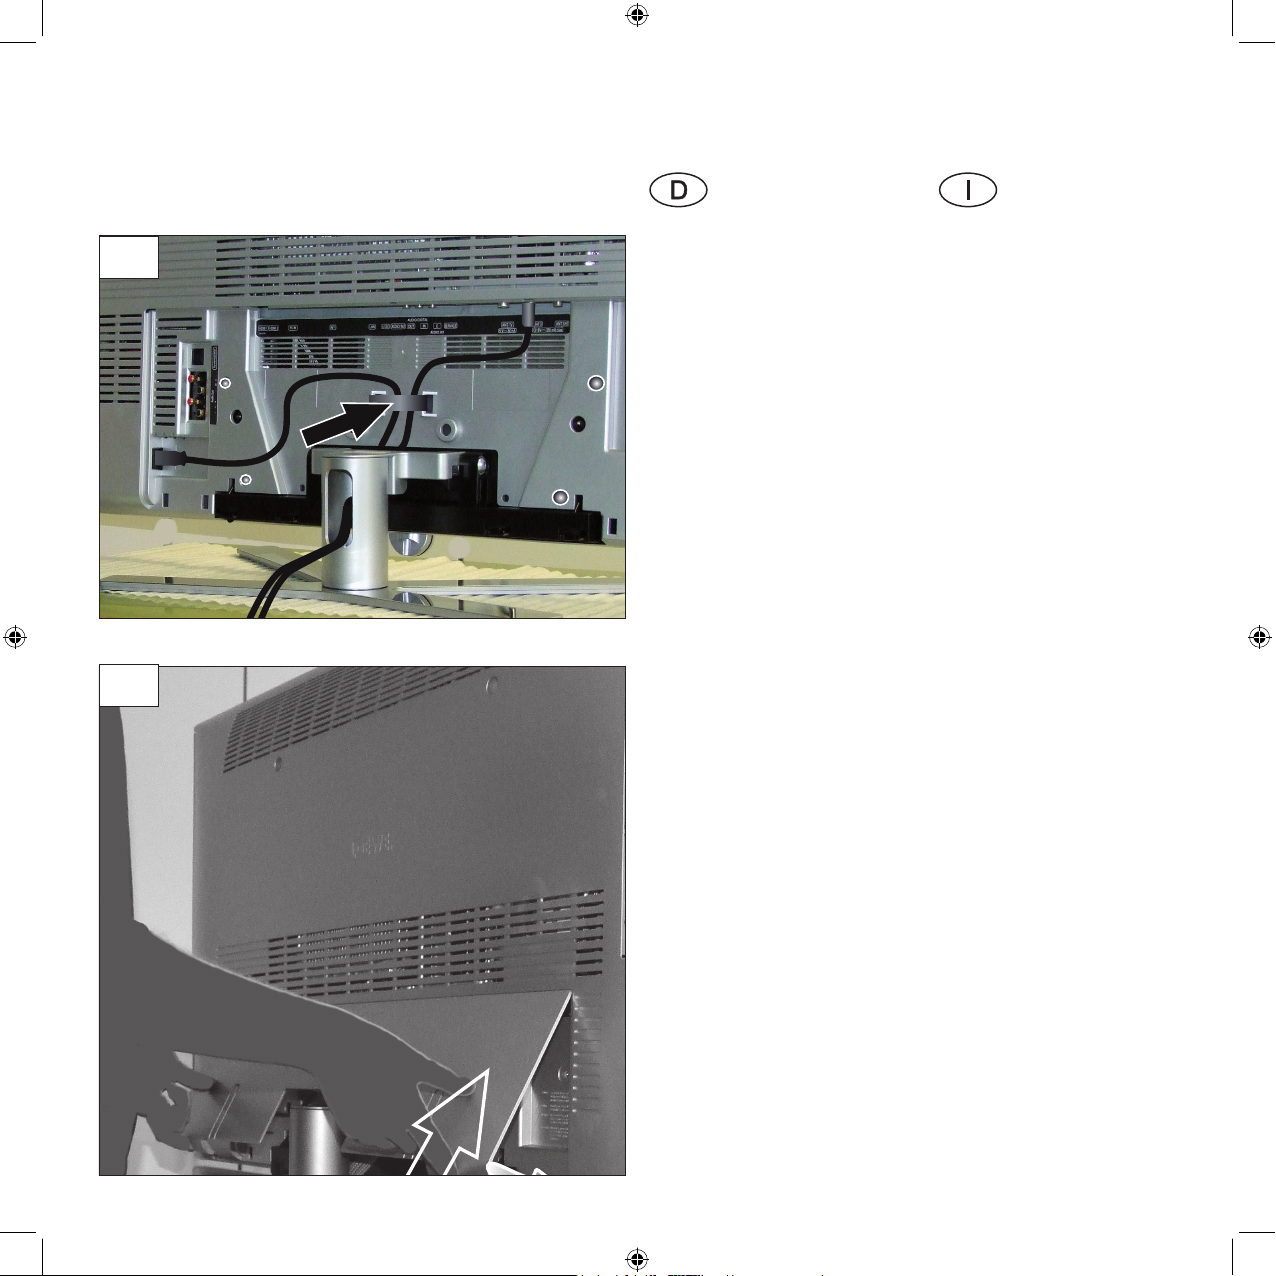
Table Stand I 40/46, Table Stand I 55
14
4
5
TV-Gerät
auf dem Table
Stand
Anschließen,
Handhabung
Das TV-Gerät und der Table
Stand sind nun verbunden, wie
auf Abb. 4 dargestellt.
Als Beispiel sind zwei Anschlusskabel verlegt, angeschlossen und mit einem Klettband (Abb. 4, Pfeil) befestigt.
Sie haben auch die Möglichkeit
die Anschlusskabel in einem
Gewebeschlauch zu verlegen,
das sieht eleganter aus.
Den Gewebeschlauch erhalten Sie auf Wunsch bei Ihrem
Fachhändler.
Das TV-Gerät kann auf dem
Table Stand um ca. 45° nach
rechts und links gedreht werden.
Auch eine Neigung (nach vorne
ca. 2° oder nach hinten ca. 4°)
ist möglich. Hierzu drücken
oder ziehen Sie oben am TVGerät mit geringer Kraft.
Weitere Hinweise fi nden Sie in
der Bedienungsanleitung des
TV-Gerätes.
Abschließend stecken Sie die
Kabelanschlußabdeckung (Abb.
5, Pfeil) wieder auf die Rückwand Ihres TV-Gerätes.
Fissaggio
dell’apparecchio TV
sul Table Stand
Collegamento e
funzionamento
L’apparecchio TV e il Table Stand
ora sono collegati come rappresentato in fi g. 4.
Nell’esempio sono stati posati e
collegati due cavi di collegamento, fi ssati con del nastro adesivo
(fi g. 4, freccia).
È possibile far passare i cavi in un
tubo di tessuto.
Questo accorgimento consente di
ottenere un effetto di maggiore
eleganza.
Il tubo di tessuto può essere acquistato presso il proprio rivenditore specializzato.
L’apparecchio TV può ruotare sul
Table Stand di circa 45° a destra e
a sinistra.
possibile regolare anche
l‘inclinazione (in avanti di ca. 2° o
all’indietro di ca. 4°)
. A tale scopo premere o tirare
dall’alto sull’apparecchio TV senza
esercitare una forza eccessiva.
Per ulteriori informazioni, consultare il manuale d’istruzioni
dell’apparecchio TV.
Al termine, riapplicare la copertura (fi g. 5, freccia) sul pannello
posteriore dell’apparecchio TV.
Page 15
Table Stand I 40/46, Table Stand I 55
Tv-toestel op de
Table Stand
Tv-toestel op de Table
Stand
Het tv-toestel en de Table
Stand zijn nu met elkaar verbonden zoals weergegeven in
afb. 4.
Als voorbeeld werden er twee
aansluitkabels gelegd, aangesloten en bevestigd met
klittenband (afb. 4, pijl).
U hebt ook de mogelijkheid de
aansluitkabels door een textielslang te leiden, wat eleganter
oogt.
De textielslang kunt u kopen bij
uw leverancier:
Het tv-toestel kan op de Table
Stand ongeveer 45° naar rechts
en naar links worden gedraaid.
Ook een kanteling (naar voren
ca. 2° of naar achteren ca. 4°)
is mogelijk. Daarvoor dient u
met geringe kracht tegen het
tv-toestel te duwen of eraan te
trekken.
Verdere aanwijzingen vindt u in
de handleiding bij het tv-toestel.
Om af te sluiten brengt u de
kabelaansluitafdekking (afb.
5, pijl) opnieuw aan op uw
tv-toestel.
TV set
on the Table
Stand
Connection, handling
The TV set and Table Stand are
now connected, as shown in
Fig. 4.
As an example, two connecting
cables are laid, connected and
fastened with a Velcro tape
(Fig. 4, arrow).
You can also lay the connecting
cables in a braided hose.
This looks more elegant.
The braided hose is available
on request from your dealer.
The TV set can be turned by
about 45° to the left and right
on the Table Stand.
A tilt (about 2° to the front or
about 4° to the rear)
is also possible. To do this,
gently push or pull the top of
the TV set.
You can fi nd more information
in your TV operating manual.
Finally, replace the cable connection cover (Fig. 5, arrow) on
the rear panel of your TV set.
Inclinaison du
sur le Table Stand
Branchement,
manutention
Le téléviseur et le support de
table sont désormais raccordés,
comme le montre la fi gure 4.
Dans cet exemple, deux câbles
de raccordement sont posés,
raccordés et fi xés à l‘aide d‘une
réglette (fi g. 4, fl èche).
Vous pouvez faire passer les
câbles dans une gaine.
Ceci est plus esthétique.
Cette gaine est disponible sur
demande chez votre revendeur.
La téléviseur peut être incliné
d‘environ 45 degrés vers la
droite et la gauche sur le Table
Stand.
De même, une inclinaison (vers
l‘avant d‘environ 2 degrés ou
vers l‘arrière d‘environ 4)
est possible. Pour ce faire,
repoussez ou tirez le téléviseur
vers vous sans forcer.
Vous trouverez de plus amples
indications pour le raccordement dans la notice d’utilisation du téléviseur.
Enfi n, replacez le couvercle des
connexions (fi g. 5, fl èche) sur la
face arrière de votre téléviseur.
El televisor sobre
el Table Stand
Conexión, manejo
El televisor y el Table Stand
están ahora conectados, como
se muestra en la fi g. 4.
Como ejemplo se muestran dos
cables de conexión conectados y sujetos con una cinta de
velcro (fi g. 4, fl echa).
También puede utilizar un tubo
de tela para el tendido del
cable de conexión,
que resulta mucho más elegante.
El tubo de tela puede adquirirse en un comercio especializado.
El televisor colocado sobre
el Table Stand puede girarse
aprox. 45° hacia la derecha e
izquierda.
También puede inclinarse
2° aprox. hacia delante o 4°
aprox. hacia atrás. Para ello
empuje o tire por la parte
superior del televisor sin ejercer
mucha fuerza.
Encontrará más información en
el manual de instrucciones del
televisor.
Por último, vuelva a colocar la
tapa de conexiones para cables
(fi g. 5, fl echa) en la parte pos-
terior del televisor.
15
Page 16
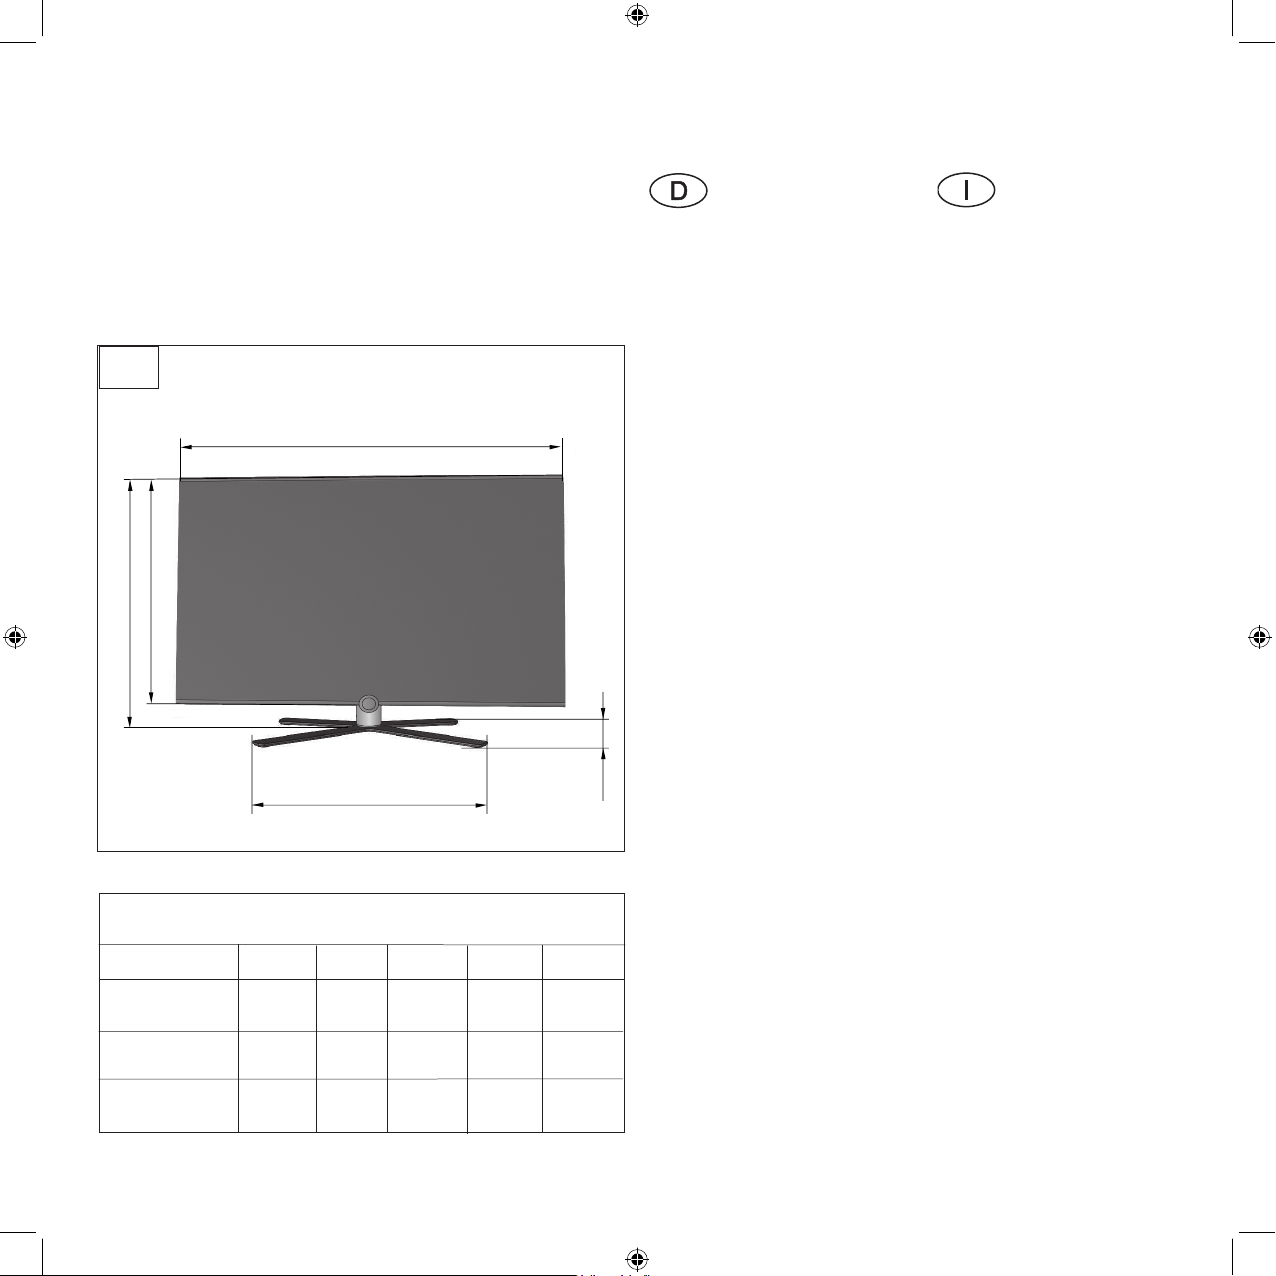
Table Stand I 40/46, Table Stand I 55
6
H - TV + TS
H - TV
B - TV
B - TS
Reinigung und
Pfl ege, Hinweise
Reinigung
Reinigen Sie die Gerätekombination mit einem feuchten,
weichen und sauberen Tuch
(ohne jedes scharfe oder scheuernde Reinigungsmittel).
Hinweis
Weitere Angaben, wie Anschließen Ihres TV-Gerätes oder
Serviceadressen, fi nden Sie in
der Bedienungsanleitung des
TV-Gerätes.
T - TS
Pulizia e cura
Pulizia
Pulire gli apparecchi combinati
con un panno umido, soffi ce e
pulito (senza detergenti aggressivi o abrasivi)..
Avvertenza
Ulteriori dati, come il collegamento dell’apparecchio TV
oppure gli indirizzi dei centri
d’assistenza, si trovano nel manuale d’uso dell’apparecchio.
Maßangaben, Abb. 6 / Dimensional data, Fig. 6
TV - Typ H-TV+TS H-TV B-TV B-TS T-TS
Individual SL40 64,8 cm 59,3 cm 100,0 cm 58,5 cm 35,1 cm
Individual SL46 72,3 cm 66,8 cm 113,3 cm 58,5 cm 35,1 cm
Individual SL55 83,8 cm 78,1 cm 132,6 cm 73,0 cm 60,2 cm
16
Maßangaben zur Geräteeinheit
entnehmen Sie der Abb. 6 und
nachstehender Tabelle.
Le dimensioni d’ingombro
dell’apparecchio sono indicate
nella tabella della fi g. 6.
Page 17
Table Stand I 40/46, Table Stand I 55
Reiniging en
onderhoud,
instructies
Reinigen
Reinig de toestellencombinatie
met een vochtige, zachte en
schone doek (zonder bijtende
of schurende reinigingsmiddelen).
Opmerking
Verdere informatie, bijvoorbeeld
over het aansluiten van het tvtoestel of over serviceadressen,
vindt u in de handleiding van
het tv-toestel.
De maten van de toesteleenheid vindt u in afb. 6, tabel.
.
Cleaning and care
information
Cleaning
Clean the devices using a soft,
clean and damp cloth (do not
use aggressive or abrasive
cleaning agents).
Note
Further information, such as
connection of the TV set or
service addresses, can be found
in the TV operating manual.
Dimensional data for the set
unit can be found in Fig. 6.
Nettoyage et
entretien,
indications
Nettoyage
Nettoyez la combinaison d’appareils avec un tissu humide,
doux et propre (sans aucun
produit d’entretien corrosif ou
abrasif).
Remarque
Vous trouverez de plus amples
renseignements, comme le raccordement de votre téléviseur
ou les adresses de service aprèsvente, dans la notice d’utilisation du téléviseur.
Les dimensions de l’appareil
sont indiquées dans le tableau
de l’illustration 6.
Limpieza y
mantenimiento,
instrucciones
Limpieza
Para la limpieza de la combinación de aparatos, utilice un
paño limpio y suave humedecido (sin emplear detergentes
corrosivos o abrasivos).
Nota
Encontrará más información,
como la conexión del televisor
o las direcciones de servicio, en
el manual de instrucciones del
televisor.
En la tabla de la fi g. 6 encon-
trará información sobre las
dimensiones de la unidad de
aparatos.
17
Page 18
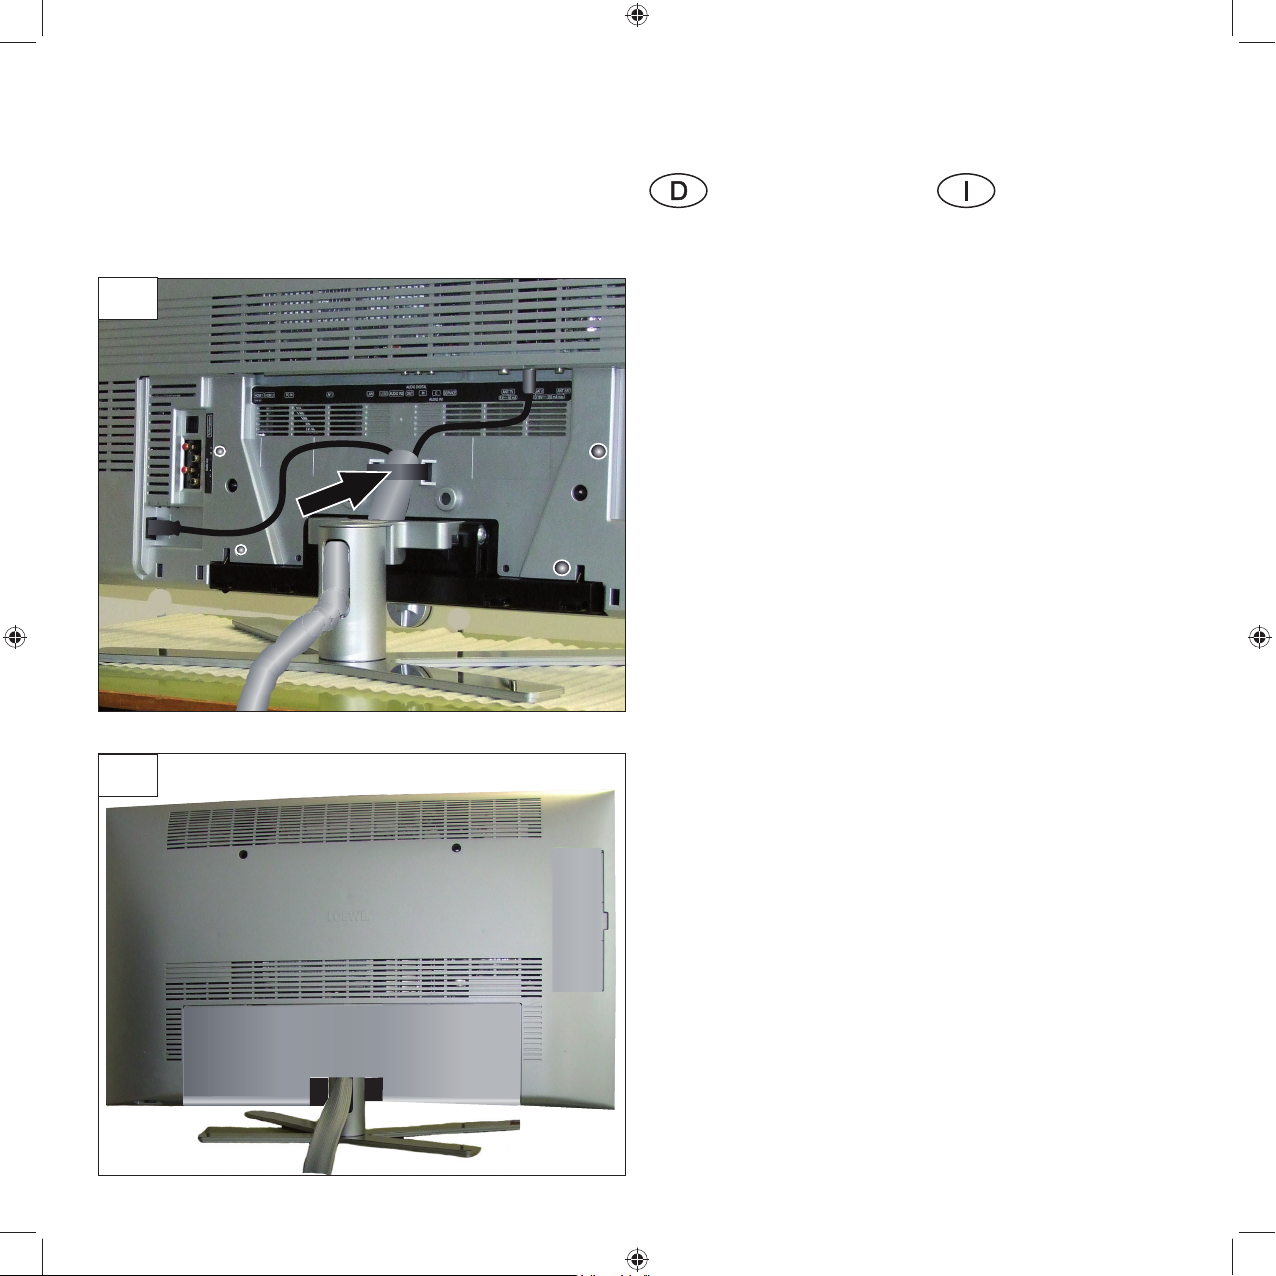
Table Stand I 40/46, Table Stand I 55
7
8
TV-Gerät,
Verkabelung mit
Gewebeschlauch
Auf den Abb. 7 und 8 sehen
Sie die Kabelverlegung im
Gewebeschlauch.
Den Gewebeschlauch befestigen Sie wie auf Abb. 7, Pfeil
dargestellt.
Gewebeschlauch
Den Gewebeschlauch erhalten
Sie in gewünschter Länge bei
Ihrem Fachhändler:
Gewebeschlauch in der Farbe
Schwarz
Artikelnummer: 31947 004
Apparecchio TV,
cablaggio con
tubo di tessuto
Nelle fi g. 7 e 8 è illustrato il
modo in cui i cavi sono posati
all‘interno del tubo di tessuto.
Fissare il tubo di tessuto come
illustrato nella fi g. 7, freccia.
Tubo di tessuto
Il tubo di tessuto può essere
acquistato nella lunghezza
desiderata presso il proprio
rivenditore specializzato.
Tubo in tessuto di colore nero
Codice articolo: 31947 004
18
Gewebeschlauch in der Farbe
Silber
Artikelnummer: 31947 005
Tubo in tessuto di colore
argento
Codice articolo: 31947 005
Page 19
Table Stand I 40/46, Table Stand I 55
Tv-toestel,
Bekabeling met
textielslang
In de afb. 7 en 8 wordt getoond hoe de kabels door een
textielslang worden geleid.
De textielslang bevestigt u
zoals getoond in afb. 7, pijl.
Textielslang
De textielslang met de gewenste lengte kunt u kopen bij uw
leverancier:
Textielslang in de kleur zwart
Artikelnummer: 31947 004
Textielslang in de kleur zilver
Artikelnummer: 31947 005
TV set,
cabling with
fabric hose
Figs. 7 and 8 show the cabling
in the braided hose.
Fasten the braided hose as
shown in Fig. 7, arrow.
Fabric hose
The braided hose is available in
the required length from your
dealer:
Braided hose in colour black
Article number: 31947 004
Braided hose in colour silver
Article number: 31947 005
Téléviseur,
câblage avec
gaine en tissu
Les ill. 7 et 8 présentent la pose
des câbles dans la gaine en
tissu.
Fixez la gaine en tissu comme
représenté sur l’ill. 7, fl èche.
Gaine fl exible en tissu
Vous pouvez obtenir cette
gaine en tissu, à la longueur
souhaitée, auprès de votre
revendeur spécialisé :
Gaine en tissu de couleur noire
Référence : 31947 004
Gaine en tissu de couleur
argent
Référence : 31947 005
Televisor,
cableado con un
tubo de tela
En las fi gs. 7 y 8 se muestra el
cableado en el tubo de tela.
El tubo de tela se fi ja como se
muestra en la fi g. 7, fl echa.
Tubo de tela
El tubo de tela puede adquirirse en la longitud deseada en
un comercio especializado.
Tubo de tela de color negro
Número de referencia:
31947 004
Tubo de tela de color plateado
Número de referencia:
31947 005
19
Page 20
20
 Loading...