

Page 1
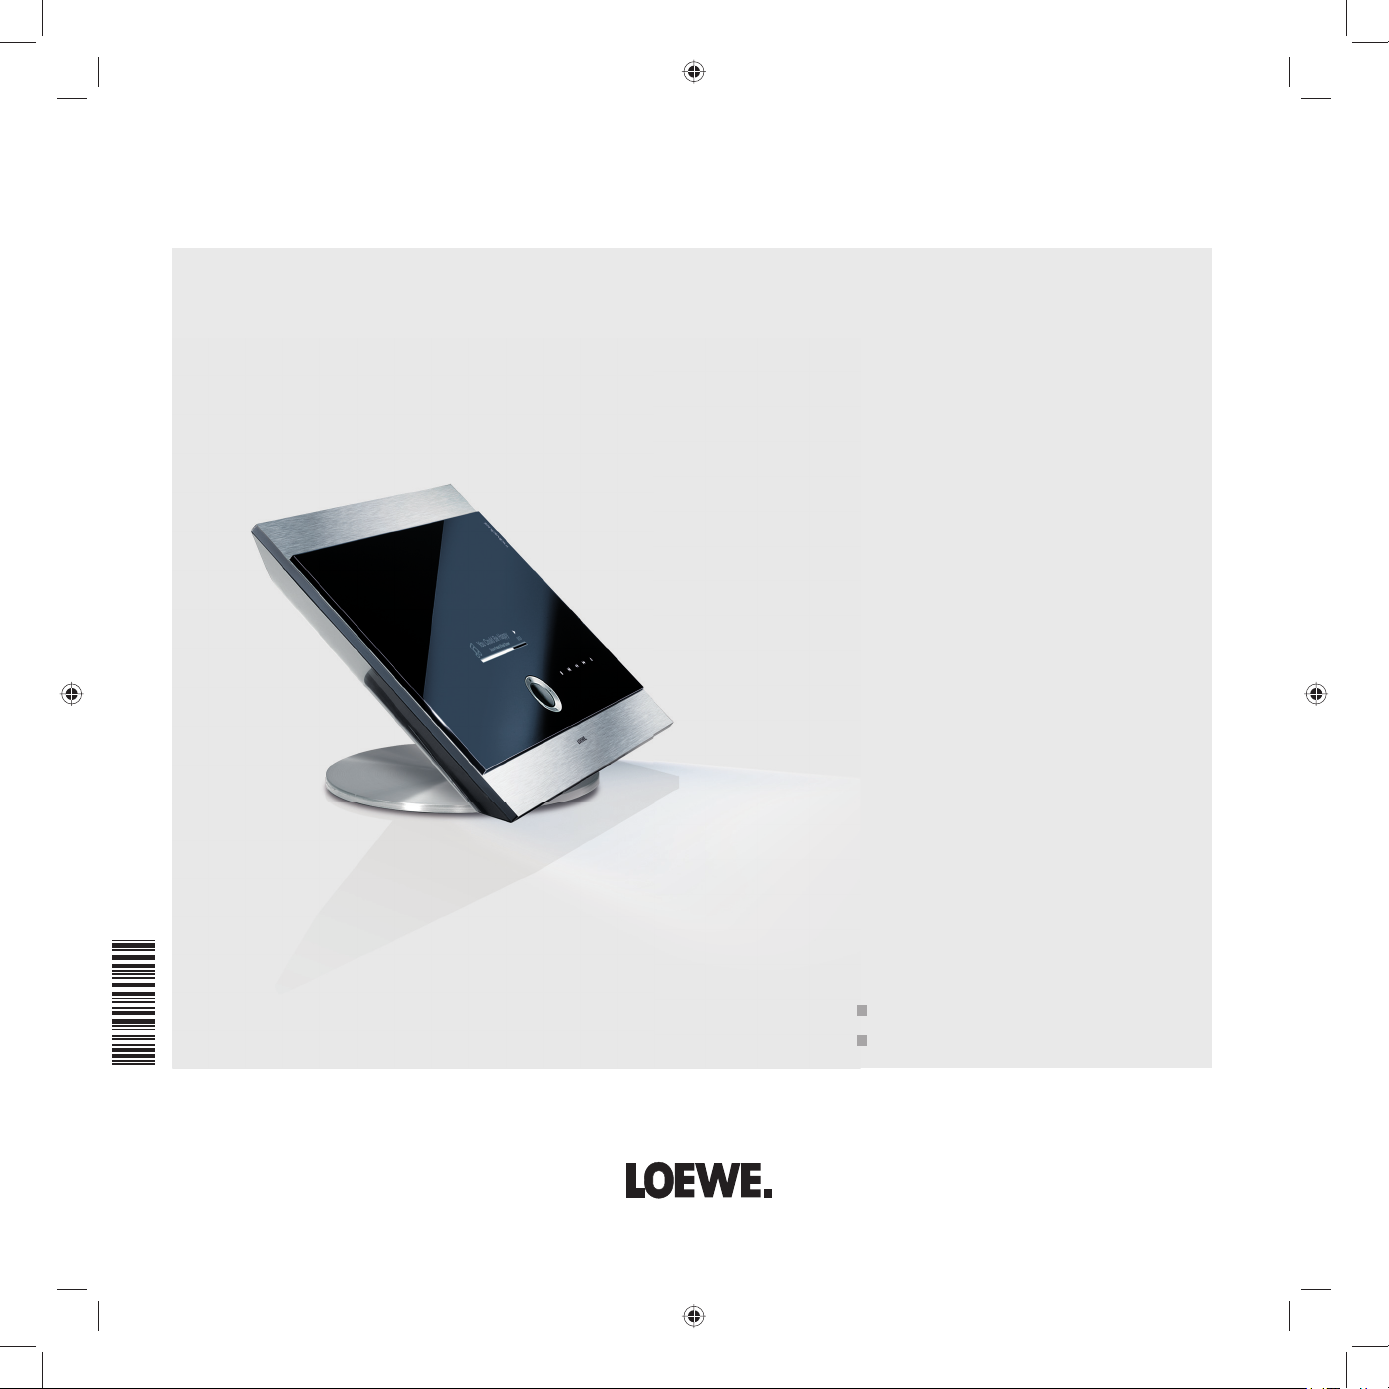
Montageanleitung
Istruzioni sul montaggio
Montage-instructis
Installation Instructions
Instructions d’installation
Instrucciones de montaje
Zubehör Audio
Accessori Audio
Toebehoren Audio
240–34040 000
Accessories Audio
Accessoires Audio
Accesorios Audio
Table Stand Individual Mediacenter
Table Stand Reference Mediacenter
Page 2
Table Stand
dividual Mediacenter
In
Art. Nr. 68280 B00
Table Stand
Reference Mediacenter
Art. Nr. 68280 B10
Printed in Germany MZ 03.09
Änderungen vorbehalten.
Con riserva di modifi che.
Wijzigingen voorbehouden.
Subject to modifications.
Modifi cations reservée.
Reservado el drecho a modificaciones.
2
Deutschland
Loewe Opta GmbH
Customer Care Center
Industriestraße 11
D-96305 Kronach
D-96317 Kronach
Telefon 01801/22256393
Telefax (09261) 99500
Page 3
Table Stand Individual Mediacenter / Table Stand Reference Mediacenter
Liebe Kundin,
lieber Kunde,
wir gratulieren Ihnen zum Kauf dieses hochwertigen Produktes. Loewe steht seit vielen
Jahren für innovatives Design, für hervorragende Qualität und Funktionalität.
Damit Ihrem Produkt diese Eigenschaften
lange erhalten bleiben, beachten Sie bitte
die Montage- und Sicherheitshinweise dieser
Anleitung.
Gentile Cliente,
Congratulazioni per l’acquisto di questo prodotto di qualità Loewe. Da molti anni Loewe
è sinonimo di design innovativo, qualità
eccellente e funzionalità.
Affi nché anche il Suo prodotto conservi a
lungo queste caratteristiche, La preghiamo di
leggere attentamente le indicazioni d’uso e
di sicurezza del presente manuale.
Beste klant,
Wij feliciteren u met de aankoop van dit
kwaliteitsproduct. De naam Loewe staat al
vele jaren lang garant voor innovatief design
en uitstekende kwaliteit en functionaliteit.
Om ervoor te zorgen dat uw product deze
eigenschappen gedurende lange tijd blijft
behouden, dient u de bedienings- en veiligheidsinstructies in deze handleiding in acht
te nemen.
3
Page 4
Table Stand Individual Mediacenter / Table Stand Reference Mediacenter
Dear
customer,
Congratulations on your purchase of this
high quality product. For many years Loewe
has stood for innovative design, excellent
quality and functionality.
Please follow the installation and safety instructions in this manual to ensure that your
product retains these properties for many
years to come.
Chère cliente,
cher client,
nous vous félicitons de l’achat de ce produit
de haute qualité. Depuis de nombreuses
années, Loewe représente un design innovateur, une excellente qualité et la fonctionnalité.
Afi n que votre appareil conserve ces qualités
pendant longtemps, veuillez respecter les
instructions de commande et de sécurité de
cette notice.
Estimada cliente,
estimado cliente:
Le felicitamos por la compra de este producto de alta calidad. En Loewe apostamos,
desde hace muchos años, por un diseño
innovador y una excelente calidad y funcionalidad.
Si desea que su producto conserve todas
estas características durante mucho tiempo,
le rogamos respete siempre las advertencias
de este manual relativas a su seguridad y
montaje.
4
Page 5
Table Stand Individual Mediacenter / Table Stand Reference Mediacenter
Inhalt
Sicherheitshinweise 6
Lieferumfang 8
Montagehinweise 10
Mediacenter vorbereiten 12
Verkabelungsmöglichkeiten 14
Montage für Kabelführung
nach hinten 16
Montage für Kabelführung
nach unten 20
Reinigung 20
Contents
Indice
Norme di sicurezza 6
Dotazione 8
Istruzioni di montaggio 10
Predisposizione del Mediacenter 12
Cablaggi disponibili 14
Montaggio per cavi con
passaggio posteriore 16
Montaggio per cavi con
passaggio verso il basso 20
Pulizia e cura 22
Contenu
Inhoud
Veiligheidsvoorschriften 7
Inhoud van de levering 9
Montage-instructies 11
Mediacenter voorbereiden 13
Bekabelingsmogelijkheden 15
Montage met kabelgeleiding
naar achteren 17
Montage met kabelgeleiding
naar beneden toe 21
Reinigen 23
Índice
Safety Instructions 7
Scope of delivery 9
Installation instructions 11
Preparing the Mediacenter 13
Wiring possibilities 15
Installation for cable laying
to rear 17
Installation for cable laying
downwards 21
Cleaning and care 23
Instructions de sécurité 7
Contenu de la livraison 9
Instructions de montage 11
Préparation du Mediacenter 13
Possibilités de câblage 15
Opérations de montage pour le
passage des câbles vers l’arrière 17
Opérations de montage pour le
passage des câbles vers le bas 21
Nettoyage 23
Advertencias de seguridad 7
Volumen de suministro 9
Instrucciones de montaje 11
Preparación del Mediacenter 13
Opciones de cableado 15
Montaje para tender los cables
hacia atrás 17
Montaje para tender los cables
hacia abajo 21
Limpieza 23
5
Page 6
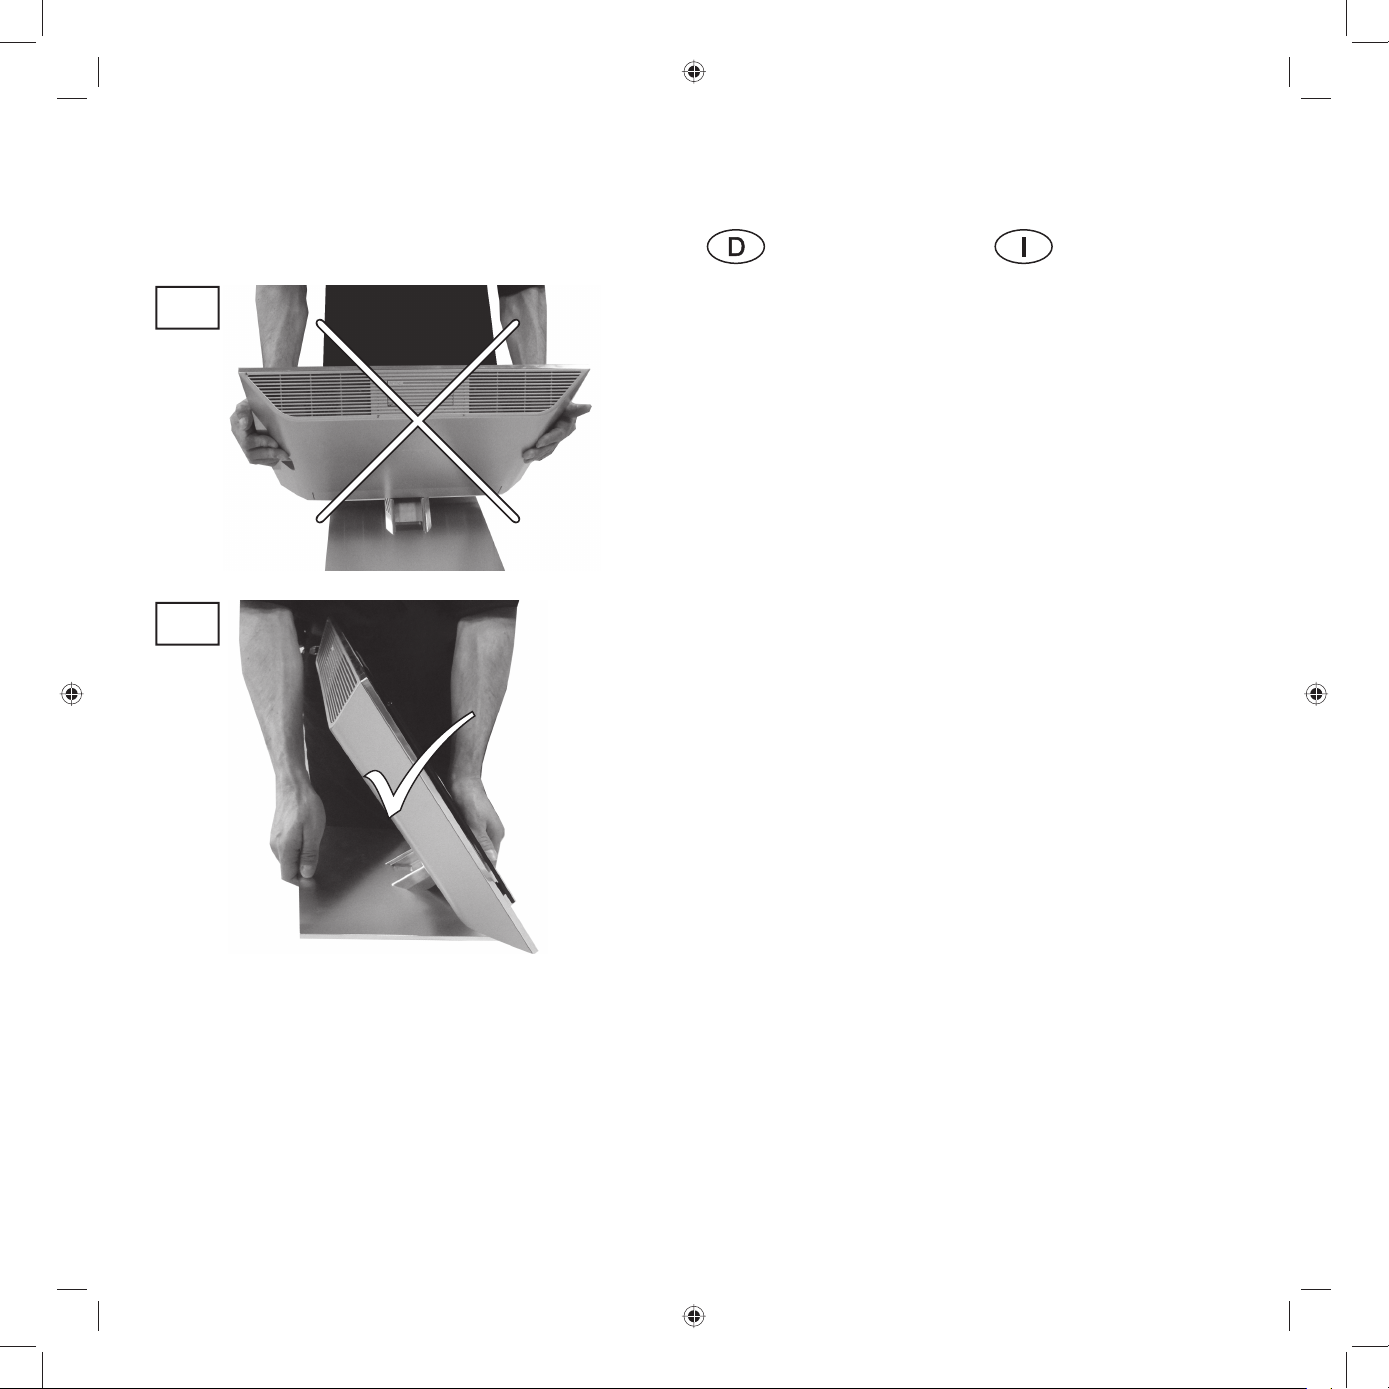
Table Stand Individual Mediacenter / Table Stand Reference Mediacenter
1
2
Sicherheitshinweise
Beachten Sie die Informationen
dieser Anleitung.
Die Aufstellfl äche für Ihren
Table Stand muss eben und
waagerecht sein.
Stellen Sie Ihre Gerätekombination so auf, dass sie, z. B.
von spielenden Kindern, nicht
umgeworfen werden kann und
für diese keine Gefahr darstellt.
Verlegen Sie Kabel so, dass
man nicht darüber stolpern
kann.
Wenn Sie den Aufstellort Ihrer
Gerätekombination ändern,
fassen Sie diese nie am Mediacenter allein (Abb. 1), sondern
immer auch am Fuß (Abb. 2).
Der Fuß ist nur eingerastet und
kann sich beim Transport lösen.
Beachten Sie auch die Bedienungsanleitung Ihres Mediacenters.
Norme di sicurezza
Osservare le informazioni riportate nelle presenti istruzioni.
La superfi cie d’istallazione del
Table Stand deve essere piana
e orizzontale.
Installare la combinazione di
apparecchi in modo tale che
non possa essere rovesciata,
ad es. da bambini che giocano, e che non costituisca un
pericolo.
I cavi vanno posati in modo
tale da non intralciare il passaggio.
Nel caso si volesse cambiare
luogo di installazione della
combinazione di apparecchi,
non afferrarla mai soltanto dal
Mediacenter (fi g. 1), ma anche
dal piede (fi g. 2). Il piede è
soltanto incastrato e durante il
trasporto potrebbe staccarsi.
Osservare anche le istruzioni
d’uso del Mediacenter.
6
Page 7
Table Stand Individual Mediacenter / Table Stand Reference Mediacenter
Veiligheidsvoorschriften
Neem de aanwijzingen in de
handleiding in acht.
Uw Table Stand moet op een
effen en en perfect horizontaal
oppervlak worden geplaatst.
Installeer uw toestelcombinatie zo dat ze niet omver kan
worden gestoten door en geen
gevaar inhoudt voor spelende
kinderen.
Installeer de kabels zo dat
niemand erover kan struikelen.
Wanneer u uw toestelcombinatie van plaats wilt veranderen,
mag u ze nooit vastpakken bij
het Mediacenter alleen (afb. 1),
maar altijd ook bij de voet (afb.
2). De voet is slechts ingeklikt
en kan loskomen tijdens het
dragen.
Raadpleeg ook de gebruiksaanwijzing van uw Mediacenter.
Safety Instructions
Observe the information in
these instructions.
The standing surface for your
Table Stand must be level and
horizontal.
Install your equipment combination so that it cannot be
knocked over by children at
play for example and presents
no danger to them.
Lay the connecting cables so
that no-one can trip over them.
If you move your equipment
combination, never hold it by
the Mediacenter alone (fi g. 1),
always by the base as well (fi g.
2). The base is only snapped
in and can come loose during
transport.
Observe also the informations
in the instruction manual of
your Mediacenter.
Instructions
de sécurité
Veuillez observer les informations contenues dans cette
notice d’utilisation.
La surface d’installation de
votre Table Stand doit être
plane et horizontale.
Placez votre combinaison
d’appareils de telle sorte
qu’elle ne puisse être renversée, p. ex. par des enfants en
train de jouer, et ne représente
ainsi aucun danger pour eux.
Installez les câbles de façon
à ce que l’on ne puisse pas
trébucher dessus.
Si vous changez de place votre
combinaison d’appareils, ne la
saisissez jamais uniquement
au niveau du Mediacenter (ill.
1), mais toujours au niveau du
pied (ill. 2). Le pied est uniquement enclenché et pourrait se
détacher pendant le transport.
Consultez également la notice
d’utilisation de votre Mediacenter.
Advertencias de
seguridad
Respete las instrucciones de
este manual.
La superfi cie de colocación de
su Table Stand debe ser plana y
horizontal.
Instale la combinación de
aparatos de manera que no
pueda ser volcado, p. ej., por
niños que estén jugando cerca,
y no represente ningún peligro
para ellos.
Tienda los cables de manera
que no den lugar a tropiezos.
Al cambiar el lugar de colocación de la combinación de
aparatos, no agarre solamente
el Mediacenter (fi g. 1), sino
también el pie (fi g. 2). El pie
simplemente está encajado y
puede soltarse cuando al ser
transportado.
Tenga también en cuenta las
instrucciones de manejo de su
Mediacenter.
7
Page 8
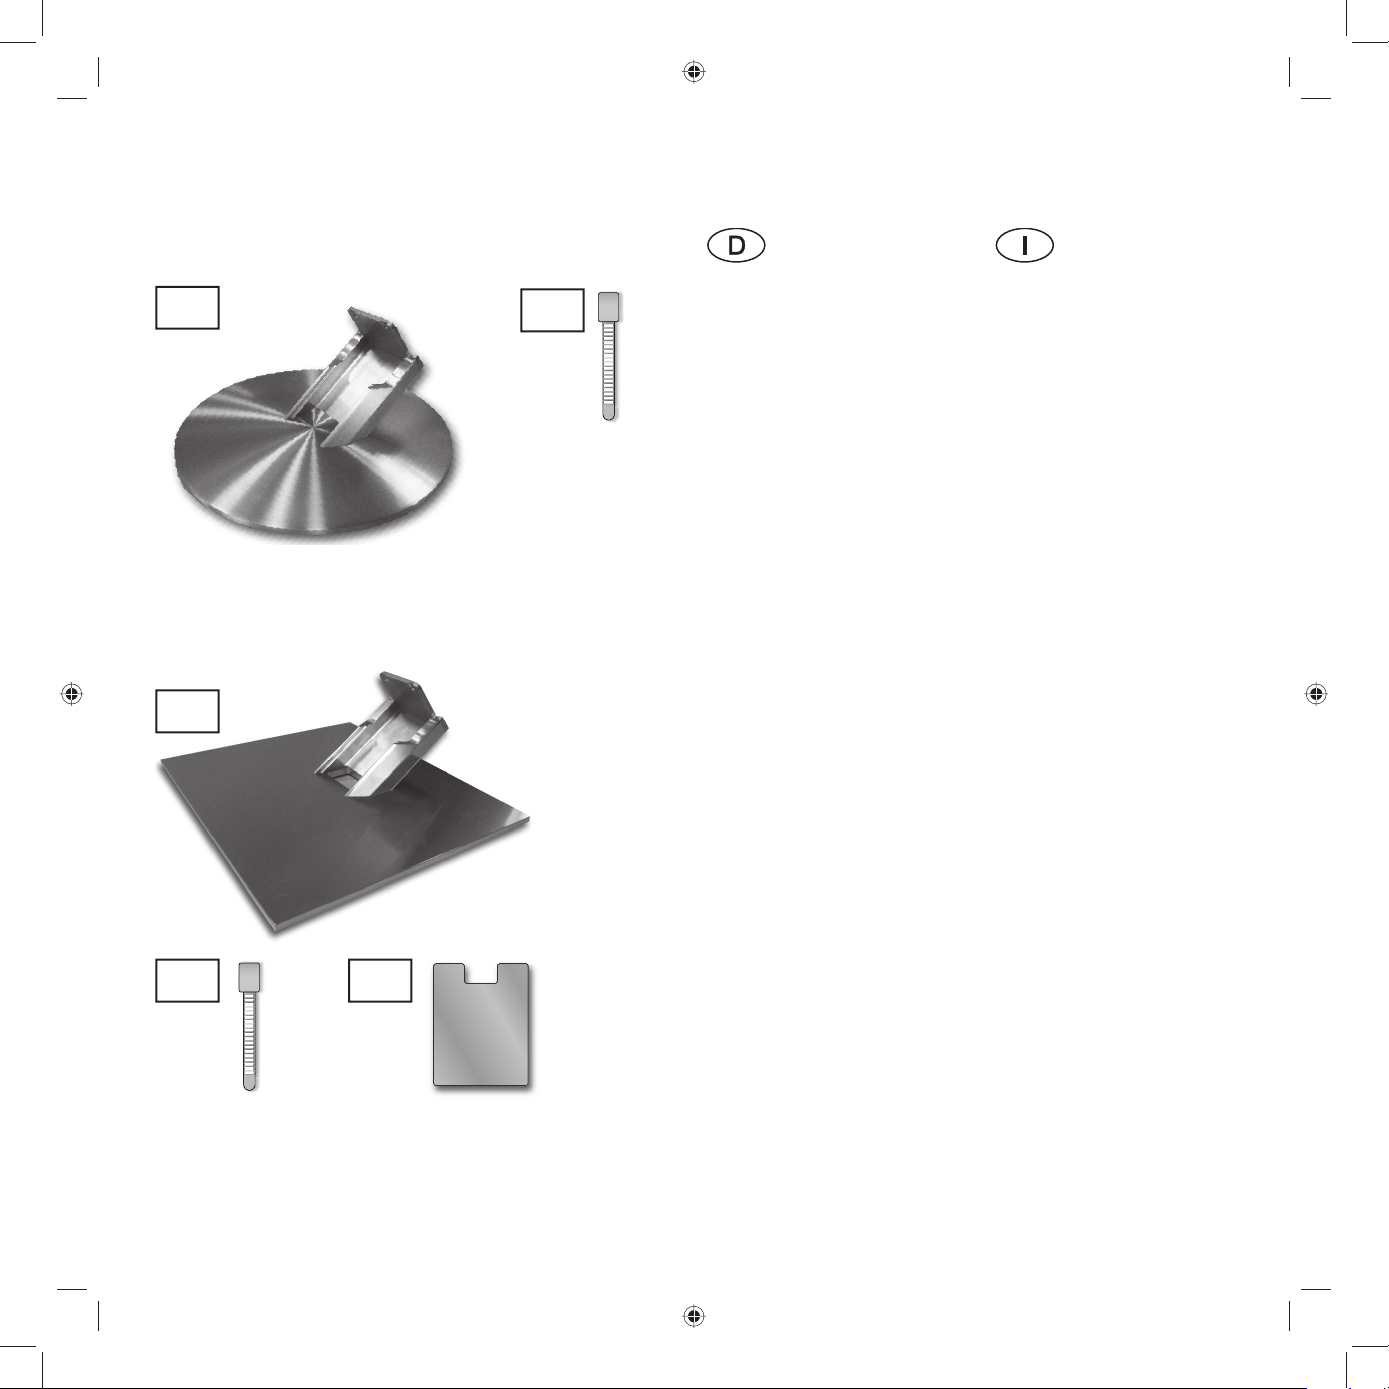
Table Stand Individual Mediacenter / Table Stand Reference Mediacenter
a
a
b
c
b
Lieferumfang
Table Stand Individual
Mediacenter:
„a“
Table Stand Individual
Mediacenter
„b“
Kabelbinder
Diese Montageanleitung,
(nicht abgebildet)
Table Stand Reference
Mediacenter:
“a”
Table Stand Reference
Mediacenter
„b“
Kabelbinder
„c“
Kabelabdeckung
Diese Montageanleitung,
(nicht abgebildet)
Dotazione
Table Stand Individual
Mediacenter:
”a“
Table Stand Individual
Mediacenter
”b“
Fascetta serracavi
Queste istruzioni di montaggio,
(non raffi gurate)
Table Stand Reference
Mediacenter:
”a”
Table Stand Reference
Mediacenter
”b“
Fascetta serracavi
”c“
Copertura del vano cavi
Queste istruzioni di montaggio,
(non raffi gurate)
8
Page 9
Table Stand Individual Mediacenter / Table Stand Reference Mediacenter
Inhoud van
de levering
Table Stand Individual
Mediacenter:
„a“
Table Stand Individual
Mediacenter
„b“
Kabelbinder
Deze montagehandleiding
(niet weergegeven)
Table Stand Reference
Mediacenter:
“a”
Table Stand Reference
Mediacenter
„b“
Kabelbinder
„c“
Kabelafdekking
Deze montagehandleiding
(niet weergegeven)
Scope of
delivery
Table Stand Individual
Mediacenter:
„a“
Table Stand Individual
Mediacenter
„b“
Cable tie
These installation
instructions,(not illustrated)
Table Stand Reference
Mediacenter:
“a”
Table Stand Reference
Mediacenter
„b“
Cable tie
”c“
Cable cover
These installation
instructions,(not illustrated)
Contenu
de la livraison
Table Stand Individual
Mediacenter:
„a“
Table Stand Individual
Mediacenter
„b“
Fixe-câbles
Cette notice de montage, (non
représentée sur l’illustration)
Table Stand Reference
Mediacenter:
“a”
Table Stand Reference
Mediacenter
„b“
Fixe-câbles
„c“
Couvercle du compartiment à
câbles
Cette notice de montage, (non
représentée sur l’illustration)
Volumen de
suministro
Table Stand Individual
Mediacenter:
“a“
Table Stand Individual Mediacenter
“b“
Abrazadera
Estas instrucciones de montaje,
(no se muestran en ninguna
ilustración).
Table Stand Reference
Mediacenter:
“a”
Table Stand Reference
Mediacenter
“b“
Abrazadera
“c“
Tapa de cables
Estas instrucciones de montaje,
(no se muestran en ninguna
ilustración).
9
Page 10
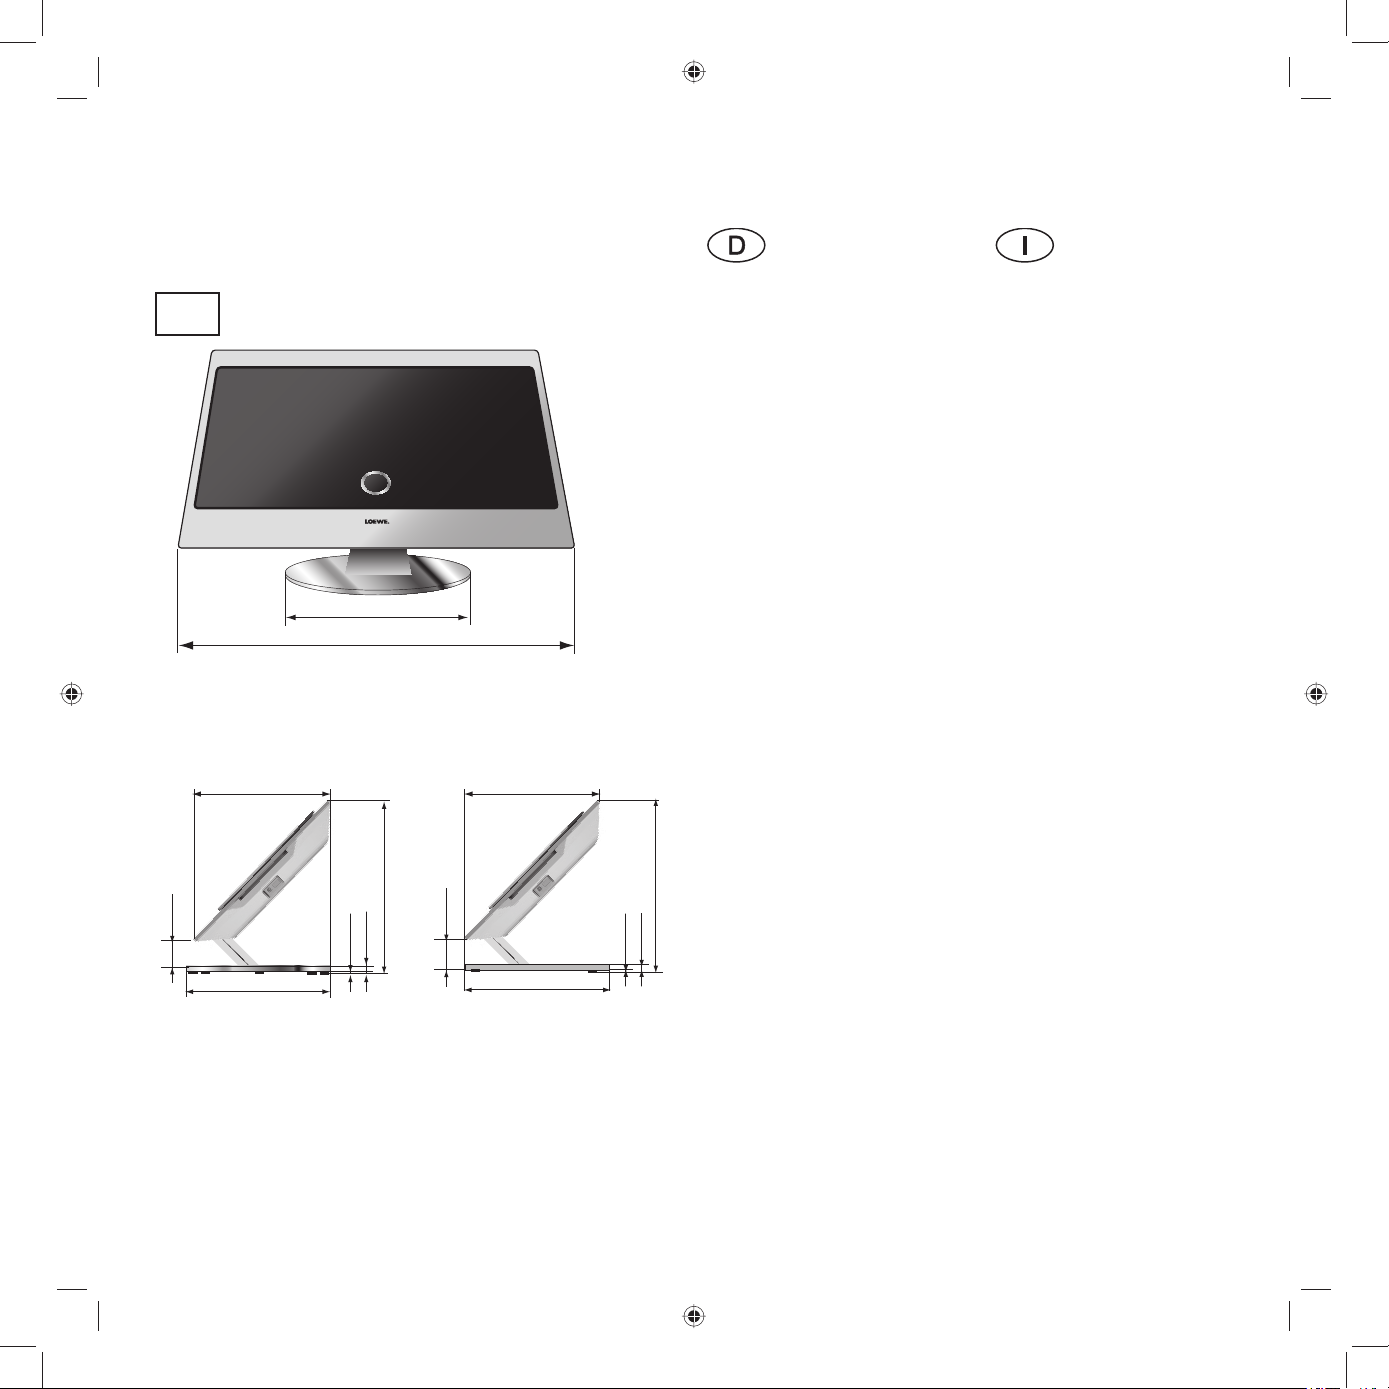
Table Stand Individual Mediacenter / Table Stand Reference Mediacenter
3
26*/29** cm
47,5 cm
* Table Stand Individual Mediacenter
** Table Stand Reference Mediacenter
23,5 cm
23,5 cm
Montagehinweise
Beachten Sie bei der Wahl des
Aufstellortes die Abmessungen
und Gewichte der Gerätekombination (Abb. 3; dargestellt:
Table Stand Individual Mediacenter).
Verwenden Sie nur die beiliegenden Originalteile.
Bei der Montage des Table
Stand müssen auch Kabel verlegt werden. Möglicherweise
müssen Sie zusätzlich zu den
Kabeln, die dem Mediacenter
beiliegen, weitere Kabel erwerben. Nähere Informationen zu
den benötigten Kabeln fi nden
Sie in der Bedienungsanleitung
des Mediacenters.
Istruzioni di
montaggio
Nella scelta del luogo di installazione, tenere in considerazione le dimensioni e i pesi della
combinazione di apparecchi
(fi g. 3: Table Stand Individual
Mediacenter).
Utilizzare soltanto i componenti originali forniti.
Durante il montaggio del Table
Stand è necessario anche posare alcuni cavi. Eventualmente,
in aggiunta ai cavi forniti con
il Mediacenter, si potranno acquistare altri cavi. Informazioni
più precise sui cavi necessari
sono riportate nel manuale di
istruzioni del Mediacenter.
5,3 cm
26 cm
Table Stand Individual
Mediacenter (11 kg)
10
9 mm
2 mm
34 cm
5,5 cm
Table Stand Reference
Mediacenter (10 kg)
25 cm
8,5 mm
2,5 mm
34 cm
Page 11
Table Stand Individual Mediacenter / Table Stand Reference Mediacenter
Montage-instructies
Houd bij de keuze van de
installatieplaats rekening met
de afmetingen en gewichten
van de toestelcombinatie (afb.
3; weergegeven: Table Stand
Individual Mediacenter).
Gebruik uitsluitend de bijgeleverde originele onderdelen.
Bij de montage van de Table
Stand moeten er ook kabels
worden gelegd. Mogelijk moet
u naast de bij het Mediacenter
geleverde kabels nog extra kabels aankopen. Meer informatie over de benodigde kabels
vindt u in de handleiding van
het Mediacenter.
Installation
instructions
Observe the dimensions and
weights of the equipment combination when selecting the
installation site (fi g. 3; illustrated: Table Stand Individual
Mediacenter).
Only use the original parts
enclosed.
Cables also have to be laid
when installing the Table
Stand. You may have to buy
other cables in addition to
those which come with the
Mediacenter. See the Mediacenter instruction manual for
more information about the
necessary cables.
Instructions de
montage
Lors du choix de
l’emplacement, veuillez tenir
compte des dimensions et
du poids de la combinaison
d’appareils (ill. 3 ; représenté :
Table Stand Individual Mediacenter).
Utilisez uniquement les pièces
originales livrées.
Des câbles doivent également
être posés lors du montage du
Table Stand. Il est possible que
vous deviez acheter des câbles
supplémentaires, en plus de
ceux qui sont joints au Mediacenter. Pour de plus amples
informations concernant les
câbles nécessaires, veuillez
consulter la notice d’utilisation
du Mediacenter.
Instrucciones
de montaje
Tenga en cuenta las dimensiones y el peso de la combinación de aparatos cuando
elija el lugar de colocación (la
fi g. 3 muestra el Table Stand
Individual Mediacenter).
Sólo utilice las piezas originales que se suministran.
Al montar el Table Stand,
también deben tenderse
cables. Seguramente deberá
adquirir otros cables, además
de los que vienen adjuntos con
el Mediacenter. Para obtener
más información sobre los
cables necesarios, consulte las
instrucciones de manejo del
Mediacenter.
11
Page 12
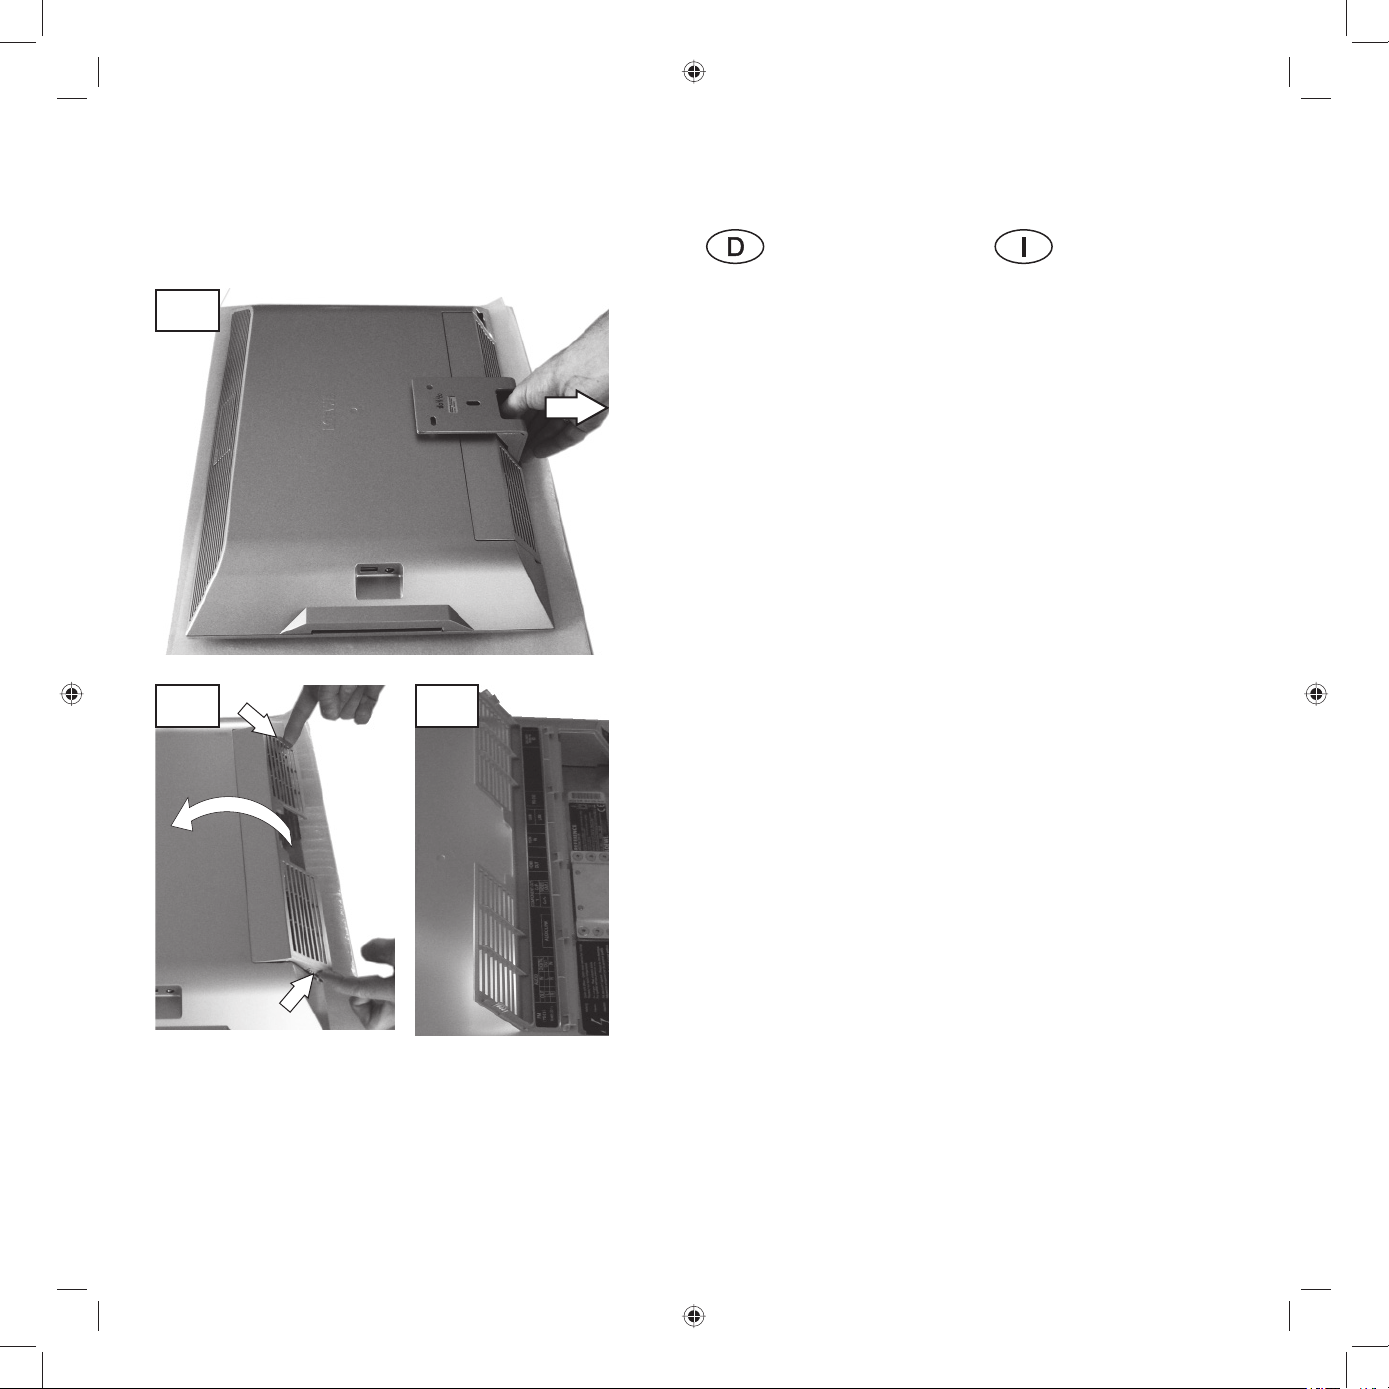
Table Stand Individual Mediacenter / Table Stand Reference Mediacenter
4
5 6
Mediacenter
vorbereiten
Nehmen Sie zunächst Ihr
Mediacenter und legen es mit
der Glasscheibe nach unten
auf eine ebene Unterlage, z. B.
einen Tisch. Verwenden Sie das
dem Mediacenter beiliegende
Vlies als Unterlage, um Kratzer
zu vermeiden (Abb. 4).
Nehmen Sie, falls angebracht,
den Wandhalter an der
Geräteunterseite ab (Abb. 4).
Er ist lediglich gesteckt und
eingerastet und kann einfach
abgezogen werden.
Nehmen Sie die Kabelanschlussabdeckung an der
Unterseite ab (Abb. 5) und
legen Sie sie über den Kabelanschlüssen auf die Geräterückseite (Abb. 6). So können Sie
später am Aufdruck sehen, wo
welches Kabel angeschlossen
werden muss.
Predisposizione
del Mediacenter
Prendere il Mediacenter e
appoggiarlo su una superfi cie
piana, ad es. su un tavolo,
con il lato dello schermo in
vetro rivolto verso il basso. Per
evitare possibili graffi , utilizzare come base di appoggio il
tessuto-non-tessuto fornito con
il Mediacenter (fi g. 4).
Se applicato, estrarre il supporto tirandolo da parete dalla
parte inferiore dell’apparecchio
(fi g. 4). Il supporto è soltanto infi lato e si può estrarre
facilmente.
Togliere la copertura del collegamento cavi dal lato inferiore
(fi g. 5) e appoggiarla sopra le
prese sul retro dell’apparecchio
(fi g. 6). Più avanti verrà indicato dove collegare i vari cavi.
12
Page 13
Table Stand Individual Mediacenter / Table Stand Reference Mediacenter
Mediacenter
voorbereiden
Leg het Mediacenter met
de glasplaat naar beneden
op een effen oppervlak, bijv.
een tafel. Gebruik het bij het
Mediacenter geleverde vlies
als ondergrond om krassen te
voorkomen (afb. 4).
Verwijder de wandhouder,
indien aangebracht, van de onderkant van het toestel (fi g. 4).
Hij is er gewoon ingestoken en
vastgeklikt en kan er eenvoudig van af worden getrokken.
Verwijder de kabelaansluitafdekking van de onderkant (afb.
5) en leg ze boven de kabelaansluitingen op de achterkant
van het toestel (afb. 6). Zo kunt
u later aan de hand van de
bedrukking zien welke kabel
waar moet worden aangesloten.
Preparing the
Mediacenter
Take your Mediacenter and
place it on a level surface, e.g.
a table, with the glass side
down. Place the enclosed felt
underneath the Mediacenter to
avoid scratching it (fi g. 4).
If necessary, remove the wall
holder from the bottom of the
set (fi g. 4). It is only plugged in
and snapped and can be pulled
off easily.
Take off he cable connection
cover on the bottom (fi g. 5)
and place it over the cable connections on the back of the set
(fi g. 6). You can then see the
labelling where which cable
has to be connected later.
Préparation
du Mediacenter
Prenez votre Mediacenter
et placez-le, avec la plaque
de verre vers le bas, sur un
support plat, p. ex. une table.
Utilisez la natte de non-tissé
jointe au Mediacenter comme protection pour éviter les
rayures (ill. 4).
Décrocher, si besoin, le support
mural par la partie inférieure
de l´appareil (ill. 4). Celui-ci est
juste enfoncé et enclenché et
peut facilement être retiré.
Retirez les raccordements
de câble à la face inférieure
(ill. 5) et posez-les sur les
branchements de câbles à la
partie arrière de l’appareil (ill.
6). Ainsi, les marquages vous
permettront ultérieurement
de voir comment les différents
câbles doivent être branchés.
Preparación
del Mediacenter
Coloque el Mediacenter con
el cristal hacia abajo sobre
una superfi cie plana, p. ej. una
mesa. Utilice el fi eltro que se
suministra con el Mediacenter
como base para su colocación
y así evitar arañazos (fi g. 4).
Retire, si es necesario, el soporte de pared de la parte inferior
del aparato (fi g. 4). Sólo está
encajado dentro del aparato y
puede extraerse fácilmente.
Retire la tapa de conexión
de cables de la parte inferior
(fi g. 5) y colóquela sobre las
conexiones de cables en la
parte posterior del aparato
(fi g. 6). Así podrá ver después
la indicación de dónde debe
conectarse cada cable.
13
Page 14
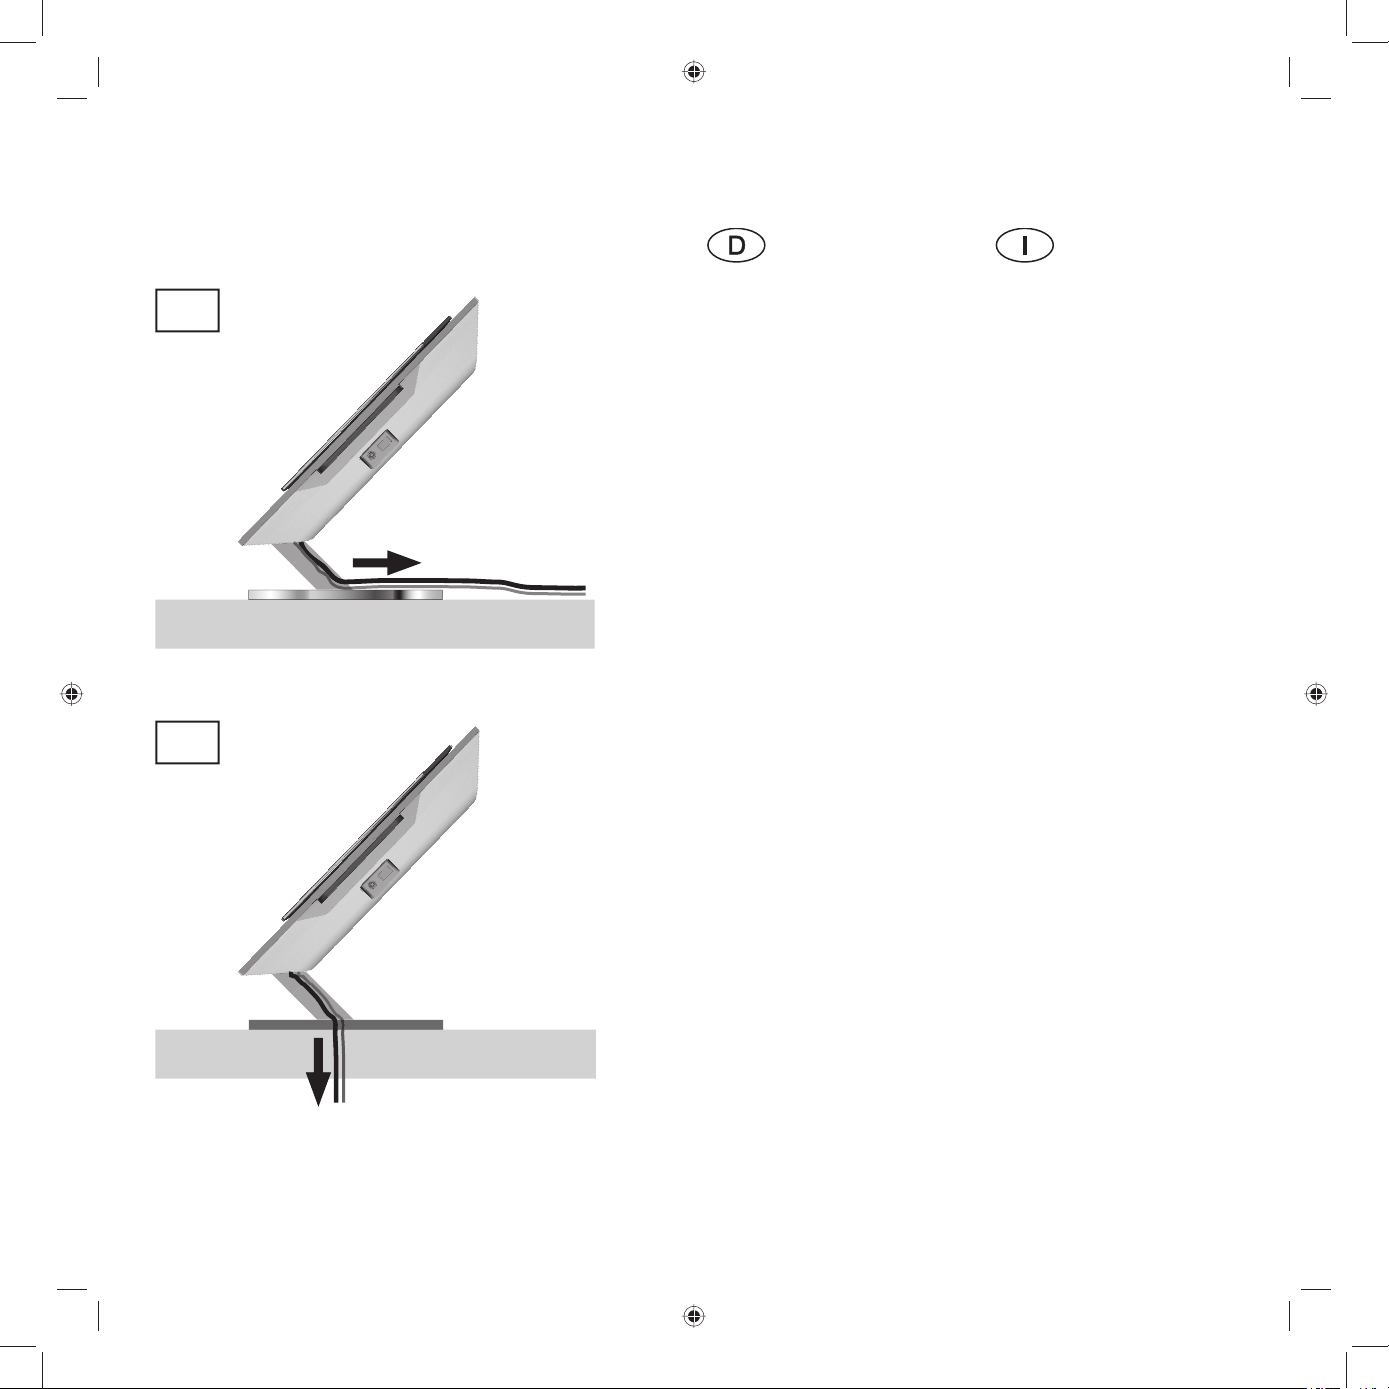
Table Stand Individual Mediacenter / Table Stand Reference Mediacenter
7
8
Verkabelungsmöglichkeiten
Sowohl beim Table Stand
Individual als auch beim Table
Stand Reference können Sie
die am Mediacenter angeschlossenen Kabel nach hinten
verlegen (Abb. 7); die dazu
erforderlichen Montagearbeiten werden auf den folgenden
Seiten beschrieben.
Beim Table Stand Reference
haben Sie zusätzlich die Möglichkeit, die Kabel durch eine
Öffnung im Fuß nach unten
zu führen (Abb. 8), beispielsweise in ein Rack, auf dem die
Gerätekombination stehen soll.
Die dafür erforderlichen Montageschritte werden ab Seite
20 beschrieben. Die folgenden
Seiten können Sie in diesem
Fall überspringen.
Cablaggi disponibili
Sia nel Table Stand Individual
che nel Table Stand Reference
è possibile posare posteriormente i cavi collegati al Mediacenter (fi g. 7); le operazioni
di montaggio richieste sono
descritte nelle prossime pagine.
Nel Table Stand Reference è
prevista anche la possibilità
di far passare i cavi attraverso
una fessura verso il basso (fi g.
8), ad esempio in un rack sul
quale si dovrà collocare la
combinazione di apparecchi.
Le operazioni di montaggio
necessarie sono descritte a
partire da pagina 20. In questo
caso, è possibile saltare le
prossime pagine.
14
Page 15
Table Stand Individual Mediacenter / Table Stand Reference Mediacenter
Bekabelingsmogelijkheden
Zowel bij de Table Stand
Individual als bij de Table
Stand Reference kunt u de op
het Mediacenter aangesloten
kabels naar achter toe leiden
(afb. 7); de daartoe vereiste
montage-ingrepen worden op
de volgende pagina’s beschreven.
Bij de Table Stand Reference
hebt u bovendien de mogelijkheid de kabels via een opening
in de voet naar beneden te
leiden (afb. 8), bijvoorbeeld in
een rek waar de toestelcombinatie op komt te staan. De
daartoe vereiste montageingrepen worden beschreven
vanaf pagina 20. De volgende
pagina’s kunt u in dat geval
overslaan.
Wiring possibilities
Both in the Table Stand Individual and in the Table Stand
Reference you can lay the
cables connected to the Mediacenter towards the rear (fi g. 7),
the necessary installation work
is described on the following
pages.
In the Table Stand Reference
you also have the option
of feeding the cables down
through an opening in the
base (fi g. 8), for example into
a rack on which the equipment
combination is to stand. The
necessary installation steps are
described from page 20. You
can skip the following pages in
this case.
Possibilités de
câblage
Pour le Table Stand Individual
comme pour le Table Stand
Reference, vous pouvez poser
vers l’arrière (ill. 7) les câbles
raccordés au Mediacenter ;
les opérations de montage
nécessaires sont décrites dans
les pages suivantes.
Pour le Table Stand Reference,
vous pouvez en outre faire passer les câbles vers le bas grâce
à un orifi ce pratiqué dans le
pied (ill. 8), par exemple dans
un rack sur lequel la combinaison d’appareils doit être
placée. Les opérations de montage nécessaires sont décrites
à partir de la page 20. Dans
ce cas, vous pouvez sauter les
pages suivantes.
Opciones
de cableado
Tanto en el Table Stand Individual, como en el Table Stand
Reference pueden tenderse los
cables conectados al Mediacenter hacia atrás (fi g. 7).
En las siguientes páginas, se
describen los pasos de montaje
necesarios.
En el Table Stand Reference,
también tiene la posibilidad
de pasar los cables por abajo
a través de un orifi cio del pie
(fi g. 8), por ejemplo, en un
mueble rack, sobre el que se
coloque la combinación de
aparatos. Los pasos de montaje
necesarios se describen a partir
de la página 20. En este caso,
puede saltarse las siguientes
páginas.
15
Page 16
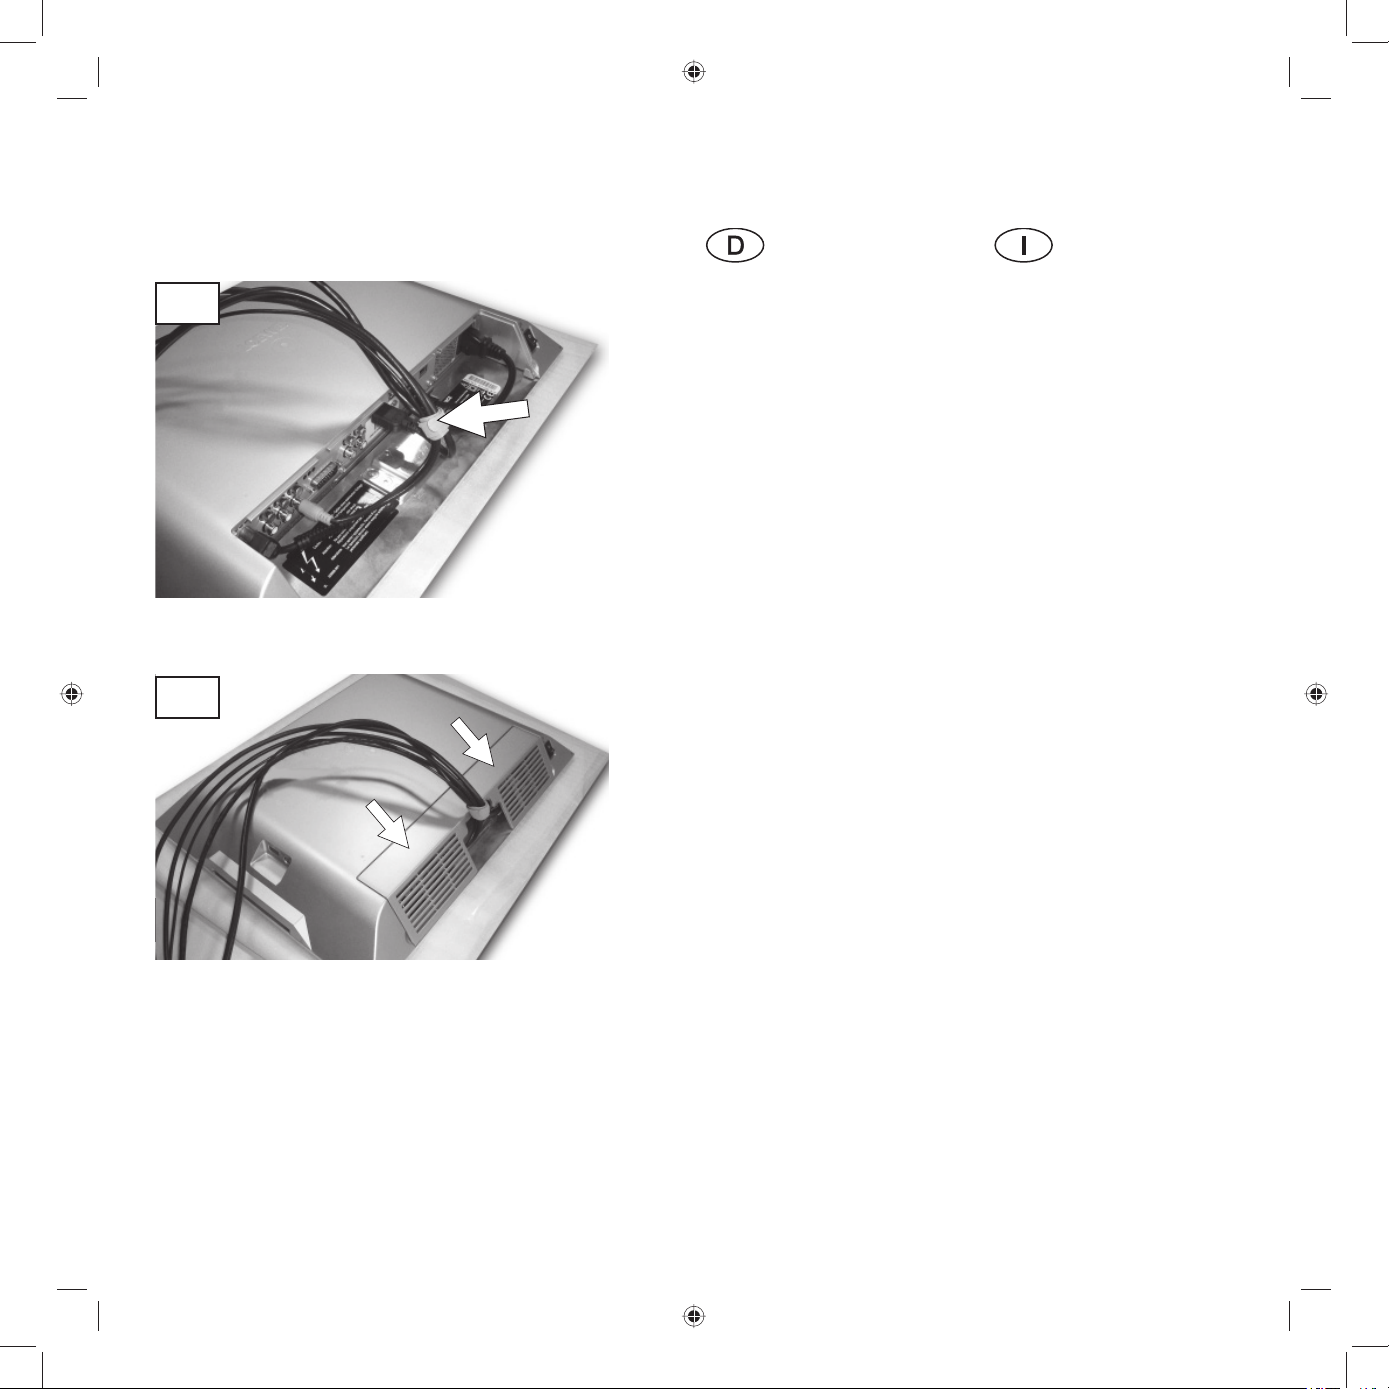
Table Stand Individual Mediacenter / Table Stand Reference Mediacenter
9
7
10
Montage für
Kabelführung
nach hinten
Schließen Sie die Kabel am
Mediacenter an (Abb. 9). Informationen dazu fi nden Sie in
der Bedienungsanleitung Ihres
Mediacenters.
Binden Sie die Kabel mit dem
Kabelbinder (siehe Pfeil), der
Ihrem Mediacenter beliegt, locker zusammen und biegen Sie
den Kabelstrang nach hinten.
Setzen Sie die Kabelanschlussabdeckung wieder auf (Abb.
10).
Montaggio per
cavi con passaggio
posteriore
Collegare i cavi al Mediacenter
(fi g. 9). Informazioni in merito
sono riportate nel manuale di
istruzioni del Mediacenter.
Legare morbidamente i cavi
con la fascetta serracavi (vedi
freccia) fornita con il Mediacenter e piegare il fascio di
cavi all’indietro.
Applicare nuovamente la
copertura del collegamento
cavi (fi g. 10).
16
8
Page 17
Table Stand Individual Mediacenter / Table Stand Reference Mediacenter
Montage met
kabelgeleiding naar
achteren
Sluit de kabels aan op het
Mediacenter (fi g. 9). Informatie
daarover vindt u in de handleiding van uw Mediacenter.
Bind de kabels met de bij uw
Mediacenter geleverde kabelbinder (zie pijl) lichtjes samen
en buig de kabelstreng naar
achteren.
Breng de kabelaansluitafdekking weer aan (fi g. 10).
Installation for
cable laying
to rear
Connect the cables to the Mediacenter (fi g. 9). You will fi nd
instructions in the Mediacenter
instruction manual.
Secure the cables loosely
with the cable tie (see arrow)
enclosed with your Mediacenter and bend the cable harness
backwards.
Replace the cable connection
cover (fi g. 10).
Opérations de
montage pour le
passage des câbles
vers l’arrière
Branchez les câbles sur le
Mediacenter (ill. 9). Pour de
plus amples informations à
ce sujet, veuillez consulter la
notice d’utilisation de votre
Mediacenter.
Regroupez les câbles, sans trop
les serrer, en faisceau avec le
fi xe-câbles (cf. fl èche) joint à
votre Mediacenter, et pliez le
faisceau vers l’arrière.
Replacez les raccordements de
câble (ill. 10).
Montaje para tender
los cables hacia atrás
Conecte los cables al Mediacenter (fi g. 9). Encontrará más
información en las instrucciones de manejo de su Mediacenter.
Sujete los cables con la abrazadera (véase la fl echa), que se
suministra con el Mediacenter,
sin apretar demasiado y doble
el conjunto de cables hacia
atrás.
Vuelva a colocar la tapa de la
conexión de cables (fi g. 10).
17
Page 18
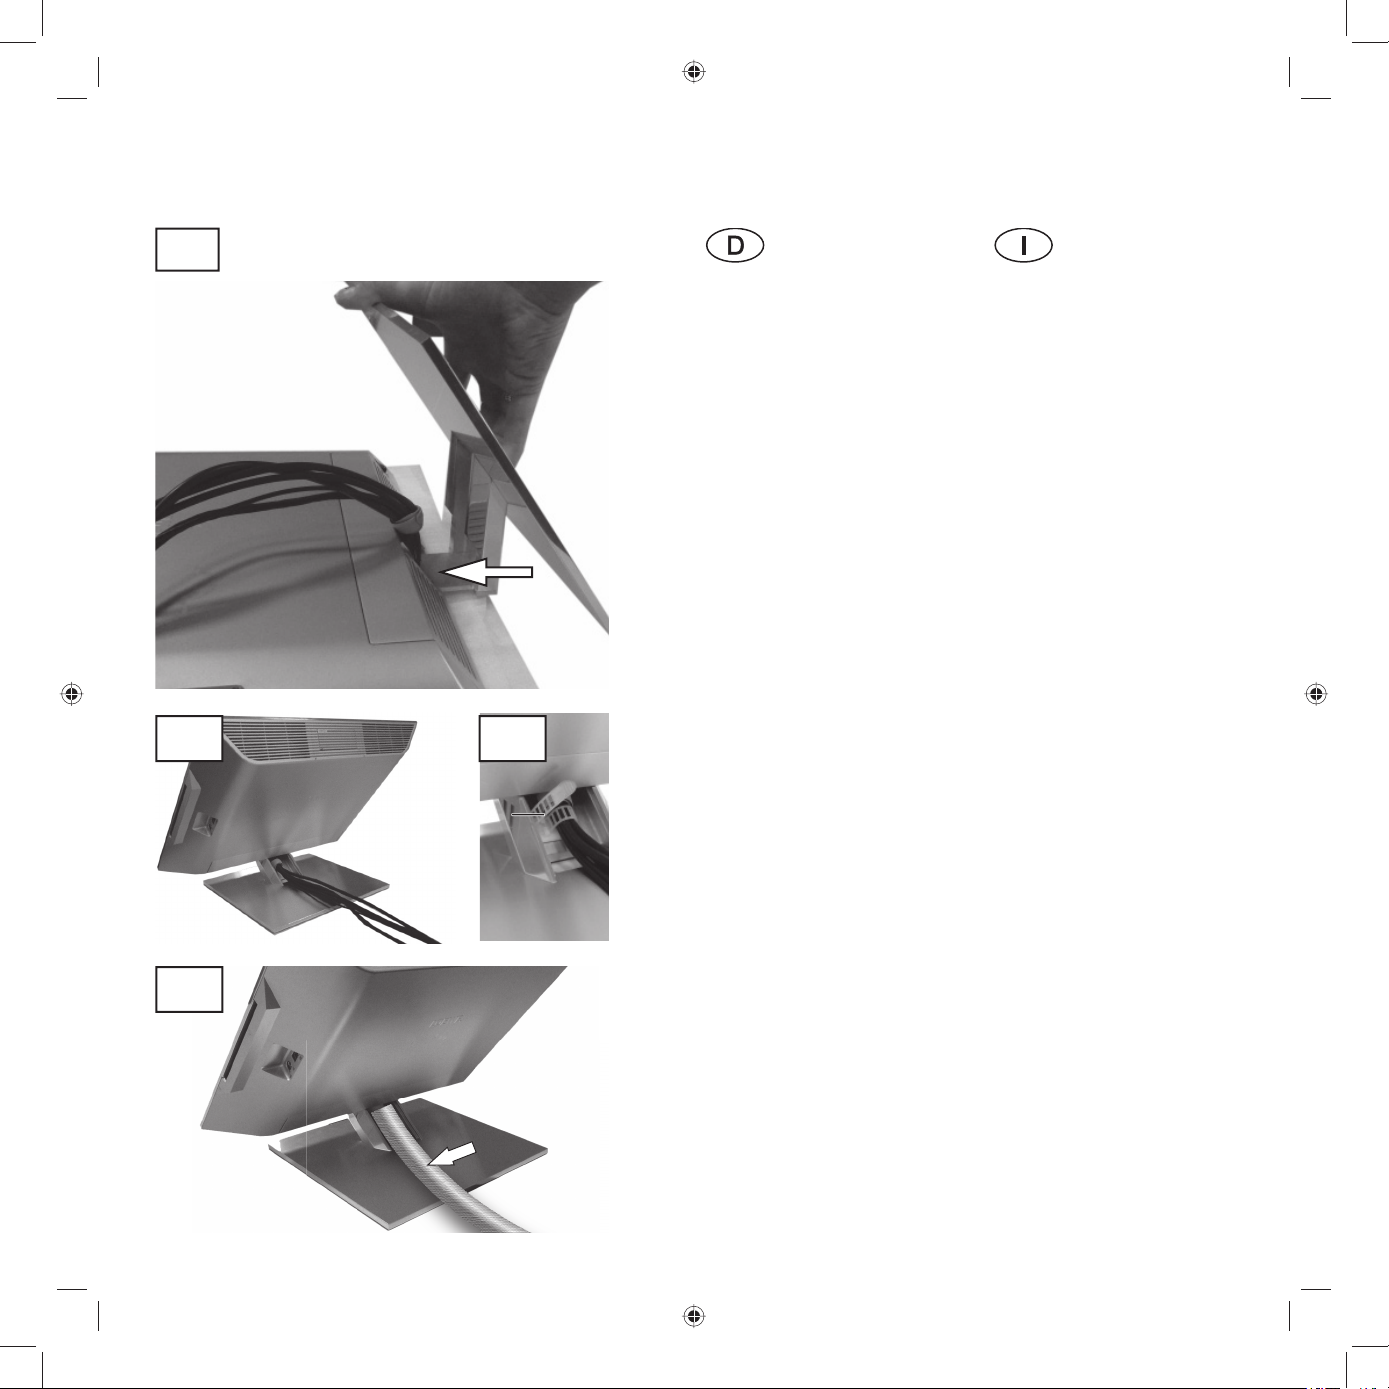
Table Stand Individual Mediacenter / Table Stand Reference Mediacenter
11
12
14
13
b
Schieben Sie nun den Table
Stand mit dem Haltewinkel bis
zum Anschlag in die Aufnahme
an der Unterseite des Mediacenters (Abb. 11).
Stellen Sie die Gerätekombination aufrecht hin (Abb. 12).
Fassen Sie sie dazu nicht am
Mediacenter allein, sondern
auch am Fuß (siehe auch Seite
6).
Fixieren Sie die Kabel mit dem
beiliegenden Kabelbinder (b)
und kleben Sie diesen wie in
Abb. 13 dargestellt an der Kabelführung im Table Stand fest.
Die Montage ist damit abgeschlossen. Sie haben nun noch
die Möglichkeit, die Kabel zum
Table Stand in einem Kabelschlauch zu verlegen. Das sieht
eleganter aus (Abb. 14). Den
Kabelschlauch erhalten Sie in
gewünschter Länge bei Ihrem
Fachhändler oder von unserem
Kundendienst:
Kabelschlauch schwarz:
Artikelnummer: 31947 004
Kabelschlauch silber:
Artikelnummer: 31947 005
Ora spingere il Table Stand
con la staffa di fi ssaggio fi no a
battuta nella fessura prevista
sul fondo del Mediacenter
(fi g. 11).
Accomodare la combinazione
di apparecchi (fi g. 12). A tale
scopo, non afferrare solo il
Mediacenter, ma anche il piede
(vedi anche pagina 6).
Fissare i cavi con la fascetta
serracavi fornita (b) e incollare
quest’ultima come raffi gurato
nella fi g. 13 sul passacavo del
Table Stand.
Il montaggio è concluso. Viene
offerta anche la possibilità di
posare i cavi del Table Stand
in un apposito tubo. Questo
accorgimento consente di
ottenere un effetto di maggiore eleganza (fi g. 14). Il tubo
può essere acquistato nella
lunghezza desiderata presso il
proprio rivenditore di fi ducia
oppure presso il nostro servizio
clienti:
Tubo cavi nero:
Codice articolo: 31947 004
Tubo cavi argento:
Codice articolo: 31947 005
18
Page 19
Table Stand Individual Mediacenter / Table Stand Reference Mediacenter
Schuif nu de Table Stand met
de bevestigingshoek tot aan de
aanslag in de opening op de
onderkant van het Mediacenter
(afb. 11).
Zet de toestelcombinatie
rechtop (afb. 12). Pak daarbij
niet alleen het Mediacenter
vast maar ook de voet (zie ook
pagina 6).
Bevestig de kabels met de
bijgeleverde kabelbinder (b) en
kleef die zoals getoond in afb.
13 vast op de kabelgeleiding in
de Table Stand.
Daarmee is de montage
voltooid. U hebt nu nog de
mogelijkheid de kabels tot
aan de Table Stand door een
kabelslang te leiden. Dat oogt
eleganter (fi g. 14). De kabelslang kunt u in de gewenste
lengte kopen bij uw dealer of
bij onze klantendienst:
Kabelslang zwart:
Artikelnummer: 31947 004
Kabelslang zilver:
Artikelnummer: 31947 005
Push the Table Stand with the
mounting bracket all the way
into the holder on the bottom
of the Mediacenter (fi g. 11).
Place the equipment combination in an upright position (fi g.
12). Do not hold by the Mediacenter alone but by the base as
well (see also page 6).
Fix the cable with the enclosed
cable tie (b) and stick this into
cable guide in the Table Stand
as shown in fi g. 13.
Installation is then complete.
You can now lay the cables to
the Table Stand in a cable hose.
This looks tidier (fi g. 14). The
cable hose is available in the
desired length from your dealer
or from our after sales service.
Cable hose, black:
Part number: 31947 004
Cable hose, silver:
Part number: 31947 005
Repoussez alors le Table Stand
avec l’équerre de fi xation
jusqu’à la butée dans le logement situé à la face inférieure
du Mediacenter (ill. 11).
Mettez en place la combinaison d’appareils (ill. 12). Pour
cela, ne la saisissez pas seulement au niveau du Mediacenter mais aussi au niveau du
pied (cf. aussi page 6).
Fixez les câbles avec le fi xecâbles joint (b) et collez ce
dernier comme présenté sur
l’ill. 13 dans le passage de
câbles dans le Table Stand.
Le montage est ainsi terminé.
Vous pouvez alors encore faire
passer les câbles menant au
Table Stand dans une gaine.
Ceci est plus esthétique (ill.
14). La gaine est disponible
dans la longueur souhaitée
chez les revendeurs ou auprès
de notre service après-vente :
Gaine noire :
Référence d’article : 31947 004
Gaine argentée :
Référence d’article : 31947 005
Introduzca ahora el Table Stand
con la escuadra hasta el tope
en el asiento de la parte inferior del Mediacenter (fi g. 11).
Coloque la combinación de
aparatos en posición vertical
(fi g. 12). Para ello no agarre
solamente el Mediacenter, sino
también el pie (véase también
la página 6).
Sujete los cables con la
abrazadera que se suministra
adjunta (b) y péguela, como
se muestra en la fi g. 13, en la
guía de cables del Table Stand.
El montaje queda así fi nalizado. Todavía tiene la posibilidad de tender los cables hasta
el Table Stand por un conducto
de cables. Así resultará mucho
más elegante (fi g. 14). El tubo
para cables puede adquirirse
en la longitud deseada en
comercios especializados o a
través de nuestro servicio al
cliente.
Conducto de cables negro:
Número de
referencia: 31947 004
Conducto de cables plateado:
Número de
referencia: 31947 005
19
Page 20
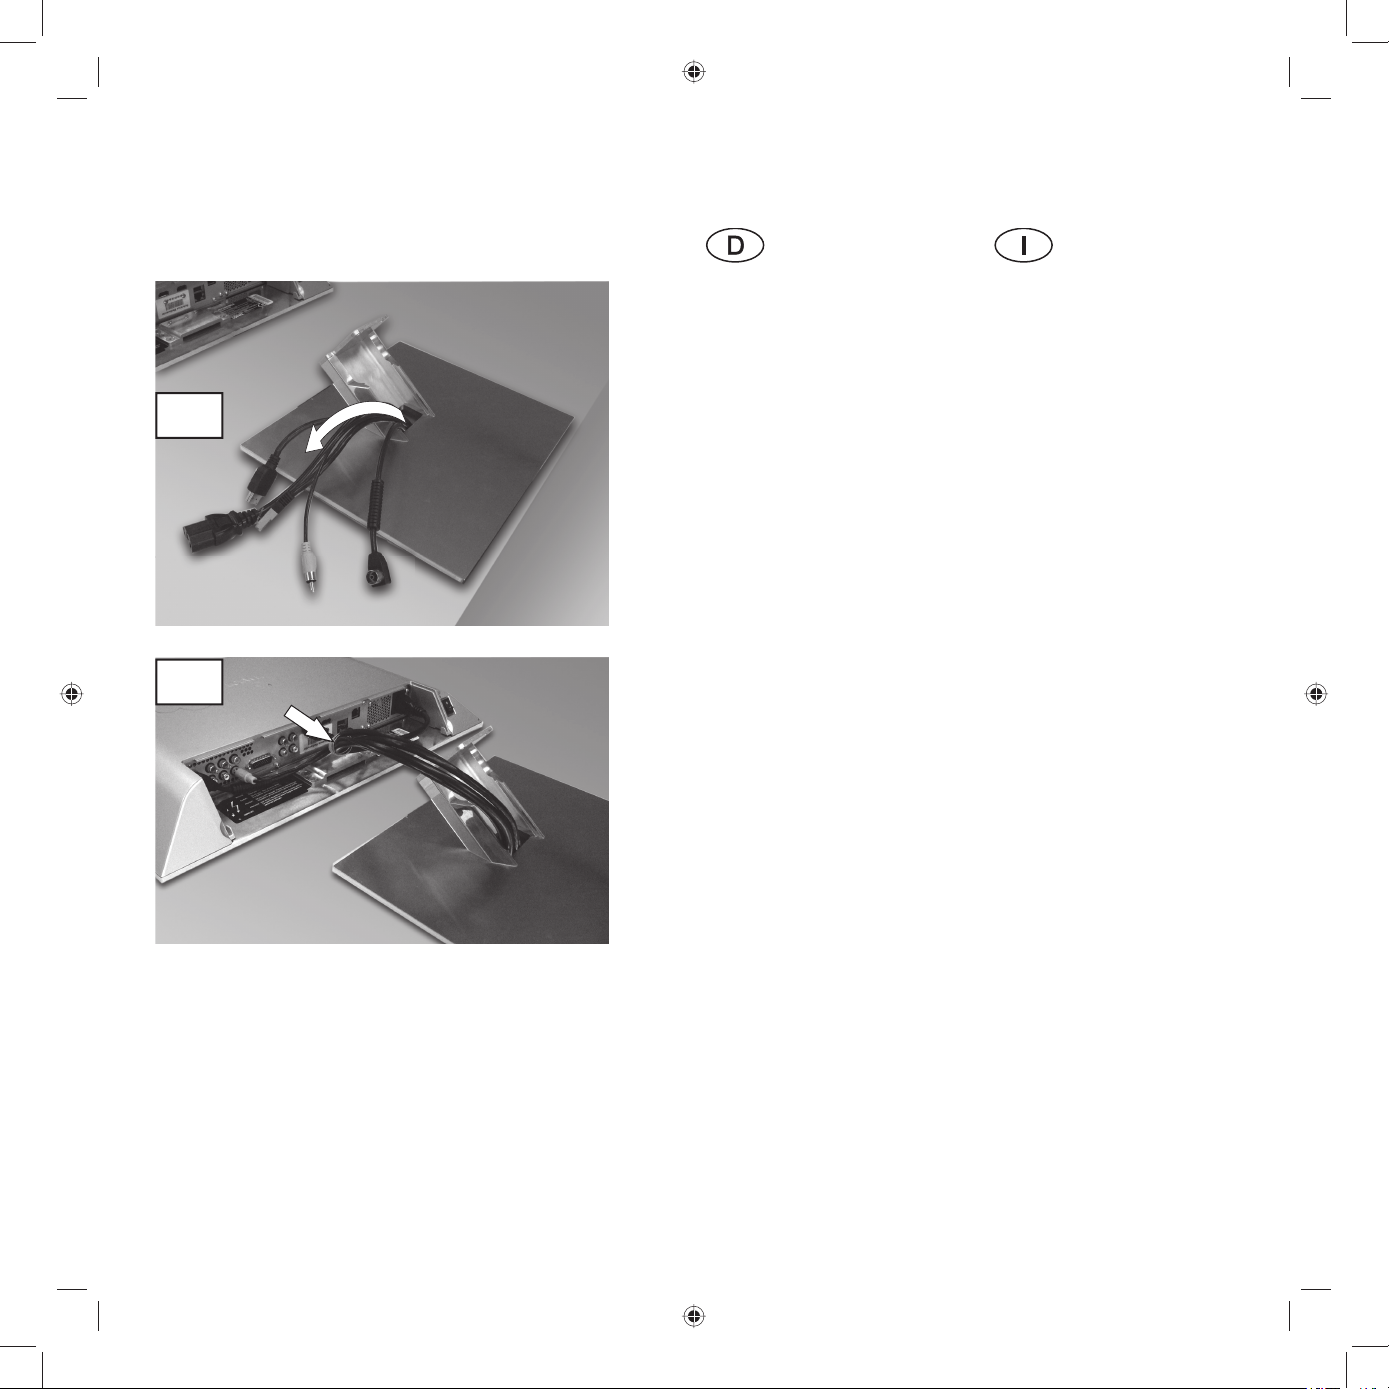
Table Stand Individual Mediacenter / Table Stand Reference Mediacenter
15
16
Montage für
Kabelführung
nach unten
(nur bei Table Stand Reference
Mediacenter)
Legen Sie Mediacenter und
Table Stand wie in Abb. 15
dargestellt auf das Rack. Positionieren Sie den Table Stand
so, dass die Kabeldurchführung
in der Bodenplatte des Table
Stand über der Öffnung für die
Kabeldurchführung im Rack zu
liegen kommt. Bedecken Sie
den Table Stand mit Vliesmaterial, das dem Mediacenter
beiliegt, um Verkratzen bei der
Kabelverlegung zu verhindern.
Schieben/ziehen Sie nun die
Kabel von unten durch die
Öffnungen im Rack und im
Table Stand nach oben (siehe
Pfeil Abb. 15). Verlegen Sie als
erstes Kabel das Netzkabel.
Schließen Sie die Kabel am
Mediacenter an (Abb. 16). Informationen dazu fi nden Sie in
dessen Bedienungsanleitung.
Fixieren Sie die Kabel locker
mit dem Kabelbinder, der dem
Mediacenter beiliegt (siehe
Pfeil).
Montaggio per cavi
con passaggio verso
il basso
(solo per il Table Stand
Reference Mediacenter)
Appoggiare il Mediacenter e
il Table Stand sul rack come
rappresentato nella fi g. 15.
Posizionare il Table Stand in
modo che il passacavi nella piastra di fondo del Table Stand
vada ad appoggiarsi nel rack
passando attraverso l’apposita
fessura. Coprire il Table Stand
con il tessuto-non-tessuto
fornito con il Mediacenter per
evitare graffi durante la posa
dei cavi.
Ora spingere/tirare i cavi dal
basso verso l’alto attraverso
le fessure nel rack e nel Table
Stand (vedi freccia fi g. 15). Posare per primo il cavo di rete.
Collegare i cavi al Mediacenter
(fi g. 16). Informazioni in merito
sono riportate nel rispettivo
manuale di istruzioni.
Legare morbidamente i cavi
con la fascetta serracavi (vedi
freccia) fornita con il Mediacenter.
20
Page 21
Table Stand Individual Mediacenter / Table Stand Reference Mediacenter
Montage met
kabelgeleiding naar
beneden toe
(uitsluitend bij Table Stand
Reference Mediacenter)
Leg het Mediacenter en de
Table Stand zoals getoond
in afb. 15 op het rek. Positioneer de Table Stand zo dat de
kabeldoorvoeropening in de
bodemplaat van de Table Stand
zich precies boven de kabeldoorvoeropening in het rek
bevindt. Bedek de Table Stand
met het bij het Mediacenter
geleverde vliesmateriaal om
krassen bij het leiden van de
kabels te voorkomen.
Steek nu de kabels van onder
uit door de openingen in het
rek en de Table Stand (zie pijl
afb. 15). Installeer de netvoedingskabel als eerste.
Sluit de kabels aan op het Mediacenter (fi g. 16). Informatie
daarover vindt u in de handleiding bij het toestel.
Bevestig de kabels lichtjes met
de kabelbinder die bij het Mediacenter is geleverd (zie pijl).
Installation for
cable laying
downwards
(only for Table Stand Reference
Mediacenter)
Place the Mediacenter and
the Table Stand on the rack
as shown in fi g. 15. Position
the Table Stand so that the
cable opening in the base of
the Table Stand is above the
opening fort he cables in the
rack. Cover the Table Stand
with the felt material enclosed
with the Mediacenter to avoid
scratching it when laying the
cables.
Now push/pull the cables up
from below through the openings in the rack and the Table
Stand (see arrow fi g. 15). Lay
the power cable fi rst.
Connect the cables to the
Mediacenter (fi g. 16). Observe
the Mediacenter instruction
manual for information.
Fix the cables loosely with the
cable tie enclosed with the Mediacenter (see arrow).
Opérations de
montage pour le
passage des câbles
vers le bas
(uniquement pour le Mediacenter Table Stand Reference)
Posez le Mediacenter et
le Table Stand sur le rack
comme présenté sur l’ill. 15.
Positionnez le Table Stand
de telle sorte que le passage
de câbles dans la plaque de
socle du Table Stand se trouve
au-dessus de l’ouverture de
passage de câbles pratiquée
dans le meuble. Recouvrez le
Table Stand avec la natte de
non-tissé jointe au Mediacenter pour éviter toute rayure lors
de la pose des câbles.
Enfi ler/tirez alors les câbles
par le bas à travers les orifi ces
du rack et par le haut dans
ceux du Table Stand (cf. fl èche,
ill. 15). Le premier câble
devant être posé est le câble
d’alimentation réseau.
Branchez les câbles sur le Mediacenter (ill. 16). Pour de plus
amples informations à ce sujet,
veuillez consulter sa notice
d’utilisation.
Fixez les câbles sans trop les
serrer avec le fi xe-câbles joint
au Mediacenter (cf. fl èche).
Montaje para
tender los cables
hacia abajo
(sólo en el Table Stand Reference Mediacenter)
Coloque el Mediacenter y el
Table Stand en el mueble rack
como se muestra en la fi g. 15.
Monte el Table Stand tendiendo los cables de la placa base
del Table Stand a través del
orifi cio para cables del mueble
rack. Cubra el Table Stand con
el fi eltro que se suministra
con el Mediacenter para no
arañarlo durante la instalación
de los cables.
Ahora tienda los cables a través de los orifi cios del mueble
rack de abajo hasta arriba del
Table Stand (véase la fl echa en
la fi g. 15). Primero coloque el
cable de red.
Conecte los cables al Mediacenter (fi g. 16). Encontrará más
información en las instrucciones de manejo del Mediacenter.
Sujete los cables con la
abrazadera que se suministra
con el Mediacenter sin apretar
demasiado (véase la fl echa).
21
Page 22
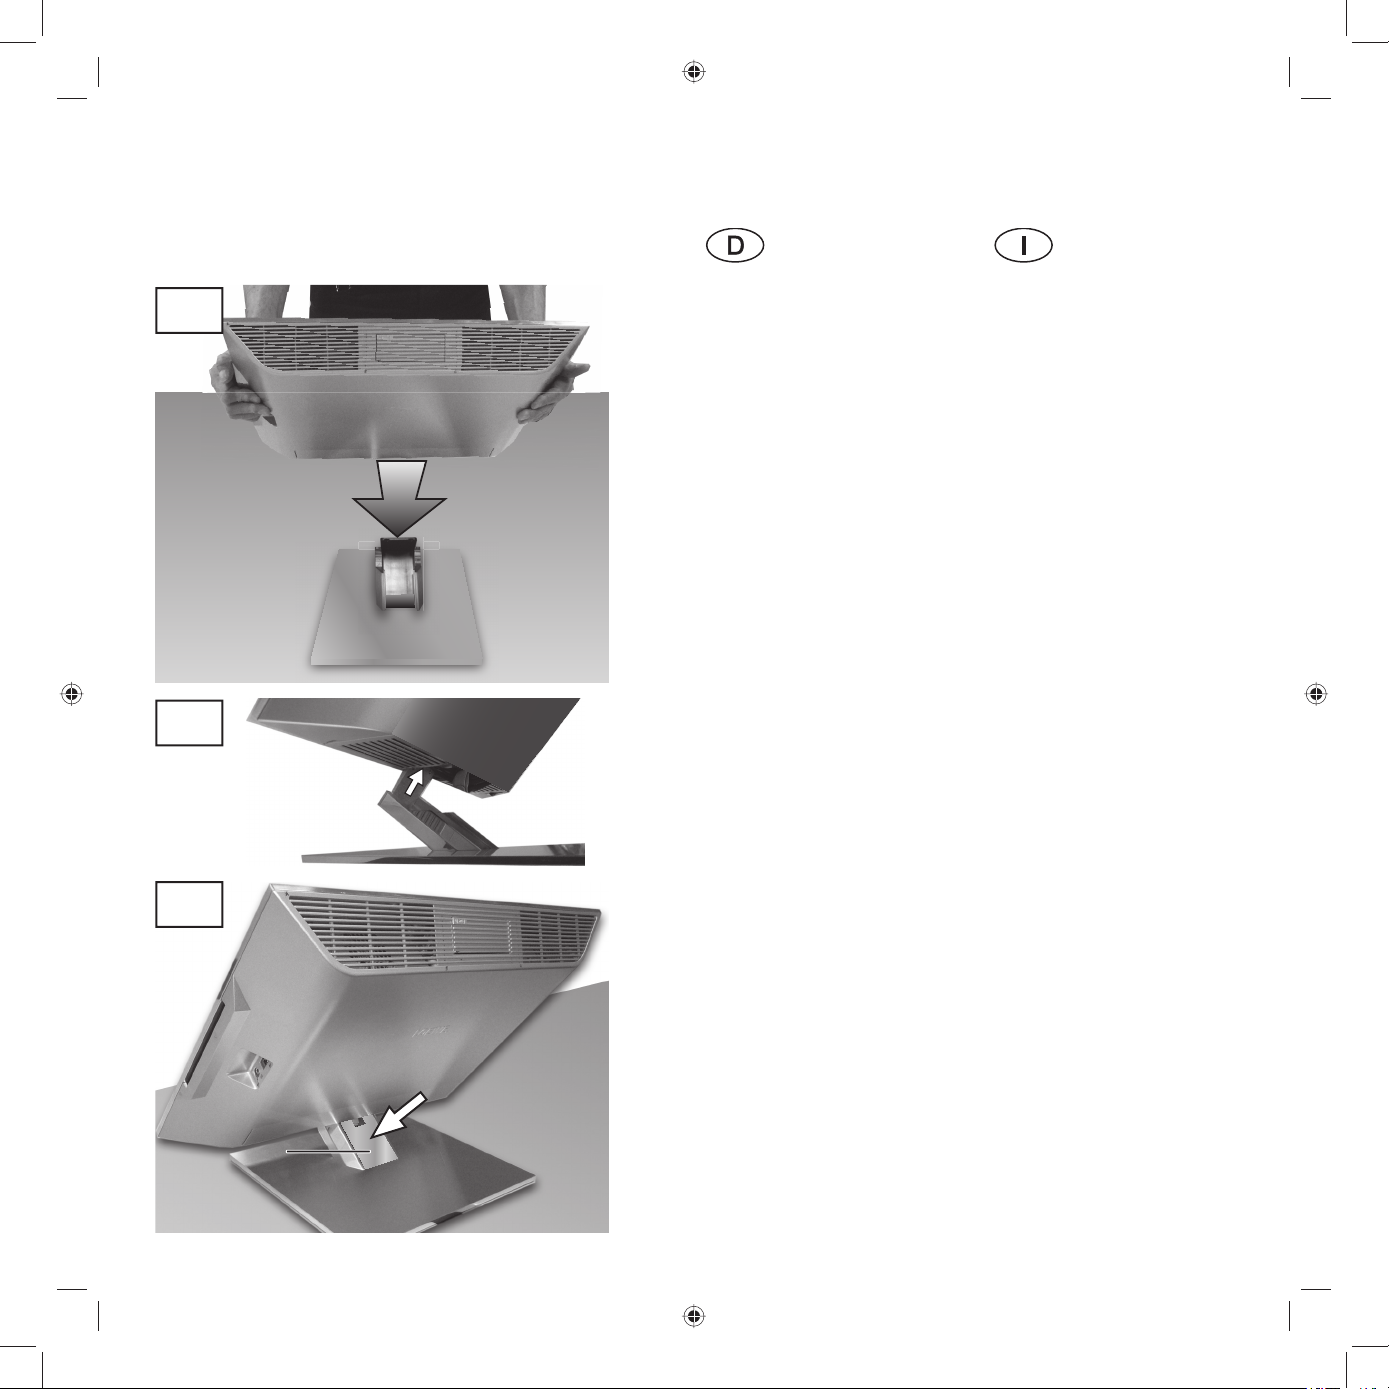
Table Stand Individual Mediacenter / Table Stand Reference Mediacenter
17
18
Setzen Sie das Mediacenter auf
den Table Stand (Abb. 17). Achten Sie dabei darauf, dass der
Haltewinkel des Table Stand bis
zum Anschlag in die Aufnahme
unten am Mediacenter eingeführt wird (Abb. 18).
Stecken Sie die mitgelieferte
Kabelabdeckung (c) auf (Abb.
19).
Die Montage ist damit abgeschlossen.
Reinigung
Reinigen Sie die Gerätekombination mit einem feuchten,
weichen und sauberen Tuch
(ohne jedes scharfe oder
scheuernde Reinigungsmittel).
Appoggiare il Mediacenter sul
Table Stand (fi g. 17). Accertarsi
che la staffa di fi ssaggio del Table Stand venga introdotta fi no
in fondo nella fessura sotto il
Mediacenter (fi g. 18).
Applicare la copertura per il
vano cavi fornita (fi g. 19).
Il montaggio è concluso.
Pulizia e cura
Pulire gli apparecchi combinati
con un panno umido, soffi ce
e pulito (senza detergenti
aggressivi o abrasivi).
22
19
c
Page 23
Table Stand Individual Mediacenter / Table Stand Reference Mediacenter
Breng het Mediacenter aan op
de Table Stand (afb. 17). Let
erop dat de bevestigingshoek
van de Table Stand tot de
aanslag in de opening op de
onderkant van het Mediacenter
wordt gestoken (afb. 18).
Breng de bijgeleverde kabelafdekking (c) aan (afb. 19).
Daarmee is de montage
voltooid.
Reinigen
Reinig de toestellencombinatie
met een vochtige, zachte en
schone doek (zonder bijtende
of schurende reinigingsmiddelen).
Place the Mediacenter on the
Table Stand (fi g. 17). Make
sure that the mounting bracket
of the Table Stand is pushed
all the way into the holder on
the bottom of the Mediacenter
(fi g. 18).
Fit the enclosed cable cover (c)
(fi g. 19).
Installation is then complete.
Cleaning and care
Clean the equipment combination with a damp, soft, clean
cloth (without any aggressive
or abrasive cleaning agents).
Placez le Mediacenter sur le
Table Stand (ill. 17). Ici, veillez
à ce que l’équerre de fi xation
du Table Stand soit bien introduite jusqu’à la butée dans le
logement situé dans le bas du
Mediacenter (ill. 18).
Mettez en place le couvercle
du compartiment à câbles joint
(c) (ill. 19).
Le montage est ainsi terminé.
Nettoyage
Nettoyez la combinaison
d’appareils avec un tissu humide, doux et propre (sans aucun
produit d’entretien corrosif ou
abrasif).
Coloque el Mediacenter sobre
el Table Stand (fi g. 17). Tenga
en cuenta que la escuadra del
Table Stand debe introducirse
hasta el tope en el asiento de
la parte inferior del Mediacenter (fi g. 18).
Coloque la tapa de cables
suministrada (c) (fi g. 19).
El montaje queda así fi nalizado.
Limpieza
Para la limpieza de la combinación de aparatos, utilice un
paño limpio y suave humedecido (sin emplear detergentes
corrosivos o abrasivos).
23
Page 24
24
 Loading...