

Loctite Hysol 175-SPRAY, Hysol 175-SPRAY-HT Operation Manual

EQUIPMENT
Operation Manual
Loctite® Hysol® 175-SPRAY
120 Volt Part No. 98037, 230 Volt Part No. 98057
Loctite® Hysol® 175-SPRAY-HT
120 Volt Part No. 98041, 230 Volt Part No. 98059

Contents
1. Please Observe the Following....................................................................................... 2
1.1 Safety................................................................................................................................ 2
1.2 Items supplied................................................................................................................... 2
2. Description ...................................................................................................................... 3
3. Technical Data ................................................................................................................3
4. Installation....................................................................................................................... 4
5. Operation......................................................................................................................... 4
5.1 Applying Adhesive - Spray Adjustment ............................................................................ 5
5.2 Adhesive Flow Rate Adjustment....................................................................................... 5
6. Application Hints ............................................................................................................ 6
7. Troubleshooting ............................................................................................................. 6
8. Care and Maintenance.................................................................................................... 7
9. Accessories and ............................................................................................................ 8
10 Appendix........................................................................................................................ 10
11, Exploded Diagram ........................................................................................................ 11
12. Parts List........................................................................................................................ 12
13. Warranty. ..................................................................................................................... 113
Page 1

1. Please Observe the Following
1.1 Emphasized Sections
Warning!
Refers to safety regulations and required safety measures that protect the operator or
other persons from injury or danger to life.
Caution!
Emphasizes what must be done or avoided so that the unit or other property is not
damaged.
Notice:
Gives recommendations for better handling of the unit during operation or adjustment
as well as for service activities.
1.2 Safety
Do not touch the nozzle or molten adhesive with bare skin as they are hot - the
operating temperature of the Loctite
applicators is approximately 400ºF (200ºC). Protective gloves should always be
worn. Careless handling can cause skin burns. If molten adhesive comes into
contact with the skin immerse the affected area immediately in plenty of cold water.
Seek medical advice if necessary.
In addition to the safety instructions herein, any statutory regulations, local fire
insurance regulations, or other generally valid “regulations for accident prevention”
must be complied with when using this tool.
• Never use the tool if it is damaged in any way.
• Do not use this tool in damp rooms, outdoors while it is raining, or where there is
high humidity.
• Do not use this tool in the vicinity of any heat-sensitive materials, or any flammable
materials, liquids, or gases.
• Only use extension cables that meet the specification shown in “Technical data”.
• Never pull on the tool’s connecting cable.
®
Hysol® 175-SPRAY and 175-SPRAY-HT
1.3 Items supplied
Loctite® Hysol® 175-SPRAY
• Pneumatically-driven Hot Melt Cartridge Dispenser, fitted with 356°F (180°C)
thermostat (suitable for standard spray hot melt adhesives)
• Valve body airline adapter
• Plastic Stand
• Manual
Loctite
• Pneumatically-driven Hot Melt Cartridge Dispenser, fitted with 383°F (195°C)
• Valve body airline adapter
• Plastic Stand
• Manual
®
Hysol® 175-SPRAY-HT
thermostat (suitable for polyamide spray hot melt adhesives)
Page 2
2 Description
The Loctite® Hysol® 175-SPRAY and 175-SPRAY-HT are the highest output, hand-held
industrial spray hot melt applicators available. With its two powerful 250W stainless steel
cartridge heaters, they are capable of dispensing up to 9 lbs. of molten hot melt per hour,
yet only take 10 minutes to warm up.
Supported by a range of spray adhesive formulations, the Loctite
®
Hysol® 175-SPRAY and
175-SPRAY-HT are suitable for most applications - they can even be used with heat
sensitive substrates such as expanded polystyrene and other plastic foams. Also, the
®
Loctite
Hysol® 175-SPRAY and 175-SPRAY-HT systems are solvent-free and non-toxic,
so there are none of the environmental problems often associated with other spray
adhesive applicators.
Designed to comply with world wide safety standards, the Loctite
®
Hysol® 175-SPRAY and
175-SPRAY-HT also feature a totally enclosed heater housing, and are fitted with thermal
fuse protection.
3 Technical Data
Dimensions (L x H x W): approx. 11 13/16” x 9 15/32” x 2 17/32”
(Approx. 300 x 240 x 65 mm)
Total weight: approx. 3 lbs. (1.4 Kg)
Connection cable with mains plug: 10 ft (3 m) long
Operating voltage: 98037/98041: 110-120 VAC 50/60Hz
98057/98059: 230 VAC 50/60Hz
Power consumption: 500W
Heating up time: 10 minutes
Operating temperature: 175-SPRAY approx. 356°F (180°C)
175-SPRAY-HT approx. 383°F (195°C)
Diameter of adhesive inlet: 1 11/16” (43 mm)
Extension cable: max. 65ft (20 m) long
Wire cross section: at least 16 a.w.g. (1.5 mm
Air Supply / Pneumatic Minimum - 45 p.s.i. (3 bar)
Maximum - 100 p.s.i. (7 bar)
2
)
Page 3
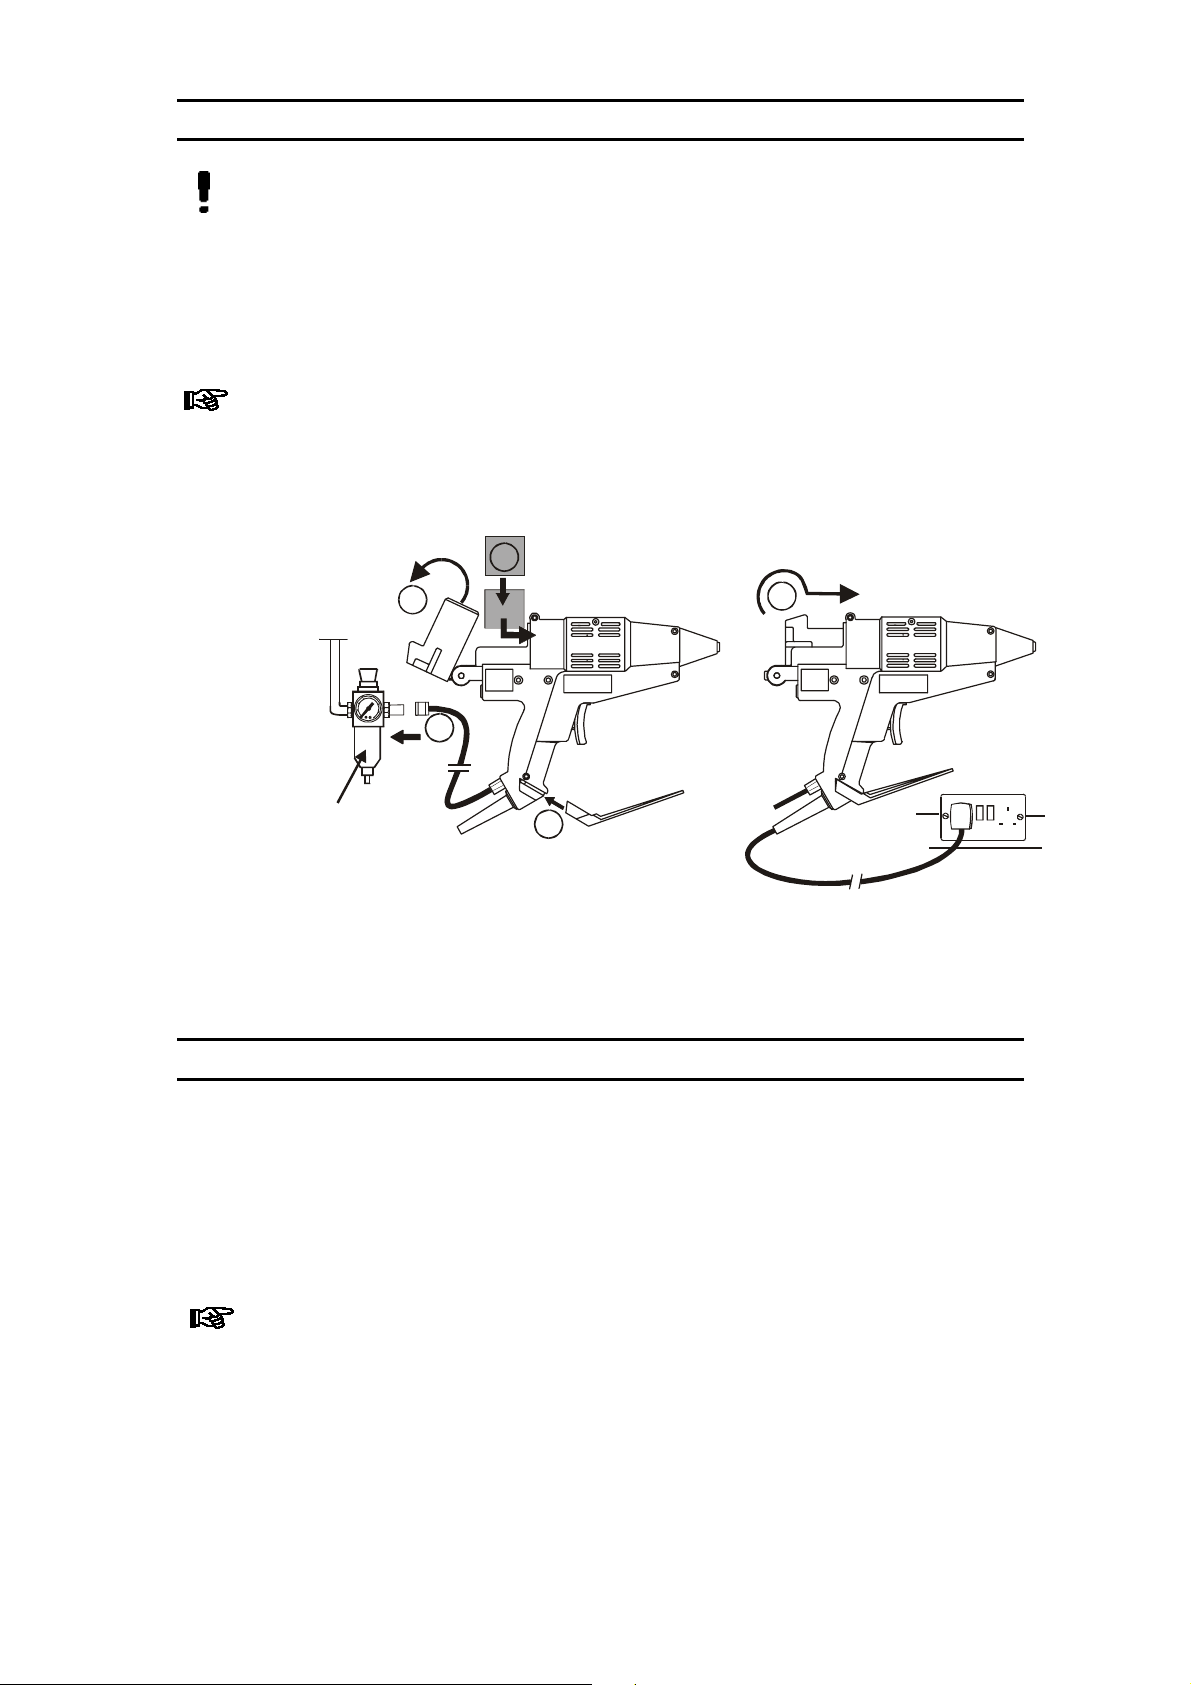
4 Installation
Before using the tool for the first time check it carefully for signs of external damage. If
any transit damage is found DO NOT USE THE TOOL - return it to your supplier
immediately.
Steps 1 – 5 should be followed before connection to the main supply:
1. Insert the applicator stand into the grooves at the base of the handle. Stand
applicator on a flat surface.
2. Connect the air supply hose to a clean, dry and regulated air supply using the
Quick-Disconnect fitting provided (use of a filter / regulator is recommended)
3. Pull piston back fully and rotate upwards.
4. Load two adhesive cartridges into the barrel of the tool and push fully forward.
5. Rotate the piston down and slide forward fully until it contacts the rear of the
adhesive cartridge - it should engage about 5/16" (6-8mm) into the applicator
barrel.
4
USERS AIR SUPPLY
6. Connect tool to main supply.
7. Red ‘Power On’ indicator light will illuminate.
8. Allow the applicator to thoroughly warm up for 10 minutes. Do not attempt to
operate the applicator until this time has elapsed.
5 Operation
Normal use:
• Assemble the stand and place the applicator in an upright position on a flat surface.
• Plug the applicator into the power supply socket, and switch on the power. Wait 10
minutes for the applicator to reach its normal operating temperature.
• Squeeze the trigger to advance the piston and extrude molten adhesive through the
nozzle.
• To stop extruding adhesive simply release the trigger.
3
5
2
1
During use, the piston will advance into the barrel as the trigger is pulled. A point will
be reached where the piston no longer advances, and the sound of air escaping can
be heard - this indicates that the applicator needs reloading.
• Release the trigger.
• Pull the piston back.
• Insert a new adhesive cartridge.
• Operate the tool normally.
Page 4
 Loading...