

Page 1
USER MANUAL
Ver. 1.0
Page 2

Contact Information
LOCOOP, Inc.
Webpage
http://www.locoop.net
General
Sales
Support
Dear Customer,
Thank you for choosing LOCOOP Y!
If you have any questions, or discover problems, please contact
[email protected], listed in the table below. We will take necessary
action.
You can find our news, on LOCOOP’s Facebook page at
https://www.facebook.com/locoopinc/ .
In addition, please check our newsletter in the future, for firmware
upgrades and new service from LOCOOP.
We hope you enjoy LOCOOP Y.
LOCOOP Team
Page 3

Table of Contents
Part A
Introduction 5
1. Basics
2. Precautions and Safety Instructions
Part B
Hardware Assembly 8
1. Getting Started
2. Attaching Magnetic Tabs
3. Assembling Left Panel and Main Board
4. Attaching Pillars
5. Attaching Right Panel and the Remaining Pillar
6. Attaching Rubber Feet
7. Attaching the Bottom
8. Attaching the Top Panel
9. Attaching End-Effector
Part C
Operation 19
1. Home Screen
2. Calibration
3. Loading Filament
4. Printing
5. Stop & Resume
6. Removing 3D Print
7. Free Control
8. CURA Download & Setting
9. Other Precautions
Part D
Troubleshooting 30
1. Troubleshooting
Page 4

Page 5
Part A
Introduction
Page 6
1. Basics
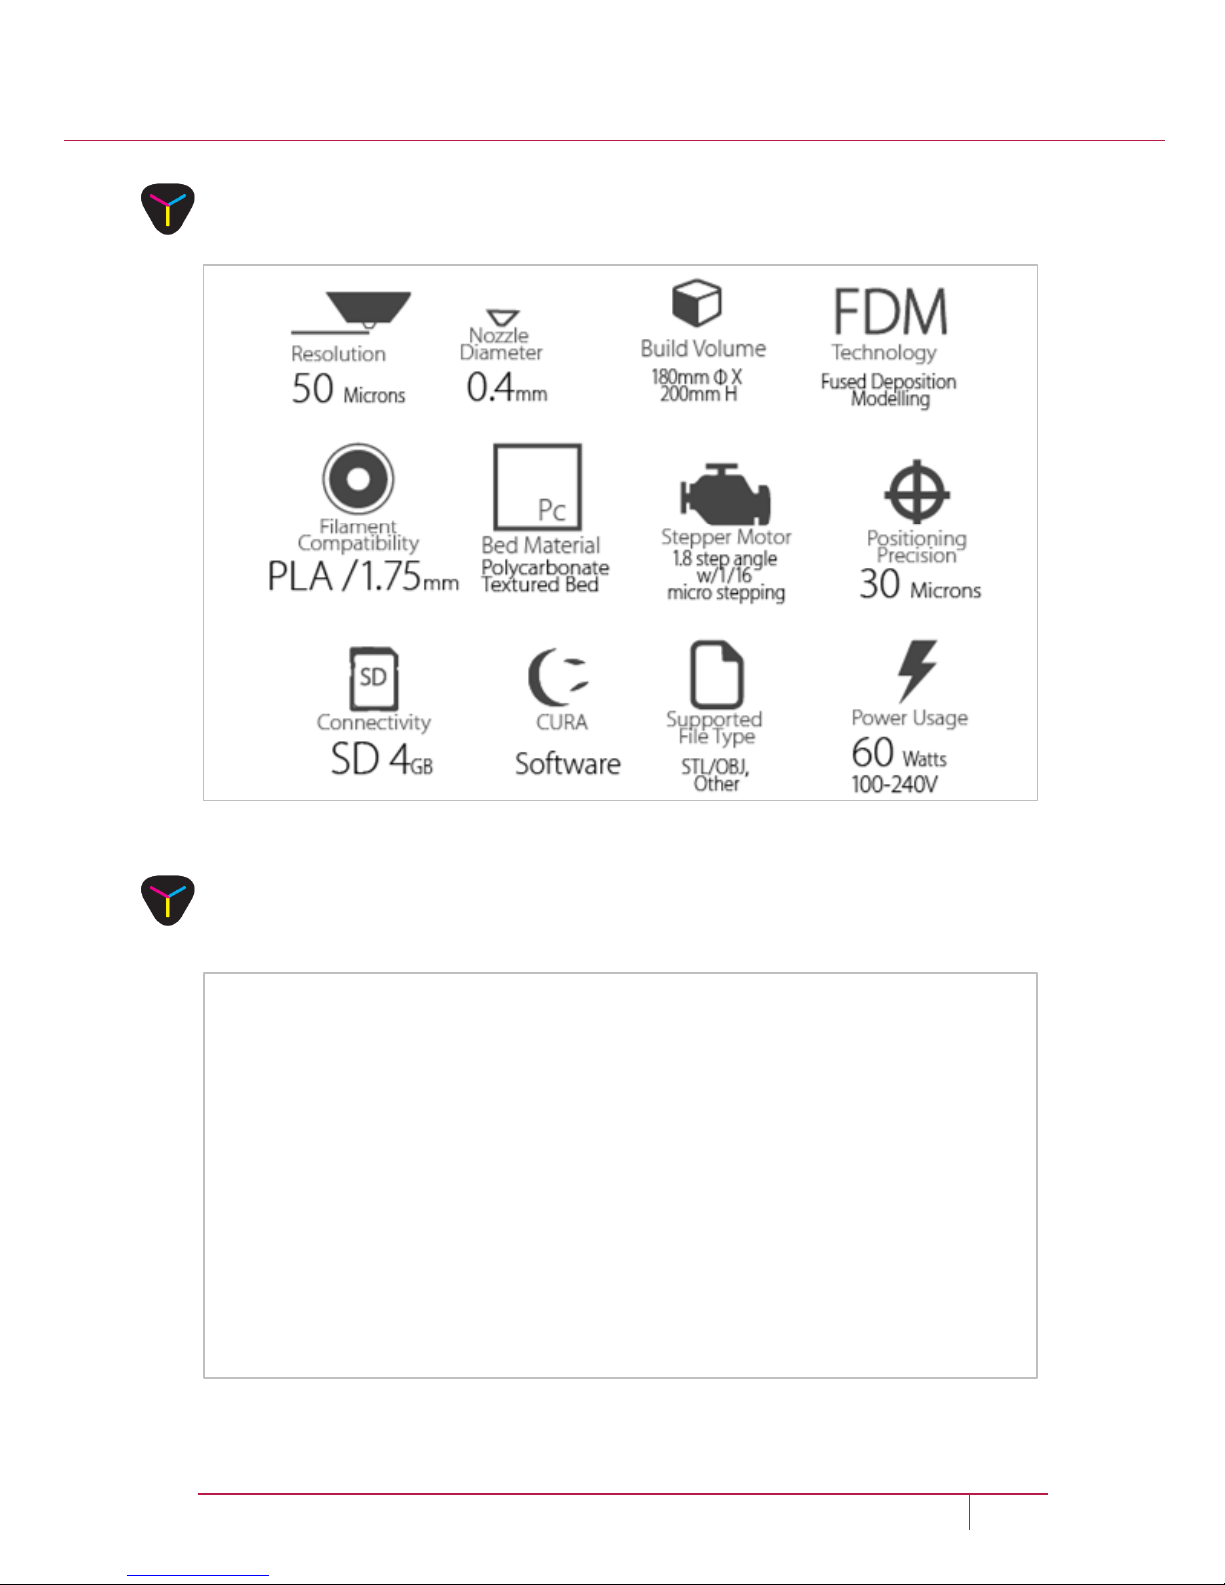
General Product Specification
Operating Conditions
To avoid malfunction, do not operate LOCOOP Y in an extremely dry or
humid environment.
6 LOCOOP Y USER MANUAL | www.locoop.net
Page 7
2. Precautions and Safety Instructions
Please do not turn off the power while the hot end temperature is
over 100℃, unless malfunction is detected.
Never touch the hot end during printing.
There is a risk of burn injury.
Do not let children operate the machine alone without adult
supervision.
Do not impact the machine during printing.
Make sure to use only PLA filaments.
Be careful when removing 3D prints from the bed.
Do not disassemble the product.
Do not use the machine for other than intended use.
Do not leave the machine outdoors, especially in direct sunlight.
Please unplug the power during lightning or when the machine is
not in use for long periods of time.
7 LOCOOP Y USER MANUAL | www.locoop.net
Page 8
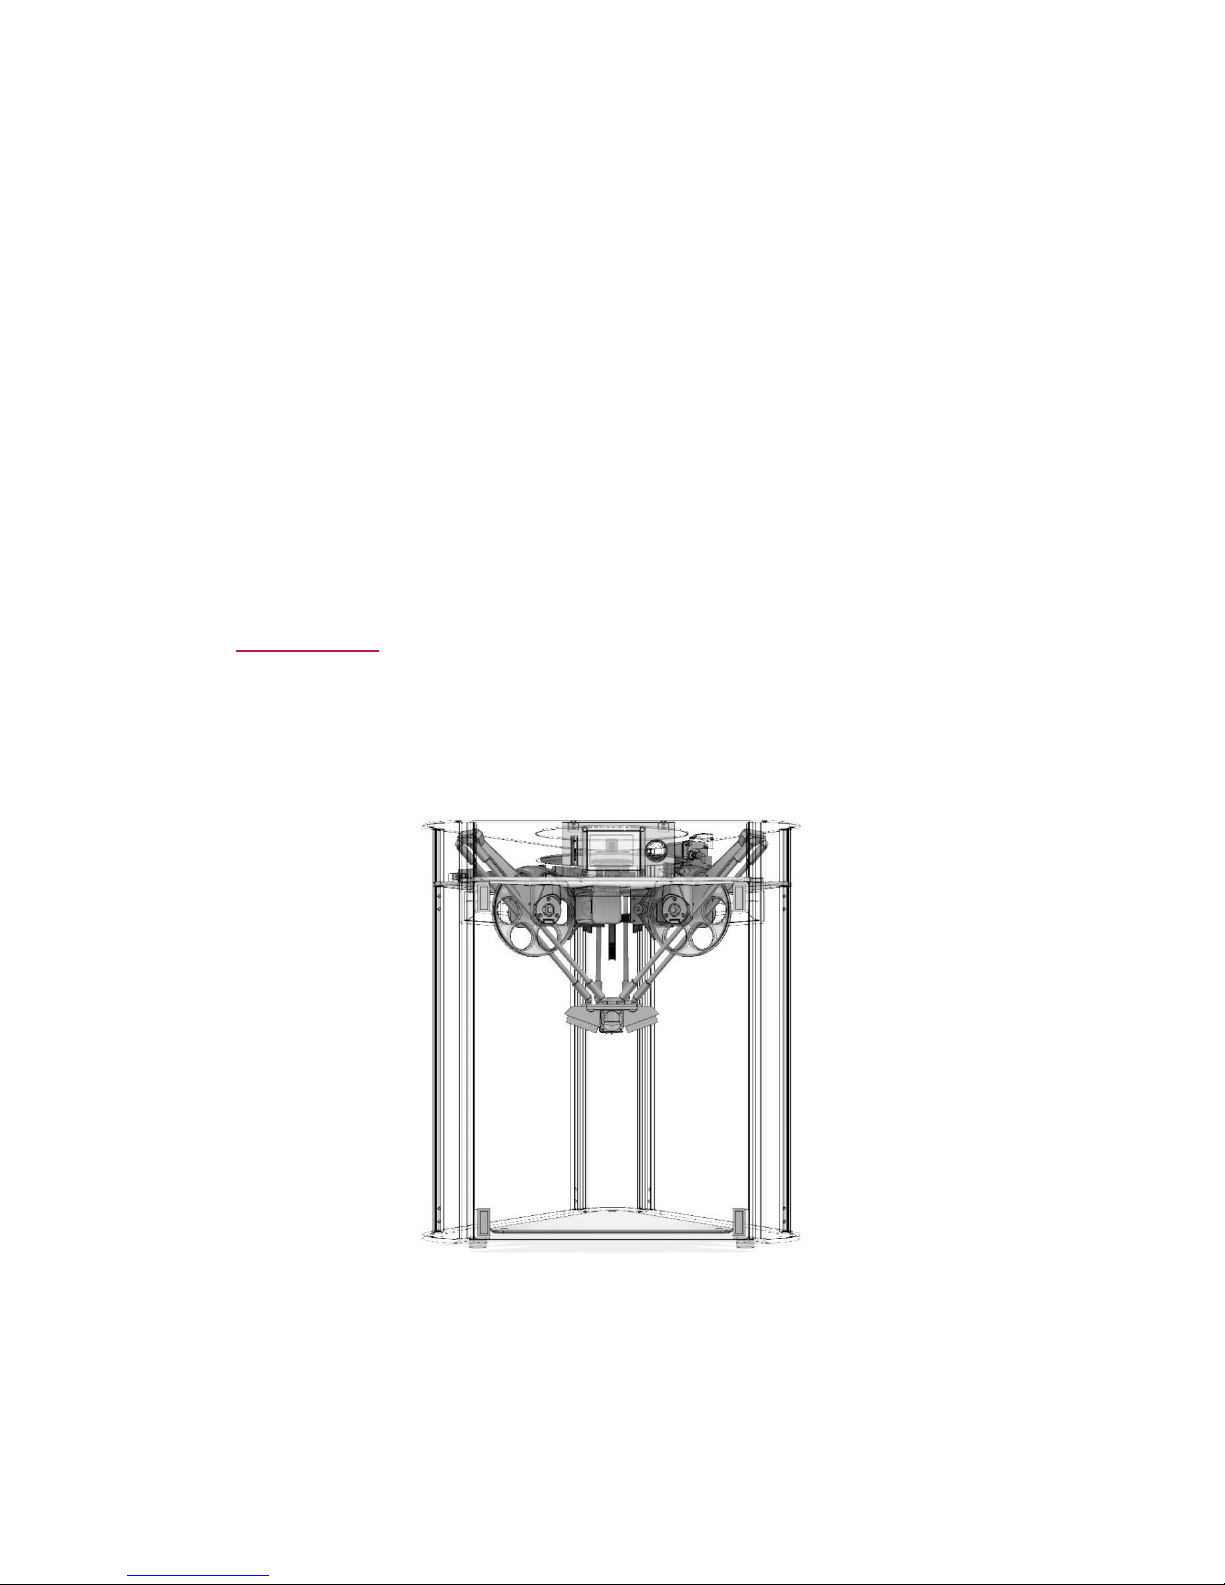
Part B
Hardware Assembly
Page 9
1. Getting Started
How long it will take
Around 30 minutes
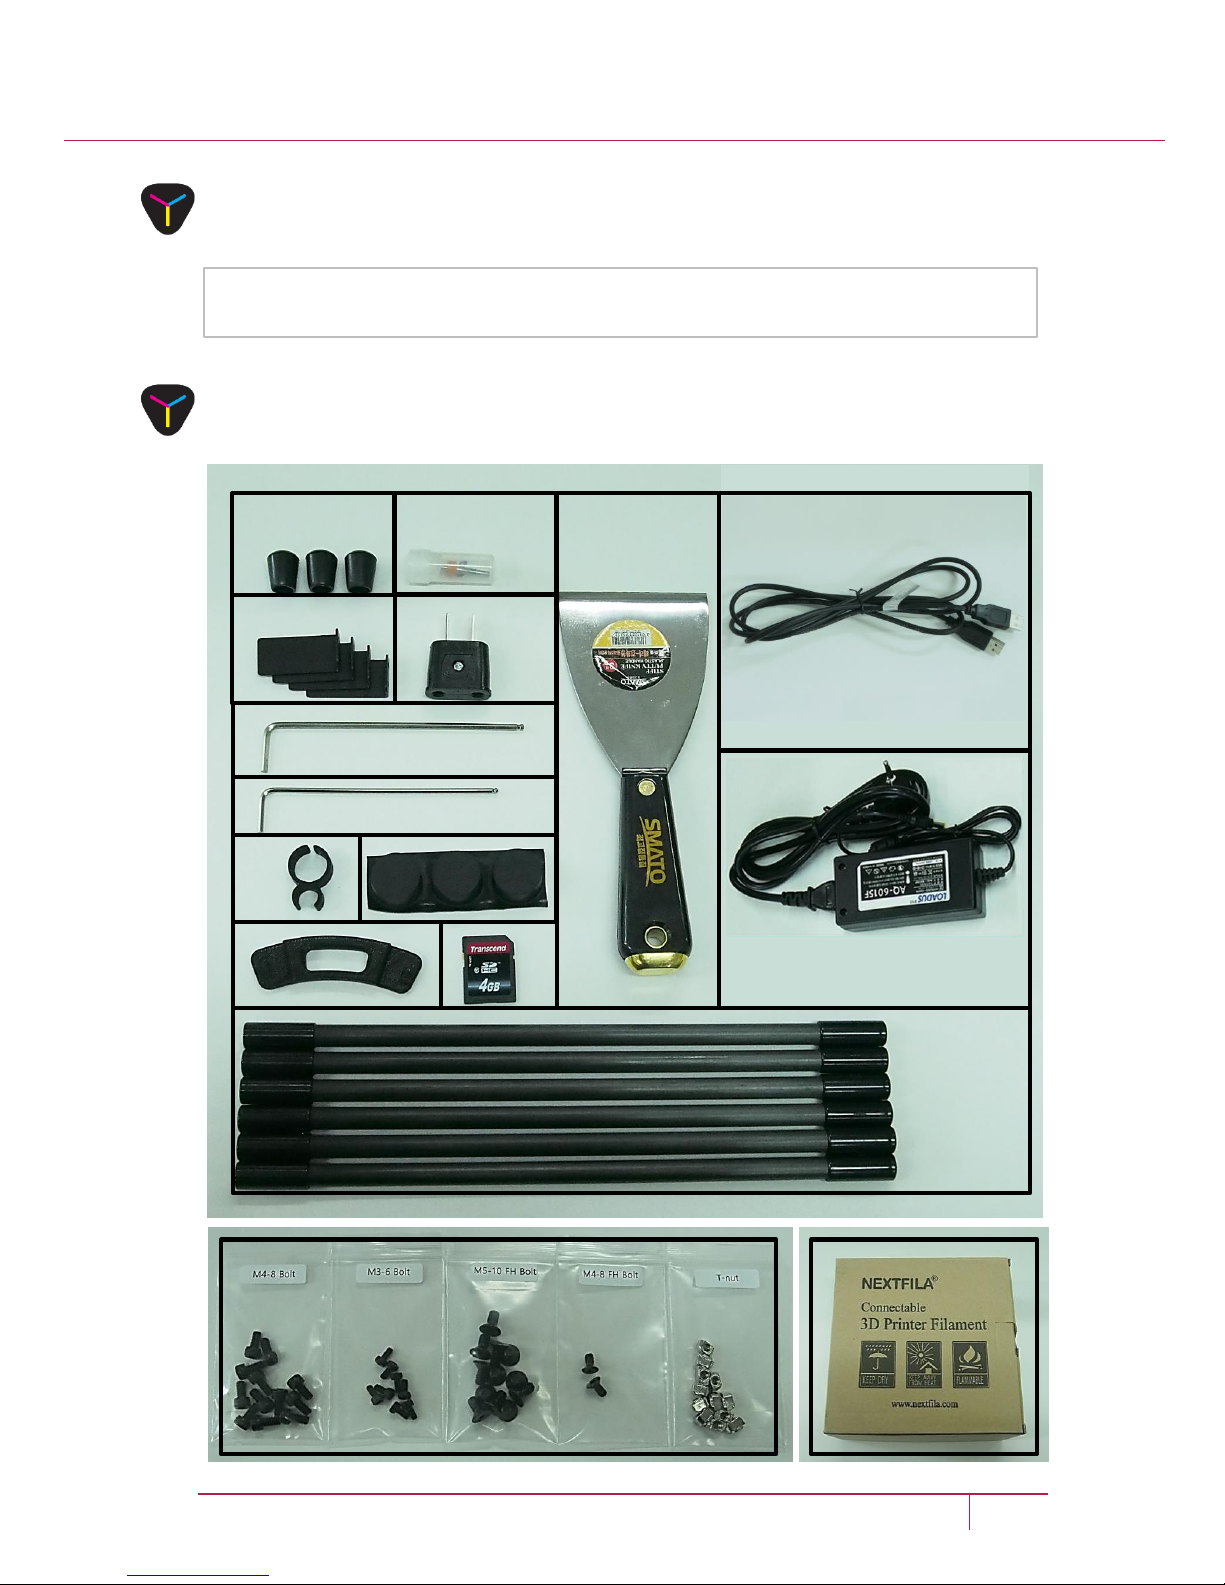
What’s included in the box
9 LOCOOP Y USER MANUAL | www.locoop.net
Rubber Cover
(3 pcs)
Nozzle Cleaning
Drill Bit (1 pc)
Magnet Tab
(4 pcs)
B Type Socket
(1 pc, Optional)
Hex Key 3mm (1 pc)
Hex Key 2.5mm (1 pc)
Rubber Foot (3 pcs)
Tube
Holder
(1 pc)
Plastic Cap (1 pc)
SD
Card
(1 pc)
Scrapper (1 pc)
Adapter (1 pc)
Lower Arm
(6 pcs)
M4-8 Bolt M3-6 Bolt M5-10 FH Bolt M4-8 FH Bolt T-nut
(12 pcs) (8 pcs) (12 pcs) (2 pcs) (12 pcs)
Filament (1 pc)
USB Cable
for Firmware Upgrade (1 pc)
Page 10
1. Getting Started
10 LOCOOP Y USER MANUAL | www.locoop.net
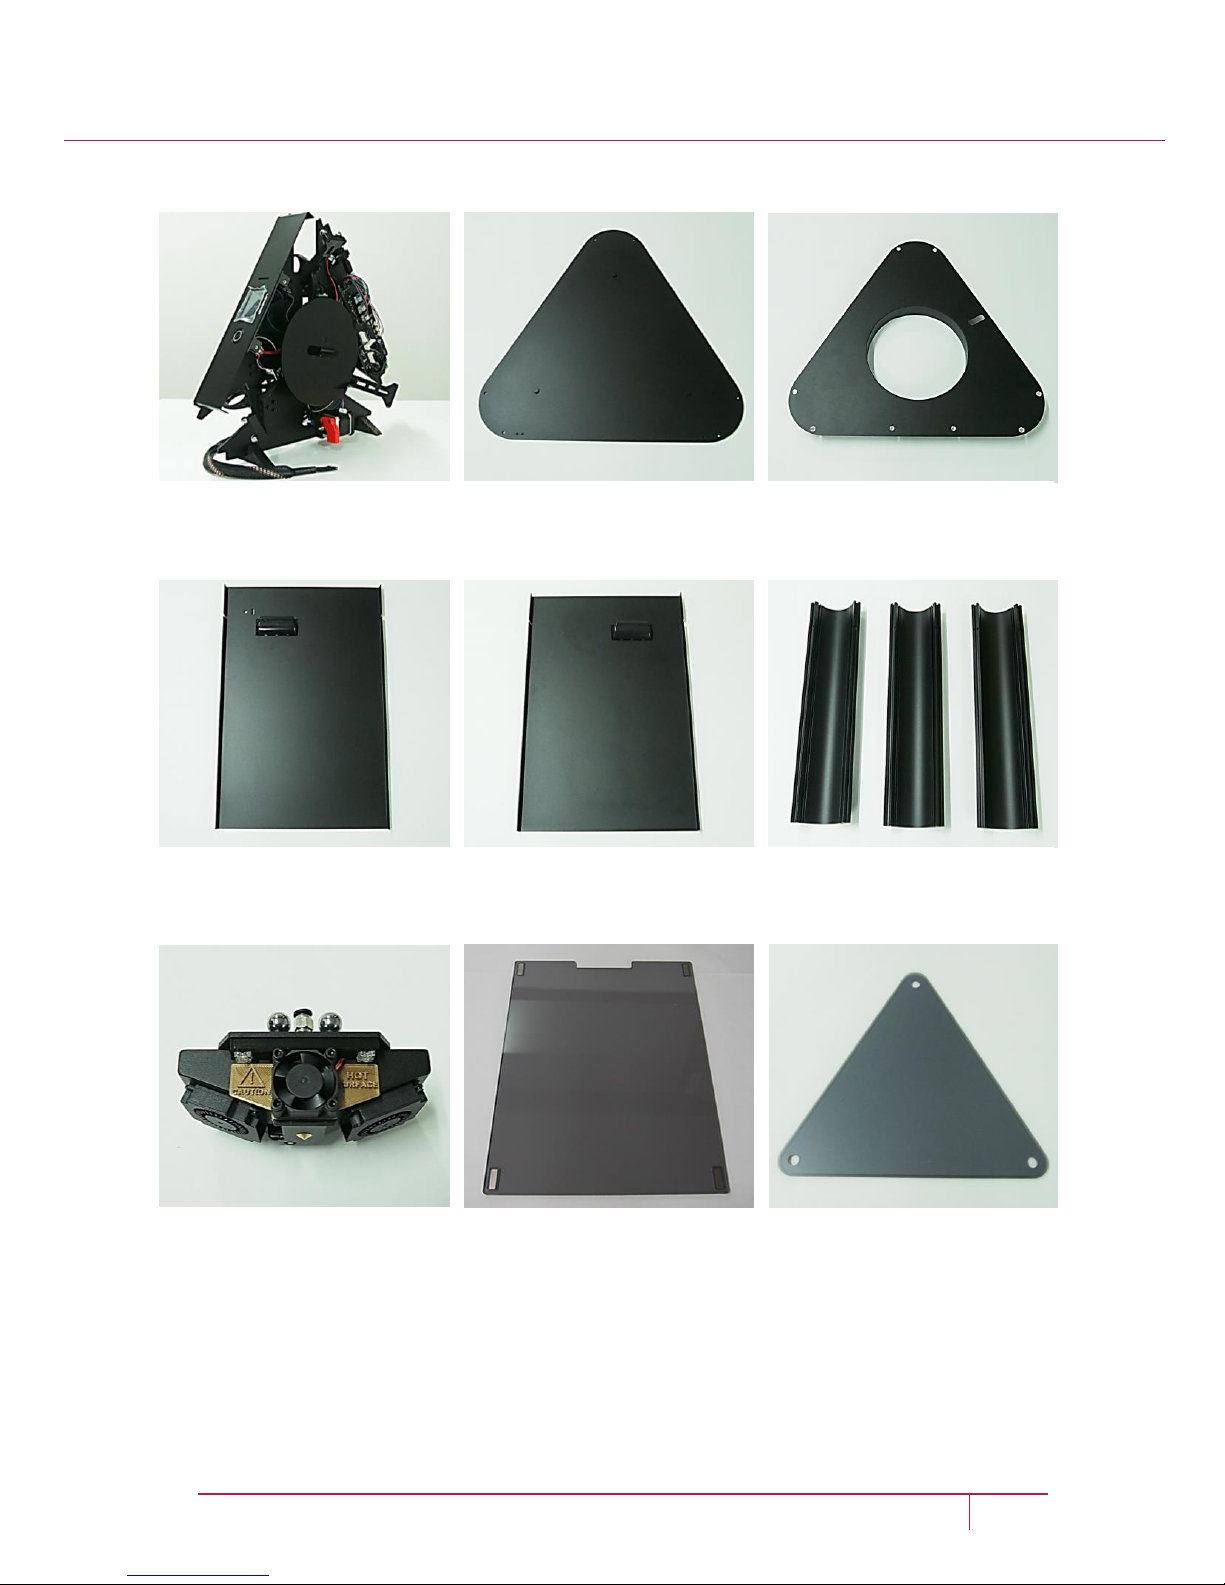
Main Board (1 pc) Bottom Panel (1 pc) Top Panel (1 pc)
Left Panel (1 pc) Right Panel (1 pc) Pillar (3 pcs)
End-Effector (1 pc) Door (1 pc) Bed (1 pc)
Front
Panel→
← Two holes
↑ ↑
Bolt holes for Magnetic Tabs
Note: Textured face is up
Note: A side near the grooves is up
Power
Switch→
Page 11
2. Attaching Magnetic Tabs
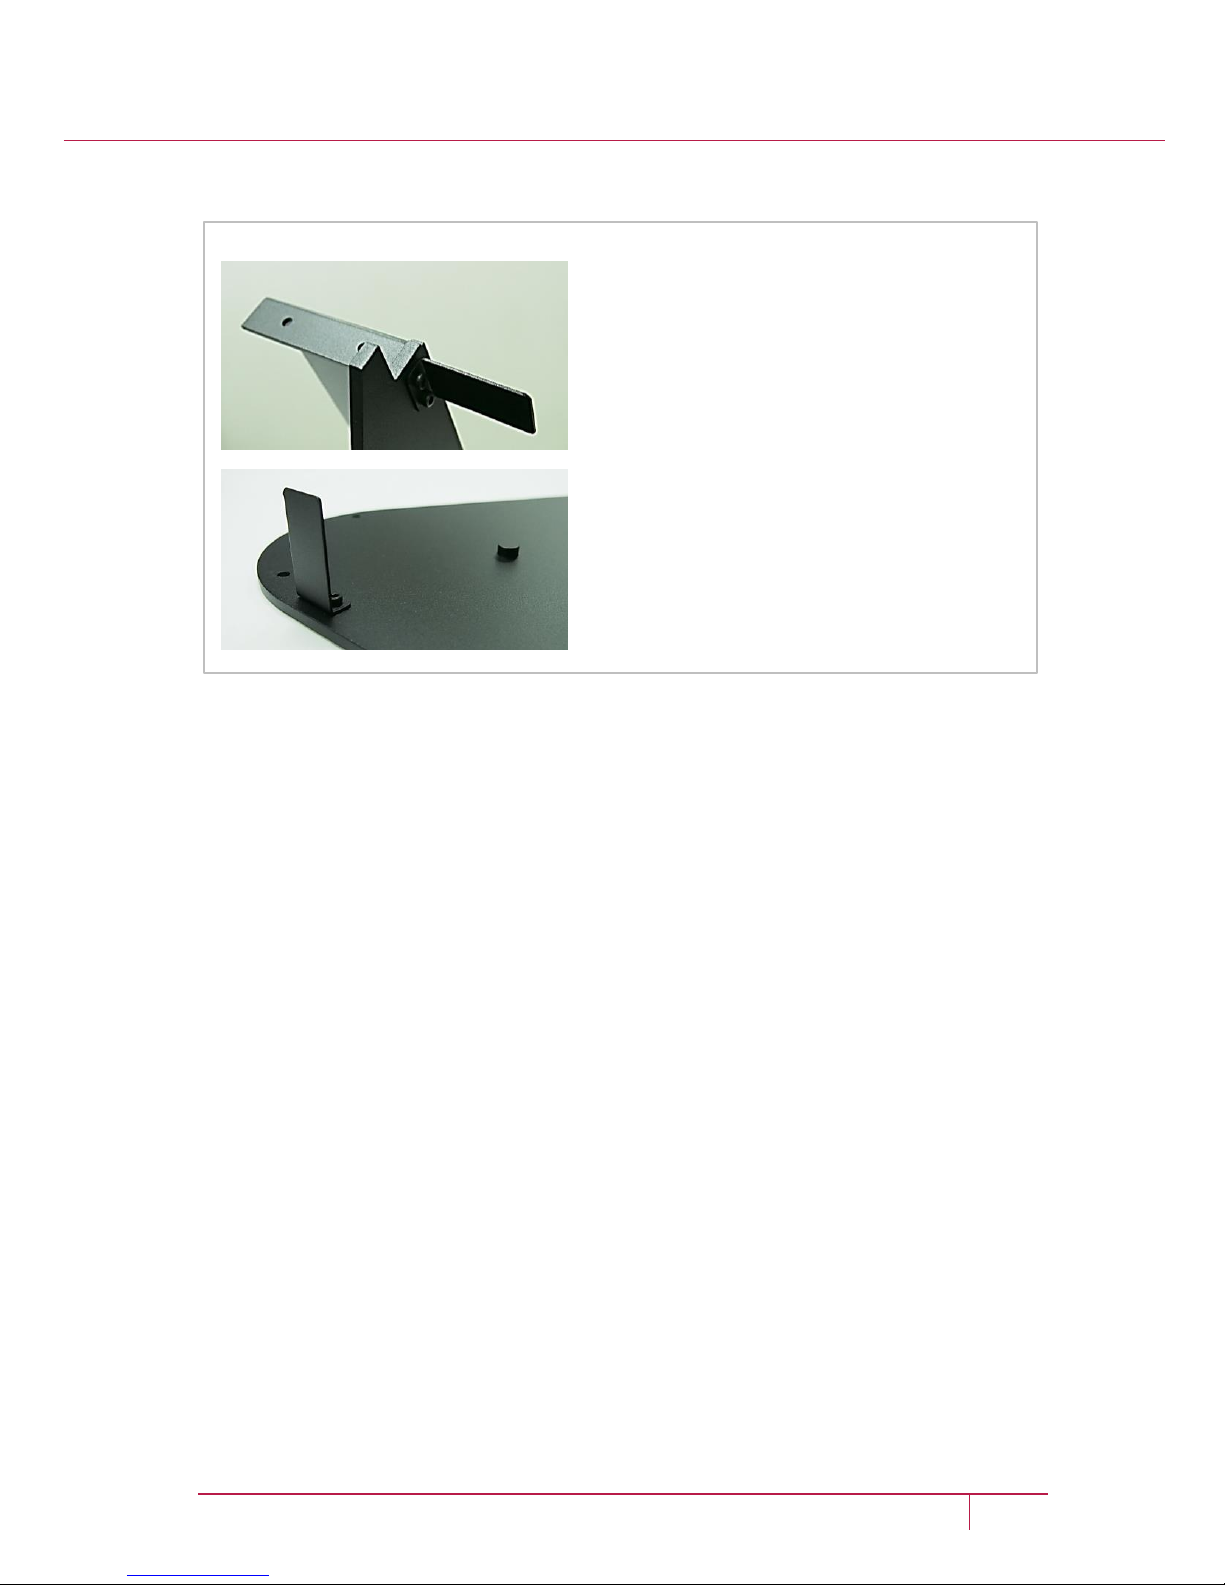
1. Attach the two magnet tabs to the
main board as shown in the upper
image.
2. Attach the two magnet tabs to the
bottom panel as shown in the lower
image.
3. Use two M3-6 bolts to attach each
tab.
11 LOCOOP Y USER MANUAL | www.locoop.net
Front
↓ Panel
Magnetic
↓ Tab
← Magnetic
Tab
Page 12
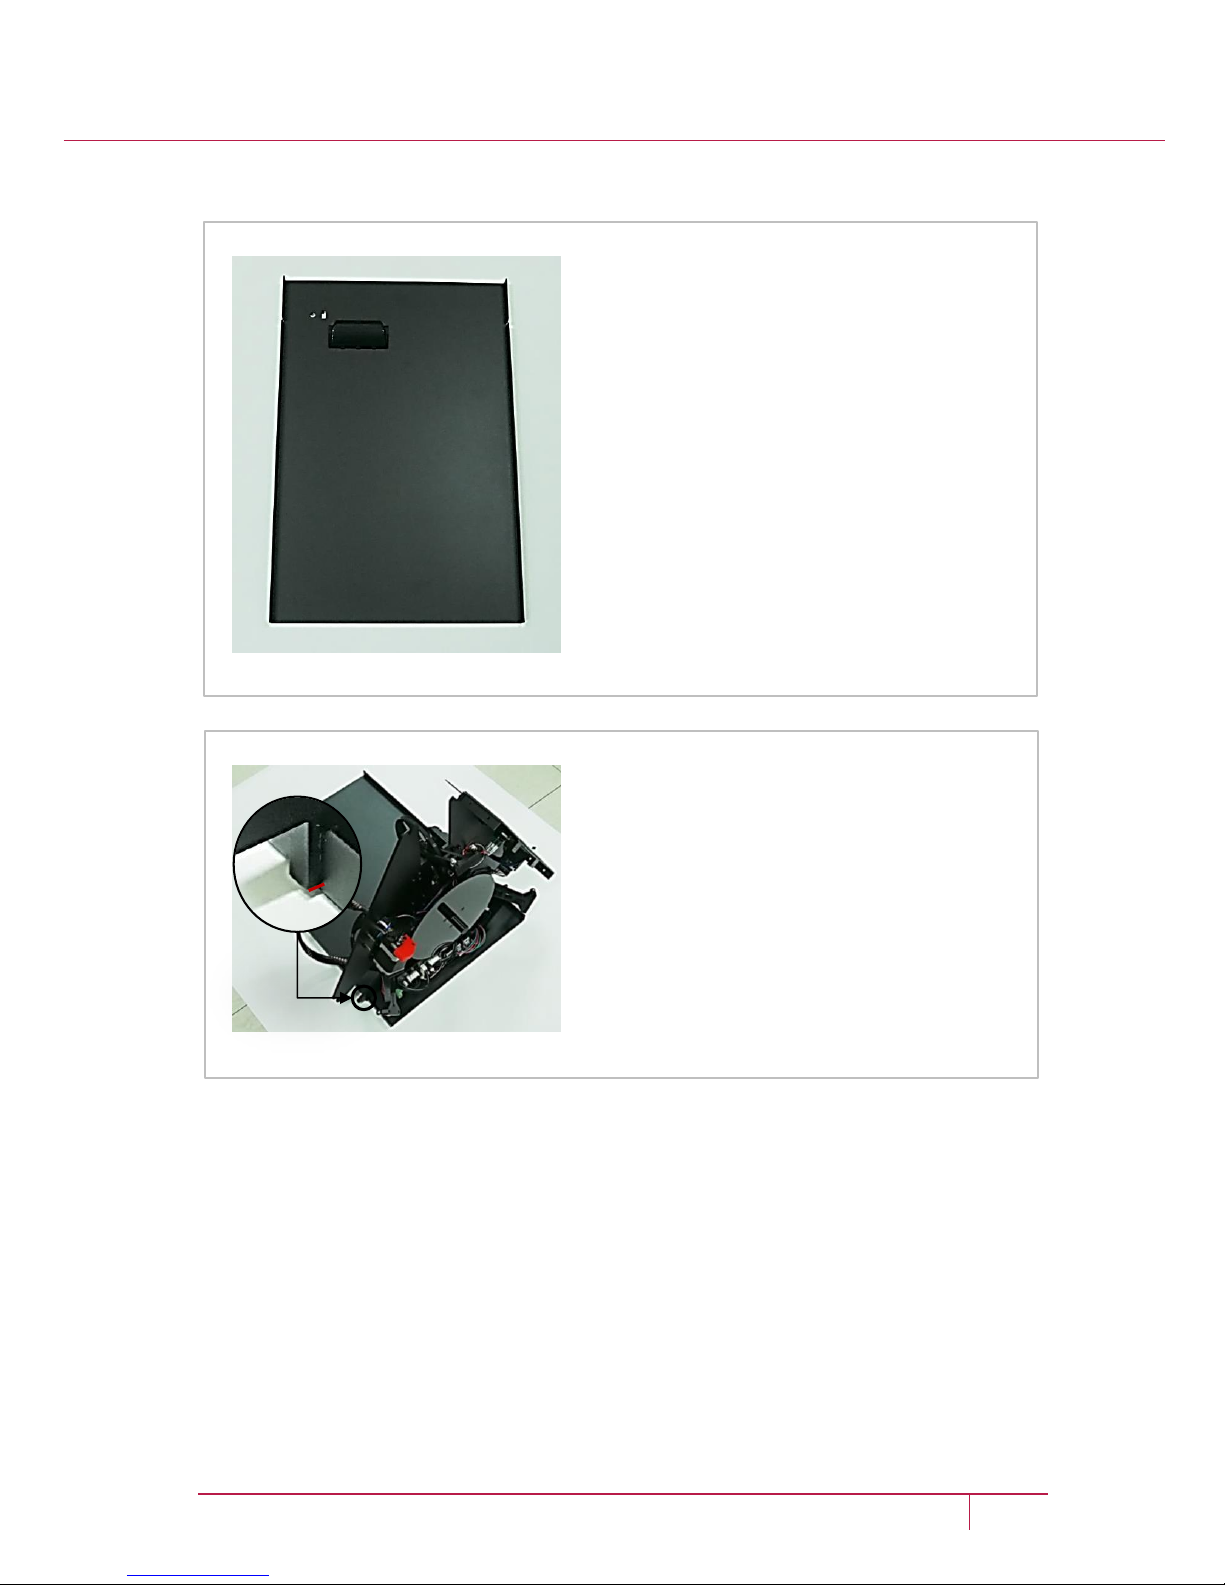
3. Assembling Left Panel and Main Board
1. Place the left panel on the floor.
2. Insert the main board into the
grooves near the top of the left panel.
3. The main board should protrude by
about 3mm each through the groove.
12 LOCOOP Y USER MANUAL | www.locoop.net
←Groove
Groove→
3mm→
Page 13
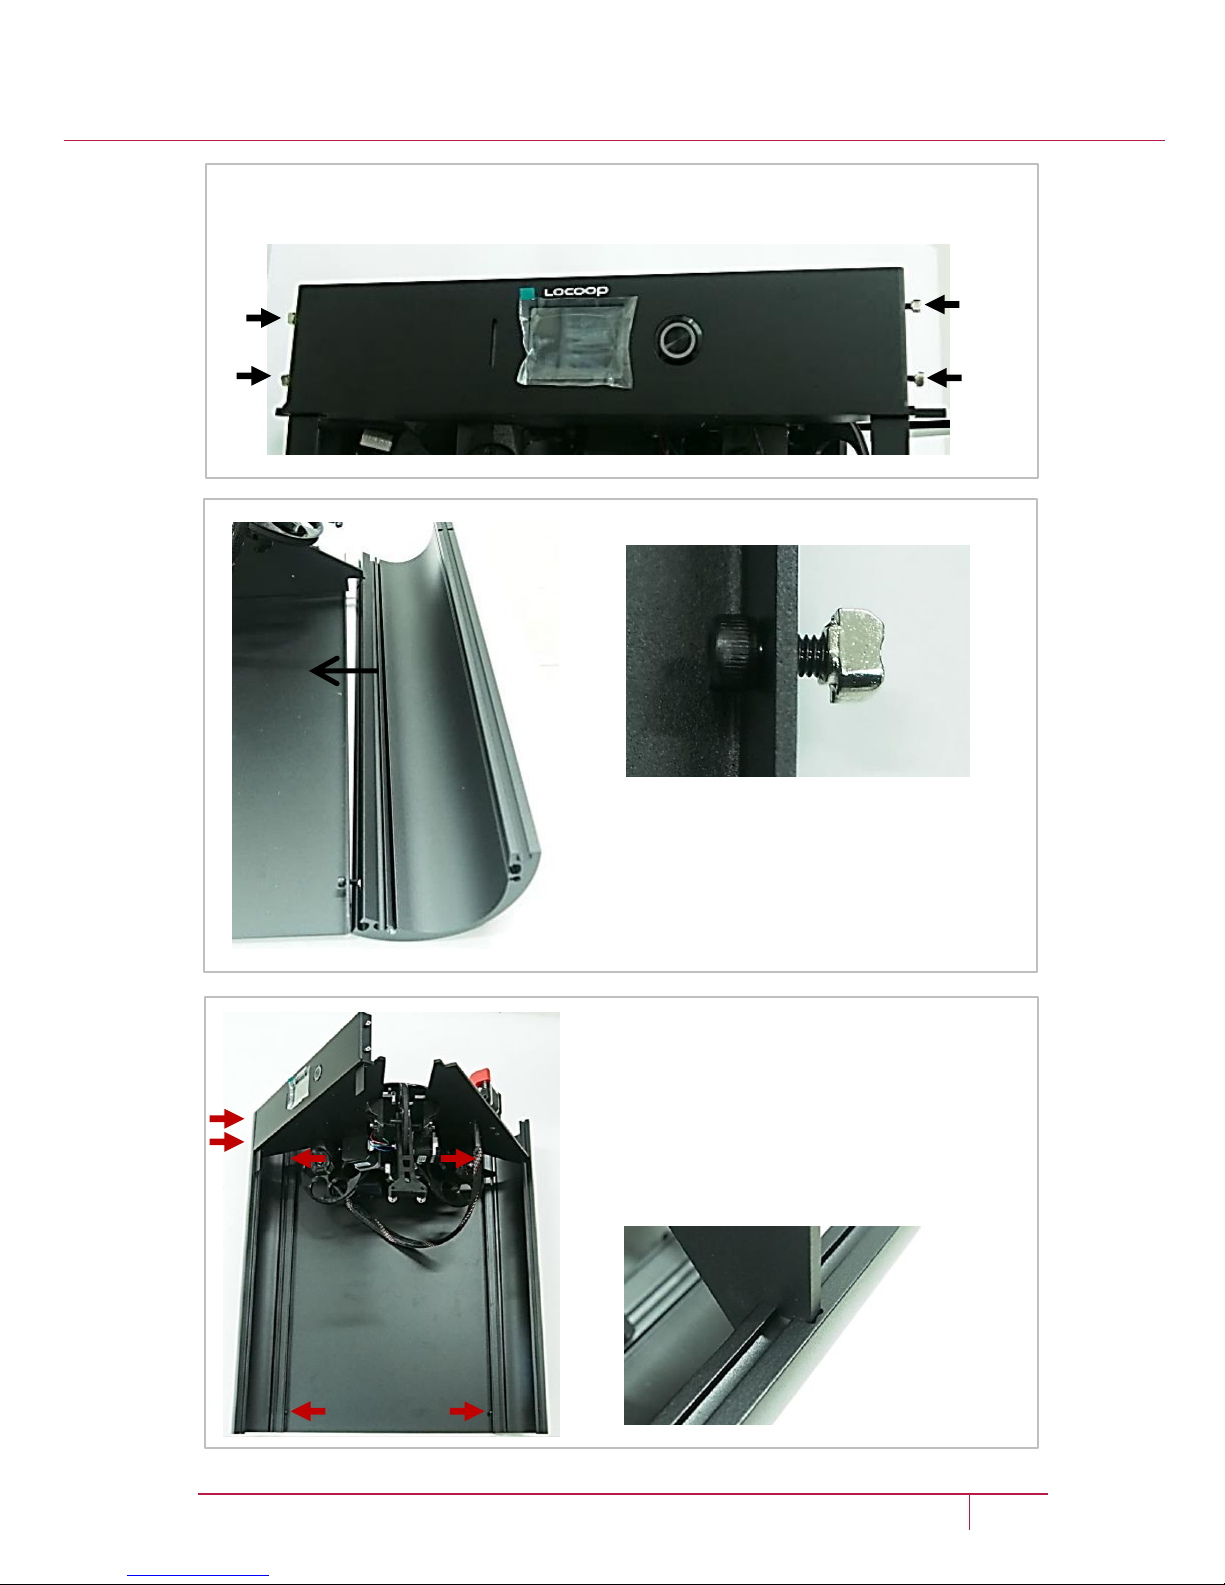
4. Attaching Pillars
2. Attach the two pillars on both sides
of the left panel. Use the M4-8 and T-
nut when attaching to the pillars.
3. Tighten six bolts (red arrows) to fix
two pillars including two ones
attached in the front panel as shown
in the left image.
4. Make sure that the two pillars are
fixed well to the left panel.
13 LOCOOP Y USER MANUAL | www.locoop.net
1. Attach the four M4-8 bolts and T-nuts (black arrows) at the front
panel as shown in the image below.
Page 14
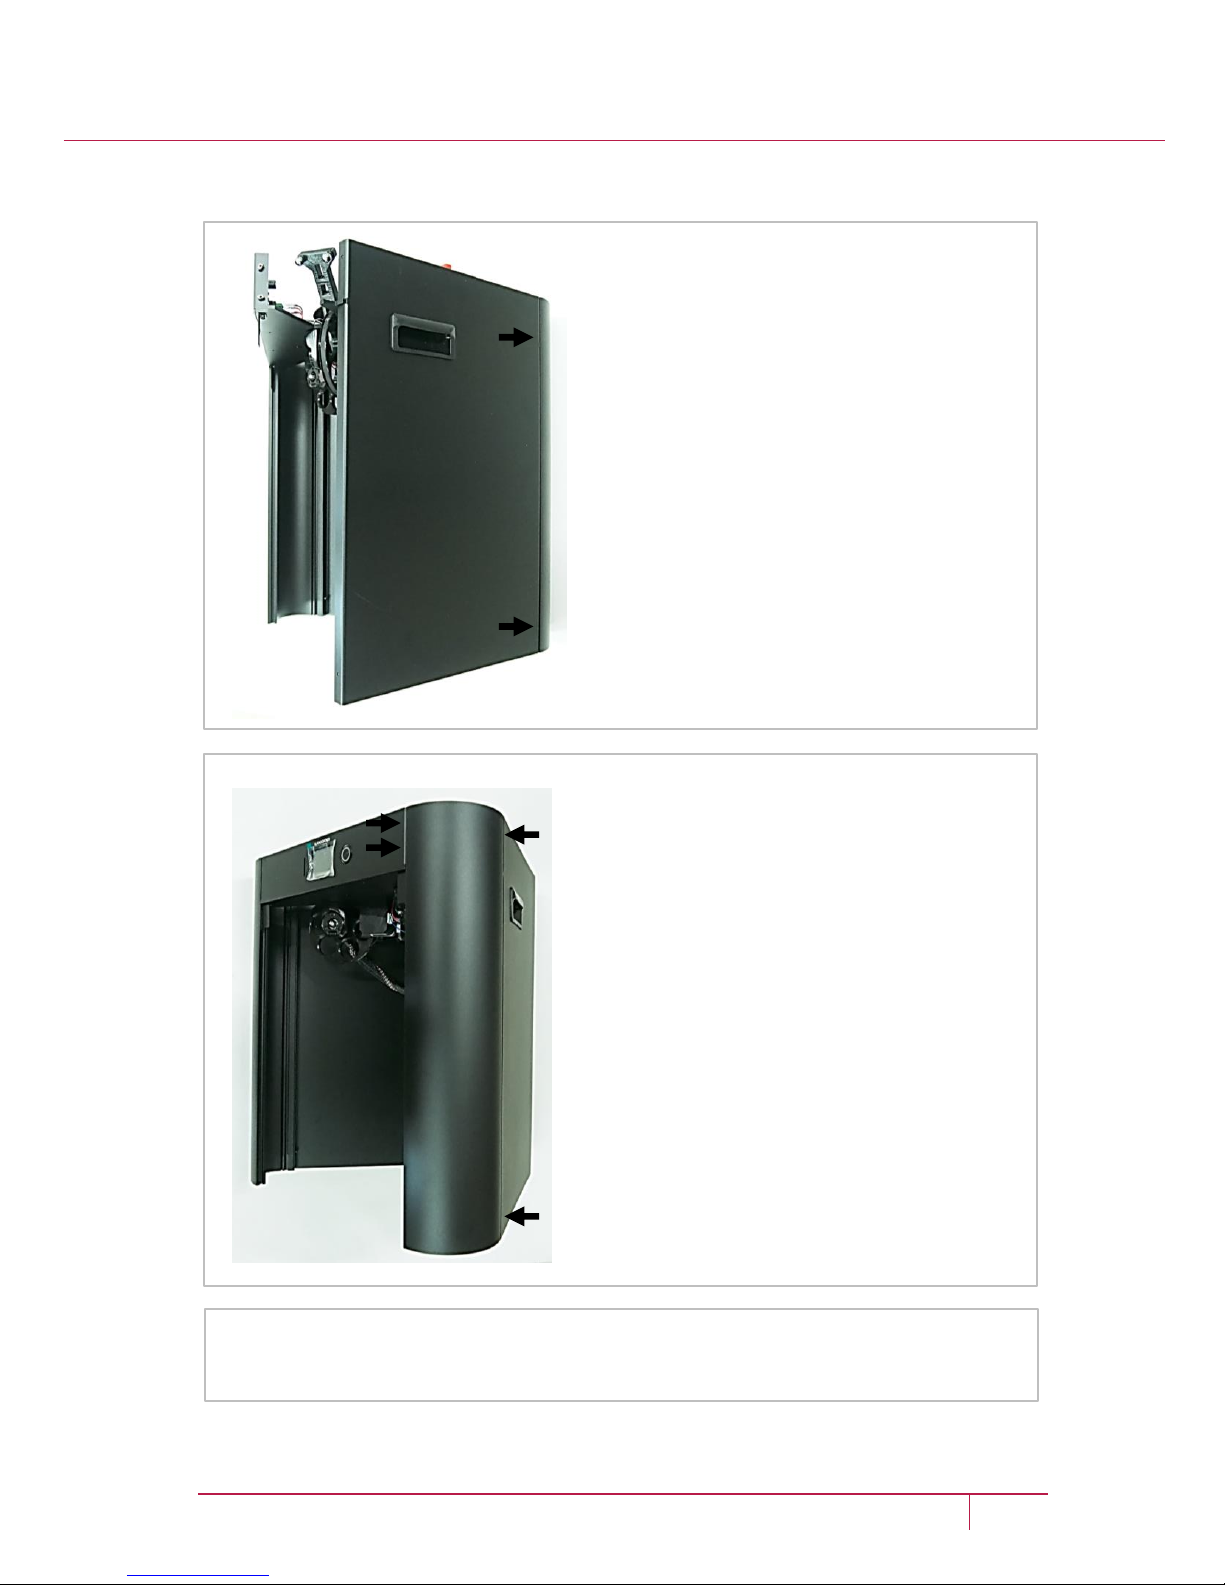
5. Attaching Right Panel and the Remaining Pillar
1. Use two M4-8 bolts and T-nuts to
attach the right panel to a pillar
(black arrows).
14 LOCOOP Y USER MANUAL | www.locoop.net
2. Attach the remaining pillar to the
right panel with four M4-8 bolts and
T-nuts (black arrows) including two
ones attached in the front panel.
Please check again if the M4-8 bolts and T-nuts that connect each pillar
and panel are well tightened.
Page 15
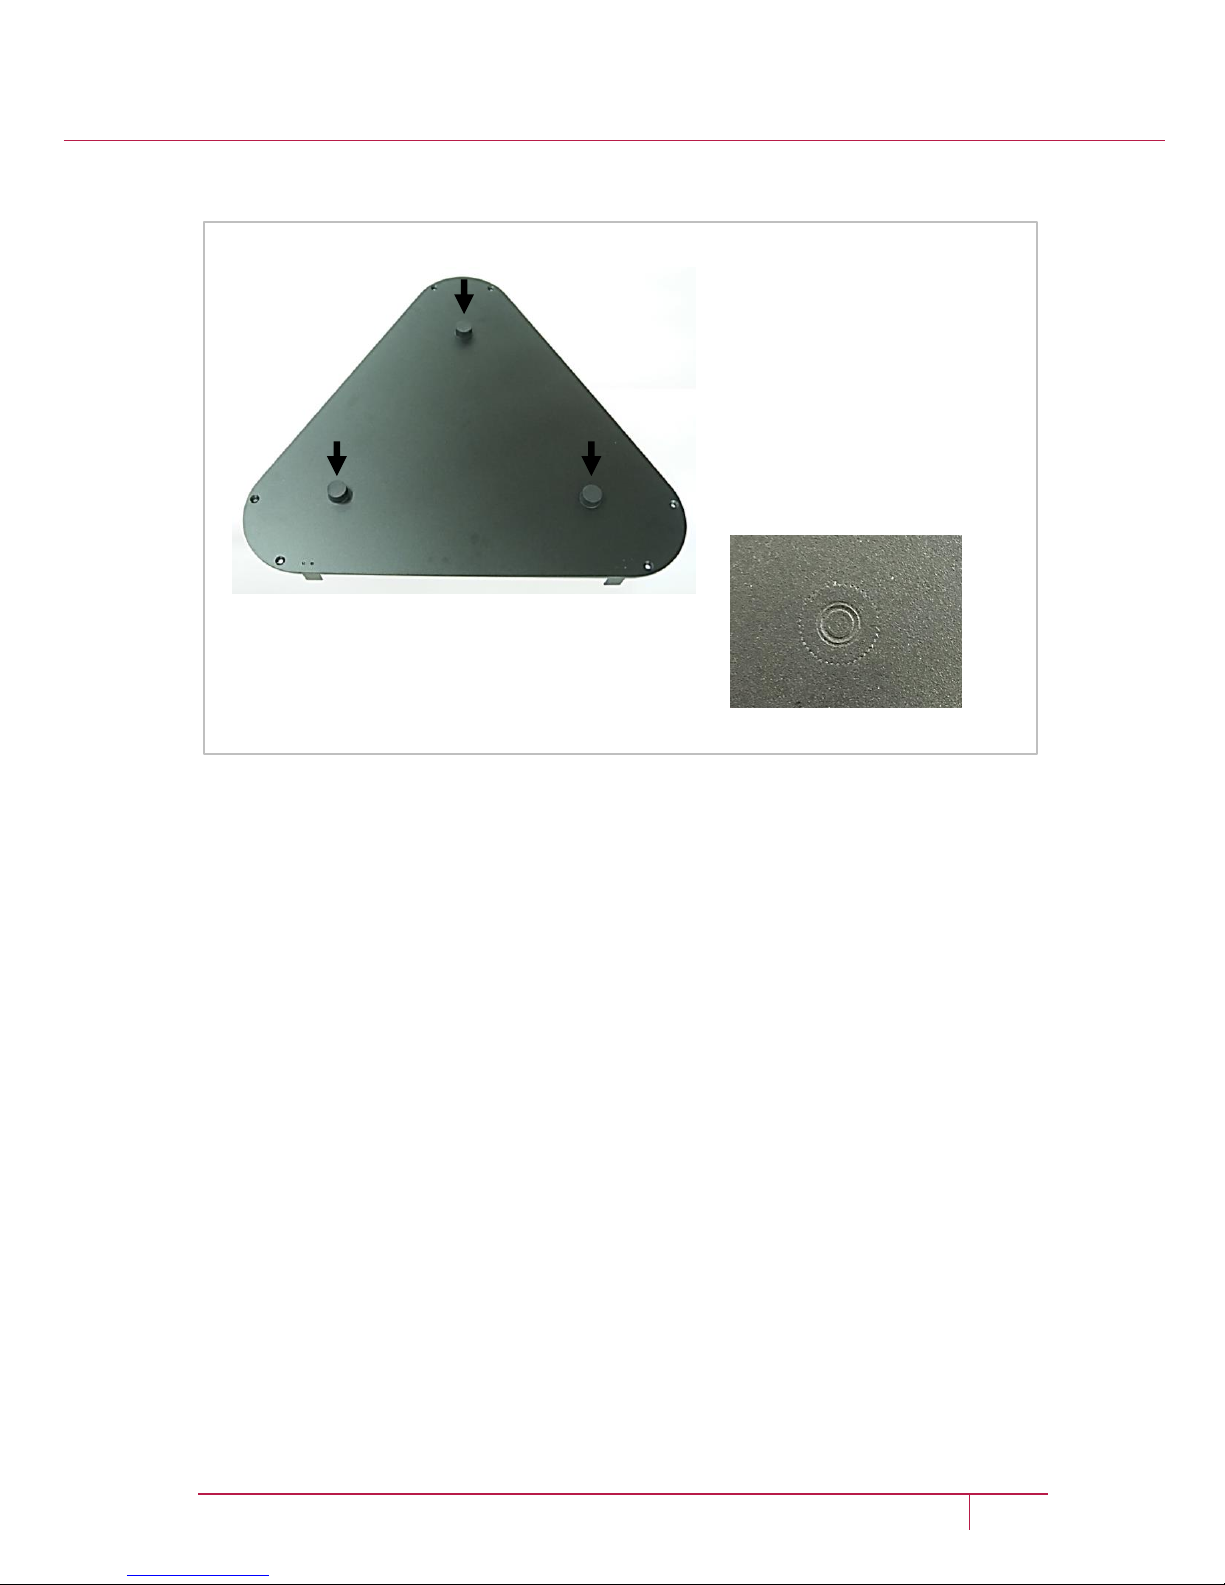
6. Attaching Rubber Feet
1. Attach the rubber feet to
the bottom panel (black
arrows).
2. Stick adhesive side of
each rubber foot to the
back of the bottom panel,
on specific positions as
shown on the image below.
15 LOCOOP Y USER MANUAL | www.locoop.net
Page 16
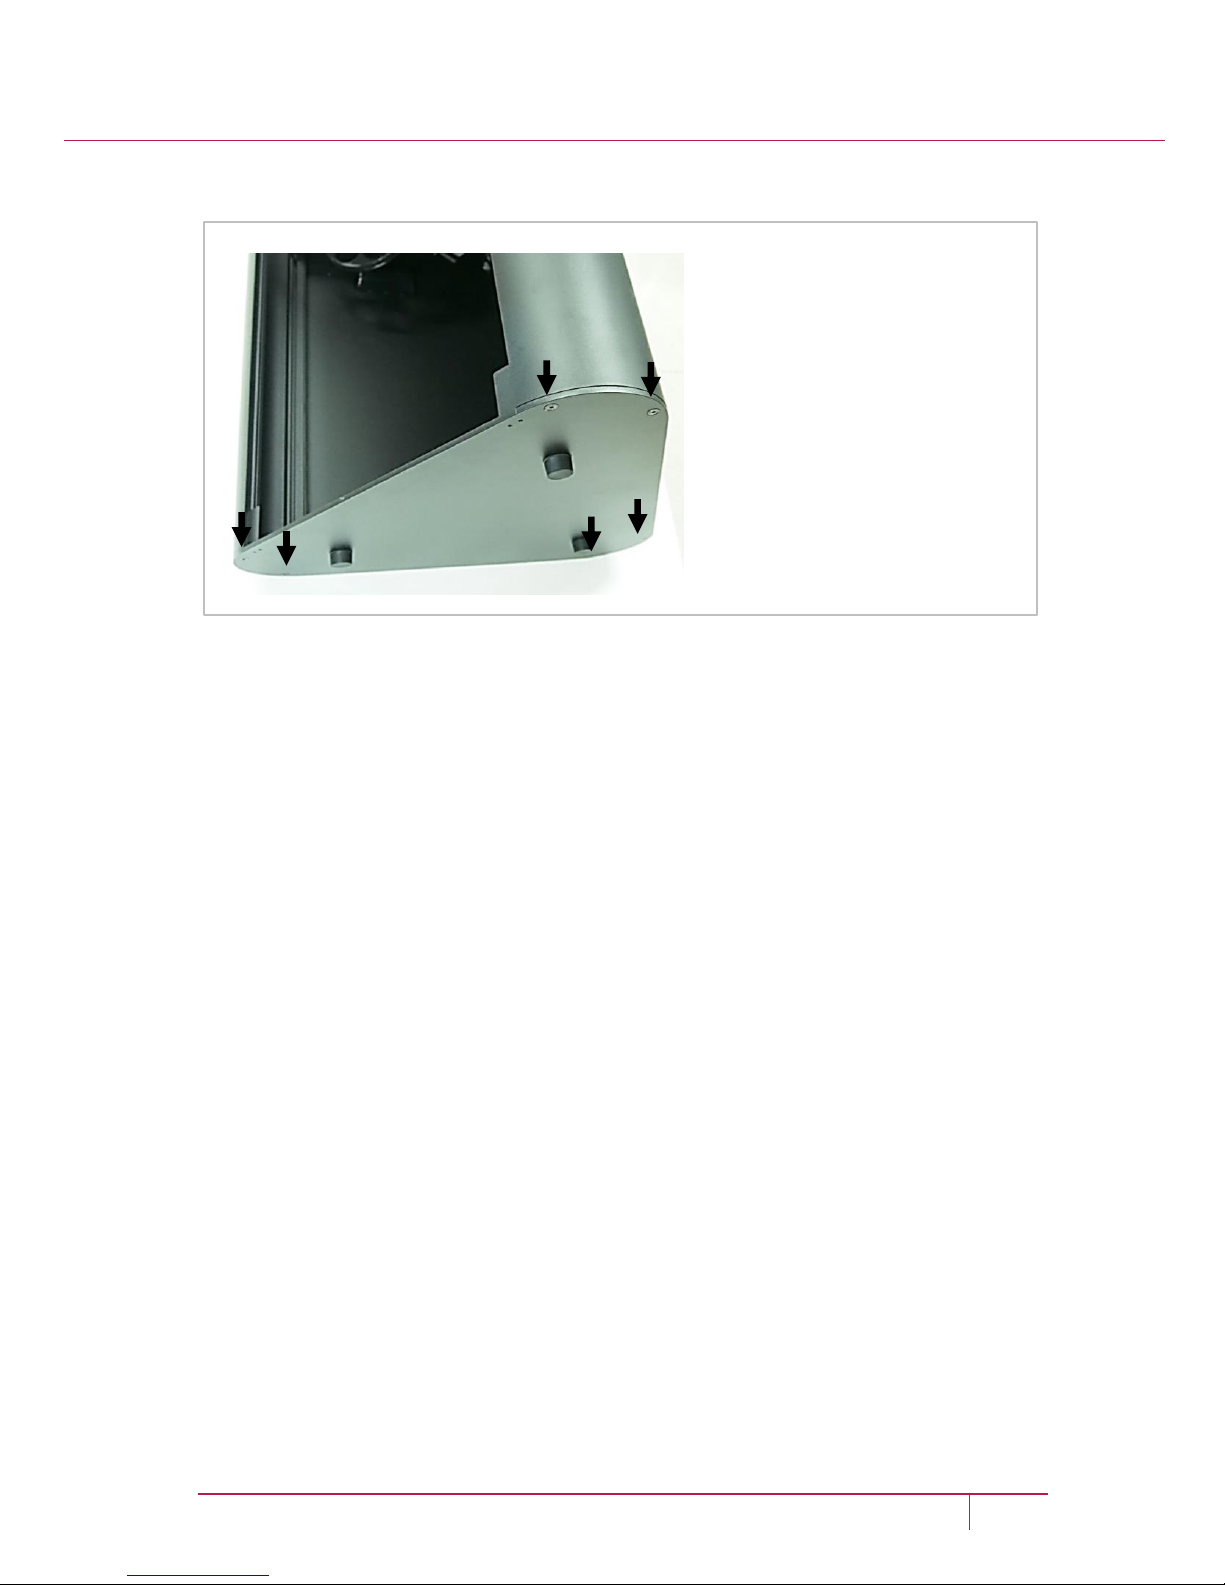
7. Attaching the Bottom Panel
1. Attach the bottom panel
to the previously
assembled structure using
a total of six FH M5-10
bolts (black arrows).
16 LOCOOP Y USER MANUAL | www.locoop.net
Page 17
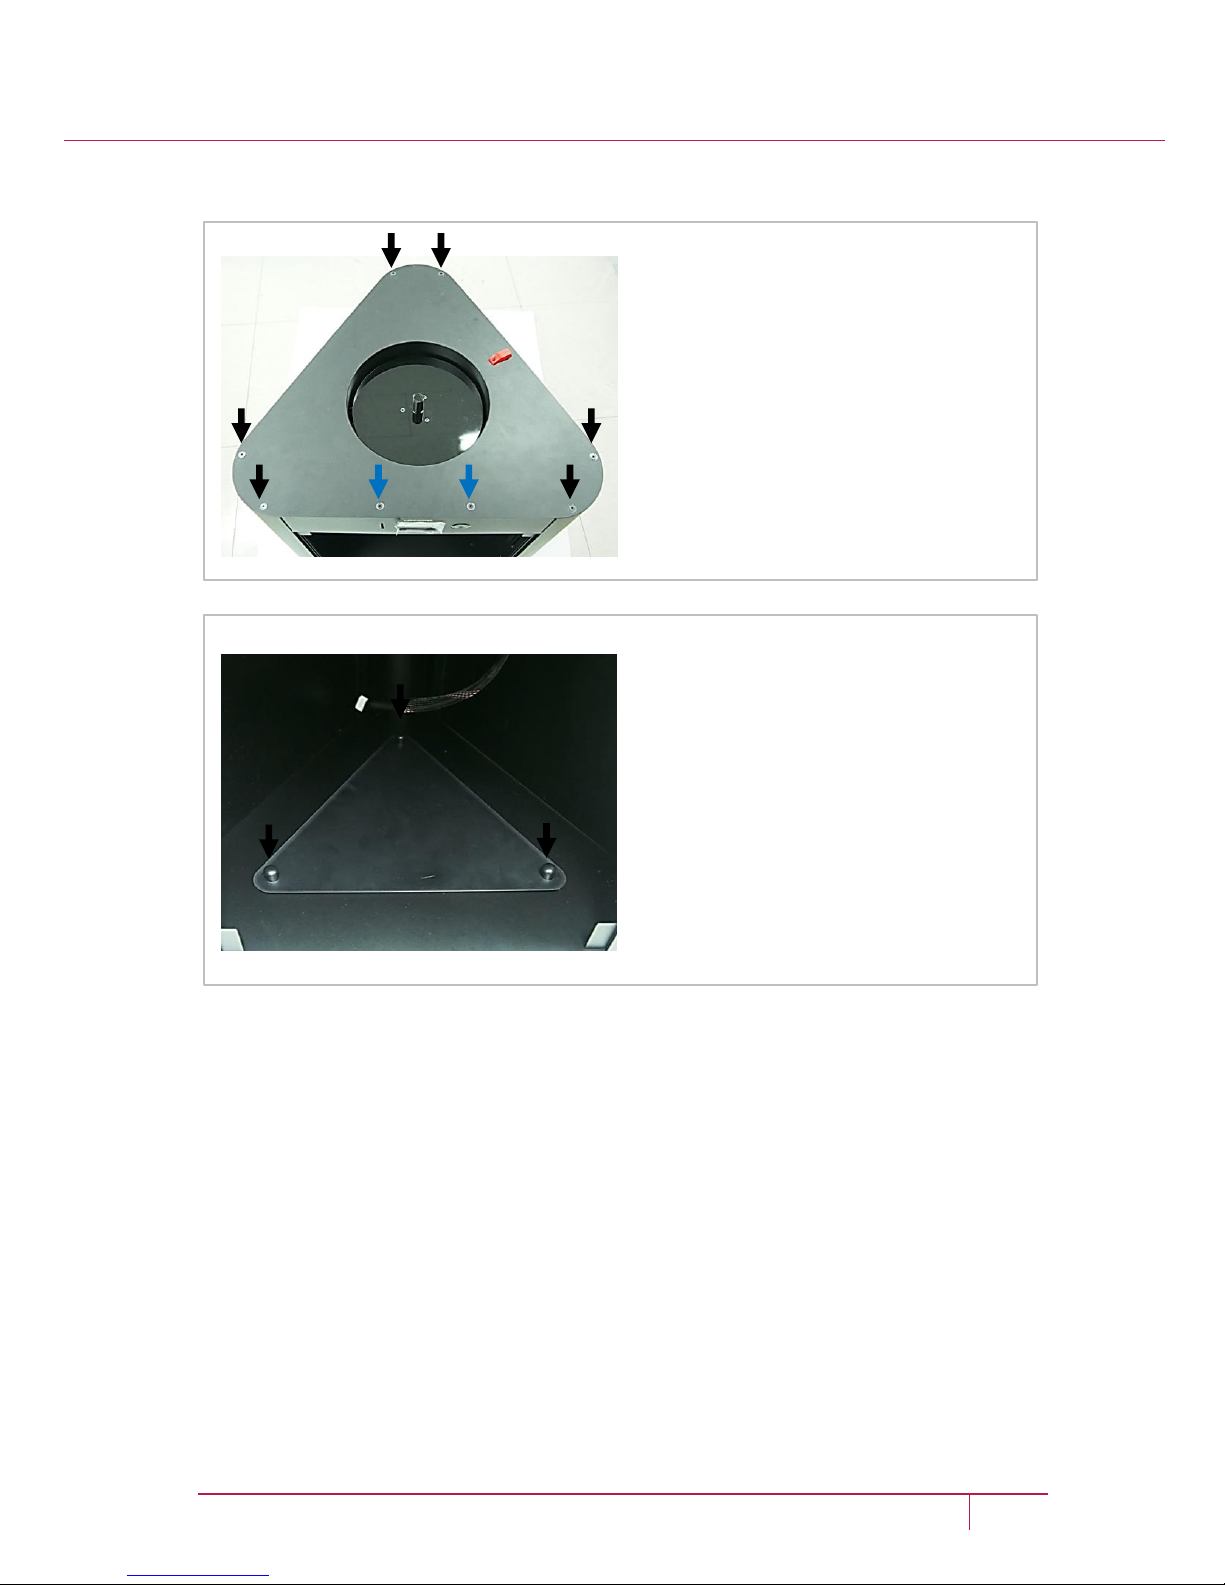
8. Attaching the Top Panel
1. Once the bottom panel is
securely attached, stand the
machine upright.
2. Use six FH M5-10 bolts (black
arrows) and two FH M4-8 bolts
(blue arrows) to assemble the
top panel.
17 LOCOOP Y USER MANUAL | www.locoop.net
1. Attach the bed through three
holes. Check that the textured
side faces up.
2. Fix the three points using the
lubber covers (black arrows).
Page 18
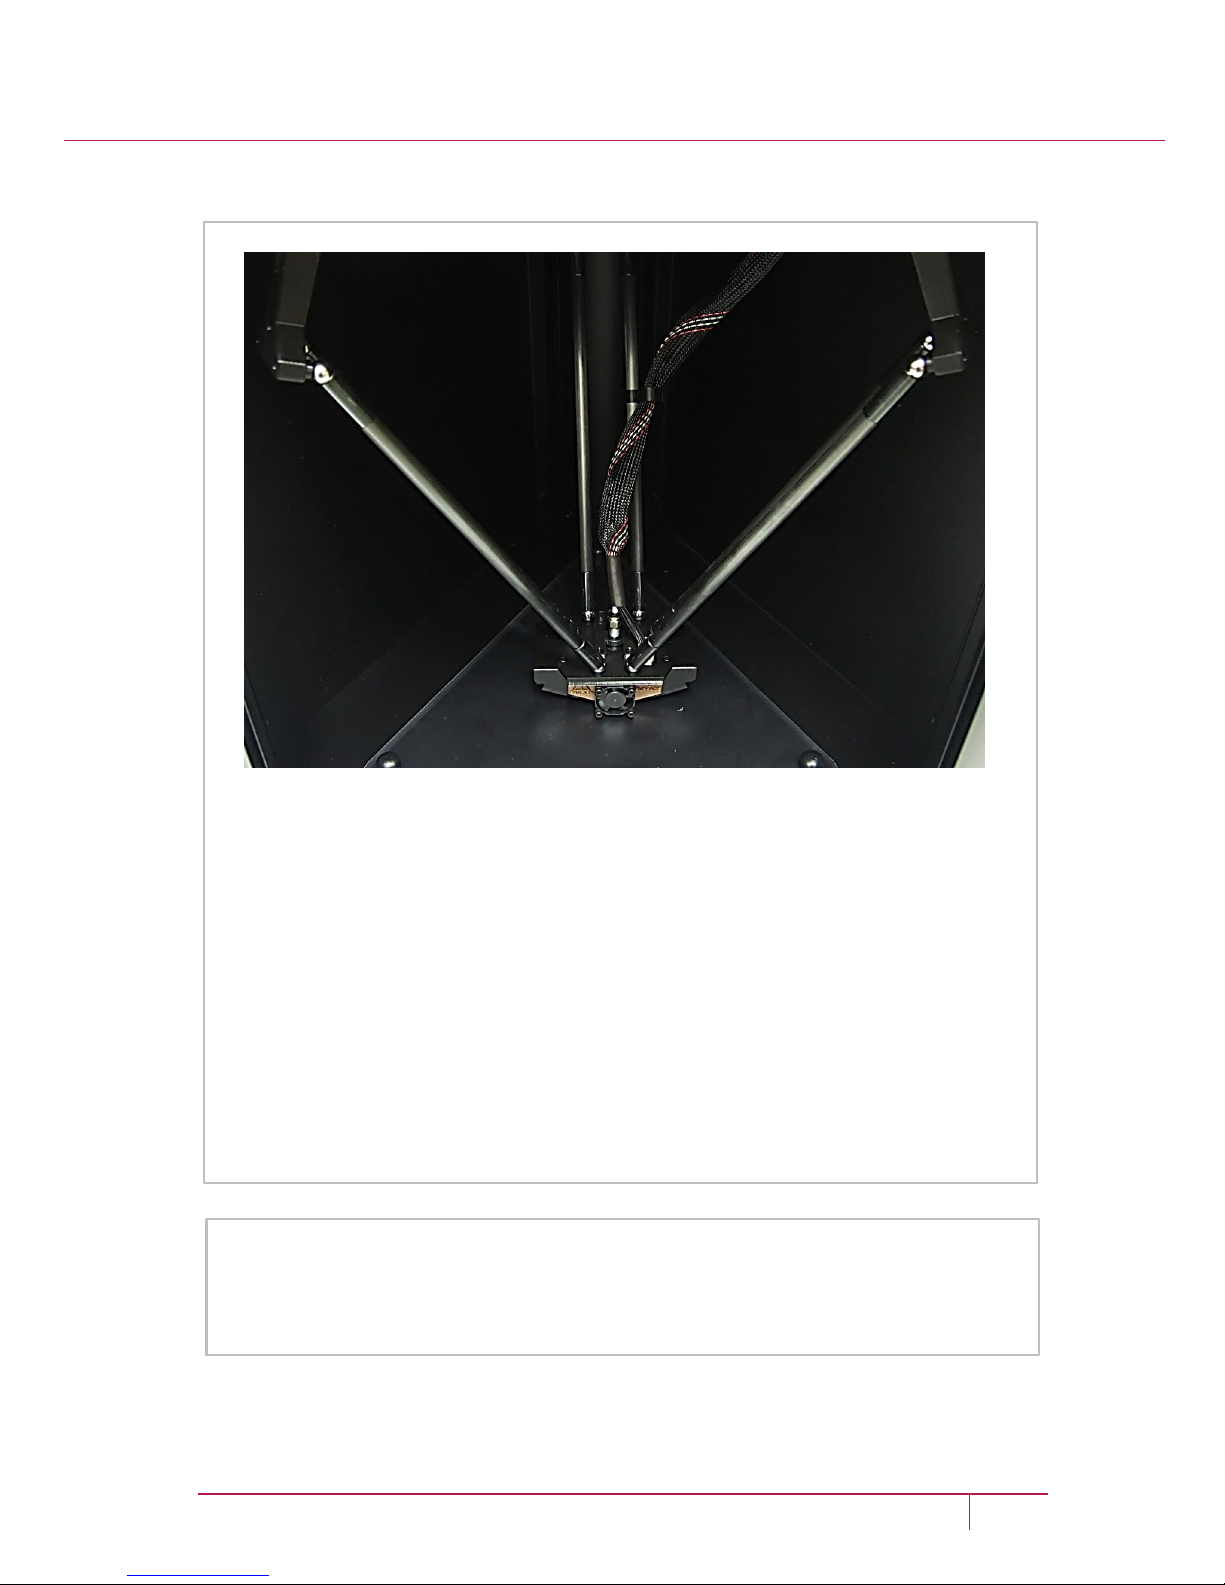
9. Attaching End-Effector
1. Plug the wire to the connector.
2. Insert the PTFE tube deep into the center hole.
3. Attach both ends of the 6 lower arms to the steel balls of upper arms
and end-effector, respectively.
4. Attach the tube holder to a bar and put the wire inside the tube
holder.
5. Connect power on the left panel using the adopter.
Now the hardware assembly is complete. Be sure to read the manual in
the next section, before using the product.
18 LOCOOP Y USER MANUAL | www.locoop.net
←1
2→
←3
←4
Page 19
Part C
Operation
Page 20
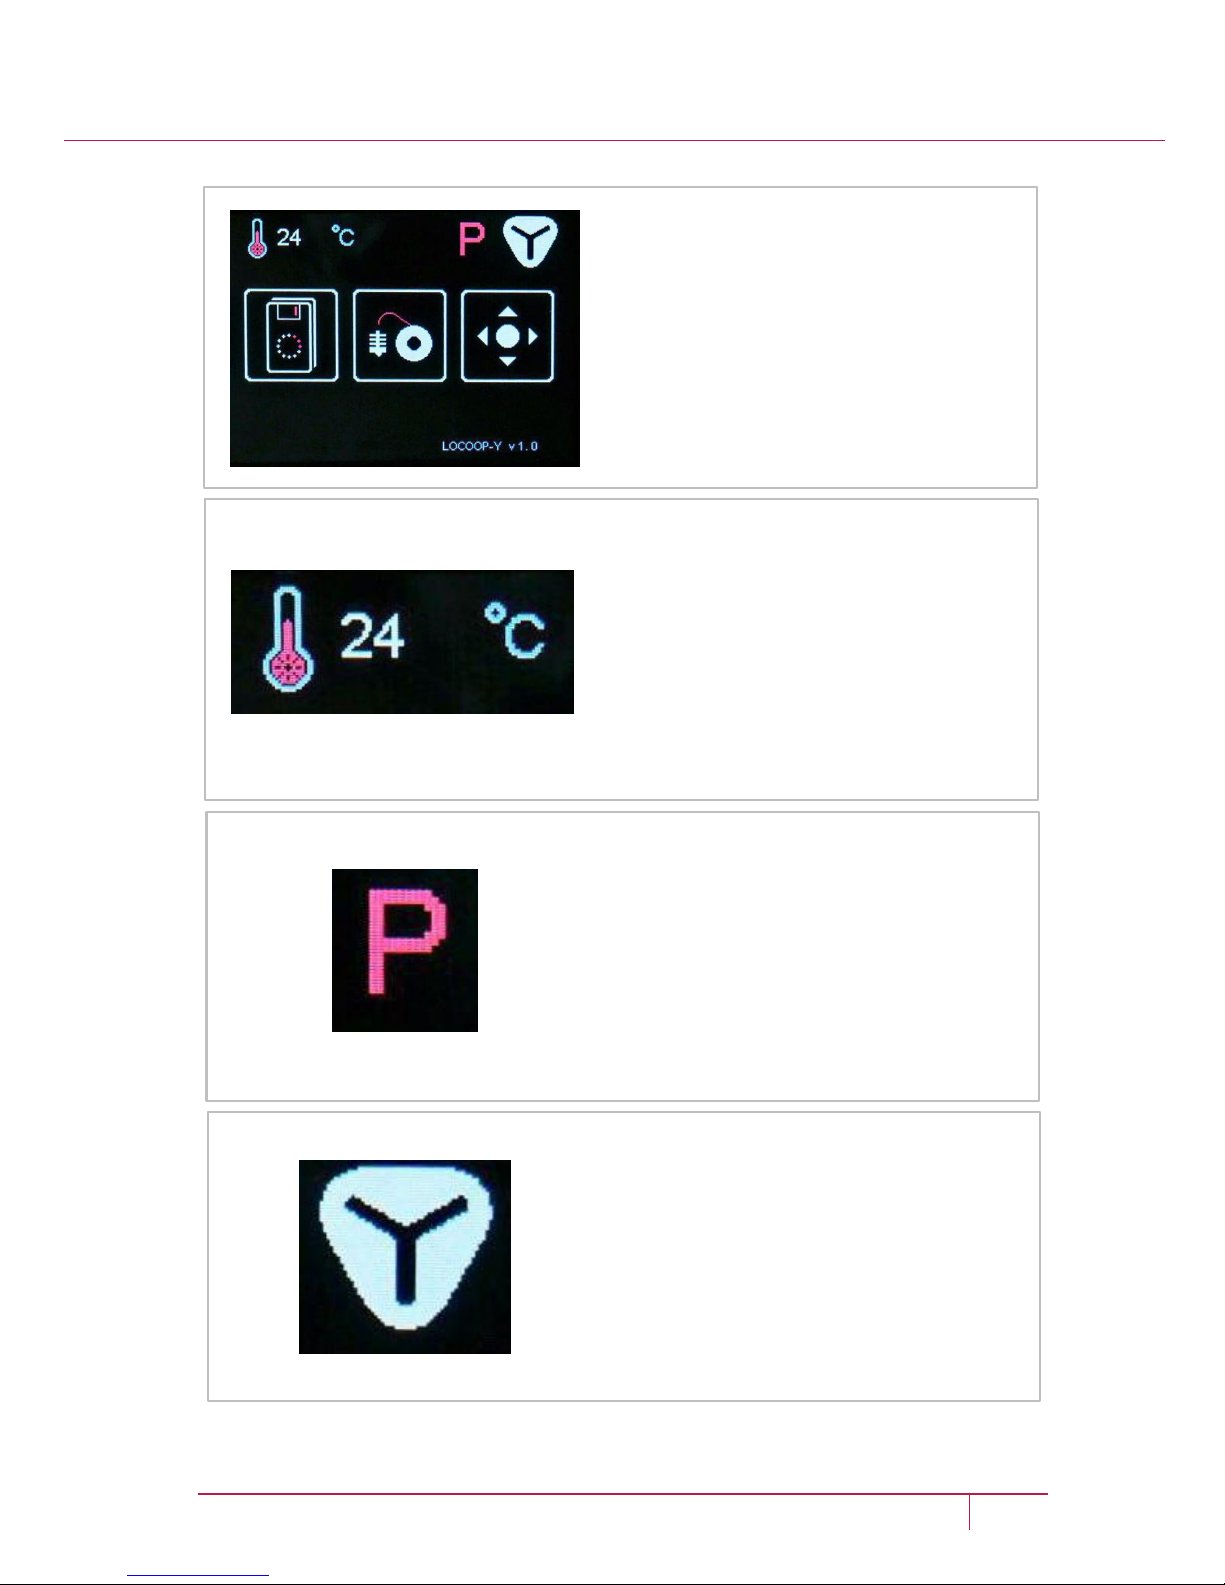
You can move back to the home
screen by tapping on the ‘Y’ icon on
the top right corner of the screen at
any time that the machine is not
printing.
1. Home Screen
When you turn on the machine, the
LCD screen will look like this. This is
the home screen.
The red ‘P’ on the top right side of
the screen means ‘Parking’.
It appears when you first turn on
the machine, and you can move the
end-effector to the top by tapping
on this icon.
The number on the top left side of
the screen shows the current nozzle
temperature in Celsius degrees.
You can check the temperature of
the hot nozzle as you print.
20 LOCOOP Y USER MANUAL | www.locoop.net
Page 21
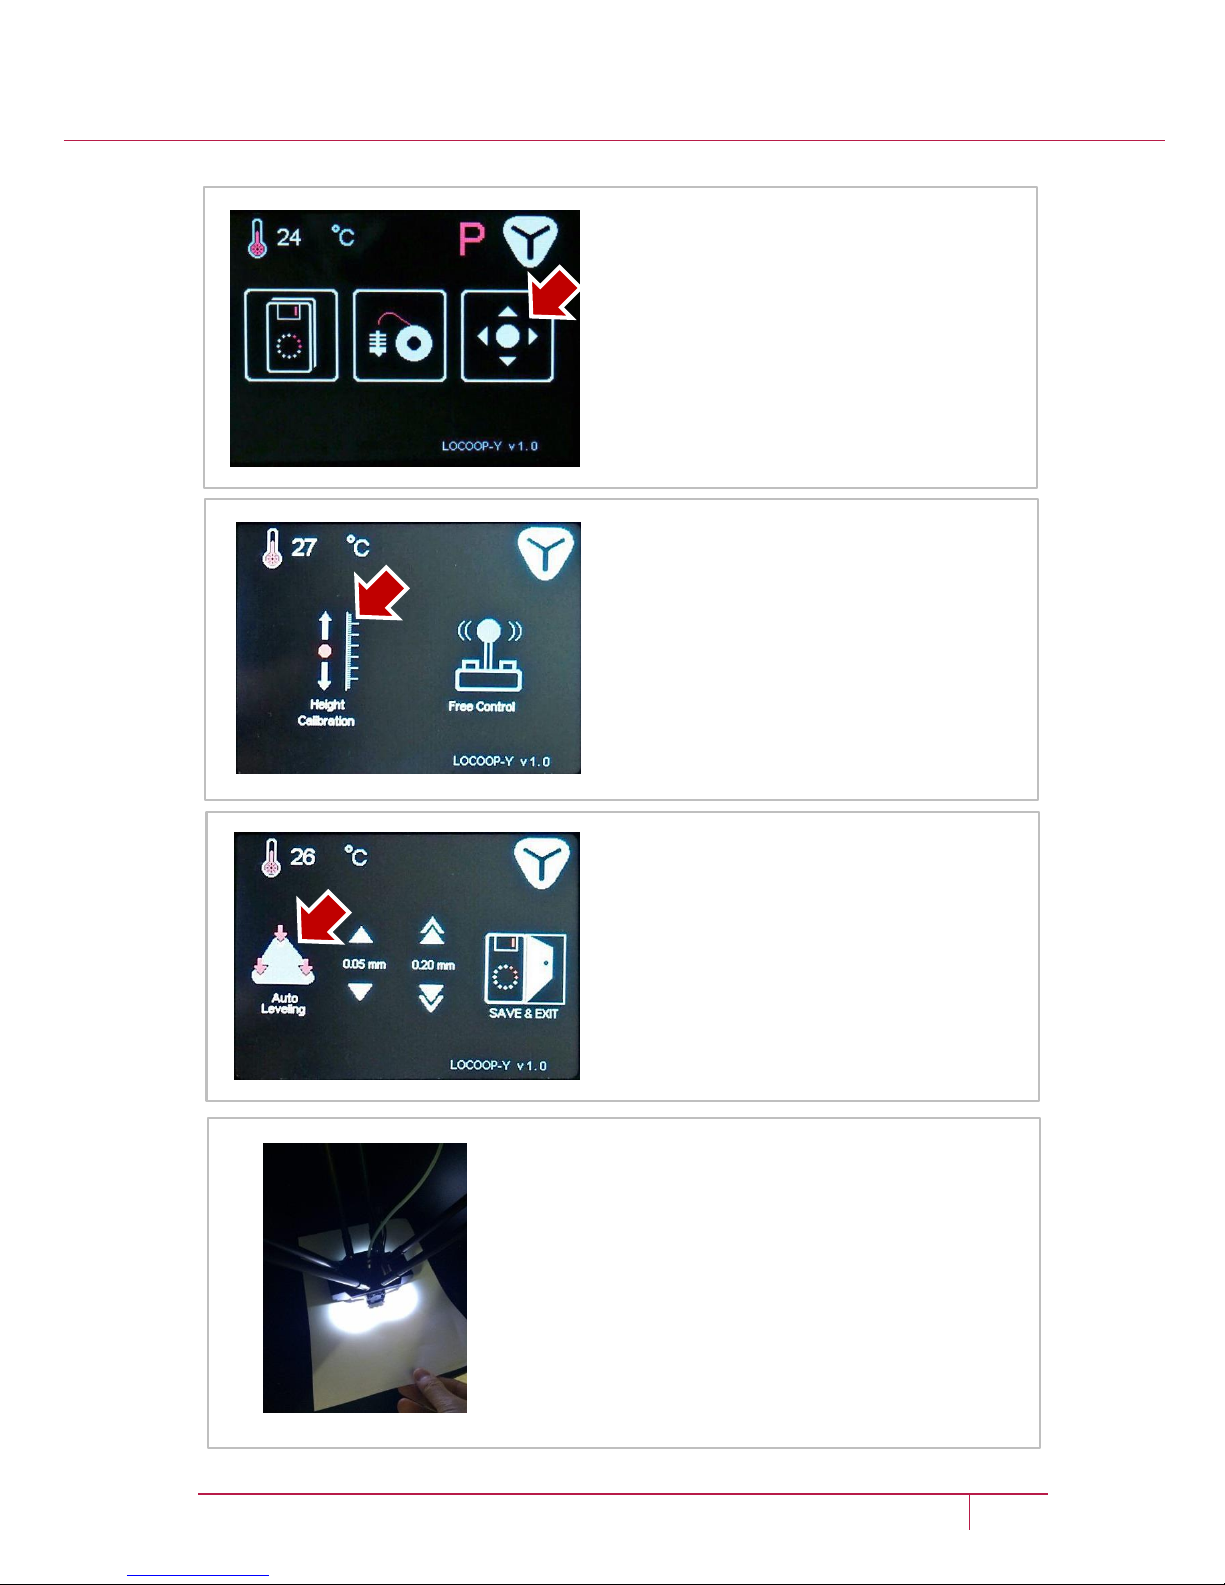
When auto-leveling is complete, place a piece
of paper between end-effector and bed.
Tap on the second or third icon on the screen
above to move the nozzle down until the
paper would not pull out smoothly. Then, tap
on the second icon to move the nozzle up by
0.05mm. Tap on the far right 'Save & Exit'
icon to finish calibration.
2. Calibration
Insert an SD card in the slot and
press the far right icon. This is
necessary job for saving calibration
data to the SD card.
When replacing the SD card, you
will need to repeat this process.
To begin auto-leveling, tap on the
far left icon and wait. The other two
icons will become activated once
auto-leveling is complete.
When you see the screen change
like this, tap on the left icon to
begin height calibration.
21 LOCOOP Y USER MANUAL | www.locoop.net
Page 22
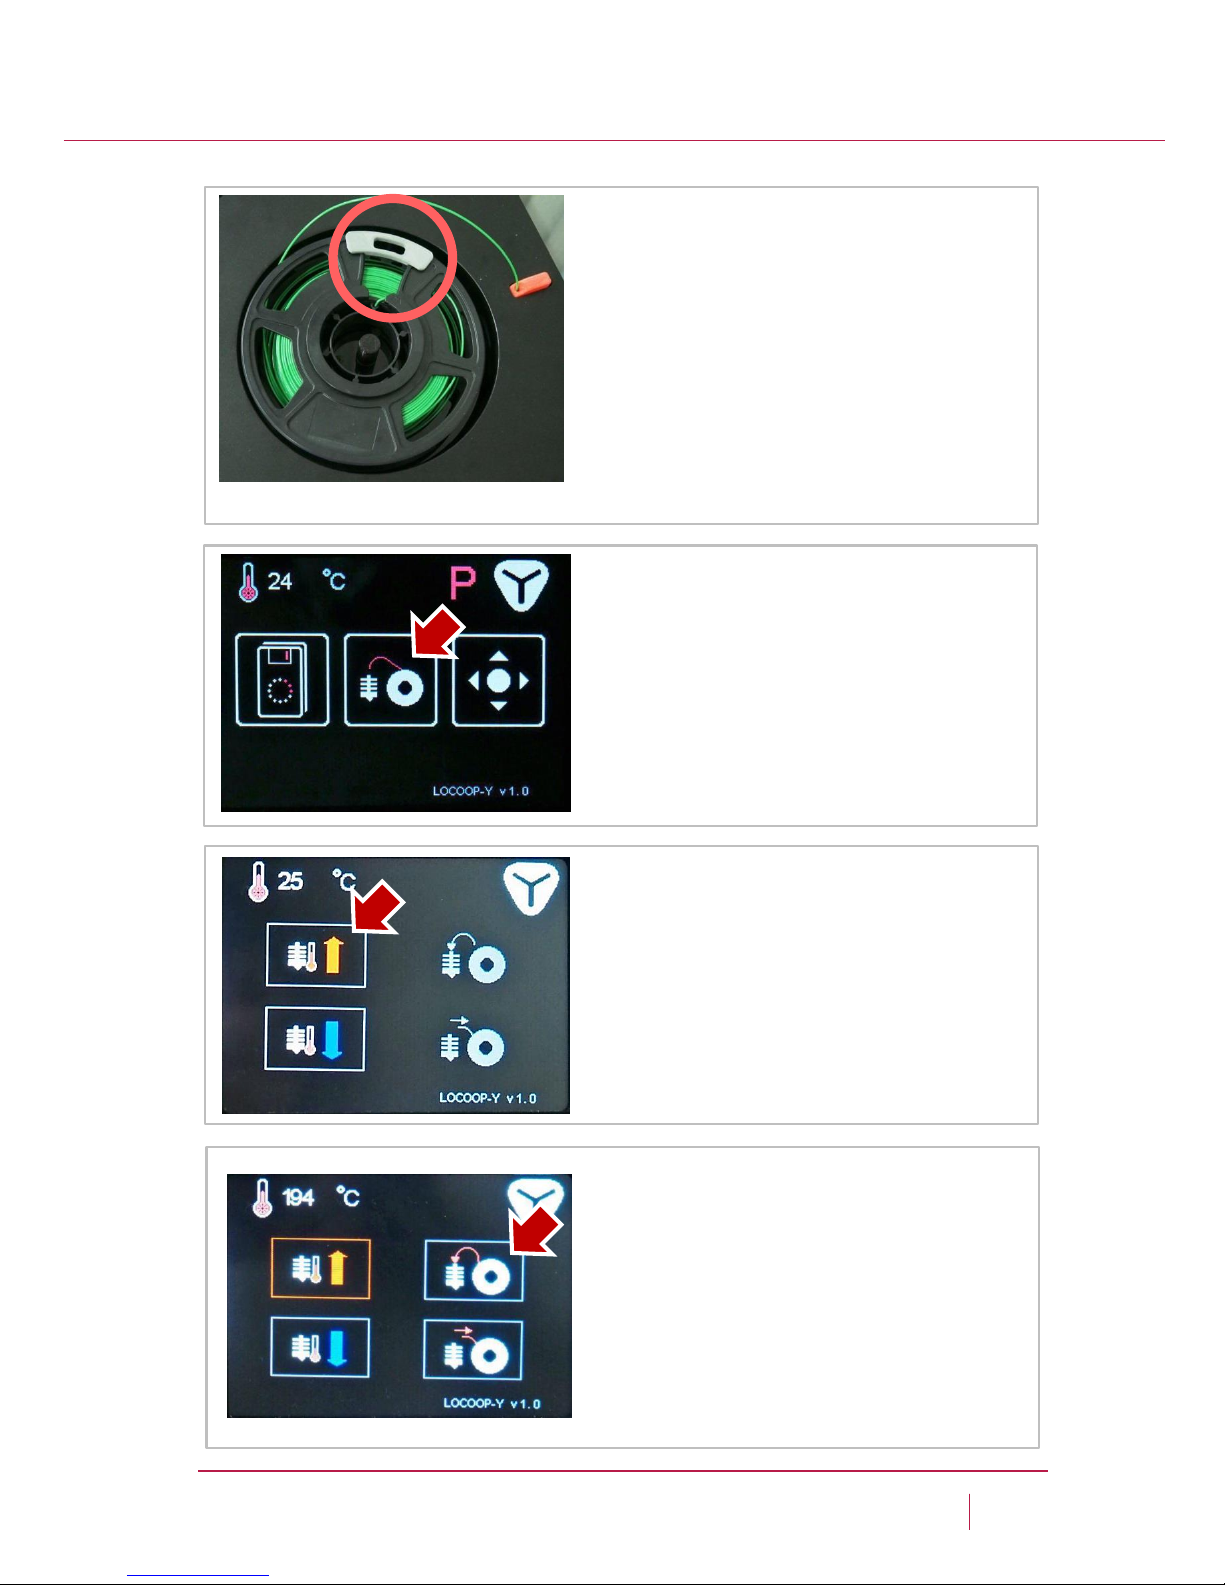
3. Loading Filament
Return to the home screen and tap
on the center icon.
When the two icons on the right are
activated, you can load/unload the
filament.
Keep pressing the upper right icon
(load) until you see filament coming
out through the nozzle.
Tap on ‘Y’ button to return to the
home screen.
When you see the screen change
like this, tap on the upper left icon
to heat up the hot end.
When using LOCOOP filament, put
the enclosed plastic cap as shown in
the left image. Place a filament on
the turn table at the top of the
machine. Push down the red spring
presser and insert the tip of the
filament into the extruder hole.
Keep pressing the spring presser
and inserting filament until you can
feel the tip of filament hit the end of
tube.
22 LOCOOP Y USER MANUAL | www.locoop.net
Page 23
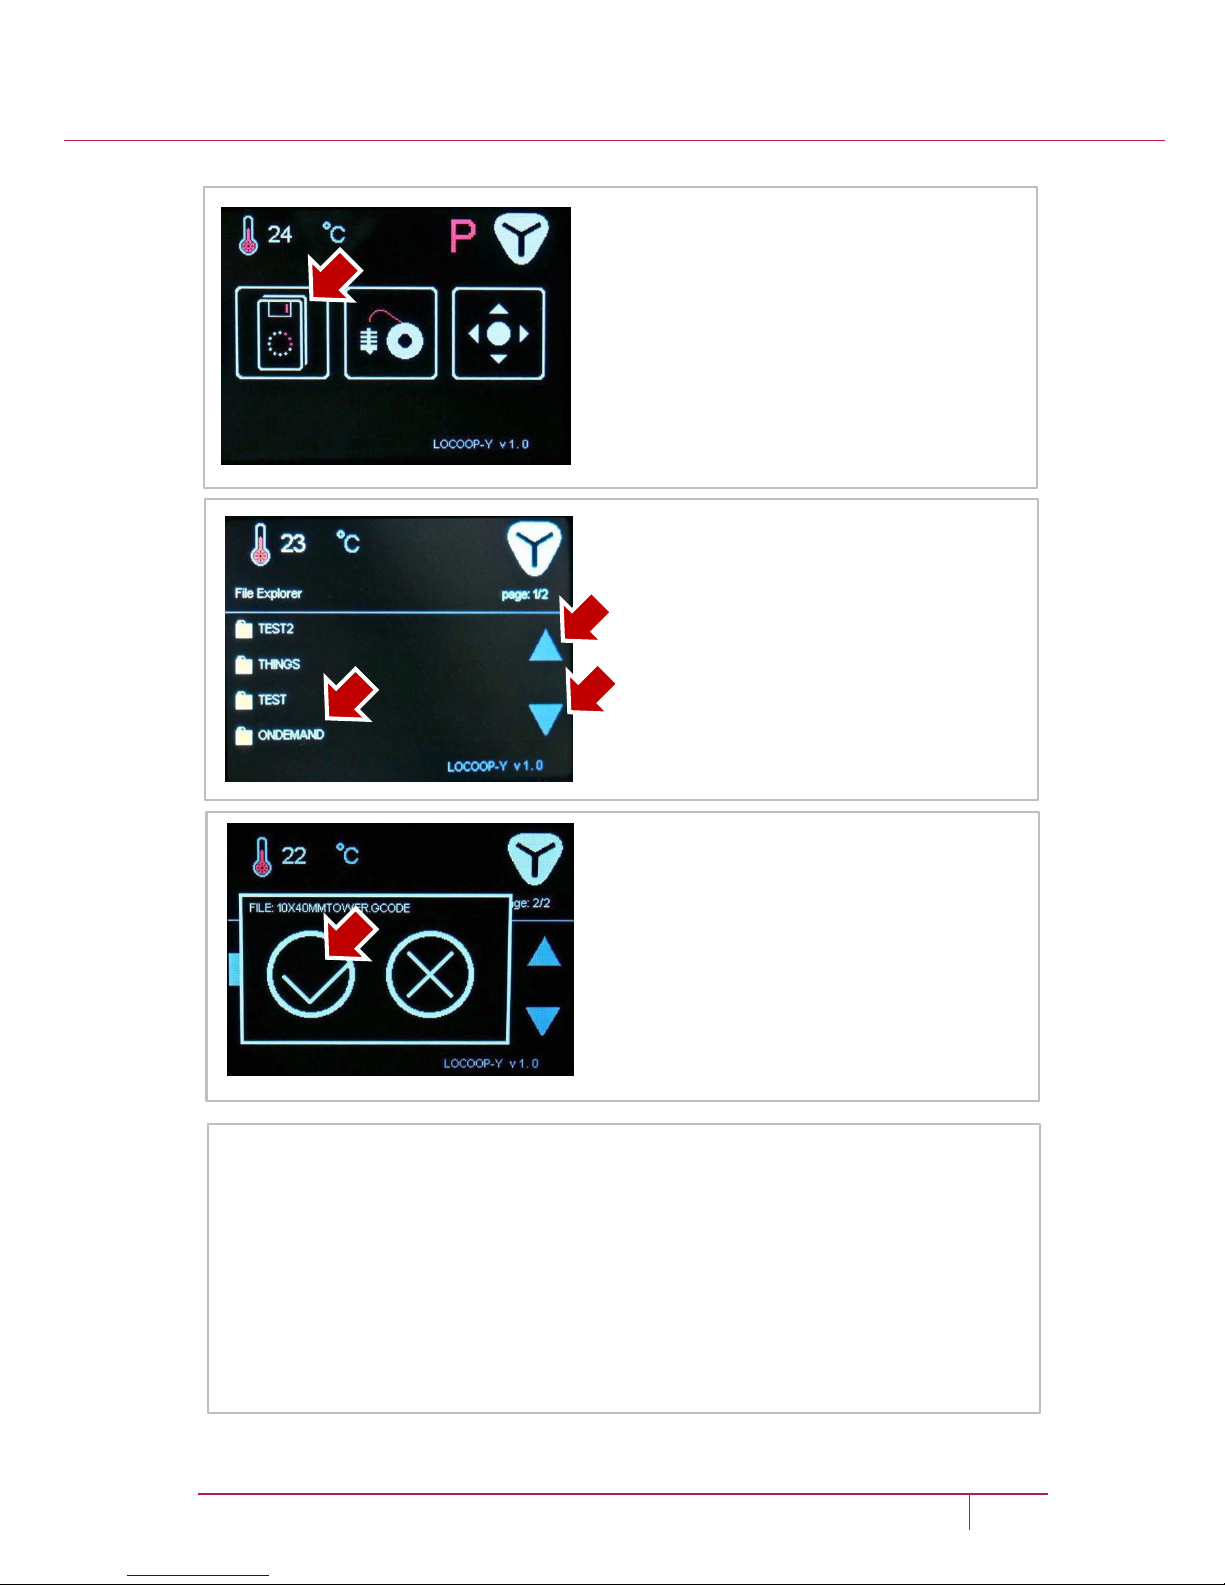
4. Printing
To begin your first print, tap on the
far left icon on home screen.
The printer will pop up a window to
make sure you have selected the
right file.
Check the file name and tap on ‘v’ to
confirm.
You can see the list of folders in
your SD card.
Tap on the up/down arrow on the
right to navigate. When you find the
print file, tap on its name.
The printing will begin. Please keep the door closed during printing to
maintain the temperature stable.
DO NOT touch the hot-end while printing, and DO NOT move or shift
the printer until printing is complete.
23 LOCOOP Y USER MANUAL | www.locoop.net
Page 24
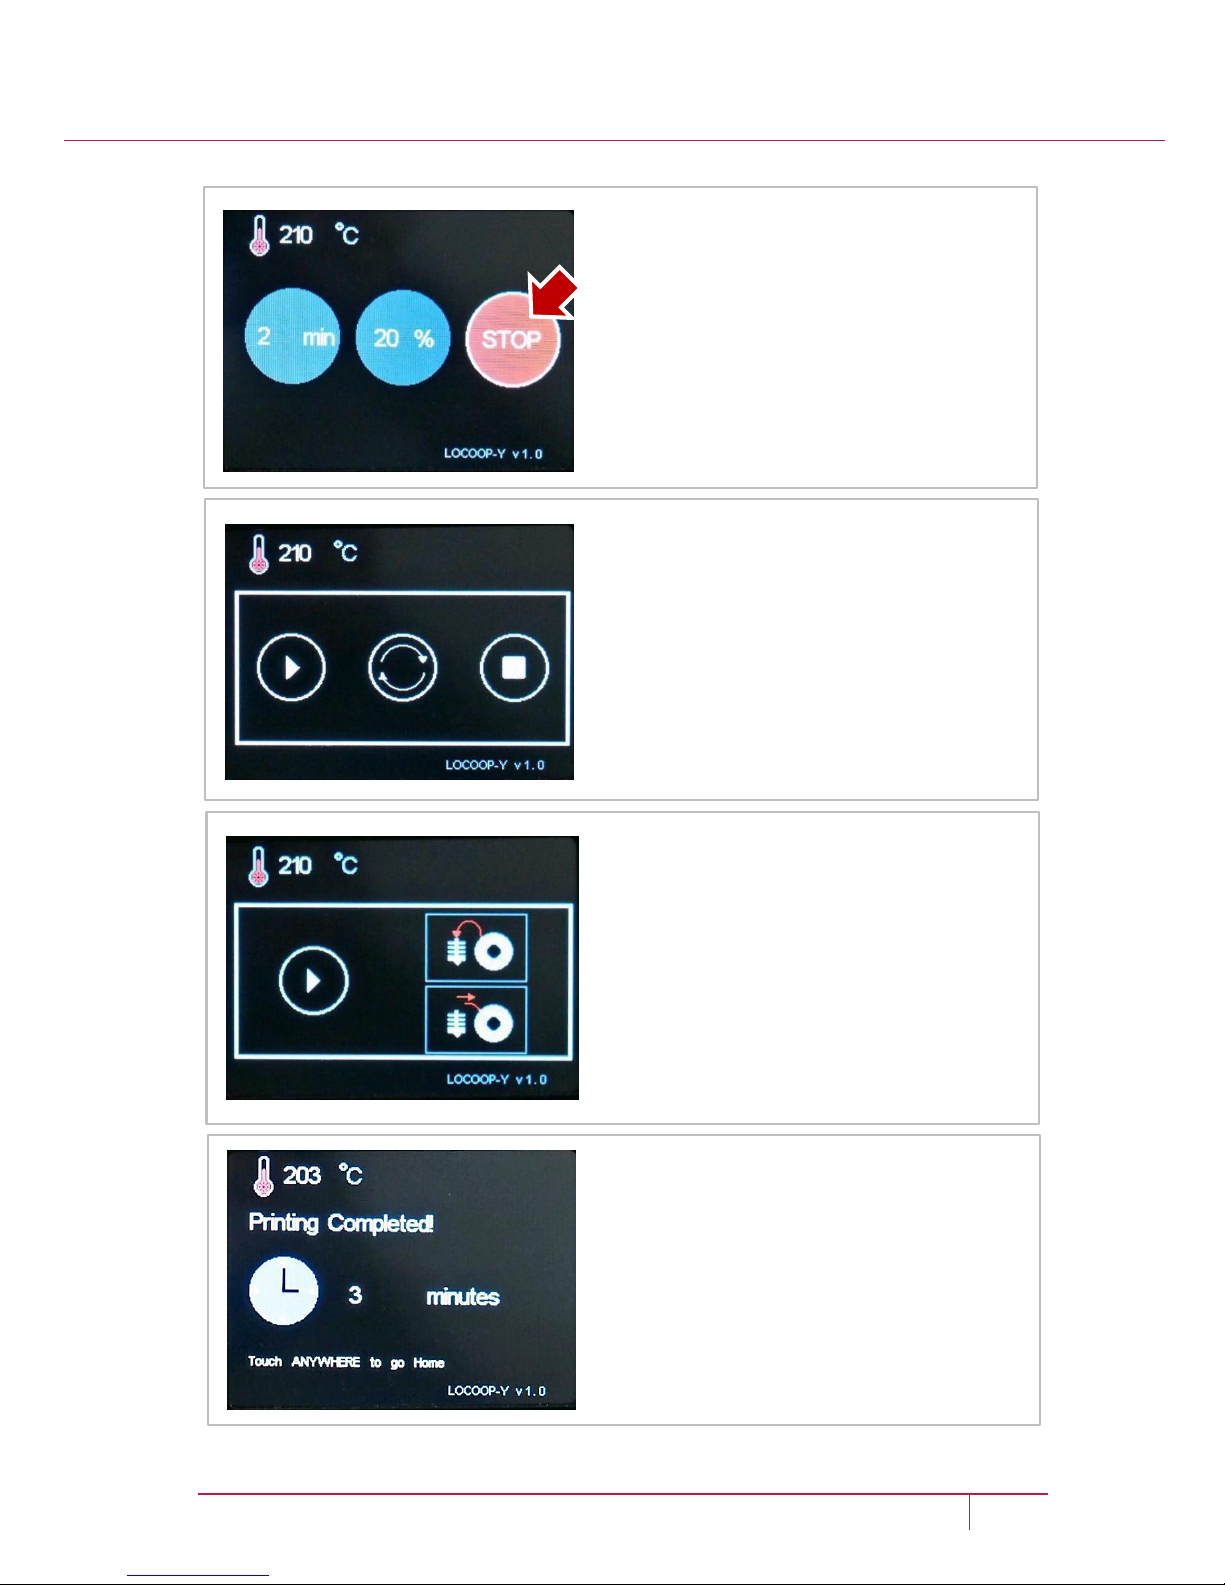
5. Stop & Resume
Once the printing begins, the screen
will change like this. Here, you can
check how long the machine has
been printing and how far the print
has progressed (%).
You can tap on ‘stop’ icon on the far
right to bring the print to a halt.
If you choose to replace filament,
the screen will change to this. Press
down on load/unload icon on the
right. At this time, the end-effector
moves to the position where it is
easy to replace the filament.
You can use this function to print an
object in multiple colors.
When you tap on the ‘Stop’ button,
the screen will change to this.
Tap on the left icon to resume
printing, the center icon to replace
filament, and the right icon to stop
completely.
After printing, the screen will show
the total time spent as seen in the
left image. Tap anywhere to return
to the home screen.
The same screen will appear when
you stop printing.
24 LOCOOP Y USER MANUAL | www.locoop.net
Page 25
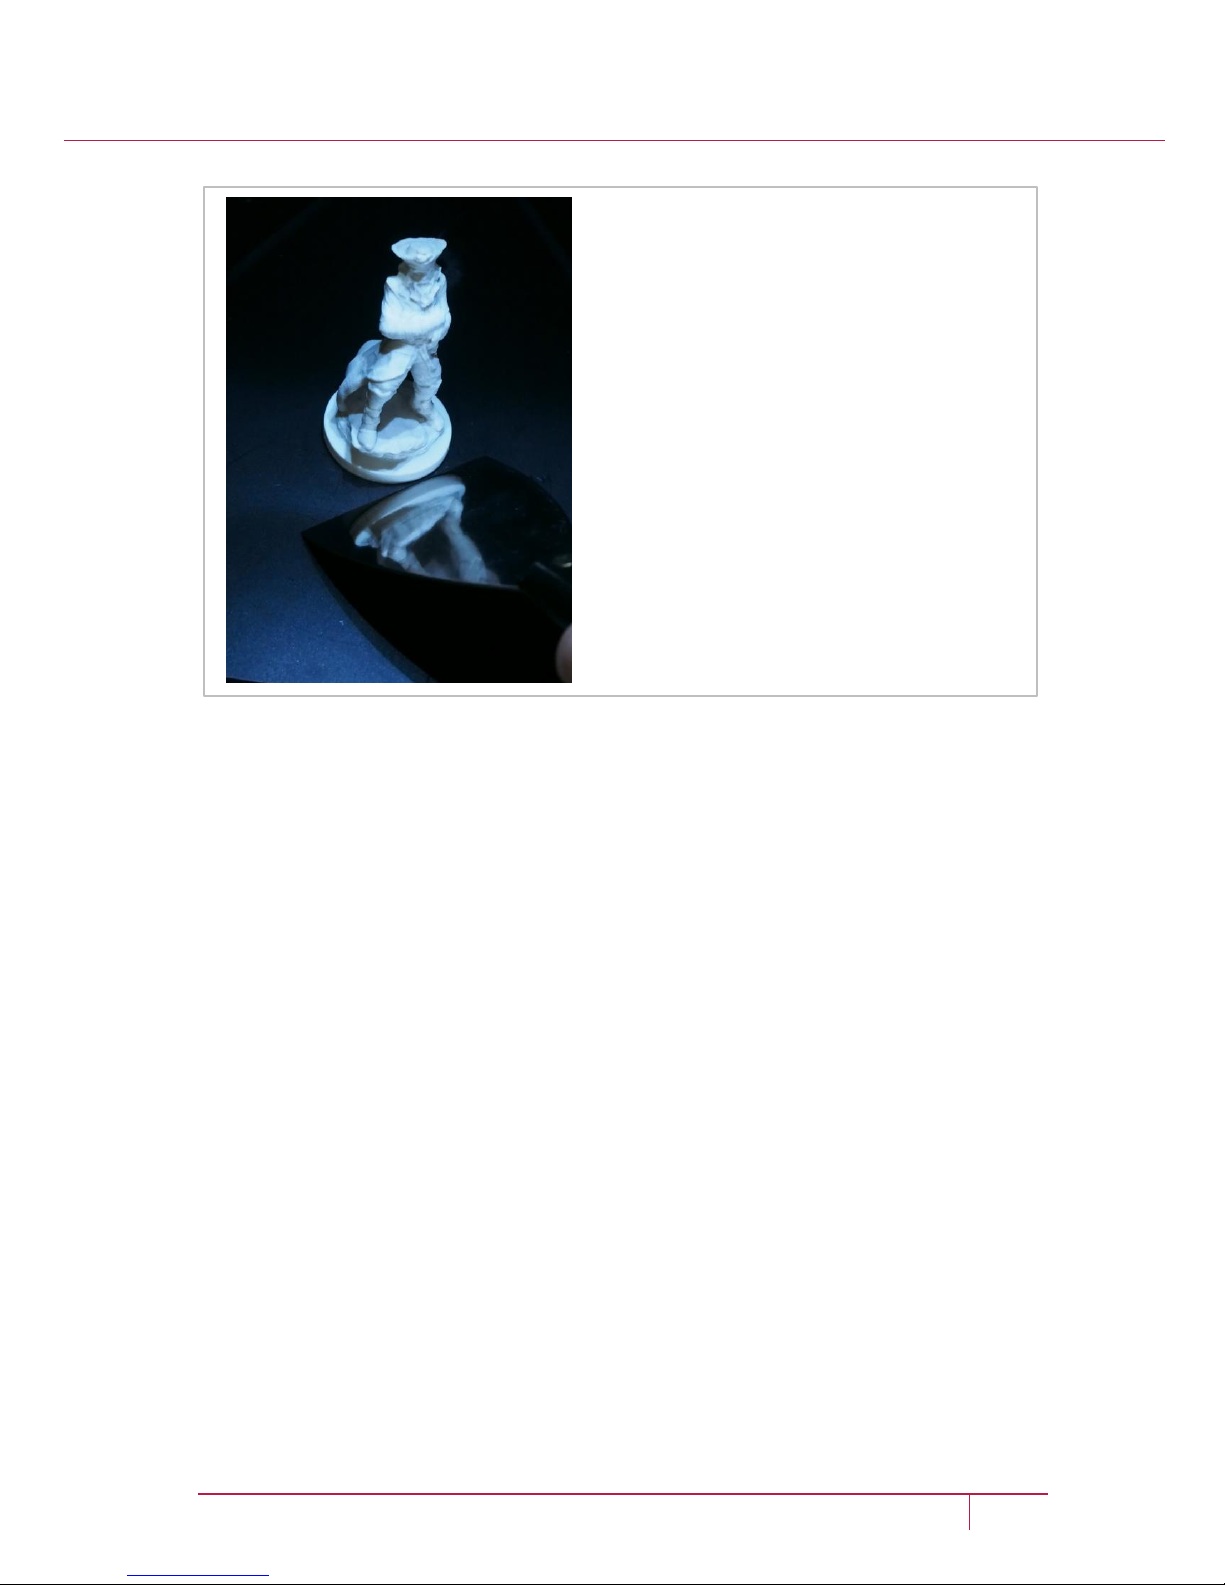
6. Removing 3D Print
Carefully remove the finished 3D
print from the bed, using a scrapper.
25 LOCOOP Y USER MANUAL | www.locoop.net
Page 26
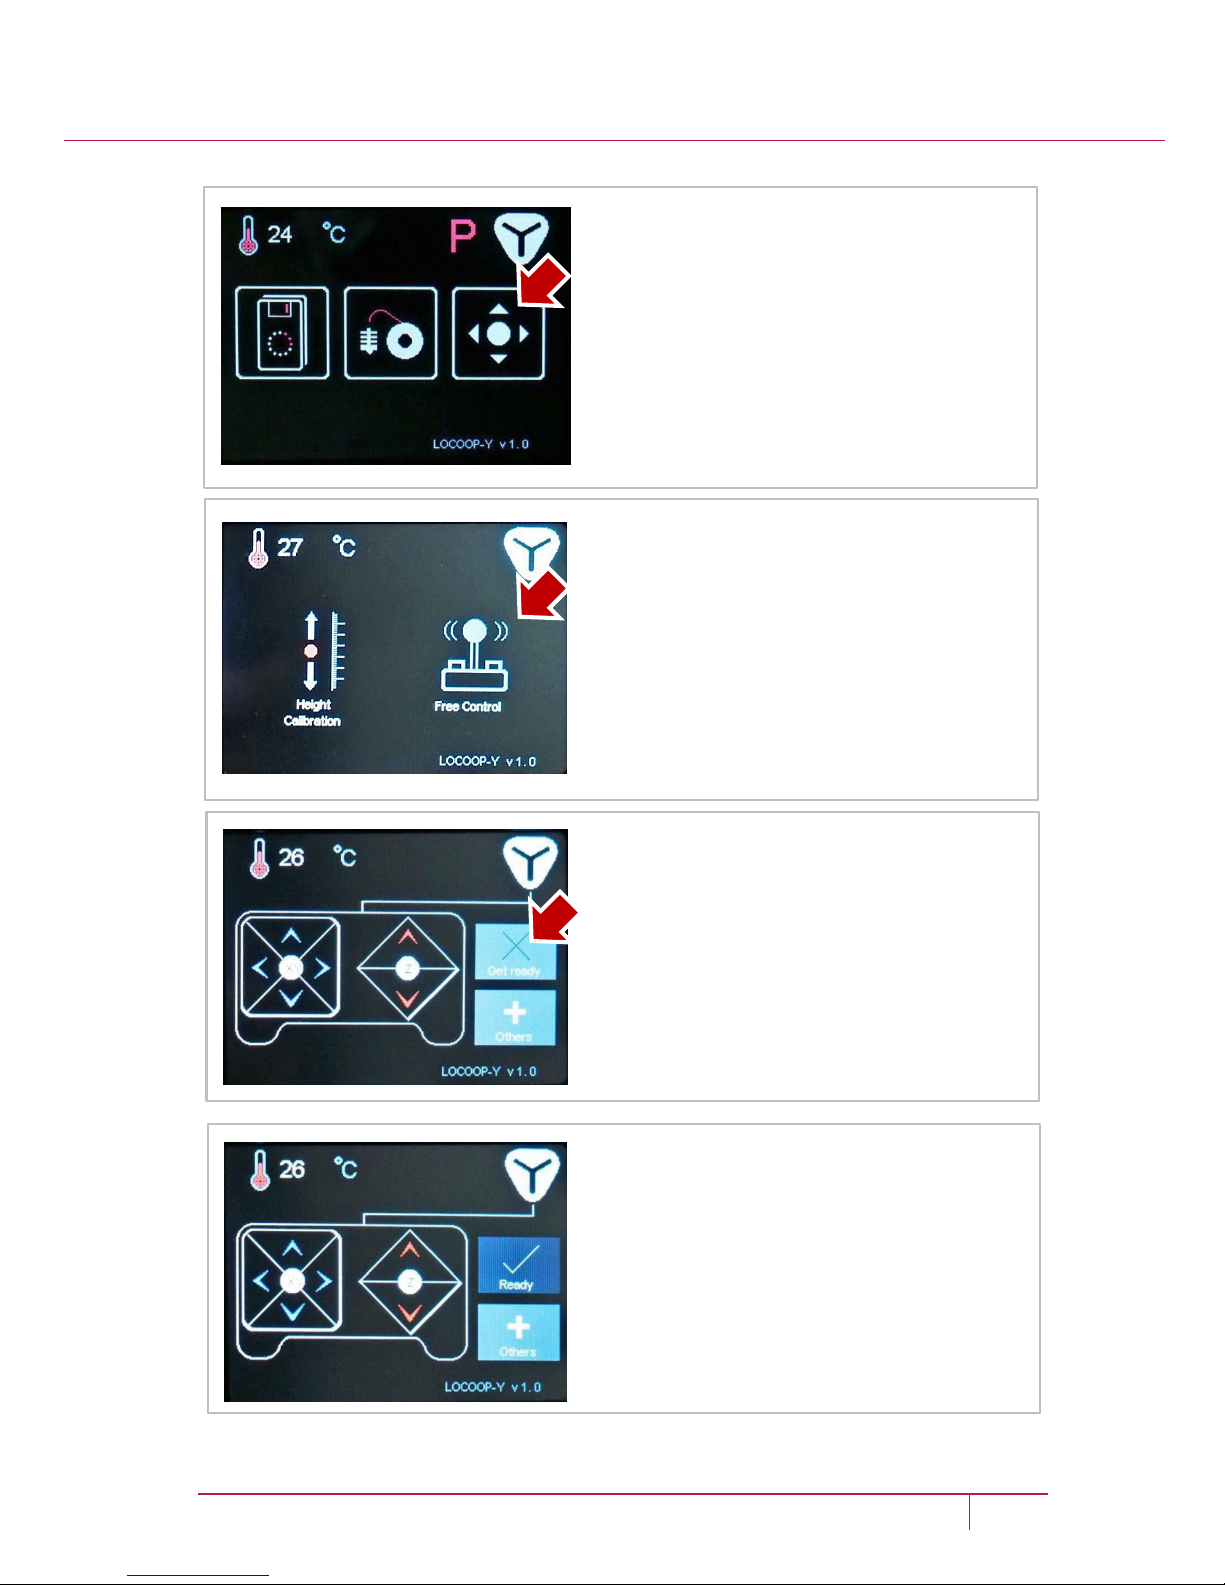
7. Free Control
Tap on the right icon from the
home screen.
Tap on ‘Get ready’ button to prepare
the machine.
Tap on the joystick icon on right.
Here, you can move the endeffector freely. Because, why not?
When the button changes to ‘Ready’,
you can control the joystick image
on screen to move the end-effector
as you want.
26 LOCOOP Y USER MANUAL | www.locoop.net
Page 27
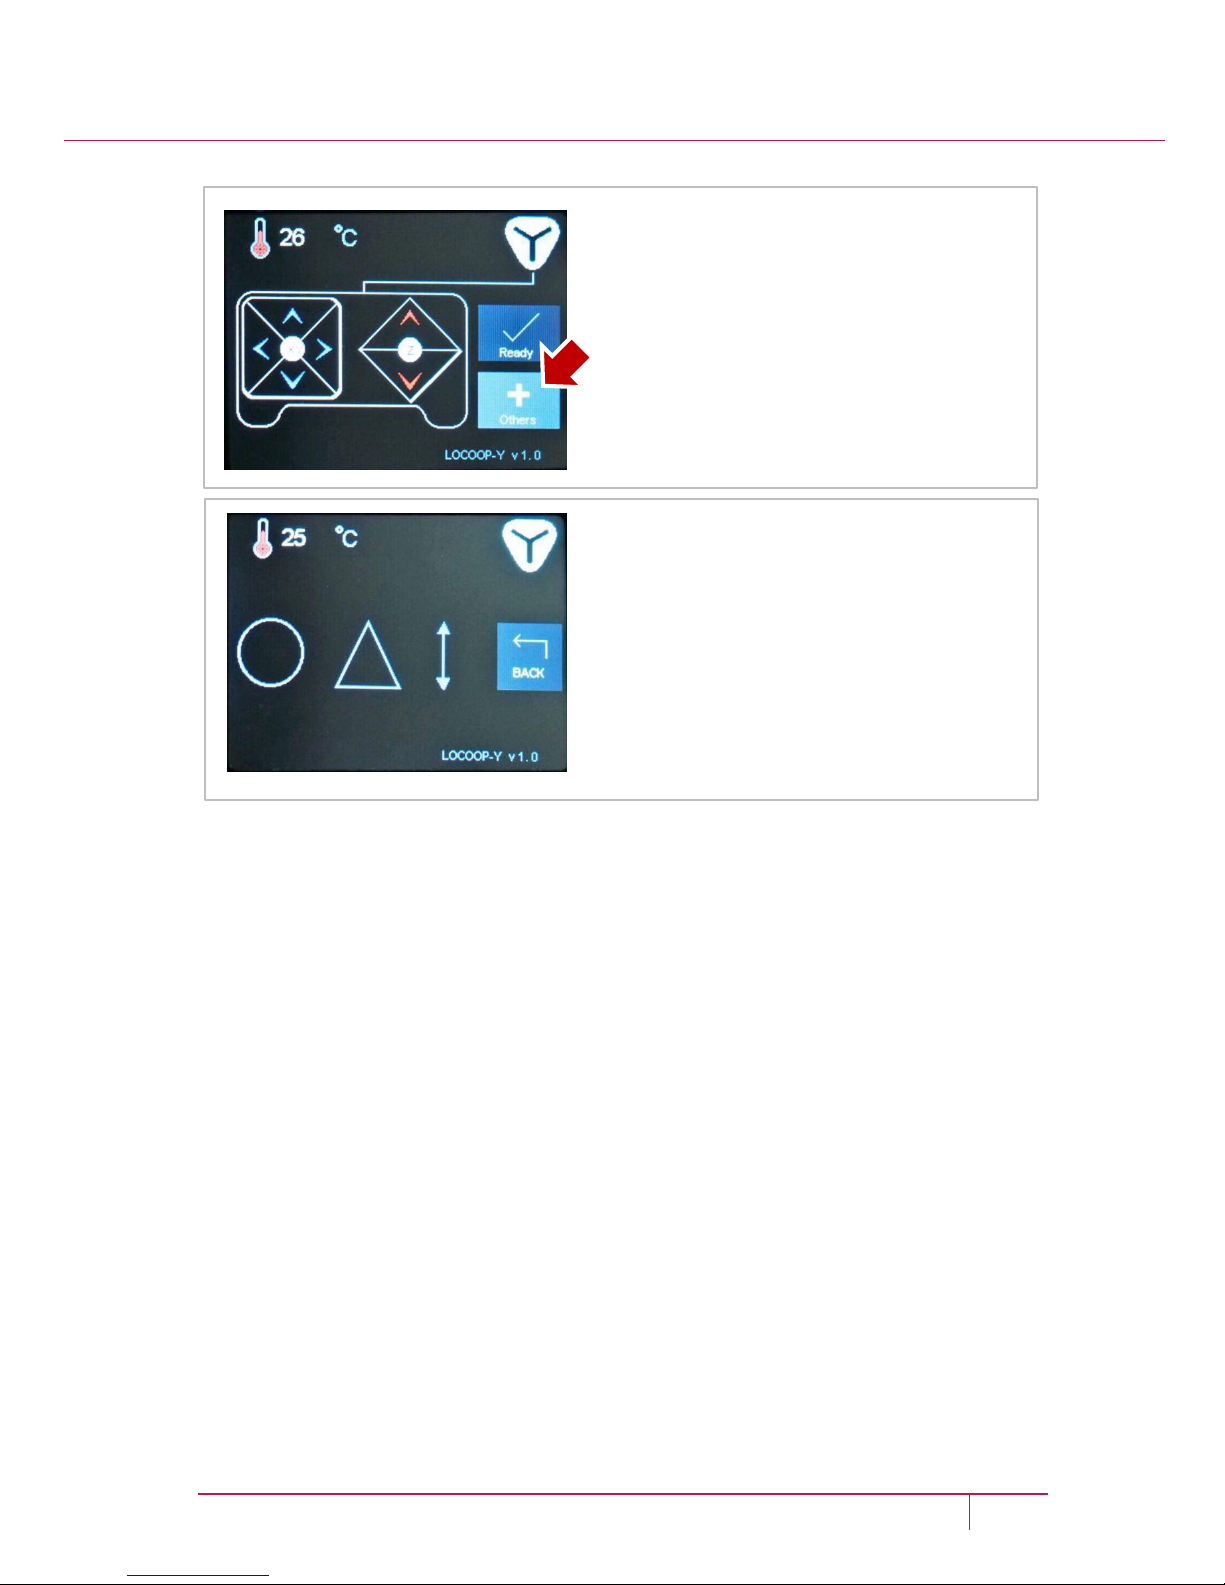
7. Free Control (Cont’d)
Now, try tapping on ‘Others’ button
in the bottom right corner.
You can tap on a shape and the
end-effector will move accordingly.
Tap on ‘Back’ button to return to the
previous screen.
27 LOCOOP Y USER MANUAL | www.locoop.net
Page 28
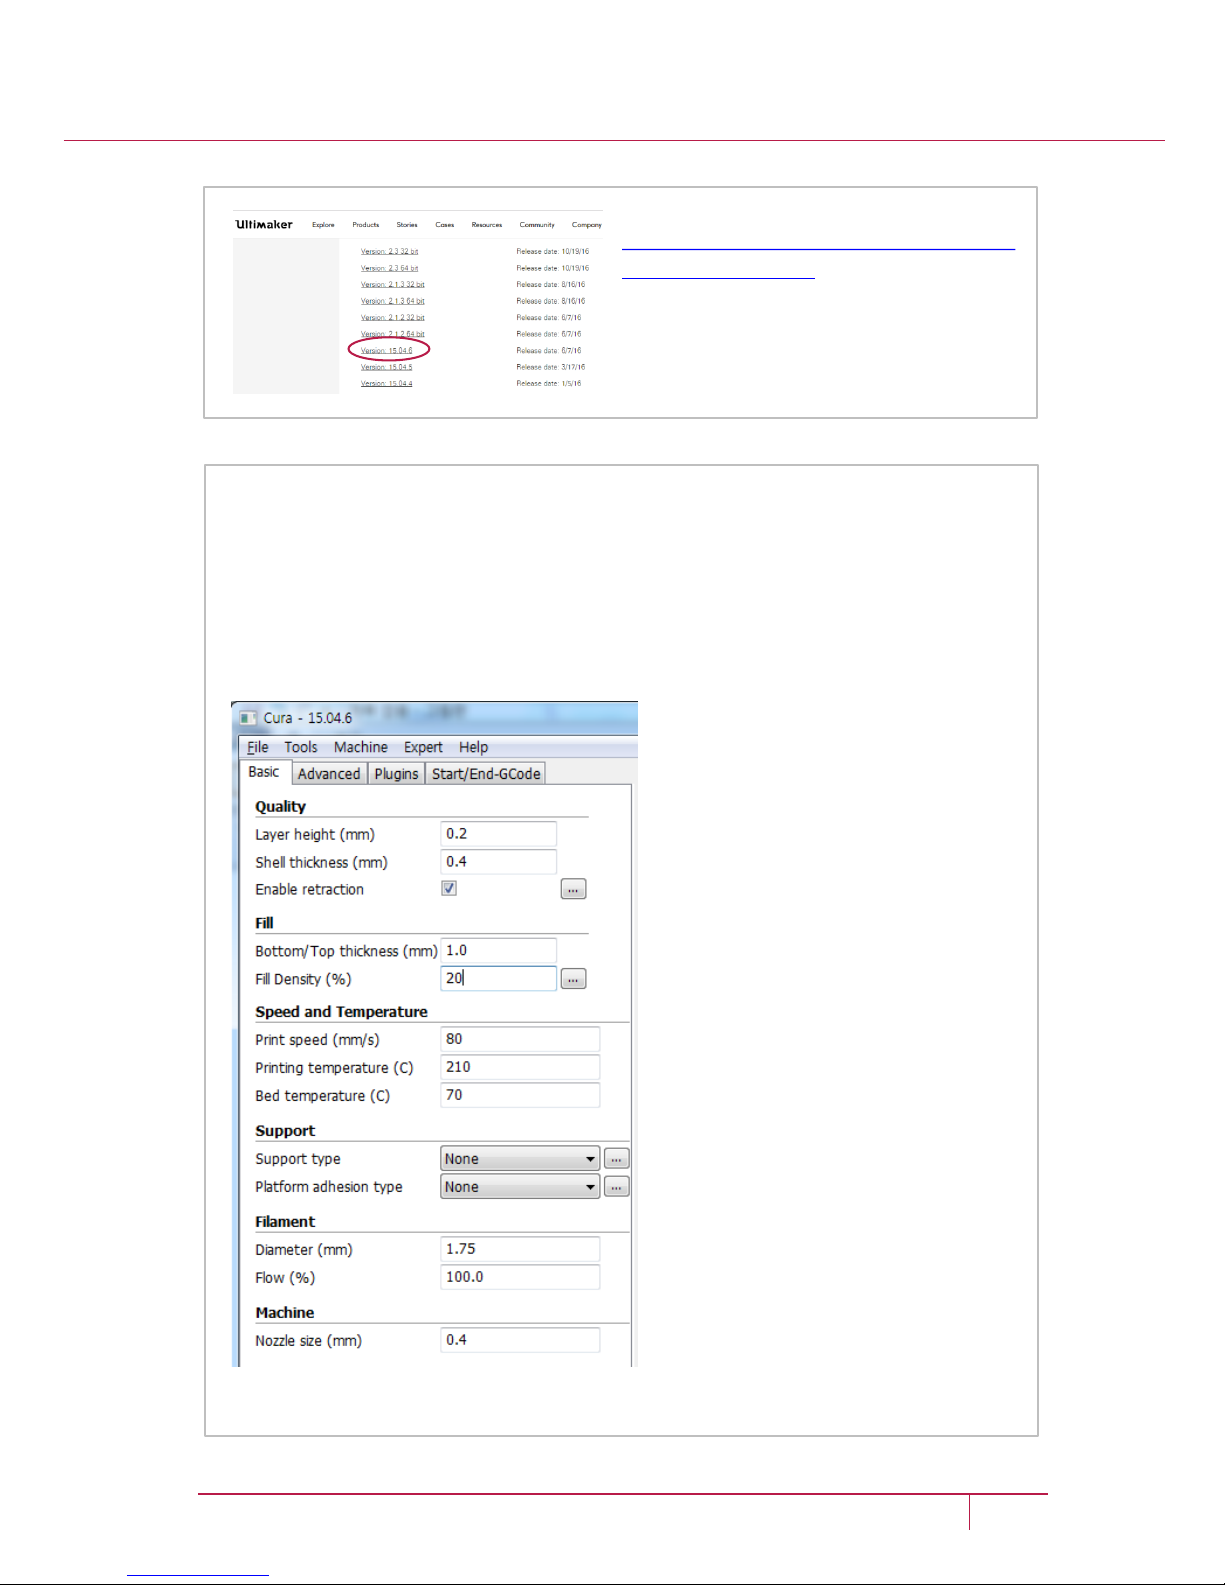
8. CURA Download & Setting
https://ultimaker.com/en/products/
cura-software/list
Download the latest version of
CURA (version 15.X) from the above
link.
Run CURA. From the top menu, select 'Machine Add new machine' to
run the Configuration Wizard. Click Next, select Other, and then click
Next again. Click Custom, and then click Next.
Enter LOCOOP Y in the machine name, and enter 180 mm for width, 180
mm for depth, 200 mm for height, and 0.4 mm for nozzle size. Then
check out Bed center is 0,0,0 and press Finish to finish.
You can enter the printing
condition by clicking the Basic
Tab on the left of CURA.
The general settings for
LOCOOP Y are shown on the left.
You can adjust the layer height
between 0.05 and 0.3 mm and
the printing temperature between 190 and 220 ° C. The
filament diameter and nozzle
size should be fixed to 1.75 mm
and 0.4 mm, respectively, and
should not be modified.
- G-code Generation: Open
the 3D model you want. Click
'File Save Gcode' to save
the Gcode with the name you
want. Move this file to the SD
card and insert it into the
printer. The printing is ready.
28 LOCOOP Y USER MANUAL | www.locoop.net
Page 29
9. Other Precautions and Information
1. Do not remove the SD card during printing.
2. The temperature suitable for PLA is 190℃~220 ℃. The optimum
temperature may depend on the manufacturers. Please set the
optimum temperature when generating g-code.
3. To avoid malfunction, there should be no more than 30 files in a
folder, including subfolders themselves.
4. Make folder and file names as short as possible.
5. The file name must be within 50 characters including the extension.
6. Sometimes the machine may reboot during operation in order to
prevent malfunction. This is normal behavior so do not worry. The
machine will NOT reboot while printing.
7. All products are provided after quality inspection. There can be some
filament remnants in and around the nozzle, which is due to the
quality inspection.
8. The estimated time that Cura shows can be different from the actual
time.
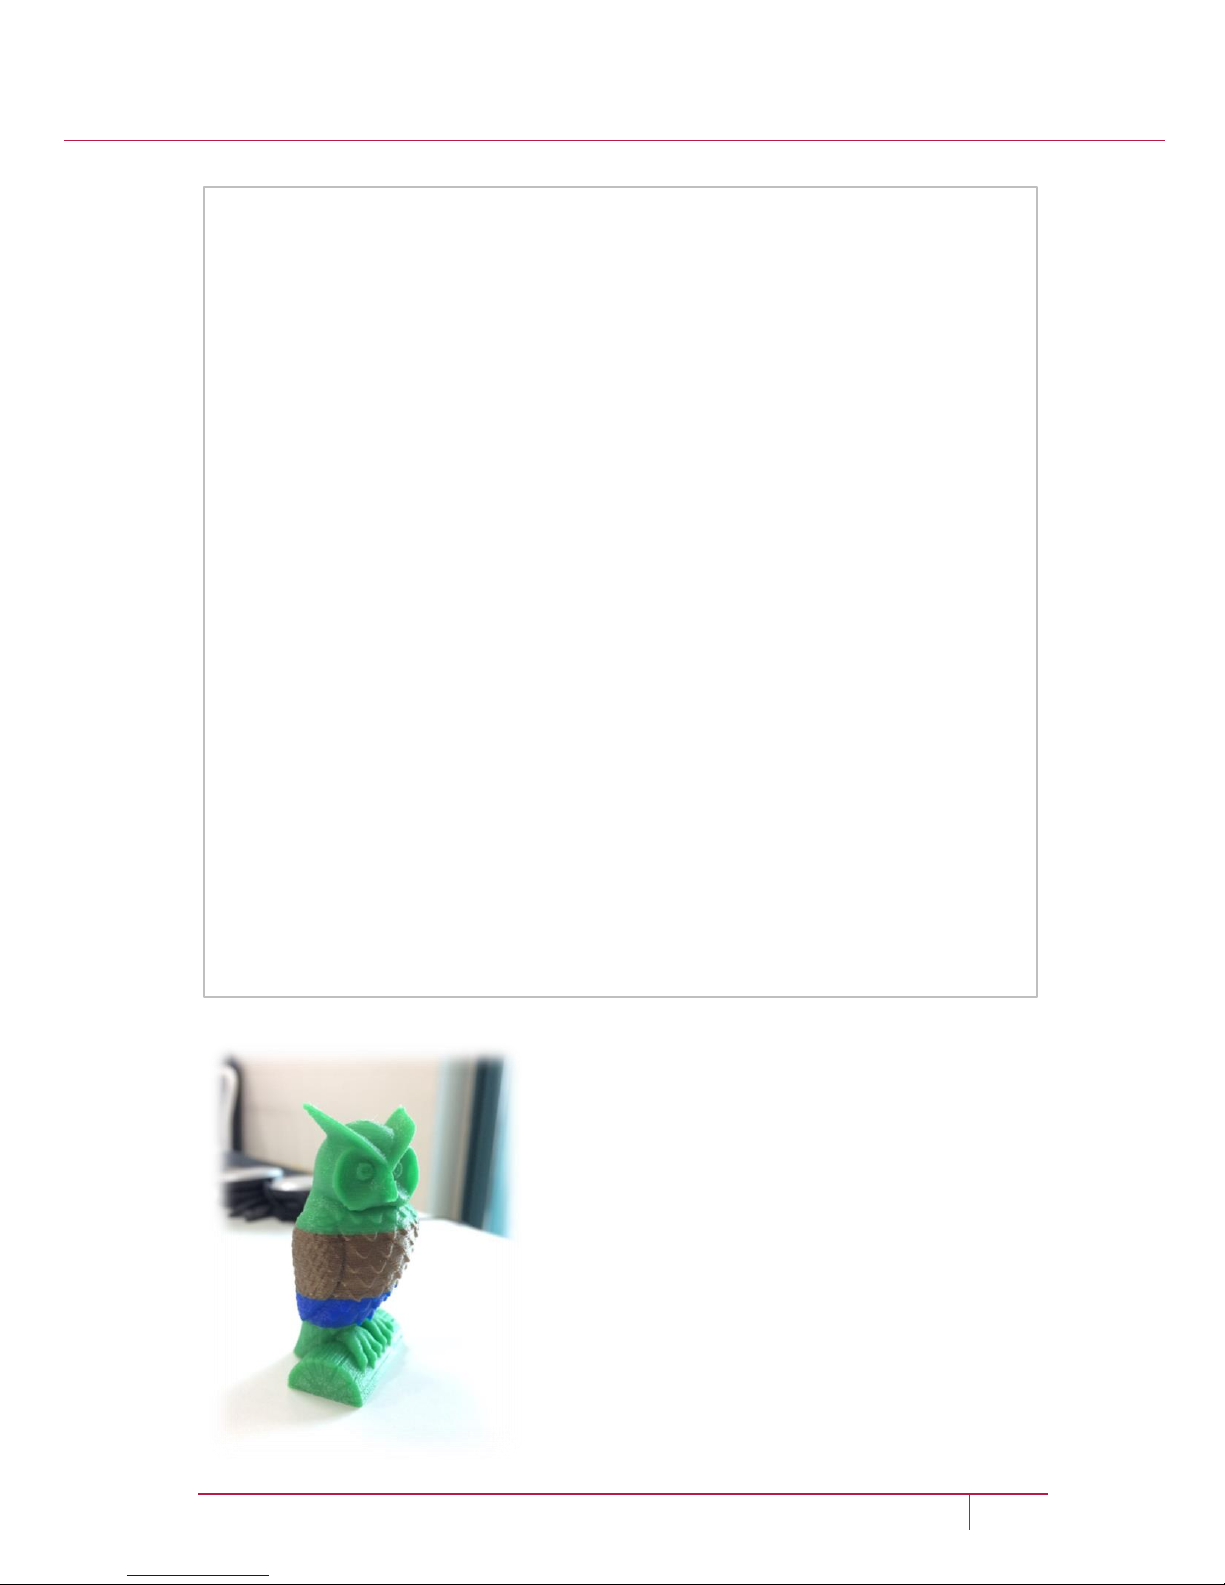
9. There are g-code files in the SD card we provided. You can also enjoy
with these files.
29 LOCOOP Y USER MANUAL | www.locoop.net
“Enjoy Your LOCOOP Y”
Page 30
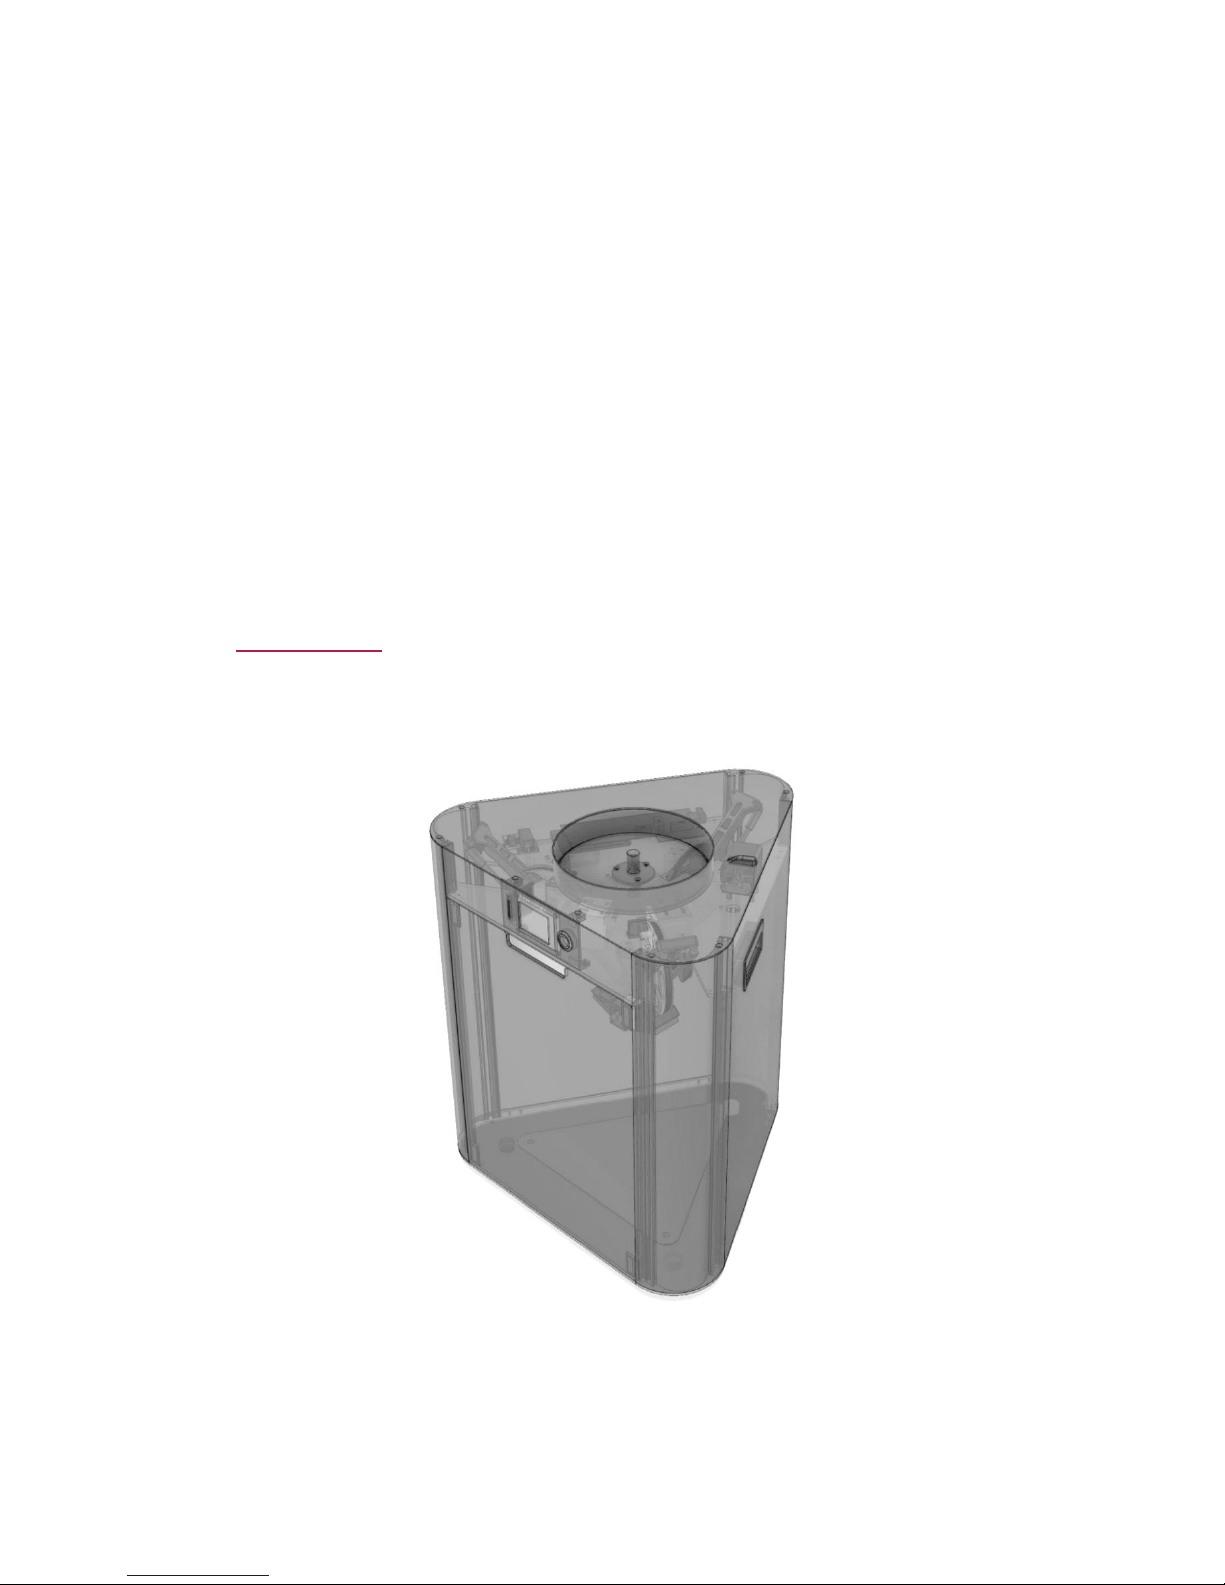
Part D
Troubleshooting
Page 31
1. Troubleshooting
The
Printout
does not Stick
well to the Bed
- The distance between nozzle and bed might be too
far. Please adjust the gap again (See page 21,
Calibration part.).
The Nozzle
Seems
to be
Clogged
- First, check if the filament on spool is twisted. If it is,
please untangle the spool and try again.
- Heat up the nozzle and try to force the filament by
hand, while pressing the red spring presser on the
extruder.
- If still clogged, pull the filament out of the extruder
with the hand, then cut off the bulged end of the
filament and reinsert it.
- If the problem persists, please use the enclosed
nozzle cleaning needle to drill directly.
31 LOCOOP Y USER MANUAL | www.locoop.net
Page 32

Thank you for choosing LOCOOP Y
 Loading...