

Page 1
MORTISE EDITION
SECURE
LUX MORTISE LOCK
USER MANUAL
Page 2

Table of Contents
Section 1 - Product Highlights
1.1 Product Features
Section 2 - Product Overview
2.1 Product Overview- Exterior
2.2 Product Overview- Interior
2.3 Understanding Your New Lock
2.4 Factory Reset
2.5 Keypad Display Switch
2.6 Setting Switch
2.7 Rebooting Lockly
2.8 Low Battery
2.9 Changing the Battery
TM
Secure
Section 3 - Using Your Smart Lock
3.1 Configuring Access
3.2 Entering Programming Mode
3.3 Adding an Access Code
3.4 Deleting an Access Code
3.5 Checking the Access Code
3.6 Adding a Fingerprint
3.7 Fingerprint Scanning Directions
3.8 Fingerprint Scanning Tips & Troubleshoot
3.9 Deleting Stored Fingerprints
3.10 Adding an RFID card
3.11 Deleting RFID Card
3.12 Adding Secure Link
Section 5 - Advanced Features
1
3
4
5
6
6
7
7
8
9
10
11
12
14
16
17
20
22
23
24
25
26
5.1 Offline Access Code (OAC)
Section 6 - Important Notes
Section 7 - Cleaning Tips
Section 8 - Safety Precaution
36
37
38
39
Section 4 - Locking and Unlocking
4.1 Locking/Unlocking with Access Codes
4.2 Locking/Unlocking Lockly™ with Fingerprints
4.3 Locking/Unlocking Lockly™ with App
4.4 Locking/Unlocking using RFID
4.5 Locking/Unlocking Lockly™ with Physical Key
4.6 Locking and Unlocking with Voice Assistant Control
4.7 Safe Mode - Overview
4.8 Lock and Unlock using Anti-theft Button
4.9 Anti - Theft Button Switch
4.10 Locking from the Outdoor
27
28
29
29
30
31
33
34
35
35
For additional support, visit http://lockly.com/help
or email [email protected]
TABLE OF CONTENTS
Page 3

1.1 Product Features
Patented Anti-Peep Keypad
Digits are randomly displayed on the key pad ensuring access codes to
be undetectable to intruders after repeated use. To experience the patented and innovative key pad software, powered by PIN Genie
download the PIN Genie
TM
Vault App from iOS App Store or Google Play.
Multiple Access Codes & Monitoring
Store up to 8 Access Codes for family, friends, and guests, as well as monitor entry and exit records.
Advanced 3D Fingerprint Recognition
Biometric Fingerprint Recognition protocol allows up to 99 registered
fingerprints to be used and accepts only actual fingerprints - preventing
lifted prints from being used.
RFID Card Access
You Lockly™ Secure Lux can be accessed by use of RFID card.
Complete Privacy
The exterior displayed keypad can be locked and switched off using the
simple ON/OFF toggle from the inside panel. The owner can prevent
others trying to input the passcode from the outside and entering the
home
TM
, please
Offline Access Code (OAC)
The offline access code can allow owners to issue access codes, set the
allowed access duration, all without Lockly™ ever connecting to the internet, so in case of power outage, you can still magically and remotely issue
Access Codes without any connection to the web.
Anti-theft Button
Thieves may use improvised wires or other picking tools to access your
inside door handle. Prevent them from unlocking your door when this
button is activated.
SECTION 1.1 1
Page 4

Automatic Lock
Owners no longer have to worry about forgetting to lock the door. With Auto
Lock enabled, Lockly™ Secure will automatically re-lock the door based on
your customized timing set between 5-300 seconds.
Backup Keys and 9V Battery Socket
The door can be opened with physical backup keys. There is also a 9V
battery connection socket for emergency power backup to access the
key pad in case your smart lock runs out of battery.
SECTION 1.12
Page 5
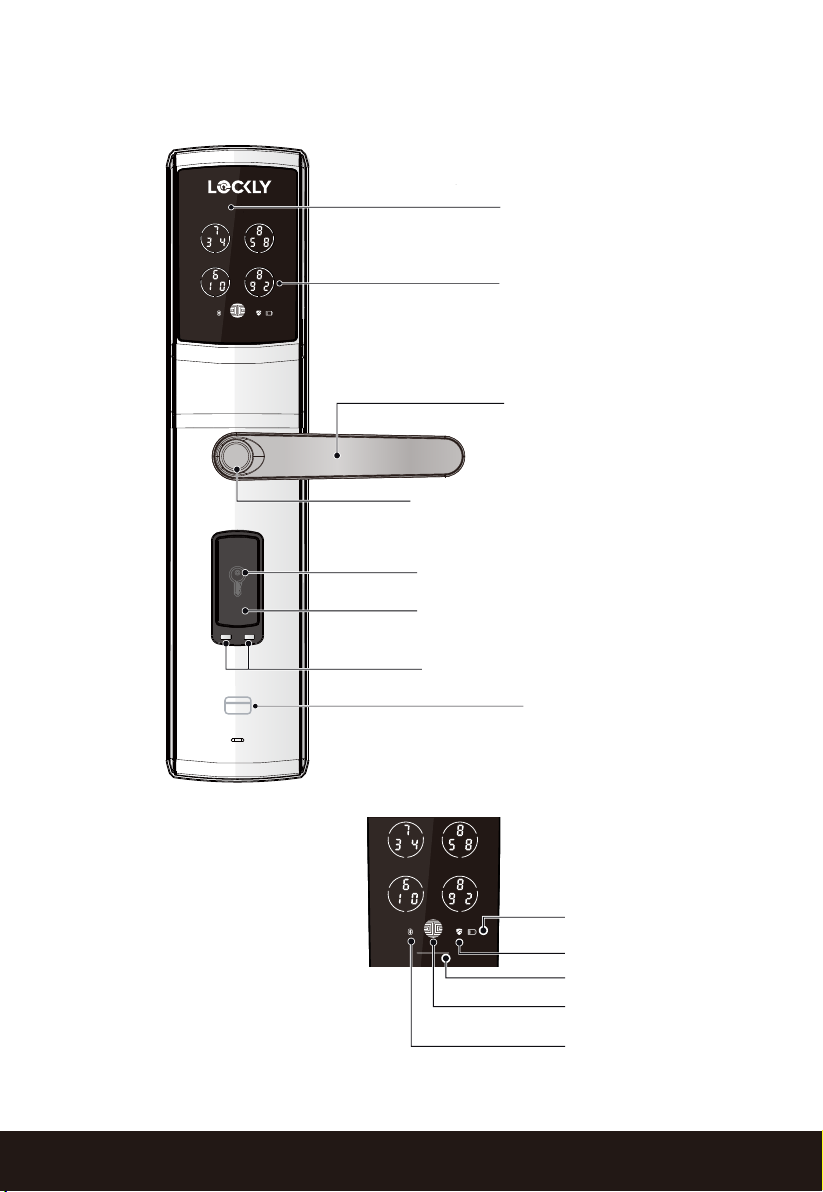
2.1 Product Overview- Exterior
Front (Front Body)
Fingerprint Reader
Key Hole
Key Hole Cover
Touchscreen
Keypad Buttons
Handle
9V Battery Back
Up Socket
RFID Card Reader
Power Status
Lock Status icon
Bluetooth light
OK Button
Bluetooth icon
SECTION 2.1 3
Page 6
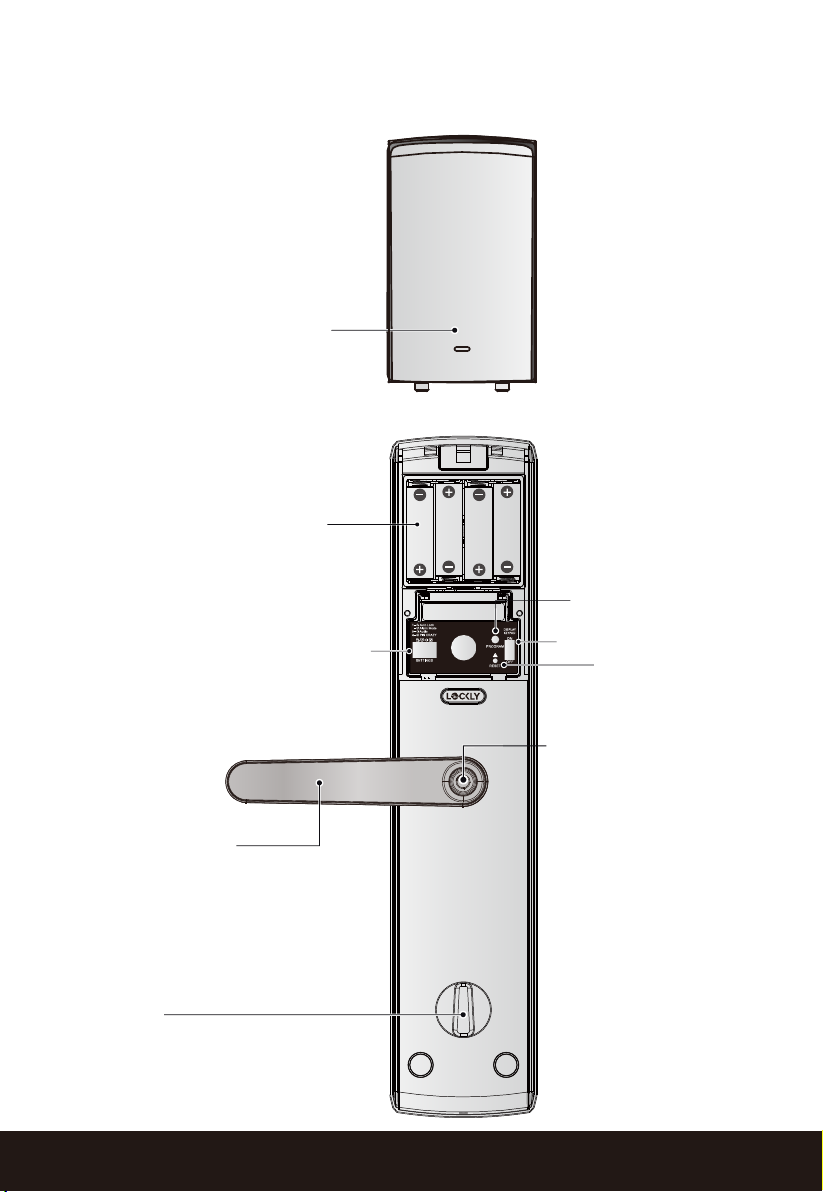
2.2 Product Overview - Interior
Back (Main Body)
Battery Compartment Cover
Battery
compartment
*Operated by 4 X AA
size alkaline batteries
( not included )
Program Button
Inside Handle
Thumbturn
Settings Switch
Touchscreen Switch
Reset Button
Anti-theft Button
SECTION 2.24
Page 7
2.3 Understanding Your New Lock
NOTICE
After the installation of your new Lockly™ , understanding some key functions of operating your smart lock is important. The following guides will
walk you through resetting a lock, adding Access Codes, deleting Access
Codes, adding and deleting fingerprints , adding and deleting RFID cards
and also how to configure your OAC (Offline Access Code).
For any questions you can always visit http://lockly.com/help for assistance.
Don't forget that Lockly™ Secure works best with our iOS and Android app.
Please download the app by visiting the link below.
The Default Access Code is
1 2 3 4 5 6
Scan or visit Lockly.com/app
SECTION 2.3 5
Page 8
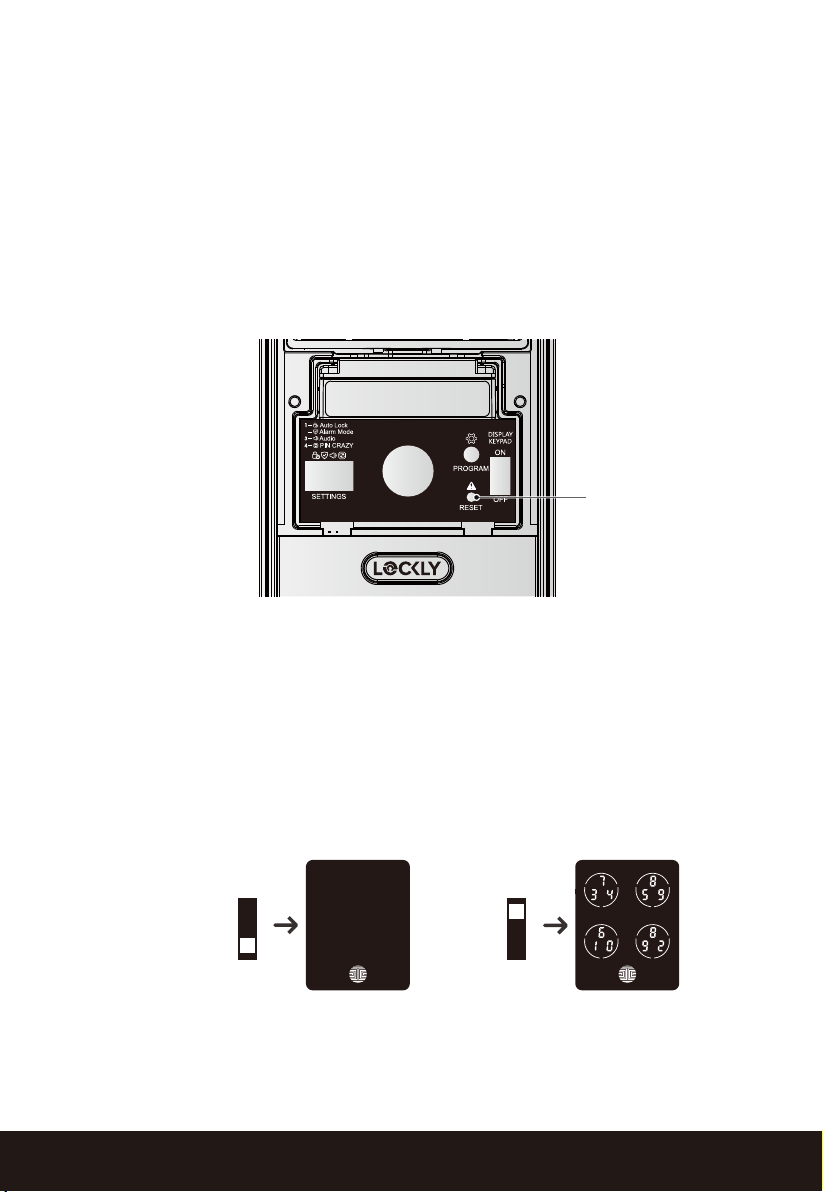
2.4 Factory Reset
In order to restore the Lockly™ to factory default settings, you must have your “Initial
Code” available. The Initial Code can be found on the Initical Code Card that
came with your smart lock. (See Quick Start Guide)
After you have the Initial Code ready, push the reset button on the back panel of
the Lockly™ to perform your reset. See below to see which Reset Process applies for you. Once the smart lock has been reset, all the data previously stored
will be deleted.
Reset Button
2.5 Keypad Display Switch
The exterior keypad screen can be locked and turned off using the
ON/OFF switch at the back panel of the smart lock. When it is switched
off, people outside cannot enter any passcode to unlock the door.
OFF
Keypad screen
ON
Keypad
SECTION 2.46
Page 9
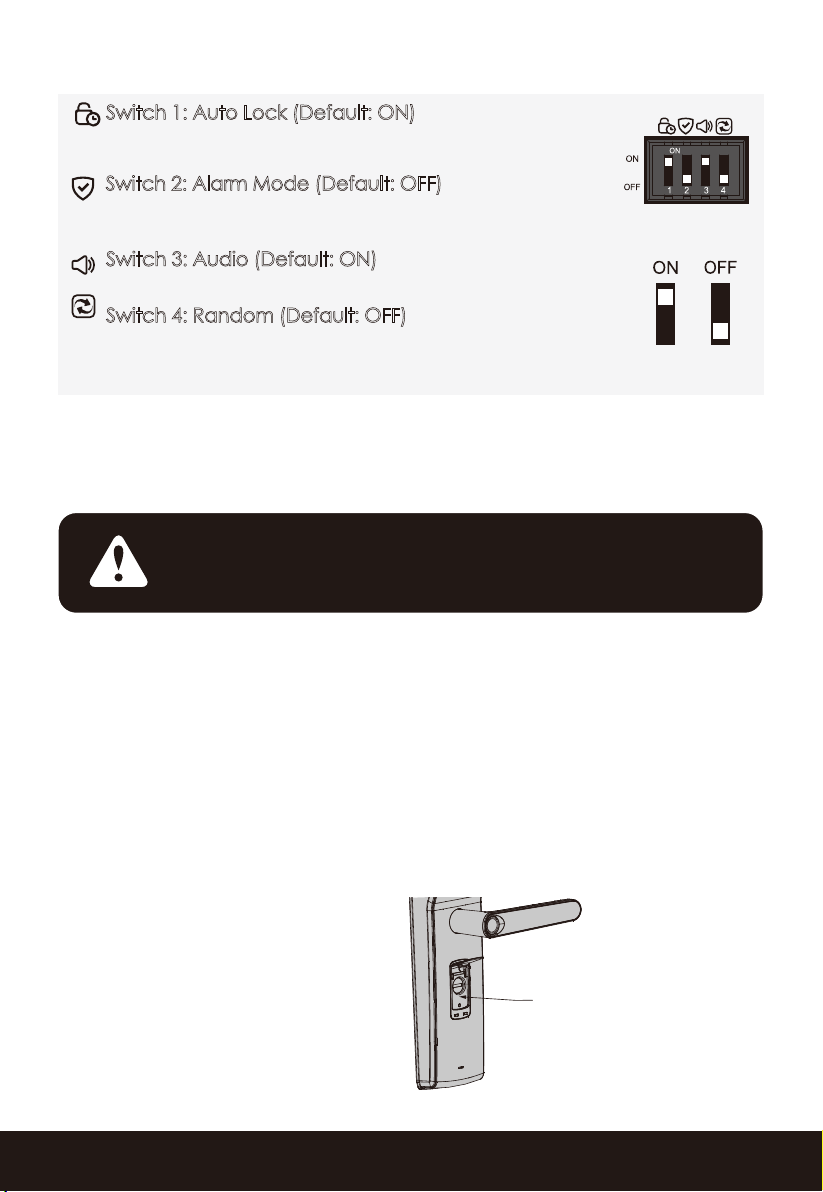
2.6 Setting Switch
Switch 1: Auto Lock (Default: ON)
With Auto Lock enabled, the smart lock will automatically
relock the door 5s to 30s after unlocking.
Switch 2: Alarm Mode (Default: OFF)
With Alarm Mode on, the door reacts against external
activity according to the sensitivity level that has been set.
Switch 3: Audio (Default: ON)
Enables the Audio sound (Beeper) when in the ON position.
Switch 4: Random (Default: OFF)
With Random mode on, every time you enter a digit
while entering passcode, the display keypad will be
refreshed.
Setting Switch
2.7 Rebooting Lockly
NOTICE
Press and release the reboot button when you want to reboot the lock. Your
Lockly™ will beep once after reboot. Only reboot when necessary.
To reboot, find the reboot button located below the keyhole from the exterior of Lockly™ Secure Lux.
You will need something small such as a paperclip, to press the reboot
button. Insert the paper clip and press down firmly.
TM
Secure
Reboot Lockly™ in case of dead battery or
malfunction. No settings will be changed and all
Access Codes will still be stored within Lockly™.
Reboot Button
SECTION 2.6 7
Page 10
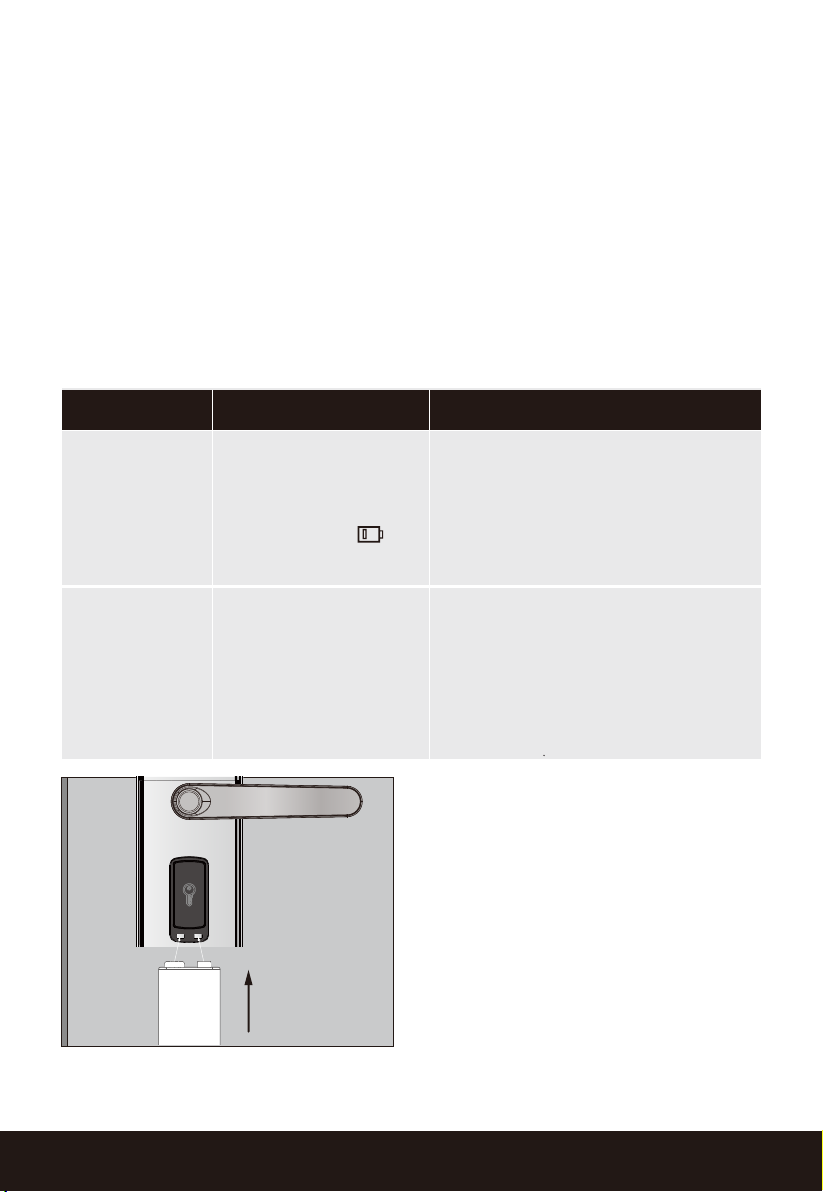
2.8 Low Battery
When the battery is in seriously low condition, Lockly™ will make continuous beeping sounds in addition to the flashing low battery icon on the
touch screen. You should replace batteries immediately to avoid your
smart lock from shutting down.
When your smart lock low-battery warning alert finally dies, you will have
3 chances to unlock your smart lock either by a password, APP or
fingerprint. If the unlock was successful, the low-battery warning alert will
be on for 1 minute. After which, the smart lock will go to dead-battery
mode and will lock auto lock in 5 seconds and the screen will display a
low-battery icon.
Condition Indicator Solution
Low Battery
Dead Battery
_
9V
Alkaline
battery
Battery Icon on the
display keypad will
light up to indicate
low battery.
When there is no
display and sounds;
and screen is
non-functional.
+
Replace batteries immediately to avoid battery
failure. Lockly™ Secure can
still operate up to 300 cycles
in low battery condition.
Replace batteries immediately.
Supplied physical backup keys
can be used to unlock the
door. Alternatively, use a 9V
battery as shown below to
temporarily activate the lock.
Your Lockly™ will automatically
detect battery polarity. So hold your
battery lead in place against
9V
bottom of
activate
Access Code.
9V battery against
points located at the bottom
lock until you have successfully
the Lockly™ to temporarily
t
he screen to enter your
Be sure to hold the
the contact
of the
unlocked your door with your
Access
batteries should
Code. Once unlocked,
be replaced imme-
diately.
SECTION 2.88
Page 11
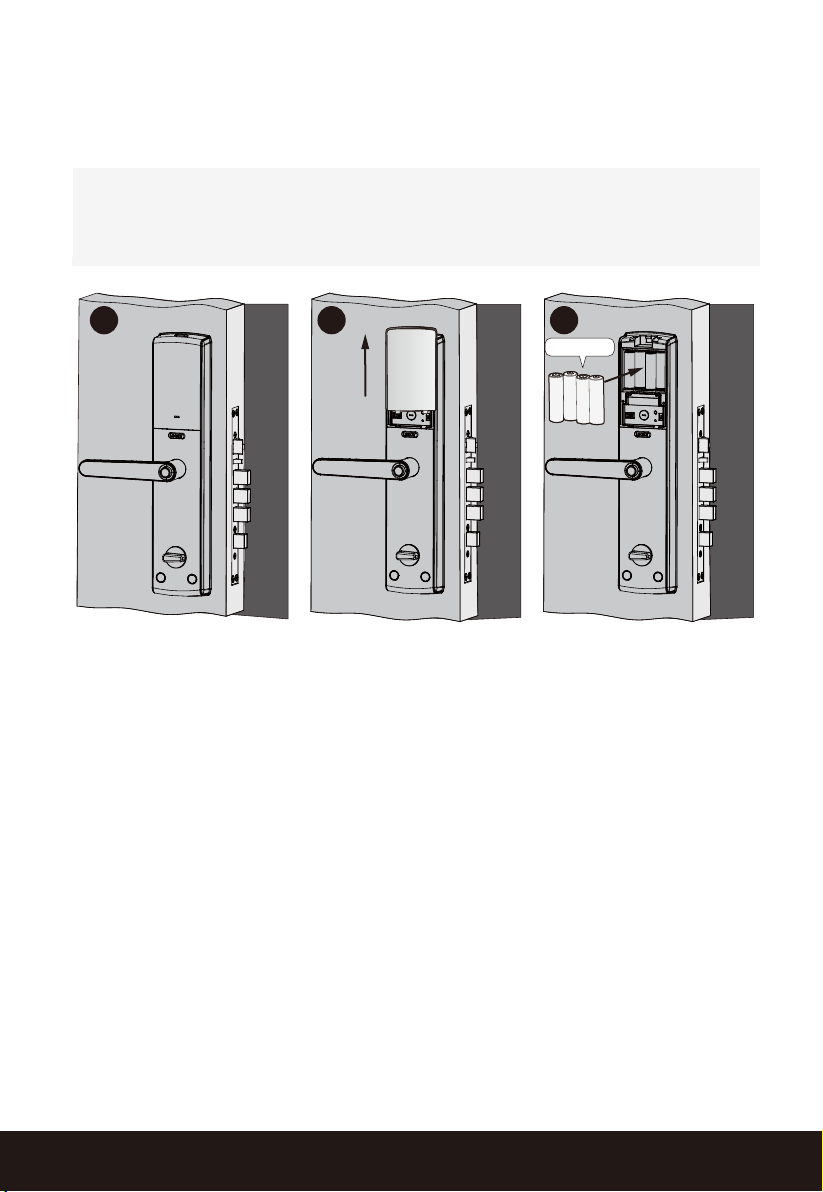
2.9 Changing the Battery
Open the battery compartment cover and insert 4 AA alkaline battery as
shown below.
• Make sure the batteries are correctly oriented.
• Replacement of batteries does not affect programmed data.
• Replace only with new batteries. DO NOT mix with used batteries.
1 2 3
AA 1.5V X 4
+
-
-
+
+
-
+
-
SECTION 2.9 9
Page 12
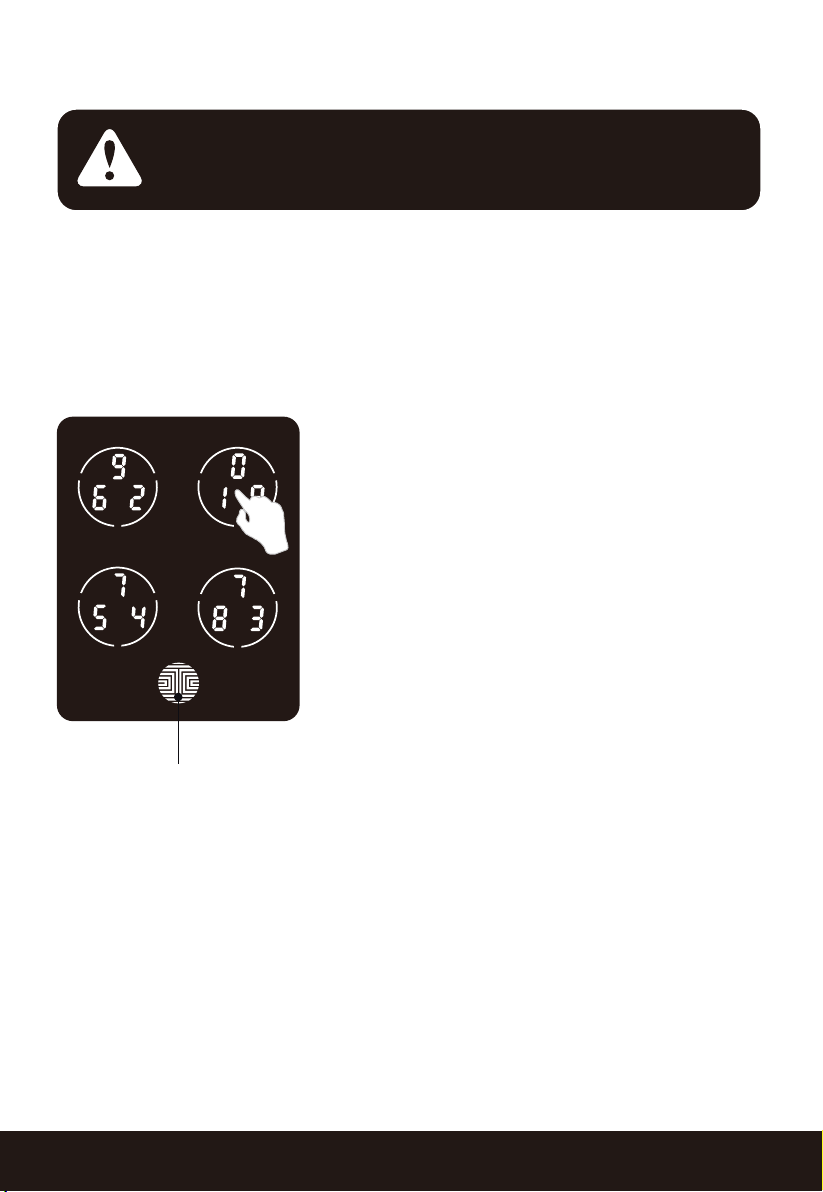
3.1 Configuring Access
NOTICE
Your new Lockly™ Access Code can be any combination of 6 to 8 digits.
Once a new Access Code is entered, the Default Access Code of 123456
would be deleted.
A Maximum of 8 sets of Access Codes can be stored for use.
The Default Access Code is
1 2 3 4 5 6
How to Use the Keypad
There are a total of five (5) buttons on the
keypad as shown in the example image
to the left. The numbers in each button
may differ than what is shown on your
device than what is displayed here.
To enter your required digit, just simply
press the circle where your number is
shown. You do not need to press the
actual number as anywhere within the
circle will suffice.
OK Button
The button on the bottom is the OK
button. You will be pressing this button
when you are done entering your Access
Code.
SECTION 3.110
Page 13
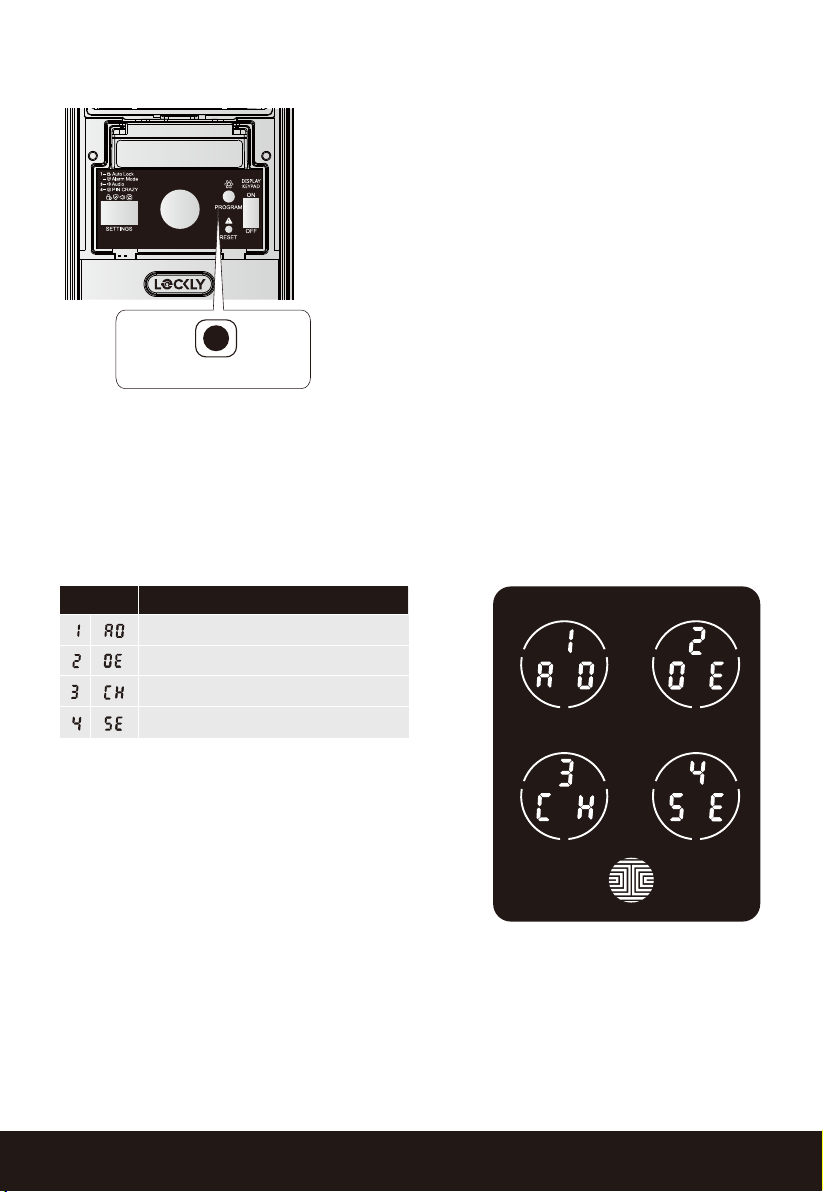
3.2 Entering Programming Mode
To enter Programming Mode, remove the
battery compartment cover on the
interior side of the Secure to expose the
Reset and Program buttons.
Simply press the Program button to enter
programming mode.
Note: Program button will be disabled
Program Button
To end Programming Mode, press the Program button anytime.
Programming Mode will automatically exit if the keypad is inactive for
more than thirty (30) seconds.
ModeNumber
Add Passcode
Delete Passcode
View Passcode
Alarm Sensitivity
once synced to a smart phone. Configure all settings via synced smart phone.
After entering Programming Mode, you
should see the screen as displayed to
the right on your Lockly™ keypad.
Follow the following steps to add,
delete, or check your Access Codes.
SECTION 3.2 11
Page 14
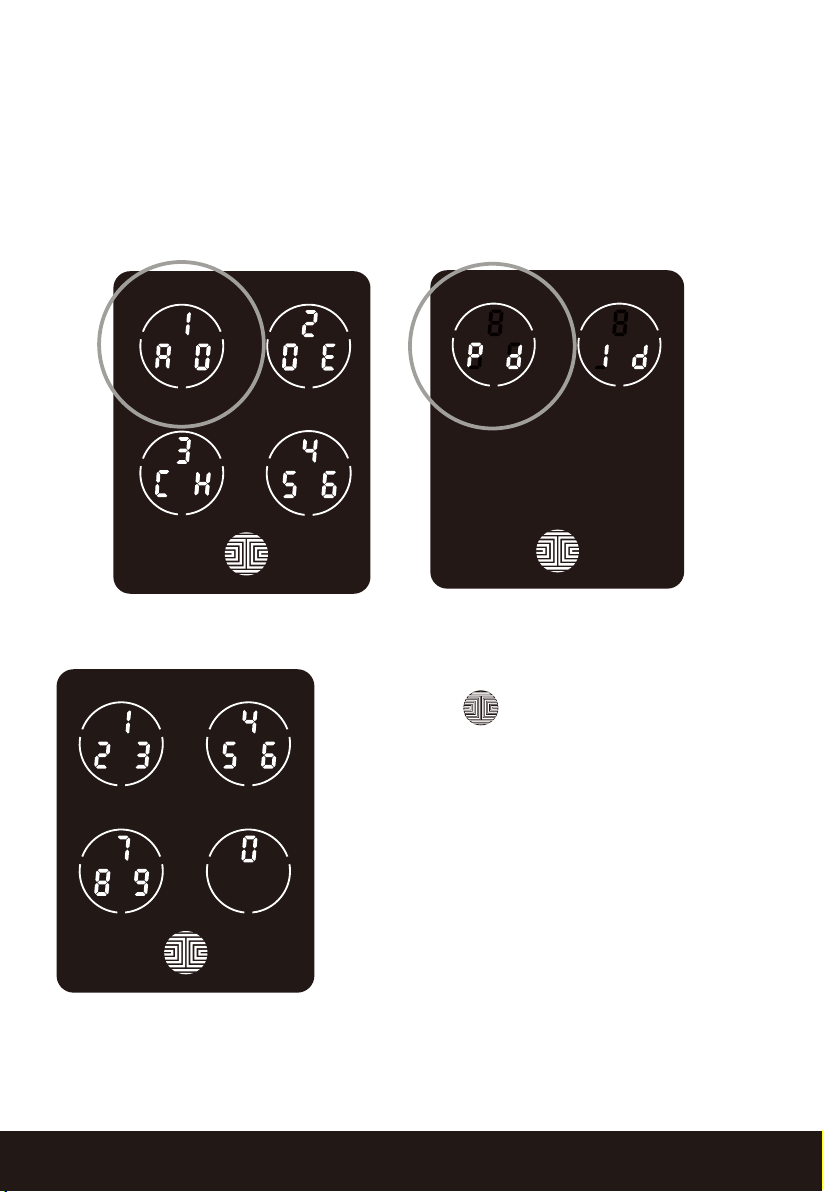
3.3 Adding an Access Code
While in Programming Mode, select “1AD” to add an Access Code. If you
are not in Programming Mode, please see Section 3.2 to enter Program-
ming Mode.
After pressing “1AD” press “Pd” to add an Access Code.
12
Enter your new 6 - 8 digit Access Code
and press when you are finished.
You will then re-enter the code to confirm
your new Access Code.
Remember, just touch the digit you need
within the circle around each 3 numbers.
There is no need to touch the exact
location of the number. For example,
based on the example image to the left, if
you need “1”, you can touch the upper
left button or the lower right button. For
“6”, you would touch the upper right
button.
SECTION 3.3
Page 15
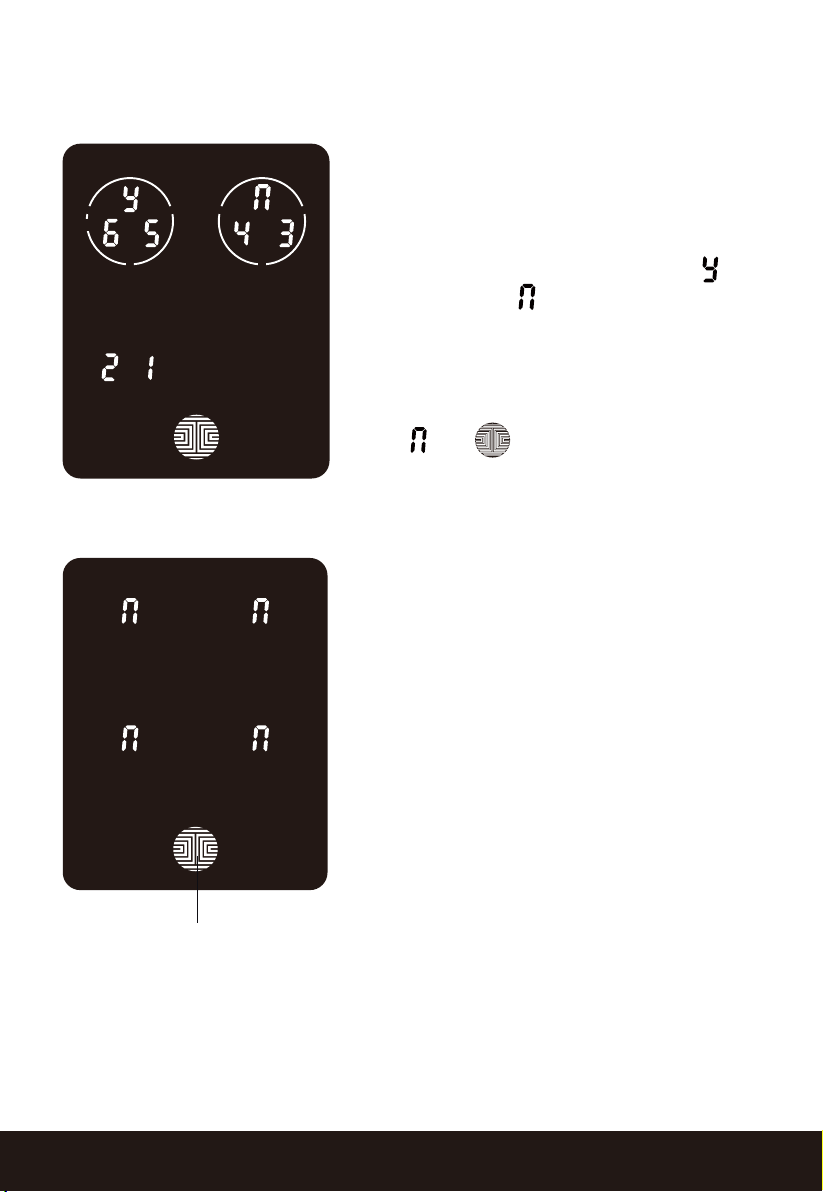
3.3 Adding an Access Code (Continued)
If you have successfully entered your
new Access Code twice, you will see
the new code displayed here. In this
example, we chose 654321. Press
to Confirm or to cancel.
To exit or cancel, you can always press
or
If the two (2) Access Codes you
entered does not match, an error
message will appear on the screen (As
shown to the left). Press OK to return to
the Programming Screen and try again.
See Section 3.3
OK Button
SECTION 3.3 13
Page 16
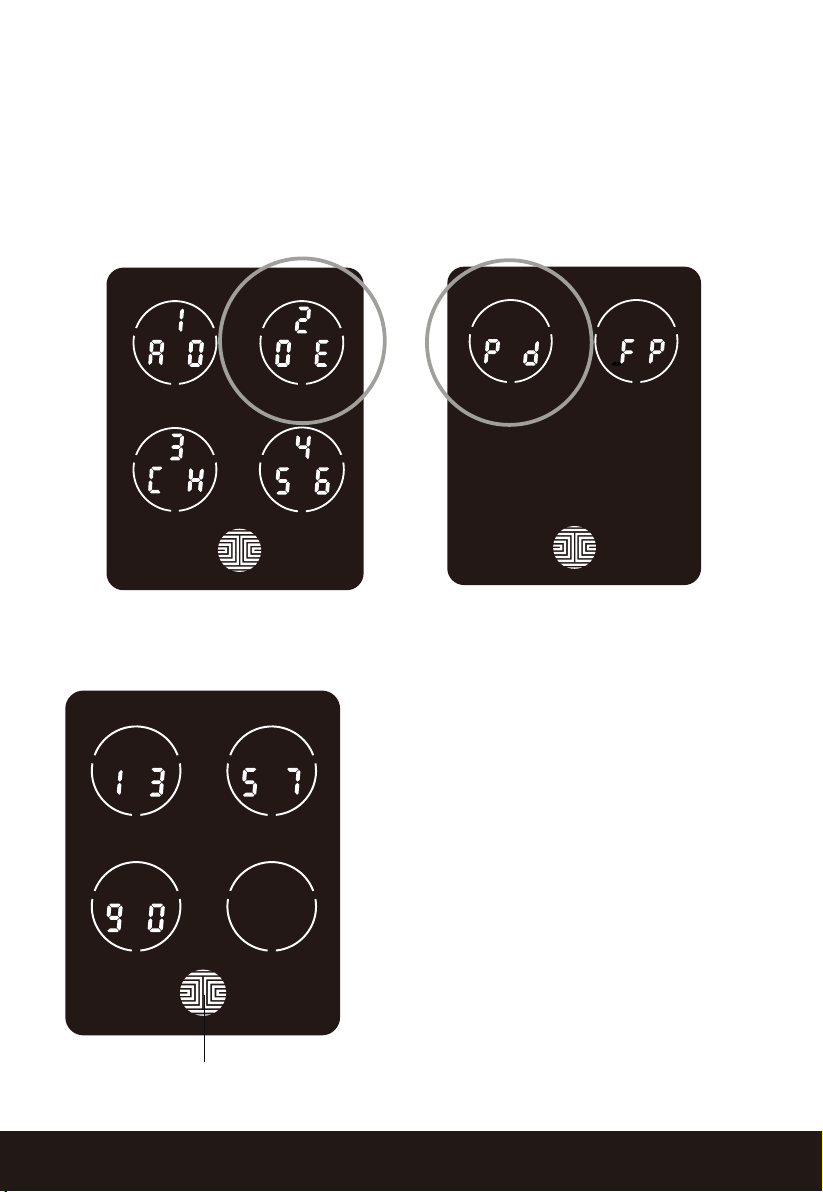
3.4 Deleting an Access Code
While in Programming Mode, select “2DE” to delete an Access Code. If you are
not in Programming Mode, please see Section 3.2 to enter Programming Mode.
After pressing “2DE” press “Pd” to delete an Access Code.
Example Only
OK Button
Active Access Codes will then be
displayed on the screen in sequence from
left to right, top to bottom. In the
example shown on the left, the Access
Code displayed is 1 3 5 7 9 0 .
Rotate through different Access Codes
shown by touching any number on the
screen. If you find the Access Code you
want to delete, simply hold the OK button
for 3 seconds. (Continue on next page)
SECTION 3.414
Page 17
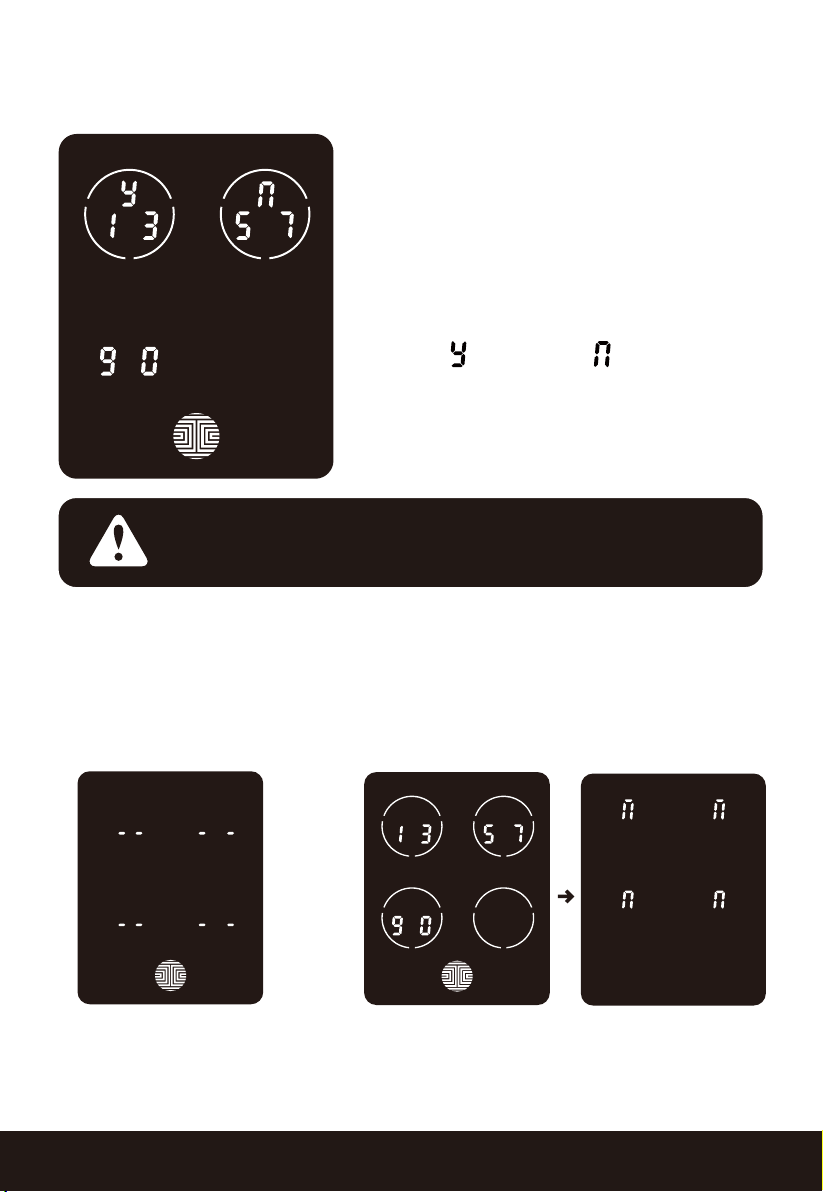
3.4 Deleting an Access Code (Continued)
Once you have selected the Access Code
you want to delete, Lockly™ will ask you to
confirm deletion by showing you the
Access Code you are deleting, in this
example,
1 3 5 7 9 0.
Press to delete, or to cancel.
NOTICE
There are no Access Codes
set. The factory default Access
Code cannot be deleted.
No Access Codes Set
There are two incidents where your Access Code
cannot be deleted.
There is only one (1) Access Code saved
in the smart lock. At least one code must
be registered. Please add another Access
Code before attempting to delete the
existing code.
Only one Active Access Code
SECTION 3.4 15
Page 18
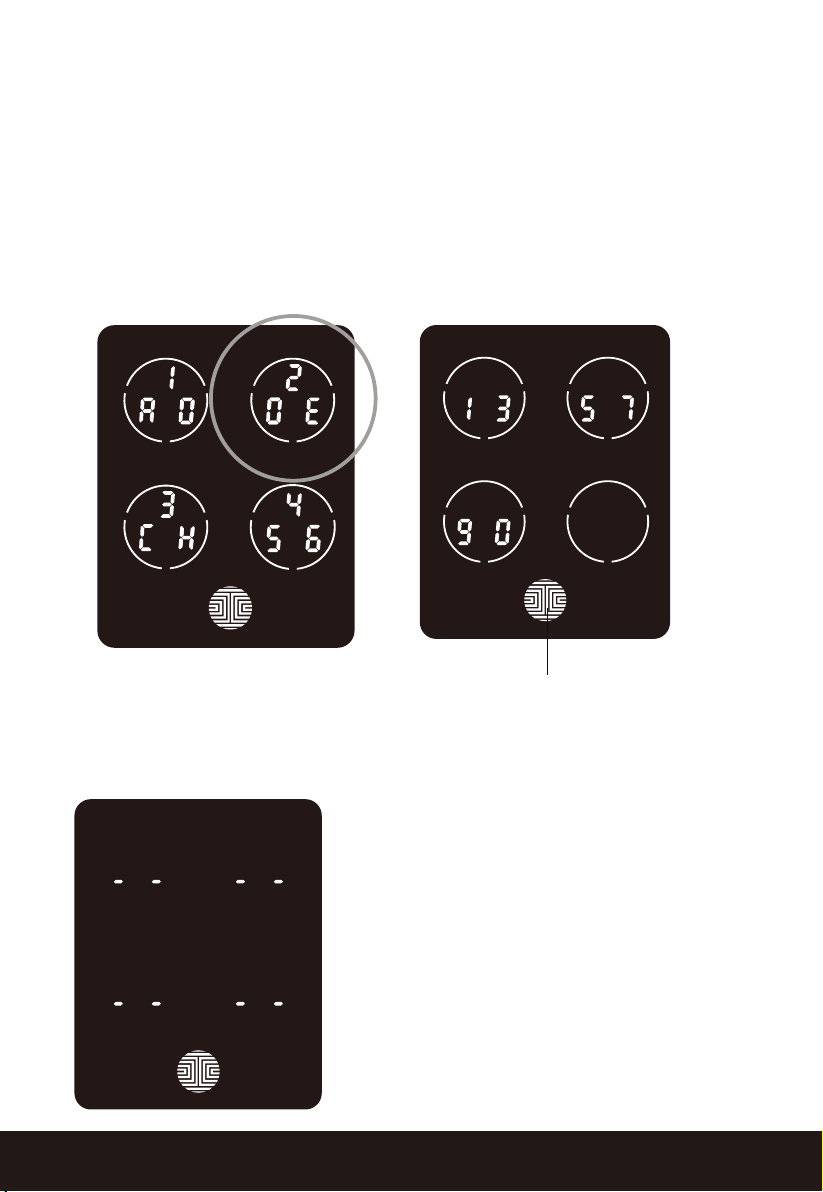
3.5 Checking the Access Codes
While in Programming Mode, select “3CH” to check registered Access Codes.
If you are not in Programming Mode, please see Section 3.2 to enter Program-
ming Mode.
Active Access Codes will then be displayed on the screen in sequence from left
to right, top to bottom. In the example shown on the left, the Access Code
displayed is 1 3 5 7 9 0 .
OK Button
Rotate through the different Access Codes by touching any number on the screen.
To exit Check Access Code screen, simply press the OK button.
If there are no Access Codes registered in
your smart lock, Check Access Code
mode will be invalid. The default Access
Code will not be shown on the display
keypad, and you will see the following
screen shown to the left instead.
SECTION 3.516
Page 19

3.6 Adding a Fingerprint
We are using an advanced biometric sensor, providing the most secure
fingerprint authentication. For security reasons, Lockly™ will only accept
fingerprint patterns that consist of cross intersection points. Patterns with no
cross intersection points will not be acceptable.
Please check your fingers before registration to make sure the finger you
want to register will be acceptable by our system. Otherwise, use an
alternative finger to ensure successful registration.
The following examples show which types of fingerprint patterns will be
acceptable. It is highly recommended to enroll at least one finger from
each hand in case the hand you are using is unavailable, such as, in
instances like if you are holding items in that hand or have sustained an
injury.
Fingerprint Pattern with
Cross Intersection Lines
Concentric or Parallel Pattern
with no Cross Intersection Lines
Fingerprint with Scars or
Worn Out Ridges
OK Not OK Not OK
Your Lockly
the following sections if you want to add or delete fingerprints. We
recommend using your app to add fingerprints, however, the following
section can show you without using the app.
TM
can register up to ninety-nine (99) fingerprints. Please read
SECTION 3.6 17
Page 20
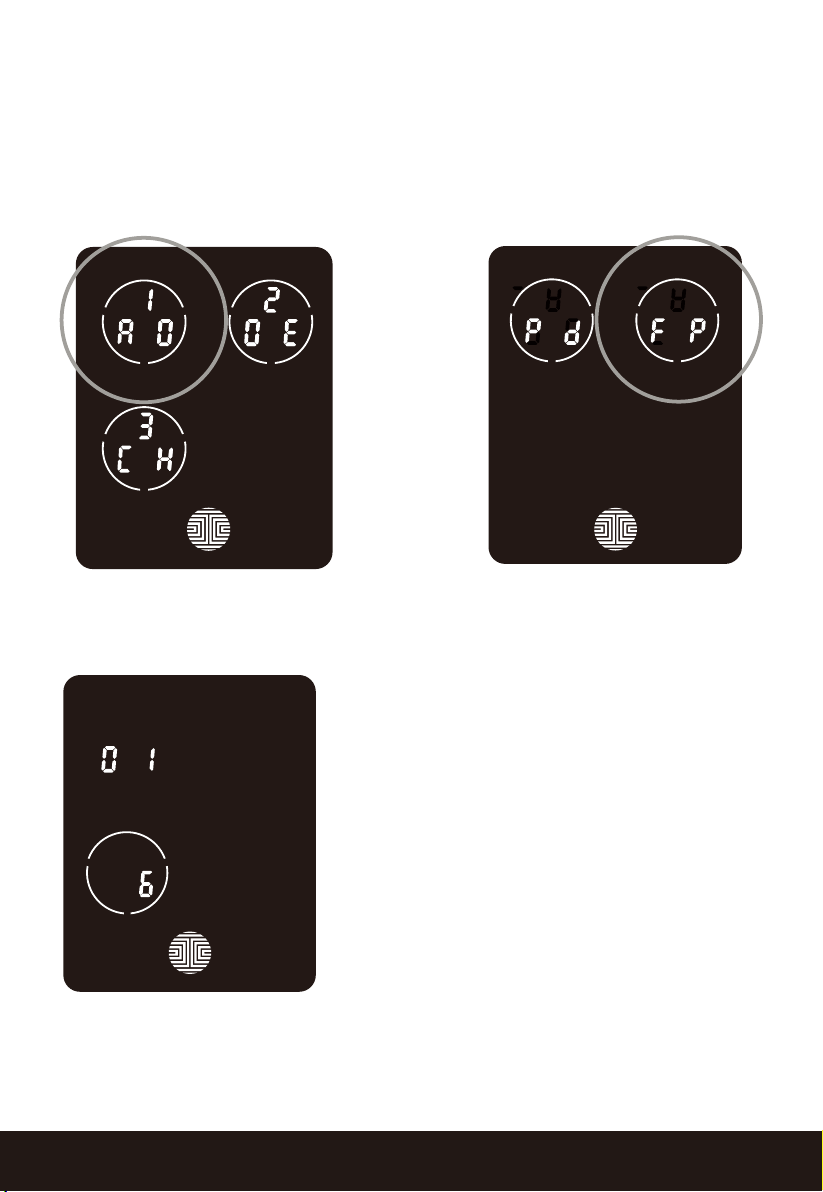
3.6 Adding a Fingerprint (Continued)
While in Programming Mode, select “1AD” to add an Access Code. If you are
not in Programming Mode, please see Section 3.2 to enter Programming Mode.
After pressing “1AD” press “FP” to register a Fingerprint.
Upon pressing “FP”, you will enter Fingerprint Registration Mode and you will see
a green LED ring light up on the fingerprint panel on the exterior of Lockly™.
Once you’re in Fingerprint Registration Mode
you will see two numbers displayed on keypad.
The top number is your Fingerprint Registration
number, in this example to the left, “1”. The
bottom number will always start with a “6”.
You must successfully scan your fingerprint six (6)
times for it to properly register. Every time you
scan your fingerprint, the number on the bottom
will change, starting from 6 - then 5, 4, 3, 2, 1, until
the fingerprint is successfully registered.
Note: For reference, please keep a record of your
fingerprint registration number to distinguish
whom it was registered to.
SECTION 3.618
Page 21
3.6 Adding a Fingerprint (Continued)
Please make sure your fingers are clean from dirt and oils
NOTICE
Scan your finger by lightly placing your designated finger on the sensor until
you hear a beep. Lift your finger and repeat the process slowly until the
digit “6” shown on the screen becomes “1”.
scanned and registered
Bluetooth icon will flash green.
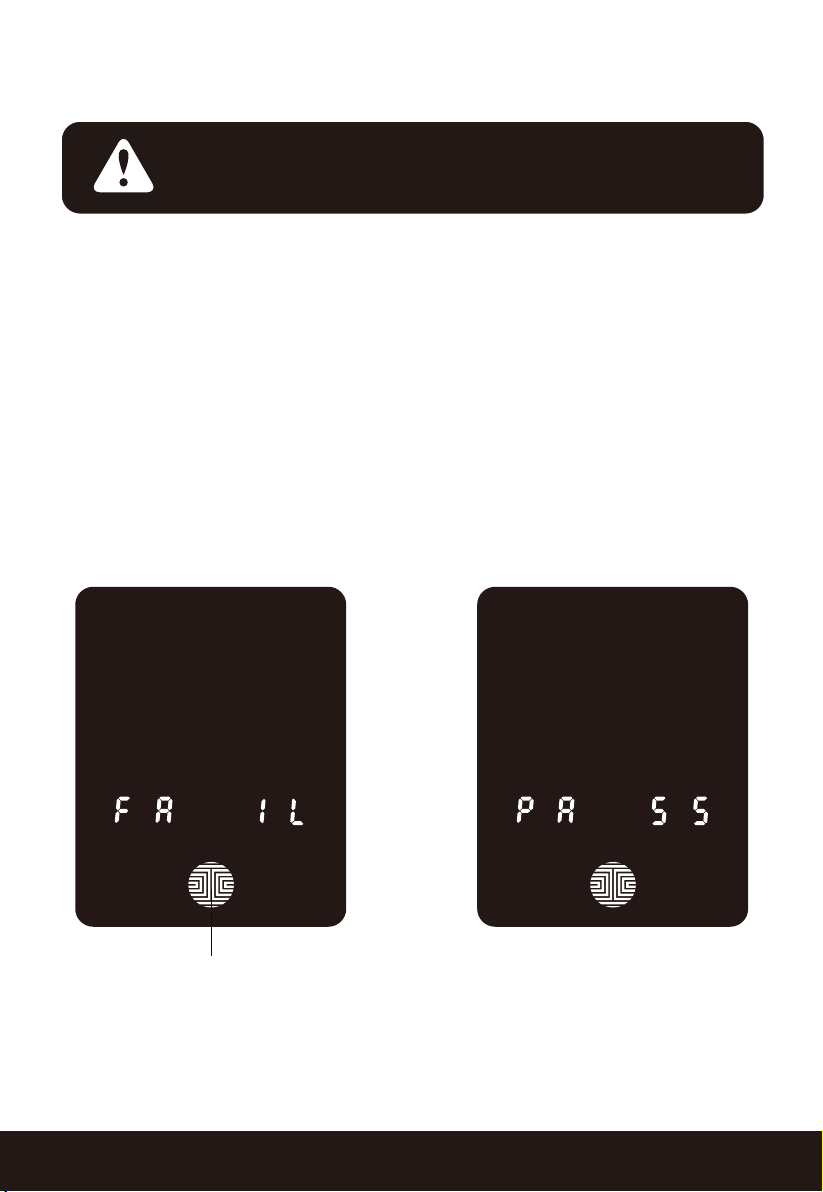
PASS will show on the keypad and press OK to exit. If you did not successfully register your fingerprint, FAIL will show on the keypad. If FAIL is
displayed, press OK to return to the previous screen to rescan your finger.
For instructions on scanning an optimal fingerprint, please proceed to
Section 3.7.
before scanning your fingerprint. Make sure the sensor is
also clean by taking a soft cloth and wiping the surface.
If you have successfully
your fingerprint, you will hear a long beep, and the
OK Button
SECTION 3.6 19
Page 22
3.7 Fingerprint Scanning Directions
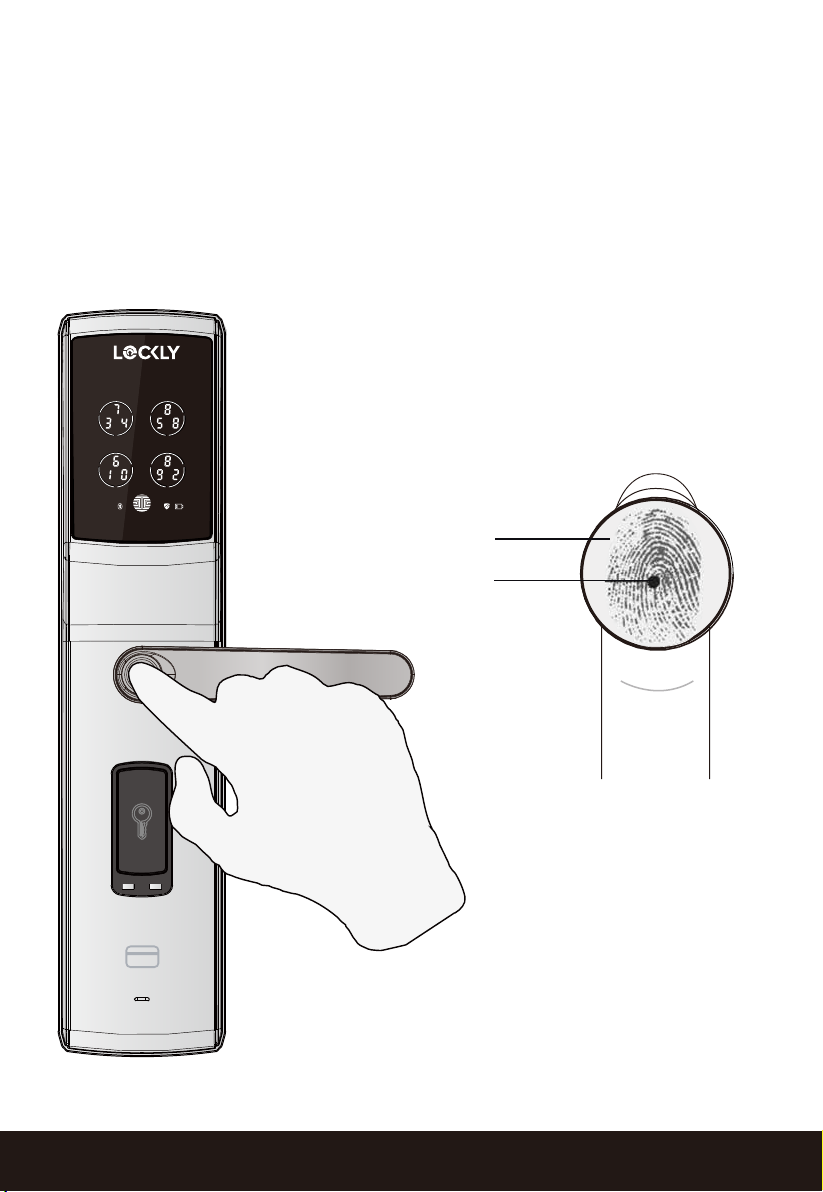
The fingerprint sensor equipped in Lockly™ is loaded with powerful
fingerprint algorithms to extract quality features from fingers, even in poor
conditions. Placing your finger on the sensor correctly helps consistency
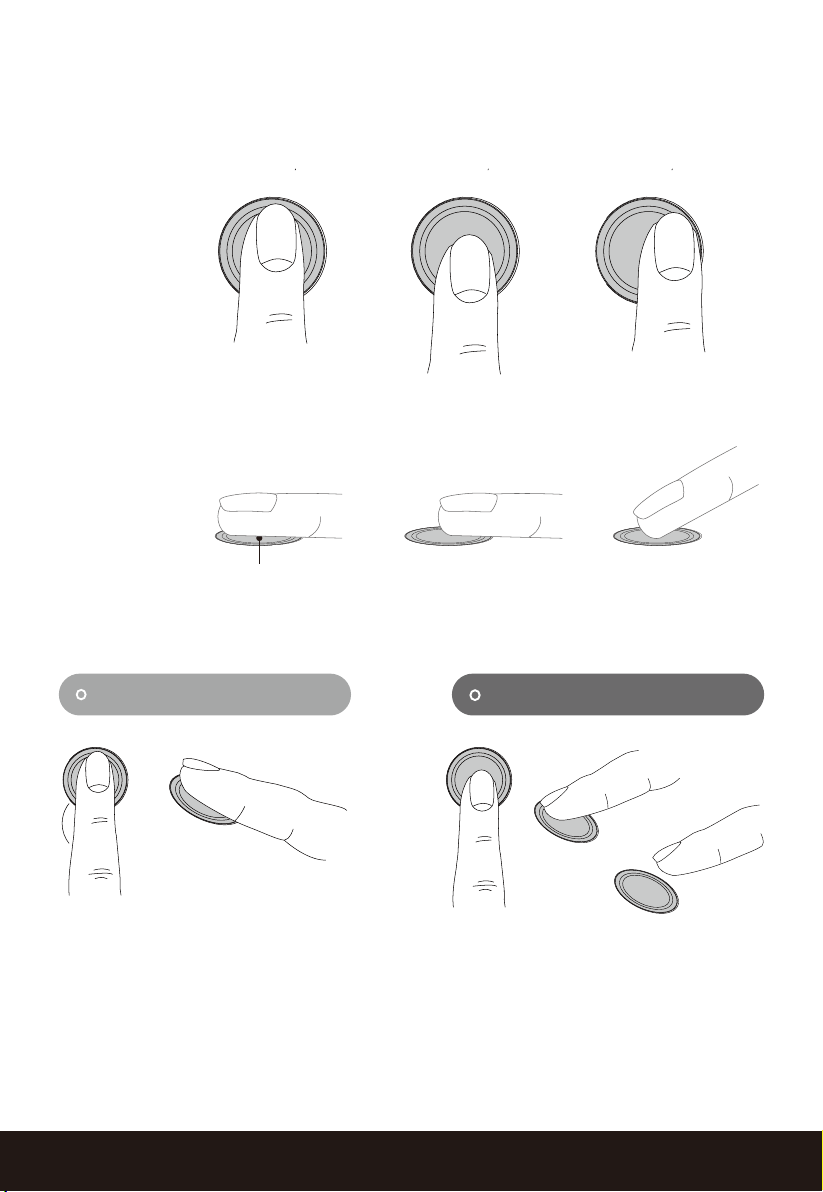
in fingerprint recognition. The following directions and tips will guide you
on how to scan an optimal fingerprint image.
Sensor
Core
Position your finger on the
center of the sensor
SECTION 3.720
Page 23
3.7 Fingerprint Scanning Directions (Continued)
OK
Top View
OK
Side View
Correct Incorrect
X
X
X
X
SECTION 3.7 21
Page 24

3.8 Fingerprint Scanning Tips & Troubleshoot
Tips for Fingerprint Enrollment and Recognition
• Place your finger to completely cover the sensor with maximum contact
surface.
• Position the center of your finger (core) to the center of the sensor.
• Hold your finger still for more than a second until you hear a beep.
• Scan a finger that is clean and free from dirt. If a finger is cracked and dry,
lightly moisten the finger to improve recognition.
• Children ages 12 and under are not recommended to use fingerprint
access due to the constant changes of their fingers during growth.
• Elderly with fading fingerprints may have difficulty in recognition.
• If your finger has a cut, scar, or cracked skin due to dryness, try another
finger.
Troubleshooting Fingerprints
In case of poor fingerprint conditions
• If wet - wipe excess moisture from finger before scanning
• If dry - moisturize or blow warm breath over finger before scanning
• If dirty - wipe stains and dirt off from finger before scanning
• Make sure the sensor is clean from dirt or smudges - wipe sensor with soft
cloth regularly
For more troubleshooting help, visit http://lockly.com/help
SECTION 3.822
Page 25
3.9 Deleting Stored Fingerprints*
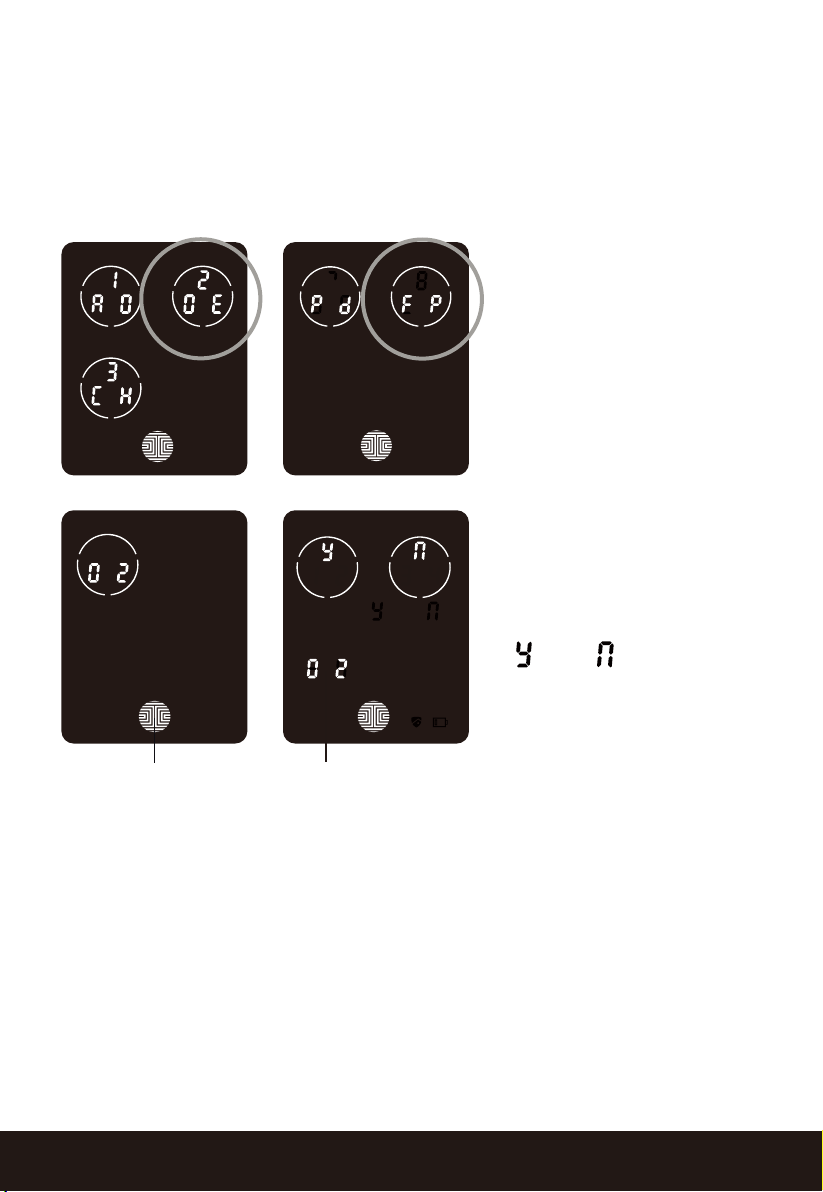
While in Programming Mode, select “2DE” to delete a Fingerprint.
If you are not in Programming Mode, please see Section 3.2 to enter
Programming Mode.
After pressing “2DE” to delete, press “FP” to delete a fingerprint.
Your registered fingerprint
numbers will be displayed
on the screen. Tap
number to rotate to the
next registered fingerprint.
When you have found the
fingerprint ID you want to
delete, press and hold the
OK button for 3 seconds
to delete. (Example shown
- “02”)
You will then see a confirmation page displaying
and with the
fingerprint number you are
deleting displayed in the
lower left. Select Y to
OK Button
Fingerprint ID Number
delete or N to cancel.
Alternatively, while on Programming Mode, select 2DE, then press FP
and place the registered fingerprint you want to delete on the finger-
print sensor.Your smart lock will identify the fingerprint and jump to
confirmation page displaying Y and N. Select Y to delete or N to
cancel.
*Only works when lock is not paired with a smart phone device.
If paired to a device please delete your fingerprints from the
administrative device paired to your lock.
SECTION 3.9 23
Page 26
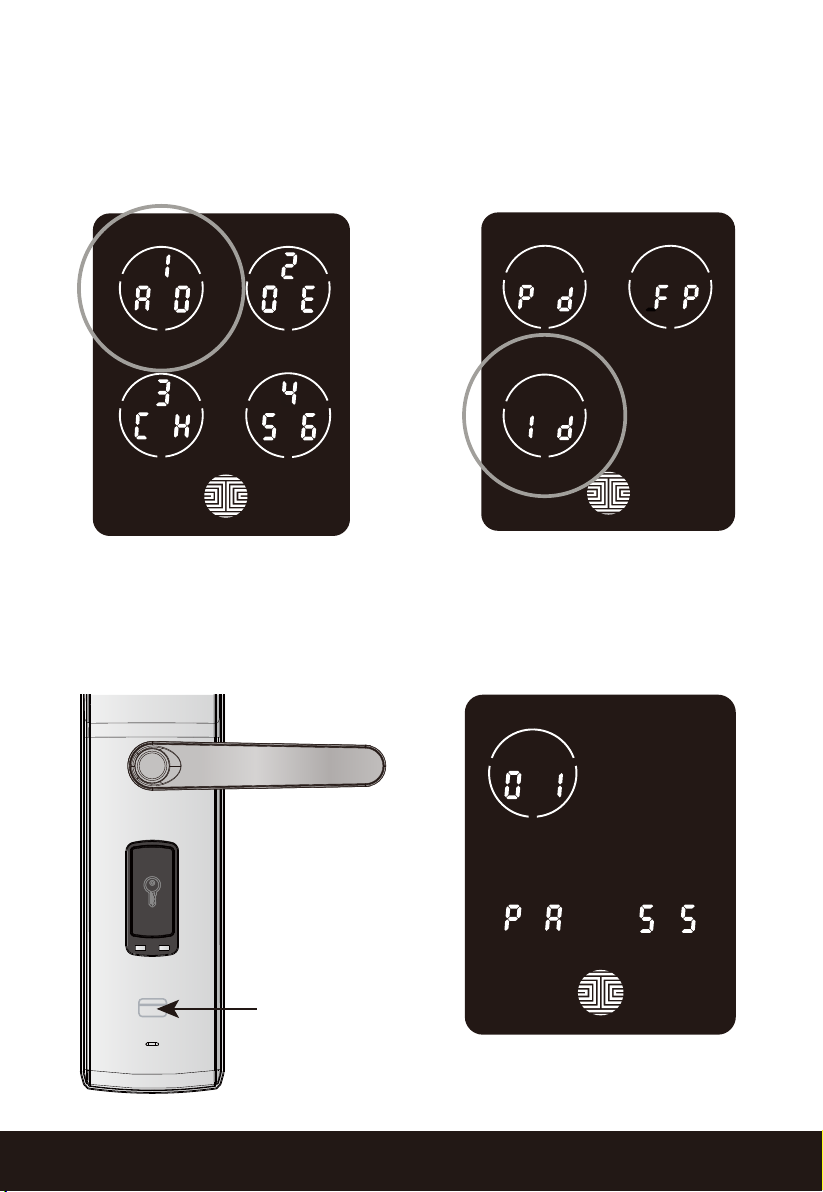
3.10 Adding an RFID Card
While in Programming Mode, select “1AD” to add an RFID card. If you are not
Programming Mode, please see Section 3.2 to enter Programming Mode.
in
After pressing “1AD” press “Id” to add an RFID card.
Put the RFID card to the RFID card
sensor position on exterior panel.
PASS will show on the keypad once
card is registered successfully.
SECTION 3.1024
Page 27
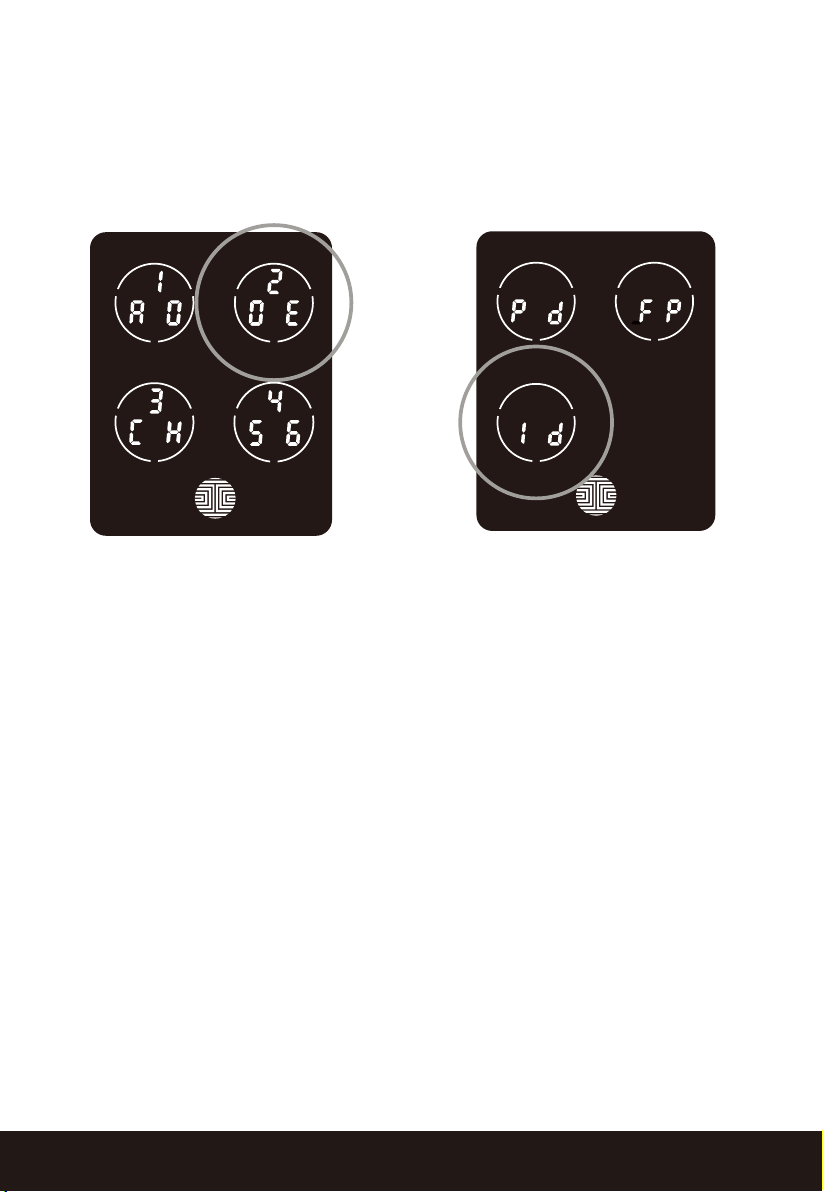
3.11 Deleting an RFID Card
While in Programming Mode, select “2DE” to delete an RFID card. If you are not
in Programming Mode, please see Section 3.2 to enter Programming Mode.
After pressing “2DE” press “Id” to add an RFID card.
Your registered RFID card will be
displayed on the screen. Tap the
screen to show the next registered
RFID. When you have found the
RFID card you want to delete,
press and hold the
seconds
to delete.
OK button for 3
You will then see a confirmation
page displaying
RFID card number you are
deleting displayed in the
Select Y to delete or N to
left.
cancel.
Y and N with
lower
SECTION 3.11 25
Page 28

3.12 Adding Secure Link
Lockly™ Secure Link adds live status monitoring and voice assistant
control capabilities to your Lockly™ Smart Lock. If you purchased a
Secure Pro model, the Secure Link is included in your package. For all
other Lockly™ products, the Secure Link can be purchased and added
anytime.
To set up the Lockly™ Secure smart lock with Secure Link Wi-Fi Hub and
Door Sensor, launch the Lockly™ App on your iOS or Android device.
From the main menu drop down located on the upper left of the screen,
select “Add a New Device” then select “Secure Link Wi-Fi Hub”. Follow
the in-app instructions to set up your Secure Link.
To activate voice commands, you will need the Google Home Assistant
or Amazon Alexa device with Actions (Google) and Skill (Amazon)
added before you can configure voice commands.
SECTION 4.126
Page 29
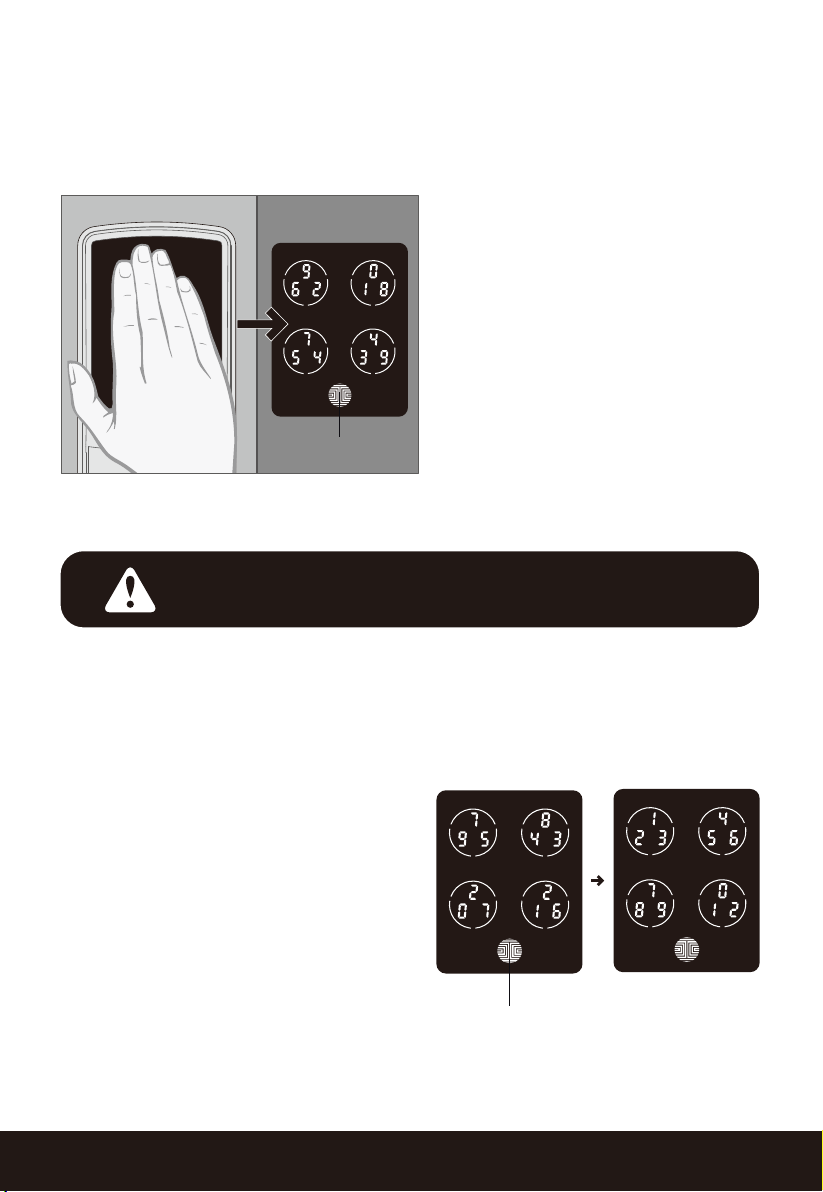
4.1 Locking/Unlocking Lockly™ with Access Codes
Lockly™ Secure can be unlocked using 1 of 5 ways - via your stored Access
Code, registered fingerprint, RFID Card, smartphone with Bluetooth, or with
the physical key supplied with your lock.
Slide your hand across the screen
to activate the keypad.
Enter your 6 to 8 digit Access Code
followed by the OK button. Press
OK anytime to reset if you entered
the wrong digit.
If the Access Code entered is
OK Button
Three consecutive wrong attempts will put Lockly™ in
“Safe Mode”. (See Section 4.6)
correct, the door will unlock. If the
Access Code entered is incorrect,
Lockly™ will beep twice.
Lock your Lockly™ Secure by pressing the OK Button anytime when the door is
closed. Lockly™ Secure will also auto-lock after five (5) seconds after unlocking and opening.
PIN Genie
TM
Fixed Digit
You may toggle between two types
of keypad displays to enter your
Access Code. The fixed digit version
and the PIN Genie
TM
version (Recom-
mended). Press and hold the OK
Button for 3 seconds to toggle back
and forth between the two keypads.
Hold OK Button (3 sec)
SECTION 4.2 27
Page 30
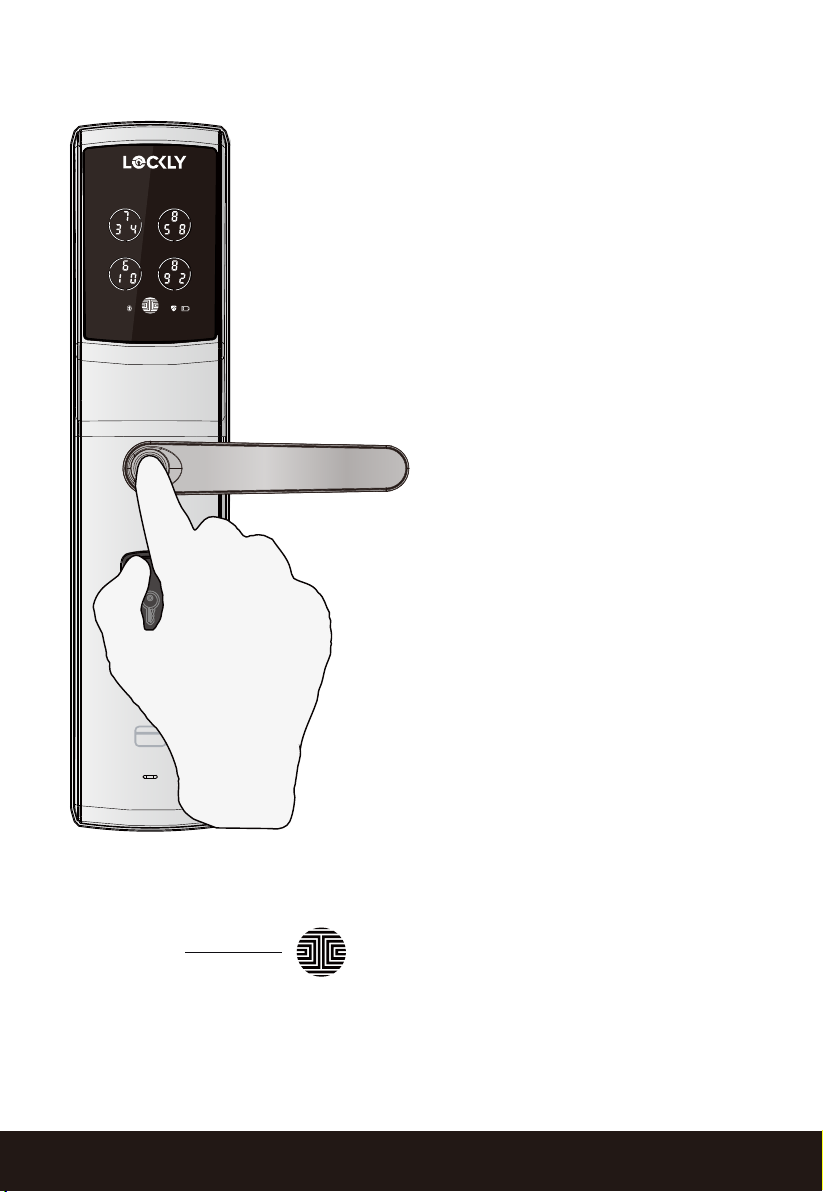
4.2 Locking/Unlocking Lockly™ with Fingerprints
Unlocking
Place a registered finger to the
fingerprint scanner located on
the exterior handle of the lock.
To register a fingerprint, please
see Section 3.6.
If your fingerprint is registered
and acknowledged, you will
hear a “beep” sound and a
Green LED will light up on the
fingerprint scanner. You can
then push down the handle and
open the door.
If you see a Red LED, it means
your fingerprint is not recognized. You must wait until the
red LED is off to try again.
OK Button
For best fingerprint scanning
practices, see Section 3.7.
Locking
To lock the Lockly™, press the
OK Button
anytime when the door is
opened.
SECTION 4.328
Page 31
4.3 Locking/Unlocking Lockly™ with App
You must have the Lockly™ iOS or Android app installed in order to lock and
unlock with the smartphone app. Please first download the app from the
correct store.
Scan or visit Lockly.com/app
4.4 Locking/Unlocking using RFID
Light up the screen by touching the keypad and move your RFID card
closer to the panel. You can push down the handle and open the door
after it chimed.
SECTION 4.4 29
Page 32
4.5 Locking/Unlocking Lockly™ with Physical Key
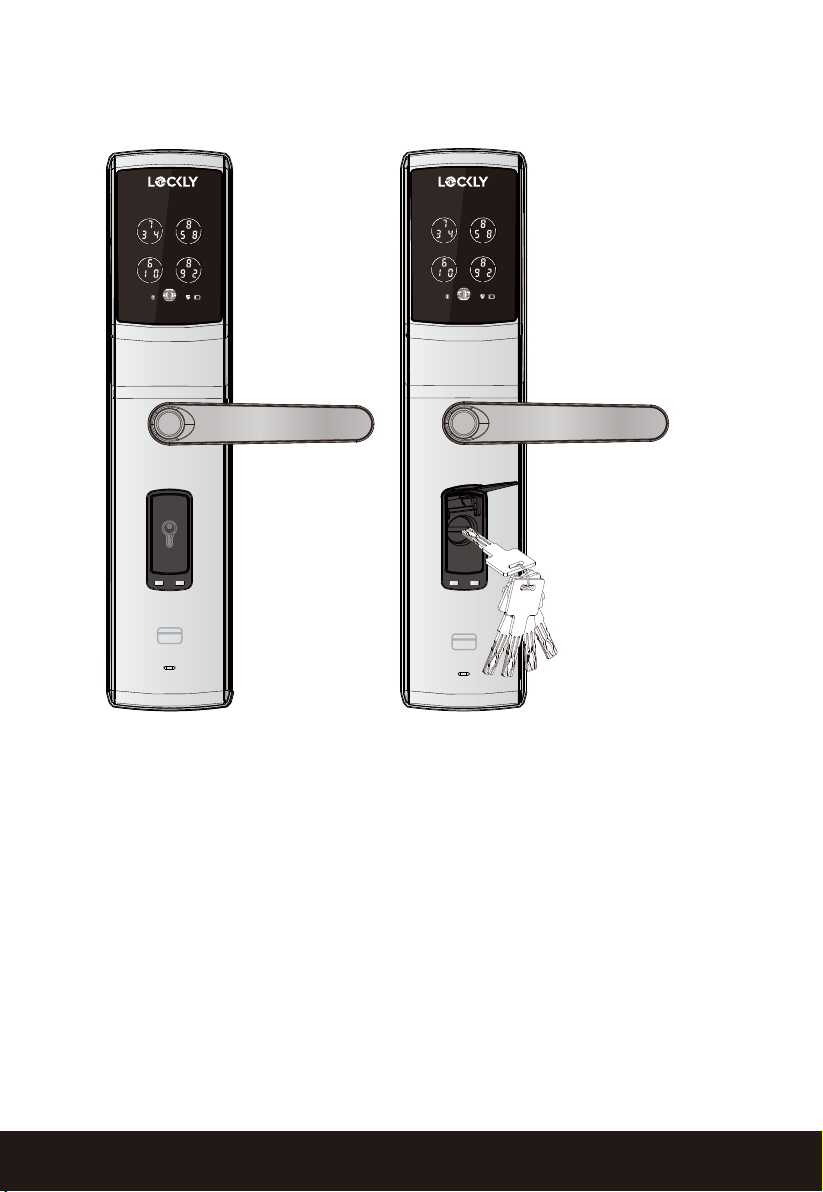
Exterior View
To unlock your Lockly™ using the physical key (supplied), open the key
cover below the exterior handle by pushing the top part of the cover to
reveal the keyhole.
Insert your key and turn clockwise or counter clockwise to lock or unlock the
door.
SECTION 4.530
Page 33
4.6 Locking and Unlocking with Voice Assistant Control
Once your Lockly™ Smart Lock and Secure Link Wi-Fi Hub has been
installed and configured correctly, make sure you enable the Lockly
Google Home Action and Amazon Alexa Skill first before you can
configure your voice to perform voice commands.
You can ask your questions such as door status or request for your door to
be locked or unlocked.
- Ok Google, unlock my Back Door.*
- Ok Google, is my Back Door locked?
- Ok Google, lock my Back Door.
- Ok Google, is my Back Door unlocked?
- Alexa, unlock my Front Door.*
- Alexa, is my Front Door locked?
- Hi Alexa, lock my Front Door.
- Alexa, is my Front Door unlocked?
™
*Unlock requests will require additional voice security codes.
You may configure it in the settings page.
SECTION 4.6 31
Page 34
4.7 Safe Mode - Overview
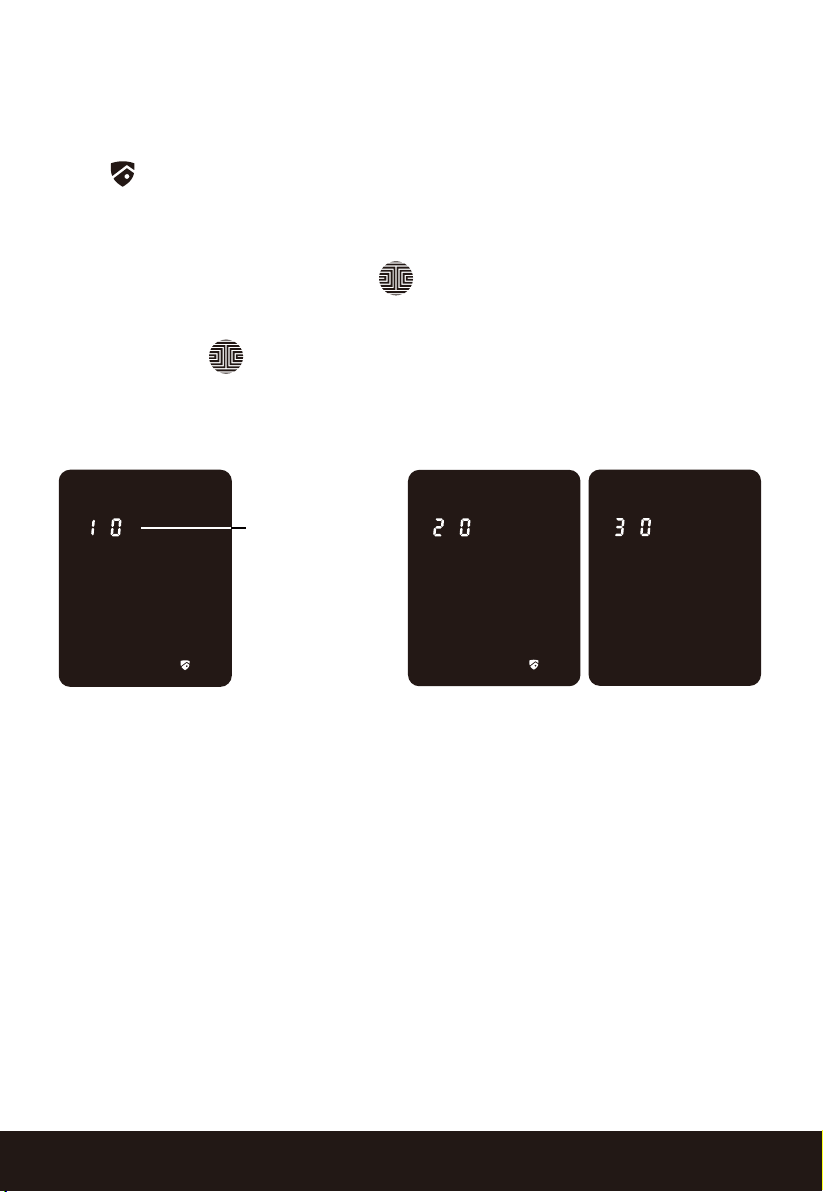
Lockly™ will enter Safe Mode when three (3) consecutive wrong Access
Codes are entered within 5 minutes. When in Safe Mode, the lock status
icon will start to flash.
To disable Safe Mode, you must unlock the door using the correct fingerprint or enter the correct Access Code twice in a row. Activate the
keypad by pressing and holding for 3 seconds.
Once the screen is activated, enter the correct Access Code carefully
twice, pressing after every time.
If you enter the wrong code, the keypad will then be disabled for 10
minutes.
Countdown
Prompt
(Displayed in
Minutes)
Will start with 10
and countdown
until 0.
Example A Example B
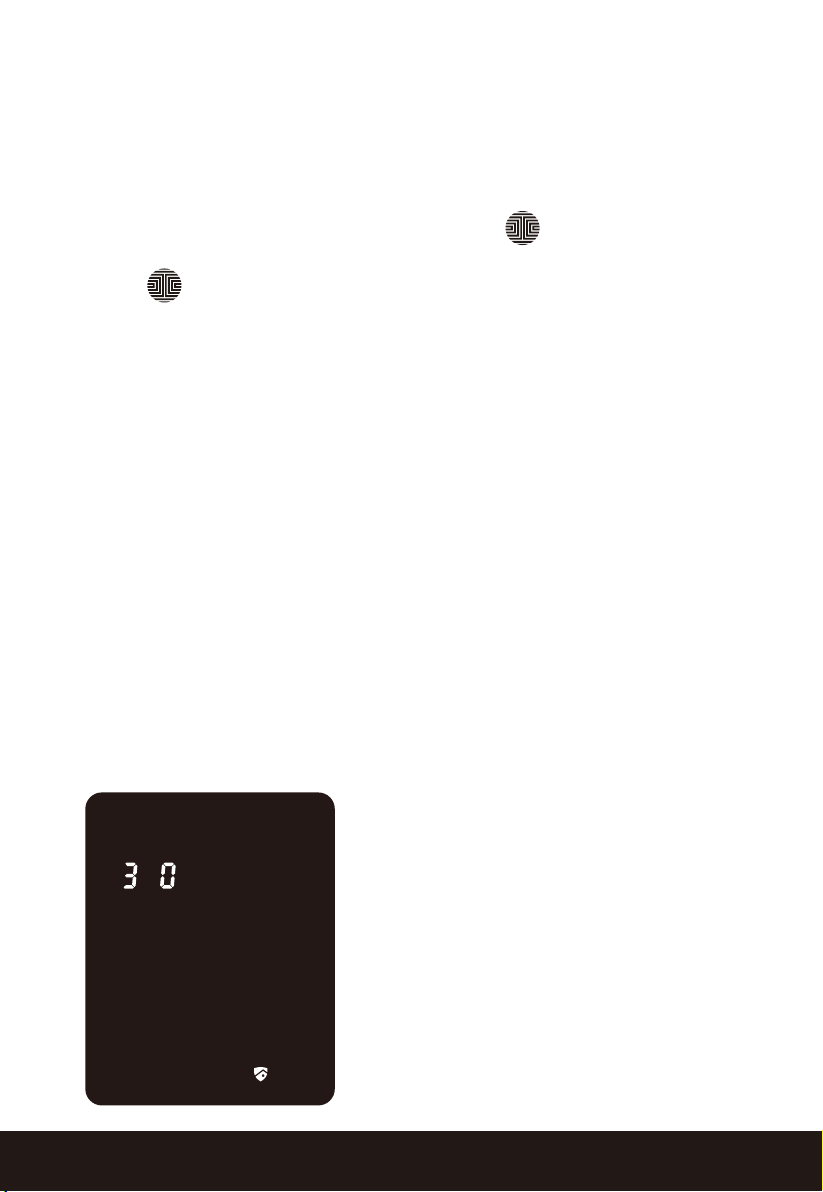
You will see a “10” on the screen, notifying the number of minutes that
the keypad is disabled for. After 10 minutes, you may attempt to enter
the correct Access Code to unlock the door. After the second incorrect
attempt to unlock the lock with the wrong Access Code, Lockly™ will
disable the keypad for 20 minutes, displaying a “20” on the screen. After
the third wrong attempt to unlock the door with the correct Access
Code, the screen will be disabled for 30 minutes. (Example A and Exam-
ple B above).
Note: In order to conserve power, the countdown prompt will only be
displayed for 3 seconds. You can reactivate the screen by sliding your
hand across the screen.
SECTION 4.732
Page 35
4.7 Safe Mode ( Continued )
There are four (4) ways to disable Safe Mode.
Option 1 - Entering Correct Access Code
Activate the keypad by pressing and holding for 3seconds.
Enter the correct Access Code twice (2) when the keypad is available,
pressing after every time the Access Code is entered.
Option 2 - Lockly™ Bluetooth App
Use the app that is synced to your Lockly™ to disable Safe Mode by
unlocking the door. If you have not downloaded the app to use with
your smart lock, you won’t be able to use this option to disable Safe
Mode.
Option 3 - Physical Key
There is a pair of keys included with your new lock. You may use the
keys to manually unlock the door. To learn how to use your physical
keys, see Section 4.4.
Option 4 - Registered Fingerprint
Use any registered fingerprint to reactivate the keypad. The door will
unlock and reactivate the keypad once a registered fingerprint is used.
Third wrong attempt: keypad will
enter SAFE mode and be disabled
for 30 minutes.
• To reactivate the screen, just slide
your hand across the screen.
SECTION 4.7 33
Page 36
4.8 Lock and Unlock using Anti-theft Button
The Anti-theft button is designed to prevent outsiders from picking your
inside door handle with use of wires or improvised tools to unlock door.
This also helps to prevent unconscious unlock by children or pets from the
inside of your home.
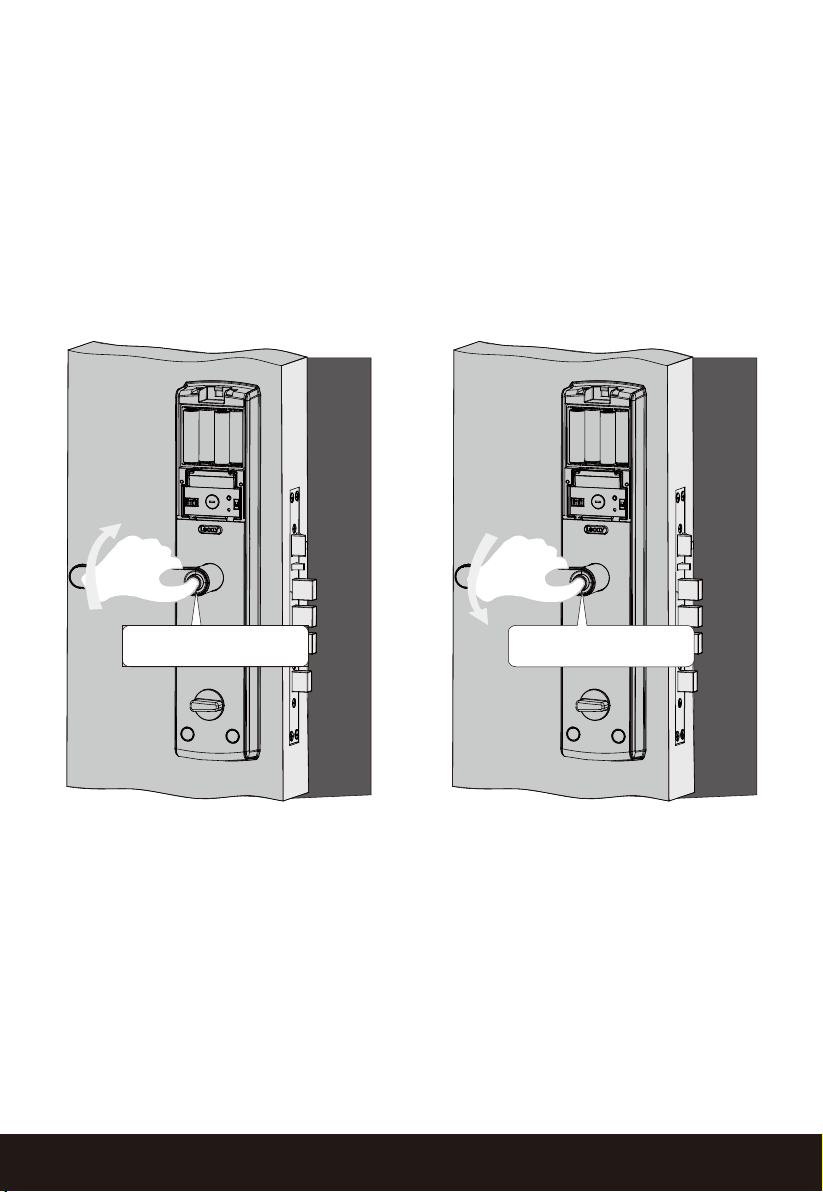
This feature is activated when the Anti - theft Button is popped - out.
Follow below actions to lock and Unlock when this feature is active:
Hold the button
To Lock : Hold and press the
button down and lift the
handle upward for locking
the door.
Hold the button
To Unlock : Hold and press the
button down and push the
handle downward for unlocking the door.
SECTION 4.834
Page 37
4.9 Anti - Theft Button Switch
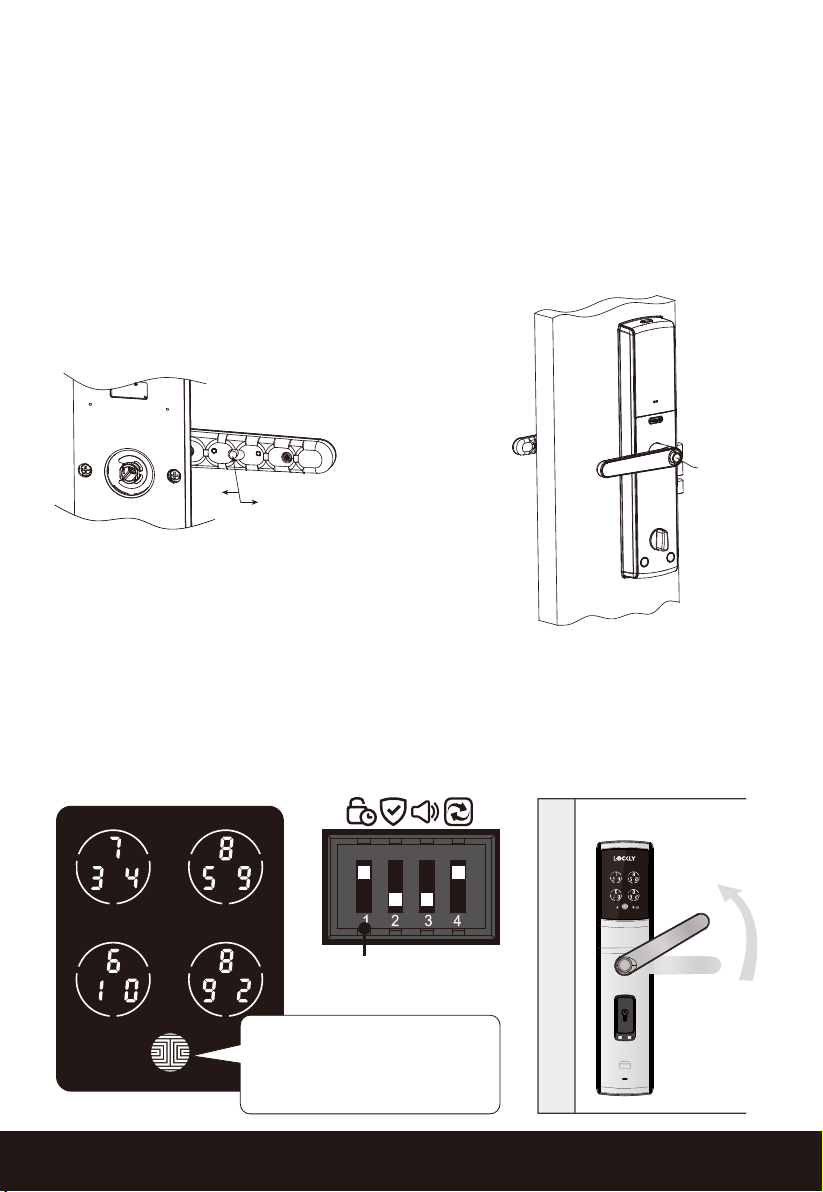
Lockly Secure Lux is shipped default with anti - theft button deactivated.
To Activate, locate the switch at the back on the indoor handle and push to
the LEFT.
To Deactivate, press the Anti-Theft Button and push the switch to the RIGHT.
Inside view of the inner handle
Anti-theft
R
L
ON/OFF Key
4.10 Locking from the Outdoor
With the auto-lock mode activated, the
mortise will be locked automatically after
5 seconds. Alternatively you can press the
OK button to lock the door.
ON
ON
OFF
When you are outside
the door, lift up the
handle or turn the key
to lock the door.
Automatic lock
The OK button will keep
flashing when the door
is opened. Press the OK
button to lock the door.
SECTION 4.9 35
Page 38

5.1 Offline Access Code (OAC)
The Offline Access Code (OAC) is a unique feature of our smart lock. It
allows you to grant access to guests remotely without guests needing to
download the app.
To use the OAC feature, make sure you download the Lockly™ app for iOS
or Android first, and sync your smart lock to your mobile device. OAC can
only be issued by the administrative owner of the lock.
From there, you can then issue an Offline Access Code within the app.
Go to “Access” and choose “Add a New User, then select Offline Access
Code (OAC)” and follow on screen instructions to generate your Offline
Access Code.
Understanding Offline Access Code (OAC)
OAC are issued to the guest by asking them to enter an 7-12 digit number
after a double - click on the .Your Lockly randomly generates the
Offline Access Code which can be shared to your guests together with the
instructions generated using the Lockly app.
SECTION 5.136
Page 39

6.1 Important Notes
Auto Lock Feature
Lockly™ Secure
after the door opening. You can always manually lock by pressing the
button anytime located on the bottom of the keypad.
9V Backup Access
When your Lockly™
keypad by using a 9V battery against the bottom of the exterior side of the
smart lock. Please see
Physical Keys
Even though you have your fingerprints registered, RFID cards and Access
Codes stored, it’s always best practice to carry your physical keys with you
at all times in case for any reason, Lockly™ falls into Safe Mode.
Initial Code
You may find an Initial Code Card with an Initial Code included in your
package. It is very crucial that you do not lose this card. Please store this
card safely as you will need the default
your lock in case, for any reason, you have lost the phone paired to
reset
Lockly™ and also forgot your
can be programmed to auto-lock between 5-300 seconds
is out of power, you can temporarily activate the
Section 2.9 for more info.
Initial Code on that card to master
Access Code.
Troubleshooting
Please visit http://lockly.com/help for troubleshooting and the most
frequently asked questions and answers.
SECTION 6.1 37
Page 40
7.1 Cleaning
Making sure your Lockly™ is clean is best practice to ensure optimal product
use. Follow the DOs and DON’Ts below.
DO DON’T
• Rinse the touchscreen with
warm water prior to cleaning.
• Use the application of soap
with a damp, lukewarm cloth.
• Airdry or wipe dry with a soft
microfiber cloth to avoid
scratches.
• Don’t use abrasives, high
alkaline cleaners, or gasoline to
clean your lock.
• Don’t apply cleaning deter-
gent directly in sunlight or at
high temperatures.
• Don’t leave cleaning deter-
gent on the display keypad for
long periods of time - wash
immediately.
• Don’t use scrapers, squee-
gees, or razors.
SECTION 7.138
Page 41
8.1 Safety Precautions
Please read all instructions carefully. Remind all Lockly™ users of the safety
precautions.
Read the following instructions for your own safety
Do not attempt to disassemble the smart lock by yourself. It can
cause product damage, void warranty, and cause injuries.
Do not use any inappropriate tools that can cause damages or
malfunction to your lock.
Always make sure your door is securely closed and locked when
you leave your house to prevent unwanted entry.
Please keep your Access Codes safe. Restrict access to the back
panel of your smart lock and check your settings regularly to ensure
Access Codes have not been changed without your knowledge.
Always dispose of used batteries according to your local laws. DO
NOT BURN.
Unauthorized changes and modifications may void your
product warranty. If you have questions or any problems
while using your Lockly™ Secure Smart Lock, contact our
customer service department at [email protected] or visit
http://lockly.com/help for technical assistance.
SECTION 8.1 39
Page 42

Certified
Warning:
This device complies with Part 15 of the FCC Rules. Operation is subject to the
following two conditions: (1) This device may not cause harmful interference,
and (2) this device must accept any interference received, including interference that may cause undesired operation.
NOTE 1: This equipment has been tested and found to comply with the limits for
a Class B digital device, pursuant to part 15 of the FCC Rules. These limits are
designed to provide reasonable protection against harmful interference in a
residential installation. This equipment generates, uses and can radiate radio
frequency energy and, if not installed and used in accordance with the
instructions, may cause harmful interference to radio communications. However, there is no guarantee that interference will not occur in a particular installation. If this equipment does cause harmful interference to radio or television
reception, which can be determined by turning the equipment off and on, the
user is encouraged to try to correct the interference by one or more of the
following measures:
- Reorient or relocate the receiving antenna.
- Increase the separation between the equipment and receiver.
- Connect the equipment into an outlet on a circuit different from that to which
the receiver is connected.
- Consult the dealer or an experienced radio/TV technician for help.
NOTE 2: Any changes or modifications to this unit not expressly approved by
the party responsible for compliance could void the user's authority to operate
the equipment.
WARNING: This product contains DEHP and other chemicals known to the
State of California to cause cancer and birth defects,or other reproductive harm. For more information go to www.P65Warnings.ca.gov
Page 43

Page 44

Lockly™ Smart Lock - Secure
Lockly™ Smart Lock - Secure Plus
Lockly™ Smart Lock - Secure Pro
Lockly™ Smart Lock - Secure Lux
U.S. Patent No. 9,665,706
Other Patents Pending With All Rights Reserved
About Lockly™ Secure, Secure Plus, Secure Pro and Secure Lux
About Lockly™ Secure, Secure Plus, Secure Pro and Secure Lux are keyless
smart locks equipped with the patented PIN Genie
and hidden camera proof algorithm software. Lockly™ makes your life
easier and safer.
For digital versions and instructional videos, please visit the following link:
TM
, which is a peep proof
http://lockly.com/help
 Loading...