

Page 1
PBX-PFX-SER Rev F
Service Manual
Models: 502, 752, 1002,
1302, 1501, 1701, and 2001
Up To 5:1 Turndown
WARNING
Save this manual for future reference.
This manual must only be used
by a qualified heating installer
/ service technician. Read all
instructions, including this
manual and the Power-fin
Installation and Operation
Manual, before installing.
Perform steps in the order given.
Failure to comply could result in
severe personal injury, death, or
substantial property damage.
Page 2

Service Manual
Contents
Contents ............................................................................................................... 2
Hazard definitions ................................................................................................ 2
Please read before proceeding ........................................................................... 3
What is in this manual? ....................................................................................... 4
1. . Service ............................................................................................................ 5
2. . Maintenance.................................................................................................... 22
3. . Troubleshooting .............................................................................................. 31
Troubleshooting Chart - No Display ................................................................ 32
Checking Temperature Sensors ..................................................................... 33
Troubleshooting Chart - Noisy System ........................................................... 34
Troubleshooting Chart - Fault Messages ....................................................... 35
Revision Notes ...................................................................................... Back Cover
Hazard definitions
The following defined terms are used throughout this manual to bring attention to the presence of hazards of various risk
levels or to important information concerning the life of the product.
DANGER
WARNING
CAUTION
CAUTION
NOTICE
DANGER indicates an imminently hazardous situation which, if not avoided, will result in death or
serious injury.
WARNING indicates a potentially hazardous situation which, if not avoided, could result in death or
serious injury.
CAUTION indicates a potentially hazardous situation which, if not avoided, may result in minor or
moderate injury.
CAUTION used without the safety alert symbol indicates a potentially hazardous situation which, if not
avoided, may result in property damage.
NOTICE indicates special instructions on installation, operation, or maintenance that are important but
not related to personal injury or property damage.
2
Page 3

Please read before proceeding
Service Manual
WARNING
NOTICE
Installer – Read all instructions,
including this manual and the Powerfin Installation and Operation Manual,
before installing. Perform steps in the
order given.
User – This manual is for use only
by a qualified heating installer/service
technician. Refer to the Power-fin User’s
Information Manual for your reference.
Have this appliance serviced/inspected
by a qualified service technician at least
annually.
Failure to comply with the above could
result in severe personal injury, death or
substantial property damage.
When calling or writing about the
appliance – Please have the appliance
model and serial number from the
appliance’s rating plate.
Consider piping and installation when
determining appliance location (see the
Power-fin Installation and Operation
Manual).
Any claims for damage or shortage in
shipment must be filed immediately
against the transportation company by
the consignee.
When servicing appliance –
• To avoid electric shock, disconnect electrical supply
before performing maintenance.
• To avoid severe burns, allow appliance to cool before
performing maintenance.
Appliance operation –
• Do not block flow of combustion or ventilation air to
the appliance.
• Should overheating occur or gas supply fail to shut off,
do not turn off or disconnect electrical supply to
circulator. Instead, shut off the gas supply at a location
external to the appliance.
• Do not use this appliance if any part has been under water.
The possible damage to a flooded appliance can be
extensive and present numerous safety hazards. Any
appliance that has been under water must be replaced.
Appliance water –
• Thoroughly flush the system (without appliance
connected) to remove sediment. The high-efficiency
heat exchanger can be damaged by build-up or
corrosion due to sediment.
• Do not use petroleum-based cleaning or sealing
compounds in the appliance system. Gaskets and seals in
the system may be damaged. This can result in
substantial property damage.
• Do not use “homemade cures” or “appliance patent
medicines”. Serious damage to the appliance, personnel,
and/or property may result.
3
Page 4

What is in this manual?
Service Manual
Service
The Power-fin display
• Display panel readout, buttons and their functions
Control module inputs
• Control module inputs and options
Control module outputs
• Control module outputs and options
General
• How the appliance operates
• How the control module operates
• Access modes -- user and installer
• Sequence of operation -- Domestic Hot Water
(DHW)/space heating
Control panel menu access
• Accessing programming mode and locating menus
(See separate guides covering the PC and pocket PC interfaces)
Control panel parameter access
• Accessing and changing parameters from the display panel
Quick start information -- parameter table
• An index of available adjustments and readouts, where to
access them and where to find detailed information.
Power-fin operation
• A: General
• B: Temperature Setting
• C: Data Logging
• D: Functions
• E: DHW Settings
• F: Outdoor Air Reset Curve
• G: Anti-cycling
• H: Control Modes
• I: Cascade
• J: Building Management System (BMS)
• K: Circulation Pumps
• L: Service Notification
Maintenance
• Service and maintenance schedules
• Address reported problems
• Inspect appliance area and appliance interior
• Clean condensate trap
• Check all piping for leaks
• Flue vent system and air piping
• Check water system
• Check expansion tank
• Check control settings
• Check igniter
• Check all appliance wiring
• Check flue gas passageways
• Flame inspection
• Inspect and clean burner
• General maintenance
• Checking manifold gas pressure
• Combustion analysis procedure
• Gas valve adjustment procedure
• Cleaning heat exchanger
• Review with owner
Troubleshooting
• Troubleshooting table - No display
• Checking temperature sensors
• Troubleshooting table - Noisy system
• Troubleshooting table -Fault messages displayed on Operator
Interface
4
Page 5
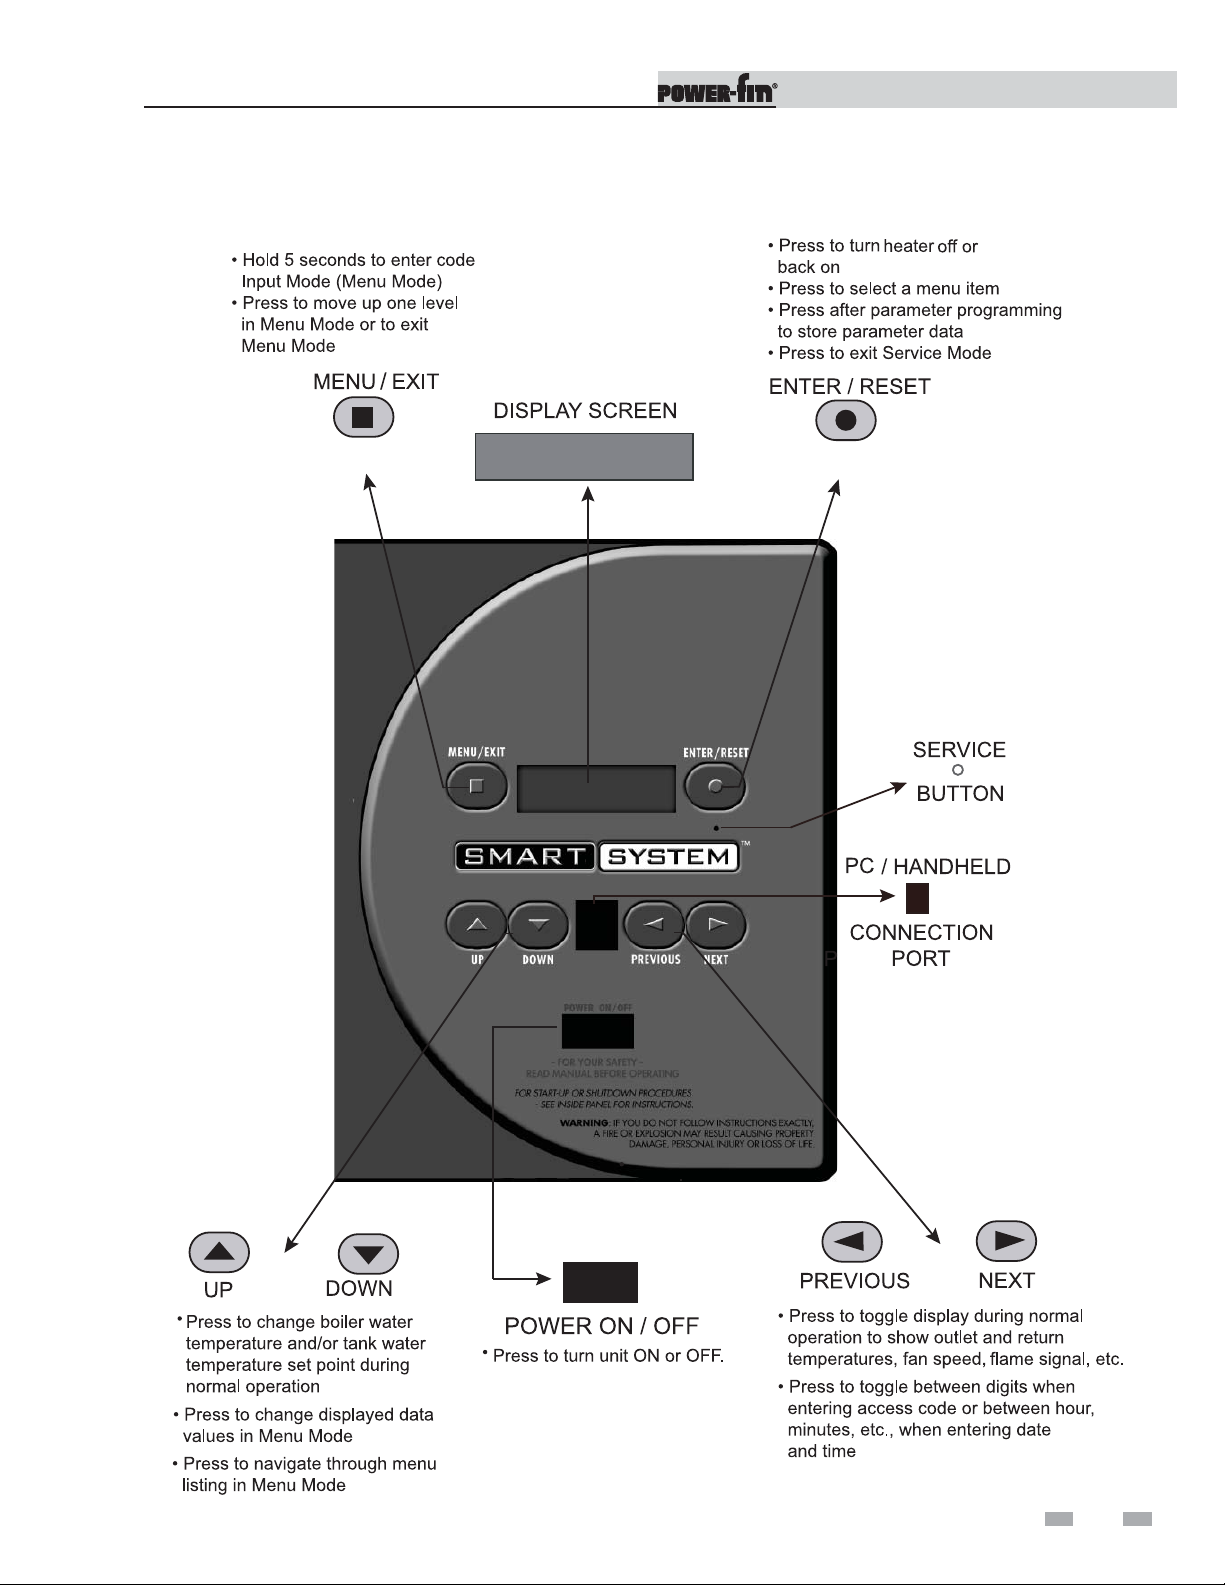
1 Service
The Power-fin display
Service Manual
5
Page 6

1 Service
Control inputs
Service Manual
6
Page 7
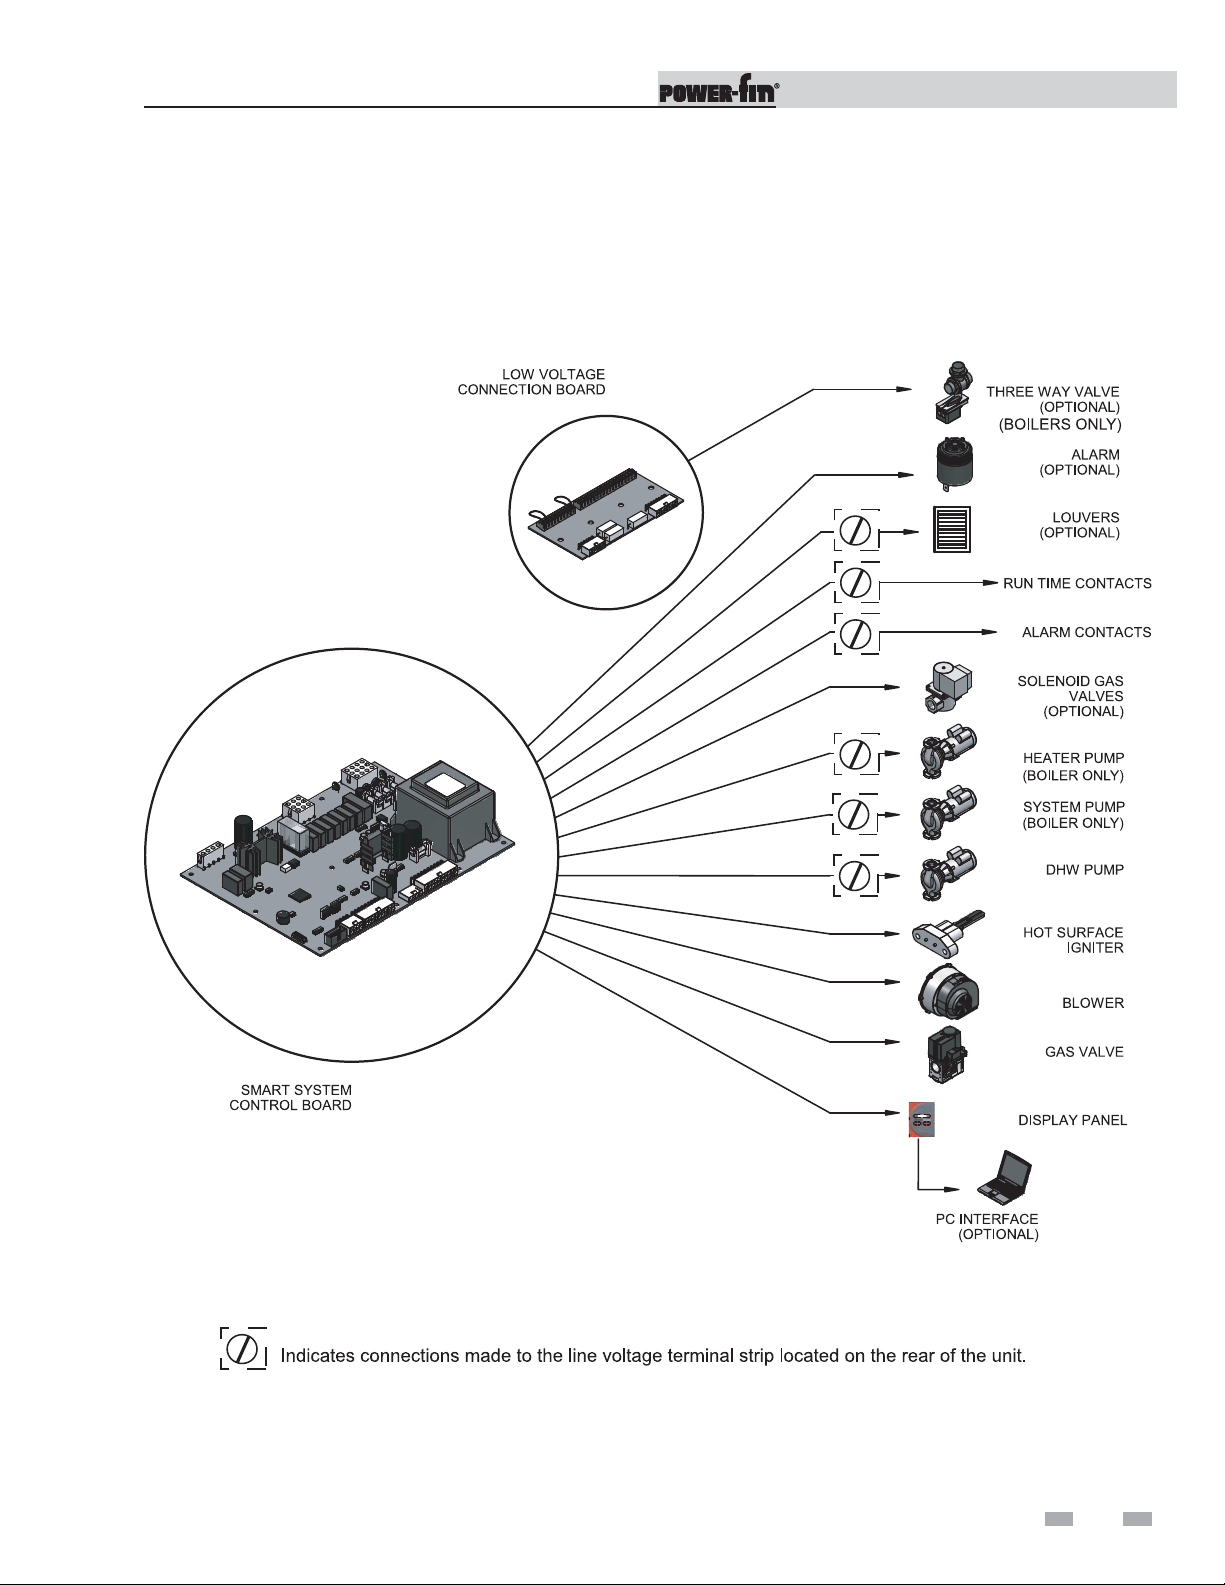
1 Service (continued)
Control outputs
Service Manual
7
Page 8

1 Service
General Operation
Service Manual
How the appliance operates
The Power-fin uses a copper-finned tube heat exchanger to
transfer heat from the flue products to the water. An electronic
control module monitors various inputs to initiate a call for
heat. The blower provides both primary and secondary air to
the burner and forces the flue products out of the combustion
chamber and into the vent system. The control module regulates
the blower speed (on B9 and M9 models) to control the firing
rate of the appliance. The modulating gas valve monitors the
amount of combustion air being pulled into the blower and
regulates the amount of gas supplied, which then mixes with the
combustion air and is supplied to the burner.
How the control module operates
The Power-fin control module receives input from appliance
sensors. The control module activates and controls the blower
and gas valve to regulate heat input and switches heater,
DHW and system pumps on and off as needed. The user/
installer programs the module to meet system needs by
adjusting control parameters. These parameters set operating
temperatures and heater operating modes. Appliance operation
can be based on heater outlet water temperature, heater return
water temperature, system supply temperature, system return
temperature or tank temperature, depending on the parameter
setting.
Sequence of operation
Table 1A shows control module normal sequences of operation
for space heating and DHW operation. The combined operation
sequence is for a typical application, programmed to provide
DHW priority.
Access modes
User
The user can adjust space heating set point using the UP
and DOWN buttons at any time during normal operation.
By entering the USER code (0704), the user can also change
temperature units, time and date, and night setback settings.
In user mode, the following parameters can be viewed but not
changed: Heater outlet water temperature in DHW mode;
heater model number; software version; total operating hours,
and total cycles.
Installer
Most parameters are available only to the installer, accessible
only by entering the installer access code (5309).
Saving parameters
To save parameters and exit programming:
Press the ENTER/RESET button, then the MENU/EXIT button
3 times.
To keep parameter settings only for a current operating cycle:
Press the MENU/EXIT button 3 times after making all desired
parameter changes.
To enter a parameter and continue programming:
Press the MENU/EXIT button 1 time to return to the parameter
listings; press again to return to the menu listings. Remember
to press the ENTER/RESET button when finished programming
in order to save the changes made.
8
Page 9
1 Service (continued)
Sequence of operation
Table 1A_Sequence of Operation - Space Heating and DHW
OPERATION DISPLAY
Service Manual
1. The manual reset high limit must be closed before any
action will take place.
2. Upon a call for heat the control turns on the appropriate
pumps (system and boiler pumps for space heating; DHW
pump for DHW call). The flow switch and low water cutoff (if
equipped) must close.
3. • If the unit is equipped with a proof of closure valve, the
proof of closure switch must be closed. The proof of
closure valve is then energized. The gas pressure
switch(es) (if equipped) must close.
• If the contact for the louvers is closed, the louver proving,
blocked drain switch, and auto reset high limit (water
heater only) inputs must close.
• If the air pressure switch is open, the prepurge cycle then
begins by starting the combustion blower. Once started,
the air pressure switch must close.
4. After the 10 second prepurge, the blower slows down and
the hot surface igniter (HSI) is energized. The HSI is heated
for at least 15 seconds.
5. Once the HSI is hot, the trial for ignition begins with the
opening of the gas valve.
HTR: Standby
OUT: 123.8F(129)
HTR: Standby
OUT: 123.8F(129)
HTR: Standby
OUT: 123.8F(129)
HTR: PREPURGE
OUT: 123.9F(129)
HTR: IGNITION
OUT: 123.9F(129)
6. If the SMART SYSTEM control does not sense flame within
7 seconds of the opening of the gas valve, then it will lock
out.
7. If the SMART SYSTEM control senses flame within 7
seconds, it will fire the burner to maintain the set point. On
B9 and M9 models, the firing rate will modulate as required
to hold the actual temperature at the set point. If the boiler
lights due to a space heating call for heat, and the ramp
delay function is active (default is disabled), the modulation
will be held to a series of increasing limits after the burner
has lit.
8. If the space heating call for heat is active, and the DHW
thermostat closes, the control will turn on the DHW pump,
wait 2 seconds, and then turn off the boiler pump. This will
divert the hot water away from the heating zone(s) and send
it to the DHW tank instead. The control will then modulate
(B9 and M9 models only) to maintain the outlet temperature
to the DHW boiler set point.
HTR: POSTPURGE, PREPURGE
OUT: 123.9F(129)
HTR: SH 20% RATE
OUT: 124.8F(129)
HTR: DHW 85% RATE
OUT: 177.8(180)
9
Page 10
1 Service
Sequence of operation
Table 1A_(continued from previous page) Sequence of Operation - Space Heating and DHW
OPERATION DISPLAY
9. If the DHW thermostat remains on for more than 30 minutes,
and the space heating call for heat is also on, then the
control will turn on the boiler pump, turn off the DHW pump
after 2 seconds, and resume firing based on the space
heating set point. As long as both the space heating and
DHW calls for heat remain active, the control will switch
back and forth between the two modes until one of them is
satisfied.
10. Once both calls for heat are satisfied, the control will turn
off the burner. The blower will remain on for the
30 second postpurge cycle. Any pumps that are running
will continue to run for their respective pump delay times,
then turn off.
HTR: SH 41% RATE
OUT: 123.0F(129)
HTR: POSTPURGE
OUT: 127.4F(129)
Service Manual
11. Boiler pump off, system pump continues its delay if
longer.
12. System pump off.
HTR: Standby
OUT: 124.7F(129)
HTR: Standby
OUT: 122.9F(129)
10
Page 11

1 Service (continued)
Display panel menu access
Table 1B_Use this procedure to access menus from the display panel
Service Manual
Note: Not all menu listings shown above are available on water heaters.
11
Page 12

Service Manual
1 Service
Display panel parameter access
Table 1C_This is a typical example of accessing a parameter, shown for parameter K2, SH pump delay
Cascade
BMS
12
Page 13

1 Service (continued)
Parameter table
Table 1D_This table lists SMART SYSTEM control module parameters and where to access them
Service Manual
MENU SUB ITEM DESCRIPTION
1 Heater Model 15 Yes No Yes No
2 User Code 15 Yes Yes Yes Yes
3 Date and Time 15 Yes Yes Yes Yes
GENERAL
A
B
SETTING
TEMPERATURE
DATA
C
LOGGING
4 Software Version 15 Yes No Yes No
5 Temperature Units 15 Yes Yes Yes Yes
6 Night Setback Temperature 15 Yes Yes Yes Yes
7 Night Setback Times 15 Yes Yes Yes Yes
1 SH Set Point User 15 Yes Yes Yes Yes
2 SH Minimum Set Point 15 No No Yes Yes
3 SH Maximum Set Point 15 No No Yes Yes
4 SH Offset 15 No No Yes Yes
5 SH Differential 15 No No Yes Yes
1 Hours Running SH 16 Yes No Yes No
2 Hours Running DHW 16 Yes No Yes No
3 Ignition Attempts 16 Yes No Yes No
4 Show Last 10 Errors 16 Yes No Yes No
SEE
PAGE
USER ACCESS INSTALLER ACCESS
DISPLAY MODIFY DISPLAY MODIFY
D
1 Service Mode Delay 16 No No Yes Yes
2 Reset Last 10 Errors 16 No No Yes Yes
FUNCTIONS
1 DHW Tank Set Point 16 Yes Yes Yes Yes
DHW
E
SETTINGS
F
OUTDOOR AIR RESET
2 DHW Boiler Set Point 16 Yes Yes Yes Yes
3 SH/DHW Switching Time 16 Yes Yes Yes Yes
1 Minimum Air Temperature 16 No No Yes Yes
2 Maximum Air Temperature 16 No No Yes Yes
3 Maximum SH Set Point 17 No No Yes Yes
4 Minimum SH Set Point 17 No No Yes Yes
5 Outdoor Air Shutdown 17 Yes Yes Yes Yes
6
7 Shift Reset Curve 17 No No Yes Yes
8 Boost Temperature 18 Yes Yes Yes Yes
9 Boost Time 18 Yes Yes Yes Yes
Outdoor Air Shutdown
Differential
17 Yes Yes Yes Yes
13
Page 14

Service Manual
1 Service
Parameter table (continued)
Table 1D_(continued from previous page) This table lists SMART SYSTEM control module parameters and where to
access them
MENU SUB ITEM DESCRIPTION
1 Anti-cycling Time 18 No No Yes Yes
Inlet Temperature Differential for
Ending Anti-Cycling
SH Controlling Sensor (Outlet/
System, Inlet)
G
ANTI-CYCLING
H
MODES
CONTROL
I
CASCADE
2
3 Ramp Delay On/Off 18 No No Yes Yes
4 Ramp Delay Settings (boiler only) 18 No No Yes Yes
1
2 Enable Input 19 No No Yes Yes
3 0-10V Building Management Input 19 No No Yes Yes
4 Cascade 19 No No Yes Yes
1 Boiler Cascade Address 19 No No Yes Yes
2 Max. Cascade Set Point 20 No No Yes Yes
3 Cascade Offset 20 No No Yes Yes
4 Cascade Off-On Differential 20 No No Yes Yes
1 BMS Type 20 No No Yes Yes
2 Voltage at Minimum 20 No No Yes Yes
SEE
PAGE
18 No No Yes Yes
19 No No Yes Yes
USER ACCESS INSTALLER ACCESS
DISPLAY MODIFY DISPLAY MODIFY
3 Voltage at Maximum 20 No No Yes Yes
4 Minimum Power 20 No No Yes Yes
J
SYSTEM (BMS)
BUILDING MANAGEMENT
K
PUMPS
5 Maximum Power 20 No No Yes Yes
6 Minimum Set Point 20 No No Yes Yes
7 Maximum Set Point 21 No No Yes Yes
8 Voltage at Start 21 No No Yes Yes
9 Voltage at Stop 21 No No Yes Yes
1 System Pump Delay 21 No No Yes Yes
2 SH Pump Delay 21 No No Yes Yes
3 DHW Pump Delay 21 No No Yes Yes
CIRCULATION
1 Service Notification in Months 21 No No Yes Yes
2 Service Notification Running Hours 21 No No Yes Yes
L
SERVICE
NOTIFICATION
3 Service Notification Boiler Cycles 21 No No Yes Yes
4 Reset Service Notification Counter 21 No No Yes Yes
5 Accept PPlug 21 No No Yes Yes
14
Page 15

1 Service (continued)
Viewable and changeable control parameters
CAUTION
Before changing parameters, note the
settings so that the unit can be returned to
its original operating parameters.
A: General
Heater model
The control will display “LOCHINVAR” as the model number
because the same control is used on several models. This will
be displayed when parameter A1 has been accessed. This
parameter is not changeable.
User code
The User Code allows the user to access and change a limited
number of control parameters. The access code can be changed
by the user or the installer to a code of their choosing. To
change the code, parameter A2 must be accessed. The default
code is 0704. The code can be changed one digit at a time by
using the arrow keys on the display.
Date and time
The control uses an internal clock for the night setback feature
and for logging of events. For these features to work correctly,
the clock must be set when the unit is first installed or any time
the unit has been powered off for more than 30 days. To set
the clock, parameter A3 must be accessed. The date and time
are displayed as “YY:MM:DD W hh:mm”. YY = year, MM =
month, DD = date, W = day (1 = Monday, 2 = Tuesday, etc.),
hh = hour (24 hour time; 2:00 PM = 14:00), mm = minutes.
NOTICE
Software version
The software version allows the user to view the software version
in use by the control. This software controls the operation of
the unit. When a new software version becomes available, the
existing control can be replaced with a new control to update
the software.
Temperature units
The control can be configured to display temperature in either
°C or °F. This parameter can be changed by the user or the
installer by accessing parameter A5. The default is °F.
Night setback temperature
Once the internal clock has been set correctly, the night setback
feature can be used to program a lower water temperature set
point for space heating or tank. This parameter can be changed
by the user or the installer by accessing parameter A6. The
temperature range for this parameter is 32°F (0°C) to 261°F
(127°C). The feature is turned off with a setting of 32.0°F (0°C).
The default value is 32.0°F (0°C).
The internal clock does not adjust for
Daylight Savings Time and therefore, will
require a manual adjustment.
Night setback times
If parameter A6 is set to anything other than 32.0°F (0°C), the
night setback feature becomes active. This will require start
and stop times to be programmed for the days that reduced
temperatures are required. These times can be changed by the
user or the installer by accessing parameter A7. Each day of the
week (Monday through Sunday) will have an on and off time.
Example: Monday ON: 22:30, Tuesday OFF: 6:45. If you wish
to skip a day and have no night setback, leave the on and off
times the same. The default times for each day will be 08:00
(OFF) and 18:00 (ON).
B: Temperature settings (boiler only)
SH Set point user
The SH set point user sets the water temperature set point for
fixed operation or the maximum temperature set point when
the outdoor air sensor is used. This parameter can be changed
by the user or the installer by accessing parameter B1. The
temperature range of this parameter is 60°F (15°C) to 230°F
(110°C). The default value is 120°F (49°C).
SH Minimum set point
The SH minimum set point sets the minimum water temperature
set point that can be used for space heating operation. The user
or installer will not be able to program the control with a lower
SH set point. This parameter can only be changed by the
installer by accessing parameter B2. The temperature range of
this parameter is 32°F (0°C) to 261°F (127°C). The default value
is 70°F (21°C).
SH Maximum set point
The SH maximum set point sets the maximum water
temperature set point that can be used for space heating. The
user or installer will not be able to program the control with a
higher SH set point. This parameter can only be changed by the
installer by accessing parameter B3. The temperature range of
this parameter is 32°F (0°C) to 261°F (127°C). The default value
is 220°F (104°C).
SH Offset
The SH offset sets how many degrees above set point the
temperature has to go before the unit will shut off. This
parameter can only be changed by the installer by accessing
parameter B4. The temperature range of this parameter is 0°F
(0°C) to 54°F (30°C). The default value is 10°F (5°C).
SH Differential
The SH differential sets how many degrees below the turn off
temperature the temperature has to go before the unit will
turn on. This parameter can only be changed by the installer
by accessing parameter B5. The temperature range of this
parameter is 0°F (0°C) to 54°F (30°C). The default value is 20°F
(11°C).
Service Manual
15
Page 16

1 Service
Service Manual
C: Data logging
Hours running SH
The hours running SH parameter shows the total number
of hours the unit has been in the SH firing position. This
parameter can be viewed by the user and the installer by
accessing parameter C1.
Hours running DHW
The hours running DHW parameter shows the total number
of hours the unit has been in the DHW firing position. This
parameter can be viewed by the user and the installer by
accessing parameter C2.
Ignition attempts
The ignition attempts parameter shows the total number of
times the unit has attempted to fire. This parameter can be
viewed by the user and the installer by accessing parameter C3.
Show last 10 errors
The control will log the 10 most current errors with the date and
time the error occurred. This parameter can be viewed by the
user and the installer by accessing parameter C4.
D: Functions
Service mode delay
By pressing the pin button on the front of the display for five
(5) seconds, the control will be placed in Service Mode. This
will override all other heat demands. The Service Mode allows
the installer to set the unit to either maximum firing rate or
minimum firing rate for the purpose of combustion analysis.
The delay sets the length of time the unit will stay in the
Service Mode if no keys have been pressed before going back
to its original state. This parameter can only be changed by the
installer by accessing parameter D1. The time range of this
parameter is 0 to 40 minutes. The default value is 20 minutes.
Reset last 10 errors
The reset last 10 errors parameter allows the error counter to be
reset to 0. This parameter can only be cleared by the installer by
accessing parameter D2. Once accessed, press the RESET key to
clear the counter.
E: DHW settings
DHW tank set point
When a temperature sensor is installed in the DHW tank, the
DHW tank set point sets the target temperature of the water
in the tank. The user or installer can adjust this set point
by accessing parameter E1. The temperature range of this
parameter is 60°F (15°C) to 190°F (88°C). The default value is
120°F (49°C).
DHW boiler set point (boiler only)
When an indirect DHW call for heat becomes active, the control
will use the DHW boiler set point to determine the firing
rate of the unit based on the actual outlet water temperature.
This parameter can be changed by the installer by accessing
parameter E2. The temperature range of this parameter is 32°F
(0°C) to 261°F (127°C). The default value is 180°F (82°C).
SH/DHW switching time (boiler only)
The SH/DHW switching time parameter sets the length of time
the control will stay in DHW Mode when a space heating (SH)
call has been received. After this time period has expired the
control will revert to SH Mode. If a DHW call is still active the
timer will reset. After the time period has expired the control
will revert back to DHW Mode. This will continue until one of
the demands has been satisfied. This parameter can be changed
by the installer by accessing parameter E3. The time range of
this parameter is 10 minutes to 240 minutes. The default value
is 30 minutes.
F: Outdoor air reset (boiler only)
Outdoor air reset operation
When the outdoor air sensor is installed, the control will
calculate the water temperature set point based on the outdoor
air temperature. As the outdoor air temperature drops the water
temperature set point increases. This feature allows the unit to
be more efficient in periods of mild weather, see FIG. 1-1 on
page 17.
Minimum air temperature
When the outdoor air temperature drops to this point, the
water temperature will be at its maximum setting (FIG. 1-1).
The water temperature will be limited by the user set point.
This parameter can be changed by the installer by accessing
parameter F1. The temperature range of this parameter is -22°F
(-30°C) to 86°F (30°C). The default value is 25°F (-4°C).
16
Maximum air temperature
When the outdoor air temperature rises to or above this point,
the water temperature will be at its minimum setting (FIG. 1-1).
This parameter can be changed by the installer by accessing
parameter F2. The temperature range of this parameter is -22°F
(-30°C) to 86°F (30°C). The default value is 70°F (21°C).
Page 17

1 Service (continued)
Figure 1-1_Outdoor Air Reset Curve
Service Manual
Maximum SH set point
When the outdoor temperature drops to its minimum
setting (F1) the water temperature will be at this point, if
the SH set point is set higher (FIG. 1-1). This parameter
can be changed by the installer by accessing parameter F3.
The temperature range of this parameter is 32°F (0°C) to
248°F (120°C). The default value is 180°F (82°C).
Minimum SH set point
When the outdoor temperature rises to or above its
maximum setting (F2) the water temperature will be at
this point (FIG. 1-1). This parameter can be changed by
the installer by accessing parameter F4. The temperature
range of this parameter is 32°F (0°C) to 248°F (120°C). The
default value is 70°F (21°C).
Outdoor air shutdown
When the outdoor temperature rises above this point, the
control will block all SH demands (DHW demands will still
be active). This parameter can be changed by the user or
the installer by accessing parameter F5. The temperature
range of this parameter is 32°F (0°C) to 122°F (50°C). The
default value is 80°F (27°C).
Outdoor air shutdown differential
The outdoor air shutdown differential parameter is the number
of degrees below parameter F5 the outdoor air temperature must
go before the unit will respond to a SH demand. This parameter
can be changed by the user or the installer by accessing
parameter F6. The temperature range of this parameter is 0°F
(0°C) to 90°F (50°C). The default value is 10°F (5°C).
Shift reset curve
The shift reset curve parameter shifts the actual set point above
the calculated set point the number of degrees in this parameter.
This parameter can be changed by the installer by accessing
parameter F7. The temperature range of this parameter is -27°F
(-15°C) to 27°F (15°). The default value is 0°F (0°C). This feature
will be active if this parameter is set to anything other than 0°F
(0°C).
17
Page 18

1 Service
Service Manual
Boost temperature
If a SH demand lasts longer than the programmed time delay
setting (F9) and there have been no DHW demands, the control
will increase the water temperature set point by the amount in
this parameter. If the SH demand continues through another
time period, the set point will be increased again. This will
continue until either the SH demand ends, a maximum of 20
increases has occurred, or the maximum set point has been
reached. Once the SH demand has been satisfied the set point
will revert back to its calculated setting. The boost temperature
can be changed by the installer by accessing parameter F8. The
temperature range of this parameter is 0°F (0°C) to 45°F (25°C).
The default value is 0°F (0°C). This feature will be active if this
parameter is set to anything other than 0°F (0°C).
Boost time
The boost time parameter sets the amount of time that must
elapse with a SH demand before the water temperature set point
will be increased. This parameter can be changed by the installer
by accessing parameter F9. The time range for this parameter is
1 minute to 250 minutes. The default value is 20 minutes.
G: Anti-cycling
Anti-cycling time
Once a SH demand has been satisfied, a set amount of time must
elapse before the control will respond to a new SH demand. The
control will block the new heat demand and anti-cycling will
be shown in the display until the time has elapsed or the water
temperature drops below parameter G2. This parameter can be
changed by the installer by accessing parameter G1. The time
range for this parameter is 0 minutes to 40 minutes. The default
value is 1 minute.
Ramp delay on/off (M9 boilers only)
When the ramp delay on/off parameter is active, the ramp delay
limits the boiler firing rate when a SH cycle has started. There
are six (6) limiting steps used to limit temperature overshoot
and short cycles, see FIG. 1-2 on page 19 of this manual. This
feature can be turned on or off depending on the installation.
This parameter can be changed by the installer by accessing
parameter G3. The control range of this parameter is 0 = Off,
1 = Ramp Up Only, and 2 = Ramp Up and Ramp Down. The
default value is 0.
Ramp delay settings (M9 boilers only)
When ramp delay is active, there are up to six (6) limiting steps,
as described above in Ramp Delay On/Off. Each step has its
own time period and modulation limit. The installer can adjust
these settings by accessing parameter G4. The settings for each
step are displayed as follows:
G4 Ramp n
mm minutes ppp.p%
Where n is the number of the step, mm is the length of time
in that step, and ppp.p is the maximum modulation allowed
during that step. Upon selecting this parameter, the ramp
number n will be flashing. Use the UP and DOWN keys to select
the step you wish to adjust. Use the NEXT and PREVIOUS
keys to select the setting you wish to adjust. Use the UP
and DOWN keys to adjust the value of each setting. NOTE
THAT THE MODULATION LIMIT IN STEP 6 WILL APPLY
THROUGHOUT THE ENTIRE CALL FOR HEAT. If 100%
modulation is required, the modulation limit in step 6 must
be 100%. The default values are 2 minutes at 50% for step 1,
1 minute at 80% for step 2, and 1 minute at 100% for steps 3
through 6.
Inlet temperature differential for ending anti-cycling
The control will bypass the anti-cycling time if the water
temperature drops too quickly. The control will use the water
temperature the unit was at when it shut off as the starting point.
If the temperature drops below the temperature parameter
the control will abort anti-cycling and allow the unit to fire.
This parameter can be changed by the installer by accessing
parameter G2. The temperature range of this parameter is 0°F
(0°C) to 54°F (30°C). The default value is 10°F (5°C).
18
Page 19

1 Service (continued)
Figure 1-2_Ramp Delay Interval
Service Manual
H: Control modes
SH controlling sensor (boiler only)
The SH controlling sensor parameter selects the sensor the
control will use to regulate the boiler firing rate. This parameter
is adjustable by the installer by accessing parameter H1. The
sensor selections are as follows: The outlet sensor regulates the
firing rate based on the outlet water temperature of the unit and
the inlet sensor regulates the firing rate based on the inlet water
temperature of the unit. If the outlet sensor is selected, and
the optional system supply sensor is connected, the control will
regulate the firing rate based on the system sensor temperature.
If the inlet sensor is selected, and the optional system return
sensor is connected, the control will regulate the firing rate
based on the system return sensor. The default sensor is the
Outlet Sensor.
Enable input
The boiler or water heater can receive a call for heat in two
different ways. First, an external contact (like a tank thermostat)
or sensor (like a tank sensor) can generate a call for heat.
Second, the 0-10Vdc voltage from a BMS can be used to
generate the call for heat, as well as provide the set point or
modulation level. On boilers, the external contact is connected
to the Enable input on the low voltage connection board. On
water heaters, the external contact is connected to the Tank
Thermostat input on the low voltage connection board. When
a tank sensor is connected, the Tank Thermostat input is not
used. When the call for heat comes from an external contact or
tank sensor, the enable input must be set to active. When the
call for heat comes from the 0-10Vdc input, the enable input
must be set to inactive. This setting is adjustable by the installer
by accessing parameter H2. The default setting is active.
0-10V building management input (BMS)
When the building management input is enabled, the control
modulates the unit (B9 or M9 only) or the cascade based on
the voltage on the 0-10V input on the connection board. The
0-10V input may control either the modulation of the unit(s),
or the set point. This setting is adjustable by the installer by
accessing parameter H3. The default value is Inactive. See
menu Section J to adjust the parameters that control the BMS
operation.
Cascade
The boiler or water heater is part of a group of units sequenced
together. The designated Leader unit determines the total
output needed from the group based on the set point and
controlling sensor reading. It assigns portions of the output to
itself (Leader) and the Member units. When Cascade is active,
each boiler in the group requires a unique address (see menu
Section I below). This setting is adjustable by the installer by
accessing parameter H4. The default value is Inactive.
I: Cascade
Boiler cascade address
The boiler designated as the Leader needs to be programmed
with address 0. All the Member boilers require addresses from 1
to 7, and the addresses must be different for each Member. The
addresses can be in any order, regardless of the order in which
the units are wired together. This parameter is adjustable by the
installer by accessing parameter I1. The outdoor air (if used)
and system supply sensor must be connected to the Leader
boiler. The default address is 1.
19
Page 20

1 Service
Max. cascade set point
This parameter determines the set point used by the individual
boilers in a Cascade. When a boiler is commanded to fire by
the Leader boiler, it will attempt to achieve this temperature
at its outlet. The Leader boiler will limit the modulation of
the last boiler to fire in order to hold the temperature at the
system supply sensor to the user set point. If any of the boiler
outlet temperatures reach the max. cascade set point, the boiler
will then modulate down on its own in order to keep its outlet
temperature within the max. cascade set point. Therefore, this
parameter can be used to limit the outlet temperatures of all
the boilers in a Cascade. Note that this parameter does not
apply when the boiler is heating an indirect DHW tank. This
parameter is adjustable by the installer by accessing parameter
I2. The temperature range for this parameter is 32°F (0°C)
- 261°F (127°C). The default max. cascade set point is 185°F
(85°C).
Cascade offset (boilers only)
This parameter determines how much the temperature must go
above set point before the lead boiler will turn off. This parameter
can be adjusted by the installer by accessing parameter I3. The
temperature range for this parameter is 0°F (0°C) - 54°F (30°C).
The default value is 9.9°F (5°C).
Voltage at maximum
This setting determines the voltage at which the external signal
forces either the modulation or the set point to their maximum
value.This parameter, along with the previous parameter,
determines how much the modulation or set point changes as
the BMS input voltage changes. The modulation or set point
will change in proportion to the change in voltage between the
minimum and maximum voltage settings. This parameter may
be adjusted by the installer by accessing parameter J3. The range
for this parameter is (J2 + 0.1V) - 10V. The default setting is
10V.
Minimum power
This setting determines the modulation of the unit (B9 or M9
only) or cascade when the BMS input voltage is at or below the
Voltage at Minimum setting. This parameter is active only when
the BMS type is set to Power. On heaters with F9 firing controls,
this function does not apply. On heaters with B9 firing controls,
this parameter should not be less than 50%. On heaters with
M9 firing controls, this parameter can be as low as 20%. When
the cascade function is also active, this parameter may be as low
as the minimum firing rate of the individual heaters divided by
the number of heaters in the cascade. This parameter may be
adjusted by the installer by accessing parameter J4. The range
for this parameter is 0 - 100%. The default value is 20%.
Service Manual
Cascade off-on differential (boilers only)
This parameter determines how much the temperature must
go below the turn off temperature (Set point + Offset) before
the lead boiler turns on. This parameter can be adjusted by the
installer by accessing parameter I4. The temperature range for
this parameter is 0°F (0°C) - 54°F (30°C).The default value is
19.8°F (11°C).
J: Building Management System (BMS)
BMS type
When the unit or cascade is controlled by the 0-10V BMS
input, the voltage signal can control either the modulation
rate (power) (B9 or M9 only) or the set point. This parameter
may be adjusted by the installer by accessing parameter J1. The
default value is Power.
Voltage at minimum
This setting determines the voltage at which the external signal
begins to increase either the modulation or the set point.
Below this voltage, the modulation or set point will be at
their minimum values. This parameter can be adjusted by the
installer by accessing parameter J2. The range for this parameter
is 0V - (J3 - 0.1V). The default value is 2V.
Maximum power
This setting determines the modulation of the unit (B9 or M9
only) or cascade when the BMS input voltage is at or above the
Voltage at Maximum setting. This parameter is only active when
the BMS type is set to Power. This parameter can be adjusted
by the installer by accessing parameter J5. The range for this
parameter is 0 - 100%. The default value is 100%.
Minimum set point
This setting determines the set point used by the unit or cascade
when the BMS voltage is at or below the Voltage at Minimum
setting. This parameter is only active when the BMS type is set
to Set Point. This parameter can be adjusted by the installer
by accessing parameter J6. The temperature range for this
parameter is 32°F (0°C) - 248°F (120°C). The default value is
70°F (21°C).
20
Page 21

1 Service (continued)
Service Manual
Maximum set point
This setting determines the set point used by the unit or cascade
when the BMS voltage is at or above the Voltage at Maximum
setting. This parameter is only active when the BMS type is set
to Set Point. This parameter can be adjusted by the installer
by accessing parameter J7. The temperature range for this
parameter is 32°F (0°C) - 248°F (120°C). The default value is
190°F (88°C) for water heaters, and 220°F (104°C) for boilers.
Voltage at start
When the Enable input is set to Inactive, this parameter
determines the BMS input voltage at which the unit or cascade is
enabled. When the unit is disabled, the unit will become enabled
when the BMS input voltage rises up to or above this value.
This parameter may be adjusted by the installer by accessing
parameter J8. The range for this parameter is (J9 + 0.1V) - 10V.
The default value is 1V.
Voltage at stop
When the Enable input is set to Inactive, this parameter
determines the BMS input voltage at which the unit or cascade
is disabled. When the unit is enabled, the unit will become
disabled when the BMS input voltage drops down to or below
this value. This parameter may be adjusted by the installer by
accessing parameter J9. The range for this parameter is 0V -
(J8 - 0.1V). The default value is 0.5V.
K: Circulation pumps
System pump delay (boiler only)
The system pump delay parameter sets the length of time the
system pump (if connected) will run after a SH demand has
been satisfied. This parameter is adjustable by the installer by
accessing parameter K1. The time range for this parameter is 1
minute to 40 minutes. The default time is 30 seconds.
L: Service Notification
Service notification in months
When the boiler control determines that a scheduled service is
due based on days of installation, the boiler display will alternate
the standard boiler display text with the message SERVICE DUE
every 5 seconds. This parameter is adjustable by the installer by
accessing parameter L1. The time range for this parameter is 0
months to 36 months. The default time is 12 months.
Service notification running hours
When the boiler control determines that a scheduled service is
due based on the hours of actual operation, the boiler display
will alternate the standard boiler display text with the message
SERVICE DUE every 5 seconds. This parameter is adjustable
by the installer by accessing parameter L2. The time range for
this parameter is 0 hours to 100,000 hours. The default time is
10,000 hours.
Service notification boiler cycles
When the boiler control determines that a scheduled service
is due based on the number of boiler cycles, the boiler display
will alternate the standard boiler display text with the message
SERVICE DUE every 5 seconds. This parameter is adjustable
by the installer by accessing parameter L3. The range for this
parameter is 0 cycles to 100,000 cycles. The default is 10,000
cycles.
Reset service notification counter
Once servicing has been completed, the service notification
counter should be reset. This parameter can be reset by the
installer by accessing parameter L4. Once accessed, press the
RESET key to reset the service notification counter.
Accept PPlug
SH pump delay (boiler only)
The SH pump delay parameter sets the length of time the boiler
pump will run after a SH demand has been satisfied. This
parameter is adjustable by the installer by accessing parameter
K2. The time range for this parameter is 1 minute to 40 minutes.
The default time is 30 seconds.
DHW pump delay
The DHW pump delay parameter sets the length of time the
DHW pump (if connected) will run after a DHW demand has
been satisfied. This parameter is adjustable by the installer by
accessing parameter K3. The time range for this parameter is 1
minute to 40 minutes. The default time is 30 seconds.
After replacing a control board, the new control will require
the installer to verify the model in which it is installed. As soon
as the power is turned on, the screen will display “Wrong ID
Plg”. Look behind the control panel at the connector plugged
into X5 on the control board. Note the number written on the
connector. Access parameter L5. That number should appear
after the word “Setting:” on the bottom line. If this number
matches the number on the connector, press “Enter”.
21
Page 22

2 Maintenance
Maintenance and annual startup
Table 2A_Service and Maintenance Schedules
Service Manual
Service technician
(see the following pages for instructions)
General:
• Address reported problems
• Inspect interior; clean and vacuum if
necessary;
• Inspect condensate system and flush with
fresh water
• Check for leaks (water, gas, flue,
condensate)
• Examine venting system
• Check system water pressure/system
piping/expansion tank
• Check control settings
• Check igniter
• Check wiring and connections
ANNUAL START-UP
Owner maintenance
(see the Power-fin User’s Information Manual for
instructions)
• Check appliance area
• Check pressure/temperature
Daily
Monthly
gauge
• Check vent piping
• Check air piping
• Check relief valve
• Check condensate drain system
• Check flue gas passageways
• Flame inspection (stable, uniform)
• Inspect and clean the burner
• Check manifold gas pressure
• Perform start-up checkout and
performance verification per Section 7
in the Power-fin Installation and Operation
Manual.
If combustion or performance
indicate need:
• Clean heat exchanger
• Remove and clean burner using
compressed air only
• Clean the blower wheel
22
Periodically
Every
6 months
End
of season
months
• Test low water cutoff (if used)
• Reset button (low water cutoff)
• Check appliance piping (gas and
water) for leaks
• Operate relief valve
• Shut appliance down (unless
boiler used for domestic hot
water)
Page 23

2 Maintenance (continued)
Service Manual
WARNING
WARNING
WARNING
Follow the service and maintenance procedures given throughout this manual and in component literature
shipped with the appliance. Failure to perform the service and maintenance could result in damage to the
appliance or system. Failure to follow the directions in this manual and component literature could result in
severe personal injury, death, or substantial property damage.
The appliance should be inspected annually only by a qualified service technician. In addition, the maintenance
and care of the appliance designated in Table 2A and explained on the following pages must be performed to
assure maximum appliance efficiency and reliability. Failure to service and maintain the appliance and system
could result in equipment failure.
Electrical shock hazard – Turn off power to the appliance before any service operation on the appliance except
as noted otherwise in this instruction manual. Failure to turn off electrical power could result in electrical shock,
causing severe personal injury or death.
Address reported problems
1. Inspect any problems reported by the owner and correct
before proceeding.
Inspect appliance area
1. Verify that appliance area is free of any combustible
materials, gasoline and other flammable vapors and liquids.
Inspect appliance interior
Figure 2-1_Condensate Trap
1. Remove the outer access panels and inspect the interior of
the appliance.
2. Vacuum any sediment from inside the appliance and
components. Remove any obstructions.
Inspect condensate system
1. Inspect the condensate drain line, condensate PVC fittings,
and condensate trap on an annual basis.
Flush condensate trap with water
1. Remove the four (4) screws securing the top cover to the
condensate trap and remove the cover (reference FIG. 2-1).
2. Locate the plastic ball inside the float tube. Verify there is
nothing under the ball causing it to not seat properly.
3. If necessary, flush with fresh water until the water begins to
pour out of the drain.
4. Replace the top cover on the condensate trap.
5. Replace the four (4) screws removed in Step 1.
Check all piping for leaks
WARNING
1. Inspect all water and gas piping and verify to be leak free.
2. Look for signs of leaking lines and correct any problems
found.
3. Check gas line using the procedure found in Section 3 - Gas
Connections of the Power-fin Installation and Operation
Manual.
Eliminate all system or appliance leaks.
Continual fresh makeup water will reduce
appliance life. Minerals can build up in
sections, reducing heat transfer, overheating
heat exchanger, and causing heat exchanger
failure. Leaking water may also cause severe
property damage.
23
Page 24

2 Maintenance
Flue vent system and air piping
1. Check for gastight seal at every connection, seam of air
piping, and vent piping periodically inspected by a qualified
service agency.
WARNING
Check water system
1. Verify all system components are correctly installed and
operational.
2. Check the cold fill pressure for the system. Verify it is
correct (must be a minimum of 12 PSI).
3. Watch the system pressure as the boiler heats up (during
testing) to ensure pressure does not rise too high. Excessive
pressure rise indicates expansion tank sizing or performance
problem.
4. Inspect automatic air vents and air separators. Remove air
vent caps and briefly press push valve to flush vent. Replace
caps. Make sure vents do not leak. Replace any leaking
vents.
Check expansion tank
1. Expansion tanks provide space for water to move in and
out as the heating system water expands due to temperature
increase or contracts as the water cools. Tanks may be open,
closed, diaphragm or bladder type. See Section 4 - Water
Connections of the Power-fin Installation and Operation
Manual for suggested best location of expansion tanks and
air eliminators.
Venting system must be sealed gastight
to prevent flue gas spillage and carbon
monoxide emissions, which will result in
severe personal injury or death.
WARNING
WARNING
Safety relief valves should be re-inspected
AT LEAST ONCE EVERY THREE YEARS,
by a licensed plumbing contractor or
authorized inspection agency, to ensure
that the product has not been affected by
corrosive water conditions and to ensure
that the valve and discharge line have not
been altered or tampered with illegally.
Certain naturally occurring conditions may
corrode the valve or its components over
time, rendering the valve inoperative. Such
conditions are not detectable unless the
valve and its components are physically
removed and inspected. This inspection
must only be conducted by a plumbing
contractor or authorized inspection agency
– not by the owner. Failure to re-inspect the
boiler relief valve as directed could result in
unsafe pressure buildup, which can result in
severe personal injury, death, or substantial
property damage.
Following installation, the valve lever must
be operated AT LEAST ONCE A YEAR to
ensure that waterways are clear. Certain
naturally occurring mineral deposits may
adhere to the valve, rendering it inoperative.
When manually operating the lever, water
will discharge and precautions must be taken
to avoid contact with hot water and to avoid
water damage. Before operating lever, check
to see that a discharge line is connected to
this valve directing the flow of hot water
from the valve to a proper place of disposal.
Otherwise severe personal injury may result.
If no water flows, valve is inoperative. Shut
down the appliance until a new relief valve
has been installed.
Service Manual
Check relief valve
1. Inspect the relief valve and lift the lever to verify flow. Before
operating any relief valve, ensure that it is piped with its
discharge in a safe area to avoid severe scald potential. Read
Section 4 - Water Connections of the Power-fin Installation
and Operation Manual before proceeding further.
24
2. After following the above warning directions, if the relief
valve weeps or will not seat properly, replace the relief valve.
Ensure that the reason for relief valve weeping is the valve
and not over-pressurization of the system due to expansion
tank waterlogging or undersizing.
Page 25

2 Maintenance (continued)
Service Manual
Inspect/replace hot surface igniter
1. Turn off main electrical power to the appliance.
2. Turn off main manual gas shutoff to the appliance.
3. Carefully pull back the insulation flaps to expose the burner
mounting flange.
4. Locate the hot surface igniter. Disconnect the two power
leads to the hot surface igniter.
5. Loosen and remove the two wing nuts that mount the
igniter.
6. Lift the igniter vertically out of the burner mounting flange.
Use care, do not hit or break the silicon carbide igniter. Do
not contaminate the igniter by handling with oily or dirty
hands.
7. Check the replacement igniter for cracks or damage before
installing.
8. Ensure that the fiber gasket used to seal the base of the
igniter to the burner flange is reinstalled to seal the base of
the replacement igniter.
9. Carefully insert the igniter into the mounting point on the
burner flange and position on the mounting studs.
Perform start-up and checks
1. Start appliance and perform checks and tests specified
in Section 7 - Start-up of the Power-fin Installation and
Operation Manual.
2. Verify cold fill pressure is correct and that operating
pressure does not go too high.
Check burner flame
Visually check main burner flames at each start-up after long
shutdown periods or at least every six months. A burner
viewport is located on the burner mounting flange.
WARNING
Figure 2-2_Flame Pattern Illustration
The area around the burner viewport is hot
and direct contact could result in burns.
10. Reinstall the two wing nuts and tighten by hand only. Over
tightening the wing nuts may break the ceramic mounting
flange.
11. Ensure that the igniter gasket is properly installed and
seals the point of contact between the igniter and burner
mounting flange.
12. Reconnect the power leads to the igniter.
13. Replace the insulation blanket flaps.
14. Turn on main gas supply and main power.
15. Test fire the appliance to ensure proper operation.
Check all wiring
1. Inspect all wiring, making sure wires are in good condition
and securely attached.
Check control settings
1. Set the SMART SYSTEM control module display to
Parameter Mode and check all settings. See Section 1 of this
manual. Adjust settings if necessary. See Section 1 of this
manual for adjustment procedures.
2. Check settings of external limit controls (if any) and adjust
if necessary.
Normal Flame: A normal flame at 100% of burner input is
blue, with slight yellow tips, a well defined flame and no flame
lifting.
Yellow Tip: Yellow tipping can be caused by blockage or partial
obstruction of air flow to the burner.
Yellow Flames: Yellow flames can be caused by blockage of
primary air flow to the burner or excessive gas input. This
condition MUST be corrected immediately.
Lifting Flames: Lifting flames can be caused by over firing the
burner, excessive primary air or high draft.
If improper flame is observed, examine the venting system,
ensure proper gas supply and adequate supply of combustion
and ventilation air.
25
Page 26

2 Maintenance
Check flue gas passageways
Access to the burner will require the following steps:
Service Manual
Any sign of soot around the inner jacket, outer jacket, flue
pipe connections, burner or in the areas between the fins on
the copper heat exchanger indicates a need for cleaning. The
following cleaning procedure must only be performed by a
qualified serviceman or installer. Proper service is required to
maintain safe operation. Properly installed and adjusted units
seldom need flue cleaning.
NOTICE
CAUTION
All gaskets/sealants on disassembled
components or jacket panels must be replaced
with new gaskets/sealants on reassembly.
Gasket and sealant kits are available from
your distributor.
When a Category IV vent system is
disconnected for any reason, the flue must
be reassembled and resealed according to the
vent manufacturer’s instructions.
Inspect and clean burner
The burner should be removed for inspection and cleaned
on an annual basis. An appliance installed in a dust or dirt
contaminated environment may require cleaning of the burner
on a 3 to 6 month schedule or more often, based on severity of
the contamination. The fan assisted combustion process may
force airborne dust and dirt contaminants, contained in the
combustion air, into the burner. With sustained operation,
non-combustible contaminants may reduce burner port area,
reduce burner input or cause non-warrantable damage to the
burner.
Use extreme care when operating an appliance for temporary
heat during new construction. Airborne contaminants such
as dust, dirt, concrete dust or drywall dust can be drawn into
the burner with the combustion air and block the burner
port area. An external combustion air filter is provided with
the appliance. This filter helps ensure clean air is used for the
combustion process. Check this filter every month and replace
when it becomes dirty. The burner of an appliance used for
temporary heat without a combustion air filter installed will
probably require a thorough cleaning before the unit is placed
into normal service.
1. Turn off main electrical power to the appliance.
2. Turn off main manual gas shutoff to the appliance.
3. Remove the front outer control panel covers. Slide out the
inner control panel to increase service clearances and
carefully remove the multi-pin wiring connectors on the
back of the control panel. Remove the screws along the
front and rear edge of the top outer jacket panel to remove
top. Remove the control panel to allow access to
the components in the top of the appliance.
4. Remove the sensing tubes from the low air pressure switch
to the combustion air blower.
5. Disconnect the wiring connections on the top of the
combustion air blower.
6. Remove the six (6) hex head bolts attaching the gas/air
venturi to the inlet of the combustion air blower.
7. Remove the four (4) nuts holding the combustion air
blower to the top of the burner and remove the combustion
air blower assembly.
8. Use care when removing the combustion air blower
assembly to prevent damage to the venturi and burner
gaskets.
9. Disconnect the power wires to the hot surface igniter.
10. Remove the hot surface igniter. The hot surface igniter is
fragile. Use care to prevent impact damage to the silicone
carbide igniter surface when removing the igniter.
11. Remove the eight (8) nuts holding the burner to the
heat exchanger.
12. The burner can now be lifted vertically out of the heat
exchanger chamber.
13. Use care when removing the burner to prevent damage
to the woven burner port surface or gaskets on removal.
14. Remove any visible dust or dirt blockage from the
surface of the burner with a vacuum. Compressed air
may also be blown across the burner surface to clean
the “pores” of the woven burner port material.
26
15. Reassemble in reverse order.
Page 27

2 Maintenance (continued)
Service Manual
Checking manifold gas pressure
The gas manifold pressure tap for F9 models is located
on the downstream test valve in the manifold assembly
(FIG. 2-3). For B9/M9 models the gas manifold pressure
tap is located on the venturi connection of the gas manifold
assembly (FIG. 2-4). The manifold gas pressure tap can be
accessed by removing the upper left access panel on the
front of the appliance.
Follow the steps below when checking manifold gas
pressure:
1. Turn the appliance power switch to the “OFF” position.
2. Loosen the thumbscrew on the upper left access panel.
Remove the upper left access panel.
3. Remove the screws along the front and rear edge of the
top outer jacket panel. Disconnect the 2-pin connector
hanging from the top panel cover inside the unit.
Remove the top outer jacket panel.
4. On F9 models remove the 1/8" hex plug from the tap
on the downstream test valve. Install a fitting in the tap
to connect a manometer to read manifold gas pressure.
Place the tubing of the manometer over the fitting.
Figure 2-3_Gas Train Assembly F9
Figure 2-4_Gas Train Assembly B9/M9
On B9/M9 models, loosen the set screw on the venturi
connection of the gas manifold assembly one full turn
from inside the pressure tap to read manifold gas
pressure. Place the tubing of the manometer over the
the tap once the set screw is loosened.
5. Turn the appliance power switch to the “ON” position.
6. Place the appliance into the active position by pressing
the ENTER/RESET button on the display board (see
page 5) until HTR:Standby appears in the display
window.
7. Locate the pinhole button below the ENTER/RESET
button (see page 5). Press the button once and hold for
five (5) seconds to place the appliance into Service
Mode. In Service Mode the appliance will fire and
operate at 100% of rate.
8. As the appliance comes on and fires, record the inches
of water column of displacement on both sides of the
manometer. The sum of these two readings will be the
gas manifold pressure. Reference Table 2B - Gas
Manifold Pressure Chart for the proper measurement.
Table 2B_Gas Manifold Pressure Chart
Firing Control /
Model No.
F9: 502 - 1302 +3.2 +10.0
B9: 1501 -4.5 to -5.4 -3.2 to -3.8
B9: 1701 -5.9 to -6.4 -3.4 to -4.0
B9: 2001 -3.5 to -4.0 -1.7 to -2.4
M9: 502 -6.7 to -7.2 -7.9 to -8.4
M9: 752 -3.0 to -3.5 -4.0 to -4.5
M9: 1002 - 6.1 to -6.6 -8.4 to 8.9
M9: 1302 -6.5 to -7.0 -9.0 to -9.5
M9: 1501 -3.9 to -4.6 -2.1 to -2.6
M9: 1701 -4.9 to -5.9 -2.1 to -2.6
M9: 2001 -3.9 to -4.6 -2.1 to -2.6
Natural Gas
Water Column
(w.c.)
LP Gas
Water Column
(w.c.)
9. This is a reference pressure only and is not field
adjustable. An appliance supplied with the required
minimum gas supply pressure will operate at the
correct manifold gas pressure.
27
Page 28

2 Maintenance
10. Once the gas manifold pressure has been checked, press the
ENTER/RESET button on the display board to take the
appliance out of Service Mode. The appliance will go to
shutdown and the display will show HTR:OFF.
11. Turn the appliance power switch to the “OFF” position.
12. Remove the manometer and related fitting(s) from the
connection tap and replace the 1/8" hex plug (on F9 models
only).
13. Replace the top jacket panel and reconnect the 2-pin
connector hanging from the top panel cover.
14. Replace the upper left access panel.
15. Turn the appliance power switch to the “ON” position.
16. Press the ENTER/RESET button on the display board until
HTR:Standby appears in the display window.
Combustion analysis procedure
1. Turn the appliance power switch to the “OFF” position.
2. Remove the flue temperature sensor from the flue pipe.
Note: Combustion measurements will be made at this
point.
3. Turn the appliance power switch to the “ON” position.
4. Place the appliance into the active position by pressing the
ENTER/RESET button on the display board (see page 5)
until HTR:Standby appears in the display window.
5. Locate the pinhole button below the ENTER/RESET
button. Press the button once and hold for 5 seconds to
place the appliance into Service Mode. In Service Mode the
appliance will fire and operate at 100% of rate.
6. Insert the probe from a combustion analyzer into the hole
left by the removal of the flue temperature sensor.
7. Compare the combustion measurement to the values listed
in Table 2C.
Table 2C_Combustion Measurements
Firing Control /
Model No.
F9: 502 - 1302 7.9 to 8.4 9.0 to 9.5
B9: 1501 - 2001 8.0 to 8.5 9.0 to 9.5
M9: 502 - 1302 8.2 to 8.7 9.0 to 9.5
M9: 1501 - 1701 8.6 to 9.1 9.6 to 10.1
M9: 2001 7.6 to 8.2 8.6 to 9.2
Natural Gas
CO2 (%)
LP Gas
CO2 (%)
8. If the combustion is not within the specified range,
reference the Troubleshooting Chart below for possible
causes and corrective actions.
Table 2D_Combustion Troubleshooting Chart
Possible Cause
- Refer to Section 2 - Venting in the
Power-fin Installation and
Vent / Air Intake
Length or Obstruction
Gas Supply Pressure
Dirty / Damaged
Burner
Gas Valve Adjustment
9. Once the combustion analysis is complete, press the
ENTER/RESET button on the display board to take the
appliance out of Service Mode. The appliance will go to
shutdown and the display will show HTR:OFF.
10. Turn the appliance power switch to the “OFF” position.
11. Replace the flue temperature sensor into the flue pipe.
12. Turn the appliance power switch to the “ON” position.
13. Press the ENTER/RESET button on the display board until
HTR:Standby appears in the display window.
WARNING
Operation Manual for the proper
venting and air intake methods.
- Check for obstructions in the
vent / air intake terminals.
- Refer to Section 3 - Gas
Connections in the Power-fin
Installation and Operation
Manual for the proper gas supply
for the Power-fin.
- Refer to page 26 of this manual
for burner removal and cleaning
procedures.
- Replace burner if necessary.
- Refer to page 29 of this manual
for the gas valve adjustment
procedure.
You must replace the flue temperature
sensor to prevent flue gas spillage into the
room. Failure to comply could result in
severe personal injury, death, or substantial
property damage.
Service Manual
Corrective Action
28
Page 29

2 Maintenance
2 Maintenance (continued)
Service Manual
Gas valve adjustment procedure
1. Turn the appliance power switch to the “OFF” position.
2. Loosen the thumbscrew on the upper left access panel.
Remove the upper left access panel.
3. Remove the screws along the front and rear edge of the
top outer jacket panel. Disconnect the 2-pin connector
hanging from the top panel cover inside the unit.
Remove the top outer jacket panel.
4. Follow the Combustion Analysis Procedure on page 28
of this manual to measure combustion.
5. With the appliance operating in the Service Mode,
locate the throttle adjustment screw on the gas valve.
See FIG. 2-5 for F9 models and FIG. 2-6 for B9/M9
models. Using a screwdriver (F9) or Allen wrench
(B9/M9) turn the throttle adjustment screw a 1/4 turn
clockwise to increase CO2 levels and a 1/4 turn
counterclockwise to decrease CO2 levels.
6. After one adjustment of the valve, measure the
combustion.
7. If the combustion is still not within the specified range,
repeat the procedure. This procedure SHOULD NOT
be performed more than four (4) times. If after four
(4) adjustments the combustion is still not within the
specified range, revisit the possible causes in Table 2D
on page 28 of this manual.
8. Once the combustion analysis is complete, press the
ENTER/RESET button on the display board to take the
appliance out of Service Mode. The appliance will go
to shutdown and the display will show HTR:OFF.
9. Turn the appliance power switch to the “OFF” position.
10. Replace the flue temperature sensor into the flue pipe.
11. Replace the top jacket panel and reconnect the 2-pin
connector hanging from the top panel cover.
12. Replace the upper left access panel.
13. Turn the appliance power switch to the “ON” position.
14. Press the ENTER/RESET button on the display board
until HTR:Standby appears in the display window.
Figure 2-5_Throttle Adjustment Screw - F9 Model
Figure 2-6_Throttle Adjustment Screw - B9/M9 Models
WARNING
Overfire and underfire hazards!
Possible fire, explosion, overheating,
and component failure. Do not attempt
to adjust firing rate of the boiler or water
heater. The firing rate must be adjusted
only by factory trained personnel.
29
Page 30

2 Maintenance
Inspect and clean the heat exchanger
1. Turn off all power to the appliance.
2. Turn off main gas to appliance.
3. Remove the front outer jacket panel.
4. Remove the inner jacket panel (see FIG. 2-7).
5. Check the heat exchanger surface for soot. If soot is
present, the heat exchanger must be cleaned and the
problem corrected.
6. Remove the burner as described in the Inspect and
Clean Burner section of this manual.
7. Check the “V” baffles on the heat exchanger. Remove
and clean if necessary.
8. Remove soot from the heat exchanger with a stiff bristle
brush. Use a vacuum to remove loose soot from
surfaces and inner chamber.
9. The heat exchanger can be removed by disconnecting
all water piping to the heat exchanger, removing the
screws holding the heat exchanger to the top of the
inner jacket and sliding the heat exchanger towards the
front of the appliance. Once the heat exchanger is
removed, a garden hose can be used to wash the tubes
to ensure that all soot is removed from the heat
exchanger surfaces. Note: Do not wet the insulation
blankets on the inside of the outer jacket panels.
10. Ensure that any soot present on the burner is removed.
See Inspect and Clean Burner section.
11. Carefully reinstall the heat exchanger and “V” baffles if
removed from the appliance.
12. Reinstall the inner jacket panel, burner, manifolds,
wires, and hoses. Use new gasket material to ensure a
proper air seal.
13. Reassemble all gas and water piping. Test for gas leaks.
NOTICE
Upon completion of any testing on the gas
system, leak test all gas connections with a
soap and water solution while main burners
are operating. Do not spray soap and water
solution on the SMART SYSTEM control
module housing. The use of an excessive
amount of soap and water solution can
damage the control. Immediately repair
any leak found in the gas train or related
components. Do not operate an appliance
with a leak in the gas train, valves, or related
piping.
Figure 2-7_Location of the Heat Exchanger Inside
Jacket
Service Manual
Review with owner
1. Review the Power-fin User’s Information Manual with the
owner.
2. Emphasize the need to perform the maintenance schedule
specified in the Power-fin User’s Information Manual (and
in this manual as well).
3. Remind the owner of the need to call a licensed contractor
should the appliance or system exhibit any unusual behavior.
4. Remind the owner to follow the proper shutdown procedure
and to schedule an annual start-up at the beginning of the
next heating season.
Oiled bearing circulators
Inspect the pump every six (6) months and oil as necessary. Use
SAE 30 non-detergent oil or lubricant specified by the pump
manufacturer.
14. Reassemble outer jacket panels.
15. Cycle unit and check for proper operation.
30
Page 31

3 Troubleshooting
Service Manual
WARNING
WARNING
Label all wires prior to disconnection when
servicing controls. Wiring errors can cause
improper and dangerous operation. Always
disconnect power to the appliance before
servicing. Failure to comply could result in
severe personal injury, death, or substantial
property damage.
Never jumper (bypass) any device except
for momentary testing as outlined in the
Troubleshooting chart. Severe personal
injury, death, or substantial property damage
can result.
Before troubleshooting:
1. Have the following items:
a. Voltmeter that can check 120 VAC, 24 VAC, and
12 VDC.
b. Continuity checker.
c. Contact thermometer.
2. Check for 120 VAC (minimum 102 VAC to maximum
132 VAC) to appliance.
Check control module fuses
NOTICE
1. Turn OFF the power to the appliance at the external line
switch.
2. Remove front access cover.
3. Inspect fuses F1, F2, F3, F5, and F6, see FIG. 3-1 below.
Figure 3-1_Control Module Fuses
ALWAYS check control module fuses before
replacing control module or any major
components (blower, etc.). If one of these
fuses is blown, it can prevent the control
module or other components from operating.
3. Make sure thermostat is calling for heat and contacts
(including appropriate zone controls) are closed. Check for
24 VAC between thermostat wire nuts and ground.
4. Make sure all external limit controls are installed and
operating.
Check the following:
1. Wire connectors to control module are securely plugged in
at the module and originating control.
2. Gas pressures:
Refer to Section 3 - Gas Connections of the Power-fin
Installation and Operation Manual for detailed information
concerning the gas supply.
4. The appliance is shipped with three (3) spare fuses in a
plastic bag attached to the control panel.
5. If necessary, replace open fuse (F1 and F6 are 1.6 amps, F3
is 3.15 amps, F2 and F5 are 5 amps).
Note: Fuses F1 - F6 are all slow blow fuses.
WARNING
6. Install front access cover after fuse inspection.
Do not jumper fuse or replace with any fuse
except as specified. Failure to comply could
result in severe personal injury, death, or
substantial property damage.
7. Restore power to the appliance at the external line switch
and verify boiler/water heater operation (Section 7 - Start-up
in the Power-fin Installation and Operation Manual) after
completing boiler/water heater service.
31
Page 32

3 Troubleshooting
Table 3A Troubleshooting Chart - No Display
FAULT CAUSE CORRECTIVE ACTION
• Check external line switch, fuse, or breaker.
• Check position of ON/OFF switch. Turn switch to the
No Display
- No 120 VAC supplied to unit.
- Bad wiring connection.
ON position.
• Check 120 VAC through the ON/OFF switch. No
voltage through switch, replace switch.
• Check wiring harness connection between the display
board and the main control board. Connect the harness
at both points.
Service Manual
No Burner
Operation
Unit Does Not
Modulate Above
50%
- Blown fuse.
- Bad display board. • Replace board.
- Bad main control board. • Replace main control board.
- Main control board temperature set point
satisfied.
- Remote thermostat satisfied.
- Outside air temperature above Warm
Weather Shutdown (WWSD) set point for
main control board.
- Unit locked out on fault.
- Ramp delay active.
- Boiler controlled by BMS.
• Replace fuse F6 on the main control board, see
FIG. 3-1 on page 31 of this manual.
• Review temperature setting.
• Review remote thermostat setting.
• Check location of outside air sensor. Check
resistance of outdoor air sensor and compare to Table
3D on page 33 of this manual.
• Consult display for specific fault. Refer to fault
descriptions on pages 35 - 42 of this manual for
corrective actions.
• Check ramp delay parameter settings. Optional PC
software required.
• Turn ramp delay feature off. See page 18 of this
manual for instructions on how to turn this feature off.
• Check BMS parameter settings. Optional PC
software required.
32
Page 33

Service Manual
3 Troubleshooting (continued)
Checking temperature sensors
The appliance temperature sensors (inlet water, outlet water, system water, tank water, flue, and outdoor air) are all resistance
type devices. The following tables show the correct values for the sensors at various temperatures. Use an ohmmeter to read
the resistance of the sensor at a known temperature. If the resistance of the sensor does not closely match its corresponding
table, replace the sensor.
Table 3B Inlet/Outlet/System/Tank Sensor Resistance vs. Temperature
Temperature Resistance Temperature Resistance
50 18,780 158 1,990
68 12,263 176 1,458
86 8,194 194 1,084
104 5,592 212 817
122 3,893
140 2,760
Table 3C Flue Temperature Sensor Resistance vs. Temperature
Temperature Resistance Temperature Resistance
68 125,500 158 16,870
77 100,000 176 12,000
86 80,220 194 8,674
104 52,590 212 6,369
122 35,270 230 4,744
140 24,160 248 3,581
Table 3D Outdoor Air Sensor Resistance vs. Temperature
Temperature Resistance Temperature Resistance
-50 490,813 20 46,218
-40 336,606 30 34,558
-30 234,196 40 26,099
-20 165,180 50 19,900
-10 118,018 60 15,311
0 85,362 70 11,883
10 62,465 80 9,299
33
Page 34

3 Troubleshooting
Table 3E Troubleshooting Chart - Noisy System
FAULT CAUSE CORRECTIVE ACTION
- Gas supply problem. • Refer to Section 3 - Gas Connections of the Power-fin
Installation and Operation Manual for detailed
information concerning the gas supply.
- Gas/air mixture problem. • Refer to the Checking Manifold Gas Pressure and
Combustion Analysis Procedure on pages 27 and 28 of
this manual for the proper settings. Verify
that the vent/air intake lengths do not exceed the
maximum listed in the Venting section of the Power-fin
Installation and Operation Manual.
Service Manual
Noisy
Operation
No Pump
Operation -
Boiler Pump
System Pump
or
DHW Pump
- Dirty/damaged burner. • Refer to page 26 in this manual for the burner removal
and inspection procedure. Clean or replace the burner
as necessary.
- Low water flow through the heat exchanger. • Refer to Section 4 - Water Connections of the
Power-fin Installation and Operation Manual for
minimum flow rates. Verify that the appliance is piped in
a primary/secondary fashion and that the appliance and
system pump are running on a call for heat.
- Air in the piping system. • Properly purge all air from the piping system.
- Low system water pressure. • Verify system pressure is a minimum of 12 PSI.
- Faulty pump.
- Internal fault on control board.
- System pressure exceeds relief valve
setting.
• Replace pump.
• Replace main control board.
Note: Make sure the pump horse power (hp) does not
exceed 1 hp.
• Lower the system pressure below the rating of
the supplied relief valve or replace the standard relief
valve with a higher rated valve up to the maximum
pressure of the heat exchanger.
Relief Valve
Opening
34
- Improperly sized expansion tank. • Install properly sized expansion tank.
- Outlet water temperature in excess of 210°.
• Check set point of temperature control.
• Check temperature rise across heat exchanger. Refer to
the temperature rise chart in Section 4 - Water
Connections of the Power-fin Installation and Operation
Manual.
Page 35

3 Troubleshooting (continued)
Table 3F Troubleshooting Chart - Fault Messages Displayed on Operator Interface
FAULT DESCRIPTION CORRECTIVE ACTION
Service Manual
Gas Pressure SW
(Will require a manual
reset once the condition
has been corrected.)
Flow Switch/
LWCO
(Lockout will reset
automatically after
5 minutes or may be
reset immediately once
condition has been
corrected. Press the
RESET button on the
SMART SYSTEM display
to reset.)
Blocked Drain SW
(Lockout will reset
automatically after
5 minutes or may be
reset immediately once
condition has been
corrected. Press the
RESET button on the
SMART SYSTEM display
to reset)
Either the optional manual reset low gas
pressure switch or the optional manual reset
high gas pressure switch tripped.
Either the flow switch or the optional low
water cutoff is not making.
The blocked drain switch has detected
excessive condensate build up inside the
unit.
• Reset the pressure switches.
• Measure the supply gas pressure to determine
cause of failure. Refer to Section 3 - Gas
Connections of the Power-fin Installation and
Operation Manual for detailed information
concerning the gas supply.
• Correct the supply gas pressure if necessary.
• Check pump operation on a call for heat.
• Check for closed valves or obstructions in the
water piping.
• Verify system is full of water and all air has been
purged from the system.
• Check condensate tube from unit to floor drain for
proper installation and obstructions.
• Inspect condensate trap for blockage. Clean if
necessary.
• Check for loose wiring connection at wire harness
plug.
• Bad blocked drain switch. Replace switch.
Flame Sequence
(Will require a manual
reset once the condition
has been corrected. Press
the RESET button on the
SMART SYSTEM
to reset.)
display
Anti-cycling
The flame detector circuit is seeing a flame
signal while no flame is present.
The main control board has received a call
for heat too quickly after the previous call for
heat has ended.
• Check supply voltage for proper polarity.
• Check external wiring for voltage feedback.
• Check the internal wiring for bad connections.
• Replace main control board.
• The control board will release the call for heat after
a set time period.
• The control board will release the call for heat if the
outlet temperature drops too quickly.
35
Page 36

Service Manual
3 Troubleshooting
Table 3F (continued from previous page) Troubleshooting Chart - Fault Messages Displayed on Operator Interface
FAULT DESCRIPTION CORRECTIVE ACTION
No Flame Ign
(Will require a manual
reset. Press the RESET
button on the SMART
SYSTEM
display to reset.)
The unit has failed to prove main burner
flame upon ignition.
• Inspect igniter and associated wiring for damage and
connection. Reference page 25 of this manual for
removal and cleaning procedure. Replace if
necessary.
• Check for proper electrical grounding of unit.
• Check incoming supply gas pressure. Refer to
Section 3 - Gas Connections in the Power-fin
Installation and Operation Manual for detailed
information concerning the gas supply.
• Verify that the tube from the gas valve to the air inlet is
connected and is not damaged.
• Verify that the vent/air intake pipes are correctly
installed and that there are no obstructions.
• Inspect the burner. Reference page 26 of this manual
for removal and cleaning procedures. Replace if
necessary.
• Refer to the Checking Manifold Gas Pressure and
Combustion Analysis Procedure on pages 27 and 28
of this manual for the proper settings.
• Check for 120 VAC to the gas valve during the ignition
attempt. If no voltage is present, check the wiring
between the gas valve and the main control board.
HSI Current Low
(Will require a manual
reset once the condition
has been corrected. Press
the RESET button on the
SMART SYSTEM
to reset.)
display
Flame CKT
Error
36
Amp draw of the hot surface igniter did not
meet the minimum requirement of 2.6 amps.
The main control board has detected an
internal fault.
• Replace the wiring or the main control board as
necessary.
• Measure the amp draw of the hot surface igniter during
the trial for ignition stage. If less than 2.6 amps
replace the hot surface igniter.
• If more than 2.6 amps replace the control module.
• Replace the main control board.
Page 37

Service Manual
3 Troubleshooting (continued)
Table 3F (continued from previous page) Troubleshooting Chart - Fault Messages Displayed on Operator Interface
FAULT DESCRIPTION CORRECTIVE ACTION
The unit was running and lost the flame signal. • Inspect igniter and associated wiring for damage and
connection. Reference page 25 of this manual for
removal and cleaning procedure. Replace if
necessary.
• Check for proper electrical grounding of unit.
• Check incoming supply gas pressure. Refer to
Section 3 - Gas Connections of the Power-fin
Installation and Operation Manual for detailed
No Flame
Running
(Will require a manual
reset once the condition
has been corrected. Press
the RESET button on the
SMART SYSTEM
to reset.)
display
information concerning the gas supply.
• Verify that the tube from the gas valve to the air inlet
is connected and is not damaged.
• Verify that the vent/air intake pipes are installed
correctly and there are no obstructions.
• Refer to the Checking Manifold Gas Pressure and
Combustion Analysis Procedure on pages 27 and 28
of this manual for the proper settings.
Auto Reset
High Limit
The outlet water temperature has exceeded the
fixed setting of the automatic reset high limit.
• Inspect the burner. Reference page 26 of this
manual for removal and cleaning procedures.
Replace if necessary.
• Replace the main control board.
• Verify that the system is full of water and that all air
has been properly purged from the system.
• Verify that the appliance is piped properly into the
heating system. Refer to Section 4 - Water
Connections of the Power-fin Installation and
Operation Manual for the proper piping methods
for the Power-fin.
• Check 120 VAC to boiler pump motor on a call for
heat. If voltage is not present, check wiring back
to the main control board. Replace the main
control board if necessary.
• If 120 VAC is present on a call for heat and the
pump is not operating, replace the pump.
• If the system pump is a variable speed pump,
ensure that the system flow is not less than the
boiler flow.
• Check temperature setting of the main control
board.
• Check resistance of water sensors and compare to
Table 3B on page 33 of this manual. Replace
sensor if necessary.
• Replace high limit.
37
Page 38

Service Manual
3 Troubleshooting
Table 3F (continued from previous page) Troubleshooting Chart - Fault Messages Displayed on Operator Interface
FAULT DESCRIPTION CORRECTIVE ACTION
Manual Reset
High Limit
(Will require a manual
reset once condition has
been corrected. Press
the RESET button on
the SMART SYSTEM
display to reset.)
Inlet Low
The outlet water temperature has exceeded
the setting of the adjustable high limit.
The inlet water temperature did not exceed
130° within 15 minutes of ignition.
• Verify setting of adjustable high limit.
• Verify that the system is full of water and that all air
has been properly purged from the system.
• Verify that the appliance is piped properly into the
system. Refer to Section 4 - Water Connections of
the Power-fin Installation and Operation Manual for
proper piping methods for the Power-fin.
• Check 120 VAC to the pump motor on a call for heat.
If voltage is not present, check wiring leading to the
main control board. Replace the main control board if
necessary.
• If 120 VAC is present on a call for heat and the pump
is not operating, replace the pump.
• If the system pump is a variable speed pump, ensure
the system flow is not less than the boiler flow.
• Check temperature setting of the main control board.
• Check resistance of water sensors and compare to
the tables on page 33 of this manual. Replace the
sensor if necessary.
• Replace high limit.
• Raise temperature set point above 130°.
• Install a 3-way valve per the piping diagram in
Section 4 - Water Connections of the Power-fin
Installation and Operation Manual.
• Replace the main control board.
Fan Low
OR
Fan Speed Low
(Will require a manual
reset once condition has
been corrected. Press
the RESET button on
the SMART SYSTEM
display to reset.)
38
The actual fan RPM is 30% lower than what
is being called for.
Blown fuse. • Replace fuse F3 on the main control board, see
• Vent/air intake lengths exceed the maximum allowed
lengths. Refer to Section 2 - Venting of the
Power-fin Installation and Operation Manual for
proper lengths.
• Check for obstruction or blockage in the vent/air
intake pipes or at terminations.
• Check wiring connections at the fan and at the
main control board.
• Replace the fan.
• Replace the main control board.
page 31 of this manual.
Page 39

Service Manual
3 Troubleshooting (continued)
Table 3F (continued from previous page) Troubleshooting Chart - Fault Messages Displayed on Operator Interface
FAULT DESCRIPTION CORRECTIVE ACTION
• Vent/air intake lengths exceed the maximum
Fan High
OR
Fan Speed High
(Will require a manual
reset once the condition
has been corrected. Press
the RESET button on the
SMART SYSTEM
to reset.)
display
Flue Open
OR
Flue Shorted
(For M9 Models operation
will not be affected. For
B9 Models the unit will
not modulate.)
The actual fan RPM is 30% higher than what
is being called for.
The flue sensor wiring has been
disconnected, grounded, or the flue sensor
has been removed from the flue.
allowed lengths. Refer to Section 2 - Venting of the
Power-fin Installation and Operation Manual for
proper lengths.
• Check for obstruction or blockage in the vent/air
intake pipes or at terminations.
• Check wiring connections at the fan and at the
main control board.
• Replace the fan.
• Replace the main control board.
• Check the sensor and associated wiring. Repair or
replace sensor or wiring if damaged.
• Reinstall sensor in flue outlet.
Sensor Open
(Will require a manual
reset once the condition
has been corrected. Press
the RESET button on the
SMART SYSTEM
to reset.)
display
Sensor Shorted
(Will require a manual
reset once the condition
has been corrected. Press
the RESET button on the
SMART SYSTEM
to reset.)
display
Louver Proving
(Lockout will reset
automatically after
5 minutes or may be
reset immediately once
condition has been
corrected. Press the
RESET button on the
SMART SYSTEM display
to reset.)
Either the inlet water or outlet water
temperature sensor has been disconnected.
Either the inlet water or outlet water
temperature sensor has been shorted.
An optional remote proving switch is not
making.
• Check the sensors and their associated wiring.
Repair or replace the sensor or wiring if damaged.
• Measure the resistance of the sensors and compare
the resistance to the tables on page 33 of this
manual.
• Replace the sensor if necessary.
• Check the sensors and their associated wiring.
Repair or replace the sensor or wiring if damaged.
• Measure the resistance of the sensors and compare
the resistance to the tables on page 33 of this
manual.
• Replace the sensor if necessary.
• Check function of remote devices.
• Check for loose or misplaced jumper if proving switch
is not installed.
Tank Open
Sensors equipped with an internal limit (such
as the Lochinvar Squire® Indirect Tank), the
limit has opened due to temperature (195°F)
or the sensor has become disconnected.
• Check the tank temperature.
• Repair or replace the sensor wiring if damaged.
• Replace the sensor if necessary.
39
Page 40

Service Manual
3 Troubleshooting
Table 3F (continued from previous page) Troubleshooting Chart - Fault Messages Displayed on Operator Interface
FAULT DESCRIPTION CORRECTIVE ACTION
APS Open
(Lockout will reset
automatically after 5
minutes or may be
reset immediately once
condition has been
corrected. Press the
RESET button on the
SMART SYSTEM display
to reset.)
APS Closed
(Lockout will reset
automatically after 5
minutes or may be
reset immediately once
condition has been
corrected. Press the
RESET button on the
SMART SYSTEM display
to reset.)
Wrong ID Plug
The air pressure switch did not make within
1 minute after the combustion air blower has
been energized.
The SMART SYSTEM control sensed that
the air pressure switch was closed before the
combustion air blower was energized.
Control module ID plug does not match
parameter L5.
• Check air filter. Clean or replace as necessary.
• Vent/air intake lengths exceed the maximum allowed
lengths.
• Check for blockage or obstruction in vent/air inlet pipe
or at terminations.
• Verify combustion air blower is operating. Replace if
necessary.
• Check for jumper on air pressure switch.
• Check for an unusually high negative draft in the vent
stack.
• Verify that ID plug is connected properly to connector
X5 on the control module.
• Verify that the wiring in the ID plug is not cut or
damaged and that the wiring connectors are seated
properly in the plug.
• Verify that the number on the ID plug matches the
number in parameter L5. If not, replace the control
module.
• When replacing control modules, verify that the
number in parameter L5 matches the number on the
ID plug. If so, press the ENTER button on the SMART
SYSTEM display. If not, replace the control module.
Temp O/Shoot
(Lockout will reset
automatically after 5
minutes or may be
reset immediately once
condition has been
corrected. Press the
RESET button on the
SMART SYSTEM display
to reset.)
40
The stack temperature has exceeded the set
parameters for the boiler/water heater.
• Inspect the heat exchanger. Reference page 30 of
this manual for the procedure on how to clean the flue
side of the heat exchanger.
• Inspect the flue sensor and associated wiring.
Measure the resistance of the flue sensor and
compare to Table 3C on page 33 of this manual.
Replace the sensor if necessary.
• Verify that the vent/air intake pipes are properly
installed and that there are no obstructions.
• Replace the main control board.
Page 41

Service Manual
3 Troubleshooting (continued)
Table 3F (continued from previous page) Troubleshooting Chart - Fault Messages Displayed on Operator Interface
FAULT DESCRIPTION CORRECTIVE ACTION
Temp O/Shoot
(continued)
(Lockout will reset
automatically after
5 minutes or may be
reset immediately once
condition has been
corrected. Press the
RESET button on the
SMART SYSTEM display
to reset.)
The temperature rise across the heat
exchanger has exceeded the set parameters
for the appliance.
Outlet water temperature has exceeded the
maximum outlet water temperature.
• Verify that the system is full of water and that all air
has been properly purged from the system.
• Verify that the appliance is piped properly into the
heating system. Refer to Section 4 - Water
Connections of the Power-fin Installation and
Operation Manual for the proper piping methods.
• Check for 120 VAC to the pump motor on a call
for heat. If voltage is not present, check the wiring
leading to the main control board. Replace the main
control board if necessary.
• If 120 VAC is present on a call for heat and the
pump is not operating, replace the pump.
• Verify that the system is full of water and that all air
has been properly purged from the system.
• Verify that the appliance is piped properly into the
system. Refer to Section 4 - Water Connections of
the Power-fin Installation and Operation Manual for
the proper piping methods.
• Check 120 VAC to the pump motor on a call for heat.
If voltage is not present, check wiring leading to the
main control board. Replace the main control board
if necessary.
• If 120 VAC is present on a call for heat and the pump
is not operating, replace pump.
• Replace the main control board.
Rem Ctrl Flt
Parameters
Progr
(Will require a manual
reset once the condition
has been corrected. Press
the RESET button on the
SMART SYSTEM
to reset.)
display
External control is cycling too often. • Check set point of the external control.
• Check the wiring between the external control and
the unit.
• Replace the control.
After downloading parameters from a laptop
or a pocket pc, the main control board must
be reset.
• Press the ENTER/RESET button on the Smart
System display panel.
41
Page 42

Service Manual
3 Troubleshooting
Table 3F (continued from previous page) Troubleshooting Chart - Fault Messages Displayed on Operator Interface
FAULT DESCRIPTION CORRECTIVE ACTION
Service Blk
Low Voltage
While the unit is in Service Mode, the outlet
temperature has exceeded 185°F (85°C).
120 VAC input to the main control board has
dropped below 80 VAC.
• Establish a heating load to remove heat from the
system.
• Verify that the system is full of water and that all air
has been properly purged from the system.
• Verify that the appliance is piped properly into the
system. Refer to Section 4 - Water
Connections of the Power-fin Installation and
Operation Manual for the proper piping methods.
• Check 120 VAC to the pump motor on a call for
heat. If voltage is not present, check the wiring
leading to the main control board. Replace the main
control board if necessary.
• If 120 VAC is present on a call for heat and the
pump is not operating, replace the pump.
• Check 120 VAC supply to the transformer.
• Check wiring connections at the low voltage terminal
strip.
• Check the wire size/length to remote devices.
• Replace the main control board.
Watch Dog Error
Write EEProm
Program EEProm
CRC Parameters
No Error Stored
42
The main control board has detected an
internal fault.
The main control board has detected an
internal fault.
The main control board has detected an
internal fault.
The main control board has detected an
internal fault.
The main control board has detected an
internal fault.
• Replace the main control board.
• Replace the main control board.
• Replace the main control board.
• Replace the main control board.
• Replace the main control board.
Page 43

NOTES
43
Page 44

Revision Notes: Revision B (PBX-PFX-SER- Rev B) reflects the
addition of Models 502 - 1302 to the manual.
Revision C (PBX-PFX-SER-Rev C) reflects the addition of parameter
ranges.
Revision D (ECO #C02918) reflects the addition of Tank Sensor Open
on page 39.
Revision E (ECO C06058) reflects the removal of heat exchanger
cleaning information in “Maintenance and annual startup” section on
page 22.
Revision F (ECO C08868) reflects the update of the Gas Manifold
Pressure Chart on page 27.
PBX-PFX-SER Rev F
9/11
 Loading...