

Page 1

User Guide
Manual del Usuario • Mode d’Emploi
Bedienungsanleitung • Manuale d’uso
Pack Contents:
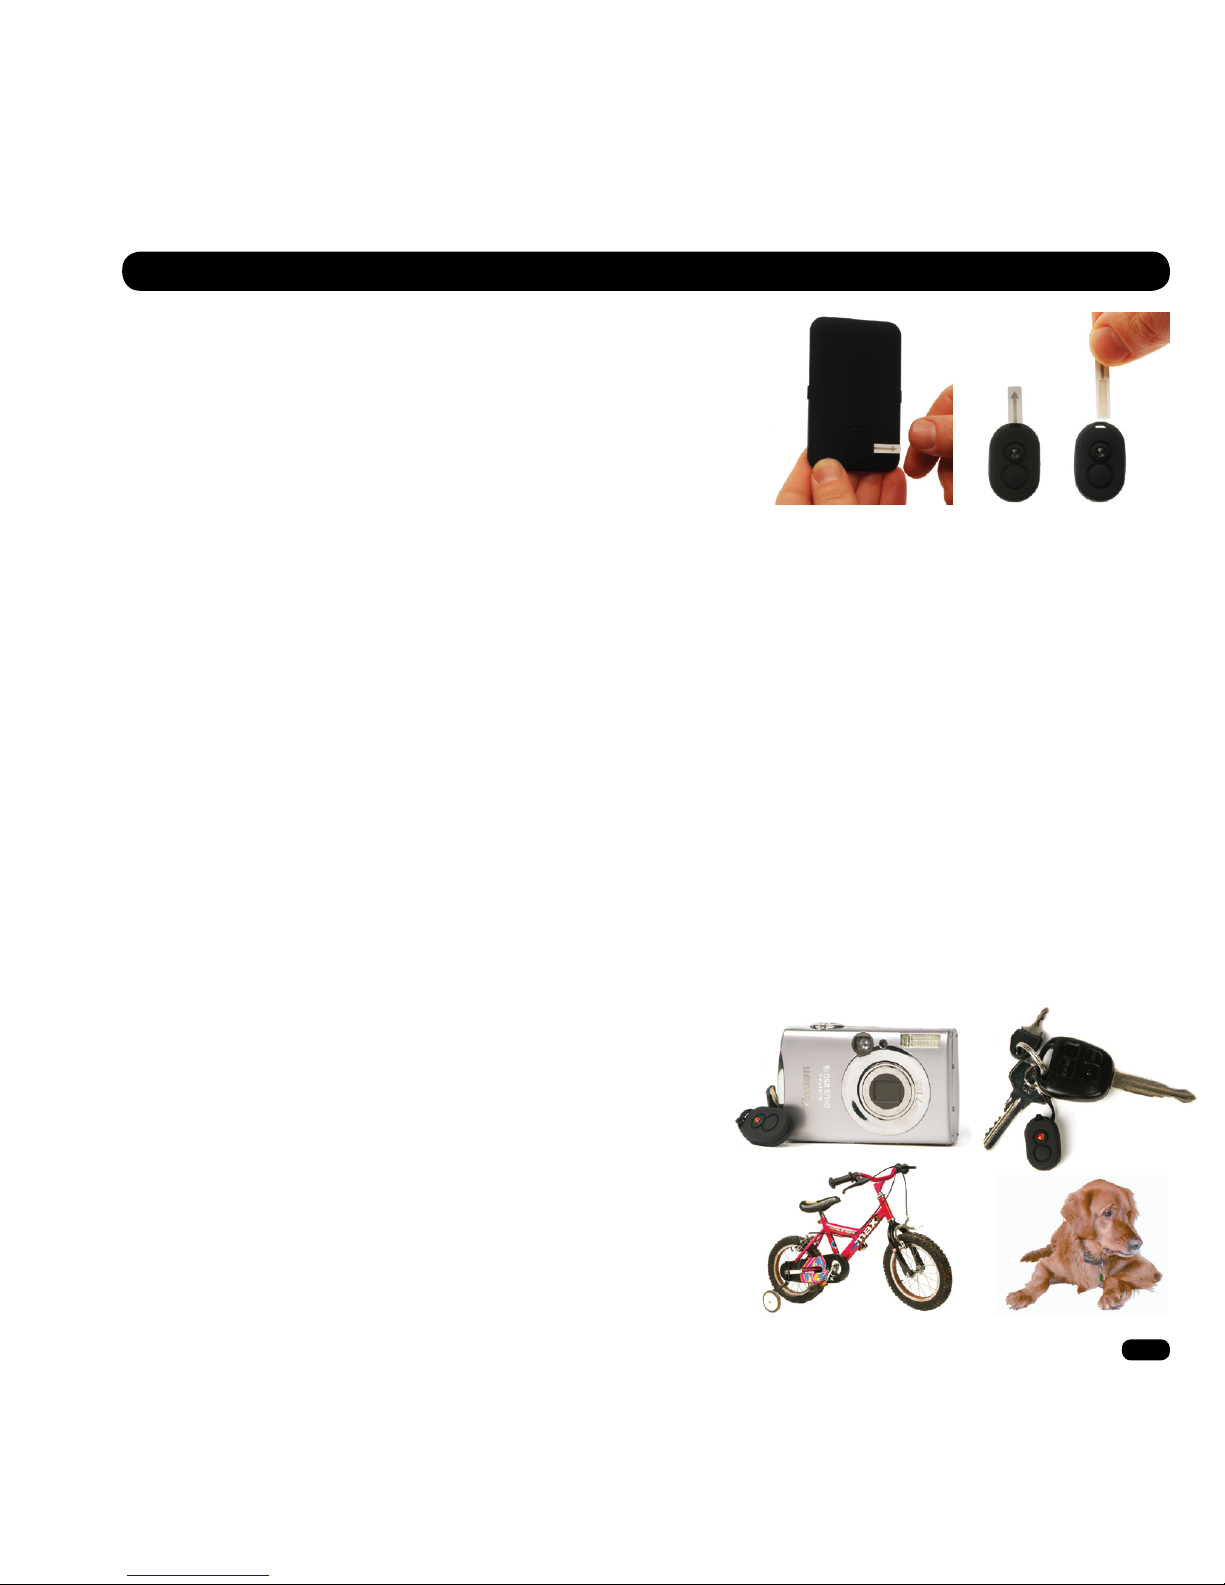
1x Loc8tor Pet
2x Mini Homing Tags
1x Mounting Bracket
Splashproof Cases
Tag ID Sticker
Key Ring Loop
Adhesive Strips
Page
English . . . . . . . . . . . . . . . 2 - 10
Español . . . . . . . . . . . . . . 11 - 19
Français . . . . . . . . . . . . . . 20 - 28
Deutsch . . . . . . . . . . . . . . 29 - 37
Italiano . . . . . . . . . . . . . . 38 - 46
Pet
Don’t lose them, locate them!
Page 2

2
www.loc8tor.co.uk www.loc8tor.com
INTRODUCTION
Thank you for purchasing a Loc8tor Pet, the great new product
that can help you keep track of your pet and help nd them even
in those hard to nd hiding places.
The Loc8tor Pet has been designed to be versatile and easy to
use, whether at home or out and about. Please take a few minutes
to read through this User Guide to help you get the most out of
your device.Loc8tor has been manufactured to quality standards
to run trouble free and comes supplied with a manufacturers
two year warranty. For additional product information, contact
details and frequently asked questions please visit our website at
www.loc8tor.com
We’d love to hear from you, what you like about Loc8tor or any
suggestions you have to improve it.
E-mail: [email protected]
We hope you enjoy the peace of mind your new purchase brings.
Anthony Richards
Managing Director
Page 3
3
www.loc8tor.co.ukwww.loc8tor.com
Page
Button Guide . . . . . . . . . . . . . . . . . 3
Getting Started . . . . . . . . . . . . . . . . 4
Switching On/Off . . . . . . . . . . . . . . . 5
Volume / Tips . . . . . . . . . . . . . . . . . 5
Locating . . . . . . . . . . . . . . . . . . . 6
Range Guidelines . . . . . . . . . . . . . . . 7
Mounting Bracket . . . . . . . . . . . . . . . 7
Batteries . . . . . . . . . . . . . . . . . . . 8
General Care . . . . . . . . . . . . . . . . . 8
Unregister / Delete a Tag . . . . . . . . . . . . 9
Please Note / Changes . . . . . . . . . . . . . 9
Warranty & FCC Statement . . . . . . . . . . . 10
Terms & Conditions . . . . . . . . . . . . . . 10
CONTENTS
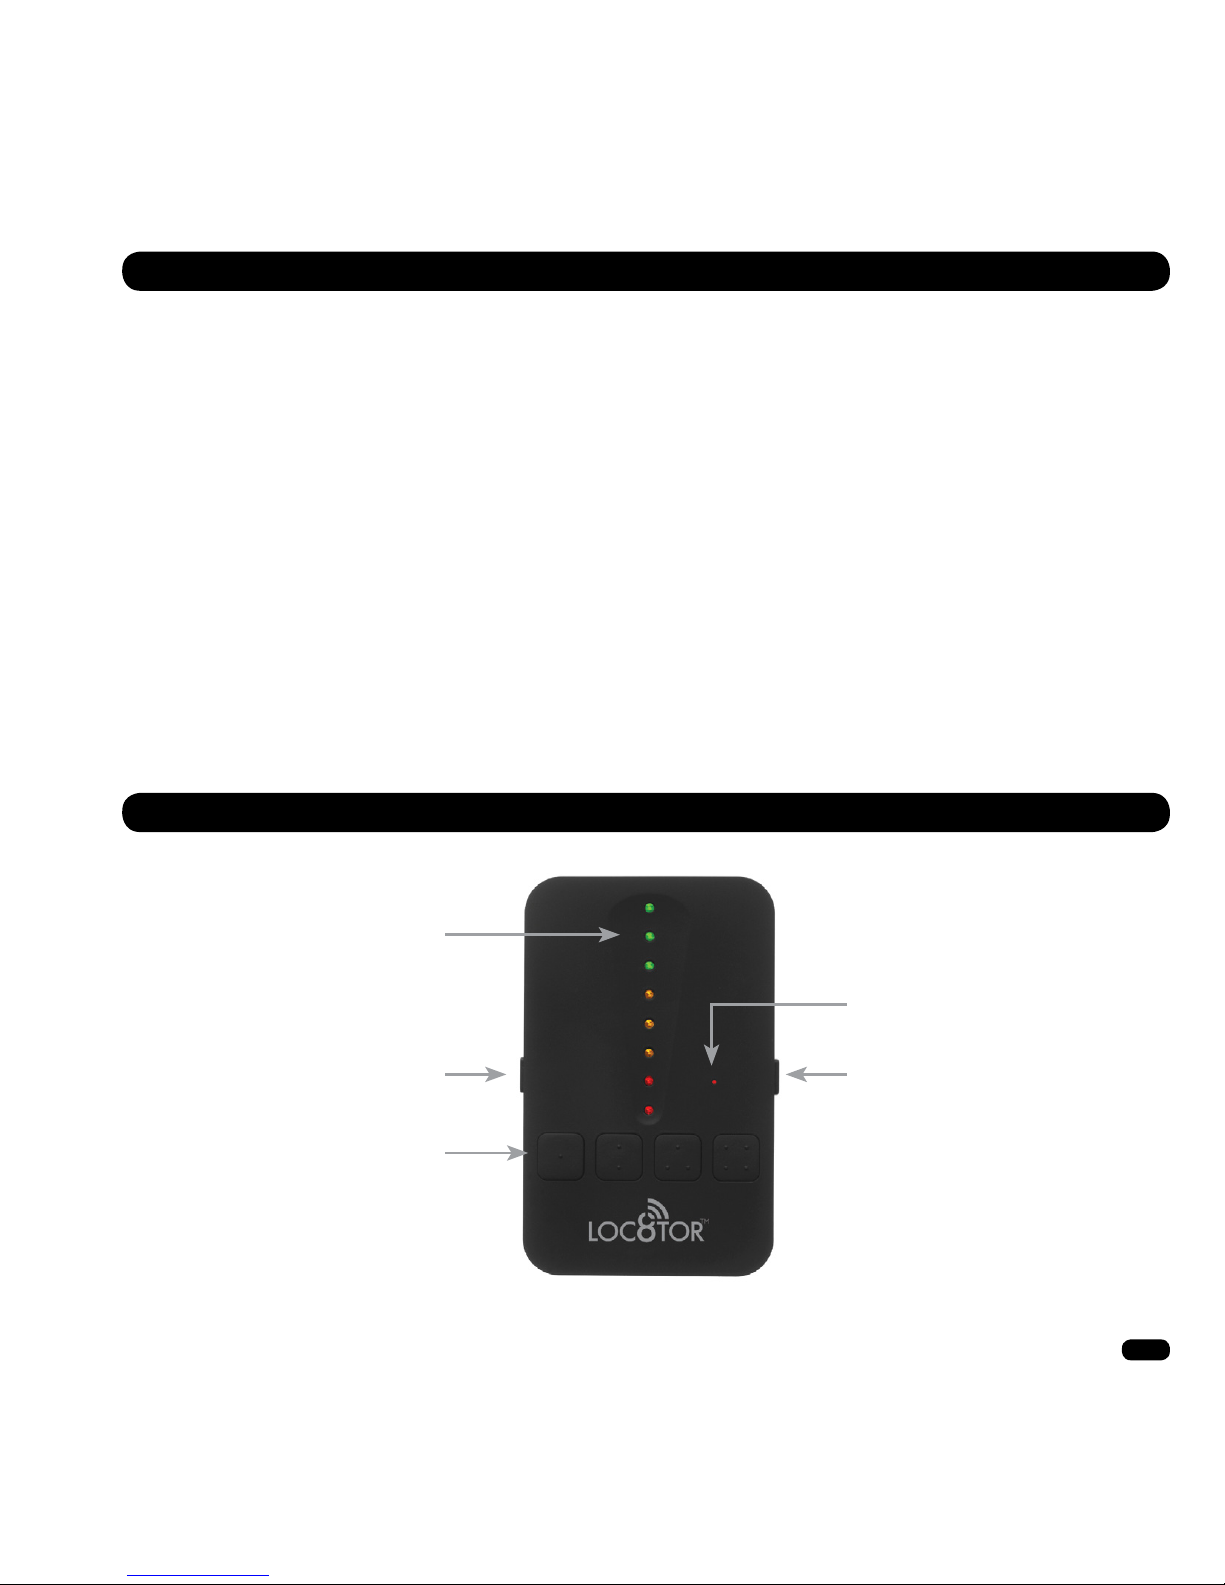
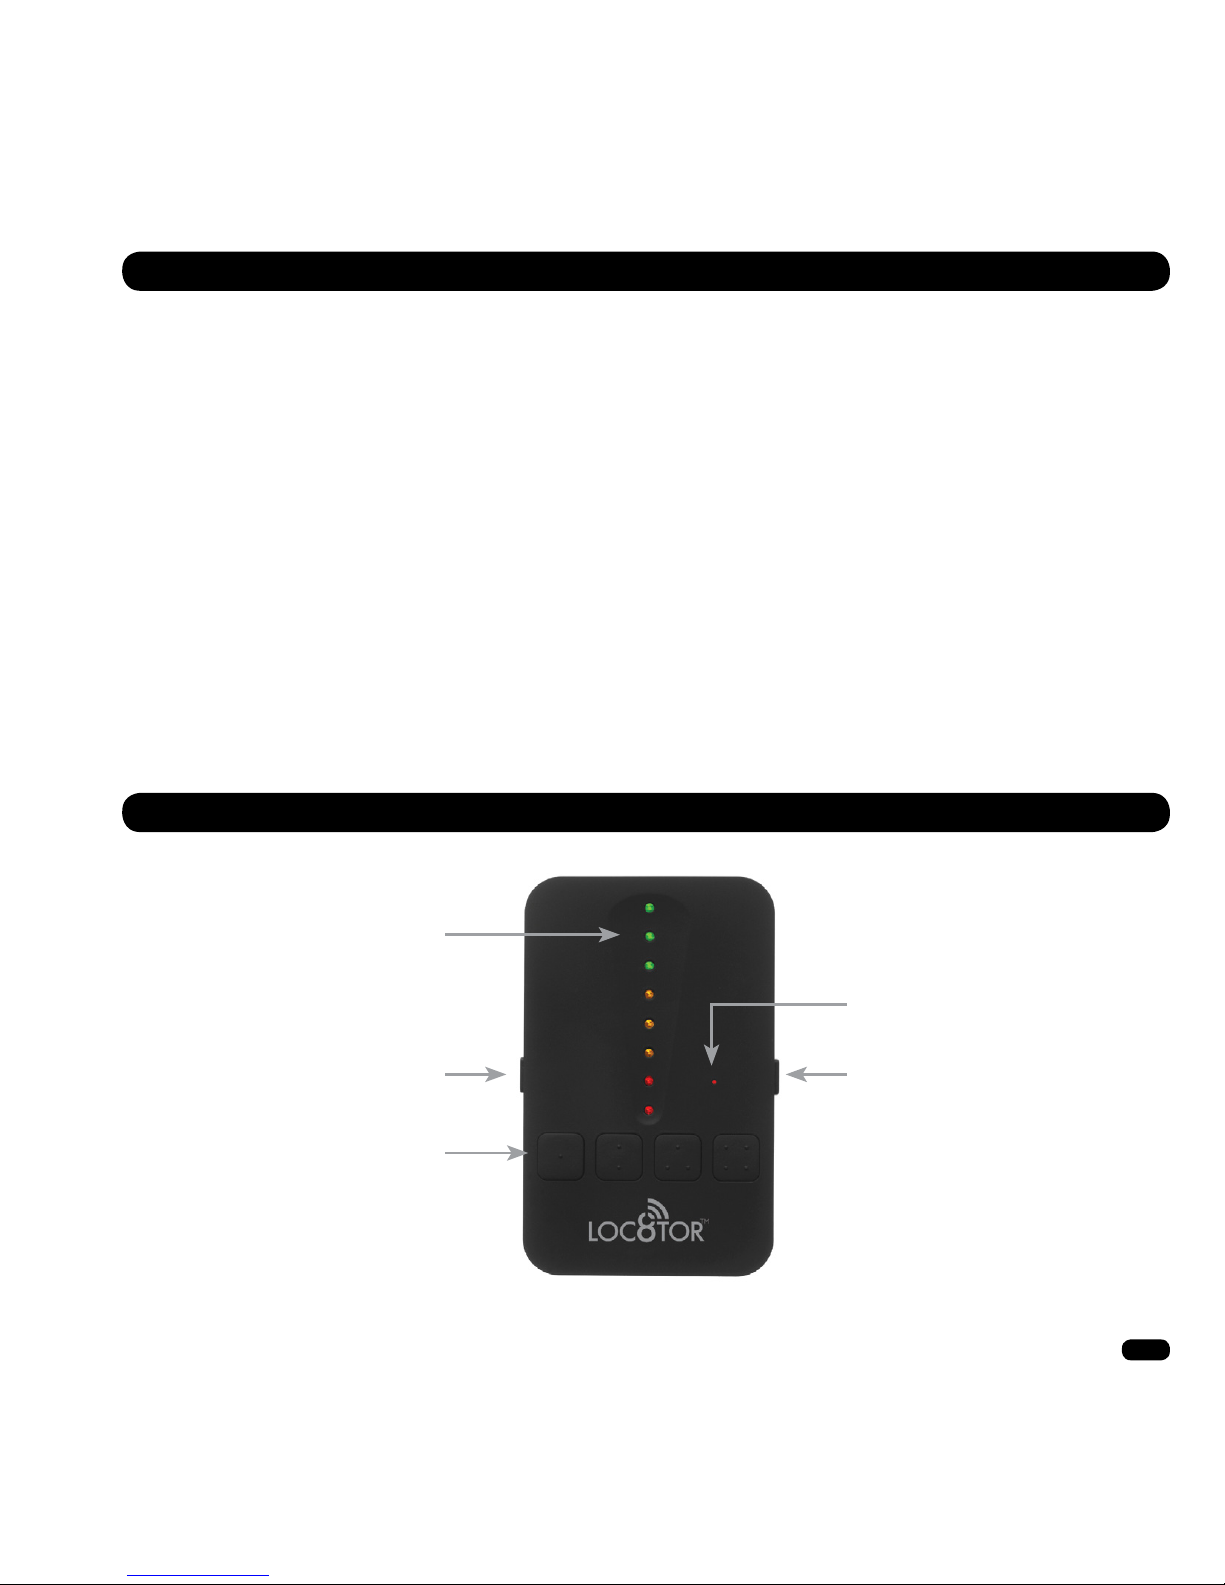
BUTTON GUIDE
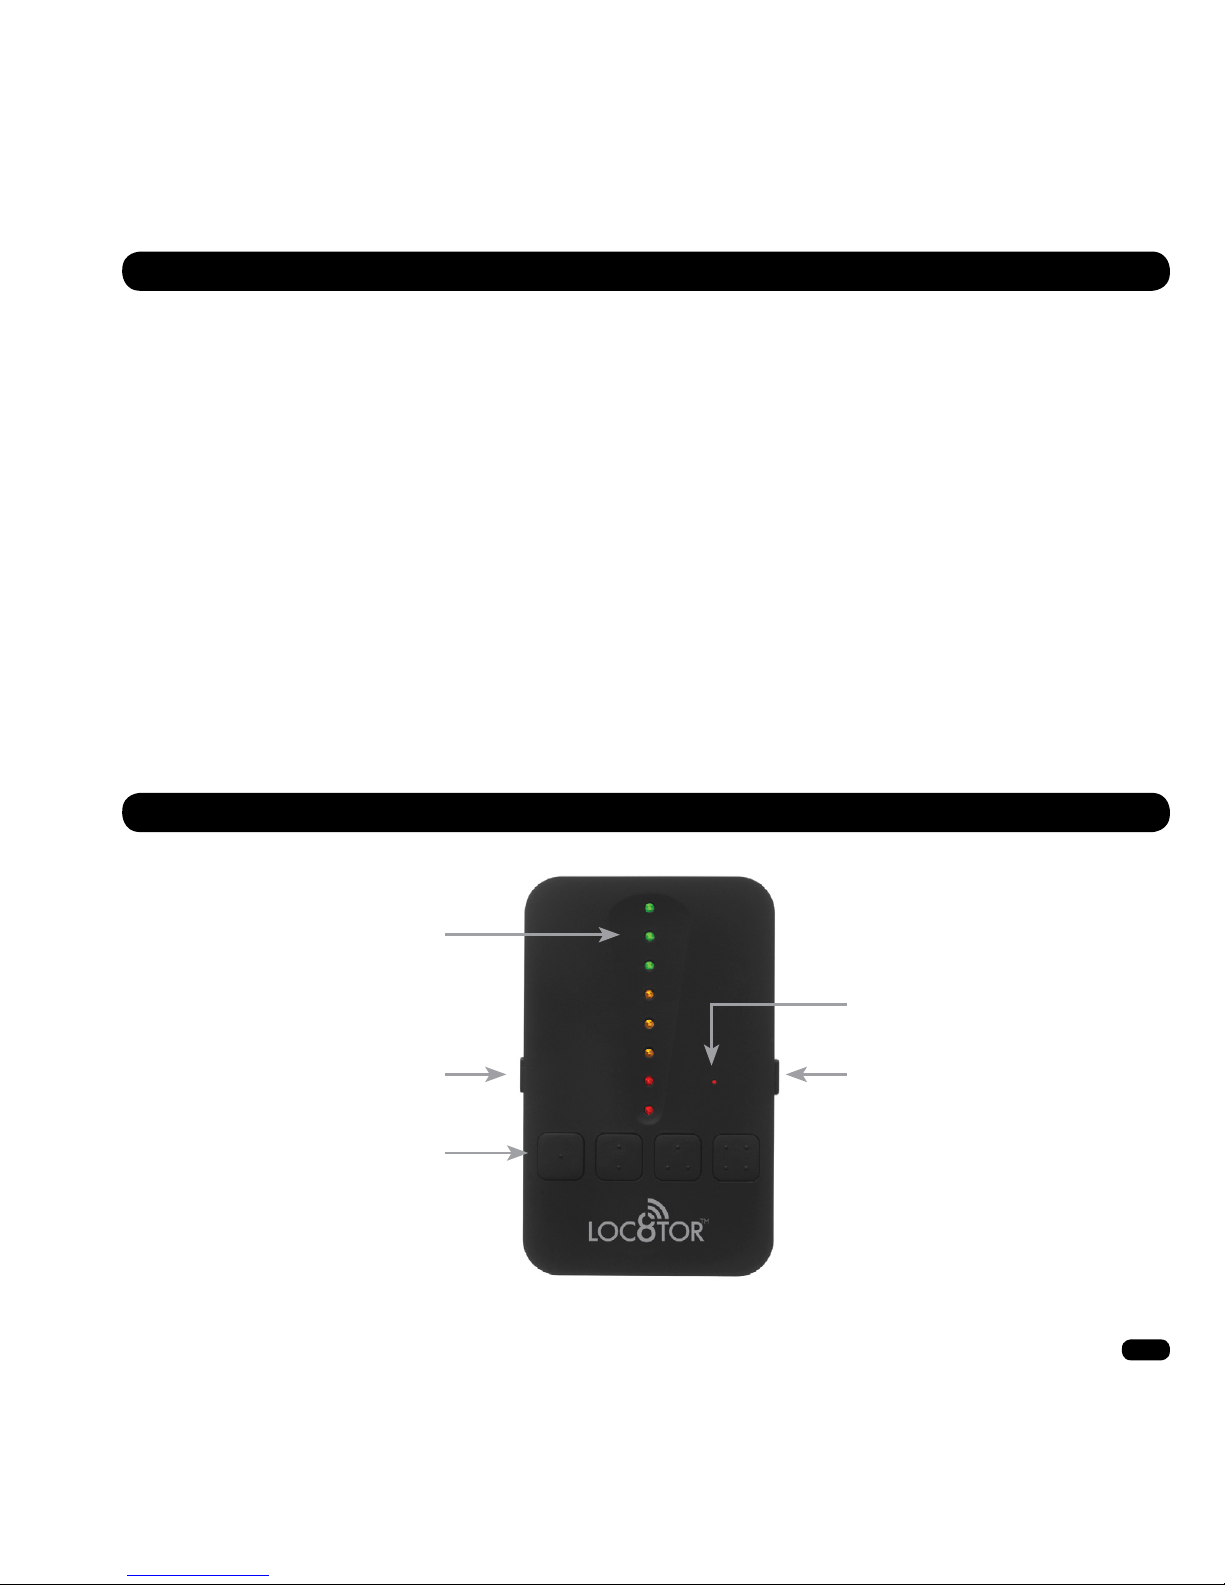
Volume
On/Off
(hold in for 2 seconds)
Register and Locate
up to four Tags
Directional Lights
Status Light
Page 4
4
www.loc8tor.co.uk www.loc8tor.com
Your Loc8tor could not be easier to setup or use. Follow these steps and
you’ll be able to start tracking down your tagged pet in no time at all.
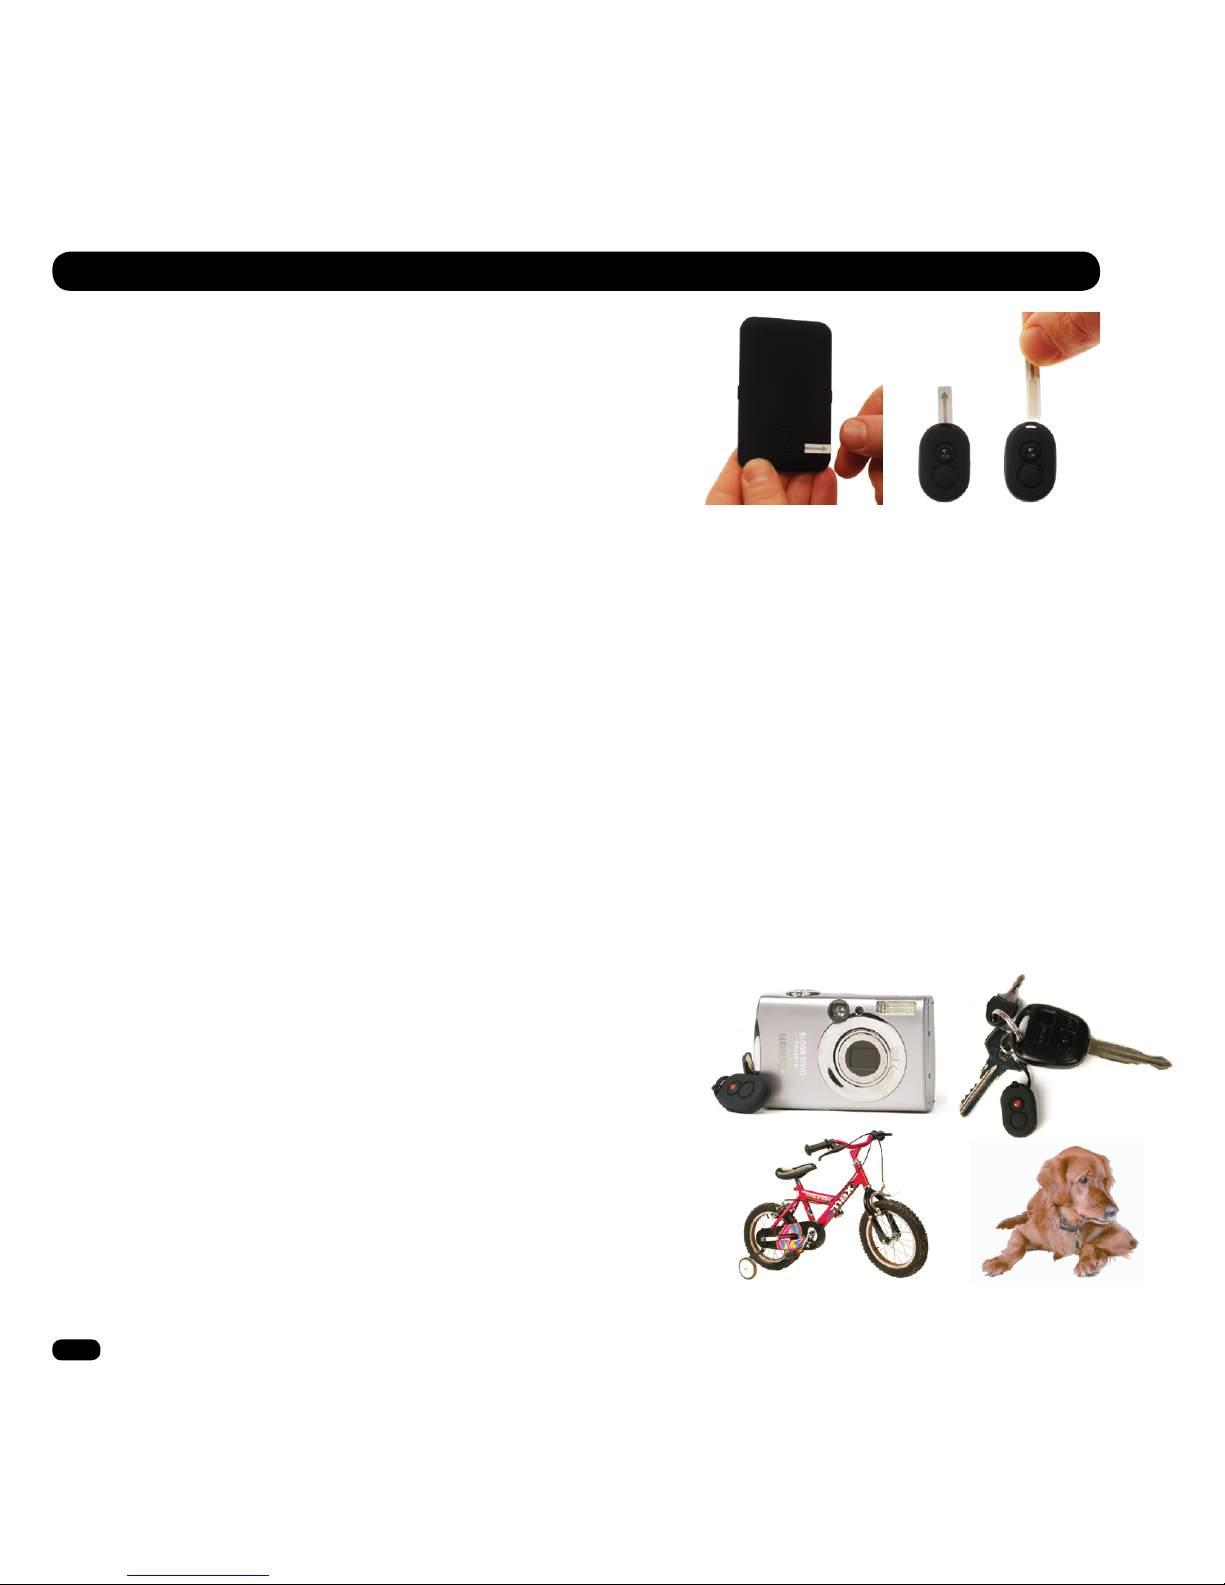
1. ACTIVATE BATTERIES
Pull out the strip on the back of the Loc8tor to activate battery.
It will beep and all the lights will ash – It is now ON.*
* After approx. 45 seconds left idle your Loc8tor will turn itself off.
2. REGISTER A TAG
• Pull out the strip on the Tag to activate batteries.
• Tag beeps twice and the red light ashes twice.
• Place Tag you wish to register next to Loc8tor making sure all
other Tags have been moved more than an arms length away.
• Make sure the Loc8tor pet is switched on (red status light will ash when ON).
• Select one of the buttons on the front of the Loc8tor to assign the Tag to.
Hold the button down for 3 seconds. The Loc8tor will beep.
• Release button – Loc8tor will beep to conrm start of registration
and status light will ash rapidly. Tag will complete registration process.
• Once registered Tag and Loc8tor will beep and ash once.
• Repeat process for up to 4 Tags, assigning each Tag to a different button.
Each of the four Tags when being located will beep differently to help identication.
3. ATTACH TAG
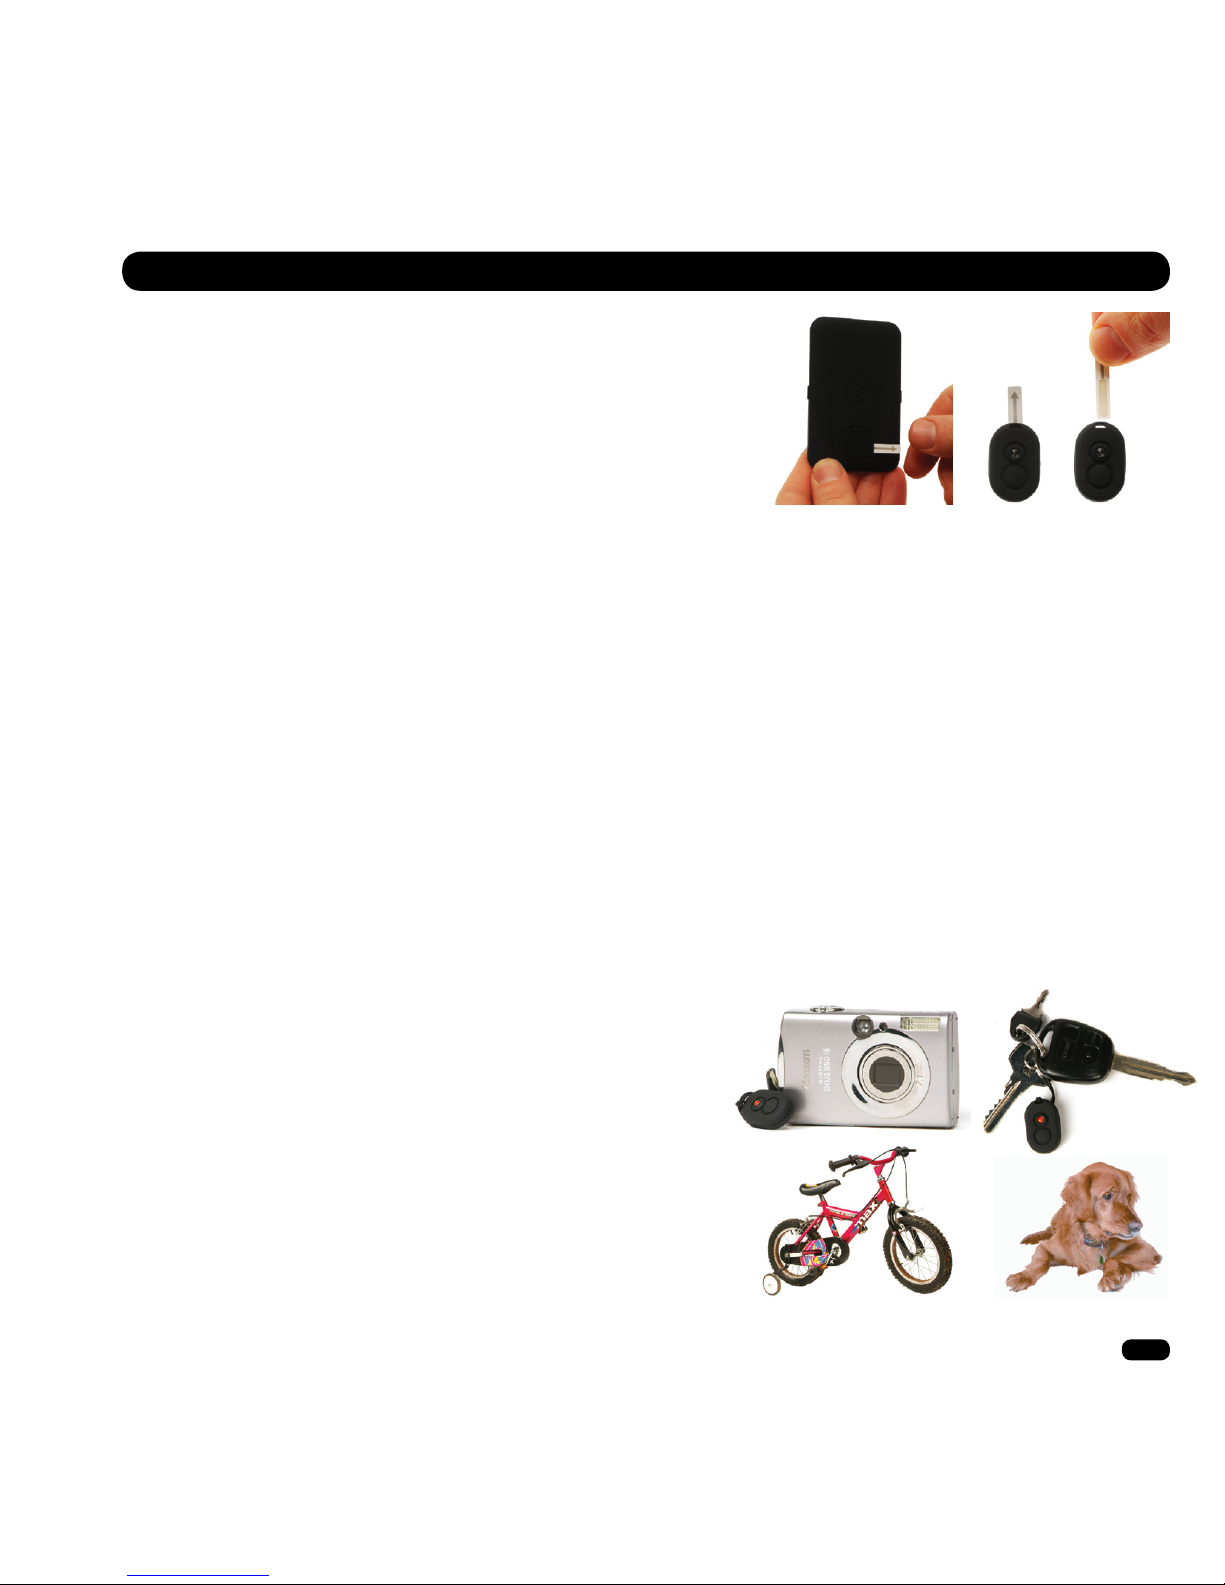
Key ring loop: Use to attach Tag to items such as your pets collar,
key ring, bags, mobile phones etc. Push loop through the Tag hole
and then pull ring through the loop.
Splashproof Tag case: Insert the Tag in to the case then attach
directly onto your pets collar either using the Key ring loop provided
or by threading your pets collar through the wings on the PetSplash
case (ts collars up to 15mm / 0.6”).
GETTING STARTED
Page 5

5
www.loc8tor.co.ukwww.loc8tor.com
SWITCHING ON / OFF
ON
• Hold in the right hand side button (see Button Guide) for 2 seconds.
The Loc8tor will bleep and all the lights ash.
• Small status light will ash whilst on.
• The Loc8tor will automatically power down after 45 seconds if left idle.
OFF
• Hold in the right hand side button for 2 seconds. Loc8tor will beep and turn off.
• Write on the sticky label provided which button is allocated to each Tag / item.
• If a locate button is pressed with no Tag assigned to it an error tone will sound
and the status lights will blink rapidly. To register a Tag to this button, complete
the steps ‘REGISTER A TAG’.
Press in the left hand side button to select from three volume settings; Off, Low or High.
An audio beep will sound when pressed indicating the current volume level.
VOLUME
TIPS
Page 6
6
www.loc8tor.co.uk www.loc8tor.com
LOST
• Press and hold down the ON button until the Loc8tor beeps and lights ash.
• Press the button that your Pet / Tag is allocated to.
• Loc8tor will beep and status light will ash rapidly as it’s searching for the Tag.
• When a Tag is detected the locating lights will light up and the audio will start.
• With the Loc8tor in your hand turn around slowly completing a full circle.
• As you point in the right direction and then move nearer to the item, the audio
pitch and frequency of beeps will increase, and lights on the Loc8tor change
from red to amber to green.
• Once a circle has been completed, face in the direction of the strongest audio
and visual signal and walk in that direction.
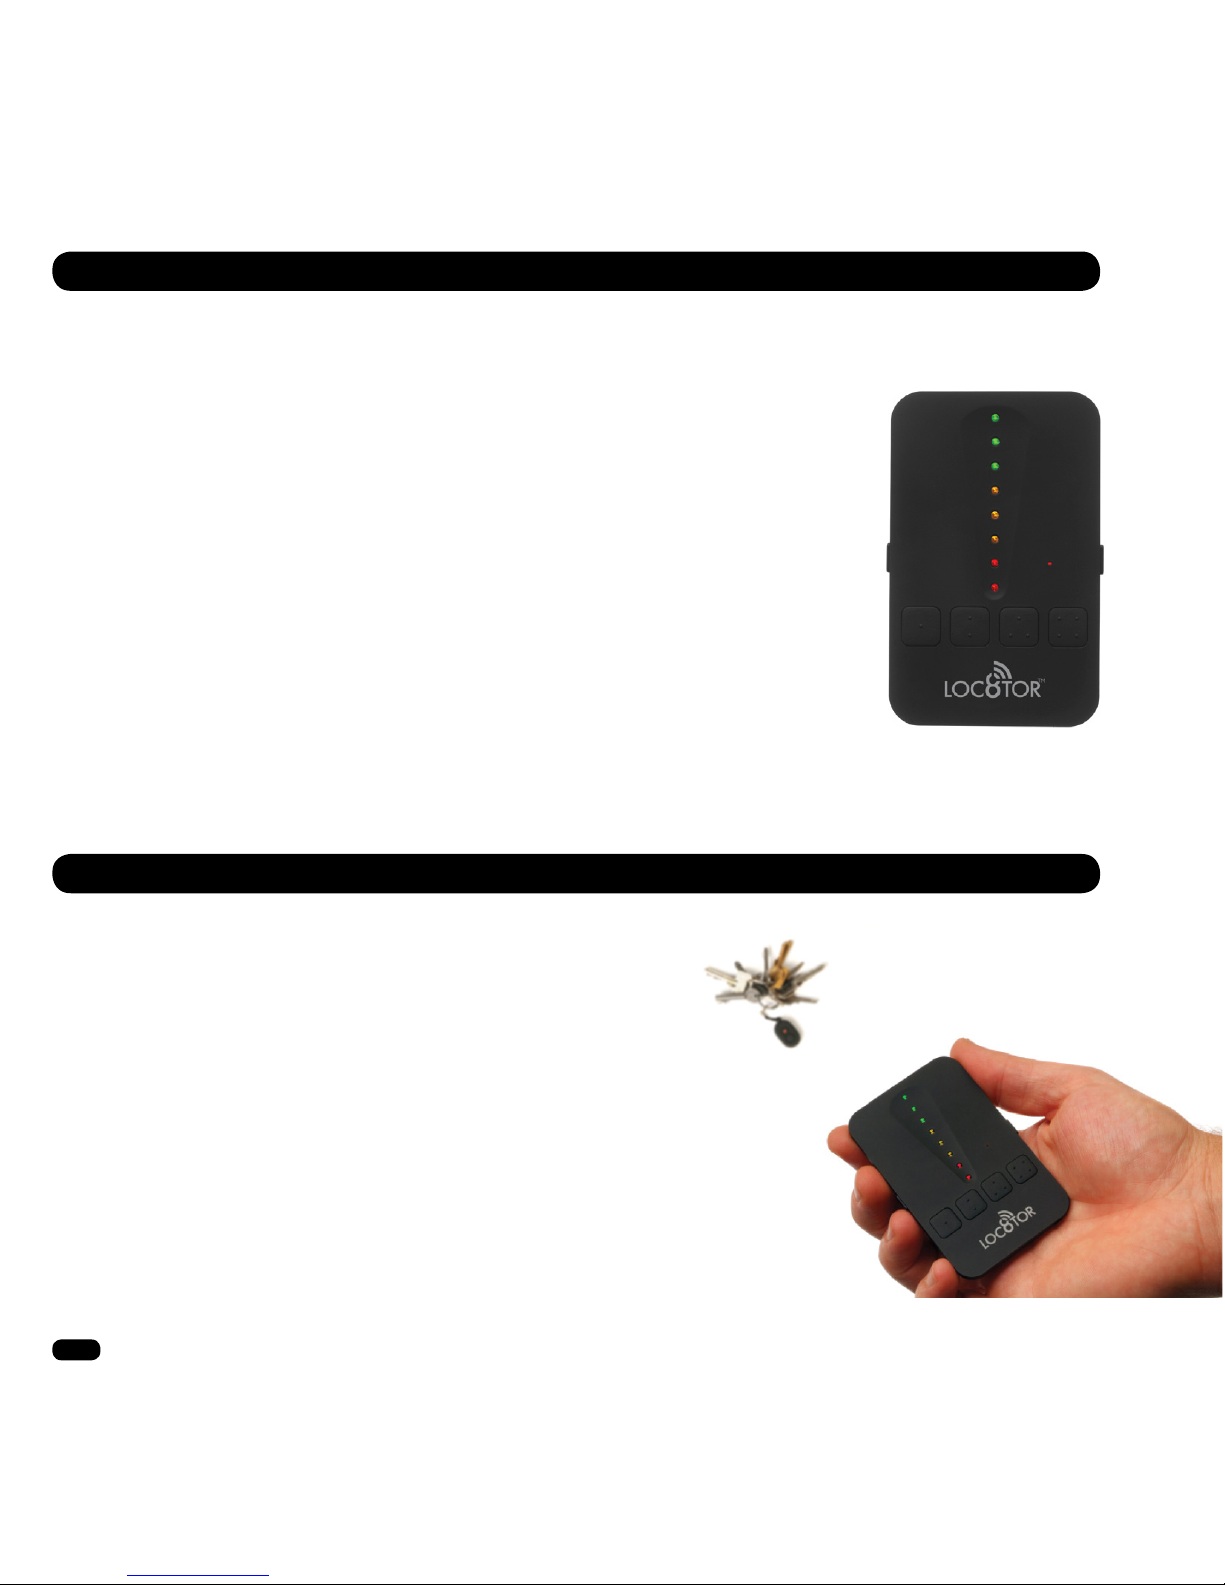
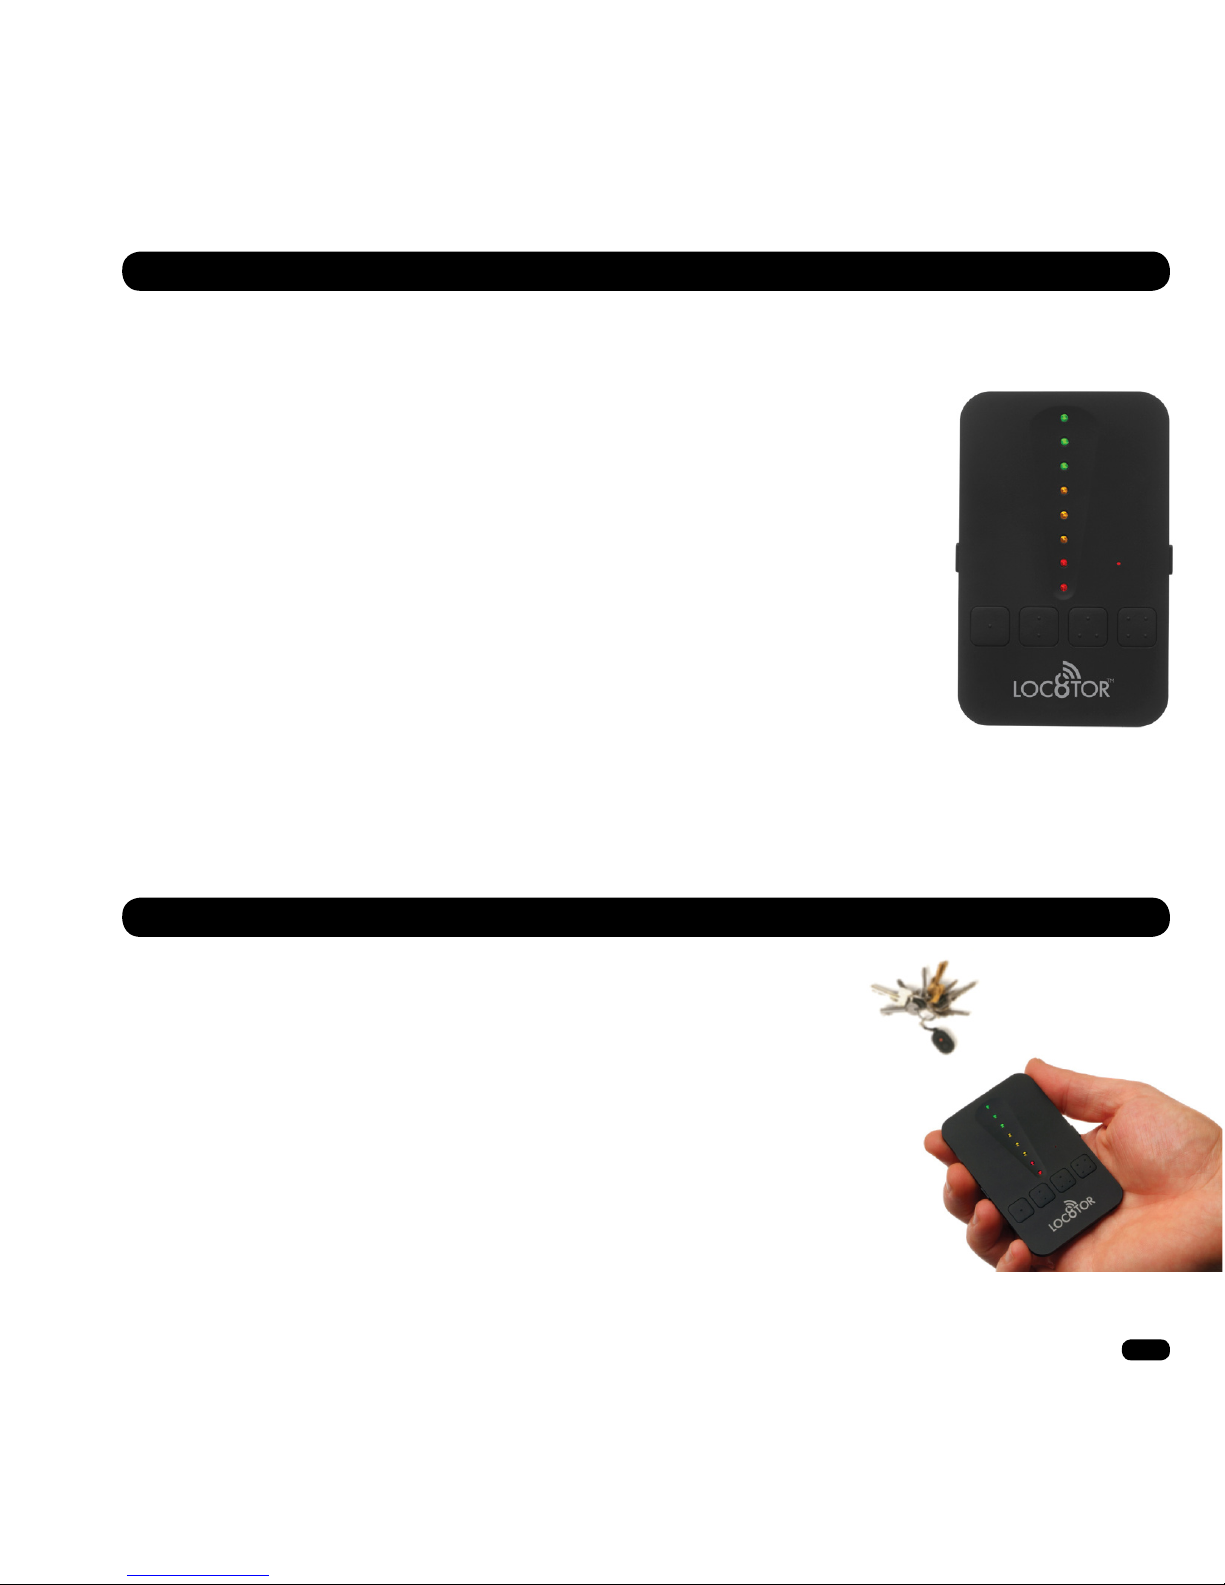
• When you see three green lights the Tag is very close by.
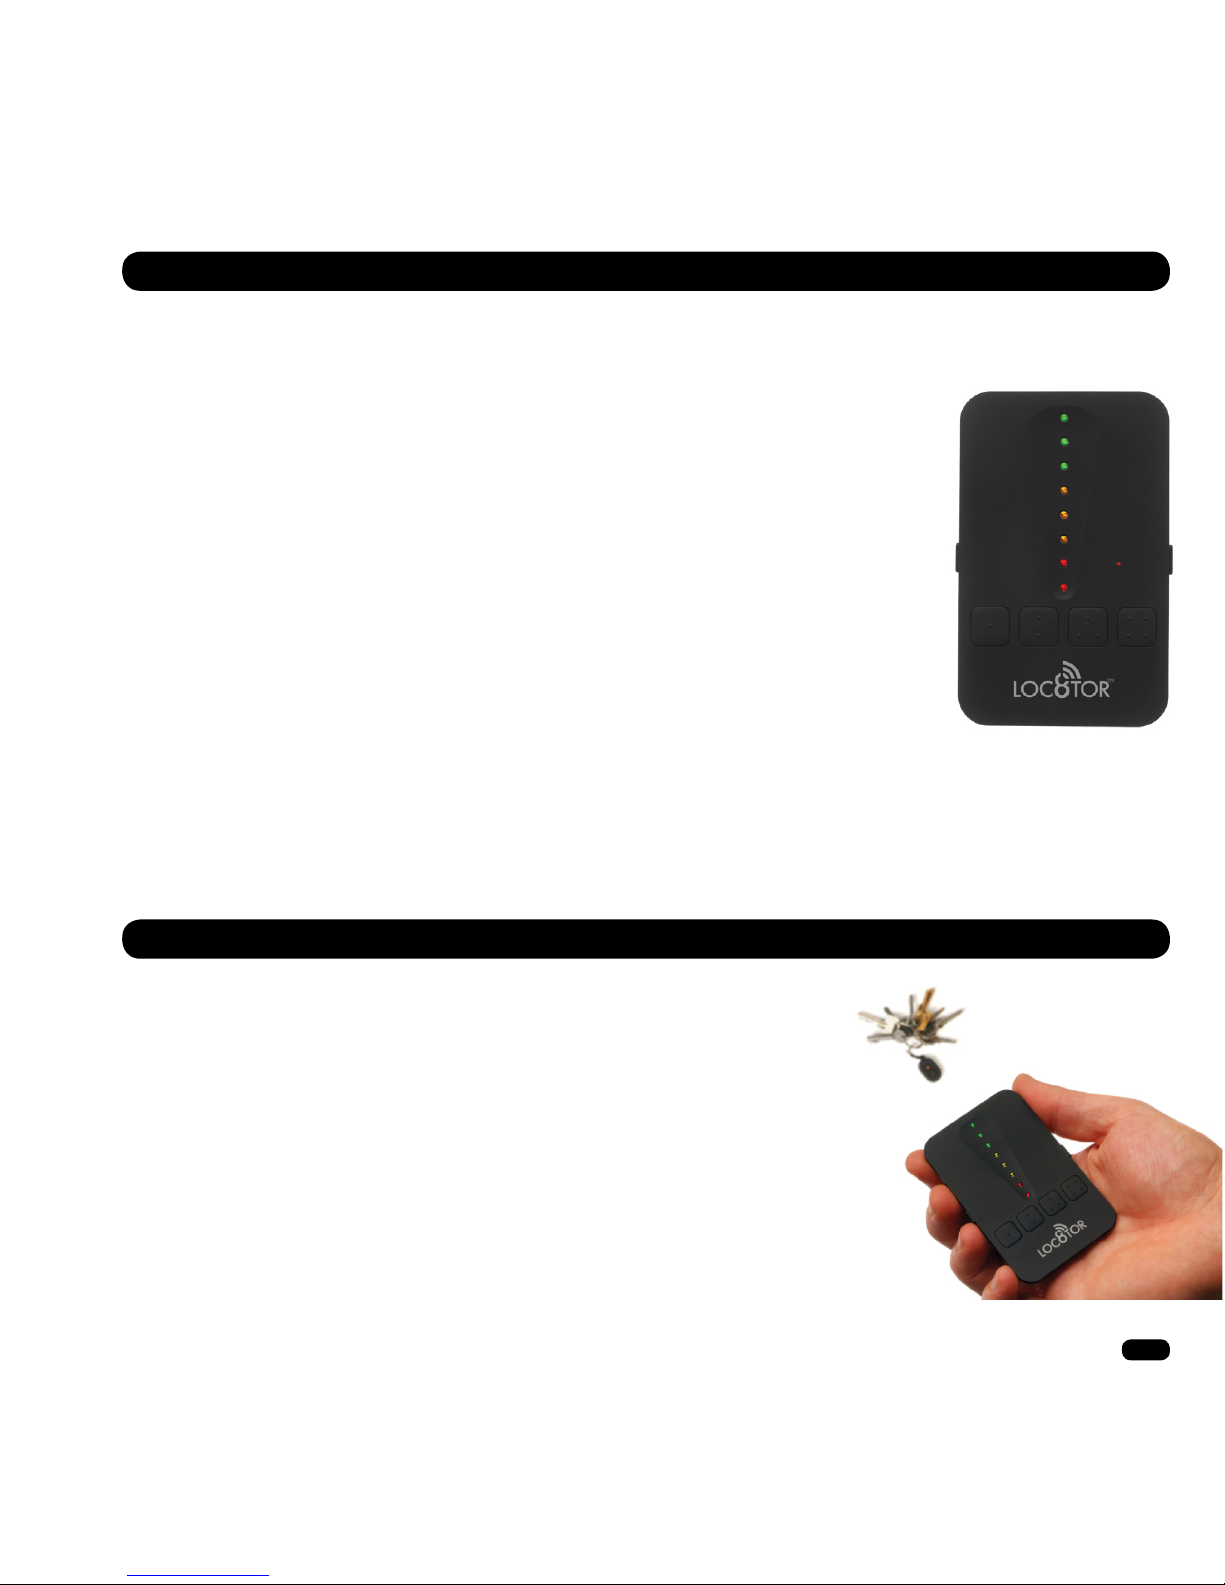
• To guide you right in, the Loc8tor now changes to ‘zooming in’ mode (pictured).
As you get closer amber then red lights illuminate and the audio pitch increases.
FOUND
To stop a search press the ON/OFF button, or the locate button your Tag is allocated to.
• Place the Tag on a surface and practice locating it a few times
to get a feel for how it works.
• If you are ever unsure of which direction to go in, slowly repeat
a full 360° circle and then go in the direction with the strongest
signal strength.
• Strongest signal is displayed when the Loc8tor is pointing
directly at the Tag. Try moving the Loc8tor up and down as the
Tag could be upstairs or downstairs.
• If you are close to a wall whilst getting a strong signal check
the room next door.
• Try pressing the volume button on the Loc8tor when you are
close in order to mute and listen out for Tag beeps.
• If no signal is displayed try moving position to a different area
and repeat the process.
LOCATING – SEARCHING FOR A PET
LOCATING TIPS
Page 7

7
www.loc8tor.co.ukwww.loc8tor.com
RANGE GUIDELINES
Range will vary greatly depending on where the Tag is used and what it’s attached to. If higher up and with a
clear line of sight, items can be found in excess of 122m/400feet. The chart gives a guideline. Actual range may
differ signicantly as performance is affected by type of application and environment it’s used in.
Keep the Loc8tor in the mounting bracket when not in use. Attach bracket to the fridge, or any other metal surface
using the sticky backed magnet.
Place the sticker on the inside of the mounting bracket as a quick reminder of what you have tagged.
MOUNTING BRACKET
ESTIMATED RANGE CHART
Model Aircraft in a Tree
180m / 600ft
Parked Car
30m - 140m / 100ft - 500ft
Cat or Dog
30m - 122m / 100ft - 400ft
Tortoise
30m / 100ft
Page 8
8
www.loc8tor.co.uk www.loc8tor.com
BATTERIES
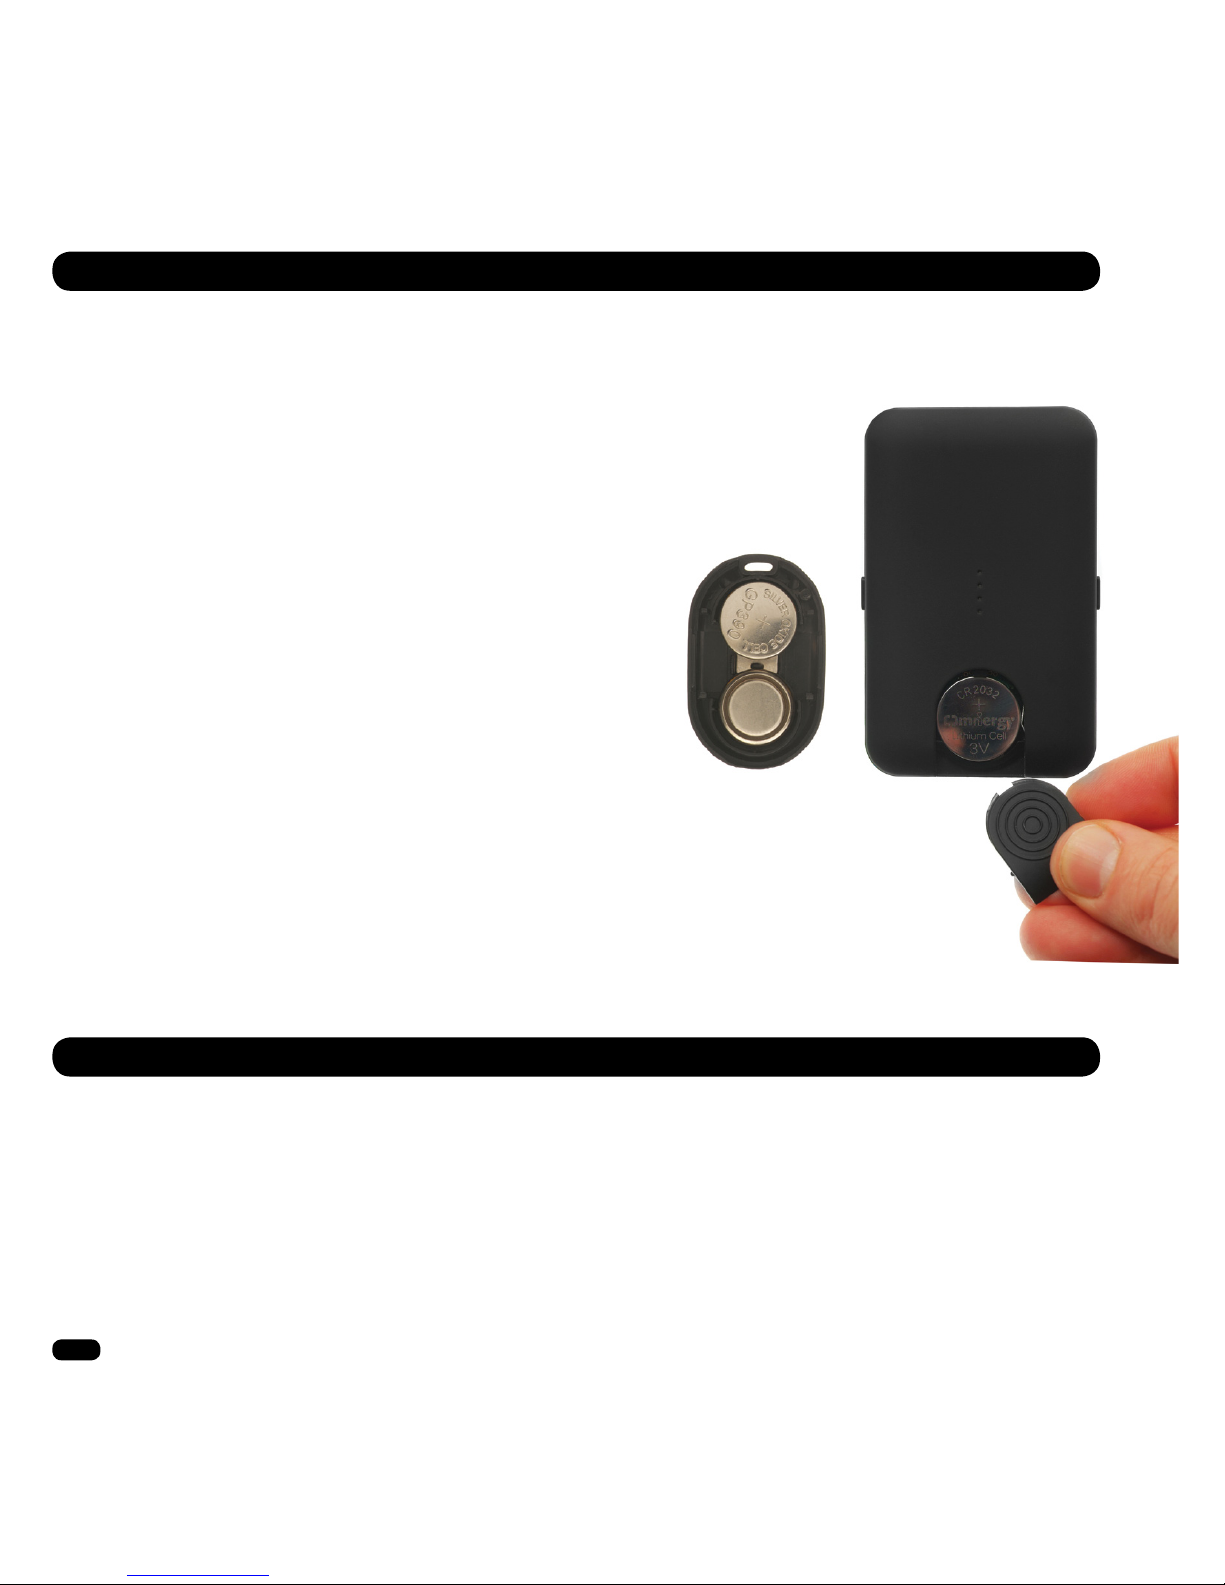
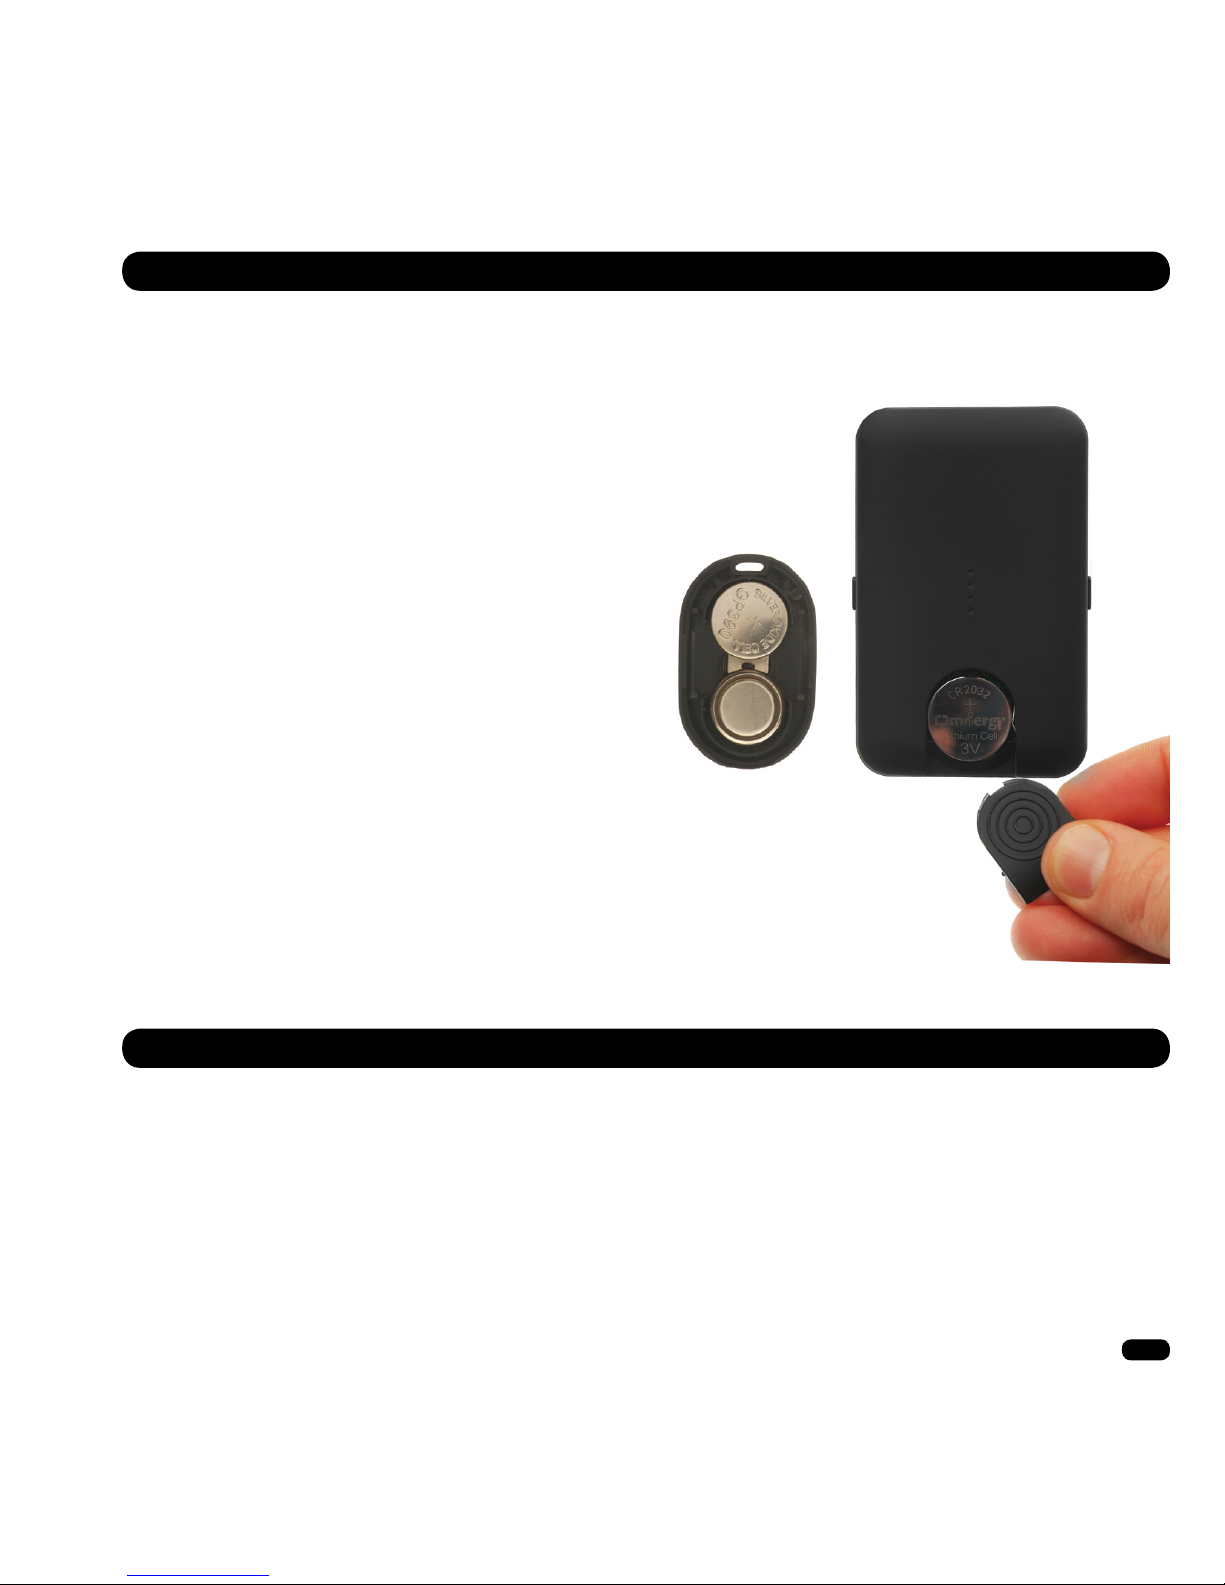
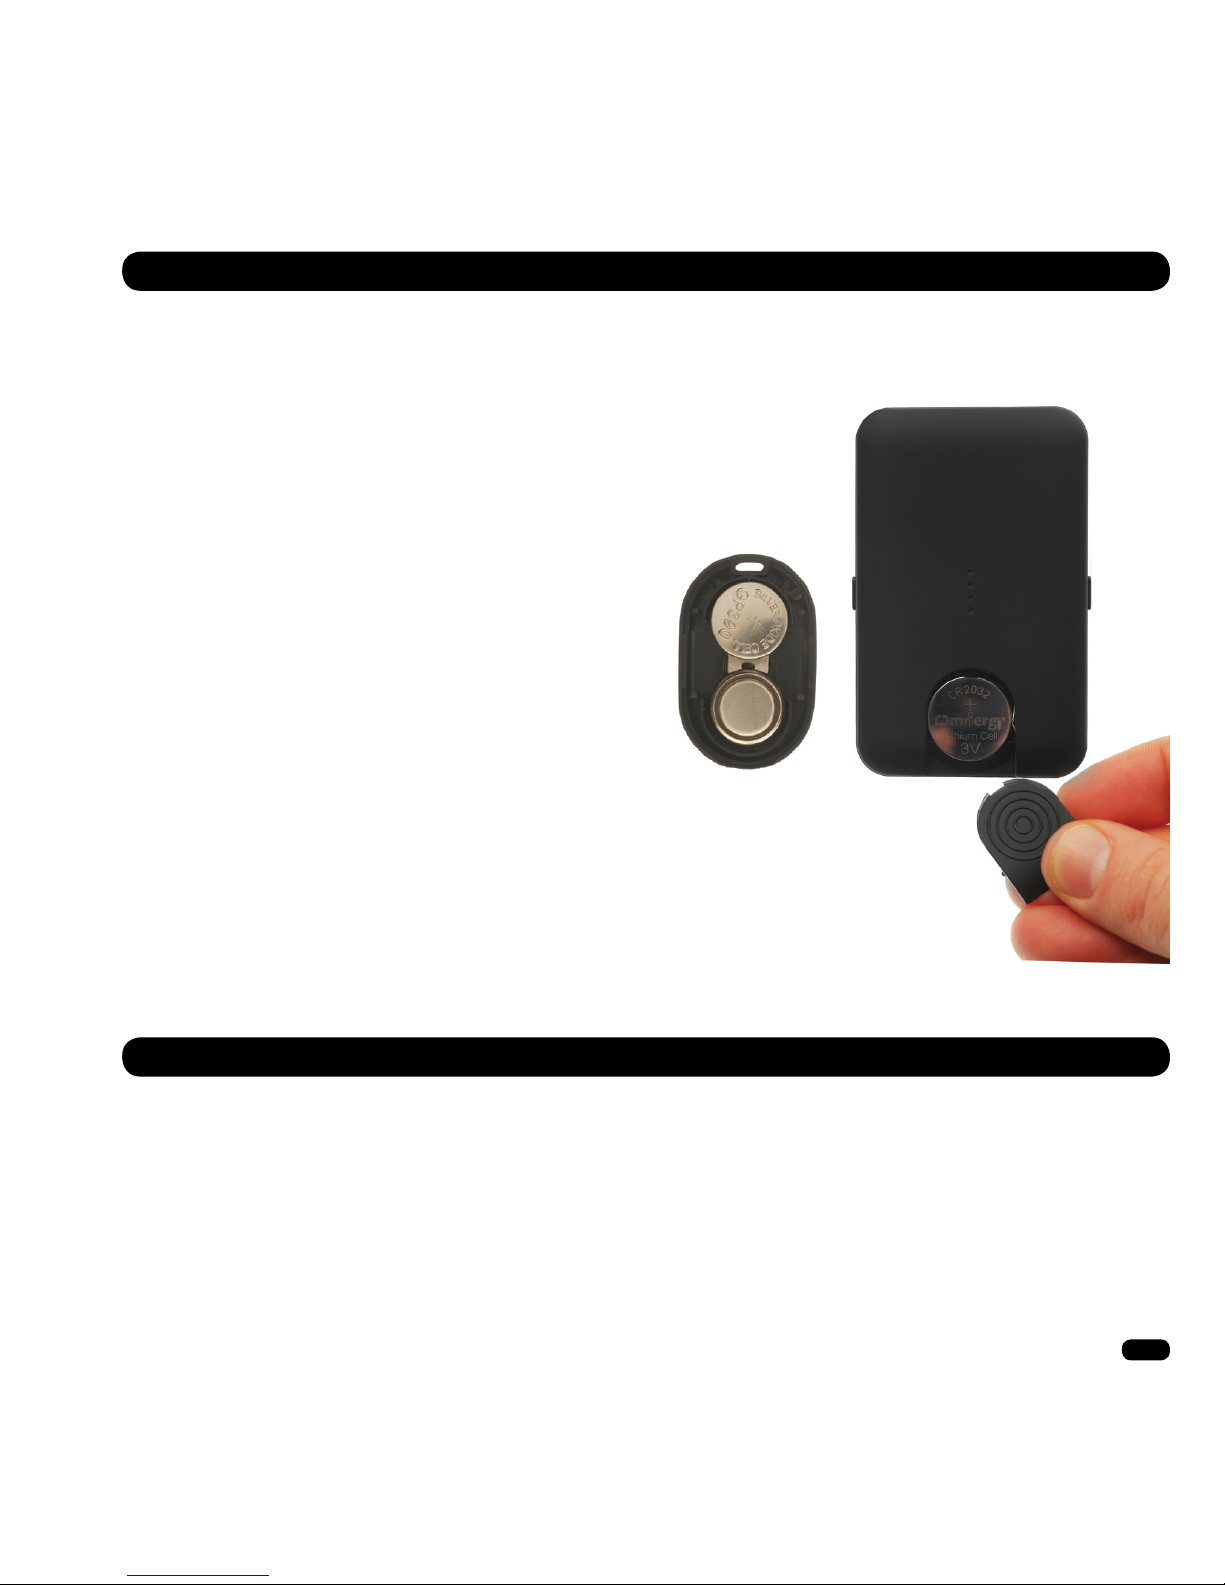
Loc8tor Handheld:
If the Loc8tor does not power up or lights are faint
replace the battery using 1 x CR2032 or equivalent
placing in the battery compartment + side up.
Battery compartment can be found on the back at
the bottom. Slide down to open.
To change the batteries in a Tag:
Put your thumbnail or a at tool at the end of the Tag,
by the lanyard hole, into the split line (line going around
the middle of the Tag).
Keeping your thumbnail / at tool in the split line move
it around to the middle of the long side. The Tag will
pop open.
• Replace with SR54 (silver oxide) 1.5v button cells
or equivalent to provide best battery life, keeping
the plus side face up nearest the lanyard hole.
• Replace the lid by putting one side in rst then
pushing shut.
• If the batteries are correctly inserted the Tag will
beep when case is closed.
To test the batteries, open then shut the lid by following
the above steps. If the Tag does not beep and ash –
replace the batteries.
GENERAL CARE
• The Loc8tor Handheld and Tags have not been designed to be waterproof. Please take care not to get wet.
(We recommend using our Splashproof or PetSplash Tag casing for extra protection.)
• Never clean with water, detergent or cleaning agent – use a clean, dry cloth.
• The Loc8tor Handheld and Tags’ operational temperature is between 0˚C to + 55˚C.
Storage temperature is between -10˚C and +60˚C.
Page 9

9
www.loc8tor.co.ukwww.loc8tor.com
UNREGISTER A TAG DELETE A TAG
Once a Tag has been registered only that button
can be used to locate it. To move the Tag to another
Loc8tor you will rst need to unregister it.
To Unregister:
• Place the Tag to be unregistered next to the Loc8tor.
• Hold down the volume button and at the same
time press the button that the Tag is registered
to for 3 seconds.
• Loc8tor will beep once – let go of the buttons.
• Loc8tor will now beep twice, the status light will
ash rapidly and start to unregister Tag.
• To conrm a successful unregistration, the Tag and
the Loc8tor will beep twice.
If a Tag has been damaged the Tag can be
deleted, enabling another Tag to be registered
to that button.
To Delete:
• Hold down the volume button and at the same
time press the button that the Tag is registered
to for 7 seconds or until the Loc8tor beeps
twice – then let go of the buttons.
• The Loc8tor will beep three times and start
to unregister the Tag.
• To conrm a successful deletion, Tag and
Loc8tor will beep and LED will ash.
PLEASE NOTE
1. 122 metre / 400 feet range is based on clear line of sight. Actual range will vary depending on use,
environment and location.
2. Loc8tor is not a toy and should only be used by adults or with parental supervision.
3. Locate mode has been designed to help nd your possessions. It should not be relied on to nd people.
4. The Loc8tor is intended to be used in accordance with these instructions.
5. BEWARE OF CHOKING HAZARD – KEEP LOOSE TAGS OUT OF THE REACH OF YOUNG CHILDREN.
CHANGES
The material in this User Guide is for information only and is subject to change without notice. Whilst reasonable
efforts have been made in the preparation of these instructions to ensure its accuracy, Loc8tor Ltd. assumes no
liability resulting from errors or omissions in this User Guide, or from the use of the information contained herein.
Loc8tor Ltd. reserves the right to make changes to the product design without reservation and without notication
to its users.
Page 10

10
www.loc8tor.co.uk www.loc8tor.com
WARRANTY
TERMS & CONDITIONS
Please contact place of purchase or Loc8tor website www.Loc8tor.com for full Terms and Conditions.
Loc8tor Ltd. warrants to the original purchaser that this product shall be free from signicant defects in material and
workmanship for two years beginning on the date of purchase as shown on your receipt.
Should the product need to be returned it must be sent back to the original place of purchase to be processed.
Proof of purchase must accompany the returned product. If purchased direct from Loc8tor Ltd. a returns authorisation
number is required prior to the product being returned. Product must be returned by signed delivery in suitable
protective packaging.
This warranty does not apply to any product that has been subject to abuse, misuse, negligence, tampering or has
been modied in any way.
Without prejudice to your rights Loc8tor Ltd. may replace a defective product or issue a credit against future purchases.
No other warranties, express or implied are made.
Loc8tor Ltd. shall not be liable for any special, incidental or consequential damages whether or not the purpose for
which you purchased the product was made known to Loc8tor Ltd., the retailer or otherwise. Your statutory rights are
not affected in any way.
FCC STATEMENT
This equipment has been tested and found to comply with the limits for a Class B digital device, pursuant to part 15
of the FCC Rules.
These limits are designed to provide reasonable protection against harmful interference in a residential installation.
This equipment generates, uses and can radiate radio frequency energy and, if not installed and used in accordance
with the instructions, may cause harmful interference to radio communications. However, there is no guarantee that
interference will not occur in a particular installation. If this equipment does cause harmful interference to radio or
television reception, which can be determined by turning the equipment off and on, the user is encouraged to try to
correct the interference by one or more of the following measures:
• Reorient or relocate the receiving antenna.
• Increase the separation between the equipment and receiver.
• Consult the dealer or an experienced radio/TV technician for help.
CAUTION - Changes or modications not expressly approved by Loc8tor Ltd. can void the users authority to
operate the Loc8tor.
Page 11

11
www.loc8tor.eswww.loc8tor.com
Manual del Usuario
User Guide • Mode d’Emploi
Bedienungsanleitung • Manuale d’uso
Contenido del paquete:
1x Loc8tor para mascotas
2x Mini etiquetas buscadoras
1x Soporte de montaje
Cajas de etiquetas antisalpicaduras
Etiqueta ID adhesiva
Anilla
Tiras adhesivas
Pet
Don’t lose them, locate them!
Página
English . . . . . . . . . . . . . . . 2 - 10
Español . . . . . . . . . . . . . . 11 - 19
Français . . . . . . . . . . . . . . 20 - 28
Deutsch . . . . . . . . . . . . . . 29 - 37
Italiano . . . . . . . . . . . . . . 38 - 46
Page 12

12
www.loc8tor.es www.loc8tor.com
INTRODUCCIÓN
Gracias por adquirir su Loc8tor Mascota, un novedoso producto
que le ayudará a controlar las mascotas y a encontrarlas incluso
en los escondrijos más recónditos. El Loc8tor Mascota se ha
diseñado de modo que resulte versátil y fácil de usar, ya sea en
casa o en exteriores. Lea detenidamente este manual de usuario
para sacar el máximo partido de su dispositivo.
El Loc8tor se ha fabricado con materiales de primera calidad para
evitar cualquier problema y, además, dispone de una garantía
de 24 meses. Visite nuestro sitio Web (www.loc8tor.es) si desea
obtener más información, necesita nuestros datos de contacto o
quiere consultar las preguntas más frecuentes sobre el producto.
Nos gustaría conocer su opinión sobre Loc8tor (lo que más le
gusta, lo que podríamos hacer para mejorarlo, etc.) y que nos
explicara alguna historia divertida sobre cómo le ha ayudado.
Envíenos un mensaje de correo electrónico a [email protected]
con sus comentarios y sugerencias.
Esperamos que disfrute de la tranquilidad que le proporcionará
su nueva adquisición.
Anthony Richards
Director Ejecutivo
Page 13
13
www.loc8tor.eswww.loc8tor.com
ÍNDICE
Volumen
Botón de
Encendido/Apagado
(mantener durante
2 segundos)
Registrar y Localizar
hasta cuatro Etiquetas
Luces de Dirección
Luz de Estado
Página
Botones . . . . . . . . . . . . . . . . . . . 13
Para Empezar . . . . . . . . . . . . . . . . 14
Encendido / Apagado . . . . . . . . . . . . . 15
Volumen / Consejos . . . . . . . . . . . . . . 15
Garantía . . . . . . . . . . . . . . . . . . . 15
Localización . . . . . . . . . . . . . . . . . 16
Alcance . . . . . . . . . . . . . . . . . . . 17
Soporte . . . . . . . . . . . . . . . . . . . 17
Términos y Condiciones . . . . . . . . . . . . 17
Pilas . . . . . . . . . . . . . . . . . . . . 18
Mantenimiento General . . . . . . . . . . . . . 18
Anular Registro / Borrar Etiquetas . . . . . . . . 19
Nota / Cambios . . . . . . . . . . . . . . . . 19
BOTONES
Page 14

14
www.loc8tor.es www.loc8tor.com
PARA EMPEZAR
Congurar y usar el Loc8tor es muy fácil. Siga los pasos siguientes
y muy pronto podrá empezar a controlar a su mascota etiquetada.
1. ACTIVACIÓN DE LA PILA
Retire la cinta de la parte posterior del Loc8tor para activa la pila.
El dispositivo emitirá un pitido y todas las luces parpadearán,
lo cual indicará que está encendido.*
* El Loc8tor se apagará solo automáticamente tras 45 segundos
de inactividad.
2. REGISTRO DE LAS ETIQUETAS
• Retire la cinta de la Etiqueta para activar la pila.
• La Etiqueta emitirá dos pitidos y la luz roja parpadeará dos veces.
• Sitúe la Etiqueta que quiere registrar junto al Loc8tor y aleje el resto de Etiquetas por lo menos un metro.
• Asegúrese de que el Loc8tor Mascota está encendido (la luz de estado roja parpadea).
• Seleccione uno de los botones de la parte frontal del Loc8tor para asignar la Etiqueta.
Mantenga pulsado el botón durante tres segundos. El Loc8tor emitirá un pitido.
• Suelte el botón – Loc8tor emitirá un pitido para conrmar el inicio del registro y la luz
de estado parpadeará rápidamente. La Etiqueta completará el proceso de registro.
• Una vez que completado, la Etiqueta y el Loc8tor emitirán un pitido y parpadearán una vez.
• Repita el proceso hasta con 4 etiquetas, asignando cada etiqueta a un botón distinto. Cuando las localice,
cada una de las cuatro etiquetas emitirá un sonido diferente para ayudarle a la identicación.
3. COLOCACIÓN DE LAS ETIQUETAS
Anilla para llaveros: se utiliza para colocar la Etiqueta en objetos
como el collar de su mascota, llaveros, bolsos, teléfonos móviles, etc.
Pase la anilla por el agujero de la Etiqueta y, a continuación, tire de
la anilla.
Caja de etiquetas antisalpicadura: inserte la etiqueta en la caja y,
a continuación, colóquela directamente en el collar de su mascota,
utilizando la anilla suministrada o ensartando el collar de su mascota
por los extremos de la caja antisalpicadura para mascotas (se ajusta
a collares de hasta 15mm).
Page 15

15
www.loc8tor.eswww.loc8tor.com
ENCENDIDO / APAGADO
ENCENDIDO
• Mantenga presionado el botón de alimentación durante 2 segundos.
El Loc8tor emitirá un pitido y todas las luces parpadearán.
• La luz de estado pequeña parpadeará mientras esté encendido.
• El Loc8tor se apagará automáticamente tras 45 segundos de inactividad.
APAGADO
• Mantenga presionado el botón derecho durante 2 segundos. El Loc8tor emitirá un pitido y se apagará.
• Escriba en las Etiquetas adhesivas suministradas qué botón se corresponde con cada etiqueta/objeto.
• Si pulsa un botón de localización que no tiene una Etiqueta asignada, el Loc8tor emitirá un tono de error y
la luz de estado parpadeará rápidamente. Para asignar una Etiqueta a dicho botón, siga los pasos anteriores.
Pulse el botón izquierdo para seleccionar una de las tres modalidades de volumen: apagado, bajo y alto.
Cada vez que pulse el botón, se emitirá un pitido que indica el nivel de volumen actual.
VOLUMEN
CONSEJOS
GARANTÍA
Loc8tor Ltd. garantiza al comprador original que el producto adquirido no tendrá defectos importantes de material y
construcción durante 1 año a partir de la fecha de compra que aparece en el recibo.
En caso de que el producto tenga que ser devuelto, envíelo al lugar donde lo compró originalmente para su proceso.
Incluya la prueba de compra con el producto devuelto. Si adquirió el producto directamente a Loc8tor Ltd., necesitará
un número de autorización de devolución para poder devolvernos el producto. El producto debe devolverse por
correo certicado/mensajería en un envoltorio de protección adecuado.
Esta garantía no será de aplicación si el producto ha sido objeto de abuso, uso incorrecto, negligencia o manipulación
o ha sido modicado de alguna manera.
Sin perjuicio de sus derechos, Loc8tor Ltd. puede sustituir un producto defectuoso o emitir un vale para compras futuras.
No se incluye ninguna otra garantía, ni expresa ni implícita.
Loc8tor Ltd. no será responsable de ningún daño especial, fortuito o indirecto, independientemente de si ha informado
a Loc8tor Ltd. o a su distribuidor sobre el objeto para el cual adquirió el producto. Sus derechos legales no se verán
afectados de ninguna manera.
Page 16
16
www.loc8tor.es www.loc8tor.com
LOCALIZACIÓN – BÚSQUEDA DE MASCOTAS
PERDIDO
• Pulse el botón de encendido hasta que el Loc8tor emita un pitido y las luces parpadeen.
• Pulse el botón que su mascota/Etiqueta tienen asignado.
• El Loc8tor emitirá un pitido y la luz de estado parpadeará rápidamente mientras
busca la etiqueta.
• Cuando detecta la Etiqueta, las luces de localización se encienden y se inicia
la emisión de pitidos.
• Con el Loc8tor en la mano, dé una vuelta completa sobre sí mismo lentamente.
• Cuando el Loc8tor apunta en la dirección correcta y se va acercando al objeto,
la frecuencia y el tono de los pitidos aumenta y las luces del Loc8tor pasan de
rojo a ámbar y de ámbar a verde.
• Una vez completada la vuelta completa, sitúese en la dirección con las indicaciones
visuales y acústicas más fuertes y camine hacia adelante.
• Cuando vea las tres luces verdes encendidas, la etiqueta está muy cerca.
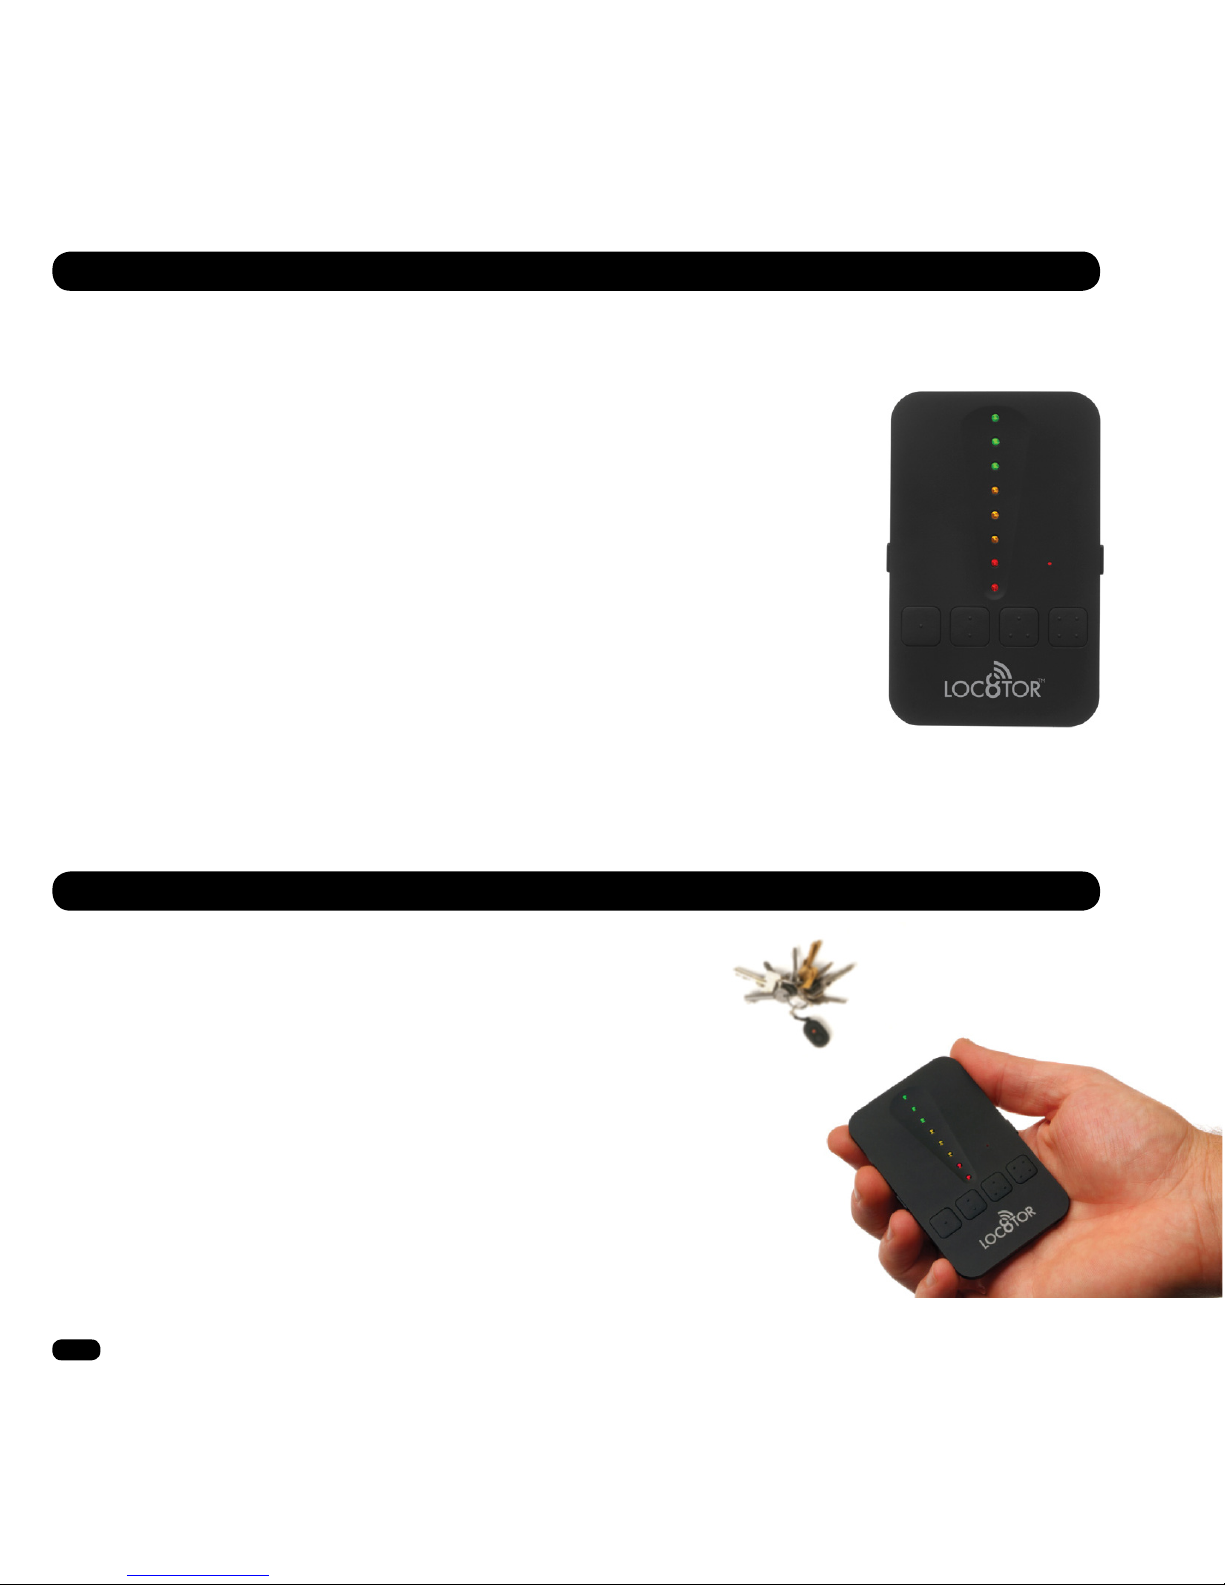
• Para guiarle directamente al objeto, el Loc8tor pasa a modo de zoom (ver fotografía).
A medida que se acerca, se iluminan más luces y aumenta el tono de los pitidos.
ENCONTRADO
Para detener una búsqueda, pulse el botón ON/OFF o el botón de localización que tenga asignado su etiqueta.
• Coloque una Etiqueta en una supercie y practique la localización
varias veces para ver cómo funciona.
• Si no está seguro sobre la dirección que debe tomar, dé una
vuelta completa sobre sí mismo lentamente y elija la dirección que
produzca mayores indicaciones.
• Las indicaciones más fuertes se producen cuando el Loc8tor apunta
directamente a la Etiqueta. Mueva el Loc8tor hacia arriba y hacia
abajo por si la Etiqueta estuviera en un piso superior o inferior.
• Si recibe una señal fuerte estando junto a una pared, compruebe en
la habitación contigua.
• Pulse el botón del volumen del Loc8tor cuando esté cerca para
silenciarlo y poder escuchar los pitidos de la Etiqueta.
• Si no se muestra ninguna indicación, cambie de ubicación y repita
el proceso.
CONSEJOS
Page 17

17
www.loc8tor.eswww.loc8tor.com
ALCANCE
El alcance depende en gran medida del lugar donde se use la etiqueta y del objeto donde esté colocada. La ilustración
siguiente puede servirle como referencia. El alcance real puede ser mucho mayor o menor, ya que el rendimiento del
Loc8tor depende en gran medida del tipo de aplicación y entorno en el que se usa. Para detener una búsqueda, pulse
el botón de encendido y apagado, o el botón de localización asignado a la etiqueta pertinente.
Para mayor seguridad, guarde el Loc8tor en su soporte cuando no lo use. El soporte puede adherirse a la nevera
o a cualquier otra supercie metálica gracias a su imán incorporado. Use el adhesivo para recordar qué botón está
asignado con cada objeto.
Enganche el adhesivo en el interior del soporte a modo de recordatorio.
SOPORTE
ALCANCE ESTIMADO
Avión Gato, perros o tortugasde juguete en un árbol
180m / 600ft
Coche aparcado
30m - 140m / 100ft - 500ft
Tortuga
30m / 100ft
Gato o perro
30m - 122m / 100ft - 400ft
TÉRMINOS Y CONDICIONES
Póngase en contacto con el establecimiento donde adquirió el producto o con el sitio Web de Loc8tor
(www.loc8tor.com/8) si desea consultar la versión íntegra de nuestros Términos y condiciones.
Page 18
18
www.loc8tor.es www.loc8tor.com
PILAS
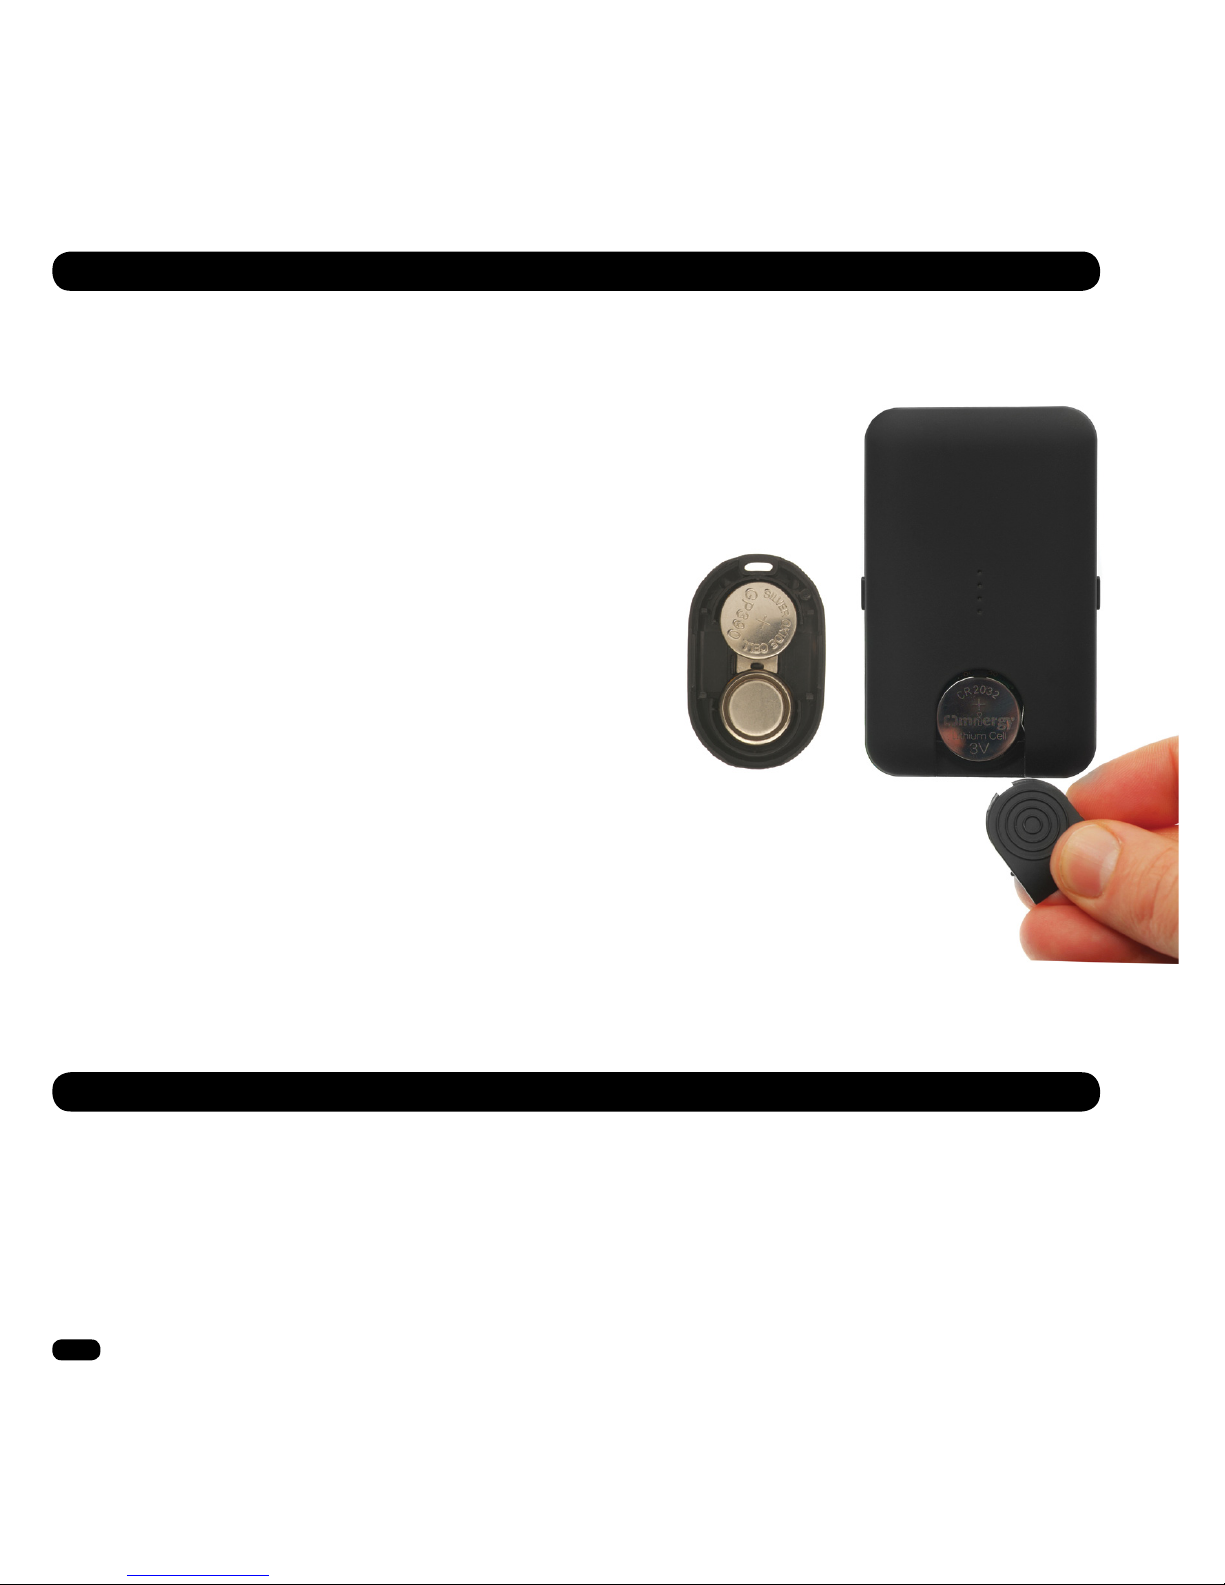
Loc8tor:
Si el Loc8tor no se enciende o las luces se muestran tenues,
extraiga la pila y cámbiela por otra del modelo CR2032 o
equivalente con la cara positiva hacia arriba. El compartimento
de la pila se encuentra en la parte inferior del reverso del
dispositivo. Deslice la cubierta hacia abajo para abrirlo.
Para cambiar las pilas de las Etiquetas:
Las Etiquetas presentan un agujero para pasar el cordel de la
anilla. Desde este extremo, coloque la uña del pulgar o una
herramienta plana en la línea divisoria (que divide la Etiqueta
en dos mitades).
Deslice la uña/herramienta por la línea divisoria hasta la
mitad del lado largo. La Etiqueta se abrirá.
• Retire las pilas gastadas e introduzca pilas nuevas de
botón SR54 (óxido de plata) de 1,5 v o equivalentes para
obtener una mayor duración, con la cara positiva hacia
arriba, lo más próxima al agujero del cordel.
• Coloque la cubierta introduciendo primero un lado y
empujando el otro a continuación.
• Si las pilas se han introducido correctamente, la Etiqueta
emitirá un pitido al cerrar la cubierta.
Para probar las pilas, abra y cierre la cubierta siguiendo los
pasos anteriores. Si la Etiqueta no emite ningún pitido ni
parpadean las luces, cambie las pilas.
MANTENIMIENTO GENERAL
• El Loc8tor y las Etiquetas no son resistentes al agua. Evite que se mojen. Le recomendamos que utilice
nuestra cubierta antisalpicadura para etiquetas con el n de conseguir una protección adicional).
• No los limpie con agua, detergente o productos de limpieza; utilice un trapo limpio y seco.
• La temperatura de funcionamiento del Loc8tor y las Etiquetas oscila entre 0˚C y +55˚C.
La temperatura de almacenamiento oscila entre -10˚C y +60˚C.
Page 19

19
www.loc8tor.eswww.loc8tor.com
Cuando una Etiqueta se ha asignado a un botón, sólo
se puede utilizar dicho botón para localizarla. Para
asignar la Etiqueta a un botón diferente o utilizarla en
otro Loc8tor, debe anular su registro.
Para anular el registro:
• Coloque la Etiqueta cuyo registro desea anular junto
al Loc8tor.
• Mantenga presionado el botón del volumen y al
mismo tiempo pulse el botón asignado a la Etiqueta
durante unos 3 segundos.
• El Loc8tor emitirá un pitido – suelte los botones.
• El Loc8tor emitirá dos pitidos y empezará a anular
el registro de la Etiqueta.
• Para conrmar la anulación del registro, la Etiqueta
y el Loc8tor emitirán dos pitidos.
Si una Etiqueta se estropea ésta puede borrarse para
poder asignar el botón a otra Etiqueta.
Para borrar una Etiqueta:
• Coloque la Etiqueta que desea borrar junto al Loc8tor.
• Mantenga presionado el botón del volumen y al mismo
tiempo pulse el botón asignado a la Etiqueta durante
unos 7 segundos hasta que el Loc8tor haya emitido
dos pitidos; a continuación, suelte los botones.
• El Loc8tor emitirá tres pitidos y empezará a anular el
registro de la Etiqueta.
• Para conrmar la eliminación, la Etiqueta y el Loc8tor
emitirán un pitido y las luces parpadearán.
Si encuentra la Etiqueta con posterioridad, puede volver
a registrarla en su Loc8tor siempre que éste disponga
de botones de localización disponibles.
NOTA
1. El alcance de 122 metros / 400 pies se basa en una línea de visión clara. El alcance real depende del uso, el
entorno y la ubicación.
2. Loc8tor no es un juguete y sólo debería ser utilizado por adultos o bajo la supervisión de un adulto.
3. El modo localizador se ha diseñado para ayudarle a encontrar sus pertenencias. No es tan útil para encontrar a
personas.
4. El Loc8tor se ha diseñado para usarse de acuerdo con las instrucciones.
5. PELIGRO DE ASFIXIA – MANTENER LAS ETIQUETAS SUELTAS FUERA DEL ALCANCE DE LOS NIÑOS.
CAMBIOS
El material del presente manual de instrucciones se ofrece a título meramente informativo y está sujeto a cambios
sin previo aviso. A pesar de que se ha hecho todo lo posible para garantizar la exactitud de las instrucciones,
Loc8tor Ltd no asume ninguna responsabilidad derivada de posibles errores u omisiones de este manual de
instrucciones o del uso de la información en él contenida. Loc8tor Ltd se reserva el derecho a realizar cambios en
el diseño del producto sin reserva alguna y sin necesidad de noticárselo a los usuarios.
ANULAR REGISTRO DE UNA ETIQUETA BORRAR UNA ETIQUETA
Page 20

20
www.loc8tor.fr www.loc8tor.com
Mode d’Emploi
User Guide • Manual del Usuario
Bedienungsanleitung • Manuale d’uso
L’emballage contient:
1x Loc8tor animaux de compagnie
2x mini étiquettes balises
1x support
boîtiers anti-éclaboussures
Autocollant d’identication d’étiquette
Anneau porte-clefs
Bandes adhésives
Pet
Don’t lose them, locate them!
Page
English . . . . . . . . . . . . . . . 2 - 10
Español . . . . . . . . . . . . . . 11 - 19
Français . . . . . . . . . . . . . . 20 - 28
Deutsch . . . . . . . . . . . . . . 29 - 37
Italiano . . . . . . . . . . . . . . 38 - 46
Page 21

21
www.loc8tor.frwww.loc8tor.com
INTRODUCTION
Nous vous remercions pour l’achat de votre Loc8tor animaux de
compagnie, ce tout nouveau produit qui vous aide à savoir où se
trouve votre animal de compagnie et à le trouver même dans ses
cachettes les plus secrètes.
Le Loc8tor animaux de compagnie a été conçu pour être polyvalent
et facile à utiliser, que ce soit à la maison ou à l’extérieur. Veuillez
prendre quelques minutes pour lire ce guide de l’utilisateur qui va
vous aider à tirer le meilleur parti de votre appareil.
Le Loc8tor a été fabriqué selon des normes de qualité lui permettant
de fonctionner sans problème. Il est
livré avec une garantie de 24 mois. Veuillez visiter notre site web à
l’adresse www.loc8tor.fr pour plus d’informations sur notre produit,
nos coordonnées et la foire aux questions.
Nous serons ravis de recevoir vos commentaires, de savoir ce que
vous aimez dans votre Loc8tor ou de connaître vos suggestions
pour l’améliorer ou même de lire vos anecdotes quant à l’aide qu’il
vous a apportée.
Envoyez-nous un email à [email protected]
Nous espérons que vous apprécierez la tranquillité d’esprit que vous
apporte votre nouvelle acquisition.
Anthony Richards
Directeur Général
Page 22
22
TABLE DES MATIÈRES
www.loc8tor.fr www.loc8tor.com
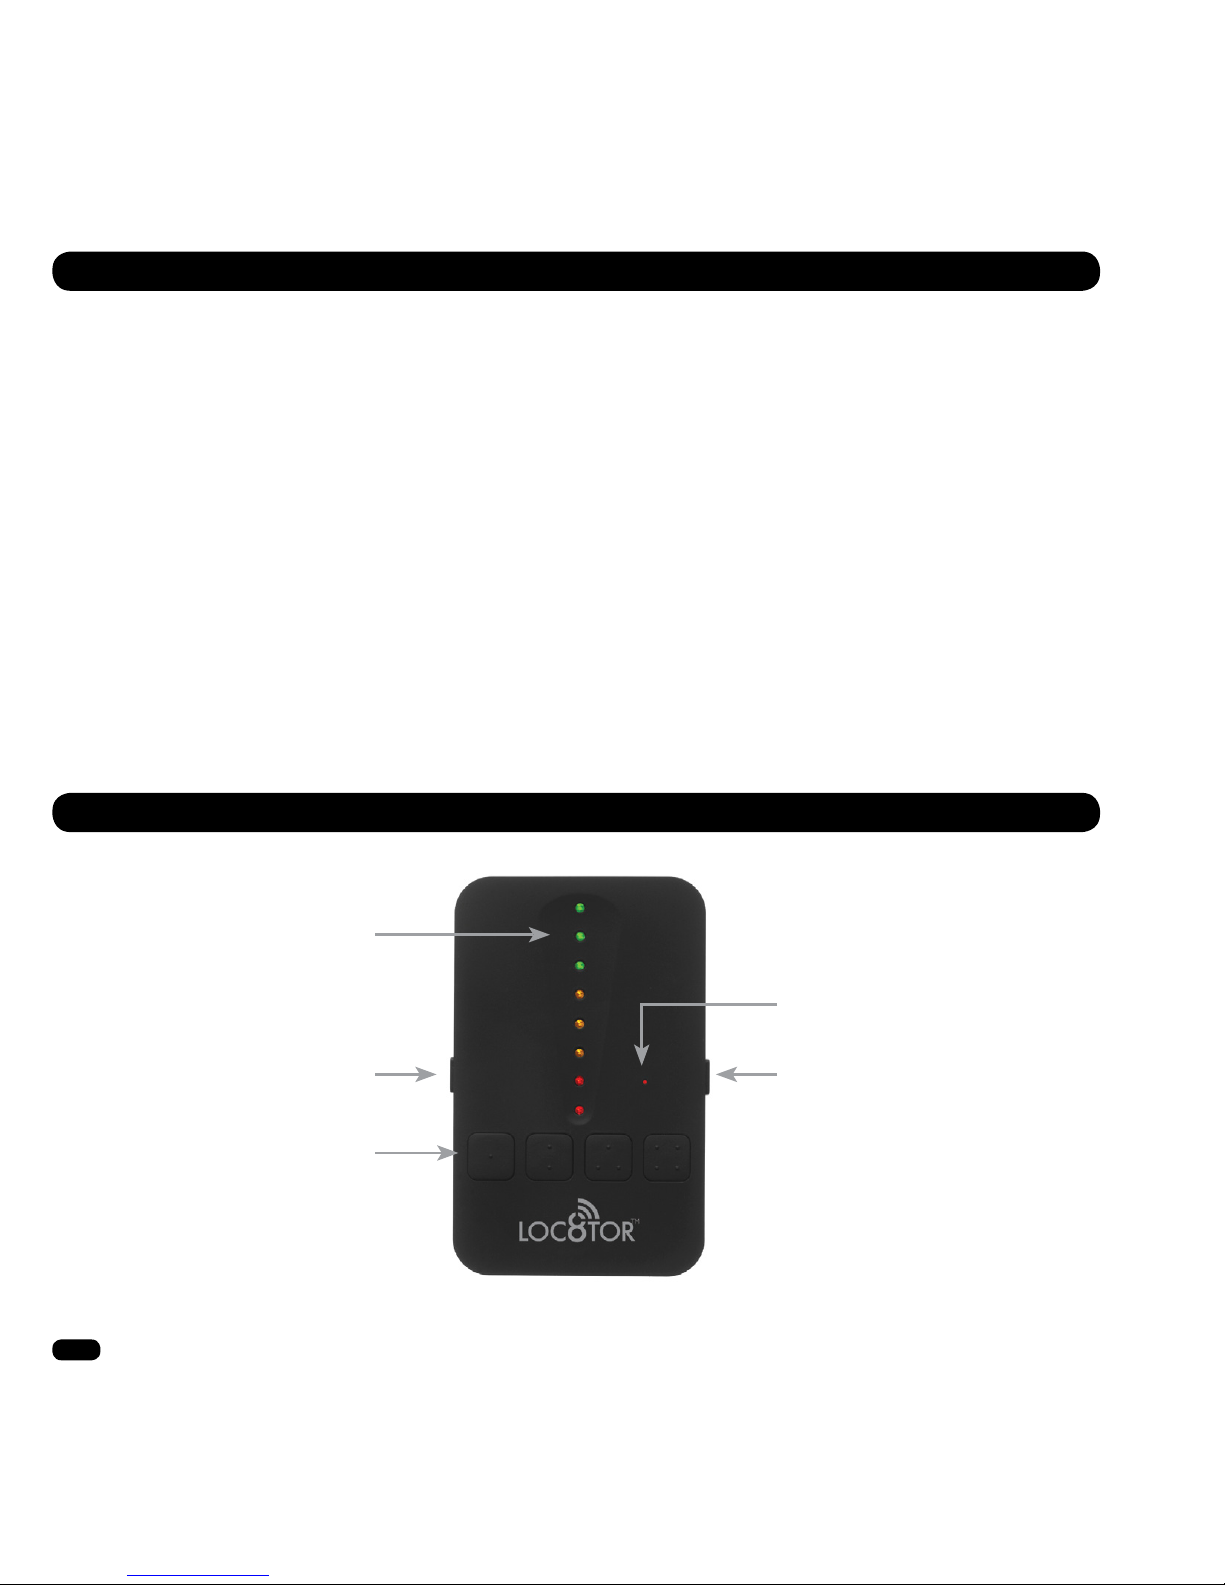
Volume
Allumer/Éteindre
(maintenir durant
2 secondes)
Enregistrer et
Localiser jusqu’à
quatre Étiquettes
Indicateurs Lumineux
Directionnels
Petit Indicateur
Lumineux
Pages
Touche de Navigation . . . . . . . . . . . . . 22
Mise en Route . . . . . . . . . . . . . . . . 23
Allumer et Éteindre . . . . . . . . . . . . . . . 24
Volume / Conseil . . . . . . . . . . . . . . . 24
Garantie . . . . . . . . . . . . . . . . . . . 24
Localiser . . . . . . . . . . . . . . . . . . . 25
Indications de Portée . . . . . . . . . . . . . . 26
Support . . . . . . . . . . . . . . . . . . . 26
Conditions Générales . . . . . . . . . . . . . . 26
Piles . . . . . . . . . . . . . . . . . . . . 27
Entretien général . . . . . . . . . . . . . . . 27
Désattribution / Suppression d’une Étiquette . . . . 28
Veuillez Noter / Modications . . . . . . . . . . 28
TOUCHE DE NAVIGATION
Page 23
23
www.loc8tor.frwww.loc8tor.com
MISE EN ROUTE
Il ne peut être plus simple de congurer ou d’utiliser votre Loc8tor. Veuillez
simplement suivre ces étapes et vous Serez prêt à détecterez votre
animal domestique étiqueté en moins de temps qu’il ne faut pour le dire.
1. ACTIVER LES PILES
Retirez la bandelette à l’arrière de votre Loc8tor pour activer la pile.
Il émettra un bip sonore et tous les indicateurs lumineux clignoteront :
Il est maintenant allumé (ON*)
* Votre Loc8tor s’éteindra après 45 secondes d’inactivité.
2. ENREGISTRER UNE ÉTIQUETTE
• Retirez la bandelette de l’Étiquette pour activer les piles.
• L’Étiquette émet un double bip sonore et l’indicateur lumineux rouge clignote deux fois.
• Disposez l’Étiquette que vous souhaitez attribuer à coté du Loc8tor en vous assurant
que toutes les autres Étiquettes ont été éloignées de plus de 1 mètre.
• Assurez-vous que le Loc8tor animaux de compagnie soit allumé
(l’indicateur lumineux rouge clignotera lorsqu’il est sur ON).
• Sélectionnez l’un des boutons situé sur le Loc8tor pour lui attribuer l’Étiquette.
Maintenez le bouton enfoncé durant 3 secondes. Le Loc8tor émettra un bip.
• Relâchez le bouton: Loc8tor émettra un bip sonore pour conrmer le début de l’attribution et
l’indicateur lumineux clignotera rapidement. L’Étiquette poursuivra la procédure d’attribution.
• Dès que l’attribution est terminée, l’Étiquette et le Loc8tor émettront un bip sonore et clignoteront une fois.
• Répétez la procédure jusqu’à ce que 4 Étiquettes soient attribuées à un bouton différent. Les quatre Étiquettes,
lorsque localisées, émettront un bip sonore différent pour permettre leur identication.
3. FIXER LES ÉTIQUETTES
Anneau porte-clefs: Utilisé pour xer l’étiquette aux articles,
comme le collier de votre animal de compagnie, un porte-clefs,
un sac, untéléphone portable, etc. Introduisez l’anneau dans le
trou de l’étiquette et faites-le pivoter.
Boîtier d’étiquette anti-éclaboussures: Insérez l’étiquette dans le
boîtier, xez-le directement au collier de votre animal de compagnie avec
l’anneau porte-clefs fourni ou en enlant le collier dans les oreillettes
du boîtier (convient pour les colliers jusqu’à 15 mm d’épaisseur).
Page 24

24
www.loc8tor.fr www.loc8tor.com
ALLUMER ET ÉTEINDRE
ALLUMER
• Maintenez le bouton d’alimentation enfoncé durant 2 secondes.
Le Loc8tor émettra un signal sonore et tous les indicateurs lumineux clignoteront.
• Le petit indicateur lumineux clignotera en position ON.
• Le Loc8tor se mettra automatiquement en position de veille après 45 secondes d’inactivité.
ÉTEINDRE
• Maintenez le bouton droit enfoncé durant 2 secondes. Le Loc8tor émettra un bip sonore et s’éteindra.
• Inscrivez sur l’autocollant fourni quel bouton est associé à quelle Étiquette / article.
• Si un bouton de localisation est pressé sans qu’il soit associé à une Étiquette, une tonalité d’erreur retentira et
l’indicateur lumineux clignotera rapidement. Pour attribuer une Étiquette à ce bouton, veuillez suivre les étapes ci-dessus.
Pressez le bouton gauche pour choisir une conguration de volume: muet, faible et élevé.
Un bip sonore retentira lors de la pression pour indiquer le volume sonore actuel.
VOLUME
CONSEIL
GARANTIE
Loc8tor Ltd. garantit au premier acheteur que ce produit est exempt de défauts matériels et de montage pour une
durée d’un an à compter de la date d’achat gurant sur votre récépissé.
Dans l’éventualité d’un retour du produit, il doit être renvoyé au lieu d’achat original pour être traité. La preuve
d’achat doit accompagner le retour du produit. Si l’achat a été effectué directement auprès de Loc8tor Ltd., un
numéro d’autorisation de retour est nécessaire avant que vous nous renvoyiez le produit. Le produit doit être
retourné avec preuve d’expédition et dans un emballage de protection adéquat.
Cette garantie ne s’applique pas aux produits ayant été maltraités, ayant fait l’objet d’un usage impropre, d’une
négligence, ayant subi une intervention ou ayant été modié de quelque façon que ce soit.
Sans préjudice de vos droits, Loc8tor Ltd. peut remplacer un produit défectueux ou émettre un avoir à valoir sur
des achats futurs.
Aucune autre garantie, expresse ou implicite, n’est fournie.
Loc8tor Ltd. ne sera pas tenue responsable pour les dommages exceptionnels, les dommages-intérêts ou les
dommages collatéraux, que Loc8tor Ltd., le revendeur ou toute autre personne aient pu connaître la raison pour
laquelle vous avez acheté le produit. Vos droits statutaires n’en sont pour autant aucunement affectés.
Page 25
25
www.loc8tor.frwww.loc8tor.com
LOCALISER – TROUVER UN ANIMAL DOMESTIQUE
PERDU
• Pressez et maintenez le bouton ON enfoncé jusqu’à ce que le Loc8tor émette un bip
sonore et que les indicateurs lumineux clignotent.
• Pressez le bouton qui correspond à votre animal domestique / Étiquette.
• Le Loc8tor émettra un bip sonore et l’indicateur de statut clignotera rapidement en
cherchant votre Étiquette.
• Lorsqu’une Étiquette est détectée, les indicateurs de localisation s’allumeront et
le son se mettra en route.
• Le Loc8tor en main, pivotez lentement sur vous-même jusqu’à ce qu’un tour complet soit fait.
• En vous dirigeant dans la bonne direction et en vous rapprochant de l’article, l’intensité
sonore et la fréquence des bips augmenteront et les indicateurs lumineux du Loc8tor
passeront du rouge à l’orange puis au vert.
• Dès que vous aurez fait un tour complet, dirigez-vous dans la direction indiquée par
le plus fort signal sonore et visuel.
• Lorsque vous apercevez trois lumières vertes, cela signie que l’étiquette est très proche.
• Pour vous conduire encore plus près, le Loc8tor se met maintenant en mode zoom
(écran directionnel). A mesure que vous vous rapprocherez, des indicateurs lumineux
supplémentaires s’allument et l’intensité sonore augmente.
TROUVÉ
Pour arrêter une recherche, pressez le bouton ON/OFF ou le bouton de localisation associé à votre Étiquette.
• Disposez l’Étiquette sur une surface et entraînez-vous à la localiser plusieurs
fois pour vous rendre compte du fonctionnement de l’appareil.
• Si vous n’êtes pas certain de la direction à prendre, recommencez à pivoter
lentement sur 360° et allez dans la direction indiquée par le signal le plus fort.
• Le signal le plus fort est afché lorsque le Loc8tor pointe directement sur
l’Étiquette. Pointez également le Loc8tor vers le haut ou vers le bas car
l’Étiquette peut se trouver à l’étage supérieur ou inférieur.
• Si, en recevant un signal fort, vous vous trouvez près d’un mur, vériez la
pièce d’à côté.
• Appuyez sur le bouton de volume sonore du Loc8tor lorsque vous êtes proche
an de le rendre muet et d’être attentif aux bips de l’Étiquette.
• Si aucun signal n’est afché, essayez de changer de lieu et répétez la procédure.
CONSEILS
Page 26

26
www.loc8tor.fr www.loc8tor.com
INDICATIONS DE PORTÉE
La portée est très variable en fonction de l’endroit où l’Étiquette est utilisée et de ce à quoi elle est xée. Le
diagramme en annexe fournit des indications. La portée réelle peut largement augmenter ou décroître car elle
dépend du type d’application et de l’environnement.
Pour le garder en lieu sûr lorsque vous ne l’utilisez pas, placez le Loc8tor dans le support. Le support
peut être xé au réfrigérateur ou sur toute surface métallique grâce à l’aimant fourni.
Utilisez l’autocollant pour vous rappeler quel bouton localisera quel objet. Collez-le à l’intérieur du
support comme aidemémoire.
SUPPORT
INDICATIONS DE PORTÉE
Aéromodèle dans un arbre
180m
Voiture en Stationnement
30m - 140m
Tortue
30m
Chat ou Chien
30m - 122m
CONDITIONS GÉNÉRALES
Veuillez contacter le lieu d’achat ou consulter le site web de Loc8tor (www.Loc8tor.com/8) pour obtenir l’intégralité
des conditions générales.
Page 27
27
www.loc8tor.frwww.loc8tor.com
PILES
Loc8tor:
Si le Loc8tor ne s’allume pas ou que les indicateurs lumineux
sont faibles, remplacez la pile CR2032 (ou équivalente) en la
disposant dans le logement. Le logement de pile se trouve à
l’arrière, en bas. Faites glisser le couvercle pour ouvrir.
Étiquettes:
Un trou permet de passer le cordon. Placez votre ongle de
pouce ou un outil plat à cet endroit de la ligne de jonction
(ligne se trouvant tout autour de l’Étiquette, au milieu).
En maintenant votre ongle / l’outil plat dans la ligne
de jonction, déplacez-le tout autour jusqu’au milieu
du grand côté. L’Étiquette s’ouvrira.
• Remplacez avec une pile bouton SR54 (oxyde d’argent)
de 1.5 V ou équivalente pour une plus longue durée de
vie de la pile, en dirigeant sa face positive vers le haut
près du trou du cordon.
• Replacez le couvercle en l’enclenchant d’un côté et
pressez ensuite pour fermer.
• Si les piles sont correctement insérées, l’Étiquette émettra
un bip sonore lorsque le boîtier sera fermé.
Pour tester les piles, ouvrez et refermez ensuite le couvercle
en suivant les étapes ci-dessus. Si l’Étiquette n’émet pas de
bip sonore ou ne clignote pas, remplacez les piles.
ENTRETIEN GÉNÉRAL
• Le Loc8tor et les Étiquettes n’ont pas été conçus pour être étanches. Prenez soin de ne pas
les mouiller. Nous vous recommandons d’utiliser nos housses pour étiquettes résistantes aux
éclaboussures pour une protection supplémentaire.
• Ne le nettoyez jamais avec de l’eau, du détergent ou un produit de nettoyage.
Utilisez simplement un tissu propre et sec.
• L’Étiquette et le Loc8tor ont une température de fonctionnement comprise entre 0˚C et + 55˚C.
La température de stockage se situe entre - 10˚C et + 60˚C.
Page 28

28
www.loc8tor.fr www.loc8tor.com
Dès qu’une Étiquette a été attribuée à un bouton,
seul ce bouton peut être utilisé pour la localiser. Pour
déplacer l’Étiquette vers un autre bouton ou utiliser un
autre Loc8tor, vous devrez d’abord la désattribuer.
Pour désattribuer:
• Disposez l’Étiquette à désattribuer près du Loc8tor.
• Maintenez le bouton du volume enfoncé et, en
même temps, pressez le bouton correspondant
à l’Étiquette durant 3 secondes.
• Loc8tor émettra un bip, relâchez les boutons.
• Loc8tor émettra deux bips et commencera à
désattribuer l’Étiquette.
• Pour conrmer la réussite de la désattribution,
l’Étiquette et le Loc8tor émettront un double bip.
Si une Étiquette a été endommagée, l’Étiquette peut
être supprimée, ce qui permet à une autre Étiquette
d’être attribuée à ce bouton.
Pour Supprimer:
• Maintenez le bouton du volume enfoncé et, en même
temps, pressez le bouton correspondant à l’Étiquette
durant 7 secondes jusqu’à ce que le Loc8tor émette
un double bip. Relâchez ensuite les boutons.
• Le Loc8tor émettra trois bips sonores et commencera
à supprimer l’Étiquette.
• Pour conrmer la réussite de la suppression, l’Étiquette
et le Loc8tor émettront un bip et l’indicateur
lumineux clignotera.
Si l’Étiquette est réparée ultérieurement, elle peut toujours
être réenregistrée sur ce Loc8tor à condition qu’aucune
autre Étiquette ne lui ait été attribuée à cette place.
VEUILLEZ NOTER
1. La portée de 122 mètres tient compte d’une ligne de visée nette. La portée réelle varie en fonction de
l’utilisation, de l’environnement et de l’emplacement.
2. Le Loc8tor n’est pas un jouet et n’est destiné qu’à l’usage adulte ou sous supervision parentale.
3. Le mode de localisation a été conçu pour vous permettre de retrouver vos effets personnels.
Il ne peut pas servir à retrouver des personnes.
4. Le Loc8tor est destiné à être utilisé conformément aux instructions.
5. PRENEZ GARDE AUX CHOCS ÉLECTRIQUES. CONSERVEZ LES ÉTIQUETTES LIBRES À L’ABRI
DE LA PORTÉE DES JEUNES ENFANTS.
MODIFICATIONS
Le contenu de ce guide de l’utilisateur est uniquement destiné à votre information et peut être modié sans préavis.
Bien que les meilleurs efforts aient été déployés lors de la préparation de ce mode d’emploi pour en assurer la
précision, Loc8tor Ltd. ne pourra être tenue responsable d’erreurs ou d’omissions qui seraient contenues dans ce
guide de l’utilisateur ou de l’emploi des informations qui y sont reprises. Loc8tor Ltd. se réserve le droit d’apporter
des modications à la conception du produit, sans restriction et sans avis à ses utilisateurs.
DÉSATTRIBUTION D’UNE ÉTIQUETTE SUPPRESSION D’UNE ÉTIQUETTE
Page 29

29
www.loc8tor.euwww.loc8tor.com
Bedienungsanleitung
User Guide • Manual del Usuario
Mode d’Emploi • Manuale d’uso
Packungsinhalt:
1x Loc8tor Pet
2x Mini-Sender
1x Halterung
Spritzwassergeschütztes Gehäuse
Sender-Aufkleber
Schlüsselring
Klebestreifen
Pet
Don’t lose them, locate them!
Page
English . . . . . . . . . . . . . . . 2 - 10
Español . . . . . . . . . . . . . . 11 - 19
Français . . . . . . . . . . . . . . 20 - 28
Deutsch . . . . . . . . . . . . . . 29 - 37
Italiano . . . . . . . . . . . . . . 38 - 46
Page 30

30
www.loc8tor.eu www.loc8tor.com
EINLEITUNG
Vielen Dank für den Kauf des Loc8tor Pet, eines neuen Produkts, mit
dem Sie Ihr Tier im Auge behalten und auch in schwer zugänglichen
Verstecken aufspüren können.
Der Loc8tor Pet wurde so konzipiert, dass er einfach und vielseitig zu
verwenden ist, ob zu Hause, unterwegs oder auf Reisen. Bitte nehmen
Sie sich einige Minuten Zeit, diese Bedienungsanleitung durchzulesen,
um den größtmöglichen Nutzen aus Ihrem Gerät zu ziehen.
Um seine einwandfreie Funktion zu gewährleisten, wurde der Loc8tor
unter Einhaltung von Qualitätsnormen hergestellt. Das versichern wir
Ihnen mit unserer 24-monatigen Garantie. Bitte besuchen Sie unsere
Website www.loc8tor.eu, falls Sie weitere Produktinformationen
wünschen. Dort nden Sie auch unsere Kontaktdaten und häug
gestellte Fragen (FAQ).
Wir würden uns freuen von Ihnen zu erfahren, was Sie besonders
am Loc8tor schätzen, oder Vorschläge aller Art zur Verbesserung
des Produkts von Ihnen zu erhalten. Oder senden Sie uns lustige
Geschichten, wie der Loc8tor Ihnen geholfen hat. Schicken Sie eine
E-Mail an [email protected], um uns Ihre Geschichte mitzuteilen.
Wir wünschen Ihnen viel Freude mit Ihrem neuen Produkt und hoffen,
dass Sie von der Ruhe und Entspannung protieren, die diese
Anschaffung mit sich bringt.
Anthony Richards
Geschäftsführer
Page 31
31
www.loc8tor.euwww.loc8tor.com
INHALT
BESCHREIBUNG DER TASTEN
Lautstärke
Ein/Aus
(2 Sekunden
gedrückt halten)
Registrieren und Orten
von bis zu vier Sendern
Richtungsleuchten
Statusleuchte
Seite
Beschreibung der Tasten . . . . . . . . . . . . 31
Inbetriebnahme . . . . . . . . . . . . . . . . 32
Ein- / Ausschalten . . . . . . . . . . . . . . . 33
Lautstärke / Tipp . . . . . . . . . . . . . . . 33
Gewährleistung . . . . . . . . . . . . . . . . 33
Orten . . . . . . . . . . . . . . . . . . . . 34
Hinweise zur Reichweite . . . . . . . . . . . . 35
Halterung . . . . . . . . . . . . . . . . . . 35
Allgemeine Geschäftsbedingungen . . . . . . . . 35
Batterien . . . . . . . . . . . . . . . . . . 36
Pege . . . . . . . . . . . . . . . . . . . . 36
Sender abmelden / löschen . . . . . . . . . . . 37
Hinweise / Änderungen . . . . . . . . . . . . . 37
Page 32
32
www.loc8tor.eu www.loc8tor.com
INBETRIEBNAHME
Die Inbetriebnahme Ihres Loc8tors könnte nicht einfacher sein.
Befolgen Sie einfach die unten aufgeführten Schritte. So können Sie Ihre
mit einem Sender ausgestatteten Tiere im Handumdrehen aufspüren.
1. BATTERIEN AKTIVIEREN
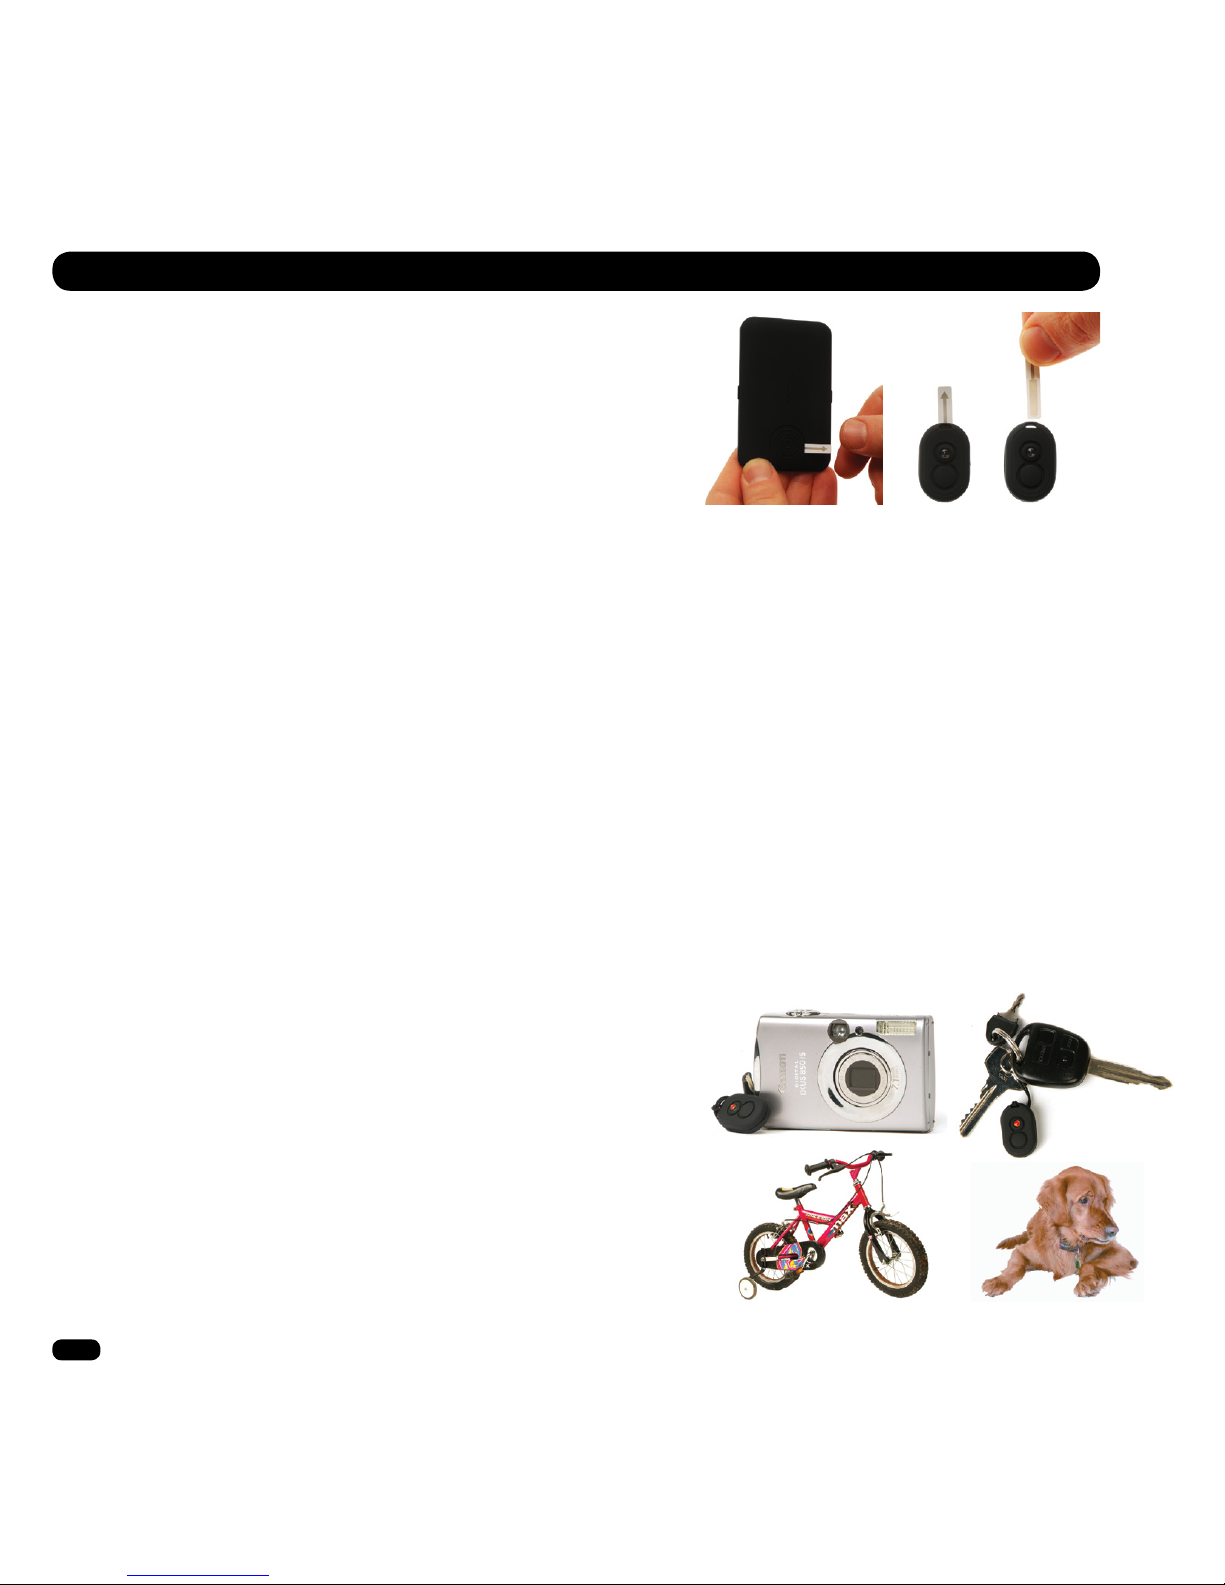
Ziehen Sie den Streifen auf der Rückseite Ihres Loc8tors heraus,
um die Batterie zu aktivieren. Das Gerät piept und alle Leuchten
blinken auf – es ist nun EINGESCHALTET.*
*(Nach 45 Sekunden im Leerlauf schaltet sich Ihr Loc8tor von selbst aus).
2. EINEN SENDER REGISTRIEREN
• Ziehen Sie den Streifen am Sender heraus, um die Batterien zu aktivieren.
• Der Sender piept zwei Mal und das rote Licht leuchtet zwei Mal auf.
• Legen Sie den Sender, den Sie registrieren wollen, neben den Loc8tor. Stellen Sie dabei sicher,
dass alle anderen Sender mindestens eine Armeslänge weit entfernt sind.
• Stellen Sie sicher, dass der Loc8tor Pet eingeschaltet ist (rote Statusleuchte blinkt, wenn EINGESCHALTET).
• Drücken Sie auf eine der Tasten auf der Vorderseite des Loc8tors, um ihr einen Sender zuzuordnen.
Halten Sie die Taste 3 Sekunden lang gedrückt, bis der Loc8tor piept.
• Lassen Sie die Taste wieder los. Der Loc8tor piept zur Bestätigung der Registrierung und
die Statusleuchte blinkt in kurzen Abständen. Die Registrierung des Senders wird abgeschlossen.
• Nach erfolgter Registrierung piepen der Sender und der Loc8tor ein Mal und leuchten kurz auf.
Wiederholen Sie den Vorgang für bis zu 4 Sender, indem Sie jeden Sender einer anderen Taste zuordnen.
Jeder der vier Sender gibt einen anderen Piepton ab, um die Identizierung zu erleichtern.
3. TAGS ANBRINGEN
Schlaufe für Schlüsselring: Verwenden Sie diese Schlaufe, um einen
Sender am Halsband Ihres Tieres zu befestigen. Schieben Sie die
Schlaufe durch die Öse am Sender und ziehen sie anschließend den
Ring durch die Schlaufe.
„Splashproof“-Gehäuse: Legen Sie den Sender in das Gehäuse
ein und befestigen Sie es direkt am Halsband Ihres Tieres. Dafür können
Sie wahlweise den Schlüsselring verwenden oder das Gehäuse auf dem
Halsband aufziehen (für Halsbänder bis 15mm (0,6“) geeignet.
Page 33

33
www.loc8tor.euwww.loc8tor.com
EIN- / AUSSCHALTEN
EIN
• Halten Sie die rechte Taste 2 Sekunden lang gedrückt. Der Loc8tor piept und die Leuchten blinken auf.
• Die kleine Statusleuchte blinkt, wenn das Gerät eingeschaltet ist.
• Der Loc8tor schaltet sich automatisch aus, wenn Sie 45 Sekunden lang keine Taste bedienen.
AUS
• Halten Sie die rechte Taste 2 Sekunden lang gedrückt. Der Loc8tor piept und schaltet sich dann aus.
• Notieren Sie auf dem beigefügten selbstklebenden Etikett, welche Taste welchem Sender/ Tier zugeordnet ist.
• Falls Sie auf eine Taste drücken, der kein Sender zugeordnet ist, ertönt ein Fehlersignal und die Statusleuchte
blinkt mehrmals schnell hintereinander auf. Wiederholen Sie den oben aufgeführten Registrierungsvorgang,
wenn Sie dieser Taste einen Sender zuordnen möchten.
Drücken Sie auf die linke Taste, um unter drei Lautstärkeeinstellungen auszuwählen: aus, leise und laut.
Ein hörbares Piepen ertönt und zeigt die jeweilige Lautstärkeeinstellung an, wenn die Taste gedrückt wird.
LAUTSTÄRKE
TIPP
GEWÄHRLEISTUNG
Loc8tor Ltd. gewährleistet dem Ersterwerber, dass dieses Produkt ein Jahr ab Kaufdatum (maßgeblich ist das
Datum auf dem Kassenbon oder der Quittung) frei von Material- und Herstellungsfehlern ist.
Sollten Sie dieses Produkt zurückgeben müssen, muss es zur Bearbeitung an den ursprünglichen Verkäufer
zurückgesandt werden. Die Quittung bzw. der Kassenbon ist dem zurückgesandten Produkt beizulegen.
Falls dieses Produkt direkt von Loc8tor Ltd. gekauft wurde, müssen Sie sich einen Autorisierungscode für die
Rücksendung besorgen, bevor Sie das Produkt an uns zurücksenden. Das Produkt muss per Einschreiben und
angemessen geschützt verpackt zurückgesandt werden.
Diese Gewährleistung gilt nicht für Produkte, die durch unsachgemäße Nutzung, Missbrauch, Unachtsamkeit oder
Manipulation beschädigt wurden oder die umgebaut wurden.
Unbeschadet Ihrer Rechte behält sich Loc8tor das Recht vor, ein defektes Gerät auszutauschen oder eine
Gutschrift für spätere Käufe auszustellen.
Es werden keine weiteren ausdrücklichen oder stillschweigenden Gewährleistungen gegeben.
Loc8tor Ltd. ist nicht verantwortlich für konkrete, beiläuge oder Folgeschäden, ganz gleich, ob Sie den Zweck,
für den Sie das Produkt gekauft haben, vorab Loc8tor Ltd., dem Verkäufer oder Dritten mitgeteilt haben. Ihre
gesetzlichen Ansprüche bleiben unberührt.
Page 34
34
www.loc8tor.eu www.loc8tor.com
ORTEN – EIN VERMISSTES TIER AUFSPÜREN
VERLOREN
• Drücken Sie so lange auf die EIN/AUS-Taste, bis der Loc8tor einen Piepton abgibt
und die Leuchten blinken.
• Drücken Sie auf die Taste, die Sie dem jeweiligen Tier zugeordnet haben.
• Der Loc8tor piept und blinkt in kurzen Abständen, während er den Sender Ihres Tieres ortet.
• Wenn ein Sender erkannt wurde, gehen die Ortungsleuchten an und es ertönt ein Signalton.
• Drehen Sie sich mit dem Loc8tor in der Hand einmal langsam im Kreis.
• Wenn Sie in die richtige Richtung zeigen und sich dem Tier nähern, nehmen Höhe
und Häugkeit der Pieptöne zu, und die Leuchten auf dem Loc8tor wechseln von
Rot zunächst auf Gelb, dann auf Grün.
• Wenn Sie sich einmal ganz im Kreis gedreht haben, laufen Sie in die Richtung,
in der Sie das stärkste sichtbare und hörbare Signal erhalten haben.
• Wenn drei grüne Leuchten auf dem Loc8tor aueuchten, ist das gesuchte Tier
in unmittelbarer Nähe.
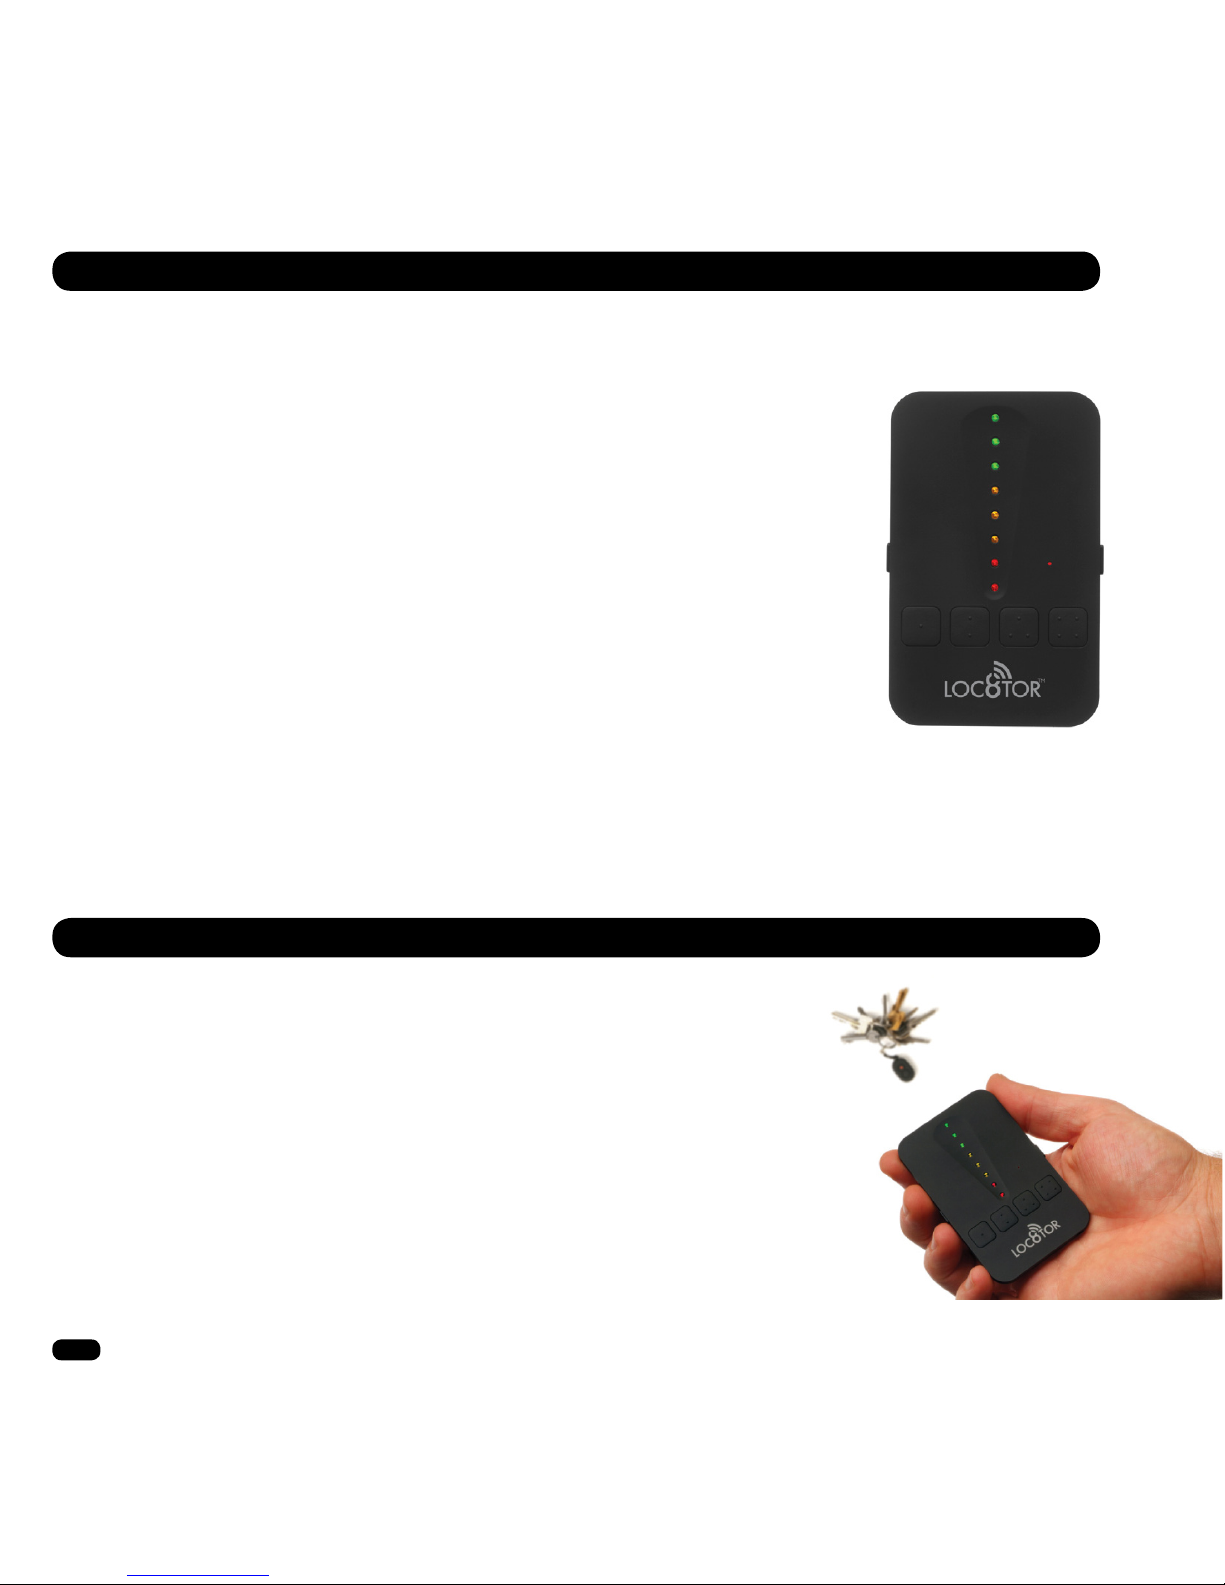
• Um Sie direkt zu Ihrem Tier zu führen, wechselt der Loc8tor nun in den Zoom-Modus
(Abbildung). Je näher Sie Ihrem Tier kommen, desto mehr Leuchten blinken auf und
umso höher wird das Tonsignal.
GEFUNDEN
Um eine Suche abzubrechen, drücken Sie die EIN / AUS-Taste oder die Ortungstaste, die Ihrem Sender zugeordnet ist.
TIPPS – ZUM ORTEN IHRES TIERES
• Legen Sie den Sender auf eine Oberäche und üben Sie den Ortungsvorgang
einige Male, um ein Gefühl für die Funktionsweise des Gerätes zu bekommen.
• Wenn Sie einmal unsicher sind, in welche Richtung Sie gehen sollen, drehen
Sie sich noch einmal ganz langsam im Kreis und wählen Sie dann die Richtung
mit dem stärksten Signal.
• Das stärkste Signal erhalten Sie, wenn der Loc8tor direkt in die Richtung des
Senders zeigt. Bewegen Sie den Loc8tor auch nach oben oder nach unten, da
sich ein Sender auch in einer anderen Ebene benden kann.
• Wenn Sie das stärkste Signal an einer Wand erhalten, suchen Sie auch im Nebenraum.
• Schalten Sie das Gerät stumm, wenn Sie glauben, nah am gesuchten Objekt zu
sein und horchen Sie auf das Tonsignal des Senders.
• Wenn Sie kein Signal hören, starten Sie den Vorgang an einem anderen Ort noch einmal.
Page 35

35
www.loc8tor.euwww.loc8tor.com
HINWEISE ZUR REICHWEITE
Die Reichweite ist stark davon abhängig, wo das Ortungsgerät genutzt wird und woran der Sender befestigt wurde.
Die nachfolgende Tabelle enthält ungefähre Angaben. Die tatsächliche Reichweite kann größer oder kleiner sein,
da die Leistung des Gerätes von der Art der Verwendung und dem Umfeld beeinusst wird, in dem es genutzt wird.
Legen Sie den Loc8tor zur sicheren Aufbewahrung in die Halterung, wenn Sie ihn nicht benutzen. Die Halterung
kann mit dem Magnet am Kühlschrank oder jeder anderen magnetischen Metalloberäche angebracht werden.
Verwenden Sie den Aufkleber als Erinnerungshilfe, welche Taste welchem Tier zugeordnet ist. Kleben Sie ihn als
Gedankenstütze auf die Innenseite der Halterung.
HALTERUNG
UNGEFÄHRE REICHWEITEN
Modellflugzeug in einem Baum
180m
Geparktes Auto
30m - 140m
Katze oder Hund
30m - 122m
Schildkröte
30m
ALLGEMEINE GESCHÄFTSBEDINGUNGEN
Die vollständigen Allgemeinen Geschäftsbedingungen erhalten Sie bei dem Verkäufer Ihres Loc8tors oder
auf der Loc8tor Website unter www.loc8tor.com/8
Page 36
36
www.loc8tor.eu www.loc8tor.com
BATTERIEN
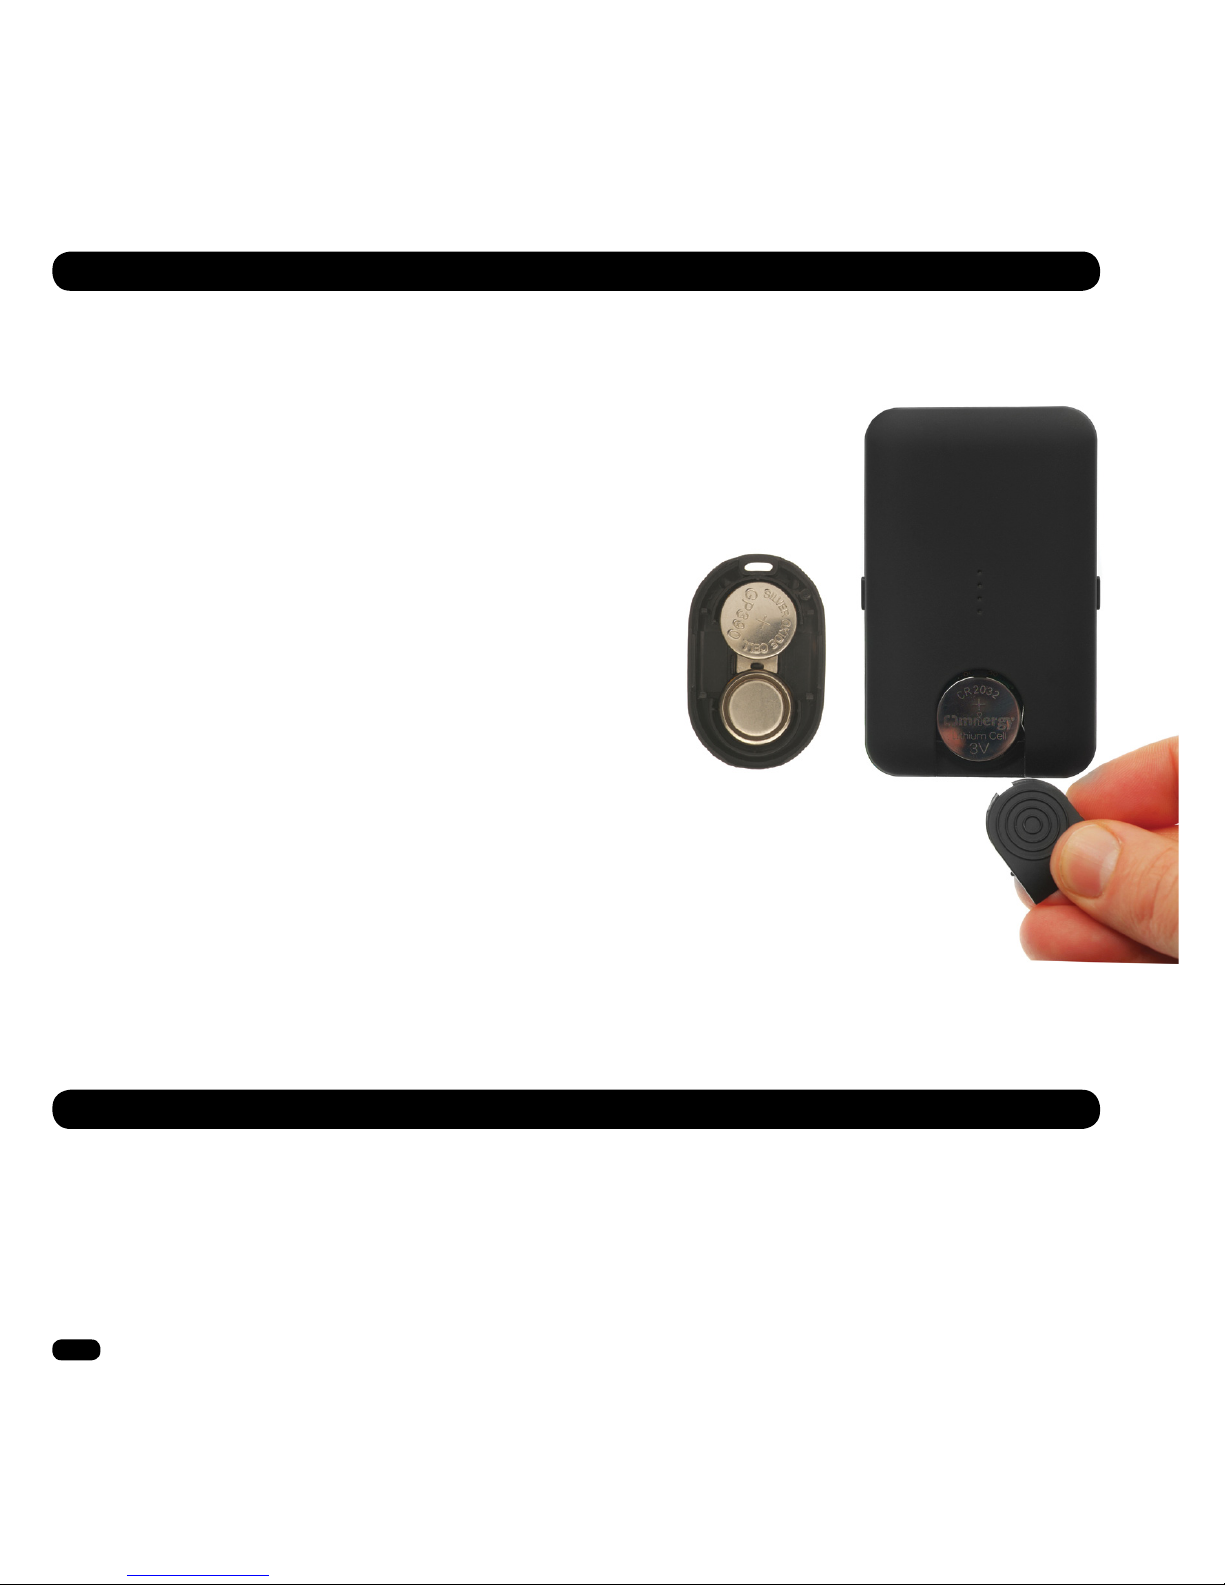
Loc8tor-Handgerät:
Wenn der Loc8tor sich nicht einschalten lässt oder die Leuchten
schwach sind, wechseln Sie die Batterie. Sie benötigen eine
CR2032-Batterie oder eine Gleichwertige Batterie, die mit der
+-Seite in das Batteriefach eingelegt wird. Das Batteriefach
bendet sich unten auf der Rückseite. Schieben Sie den Deckel
nach unten, um es zu öffnen.
Loc8tor-Sender:
Am Sender bendet sich ein Loch, durch das Sie ein Schlaufe
fädeln können. Schieben Sie an diesem Ende Ihren Daumennagel
oder ein aches Werkzug in die Nut, um beide Hälften auseinander
zu ziehen. (Die Nut verläuft um die Mitte des Senders).
Schieben Sie Ihren Daumennagel oder das ache Werkzeug in dieser
Nut bis zur Mitte der Längsseite. Das Gehäuse springt jetzt auf.
• Sie benötigen 1,5-V-Knopfzellen des Typs SR54 (Silberoxid) oder
gleichwertige Batterien, um die bestmögliche Batterieleistung zu
erhalten. Die Batterie, die dem Schlaufenloch am nächsten ist,
muss mit der +-Seite nach oben eingelegt werden.
• Schließen Sie den Deckel, indem Sie erst eine Seite einschieben
und den Deckel dann zudrücken.
• Wenn die Batterien richtig eingelegt wurden, piept der Sender
beim Schließen des Gehäuses.
Um die Batterien zu testen, öffnen und schließen Sie den Deckel
wie oben beschrieben. Wenn der Sender nicht piept und leuchtet,
müssen die Batterien gewechselt werden.
PFLEGE
• Der Loc8tor und die Sender sind nicht wasserdicht. Bitte achten Sie darauf, sie vor Nässe zu schützen.
(Wir empfehlen den Kauf unseres „Splashproof“-Gehäuses für einen zusätzlichen Schutz).
• Nicht mit Wasser, Seife oder Reinigungsmitteln reinigen – verwenden Sie nur ein sauberes, trockenes Tuch.
• Die Betriebstemperatur für Sender und Loc8tor liegt zwischen 0°C und + 55°C. Die Lagertemperatur liegt
zwischen – 10°C und + 60°C.
Page 37

37
www.loc8tor.euwww.loc8tor.com
EINEN SENDER ABMELDEN EINEN SENDER LÖSCHEN
Ein Sender, der einer Taste zugeordnet ist, kann nur
über diese Taste geortet werden. Um den Sender
einer anderen Taste oder einem anderen Loc8tor
zuzuordnen, müssen Sie ihn zuerst abmelden.
Abmelden:
• Legen Sie den Sender, den Sie abmelden möchten,
neben den Loc8tor.
• Drücken Sie 3 Sekunden lang gleichzeitig auf die
Lautstärketaste und die Taste, die dem Sender
zugeordnet ist.
• Der Loc8tor piept ein Mal – lassen Sie die Tasten los.
• Jetzt piept der Loc8tor 2 Mal, die Statusleuchte
blinkt mehrmals schnell hintereinander auf und der
Sender wird abgemeldet.
• Zur Bestätigung einer erfolgreichen Abmeldung
piepen Sender und Loc8tor jeweils 2 Mal.
Wenn ein Sender beschädigt wurde, kann er gelöscht
werden, damit ein anderer Sender dieser Taste
zugeordnet werden kann.
Löschen:
• Legen Sie den Sender, den sie löschen möchten,
neben den Loc8tor.
• Drücken Sie 7 Sekunden lang gleichzeitig auf die
Lautstärketaste und auf die Taste, die dem Sender
zugeordnet ist, bis der Loc8tor zwei Mal piept, und
lassen Sie dann die Tasten los
• Der Loc8tor piept dann drei Mal und beginnt, den
Sender zu löschen.
• Zur Bestätigung eines erfolgreichen Löschens piepen
Sender und Loc8tor und ihre LEDs leuchten auf.
Sollte der Sender später doch noch gefunden werden,
kann er jederzeit wieder bei dem Loc8tor registriert werden,
wenn stattdessen kein anderer Sender zugeordnet wurde.
HINWEISE
1. Die angegebene Reichweite von 122 Metern gilt bei freier Sicht. Die tatsächliche Reichweite kann je nach
Einsatzart, Umfeld und Standort abweichen.
2. Der Loc8tor ist kein Spielzeug und sollte nur von Erwachsenen oder unter elterlicher Aufsicht verwendet werden.
3. Diese Ortungsmethode ist für das Aufnden von Gegenständen oder Tieren gedacht. Ihre Zuverlässigkeit beim
Aufnden von Personen kann nicht zugesichert werden.
4. Der Loc8tor sollte stets nach Maßgabe dieser Anleitung verwendet werden.
5. ACHTUNG! ERSTICKUNGSGEFAHR – HALTEN SIE LOSE SENDER VON KLEINEN KINDERN FERN.
ÄNDERUNGEN
Der Inhalt dieser Betriebsanleitung dient nur zur Information und kann ohne vorherige Ankündigung geändert
werden. Obwohl wir bei der Erarbeitung dieser Betriebsanleitung alle angemessenen Bemühungen unternommen
haben, sämtliche Angaben korrekt wiederzugeben, übernimmt Loc8tor Ltd. keine Verantwortung für Fehler
oder Auslassungen in dieser Betriebsanleitung, oder für die Verwendung der hierin enthaltenen Informationen.
Loc8tor Ltd. behält sich das Recht vor, vorbehaltlos und ohne vorherige Ankündigung Änderungen an der
Produktgestaltung vorzunehmen.
Page 38

38
www.loc8tor.eu www.loc8tor.com
Manuale d’uso
User Guide • Manual del Usuario
Bedienungsanleitung • Mode d’Emploi
Contenuto della confezione:
1x Loc8tor per gli animali
2x disposittivi di ricerca
1x scaffale a muro
casi impermeabili
Targa per il-disposittivo
Filo per il portachiavi
Nastro adesivo
Pet
Don’t lose them, locate them!
Pagina
English . . . . . . . . . . . . . . . 2 - 10
Español . . . . . . . . . . . . . . 11 - 19
Français . . . . . . . . . . . . . . 20 - 28
Deutsch . . . . . . . . . . . . . . 29 - 37
Italiano . . . . . . . . . . . . . . 38 - 46
Page 39

39
www.loc8tor.euwww.loc8tor.com
PREMESSA
Grazie per aver scelto Loc8tor per animali domestici, un nuovo
fantastico prodotto che vi permetterà di tener d’occhio il vostro animale
domestico e di ritrovarlo persino nei nascondigli più difcili da scovare.
Il Loc8tor per animali domestici è estremamente versatile e facile da
usare, sia che vi troviate in casa o che siate in giro. Per utilizzare al
meglio questo dispositivo, vi chiediamo di dedicare pochi minuti alla
lettura di questo manuale.
Loc8tor è stato realizzato secondo i migliori standard di qualità per
garantire un perfetto funzionamento. Il prodotto è coperto da una
garanzia di due anni.
Per maggiori informazioni sul prodotto, per contattarci o accedere alla
sezione FAQ, visitate il nostro sito all’indirizzo www.loc8tor.eu
Saremo lieti di ricevere i vostri commenti ed eventuali suggerimenti su
Loc8tor, per permetterci di migliorare
il nostro prodotto. E-mail: [email protected]
Ci auguriamo che possiate godere a pieno della tranquillità che vi
procurerà il vostro nuovo acquisto.
Anthony Richards
Amministratore delegato
Page 40
40
INDICE
Pagina
Guida ai pulsanti . . . . . . . . . . . . . . . 40
Guida introduttiva . . . . . . . . . . . . . . . 41
Accensione/Spegnimento . . . . . . . . . . . . 42
Volume / Suggerimenti . . . . . . . . . 42
Garanzia . . . . . . . . . . . . . . . . . . . 42
Localizzazione . . . . . . . . . . . . . . . . 43
Istruzioni sul raggio d’azione . . . . . . . . . . . 44
Staffa di montaggio . . . . . . . . . . . . . . . 44
Condizioni D’uso . . . . . . . . . . . . . . . . 44
Batterie . . . . . . . . . . . . . . . . . . . 45
Accorgimenti generali . . . . . . . . . . . . . 45
Disattivazione / Cancellazione di una targhetta . . . 46
Nota bene / Modiche . . . . . . . . . . . . . 46
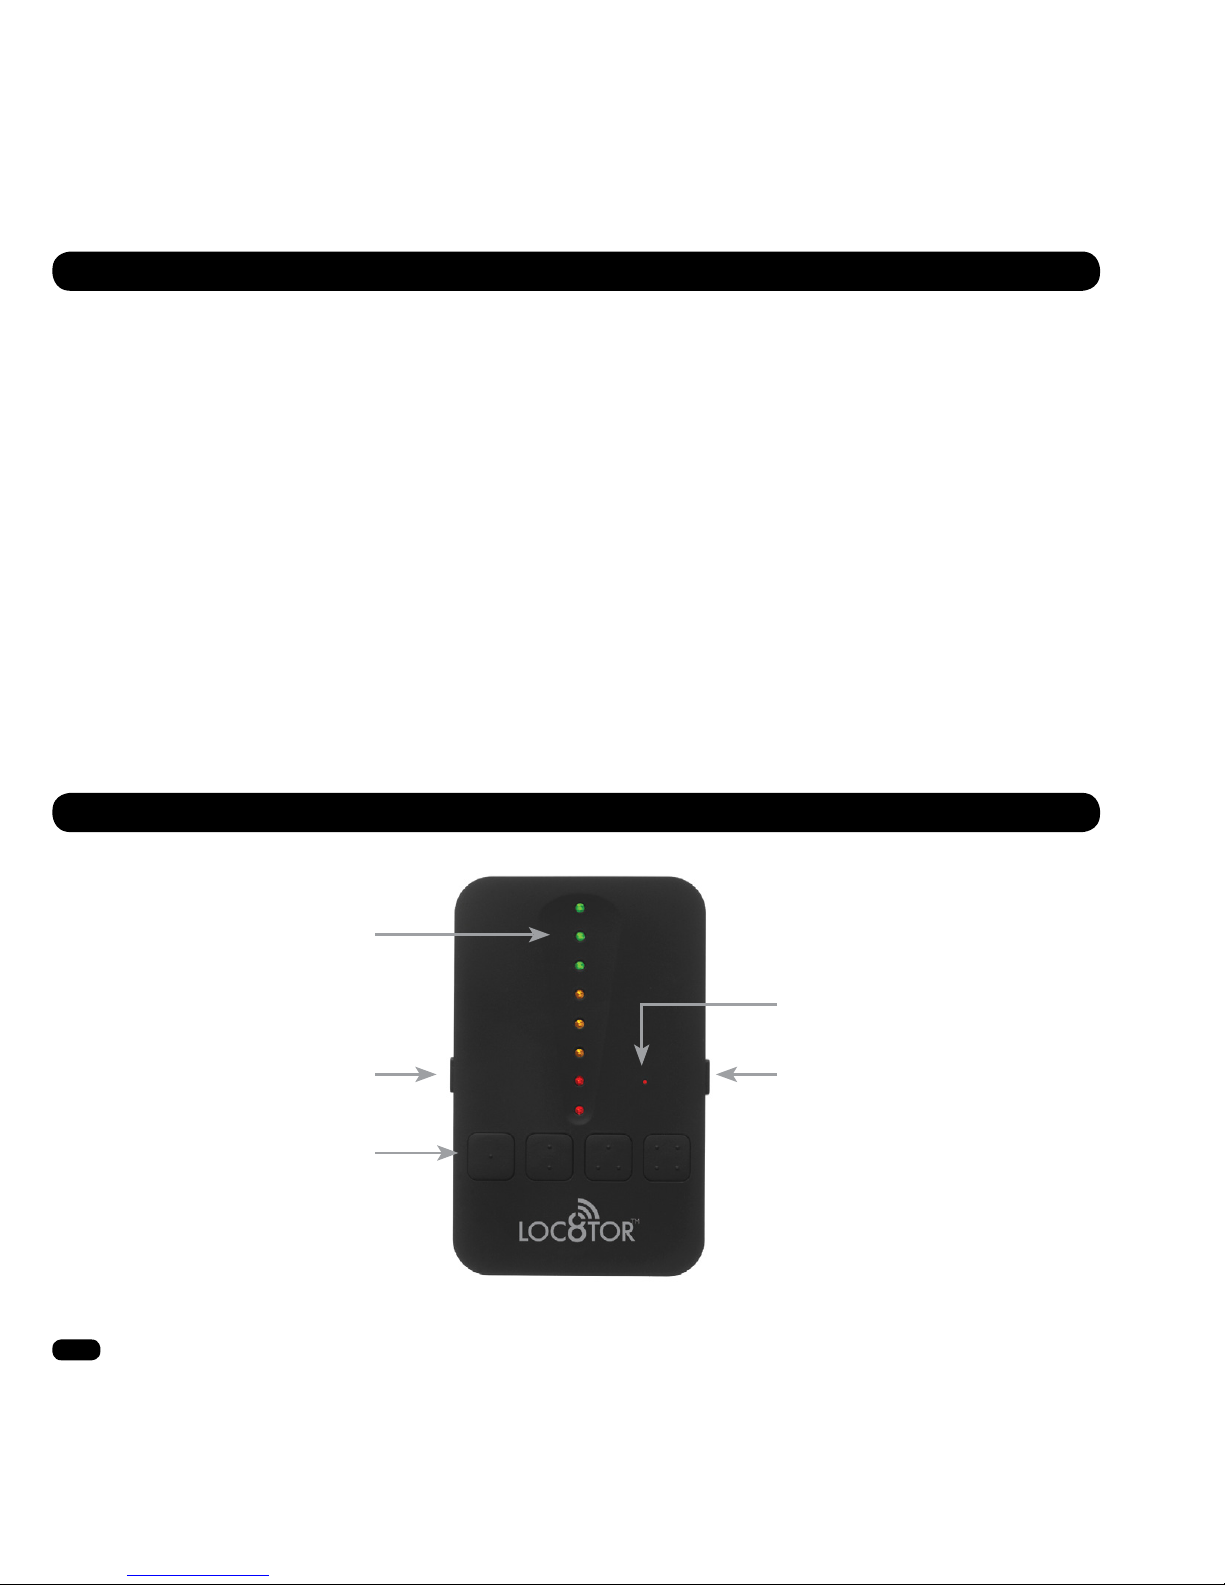
GUIDA AI PULSANTI
Volume
Accensione/
spegnimento
(tenere premuto
per due secondi)
Registrazione e
localizzazione di 4
targhette al massimo
Luci direzionali
LED di stato
www.loc8tor.eu www.loc8tor.com
Page 41
41
GUIDA INTRODUTTIVA
Congurare ed usare Loc8tor? Niente di più semplice! Basterà
seguire questa semplice procedura per iniziare in brevissimo tempo
a tenere traccia del vostro animale domestico munito di targhetta.
1. ATTIVAZIONE DELLE BATTERIE
Per attivare la batteria, rimuovere la linguetta sul retro del Loc8tor.
A questo punto, il Loc8tor emetterà un segnale acustico e le luci
lampeggeranno ad indicare che il dispositivo è acceso.*
* Se il Loc8tor rimane inattivo per circa 45 secondi consecutivi, si spegne automaticamente.
2. REGISTRAZIONE DI UNA TARGHETTA
• Per attivare le batterie, rimuovere la linguetta sulla targhetta.
• La targhetta emette un doppio segnale acustico e la luce rossa lampeggia due volte.
• Posizionare la targhetta da registrare vicino al Loca8tor, assicurandosi di aver allontanato tutte le altre
targhette a debita distanza.
• Assicurarsi che il Loc8tor per animali domestici sia acceso (se acceso, il LED rosso lampeggia).
• Selezionare uno dei pulsanti sulla parte anteriore del Loc8tor per effettuare l’assegnazione della targhetta.
Tenere premuto il pulsante per tre secondi. Il Loc8tor emetterà un segnale acustico.
• Rilasciare il pulsante: il Loc8tor emetterà un altro segnale acustico a conferma dell’inizio della registrazione,
mentre il LED lampeggerà rapidamente. Il processo di registrazione della targhetta verrà completato.
• Una volta conclusa la registrazione, sia la targhetta che il Loc8tor emetteranno un solo segnale acustico e
lampeggeranno una sola volta.
• Ripetete il processo per un massimo di 4 disposittivi asseniando ogni disposittivo a bottoni differenti.
I disposittivi fanno un rumore distinto quando li stai cerchando per aiutarti identicare tra di loro.
3. APPLICAZIONE DELLA TARGHETTA
Anello da portachiavi: Si può usare per agganciare la targhetta
a oggetti come collari per animali domestici, portachiavi, borse,
cellulari, ecc. Inserire il ferretto di inizio corsa dell’anello nel foro
della targhetta, poi far scorrere tutto l’anello.
Custodia impermeabile per targhetta : Inserire la targhetta
nella custodia, quindi applicarla direttamente al collare dell’animale
domestico, utilizzando l’anello da portachiavi in dotazione o inlando
il collare attraverso le alette della custodia impermeabile per targhette
(adattabile a collari con uno spessore massimo di 15mm).
www.loc8tor.euwww.loc8tor.com
Page 42

42
ACCENSIONE / SPEGNIMENTO
ACCENSIONE
• Tenere premuto il pulsante laterale destro per due secondi (cfr. sezione “Guida ai pulsanti”).
Il Loc8tor emetterà un segnale acustico, e tutte le luci lampeggeranno.
• La lucina di stato lampeggerà per tutto il tempo in cui il dispositivo rimane acceso.
• Se lasciato inattivo, il Loc8tor si spegnerà automaticamente dopo 45 secondi.
SPEGNIMENTO
• Tenere premuto il pulsante laterale destro per due secondi. Il Loc8tor emetterà un segnale acustico e si spegnerà.
• Annotare sull’etichetta adesiva in dotazione quale pulsante è stato assegnato ad ogni targhetta/oggetto.
• Se si preme un pulsante di localizzazione al quale non è stata assegnata alcuna targhetta, il dispositivo
emette un segnale acustico di errore e il LED lampeggia rapidamente. Per registrare una targhetta su
questo pulsante, completare le fasi di ’REGISTRAZIONE DI UNA TARGHETTA’.
Tenere premuto il pulsante laterale sinistro per selezionare una delle tre impostazioni di volume:
silenzioso, basso e alto. Quando si preme il pulsante, il dispositivo emette un segnale acustico che
indica il volume attualmente impostato.
VOLUME
SUGGERIMENTI
GARANZIA
Loc8tor Ltd. garantisce all’acquirente originale che il prodotto sarà privo di difetti signicativi, di materiale e di
fabbricazione, per due anni a partire dalla data di acquisto che compare sullo scontrino. In caso di reso, il prodotto
dovrà essere rispedito al punto di acquisto originale per la verica.
Il prodotto reso dovrà essere corredato da una prova di acquisto. Se acquistato direttamente da Loc8tor Ltd.,
l’articolo dovrà essere accompagnato da un numero di autorizzazione al rientro prima di essere restituito. L’articolo
dovrà essere restituito a mezzo raccomandata con ricevuta di ritorno, in un adeguato imballaggio protettivo.
Le condizioni previste dalla presente garanzia non verranno applicate qualora l’articolo dovesse essere oggetto
di maltrattamenti, uso improprio, negligenza, manomissione o modiche di qualsiasi tipo.
Loca8tor Ltd. può sostituire il prodotto difettoso oppure emettere un buono per futuri acquisti corrispondente
all’importo pagato, senza arrecare alcun pregiudizio ai vostri diritti.
Non è previsto alcun altro tipo di garanzia, né implicita né esplicita.
Loca8tor Ltd. declina ogni responsabilità per eventuali danni speciali, accidentali o conseguenti a prescindere
dal fatto che Loca8tor Ltd., il rivenditore o chi per loro siano o meno al corrente delle ragioni alla base dell’acquisto
del prodotti. I vostri diritti legali non saranno lesi in alcun modo.
www.loc8tor.eu www.loc8tor.com
Page 43
43
LOCALIZZAZIONE – RICERCA DI UN ANIMALE DOMESTICO
PERSO
• Tenere premuto il pulsante di accensione nché il Loc8tor non emette un segnale acustico e le luci non lampeggiano.
• Premere il pulsante al quale è stato assegnato l’animale domestico/oggetto.
• Durante la ricerca della targhetta, il Loc8tor emette un segnale acustico mentre
il LED lampeggia rapidamente.
• Una volta individuata la targhetta, si accenderanno le luci di localizzazione e
il dispositivo inizierà a suonare.
• Con il Loc8tor in mano, girare lentamente no a percorrere un cerchio completo.
• Quando si individua la direzione giusta e ci si avvicina sempre più all’oggetto,
il volume dell’audio e la frequenza dei segnali acustici aumenteranno, mentre
le luci sul Loc8tor cambieranno colore: prima rosso, poi giallo, inne verde.
• Dopo aver percorso un intero cerchio, rivolgersi verso la direzione corrispondente
al segnale acustico e visivo più intensi e iniziare a camminare in tale direzione.
• Quando si vedono tre luci verdi, signica che la targhetta è vicinissima.
• A questo punto il Loc8tor vi guiderà per raggiungere esattamente il punto desiderato,
passando alla modalità “zoom”, (vd. gura). Man mano che ci si avvicina, si accenderanno
dapprima le luci gialle, poi quelle rosse, mentre il volume dell’audio aumenterà progressivamente.
RITROVAMENTO
Se vuoi fermare la ricerca, premi il pulsante On/Off o il pulsante rispettivo assegnato al disposittivo.
• Posizionare la targhetta su una supercie e fare alcune prove di localizzazione
per acquisire dimestichezza con il dispositivo.
• In caso di incertezza sulla direzione da seguire, ripercorrere lentamente un angolo
di 360°, poi seguire la direzione che ha provocato il segnale acustico più forte.
• Il segnale acustico più forte compare nel momento in cui il Loc8tor sta
puntando direttamente una targhetta. Provare a muovere il Loc8tor verso
l’alto o verso il basso per capire se la targhetta si trova sopra o sotto.
• Se il dispositivo emette un forte segnale acustico mentre ci si trova vicino a
un muro, controllare la stanza vicina.
• Dopo essersi avvicinati, provare a premere il pulsante del volume sul Loc8tor
per impostare la modalità silenziosa, e poter avvertire gli eventuali segnali
acustici della targhetta.
• Nel caso in cui non si visualizzasse alcun segnale, provare a spostarsi e ripetere la procedura.
SUGGERIMENTI PER LA LOCALIZZAZIONE
www.loc8tor.euwww.loc8tor.com
Page 44

44
www.loc8tor.eu www.loc8tor.com
ISTRUZIONI SUL RAGGIO D’AZIONE
Il raggio d’azione può variare molto, a seconda del luogo in cui si utilizza la targhetta e dell’animale domestico/
oggetto a cui la si assegna. Se gli oggetti si trovano in alto e sono in una buona linea visiva, il Loca8tor potrà avere
un raggio d’azione superiore a 122 m. Il graco fornisce delle indicazioni in merito. L’effettivo raggio d’azione può
subire delle variazioni signicative in base al tipo di utilizzo e di ambiente.
Quando non lo si usa, conservare il Loc8tor nella staffa di montaggio.
Fissare la staffa al frigo o a una qualsiasi supercie metallica, servendosi della calamita adesiva. Posizionare
l’adesivo all’interno della staffa di montaggio, come promemoria di ciò a cui si è assegnata una targhetta.
STAFFA DI MONTAGGIO
GRAFICO PER LA STIMA DEL RAGGIO D’AZIONE
Modellino di aereo su un albero
180m
Auto parcheggiata
30m - 140m
Gatto o Cane
30m - 122m
Tartaruga
30m
CONDIZIONI D’USO
Per le condizioni d’uso, contattare il punto vendita dove si è acquistato il Loc8tor o visitare il sito www.loc8tor.com/8
Page 45
45
www.loc8tor.euwww.loc8tor.com
BATTERIE
Dispositivo manuale del Loc8tor:
Se il Loca8tor non si accende o le luci sono deboli, sostituire la batteria con
1 pezzo di tipo CR2032 o con un modello equivalente, posizionandola nello
scomparto della batteria con il + rivolto verso l’alto. Lo scomparto della
batteria è situato in basso sulla parte posteriore del dispositivo. Scorrere il
coperchio verso il basso per aprire lo scomparto.
Come sostituire le batterie in una targhetta:
Inserire un’unghia o un oggetto piatto all’estremità della
targhetta, attraverso il foro per il laccetto, nella fessura
centrale. Mantenendo l’unghia o lo strumento piatto nella
fenditura, girarla no a farla arrivare al centro del lato
lungo. La targhetta si aprirà di scatto.
• Sostituire la batteria con delle batterie a bottone
(ossido d’argento) da 1,5v, modello SR54 o equivalente,
per prolungare al massimo la carica . L’estremità positiva
dovrà essere rivolta verso l’alto nel punto più vicino al
foro per il laccetto.
• Posizionare nuovamente il coperchio appoggiandone dapprima
un’estremità, poi spingere in modo deciso.
• Se le batterie sono state inserite correttamente, la targhetta emetterà
un segnale acustico nel momento in cui la custodia sarà chiusa.
Per vericare il corretto funzionamento delle batterie aprire e chiudere
il coperchio seguendo la procedura indicata. Se la targhetta non emette
un segnale acustico né luminoso, occorrerà sostituire le batterie.
ACCORGIMENTI GENERALI
• Né il Loc8tor, né le targhette sono stati realizzati per essere impermeabili. Evitare pertanto il contatto con
l’acqua. Come ulteriore cautela, si raccomanda di utilizzare l’apposita custodia per targhette impermeabile.
• Non lavare con acqua, detergenti o agenti di pulizia. Utilizzare un panno pulito e asciutto.
• La temperatura operativa della targhetta e del dispositivo manuale del Loc8tor è compresa tra 0°C e +55°C.
Conservare ad una temperatura compresa tra -10°C e +60°C.
Page 46

46
www.loc8tor.eu www.loc8tor.com
DISATTIVAZIONE DI UNA TARGHETTA CANCELLAZIONE DI UNA TARGHETTA
Una volta registrata una targhetta, sarà possibile
usare solo quel pulsante per localizzarla.
Per spostare la targhetta su un altro Loca8tor
occorrerà prima disattivarla.
Per rimovere un disposittivo dal Loc8tor:
• Posizionare la targhetta da disattivare vicino al Loc8tor.
• Tenere premuto il pulsante del volume e,
contemporaneamente premere per tre secondi il
pulsante sul quale è registrata quella targhetta.
• Il Loc8tor emetterà un unico segnale acustico –
rilasciare tutti i pulsanti.
• Il Loc8tor emetterà due segnali acustici, mentre
il LED di stato lampeggerà rapidamente. A questo
punto, si avvia la disattivazione della targhetta.
• A conferma dell’avvenuta disattivazione, sia la
targhetta che il Loc8tor emetteranno due segnali acustici.
Qualora una targhetta venga danneggiata, la si
può cancellare in modo da consentire la registrazione
di un’altra targhetta sullo stesso pulsante.
Per cancellare una targhetta:
• Tenere premuto il pulsante del volume e premere
contemporaneamente il pulsante al quale è stata
assegnata la targhetta per sette secondi oppure
nché il Loc8tor non emette due segnali acustici.
A questo punto rilasciare i pulsanti.
• Il Loc8tor emetterà tre segnali acustici. A questo
punto si avvia la disattivazione della targhetta.
• A conferma dell’avvenuta cancellazione, sia la
targhetta che il Loc8tor emetteranno un segnale
acustico e il LED lampeggerà.
NOTA BENE
1. Il raggio d’azione di 122 m si basa su un chiaro raggio visivo. Il raggio d’azione effettivo varia in base alle
condizioni di utilizzo, all’ambiente e al luogo.
2. Loc8tor non è un giocattolo, pertanto può essere utilizzato esclusivamente da adulti o da bambini sotto la
supervisione dei genitori.
3. La modalità di localizzazione è stata concepita al ne di aiutarvi a ritrovare di oggetti. Il prodotto non è afdabile
per la ricerca di persone.
4. Il Loc8tor dovrà essere utilizzato ai sensi delle presenti istruzioni.
5. ATTENZIONE: RISCHIO DI SOFFOCAMENTO: MANTENERE LE TARGHETTE FUORI DALLA PORTATA
DEI BAMBINI.
MODIFICHE
Il contenuto del presente manuale d’uso ha uno scopo puramente informativo e può essere soggetto a modiche
senza preavviso. Sebbene tali istruzioni siano state redatte con la massima accuratezza, Loc8tor Ltd non risponde
di eventuali errori o omissioni contenuti nel presente manuale d’uso o che risultino dall’utilizzo delle informazioni
ivi contenute.Loca8tor Ltd. si riserva il diritto di apportare modiche alla progettazione del prodotto senza riserve e
senza alcun preavviso agli utenti.
Page 47

www.loc8tor.co.ukwww.loc8tor.com
HANDHELD
FCC ID:TUW-SYC1
IC: 6444A-SYC1
TAG
FCC ID: TUW-FIR1
IC: 6444A-FIR1
Designed in the UK. Made in China for Loc8tor Ltd
in compliance with ISO 9001:2000 and ISO 14001 Certification
R
R
203WWJN000010
203WWJN000011
Page 48

Head Office
Loc8tor Ltd, Devonshire House
Manor Way, Borehamwood
Herts WD6 1QQ
email: [email protected]
Customer Services:
UK +44 208 207 0880
USA Toll Free 1 888 539 4669
Download a larger copy of instructions from our website
THE ENTIRE CONTENTS OF THIS BROCHURE © 2009, Loc8tor Ltd.
www.loc8tor.co.uk
www.loc8tor.com
www.loc8tor.es
www.loc8tor.fr
www.loc8tor.eu
Don’t lose them, locate them!
 Loading...