

Loc8tor FIR1, SYC1 User Manual

Loc8tor Lite
User Guide
Manual del Usuario, Mode d’Emploi
Bedienungsanleitung
Pack Contents:
1x Loc8tor Lite, 2x Mini Homing Tags
1x Mounting Bracket, Tag ID Sticker
Key Ring Loop, Adhesive Strips
English 2
Page
Español 13
Français 25
Deutsch 36

INTRODUCTION
Thank you for purchasing a Loc8tor Lite, the great new product that guides you to
your mislaid valuables even in those hard to nd places.
The Loc8tor Lite has been designed to be versatile and easy to use, whether at home,
out and about or in business. Please take a few minutes to read through this User
Guide to help you get the most out of your Loc8tor.
Loc8tor has been manufactured to quality standards to run trouble free and
comes supplied with a manufacturers two year warranty. For additional product
information, contact details and frequently asked questions please visit our website
at www.loc8tor.com.
We’d love to hear from you, what you like about Loc8tor or any suggestions you have
to improve it. E-mail sales@loc8tor.com.
We hope you enjoy your new purchase and can now rest at ease, avoiding those
frustrating moments of mislaying your important items.
Anthony Richards
Managing Director
2
www.loc8tor.co.uk
www.loc8tor.com

Page
Button Guide 3
Getting Started 4
Switching ON / OFF 5
Volume 5
Locating – Find a mislaid item 6
Range Guidelines 7
Unregister / Deleting a Tag 8
Mounting Bracket 9
Batteries 9
General Care 10
Please note 11
Warranty 11
CONTENTS
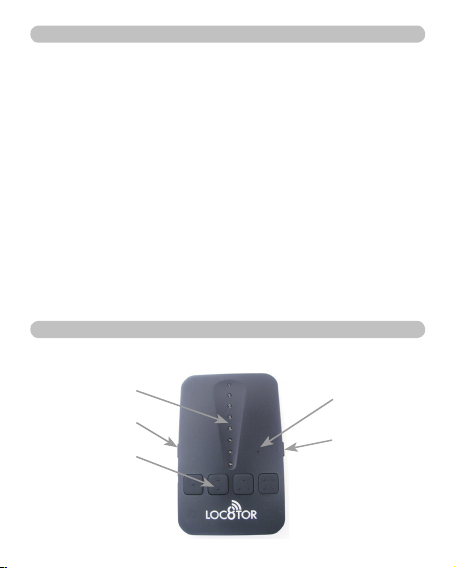
Button Guide
Directional lights Status Light
Volume
Register and Locate
up to four Tags
On / Off
(hold in for
2 seconds)
3

GETTING STARTED
Your Loc8tor could not be easier to setup or use. Follow these steps and you’ll be
tracking down your tagged valuables in no time at all.
1. ACTIVATE BATTERIES
Pull out the strip on the back of the Loc8tor to activate battery.
It will beep and all the lights will ash – It is now ON. *
* After approx. 45 seconds left idle your Loc8tor will turn itself off.
2. REGISTER A TAG
• Pull out the strip on the Tag to activate batteries.
• Tag beeps twice and the red light ashes twice .
• Place Tag you wish to register next to Loc8tor making sure all other Tags have
been moved more than an arms length away.
• Make sure the Loc8tor Lite is switched on (red status light will ash when ON).
• Select one of the buttons on the front of the Loc8tor to assign the Tag to. Hold the
button down for 3 seconds. The Loc8tor will beep.
• Release button – Loc8tor will beep to conrm start of registration and status
light will ash rapidly. Tag will complete registration process.
• Once registered Tag and Loc8tor will beep and ash once.
Repeat process for up to 4 Tags, assigning each Tag to a different button. Each of
the four Tags when being located will beep differently to help identication.
3. ATTACH TAG
Adhesive strips: Best used when attaching to a clean, dry, hard, at surface. Peel
off backing to attach. Sticky tabs are not permanent but increase their bond with
time. Ideally leave for a minimum of 10 minutes. Strongest bond after 24 hours. To
remove insert at tool under Tag and gently twist to prise off.
Key ring loop: Use to attach Tag to items such as key ring, bags, mobile phones etc.
Push loop through the Tag hole and then pull ring through the loop.
4

SWITCHING ON / OFF
ON
• Hold in the right hand side button (see Button Guide) for 2 seconds. The Loc8tor
will bleep and all the lights ash.
• Small status light will ash whilst on.
• The Loc8tor will automatically power down after 45 seconds if left idle.
OFF
• Hold in the right hand side button for 2 seconds. Loc8tor will beep and turn off.
VOLUME
Press in the left hand side button to select from three volume settings; off, low and
high. An audio beep will sound when pressed indicating the current volume level.
TIPS
• Write on the sticky label provided which button is allocated to each Tag / item.
• If a locate button is pressed with no Tag assigned to it an error tone will sound
and the status lights will blink rapidly. To register a Tag to this button, complete
the steps ‘REGISTER A TAG’.
5
LOCATING – FIND A MISLAID ITEM
LOST
• Press and hold down the ON button until the Loc8tor beeps and lights ash.
• Press the button that your item / Tag is allocated to.
• Loc8tor will beep and status light will ash rapidly as it’s searching for the Tag.
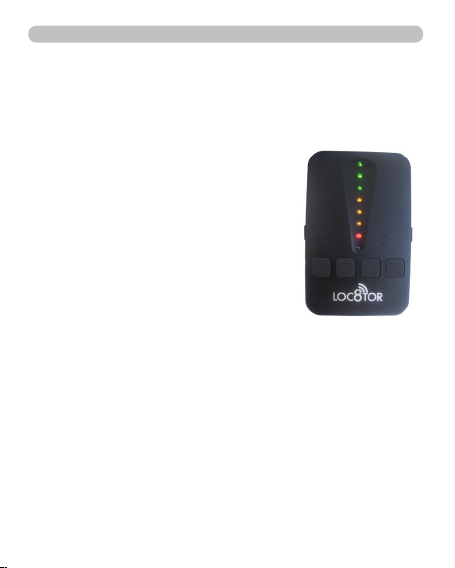
• When a Tag is detected the locating lights will light
up and the audio will start.
• With the Loc8tor in your hand turn around slowly
completing a full circle.
• As you point in the right direction and then move
nearer to item, the audio pitch and frequency
of beeps will increase, and lights on the Loc8tor
change from red to amber to green.
• Once a circle has been completed, face the
direction of the strongest audio and visual signal
and walk in this direction.
• When you see three green lights the Tag is very
close by.
• To guide you right in, the Loc8tor now changes to
‘zooming in’ mode (pictured). As you get closer amber then red lights illuminate
and the audio pitch increases.
FOUND
To stop a search press ON/OFF button or the locate button your Tag is allocated to.
6
LOCATING TIPS
• Place the Tag on a surface and practice locating a few times to get a feel for how
it works.
• If you are ever unsure which direction to go in slowly repeat full 360° circle and
then go in the direction with the strongest signal strength.
• Strongest signal is displayed when the Loc8tor is pointing directly at Tag. Try
moving Loc8tor up and down as the Tag could be upstairs or downstairs.
• If you are close to a wall whilst getting a strong signal check the room next door.
• Try pressing the volume button on the Loc8tor when you are close in order to
mute and listen out for Tag beeps.
• If no signal is displayed try moving position to a different area and repeat
process.
RANGE GUIDELINES
Range will vary greatly depending on where the Tag is used and what it’s attached to.
If higher up and clear line of sight, items can be found in excess of 122m/400feet.
The chart gives a guideline. Actual range may differ signicantly as performance is
affected by type of application and environment it’s used in.
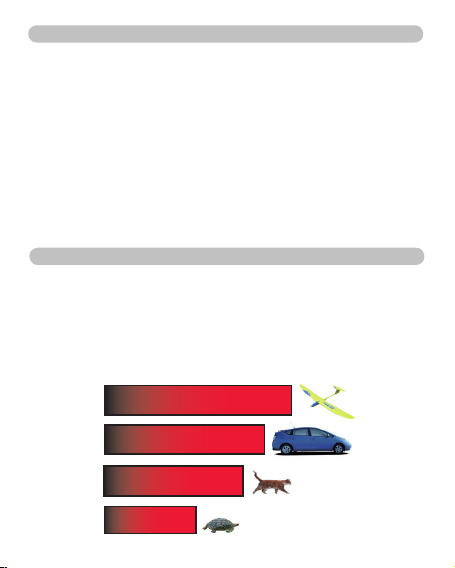
ESTIMATED RANGE CHART
Model Aircraft up a tree
180m / 600ft
Parked Car
30 – 140m / 100 – 500ft
Cat or Dog
30 - 100m / 100 - 300
Tortoise
30m / 100ft
ft
7

UNREGISTER A TAG
Once a Tag has been registered to a button only that button can be used to locate it.
To move the Tag to a different button or use on another Loc8tor you will rst need
to unregister it.
To Unregister:
• Place the Tag to be unregistered next to the Loc8tor.
• Hold down the volume button and at the same time press the button that the Tag
is registered to for 3 seconds.
• Loc8tor will beep once – let go of the buttons.
• Loc8tor will now beep twice, the status light will ash rapidly and start to
unregister Tag.
• To conrm successful unregistration Tag and Loc8tor will beep twice.
DELETE A TAG
If a Tag has been damaged the Tag can be deleted enabling another Tag to be
registered to that button.
To Delete :
• Place the Tag to be unregistered next to the Loc8tor
• Hold down the volume button and at the same time press button that the Tag is
registered to for 7 seconds or until the Loc8tor beeps twice – then let go of the
buttons.
• The Loc8tor will beep three times and start to unregister the Tag.
• To conrm successful deletion, Tag and Loc8tor will beep and LED will ash.
Should the Tag be subsequently found it can always be re-registered back to that
Loc8tor if there is a free button with no other Tag assigned to it.
8

MOUNTING BRACKET
Keep the Loc8tor in the mounting bracket when not in use. Attach bracket to the
fridge or any other metal surface using the sticky backed magnet or attach it to a
door/wall using the raw plug and screw provided.
Place the sticker on the inside of the mounting bracket as a quick reminder what
you have tagged.
BATTERIES
Loc8tor Handheld: If the Loc8tor does not power up or lights are faint replace
the battery using 1 x CR2032 or equivalent placing in the battery compartment +
side up. Battery compartment can be found on the back at the bottom. Slide down
to open.
To change the batteries in a Tag: Put your thumbnail or a at tool at the end
of the Tag, by the lanyard hole, into the split line (line going around the middle of
the Tag).
Keeping your thumbnail / at tool in the split line move it around to the middle of
the long side. The Tag will pop open.
• Replace with SR54 (silver oxide) 1.5v button cells or equivalent to provide best
battery life, keeping the plus side face up nearest the lanyard hole.
• Replace the lid by putting one side in rst then pushing shut.
• If batteries are correctly inserted the Tag will beep when case is closed.
To test batteries open then shut lid by following the above steps.
If the Tag does not beep and ash replace batteries.
9

GENERAL CARE
• The Loc8tor and Tags have not been designed to be waterproof. Please take care
not to get wet. (Look out for our splash proof Tag casing out soon).
• Never clean with water, detergent or cleaning agent - use a clean, dry cloth.
• Tag and Handheld Loc8tor operational temperature is between 0˚C to + 55˚C.
Storage temperature is between - 10˚C and + 60˚C.
CHANGES
The material in this User Guide is for information only and is subject to change
without notice. Whilst reasonable efforts have been made in the preparation of
these instructions to ensure its accuracy, Loc8tor Ltd. assumes no liability resulting
from errors or omissions in this User Guide, or from the use of the information
contained herein. Loc8tor Ltd. reserves the right to make changes to the product
design without reservation and without notication to its users.
PLEASE NOTE
122 metre / 400 feet range is based on clear line of sight. Actual range will vary 1.
depending on use, environment and location.
Loc8tor is not a toy and should only be used by adults or with parental 2.
supervision.
Locate mode has been designed to help nd your possessions. It should not be 3.
relied on to nd people.
The Loc8tor is intended to be used in accordance with these instructions.4.
BEWARE OF CHOKING HAZARD – KEEP LOOSE TAGS OUT OF THE REACH OF YOUNG 5.
CHILDREN.
10

TERMS & CONDITIONS
Please contact place of purchase or Loc8tor website www.Loc8tor.com for full Terms
and Conditions.
WARRANTY
Loc8tor Ltd warrants to the original purchaser that this product shall be free from
signicant defects in material and workmanship for two years beginning on the date
of purchase as shown on your receipt.
Should the product need to be returned it must be sent back to the original place of
purchase to be processed. Proof of purchase must accompany the returned product.
If purchased direct from Loc8tor Ltd. a returns authorisation number is required
prior to the product being returned. Product must be returned by signed delivery in
suitable protective packaging.
This warranty does not apply to any product that has been subject to abuse, misuse,
negligence, tampering or has been modied in any way.
Without prejudice to your rights Loc8tor Ltd. may replace a defective product or issue
a credit against future purchases.
No other warranties, express or implied are made. Loc8tor Ltd. shall not be liable
for any special, incidental or consequential damages whether or not the purpose
for which you purchased the product was made known to Loc8tor Ltd, the retailer or
otherwise. Your statutory rights are not affected in any way.
11

FCC STATEMENT
This equipment has been tested and found to comply with the limits for a Class
B digital device, pursuant to part 15 of the FCC Rules. These limits are designed
to provide reasonable protection against harmful interference in a residential
installation. This equipment generates, uses and can radiate radio frequency
energy and, if not installed and used in accordance with the instructions, may cause
harmful interference to radio communications. However, there is no guarantee that
interference will not occur in a particular installation. If this equipment does cause
harmful interference to radio or television reception, which can be determined
by turning the equipment off and on, the user is encouraged to try to correct the
interference by one or more of the following measures:
• Reorient or relocate the receiving antenna.
• Increase the separation between the equipment and receiver.
• Consult the dealer or an experienced radio/TV technician for help.
CAUTION - Changes or modications not expressly approved by Loc8tor Ltd can
void the users authority to operate the Loc8tor.
12

INTRODUCCIÓN
Gracias por adquirir su Loc8tor Lite, un novedoso producto que le guiará hasta sus
objetos perdidos.
El Loc8tor Lite se ha diseñado de modo que resulte versátil y fácil de usar, ya sea en
casa, en el trabajo o en exteriores. Lea detenidamente este manual de instrucciones
para sacar el máximo partido a su Loc8tor.
El Loc8tor se ha fabricado con materiales de primera calidad para evitar cualquier
problema y, además, dispone de una garantía de 24 meses. Visite nuestro sitio Web
(www.loc8tor.es) si desea obtener más información, necesita nuestros datos de
contacto o quiere consultar las preguntas más frecuentes sobre el producto.
Nos gustaría conocer su opinión sobre Loc8tor (lo que más le gusta, lo que podríamos
hacer para mejorarlo, etc.) y que nos explicara alguna historia divertida sobre cómo
le ha ayudado. Envíenos un mensaje de correo electrónico a sales@loc8tor.com con
sus comentarios y sugerencias.
Esperamos que disfrute de su nueva adquisición y que pueda descansar tranquilo
sabiendo que ya no volverá a sentir la frustración de perder sus objetos de valor.
Anthony Richards
Director Ejecutivo
www.Loc8tor.es
13
Página
Botones 14
Para Empezar 15
Encendido y Apagado 17
Volumen 17
Localización – Búsqueda de un objeto perdido 18
Alcance 19
Anular Registro y Borrar Etiquetas 20
Soporte 21
Pilas 21
Mantenimiento General 22
Garantía 22
Nota 23
ÍNDICE
BOTONES
Luces de Dirección
Volumen
Registrar y Localizar
hasta cuatro Etiquetas
14
Luz de Estado
Botón de Encendido/
Apagado (mantener
durante 2 segundos)

PARA EMPEZAR
Congurar y usar el Loc8tor es muy fácil. Siga los pasos siguientes y muy pronto
podrá empezar a buscar sus objetos de valor Etiquetados.
1. ACTIVACIÓN DE LA PILA
Retire la cinta de la parte posterior del Loc8tor para activar la pila. El dispositivo
emitirá un pitido y todas las luces parpadearán, lo cual indicará que está
encendido*.
* El Loc8tor Lite se apagará solo automáticamente tras 45 segundos de inactividad.
2. REGISTRO DE LAS ETIQUETAS
• Retire la cinta de la Etiqueta para activar la pila.
• La Etiqueta emitirá dos pitidos y la luz roja parpadeará dos veces.
• Sitúe la Etiqueta que quiere registrar junto al Loc8tor y aleje el resto de Etiquetas
por lo menos un metro.
• Asegúrese de que el Loc8tor Lite está encendido (la luz de estado roja parpadea)
• Seleccione uno de los botones de la parte frontal del Loc8tor al que desee
asignar la Etiqueta. Mantenga presionado el botón seleccionado durante 3
segundos. El Loc8tor emitirá un pitido.
• Suelte el botón. El Loc8tor emitirá un nuevo pitido para conrmar el inicio del
registro y la luz de estado parpadeará rápidamente. La Etiqueta completará el
proceso de registro.
• Una vez completado, la Etiqueta y el Loc8tor emitirán un pitido y parpadearán
una vez.
Repita el proceso para un máximo de hasta 4 Etiquetas, asignando un botón
diferente a cada una de ellas. Cada Etiqueta emite un pitido diferente, lo cual ayuda
a identicarlas.
15
 Loading...