


LR810
WEIGHING
SYSTEM
Operating
Manual

LR810
Distributed Worldwide by:
Loadrite Ltd
93 First Avenue
P.O. Box 13-115, Tauranga,
New Zealand
Facsimile: INTL-64-7-5776034
Phone: INTL-64-7-5782820

For: LOADRITE model LR 810
Software # 60042. Version: 3.20
Issue Date: December, 1996
Designed and Manufactured by:
A MEMBER OF THE LOADRITE GROUP OF COMPANIES
Actronic New Zealand Ltd reserves the right to make changes to the Loadrite range of products without prior notice
and assumes no liability in connection with the use of any Loadrite branded product.
© 1996, ACTRONIC NEW ZEALAND LTD
When re-ordering this manual, quote Doc number 80085-05.MAN


i
Contents
1 About This Manual.................................................................1
2 The Loadrite LR810 Weighing System................................ 2
Main Parts of the LR810 System.......................................................... 2
Weight Measurement............................................................................ 3
Displays................................................................................................ 3
Indicator Lights..................................................................................... 4
Optical Trigger ..................................................................................... 4
3 Getting Started........................................................................5
Switching On........................................................................................ 5
Warming Up......................................................................................... 5
Weight Display Modes......................................................................... 5
Multiple Products ................................................................................. 6
4 Weighing - Overview..............................................................7
Before Weighing a Load....................................................................... 7
Weighing a Load .................................................................................. 7
Multiple Scales..................................................................................... 8
5 Total Mode............................................................................... 9
Short Total............................................................................................ 9
Long Total.......................................................................................... 10
Clearing Totals for all Products.......................................................... 10
6 Target Mode..........................................................................11
7 Product Names......................................................................13
Identification/Tracking....................................................................... 13
One Product Only............................................................................... 13
Multiple Products ............................................................................... 13
8 Zeroing the LR810................................................................15
9 Automatic Zero Prompt....................................................... 17
10 Adding, Subtracting and Recalling...................................18
Adding a Weight................................................................................. 18
Subtracting a Weight.......................................................................... 19
Recalling Last Weight........................................................................ 21
11 Batch Weighing Mode........................................................22
12 Weighing with Tare............................................................23
13 Operating with Interlock...................................................25
14 Additional Data................................................................... 26
15 Operator Menu Options.....................................................28
Menu Keys.......................................................................................... 28
Change Scale...................................................................................... 28
Batch Mode On / Off.......................................................................... 29
Setting the Time and Date.................................................................. 29

ii
Clearing Long Totals.......................................................................... 30
Menu Map .......................................................................................... 32
16 Using the LD640 Data Logger...........................................33
Displays.............................................................................................. 33
17 Print Functions....................................................................34
18 Obtaining the Best Accuracy............................................. 36
Lifting Speed...................................................................................... 36
Trigger Point....................................................................................... 36
Bounce................................................................................................ 36
Centre of Gravity................................................................................ 36
Uneven Ground .................................................................................. 36
Temperature........................................................................................ 37
19 Span Calibration Correction.............................................38
20 Changing the Backup Battery ...........................................40
21 Error Messages ...................................................................41
Lift Speed Changed? .......................................................................... 41
Bouncing Load ................................................................................... 41
Error Close to Tolerance Limit........................................................... 42
Trigger Fault....................................................................................... 42
22 Keys......................................................................................43
23 Specifications.......................................................................45
24 Output/Input Connections................................................. 47
25 Index.....................................................................................49

1 About This Manual
1
1 About This Manual
This manual describes the day to day operation of the Loadrite LR810
weighing system.
Other Manuals
For information on ... See...
Installation of the system Installation Manual
Calibration of the system Setup and Calibration Manual
Printing weight data LP750 Data Printer Manual
Storing data LD640 Data Capture Manual
Parts list LR810 / LP750 Spare Parts Manual

2 The Loadrite LR810 Weighing System
2
2 The Loadrite LR810 Weighing System
The Loadrite LR810 weighing system measures the weight of loads lifted by
front end loaders, log loaders, fork lift trucks and similar machines which
use hydraulic rams to lift the load.
The heart of the system is the LR810 indicator which provides a keypad for
entering instructions and LCD screens to display readings and messages.
The indicator has internal memory which stores settings and production data
even when switched off.
The LR810 is installed in the cab of the loading machine and is connected to
sensors on the lifting arms.
Main Parts of the LR810 System
The main parts of the controller are shown in the diagram below.

2 The Loadrite LR810 Weighing System
3
Weight Measurement
The LR810 measures the hydraulic pressure in the lift cylinders as the
machine raises the load. The indicator converts pressure into a weight
reading and displays the value.
An electronic trigger device mounted on the lift arms ensures that the
pressure readings are always taken at the same position on every lift.
The weight of the bucket or forks and associated structures is zeroed out
when the system is calibrated so that only the weight of the payload is
displayed.
When a weight is displayed, the driver can add it to a total or use one of the
other functions described later in this manual.
Displays
The LR810 provides two displays.
The top display gives instructions and information to the operator, including
product names and weight data.
The bottom display shows the current weight as it is lifted, then shows the
total weight loaded or weight required to reach a target, depending on the
mode of operation currently selected.
Both displays on the LR810 can be backlit for ease of operation in low light
conditions.
>>>>
To turn on or off the display lighting
• Press the LIGHT key.

2 The Loadrite LR810 Weighing System
4
Indicator Lights
The LR810 provides three indicator lights (positioned between the two
displays).
TRIG Light
This light comes on when the lifting arms have passed the trigger point.
This indicates that the displays now show the currently lifted weight.
Interlock Light (middle light
If the interlock feature is enabled, this light comes on when the bucket is in
the correct weighing position (not used with a standard LR810 installation).
TARE Light
This light is on when a tare has been entered. This means that the LR810 is
subtracting the tare weight from the lifted weight and is displaying the net
weight.
Optical Trigger
To ensure consistent and accurate measurement, the LR810 system
incorporates an optical trigger which initiates the weight measurement as the
lifting arms pass a certain point.

3 Getting Started
5
3 Getting Started
Switching On
The on / off switch is on the right hand side of the casing, just below the
rubber mounting bush.
On power up, the upper display shows a sequence of check messages and
then the Ready message (or Warm Up message - see below).
The lower display shows the total weight recorded when the LR810 was last
turned off.
Warming Up
For best weighing accuracy, the hydraulic fluid in the lift cylinders should be
at normal operating temperature.
If the machine has been standing idle or used only occasionally during the
last 30 minutes, the empty bucket should be lifted a few times. A zero
check should be performed before weighing.
You can ignore the readings on the weight displays as you warm up the
machine.
Initial Warm up Message
If your LR810 has been set up to display an initial warm up message and has
been off for two hours or more, it prompts you to warm up the machine
before starting weighing.
You need to do three lifts before the display shows Check -00-.
Refer to section 8 on how to zero the LR810.
Weight Display Modes
The LR810 provides two modes for displaying weight data:
• Total mode
• Target mode.

3 Getting Started
6
In total mode the LR810 displays each weight lifted and the running total as
you add weights.
In target mode the LR810 displays each weight lifted and the amount to go
to reach a specified target.
Details of total mode and target mode are given on pages 9 and 11
respectively.
Multiple Products
The LR810 allows you to weigh and store totals for up to sixteen different
products. The selected number of products are enabled when the LR810 is
installed.
The top display shows the name (number) of the currently selected product.
If your LR810 is set up for one product only, the display simply shows Total
instead of a product name.
Further information about product names is given on page 13.
4 Weighing - Overview
7
4 Weighing - Overview
When ready to weigh, the LR810 displays Ready on the top display.
There may be other information on the top display, depending on the mode
of operation.
The total (or target) weight is shown on the second line of the top display
and on the large bottom display.
Before Weighing a Load
Before weighing, make sure that:
• The bucket or forks are rolled fully back for each lift.
• The loader is on level ground.
• The loader is stationary (for best accuracy).
• The lift arms start well below the trigger point. This ensures that all
aceleration and load bounce has been eliminated well before the
trigger sequence begins.
• The LR810 is correctly zeroed.
Weighing a Load
>>>>
To weigh a load
Raise the load smoothly through the trigger point, using normal engine revs.
For best results, operate the lift lever before accelerating the engine so that
the machine does not rock as it lifts.
As you raise the load past the trigger point, the LR810 beeps and the TRIG
light comes on to show that the weight has been measured.
The lifted weight is briefly displayed on the top line of the top display and
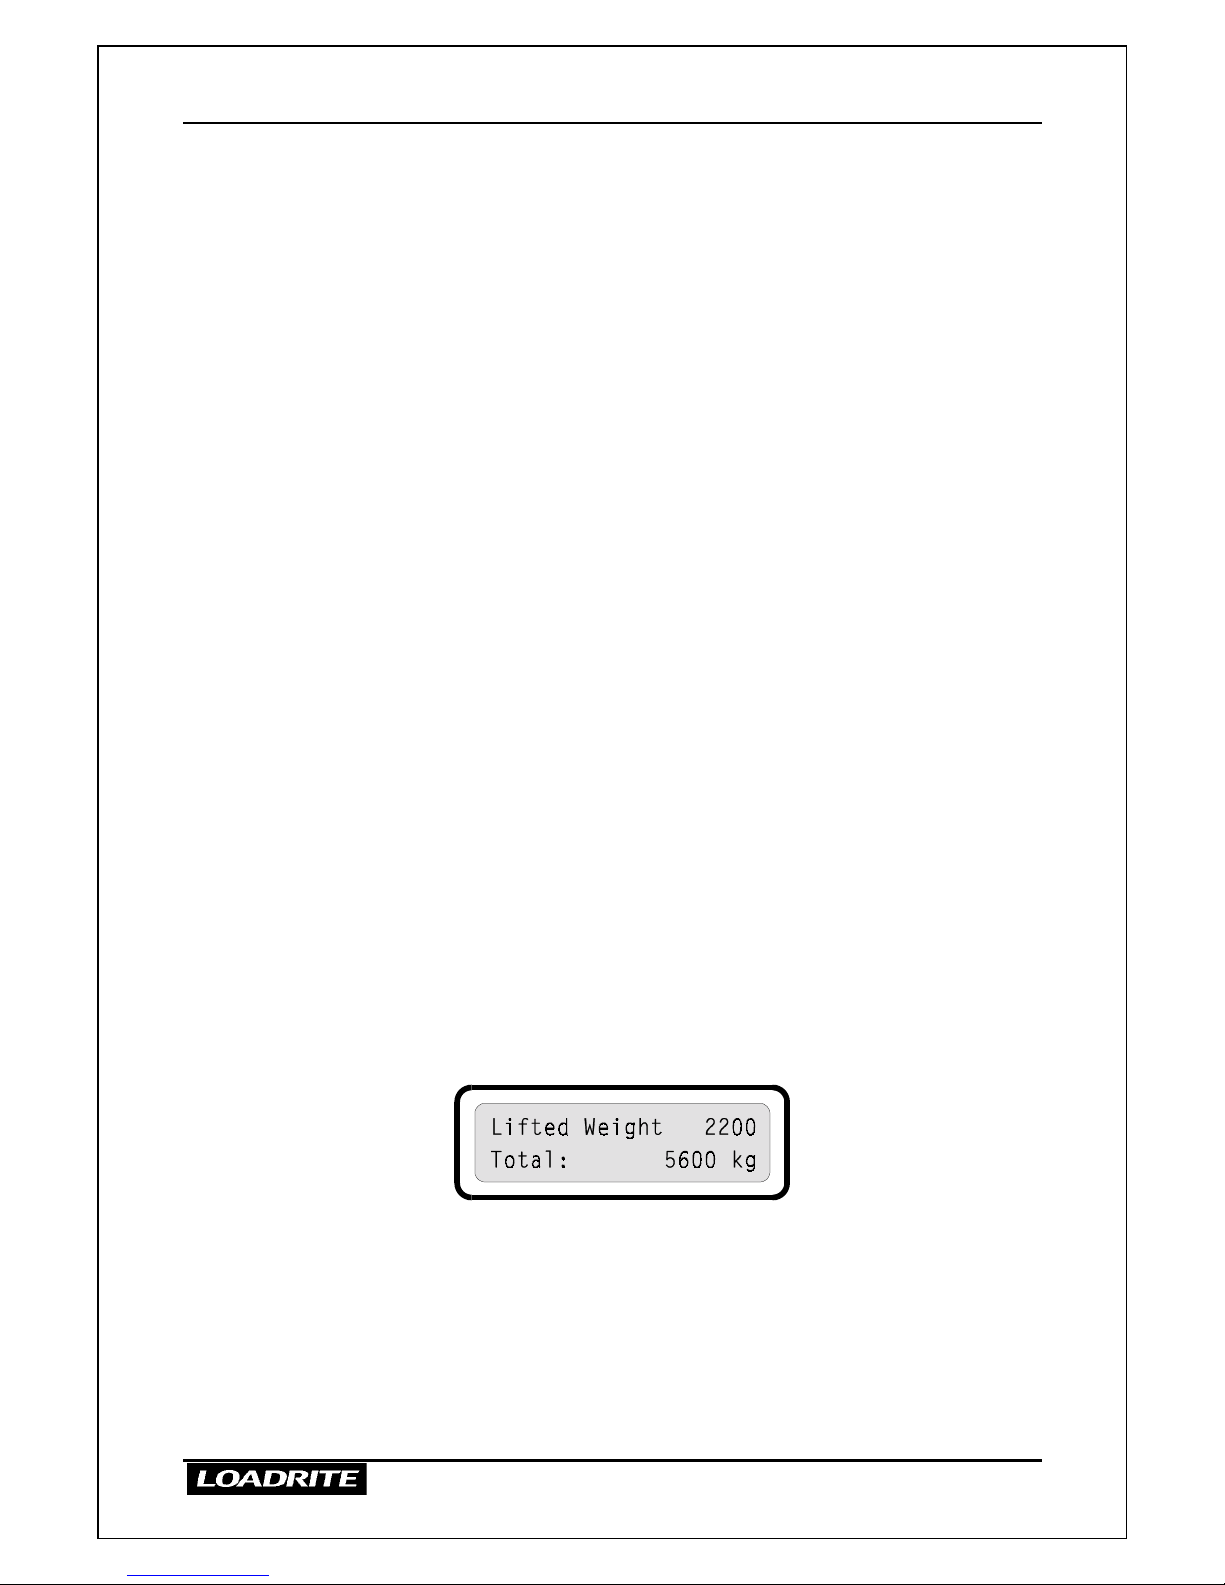
on the bottom (large number) display.
In the diagram above, the lifted weight is 2200kg and the total so far is
5600kg.
While the TRIG light remains on (few seconds), you can:
• Press ADD, to add the displayed weight to the running totals.
• Press SUB, to reduce the running totals by the displayed weight.
• Press ZERO to zero the measuring system.

4 Weighing - Overview
8
These functions are described seperately in this manual.
If you don’t press a key, the LR810 beeps and prompts you to take action. If
after a further delay, you do not press a key, the LR810 discards the just
measured weight and goes back to the Ready state.
Multiple Scales
If the multiple scale option is enabled in your LR810, you can measure
weights using Scale 1 or Scale 2.
Scale 1 and Scale 2 allow two different load bearing implements to be used
for lifting. For example, two different types of bucket/fork attachments.
The scale currently in use is displayed on the top line of the display.
To change the scale, see page 28.
5 Total Mode
9
5 Total Mode
In total mode the LR810 displays each weight lifted and the running total as
you add weights.
Total mode provides two running totals for each product:
• Short total
• Long total
•
When a load is added, both the short and long totals are updated.
The short and long totals are independent and are individually cleared and
restarted as necessary.
Selecting Total Mode
The LR810 starts up in Total mode when switched on.
You can return to total mode from Target mode by pressing TOTAL.
Short Total
The short total is typically used to display the total weight lifted onto a
truck.
As you add successive loads, the LR810 displays the weight of the current
load and the updated short total (sum of the loads so far).
The LR810 displays short totals on the second line of the top display and on
the lower (large) display.
>>>>
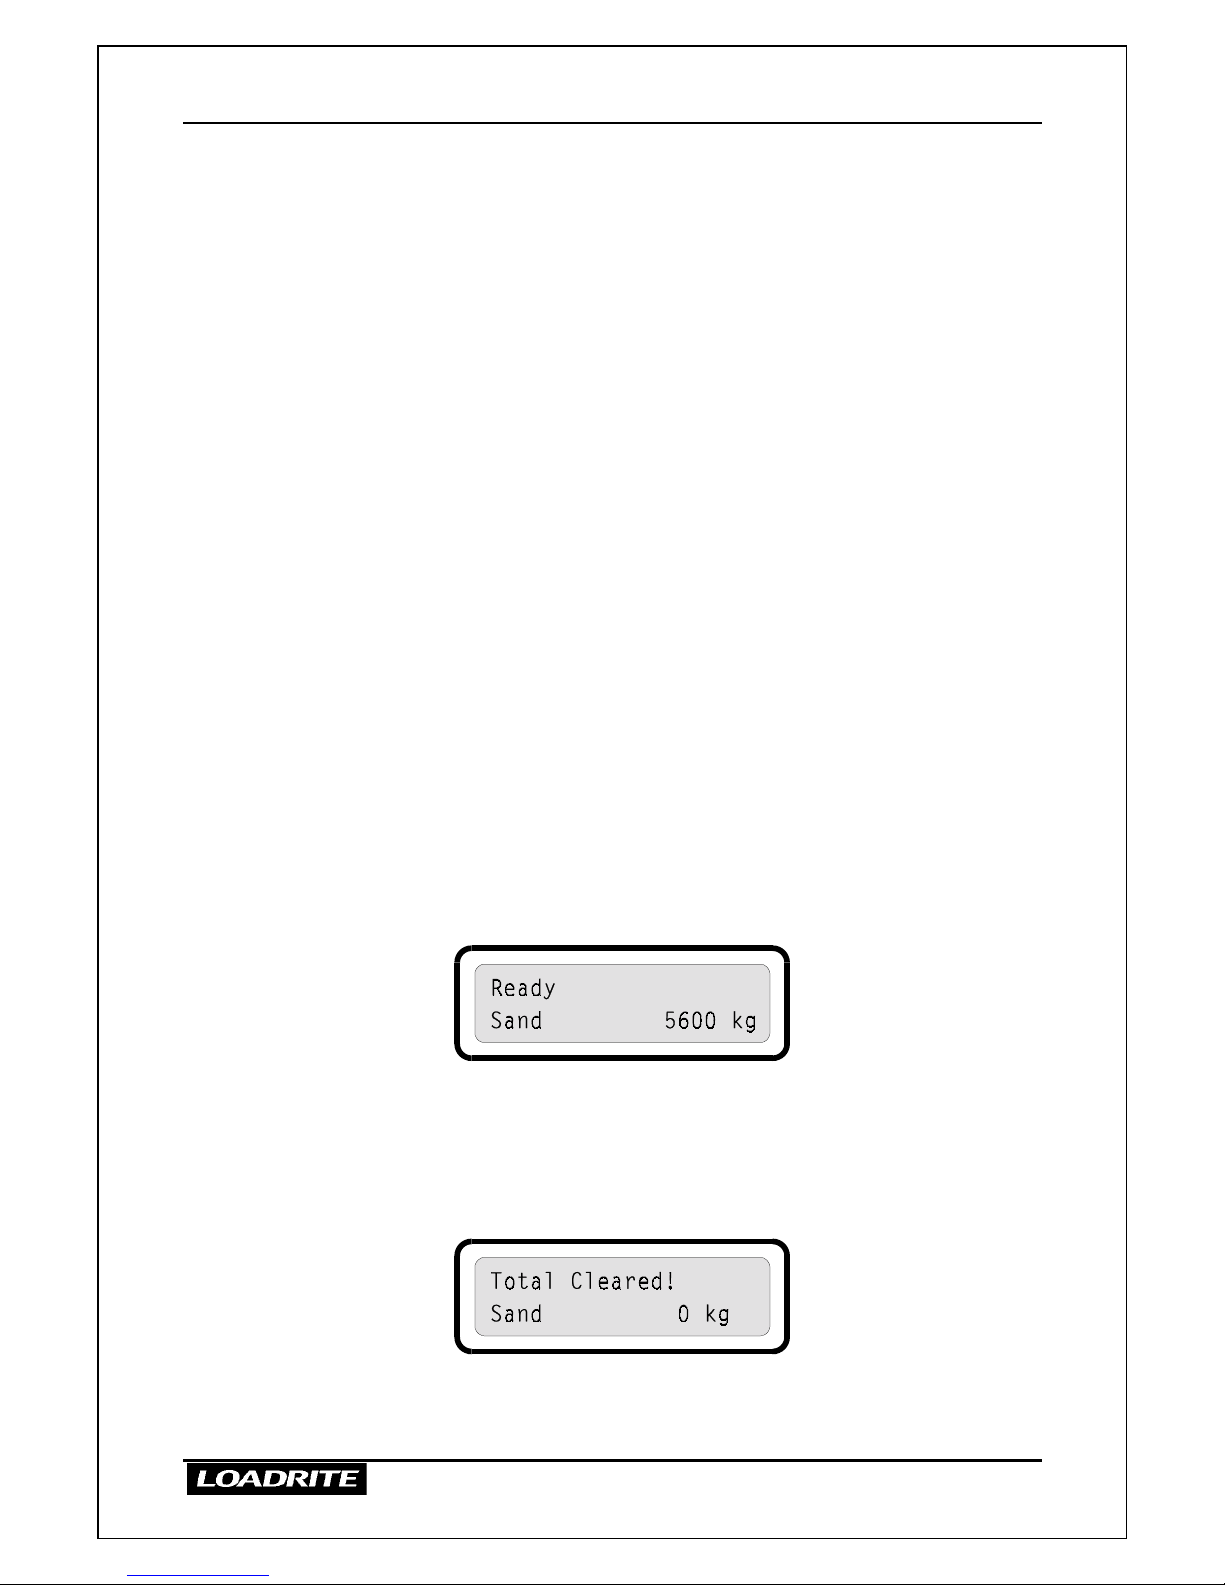
To clear the short total
Press CLEAR.
The indicator clears the short total for the current product and then displays
the following message.
The next ADD operation starts a new short total for this product.

5 Total Mode
10
Long Total
The long total is typically used for accumulating the weights lifted over a
longer period; for example a shift or a day.
>>>>
To display the long total
• Press LONG.
The long total is displayed while the LONG key is held down and for
3 seconds after it is released.
>>>>
To clear the long total
1. While the long total is displayed, press ENT.
The LR810 prompts you to confirm:
2. To clear, press ENT.
The indicator clears the long total for the current product and then
displays the following message.
(In this example, the long total for product number 1 was cleared.)
The next ADD operation starts a new long total for the current
product.
Clearing Totals for all Products
To clear the short totals for all products, you need to select each product in
turn and clear the short total as described above.
You can clear the long totals in the same way, or use the MENU option
Clear All Long. See page 30.
Multiple products are described on page 13.

6 Target Mode
11
6 Target Mode
Target mode allows you to enter a target weight and then load up to that
weight in a series of lifts.
Each time you lift and add a weight, the LR810 displays the remaining
amount to reach the target.
Target mode is used typically when loading a truck to its optimum payload.
Target mode is an optional feature which can be enabled when the LR810 is
installed.
>>>>
To select target mode and enter the target weight
1. Make sure the LR810 is Ready and you have finished (cleared) the last
target operation.
2. Press TARG.
The indicator prompts you to enter a new target weight.
3. Enter the new target using the number keys 0 to 9, or simply press
ENT to select the displayed target weight again.
You can use the CLEAR ENTRY key to correct any errors made while
entering the number.
The indicator displays the amount “To Load” to reach the target and
goes to the Ready state.
>>>>
To reset to the target weight
When you have completed a load, you need to clear the “To Load” amount
for the current product before starting another target operation.
1. Press CLEAR.
The LR810 resets to the last entered target weight and resets the short
total for the current product to zero.

6 Target Mode
12
2. The LR810 returns to the Ready state with the new “To Load” amount
displayed.
At this stage you can press TARG to enter a new target weight or continue
weighing with the current target weight.
Target Mode Notes
• If you have lifted and added any weights, you must clear the totals
before you can reset or change the target weight.
• During a target weight operation, you can check the amount added so
far by pressing TOTAL to switch to total mode. You can then return
to target mode by pressing TARG.
• During a target weight session, you can review the target weight and
the weight still to go by pressing and holding down TARG.
• If the total of the weights added exceeds the target by a certain
percentage, the LR810 beeps and displays a negative weight to load.
You can still add the weight to the totals in the normal way.
7 Product Names
13
7 Product Names
Identification/Tracking
The LR810 allows you to weigh and store separate short and long totals for
up to sixteen different products.
The number of products and names for them can be entered when the LR810
is installed.
When used with an LD640 data logger, the LR810 can track up to 999
different products, but these can only be identified by number.
One Product Only
If your LR810 is set up for one product only, the display simply shows Total
instead of a product name.
Multiple Products
If your LR810 is set up for multiple products, the display shows the name of
the currently selected product.
The LR810 maintains a separate short and long total for each product. The
ADD and SUB functions only affect the totals for the current product.

7 Product Names
14
>>>>
To select a different product
1. Press PROD.
2. Enter the number or press
≤
or to display the product required.
3. When the required product is displayed, press ENT.
The LR810 displays the product name corresponding to the number
you entered and is ready to weigh.
Notes
• If you do not select a new product within a few seconds, the LR810
reverts to the original product.
• You can select a different product in the middle of a total or target
operation and return to the original at any time without losing the data.

8 Zeroing the LR810
15
8 Zeroing the LR810
When you raise an empty bucket past the trigger point, the indicator should
display zero. However, due to build up of material in the bucket or changes
in the oil temperature, a small zero error may occur.
Zero error affects the accuracy of lifted weights.
Remember the following requirements for accurate measurements:
• The bucket or forks must be fully rolled back.
• The loader must be stationary.
• The loader must be on level ground.
• Raise the lifting arms smoothly past the trigger point.
>>>>
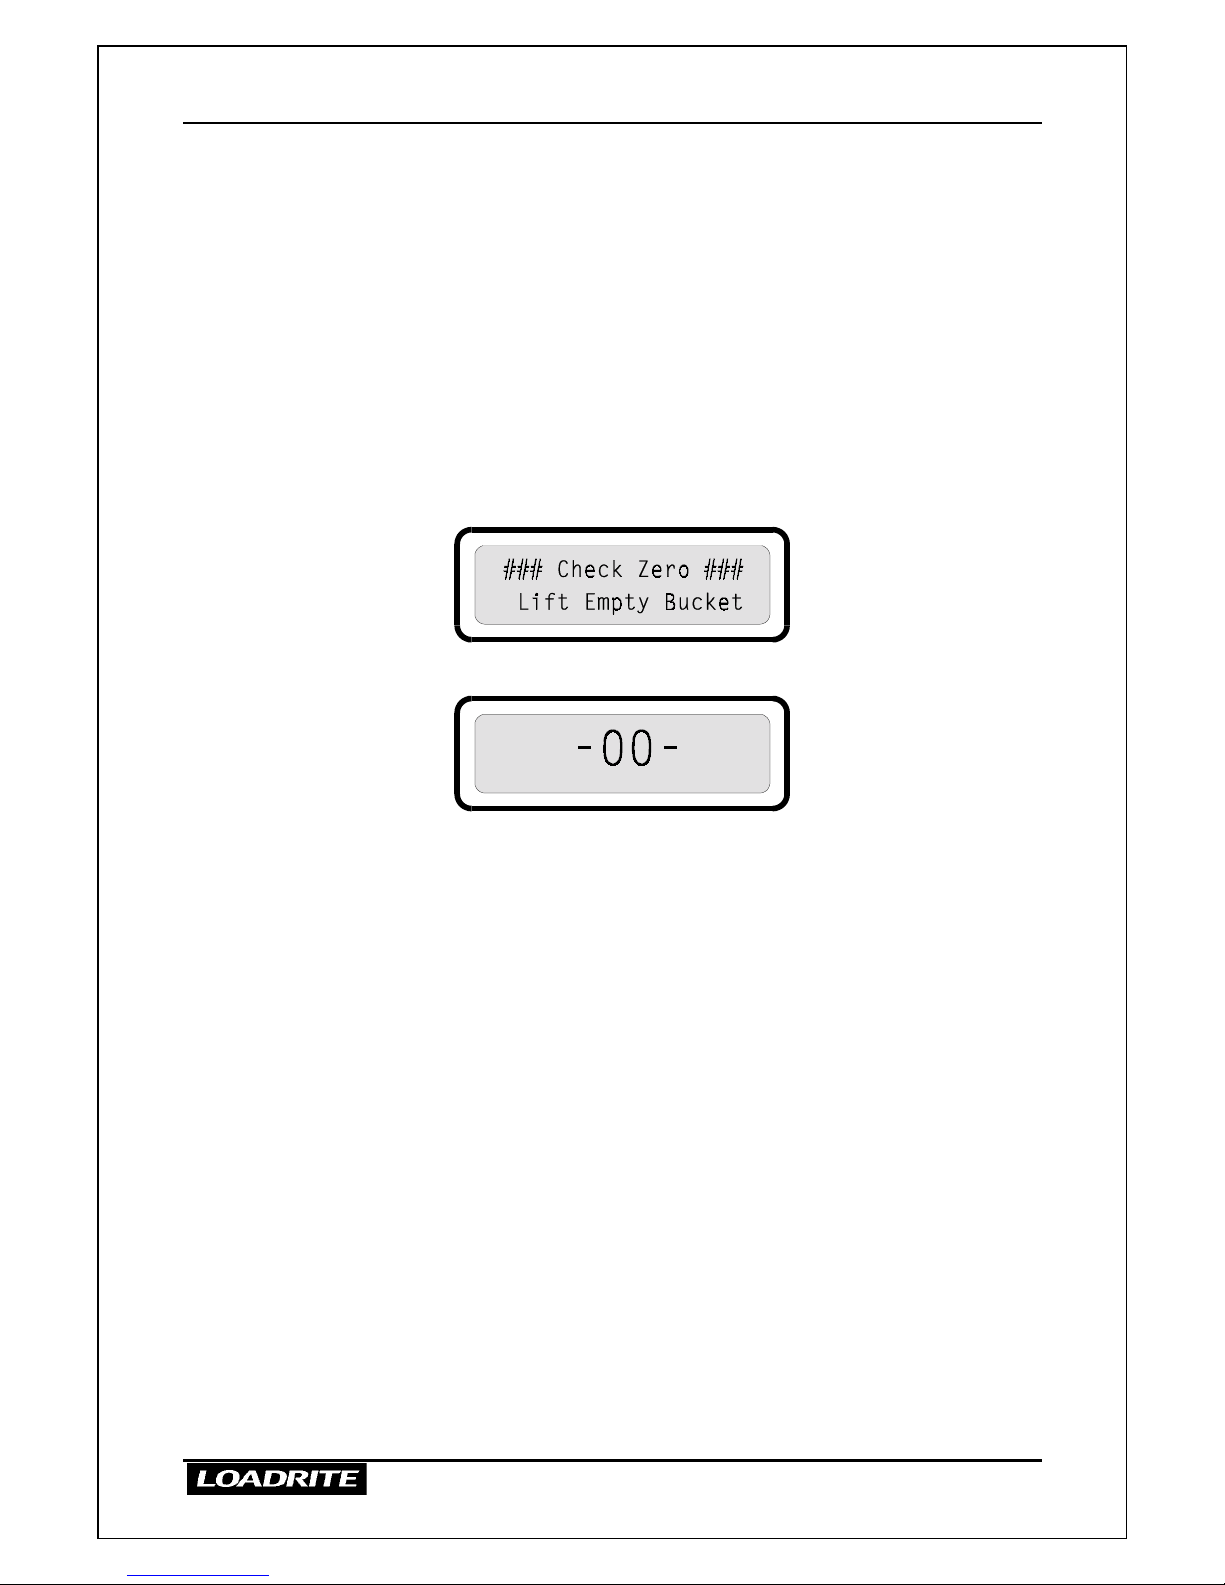
To zero the LR810
1. Raise the empty bucket smoothly until the LR810 beeps and the TRIG
light comes on.
2. While the TRIG light is on, press ZERO.
3. The LR810 performs the zero adjustment and displays a confirmation
message.
4. The LR810 then returns to the Ready to weigh state.
Large Zero Error
If, while zeroing, there is a large zero error (displayed weight greater than
5% of full scale), the LR810 asks you to confirm that the bucket is empty.
Depending on your response, the indicator displays “Zeroed” or “Not
Zeroed”.
If the bucket is empty and this message still occurs, there may be a fault in
the system. The LR810 should be checked and, if necessary, re-calibrated.

8 Zeroing the LR810
16
Bucket Too Heavy Message
If, while zeroing, the weight is greater than 10% of full scale, the indicator
displays the following message and does not carry out any adjustment.
This prevents any accidental zeroing of valid weights.
9 Automatic Zero Prompt
17
9 Automatic Zero Prompt
Because zero errors affect the accuracy of lifted weights, it is important to
do zero checks regularly. Changes in zero occur more often while the
machine is warming up.
The automatic zero prompt is an optional feature which can be enabled
when the LR810 is installed.
The automatic zero prompt reminds the operator to do a zero check:
• Every 15 minutes for the first hour.
• Every 30 minutes thereafter.
The reminder consists of a series of short beeps and the following display.
You should then carry out the zeroing operation described on page 15.
Note
The automatic zero prompt does not appear if you have recently checked
zero.
10 Adding, Subtracting and Recalling
18
10 Adding, Subtracting and Recalling
Adding a Weight
The ADD function adds the lifted weight to the short and long totals for the
current product.
>>>>
To add a new load
1. Lift the load smoothly until the LR810 beeps and the TRIG light
comes on. (The lower display shows the lifted weight.)
2. While the TRIG light is on, press ADD.
The LR810 updates the long and short totals for the current product
and displays the result.
The displays depend on whether you are in Total mode or Target mode
as shown below.
Total mode
When the weight is added the
upper display briefly shows the
number of lifts and then the short
total for the product.
Lifted Weight 1000
Sand 1500 kg
Then
2 Added
Sand 2500 kg
Then
Ready
Sand 4000 kg
Target mode
The upper display briefly shows
“Reduced amount” and then the
amount still required to reach the
target.
Ready
To Load 12000 kg
Then
Lifted Weight 2500
To Load 12000 kg
Then
Reduced Amount
To Load 9500 kg
Then
Ready
To Load 9500 kg
The lower display shows the current short total or the amount to reach
the target according to the mode selected.

10 Adding, Subtracting and Recalling
19
Subtracting a Weight
The subtract function subtracts the lifted weight from the short and long
totals for the current product.
This can be used, for example, when a log has been added and then removed
from a truck.
Another example is when only part of a final bucket load of loose material is
required. You can add the full bucket weight and then re-weigh and subtract
the amount remaining in the bucket.
>>>>
To subtract a weight
1. Lift the load smoothly until the LR810 beeps and the TRIG light
comes on. (The lower display shows the lifted weight.)
2. While the TRIG light is on, press SUB.
The LR810 subtracts the weight from the long and short totals for the
current product and displays the result.
The information given in the upper display depends on whether you
are in Total mode or Target mode as shown below.

10 Adding, Subtracting and Recalling
20
Total mode
The upper display briefly shows
“Subtracted!” and then the
reduced short total.
Lifted Weight 2500
Sand 9650 kg
Then
Subtracted! 2500
Sand 7150 kg
Then
Ready
Sand 7150 kg
Target mode
The upper display briefly shows
“Increased amount” and then the
amount required to reach the
target (which has been
increased).
Ready
To Load 12000 kg
Then
Lifted Weight 2500
To Load 12000 kg
Then
Increase Amount
To Load 14500 kg
Then
Ready
To Load 14500 kg
The lower display shows the current short total or the amount to reach
the target according to the mode selected.
NOTE:
The LR810 treats SUB as a similar action to ADD. If you add three
weights and then subtract one, on the next ADD the indicator briefly
displays 5 added, not 3.

10 Adding, Subtracting and Recalling
21
Recalling Last Weight
The recall function is a feature which recalls and displays the last weight
lifted. This allows you to correct mistakes in adding or subtracting weights
to the totals.
Recalling is equivalent to lifting the same weight again, but there are some
limitations.
You can only recall the last weight if it has been:
• Added
• Subtracted, or
• Timed out (ignored)
>>>>
To recall the previously lifted weight
1. Press RECALL.
The LR810 displays the previous weight and the TRIG light comes on.
2. While the TRIG light is on, you can:
• ADD (unless the previous action was an ADD)
• SUB (unless the previous action was a SUB)
• TARE
• Ignore (allow to time out).

11 Batch Weighing Mode
22
11 Batch Weighing Mode
Batch weighing allows you to add the weights of different products together
to obtain the total weight of a mix.
Batch weighing mode is an optional feature which can be enabled when the
LR810 is installed.
If it is available in your installation, you can switch batch mode on or off
from the MENU options (see page 29).
When batch mode is on, the functions of the weight displays change as
follows:
Top display
While the TRIG light is on, shows the lifted weight.
While the TRIG light is off, shows the short total for this product.
Bottom (large) display
While the TRIG light is on, shows the lifted weight.
While the TRIG light is off, shows the sum of the short totals for all
the products.
>>>>
To clear batch totals
In batch mode, the CLEAR key clears all short totals including the batch
total.

12 Weighing with Tare
23
12 Weighing with Tare
A tare is a weight that is lifted but is not part of the payload. (For example,
the weight of a wooden pallet). If only the weight of the product is required,
the weight of the pallet can be automatically subtracted from the total
weight. This is performed by the tare function.
The tare function is an optional feature which can be enabled when the
LR810 is installed.
The LR810 provides two methods of entering a tare:
1. Push button tare
The LR810 is used to weigh the unwanted weight (eg. pallet)
separately. The LR810 then automatically subtracts this tare weight
from all subsequently measured weights.
2. Keyboard tare
The unwanted weight is already known and is entered using the
keyboard. The LR810 then automatically subtracts this tare weight
from all subsequently measured weights.
>>>>
To enter a push button tare
(Use this method if you do not know the tare weight.)
1. Lift the empty container or pallet until the LR810 beeps and the TRIG
light comes on.
2. Press TARE.
3. To accept the tare weight, press ENT.
The LR810 briefly displays the following
4. The TARE light comes on and the LR810 returns to Ready.
You can now commence weighing with the tare applied to all lifted weights.

12 Weighing with Tare
24
>>>>
To enter a keyboard tare
(Use this method if you already know the tare weight.)
1. Before lifting any load, press the TARE key.
2. Enter the tare weight using the number keys 0 to 9 and press ENT.
(You can use the CLEAR ENTRY key to correct any mistakes.)
3. The LR810 briefly confirms the tare entered.
4. The tare light comes on and the LR810 returns to Ready.
You can now commence weighing with the tare applied to all lifted weights.
Note
The LR810 rounds the tare weight to the weighing resolution of your
installation. If the weighing resolution is set to 100kg and you enter a tare
of 260kg, the LR810 rounds the tare weight to 300kg.
>>>>
To clear the tare
To clear a tare, use the keyboard as described above to enter a tare of zero.
The LR810 turns off the tare light and briefly displays a confirmation
message.
Notes on tare
• Whenever the tare light is on, the LR810 displays the net weight of the
product.
• You cannot tare out negative weights.
• If you enter a tare for a container or pallet and then lift the forks
empty, the LR810 displays the negative of the tare weight.

13 Operating with Interlock (not part of standard LR810 installation kit)
25
13 Operating with Interlock
(not part of standard
LR810 installation kit)
The interlock feature is used to ensure that the bucket or forks are in the
correct position for weighing.
Interlocking is an optional feature which can be enabled when the LR810 is
installed.
When working with interlock enabled, you carry out weighing in the normal
way, except that the bucket or forks of the machine must be in the correct
position before a weight can be measured.
The correct position is indicated when the interlock light (centre light on the
LR810) is on.
>>>>
To weigh with interlocking
1. Make sure the LR810 is Ready.
2. Operate the bucket to pick up the load.
3. Move the bucket to the correct lifting position.
The interlock light comes on.
4. Lift the load smoothly until the LR810 beeps and the TRIG light
comes on.
5. You can then add or subtract the load as normal.
If you attempt to weigh when the interlock light is not on, the LR810
displays a message and no weight is measured.
.

14 Additional Data
26
14 Additional Data
If this feature is enabled, the LR810 allows you to enter three numbers
which provide additional information to the weight data.
Each number has a label to identify it. The specific labels for your LR810
are set up at installation time.
Typical labels might be, for example:
Customer number
Truck number
Docket Number
When you press the DATA key, the LR810 displays the three labels in
sequence and you can enter the relevant numbers for the current load. The
numbers can be up to 8 digits long.
If you have the appropriate equipment installed, this information can be
stored in the data logger and / or printed with the weight data.
>>>>
To enter additional data numbers
(This explanation uses the example labels above)
1. When the LR810 is Ready, press DATA.
The LR810 displays the first label and prompts you to enter a number.
2. Enter a number (up to eight digits) and press ENT.
The LR810 displays the second label and prompts you to enter a
number.
3. Enter a number and press ENT.
4. Enter the third number in the same way.
The LR810 returns to the Ready state.
Note
If you have an on-board computer, the third number can be altered remotely
from the computer or made to increment automatically when the CLEAR
key is pressed.
Note

14 Additional Data
27
You may have either one, two or three numbers available depending on how
the LR810 is set up at installation time.

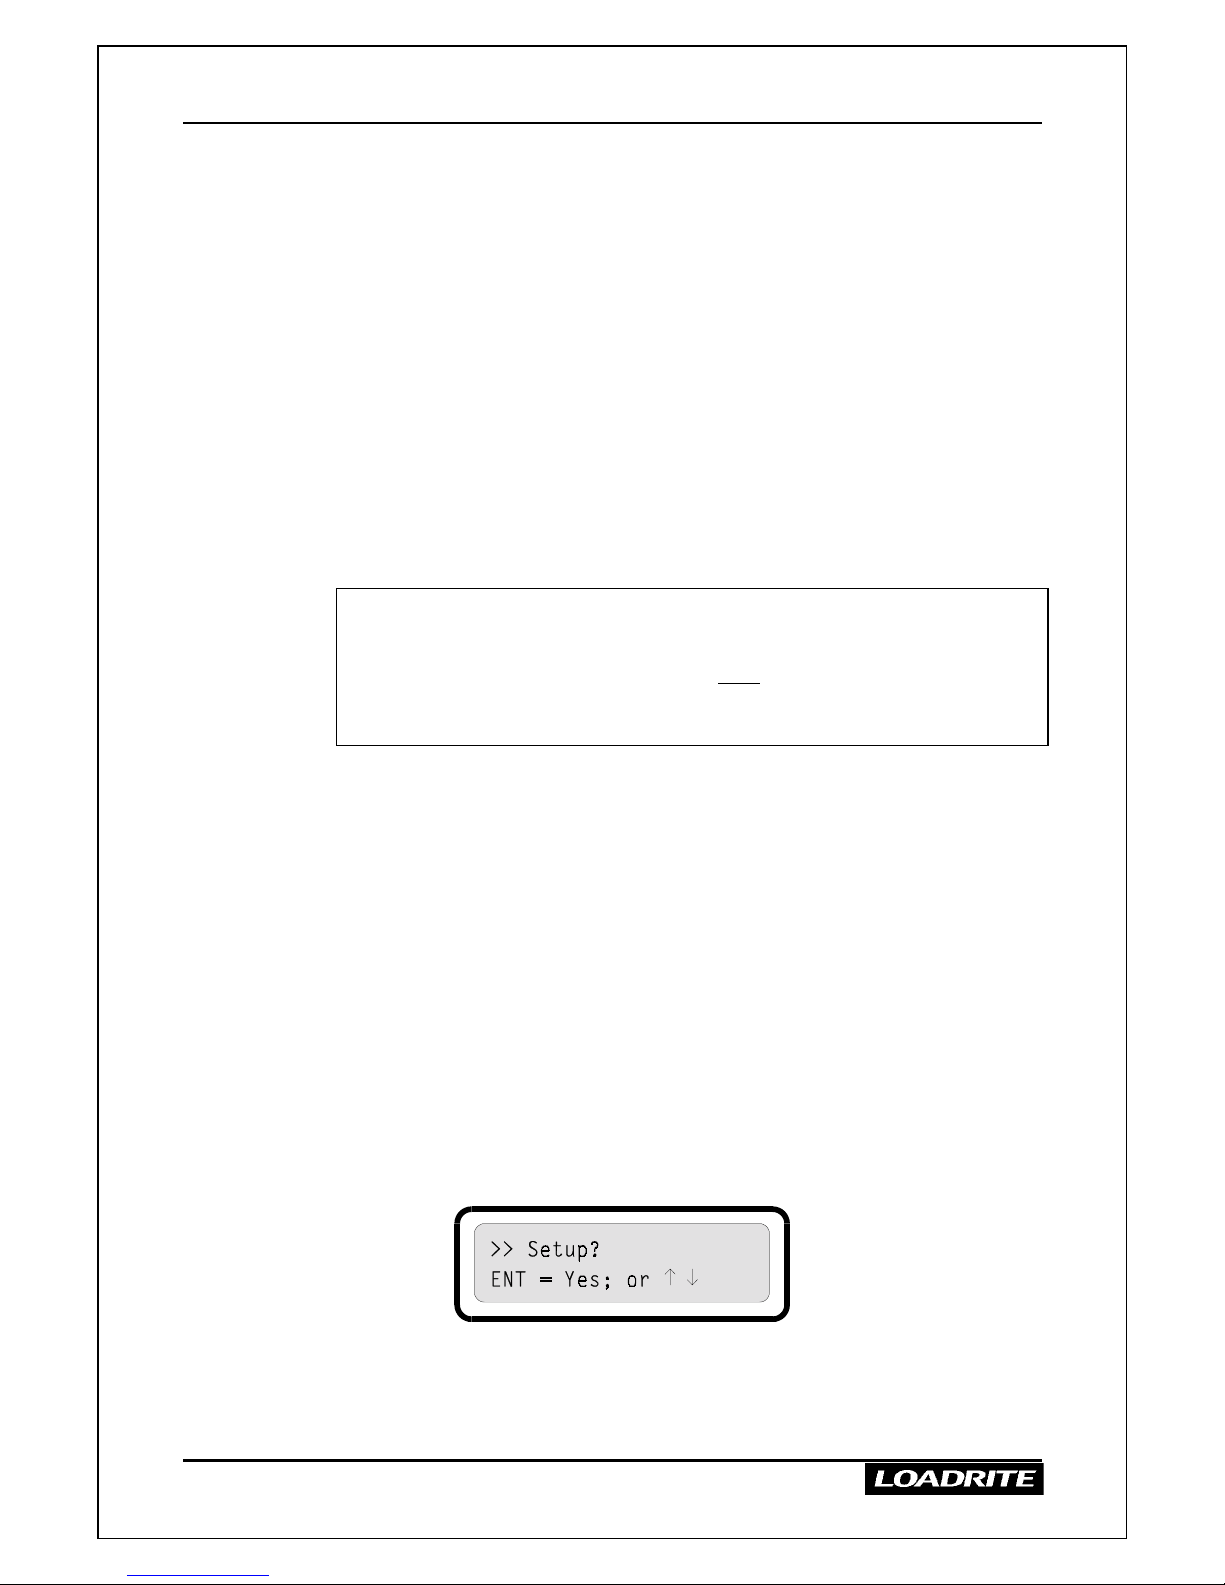
15 Operator Menu Options
28
15 Operator Menu Options
The operator menu provides options for you to change some of the settings
of the LR810.
The settings you can change are:
• Switch between scale 1 and scale 2.
• Switch batch mode on or off.
• Set the clock.
• Clear all long totals.
These functions are described below. A diagram showing the menu options
(menu map) is given on page 32.
(Another option on the menu is Setup, which provides further functions used
at installation time. Setup requires a security code to allow access to these
functions.)
Menu Keys
The same keys are used for all menu options as follows:
• To access the menu, press MENU.
• To accept an option, press ENT.
• To obtain the next menu option, press
≤
or
(shown as ↑↓ on the display).
• To exit the menu, press EXIT then ENT.
• If you do not press a key, the LR810 returns to the Ready state after a
short delay.
Change Scale
If the multiple scale option is enabled in the LR810, you can select Scale 1
or Scale 2.
Scale 1 and Scale 2 allow two different load bearing implements to be used
for lifting (for example, two different types of bucket).
>>>>
To change scale
1. When the LR810 is Ready, press MENU.
2. Press
≤
or to reach the Change Scale option.

15 Operator Menu Options
29
3. To change the scale, press ENT.
The LR810 displays the new scale for a few seconds and then returns
to the Ready state with the new scale selected.
The LR810 then prompts you to check zero.
Batch Mode On / Off
If batch mode is enabled in the LR810, you can switch batch mode on or off.
Operating with batch mode is described on page 22.
>>>>
To switch batch mode on / off
1. When the LR810 is Ready, press MENU.
2. Press
≤
or to reach the Change Batch Mode option.
3. To change the mode, press ENT.
The LR810 displays the new setting of batch mode for a few seconds
and then returns to the Ready state.
Setting the Time and Date
The LR810 has an internal clock which can used for inserting the time and
date into recorded and printed data. You can also display the time and date
on the upper display by pressing the TIME key.
The LR810 has a backup battery which maintains the clock and memory
when main power is off.
>>>>
To set the time and date
1. When the LR810 is Ready, press MENU.
2. Press
≤
or to reach the Set Clock option.
3. To set the clock, press ENT.
4. The display shows the current time and prompts you to enter the
minutes.
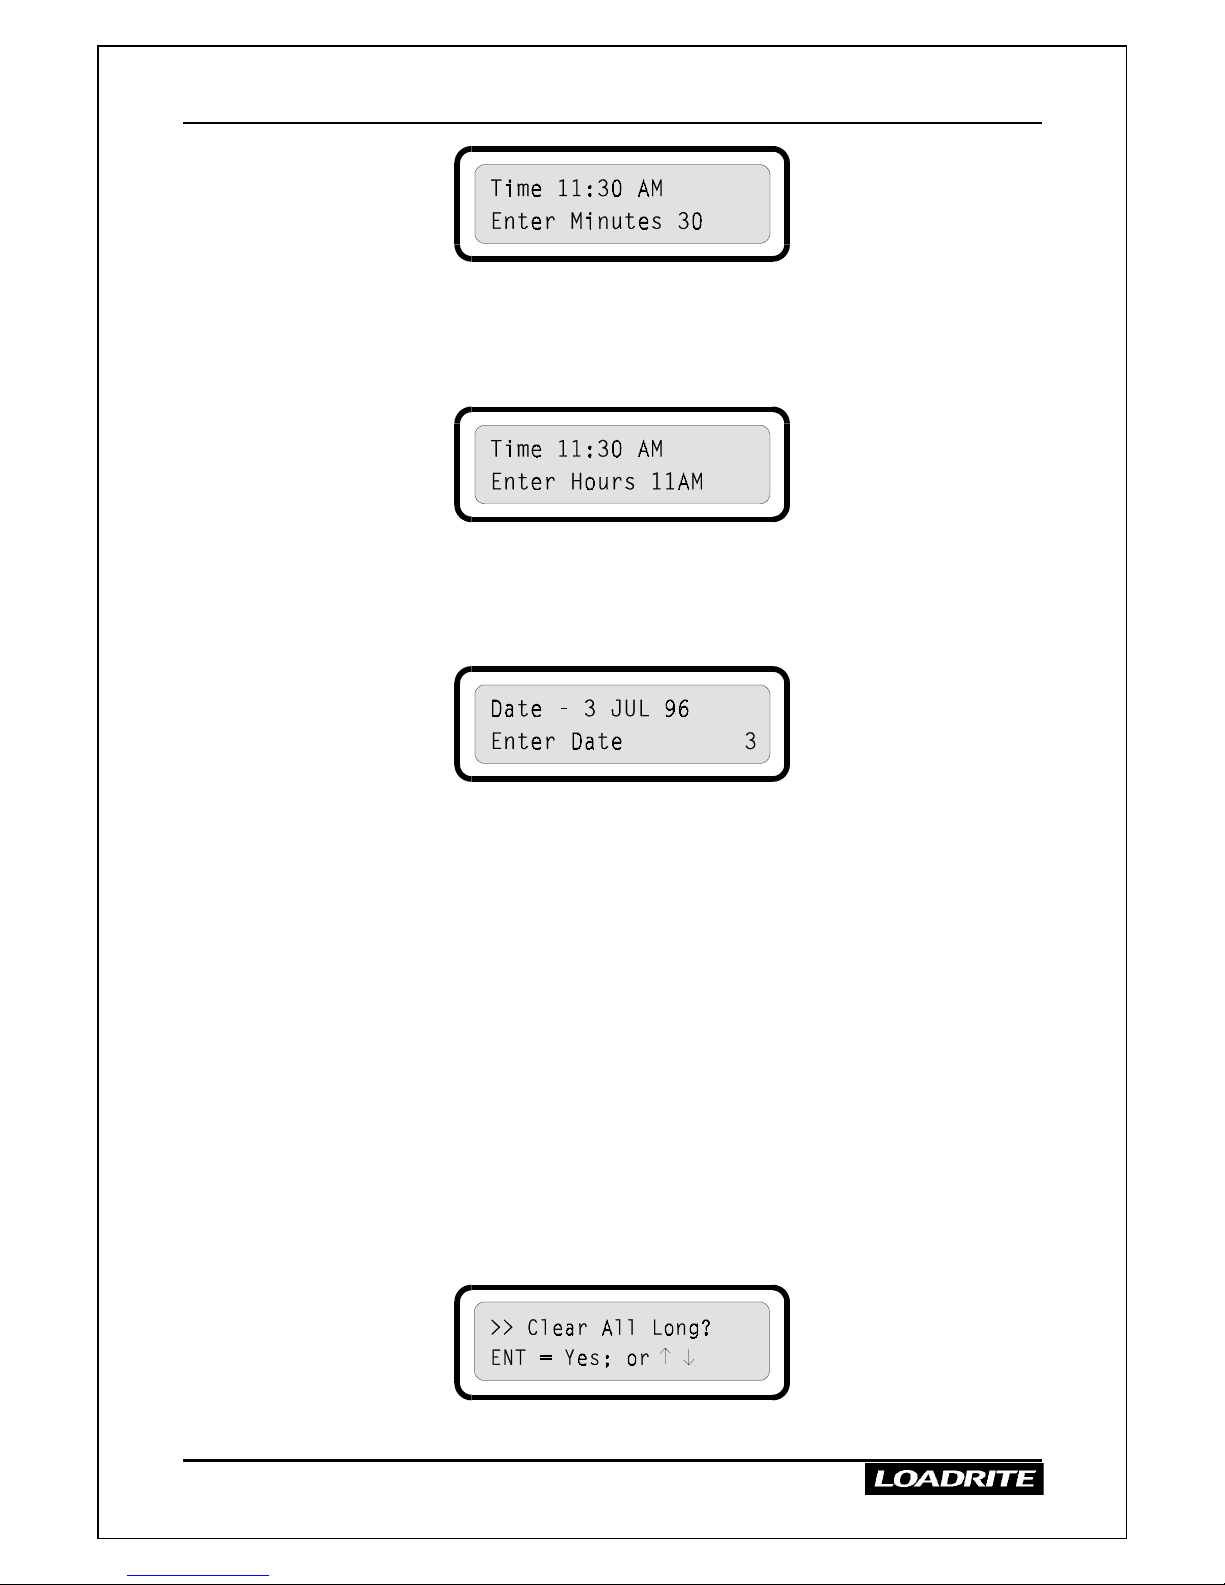
15 Operator Menu Options
30
Enter the correct minutes using the number keys.
(You can clear mistakes using the CLEAR ENTRY key.)
When the minutes are correct, press ENT.
5. The display prompts you to enter the hours.
Enter the correct hours using the number keys.
Toggle between AM and PM using the
≤
and keys
When the hours are correct, press ENT.
6. The LR810 displays the date and prompts you to enter the date.
Enter the date as prompted (day 1-31, month 1-12, year 0-99), pressing
ENT between each part.
7. Finally, the LR810 displays the complete time and date for a few
seconds before returning to the Ready state.
Note: at any time while entering the time and date you can press EXIT to
return the LR810 to the Ready state without altering the current time and
date.
Clearing Long Totals
This option allows you to clear the long totals for all products in one go.
For an explanation of long totals, see page 10.
>>>>
To clear the long totals
1. When the LR810 is Ready, press MENU.
2. Press
≤
or to reach the Clear All Long option.
3. To clear the totals, press ENT.

15 Operator Menu Options
31
4. The LR810 prompts you to confirm the operation.
To clear the totals, press ENT. To exit without clearing, press any
other key.
Note:
If the LR810 has a printer connected, the long totals are printed
together with a grand total before being cleared.

15 Operator Menu Options
32
Menu Map
The diagram below shows the menu options available when you press the
MENU key.

16 Using the LD640 Data Logger
33
16 Using the LD640 Data Logger
The LD640 Data Logger is an optional accessory to the LR810 weighing
system. The LD640 consists of a portable capsule which stores the data and
a base unit which is connected to the LR810.
The LD640 records weight data as you operate the LR810. The data can
later be transferred to a computer for analysis. Data is recorded whenever a
weight is added, subtracted, zeroed or tared, or when a total is cleared.
Once installed, the LD640 operates automatically as you weigh loads, it
does not require any action by the operator.
Displays
The LD640 causes the LR810 to display the following messages at certain
times.
When data capsule inserted
When a data capsule is inserted into the base, the LR810 briefly displays the
following message.
(4.2% is replaced by the actual amount of data in the capsule)
When data capsule removed
If the data capsule has been removed from the base and the LR810 attempts
to send data to it, the LR810 briefly displays the following message.
Operation of the LR810 is unaffected.
A warning is also given as the capsule reaches 95% full.
When data capsule is full
When the data capsule has stored data up to its capacity, the LR810 briefly
displays a message to that effect.
You can continue to operate the LR810, but if you want to record the data,
you must insert another data capsule.

17 Print Functions
34
17 Print Functions
When an LP750 printer is connected weight data can be printed as the
LR810 makes measurements. Most print options can be set up at
installation.
The data can be automatically printed when particular functions are
performed as listed below.
On Power Up
LR810 Always printed
ADD performed
Sequence number Optional
Weight Optional
Tare Optional
Gross Optional
Time Optional
User defined number 1 Optional
User defined number 2 Optional
User defined number 3 Optional
SUB performed
Sequence number Optional
Weight Optional
Clear short total
Product number Optional
Total weight Optional
User defined number 1 Optional
User defined number 2 Optional
User defined number 3 Optional
ID number (of loader) Optional
Time and date Optional
User title (company name) Optional
Product name Optional
Scale Number Optional
Clear long total
Product name Printed if more than one product is being used
Long total weight Always printed
ID number (of loader) Always printed
Time and date Always printed
Clear all Long (MENU option)
All long total weights Always printed
Product numbers Always printed
ID number Always printed

17 Print Functions
35
Time and date Always printed
Zero performed
Weight zeroed Always printed
Tare performed
New tare value or tare cleared
Change of scale
New scale number Always printed

18 Obtaining the Best Accuracy
36
18 Obtaining the Best Accuracy
Lifting Speed
The hydraulic pressure required to lift a load varies with the speed of lift.
The LR810 electronically corrects for most variations, but better accuracy is
obtained if you limit the range of lifting speed used.
Keep engine revs consistant
Trigger Point
The hydraulic pressure required to start lifting is much greater than is
required to keep the load moving smoothly upwards. It is important that the
load is moving at a steady speed when it reaches the trigger point.
We recommend that you:
Start the lift well below the trigger point
(In terms of time, at least 2 seconds of lift before the trigger point.)
Bounce
Most loaders have pneumatic tyres which can cause the machine to bounce
when lifting. Any bounce causes variation in the hydraulic pressure and
affects the accuracy of the weight measurement.
To minimise the effect of bounce:
Always operate the lift lever before accelerating the engine and as
recommended above “Start the lift well below the trigger point”
Centre of Gravity
The hydraulic pressure in the lifting cylinders depends on where the centre
of gravity of the load is.
It is important that:
The bucket is always in the same position - fully rolled back
Uneven Ground
Uneven or sloping ground changes the pressure required to lift a load and
hence affects the accuracy of weighing.
Whenever possible:
Avoid weighing on uneven or sloping ground.

18 Obtaining the Best Accuracy
37
Temperature
The temperature of the hydraulic fluid in the lifting cylinders affects
weighing accuracy. If the loader is idle for more than an hour, the oil cools
down.
If practical:
Warm the oil to the normal working temperature before weighing
19 Span Calibration Correction
38
19 Span Calibration Correction
This function allows small changes to be made to the LR810 calibration if
the bucket or forks of the loader are modified or if no accurate test weight is
available when the LR810 is calibrated at installation time.
The adjustment is carried out by entering the total of weights recorded at a
weighbridge (scale house) over a period of time and the corresponding
LR810 total.
If your LR810 is set up to use two measuring scales, both Scale 1 and Scale
2 calibration must be adjusted.
To perform the adjustment you need to obtain a security access code from
your Loadrite installer.
WARNING
The LR810 alters its calibration every time this function is used. It is
important that you only use this function once with a given set of data. If
the same weights are entered again, the LR810 will over correct and its
accuracy will be seriously impaired.
The method is explained below using an example.
Suppose a bucket loader loads aggregate onto trucks which then proceed to a
weighbridge (scale house). The figures of the loads are as follows:
LR810 26.000 tonnes
Weighbridge 26.600 tonnes
>>>>
To correct the calibration of the LR810
1. Select the scale to be corrected (see Change Scale on page 28)
2. Press MENU.
3. Press
≤
or to reach the Setup option.
4. Press ENT. The LR810 prompts you to enter the security access code.

19 Span Calibration Correction
39
5. Enter the access code and press ENT.
6. Press
≤
or to reach the Alter Span option.
7. Press ENT. The LR810 prompts you to enter the Loadrite value for
the weight.
8. Enter the Loadrite weight (26.000 in this example) and press ENT.
The LR810 prompts you to enter the weighbridge value.
9. Enter the weighbridge weight (26.600 in this example) and press
ENT.
10. If the adjustment is within limits, the LR810 alters its calibration,
briefly displays a value of scale factor and then returns to the ready
state.
If the required adjustment is too large, the LR810 displays an error
message and does not change its calibration.
Checking the Adjustment
You can check the calibration adjustment by obtaining and comparing new
Loadrite and weighbridge totals. If necessary, the calibration adjustment can
be performed again using the new data.
Notes to remember:
All trucks and trailers should have tare weights checked for all loads to be
checked. This ensures that a true weight can be established. Avoid split
weighing.

20 Changing the Backup Battery
40
20 Changing the Backup Battery
The LR810 has a backup battery which maintains the clock and memory
when main power is off.
When the battery requires changing, the LR810 displays a “Low Battery”
message each time the unit is switched on.
When this message appears, you should install a new battery as soon as
possible.
The battery compartment is at the top of the rear of the LR810 indicator.
All totals + time/date.
WARNING - memory lost if power off and battery out for 30 seconds
>>>>
To replace the battery
1. Make sure the LR810 is switched on to prevent loss of data.
2. Remove the battery cover which is held in place by four screws.
3. Unplug the old battery.
4. Plug in a new 9V alkaline battery (6LR61).
5. Replace the battery cover.

21 Error Messages
41
21 Error Messages
Lift Speed Changed?
For accurate measurement, the speed of raising the lift arms must be smooth,
without acceleration or deceleration.
The LR810 can detect changing speed as the arms go past the trigger point.
If this occurs, the indicator displays the following error message.
Depending on the installation of the LR810, there are two possibilities:
1. No weight is displayed and hence there is no weight to add.
You should repeat the lift. Avoid accelerating and decelerating at or
near the trigger sequence.
2. If weighing error is turned “off” and a weight is displayed.
You can add the weight to the running total (bearing in mind that the
weight measurement is not reliable) or you can ignore this weight and
repeat the lift again avoiding acceleration and deceleration at or near
the trigger sequence.
Bouncing Load
If the lift arms are bouncing significantly while weighing, an error occurs.
This can happen if, for example, the loader is driven over uneven ground
while lifting the load.
The LR810 can detect a bouncing load and if this occurs, the indicator
displays the following message.
No weight is displayed and hence there is no weight to add.

21 Error Messages
42
Error Close to Tolerance Limit
If a weighing error is close to but not greater than the tolerance limit, the
LR810 displays the following warning message.
The weight can be added as usual.
Trigger Fault
The optical trigger uses light beams to sense the position of the lifting arms.
The light beams are quite powerful and pass through normal build up of dirt
or dust. However, a large chunk of dirt or mud may block one of the beams.
If this occurs, the indicator displays the following message.
If this occurs, clean the faces inside the U shaped trigger sensor with a damp
cloth. There are two dark lenses on either side through which the light
beams pass. In most situations, the beams are never blocked. However, in
extremely dusty or damp environments, regular (say weekly) cleaning is
advisable.
Warning
Avoid using abrasive cleaners

22 Keys
43
22 Keys
This section gives brief descriptions of the function(s) of each key.
Adds the measured weight to the short and long totals
Clears the short total to zero, ready to start another truck load
Zeroes the LR810 when an empty bucket is lifted
Switches the LR810 from total to target mode.
Allows you to enter a new target weight
PROD Allows you to select a new product
TOTAL Switches the LR810 from target to total mode
TARE Allows you to enter or acquire a tare weight
≤
Scrolls the menu options.
DATA Allows you to enter additional data
EXIT Exits some menu options
Clears a numeric entry made in error
Accepts data or options entered
4 Enters the number 4
RECALL Recalls the last measured weight
SUB Subtracts the measured weight from the totals.
Scrolls the menu options
LONG Displays the current long total of the product
currently selected
TIME Displays the time and date
LIGHT Toggles the display lighting on / off

22 Keys
44
MENU Displays the operator menu options
Number keys

23 Specifications
45
23 Specifications
Suitable Applications
The LR810 measures weight by sensing the hydraulic pressure required to
lift a load. An optical trigger mechanism senses the position of the lifting
arms.
Typical vehicles using the LR810 system are:
• Front end loaders (bucket and/or fork)
• Fork lift trucks
Weighing Accuracy
Typical accuracy is ±1% for most bucket loaders. This may vary with
different machine types and installation options.
Minimal Weighing Delay
Weighing delay is minimal, because the weighing function is carried out
during a normal lift.
LR810 Power Requirements
Supply Voltage 11.4 to 32 Volts DC
Supply Current LR810 - 120mA typical, 220mA max.
LP750 printer - 50mA standby, 4A peak.
LD640 data logger - 120mA.
Automatic transient suppression exceeds relevant SAE specifications for DC
automotive power supply transients.
Clock and data backup 9V alkaline battery (8µA typical drain).
Typical battery life 2-3 years.
Signal Inputs and Outputs
Pressure transducer inputs 1 - 20mA (0-100%)
Trigger inputs Pull up resistor requiring switch to ground.
Serial communications RS232C protocol to printer and data logger.
Display / Keyboard
Main display 2 line by 20 character backlit LCD.
alphanumeric.
Auxiliary display 6 digit numeric only backlit LCD.
Keyboard 21 keys including numeric and special function
keys.

23 Specifications
46
Clock
Built in clock Provides time and date.
Hours, minutes, AM/PM, day, month, year.
Physical
LR810 indicator Protected to IP54.
Dimensions W 170mm, L 270mm, H 90mm.
Weight - 2kg with mounting frame.
Anti-vibration mounts.
LX400 pressure transducer Protected to IP67
Optical trigger IP67
Available Options
LP750 printer 24 column.
LD640 data logger Provides electronic data collection.
Remote ADD button For operator convenience.
Interlock system To disable weighing under defined machine
conditions.
A large number of additional operating features can be enabled at
installation time.

24 Output/Input Connections
47
24 Output/Input Connections
Transducer 1
1. NC.
2. Auxillary analog input. (LX400)
3. Transducer 1 current input.
4. +10 volt excitation.
5. Auxillary analog input. (LX400)
6. Shield.
7. Ground.
Transducer 2
1. NC.
2. Auxillary analog input.
3. Transducer 2 current input.
4. +10 volt excitation.
5. Auxillary analog input.
6. Shield.
7. Ground.
Power/Control (15 way)
1. -VE SUPPLY
2. +VE SUPPLY
3. INTERLOCK
4. REMOTE ADD
5. AUXILLARY ANALOG 2
6. TRIGGER 1
7. AUXILLARY ANALOG 1
8. AUX INPUT
9. AUXILLARY INDICATOR
10. TRIGGER 2
11. AUX OUTPUT
12. NC.
13. NC.
14. +VE SWITCHED OUTPUT
15. -VE SWITCHED OUTPUT

24 Output/Input Connections
48
Printer/EDP (12 way)
1. -VE
2. +VE
3. +5V OUTPUT
4. AUX RS232 INPUT
5. AUX RS232 OUTPUT
6. PRINTER RS232 OUTPUT
7. PRINTER BUSY
8. EDP RS232 INPUT
9. EDP RS232 OUTPUT
10. -VE
11. NC.
12. NC.

25 Index
49
25 Index
A
Accuracy...........................36, 45
Adding a weight......................18
Additional data........................ 26
B
Batch weighing........................22
switching on/off.................. 29
Battery..................................... 40
Bouncing.................................41
Bucket too heavy message ...... 16
C
Customer number
entering...............................26
D
Data logger.............................. 33
Date
setting................................. 29
time and date key................43
Display
introduction to......................3
lighting ................................. 3
weight display modes...........5
E
Error messages........................41
I
Indicator lights..........................4
Interlock.................................. 25
light ...................................... 4
K
Keys........................................43
L
Long total................................10
clearing all..........................30
M
Menu map ............................... 32
Menu options...........................28
O
Operator menu.........................28
P
Product names.........................13
introduction to......................6
R
Recalling last weight...............21
S
Scale
introduction to.......................8
Scales
changing..............................28
Short total..................................9
Span calibration adjustment.....38
Specifications ..........................45
Subtracting a weight................ 19
Switching on..............................5
T
Tare
clearing ...............................24
entering a tare weight..........23
light.......................................4
Target mode.............................11
Time
key ......................................43
setting..................................29
Total mode.................................9
TRIG light .................................4
Trigger
cleaning...............................42
optical trigger........................4
W
Warming up...............................5
Weighing
adding a weight...................18
error messages ....................41
overview...............................7
subtracting a weight............19
Weighing accuracy..................45
Weight display modes
introduction...........................5
target mode.........................11
total mode.............................9
Z
Zero prompt.............................15
Zeroing....................................15
 Loading...