

Page 1
ES-M142104
L24ND
Page 2
.
Congratulations on being the proud owner of Lloyd LED TV
Your LED TV comes with Lloyd Guarantee of Quality.
Dear Customer
Lloyd takes great pride in
Page 3
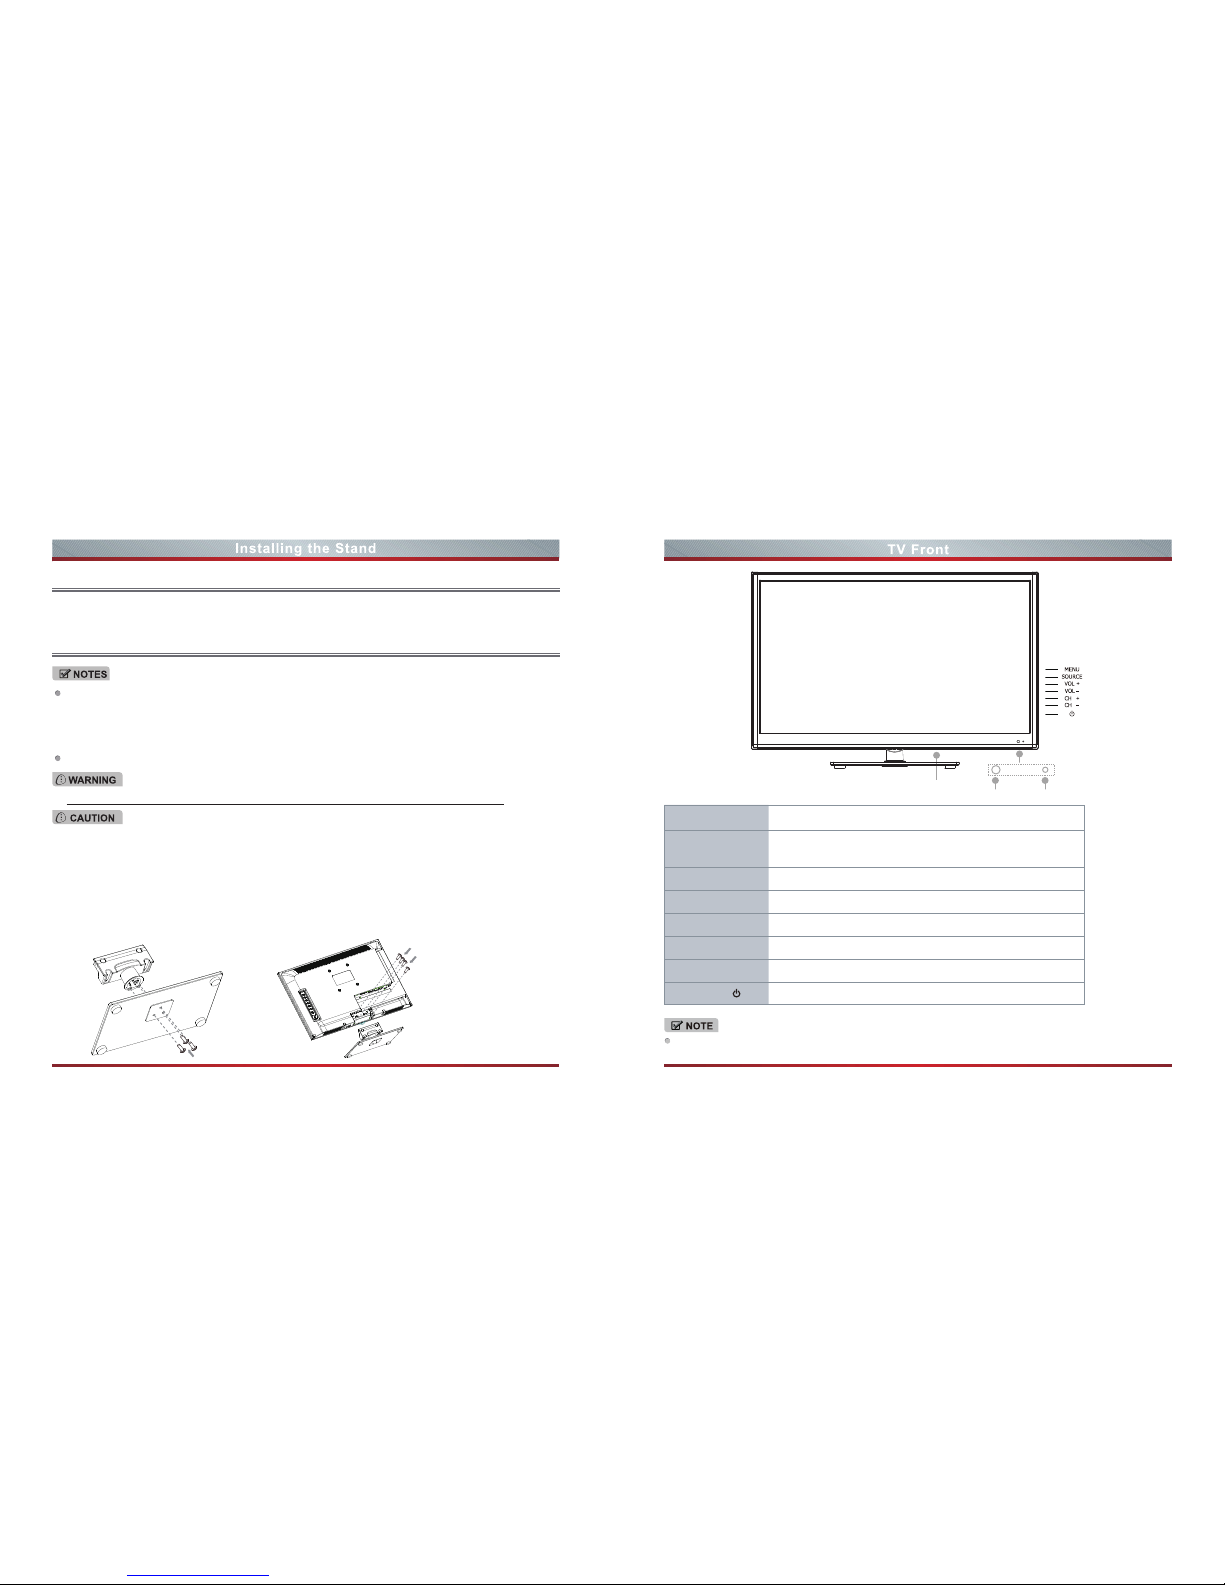
Be sure to disconnect the AC power cord before installing a stand or wall-mount brackets.
Carefully place your TV facedown on a soft,cushioned surface to prevent damage to the TV or
scratching to the screen.
Product image is only for reference,actual product may vary in appearance:
Accessories List
User Manual × 1 Quick Setup Guide × 1 Remote Control × 1 Battery × 2
Screws(M4 × 16) × 2 Screws(ST3 × 16C) × 2 Screws(ST4 × 12F) × 3
Installing the Stand
The TV screen is very fragile,and must be protected at all times when removing the base stand.Be
sure that no hard or sharp object,or anything that could scratch or damage the screen,come into
contact with it.DO NOT exert pressure on the front of the TV at any time because the screen could
crack.
For tabletop use,the TV must be attached to the provided stand as shown on this page.
1 2
Powering up or down the TV requires several seconds of processing time.Do not rapidly turn the TV on/off as
abnormal operation may occur.
1.
Use the screws (ST4x12F) X 3 to fix the Neck and Base.
2. Attach the stand to the TV set as shown in the picture.
3. Use the screws (M4x16) X 2 and screws (ST3x16C) X 2 to fix the stand tightly.
Neck
Base
item Description
Remote Sensor
Receive remote signals from the remote control.
Do not put anything near the sensor, as its function may be affected.
Remote Indicator Red light up in standby mode. Blue light up in power on mode.
MENU Open the OSD menu.
SOURCE Select among the different signal sources.
CH +
-
-
Select the channel.
VOL + Adjust the volume.
STANDBY
Turn on the TV or put the TV in standby mode.
Remote Sensor Remote Indicator
AC Power ON/OFF
Page 4
3 4
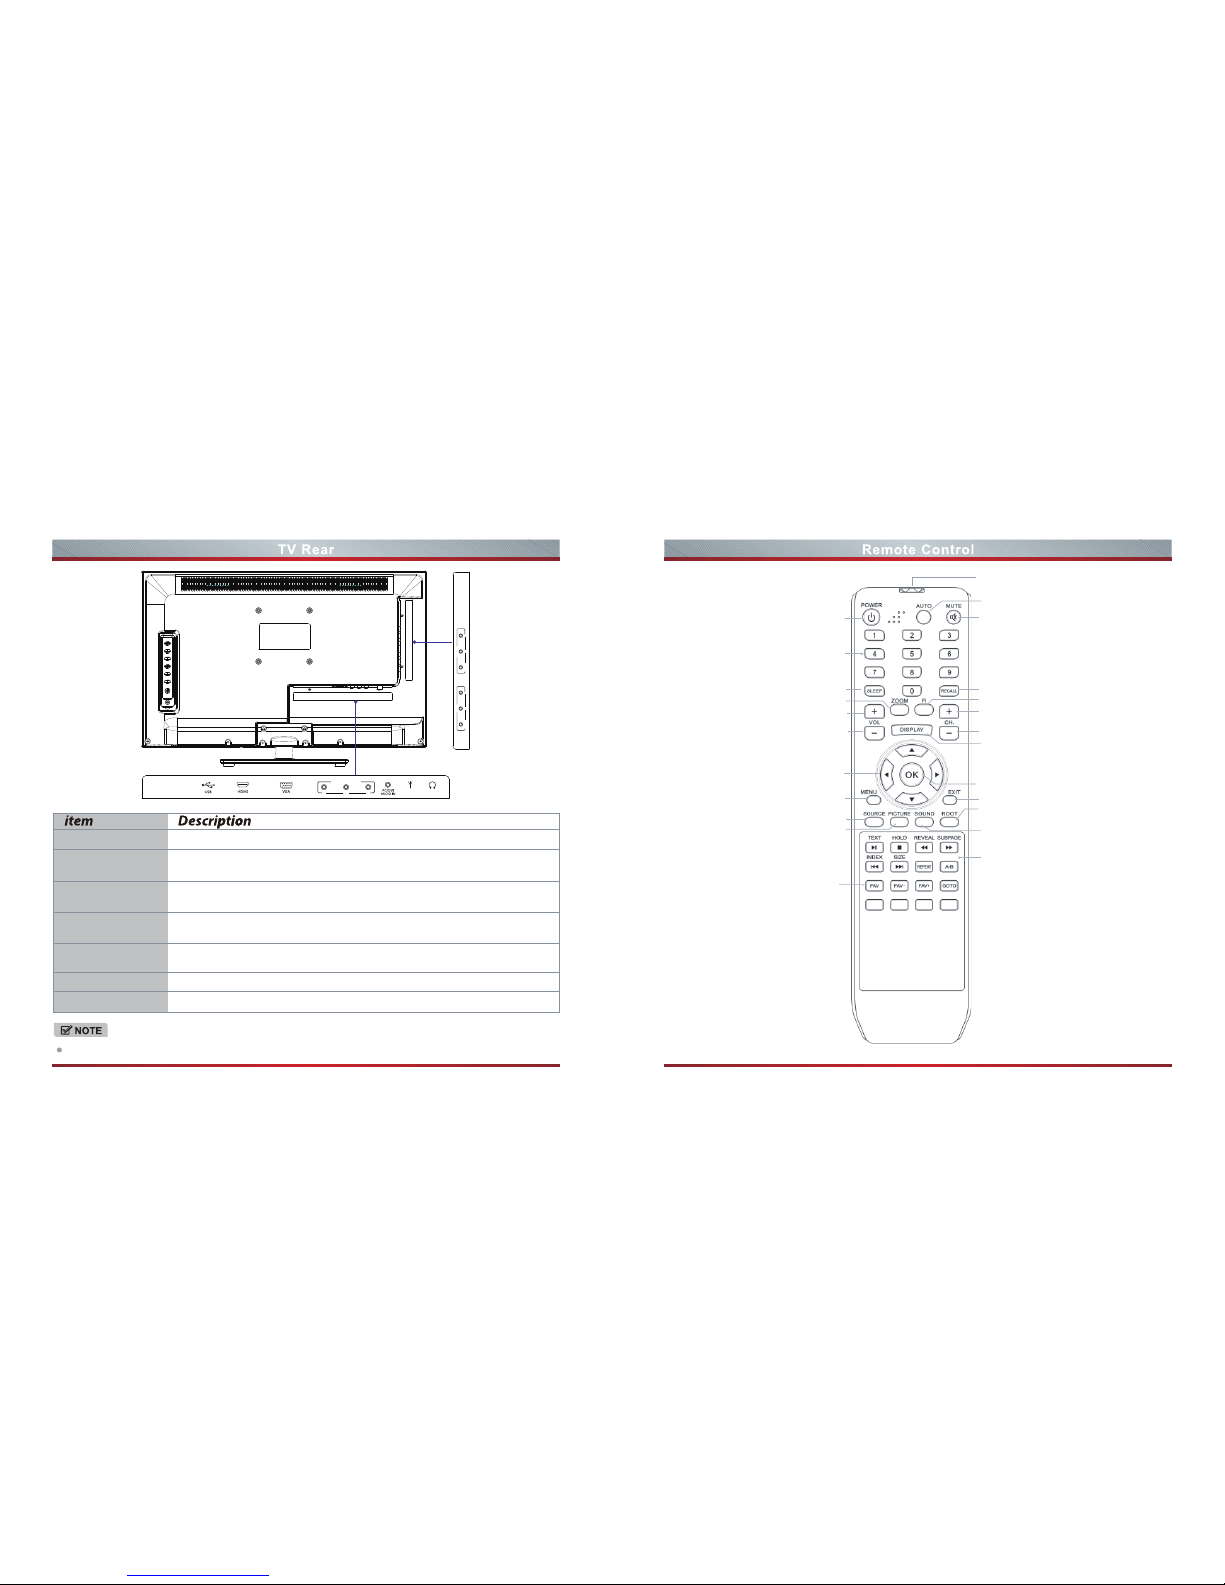
Power on/off
Decrease volume
FAV button
Increase volume
▲/
▲
/▲/
▲
Move Up/Down/Left/Right
or adjust settings
Go to the previous channel
Display the information banner
Confirm selections
Mute button
Zoom button
Close the menu
Next channel
Freeze
Select sound mode
Back to the initial page
(DMP Mode Only)
Select picture mode
Previous channel
Select input source
Remote sensor
Direct channel selection
Menu button
Player button
sleep timer button
Auto adjust button
LR
AV IN
VIDEO LR
AV OUT
VIDEO
HEADPHONE
ANT 75ΩANT 75Ω
P
rPb
COMPONENT IN
Y
Connect an antenna or cable TV to this jack.
HDMI (High-Definition Multimedia Interface)provides uncompressed video
data and digital audio data.Support: 480i\480p\576i\576p\720p\1080i\1080p
Connect to the composite video and audio (L/R) output / input jacks on
external video devices.
Connect to headphone for private listening.
Component audio Jack share AV IN audio Jack.
Support: 480i\480p\576i\576p\720p\1080i\1080p
Connect to a PC or other devices with a VGA interface.
Photo, Music, Movie play and software update.
ANT CABLE
HDMI
COMPONENT IN
AV IN / OUT
VGA
PC/DVI AUDIO IN
HEADPHONE
USB
FOR ILLUSTRATION ONLY.
Page 5
5
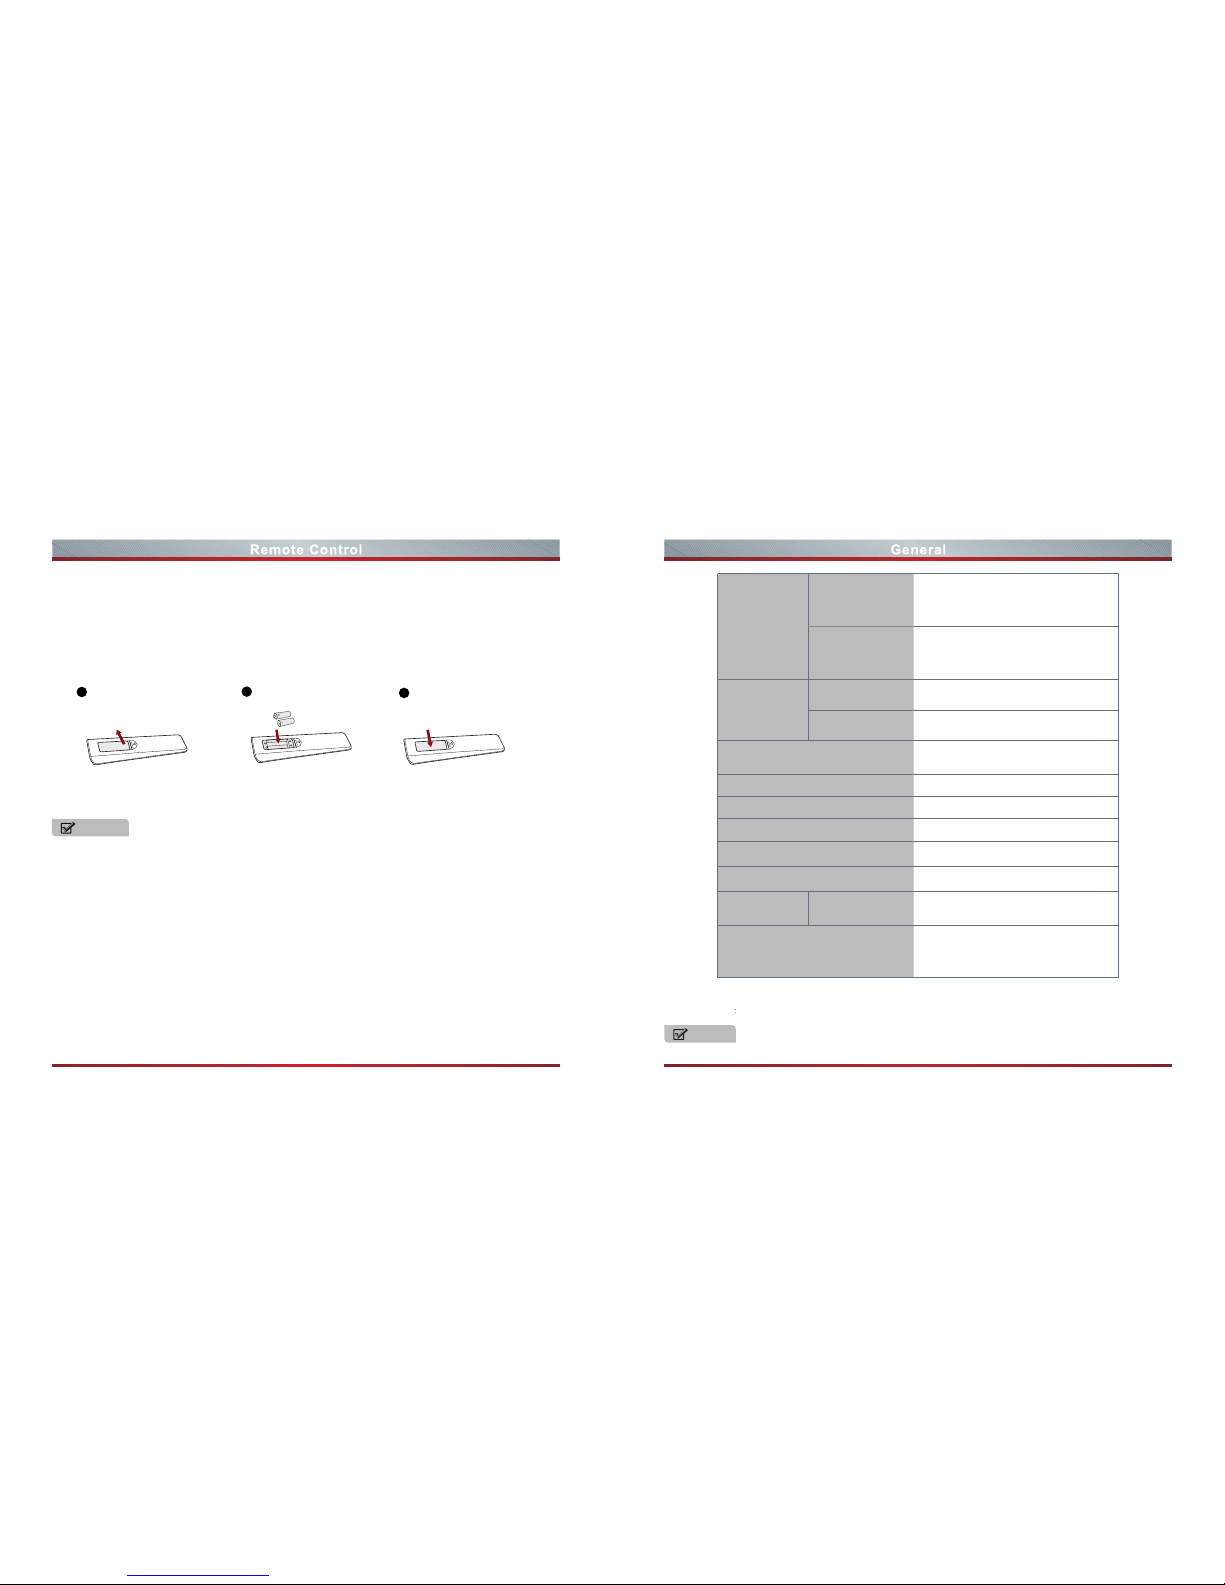
1. Slide the back cover to open the battery compartment of the remote control.
2. Insert two AAA size batteries. Be sure to match the (+) and ( - ) ends of the batteries with the (+)
and ( - ) ends indicated in the battery compartment.
3. Close the battery compartment cover.
1
Gently lift up
Change the batteries
2
Insert the batteries
3
Gently push down
NOTES
1. Dispose of your batteries in a designated disposal area. Do not throw the batteries into fire.
2. Do not mix battery types or combine used batteries with new ones.
3. Remove depleted batteries immediately to prevent battery acid from leaking into the battery
compartment.
4. If you do not intend to use the remote control for a long time, remove the batteries.
5. Batteries should not be exposed to excessive heat, such as sunshine, heat registers, or fire.
6. Battery chemicals can cause a rash. If the batteries leak, clean the battery compartment with a cloth.
If chemicals touch your skin, wash immediately.
6
Features, appearance and specifications are subject to change without notice.
NOTE
Dimension
With Stand
Width: 557 mm
Height: 381 mm
Depth: 160 mm
Width: 557 mm
Height: 344 mm
Depth: 47 mm
Without Stand
Weight
NET 4.3 kg
GROSS
LED Panel Minimum size
(diagonal)
23.6 inches
Screen resolution
1366 × 768
Audio power 2.5 W + 2.5 W
Power consumption 35 W
Power supply
USB supply
100-240 V ~ 50 / 60 Hz
DC 5V, Max 500 mA
Receiving
systems
Analog
PAL SECAM
Environmental conditions
Temperature: 5°C~ 45°C
Humidity: 20%-80% RH
Atmospheric pressure: 86 kPa - 106kPa
5.3 kg
Attention
Excessive sound pressure from earphones and headphones can cause hearing loss.
Disposal of this unit
Product should not be damaged, dismantled or thrown in municipal waste. It should be packed and
handed over to authorised re-cycler.
 Loading...