

Page 1
Page 2

Contents
1. Important Safety Information
Important Safety Instruction...........................................................................................................2
Warnings.........................................................................................................................................3
Safety Precautions Instruction........................................................................................................4
2. Accessories................................................................................................................................6
3. Installing the LED TV
Installing the Stand.........................................................................................................................7
4. Overview of the TV set
Front View.......................................................................................................................................8
Rear View ...................................................................................................................................... 9
5. Connect External Devices
Connect the Power Cord ...............................................................................................................10
Conect to Antenna or Cable .......................................................................................................... 11
Connect Device Via HDMI interface............................................................................................11
Connect Device Via Component(Y/Pb/Pr) + Audio L/R Interface ..............................................12
Connect Device Via Video + Audio L/R Interface .......................................................................12
Connect PC Via VGA/HDMI Interface ........................................................................................13
6. Using the Remote Control
Inserting Remote Control Batteries ..............................................................................................14
Operating the Remote Control ......................................................................................................14
Remote Control .............................................................................................................................15
Remote Control function buttons ..................................................................................................16
7. Basic operation of the TV
Turning the TV On and Off ..........................................................................................................17
Select Language ............................................................................................................................ 17
Install TV Channels Automatically ...............................................................................................17
Changing Channels ....................................................................................................................... 17
Adjusting the Volume ....................................................................................................................18
Selecting the Input Source ............................................................................................................18
Access to the On Screen Display Menu .......................................................................................18
8. Channel setting
Channel menu ...............................................................................................................................19
9. Picture Setting
Picture menu .................................................................................................................................20
10. Sound Setting
Sound menu ..................................................................................................................................21
11. Time setting
Time menu ....................................................................................................................................22
12.Setting
Setting menu .................................................................................................................................23
13. Multimedia
Media Play-USB Device ............................................................................................................... 24
14. Troubleshooting ....................................................................................................................29
15. Specifi cation ..........................................................................................................................31
1
Page 3
Important Safety Information
1
2
Page 4
1
Important Safety Information
Warnings
1.Read these instructions.
2.Keep these instructions.
3.Heed all warnings.
4.Follow all instructions.
5.Do not use this apparatus near water.
6.Clean only with dry cloth.
7.Do not block any ventilation openings. Install in accordance with the manufacturer’s instructions.
8.Do not install near any heat sources such as radiators, heat registers, stoves, or other apparatus (including
amplifi ers) that produce heat.
9.Do not defeat the safety purpose of the polarized or grounding-type plug. A polarized plug has two
blades with one wider than the other. A grounding type plug has two blades and a third grounding prong.
The wide blade or the third prong are provided for your safety. If the provided plug does not fi t into your
outlet, consult an electrician for replacement of the obsolete outlet.
10.Protect the power cord from being walked on or pinched particularly at plugs, convenience receptacles,
and the point where they exit from the apparatus.
11.Only use attachments/accessories specifi ed by the manufacturer.
12.Use only with the cart, stand, tripod, bracket, or table specifi ed by the manufacturer, or sold
paratus. When a cart is used, use caution when moving the cart/apparatus combination to
from tip-over.
13. Unplug this apparatus during lighting storms or when unused for long periods of time.
14. Refer all servicing to qualifi ed service personnel. Servicing is required when the apparatus has been
damaged in any way, such as power-supply cord or plug is damaged, liquid has been spilled or objects
have fallen into the apparatus. the apparatus has been exposed to rain or moisture. does not operate normally, or has been dropped.
15. WARNING:To Reduce The Risk Of Fire Or Electric Shock, Do Not Expose This Apparatus To Rain Or
Moisture.
16. Apparatus shall not be exposed to dripping or splashing and no objects fi lled with liquids, such as
vases, shall be placed on the apparatus.
17. The mains plug or appliance coupler shall remain readily operable.
18. Use in outdoor: This TV is not designed for outdoors installation. Do not expose the TV to rain, as it
may result in a fi re or an electric shock. Also, do not expose the TV to direct sunlight, as it may heat up and
become damaged.
Safety:
TO REDUCE THE RISK OF ELECTRICAL SHOCK DO NOT REMOVE COVER
(OR BACK). NO USER SERVICEABLEPARTS ARE INSIDE. REFER TO QUALIFIED
PERSONNEL ONLY.
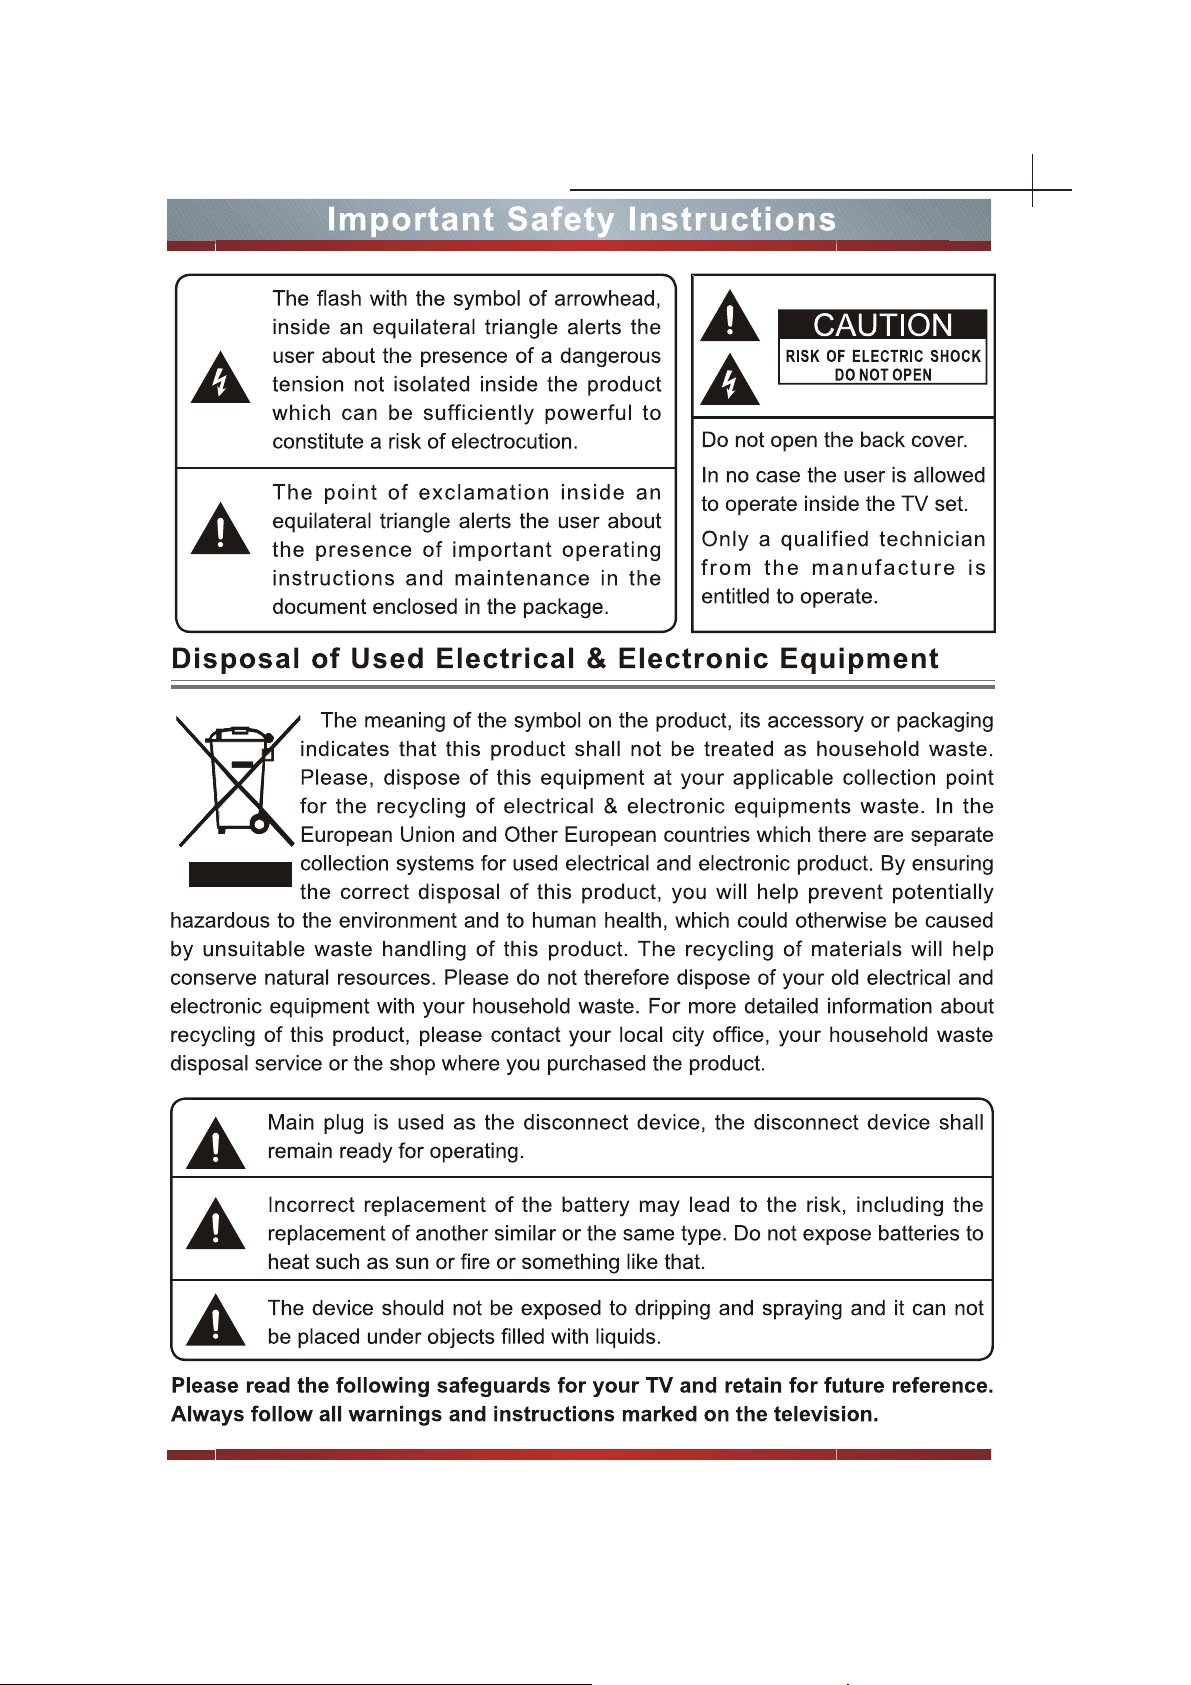
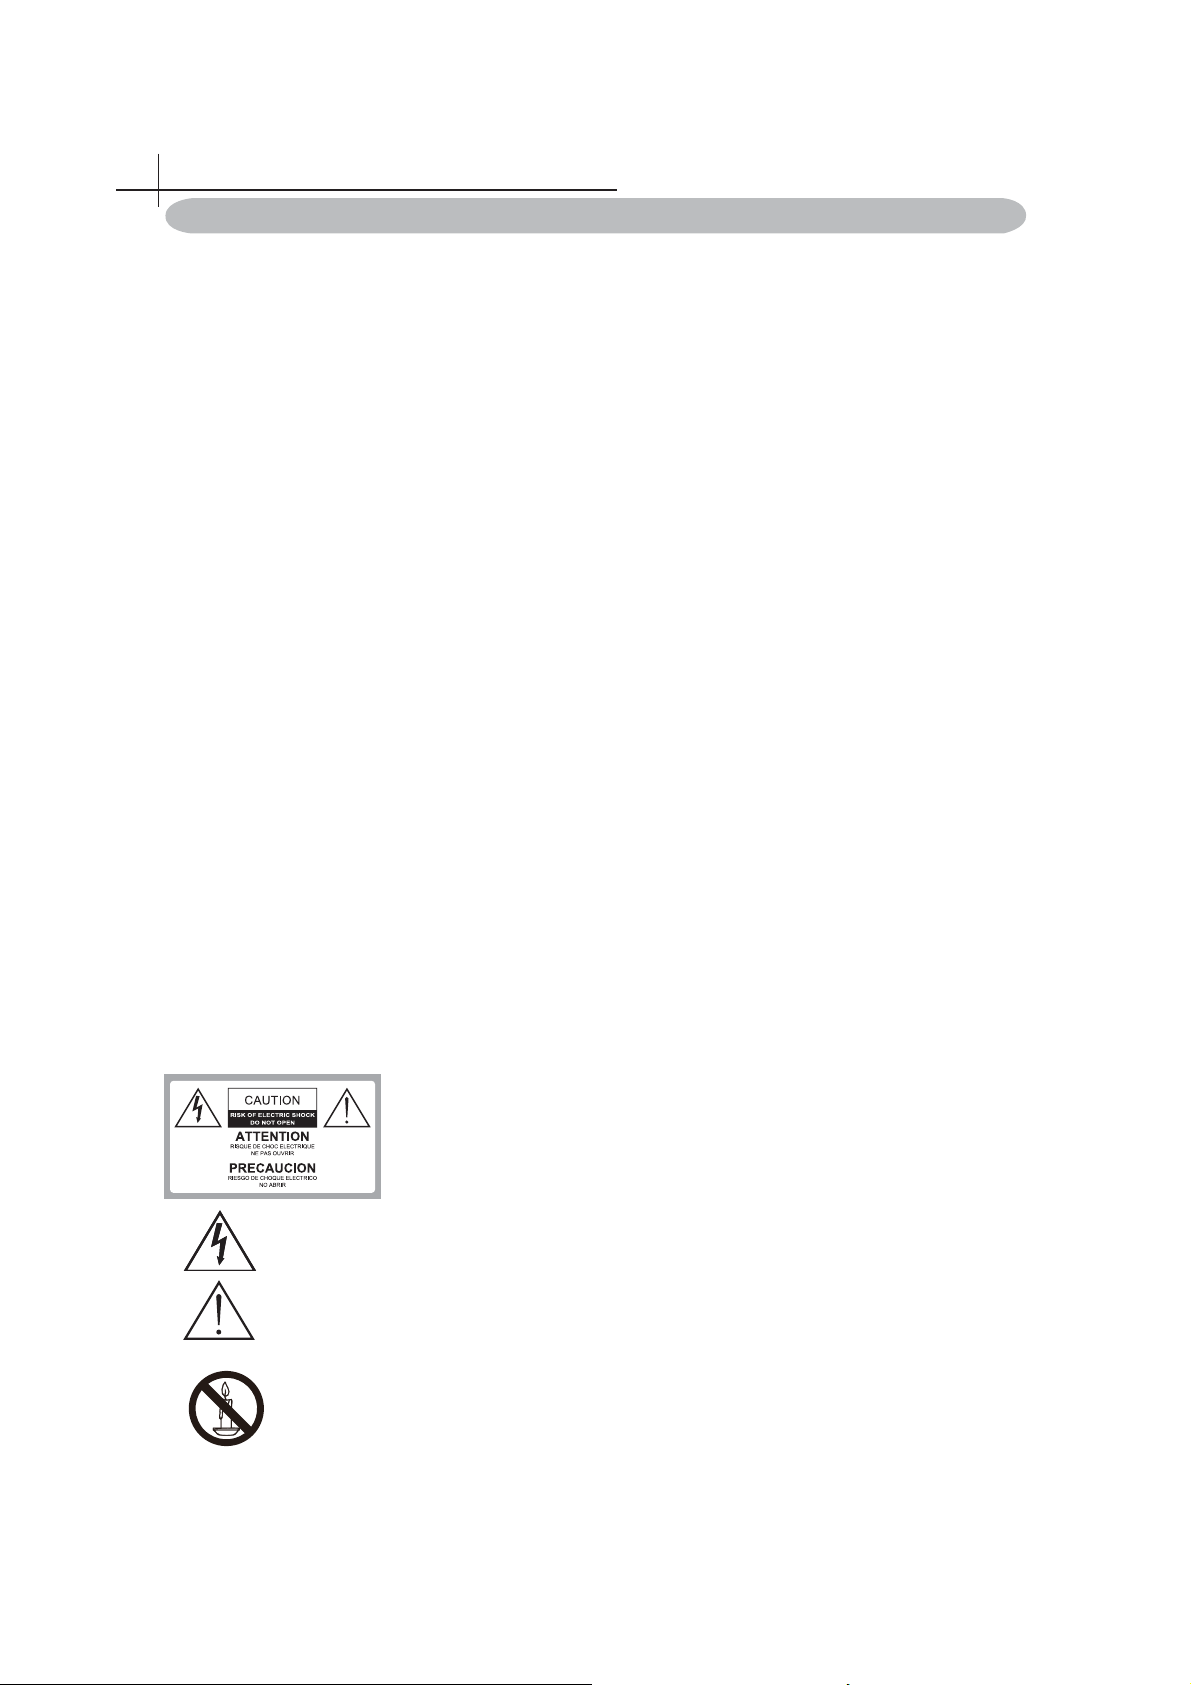
Dangerous Voltage: The lightning fl ash with arrowhead symbol, within an equilateral tri-
angle, is intended to alert the user to the presence of dangerous voltage within the inside
of the product that may be suffi cient level to constitute a risk of electric shock to persons.
Instruction: The
exclamation point within an equilateral triangle is intended to alert the user to the presence
of important operating and servicing instructions in the literature accompanying the appliance.
To prevent the spread of fi re.keep candles or other open fl ames away from this product at
all time.
WARNING: To prevent injury,this apparatus must be securely attached to the fl oor/wall in
accordance with the installation instruction.
CAUTION: Connect headphone with the volume set low and increase if required.
3
Page 5

Important Safety Information
Safety Precautions Instruction
Observing the simple precautions discussed in this booklet will provide you with many years of enjoyment and safe operation.
This product complies with all applicable India safety requirements.
1. Read & Follow Instructions
All safety and operating instructions should be read and followed before the TV is operated.
2. Retain Instructions
The safety and operating instructions should be retained for future reference.
3. Heed Warnings
All warnings on the TV and in the operating instructions should be adhered to.
4. Cleaning
Unplug the TV from the wall outlet before cleaning. Do not use liquid cleaners or aerosol cleaners. Use a
soft and slightly damp cloth for cleaning.
5. Water and Moisture
Do not use this TV near water, for example, near a bathtub,wash bowl, kitchen sink, or laundry tub, in a
wet basement, or near a swimming pool.
1
6. Accessories Carts and Stands
Do not place this TV on a slippery or tilted surface, or on an unstable cart, stand, or table. The TV may
slide or fall, causing serious injury to a child or adult, and serious damage to the TV.
7. Transporting the Television
A TV and cart combination should be moved with care. Quick stops, excessive force, and uneven surfaces
may cause the TV and cart combination to overturn.
8. Ventilation
Slots and openings in the cabinet are provided for ventilation and to ensure reliable operation of the TV
and to protect it from overheating, and these openings must not be blocked or covered. The openings
should never be blocked by placing the TV on a bed, sofa, rug, or other similar surface. The TV should not
be placed in a built-in installation such as a bookcase or rack unless proper ventilation is provided.
9. Power Sources
This TV should be operated only from the type of power source indicated on the marking label. If you are
not sure of the type of power supply to your home, consult your electronics retailer or local power company.
4
Page 6
Important Safety Information
1
10. Power-Cord Protection
Power-supply cords should be routed so that they are not likely to be walked on or pinched by items placed
upon or against them, paying particular attention to cords at plugs,convenience receptacles, and the point
where they exit from the TV.
11. Lightning
For added protection for the TV during a lightning storm, or when it is left unattended and unused for long
periods of time,unplug it from the wall outlet and disconnect the antenna or cable system. This will prevent
damage to the TV from lightning and power-line surges.
12. Outdoor Antenna Grounding
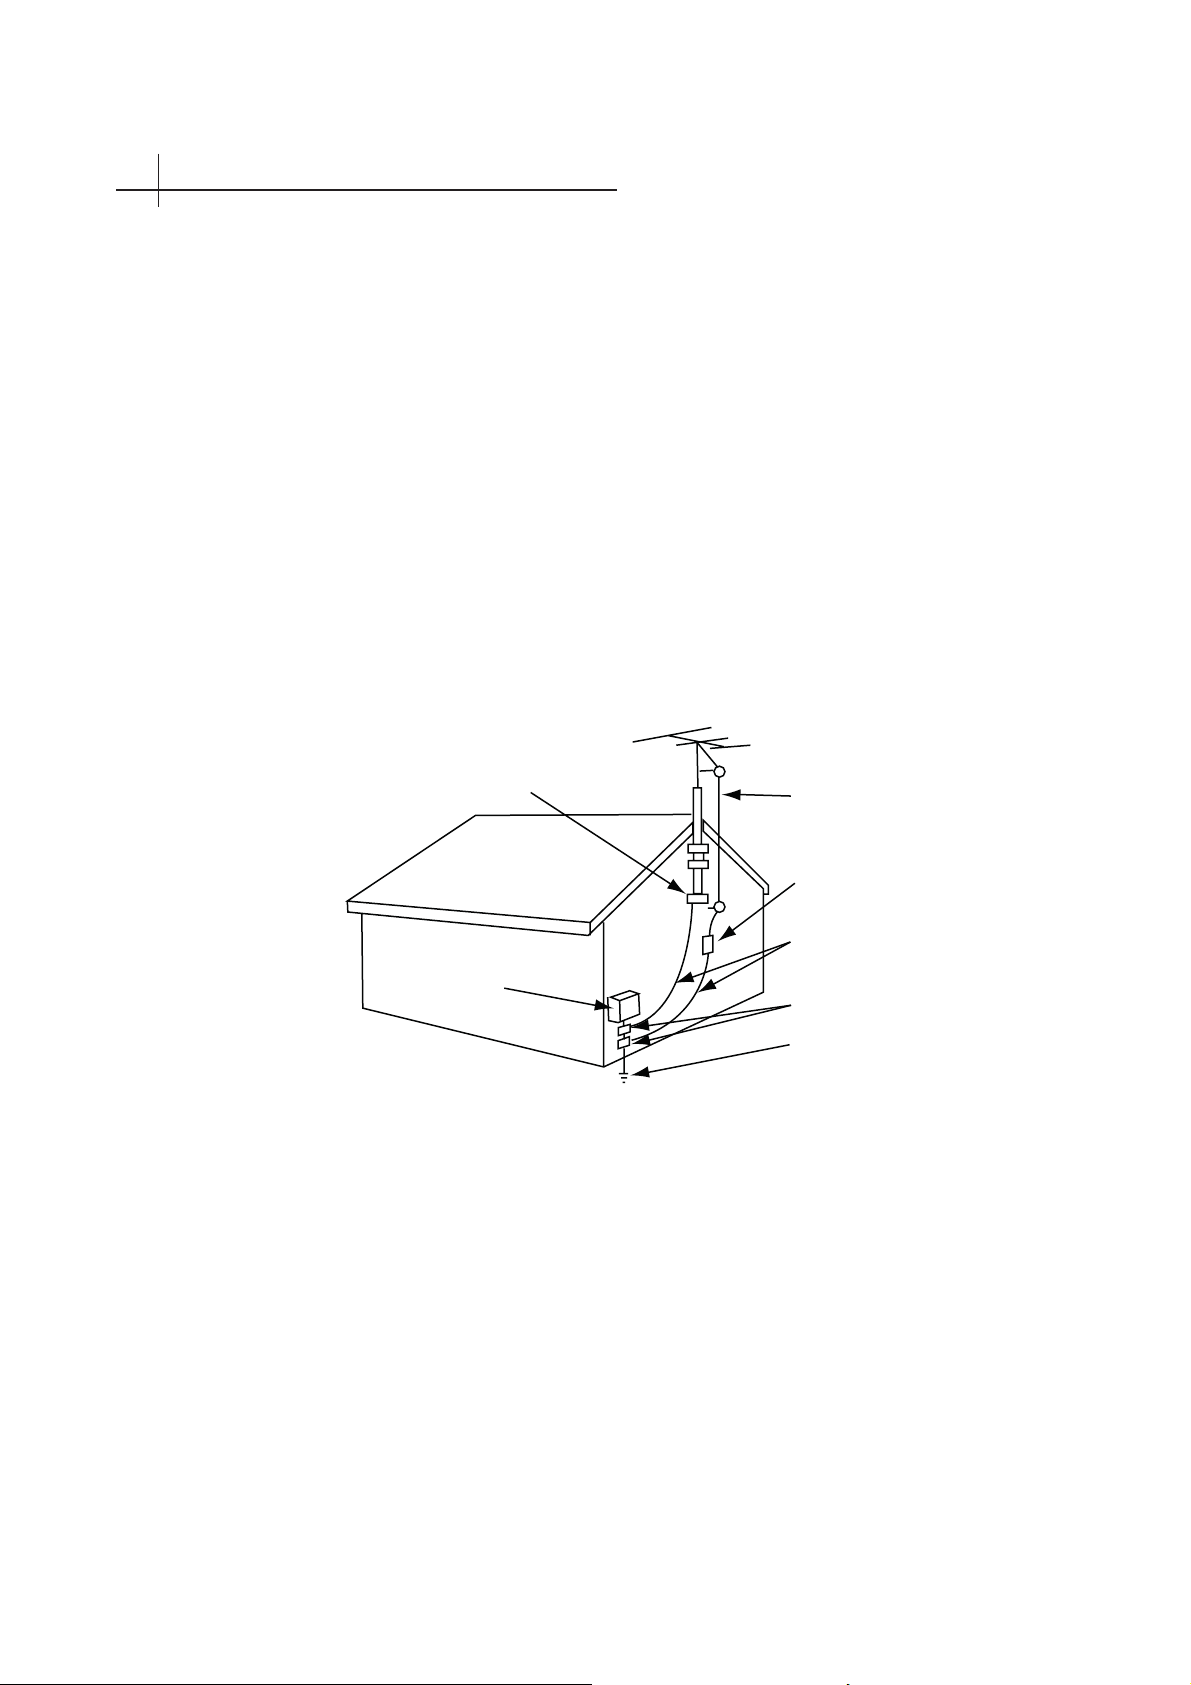
If an outside antenna or cable system is connected to the TV be sure the antenna or cable system is grounded so as to provide some protection against voltage surges and built up static charges. Article 810 of the
National Electrical Code (U.S.A.), ANSI / NFPA 70 provides information with regard to proper grounding
of the mast and supporting structure, grounding of the lead-in wire to an antenna discharge unit, size of
grounding conductors, location of antenna-discharge unit, connect on to grounding electrodes, and requirements for the grounding electrode.
Example of Grounding According to National
Electrical Code Instructions
Ground Clamp
Antenna Lead in Wire
Antenna Discharge Unit
(NEC Section 810-20)
Grounding Conductor
(NEC Section 810-21)
Electric Service
Equipment
Ground Clamps
Power Service Grounding
Electrode System (NEC
Art 250, Part H)
NEC - National Electrical Code
13. Power Lines
An outside antenna system should not be located in the vicinity of overhead power lines or other electric
light or power circuits, or where it can fall on to power lines or circuits. When installing an outside antenna
system, extreme care should be taken to keep from touching such power lines or circuits as contact with
them might be fatal.
14 . Overloading
Do not overload wall outlets and extension cords as this can result in a risk of fi re or electric shock.
5
Page 7

Important Safety Information
15. Object and Liquid Entry
Never push objects of any kind into this TV through openings as they may touch dangerous voltage points
or short-out parts that could result in a fi re or electric shock. Never spill liquid of any kind on or inside the
TV.
16. Servicing
Do not attempt to service this TV yourself as opening or removing covers may expose you to dangerous
voltage or other hazards. Refer all servicing to qualifi ed service personnel.
17. Damage Requiring Service
Unplug from the wall outlet and refer servicing to qualifi ed
service personnel under the following conditions:
a. If the power-supply cord or plug is damaged.
b. If liquid has been spilled, or objects have fallen into the product.
c. If the TV has been exposed to rain or water.
1
6
Page 8
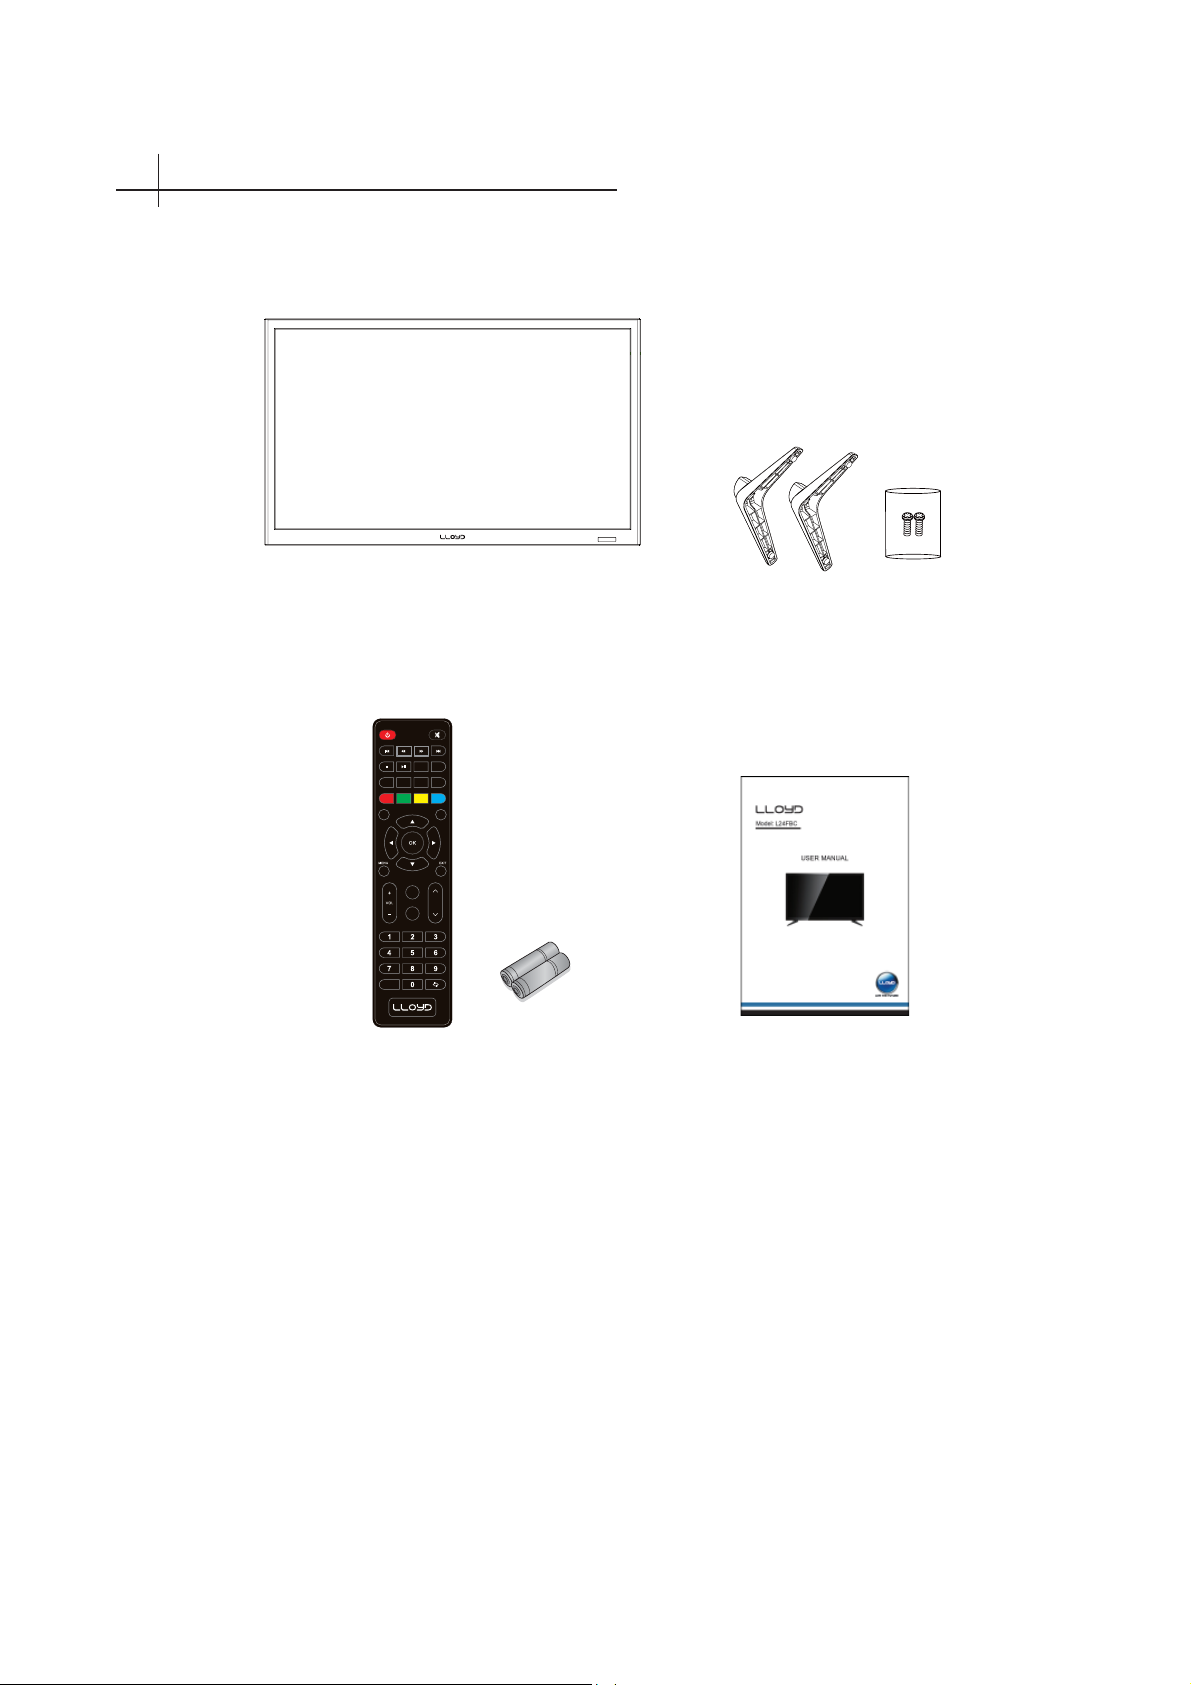
Accessories2
Please make sure the following items are included with your LED TV.
If any items are missing, please contact your dealer.
LED TV
P.MODE
S.MODE
FREEZE
CH.LIST
ASPECT
AUTO
SOURCE DISPLAY
FAV
CH
SLEEP
-/--
Remote Control and batteries
Stands and Screws
Instruction Manual
7
Page 9
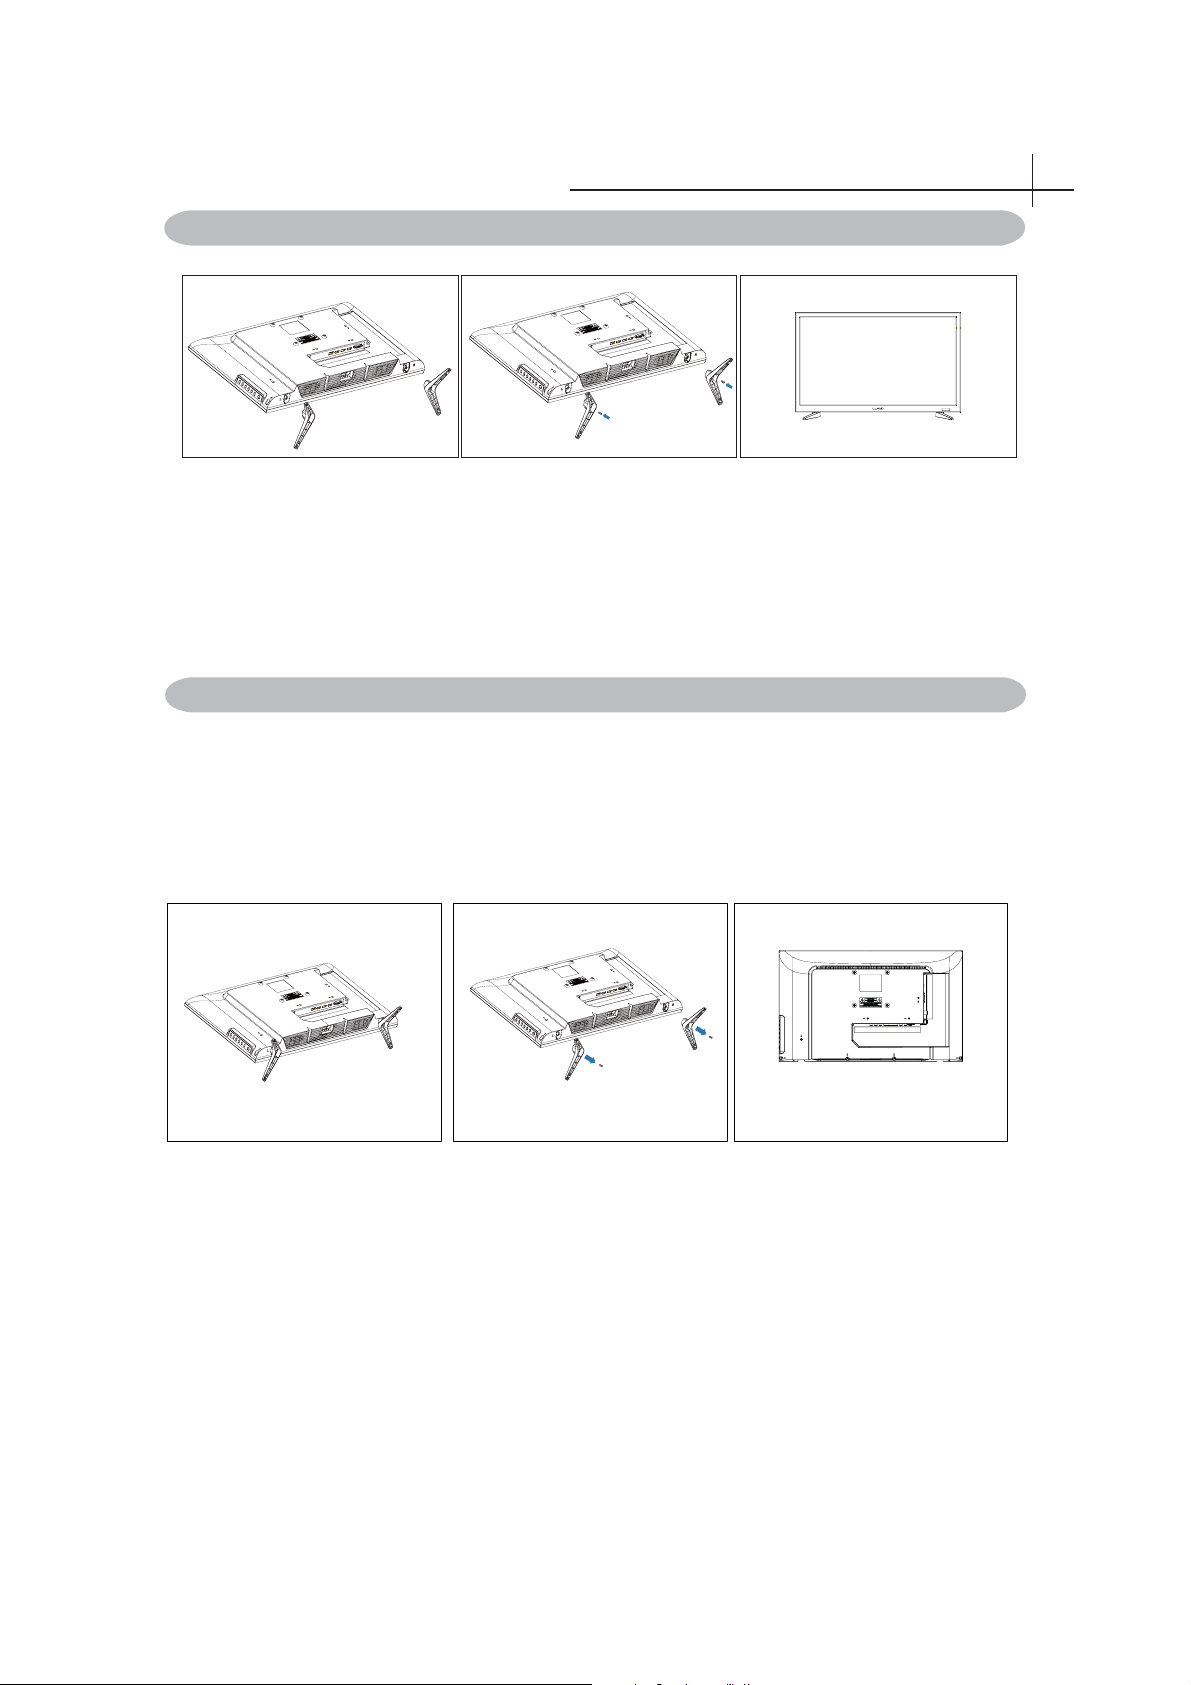
Installing the LED TV
Installing the Stand
Figure 1 Figure 2 Figure 3
1. Place the TV set on soft cloth or cushion with face down.Place the base in position as shown.
(see Figure 1).
2. Insert and tighten 2screws into the pedestal holes as show (see Figure 2)
3. Stand the TV up. (see Figure 3)
Disconnecting the Stand and neck
1. Lay the TV fl at on a table with the LED screen face down. To prevent the TV from being
scratched, put a piece of soft cloth on the table on which the screen will be set. (see Figure 1)
2. Then remove the stand as show. (see Figure 2)
4. Then you successfully removed the base and neck. (see Figure 3)
3
Figure 1 Figure 2 Figure 3
8
Page 10
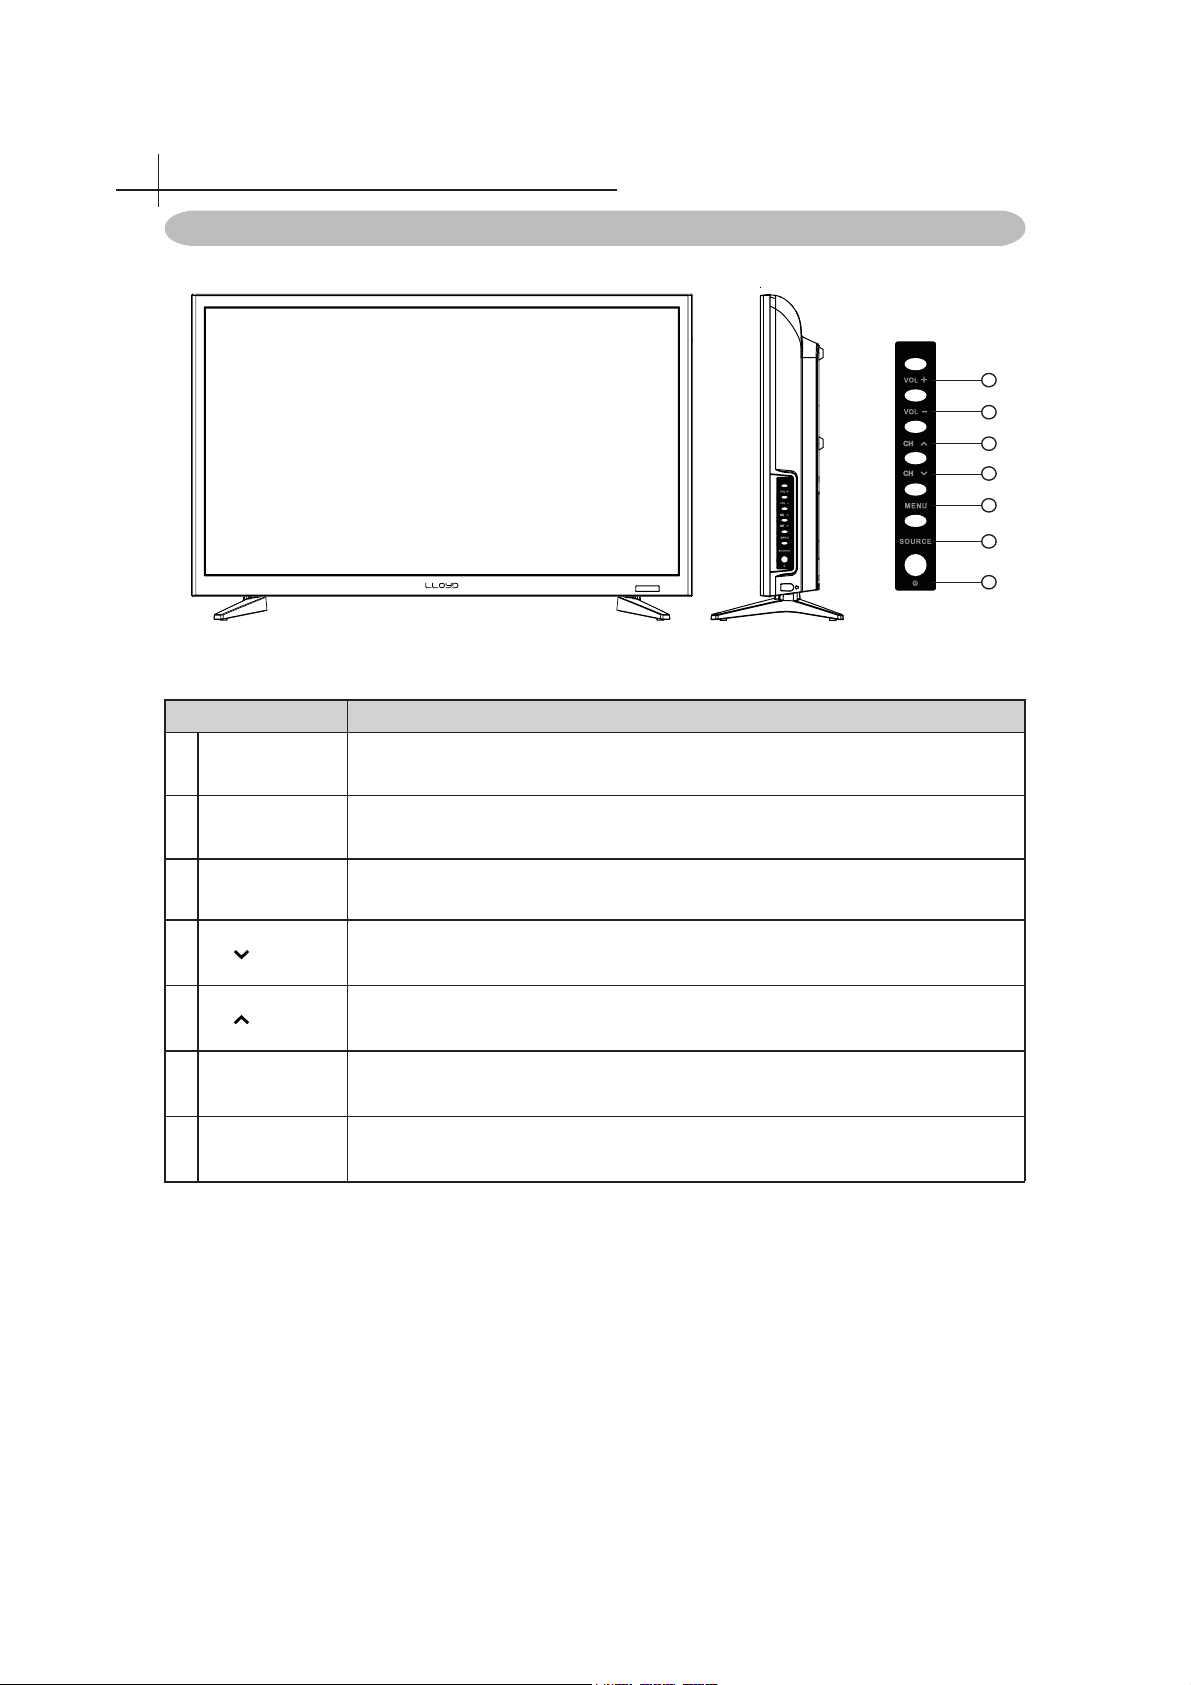
Overview of the TV set
4
Front View
Item Description
7
6
5
4
3
2
1
Power Switch the TV on/standby.
1
SOURCE Select input source.
2
MENU Switch OSD menu ON/OFF.
3
CH Channel down when source is TV, or select a control while in OSD menu.
4
CH Channel up when source is TV, or select a control while in OSD menu.
5
VoL- Decrease sound volume or adjust a highlighted control while in OSD menu.
6
VoL+ Increase sound volume or adjust a highlighted control while in OSD menu.
7
9
Page 11
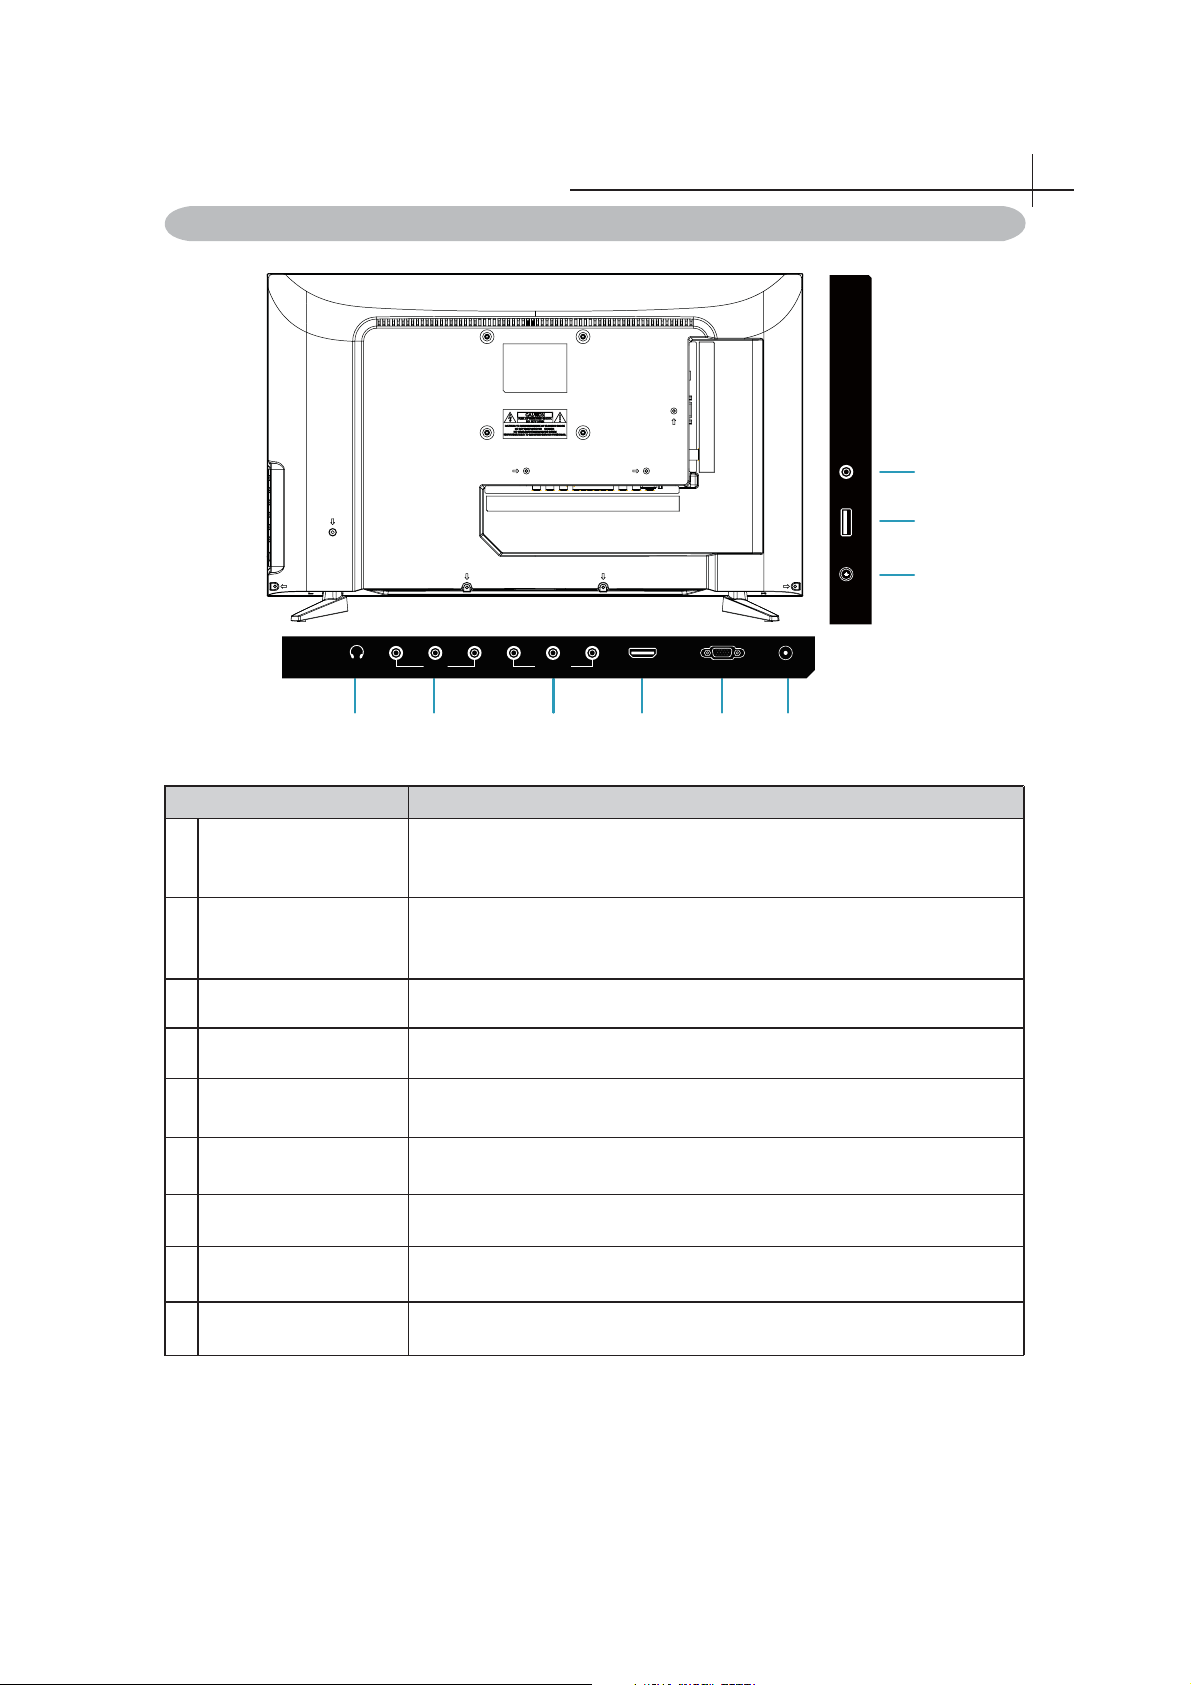
Rear View
Overview of the TV set
9
MINI AV OUTUSB
8
7
RF IN
4
EARPHONE
LVR
AV IN
YPrPb
YPbPr IN
HDMI
VGA IN PC AUDIO IN
12 3 45 6
Item Description
Connect to your earphones. By connecting the earphones, you can listen to
EARPHONE
1
2
AV IN (CVBS RL)
3 YPbPr signal input Connect this port to the YPbPr output of A/V device.
4 HDMI Input Terminal Connect this port to the HDMI output of A/V device.
5 VGA signal input
PC Audio input
6
7 TV Input Jack (RF) Connect this jack to your Cable or VHF/UHF antenna.
the sound from the TV on headphones.
*If you connect the earphones, the TV speakers will be muted.
Connect a external device to the composite VIDEO(V) and AUDIO (L/R)
out jacks found on most video equipment .
*L/R (Audio in) is sharing with YPbPr.
Connect a 15-pin D-sub RGB cable to the RGB output of your
computer and the other end to the RGB input on the rear of the LED TV.
Connect the Audio Out on your computer to the Audio on the rear of the
LED TV.
8 USB Connect to your USB devices, such as USB fl ash drive.
9 AV OUT Connect a external device to the composite MINI AV OUT in jacks.
10
Page 12
Connect External Devices
5
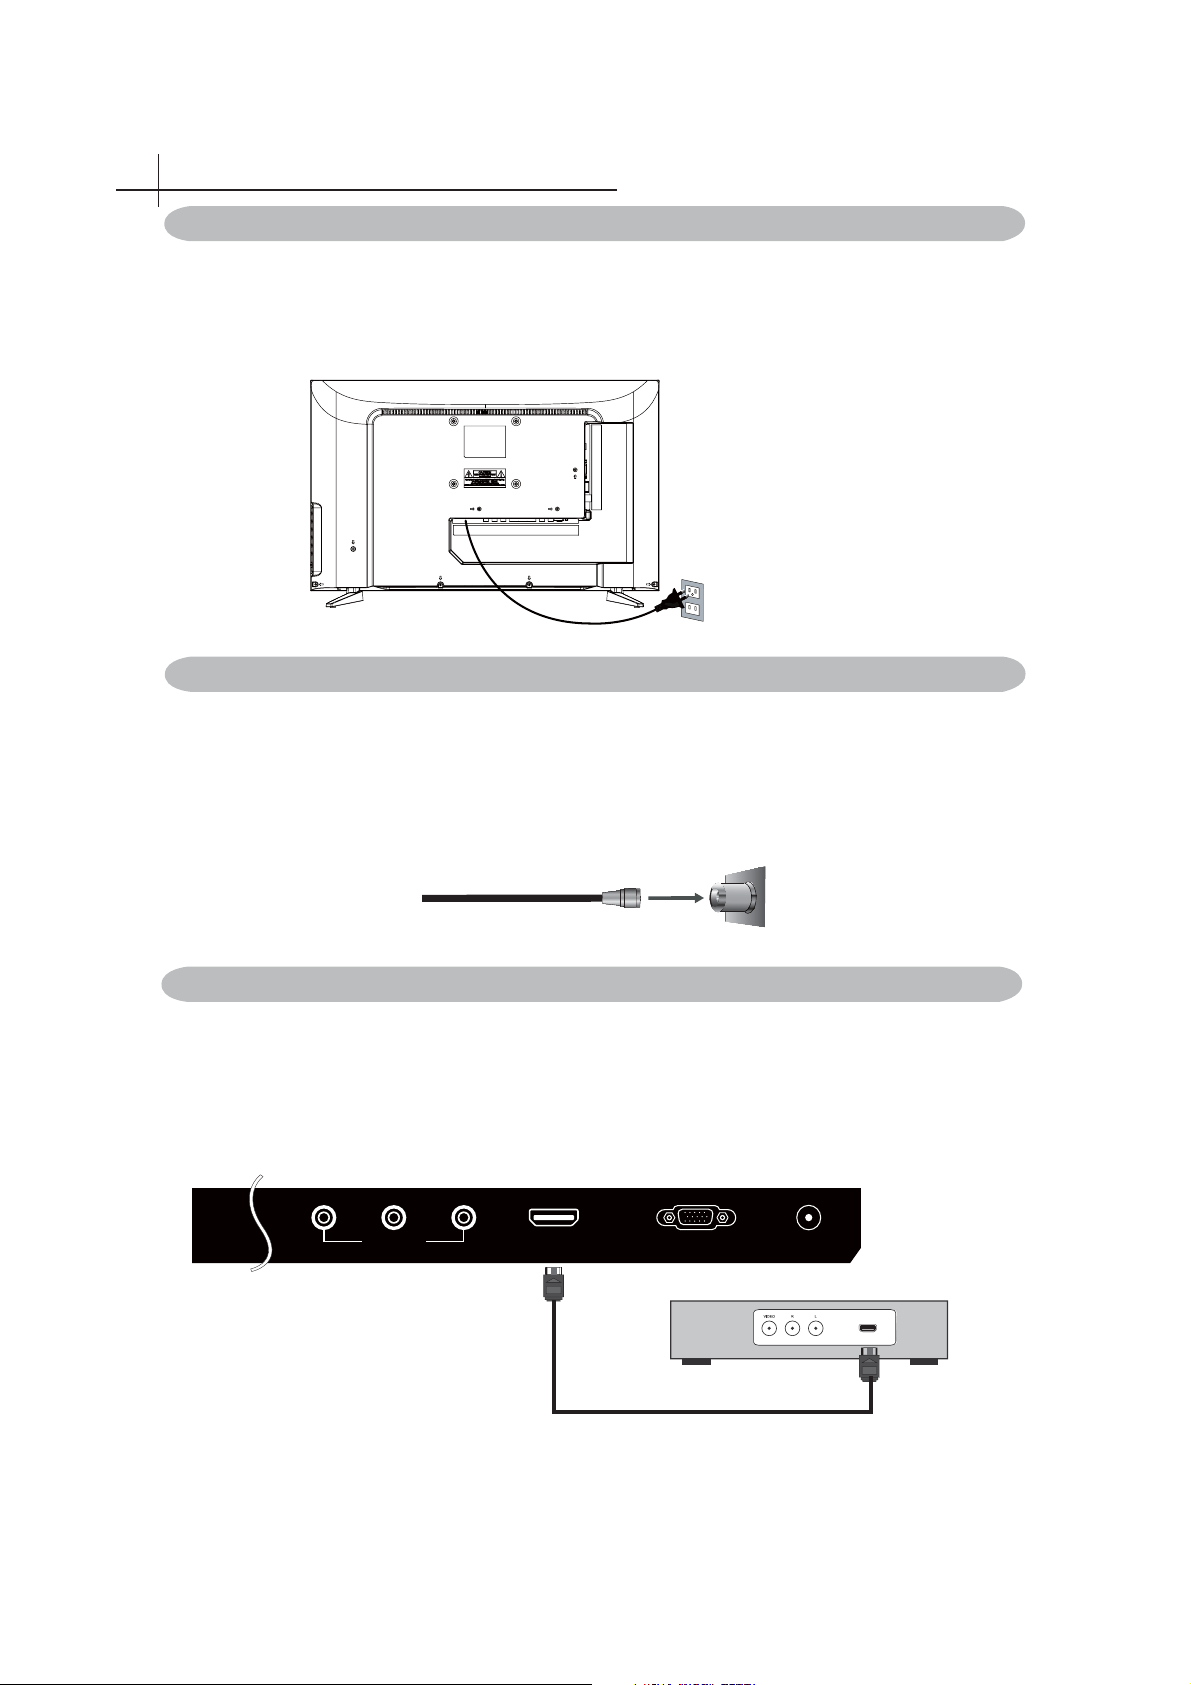
Connect the Power Cord
How to connect with power cord
Plug the power cord into the power outlet. Ensuring that the cord is tightly
connected at both ends.
It is strongly recommended for best broadcast reception, to use digital cable,
satellite, or a high quality roof top antenna.
Connect to Antenna or Cable
Typical wall antenna jack is used in apartment buildings, connect the antenna cable, as
shown in
below diagram (Please use the correct type of antenna cable).
We strongly recommend that you connect the antenna/cable input using a 75-ohm coaxial
cable (not supplied) to ensure the best picture quality.
Cable or VHF/UHF
75-ohm coaxial cable
Rear of TV
VHF/UHF/CABLE input
Connect Device Via HDMI interface
You can also enjoy high-defi nition programming by subscribing to a high-defi nition cable
service or a high-defi nition satellite service. For the optimum picture quality, be sure to
connect this device to your TV via the HDMI or component video (with audio) input on the
back of your LED TV.
YPrPb
YPbPr IN
HDMI Connection
Digital set top box, gaming
console,or Blu-ray w / HDMI
interface
HDMI
Optional HDMI cable ( not included )
VGA IN PC AUDIO IN
HDMI
11
Page 13
Connect External Devices
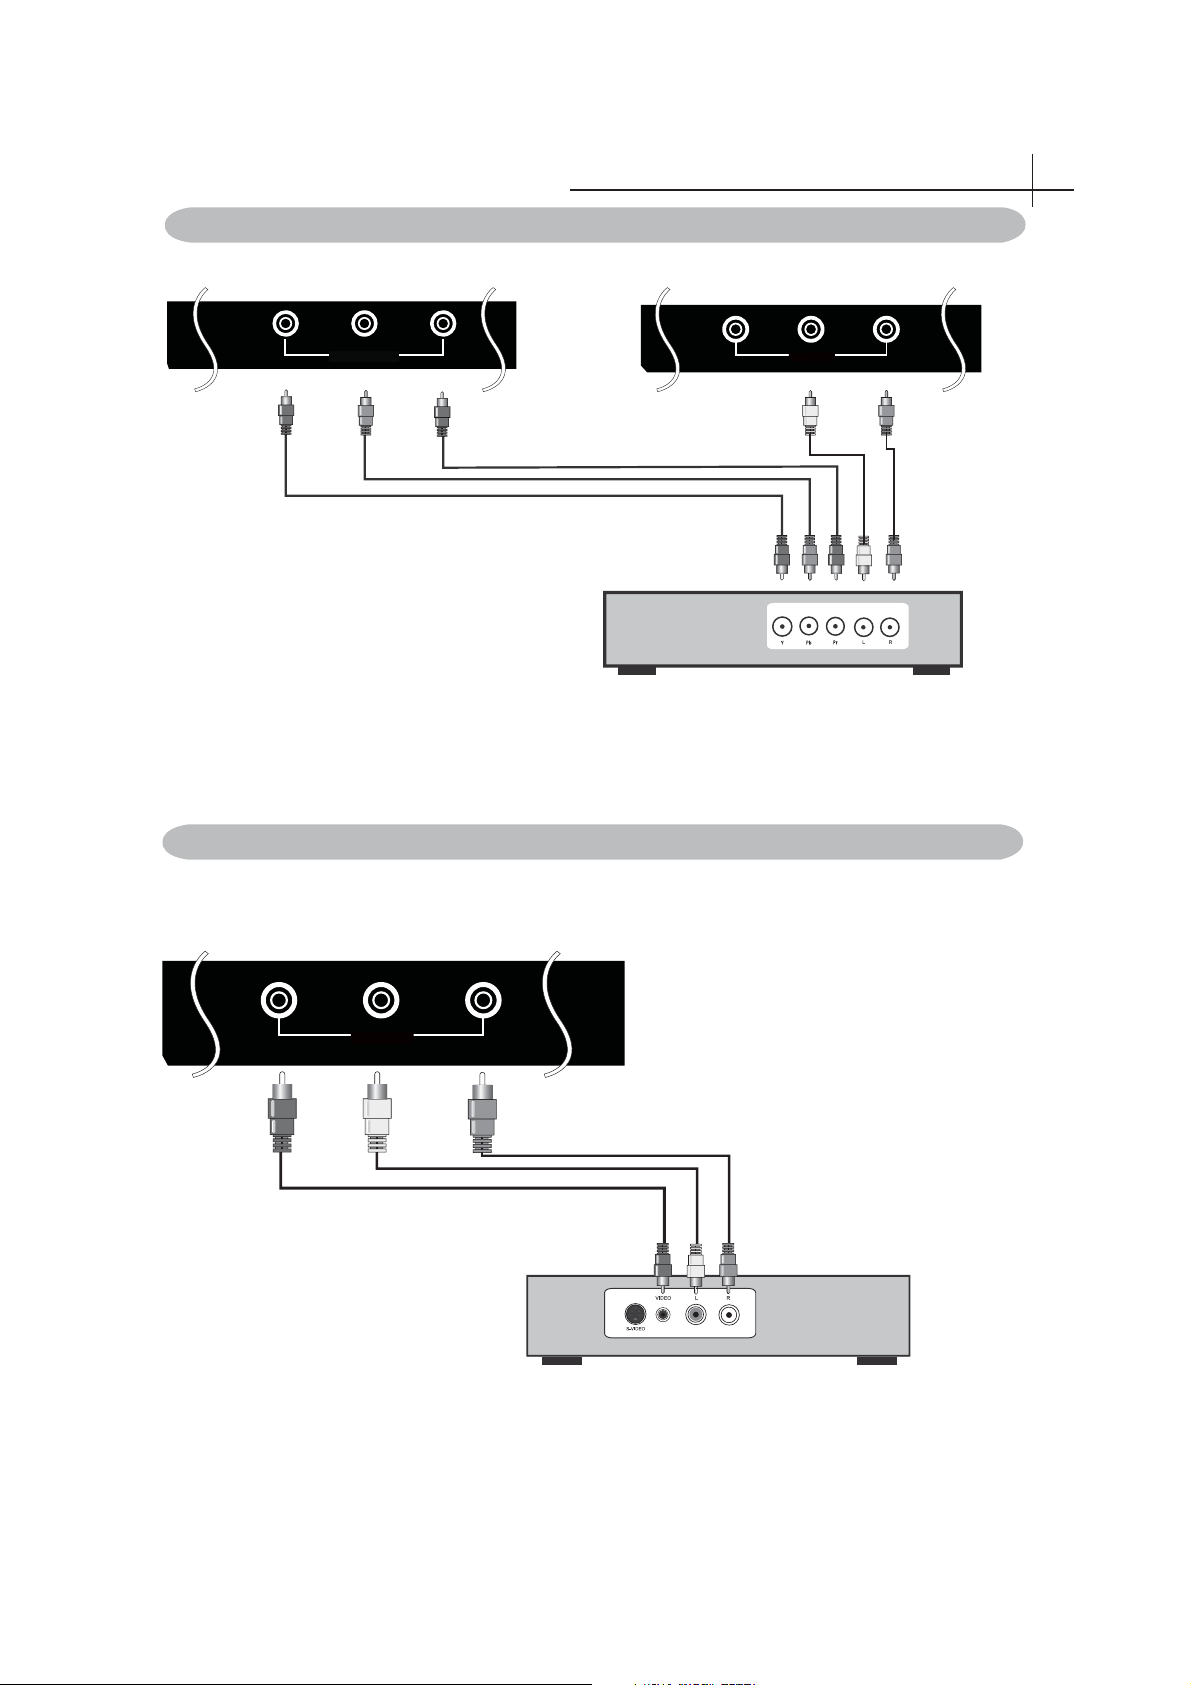
Connect Device Via Component(Y/Pb/Pr) + Audio L/R Interface
TV REAR PANEL
5
Y Pb Pr
YPbPr
Optional Component cables
(not included)
Digital set top box, gaming console or DVD
Connect Device Via Video + Audio L/R Interface
LVR
AV IN
TV REAR PANEL
LVR
AV IN
Audio Video Cable (not included)
Digital set top box, gaming console or DVD
12
Page 14
Connect External Devices
5
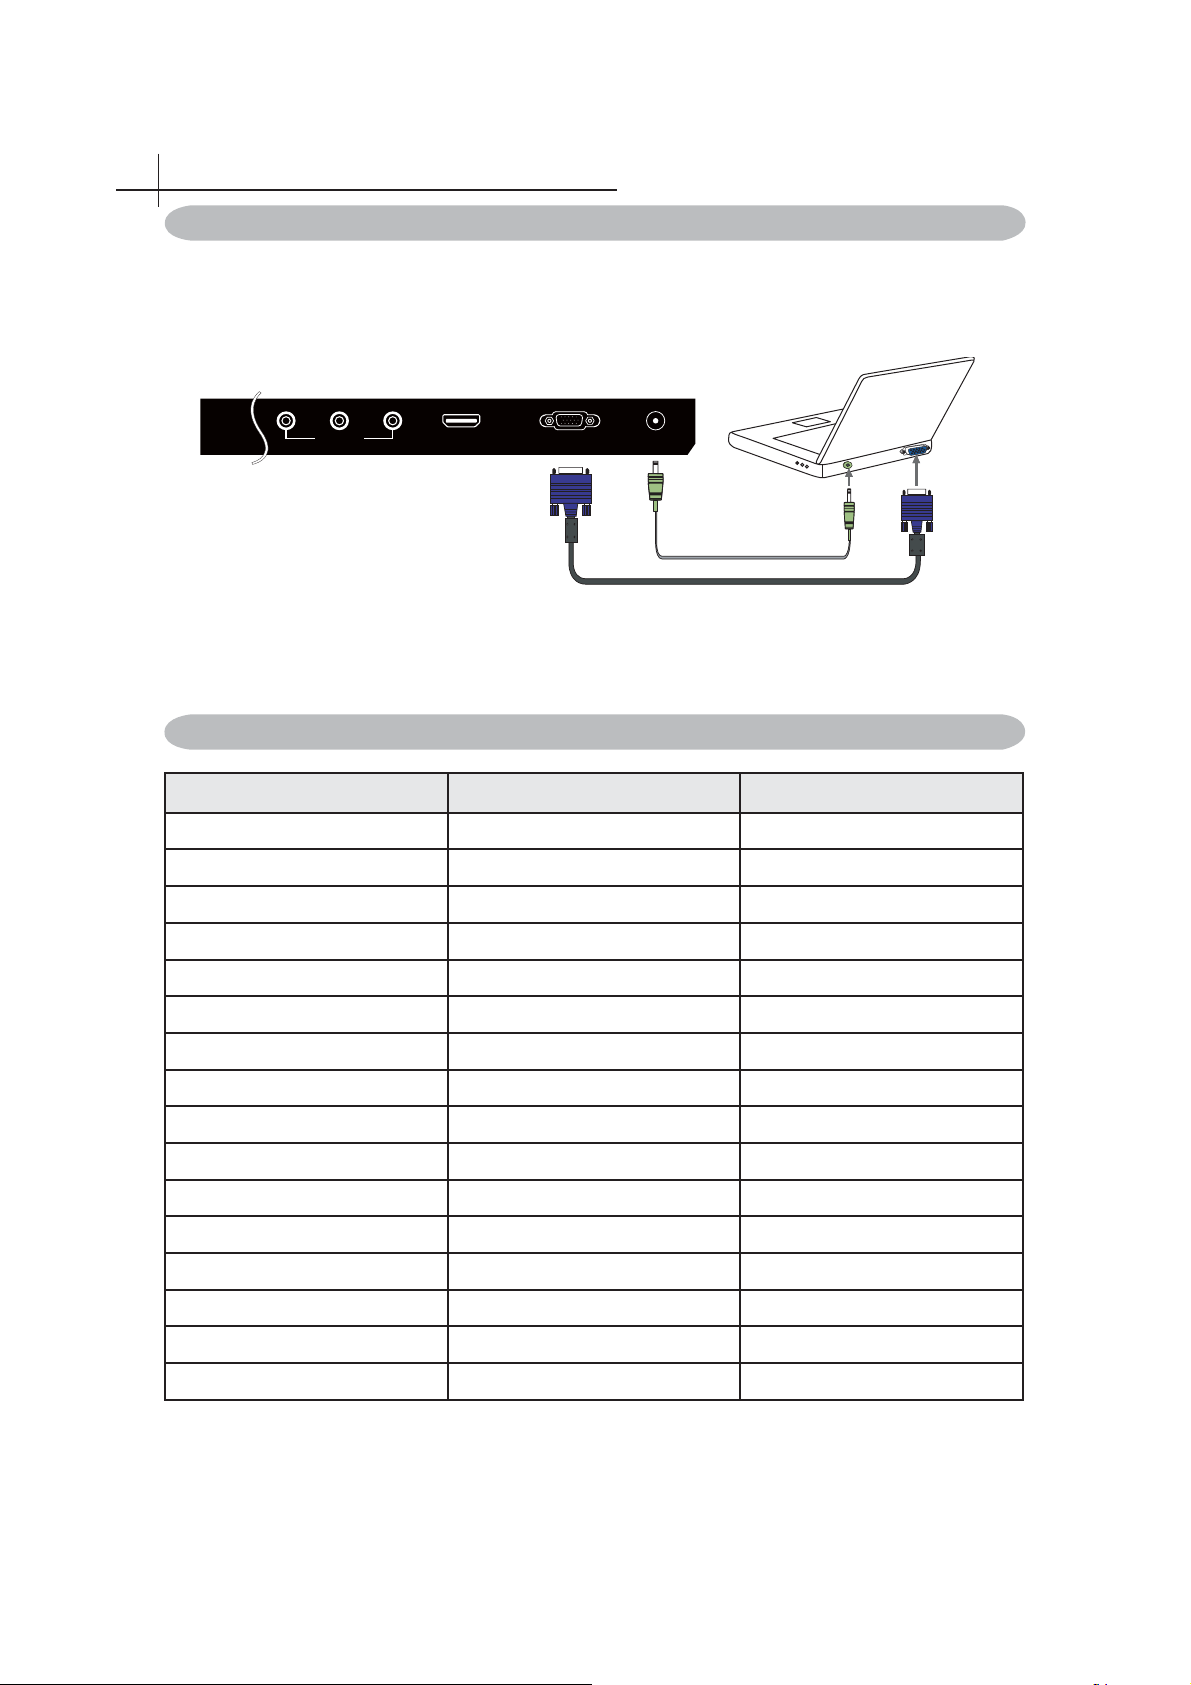
Connect PC Via VGA/HDMI Interface
Use the LED TV as the monitor of your computer.
The picture below shows the connection for PC. The LED TV can also be connected to PC with
VGA or HDMI output.
YPrPb
YPbPr IN
☼
• Connect the PC IN jack to the PC using a 15-pin cable and audio cable.
• If the PC is connected to TV and no signal has been input from PC for more than 5 seconds,
the TV will enter standby mode automatically.
HDMI
VGA IN PC AUDIO IN
Supporting signals
YPbPr VGA HDMI
480i
576i
480P
576P
720P / 50Hz 1920X1080 / 60Hz 720P / 50Hz
640X480 / 60Hz
800X600 / 60Hz
1024X768 / 60Hz
1280X1024 / 60Hz
480i
576i
480P
576P
720P / 60Hz 720P / 60Hz
1080i / 50Hz 1080i / 50Hz
1080i / 60Hz 1080i / 60Hz
1080P / 50Hz 1080P / 50Hz
1080P / 60Hz 1080P / 60Hz
13
Page 15
Using the Remote Control
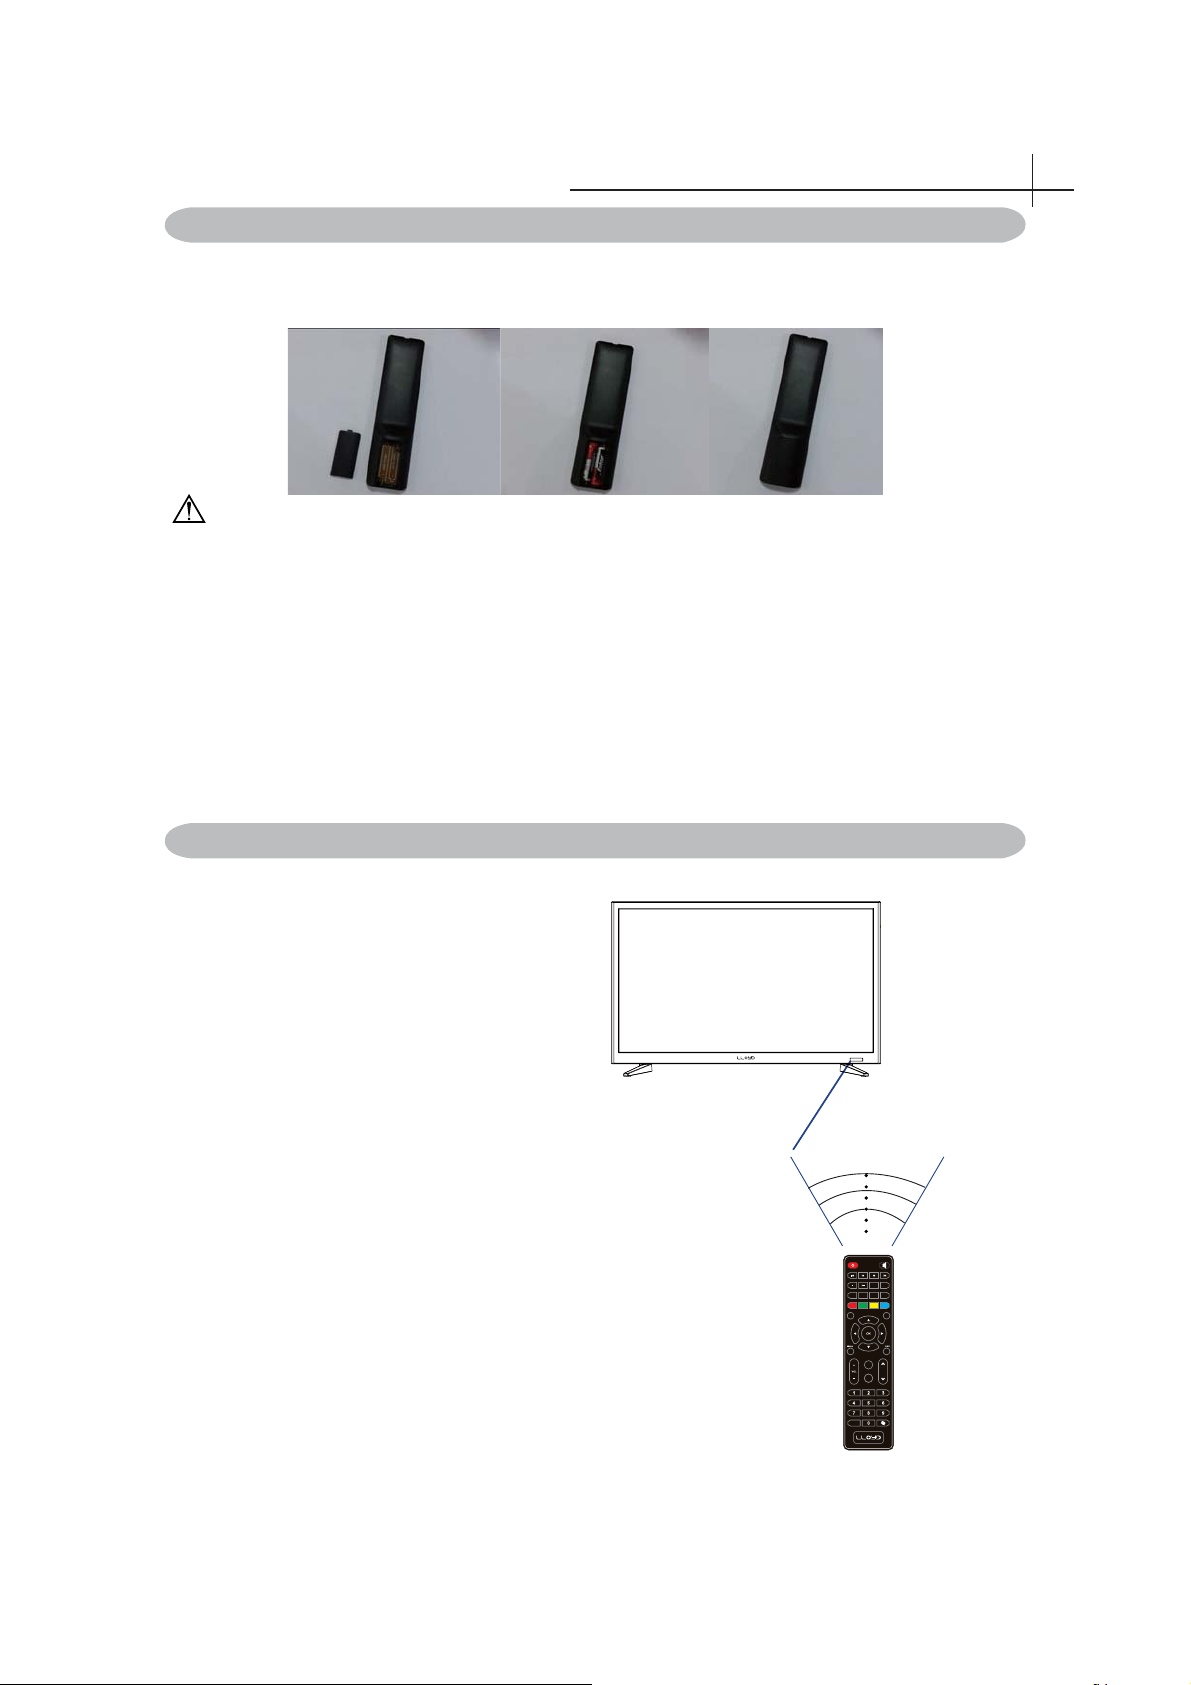
Inserting Remote Control Batteries
1. Remove the battery cover by pulling then lifting the knob on the cover.
2. Insert the batteries, corresponding to the (+) and (-) markings on the battery compartment.
3. Reattach the battery cover.
CAUTION
• Only use the specifi ed AAA batteries.
• Do not mix new and old batteries. This may result in creaking or leakage, which may pose a
risk of fi re or lead to personal injury.
• Insert batteries according to (+) and (-) markings. Inserting the batteries incorrectly may result
in leakage, which may pose a risk of fi re or lead to personal injury.
• Dispose of the battery in accordance with local laws and regulations.
• Keep the batteries away from children or pets.
• When the remote control will not to be used for an extended period, remove the batteries.
6
Oper ating the Remote Control
1 .Aim Remote Control directly at the Remote
Control Sensor on the left down corner of the TV
set.
2 .Remote Control range is at approx.16 feet with
angles of approx.30 degree.
3. Avoid obstructions between the Remote Control
and the sensor.
☼If you do not intent to use the remote control for a
long time, remove the batteries.
☼If the remote control does not operate correctly, or
if the operating range reduced,replace both batteries
with new ones.
IR Receiver
30 30
P.MODE
S.MODE
FREEZE
CH.LIST
ASPECT
AUTO
SOURCE DISPLAY
FAV
CH
SLEEP
-/--
14
Page 16
Using the Remote Control
6
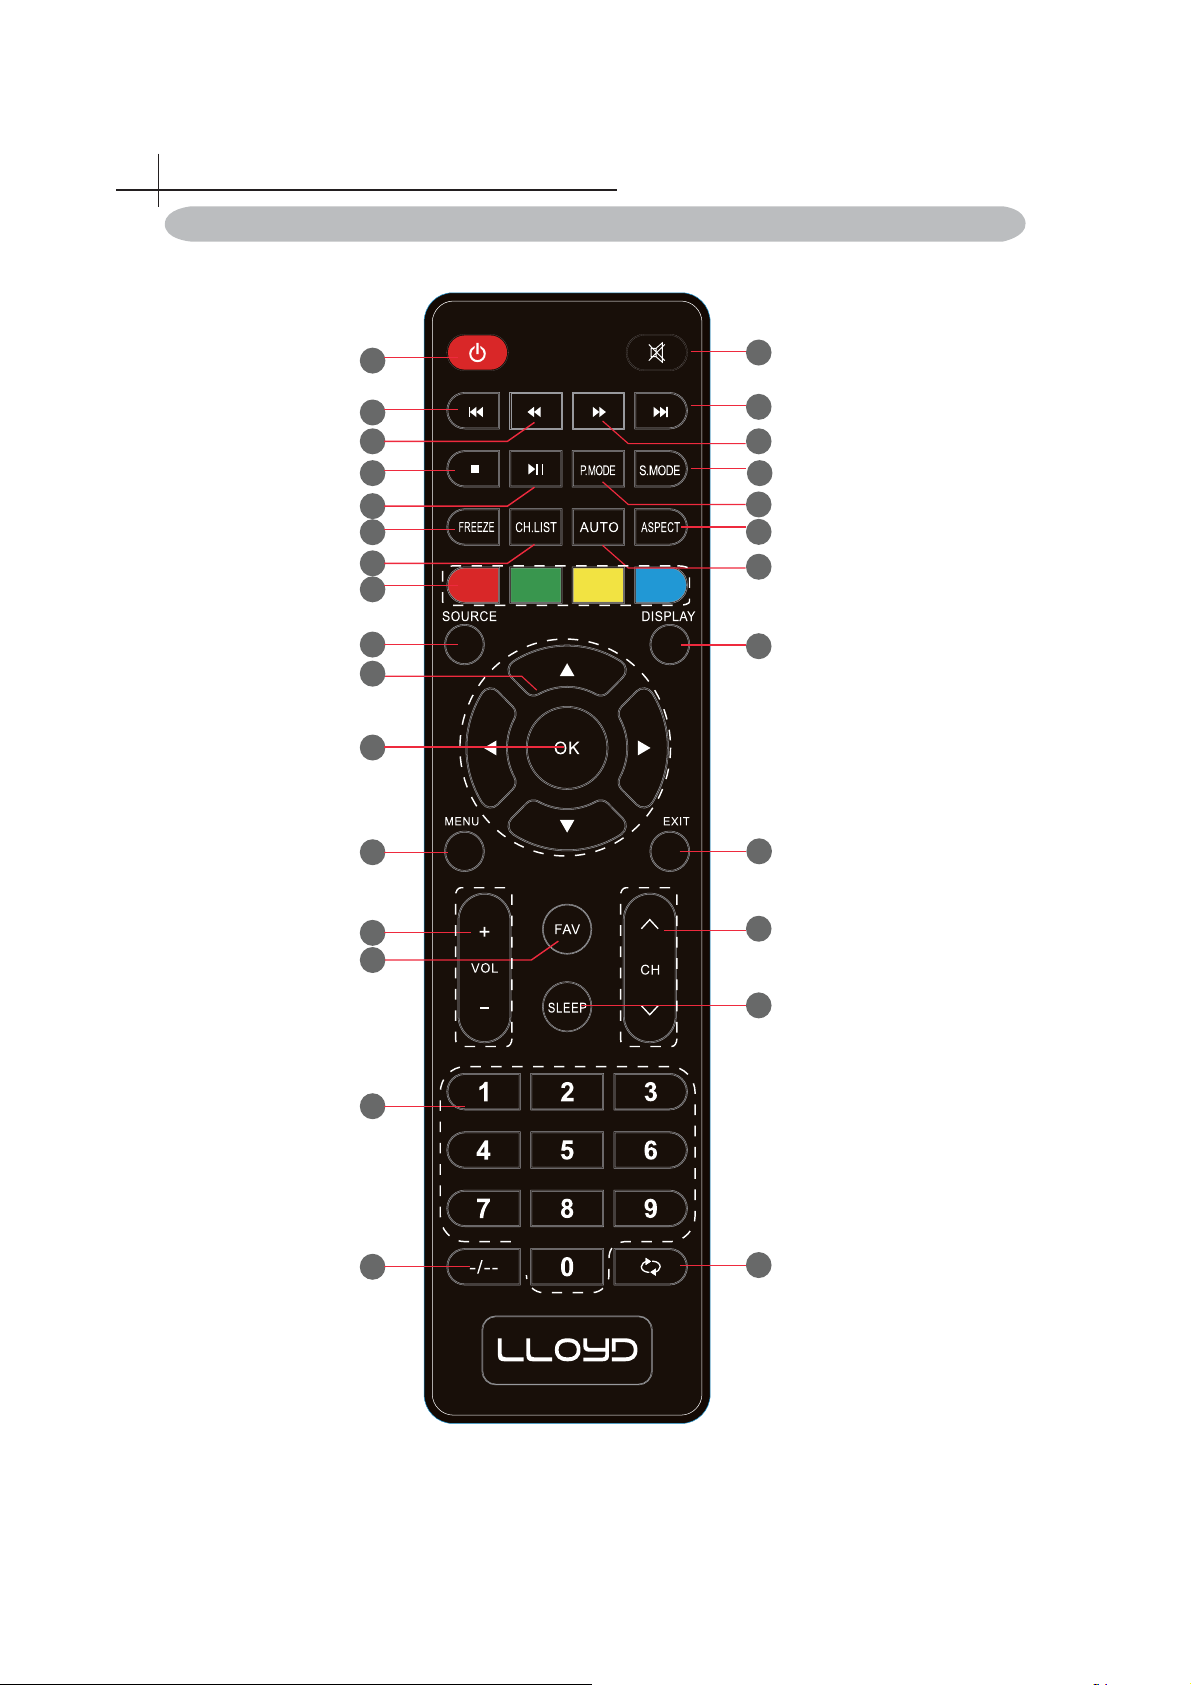
Remote Control
1
3
4
7
8
11
12
15
16
18
19
20
22
24
2
6
5
10
9
14
13
17
21
23
26
27
25
28
15
Page 17
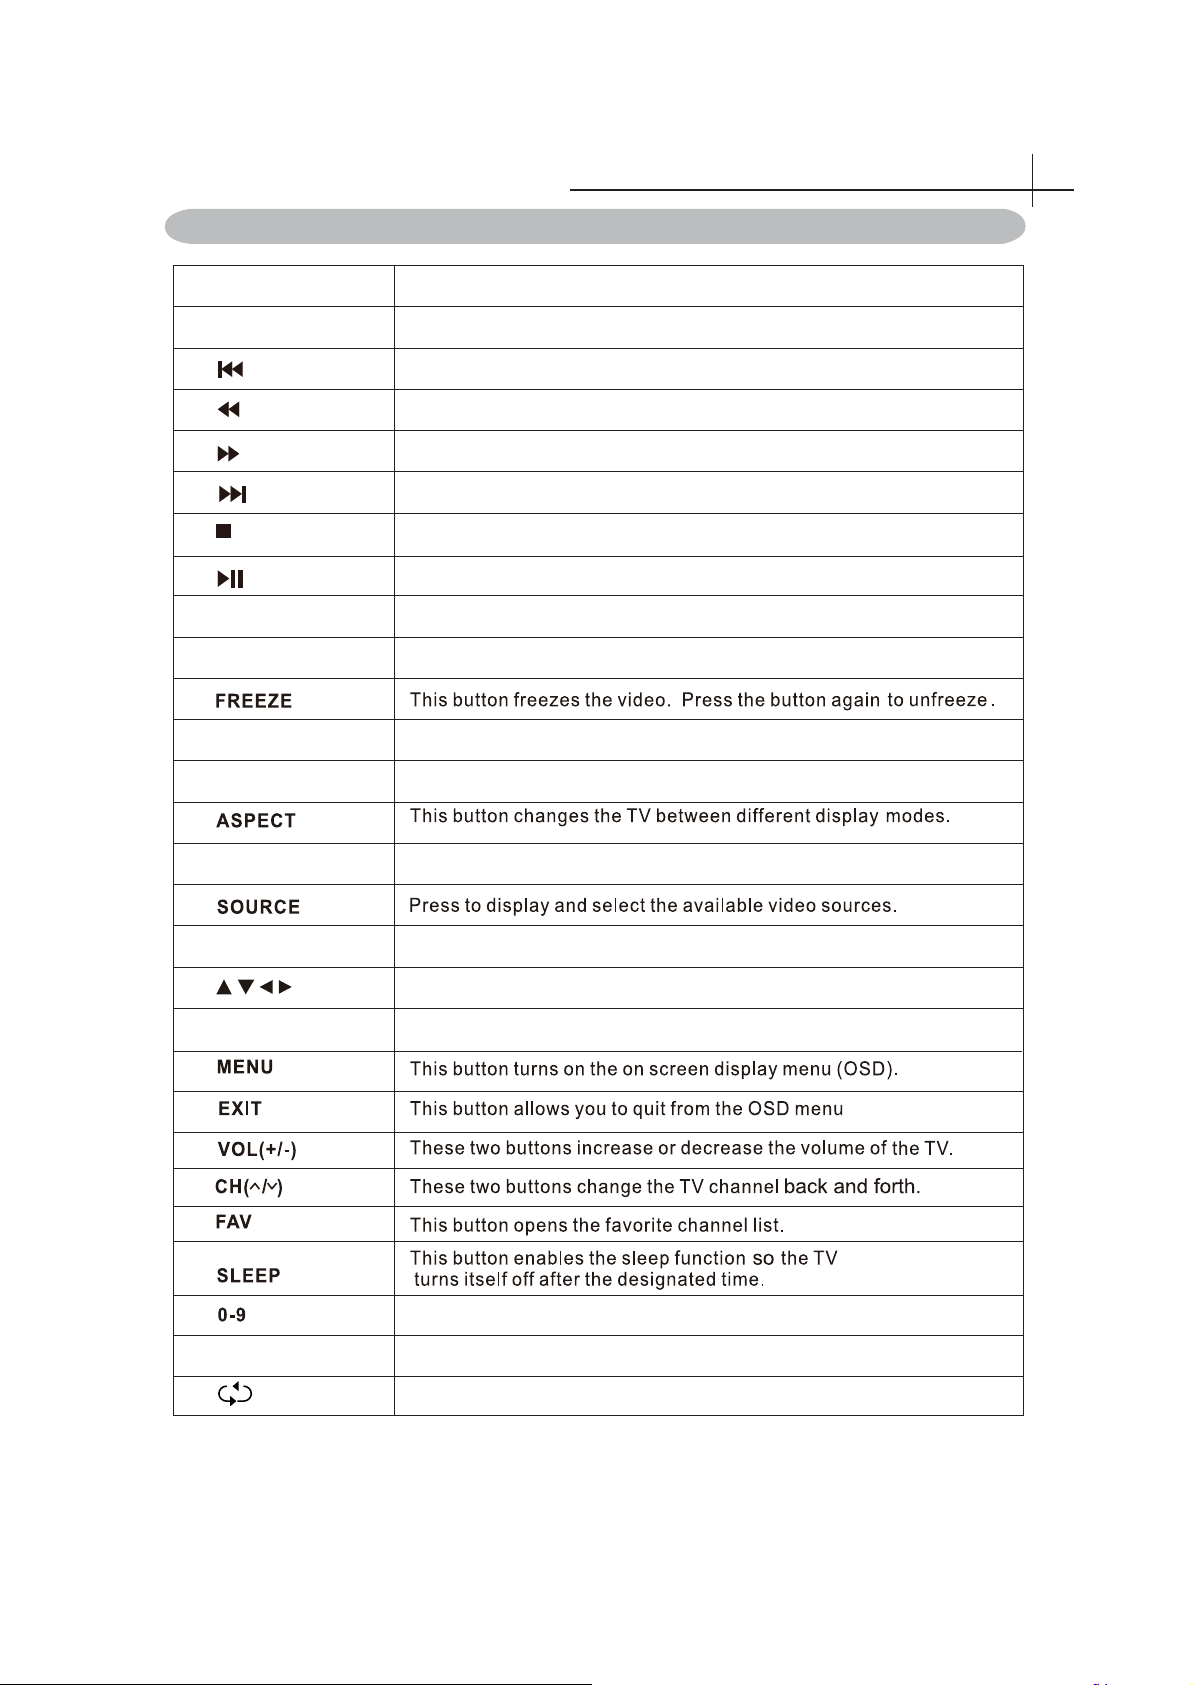
Remote Control function buttons
Using the Remote Control
6
1. POWER
2. MUTE
3.
4.
5.
6.
7.
8.
9.
P.MODE
10.
S.MODE
11.
CH.LIST
12.
AUTO
13.
14.
Color
15.
Press to enter or exit standby mode.
Press to turn on or off the Audio Sound.
To play the previous chapter, title or track.
Press to scan in reverse.
Press to scan in forward.
To play the next chapter, title or track.
Press the botton to stop the current program.
Press to play or stop the current program.
Press to select the picture mode.
Press to change the audio mode.
Press to display the Channel List.
Press to adjust automatically in VGA mode.
According to the OSD prompt operation.
16.
DISPLAY
17.
18.
19.
OK
20.
21.
22.
23.
24.
25.
26.
27.
-/--
28.
Press to display the information window.
Press the direction buttons to select menu options or settings.
Confirmation button,select the OSD menu option.
Press to change the channel of the TV in ATV mode.
Press this button before entering a programme greater than 09.
Press to return to the channel last viewed.
16
Page 18
Basic Operation of the TV
7
Turning the TV On and Off
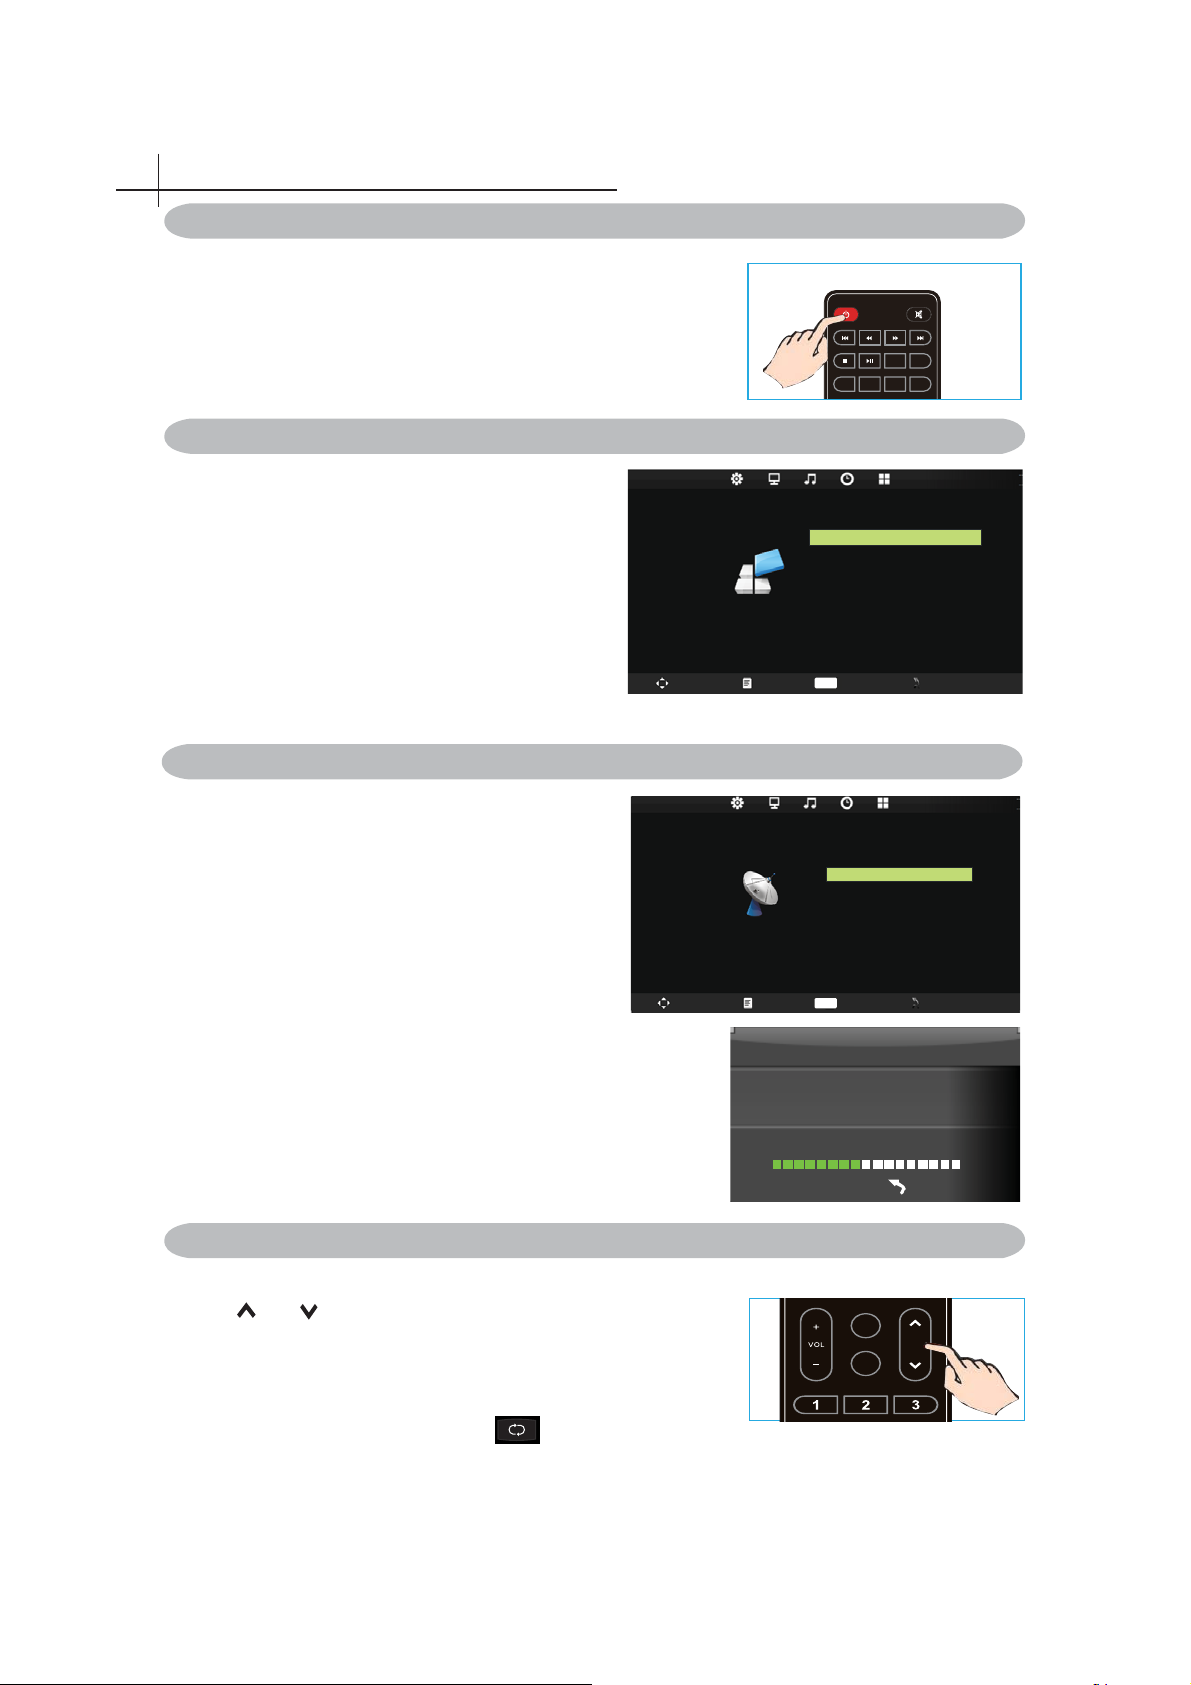
Press the POWER button on the remote control.
You can also use the Power button on the side of the panel.
*If there is no input signal within 15 minutes, TV will be
turned off automatically.
Select Language
The fi rst time you switch on the TV,please select the
language for the TV menu and follow the On Screen
Display prompt to complete the TV setup.
Language Setting
1 .Press MENU on the Remote Control to display the
main Menu.
2. Press◄ or ►to locate the SETTING.
3. Press▼to highlight OSD Language item.
press►to enter OSD Language submenu.
4. Press◄ or ► to select one of OSD languages.
5. Press MENU to return.
Install TV Channels Automatically
1 .Press MENU on the Remote Control to display
the main Menu.
2. Press◄ or ►to locate the Channel Setting.
3. Press▼to highlight Auto Scan item.
4.press►to enter Auto Tuning submenu.
5. Press MENU to return.
P.MODE
FREEZE
CH.LIST
AUTO
OSD Language English
Asp ect R ati o 16: 9
SETTING
Swap Menu Enter Exit
CHANNEL
Bl ue Scr een
Ke y Lo ck Of f
Re set
Sof tware Updat e(USB)
OK
Auto Tuning
Manual Tuning
Programme Edit
S.MODE
ASPECT
Off
Changing Channels
1. Using Channel Buttons
Press
changes channels in sequence. You will see all channels
that have been memorized. Channels erased or not
memorized will not be shown.
*Return to the previous channel, press button.
CH button to change channels, and the TV
17
Swap Men u En ter Exit
OK
Channel Tuning
TV : 5 Programme(s)
44%... 433.75MHZ (TV)
Menu
FAV
CH
SLEEP
Page 19
Adjusting the Volume
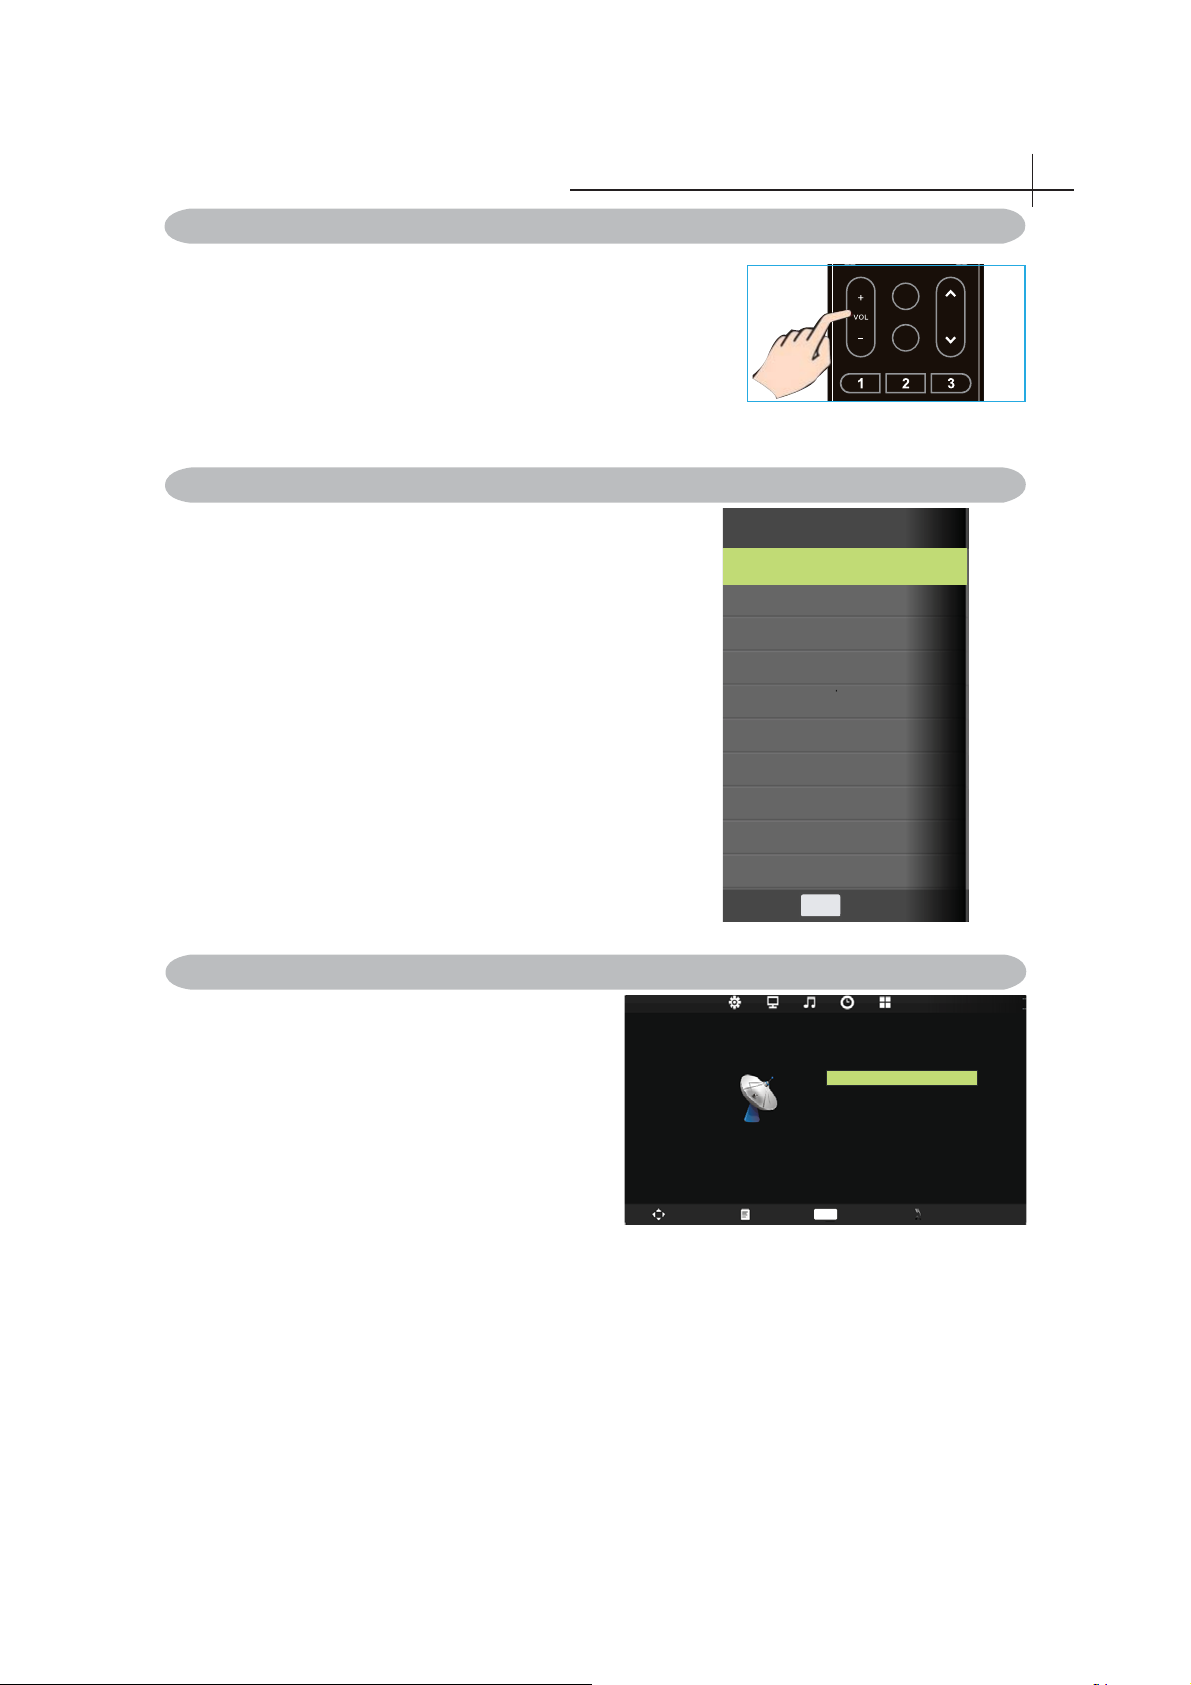
Press VOL +/- to adjust volume.
To turn off the volume, press MUTE.
To restore volume, press MUTE again.
Selecting the Input Source
Basic Operation of the TV
FAV
CH
SLEEP
7
To select the TV or other external input sources connected to
the TV.
1. Press the SOURCE button on the remote control.
2. Press ▲ or ▼ to select the required input source between TV,
AV, YPBPR , HDMI ,PC or Media.
3. To confi rm the selection, press OK button to enter.
Access to the On Screen Display Menu
1.Press MENU on the remote control to display the
main Menu.
The icons on the top of main menu stand for
the following five settings:CHANNEL/PICTURE/
SOUND/TIME/SETTING (lt is subject to current
source model).
2. Press◄ or ►to locate your desired setting.
3. Press▲ or ▼to highlight an item need to adjust.
4. Press ◄ or ► to adjust the setting or Press OK
to enter submenu.
5. Press MENU to return.
CHANNEL
Input Source
TV
AV
YPbPr
HDMI
PC
Media
OK
Enter
Auto Tuning
Manual Tuning
Programme E dit
Swap Menu Enter Exit
OK
18
Page 20
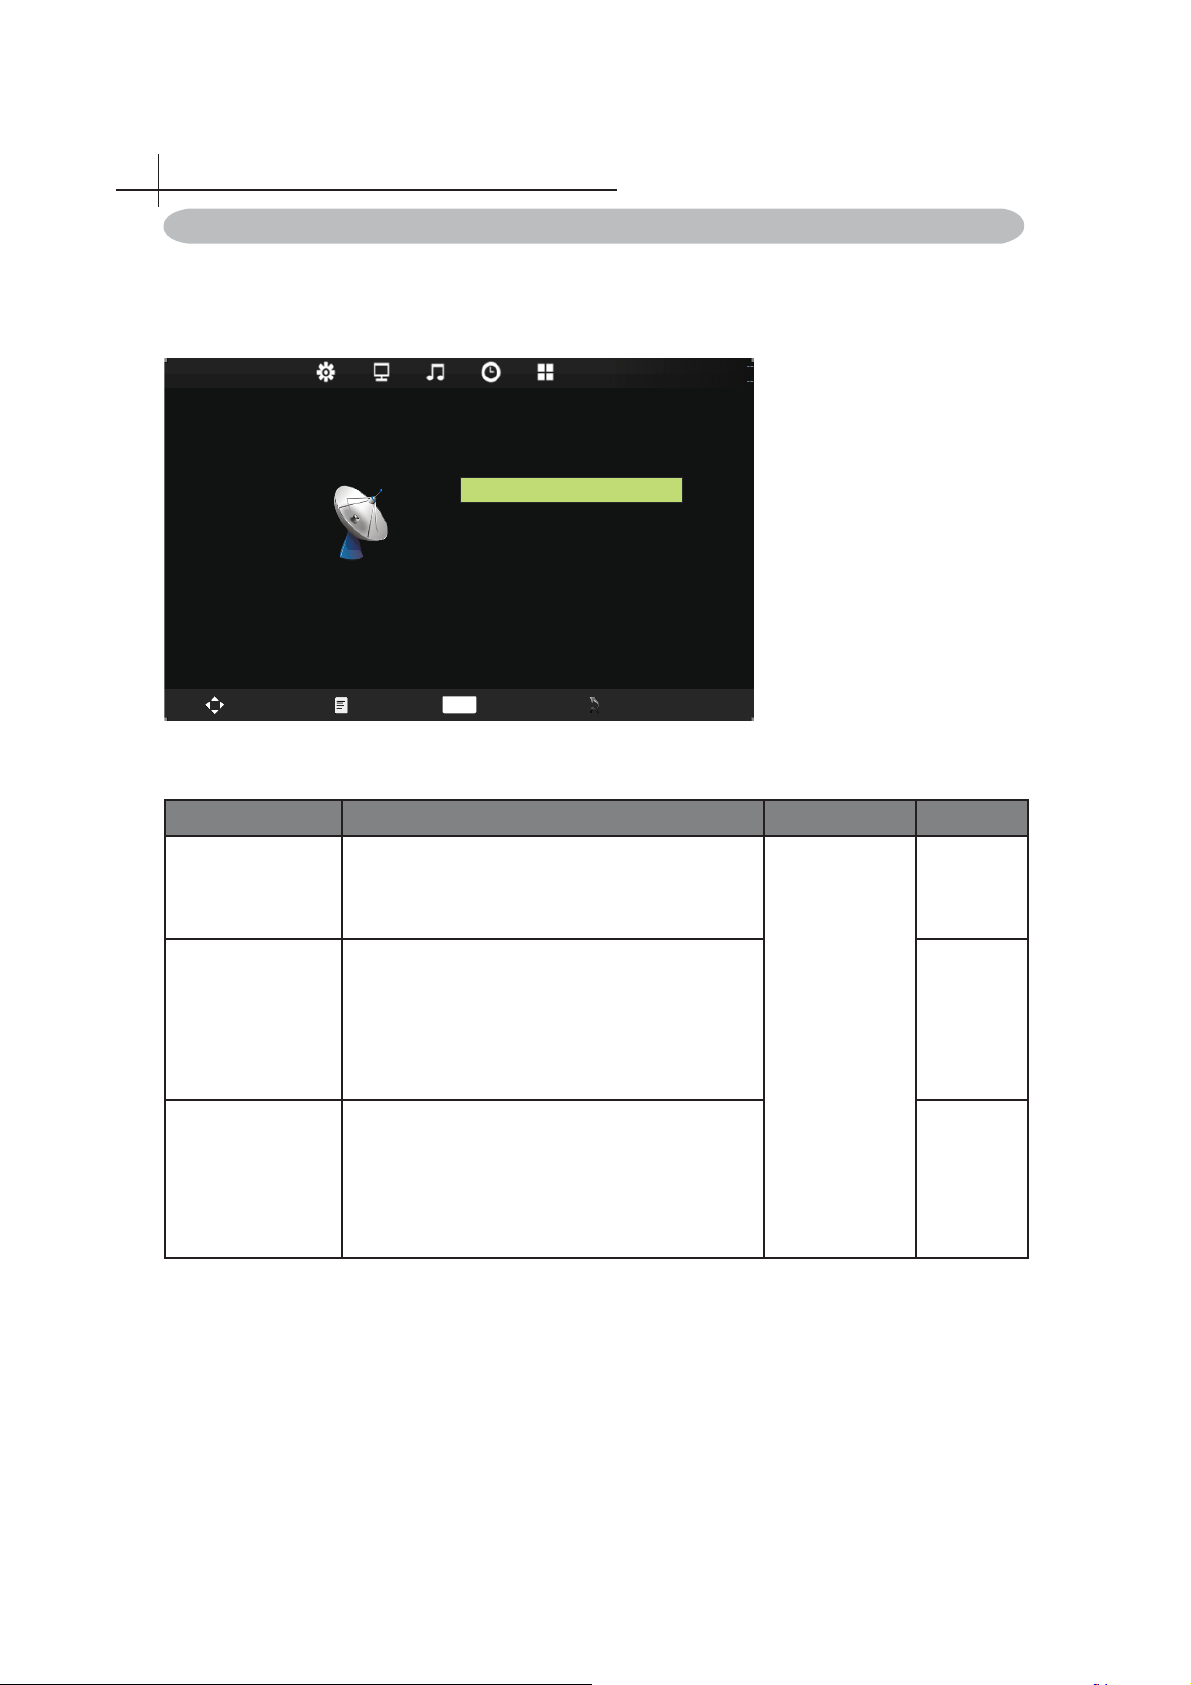
Channel setting
8
Channel menu
Press MENU on the remote control to display the main Menu.
1. Press◄ or ►to select CHANNEL.
2. Press▲ or ▼to highlight an item, press OK button to enter submenu.
Auto Tuning
CHANNEL
Manual Tuning
Programme Edit
Swap Menu Enter Exit
OK
NOTE:CHANNEL can be only selected under TV/RF condition, others can’t be used.
Item Function Operation Range
Auto Tuning
Manual Tuning
Programme Edit
Enter Auto Scan,it shows the process of frequency and
the number of channels.
Enter Manual Tuning, and then select the project which
you need to change.Note : Before auto/manual tuning
keep sound system BG for INDIA.
Enter Programme Edit, and then use the color buttons
on the remote control for editing.
(red for "delete" button, the green button to "rename",
yellow button for "swap", a dark blue button for "skip",
"FAV" button can be set like program)
Press▲ or ▼to
highlight an item,
press OK or
button to enter
Sub menu.
►
19
Page 21
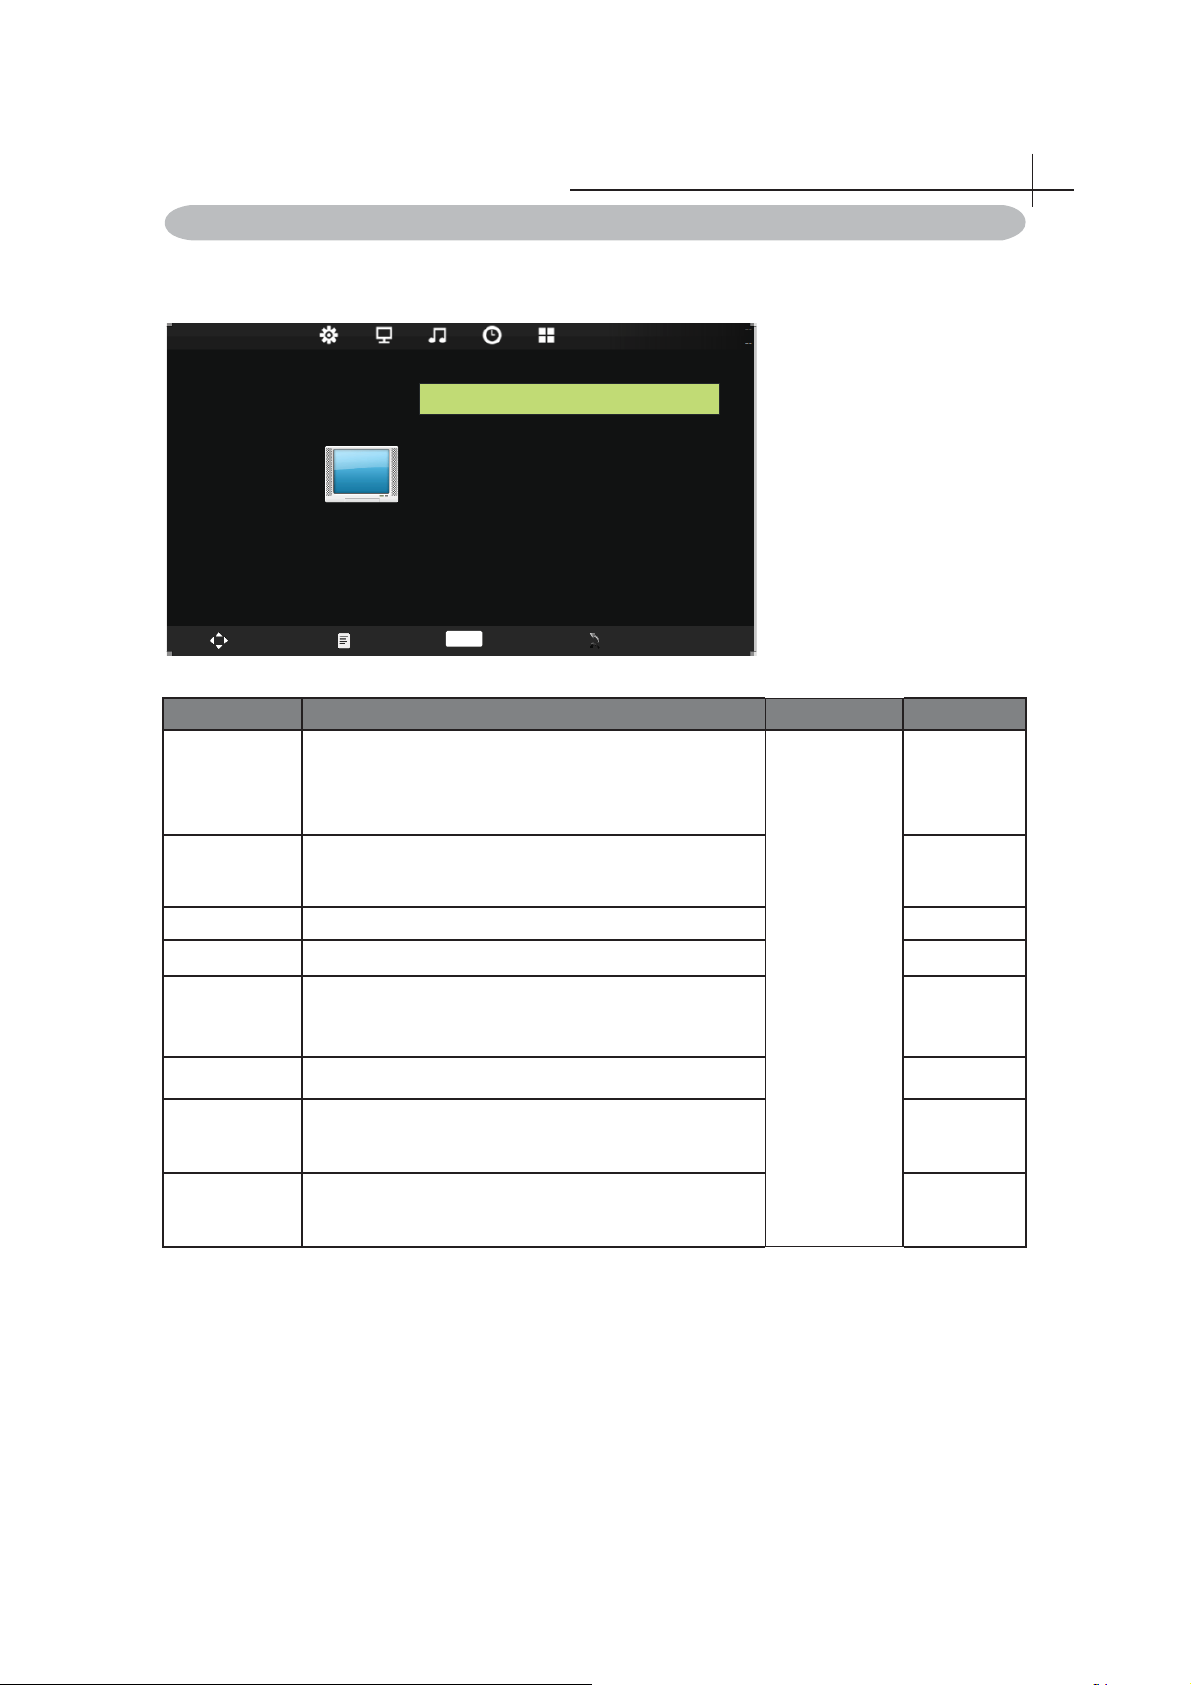
Picture menu
Press MENU on the remote control to display the main Menu.
1. Press◄ or ►to select PICTURE.
2. Press▲ or ▼to highlight an item, press OK button to enter submenu.
Picture Mode Standard
Co ntr ast 50
Brig ht ness 50
PI CT URE
PI CT URE
Co lo r 50
Tin t 50
Sharpness 50
Co lo r Tem pera tur e Me di um
Noise Reduction Middle
Picture Setting
9
Move Menu Enter Exit
Swap Menu Enter Exit
Item Function Operation Range
OK
• Dynamic
Picture mode Select your viewing preference from 4 options.
• Standard
• Eyesafe
• User
Contrast Set contrast intensity. 0-100
Brightness Set overall brightness. 0-100
Color Set color intensity. 0-100
Adjust colors toward green or red tint.
Tint
Note: Tint is available to be adjusted only when the
system of the video signal is NTSC.
Press▲ or
▼to highlight
an item, press
OK or ◄►
button to enter
Sub menu.
0-100
Sharpness Adjust the picture clarity. 0-100
Color
Temperature
Noise
Reduction
Cycle among color temperature display modes:Cool/
Warm/Medium.
Select to reduce the noise level of connected
equipment:Off/Low/Middle/High.
20
Page 22
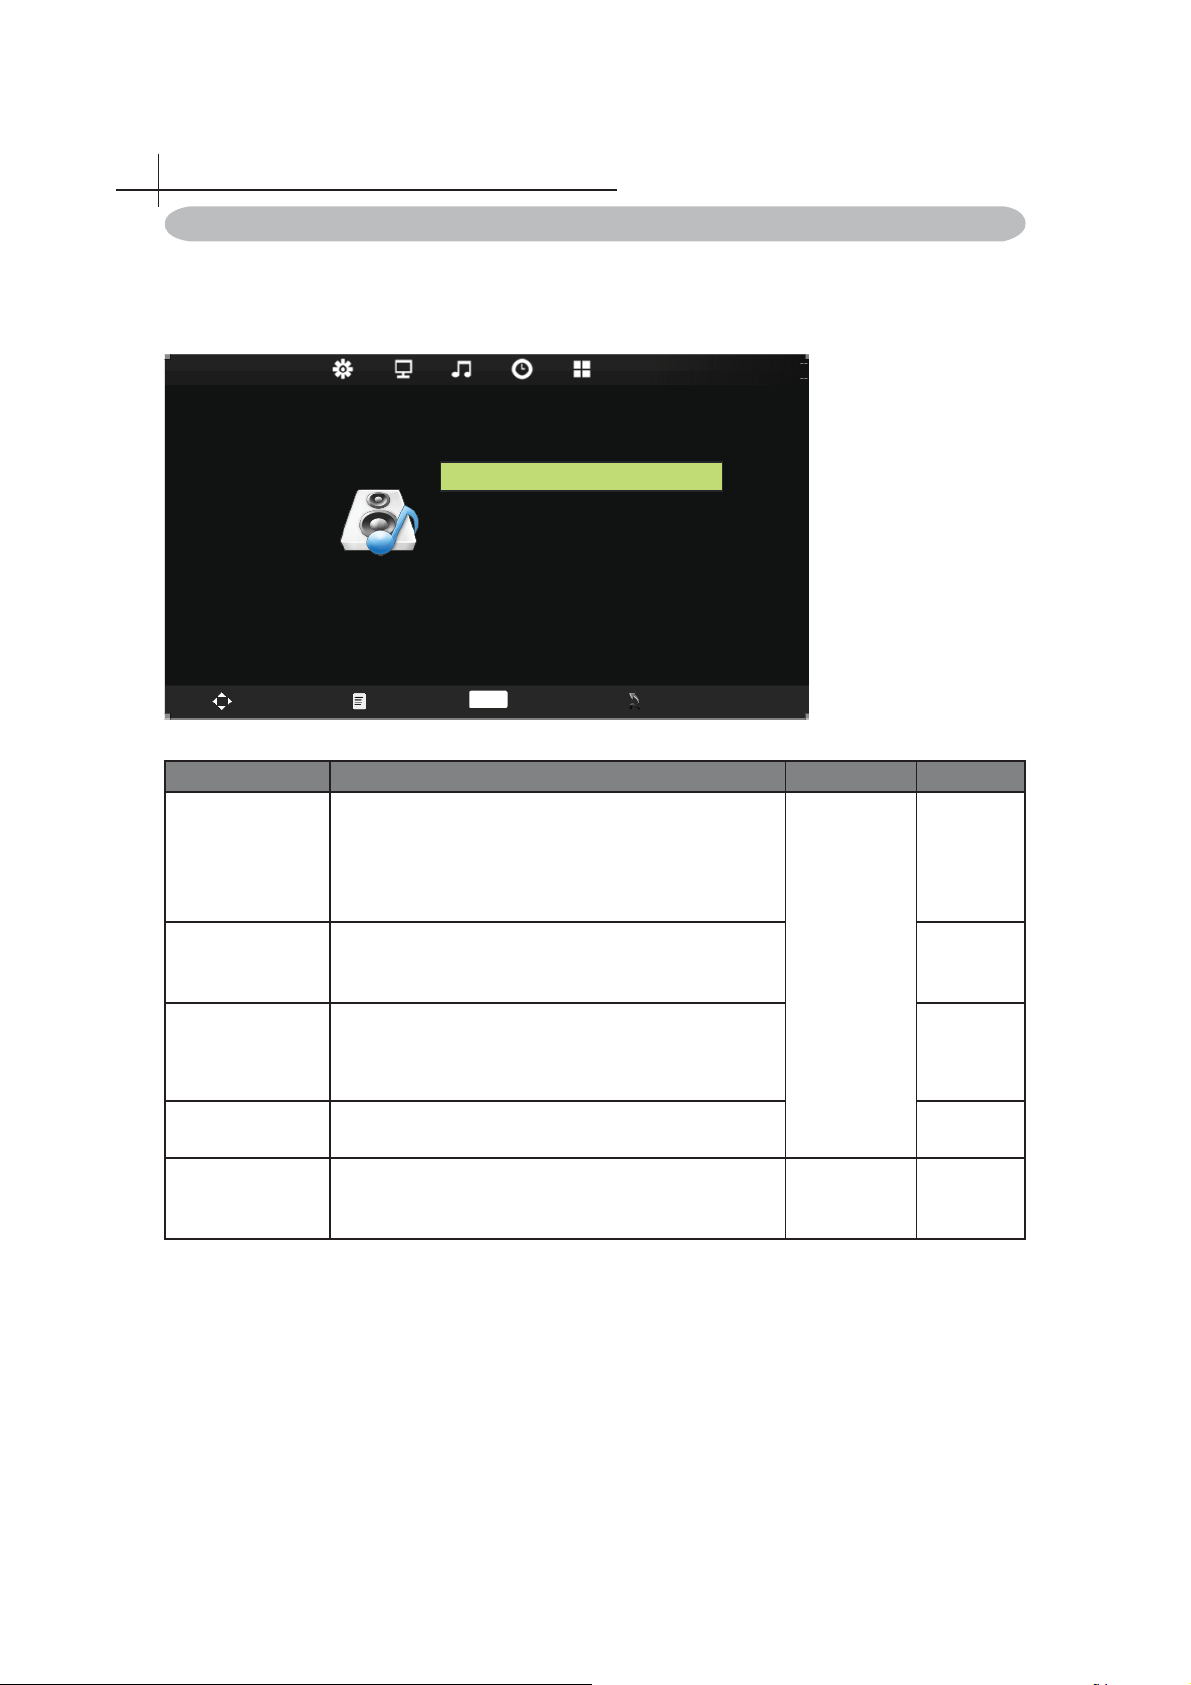
10
Sound Setting
Sound menu
Press MENU on the remote control to display the main Menu.
1. Press◄ or ►to select SOUND.
2. Press▲ or ▼to highlight an item, press OK button to enter submenu.
Sound Mode Standard
Treb le 50
SO UND
Bass 50
Bal ance 0
Aut o Volu me O f f
Swap Menu Enter Exit
Item Function Operation Range
Selects a sound type when viewing programs or
Sound Mode
videos that support multiple sounds.
* If you select the User mode,you can individually set
the Bass and Treble.
Navigate using the left right buttons to increase or
Treble
decrease high frequency intensity. 0-100
OK
Press▲ or
▼to highlight
an item, press
• Standard
• Music
• Movie
• Sports
• User
OK or◄ ►
button to enter
Sub menu.
Press ◄► to
adjustment.
0-100
-50~50
On/Off
Bass
Balance
Auto Volume
Navigate using the left right buttons to increase or
decrease low frequency intensity.
Adjusts the volume balance of the left or right speaker
.
To turn on/off AVC ( automatic volume control )
function.
21
Page 23
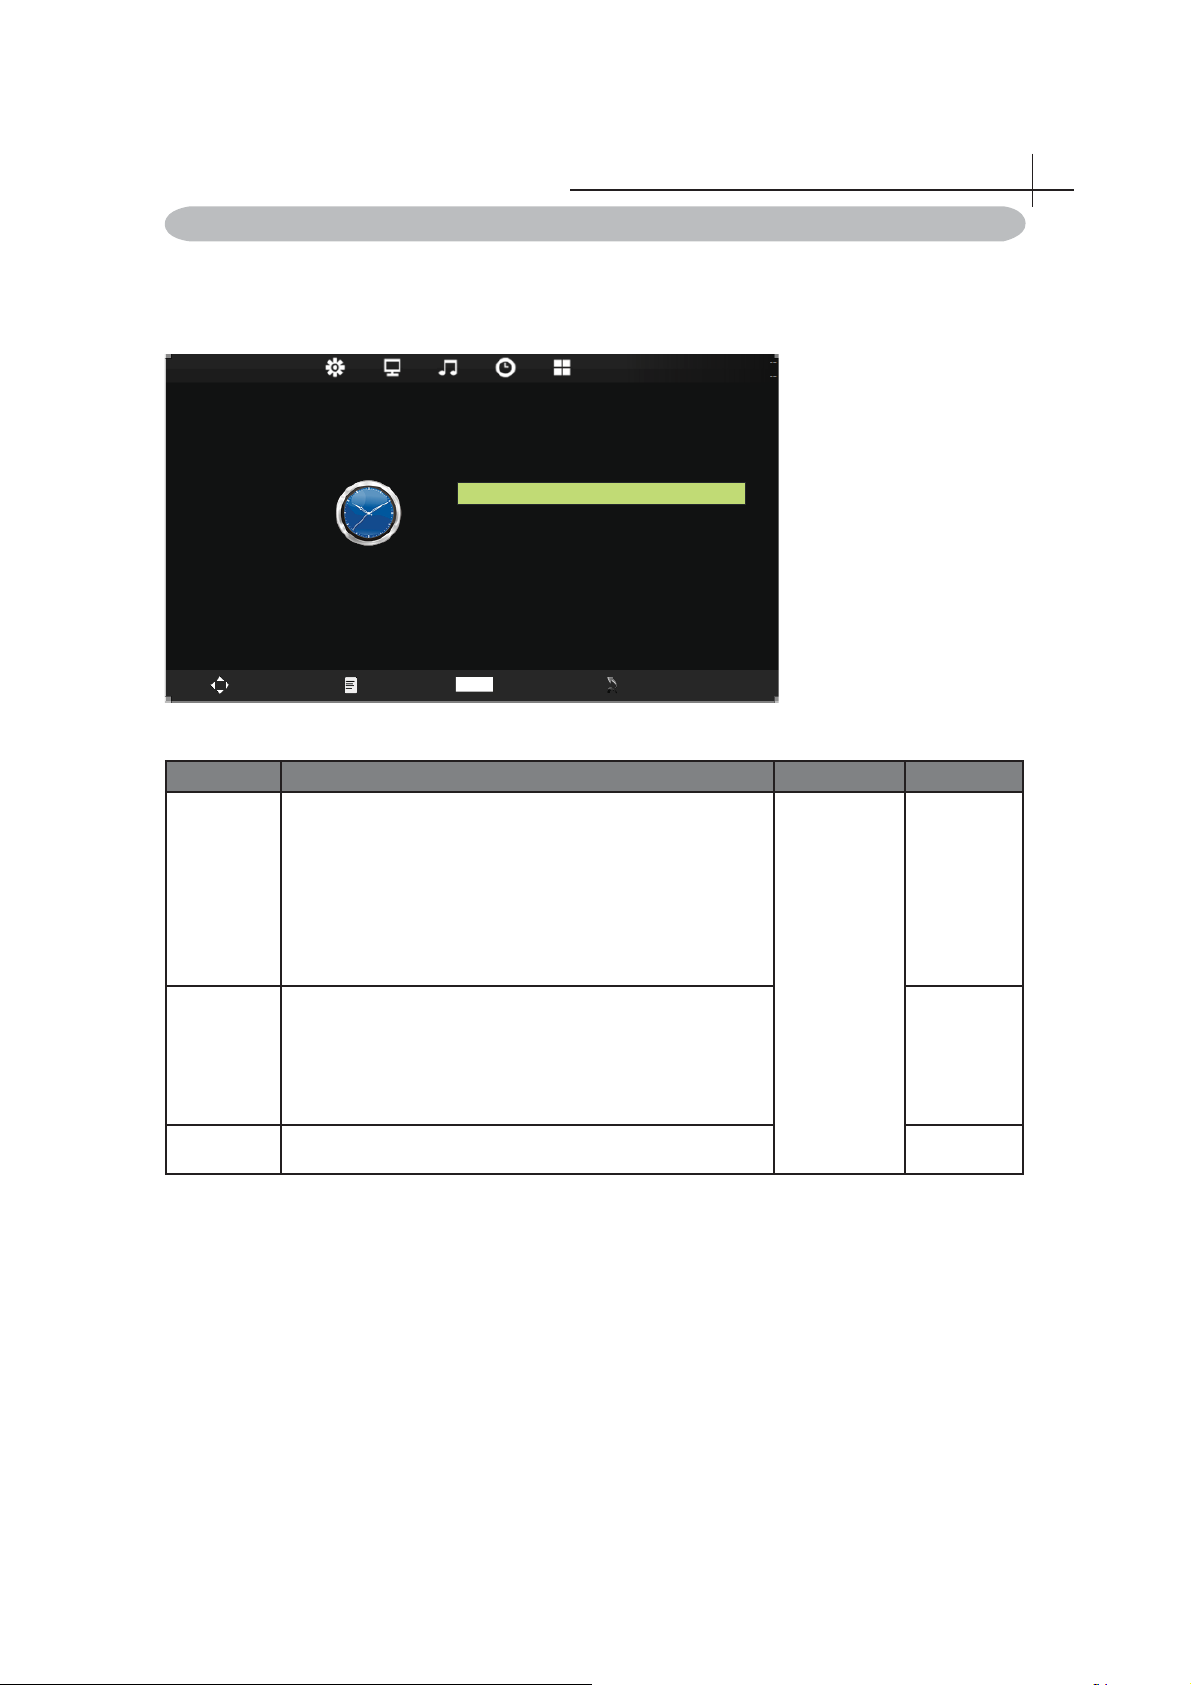
Time menu
Press MENU on the remote control to display the main Menu.
1. Press◄ or ►to select TIME.
2. Press▲ or ▼to highlight an item, press OK button to enter submenu.
Sle ep Time r Off
TIME
Swap
Menu
Auto Sle ep Off
OSD Time r 30s
OK
Enter
Exit
Time setting
11
Item Function Operation Range
Sleep Timer
Closed or choose TV enters the sleep time, press the
right key to adjust: off / 10 min / 20min/30 min / 60 min
/ 90min/120min/180min/240min. Explains: the time is set
up to start to sleep time, the fi nal 30 seconds, the system
• Off
• 10min240min
prompt "press any key to cancel", to confi rm whether
confi rm to shut down, at the same time, the system
automatically set it to off.
Press ► to
adjustment.
• Off
• 3H
• 4H
• 5H
Auto sleep
Select on, the TV will be automatically turned off, in case
of no signal in TV & input source or no remote control
input.
OSD Timer Allow selection of the display time of the on-screen menu.
22
Page 24
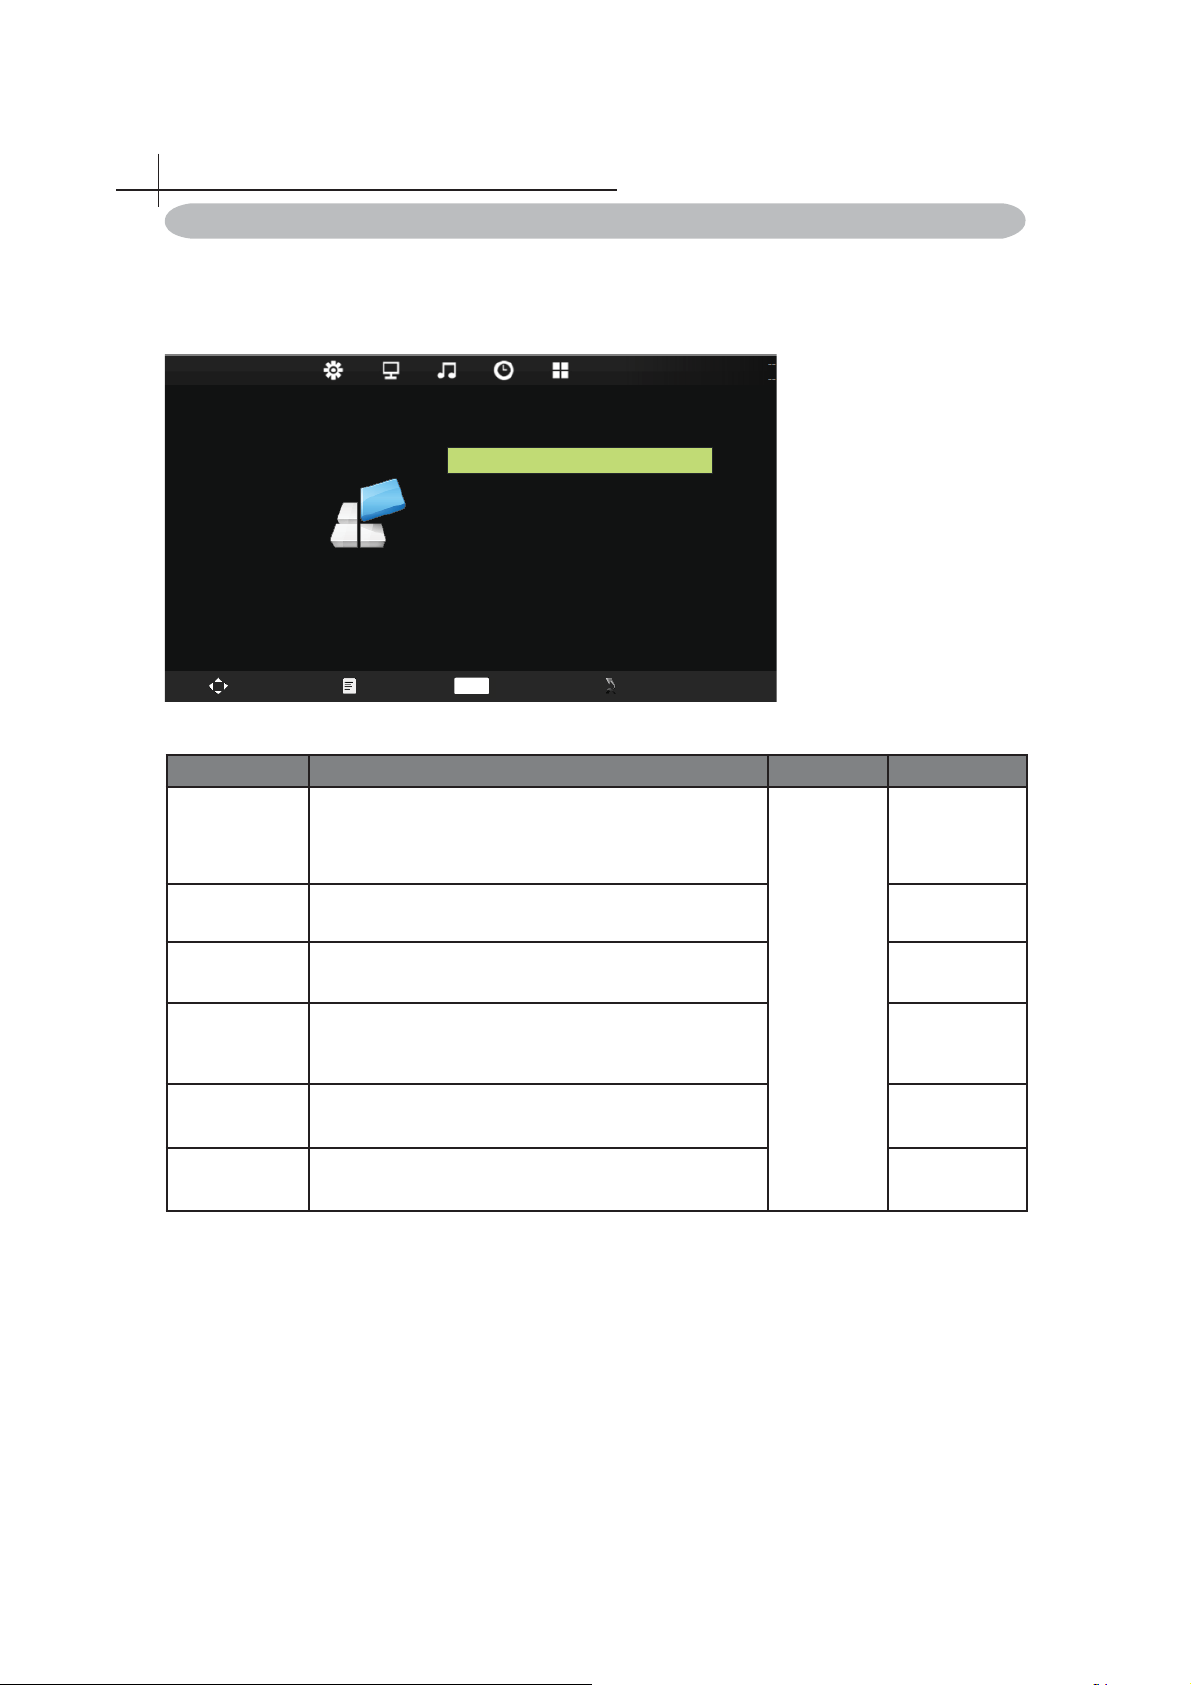
12
Setting
Setting menu
Press MENU on the remote control to display the main Menu.
1. Press◄ or ►to select SETTING.
2. Press▲ or ▼to highlight an item, press OK button to enter submenu.
OSD Language English
Aspect R ati o 16 : 9
Blu e Scre en
SETTING
Key Lo ck O ff
Re se t
Sof tware Update(USB)
Off
Swap Menu Enter Exit
Item Function Operation Range
OK
OSD Language Setup menu display language.
Aspect Ratio
Blue Screen Select blue screen function on/off.
Key Lock
Allow to select the option of Aspect Ratio: 4:3, 16:9,
Zoom1, Zoom2, Full.
Allow you to select the keylock to be On or Off. When
keylock’s condition is on, you can’t use the key panel
button.
Press ◄
or ► to
Adjustment.
• On
• Off
• On
• Off
Reset Select Reset choose what you want.
Software
Update(USB)
For service use only.
23
Page 25
Multimedia
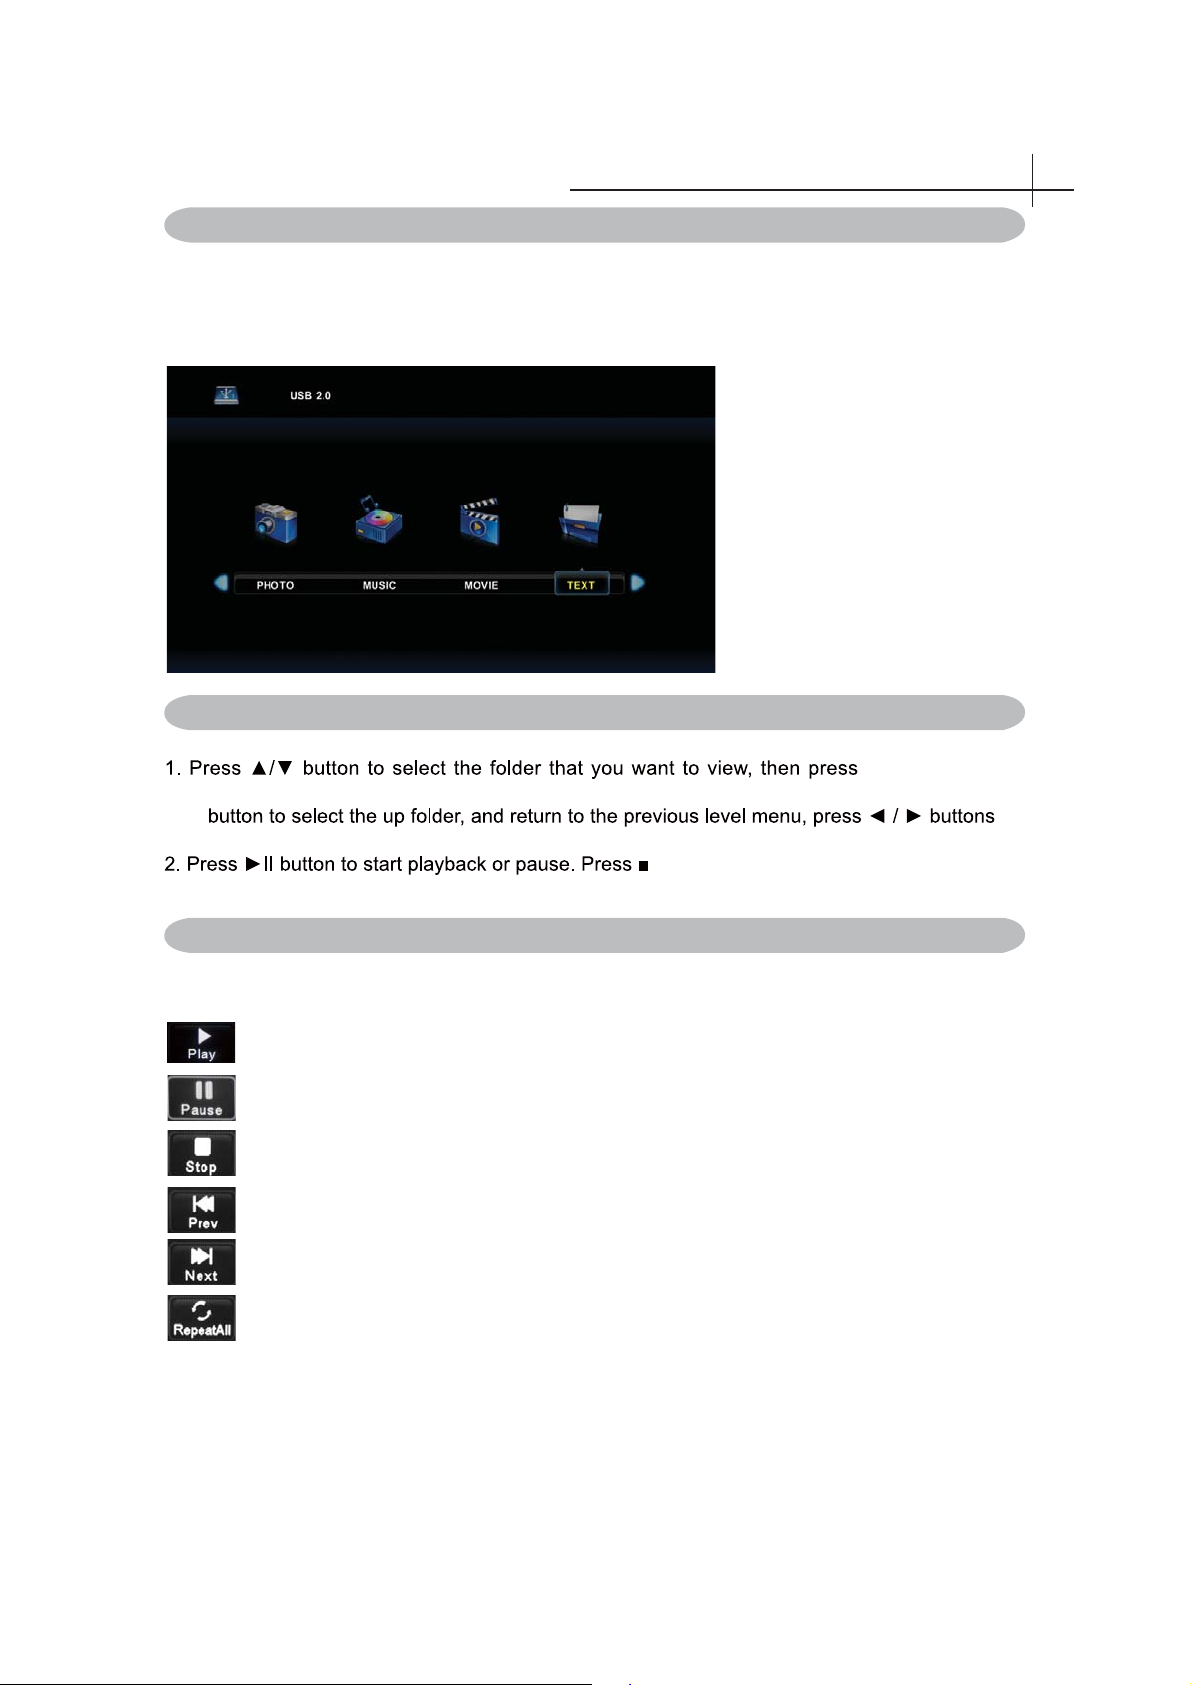
Media Play - USB Device
First press SOURCE into multimedia channel, plug in USB storage device, the following picture
mark color, if blue say television has to recognize the USB, gray has said no to recognize.
After confi rmed television to recognize USB storage devices, press ◄ or ►button to select photo/music/
movie/text, and press OK button to enter photo/music/movie/text operation basic same.
Plating Photo / Music / Movie / Text
13
OK
button to
select t he s ub folder. Press button to play, press the exit button to return b ack. P ress
OK
to turn pages.
3. Press button to play to the last item. Press button to play to the next item.
OK
button to stop playback.
Photo / Music / Movie / Text Screen Display
1. Follow the instruction below to enter the desired function.
Play
Pause
Stop
Play previous a photo/music/movie/text.
Play next a photo/music/movie/text.
Circle mode,can choose repeat one,repeat all, repeat none.
24
Page 26
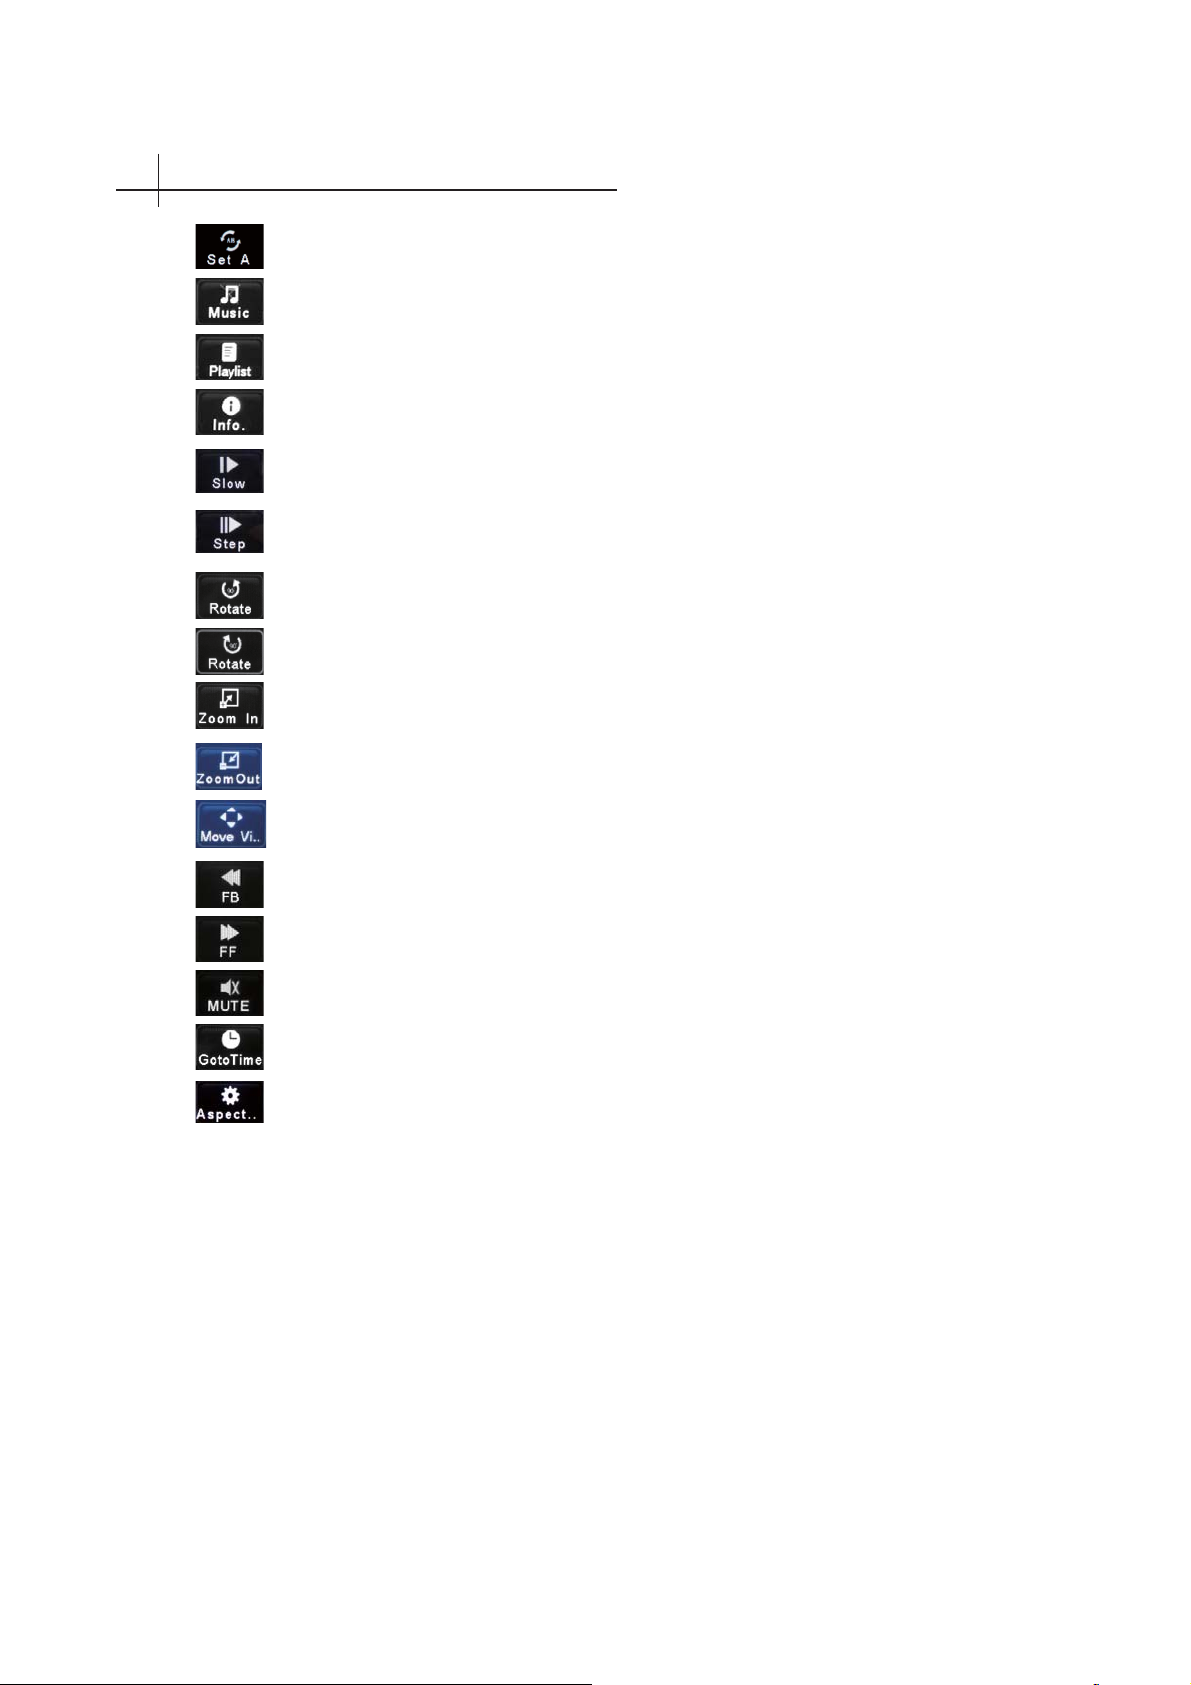
Multimedia13
Set A to Set B.
Start or stop the background music.
Browse photo/music/moive/text list.
Displays the current photo/music/moive/text information.
Slow Forward.
Step Forward.
Counter clockwise turn pictures.
Clockwise turn pictures.
Zoom in
Zoom out
Zoom photo/moive fi rst, and then select the press OK key to enter mobile model,
and then press▲/▼&◄ or ►move.
Fast back
Fast forward
MUTE
You can set time which you want to go.
Adjust picture Size.
25
Page 27

Multimedia
Precautions when using a USB device
• MTP (Media Transfer Protocol) is not supported.
• Max HDD capacity:500G.
• This unit supports only USB Flash Drive with FAT32 format. This TV is not guaranteed the USB
Flash Drive with other formats (such as FAT16 or NTFS).
• Certain types of USB Digital camera and audio devices may not be compatible with this TV.
Media only guarantees to support USB Flash Drive. Other devices such as fl ash card reader,
USB HDD, USB Digital Camera and audio devices may not be compatible with this TV.
• If a USB device requires high power (more than 500mA or 5V), the USB device may not be
supported.
• This TV is not supported the USB device with multiple partitions.
• Please connect directly to the USB port of your TV. If you are using a separate cable connection
or through a USB hub, there may be a USB compatibility problem.
•Before connecting your device to the TV, please back up your fi les to prevent them from damage
or loss of data. Any data fi le damage or data loss is at your own risk.
•The higher the resolution of the image, the longer it takes to display on the screen.
• How fast a USB device is detected differs from device to device.
• For unsupported or corrupted fi les, the "unsupported File" message is displayed.
• MP3 fi les with DRM that have been downloaded from a non-free site cannot be played. Digital
Rights Management (DRM) is a technology that supports the creation of content, the distribution
and management of the content in an integrated and comprehensive way, including the
protection of the rights and interests of the content providers, the prevention of the illegal
copying of contents, as well as managing billings and settlements.
• When moving to a photo, loading may take a few seconds. At this point, the loading icon will
appear at the screen.
• If USB card reader is connected, its volume may not be detected.
• If USB device does not function properly, please unplug and reconnect it.
• If verify whether the USB device is functioned properly with your PC.
13
26
Page 28
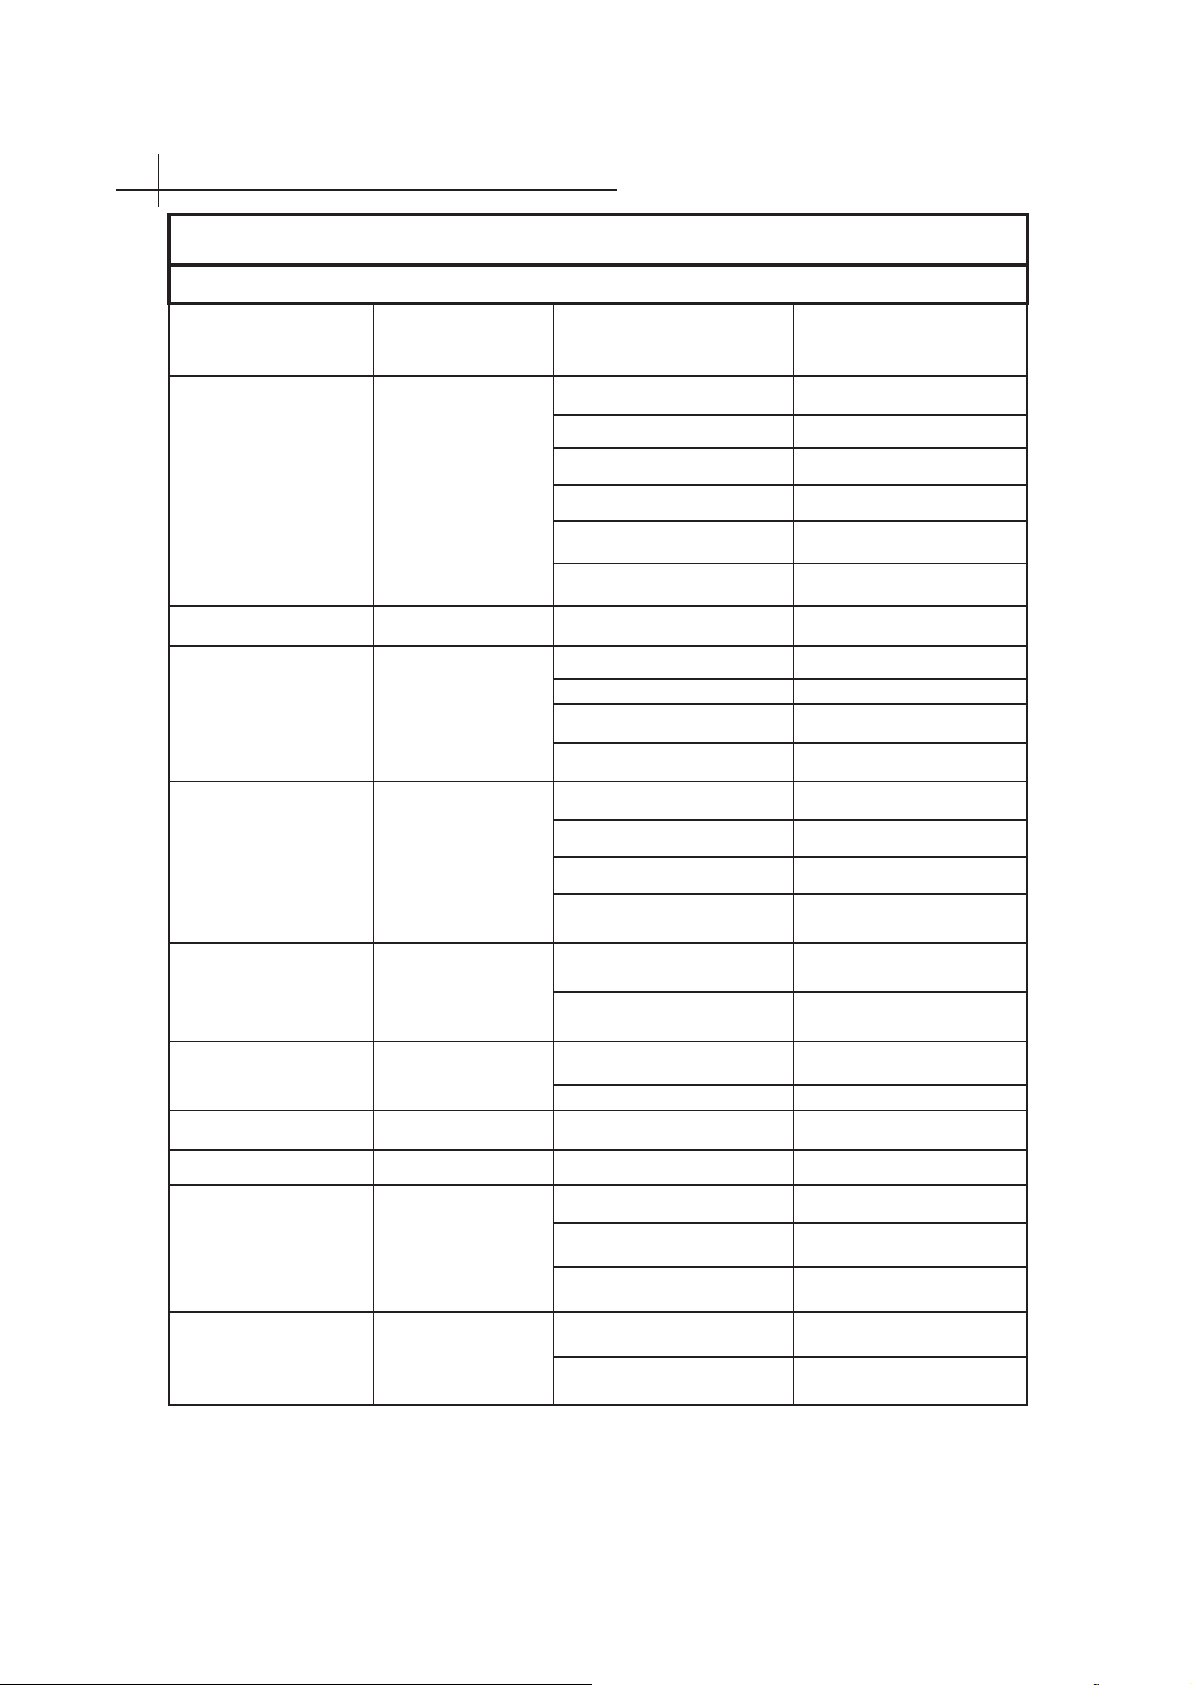
13
Multimedia
Video Codec support list
O refer to support, X refer to NOT support
File Extension Container Video Codec
Divx X
* .avi AVI
* .wmv, * .asf ASF VC-1 X
Divx X
* .mp4 *.mov
* .mkv MKV
MP4
Motion JPEG (* .mov) O
TSUMV59XU/XE-Z1
TSUMV59XUS/XES-Z1
ODivX
O2GEPM
O462.H
O4-GEPM
OGEPJ noitoM
O462.H
O4-GEPM
O462.H
O4-GEPM
O2-GEPM
* .mpg,* .mpeg MPG,MPEG
*.ts,*.trp,*.tp,*.m2ts
*.rm,*.rmvb RM,RMVB
*.FLV FLV
MPEG2-TS
EPM
RV 8 X
RV 9 X
RV 10 X
O1-GEPM
O1-GEPM
O2-GEPM
O2-G
O462.H
O1-GEPMGPMtad.*
O2-GEPMSP-2GEPMbov.*
Onosneros
O462.H
27
Page 29
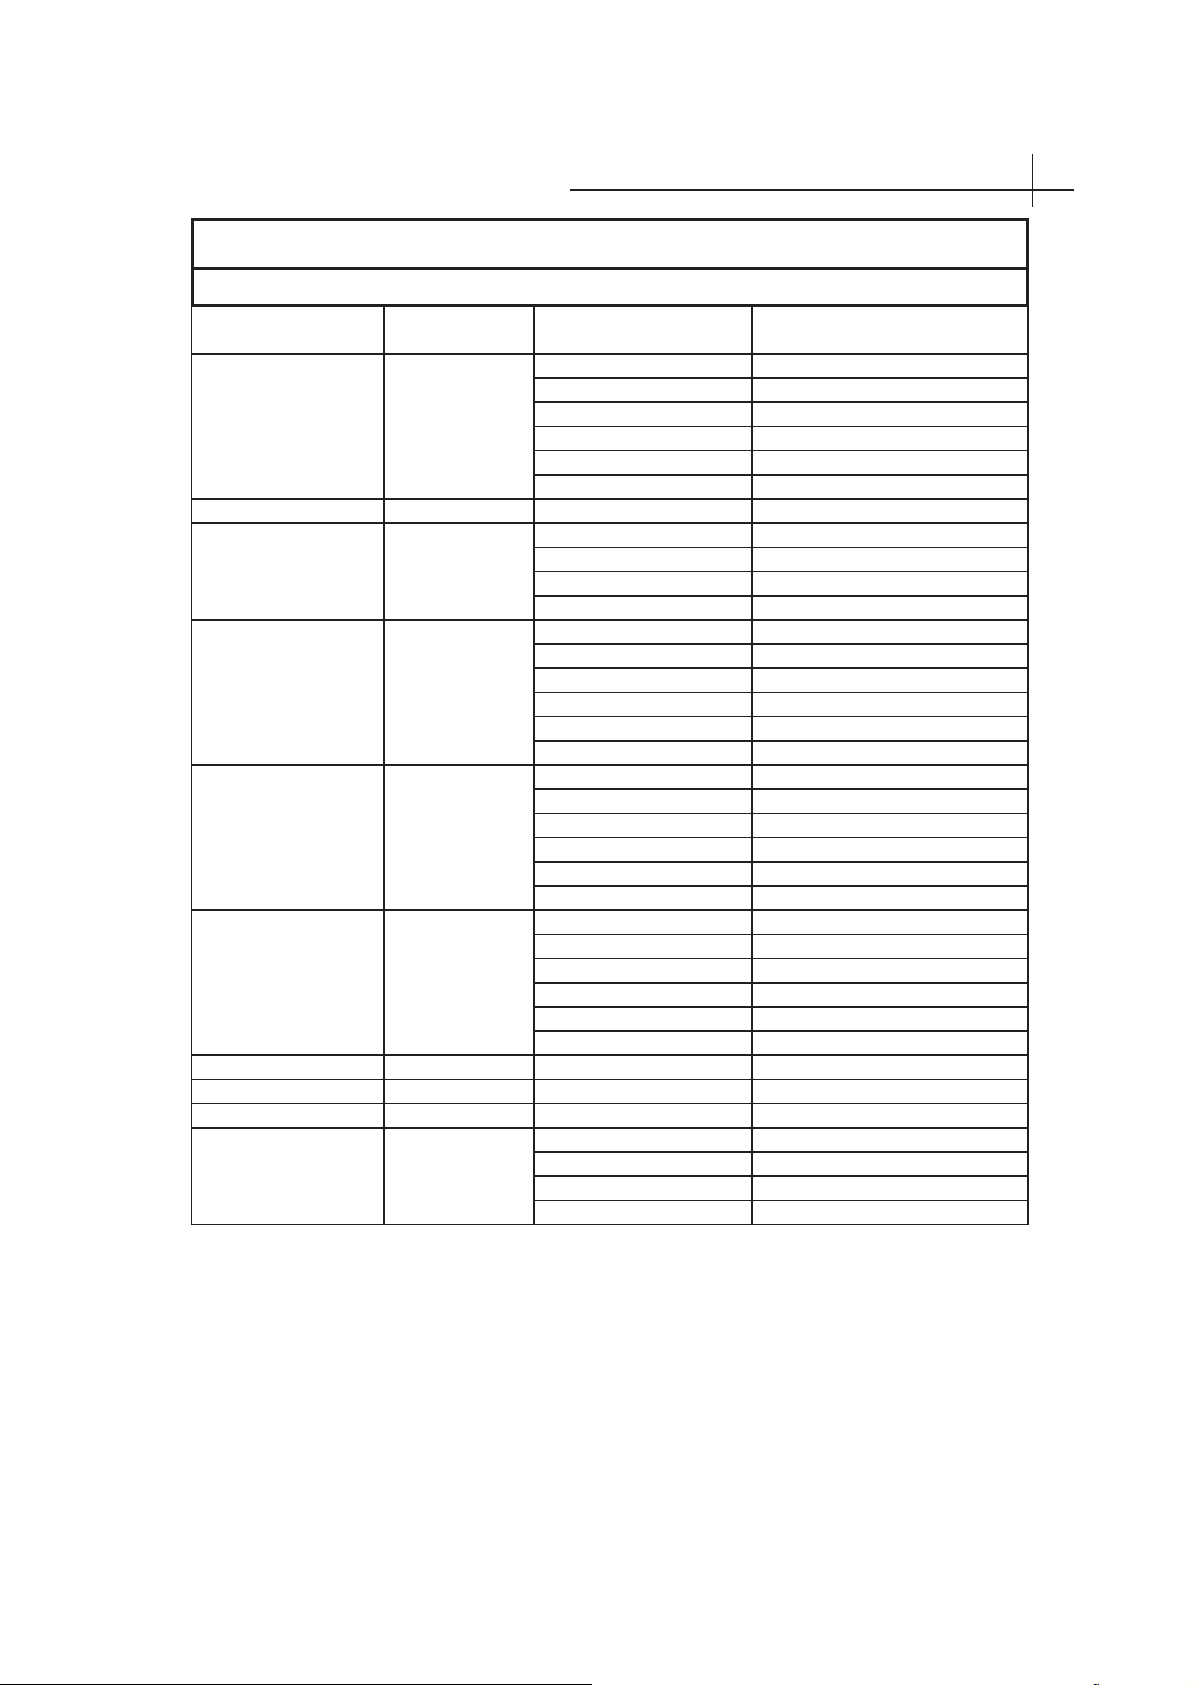
Audio Codec support list
O refer to support, X refer to NOT support
File Extension Container Audio Codec
* .avi AVI
AC3 X
* .wmv, * .asf ASF WMA X
* .mp4 *.mov MP4
* .mkv MKV
AC3 X
* .mpg,* .mpeg
*.ts,*.trp,*.tp,*.m2ts MPEG2-TS
*.rm,*.rmvb RM,RMVB COOK X
*.FLV FLV
MPG,MPEG
AC3 X
3PM
AC3 X
TSUMV59XU/XE-Z1
TSUMV59XUS/XES-Z1
Multimedia 13
OMCP
O3PM
OCAA
OCAA-EH
O2PM
O3PM
OCAA
OCAA-EH
O2PM
OMCP
O3PM
OCAA
OCAA-EH
O2PM
OMCP
O3PM
OCAA
OCAA-EH
O2PM
OMCP
O
OCAA
OCAA-EH
O2PM
O2PMGPMtad.*
O2PMSP-2GEPMbov.*
OMCP
O3PM
OCAA
OCAA-EH
Note:
if support for audio and video files with AC3 format, need to get AC3 copyright
if support for audio files with WAM format, need to get WAM copyright
if support for video files with DIVX format, need to get DIVX copyright
if support for RM/RMVB audio files , need to get RM copyright
if support for video files with VC1 format, need to get MPEG LA copyright
if support for audio files with AAC format, need to get AAC copyright
if support for video files with MPEG format, need to get MPEG LA copyright
* Subject to change due to Lloyd's continuous improvement policy.
28
Page 30
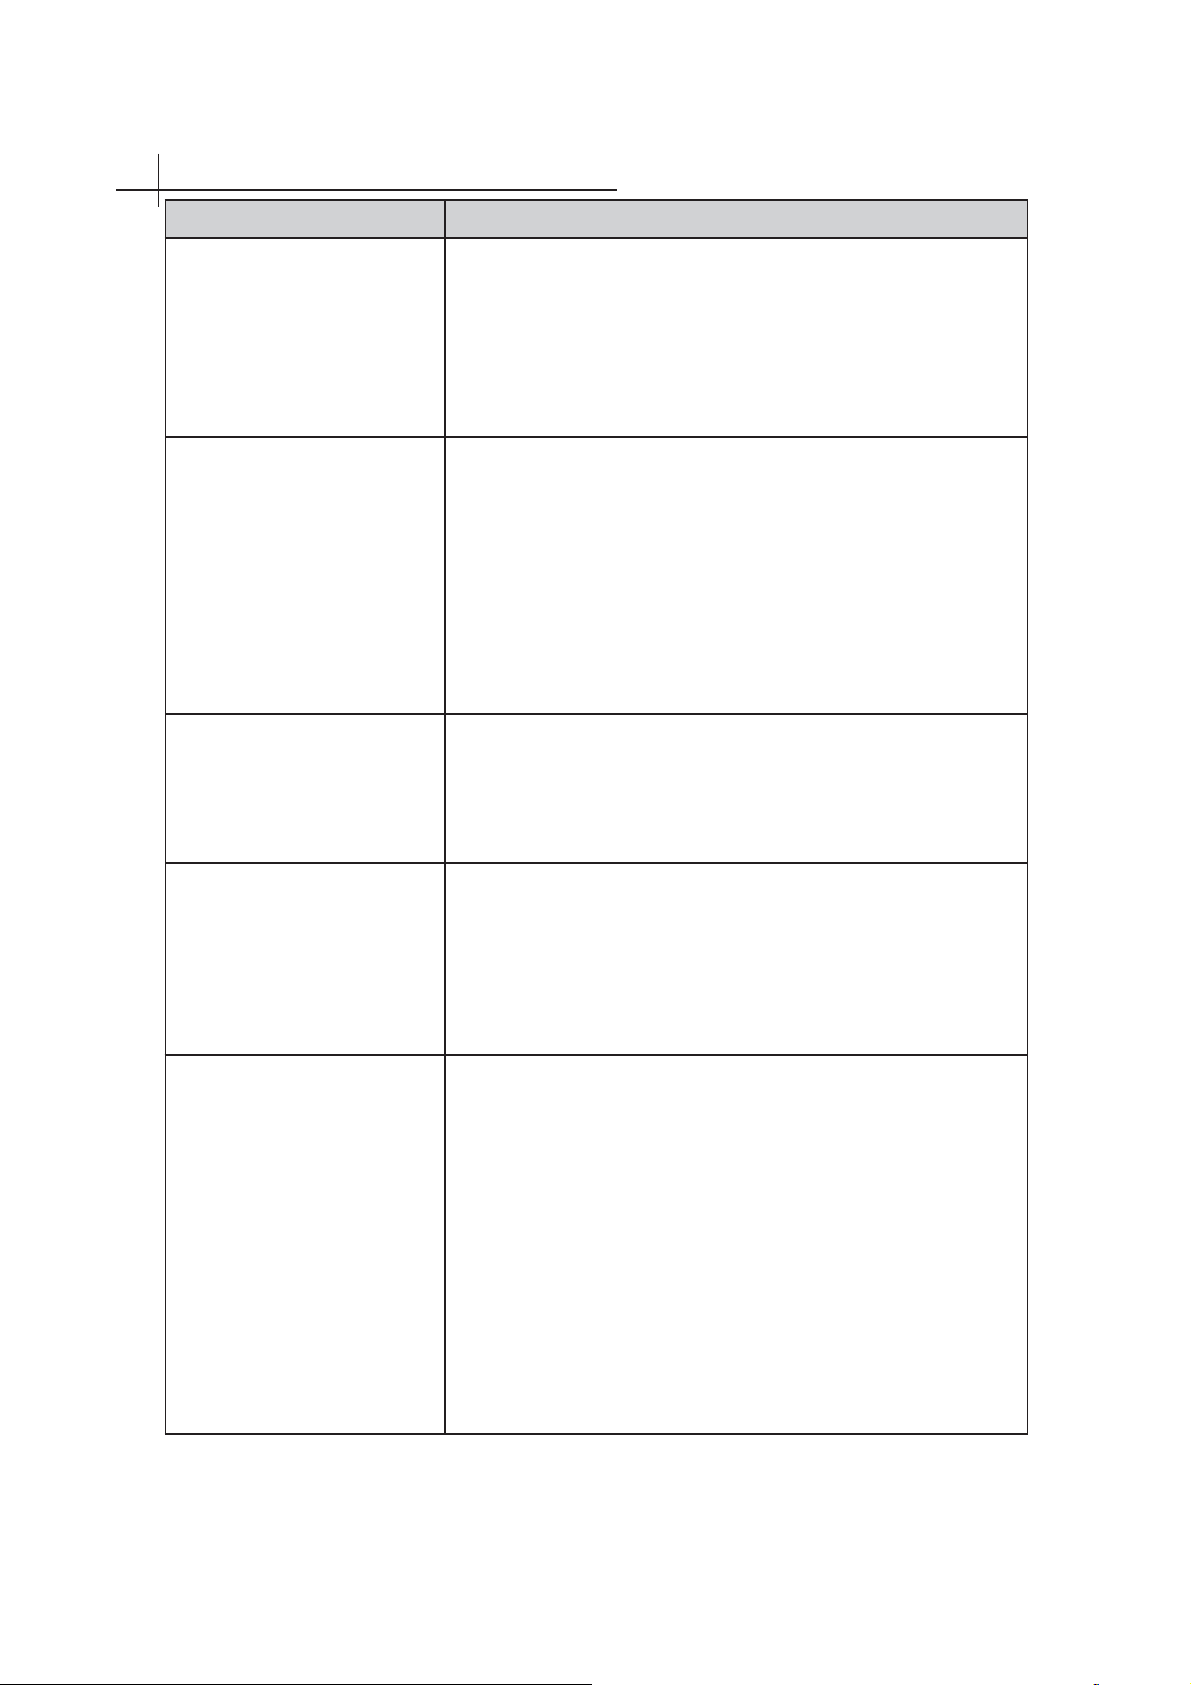
Troubleshooting
Problem Possible Solution
No power • Make sure the power cord is properly connected to the
LED TV AC power socket.
• Make sure the AC power cord is properly connected to the
wall outlet.
• Make sure the DC power button is ON (Blue LED).
• Plug another electrical device (like a radio) to the power
outlet to verify that the outlet is supplying the proper voltage.
No picture • The TV station may be experiencing problems. Try another
channel.
• The Cable TV signal may be scrambled or encoded. Please
contact your local cable operator.
• Make sure that connection to other components are correct
referring to the user guide.
• Make sure that setup has been done correctly after
connections.
• Make sure the correct input is selected and the input signal is
compatible.
14
Strange color, light color,
or color misalignment
No sound • Check your audio connections are properly connected
Remote control unit does not
operate
• Ensure that the video cable is securely connected.
• The picture may appear dim in a brightly lit room.
• Adjust brightness, contrast, saturation (color), and tint
referring to the user guide.
• Check the input signal setting.
referring to the user guide.
• The MUTE button may have been pressed, try pressing this
button again.
• Check your audio settings, your TV audio may be set to
minimum.
• Press the Volume + (Up) button on the remote control.
• Make sure the directions of batteries are inserted correctly
referring to the user guide.
• Batteries could be weak or dead. Replace with new batteries.
• Is a fl uorescent light illuminated near the remote control
sensor?
• The path of the remote control beam may be blocked. Make
sure the path is clear and that the remote control is aimed at
the remote control sensor on the TV.
• Press the POWER button on the remote control to see if you
can turn on the TV.
• Press MENU button on the remote control to see if there is a
MENU shown on the screen.
• Press only one button at a time and it is the correct one for
the operation you want to perform.
29
Page 31
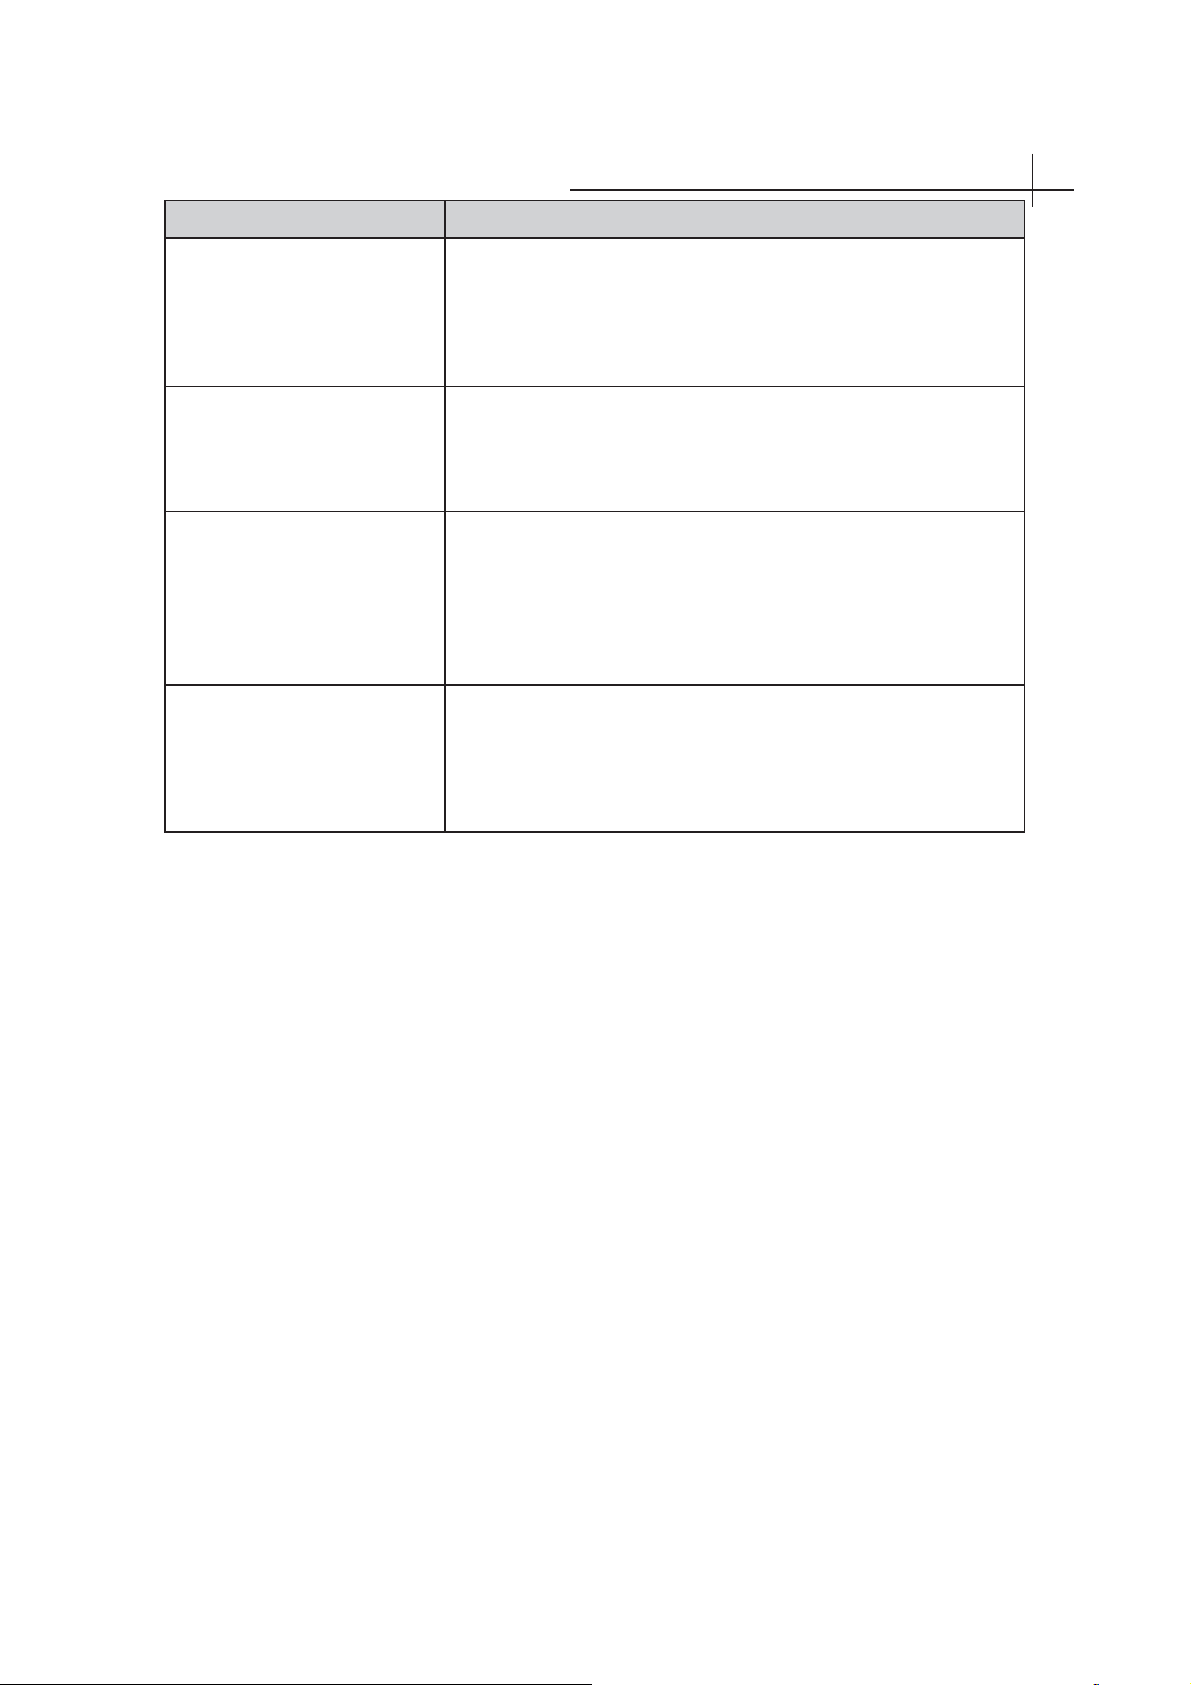
14
Troubleshooting
Problem Possible Solution
Unit cannot be operated • External infl uences such as lightning or static electricity may
cause improper operation. In this case, operate the unit after
fi rst turning on the power of the LED TV and the AVC
System, or unplug the AC cord for 1 to 2 minutes, then
replug again.
Power is cut off suddenly • Is the sleep timer set in advance?
• Is there no signal in PC mode or HDMI mode?
• The internal temperature of the unit has increased. Remove
any objects blocking the vent or clean as necessary.
No CATV reception (or no
reception above CH13)
Picture is cut off/with sidebar
screen
• Is the AIR/CABLE option set correctly? Please set the AIR/
CABLE option to CABLE referring to the user guide.
• CATV is connected improperly or not connected; please
check all the CATV connections.
• The cable TV service is interrupted; please contact your
cable operator.
• Is the image positioned correctly?
• Are screen mode adjustments such as picture size set
correctly?
• Press WIDE button repeatedly on the remote control to see if
you can get the picture you prefer.
30
Page 32
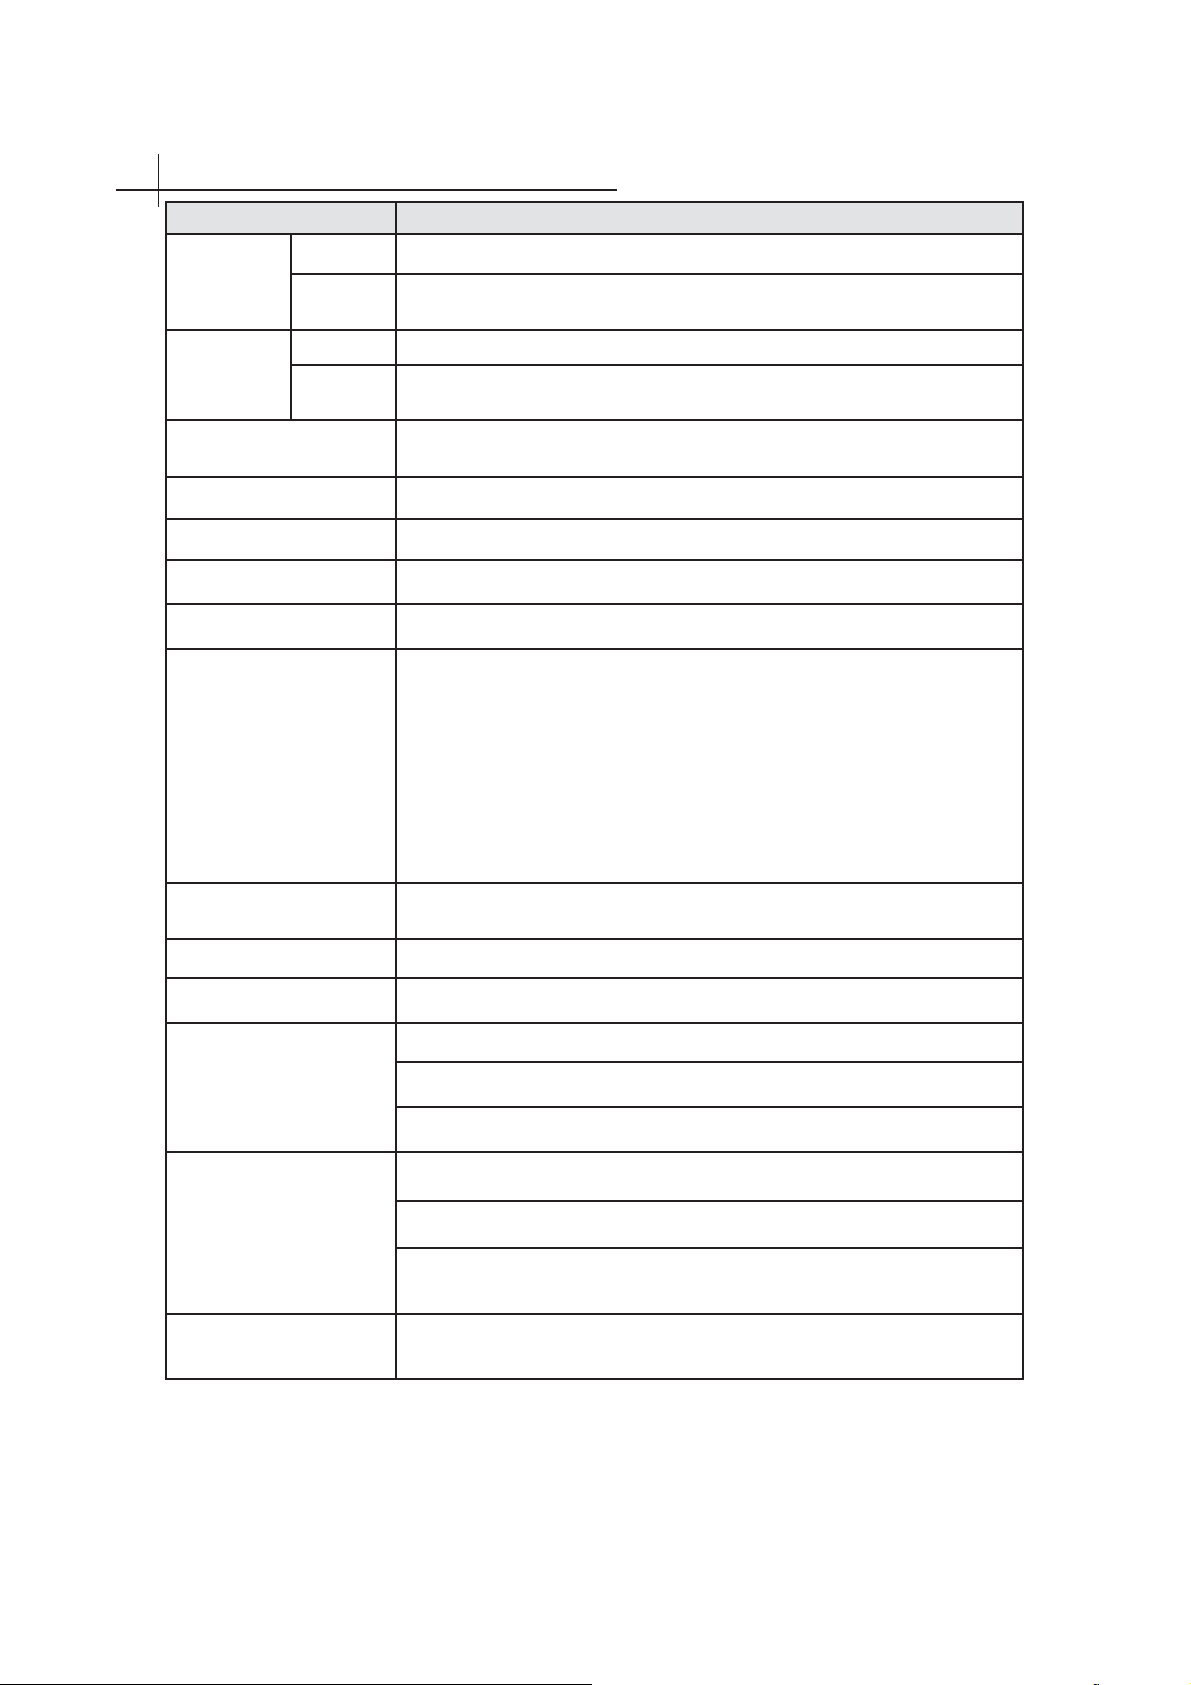
Spcifi cation
15
Model
with stand
Weight
without
stand
with stand
Dimensions
(W × H × D)
without
stand
LED panel size (LED
Backlight)
Aspect ratio
Native resolution
Brightness (typical)
Built-in speakers
Signal input
L24FBC
3.08Kg
3.05Kg
558.3 × 362.9 × 147.2 mm
558.3 × 336.6× 70.0 mm
60.5 cm (23.8")
16:9
1920 × 1080
250 nits
5W × 2
• EARPHONE× 1
• USB × 1
• HDMI × 1
• VGA × 1
• Y PBPR × 1
• PC AUDIO × 1
• RF × 1
• AV IN (CVBS/L/R)× 1
Signal output
Power supply
Power consumption
Operating temperature
Storage temperature
Video systems
* Subject to change due to Lloyd's continuous improvement policy.
• MINI AV OUT
100-240V~, 50/60Hz
35W (Max.)
Temperature: 0°C ~ 40°C (at sea level)
Humidity: 20% ~80% non-condensing
Altitude: 0 meter to 2,000 meters above sea level
Temperature: -20°C ~ +60°C (at sea level)
Humidity: 10% ~90% non-condensing
Altitude: 0 meter to 3,790.3 meters above sea level
PAL,SECAM
31
 Loading...