

Page 1
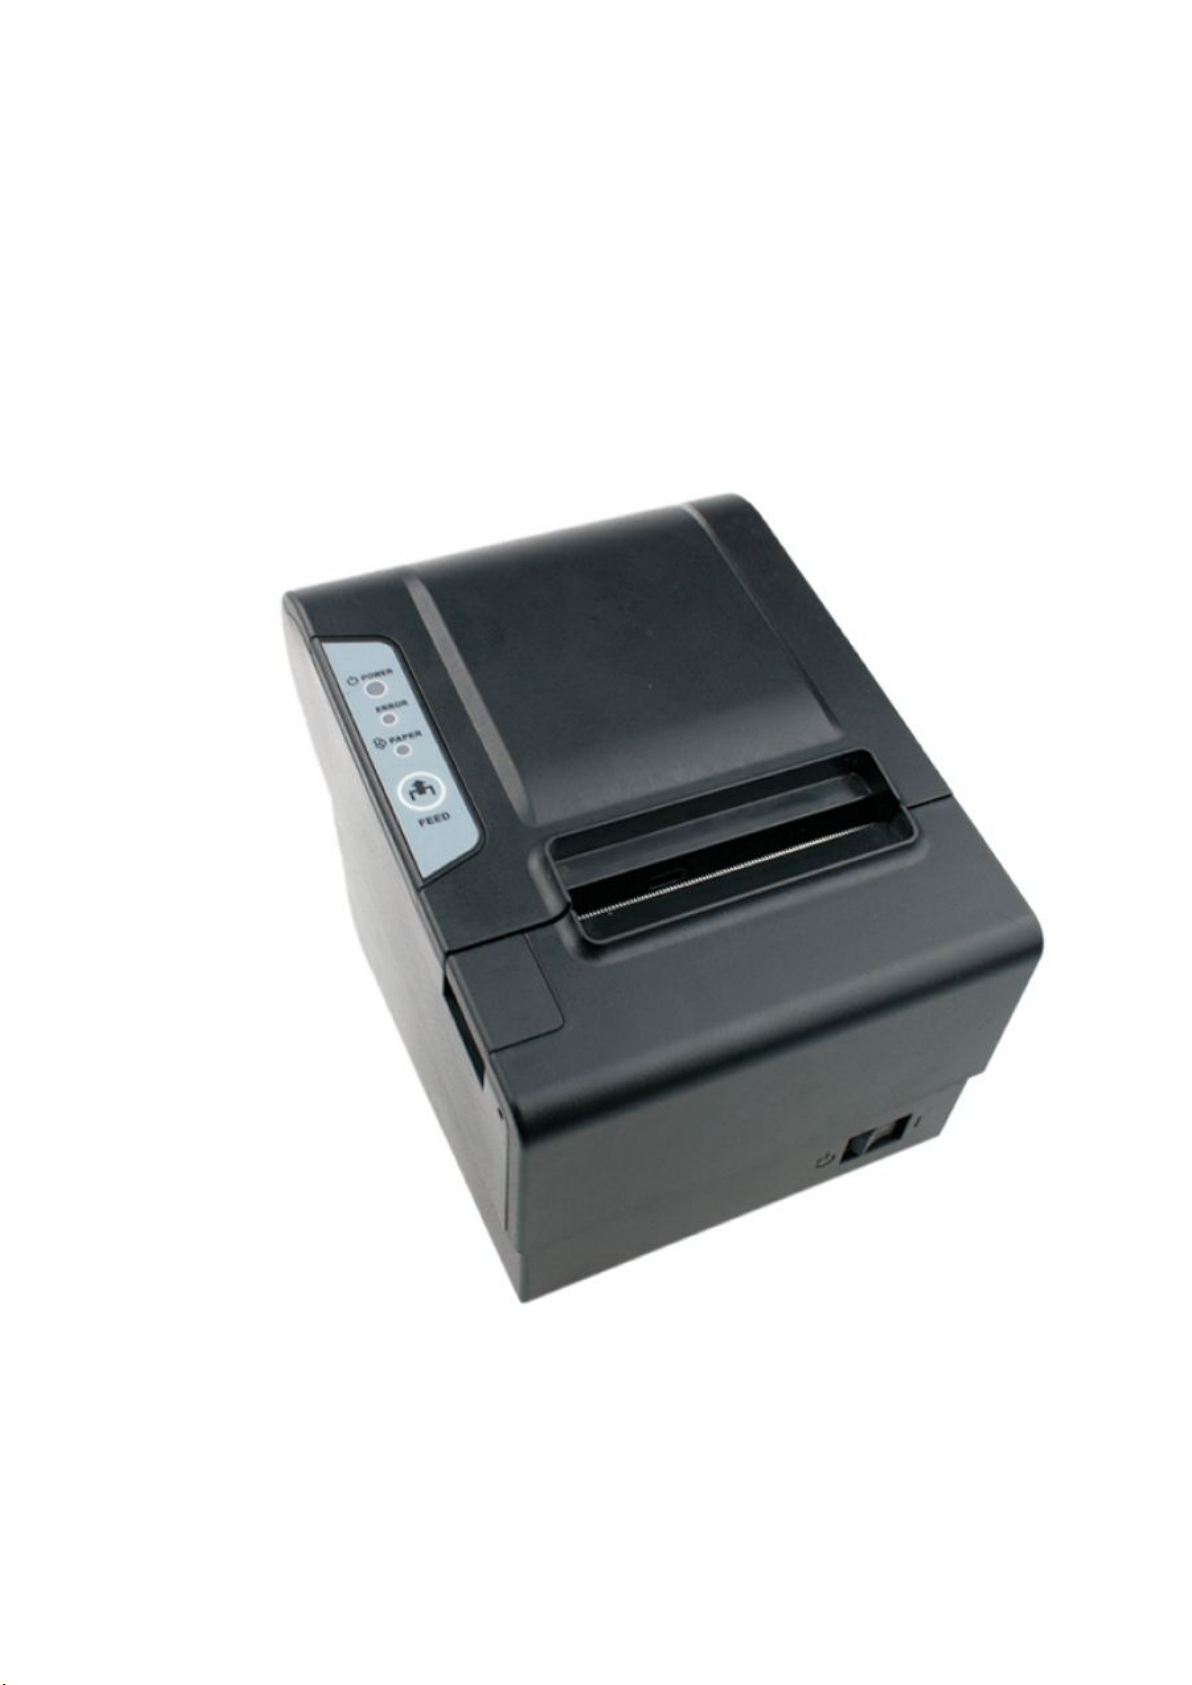
User
Manual
1
Page 2

Contents
Contents...............................................................................................................................................2
Preface............................................................................................................................................... 3
1.The printer introduction................................................................................................................ 4
1.1 Open box.............................................................................................................................4
1.2 All parts of the printer name.............................................................................................4
2.Technical parameters................................................................................................................... 5
3.Basic operation and use............................................................................................................6
3.1 Open the paper roll cabinet’s cover................................................................................6
3.2 Load paper roll................................................................................................................... 7
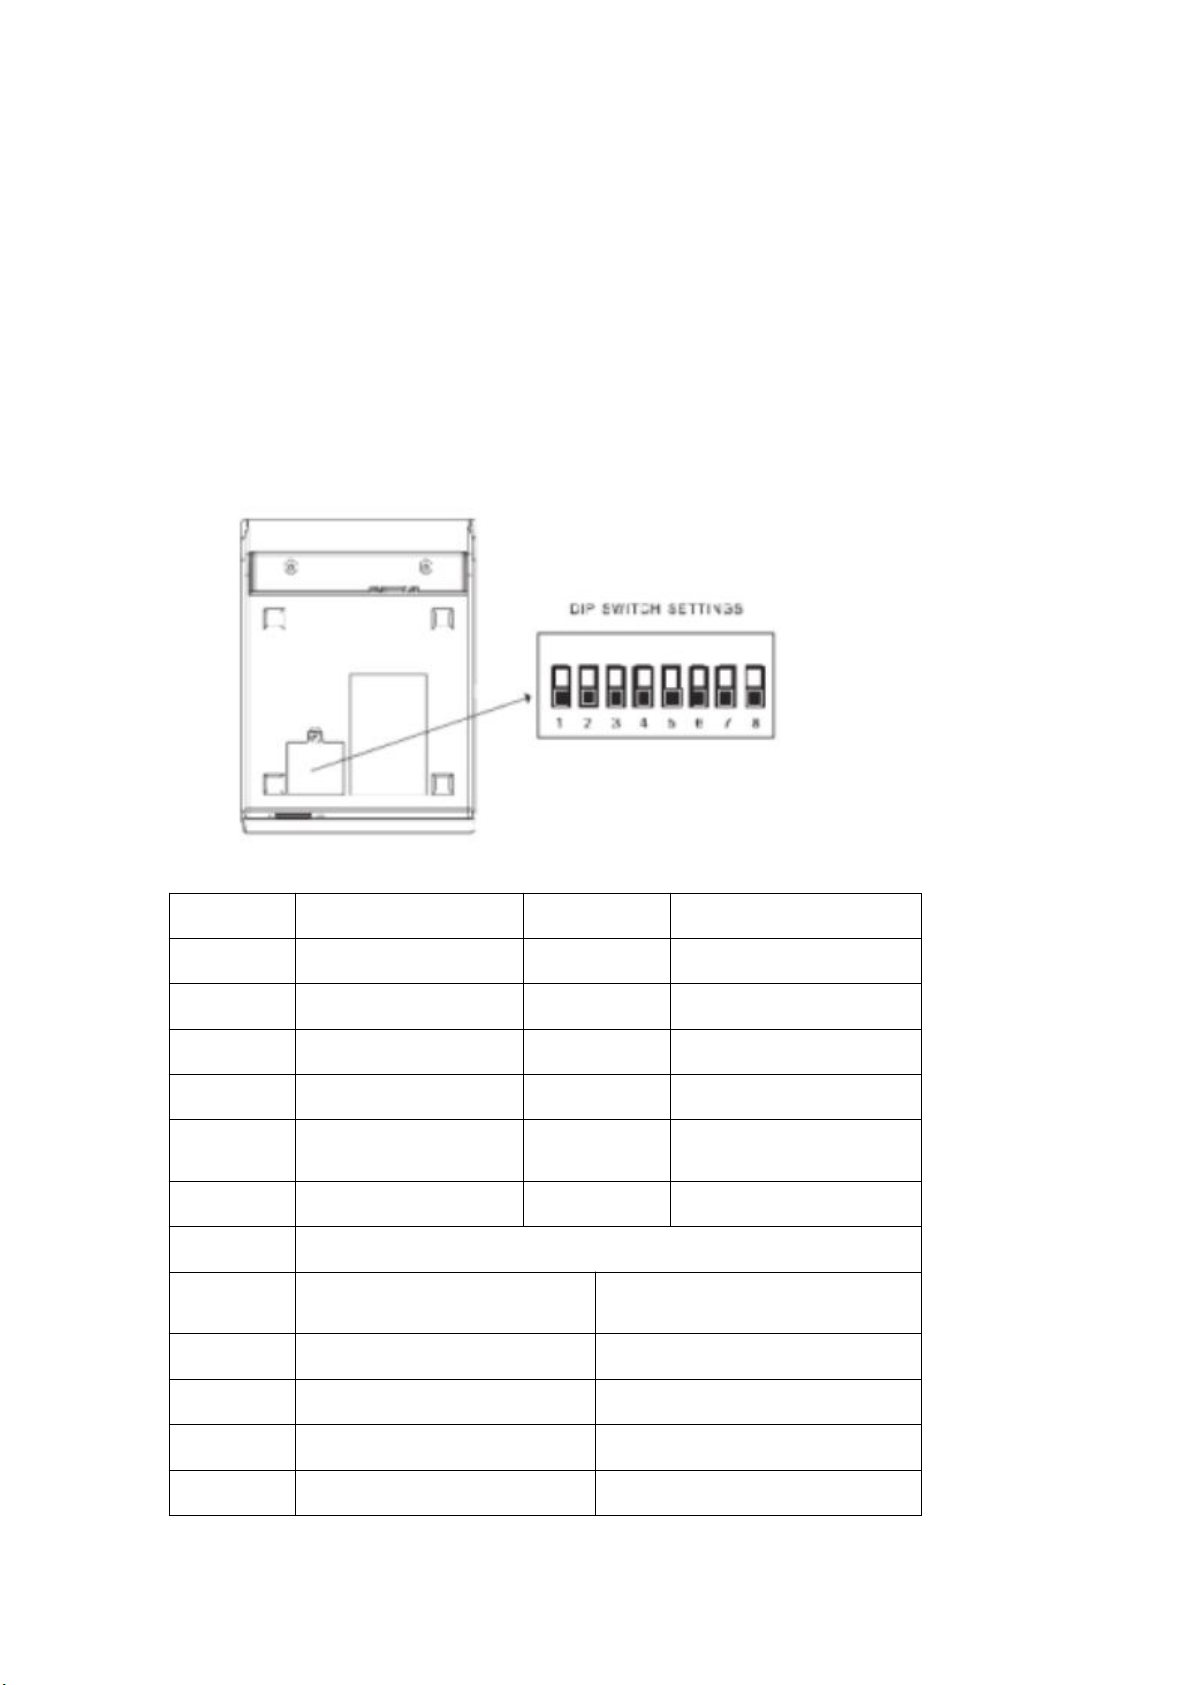
3.3 Set the print mode(DIP Switch)..................................................................................8
3.4 Control panel...................................................................................................................... 9
3.5 Run self-test program........................................................................................................9
3.6 Connect printer...................................................................................................................9
①RS232C..........................................................................................................................9
②USB port.......................................................................................................................10
③Ethernet port................................................................................................................10
4.Printer failure analysis................................................................................................................ 10
4.1 Exclude paper jammed................................................................................................... 10
4.2 Clean printer..................................................................................................................... 11
2
Page 3

Preface
Thank you very much for your choose and buy our thermal receipt printers,
before using the printer,please read this instruction manual and related data, in
order to correctly use and better play to the performance characteristics of the
machine
Note
1.Printer should be installed in a stable place, avoid the printer in the
vibration and shock.
2.Do not use and store printer in high temperature,high humidity and
serious pollution.
3.Connect the power adapter for the printer to a properly grounded outlet,
to avoid large motor or other devices that can lead to the power supply voltage
fluctuation using the same socket.
4.To avoid water or conductive materials (metal, for example) into the
printer, once occurred, should immediately shut off the power
5.If do not use the printer for a long time, please disconnect the power of
the printer power adapter.
6.Users shall not remove the printer for repair or reconstruction.
7.The power adapter using only randomly designed with power adapter.
8.In order to ensure the quality of the printer and the life of the product, it is
recommended to use high quality printing paper.
Application
Electronic cash register POS thermal receipt printing
※
Electronic transfer(EFT)POS system receipt printing
※
Sports, post, civil aviation receipt printing
※
Inquiry service system receipt printing
※
Measuring instrument and meter data printing
※
Tax bill,bill printing
※
。
3
Page 4
1.The printer introduction
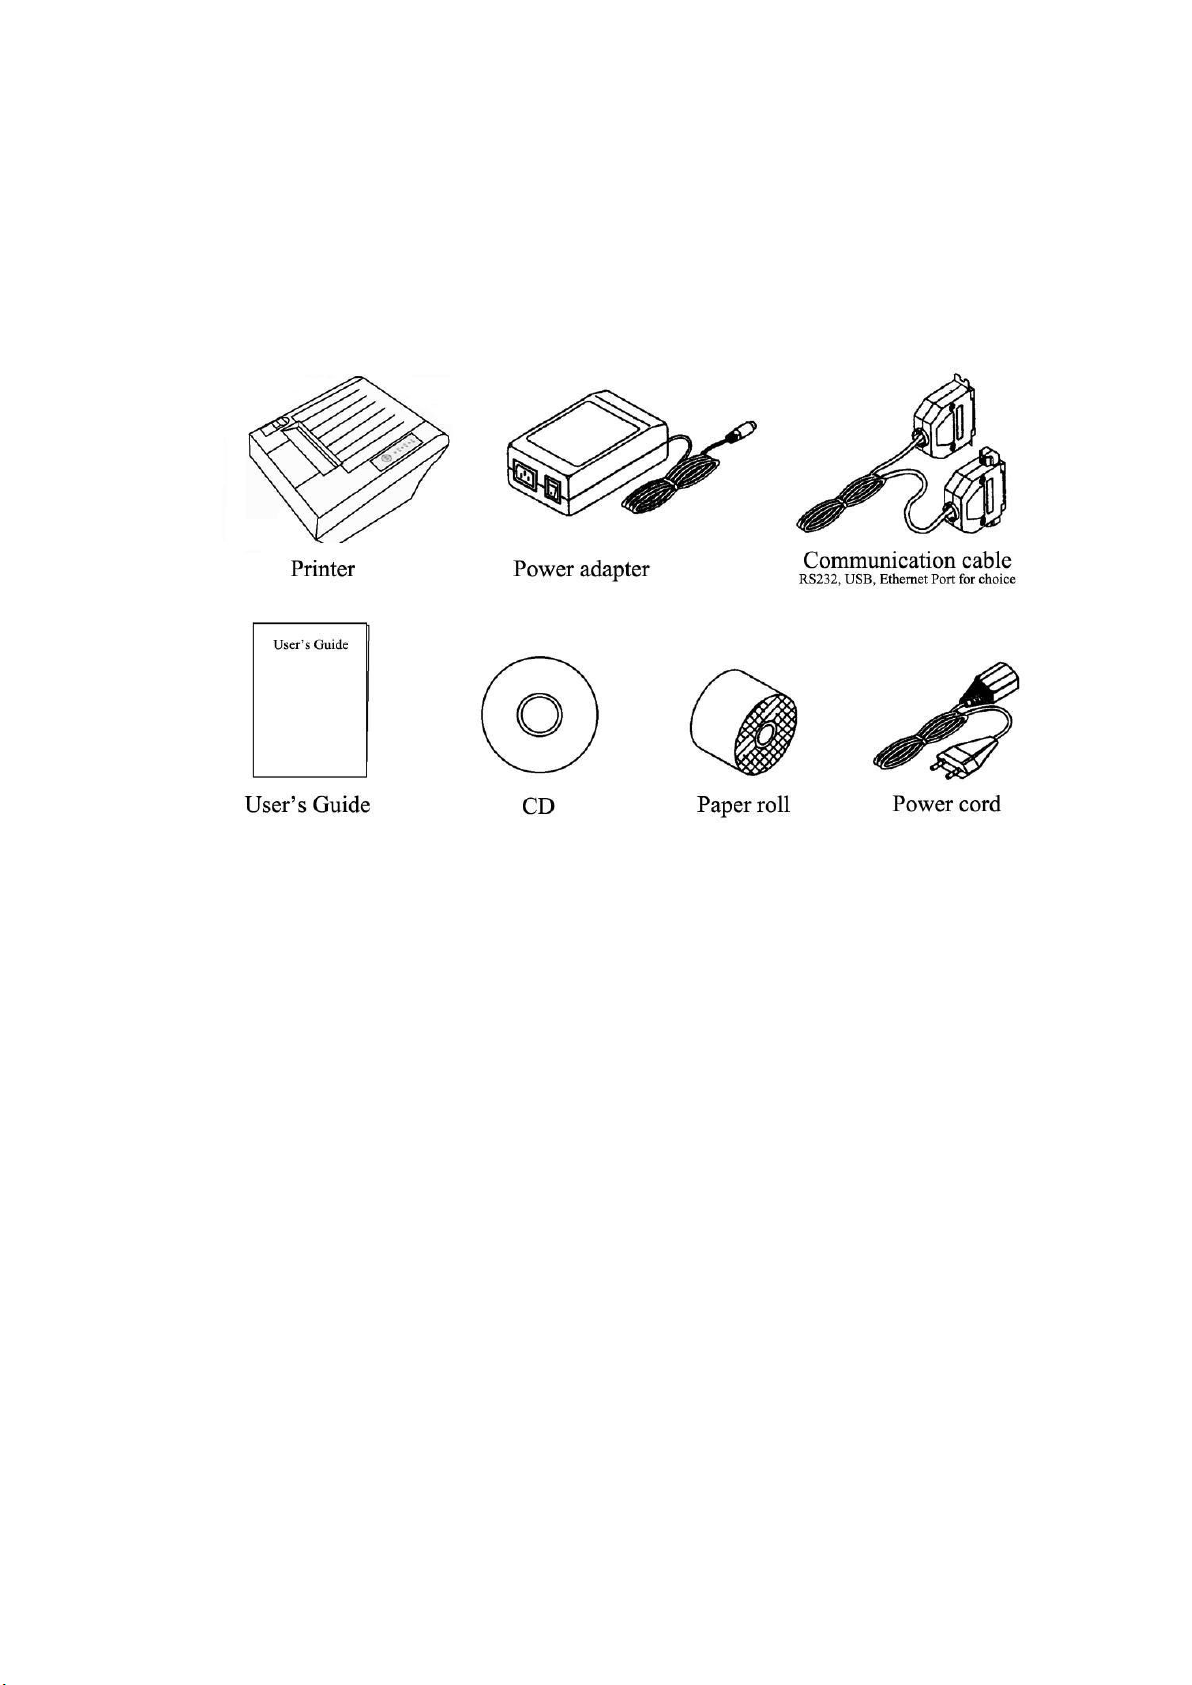
1.1 Open box
After opening the package, please immediately confirm whether the
following parts is complete, and there is no damage in transit.
If you have questions,please do not hesitate to contact supplier.
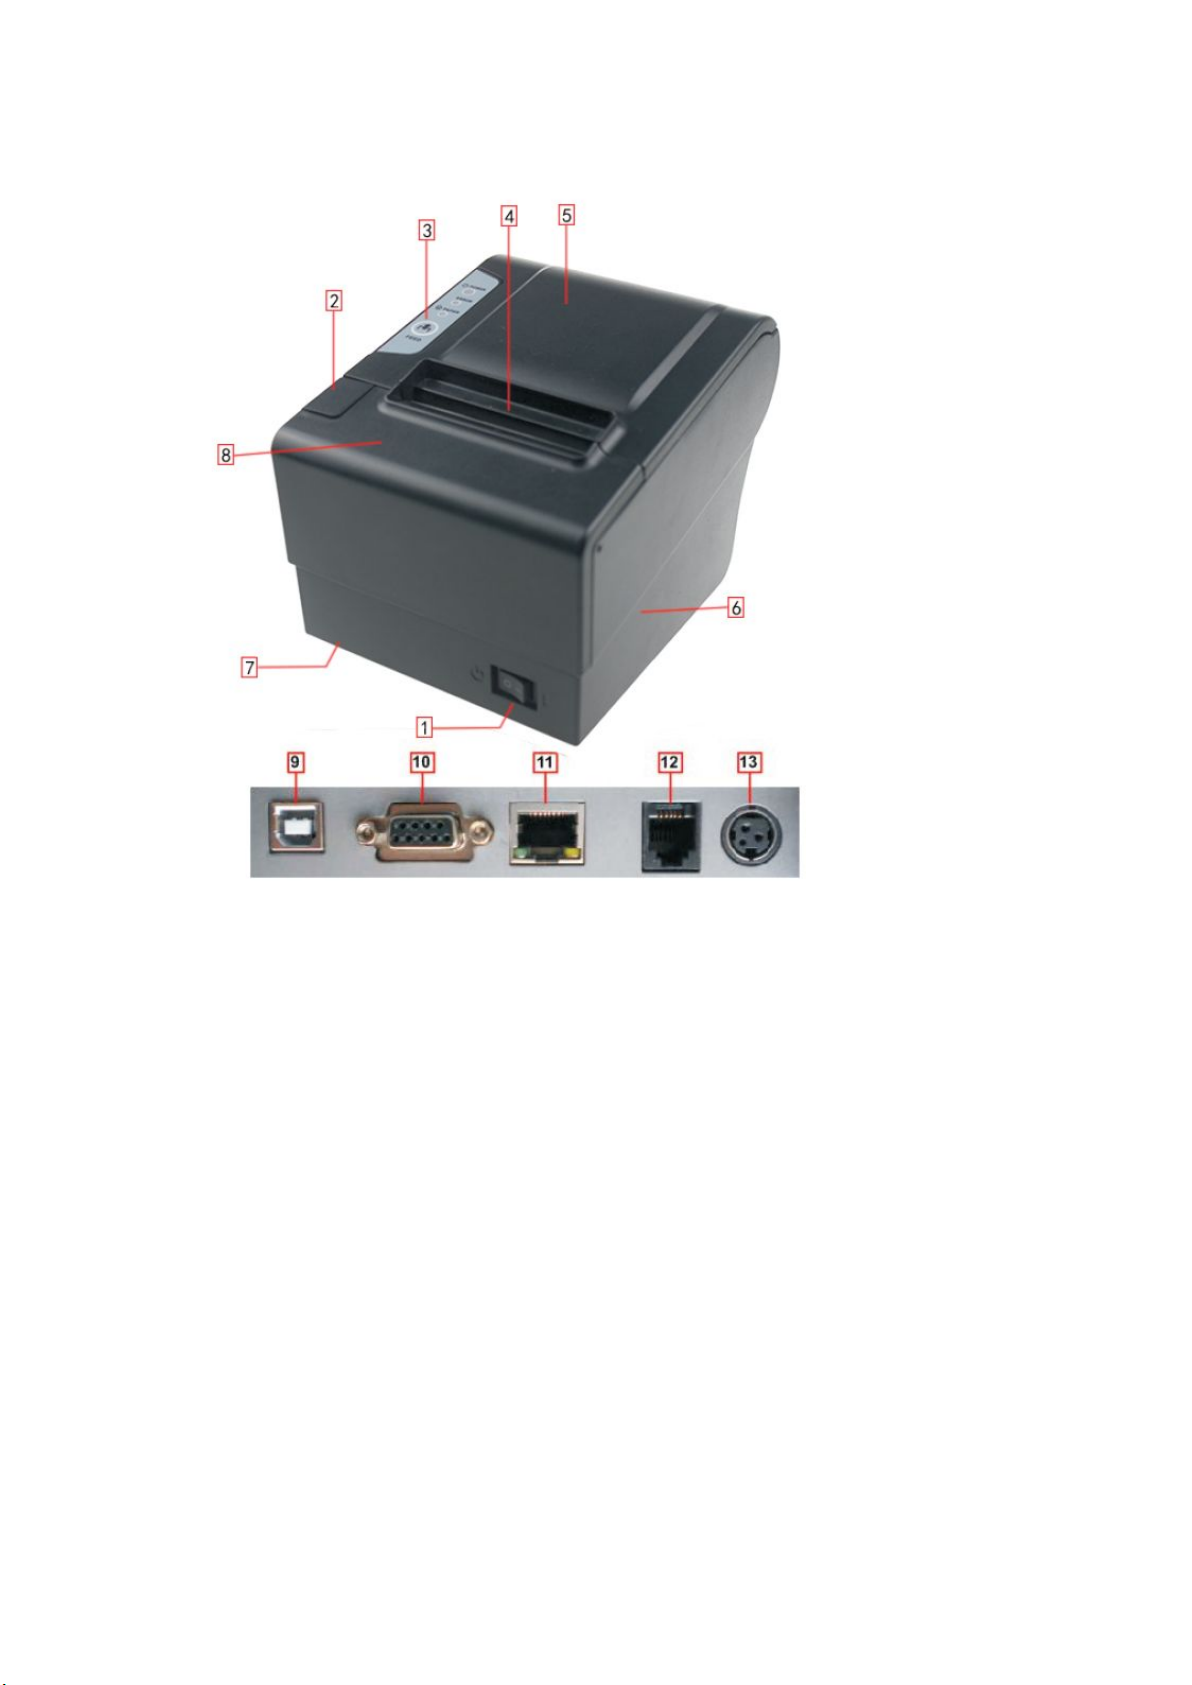
1.2 All parts of the printer name
Power switch
⑴
Control panel
⑶
Paper roll cabinet’s cover
⑸
Cover of function switch
⑺
USB port
⑼
Ethernet port(RJ45
⑾
DC Power-In(DIN-3P
⒀
) ⑿
)
Open handle
⑵
Paper outlet
⑷
Lower case
⑹
Cover of cutter adjustment
⑻
Serial port(DB9
⑽
Cash drawer interface(RJ11
)
)
4
Page 5
2.Technical parameters
5
Page 6

3.Basic operation and use
Print method
Thermal printer
Paper width
80±0.5mm
Printing Width
72mm
Print Density
8 dots/ mm,576 dots/line
Max Print
speed
250mm/ sec
Reliability
Prpint head lif:about 50km
Cutter life:About 300000 times
MCBF:1.5X10⁶ line
Character size
(ANK Character):12×24 dots,1.5(width)×3.00(height)mm
(Jan/traditional form): 24×24 dots,3.00(height)
×3.00(high)mm
Print
Command
Support ANK character, self-defined Chinese
characters
and support Chinese characters’ times width,
times of
high print, character line spacing is adjustable,
Dot print
command
print full character and tab
character
Thermal paper
roll
Widt h: 80±0.5mm
Maximum diameter: Ф80mm
Paper thick 53-60g / m
Power
supply
DC 24V/2.5A
Cashbox
control
24V/1A,support 12V and 24V Cashbox
Interface
RS232C+USB+LAN
Work
environment
requirements
Temperature 5℃—40℃;:Relative humidity:10%—80%
Store
environmental
requirements
Temperature-20℃—60℃;Relative humidity:10%—90%
3.1 Open the paper roll cabinet’s cover
Printer need to change printer paper,must open the printer cover.Opens,
please press with finger printer on the left side of the open button, hold down
pressure, printer paper cover up up, and then use hand the paper cover above
the back flip.(See figure 1
)
6
Page 7
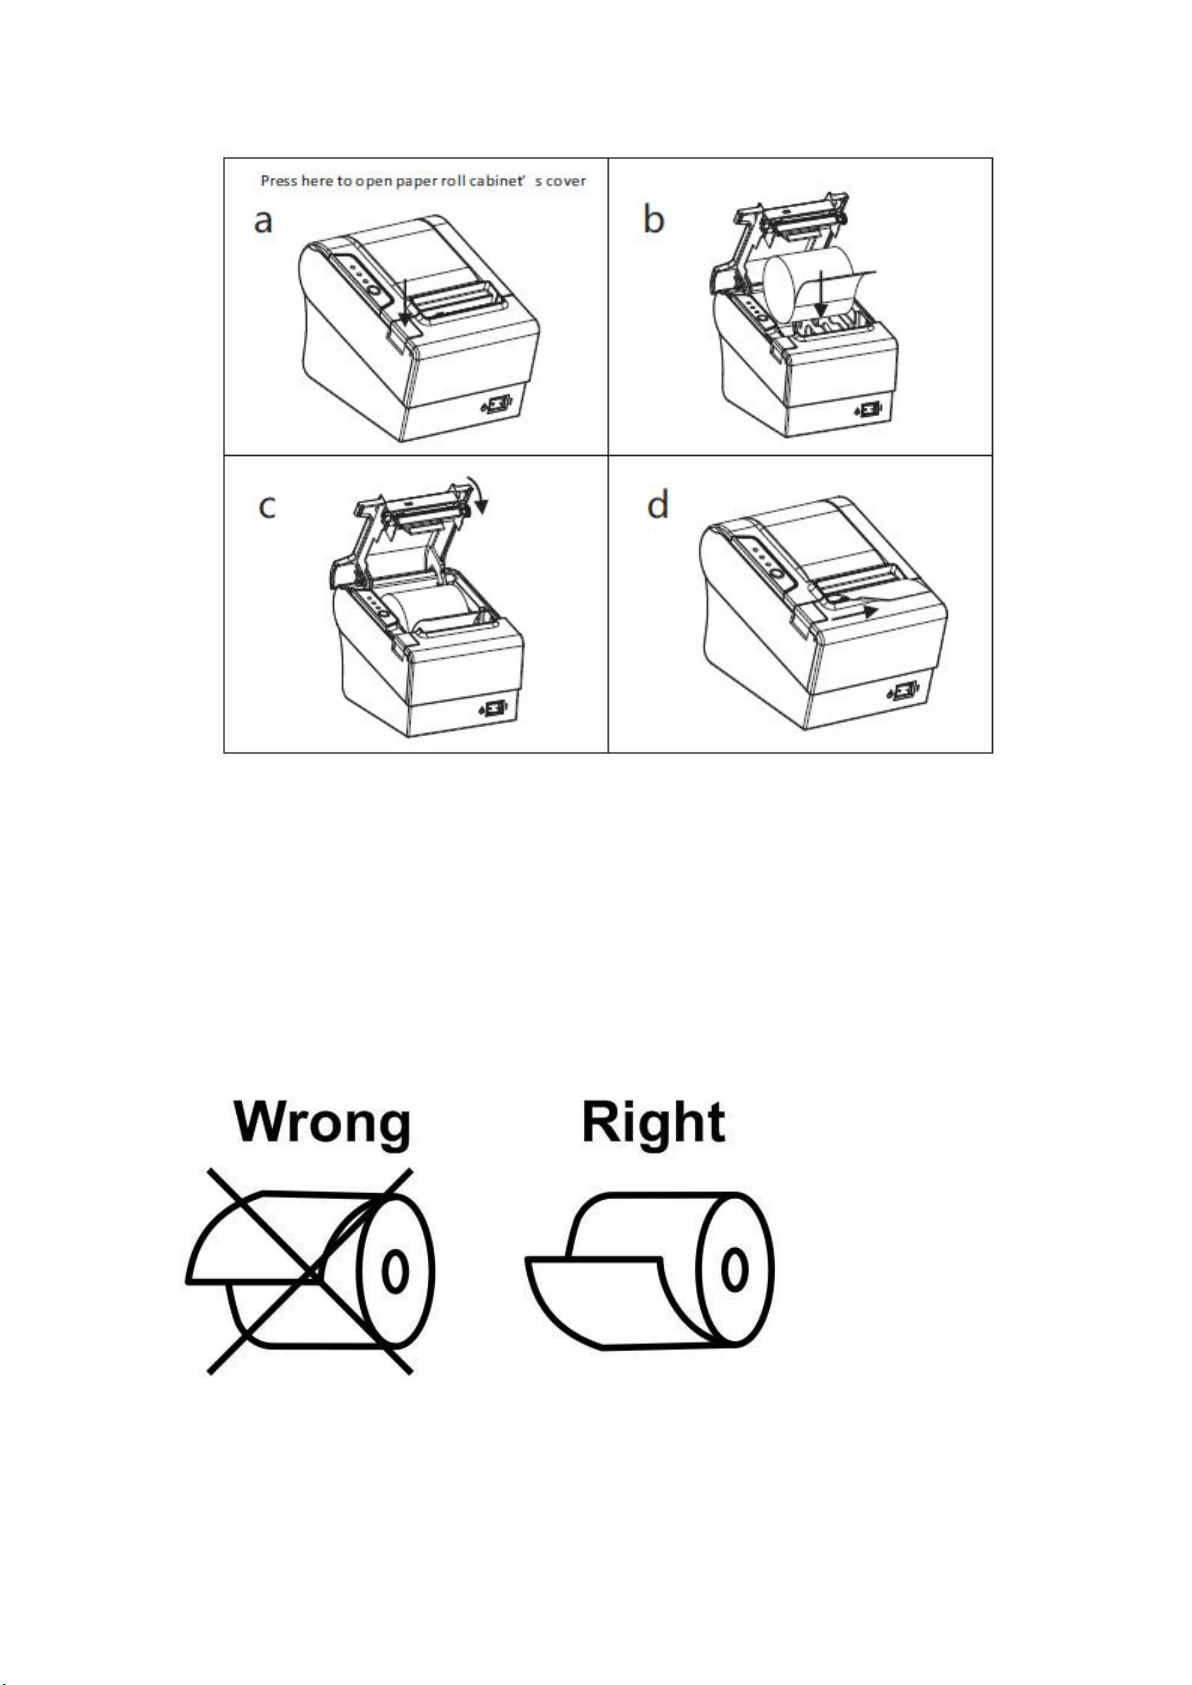
Figure 1
3.2 Load paper roll
Please select the right specification paper roll before installation.
1. Power off the printer.
2. Open the cover of paper roll cabinet.
3. Remove the core bar of running out thermal paper.
4. Load a new paper roll as following picture.
5. Close the cover of paper roll cabinet gently.
Caution: Pay attention to the paper roll’s direction. Close paper roll
cabinet’s
cover gently.
Notice:
7
Page 8
Make sure using thermal rolls that meet specificat ions and with standard
switch
function
On
Off
1
Cutter
Disable
Enable
2
Beep alarm
Disable
Enable
3
Printing gray
Deep
Normal
4
None
None
None
5
Print number of
characters in a row
64
48
6
None
None
None
7-8
Baud rate of serial port (bps)
SW7
SW8
Baud rate of serial port (bps)
bit/second
ONON9600
ON
OFF
19200
OFF
ON
38400
OFF
OFF
115200
quality;
When take thermal paper out of printer, you must make sure that paper
stay in
the center of thermal printer mechanism and paper exit, or may affect the
normal work of the printer;
Remember, when close the printer's top cover, be sure to cover in place.
3.3 Set the print mode(DIP Switch
Through the DIP switch Settings can change the cutter, language, speed of
printer, buzzer and the concentration of print mode Settings.
)
8
Page 9
Note:Language and baud rate can be set by the printer
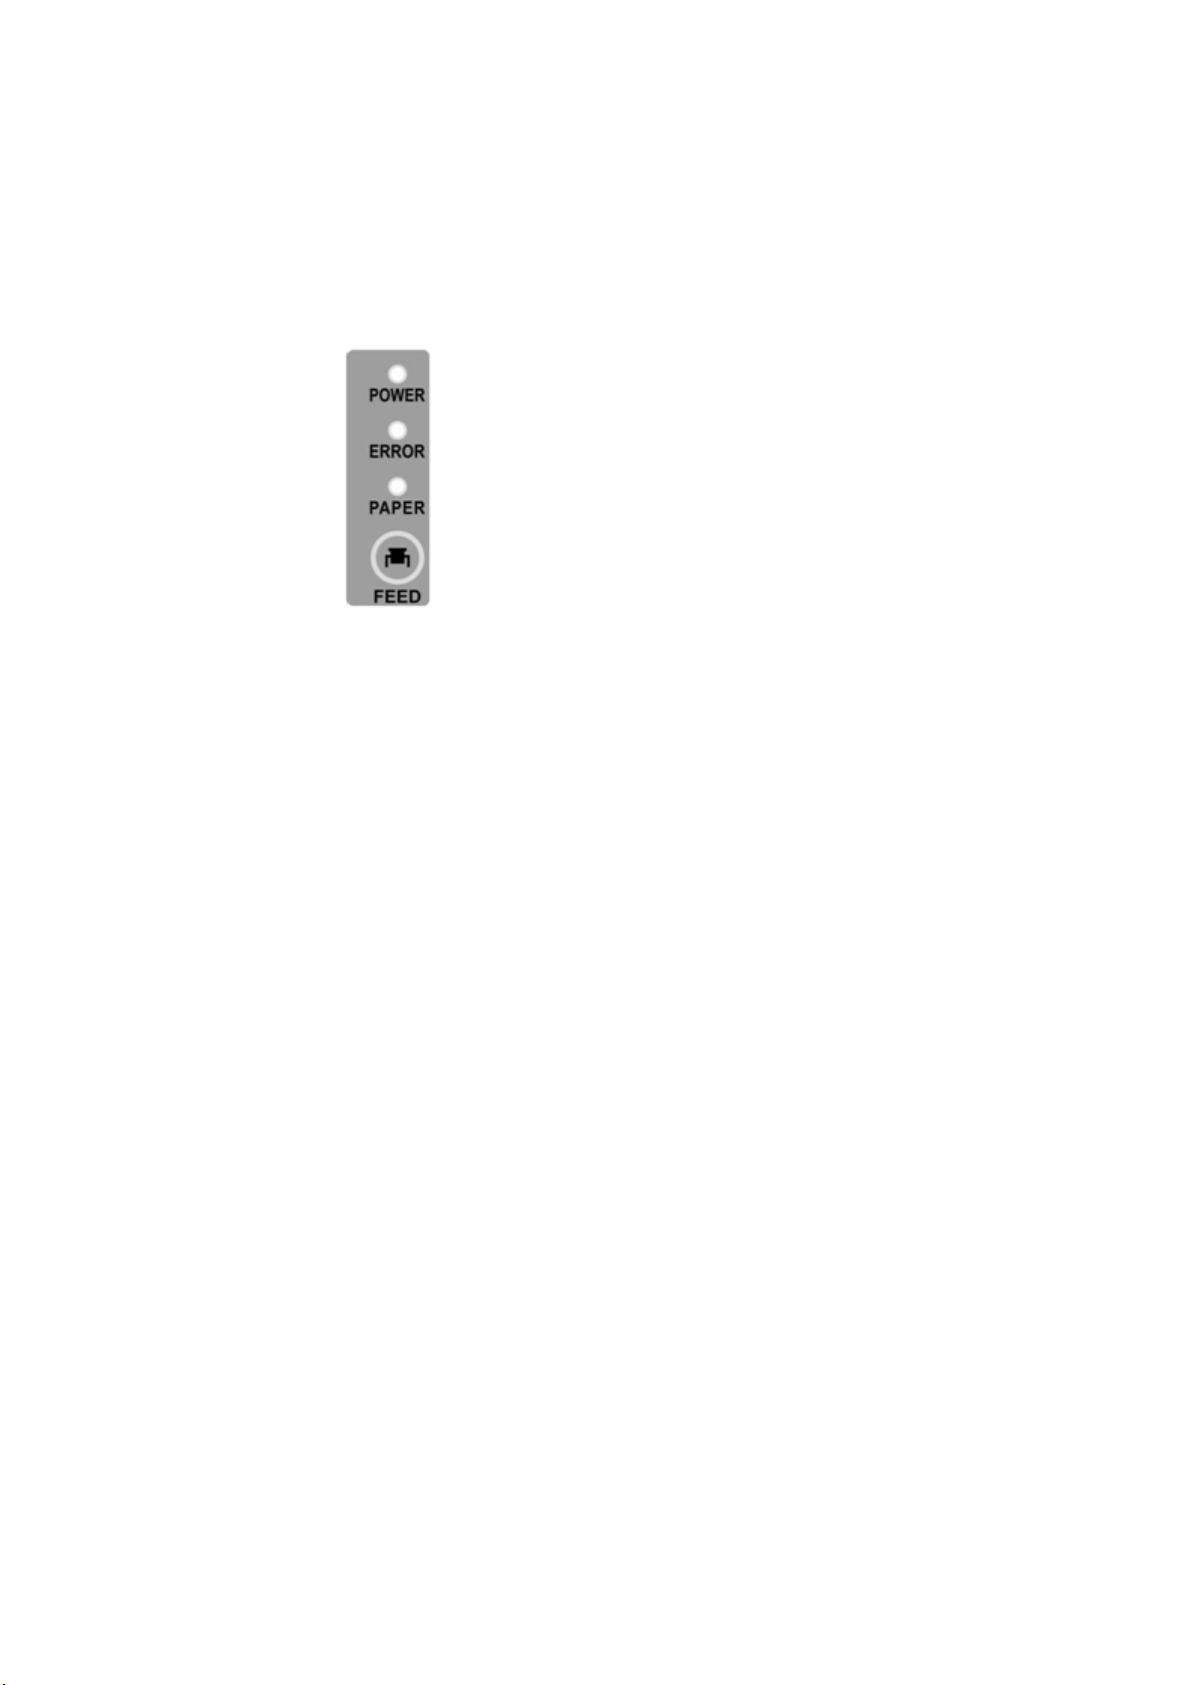
3.4 Control panel
There are one button and three indicators on control panel.
Figure 3
Feed
⑴【
Click this button to send paper, if continue this button is connected to send
paper.
Lack paper】light(Paper
⑵【
The light and the Error light bright at the same time shows printer paper
out.The Error lights out said printer have paper.
Power】light(Power
⑶【
The light said the printer power on, the lights went out said printer power shut
down
Error
⑷【
Happens when the printer paper, errors of the blade and the print head
overheat mistakes such as the lights flashing.
】(
】(
Feed
Error
)
)
)
)
3.5 Run self-test program
1) Make sure the printer is power off, and installed printing paper as described;
2) Press “FEED” button on the printer control panel, and then turn on power
switch, wait 1-2 seconds, release “FEED” button, the printer began to self-test
and print report;
3.6 Connect printer
POS80V interface:RS232C+USB Port+Ethernet interface
RS232C
①
Mode of data transmission:Serial
Synchronization method:asynchronous
Handshaking:DTR/DSR or XON/XOFF Control
Bit rate:9600、38400、57600、115200bps (Default)Optional
Word Length:8 bit
9
。
Page 10

Odd-even check:None
Stop bit:1 bit
USB port
②
USB port as printer directly
Ethernet port
③
When using the Ethernet interface,please use the setting tool in the CD
to set printer IP address which is the same as address of PC to the same
network segment (The IP address of the factory default for: 192.168.1.87) and
document set software CD)
4.Printer failure analysis
4.1 Exclude paper jammed
Printer in use process, if encounter a paper jam phenomenon occurs,
please stop printing work and close the printer power switch.
Paper jam phenomenon found occurs, usually caused by the printer paper
cover can't open normally, at this time, please do not forced open paper cover,
lest cause damage of the printer。.
Paper jam elimination method is as follows
1. Close the printer power switch and pull out all the cables connected to
the printer
2. As shown in figure 4 level pull forward the paper cutting knife cover
3. Paper cutting knife adjustment wheels with finger, paper cutting head
back into the paper cutting knife
4. Vertical downward pressure "paper cover open button” to open the paper
cover to remove cardboard
5. If the printer to print and print paper is normal, and then reinstall the
cover paper cutting knife
;
;
;
。
:
;
10
Page 11
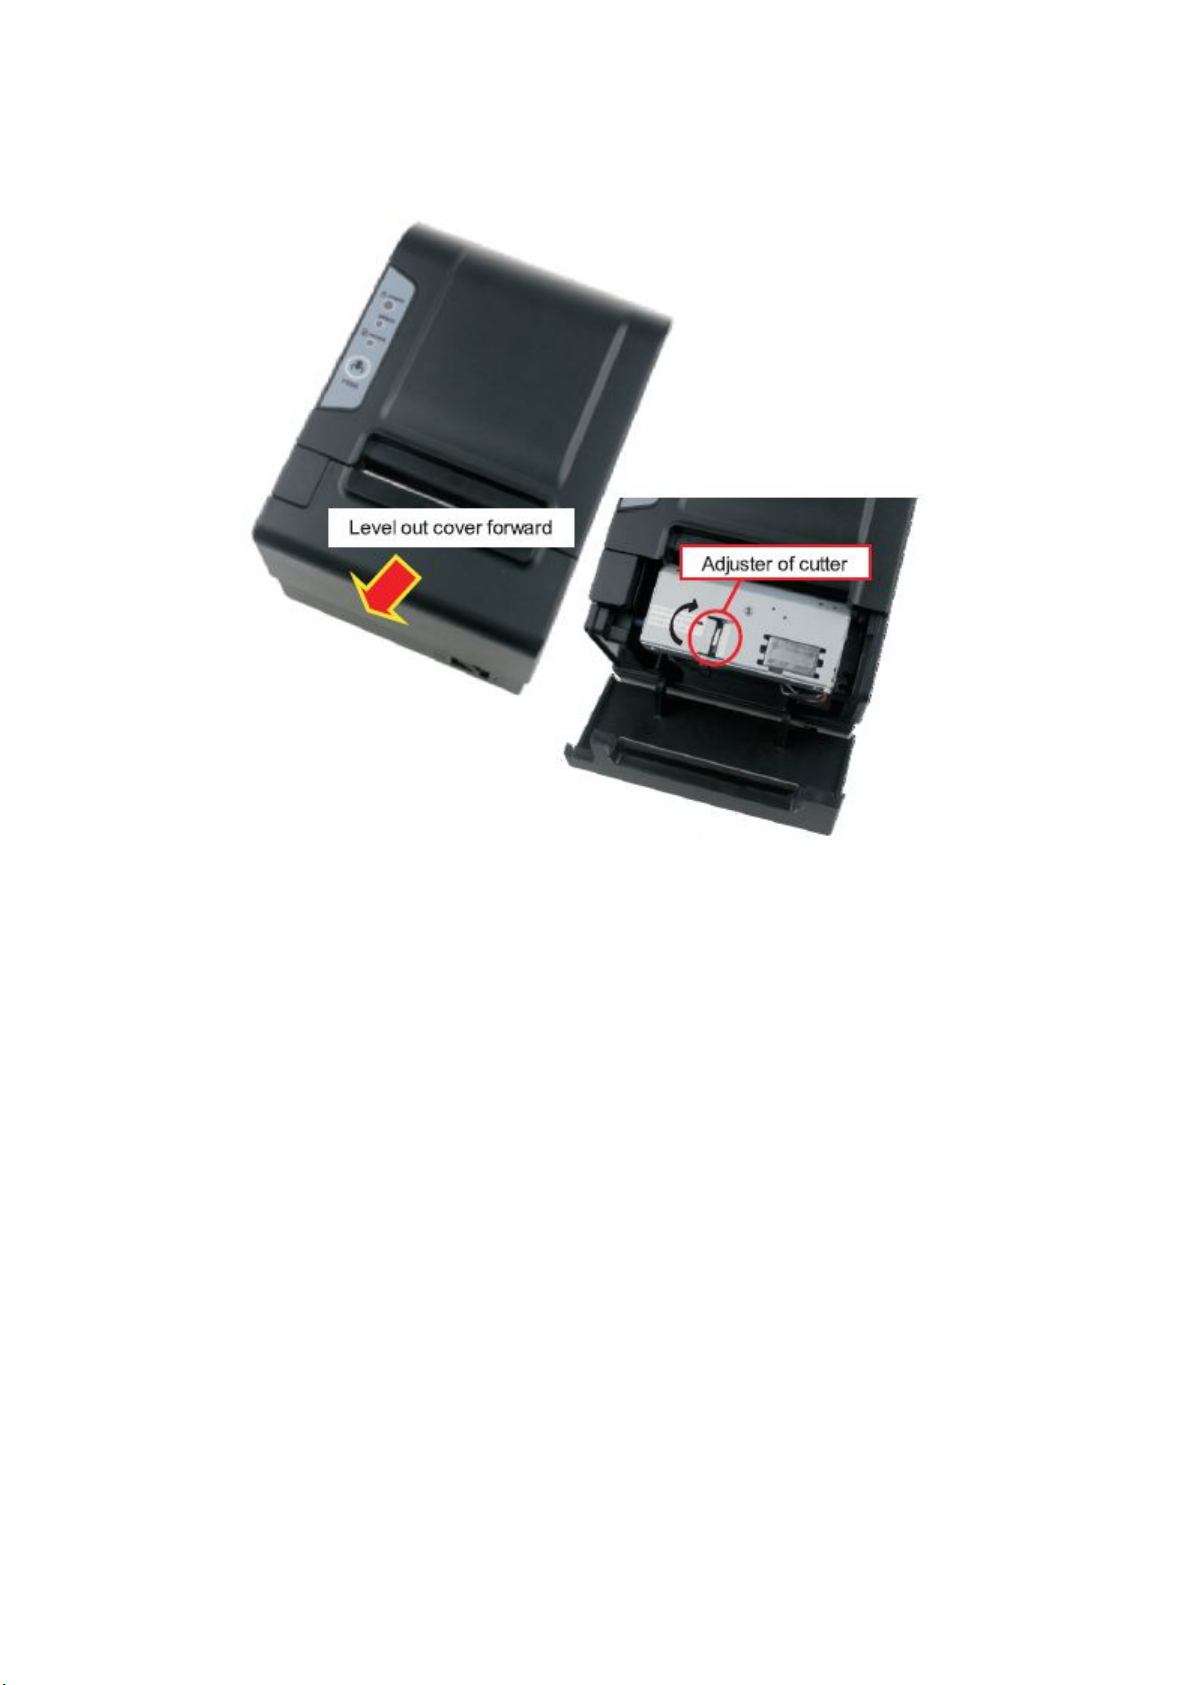
Figure4
4.2 Clean printer
When there is one of the following conditions,printer head should be
cleaned
⑴
⑵
⑶
The print head cleaning steps are as follows
⑴
the paper
⑵
⑶
thermal dust and stains on the surface
commissioning print again.
Note
⑴
⑵
:
Print is not clear
Print the page vertical column is not clear
Noisy when start to print.
Close the printer power supply, open the cover, if there is a paper, remove
;
If just finished printing, should wait for the print head cool completely
Should dip in with soft cloth anhydrous ethanol (dry) erase the print head
Waiting for anhydrous ethanol completely evaporated, close up and cover,
⑷
:
When the printer maintenance must ensure that the power is shut down
Don't touch the surface of the print head, with the hand, and metal items
;
;
:
;
;
;
11
Page 12

may not be used tweezers and other tools cut the print head, printing rubber
roller, and the sensor surface
Shall not use gasoline, acetone and other organic solvents
⑶
Waiting for anhydrous ethanol volatilization completely, then open the
⑷
;
;
power supply to continue printing.
FCC (additional information)
Note: This equipment has been tested and found to comply with the limits for a Class B digital
device, pursuant to part 15 of the FCC Rules. These limits are designed to provide
reasonable protection against harmful interference in a residential installation. This equipment
generates, uses and can radiate radio frequency energy and, if not installed and used in
accordance with the instructions, may cause harmful interference to radio communications.
However, there is no guarantee that interference will not occur in a particular installation. If
this equipment does cause harmful interference to radio or television reception, which can be
determined by turning the equipment off and on, the user is encouraged to try to correct the
interference by one or more of the following measures:
—Reorient or relocate the receiving antenna.
—Increase the separation between the equipment and receiver.
—Connect the equipment into an outlet on a circuit different from that to which the receiver is
connected.
—Consult the dealer or an experienced radio/TV technician for help.
Caution: Changes or modifications not expressly approved by the party responsible for
compliance could void the user's authority to operate the equipment.
12
 Loading...