

Page 1

User’s Manual
Wireless Barcode Scanner
Page 2

Contents
Part One: Relative Pictures……………………………………………Page 2
Part Two: Performance……………………………………………….. Page 3
Part Three: Product Accessories……………………………………….Page 4
Part Four: Installation………………………………………………….Page 4
Part Five: Scanning Mode……………………………………………...Page 5
Part Six: Memory………………………………………………………Page 6
Part Seven: Power Off………………………………………………….Page 6
Part Eight: Lower Power Alarm………………………………………..Page 6
Part Nine: Re-Charge…………………………………………………...Page 6
Part Ten: Matching (Networking)………………………………………Page 6
Part Eleven: Barcode for Common Function Setting…………………...Page 8
Part Twelve: Default Parameters of Barcode Types……………………..Page 10
Part Thirteen: Performance Parameter…………………………………..Page 13
Part Fourteen: Problems Solutions………………………………………Page 14
Part Fifteen: Technical Support & After-Sale Service…………………...Page 17
Appendix: Barcode Setting
1. General Setting……………………………………………………Page 17
2. Switch For Recognition Type……………………………………..Page 18
3. Length Configuration……………………………………………..Page 21
4. Check Code Output Switch Setting……………………………….Page 23
5. Error Check Switch Settings………………………………………Page 25
6. Leading Code Output Setting……………………………………...Page 26
7. Complement Code Output Switch Settings……………………….Page 27
8. FULL ASCII Switch Setting………………………………………Page 28
9. Only Digit Recognition of Barcode- Switch Setting……………..Page 28
10. Digit Barcode……………………………………………………..Page 29
11. Configuration Confirm & Cancel…………………………………Page 30
12. Power Setting……………………………………………………...Page 30
13. Advanced Setting………………………………………………….Page 31
1
Page 3

2
Introduction
D90E series wireless barcode scanner (hereinafter referred to as scanner), with
fashion design, excellent performance, completely combine high performance
laser scanning, wireless transmission and ergonomics advantages, such as long
distance/high speed/stable transmission. Good decoding ability to recognize
incomplete and fuzzy barcode, make sure with high speed to read all ID
barcode. Now it is widely using in supermarket, storage and logistics, book
store, bank, transportation, post, industry, factory production line and so on.
Main features:
Excellent scanning performance
Fashion design, light & flexible, convenient
Own proprietary intellectual property rights
Using special communication technology to support
“one-to-many networking” and “many-for-one networking”
Buffer memory, reliable communication and wide working range
USB interface output, support RS232/keyboard mode
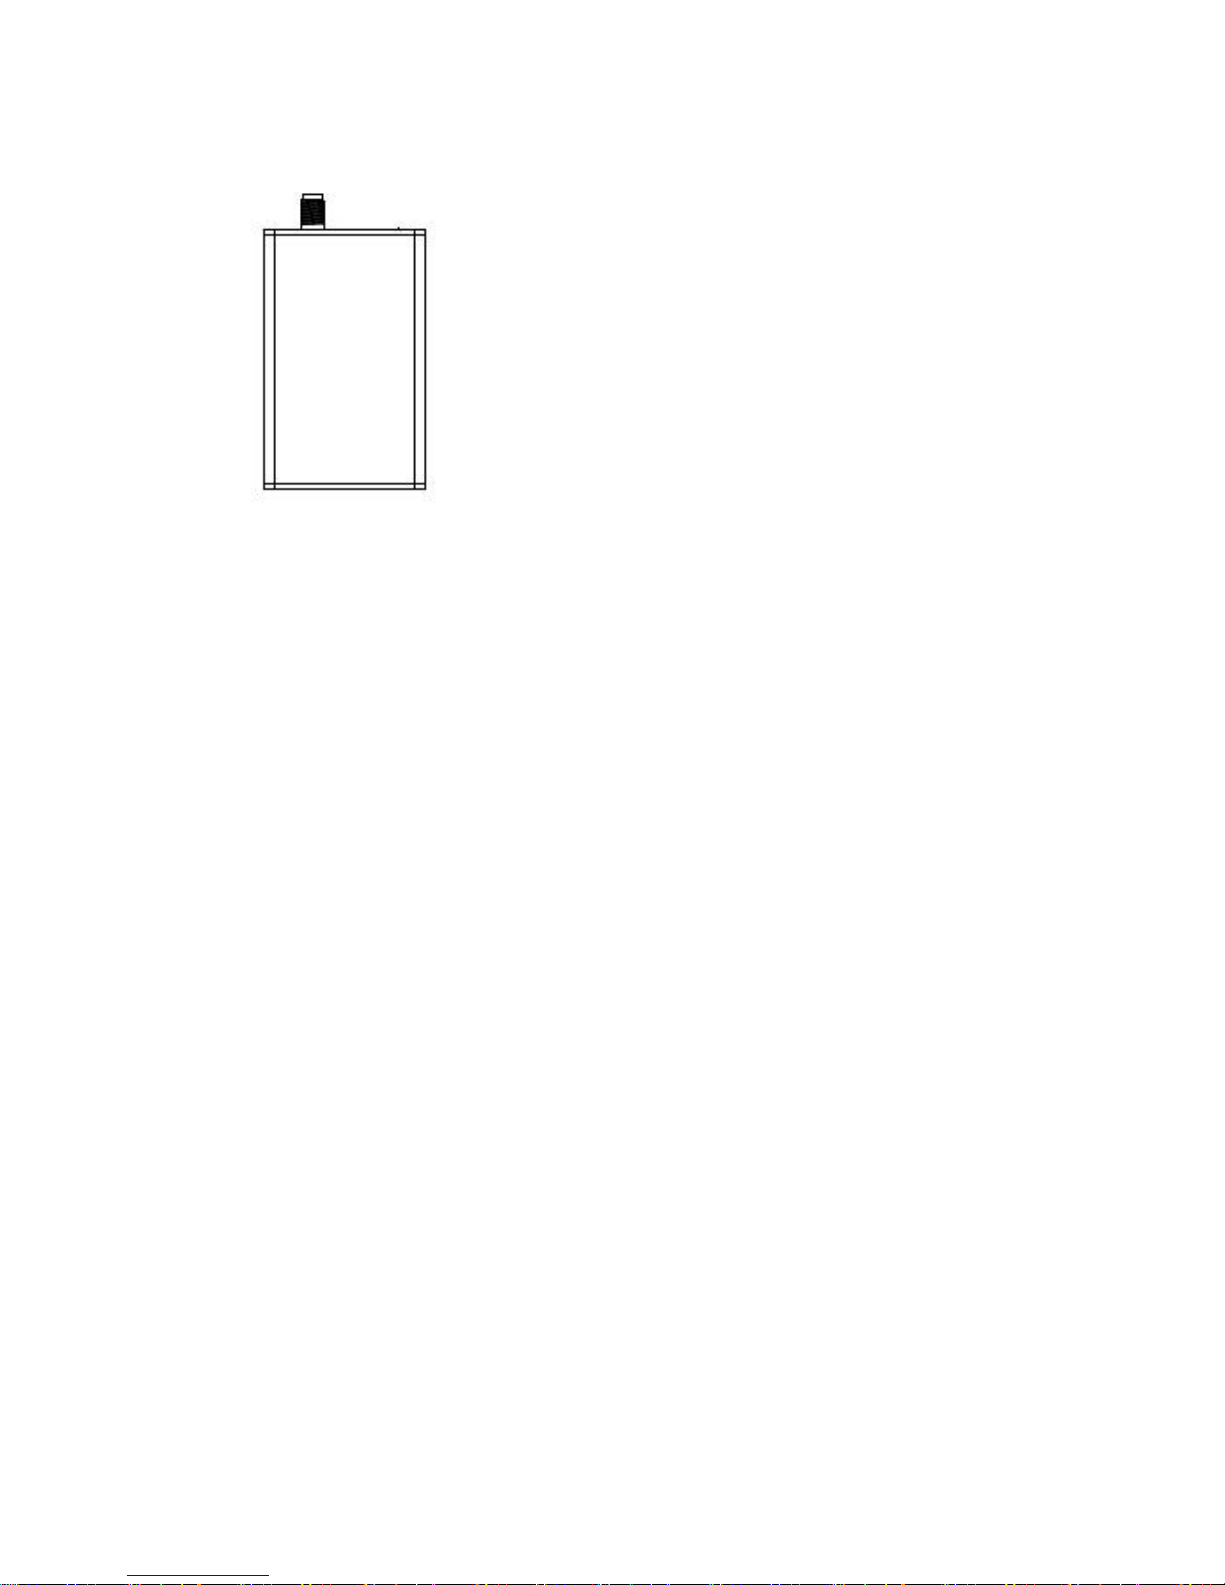
Part One: Relative Pictures
Page 4
3
Part Two: Performance
1. Easy Installation
Receiver via USB line connect with PC, use directly
2. Long distance transmission, good through-wall ability
Up to 200 meters at open place, with diffraction and trough-wall ability.
3. Memory
Beyond the distance directly to receiver, never lost data, if barcode ≤15
characters (including “Enter”), scanner can record 500 barcode data.
Once back to reading distance, scanner can upload dada automatically.
If record over maximum range, scanner will be auto turned off too. User
also can use common function “memory function disable” or “Factory
Reset” to clear the recorded barcode, that is to say, make scanner with
memory space, then can go on reading barcode.
4. Low Power Consumption
During setting duration, if scanner does not work, scanner will be turned
off automatically. If need to work again, just press the scanner button, it
can return to working condition. If scanner does not finish uploading
barcode data, it cannot be turned off. User can set this “turn off time”
according to user’s requirements.
5. Anti-interfere Ability
Multiple scanners in the same area use at the same time, scanner can turn
to unoccupied wireless channel, avoiding conflict and interfere. In the
same area allow 32 groups scanners and relative receivers (Max) to work
Page 5

4
at the same time.
6. Reliable Transmission
Scanner and relative receiver repeat-check each data packet with each
other, ensure the accuracy of the data transmission, do not have error data
or last data.
Part Three: Product Accessories
Name
Specification
Quantity (pc)
Wireless Barcode Scanner
D90E
1
Receiver
D90E
1
Re-charger
5V/500mA
1
USB Line
A-A 80cm
1
Receiver’s Outer Antenna
433MHz
1
User’s Manual
1
Warranty Card
1
QC Card 1
Part Four: Installation
When out of factory, scanner has matched well with relative receiver, unless
user want to do advance network setting, usually user is no need to match again.
Please follow up the following steps to install,
1. Outer antenna connect to receiver, tighten the screw
2. USB line connect to receiver, then the other side of USB line connect
with PC, after connecting well, the indicator light of antenna can be
flashing.
3. Create a new text on PC, such as TXT, EXCEL, and WORD and so on,
put the cursor stay at the text input line.
4. Press the button on scanner, buzzer “Di-Di-Di” three ticking sounds;
which mean the scanner get into work condition, also the working status
light is on.
5. Successful scanning, scanner will have “Di” one ticking sound, also blue
Page 6

5
light can be flashing, when receiver get the barcode data, indicator light
of antenna will be flashing too, then the barcode data will show at the text
input line.
Part Five: Scanning Mode
1. Please keep the scanner and barcode at certain distance, best reading
distance is 15-20cm.
2. Please follow the following correct reading method to read the barcode,
3. When barcode scanning, please make sure scanner and receiver are inside
effective transmission distance.
Part Six: Memory
When scanner is far away from the receiver or environment interferes, data
transmission will fail, at this moment, scanner can record the reading barcode
data. After communication signal return to normal, according to “first-in
first-out” principle, scanner can send out the recorded barcode data
automatically. If fail to send out, buzzer “Di-Di” two ticking sounds.
Two reasons of failure: first one, the distance between scanner and receiver is
beyond effective transmission distance; second one, influenced by other signal
Page 7

6
interfere from other wireless equipments.
Solving methods: first one, shorten the distance between scanner and receiver;
second one, it is no need to do other operation, scanner can turn to other
channel automatically, until send out successfully.
Part Seven: Power Off
When user needs the scanner stop working temporary, just keep on pressing the
button on scanner over 20 seconds, it will be turned off.
Part Eight: Lower Power Alarm
During scanner reading barcode, buzzer constantly “Di-Di-Di” three ticking
sounds, which mean the scanner need to re-charge.
Part Nine: Re-Charge
Close the scanner; insert the round port of recharger into the bottom of scanner,
then connect it to power source to start recharging. If scanner is not closed,
indicator light will be on all the time; if the scanner is closed or low battery,
indicator light can be flashing. Re-charging time is about 2 hours and a half,
power indicator light will be flashing; during re-charging, this light is on all the
time.
Part Ten: Matching (Networking)
When out of factory, scanner has matched well with relative receiver; usually
user is no need to match again. If need, please follow up the following steps to
match,
1. Open the scanner
2. Pull out the receiver’s USB line from PC, please make sure the USB line
and receiver connect well, and receiver’s antenna is connected well too.
3. Scanner read the barcode on this manual, “one on one pairing” barcode
(please see the barcode for common function setting on this manual.)
4. After scanning, connect the receiver’s USB line to PC within 5 seconds.
5. If scanner buzzer “Di-Di-Di” three ticking sounds, which mean matching
successfully; if scanner buzzer “Di-Di-Di-Di-Di-Di” six ticking sounds,
which mean failure.
6. If match successfully, scanner and relative receiver can start
Page 8

7
matching-work.
7. If fail to match, please repeat above step 2, 3, and 4 to reset.
Advance Networking Setting
At present support one scanner with two receivers networking mode
(hereinafter referred to as “one to two mode”), or support four scanners or
less with one receiver networking mode (hereinafter referred to as “four
to one mode”).
“One to two mode”, the barcode data from one scanner, then send the data
to two PC at the same time; “four to one mode”, barcode data from four
scanners (max) can be sent to one PC. If user has multiple scanners and
multiple receivers, user can match according to their own requirements.
For example, user has five scanners and three receivers, they can build
two groups, one is “four to one mode”, and another one is “one to two
mode”.
Please follow up the following steps to build “four to one mode”,
1. Open the first scanner
2. According the above “ one on one pairing” to set the scanner
3. Match successfully, which mean the first scanner work under
networking; it is “one to one mode”.
4. Open the second scanner, same operation as above, “one on one
pairing”, after match successfully; they become “two to one
mode”.
5. Open the third scanner, same operation as above, “one on one
pairing”, after match successfully; they become “three to one
mode”.
6. Open the fourth scanner, same operation as above, “one on one
pairing”, after match successfully; they become “four to one
mode”.
Remarks: If need “two to one mode”, stop at the fourth step; if need
“three to one mode”, stop at the fifth step.
Please follow up the following steps to build “one to two mode”,
1. Open the first scanner
2. According the above “ one on one pairing” to set the scanner
Page 9
8
3. Match successfully, which mean the first scanner work under
networking; it is “one to one mode”.
4. Matching the second receiver,
(1) Pull out the second receiver’s USB line from PC, please make sure
the USB line and receiver connect well, and receiver’s antenna is
connected well too.
(2) Scanner read the barcode on this manual, “one to two pairing”
barcode (please see the barcode for common function setting on this
manual.)
(3) After scanning, connect the receiver’s USB line to PC within 5
seconds.
(4) If scanner buzzer “Di-Di-Di” three ticking sounds, which mean
matching successfully; if scanner buzzer “Di-Di-Di-Di-Di-Di” six
ticking sounds, which mean failure.
(5) If match successfully, “one to two mode” networking setting
successfully.
(6) If fail to match, please repeat above step (1), (2), (3) to reset.
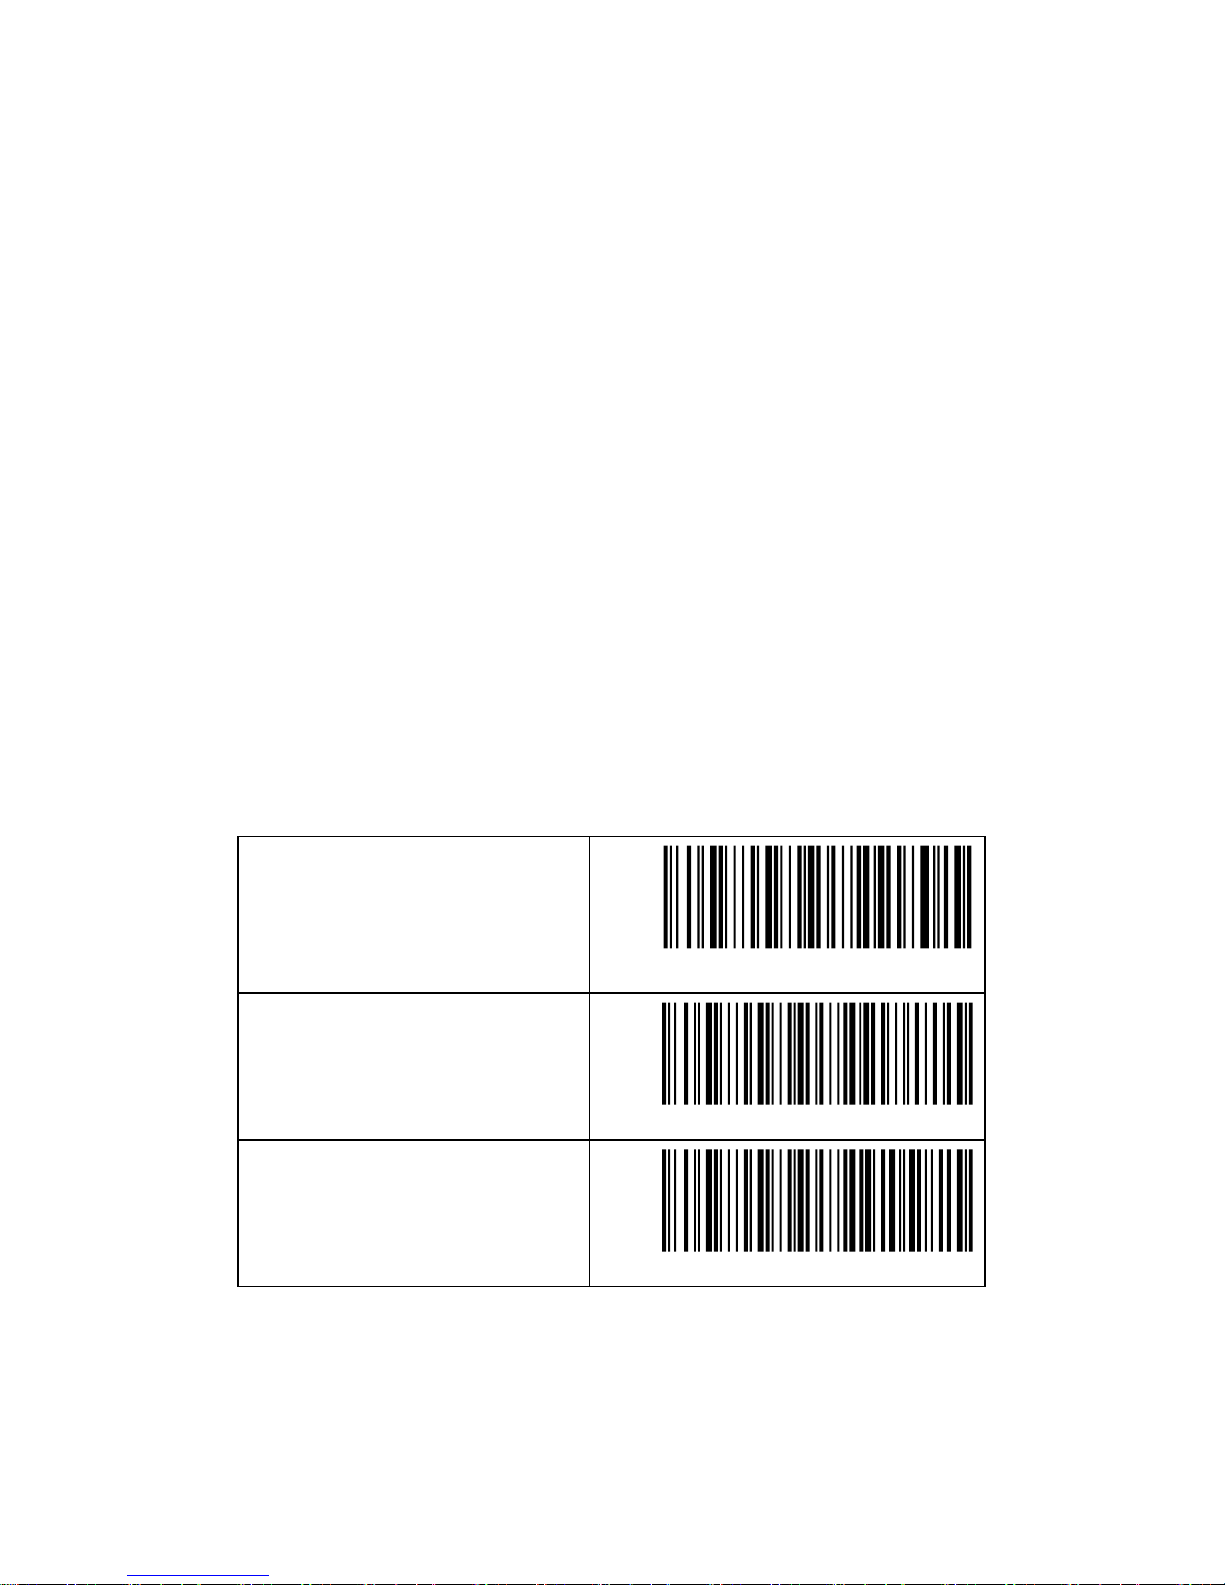
Part Eleven: Barcode For Common Function Setting
One on One pairing, after
scanning this command, the
original matching mode is
unusable; scanner will do
according to new matching mode.
H Y C O C M D - M G
One to Two pairing”, for setting
one to two mode, when setting
the second receiver, please scan
this command.
H Y C O C M D - M G A
20 seconds without any scanning
auto off: for setting scanner auto
shutdown time.
H Y C O C M D - S 2 0
Page 10
9
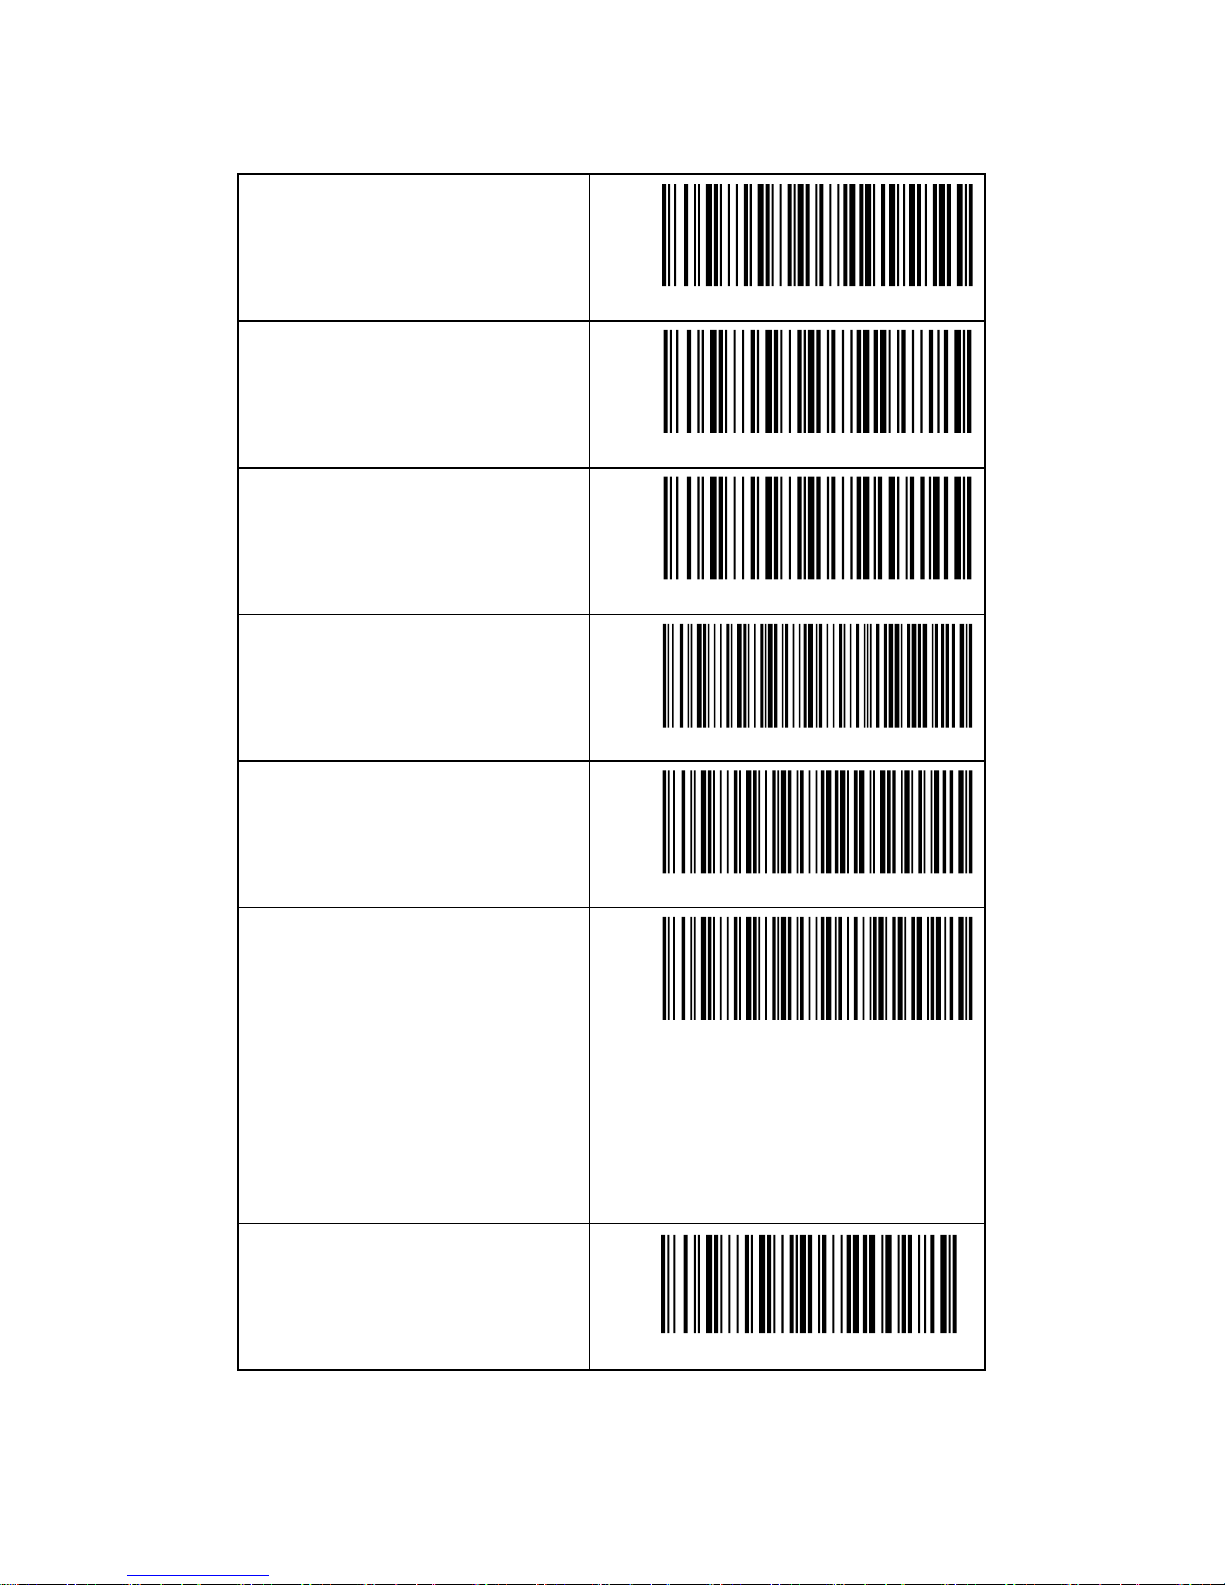
1 minute without any scanning
auto off: for setting scanner auto
shutdown time.
H Y C O C M D - S 6 0
Prohibit auto shutdown, even
without any scanning, not allow
auto shutdown.
H Y C O C M D - S D
Receiver keyboard mode output,
after scanning this command,
receiver will change to keyboard
mode output.
H Y C O C M D - K B
Factory reset, please scan this
command.
H Y C O C M D - D E F A U L T
Memory function enable, for
setting the scanner to record
barcode data if fail to data
transmission.
H Y C O C M D - S T O R E
Memory function disable, for
setting scanner no need to record
barcode data if fail to data
transmission during normal
scanning, also delete all the
recorded data.
Please be attention:
If scanner has recorded barcode
data, be cautious of using this
function.
H Y C O C M D - D I S S T
Open wireless transmission, after
scanning this command; enable
wireless transmission, system
default to open it.
H Y C O C M D - T X
Page 11
10
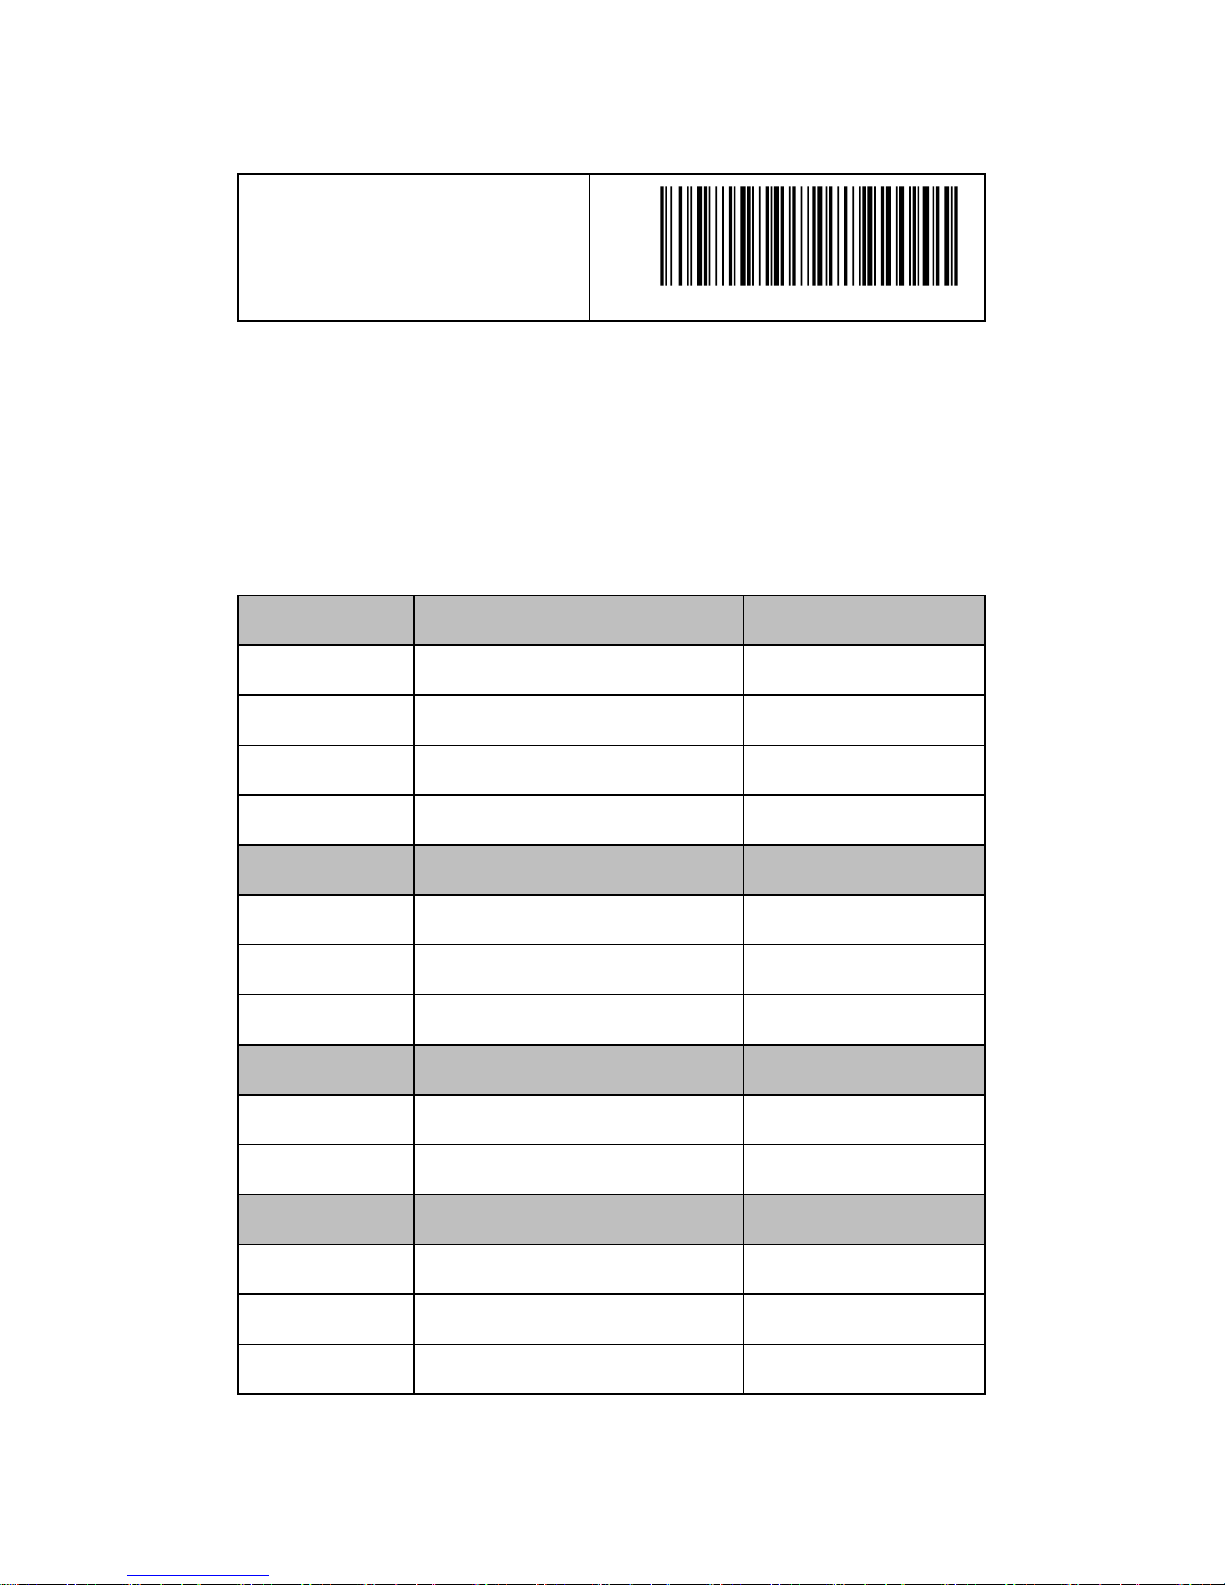
Close wireless transmission, after
scanning this command, whatever
the network condition, will close
wireless transmission function.
H Y C O C M D - D I S T X
***Factory setting: Dormant time is 20 seconds, memory function
enable and delete matching information. After scanning this
command, restore to the above factory setting, both open
recognition barcode type and parameters keep the same.
Furthermore, if scanner has recorded barcode data, the data will
be deleted.
Part Twelve: Default Parameters of Barcode Types
EAN
Decode
OPEN
EAN13 Check Code Output
OPEN
EAN8 Check Code Output
OPEN
Lead Code Output
OPEN
Complement Decode
AUTO
UPC
Decode
OPEN
UPCA Check Code Output
OPEN
UPCE Check Code Output
OPEN
Lead Code Output
OPEN
CODE128
Decode
OPEN
Recognition Length (Min)
4 Recognition Length (Max)
50
CODE39
Decode
OPEN
Recognition Length (Min)
5 Recognition Length (Max)
50 Error Checking
CLOSE
Page 12
11
Check Code Output
OPEN
FULLASCII
OPEN
CODE93
Decode
CLOSE
Recognition Length (Min)
8 Recognition Length (Max)
50
CODE11
Decode
CLOSE
Recognition Length (Min)
8 Recognition Length (Max)
50 Error Checking
CLOSE
Check Code Output
OPEN
GS1
Decode
CLOSE
ITF25
Decode
OPEN
Recognition Length (Min)
8 Recognition Length (Max)
50 Error Checking
CLOSE
Check Code Output
OPEN
INDUS25
Decode
CLOSE
Recognition Length (Min)
8
Recognition Length (Max)
50
IATA25
Decode
CLOSE
Recognition Length (Min)
8 Recognition Length (Max)
50
Error Checking
CLOSE
Check Code Output
OPEN
Page 13
12
MATRIX25
Decode
CLOSE
Recognition Length (Min)
8 Recognition Length (Max)
50 Error Checking
CLOSE
Check Code Output
OPEN
CHINESE25
Decode
CLOSE
Recognition Length (Min)
8 Recognition Length (Max)
50
CODABAR
Decode
OPEN
Recognition Length (Min)
8 Recognition Length (Max)
50
MSI
Decode
Close
Recognition Length (Min)
8 Recognition Length (Max)
50 Error Checking
CLOSE
Check Code Output
OPEN
Part Thirteen: Performance Parameter
Functionality Item
Performance Parameter
Working Frequency
433MHz ISM Frequency Range
Communication Distance
Up to 200 Meters at open place
Type of Illuminant
650nm Laser
Use Type
Hand-held
Scanning Method
Manual
Indicator Light
LED Red & Green
Page 14
13
Buzzer
Buzzer Volume Adjustable
Width of Scan Field
60mm@30mm(from engine face),
98mm@100mm(from engine face)
Depth of Scan Field
10-450mm(Contrast 0.9 Density0.25)
Scan Speed
48 times/sec
Scan Precision
0.10-0.825mm
Bit Error Rate
1/ 8million
Barcode Types
EAN8,EAN13,UPC_A,UPC_E,CODE128,C
ODE39,CODE93,CODE11,GS1_DATABAR
,ITF25,INDUS25,IATA25,MATRIX25,CHI
NESE25,CODABAR,MSI …. All Standard
One-dimensional code
Battery
3.7V/1000mAh,Li-ion
Charge Time
2.5 Hours
Scan Time
30 Hours
Scan Current
85mA
Standby Current
30mA
Maximum Pitch Angles
60°
Maximum Tilt Angles
45°
Working Frequency
433MHz
Communication Distance
200m(Open Places)
Communication Interface
USB
Operating Temperature
-10℃ to 45℃
Storage Temperature
-20℃to 45℃
Page 15
14
Operating Humidity
5%-85%(Non-Condensing)
Storage Humidity
5%-85%(Non-Condensing)
ESD
±15kVDC Air Discharge,±8kVDC
Direct/Indirect Discharge
Drop Specification
1.5m
Intensity Of Light
Light 4.000luX max
EMI
EN50081,par1
Anti-EMI
EN50082,par1
Waterproof & Dustproof
IEC529,IP42
Materials
ABS+TPU/Aluminum Alloy
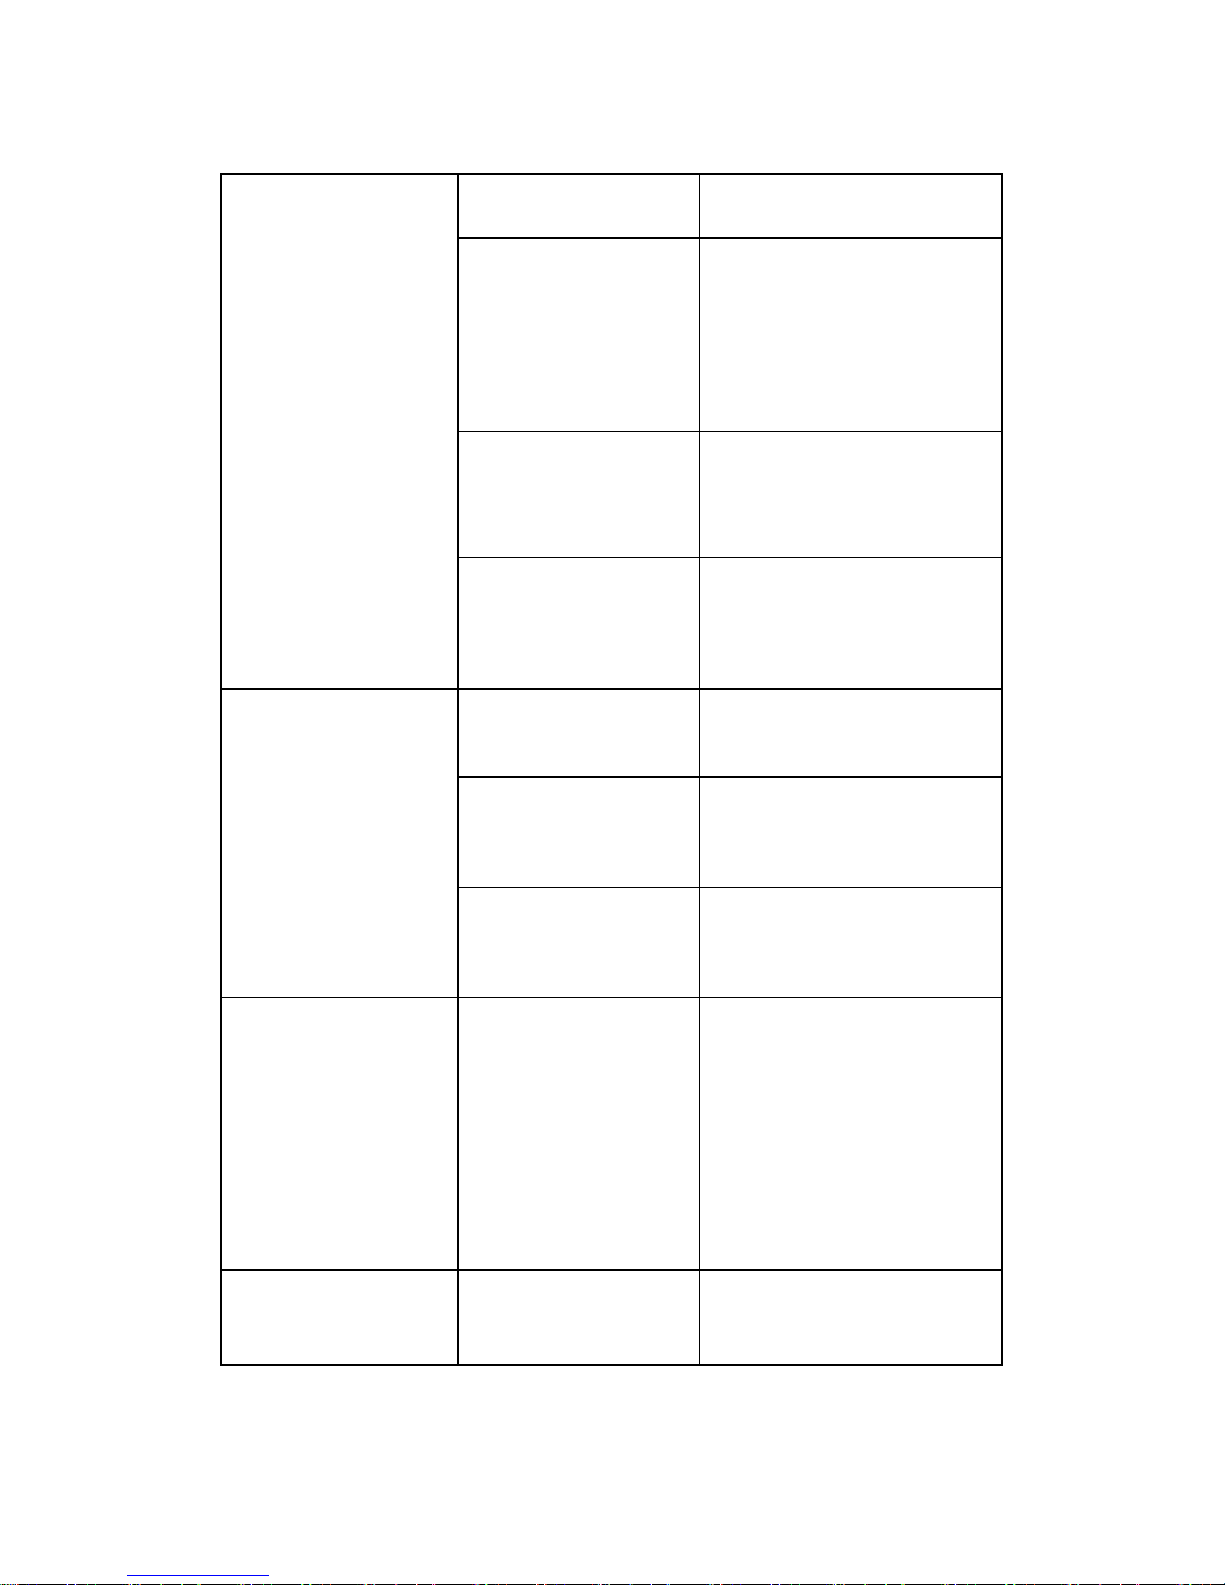
Part Fourteen: Problems Solutions
Problems
Possible Reasons
Possible Solutions
Follow up the
operating
Instructions, but
scanner no reaction
Scanner does not
connect properly with
power source
Checkout system power
source. Check whether
scanning button has already
pressed or battery has used
up or not.
Cannot start after
pressing the scanner
button
Low Battery
Restart after recharged
Indicator light is off
when scanner is
recharging
Plug of recharger is
not connected with
scanner recharging
port
Turn the plug of recharger to
make them well connected.
With laser line but
cannot decode
Do not open the
setting identify
options of that
barcode type
Make sure the setting
identify options of the exact
barcode type has already
opened. After starting, try to
Page 16
15
scan other barcode of the
same type.
The length of barcode
exceed the maximum
and minimum length
of corresponding
barcode type
Make sure the barcode
length is inside the range of
maximum and minimum
length
Barcode can’t be read
Check the barcode to make
sure no damage. Try to scan
other barcode of the same
barcode type.
The distance between
scanner and barcode
is not suitable.
Move scanner closer or far
away to be inside suitable
distance.
Always alarm and
cannot send barcode
data to PC after
scanning
Receiver does not
connect with PC
Check receiver and make it
connected well with PC.
Receiver does not
match successfully
with scanner
Check receiver to make it
match successfully with
scanner
Transmission range is
exceed effective
range
Make sure receiver and
scanner are inside effective
transmission range.
Scanner always
cannot match
successfully with
receiver
Wrong matching
steps
Follow the matching step
strictly; please check Part
Ten in User’s Manual
(networking). If still cannot
match, try to scan the
barcode for factory reset
then match again.
Scanner always
alarm because of data
recorded.
Clear the data record.
Open receiver to receive
barcode. Or scan “memory
function disable” in
Page 17

16
common function setting
barcode series. This function
will help clearing the
recorded barcode data.
Alarm will be stopped after
clearing finished. If still
need memory record
function, please scan
“memory function enable”
Barcode data can’t be
displayed in the PC
after scanning
successfully.
Wrong output mode
Check whether output mode
is set to serial output mode.
Regarding the details, please
check the advance setting in
thirteen section of user’s
manual appendix.
Mess code appeared
after barcode data
sending to PC
Check whether PC is
poisoned or not.
Kill poison.
Part Fifteen: Technical Support & After-Sale Service
In normal use of this product, the warranty is one year. During warranty period,
all quality problems that due to raw material or production process, our
company can repair for free. All the problem or damage that due to the behave
which result from the operating not according to User’s Manual, install yourself,
dismantle yourself or misapplication, our company provide the warranty
maintenance , but need proper service charges and parts cost.
Warranty Principle:
1. Warranty period is one year.
2. During warranty period, in the normal use of this product (judge by the
technical personnel that authorized by our company), all the damage and
broken parts can be repaired or exchanged for free.
3. During warranty period, the product that is repaired or changed before by
other maintenance personnel who does not belong to our maintenance
center, or the damage that due to improper installing, wrong input voltage,
improper using, accident, or nature calamities not belong to warranty
scope.
4. Our company consider the serial number and the date/lot number of parts
Page 18
17
as proof for machine repair within warranty period or not; Machine that
without identification and warranty certification will be repaired but not
inside warranty period; please do not wipe the serial number or lot
number on the machine, otherwise our company can refuse to provide
repairing service.
5. When product need repair, user should send the product with all
components together to maintenance center. If customer dismantle
component himself, we will repair but not inside warranty period.
6. User should pack the product that plan to send for repairing well, our
company suggest pack it by original packing carton. We are not
responsible for the damage that due to logistic.
7. We are not responsible for the special, accident or indirect losses of
customers’ and distributors’.
8. Content is subject to change without prior notice.
9. Regarding the related issues, please visit our website: www.liverdol.com
10. We reserve the right to explain the content of this warranty card.
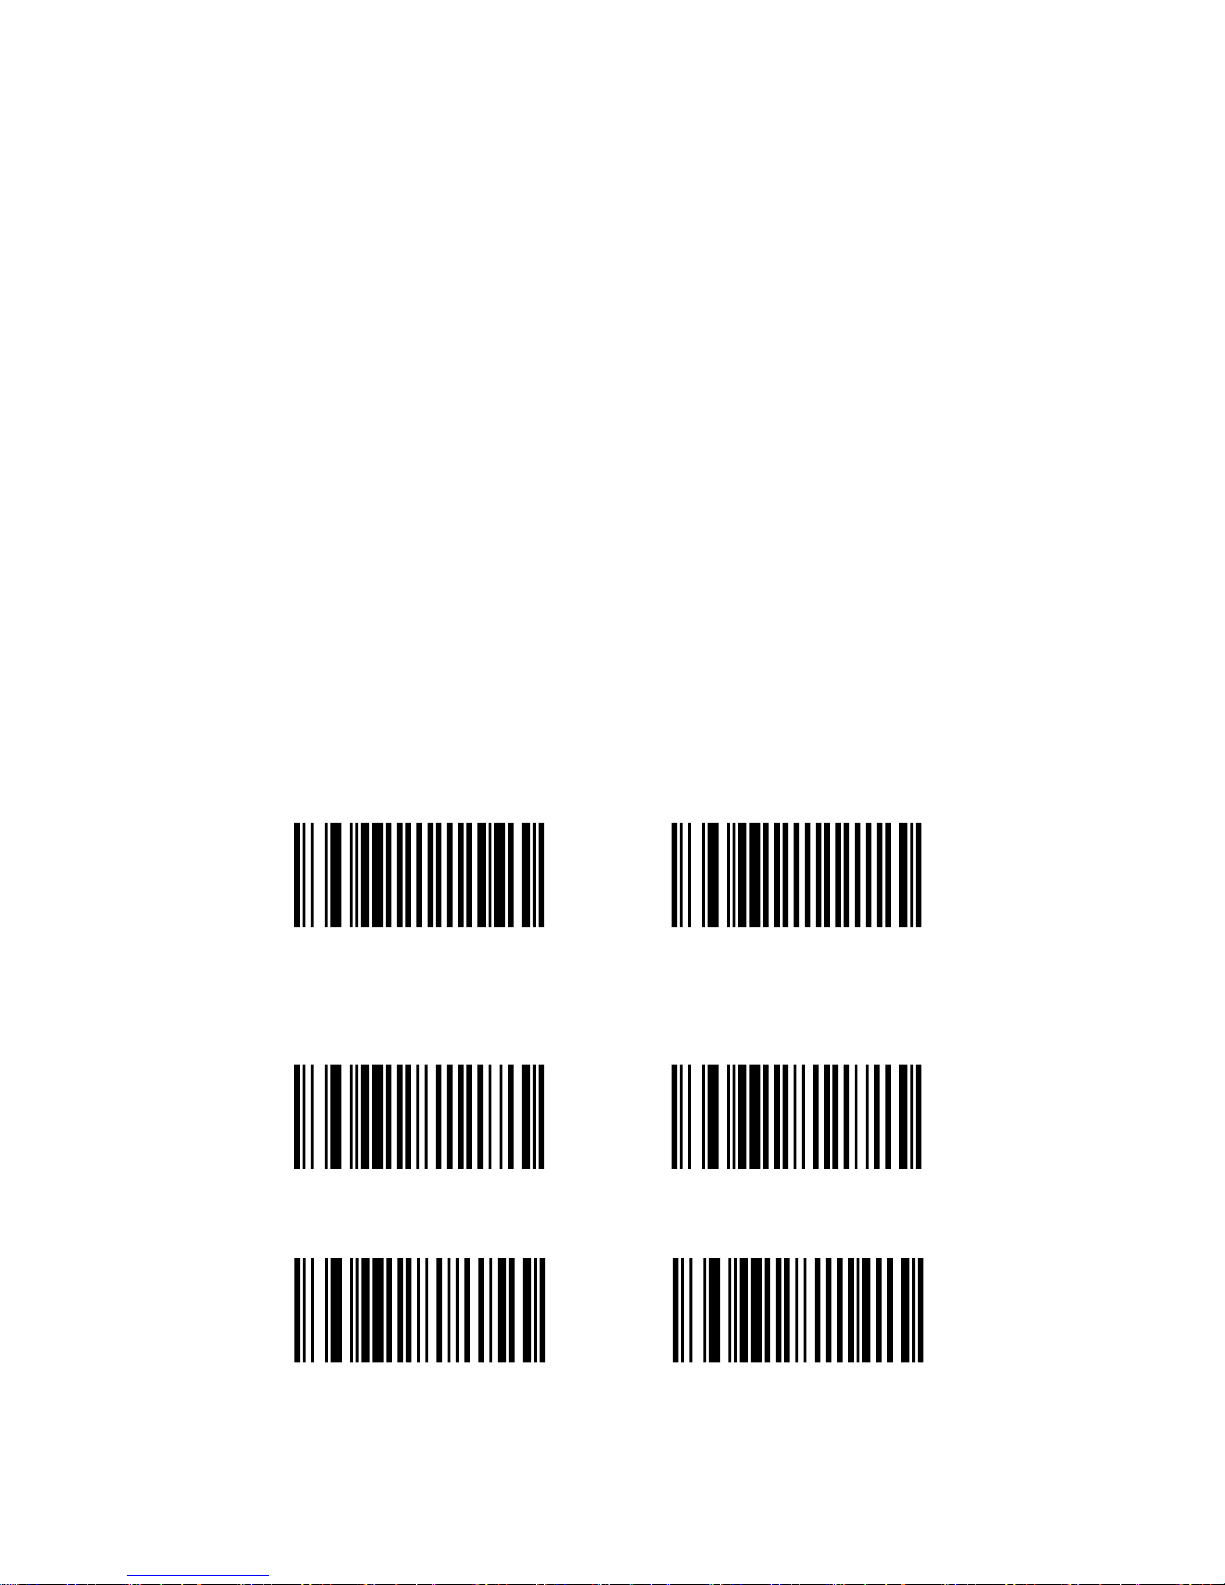
Appendix: Barcode Setting
1. General Setting
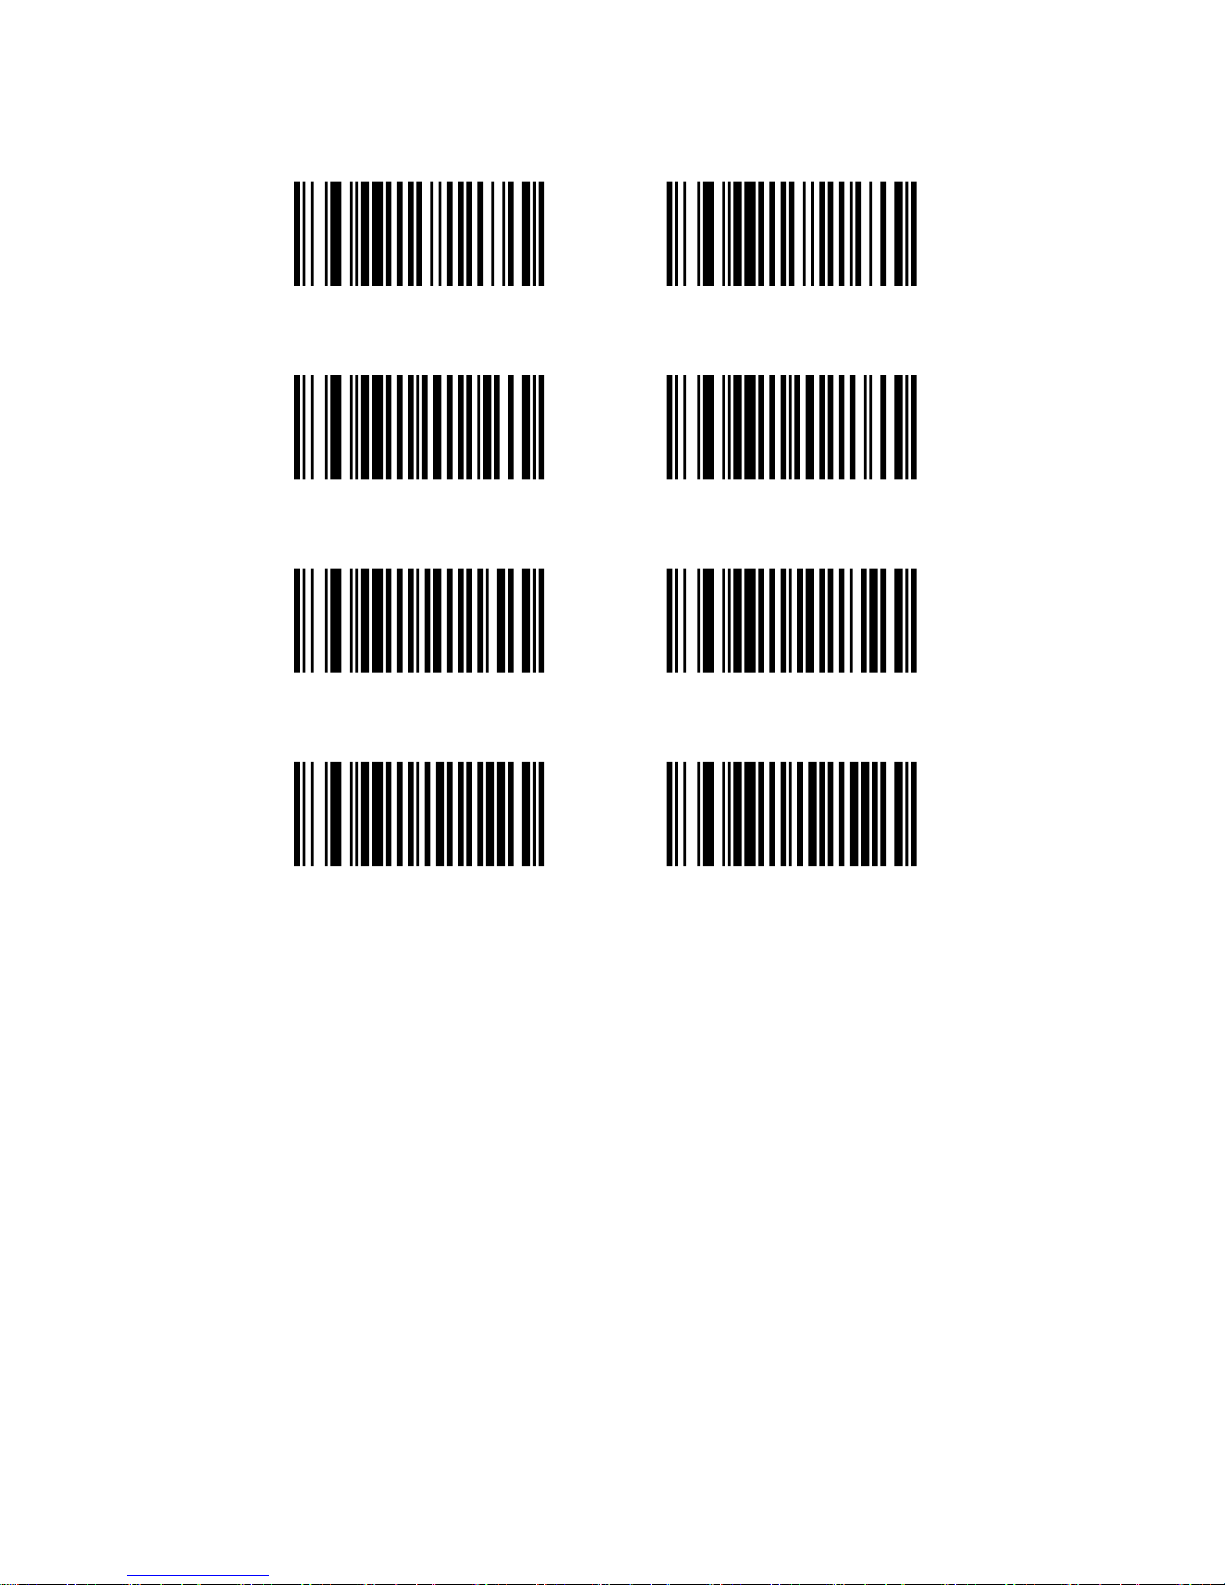
\ F N C 3 0 1 0 1 0 1
\ F N C 3 0 1 0 2 0 1
\ F N C 3 0 1 0 4 0 1
\ F N C 3 0 1 0 4 0 0
\ F N C 3 0 1 0 4 0 3
\ F N C 3 0 1 0 4 0 2
Page 19
18
\ F N C 3 0 1 0 5 0 1
\ F N C 3 0 1 0 5 0 0
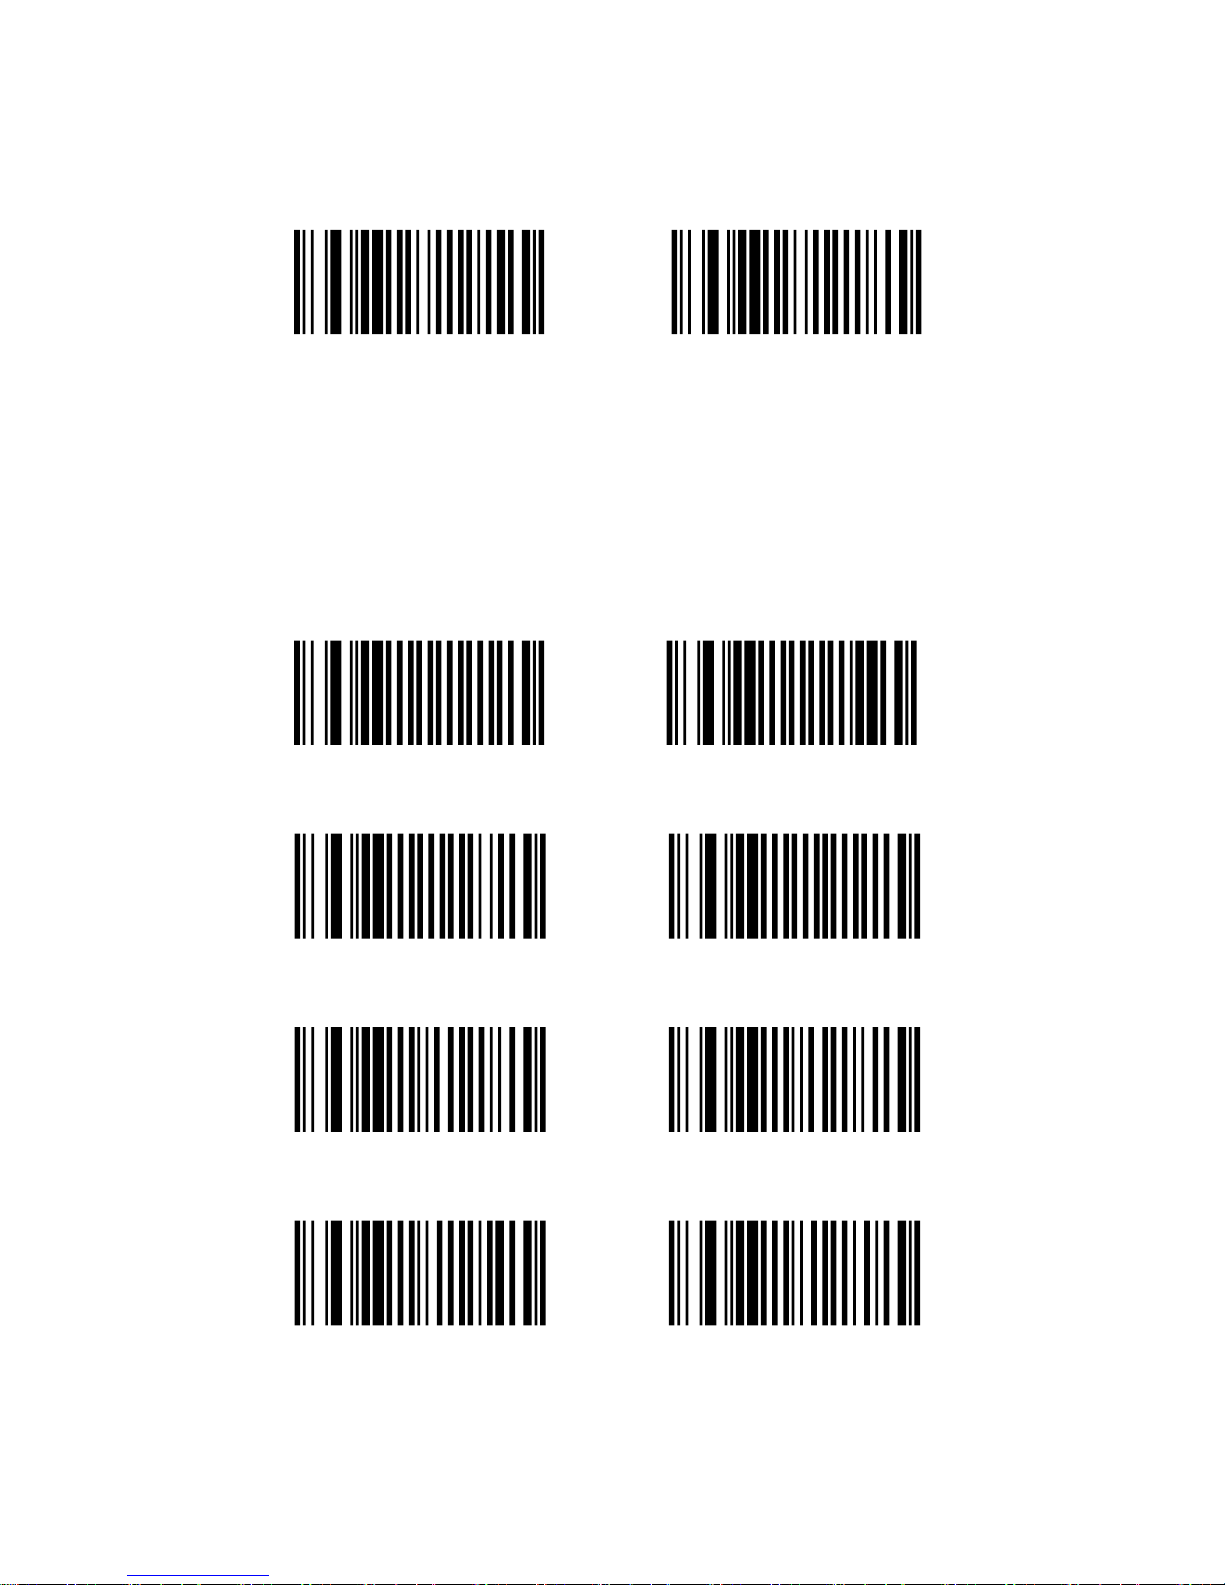
2. Switch For Recognition Type
User can open or close the recognition of any type of barcode by manual. Open
means scan the setting barcode -“Enable” of corresponding barcode type; close
means scan the setting barcode – “Disable” of corresponding barcode type.
Because the setting barcode is CODE 128, so the CODE128 barcode can’t be
closed.
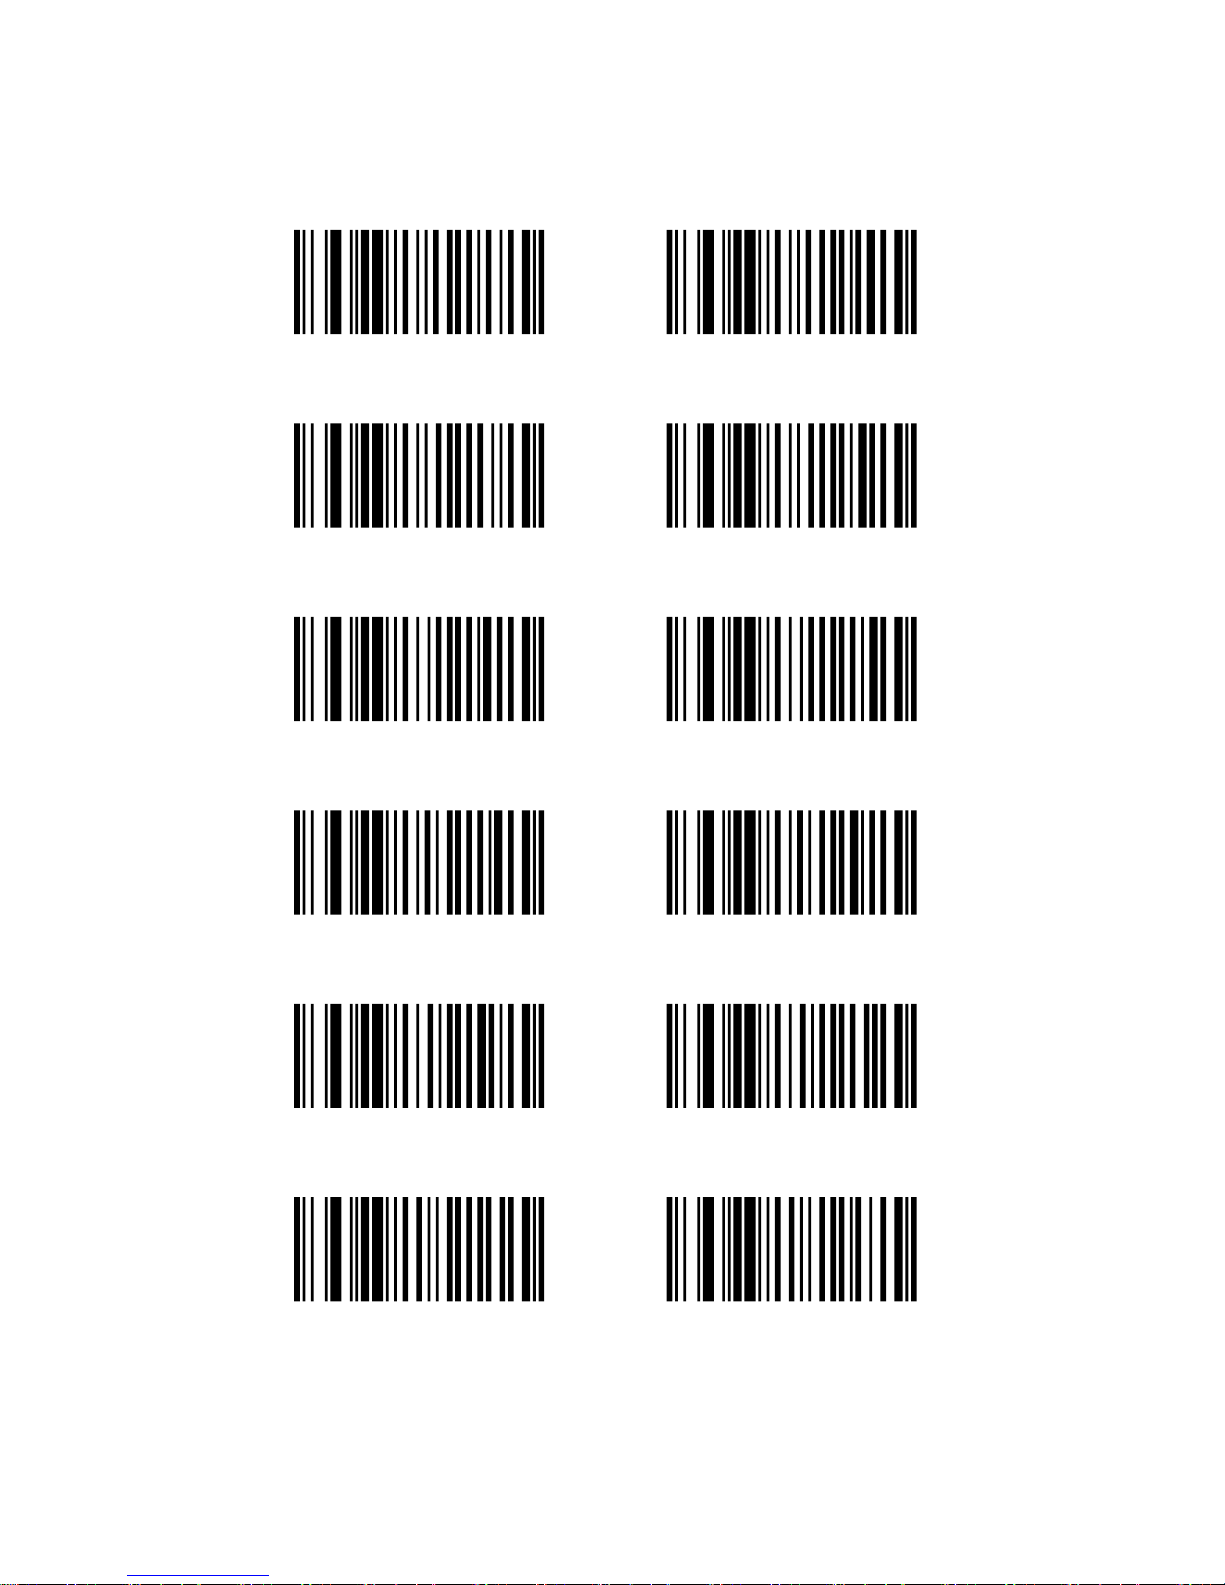
\ F N C 3 0 2 0 1 0 1
\ F N C 3 0 2 0 1 0 0
\ F N C 3 0 2 0 2 0 1
\ F N C 3 0 2 0 2 0 0
\ F N C 3 0 2 0 3 0 1
\ F N C 3 0 2 0 3 0 0
\ F N C 3 0 2 0 4 0 1
\ F N C 3 0 2 0 4 0 0
Page 20
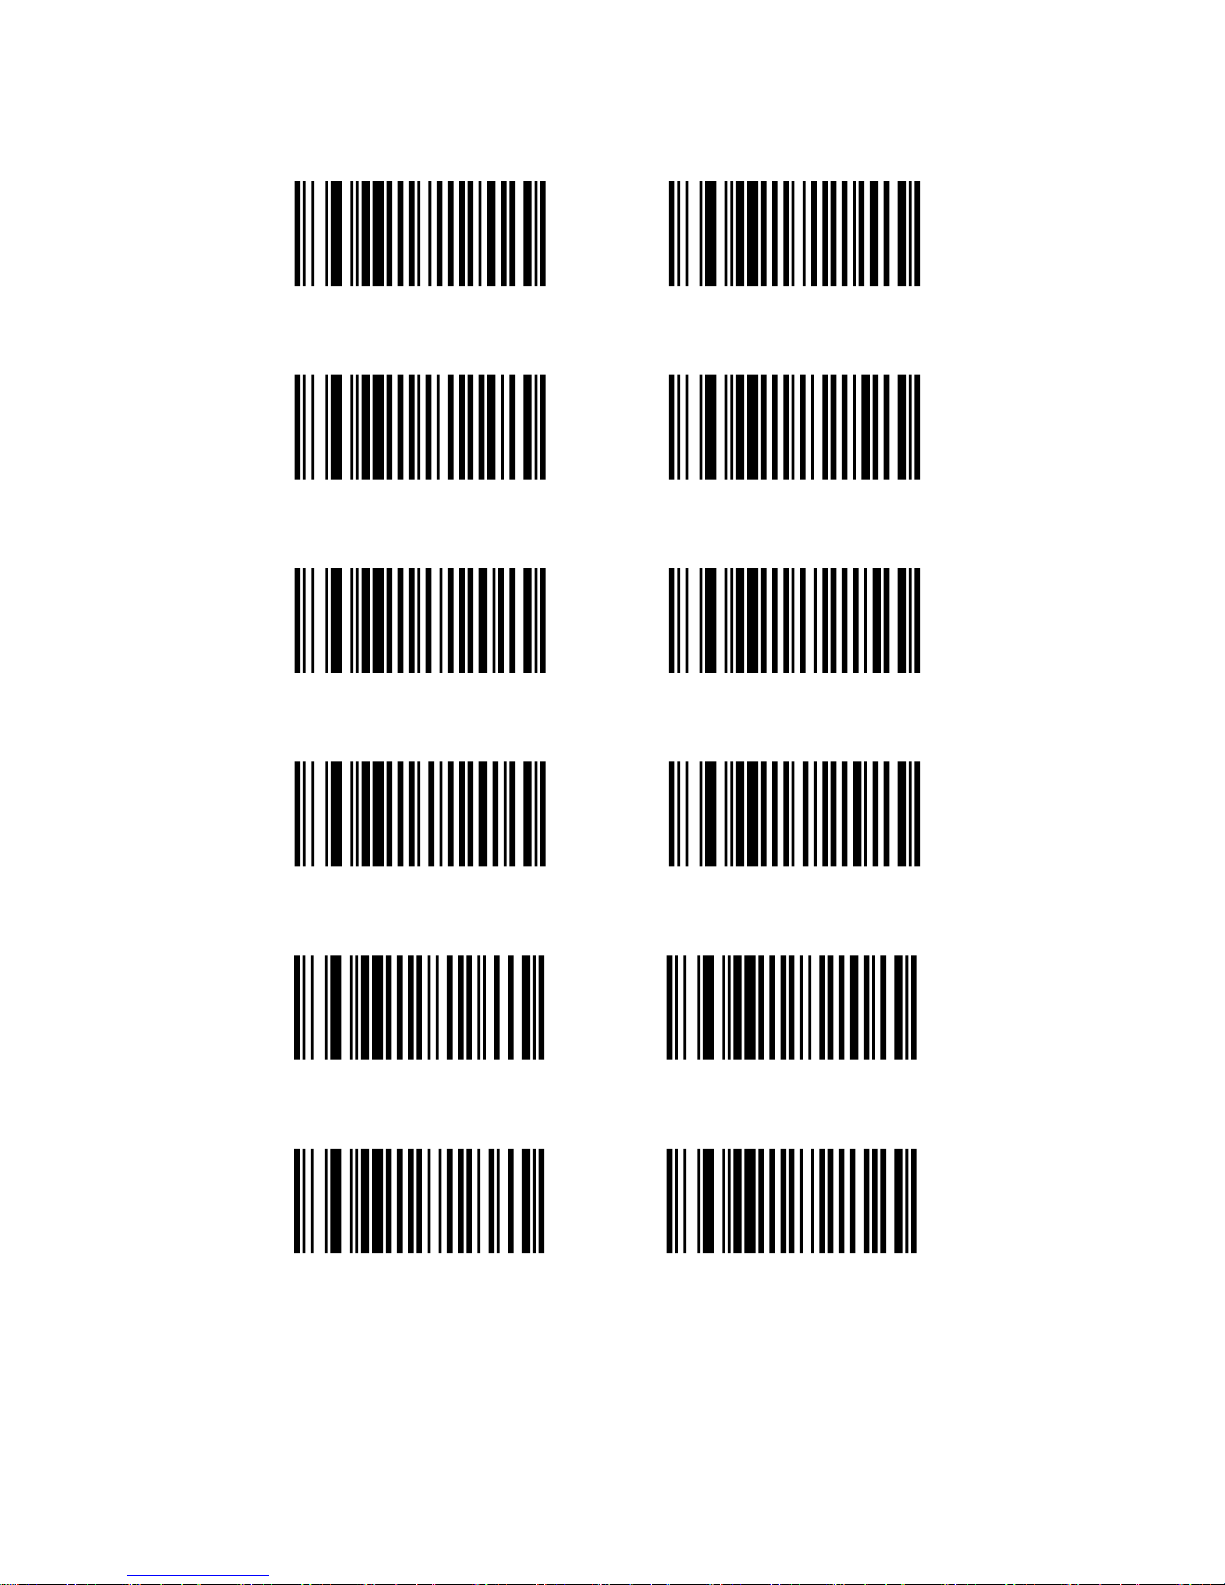
19
\ F N C 3 0 2 0 5 0 1
\ F N C 3 0 2 0 5 0 0
\ F N C 3 0 2 0 6 0 1
\ F N C 3 0 2 0 6 0 0
\ F N C 3 0 2 0 7 0 1
\ F N C 3 0 2 0 7 0 0
\ F N C 3 0 2 0 8 0 1
\ F N C 3 0 2 0 8 0 0
\ F N C 3 0 2 0 9 0 1
\ F N C 3 0 2 0 9 0 0
\ F N C 3 0 2 1 0 0 1
\ F N C 3 0 2 1 0 0 0
Page 21
20
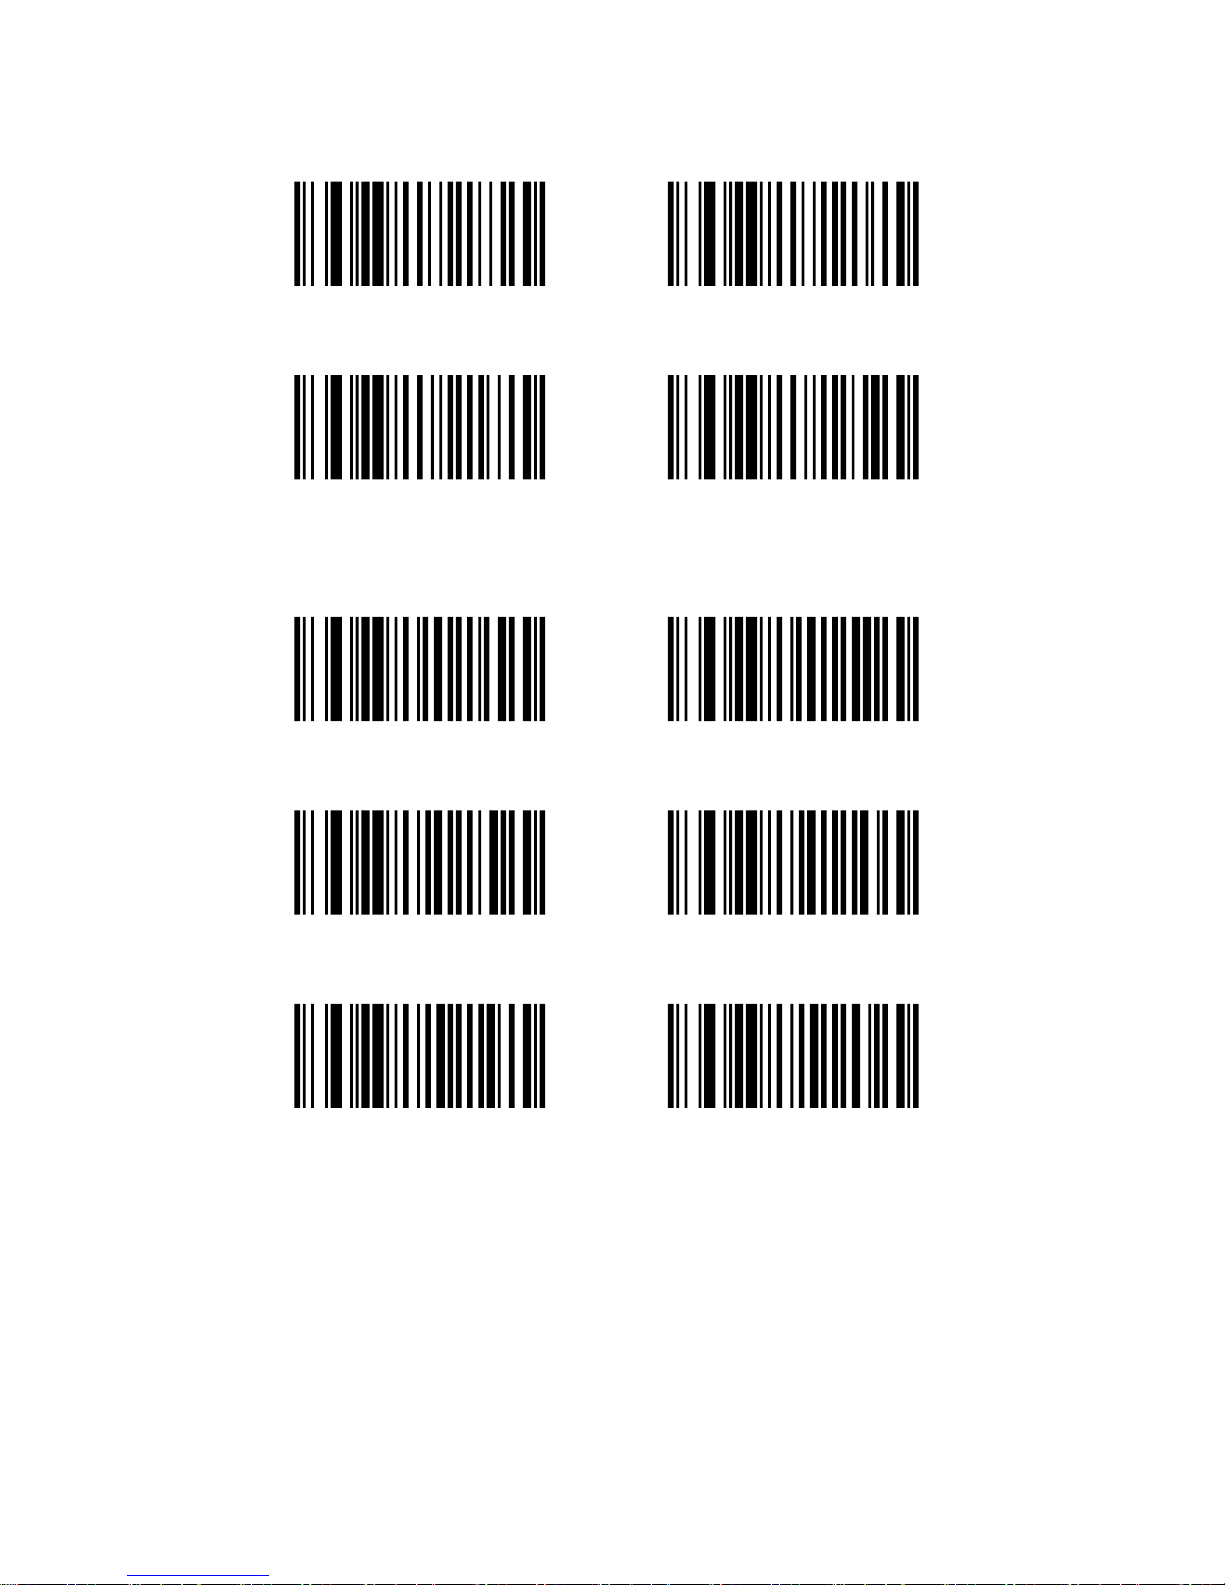
\ F N C 3 0 2 1 1 0 1
\ F N C 3 0 2 1 1 0 0
\ F N C 3 0 2 1 2 0 1
\ F N C 3 0 2 1 2 0 0
\ F N C 3 0 2 1 3 0 1
\ F N C 3 0 2 1 3 0 0
\ F N C 3 0 2 1 4 0 1
\ F N C 3 0 2 1 4 0 0
3. Length Configuration
These setting barcode is used for setting the maximum length and minimum
length of corresponding barcode type. If the maximum length and minimum
length are set to be 0, which means it is set to recognize random length. The
setting process is as following,
(1) Scan the “maximum length setting” barcode of corresponding barcode type;
(2) Scan digital barcode; please see “Digital barcode” in page 29, scanning the
digit. Such as if need to input 15, then should first scan digital barcode “1” and
then scan digital barcode “5”.
(3) Scan setting barcode “confirm”, check page 30. If do not confirm, then all
the previous setting will become invalid.
For example: setting the maximum length of CODE93 to be 25 bits:
(1) Scan “CODE 93 Maximum Length”
(2) Scan “Digit 2”
(3) Scan “Digit 5”
(4) Scan “Setting Confirm”
Page 22
21
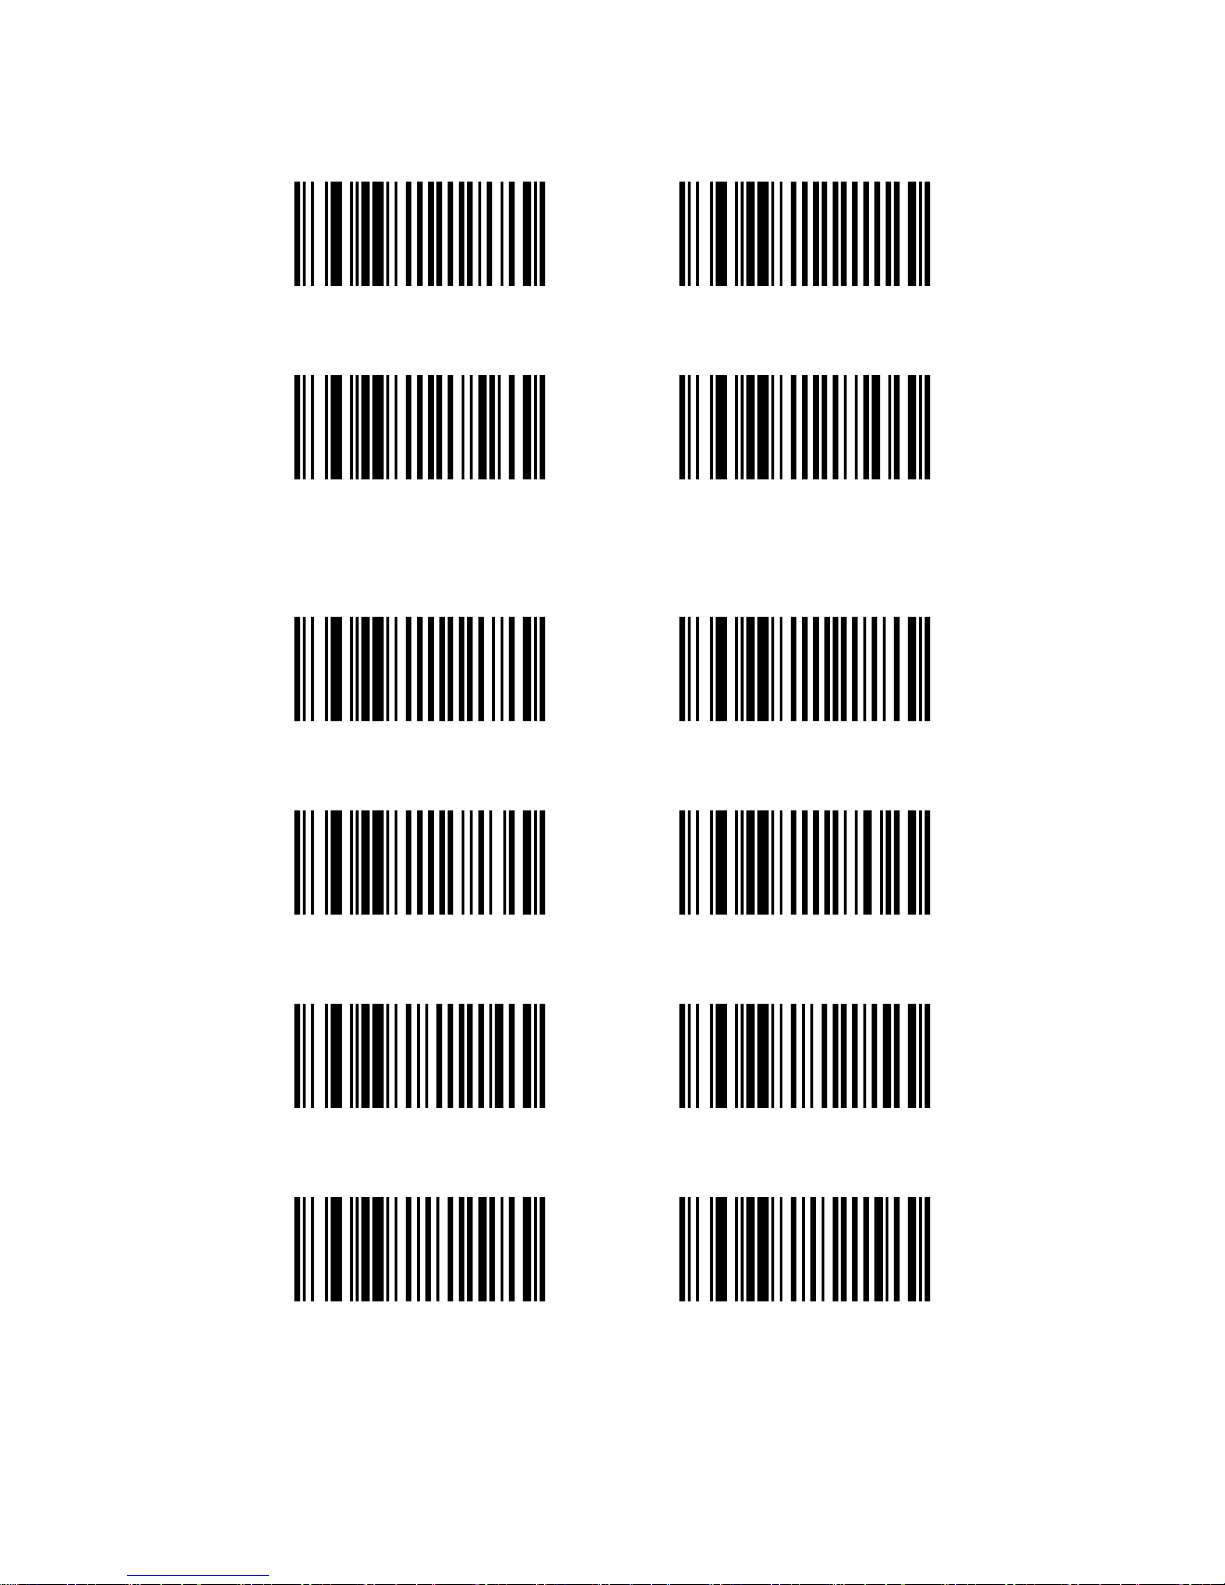
\ F N C 3 0 3 0 3 0 0
\ F N C 3 0 3 0 3 0 1
\ F N C 3 0 3 0 4 0 0
\ F N C 3 0 3 0 4 0 1
\ F N C 3 0 3 0 5 0 0
\ F N C 3 0 3 0 5 0 1
\ F N C 3 0 3 0 6 0 0
\ F N C 3 0 3 0 6 0 1
\ F N C 3 0 3 0 8 0 0
\ F N C 3 0 3 0 8 0 1
\ F N C 3 0 3 0 9 0 0
\ F N C 3 0 3 0 9 0 1
Page 23
22
\ F N C 3 0 3 1 0 0 0
\ F N C 3 0 3 1 0 0 1
\ F N C 3 0 3 1 1 0 0
\ F N C 3 0 3 1 1 0 1
\ F N C 3 0 3 1 2 0 0
\ F N C 3 0 3 1 2 0 1
\ F N C 3 0 3 1 3 0 0
\ F N C 3 0 3 1 3 0 1
\ F N C 3 0 3 1 4 0 0
\ F N C 3 0 3 1 4 0 1
4. Check Code Output Switch Setting
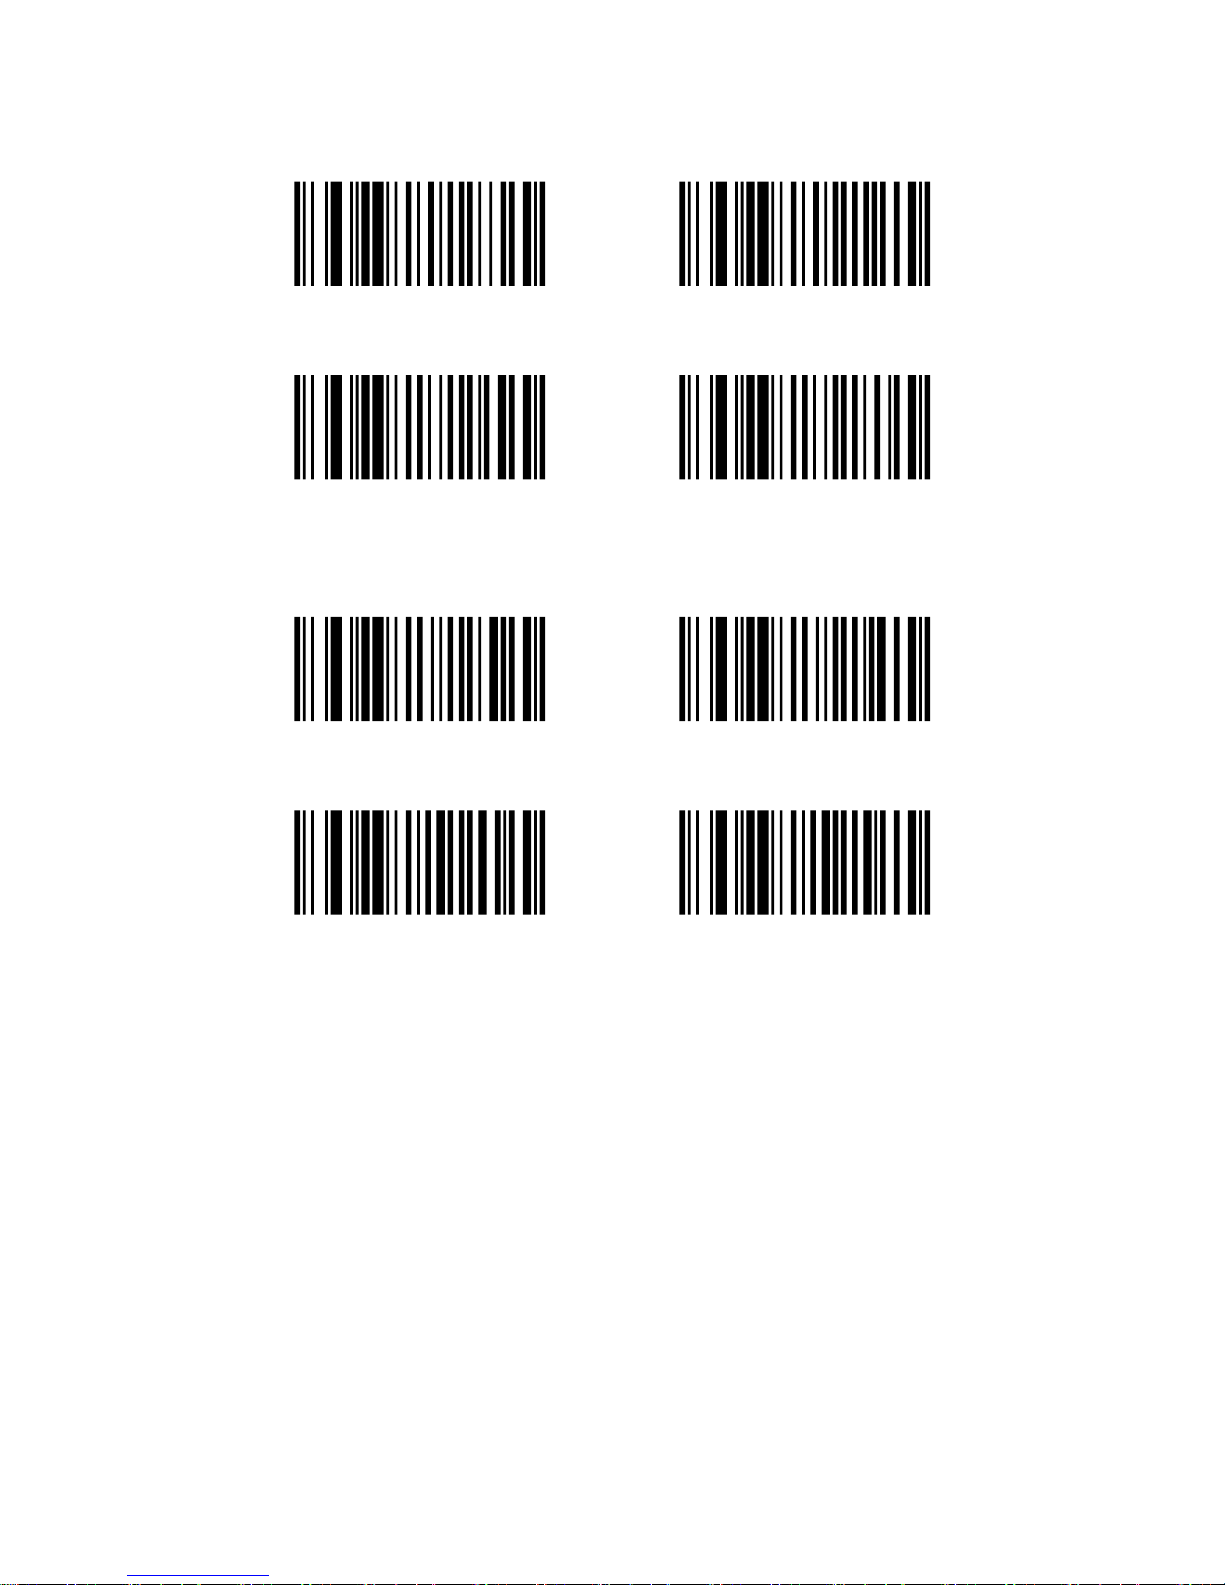
These code is used to setting whether output the check code of corresponding
barcode type. User can open or close the check codes’ output of designated
barcode type. Open means scan setting barcode “check code output enable” of
corresponding barcode type; close means scan setting barcode “check code
output Disable” of corresponding barcode type.
Page 24
23
\ F N C 3 0 4 0 1 0 1
\ F NC3 0 4 0 1 0 0
\ F N C 3 0 4 0 1 1 1
\ F NC3 0 4 0 1 1 0
\ F N C 3 0 4 0 2 0 1
\ F NC3 0 4 0 2 0 0
\ F N C 3 0 4 0 2 1 1
\ F NC3 0 4 0 2 1 0
\ F N C 3 0 4 0 4 0 1
\ F NC3 0 4 0 4 0 0
\ F N C 3 0 4 0 6 0 1
\ F NC3 0 4 0 6 0 0
Page 25
24
\ F N C 3 0 4 0 8 0 1
\ F NC3 0 4 0 8 0 0
\ F N C 3 0 4 1 0 0 1
\ F NC3 0 4 1 0 0 0
\ F N C 3 0 4 1 1 0 1
\ F NC3 0 4 1 1 0 0
\ F N C 3 0 4 1 4 0 1
\ F NC3 0 4 1 4 0 0
5. Error Check Switch Settings
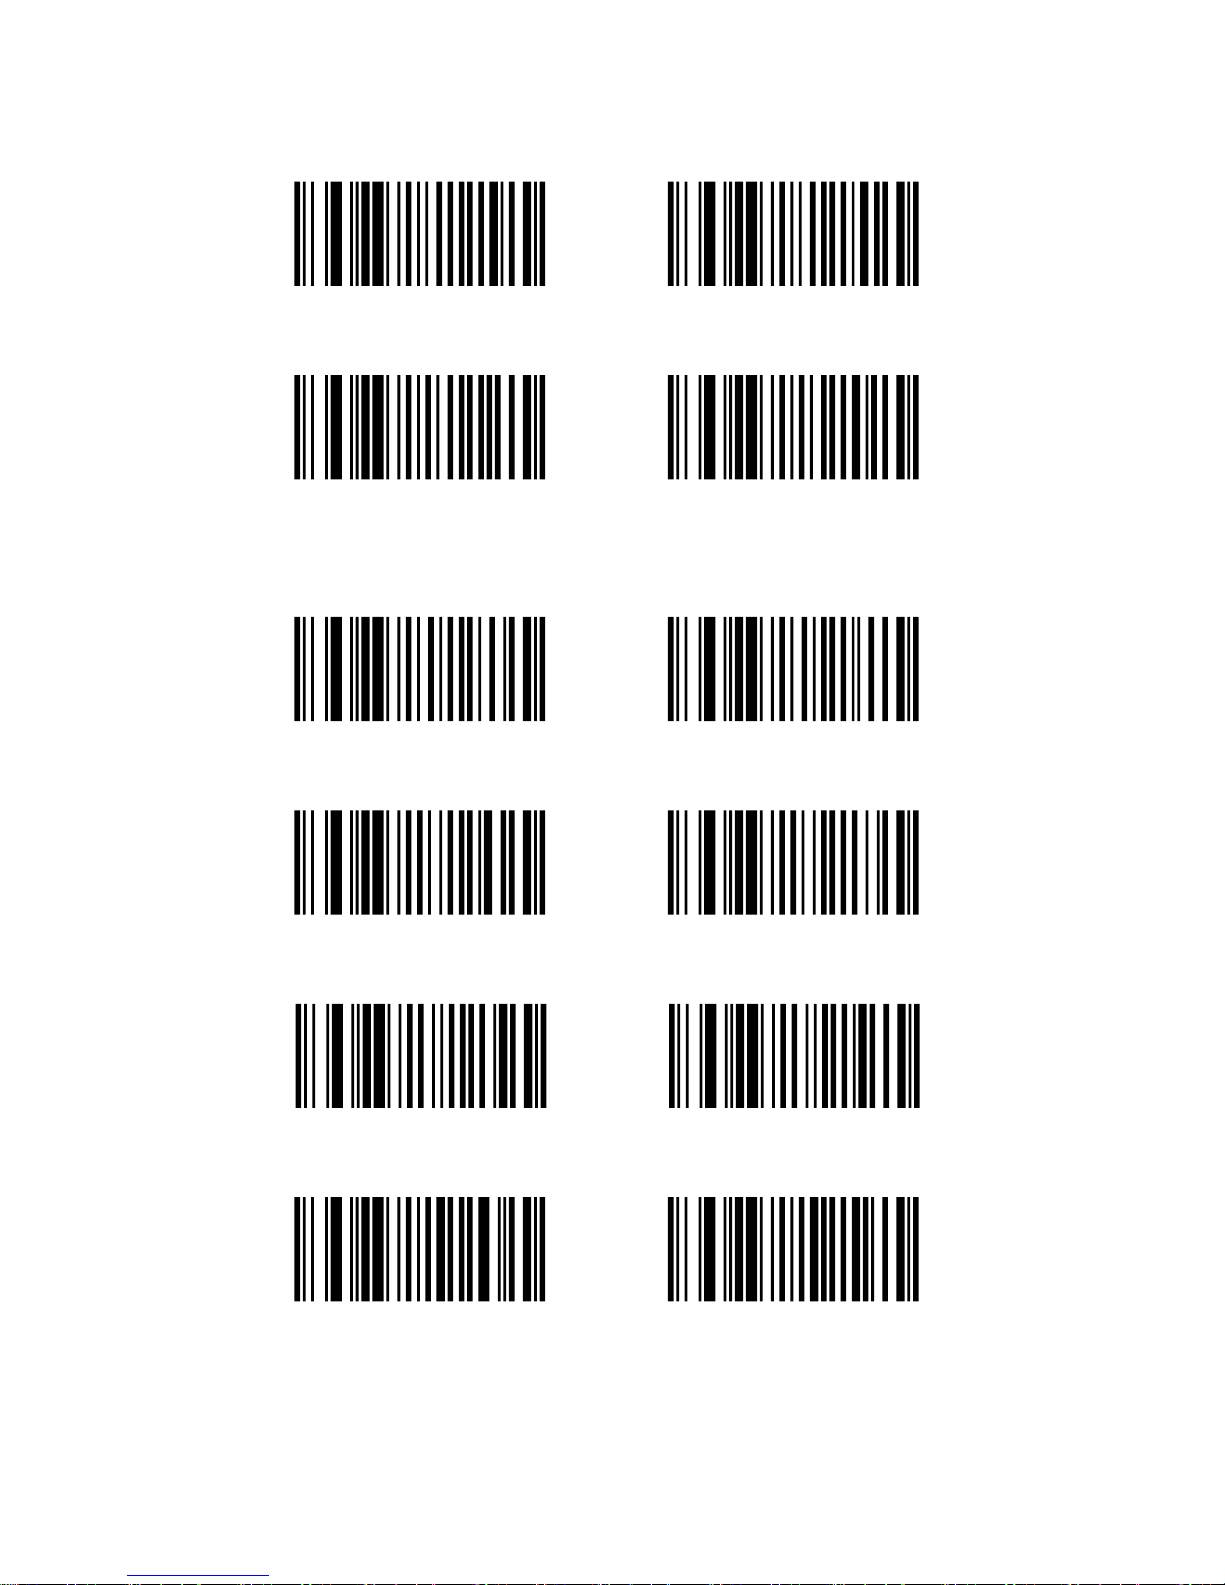
There is error-checking code for some barcode type. The code value can be
used for checking whether the barcode is recognized correctly or not. If open
this function, means use check code to calibrated with barcode characters, if
calibrate error, then it would be considered as misrecognition, cannot output
barcode. User can open or close the error-checking of a barcode by manual
according to user’s needs. Scan the setting barcode “Error-checking Enable” of
corresponding barcode type can open this function; scanning the setting barcode
“Error-checking Disable” of corresponding barcode type can close.
Warning: Because check code not only can be used to checkout, but also can be
used as barcode character, so users should use this function prudently before
confirming the specific property of barcode that recognized.
Page 26
25
\ F N C 3 0 5 0 4 0 1
\ F N C 3 0 5 0 4 0 0
\ F N C 3 0 5 0 6 0 1
\ F N C 3 0 5 0 6 0 0
\ F N C 3 0 5 0 8 0 1
\ F N C 3 0 5 0 8 0 0
\ F N C 3 0 5 1 0 0 1
\ F N C 3 0 5 1 0 0 0
\ F N C 3 0 5 1 1 0 1
\ F N C 3 0 5 1 1 0 0
\ F N C 3 0 5 1 4 0 1
\ F N C 3 0 5 1 4 0 0
6. Lead Code Output Setting
Page 27
26
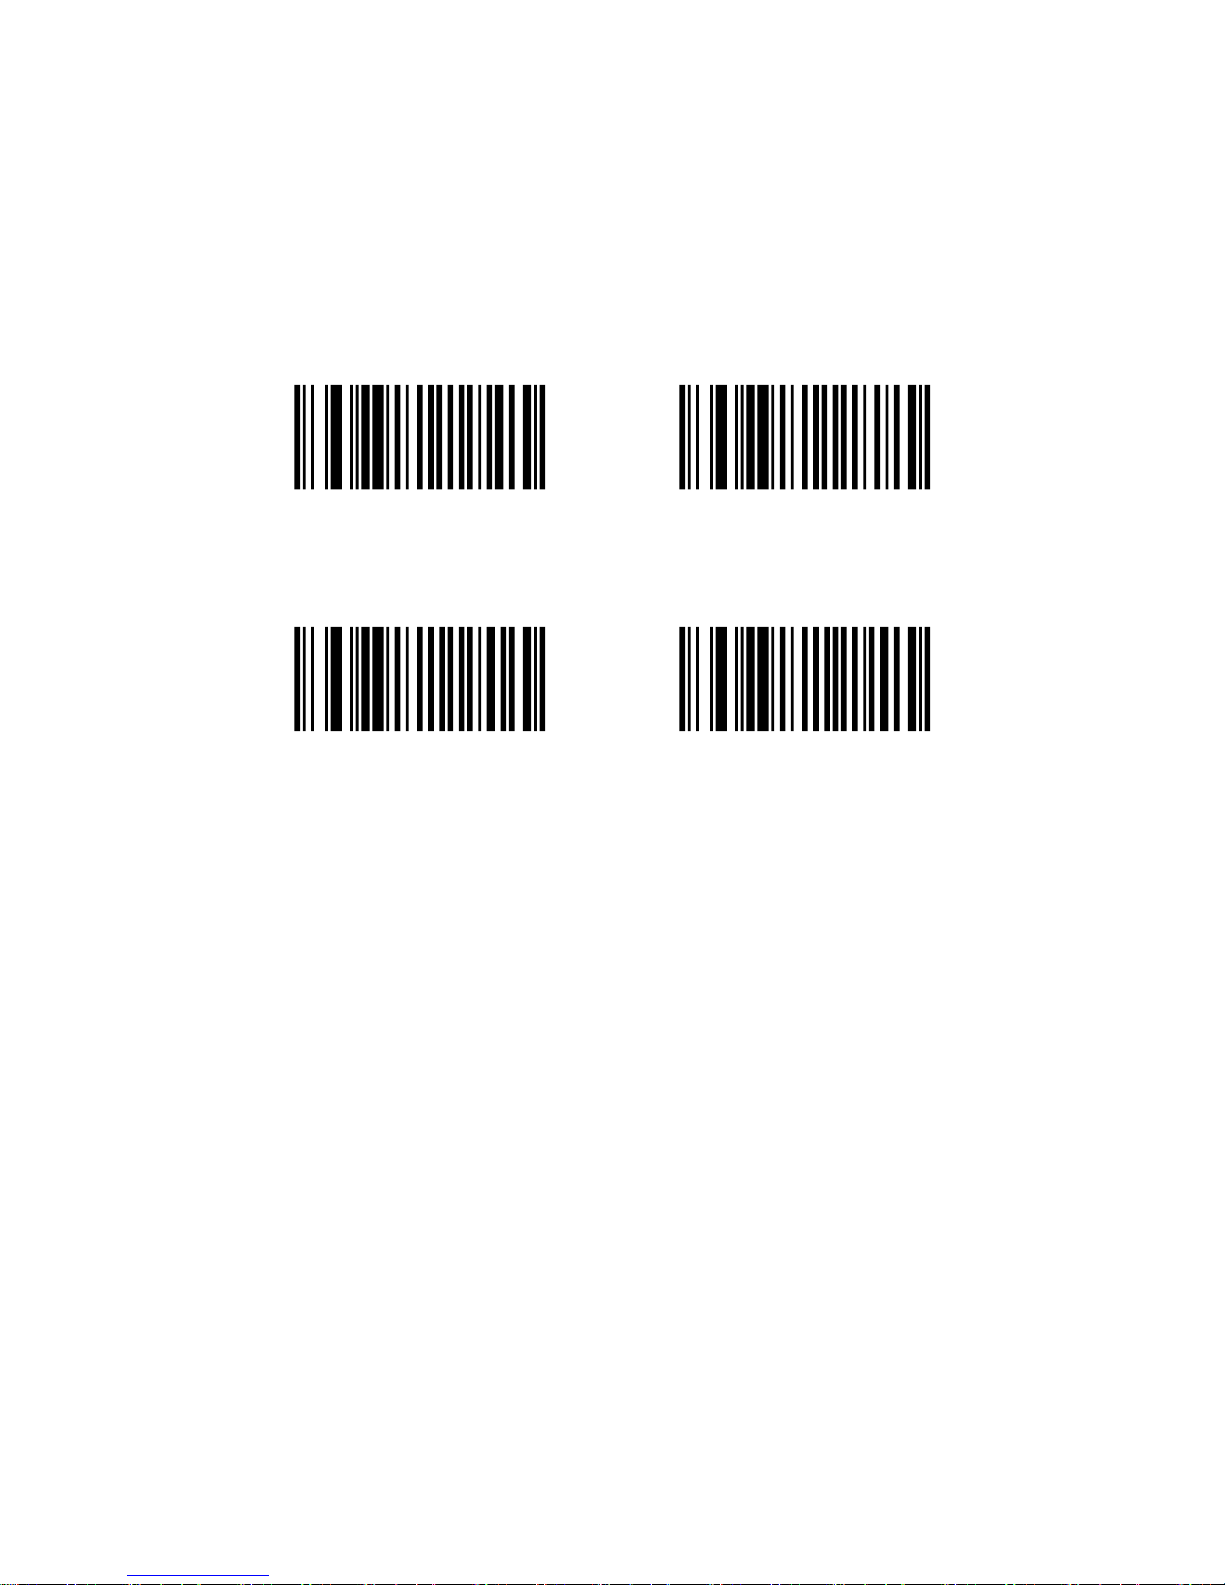
These setting barcode is used to set whether output the lead code of
corresponding barcode. User can open or close the lead code outputting by
manual according to user’s need. Open means scan the setting barcode “lead
code enable” of corresponding barcode; close means scan the “lead code
disable” of corresponding barcode.
\ F N C 3 0 6 0 1 0 1
\ F NC3 0 6 0 1 0 0
\ F N C 3 0 6 0 2 0 1
\ F NC3 0 6 0 2 0 0
7. Complement Code Output Switch Settings
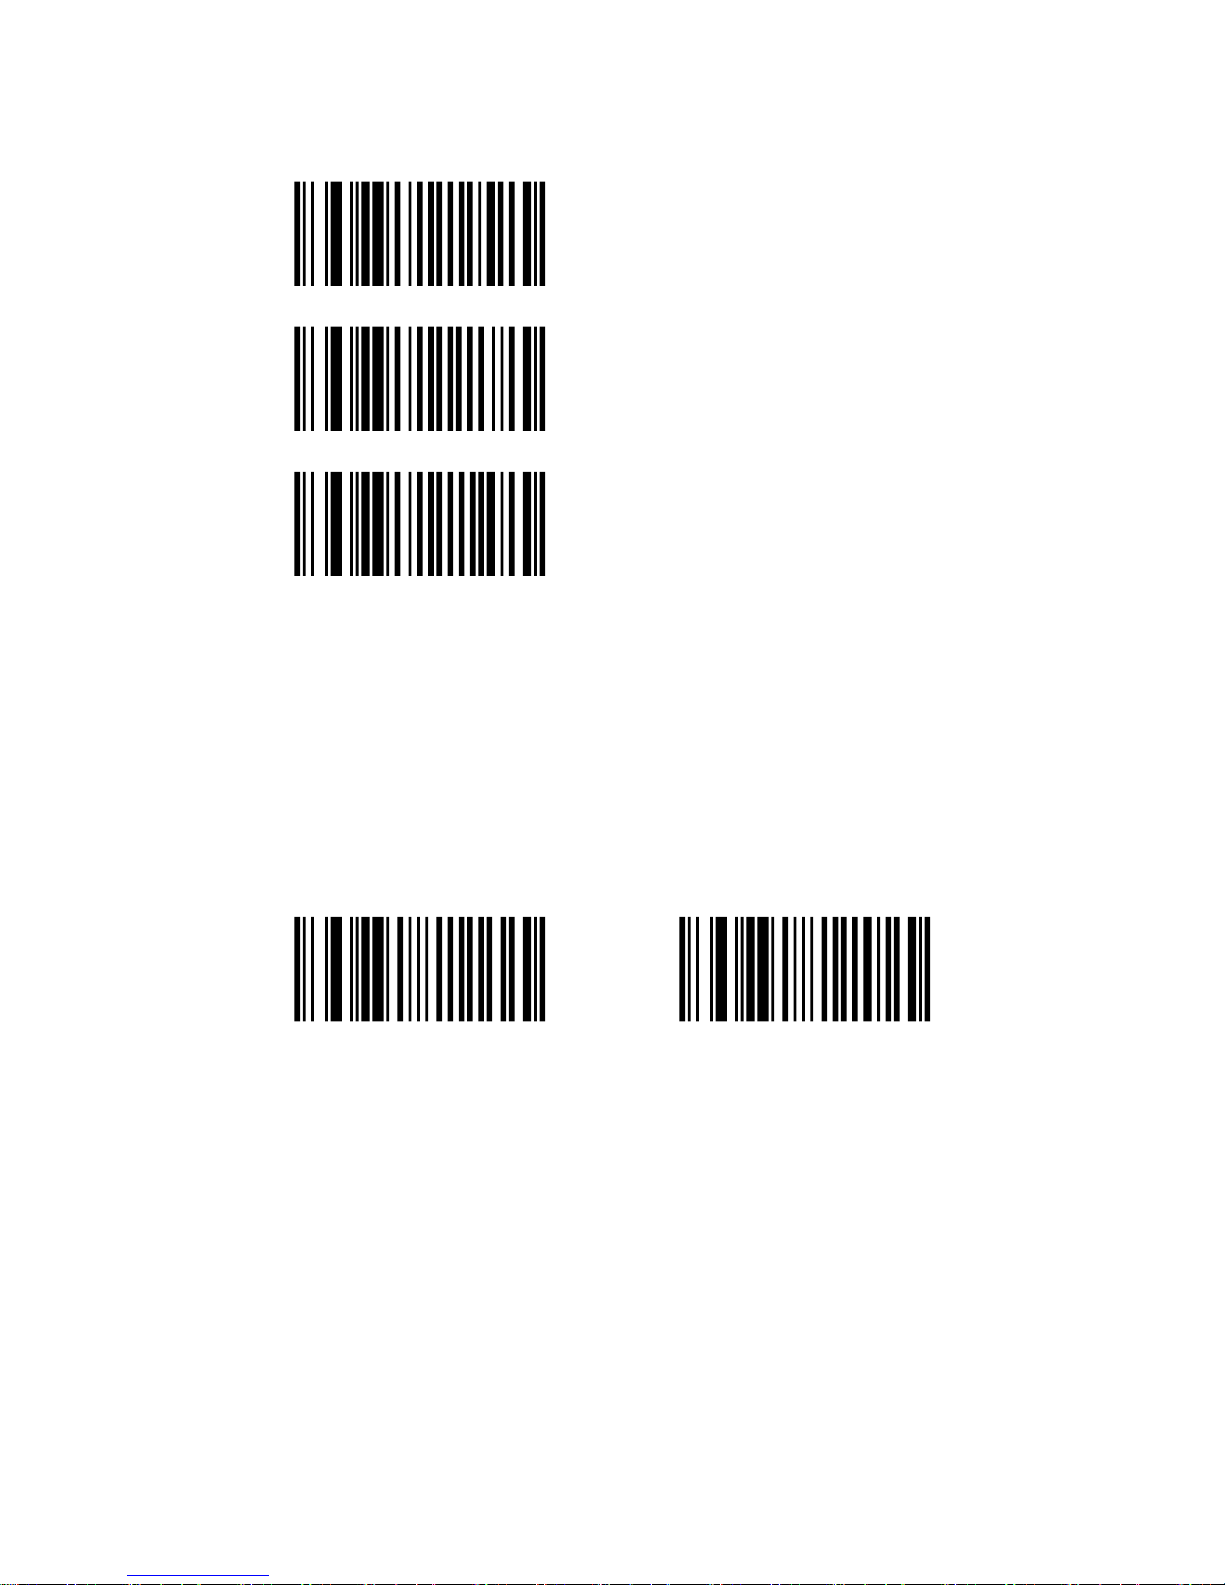
These setting barcode is used to set whether output the complement code of
corresponding barcode. Users can open and close the fill code outputting of a
barcode by manual according to user’s need. Open means scan the barcode “Fill
code outputting enable” of corresponding barcode; close means scan the
barcode “Fill code outputting Disable” of corresponding barcode.
Open: When the complement code cannot be recognized correctly, it will be
considered as wrong recognition, would not output barcode; when the
complement code can be recognized correctly, barcode character will be output
with complement code character ;
Close: No matter whether there is complement code for the barcode,
complement code would not be output;
Auto: When complement code can be recognized, barcode character will be
output with complement code character; when complement code cannot be
recognized, only barcode character will be output.
Page 28
27
\ F N C 3 0 7 0 1 0 1
\ F N C 3 0 7 0 1 0 0
\ F N C 3 0 7 0 1 0 2
8. FULL ASCII Switch Setting
This setting is only effective to barcode type CODE 39 because only CODE39
has FULL ASCII conversion. User can open or close FULL ASCII switch
setting by manual according to user’s requirement.
Open: recognize barcode CODE39 of FULL ASCII CODE.
Close: only recognize normal barcode CODE 39;
\ F N C 3 0 8 0 4 0 1
\ F NC3 0 8 0 4 0 0
9. Only Digit Recognition of Barcode- Switch Setting
In order to increase the recorded number of barcode, user can set the mode to be
“Only Digit Recognition of Barcode”, which could double the recorded number.
Recognition All Letters & Digits of Barcode
Page 29
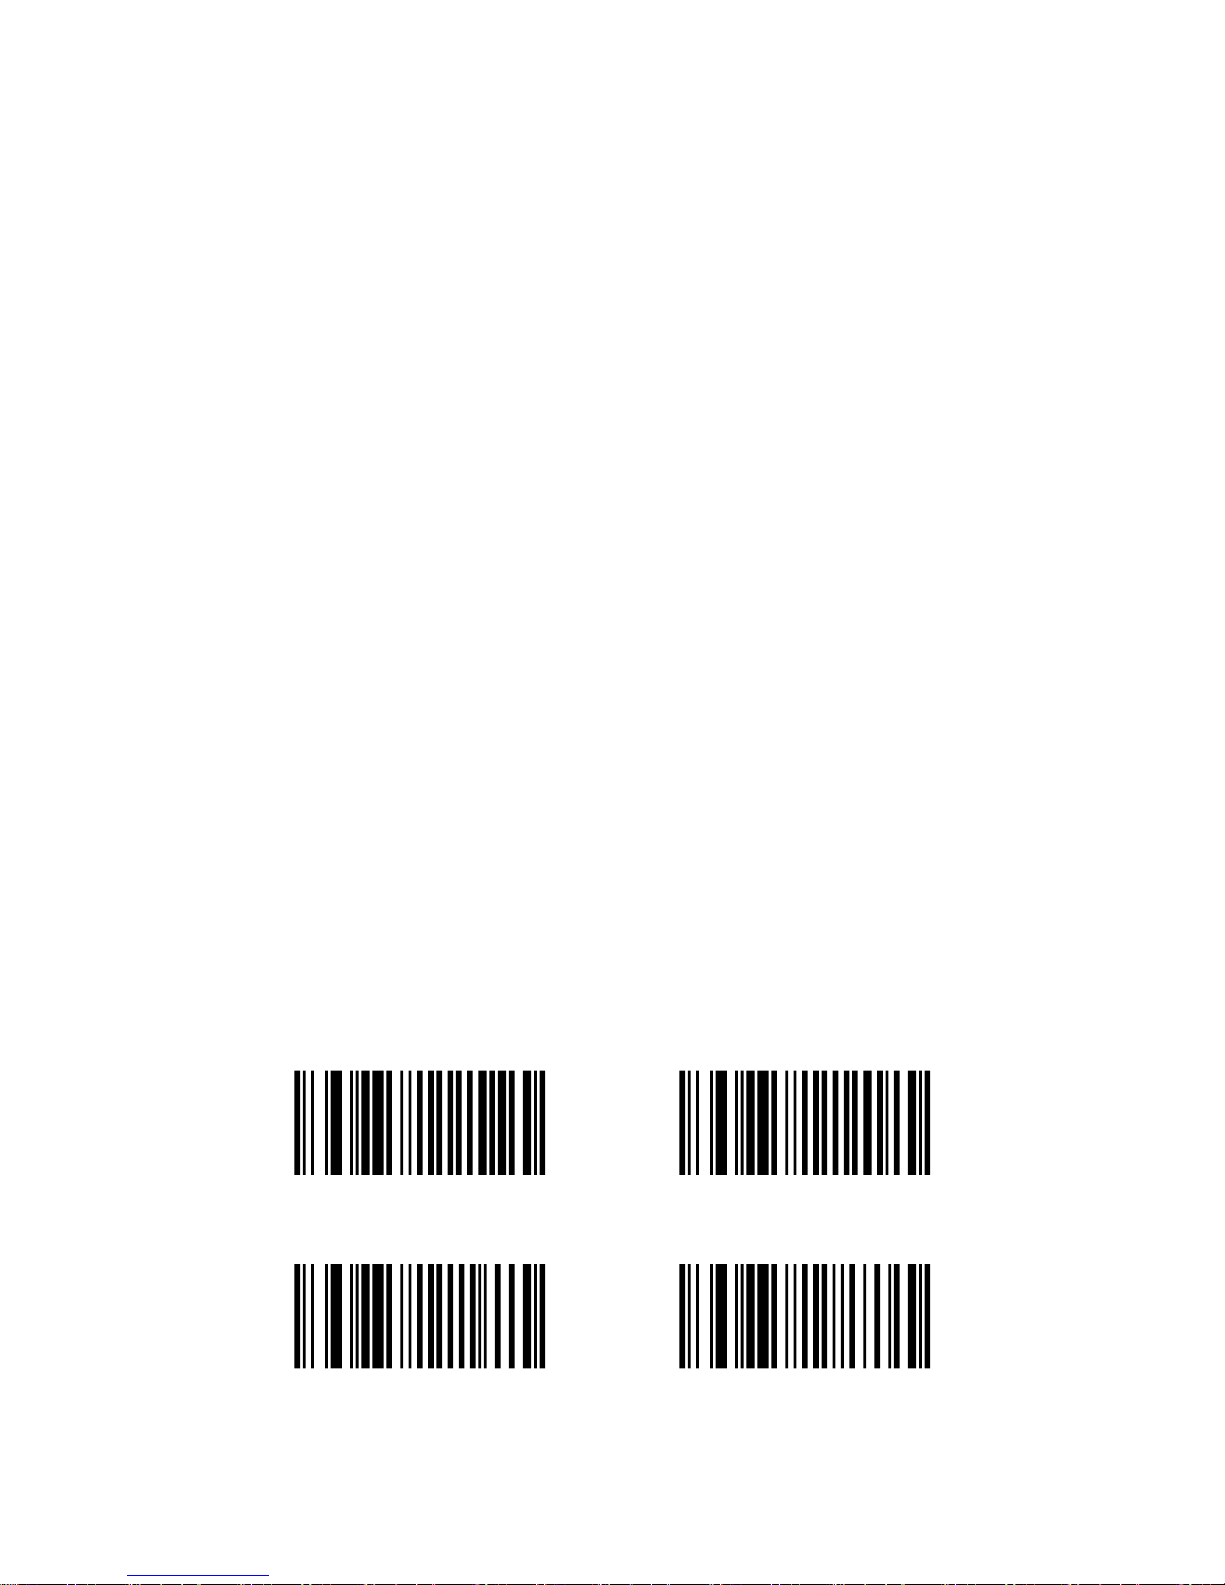
28
When Scan “HYCOCMD-ALLBAR”, recognize all letters and digits of
barcode. At this time, if barcode less than or equal to 15 characters (including
Enter or Tab character), the maximum recorded number is 512 bar codes. When
record reach 500 bar codes, scanner head will close. More than 15 and less than
or equal to 30 characters (including Enter or Tab character), the maximum
recorded number is 256 bar codes; when record reach 250 bar codes, scanner
head will close. More then or 30 and less than or equal to 45 characters
(including Enter or Tab character), the maximum recorded number is 170 bar
codes, when record already 166 bar codes, scanner head will close.
When scan “HYCOCMD-NUMBAR”, only recognize the digits of barcode,
ignore letters. At that time, if barcode less than or equal to 30 characters
(including Enter or Tab character), the maximum recorded number is 512 bar
codes. When record reach 500 bar codes, scanner head will close. More than 30
and less than or equal to 60 characters (including enter and tab character), the
maximum recorded number is 256 bar codes, when record reach 250 bar codes,
scanner head will close.
Scanner default value: all letters and digits of recognized barcode, which is
“HYCOCMD-ALLBAR”.
10. Digit Barcode
Digit barcode 0~9, is the Auxiliary barcode of setting barcode.
\ F N C 3 1 1 0 1 0 0
\ F NC3 1 1 0 1 0 1
\ F N C 3 1 1 0 1 0 2
\ F NC3 1 1 0 1 0 3
Page 30
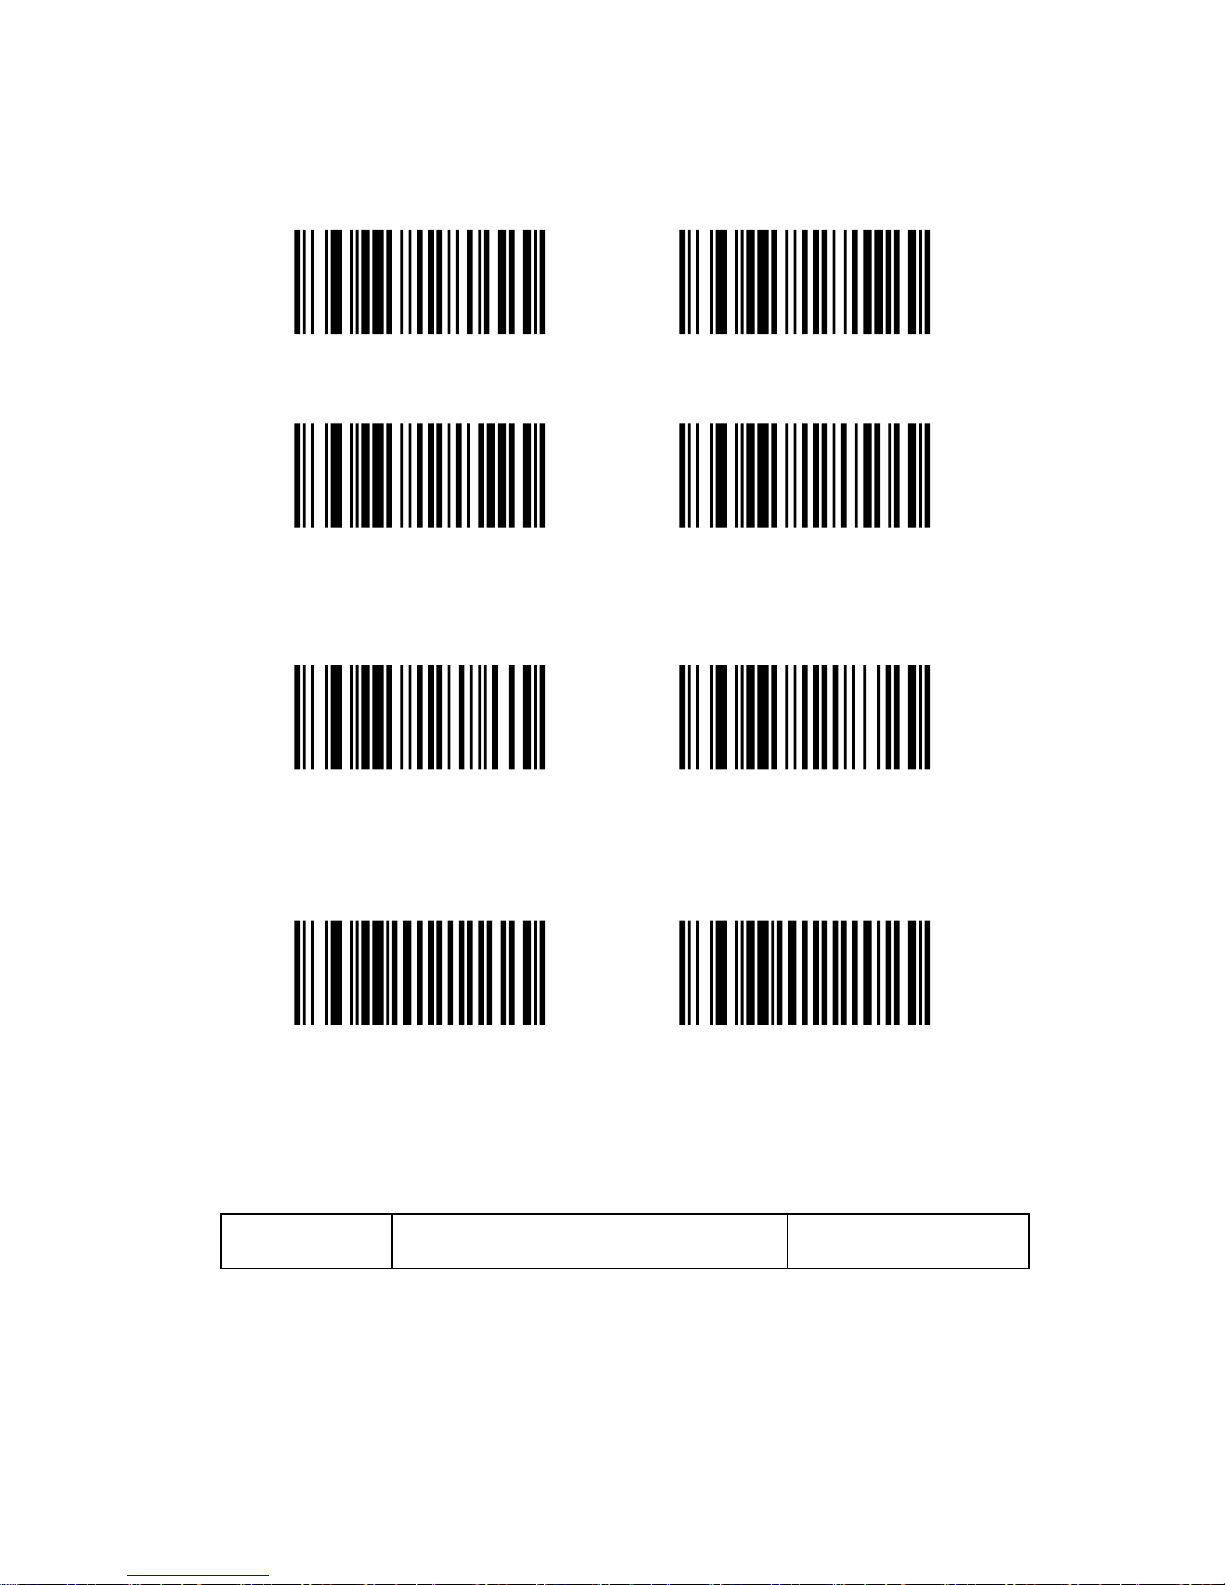
29
\ F N C 3 1 1 0 1 0 4
\ F NC3 1 1 0 1 0 5
\ F N C 3 1 1 0 1 0 6
\ F NC3 1 1 0 1 0 7
\ F N C 3 1 1 0 1 0 8
\ F NC3 1 1 0 1 0 9
11. Configuration Confirm & Cancel
“Confirm” and “Cancel” barcode, is the Auxiliary barcode of setting barcode.
\ F N C 3 1 2 0 1 0 1
\ F NC3 1 2 0 1 0 0
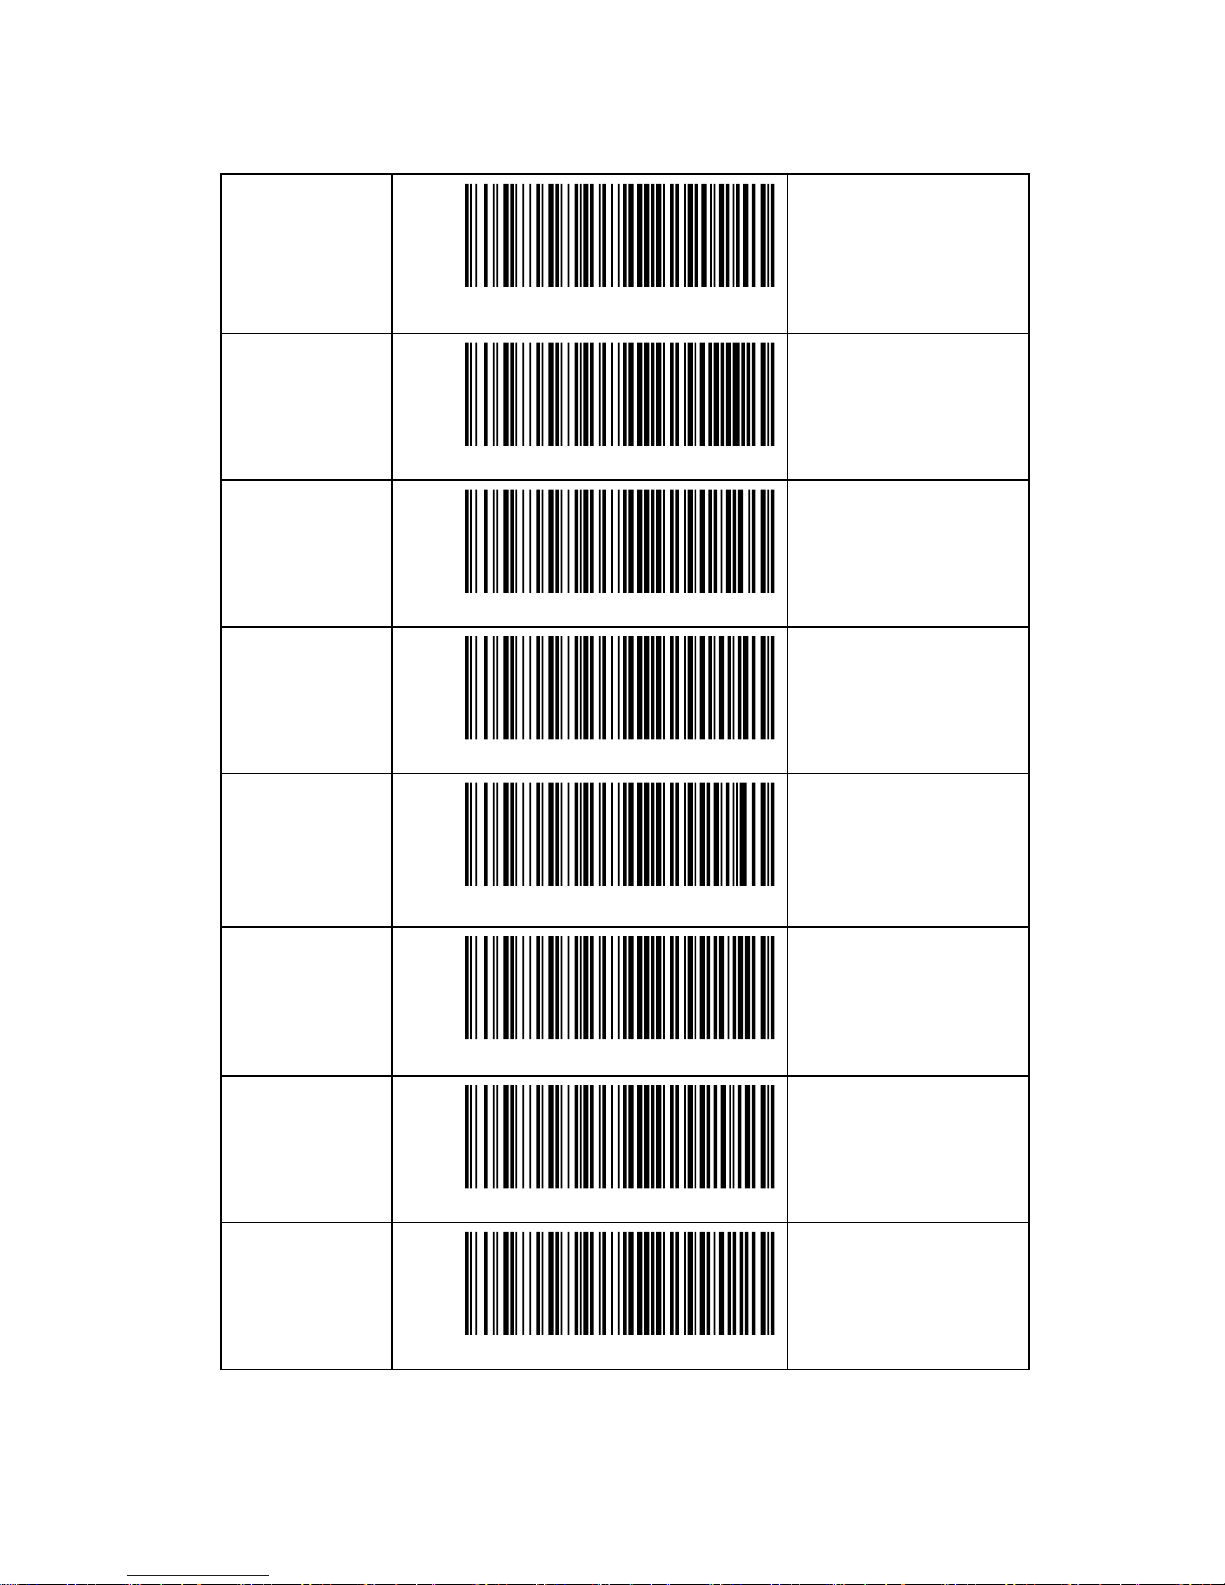
12. Power Setting
This is advanced setting; users can set the corresponding power of barcode
scanner according to the actual application. Users should use this setting
prudently, before setting, please consult distributor or our factory.
Power Grade
Barcode
Transmission Range
Page 31
30
Grade 8
(the max
power, factory
default )
H Y C O C M D - P W R 2 0
200 Meters
Grade 7
H Y C O C M D - P W R 1 7
160 Meters
Grade 6
H Y C O C M D - P W R 1 4
120 Meters
Grade 5
H Y C O C M D - P W R 1 1
100 Meters
Grade 4
H Y C O C M D - P W R 0 8
80 Meters
Grade 3
H Y C O C M D - P W R 0 5
60 Meters
Grade 2
H Y C O C M D - P W R 0 2
40 Meters
Grade 1
H Y C O C M D - P W R 0 1
20 Meters
Page 32

31
13. Advanced Setting
Warning: Should install serial port driver after changing into serial mode.
If do not install driver, then every time connecting to USB, will get popup
installation indication; also cannot change back to keyboard mode anymore, and
the read barcode data can’t be transmitted.
 Loading...