

Page 1

User Guide
NC950 Series
使用指南
Page 2

Registering your product allows you to access
support information and receive latest product
updates. Register you products on the Livewire
Asia Pacific webisite below.
www.livewire-asiapacific.com
Product Registration
Page 3

Table of Contents
1
3
4
6
8
9
10
11
12
13
14
15
16
17
17
17
17
18
19
19
19
20
20
21
22
23
23
24
24
Main Unit Description
Active Remote Description
General Operation
Cable Test
- Cable Test Overview
- Cable Test Set Up
- Cable Type
- Cable Name
- Perform a Cable Test
- Cable Fault
- Save Cable Test result
- Test List
Link Test
- Port discovery
- POE Test
- Tone
- Link Light
Network Test
- Link Status
- DHCP
- Ping Test
- Trace Route
- VLAN
- Discovery Protocols
System Settings
- IPV4 Setup
- Display Settings
- Time and Date Settings
- Timeout Settings
24
25
27
28
29
29
30
31
32
33
34
35
36
- User Information
- Firmware
- Versions
File Manager
- File Management
- File Transfer
Icon Glossary
Product Kit Description
Optional Accessories
Product Specification
Maintenance
Safty Information
Warranty and After Service
Page 4
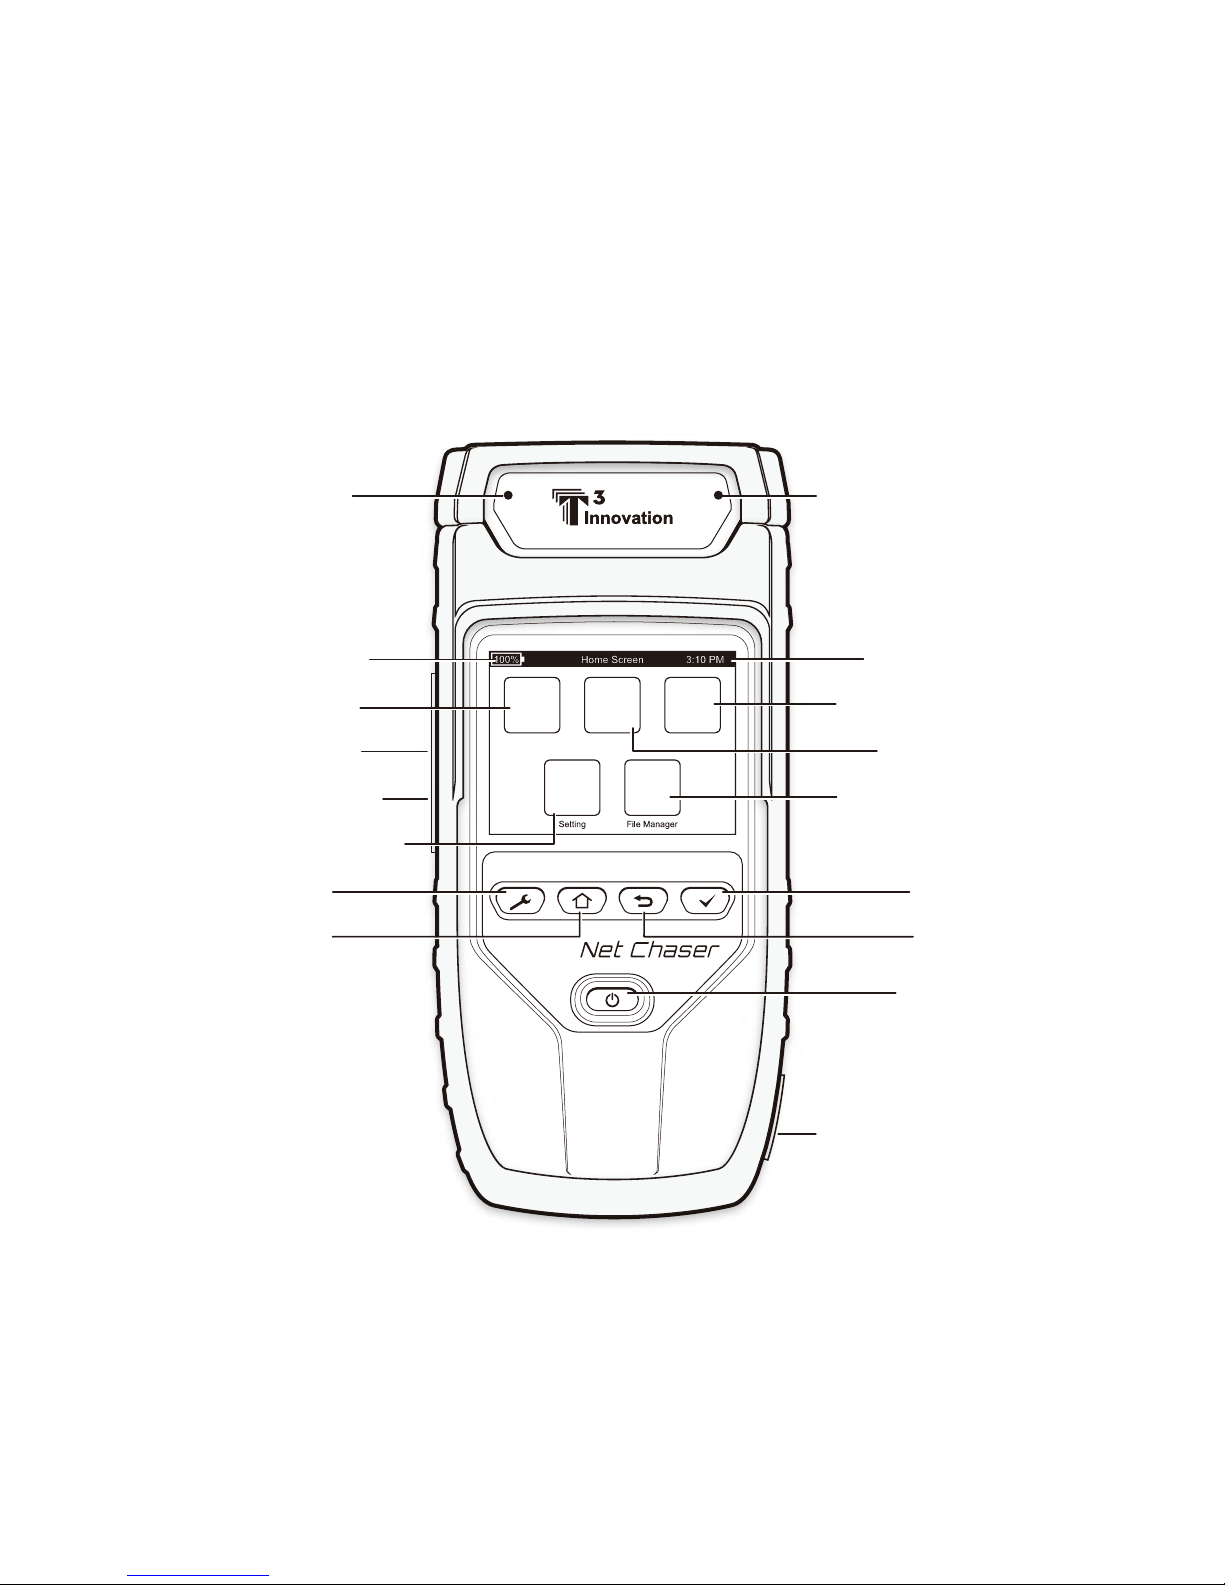
Net Chaser
Main Unit Description
Cable Test Link Test Network Test
CHARGELINK
Cable Test
Power Sign
System Seng
File Manager
Network Test
Link Test
Seng
Test
Power
Home
Back
Link Sign
Power Warning
Status Bar
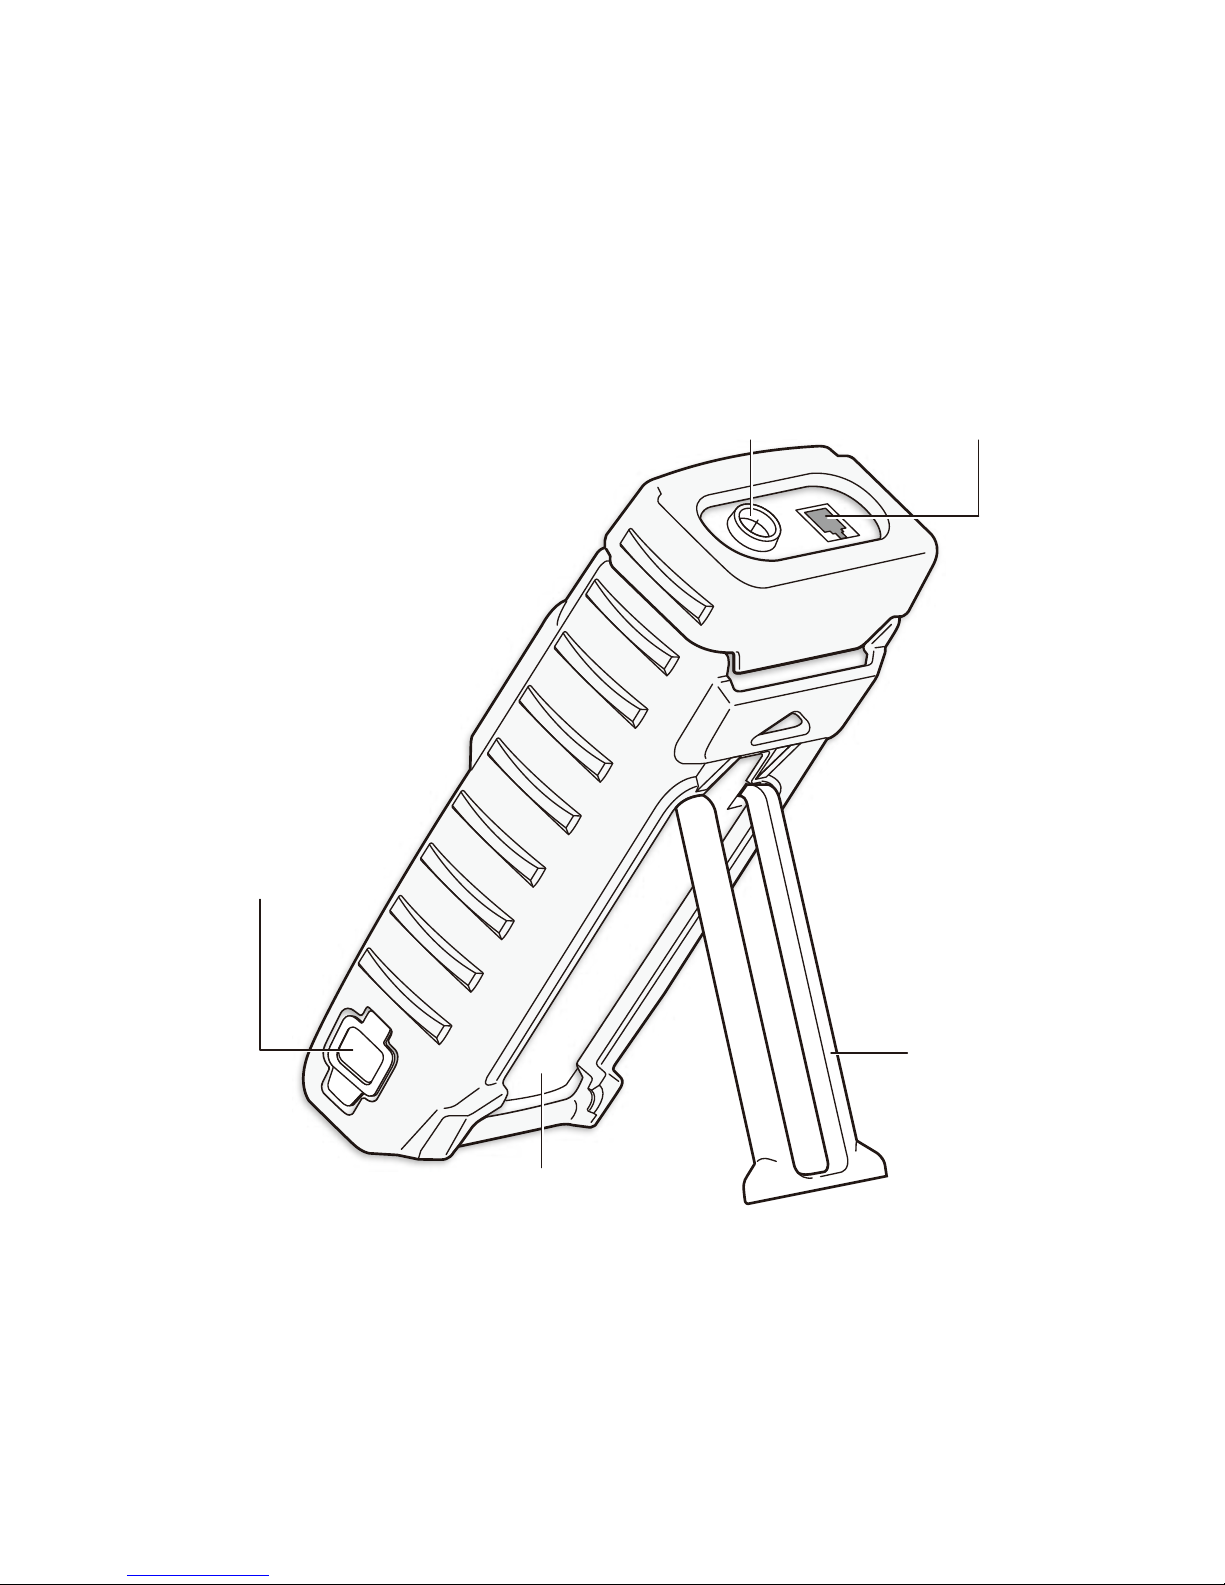
D/C Charger Plug
Micro USB
SD Card Slot
1
Page 5
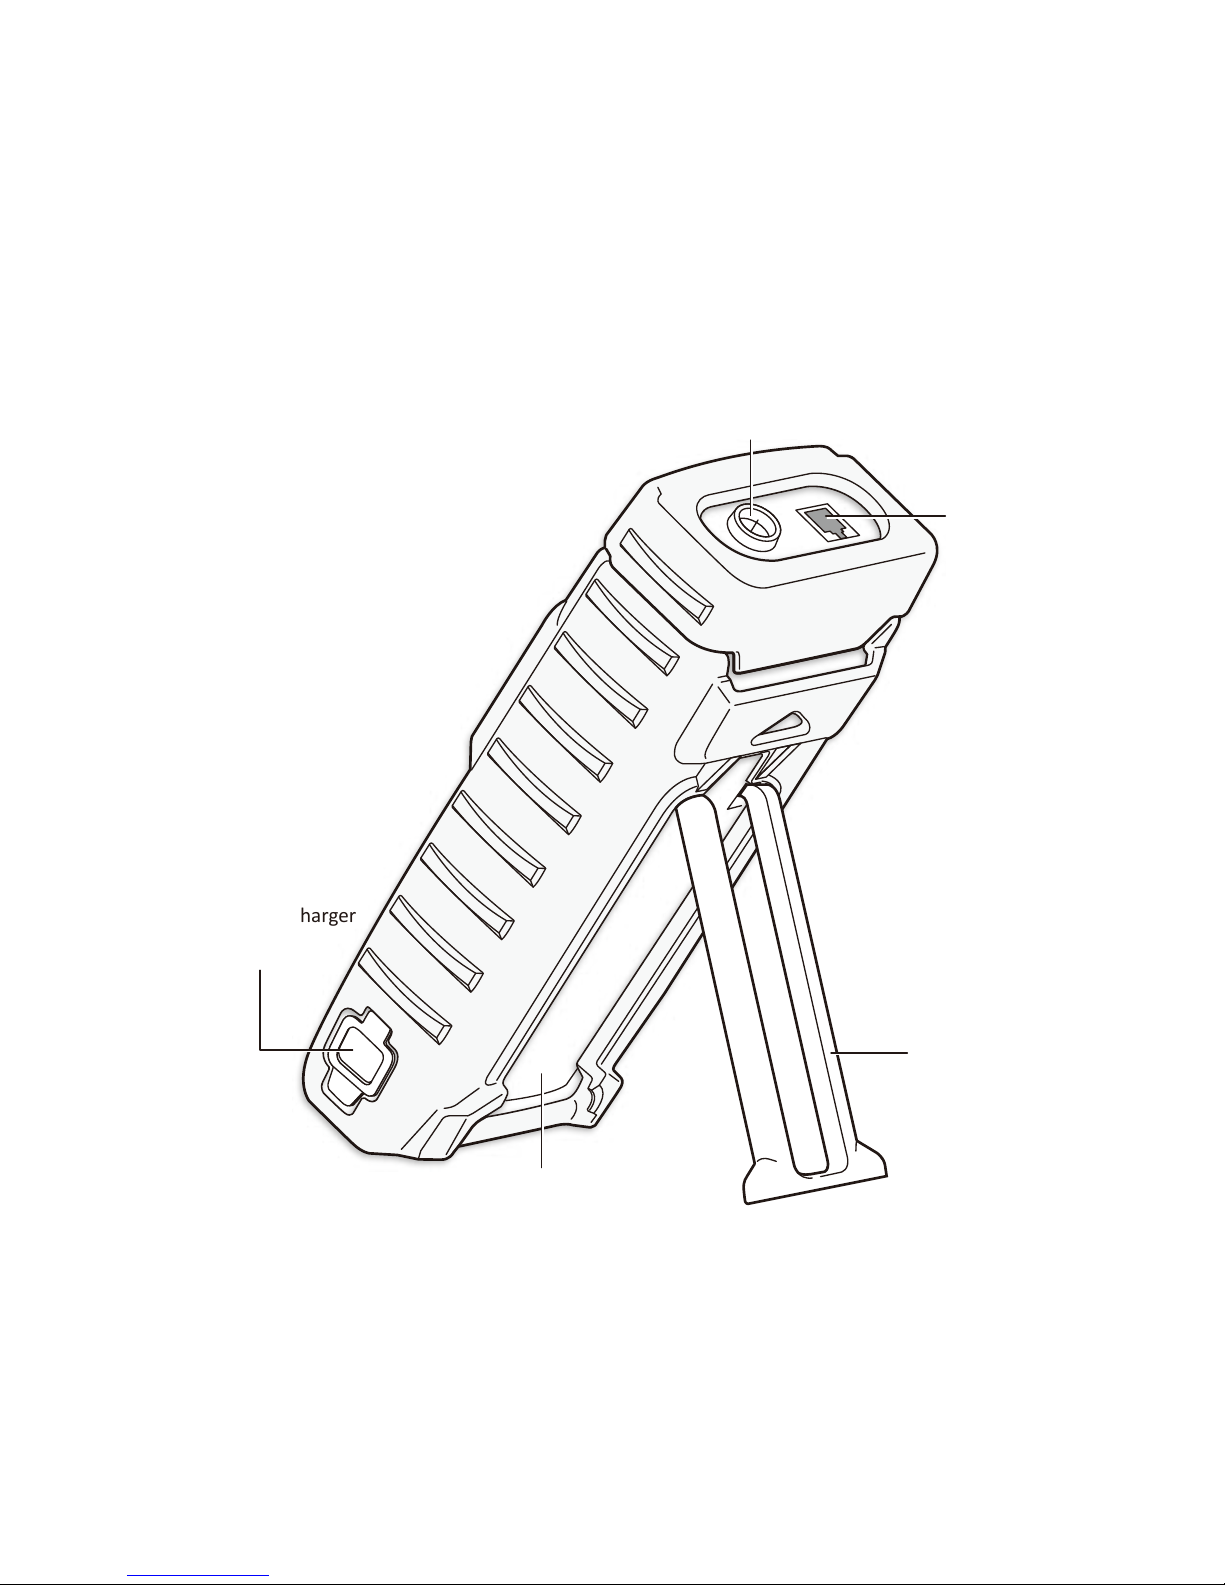
D/C Charger
Plug
RJ45
Jack
F-Connector
Kickstand
Baery Door
2
Page 6
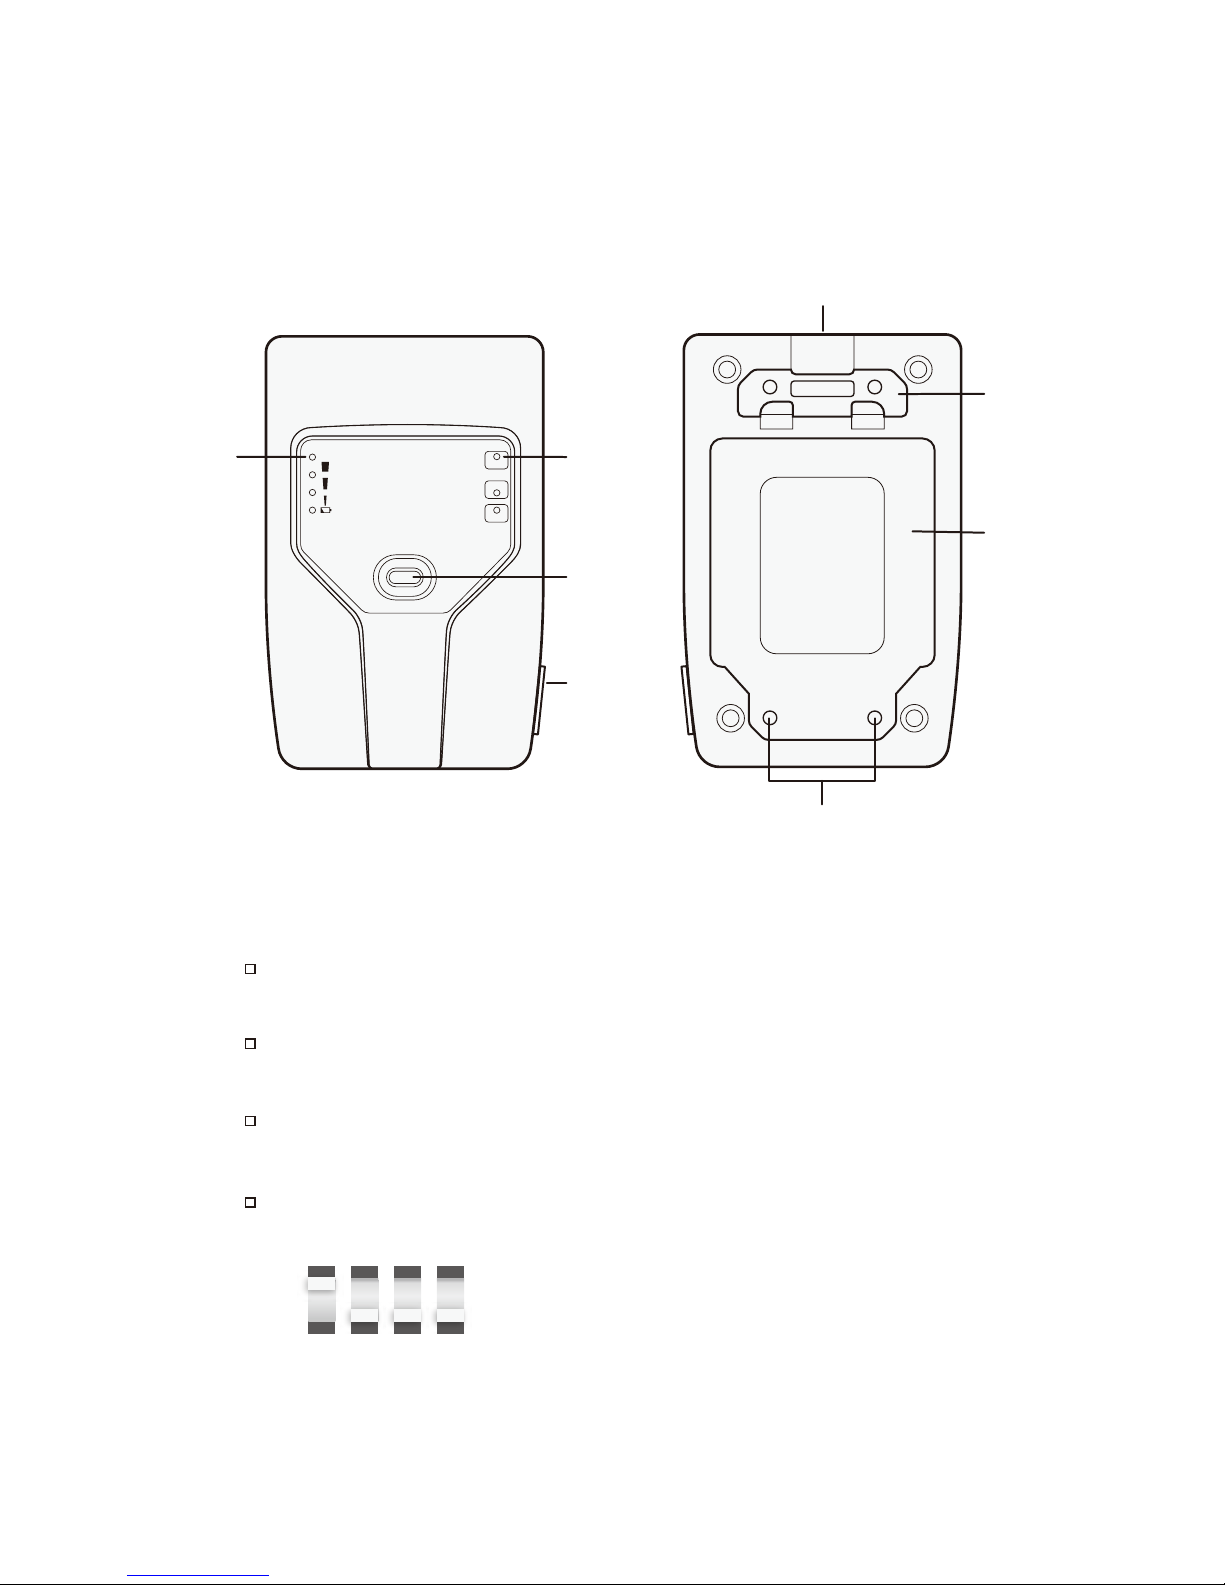
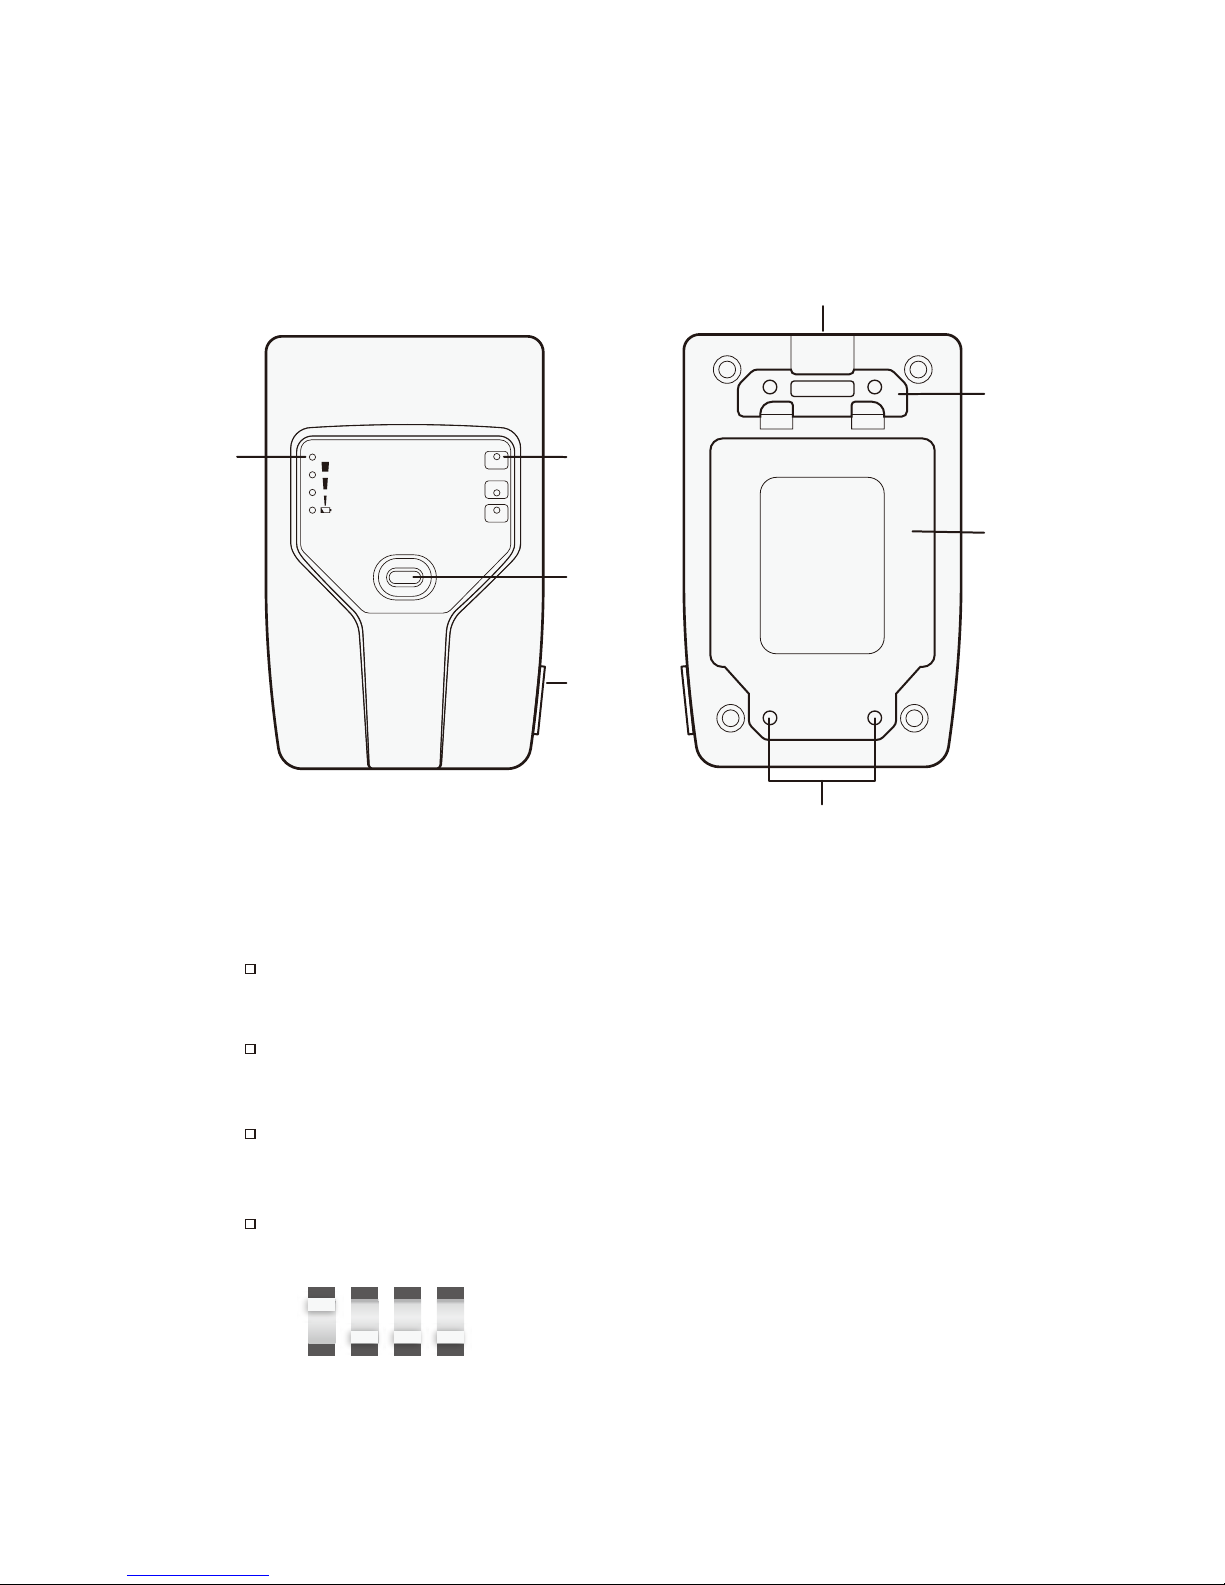
STATUS
100%
75%
25%
BAT LOW
LINKED
PASS
FAIL
RJ45 Jack
Net Chaser
Active Remote Description
#Active Remote is only included in NC950-AR kit
Remote set to ID1
Working
Status
LED’s
Baery
Status
LED’s
Status
Buon
D/C
Charger
Plug
1 2 3 4
860
ON
A6TN
Hook
Strap
Loop
Baery
Door
Baery Door Screws
The Active Remote is used with the Net Chaser to perform a speed
certification test. The Active remote can be configured to display 1-4
remote ID’s
Press the Status button to display the battery percentage and the
Pass/Fail result of the previous cable test.
Push the desired ID switch up and push the other keys down.
To set the remote ID, remove the battery door screws (see Active
Remote on pg.8) and remove the battery door.
Gently pull out the battery (it is not necessary to unplug the battery
to access the ID indicator switch.)
3
Page 7
On / Off
Turn Net Chaser on by pressing the Power button.
Tap the Power button to put the Net Chaser in sleep mode.
Press and hold the Power button to power the unit off.
Automatic Power Down
The Net Chaser automatically enters sleep mode to conserve battery
power if no input or activity is performed on the device. See System
Settings page to adjust the length of time before the automatic power
down occurs.
General Operation
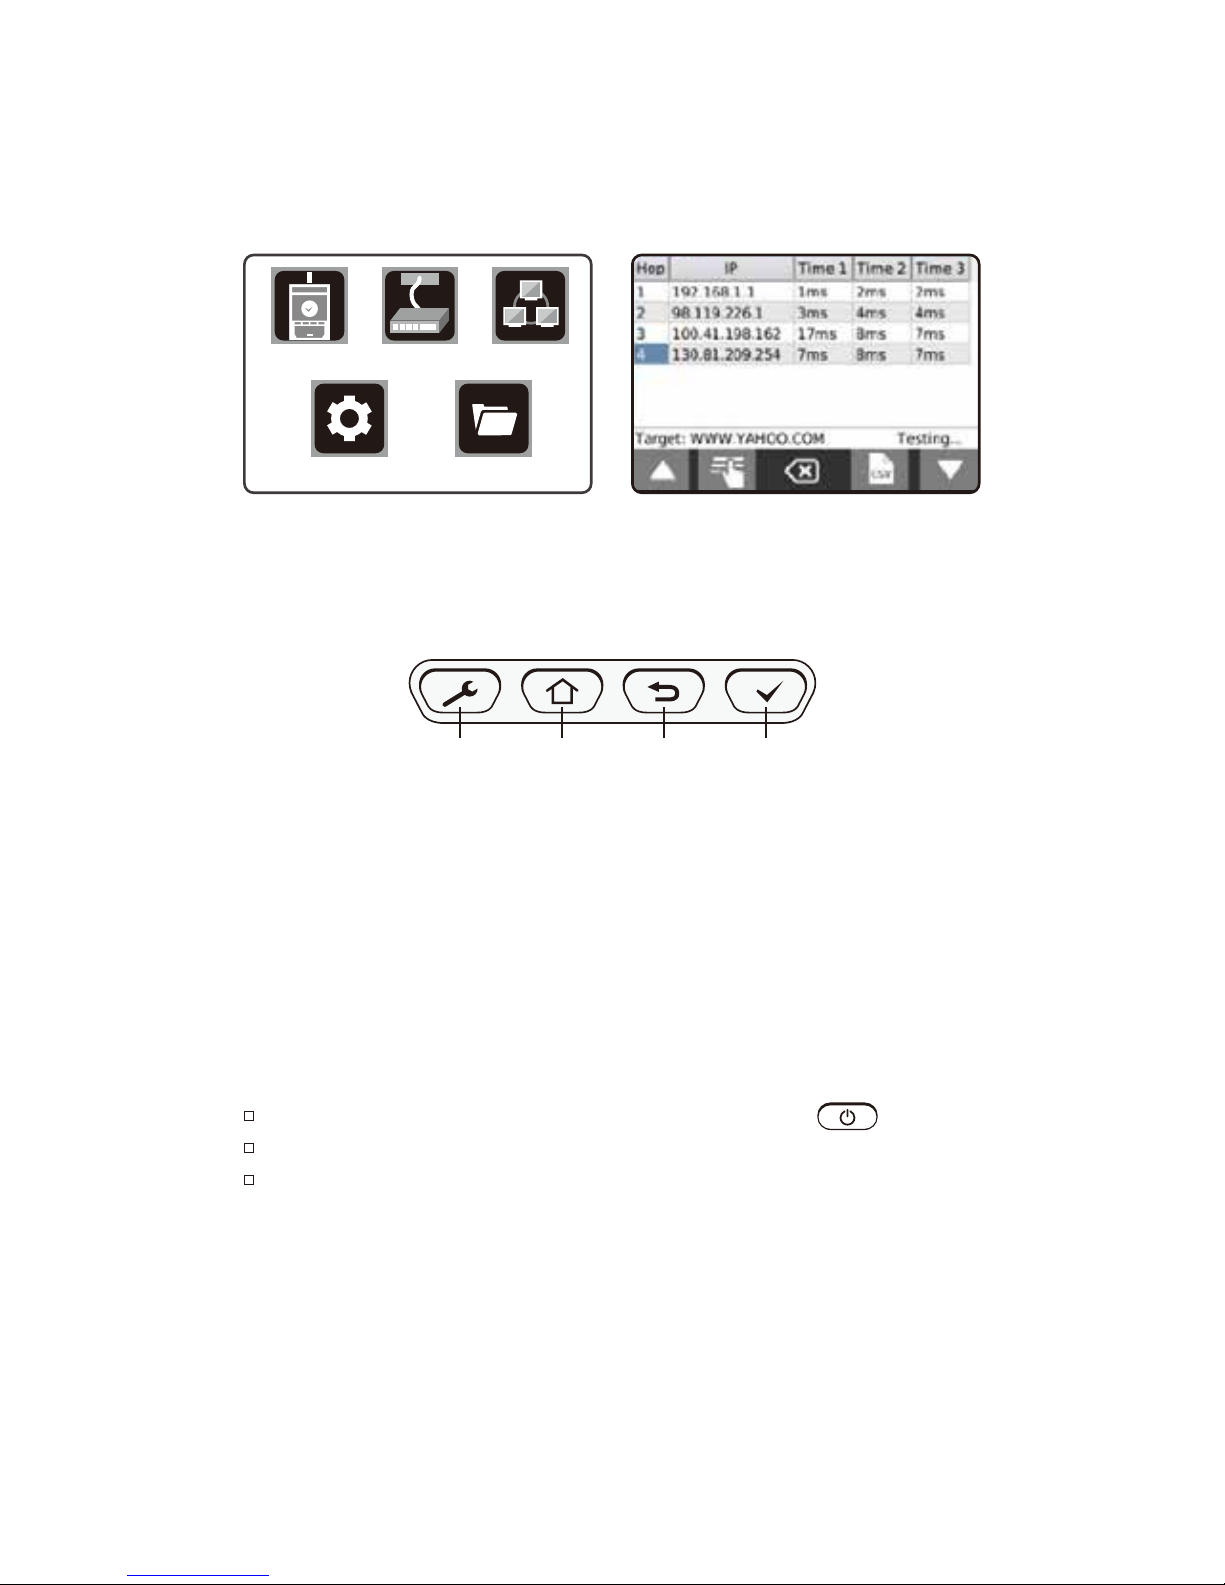
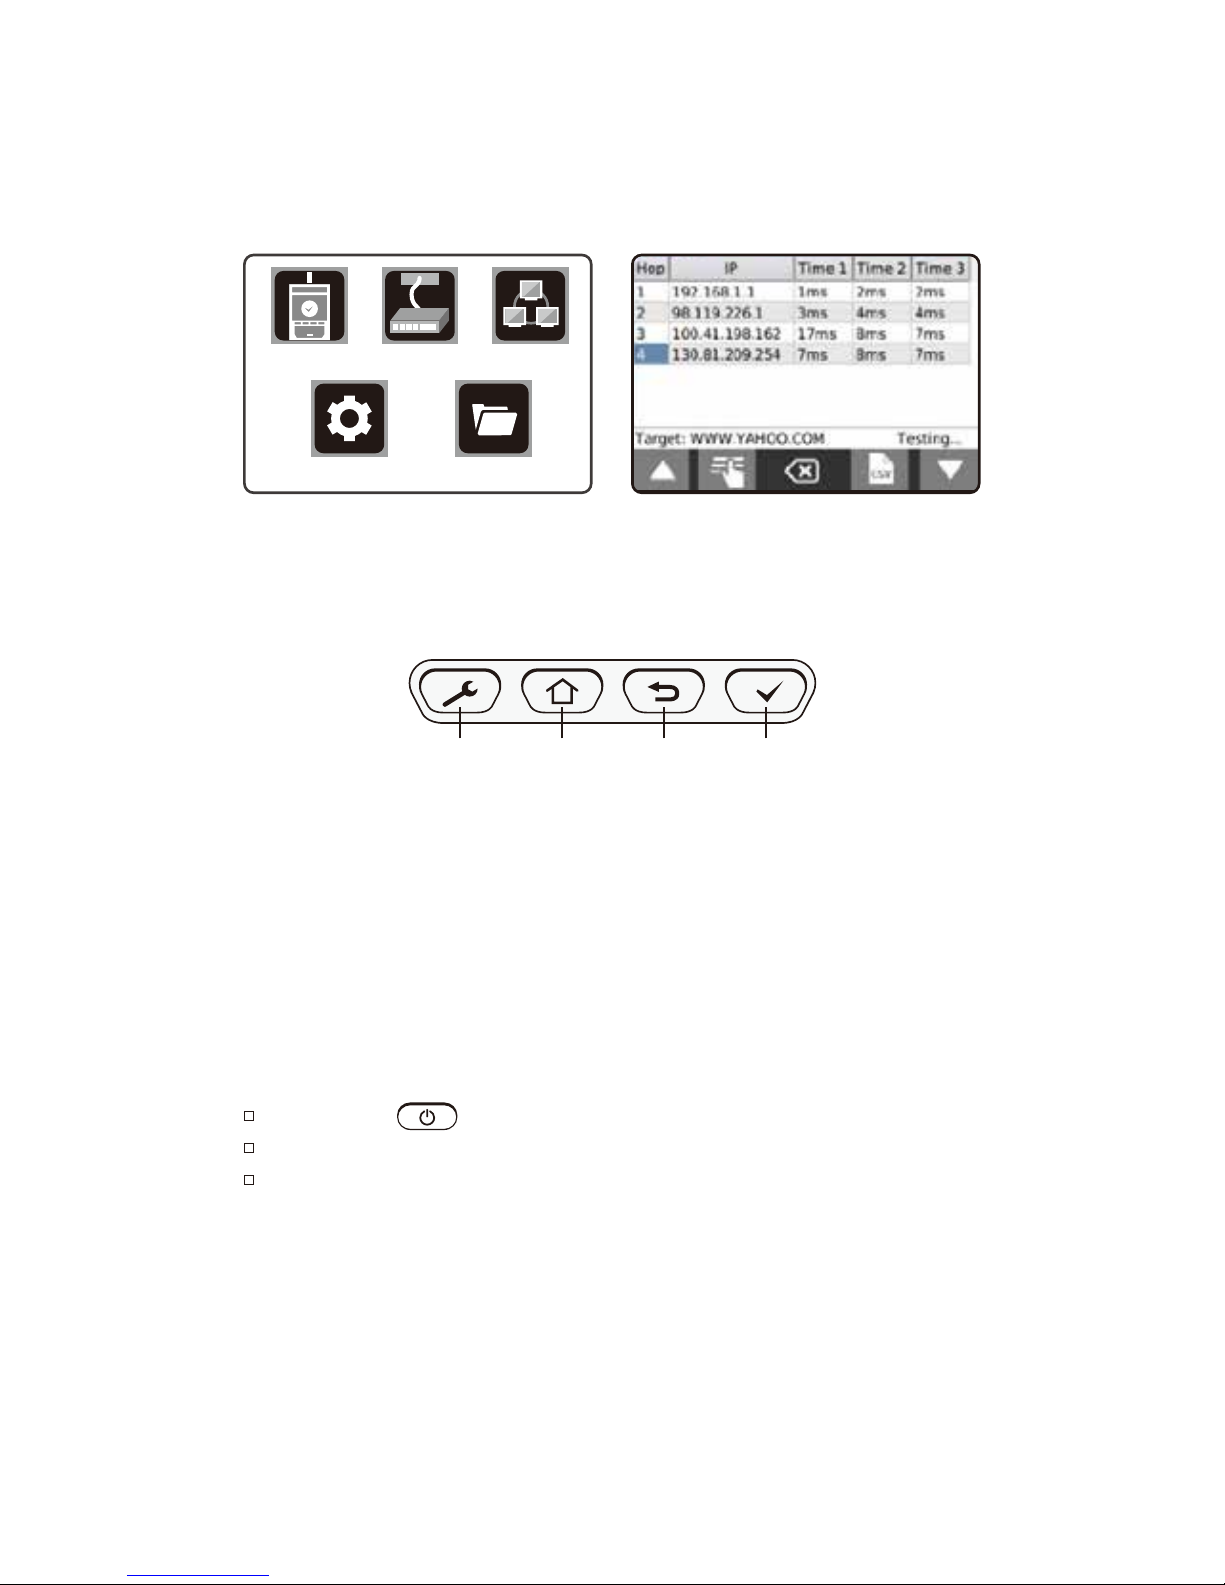
Full Color Touch Screen and Button for Easy Navigation
The Buttons assist with Navigation, starting and stopping a test.
Setting :
Home :
Back :
Test :
The Settings button displays the settings menu. Pressing
the settings while in the settings menu will display
additional menu screens.
The Home button displays the home screen from any menu
The Back button displays the previous screen.
The Test button will start/stop a test.
Touch and drag a list to scroll up or
down or touch Up / Down arrows.
Touch an icon to select an option.
Settngs Home Back Test
File ManagerSystem Settings
Cable Test Link Test Network Test
4
Page 8

Net Chaser Active Remote
Check the Active Remote battery status and last test result by
pressing the Status Button.
Batteries
Net Chaser battery is not user serviceable. In the event you need to
remove the battery, unscrew the back panel of the Net Chaser and
unplug the battery from the Net Chaser. Do not pull on the battery
wires as this may damage the battery. If the battery is removed, use
caution as it plugs in one way. Do not force the plug in to the remote
as this will damage the plug and/or remote
SECTION END
5
Page 9
The Net Chaser performs a wire map test, measures
cable length by using capacitance and TDR, and
speed certifies a cable up to 1 Gigabit.
Cable Test
6
Page 10

Cable Test
There are four test options depending on the type of remote being
used or if no remote being used. Below are descriptions of the test
results given for each test option. To see a full screen view of the
results, touch Full Screen icon . Press Back button to exit
full screen view.
Active Remote
When an active remote is being used to perform a cable test, the
Net Chaser will display the cable wire map, active remote ID, SNR,
SKEW, and BER test results. The Net Chaser will display a green
check mark to indicate that the cable has passed the network
speed certification test.
Network Testing Remote
When a network remote is being used, the Net Chaser will display
the wire map, cable length, ID, and an orange check mark
indicating that the cable passes the wire map test.
Coax Remote
When using coax remotes, the Net Chaser will display the remote
ID. If a short or open is detected, the Net Chaser will measure the
distance to the fault.
Open Ended Test
When no remote is being used, the Net Chaser will display the
cable length and “Status” for each pair.
ID Only Remote RJ45 / Coax
When an ID only remote is being used, the Net Chaser will only
show the remote ID on the Detailed Test Results screen. The ID
remotes are used to assist with mapping and labeling network
cable runs.
7
Page 11
Cable Test
Cable Test Overview
The Cable Test menu saves all tests, except when using ID only
remotes, to a file in internal memory with the extension ".tst".
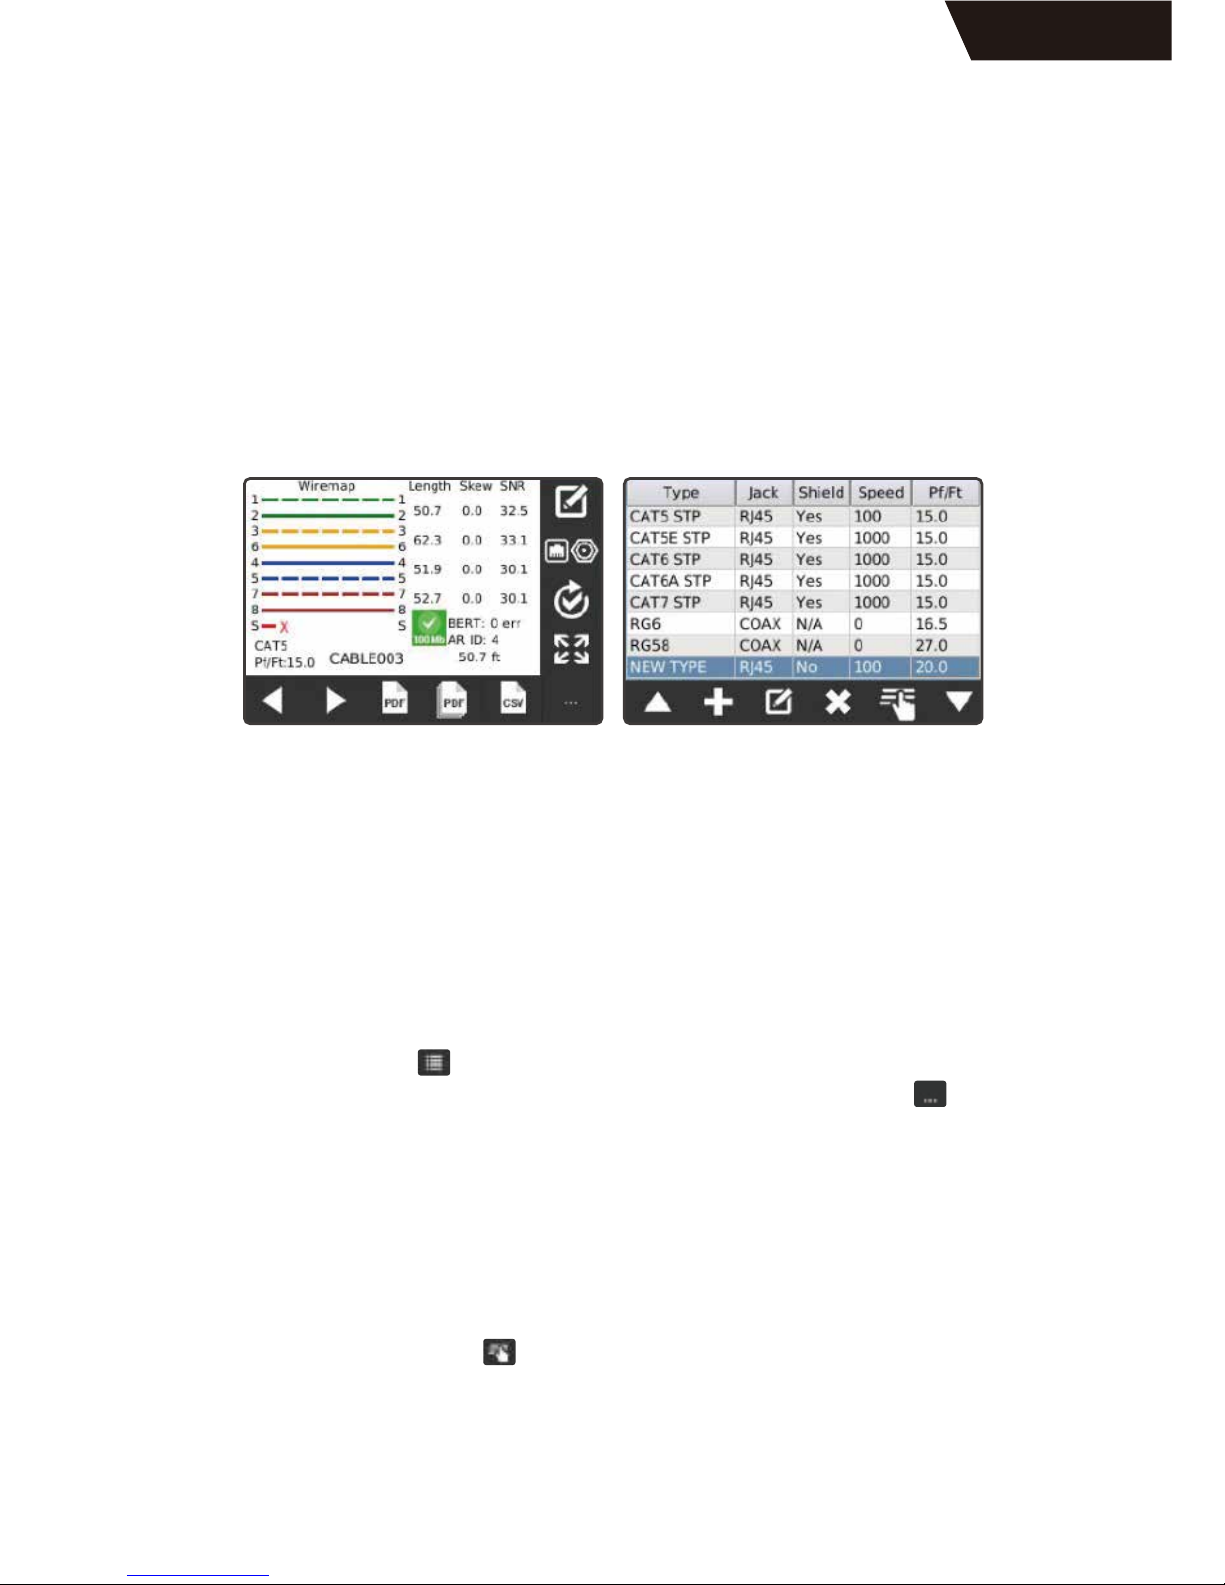
The Cable Test has two screens; a Detailed Results screen and a
spreadsheet-like Test List screen. Testing can be initiated from either
screen by pressing the Test button.
When initiating a test from the Test List Screen, only a summary of the
results is shown. If no test file is defined, "UNTITLED1.TST" will be
used to save test results to. The test file name that is being used
appears in the title bar along with the current function, Cable Test.
Detailed Result Screen -> Test List Screen
To navigate from the Detailed Results screen to the Test List screen,
touch List icon at the bottom of screen. If the List icon is not
displayed at the bottom of the screen, touch more options icon on
the bottom right of the screen . The Test List will be displayed with a
highlighted cable test in the list which the Detailed Results screen
was displaying results for.
Test List Screen -> Detailed Result Screen
To navigate from the Test List to the Detailed Results screen, highlight
a cable test in the list that you would like to display the test details for
and touch Select icon at the bottom of the screen. To exit the Test
List screen without making a selection, press the Back button.
Detailed Result screen Test List screen
8
Page 12

Cable Test
Cable Test Setup
From home screen, touch the Cable Test icon to get into the
Cable Test mode. You will be at the Detailed Results Screen.
Creating a New Test List
To creat a new test list, touch File icon at the detailed Results
screen, enter a file name, and touch OK. Return to Detailed Result
screen, and the Test List name will appear at the title bar.
Opening a Test List
If a Test List (.tst) file already exists, touching File Manager icon .
The file manager will open the internal memory directory of TST
files. Touch to select file and select File Open icon to open the
test list and return to Detailed Results screen.
Selecting a Cable Type
Touch Cable Type icon . A list of defined cable types will be
displayed with a scroll bar. If the cable type to be used is in the list,
select it and touch the Select icon to make it the current cable
type, and return to the Detailed Results screen. See the Cable Type
section next page for instructions to edit, add or delete cable types.
The cable ID naming convention is a prefix plus an incrementing
three digit index number. The prefix should be 9 characters and
three digit index, there will be a total of 12 characters in the name.
From the Detailed Result screen, touch Edit icon . The Cable
Test Setup screen will appear with the current values for prefix and
index displayed. Touch Edit icon then type in new name or index
and touch OK.
Touch Save icon to keep the edited values or touch Cancel
to exit without saving.
Setting Cable ID Names
9
Page 13
Cable Test
Cable Type
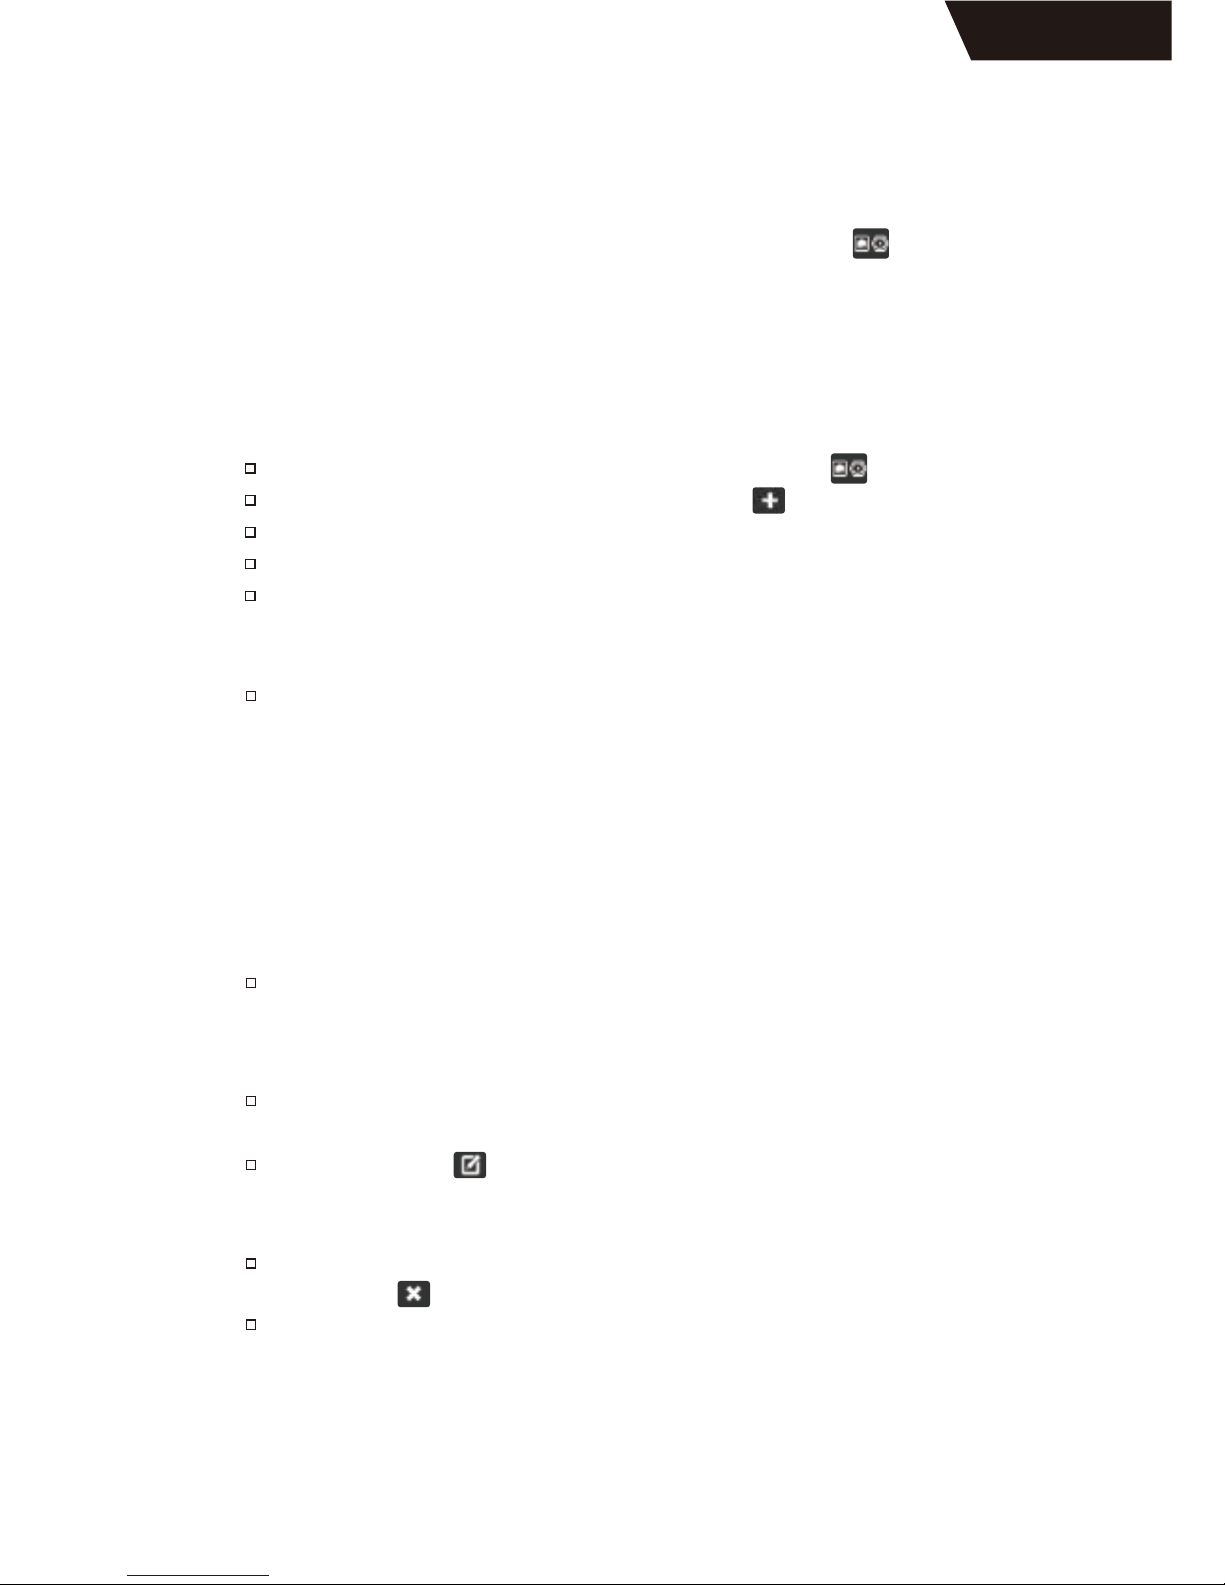
To go to the cable type list, press the Cable Type icon at the
right hand side of the Detailed Result screen. The cable type list
contains a list of all the defined cable types to be tested. Cable type
list is used to select the test criteria for cables to be tested and
manage the list by editing, adding or deleting entries.
Add New Cable Type
From the Cable Test Screen, touch Cable Type icon
To add a new cable type, touh the new icon
Enter cable name on next screen and press OK.
Touch test connector “RJ45” or “Coax” and press OK.
Touch a data rate (100 Mbps, 1 Gbps, 2-pair 100 Mbps, or 0
Mbps) for a Bit Error Rate test and touch OK.(If you choose Coax
cable, then you will skip this step)
Enter length constant in pF/foot or pF/meter and press OK.
Typical cable length constant(pF/ft, pF/m):
- CAT5/5E: 15 pF/ft
- CAT6: 15 pF/ft
- CAT7: 15 pF/ft
- RG6: 16.5 pF/ft
- RG58: 27 pF/ft
- RG59: 16.5 pG/ft
Edit Existing Cable Types
Touch a cable type from the Cable Type list, and select a cable
type on the list.
Touch Edit icon to edit the cable type you select ( the
highlighted entry ) . The name may be changed or kept default.
All other settings are entered as Add New Cable Type section.
To delete the cable type (with the highlighted entry), touch the
delete icon
Touch OK to confirm action or cancel.
Touch shielded cable, Non-shielded cable, or Ignore shield then
touch OK.
10
Page 14

Touch Cable Index icon to edit the incrementing numerical
portion of Cable ID. When the desired Index is entered, touch OK.
To accept the changes, touh Save icon To exit without saving,
touch the Cancel icon .
Cable Test
Cable Name
You can name the cable you are about to test. Please do as follow:
WARNING!
All cable test files refer to the cable type list to extract information about
the cable definition used in the testing. If a cable type is deleted or the
name changed, any Test List that uses that cable type will be corrupted. It
is suggested that any PDF or CSV files created from a Test List affected by
a cable list change be generated before making a change to a cable type
that is used by the test list.
Select a Cable Type to Test
Touch a cable type from the Cable Type list. Add the highlighted
cable type to the test list by touching Select icon . The Cable
Test screen will appear with the selected cable type displayed in the
lower left of the screen.
From the Detailed Result screen, touch Edit icon To enter a
cable name prefix touch Edit icon again. The prefix is the first
part of the cable name that does not increment when a cable is
added to the test list. Enter the desired prefix using the touchscreen
keypad and touch OK.
11
Page 15
Cable Test
Perform a Cable Test
Ethernet Cable Test
From the home screen, touch Cable Test icon .
Connect an Ethernet cable to the Net Chaser then connect the
Active Remote to the opposite end of the cable. If an Active
Remote is not being used, connect a Network Testing ID remote
to the opposite end of the cable.
Touch Cable Type icon .
Touch the Desired cable type from the cable type list and then
touch Select icon .
Press the Test button to perform a test. The Net Chaser will
add an incremented cable name to the test list and perform a
test.
To perform another test, press Test button . The Net Chaser
will add another cable to the test list and perform a test.
To re-test a cable test, touch the left or right arrows to navigate to
the desired cable test then touch Retest icon .
NOTE!
If testing an Ethernet cable that is terminated to a wall plate, use the
included RJ45 patch cables to connect to the wall plate or modular
RJ45 jack.
Coax Cable Test
Connect the included F81 barrel adaptor to the Net Chaser
module and then connect a Coax ID Remote to the opposite end
of the cable.
From the home screen, touch Cable Test icon .
Touch Cable Type icon .
Touch the desired coax cable type from the cable type list then
touch the Select icon .
Press the Test button to perform a test.
12
Page 16

Cable Test
Cable Fault
Below are the types of cable faults that the Net Chaser will detect and
display if the cable under test is damaged or faulty.
OPEN :
The wire(s) is not continuous throughout the cable. This may be
caused by improper termination or a break in the cable.
SHORT :
Two or more wires in the cable are connected. This may be caused
by an improperly terminated cable, damaged RJ45 plug/jack, or a
damaged cable.
MISWIRE :
Cable’s wire connection does not follow TIA568A/B Ethernet
cabling standards. This occurs when there is an error made when
terminating the cable.
SPLIT :
The cable has been wired with correct continuity but not with
correct circuitry pairing. This most often happens when the cable is
terminated consistently at both ends but in the wrong order.
SKEW :
The delay skew is higher than 35 nanoseconds. This may be
caused by velocity of propagation or length difference between the
cable pairs.
SNR :
The Signal to Noise Ratio is lower than 22db. This may be caused
by attenuation, excessive crosstalk, or noise that is imposed on the
cable from an external source such as electrical cabling,
fluorescent lighting, or electrical equipment.
13
Page 17
Cable Test
Save Cable Test Result
The cable test result can be saved as PDF file and CSV file.
In the Detailed Results screen there are two options; the Net Chaser
can save the last cable test results as PDF, or the entire test list can be
saved as a report.
Saving Results as a CSV file
The test list can be saved as a CSV file to be opened with excel or
CSV compatible software.
Save the last cable test results as a PDF file
- From the detailed Results screen, touch More Option .
- Touch PDF icon .
- Enter the desired file name and press OK.
- The PDF file would be saved to the external memory (SD card)
Save the entire test list as PDF Report
- From the detailed Results screen, touch More Option .
- Touch PDF Report icon on the Cable Test screen.
- Enter the desired file name and press OK.
- The PDF file would be saved to the external memory (SD card)
From the Cable Test screen, touch More Option .
Touch CSV icon .
Use the keypad to enter a file name then touch OK.
The CSV file will be saved to the external memory (SD card).
WARNING!
Do not remove SD card until dialog box disappears!
Saving Results as a PDF file
14
Page 18

Cable Test
SECTION END
Test List
The Test List screen contains a list of cables that have been tested. The
Test List allows the user to view, save, retest, add, or edit cable tests.
A new Test List can be created if necessary. When a Test list is created,
The Net Chaser automatically saves your test list as a .tst file to internal
memory. The .tst file can be transferred to an SD card or computer. TST
files can be re-opened by a Net Chaser for editing, retesting, or adding
new tests.
From the Cable Test screen, touch Test List icon .
Touch the Up and Down arrows to scroll through the cable
test list.
To edit the cable name of an existing cable test, touch edit .
Use the keypad to enter a new cable name then touch OK.
To add a cable from the test list screen touch Add icon .
Retest
To retest a cable from the test list, touch a cable from the list and
press Select icon , then touch retest icon to retest.
Delete
To delete cable from the test list, touch delete icon .
Confirm
Touch OK to accept the automatically incremented cable name or
use the keypad to enter a new cable name then touch OK.
NOTE!
Pressing the test button again will add a new cable to the test list and
a test will be performed. The test list can have up to 256 cable tests. If
you will be testing more than 256 cables, create a new Test List to
continue testing (see “Cable Name” section for instructions on how to
increment the cable name).
File Manager icon
Save New Test List
File manager contains tst, pdf, and csv files that have been saved to
internal or external memory. You can go to File Manager directly from
the Cable Test screen by press the File Manager icon .See “File
Manager” section for File manager instructions.
15
Page 19
The Link Test mode includes a comprehensive set of
features for testing active network capabilities.
Link Test
16
Page 20
From the Link Test screen, touch Tone icon .
Press the Test button to transmit the tone.
Use arrow icon to alternate which pin/pair to transmit tones.
Touch Low/High to change the tone output level and cadence.
Use a tone probe to trace tone alongside or at the end of the cable.
Connect the Net Chaser to a cable that it plugged into an active
hub, switch or router.
From the Link Test screen, touch Link Light icon .
Press the Test button . The Link Light graphic will begin to
blink indicating that the test is running.
The LED of the port you are connected to on a switch or router will
blink at a slow and consistent cadence for easy identification.
To select the Link speed, touch the Left or Right arrows . The
Link Light can be connected at 10Mbps half or full duplex, 100
Mbps half or full duplex, 1Gbps half or full duplex or auto.
Link Light
The Link light blinks the port LED on a switch or router to identify
which port the Net Chaser is connected to.
From the home screen, touch Link Test . Select Link Test option.
Port Discovery
The Port Discovery test will display port services and capabilities
such as link speed, MDI/MDI-X, auto negotiation, and SNR of each
pair within the cable.
POE Test
The detailed POE test displays POE mode, type, and min/max load.
Tone
The tone generator will transmit a frequency onto a cable to be made
audible using a tone probe. The tone generator will assist in locating
an inactive cable in a bundle, patch panel, or wall plate.
Port Discovery is the default Link Test option.
Press the Test button to perform a Port Discovery test.
Touch PDF to save the Port Discovery test results.
Use the keypad to enter a file name then touch OK.
From the Link Test screen, touch POE icon .
Press the Test button to perform a POE test.
Touch PDF icon to save the POE test.
Use the keypad to enter a file name then touch OK.
SECTION END
Link Test
17
Page 21
The Network Test provides advanced network tests
to discover, verify and troubleshoot the network.
Network Test
18
Page 22
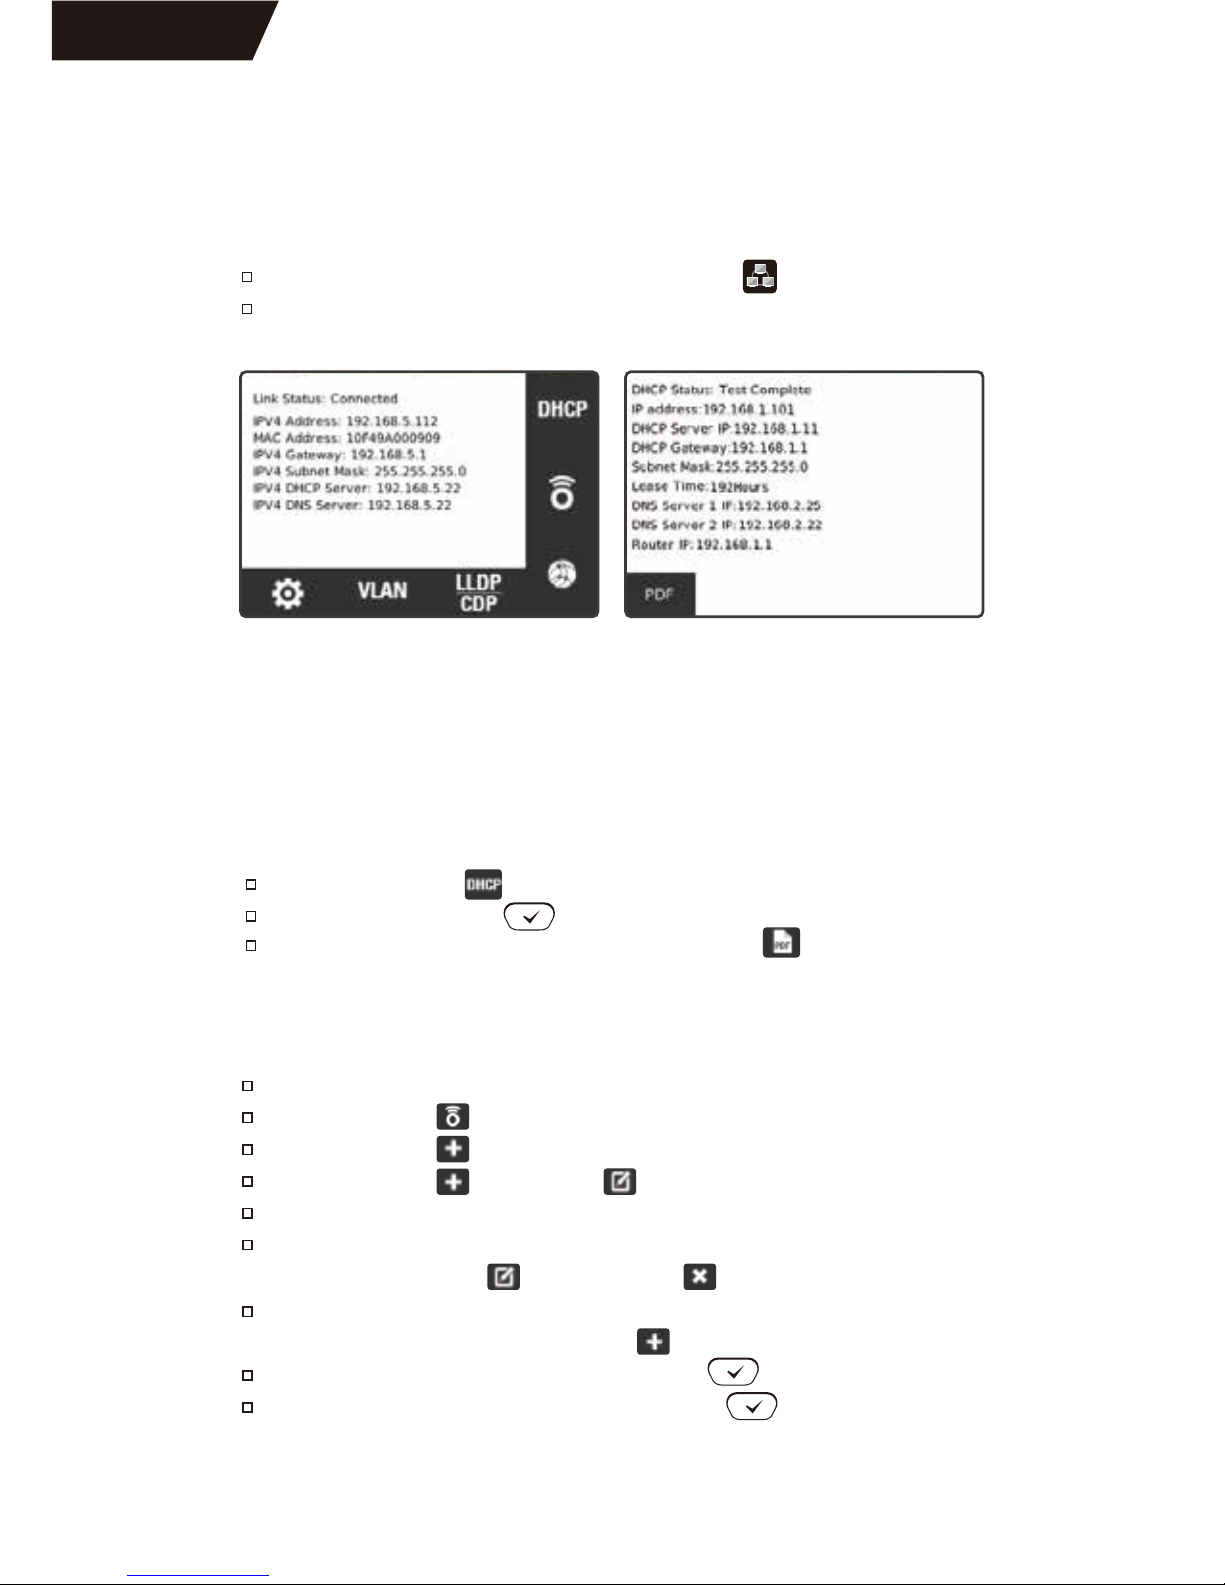
The Network Test menu provides advanced network tests to discover,
verify and troubleshoot the network.
From the home screen, touch Network Test .
The Net Chaser will automatically establish a link upon entering the
Network Test screen.
Network Test Screen Save DHCP Results
Link Status
Upon entering the Link Test screen, the Net Chaser will automatically
perform a port test by acquiring an IP address and DHCP information.
DHCP
Touch DHCP icon from the Network test screen.
Press the Test button .
To save the DHCP test results, touch PDF icon on the lower right
of the LCD screen. Enter a file name then touch OK.
Ping Test
Connect the Net Chaser to an active Ethernet port or cable.
Touch Ping icon from the Network test screen.
Touch Add icon . The saved target list will be displayed.
Touch Add icon or Edit icon to enter a new IP address or URL.
Use the keypad to enter an IP or URL
To edit or remove an address, touch an address under “IP/URL”
then touch Edit icon or Delete icon .
To add an IP address or URL to the target list, touch an address
under IP/URL then touch Add icon .
To ping the Targets, press the Test button .
To stop the ping test, press the Test button .
Network Test
19
Page 23
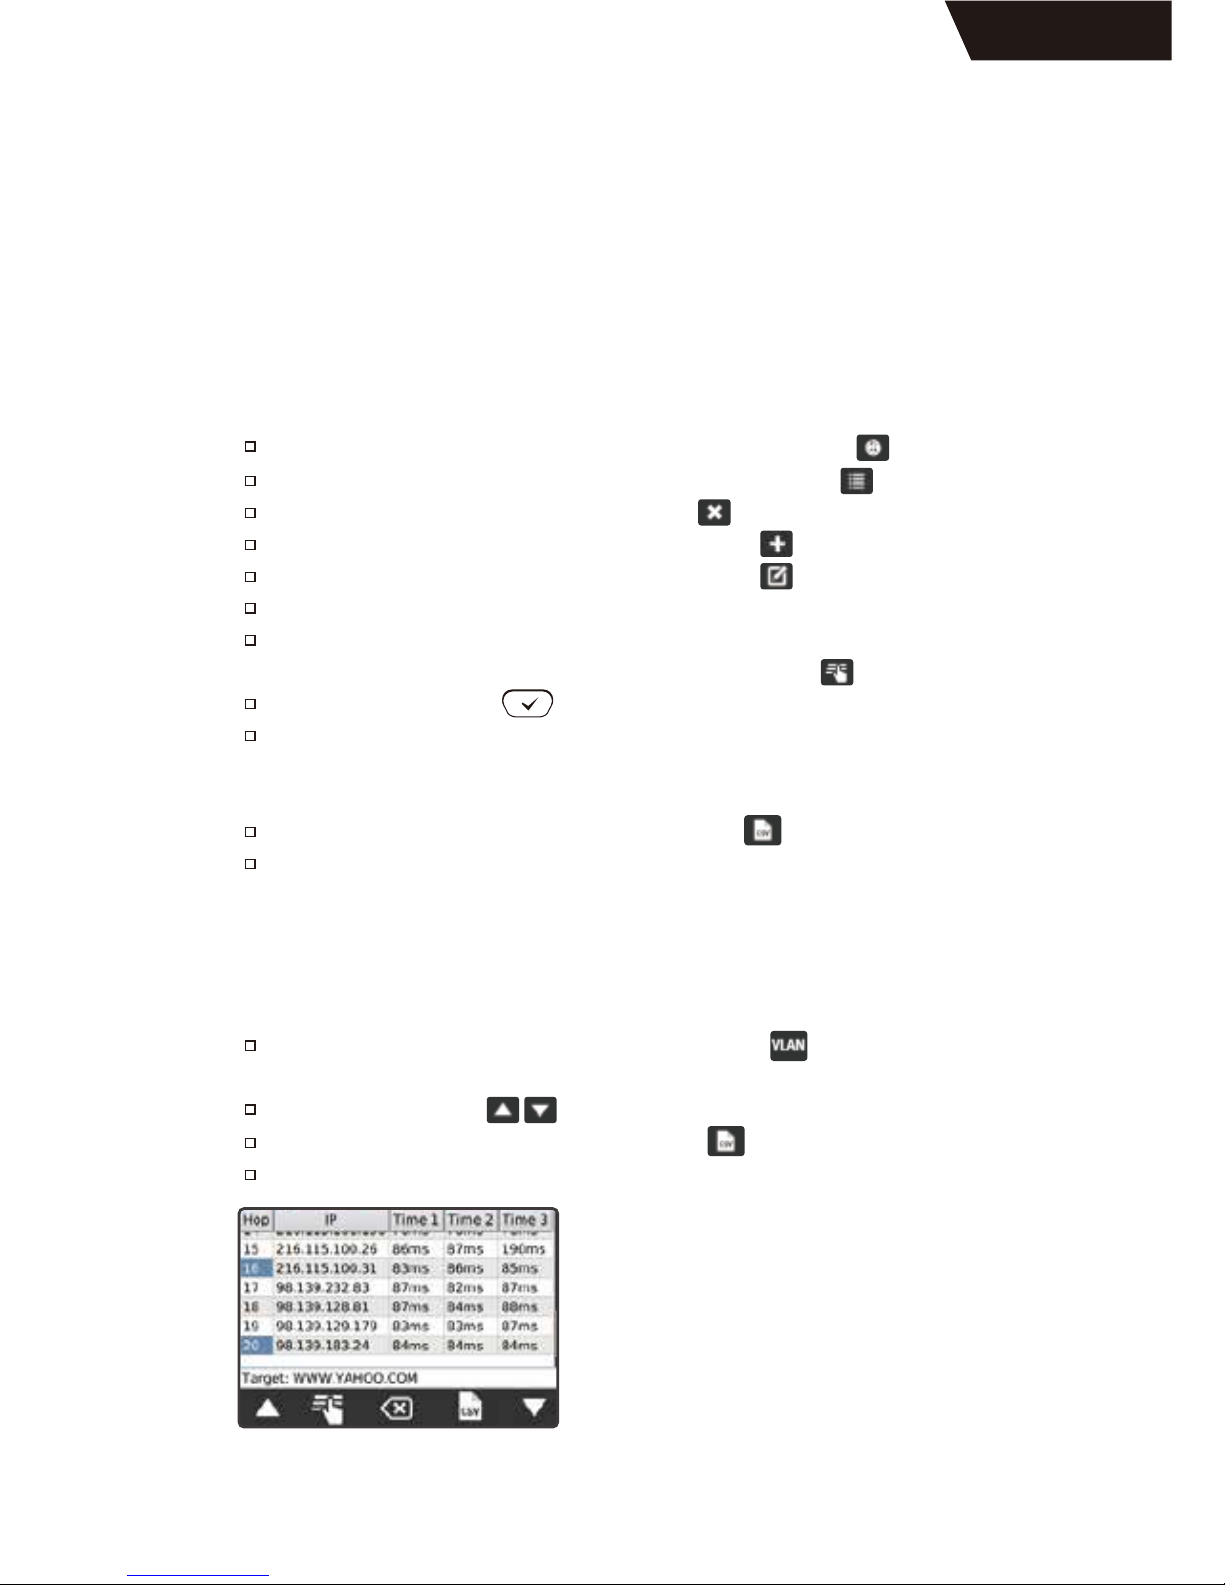
VLAN
Net Chaser identifies Virtual Local Area Networks and displays them in
a list for easy identification. The list will include the VLAN ID and Priority.
From the Network Test screen, touch VLAN icon .The Net Chaser
will automatically list the available VLAN’s.
Use the arrows icon to scroll through the VLAN list.
To save the VLAN results, touch CSV icon .
Use the Keypad to name the CSV file then touch OK.
Trace Route
Trace route is an ICMP ping test that shows much more detail than a
regular Ping Test. Choose a target and each device along the route to
the target will be displayed with a corresponding hop number. The
largest hop number will be the destination. If a device does not
respond to ICMP dashes will be shown next to the hop number. Three
pings will be sent to each hop and the response times will be shown.
From the Network Test screen, touch Trace Route icon .
To Add/Edit trace route IP addresses, touch List icon .
To delete an address, touch Delete icon .
To add an IP address or URL, touch Add icon .
To edit an IP address or URL, touch Edit icon .
Use the keypad to add or edit IP address or URL then touch OK.
To add an IP address or URL to the trace route test, touch the
desired address from the list and touch Select icon .
Press the Test button to begin the Trace Route test.
The Net Chaser will display the hop number, IP address, and
response time. If a device does not respond with an IP, the Net
Chaser will display dashes “- - - -“ for that device.
To save the Trace Route test list, touch CSV .
Use the keypad to name the CSV file then touch OK.
Network Test
20
Page 24
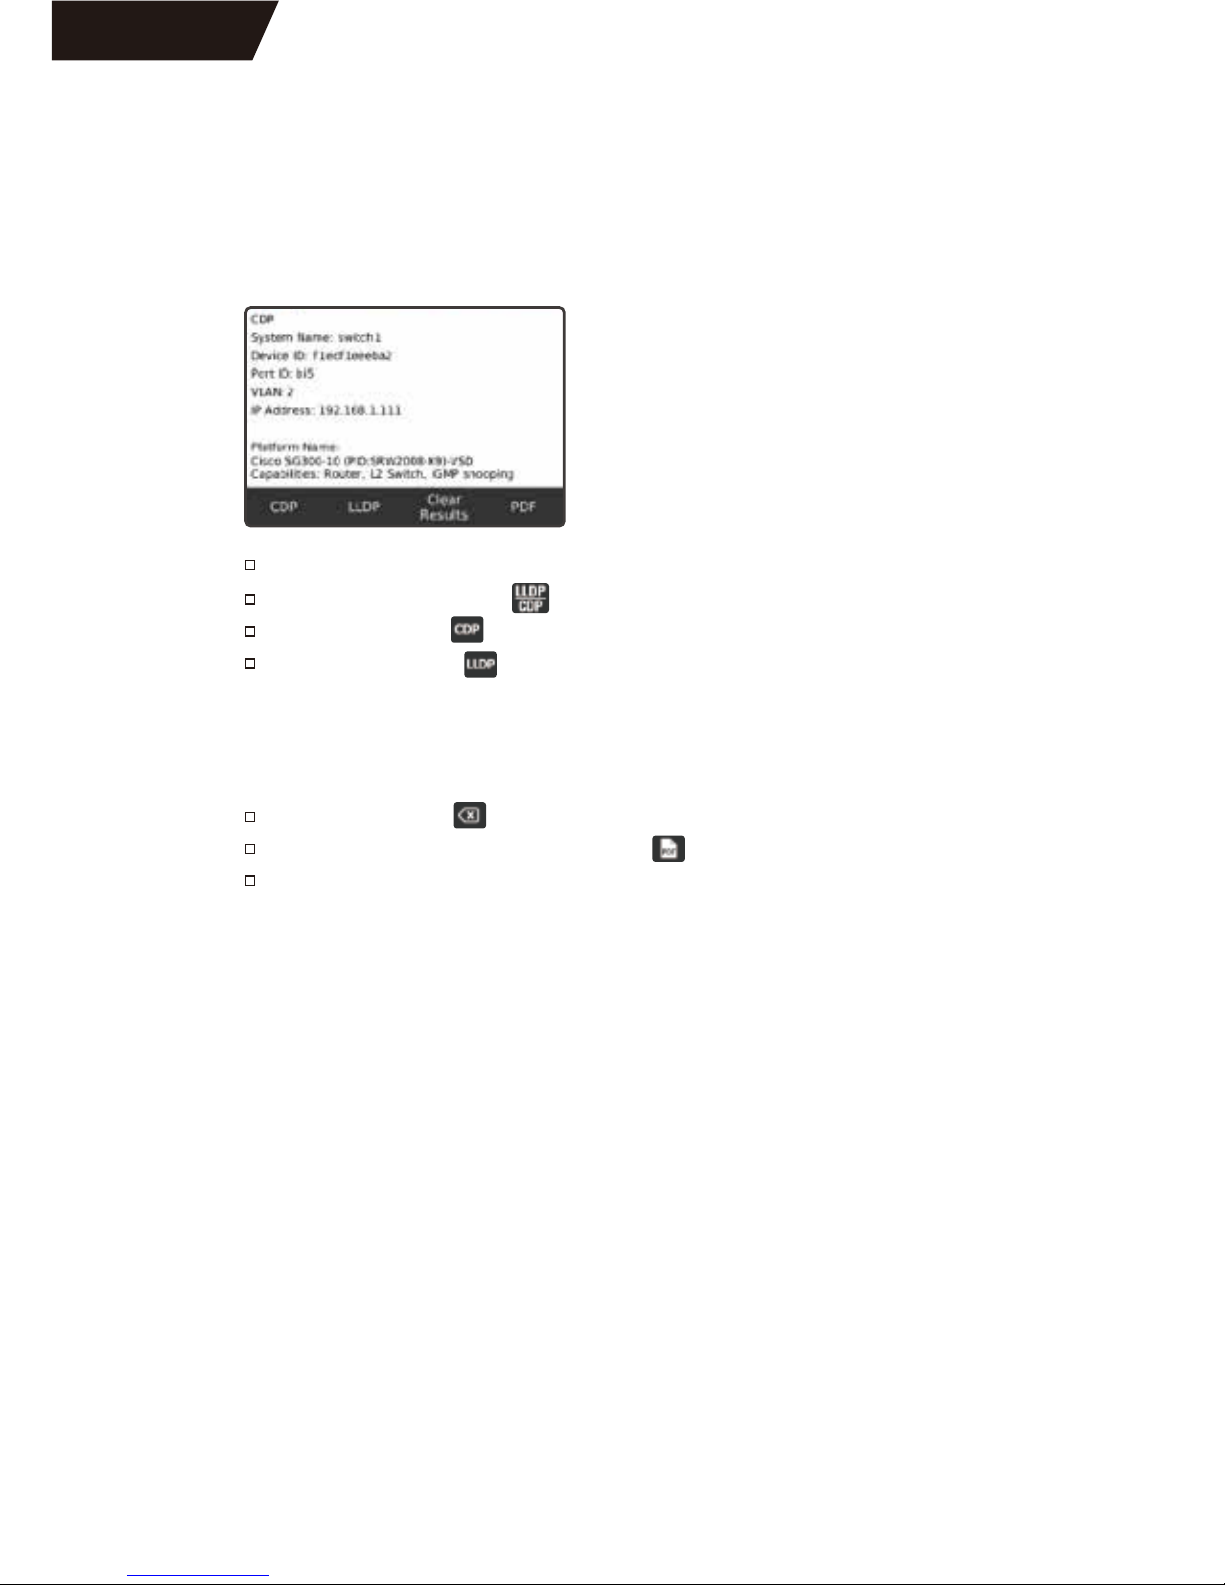
Discovery Protocols
The Discovery Protocol menu provides Cisco switch Protocol and
Link Layer Protocol information.
Connect the Net Chaser to an active Ethernet port or cable.
Touch CDP/LLDP icon .
Touch CDP icon to display Cisco switch information.
Touch LLDP icon to display Link Layer switch information.
Touch Clear icon to clear the CDP or LLDP screen.
To save the results, touch PDF icon .
Use the keypad to enter a file name then touch OK.
NOTE!
The information displayed may vary depending on the information
provided by the switch.
NOTE!
CDP/LLDP information is obtained from a broadcast packet from a
switch or switches on the network. The time between packets is a
switch setting and can be in excess of 30 seconds or turned off.
Usually, only managed switches support CDP or LLDP.
SECTION END
Network Test
21
Page 25
The Net Chaser System Settings consists of seven
screens to configure the unit to user’s preference.
System Settings
22
Page 26
Display Settings
Use the Settings button to navigate through the settings screens.
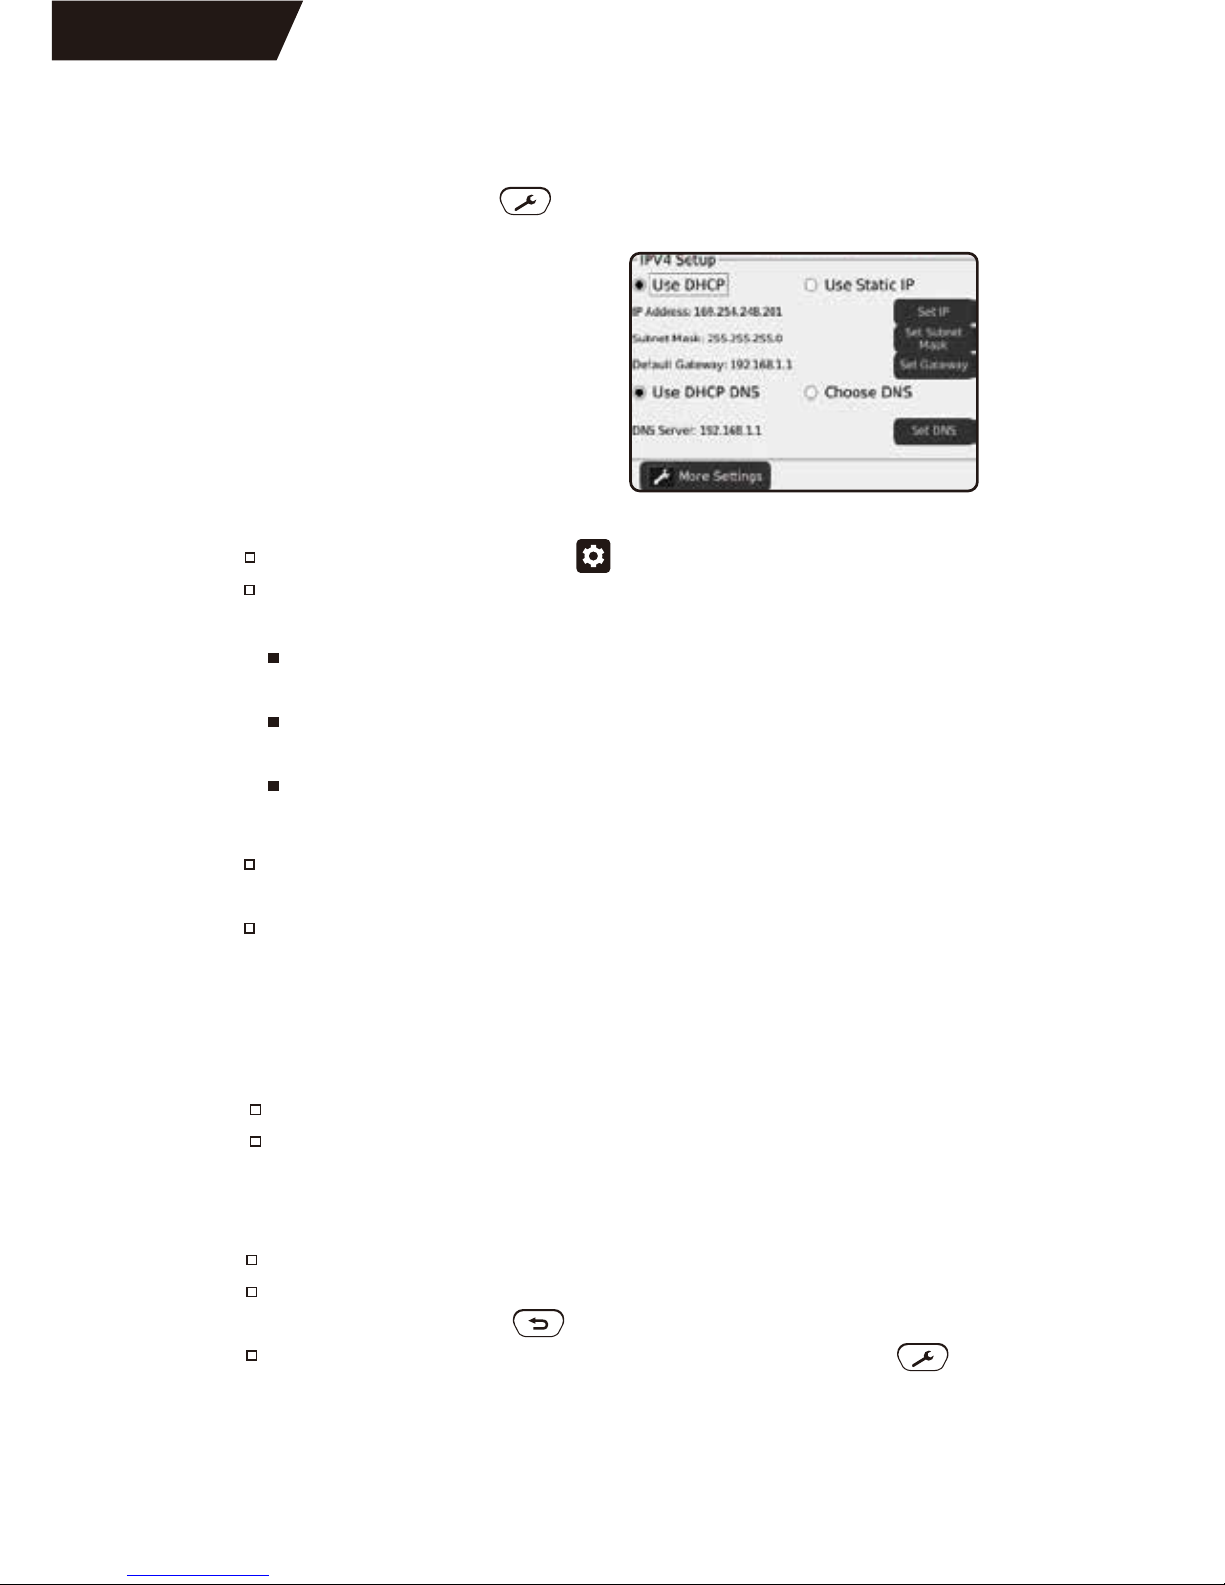
IPV4 Setup
In the IPV4 setup screen, the
Net Chaser’s network tests can
be configured to use DHCP or
a Static IP addresses. The Net
Chaser can also be set to use a
DHCP provided DNS or a fixed
DNS IP.
Length settings:
Under Display Units, touch either Feet or Meters.
Under “Standard”, touch either T568A or T568B. The touched wiring
standard will be displayed in the cable test wiring diagram.
LCD screen brightness:
To the right of Brightness, touch Set.
Enter a number between 5 and 100 then touch OK. To cancel,
press the Back button .
To continue, touch More Settings or press Settings button .
Touch System Settings icon on the home screen.
“Use DHCP” is set as default. To enter static IP’s touch “Use Static
IP” and enter the following:
Use “DHCP DNS” is set as default. To manually enter DNS
addresses, touch “Choose DNS”.
Touch “Set DNS” and use the numeric keypad to enter a preferred
DNS IP address and touch OK.
Touch “Set IP” and enter the Net Chaser IP address using the
numeric keypad, then touch OK.
Touch “Set Subnet Mask” and enter the Subnet Mask IP address
using the numeric keypad, then touch OK.
Touch “Set Gateway” and enter the Gateway IP address, then
touch OK.
System Settings
23
Page 27
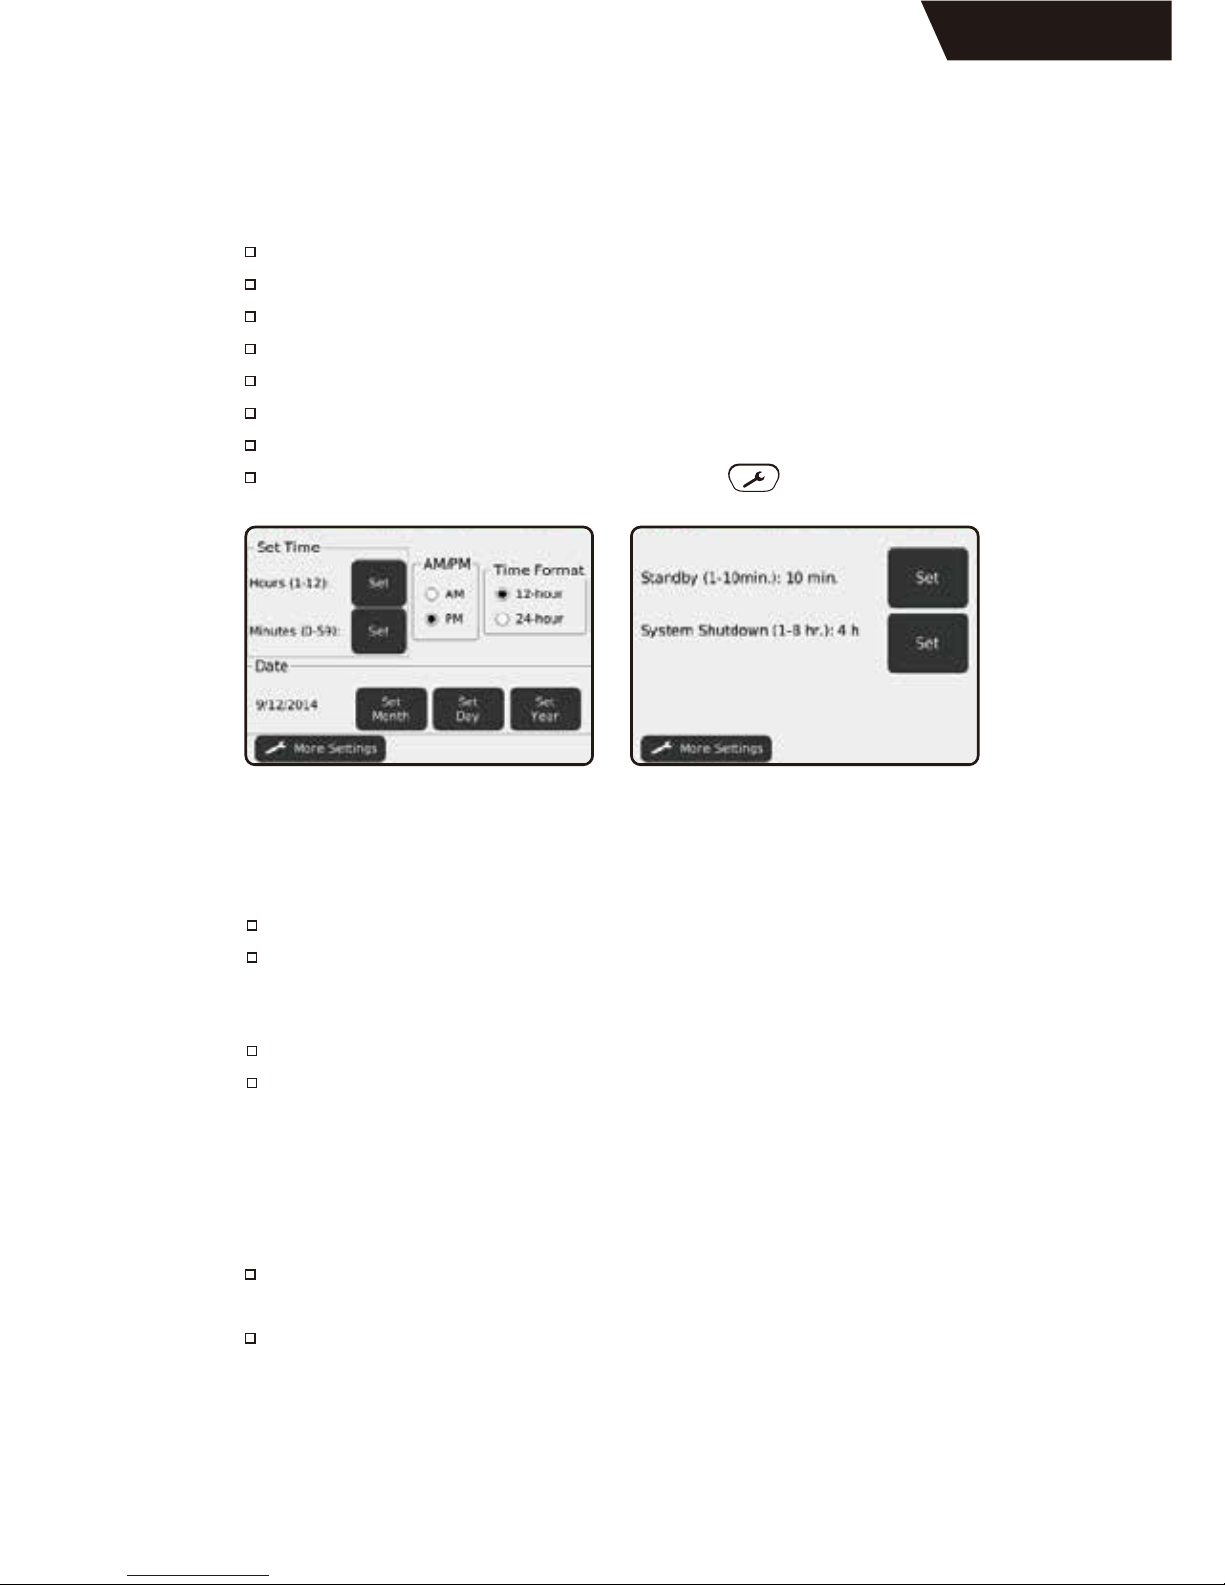
Timeout Settings
To set Stand-by power down :
Touch “Set” to the right of Stand-by (default is 10 mins)
Enter 1-10 (minutes) then touch OK. To cancel.
To set System Shutdown Time :
Touch “Set” to the right of System Shutdown ( default is 4 hours)
Touch the number between1 to 8 (hours) then OK.
Under Time Format, touch either 12-hour or 24-hour format.
Touch “Set Hour” then select Hours(1–12), then touch OK.
Touch “Set Minute” then select Minutes (0-59), then touch OK.
Under AM/PM, touch AM or PM on the screen.
Under Date, Touch “Set Month” Enter the month, then touch OK.
Touch “Set Day”. Enter the number of the day, and then touch OK.
Touch “Set Year”. Enter the year(allfourdigits), then touch OK.
To continue, touch More Settings or press .
Time and Date Setting
Time and Date Timeout Settings
User Information
The user information screen allows the user to enter Company name,
user name, and email to be included on the Net Chaser test reports.
Touch “Set Company” and use the keypad to enter the company
name (Max 20 characters) then touch OK.
Touch “Set Name” (Max 20 characters) and use the keypad to enter
a name then touch OK.
System Settings
24
Page 28
NOTE!
If the SD card does not have a logo folder, right click in the SD Card
dialog box and click on a new folder. Name the new folder “logo”.
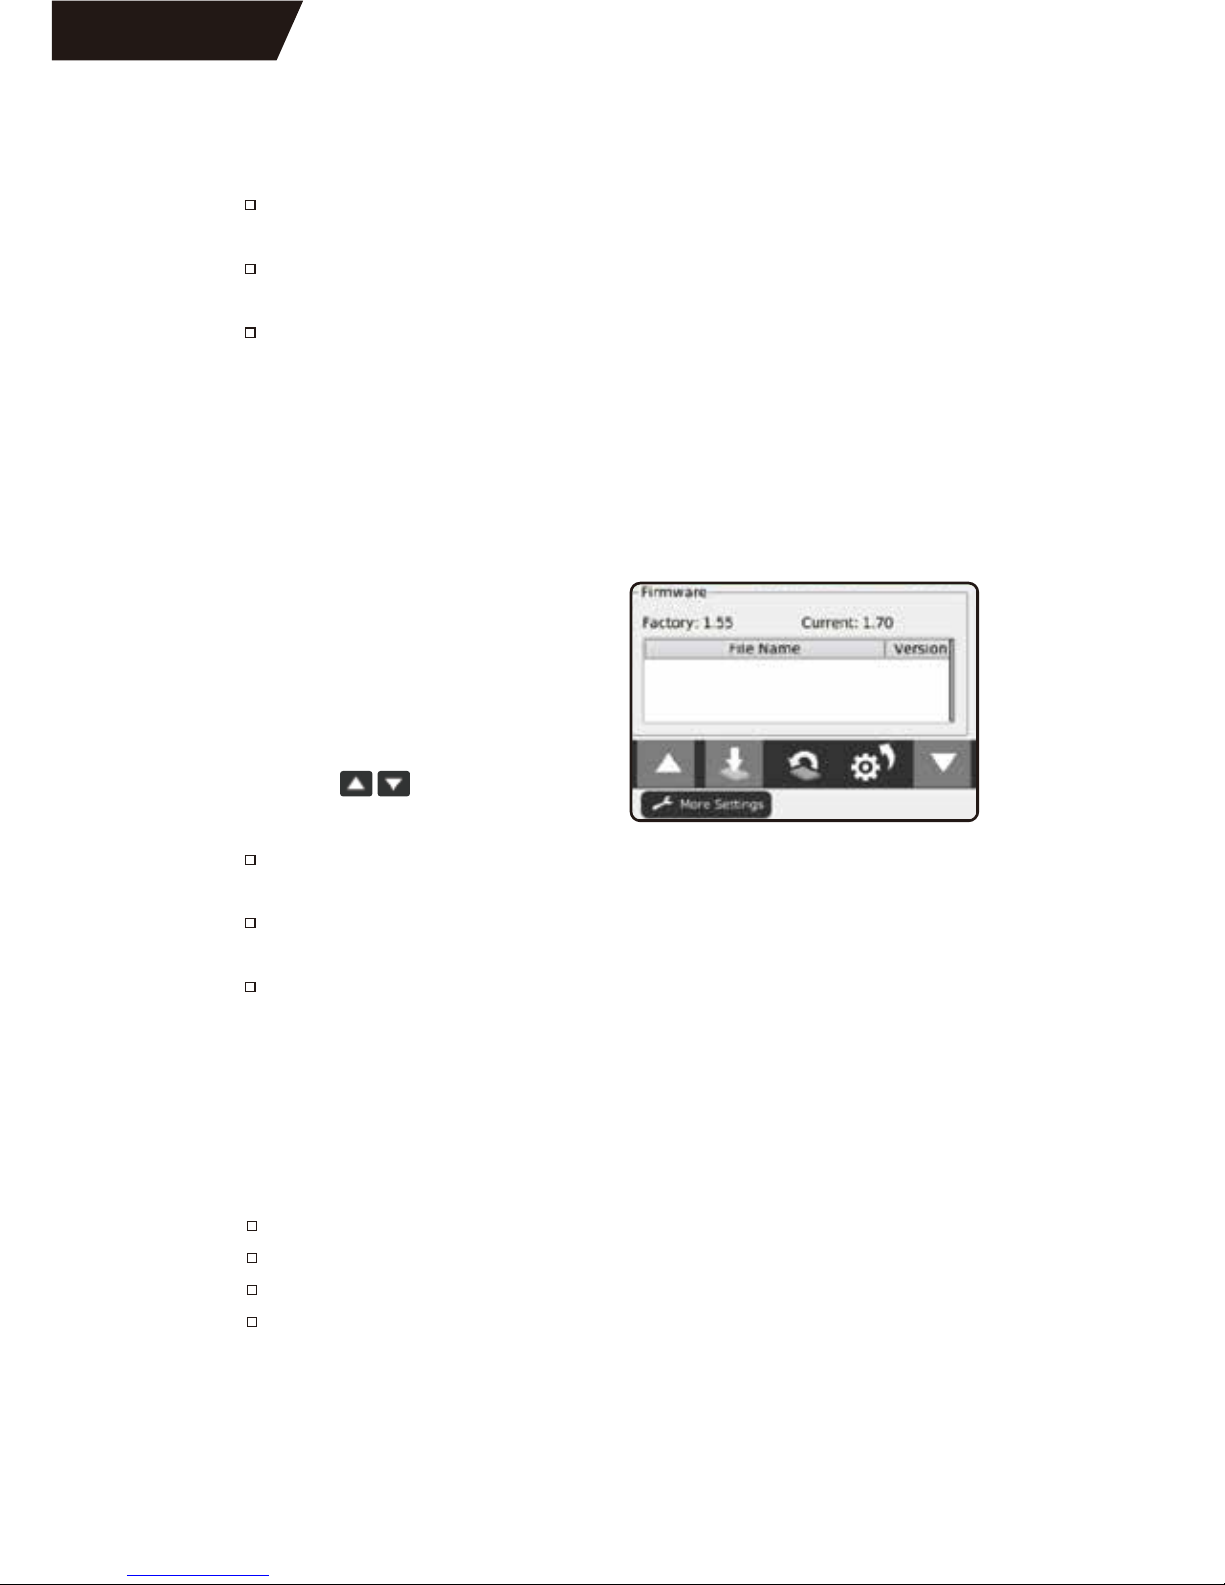
Firmware
You can have more than one
version of firmware on the SD
card- all firmware files on the SD
card will be displayed on this
screen. Use the up and down
buttons to scroll through
multiple firmware files.
The factory installed frimware revision (default firmware) is displayed
above the firmware file table.
The current firmware revision that is being used is displayed above
the firmware file table Current x.xx.
To update the Net Chaser Firmware, go to Livewire Asia Pacific
website : livewire-asiapacific.com .Download the firmware file to
your computer.
Touch “Set E-mail” and use the keypad to enter an email address
then touch OK.
Touch “Set Phone” and use keypad to enter a phone number (Max
20 characters) then touch OK.
To include a company logo, copy the desired image from your
computer to the Logo folder on the Net Chaser SD card. The mage
size can’t exceed 586x163 dpi. Touch the “Enable/Disable” button to
include the company logo.
NOTE!
Be sure the Net Chaser is plugged into AC power before update
firmware.
Upload firmware using the SD card :
Insert the Net Chaser SD Card into your computer.
Copy-paste the new firmware file(s) to the SD card.
Re-insert the SD Card into the Net Chaser.
Proceed “Install Net Chaser Update” process below to install the
firmware and complete the update.
NOTE!
When installing SD Card with firmware update, refresh the firmware table
by exiting and re-entering the firmware screen.
System Settings
25
Page 29
Upload firmware using the Micro USB cable :
Connect Net Chaser to your computer by using USB cable.
Touch File Manager icon on the Home screen.
Touch More Options icon .
Touch USB icon . Net Chaser will reboot into File Transfer Mode.
Net Chaser will be recognized as a removable drive on computer.
NOTE!
The removable drive may be listed in “Computer” as an SD Card, as the
Net Chaser simulates an SD Card reader.
Copy-paste the new firmware file to the Net Chaser removable drive.
Click on “safely remove hardware” on your computers toolbar.
Eject“MQX Mass Storage Device”.
Remove the micro USB cable from the Net Chaser.
Net Chaser will automatically reboot. Follow the instructions below
to complete the update.
Install Net Chaser Update :
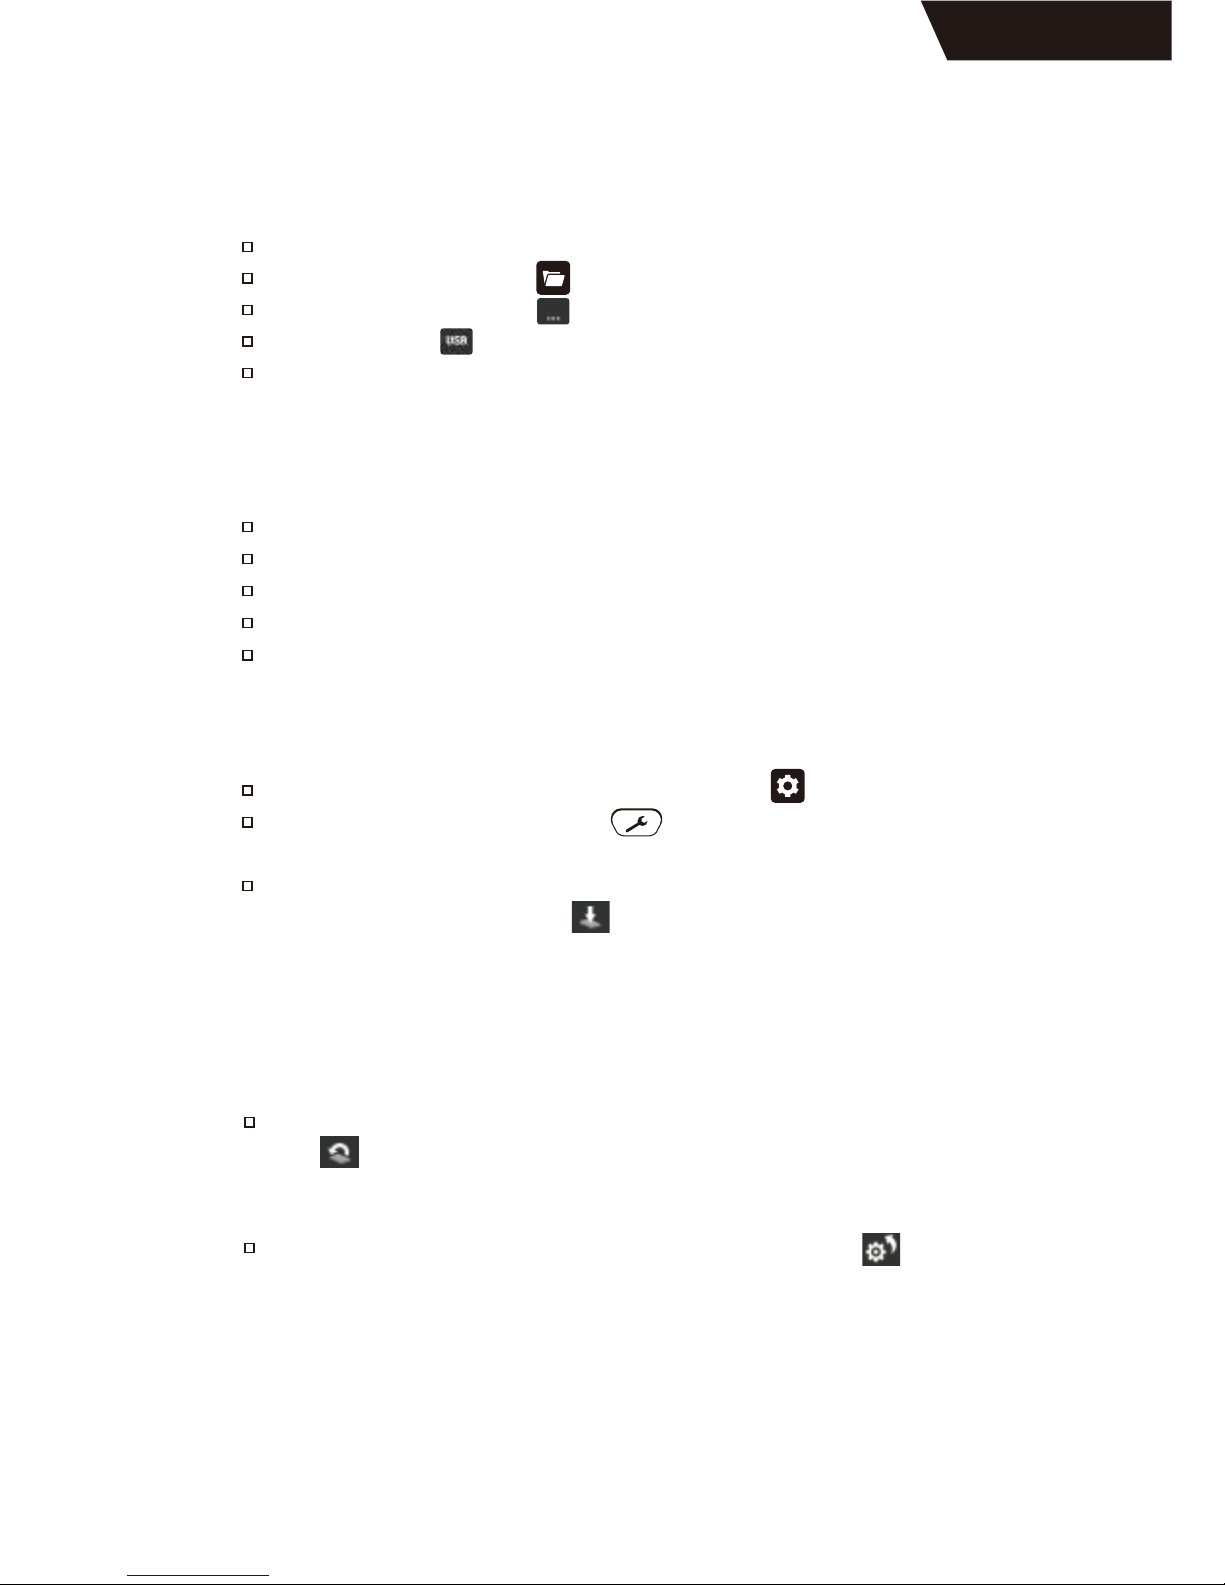
Reset firmware :
From the home screen, Touch System Settings .
Touch More Settings or press until the firmware screen is
displayed (6th settings screen).
Update by touching the firmware file in the firmware table then
touch Update Firmware icon on the screen. System will confirm
that you are updating firmware. Touch OK to continue.
NOTE!
System will reboot after update. Please make sure battery is not low.
To reset to the factory firmware, touch the Reload Factory Firmware
icon . A new screen will appear, confirming that you are deleting
the firmware update and restoring to factory default. Touch “OK” to
continue or “Cancel” to cancel. Net Chaser will then restart.
To reset to the factory settings, touch Reset Settings icon . A new
screen will appear, confirming that you are restoring factory Cable
Type list. You will be prompted to touch OK to continue or Cancel to
cancel.
System Settings
26
Page 30
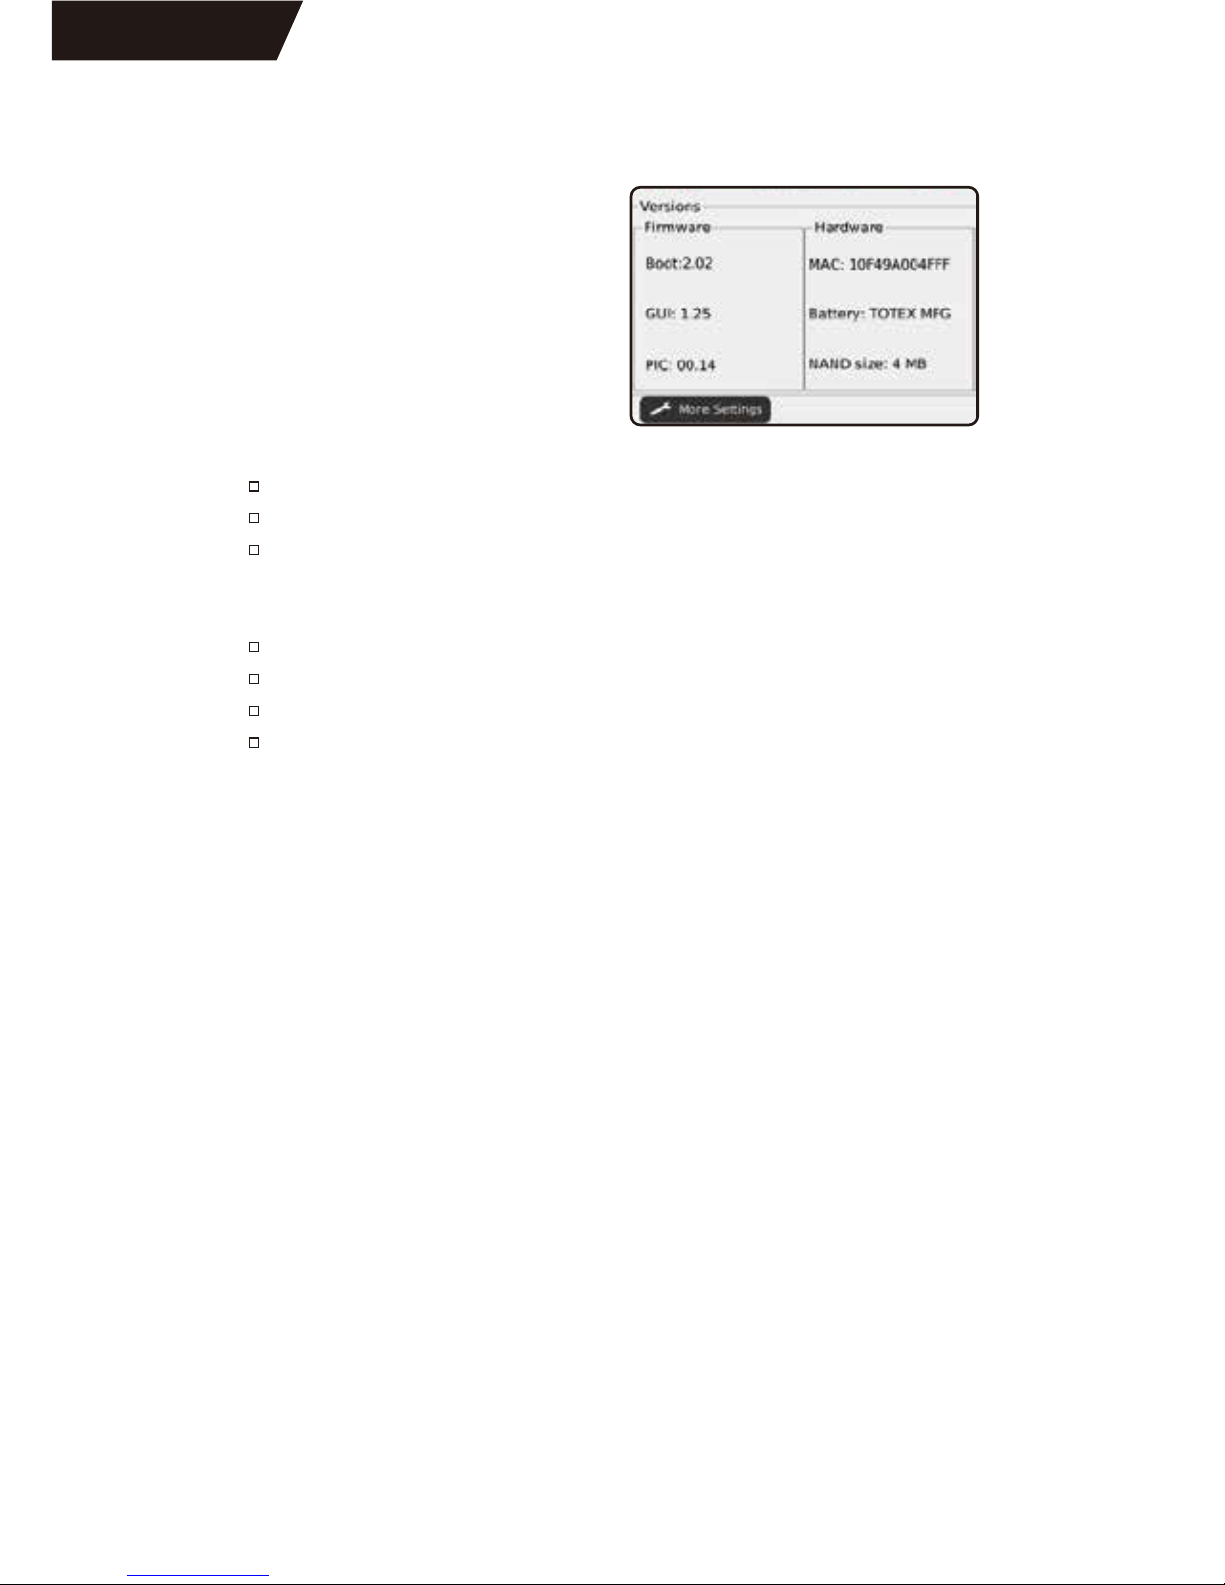
Versions
You can check which versions of
firmware and hardware are in your
Net Chaser at “Version” Screen.
Firmware
Boot (initializes hardware, loads, and executes operating system )
GUI (Graphical user interface)
PIC (cable tester processor)
Hardware
Serial Number (Net Chaser MAC Address)
Module revision (number of your updated module)
Battery (type of battery)
NAND size (flash memory in megabytes)
SECTION END
System Settings
27
Page 31
Manage all the test files in your Net Chaser unit.
File Manager
28
Page 32
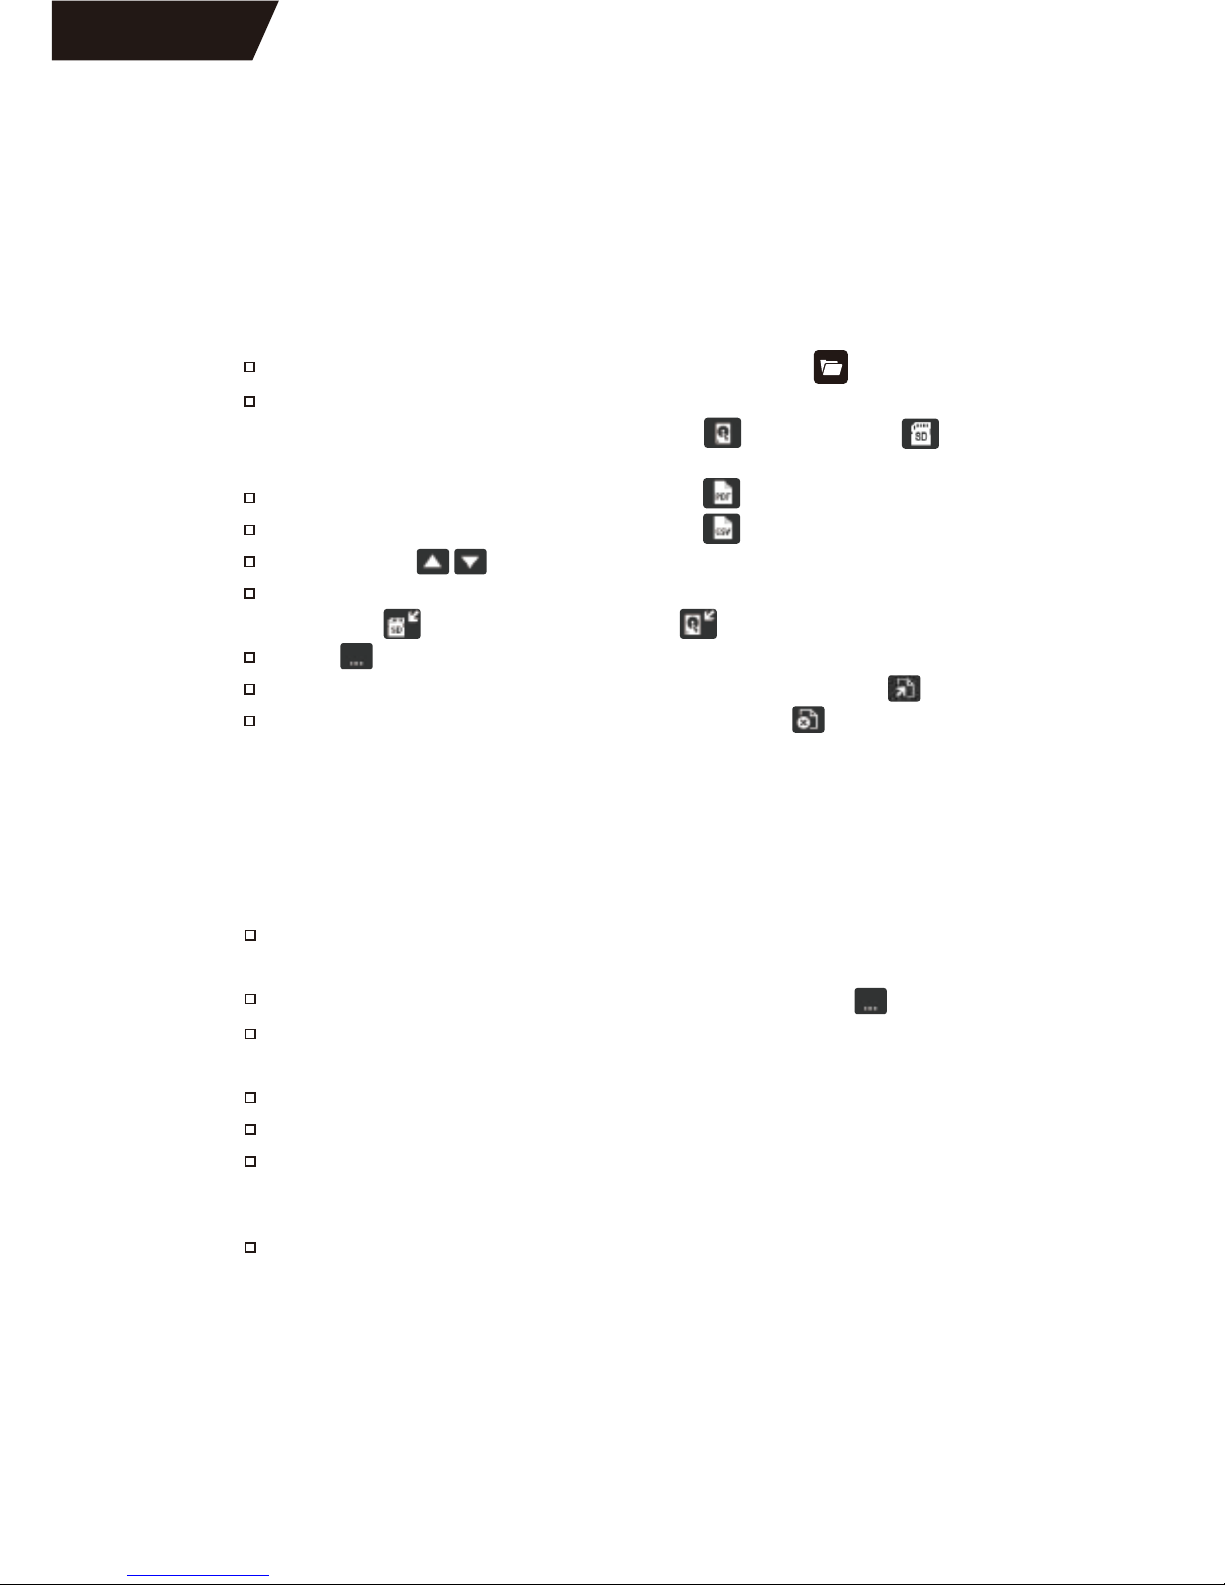
The File manager contains saved PDF, CSV, and TST test files. In this
menu, they can be renamed, deleted, or transferred between internal
and external memory.
Files can be uploaded to a computer by SD card, or by plugging the
Net Chaser into a computer via USB.
File Management
File Transfer
Using SD Card
Using USB
From the home screen, touch the File Manager icon .
The File Manager displays files from internal memory and external
memory (SD Card). Touch Show Internal or Show SD to
view the desired memory location.
To display PDF files only, touch PDF icon .
To display CSV files only, touch CSV icon .
Touch arrows to scroll through the file list.
To copy files, touch one or more files from the list, then touch Copy
to SD icon or Copy to Internal icon .
Touch for more options.
To open a .tst file, touch a .tst file then touch Open file icon .
To delete a file, touch a file then touch delete icon .
To upload files from the Net Chaser to a computer via USB, plug a
micro USB cable into a computer then into the Net Chaser.
From the File Manager screen, touch More options icon .
Touch USB. A dialog box will appear to confirm the selection. Touch
OK to proceed or Cancel to return to the file manager screen.
Open the removable storage device drive on your computer.
Double click on the PDF or CSV folders to view the test files.
Copy the desired files to your computer.
Remove the SD Card from the Net Chaser. Push the SD Card inward
then release to unlock the SD Card.
SECTION END
File Manager
29
Page 33
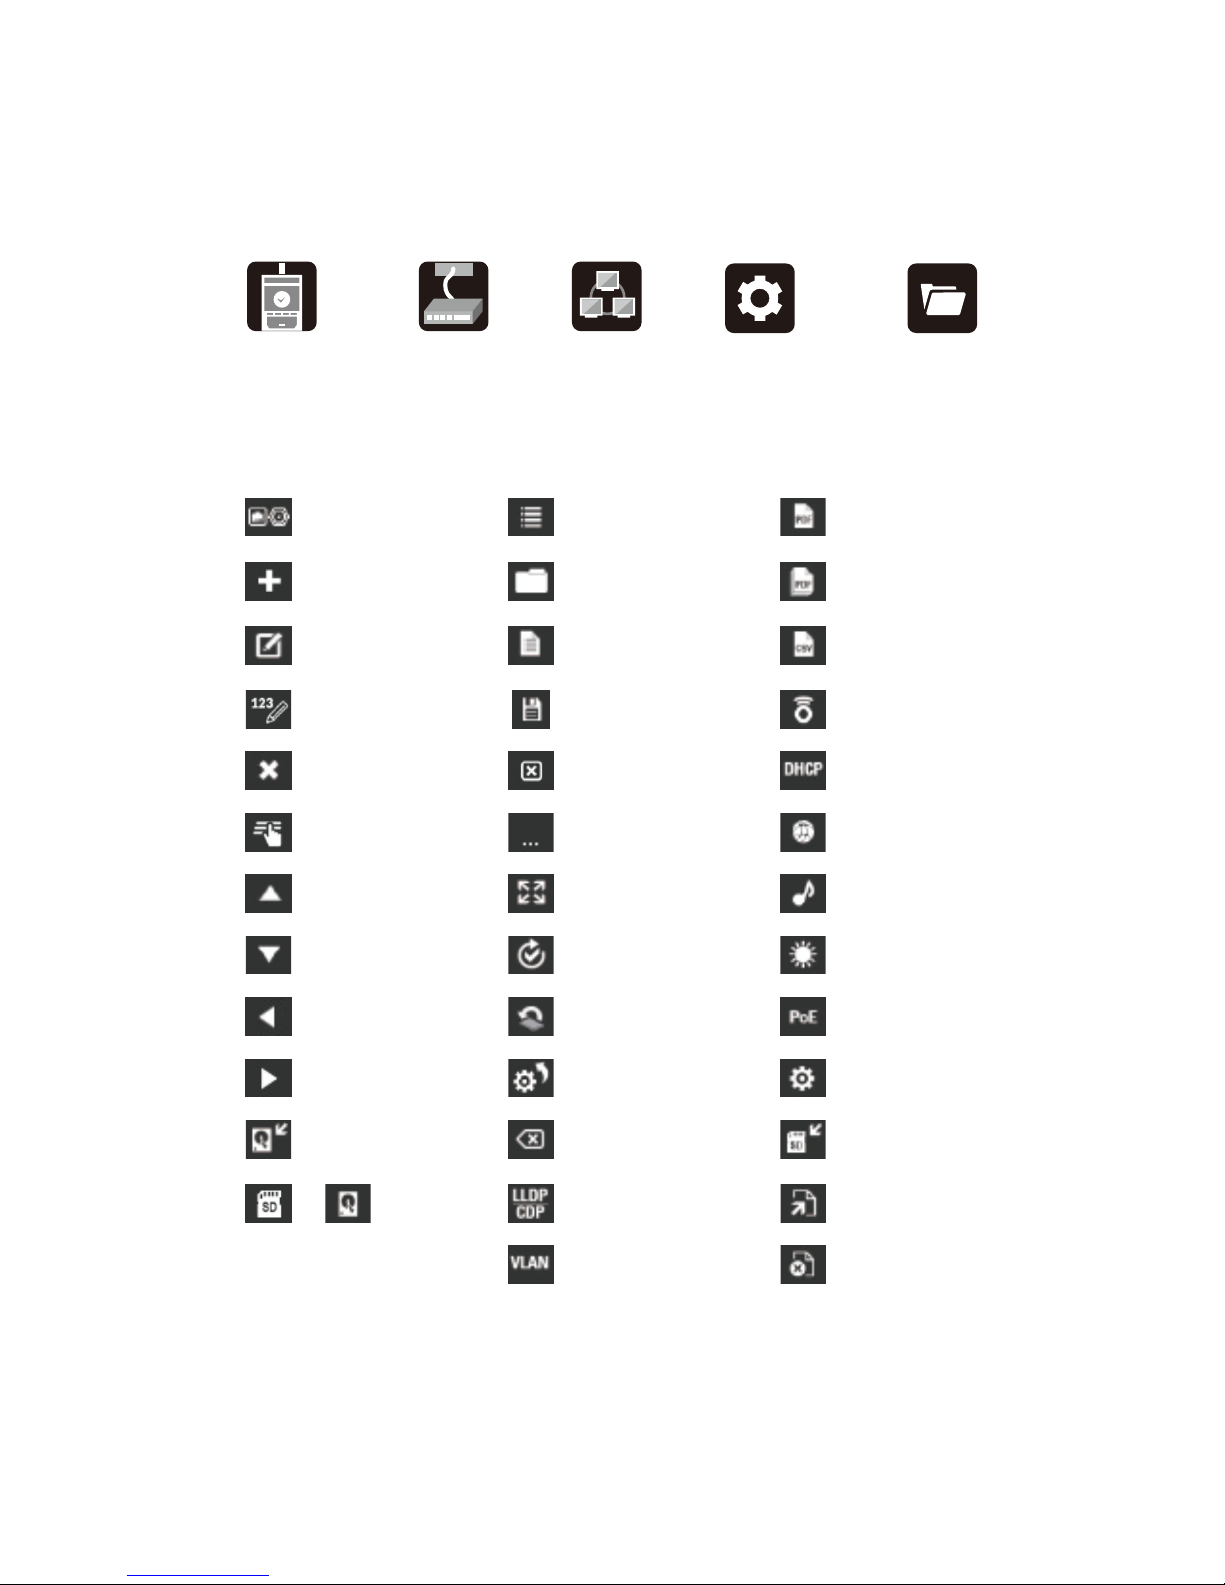
Cable Type
Add
Edit
Edit Index
Delete
Select
Page Up
Page Down
Previous
Next
Copy to Internal
Memory
SD Card / Internal
Memory View Toggle
LLDP / CDP
Clear Screen
VLAN Screen
Copy to SD Card
File Open
File Delete
List
File Manager
New File
Save
Cancel
More Options
Full Screen
Retest
Reload Factory
software
Restore Defaults
Save one Test
to a PDF file
Save *.tst file
to a PDF
Save *.tst file
as CSV file
Ping Test
DHCP request
Trace route
Tone Test
Blink Link Light
PoE Test
Setup IP
Addresses
Home Screen Icon
Other Icon
File ManagerSystem
Settings
Cable Test Link Test Network
Test
Icon Glossary
30
Page 34

Part Number Description
Kit Number
NC 950
NC 950-AR
Description
- Net Chaser main unit
- Power Supply
- Network patch cable x2
- Sacrificial cable x2
- 4GB SD Card
- Micro USB
- #1 Testing Network Remote
- Network and Coax Remote set:
#1-5, F-connector coupler
- T3 hanging strap and clip
- Large T3 carrying bag
- Net Chaser main unit
- Active Remote
- Power Supply x2
- Network patch cable x2
- Sacrificial cable x2
- 4GB SD Card
- Micro USB
- #1 Testing Network Remote
- Network and Coax Remote set:
#1-5, F-connector coupler
- T3 hanging strap and clip x2
- Large T3 carrying bag
Product kit Description
31
Page 35
Part Number Description
Part Number Description
#1-8 Network Testing and ID Remotes
#2-8 Network Testing and ID Remotes
#1-20 ID Only Coax Remotes
#1-20 ID Only Network Remotes
Network Accessory kit :
Network patch cable 1ft x4,
RJ45 to 8 way alligator clips x2
F-Jack to BNC adaptor x2
RJ45 Sacrificial cables x2
Active Remote with selectable ID 1-4
TrakAll Tone and Probe
Net Chaser Protective Case
AC to DC Power Supply : 12V 2.5A
Sacrificial Cable for extending life of
modular plug
24 inch cable assembly 8-way alligator
clips to RJ45
1 ft Network patch cable
Hanging T3 pouch
F-Connector coupler(F81)
TT108
TT208
RK120
RK220
AK030
AR104
TP200
PC060
PS120
CA014
CA015
CA016
CP100
AD004
Optional Accessories
32
Page 36
Part Number Description
Spec List Description
Time Domain Reflectometry & CapacitanceLength Technology
Ouput Connector
Size
Weight
Power
Battery
Altitude
Temperature
Humidity
Warranty
Enclosure
8-Position shielded modular jack / F-Coax
6.12 x 10.61 x 22.94 (cm)
1.02kg
Wall Power Adapter :
Input - 100-240VAC 50/6-Hz
Output - 12VDC
DCInput Jack : 10-28VDC, 20 watts max
Battery Pack : Rechargeable Li-ion
rated 7.8V, 5500mAh, initial capacity
Battery Life : Linked @ 1GB - 8hrs
Active, not linked - 20hrs
3,000m operating
Operating : -10 to 60°C
Storage : -30 to 70°C
Charging temperature range : 10 to 45°C
10-90% non-condensing
1 year
High-strength PC/ABS plastic with V0 rating
Product Specification
33
Page 37

Batteries
The Net Chaser is powered by a rechargeable Lithium ion battery.
To charge the battery, plug the charger into the side port and then
plug the charger into the power source.
Net Chaser battery is not user serviceable. In the event you need to
remove the battery, unscrew the back panel of the Net Chaser and
unplug the battery from the Net Chaser. Be sure to remove all the
leads connecting the battery to the device.
Cleaning
Use a clean, damp cloth to clean the Net Chaser.
Before cleaning, disconnect all cables from the device. Failing to
disconnect cables can damage the device and cause personal injury.
Do not use harsh cleaners, abrasives, or solvents.
Storage
When not in use, store the Net Chaser in the protective bag.
Do not expose the Net Chaser to high temperatures (above 80°C) or
humidity. See the specification section for temperature limits.
NOTE!
The advanced Lithium ion battery is designed to last the life of the unit
and should not have to be replaced. Lithium ion batteries are hazardous
waste and should be disposed of in compliance with local, state, and
federal hazardous waste regulations.
Maintenance
34
Page 38
To ensure safe operations of the Net Chaser, follow instructions
carefully and observe warning and caution messages in this manual.
Failure to observe warnings can result in severe injury or death and can
damage the equipment.
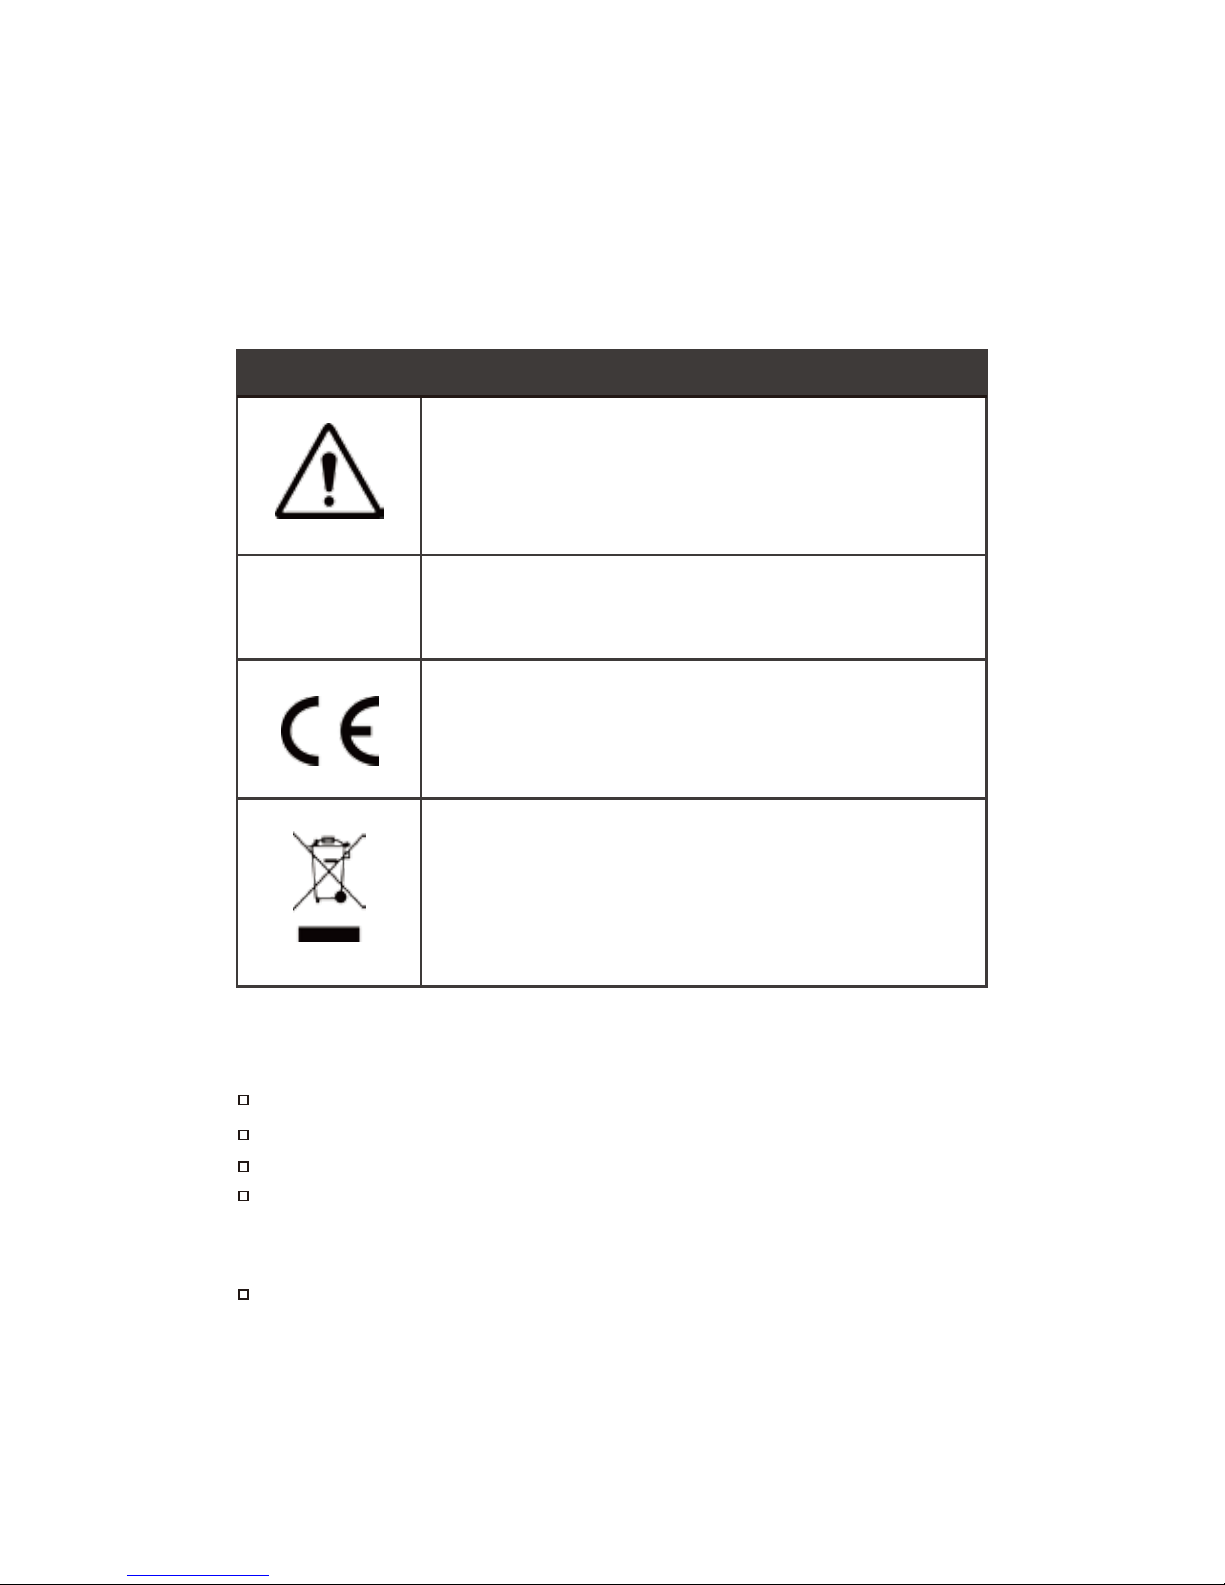
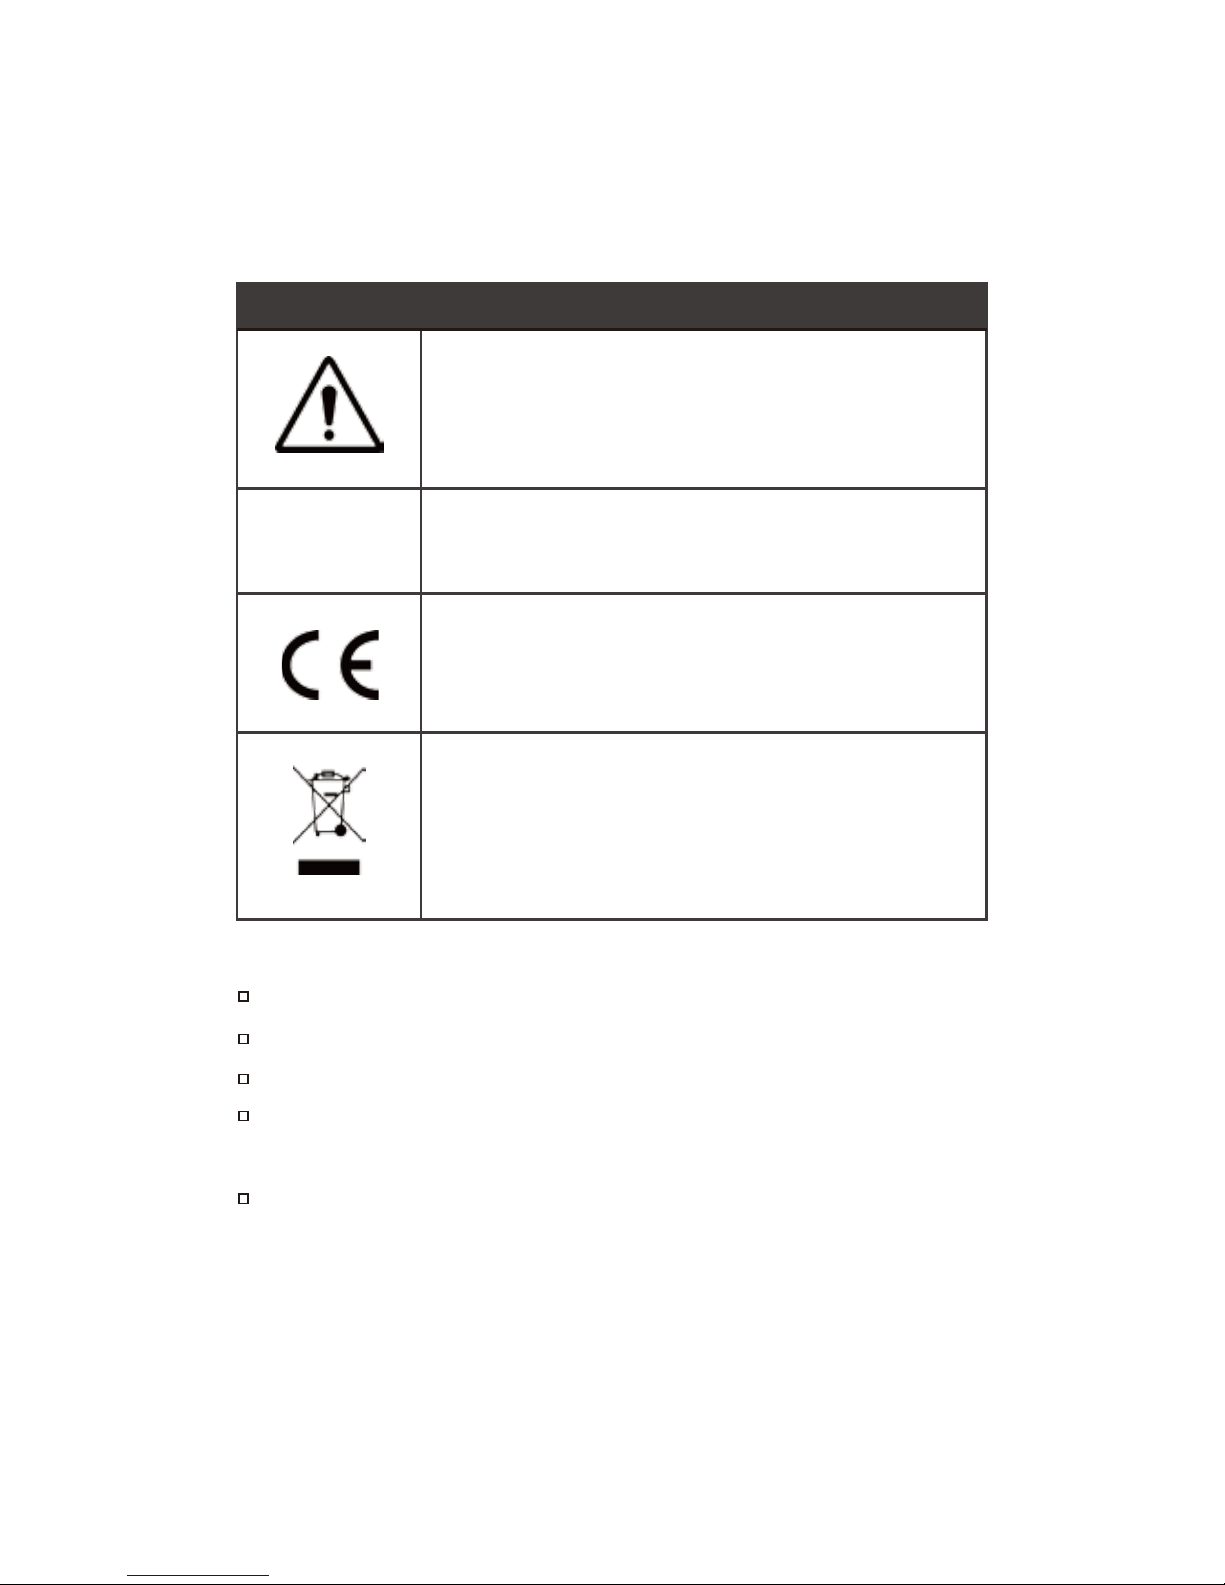
Notification Definition
Warning / Caution : Potential for perosnal
injury or damage to equipment.
Conformité Européenne. Conforms to European
Economic Area directives.
Warning : hazards could cause harm or death.
Dispodal information :
Thsi unit cannot be disposed as unsorted waste
but must be taken to separate collection at their
end-of-life.
Voltage!
WARNING!
To avoid possible fire, electric shock, or prsonal injury :
Do not open the case; no user-serviceable parts are inside.
Do not modify the tester.
Do not use the tester if it is damaged. inspect the tester before use.
The tester in not intended to be connected to active telephone inputs,
systems, equipments, including ISDN devices. Prolonged exposure
to the voltages applied by these interfaces may damage the tester.
The Lithium Ion battery pack should be serviced by qualified
personnel. Only the original battery pack type should be used with
this product.
Safty Information
35
Page 39

T3 Innovation guaranteesthat its products will be free of all defectsin
material and workmanship. This warranty extendsfor a period of 12
months for the T3 Innovation test equipment from the date of
manufacture or proof-of-purchase.
All products deemed defective underthis warranty will be repaired or
replaced at T3 Innovation’s discretion. No further warranties either
implied or expressed will apply, nor will responsibility for operation of
this device be assumed by T3 Innovation.
Product Registration
Registering your Net Chaser allows you to accesssupport information
and receive product updates. Register your products on the T3
Innovation website: www.t3innovation.com/warranty
Warranty Card
You would find a warranty card with the product you purchased. Make
sure to keep the warranty card with care. The official warranty service
would only be provided to the product with the warranty card.
Returns
After Service
Prior to returning any product to T3 Innovation, you must first request
a Return Merchandise Authorization Number. Please contact the agent
or dealer that you purchased the product from to start the return
process.
Warranty & After Service
To receive further technical info or customer support, please contact
the exclusive agent of T3 Innovation in Asia Pacific region : Livewire
Asia Pacific Co.,Ltd, or contact our official authorized distributors.
Asia Pacific Region Exclusive Agent
Livewire Asia Pacific Co., Ltd
www.livewire-asiapacific.com
Customer Service:[email protected]
36
Page 40

註冊您的產品以獲得全方位的服務以及最新
的產品更新資訊,請前往以下官方網站進行
註冊手續.
www.livewire-asiapacific.com
產品註冊
Page 41

使用指南目錄
1
3
4
6
8
9
9
11
12
13
14
15
16
16
16
16
17
18
18
18
19
19
20
21
22
22
22
23
23
本體主機介紹
主動式遠端識別機
一般操作
纜線測試
- 纜線測試一覽
- 纜線測試設定
- 纜線種類
- 進行纜線測試
- 纜線故障種類
- 儲存測試結果
- 纜線檢測清單
連線診斷
- 埠口連線診斷
- POE網路供電檢測
- 音頻追蹤檢測
- 燈號比對
網路檢測
- 連線狀態
- DHCP
- Ping測試
- 路由追蹤
- 虛擬區域網路
- 搜尋協定
系統設定
- IPV4 設定
- 單位與標準設定
- 日期與時間設定
- 待機與關機設定
- 使用者資料設定
24
25
25
26
27
27
28
29
30
31
32
33
34
- 韌體設定
- 韌體重置
- 版本確認
檔案管理
- 檔案管理操作
- 檔案傳輸
圖示說明
產品組合
選配品項
規格清單
一般保養
安全指標
產品保固與售後服務
Page 42
Net Chaser - NC950
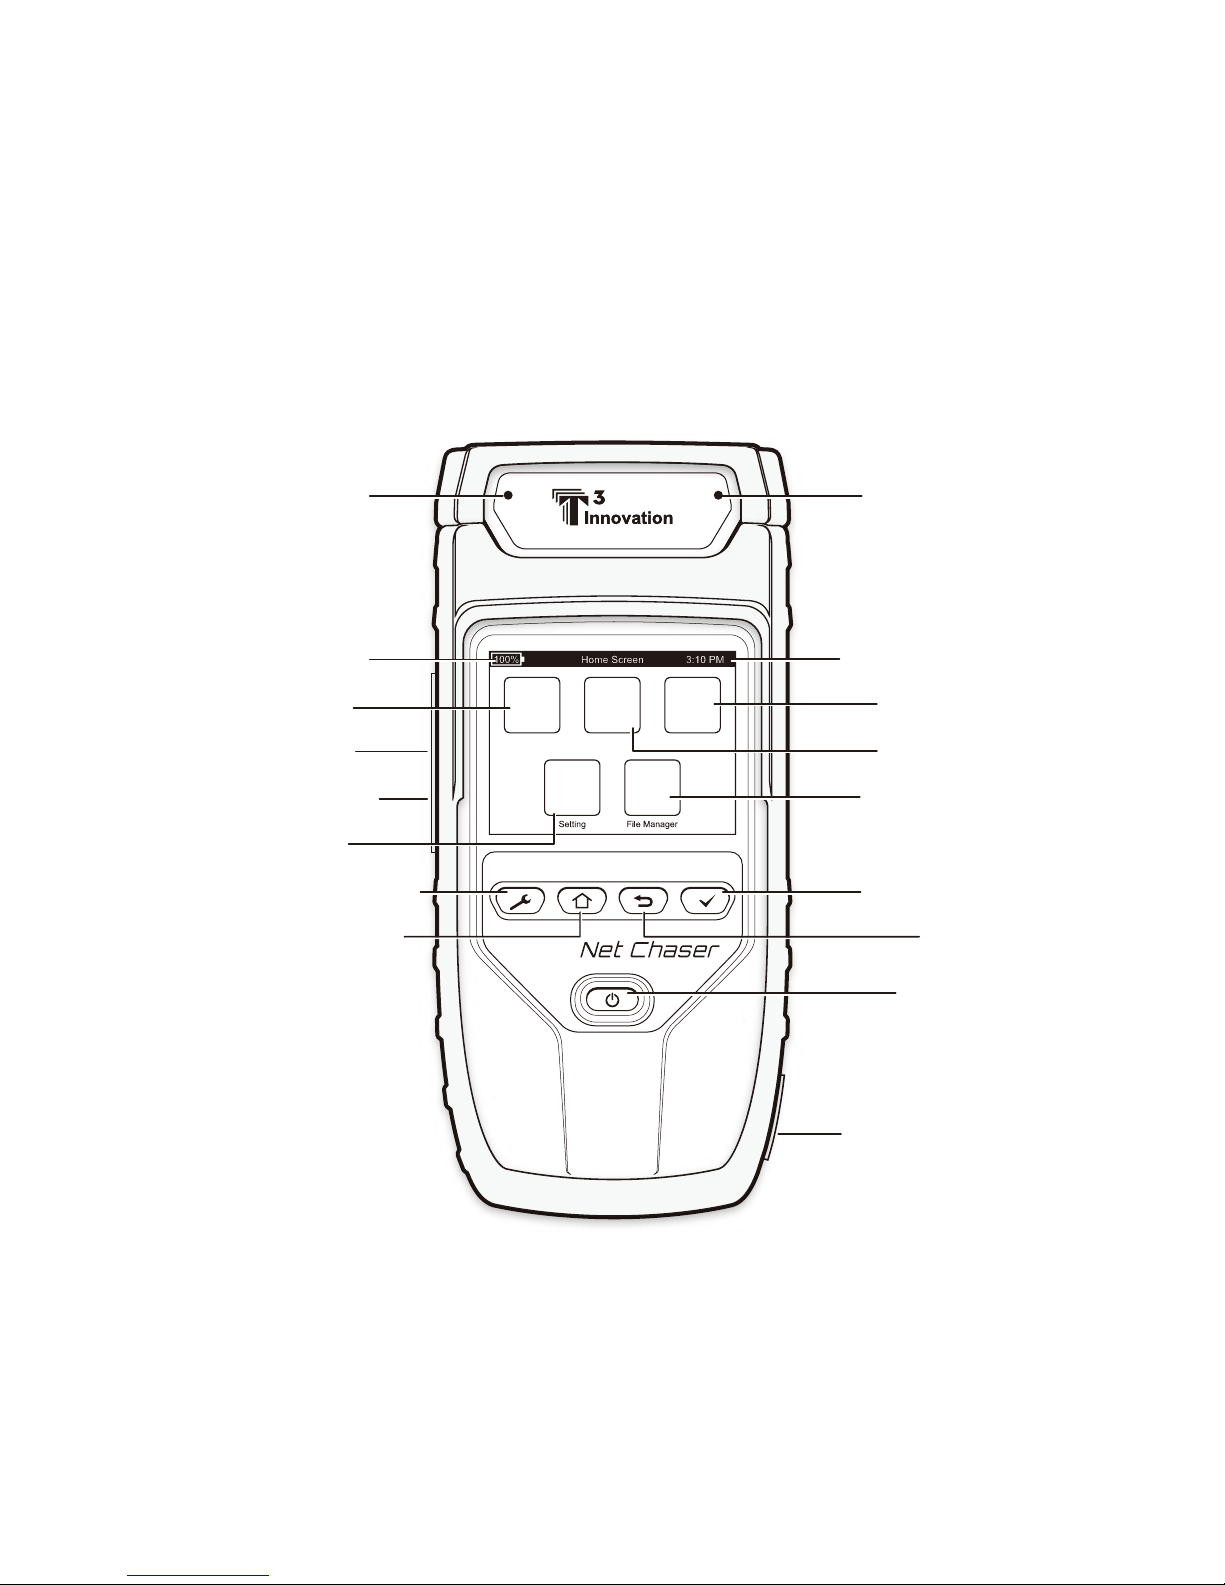
本體主機介紹
Cable Test Link Test Network Test
CHARGELINK
纜線測試
電量指示燈
系統設定
檔案管理員
網絡測試
連線測試
系統設定(快捷)
測試執行鍵
電源鍵
主畫面(快捷)
返回
連線指示燈
充電指示燈
狀態顯示欄位
D/C 充電插孔
Micro USB
SD Card 插槽
1
Page 43
RJ45
網路纜線 轉接座
F-Connector
同軸纜線 轉接座
擺放立架
電池封裝蓋
D/C 充電插孔
2
Page 44
STATUS
100%
75%
25%
BAT LOW
LINKED
PASS
FAIL
Net Chaser - Active Remote
主動式遠端識別機
#主動式遠端識別機為 NC950-AR 套裝隨機配件
範例:將識別號碼設為1號
檢測工作
指示燈
電池狀態
指示燈
狀態
確認鍵
D/C
充電插孔
1 2 3 4
860
ON
A6TN
吊掛扣還
固定處
電池封裝蓋
電池封裝蓋 螺絲鎖孔
進行纜線速度認證檢測時,需將主動式遠端識別機與NC950主機搭配
做使用。主動式遠端識別機單機可設定識別號碼1-4號。
按下狀態確認鍵以顯示左測電池狀態指示燈之電量百分比,並顯示
上一次的纜線測量結果為通過 / 未通過。
將您所希望設定的號碼鍵往上,其餘則一律往下。
欲設定識別號碼,需將電池封裝蓋螺絲卸除,以方便卸下內部的鋰
離子充電電池。
在保持電池與裝置的連結下,輕柔地拉出電池(若非必要,請勿卸
下電池與機器連結的線路),便會看到下圖之識別號碼調整開關。
RJ45 網路纜線 轉接座
3
Page 45
開機 / 關機
按下電源鍵 將主機開機。
輕按一下電源鍵,主機即會進入休眠模式。
長按電源鍵三到五秒,主機即會直接關機。
自動休眠狀態
若長時間沒有在裝置上進行任何操作,主機即會自行進入休眠狀態以
延長電池續航力。您可進入系統設定畫面來調整自動進入休眠狀態的
時間長度。
一般操作
彩色觸控屏幕,操作簡單順手。
使用下方四大快捷鍵來快速瀏覽、開始與暫停測試。
設定 :
首頁 :
返回 :
開始測試 :
按此鍵即可進入系統設定畫面。進入系統設定畫面後,重
複按即可切換系統設定畫面當中的不同頁面。
按此鍵即可返回開機首頁選單。
按此鍵即可回到上一個操作畫面。
按此鍵即可開始 / 暫停測試。
觸控屏幕搭配直覺圖示,操作起來更
得心應手
快速進入欲操作之功能項目
設定 首頁 返回 開始測試
File ManagerSystem Settings
Cable Test Link Test Network Test
4
Page 46

主動式遠端識別機
按下狀態確認鍵以顯示左測電池狀態指示燈之電量百分比,並顯示上
一次的纜線測量結果為通過 / 未通過。
拆裝電池
NC950主機與主動式遠端識別機皆採用相同的鋰離子充電電池,在正
常使用的狀態下並不需要進行電池拆卸。若因其他原因需要進行電池
的拆卸,請務必小心並勿過度拉扯電池連結線。裝置與電池間的連結
插座為單向設計,安裝時請按照孔位安裝,避免過度施力造成損壞。
段落結束
5
Page 47
在此模式下,NC950可執行多項纜線檢測,並驗證
纜線是否合乎指定之網路使用標準。
纜線測試
6
Page 48

纜線測試
根據您所搭配使用的遠端識別器種類或完全不使用的狀態下,會有不
同的測試選項並連帶呈現不同的測試結果。以下將詳述各種測試選項
與其所呈現的內容。您可以點選螢幕上的放大圖示 來進行全螢幕瀏
覽,按下返回鍵 即可回復正常瀏覽狀態。
主動式遠端識別機
此狀態下,NC950會呈現出最完整的纜線測試內容,包含線路圖、
識別號碼、信號雜訊比、位元誤碼率、訊號延遲、短路與纜線長度
等詳細內容。NC950會以綠色打勾符號 來表示纜線通過驗證。
網絡遠端識別器
當使用黑色的網絡遠端識別器,NC950會呈現包含線路圖、識別號
碼、短路與纜線長度等內容。NC950會以橘色打勾符號 來表示纜
線通過測試。
ID識別器 RJ45
黃色的RJ45型ID識別器,可協助使用者進行佈線與纜線標籤作業,
NC950僅會顯示纜線所對應的識別器編號。
ID識別器 Coax
銀色的Coax同軸型ID識別器,可協助使用者進行同軸纜線的佈線與
纜線標籤作業,NC950僅會顯示纜線所對應的識別器編號。
未使用任何遠端識別器
若僅是單純將纜線的一端接上NC950進行測試,而未在纜線的另一
端接上識別器時,NC950會進行纜線的長度檢測以及纜線的開路、
短路狀態呈現。
7
Page 49
纜線測試
纜線測試一覽
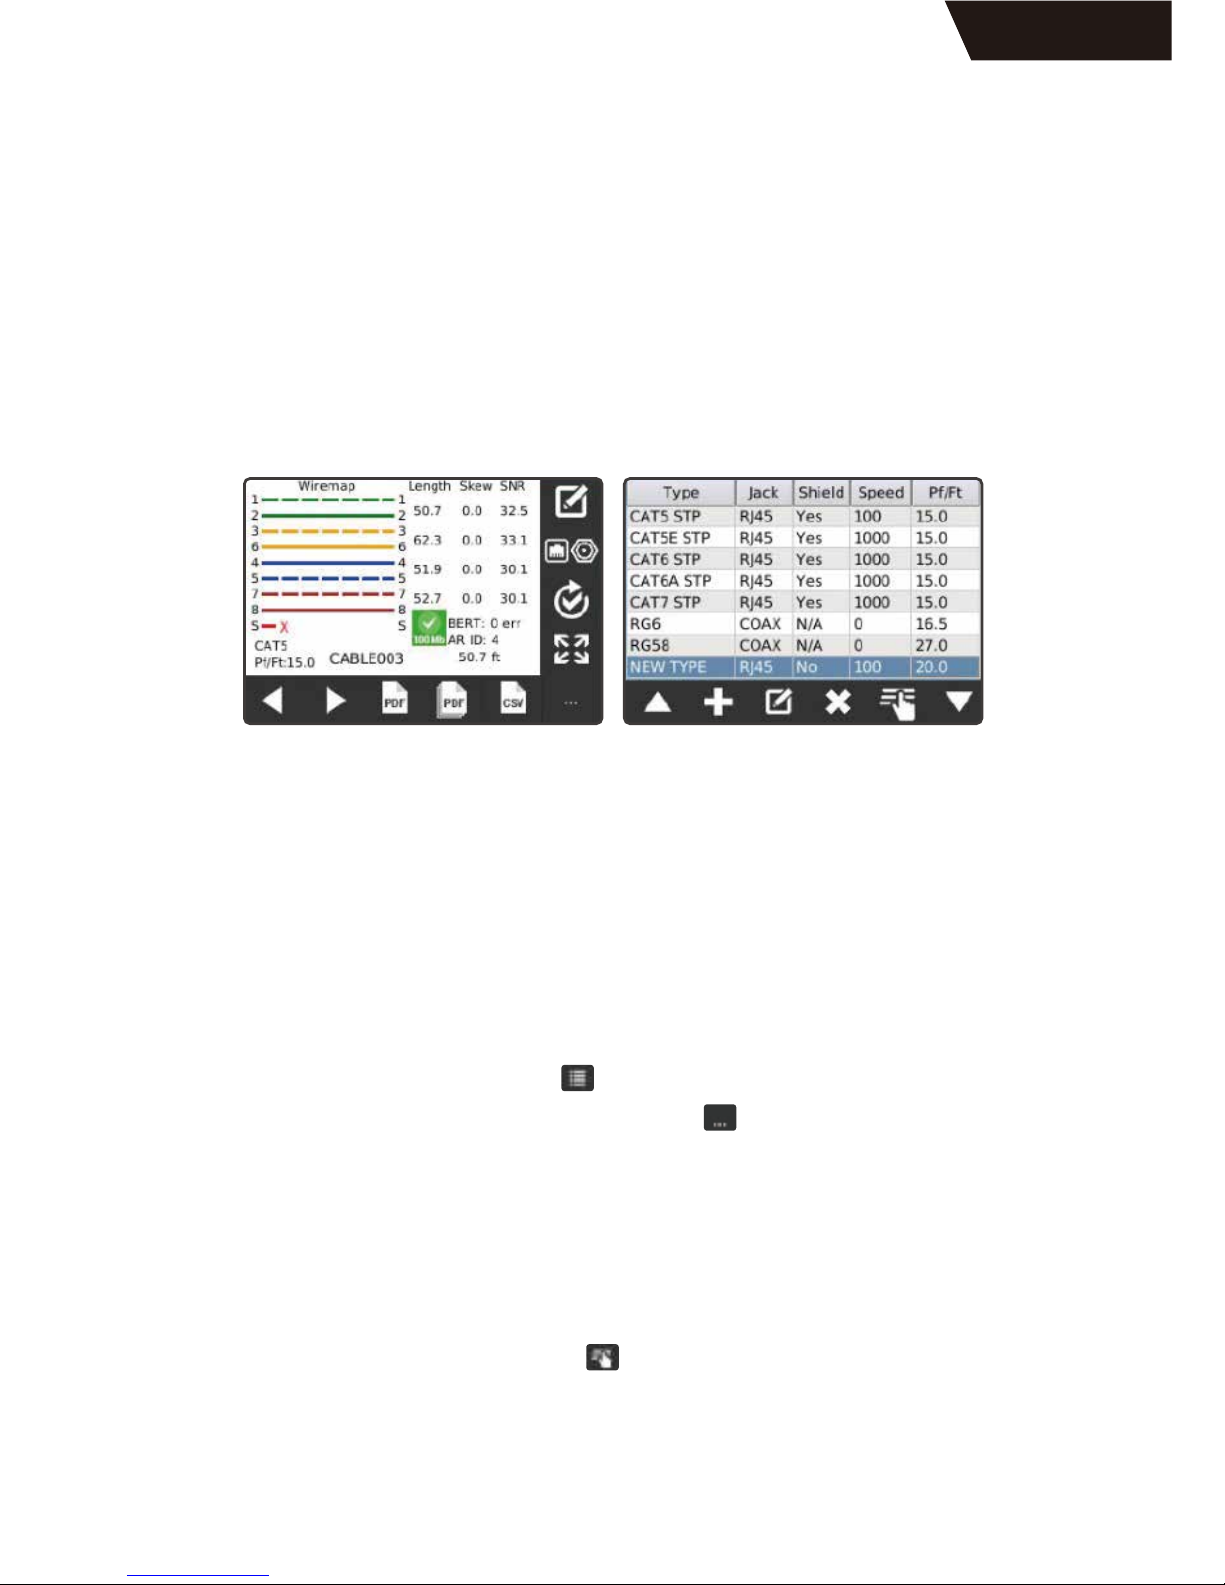
NC950可記下所有的纜線檢測記錄,並儲存為.tst.的格式檔案於本機記
憶體或SD卡當中。
纜線測試共有兩種主要畫面如下:(左)完整畫面與(右)清單畫面
,從兩種畫面都可以進行纜線測試操作。
若是從清單畫面開始進行纜線測試,僅有部分的測試結果會呈現在畫
面當中。若沒有預先設定存檔名稱,則會以“UNTITLED1.TST”作為檔
案預設名稱進行存檔。可以在畫面最上方的綠色狀態顯示欄位看到目
前測試或瀏覽的檔案儲存名稱。
完整畫面 切換至 清單畫面
點選完整畫面下方的清單圖示 即可將螢幕切換至清單畫面。若找不
到清單圖示,請點選右下角的其他選項圖示 以切換畫面下方的選項
列表。切換之後的清單畫面選項,會自動停留在原本完整畫面中所呈
現的測試結果。
清單畫面 切換至 完整畫面
使用螢幕上之上下方向觸控鍵或直接觸控來選擇欲切換之測試結果,
選取後請點選螢幕上的選取圖示 ,畫面即會自動切換至完整畫面。
也可按下返回軟鍵退出畫面。
完整畫面 清單畫面
8
Page 50

纜線種類
使用者可自畫面點選纜線種類圖示 ,即可進入瀏覽原廠內建的纜線
種類清單。使用者除了可以瀏覽各種纜線種類的規格,更可以針對纜
線種類內容進行增加、刪除與修改,讓纜線種類更貼近作業需求。
纜線測試設定
欲進入纜線測試畫面,在首頁點選纜線測試圖示 即會進入纜線測試
畫面當中。螢幕會自動顯示最近一次的測試結果。
創建新的檢測清單
欲創建新的檢測清單,請在完整畫面點選清單圖示 ,按照指示輸
入檢測清單名稱並點選OK鍵完成。在完整畫面的下方及會看到您所
設定的檢測清單名稱。
開啟已建立的檢測清單
欲開啟之前已建立的檢測清單,請在完整畫面點選檔案夾圖示 ,
點選欲開啟的檢測清單名稱後,按下開啟檔案圖示 ,畫面即會自
動切換至該檢測清單內容。
選擇纜線種類
在螢幕點選纜線種類圖示 ,即會進入原廠內建的纜線清單,直接
使用上下方向鍵或觸控選取欲選擇的纜線種類,再點選畫面上的選
取圖示 即可。欲新增、修改纜線清單,請參考下一頁文字說明。
設定纜線記錄編號
NC950會自動為您的每次檢測進行編號排序,並顯示在畫面下方。
使用者可自行編輯編號的排序方式與名稱。
編號排序組成為最多九位元的英文字母加上三位元的數字欄位,欲
進行記錄編號設定請自完整畫面點選編輯圖示 。進入編輯畫面後
,點選圖示 與 即可分別進入修改英文字母組成與數字組成,
完成後按下存檔圖示 即完成設定,或點選退出圖示 退出編輯
畫面。
纜線測試
9
Page 51

警告:編輯或刪除現有的纜線種類名稱,可能會導致既有的檢測記錄
因而連動異常,建議先將檢測清單或測試結果轉成PDF格式或CSV格式
檔案以避免造成檢測記錄的遺失。
新增纜線種類
刪除纜線種類
從纜線測試畫面點選纜線種類圖示 。
點選新增圖示 。
輸入新增的纜線種類名稱並按下OK。
選擇纜線所使用的接頭種類:RJ45或Coax,選完後按下OK。
選擇BER檢測時的數據傳輸種類(100Mbps,1Gbps,2-pair100Mbps,或
0Mbps),按下OK。(若使用者選擇的是Coax同軸纜線,請直接跳
過此步驟)
輸入纜線的長度常數pF/foot或pF/meter,並按下OK。
常見的常數設定如下:
- CAT5 / 5E : 15 pF/ft
- CAT6 : 15 pF/ft
- CAT7 : 15 pF/ft
- RG6 : 16.5 pF/ft
- RG58 : 27 pF/ft
- RG59 : 16.5 pF/ft
選擇纜線為Shield cable / Non-shielded cable / 忽視Ignore shield,並按
下OK即完成。
編輯纜線種類
自纜線種類清單選取欲修改的纜線名稱。
以上下方向鍵或觸控點選後按下編輯圖示 即進入編輯畫面。使用
者可選擇更改或保留原本的纜線名稱,後續設定比照上述新增纜線
種類之說明進行。
完成後按下OK即完成並跳出畫面。
從纜線測試畫面點選纜線種類圖示 。
點選刪除圖示 並按下OK即完成。
纜線測試
10
Page 52

進行纜線測試
網絡纜線檢測
自首頁點選纜線測試圖示 進入纜線測試畫面。
將欲檢測之網絡纜線接上NC950機身上方的網絡埠口,再將該網
絡纜線的另一端接上ActiveRemote(主動式遠端識別機)或
Network Testing ID Retmoe(網絡遠端識別器)。
點選纜線種類圖示 。
自纜線種類清單中選取正確的纜線種類並按下選取圖示 。
按下測試執行鍵 ,NC950即會執行一次纜線測試。NC950會
自動為您編列測試的記錄編號,編號將顯示於螢幕下方,並按照
測試執行的次數逐漸累加。
每按一次測試執行鍵,NC950便會增加一項纜線測試結果至檢測
清單當中。
若要針對同一條纜線再次進行檢測,請點選重新檢測圖示 。
注意:若欲檢測之纜線已固定 / 轉接於牆上母座,可使用隨機配
置的RJ45轉接線將該纜線與NC950主機相連以進行檢測。
同軸纜線檢測
自首頁點選纜線測試圖示 進入纜線測試畫面。
將F81轉接頭接上NC950機身上方同軸纜線埠口,再將欲測隻同軸
纜線與之接上,並在該同軸纜線的另一端接上ID識別器。
點選纜線種類圖示 。
自纜線種類清單中選取正確的同軸纜線種類並按下選取圖示 。
按下測試執行鍵 ,NC950即會執行一次纜線測試。
纜線測試
11
Page 53

纜線故障種類
以下為NC950針對纜線所能診斷並顯示出的纜線故障種類。
OPEN :
纜線的另一端為開路,可能是因為斷線或纜線與轉接頭的安裝失誤
所造成。
SHORT :
纜線中出現短路,可能是絕緣不良、線頭受損或安裝失誤所造成。
MISWIRE :
纜線當中的線對排序不符合TIA568A/B規範。
SPLIT :
纜線當中的線對發生錯接,主因為線對在纜線頭尾兩端的排序順序
不一致所造成。
SKEW :
當SKEW檢測結果超過35微秒,則表示不同線對之間的訊號延遲差異
過大。
SNR :
若SNR的檢測數值超過22分貝,則表示信號雜訊比測試結果不佳。
主要原因可能是信號衰退、串音或來自外部環境的雜訊所造成。外
部雜訊來源包含臨近的電纜線、機電裝置。
纜線測試
12
Page 54

儲存檢測結果
纜線檢測結果可直接儲存為PDF格式或CSV格式。.
在纜線測試的完整畫面中,PDF檔案的儲存方式可分為兩種:使用者
可將單一次的纜線檢測結果存為單一PDF檔案,或是將一整個檢測清
單統整為一份PDF檔案。
使用者可將測試結果儲存為CSV格式,方便使用EXCEL或其他支援
CSV檔案格式之軟體開啟。
將單一次的纜線檢測結果儲存為單一PDF檔案
- 自完整畫面點選其他選項圖示 。
- 點選單一PDF檔案圖示 。
- 按照指示輸入檔案名稱並點選OK。
- PDF檔案將自動儲存至SD記憶卡。
將檢測清單統整為PDF檔案
- 自完整畫面點選其他選項圖示 。
- 點選清單式PDF檔案圖示 。
- 按照指示輸入檔案名稱並點選OK。
- PDF檔案將自動儲存至SD記憶卡。
- 自完整畫面點選其他選項圖示 。
- 點選CSV檔案圖示 。
- 按照指示輸入檔案名稱並點選OK。
- PDF檔案將自動儲存至SD記憶卡。
警告:檔案儲存的過程當中,請勿取出SD記憶卡。
儲存為PDF格式
儲存為CSV格式
纜線測試
13
Page 55

段落結束
纜線檢測清單
纜線測試的清單畫面包含該清單中所有已測的結果。使用者可針對指定
的檢測清單內容進行瀏覽、儲存、重測、增加與修改。
每份新創建的檢測清單都會自動以.tst結尾的檔案格式儲存在NC950本
機的記憶體,使用者可將檔案自本機記憶體轉移至SD記憶卡內,也可
直接在NC950主機上開啟檔案進行編輯、重測與新增項目。
進入纜線測試畫面後,點選清單畫面圖示 。
使用上下方向鍵來瀏覽清單內項目。
針對選定的已測纜線名稱,可點選編輯圖示 進入修改名稱。
欲新增新的纜線測試至既有清單,請點選增加圖示 。
點選OK以確認記錄編號的排列,使用者也可先修改記錄編號的排列
方式後再點選OK。
欲刪除選取的纜線測試結果,請點選刪除圖示 。
欲進行重新檢測,請先選定欲重測的項目並點選選取圖示 ,之後再
點選重測圖示 執行纜線的重新檢測。
注意:每按一次測試執行鍵,NC950就會自動新增一筆纜線檢測結果至
清單當中,每份清單最多可以儲存256項檢測結果。若使用者欲儲存超
過256項纜線檢測結果,請建制新的清單後再繼續執行檢測。
檔案管理
NC950的檔案管理夾內包含tst、PDF與CSV等三種檔案格式,可儲存於
本機記憶體或SD記憶卡當中。使用者可以直接自首頁前往NC950的檔
案管理中心,也可從纜線測試畫面點選檔案管理圖示 進入檔案管理
畫面。相關操作請參考檔案管理中心的相關說明。
清單的儲存位置
纜線測試
14
Page 56
此模式可快速診斷使用者的網絡埠口連線狀態,並
可進行乙太網絡供電的量測與網絡纜線的追蹤。
連線診斷
15
Page 57
進入連線診斷模式後,點選音頻追蹤圖示 。
按下測試執行鍵 裝置便會開始發送音頻訊號。
使用左右箭頭圖示 來選擇音頻訊號的傳輸管道。
點選Low/High來改變音頻訊號的音調。
進入連線診斷模式後,點選音頻追蹤圖示 。
按下測試執行鍵 燈號圖示便會開始閃爍表示燈號正在發送。
裝置所連接最近之交換器或路由器上的埠口LED指示燈便會開始閃爍
,方便使用者辨識纜線所使用之連接埠口。
使用左右方向圖示 選擇連線速度,包含10Mbps/100Mbps/1Gps
half or full duplex,也可由裝置自動選擇。
燈號比對
NC950發送燈號訊號至最近的交換器或路由器,方便使用者從遠端判
別測試纜線的連接位置。
從首頁選單點選連線診斷圖示 進入本模式。
埠口連線診斷
針對使用者目前所使用之網絡埠口狀態進行診斷,顯示之埠口資訊包
含連線速度、MDI/MDI-X、Auto Negotiation與纜線中每對線之SNR。
POE網絡供電檢測
檢測並顯示網絡供電之相關細節,包含供電類型、線對與電壓值。
音頻追蹤纜線
NC950將發送音頻訊號至纜線當中,使用者可搭配音頻探測儀(
TP200)進行網絡纜線追蹤、查找與辨認的工作。
點選進入連線診斷模式後,裝置就會自動進行一次埠口連線診斷。
按下測試執行鍵 即可進行埠口連線診斷。
點選PDF檔案圖示 儲存診斷結果。
使用畫面上跳出之鍵盤為欲儲存的檔案命名。
進入連線診斷模式後,點選POE圖示 。
按下測試執行鍵 進行檢測。
點選PDF檔案圖示 儲存檢測結果。
使用畫面上顯示之鍵盤為欲儲存的檔案命名。
段落結束
連線診斷
16
Page 58
此模式可針對網絡進行進階檢測,確認網絡的連線
狀態與連線路徑等內容。
網絡檢測
17
Page 59
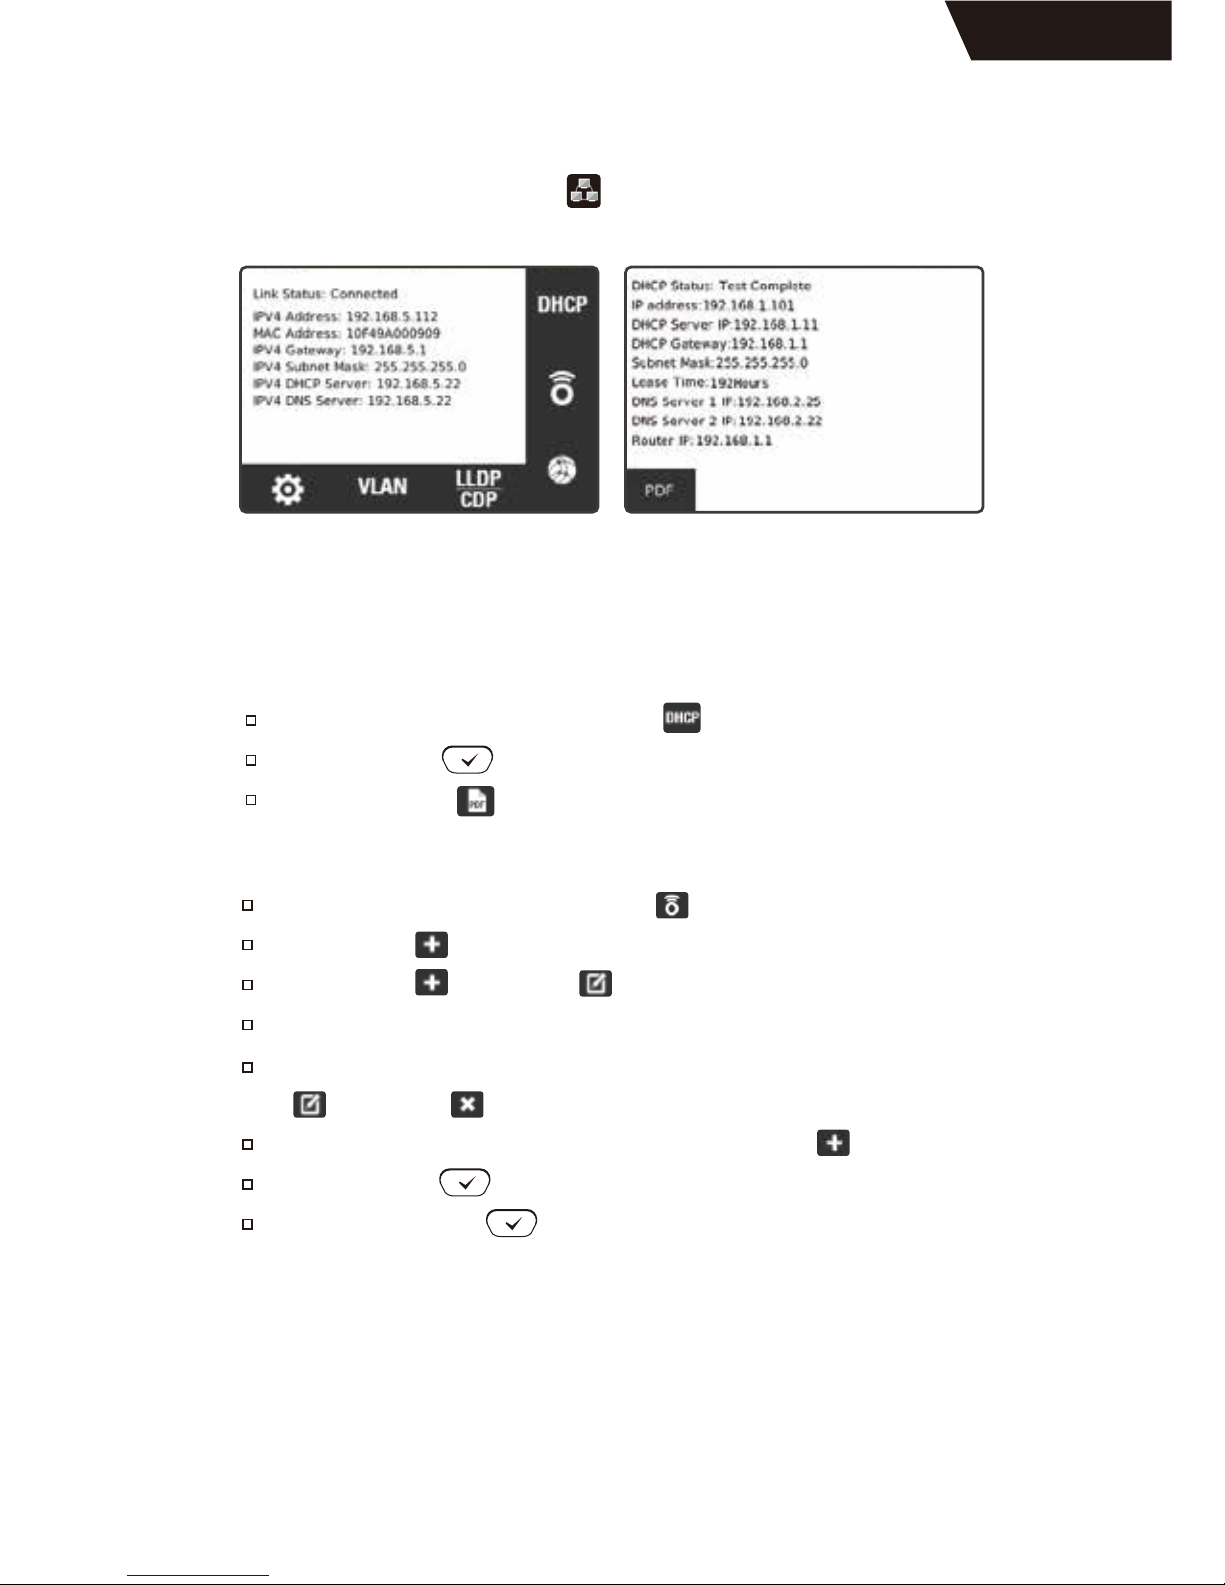
連線狀態診斷畫面 DHCP檢測畫面
連線狀態
上述連線狀態診斷畫面包含IP位置、DHCP與DNS等相關資訊。
DHCP
進入網絡檢測模式後,點選DHCP圖示 。
按下測試執行鍵 進行檢測。
點選PDF檔案圖示 儲存檢測結果。
Ping測試
進入網絡檢測模式後,點選PING圖示 。
點選新增圖示 ,已儲存的IP位置清單將會顯示於畫面中。
點選新增圖示 或編輯圖示 來輸入新的IP或網址。
使用跳出之鍵盤輸入IP位置或網址。
欲編輯或刪除已儲存於清單中之IP或網址,選定項目後按下編輯圖
示 或刪除圖示 即可。
欲新增IP或網址至清單中,選定項目後按下新增圖示 即可。
按下測試執行鍵 進行Ping測試。
再次按下測試執行鍵 停止Ping測試。
從首頁選單點選連線診斷圖示 進入本模式。
進入本模式後,NC950即會自動進行一次基礎連線狀態診斷如下。
網路檢測
18
Page 60
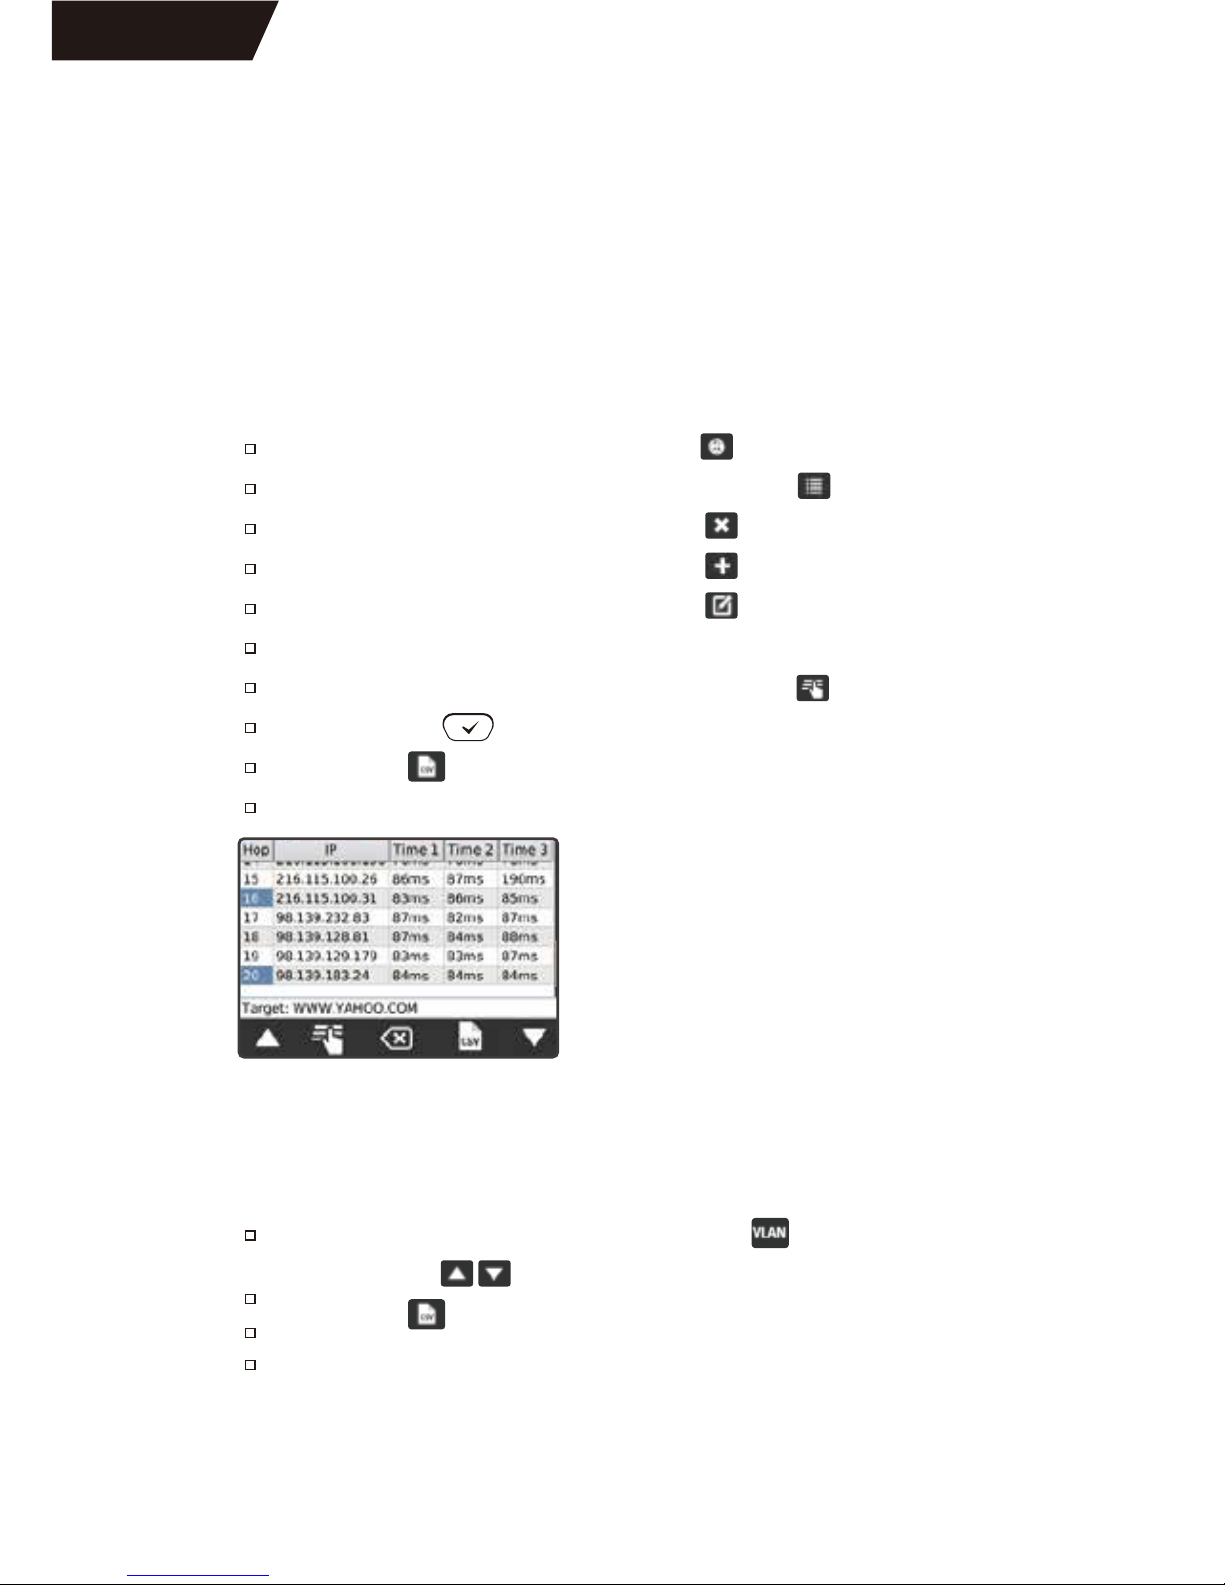
虛擬區域網路
NC950會主動偵測虛擬區域網路的存在並陳列包含虛擬區域網路ID與
優先順序等相關訊息。
進入網絡檢測模式後,點選虛擬區域網路圖示 。
使用上下方向鍵 來瀏覽偵測到的虛擬區網清單。
點選CSV圖示 儲存檢測結果。
使用畫面上顯示之鍵盤為欲儲存的檔案命名。
路由追蹤
路由追蹤是利用ICMP封包來協助進行網絡連接狀態的檢測功能,透過
路由追蹤檢測﹐使用者可以找出通往目的地所經過的路由節點﹐並以
數字將路由順序標識出來。每一個節點都會返回 3 個 round-trip 時間作
參考。但路由節點的路由設備沒有回應ICMP封包,則會在該路由節點
旁以破折號顯示。
進入網絡檢測模式後,點選路由追蹤圖示 。
欲新增或編輯路由追蹤的目的地,請點選清單圖示 進入選單。
欲刪除路由追蹤目的地,請點選刪除圖示 。
欲新增路由追蹤目的地,請點選新增圖示 。
欲編輯路由追蹤目的地,請點選編輯圖示 。
使用螢幕顯示鍵盤來輸入目的地IP或網址,完成後點選OK。
自清單選擇欲進行檢測的目的地,再點選選取圖示 完成選擇。
按下測試執行鍵 開始進行路由追蹤檢測。
點選CSV圖示 儲存檢測結果。
使用畫面上顯示之鍵盤為欲儲存的檔案命名。
網路檢測
19
Page 61
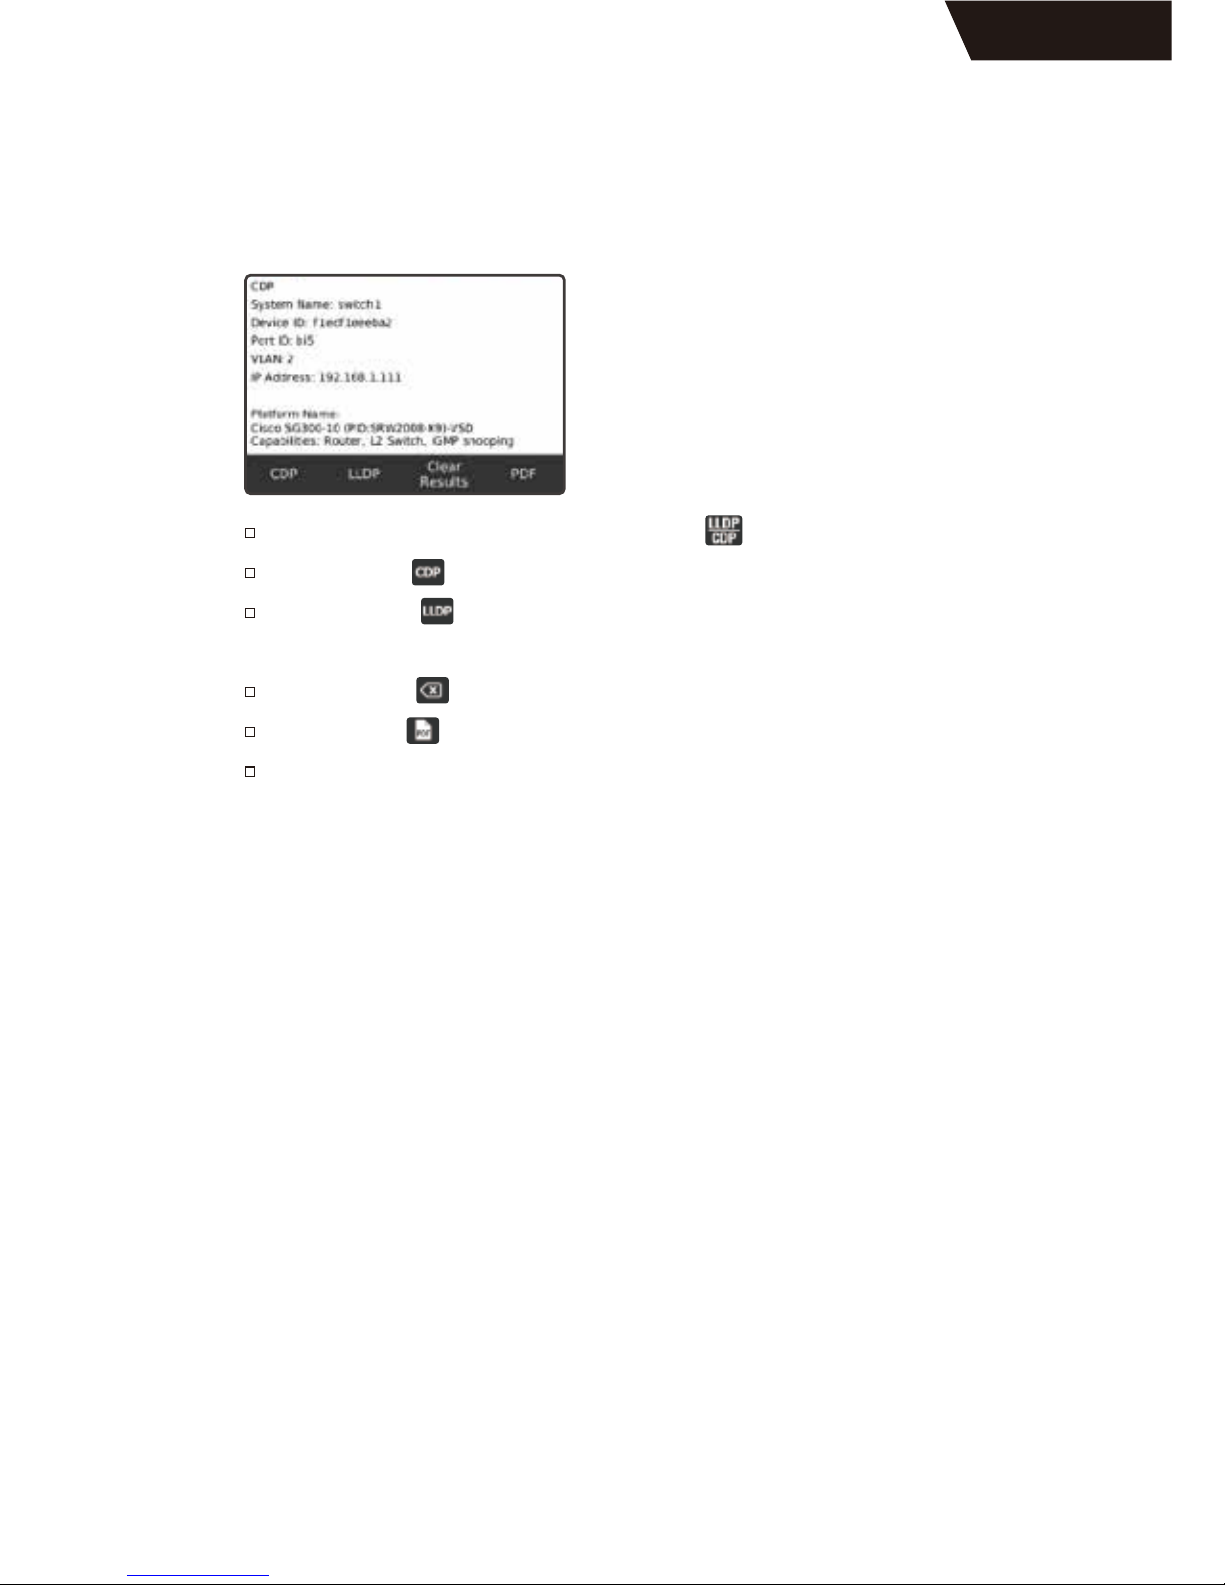
搜尋協定
NC950的搜尋協定功能可提供CDP與LLDP的相關資訊。
進入網路檢測模式後,點選搜尋協定圖示 。
點選CDP圖示 ,顯示Cisco Discovery Protocol資訊。
點選LLDP圖示 ,顯示Link Layer Discovery Protocol資訊。
點選退出圖示 退出CDP或LLDP資訊畫面。
點選PDF圖示 儲存檢測結果。
使用畫面上顯示之鍵盤為欲儲存的檔案命名。
注意:顯示出的協定資訊會因為交換器的不同而有所改變。
注意:CDP與LLDP的資訊來源為發出自交換器的封包。封包發出的
時間間隔可能會因為設定的不同而拉長或縮短,更有可能因為設定
而關閉,導致蒐集不到協定資訊的狀況發生。
段落結束
網路檢測
20
Page 62
系統設定共包含七個設定畫面,方便使用者針對裝
置進行個人化設定。
系統設定
21
Page 63
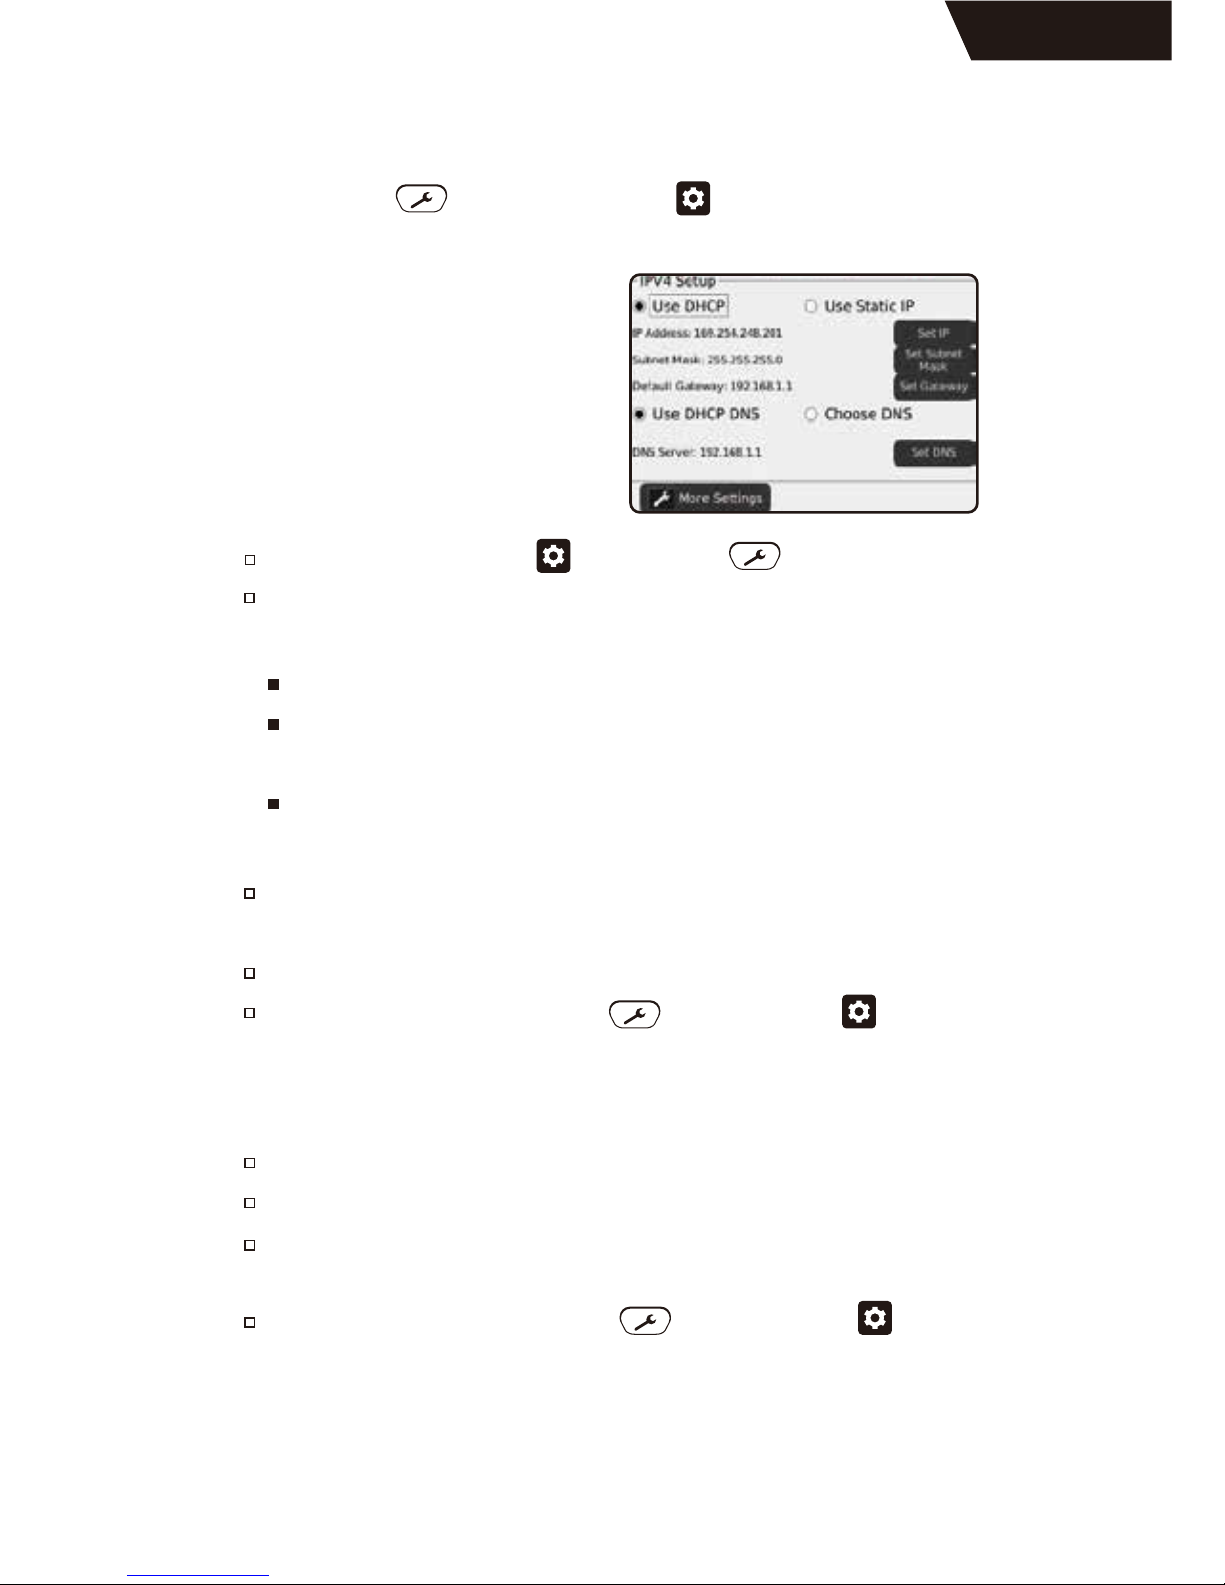
單位與標準設定
按下快捷軟鍵 或首頁系統設定圖示 即可進入系統設定畫面,
進入畫面後按下設定軟鍵即可再切換至不同的設定畫面,順序如下:
IPV4 設定
使用者可針對DHCP、IP位置、
子網路遮罩、Gateway與DNS等
多個項目進行選擇與設定。
在”Display Units”選擇您所偏好的測量距離單位:公尺/英尺
在“Standard”選擇您的纜線測量標準:T568A/T568B
在“LCD Screen”點選“Set”來設定您所偏好的螢幕亮度。
(亮度的調整尺規為最暗5 至 最亮100)
設定完後,再按下一次設定軟鍵 或系統設定圖示 即可切
換至下一個設定畫面,也可按下返回軟件已退出設定畫面。
自首頁點選系統設定圖示 或按快捷軟鍵 進入設定畫面。
原廠的設定是“Use DHCP”,欲使用固定IP的使用者可點選“Use
Static IP”並輸入以下設定 :
原廠即有預先設定裝置的“DHCP DNS”。使用者欲手動更改可點選
“Choose DNS”。
點選“Set DNS”,使用者即可輸入欲設定的DNS位置。
設定完後,再按下一次設定軟鍵 或系統設定圖示 即可切換
至下一個設定畫面,也可按下返回軟件退出設定畫面。
點選“Set IP”並使用螢幕顯示之鍵盤輸入欲設定的裝置IP位置。
點選“Set Subnet Mask”並使用螢幕顯示之鍵盤輸入欲設定的子網
路遮罩IP位置。
點選”Set Gateway”並使用螢幕顯示之鍵盤輸入欲設定的Gateway
IP位置。
系統設定
22
Page 64
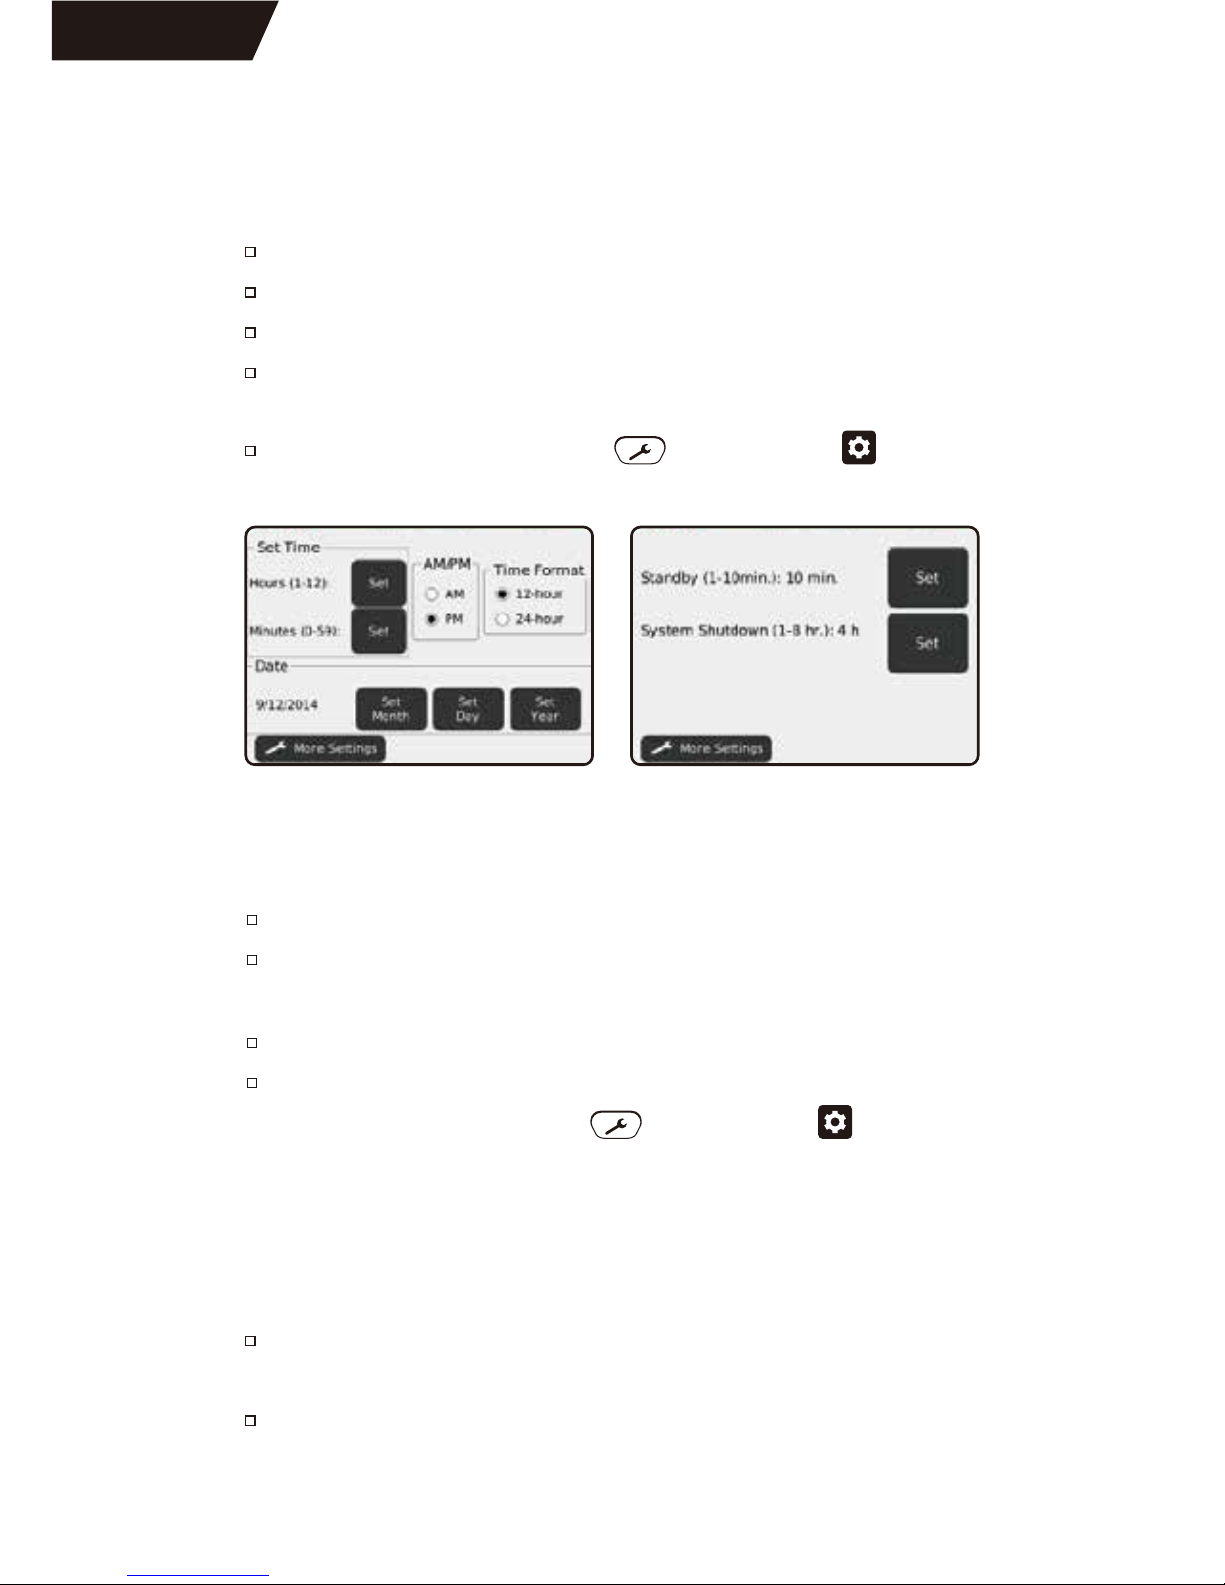
待機與關機設定
設定裝置進入待機的時間。
設定裝置自動關機的時間。
設定完後,再按下一次設定軟鍵 或系統設定圖示 即可切換至
下一個設定畫面,也可按下返回軟件退出設定畫面。
點選“Set”設定裝置進入待機狀態的時間。(出廠設定:10分鐘)
輸入1-10(分鐘)並按OK即完成設定。
點選“Set”設定裝置自動關機的時間。(出廠設定:4小時)
輸入1-8(小時)並按OK即完成設定。
在“Set Time”可點選“Set”進入設定時間。
在“AM/PM”可選擇設定時間為上午或下午。
在“Time Format”可選擇採用12小時或24小時的時間格式。
在“Date”可點選“Set Month”設定月份 /“Set Day”設定日期
/“Set Year”設定年費。
設定完後,再按下一次設定軟鍵 或系統設定圖示 即可切換
至下一個設定畫面,也可按下返回軟件退出設定畫面。
日期與時間設定
日期與時間設定畫面 待機與關機設定畫面
使用者資料設定
使用者可輸入公司名稱、商標、姓名、電郵與電話號碼等資料至裝置
當中,此資料將會直接輸出至裝置產出的報告當中。
於Company點選“Set”使用鍵盤輸入公司名稱,以英文字母20個字
元為上限,輸入完成後點選OK即可。
於Name點選“Set”使用鍵盤輸入人員名稱,以英文字母20個字元
為上限,輸入完成後點選OK即可。
系統設定
23
Page 65
注意:若裝置SD卡當中並沒有logo名稱的資料夾,請直接新增名稱為
“logo”的資料夾,再將商標圖形檔案存入該資料夾當中即可。
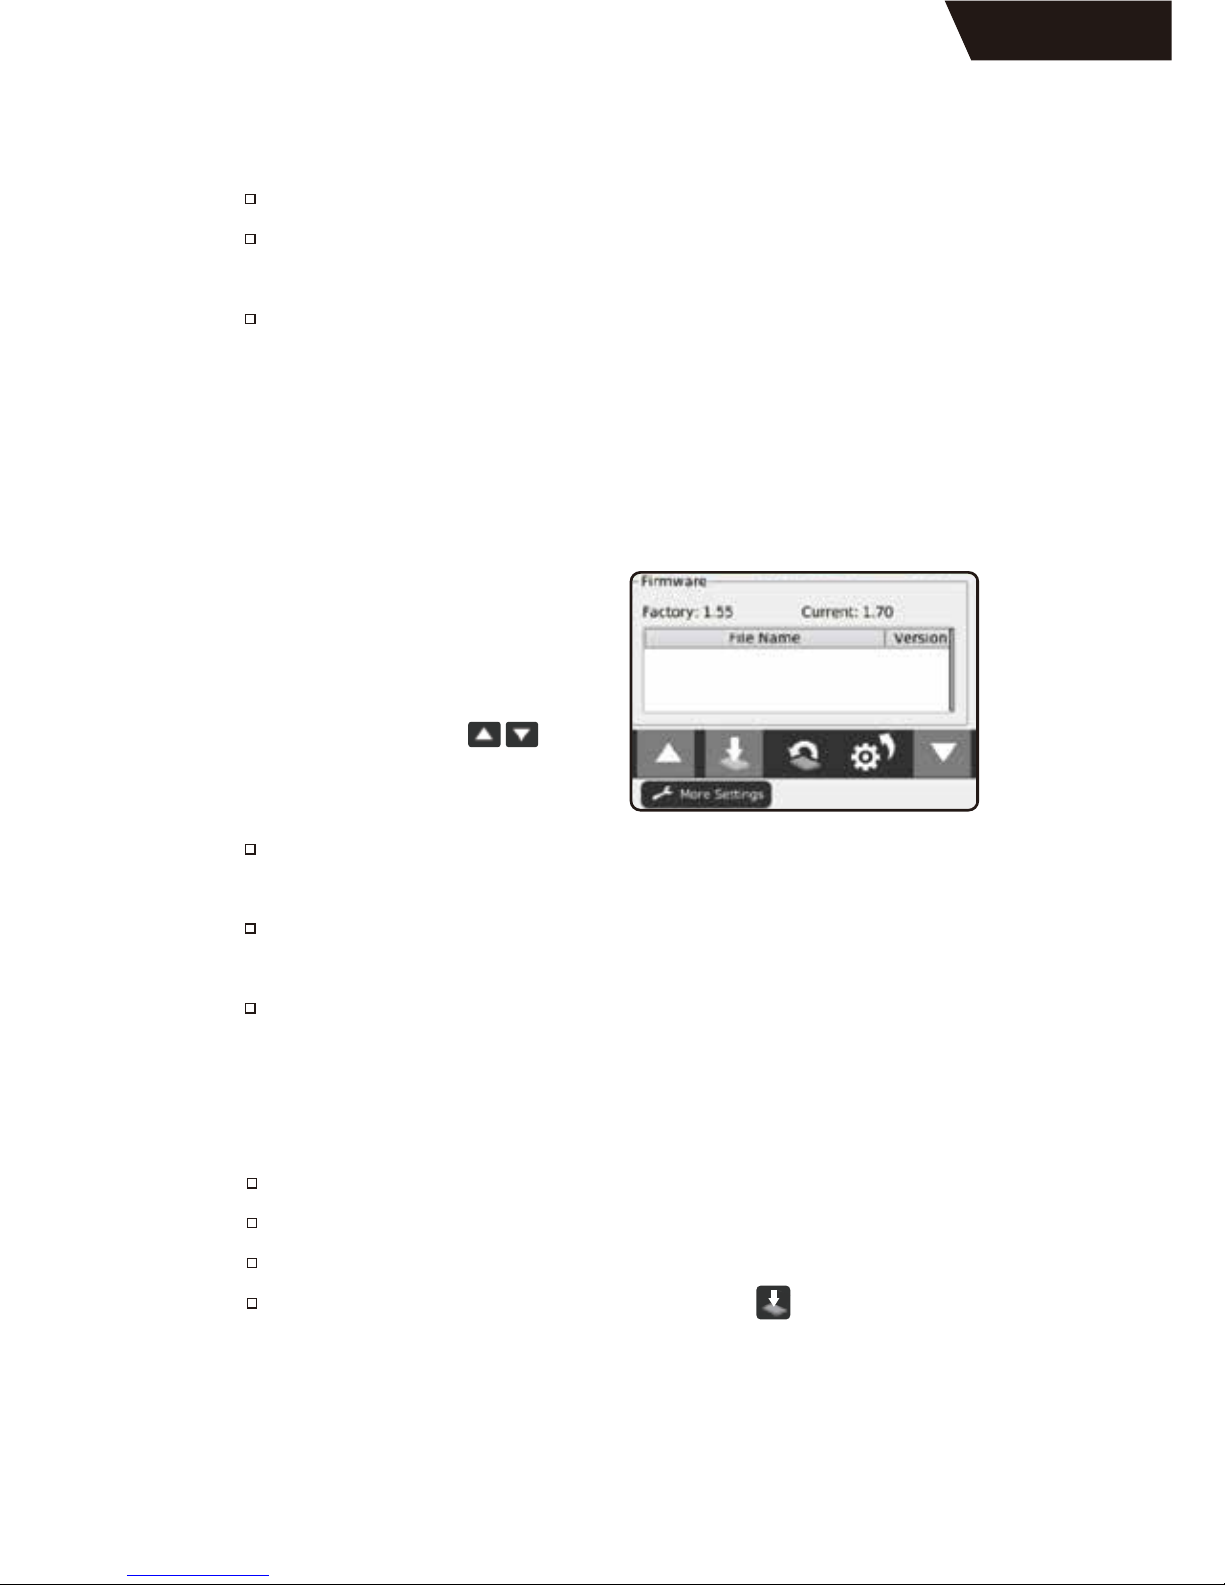
韌體設定
本畫面會顯示存在SD卡當中的韌
體檔案版本,使用者可以存放多
個韌體版本的檔案於SD卡當中。
使用上下方向鍵圖示 選取
欲安裝的韌體版本。
本裝置出廠所配置的韌體版本,將會顯示在畫面左上角”Factory”
的後方。(以右圖為例,該裝置的出廠韌體版本為1.55)
目前裝置上所配置的韌體版本,將會顯示在畫面右上角”Current”
的後方。(以右圖為例,目前的韌體版本為1.70)
欲下載最新的Net Chaser韌體版本,請至Livewire Asia Pacific官方網
站:livewire-asiapacific.com。
注意:進行韌體更新的時候,請先確保您的裝置已連上充電器。
使用者可選擇以SD卡進行韌體檔案的更新:
插入SD卡至電腦當中。
複製並貼上更新檔案(有時會有多個檔案)至SD卡資料夾當中。
重新將SD卡插入至Net Chaser裝置。
切換至本設定畫面,選取韌體後點選更新圖示 執行韌體更新。
注意:當有新的韌體檔案存放至SD卡,使用者可先跳出本畫面再重
新登入來刷新內容。
於E-mail項目點選“Set”輸入聯絡電郵信箱,輸入後點選OK即可。
於Phone項目點選“Set ”輸入聯絡電話,以英文字母20個字元為上
限,輸入完成後點選OK即可。
於Company Logo點選“Enable / Disable”來切換是否使用公司商標。
欲上傳公司商標,請將商標圖形檔案複製到裝置SD記憶卡當中的
”Logo”資料夾。圖形檔案請使用JPEG格式,尺寸限制為
586px*163px。
系統設定
24
Page 66
使用者可選擇以Micro USB進行韌體檔案的更新:
以隨機的Micro USB線將裝置連上電腦。
在裝置的首頁點選資料夾圖示 。
點選其他選項圖示 。
點選USB連線圖示 ,裝置便會重新開機進入檔案傳輸模式。
注意:裝置在電腦上會以“抽取式磁碟”的名稱做顯示。
將韌體檔案複製並貼上裝置在電腦上所顯示的抽取式磁碟資料夾,
並結束裝置與電腦的連線。
按照以下手續從裝置上進行韌體更新:
韌體重置
版本確認
注意:執行軟體更新後,裝置便會重新開機,請確保裝置的電量充
足或直接接上充電器。
使用者可以選擇將韌體還原至出廠的韌體狀態。於本設定畫面點選
韌體重置圖示 並按下OK,裝置即會重新開機並將韌體還原至出
廠狀態。
使用者可以選擇將裝置所有的設定還原至出廠狀態,於本設定畫面
點選原廠還原圖示 並按下OK,裝置便會重新開機並還原。
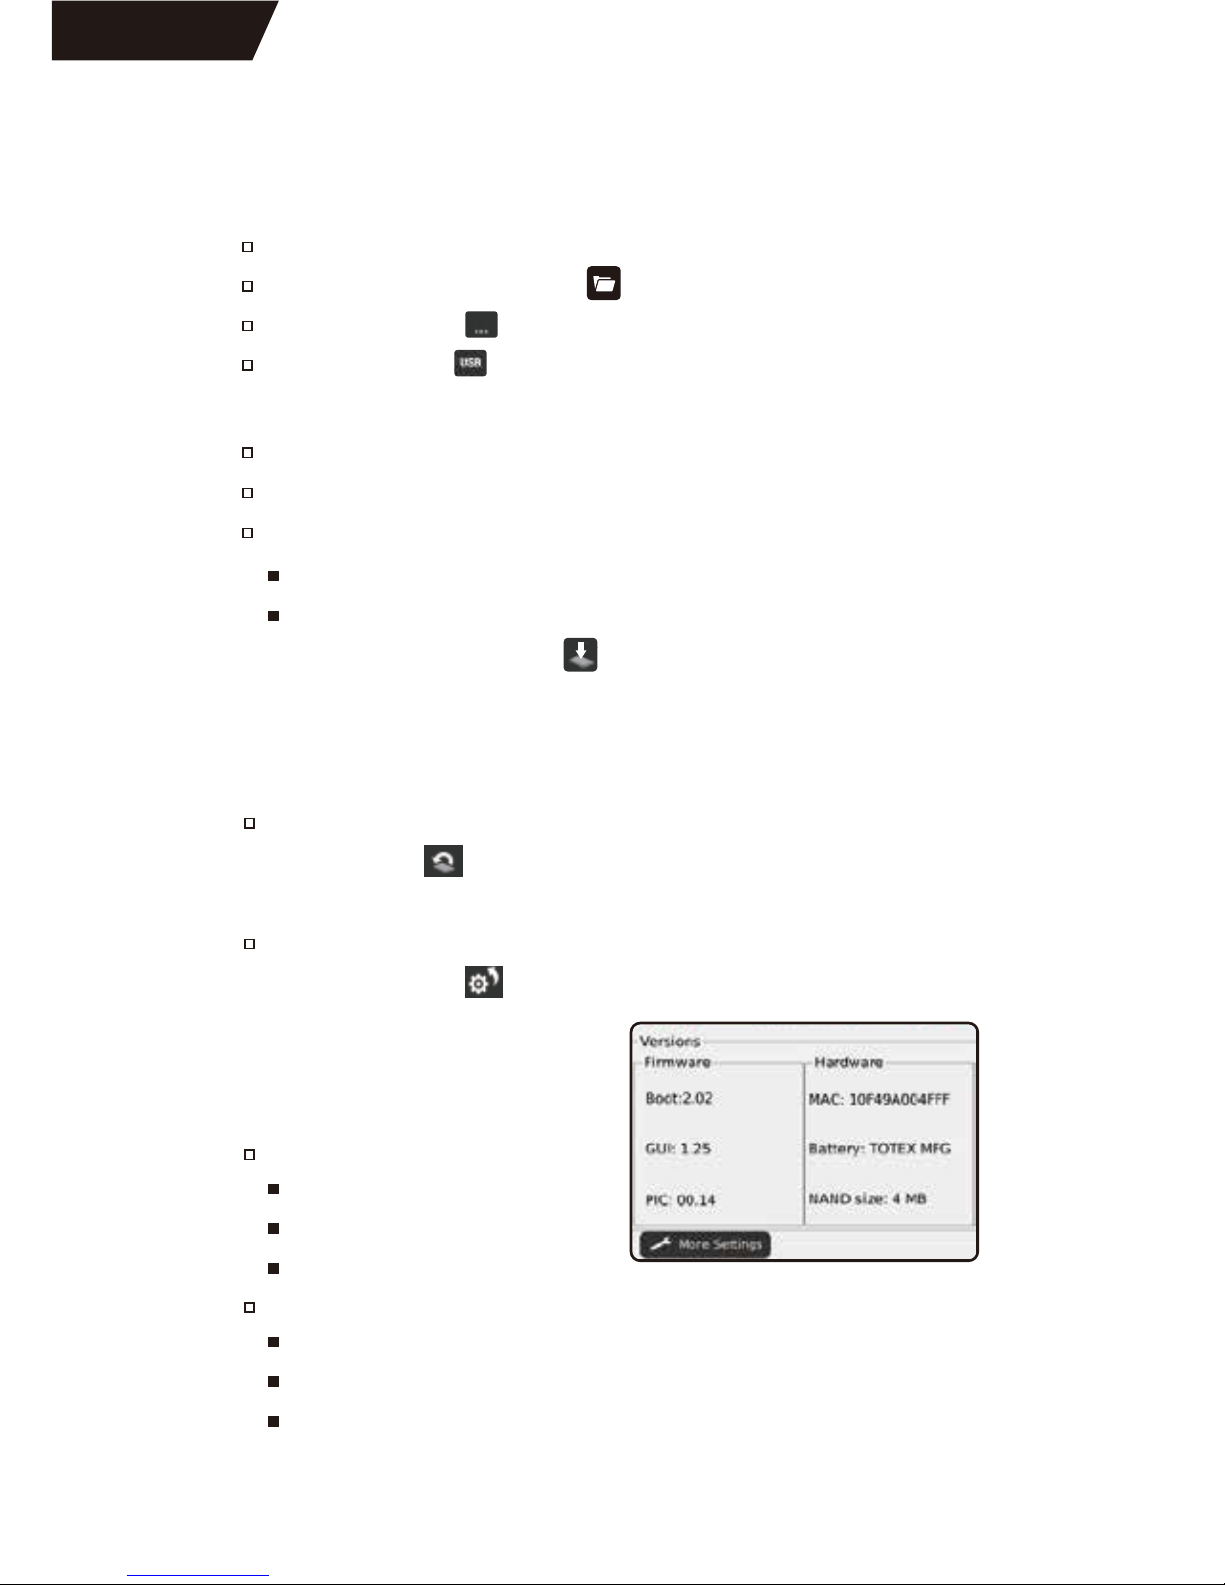
軟體
Boot:軟體運行的核心軟體。
GUI:使用者介面。
PIC:纜線測試處理器。
重新進入本設定畫面。
使用者所貼上的韌體檔案會顯示在韌體清單當中,選取欲更新的
韌體版本後點選更新圖示 ,即會開始執行韌體更新。
硬體
MAC:裝置的MAC位置,同時也是裝置的機身編號。
Battery:裝置所使用之電池類型。
NAND size:裝置的快閃記憶體大小。
使用者可以在“Version”畫面檢
視所有的軟、硬體版本如右圖。
段落結束
系統設定
25
Page 67
使用者可自由管理儲存在裝置內與SD記憶卡上的檢
測結果檔案。
檔案管理
檔案管理
26
Page 68

檔案管理模式包含了所有已儲存的PDF、CSV與TST格式檢測報告,使
用者可以針對個檔案進行重新命名與刪除,也可在裝置本身的記憶體
與SD卡之間進行檔案的轉移。
儲存在裝置內的檔案,可以藉由SD卡或USB傳輸線來進行檔案轉移與
傳輸,請參考以下做法。
檔案管理操作
檔案傳輸
自首頁點選檔案管理圖示 進入操作畫面。
操作畫面會顯示儲存在裝置本身以及SD卡內的檔案。欲查看儲存於
本機裝置的檔案請點選內建記憶圖示 ,欲查看儲存於SD卡的檔案
請點選SD記憶卡圖示 。
欲查看PDF格式檔案請點選PDF圖示 。
欲查看CSV格式檔案請點選CSV圖示 。
使用上下方向圖示 來瀏覽檔案清單。
選取一個或多個檔案後,點選圖示 或 來將所選取的檔案分別
複製至SD卡或本機記憶體當中。
點選其他選項圖示 來瀏覽更多操作項目。
欲直接開啟TST格式檔案,選取檔案後點選檔案開啟圖示 。
欲刪除檔案,選取檔案後點選刪除檔案圖示 。
使用產品配件內的USB傳輸線將Net Chaser裝置與電腦做連接。
開機後,從首頁進入檔案管理模式,點選其他選項圖示 。
找到USB圖示並點選,即會有連線對話視窗跳出,點選OK或取消。
連線後,裝置在電腦上會以“抽取式磁碟”做顯示。
從電腦點選進入“抽取式磁碟”資料夾後,即可自由瀏覽、複製或
刪除檔案。
將SD記憶卡從Net Chaser裝置取出後,插入電腦或讀卡機當中,即可
直接瀏覽、複製或刪除儲存在SD卡當中的檔案。
使用USB傳輸線
使用SD卡
段落結束
檔案管理
27
Page 69
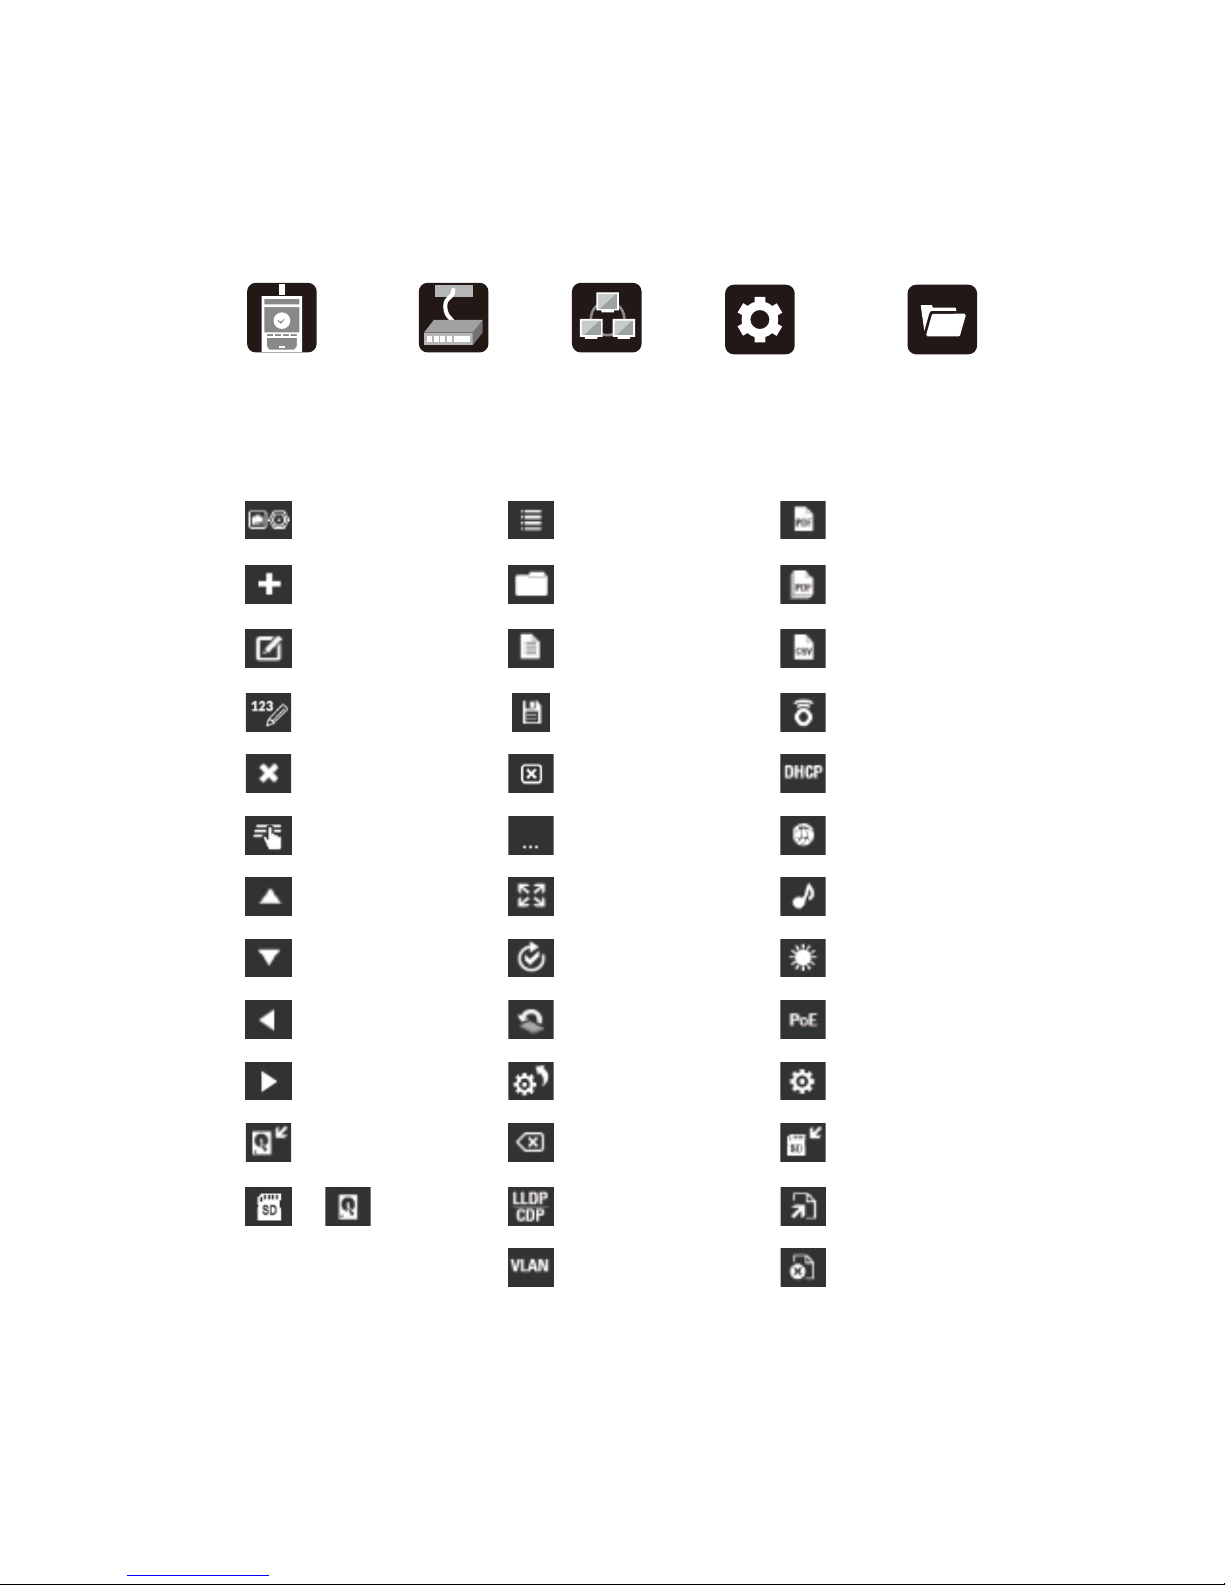
纜線種類
增加
編輯
編號設定
刪除
選取
往上
往下
前一項
後一項
複製至內建
記憶體
切換SD卡與本機裝置
內的檔案瀏覽
LLDP / CDP 搜尋協定
上一頁
虛擬區域網絡
複製至SD記憶卡
開啟檔案
刪除檔案
清單
檔案管理
新建清單
儲存
取消
其他選項
全螢幕檢視
再次檢測
重置原廠
軟體設定
還原至出廠狀態
將單一結果儲存為
PDF格式檔案
將整份清單儲存儲存為
PDF格式檔案
將TST檔案儲存為
EXCEL格式檔案
Ping 檢測
DHCP 檢測
路由追蹤
音頻追蹤
燈號比對
網路供電測試
設定
首頁圖示說明
其他操作圖示說明
File ManagerSystem
Settings
Cable Test Link Test Network
Test
纜線測試 連線診斷 網路檢測 系統設定 檔案管理
圖示說明
28
Page 70

Part Number Description
產品編號
NC 950
NC 950-AR
內容物說明
- Net Chaser主機
- 變壓充電器
- 網絡 patch cable x2
- Sacrificial cable x2
- 4GB SD 記憶卡
- Micro USB 傳輸線
- 網路遠端識別器:編號1號
- RJ45 / Coax ID識別器組: 編號1-5號
- T3原廠掛鉤及吊帶
- T3原廠大收納包
- Net Chaser主機
- 主動式遠端識別器
- 變壓充電器 x2
- 網絡 patch cable x2
- Sacrificial cable x2
- 4GB SD 記憶卡
- Micro USB 傳輸線
- 網路遠端識別器:編號1號
- RJ45 / Coax ID識別器組: 編號1-5號
- T3原廠掛鉤及吊帶 x2
- T3原廠大收納包
產品組合
29
Page 71
Part Number Description
網絡遠端識別器:編號1-8號
網絡遠端識別器:編號2-8號
Coax ID識別器:編號1-20號
RJ45 ID識別器:編號1-2
網絡配件組 :
網絡 patch cable 1ft x4,
RJ45 to 8 way alligator clips x2
F-Jack to BNC adaptor x2
RJ45 Sacrificial cables x2
主動式遠端識別器
音頻追蹤探棒
Net Chaser 保護收納箱
變壓充電器 : 12V 2.5A
Sacrificial Cable
(延長RJ45轉接座使用壽命)
24 inch cable assembly 8-way alligator
clips to RJ45
1 ft 網路 patch cable
T3輕便收納包
F-Connector coupler(F81)
TT108
TT208
RK120
RK220
AK030
AR104
TP200
PC060
PS120
CA014
CA015
CA016
CP100
AD004
產品編號 內容物說明
選配品項
30
Page 72
Part Number Description
規格清單 規格說明
TDR時域反射技術核心技術
輸出 / 輸入
尺寸
重量
電源
電池
高度
溫度
濕度
產品主機保固
機殼
RJ45接頭 / F-同軸纜線轉接頭
檔案傳輸、轉移:Micro USB / SD記憶卡
6.12 x 10.61 x 22.94 (公分)
1.02kg
Wall Power Adapter :
Input - 100-240VAC 50/6-Hz
Output - 12VDC
DCInput Jack : 10-28VDC, 20 watts max
鋰離子充電電池組
7.8V, 5500mAh, initial capacity
使用效能 :
Linked @ 1GB - 8小時 / 待機 - 71hrs
3,000公尺
操作中 : 0 to 60°C
存放環境 : -30 to 70°C
溫差變化 : 10 to 45°C
10-90% non-condensing
1 年
高強度 PC/ABS plastic 阻燃防火等級:V0
規格清單
31
Page 73

電池
Net Chaser採用鋰離子充電電池作為電源供應。
欲充電時,將配件之變壓充電器接上裝置上的接電口,再將充電器
接上插座後即可開始充電。
使用者並沒有將電池自行取出的必要,若遇到需要移除電池的場合
,請將裝置後方的電池蓋以適當規格的螺絲起子解開,再小心地將
電池移出,並拔除電池與裝置的連結。
清潔
使用乾淨且微濕的布斤來清潔本裝置。
清潔裝置以前,請務必卸除其他與裝置連接的纜線,以免造成裝置
損壞或人員傷害。
請勿使用高強度清潔劑,以免造成產品損壞。
存放
裝置沒在使用時,請務必小心存放於收納空間。
切勿將裝置曝曬於高溫(攝氏高於80度)或高濕度的環境,請參考
規格表的溫度與濕度限制。
注意:本裝置所使用之鋰離子充電電池之使用壽命與裝置本身相同
,除非電池或裝置發生損壞,否則並沒有替換的必要。依照法律規
定,鋰離子充電電池不可隨丟棄,請參照當地條管、規定來進行電
池的回收與處置。
一般保養
32
Page 74
為確保使用者在產品操作上的安全,請參照以下安全指標與說明。任
何不當的操作都有可能造成對裝置本身或操作人員的危害。
提示圖像 提示說明
警告 / 注意:
可能對產品或操作人員造成危害。
Conformité Européenne.
符合歐盟安全指標與規範
電壓警告:可能造成生命危害
產品棄置說明:
請按照當地法規,將本產品進行分類回收,
切勿直接丟棄。
Voltage!
警告:請遵守以下準則,避免造成裝置與人員危害!
請勿擅自拆解本產品 / 裝置。
請勿擅自對本產品進行修改、改裝。
若裝置損壞,請勿繼續使用。
本裝置並不適用於通電環境,包含啟用的電話線、系統與裝置等,
當中的夾帶電壓將對本裝置造成直接損壞。
鋰離子電池應該由官方指定的專業人員進行拆裝,切勿擅自替換不
同裝置的鋰離子電池。
安全指標
33
Page 75

美國T3公司針對旗下測試儀器產品提供12個月產品保固與保修服務。
自出廠日期或銷售證明日起算十二個月內,若產片發生瑕疵與非人為
因素所造成之故障,將由T3與官方授權之銷售通路進行產品的回收與
維修。T3與官方授權之銷售通路會依照原廠設定之標準來決定要針對
問題產品進行維修或替換,尚不提供其他延伸保固服務。
產品註冊
前往以下網站進行產品註冊,您將可獲得最新的產品相關訊息與更新
內容:
livewire-asiapacific.com
產品保固卡
每台T3售出的測試儀器都付有產品保固卡乙張,內含該產品的機身序
號與授權經銷商。請務必妥善收好產品保固卡,T3與官方授權之經銷
通路將憑使用者提供的保固卡來提供相關保固服務。
產品回收
售後服務
若使用者希望將產品寄回給T3母公司,請務必先透過當初的採購通路
進行聯繫。
產品保固 與 售後服務
欲獲得進一步技術支援與產品售後服務,請聯繫美國T3公司的亞太區
總代理 勁澤科技股份有限公司,或聯繫官方授權之代理、經銷機構。
亞太區總代理 勁澤科技股份有限公司
官方網站:www.livewire-asiapacific.com
客服信箱:[email protected]
34
Page 76

Asia Pacific Region Exclusive Agent
Livewire Asia Pacific Co., Ltd
www.livewire-asiapacific.com
UG-2015-NC950-v1
 Loading...