

Page 1
Basics
Livescribe™ wi smartpen
Page 2
Tip:
Setup
Please make sure you’ve followed the steps on the Quick Start sheet
to setup your account and activate your smartpen before you continue.
(If you haven’t, go to livescribe.com/setup from your computer’s
browser to begin now.)
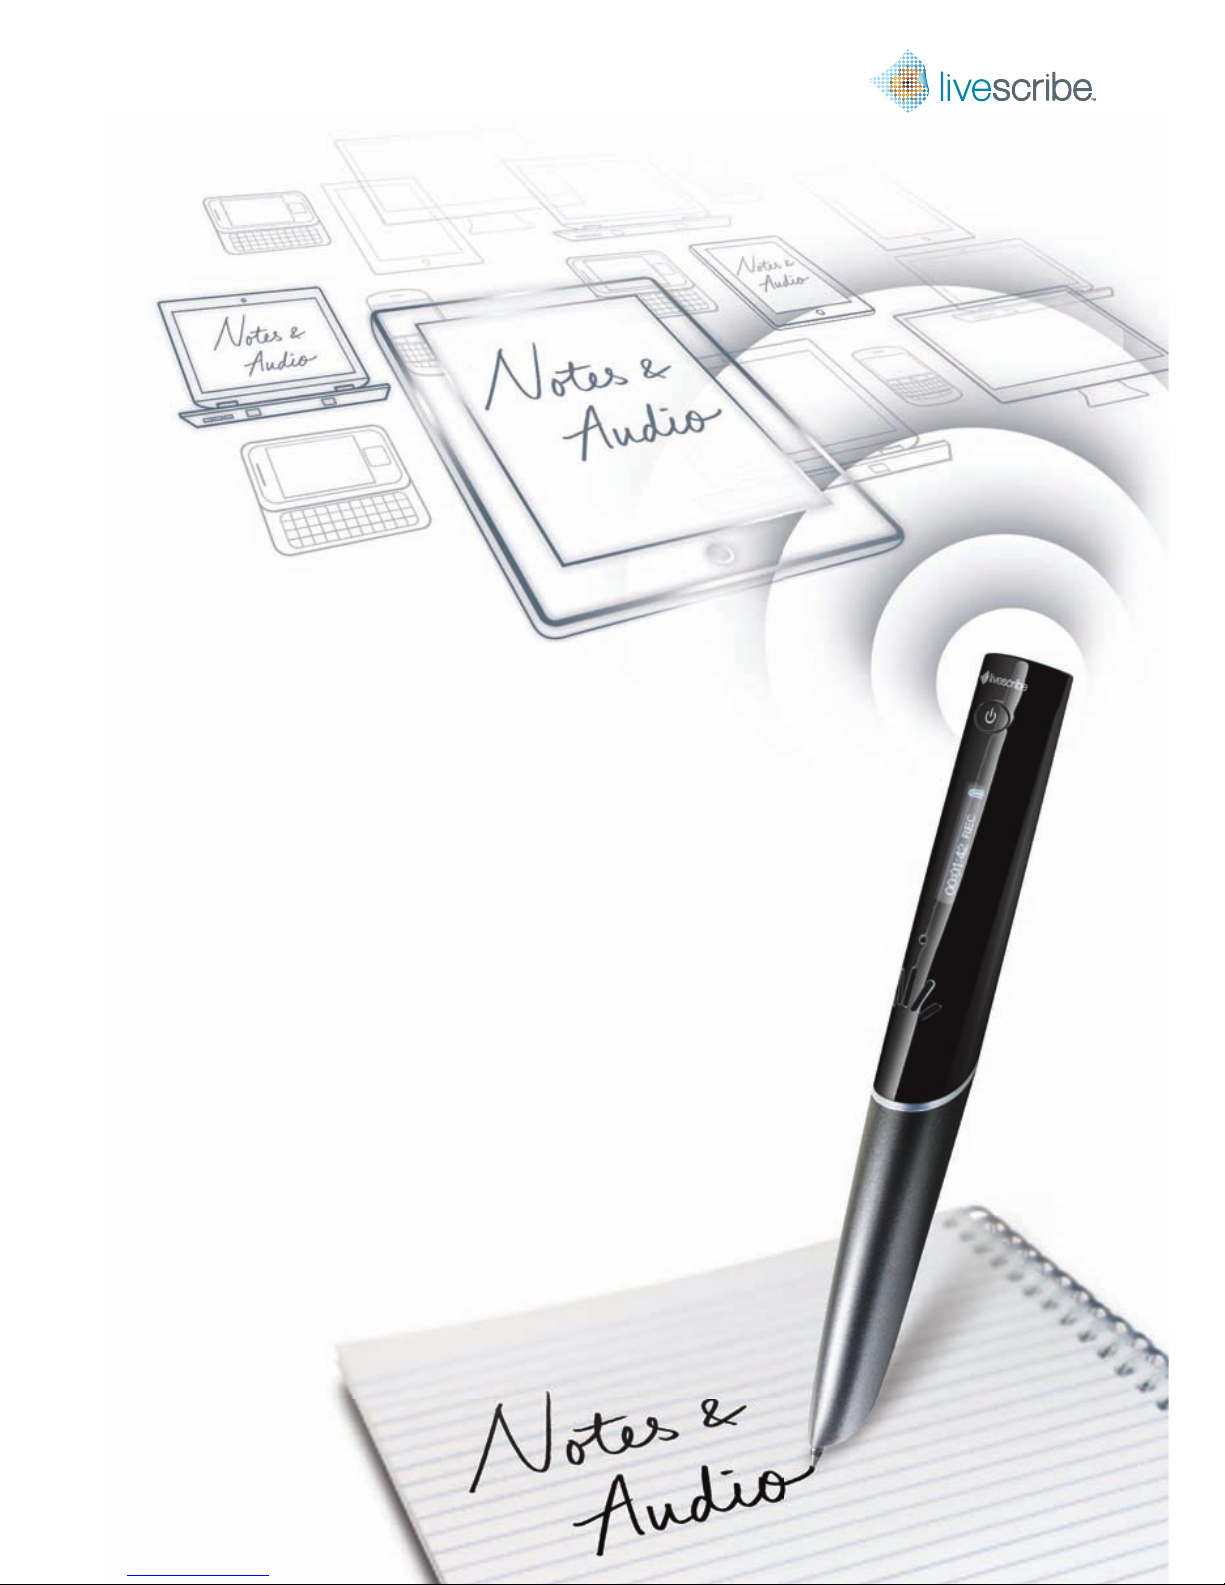
Meet your Livescribe™ wi smartpen
Take the work out of note-taking by recording everything you write and hear.
Automatically, your notes and audio are wirelessly sent and securely stored in
Evernote.® Whether you play back your meetings and lectures from your smartpen,
computer or mobile device, you’ll have your most important information wherever
and whenever you need it.
1
English 1
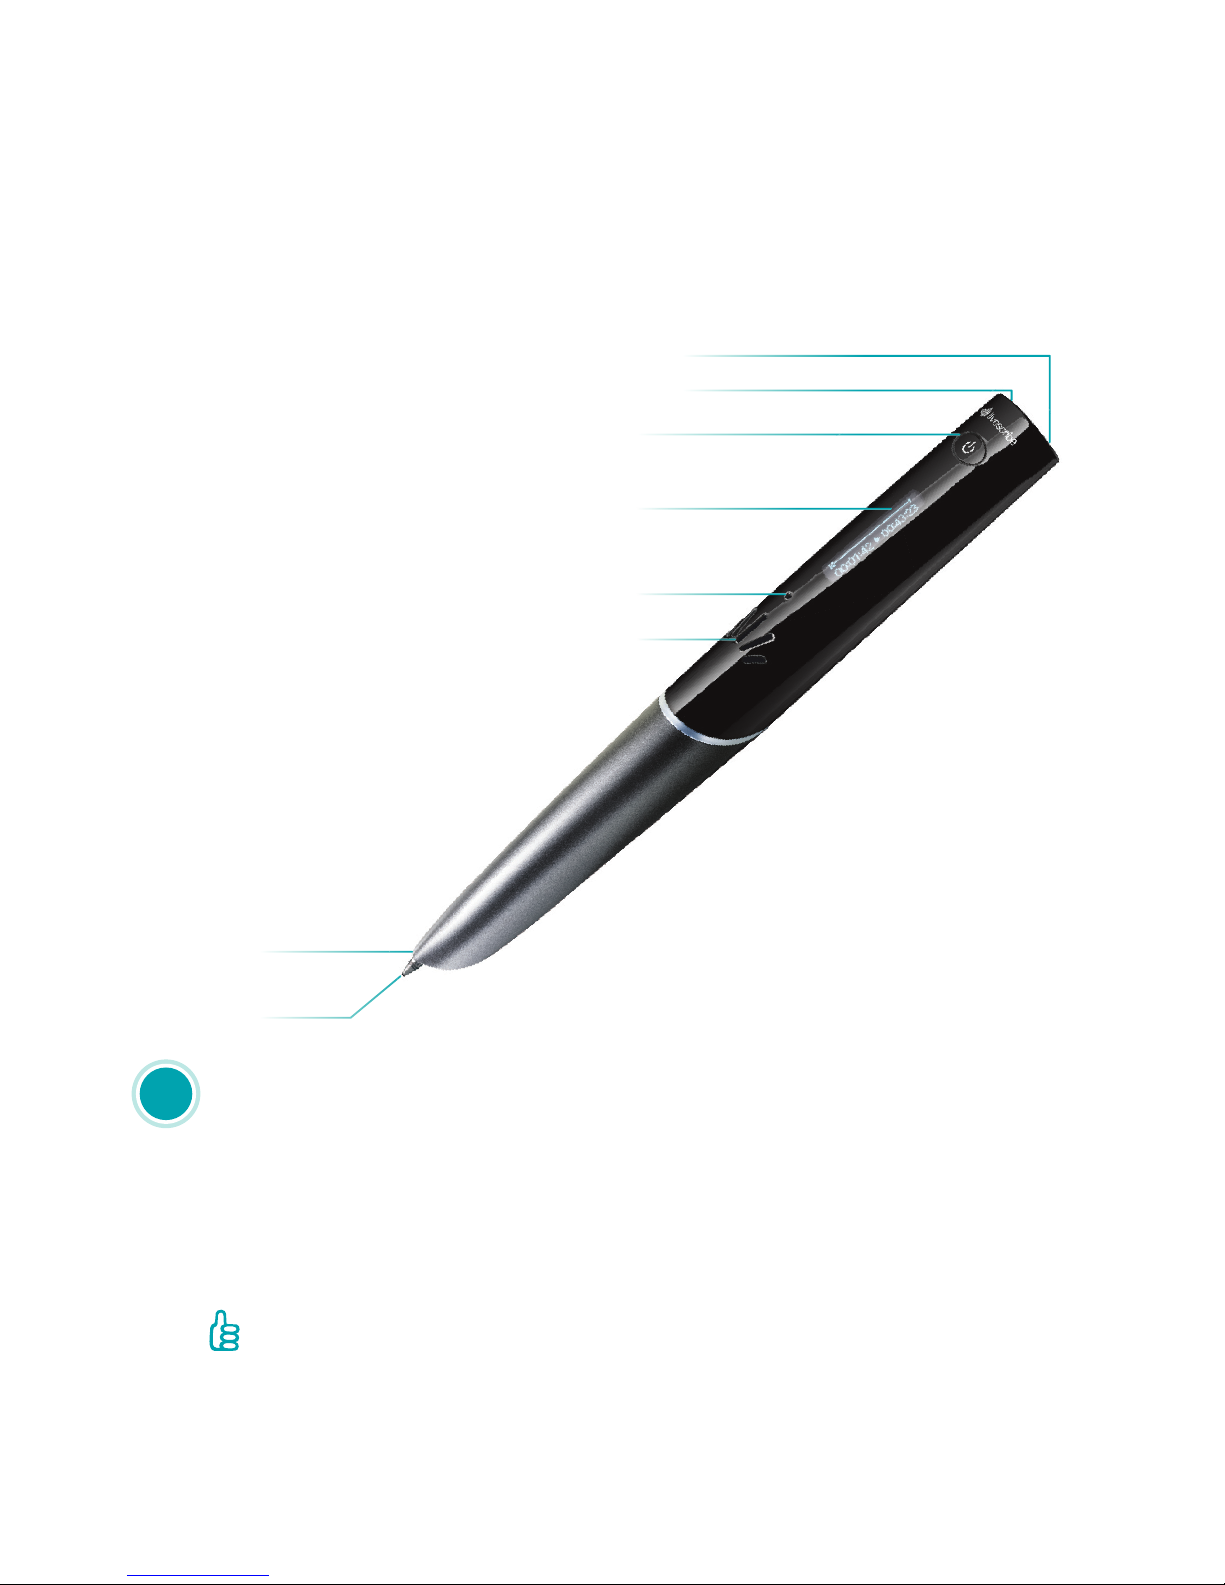
a. To charge your smartpen, use the USB cable and connect it to a
computer or a USB AC wall adapter.
b. Set your date & time using the controls on the inside back cover of
your notebook.
Microphone
Speaker
USB Connector (for charging)
Audio Jack
Power Button
Display
Infrared Camera
Replaceable Ink
Cartridge
Page 3
2
Record and Play Back
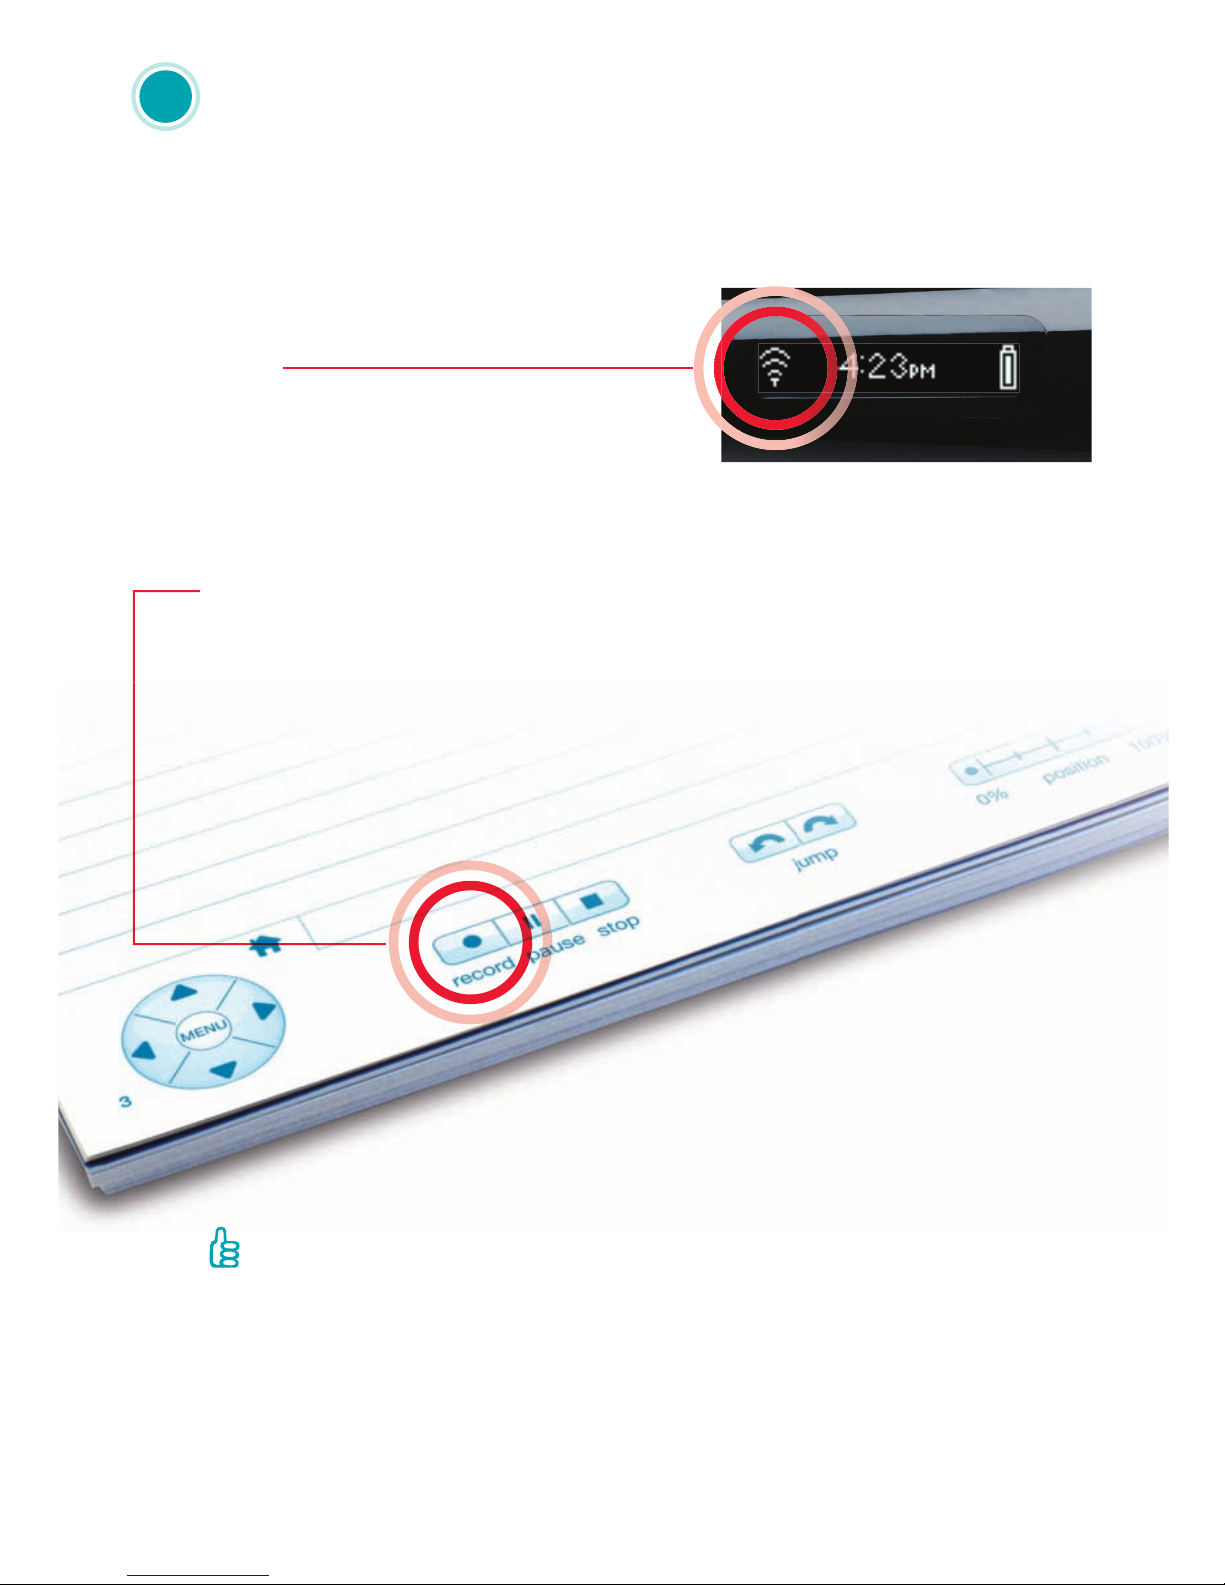
Step 1
Power on your Livescribe wi smartpen.
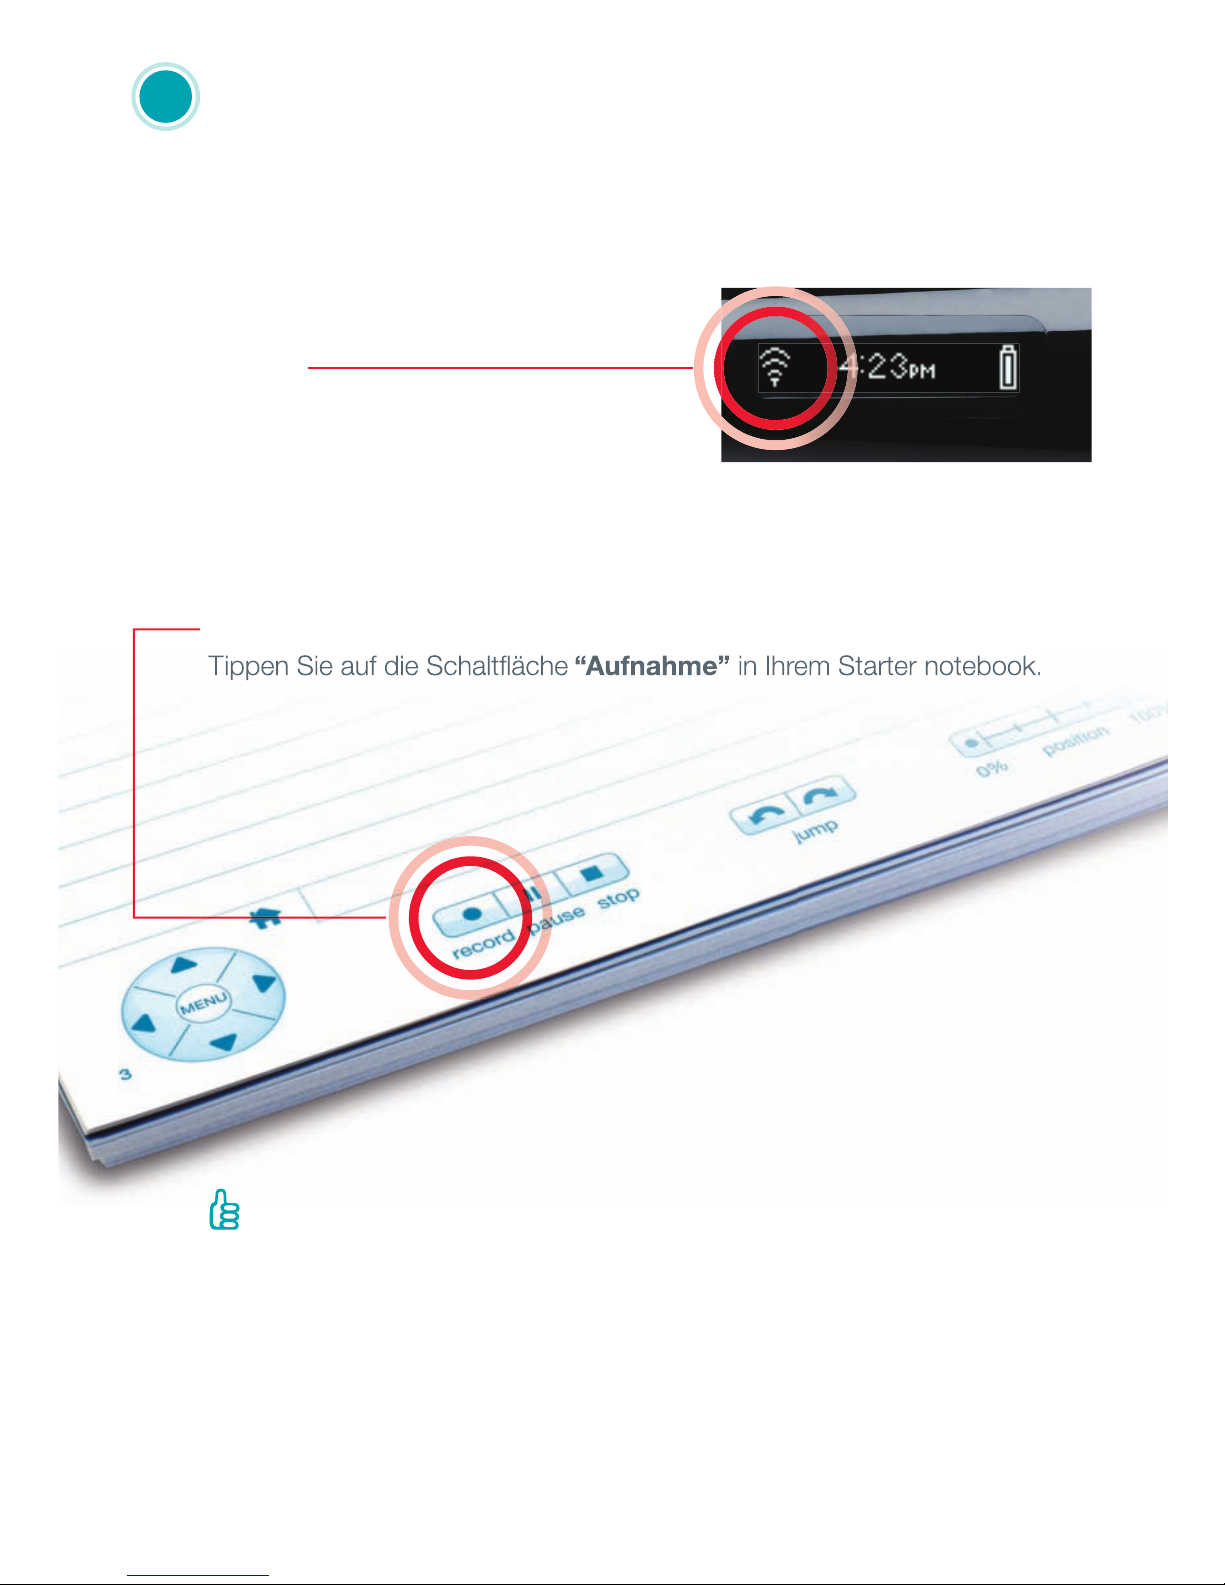
Step 2
Connect your smartpen to a Wi-Fi
network using the printed controls on
the inside cover of your Starter Notebook.
Step 3
Tap the record button on your Starter notebook.
English 2
Tip:
a. For additional help with connecting to Wi-Fi networks, please go to
livescribe.com/wi help.
b. Use the included sticker sheets to place interactive Wi-Fi controls in
other convenient locations.
c. You can also print your own Wi-Fi controls. Go to livescribe.com/
wi -smartpen and review the Printing Livescribe Dot Paper section.
Page 4
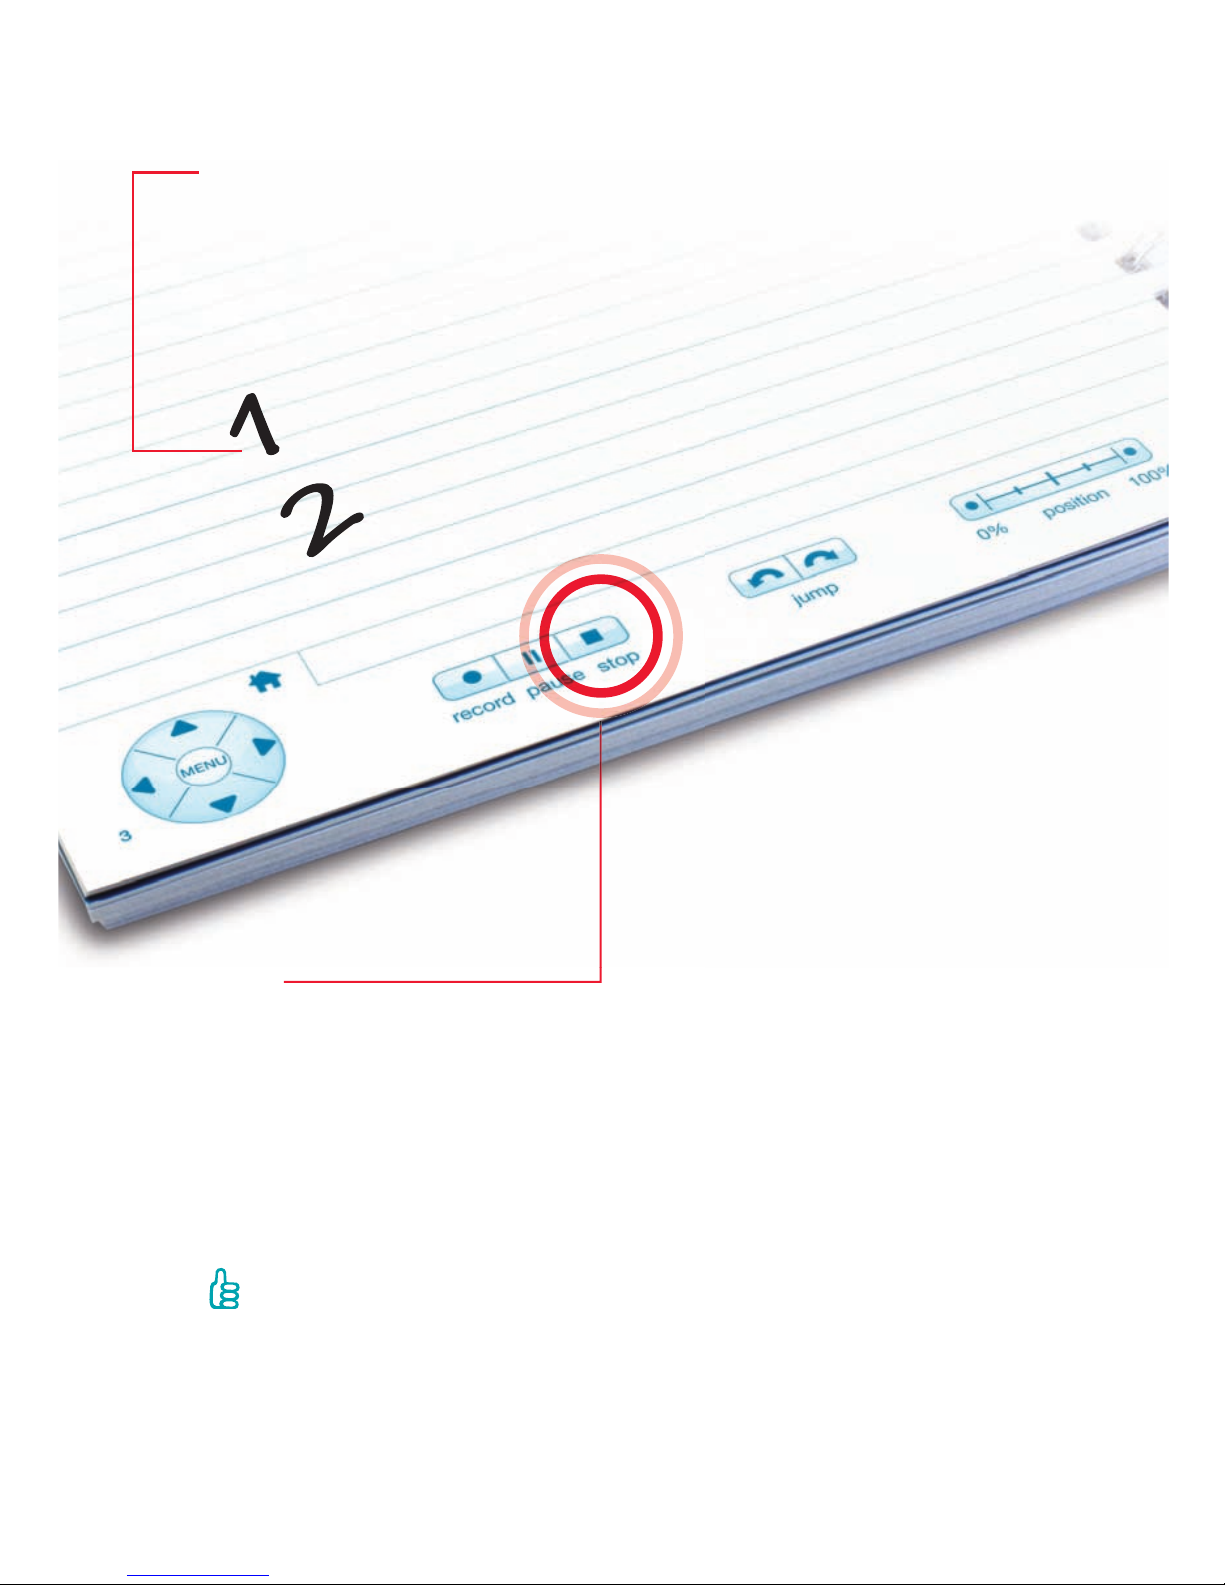
Step 4
Write the number “1” on your paper and as you write it,
say your full name.
Write the number “2” and as you write it,
say the city where you were born.
Step 5
Tap the stop button with your smartpen. Your notes and audio will sync
to your Evernote® account.
Step 6
Tap on the “1” or “2” with your smartpen, to hear what you’ve recorded.
English 3
Tip:
a. If you are just taking notes and not recording audio, tap the Sync Now
button on the inside cover of your Starter Notebook to sync your notes
to Evernote.
b. As a shortcut, you can also tap the number “1” on the top of your
notebook pages to sync to Evernote.
Page 5
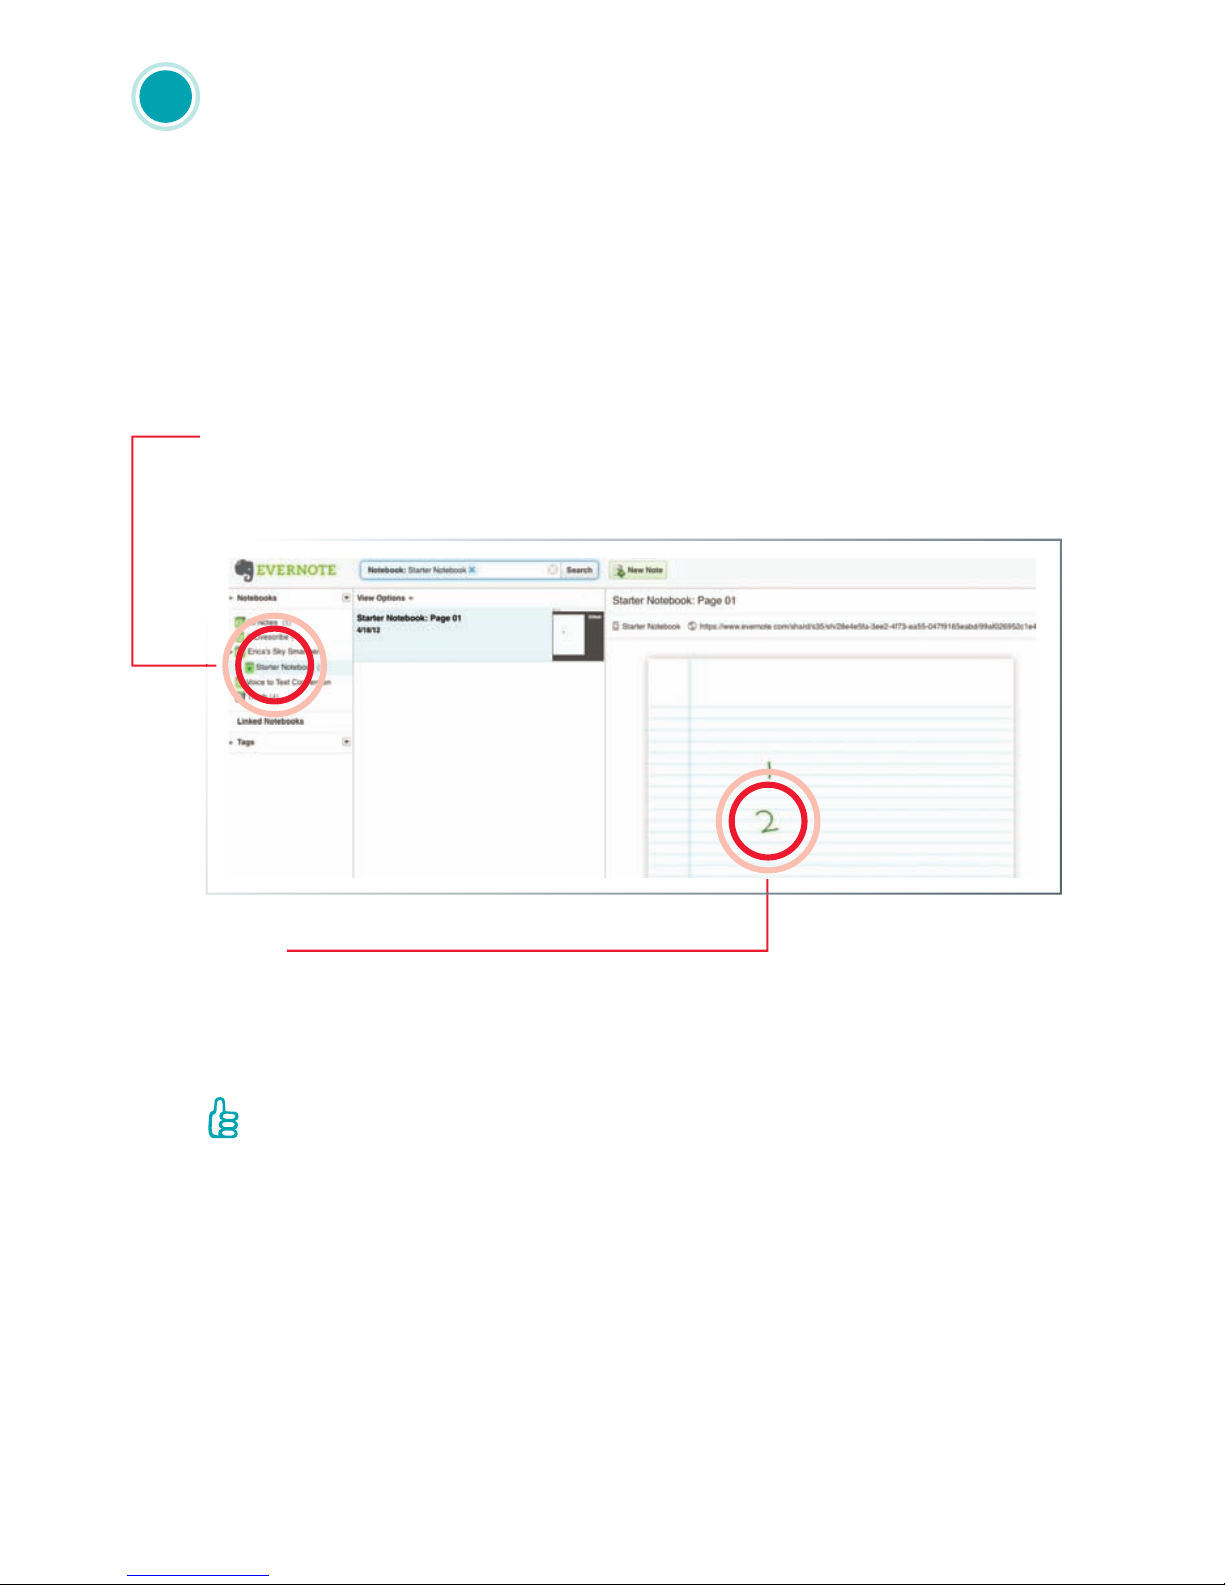
Your Notes and Audio in Evernote
®
Automatically, your recorded notes and audio are wirelessly sent and
securely stored in Evernote. You can quickly search, share, organize
and play back your notes and audio any time, on nearly any device.
Step 1
Go to evernote.com, or open your Evernote desktop application, and
sign in to your account.
Step 2
Look for your Livescribe wi smartpen (it will be listed by the name you chose
during activation) and locate the A5 Wifi Starter Notebook 1 under it.
Step 3
Clicking anywhere on the note in the large window will open
Livescribe Player, where the ink strokes and audio will play back.
3
Tip:
If you can’t nd your note:
a. Allow Evernote a little more time to synchronize your notes, it could take a
few minutes. If you are using the Evernote web client, refreshing your web
browser to reload the page may help. If you are using other Evernote apps,
use the Sync button to refresh your account.
b. Make sure your smartpen is connected to a Wi-Fi network and that you’ve
completed the steps to activate your smartpen.
c. If your notes and audio haven’t automatically transferred to Evernote yet,
tap the Sync Now button on the inside cover of your Starter notebook.
English 4
Page 6
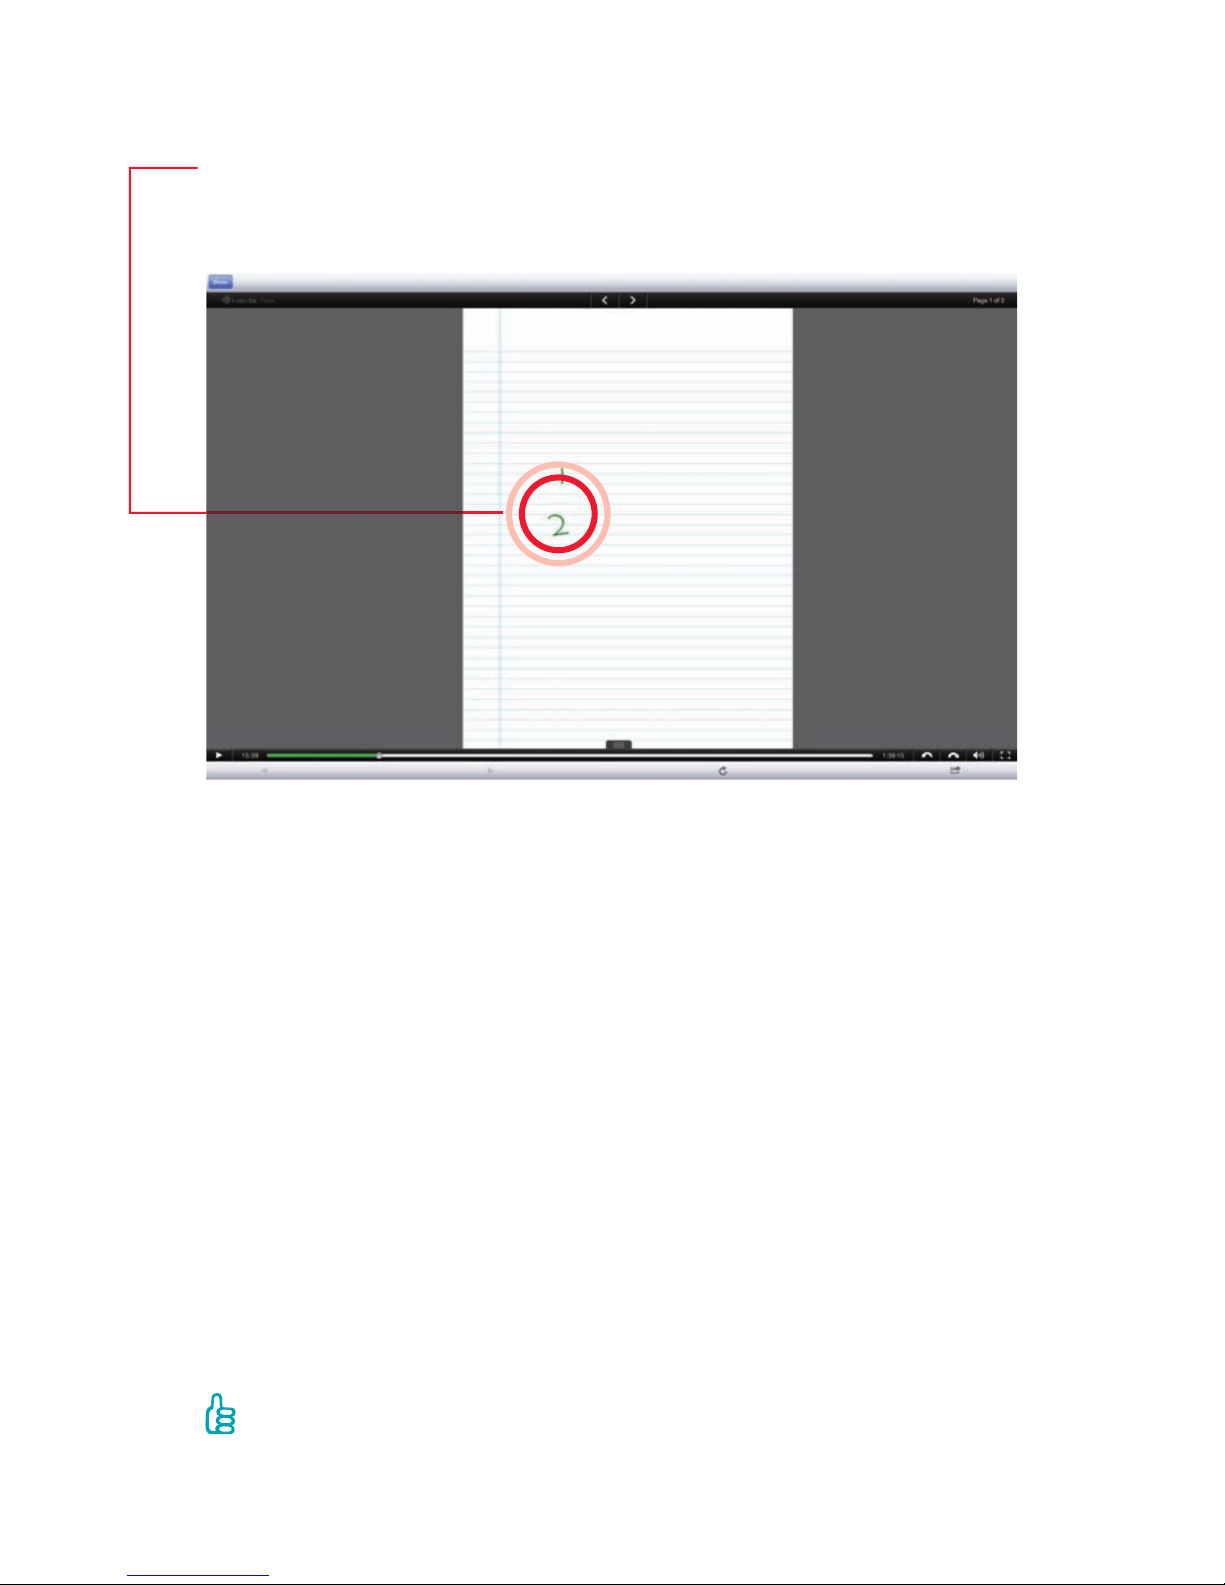
Step 4
Click anywhere on the green strokes of your notes to play back
the audio from that moment in time.
Step 5
To learn more about getting the most out of your Livescribe wi
smartpen, go to livescribe.com/wi -smartpen for helpful videos, tips
and tricks and our online help documentation.
Step 6
Download Evernote® apps at evernote.com/download so that you can
access your Livescribe notes and audio on your computer, tablet or
smartphone any time and anywhere.
English 5
Tip:
Black notes indicate that no audio was recorded while those
notes were written.
Page 7

Learn More:
For videos, tips and tricks, and
documentation about your Livescribe
wi smartpen and Evernote:
livescribe.com/wi-smartpen
Wi-Fi Help:
livescribe.com/wihelp
Online Help:
livescribe.com/wi-smartpenonlinehelp
Livescribe Customer Support:
livescribe.com/support
Evernote Customer Support:
evernote.com/contact/support
Facebook Fan Page:
facebook.com/livescribe
Global Twitter Page:
twitter.com/livescribe
Livescribe Blog:
livescribe.com/blog
Education Twitter Page:
twitter.com/livescribek12
Education Blog:
livescribe.com/blog/education
English 6
Livescribe Inc. Models: 2GB, 4GB, 8GB FCC ID: CKD-00053 IC: 10240A-00053
This device complies with part 15 of the FCC Rules. Operation is subject to the following two conditions: (1) This device
may not cause harmful interference, and (2) this device must accept any interference received, including interference that
may cause undesired operation.
Caution: Any changes or modication to the equipment not expressly approved by Livescribe, Inc. could void your authority
to operate this equipment.
Note: This equipment has been tested and found to comply with the limits for a Class B digital device, pursuant to part 15
of the FCC Rules. These limits are designed to provide reasonable protection against harmful interference in a residential
installation. This equipment generates, uses and can radiate radio frequency energy and, if not installed and used in
accordance with the instructions, may cause harmful interference to radio communications. However, there is no guarantee
that interference will not occur in a particular installation. If this equipment does cause harmful interference to radio or
television reception, which can be determined by turning the equipment off and on, the user is encouraged to try to correct
the interference by one or more of the following measures:
• Reorient or relocate the receiving antenna.
• Increase the separation between the equipment and receiver.
• Connect the equipment into an outlet on a circuit different from that to which the receiver is connected.
• Consult the dealer or an experienced radio/TV technician for help.
This device complies with Industry Canada license-exempt RSS standard(s). Operation is subject to the following two
conditions: (1) This device may not cause harmful interference, and (2) this device must accept any interference received,
including interference that may cause undesired operation.
For body worn operation, this device has been tested and meets the RF exposure limits for general population/uncontrolled
exposure set forth by the FCC and Industry Canada. Testing was performed with the device in direct contact with the
measurement phantom with zero spacing in order to simulate normal operating conditions. The resulting maximum SAR
value from this evaluation was found to be 0.57W/kg. Other than a USB cable, no other accessory is supplied or designated
for use with this product. The use of certain accessories may impact the compliance with FCC RF exposure guidelines.
Join Our Communities:
Page 8

Einrichten
Folgen Sie den Schritten in der Schnellstartanleitung zur Einrichtung Ihres
Kontos und zur Aktivierung Ihres Smartpens, bevor Sie fortfahren. (Falls Sie
dies noch nicht getan haben, rufen Sie über den Browser Ihres Computers
livescribe.com/setup auf, um die Einrichtung/Aktivierung jetzt auszuführen.)
Lernen Sie Ihren Livescribe™ Wi Smartpen kennen
Machen Sie sich das Notieren einfach, indem Sie alles aufzeichnen, was Sie
schreiben oder hören. Ihre Notizen und Audiodaten werden automatisch kabellos
an Evernote® gesendet und dort gespeichert. Egal, ob Sie Ihre Aufzeichnungen
auf dem Smartpen oder einem Computer oder Mobilgerät wiedergeben – die
Informationen, die Sie benötigen, sind immer und überall verfügbar.
Ein/Aus-Schalter
Mikrofon
Lautsprecher
USB-Anschluss (zum Aufl aden)
Audiobuchse
Display
Infrarotkamera
Austauschbare
Tintenpatrone
DE 1
1
Tipp:
a. Laden Sie den Smartpen mithilfe des beiliegenden USB-Kabels am
USB-Port Ihres Computers oder mit einem USB-Netzadapter auf.
b. Stellen Sie Datum und Uhrzeit mit den Steuerelementen auf dem
hinteren Innendeckel Ihres Notizbuchs ein.
Page 9
DE 2
2
Aufzeichnen und Abspielen
Schritt 1
Schalten Sie den Livescribe Wi Smartpen ein.
Schritt 2
Verbinden Sie Ihren Smartpen mithilfe
der gedruckten Steuerelemente auf der
Innenseite Ihres Starter-Notizbuchs mit
einem WLAN-Netzwerk.
Schritt 3
Tippen Sie auf die Schaltfl äche “Aufnahme” in Ihrem Starter notebook.
Tippen Sie auf die Schaltfl äche
in Ihrem Starter notebook.
Tipp:
a. Zusätzliche Hilfe zur Verbindung mit einem WLAN-Netzwerk nden Sie
auf livescribe.com/wi help.
b. Verwenden Sie die Sticker-Sheets, um interaktive WLAN-Steuerelemente
an anderen geeigneten Orten zu platzieren.
c. Sie können auch Ihre eigenen WLAN-Steuerelemente drucken. Rufen
Sie livescribe.com/wi -smartpen auf und lesen Sie den Abschnitt zum
Drucken von Livescribe-Punktpapier.
Page 10

DE 3
Tipp:
a. Wenn Sie nur Notizen machen und kein Audio aufzeichnen, tippen Sie
auf die Schaltfl äche Jetzt synchronisieren auf der Innenseite Ihres
Starter-Notizbuchs, um Ihre Notizen mit Evernote zu synchronisieren.
b. Sie können auch einfach auf die Nummer “1” oben auf den Seiten Ihres
Notizbuchs tippen, um die Notizen mit Evernote zu synchronisieren.
Schritt 4
Schreiben Sie die Zahl “1” auf Ihr Papier.
Sagen Sie währenddessen Ihren vollen Namen.
Schreiben Sie die Zahl “2”,
während Sie Ihren Geburtsort aufsagen.
Schritt 5
Tippen Sie mit dem Smartpen auf die Stopp-Schaltfl äche. Ihre Notizen
und Audioaufzeichnungen werden mit Ihrem Evernote-Konto synchronisiert.
Schritt 6
Tippen Sie mit Ihrem Smartpen auf “1” oder “2”, um sich die
entsprechende Aufnahme anzuhören.
Page 11

DE 4
Tipp:
Falls Sie Ihre Notiz nicht nden:
a. Lassen Sie Evernote ein bisschen mehr Zeit für die Synchronisierung Ihrer Notizen
Dies kann ein paar Minuten dauern. Wenn Sie den Evernote-Webclient verwenden,
kann es hilfreich sein, Ihren Webbrowser zu aktualisieren, um die Seite neu zu laden.
Wenn Sie andere Evernote-Apps verwenden, aktualisieren Sie Ihr Konto mithilfe der
Synchronisierungsschaltfl äche.
b. Stellen Sie sicher, dass Ihr Smartpen mit einem WLAN-Netzwerk verbunden ist und
dass Sie die Schritte zur Aktivierung Ihres Smartpens ausgeführt haben.
c. Wenn Ihre Notizen und Audiodaten nicht automatisch an Evernote übertragen
wurden, tippen Sie auf die Schaltfl äche Jetzt synchronisieren auf der Innenseite
Ihres Starter-Notizbuchs.
Ihre Notizen und Audiodaten in Evernote
®
Ihre Notizen und Audiodaten werden automatisch kabellos an Evernote
gesendet und dort gespeichert. Mit Evernote können Sie jederzeit mit fast
jedem Gerät Ihre Notizen und Audiodaten schnell durchsuchen, freigeben,
organisieren und wiedergeben.
Schritt 1
Gehen Sie zu evernote.com oder öffnen Sie Ihre Evernote-Desktopanwendung und melden Sie sich bei Ihrem Konto an.
Schritt 2
Suchen Sie Ihren Livescribe™ Wi Smartpen (er wird unter dem Namen
aufgeführt, den Sie bei der Aktivierung gewählt haben) und das A5 Wifi
Starter-Notizbuch 1 unter diesem Smartpen.
Schritt 3
Klicken Sie auf die Notiz im großen Fenster. Der Livescribe Player wird
gestartet und die Tintenstriche und Audiodaten werden wiedergegeben.
3
Page 12

DE 5
Schritt 4
Tippen Sie auf die grünen Striche Ihrer Notizen, um die
Audioaufzeichnung ab diesem Zeitpunkt wiederzugeben.
Schritt 5
Weitere Infos zur optimalen Nutzung Ihres Livescribe™ Wi Smartpens
inklusive hilfreicher Videos, Tipps und Tricks sowie unsere Online-Hilfe
nden Sie auf livescribe.com/wi -smartpen.
Schritt 6
Laden Sie Evernote-Apps unter www.evernote.com/download herunter,
um über Ihren Computer, Ihr Tablet oder Ihr Smartphone jederzeit auf
Ihre Livescribe-Notizen und -Audiodaten zugreifen zu können.
Tipp:
Schwarze Tintenstriche weisen darauf hin, dass beim Schreiben dieser
Notizen kein Audiomaterial aufgezeichnet wurde.
Page 13

DE 6
Weitere Infos:
Videos, Tipps und Tricks sowie
Dokumentation zum Livescribe
Wi Smartpen und zu Evernote
nden Sie hier:
livescribe.com/wi-smartpen
WLAN-Hilfe:
livescribe.com/wihelp
Online-Hilfe:
livescribe.com/wi-smartpenonlinehelp
Kundendienst:
livescribe.com/support
Evernote-Support:
evernote.com/contact/support
Facebook-Fanseite:
facebook.com/livescribe
Globale Twitter-Seite:
twitter.com/livescribe
Livescribe-Blog:
livescribe.com/blog
Twitter-Seite für den Bildungsbereich:
twitter.com/livescribek12
Bildungs-Blog:
livescribe.com/blog/education
Melden Sie sich bei unseren Communitys an:
Livescribe Inc. Modelle: 2 GB, 4 GB, 8 GB
FCC ID: CKD-00053 IC: 10240A-00053
Dieses Gerät erfüllt Teil 15 der FCC-Bestimmungen. Der Betrieb unterliegt den folgenden beiden Bedingungen: (1) Das
Gerät darf keine störenden Interferenzen verursachen und (2) das Gerät muss Störungen von außen ertragen können.
Darunter fallen auch solche Störungen, die zu einer Beeinträchtigung der Funktion führen können.
Achtung: Jegliche Änderungen an den Geräten, denen Livescribe, Inc. nicht ausdrücklich zugestimmt hat, können Ihre
Berechtigung zur Verwendung dieses Geräts aufheben.
Hinweis: Dieses Produkt wurde getestet und entspricht den Grenzwerten für digitale Geräte der Klasse B gemäß Teil 15
der FCC-Bestimmungen. Die Grenzwerte wurden für eine typische Wohnumgebung erarbeitet, um einen angemessenen
Schutz vor störenden Interferenzen zu gewährleisten. Das Gerät erzeugt, verwendet und gibt Strahlung im
Radiofrequenzbereich ab. Wenn es nicht gemäß der Anleitung installiert und benutzt wird, kann es den Funkverkehr
anderer Geräte beeinträchtigen. Es kann jedoch nicht ausgeschlossen werden, dass auch bei ordnungsgemäßer
Installation und Verwendung in einigen Fällen Störungen auftreten. Sollte das Gerät den Radio- oder Fernsehempfang
stören, was sich durch Ein- und Ausschalten des Geräts nachprüfen lässt, versuchen Sie die Störungen durch eine oder
mehrere der folgenden Maßnahmen zu beheben:
• Verändern Sie die Position der Antenne oder richten Sie sie neu aus.
• Vergrößern Sie den Abstand zwischen dem Gerät und dem gestörten Empfänger.
• Schließen Sie das Gerät an einen anderen Stromkreis als den des Empfängers an.
• Suchen Sie Rat bei Ihrem Händler oder einem erfahrenen Radio/TV-Techniker.
Dieses Gerät erfüllt die Standards für lizenzfreie RSS-Feeds von Industry Canada. Der Betrieb unterliegt den folgenden
beiden Bedingungen: (1) Das Gerät darf keine störenden Interferenzen verursachen und (2) das Gerät muss Störungen von
außen ertragen können. Darunter fallen auch solche Störungen, die zu einer Beeinträchtigung der Funktion führen können.
Das Gerät wurde für den Betrieb in Körpernähe getestet und liegt unter den von der FCC und Industry Canada
festgelegten Grenzwerten für Strahlenbelastung für die allgemeine Bevölkerung/unkontrollierte Belastung. Bei den Tests
war das Gerät in direktem Kontakt mit dem Messphantom, um normale Betriebsbedingungen zu simulieren. Bei diesem
Test wurde ein maximaler SAR-Wert von 0,57 W/kg festgestellt. Für die Verwendung dieses Produkts wird außer dem
USB-Kabel kein weiteres Zubehör mitgeliefert und es sind auch keine weiteren Geräte erforderlich. Die Verwendung
bestimmter Zubehörteile kann sich auf die Einhaltung der Bestimmungen zur Strahlenbelastung der FCC auswirken.
Page 14

Micrófono
Altavoz
Conector USB (para cargar)
Toma de audio
Botón de encendido
Pantalla
Cámara de infrarrojos
Cartucho de tinta
sustituible
Le presentamos su nuevo Livescribe™ wi smartpen
Tome notas sin esfuerzo, ya que ahora podrá grabar todo lo que escriba y escuche.
Las notas y el audio se envían automáticamente de forma inalámbrica y se guardan
de forma segura en Evernote. Tanto si reproduce las reuniones y conferencias desde
el smartpen, ordenador o dispositivo móvil, podrá acceder a la información más
importante en el momento y el lugar en que la necesite.
ES 1
1
Sugerencia:
a. Para cargar el smartpen, use el cable USB y conéctelo a un ordenador
o a un adaptador de pared de CA USB.
b. Con gure los datos de fecha y hora mediante los controles situados en
el interior de la tapa posterior del bloc de notas.
Con guración
Asegúrese de que ha seguido los pasos de la hoja Inicio rápido para
crear una cuenta y activar el smartpen antes de continuar. De no ser así,
utilice el navegador para acceder a livescribe.com/setup y hacerlo ahora.
Page 15

ES 2
2
Grabar y reproducir
Paso 1
Encienda Livescribe wi smartpen.
Paso 2
Conecte el smartpen a una red
Wi-Fi usando los controles impresos
en el interior de la tapa frontal de
Starter Notebook.
Paso 3
Pulse el botón de grabación en el bloc de Starter notebook.
Sugerencia:
a. Si necesita asistencia para conectarse a redes Wi-Fi, vaya a
livescribe.com/wi help.
b. Use las hojas de etiquetas adhesivas incluidas para colocar controles
Wi-Fi interactivos en otras ubicaciones convenientes.
c. También puede imprimir sus propios controles Wi-Fi. Vaya a
livescribe.com/wi -smartpen y consulte la sección sobre impresión
de papel punteado Livescribe.
Page 16

ES 3
Sugerencia:
a. En caso de tomar apuntes únicamente (sin grabar audio), pulse el botón
Sync Now (Sincronizar ahora) situado en el interior de la tapa de Starter
Notebook para sincronizar sus notas con Evernote.
b. Como método abreviado de sincronización con Evernote, puede pulsar
el número “1” en la parte superior de las páginas del cuaderno Evernote.
Paso 4
Escriba el número “1” en el papel y,
mientras lo escribe, diga su nombre y apellidos.
Escriba el número “2” y, mientras lo escribe,
diga el nombre de la ciudad donde nació.
Paso 5
Pulse el botón de detención con el smartpen. Las notas y el audio se
sincronizarán con la cuenta de Evernote®.
Paso 6
Pulse el número “1” o “2” con el smartpen para oír lo que ha grabado.
Page 17

ES 4
Sugerencia:
Si no puede encontrar su nota:
a. Espere un momento mientras Evernote se sincroniza con sus notas (puede tardar
unos minutos). Si utiliza el cliente web Evernote, puede ser conveniente actualizar
el navegador web para volver a cargar la página. Si utiliza alguna otra aplicación
de Evernote, use el botón de sincronización para actualizar la cuenta.
b. Asegúrese de que el smartpen está conectado a una red Wi-Fi y de que ha
completado el procedimiento de activación del smartpen.
c. Si las notas y el audio aún no se han transferido automáticamente a Evernote,
pulse el botón Sync Now (Sincronizar ahora) en el interior de la tapa del bloc
de notas Starter.
Sus notas y audio en Evernote
®
Las notas y el audio grabados se envían automáticamente de forma
inalámbrica y se guardan de forma segura en Evernote. Puede buscar,
compartir, organizar y reproducir rápidamente las notas y el audio,
en cualquier momento, en prácticamente cualquier dispositivo.
Paso 1
Vaya a evernote.com o abra su aplicación de escritorio de Evernote
e inicie una sesión de su cuenta.
Paso 2
Busque su Livescribe™ wi smartpen (aparecerá en la lista con el nombre
que le haya asignado durante la activación) y localice A5 Wifi Starter
Notebook 1, debajo del smartpen.
Paso 3
Al hacer clic en un punto cualquiera de la nota en la ventana grande, se
abrirá Livescribe Player para reproducir los trazos de escritura y el audio.
3
Page 18

ES 5
Paso 4
Haga clic en cualquier lugar de los trazos verdes de las notas para
reproducir el audio desde ese momento concreto.
Paso 5
Para obtener más información sobre el uso más e caz del smartpen,
vaya a livescribe.com/wi -smartpen, donde encontrará vídeos,
sugerencias y documentación de ayuda en línea.
Paso 6
Descargue aplicaciones de Evernote desde evernote.com/download
para poder acceder a sus notas y audio Livescribe™ desde su ordenador
de sobremesa, tablet o smartphone en cualquier momento y lugar.
Sugerencia:
Los trazos de tinta negra indican que no se grabó audio mientras se
escribían esas notas.
Page 19

ES 6
Mucho más:
Si quiere ver vídeos, sugerencias
o documentación relacionada con
el smartpen y Evernote:
livescribe.com/wi-smartpen
Ayuda para Wi-Fi:
livescribe.com/wihelp
Ayuda en pantalla:
livescribe.com/wi-smartpenonlinehelp
Servicio de atención al cliente:
livescribe.com/support
Soporte de Evernote:
evernote.com/contact/support
Página de admiradores en Facebook:
facebook.com/livescribe
Página global de Twitter:
twitter.com/livescribe
Blog de Livescribe:
livescribe.com/blog
Página de educación de Twitter:
twitter.com/livescribek12
Blog de educación:
livescribe.com/blog/education
Livescribe Inc. Modelos: 2 GB, 4 GB, 8 GB
FCC ID: CKD-00053 IC: 10240A-00053
Este dispositivo cumple con el apartado 15 de las normas de la FCC. Su funcionamiento está sujeto a las dos
condiciones siguientes: (1) este dispositivo no debe causar interferencias perjudiciales y (2) este dispositivo debe
aceptar cualquier interferencia que reciba, incluidas aquellas que puedan causar un funcionamiento no deseado.
Precaución: los cambios o modicaciones en el equipo que no hayan sido expresamente aprobados por Livescribe, Inc.
podrían anular el derecho del usuario para utilizar este equipo.
Nota: se han realizado pruebas de este equipo y se ha determinado que cumple con los límites establecidos para los
dispositivos digitales de clase B, según el apartado 15 de las normas de la FCC. Estos límites se han establecido para
ofrecer un nivel de protección razonable contra las interferencias perjudiciales en instalaciones residenciales. Este equipo
genera, utiliza y puede irradiar energía de radiofrecuencia y, si no se instala y usa de acuerdo con las instrucciones, puede
causar interferencias perjudiciales en las radiocomunicaciones. No obstante, no se puede garantizar la ausencia de
interferencias en una instalación determinada. Si este equipo causa interferencias perjudiciales en la recepción de radio o
televisión, lo que se puede determinar desconectando y volviendo a conectar el equipo, se recomienda al usuario que las
corrija mediante una o más de las siguientes medidas:
• Reorientar o reubicar la antena receptora.
• Aumentar la separación entre el equipo y el receptor.
• Conectar el equipo a una toma de corriente de un circuito distinto al que se encuentra conectado el receptor.
• Consultar al distribuidor o a un técnico experimentado en radio y televisión para obtener asistencia.
Este dispositivo cumple las normas RSS de exención de licencia de Industry Canada. Su funcionamiento está sujeto a
las dos condiciones siguientes: (1) este dispositivo no debe causar interferencias perjudiciales y (2) este dispositivo debe
aceptar cualquier interferencia que reciba, incluidas aquellas que puedan causar un funcionamiento no deseado.
En lo que respecta al uso en contacto con el cuerpo, este dispositivo se ha sometido a pruebas y cumple con los límites
de exposición a radiofrecuencia para el público general o exposición no controlada establecidos por la FCC e Industry
Canada. Para simular las condiciones de funcionamiento estándar, las pruebas se han realizado con el dispositivo en
contacto directo con el simulador, sin espacio alguno de separación. El valor SAR máximo resultante de esta evaluación fue
0,57 W/kg. Aparte de un cable USB, no se suministra ningún otro accesorio ni hay ninguno diseñado para usar con este
producto. El uso de ciertos accesorios puede afectar al cumplimiento de las directrices de la FCC sobre exposición a RF.
Únase a nuestras comunidades:
Page 20

FR 1
Faites connaissance avec votre nouveau
smartpen Livescribe
™
W i
Simpli ez votre prise de notes en enregistrant tout ce que vous écrivez et
entendez. Vos notes et données audio associées sont envoyées et stockées
automatiquement dans Evernote®. Vous avez accès à vos notes de réunion
ou de cours partout et à tout moment, à partir de votre smartpen, de votre
ordinateur,ou de votre smartphone.
Conseil :
a. Pour charger votre smartpen, utilisez le câble USB et connectez-le à
votre ordinateur ou à un adaptateur secteur USB.
b. Con gurez la date et l’heure à l’aide des commandes situées sur la
troisième de couverture du carnet.
Installation
Véri ez que vous avez suivi les étapes du Guide de démarrage rapide pour
con gurer votre compte et activer votre smartpen avant de continuer. Si tel
n’est pas le cas, accédez à livescribe.com/setup depuis le navigateur de
votre navigateur pour le faire dès maintenant.
1
Microphone
Haut-parleur
Connecteur USB (pour la charge)
Bouton de mise sous
tension/hors tension
Affi chage
Caméra infrarouge
Cartouche d’encre
remplaçable
Prise audio
Page 21

FR 2
2
Enregistrer et restituer
Étape 1
Allumez votre smartpen Livescribe Wi .
Étape 2
Connectez votre smartpen à un
réseau Wi-Fi à l’aide des commandes
imprimées sur l’intérieur de la
couverture de votre carnet Starter Notebook.
Étape 3
Pointez sur le bouton d’enregistrement de votre Starter Notebook.
Conseil :
a. Pour obtenir de l’aide supplémentaire sur la connexion à un réseau Wi-Fi,
accédez à livescribe.com/wi help.
b. Placez des commandes Wi-Fi interactives à d’autres emplacements
utiles à l’aide des feuilles d’étiquettes fournies.
c. Vous pouvez également imprimer vos propres commandes Wi-Fi.
Accédez à livescribe.com/wi -smartpen et consultez la section relative
à l’impression de papier tramé Livescribe.
Page 22

FR 3
Conseil :
a. Si vous vous contentez de prendre des notes sans enregistrer le son,
pointez sur le bouton Synchroniser maintenant à l’intérieur de la
couverture de votre carnet Starter Notebook pour synchroniser vos
notes avec Evernote.
b. Pour aller plus vite, vous pouvez également pointer sur le chiffre 1 en
haut des pages de votre carnet pour synchroniser avec Evernote.
Étape 4
Écrivez le chiffre 1 sur la page et dites votre nom en
même temps que vous écrivez.
Écrivez ensuite le chiffre 2 tout en disant le nom de votre
lieu de naissance.
Étape 5
Pointez votre smartpen sur le bouton d’arrêt. Vos notes et données
audio se synchronisent avec votre compte Evernote®.
Étape 6
Pointez sur 1 ou 2 avec votre smartpen pour entendre ce que
vous avez enregistré.
Page 23

FR 4
Conseil :
Si vous ne trouvez pas vos notes :
a. Laissez à Evernote le temps de synchroniser vos notes ; cette opération peut
prendre plusieurs minutes. Si vous utilisez le client Web Evernote, il peut être utile
d’actualiser votre navigateur Web pour recharger la page. Si vous utilisez d’autres
applications Evernote, utilisez le bouton Synchroniser pour actualiser votre compte.
b. Véri ez que votre smartpen est connecté à un réseau Wi-Fi et que vous avez
effectué toutes les étapes pour l’activer.
c. Si vos notes et données audio n’ont pas encore été transférées automatiquement
vers Evernote, pointez sur le bouton Synchroniser maintenant à l’intérieur de la
couverture de votre Starter Notebook.
Vos notes et données audio dans Evernote
®
Vos notes et données audio enregistrées sont envoyées et stockées
automatiquement dans Evernote. Evernote vous permet de rechercher
rapidement vos notes et données audio, de les partager, de les organiser et
de les restituer à n’importe quel moment et sur pratiquement tous les appareils.
Étape 1
Accédez à evernote.com, ou ouvrez votre application de bureau Evernote,
et connectez-vous à votre compte.
Étape 2
Recherchez votre smartpen Livescribe™ Wi (celui-ci apparaît sous le nom
choisi au moment de l’activation) et repérez A5 Wifi Starter Notebook 1
en dessous.
Étape 3
Cliquez n’importe où sur cette note dans la grande fenêtre pour ouvrir
Livescribe Player et restituer vos notes manuscrites et données audio.
3
Page 24

Étape 4
Cliquez n’importe où sur les notes en vert pour restituer les données
audio correspondantes.
Étape 5
Pour savoir comment tirer le meilleur parti de votre smartpen Livescribe™
Wi , accédez à livescribe.com/wi -smartpen pour obtenir des conseils et
astuces, des vidéos utiles ainsi que notre documentation d’aide en ligne.
Étape 6
Téléchargez les applications Evernote sur depuis le site evernote.com/
download a n d’accéder à tout moment à vos notes et données audio
Livescribe sur votre ordinateur, tablette ou smartphone.
FR 5
Conseil :
Si les notes apparaissent en noir, cela signi e qu’aucune donnée audio
n’a été enregistrée au moment de leur rédaction.
Page 25

FR 6
En savoir plus :
Pour obtenir des vidéos, des conseils
et astuces, ainsi que la documentation
sur votre smartpen Livescribe Wi et
Evernote :
livescribe.com/wi-smartpen
Aide du Wi-Fi :
livescribe.com/wihelp
Aide en ligne :
livescribe.com/wi-smartpenonlinehelp
Service d’assistance technique :
livescribe.com/support
Centre de support :
evernote.com/contact/support
Page Facebook :
facebook.com/livescribe
Page Twitter :
twitter.com/livescribe
Blog de Livescribe :
livescribe.com/blog
Page Twitter (enseignement) :
twitter.com/livescribek12
Blog éducatif :
livescribe.com/blog/education
Rejoignez nos communautés :
Livescribe Inc. Modèles: 2 Go, 4 Go, 8 Go
FCC ID: CKD-00053 IC: 10240A-00053
Cet appareil est conforme à la section 15 des règlements de la FCC, commission fédérale des communications américaine.
Son utilisation est soumise aux conditions suivantes : (1) cet appareil ne doit pas causer d’interférences nuisibles, et (2) doit
accepter toute interférence reçue, y compris les interférences pouvant entraîner un fonctionnement indésirable.
Attention : toute modication ou altération de cet équipement non expressément reconnue par Livescribe, Inc. peut
entraîner l’annulation de votre autorisation à utiliser cet équipement.
Remarque : cet équipement a été testé et déclaré conforme aux appareils numériques de classe B, au regard de la
section 15 des règles de la FCC. Ces critères de conformité ont été conçus an de protéger raisonnablement de toute
interférence nuisible dans une installation résidentielle. Ce matériel génère, utilise et peut émettre de l’énergie sous forme
de fréquences radio et, s’il n’est pas installé et utilisé conformément aux instructions, peut provoquer des interférences
perturbant les communications radio. Nous ne pouvons cependant pas garantir qu’aucune interférence ne se produira
dans une installation donnée. Si cet appareil interfère avec la réception radiophonique ou télévisuelle, ce qui se vérie en
allumant et éteignant successivement l’appareil, l’utilisateur est invité à corriger ces interférences en prenant l’une des
mesures suivantes :
• changer l’orientation ou la position de l’antenne de réception ;
• augmenter la distance entre l’appareil et le récepteur ;
• connecter l’appareil à une prise d’un autre circuit que celui auquel le récepteur est connecté ;
• solliciter l’aide du revendeur ou d’un technicien radio/TV expérimenté.
Cet appareil est conforme aux normes d’exemption de licence RSS d’Industrie Canada. Son utilisation est soumise aux
conditions suivantes : (1) cet appareil ne doit pas causer d’interférences nuisibles, et (2) doit accepter toute interférence
reçue, y compris les interférences pouvant entraîner un fonctionnement indésirable.
Pour le port et l’utilisation sur le corps, cet appareil a été testé et respecte les seuils d’exposition aux radiofréquences
pour le grand public/d’exposition non contrôlée mis en place par la FCC et Industrie Canada. Les tests ont été effectués
alors que l’appareil était en contact direct avec le fantôme, sans aucun espace, dans le but de simuler les conditions
normales d’utilisation. La valeur DAS maximale obtenue était de 0,57 W/kg. Hormis le câble USB, aucun autre accessoire
n’est fourni ou désigné pour l’utilisation avec ce produit. L’utilisation de certains accessoires peut affecter la conformité
aux directives d’exposition aux radiofréquences de la FCC.
Page 26

IT 1
Microfono
Altoparlante
Connettore USB (per la ricarica)
Jack audio
Tasto di accensione
Display
Fotocamera a infrarossi
Cartuccia di
inchiostro sostituibile
Suggerimento:
Guida all’uso della wi smartpen
La smartpen consente di sempli care il modo di prendere appunti registrando
tutto ciò che viene scritto e ascoltato. Le note e l’audio registrati vengono
automaticamente inviati in modalità wireless e archiviati in modo sicuro in Evernote®.
Che si scelga di riprodurre riunioni e lezioni dalla smartpen, su un computer o un
dispositivo mobile, le informazioni più importanti saranno sempre a disposizione in
qualsiasi momento e in ogni luogo.
1
a. Per caricare la smartpen, utilizzare il cavo USB e collegarlo a un
computer o a un alimentatore USB per presa CA.
b. Impostare la data e l’ora utilizzando i controlli posti nella parte interna
del retrocopertina del blocco note.
Con gurazione
Prima di procedere, assicurarsi di aver seguito la procedura nella
scheda di Avvio rapido per con gurare l’account e attivare la
smartpen. Se la procedura non è ancora stata eseguita, visitare
livescribe.com/setup per eseguirla ora.
Page 27

IT 2
2
Registrazione e riproduzione
Passaggio 1
Accendere la Livescribe™ wi smartpen.
Passaggio 2
Collegare la smartpen a una rete
Wi-Fi utilizzando i controlli stampati
sulla copertina interna del blocco note
Starter Notebook.
Passaggio 3
Toccare il tasto di registrazione sul Starter notebook
Suggerimento:
a. Per ulteriore assistenza sulla connessione alle reti Wi-Fi, visitare il sito
livescribe.com/wi help.
b. Utilizzare gli adesivi forniti per collocare i controlli interattivi del Wi-Fi
in posizioni più comode.
c. È possibile stampare i controlli del Wi-Fi. Visitare livescribe.com/wi -
smartpen e consultare la sezione relativa alla stampa della carta
isometrica Livescribe.
Page 28

IT 3
Suggerimento:
a. Se si sono scritte note senza registrare audio, toccare il pulsante
Sync Now (Sincronizza ora) sulla copertina interna del blocco note
Starter Notebook per sincronizzare le note con Evernote.
b. Per avviare la sincronizzazione con Evernote è anche possibile
toccare l’abbreviazione da tastiera “1” stampata sulla parte superiore
delle pagine del blocco note.
Passaggio 4
Scrivere il numero “1” sulla carta e, mentre lo si scrive,
dire il proprio nome completo.
Scrivere il numero “2” e, mentre lo si scrive,
dire il proprio luogo di nascita.
Passaggio 5
Toccare il tasto Stop (Interrompi) con la smartpen. Le note e i le
audio vengono sincronizzati con l’account Evernote®.
Passaggio 6
Toccare “1” o “2” con la smartpen per ascoltare la registrazione.
Page 29

IT 4
Suggerimento:
Se non si riesce a individuare le proprie note:
a. Attendere qualche minuto af nché Evernote possa sincronizzare le note. Se si sta
utilizzando il client Web di Evernote, può risultare utile aggiornare il browser Web
per ricaricare la pagina. Se si stanno utilizzando altre app di Evernote, toccare il
pulsante Sync per aggiornare l’account.
b. Assicurarsi che la smartpen sia collegata a una rete Wi-Fi e che i passaggi per
l’attivazione della smartpen siano stati completati.
c. Se le note e l’audio non sono stati trasferiti automaticamente in Evernote, toccare
il tasto Sync Now (Sincronizza ora) sulla copertina interna del blocco note Starter.
Note e audio in Evernote
®
Le note e l’audio registrati vengono inviati in modalità wireless e archiviati
in modo sicuro in Evernote. È possibile cercare, condividere, organizzare e
riprodurre rapidamente note e audio in ogni momento e praticamente con
qualsiasi dispositivo.
Passaggio 1
Andare sul sito evernote.com o aprire l’applicazione desktop Evernote,
quindi accedere al proprio account.
Passaggio 2
Cercare la smartpen Livescribe™ wi (apparirà elencata in base al nome
scelto in fase di attivazione) e individuare la voce A5 Wifi Starter
Notebook 1 al di sotto della smartpen.
Passaggio 3
Fare clic in qualsiasi punto della nota nella nestra grande: verrà aperto
Livescribe Player che avvierà la riproduzione dei tratti di inchiostro e
dell’audio.
3
Page 30

IT 5
Passaggio 4
Fare clic in un punto qualsiasi sui tratti verdi delle note per riprodurre
l’audio a partire da quel punto.
Passaggio 5
Per ulteriori informazioni sulla Livescribe™ wi smartpen, visitare il sito
livescribe.com/wi -smartpen per visualizzare i video dimostrativi,
la documentazione per l’utente e apprendere trucchi e suggerimenti
per l’utilizzo del dispositivo.
Passaggio 6
Scaricare le app Evernote all’indirizzo evernote.com/download per
accedere alle note e all’audio Livescribe dal computer desktop, tablet
o smartphone, ovunque ci si trovi e in qualsiasi momento.
Suggerimento:
I tratti di inchiostro nero indicano che durante la scrittura di tali note non
è stato registrato audio.
Page 31

IT 6
Maggiori informazioni:
Per i video, la documentazione, i
suggerimenti e i trucchi per l’utilizzo
della Livescribe wi smartpen e di
Evernote, visitare:
livescribe.com/wi-smartpen
Guida al Wi-Fi:
livescribe.com/wihelp
Guida in linea:
livescribe.com/wi-smartpenonlinehelp
Assistenza clienti:
livescribe.com/support
Supporto tecnico Evernote:
evernote.com/contact/support
Pagina dei fan su Facebook:
facebook.com/livescribe
Pagina Twitter globale:
twitter.com/livescribe
Blog Livescribe:
livescribe.com/blog
Pagina Twitter per l’apprendimento:
twitter.com/livescribek12
Blog per l’apprendimento:
livescribe.com/blog/education
Unisciti alle community:
Livescribe Inc. Modelli: 2GB, 4GB, 8GB
FCC ID: CKD-00053 IC: 10240A-00053
Questo dispositivo è conforme all’articolo 15 della direttiva FCC. L’utilizzo del presente dispositivo è soggetto alle due
seguenti condizioni: (1) il dispositivo non può causare interferenze dannose e (2) deve essere in grado di accettare eventuali
interferenze ricevute, incluse quelle che potrebbero provocare anomalie nel funzionamento.
Avviso: eventuali modiche o variazioni apportate al dispositivo in assenza dell’approvazione esplicita da parte di Livescribe,
Inc. possono rappresentare motivo di invalidazione del diritto dell’utente all’utilizzo del dispositivo stesso.
Nota: il presente dispositivo è stato sottoposto a test ed è risultato conforme ai limiti previsti per i dispositivi digitali di
classe B, ai sensi della direttiva FCC, articolo 15. Tali limiti intendono garantire un livello di protezione adeguato da
interferenze dannose nell’ambito di installazioni di tipo residenziale. Questo dispositivo genera, utilizza ed emette energia a
radiofrequenza e può causare interferenze con le comunicazioni radio, se non installato e utilizzato seguendo le istruzioni
fornite. Tuttavia, non esiste alcuna garanzia che tali interferenze non si verichino in una determinata installazione. Qualora
il dispositivo generasse interferenze dannose per la ricezione di segnali radio o televisivi (condizione vericabile spegnendo
e riaccendendo il dispositivo), si consiglia di adottare le seguenti misure correttive.
• Orientare o posizionare diversamente l’antenna ricevente.
• Aumentare la distanza tra dispositivo e ricevitore.
• Collegare il dispositivo a una presa di corrente su un circuito diverso da quello a cui è collegato il ricevitore.
• Rivolgersi al rivenditore o a un tecnico radio/TV per ulteriore assistenza.
Questo dispositivo è conforme agli standard canadesi RSS del settore che non richiedono una licenza. L’utilizzo del
presente dispositivo è soggetto alle due seguenti condizioni: (1) il dispositivo non può causare interferenze dannose e
(2) deve essere in grado di accettare eventuali interferenze ricevute, incluse quelle che potrebbero provocare anomalie
nel funzionamento.
Il dispositivo è stato testato per l’utilizzo a contatto diretto con il corpo ed è risultato conforme ai limiti di esposizione alle
radiofrequenze del pubblico previsti dalle direttive FCC e da Industry Canada. Il test è stato eseguito con il dispositivo a
diretto contatto con il fantoccio per simularne le normali posizioni di funzionamento. Il massimo valore di assorbimento
specico SAR rilevato nell’ambito del test è stato di 0,57 W/kg. Ad eccezione del cavo USB, nessun altro accessorio
viene fornito o altrimenti indicato per l’utilizzo con questo prodotto. L’uso di accessori di altro tipo potrebbe pregiudicare
la conformità del prodotto alle direttive FCC sull’esposizione alle radiofrequenze.
Page 32

livescribe.com
LIVESCRIBE and PAPER REPLAY are trademarks of Livescribe Inc.
©2013 Livescribe Inc. All rights reserved. Other brands and product
names are trademarks of their respective owners.
212-00018-000-AB
 Loading...